preservation treatments protection and · pdf filehistoric lighthouse preservation handbook...
TRANSCRIPT

Historic Lighthouse Preservation Handbook Part IV. A, Page 11
PRESERVATION TREATMENTSMany of the maintenance and repair techniques described in this text, if not properlyperformed, can cause potentially irreversible damage to the character-defining features andhistoric fabric of a masonry lighthouse. Therefore, if the tasks to be performed are beyondthe skills of on-site personnel, they should be carried out by experienced and qualifiedworkmen. A historical architect or building conservator may be required to assess thecondition of the masonry and prepare contract documents for its treatment. In Part V.,Beyond Basic Preservation, examples of treatments that are considered rehabilitation andrestoration are illustrated and discussed.
Protection and Stabilization (Mothballing)Despite their inherent durability, a historic masonry lighthouse that is vacant and receivesonly minimal routine maintenance is highly vulnerable to decay if not protected andstabilized properly. To properly protect and stabilize a historic masonry lighthouse, athorough inspection and diagnosis should be performed using the inspection chart in thepreceding section as a guide. The results of this inspection can then be used to develop aprotection and stabilization plan. The following recommended protection and stabilizationguidelines for vacant historic masonry lighthouses are the minimum treatmentrequirements to prevent any further damage from occurring.
Figure 7. Lantern glass with holes and/or cracks should bereplaced as soon as possible to minimize water infiltration.If immediate replacement is not feasible, the glass can betemporarily patched.
WPT
C p
hoto
Figure 8. Detail of an acceptable temporary repair to alantern glass using a piece of painted sheet metal that hasbeen adhered to the glass with a high quality, exterior gradecaulk. This type of temporary repair will prevent waterfrom entering the lantern and therefore help avoid furtherdamage. This fix should be considered only as an interimtreatment until replacement of the lantern glass.
Weatherization
When a masonry lighthouse is mothballed,the exterior envelope should be completelyweathertight. When moisture penetratesinto masonry walls and foundations, it canbe exceedingly detrimental to the masonry.Moisture in a wall or foundation causesvarious types of damage: it washes awaysofter lime mortars, expands and crackssurrounding masonry in freezing weather,causes efflorescence (the leaching of saltsout of the mortar and masonry units),
WPT
C p
hoto
causes adjacent wood elements to rot, andencourages fungal growth.
To prevent moisture penetration, be surethe following moisture infiltration points areweathertight or functioning properly:
� Lantern glass: Lantern glass, frames, and roofsmust be weathertight before mothballing. Referto the Lantern section of this handbook formore information concerning weatherproofinglantern components.

Part IV. A, Page 12 MASONRY
� Weep and vent holes: If the walls have cavitiesbetween the interior and exterior walls, weepholes may exist at or near the base of thesewalls. Weep holes typically range in size fromsmall slits to large brick headers. These holesallow any moisture that has entered the cavitybetween the walls to drain out. These openingsmust be kept clear in order to provide sufficientdrainage of the cavity. In some instances thewalls may have vent holes (larger than weepholes) that allow the movement of air throughthe cavities or voids. Typically vent holes openinto the interior. These openings must be keptclear in order to provide sufficient ventilation(see Figure 12).
� Protective coatings: Lighthouses were oftenpainted as a protective measure and foridentification as a daymark. As part of a
Figure 10. View of underside of gallery deck; the streakson the stucco indicate that water is passing between thedeck plates and possibly entering the masonry wall.
WPT
C p
hoto
Figure 11. Detail of severely eroded brick and painting.
WPT
C p
hoto
Figure 9. View of built-in gutter system on a mansard-style roof; the arrow indicates where a fist-size hole exists.This hole allows water to enter the interior of thelighthouse.
� Built-in gutter systems: All rainwater guttersystems (lantern roofs, or other tower roofforms) should be cleaned and checked forholes. All holes and non-functioning guttersystem components should be repaired. Formore information refer to the discussion onroofing in the Lantern section of the handbook.
� Gallery decks: In most masonry lighthousesgallery decks are cast iron, sheet-metal-coveredwood, stone, or concrete. These decks aregenerally laid directly on top of the masonrywall structure. The decking should be slopedaway from the lighthouse to shed the wateraway from the structure. If the decking materialis not weathertight, moisture can enter theinterior cavity of the masonry wall. See Figure10 for signs that a gallery deck is failing. Referto the Lantern section of this handbook formore information concerning theweatherproofing of gallery decks.
� Door and window frames: The joints along theperimeter of door and windows where a woodor metal frame is fitted into a masonry openingshould be caulked to prevent moisture fromentering the walls. See the Windows section ofthis handbook for the proper caulk for thisapplication.
� Loose or eroded mortar joints: If pointingbetween masonry units is loose, cracked,eroded, or is completely missing, moisture willpenetrate (see Figure 11). In order to preventthis infiltration, all pointing that is in disrepairmust be removed and the affected jointsrepointed. For more information refer to thediscussion on repointing under the Repairtreatment in this section of the handbook.
WPT
C p
hoto

Historic Lighthouse Preservation Handbook Part IV. A, Page 13
Figure 12. Typical masonry lighthouse weep holelocations. Each weep hole provides drainage for eachindividual cavity within the masonry wall.
WPT
C p
hoto
WPT
C p
hoto
Figure 14. Detail of failing paint, a problem which shouldbe addressed during stabilization and protection. In thisparticular case, spot painting may be all that is required tomaintain a weatherproof protective coating.
mothballing treatment, the exterior coatingshould be checked for loose and flaking paint.Any deteriorating areas should be scraped andrepainted to match the existing color.Ultimately, as part of a mothballing treatmentthe entire lighthouse should have all loose andflaking paint removed and a new coatingapplied according to the manufacturersspecifications. If the overall condition of thecoating system is sound and there are only a fewbare spots, however, the lighthouse can be spotpainted to provide a weatherproof coating.Either of these actions will result in a coating
system that will require minimal service duringthe mothballed period. For more informationrefer to the discussion on repainting under theRepair treatment in this section of thehandbook.
� Open cracks in walls: Cracks in exteriormasonry walls indicate that movement hasoccurred, either caused by shrinkage (in thecase of stucco) or by settlement or mechanicalimpact. Cracks should be monitored todetermine if movement is still occurring and
WPT
C p
hoto
Figure 15. Cracks such these in a sandstone lighthouseshould be monitored for movement prior to treatment.
WPT
C p
hoto
Figure 13. Vent hole located in the window well of abrick lighthouse.
Part IV. A, Page 14 MASONRY
mortar employed should be soft enough tonot permanently adhere to the historicmasonry, thus making the treatmentreversible. Other methods of door orwindow opening stabilization includefitting the opening with a structural woodframe covered with a painted plywoodpanel that has large louvers to aid inventing the interior of the lighthouse. Thestabilization treatment utilized should notpermanently damage historic character-defining features and should be easilyreversible so that when the budget allows,the structure can be properly repaired.
Ventilation
The most difficult lighthouses to adequatelyventilate without resorting to extensivelouvering and/or mechanical exhaust fansystems are masonry lighthouses in humidclimates. During the summer monthsmasonry lighthouses will need to beventilated to eliminate stagnate air anddamaging condensation on the interiorwalls and woodwork. In order to achievethis, almost every window opening willneed to be fitted with some type of passivelouvered ventilation. Installation ofwindow-mounted passive louver systems iscovered in the Windows section of thishandbook. For more information onlighthouse ventilation refer to the Interiorssection of this handbook.
Fire Protection
Despite the fact that masonry isnoncombustible, fire is still a threat tocombustible components of masonrylighthouses. The impacts of a fire aredevastating and will often cause seriousirreversible damage and loss to historicinterior fabric. For guidance on theseissues, refer to �Fire Prevention andProtection Objectives� under Part V.,Related Activities.
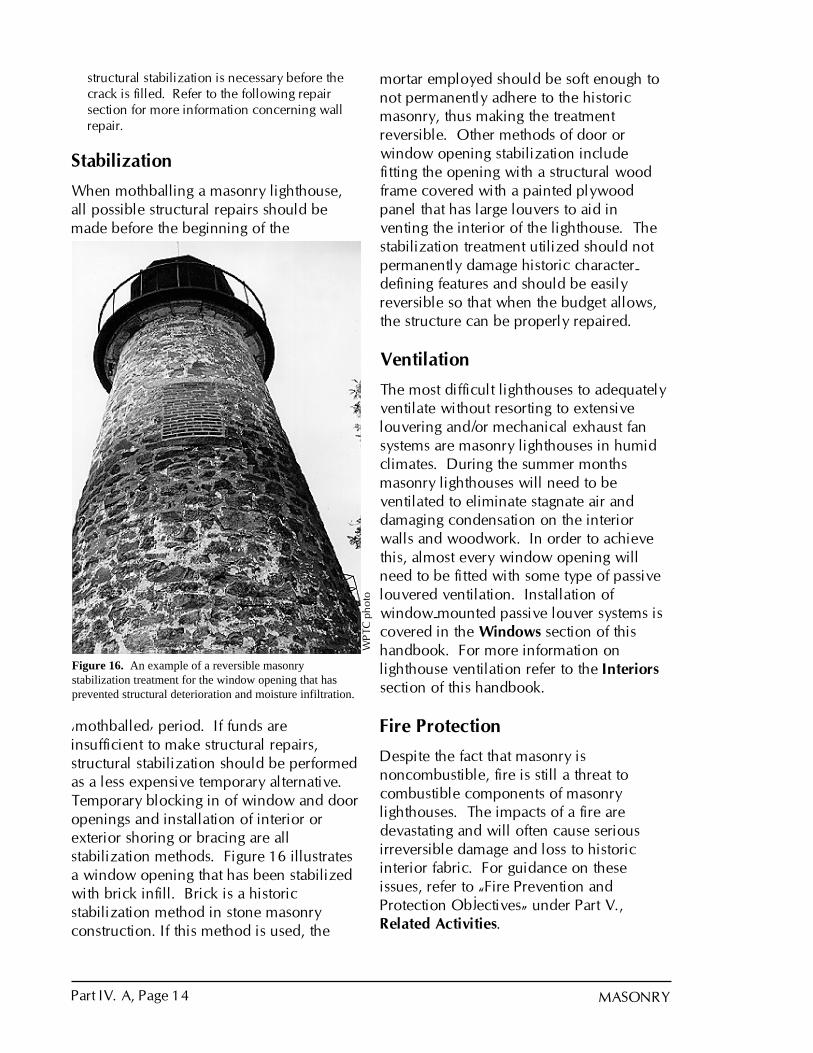
�mothballed� period. If funds areinsufficient to make structural repairs,structural stabilization should be performedas a less expensive temporary alternative.Temporary blocking in of window and dooropenings and installation of interior orexterior shoring or bracing are allstabilization methods. Figure 16 illustratesa window opening that has been stabilizedwith brick infill. Brick is a historicstabilization method in stone masonryconstruction. If this method is used, the
structural stabilization is necessary before thecrack is filled. Refer to the following repairsection for more information concerning wallrepair.
Stabilization
When mothballing a masonry lighthouse,all possible structural repairs should bemade before the beginning of the
Figure 16. An example of a reversible masonrystabilization treatment for the window opening that hasprevented structural deterioration and moisture infiltration.
WPT
C p
hoto
Historic Lighthouse Preservation Handbook Part IV. A, Page 15
Cleaning
The simple act of cleaning painted masonrysurfaces can effectively extend the life ofthe coating as well as effectively enhancethe appearance of a historic masonrylighthouse. In some cases where themasonry has not been painted, a deepcleaning of the porous masonry surfaces isneeded. This treatment should be used if abuildup of pollution or salts is causingdeterioration to the masonry substrate. Thefollowing are guidelines for cleaninghistoric masonry lighthouses:
� Clean masonry only when necessary to haltdeterioration or when heavy soiling must beremoved to prevent damage to the masonry.
� Carry out masonry surface cleaning tests after ithas been determined that such cleaning isnecessary. Do not clean masonry merely toimprove appearance.
� Clean masonry surfaces with the gentlestmethod possible, such as using low pressurewater and detergents and natural bristle brushes.To select the gentlest method possible, testsshould cover a period of time sufficient todetermine both the immediate and long-rangeeffects.
� Always allow for thorough drying time of themasonry (months or possibly years) beforeproceeding with any sealing of the exterior orinterior.
� Always neutralize any chemical treatment.
� Do not sandblast brick or stone surfaces usingdry or wet grit or other abrasives. Thesemethods of cleaning permanently erode the
surface of the material and greatly acceleratedeterioration.
� Do not use a cleaning method that involveswater or liquid chemical solutions when there isany possibility of freezing temperatures.
� Do not clean with chemical products that willdamage masonry, such as using acid onlimestone or marble or leaving chemicals onmasonry surfaces.
� Do not apply high-pressure water-cleaningmethods that will damage historic masonry andthe mortar joints.
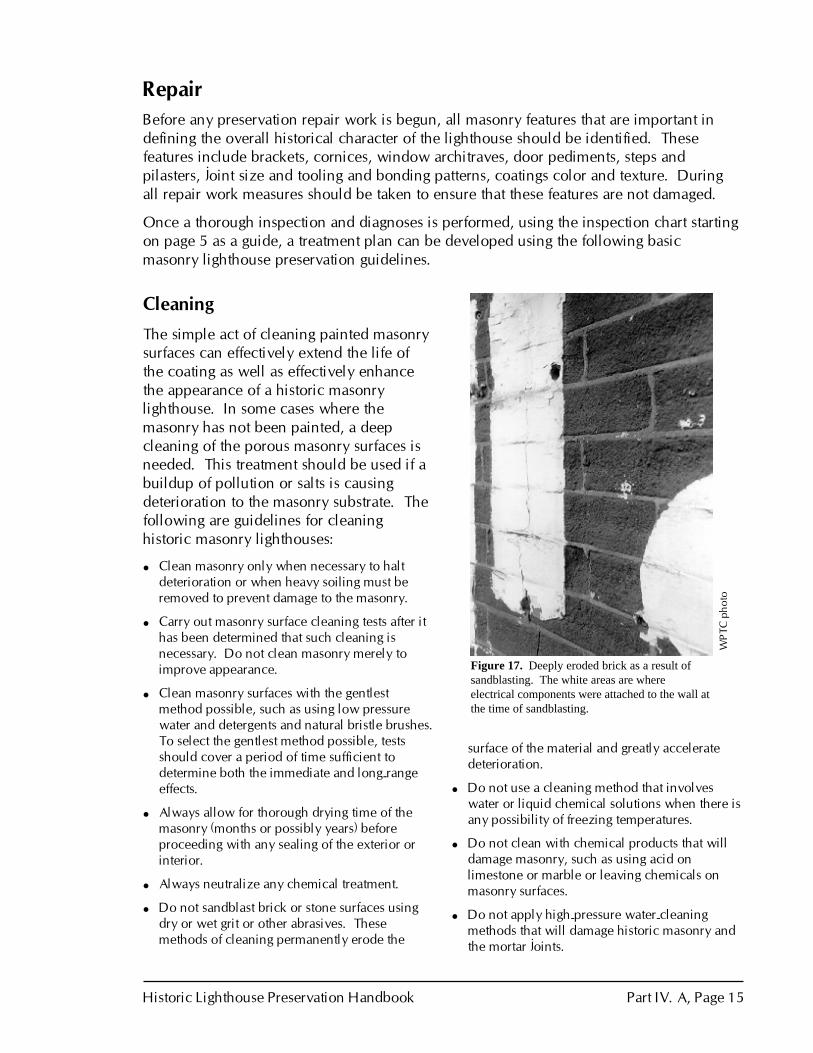
Figure 17. Deeply eroded brick as a result ofsandblasting. The white areas are whereelectrical components were attached to the wall atthe time of sandblasting.
RepairBefore any preservation repair work is begun, all masonry features that are important indefining the overall historical character of the lighthouse should be identified. Thesefeatures include brackets, cornices, window architraves, door pediments, steps andpilasters, joint size and tooling and bonding patterns, coatings color and texture. Duringall repair work measures should be taken to ensure that these features are not damaged.
Once a thorough inspection and diagnoses is performed, using the inspection chart startingon page 5 as a guide, a treatment plan can be developed using the following basicmasonry lighthouse preservation guidelines.
WPT
C p
hoto

Part IV. A, Page 16 MASONRY
External Coating Systems
Historically, external coatings were reliedupon to protect masonry, such as soft brickor stone, that was susceptible to waterinfiltration. The external coating was thefirst line of defense against the elements.Typically the coating was either a paint,stucco, or whitewash/lime mortar wash. Aspart of preserving the lighthouse, allcoatings should be maintained.
Each type of coating protects the lighthousein a slightly different manner. Paintprovides a film over the masonry thatprevents water from penetrating. Stucco isa three-layer mortar and sand shell thatbonds to the masonry to prevent water frompenetrating. Whitewash and lime mortarwash are lime and water based �sacrificial�coatings that protect the lighthouse byslowly deteriorating as they weather.
Lime mortar wash is typically a three-layercoating. The first coat consists of lime,water, and sand; the second, half as muchsand; the third, just lime and water.Whitewash is lime and water only. Both ofthese coatings are meant to be reappliedevery three to five years. More informationon this coating and its application can befound in the Cape Florida Lighthousesidebar on page 23.
The key to the preservation of an externalcoating system, especially a lighthousecoating that is subjected to severe marineenvironment conditions, is a thorough studyof the mechanics of the system. Whethersimply touching-up the coating or followingthrough with a complete restoration of theexternal coatings, it is wise to seek theadvice of paint manufacturers� technicalrepresentatives.
A thorough study of materials isrecommended before starting any coatingprogram. An understanding of thesubstrate, or base material, must also be
had. This can best be achieved by athorough inspection of both the substrateand the existing coating system. Any areasof deteriorated substrate should beexamined and repaired before recoating.
Coatings applied to masonry surfacesshould �breathe�, i.e., the coating shouldallow the transpiration of moisture at themicroscopic level. Modern paint coatingsare able to do this. A successful coatingsystem for masonry surfaces is anelastomeric acrylic paint system for theexterior surfaces and a breathable acrylicemulsion paint system for the interiorsurfaces.
All external coatings, especially paintswhich may date from the 19th and early20th century, should be tested for leadcontent. If lead is present, local codes onhealth, life safety, and environmentalrequirements must be met.
Lead found in otherwise sound paint layersdoes not dictate the removal of that paint.In most cases it is far safer and more cost-effective to leave intact paint areas in place.For further information refer to NPSPreservation Briefs 37: AppropriateMethods of Reducing Lead-Paint Hazards inHistoric Housing.
Follow the manufacturer�s specifications forsurface preparation and application ofpaint. This will ensure the coating willperform as designed. For more informationon types of masonry paints currently beingused in the field, refer to the case study onPoint Conception Light Station in Part V.,Beyond Basic Preservation.
The following guidelines are to be followedwhen recoating historic masonrylighthouses.
� Before recoating, inspect all painted masonrysurfaces to determine whether repainting isnecessary. If painting is the determinedtreatment, a schedule of colors, locations, andquantities should be developed.

Historic Lighthouse Preservation Handbook Part IV. A, Page 17
� Remove damaged or deteriorated material onlyto the next sound layer, using the gentlestmethod possible (e.g., hand scraping) beforerecoating.
� Recoat surfaces with a system designed for themasonry substrate�brick, stone, or stucco. Thesystem should be designed to �breathe� so thatmoisture trapped within the masonry units canescape. This quality is referred to as thepermeability of the coating system.
� Use colors that are historically appropriate tothe lighthouse or that maintain the character-defining features of the daymark.
� Do not remove any coating that is firmlyadhering to, and thus protecting, masonrysurfaces.
� Do not use methods of removing coatingswhich are destructive to masonry, such assandblasting, application of caustic solutions, orhigh-pressure water blasting.
� Do not apply coatings such as stucco tomasonry that historically has been unpainted oruncoated.
� Do not remove historic masonry coatings andleave the underlying layer exposed to theelements.
� Do not apply a sealing type paint to the interiorof a lighthouse. This will potentially trapmoisture in the wall which will cause the wallto deteriorate.
Repointing
Repointing is the process of removingdeteriorated mortar from the joints of amasonry wall and replacing it with newmortar. Properly done, repointing (alsocalled, somewhat incorrectly, tuck pointing)restores the visual, physical, and structuralintegrity of the masonry. Improperly done,repointing not only detracts from theappearance of the building, but may in factcause physical damage to the masonry unitsand the overall structure.
Mortar joints bind together the individualmasonry elements of a wall into a structuralwhole, ensuring a watertight seal. Themortar bed compensates for irregularities inthe stones or bricks, which would otherwiselead to uneven stresses and cracking of themasonry unit. The more regular the stoneor brick, the thinner the joint can be.
A wall made up of many small units such asbrick or stone is both easy to construct andabsorbs inevitable slight movements,including variations in temperature,settlement of the building, and vibrations.To absorb these movements, the mortarjoints must be somewhat weaker than themasonry units to allow for compressiveloading. If a mortar is used which is high incompressive strength (i.e., portlandcement), the masonry units become theweakest part of the wall, and slightmovements can cause the brick or stone tocrack or spall. As mortars become stronger,they tend to become more impermeable tomoisture than the masonry units and thusprevent drying through the joints. Moisturemovement then is concentrated in the brickFigure 16. Daymark patterns are a character-defining
feature and should be preserved.
NM
I pho
to

Part IV. A, Page 18 MASONRY
or stone, leading to damage of the masonrystructure.
Unlike most other parts of a lighthouse,mortar joints are not designed to bepermanent, although a good pointing jobshould last 50 to 100 years. When the timecomes to repoint, shortcuts and poorcraftsmanship will result in a job that needsto be done soon again or, in the worst case,in a structural failure.
When repointing joints in historiclighthouses, special care must be given tothe matching of the strength of thereplacement pointing mortar with that ofthe original pointing mortar. Historically,softer lime-based mortars were used forpointing. If the compressive strength of theoriginal mortar cannot be readilydetermined, i.e., the lighthouse had beenimproperly repointed with a hard portlandcement based mortar, the mortar should bematched to the compressive strength of thebrick on stone. For more information onrepointing historic lighthouses refer to NPSPreservation Briefs 2: Repointing MortarJoints in Historic Brick Buildings. Thesesofter mortars were flexible enough toexpand and contract with the expansionand contraction of the masonry units whichmade up the wall structure.
Modern portland cement has a highercompressive strength than the lime-basedmortars. This quality makes the portland-based cements less flexible than the lime-based mortars; therefore, the pointing tendsto resist the expansion and contraction ofthe softer historic bricks. This resistancewill ultimately cause the faces of the bricksto fracture and spall off the body of thebrick. In some cases the exterior wythes ofbrick may shear from the inner core of thewall, resulting in the failure of the outersections of the wall.
Before repointing, a thorough inspection ofthe masonry should made to determine theextent of repointing needed. Pointing that
Figure 19. The use of hard portland cement mortar andsloppy pointing technique have aided in the deterioration ofthis soft sandstone wall.
WPT
C p
hoto
Figure 20. Diagramshowing the behaviorof lime-based mortarand cement-basedmortar during relativetemperature changesof the surroundingmasonry. (Source:NPS PreservationBriefs 2, 1980)

Historic Lighthouse Preservation Handbook Part IV. A, Page 19
� Do not use electric saws and hammers ratherthan hand tools to remove deteriorated mortarfrom joints prior to repainting.
� Do not repoint with mortar of high portland-cement content (unless it is the same content ofthe historic mortar). This can often create abond that is stronger than the historic materialand cause damage resulting from the differingcoefficient of expansion and the differingporosity of the material and the mortar.
� Do not repoint with a synthetic caulkingcompound.
Damaged Masonry Repair
Repair of damaged masonry features can beperformed in a variety of ways. Repairingmasonry features by patching, piecing in,replacement in kind, or consolidating themasonry using recognized preservationmethods is a task best performed by
is in need of repair shows signs ofdeterioration such as disintegrating mortar,cracks in mortar joints, loose bricks, ordamp walls. The following are guidelinesthat should be followed when repointingmasonry in historic lighthouses.
� Remove deteriorated mortar by carefully handraking the joints to avoid damaging themasonry.
� Consider leaving the intact portland cementpointing in place because removal may damagethe masonry.
� Duplicate the historic mortar in strength,composition, color, and texture. A mortaranalysis can be performed by most preservationprofessionals.
� Duplicate old mortar joints in width and in jointprofile.
� Do not remove non-deteriorated mortar fromsound joints for purely cosmetic reasons.
Figure 22. A failing repair made to a stone gallery deckusing a simulated stone material. A stone dutchman repairshould have been used.
Figure 21. Detail of eroded pointing.
WPT
C p
hoto
WPT
C p
hoto

Part IV. A, Page 20 MASONRY
professionals specializing in such work.The following are general guidelines toconsider when repairing historic masonry.
� Repair only damaged materials. If possible,limit this type of work to replacement ofdamaged masonry units only, i.e., isolatedremoval of a single damaged brick or stone.
� When repairing stone, use traditional dutchmanrepair techniques as a first choice; considersubstitute materials only as a last resort.
� For replacement, use only substitute materialsthat convey the visual appearance of thesurviving parts of the masonry feature and thatare physically and chemically compatible.
� Do not apply waterproof, water-repellent, ornon-historic coatings such as stucco to masonryas a substitute for repainting and masonryrepairs. Coatings are frequently unnecessary,expensive, and may change the appearance ofhistoric masonry as well as accelerate itsdeterioration.
Stucco
Stucco is an exterior plaster which hashistorically been used to weatherproof andin some cases decorate masonry lighthouseexteriors. Although stucco is nonstructural,it offers a protective coating and prolongsthe life of a lighthouse. Stucco is bothconvenient and affordable: its ingredientsare readily available; it can be readilyapplied over stone or brick; and it isrepairable when cracked or broken.
The choice of materials for the aggregateand binder is critical to match an existingstuccoed surface. Stucco is an inexpensivematerial that forms a resistant exterior shellto protect more costly and vulnerablematerials, i.e., soft bricks or stone, in thesubstrate from exposure and decay; it mayconsiderably prolong the life of a masonrylighthouse by sheltering major componentsfrom wear. Also, though stucco applicationrequires a skilled worker, only a minimalamount of specialized equipment isnecessary.
Stucco failure is caused by the breakdownof the its water-shedding capacity and theultimate deterioration of the supportingstructure. Poor original materials andtechniques, incompatible building materialswith different expansion rates, structuralsettlement, seismic movement, andbiological growth can all cause cracking oradhesion failure between the stucco and itsbacking or between individual stuccolayers. Lack of proper maintenanceincreases the likelihood of problems thatcan lead to the breakdown of the stuccoskin.
An aggregate and a binder are the two basicstucco constituents. The aggregate consistsof a fine granular substance�such ascrushed sea shells, crushed brick and stone,sand, or old mortar�while traditionalbinders include lime, gypsum, or naturaland manmade (portland) cements. Inaddition, mineral pigments can be addedfor color and synthetic additives used tofurther improve the performance of thestucco mixture.
A mechanical key must be created toensure a strong bond between the stuccoand its support. For masonry, either rakingout the mortar joints or texturing themasonry surface is usually necessary.Generally, stucco is applied in one to threecoats; three-coat work is most common.Layers usually differ slightly in composition,and each coat is scored to provide a key forthe next layer.
Although the earliest stuccoes used lime asa binder, by the middle of the 19th centurystucco included other elements such asimported natural cement. Gray portlandcement stucco, harder and denser thanearlier stuccoes, appeared in the 1880s;with the introduction of white portlandcement in the early 20th century, a range oftinted stuccoes became available.

Historic Lighthouse Preservation Handbook Part IV. A, Page 21
The following are guidelines to considerwhen repairing historic stucco:
Identify, retain, and preserve stuccocoatings that are important in defining theoverall historic character of the building.
� Determine whether the historic finish coat ofstucco was painted, unpainted, or integrallycolored.
� When repairing stucco, identify originalcomponents of the stucco mix throughlaboratory analysis to match strength,composition, color, and texture.
� Identify substrate and method of keying stuccoto the underlying structure.
� Identify finish trowelling techniques to duplicatethe original finish in replacement stucco.
� Do not remove stucco from surfaces thathistorically featured a stucco finish.
� Do not remove and reapply a major portion of astucco coating that could be repaired.
� Do not apply paint to stucco that has beenhistorically unpainted or, conversely, removepaint from historically painted stucco.
Maintain:
� Maintain lantern roofs, gutters, and gallerydecks to prevent moisture from penetratingwalls.
� Remove all plant materials from the base ofstuccoed lighthouse walls.
� Survey stucco surfaces for conditions such asbiological growth, water or metallic staining, orleaching deposits, which may indicate activewater penetration or damage that is masked bythe stucco coat.
� Determine the extent of detached stucco bysystematically sounding the surface with a woodor acrylic mallet. Areas where stucco layershave delaminated or are no longer keyed to thesubstrate will produce a characteristicreverberating or hollow sound and should berepaired as outlined below.
Clean stucco only when necessary to haltdeterioration. It is difficult to clean moststucco without also removing some of thetextured surface. Test cleaning methods in adiscreet location before full-scale treatment.
The gentlest method should be selected andtested to avoid unnecessary damage.
� Remove soiling and biological growth, such asmold, using a low-pressure water rinse and milddetergent applied with natural fiber brushes.Poultice-applied solvents are probably the mostappropriate method for removing graffiti andmetallic stains.
� Do not use abrasive cleaning techniques onstuccoed surfaces, which can pit the surface andincrease moisture penetration.
� Remove damaged or deteriorated paint fromstucco only to the next sound layer using thegentlest method possible, such as hand-scrapingor natural bristle brushes.
� Maintain paint coatings by applying a vapor-permeable coating when necessary, matched toexisting color.
Repair most stucco by removing damagedmaterial and patching with new stucco thatduplicates the old in strength, composition,color, and texture.
� Repair cracks in stuccoed surfaces by raking outthe crack and undercutting the edges to providea mechanical key for new stucco. Cracks aremost likely to occur at doors, windows, andwhere stucco covers joints between dissimilarmasonry materials, i.e., brick and stone.
� Do not insert a metal lath over masonry.Attaching the lath will damage the masonry;moisture penetration can cause the metal lathand attachments to corrode.
� Do not apply a stucco patch without remedyingthe underlying problem.
� Remove incipient spalls or bulges back to soundplaster. Identify and rectify the cause ofdeterioration before patching.
� Remove previous patches that do not matchtexture, color, or strength of the original stucco.
� Undercut the repair boundaries to create adovetail-shaped mechanical bond between theold and new stucco.
� Test new stucco in an inconspicuous locationand allow test samples to weather as long aspossible, ideally for one year. Matching theoriginal material will probably require a numberof test samples.

Part IV. A, Page 22 MASONRY
� Do not remove sound stucco or use new stuccowhich is stronger or denser than the historicmaterial. Doing so will damage underlyingmasonry as well as alter the appearance.
� Patch stucco rather than replace. It is difficult tomatch stucco and to conceal patched areas,especially on smooth-finished stucco. A colormatch may not be critical if the surface wasoriginally painted and will be repaintedfollowing repairs.
� Thoroughly wet the substrate before patching toprevent it from drawing moisture out of thestucco too rapidly which could affect the curingtime and eventual strength.
� Do not patch cracks with commercial caulkingcompounds. This type of patch is highly visiblebecause the material has a different texture andsheen than stucco. It also tends to attract dirtand weathers differently.
� Do not apply new stucco when there is dangerof frost, or in temperatures below 40° F.
� When applying stucco, provide adequateseparation from the ground. Moisture from theground can rise through the stucco and into thesupporting structure.
� Do not apply paint to repair patches before thenew stucco has fully cured.
� Do not apply a bonding agent where amechanical bond is possible. A goodmechanical bond is always preferable toreliance on bonding agents. Only substratesthat do not offer a good bonding surface mayrequire the use of a bonding agent.
� Prevent new stucco from drying too rapidlyduring hot weather by shading or repeatedmisting for 48 to 72 hours.
� Reintegrate detached or delaminated stucco bylow pressure injection grouting with fluidmortars or synthetic adhesive materials. Thesesubstances must be compatible with the originalstucco. This treatment is generally appropriateonly for decorative stucco that may be difficultto replicate. The work should be executedunder the supervision of a qualified preservationmaintenance professional.
� Use chemical consolidants on deterioratedstucco only when deemed necessary by atrained conservator. The need for this type oftreatment on most stucco-covered lighthouses islimited. Materials and methods must be testedFigure 23. The five basic steps of stucco repair; each layer
of stucco must be patched separately. (NPS drawing)

Historic Lighthouse Preservation Handbook Part IV. A, Page 23
before attempting full-scale treatment; differentstuccoes may require different consolidationmaterials for chemical compatibility.
Limited Replacement In kind
If repair by stabilization, consolidation, andconservation proves inadequate, the nextlevel of intervention involves the limitedreplacement in kind of extensivelydeteriorated or missing parts of featureswhen there are surviving prototypes (forexample brick cornices and doorpediments, stone window architraves, wallstructure masonry units). The replacementmaterial needs to match the old bothphysically and visually, i.e., sandstone for
sandstone or dark red, hard-fired brick fordark red, hard-fired brick, etc. Thus, withthe exception of hidden structuralreinforcement and new mechanical systemcomponents, substitute materials are notappropriate in the preservation treatment.Again, it is important that all new materialbe identified and properly documented forfuture research.
If prominent features are missing, such asformal stone or brick entry stairs or interiordecorative brick or marble floors, then arehabilitation or restoration treatment maybe more appropriate.
SIDEBAR: Brick Replacement andCoating of Cape FloridaLighthouse
The original Cape Florida Lighthouse on KeyBiscayne, Florida, was built in 1825 to a heightof 65 feet. The tower wall was constructedwith a solid brick wall five feet thick at the baseand tapering to two feet at the top. Thepresent Cape Florida Lighthouse wasconstructed around 1846 with a four-feet-thickbrick masonry wall at the base. To meet theaid-to-navigation needs, in 1855 the tower�sheight was raised to 95 feet with a focal plane at100 feet above sea level. From 1869 until thelight was discontinued in 1878, the lighthousereceived numerous repairs.
After 1878, the lighthouse began deterioratingbecause of lack of maintenance. It was restoredand the foundation upgraded in 1915 and 1918respectively. The deterioration was reinitiatedwhen a hurricane in 1926 eroded the tip of theCape, increasing the vulnerability of the towerto further decay and deterioration. In 1966when the state of Florida acquired thelighthouse, a four-year renovation effort was
instituted for the entire station. During this time a replica of the keepers quarters and a newlantern was constructed.
Ben
der
& A
ssoc
iate
s, A
rchi
tect
s
Figure 24. Cape Florida Lighthouse withscaffolding used during the 1996 restoration. Thewhite coating on the tower is the lime mortar washapplied to help protect the damaged brick and torestore the tower to its 1846 appearance.

Part IV. A, Page 24 MASONRY
A condition assessment performed in 1989stated that the outer brick surface wasseverely deteriorated with large areascovering approximately 40% of the first brickwythe missing.2 Two causes contributed tothe deterioration of the lighthouse�s exteriorbrick. First, there was the lack ofmaintenance for the circa-1870-appliedmortar wash coating after deactivation of thelighthouse in 1878. Second, the remainingremnants of the exterior mortar wash coatingwere removed from the brick during the1960s renovation by sandblasting.Sandblasting is a treatment method that pitsthe masonry surface, exposing the soft innercore of the bricks, thus acceleratingweathering and deterioration. Despite thisdeterioration the condition assessmentdetermined that the tower was constructed ofgood quality bricks, and the tower remainedstructurally sound.
In 1996, the Cape Florida Lighthouse wasrestored to its 1846 appearance. The severedeterioration of the exterior brick requiredthe replacement of nearly 26,000 bricks.Before installing the replacement bricks, theexterior surface of the lighthouse wasstabilized by removing the deterioratedmortar and repointing with a similar mortarmix that was used historically. The mortarused was designed to be compatible with thestrength of the extant bricks. The areas ofmissing bricks were repaired using newreplacement hand-molded bricks andmasonry anchors. The masonry anchorswere placed in holes drilled into the existingbricks and then set with mortar. Thistreatment helped to tie together the old andnew masonry.
To protect the historic bricks from furtherdeterioration, the exterior of the tower wascoated with a sacrificial lime mortar wash.Protection of the soft masonry is vital to
Figure 26. View of the lower tower window; notethe depth of the brick deterioration at the windowopenings. The face of the protruding granite lintelabove the window opening represents the face ofthe original wall.
Ben
der
& A
ssoc
iate
s, A
rchi
tect
s
2 Bert L. Bender, Architectural and EngineeringReport, Cape Florida Light, Key Biscayne, Dade County,Florida, Key West, Florida, November 1989.
Figure 25. View of the lower portion of the towershowing the more severe deterioration. Note that alarge percentage of the first brick wythe is missing orhas been removed. The white areas are remains of aportland-cement-based parging applied in the late1960s in an effort to protect the deteriorating bricks.
Ben
der
& A
ssoc
iate
s, A
rchi
tect
s

Historic Lighthouse Preservation Handbook Part IV. A, Page 25
maintaining the historic fabric and character of the structure. The sacrificial lime mortar washis a three-coat system that was applied with natural bristle whitewash brushes. The specificationfor the lime mortar wash mix was as follows:
3-coat lime mortar wash:
1st - 6 parts lime, 6 parts sand, 1 part portland cement.
2nd - 12 parts lime, 6 parts sand, ½ part portland cement
3rd - 1 finish coat whitewash - water and lime mix (no sand)
This coating system allows the porous brick to �breathe�; therefore any moisture trapped in thebrick can escape. Non-breathable coatings tend to trap moisture in the walls, which canaccelerate the deterioration of the masonry. The life expectancy of this coating is approximatelyten years in this part of the country.
Figure 27. View of repairs being made to the exteriorwall. A new brick wythe is being installed wherebricks were missing, using mortar that matches thestrength of the new and historic bricks. Masonryanchors are used to attach the new wythe to existingwall. The deteriorated mortar joints in the extant wallwere repointed with a matching mortar mix.
Ben
der
& A
ssoc
iate
s, A
rchi
tect
s
Figure 28. Here a mason is implementing repairs to theexterior wall. The missing bricks were replaced with in-kind materials: the bricks match the historic bricks in sizeshape and strength. The mortar joint sizes are also beingmade to match the historic in size, color, and texture, asdemonstrated in this photo. The vertical strings over thebrickwork define the wall plane, so when the masonplaces the bricks, they maintain the taper of the conicaltower.
Ben
der
& A
ssoc
iate
s, A
rchi
tect
s

Part IV. A, Page 26 MASONRY
SIDEBAR: TheBuilding of MinotsLedge Light Station
For many people, their visionof a classic lighthouse is awave-swept tower. JohnSmeaton, an Englishman,built the first successful wave-swept tower in 1759 atEddystone Rock, in theEnglish Channel, madefamous by the song EddystoneLight. This was the firstinterlocking-masonry-blocklighthouse tower. LaterSmeaton developed a cementthat would set up in water.These two inventionsrevolutionized open-sealighthouse construction andremained the principalmethod for their constructionuntil concrete and steel cameinto use just after the turn ofthe 19th century. Wave-swept towers were built byinterlocking large cut stones,both horizontally andvertically. This integral inter-tonguing formed a monolithof great weight, whichcombined with their conicalshape, diverted the energy ofthe waves away from thetower, enabling them towithstand the heavypounding of the surf.
Minots Ledge Lighthouse,located on a rock barelyvisible above the sea near theentrance to Boston Harbor,Massachusetts, is America�s
Figure 29. Cross section for 114-footMinots Ledge Lighthouse. N
atio
nal A
rchi
ves
phot
o

Historic Lighthouse Preservation Handbook Part IV. A, Page 27
version of Eddystone Lighthouse. The first wave-swept stone tower to be built in the UnitedStates, it took five years to complete and cost approximately $300,000 to build. Between 1832and 1841 over 40 vessels had been lost in the area of Minots Ledge. In 1847 Congressappropriated $20,000 for construction of the first Minots �Rock� Lighthouse�the first ironstraight-pile lighthouse built in the United States. The lighthouse consisted of a skeletalwrought-iron pile tower built with one central and eight periphery wrought-iron piles, wedgedinto holes drilled in the ledge�designed to provoke the least amount of resistance to the sea.Construction equipment was twice swept from the rock during summer storms; workmenwere several times swept into the sea by unexpected waves, but none were drowned. The firstMinots Ledge Lighthouse, lit on January 1, 1850, was destroyed in a storm on April 16, 1851;both keepers were lost. The piles were found twisted and broken, leaving stubs still wedged inplace.
On August 31, 1852, Congress approved the erection of the second and still standing lighthouseon the �Outer Minots rock.� This time the design chosen was one of interlocking graniteblocks. The plans consisted of a masonry tower in the form of a frustum of a cone, solid forthe lower 40 feet of its 114-foot height. Because the ledge was exposed only at low tide and oncalm days, the work was very slow. Tides were found to be right only �six times during anyone lunation, three at full moon and three at the change.� It took three years to prepare theledge for the first course of granite masonry which was cut and test assembled on nearby Gulf(later called Government) Island, near Cohasset, where the government acquired 7.3 acres offarmland for a staging area for the building of the second lighthouse. Here stone-sheds wereerected for the stone cutters and a perfectly flat pavement prepared so the stones once cut couldbe pre-assembled for correct fitness. Granite from Quincy was chosen as being �finest of grain,toughest and clearest of sap.� An iron scaffold was erected on the ledge for the safety of the
Nat
iona
l Arc
hive
s ph
oto
Figure 30. Workers on a calm day, completing the first course of granite block for the foundation of Minots LedgeLighthouse, 1858

Part IV. A, Page 28 MASONRY
Nat
iona
l Arc
hive
s ph
oto
Figure 31. Work on Minots Ledge Lighthouse as itprogressed just above the entrance level which is visibleon the left. The tower below this level was essentiallysolid.
workmen and to facilitate the tedious anddifficult operations on the rock. CaptainMichael �Neptune� Brennock was hiredas lifeguard. He stationed himself in asloop along side the rock to pick upworkmen whom the waves swept fromthe ledge. Additionally a man was postedto warn the workmen of incoming largewaves, hollering out �roller coming!�when necessary.
Permanent iron shafts, about 20 feet highwere set in eight of the holes in which theold lighthouse piles had been placed,while the central hole was left open toform a cavity for the base circle ofstones�later formed into a 2,200 galloncapacity cistern. Ropes attached to thepiles were used by the workman to graspwhen waves washed over the ledge. Thepiles were also used as derricks in layingthe stones. This framework wasdestroyed on January 19, 1857, when thebark New Empire struck the ledge duringa severe storm and altered the rocksurface, necessitating a change in theshape of the foundation stones. Newpilings were inserted in the holes, thistime 25 feet long. Temporary cofferdamswere constructed from sand bags so thefoundation stones, which lay more thantwo feet below low tide, could becemented to the rock ledge. After muchexperimentation, it was determined that the mortar should be spread on muslin cloth andwrapped around each stone before it was lowered into place. The mortar was thencompressed by the weight of the stone and oozed through the cloth and formed a goodadhesion with the rock-surface. Each stone was �dovetailed and doweled to each other in thesecurest manner� so that the pressure from the impact of the waves tightened instead ofweakening the union. Each foundation stone weighted about two tons and was fastened tothe rock by 2-inch galvanized wrought-iron bolts. Strap irons attached between the pileskept the stone courses apart until the cement hardened.
The lighthouse was ceremoniously lit August 22, 1860, one day short of five years afterbeginning construction. But the light was not regularly shown until November 15 when thekeepers assumed their official duties. Unlike the first pile structure, the stone wave-swepttower has survived to the present. Minots Ledge Lighthouse is considered the �mostimportant engineering work� constructed by the U.S. Lighthouse Board; �it ranks, by theengineering difficulties surrounding its erection, and by the skill and science shown in thedetails of its construction, among the chief of the great sea-rock light-houses of the world.�