powerpoint basics (for macs) 1. before you start your project, you need: completed project...
TRANSCRIPT

PowerPoint Basics (for Macs)
1. Before you start your project, you need:
• Completed project storyboard.
• Files with images, sound, or video already saved on your desktop.
2. If you make a mistake, press the command and z keys at the same time to undo, or choose undo in the edit menu.
3. Save after every step.
4. Red lines under words mean “check your spellng.”

• Open PowerPoint.
• In the file menu, choose new presentation. (Older version: window of options)
• In the file menu, choose save as and name the project. Use your first name, a dot, and biography, for example, karen.biography
Starting a New Project
Save

• Click in the text boxes to add a title and your name.
• To move the box to a new location, click on the box edge to get the move-things-around tool (hand or crossed arrows depending on version) . Drag the box to the new place.
• Change the size of the box by clicking and dragging on the handles, the little squares or circles at the edge.
Text Boxes
Save

• The toolbox is a set of menus with choices for how the slides looks, including the formatting palette. Open it from the view menu or look for a button at the top of the window
• The palette has different drawers of tools. The choice of tools changes. When you click inside a text box, there are choices for the how the text looks. When you click the edge of a text box, there are choices about how the whole box looks.
• Click on the font menu to change the look of the words. Use a font that is easy to read.
Formatting Text Boxes
Save

• Click on the colors, weights, and fills menu.
• Find the line choices, then click on style and select the kind of outline you want for the box.
• In the fill choices, click on the paint bucket and choose more fill colors. Then explore the options listing different colors. Choose a color that contrasts with your text.
Formatting Text Boxes
Save
• To make a box around the title, click on the edge of the text box, to get format choices for the whole box.

• To add a picture, check that it is saved on your desktop.
• In the insert menu, click on picture and then choose from file.
• A window comes up with files from your computer. Find the picture you want, choose it, then click insert.
• The picture appears in your project. Sometimes the picture is HUGE. Move the picture until you see the handles at a corner. Click and drag a corner handle until the picture is the size you want.
• You can also add images using copy and paste from the edit menu, or directly drag an image from your desktop onto the slide.
Inserting Pictures
Save

Backgrounds
• To set the background color for all your slides, click on the format menu (different than the formatting palette) and choose slide background.
• Click the pulldown menu arrow on the left, then choose more colors.
• Explore the color options, but be sure to choose one that contrasts with the color of your text.
• Click apply to all to set the color for the whole project.
(You can also set a slide background using the formatting palette. Click on the background to get the slide background drawer choice.)
Save

• To add a subtitle for your project, click on the insert menu and choose textbox. The cursor changes to the letter A.
• Click and drag to form the box.
• Type your text inside it.
• Use the font menu in the formatting palette to change the size or text type.
Adding Textboxes
Save

• Remember your audience needs to be able to read your project!
What would you change on this slide?
Title Page Check
Frank Zamboni
By Karen
How did this inventor change the world of ice skating?
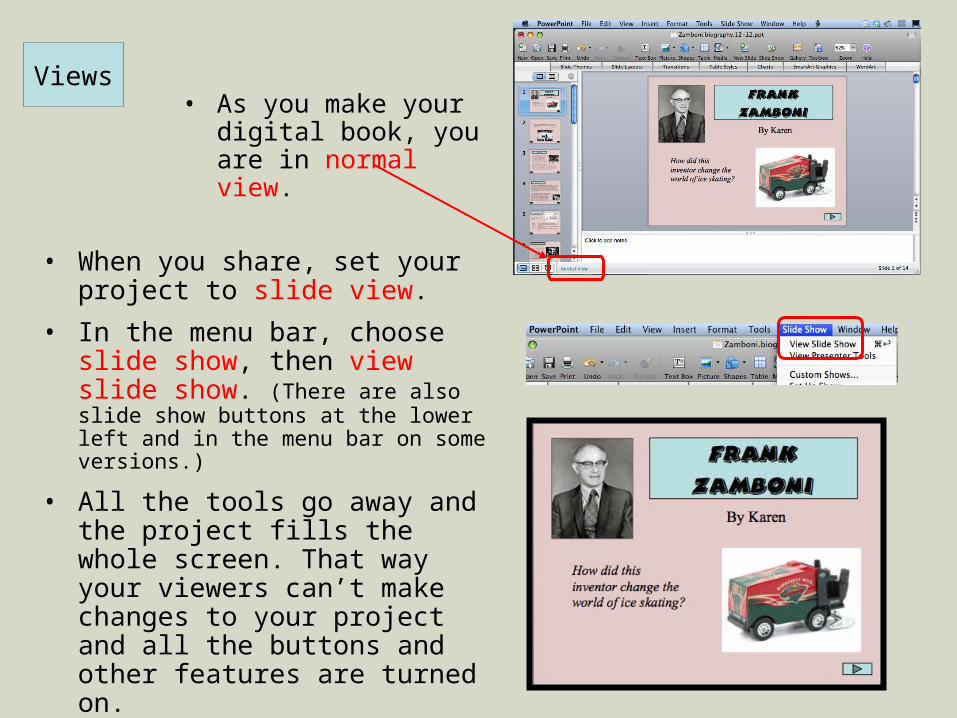
• As you make your digital book, you are in normal view.
Views
• When you share, set your project to slide view.
• In the menu bar, choose slide show, then view slide show. (There are also slide show buttons at the lower left and in the menu bar on some versions.)
• All the tools go away and the project fills the whole screen. That way your viewers can’t make changes to your project and all the buttons and other features are turned on.
• Press the esc key on your computer to return to normal view.

Action Buttons
• Give your reader action buttons to click for turning pages.
• Choose slide show in the menu bar, then action button, then next slide.
• Use the cursor to draw the size button you want.
• Action buttons only work when you are in the slide show view.
Save

Adding Pages
• Add a new page by choosing• New slide, or• Duplicate slide from the insert menu, or• Newer versions have a new slide button at the top of the window.
• Hint: If you duplicate a slide, you can save time. You just change what is in the boxes on the copy.
Save

Moving Between Slides to Revise
• The normal view includes a list of all your slides on the left side of the window.
• Newer versions of PowerPoint show them as little pictures called thumbnails.
• To work on a different slide, click on it in the list.
If you can’t see thumbnails, click on the view button at the bottom left of the window.
Save

Adding Sound
• To add sound, first you need to have a sound file on your desktop.
• Then choose insert.
• Then select sound and music and choose from file.
Save
Note: When you copy a PowerPoint project to a different computer, you have to also copy any sound files it uses.

Adding Sound
• In the window that pops up, find your music file on your computer. Click on it and then click insert.
• Choose when the sound plays—right away, or after someone clicks on it.
• The speaker icon tells you there is a sound with the page.
Save

Playing Sound Across Slides
You can use the formatting palette to set your sound to play across many slides.
• Click on the speaker icon so the handles show.
• When the icon is selected, the sound choices show.
• Look for play and choose across slides.
Save

Adding Internet Links: Choosing an Address
A link is a place to click that then opens an Internet page. Links can be text or pictures. You have to tell the computer what page to open when they are clicked.
• In a browser, find the Internet page you want to share with your readers.
• Copy its address by highlighting it, then choosing edit and copy.

Adding Internet Links: Pasting an Address
• In PowerPoint, highlight the text or click on the picture that you want to turn into a link.
• Choose insert in the menu bar.
• Choose hyperlink from the bottom of the list.
• Paste the web address in the blank that says link to and click OK.
• Text links show up underlined.
Save

Spell Check
Look for spelling help in the tools menu.
Play Your Project
• Open the slide show menu.• Select view slide show.• Enjoy!• To exit the show before the end, press the esc key. (escape)
Save