powerchart maternity: pregnancy summary page · powerchart maternity: pregnancy summary page...
TRANSCRIPT
1
PowerChart Maternity: Pregnancy Summary Page
The Pregnancy Summary Page is an interactive page that displays patient specific information related to an active pregnancy. This information has been pulled from previously charted data in various locations in PowerChart. You can also add information, and can easily navigate to other PowerChart locations by clicking links on this page. The following instructions will describe how to view information on the page, how to add information, and how to navigate throughout the chart from the page. Table of Contents:
Instructions Page Number
Pregnancy Summary Page: Navigation To 2
Add the current pregnancy & Add EDD 2
Appearance of Pregnancy Summary Page o Sections o Links
6
• Overview 7
Labor Flowsheet/Labor Graph 8
Vital Signs/Labor Graph 8
Results Timeline 9
Risk Factors 9
Pregnancy History 10
Birth Plan 10
Archived Strips 10
Education and Counseling 10
Procedure History 10
Documents 11
Labs 11
Microbiology 11
Consolidated Problems 11
New Order Entry 11
Home Medications 11
Medications 11
Immunizations 12
EDD Maintenance 12

2
PowerChart Maternity: Pregnancy Summary Page
Pregnancy Summary Page: Navigation To There are a couple ways to open the Pregnancy Summary Page: 1. From the tracking shell, double click on the patient indicator to open the patient’s
chart. The Pregnancy Summary will open as your default view. 2. Click the Pregnancy Summary icon from the toolbar If the patient does not yet have a pregnancy opened, this page will appear blank and will display the notice There are currently no active pregnancies for this patient. You must document confirmation of pregnancy to open a pregnancy so that information will display on the Pregnancy Summary Page.
Add the current pregnancy Add Pregnancy All patients must have a Pregnancy Added through the Pregnancy Summary tab. It is recommended to do this prior to any documentation.
1. Click the drop down arrow from the Overview section 2. Click Add Pregnancy 3. The Add Pregnancy window opens. The Onset date is used to document the date of onset of pregnancy. Enter the date that incorporates the entire pregnancy like the LMP date, if known. This date is used to set the starting point or ‘bookend’ for all visits to be included in this pregnancy.
3
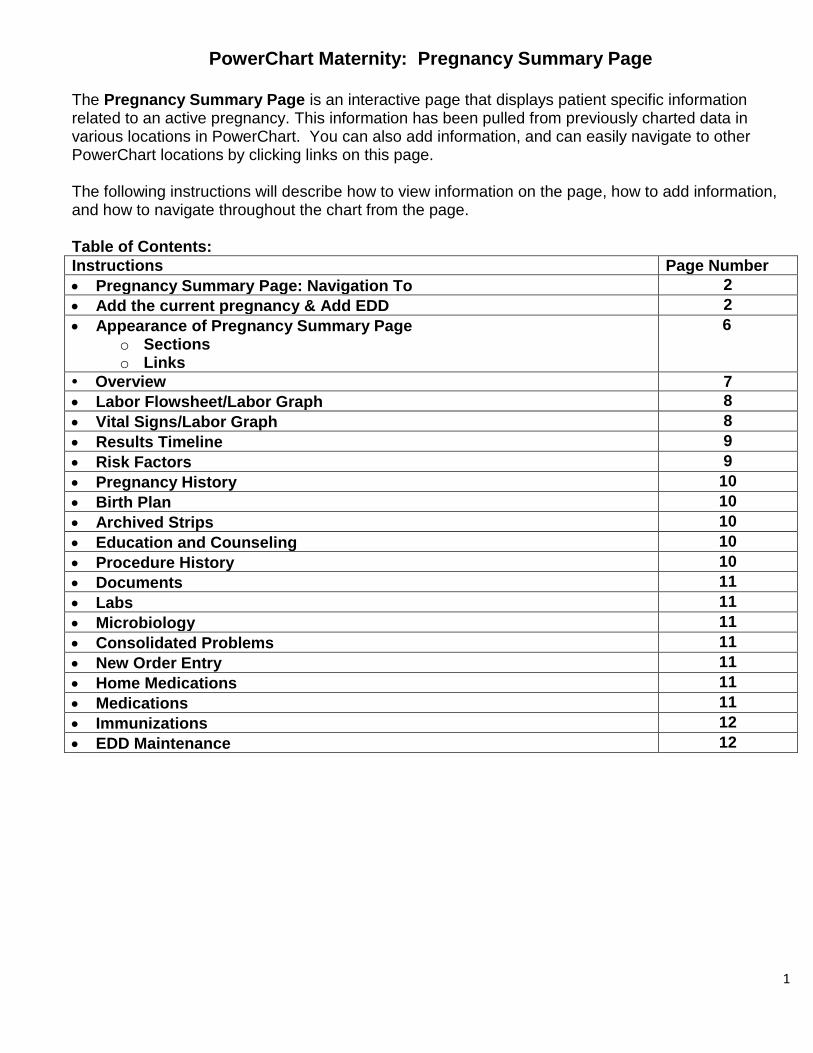
4. To complete process and save information, click OK.
Data is saved and active pregnancy is initiated for the patient.
Pregnancy is listed as an Active Problem on the patient’s Problem List. 5. You are returned to the Pregnancy Summary Page, which now displays the Active Pregnancy information. All sections on page are activated and in IView. Now you must add information to calculate the EDD.
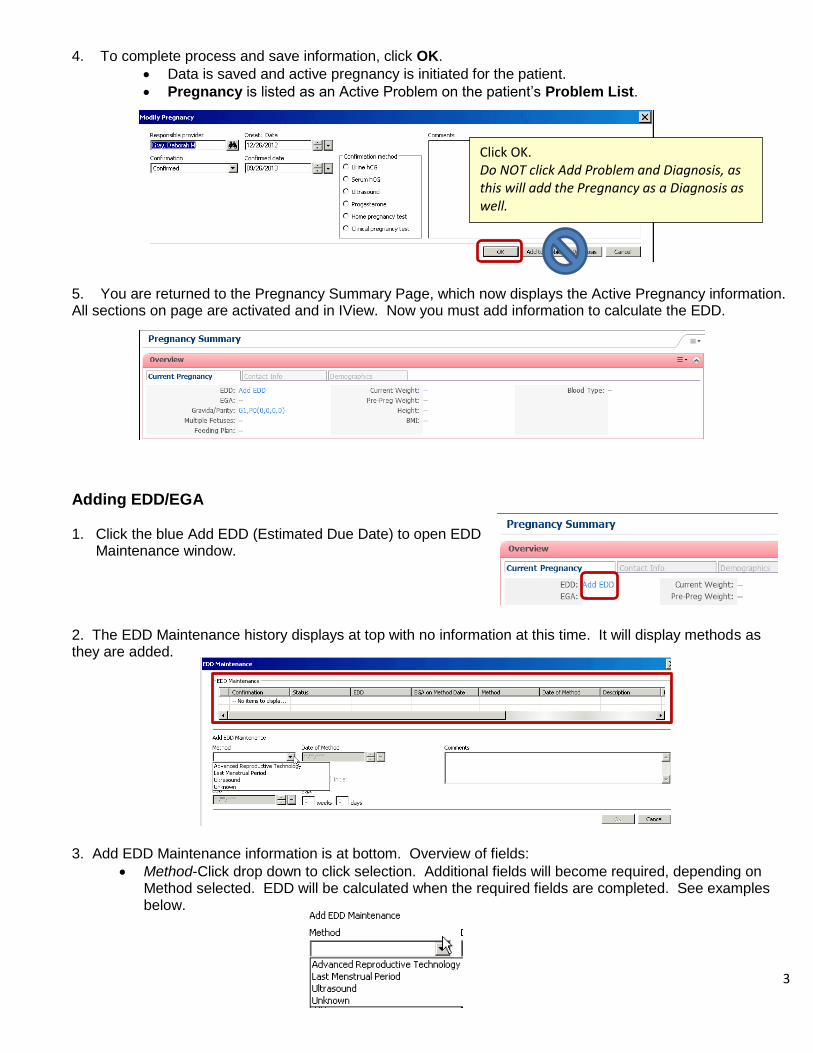
Adding EDD/EGA 1. Click the blue Add EDD (Estimated Due Date) to open EDD
Maintenance window. 2. The EDD Maintenance history displays at top with no information at this time. It will display methods as they are added.
3. Add EDD Maintenance information is at bottom. Overview of fields:
Method-Click drop down to click selection. Additional fields will become required, depending on Method selected. EDD will be calculated when the required fields are completed. See examples below.
Click OK. Do NOT click Add Problem and Diagnosis, as this will add the Pregnancy as a Diagnosis as well.
4
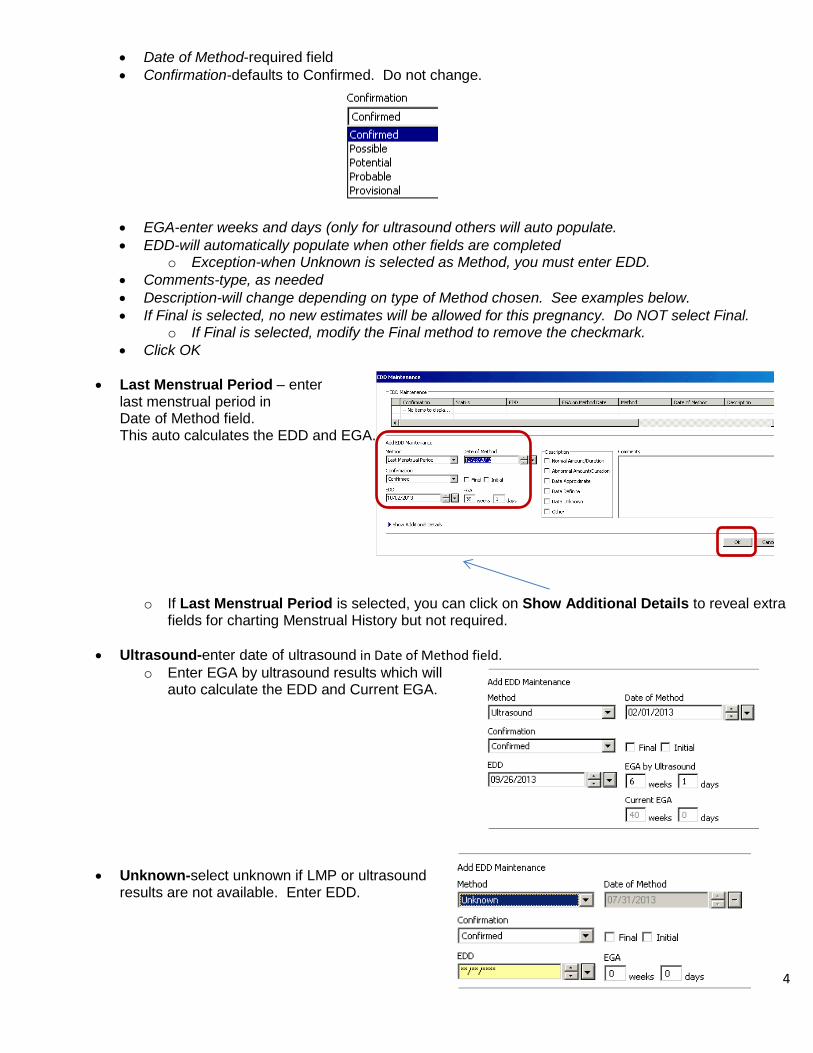
Date of Method-required field
Confirmation-defaults to Confirmed. Do not change.
EGA-enter weeks and days (only for ultrasound others will auto populate.
EDD-will automatically populate when other fields are completed o Exception-when Unknown is selected as Method, you must enter EDD.
Comments-type, as needed
Description-will change depending on type of Method chosen. See examples below.
If Final is selected, no new estimates will be allowed for this pregnancy. Do NOT select Final. o If Final is selected, modify the Final method to remove the checkmark.
Click OK
Last Menstrual Period – enter last menstrual period in Date of Method field. This auto calculates the EDD and EGA.
o If Last Menstrual Period is selected, you can click on Show Additional Details to reveal extra fields for charting Menstrual History but not required.
Ultrasound-enter date of ultrasound in Date of Method field. o Enter EGA by ultrasound results which will
auto calculate the EDD and Current EGA.
Unknown-select unknown if LMP or ultrasound results are not available. Enter EDD.
5
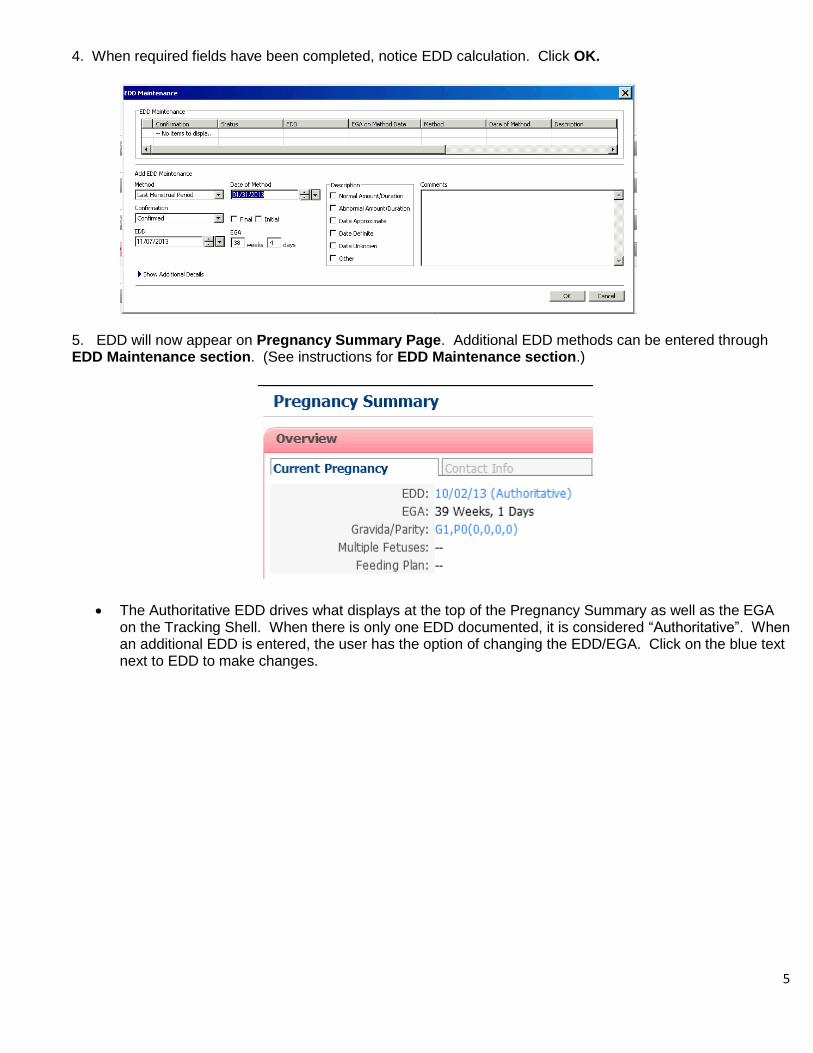
4. When required fields have been completed, notice EDD calculation. Click OK.
5. EDD will now appear on Pregnancy Summary Page. Additional EDD methods can be entered through EDD Maintenance section. (See instructions for EDD Maintenance section.)
The Authoritative EDD drives what displays at the top of the Pregnancy Summary as well as the EGA on the Tracking Shell. When there is only one EDD documented, it is considered “Authoritative”. When an additional EDD is entered, the user has the option of changing the EDD/EGA. Click on the blue text next to EDD to make changes.

6
Appearance of Pregnancy Summary Page Sections
o Display information pulled from previous documentation in various locations in PowerChart. o Click arrow at right of section heading to open or close section to view data.
Links o Section headings serve as links to click to navigate to various locations in the chart. o Information displayed in blue also serves as a link to click to navigate to the source of the
information. o You can also hover on blue information to view details, such as date/time of entry, who
documented, etc.
Selected sections will default
open.
Click to view drop
down menu.
Indicates number of documents in
folder.
To open or collapse sections, click drop
down arrow.
Click blue + to
make additions.
Hover to view link. Click section header to go to link.
Hover over blue text to view additional information.
7
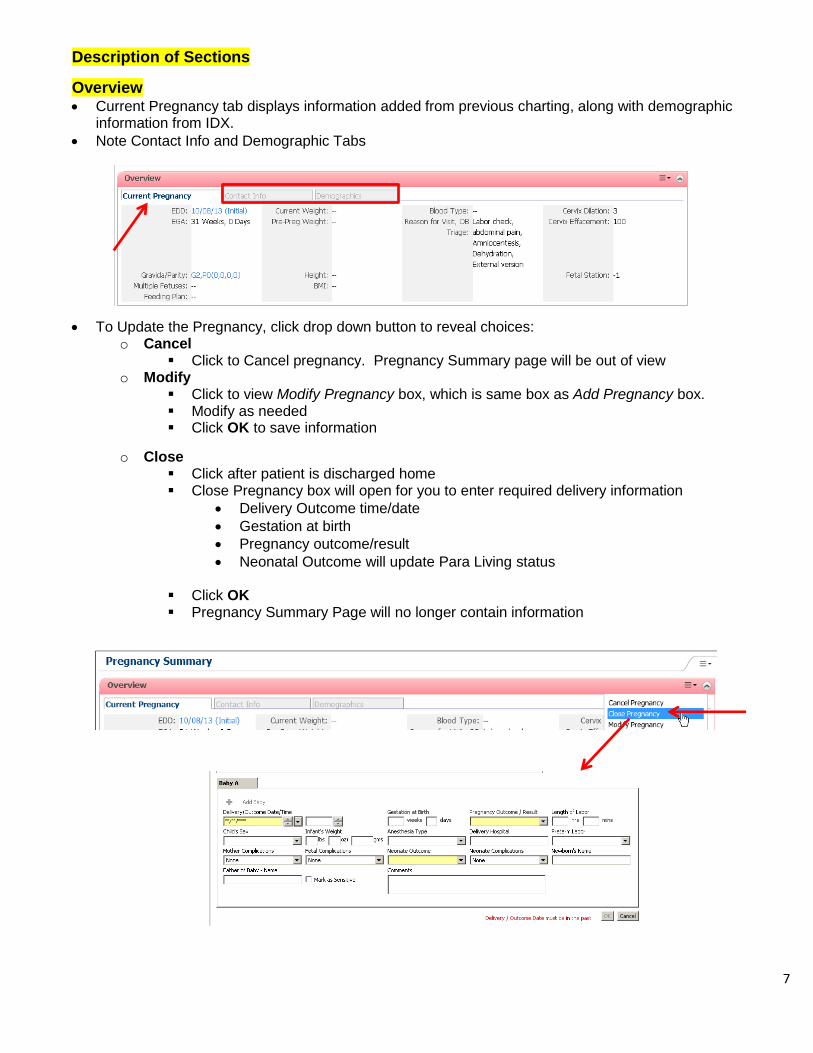
Description of Sections
Overview Current Pregnancy tab displays information added from previous charting, along with demographic
information from IDX.
Note Contact Info and Demographic Tabs
To Update the Pregnancy, click drop down button to reveal choices: o Cancel
Click to Cancel pregnancy. Pregnancy Summary page will be out of view o Modify
Click to view Modify Pregnancy box, which is same box as Add Pregnancy box. Modify as needed Click OK to save information
o Close Click after patient is discharged home Close Pregnancy box will open for you to enter required delivery information
Delivery Outcome time/date
Gestation at birth
Pregnancy outcome/result
Neonatal Outcome will update Para Living status
Click OK Pregnancy Summary Page will no longer contain information
8
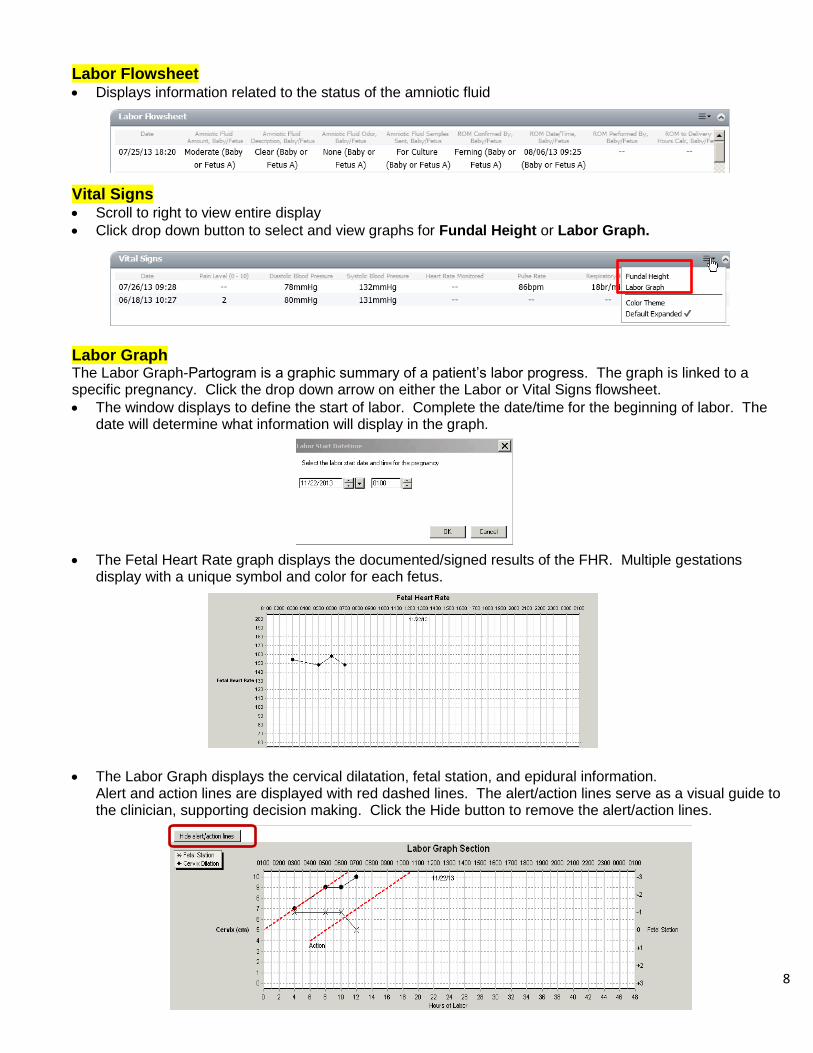
Labor Flowsheet Displays information related to the status of the amniotic fluid
Vital Signs Scroll to right to view entire display
Click drop down button to select and view graphs for Fundal Height or Labor Graph.
Labor Graph The Labor Graph-Partogram is a graphic summary of a patient’s labor progress. The graph is linked to a specific pregnancy. Click the drop down arrow on either the Labor or Vital Signs flowsheet.
The window displays to define the start of labor. Complete the date/time for the beginning of labor. The date will determine what information will display in the graph.
The Fetal Heart Rate graph displays the documented/signed results of the FHR. Multiple gestations display with a unique symbol and color for each fetus.
The Labor Graph displays the cervical dilatation, fetal station, and epidural information.
Alert and action lines are displayed with red dashed lines. The alert/action lines serve as a visual guide to the clinician, supporting decision making. Click the Hide button to remove the alert/action lines.
9
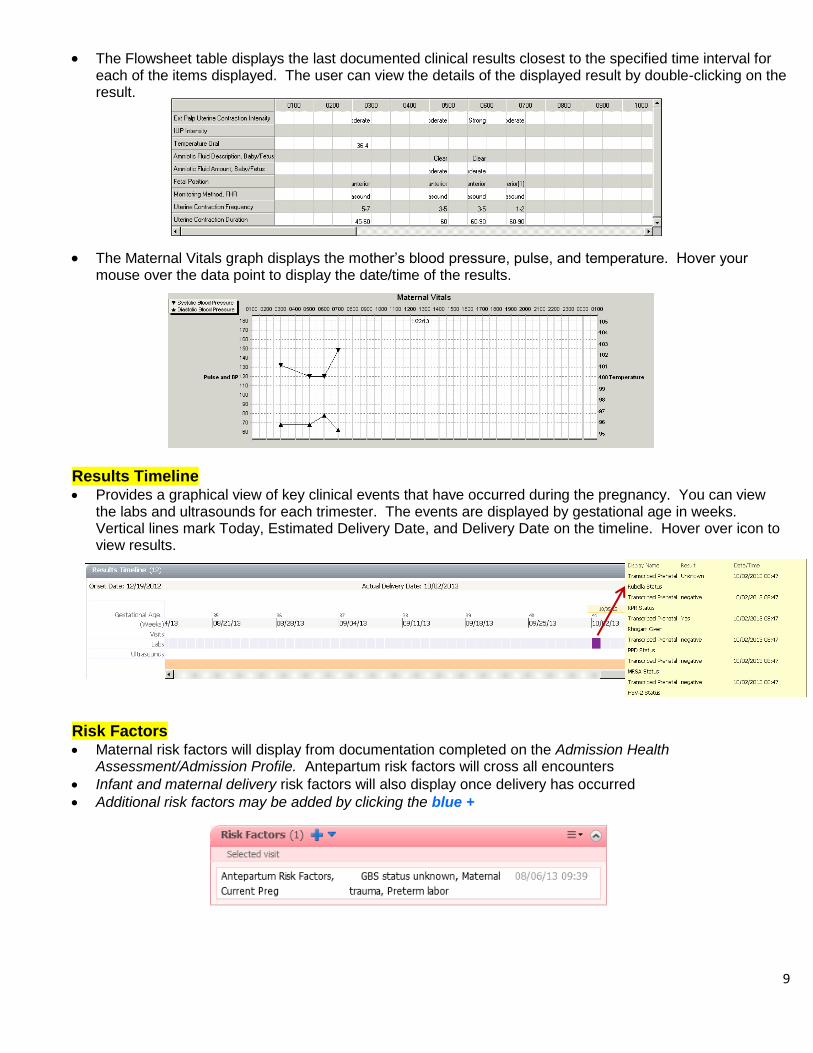
The Flowsheet table displays the last documented clinical results closest to the specified time interval for each of the items displayed. The user can view the details of the displayed result by double-clicking on the result.
The Maternal Vitals graph displays the mother’s blood pressure, pulse, and temperature. Hover your mouse over the data point to display the date/time of the results.
Results Timeline Provides a graphical view of key clinical events that have occurred during the pregnancy. You can view
the labs and ultrasounds for each trimester. The events are displayed by gestational age in weeks. Vertical lines mark Today, Estimated Delivery Date, and Delivery Date on the timeline. Hover over icon to view results.
Risk Factors Maternal risk factors will display from documentation completed on the Admission Health
Assessment/Admission Profile. Antepartum risk factors will cross all encounters
Infant and maternal delivery risk factors will also display once delivery has occurred
Additional risk factors may be added by clicking the blue +
10
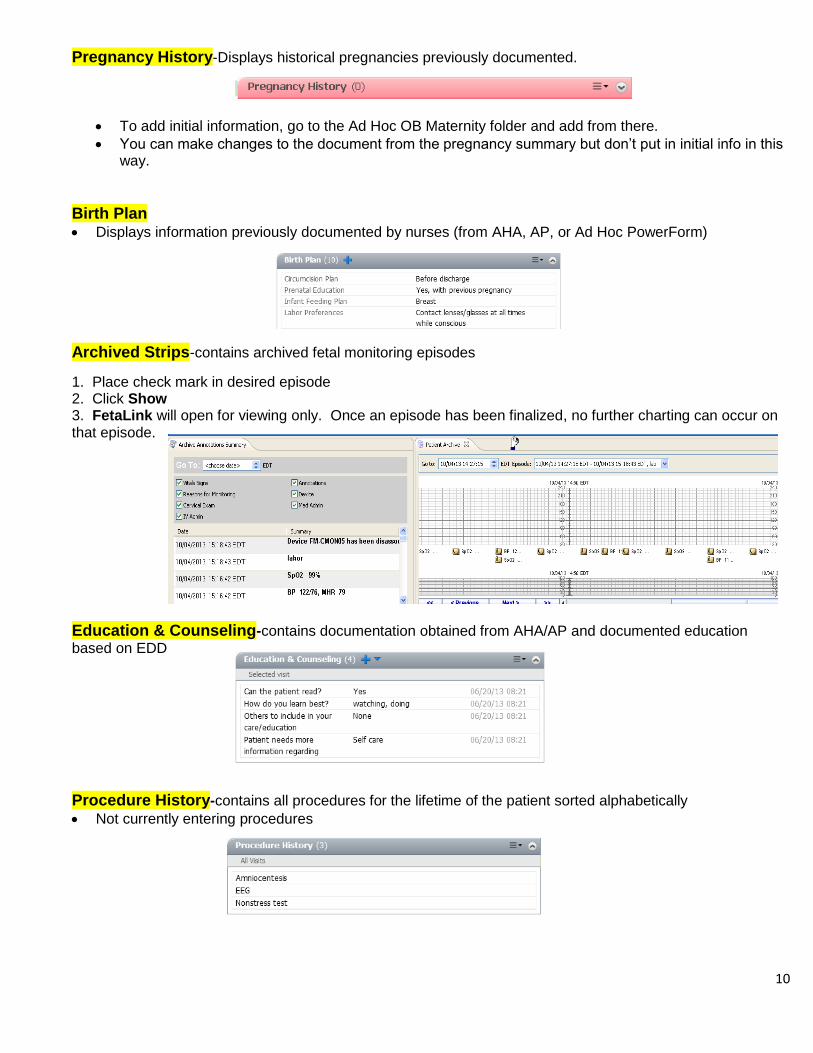
Pregnancy History-Displays historical pregnancies previously documented.
To add initial information, go to the Ad Hoc OB Maternity folder and add from there.
You can make changes to the document from the pregnancy summary but don’t put in initial info in this way.
Birth Plan Displays information previously documented by nurses (from AHA, AP, or Ad Hoc PowerForm)
Archived Strips-contains archived fetal monitoring episodes
1. Place check mark in desired episode 2. Click Show 3. FetaLink will open for viewing only. Once an episode has been finalized, no further charting can occur on that episode.
Education & Counseling-contains documentation obtained from AHA/AP and documented education
based on EDD
Procedure History-contains all procedures for the lifetime of the patient sorted alphabetically
Not currently entering procedures
11
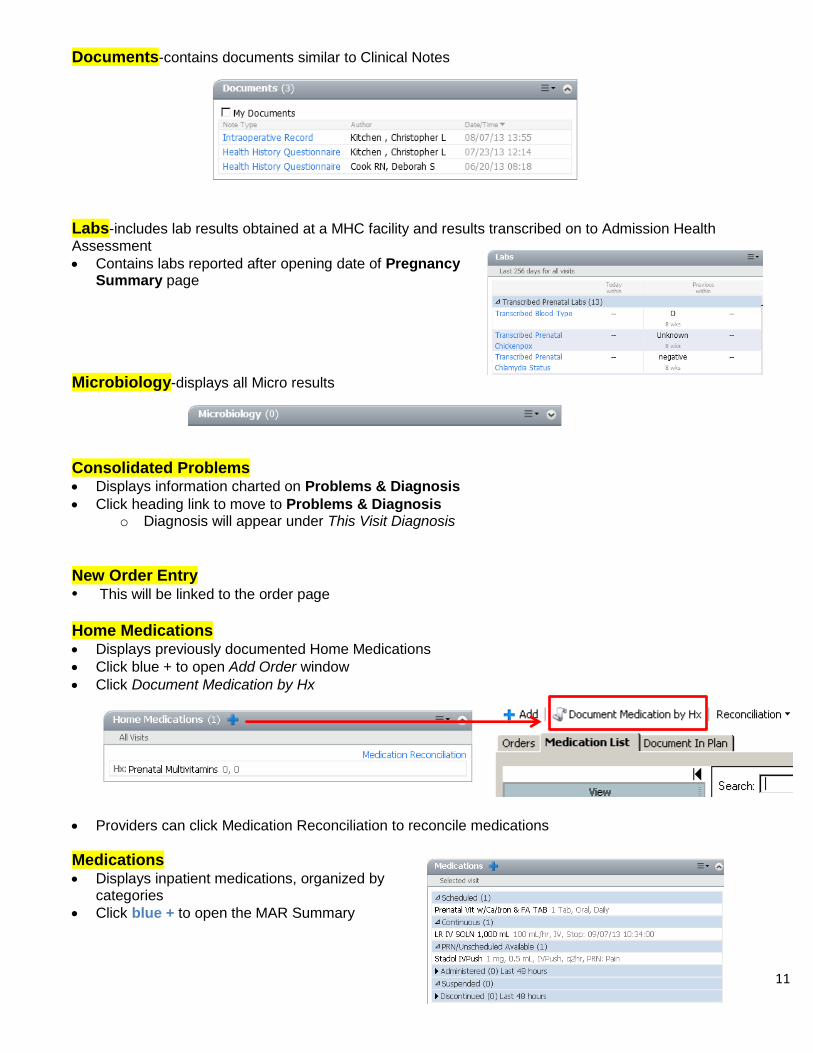
Documents-contains documents similar to Clinical Notes
Labs-includes lab results obtained at a MHC facility and results transcribed on to Admission Health
Assessment
Contains labs reported after opening date of Pregnancy Summary page
Microbiology-displays all Micro results
Consolidated Problems Displays information charted on Problems & Diagnosis
Click heading link to move to Problems & Diagnosis o Diagnosis will appear under This Visit Diagnosis
New Order Entry • This will be linked to the order page Home Medications Displays previously documented Home Medications
Click blue + to open Add Order window
Click Document Medication by Hx
Providers can click Medication Reconciliation to reconcile medications
Medications Displays inpatient medications, organized by
categories
Click blue + to open the MAR Summary
12
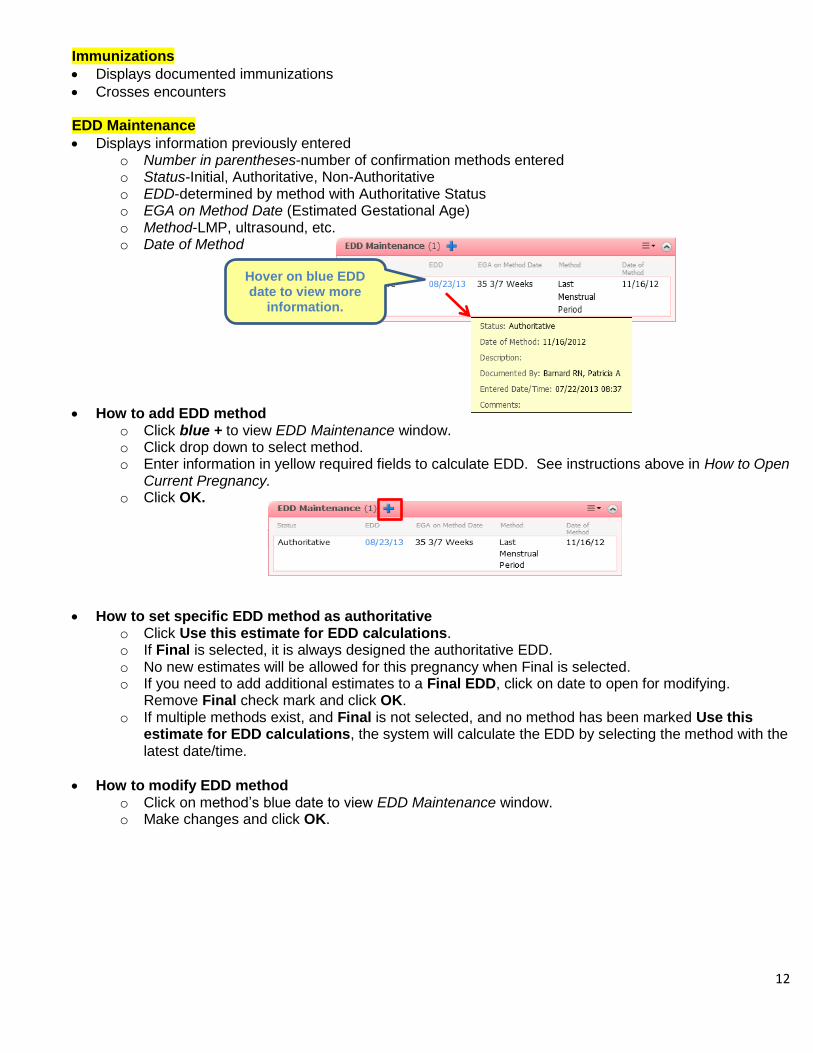
Immunizations
Displays documented immunizations
Crosses encounters EDD Maintenance
Displays information previously entered o Number in parentheses-number of confirmation methods entered o Status-Initial, Authoritative, Non-Authoritative o EDD-determined by method with Authoritative Status o EGA on Method Date (Estimated Gestational Age) o Method-LMP, ultrasound, etc. o Date of Method
How to add EDD method o Click blue + to view EDD Maintenance window. o Click drop down to select method. o Enter information in yellow required fields to calculate EDD. See instructions above in How to Open
Current Pregnancy. o Click OK.
How to set specific EDD method as authoritative o Click Use this estimate for EDD calculations. o If Final is selected, it is always designed the authoritative EDD. o No new estimates will be allowed for this pregnancy when Final is selected. o If you need to add additional estimates to a Final EDD, click on date to open for modifying.
Remove Final check mark and click OK. o If multiple methods exist, and Final is not selected, and no method has been marked Use this
estimate for EDD calculations, the system will calculate the EDD by selecting the method with the latest date/time.
How to modify EDD method o Click on method’s blue date to view EDD Maintenance window. o Make changes and click OK.
Hover on blue EDD date to view more
information.