position management - ubc human resources · remember to change it! ... position created in...
TRANSCRIPT
Position Management User Guide for Staff
UBC Human Resources - HR Management Systems
3/18/2015
Please refer to the most recent revision at: http://www.hr.ubc.ca/information-systems/hrms/hrms-manuals/
0 Contents Page 1 of 49
Contents
Contents ......................................................................................................................................................................... 1
1 Accessing the Position Management/Recruitment Portal ......................................................................................... 3
1.1 The CWL Portal ..................................................................................................................................................... 4
1.2 The Management Systems Portal ........................................................................................................................ 5
2 Position Management ................................................................................................................................................ 7
2.1 Position Management Defined ............................................................................................................................ 9
2.2 Create a New Position ........................................................................................................................................ 10
2.2.1 Find an existing position or add a new position ......................................................................................... 10
2.2.2 Enter Position Information ......................................................................................................................... 12
2.2.3 Job Standard/Benchmark ........................................................................................................................... 15
2.2.4 Qualifications .............................................................................................................................................. 16
2.2.5 Enter Job Description/Ad ............................................................................................................................ 17
2.2.6 Review Approvals .......................................................................................... Error! Bookmark not defined.
2.2.7 Enter Budget details.................................................................................................................................... 20
2.2.8 Review Incumbents ..................................................................................................................................... 22
2.2.9 Attach Documents ...................................................................................................................................... 23
2.2.10 Enter Joint Position details (if applicable) ............................................................................................... 24
2.2.11 Submit Position for approvals ................................................................................................................. 25
2.3 Position Approval Process .................................................................................................................................. 28
2.3.1 Email notification ........................................................................................................................................ 28
2.3.2 Approval Status and History ....................................................................................................................... 30
2.4 Edit Position Information ................................................................................................................................... 32
2.4.1 Find an existing position ............................................................................................................................. 32
2.4.2 Select the position to update ...................................................................................................................... 33
2.4.3 Positions and effective dates ...................................................................................................................... 34
2.4.4 Events and the Event Start Date ................................................................................................................. 36
2.5 Copy a Position ................................................................................................................................................... 37
2.5.1 Find an existing position ............................................................................................................................. 37
2.5.2 Select the position to copy ......................................................................................................................... 38
2.5.3 Enter Position Information ......................................................................................................................... 39
2.5.4 Review or modify Job Qualifications........................................................................................................... 40
2.5.5 Review or modify Job Description .............................................................................................................. 41
2.5.6 Review Budget ............................................................................................................................................ 42
0 Contents Page 2 of 49
2.5.7 Attach Documents ...................................................................................................................................... 43
2.5.8 Enter Joint Position details (if applicable)................................................................................................... 43
2.5.9 Submit Position for approvals ..................................................................................................................... 44
2.6 Delete a Position ................................................................................................................................................ 45
2.6.1 Create a Run Control ID .............................................................................................................................. 45
2.6.2 Use an existing Run Control ID ................................................................................................................... 46
2.6.3 Select a Position to delete .......................................................................................................................... 47
2.6.4 Run the delete process ............................................................................................................................... 48
2.6.5 Confirm the delete process......................................................................................................................... 49
1
Accessing the Position
Management/Recruitment
Portal
1.1 The CWL Portal Page 4 of 49
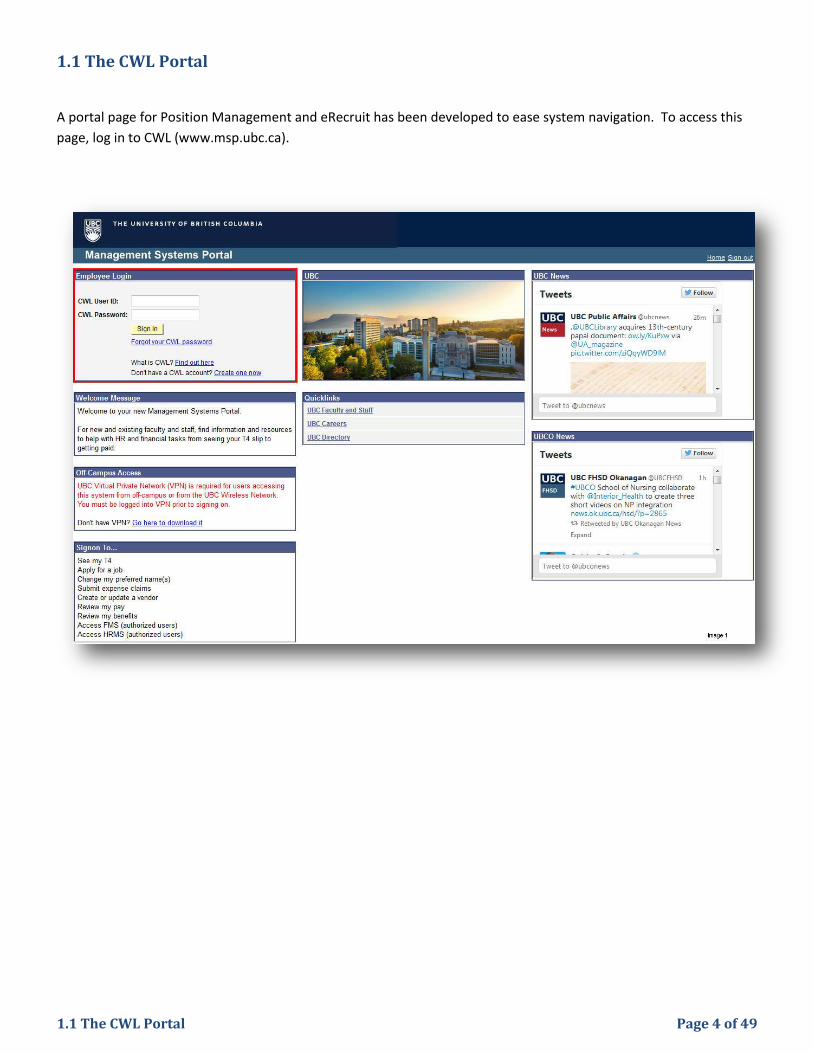
1.1 The CWL Portal
A portal page for Position Management and eRecruit has been developed to ease system navigation. To access this
page, log in to CWL (www.msp.ubc.ca).
1.2 The Management Systems Portal Page 5 of 49
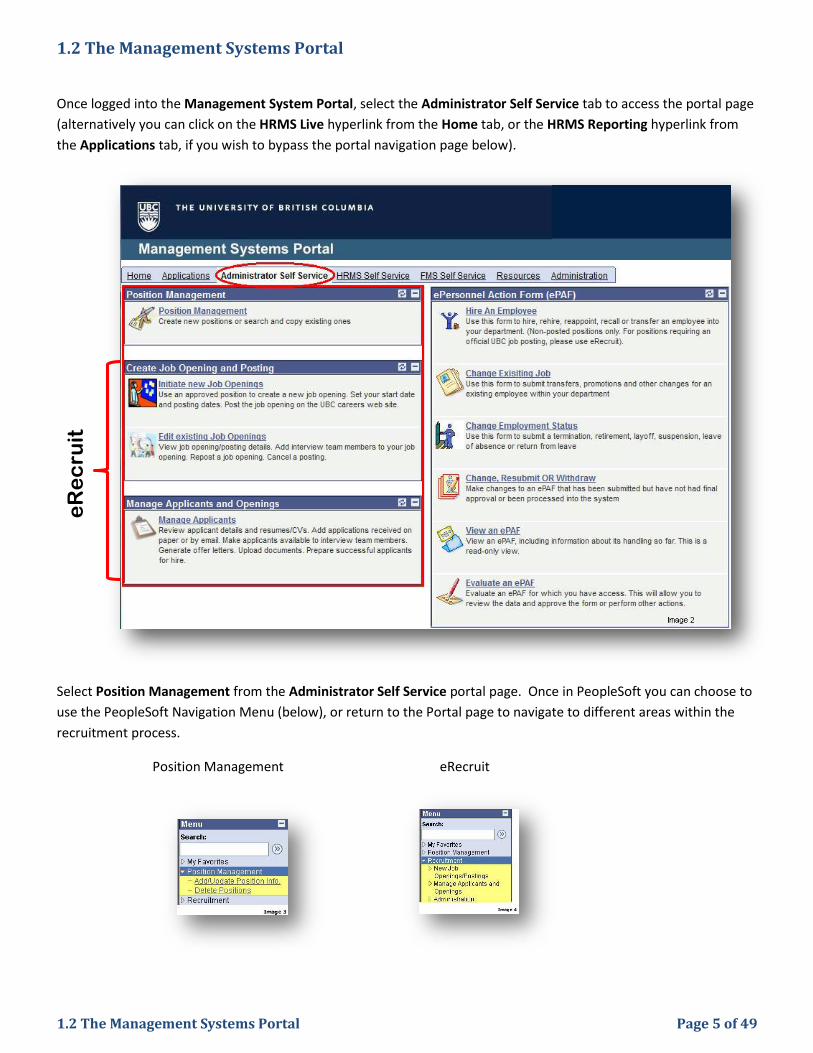
1.2 The Management Systems Portal
Once logged into the Management System Portal, select the Administrator Self Service tab to access the portal page
(alternatively you can click on the HRMS Live hyperlink from the Home tab, or the HRMS Reporting hyperlink from
the Applications tab, if you wish to bypass the portal navigation page below).
Select Position Management from the Administrator Self Service portal page. Once in PeopleSoft you can choose to
use the PeopleSoft Navigation Menu (below), or return to the Portal page to navigate to different areas within the
recruitment process.
Position Management eRecruit
eR
ec
ruit

1.2 The Management Systems Portal Page 6 of 49

2
Position Management

2.1 Position Management Defined
What is position management?
Position Management is the starting point for creating a job opening/posting.
Position management maintains both Human Resources and Budget information for every authorized Faculty and Staff position (positions are optional for student positions).
Defines Human Resources by position, rather than by employee.
Defines key attributes of a position such as position number, department, job code, business title, FTE and reporting relationships. Job descriptions and Faculty job ads can also be attached to the position, facilitating the recruitment process in eRecruit.
Defines funding distribution of a position such as funding effective dates and associated speedchart, for both salary and benefit expenses.
Why is it important? What are the advantages?
Provides the ability to manage the University’s workforce by position, in addition to employees occupying those positions.
Streamlines processes for recruiting and hiring Faculty and Staff.
Provides committed budget funding and salary expenses for both filled and vacant positions.
Fully integrated with UBC’s PeopleSoft HRMS and Oracle Hyperion budget system.
Provides organizational reporting structure by position, which can then be linked to employees occupying those positions.
Improved reporting and turnover analysis.
2.2 Create a New Position Page 10 of 49
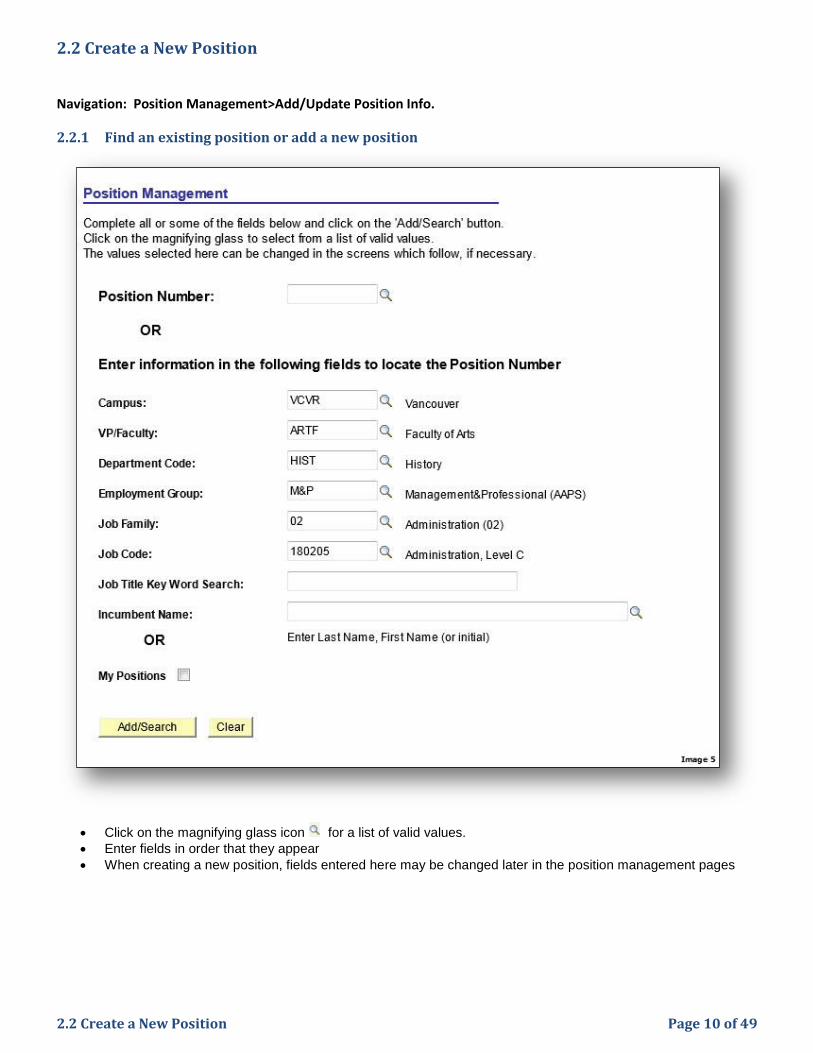
2.2 Create a New Position
Navigation: Position Management>Add/Update Position Info.
2.2.1 Find an existing position or add a new position
Click on the magnifying glass icon for a list of valid values.
Enter fields in order that they appear
When creating a new position, fields entered here may be changed later in the position management pages
2.2 Create a New Position Page 11 of 49
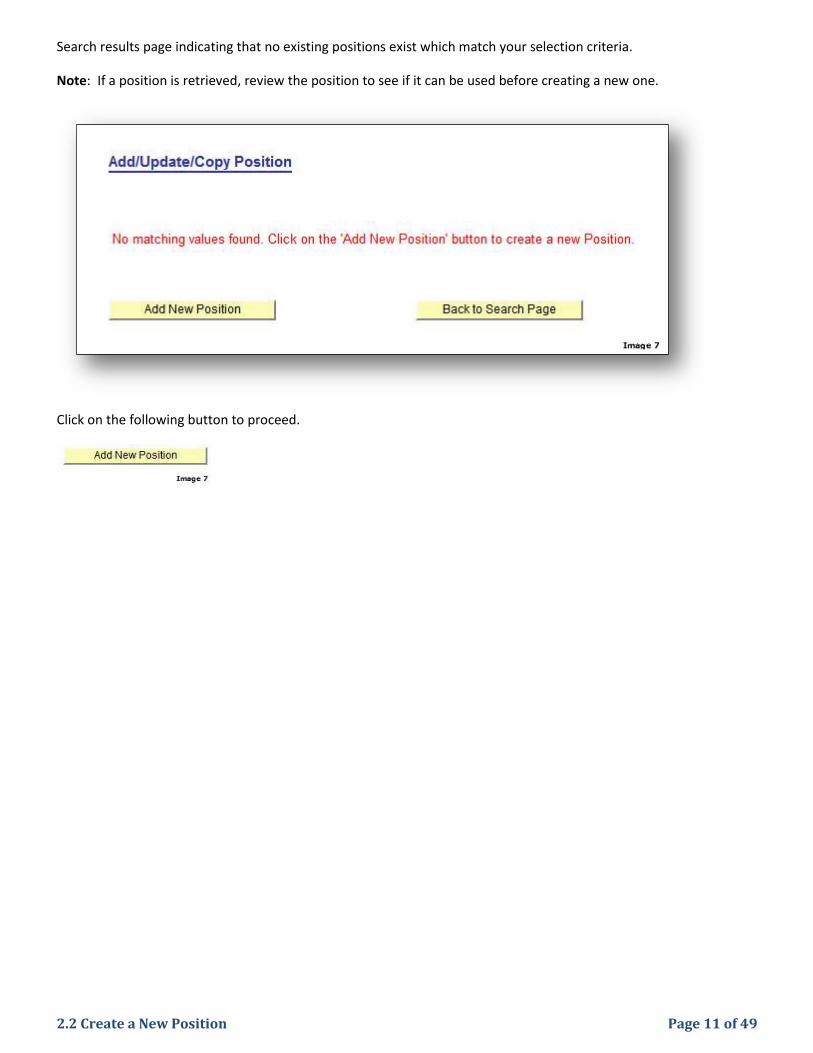
Search results page indicating that no existing positions exist which match your selection criteria.
Note: If a position is retrieved, review the position to see if it can be used before creating a new one.
Click on the following button to proceed.
2.2 Create a New Position Page 12 of 49
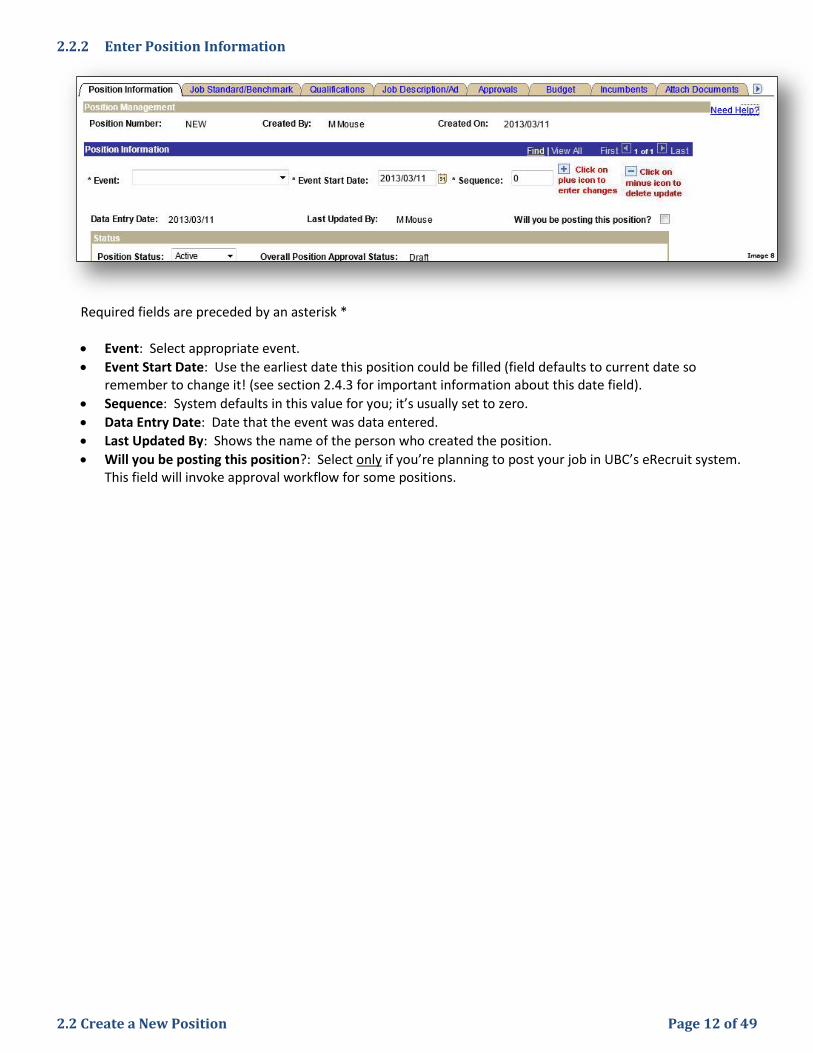
2.2.2 Enter Position Information
Required fields are preceded by an asterisk *
Event: Select appropriate event.
Event Start Date: Use the earliest date this position could be filled (field defaults to current date so remember to change it! (see section 2.4.3 for important information about this date field).
Sequence: System defaults in this value for you; it’s usually set to zero.
Data Entry Date: Date that the event was data entered.
Last Updated By: Shows the name of the person who created the position.
Will you be posting this position?: Select only if you’re planning to post your job in UBC’s eRecruit system. This field will invoke approval workflow for some positions.
2.2 Create a New Position Page 13 of 49
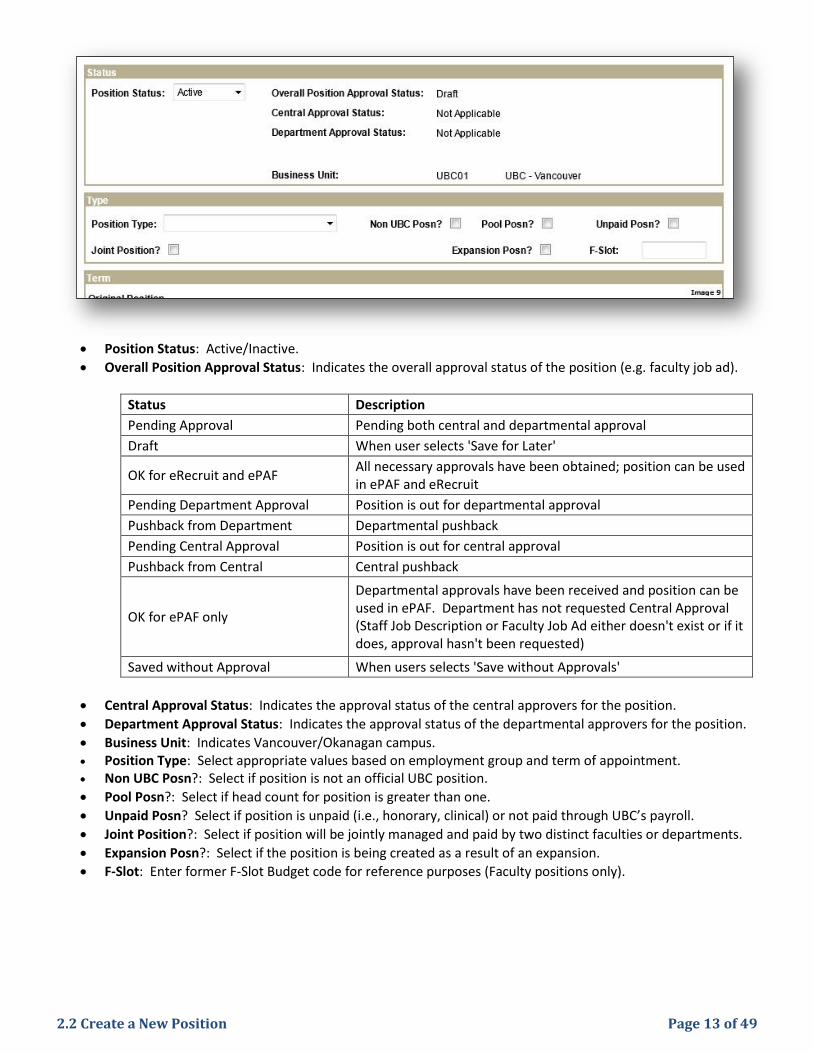
Position Status: Active/Inactive.
Overall Position Approval Status: Indicates the overall approval status of the position (e.g. faculty job ad).
Status Description
Pending Approval Pending both central and departmental approval
Draft When user selects 'Save for Later'
OK for eRecruit and ePAF All necessary approvals have been obtained; position can be used in ePAF and eRecruit
Pending Department Approval Position is out for departmental approval
Pushback from Department Departmental pushback
Pending Central Approval Position is out for central approval
Pushback from Central Central pushback
OK for ePAF only
Departmental approvals have been received and position can be used in ePAF. Department has not requested Central Approval (Staff Job Description or Faculty Job Ad either doesn't exist or if it does, approval hasn't been requested)
Saved without Approval When users selects 'Save without Approvals'
Central Approval Status: Indicates the approval status of the central approvers for the position.
Department Approval Status: Indicates the approval status of the departmental approvers for the position.
Business Unit: Indicates Vancouver/Okanagan campus. Position Type: Select appropriate values based on employment group and term of appointment. Non UBC Posn?: Select if position is not an official UBC position.
Pool Posn?: Select if head count for position is greater than one.
Unpaid Posn? Select if position is unpaid (i.e., honorary, clinical) or not paid through UBC’s payroll.
Joint Position?: Select if position will be jointly managed and paid by two distinct faculties or departments.
Expansion Posn?: Select if the position is being created as a result of an expansion.
F-Slot: Enter former F-Slot Budget code for reference purposes (Faculty positions only).
2.2 Create a New Position Page 14 of 49
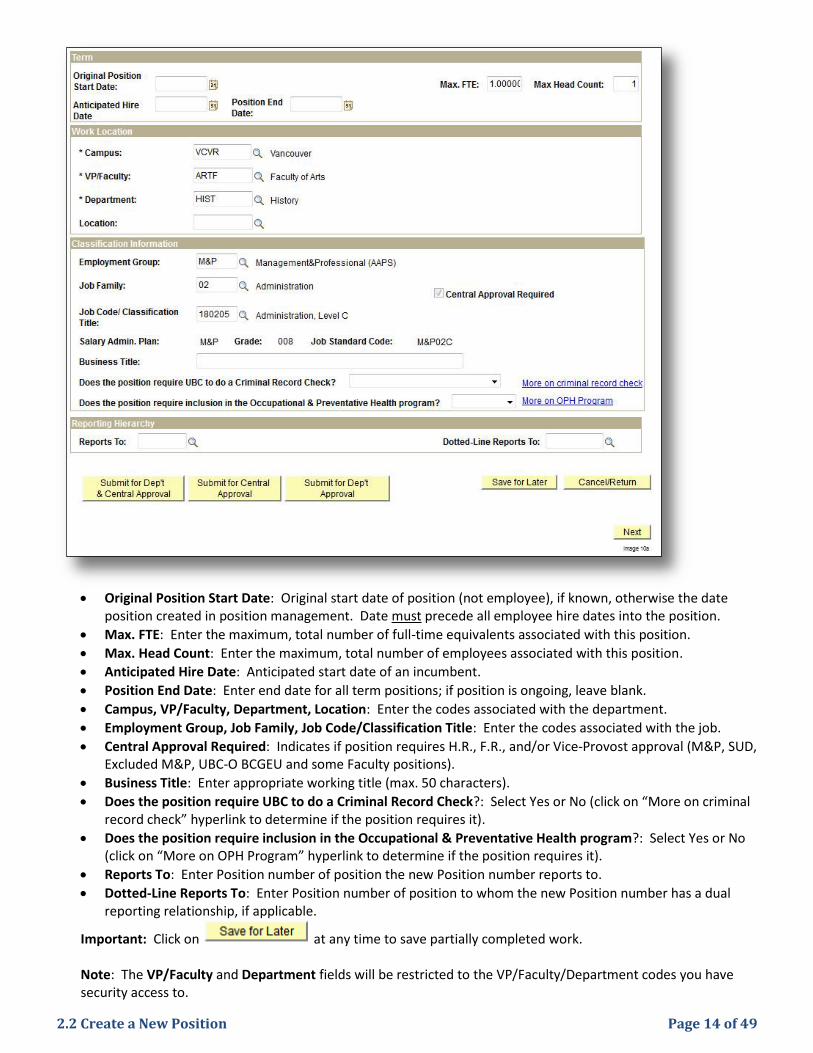
Original Position Start Date: Original start date of position (not employee), if known, otherwise the date
position created in position management. Date must precede all employee hire dates into the position.
Max. FTE: Enter the maximum, total number of full-time equivalents associated with this position.
Max. Head Count: Enter the maximum, total number of employees associated with this position.
Anticipated Hire Date: Anticipated start date of an incumbent.
Position End Date: Enter end date for all term positions; if position is ongoing, leave blank.
Campus, VP/Faculty, Department, Location: Enter the codes associated with the department.
Employment Group, Job Family, Job Code/Classification Title: Enter the codes associated with the job.
Central Approval Required: Indicates if position requires H.R., F.R., and/or Vice-Provost approval (M&P, SUD, Excluded M&P, UBC-O BCGEU and some Faculty positions).
Business Title: Enter appropriate working title (max. 50 characters).
Does the position require UBC to do a Criminal Record Check?: Select Yes or No (click on “More on criminal record check” hyperlink to determine if the position requires it).
Does the position require inclusion in the Occupational & Preventative Health program?: Select Yes or No (click on “More on OPH Program” hyperlink to determine if the position requires it).
Reports To: Enter Position number of position the new Position number reports to.
Dotted-Line Reports To: Enter Position number of position to whom the new Position number has a dual reporting relationship, if applicable.
Important: Click on at any time to save partially completed work. Note: The VP/Faculty and Department fields will be restricted to the VP/Faculty/Department codes you have security access to.
2.2 Create a New Position Page 15 of 49
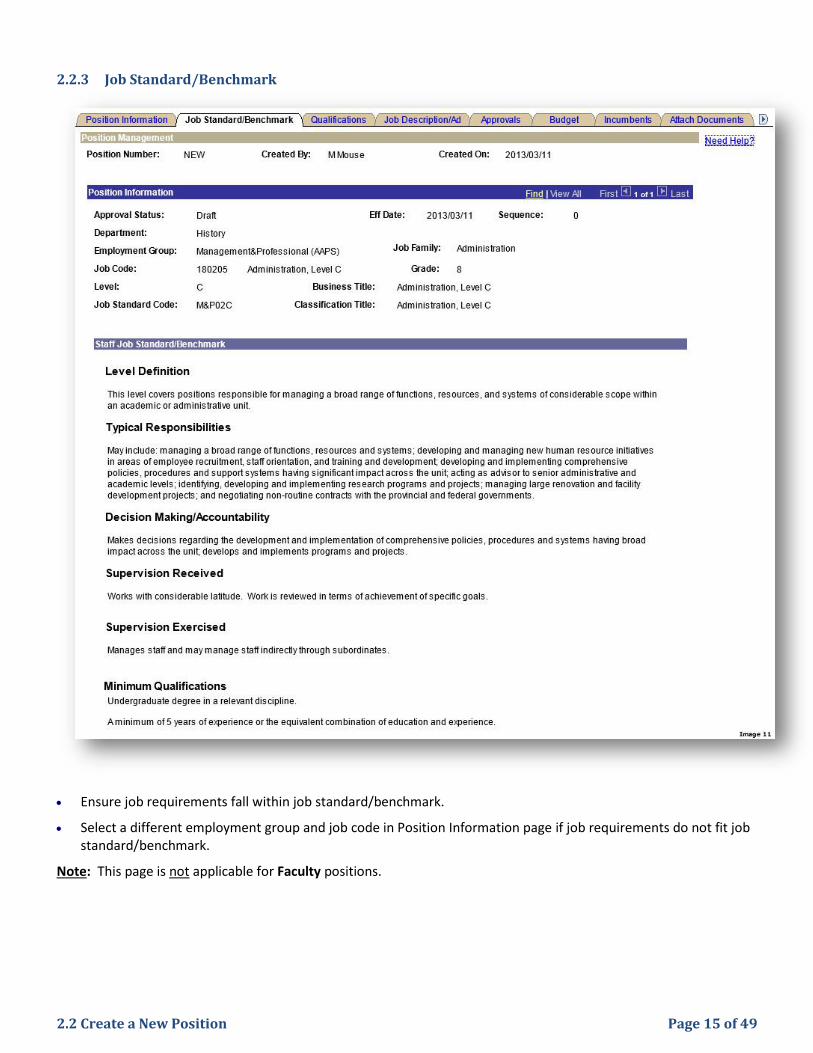
2.2.3 Job Standard/Benchmark
Ensure job requirements fall within job standard/benchmark.
Select a different employment group and job code in Position Information page if job requirements do not fit job standard/benchmark.
Note: This page is not applicable for Faculty positions.
2.2 Create a New Position Page 16 of 49
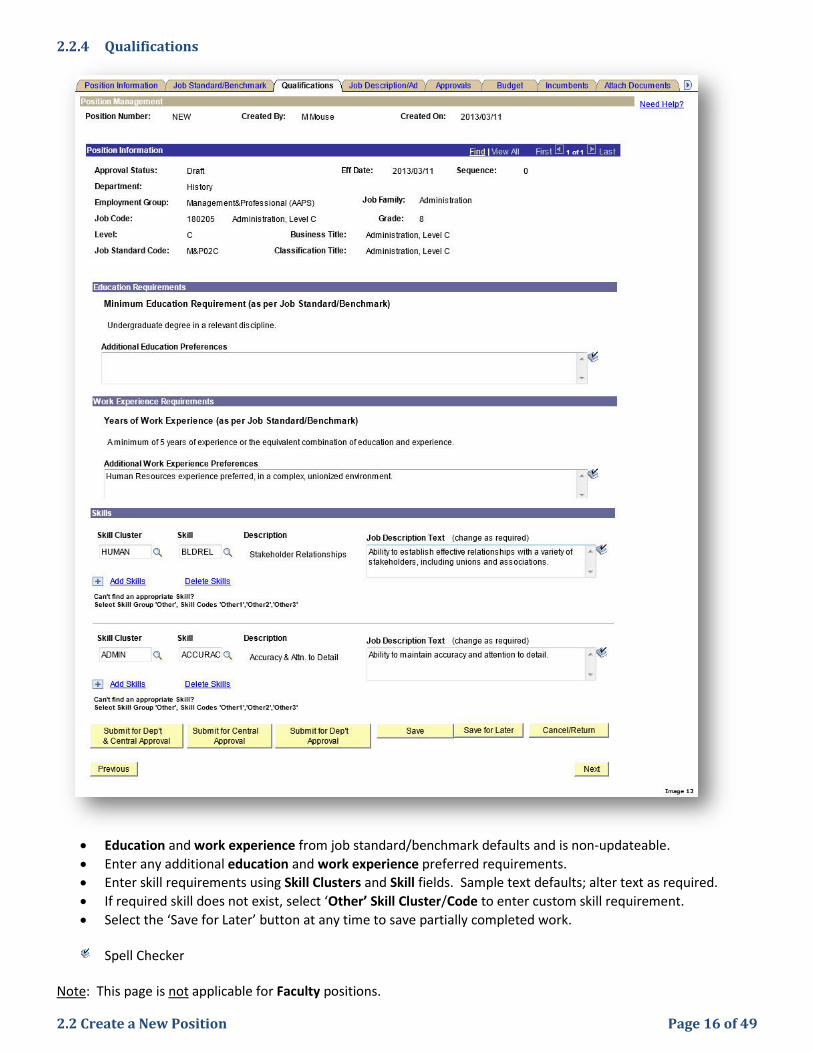
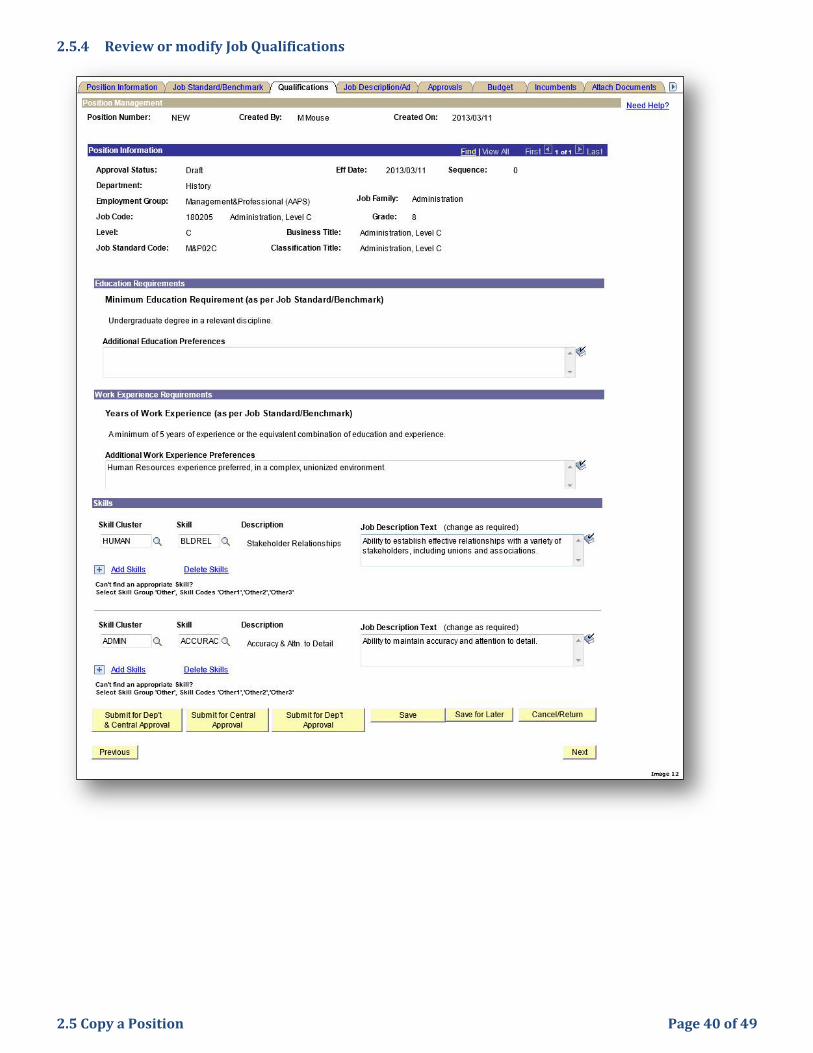
2.2.4 Qualifications
Education and work experience from job standard/benchmark defaults and is non-updateable.
Enter any additional education and work experience preferred requirements.
Enter skill requirements using Skill Clusters and Skill fields. Sample text defaults; alter text as required.
If required skill does not exist, select ‘Other’ Skill Cluster/Code to enter custom skill requirement.
Select the ‘Save for Later’ button at any time to save partially completed work.
Spell Checker Note: This page is not applicable for Faculty positions.
2.2 Create a New Position Page 17 of 49
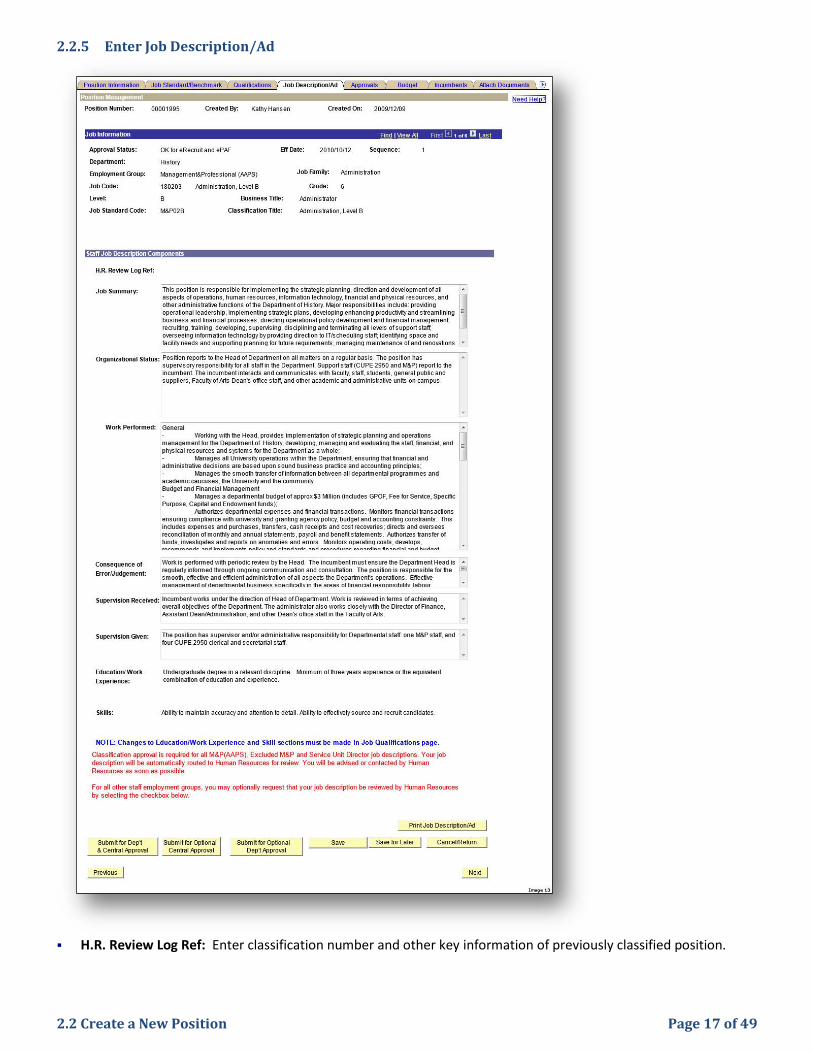
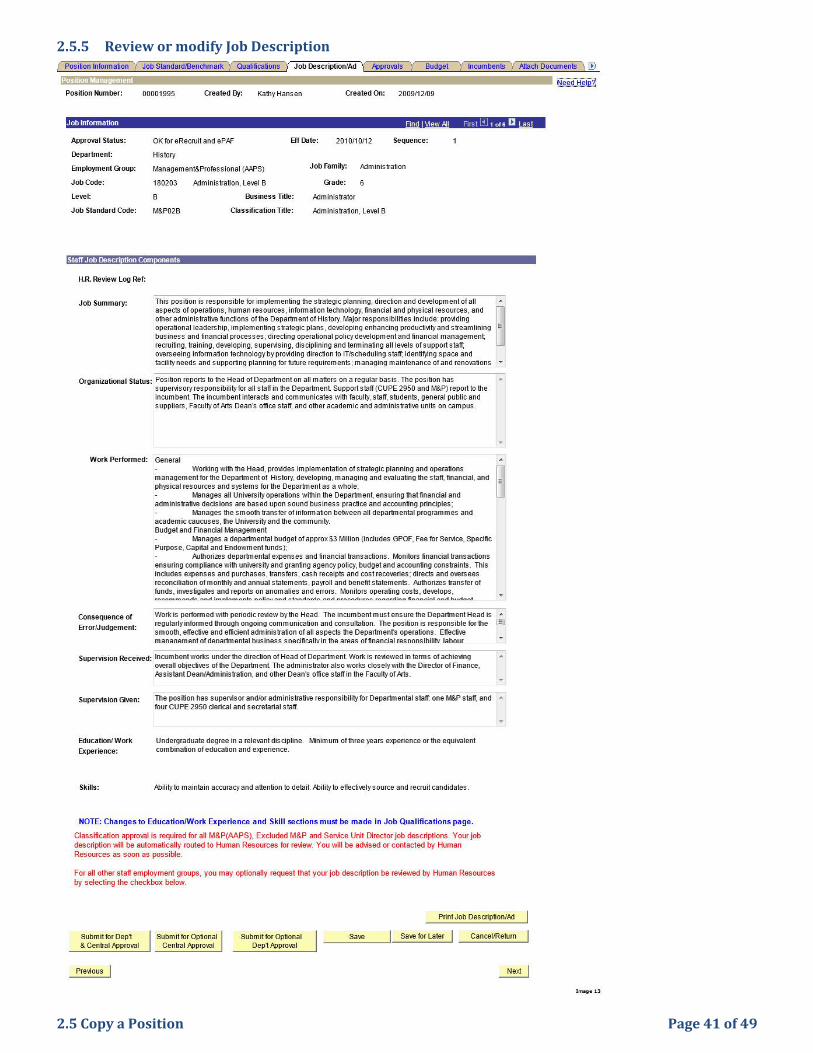
2.2.5 Enter Job Description/Ad
H.R. Review Log Ref: Enter classification number and other key information of previously classified position.
2.2 Create a New Position Page 18 of 49
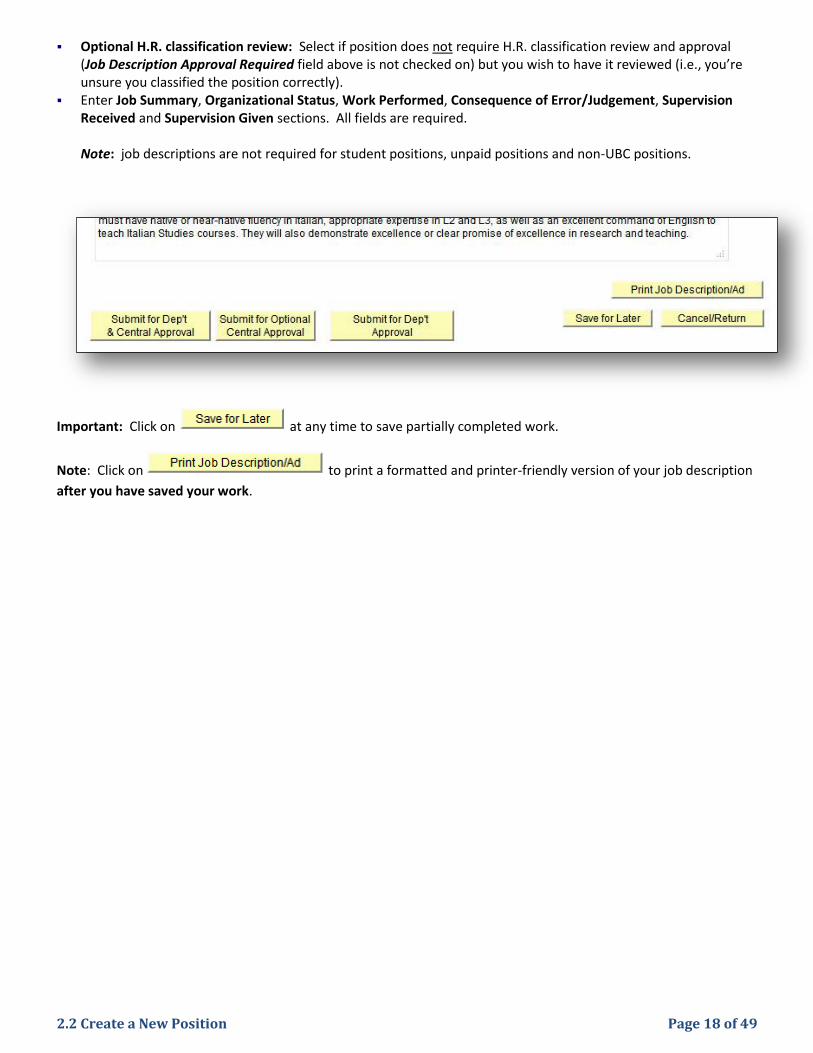
Optional H.R. classification review: Select if position does not require H.R. classification review and approval (Job Description Approval Required field above is not checked on) but you wish to have it reviewed (i.e., you’re unsure you classified the position correctly).
Enter Job Summary, Organizational Status, Work Performed, Consequence of Error/Judgement, Supervision Received and Supervision Given sections. All fields are required. Note: job descriptions are not required for student positions, unpaid positions and non-UBC positions.
Important: Click on at any time to save partially completed work.
Note: Click on to print a formatted and printer-friendly version of your job description
after you have saved your work.
2.2 Create a New Position Page 19 of 49
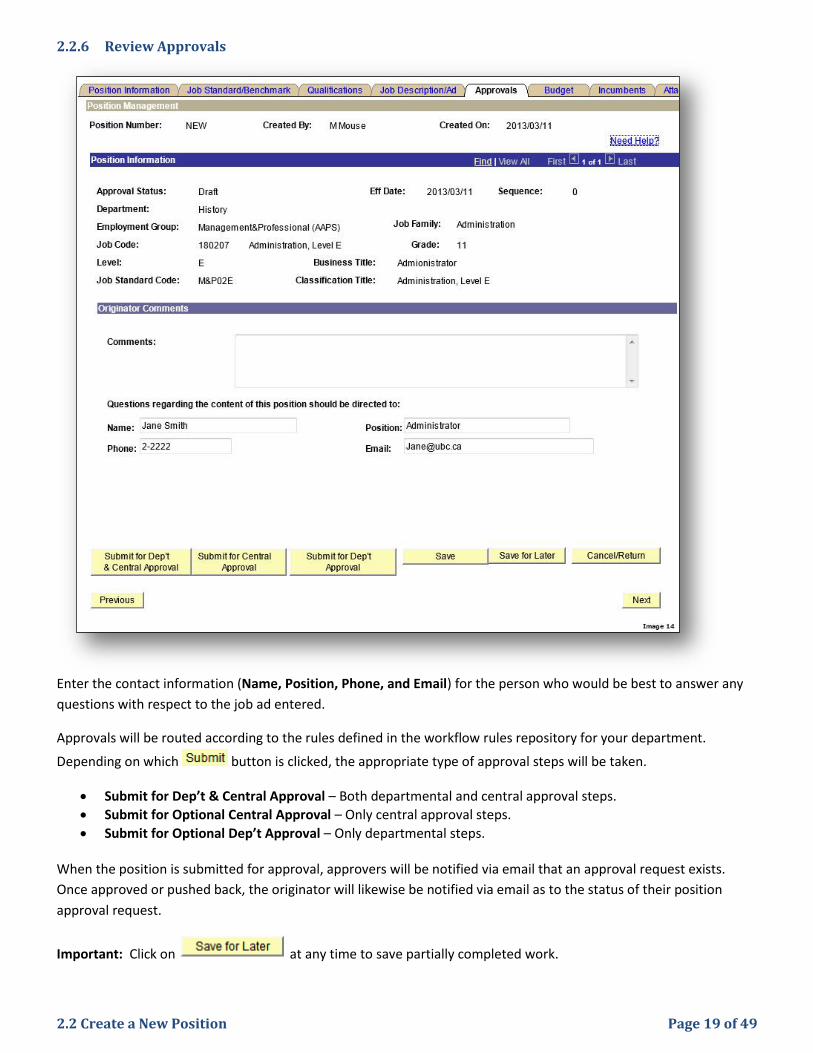
2.2.6 Review Approvals
Enter the contact information (Name, Position, Phone, and Email) for the person who would be best to answer any
questions with respect to the job ad entered.
Approvals will be routed according to the rules defined in the workflow rules repository for your department.
Depending on which button is clicked, the appropriate type of approval steps will be taken.
Submit for Dep’t & Central Approval – Both departmental and central approval steps.
Submit for Optional Central Approval – Only central approval steps.
Submit for Optional Dep’t Approval – Only departmental steps.
When the position is submitted for approval, approvers will be notified via email that an approval request exists.
Once approved or pushed back, the originator will likewise be notified via email as to the status of their position
approval request.
Important: Click on at any time to save partially completed work.
2.2 Create a New Position Page 20 of 49
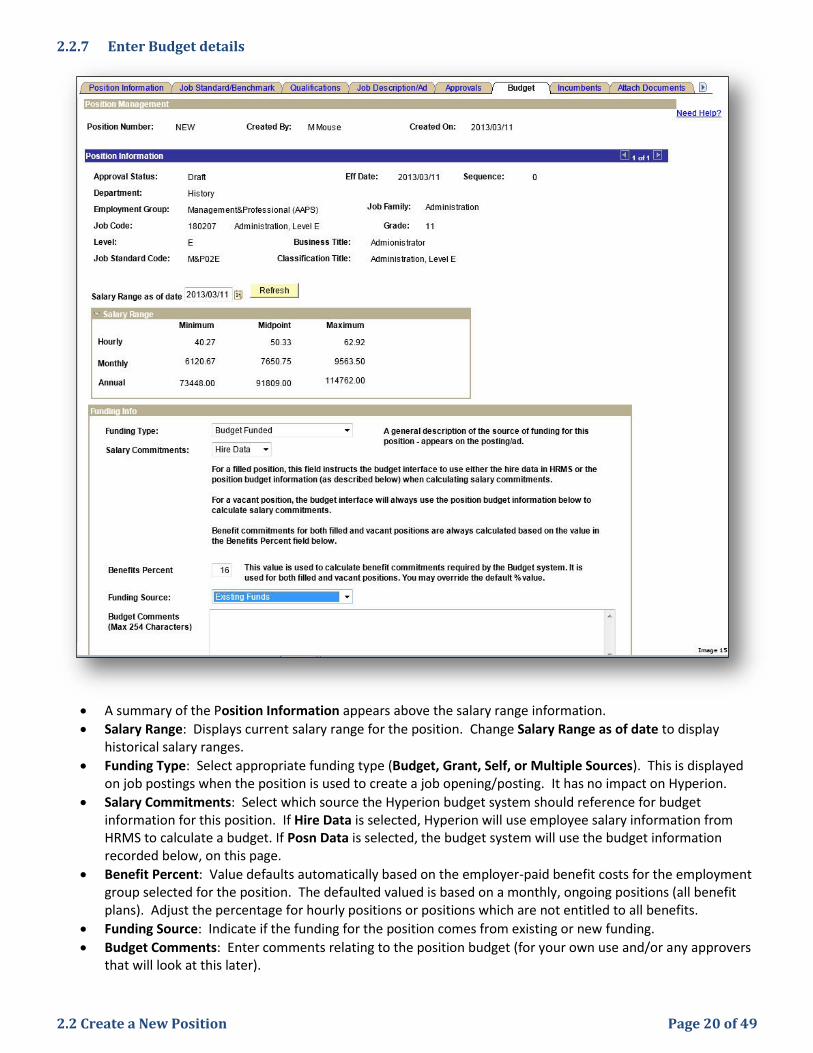
2.2.7 Enter Budget details
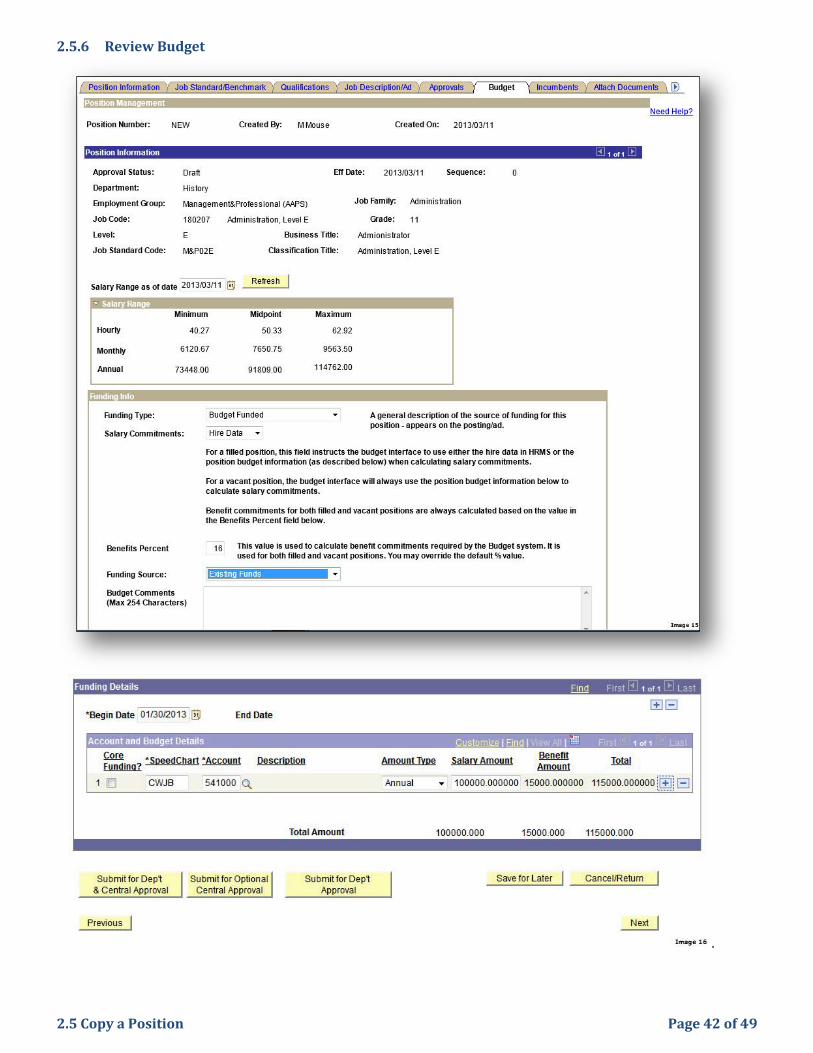
A summary of the Position Information appears above the salary range information.
Salary Range: Displays current salary range for the position. Change Salary Range as of date to display historical salary ranges.
Funding Type: Select appropriate funding type (Budget, Grant, Self, or Multiple Sources). This is displayed on job postings when the position is used to create a job opening/posting. It has no impact on Hyperion.
Salary Commitments: Select which source the Hyperion budget system should reference for budget information for this position. If Hire Data is selected, Hyperion will use employee salary information from HRMS to calculate a budget. If Posn Data is selected, the budget system will use the budget information recorded below, on this page.
Benefit Percent: Value defaults automatically based on the employer-paid benefit costs for the employment group selected for the position. The defaulted valued is based on a monthly, ongoing positions (all benefit plans). Adjust the percentage for hourly positions or positions which are not entitled to all benefits.
Funding Source: Indicate if the funding for the position comes from existing or new funding.
Budget Comments: Enter comments relating to the position budget (for your own use and/or any approvers that will look at this later).
2.2 Create a New Position Page 21 of 49
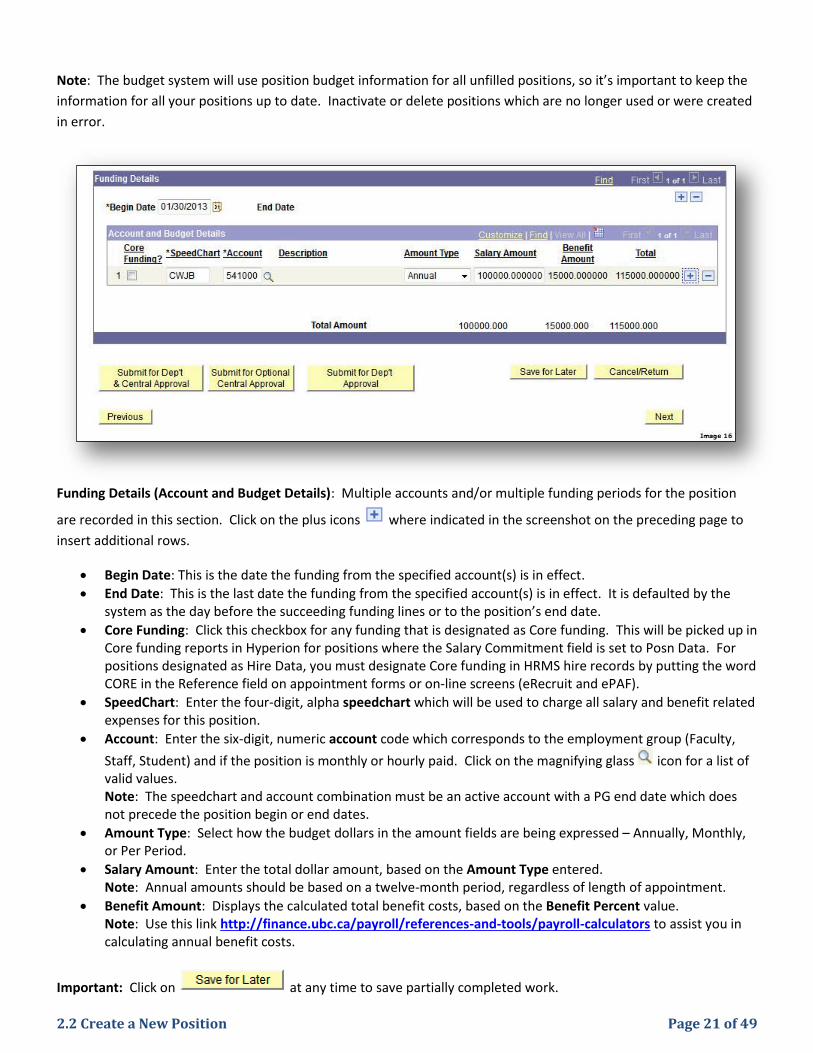
Note: The budget system will use position budget information for all unfilled positions, so it’s important to keep the
information for all your positions up to date. Inactivate or delete positions which are no longer used or were created
in error.
Funding Details (Account and Budget Details): Multiple accounts and/or multiple funding periods for the position
are recorded in this section. Click on the plus icons where indicated in the screenshot on the preceding page to
insert additional rows.
Begin Date: This is the date the funding from the specified account(s) is in effect.
End Date: This is the last date the funding from the specified account(s) is in effect. It is defaulted by the system as the day before the succeeding funding lines or to the position’s end date.
Core Funding: Click this checkbox for any funding that is designated as Core funding. This will be picked up in Core funding reports in Hyperion for positions where the Salary Commitment field is set to Posn Data. For positions designated as Hire Data, you must designate Core funding in HRMS hire records by putting the word CORE in the Reference field on appointment forms or on-line screens (eRecruit and ePAF).
SpeedChart: Enter the four-digit, alpha speedchart which will be used to charge all salary and benefit related expenses for this position.
Account: Enter the six-digit, numeric account code which corresponds to the employment group (Faculty,
Staff, Student) and if the position is monthly or hourly paid. Click on the magnifying glass icon for a list of valid values. Note: The speedchart and account combination must be an active account with a PG end date which does not precede the position begin or end dates.
Amount Type: Select how the budget dollars in the amount fields are being expressed – Annually, Monthly, or Per Period.
Salary Amount: Enter the total dollar amount, based on the Amount Type entered. Note: Annual amounts should be based on a twelve-month period, regardless of length of appointment.
Benefit Amount: Displays the calculated total benefit costs, based on the Benefit Percent value. Note: Use this link http://finance.ubc.ca/payroll/references-and-tools/payroll-calculators to assist you in calculating annual benefit costs.
Important: Click on at any time to save partially completed work.
2.2 Create a New Position Page 22 of 49
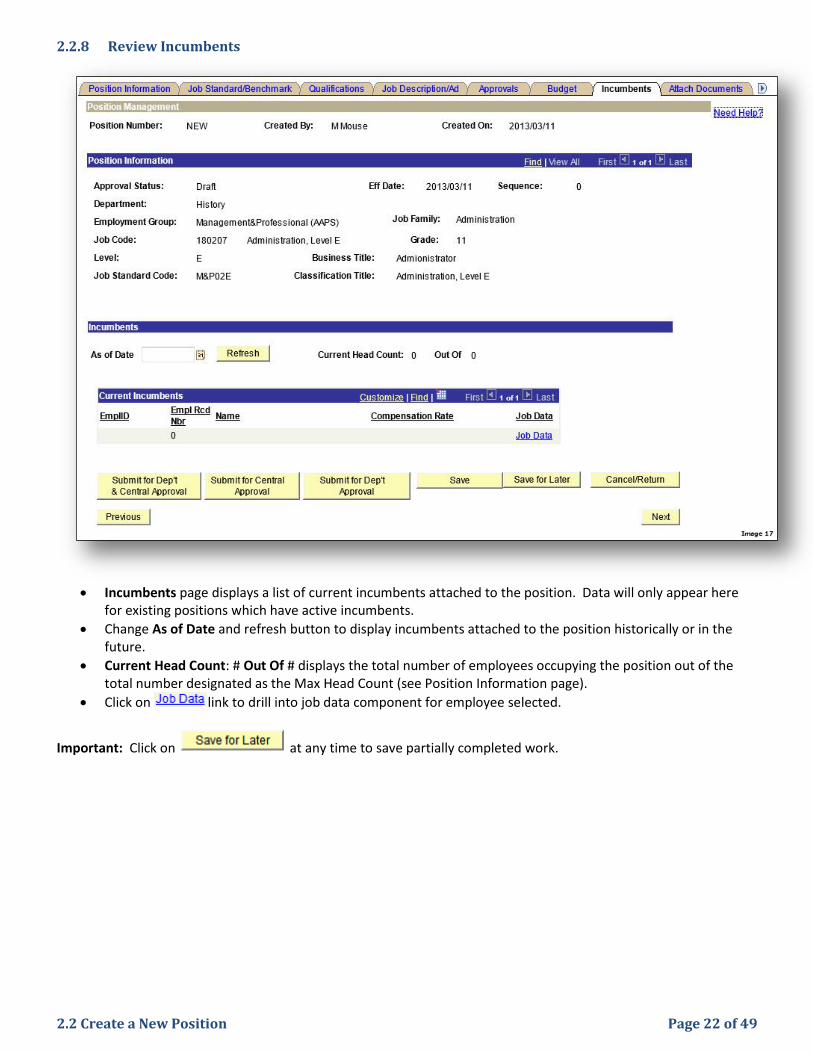
2.2.8 Review Incumbents
Incumbents page displays a list of current incumbents attached to the position. Data will only appear here
for existing positions which have active incumbents.
Change As of Date and refresh button to display incumbents attached to the position historically or in the future.
Current Head Count: # Out Of # displays the total number of employees occupying the position out of the total number designated as the Max Head Count (see Position Information page).
Click on link to drill into job data component for employee selected.
Important: Click on at any time to save partially completed work.
2.2 Create a New Position Page 23 of 49
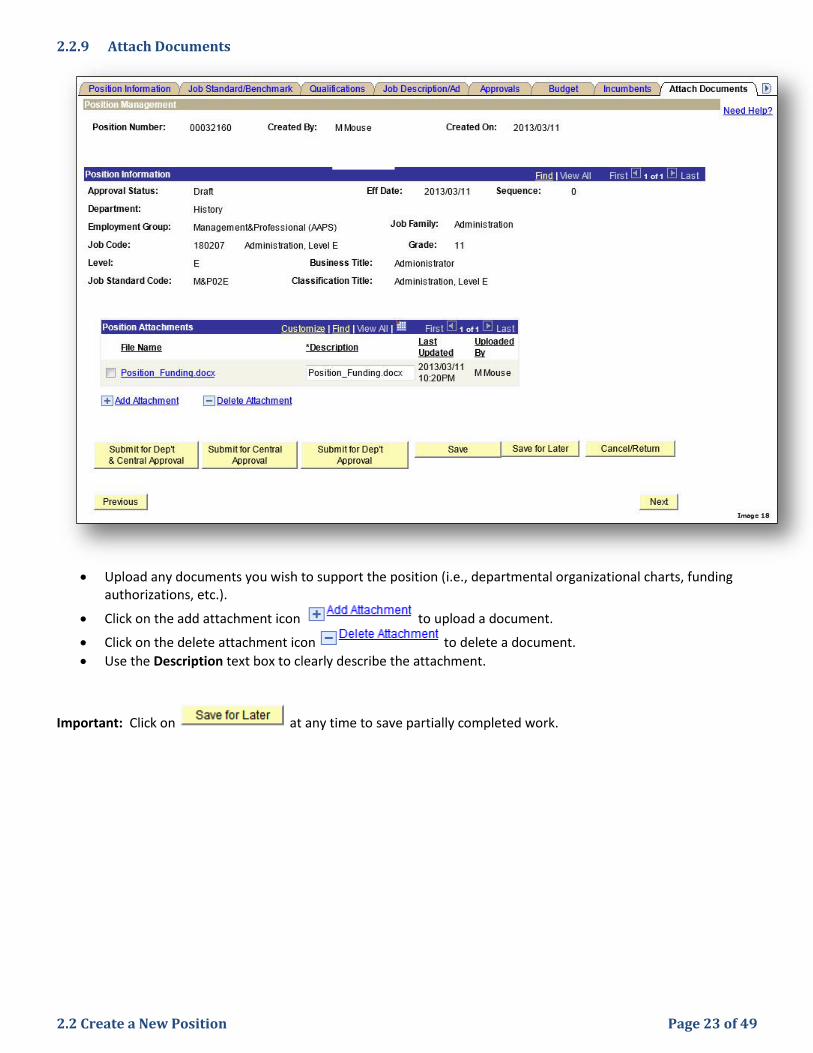
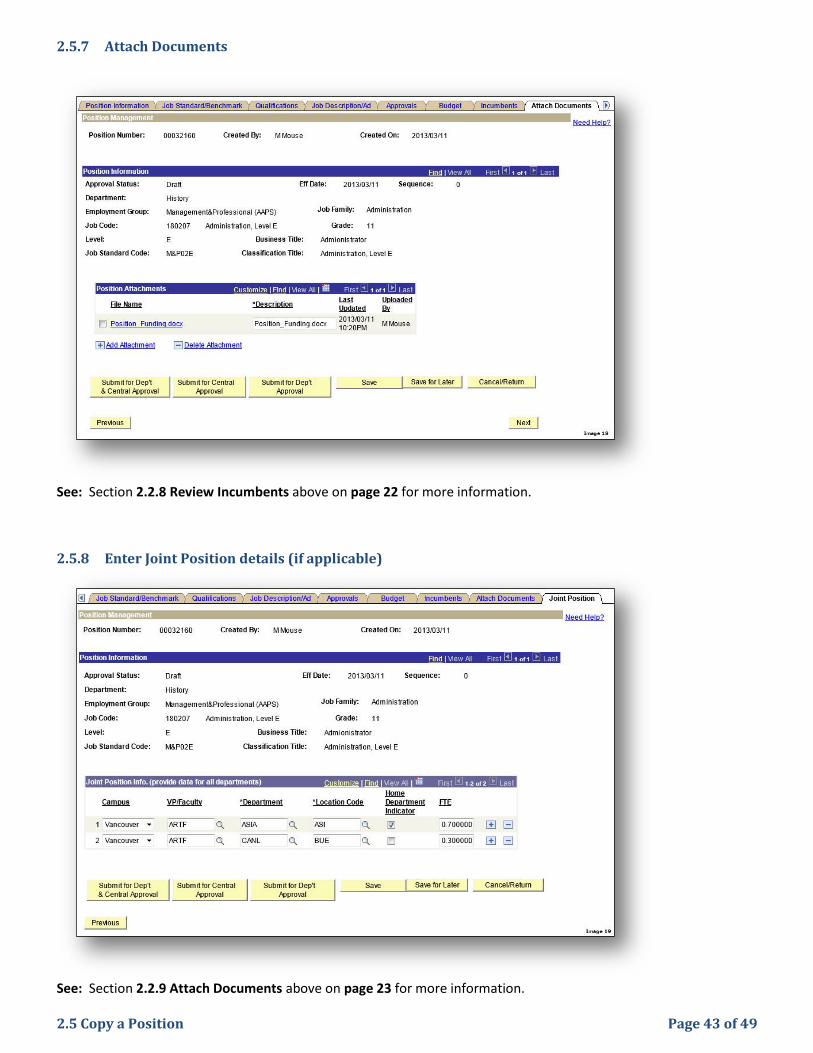
2.2.9 Attach Documents
Upload any documents you wish to support the position (i.e., departmental organizational charts, funding
authorizations, etc.).
Click on the add attachment icon to upload a document.
Click on the delete attachment icon to delete a document.
Use the Description text box to clearly describe the attachment.
Important: Click on at any time to save partially completed work.

2.2 Create a New Position Page 24 of 49
2.2.10 Enter Joint Position details (if applicable)
If the Joint Position? field was clicked on in the Position Information page (1st tab in component), you’ll need to
complete the Joint Position page.
Enter the Campus, VP/Faculty, Department, Location Code, Home Department Indicator and FTE fields for all departments jointly sharing the position, including the home department.
Click on the magnifying glass icon for a list of valid values.
Click on the plus icon to insert a row to add joint department information.
Note: In order for positions to be retrieved in position management by both the home and non-home departments,
the non-home department information, must be entered in its entirety on this page.
Important: Click on at any time to save partially completed work.
2.2 Create a New Position Page 25 of 49
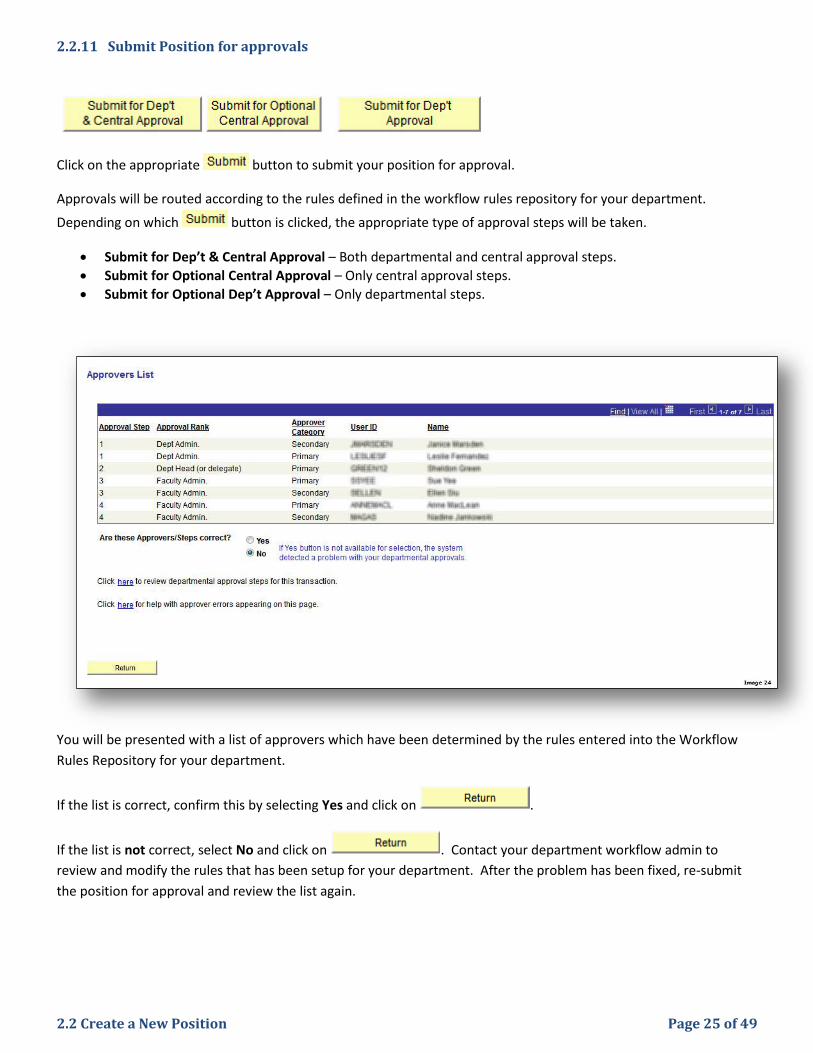
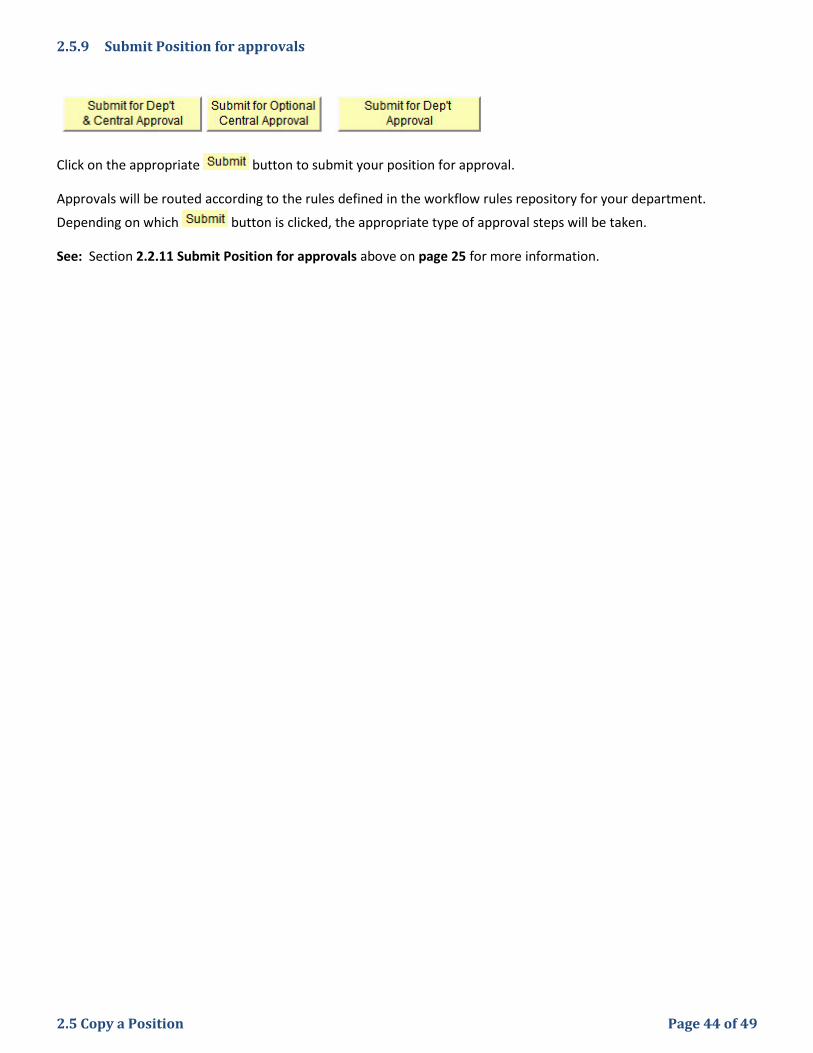
2.2.11 Submit Position for approvals
Click on the appropriate button to submit your position for approval.
Approvals will be routed according to the rules defined in the workflow rules repository for your department.
Depending on which button is clicked, the appropriate type of approval steps will be taken.
Submit for Dep’t & Central Approval – Both departmental and central approval steps.
Submit for Optional Central Approval – Only central approval steps.
Submit for Optional Dep’t Approval – Only departmental steps.
You will be presented with a list of approvers which have been determined by the rules entered into the Workflow
Rules Repository for your department.
If the list is correct, confirm this by selecting Yes and click on .
If the list is not correct, select No and click on . Contact your department workflow admin to
review and modify the rules that has been setup for your department. After the problem has been fixed, re-submit
the position for approval and review the list again.
2.2 Create a New Position Page 26 of 49
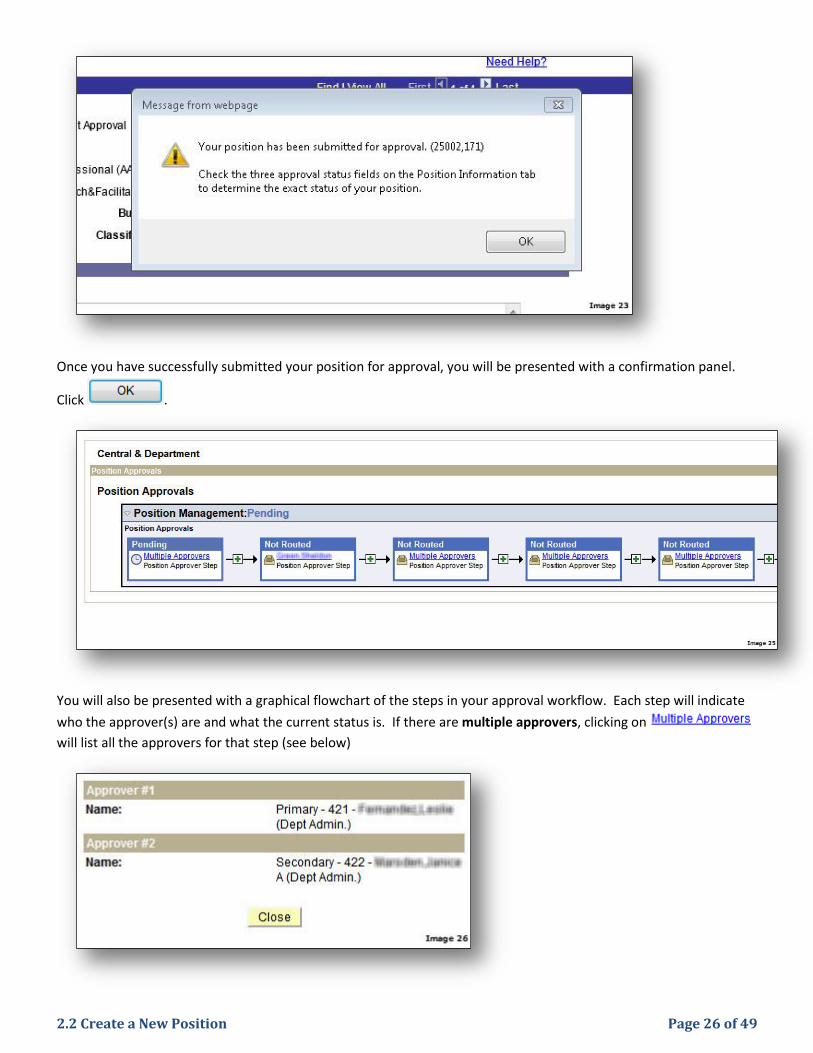
Once you have successfully submitted your position for approval, you will be presented with a confirmation panel.
Click .
You will also be presented with a graphical flowchart of the steps in your approval workflow. Each step will indicate
who the approver(s) are and what the current status is. If there are multiple approvers, clicking on
will list all the approvers for that step (see below)
2.2 Create a New Position Page 27 of 49
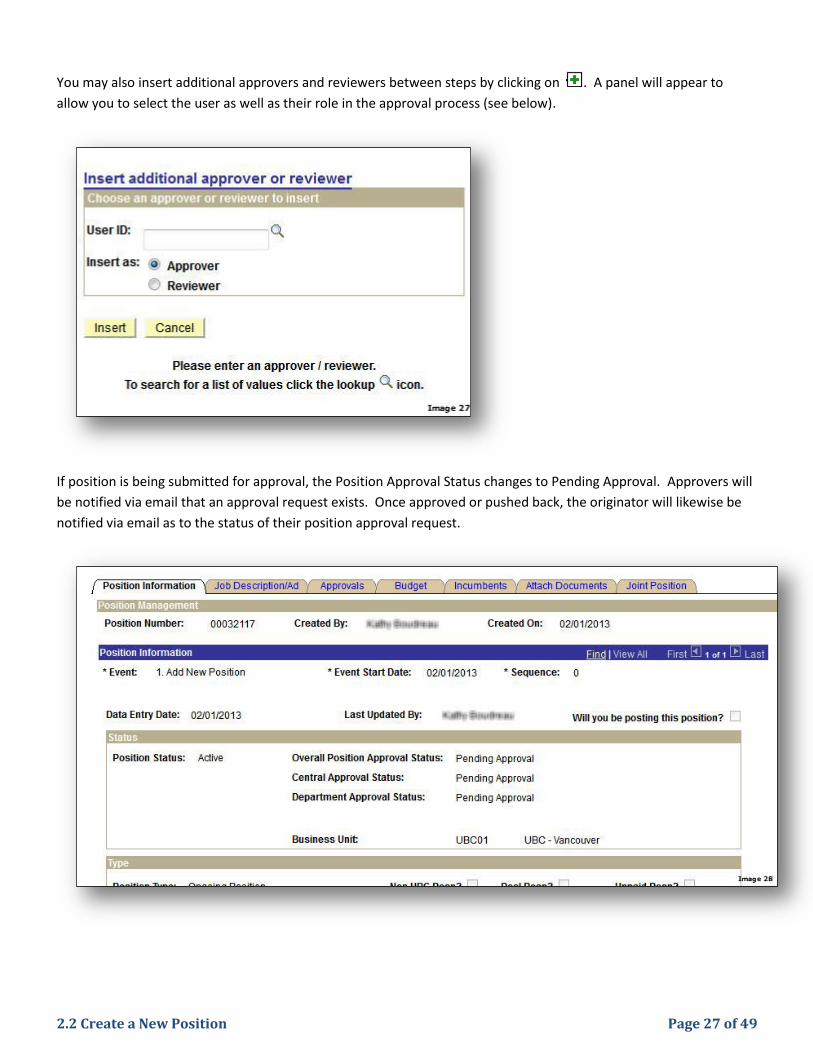
You may also insert additional approvers and reviewers between steps by clicking on . A panel will appear to
allow you to select the user as well as their role in the approval process (see below).
If position is being submitted for approval, the Position Approval Status changes to Pending Approval. Approvers will
be notified via email that an approval request exists. Once approved or pushed back, the originator will likewise be
notified via email as to the status of their position approval request.
2.3 Position Approval Process Page 28 of 49
2.3 Position Approval Process
Human Resources is responsible for classifying and approving all new Positions which fall under the following employment groups: Management & Professional (M&P) Excluded Management & Professional (XMP) Service Unit Directors (SUD) Some select CUPE 2950 positions (C29, B29) BCGEU at UBC-O (OK1) Positions created under any of these categories will be automatically routed to Human Resources for classification review and approval. Positions not requiring approval may be optionally reviewed/classified by H.R. by selecting the ‘Submit for Optional Central Approval’ button at the bottom of any page.
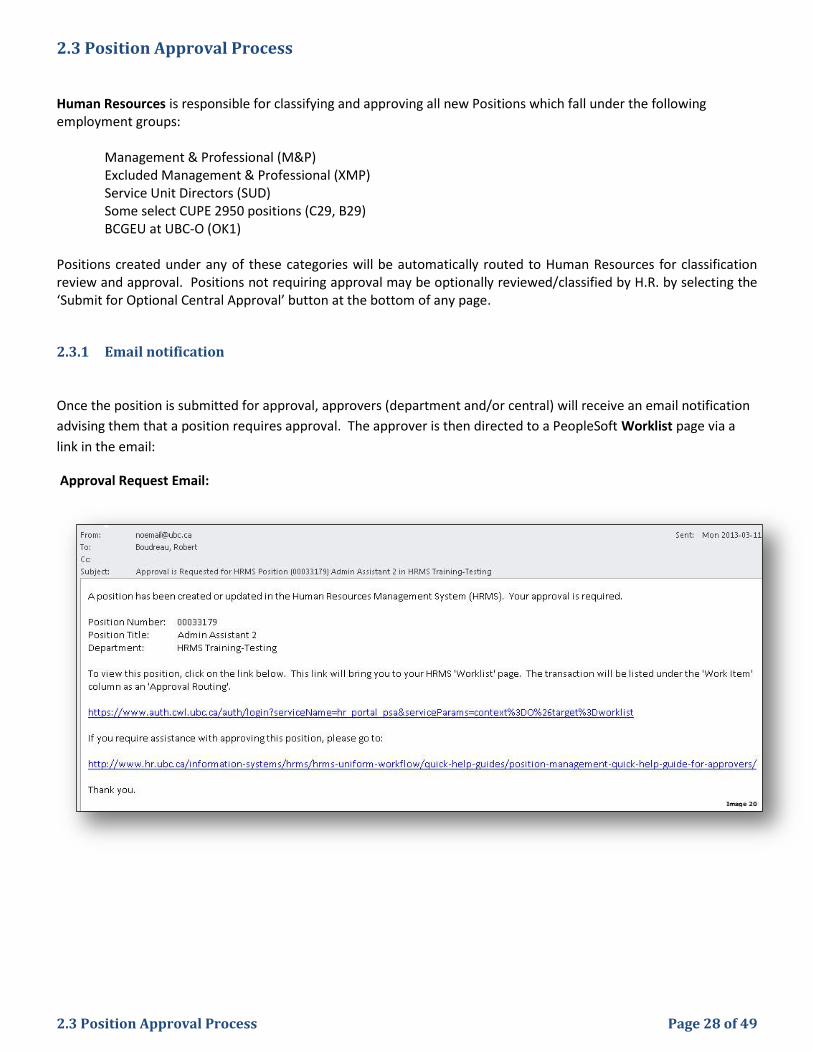
2.3.1 Email notification
Once the position is submitted for approval, approvers (department and/or central) will receive an email notification
advising them that a position requires approval. The approver is then directed to a PeopleSoft Worklist page via a
link in the email:
Approval Request Email:
2.3 Position Approval Process Page 29 of 49
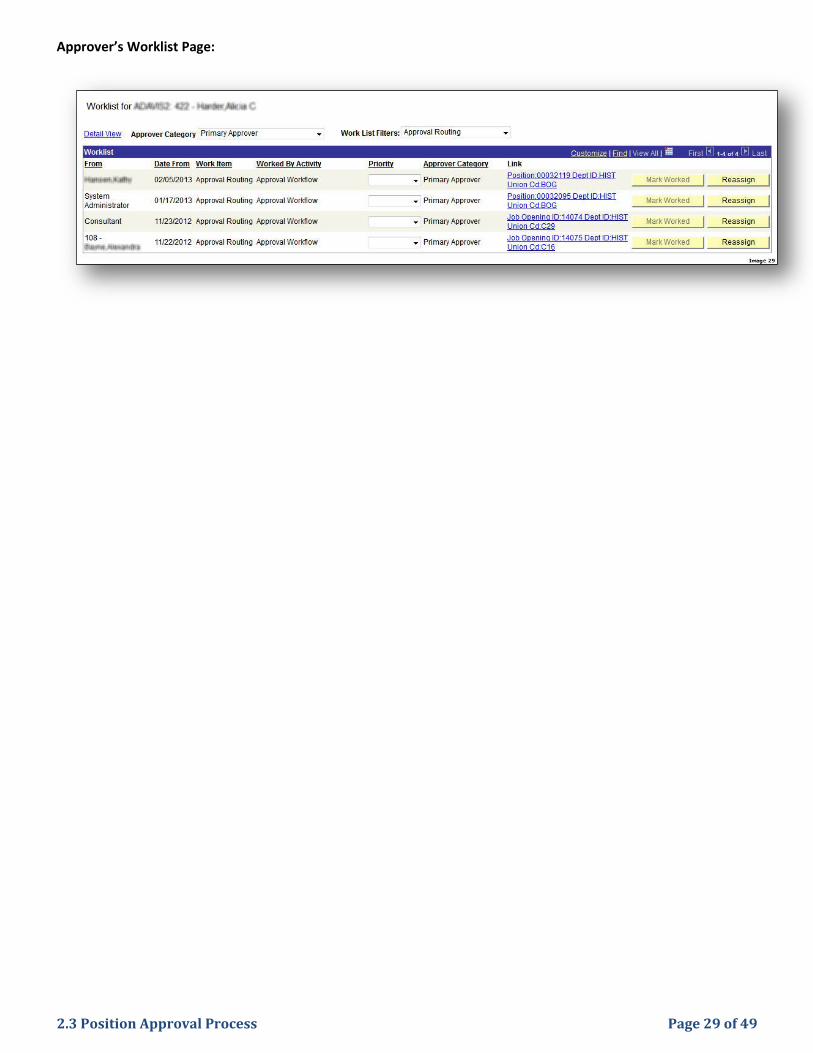
Approver’s Worklist Page:
2.3 Position Approval Process Page 30 of 49
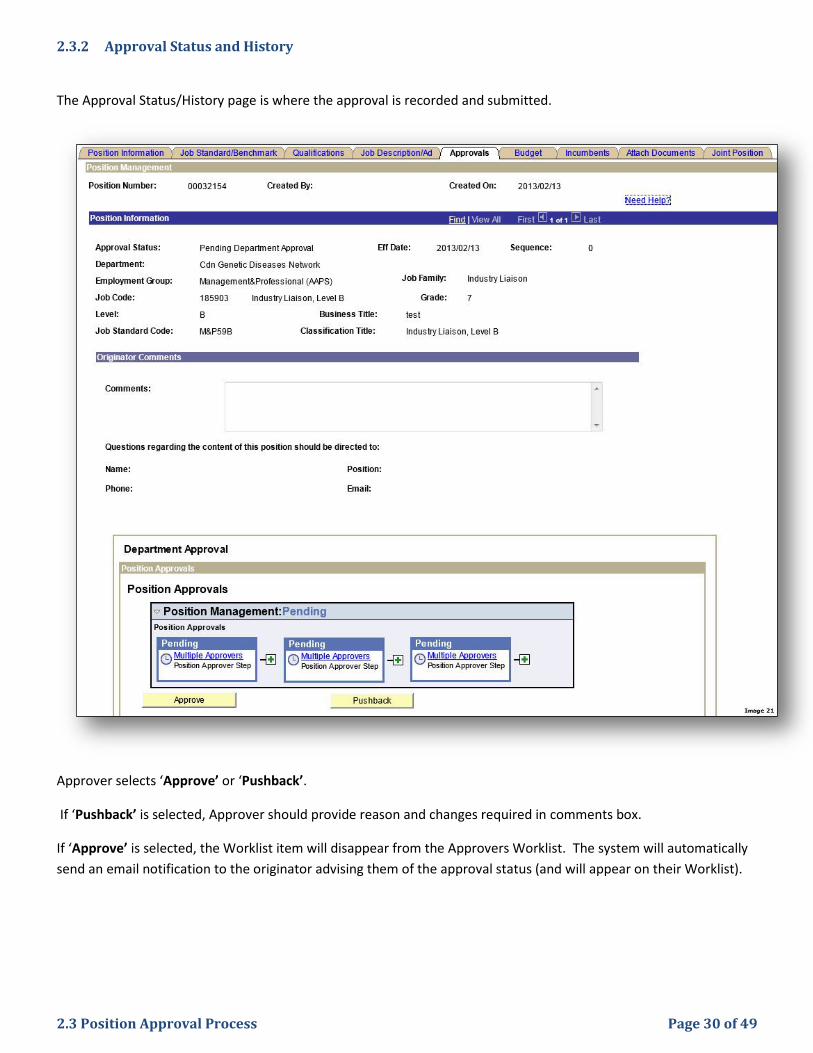
2.3.2 Approval Status and History
The Approval Status/History page is where the approval is recorded and submitted.
Approver selects ‘Approve’ or ‘Pushback’.
If ‘Pushback’ is selected, Approver should provide reason and changes required in comments box.
If ‘Approve’ is selected, the Worklist item will disappear from the Approvers Worklist. The system will automatically
send an email notification to the originator advising them of the approval status (and will appear on their Worklist).
2.3 Position Approval Process Page 31 of 49
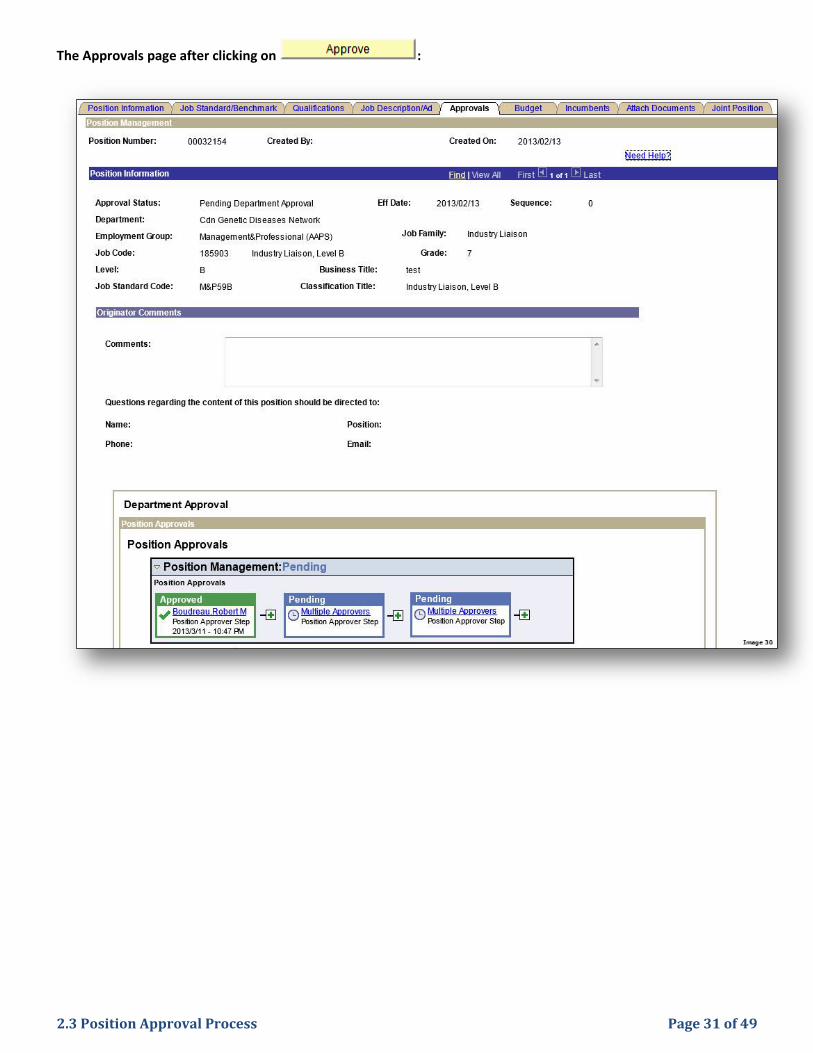
The Approvals page after clicking on :
2.4 Edit Position Information Page 32 of 49
2.4 Edit Position Information
Navigation: Position Management>Add/Update Position Info.
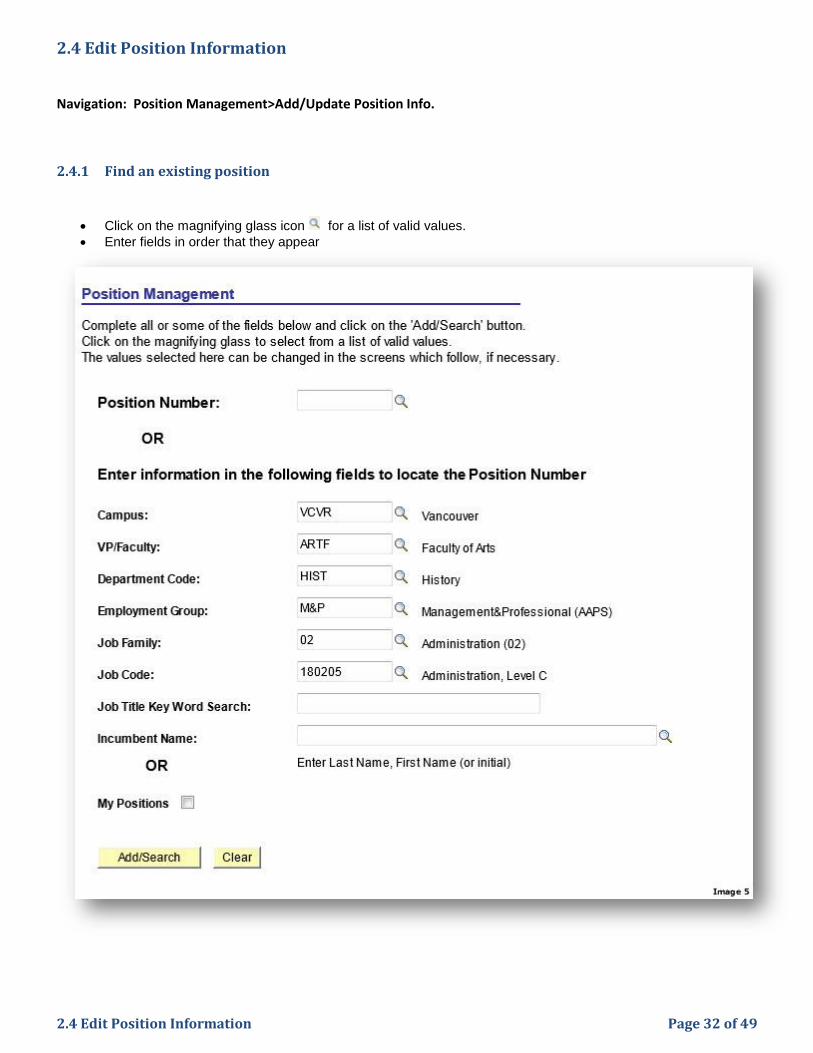
2.4.1 Find an existing position
Click on the magnifying glass icon for a list of valid values.
Enter fields in order that they appear
2.4 Edit Position Information Page 33 of 49
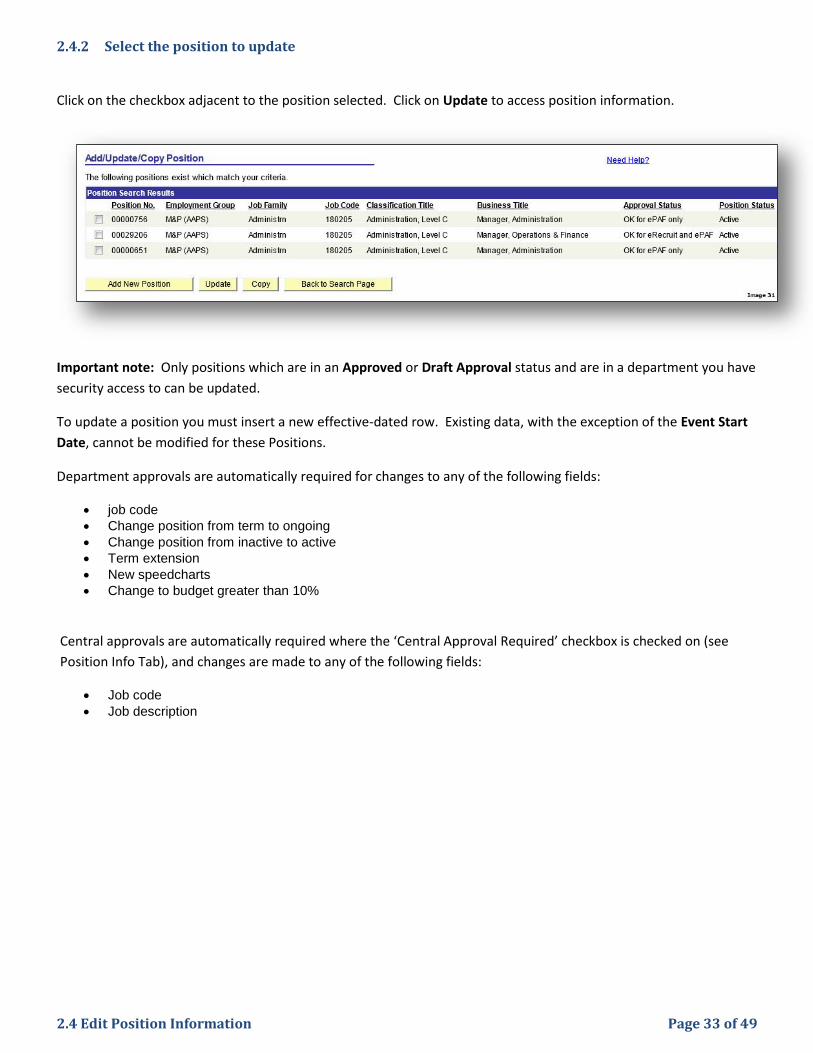
2.4.2 Select the position to update
Click on the checkbox adjacent to the position selected. Click on Update to access position information.
Important note: Only positions which are in an Approved or Draft Approval status and are in a department you have
security access to can be updated.
To update a position you must insert a new effective-dated row. Existing data, with the exception of the Event Start
Date, cannot be modified for these Positions.
Department approvals are automatically required for changes to any of the following fields:
job code
Change position from term to ongoing
Change position from inactive to active
Term extension
New speedcharts
Change to budget greater than 10%
Central approvals are automatically required where the ‘Central Approval Required’ checkbox is checked on (see
Position Info Tab), and changes are made to any of the following fields:
Job code
Job description
2.4 Edit Position Information Page 34 of 49
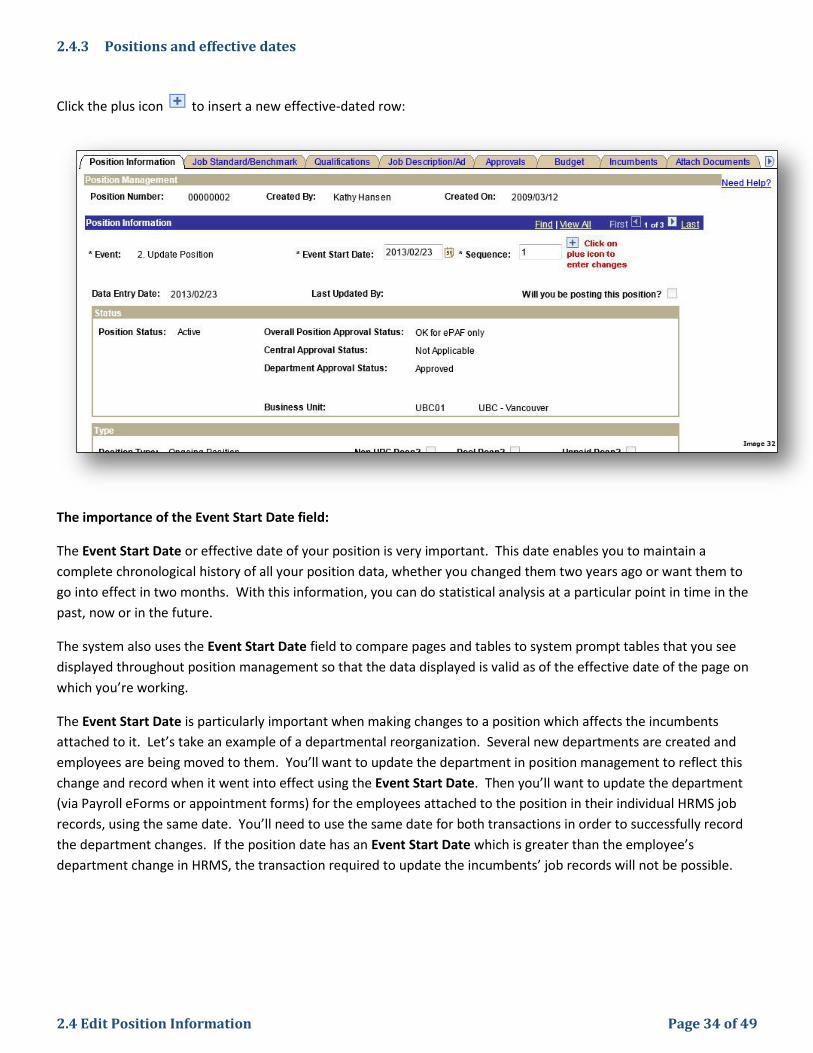
2.4.3 Positions and effective dates
Click the plus icon to insert a new effective-dated row:
The importance of the Event Start Date field:
The Event Start Date or effective date of your position is very important. This date enables you to maintain a
complete chronological history of all your position data, whether you changed them two years ago or want them to
go into effect in two months. With this information, you can do statistical analysis at a particular point in time in the
past, now or in the future.
The system also uses the Event Start Date field to compare pages and tables to system prompt tables that you see
displayed throughout position management so that the data displayed is valid as of the effective date of the page on
which you’re working.
The Event Start Date is particularly important when making changes to a position which affects the incumbents
attached to it. Let’s take an example of a departmental reorganization. Several new departments are created and
employees are being moved to them. You’ll want to update the department in position management to reflect this
change and record when it went into effect using the Event Start Date. Then you’ll want to update the department
(via Payroll eForms or appointment forms) for the employees attached to the position in their individual HRMS job
records, using the same date. You’ll need to use the same date for both transactions in order to successfully record
the department changes. If the position date has an Event Start Date which is greater than the employee’s
department change in HRMS, the transaction required to update the incumbents’ job records will not be possible.
2.4 Edit Position Information Page 35 of 49
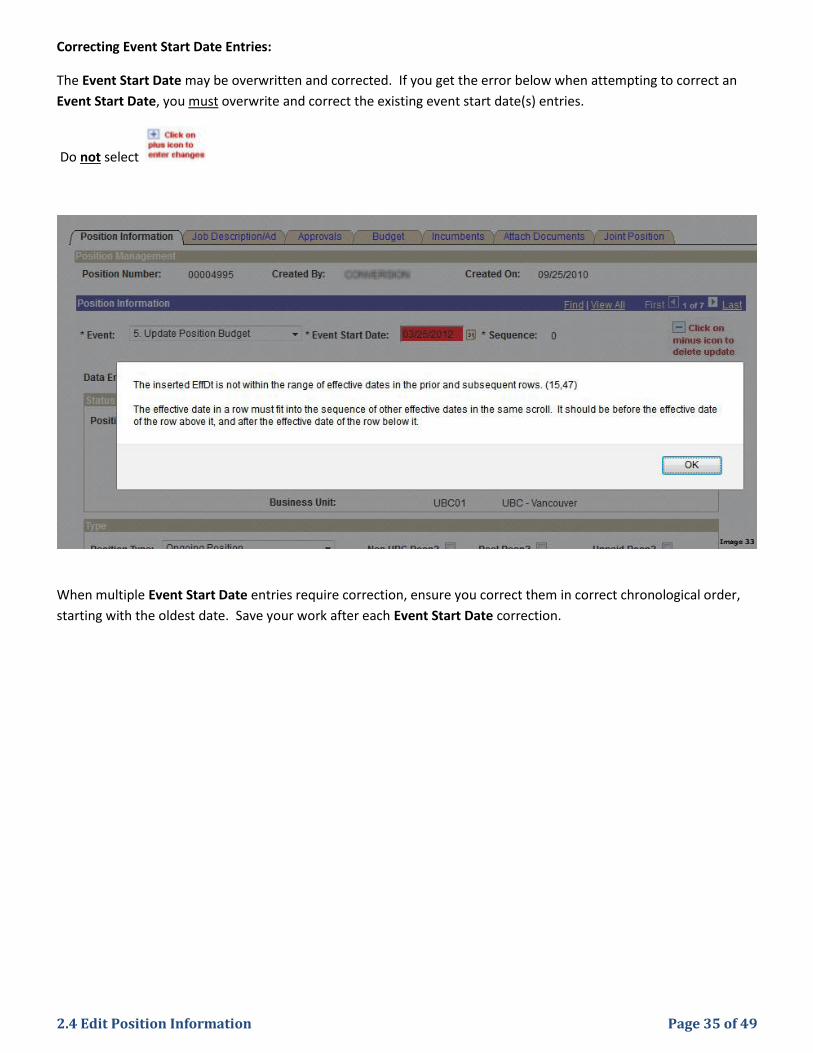
Correcting Event Start Date Entries:
The Event Start Date may be overwritten and corrected. If you get the error below when attempting to correct an
Event Start Date, you must overwrite and correct the existing event start date(s) entries.
Do not select
When multiple Event Start Date entries require correction, ensure you correct them in correct chronological order,
starting with the oldest date. Save your work after each Event Start Date correction.
2.4 Edit Position Information Page 36 of 49
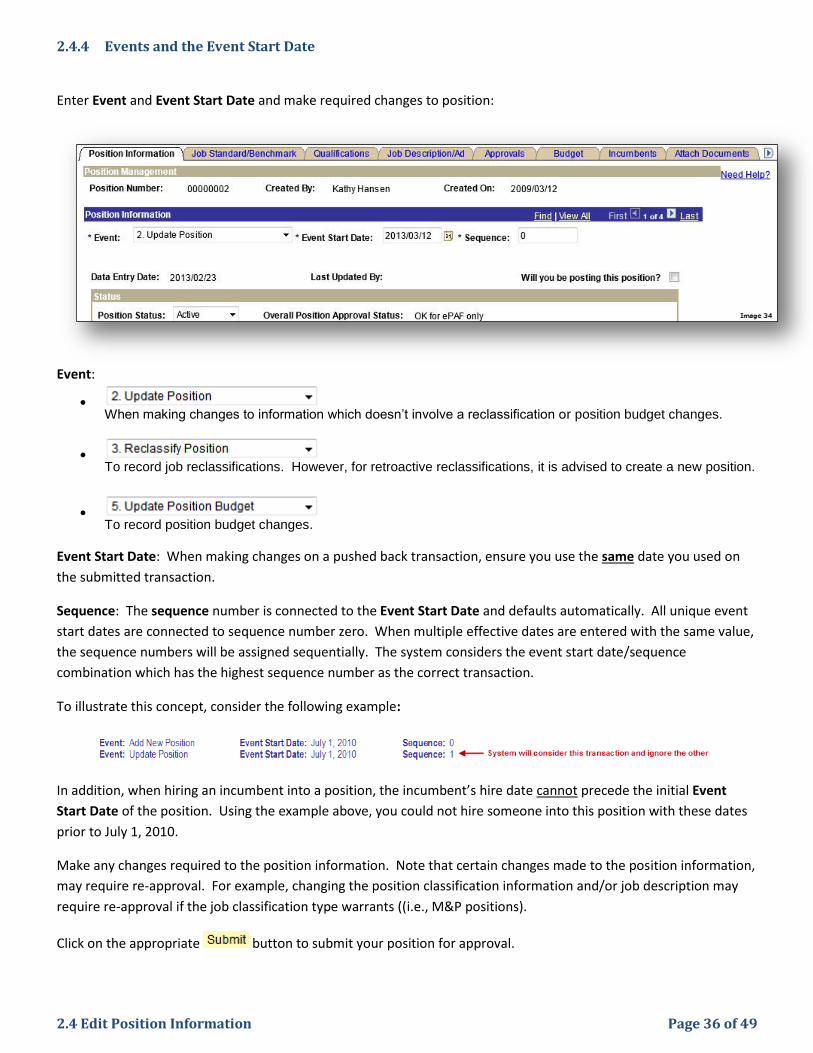
2.4.4 Events and the Event Start Date
Enter Event and Event Start Date and make required changes to position:
Event:
When making changes to information which doesn’t involve a reclassification or position budget changes.
To record job reclassifications. However, for retroactive reclassifications, it is advised to create a new position.
To record position budget changes.
Event Start Date: When making changes on a pushed back transaction, ensure you use the same date you used on
the submitted transaction.
Sequence: The sequence number is connected to the Event Start Date and defaults automatically. All unique event
start dates are connected to sequence number zero. When multiple effective dates are entered with the same value,
the sequence numbers will be assigned sequentially. The system considers the event start date/sequence
combination which has the highest sequence number as the correct transaction.
To illustrate this concept, consider the following example:
In addition, when hiring an incumbent into a position, the incumbent’s hire date cannot precede the initial Event
Start Date of the position. Using the example above, you could not hire someone into this position with these dates
prior to July 1, 2010.
Make any changes required to the position information. Note that certain changes made to the position information,
may require re-approval. For example, changing the position classification information and/or job description may
require re-approval if the job classification type warrants ((i.e., M&P positions).
Click on the appropriate button to submit your position for approval.
2.5 Copy a Position Page 37 of 49
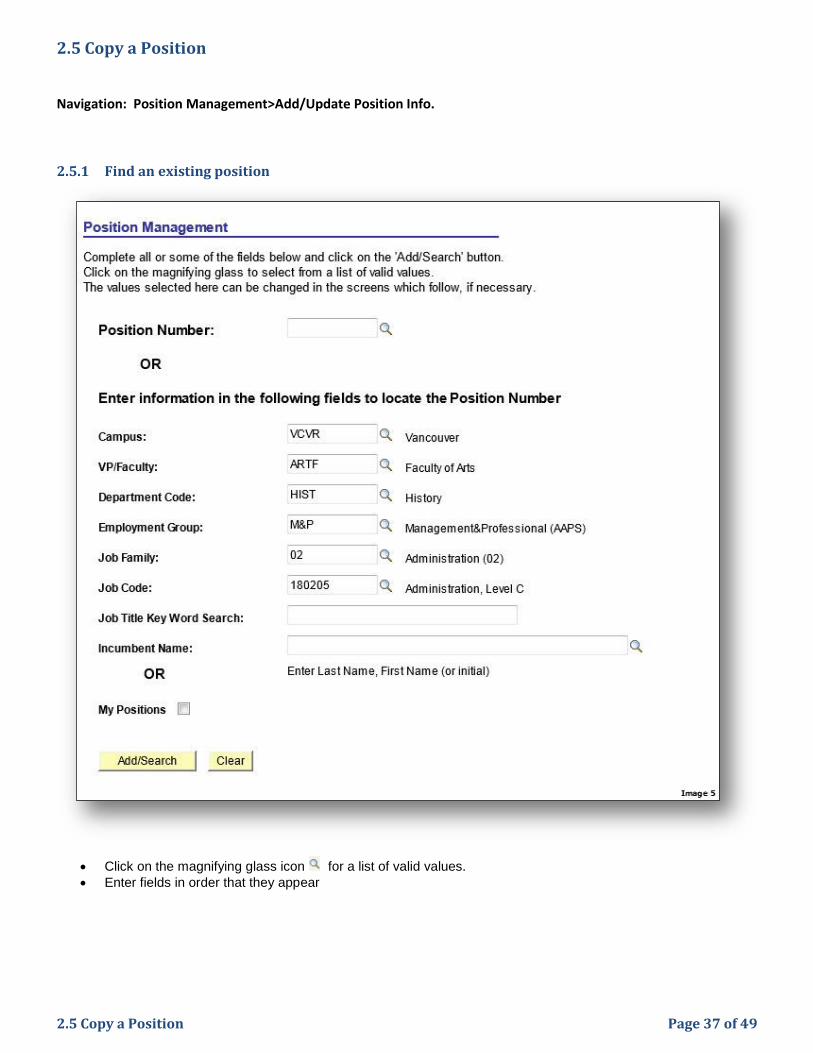
2.5 Copy a Position
Navigation: Position Management>Add/Update Position Info.
2.5.1 Find an existing position
Click on the magnifying glass icon for a list of valid values.
Enter fields in order that they appear
2.5 Copy a Position Page 38 of 49
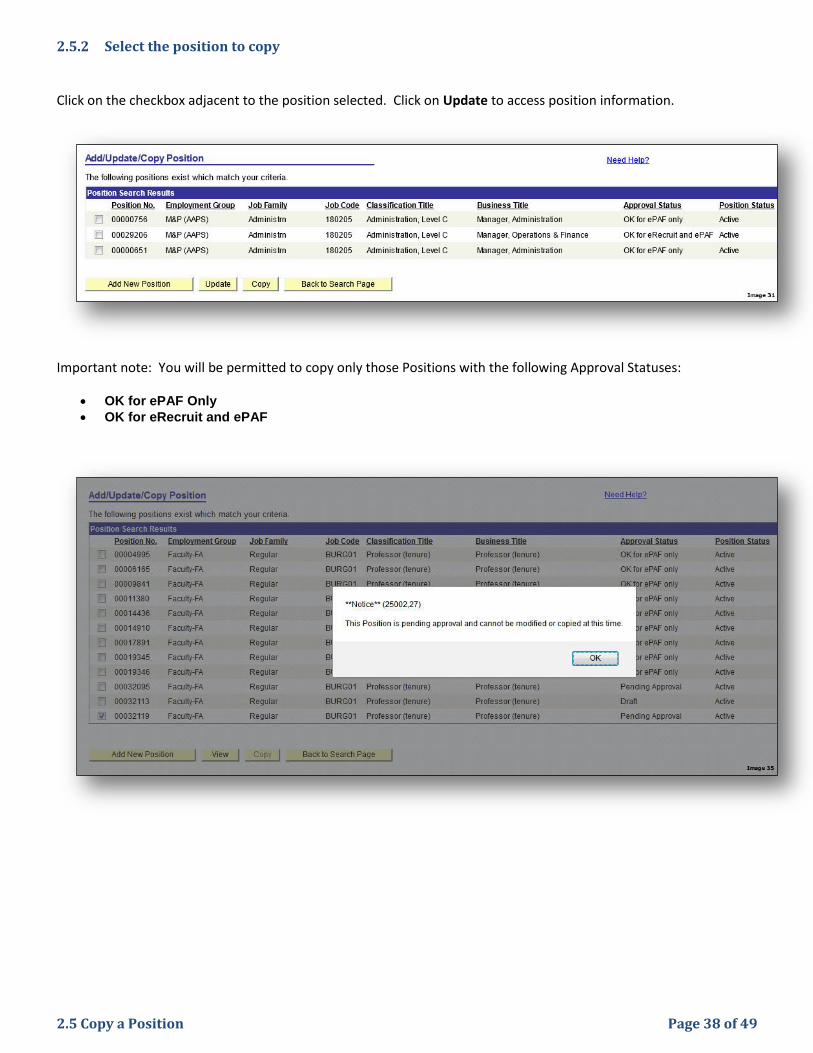
2.5.2 Select the position to copy
Click on the checkbox adjacent to the position selected. Click on Update to access position information.
Important note: You will be permitted to copy only those Positions with the following Approval Statuses:
OK for ePAF Only
OK for eRecruit and ePAF
2.5 Copy a Position Page 39 of 49
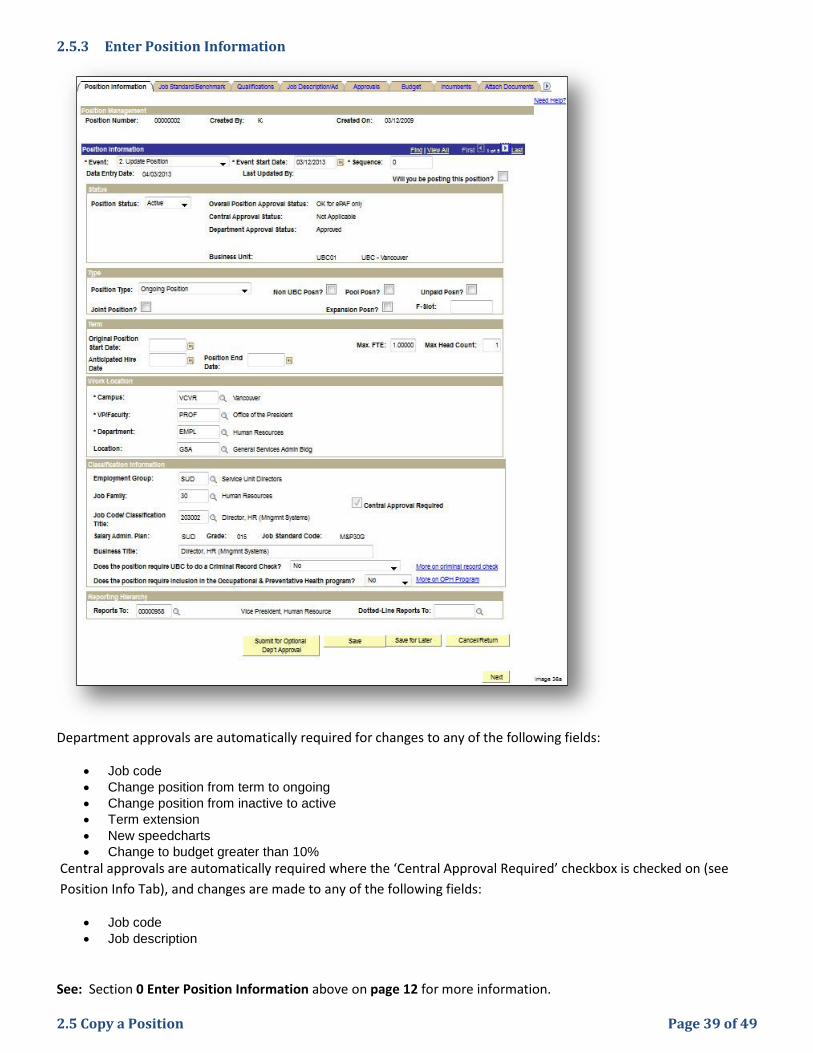
2.5.3 Enter Position Information
Department approvals are automatically required for changes to any of the following fields:
Job code
Change position from term to ongoing
Change position from inactive to active
Term extension
New speedcharts
Change to budget greater than 10%
Central approvals are automatically required where the ‘Central Approval Required’ checkbox is checked on (see
Position Info Tab), and changes are made to any of the following fields:
Job code
Job description
See: Section 0 Enter Position Information above on page 12 for more information.
2.5 Copy a Position Page 40 of 49
2.5.4 Review or modify Job Qualifications
2.5 Copy a Position Page 41 of 49
2.5.5 Review or modify Job Description
2.5 Copy a Position Page 42 of 49
2.5.6 Review Budget
.
2.5 Copy a Position Page 43 of 49
2.5.7 Attach Documents
See: Section 2.2.8 Review Incumbents above on page 22 for more information.
2.5.8 Enter Joint Position details (if applicable)
See: Section 2.2.9 Attach Documents above on page 23 for more information.
2.5 Copy a Position Page 44 of 49
2.5.9 Submit Position for approvals
Click on the appropriate button to submit your position for approval.
Approvals will be routed according to the rules defined in the workflow rules repository for your department.
Depending on which button is clicked, the appropriate type of approval steps will be taken.
See: Section 2.2.11 Submit Position for approvals above on page 25 for more information.
2.6 Delete a Position Page 45 of 49
2.6 Delete a Position
Navigation: Position Management>Delete Positions
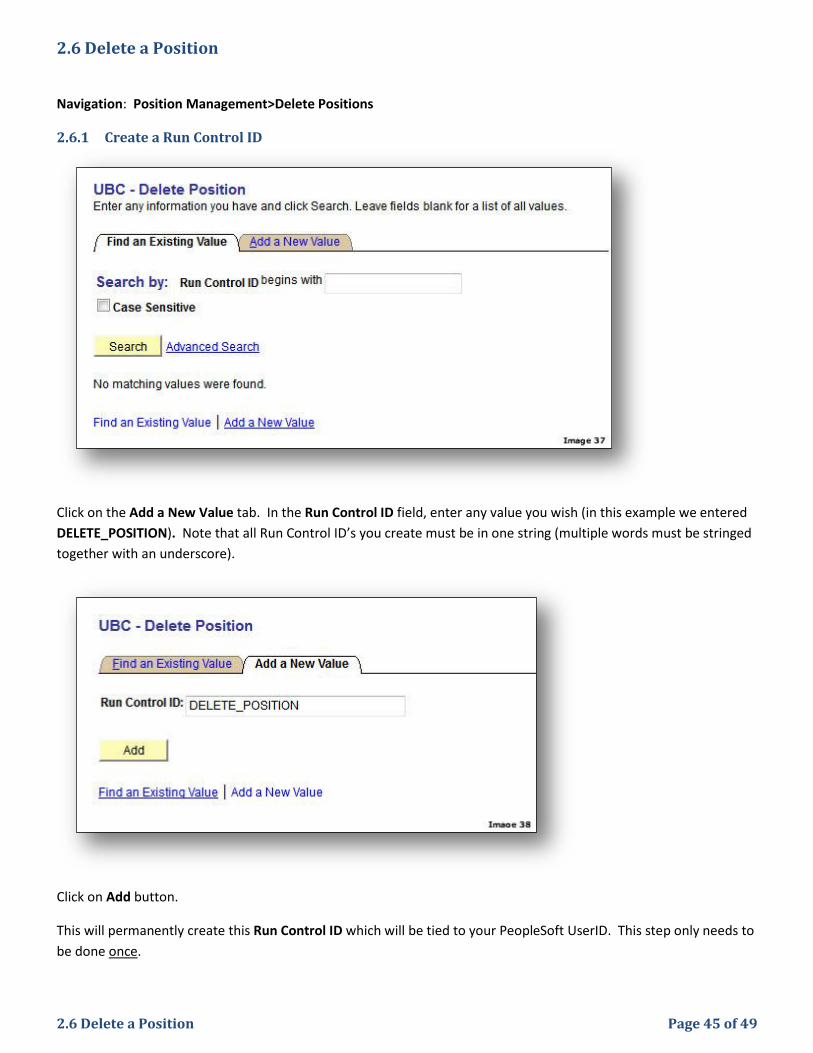
2.6.1 Create a Run Control ID
Click on the Add a New Value tab. In the Run Control ID field, enter any value you wish (in this example we entered
DELETE_POSITION). Note that all Run Control ID’s you create must be in one string (multiple words must be stringed
together with an underscore).
Click on Add button.
This will permanently create this Run Control ID which will be tied to your PeopleSoft UserID. This step only needs to
be done once.
2.6 Delete a Position Page 46 of 49
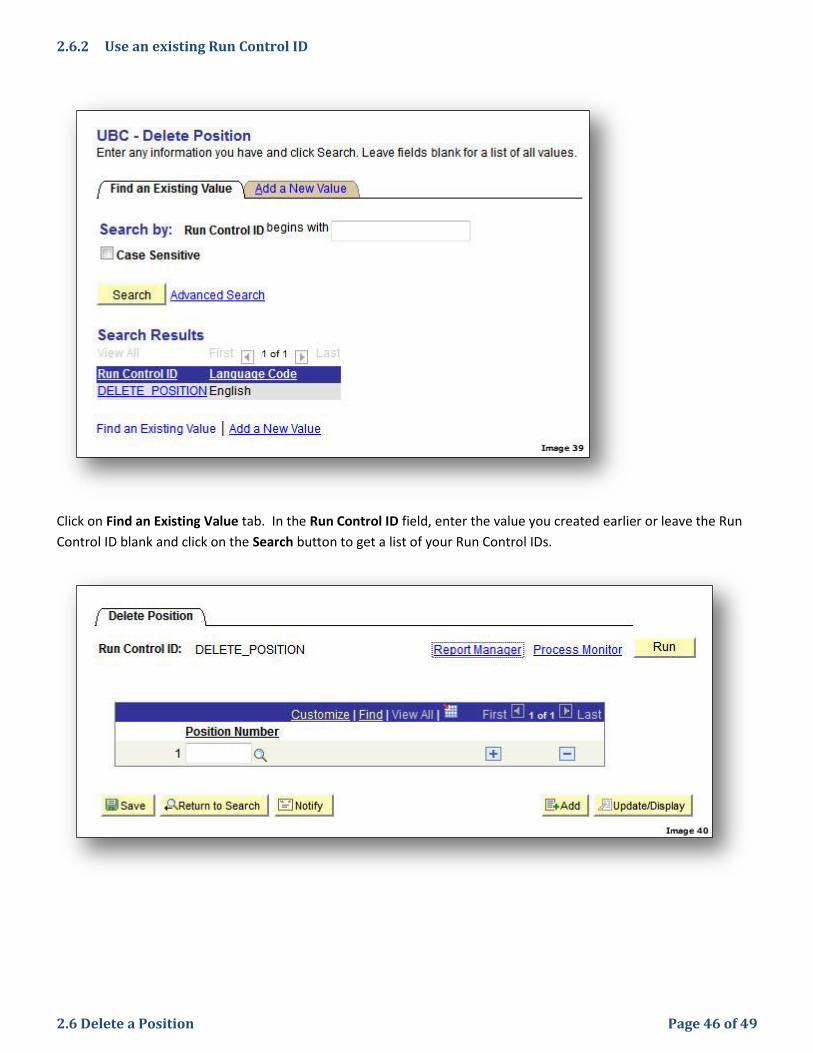
2.6.2 Use an existing Run Control ID
Click on Find an Existing Value tab. In the Run Control ID field, enter the value you created earlier or leave the Run
Control ID blank and click on the Search button to get a list of your Run Control IDs.
2.6 Delete a Position Page 47 of 49
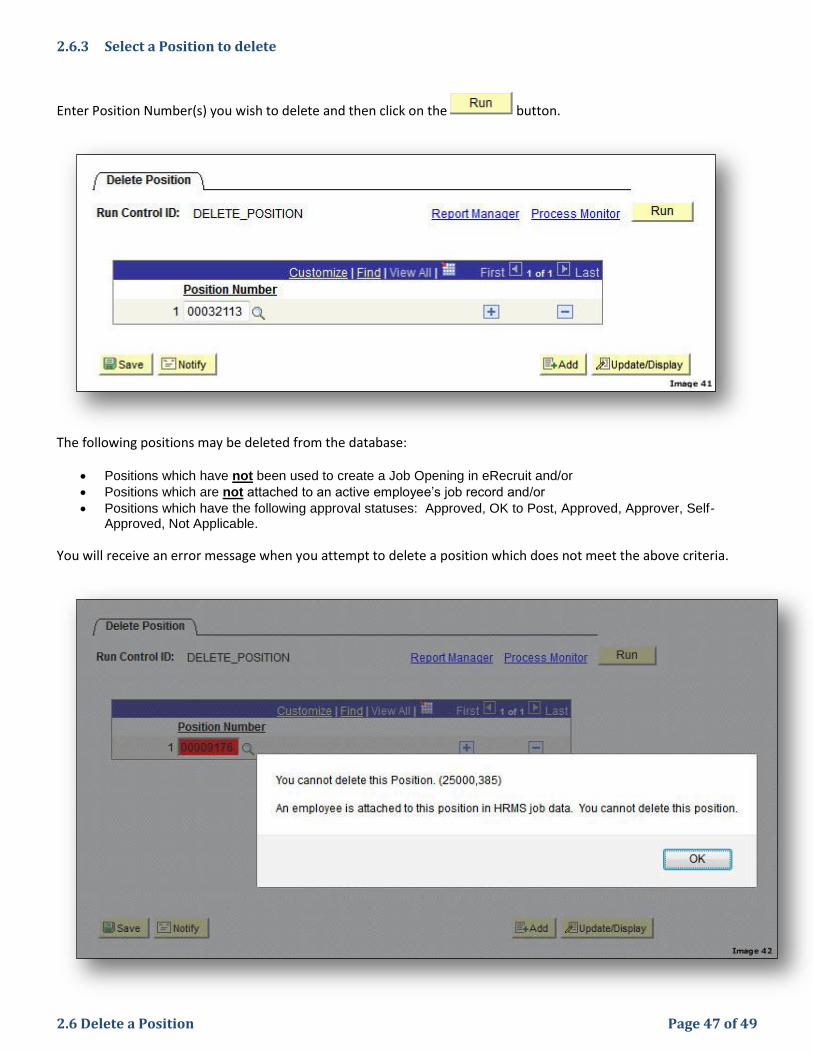
2.6.3 Select a Position to delete
Enter Position Number(s) you wish to delete and then click on the button.
The following positions may be deleted from the database:
Positions which have not been used to create a Job Opening in eRecruit and/or
Positions which are not attached to an active employee’s job record and/or
Positions which have the following approval statuses: Approved, OK to Post, Approved, Approver, Self-Approved, Not Applicable.
You will receive an error message when you attempt to delete a position which does not meet the above criteria.

2.6 Delete a Position Page 48 of 49
2.6.4 Run the delete process
In the Server Name field, click on the down arrow and select PSUNX. Click on the button.
A Process Instance number should now appear, indicating that you’ve successfully launched the deletion process.
The process takes approximately one minute for each position deletion.

2.6 Delete a Position Page 49 of 49
2.6.5 Confirm the delete process
To verify if the position has been deleted, navigate to Position Management>Add/Update Position Info. and enter
the Position Number you had requested be deleted. The system should return a message stating the Position
Number is invalid or ‘no matching values were found’.