position management console - north carolina … · 3 position management console the position...
TRANSCRIPT
1
Position Management Console
Last Update: 7/13/2009
2
Table of Contents
Position Management Console .............................................................................................................................. 3
Viewing the Position Search Results ...................................................................................... 4
Viewing the Position Information ........................................................................................... 5
Editing the Position Information ............................................................................................ 6
Entering the Position Reporting Information ................................................................... 7
Entering Salary / Payment Information ............................................................................ 7
Budget Code Information........................................................................................................ 8
Rules for Adding a Base Budget Code: .............................................................................. 8
Rules for requesting the Supplement Budget Code Type: ......................................... 9
Rules for requesting the Additional Pay Budget Code Type: .................................... 9
HRMS Assignment Information ........................................................................................... 10
Creating a Position Vacancy Announcement ................................................................................................. 12
Editing a Position Vacancy Announcement ............................................................................ 14
Removing a Position Vacancy Announcement ....................................................................... 15
Creating a New Vacancy ........................................................................................................................................ 16
Position Actions ........................................................................................................................................................ 18
Search Positions ............................................................................................................... 18
Position List ..................................................................................................................... 18
Create Position ................................................................................................................. 18
Inactive List ..................................................................................................................... 19
Mass Update - Core Academic Subject Area Indicator ............................................................ 19
Mass Update – SS300 Reporting Code ................................................................................. 20
Using the Position Management Console as a Site Administrator ....................................................... 21
This document is the property of North Carolina Department of Public Instruction (NCDPI) and may not be copied in whole or in part without the express written permission of the NCDPI. However, LEA users may print and download curriculum for individual use and HRMS trainings. All data used in this document is fictitious and is used for the purpose of instruction delivery.
3
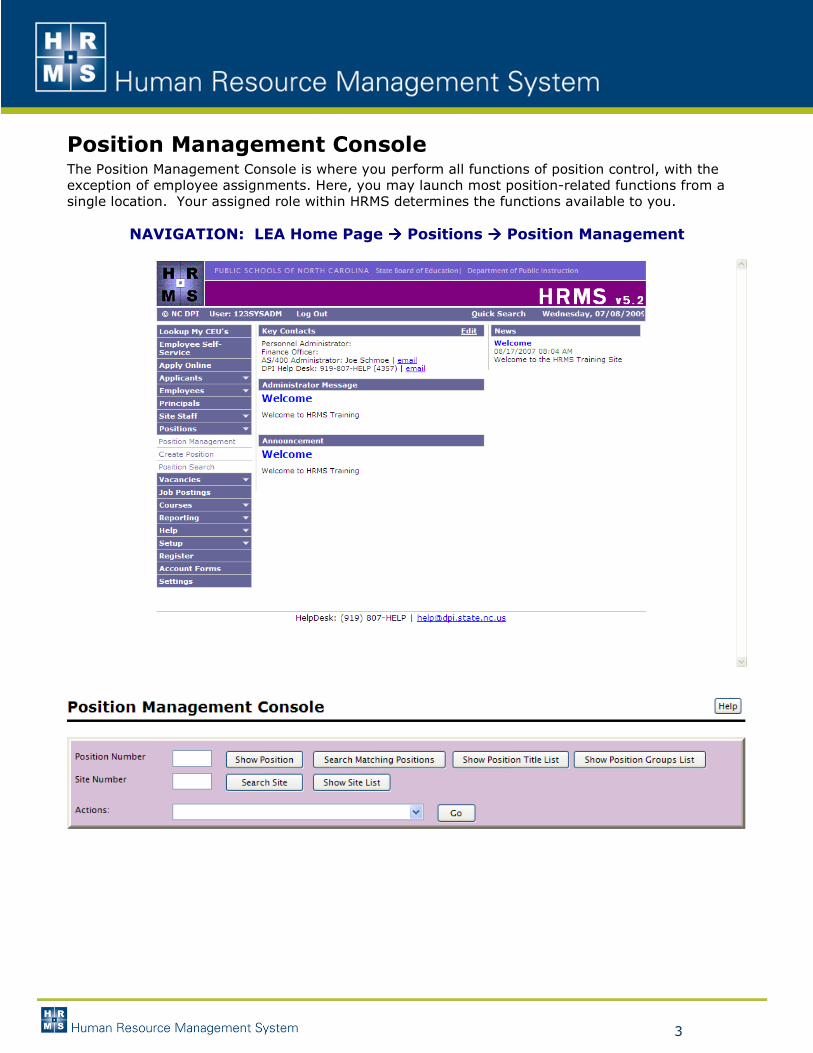
Position Management Console The Position Management Console is where you perform all functions of position control, with the exception of employee assignments. Here, you may launch most position-related functions from a single location. Your assigned role within HRMS determines the functions available to you.
NAVIGATION: LEA Home Page ���� Positions ���� Position Management
4
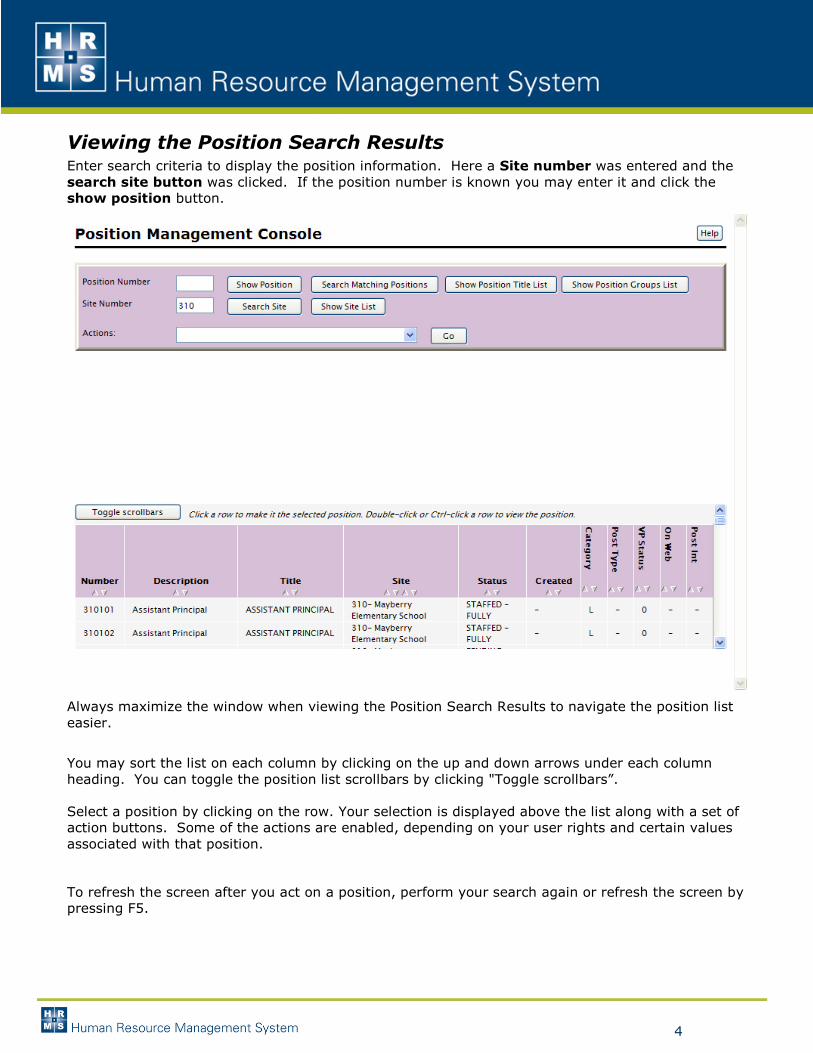
Viewing the Position Search Results Enter search criteria to display the position information. Here a Site number was entered and the search site button was clicked. If the position number is known you may enter it and click the show position button.
Always maximize the window when viewing the Position Search Results to navigate the position list easier.
You may sort the list on each column by clicking on the up and down arrows under each column heading. You can toggle the position list scrollbars by clicking "Toggle scrollbars”. Select a position by clicking on the row. Your selection is displayed above the list along with a set of action buttons. Some of the actions are enabled, depending on your user rights and certain values associated with that position.
To refresh the screen after you act on a position, perform your search again or refresh the screen by pressing F5.
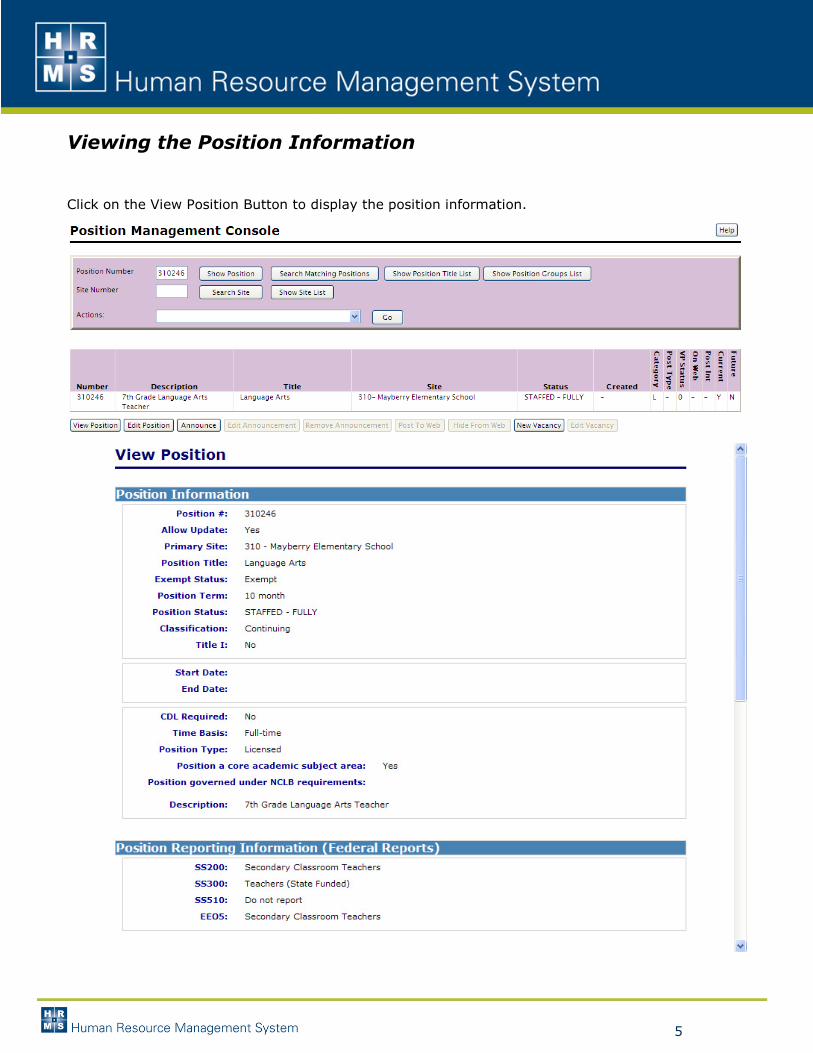
5
Viewing the Position Information
Click on the View Position Button to display the position information.
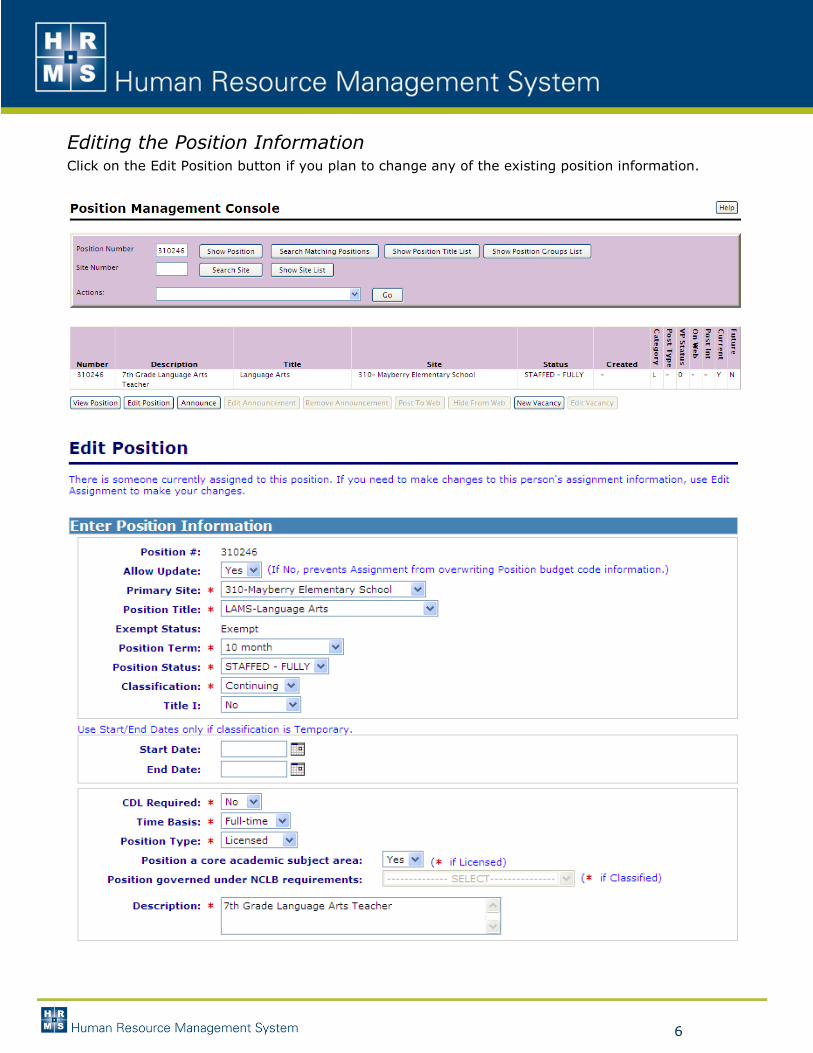
6
Editing the Position Information Click on the Edit Position button if you plan to change any of the existing position information.
7
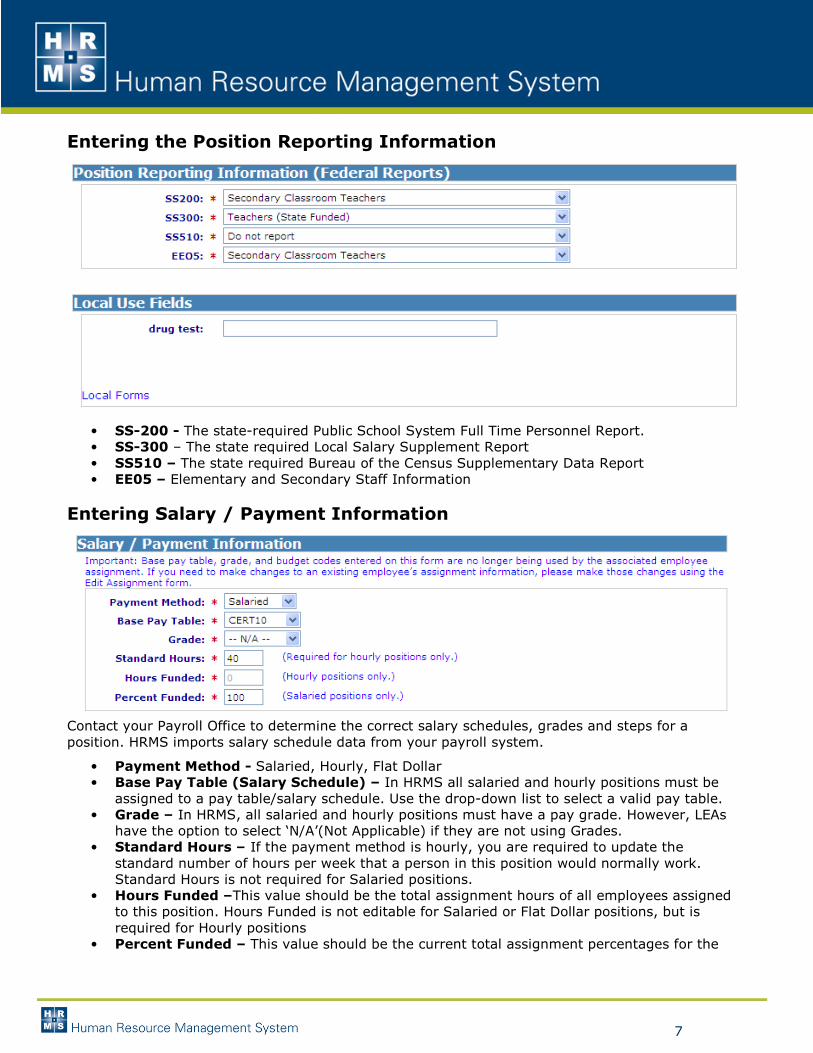
Entering the Position Reporting Information
• SS-200 - The state-required Public School System Full Time Personnel Report. • SS-300 – The state required Local Salary Supplement Report • SS510 – The state required Bureau of the Census Supplementary Data Report • EE05 – Elementary and Secondary Staff Information
Entering Salary / Payment Information
Contact your Payroll Office to determine the correct salary schedules, grades and steps for a position. HRMS imports salary schedule data from your payroll system.
• Payment Method - Salaried, Hourly, Flat Dollar • Base Pay Table (Salary Schedule) – In HRMS all salaried and hourly positions must be
assigned to a pay table/salary schedule. Use the drop-down list to select a valid pay table. • Grade – In HRMS, all salaried and hourly positions must have a pay grade. However, LEAs
have the option to select ‘N/A’(Not Applicable) if they are not using Grades. • Standard Hours – If the payment method is hourly, you are required to update the
standard number of hours per week that a person in this position would normally work. Standard Hours is not required for Salaried positions.
• Hours Funded –This value should be the total assignment hours of all employees assigned to this position. Hours Funded is not editable for Salaried or Flat Dollar positions, but is required for Hourly positions
• Percent Funded – This value should be the current total assignment percentages for the
8
position. Percent Funded is not editable for Hourly and Flat Dollar positions, but is required for Salaried positions.
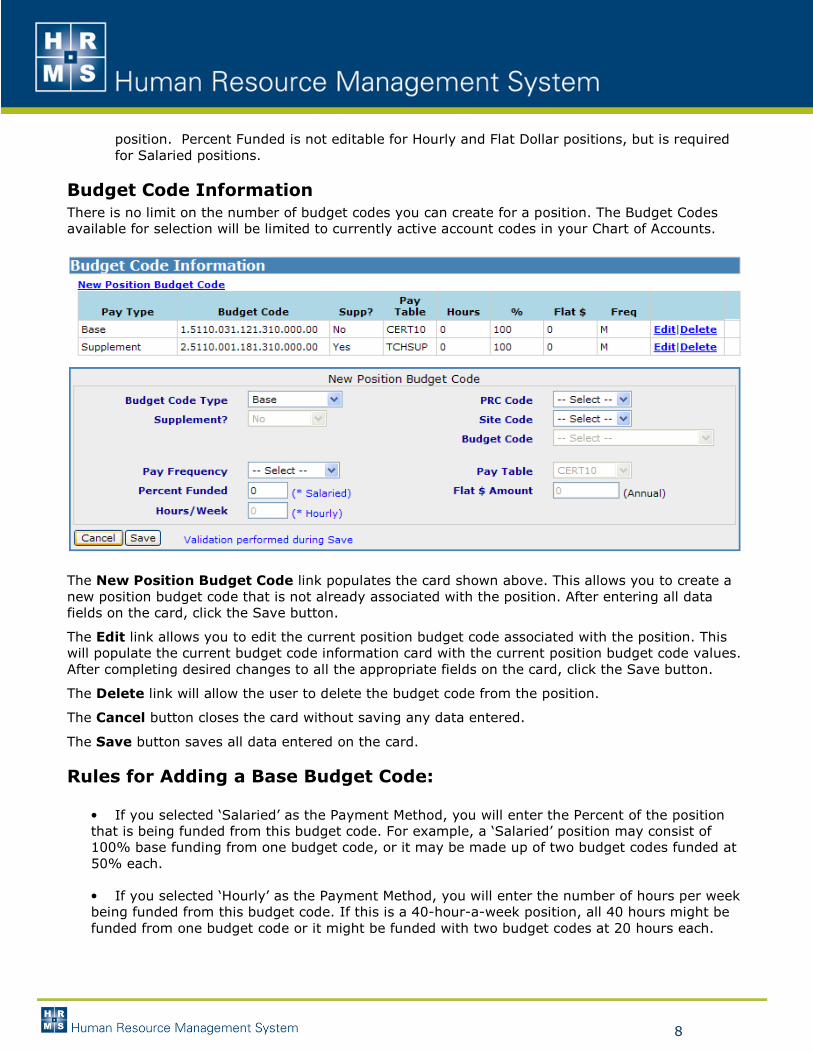
Budget Code Information
There is no limit on the number of budget codes you can create for a position. The Budget Codes available for selection will be limited to currently active account codes in your Chart of Accounts.
The New Position Budget Code link populates the card shown above. This allows you to create a new position budget code that is not already associated with the position. After entering all data fields on the card, click the Save button.
The Edit link allows you to edit the current position budget code associated with the position. This will populate the current budget code information card with the current position budget code values. After completing desired changes to all the appropriate fields on the card, click the Save button.
The Delete link will allow the user to delete the budget code from the position.
The Cancel button closes the card without saving any data entered.
The Save button saves all data entered on the card.
Rules for Adding a Base Budget Code:
• If you selected ‘Salaried’ as the Payment Method, you will enter the Percent of the position that is being funded from this budget code. For example, a ‘Salaried’ position may consist of 100% base funding from one budget code, or it may be made up of two budget codes funded at 50% each. • If you selected ‘Hourly’ as the Payment Method, you will enter the number of hours per week being funded from this budget code. If this is a 40-hour-a-week position, all 40 hours might be funded from one budget code or it might be funded with two budget codes at 20 hours each.
9
• You may enter as many base budget codes as you like, as long as the total Percent Employed (or Hours) from all base budget codes does not exceed the Percent Funded or Hours funded that you entered in the Salary/Payment Information Section.
Rules for requesting the Supplement Budget Code Type:
• This budget code type is available if you selected Salaried or Hourly payment method in the
Salary/Payment Information Section of this form.
� Supplements must be entered using a salary schedule. Supplement amounts must be stored in the salary tables in monthly amounts.
� Supplements cannot be entered as a percentage of a base salary or as a flat dollar amount.
If, for example, your supplement equals 10% of the base salary, then the monthly dollar amount of that 10% supplement should be stored in your supplement salary schedule and designate that salary schedule when entering the supplement budget code. You should work with your Finance Officer to make sure your Supplement Salary Schedule is setup correctly.
� If you selected ‘Salaried’ as the Payment Method, you will enter the actual percent of the
supplement amount in the salary schedule that is being funded from this budget code. For example, if you have a 100% funded position and the entire supplement is being paid from one supplement budget code, you would enter 100% in Percent Employed. If you have a 100% funded position where the supplement is being split equally between two different budget codes, you would enter 50% for Percent Employed in each supplement budget code. The frequency of payments to be used for this supplement budget code will be pulled from the current salary schedule.
� If you selected ‘Hourly’ as the Payment Method, you enter the actual hours associated with
the supplement amount in the salary schedule that is being funded from this budget code. For example, if you have a 40-hour-a-week position and the entire supplement is being paid from one supplement budget code, you would enter 40 in Hours for that supplement budget code. If you have a 40-hour-a-week position where the supplement is being split funded (equally) between two different budget codes, you would enter 20 hours in each supplement budget code. The frequency of payments to be used for this supplement budget code will be pulled from the current salary schedule.
� Supplement Budget Codes automatically have their Supplement(s) indicator set to ‘Yes’.
Rules for requesting the Additional Pay Budget Code Type:
• This budget code type is available if you selected Salaried, Hourly or Flat Dollar payment method in the salary/payment information section of this form. It is important to note that if you selected Flat Dollar payment method, Additional Pay is the ONLY budget code type that you can select.
• Additional Pay budget codes can be entered using either a salary schedule or as a flat dollar
amount but not both.
• Additional Pay budget codes can be used to designate a flat dollar amount that is not
10
contained in a salary schedule, or for budget codes funded that are not set up in payroll as supplement assignments.
• For additional pay budget codes entered using a salary schedule, select the appropriate
schedule from the pay table drop-down menu. For flat dollar budget codes, leave the dropdown list as is (** Select **).
• Changes made to all pay position budget codes are not reflected existing employee
assignments to the position.
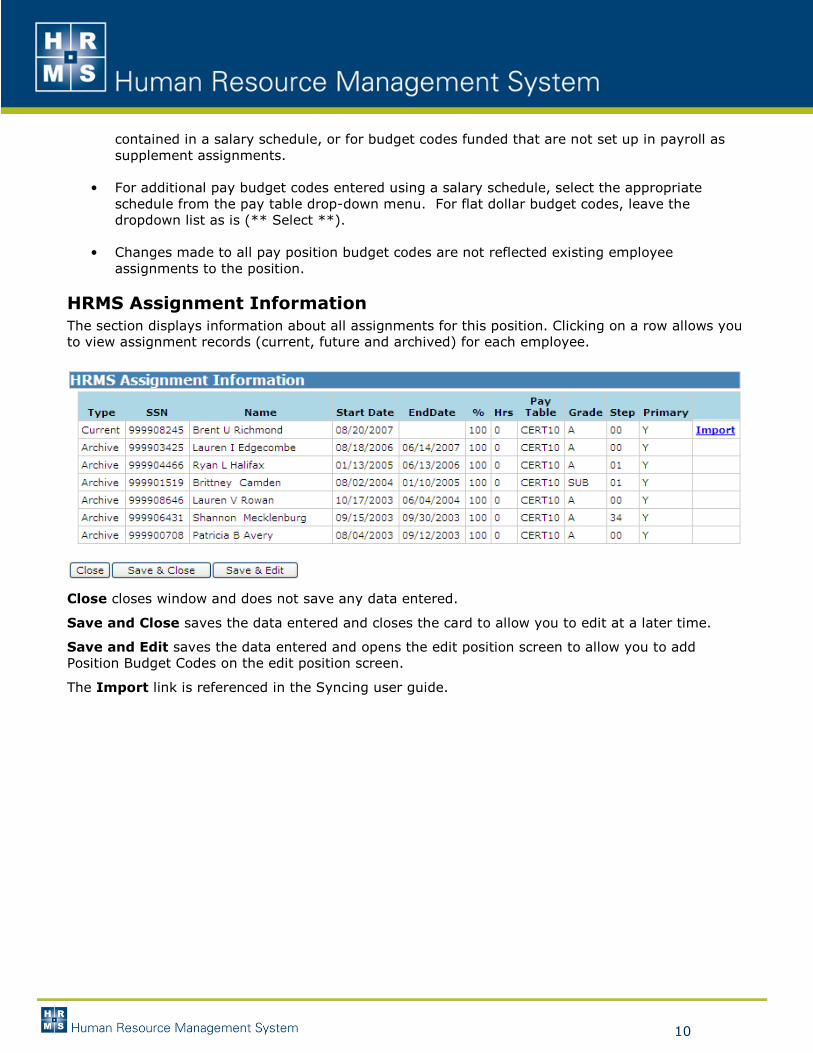
HRMS Assignment Information
The section displays information about all assignments for this position. Clicking on a row allows you to view assignment records (current, future and archived) for each employee.
Close closes window and does not save any data entered.
Save and Close saves the data entered and closes the card to allow you to edit at a later time.
Save and Edit saves the data entered and opens the edit position screen to allow you to add Position Budget Codes on the edit position screen.
The Import link is referenced in the Syncing user guide.
11
12
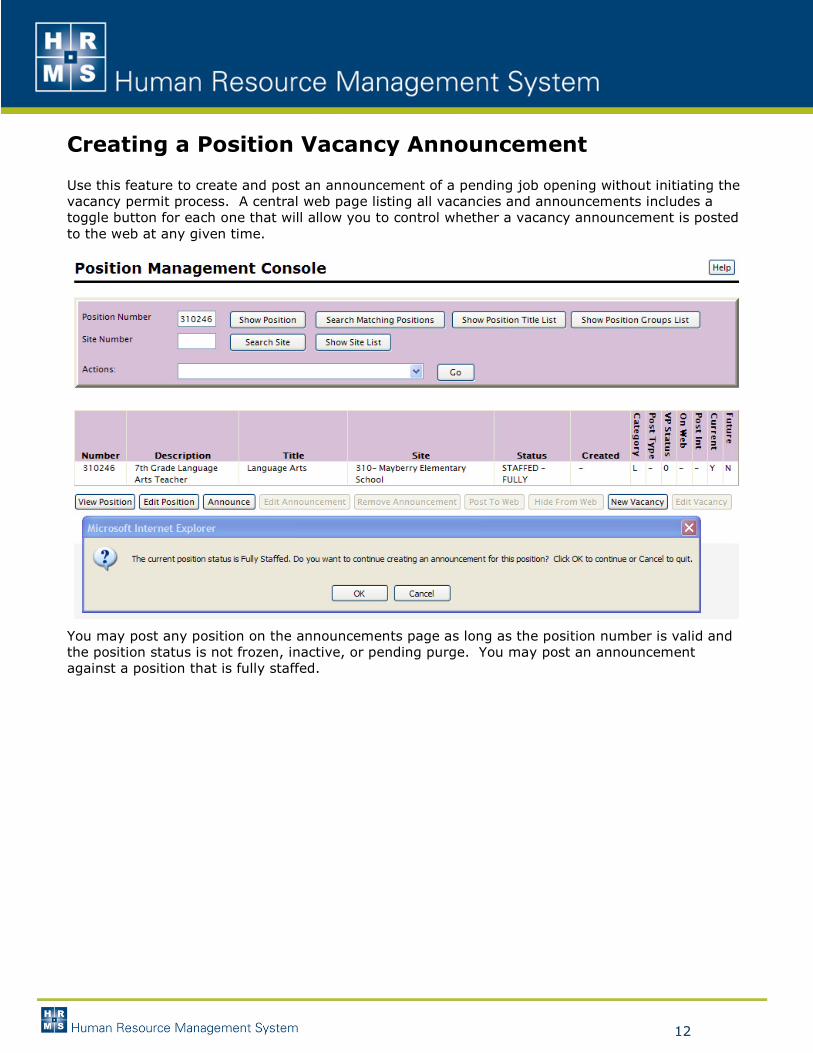
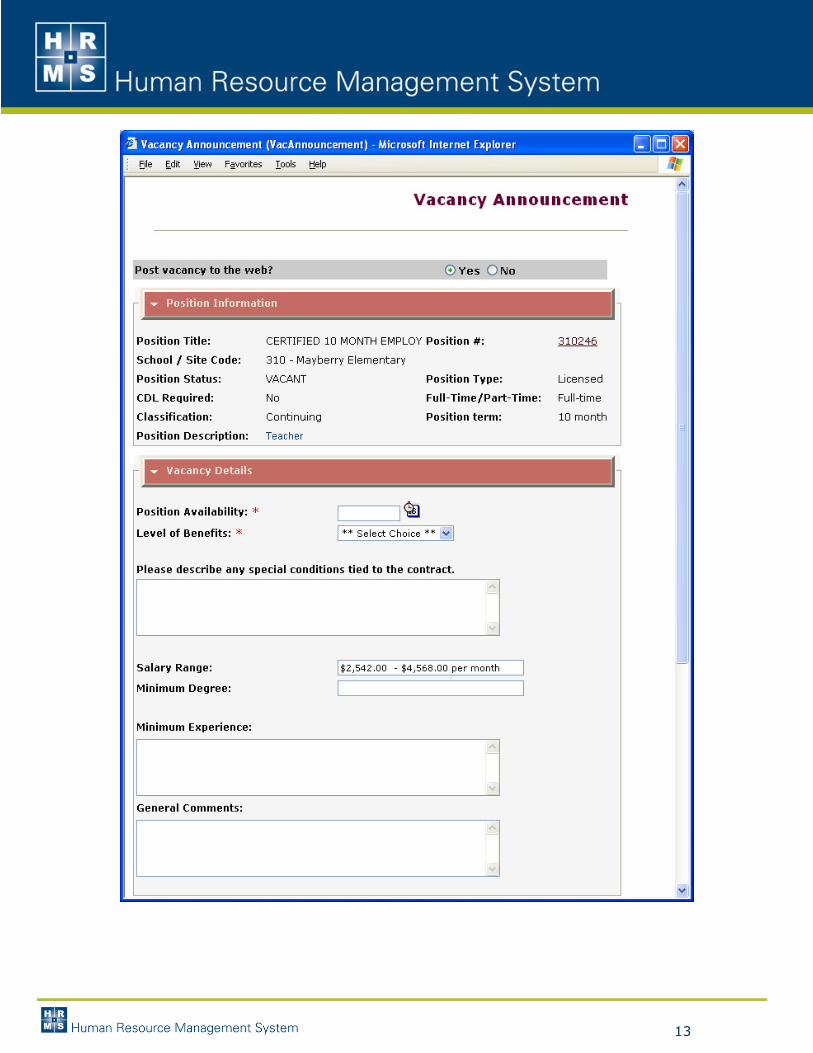
Creating a Position Vacancy Announcement Use this feature to create and post an announcement of a pending job opening without initiating the vacancy permit process. A central web page listing all vacancies and announcements includes a toggle button for each one that will allow you to control whether a vacancy announcement is posted to the web at any given time.
You may post any position on the announcements page as long as the position number is valid and the position status is not frozen, inactive, or pending purge. You may post an announcement against a position that is fully staffed.
13
14
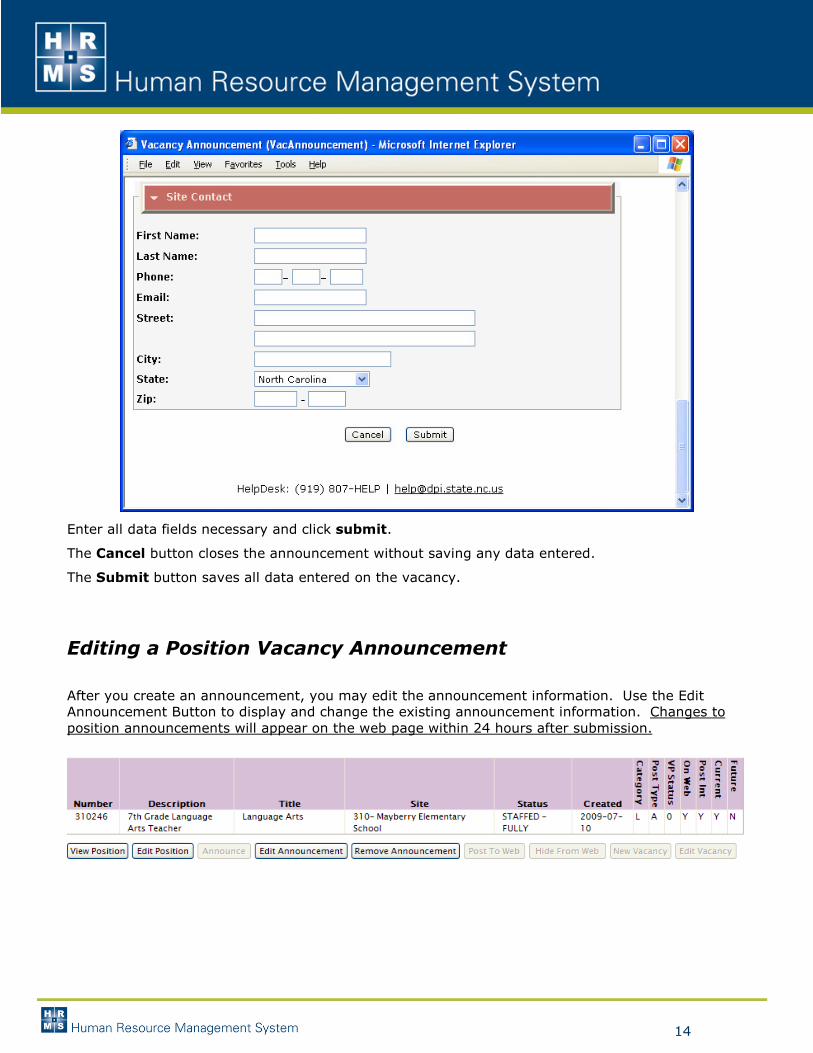
Enter all data fields necessary and click submit.
The Cancel button closes the announcement without saving any data entered.
The Submit button saves all data entered on the vacancy.
Editing a Position Vacancy Announcement
After you create an announcement, you may edit the announcement information. Use the Edit Announcement Button to display and change the existing announcement information. Changes to position announcements will appear on the web page within 24 hours after submission.
15
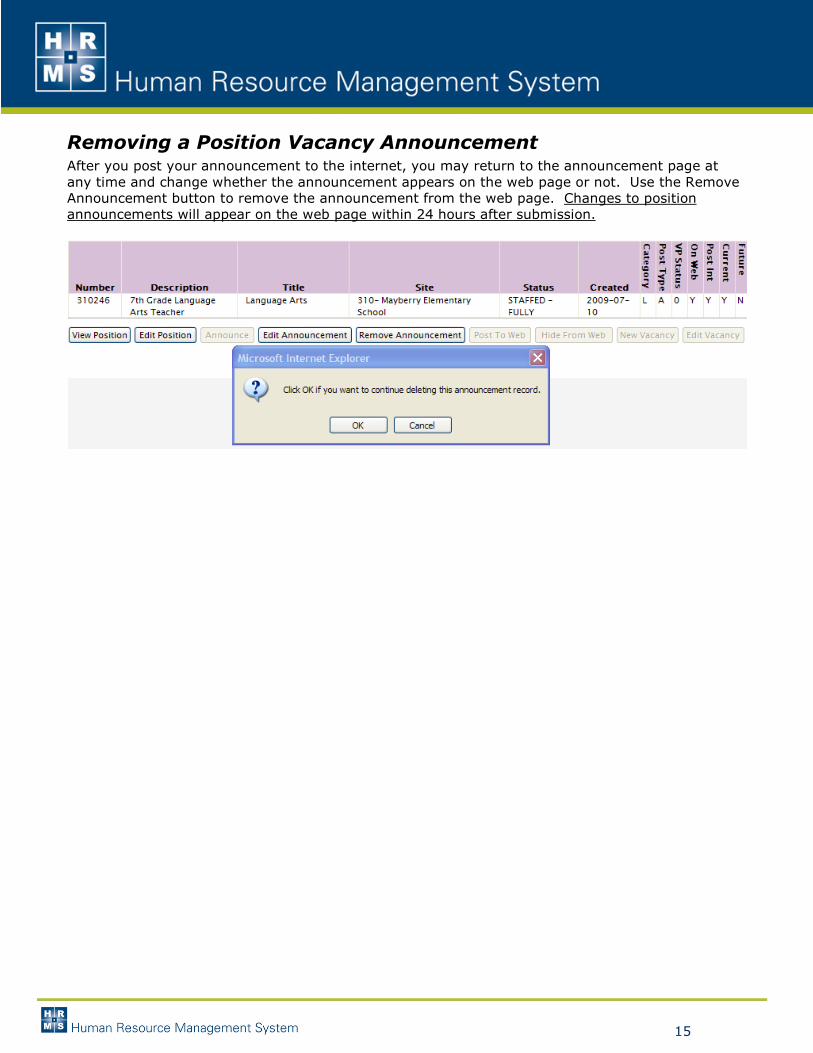
Removing a Position Vacancy Announcement After you post your announcement to the internet, you may return to the announcement page at any time and change whether the announcement appears on the web page or not. Use the Remove Announcement button to remove the announcement from the web page. Changes to position announcements will appear on the web page within 24 hours after submission.
16
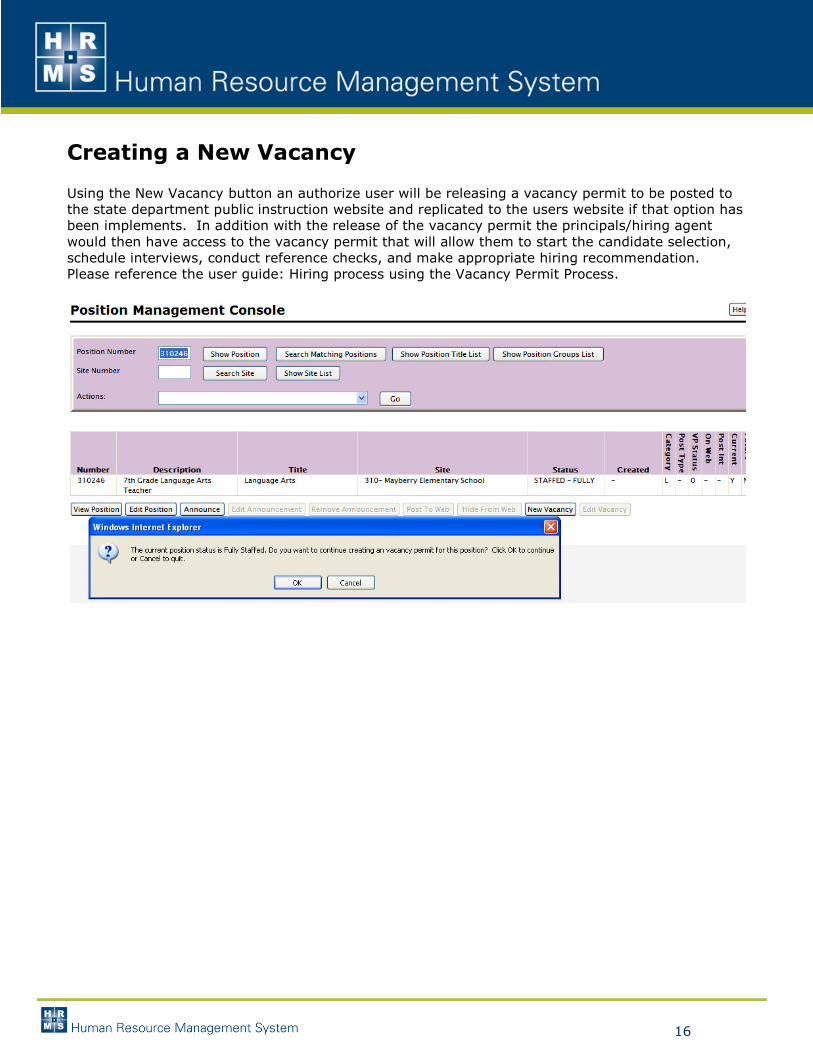
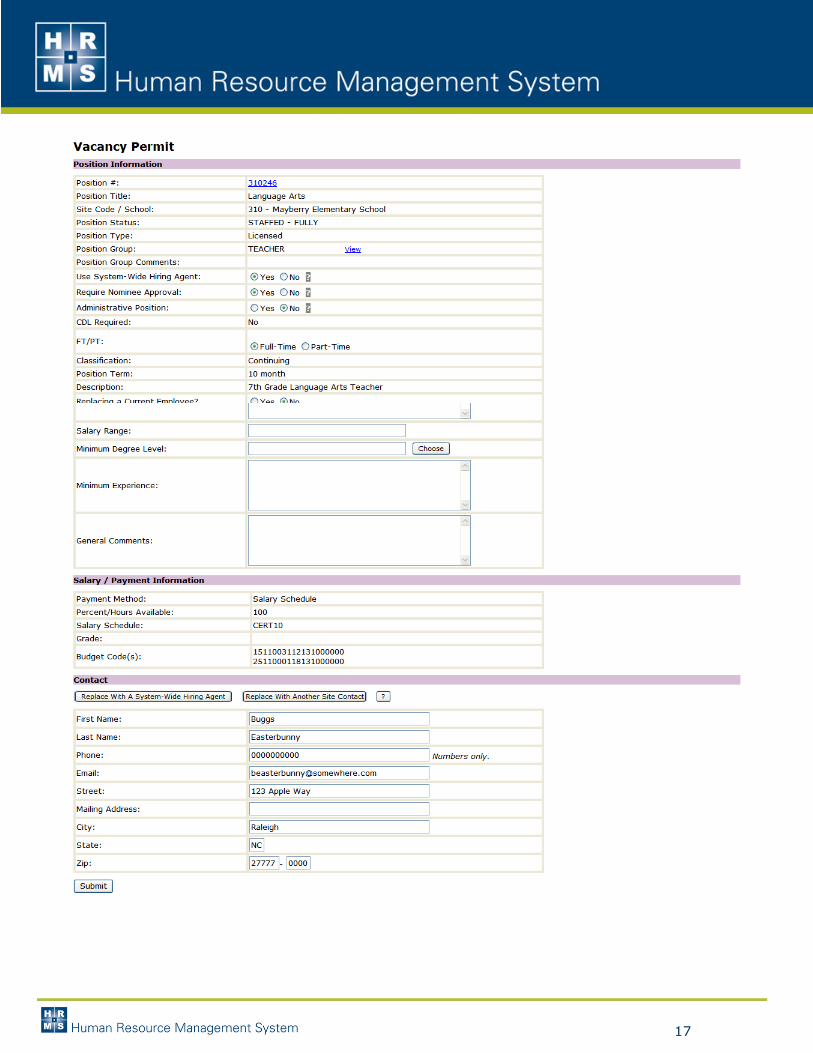
Creating a New Vacancy Using the New Vacancy button an authorize user will be releasing a vacancy permit to be posted to the state department public instruction website and replicated to the users website if that option has been implements. In addition with the release of the vacancy permit the principals/hiring agent would then have access to the vacancy permit that will allow them to start the candidate selection, schedule interviews, conduct reference checks, and make appropriate hiring recommendation. Please reference the user guide: Hiring process using the Vacancy Permit Process.
17
18
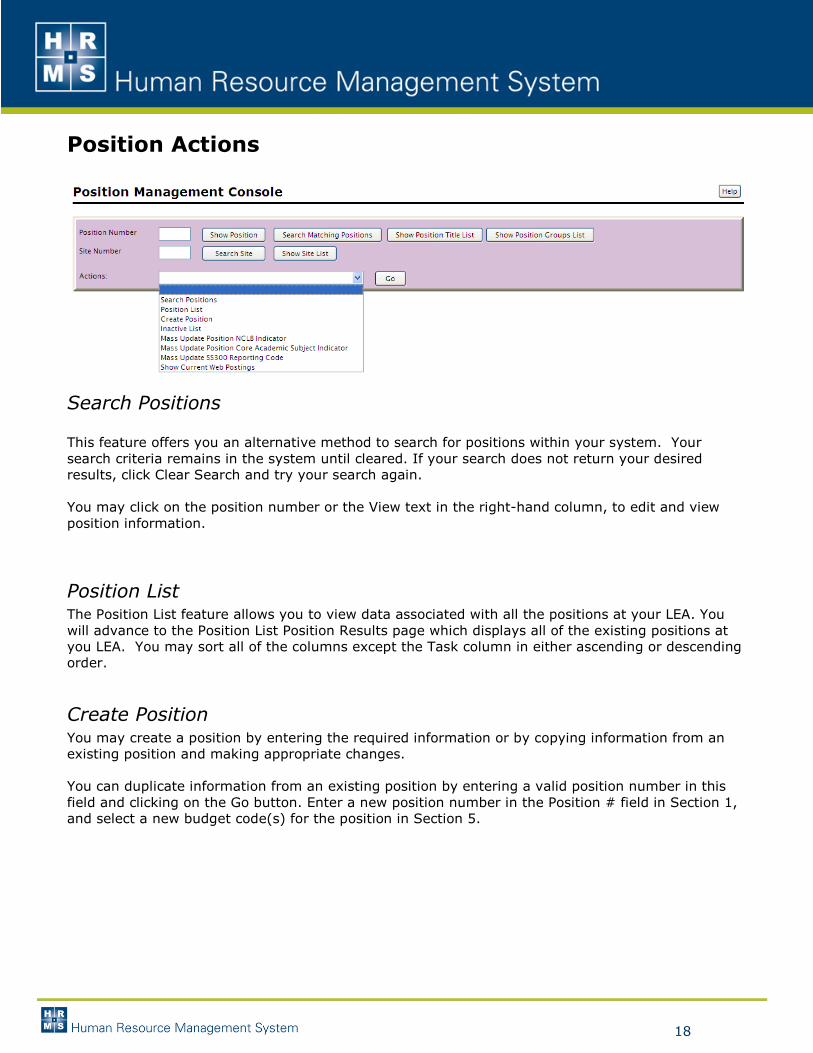
Position Actions
Search Positions This feature offers you an alternative method to search for positions within your system. Your search criteria remains in the system until cleared. If your search does not return your desired results, click Clear Search and try your search again.
You may click on the position number or the View text in the right-hand column, to edit and view position information.
Position List The Position List feature allows you to view data associated with all the positions at your LEA. You will advance to the Position List Position Results page which displays all of the existing positions at you LEA. You may sort all of the columns except the Task column in either ascending or descending order.
Create Position You may create a position by entering the required information or by copying information from an existing position and making appropriate changes. You can duplicate information from an existing position by entering a valid position number in this field and clicking on the Go button. Enter a new position number in the Position # field in Section 1, and select a new budget code(s) for the position in Section 5.
19
Inactive List The Inactive Position List feature allows you to view and modify information about inactive positions at your LEA on the Position Results Page. After selecting a position from this screen you can:
� View position information created on the position screen. � Modify position information in all fields. � Modify budget codes for filled (or partially filled) positions through Staff Action, rather than
updating the Position form directly. Use the Modify Position form in Staff Action to update budget codes.
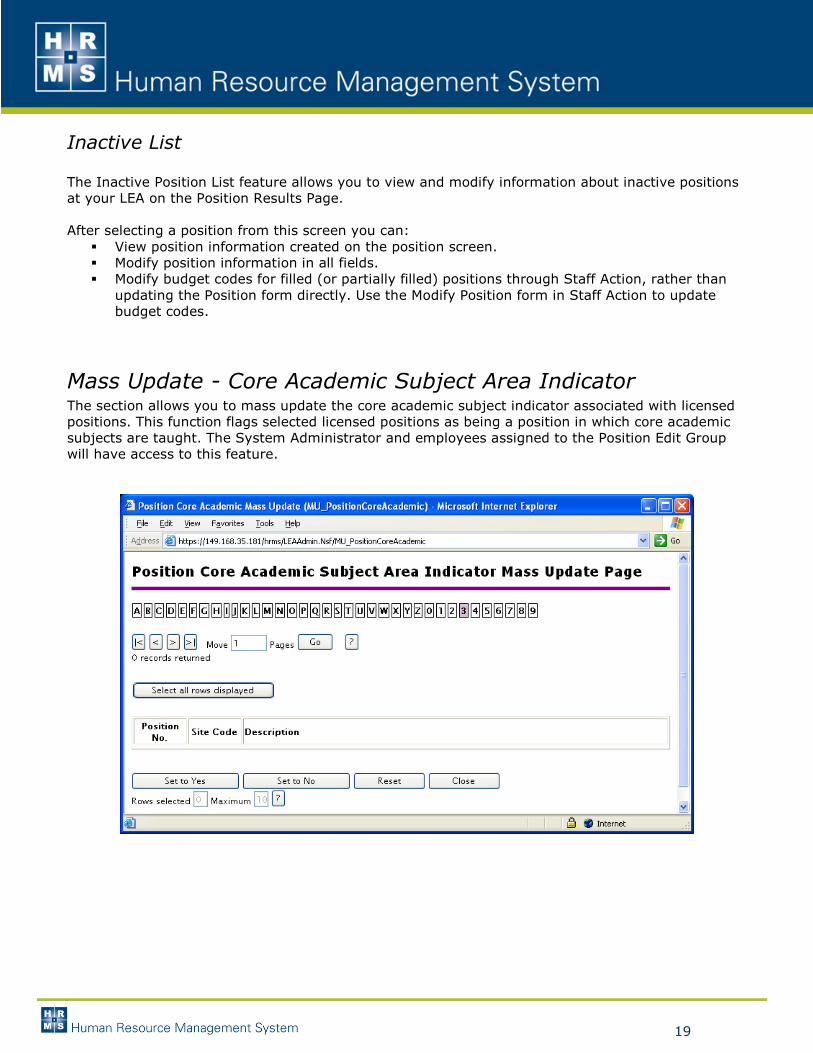
Mass Update - Core Academic Subject Area Indicator The section allows you to mass update the core academic subject indicator associated with licensed positions. This function flags selected licensed positions as being a position in which core academic subjects are taught. The System Administrator and employees assigned to the Position Edit Group will have access to this feature.
20
Mass Update – SS300 Reporting Code This Mass Update will assist users with updating the SS300 Reporting setting for all positions currently set to "1.4 Teachers (Vocational Funded)" to a new value.
Run will run the report Print will allow you to print the results after the results have completely populated. Close will close the window and return to the position management console.
Show Current Web Postings This system view contains a list of all vacancies and announcements at your LEA. Always maximize the window. This allows you to navigate the position list easier.
You can toggle the position list scrollbars by clicking "Toggle scrollbars."
You may sort the list on each column. Click on the up and down arrows under each column heading to sort. Click on a row to act on that position. The position you click will be displayed at the top of the list with a set of action buttons. Some of which will be enabled, depending on your user rights and certain values associated with that position.
After you select a position, you may do the following actions
• View or Edit the position details • Edit the Vacancy Announcement • Remove the Vacancy Announcement
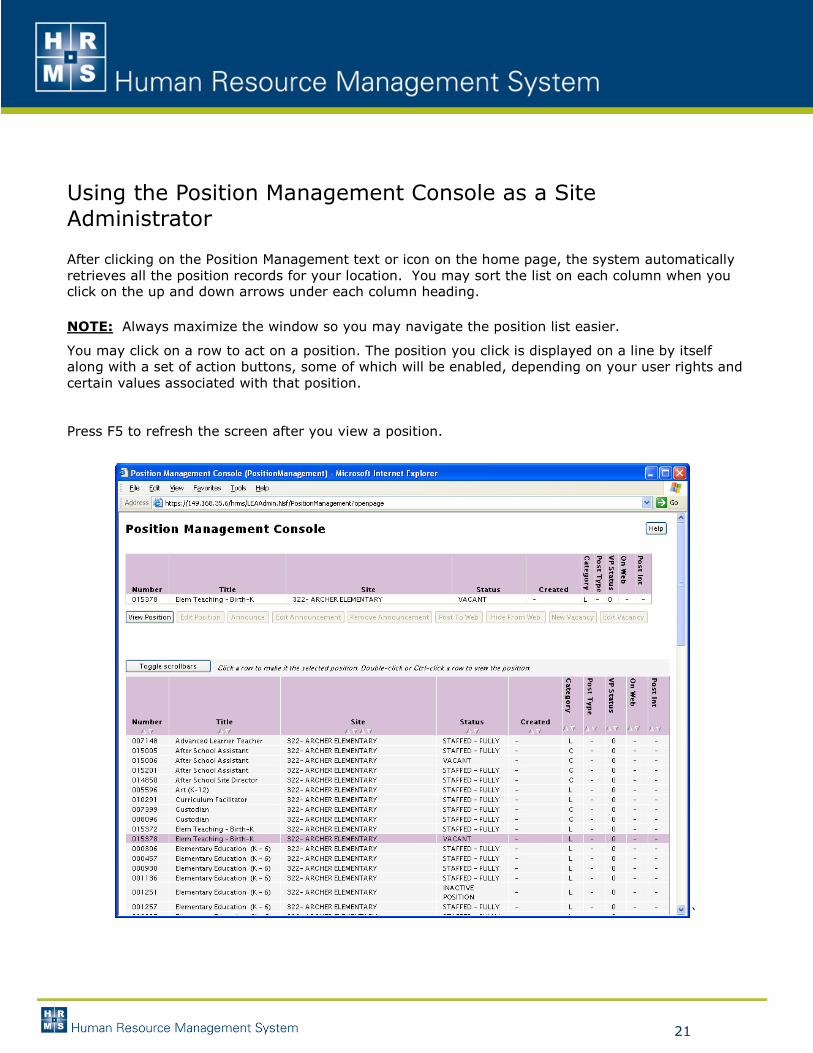
21
Using the Position Management Console as a Site Administrator After clicking on the Position Management text or icon on the home page, the system automatically retrieves all the position records for your location. You may sort the list on each column when you click on the up and down arrows under each column heading.
NOTE: Always maximize the window so you may navigate the position list easier.
You may click on a row to act on a position. The position you click is displayed on a line by itself along with a set of action buttons, some of which will be enabled, depending on your user rights and certain values associated with that position.
Press F5 to refresh the screen after you view a position.
`