portable usb recorder - images4.static-thomann.de fileportable usb recorder tragbarer usb-rekorder...
TRANSCRIPT

P o r t a b L e U S B R e c o r d e rT R A G B A R E R U S B - R E K O R D E R
G R A B A D O R P O R T A T I L P O R U S B E N R E G I S T R E U R P O R T A B L E U S B
In the USA: If you experience problems with this unit, please go to http://www.geminidj.com/support.html or call 1-732-738-9003 for Gemini Customer Service. Do not attempt to return this equipment to your deal-er. Gemini stands behind their products with an industry-leading 3 year limited warranty on all audio products. For larger images & detailed specs visit our website @ http://www.geminidj.com. WE ARE NOT RESPON-SIBLE FOR TYPOGRAPHICAL ERRORS OR OMISSIONS. WE RESERVE THE RIGHT TO CHANGE WITHOUT NOTICE. Parts of the design of this product may be protected by worldwide patents. Information in thismanual is subject to change without notice and does not represent a commitment on the part of the vendor. Gemini Sound Products Corp. shall not be liable for any loss or damage whatsoever arising from the useof information or any error contained in this manual. No part of this manual may be reproduced, stored in a retrieval system or transmitted, in any form or by any means, electronic, electrical, mechanical, optical,chemical, including photocopying and recording, for any purpose without the express written permission of Gemini Sound Products Corp. It is recommended that all maintenance and service on this product is per-formed by Gemini Sound Products Corp. or its authorized agents. Gemini Sound Products Corp. will not accept liability for loss or damage caused by maintenance or repair performed by unauthorized personnel.
USA:Gemini Sound Products Corp.Worldwide Headquarters120 Clover PlaceEdison, New Jersey 08837Ph: 732.738.9003Fax: 732.738.9006
Germany:Gemini Sound Products GmbHLiebigstrasse 1685757 KarlsfeldPh: + 49 8131 39171-0Fax: + 49 8131 39171-9
Spain:Gemini Sound Products S.A.Rosellon 516 local08026 BarcelonaPh: + 34 93 436 37 00Fax: + 34 93 347 69 61
UK:Gemini Sound Products LTDUnit C4 HazletonIndustrial Estate,Waterlooville P08 9JUPh: +44 (0)87 087 00880Fax: +44 (0)87 087 00990
France:GSL France1, Allée d' Effiat,Parc de l'événementF-91160 LongjumeauPh: + 33 1 69 79 97 70Fax: + 33 1 69 79 97 80
Worldwide Offices
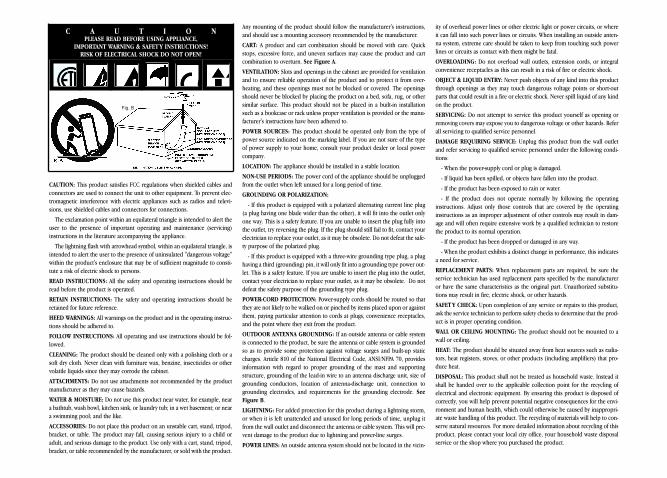
CAUTION: This product satisfies FCC regulations when shielded cables andconnectors are used to connect the unit to other equipment. To prevent elec-tromagnetic interference with electric appliances such as radios and televi-sions, use shielded cables and connectors for connections.
The exclamation point within an equilateral triangle is intended to alert theuser to the presence of important operating and maintenance (servicing)instructions in the literature accompanying the appliance.
The lightning flash with arrowhead symbol, within an equilateral triangle, isintended to alert the user to the presence of uninsulated "dangerous voltage"within the product's enclosure that may be of sufficient magnitude to consti-tute a risk of electric shock to persons.
READ INSTRUCTIONS: All the safety and operating instructions should beread before the product is operated.
RETAIN INSTRUCTIONS: The safety and operating instructions should beretained for future reference.
HEED WARNINGS: All warnings on the product and in the operating instruc-tions should be adhered to.
FOLLOW INSTRUCTIONS: All operating and use instructions should be fol-lowed.
CLEANING: The product should be cleaned only with a polishing cloth or asoft dry cloth. Never clean with furniture wax, benzine, insecticides or othervolatile liquids since they may corrode the cabinet.
ATTACHMENTS: Do not use attachments not recommended by the productmanufacturer as they may cause hazards.
WATER & MOISTURE: Do not use this product near water, for example, neara bathtub, wash bowl, kitchen sink, or laundry tub; in a wet basement; or neara swimming pool; and the like.
ACCESSORIES: Do not place this product on an unstable cart, stand, tripod,bracket, or table. The product may fall, causing serious injury to a child oradult, and serious damage to the product. Use only with a cart, stand, tripod,bracket, or table recommended by the manufacturer, or sold with the product.
Any mounting of the product should follow the manufacturer's instructions,and should use a mounting accessory recommended by the manufacturer.
CART: A product and cart combination should be moved with care. Quickstops, excessive force, and uneven surfaces may cause the product and cartcombination to overturn. See Figure A.
VENTILATION: Slots and openings in the cabinet are provided for ventilationand to ensure reliable operation of the product and to protect it from over-heating, and these openings must not be blocked or covered. The openingsshould never be blocked by placing the product on a bed, sofa, rug, or othersimilar surface. This product should not be placed in a built-in installationsuch as a bookcase or rack unless proper ventilation is provided or the manu-facturer's instructions have been adhered to.
POWER SOURCES: This product should be operated only from the type ofpower source indicated on the marking label. If you are not sure of the typeof power supply to your home, consult your product dealer or local powercompany.
LOCATION: The appliance should be installed in a stable location.
NON-USE PERIODS: The power cord of the appliance should be unpluggedfrom the outlet when left unused for a long period of time.
GROUNDING OR POLARIZATION:
- If this product is equipped with a polarized alternating current line plug(a plug having one blade wider than the other), it will fit into the outlet onlyone way. This is a safety feature. If you are unable to insert the plug fully intothe outlet, try reversing the plug. If the plug should still fail to fit, contact yourelectrician to replace your outlet, as it may be obsolete. Do not defeat the safe-ty purpose of the polarized plug.
- If this product is equipped with a three-wire grounding type plug, a plughaving a third (grounding) pin, it will only fit into a grounding type power out-let. This is a safety feature. If you are unable to insert the plug into the outlet,contact your electrician to replace your outlet, as it may be obsolete. Do notdefeat the safety purpose of the grounding type plug.
POWER-CORD PROTECTION: Power-supply cords should be routed so thatthey are not likely to be walked on or pinched by items placed upon or againstthem, paying particular attention to cords at plugs, convenience receptacles,and the point where they exit from the product.
OUTDOOR ANTENNA GROUNDING: If an outside antenna or cable systemis connected to the product, be sure the antenna or cable system is groundedso as to provide some protection against voltage surges and built-up staticcharges. Article 810 of the National Electrical Code, ANSI/NFPA 70, providesinformation with regard to proper grounding of the mast and supportingstructure, grounding of the lead-in wire to an antenna discharge unit, size ofgrounding conductors, location of antenna-discharge unit, connection togrounding electrodes, and requirements for the grounding electrode. SeeFigure B.
LIGHTNING: For added protection for this product during a lightning storm,or when it is left unattended and unused for long periods of time, unplug itfrom the wall outlet and disconnect the antenna or cable system. This will pre-vent damage to the product due to lightning and power-line surges.
POWER LINES: An outside antenna system should not be located in the vicin-
ity of overhead power lines or other electric light or power circuits, or whereit can fall into such power lines or circuits. When installing an outside anten-na system, extreme care should be taken to keep from touching such powerlines or circuits as contact with them might be fatal.
OVERLOADING: Do not overload wall outlets, extension cords, or integralconvenience receptacles as this can result in a risk of fire or electric shock.
OBJECT & LIQUID ENTRY: Never push objects of any kind into this productthrough openings as they may touch dangerous voltage points or short-outparts that could result in a fire or electric shock. Never spill liquid of any kindon the product.
SERVICING: Do not attempt to service this product yourself as opening orremoving covers may expose you to dangerous voltage or other hazards. Referall servicing to qualified service personnel.
DAMAGE REQUIRING SERVICE: Unplug this product from the wall outletand refer servicing to qualified service personnel under the following condi-tions:
- When the power-supply cord or plug is damaged.
- If liquid has been spilled, or objects have fallen into the product.
- If the product has been exposed to rain or water.
- If the product does not operate normally by following the operatinginstructions. Adjust only those controls that are covered by the operatinginstructions as an improper adjustment of other controls may result in dam-age and will often require extensive work by a qualified technician to restorethe product to its normal operation.
- If the product has been dropped or damaged in any way.
- When the product exhibits a distinct change in performance, this indicatesa need for service.
REPLACEMENT PARTS: When replacement parts are required, be sure theservice technician has used replacement parts specified by the manufactureror have the same characteristics as the original part. Unauthorized substitu-tions may result in fire, electric shock, or other hazards.
SAFET Y CHECK: Upon completion of any service or repairs to this product,ask the service technician to perform safety checks to determine that the prod-uct is in proper operating condition.
WALL OR CEILING MOUNTING: The product should not be mounted to awall or ceiling.
HEAT: The product should be situated away from heat sources such as radia-tors, heat registers, stoves, or other products (including amplifiers) that pro-duce heat.
DISPOSAL: This product shall not be treated as household waste. Instead itshall be handed over to the applicable collection point for the recycling ofelectrical and electronic equipment. By ensuring this product is disposed ofcorrectly, you will help prevent potential negative consequences for the envi-ronment and human health, which could otherwise be caused by inappropri-ate waste handling of this product. The recycling of materials will help to con-serve natural resources. For more detailed information about recycling of thisproduct, please contact your local city office, your household waste disposalservice or the shop where you purchased the product.
C A U T I O NPLEASE READ BEFORE USING APPLIANCE,
IMPORTANT WARNING & SAFET Y INSTRUCTIONS!RISK OF ELECTRICAL SHOCK DO NOT OPEN!
I28 I92 ERRORWAV256
PROGRESS
level clip
60% I00%80% LOW BATTERY40%20%REC sel
line inline in
r l
level
minmax
DC in(chargeable)
power
reset USb keyon off
1
2**
3 4 56
7
8 9
10
11
12
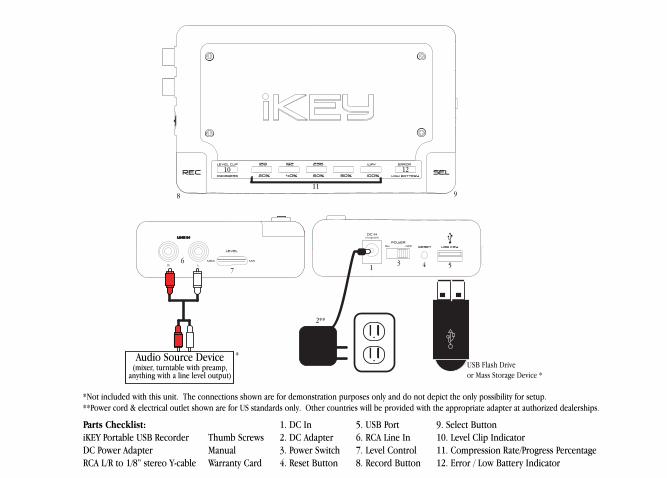
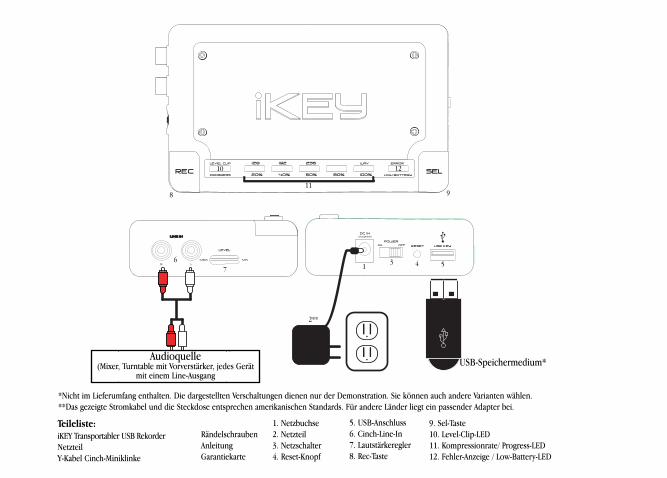
*USB Flash Driveor Mass Storage Device *
Audio Source Device(mixer, turntable with preamp,
anything with a line level output)
*Not included with this unit. The connections shown are for demonstration purposes only and do not depict the only possibility for setup.**Power cord & electrical outlet shown are for US standards only. Other countries will be provided with the appropriate adapter at authorized dealerships.
Parts Checklist:iKEY Portable USB RecorderDC Power AdapterRCA L/R to 1/8” stereo Y-cable
Thumb ScrewsManualWarranty Card
1. DC In2. DC Adapter3. Power Switch4. Reset Button
5. USB Port6. RCA Line In7. Level Control8. Record Button
9. Select Button10. Level Clip Indicator11. Compression Rate/Progress Percentage12. Error / Low Battery Indicator

iKEY PORTABLE USB RECORDER
INTRODUCTION:
Congratulations on purchasing a GEMINI iKEY PORTABLE USB RECORDER. This stateof-the-art recording device features the latest technology and is backed by a ONE yearlimited warranty*. Prior to use, we suggest that you carefully read all the instruc-tions.
FEATURES:
- USB Port (For direct connectivity to supported USB Storage Device)- Compatible with USB 2.0/1.1/1.0 devices- Records audio to Uncompressed WAV format or MP3 format (w/ selectable bit rate,up to 256kbps)- Gold plated RCA inputs - LED Indicator shows memory remaining on target drive- Battery powered w/ low battery indicator - DC charger input for use with rechargeable batteries - Level clip indicator- Record volume control- Reset button- DC adapter included- Battery powered (with the use of 4 ‘AA’ batteries; not included)
CAUTIONS:
1. Read all operating instructions before using this equipment.2. To reduce the risk of electrical shock, do not open the unit. There are NO USER
REPLACEABLE PARTS INSIDE. Please contact the GEMINI SERVICE DEPARTMENT or yourauthorized dealer to speak to a qualified GEMINI SOUND PRODUCTS technician.3. In the USA: If you experience problems with this unit, please visit HTTP://WWW.GEM-INIDJ.COM/SUPPORT.HTML or call 1 (732) 738-9003 for GEMINI CUSTOMER SERVICE. Donot attempt to return this equipment to your dealer.4. Be sure to allow adequate ventilation to avoid possible heat damage to your
equipment.5. DO NOT EXPOSE THIS UNIT TO RAIN OR MOISTURE. Operators of electronic equip-ment should in no way be in contact with water.6. DO NOT USE ANY SPRAY CLEANER OR LUBRICANT ON ANY CONTROLS OR SWITCHES.
QUICK START INSTRUCTIONS:
1. After installing batteries or connecting the DC ADAPTOR (2), turn the POWER
SWITCH (3) ON. 2. Connect your USB mass storage device to the USB PORT (5). Once the storagedevice is initialized, the PROGRESS LEDS (11) will flash six times indicating how muchstorage is occupied on the connected device.3. Connect a line-level audio signal to the RCA LINE IN (6) jacks. Adjust the LEVEL
(7) control until the LEVEL CLIP (10) LED stays unlit.4. Press the SELECTOR (9) button to set the desired BIT RATE at which you would liketo record. You may also choose uncompressed WAV format.5. Press the RECORD (8) button to start and stop your recording. Each time theRECORD (8) button is pressed, all of the progress LEDs will flash once to indicate thatthe unit has understood your command.6. When you are finished recording, press and hold the RECORD (8) button until allof LED lights flash 3 times consecutively. You may now remove the connected USBstorage device.NOTE: IF YOU PLAN TO RECORD TO AN iPod®, PLEASE BE SURE TO READ THE SECTION ENTI-TLED “iPod® OPERATION NOTES.” BEFORE PROCEEDING!
BATTERY INSTALLATION:
1. Make sure the POWER SWITCH (3) is set to OFF before plugging in the unit to anelectrical outlet.2. Behind the iKEY’s aluminum faceplate is a battery compartment for four AA bat-teries to power the unit. To access the battery compartment, unscrew the fourscrews that are found on the corners of the aluminum faceplate. In the event thatyou need quick access to the battery compartment, you may use the four thumb
<4>
screws that are supplied as an alternative to the standard screws that are installed bydefault.3. Install the batteries according to the diagram inside the battery slot. Place the pos-itive (+) end of the battery with the positive connections. Place the negative (-) withthe negative connections. 4. Gently fasten the aluminum faceplate back in place, being careful not to overtight-en the screws. NOTE: WHEN THE BATTERY POWER IS RUNNING LOW, THE LOW BATTERY LED LOCATED ON THE
RIGHT OF THE FACE PANEL OF THE iKEY WILL FLASH. WHEN THERE IS NOT SUFFICIENT POWER
TO OPERATE THE UNIT RELIABLY, THE iKEY WILL FLASH ALL LEDS THREE TIMES AND THEN
GRACEFULLY CLOSE ANY CONNECTIONS WITH THE ATTACHED STORAGE DEVICE AND CEASE
RECORDING. ALTHOUGH THE iKEY IS ABLE TO SAVE THE FILE BEFORE LOSING POWER, IT IS
ADVISABLE TO END THE RECORDING BY PRESSING THE RECORD (8) BUTTON ONCE THE LOW
BATTERY LED BEGINS TO FLASH.
5. To charge rechargeable batteries, plug one end of the DC ADAPTOR (2) into an elec-trical outlet. Plug the other end of the DC ADAPTOR (2) into the DC IN (1) to powerthe iKEY or to charge the rechargeable batteries installed in the unit. The POWER
SWITCH (3) must be in the ‘ON’ position to charge the installed batteries.NOTE: ATTEMPTING TO RECHARGE NON-RECHARGEABLE BATTERIES MAY RESULT IN BATTERY
LEAKAGE, FIRE, OR EXPLOSION. SINCE THERE ARE MANY T YPES OF RECHARGEABLE BATTERIES
AVAILABLE, NECESSARY CHARGING TIMES MAY VARY AND SHOULD BE RESEARCHED PRIOR TO
USING THE iKEY’S RECHARGING FUNCTION. FOR OPTIMAL RESULTS, WE SUGGEST USING NICK-EL METAL-HYDRIDE-T YPE (NiMH) RECHARGEABLE BATTERIES.
CONNECTIONS:
1. Make sure the POWER SWITCH (3) is set to OFF before plugging in theunit to an electrical outlet.2. Plug one end of the DC ADAPTOR (2) to an electrical outlet. Plug the otherend of the DC ADAPTOR (2) into the DC IN JACK (1) in order to power the
iKEY or to charge the rechargeable batteries installed in the unit. Alternatively, 4Alkaline ‘AA’ size batteries may be used to power the unit.3. The RCA LINE IN (6) is used to plug any line-level device into the
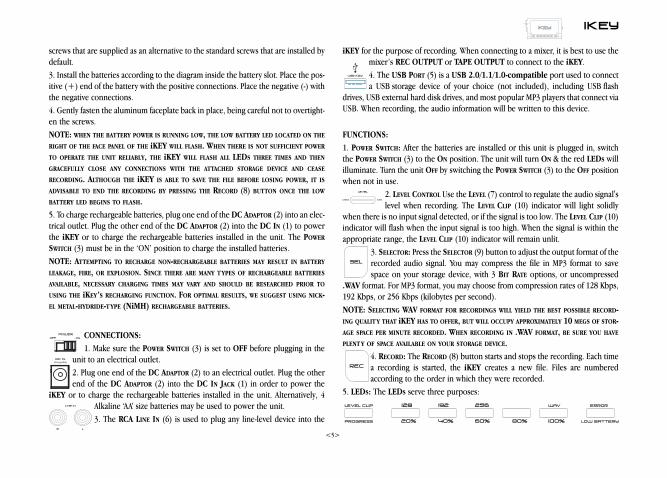
iKEY for the purpose of recording. When connecting to a mixer, it is best to use themixer’s REC OUTPUT or TAPE OUTPUT to connect to the iKEY.4. The USB PORT (5) is a USB 2.0/1.1/1.0-compatible port used to connecta USB storage device of your choice (not included), including USB flash
drives, USB external hard disk drives, and most popular MP3 players that connect viaUSB. When recording, the audio information will be written to this device.
FUNCTIONS:
1. POWER SWITCH: After the batteries are installed or this unit is plugged in, switchthe POWER SWITCH (3) to the ON position. The unit will turn ON & the red LEDS willilluminate. Turn the unit OFF by switching the POWER SWITCH (3) to the OFF positionwhen not in use.
2. LEVEL CONTROL Use the LEVEL (7) control to regulate the audio signal'slevel when recording. The LEVEL CLIP (10) indicator will light solidly
when there is no input signal detected, or if the signal is too low. The LEVEL CLIP (10)indicator will flash when the input signal is too high. When the signal is within theappropriate range, the LEVEL CLIP (10) indicator will remain unlit.
3. SELECTOR: Press the SELECTOR (9) button to adjust the output format of therecorded audio signal. You may compress the file in MP3 format to savespace on your storage device, with 3 BIT RATE options, or uncompressed
.WAV format. For MP3 format, you may choose from compression rates of 128 Kbps,192 Kbps, or 256 Kbps (kilobytes per second).NOTE: SELECTING WAV FORMAT FOR RECORDINGS WILL YIELD THE BEST POSSIBLE RECORD-ING QUALIT Y THAT iKEY HAS TO OFFER, BUT WILL OCCUPY APPROXIMATELY 10 MEGS OF STOR-AGE SPACE PER MINUTE RECORDED. WHEN RECORDING IN .WAV FORMAT, BE SURE YOU HAVE
PLENT Y OF SPACE AVAILABLE ON YOUR STORAGE DEVICE.
4. RECORD: The RECORD (8) button starts and stops the recording. Each timea recording is started, the iKEY creates a new file. Files are numberedaccording to the order in which they were recorded.
5. LEDS: The LEDS serve three purposes:
poweronoff
DC in(chargeable)
line in
r l
USb key
level
minmax
REC
sel
I28 I92 ERRORWAV256
PROGRESS
level clip
60% I00%80% LOW BATTERY40%20%
REC sel
iKey
<5>

- The LEVEL CLIP (10) LED flashes to alert you when the input signal exceeds thethreshold required to make a digital recording free of distortion. The LED lightssolidly to alert you that the input level is too low, or is absent completely.- The line of text above the LEDs indicates the BIT RATES available to make record-ings on the iKEY. When using the SELECT (9) button to select the BIT RATE, therespective LED below the BIT RATE that you have selected will illuminate. - The line of text below the LEDs, made up of percentages, indicates the amount ofstorage that is occupied on the target storage device. These are referred to as thePROGRESS LEDS (11). When the LED above a particular percentage is flashing, itmeans that the amount of storage occupied is less than the value below the flashingLED. When an LED is solid, it means that the storage occupied has exceeded thatpercentage. When the unit approaches 100% full, the LED display will alert you byflashing all 5 LEDs repeatedly until the storage device reaches its full capacity. - The LED at the far right flashes when the batteries are low or stays solid when thereis an error preventing the device from operating.
6. RESET: The RESET (4) button is used to re-initialize the unit, if there is anyerror with your connected storage device, or in the event that the unit needs
to be restarted for any reason. The RESET (4) button is recessed, as typically it willnever have to be used.
OPERATIONS:
1. Once the unit has been supplied with power using 4 ‘AA’ batteries or the DCADAPTOR (2), turn the unit on by moving the POWER SWITCH (3) to the ‘ON’ position.The LEVEL CLIP (10) indicator will light, indicating that there is no input signal.2. Plug your USB STORAGE DEVICE (e.g., USB flash drive, USB external hard drive,USB compatible MP3 player) into the USB KEY INPUT (5). Within a few seconds, theunit will detect and initialize the USB STORAGE DEVICE. During this time, you may seeyour USB STORAGE DEVICE’S activity light illuminate. Once the iKEY has initializedyour USB STORAGE DEVICE, the LED indicators showing the space occupied on thetarget device will flash six (6) times. 3. Once the LED(s) indicating the occupied space turn off, you may use the SELECTOR
(9) button to select the BIT RATE at which you would like to record. Pressing theSELECTOR (9) button toggles through the BIT RATES, which include 128Kbps,
192Kbps, 256Kbps, and uncompressed .WAV. At this point, if you would like tocheck the amount of space occupied on the target device, you can hold down theSELECTOR (9) button for 3-4 seconds, after which the LEDs will display the spaceoccupied on the target device until you release the SELECTOR (9) button.4. After you have selected the BIT RATE at which you would like to record, you mustadjust the input level in order to ensure that your recording volume will be ade-quate, but not so loud that it overloads the inputs of the iKEY. The simplest way todo this is to first adjust the volume of the source to as loud as needed, then adjustthe LEVEL (7) control so that the input signal does not overload the iKEY. To set therecording levels, increase the LEVEL (7) control until the LEVEL CLIP (10) indicatorbegins to flash repeatedly. Then, decrease the LEVEL (7) control gradually until theLEVEL CLIP (10) indicator flashes no more than once every 3 to 4 seconds. If you sus-pect that the level of the source may increase unexpectedly, you may want todecrease the LEVEL (7) control even more, to insure that clipping does not happenunexpectedly.NOTE: IF THE LEVEL CLIP (10) INDICATOR FLASHES MORE THAN OCCASIONALLY, YOUR
RECORDING WILL SUFFER FROM DIGITAL DISTORTION. WHEN IN DOUBT, IT IS ALWAYS EASIER
TO RECORD AT A LOWER VOLUME WITH THE iKEY AND
INCREASE THE VOLUME LEVEL AFTERWARDS USING EDITING SOFT WARE ON YOUR PC THAN IT IS
TO REMOVE THE DISTORTION FROM A POORLY MADE RECORDING.
5. Once you have set all of the necessary parameters, you may press the RECORD (8)button to start recording. When the record button is pressed, all of the progressLEDs will flash once to indicate that the unit has understood your command. Oncerecording has commenced, the iKEY will again display the percentage of space occu-pied on the connected target device. The LED indicating the space that the unit isapproaching will flash. If you wish to instead view the selected BIT RATE, you maypress the SELECTOR (9) button to toggle between space occupied and BIT RATE. Whenyou wish to stop recording, press the RECORD (8) button again. Immediately afterpressing the RECORD (8) button to stop the recording, the flashing LED indicatingthe space occupied will turn solid, indicating the end of recording. After the iKEYhas finished all recording operations and has closed the file, all of the progress LEDswill flash once to indicate that the unit is ready for the next command.NOTE: IF YOU ARE RECORDING TO AN iPod® WITH A LARGE AMOUNT OF SONGS IN THE
reset
<6>

LIBRARY, YOU MAY NOTICE A DELAY WHEN STARTING AND STOPPING THE RECORDING PROCESS
WITH THE iKEY. THIS IS PERFECTLY NORMAL, AND IS A RESULT OF THE iKEY PREPARING THE
FILE SO THAT IT MAY BE PLAYED BACK USING THE iPod®. FOR MORE DETAILS ON USING THE
iKEY WITH AN iPod®, SEE THE SECTION ENTITLED “iPod® OPERATION NOTES”.6. If you wish to begin recording again, you may press the RECORD (8) button, whichwill begin recording a new file. 7. If, during recording, your storage device approaches full capacity, all PROGRESS
LEDS will flash repeatedly. As a safeguard, the PROGRESS LEDS will begin to flashwhen there is approximately 5% remaining on the target device. When the targetdevice is full, all LEDs will blink 3 times, indicating that the unit has ceased record-ing. Then, the 100% full indicator will stay solid while the other PROGRESS LEDS willflash rapidly to further alert the user. After approximately 3 minutes, all of thePROGRESS LEDS will stay solid.8. To disconnect the target USB STORAGE DEVICE, press and hold the RECORD (8) but-ton until all of LED lights flash 3 times consecutively. This gracefully closes the con-nection with the target device so that it may be disconnected without any risk of cor-rupting the data that you have recorded to it. Once the disconnect sequence is done,the storage device must be removed and re-connected prior to recording again. Ifthis is not done, all of the LEDs will flash three (3) times indicating that the storagedevice must be ejected before continuing.NOTE: ALTHOUGH THE iKEY IS OUTFITTED WITH SOFT WARE TO PREVENT DATA CORRUPTION
IN THE EVENT OF ACCIDENTAL DISCONNECTION WITH THE TARGET DEVICE, IT IS ALWAYS BEST
TO PERFORM THIS PRECAUTIONARY MEASURE TO INSURE THAT THE INTEGRIT Y OF YOUR
RECORDED DATA IS MAINTAINED.
9. To playback or edit your recording, simply connect the target USB STORAGE DEVICE
to your PC or Macintosh computer and view the files on the device. The iKEY willname the files in numerical order according to the order in which they were record-ed. Also note that the filename reflects which file format it is in - MP3 or WAV. Simplyuse your favorite audio editing application (not included) to manipulate, trim, edit,and burn your creation to CD.
NOTE: FOR MORE DETAILS ON TRANSFERRING RECORDINGS FROM YOUR iPod®, SEE THE SEC-TION ENTITLED “iPod® OPERATION NOTES”.
10. In the event that you are storing your recording to an iPod, you will be able to
instantly listen to your recording by locating the file under the ‘Songs’ list found onyour iPod’s menu. The filenames that are produced by the iKEY start with the word“iKEY”, and are then followed by the file format and the number sequence in whichthe recording was made.
NOTE: FOR MORE DETAILS ON USING THE iKEY WITH AN iPod®, SEE THE SECTION ENTI-TLED “iPod® OPERATION NOTES.”
KNOWN LIMITATIONS:
1. When recording to an iPod®, especially one with a large amount of songs in itslibrary, you may notice a delay when starting and stopping the recording process. Ifthere are a large amount (1,000+) of songs in your library, you will notice that ittakes approximately 5 seconds for the iKEY to begin recording from the time theRECORD (8) button is pressed. When the RECORD (8) button is pressed again (to stopthe recording), the iKEY may take approximately 15 seconds to close the file. This isperfectly normal, and is a result of the iKEY preparing the file so that it may beplayed back using the iPod®. This performance can be improved by either record-ing to an iPod® that has a smaller library of songs, or by defragmenting the iPod®itself.
2. If you are recording to a USB hard drive or to a hard-drive based MP3 player (suchas an iPod®), skipping or audio glitches may be caused by fragmented files. For bestperformance, make sure that your unit has been defragmented before recording.
3. When attempting to record to an MP3 player with internal storage, keep in mindthat the iKEY will only be able to access those devices which are plug-and-play andrequire no additional drivers. Units that require proprietary software to access thefiles stored on the device are not supported. The vast majority of USB mass storagedevices are able to operate without additional driver software and are therefore com-patible with the iKEY.
iPod® OPERATION NOTES:
1. When connecting your iPod® to your PC or Macintosh computer, it is imperativethat you specify, in iTunes®, that you wish to ‘Manually manage songs andplaylists.’ If your iTunes® is set to automatically update, the recordings that were
<7>

made using the iKEY WILL BE DELETED by iTunes® upon connection to your com-puter. This option can be found by dragging down the ‘Edit’ menu at the top of theiTunes® window, then by selecting ‘Preferences.’ Next, select the tab that reads‘iPod’, and then the tab that reads ‘Music’.
NOTE: THIS SETTING SHOULD BE CHANGED PRIOR TO MAKING ANY RECORDINGS WITH THE
iKEY TO INSURE THAT THE FIRST RECORDINGS YOU MAKE WITH THE iKEY ARE NOT DELETED.
2. Before you record to an iPod®, the unit must be initialized by the iTunes® soft-ware. You must also use iTunes® to put at least one song on your iPod® beforemaking a recording with the iKEY. This only applies to brand unused or reformat-ted iPods - if you have already used your iPod® with the iTunes® software to man-age your music, then you can skip this step.
3. When the iPod® is connected to the iKEY, the display on the iPod® will read “DoNot Disconnect.” This indicates that there is data being sent to the iPod®.
4. To disconnect the iPod®, press and hold the RECORD (8) button until all of theLED lights flash 3 times consecutively. Wait until the iPod®’s display no longer reads“Do Not Disconnect.”
5. If you wish to play back your recordings directly from your iPod®, you will beable to find the iKEY’s recordings under the ‘Songs’ folder, at the very end of thelist.
6. In order to retrieve your recordings from your iPod® for editing, you must firstfollow the directions listed below. The iKEY’s files are placed in a hidden directoryon the iPod®, and the directory must be un-hidden to access the files. Keep in mindthat Mac and PC formatted iPods use different file systems, and are not interopera-ble
WINDOWS XP (PC) DIRECTIONS:
1. After connecting your iPod®, navigate to ‘My Computer’ (found under the startmenu), and double click on your iPod®, which should appear under ‘Devices withRemovable Storage.’
2. Once you are viewing the iPod, go to ‘Tools’, then to ‘Folder Options.’
3. Click on the tab labeled ‘View,’ and select the radio button below that reads‘Show hidden files and folders.” Once you have clicked ‘OK’, you will see a fold-
er appear with the name ‘iPod_Control.’
4. Open the ‘iPod_Control’ directory, then the ‘Music’ directory, then right clickon the directory (usually at the very bottom), labeled ‘iKEY’, and select ‘CreateShortcut.’ Drag this shortcut to your Desktop.
5. Once you have moved the shortcut to your Desktop (or wherever you prefer it),again go to ‘Tools’, then to ‘Folder Options.’
6. Again click on the tab labeled ‘View,’ and select the radio button below that reads‘Do not show hidden files and folders.” Once you have clicked ‘OK’, you will nolonger see the hidden files .
7. Once you have completed this procedure, the files recorded from your iKEY willbe accessible by opening the shortcut you have created and placed on yourDesktop. Although you are free to delete files from this folder, it is advisable to useiTunes® to manage the library on your iPod®.
NOTE: ONCE YOU UNPLUG THE iPod® YOUR PC, THE SHORTCUT WILL NO LONGER BE
ACCESSIBLE.
OS X (MACINTOSH) DIRECTIONS:
1. After connecting your iPod®, navigate to ‘Macintosh HD (found on your desk-top), and open ‘Applications’, then ‘Utilities’, then load the application called‘Terminal’. This will bring you to a text-based prompt.
2. Type the following string, exactly as you see it below:
defaults write com.apple.finder AppleShowAllFiles TRUE (enter key)
killall finder (enter key)
Keep this window open, as you will need to return here in step #6.
3. Next, go back to your desktop and open the ‘iPod_Control’ directory, then the‘Music’ directory, then click on the directory (usually at the very bottom), labeled‘iKEY’.
4. At the top of the screen, pull down the ‘Action‘ menu (the icon looks like asprocket) and select ‘Make Alias.’ Drag this shortcut to your Desktop.
<8>

5. Drag the ‘iKEY Alias’ to your Desktop.
6. Once you have moved the Alias to your Desktop (or wherever you prefer it),return to the ‘Terminal’ application and type the following string, exactly as you seeit below:
defaults write com.apple.finder AppleShowAllFiles FALSE (enter key)
killall finder (enter key)
Once you have done this procedure, you will no longer see the hidden files.
7. Once you have completed this procedure, the files recorded from your iKEY willbe accessible by opening the alias you have created and placed on your Desktop.Although you are free to delete files from this folder, it is advisable to use iTunes®to manage the library on your iPod®.
NOTE: ONCE YOU UNPLUG THE iPod® YOUR PC, THE SHORTCUT WILL NO LONGER BE
ACCESSIBLE.
SPECIFICATIONS:
Sampling Rate:......................................................................................44.1kHz, 16 Bit
Dynamic Range: ...................................................................................................98 dB
THD+N:..............................................................................................................91 dB
Freq Response:.......................................................................................20Hz – 20KHz
Power Source..................................................................4 ‘AA’ batteries (not included)
..................................................................................................9V 500mA DC adapter
Recording time on battery power.......................................Approximately 4 to 5 hours
...........................................(depending on storage device used and type of batteries)
AC Voltage Requirements............................................120 VAC 60Hz or 230 VAC 50Hz
iPod® and iTunes® are registered trademarks of Apple Computer, Inc.
*The stated warranty does not affect statutory local warranties
NOTES:
________________________________________________________________________________________________________________________________________________________________________________________________________________________________________________________________________________________________________________________________________________________________________________________________________________________________________________________________________________________________________________________________________________________________________________________________________________________________________________________________________________________________________________________________________________________________________________________________________________________________________________________________________________________________________________________________________________________________________________________________________________________________________________________________________________________________________________________________________________________________________________________________________________________________________________________________________________________________________________________________________________________________________________________________________________________________________________________________________________________________________________________________________________________________________________________________________________________________________________________________________________________________________________________________________________________________________________________________________________________________________________________________________________________________________________________________________________________________________________________________________________________________________________________________________________________________________________________________________________________________________________________________________________________________________________________________________________________________________________________________________________________________________________________________________________________________________________________________________________________________________________________________________________________________________________________________________________________________________________________________________________________________________________________________________________________________________________________________________________________________________________________________________________________________________________________________________________________________________________________________________________________________________________________________________________________________________________________________________________________________________________________________________________________________________________________________________________________________________________________________________________________________________
<9>
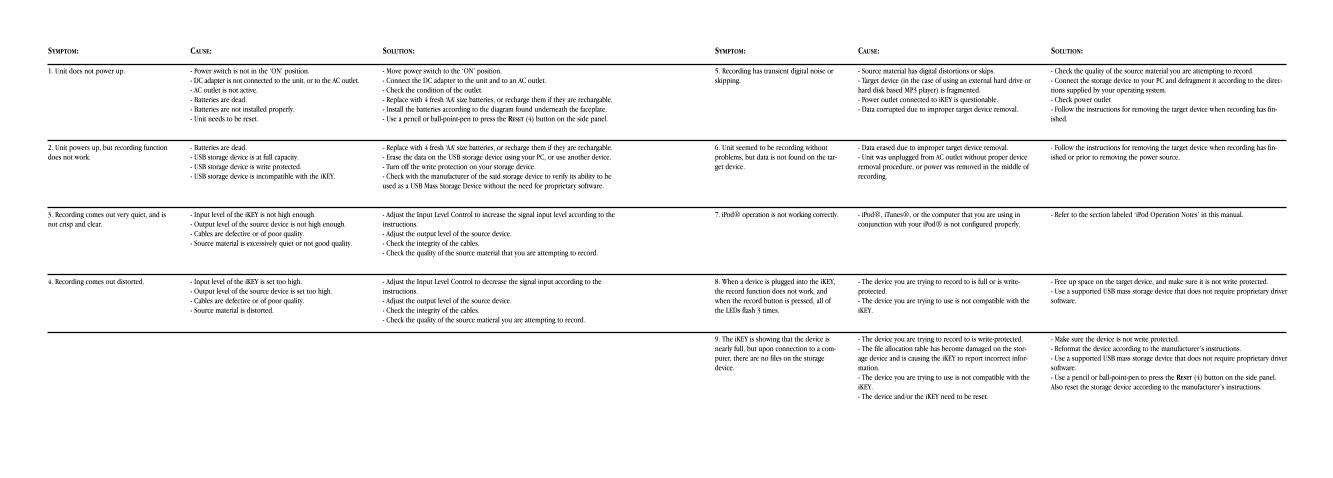
SYMPTOM:
1. Unit does not power up.
2. Unit powers up, but recording functiondoes not work.
3. Recording comes out very quiet, and isnot crisp and clear.
4. Recording comes out distorted.
SYMPTOM:
5. Recording has transient digital noise orskipping.
6. Unit seemed to be recording withoutproblems, but data is not found on the tar-get device.
7. iPod® operation is not working correctly.
8. When a device is plugged into the iKEY,the record function does not work, andwhen the record button is pressed, all ofthe LEDs flash 3 times.
9. The iKEY is showing that the device isnearly full, but upon connection to a com-puter, there are no files on the storagedevice.
CAUSE:
- Power switch is not in the ‘ON’ position.- DC adapter is not connected to the unit, or to the AC outlet.- AC outlet is not active.- Batteries are dead.- Batteries are not installed properly.- Unit needs to be reset.
- Batteries are dead.- USB storage device is at full capacity.- USB storage device is write protected.- USB storage device is incompatible with the iKEY.
- Input level of the iKEY is not high enough. - Output level of the source device is not high enough.- Cables are defective or of poor quality.- Source material is excessively quiet or not good quality.
- Input level of the iKEY is set too high.- Output level of the source device is set too high.- Cables are defective or of poor quality.- Source material is distorted.
CAUSE:
- Source material has digital distortions or skips.- Target device (in the case of using an external hard drive orhard disk based MP3 player) is fragmented.- Power outlet connected to iKEY is questionable.- Data corrupted due to improper target device removal.
- Data erased due to improper target device removal.- Unit was unplugged from AC outlet without proper deviceremoval procedure, or power was removed in the middle ofrecording.
- iPod®, iTunes®, or the computer that you are using inconjunction with your iPod® is not configured properly.
- The device you are trying to record to is full or is write-protected.- The device you are trying to use is not compatible with theiKEY.
- The device you are trying to record to is write-protected.- The file allocation table has become damaged on the stor-age device and is causing the iKEY to report incorrect infor-mation.- The device you are trying to use is not compatible with theiKEY. - The device and/or the iKEY need to be reset.
SOLUTION:
- Move power switch to the ‘ON’ position.- Connect the DC adapter to the unit and to an AC outlet.- Check the condition of the outlet.- Replace with 4 fresh ‘AA’ size batteries, or recharge them if they are rechargable.- Install the batteries according to the diagram found underneath the faceplate.- Use a pencil or ball-point-pen to press the RESET (4) button on the side panel.
- Replace with 4 fresh ‘AA’ size batteries, or recharge them if they are rechargable.- Erase the data on the USB storage device using your PC, or use another device.- Turn off the write protection on your storage device.- Check with the manufacturer of the said storage device to verify its ability to beused as a USB Mass Storage Device without the need for proprietary software.
- Adjust the Input Level Control to increase the signal input level according to theinstructions.- Adjust the output level of the source device.- Check the integrity of the cables. - Check the quality of the source material that you are attempting to record.
- Adjust the Input Level Control to decrease the signal input according to theinstructions.- Adjust the output level of the source device.- Check the integrity of the cables.- Check the quality of the source matieral you are attempting to record.
SOLUTION:
- Check the quality of the source material you are attempting to record. - Connect the storage device to your PC and defragment it according to the direc-tions supplied by your operating system.- Check power outlet- Follow the instructions for removing the target device when recording has fin-ished.
- Follow the instructions for removing the target device when recording has fin-ished or prior to removing the power source.
- Refer to the section labeled ‘iPod Operation Notes’ in this manual.
- Free up space on the target device, and make sure it is not write protected.- Use a supported USB mass storage device that does not require proprietary driversoftware.
- Make sure the device is not write protected.- Reformat the device according to the manufacturer’s instructions.- Use a supported USB mass storage device that does not require proprietary driversoftware.- Use a pencil or ball-point-pen to press the RESET (4) button on the side panel.Also reset the storage device according to the manufacturer’s instructions.
VORSICHT: Dieses Produkt erfüllt die FCC-Regeln, wenn Sie zum Anschlussabgeschirmte Kabel und Stecker verwenden, um es mit anderen Geräten zuverbinden. Auch um elektromagnetische Störungen anderer elektrischerGeräte wie Radios oder Fernseher zu vermeiden, benutzen Sie abgeschirmteKabel und Stecker für die Verbindungen.
Das Ausrufezeichen im gleichseitigen Dreieck weißt Sie in derBedienungsanleitung auf wichtige Bedienungsanweisungen und Wartungs-/Serviceanweisungen hin.
Das Blitzsymbol im gleichseitigen Dreieck dient dazu, den Benutzer vorgefährlichen Spannungen an nicht isolierten Stellen im Gehäuse zu warnen,die so groß sind, dass Sie eine Gefahr für den Benutzer darstellen.ANWEISUNGEN LESEN: Lesen Sie alle Sicherheits- undBedienungsanweisungen, bevor Sie mit dem Produkt arbeiten.AUFBEWAHRUNGSHINWEIS: Bewahren Sie alle Sicherheits- undBedienungsanweisungen gut auf.WARNHINWEISE: Alle Warnhinweise für das Produkt und dieBedienungsanweisungen müssen genau eingehalten werden.ANWEISUNGEN BEFOLGEN: Alle Anweisungen zum Betrieb des Produktssollten befolgt werden.REINIGUNG: Das Produkt sollte nur mit einem Polier- oder einem weichentrockenen Tuch gereinigt werden. Benutzen Sie dazu niemals Möbelwachs,Benzine, Insektenmittel oder andere flüchtige Reinigungsmittel, denn Sie kön-nten zur Korrosion des Gehäuses führen.ERWEITERUNGEN: Benutzen Sie keine Erweiterungen, die nicht vomHersteller empfohlen sind, da sie zu Risiken führen könnten.WASSER&FEUCHTIGKEIT: Benutzen Sie dieses Produkt nicht in der Nähevon Wasser, z. B. in der Nähe einer Badewanne, einer Waschschüssel, einesKüchenspülbeckens eines Waschbeckens, in einem feuchten Keller, einemSchwimmbecken oder an ähnlichen Orten.ZUBEHÖR: Stellen Sie das Produkt nicht auf eine wackelige und labileUnterlage. Das Produkt könnte herunterfallen und dabei Kinder oderErwachsene verletzen, wie auch selber beschädigt werden. Stellen Sie dasProdukt nur auf vom Hersteller empfohlene oder verkaufte Unterlagen. JedeBefestigung und Montage des Produkts sollte nach den Anweisungen des
Herstellers ausgeführt werden. Nutzen Sie dazu ein vom Hersteller emp-fohlenes Montageset.MOBILE UNTERLAGEN: Bewegen Sie eine Kombination aus dem Produktund einer mobilen Unterlage mit Vorsicht. Schnelles Anhalten, zu viel Schuboder unebene Böden können dazu führen, dass sich Produkt und mobileUnterlage überschlagen (SIEHE BILD A).BELÜFTUNG: Schlitze und Öffnungen im Gehäuse sind für die Belüftungvorgesehen. Sie stellen den zuverlässigen Betrieb des Produkts sicher undschützen es vor Überhitzung. Diese Öffnungen dürfen nicht verschlossen,blockiert oder bedeckt werden. Stellen Sie deswegen das Produkt niemals aufein Bett, ein Sofa, einen Teppich oder Stellen mit ähnlicher Oberfläche. WennSie dieses Produkt in einer festen Installation wie z. B. in einem Regal odereinem Rack einbauen, sorgen Sie für ausreichende Belüftung oder sorgen Siedafür, dass die Bestimmungen des Herstellers genau eingehalten werden.STROMANSCHLUSS: Dieses Produkt darf nur mit dem auf dem Gerätangegebenen Strom betrieben werden. Wenn Sie sich nicht sicher sind, welcheStromart Sie bei sich zuhause haben, fragen Sie den Verkäufer des Geräts oderIhren Stromversorger.AUFSTELLUNGSORT: Stellen Sie das Gerät an einem festen Ort auf.ZEITEN DES NICHTGEBRAUCHS: Ziehen Sie das Stromkabel aus dem Gerätheraus, wenn Sie es für eine längere Zeit nicht gebrauchen.ERDUNG ODER POLUNG:
- Wenn dieses Produkt mit einem gepolten Wechselstromstecker (EinStecker mit einem Kontakt mehr als andere Stecker) ausgestattet ist, passtdieser nur in einer bestimmten Richtung in die Steckdose und ist ein beson-deres Sicherheitsmerkmal. Sollten Sie den Stecker nicht komplett in dieSteckdose stecken können, versuchen Sie ihn andersherum einzustecken.Sollte der Stecker auch dann noch nicht in die Steckdose passen, beauftragenSie einen Elektriker, um diese veraltete Steckdose auszutauschen.
- Wenn dieses Produkt mit einem geerdeten dreipoligen Stecker ausgestat-tet ist, hat der Stecker einen dritten (Erdungs-)Kontakt und passt nur in eineSteckdose mit entsprechender Erdung. Auch das ist ein Sicherheitsmerkmal.Sollte der Stecker nicht in die Steckdose passen, beauftragen Sie einenElektriker, um diese veraltete Steckdose auszutauschen.SCHUTZ DES STROMKABELS: Stromkabel sollten so verlegt werden, dassman nicht auf sie treten kann noch dass sie von darauf stehenden oder gegensie stoßenden Gegenständen gequetscht werden. Achten Sie besonders aufKanten, Sicherung, Stecker und Buchsen.AUSSENANTENNENERDUNG: Wenn Sie eine Außenantenne oder ein Radio-/Fernsehkabelsignal an das Produkt anschließen, achten Sie darauf, dass dieAntenne oder das Kabel geerdet sind, um dafür zu sorgen, dass Überspannun-gen und elektrostatische Aufladungen nicht auftreten können. Im Artikel 810des National Electrical Code, ANSI/NFPA 70, finden Sie Informationen über dierichtige Erdung des Antennenmasts und weitere Informationen zu diesemThema. (SIEHE AUCH ABBILDUNG B).GEWITTER: Trennen Sie das Produkt während eines Gewitters oder wenn esunbeaufsichtigt ist oder wenn es für eine lange Zeit nicht benutzt wird durchZiehen des Stromkabels vom Stromnetz. Trennen Sie auch die Verbindung zueiner Antenne oder Radio-/Fernsehkabeln. Dadurch vermeiden SieBeschädigungen des Produkts durch Blitze oder Überspannungen.STROM- UND ÜBERLANDLEITUNGEN: Stellen Sie eine Außenantenne nichtin der Nähe von Überlandleitungen, elektrischen Licht- oder Stromkreisenoder an Stellen, wo sie in eine solche Leitung fallen könnte auf. Wenn Sie eineAußenantenne aufstellen, achten Sie besonders darauf, dass Sie auf keinen Fallirgendwelche Stromleitungen berührt. Das kann zu gefährlichen
Auswirkungen führen.ÜBERLASTUNG: Überlasten Sie keine Steckdosen, Verlängerungskabel oderSicherungen. Das kann zu Bränden oder elektrischen Schlägen führen.EINDRINGEN VON GEGENSTÄNDEN ODER FLÜSSIGKEIT: Führen Sieniemals irgendwelche Gegenstände durch Öffnungen in das Produkt ein. Siekönnten mit Strom führenden Stellen in Verbindung kommen oderKurzschlüsse verursachen, die zu Bränden oder elektrischen Schlägen führenkönnen. Gießen Sie niemals irgendwelche Flüssigkeiten auf oder in dasProdukt.SERVICE: Versuchen Sie nicht, das Produkt selber zu reparieren. Durch dasÖffnen des Gehäuses oder Entfernen von Schrauben können Sie mitgefährlichen Spannungen oder anderen Risiken in Kontakt kommen.Beauftragen Sie im Reparaturfall nur qualifiziertes Servicepersonal.WANN SERVICE NÖTIG IST: Unter den folgenden Bedingungen ziehen Sieauf jeden Fall das Stromkabel aus der Steckdose und beauftragen Sie für eineReparatur nur qualifiziertes Servicepersonal:
- Wenn das Stromkabel defekt ist.- Wenn Flüssigkeit auf oder in das Produkt gelaufen ist oder Gegenstände in
das Produkt gefallen sind.- Wenn das Produkt Regen oder Wasser ausgesetzt war.- Wenn das Produkt trotz Befolgen der Bedienungsanweisungen nicht nor-
mal arbeitet. Stellen Sie dabei das Produkt nur nach den Anweisungen derBedienungsanleitung ein, andere Einstellungen können das Produkt beschädi-gen und den aufwändigen Einsatz von Technikern für die Wiederherstellungerfordern.
- Wenn das Produkt hingefallen oder auf andere Art und Weise beschädigtist.
- Wenn das Produkt eine eindeutige Veränderung im Betrieb zeigt.ERSATZTEILE: Wenn Ihr Produkt Ersatzteile benötigt, achten Sie darauf, dassder Servicetechniker nur vom Hersteller erlaubte Ersatzteile oder Ersatzteile,die die gleichen Eigenschaften wie die originalen Teile aufweisen, einsetzt.Falsche Ersatzteile können zu Bränden, elektrischen Schlägen oder anderenRisiken führen.SICHERHEITSTEST: Bevor der Service oder eine Reparatur für diesesProdukt beendet sind, beauftragen Sie den Servicetechniker, einen Servicetestdurchzuführen, um sicher zu stellen, dass das Produkt einwandfrei funktion-iert.WAND- ODER DECKENMONTAGE: Das Produkt sollte nicht an einer Wandoder der Decke montiert werden.HITZE: Stellen Sie das Produkt nicht in die Nähe von Wärmequellen wieRadiatoren, Wärmespeichern, Öfen oder anderen Produkten (auchVerstärker), die Hitze erzeugen.VERWERTEN SIE WIEDER: Dieses Produkt sollte nicht als Haushaltsmüllentsorgt werden. Entsorgen Sie das Produkt im Bedarfsfall bei einer zuständi-gen Entsorgungsstelle, die das Recycling der elektrischen und elektronischenBauteile übernimmt. Wenn Sie das Produkt dem gemäß entsorgen, schützenSie die Umwelt und die menschliche Gesundheit. Bei nicht sachgemäßerEntsorgung gefährden Sie die Umwelt und die menschliche Gesundheit. DasRecycling verschiedener Materialien hilft, die Natur und Ihre Ressourcen zuschonen. Für nähere Informationen bezüglich der Entsorgung dieses Produktsnehmen Sie Kontakt auf mit Ihrer lokalen Stadtverwaltung, dem zuständigenEntsorgungsunternehmen oder dem Händler, bei dem Sie das Produkt gekaufthaben.
A C H T U N G !BITTE UNBEDINGT VOR BENUTZUNG DES GERÄTS LESEN!WICHTIGE HINWEISE UND SICHERHEITSANWEISUNGEN
GEFAHR EINES ELEKTRISCHEN SCHLAGS. GERÄT NICHT ÖFFNEN!
I28 I92 ERRORWAV256
PROGRESS
level clip
60% I00%80% LOW BATTERY40%20%REC sel
line inline in
r l
level
minmax
DC in(chargeable)
power
reset USb keyon off
1
2**
3 4 56
7
8 9
10
11
12
*USB Flash Driveor Mass Storage Device *
*Nicht im Lieferumfang enthalten. Die dargestellten Verschaltungen dienen nur der Demonstration. Sie können auch andere Varianten wählen. **Das gezeigte Stromkabel und die Steckdose entsprechen amerikanischen Standards. Für andere Länder liegt ein passender Adapter bei.
Teileliste:iKEY Transportabler USB RekorderNetzteilY-Kabel Cinch-Miniklinke
RändelschraubenAnleitungGarantiekarte
1. Netzbuchse2. Netzteil3. Netzschalter4. Reset-Knopf
USB-Speichermedium*
9. Sel-Taste10. Level-Clip-LED11. Kompressionrate/ Progress-LED12. Fehler-Anzeige / Low-Battery-LED
Audioquelle(Mixer, Turntable mit Vorverstärker, jedes Gerät
mit einem Line-Ausgang
5. USB-Anschluss6. Cinch-Line-In7. Lautstärkeregler8. Rec-Taste

iKEY Tragbarer USB-REKORDER
EINLEITUNG:
Wir beglückwünschen Sie zum Kauf eines Tragbaren GEMINI iKEYUSB-REKORDERS. Dieses State-of-the-art-Aufnahmegerät spiegelt denaktuellsten Stand der Technik wieder und ist mit einer einjährigen Garantieausgestattet*. Lesen Sie diese Bedienungsanleitung vor der Inbetriebnahmedes Geräts sorgfältig durch.
AUSSTATTUNG:
- Kompatibel mit iPod®- USB Port (zum direkten Anschluss von unterstützten USB-Speichermedien)- Kompatibel mit USB 2.0/1.1/1.0-Geräten- Nimmt Audio im unkomprimierten WAV-Format oder im MP3-Formatmit wählbarer Kompressionsrate (bis zu 256 kbps) auf- Vergoldete Cinch-Eingänge- LED-Anzeige für verbleibenden Speicherplatz auf dem angeschlossenenSpeichermedium- Batteriebetrieben mit Warnanzeige für leere Batterien- Eingang für Netzteil zum Laden von wiederaufladbaren Batterien- Optische Übersteuerungsanzeige- Einstellbare Aufnahmelautstärke - Reset-Taste- Netzteil im Lieferumfang enthalten- Benötigt 4 AA Batterien (nicht im Lieferumfang enthalten)
WARNHINWEISE:
1. Lesen Sie alle Anweisungen der Bedienungsanleitung aufmerksam durch,bevor Sie den iKEY in Betrieb nehmen.2. Öffnen Sie das Gehäuse des Geräts auf keinen Fall, da die Gefahr eineselektrischen Schlages besteht. Es gibt keine vom Benutzer auszutauschen-den Teile im Inneren des iKEY. Bitte benachrichtigen Sie den GEMINI
SERVICE oder einen autorisierten Händler, um mit einem qualifiziertenGEMINI-SOUND-PRODUCTS-Techniker zu sprechen.3. Stellen Sie sicher, dass der iKEY gut belüftet wird, um eventuelleHitzeschäden zu vermeiden.4. SETZEN SIE DEN IKEY UNTER KEINEN UMSTÄNDEN REGEN ODER
FEUCHTIGKEIT AUS.5. BENUTZEN SIE KEINEN SPRÜHREINIGER ODER SCHMIERMITTEL FÜR
DIE REGLER ODER DIE SCHALTER.
SCHNELLSTART-ANLEITUNG:
1. Nachdem Sie Batterien in den iKEY eingelegt oder ihn mit demNETZTEIL (2) verbunden haben, schalten Sie ihn mit dem NETZSCHALTER
(3) EIN.2. Verbinden Sie Ihr USB-Speichermedium mit dem USB- ANSCHLUSS (5).Nachdem das Speichermedium initialisiert ist, blinken die PROGRESS-LEDS
(11) sechs Mal, um anzuzeigen, wie viel Speicherplatz auf dem angeschlosse-nen Speichermedium vorhanden ist.3. Schließen Sie nun ein Audiosignal mit Line-Pegel an die LINE-IN-CINCH-BUCHSEN (6) an. Stellen Sie die AUFNAHMELAUTSTÄRKE (7) so ein, dass dieÜBERSTEUERUNGS-LED (10) nicht leuchtet.4. Stellen Sie mit der SEL-TASTE (9) die gewünschte BIT RATE ein, mit derSie aufnehmen wollen. Sie können auch das unkomprimierte WAV-Formatauswählen.5. Drücken Sie REC-TASTE (8), um die Aufnahme zu starten und durcherneutes Drücken wieder zu stoppen. Jedes Mal, wenn Sie die REC-TASTE (8)drücken, leuchten alle Progress-LEDs auf, um zu zeigen, dass der iKEY IhreBefehle verstanden hat.6. Wenn Sie Ihre Aufnahme beendet haben, drücken Sie die REC-TASTE (8)und halten Sie so lange gedrückt, bis alle LEDs drei Mal nacheinanderaufleuchten. Ist dies geschehen, können Sie das angeschlossene USB-Speichermedium vom iKEY trennen.ACHTUNG: WENN SIE PLANEN, AUF EIN GERÄT DER iPod®-SERIE
<14>

AUFZUNEHMEN, LESEN SIE VORHER UNBEDINGT DEN ABSCHNITT “iPod®BEDIENUNGSHINWEISE” !
EINLEGEN DER BATTERIEN:
1. Stellen Sie sicher, dass sich der NETZSCHALTER (3) in der AUS-Positionbefindet.2. Hinter der Aluminiumfrontplatte des iKEY befindet sich ein Batteriefachfür vier AA-Batterien, die das Gerät mit Energie versorgen. Um an dasBatteriefach zu gelangen, lösen Sie die vier Schrauben in den Ecken derFrontplatte. Wenn Sie das Batteriefach schneller und ohne Schraubendreheröffnen wollen, können Sie alternativ auch die vier mitgeliefertenRändelschrauben anstelle der Standardschrauben verwenden.3. Legen Sie die Batterien gemäß der Zeichnung im Inneren des Fachs in ihrePositionen. Achten Sie darauf, dass der PLUS (+)-Pol mit den PLUS-Anschlüssen und der MINUS (-)-Pol mit den MINUS-Anschlüssen verbun-den ist.4. Schließen Sie nun das Batteriefach mit der Frontplatte und ziehen Sie dieSchrauben vorsichtig an, ohne sie zu überdrehen.ACHTUNG: GEHT DIE BATTERIESPANNUNG ZUR NEIGE, BEGINNT DIE
LOW-BATTERY-LED AUF DER RECHTEN SEITE DER FRONTPLATTE DES
IKEY ZU BLINKEN. BEENDEN SIE IHRE AUFNAHMEN UND UNTER-BRECHEN SIE ALLE VERBINDUNGEN ZU ANGESCHLOSSENEN
SPEICHERMEDIEN. OBWOHL DER iKEY IN DER LAGE IST, DATEN ZU
SICHERN, BEVOR DIE BATTERIESPANNUNG ZU ENDE IST, SOLLTEN SIE
EINE AUFNAHME DURCH DRÜCKEN DER REC-TASTE (8) BEENDEN, WENN
DIE LOW-BATTERY-LED ZUM ERSTEN MAL AUFLEUCHTET.
5. Wenn Sie wiederaufladbare Batterien im iKEY aufladen möchten,verbinden Sie das eine Ende des NETZTEILS (2) mit einer Steckdose.Verbinden Sie das andere Ende des NETZTEILS (2) mit der NETZBUCHSE
(1). Jetzt wird der iKEY mit Strom versorgt und im iKEY befindliche wieder-aufladbare Batterien werden aufgeladen. Der NETZSCHALTER (3) muss sichdazu in der EIN-Position befinden.ACHTUNG: VERSUCHEN SIE NICHT, NORMALE NICHT WIEDERAUFLAD-
BARE BATTERIEN MIT DEM IKEY AUFZULADEN, DA DIES ZU
BESCHÄDIGUNGEN DURCH AUSLAUFENDE BATTERIEN, FEUER ODER
EXPLOSIONEN FÜHREN KANN. DA ES SEHR VIELE UNTERSCHIEDLICHE
BATTERIETYPEN MIT UNTERSCHIEDLICHEN AUFLADEZEITEN GIBT, SOLL-TEN SIE DIESE VOR DER AUFLADUNG MIT DEM IKEY HERAUSFINDEN. FÜR
OPTIMALE ERGEBNISSE EMPFEHLEN WIR DIE VERWENDUNG VON WIEDER-AUFLADBAREN NiMH-Batterien. WOLLEN SIE DEN IKEY FÜR VIELE
STUNDEN MIT DEM NETZTEIL BETREIBEN, SOLLTEN SIE NICHT WIEDER-AUFLADBARE BATTERIEN AUS DEM BATTERIEFACH ENTFERNEN, UM
BESCHÄDIGUNGEN ZU VERMEIDEN.
ANSCHLIEßEN:
1. Stellen Sie sicher, dass sich der NETZSCHALTER (3) in der AUS-Position befindet, bevor Sie das Netzteil mit einer Steckdose
verbinden.2. Verbinden Sie das eine Ende des NETZTEILS (2) mit einerSteckdose. Verbinden Sie das andere Ende des NETZTEILS (2) mit derNETZBUCHSE, um den iKEY mit Strom zu versorgen oder imBatteriefach befindliche wiederaufladbare Batterien aufzuladen.
Alternativ können Sie den iKEY auch mit 4 Alkaline AA Batterien betreiben.3. An die LINE-IN-CINCH-BUCHSEN (6) schließen Sie einbeliebiges Audiosignal mit Line-Pegel an, um mit dem iKEYaufnehmen zu können. Wenn Sie den iKEY mit einem Mixer
verbinden, nutzen Sie am Besten des REC- oder TAPE-Ausgang.4. Der USB-ANSCHLUSS (5) ist KOMPATIBEL MIT USB 2.0/1.1/1.0und dient zur Verbindung mit einem USB-Speichermedium IhrerWahl (nicht im Lieferumfang enthalten). Als Speichermedium könnenSie USB-Flash-Speicher, externe USB-Festplatten oder die meisten
populären MP3-Player mit USB-Anschluss verwenden. Auf ein solchesSpeichermedium werden die Audiosignale bei einer Aufnahme gespeichert.
poweronoff
DC in(chargeable)
line in
r l
USb key
REC sel
iKey
<15>

FUNKTIONEN:
1. NETZSCHALTER: Nachdem Sie die Batterien in den iKEY eingelegt habenoder er an das Stromnetz angeschlossen ist, schalten Sie den NETZSCHALTER
(3) in die EIN-Position. Sie können an den nun erleuchteten roten LEDserkennen, dass der iKEY jetzt eingeschaltet ist. Indem Sie denNETZSCHALTER (3) in die AUS-Position bewegen, schalten Sie den iKEY aus.
2. LAUTSTÄRKEREGLER: Mit dem LAUTSTÄRKEREGLER (7)stellen Sie die richtige Aufnahmelautstärke für Ihre Aufnahmen
ein. Die LEVEL-CLIP-LED (10) leuchtet konstant, wenn kein Signal anliegtoder dieses einen zu niedrigen Pegel hat. Die LEVEL-CLIP-LED (10) blinkt,wenn das Signal zu laut ist. Hat das Signal die richtige Lautstärke, leuchtet dieLEVEL-CLIP-LED (10) nicht auf.
3. SEL-TASTE: Drücken Sie die SEL-TASTE (9) um das gewünschteAufnahmeformat einzustellen. Sie können im komprimierten MP3-Format mit DREI UNTERSCHIEDLICHEN BIT-RATEN aufnehmen, umSpeicherplatz auf Ihrem angeschlossenen USB-Speichermedium zu
sparen oder Sie können im unkomprimierten WAV-Format aufnehmen.Wenn Sie im MP3-Format aufnehmen, stehen Ihnen die Bit Raten (oderauch Kompressionsraten) 128 kbps, 192 kbps oder 256 kbps (Kilobit proSekunde) zur Auswahl.ACHTUNG: WENN SIE IM WAV-FORMAT AUFNEHMEN, ERHALTEN SIE
DIE BESTMÖGLICHE QUALITÄT, DIE MIT DER iKEY LIEFERN KANN. IN
DIESEM FORMAT FALLEN PRO MINUTE ETWA 10 MB DATEN AN, DIE AUF
DAS ANGESCHLOSSENE USB-SPEICHERMEDIUM GESCHRIEBEN WERDEN
MÜSSEN. STELLEN SIE BEI AUFNAHMEN IM WAV-FORMAT SICHER, DASS
NOCH GENÜGEND FREIER SPEICHERPLATZ AUF DEM ANGESCHLOSSENEN
USB-SPEICHERMEDIUM VORHANDEN IST.
4. REC-TASTE: Mit der REC-TASTE (8) beginnen und beenden SieIhre Aufnahmen. Jedes Mal, wenn eine Aufnahme gestartet wird,schreibt der iKEY eine neue Datei auf das angeschlossene USB-Speichermedium. Die Dateien werden entsprechend der
Aufnahmereihenfolge fortlaufend nummeriert.5. LEDS: Die LEDS dienen drei Zwecken:
- Die LEVEL-CLIP-LED (10) blinkt, um Sie zu warnen, wenn dasAudiosignal einen zu hohen Pegel hat und dadurch keine verzerrungsfreiendigitalen Aufnahmen mehr möglich sind. Die LED leuchtet dauerhaft, wennder Pegel des Audiosignals zu niedrig ist oder kein Audiosignal an denEingängen ankommt.- Über den LEDs finden Sie die Bezeichnung der einzelnen BIT RATEN, dieIhnen bei Aufnahmen mit dem iKEY zur Verfügung stehen. Mit der SEL-TASTE (9) wählen Sie die gewünschte BIT RATE aus. Drücken Sie die SEL-TASTE sooft, bis die gewünschte LED unter der von Ihnen gewünschten BIT
RATE aufleuchtet.- Die Zahlen unterhalb der LEDs zeigen Ihnen an, wie viel Platz auf demangeschlossenen USB-Speichermedium schon verbraucht ist, indem dieentsprechende PROGRESS LED (11) über der jeweiligen Zahl aufleuchtet.Blinkt eine dieser LEDs, zeigt das an, dass der Füllgrad des angeschlossenenUSB-Speichermediums sich noch unterhalb des angezeigten Prozentwertesbefindet. Leuchtet die LED dauerhaft, ist der prozentuale Wert erreicht. Istder Speicherplatz auf dem angeschlossenen USB-Speichermedium fast kom-plett verbraucht, macht der iKEY Sie darauf aufmerksam, indem alle fünfLEDs so lange zu blinken beginnen, bis kein Speicherplatz mehr frei ist.- Die LED am äußersten rechten Ende blinkt, wenn die Batteriespannungsich dem Ende zu neigt. Sie leuchtet dauerhaft auf, wenn ein Fehler deniKEY daran hindert, weiter aufzunehmen.
6. RESET-KNOPF: Mit dem RESET-KNOPF (4) können Sie den iKEYinitialisieren, falls ein Fehler in der Verbindung mit einem angeschlosse-
nen USB-Speichermedium aufgetreten ist oder der iKEY aus einem anderenGrund neu gestartet werden muss. Der RESET-KNOPF (4) ist versenkt einge-baut, da er normalerweise nie benutzt werden muss.
AUFNEHMEN:1. Nachdem Sie den iKEY mittels vier AA-Batterien oder dem NETZTEIL (2)
reset
level
minmax
sel
REC
I28 I92 ERRORWAV256
PROGRESS
level clip
60% I00%80% LOW BATTERY40%20%
<16>

mit Strom versorgt haben, schalten Sie den iKEY ein, indem Sie denNETZSCHALTER (3) auf die Position “Ein” bewegen. Die LEVEL-CLIP-LED(10) wird nun aufleuchten und damit anzeigen, dass noch kein Audiosignalanliegt.2. Verbinden Sie Ihr USB-SPEICHERMEDIUM (z. B. ein USB-Flash-Speicher,eine externe USB-Festplatte oder ein USB kompatibler MP3-Player) mit demUSB-EINGANG (5). Nach einigen Sekunden erkennt der iKEY das USB-SPEICHERMEDIUM und bereitet es durch Initialisieren auf den Betrieb vor.Während des Initialisierungsvorgangs kann es sein, dass die Aktivitätsleuchtean Ihrem USB-SPEICHERMEDIUM leuchtet. Ist die Initialisierung IhresUSB-SPEICHERMEDIUMS durch den iKEY erfolgreich abgeschlossen,blinken die LEDs am iKEY, die den belegten Speicherplatz anzeigen, sechsMal und informieren Sie über den verfügbaren Speicherplatz auf dem USB-SPEICHERMEDIUM.3. Nachdem die LED(s) wieder erloschen sind, können Sie mit der SEL-TASTE (9) das gewünschte Aufnahmeformat und die gewünschte BIT RATE
auswählen. Jedes Drücken der SEL-TASTE (9) schaltet zwischen den BIT
RATES 128 kbps, 192 kbps, 256 kbps und dem unkomprimierten WAV-FORMAT um. Wollen Sie überprüfen, wie viel Speicherplatz auf demangeschlossenen USB-Speichermedium schon belegt ist, können Sie die SEL-TASTE (9) für etwa 3-4 Sekunden gedrückt halten. Die LEDs zeigen Ihnennun so lange den Wert an, bis Sie die SEL-TASTE (9) wieder loslassen.4. Wenn Sie sich für ein Aufnahmeformat entschieden haben, müssen Sie dierichtige Aufnahmelautstärke einstellen. Dabei sollten Sie eine Einstellungfinden, die weder zu leise ist noch so laut, dass es zu Übersteuerungen undVerzerrungen kommt. Der einfachste Weg dahin ist als erstes dieAusgangslautstärke der Signalquelle, von der Sie aufnehmen möchten, so lautwie gewünscht einzustellen (sofern die Quelle eine Möglichkeit dazu bietet).Jetzt können Sie mit dem LAUTSTÄRKEREGLER (7) am iKEY dieAufnahmelautstärke so einstellen, dass es nicht zu Übersteuerungen kommt.Erhöhen Sie die Aufnahmelautstärke mit dem LAUTSTÄRKEREGLER (7) solange, bis die LEVEL-CLIP-LED (10) zu blinken beginnt. Jetzt drehen Sie dieAufnahmelautstärke vorsichtig mit dem LAUTSTÄRKEREGLER (7) soweitzurück, bis die LEVEL-CLIP-LED (10) nur noch ab und an kurz blinkt(höchstens alle 3 oder 4 Sekunden einmal kurz). Wenn Sie vermuten, dass die
Lautstärke Ihrer Audiosignalquelle sich unerwartet erhöhen könnte, solltenSie die Aufnahmelautstärke mit dem LAUTSTÄRKEREGLER (7) etwas mehrverringern, um etwaige Übersteuerungen zu vermeiden.ACHTUNG: WENN DIE LEVEL-CLIP-LED (10) HÄUFIGER BLINKT, WIRD
IHRE AUFNAHME DURCH DIGITALE VERZERRUNGEN UNBRAUCHBAR.SIND SIE SICH NICHT SICHER, WIE HOCH DIE ZU ERWARTENDEN
LAUTSTÄRKEN IHRER AUDIOSIGNALQUELLE WERDEN, NEHMEN SIE
LIEBER MIT EINER NIEDRIGEREN AUFNAHMELAUTSTÄRKE AUF DEN IKEYAUF UND ERHÖHEN DIE LAUTSTÄRKE IM NACHHINEIN AM COMPUTER MIT
EINER PASSENDEN EDITOR-SOFTWARE. DAS IST BEDEUTEND EINFACHER
UND BESSER ALS IM NACHHINEIN ZU VERSUCHEN, DIGITALE
VERZERRUNGEN AM PC MIT EINER SOFTWARE WIEDER ZU ENTFERNEN.5. Haben Sie alle benötigten Parameter eingestellt, können Sie die Aufnahmedurch Drücken der REC-TASTE (8) beginnen. Ist die Rec-Taste gedrückt,zeigt das Aufleuchten aller Progress-LEDs an, dass der iKEY Ihren Befehlverstanden und ausgeführt hat. Wenn die Aufnahme begonnen hat, zeigt deriKEY den auf dem angeschlossenen USB-Speichermedium verbrauchtenSpeicherplatz an. Die LED, die anzeigt, wie viel Speicherplatz desangeschlossenen Speichermediums belegt ist, blinkt. Wollen Sie anstelledessen lieber das ausgewählte Aufnahmeformat angezeigt bekommen, kön-nen Sie mit der SEL-TASTE (9) zwischen den beiden Anzeigemodi umschal-ten. Wollen Sie die Aufnahme beenden, drücken Sie erneut die REC-TASTE
(8). Die Aufnahme stoppt und die blinkende LED, die den benutztenSpeicherplatz anzeigt, leuchtet nun dauerhaft und zeigt das Ende derAufnahme an. Hat der iKEY alle Aufnahmevorgänge beendet und alle Datenabgespeichert, leuchten alle Progress-LEDs einmal auf und zeigen, dass deriKEY nun für neue Aufgaben bereit steht.ACHTUNG: WENN SIE AUF EINEN iPod® MIT EINER GROßEN ZAHL AN
SONGS IN DESSEN DATENBANK AUFNEHMEN WOLLEN, KANN ES ZU
LEICHTEN VERZÖGERUNGEN BEIM STARTEN UND STOPPEN DER
AUFNAHME KOMMEN. DAS IST VÖLLIG NORMAL UND LIEGT DARAN, DASS
DER iKEY DIE DATEN SO AUFBEREITET, DASS SIE VOM iPod® ABGESPIELT
WERDEN KÖNNEN. UM WEITERE EINZELHEITEN ZU DIESEM THEMA ZU
ERFAHREN, LESEN SIE DEN ABSCHNITT “iPod® BEDIENUNGSHIN-WEISE”.
<17>

6. Wollen Sie erneut eine Aufnahme starten, drücken Sie einfach die REC-TASTE (8) und der iKEY beginnt mit der Aufnahme einer neuen Datei.7. Sollte das an den iKEY angeschlossene USB-Speichermedium währendeiner Aufnahme das Ende seiner Aufnahmekapazität erreichen, beginnen diePROGRESS-LEDS zu blinken. Die PROGRESS-LEDS beginnen ausSicherheitsgründen schon zu blinken, wenn noch 5 % derAufnahmekapazität auf dem angeschlossenen USB-Speichermedium zurVerfügung stehen. Ist die Kapazität des angeschlossenen USB-Speichermediums erschöpft, blinken alle LEDs drei Mal und zeigen damit an,dass die Aufnahme beendet wurde. Danach leuchtet die LED über der 100-%-Anzeige dauerhaft und die übrigen PROGRESS-LEDS blinken weiterhin,um auf das volle USB-Speichermedium hinzuweisen. Nach etwa 3 Minutenleuchten dann alle PROGRESS-LEDS dauerhaft.8. Um das angeschlossene USB-Speichermedium vom iKEY zu trennen,drücken Sie die REC-TASTE (8) und halten Sie so lange gedrückt, bis alleLEDs drei Mal hintereinander blinken. Dadurch wird die Datenverbindungzum angeschlossenen Speichermedium geschlossen und Sie können dieUSB-Verbindung trennen, ohne den Verlust der gerade aufgenommenenDaten zu befürchten. Ist dieser Abschlussvorgang einmal getätigt und Siewollen eine erneute Aufnahme starten, müssen Sie das USB-Speichermediumerst vom iKEY trennen und dann erneut verbinden. Geschieht das nicht,blinken alle LEDs drei Mal, um anzuzeigen, dass Sie das USB-Speichermedium erst trennen und erneut verbinden müssen, um aufnehmenzu können.ACHTUNG: OBWOHL DER iKEY MIT EINER SOFTWARE ARBEITET, DIE
DATENVERLUST IM FALLE VON UNBEABSICHTIGTER TRENNUNG VON
iKEY UND ANGESCHLOSSENEM USB-SPEICHERMEDIUM VERHINDERT, IST
ES IMMER DIE BESTE LÖSUNG, WENN SIE DIE OBEN BESCHRIEBENE VOR-BEUGENDE PROZEDUR VOLLZIEHEN, UM EINEM MÖGLICHEN
DATENVERLUST VORZUBEUGEN.9. Um Ihre Aufnahmen abzuspielen oder zu editieren schließen Sie einfachIhr USB-SPEICHERMEDIUM, das Sie für die Aufnahme genutzt haben, aneinen PC- oder Macintosh-Computer an. Dort können Sie die einzelnenDateien ansehen. Der iKEY benennt die einzelnen Dateien numerischentsprechend der Reihenfolge ihrer Aufnahme. Zusätzlich können Sie am
Dateinamen erkennen, ob die jeweilige Datei im MP3- oder WAV-Formataufgenommen wurde. Nutzen Sie einfach Ihr gewohntes Audioprogramm(nicht im Lieferumfang enthalten), um Ihre Aufnahmen zu bearbeiten, zuschneiden, zu editieren und zuguterletzt auf CD oder DVD zu brennen.ACHTUNG: FÜR WEITERE DETAILS ÜBER DIE ÜBERSPIELUNG VON
AUFNAHMEN VON IHREM iPod® LESEN SIE ABSCHNITT “iPod® BEDI-ENUNGSHINWEISE”.
10. Falls Sie Ihre Aufnahme auf einen iPod® speichern, können Sie IhreAufnahme sofort über den iPOD® wiedergeben. Sie finden die Aufnahme inder “Songs”-Liste im Menü des iPod®. Die von iKEY erzeugtenDateinamen beginnen mit dem Wort “iKEY”, dem das Dateiformat und eineNummer folgen. Die Nummer entspricht der Reihenfolge der Aufnahme.ACHTUNG: FÜR WEITERE DETAILS ÜBER DIE ÜBERSPIELUNG VON
AUFNAHMEN VON IHREM iPod® LESEN SIE ABSCHNITT “iPod® BEDI-ENUNGSHINWEISE”.
BEKANNTE LIMITIERUNGEN:
1. Wenn Sie auf einen iPod®, insbesondere einen mit einer großen Zahl anSongs in dessen Datenbank aufnehmen wollen, kann es zu leichtenVerzögerungen beim Starten und Stoppen der Aufnahme kommen. Ist dieZahl der in Ihrer Datenbank enthaltenen Songs sehr groß (mehr als 1.000),werden Sie feststellen, dass es etwa 5 Sekunden dauert, bis der iKEY nachdem Drücken der REC-TASTE (8) die Aufnahme startet. Drücken Sie zumStoppen der Aufnahme die REC-TASTE (8) erneut, kann es bis zu etwa 15Sekunden dauern, bis dieser Befehl ausgeführt wird. Das ist völlig normalund liegt daran, dass der iKEY die Daten so aufbereitet, dass sie vom iPod®abgespielt werden können. Sie können die Performance jedoch deutlichverbessern, indem Sie auf einen iPod® mit einer kleineren Libraryaufnehmen oder den iPod® defragmentieren.2. Wenn Sie auf eine USB-Festplatte oder einen MP3-Player mit internerFestplatte (wie ein iPod®) aufnehmen, kann es auf Grund von fragmen-tierten Dateien zu kurzen Aussetzern oder Störungen kommen. Für die bestePerformance sollten Sie darauf achten, dass die jeweiligen Geräte vor derAufnahme defragmentiert wurden.Dadurch werden die Aufnahmen aneinem Stück auf dem Ziellaufwerk aufgenommen und nicht zerteilt ge-
<18>

speichert.3. Wenn Sie auf einen MP3-Player mit internem Speicher aufnehmen wollen,bedenken Sie, dass der iKEY nur mit solchen Geräten zusammenarbeitenkann, die den Plug-and-Play-Standard unterstützen und keine zusätzlichenTreiber benötigen. Geräte, die spezielle Software für das jeweilige Gerätbenötigen, um auf die auf dem Gerät gespeicherten Dateien zugreifen zukönnen, werden nicht unterstützt. Die große Mehrheit der USB-Speichermedien arbeitet jedoch nach diesem Standard und benötigt keinezusätzlichen Treiber, sodass Sie ohne Probleme mit dem iKEY zusammenar-beiten.
iPod® BEDIENUNGSHINWEISE:
1. Wenn Sie Ihren iPod® mit einem PC- oder Macintosh-Computerverbinden, ist es zwingend notwendig, dass Sie in iTunes® definieren, dassIhre SONGS UND WIEDERGABELISTEN MANUELL VERWALTEN wollen. IstiTunes® auf “automatisches Update” eingestellt, werden alle vom iKEYgemachten Aufnahmen beim Anschluss an Ihren Computer von iTunes®GELÖSCHT. Sie finden diese Option im Bearbeiten-Menü in derMenüleiste des iTunes®-Fensters. Wählen Sie “Einstellungen”, dann denReiter “iPod” und daraufhin die Option “Musik”.ACHTUNG: SIE SOLLTEN DIESE EINSTELLUNGEN TÄTIGEN, BEVOR SIE
MIT DEM iKEY AUFNEHMEN, UM SICHERZUSTELLEN, DASS DIE ERSTEN
MIT DEM IKEY GEMACHTEN AUFNAHMEN, NICHT GELÖSCHT WERDEN.
2. Bevor Sie auf einen iPod® aufnehmen können, muss dieser mit deriTunes®-Software initialisiert werden. Zusätzlich müssen Sie mit iTunes®mindestens einen Song auf Ihren iPod® übertragen, bevor Sie Aufnahmenmit Ihrem iKEY machen. Das gilt nur für noch nie benutzte oder neu for-matierte iPod®s. Sind ihr iPod® und die iTunes®-Software schon im Einsatzgewesen, entfällt dieser Punkt für Sie.3. Ist der iPod® mit dem iKEY verbunden, zeigt das Display des iPod®s“Do Not Disconnect” (“nicht trennen”) an. Das zeigt an, dass Daten zumiPod® gesendet werden.4. Um den iPod® vom iKEY zu trennen, drücken Sie die REC-TASTE (8) und
halten sie so lange gedrückt, bis alle LEDs am iKEY drei Mal nacheinanderblinken. Warten Sie nun so lange, bis das Display des iPod® nicht mehr dieMeldung “Do Not Disconnect.” (“nicht trennen”) anzeigt. Nun können Sieden iPod® vom iKEY trennen.5. Wenn Sie Ihre Aufnahmen direkt von Ihrem iPod® abspielen wollen, find-en Sie diese im “Song”-Ordner ganz am Ende der Liste.6. Wollen Sie Ihre Aufnahmen vom iPod® abrufen, um sie zu editieren, fol-gen Sie einfach den Schritten der unten folgenden Anleitung. Die Dateienvom iKEY sind in einem nicht sichtbaren Ordner im iPod® gespeichert undSie müssen den Ordner erst sichtbar machen, um auf die Dateien darinzugreifen zu können. Denken Sie bitte daran, dass für den PC- und für denMac formatierte iPod®s unterschiedliche Dateisysteme verwenden und keineDateien untereinander austauschen können.WINDOWS XP (PC) ANLEITUNG:1. Nachdem Sie Ihren iPod® mit dem Computer verbunden haben, öffnenSie den “Arbeitsplatz”, der in der Regel auf Ihrem Desktop oder im Menü“Start” zu finden ist. Hier sollten Sie in der Auflistung Ihrer Laufwerke deniPod® finden, den Sie mittels Doppelklick öffnen.2. Wenn Sie das Verzeichnis des iPod® vor sich sehen, gehen Sie in derMenüleiste am oberen Bildschirmrand auf “Extras” und dann auf die“Ordneroptionen”.3. Klicken Sie auf den Reiter “Ansicht” und wählen Sie den Eintrag “Zeigeversteckte Dateien und Ordner”. Wenn Sie auf “OK” geklickt haben, kön-nen Sie danach einen Ordner mit dem Namen “iPod_Control” sehen.4. Öffnen Sie den Ordner “iPod_Control” und dann den Ordner “Musik”.Mit einem Klick der rechten Mautaste auf den Ordner “iKEY” öffnet sichein Menü, aus dem Sie “Senden an” und dann die erste Wahlmöglichkeit“Desktop (Verknüpfung erstellen)” wählen.5. Haben Sie die Verknüpfung auf Ihrem Desktop erstellt, gehen Sie erneutin den Bereich “Extras” und dort in den Bereich “Ordneroptionen”.6. Klicken Sie erneut auf den Reiter “Ansicht” und wählen Sie den Eintrag“versteckte Dateien und Ordner ausblenden”. Wenn Sie auf “OK” gek-lickt haben, können Sie den Ordner danach nicht mehr sehen.7. Haben Sie diesen Vorgang abgeschlossen, können Sie von jetzt an die
<19>

Dateien, die Sie mit dem iKEY aufgenommen haben, direkt erreichen,indem Sie auf die Verknüpfung auf Ihrem Desktop (oder dem Ort, wo Siedie Verknüpfung gespeichert haben) doppelklicken. Zwar ist es möglich,Dateien direkt aus dem Ordner zu löschen, doch ist es empfehlenswerter,das mit iTunes® zu tun, damit die Datenbank auf Ihrem iPod® nichtbeschädigt wird.ACHTUNG: WENN SIE DEN IPOD® VON IHREM PC GETRENNT HABEN,KÖNNEN SIE ÜBER DIE VERKNÜPFUNG NICHT MEHR AUF IHREN IPOD®ZUGREIFEN. DAFÜR MUSS DIESER ANGESCHLOSSEN SEIN.
OS X (MACINTOSH) ANLEITUNG:
1. Nachdem Sie Ihren iPod® mit dem Macintosh-Computer verbundenhaben, gehen Sie auf “Macintosh HD” auf Ihrem Desktop und öffnendort den Ordner “Programme”, dann den Ordner “Dienstprogramme”und starten Sie dort das Programm “Terminal”. Sie sehen jetzt ein Fenstermit Text basierter Eingabe und einem blinkenden Cursor.2. Geben Sie in dieses Fenster exakt den folgenden Befehl ein:defaults write com.apple.finder AppleShowAllFiles TRUE (Enter-Tastedrücken)killall finder (Enter-Taste drücken)Lassen Sie dieses Fenster geöffnet, da Sie es für Schritt 6 wieder benötigen.3. Gehen Sie als Nächstes wieder auf den Desktop und öffnen Sie denOrdner “iPod_Control” und dort den Ordner “Musik”. Klicken Sie aufden Ordner “iKEY” (normalerweise ganz unten).4. Oben im Fenster gibt es das Menü “Aufgaben” (Das Icon sieht aus wieein Zahnrad). Dort wählen Sie “Alias erzeugen”.5. Ziehen Sie das Alias “iKEY” jetzt auf Ihren Desktop.
6. Haben Sie Ihre Verknüpfung auf den Desktop (oder einen anderenbevorzugten Ort) verschoben, gehen Sie wieder in das “Terminal”-Fensterund geben Sie dort exakt den folgenden Befehl ein:defaults write com.apple.finder AppleShowAllFiles FALSE (Enter-Taste
drücken)killall Finder (Enter-Taste drücken)Haben Sie das getan, können Sie nun versteckte Dateien nicht mehr sehen.7. Haben Sie diesen Vorgang abgeschlossen, können Sie von jetzt an dieDateien, die Sie mit dem iKEY aufgenommen haben, direkt erreichen, indemSie auf die Verknüpfung auf Ihrem Desktop (oder dem Ort, wo Sie dieVerknüpfung gespeichert haben) doppelklicken. Zwar ist es möglich, Dateiendirekt aus dem Ordner zu löschen, doch ist es empfehlenswerter, das mitiTunes® zu tun, damit die Datenbank auf Ihrem iPod® nicht beschädigtwird.ACHTUNG: WENN SIE DEN IPOD® VON IHREM MACINTOSH GETREN-NT HABEN, KÖNNEN SIE ÜBER DAS ALIAS NICHT MEHR AUF IHREN IPOD®ZUGREIFEN. DAFÜR MUSS DIESER ANGESCHLOSSEN SEIN.
TECHNISCHE DATEN:
Sampling-Rate:................................................................................44,1 kHz, 16 BitDynamikumfang: .............................................................................................98 dBTHD+N:...........................................................................................................91 dBFrequenzgang:.................................................................................20 Hz – 20 kHzStromversorgung:................4 AA-Batterien (nicht im Lieferumfang enthalten).................9-V-Gleichspannung-500-mA-Netzteil (im Lieferumfang enthalten)Aufnahmezeit im Batteriebetrieb:............................................ca. 4 bis 5 Stunden.......(abhängig vom verwendeten USB-Speichermedium und dem Batterietyp)Netzanschluss:........................................... 230 VAC 50 Hz oder 120 VAC 60 Hz
iPod® und iTunes® sind geschützte Handelsmarken von Apple Computer,Inc.*Die allgemeinen gesetzlichen Gewährleistungen bleiben von denHerstellergarantien unberührt.
<20>

SYMPTOM:
1. Der iKEY lässt sich nicht einschalten.
2.Der iKEY lässt sich einschalten, nimmt aber nichts auf.
3.Die Aufnahmen sind sehr leise und klingen dumpf und verwaschen.
4.Die Aufnahmen klingen verzerrt.
SYMPTOM:
5.Die Aufnahme springt und es sind digitaleStörgeräusche zu hören.
6.Der iKEY scheint normal aufzunehmen, aber auf dem USB-Speichermedium können keine Daten gefunden werden.
7.Die Zusammenarbeit mit einem iPod® funktioniert nicht richtig.
8.Sie können auf ein angeschlossenesUSB-Speichermedium nicht aufnehmen. Drücken Sie die Rec-Taste, blinken alle LEDs drei Mal.
9.Der iKEY zeigt an, dass das angeschlossene USB-Speichermedium fast vollist. Schließen Sie das USB-Speichermedium jedoch an einen Computer an, können Sie keine Daten auf dem USB-Speichermedium sehen.
GRUND:
- Der Netzschalter befindet sich nicht in der “Ein”-Position.- Netzteil ist nicht am iKEY oder der Steckdose angeschlossen.- Die Steckdose für das Netzteil ist nicht aktiv.
- Die Batterien sind leer.
- Die Batterien sind nicht richtig ins Batteriefach eingesetzt.- Der iKEY benötigt einen Reset.- Die Batterien sind leer.
- Das USB-Speichermedium hat keinen freien Speicherplatz.
- Das USB-Speichermedium ist schreibgeschützt.- Das USB-Speichermedium ist nicht mit dem iKEY
kompatibel.- Der Eingangspegel des iKEY ist nicht hoch genug.
- Der Ausgangspegel der Audioquelle ist zu niedrig. - Die Anschlusskabel sind defekt oder von schlechter
Qualität.- Das Ausgangsmaterial klingt dumpf und verwaschen.
- Der Eingangspegel des iKEY ist zu hoch.
- Der Ausgangspegel der Audioquelle ist zu hoch.- Die Anschlusskabel sind defekt oder von schlechter
Qualität.- Das Ausgangsmaterial klingt verzerrt.
GRUND:
- Die Fehler sind schon im Ausgangsmaterial enthalten.- Das USB-Speichermedium (falls es sich um eine Festplatte
oder einen MP3-Player mit Festplatte handelt) ist fragmentiert.
- Die Funktion der Steckdose, an der der iKEY angeschlossen ist, ist nicht sichergestellt.
- Die Daten sind beschädigt, da das USB-Speichermedium unsachgemäß entfernt wurde.
- Die Daten sind gelöscht, da das USB-Speichermedium unsachgemäß entfernt wurde.
- Der iKEY wurde von der Stromversorgung getrennt ohne sachgemäße Entfernung des USB-Speichermediums. Es gab eine Unterbrechung der Stromversorgung.
- iPod®, iTunes® oder der dafür genutzte Computer sind nicht richtig konfiguriert.
- Das angeschlossene USB-Speichermedium ist voll oder schreibgeschützt.
- Das angeschlossene USB-Speichermedium ist mit dem iKEY nicht kompatibel.
- Das angeschlossene USB-Speichermedium ist schreibgeschützt.
- Die FAT des angeschlossenen USB-Speichermediums ist defekt und beliefert den iKEY mit falschen Informationen.
- Das angeschlossene USB-Speichermedium ist mit dem iKEY nicht kompatibel.
- Das angeschlossene USB-Speichermedium oder der iKEY benötigen einen Reset.
LÖSUNG:
- Bewegen Sie den Netzschalter in die “Ein”-Position.- Schließen Sie das Netzteil an den iKEY und die Steckdose an..- Überprüfen Sie, ob Sie die Steckdose einschalten können. Im Zweifel
kontaktieren Sie einen Elektriker.- Setzen Sie vier neue AA-Batterien ein oder laden Sie wiederaufladbare Batterien
auf.- Setzen Sie die Batterien richtig in das Batteriefach ein.- Drücken Sie mit einem Kugelschreiber den RESET-KNOPF (4).- Setzen Sie vier neue AA-Batterien ein oder laden Sie wiederaufladbare Batterien
auf.- Löschen Sie mit einem Computer nicht benötigte Daten auf dem
USB-Speichermedium.- Schalten Sie den Schreibschutz am USB-Speichermedium aus.- Fragen Sie den Herstellers des USB-Speichermediums, ob dieses auch ohne
spezielle Software als USB-Speichermedium arbeitet.- Erhöhen Sie den Eingangspegel mit dem Lautstärkeregler wie in der Anleitung
beschrieben.- Erhöhen Sie den Ausgangspegel der Signalquelle.- Überprüfen Sie die Kabel und tauschen diese gegebenenfalls aus.
- Überprüfen Sie die Qualität des Ausgangsmaterials.
- Verringern Sie den Eingangspegel mit dem Lautstärkeregler, wie in der Anleitungbeschrieben.
- Verringern Sie den Ausgangspegel der Signalquelle.- Überprüfen Sie die Kabel und tauschen diese gegebenenfalls aus.
- Überprüfen Sie die Qualität des Ausgangsmaterials.
LÖSUNG:
- Überprüfen Sie die Qualität des Ausgangsmaterials. - Schließen Sie das USB-Speichermedium an einen Computer an und defragmen
tieren es entsprechend den Richtlinien Ihres Betriebssystems.
- Überprüfen Sie die Steckdose. Im Zweifel kontaktieren Sie einen Elektriker.
- Befolgen Sie die Anweisungen, wie ein USB-Speichermedium nach dem Ende einer Aufnahme entfernt werden muss.
- Befolgen Sie die Anweisungen, wie ein USB-Speichermedium nach dem Ende einer Aufnahme entfernt werden muss.
- Schauen Sie in der Anleitung, wie die Stromversorgung des iKEY entfernt werden kann.
- Schauen Sie im Abschnitt “iPod Bedienungshinweise” nach.
- Löschen Sie mit einem Computer nicht benötigte Daten auf dem USB-Speichermedium und schalten Sie den Schreibschutz am USB-Speichermedium aus.
- Nutzen Sie ein USB-Speichermedium, das keine spezielle Software zum Betrieb benötigt und mit dem iKEY kompatibel ist.
- Stellen Sie sicher, dass Ihr USB-Speichermedium nicht schreibgeschützt ist.
- Formatieren Sie Ihr USB-Speichermedium nach den Anweisungen des Herstellers. Achtung, Daten auf dem USB-Speichermedium gehen dabei verloren.
- Nutzen Sie ein USB-Speichermedium, das keine spezielle Software zum Betrieb benötigt und mit dem iKEY kompatibel ist.
- Drücken Sie mit einem Kugelschreiber den Reset-Knopf (4) am iKEY. Lösen Sie auch am USB-Speichermedium einen Reset aus.
PRECAUCION: Este producto sigue las regulaciones FCC siempre que se util-icen cables y conectores blindados para conectar este equipo a otras unidades.Para prevenir interferencias electromagnéticas con otros aparatos eléctricoscomo radios y televisiones, utilice siempre conectores y cables con blindaje amasa.
El símbolo de exclamación en un triangulo equilátero alerta al usuario deinstrucciones importantes de operación y mantenimiento (servicio) en eltexto marcado.
El símbolo de luz flash con un rayo en un triangulo equilátero, alerta alusuario de la presencia de "voltaje peligroso" no aislado en el producto quepuede ser de suficiente magnitud como para causar un shock eléctrico a per-sonas.
LEA LAS INSTRUCCIONES: Todas las instrucciones de manejo y seguridaddeben ser leídas antes de poner en marcha el aparato.
GUARDE LAS INSTRUCCIONES: Las instrucciones deben guardarse parafuturas consultas.
OBVIAR LOS AVISOS: Todos los aviso en el propio producto y manual deinstrucciones deben ser tenidos en cuenta.
SEGUIR LAS INSTRUCCIONES: Todas las instrucciones deben ser estricta-mente realizadas.
LIMPIEZA: El producto debe limpiarse solo con un trapo suave y seco. Nuncautilice cera para muebles, gasolina, insecticidas u otro producto que puedacorroer el chasis.
ACCESORIOS: No utilice accesorios no recomendados por el fabricante paraevitar posibles daños.
AGUA Y HUMEDAD: No use este producto cerca del agua, por ejemplo, cercade la ducha, el baño, la pica de la cocina, o del lavadero; en una superficiehúmeda; o cerca de una piscina o similar.
COLOCACION: No colocar este producto en mesas, soportes o brazos que nosean totalmente estables. El producto podría caer y dañarse seriamente o
causar daños a personas. Utilice solo soportes recomendados por el fabri-cante, o vendidos con el producto. Al montar la unidad, siga las instruccionesdel manual, y utilice los accesorios recomendados por el fabricante.
MOBILIDAD: El producto montado en soporte móvil, debe ser desplazadocon cuidado. Frenazos, excesiva fuerza, y superficies deslizantes pueden hacervolcar el conjunto entero. VEA FIGURA A.
VENTILACION: Las ventanas y aberturas del chasis dan la ventilación nece-saria para asegurar la correcta operativa y proteger la unidad de sobrecalen-tamientos, y estas aberturas no deben ser bloqueadas o tapadas en ningúncaso. Estas aberturas nunca deben bloquearse colocando el producto sobre unsofá, cama, alfombra u otra superficie similar. Este producto no debe instalarseen un sitio cerrado como una librería o rack que no tengan la suficiente ven-tilación.
ALIMENTACION: Este producto debe operar solamente con fuentes de ali-mentación del tipo indicado en la etiqueta de voltaje. Si usted no tiene laseguridad de la tensión que tiene en su casa, consulte a su distribuidor localo compañía de electricidad.
COLOCACION: Este producto debe ser colocado en un sitio estable.
PERIODOS SIN USO: El cordón de alimentación debe ser desenchufado dela corriente en caso de no uso durante un largo periodo.
MASA O POLARIZACION:
- Si este producto esta equipado con un cable de polarización alternativa(un conector con una pata más ancha que la otra), solo se podrá conectar enuna posición. Esto es una característica de seguridad. Si usted no puede intro-ducir el conector, pruebe a invertir la posición. Si continua sin introducirse,contacte con un electricista para reemplazar la base. No deseche la posibilidadde utilizar conectores de seguridad.
- Si el producto viene equipado con un conector de tres bornes, es decir contoma de masa, solo encajara en una toma de corriente del mismo tipo. Esto espara su seguridad. Si el conector no encaja en la toma, contacte con un elec-tricista para reemplazar la base. No deseche la posibilidad de utilizar conec-tores de seguridad.
PROTECCION DEL CABLE: Los cables de corriente deben colocarse de formaque nadie pise o pinche los mismos, poniendo particular atención en la unióncon el conector, y en el punto donde se une a la unidad.
TOMA DE TIERRA DE ANTENA EXTERIOR: Si hay conectado a este produc-to un cable de antena o antena exterior, asegúrese de su correcta conexión atierra para proteger de posibles entradas de tensión y cargas de electricidadestática. El Articulo 810 del Código Eléctrico Nacional, ANSI/NFPA 70, da infor-mación de la correcta conexión de masa de los soportes utilizados, del cablede conexión de descarga de la antena, medidas de los conductores de masa,colocación de las antenas, inserción de electrodos de masa, y características delos electrodos. VER FIGURA B.
RAYOS: Para protección adicional de este producto durante una tormentaeléctrica, o cuando este desatendido o sin utilización durante un largo perio-do de tiempo, desconecte de la toma de corriente y desconecte la antena delsistema. Esto evitará cualquier problema debido a rayos y subidas de tensión.
LINEA DE TENSION: Los sistemas de antena exterior nunca deben colocarse
en la proximidad de líneas eléctricas de alta tensión o centrales de transforma-ción eléctrica, o donde puede ser afectado por este tipo de líneas. Al instalarun sistema de este tipo, extreme la precaución de no tocar ningún tipo delínea eléctrica ya que esto resultaría fatal.
SOBRECARGA: No sobrecargue las tomas de corriente, cables de alargo, oladrones de conexión ya que esto podría provocar fuego o shock eléctrico.
ENTRADA DE OBJECTOS & LIQUIDOS: Nunca introduzca objetos deningún tipo en las aberturas del producto ya que puedes provocar cortocir-cuitos o tocar con puntos de alto voltaje provocando fuego o shock eléctrico.Nunca tire líquidos en este tipo de productos.
SERVICIO TECNICO: No intente reparar la unidad usted mismo abriendo oquitando las tapas ya que el producto funciona con niveles peligrosos de ten-sión. Contacte con el servicio cualificado para cualquier reparación.
SOLICITUD DE REPARACION: Desconecte de la toma de corriente el pro-ducto y contacte con el servicio en caso de:
- Cuando la toma de corriente este dañada.
- Si se ha vertido líquido u objetos dentro de la unidad.
- Si el producto ha estado expuesto a lluvia o agua.
- Si el producto no funciona según las especificaciones del manual. Ajustetan solo los controles que le indique el manual ya que el modificar ajustesinternos puede dañar la unidad y eso requerirá mas trabajo del servicio parareajustar la unidad a sus parámetros iniciales.
- Si el producto ha caído al suelo.
- Cuando el producto no actúa de forma normal.
RECAMBIOS: Cuando se necesiten recambios, asegúrese que los técnicos hanutilizado recambios originales especificados por el fabricante o tienen las mis-mas características del recambio original. La substitución incorrecta de piezaspuede crear fuego, shock eléctrico, u otros daños.
COMPROBACIONES: Tras una reparación, solicite al servicio que testee launidad para comprobar su correcto funcionamiento.
INSTALACION EN TECHO O PARED: Los productos no deben ser instaladosen techos ni paredes.
CALOR: El producto debe estar alejado de Fuentes de calor como radiadores,estufas, u otros productos (incluyendo amplificadores) que producen yemiten calor.
RECIRCULACIÓN: Este producto no debe tratarse del mismo modo que losdesechos domésticos. En su lugar, usted debe llevarlo al punto verde derecogida más cercano para reciclaje de aparatos eléctricos y electrónicos.Asegurándose que este producto se desecha de forma apropiada, usted estaayudando a preservar posibles consecuencias negativas para la salud humanaque se producirían por incorrectas manipulaciones en caso de utilizar otrométodo de desecho. El reciclaje de materiales ayudará a conservar el entornonatural. Para información más detallada sobre el reciclaje de este producto,por favor contacte con su ayuntamiento local, el servicio local de basuras, o latienda donde usted adquirió el producto.
P R E C A U C I O NPOR FAVOR LEALO ANTES DE UTILIZAR LA UNIDAD,
INSTRUCCIONES IMPORTANTES DE AVISO & SEGURIDAD!RIESGO DE SHOCK ELÉCTRICO NO ABRIR!
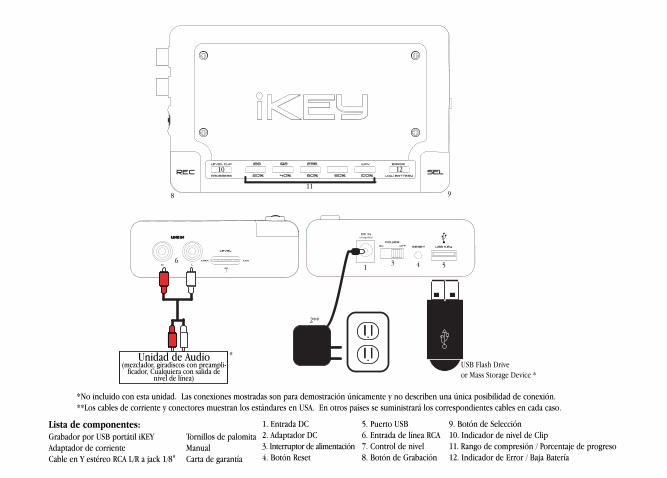
I28 I92 ERRORWAV256
PROGRESS
level clip
60% I00%80% LOW BATTERY40%20%REC sel
line inline in
r l
level
minmax
DC in(chargeable)
power
reset USb keyon off
1
2**
3 4 56
7
8 9
10
11
12
*USB Flash Driveor Mass Storage Device *
Unidad de Audio(mezclador, giradiscos con preampli-
ficador, Cualquiera con salida denivel de línea)
*No incluido con esta unidad. Las conexiones mostradas son para demostración únicamente y no describen una única posibilidad de conexión.**Los cables de corriente y conectores muestran los estándares en USA. En otros países se suministrará los correspondientes cables en cada caso.
Lista de componentes:Grabador por USB portátil iKEYAdaptador de corrienteCable en Y estéreo RCA L/R a jack 1/8"
Tornillos de palomitaManualCarta de garantía
1. Entrada DC2. Adaptador DC3. Interruptor de alimentación4. Botón Reset
5. Puerto USB6. Entrada de línea RCA7. Control de nivel8. Botón de Grabación
9. Botón de Selección10. Indicador de nivel de Clip11. Rango de compresión / Porcentaje de progreso12. Indicador de Error / Baja Batería
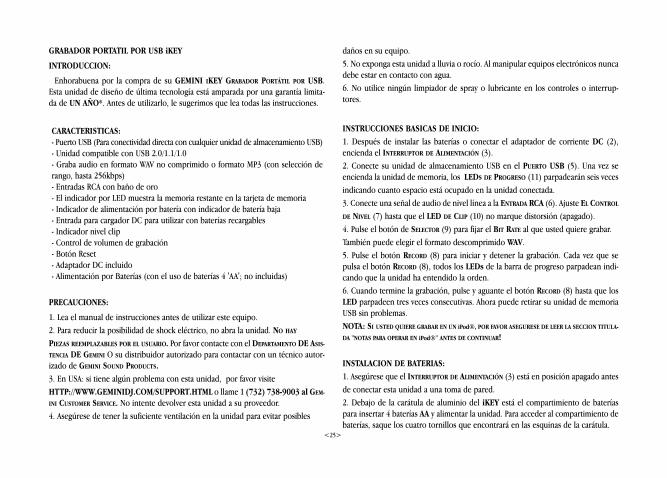
GRABADOR PORTATIL POR USB iKEY
INTRODUCCION:
Enhorabuena por la compra de su GEMINI IKEY GRABADOR PORTÁTIL POR USB.Esta unidad de diseño de última tecnología está amparada por una garantía limita-da de UN AÑO*. Antes de utilizarlo, le sugerimos que lea todas las instrucciones.
CARACTERISTICAS:- Puerto USB (Para conectividad directa con cualquier unidad de almacenamiento USB)- Unidad compatible con USB 2.0/1.1/1.0- Graba audio en formato WAV no comprimido o formato MP3 (con selección derango, hasta 256kbps)- Entradas RCA con baño de oro- El indicador por LED muestra la memoria restante en la tarjeta de memoria- Indicador de alimentación por batería con indicador de batería baja- Entrada para cargador DC para utilizar con baterías recargables- Indicador nivel clip- Control de volumen de grabación- Botón Reset- Adaptador DC incluido- Alimentación por Baterías (con el uso de baterías 4 'AA'; no incluidas)
PRECAUCIONES:
1. Lea el manual de instrucciones antes de utilizar este equipo.2. Para reducir la posibilidad de shock eléctrico, no abra la unidad. NO HAY
PIEZAS REEMPLAZABLES POR EL USUARIO. Por favor contacte con el DEPARTAMENTO DE ASIS-
TENCIA DE GEMINI O su distribuidor autorizado para contactar con un técnico autor-izado de GEMINI SOUND PRODUCTS.
3. En USA: si tiene algún problema con esta unidad, por favor visiteHTTP://WWW.GEMINIDJ.COM/SUPPORT.HTML o llame 1 (732) 738-9003 al GEM-
INI CUSTOMER SERVICE. No intente devolver esta unidad a su proveedor.4. Asegúrese de tener la suficiente ventilación en la unidad para evitar posibles
daños en su equipo.5. No exponga esta unidad a lluvia o rocío. Al manipular equipos electrónicos nuncadebe estar en contacto con agua.6. No utilice ningún limpiador de spray o lubricante en los controles o interrup-tores.
INSTRUCCIONES BASICAS DE INICIO:
1. Después de instalar las baterías o conectar el adaptador de corriente DC (2),encienda el INTERRUPTOR DE ALIMENTACIÓN (3).2. Conecte su unidad de almacenamiento USB en el PUERTO USB (5). Una vez seencienda la unidad de memoria, los LEDS DE PROGRESO (11) parpadearán seis vecesindicando cuanto espacio está ocupado en la unidad conectada.3. Conecte una señal de audio de nivel línea a la ENTRADA RCA (6). Ajuste EL CONTROL
DE NIVEL (7) hasta que el LED DE CLIP (10) no marque distorsión (apagado).4. Pulse el botón de SELECTOR (9) para fijar el BIT RATE al que usted quiere grabar.También puede elegir el formato descomprimido WAV.5. Pulse el botón RECORD (8) para iniciar y detener la grabación. Cada vez que sepulsa el botón RECORD (8), todos los LEDs de la barra de progreso parpadean indi-cando que la unidad ha entendido la orden.6. Cuando termine la grabación, pulse y aguante el botón RECORD (8) hasta que losLED parpadeen tres veces consecutivas. Ahora puede retirar su unidad de memoriaUSB sin problemas.NOTA: SI USTED QUIERE GRABAR EN UN iPod®, POR FAVOR ASEGURESE DE LEER LA SECCION TITULA-
DA "NOTAS PARA OPERAR EN iPod®" ANTES DE CONTINUAR!
INSTALACION DE BATERIAS:
1. Asegúrese que el INTERRUPTOR DE ALIMENTACIÓN (3) está en posición apagado antes de conectar esta unidad a una toma de pared.2. Debajo de la carátula de aluminio del iKEY está el compartimiento de bateríaspara insertar 4 baterías AA y alimentar la unidad. Para acceder al compartimiento debaterías, saque los cuatro tornillos que encontrará en las esquinas de la carátula.
<25>
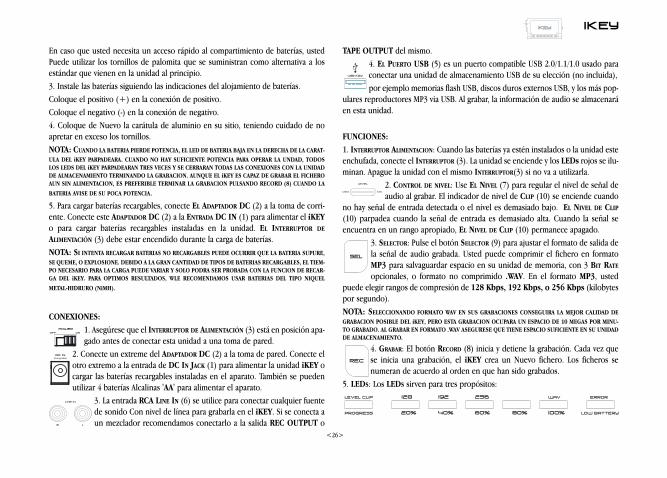
En caso que usted necesita un acceso rápido al compartimiento de baterías, ustedPuede utilizar los tornillos de palomita que se suministran como alternativa a losestándar que vienen en la unidad al principio.3. Instale las baterías siguiendo las indicaciones del alojamiento de baterías.Coloque el positivo (+) en la conexión de positivo.Coloque el negativo (-) en la conexión de negativo.4. Coloque de Nuevo la carátula de aluminio en su sitio, teniendo cuidado de noapretar en exceso los tornillos.NOTA: CUANDO LA BATERIA PIERDE POTENCIA, EL LED DE BATERIA BAJA EN LA DERECHA DE LA CARAT-
ULA DEL iKEY PARPADEARA. CUANDO NO HAY SUFICIENTE POTENCIA PARA OPERAR LA UNDAD, TODOSLOS LEDS DEL iKEY PARPADEARAN TRES VECES Y SE CERRARAN TODAS LAS CONEXIONES CON LA UNIDADDE ALMACENAMIENTO TERMINANDO LA GRABACION. AUNQUE EL iKEY ES CAPAZ DE GRABAR EL FICHEROAUN SIN ALIMENTACION, ES PREFERIBLE TERMINAR LA GRABACION PULSANDO RECORD (8) CUANDO LA
BATERIA AVISE DE SU POCA POTENCIA.
5. Para cargar baterías recargables, conecte EL ADAPTADOR DC (2) a la toma de corri-ente. Conecte este ADAPTADOR DC (2) a la ENTRADA DC IN (1) para alimentar el iKEYo para cargar baterías recargables instaladas en la unidad. EL INTERRUPTOR DE
ALIMENTACIÓN (3) debe estar encendido durante la carga de baterías.NOTA: SI INTENTA RECARGAR BATERIAS NO RECARGABLES PUEDE OCURRIR QUE LA BATERIA SUPURE,
SE QUEME, O EXPLOSIONE. DEBIDO A LA GRAN CANTIDAD DE TIPOS DE BATERIAS RECARGABLES, EL TIEM-PO NECESARIO PARA LA CARGA PUEDE VARIAR Y SOLO PODRA SER PROBADA CON LA FUNCION DE RECAR-GA DEL iKEY. PARA OPTIMOS RESULTADOS, WLE RECOMENDAMOS USAR BATERIAS DEL TIPO NIQUEL
METAL-HIDRURO (NiMH).
CONEXIONES:
1. Asegúrese que el INTERRUPTOR DE ALIMENTACIÓN (3) está en posición apa-gado antes de conectar esta unidad a una toma de pared.
2. Conecte un extreme del ADAPTADOR DC (2) a la toma de pared. Conecte elotro extremo a la entrada de DC IN JACK (1) para alimentar la unidad iKEY ocargar las baterías recargables instaladas en el aparato. También se puedenutilizar 4 baterías Alcalinas 'AA' para alimentar el aparato.
3. La entrada RCA LINE IN (6) se utilice para conectar cualquier fuentede sonido Con nivel de línea para grabarla en el iKEY. Si se conecta aun mezclador recomendamos conectarlo a la salida REC OUTPUT o
TAPE OUTPUT del mismo.4. EL PUERTO USB (5) es un puerto compatible USB 2.0/1.1/1.0 usado paraconectar una unidad de almacenamiento USB de su elección (no incluida), por ejemplo memorias flash USB, discos duros externos USB, y los más pop-
ulares reproductores MP3 via USB. Al grabar, la información de audio se almacenaráen esta unidad.
FUNCIONES:
1. INTERRUPTOR ALIMENTACION: Cuando las baterías ya estén instalados o la unidad esteenchufada, conecte el INTERRUPTOR (3). La unidad se enciende y los LEDs rojos se ilu-minan. Apague la unidad con el mismo INTERRUPTOR(3) si no va a utilizarla.
2. CONTROL DE NIVEL: Use EL NIVEL (7) para regular el nivel de señal deaudio al grabar. El indicador de nivel de CLIP (10) se enciende cuando
no hay señal de entrada detectada o el nivel es demasiado bajo. EL NIVEL DE CLIP
(10) parpadea cuando la señal de entrada es demasiado alta. Cuando la señal seencuentra en un rango apropiado, EL NIVEL DE CLIP (10) permanece apagado.
3. SELECTOR: Pulse el botón SELECTOR (9) para ajustar el formato de salida dela señal de audio grabada. Usted puede comprimir el fichero en formatoMP3 para salvaguardar espacio en su unidad de memoria, con 3 BIT RATE
opcionales, o formato no comprimido .WAV. En el formato MP3, ustedpuede elegir rangos de compresión de 128 Kbps, 192 Kbps, o 256 Kbps (kilobytespor segundo).NOTA: SELECCIONANDO FORMATO WAV EN SUS GRABACIONES CONSEGUIRA LA MEJOR CALIDAD DE
GRABACION POSIBLE DEL iKEY, PERO ESTA GRABACION OCUPARA UN ESPACIO DE 10 MEGAS POR MINU-TO GRABADO. AL GRABAR EN FORMATO .WAV ASEGURESE QUE TIENE ESPACIO SUFICIENTE EN SU UNIDADDE ALMACENAMIENTO.
4. GRABAR: El botón RECORD (8) inicia y detiene la grabación. Cada vez quese inicia una grabación, el iKEY crea un Nuevo fichero. Los ficheros senumeran de acuerdo al orden en que han sido grabados.
5. LEDS: Los LEDS sirven para tres propósitos:
poweronoff
DC in(chargeable)
line in
r l
USb key
level
minmax
REC
sel
I28 I92 ERRORWAV256
PROGRESS
level clip
60% I00%80% LOW BATTERY40%20%
REC sel
iKey
<26>

- EL NIVEL DE CLIP (10) parpadea para alertar de un exceso de señal en la entradarequerida para obtener una grabación digital libre de distorsión. El LED se iluminafijo para alertar de una señal excesivamente baja, o la ausencia de señal.- La línea de texto sobre los LEDS indica el rango de BIT RATES disponible para grabaren el iKEY. Al utilizar el botón SELECT (9) para elegir el BIT RATE, el LED correspon-diente a su selección se ilumina.- La línea de texto bajo los LEDS, son porcentajes que indican la cantidad de memo-ria utilizada en la unidad de almacenamiento. Nosotros lo hemos llamado BARRA DE
PROGRESO (11). Cuando el LED sobre algún particular porcentaje parpadea, esto sig-nifica que la memoria ocupada está por debajo de este porcentaje. Cuando el LEDqueda iluminado, significa que la memoria ocupada ha excedido el porcentaje mar-cado. Cuando la unidad se acerca al 100%, el LED alertará parpadeando todos los 5LEDS repetidamente hasta que la unidad de almacenamiento esté totalmente llena.- El LED de la derecha parpadea cuando las baterías están bajas o se ilumina fijocuando detecta un error en la unidad.
6. RESET: El botón RESET (4) se utilice para re-inicializar la unidad, si hay algúnerror con su unidad de almacenamiento, o en el caso que la unidad deba ser
re-inicializada por cualquier motivo. El botón RESET (4) se encuentraembutido ya que normalmente no debe ser utilizado.
OPERATIVA:
1. Una vez la unidad ha sido alimentada usando 4 baterías 'AA' o el DC ADAPTOR (2),encienda la unidad con el interruptor de alimentación (3) EL NIVEL DE CLIP (10) seencenderá indicando que no hay señal de entrada.
2. Conecte su unidad de almacenamiento USB (ejemplo, tarjeta USB, disco duroexterno USB, reproductor MP3 USB) en la entrada USB KEY (5). En unos segundos,la unidad detectará e inicializará la unidad USB. Durante este tiempo, usted verá laluz de actividad de la unidad USB encendida. Una vez el iKEY haya inicializado launidad USB, los LEDS que indican el espacio ocupado de la tarjeta, parpadearán seisveces (6).
3. Una vez los LED(s) de memoria restante se apaguen, usted puede usar el botónSELECTOR (9) para elegir el BIT RATE al cual desea grabar Pulsando el botón SELECTOR
(9) salta por los distintos BIT RATES, incluyendo 128Kbps, 192Kbps, 256Kbps, y nocomprimido .WAV. En ese momento, si usted desea saber la memoria restante de latarjeta de memoria, mantenga apretado el botón SELECTOR (9) durante 3-4 segun-dos,y los LEDS mostrarán el espacio ocupado de la tarjeta conectada hasta que ustedsuelte el botón SELECTOR (9).
4. Después de haber seleccionado el BIT RATE al cual desea grabar, Usted debe ajus-tar el nivel de entrada para asegurarse que el volumen de grabación es el adecuado,sin ser tan alto que sobrepase el nivel de entrada del iKEY. La manera más sencillade hacerlo es ajustar el volumen de la fuente tan alto como le interese y luego ajus-tar el control de nivel LEVEL (7) evitando que la señal se sature en el iKEY. Para fijarlos niveles de grabación, aumente el control LEVEL (7) hasta que el nivel de CLIP (10)parpadee repetidamente. Luego, baje el nivel LEVEL (7) gradualmente hasta que elnivel de CLIP(10) no parpadee más de cada 3 o 4 segundos. Si sospecha que durantela grabación el nivel de sonido puede incrementarse, entonces es conveniente quedisminuya aún mas el nivel LEVEL (7), asegurándose de no tener distorsiones noesperadas.
NOTA: SI EL NIVEL DE CLIP (10) PARPADEA A MENUDO, SU GRABACION PUEDE SUFRIR DISTORSION
DIGITAL. EN CASO DE DUDA, ES SIEMPRE MAS RECOMENDABLE EL GRABAR A UN NIVEL MAS BAJO CON ELiKEY E INCREMENTAR POSTERIORMENTE EL VOLUMEN USANDO UN SOFT WARE EDITOR EN SU PC QUE EVI-TARA LA DISTORSION DE UNA GRABACION DE POBRE CALIDAD.
5. Habiendo ajustado los parámetros necesarios, pulse el botón RECORD (8) paraempezar la grabación. Cuando el botón de grabación se pulsa, todos los LEDS deprogreso parpadean indicando que la unidad ha entendido la orden de empezar. Alempezar la grabación, el iKEY mostrará de nuevo el porcentaje de espacio ocupadoen la tarjeta de memoria conectada. El LED que indica el porcentaje mas aproxima-do parpadeará. Si usted desea ver el BIT RATE seleccionado, presione el botón SELEC-
TOR (9) para pasar de el espacio ocupado al nivel de BIT RATE. Cuando quiera pararla grabación, pulse el botón RECORD (8) de nuevo. Inmediatamente después de pul-sar el botón RECORD (8) se para la grabación, el LED parpadeante que indica el espa-cio ocupado queda fijo, indicando que la grabación está detenida. Cuando el iKEYha detenido todas las operaciones de grabación y ha cerrado el fichero, toda la barrade progreso parpadeará una vez indicando que la unidad está lista para recibir otraorden de trabajo.
NOTA: Si ESTA GGRABANDO EN UN iPod® CON UN GRAN NUMERO DE CANCIONES EN LA BIBLIOTECA,
reset
<27>

PUEDE NOTAR UN LIGERO RETARDO AL INICIAR Y DETENER EL PROCESO DE GRABACION CON EL iKEY.ESTO ES PERFECTAMENTE NORMAL, Y SE PRODUCE DEBIDO A QUE EL iKEY ESTA PREPARANDO EL FICHEROPARA QUE PUEDE SER POSTERIORMENTE REPRODUCIDO POR EL iPod®. PARA MAS DETALLES REFIERASEA USANDO EL iKEY CON UN iPod®, VEA SECCION TITULADA "iPod® NOTAS OPERATIVA".
6. Si desea volver a grabar de nuevo, pulse el botón RECORD (8), que iniciará lagrabación de un nuevo fichero.
7. Si, durante la grabación, su unidad de memoria se acerca al tope de capacidad,todos los LEDS de progreso parpadearan. Como método de seguridad, la Barra deprogreso empezará a parpadear cuando queden aproximadamente un 5% de memo-ria en la tarjeta. Cuando la tarjeta está llena, todos los LEDS parpadearan 3 veces,indicando que la unidad ha cesado la grabación. Entonces, el indicador de 100%quedará encendido mientras el resto de LEDS parpadean para avisar al usuario. Trasunos tres minutos, la barra de progreso quedará definitivamente encendida.
8. Para desconectar la tarjeta de almacenamiento USB, pulse y mantenga el botónRECORD (8) hasta que todos los LED parpadeen 3 veces seguidas. Esto cierra laconexión con la tarjeta de memoria para que pueda ser desconectada sin riesgo decorromper los datos que se han almacenado en la misma. Una vez la secuencia dedesconexión está hecha, la unidad de almacenamiento puede quitarse y reconec-tarse si se desea volver a grabar. Al hacer esto, todos los LEDS parpadean tres (3)veces indicando que la tarjeta debe ser retirada antes de continuar.
NOTA: A PESAR QUE EL iKEY ESTA CARGADO CON UN SOFT WARE PARA PREVENIR LA CORRUPCION DE
DATOS EN CASO DE DESCONEXION ACCIDENTAL DE LA TARJETA, ES PREFERIBLE ACTUAR SIEMPRE SEGUNESTAS INDICACIONES PARA ASEGURARSE DE LA INTEGRIDAD DE LOS DATOS GUARDADOS.
9. Para reproducir o editar su grabación, conecte la unidad de almacenamiento USBa su PC o Macintosh y verá los ficheros en su memoria. El iKEY nombrará los ficherosen orden numérico según se hayan grabado. También verá que los nombres refle-janel formato en que están grabados - MP3 o WAV. Utilice su editor favorito de audio(no incluido) para manipularlo, variarlo, editarlo, y planchar su creación en CD.
NOTA: PARA MAS DETALLES REFIERASE A USANDO EL iKEY CON UN iPod®, VEA SECCION TITULADA
"iPod® NOTAS OPERATIVA."
10. En el caso de estar almacenando su grabación en un iPod, usted podrá escucharinstantáneamente su grabación colocándola en la lista de 'Canciones' en el menu desu iPod. Los ficheros creados con el iKEY empiezan con la palabra "iKEY", seguidodel formato del fichero y el numero de secuencia en que ha sido grabado.
NOTA: PARA MAS DETALLES REFIERASE A USANDO EL iKEY CON UN iPod®, VEA SECCION TITULADA
"iPod® NOTAS OPERATIVA"
CONOCER LAS LIMITACIONES:
1. Al grabar en un iPod®, especialmente uno que tenga una gran cantidad de can-ciones en la librería, puede notar un retardo al iniciar y parar el proceso degrabación. Si hay muchas canciones (1,000+) en la librería notará que tarda aprox-imadamente 5 segundos el iKEY en empezar la grabación desde que se pulsa elbotón RECORD (8). Cuando el botón RECORD (8) se pulsa de Nuevo(para detener lagrabación), el iKEY tarda aproximadamente 15 segundos en cerrar el fichero. Estoes perfectamente normal, y es el resultado de la preparación por parte del iKEY delfichero para poder ser reproducido por el iPod®. Esta circunstancia puede mejo-rarse si se graba en un iPod® con una librería mas pequeña, o desfragmentando elmismo iPod®.
2. Si está grabando en un disco duro externo USB o un reproductor MP3 de discoduro (como es el iPod®), saltos o agujeros de audio pueden producirse debido alos ficheros fragmentados. Para una mayor utilización, asegúrese de haber desfrag-mentado la unidad antes de grabar.
3. Cuando intente grabar en un reproductor MP3, recuerde que el iKEY solo podráacceder a aquellos que funcionan por plug-and-play y no requieren drivers adi-cionales. Las unidades que necesitan software propio para acceder a los ficherosgrabados no pueden ser utilizados. La gran mayoría de unidades de almacenamien-to por USB pueden funcionar sin necesidad de software adicional y por lo tanto soncompatibles con iKEY.
iPod® NOTAS OPERATIVA:
1. Cuando conecte su iPod® a su ordenador PC o Macintosh, es básico que especi-fique, en iTunes®, que desea 'Controlar manualmente canciones y listas dereproducción.' Si su iTunes® está en puesta al día automática, las grabacionesque se realicen utilizando el iKEY SERAN BORRADAS por el iTunes® al conectarseal ordenador. Esta opción puede encontrarse abriendo el menú 'Edit' en la partesuperior de iTunes®, luego seleccione 'Preferencias.' Después seleccione 'iPod', yfinalmente donde ponga 'Music'.
<28>
NOTA: ESTOS PARAMETROS DEBEN SER FIJADOS ANTES DE REALIZAR GRABACIONES CON iKEY PARA
ASEGURARSE QUE SUS PRIMERAS GRABACIONES CON EL iKEY NO SON BORRADAS.
2. Antes de grabar con un iPod®, la unidad debe ser inicializada con el softwareiTunes®. Usted debe utilizar iTunes® para introducir al menos una canción en suiPod® antes de grabar con el iKEY. Esto solo se aplica a unidades nuevas o refor-mateadas de iPods - si ya ha utilizado su iPod® con el software iTunes® para traba-jar con su música, entonces puede saltar este paso.
3. Cuando el iPod® se conecta al iKEY, el display del iPod® mostrará "Nodesconectar." Esto indica que los datos se están enviando al iPod®.
4. Para desconectar el iPod®, pulse y mantenga el botón RECORD (8) hasta que todoslos LED parpadeen por tres veces consecutivas. Espere hasta que el display deliPod® no ponga "no desconectar."
5. Si quiere reproducir directamente sus grabaciones desde el iPod®, debe encon-trar las grabaciones del iKEY bajo la carpeta 'Canciones', muy al final de la lista dereproducción.
6. Para recuperar sus grabaciones del iPod® para edición, siga las siguientes instruc-ciones. Los ficheros iKEY's están colocados en un directorio escondido del iPod®,y el directorio debe volverse visible antes de poder acceder a los ficheros. Recuerdeque los formatos iPod de Mac y PC son diferentes y no pueden operar entre ellos.
WINDOWS XP (PC) DIRECTIVAS:
1. Después de conectar su iPod®, navegue a 'Mi PC' (en el menú de inicio), y dobleclick en su iPod®, que debe aparecer bajo 'Unidades con Memoria Extraible.'
2. Una vez vea el iPod, vaya a 'Herramientas', luego 'Opciones de carpeta.'
3. Click en la opción 'Ver,' y seleccione el botón radial señalado como 'Mostrarficheros y carpetas ocultas’ Una vez clicke 'OK', verá aparecer la carpeta con elnombre 'iPod_Control.'
4. Abra el directorio 'iPod_Control', luego directorio 'Music', luego click derechoen el directorio (normalmente muy abajo, etiquetado 'iKEY', y seleccione 'CrearAcceso Directo' Arrastre este acceso a su Escritorio.
5. Una vez ha trasladado el Acceso Directo al Escritorio (o donde usted prefiera),vuelva a 'Herramientas', luego 'Opciones de carpeta.'
6. De nuevo click en la opción 'Ver,' y seleccione el control radial marcado 'Nomostrar ficheros y carpetas ocultas." Una vez clicke 'OK', no volverá a ver losficheros ocultos.
7. Cuando termine este proceso, los ficheros grabados por su iKEY serán facilmenteaccesibles abriendo el acceso directo creado y colocado en su Escritorio. Aunqueusted es libre de borrar ficheros de esta carpeta, es preferible utilizar iTunes® paramanejar la librería de su iPod®.
NOTA: UNA VEZ DESCONECTE EL iPod® DE SU PC, EL ACCESO DIRECTO DEJARA DE FUNCIONAR.
OS X (MACINTOSH) DIRECTIVAS:
1. Después de conectar su iPod®, navegue a 'Macintosh HD (que está en su escrito-rio), y abra 'Aplicaciones', luego 'Utilidades', luego cargue la aplicación llamada'Terminal'. Esto traerá un cursor basado en texto.
2. Escriba la siguiente frase, exactamente como esta aquí:
defaults write com.apple.finder AppleShowAllFiles TRUE (tecla enter)
killall finder (tecla enter)
Mantenga esta ventana abierta, ya que deberá volver en el paso #6.
3. Luego, vuelva al escritorio y abra el directorio 'iPod_Control', luego directorio'Music', luego click en directorio (usualmente muy al final), marcado 'iKEY'.
4. En la parte de arriba de la pantalla, abra el menú 'Accion' (el icono parece unarueda dentada) y seleccione 'Poner Alias.' Arrastre este acceso directo a suEscritorio.
5. Arrastre 'iKEY Alias' al Escritorio.
6. Una vez tenga el acceso directo en el Escritorio (o donde usted prefiera) vuelvaa la aplicación 'Terminal' y escriba la siguiente frase, exactamente como está aquí:
defaults write com.apple.finder AppleShowAllFiles FALSE (tecla enter)
killall finder (tecla enter)<29>

Una vez realizado este proceso, no volverá a ver los ficheros ocultos.
7. Cuando termine este proceso, los ficheros grabados por su iKEY serán fácilmenteaccesibles abriendo el acceso directo creado y colocado en su Escritorio. Aunqueusted es libre de borrar ficheros de esta carpeta, es preferible utilizar iTunes® paramanejar la librería de su iPod®.
NOTA: UNA VEZ DESCONECTE EL iPod® DE SU Mac, EL ACCESO DIRECTO DEJARA DE FUNCIONAR.
ESPECIFICACIONES:
Muestreo:..............................................................................................44.1kHz, 16 Bit
Rango dinámico:..................................................................................................98 dB
THD+N:..............................................................................................................91 dB
Respuesta Frecuencia:.............................................................................20Hz - 20KHz
Alimentación....................................................................4 'AA' baterías (no incluidas)
...............................................................................................9V 500mA DC adaptador
Tiempo de grabación con baterías................................Aproximadamente 4 a 5 horas
.......................(dependiendo de la unidad de memoria utilizada y el tipo de baterías)
Voltaje AC ....................................................................120 VAC 60Hz o 230 VAC 50Hz
iPod® y iTunes® son marcas registradas por Apple Computer, Inc.
*La garantía establecida se supeditará a las leyes locales de garantía.
NOTES:
________________________________________________________________________________________________________________________________________________________________________________________________________________________________________________________________________________________________________________________________________________________________________________________________________________________________________________________________________________________________________________________________________________________________________________________________________________________________________________________________________________________________________________________________________________________________________________________________________________________________________________________________________________________________________________________________________________________________________________________________________________________________________________________________________________________________________________________________________________________________________________________________________________________________________________________________________________________________________________________________________________________________________________________________________________________________________________________________________________________________________________________________________________________________________________________________________________________________________________________________________________________________________________________________________________________________________________________________________________________________________________________________________________________________________________________________________________________________________________________________________________________________________________________________________________________________________________________________________________________________________________________________________________________________________________________________________________________________________________________________________________________________________________________________________________________________________________________________________________________________________________________________________________________________________________________________________________________________________________________________________________________________________________________________________________________________________________________________________________________________________________________________________________________________________________________________________________________________________________________________________________________________________________________________________________________________________________________________________________________________________________________________________________________________________________________________________________________________________________________________________________________________________
<30>

SINTOMAS:
1. La unidad no se enciende.
2. La unidad se enciende, pero no graba.
3. La grabación es muy baja, y no es clara ynítida.
4. La grabación está distorsionada.
SYMPTOM:
5. La grabación tiene ruidos de portadoradigital o saltos.
6. La unidad parece que graba sin proble-mas, pero no se encuentralos datos en la tarjeta.
7. iPod® operativa no funciona bien.
8. Cuando se conecta una unidad en eliKEY, la grabación no funciona, y cuando elbotón rec se pulsa, todos los LEDsparpadean 3 veces.
9. El iKEY muestra que la unidad está cercade lleno, pero conectándola a un orde-nador, no hay ficheros en la unidad dealmacenaje.
CAUSA:
- El interruptor de alimentación está apagado.- El adaptador DC no está conectado a la unidad o a la tomade pared.- La toma de pared no funciona.- Baterías bajas.- Baterías no están conectadas bien.- La unidad debe ser reseteada.
- Baterías bajas.- La unidad de almacenamiento USB está llena.- La unidad de almacenamiento USB esta protegida a escritura.- La unidad de almacenamiento USB es incompatible con eliKEY.
- El nivel de entrada del iKEY no es suficiente.- El nivel de salida de la fuente de audio no es suficiente.- Los cables son defectuosos o de pobre calidad.- El material a grabar es excesivamente bajo o sin calidad.
- El nivel de entrada del iKEY está demasiado alto.- El nivel de salida de la fuente de audio está demasiadoalto.- Los cables son defectuosos o de pobre calidad.- La fuente de sonido está distorsionada.
CAUSE:
- La fuente de sonido tiene distorsión digital o saltos.- La unidad de memoria (en caso de usar disco duro externoo reproductor (MP3 basado en disco duro) no está desfrag-mentada.- La alimentación del iKEY es cuestionable.- Datos corrompidos por extracción incorrecta de la tarjeta.
- Datos borrados por extracción incorrecta de la tarjeta.- La unidad ha estado desconectada de la alimentación sinutilizar los procedimientos de extracción de memoria o seha quitado la alimentación en medio de la grabación.
- iPod®, iTunes®, o el ordenador que esta utilizando con eliPod® no está configurado correctamente.
- Le unidad donde está intentando grabar está lleno o prote-gido a escritura.- La unidad donde está intentando grabar no es compatiblecon iKEY.
- La unidad donde está intentando grabar está protegido aescritura.- La tabla de localización de la unidad de grabación estádañada y causa errores en la información del iKEY.- La unidad donde está intentando grabar no es compatiblecon iKEY.- La unidad de grabación y/o el iKEY necesita ser reseteado.
SOLUCION:
- Encienda el interruptor de alimentación.- Conecte el adaptador DC a la unidad y a la toma de pared.- Compruebe la toma de pared.- Reemplace las baterías por 4 'AA', o recárguelas si son recargables.- Instale baterías de acuerdo al diagrama del alojamiento.- Use un lápiz o bolígrafo para pulsar el botón RESET (4) en el lateral.
- Reemplace las baterías por 4 'AA', o recárguelas si son recargables.- Borre los datos en la unidad de almacenamiento USB usando su PC, o use otramemoria.- Quite la protección de escritura de la unidad de almacenamiento.- Compruebe con el fabricante la utilización de su unidad de almacenamiento sinutilizar software propio.
- Ajuste el nivel de entrada incrementando la señal según las instrucciones.- Ajuste el nivel de salida de la fuente de audio.- Compruebe la integridad de los cables.- Compruebe la calidad de la fuente de sonido que está intentando grabar.
- Ajuste el nivel de entrada para reducir la señal de acuerdo a las instrucciones.- Ajuste el nivel de salida de la fuente de audio.- Compruebe la integridad de los cables.- Compruebe la calidad del material original que intenta grabar.
SOLUTION:
- Compruebe la calidad del material original que intenta grabar.- Conecte la unidad de almacenamiento a su PC y desfragmente según las instruc-ciones de su sistema operativo.- Compruebe la toma de pared- Siga las instrucciones para quitar la tarjeta de memoria cuando la grabación seacabe.
- Siga las instrucciones para quitar la tarjeta de memoria cuando la grabación seacabe.
- Vea la sección 'iPod Notas Operativas' en este manual.
- Libere espacio el la unidad de memoria, y asegúrese que no está protegido aescritura.- Use una unidad de almacenamiento USB que no necesite software propio.
- Asegúrese que la unidad de memoria no está protegida a escritura.- Reformatee la unidad según las instrucciones del fabricante.- Use una unidad de almacenamiento USB que no necesite software propio.- Use un lápiz o bolígrafo para pulsar el botón RESET (4) en el lateral. Resetee tam-bién la unidad de almacenamiento según las instrucciones del fabricante.

ATTENTION: Cet appareil répond aux certifications FCC lorsqu'il est connec-té à d'autres appareils à l'aide de cordons blindés. Afin de prévenir tout risquede parasites électromagnétiques avec un poste radio ou TV, veuillez utiliserdes cordons blindés.
Le point d'exclamation situé dans un triangle est destiné à attirer votreattention durant l'utilisation de votre appareil ou d'un entretien périodique dece dernier. Vous en trouverez plusieurs dans le mode d'emploi de l'appareil.
LIRE LES INSTRUCTIONS: Toutes les instructions et consignes d'utilisationdoivent être lues avant l'utilisation de l'appareil.
CONSERVEZ LES INSTRUCTIONS: Nous vous recommandons de conserverles instructions et consignes d'utilisation en cas de nécessité ultérieure.
RESPECT DES CONDITIONS D'UTILISATION: Nous vous recommandonsde respecter les instructions d'utilisation.
SUIVRE LES INSTRUCTIONS D'UTILISATION: Nous vous recommandonsde respecter la chronologie des instructions d'utilisation.
NETTOYAGE: L'appareil doit être nettoyé avec un chiffon légèrement humide.Ne pas utiliser de produits chimiques corrosifs & volatiles (cire, essence, insec-ticide…) afin de ne pas endommager l'appareil.
CORDON: Ne pas utiliser de cordons non préconisés par le fabricant afin dene pas endommager l'appareil.
EAU & HUMIDITE: Ne pas utiliser l'appareil à proximité d'une source d'eau(cuisine, salle de bain, lavabo…), ni dans un endroit sujet à l'humidité(piscine…).
ACCESSOIRES: Ne pas installer cet appareil sur un support ou dans unendroit instable. L'appareil pourrait tomber au risque de blesser une person-ne et être endommagé. Veiller à utiliser des accessoires (Pied, support, cro-chet..) recommandés par le fournisseur ou vendu avec l'appareil. Tout mon-tage ou installation doit respecter les instructions du fabricant et utiliser des
accessoires d'installation recommandés par le fabricant.
TRANSPORT SUR CHARIOT: Tout produit installé sur un chariot doit êtremanipulé avec précaution. Un déplacement brusque ou trop rapide sur unesurface non plane pourrait entraîner la chute de l'ensemble et endommagerl'appareil. VOIR FIGURE A.
VENTILATION: Les ouvertures et ouïes d'aération situées sur l'appareil per-mettent une ventilation optimale de ce dernier afin d'éviter toute surchauffe.Ces ouvertures ne doivent jamais être obstruées. Ne pas placer l'appareil surun support souple risquant de bloquer les ouïes d'aération (Lit, sofa,canapé…). Si l'appareil est intégré dans une installation ou dans un rack,veillez à la ventilation et consultez le fabricant pour toute information complé-mentaire.
ALIMENTATION: Veillez à respecter la tension d'alimentation située au dos del'appareil. Si vous n'êtes pas certain de la tension d'utilisation dans votre pays,contactez votre revendeur.
EMPLACEMENT: Veillez à installer l'appareil sur un support stable.
PERIODE DE NON UTILISATION: Débranchez le cordon d'alimentation del'appareil en cas de non utilisation prolongée.
MISE A LA TERRE:
- Si l'appareil est équipé d'une alimentation à courant alternatif (Prise pos-sédant un contact plus large que l'autre), celle-ci se connectera correctementà la prise uniquement si vous respectez le sens de branchement. Il s'agit làd'une mesure de sécurité. Si vous n'arrivez pas à insérer la fiche dans la prise,inversez la fiche. Si vous ne pouvez toujours pas insérer cette dernière, con-tactez un électricien afin de remplacer votre prise électrique qui est obsolète.Veillez à respecter cette consigne.
- Si l'appareil est équipé d'une fiche d'alimentation avec terre, veillez à laconnecter à une prise électrique équipée d'une connexion à la terre. Il s'agitd'une mesure de sécurité. Si vous ne pouvez insérer la fiche dans la prise élec-trique, contactez un électricien afin de remplacer votre prise électrique qui estobsolète. Il est important de respecter cette mesure de sécurité.
INSTALLATION DU CORDON D'ALIMENTATION: Les cordons d'alimenta-tion doivent être déroulés et rangés proprement afin d'éviter de se prendre lespieds dedans, en particulier les cordons reliés aux prises électriques.
ANTENNE EXTERIEURE: Si vous reliez votre appareil à une antenne ou uncâble extérieur, assurez-vous de la présence d'une connexion à la terre afind'éviter les surtensions et les décharges d'électricité statique. L'article 810 duNational Electrical Code, ANSI/NFPAS 70, précise toutes les informationsnécessaires afin d'effectuer correctement le branchement à la terre du pylôneou de la structure porteuse, la connexion du câble à l'antenne de décharge,dimensions des connecteurs de mise à la terre, connexions des électrodes,consignes de mise à la terre des électrodes. VOIR SCHÉMA B.
ORAGE/FOUDRE: En cas d'orage et de non utilisation prolongée, débranchezle cordon d'alimentation, le câble d'antenne et les cordons audio. Ceci afind'éviter les dégâts occasionnés par la foudre et les surcharges électriques.
LIGNES ELECTRIQUES: Une antenne extérieure ne doit pas être située à
proximité immédiate de lignes électriques et/ou d'un transformateur élec-trique, afin de ne pas tomber dessus en cas de chute. Lors de l'installationd'une antenne extérieure, veillez à éviter tout contact avec des lignes élec-triques : tout contact peut être fatal.
SURCHARGE: Ne surchargez pas les prises électriques, blocs multiprises &rallonges en y connectant trop d'appareils. Ceci afin d'éviter tout risque desurcharge électrique ou d'incendie (Surchauffe).
INSERTION D'OBJET & DE LIQUIDE: N'insérez pas d'objets dans les fentesou ouvertures de l'appareil afin d'éviter tout risque de choc électrique et d'in-cendie. Ne jamais renverser de liquide sur l'appareil.
SERVICE APRES VENTE: N'essayez pas de réparer cet appareil ; en l'ouvrantou en le démontant afin d'éviter tout risque de choc électrique. En cas deproblème, veuillez prendre contact avec votre revendeur.
PANNE/SITUATION NECESSITANT UN RETOUR EN SAV: Débranchez l'ap-pareil de la prise électrique, remettez le dans son emballage d'origine et con-tactez votre revendeur en tenant compte des situations suivantes :
- Lorsque le cordon d'alimentation est endommagé.
- Si un liquide a été renversé dessus.
- Si l'appareil a été exposé à la pluie.
- Si l'appareil ne fonctionne pas correctement malgré le respect des instruc-tions d'utilisation. Ajustez uniquement les réglages préconisés dans le moded'emploi, toute manipulation ou réglage non conseillés dans ce dernier peutendommager l'appareil et procurer plus de travail en cas d'intervention SAVafin de remettre l'appareil en état de marche.
PIECES DE RECHANGE: Lorsque vous avez besoin de remplacer des piècesde l'appareil, veillez à utiliser des pièces d'origine ou possédant des caractéris-tiques identiques. L'utilisation de pièces non autorisées peut endommagerl'appareil : surchauffe, court-circuit, choc électrique…
CONTROLE DE SECURITE: Avant de récupérer votre appareil, assurez vousque le SAV a effectué tous les contrôles de sécurité nécessaires afin de vousrestituer un appareil en état de marche.
INSTALLATION AU PLAFOND OU SUR UN MUR: Ce type d'installation estdéconseillé.
CHALEUR: Veillez à installer l'appareil loin de toute source de chaleur telleque radiateur, réchaud ou tout autre appareil produisant de la chaleur.
RECYCLAGE: Cet appareil ne doit pas être considéré comme un déchetdomestique à usage unique. Vous devez le déposer dans un point de collectedestiné au recyclage des appareils électroniques et électroménagers. AInsivous préserverez l'environnement et éviterez les problêmes de santé publiquevis à vis de conséquences négatives; liées à leur dépôt dans un endroit nonapproprié. Le recyclage contribue à préserver les ressources naturelles. Pourplus d'informations sur les conditions de recyclage de l'appareil, veuillez con-tacter les autorités de votre pays, les institutions locales ou votre revendeur.
A T T E N T I O NAVANT TOUTE UTILISATION DE L'APPAREIL, MERCI DE PRENDRECONNAISSANCE DES INSTRUCTIONS D'UTILISATION & DE SECU-
RITE! RISQUE DE CHOC ÉLECTRIQUE, NE PAS OUVRIR!

I28 I92 ERRORWAV256
PROGRESS
level clip
60% I00%80% LOW BATTERY40%20%REC sel
line inline in
r l
level
minmax
DC in(chargeable)
power
reset USb keyon off
1
2**
3 4 56
7
8 9
10
11
12
*USB Flash Driveor Mass Storage Device *
Source Audio (Console de mixage, platinevinyle avec pré-amplificateur, tout appareil
fournissant un niveau ligne en sortie)
*Eléments non livrés avec l'appareil. Les schémas illustrent les différentes possibilités de branchements…. **Les cordons et prises électriques ne concernent que les USA. Les appareils destinés aux autres pays sont livrés avec les cordons adéquates.
Pièces livrées:Enregistreur Portable USB iKEYAlimentation externeCordon RCA RCA / Mini-jack 3.5mm
VisManuel d'utilisationCarte de garantie
1. Embase pour Alimentation Externe2. Alimentation Externe3. Mise sous Tension4. Touche Reset
5. Port USB6. Entrée RCA7. Niveau d'Enregistrement8. Touche Enregistrement
9. Touche Sélection10. Indicateur de Niveau Excessif11. Taux de Compression / Indicateur de Chargement12. Erreur / Témoin de Batteries Faibles
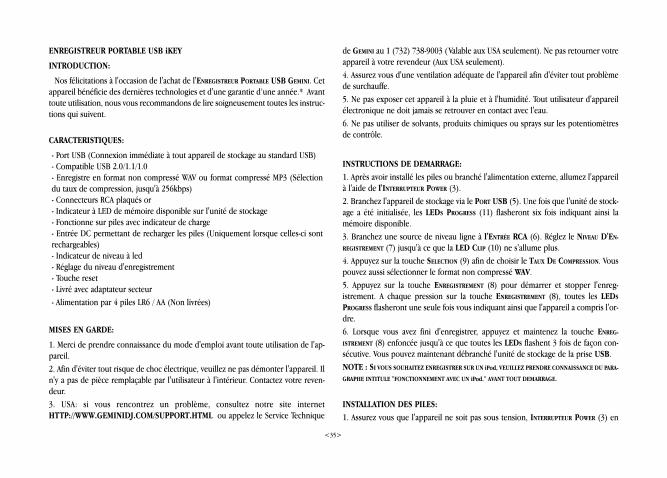
ENREGISTREUR PORTABLE USB iKEY
INTRODUCTION:
Nos félicitations à l'occasion de l'achat de l'ENREGISTREUR PORTABLE USB GEMINI. Cetappareil bénéficie des dernières technologies et d'une garantie d’une année.* Avanttoute utilisation, nous vous recommandons de lire soigneusement toutes les instruc-tions qui suivent.
CARACTERISTIQUES:
- Port USB (Connexion immédiate à tout appareil de stockage au standard USB)- Compatible USB 2.0/1.1/1.0- Enregistre en format non compressé WAV ou format compressé MP3 (Sélectiondu taux de compression, jusqu'à 256kbps)- Connecteurs RCA plaqués or- Indicateur à LED de mémoire disponible sur l'unité de stockage- Fonctionne sur piles avec indicateur de charge- Entrée DC permettant de recharger les piles (Uniquement lorsque celles-ci sontrechargeables)- Indicateur de niveau à led- Réglage du niveau d'enregistrement- Touche reset- Livré avec adaptateur secteur- Alimentation par 4 piles LR6 / AA (Non livrées)
MISES EN GARDE:
1. Merci de prendre connaissance du mode d'emploi avant toute utilisation de l'ap-pareil.2. Afin d'éviter tout risque de choc électrique, veuillez ne pas démonter l'appareil. Iln'y a pas de pièce remplaçable par l'utilisateur à l'intérieur. Contactez votre reven-deur. 3. USA: si vous rencontrez un problème, consultez notre site internetHTTP://WWW.GEMINIDJ.COM/SUPPORT.HTML ou appelez le Service Technique
de GEMINI au 1 (732) 738-9003 (Valable aux USA seulement). Ne pas retourner votreappareil à votre revendeur (Aux USA seulement).4. Assurez vous d'une ventilation adéquate de l'appareil afin d'éviter tout problèmede surchauffe.5. Ne pas exposer cet appareil à la pluie et à l'humidité. Tout utilisateur d'appareilélectronique ne doit jamais se retrouver en contact avec l'eau.6. Ne pas utiliser de solvants, produits chimiques ou sprays sur les potentiomètresde contrôle.
INSTRUCTIONS DE DEMARRAGE:
1. Après avoir installé les piles ou branché l'alimentation externe, allumez l'appareilà l'aide de l'INTERRUPTEUR POWER (3). 2. Branchez l'appareil de stockage via le PORT USB (5). Une fois que l'unité de stock-age a été initialisée, les LEDS PROGRESS (11) flasheront six fois indiquant ainsi lamémoire disponible. 3. Branchez une source de niveau ligne à l'ENTRÉE RCA (6). Réglez le NIVEAU D'EN-
REGISTREMENT (7) jusqu'à ce que la LED CLIP (10) ne s'allume plus.4. Appuyez sur la touche SELECTION (9) afin de choisir le TAUX DE COMPRESSION. Vouspouvez aussi sélectionner le format non compressé WAV. 5. Appuyez sur la touche ENREGISTREMENT (8) pour démarrer et stopper l'enreg-istrement. A chaque pression sur la touche ENREGISTREMENT (8), toutes les LEDS
PROGRESS flasheront une seule fois vous indiquant ainsi que l'appareil a compris l'or-dre.6. Lorsque vous avez fini d'enregistrer, appuyez et maintenez la touche ENREG-
ISTREMENT (8) enfoncée jusqu'à ce que toutes les LEDS flashent 3 fois de façon con-sécutive. Vous pouvez maintenant débranché l'unité de stockage de la prise USB.NOTE : SI VOUS SOUHAITEZ ENREGISTRER SUR UN iPod, VEUILLEZ PRENDRE CONNAISSANCE DU PARA-
GRAPHE INTITULE ''FONCTIONNEMENT AVEC UN iPod.'' AVANT TOUT DEMARRAGE.
INSTALLATION DES PILES:
1. Assurez vous que l'appareil ne soit pas sous tension, INTERRUPTEUR POWER (3) en
<35>

position OFF, avant de le relier à une prise électrique. 2. Derrière la façade en aluminium de l'iKEY se trouve l'emplacement pour les pilesnécessaires à l'alimentation de l'appareil. Pour accéder à l'emplacement enlevez lesvis situées à chaque angle de la plaque en aluminium. Si vous devez changer rapide-ment les piles, vous pouvez utiliser des vis cruciformes à accès rapide en lieu etplace des vis installées d'origine. 3. Installez les batteries/piles en respectant les instructions du diagramme présentdans le compartiment. Respectez la polarité +/+ & -/-.4. Remettez en place la façade en aluminium et ne serrez pas trop fort les vis de fix-ation. 5. Pour recharger des batteries rechargeables, branchez l'ADAPTATEUR SECTEUR (2) surune prise électrique. Branchez l'extrémité du cordon à l'ENTREE DC IN (1) afin d'ali-menter le iKEY ou de recharger les batteries. L'INTERRUPTEUR POWER (3) doit être enposition ON afin de recharger les batteries.NOTE : NE PAS RECHARGER DES PILES NON RECHARGEABLES, CELA PEUT ENTRAINER UN RISQUE DE
FUSION, D'INCENDIE OU D'EXPLOSION. IL EXISTE PLUSIEURS T YPES DE PILES RECHARGEABLES ET LETEMPS NECESSAIRE A LEUR RECHARGE N'EST PAS NECESSAIREMENT IDENTIQUE. NOUS VOUS RECOMMAN-
DONS D'UTILISER DES PILES DE T YPE NICKEL-METAL-HYBRIDE T (NiMH).
CONNECTIONS:
1. Assurez vous que L'INTERRUPTEUR POWER (3) soit en position OFF avanttout branchement sur une prise électrique.
2. Branchez l'ADAPTATEUR SECTEUR (2) sur une prise électrique et branchez l'ex-trémité du cordon à l'ENTREE DC IN (1) afin d'alimenter le iKEY ou derecharger les batteries. 4 piles alcalines LR6 / AA peuvent être utilisées afin
d'alimenter l'appareil.3. L'ENTRÉE LIGNE RCA (6) permet de connecter toute source audio deniveau ligne au iKEY afin de procéder à l'enregistrement. Lorsque vousconnectez le iKEY à votre console de mixage, veuillez utiliser la SOR-
TIE ENREGISTREMENT.
4. Le PORT USB (5) est compatible avec les standard 2.0/1.1/1.0 et permet derelier le iKEY à tout périphérique de stockage compatible USB (Non livré) :
clé USB, disque dur externe & baladeur MP3… Lors de l'enregistrement, toutes lesinformations seront enregistrées sur ce périphérique.
FUNCTIONS:
1. L'INTERRUPTEUR POWER: Après avoir installé les piles/batteries et relié l'appareil àune prise électrique, mettez L'INTERRUPTEUR POWER (3) en position ON. L'appareil s'al-lumera et les LEDs rouges s'allumeront. Eteignez l'appareil en mettant L'INTERRUP-
TEUR POWER (3) en position OFF. 2. REGLAGE DE NIVEAU : Le niveau d'enregistrement se règle à l'aide dupotentiomètre LEVEL/NIVEAU (7). La LED LEVEL CLIP (10) restera allumée
en l'absence de signal ou de signal trop faible. La LED LEVEL CLIP (10) clignoteralorsque le niveau audio en entrée est trop élevé. Lorsque le niveau audio est cor-rectement réglé, la led restera éteinte.
3. SELECTION : Appuyez sur la touche SELECTION (9) afin de sélectionner le for-mat d'enregistrement. Vous pouvez choisir le format MP3 afin d'obtenir unfichier compressé léger et le format non compressé WAV. En sélectionnantle format MP3, vous pouvez choisir le taux de compression : 128 kbps, 192
kbps ou 256 kbps (Kylobites par seconde).NOTE: EN SELECTIONNANT LE FORMA WAV, VOUS CHOISISSEZ LA MEILLEURE QUALITE AUDIO POU-
VANT ETRE FOURNIE PAR LE iKEY. CE FORMAT NECESSITE 10 Mo DE MEMOIRE PAR MINUTE D'ENREG-ISTREMENT. LORSQUE VOUS ENREGISTREZ DANS CE FORMAT, ASSUREZ VOUS D'AVOIR UNE CAPACITE DEMEMOIRE SUFFISANTE.
4. ENREGISTREMENT: La touche RECORD (8) permet le démarrage et l'arrêt del'enregistrement. A chaque enregistrement, le iKEY crée un nouveau fichi-er. Les fichiers sont numérotés suivant leur ordre d'enregistrement.
5. LEDS: Les LEDS possèdent 3 fonctions d'information:
- La led LEVEL CLIP (10) clignote lorsque le niveau audio en entrée est trop élevé. Laled LEVEL CLIP (10) reste allumée lorsque le niveau audio en entrée est trop faible ouen l'absence totale de niveau audio. - La sérigraphie située au dessus des leds indique les TAUX DE COMPRESSION
poweronoff
DC in(chargeable)
line in
r l
USb key
level
minmax
REC
sel
I28 I92 ERRORWAV256
PROGRESS
level clip
60% I00%80% LOW BATTERY40%20%
REC sel
iKey
<36>

disponibles pour l'enregistrement. Appuyez sur la touche SELECTION (9) afin desélectionner le taux de compression désiré. - La sérigraphie située sous les leds indique, en pourcentage, l'espace occupé parl'enregistrement sur le périphérique de destination. Les LEDS (11) s'allument au furet à mesure de la progression de l'enregistrement. Lorsque la LED d'une valeur clig-note cela signifie que l'espace de cette dernière n'a pas encore été atteint. Lorsquecette même LED reste allumée, cela signifie que la valeur de cette dernière a étéatteinte. Lorsque l'on approche des 100%, les 5 LEDS clignotent simultanément.- La LED située a droite clignote lorsque les piles/batteries sont vides ou resteallumée en cas de problème de fonctionnement.
6. RE-INITIALISATION : La touche RE-INITIALISATION (4) sert réinitialiser l'appareilen cas de problème de connexion ou tout autre problème de fonctionnement.
L'accès à la touche RE-INITIALISATION (4) est protégé et ne se doit s'effectuer que defaçon occasionnelle.
INSTRUCTIONS D'UTILISATION
1.Maintenant que votre appareil est alimenté , soit avec les batteries LR6 'AA' ,soitavec L'ADAPTATEUR SECTEUR (2), mettez L'INTERRUPTEUR POWER (3) en position 'ON'.L'INDICATEUR DE NIVEAU (10) va s'allumer indiquant qu'il n'y a aucun signal d'entré.
2. Connectez votre unité de stockage USB (exp. : clef USB, disque dur externe USB,Lecteur MP3 compatible USB) dans le PORT USB (5). En quelques secondes, l'ap-pareil va détecter et initialiser votre unité de stockage USB. Durant cette période, lesvoyants de votre appareil vont s'illuminer. Une fois l'initialisation de la mémoire ter-minée, votre iKEY affichera la place disponible sur votre unité de stockage en faisantclignoter 6 fois les LEDs d'affichage.
3. Dès que les LEDS indiquant l'espace libre sur votre unité de stockage USBs'éteignent, vous pouvez sélectionner le taux de compression grâce au SELECTEUR
(9). En appuyant sur ce sélecteur, vous sélectionnerez soit 128Kbps,192Kbps,256Kbps soit aucune compression en .WAV. Après cette sélection,si vous voulez vérifier l'espace restant sur votre unité de stockage, il vous suffit degarder le SELECTEUR (9) enfoncé pendant 3 ou 4 secondes. L'espace libre de votremémoire restera ainsi affiché jusqu'à ce que le SELECTEUR (9) soit de nouveau pressé.
4. Après avoir sélectionné le taux de compression, vous devez maintenant régler leniveau d'enregistrement audio afin d'obtenir un volume adéquate pour ne pas sat-urer le iKEY. Pour faciliter ce réglage, nous vous conseillons d'abord de régler leniveau de sortie de votre source audio si cela est possible, puis dans un deuxièmetemps, ajustez le niveau d'entrée sur votre iKEY grâce au POTENTIOMETRE (7) . Pourobtenir le niveau d'enregistrement adéquate, augmentez le niveau d'entrée grâce auPOTENTIOMETRE (7), jusqu'à obtenir un clignotement rapide de la LED DE CLIP (10),puis diminuez progressivement le niveau, jusqu'à n'obtenir qu'un seul clignotementde la LED DE CLIP toutes les 3 ou 4 secondes.
Si toutefois vous suspectez que votre niveau audio peut augmenter inopinément, ilserait préférable de diminuer encore légèrement le réglage de niveau d'enreg-istrement à l'aide du POTENTIOMETRE (7).
NOTE : SI VOTRE LED DE CLIP CLIGNOTE TROP SOUVENT, VOTRE ENREGISTREMENT SERA SAT-URÉ. EN CAS DE DOUTE, IL VAUT MIEUX AVOIR RÉGLÉ UN FAIBLE NIVEAU D'ENTRÉE TOUT EN
SACHANT QU'IL EST TOUJOURS PLUS SIMPLE DE RELEVER LE NIVEAU AUDIO SUR VOTRE LOGICIEL
PC, QUE DE SUPPRIMER LA DISTORSION DUE À UN MAUVAIS ENREGISTREMENT.
5. Une fois tous ces paramètres correctement sélectionnés, appuyez sur le boutonENREGISTREMENT (8) pour commencer l'enregistrement. Lorsque vous appuyez sur lebouton ENREGISTREMENT (8), toutes les LEDs d'affichage vont clignoter une fois pourvous indiquer que la commande d'enregistrement a bien été validée. Dès le lance-ment de l'enregistrement , le iKEY affichera à nouveau le pourcentage de placeoccupée sur votre unité de stockage USB. Les LEDs de niveau clignotent à l'ap-proche du remplissage de la mémoire qu'elles indiquent. Si vous désirez visualiserle Taux de compression sélectionner plutôt que le niveau de remplissage de votreunité de stockage, appuyez simplement sur le SELECTEUR (9) et ainsi basculer entreles deux affichages. Lorsque vous désirez stopper l'enregistrement, appuyer à nou-veau sur le bouton d'ENREGISTREMENT (8). Dès que vous appuyez sur le boutond'ENREGISTREMENT (8), l'enregistrement cessera et les LEDS indiquant l'espace utilisécesseront de clignotées et resteront allumées pour vous indiquer la fin de la phased'enregistrement. Après l'arrêt de l'enregistrement le iKEY va fermer le fichier ettoutes les LEDS de visualisation vont clignoter une fois indiquant ainsi que votreiKEY est prêt à recevoir une autre commande.
NOTE : SI VOUS ENREGISTREZ SUR UN iPOD® QUI POSSÈDE DÉJÀ UNE QUANTITÉ IMPORTANTE
reset
<37>

DE FICHIERS EN LIBRAIRIE, VOUS REMARQUEREZ CERTAINEMENT UN PETIT RETARD AU DÉMAR-RAGE ET À L'ARRÊT DE L'ENREGISTREMENT AVEC VOTRE iKEY . CECI EST TOUT À FAIT NORMAL.CE RETARD REFLÈTE LE TEMPS DE TRAITEMENT DES INFORMATIONS NÉCESSAIRES POUR QUE LE
IPOD® PUISSE LIRE CE FICHIER. POUR PLUS D'INFORMATION, VEUILLEZ VOUS RÉFÉRER À LA
SECTION “NOTES D'UTILISATION POUR LE iPOD®".
6. Si vous désirez relancer l'enregistrement, il vous suffit d'appuyer à nouveau sur lebouton d'ENREGISTREMENT (8), ce qui relancera l'enregistrement sur un nouveau fichi-er.
7. Si, pendant l'enregistrement, votre unit de stockage approche de sa capacitétotale, les LEDS vont clignoter continuellement. Ce clignotement sera déclenché àl'approche des 5% restants de votre unité de stockage.
Quand votre unité de stockage est plein, toutes les LEDS vont clignoter trois fois,vous indiquant que le iKEY a cessé l'enregistrement. La LED indiquent les 100% vamaintenant s'allumer pendant que les autres LED vont continuer de clignoter rapi-dement pour vous alerter de l'arrêt total du processus d'enregistrement du à lamémoire pleine de votre unité de stockage. Après environs 3 minutes, toutes lesLEDS de progression vont s'allumer.
8. Pour déconnecter votre UNITÉ DE STOCKAGE USB, restez appuyer sur le boutond'ENREGISTREMENT (8) jusqu'au clignotement (3 fois) de toutes les LEDS de progres-sion. Cette action a pour but de cloturer correctement l''échange de données entrele iKEY et votre unité de stockage USB. Vous éviterez ainsi tout risque de corrup-tion des données que vous venez d'enregistrer. Une fois la séquence de déconnec-tion achevée, l'unité de stockage doit être déconnecté puis re-connecté afin derecommencer un enregistrement. Si ceci n'est pas fait, toutes les LEDS vont alorsclignoter trois (3) fois, vous indiquant que l'unité de stockage doit être retiré avantde continuer.
NOTE : BIEN QUE LE iKEY SOIT POURVU D'UN PROGRAMME DE SÉCURITÉ DES DATA EN CAS
DE DÉCONNECTION ACCIDENTELLE, IL EST TOUJOURS PRÉFÉRABLE DE SUIVRE LA PROCÉDURE DE
DÉCONNECTION EXPLIQUÉE CI-DESSUS AFIN DE PRÉSERVER L'INTÉGRITÉ DES DONNÉES QUE
VOUS VENEZ D'ENREGISTRER.
9. Pour écouter ou éditer votre enregistrement, il vous suffit de connecter votreunité de stockage USB sur un PC ou Macintosh. Les fichiers seront ainsi directement
accessibles depuis votre unité de stockage USB. Le iKEY va nommer les fichiersnumériquement dans l'ordre dans lequel ils auront été enregistrés. Ces noms defichiers indiqueront également le format dans lequel ils auront été enregistré : .MP3ou .WAV . Vous pouvez maintenant utiliser votre programme d'application audiopréférée pour manipuler, éditer, et graver vos créations sur un CD.
NOTE : POUR PLUS D'INFORMATION SUR LE TRANSFERT DEPUIS VOTRE iPOD®, VEUILLEZ
VOUS REPORTER AU PARAGRAPHE INTITULÉ “NOTES D'UTILISATION POUR LE iPOD®” .
10. Dans le cas où vous utilisez un iPod® pour stocker votre enregistrement, vousavez la possibilité d'écouter instantanément votre enregistrement en plaçant votrefichier en dernier sur votre liste de chanson de votre iPod®. Le nom du fichier encours créé par le iKEY commence par “iKEY” suivit du format (MP3 ou WAV) et dunuméro de la séquence dans laquelle l'enregistrement a été créé.
NOTE : POUR PLUS D'INFORMATIONS SUR LE FONCTIONNEMENT DE VOTRE iKEY AVEC LE
iPOD, VEUILLEZ VOUS RÉFÉRER AU PARAGRAPHE INTITULÉ " NOTES D'UTILISATION POUR LE
iPOD® ".
LIMITES D'UTILISATIONS:
1. Dans le cas où vous utilisez un iPod® pour stocker votre enregistrement, et sicelui-ci contient déjà un nombre important de chansons dans sa librairie, vousremarquerez certainement un petit retard au démarrage et à l'arrêt de l'enreg-istrement avec votre iKEY . Si cette librairie possède déjà approximativement 1000chansons ou plus, vous remarquerez un retard d'environs 5 secondes au départ del'enregistrement lorsque vous appuierez sur la touche ENREGISTREMENT (8) Si vousappuyez de nouveau sur cette touche ENREGISTREMENT (8) (pour arrêter l'enreg-istrement) le iKEY mettra environs 15 secondes pour fermer le fichier. Ceci est toutà fait normal. Ce retard reflète le temps de traitement des informations nécessairespour que le iPod® puisse lire ce fichier.
Ce retard peut néanmoins être réduit si vous utilisez un iPod® avec une librairieplus petite ou en défragmentant votre iPod® .
2. Si vous utilisez un disque dur USB ou une unité de stockage interne à un lecteurMP3 (type iPod®), des grésillements ou des sauts peuvent être présent dans votreenregistrement, ils sont causés par la fragmentation des fichiers. Pour de meilleuresperformances assurez vous d'avoir défragmenté votre unité de stockage avant d'en-
<38>

registrer.
3. Si vous désirez enregistrer sur des lecteurs MP3 qui possèdent une mémoireinterne, n'oubliez pas que le iKEY ne sera capable d'accéder qu'à des appareils quisont de type “Plug & Play” c'est-à-dire qui ne nécessitent aucun pilote . Les appareilsnécessitant un logiciel approprié ne seront pas reconnu par le iKEY. La plupart desunités de stockage USB en requière aucun pilote ni logiciel et sont donc compati-bles avec le iKEY.
NOTES D'UTILISATION POUR LE iPod®
1. Lorsque vous connectez votre iPod® à votre PC ou Macintosh, sur votre logicieliTunes®, il est impératif de spécifier que vous désirez “un transfert manuel desmorceaux”. Si votre iTunes® est configuré en “mise à jour automatique desmorceaux et liste de lecture”, les enregistrements effectués précédemment avec leiKEY seront EFFACES. Cette option peut être sélectionnée dans l'onglet “Edition”dans la fenêtre principale de iTunes®, puis sélectionnez“Préferences”.Sélectionnez maintenant l'onglet “iPod”, puis l'onglet “Music”.
NOTE : CETTE CONFIGURATION DOIT ÊTRE FAITE AVANT TOUT ENREGISTREMENT AVEC VOTRE
iKEY POUR VOUS ASSURER DE NE PAS PERDRE VOS ENREGISTREMENTS PRÉCÉDENTS..
2. Avant d'enregistrer sur votre iPod®, celui-ci doit être initialisé par le logicieliTunes®. Vous devez également utiliser iTunes® pour charger au moins une chan-son sur votre iPod® avant de commencer l'enregistrement avec votre iKEY. Cecin'est valable que si votre iPod® est neuf et pas encore formaté. Si vous avez déjàutilisé votre iPod® avec le logiciel iTunes® , vous pouvez sauter cette étape.
3. Quand votre iPod® est connecté au iKEY , l'écran de votre iPod® indiquera “Nepas déconnecter”. signifiant que le transfert de données est en cours.
4. Pour déconnecter le iPod®, maintenez enfoncé la touche ENREGISTREMENT (8)jusqu'à ce que les LEDS clignotent 3 fois. Attendez que votre iPod® n'indique plusle message “Ne Pas Débrancher”.
5. Si vous désirez lire votre enregistrement avec votre iPod® , vous pourrez trou-ver les enregistrement du iKEY dans le dossier "chanson" à la fin de la liste.
6. Pour retrouver vos enregistrements dans votre iPod®, vous devez suivre les
instructions ci-après. Les fichiers iKEY sont placés dans un répertoire caché .Cerépertoire doit donc être visible pour accéder aux fichiers. Notez que les for-matages de iPod® faits par un PC ou un Mac sont différent et non compatiblesentre eux.
APPLICATION AVEC WINDOWS XP (PC) :
1. Après avoir connecté votre iPod® , sélectionnez “Poste de travail” puis doublecliquez sur le iPod® qui doit apparaître sous “Périphériques utilisant des sup-ports amovibles”.
2. Cliquez maintenant sur l'onglet “Outils” puis sur “Options des dossiers”.
3. Cliquez maintenant sur l'onglet “Affichage” puis cochez la case “Afficher lesfichiers et dossiers cachés”. Cliquez sur “Appliquer” puis sur “OK”. Dès que vousaurez cliqué sur “OK”, vous verrez apparaître un dossier appelé “iPod_Control”.
4. Ouvrez le répertoire “iPod_Control” puis le répertoire “Music”. Cliquez main-tenant avec le bouton droit de votre souris sur “créer un Raccourci”. Indiquez lechemin de votre “Bureau” dans ce raccourci.
5. Une fois le raccourci créé sur votre “Bureau”, retourner sur “Outils” puis sur“Options des dossiers”.
6. Cliquez à nouveau sur l'onglet “Affichage” puis cochez la case “Ne pas afficherles fichiers et dossiers cachés”. Après avoir cliqué sur “Appliquer”, cliquez sur“OK”. Les fichiers cachés ne seront plus visibles.
7. Après avoir terminé cette procédure, les fichiers créés par votre iKEY serontdésormais rapidement accessibles grâce au raccourci créé et placé sur votre“Bureau”.
NOTE : UNE FOIS VOTRE iPOD® DÉBRANCHÉ DE VOTRE ORDINATEUR, LE RACCOURCI CRÉÉ
NE SERA PLUS UTILISABLE.
INSTRUCTIONS POUR MAC OS X (APPLE) :
1. Après avoir branché votre iPod®, naviguez sur le menu ''Macintosh HD'' (Situésur le bureau), puis ouvrez ''Applications'', puis ''Utilitaires'', chargez l'application
<39>

appelée ''Terminal''. Ceci affichera une fenêtre de commande.
2. Tapez ce qui suit de façon exacte :
defaults write com.apple.finder AppleShowAllFiles TRUE (Puis tapez entrée)
killall finder (Puis tapez entrée).
Conservez cette fenêtre ouverte, car vous devrez y revenir à l'étape #6.
3. Revenez sur le bureau et ouvrez 'iPod_Control', puis 'Music', enfin cliquez sur'iKEY' (Situé en tout en bas).
4. En haut de l'écran, déroulez le menu 'Action' (L'icône ressemble à un engrenage)& sélectionnez 'Make Alias.' Copiez le lien sur votre bureau.
5. Tirez le 'iKEY Alias' sur votre bureau.
6. Une fois que vous avez installé votre Alias sur le bureau (Où ailleurs si vouspréférez), retournez dans l'application 'Terminal' et rentrez ce qui suit de façonexacte:
defaults write com.apple.finder AppleShowAllFiles FALSE (Puis tapez entrée)
killall finder (Puis tapez entrée).
Une fois que vous avez terminé cette procédure, vous ne verrez plus les fichierscachés.
7. Lorsque vous avez terminé ces procédures, les fichiers enregistrés via votre iKEYseront accessibles en ouvrant l'Alias créé et installé sur votre bureau. Bien que vouspuissiez effacer les fichiers de ce dossier, il est recommandé d'utiliser iTunes® afinde gérer la librairie de votre your iPod®.
NOTE : LORSQUE VOUS DEBRANCHEZ L'iPod® DE VOTRE APPLE, CE LIEN NE SERA PLUS ACCESSIBLE.
CARACTERISTIQUES:
Fréquence d'échantillonnage..............................................................44.1kHz, 16 Bits
Dynamique:...........................................................................................................98dB
Distorsion Harmonique Totale:............................................................................91 dB
Bande passante:.......................................................................................20Hz - 20KHz
Alimentation:.............................................................4 x PILES LR6 / AA (non incluses)
........................................................................................Adaptateur secteur 9V 500mA
Capacité d'enregistrement sur piles/batteries.....…………....…..+/- 4 ou 5 heures
.....................(Variable suivant le périphérique utilisé et la qualité des piles/batteries)
Alimentation électrique:.............................................120 VAC 60Hz ou 230 VAC 50Hz
iPod® & iTunes® sont des marques déposées de Apple Computer, Inc.
*La garantie énoncée n'affecte pas les garanties locales.
NOTES:
________________________________________________________________________________________________________________________________________________________________________________________________________________________________________________________________________________________________________________________________________________________________________________________________________________________________________________________________________________________________________________________________________________________________________________________________________________________________________________________________________________________________________________________________________________________________________________________________________________________________________________________________________________________________________________________________________________________________________________________________________________________________________________________________________________________________________________________________________________________________________________________________________________________________________________________________________________________________________________________________________________________________________________________________________________________________________________________________________________________________________________________________________________________________________________________________________________________________________________________________________________________________________________________________________________________________________________________________________________________________________________________________________________________________________________________________________________________________________________________________________________________________________________________________________________________________________________________________________________________________________________________________________________________________________________________________________________________________________________________________________________________________________________________________________________________________________________________________________________________________________________________________________________________________________________________________________________________________________________________________________________________________________________________________________________________________________________________________________________________________________________________________________________________________________________________________________________________________________________________________________________________________________________________________________________________________________________________________________________
<40>
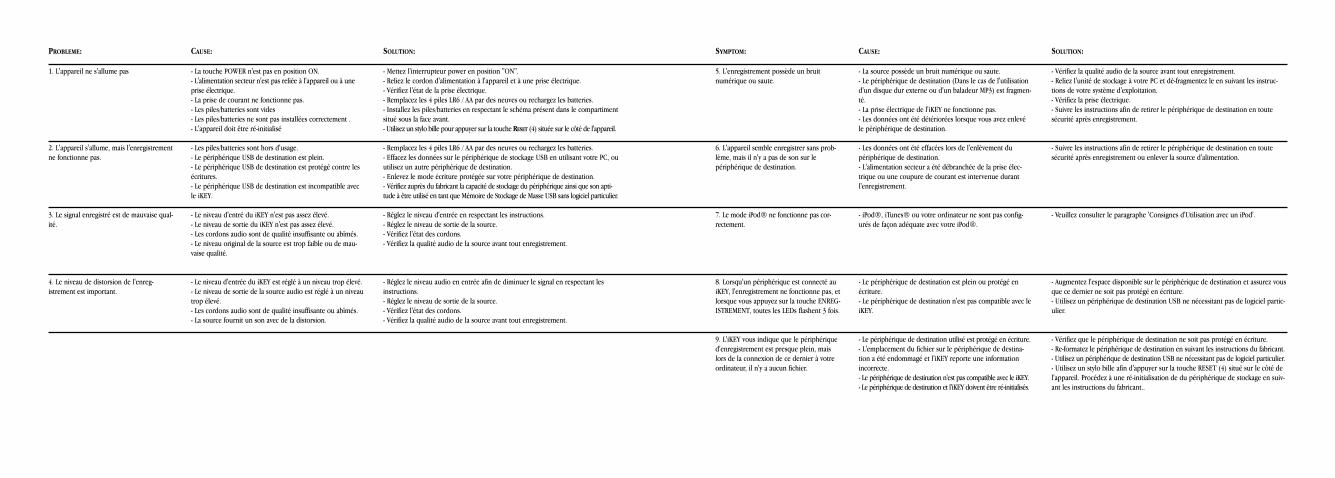
PROBLEME:
1. L'appareil ne s'allume pas
2. L'appareil s'allume, mais l'enregistrementne fonctionne pas.
3. Le signal enregistré est de mauvaise qual-ité.
4. Le niveau de distorsion de l'enreg-istrement est important.
SYMPTOM:
5. L'enregistrement possède un bruitnumérique ou saute.
6. L'appareil semble enregistrer sans prob-lème, mais il n'y a pas de son sur lepériphérique de destination.
7. Le mode iPod® ne fonctionne pas cor-rectement.
8. Lorsqu'un périphérique est connecté auiKEY, l'enregistrement ne fonctionne pas, etlorsque vous appuyez sur la touche ENREG-ISTREMENT, toutes les LEDs flashent 3 fois.
9. L'iKEY vous indique que le périphériqued'enregistrement est presque plein, maislors de la connexion de ce dernier à votre ordinateur, il n'y a aucun fichier.
CAUSE:
- La touche POWER n'est pas en position ON.- L'alimentation secteur n'est pas reliée à l'appareil ou à uneprise électrique.- La prise de courant ne fonctionne pas.- Les piles/batteries sont vides- Les piles/batteries ne sont pas installées correctement .- L'appareil doit être ré-initialisé
- Les piles/batteries sont hors d'usage.- Le périphérique USB de destination est plein.- Le périphérique USB de destination est protégé contre lesécritures.- Le périphérique USB de destination est incompatible avecle iKEY.
- Le niveau d'entré du iKEY n'est pas assez élevé.- Le niveau de sortie du iKEY n'est pas assez élevé.- Les cordons audio sont de qualité insuffisante ou abîmés.- Le niveau original de la source est trop faible ou de mau-vaise qualité.
- Le niveau d'entrée du iKEY est réglé à un niveau trop élevé.- Le niveau de sortie de la source audio est réglé à un niveautrop élevé.- Les cordons audio sont de qualité insuffisante ou abîmés.- La source fournit un son avec de la distorsion.
CAUSE:
- La source possède un bruit numérique ou saute.- Le périphérique de destination (Dans le cas de l'utilisationd'un disque dur externe ou d'un baladeur MP3) est fragmen-té. - La prise électrique de l'iKEY ne fonctionne pas.- Les données ont été détériorées lorsque vous avez enlevéle périphérique de destination.
- Les données ont été effacées lors de l'enlèvement dupériphérique de destination.- L'alimentation secteur a été débranchée de la prise élec-trique ou une coupure de courant est intervenue durantl'enregistrement.
- iPod®, iTunes® ou votre ordinateur ne sont pas config-urés de façon adéquate avec votre iPod®.
- Le périphérique de destination est plein ou protégé enécriture.- Le périphérique de destination n'est pas compatible avec leiKEY.
- Le périphérique de destination utilisé est protégé en écriture.- L'emplacement du fichier sur le périphérique de destina-tion a été endommagé et l'iKEY reporte une informationincorrecte.- Le périphérique de destination n'est pas compatible avec le iKEY.- Le périphérique de destination et l'iKEY doivent être ré-initialisés.
SOLUTION:
- Mettez l'interrupteur power en position "ON".- Reliez le cordon d'alimentation à l'appareil et à une prise électrique.- Vérifiez l'état de la prise électrique.- Remplacez les 4 piles LR6 / AA par des neuves ou rechargez les batteries.- Installez les piles/batteries en respectant le schéma présent dans le compartimentsitué sous la face avant.- Utilisez un stylo bille pour appuyer sur la touche RESET (4) située sur le côté de l'appareil.
- Remplacez les 4 piles LR6 / AA par des neuves ou rechargez les batteries.- Effacez les données sur le périphérique de stockage USB en utilisant votre PC, ouutilisez un autre périphérique de destination.- Enlevez le mode écriture protégée sur votre périphérique de destination. - Vérifiez auprès du fabricant la capacité de stockage du périphérique ainsi que son apti-tude à être utilisé en tant que Mémoire de Stockage de Masse USB sans logiciel particulier.
- Réglez le niveau d'entrée en respectant les instructions.- Réglez le niveau de sortie de la source.- Vérifiez l'état des cordons.- Vérifiez la qualité audio de la source avant tout enregistrement.
- Réglez le niveau audio en entrée afin de diminuer le signal en respectant lesinstructions. - Réglez le niveau de sortie de la source.- Vérifiez l'état des cordons.- Vérifiez la qualité audio de la source avant tout enregistrement.
SOLUTION:
- Vérifiez la qualité audio de la source avant tout enregistrement.- Reliez l'unité de stockage à votre PC et dé-fragmentez le en suivant les instruc-tions de votre système d'exploitation. - Vérifiez la prise électrique.- Suivre les instructions afin de retirer le périphérique de destination en toutesécurité après enregistrement.
- Suivre les instructions afin de retirer le périphérique de destination en toutesécurité après enregistrement ou enlever la source d'alimentation.
- Veuillez consulter le paragraphe 'Consignes d'Utilisation avec un iPod'.
- Augmentez l'espace disponible sur le périphérique de destination et assurez vousque ce dernier ne soit pas protégé en écriture.- Utilisez un périphérique de destination USB ne nécessitant pas de logiciel partic-ulier.
- Vérifiez que le périphérique de destination ne soit pas protégé en écriture.- Re-formatez le périphérique de destination en suivant les instructions du fabricant.- Utilisez un périphérique de destination USB ne nécessitant pas de logiciel particulier.- Utilisez un stylo bille afin d'appuyer sur la touche RESET (4) situé sur le côté del'appareil. Procédez à une ré-initialisation de du périphérique de stockage en suiv-ant les instructions du fabricant..