polycom zero-touch provisioning guide
TRANSCRIPT

Polycom, Inc. 1
PROVISIONING GUIDE
Polycom® Zero-Touch Provisioning
Release 1.5 | May 2016 | 3725-11529-003B
Polycom, Inc. 2
Copyright© 2016, Polycom, Inc. All rights reserved. No part of this document may be reproduced, translated into another language or format, or transmitted in any form or by any means, electronic or mechanical, for any purpose, without the express written permission of Polycom, Inc.
6001 America Center Drive
San Jose, CA 95002
USA
Polycom®, the Polycom logo and the names and marks associated with Polycom products are trademarks and/or service marks of Polycom, Inc. and are registered and/or common law marks in the United States and various other countries. All other trademarks are property of their respective owners. No portion hereof may be reproduced or transmitted in any form or by any means, for any purpose other than the recipient's personal use, without the express written permission of Polycom.
End User License Agreement By installing, copying, or otherwise using this product, you acknowledge that you
have read, understand and agree to be bound by the terms and conditions of the End User License Agreement for this product.
Patent Information The accompanying product may be protected by one or more U.S. and foreign patents and/or
pending patent applications held by Polycom, Inc.
Open Source Software Used in this Product This product may contain open source software. You may receive
the open source software from Polycom up to three (3) years after the distribution date of the applicable product or software at a charge not greater than the cost to Polycom of shipping or distributing the software to you. To receive software information, as well as the open source software code used in this product, contact Polycom by email at [email protected].
Disclaimer While Polycom uses reasonable efforts to include accurate and up-to-date information in this document,
Polycom makes no warranties or representations as to its accuracy. Polycom assumes no liability or responsibility for any typographical or other errors or omissions in the content of this document.
Limitation of Liability Polycom and/or its respective suppliers make no representations about the suitability of the
information contained in this document for any purpose. Information is provided “as is” without warranty of any kind and is subject to change without notice. The entire risk arising out of its use remains with the recipient. In no event shall Polycom and/or its respective suppliers be liable for any direct, consequential, incidental, special, punitive or other damages whatsoever (including without limitation, damages for loss of business profits, business interruption, or loss of business information), even if Polycom has been advised of the possibility of such damages.
Customer Feedback We are striving to improve our documentation quality and we appreciate your feedback. Email
your opinions and comments to [email protected].
Visit the Polycom Support Center for End User License Agreements, software downloads, product documents,
product licenses, troubleshooting tips, service requests, and more.
Polycom, Inc. 3
Contents
Conventions Used in This Guide ............................................................................................ 5
Information Elements ............................................................................................................................... 5
Typographic Conventions ........................................................................................................................ 5
Before You Begin ..................................................................................................................... 5
Audience, Purpose, and Required Skills ................................................................................................. 5
Terminology Used in this Guide ............................................................................................................... 5
Get Help ................................................................................................................................................... 6 The Polycom Community .................................................................................................................................... 6
Launch the Polycom Zero-Touch Provisioning Solution ...................................................... 7
Understand the ZTP Solution .................................................................................................................. 7 Access Services ................................................................................................................................................. 7 Limitations on the Use of ZTP ............................................................................................................................ 7
Before You Deploy Devices Using ZTP ................................................................................................... 8
Launch the Polycom ZTP Console .......................................................................................................... 9
Search for Profile and Device Associations..........................................................................12
Make Profile Associations ......................................................................................................17
Manual Profile Association ............................................................................................................................... 18 Create Device Fields ........................................................................................................................................ 20 Bulk Profile Association .................................................................................................................................... 21 Bulk Association Parameter Details .................................................................................................................. 23 CSV File Format ............................................................................................................................................... 24
Manage Profiles and Devices .................................................................................................26
Manage Configuration Profiles .............................................................................................................. 26 Create a Profile ................................................................................................................................................. 26 Modify a Profile ................................................................................................................................................. 28 Profile Editor Fields ........................................................................................................................................... 30 Delete a Profile ................................................................................................................................................. 31
Manage Devices .................................................................................................................................... 31 Modify a Device Association ............................................................................................................................. 32 Modify Device Fields ......................................................................................................................................... 34 Add a Device to a Profile .................................................................................................................................. 35 Copy a Device Profile ....................................................................................................................................... 37 Change the Device Associated with a Profile ................................................................................................... 38 Delete a Device ................................................................................................................................................ 39
Provisioning with ZTP ............................................................................................................42
Polycom Zero-Touch Provisioning Guide Contents
Polycom, Inc. 4
Provision Server Discovery .................................................................................................................... 42 Provisioning on ZTP ......................................................................................................................................... 43
Software Updates Using ZTP for UCS Devices .................................................................................... 44 Notes About Updating Software ....................................................................................................................... 44
Troubleshoot ZTP ...................................................................................................................45
Identify Issues ........................................................................................................................................ 45 Use the ZTP Console to Troubleshoot .............................................................................................................. 46 Use the Device or Web Configuration Utility to Troubleshoot ........................................................................... 48 Additional Troubleshooting ............................................................................................................................... 49
Why Did No Search Results Display? ................................................................................................... 50
If the Device Did Not Contact ZTP ......................................................................................................... 51 Troubleshoot Settings on the Device ................................................................................................................ 51 Verify that the Device has HTTP/HTTPS Access to ZTP .................................................................................. 52 Verify the Security Certificates .......................................................................................................................... 52
Polycom, Inc. 5
Before You Begin
This provisioning guide shows you how to use the Polycom® Zero-Touch Provisioning (ZTP) solution to
provision Polycom phones and video endpoints, and describes the operations you can use to perform
device association without using the ZTP console.
Audience, Purpose, and Required Skills This document is intended primarily for the following persons managing the deployment of Polycom
devices:
● Reseller A company that delivers products to end customers of Polycom devices. Resellers
may be responsible for device associations, typically on behalf of a Service provider.
● Service Provider A company that offers VoIP services to subscribers. The service provider
may operate their own network or may purchase VoIP network services from a carrier as a
wholesale or white label service. Service providers may be responsible for creating and
managing device profiles and, optionally, performing device association operations.
● Enterprise Administrators Individuals responsible for managing corporate deployments of
devices to locations outside of the enterprise network (such as home office or remote
location).
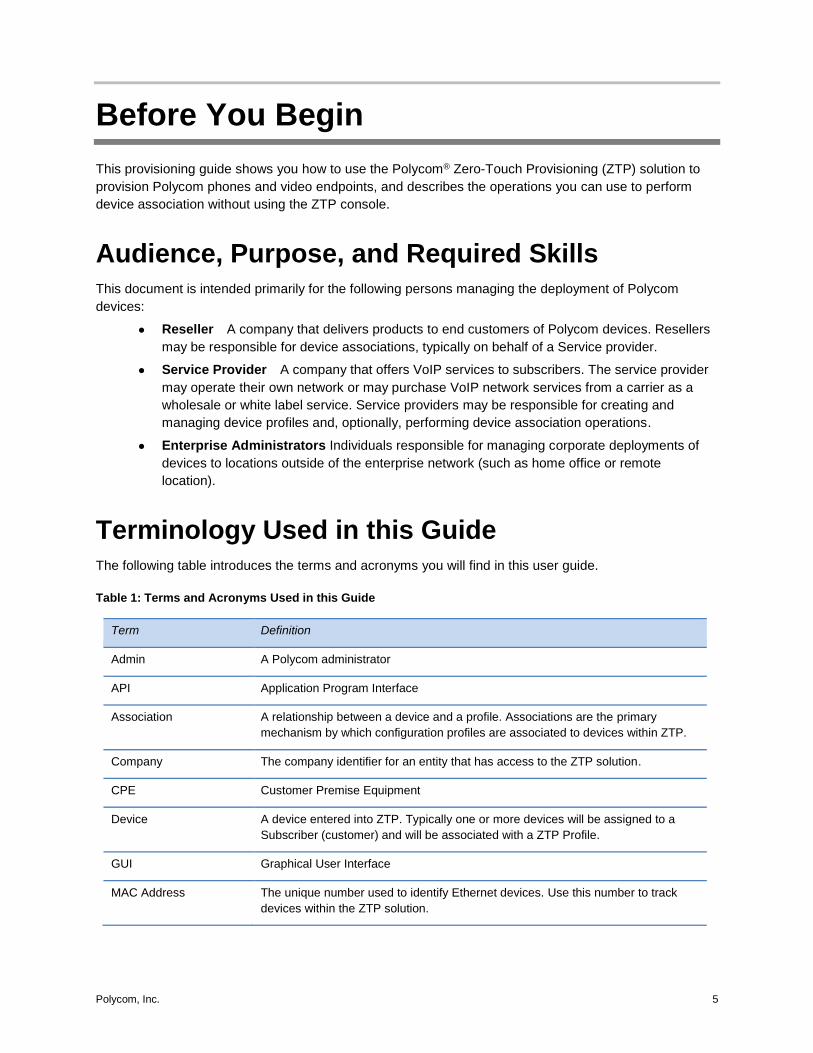
Terminology Used in this Guide The following table introduces the terms and acronyms you will find in this user guide.
Table 1: Terms and Acronyms Used in this Guide
Term Definition
Admin A Polycom administrator
API Application Program Interface
Association A relationship between a device and a profile. Associations are the primary
mechanism by which configuration profiles are associated to devices within ZTP.
Company The company identifier for an entity that has access to the ZTP solution.
CPE Customer Premise Equipment
Device A device entered into ZTP. Typically one or more devices will be assigned to a
Subscriber (customer) and will be associated with a ZTP Profile.
GUI Graphical User Interface
MAC Address The unique number used to identify Ethernet devices. Use this number to track
devices within the ZTP solution.
Polycom Zero-Touch Provisioning Guide Before You Begin
Polycom, Inc. 6
Term Definition
Profile A set of configuration details created by a service provider. The profile name will
be used for device association operations and communicates “out of band” to
people that will need to associate devices to this profile.
Reseller An organization that sells Polycom devices to end customers. Resellers will use
ZTP to associate devices to an appropriate configuration profile that has been set
up by a service provider.
Service provider An organization that provides services to customers using Polycom devices. This
entity uses ZTP to enable reseller partners to associate devices to a certain
configuration profile.
SIP Session Initiation Protocol (SIP) is a signaling protocol that is widely used for
controlling multimedia communication sessions such as voice and video calls over
Internet Protocol (IP).
Subscriber An entity within ZTP that has one or more devices assigned to it. This entity is
tracked by a reference ID created by the user when performing device
associations.
ZTP Zero-Touch Provisioning
Get Help For more information about installing, configuring, and administering Polycom products, refer to
Documents and Downloads at Polycom Support.
The Polycom Community
The Polycom Community gives you access to the latest developer and support information. Participate in
discussion forums to share ideas and solve problems with your colleagues. To register with the Polycom
Community, simply create a Polycom online account. When logged in, you can access Polycom support
personnel and participate in developer and support forums to find the latest information on hardware,
software, and partner solutions topics.
Polycom, Inc. 7
Launch the Polycom Zero-Touch
Provisioning Solution
This section shows you how to launch the Polycom Zero-Touch Provisioning (ZTP) solution. Before you
begin, take a moment to read Understanding the ZTP Solution, which introduces the ZTP solution and
shows you how to log in to the Polycom ZTP console.
Understand the ZTP Solution The ZTP solution is a cloud-based Web service designed to simplify the deployment of Polycom devices.
Specifically, the Polycom ZTP console is a Web interface—also called a Web console—that you can use
to create and manage profiles and device associations.
The ZTP solution is intended primarily as a one-time step at initial deployment. There are several
advantages to using the ZTP solution to deploy Polycom devices. Typically, end customers require a
supplier or skilled installer to deploy devices out of the box. The ZTP Web console enables you to create
provisioning profiles that you can associate with one or more devices. These profiles enable end
customers to save time and money by installing the devices themselves. Most importantly, the profiles
you create provide a central provisioning server address that automatically redirects multiple customer
devices to your provisioning server.
In addition to setting the provisioning server address, you may also use the ZTP solution to do the
following:
● Perform software updates (VOIP Phones only)
● Set additional configuration parameters that simplify deployment. For example, a custom CA
certificate for HTTPS provisioning. (VOIP Phones only)
Access Services
Polycom ZTP users have access to the following services and components:
● An automated server available 24x7 that will accept requests from Polycom devices and
provide an initial configuration of the product
● A partner Web portal and API accessible by registered partners and channels that you can
use:
To create configuration profiles
To associate devices to a configuration profile
To generate reports and query the status of devices associated with the ZTP solution
Limitations on the Use of ZTP
Consider the following limitations when using ZTP:
● Polycom® RealPresence® Group systems must be running software version 5.0. In addition,
individual units must be manufactured after October 1, 2015.
Polycom Zero-Touch Provisioning Guide Launch the Polycom Zero-Touch Provisioning Solution
Polycom, Inc. 8
Note: Downgrading software on a video endpoint
RealPresence Group Series software version 5.0 must be factory installed on video endpoints and maintain that version or higher. Downgrading to a version earlier than version 5.0 will cause the TLS certificate to be destroyed and ZTP to become non-operational.
● RealPresence Group systems support software updates using a public Polycom server or
RealPresence Resource Manager. Software updates using ZTP are not available on these
systems. For more information, see the Polycom RealPresence Group Series Software,
Options, and Accessories Installation Guide.
● You cannot download language files for the device using the ZTP server.
● Polycom makes available a number of language files with the UC Software. If you choose a
language other than the default English in ZTP, you will need to place the language file on
your final provisioning server. To apply a non-English language file to your devices, see Set
the Phone Language in the Polycom UC Software Administrator Guide.
Before You Deploy Devices Using ZTP Before you deploy devices using ZTP, ensure that all of the following conditions are met:
● You can use ZTP to provision Polycom SoundPoint IP, SoundStation IP, and VVX business
media phones running UCS 3.3.2 or later, RealPresence Group systems running version 5.0
or later, and Polycom® RealPresence® Debut systems.
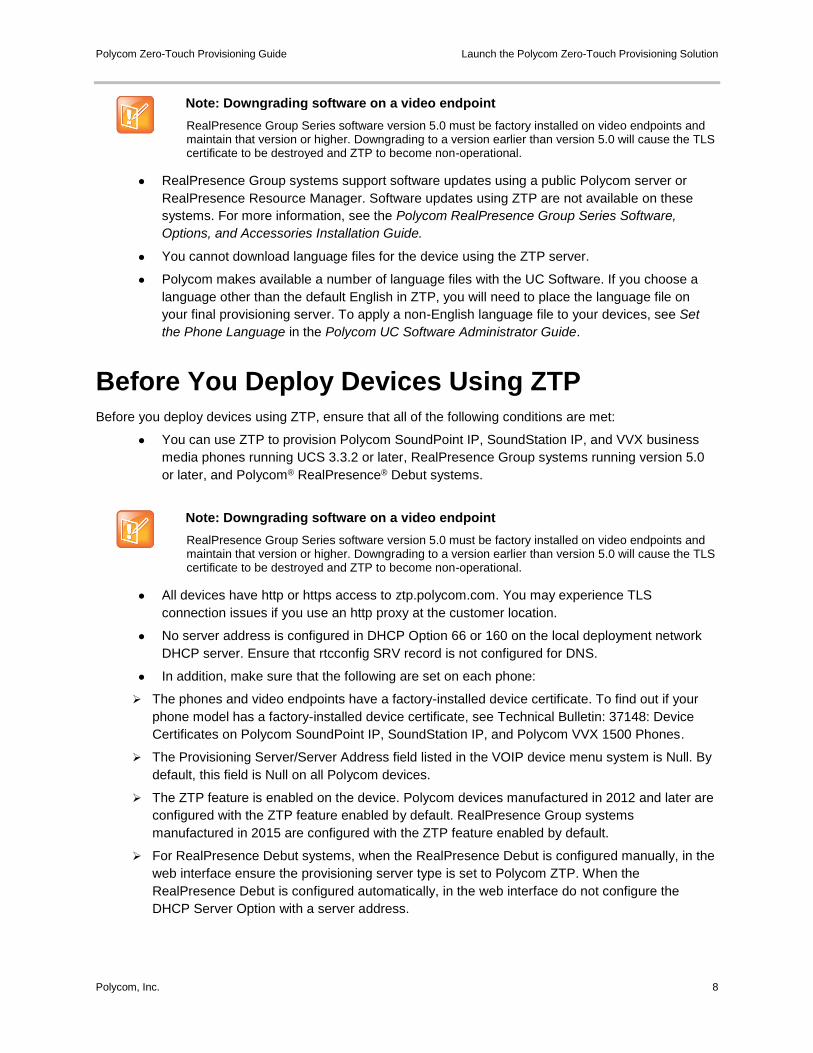
Note: Downgrading software on a video endpoint
RealPresence Group Series software version 5.0 must be factory installed on video endpoints and maintain that version or higher. Downgrading to a version earlier than version 5.0 will cause the TLS certificate to be destroyed and ZTP to become non-operational.
● All devices have http or https access to ztp.polycom.com. You may experience TLS
connection issues if you use an http proxy at the customer location.
● No server address is configured in DHCP Option 66 or 160 on the local deployment network
DHCP server. Ensure that rtcconfig SRV record is not configured for DNS.
● In addition, make sure that the following are set on each phone:
The phones and video endpoints have a factory-installed device certificate. To find out if your
phone model has a factory-installed device certificate, see Technical Bulletin: 37148: Device
Certificates on Polycom SoundPoint IP, SoundStation IP, and Polycom VVX 1500 Phones.
The Provisioning Server/Server Address field listed in the VOIP device menu system is Null. By
default, this field is Null on all Polycom devices.
The ZTP feature is enabled on the device. Polycom devices manufactured in 2012 and later are
configured with the ZTP feature enabled by default. RealPresence Group systems
manufactured in 2015 are configured with the ZTP feature enabled by default.
For RealPresence Debut systems, when the RealPresence Debut is configured manually, in the
web interface ensure the provisioning server type is set to Polycom ZTP. When the
RealPresence Debut is configured automatically, in the web interface do not configure the
DHCP Server Option with a server address.
Polycom Zero-Touch Provisioning Guide Launch the Polycom Zero-Touch Provisioning Solution
Polycom, Inc. 9
Launch the Polycom ZTP Console This section shows you how to launch the Polycom ZTP console. To begin, you need to use one of the
following web browsers:
Microsoft® Internet Explorer 9.0 or later
Mozilla® Firefox® 22 or later
Google Chrome™ 20 or later
Apple® Safari® 6.04 or later
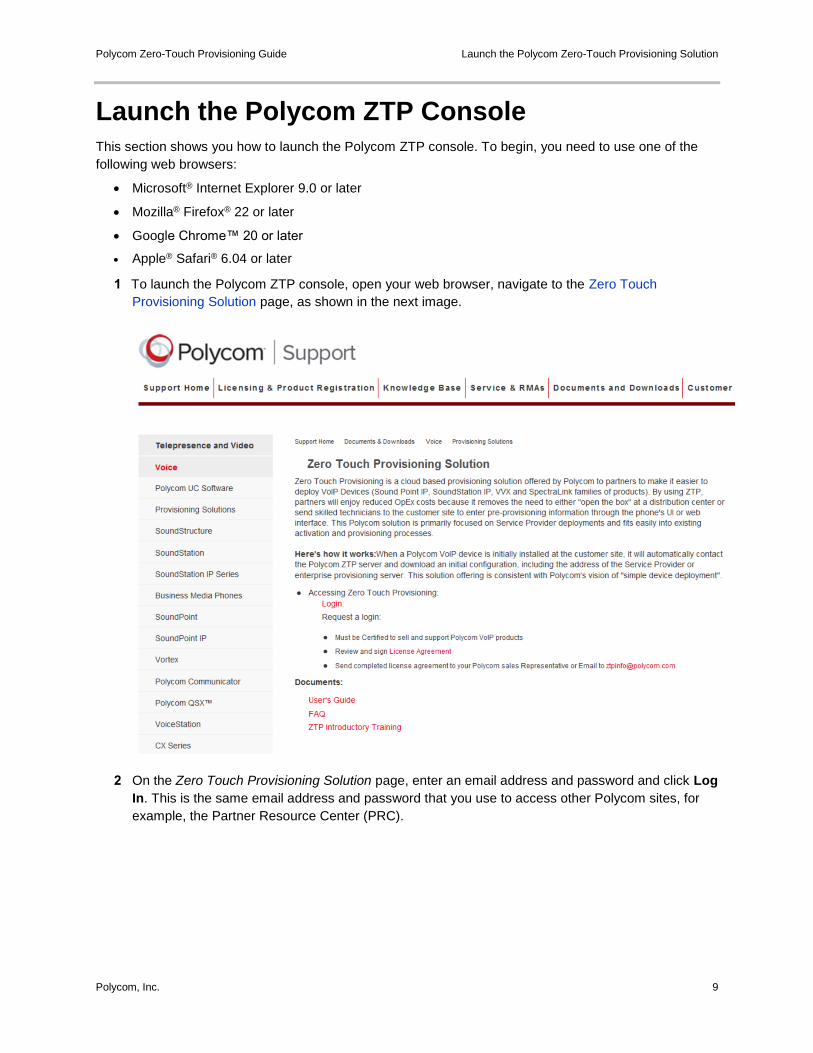
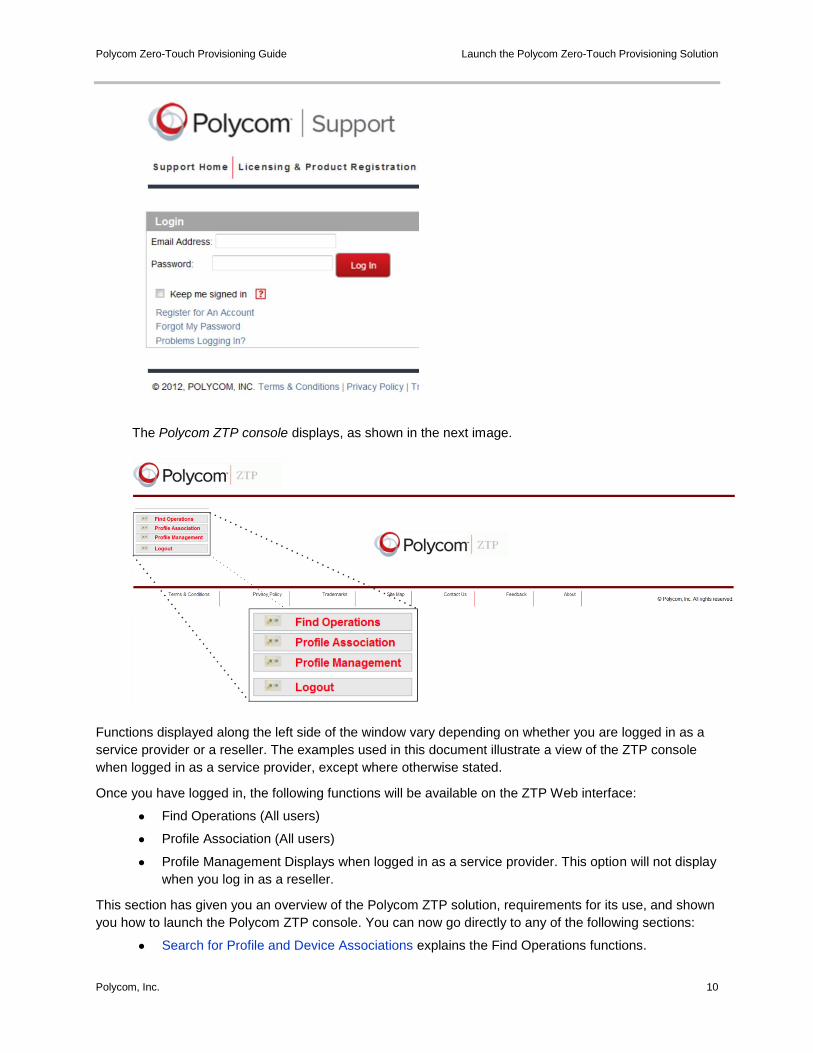
1 To launch the Polycom ZTP console, open your web browser, navigate to the Zero Touch
Provisioning Solution page, as shown in the next image.
2 On the Zero Touch Provisioning Solution page, enter an email address and password and click Log
In. This is the same email address and password that you use to access other Polycom sites, for
example, the Partner Resource Center (PRC).
Polycom Zero-Touch Provisioning Guide Launch the Polycom Zero-Touch Provisioning Solution
Polycom, Inc. 10
The Polycom ZTP console displays, as shown in the next image.
Functions displayed along the left side of the window vary depending on whether you are logged in as a
service provider or a reseller. The examples used in this document illustrate a view of the ZTP console
when logged in as a service provider, except where otherwise stated.
Once you have logged in, the following functions will be available on the ZTP Web interface:
● Find Operations (All users)
● Profile Association (All users)
● Profile Management Displays when logged in as a service provider. This option will not display
when you log in as a reseller.
This section has given you an overview of the Polycom ZTP solution, requirements for its use, and shown
you how to launch the Polycom ZTP console. You can now go directly to any of the following sections:
● Search for Profile and Device Associations explains the Find Operations functions.
Polycom Zero-Touch Provisioning Guide Launch the Polycom Zero-Touch Provisioning Solution
Polycom, Inc. 11
● Make Profile Associations explains the Profile Associations functions.
● Manage Profiles and Devices explains the Profile Management functions.
● Provisioning with ZTP shows you how to use ZTP to provision your devices.
● Troubleshoot ZTP provides solutions for a number of common troubleshooting tasks.
Polycom, Inc. 12
Search for Profile and Device
Associations
This section shows you how to use the Find Operations function to search for profiles and device
associations. You can use the Find Operations function to search for profiles or devices for informational
purposes or for troubleshooting. You can also use the Find Operations function to search for profiles and
devices when you want to associate a configuration profile with one or more devices, or when you want to
manage your profiles or devices.
The Find Operations function enables you to search by the following:
● Customer information such as reference ID, first name, last name, phone number, email, and
city
● Device information such as MAC address, Model, and Serial Number
Note: Customer and device information linked to a reference ID
All customer and device information is associated with a reference ID.
For confidentiality reasons, the following restrictions on search results and modifications are enforced.
● You can view and modify search results only for devices that were associated by someone
from the same company as you.
● Service providers can view only those devices associated with a profile that they created.
Once you have launched the Polycom ZTP console, as shown in Launch the Polycom ZTP Console, you
can begin searching for existing profile and device associations.
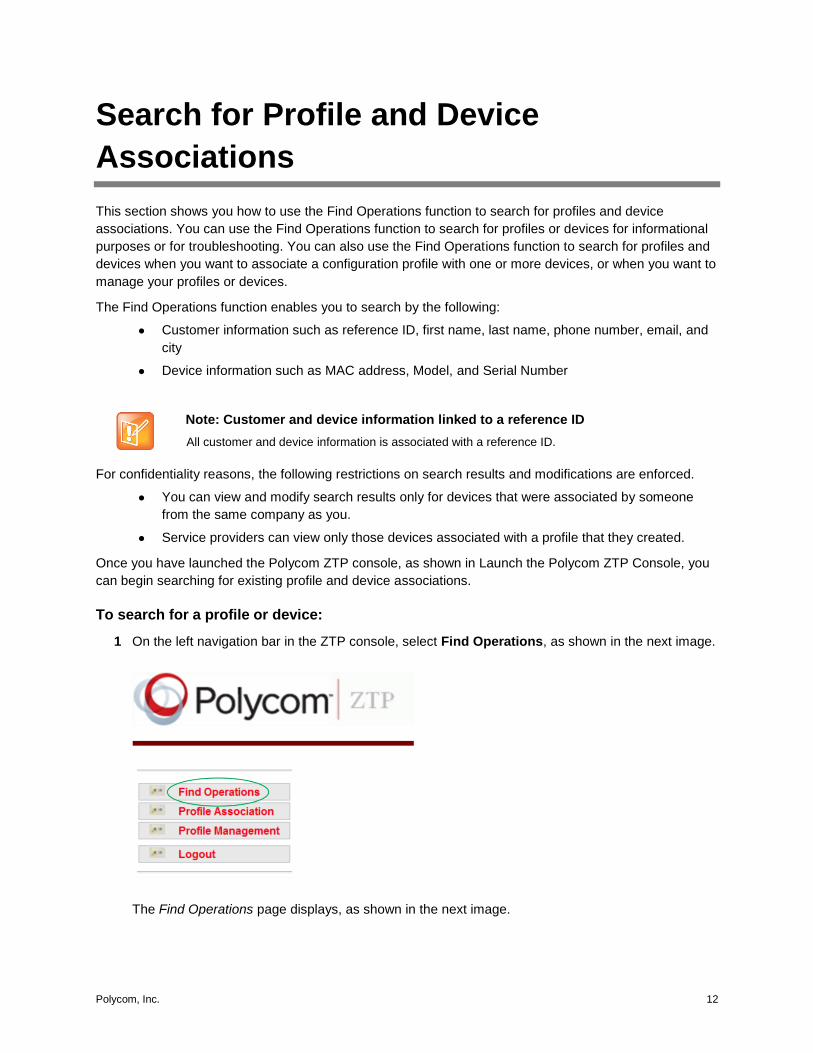
To search for a profile or device:
1 On the left navigation bar in the ZTP console, select Find Operations, as shown in the next image.
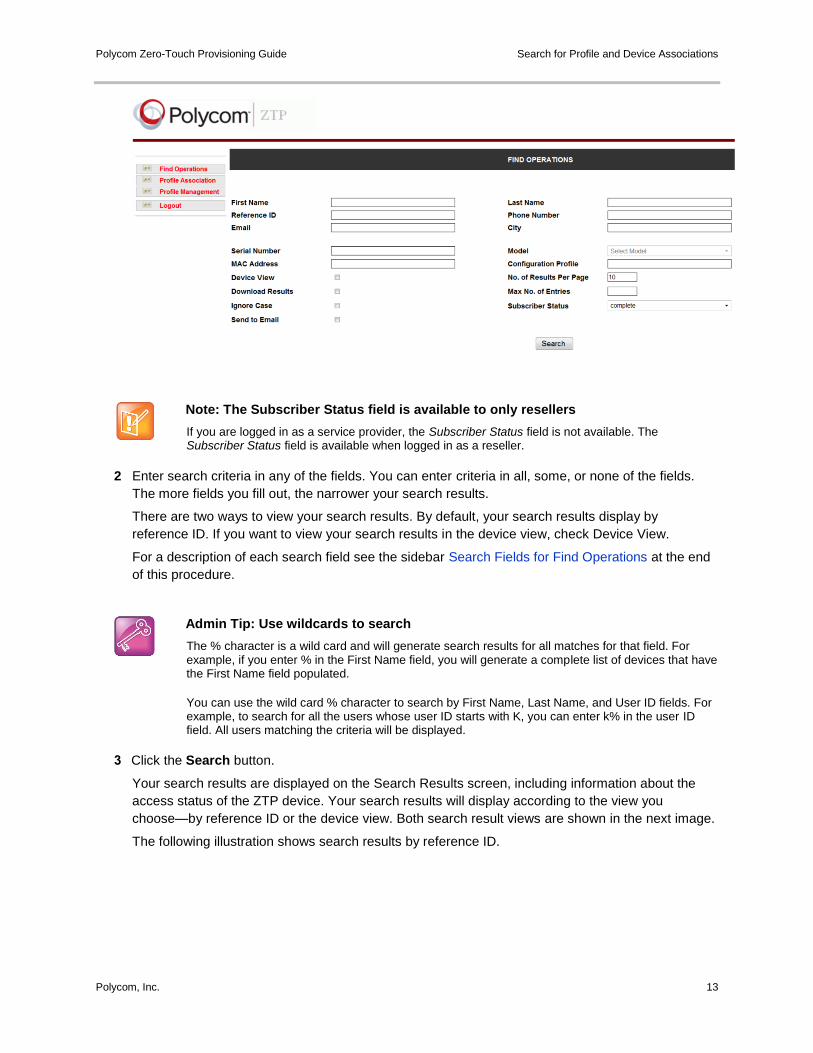
The Find Operations page displays, as shown in the next image.
Polycom Zero-Touch Provisioning Guide Search for Profile and Device Associations
Polycom, Inc. 13
Note: The Subscriber Status field is available to only resellers
If you are logged in as a service provider, the Subscriber Status field is not available. The Subscriber Status field is available when logged in as a reseller.
2 Enter search criteria in any of the fields. You can enter criteria in all, some, or none of the fields.
The more fields you fill out, the narrower your search results.
There are two ways to view your search results. By default, your search results display by
reference ID. If you want to view your search results in the device view, check Device View.
For a description of each search field see the sidebar Search Fields for Find Operations at the end
of this procedure.
Admin Tip: Use wildcards to search
The % character is a wild card and will generate search results for all matches for that field. For example, if you enter % in the First Name field, you will generate a complete list of devices that have the First Name field populated.
You can use the wild card % character to search by First Name, Last Name, and User ID fields. For example, to search for all the users whose user ID starts with K, you can enter k% in the user ID field. All users matching the criteria will be displayed.
3 Click the Search button.
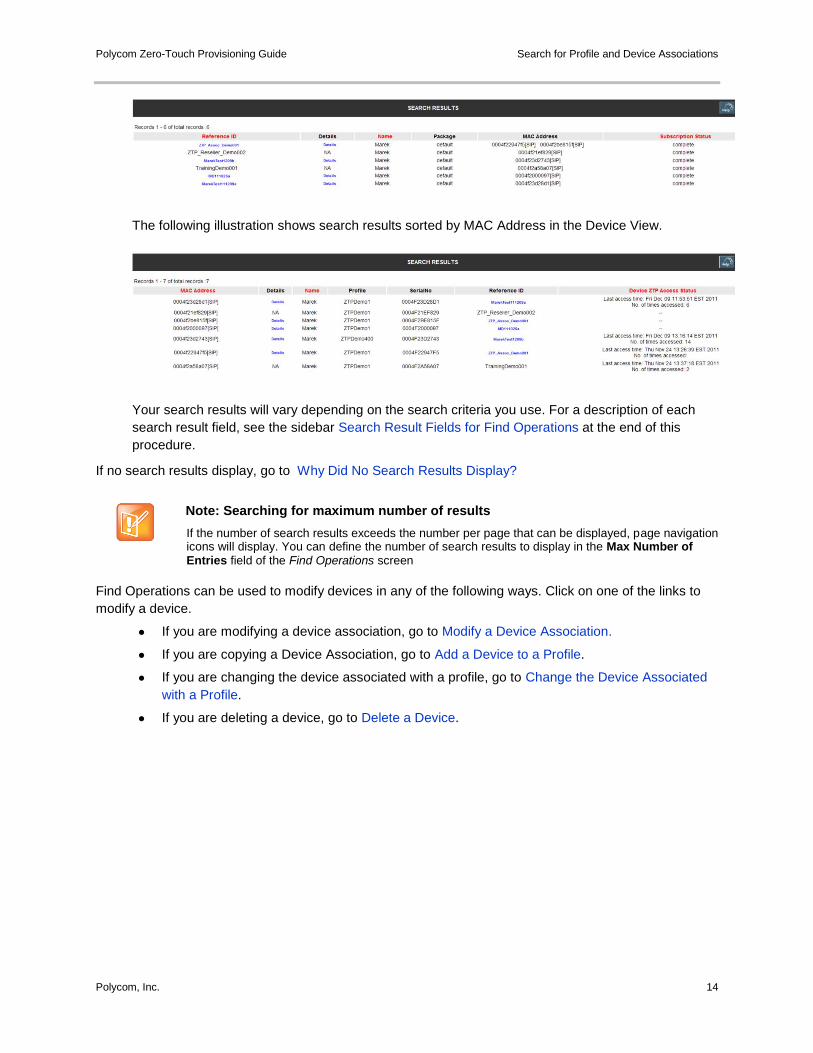
Your search results are displayed on the Search Results screen, including information about the
access status of the ZTP device. Your search results will display according to the view you
choose—by reference ID or the device view. Both search result views are shown in the next image.
The following illustration shows search results by reference ID.
Polycom Zero-Touch Provisioning Guide Search for Profile and Device Associations
Polycom, Inc. 14
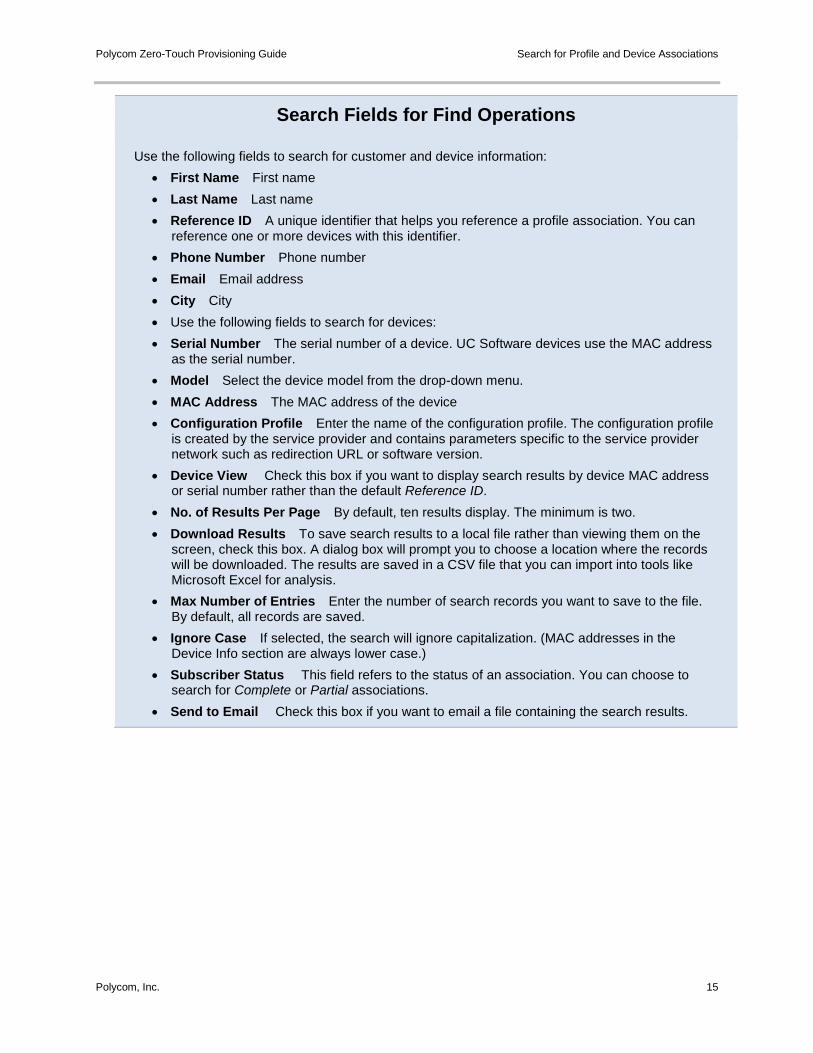
The following illustration shows search results sorted by MAC Address in the Device View.
Your search results will vary depending on the search criteria you use. For a description of each
search result field, see the sidebar Search Result Fields for Find Operations at the end of this
procedure.
If no search results display, go to Why Did No Search Results Display?
Note: Searching for maximum number of results
If the number of search results exceeds the number per page that can be displayed, page navigation icons will display. You can define the number of search results to display in the Max Number of Entries field of the Find Operations screen
Find Operations can be used to modify devices in any of the following ways. Click on one of the links to
modify a device.
● If you are modifying a device association, go to Modify a Device Association.
● If you are copying a Device Association, go to Add a Device to a Profile.
● If you are changing the device associated with a profile, go to Change the Device Associated
with a Profile.
● If you are deleting a device, go to Delete a Device.
Polycom Zero-Touch Provisioning Guide Search for Profile and Device Associations
Polycom, Inc. 15
Search Fields for Find Operations
Use the following fields to search for customer and device information:
First Name First name
Last Name Last name
Reference ID A unique identifier that helps you reference a profile association. You can reference one or more devices with this identifier.
Phone Number Phone number
Email Email address
City City
Use the following fields to search for devices:
Serial Number The serial number of a device. UC Software devices use the MAC address as the serial number.
Model Select the device model from the drop-down menu.
MAC Address The MAC address of the device
Configuration Profile Enter the name of the configuration profile. The configuration profile is created by the service provider and contains parameters specific to the service provider network such as redirection URL or software version.
Device View Check this box if you want to display search results by device MAC address or serial number rather than the default Reference ID.
No. of Results Per Page By default, ten results display. The minimum is two.
Download Results To save search results to a local file rather than viewing them on the screen, check this box. A dialog box will prompt you to choose a location where the records will be downloaded. The results are saved in a CSV file that you can import into tools like Microsoft Excel for analysis.
Max Number of Entries Enter the number of search records you want to save to the file. By default, all records are saved.
Ignore Case If selected, the search will ignore capitalization. (MAC addresses in the Device Info section are always lower case.)
Subscriber Status This field refers to the status of an association. You can choose to search for Complete or Partial associations.
Send to Email Check this box if you want to email a file containing the search results.
Polycom Zero-Touch Provisioning Guide Search for Profile and Device Associations
Polycom, Inc. 16
Search Result Fields for Find Operations
The following is a list of all search result fields:
MAC Address Displays the device MAC address and links to the Device Summary Report screen, which displays device association information.
Details Links to the Detailed Subscriber Information page, which provides the customer information your search captured.
Name Displays the first and last name of the subscriber. Click on the active column heading Name to sort the list by subscriber name.
Profile Displays the names of the configuration profile associated with the device.
Serial Number Displays the device serial number.
Reference ID Displays the reference ID of the device association. If the reference ID is linked, you can click on it to get more information about the association, and to sort the column in ascending or descending order.
Device ZTP Access Status Displays the current status of the device.
Return to Search Result Fields for Find Operations.
This section has shown you how to search for profiles and devices. Once you have a list of search
results, you can search for profiles and devices when you want to associate a configuration profile with
one or more devices or you can manage your profile and device associations.
Refer to Make Profile Associations to make device associations.
Refer to Manage Profiles and Devices to manage profile and device associations.

Polycom, Inc. 17
Make Profile Associations
This section shows you how to use the Profile Association function, which you can use to associate one
or more devices with a configuration profile.
Once you have launched the Polycom ZTP console, as shown in Launch the Polycom ZTP Console, you
can begin making a profile association. To make a profile association, you will need to create a customer
contact profile, the personal information that identifies the customer contact.
The following procedure enables you to choose a bulk or a manual profile method.
To perform an association
1 On the left navigation bar in the ZTP console, click Profile Association, as shown in the next
image.
The Add Personal Information page displays, shown next.
2 Create a customer contact profile by entering information in one or more of the available fields:
Reference ID (mandatory) This ID must be unique for every association. It must be an
alphanumeric string between four and 20 characters.
Company Name Enter the name of the company that will use the devices.

Polycom Zero-Touch Provisioning Guide Make a Profile Association
Polycom, Inc. 18
First Name Enter the first name of the customer contact.
Last Name Enter the last name of the customer contact.
Phone Number Enter the phone number of the customer contact.
Email Address Enter the email address of the customer contact.
Street, Address, City, State, Zip/Postal Code, Country Code
If you want to clear all fields, click the Reset button.
Settings: Customer contact profiles
Any devices that you associate with a profile will be linked to the reference ID you enter here. The examples shown next will refer to the customer contact profile to indicate that a device is linked to the personal information of a particular reference ID.
3 Choose a profile association method from Profile Association Mode, shown next. You can choose
Manual Profile Association or Bulk Profile Association.
If you want to manually upload your profile associations, choose Manual Profile and continue to
the section Manual Profile Association.
If you want to upload a file to associate multiple devices in an automated server, choose Bulk
Profile Association as the Profile Association mode and continue to the section Bulk Profile
Association.
Manual Profile Association
This section shows you how to make manual profile associations.
To make manual profile associations:
1 Once you have chosen Manual Profile Association, click Next to continue.
The Create screen displays, as shown in the next image.
Polycom Zero-Touch Provisioning Guide Make a Profile Association
Polycom, Inc. 19
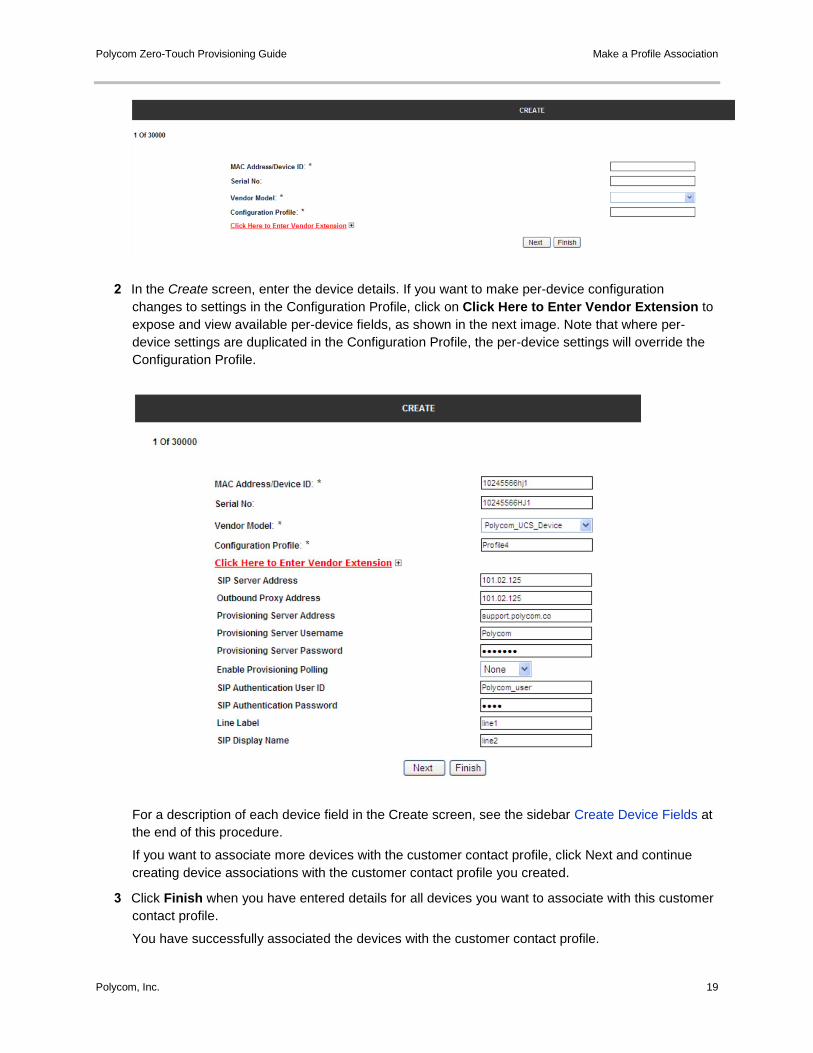
2 In the Create screen, enter the device details. If you want to make per-device configuration
changes to settings in the Configuration Profile, click on Click Here to Enter Vendor Extension to
expose and view available per-device fields, as shown in the next image. Note that where per-
device settings are duplicated in the Configuration Profile, the per-device settings will override the
Configuration Profile.
For a description of each device field in the Create screen, see the sidebar Create Device Fields at
the end of this procedure.
If you want to associate more devices with the customer contact profile, click Next and continue
creating device associations with the customer contact profile you created.
3 Click Finish when you have entered details for all devices you want to associate with this customer
contact profile.
You have successfully associated the devices with the customer contact profile.

Polycom Zero-Touch Provisioning Guide Make a Profile Association
Polycom, Inc. 20
Create Device Fields
This section details the device fields that you can enter from the Web UI if using the Manual Mode of Association, or using a Comma Separated set of values if using Bulk Profile Association. All fields are string values except the Enable provisioning polling which is a selection box in manual mode and a Boolean value if using Bulk profile Association.
Use the available fields to associate a device with the customer contact profile you created:
MAC Address / Device ID Enter the unique MAC address or device ID of the device you want to associate. MAC addresses are usually located on the device in a hexadecimal format, for example, 0004f2000001. Do not add any other characters to the MAC address or Device ID fields.
Serial Number Enter the serial number of the device. For Bulk Associations you can leave this field blank.
Vendor Model Enter Polycom_UCS_Device in this field for the SoundPoint IP, SoundStation IP, VVX, RealPresence Debut, and SpectraLink 8400 Series products. For RealPresence Group systems, enter Polycom Video Endpoint. You can leave this field blank for Bulk Associations.
Configuration Profile Enter the name of the configuration profile that you want to associate with this device.
The following is a list of the per-device Vendor Extension fields. For Bulk Associations you can leave all or any of these fields blank. Entering values for these fields is optional.
Click Here to Enter Vendor Extension Click this to expose and view available parameters for single devices. Note that any settings you make in these fields will override settings in the Configuration Profile.
SIP Server Address Enter the SIP registration server address.
Outbound Proxy Address Enter the IP address or URL/FQDN of the applicable SIP Outbound Proxy server.
Provisioning Server Address Enter the provisioning server address of the service provider you want to download the configuration file from. As a shortcut, you can embed the port number, username, and password in the URL you enter in this field in the following format:
protocol://username:[email protected]:port/filepath
For example:
http://alice:[email protected]:8080/Polycom/
Note that often the provisioning server address is already included in the Configuration Profile. If this address is included, leave this field blank to avoid overriding the value in the Configuration Profile.
Provisioning Server Username Enter the user name for authenticating with the provisioning server. Note that often the user name is already included in the Configuration Profile. If the user name is included, leave this field blank to avoid overriding the value in the Configuration Profile.
Provisioning Server Password Enter the password used for authenticating with the provisioning server. Note that often the password is already included in the Configuration Profile. If the password is included, leave this field blank to avoid overriding the value in the Configuration Profile.
Polycom Zero-Touch Provisioning Guide Make a Profile Association
Polycom, Inc. 21
Enable Provisioning Polling Enter None, Enable, or Disable. If using Bulk Association you must enter a value of 1 for Enable, 0 for Disable, or leave this field blank if you want the device to use the default setting.
SIP Authentication User ID Enter the user name of the SIP device.
SIP Authentication Password Enter the password of the SIP device.
Line Label Enter the line label that will display on the SIP device.
SIP Display Name Enter the name of the SIP device that you want to display.
Return to the Create Device Fields screen.
Bulk Profile Association
Bulk Profile Association is designed to be used when you want to create multiple profile associations in a
single step. In this mode you upload a comma separated (CSV) file to the ZTP database and ZTP
performs the associations for you. When using this method, confirm that the association is successful
using the Find Operations function in the main menu to verify that the upload has been successful.
To perform a bulk association:
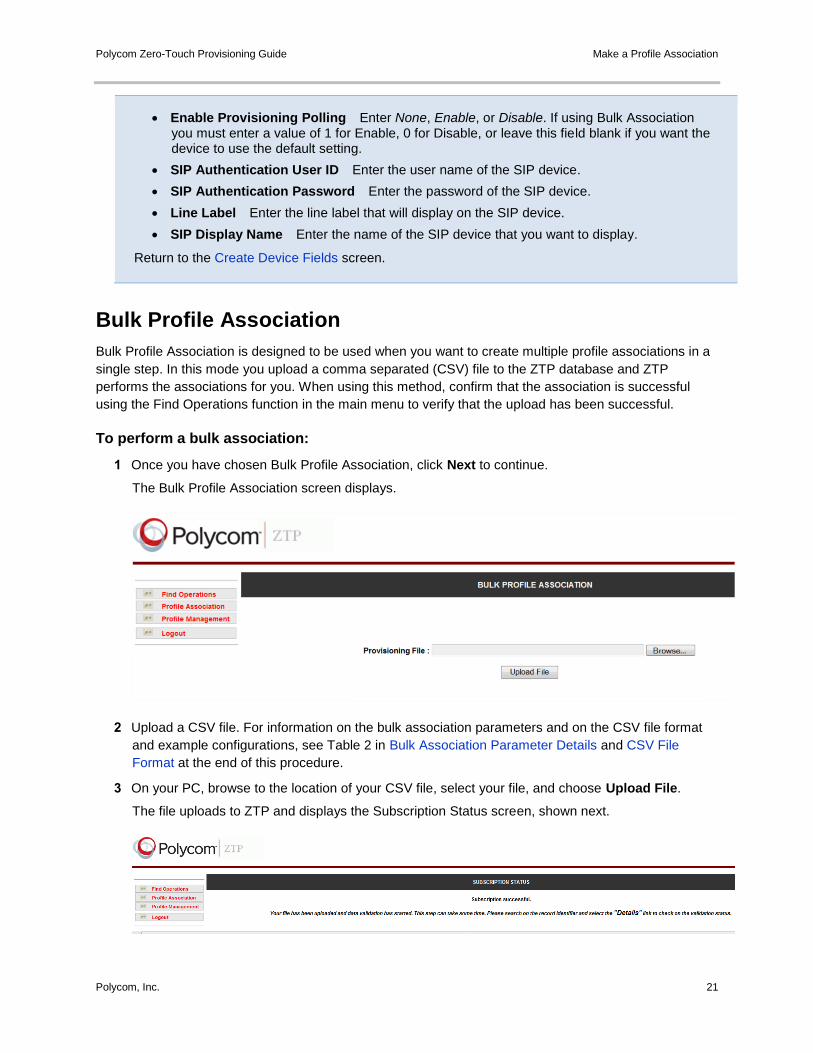
1 Once you have chosen Bulk Profile Association, click Next to continue.
The Bulk Profile Association screen displays.
2 Upload a CSV file. For information on the bulk association parameters and on the CSV file format
and example configurations, see Table 2 in Bulk Association Parameter Details and CSV File
Format at the end of this procedure.
3 On your PC, browse to the location of your CSV file, select your file, and choose Upload File.
The file uploads to ZTP and displays the Subscription Status screen, shown next.
Polycom Zero-Touch Provisioning Guide Make a Profile Association
Polycom, Inc. 22
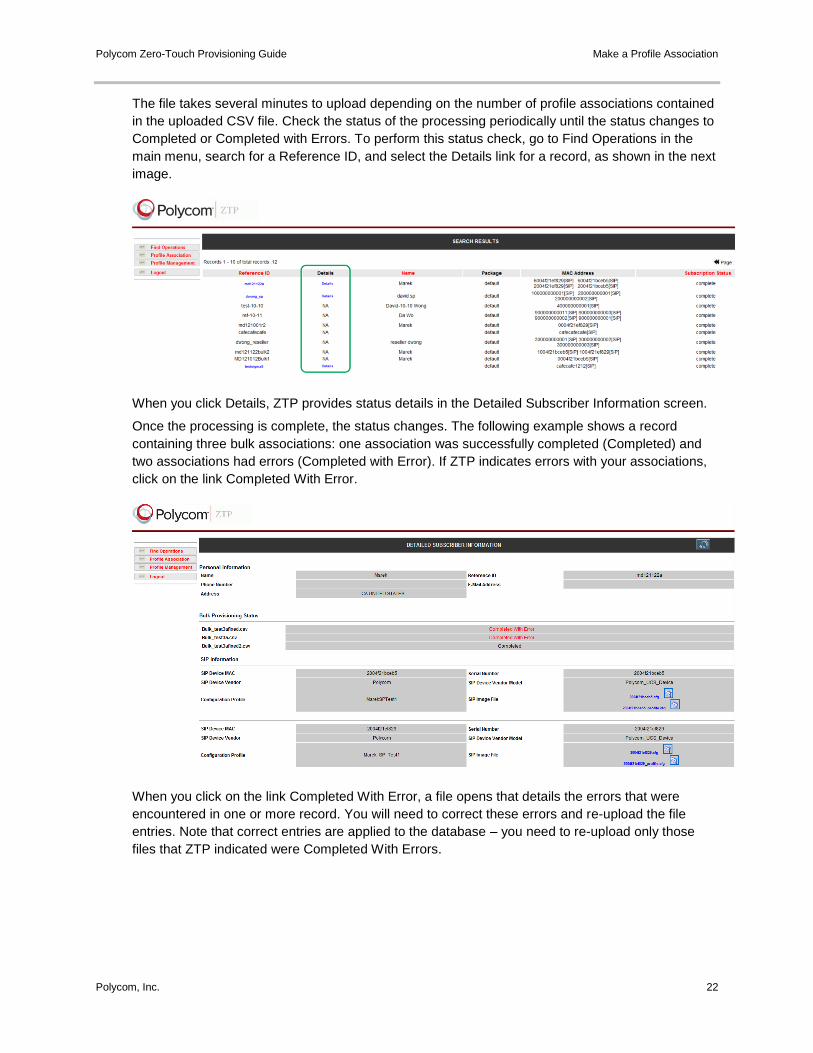
The file takes several minutes to upload depending on the number of profile associations contained
in the uploaded CSV file. Check the status of the processing periodically until the status changes to
Completed or Completed with Errors. To perform this status check, go to Find Operations in the
main menu, search for a Reference ID, and select the Details link for a record, as shown in the next
image.
When you click Details, ZTP provides status details in the Detailed Subscriber Information screen.
Once the processing is complete, the status changes. The following example shows a record
containing three bulk associations: one association was successfully completed (Completed) and
two associations had errors (Completed with Error). If ZTP indicates errors with your associations,
click on the link Completed With Error.
When you click on the link Completed With Error, a file opens that details the errors that were
encountered in one or more record. You will need to correct these errors and re-upload the file
entries. Note that correct entries are applied to the database – you need to re-upload only those
files that ZTP indicated were Completed With Errors.
Polycom Zero-Touch Provisioning Guide Make a Profile Association
Polycom, Inc. 23
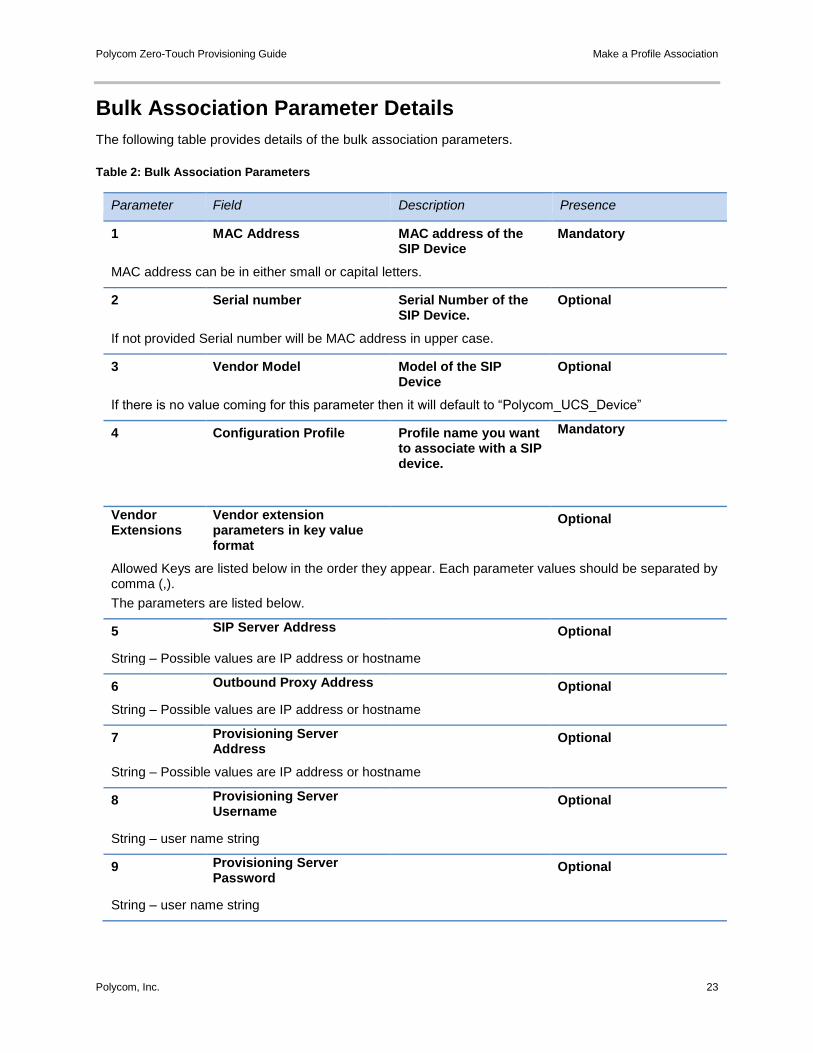
Bulk Association Parameter Details
The following table provides details of the bulk association parameters.
Table 2: Bulk Association Parameters
Parameter Field Description Presence
1 MAC Address MAC address of the SIP Device
Mandatory
MAC address can be in either small or capital letters.
2 Serial number Serial Number of the SIP Device.
Optional
If not provided Serial number will be MAC address in upper case.
3 Vendor Model Model of the SIP Device
Optional
If there is no value coming for this parameter then it will default to “Polycom_UCS_Device”
4 Configuration Profile Profile name you want to associate with a SIP device.
Mandatory
Vendor Extensions
Vendor extension parameters in key value format
Optional
Allowed Keys are listed below in the order they appear. Each parameter values should be separated by comma (,).
The parameters are listed below.
5 SIP Server Address Optional
String – Possible values are IP address or hostname
6 Outbound Proxy Address Optional
String – Possible values are IP address or hostname
7 Provisioning Server Address
Optional
String – Possible values are IP address or hostname
8 Provisioning Server Username
Optional
String – user name string
9 Provisioning Server Password
Optional
String – user name string
Polycom Zero-Touch Provisioning Guide Make a Profile Association
Polycom, Inc. 24
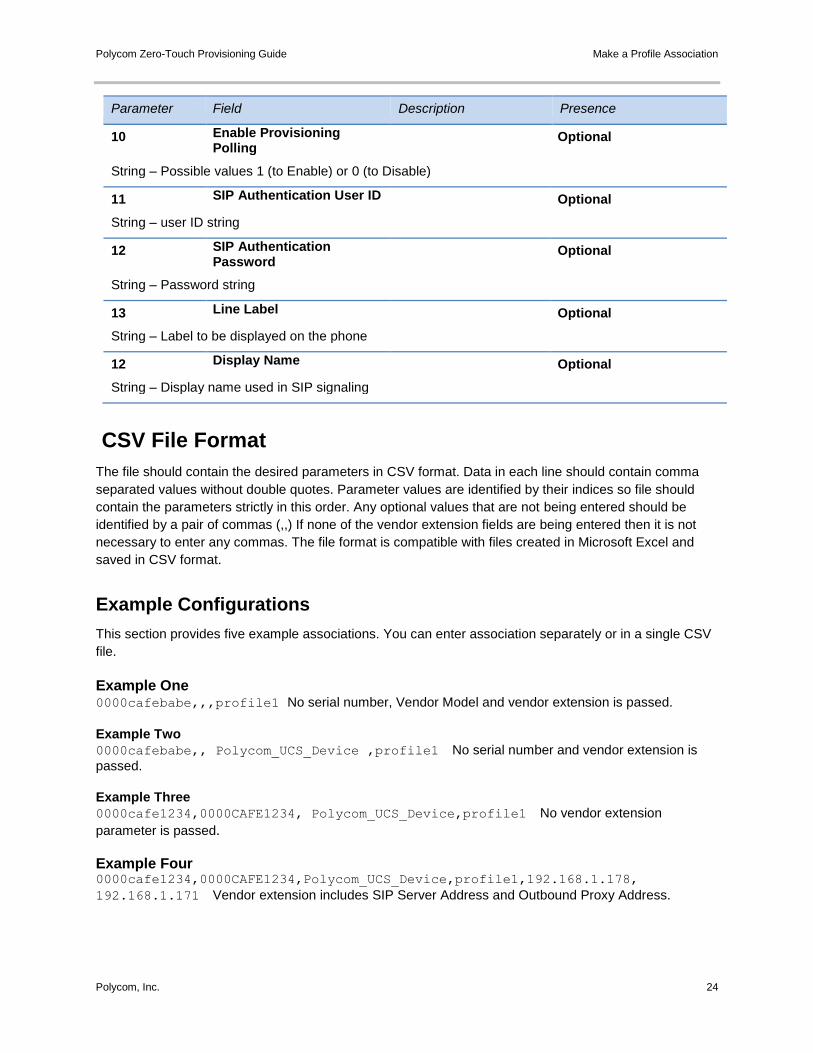
Parameter Field Description Presence
10 Enable Provisioning Polling
Optional
String – Possible values 1 (to Enable) or 0 (to Disable)
11 SIP Authentication User ID Optional
String – user ID string
12 SIP Authentication Password
Optional
String – Password string
13 Line Label Optional
String – Label to be displayed on the phone
12 Display Name Optional
String – Display name used in SIP signaling
CSV File Format
The file should contain the desired parameters in CSV format. Data in each line should contain comma
separated values without double quotes. Parameter values are identified by their indices so file should
contain the parameters strictly in this order. Any optional values that are not being entered should be
identified by a pair of commas (,,) If none of the vendor extension fields are being entered then it is not
necessary to enter any commas. The file format is compatible with files created in Microsoft Excel and
saved in CSV format.
Example Configurations
This section provides five example associations. You can enter association separately or in a single CSV
file.
Example One 0000cafebabe,,,profile1 No serial number, Vendor Model and vendor extension is passed.
Example Two 0000cafebabe,, Polycom_UCS_Device ,profile1 No serial number and vendor extension is
passed.
Example Three 0000cafe1234,0000CAFE1234, Polycom_UCS_Device,profile1 No vendor extension
parameter is passed.
Example Four 0000cafe1234,0000CAFE1234,Polycom_UCS_Device,profile1,192.168.1.178,
192.168.1.171 Vendor extension includes SIP Server Address and Outbound Proxy Address.
Polycom Zero-Touch Provisioning Guide Make a Profile Association
Polycom, Inc. 25
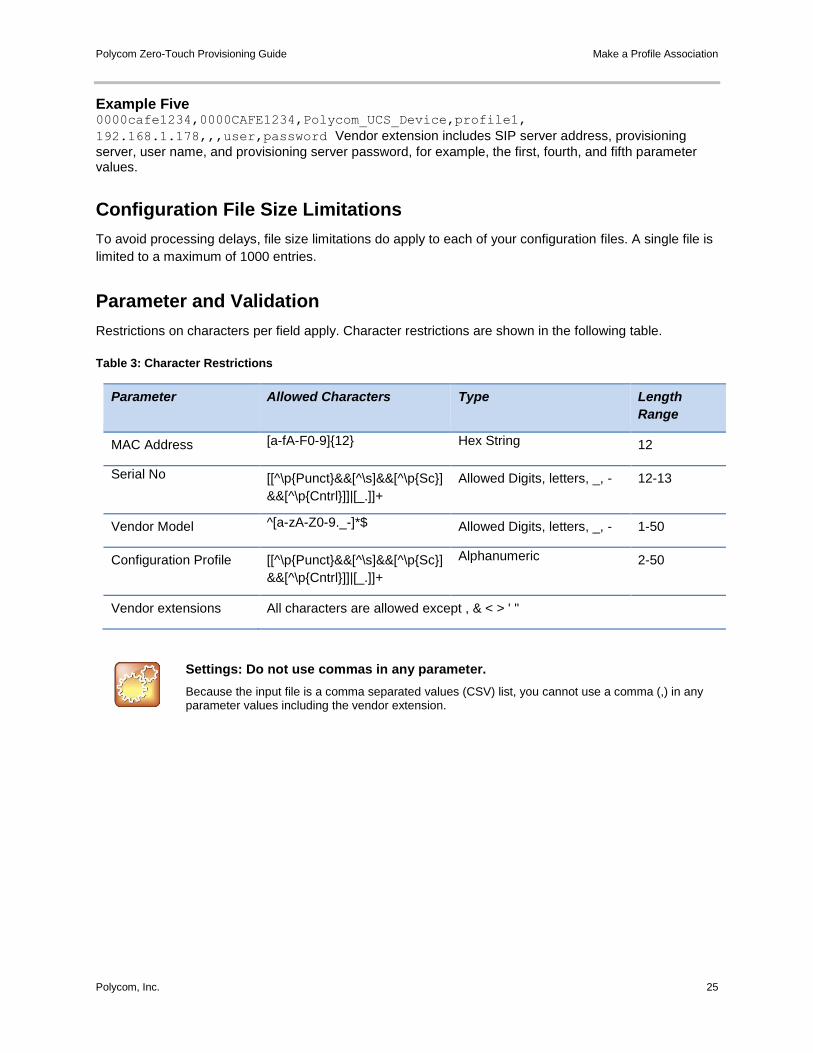
Example Five 0000cafe1234,0000CAFE1234,Polycom_UCS_Device,profile1,
192.168.1.178,,,user,password Vendor extension includes SIP server address, provisioning
server, user name, and provisioning server password, for example, the first, fourth, and fifth parameter values.
Configuration File Size Limitations
To avoid processing delays, file size limitations do apply to each of your configuration files. A single file is
limited to a maximum of 1000 entries.
Parameter and Validation
Restrictions on characters per field apply. Character restrictions are shown in the following table.
Table 3: Character Restrictions
Parameter Allowed Characters Type Length
Range
MAC Address [a-fA-F0-9]{12} Hex String 12
Serial No [[^\p{Punct}&&[^\s]&&[^\p{Sc}]
&&[^\p{Cntrl}]]|[_.]]+
Allowed Digits, letters, _, - 12-13
Vendor Model ^[a-zA-Z0-9._-]*$ Allowed Digits, letters, _, - 1-50
Configuration Profile [[^\p{Punct}&&[^\s]&&[^\p{Sc}]
&&[^\p{Cntrl}]]|[_.]]+
Alphanumeric 2-50
Vendor extensions All characters are allowed except , & < > ' "
Settings: Do not use commas in any parameter.
Because the input file is a comma separated values (CSV) list, you cannot use a comma (,) in any parameter values including the vendor extension.
Polycom, Inc. 26
Manage Profiles and Devices
This section shows you how to manage configuration profiles and devices using the Profile Management
function. Note that the Profile Management function is available only when logged in as a service
provider. The Profile Management function enables service providers to perform the following operations:
Create a Profile
Modify a Profile
Delete a Profile
Modify a Device Association
Add a Device to a Profile
Change the Device Associated with a Profile
Delete a Device
Manage Configuration Profiles This section shows you how to create, modify, add, and delete device profiles.
Create a Profile
Once you have launched the Polycom ZTP console, as shown in Launch the Polycom ZTP Console, you
can begin managing profiles and devices.
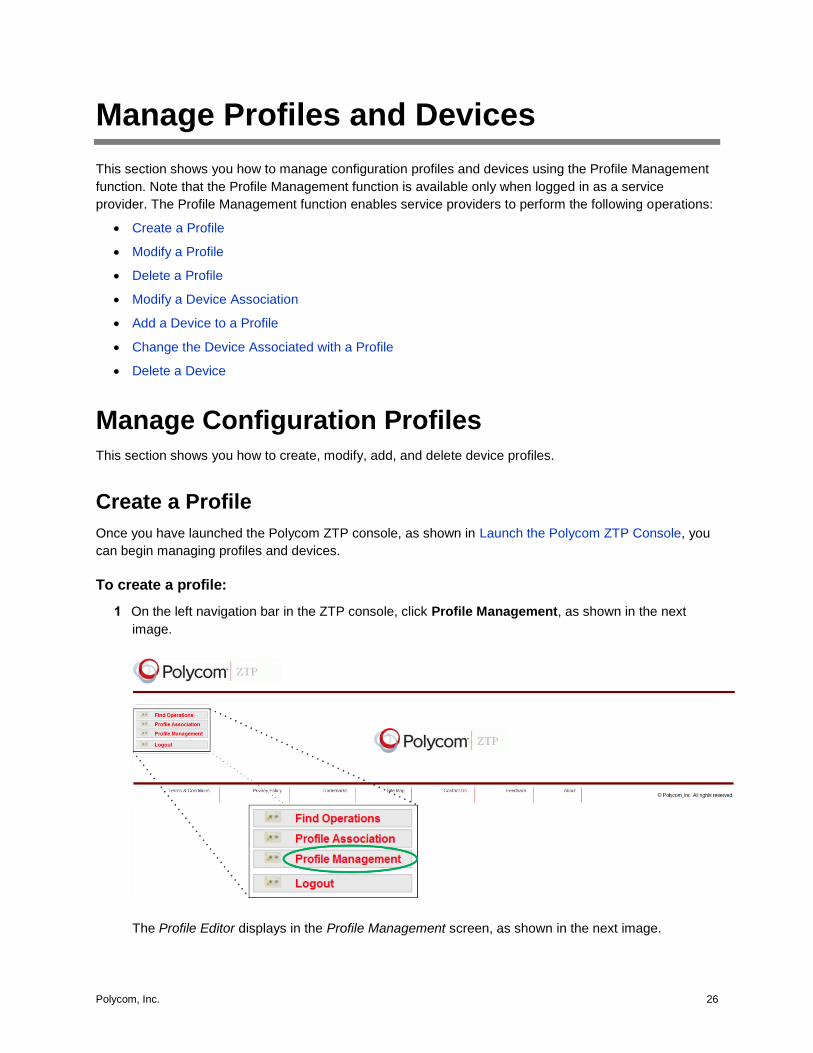
To create a profile:
1 On the left navigation bar in the ZTP console, click Profile Management, as shown in the next
image.
The Profile Editor displays in the Profile Management screen, as shown in the next image.
Polycom Zero-Touch Provisioning Guide Manage Profiles and Devices
Polycom, Inc. 27
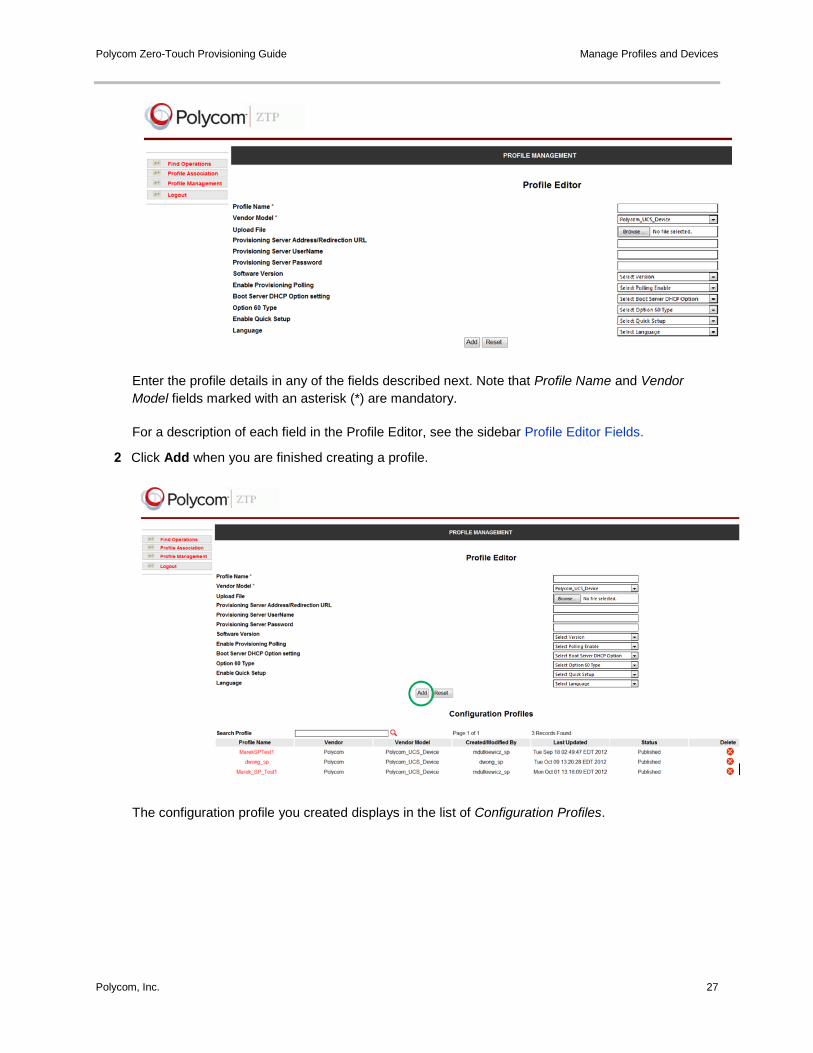
Enter the profile details in any of the fields described next. Note that Profile Name and Vendor
Model fields marked with an asterisk (*) are mandatory.
For a description of each field in the Profile Editor, see the sidebar Profile Editor Fields.
2 Click Add when you are finished creating a profile.
The configuration profile you created displays in the list of Configuration Profiles.
Polycom Zero-Touch Provisioning Guide Manage Profiles and Devices
Polycom, Inc. 28
Modify a Profile
You can modify a configuration profile by changing the profile parameters.
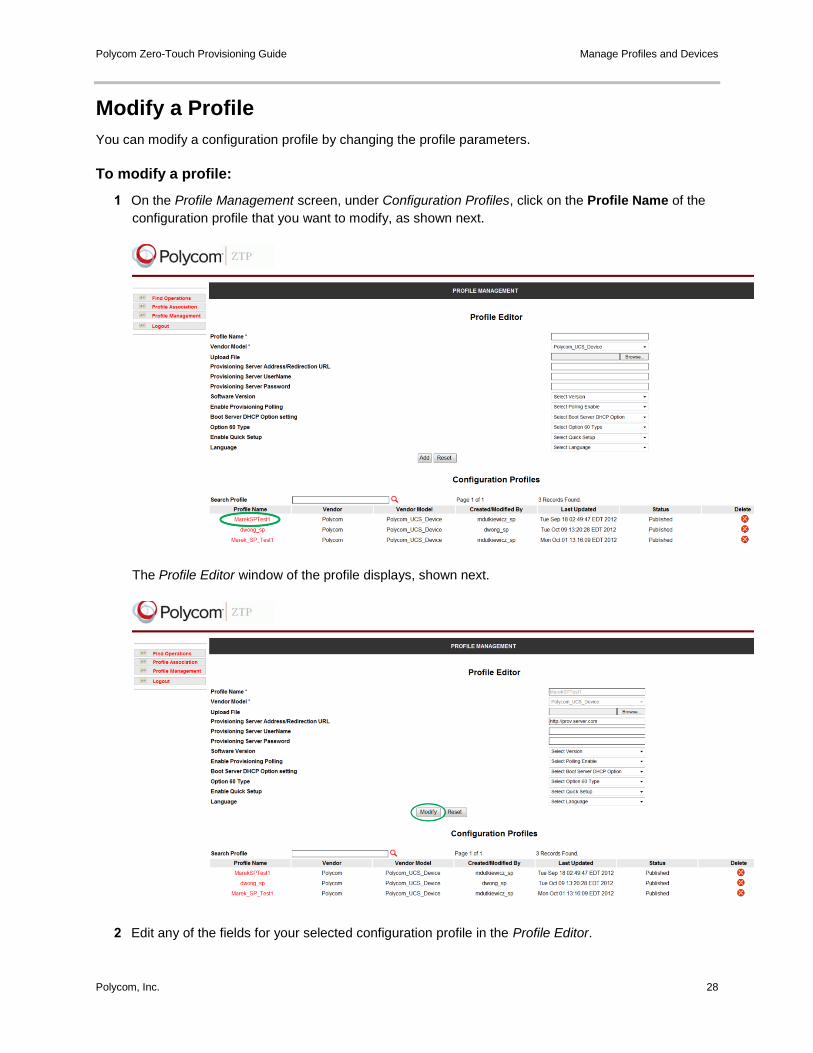
To modify a profile:
1 On the Profile Management screen, under Configuration Profiles, click on the Profile Name of the
configuration profile that you want to modify, as shown next.
The Profile Editor window of the profile displays, shown next.
2 Edit any of the fields for your selected configuration profile in the Profile Editor.

Polycom Zero-Touch Provisioning Guide Manage Profiles and Devices
Polycom, Inc. 29
For a description of each field in the Profile Editor, see the sidebar Profile Editor Fields at the end of
this procedure.
3 Click Modify when you are finished modifying the profile.
The profile is modified and displays in your list of Configuration Profiles.
Polycom Zero-Touch Provisioning Guide Manage Profiles and Devices
Polycom, Inc. 30
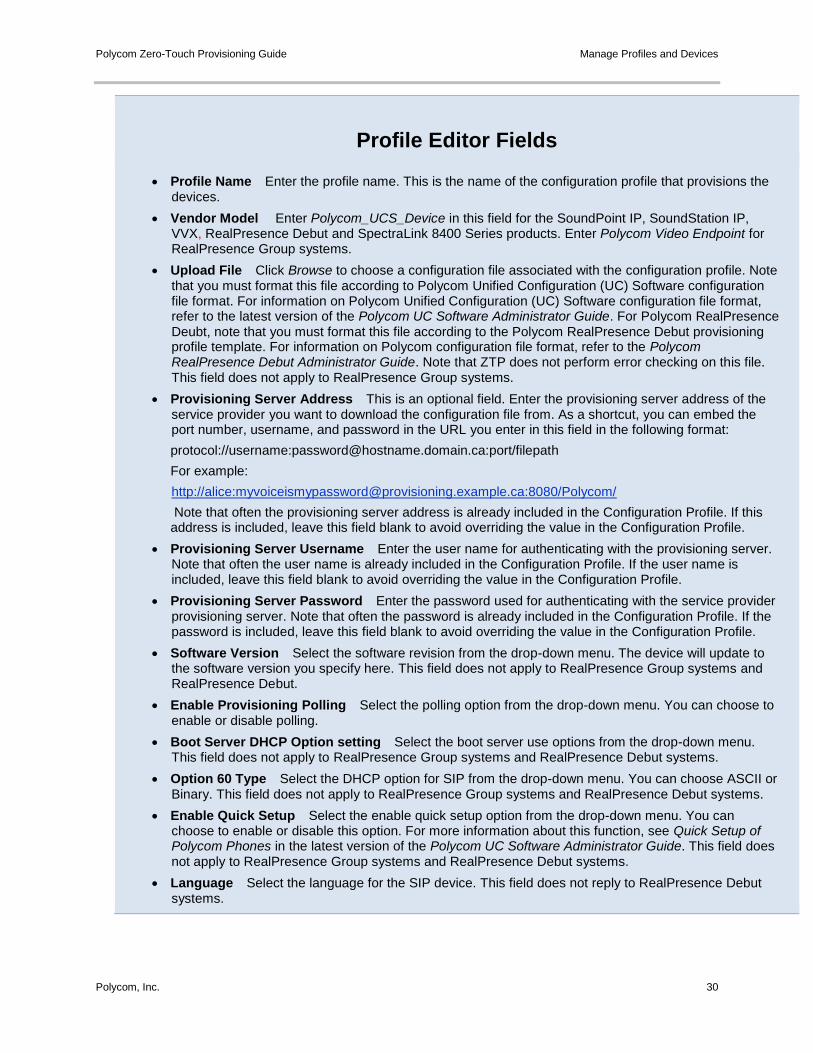
Profile Editor Fields
Profile Name Enter the profile name. This is the name of the configuration profile that provisions the devices.
Vendor Model Enter Polycom_UCS_Device in this field for the SoundPoint IP, SoundStation IP, VVX, RealPresence Debut and SpectraLink 8400 Series products. Enter Polycom Video Endpoint for RealPresence Group systems.
Upload File Click Browse to choose a configuration file associated with the configuration profile. Note that you must format this file according to Polycom Unified Configuration (UC) Software configuration file format. For information on Polycom Unified Configuration (UC) Software configuration file format, refer to the latest version of the Polycom UC Software Administrator Guide. For Polycom RealPresence Deubt, note that you must format this file according to the Polycom RealPresence Debut provisioning profile template. For information on Polycom configuration file format, refer to the Polycom RealPresence Debut Administrator Guide. Note that ZTP does not perform error checking on this file. This field does not apply to RealPresence Group systems.
Provisioning Server Address This is an optional field. Enter the provisioning server address of the service provider you want to download the configuration file from. As a shortcut, you can embed the port number, username, and password in the URL you enter in this field in the following format:
protocol://username:[email protected]:port/filepath
For example:
http://alice:[email protected]:8080/Polycom/
Note that often the provisioning server address is already included in the Configuration Profile. If this address is included, leave this field blank to avoid overriding the value in the Configuration Profile.
Provisioning Server Username Enter the user name for authenticating with the provisioning server. Note that often the user name is already included in the Configuration Profile. If the user name is included, leave this field blank to avoid overriding the value in the Configuration Profile.
Provisioning Server Password Enter the password used for authenticating with the service provider provisioning server. Note that often the password is already included in the Configuration Profile. If the password is included, leave this field blank to avoid overriding the value in the Configuration Profile.
Software Version Select the software revision from the drop-down menu. The device will update to the software version you specify here. This field does not apply to RealPresence Group systems and RealPresence Debut.
Enable Provisioning Polling Select the polling option from the drop-down menu. You can choose to enable or disable polling.
Boot Server DHCP Option setting Select the boot server use options from the drop-down menu. This field does not apply to RealPresence Group systems and RealPresence Debut systems.
Option 60 Type Select the DHCP option for SIP from the drop-down menu. You can choose ASCII or Binary. This field does not apply to RealPresence Group systems and RealPresence Debut systems.
Enable Quick Setup Select the enable quick setup option from the drop-down menu. You can choose to enable or disable this option. For more information about this function, see Quick Setup of Polycom Phones in the latest version of the Polycom UC Software Administrator Guide. This field does not apply to RealPresence Group systems and RealPresence Debut systems.
Language Select the language for the SIP device. This field does not reply to RealPresence Debut systems.
Polycom Zero-Touch Provisioning Guide Manage Profiles and Devices
Polycom, Inc. 31
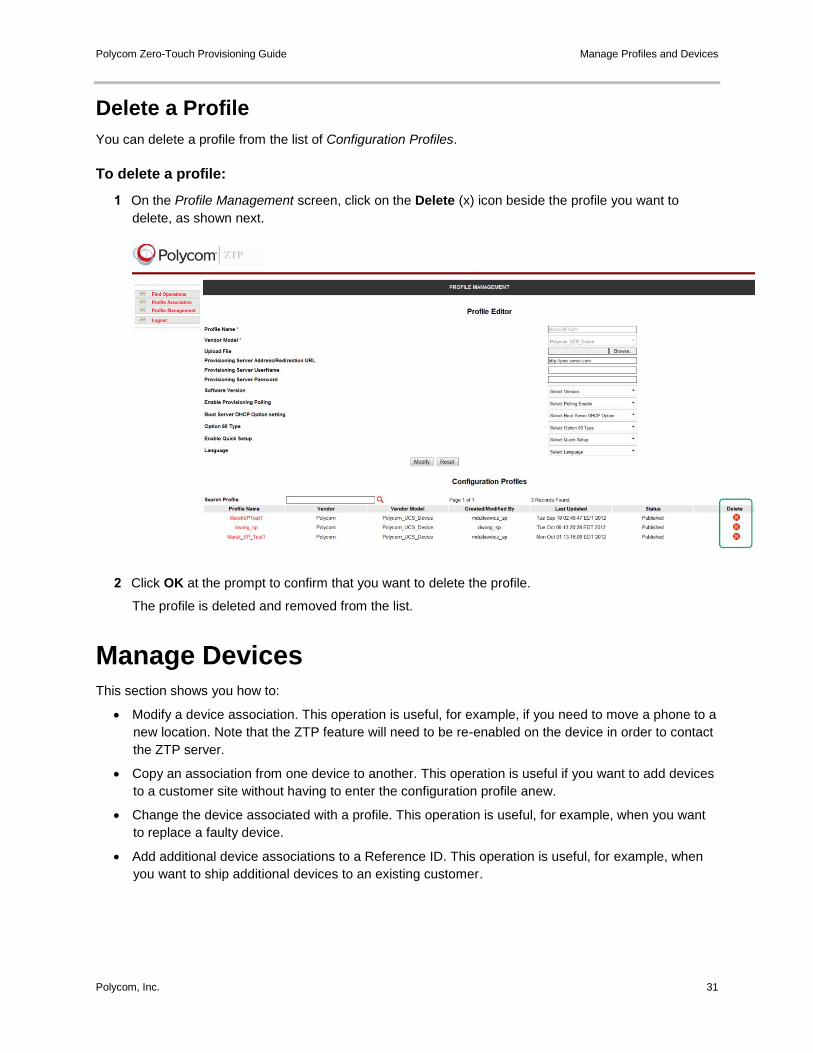
Delete a Profile
You can delete a profile from the list of Configuration Profiles.
To delete a profile:
1 On the Profile Management screen, click on the Delete (x) icon beside the profile you want to
delete, as shown next.
2 Click OK at the prompt to confirm that you want to delete the profile.
The profile is deleted and removed from the list.
Manage Devices This section shows you how to:
Modify a device association. This operation is useful, for example, if you need to move a phone to a
new location. Note that the ZTP feature will need to be re-enabled on the device in order to contact
the ZTP server.
Copy an association from one device to another. This operation is useful if you want to add devices
to a customer site without having to enter the configuration profile anew.
Change the device associated with a profile. This operation is useful, for example, when you want
to replace a faulty device.
Add additional device associations to a Reference ID. This operation is useful, for example, when
you want to ship additional devices to an existing customer.
Polycom Zero-Touch Provisioning Guide Manage Profiles and Devices
Polycom, Inc. 32
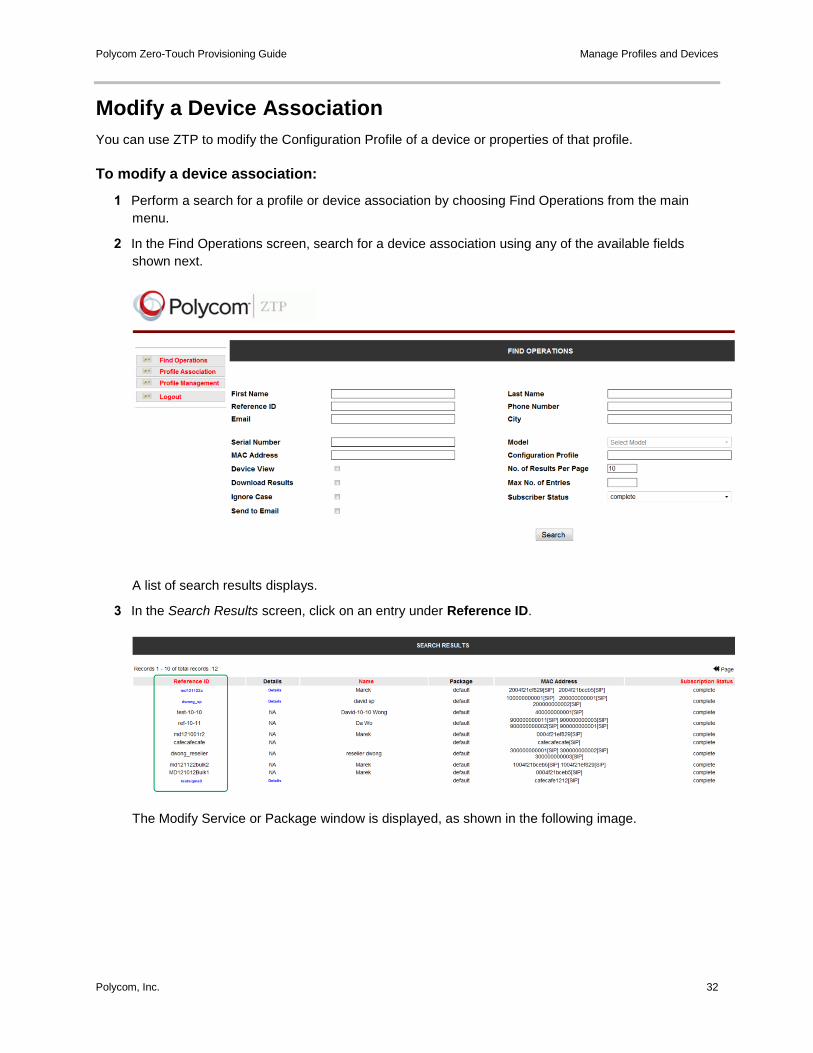
Modify a Device Association
You can use ZTP to modify the Configuration Profile of a device or properties of that profile.
To modify a device association:
1 Perform a search for a profile or device association by choosing Find Operations from the main
menu.
2 In the Find Operations screen, search for a device association using any of the available fields
shown next.
A list of search results displays.
3 In the Search Results screen, click on an entry under Reference ID.
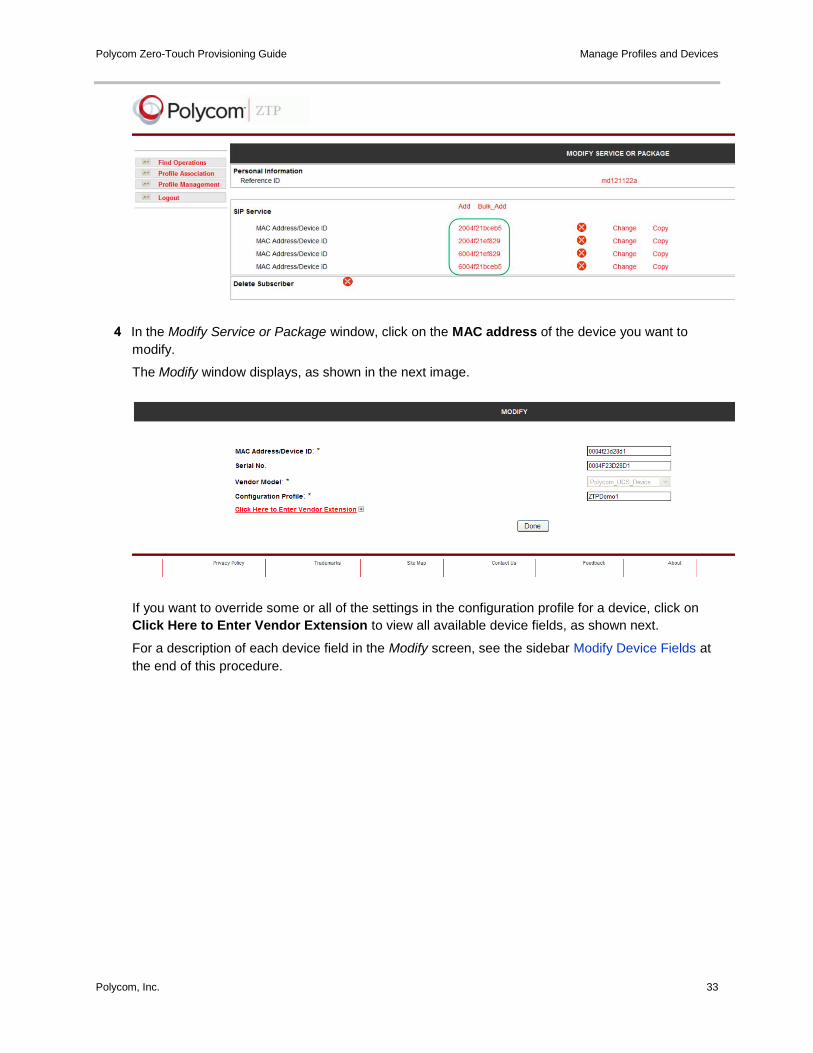
The Modify Service or Package window is displayed, as shown in the following image.
Polycom Zero-Touch Provisioning Guide Manage Profiles and Devices
Polycom, Inc. 33
4 In the Modify Service or Package window, click on the MAC address of the device you want to
modify.
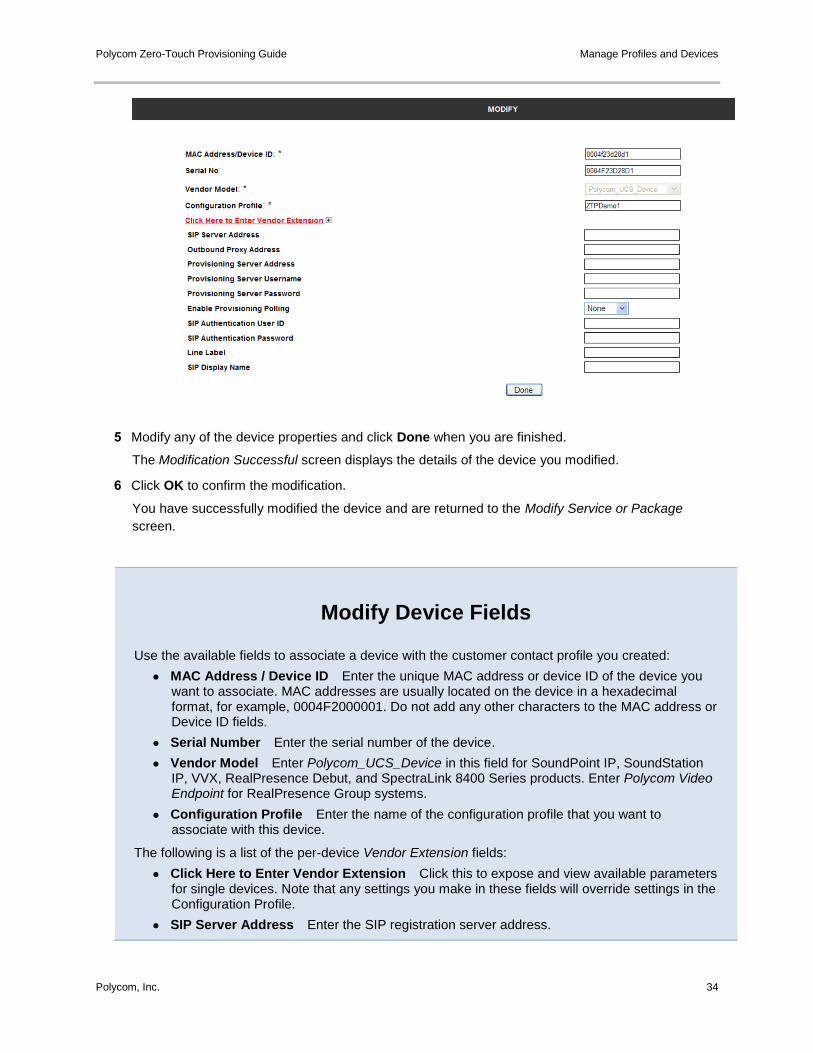
The Modify window displays, as shown in the next image.
If you want to override some or all of the settings in the configuration profile for a device, click on
Click Here to Enter Vendor Extension to view all available device fields, as shown next.
For a description of each device field in the Modify screen, see the sidebar Modify Device Fields at
the end of this procedure.
Polycom Zero-Touch Provisioning Guide Manage Profiles and Devices
Polycom, Inc. 34
5 Modify any of the device properties and click Done when you are finished.
The Modification Successful screen displays the details of the device you modified.
6 Click OK to confirm the modification.
You have successfully modified the device and are returned to the Modify Service or Package
screen.
Modify Device Fields
Use the available fields to associate a device with the customer contact profile you created:
● MAC Address / Device ID Enter the unique MAC address or device ID of the device you want to associate. MAC addresses are usually located on the device in a hexadecimal format, for example, 0004F2000001. Do not add any other characters to the MAC address or Device ID fields.
● Serial Number Enter the serial number of the device.
● Vendor Model Enter Polycom_UCS_Device in this field for SoundPoint IP, SoundStation IP, VVX, RealPresence Debut, and SpectraLink 8400 Series products. Enter Polycom Video Endpoint for RealPresence Group systems.
● Configuration Profile Enter the name of the configuration profile that you want to associate with this device.
The following is a list of the per-device Vendor Extension fields:
● Click Here to Enter Vendor Extension Click this to expose and view available parameters for single devices. Note that any settings you make in these fields will override settings in the Configuration Profile.
● SIP Server Address Enter the SIP registration server address.
Polycom Zero-Touch Provisioning Guide Manage Profiles and Devices
Polycom, Inc. 35
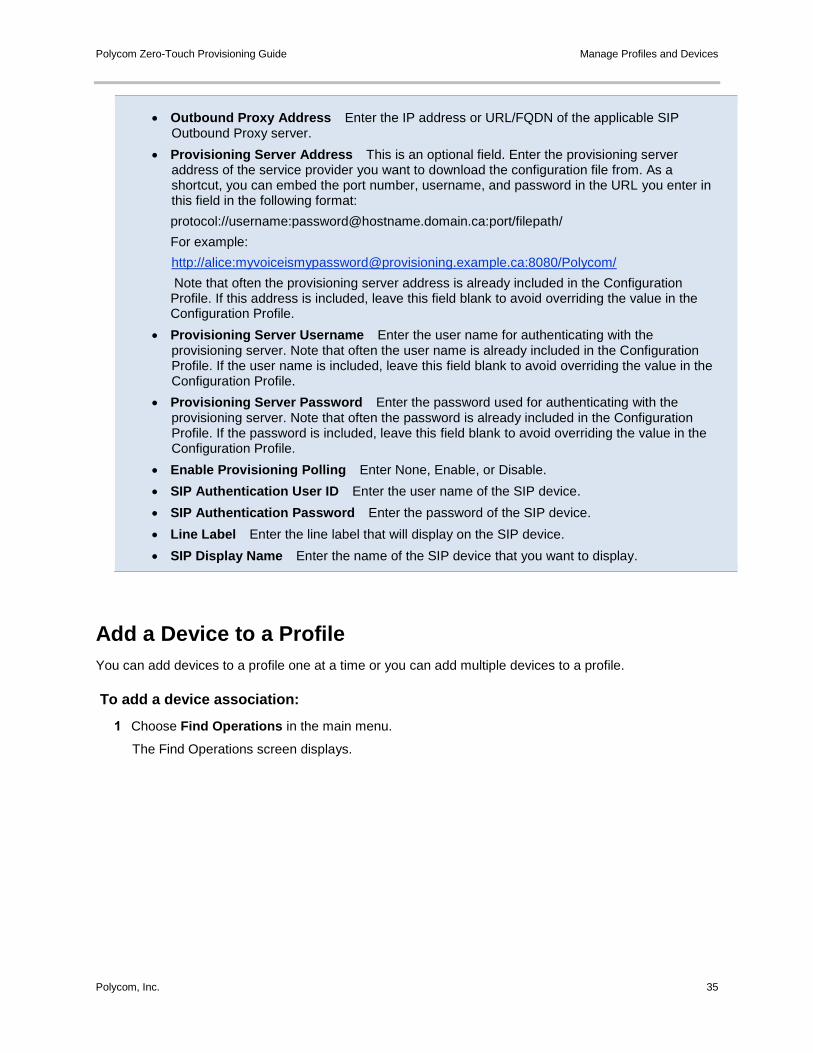
Outbound Proxy Address Enter the IP address or URL/FQDN of the applicable SIP Outbound Proxy server.
Provisioning Server Address This is an optional field. Enter the provisioning server address of the service provider you want to download the configuration file from. As a shortcut, you can embed the port number, username, and password in the URL you enter in this field in the following format:
protocol://username:[email protected]:port/filepath/
For example:
http://alice:[email protected]:8080/Polycom/
Note that often the provisioning server address is already included in the Configuration Profile. If this address is included, leave this field blank to avoid overriding the value in the Configuration Profile.
Provisioning Server Username Enter the user name for authenticating with the provisioning server. Note that often the user name is already included in the Configuration Profile. If the user name is included, leave this field blank to avoid overriding the value in the Configuration Profile.
Provisioning Server Password Enter the password used for authenticating with the provisioning server. Note that often the password is already included in the Configuration Profile. If the password is included, leave this field blank to avoid overriding the value in the Configuration Profile.
Enable Provisioning Polling Enter None, Enable, or Disable.
SIP Authentication User ID Enter the user name of the SIP device.
SIP Authentication Password Enter the password of the SIP device.
Line Label Enter the line label that will display on the SIP device.
SIP Display Name Enter the name of the SIP device that you want to display.
Add a Device to a Profile
You can add devices to a profile one at a time or you can add multiple devices to a profile.
To add a device association:
1 Choose Find Operations in the main menu.
The Find Operations screen displays.
Polycom Zero-Touch Provisioning Guide Manage Profiles and Devices
Polycom, Inc. 36
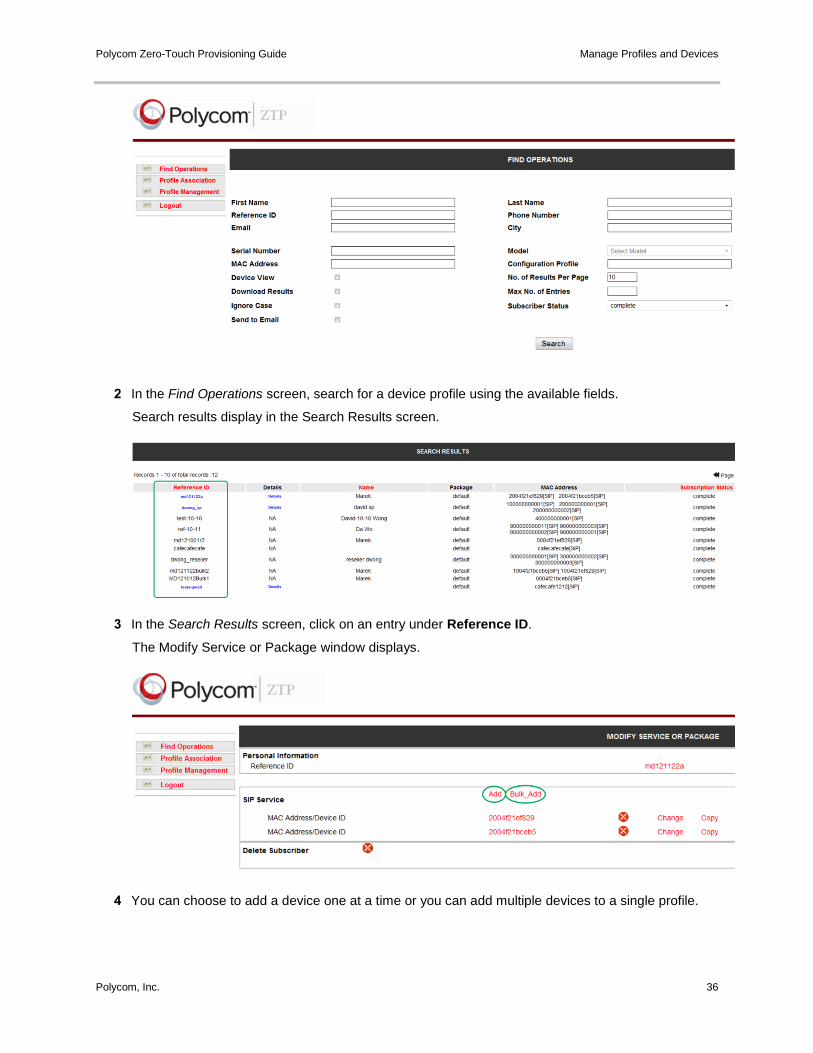
2 In the Find Operations screen, search for a device profile using the available fields.
Search results display in the Search Results screen.
3 In the Search Results screen, click on an entry under Reference ID.
The Modify Service or Package window displays.
4 You can choose to add a device one at a time or you can add multiple devices to a single profile.
Polycom Zero-Touch Provisioning Guide Manage Profiles and Devices
Polycom, Inc. 37
Click Add to add a device one at a time.
If you choose Add, the Create screen displays. Enter the device information in the available
fields. To view all available fields, choose Click Here to Enter Vendor Extension.
OR
Click Bulk_Add to add multiple devices.
If you choose Bulk_Add, the Bulk Profile Association screen displays. Upload a CVS file
containing the list of devices you want to associate with a profile.
Copy a Device Profile
When you want to deploy a new device with the same or similar configuration to that of an existing
device, you can copy the association of the existing device to the new device.
To copy a device association:
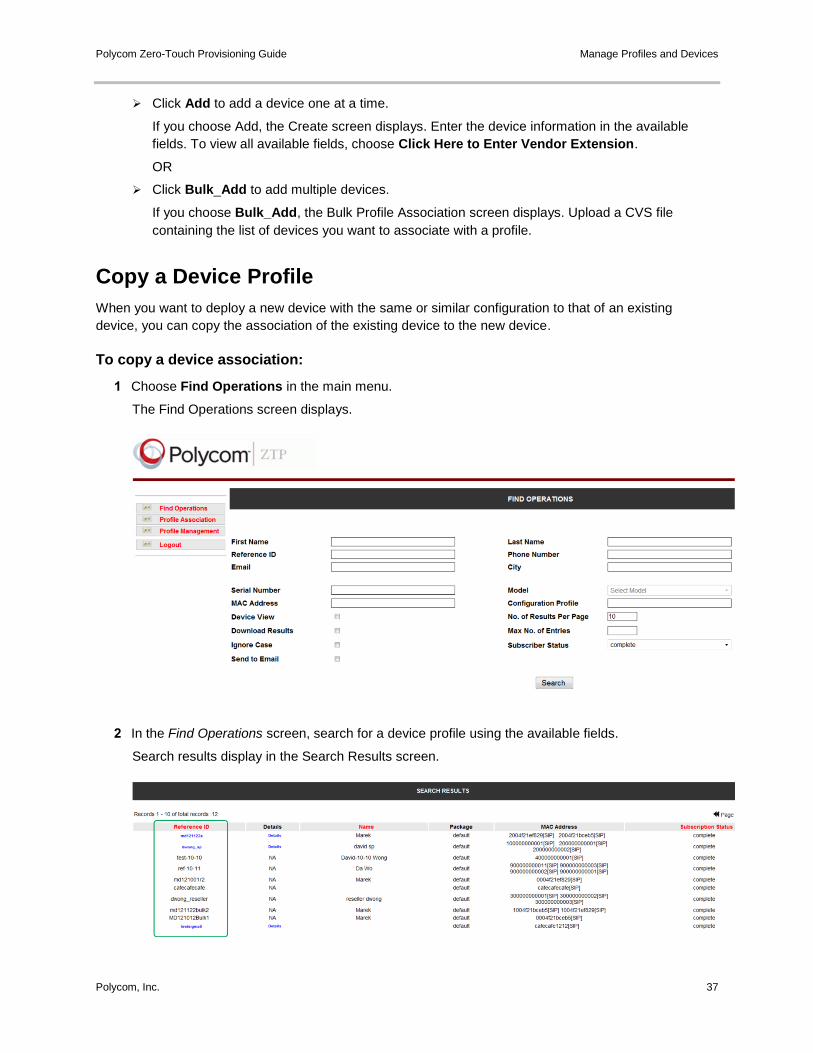
1 Choose Find Operations in the main menu.
The Find Operations screen displays.
2 In the Find Operations screen, search for a device profile using the available fields.
Search results display in the Search Results screen.
Polycom Zero-Touch Provisioning Guide Manage Profiles and Devices
Polycom, Inc. 38
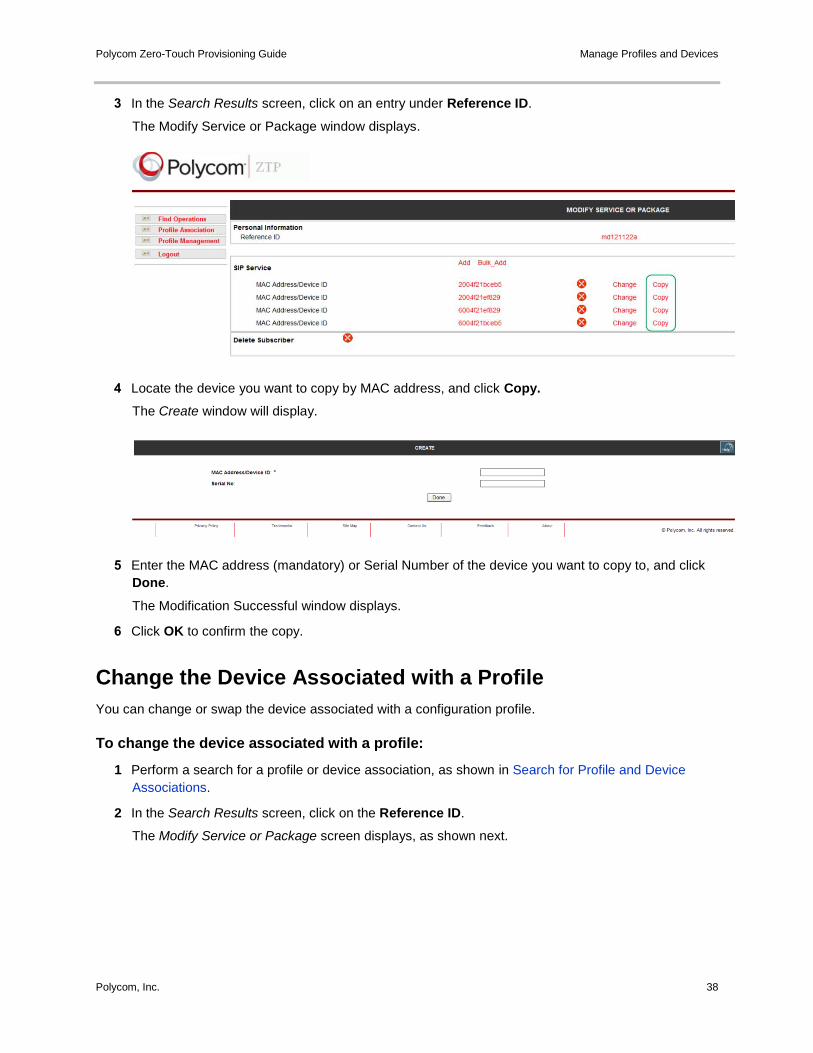
3 In the Search Results screen, click on an entry under Reference ID.
The Modify Service or Package window displays.
4 Locate the device you want to copy by MAC address, and click Copy.
The Create window will display.
5 Enter the MAC address (mandatory) or Serial Number of the device you want to copy to, and click
Done.
The Modification Successful window displays.
6 Click OK to confirm the copy.
Change the Device Associated with a Profile
You can change or swap the device associated with a configuration profile.
To change the device associated with a profile:
1 Perform a search for a profile or device association, as shown in Search for Profile and Device
Associations.
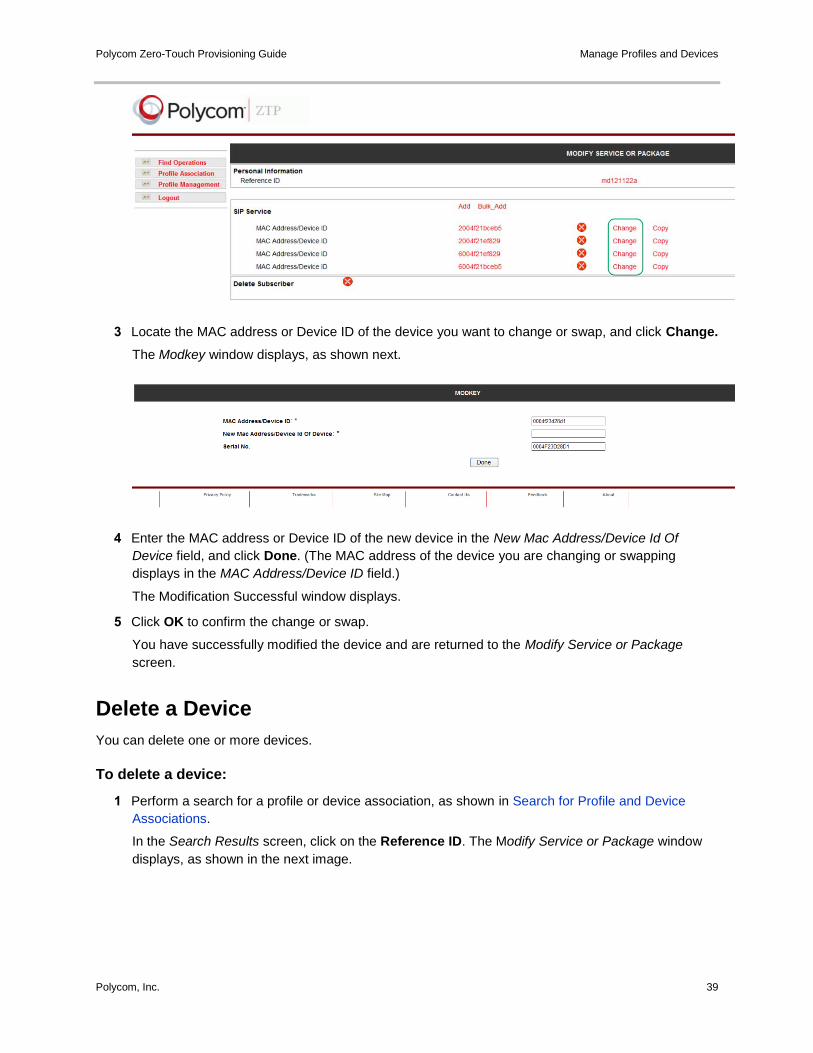
2 In the Search Results screen, click on the Reference ID.
The Modify Service or Package screen displays, as shown next.
Polycom Zero-Touch Provisioning Guide Manage Profiles and Devices
Polycom, Inc. 39
3 Locate the MAC address or Device ID of the device you want to change or swap, and click Change.
The Modkey window displays, as shown next.
4 Enter the MAC address or Device ID of the new device in the New Mac Address/Device Id Of
Device field, and click Done. (The MAC address of the device you are changing or swapping
displays in the MAC Address/Device ID field.)
The Modification Successful window displays.
5 Click OK to confirm the change or swap.
You have successfully modified the device and are returned to the Modify Service or Package
screen.
Delete a Device
You can delete one or more devices.
To delete a device:
1 Perform a search for a profile or device association, as shown in Search for Profile and Device
Associations.
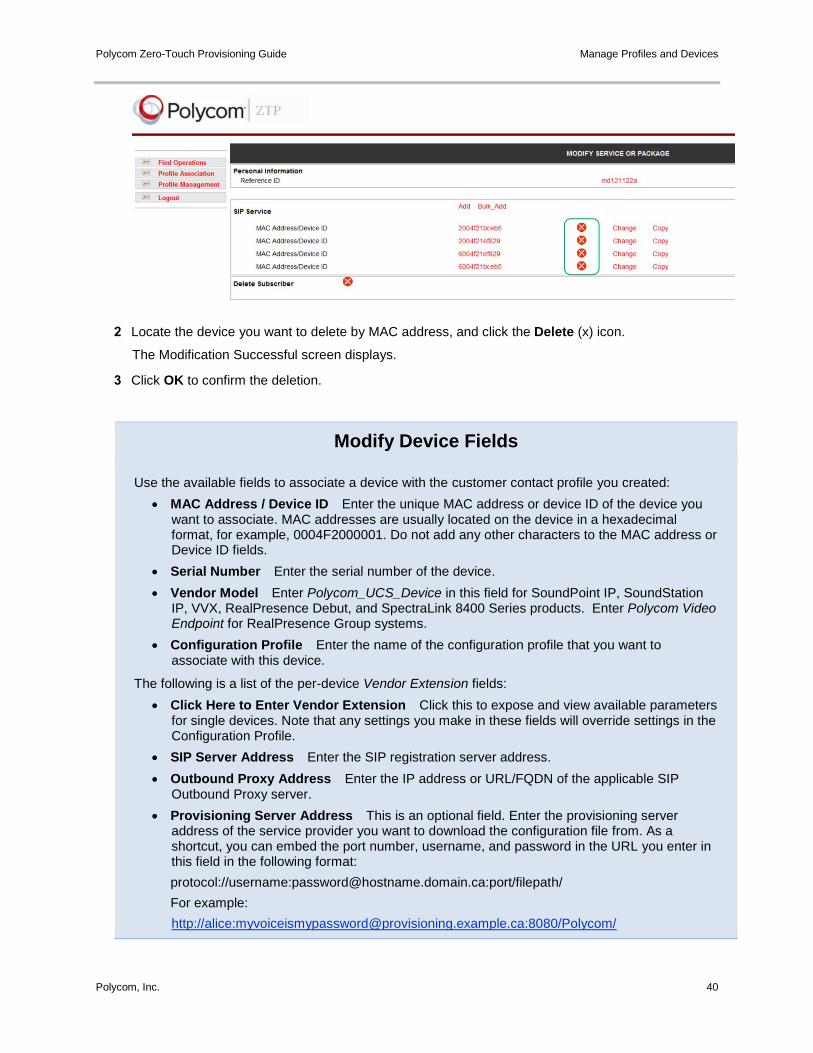
In the Search Results screen, click on the Reference ID. The Modify Service or Package window
displays, as shown in the next image.
Polycom Zero-Touch Provisioning Guide Manage Profiles and Devices
Polycom, Inc. 40
2 Locate the device you want to delete by MAC address, and click the Delete (x) icon.
The Modification Successful screen displays.
3 Click OK to confirm the deletion.
Modify Device Fields
Use the available fields to associate a device with the customer contact profile you created:
MAC Address / Device ID Enter the unique MAC address or device ID of the device you want to associate. MAC addresses are usually located on the device in a hexadecimal format, for example, 0004F2000001. Do not add any other characters to the MAC address or Device ID fields.
Serial Number Enter the serial number of the device.
Vendor Model Enter Polycom_UCS_Device in this field for SoundPoint IP, SoundStation IP, VVX, RealPresence Debut, and SpectraLink 8400 Series products. Enter Polycom Video Endpoint for RealPresence Group systems.
Configuration Profile Enter the name of the configuration profile that you want to associate with this device.
The following is a list of the per-device Vendor Extension fields:
Click Here to Enter Vendor Extension Click this to expose and view available parameters for single devices. Note that any settings you make in these fields will override settings in the Configuration Profile.
SIP Server Address Enter the SIP registration server address.
Outbound Proxy Address Enter the IP address or URL/FQDN of the applicable SIP Outbound Proxy server.
Provisioning Server Address This is an optional field. Enter the provisioning server address of the service provider you want to download the configuration file from. As a shortcut, you can embed the port number, username, and password in the URL you enter in this field in the following format:
protocol://username:[email protected]:port/filepath/
For example:
http://alice:[email protected]:8080/Polycom/
Polycom Zero-Touch Provisioning Guide Manage Profiles and Devices
Polycom, Inc. 41
Note that often the provisioning server address is already included in the Configuration Profile. If this address is included, leave this field blank to avoid overriding the value in the Configuration Profile.
Provisioning Server Username Enter the user name for authenticating with the provisioning server. Note that often the user name is already included in the Configuration Profile. If the user name is included, leave this field blank to avoid overriding the value in the Configuration Profile.
Provisioning Server Password Enter the password used for authenticating with the provisioning server. Note that often the password is already included in the Configuration Profile. If the password is included, leave this field blank to avoid overriding the value in the Configuration Profile.
Enable Provisioning Polling Enter None, Enable, or Disable.
SIP Authentication User ID Enter the user name of the SIP device.
SIP Authentication Password Enter the password of the SIP device.
Line Label Enter the line label that will display on the SIP device.
SIP Display Name Enter the name of the SIP device that you want to display.
Polycom, Inc. 42
Provisioning with ZTP
This section shows you how to use the ZTP solution as part of the provisioning server discovery process,
and shows you how to use the ZTP solution to update the Polycom Unified Communication Software
(UCS) running on your devices.
Provision Server Discovery The ZTP solution is used as part of the provisioning server discovery process on the SoundPoint IP,
SoundStation IP, VVX business media phones, RealPresence Debut, and RealPresence Group systems
video endpoints. If you want to use ZTP as part of the server discovery process for your SpectraLink 8400
Series wireless handsets, the handsets must be running UCS release 4.0.1 or later. Note that when you
enable the ZTP feature, an additional step is added to the provisioning server discovery process.
A device will carry out the following steps until it finds the provisioning server address:
1 Search in DHCP:
a UCS Devices and RealPresence Debut: If DHCP provisioning server discovery is set on the
device to Custom, Option 66, or Custom+Option 66 (the factory default), the device will look for
a provisioning server address in DHCP or DHCP INFORM.
b Video Endpoints: The device will look for the provisioning server address in DHCP record option
66.
2 Search for server address:
a UCS Devices: The device will look for a statically configured provisioning server address (not
0.0.0.0 or Null).
b Video Endpoints: The device will query DNS for the_rtcconfig SRV record.
3 If ZTP is enabled, the device will contact ZTP. (UCS Devices and Video Endpoints)
For more details about the provisioning server discovery process, see Set up Your Phone Network in the
latest revision of the Polycom UC Software Administrator Guide or see UC Software Provisioning Best
Practices. For RealPresence Group systems, see the Polycom RealPresence Group Series Administrator
Guide. For RealPresence Debut systems, see the Polycom RealPresence Debut Administrator Guide.
Once ZTP completes:
● Video Endpoints: ZTP will be disabled and the endpoint will remain connected to the provisioning
server.
● RealPresence Debut: ZTP will be enabled and the endpoint will remain connected to the
provisioning server.
● UCS Devices: Once the provisioning server discovery process is complete, you can enable or
disable ZTP in one of two ways:
On the phone, press Menu > Settings > Advanced and enter the phone’s password (default
456). Choose Admin Settings > Network Configuration > Provisioning Server/Server Menu
> ZTP.
OR
Polycom Zero-Touch Provisioning Guide Provisioning with ZTP
Polycom, Inc. 43
Use the Polycom centralized provisioning method. You will need to locate the following
parameters in either the device.cfg or site.cfg template configuration file, and set the value of
each of the following parameters to 1:
o device.set
device.prov.ztpEnabled
device.prov.ztpEnabled.set
Note: ZTP disabled by a software update
By default, the ZTP feature is disabled on a phone when you update to a UC Software version that supports ZTP.
Provisioning on ZTP
This section describes how the device interacts with ZTP.
When a device running BootROM 4.3.1/UCS 3.3.2, or newer 3.3.x patches, contacts ZTP:
1 The device will request the BootROM.ld using http. This file will not be delivered by ZTP unless a
software update is required.
2 The device or video endpoint will request its own <MACaddress>.cfg.
If there is a device or endpoint association in ZTP:
a A software update will be carried out, if required. See Software Updates Using ZTP for details
on updating software.
b The phone or video endpoint will request its <MACaddress>.cfg using https, and a mutually
authenticated TLS session will be used to deliver the configuration profile defined in
<MACaddress>-profile.cfg to the phone or video endpoint.
c The ZTP feature on the phone or video endpoint will be disabled.
If there is no device association in ZTP:
The device or video endpoint will serve up 000000000000.cfg, which will set ztpEnabled=0 and
the provisioning server address to Null.
Note: For software versions prior to UCS 4.0.0, phones get the <MACaddress>.cfg using http
If you are running BootROM 4.3.1/ UC Software 3.3.x, the phone will request and receive <MACaddress>.cfg using http as an initial stage. This additional step is required since the BootROM software does not support file download using the https protocol. Note also that the <MACaddress>.cfg file does not contain sensitive or confidential information.
When a device contacts ZTP running UCS 4.0.0 and later:
All files will be delivered using mutually authenticated https sessions.
A software update will be triggered after initial configuration.
Polycom Zero-Touch Provisioning Guide Provisioning with ZTP
Polycom, Inc. 44
Software Updates Using ZTP for UCS Devices You can use the ZTP solution to update your devices to UC Software version 4.0.0 and all later UCS
versions. You will not be able to use the ZTP solution to update your devices with UCS versions earlier
than 4.0.0. Note, the information provided in this section does not apply to video endpoints. These system
must use either the Polycom public server or a provisioning server, such as RealPresence Resource
Manager, to obtain software updates.
Software updates for video endpoints
RealPresence Group systems can update software using the public or provisioning server. See the Polycom RealPresence Group Series Administrator Guide. RealPresence Debut systems can update software using the web interface, USB devices, or the provisioning server. See the Polycom RealPresence Debut Administrator Guide.
Phones use the following process when you perform a software update:
If the current software is BootROM 4.3.1/UCS 3.3.x (as determined by the HTTP user Agent string)
then ZTP uses a re-direction procedure to update to the version of software (UCS 4.0.0 or later)
specified in the profile.
Update re-direction modifies the provisioning server address
The re-direction used for the software update will cause the provisioning server address to be modified during the software update. This should be taken into account if you are troubleshooting a deployment issue when you select a software update as part of a profile.
If the software on the phone is already UCS 4.0.0 or newer, then the APP-FILE-PATH string in the
<MACaddress>.cfg file is used to specify where the new software is located.
Notes About Updating Software
Before you begin updating your software, consider the following points:
● ZTP is designed to be used once for your initial device installation. It is not designed to be used for
ongoing management of devices.
● The ZTP system will use configuration parameters to disable the ZTP features once you have
completed provisioning the devices and the devices contact ZTP for the first time.
● If it is necessary to use ZTP at a later time, you can re-enable it and re-apply a profile.
● The following device requirements must be met to use ZTP:
Devices must be running software revision UCS3.3.2/BR4.3.1 or later.
Devices must have a factory installed device certificate that is activated. For details, see
Technical Bulletin 37148: Device Certificates on Polycom SoundPoint IP, SoundStation IP, and
VVX 1500 Phones.
Devices must be able to contact the ZTP solution using HTTP and HTTPS protocols (typically
using Ports 80 and 443) from their point of installation.
Polycom, Inc. 45
Troubleshoot ZTP
This section contains troubleshooting tips for ZTP users, and is intended primarily for Polycom and
partner technical support personnel.
Note: Troubleshooting video endpoints
If ZTP is not functioning properly for video endpoints, the system will automatically go through the normal out-of-box wizard.
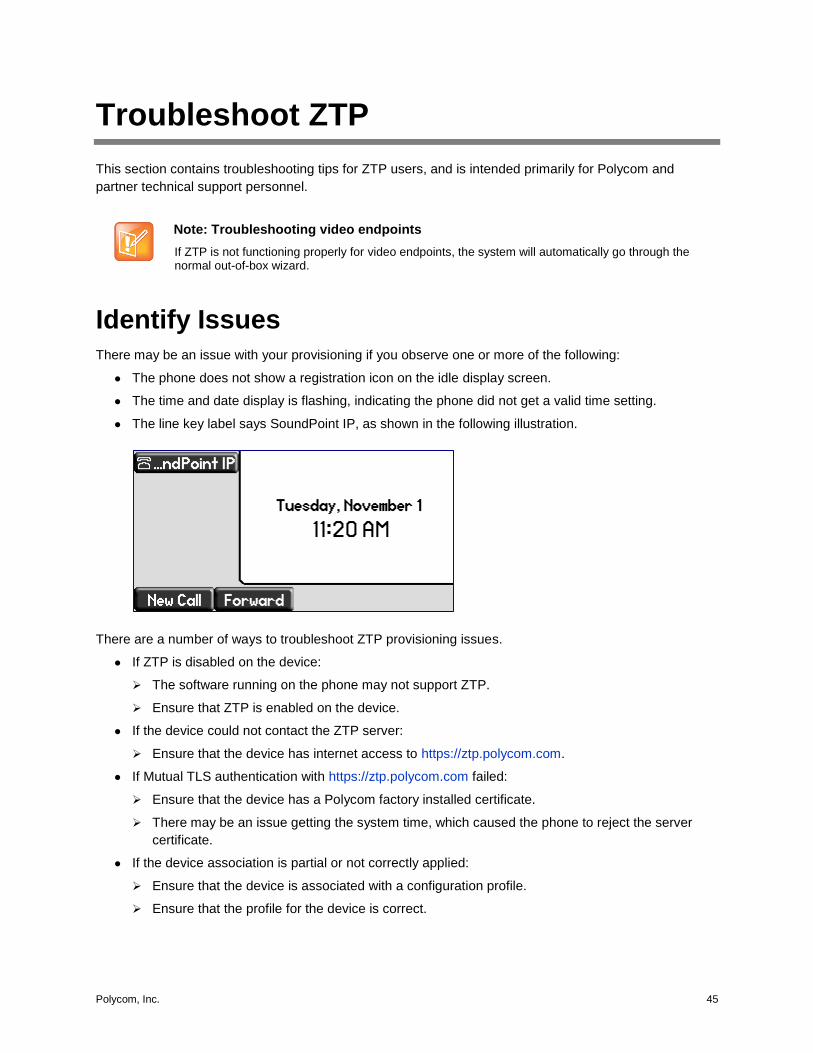
Identify Issues There may be an issue with your provisioning if you observe one or more of the following:
● The phone does not show a registration icon on the idle display screen.
● The time and date display is flashing, indicating the phone did not get a valid time setting.
● The line key label says SoundPoint IP, as shown in the following illustration.
There are a number of ways to troubleshoot ZTP provisioning issues.
● If ZTP is disabled on the device:
The software running on the phone may not support ZTP.
Ensure that ZTP is enabled on the device.
● If the device could not contact the ZTP server:
Ensure that the device has internet access to https://ztp.polycom.com.
● If Mutual TLS authentication with https://ztp.polycom.com failed:
Ensure that the device has a Polycom factory installed certificate.
There may be an issue getting the system time, which caused the phone to reject the server
certificate.
● If the device association is partial or not correctly applied:
Ensure that the device is associated with a configuration profile.
Ensure that the profile for the device is correct.
Polycom Zero-Touch Provisioning Guide Troubleshoot ZTP
Polycom, Inc. 46
The remainder of this section describes several troubleshooting strategies in more detail. There are two
strategies you can use to troubleshoot ZTP: using the ZTP Web console and, if you have access to the
device, using the device user interface.
Use the ZTP Console to Troubleshoot
You can use the ZTP console to identify and resolve provisioning issues.
To troubleshoot using the ZTP console:
1 To begin troubleshooting using the ZTP console, you must obtain the MAC address of the device
you are troubleshooting. If you do not know the MAC address, the end user can locate the MAC
address of a Polycom device in one of two ways:
On a label on the back of the device. The MAC address is a hexadecimal number located on the
bar code label, directly above the bar code, in the following format: 0004f2000001.
OR
Navigate on the Polycom device:
If you are using a SoundPoint IP or VVX device, go to Menu > Status > Platform > Phone.
The MAC address is in the Serial Number (S/N) field.
If you are using a SpectraLink device, go to Settings > Status > Platform > Phone. The
MAC address is in the MAC field.
2 Once you have the MAC address of the device you are troubleshooting, log in to the ZTP console.
For help on logging in, see Launch the Polycom ZTP Console.
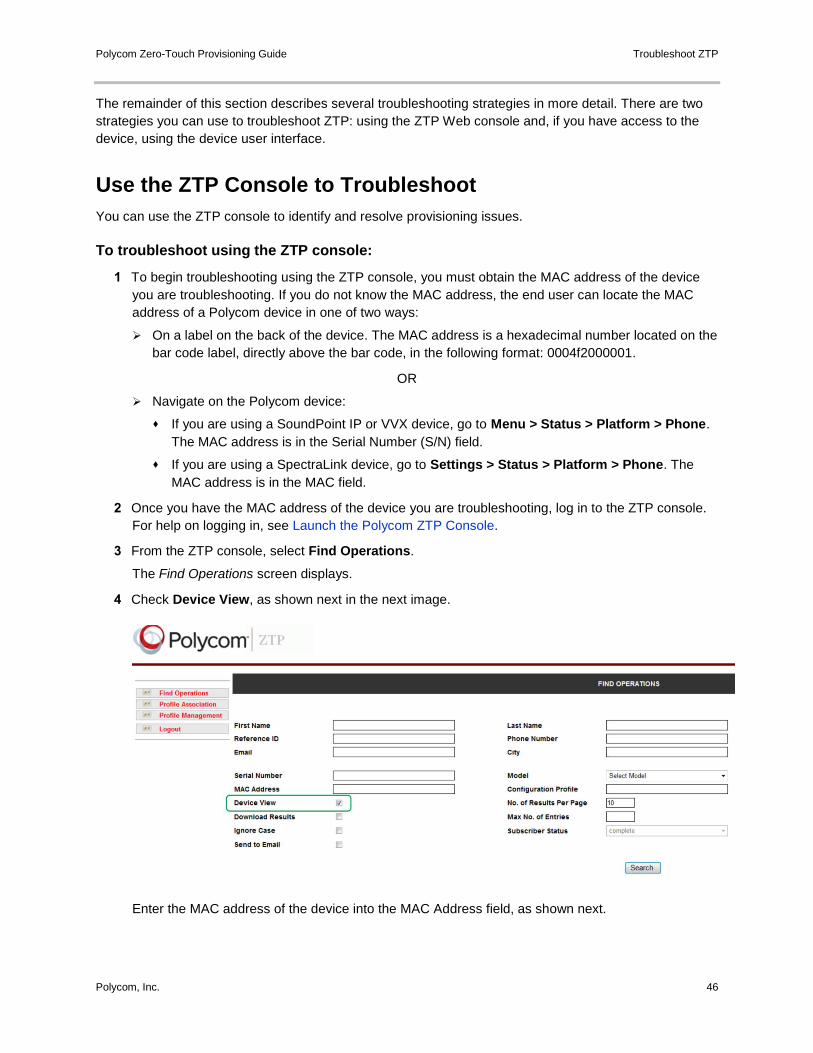
3 From the ZTP console, select Find Operations.
The Find Operations screen displays.
4 Check Device View, as shown next in the next image.
Enter the MAC address of the device into the MAC Address field, as shown next.
Polycom Zero-Touch Provisioning Guide Troubleshoot ZTP
Polycom, Inc. 47
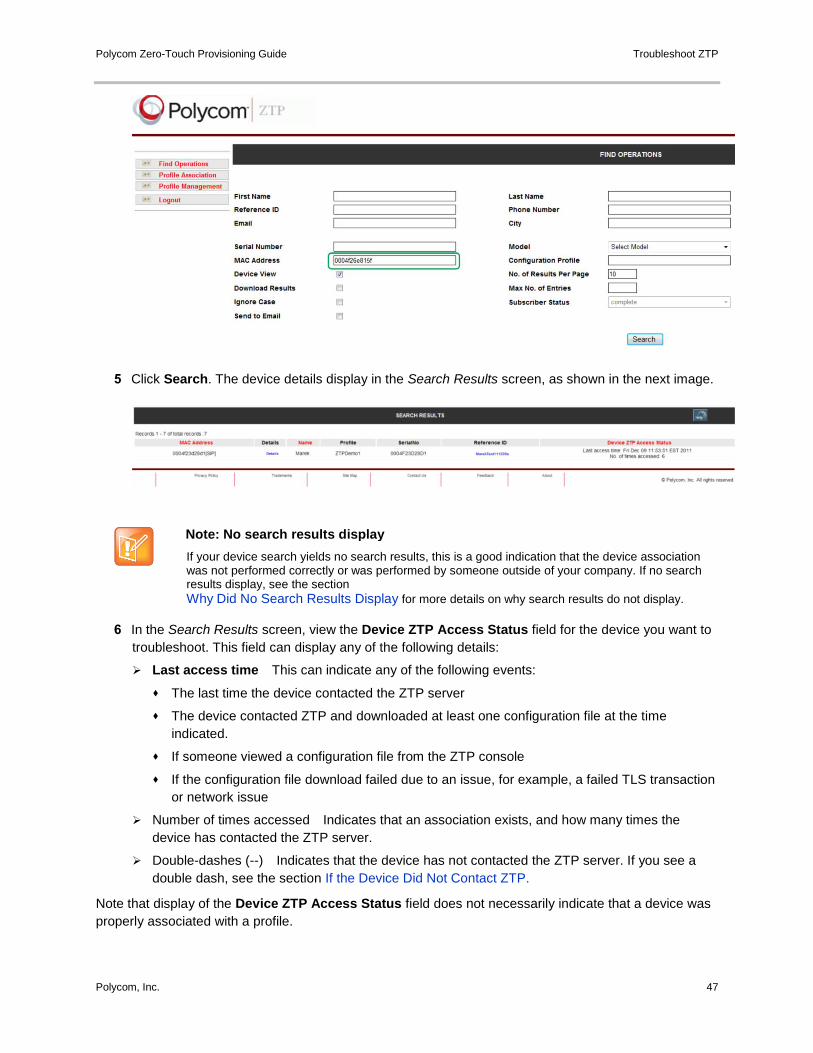
5 Click Search. The device details display in the Search Results screen, as shown in the next image.
Note: No search results display
If your device search yields no search results, this is a good indication that the device association was not performed correctly or was performed by someone outside of your company. If no search results display, see the section Why Did No Search Results Display for more details on why search results do not display.
6 In the Search Results screen, view the Device ZTP Access Status field for the device you want to
troubleshoot. This field can display any of the following details:
Last access time This can indicate any of the following events:
The last time the device contacted the ZTP server
The device contacted ZTP and downloaded at least one configuration file at the time
indicated.
If someone viewed a configuration file from the ZTP console
If the configuration file download failed due to an issue, for example, a failed TLS transaction
or network issue
Number of times accessed Indicates that an association exists, and how many times the
device has contacted the ZTP server.
Double-dashes (--) Indicates that the device has not contacted the ZTP server. If you see a
double dash, see the section If the Device Did Not Contact ZTP.
Note that display of the Device ZTP Access Status field does not necessarily indicate that a device was
properly associated with a profile.
Polycom Zero-Touch Provisioning Guide Troubleshoot ZTP
Polycom, Inc. 48
Use the Device or Web Configuration Utility to Troubleshoot
In addition to using the ZTP Web console to troubleshoot, you can also use either a device’s user
interface, if you have access to it, or the Web Configuration Utility. There are a number of device fields
you can use to verify that the device accessed ZTP during boot-up, and which you can reset by rebooting
the phone. This section shows you how to use the device interface and the Web Configuration Utility to
troubleshoot.
To troubleshoot using the device interface:
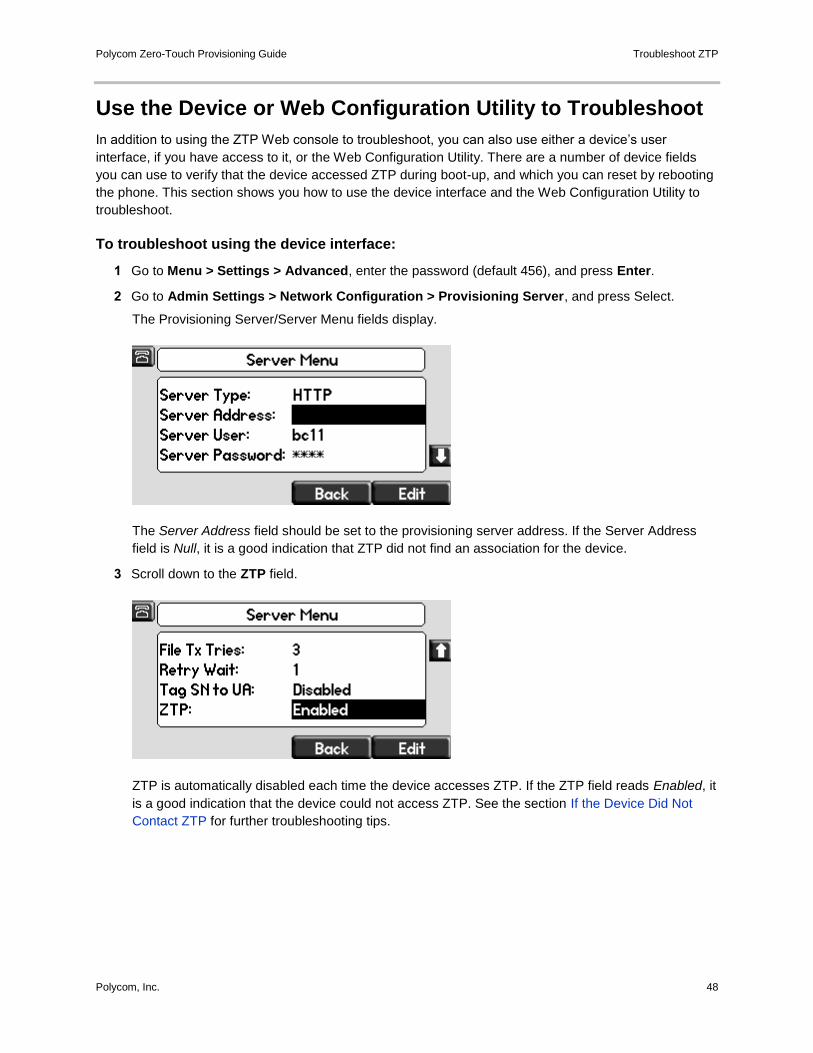
1 Go to Menu > Settings > Advanced, enter the password (default 456), and press Enter.
2 Go to Admin Settings > Network Configuration > Provisioning Server, and press Select.
The Provisioning Server/Server Menu fields display.
The Server Address field should be set to the provisioning server address. If the Server Address
field is Null, it is a good indication that ZTP did not find an association for the device.
3 Scroll down to the ZTP field.
ZTP is automatically disabled each time the device accesses ZTP. If the ZTP field reads Enabled, it
is a good indication that the device could not access ZTP. See the section If the Device Did Not
Contact ZTP for further troubleshooting tips.
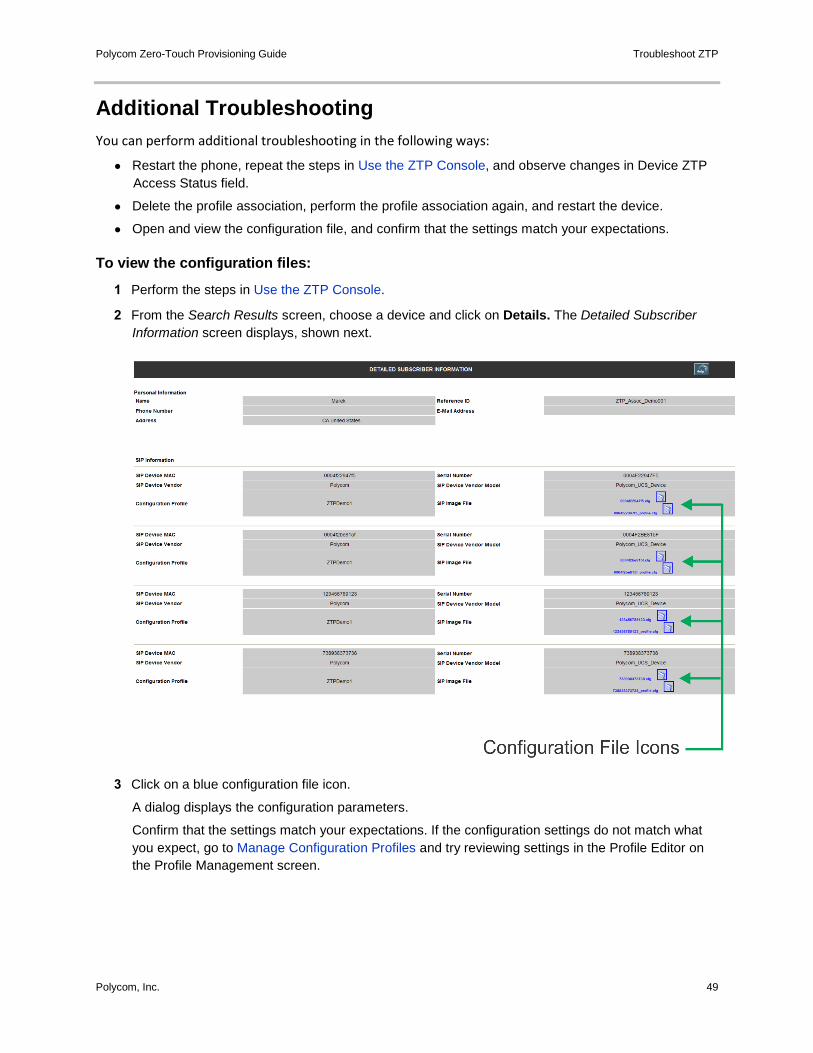
Polycom Zero-Touch Provisioning Guide Troubleshoot ZTP
Polycom, Inc. 49
Additional Troubleshooting
You can perform additional troubleshooting in the following ways:
● Restart the phone, repeat the steps in Use the ZTP Console, and observe changes in Device ZTP
Access Status field.
● Delete the profile association, perform the profile association again, and restart the device.
● Open and view the configuration file, and confirm that the settings match your expectations.
To view the configuration files:
1 Perform the steps in Use the ZTP Console.
2 From the Search Results screen, choose a device and click on Details. The Detailed Subscriber
Information screen displays, shown next.
3 Click on a blue configuration file icon.
A dialog displays the configuration parameters.
Confirm that the settings match your expectations. If the configuration settings do not match what
you expect, go to Manage Configuration Profiles and try reviewing settings in the Profile Editor on
the Profile Management screen.
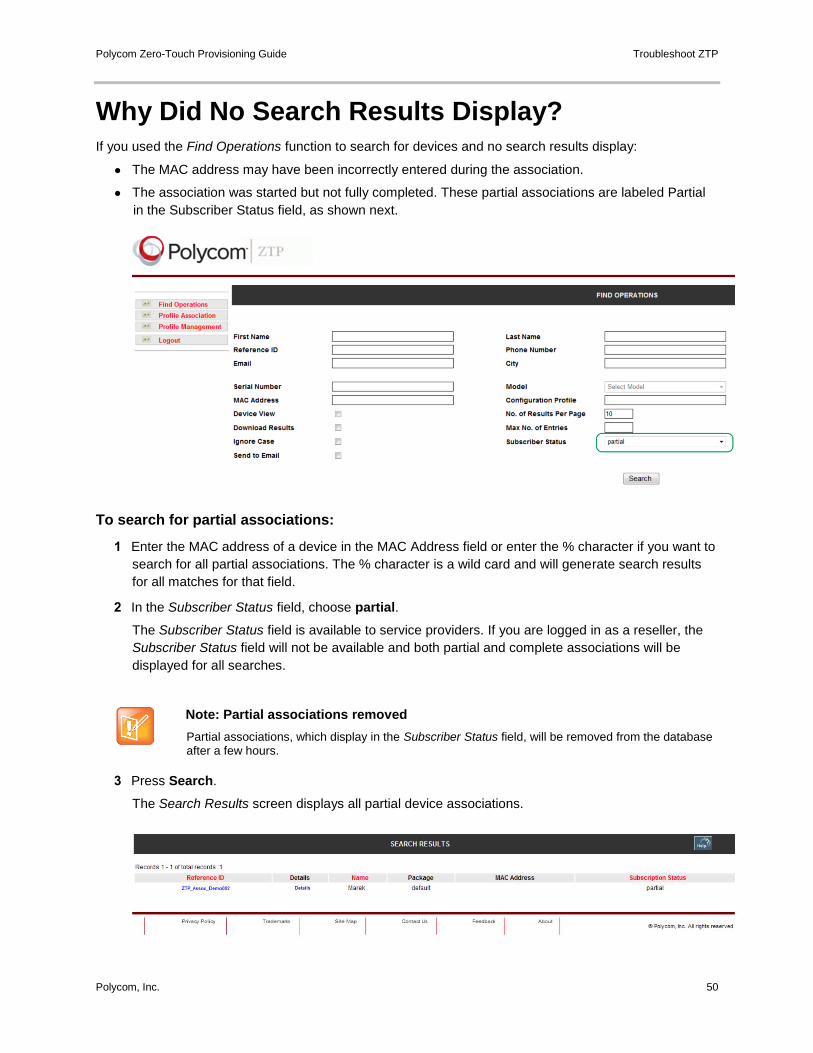
Polycom Zero-Touch Provisioning Guide Troubleshoot ZTP
Polycom, Inc. 50
Why Did No Search Results Display? If you used the Find Operations function to search for devices and no search results display:
● The MAC address may have been incorrectly entered during the association.
● The association was started but not fully completed. These partial associations are labeled Partial
in the Subscriber Status field, as shown next.
To search for partial associations:
1 Enter the MAC address of a device in the MAC Address field or enter the % character if you want to
search for all partial associations. The % character is a wild card and will generate search results
for all matches for that field.
2 In the Subscriber Status field, choose partial.
The Subscriber Status field is available to service providers. If you are logged in as a reseller, the
Subscriber Status field will not be available and both partial and complete associations will be
displayed for all searches.
Note: Partial associations removed
Partial associations, which display in the Subscriber Status field, will be removed from the database after a few hours.
3 Press Search.
The Search Results screen displays all partial device associations.
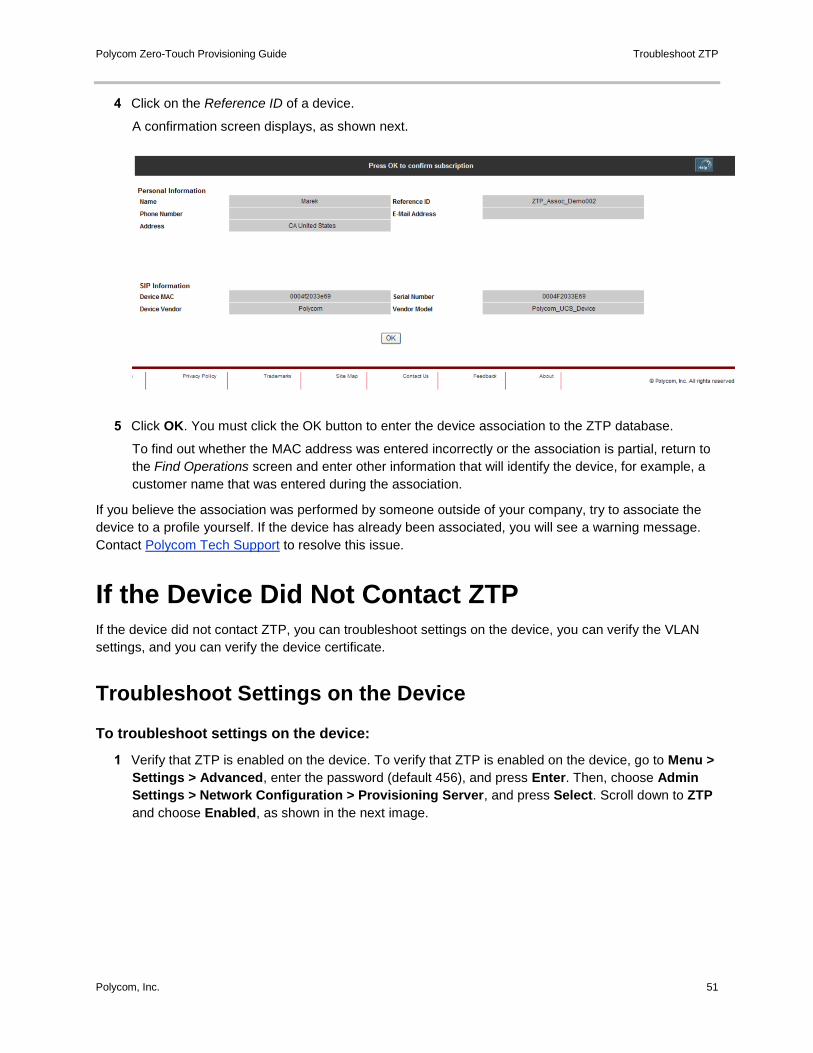
Polycom Zero-Touch Provisioning Guide Troubleshoot ZTP
Polycom, Inc. 51
4 Click on the Reference ID of a device.
A confirmation screen displays, as shown next.
5 Click OK. You must click the OK button to enter the device association to the ZTP database.
To find out whether the MAC address was entered incorrectly or the association is partial, return to
the Find Operations screen and enter other information that will identify the device, for example, a
customer name that was entered during the association.
If you believe the association was performed by someone outside of your company, try to associate the
device to a profile yourself. If the device has already been associated, you will see a warning message.
Contact Polycom Tech Support to resolve this issue.
If the Device Did Not Contact ZTP If the device did not contact ZTP, you can troubleshoot settings on the device, you can verify the VLAN
settings, and you can verify the device certificate.
Troubleshoot Settings on the Device
To troubleshoot settings on the device:
1 Verify that ZTP is enabled on the device. To verify that ZTP is enabled on the device, go to Menu >
Settings > Advanced, enter the password (default 456), and press Enter. Then, choose Admin
Settings > Network Configuration > Provisioning Server, and press Select. Scroll down to ZTP
and choose Enabled, as shown in the next image.
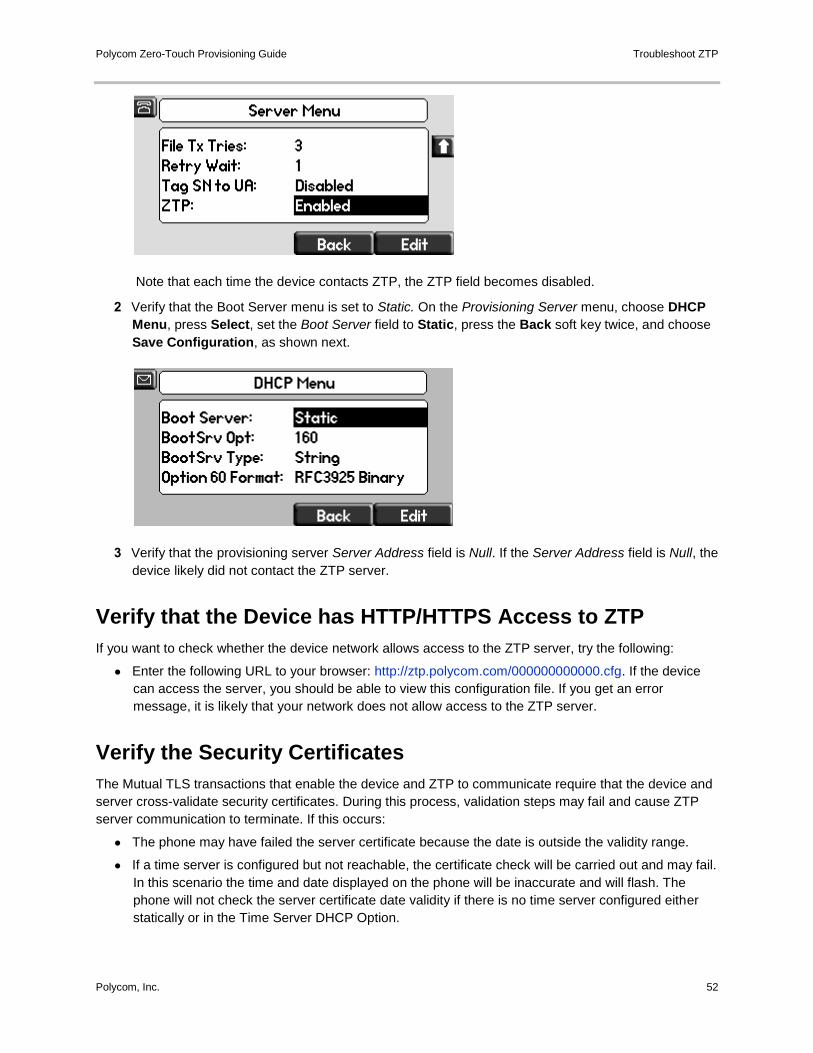
Polycom Zero-Touch Provisioning Guide Troubleshoot ZTP
Polycom, Inc. 52
Note that each time the device contacts ZTP, the ZTP field becomes disabled.
2 Verify that the Boot Server menu is set to Static. On the Provisioning Server menu, choose DHCP
Menu, press Select, set the Boot Server field to Static, press the Back soft key twice, and choose
Save Configuration, as shown next.
3 Verify that the provisioning server Server Address field is Null. If the Server Address field is Null, the
device likely did not contact the ZTP server.
Verify that the Device has HTTP/HTTPS Access to ZTP
If you want to check whether the device network allows access to the ZTP server, try the following:
● Enter the following URL to your browser: http://ztp.polycom.com/000000000000.cfg. If the device
can access the server, you should be able to view this configuration file. If you get an error
message, it is likely that your network does not allow access to the ZTP server.
Verify the Security Certificates
The Mutual TLS transactions that enable the device and ZTP to communicate require that the device and
server cross-validate security certificates. During this process, validation steps may fail and cause ZTP
server communication to terminate. If this occurs:
● The phone may have failed the server certificate because the date is outside the validity range.
● If a time server is configured but not reachable, the certificate check will be carried out and may fail.
In this scenario the time and date displayed on the phone will be inaccurate and will flash. The
phone will not check the server certificate date validity if there is no time server configured either
statically or in the Time Server DHCP Option.
Polycom Zero-Touch Provisioning Guide Troubleshoot ZTP
Polycom, Inc. 53
You can also check if the certificate is installed on the device. The server will reject the connection if the
device does not contain a factory installed device certificate.
To confirm whether a certificate is installed on the device:
» Go to Menu > Status > Platform > Phone, and scroll down to Device Certificate.
● The device certificate must be set to Factory Installed for the device to access ZTP. If the
device certificate is set to Not Installed or Self-Signed, the device will not be able to access
ZTP. Note that even if the device cannot access ZTP, ZTP will log an access.
● The Device Certificate field on devices that were updated to UC Software 4.0.0 and
subsequently downgraded will indicate Factory Installed even though the certificate may not
have been installed. For more information on phone revisions that include factory installed
device certificates, see Technical Bulletin: 37148: Device Certificates on Polycom SoundPoint
IP, SoundStation IP, and Polycom VVX 1500 Phones.