polycom acoustic fence and acoustic fence wth …...polycom® acoustic fence and polycom acoustic...
TRANSCRIPT
Polycom, Inc. 1
Polycom® Acoustic Fence™ and Polycom Acoustic
Fence with Beam Shaping Technology
Introduction
Polycom® Acoustic Fence™ and Polycom Acoustic Fence with Beam Shaping technology limit the pickup
of microphone audio to designated areas in open office environments. These features only affect the
audio transmitted from the room to the far-end, not the audio output from the far-end.
Polycom Acoustic Fence is made up of primary microphones and fence microphones, which determine
the area where audio is picked up and sent to the far-end. The primary microphones serve to pick up the
audio within the fence boundaries. The fence microphones define the boundary of audio that is picked up
and sent to the far-end. Any audio outside of the fence is not picked up.
Polycom Acoustic Fence with Beam Shaping defines a beam aligned with a particular microphone in the
table microphone array or ceiling microphone array. Only sounds within the beam region are picked up
and sent to the far-end. Sounds outside the beam region are not picked up. Unlike the Acoustic Fence,
the Acoustic Fence with Beam Shaping works with a single microphone array. You can adjust the beam
width from +/-10 to +/- 60 degrees.
Polycom Acoustic Fence is supported on Polycom® RealPresence® Group Series and Polycom®
RealPresence Centro™ systems. Polycom Acoustic Fence with Beam Shaping technology is supported on
RealPresence Group Series.
November 2017 | 3725-84091-002A TECHNICAL BULLETIN
Polycom, Inc. 2
Polycom Acoustic Fence
The Polycom Acoustic Fence feature determines whether sounds are outside or inside the fence region
by comparing the strength of the sound at the fence microphone with the strength of sound at the primary
microphone. For sounds inside the fence region, the sound should be stronger at the primary microphone
relative to the fence microphone. Alternatively, for sounds outside the fence region, the sound should be
stronger at the fence microphone relative to the primary microphone.
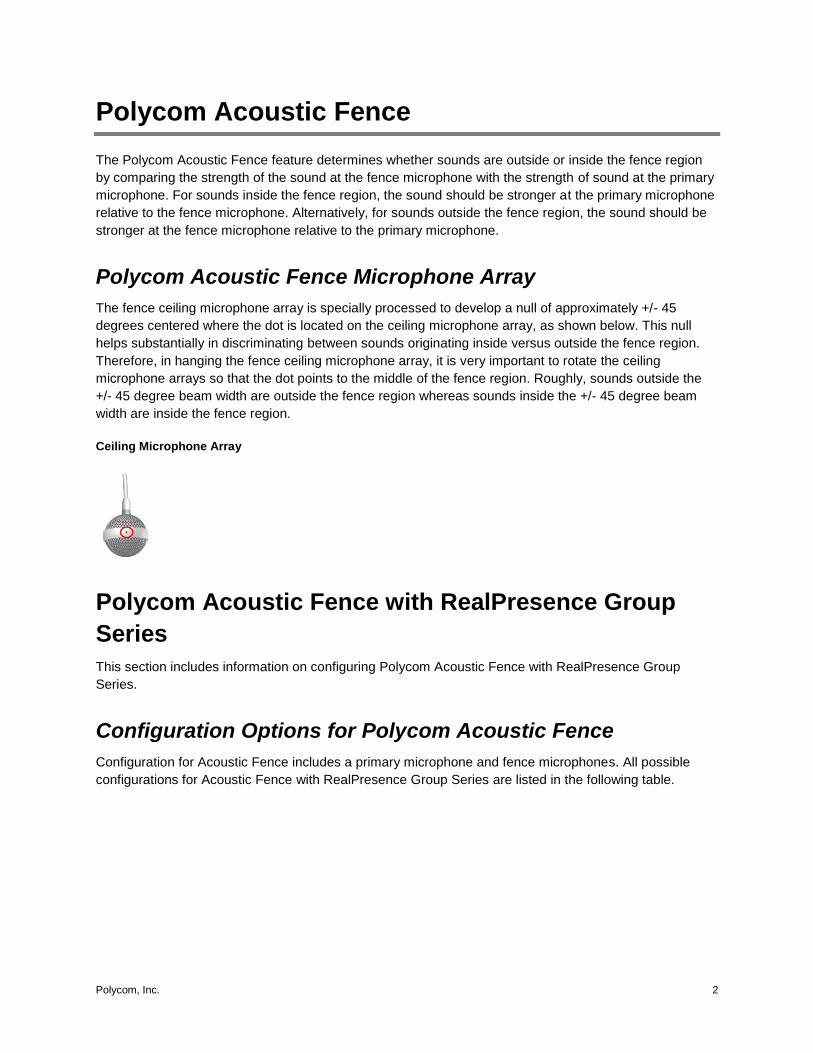
Polycom Acoustic Fence Microphone Array
The fence ceiling microphone array is specially processed to develop a null of approximately +/- 45
degrees centered where the dot is located on the ceiling microphone array, as shown below. This null
helps substantially in discriminating between sounds originating inside versus outside the fence region.
Therefore, in hanging the fence ceiling microphone array, it is very important to rotate the ceiling
microphone arrays so that the dot points to the middle of the fence region. Roughly, sounds outside the
+/- 45 degree beam width are outside the fence region whereas sounds inside the +/- 45 degree beam
width are inside the fence region.
Ceiling Microphone Array
Polycom Acoustic Fence with RealPresence Group
Series
This section includes information on configuring Polycom Acoustic Fence with RealPresence Group
Series.
Configuration Options for Polycom Acoustic Fence
Configuration for Acoustic Fence includes a primary microphone and fence microphones. All possible
configurations for Acoustic Fence with RealPresence Group Series are listed in the following table.
Polycom Acoustic Fence and Polycom Acoustic Fence with Beam Shaping Technology
Polycom, Inc. 3
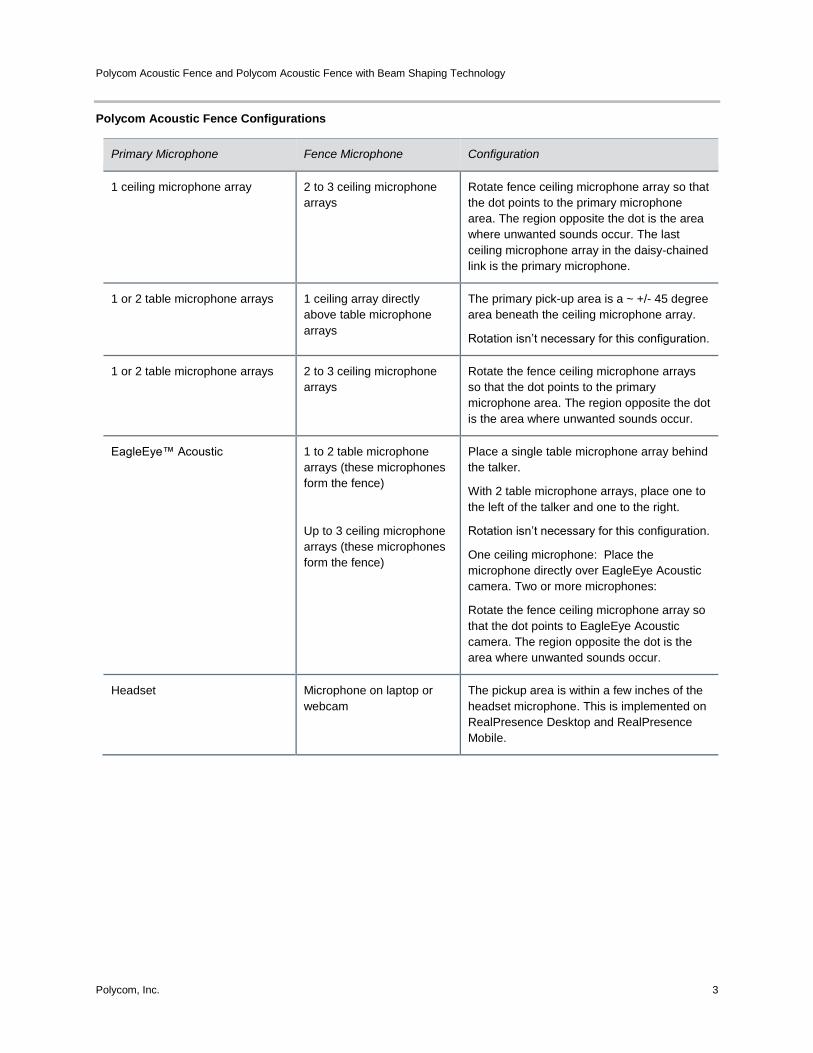
Polycom Acoustic Fence Configurations
Primary Microphone Fence Microphone Configuration
1 ceiling microphone array 2 to 3 ceiling microphone
arrays
Rotate fence ceiling microphone array so that
the dot points to the primary microphone
area. The region opposite the dot is the area
where unwanted sounds occur. The last
ceiling microphone array in the daisy-chained
link is the primary microphone.
1 or 2 table microphone arrays 1 ceiling array directly
above table microphone
arrays
The primary pick-up area is a ~ +/- 45 degree
area beneath the ceiling microphone array.
Rotation isn’t necessary for this configuration.
1 or 2 table microphone arrays 2 to 3 ceiling microphone
arrays
Rotate the fence ceiling microphone arrays
so that the dot points to the primary
microphone area. The region opposite the dot
is the area where unwanted sounds occur.
EagleEye™ Acoustic 1 to 2 table microphone
arrays (these microphones
form the fence)
Up to 3 ceiling microphone
arrays (these microphones
form the fence)
Place a single table microphone array behind
the talker.
With 2 table microphone arrays, place one to
the left of the talker and one to the right.
Rotation isn’t necessary for this configuration.
One ceiling microphone: Place the
microphone directly over EagleEye Acoustic
camera. Two or more microphones:
Rotate the fence ceiling microphone array so
that the dot points to EagleEye Acoustic
camera. The region opposite the dot is the
area where unwanted sounds occur.
Headset Microphone on laptop or
webcam
The pickup area is within a few inches of the
headset microphone. This is implemented on
RealPresence Desktop and RealPresence
Mobile.
Polycom Acoustic Fence and Polycom Acoustic Fence with Beam Shaping Technology
Polycom, Inc. 4
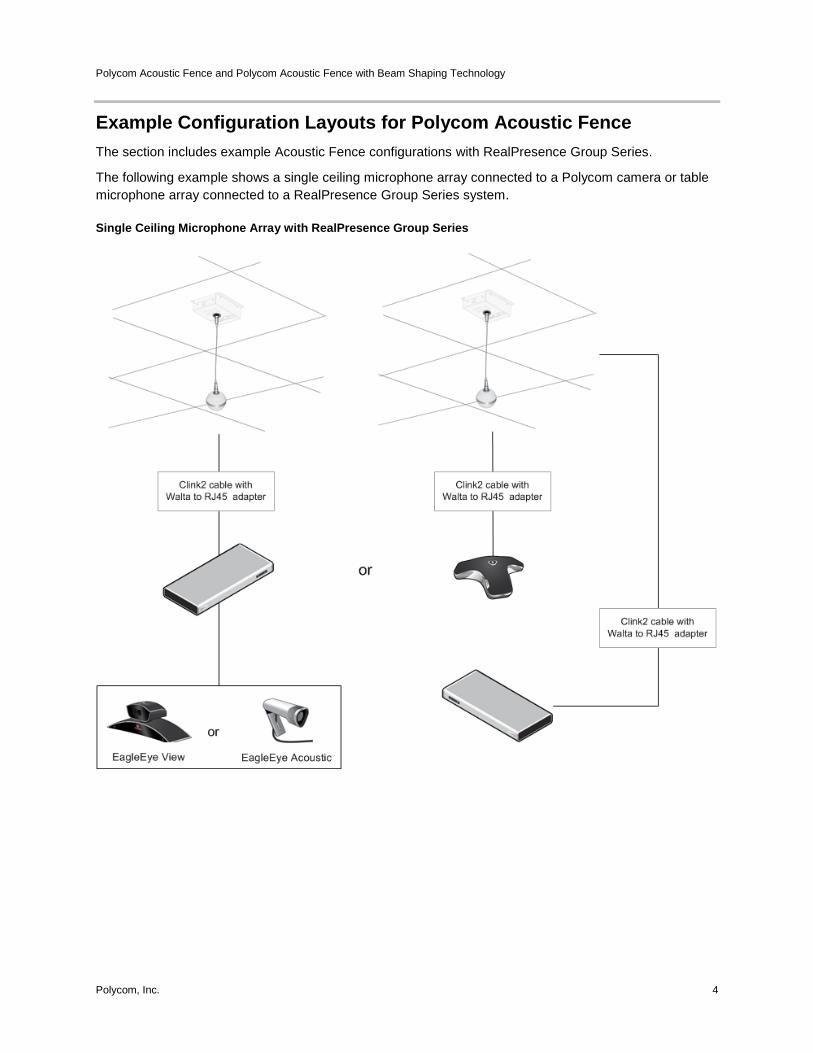
Example Configuration Layouts for Polycom Acoustic Fence
The section includes example Acoustic Fence configurations with RealPresence Group Series.
The following example shows a single ceiling microphone array connected to a Polycom camera or table
microphone array connected to a RealPresence Group Series system.
Single Ceiling Microphone Array with RealPresence Group Series
Polycom Acoustic Fence and Polycom Acoustic Fence with Beam Shaping Technology
Polycom, Inc. 5
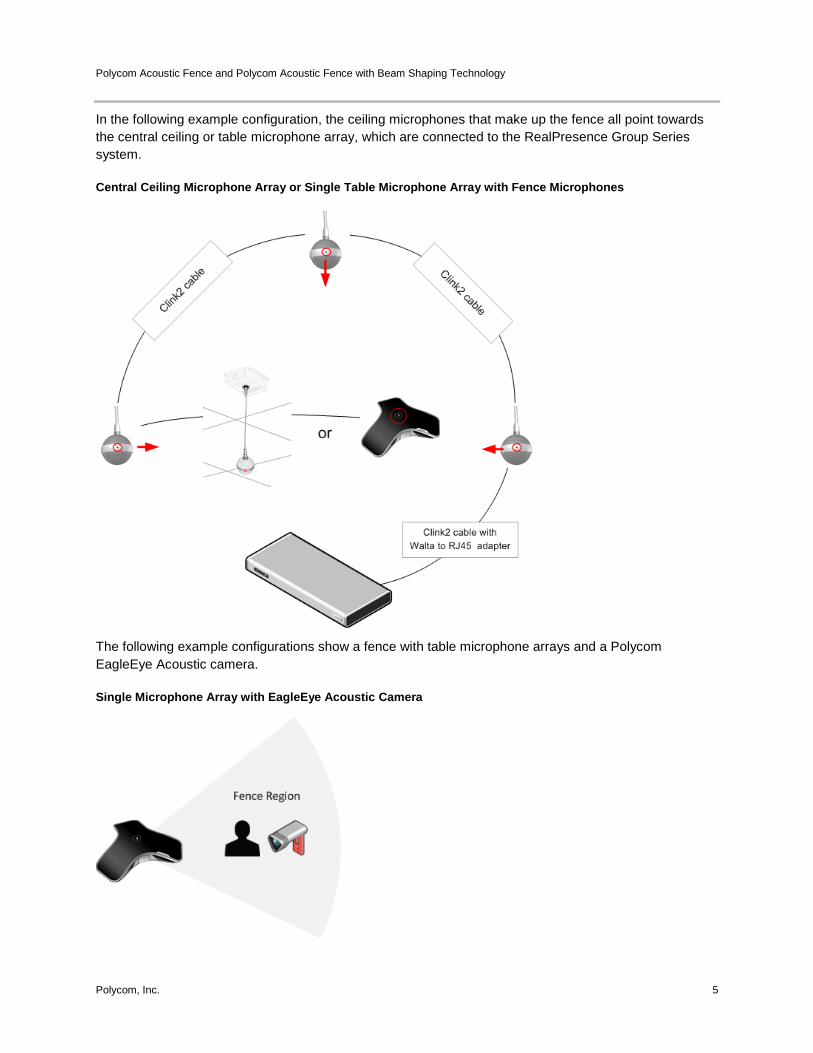
In the following example configuration, the ceiling microphones that make up the fence all point towards
the central ceiling or table microphone array, which are connected to the RealPresence Group Series
system.
Central Ceiling Microphone Array or Single Table Microphone Array with Fence Microphones
The following example configurations show a fence with table microphone arrays and a Polycom
EagleEye Acoustic camera.
Single Microphone Array with EagleEye Acoustic Camera
Polycom Acoustic Fence and Polycom Acoustic Fence with Beam Shaping Technology
Polycom, Inc. 6
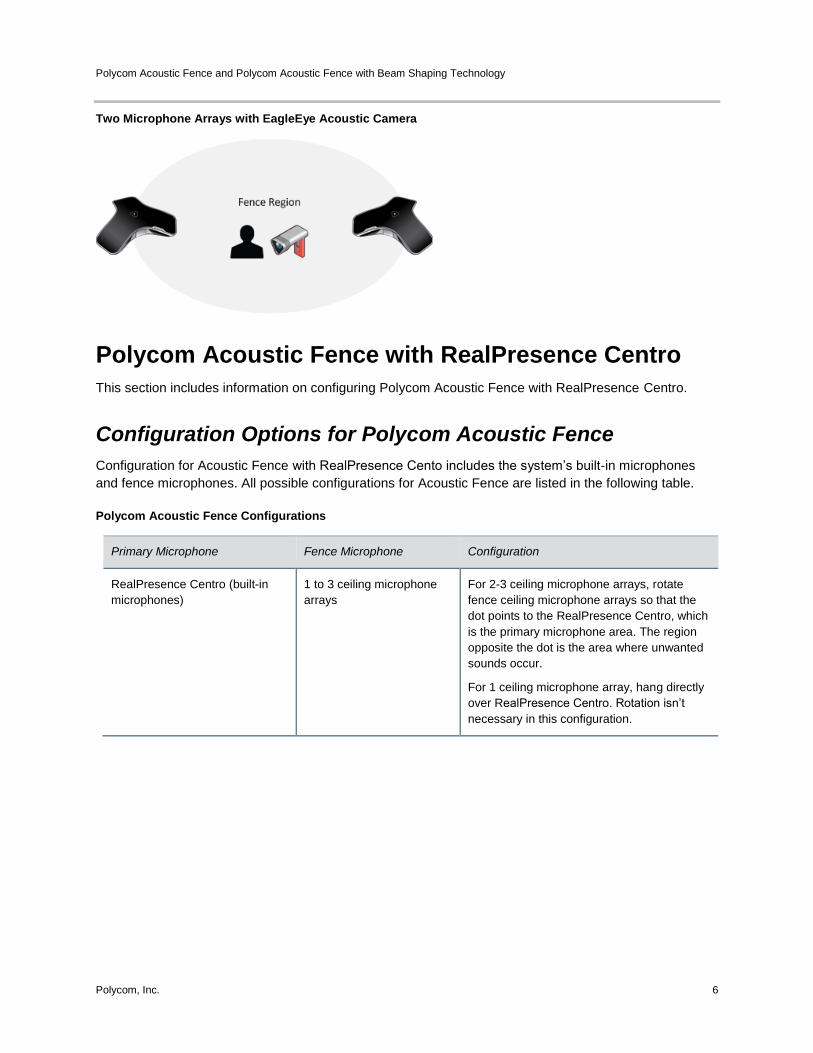
Two Microphone Arrays with EagleEye Acoustic Camera
Polycom Acoustic Fence with RealPresence Centro
This section includes information on configuring Polycom Acoustic Fence with RealPresence Centro.
Configuration Options for Polycom Acoustic Fence
Configuration for Acoustic Fence with RealPresence Cento includes the system’s built-in microphones
and fence microphones. All possible configurations for Acoustic Fence are listed in the following table.
Polycom Acoustic Fence Configurations
Primary Microphone Fence Microphone Configuration
RealPresence Centro (built-in
microphones)
1 to 3 ceiling microphone
arrays
For 2-3 ceiling microphone arrays, rotate
fence ceiling microphone arrays so that the
dot points to the RealPresence Centro, which
is the primary microphone area. The region
opposite the dot is the area where unwanted
sounds occur.
For 1 ceiling microphone array, hang directly
over RealPresence Centro. Rotation isn’t
necessary in this configuration.
Polycom Acoustic Fence and Polycom Acoustic Fence with Beam Shaping Technology
Polycom, Inc. 7
Example Configuration Layouts of Acoustic Fence Configurations
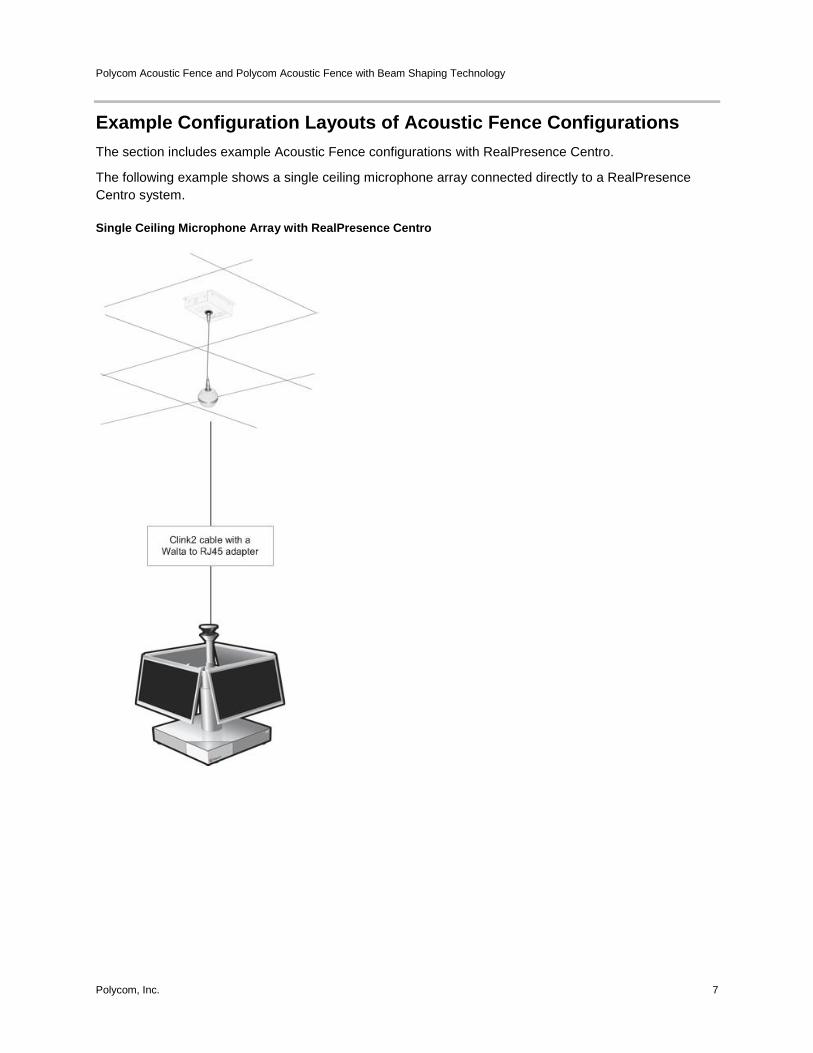
The section includes example Acoustic Fence configurations with RealPresence Centro.
The following example shows a single ceiling microphone array connected directly to a RealPresence
Centro system.
Single Ceiling Microphone Array with RealPresence Centro
Polycom Acoustic Fence and Polycom Acoustic Fence with Beam Shaping Technology
Polycom, Inc. 8
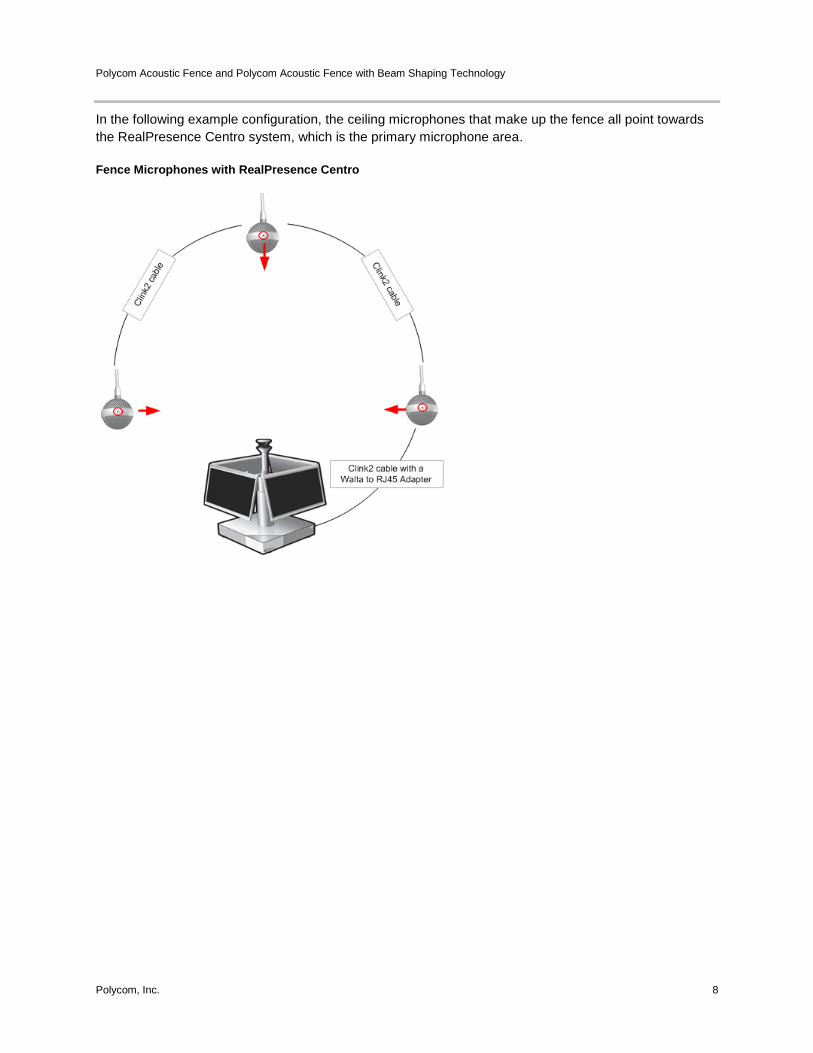
In the following example configuration, the ceiling microphones that make up the fence all point towards
the RealPresence Centro system, which is the primary microphone area.
Fence Microphones with RealPresence Centro
Polycom, Inc. 9
Polycom Acoustic Fence with Beam Shaping
Technology
Polycom Acoustic Fence with Beam Shaping technology greatly reduces sounds outside a well-defined
beam. The beam width can vary from +/- 10 degrees to +/- 60 degrees.
It is important to choose the beam width so that talkers within the desired region are heard by the far-end.
When configuring the beam region, start with the widest beam width, then decrease the width if you hear
any noise interference. You can adjust the beam width by choosing a number from 0 to 10 in the Acoustic
Fence Sensitivity menu, where 10 corresponds to the widest beam angle of +/- 60 degrees and 0
corresponds to the smallest beam angle.
A single table microphone array or a single ceiling microphone array forms the beam by comparing the
energy between the microphones in the beam direction with the energies of the other two microphones.
All three microphones are contained in a single microphone array.
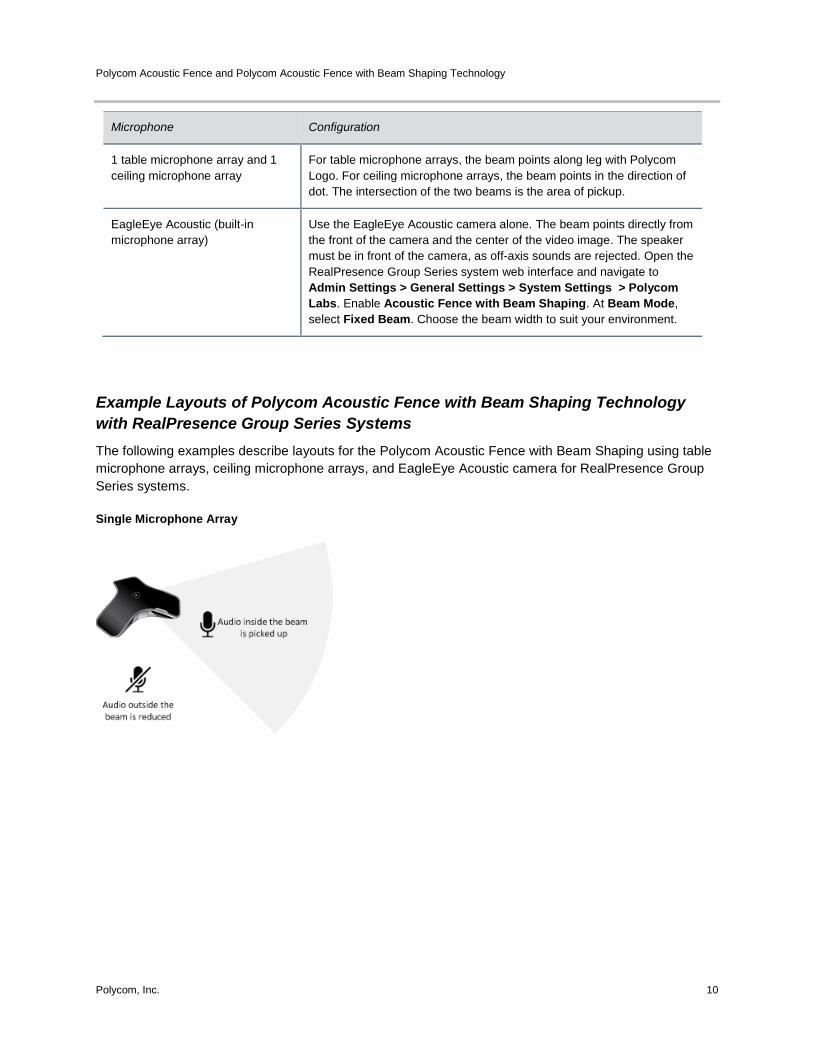
If two table microphone arrays or two ceiling microphone arrays are connected and facing each other,
then the only sounds picked up are inside the intersection of the beams formed by each of the two
microphone arrays. In addition, if one table microphone array and one ceiling microphone array are set
up, then the only sound picked up is within the intersection of those two beams.
Polycom Acoustic Fence with Beam Shaping Technology
with RealPresence Group Series
The following sections provide configuration options and example configurations of Polycom Acoustic
Fence with Beam Shaping technology with RealPresence Group Series.
Configuration Options for Polycom Acoustic Fence with Beam
Shaping Technology
The following table describes all possible configurations with RealPresence Group Series system
microphones.
Polycom Acoustic Fence with Beam Shaping Configurations
Microphone Configuration
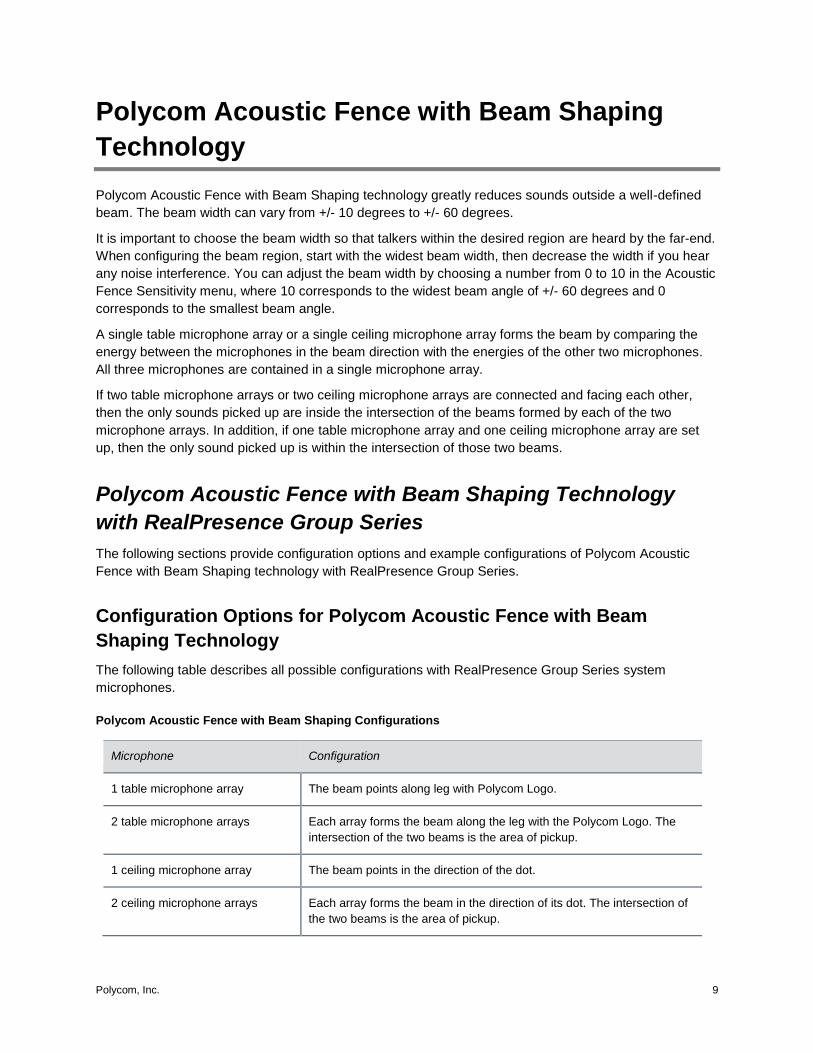
1 table microphone array The beam points along leg with Polycom Logo.
2 table microphone arrays Each array forms the beam along the leg with the Polycom Logo. The
intersection of the two beams is the area of pickup.
1 ceiling microphone array The beam points in the direction of the dot.
2 ceiling microphone arrays Each array forms the beam in the direction of its dot. The intersection of
the two beams is the area of pickup.
Polycom Acoustic Fence and Polycom Acoustic Fence with Beam Shaping Technology
Polycom, Inc. 10
Microphone Configuration
1 table microphone array and 1
ceiling microphone array
For table microphone arrays, the beam points along leg with Polycom
Logo. For ceiling microphone arrays, the beam points in the direction of
dot. The intersection of the two beams is the area of pickup.
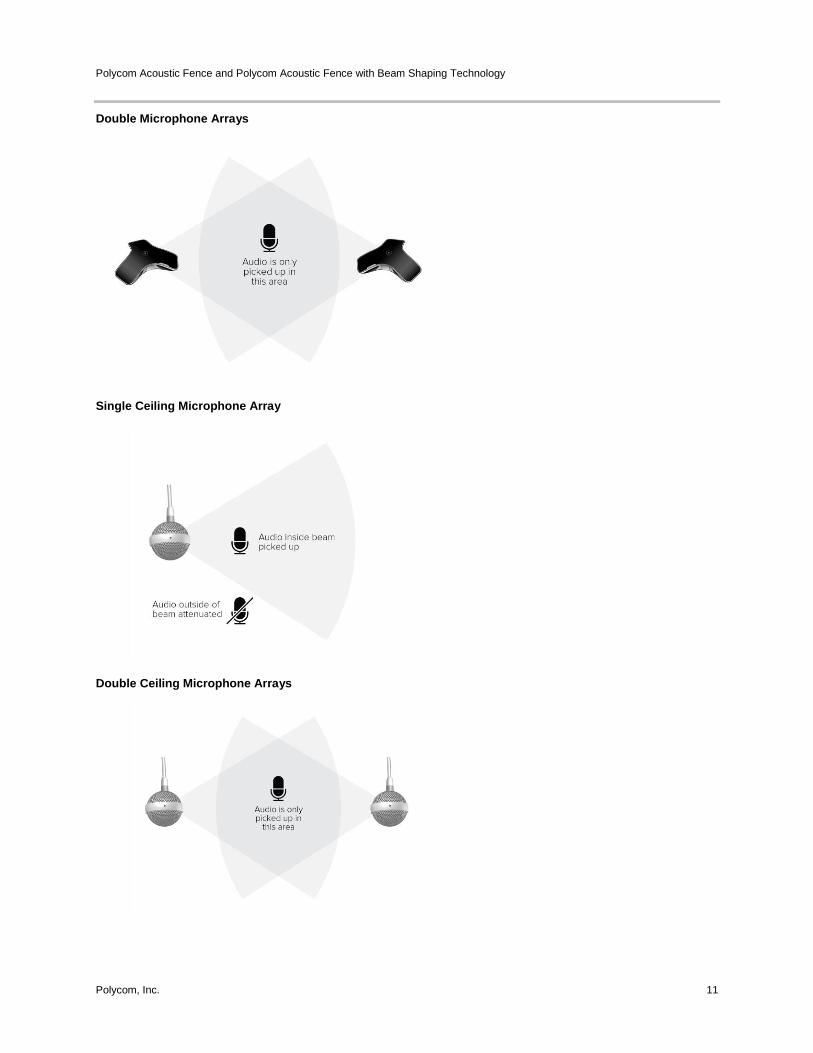
EagleEye Acoustic (built-in
microphone array)
Use the EagleEye Acoustic camera alone. The beam points directly from
the front of the camera and the center of the video image. The speaker
must be in front of the camera, as off-axis sounds are rejected. Open the
RealPresence Group Series system web interface and navigate to
Admin Settings > General Settings > System Settings > Polycom
Labs. Enable Acoustic Fence with Beam Shaping. At Beam Mode,
select Fixed Beam. Choose the beam width to suit your environment.
Example Layouts of Polycom Acoustic Fence with Beam Shaping Technology
with RealPresence Group Series Systems
The following examples describe layouts for the Polycom Acoustic Fence with Beam Shaping using table
microphone arrays, ceiling microphone arrays, and EagleEye Acoustic camera for RealPresence Group
Series systems.
Single Microphone Array
Polycom Acoustic Fence and Polycom Acoustic Fence with Beam Shaping Technology
Polycom, Inc. 11
Double Microphone Arrays
Single Ceiling Microphone Array
Double Ceiling Microphone Arrays
Polycom Acoustic Fence and Polycom Acoustic Fence with Beam Shaping Technology
Polycom, Inc. 12
EagleEye Acoustic
Polycom, Inc. 13
Copyright© 2018, Polycom, Inc. All rights reserved. No part of this document may be reproduced, translated into another language or format, or transmitted in any form or by any means, electronic or mechanical, for any purpose, without the express written permission of Polycom, Inc.
6001 America Center Drive
San Jose, CA 95002
USA
Polycom®, the Polycom logo and the names and marks associated with Polycom products are trademarks and/or service marks of Polycom, Inc. and are registered and/or common law marks in the United States and various other countries. All other trademarks are property of their respective owners. No portion hereof may be reproduced or transmitted in any form or by any means, for any purpose other than the recipient's personal use, without the express written permission of Polycom.
End User License Agreement By installing, copying, or otherwise using this product, you acknowledge that you have read, understand and agree to be bound by the terms and conditions of the End User License Agreement for this product.
Patent Information The accompanying product may be protected by one or more U.S. and foreign patents and/or pending patent applications held by Polycom, Inc.
Open Source Software Used in this Product This product may contain open source software. You may receive the open source software from Polycom up to three (3) years after the distribution date of the applicable product or software at a charge not greater than the cost to Polycom of shipping or distributing the software to you. To receive software information, as well as the open source software code used in this product, contact Polycom by email at [email protected].
Disclaimer While Polycom uses reasonable efforts to include accurate and up-to-date information in this document, Polycom makes no warranties or representations as to its accuracy. Polycom assumes no liability or responsibility for any typographical or other errors or omissions in the content of this document.
Limitation of Liability Polycom and/or its respective suppliers make no representations about the suitability of the information contained in this document for any purpose. Information is provided “as is” without warranty of any kind and is subject to change without notice. The entire risk arising out of its use remains with the recipient. In no event shall Polycom and/or its respective suppliers be liable for any direct, consequential, incidental, special, punitive or other damages whatsoever (including without limitation, damages for loss of business profits, business interruption, or loss of business information), even if Polycom has been advised of the possibility of such damages.
Customer Feedback We are striving to improve our documentation quality and we appreciate your feedback. Email your opinions and comments to [email protected].
Visit the Polycom Support Center for End User License Agreements, software downloads, product documents, product licenses, troubleshooting tips, service requests, and more.