plant propagation - california rare fruit growers · pdf fileplant propagation an overview of...
TRANSCRIPT

PLANT PROPAGATION
An Overview of Plant Propagation Methods
Two Techniques of Stem Cutting Propagation

Types of Propagation
Sexual Propagation:
• Seed
Asexual Propagation:
• Division & Separation
• Cuttings
• Grafting & Budding
• Layering
• Tissue Culture
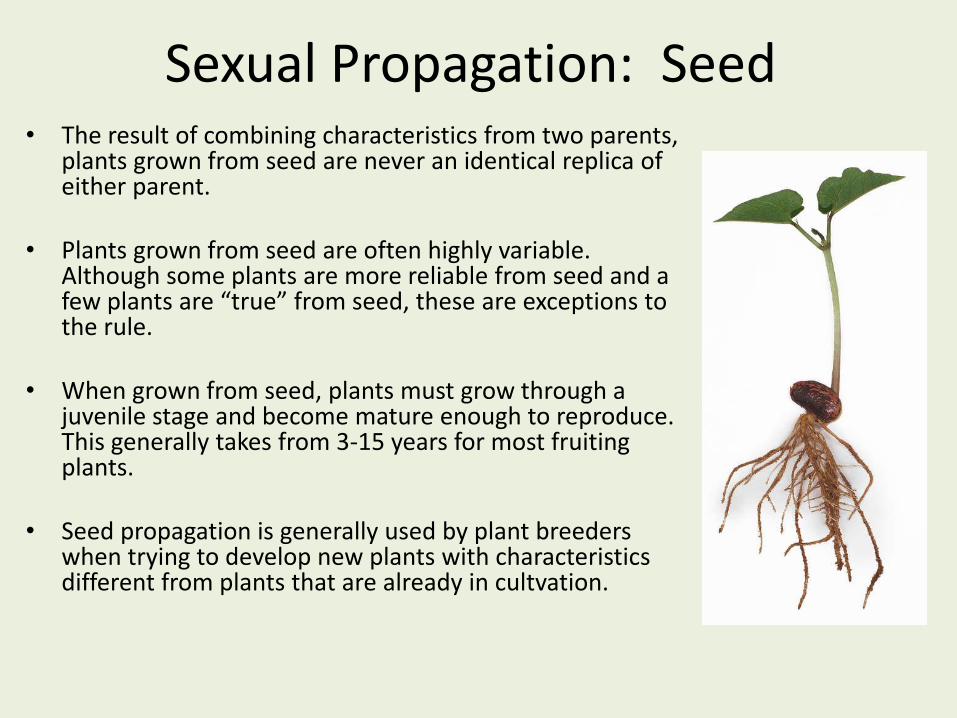
Sexual Propagation: Seed • The result of combining characteristics from two parents,
plants grown from seed are never an identical replica of either parent.
• Plants grown from seed are often highly variable. Although some plants are more reliable from seed and a few plants are “true” from seed, these are exceptions to the rule.
• When grown from seed, plants must grow through a juvenile stage and become mature enough to reproduce. This generally takes from 3-15 years for most fruiting plants.
• Seed propagation is generally used by plant breeders when trying to develop new plants with characteristics different from plants that are already in cultvation.

Asexual Propagation: Division • Propagation by division is the
simplest form of propagation.
• Plants with more than one rooted crown may be divided and the crowns planted separately.
• If the stems are not joined, gently pull the plants apart. If the crowns are united by horizontal stems, cut the stems and roots with a sharp knife or pruners to minimize injury to the plant.
• Divisions of some outdoor plants should be dusted with a fungicide before they are replanted.
• Examples: snake plant, iris, prayer plant, day lilies.

Asexual Propagation
Separation Separation is a term applied to a form of propagation by which plants that produce bulbs or corms multiply.
Bulbs • New bulbs form beside the originally planted bulb. Separate these bulb clumps
every 3 to 5 years for largest blooms and to increase bulb population. • Dig up the clump after the leaves have withered. Gently pull the bulbs apart and
replant them immediately so their roots can begin to develop. Small, new bulbs may not flower for 2 or 3 years, but large ones should bloom the first year.
• Examples: onion, tulip, narcissus. Corms • A large new corm forms on top of the old corm, and tiny cormels form around
the large corm. • After the leaves wither, dig up the corms and allow them to dry in indirect light
for 2 or 3 weeks. Remove the cormels, then gently separate the new corm from the old corm.
• Dust all new corms with a fungicide and store in a cool place until planting time. • Examples: crocus, gladiolus.

Asexual Propagation: Cuttings • Cutting propagation can use root cuttings or leaf
cuttings as well as hardwood, semi-hardwood or softwood stem cuttings.
• Many cuttings can be taken from a small number of stock plants.
• New plants produces are fairly small and it requires time for the new plants to grow and become large.
• Not all plants can be propagated by cuttings.

Root Cuttings, Rhizomes & Tubers
• Root cuttings are usually taken from 2- to 3-year-old plants during their dormant season when they have a large carbohydrate supply.
• Root cuttings of some species produce new shoots, which then form their own root systems, while root cuttings of other plants develop root systems before producing new shoots.
• A rhizome is a horizontal, usually underground stem that often sends out roots and shoots from its nodes.
• A tuber is a swollen, fleshy, usually underground stem of a plant, such as the potato, bearing buds from which new plant shoots arise.
• (Examples: horse radish, bearded iris, canna lily, potato, dahlia, ginger).

Asexual Propagation: Leaf Cuttings • Leaf Cuttings
Leaf cuttings are used almost exclusively for a few indoor plants. Leaves of most plants will either produce a few roots but no plant, or just decay.
• Whole Leaf with Petiole
Detach the leaf and up to 1 1/2 inches of petiole. Insert the lower end of the petiole into the medium. One or more new plants will form at the base of the petiole.
• Whole Leaf without Petiole This is used for plants with sessile leaves. Insert the cutting vertically into the medium. A new plant will form from the axillary bud.
• Split Vein Detach a leaf from the stock plant. Slit its veins on the lower leaf surface. Lay the cutting, lower side down, on the medium. New plants will form at each cut.
• Leaf Section This method is frequently used with snake plant and fibrous rooted begonias. Cut begonia leaves into wedges with at least one vein. Lay leaves flat on the medium. A new plant will arise at the vein. Cut snake plant leaves into 2-inch sections. Consistently make the lower cut slanted and the upper cut straight so you can tell which is the top. Insert the cutting vertically.

Asexual Propagation: Cuttings
Types of Stem Cuttings
• The four main types of stem cuttings are herbaceous, softwood, semi-hardwood, and hardwood. These terms reflect the growth stage of the stock plant, which is one of the most important factors influencing whether or not cuttings will root.

Asexual Propagation: Cuttings
Herbaceous cuttings are made from non-woody, herbaceous plants such as coleus, chrysanthemums, and dahlia.
• A 3- to 5-inch piece of stem is cut from the parent plant. The leaves on the lower one-third to one-half of the stem are removed. A high percentage of the cuttings root, and they do so quickly.

Asexual Propagation: Cuttings Softwood cuttings are prepared from soft, succulent,
new growth of woody plants, just as it begins to harden (mature).
• Shoots are suitable for making softwood cuttings
when they can be snapped easily when bent and when they still have a gradation of leaf size (oldest leaves are mature while newest leaves are still small). For most woody plants, this stage occurs in May, June, or July.
• The soft shoots are quite tender, and extra care must be taken to keep them from drying out. The extra effort pays off, because they root quickly.
Semi-hardwood cuttings are usually prepared from partially mature wood of the current season’s growth, just after a flush of growth. This type of cutting normally is made from mid-July to early fall.
• The wood is reasonably firm and the leaves of
mature size. Many broadleaf evergreen shrubs and some conifers are propagated by this method.
Softwood
Semi-
hardwood

Asexual Propagation: Cuttings Hardwood cuttings are taken from dormant, mature stems in late fall,
winter, or early spring.
• Plants generally are fully dormant with no obvious signs of active growth. The wood is firm and does not bend easily.
• Hardwood cuttings are used most often for deciduous shrubs but can be used for many evergreens.
• The three types of hardwood cuttings are straight, mallet, and heel. A straight cutting is the most commonly used stem cutting.
• Mallet and heel cuttings are used for plants that might otherwise be more difficult to root. For the heel cutting, a small section of older wood is included at the base of the cutting.
• For the mallet cutting, an entire section of older stem wood is included.

Asexual Propagation: Grafting
• Grafting describes any of a number of techniques in which a section of a stem with leaf buds is inserted into the stock of a tree.
• The upper part of the graft (the scion) becomes the top of the plant, the lower portion (the understock) becomes the root system or part of the trunk.
• Although grafting usually refers to joining only two plants, it may be a combination of several. A third plant added between two others becomes the trunk or a portion of it. This is called an interstem.

Asexual Propagation: Grafting • Grafting techniques are used to produce new plants as well as to add varieties to an existing plant or
to change an existing plant to an entirely new variety.
• Grafting requires that rootstocks are available to reproduce new plants. Rootstocks are generally propagated by seed , layering or by cuttings.
• Growth which develops from below the graft union is often referred to as “suckers” or “root suckers”.
• “Suckers” can overgrow the scion of the tree and can become dominant, stunting or killing off the grafted portion of the tree. All “suckers” and “root suckers” should always be removed.

Asexual Propagation: Budding
• Budding is a method of grafting in which the scion (upper portion of the graft) is a single bud rather than a piece of stem or twig. It is the most commonly used method of grafting for production in the nursery.
• Budding is a very fast technique. Like grafting, rootstocks must be available to produce new plants.
• Advantages of grafting or budding over other types of propagation is that the rootstock may be chosen for certain desirable traits (such as dwarfing of the mature plant, tolerance to heavy or sandy soils, resistance to diseases or pests such as nematodes, phytopthera, etc.) while the scion can be chosen for fruiting, flowering, foliage or growth characteristics.

Asexual Propagation: Layering • Stems still attached to their parent
plants may form roots where they touch a rooting medium. Severed from the parent plant, the rooted stem becomes a new plant. This method of vegetative propagation promotes a high success rate because it prevents the water stress and carbohydrate shortage that plague cuttings.
• Layering can produce larger plants than other types of cutting propagation and can be used to reproduce plants when other types of cutting propagation may be marginally successful.
• Layering does not require special types of propagation equipment such as mist systems or bottom heat. Stool Layering

Asexual Propagation: Layering Tip layering
• Dig a hole 3 to 4 inches deep. Insert the shoot tip and cover it with soil. The tip grows downward first, then bends sharply and grows upward. Roots form at the bend, and the recurved tip becomes a new plant. Remove the tip layer and plant it in the early spring or late fall. Examples: purple and black raspberries, trailing blackberries.
Simple layering
• Bend the stem to the ground. Cover part of it with soil, leaving the last 6 to 12 inches exposed. Bend the tip into a vertical position and stake in place. The sharp bend will often induce rooting, but wounding the lower side of the branch or loosening the bark by twisting the stem may help. Examples: forsythia, honeysuckle.

Asexual Propagation: Layering Compound layering • This method works for plants with flexible stems.
Bend the stem to the rooting medium as for simple layering, but alternately cover and expose stem sections. Wound the lower side of the stem sections to be covered.
• Examples: heart-leaf philodendron, pothos.
Mound (stool) layering • Cut the plant back to 1 inch above the ground in
the dormant season. Mound soil over the emerging shoots in the spring to enhance their rooting.
• Examples: gooseberries, apple rootstocks.

Stolons, Runners and Offsets • A stolon is a horizontal, often fleshy stem that can root, then
produce new shoots where it touches the medium.
• A runner is a slender stem that originates in a leaf axil and grows along the ground or downward from a hanging basket, producing a new plant at its tip.
• Plants that produce stolons or runners are propagated by severing the new plants from their parent stems. Plantlets at the tips of runners may be rooted while still attached to the parent, or detached and placed in a rooting medium.
• Examples: strawberry, spider plant.
Offsets • Plants with a rosetted stem often reproduce by forming new
shoots at their base or in leaf axils. Sever the new shoots from the parent plant after they have developed their own root system.
• Unrooted offsets of some species may be removed and placed in a
rooting medium. Some of these must be cut off, while others may be simply lifted off of the parent stem.
• Examples: date palm, haworthia, bromeliads, many cacti

Asexual Propagation: Air-Layering
• Air-layering produces roots on a stem or branch that is not in contact with soil.
• Large plants can be produced in a relatively short period of time.
• This propagation method is frequently used on subtropical fruit trees.
• Stock plants must be fairly large to support this type of propagation.

Asexual Propagation: Tissue Culture
• This propagation method can produce large numbers of new plants from a small amount of stock material.
• Requires fairly sophisticated equipment and is more expensive than other types of propagation.
• Not widely used unless quantity of material sold makes this propagation method “cost effective”.
• Few fruiting plants are propagated by tissue culture and techniques for successful propagation have not been developed for all types of plants.

Rooting Stem Cuttings

Rooting Media • In order for a plant to form a new root system, it must have a ready moisture
supply at the cut surface. Oxygen is required for all living cells.
• The potting soil, or medium in which a plant grows, must be of good quality. It should be porous for root aeration and drainage, but also capable of water and nutrient retention.
• Rooting media for asexual propagation should be clean and sterile. Cuttings are not susceptible to damping-off, but they are attacked by other fungi and bacteria which may come along in the medium. Most commercially prepared media are clean when purchased.
• Most commercially prepared mixes are termed soilless, which means they contain no soil. The basic ingredients of such a mix are sphagnum peat moss and vermiculite, both of which are generally free of diseases, weed seeds, and insects.
• The media should be low in fertilizer. Excessive fertility will damage or inhibit new roots. Begin fertilizing after cuttings are rooted and have been transplanted to a growing medium.
• High-quality artificial mixes sometimes contain slow-release fertilizers.

Rooting Media • Clean, coarse, construction-grade sand may be used for rooting cuttings. Avoid
very fine sand because it has poor aeration, which retards root formation. A mixture of one-half sand and one-half peat moss is a better rooting medium.
• Coarse perlite alone can be used to start some cuttings. This doesn't hold much water for long, but it is fine for rooting cuttings of cactus-type or plumaria plants which would ordinarily rot in higher moisture media.
• Vermiculite is suitable for rooting cuttings. The horticultural grade (No. 2) is the
best size to use, and it may be used separately or mixed with an equal volume of sand.
• A mix of 50% peat moss and 50% perlite favors good aeration. An equal mix of peat moss, vermiculite, and perlite is also good and favors moisture retention.
• Compressed peat pellets that expand when water is added make a convenient propagation medium and container.

Rooting Media • Heavy soils should not be used for rooting. They tend to
pack tightly, which results in poor aeration and little or no root formation. They also must be thoroughly sterilized to prevent disease development.
• Plain water can be used to propagate some cuttings. This is possible and actually works quite well for some species which root easily. It certainly provides the needed moisture, but if the water is not changed on a frequent basis, it will become stagnant, oxygen deficient, and inhibitory to rooting.
• Roots produced in 100% water are different from those produced in solid media. They may undergo greater transplant shock with a greater incidence of death when transplanted into a growing media.
• Rooting in water is not the most desirable method for rooting most plants, but it certainly is feasible.

Rooting Enhancement • Once you've selected the right medium, your first priority is to get roots produced as quickly
as possible.
• Even though the exposed cells on the cut surface of the cutting ordinarily transport water throughout the plant, they are not equipped to adequately absorb it from the medium. This can only be done in most plants by roots, and particularly root hairs. The consequences of slow rooting may be death of the cutting because the cutting must rely on its limited water reserves.
• Make sure the medium is moist prior to inserting cuttings. If incompletely moist, then the cut surface may contact a dry pocket and have its own water absorbed away by the medium component.
• Try to keep both the air and medium temperature warm: 70-75°F. Higher temperatures enhance growth, but excessively high temperatures do not allow for photosynthesis to keep up with food breakdown in normal cell energy use (respiration).
• Get air circulation around the cuttings as much as possible to discourage fungal growth.
• Place in bright light , but not direct sunlight. If rooting cuttings inside, an east window is fine but a west window is too warm and a south facing window too bright. North is too dim.

Rooting Enhancement • One way to provide good environmental conditions for asexual
propagation by cuttings is through the use of a mist bed. This system sprays a fine mist of water over the cuttings once every few minutes, and the time is adjustable. It should only be on during the day, as nighttime operation would keep the medium too wet and encourage rotting.
• Misting inhibits transpiration and forces the plant to conserve water while it forms new roots. If a mist system is unavailable, one can be imitated in a small propagation tray in the home.
Bottom Heat • Professional growers have learned that if you can heat the soil or
other growing medium without raising the air temperature around the tops of the plants, root development can be induced and or speeded.
• The secret to using this propagation technique is to warm the soil without increasing the air temperature above the soil. The ideal situation is to maintain a soil temperature of 69-70 degrees F. and an air temperature of 40-45 degrees F.
• An easy way to provide bottom heat is to purchase an electric soil warming cable or a heating mat that goes under your flats. I recommend heating mats over soil warming cables.

Rooting Hormone • All plant cuttings need rooting regulators, called auxins, to make
roots. The plant itself produces these natural auxins, in limited quantities within the leaves and meristems.
• When we take cuttings from the mother plant, the auxins are translocated from the growing leaves and meristems to the basal end of the cutting.
• When the amount of auxins at the basal ends of the cuttings exceeds a boundary level the cells re-program themselves. These cells become root cells.
• In some plants the natural auxin production in the cuttings is not sufficient. Only occasional roots may form. Some cuttings may have delayed rooting or may not form any roots. Developing roots that are evenly spread out at the basal ends of the cuttings is important. Strong rooting systems assure quality plant development and health.
• When you supplement the natural auxins with a bio-simulator of the natural auxins, consistent and uniform roots are achieved. Rapid and steady rooting occurs around the base of the cuttings.

Rooting Hormone • Rooting hormone is effective, but it is a hazardous material.
Some manufacturers recommend against using rooting hormone on food plants, so check the label cautions to make sure the variety you're using is safe for food plants.
• Do not dispose of excess rooting hormone in areas where it can contaminate water supplies or soil. It should be treated like any bioactive chemical and disposed of in a solid waste facility.
• Powdered rooting hormone is generally preferred for herbaceous and softwood cuttings.
• Gel or liquid rooting hormones are generally preferred for semi hardwood and hardwood cuttings.
• Liquid rooting hormones are generally preferred for hardwood cuttings.

Rooting Hormone • Rooting hormone comes in a variety of strengths. Softwood cutting use the
weakest while hardwood cuttings use the strongest. Experimenting with different strengths of hormone is the key to find what works best for you and your techniques.
RATES FOR CUTTING TYPES (ppm IBA)
• Annuals: 80-200
• Herbaceous, perennials, tropical house plants, pot rose., etc. (For difficult to root perennials consider using the Basal Long Soak Method): 150-500 Sometimes: 500-1500
• Softwood: 500-1500
• Hardwood: 500-2000
• Difficult to root hardwood (For these consider using the Basal Long Soak Method) 5000-10,000

Propagation by Cuttings
1. Herbaceous and Semi Hardwood Cuttings
2. Dormant Hardwood Cuttings

Herbaceous and Semi Hardwood Cuttings You can make more plants from your existing house and garden plants, by taking stem
cuttings and rooting them. Here’s what you will need: • A Mother Plant • Soilless Potting Mix • Rooting Hormone • Water • Containers or Pots for planting • Containers for holding water and rooting hormone • Scissor or Hand Pruners • Alcohol or 10% Bleach Solution • Pencil or Stick • Plastic Bag
• I personally like side cutting type (bypass) cutters. They slice through the plant material rather than crushing it.
• The "blade and anvil" type crush the plant cells and may stop the cutting from developing roots.
• A good pair of scissors also works well.

Herbaceous and Semi Hardwood Cuttings • Fill a clean plant pot or container with soilless potting mix or other rooting
medium.
• If reusing old pots, be sure to wash them and then soak them in a 10% bleach solution to sterilize them.
• The rooting medium should be sterile, low in fertility, and well-drained to provide sufficient aeration. It should also retain enough moisture so that watering does not have to be done too frequently.
• Media should be watered before sticking cuttings and should be moist but not soggy.

Herbaceous and Semi Hardwood Cuttings • With a pencil or similar pointed object, poke holes into the potting mix or rooting
medium.
• Pre-making the planting holes will insure that the rooting hormone you will be using remains on the cuttings and doesn’t rub off on the potting mix. This will improve chances of rooting the cuttings and making new plants.

The Stock or Mother Plant
• Take cuttings from healthy, disease-free plants. This plant is referred to as the stock or mother plant.
• Cuttings should generally consist of the current or past season’s growth. Avoid material with flower buds if possible. Remove any flowers and flower buds when preparing cuttings so the cutting’s energy can be used in producing new roots rather than flowers.
• The fertility status of the stock (parent) plant can influence rooting. Avoid taking cuttings from plants that show symptoms of mineral nutrient deficiency.
• Conversely, plants that have been fertilized heavily, particularly with nitrogen, may not root well.
• The stock plant should not be under moisture stress.

Juvenile cuttings • In general, cuttings taken from young plants or from juvenile parts of the plant root in higher
percentages than cuttings taken from older, more mature plants.
• Cuttings from lateral shoots often root better than cuttings from terminal shoots.
• When taking shoot cuttings from the same stock plant at the same time , some cuttings may have different rooting ability.
• While a cutting may be young in growth age they may be old relative to the stem from which the cutting is taken. Physically young cuttings taken from the top of a two year old tree branch may exhibit root initiation performance as if they were two year old cuttings. Cuttings taken from near the base of the plant may exhibit rooting characteristics similar to the real age of the cuttings; months old rather than years old.
• Sometimes it is beneficial to induce juvenility by maintaining relatively young mother plants or to hedge mother plants. Pruning of the mother plants should be limited since the mother plant must constantly produce energy to produce new shoots.
• Change the mother plants frequently to induce better quality cuttings.

Herbaceous Tip Cuttings • Newer growth is easier to root than woody stems. Choose green,
non-woody stems for taking tip cuttings.
• You are looking for a stem with a node on it. A node is where a leaf is or was attached. It looks like a joint on the stem.

Herbaceous and Semi Hardwood Cuttings • Stem cuttings should be 4 to 6 inches long. The cutting doesn’t need to be long. A
single node with a couple of leaves will be fine.
• Use a razor blade, scissor or sharp bypass hand pruners that have been sterilized in alcohol to cut just below a node. A slanting cut slightly below a node will generally give best results.
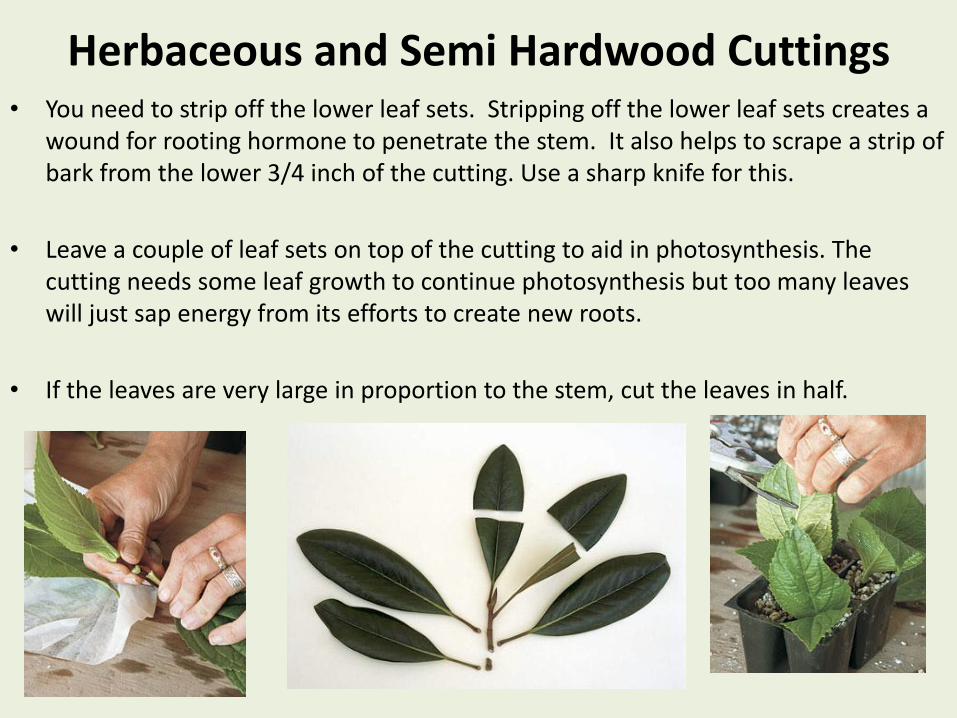
Herbaceous and Semi Hardwood Cuttings • You need to strip off the lower leaf sets. Stripping off the lower leaf sets creates a
wound for rooting hormone to penetrate the stem. It also helps to scrape a strip of bark from the lower 3/4 inch of the cutting. Use a sharp knife for this.
• Leave a couple of leaf sets on top of the cutting to aid in photosynthesis. The cutting needs some leaf growth to continue photosynthesis but too many leaves will just sap energy from its efforts to create new roots.
• If the leaves are very large in proportion to the stem, cut the leaves in half.

Herbaceous and Semi Hardwood Cuttings • Fill one cup or container with water and place some rooting hormone into
another. You won’t need much hormone.
• Dip the node end of the plant cutting into the water and then into the rooting hormone.
• Tap or shake cuttings to remove excess rooting hormone when using powdered hormones.
• Don’t return used hormone to the original container. Once it comes in contact with the cuttings, it is activated.

Herbaceous and Semi Hardwood Cuttings • Carefully place the cuttings into the holes you made in your potting mix and gently
firm the soil around them.
• Insert the cuttings one-third to one-half their length into the medium. Maintain the vertical orientation of the stem (do not insert the cuttings upside down). Make sure the buds are pointed up.
• You can fit several cuttings into one container. Space them so that the leaves do not touch one another. Space cuttings just far enough apart to allow all leaves to receive sunlight. Water again after inserting the cuttings

Herbaceous and Semi Hardwood Cuttings • Make sure you label your work with plant type, hormone used, date started and
any other information you think necessary.
• Use plastic labels and write on them with pencil. Ball point pen ink will wash off in no time. Labels have a smooth and a rough side. Write with pencil on the rough side.

Herbaceous and Semi Hardwood Cuttings • Place the container of cuttings into a plastic bag. The bag will keep the humidity high and
hold in heat. Don’t seal the bag completely, to allow some air flow.
• Don’t let the cuttings touch the sides of the bag. If necessary, use a couple of sticks to keep the bag off of the cuttings.
• Place the bag and container in a warm spot in bright but filtered sunlight. Don’t put them into full sun until new growth appears and they can be removed from the bag.
• Never place plastic-enclosed containers in direct sunlight, because excessive heat will build up and you will cook your cuttings.

Herbaceous and Semi Hardwood Cuttings
• Check regularly to be sure there is not so much condensation on the top of the bag that it is dripping onto the seedlings. If this happens, the potting mix is probably too wet. Remove the cuttings from the bag and allow the potting mix to dry out a bit.
• The propagation medium should never dry out during rooting. Also, avoid excessive watering, which results in poor aeration and death of new roots. Monitor the plastic bags for condensate, and water the medium when condensate disappears.
• Check your cuttings regularly in case they start to rot before they root. Remove any suspect cuttings as soon as you spot trouble.

Care of rooted cuttings • The time necessary to form roots differs greatly between plants. Some cuttings
root in several weeks, but hard-to-root cuttings may take three to six months.
• Check for roots by tugging gently on the cuttings and testing for resistance. After cuttings have produced some roots at least 1 inch long, they are ready to be removed from the bag and planted in pots of their own into a growing medium.
• The move from high humidity and moist rooting medium to low humidity and dryer soil is critical. Do it carefully. Give these new plants special care and close attention during the first weeks after the move.

Propagation by Hardwood Cuttings • Two things greatly improve
rooting success on hardwood cuttings: pre-rooting in a bag, and transplanting to a clear plastic cup containing specific media.
• Rooting is greatly speeded up when temperatures are 70F or higher. Providing a warm environment can be as simple as placing your cuttings in a bag on top of the refrigerator, or a shelf above the stove.
• Powdered hormone seems to actually encourage rotting of some hardwood cuttings. Use a liquid hormone for best results.

Propagation by Hardwood Cuttings • Rooting success is almost entirely dependent on controlling moisture, both in the
potting media and in the atmosphere around your cuttings. Soil moisture and humidity are crucial.
• The cuttings will rot if their soil is too wet. If it is too dry, the new roots will desiccate and die. Using a rooting media that maintains proper levels of air and moisture greatly increases rooting success.
• When choosing a rooting medium you need to have a mix which allows for moisture to be retained, but one which does not allow the water to completely saturate the medium so that there is no air (oxygen) in the medium.
• Texture or coarseness is an important factor in balancing these two requirements. The smaller particle sizes tend to allow the medium to become saturated, excluding all air and holding too much moisture. Larger particles will hold less moisture and allow air. Most sand is too fine to prevent saturation. Potting soils hold too much moisture.
• Coarse vermiculite (#2-#3 grade) produces very good results. The coarse texture allows for good air penetration in the media, while the vermiculite holds the moisture.
• A mix of 60% Perlite and 40% finer vermiculite also works well.

Propagation by Hardwood Cuttings
• If the humidity is too high, mold is a likely outcome, and if it is too low, the cuttings are at risk of desiccation before rooting occurs.
• Humidity can be controlled in a greenhouse, or using something simple like a plastic bag over a black nursery pot.
• I have also used a plastic storage box with the lid substantially closed.

Propagation by Hardwood Cuttings • When taking cuttings, make the bottom cut just below the nodes, but not into
them. It is also helpful to actually wound or injure a cutting slightly when trying to force it to develop roots. When a plant is injured, it develops a callous over the wound as protection. This callous build up is necessary before roots will develop. Cutting just below a node on the bottom of a cutting causes the plant to develop callous and eventually, roots.
• Making the cut on the top of the cutting 3/4" above the node is done so that the 3/4" section of stem above the node will provide protection for the top node. This keeps the buds from being damaged or knocked off during handling and planting.
• Although not necessary, it helps to make the cut at the top of the cutting at an angle. This sheds water away from the cut end of the cutting and helps to keep disease and insects away from the cuttings. It also helps to identify which end is up.
• Once you have all of your cuttings made, dip them in a rooting compound. Make sure you have the right strength rooting compound for hardwood cuttings.

Propagation by Hardwood Cuttings
Pre-rooting Cuttings • Wrap dormant cuttings in lightly dampened
paper towels or newspaper. Cover the tops of the cuttings, but leave the basal ends exposed. This helps to keep the tops dormant.
• Place the cuttings in a sealed plastic bag and put them in a warm place.
• In a few weeks, you will see root initials begin to form, and then roots.
• Be patient; each variety is different and each cutting, even when from the same tree, can differ in its response.

Propagation by Hardwood Cuttings • Once the cuttings have formed roots they are removed from the bag
for transfer to a clear cup.
• This "bag" technique can be used on all sizes of cuttings. I have done some as large as 2" in diameter.

Propagation by Hardwood Cuttings • Transfer the cuttings from
bags to 26-oz. clear plastic cups containing a rooting medium and with holes drilled in their bottoms.
• The pre-rooted cuttings are placed in these clear cups for further root development.
• Deeper cups are better than short, squat cups.

Propagation by Hardwood Cuttings • The pre-rooted cuttings in clear plastic cups
are placed on wire racks, in plastic storage boxes. These boxes hold 20 cuttings and can be used to control humidity.
• Screen "racks" are used to keep the cups above the water that collects at the bottom of the storage box. If the cups sit in water, the rooting media wicks up the water rotting the cuttings.
• The water which collects underneath the screen provides humidity within the box and helps to maintain moisture in the cutting.

Propagation by Hardwood Cuttings
• Place the box of cuttings in an area that receives filtered sunlight. Too much sun can heat up the box and “cook” your cuttings.
• Open the lid of the box a little bit. This allows fresh air to enter, which is important in controlling mold. If the lids are wide open, you lose too much humidity.
• The water at the bottom of the crate, under the screen, replenishes the humidity lost by having the lids open.

Propagation by Hardwood Cuttings
• Eventually the cuttings will develop roots. Each cutting may develop at a different rate.
• An important principle to remember is that roots and leaves have no relationship to each other.
• Under identical conditions, some cuttings will grow roots, some will grow leaves, and some will grow both.

Propagation by Hardwood Cuttings • You cannot presume root
development from observing leaf development. This is why clear cups are beneficial; they allow me to actually see whether roots are developing.
• Here is a cutting that looked strong and healthy but there was little root development. This is not a good candidate for transplanting and should be kept in a very high humidity environment.

Propagation by Hardwood Cuttings • This cutting has very
vigorous root development seen through the cup as well as good leaf development.
• It is now removed from the cup and ready for repotting into a 1 gallon pot.

Propagation by Hardwood Cuttings
• An advantage of vermiculite and perlite as a rooting medium is the ease of removing the rooted cutting for repotting. Mixes that contain organic materials tend to stick to the sides of the cups, which leads to root damage.
• If the roots stick to the sides of the cup, squeeze and flex the cup. The sides of the cup can bend at sharp angles, and the roots will not. The cup may crack, but even cracked cups can be reused because they don't need to hold water.

Propagation by Hardwood Cuttings • Transfer the cuttings to 1-gallon pots
containing a potting mix of 60% Perlite and 40% potting soil.
• Acclimate them to the outdoors, usually putting them in shade with augmented humidity for a few days, and gradually introducing them to more sunlight over a period of weeks.
• At this stage, potting mix moisture control is still critical. Too much moisture will still cause root rot and plant failure.
• When I see roots in the drain holes, I transfer the trees to 2-gallon pots while reversing the mix to 40% perlite and 60% potting soil.

PLANT PROPAGATION
An Overview of Plant Propagation Methods
Two Techniques of Stem Cutting Propagation