pink flower pendant beading & jewelry...
TRANSCRIPT
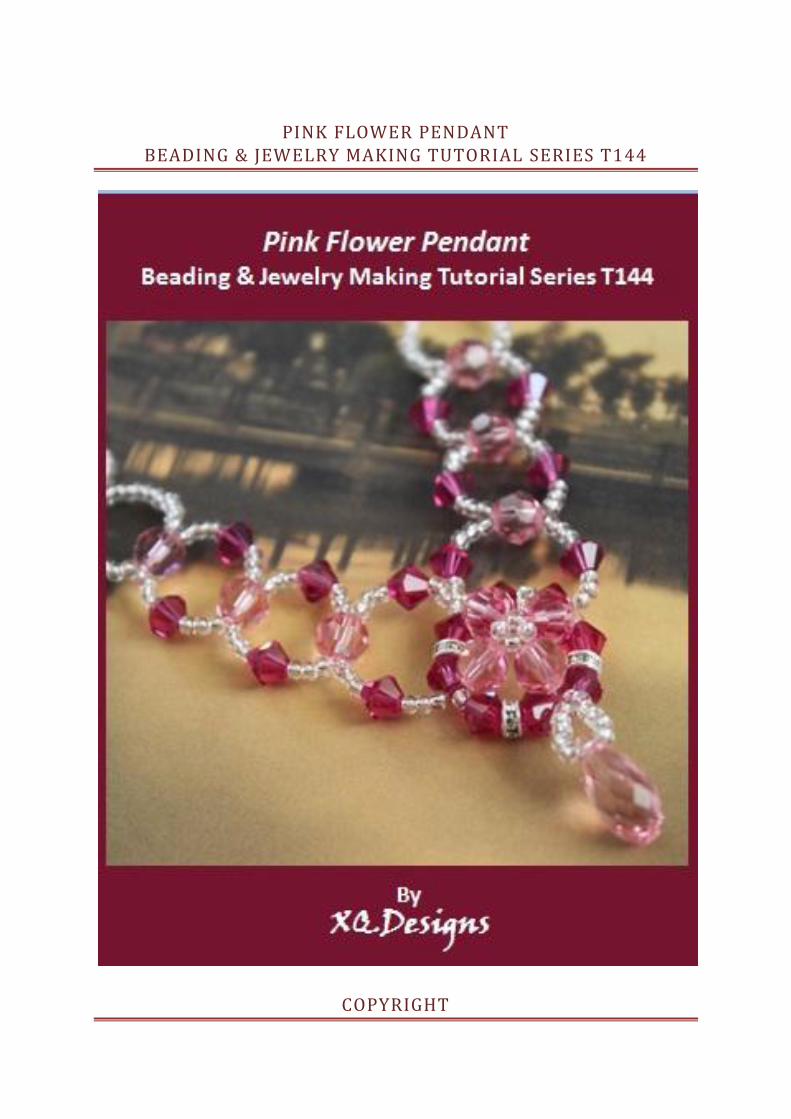
PINK FLOWER PENDANT BEADING & JEWELRY MAKING TUTORIAL SERIES T144
COPYRIGHT
XQ Designs
Copyrights XQ Designs 2012
Published By DIY Beading Club
INTRODUCTION
Another right angle weaving technique tutorial for beading enthusiasts! Learn how to create a
flower using the RAW technique while weaving in circular direction. You'll also learn how to
create a dangle or tail to add onto your flower shape pendant that will make the flower even
more unique and beautiful. This additional tip will also be useful for other beading techniques
and by playing with different sizes of beads, you can create your own variation of the
necklace.
The tutorial is catered for beginners or anyone who loves to learn this basic weave. It has in-
depth instructions and ultra-clear, close-up photos at each step. Additionally, you can ask me
question you have on the tutorial. No more getting stuck and frustrated on a confusing or just
plain inaccurate pattern.
MATERIALS AND TOOLS NEEDED:
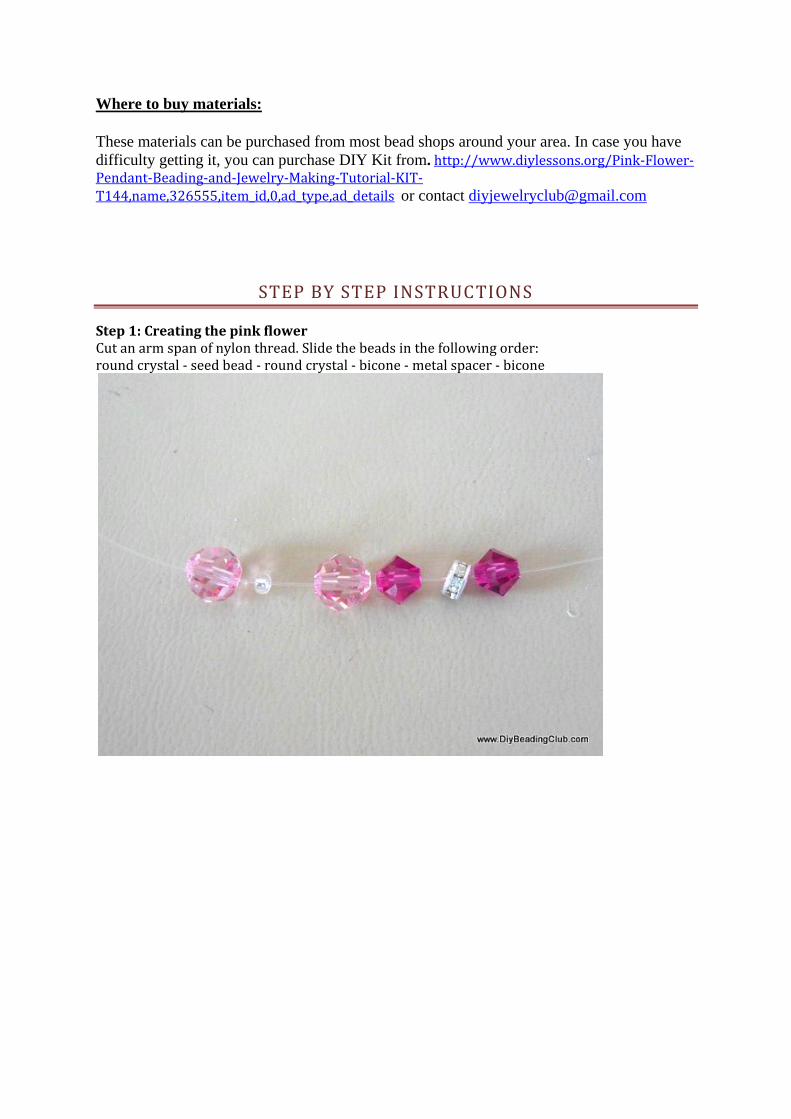
Materials Needed 20 4mm purple bicone crystals 10 x 5mm pink round crystals 16 x 4mm pink bicone crystals 4 metal spacers 1 tear drop crystal some white seed beads 2 jump rings 2 crimp beads 2 calotte 1 lobster clasp 1 extension chain (optional) Nylon thread Tools Needed Scissors Flat nose pliers
Where to buy materials:
These materials can be purchased from most bead shops around your area. In case you have
difficulty getting it, you can purchase DIY Kit from. http://www.diylessons.org/Pink-Flower-Pendant-Beading-and-Jewelry-Making-Tutorial-KIT-T144,name,326555,item_id,0,ad_type,ad_details or contact [email protected]
STEP BY STEP INSTRUCTIONS
Step 1: Creating the pink flower Cut an arm span of nylon thread. Slide the beads in the following order: round crystal - seed bead - round crystal - bicone - metal spacer - bicone
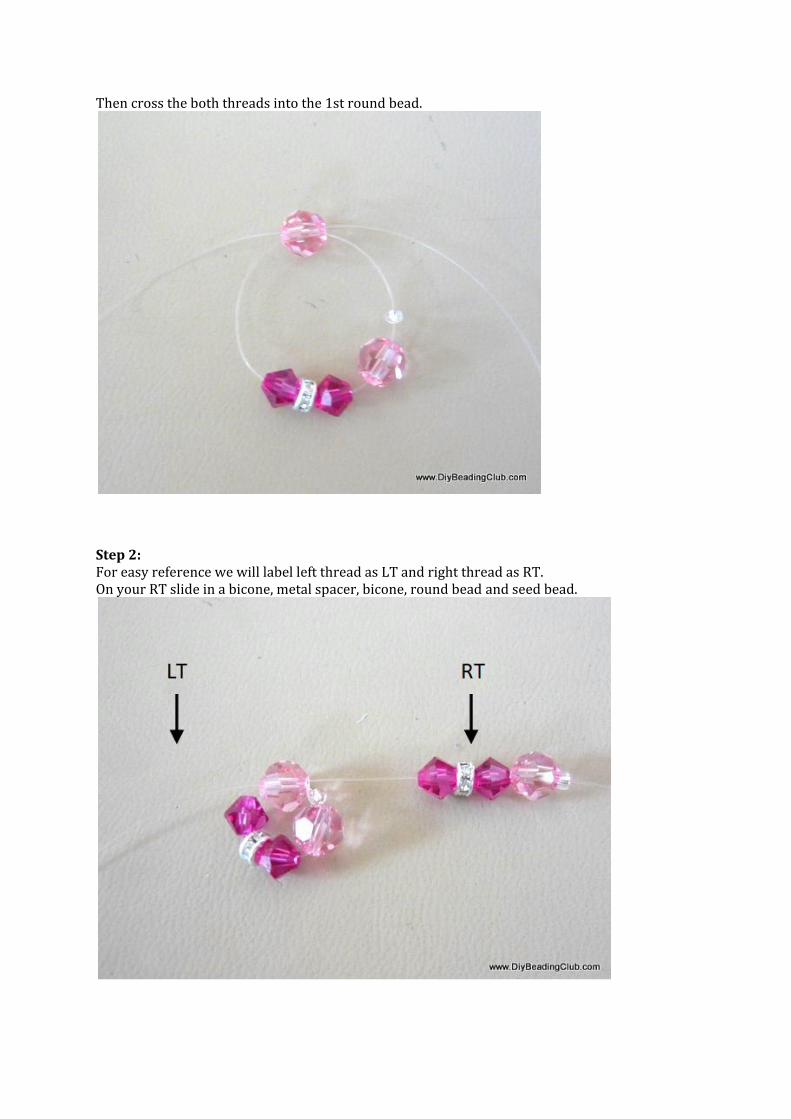
Then cross the both threads into the 1st round bead.
Step 2: For easy reference we will label left thread as LT and right thread as RT. On your RT slide in a bicone, metal spacer, bicone, round bead and seed bead.
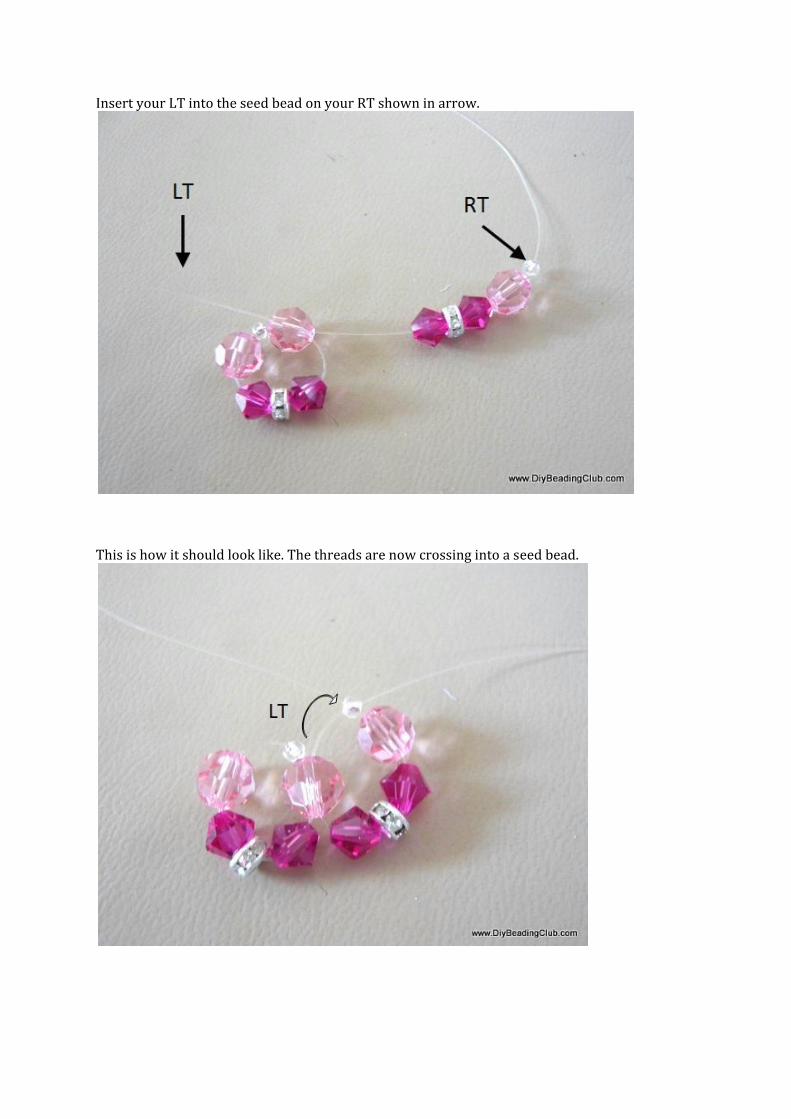
Insert your LT into the seed bead on your RT shown in arrow.
This is how it should look like. The threads are now crossing into a seed bead.
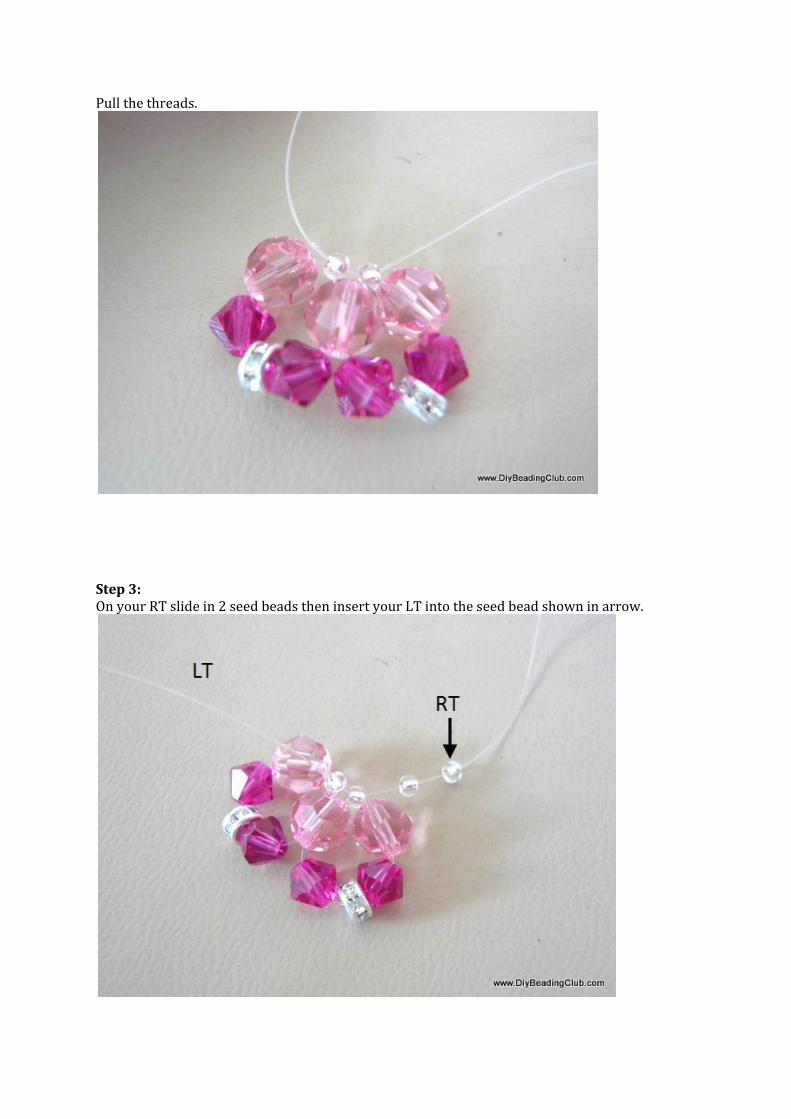
Pull the threads.
Step 3: On your RT slide in 2 seed beads then insert your LT into the seed bead shown in arrow.
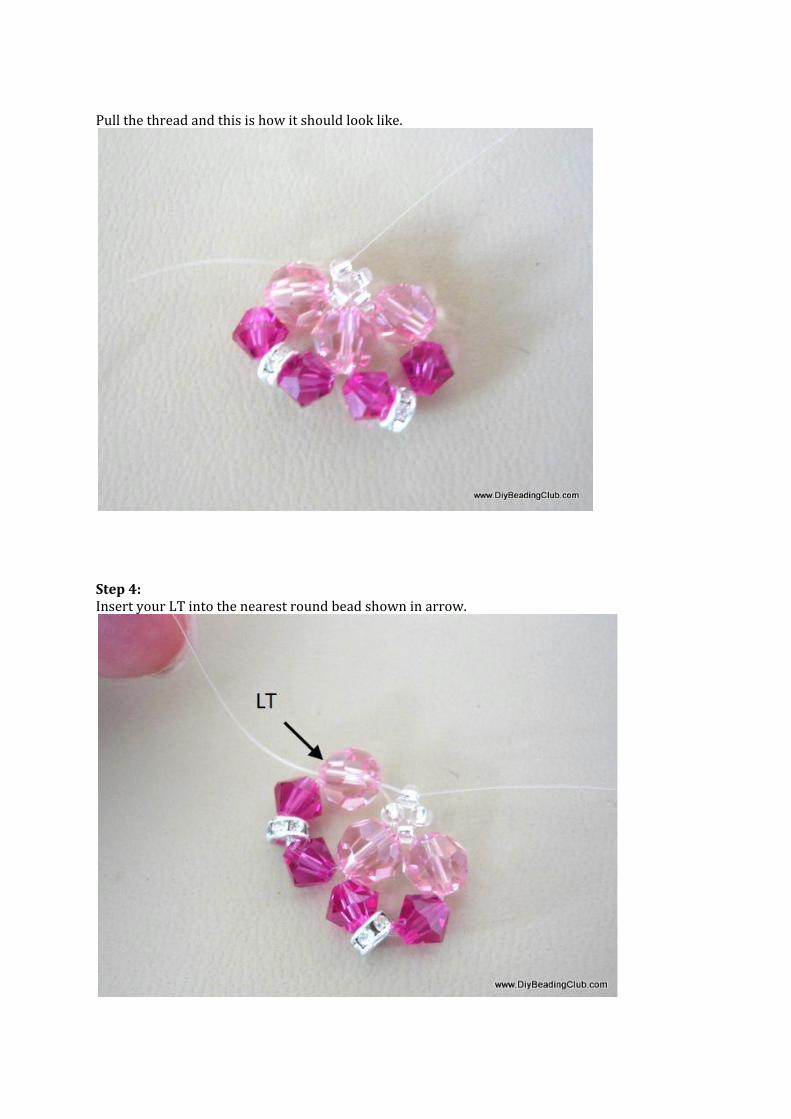
Pull the thread and this is how it should look like.
Step 4: Insert your LT into the nearest round bead shown in arrow.
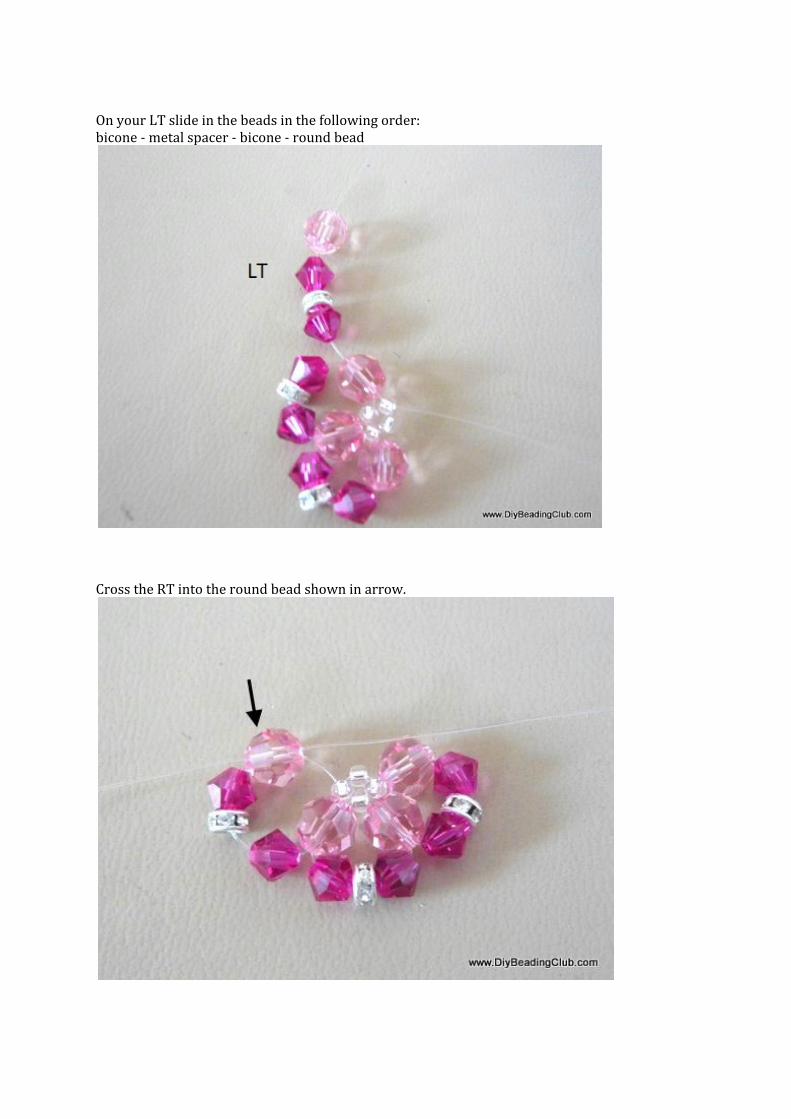
On your LT slide in the beads in the following order: bicone - metal spacer - bicone - round bead
Cross the RT into the round bead shown in arrow.
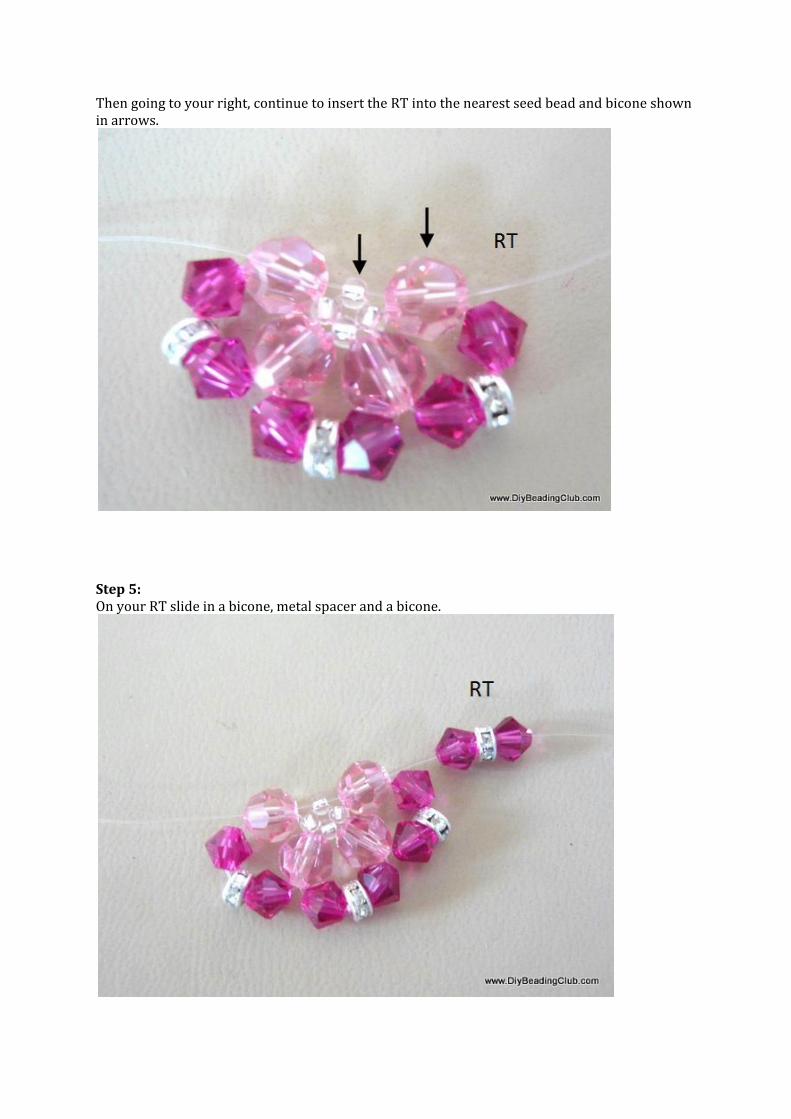
Then going to your right, continue to insert the RT into the nearest seed bead and bicone shown in arrows.
Step 5: On your RT slide in a bicone, metal spacer and a bicone.
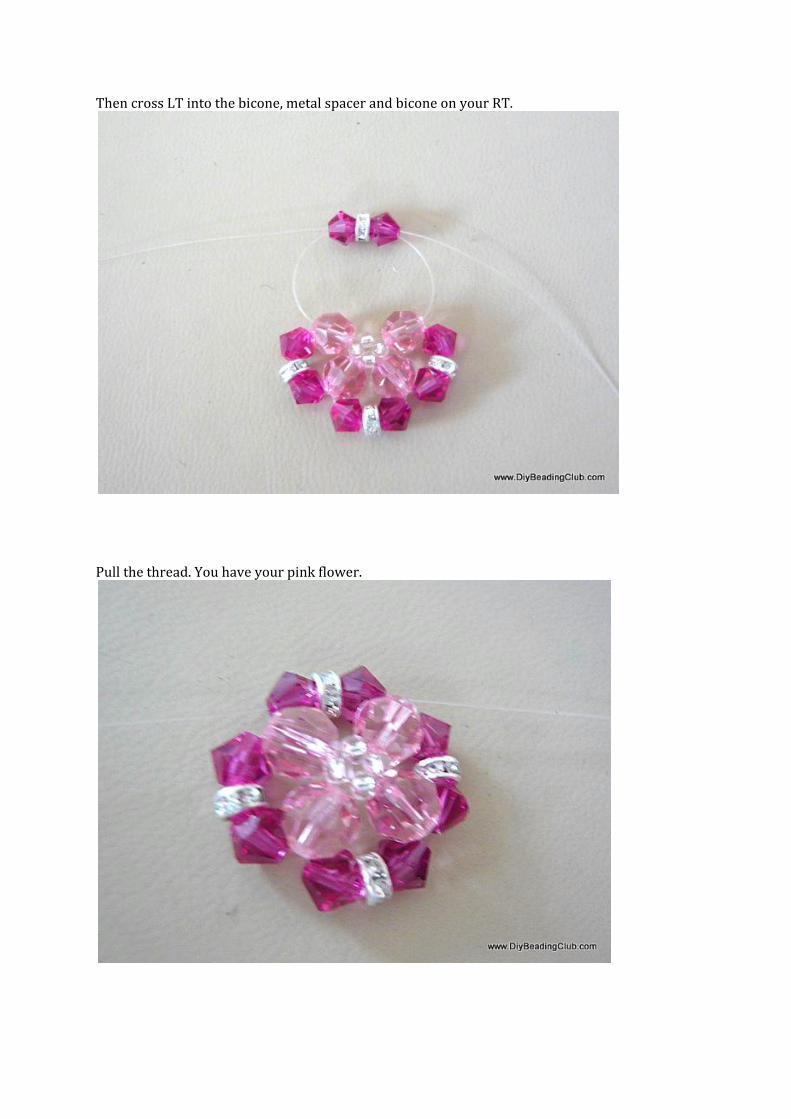
Then cross LT into the bicone, metal spacer and bicone on your RT.
Pull the thread. You have your pink flower.
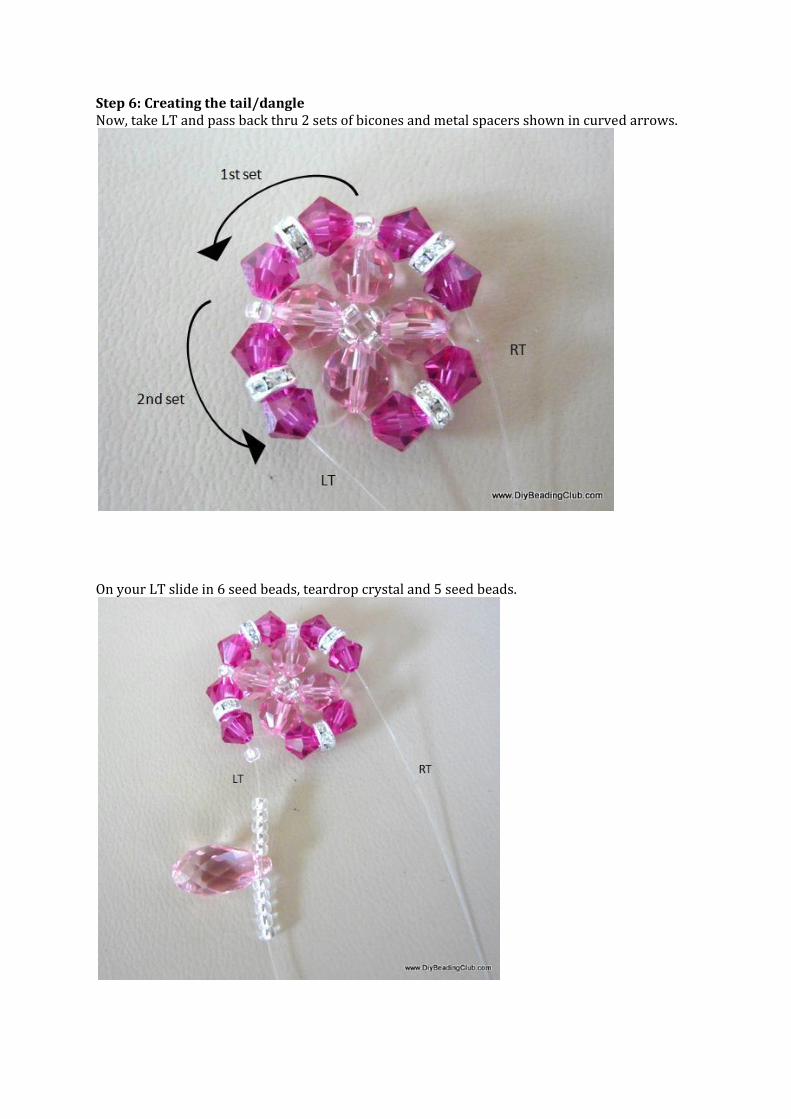
Step 6: Creating the tail/dangle Now, take LT and pass back thru 2 sets of bicones and metal spacers shown in curved arrows.
On your LT slide in 6 seed beads, teardrop crystal and 5 seed beads.

Then pass LT back thru the seed beads shown in arrow.
Pull the thread and as you pull, continue to pass thru the next set of bicones and metal spacer shown in bracket.

Then pass LT into the next seed bead, bicone, metal spacer and bicone shown in bracket. Now, you have the both threads crossing each other again and ready to create the necklace.
Step 7: Creating the necklace with Figure 8 Technique On LT slide in the following: 3 seed beads, bicone, 3 seed beads On RT slide in the following: 3 seed beads, bcone, 3 seed beads, round bead
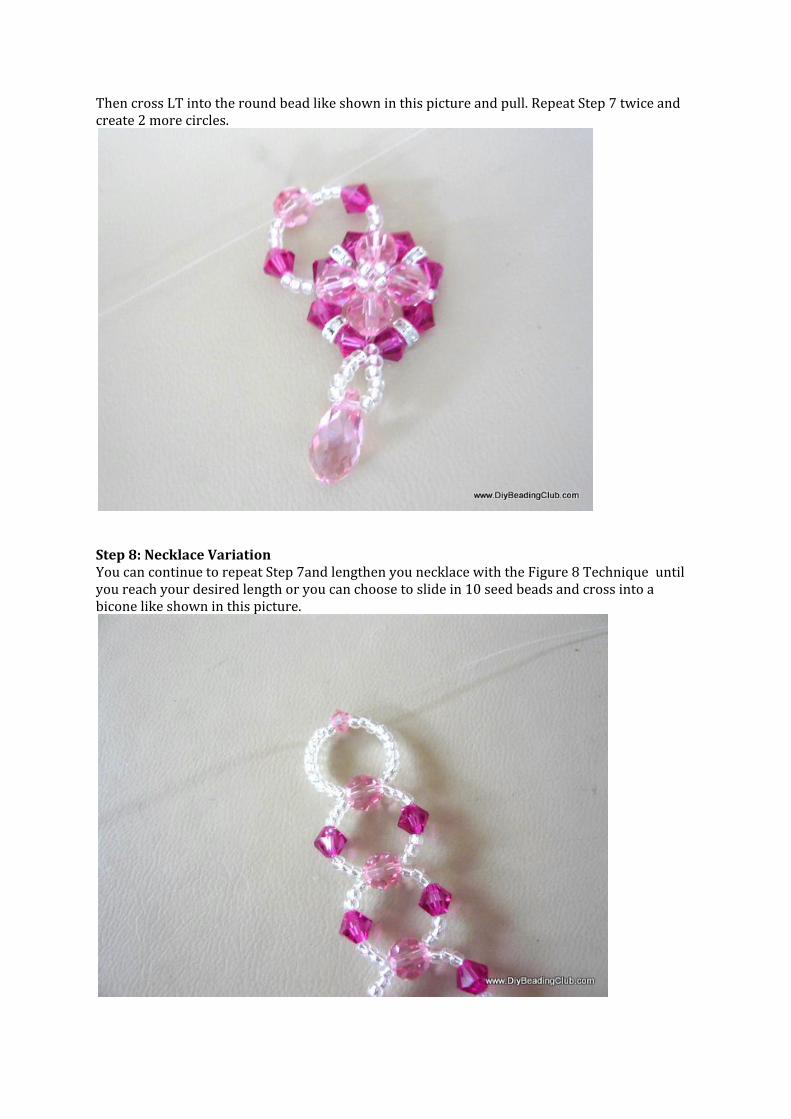
Then cross LT into the round bead like shown in this picture and pull. Repeat Step 7 twice and create 2 more circles.
Step 8: Necklace Variation You can continue to repeat Step 7and lengthen you necklace with the Figure 8 Technique until you reach your desired length or you can choose to slide in 10 seed beads and cross into a bicone like shown in this picture.
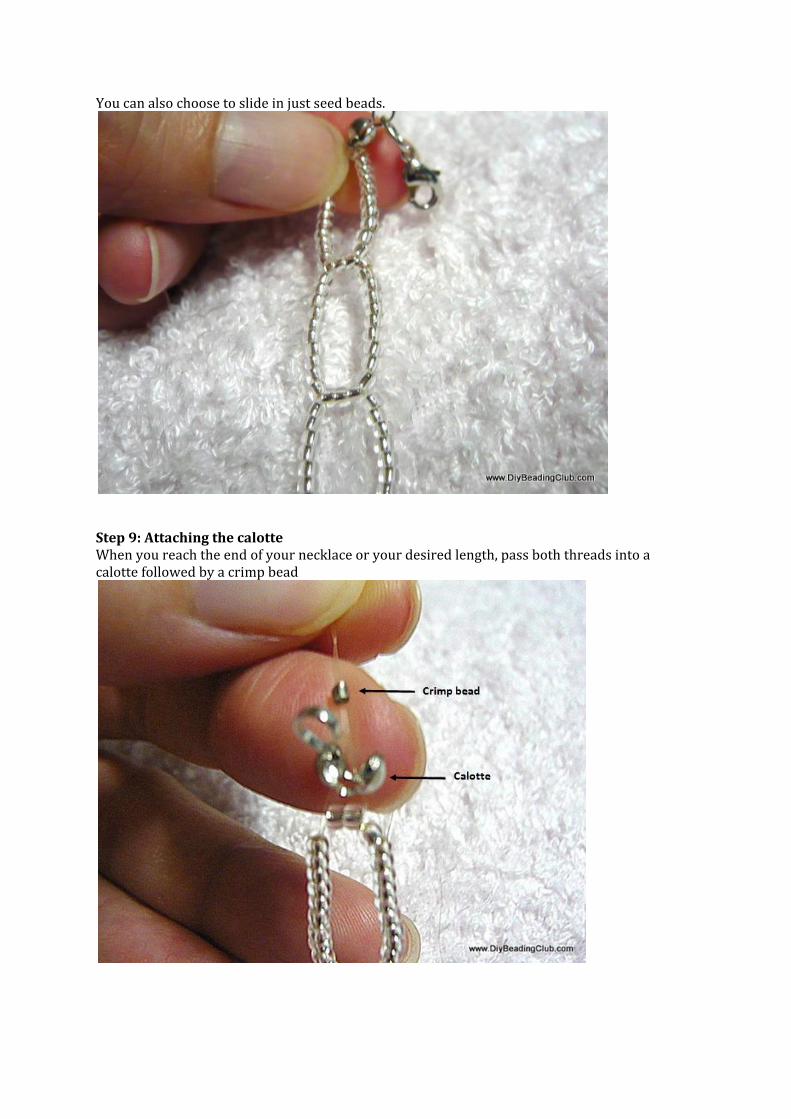
You can also choose to slide in just seed beads.
Step 9: Attaching the calotte When you reach the end of your necklace or your desired length, pass both threads into a calotte followed by a crimp bead
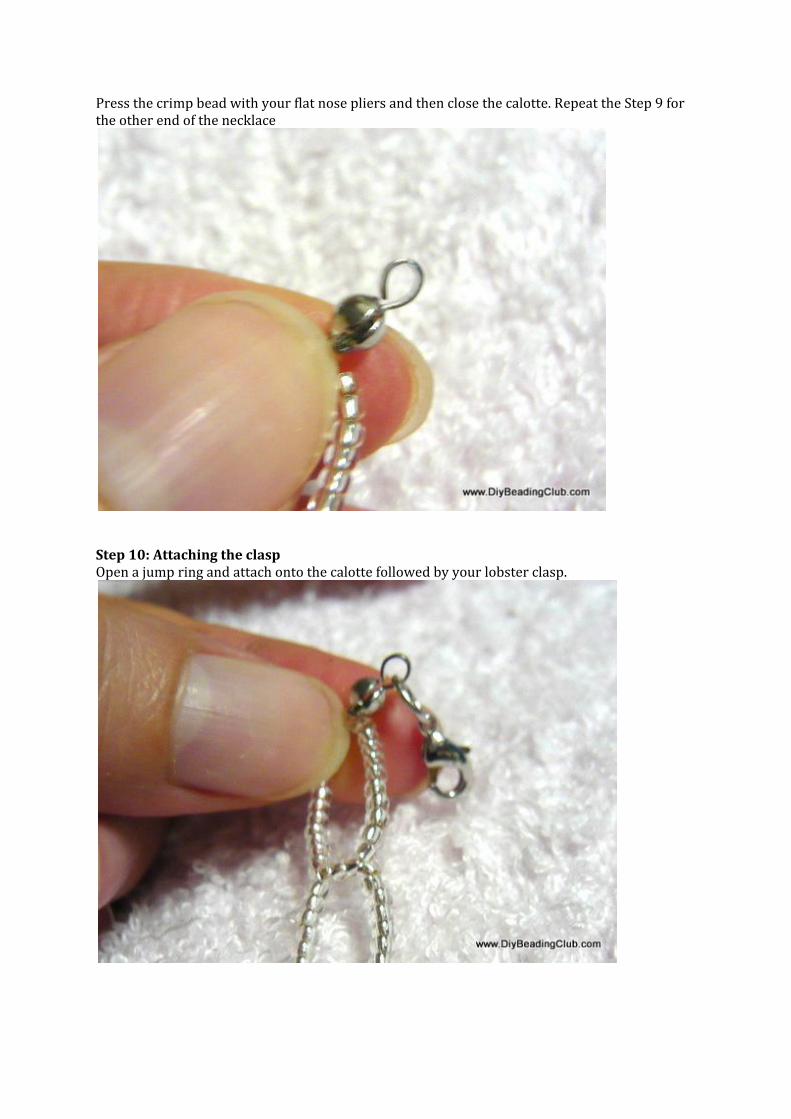
Press the crimp bead with your flat nose pliers and then close the calotte. Repeat the Step 9 for the other end of the necklace
Step 10: Attaching the clasp Open a jump ring and attach onto the calotte followed by your lobster clasp.
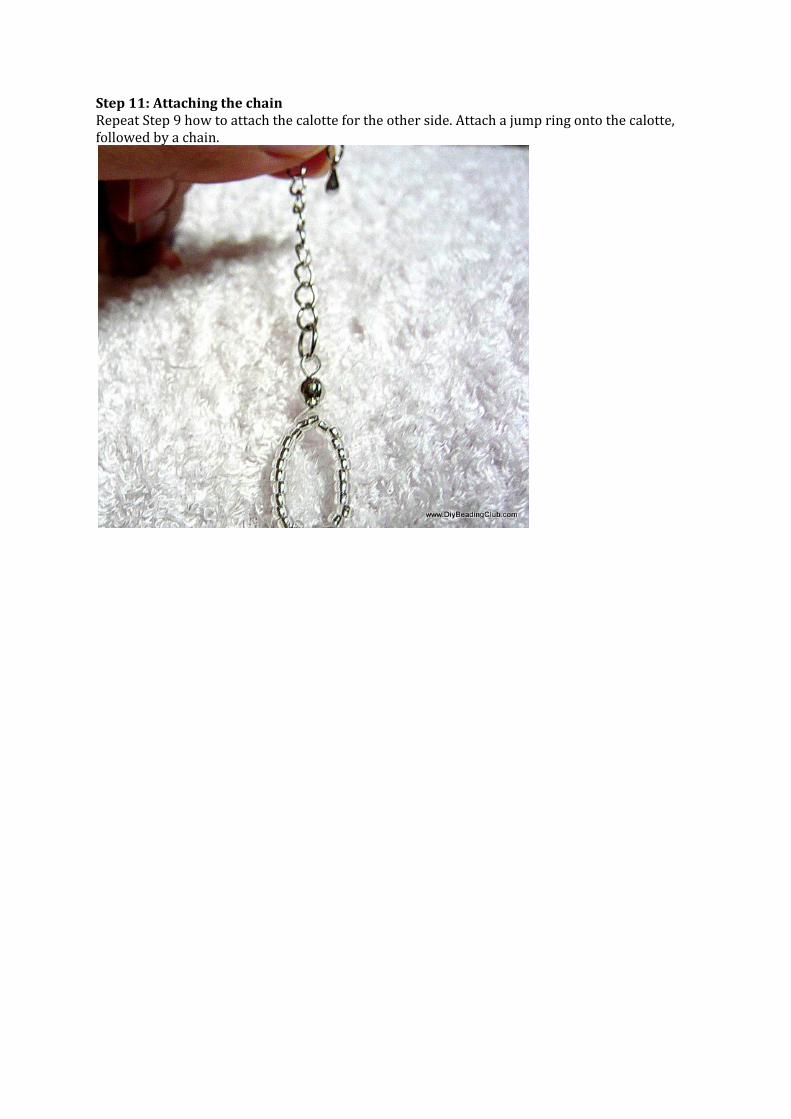
Step 11: Attaching the chain Repeat Step 9 how to attach the calotte for the other side. Attach a jump ring onto the calotte, followed by a chain.
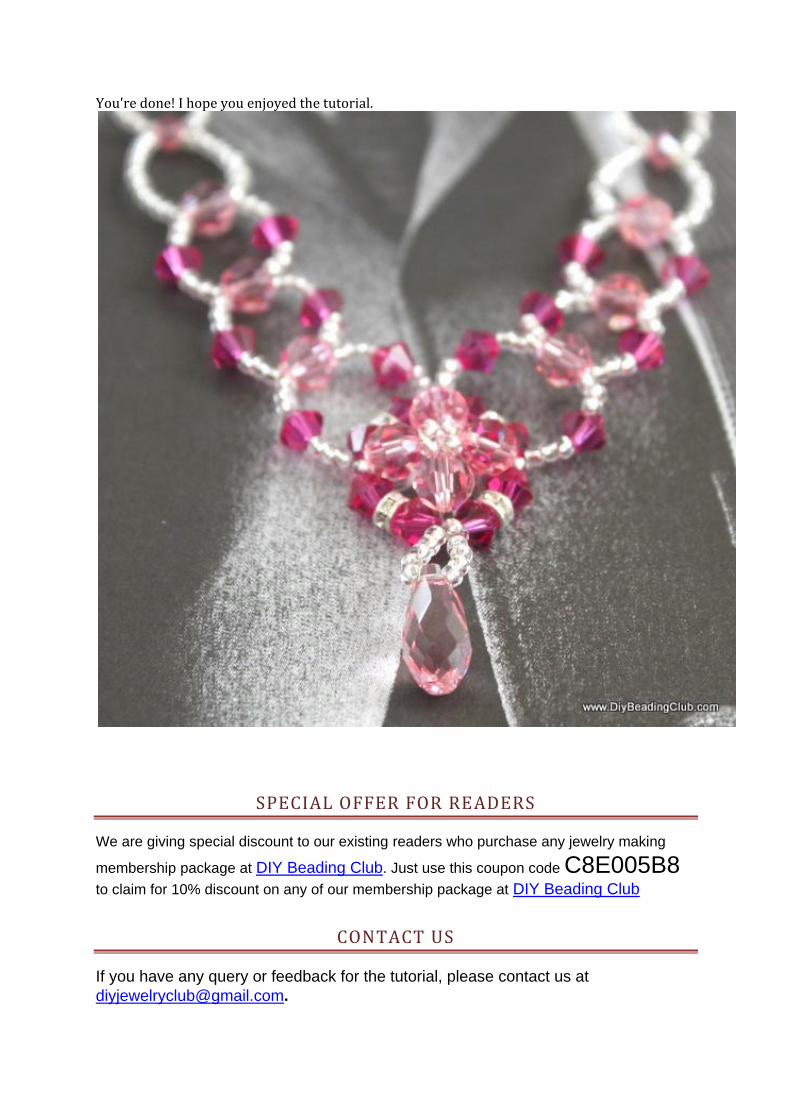
You're done! I hope you enjoyed the tutorial.
SPECIAL OFFER FOR READERS
We are giving special discount to our existing readers who purchase any jewelry making
membership package at DIY Beading Club. Just use this coupon code C8E005B8
to claim for 10% discount on any of our membership package at DIY Beading Club
CONTACT US
If you have any query or feedback for the tutorial, please contact us at

ABOUT THE AUTHOR
Started as a hobby, I have then addicted into sharing my knowledge through tutorial
writing. I publish my knowledge and research through my websites. I also work with
other jewelry artists to develop tutorials and publish their works. I hope you will
browse through all our creations and hope you will like them.
Do join me at
Browse my ebooks at www.diybeadingclub.com: