phacoemulsification - rajswasthya.nic.inrajswasthya.nic.in/rhsdp training...
TRANSCRIPT
Chapter - 7
PHACOEMULSIFICATION
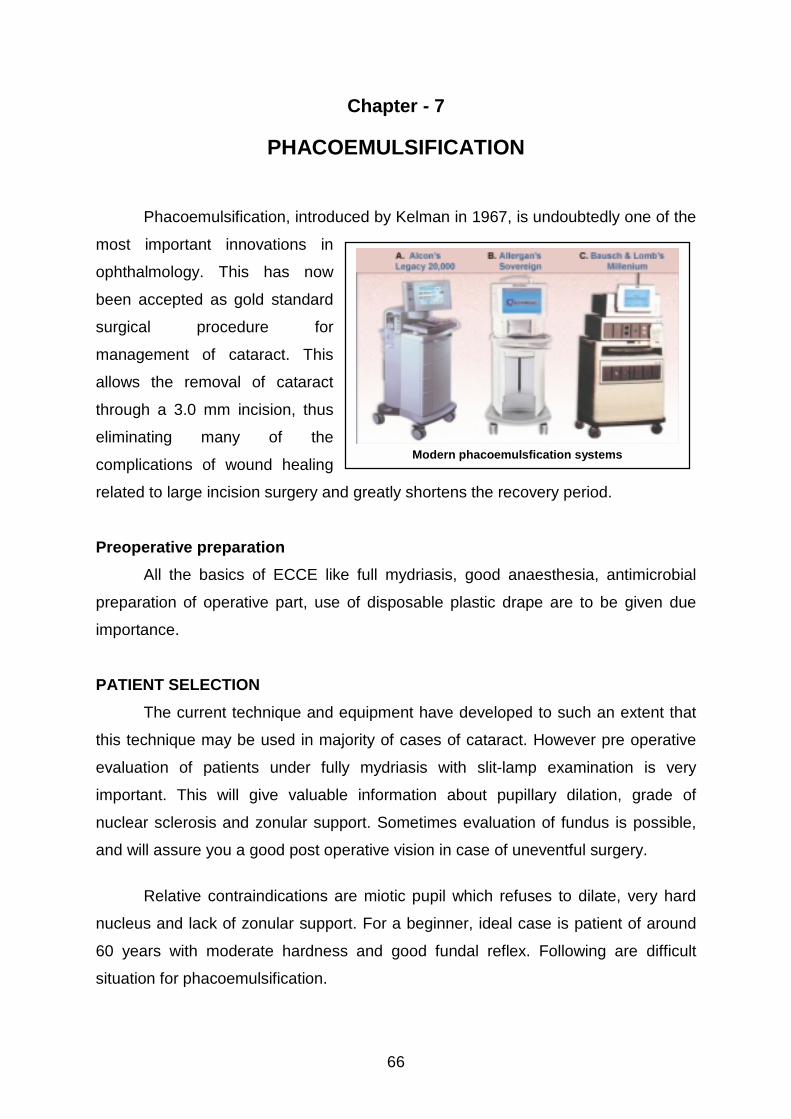
Phacoemulsification, introduced by Kelman in 1967, is undoubtedly one of the
most important innovations in
ophthalmology. This has now
been accepted as gold standard
surgical procedure for
management of cataract. This
allows the removal of cataract
through a 3.0 mm incision, thus
eliminating many of the
complications of wound healing
related to large incision surgery and
Preoperative preparation
All the basics of ECCE like
preparation of operative part, use
importance.
PATIENT SELECTION
The current technique and e
this technique may be used in majo
evaluation of patients under fully
important. This will give valuable
nuclear sclerosis and zonular supp
and will assure you a good post ope
Relative contraindications ar
nucleus and lack of zonular suppor
60 years with moderate hardness
situation for phacoemulsification.
Modern phacoemulsfication systems
66
greatly shortens the recovery period.
full mydriasis, good anaesthesia, antimicrobial
of disposable plastic drape are to be given due
quipment have developed to such an extent that
rity of cases of cataract. However pre operative
mydriasis with slit-lamp examination is very
information about pupillary dilation, grade of
ort. Sometimes evaluation of fundus is possible,
rative vision in case of uneventful surgery.
e miotic pupil which refuses to dilate, very hard
t. For a beginner, ideal case is patient of around
and good fundal reflex. Following are difficult
67
! Deep set eyes
! Shallow AC
! Hazy cornea
! Non dilating pupil
! Brunescent cataract Grade IV/V or very soft cataract
! Subluxated/ dislocated lens
! Cataract in vitrectomised patient
Hardness of Nucleus
Utmost importance should be given to assessment of the hardness of the
nucleus. This can be assessed with slit-lamp examination under mydriasis. Nucleus
of crystalline lens changes from transparent to gray, to gray-yellow amber, brown
and finally to almost black. To a certain degree, variation in colour corresponds to an
increase in hardness of nucleus. Other important consideration is patient age. Older
the patient harder the nucleus is likely to be. Hardness of nucleus can be classified
as follows.
1. Soft nucleus (Grade 1) - transparent to pale gray
2. Slightly hard nucleus (Grade 2) gray - grayish yellow
3. Moderately hard nucleus (Grade 3) - yellow with tinge of gray
4. Hard Nucleus (Grade 4) - Yellow amber
5. Very hard Nucleus (Grade 5) - brown-black
PHACOEMULSIFICATION MACHINE
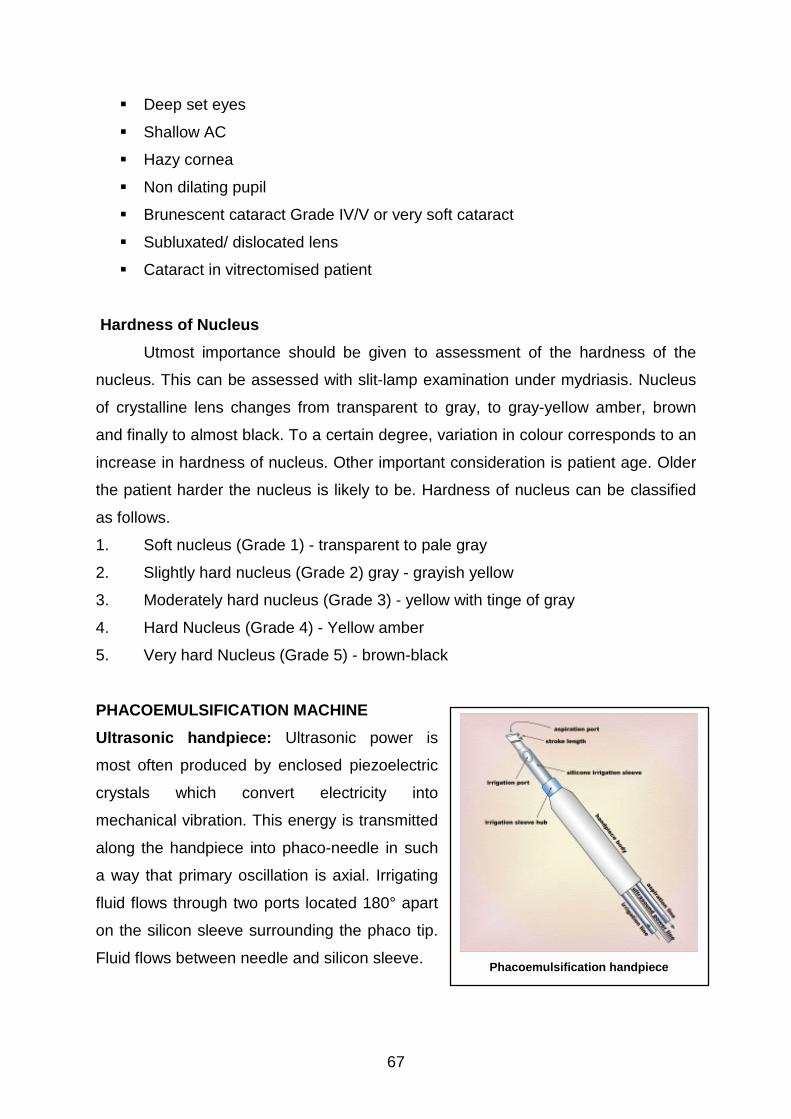
Ultrasonic handpiece: Ultrasonic power is
most often produced by enclosed piezoelectric
crystals which convert electricity into
mechanical vibration. This energy is transmitted
along the handpiece into phaco-needle in such
a way that primary oscillation is axial. Irrigating
fluid flows through two ports located 180° apart
on the silicon sleeve surrounding the phaco tip.
Fluid flows between needle and silicon sleeve.
Phacoemulsification handpiece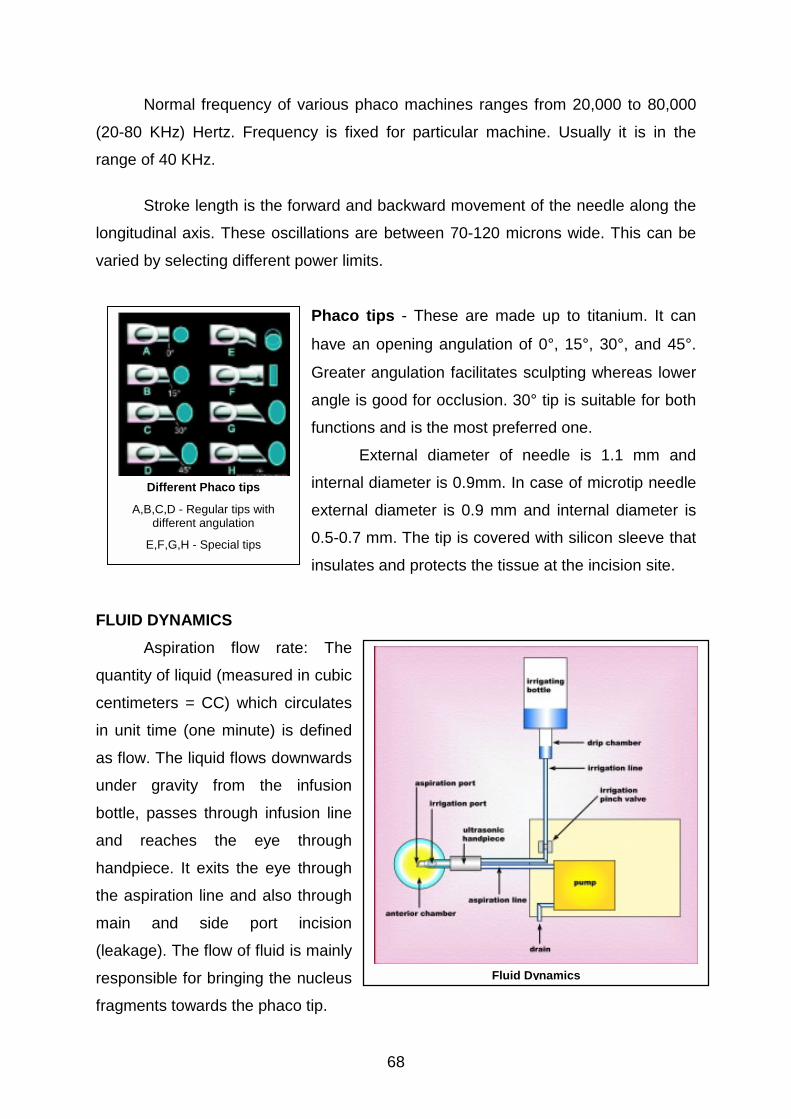
Normal frequency of various phaco machines ranges from 20,000 to 80,000
(20-80 KHz) Hertz. Frequency is fixed for particular machine. Usually it is in the
range of 40 KHz.
Stroke length is the forward and backward movement of the needle along the
longitudinal axis. These oscillations are between 70-120 microns wide. This can be
varied by selecting different power limits.
Phaco tips - These are made up to titanium. It can
have an opening angulation of 0°, 15°, 30°, and 45°.
Greater angulation facilitates sculpting whereas lower
angle is good for occlusion. 30° tip is suitable for both
functions and is the most preferred one.
External diameter of needle is 1.1 mm and
internal diameter is 0.9mm. In case of microtip needle
external diameter is 0.9 mm and internal diameter is
0.5-0.7 mm. The tip is covered with silicon sleeve that
FL
qu
ce
in
as
un
bo
an
ha
th
m
(le
re
fra
Different Phaco tips
A,B,C,D - Regular tips withdifferent angulation
E,F,G,H - Special tips
insulates and protects the tissue at the incision site.
UID DYNAMICS
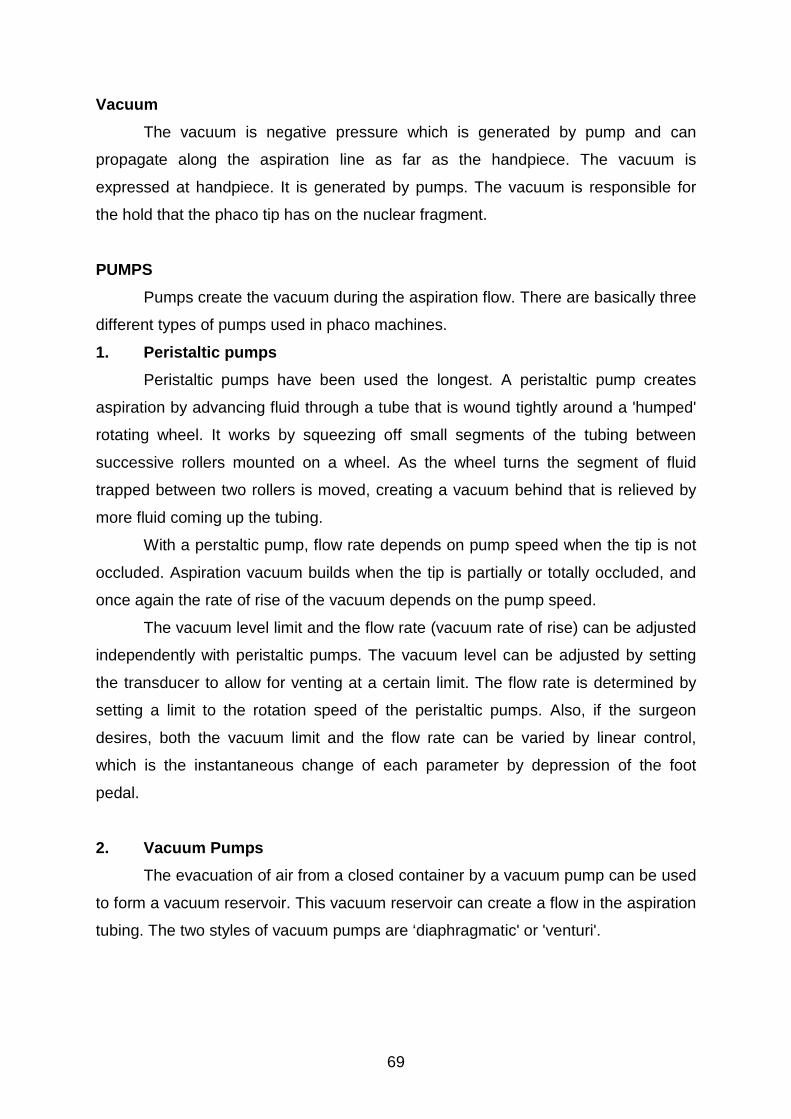
Aspiration flow rate: The
antity of liquid (measured in cubic
ntimeters = CC) which circulates
unit time (one minute) is defined
flow. The liquid flows downwards
der gravity from the infusion
ttle, passes through infusion line
d reaches the eye through
ndpiece. It exits the eye through
e aspiration line and also through
ain and side port incision
akage). The flow of fluid is mainly
sponsible for bringing the nucleus
gments towards the phaco tip.
Fluid Dynamics
68
69
Vacuum
The vacuum is negative pressure which is generated by pump and can
propagate along the aspiration line as far as the handpiece. The vacuum is
expressed at handpiece. It is generated by pumps. The vacuum is responsible for
the hold that the phaco tip has on the nuclear fragment.
PUMPS
Pumps create the vacuum during the aspiration flow. There are basically three
different types of pumps used in phaco machines.
1. Peristaltic pumps
Peristaltic pumps have been used the longest. A peristaltic pump creates
aspiration by advancing fluid through a tube that is wound tightly around a 'humped'
rotating wheel. It works by squeezing off small segments of the tubing between
successive rollers mounted on a wheel. As the wheel turns the segment of fluid
trapped between two rollers is moved, creating a vacuum behind that is relieved by
more fluid coming up the tubing.
With a perstaltic pump, flow rate depends on pump speed when the tip is not
occluded. Aspiration vacuum builds when the tip is partially or totally occluded, and
once again the rate of rise of the vacuum depends on the pump speed.
The vacuum level limit and the flow rate (vacuum rate of rise) can be adjusted
independently with peristaltic pumps. The vacuum level can be adjusted by setting
the transducer to allow for venting at a certain limit. The flow rate is determined by
setting a limit to the rotation speed of the peristaltic pumps. Also, if the surgeon
desires, both the vacuum limit and the flow rate can be varied by linear control,
which is the instantaneous change of each parameter by depression of the foot
pedal.
2. Vacuum Pumps
The evacuation of air from a closed container by a vacuum pump can be used
to form a vacuum reservoir. This vacuum reservoir can create a flow in the aspiration
tubing. The two styles of vacuum pumps are ‘diaphragmatic' or 'venturi'.
70
Venturi pump
This is driven the compressed gas (nitrogen or air) that is directed through the
chamber. By varying the size of the opening, the volume of the gas through the
chamber is proportionately controlled. The gas flow over the opening of tube into
chamber creates a pressure differential via a venturi effect with air flow. This air flow
and pressure differential in the tube creates a vacuum in the chamber that pulls fluid
in from the aspiration tubing. Vacuum and flow rate are proportionately linked on a
venturi pump and cannot be independently adjusted as they can on a peristaltic
pump.
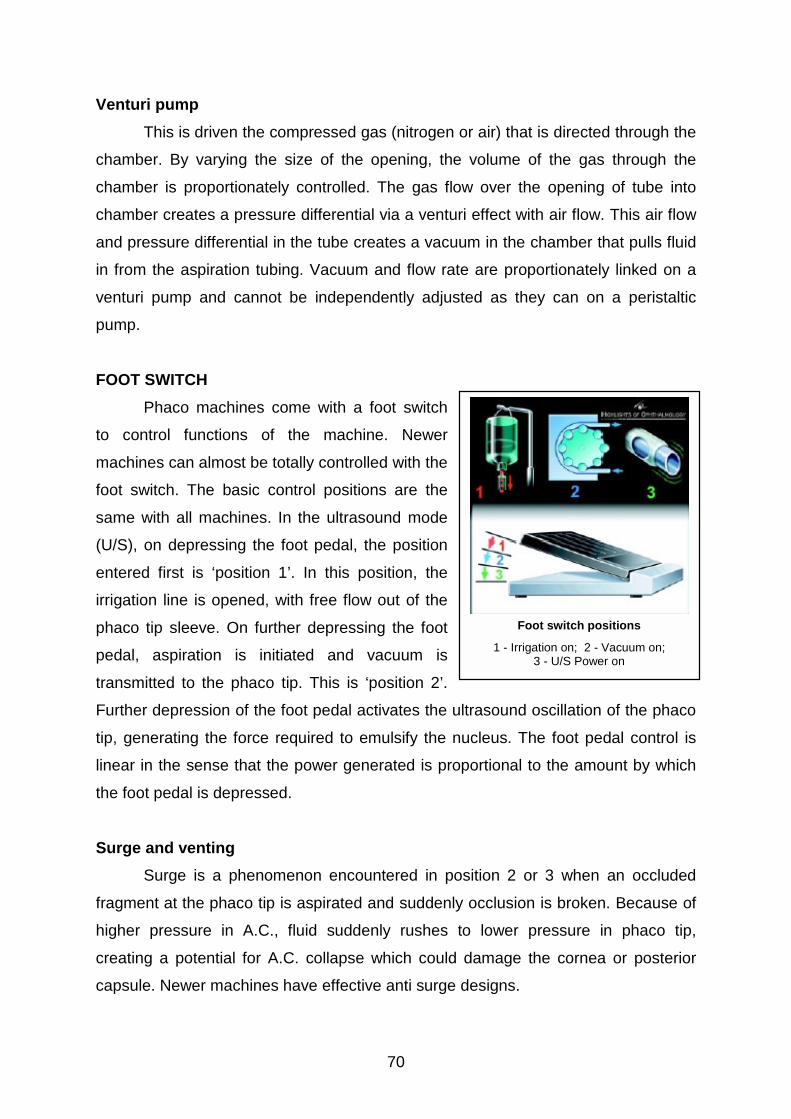
FOOT SWITCH
Phaco machines come with a foot switch
to control functions of the machine. Newer
machines can almost be totally controlled with the
foot switch. The basic control positions are the
same with all machines. In the ultrasound mode
(U/S), on depressing the foot pedal, the position
entered first is ‘position 1’. In this position, the
irrigation line is opened, with free flow out of the
phaco tip sleeve. On further depressing the foot
pedal, aspiration is initiated and vacuum is
transmitted to the phaco tip. This is ‘position 2’.
Further depression of the foot pedal activates the u
tip, generating the force required to emulsify the n
linear in the sense that the power generated is pro
the foot pedal is depressed.
Surge and venting
Surge is a phenomenon encountered in po
fragment at the phaco tip is aspirated and suddenly
higher pressure in A.C., fluid suddenly rushes t
creating a potential for A.C. collapse which could
capsule. Newer machines have effective anti surge
Foot switch positions
1 - Irrigation on; 2 - Vacuum on;3 - U/S Power on
ltrasound oscillation of the phaco
ucleus. The foot pedal control is
portional to the amount by which
sition 2 or 3 when an occluded
occlusion is broken. Because of
o lower pressure in phaco tip,
damage the cornea or posterior
designs.
71
Venting is the main anti collapse system. In this case the negative pressure
inside the aspiration line is neutralized with emission of liquid or air.
INCISION CONSTRUCTION
Ideal incision for phacoemulsification should be astigmatically neutral and free
from sutures.
There are following different parameter in relation to incision
1. Position (a) with regard to limbus
(b) with regard to o’clock position
2. Size
3. Shape
Position with regards to the limbus, three sites can be chosen for incision.
1. Sclero-corneal
2. Limbal
3. Clear corneal
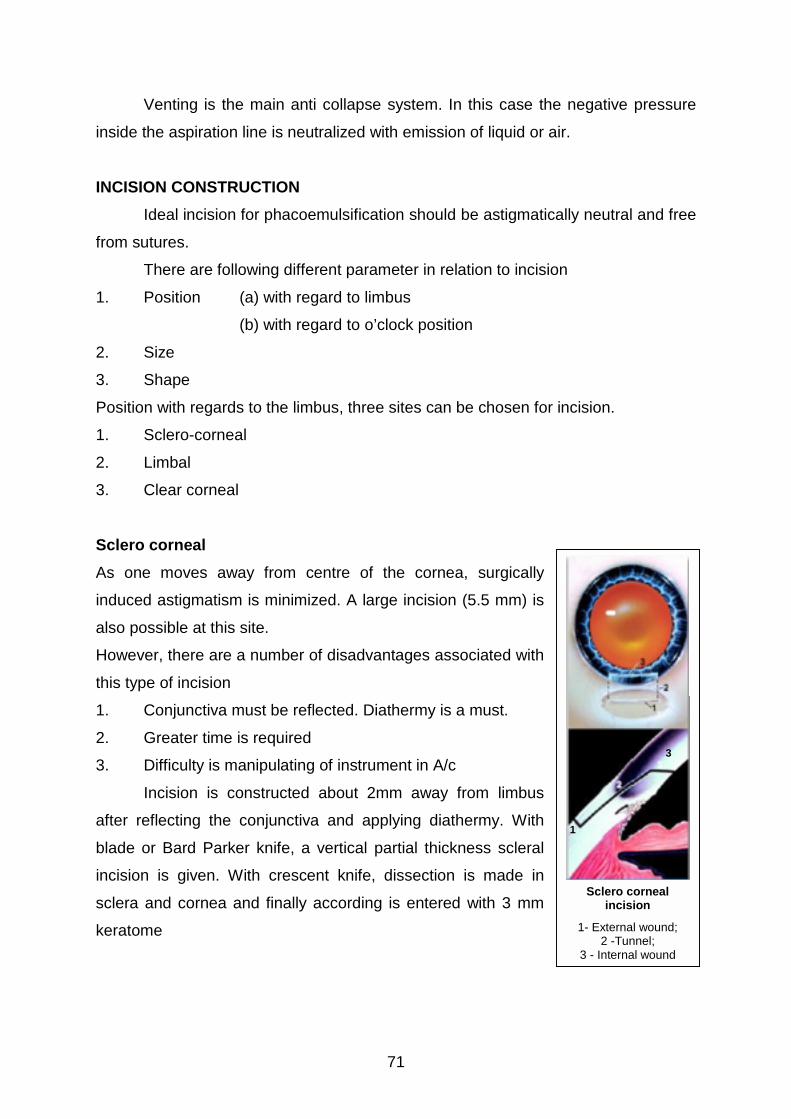
Sclero corneal
As one moves away from centre of the cornea, surgically
induced astigmatism is minimized. A large incision (5.5 mm) is
also possible at this site.
However, there are a number of disadvantages associated with
this type of incision
1. Conjunctiva must be reflected. Diathermy is a must.
2. Greater time is required
3. Difficulty is manipulating of instrument in A/c
Incision is constructed about 2mm away from limbus
after reflecting the conjunctiva and applying diathermy. With
blade or Bard Parker knife, a vertical partial thickness scleral
incision is given. With crescent knife, dissection is made in
sclera and cornea and finally according is entered with 3 mm
keratome
1
3
Sclero cornealincision
1- External wound;2 -Tunnel;
3 - Internal wound
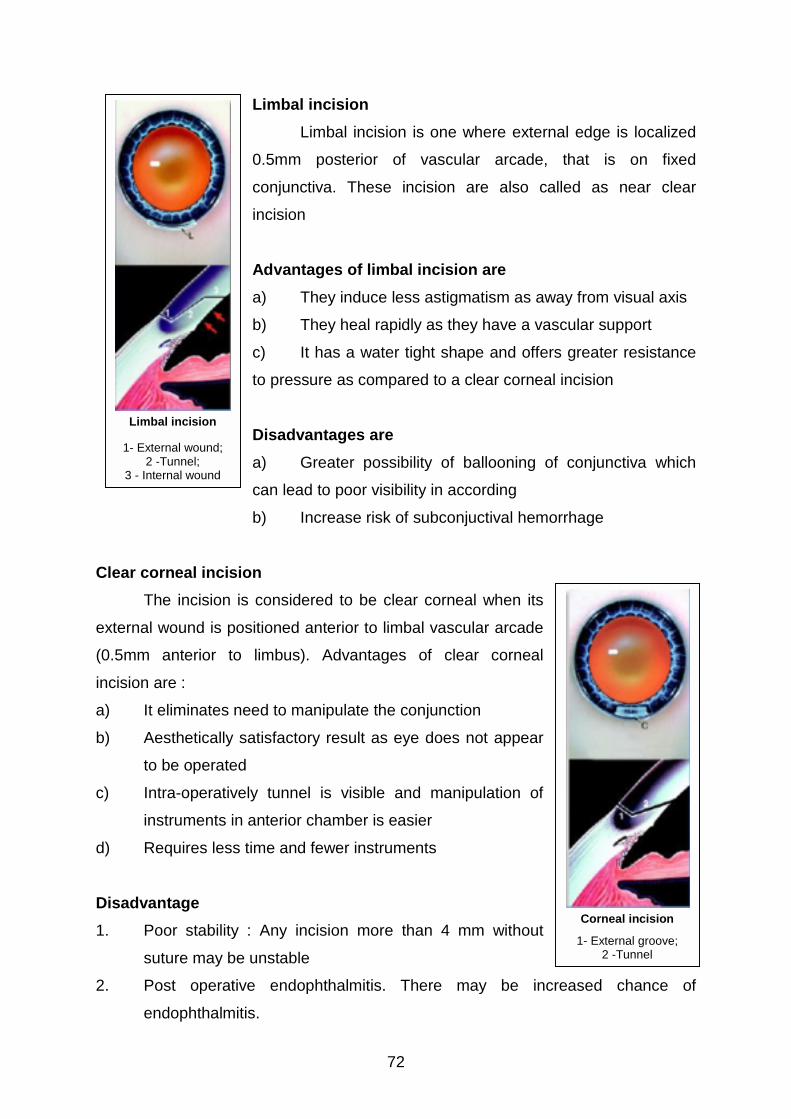
Limbal incision
Limbal incision is one where external edge is localized
0.5mm posterior of vascular arcade, that is on fixed
conjunctiva. These incision are also called as near clear
incision
Advantages of limbal incision are
a) They induce less astigmatism as away from visual axis
b) They heal rapidly as they have a vascular support
c) It has a water tight shape and offers greater resistance
to pressure as compared to a clear corneal incision
Disadvantages are
a) Greater possibility of ballooning of conjunctiva which
C
ex
(0
in
a)
b)
c)
d)
D
1.
2.
Limbal incision
1- External wound;2 -Tunnel;
3 - Internal wound
72
can lead to poor visibility in according
b) Increase risk of subconjuctival hemorrhage
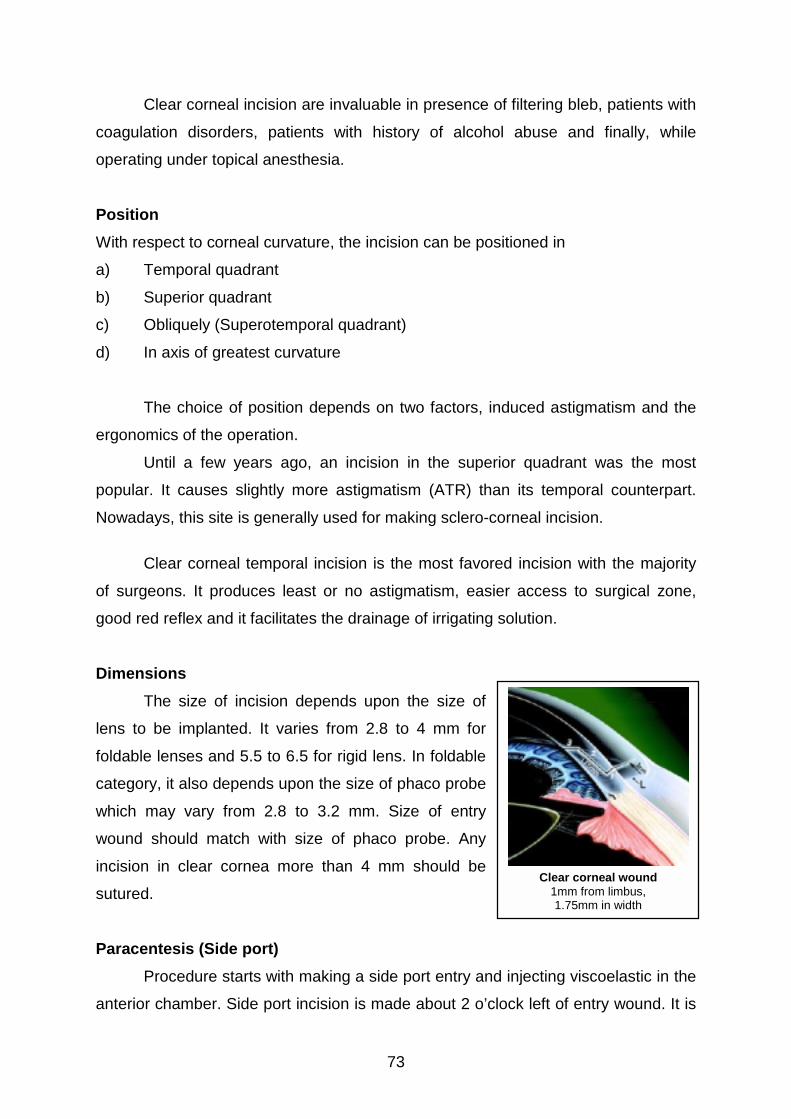
lear corneal incision
The incision is considered to be clear corneal when its
ternal wound is positioned anterior to limbal vascular arcade
.5mm anterior to limbus). Advantages of clear corneal
cision are :
It eliminates need to manipulate the conjunction
Aesthetically satisfactory result as eye does not appear
to be operated
Intra-operatively tunnel is visible and manipulation of
instruments in anterior chamber is easier
Requires less time and fewer instruments
isadvantage
Poor stability : Any incision more than 4 mm without
suture may be unstable
Post operative endophthalmitis. There may be incr
endophthalmitis.
Corneal incision
1- External groove;2 -Tunnel
eased chance of
73
Clear corneal incision are invaluable in presence of filtering bleb, patients with
coagulation disorders, patients with history of alcohol abuse and finally, while
operating under topical anesthesia.
Position
With respect to corneal curvature, the incision can be positioned in
a) Temporal quadrant
b) Superior quadrant
c) Obliquely (Superotemporal quadrant)
d) In axis of greatest curvature
The choice of position depends on two factors, induced astigmatism and the
ergonomics of the operation.
Until a few years ago, an incision in the superior quadrant was the most
popular. It causes slightly more astigmatism (ATR) than its temporal counterpart.
Nowadays, this site is generally used for making sclero-corneal incision.
Clear corneal temporal incision is the most favored incision with the majority
of surgeons. It produces least or no astigmatism, easier access to surgical zone,
good red reflex and it facilitates the drainage of irrigating solution.
Dimensions
The size of incision depends upon the size of
lens to be implanted. It varies from 2.8 to 4 mm for
foldable lenses and 5.5 to 6.5 for rigid lens. In foldable
category, it also depends upon the size of phaco probe
which may vary from 2.8 to 3.2 mm. Size of entry
wound should match with size of phaco probe. Any
incision in clear cornea more than 4 mm should be
sutured.
Paracentesis (Side port)
Procedure starts with making a side port entry and
anterior chamber. Side port incision is made about 2 o’cl
Clear corneal wound1mm from limbus,1.75mm in width
injecting viscoelastic in the
ock left of entry wound. It is
74
made in clear cornea with 15° angled knife or 20 G MVR blade. The side port should
measure about 1 mm and run parallel to iris plane. After supporting the globe by
placing a toothed forceps outside limbus opposite to the site of making side port,
enter the AC with 15° angled knife or MVR blade.
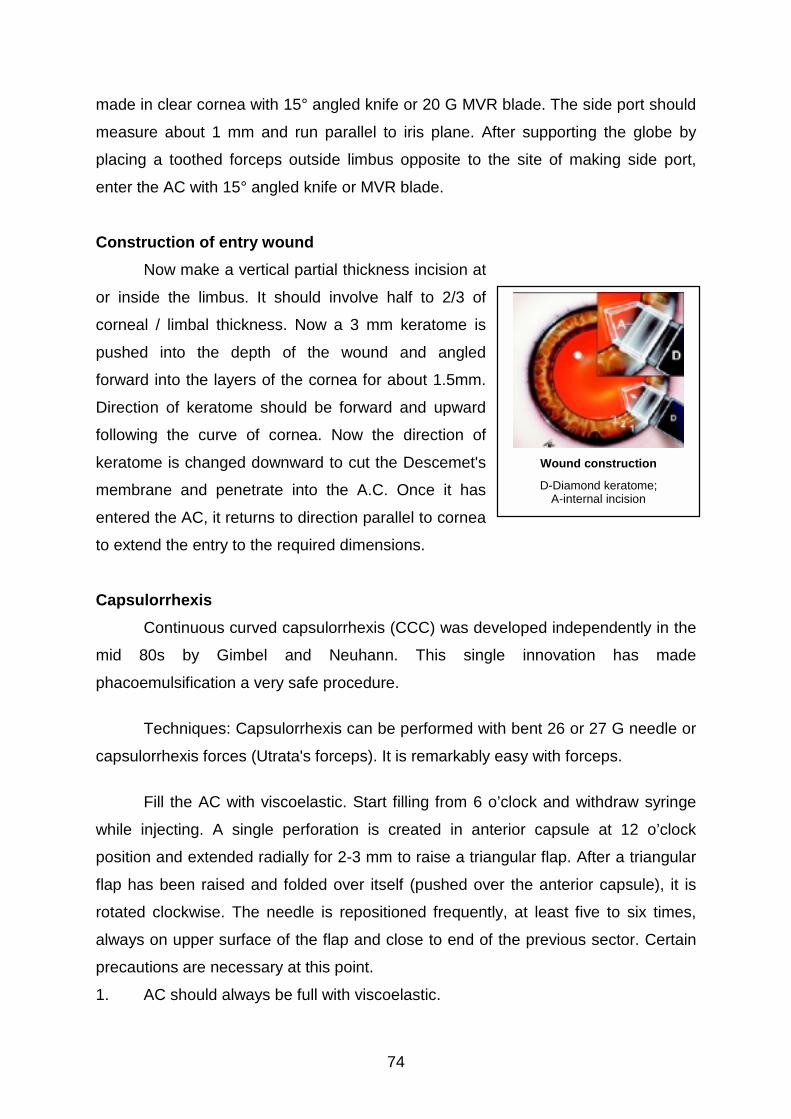
Construction of entry wound
Now make a vertical partial thickness incision at
or inside the limbus. It should involve half to 2/3 of
corneal / limbal thickness. Now a 3 mm keratome is
pushed into the depth of the wound and angled
forward into the layers of the cornea for about 1.5mm.
Direction of keratome should be forward and upward
following the curve of cornea. Now the direction of
keratome is changed downward to cut the Descemet's
membrane and penetrate into the A.C. Once it has
entered the AC, it returns to direction parallel to cornea
to extend the entry to the required dimensions.
Capsulorrhexis
Continuous curved capsulorrhexis (CCC) was developed independently in the
mid 80s by Gimbel and Neuhann. This single innovation has made
phacoemulsification a very safe procedure.
Techniques: Capsulorrhexis can be performed with bent 26 or 27 G needle or
capsulorrhexis forces (Utrata's forceps). It is remarkably easy with forceps.
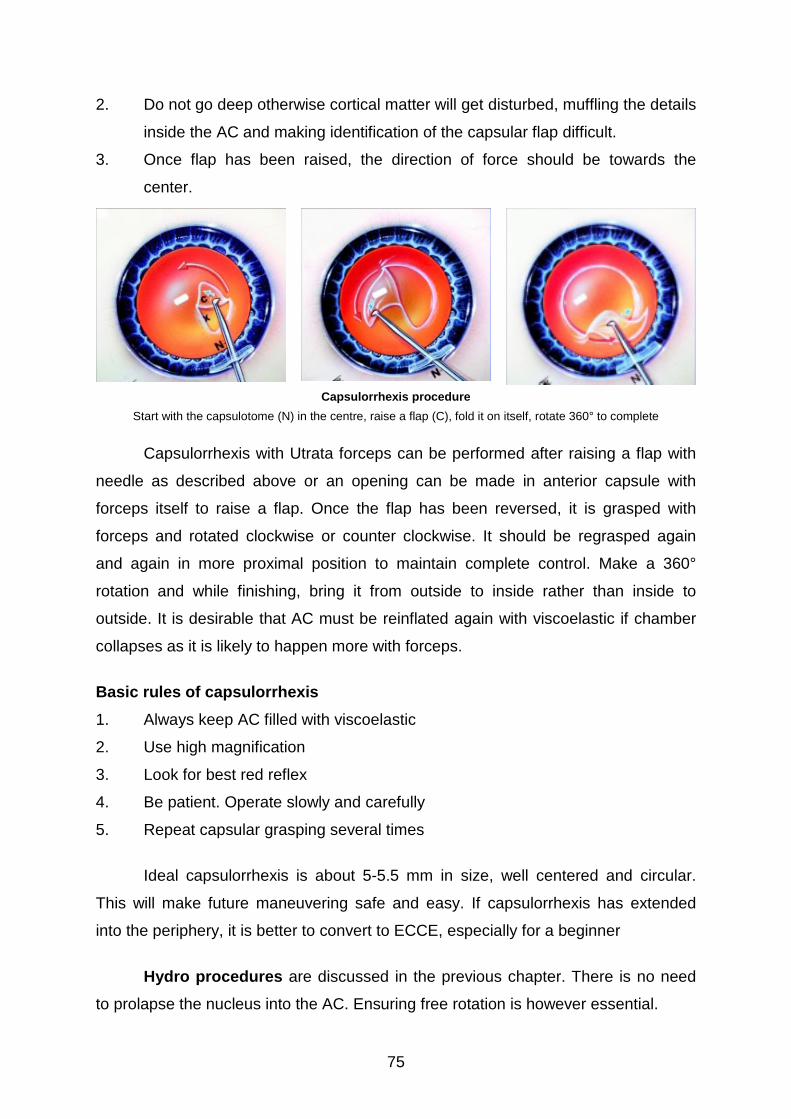
Fill the AC with viscoelastic. Start filling from 6 o’clock and withdraw syringe
while injecting. A single perforation is created in anterior capsule at 12 o’clock
position and extended radially for 2-3 mm to raise a triangular flap. After a triangular
flap has been raised and folded over itself (pushed over the anterior capsule), it is
rotated clockwise. The needle is repositioned frequently, at least five to six times,
always on upper surface of the flap and close to end of the previous sector. Certain
precautions are necessary at this point.
1. AC should always be full with viscoelastic.
Wound construction
D-Diamond keratome;A-internal incision
75
2. Do not go deep otherwise cortical matter will get disturbed, muffling the details
inside the AC and making identification of the capsular flap difficult.
3. Once flap has been raised, the direction of force should be towards the
center.
Capsulorrhexis procedure
Start with the capsulotome (N) in the centre, raise a flap (C), fold it on itself, rotate 360° to complete
Capsulorrhexis with Utrata forceps can be performed after raising a flap with
needle as described above or an opening can be made in anterior capsule with
forceps itself to raise a flap. Once the flap has been reversed, it is grasped with
forceps and rotated clockwise or counter clockwise. It should be regrasped again
and again in more proximal position to maintain complete control. Make a 360°
rotation and while finishing, bring it from outside to inside rather than inside to
outside. It is desirable that AC must be reinflated again with viscoelastic if chamber
collapses as it is likely to happen more with forceps.
Basic rules of capsulorrhexis
1. Always keep AC filled with viscoelastic
2. Use high magnification
3. Look for best red reflex
4. Be patient. Operate slowly and carefully
5. Repeat capsular grasping several times
Ideal capsulorrhexis is about 5-5.5 mm in size, well centered and circular.
This will make future maneuvering safe and easy. If capsulorrhexis has extended
into the periphery, it is better to convert to ECCE, especially for a beginner
Hydro procedures are discussed in the previous chapter. There is no need
to prolapse the nucleus into the AC. Ensuring free rotation is however essential.
76
NUCLEUS MANAGEMENT
DIVIDE AND CONQUER
Divide and conquer nucleotomy incorporates 4 basic steps.
1. Sculpting until a very thin posterior plate of nucleus, if any remains.
2. Fracturing the nuclear rim and posterior plate of the nucleus and nuclear rim.
3. Fracturing again and breaking away a wedge shaped section of nuclear
material for emulsification and
4. Rotating the nucleus for further fracturing and emulsification.
Crater Divide and Conquer
Initially, deep central sculpting is done, resulting in a large crater, and leaving
and leaving a dense peripheral rim to fracture into multiple sections.
Once this is complete, the nuclear rim is fractured, using the bimanual method
in which the spatula/chopper and the phacoemulsification tip create a counter
pressure. The lens is rotated and a second crack is made, isolating a pie-shaped
section. The nuclear rim is then rotated clockwise, for systematic piece-by-piece
nucleofractis. The harder the nuclear rim, the smaller the wedge-shaped sections
must be, to allow manageability and to reduce the possibility of tearing the posterior
capsule.
Usually when performing CDC, especially in dense and brunescent cataracts,
rather than immediately emulsifying each wedge-shaped section, the nuclear
sections are left in place for capsular bag distension. Once the fracturing is complete
each pie shaped wedge of the nucear rim is brought to the center of the capsule
where phacoemulsification is safely accomplished. The ultrasonic turbulence is
contained within the lens bag and absorbed by the lens, for all but the last one or two
nuclear fragments.
Trench Divide and Conquer (TDC)
In soft lenses, after making a central trench a central fracture is created, and
then the left as well as right sides of the lens are divided by fracturing.
77
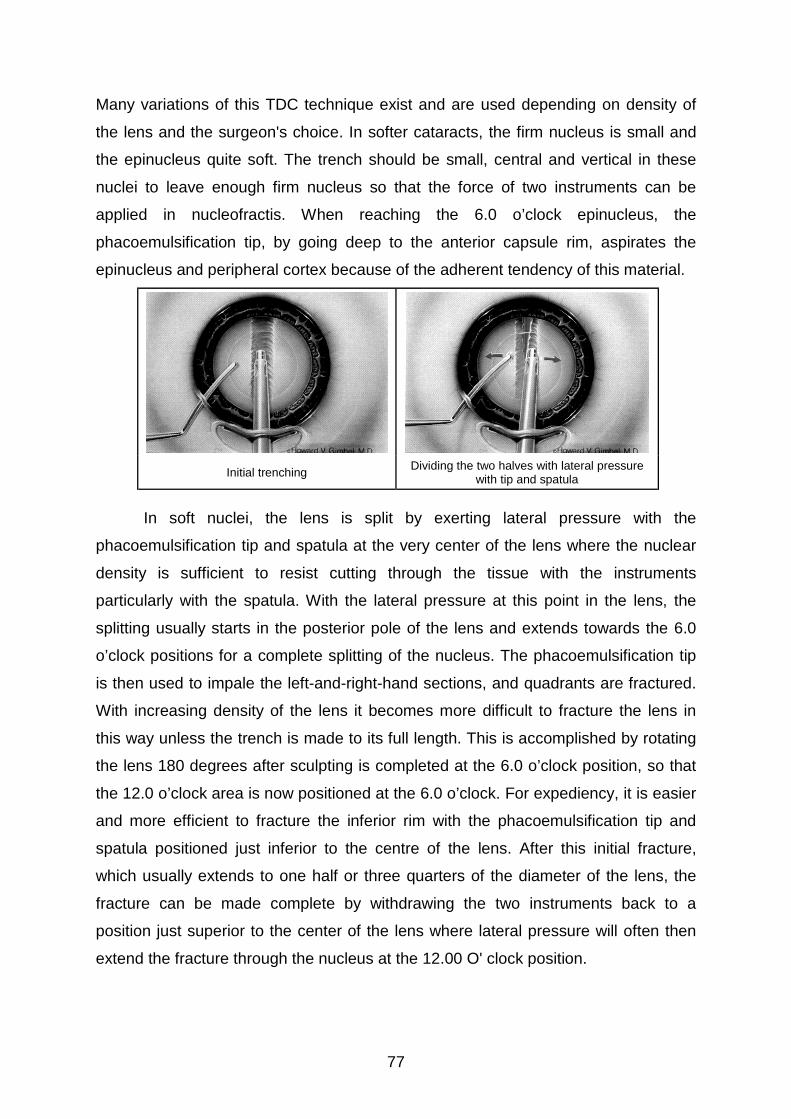
Many variations of this TDC technique exist and are used depending on density of
the lens and the surgeon's choice. In softer cataracts, the firm nucleus is small and
the epinucleus quite soft. The trench should be small, central and vertical in these
nuclei to leave enough firm nucleus so that the force of two instruments can be
applied in nucleofractis. When reaching the 6.0 o’clock epinucleus, the
phacoemulsification tip, by going deep to the anterior capsule rim, aspirates the
epinucleus and peripheral cortex because of the adherent tendency of this material.
Initial trenching Dividing the two halves with lateral pressurewith tip and spatula
In soft nuclei, the lens is split by exerting lateral pressure with the
phacoemulsification tip and spatula at the very center of the lens where the nuclear
density is sufficient to resist cutting through the tissue with the instruments
particularly with the spatula. With the lateral pressure at this point in the lens, the
splitting usually starts in the posterior pole of the lens and extends towards the 6.0
o’clock positions for a complete splitting of the nucleus. The phacoemulsification tip
is then used to impale the left-and-right-hand sections, and quadrants are fractured.
With increasing density of the lens it becomes more difficult to fracture the lens in
this way unless the trench is made to its full length. This is accomplished by rotating
the lens 180 degrees after sculpting is completed at the 6.0 o’clock position, so that
the 12.0 o’clock area is now positioned at the 6.0 o’clock. For expediency, it is easier
and more efficient to fracture the inferior rim with the phacoemulsification tip and
spatula positioned just inferior to the centre of the lens. After this initial fracture,
which usually extends to one half or three quarters of the diameter of the lens, the
fracture can be made complete by withdrawing the two instruments back to a
position just superior to the center of the lens where lateral pressure will often then
extend the fracture through the nucleus at the 12.00 O' clock position.
78
After the initial split inferiorly that extends to the center of the lens or three
quarters of the diameter, subsequent fracturing can be accomplished without the first
fracture complete to the 12.0 o’clock position. The direction of the
phacoemulsification tip is angled to the left and with a little more sculpting centrally
the tip burrows deeply into the nucleus of the left hemisection. While the hemisection
is stabilized with a spatula and aspiration, but no ultrasonic power the
phacoemulsification tip is pushed and rotated clockwise to break off a pie-shaped
inferior section of the lens. In softer nuclei this usually will break as a quarter section.
In more firm nuclei one can try to break away a smaller section, usually about one
third of the hemisection. After this section is pulled to the center by aspiration, it is
emulsified.
Then, either another section can be similarly broken on the left hand side or
the spatula can rotate the remaining three quarters of the nucleus counterclockwise,
so that the phacoemulsification tip can then burrow into the right hemisection and
break away one third or one half of this section while the remainder is stabilized with
the spatula.
After fracturing is complete, the phacoemulsification setting is switched to the
pulse mode to enhance holdability of the nuclear fragments to the
phacoemulsification tip. The second instrument is then used to elevate the central
apex of each quadrant and the phaco tip is used to deeply engage the nuclear
fragment. Once occlusion has occurred the segment is brought into the middle of the
epinuclear shell to be emulsified. The remaining quadrants are rotated and
sequentially emulsified in a similar manner, leaving an intact epinuclear shell.
Four Quadrant divide and conquer
Beginner should start with sculpting. This is preferably done with 30° or 45°
needle. Setting of machine should be as follows.
Vacuum : 20-40 mm Hg
Flow : 18-20CC/ minute
U/S power : 70%
After stabilizing the nucleus with spatula/ chopper introduced through side
port, start making a groove on the nucleus from 12 to 6 o’clock. Press the foot pedal
79
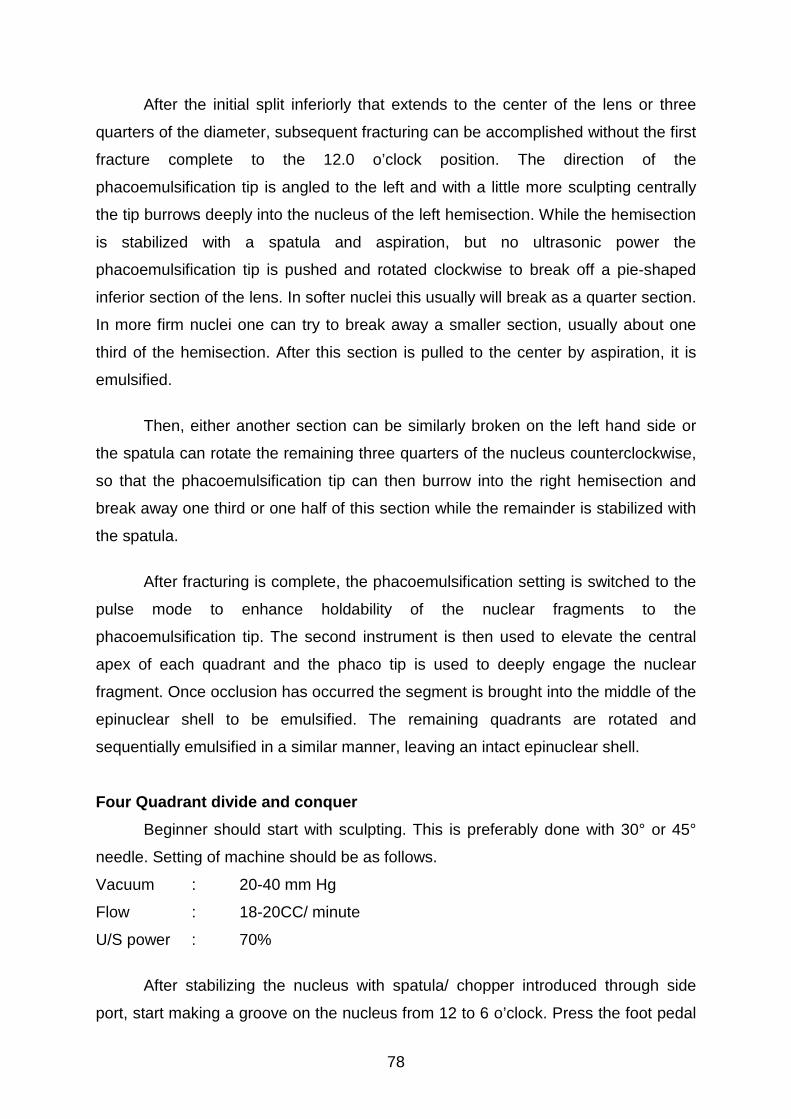
to position 3 and move the handpiece toward 6 o’clock edge of the capsulorrhexis.
Never try to reach to the edge of the nucleus. Once at 6 o’clock, comeback to
position 2 on foot pedal. The groove should be one phaco-tip wide and depth should
be about 80%. Depth can be judged by depth of two sides of the groove and
presence of red reflex obtained through the remaining nucleus. In soft nucleus,
trench should be narrow deep and localized to
central 2/3 whereas in hard cataract trench should
be wide and reach further toward the edge of
nucleus. Now, engaging the spatula at the end of
tunnel rotate the nucleus by 90°. Same procedure
is repeated for each half. In between i.e. when
rotating the nucleus, the foot pedal should be at
position 1(irrigation only). After required depth has
been achieved, stage is set for cracking the
nucleus. With foot pedal at position 1, place the
phaco-tip on right side and spatula or chopper on oth
with lateral gentle force. It is very important that bot
deep in the groove. A beginner can use two spatula/
after filling the eye with viscoelastic. The direction of
no vertical component. The procedure is then repea
four quadrants. At this stage, ensure the crack is co
quadrants are separated from each other.
Now change the machine parameters as follows
Vacuum : 150-200 cc
Flow : 20-24 cc/ minute
U/s power : 20%
Engage one piece at its depth, bring it forw
Repeat same procedure for other 3 quadrants.
Phaco Chop
K. Nagahara introduced the phaco chop in 199
principle that adopts the physics of splitting wood
Four Quadrant divide & conquer
After separating the 4 quadrants,each one is tipped up and emulsified.
S - Spatula; P - Probe; C - Crack
er side and separate the piece
h instruments should be placed
choppers to divide the nucleus
force should be horizontal with
ted to completely separate the
mplete posteriorly and all four
ard and emulsify in iris plane.
3. The technique is based on a
. A chopping instrument (the
80
hatchet) is used to split the nucleus (the log) resting against the phacoemulsification
tip (the chopping block). This permits the nucleus to be fractured along its
longitudinal fibres using appositional forces rather than the parallel forces used by
Gimbel. Every motion pulls the nucleus in towards the middle of the capsular bag,
moving it out of the capsular fornix.
After completing capsulorrhexis and the hydrodissection, the
phacoemulsification tip is placed in the eye burying it in the nucleus as far superiorly
as possible. The nucleus is held firmly preventing it from moving superiorly as the
chop is performed.
Next, an instrument i.e. a chopper is placed in the eye through the sideport
incision and pushed down into the nucleus as far as the capsulotomy would allow. It
is then pulled up towards the phacoemulsification tip, ripping a narrow groove in the
nucleus as it cuts its way towards the chopping block. As the second instrument
(chopper) approaches the phacoemulsification tip the two instruments move gently
apart, the chopper to the left and the phaco tip to the right effectively chopping the
nucleus in two pieces.
The operation continues, with the nucleus being rotated 90 degrees orienting
the original chops horizontally and then the steps were repeated on the inferior half
of the nucleus. The phacoemulsification tip is buried in the nucleus half just inside
the original chop, the chopper is placed inferiorly and pulled up towards the phaco
tip, chopping the inferior nucleus half into quarters. After another rotation, the second
nucleus half is also chopped into two. The four quarters were now emulsified.
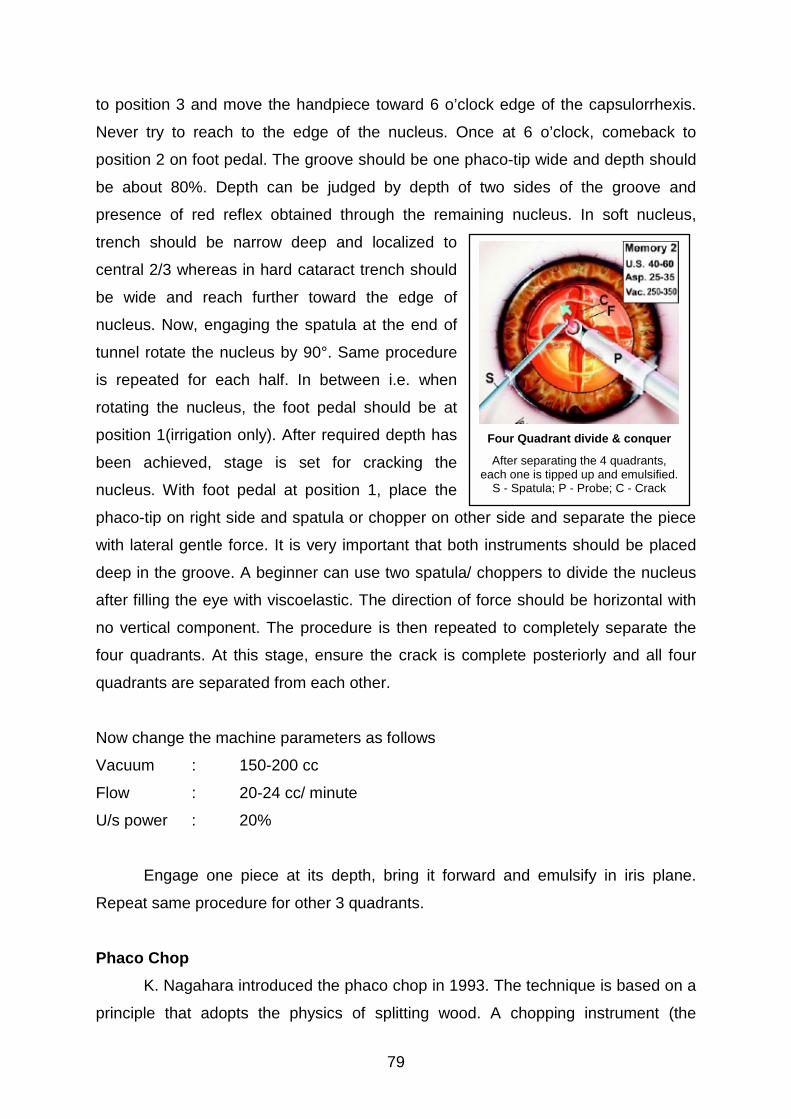
Stop and Chop
Koch and Katzen, modified the phaco-chop technique to provide space for
tissue separation, nucleus manipulation, and aid ease of removal. Without tissue
removal the nuclear segments could fall back together after each chop,
reassembling like an intraocular jigsaw puzzle. Hence a crater or a trench is made
first and then one stops and then chopping is performed.
81
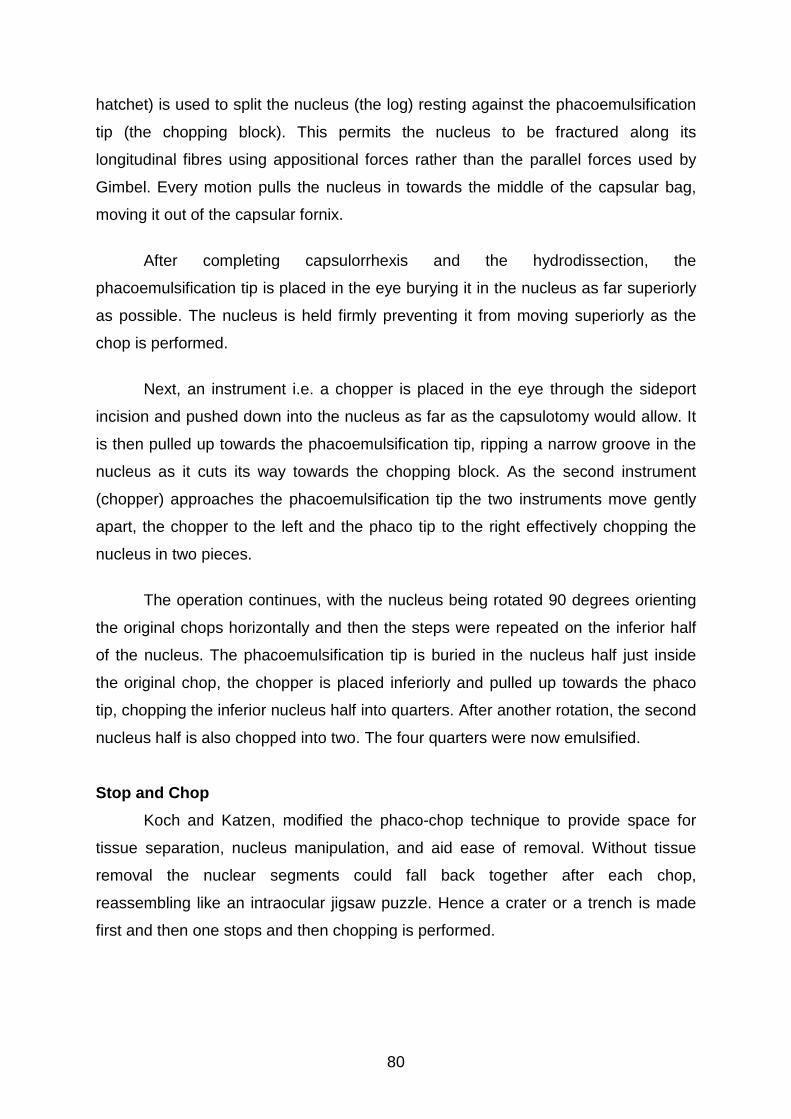
Automated I/A
F - Sinskey hook ; E - Epinucleus
Initial trench Rotation & separation ofnuclear fragment
Chopping of each half Phacoemulsification ofnuclear pieces
Stop & Chop technique
G - Golden Ring; C - Cortex; F - Sharp chopper ; P - Phaco tip; H - Nuclear half;1,2 - Breaking nucleus in two halves; 3 - Chopping the nuclear half
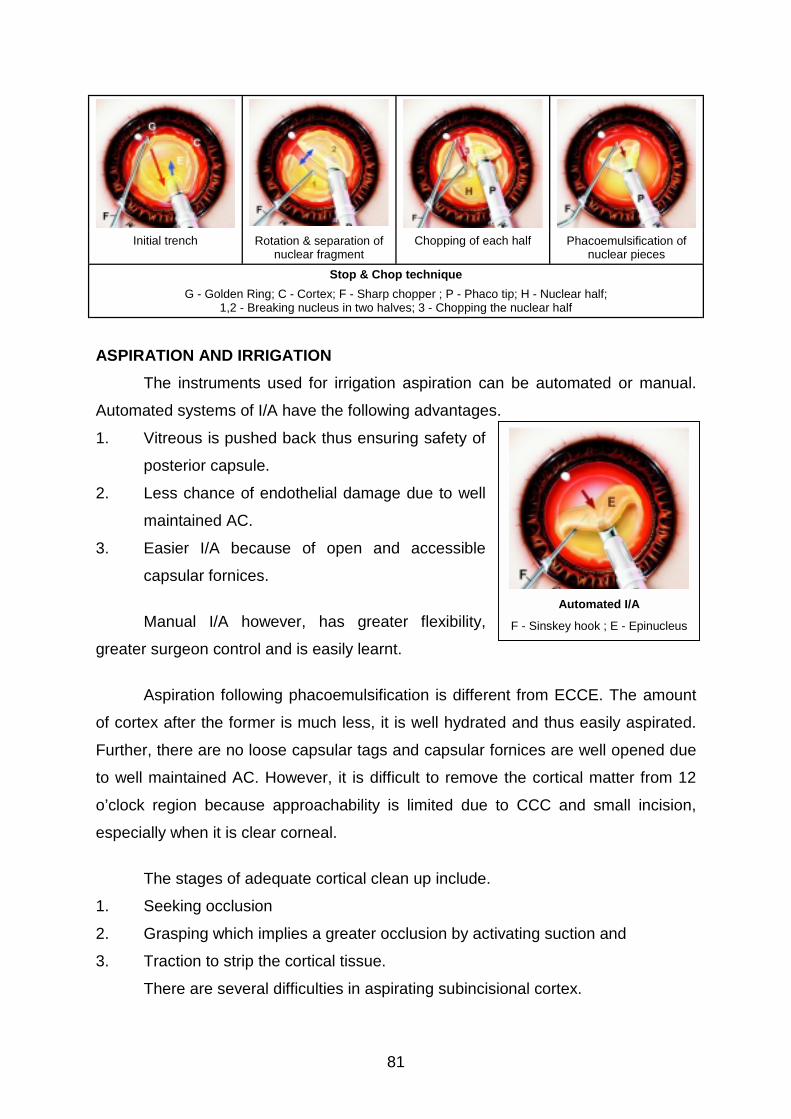
ASPIRATION AND IRRIGATION
The instruments used for irrigation aspiration can be automated or manual.
Automated systems of I/A have the following advantages.
1. Vitreous is pushed back thus ensuring safety of
posterior capsule.
2. Less chance of endothelial damage due to well
maintained AC.
3. Easier I/A because of open and accessible
capsular fornices.
Manual I/A however, has greater flexibility,
greater surgeon control and is easily learnt.
Aspiration following phacoemulsification is different from ECCE. The amount
of cortex after the former is much less, it is well hydrated and thus easily aspirated.
Further, there are no loose capsular tags and capsular fornices are well opened due
to well maintained AC. However, it is difficult to remove the cortical matter from 12
o’clock region because approachability is limited due to CCC and small incision,
especially when it is clear corneal.
The stages of adequate cortical clean up include.
1. Seeking occlusion
2. Grasping which implies a greater occlusion by activating suction and
3. Traction to strip the cortical tissue.
There are several difficulties in aspirating subincisional cortex.
82
Reasons for difficulty during aspiration of subincisional cortex with the
tunnel incision
! Long pathway of the tip inside the tunnel
! Difficult verticalization of the tip as well as access to the capsular equator
! Increase in fluid leakage and decrease of chamber depth due to
divarication of incision lips
! Small rhexis
! Distally decentralized rhexis
! Possible miosis
! Corneal folds
The methods described to aspirate the subincisional cortex are following:
1. Post IOL implantation, dialing the IOL loosens cortex making aspiration
easier.
2. Using a 26 G 'J' shaped cannula
3. Using a 30 G cannula through side port, i.e. suck and spit method. The entire
lens matter is engaged using the cannula and pulled towards 6 o’clock and
released into the anterior chamber. This is then aspirated using Simcoe I/A
cannula or a syringe filled with 0.25 cc BSS.
4. 6 o’clock approach - A stab incision is given at 6o’clock and 30g cannula is
used through the side port.
Vacuuming and polishing can also be done with I/A tip with suction kept at the
minimum (25-30mmHg).
INTRAOCULAR LENS IMPLANTATION
The IOLs which can be used after phacoemulsification are single piece PMMA
IOLs or foldable IOLs. The rigid IOLs used in phaco surgery have an optic diameter
of 5.5mm or less so that only one suture is required to close the wound.
Foldable IOLs can be made of soft acrylic and hydrogels or silicone
material. The design can be either three piece lenses or single piece or plate
haptic design. Presently, three piece lenses are used and plate haptic design is
used for toric IOLs to correct astigmatism of < 3D.
83
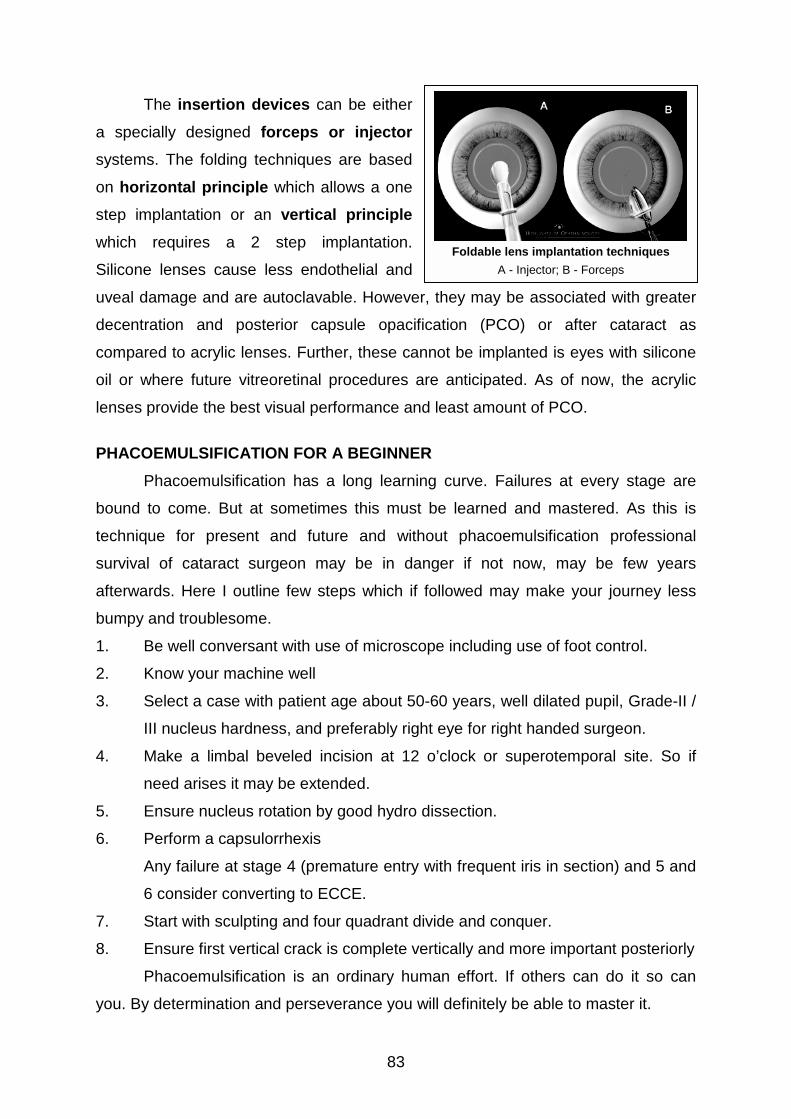
The insertion devices can be either
a specially designed forceps or injector
systems. The folding techniques are based
on horizontal principle which allows a one
step implantation or an vertical principle
which requires a 2 step implantation.
Silicone lenses cause less endothelial and
uveal damage and are autoclavable. However,
decentration and posterior capsule opacific
compared to acrylic lenses. Further, these can
oil or where future vitreoretinal procedures ar
lenses provide the best visual performance and
PHACOEMULSIFICATION FOR A BEGINNER
Phacoemulsification has a long learnin
bound to come. But at sometimes this must
technique for present and future and witho
survival of cataract surgeon may be in dan
afterwards. Here I outline few steps which if f
bumpy and troublesome.
1. Be well conversant with use of microsco
2. Know your machine well
3. Select a case with patient age about 50-
III nucleus hardness, and preferably righ
4. Make a limbal beveled incision at 12
need arises it may be extended.
5. Ensure nucleus rotation by good hydro d
6. Perform a capsulorrhexis
Any failure at stage 4 (premature entry w
6 consider converting to ECCE.
7. Start with sculpting and four quadrant div
8. Ensure first vertical crack is complete ve
Phacoemulsification is an ordinary hum
you. By determination and perseverance you w
Foldable lens implantation techniques
A - Injector; B - Forceps
they may be associated with greater
ation (PCO) or after cataract as
not be implanted is eyes with silicone
e anticipated. As of now, the acrylic
least amount of PCO.
g curve. Failures at every stage are
be learned and mastered. As this is
ut phacoemulsification professional
ger if not now, may be few years
ollowed may make your journey less
pe including use of foot control.
60 years, well dilated pupil, Grade-II /
t eye for right handed surgeon.
o’clock or superotemporal site. So if
issection.
ith frequent iris in section) and 5 and
ide and conquer.
rtically and more important posteriorly
an effort. If others can do it so can
ill definitely be able to master it.