peripheral intravenous (piv) successful starts & care...
TRANSCRIPT

1
Peripheral Intravenous (PIV) Successful Starts & Care 2012
St. James Healthcare, SCLHSButte, Montana
Created By: SJH Education Collaborative
With The Support Of: EXEMPLA Good Samaritan Medical Center & St. Francis Health Center Vascular Access Specialists
2
Medelearn
Test Instructions
This online tutorial is available on MedELearn
to be completed as assigned. An 80% pass score is required.
The St James Healthcare Education Department may assign this test for new RNs during orientation or as requested by a unit director.

3
Peripheral IV Starts: AdultsLearning Module Objectives: At the completion of this module the RN will be able to - Identify 3 layers of the blood vessel
List the risks and benefits in starting a peripheral intravenous line (PIV)
Identify the steps in starting a PIV
Identify the appropriate areas of PIV insertion
Identify 3 complications of PIV insertion
4
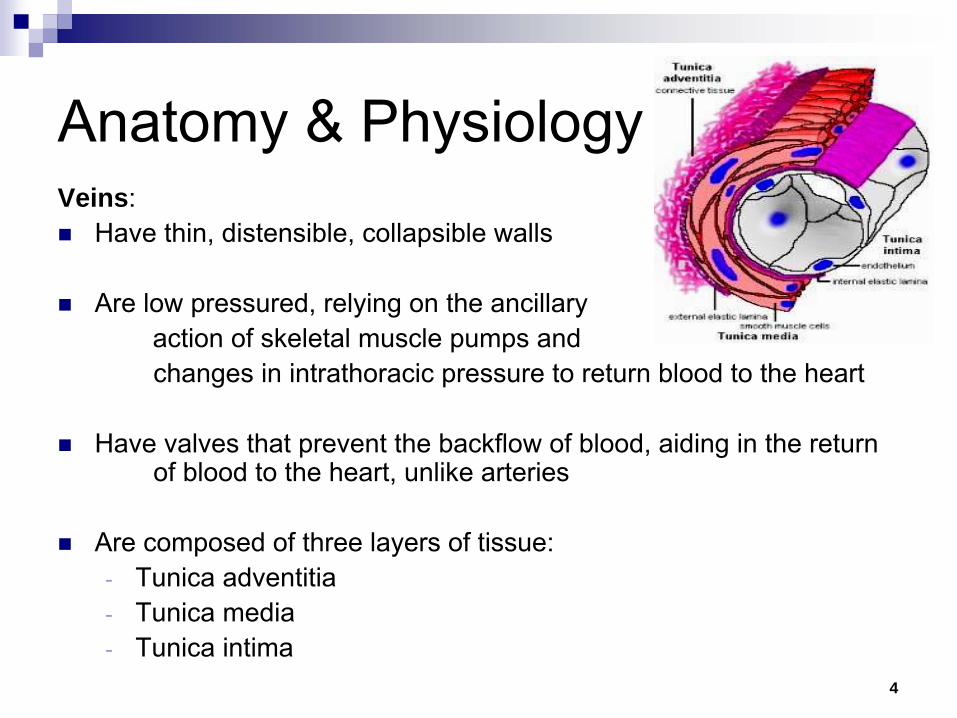
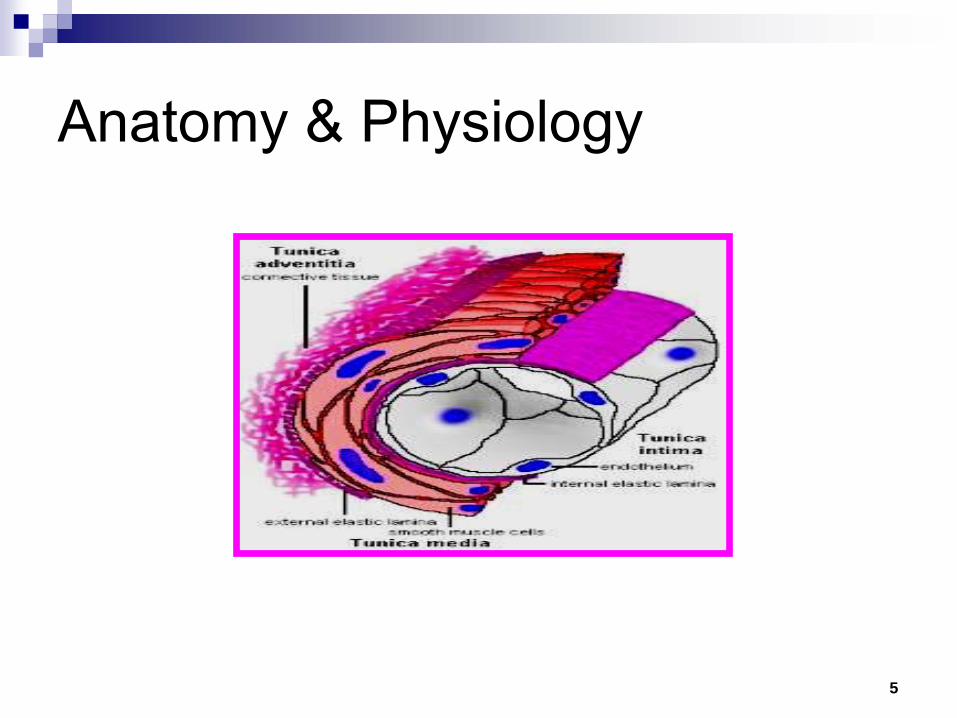
Anatomy & PhysiologyVeins: Have thin, distensible, collapsible walls
Are low pressured, relying on the ancillary action of skeletal muscle pumps and changes in intrathoracic
pressure to return blood to the heart
Have valves that prevent the backflow of blood, aiding in the
return of blood to the heart, unlike arteries
Are composed of three layers of tissue: -
Tunica adventitia-
Tunica media-
Tunica intima
5
Anatomy & Physiology
6
Special Considerations
With normal aging, collagen in the blood vessel wall is depleted, resulting in veins becoming thin and tortuous
Certain disease states affect vein wall structure, resulting in difficult PIV placement
-
Diabetes-
Hypertension-
Steroid dependence-
Autoimmune disorders-
IV drug abuse
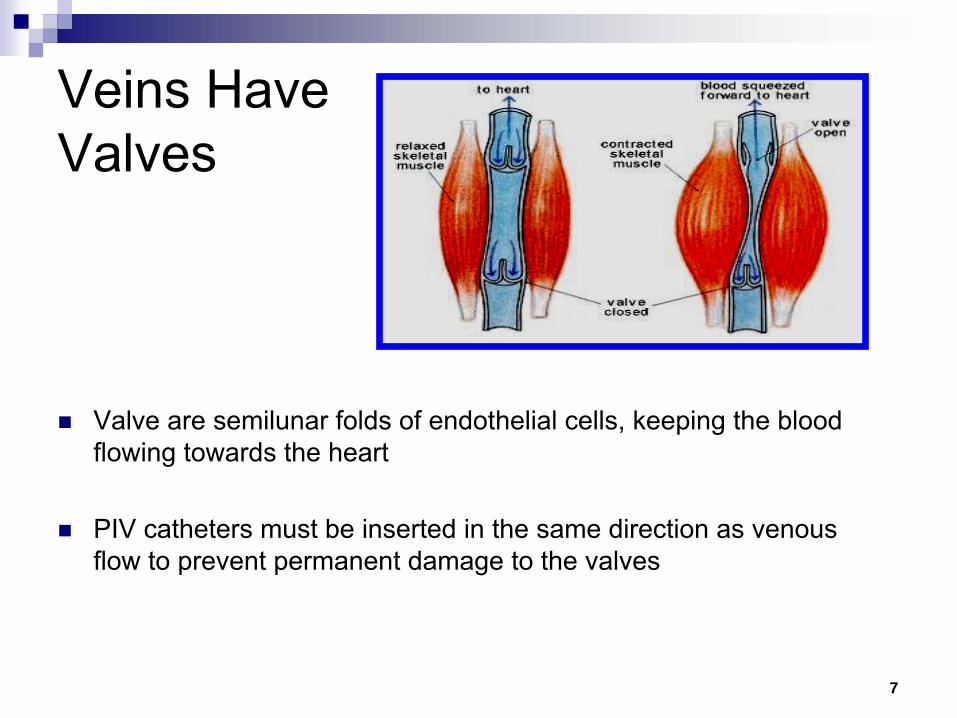
7
Veins Have Valves
Valve are semilunar
folds of endothelial cells, keeping the blood flowing towards the heart
PIV catheters must be inserted in the same direction as venous flow to prevent permanent damage to the valves
8
Vasodilation
/ VasoconstrictionVasodilation –
widening of the blood vessels from relaxation of the muscle wall: Exposure to warmth and relaxation will help facilitate vasodilation
Vasodilation
allows easier access, aiding in PIV insertion
Vasoconstriction –
narrowing of the blood vessels resulting from contraction of the muscular wall of the vessels: Exposure to cold causes severe vasoconstriction
Vasospasm also causes vessel constriction
Fear, anxiety, holding one’s breath can enhance venous constriction making a PIV insertion difficult
9
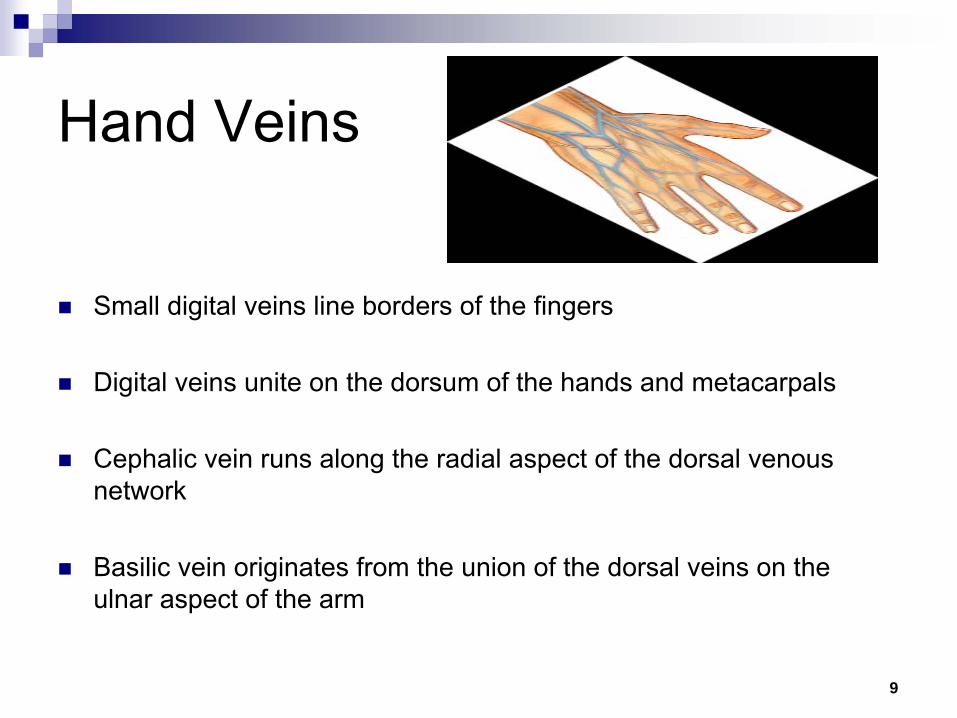
Hand Veins
Small digital veins line borders of the fingers
Digital veins unite on the dorsum of the hands and metacarpals
Cephalic vein runs along the radial aspect of the dorsal venous network
Basilic
vein originates from the union of the dorsal veins on the ulnar
aspect of the arm

10
Solution pH
Solutions and medications with extremes in pH (less than 5 or greater than 9) cause extensive changes in the endothelium, resulting in thrombosis and inflammation:
-
Normal blood pH is 7.35 –
7.45-
Alkaline pH is 7.0 –
14.0-
Acidic pH is 0.0 –
7.0
A solution with a pH of 6 –
8 minimizes disruption of the vein endothelium
Alkaline / Acidic solutions are phlebogenic
(irritating to the vein wall)

11
Movement of Fluids (Tonicity or Osmotic Pressure)
Hypertonic Isotonic HypotonicSolutions that exert more osmotic pressure than the
extracellular fluid
Solutions used to expand the extracellular fluid
Solutions that exert less osmotic pressure than the
extracellular fluidAllows fluid to be pulled into
the vascular systemDo not cause movement of fluid from or into the blood
cells
Allows water to be drawn into the interstitial and
intracellular spaces3 % and 5 % sodium chloride
20 % and 50 % dextrose5 % dextrose in lactated
ringers
0.9 % sodium chloride (NS)5 % dextrose in water (D5W)
lactated Ringers (LR)
0.45 % sodium chloride
12
Blood Vessel Flow RatesBoth blood vessel diameter and blood flow increase as they get closer to the heart - Flow rates:
-
Digital veins of the hand is 10 –
20 ml/hr-
Forearm cephalic vein is 40 –
90 ml / hr-
Axillary
vein is 150 –
350 ml / hr-
Subclavian
vein is 350 –
800 ml / hr-
Superior vena cava vein is over 2000 ml / hr
Incidence of phlebitis increases as the concentration of the infusate
increases:-
Concentration can be manipulated by adjusting the dose, diluent
and volume of solution
-
pH cannot be easily adjusted, so hemodilution
by blood flow should be maximized to prevent damage to the veins

13
Arm VeinsMedian veins are created from the union of veins of the palmar aspect of the hand
Antecubital fossa is in the fold of the elbow and contains the median cephalic and/or median basilic vein
In adults, veins to be considered for peripheral cannulation are those found on the dorsal and ventral surfaces of the arm:
-Metacarpal-Cephalic-Basilic-Median
14
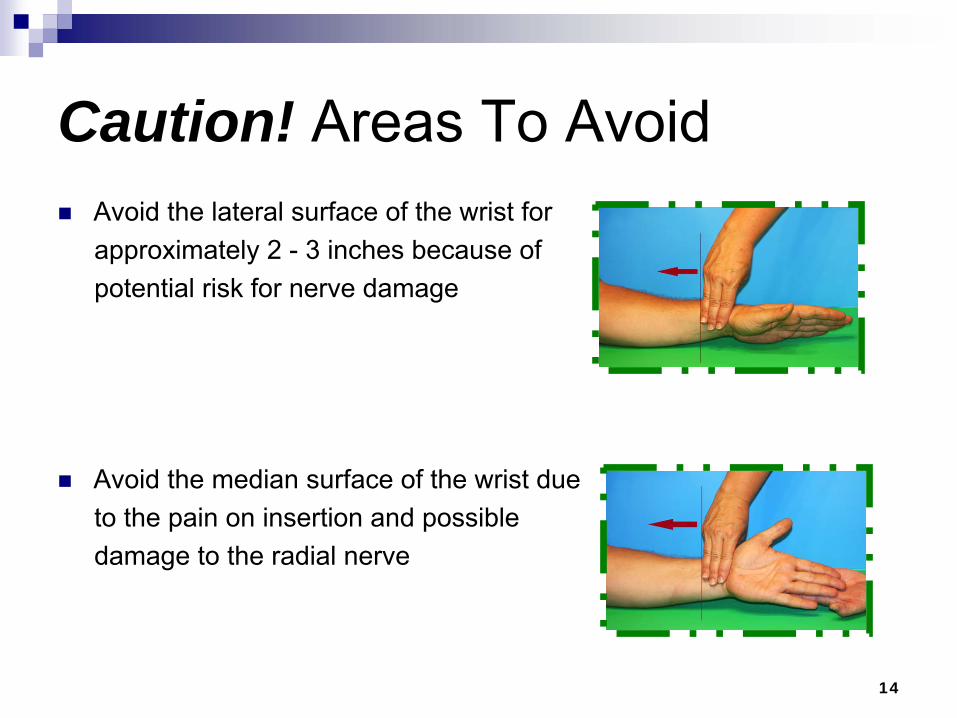
Caution! Areas To Avoid
Avoid the lateral surface of the wrist for approximately 2 -
3 inches because of potential risk for nerve damage
Avoid the median surface of the wrist due to the pain on insertion and possible damage to the radial nerve
15
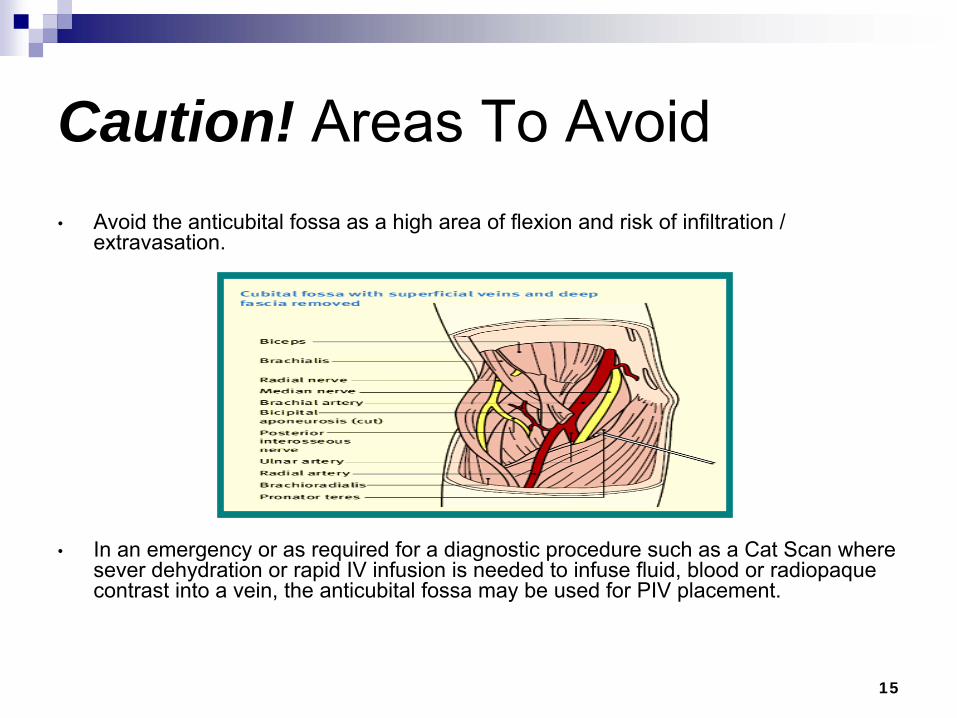
Caution! Areas To Avoid•
Avoid the anticubital
fossa
as a high area of flexion and risk of infiltration / extravasation.
•
In an emergency or as required for a diagnostic procedure such as a Cat Scan where sever dehydration or rapid IV infusion is needed to infuse fluid, blood or radiopaque
contrast into a vein, the anticubital
fossa
may be used for PIV placement.
16
Caution! Upper Arm Veins
Cannulation
of an upper arm vein eliminates use of that site for peripherally inserted central catheter (PICC) placement
Veins in an upper extremity should be avoided on:-
The side of breast surgery
With axillary
node dissection
After radiation therapy to that side
With lymphedema-
The affected extremity from a cerebrovascular
accident (CVA)-
A Dialysis Fistula / Graft extremity / site
A collaborative discussion with the LIP needs to take place related to the benefits and risks of using a vein in an affected extremity.
17
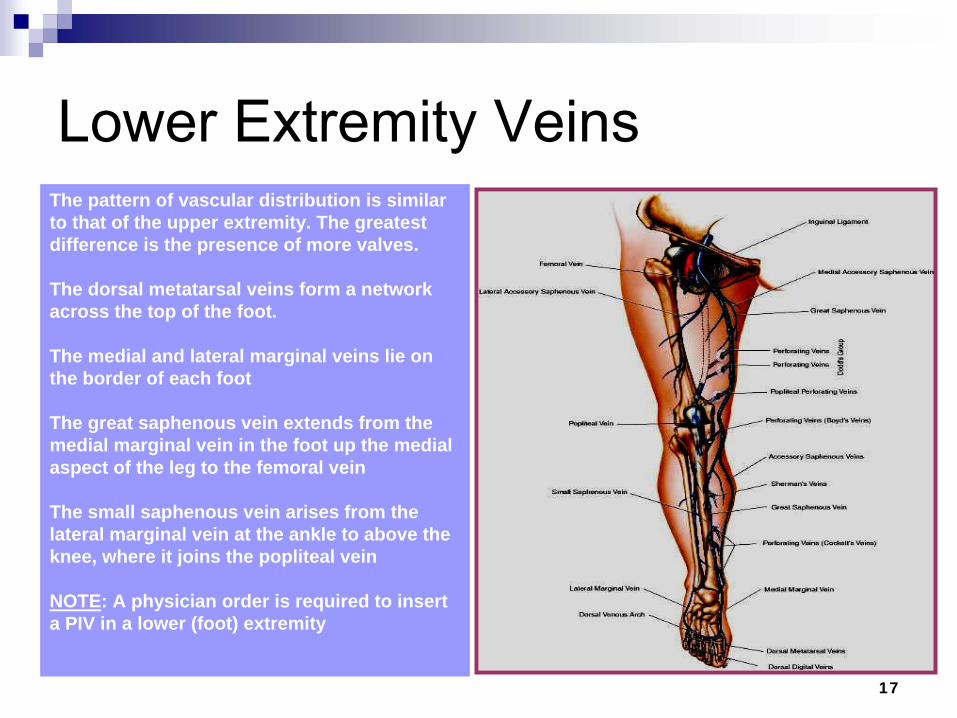
Lower Extremity VeinsThe pattern of vascular distribution is similar to that of the upper extremity. The greatest difference is the presence of more valves.
The dorsal metatarsal veins form a network across the top of the foot.
The medial and lateral marginal veins lie on the border of each foot
The great saphenous vein extends from the medial marginal vein in the foot up the medial aspect of the leg to the femoral vein
The small saphenous vein arises from the lateral marginal vein at the ankle to above the knee, where it joins the popliteal vein
NOTE: A physician order is required to insert a PIV in a lower (foot) extremity
18
Principles of PIV Insertion
The nurse selects a short peripheral catheter based on:-
Prescribed therapies-
Duration of treatment-
Availability of access sites-
Diagnosis-
Known complications of the device
The catheter selected should be:-
The smallest gauge and length-
Fewest number of lumens-
Least invasive device needed to accommodate and manage the prescribed therapy
19
Principles of PIV Insertion
Do not place a PIV distal to existing infiltrate, phlebitis or extravasation
sites
Do not place PIV next to a failed insertion attempt
Avoid use of lower extremities in the adult population due to the risk of tissue damage, thrombophlebitis, and ulceration
Therapies not appropriate for short peripheral catheters include:-
Continuous irritant therapies (i.e. chemotherapy or vasopressors)
-
Parenteral
nutrition-
Infusates
with pH less than 5 or greater than 9-
Infusates
with osmolality
greater than 600 mOsm/L
The nurse collaborates with the pharmacist and LIP to assist in selection of the most appropriate vascular access device based on the projected treatment plan.
20
Site Assessment
Choose the right site for the right therapy
The IV line will only be as good as the vein cannulated. Use veins that feel round, firm, elastic, engorged and bounce when palpated.
Initiate the following techniques with the patient to distend / dilate veins:
-
Educate about the procedure and importance of relaxing-
Encourage relaxation breathing techniques (not breath-holding)-
Warm the extremity-
Place extremity in dependent position; and, instruct to flex and
relax the hand
-
Place the tourniquet high up on the arm and tightly enough to trap venous blood in the lower arm veins without interfering with arterial flow (if no pulse if felt then the tourniquet is too tight).
21
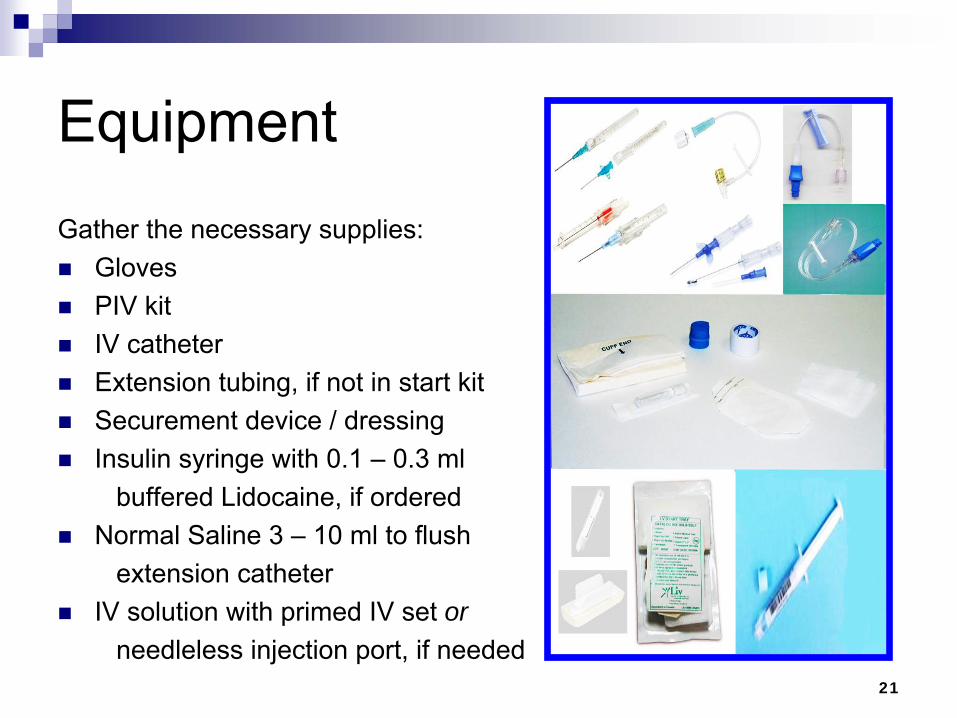
Equipment Gather the necessary supplies: Gloves PIV kit IV catheter Extension tubing, if not in start kit Securement
device / dressing Insulin syringe with 0.1 –
0.3 ml buffered Lidocaine, if ordered
Normal Saline 3 –
10 ml to flush extension catheter
IV solution with primed IV set orneedleless injection port, if needed
22
Topical or Local Anesthetic
Follow hospital policy for the use of a local anesthetic before venipuncture
to reduce pain and anxiety.
Document the use of topical or local anesthetic in the IV Start section of EPIC.
1% lidocaine
(Xylocaine) intradermal
is the general anesthetic of choice; and, an alternative is bacteriostatic
0.9% sodium chloride intradermal
injection or a topical anesthetic cream (but must be may be applied 30 minutes to 1 hour before the procedure and may cause vasoconstriction thus difficult venous cannulation)
To use lidocaine
a health care provider’s order is required
23
Topical or Local Anesthetic
First clean the skin, while the tourniquet is in place and the vein is immobilized. This technique helps to give the anesthetic at the same site a venipuncture
site is selected.
Procedure:
Hand wash and glove application according to facility policy for
venipuncture.
Draw up the anesthetic solution into a tuberculin syringe.
The needle is positioned at a 5-
to 15-degree angle to the side of the vein selected for cannulation.
Introduce the needle tip into the skin with the bevel up. Take care not to penetrate the vein wall. Avoid accidentally injecting the drug into the vein by injecting the solution beside or below the vein.
For superficial vein: insert about one-fourth to one-third of the needle’s length (for deeper veins you may have to go deeper).
Lift up the needle tip slightly so a wheal can be formed.
Observe the small intradermal
wheal rise as the plunger is depressed. Superficial veins may require only 0.05 ml of solution; deep veins, may require 0.2-ml dose to produce a pea-size wheal (0.5 cm).
Withdraw the needle. Gently massage the wheal with an alcohol sponge to hasten absorption and prevent the wheal from obscuring the vein. Allow 5 to 10 seconds for the anesthetic to take full effect.
LYNN C. HADAWAY, RN,C, CRNI, MED, AND DORIS A. MILLAM, RN, MS (2005). On the road to successful IV starts. NURSING 2005. Vol. 35; supp. 1.
24
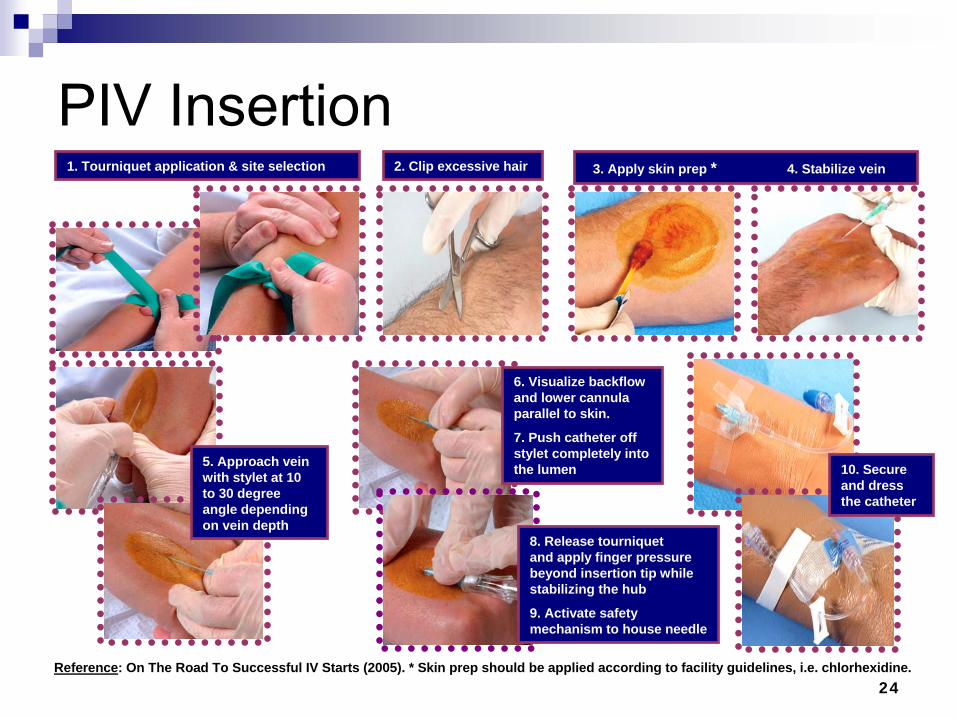
PIV Insertion1. Tourniquet application & site selection 2. Clip excessive hair 3. Apply skin prep * 4. Stabilize vein
5. Approach vein with stylet at 10 to 30 degree angle depending on vein depth
6. Visualize backflow and lower cannula parallel to skin.
7. Push catheter off stylet completely into the lumen
8. Release tourniquet and apply finger pressure beyond insertion tip while stabilizing the hub
9. Activate safety mechanism to house needle
10. Secure and dress the catheter
Reference: On The Road To Successful IV Starts (2005). * Skin prep should be applied according to facility guidelines, i.e. chlorhexidine.
25
PIV Insertion
Position self in a way this is best. Consider individual approaches to ergonomic correction, i.e. elevate bed to stand straight, lower bed to sit during PIV insertion steps
Wash hands
Apply gloves
Open contents of IV start kit; do not contaminate
Apply tourniquet to look and determine site (follow department guidelines for insertion, i.e. L & D, surgery, etc)
Always palpate a vein before cannulation, despite how good it looks
26
PIV Insertion
Remove tourniquet and apply loosely, closer to the intended insertion site
Cleanse the intended site with antiseptic using sufficient friction to assure the solution reaches into the cracks and fissures of the skin
Allow the antiseptic to dry for 30 seconds. It should never be wiped off but rather allowed to air dry to ensure skin antisepsis. Do
not re-
touch the area after cleansing with antiseptic.
If you are unable to place the IV with a no-touch technique –
apply sterile gloves.
Do not pre-tear tape –
there is nowhere to place it aseptically.

27
PIV Insertion
While site is drying, pre-prime needleless port and / or extension tubing
Assemble necessary components (keeping them in the IV start kit to prevent contamination)
28
PIV Insertion
Administer intradermal
anesthetic agent (Lidocaine, buffered Lidocaine, bacteriostatic
normal saline), if ordered by physician
Using an insulin syringe, inject 0.1 –
0.3 ml of buffered Lidocaine
or normal saline, intradermally
to form a wheal slightly larger than the catheter you are going to insert on the side of the vessel to void obscuring; allow the anesthetic agent to activate for approximately 15 –
30 seconds and then continue with catheter placement
SJH IV Therapy V-A 45 Policy: “0.2 cc of 1% Lidocaine
may be used as a local anesthetic. Do not use a local anesthetic for venipunctures
on a patient under the age of five (5) years. If a documented allergy to Lidocaine
exists, normal saline with Benzyl Alcohol preservative may be used in its place”.
29
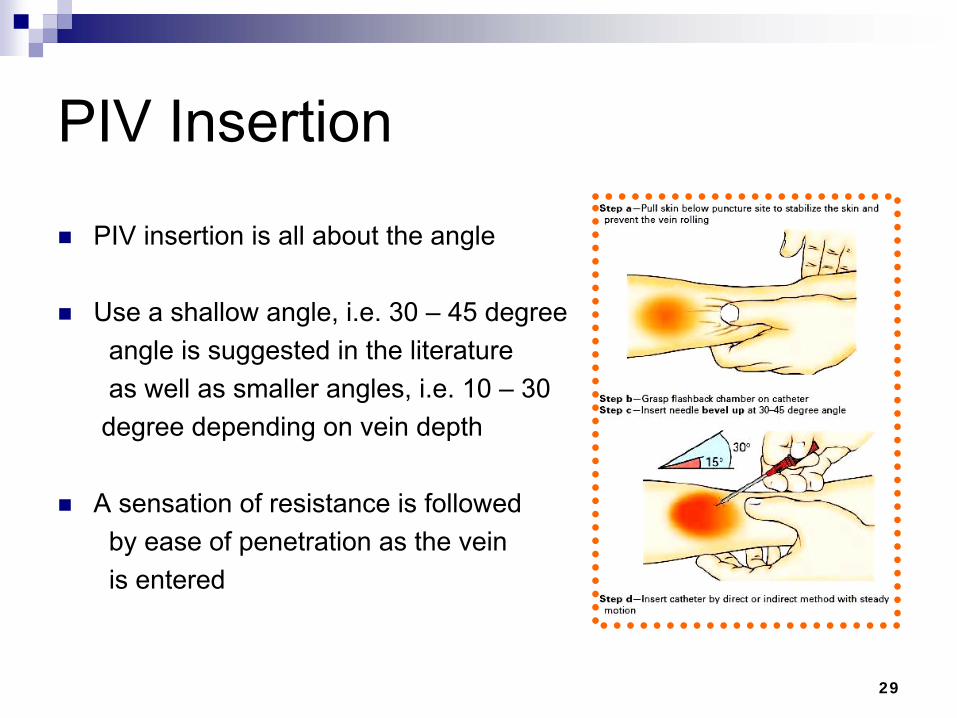
PIV Insertion
PIV insertion is all about the angle
Use a shallow angle, i.e. 30 –
45 degreeangle is suggested in the literatureas well as smaller angles, i.e. 10 –
30 degree depending on vein depth
A sensation of resistance is followed by ease of penetration as the vein is entered
30
PIV Insertion
Insert IV needle, bevel up, at a shallow angle approximately a half inch below the proposed site of entry
Lower the shaft of the needle until it is almost flush with the skin surface and enter the vein, noting a backflow of blood
Once the backflow occurs, advance slightly, and slide the catheter off the needle
The catheter slides off the needle, the needle should never be re-
advanced inside or outside the cannula
31
PIV Insertion
Release the tourniquet and apply pressure above the end of the catheter to reduce blood spills
Attached primed extension tubing
Flush with normal saline, clamping the extension tubing as you are instilling the last 1 –
0.5 ml of saline
Watch the insertion site during the flush to assess the integrity of the vein
Apply securement
device / dressing over the insertion site. Document the date, time and inserter’s initials on the dressing
Dispose of waste in the appropriate receptacle

32
PIV Insertion
Only one vascular access device will be used for each insertion attempt
No more than two (2) attempts at vascular access placement should be made by any nurse
Multiple attempts limit future access and cause unnecessary pain
33
Troubleshooting TipsCommon reasons for problems during venipuncture
include:
tourniquet placement -
too high, too low, too tight, or too loose (causing insufficient engorgement)
failure to release the tourniquet promptly after venous cannulation -
causes potential bleeding into tissue
“stop and start” technique -
a problem with beginners injuring the vein and can cause bruising
inadequate vein stabilization -
allows the stylet
to push the vein aside
failure to recognize cannula peforation through the opposite vein wall -
indicated by diminished blood return
stylet—not the plastic catheter— enters the lumen -
caused by stopping too soon after insertion [HINT: no blood return with stylet
removal because the catheter isn’t in the lumen]
inserting the cannula too deep, below the vein -
improper insertion angle (too steep), causing the cannula
to ride below the vein [HINT: evident with ↓free movement of cannula
because it’s imbedded in fascia / muscle; causing severe discomfort and possible nerve injury].
Hematoma formation and leaking from the insertion site might require to stop venipuncture. A most common occurrence in older adults, who have fragile veins, and in infants, who have very small ones.
Vasospasm, another problem that can prevent catheter insertion, is more common in patients who are anxious about the procedure. If blood backflow stops when you remove the stylet, the catheter may not be fully in the vein or it may have passed through the vein’s opposite wall.
occlusion of the cannula with a fat plug or blood clot is another possible reasons for a
lack of backflow include severe vasospasm; in many cases, you can’t tell exactly what’s wrong.
puncture of the opposite wall indicates a sudden backflow of blood when retracting the catheter. Remove the catheter otherwise the infusing fluid could infiltrate from the additional puncture site. Never try to reinsert the stylet
to avoid shearing the plastic catheter.
34
Troubleshooting Tips
As you work to correct problems, don’t forget to check the patient and be reassuring. Inexperience can tend to make a nurse
become overly focused on a difficult IV start so that the patient is forgotten. Check the patient’s level of anxiety
and reactions to having a venipunture
performed. Collaborate with a peer for support if needed or
who can be present for the patient if they are predisposed to fainting or vasovagal
responses.
35
Joint StabilizationPIV’s
placed in areas of flexion (i.e., wrist, elbow) are at increased risk of: Phlebitis (due to movement of the IV catheter)
Malfunctioning (catheter kinking, preventing or slowing infusion rate)
Catheter fracture (constant movement can damage catheter materials)
Protection devices such as an arm board, limb or finger splint may be implemented to facilitate infusion delivery when the catheter is
located in or adjacent to an area of flexion: Protective devices are not restraints
36
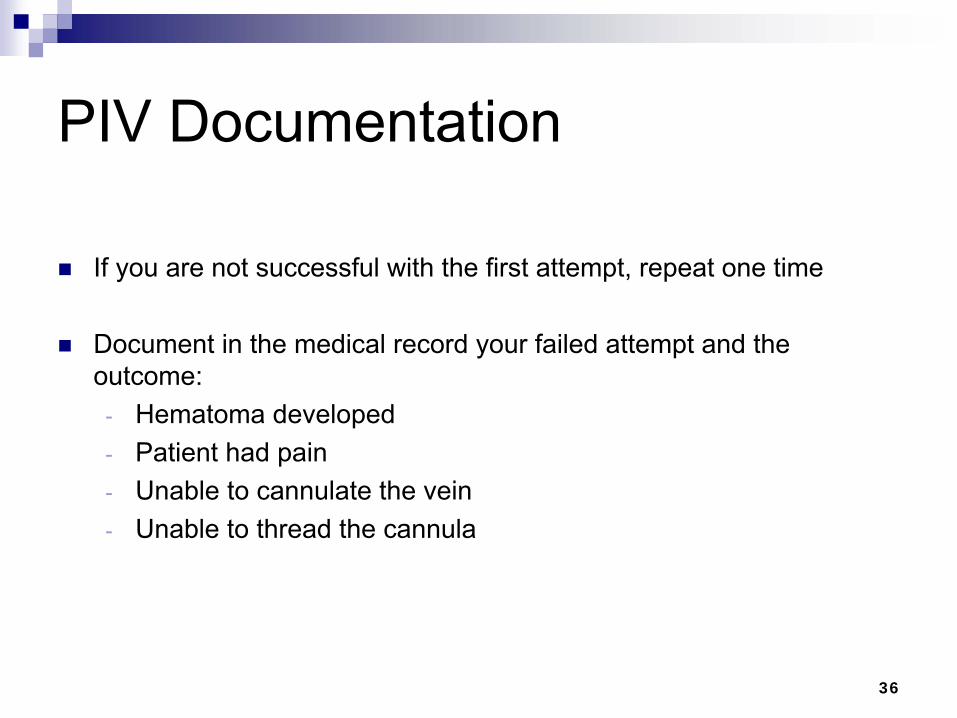
PIV Documentation
If you are not successful with the first attempt, repeat one time
Document in the medical record your failed attempt and the outcome:
-
Hematoma developed-
Patient had pain-
Unable to cannulate
the vein-
Unable to thread the cannula
37
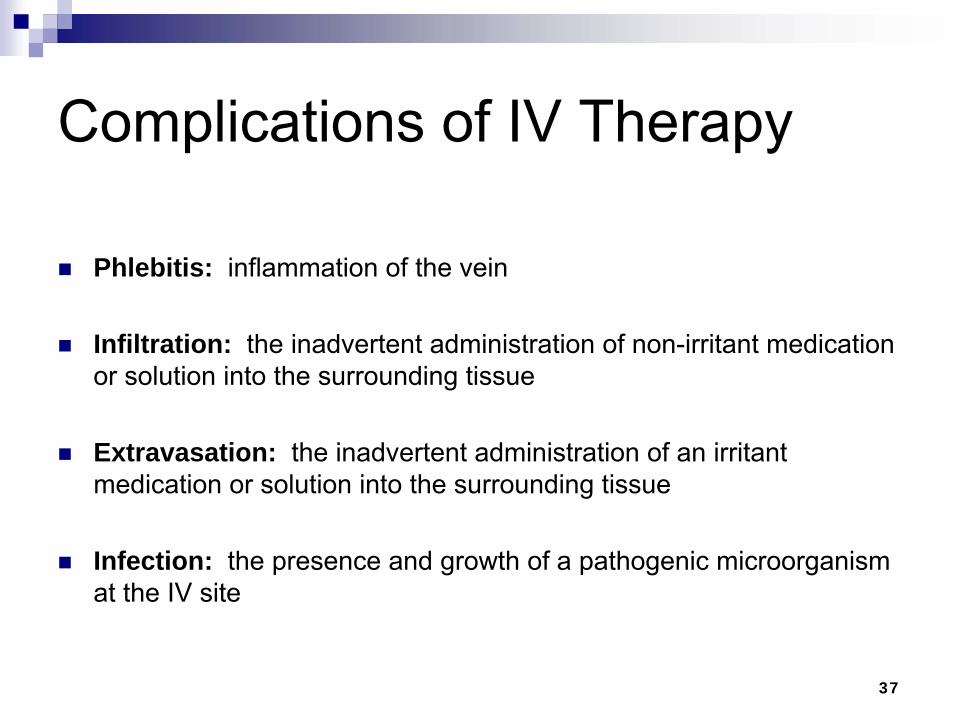
Complications of IV Therapy
Phlebitis: inflammation of the vein
Infiltration: the inadvertent administration of non-irritant medication or solution into the surrounding tissue
Extravasation: the inadvertent administration of an irritant medication or solution into the surrounding tissue
Infection: the presence and growth of a pathogenic microorganism at the IV site
38
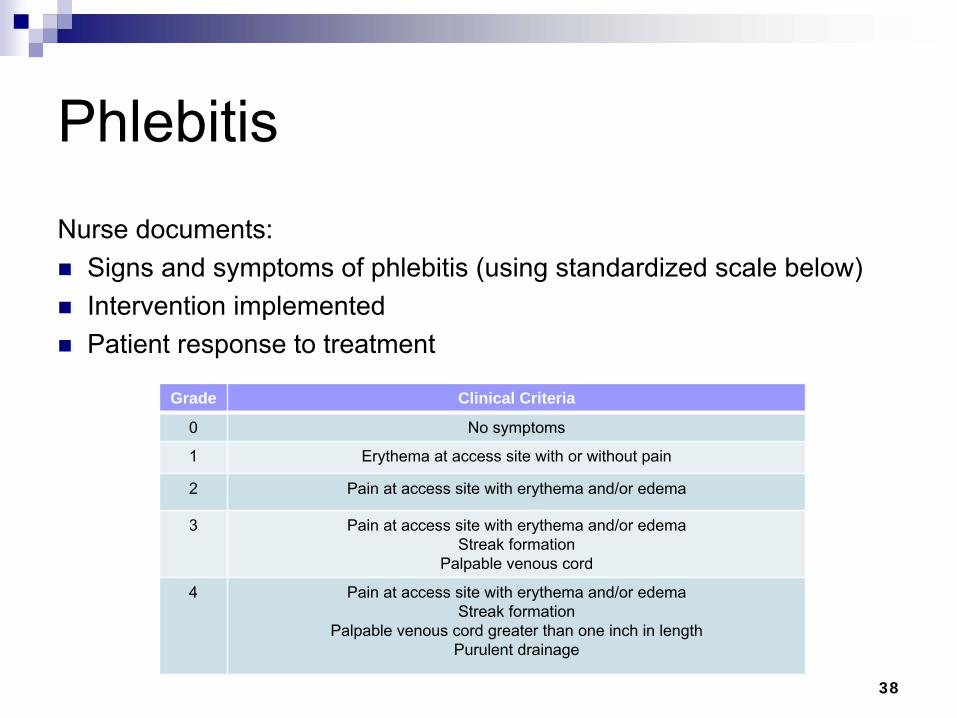
Phlebitis Nurse documents: Signs and symptoms of phlebitis (using standardized scale below) Intervention implemented Patient response to treatment
Grade Clinical Criteria
0 No symptoms
1 Erythema
at access site with or without pain
2 Pain at access site with erythema
and/or edema
3 Pain at access site with erythema
and/or edemaStreak formation
Palpable venous cord
4 Pain at access site with erythema
and/or edemaStreak formation
Palpable venous cord greater than one inch in lengthPurulent drainage

39
Infiltration and ExtravasationNurse documents: Signs and symptoms of infiltration (using standardized scale below) Intervention implemented Patient response to treatment
Grade Clinical Criteria
0 No symptoms
1 Skin blanched, cool to touchEdema less than 1 inch in any direction
With or without pain
2 Skin blanched, cool to touchEdema 1 –
6 inches in any directionWith or without pain
3 Skin blanched, translucent, cool to touchGross edema greater than 6 inches in any direction
Mild to moderate pain
4 Skin blanched, translucent; skin tight, leakingSkin discolored, bruised, swollen
Gross edema greater than six inches in any directionDeep pitting tissue edema
Circulatory impairment; moderate to severe painInfiltration of any amount of blood product, irritant
40
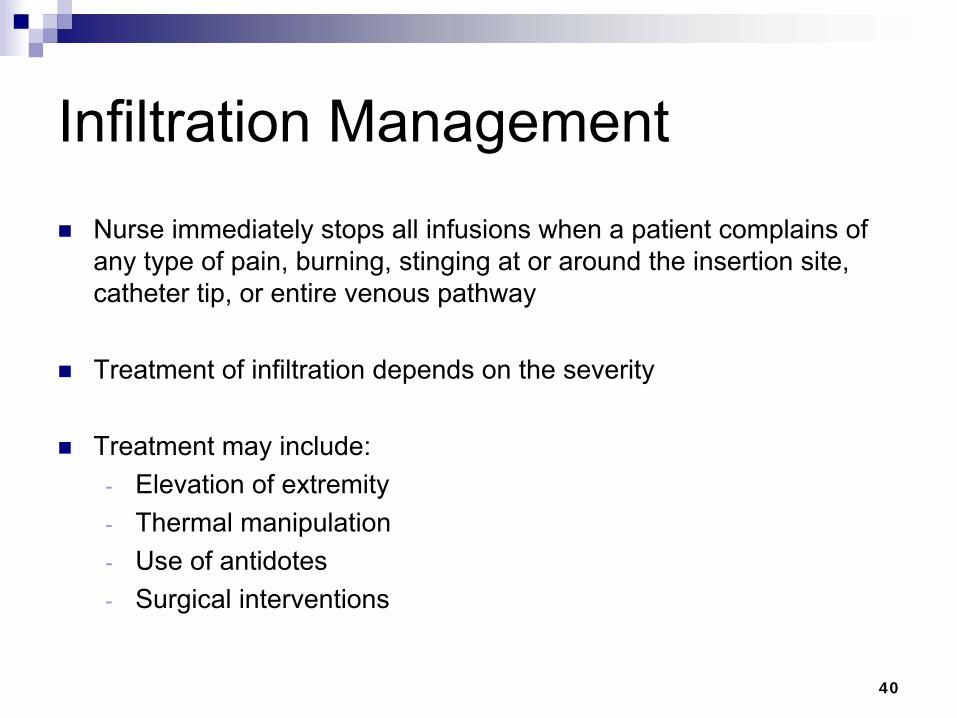
Infiltration Management
Nurse immediately stops all infusions when a patient complains of any type of pain, burning, stinging at or around the insertion site, catheter tip, or entire venous pathway
Treatment of infiltration depends on the severity
Treatment may include:-
Elevation of extremity-
Thermal manipulation-
Use of antidotes-
Surgical interventions
41
Extravasation
Management
Inadvertent administration of Vesicant solution or medication into the surrounding tissue
Estimate the volume of fluid that has escaped into the tissue based on the rate of infusion and the length of time since the last assessment
Nurse provides ongoing observation and assessment of the extravasated
site, including:-
Circulation-
Motion-
Sensation
Document this in the patient’s medical record
42
Infection
Nurse documents:
Signs and symptoms of infusion and vascular access device (VAD) related to infection
Interventions implemented
Patient response to treatment
43
Center of Disease Control (CDC)CDC (2011). Guidelines for the Prevention of Intravascular
Catheter-Related Infections. Summary of Recommendations - Education, Training and Staffing
Educate healthcare personnel regarding the indications for intravascular catheter use, proper procedures for the insertion and maintenance of intravascular catheters, and appropriate infection control measures to prevent intravascular catheter-related infections [7–15]. Category IA
Periodically assess knowledge of and adherence to guidelines for
all personnel involved in the insertion and maintenance of intravascular catheters [7–15]. Category IA
44
Center of Disease Control (CDC)
CDC (2011). Guidelines for the Prevention of Intravascular Catheter-Related Infections. Summary of Recommendations - Education, Training and Staffing
Designate only trained personnel who demonstrate competence for the insertion and maintenance of peripheral and central intravascular catheters. [14–28]. Category IA
Ensure appropriate nursing staff levels in ICUs. Observational studies suggest that a higher proportion of "pool nurses" or an elevated patient–to-nurse ratio is associated with CRBSI in ICUs where nurses are managing patients with CVCs
[29–31]. Category IB

45
Center of Disease Control (CDC)CDC (2011). Guidelines for the Prevention of Intravascular
Catheter-Related Infections. Summary of Recommendations - Selection of Catheters and Sites (Peripheral & Midline Catheters)
In adults, use an upper-extremity site for catheter insertion. Replace a catheter inserted in a lower extremity site to an upper extremity site as soon as possible. Category II
In pediatric patients, the upper or lower extremities or the scalp (in neonates or young infants) can be used as the catheter insertion
site [32, 33]. Category II
46
Center of Disease Control (CDC)CDC (2011). Guidelines for the Prevention of Intravascular Catheter-
Related Infections. Summary of Recommendations - Selection of Catheters and Sites (Peripheral & Midline Catheters)
Select catheters on the basis of the intended purpose and duration of use, known infectious and non-infectious complications (e.g., phlebitis and infiltration), and experience of individual catheter operators [33–
35]. Category IB
Avoid the use of steel needles for the administration of fluids and medication that might cause tissue necrosis if extravasation
occurs [33, 34]. Category IA
Use a midline catheter or peripherally inserted central catheter
(PICC), instead of a short peripheral catheter, when the duration of IV therapy will likely exceed six days. Category II
47
Center of Disease Control (CDC)
CDC (2011). Guidelines for the Prevention of Intravascular Catheter- Related Infections. Summary of Recommendations - Selection of Catheters and Sites (Peripheral & Midline Catheters)
Evaluate the catheter insertion site daily by palpation through the dressing to discern tenderness and by inspection if a transparent dressing is in use. Gauze and opaque dressings should not be removed if the patient has no clinical signs of infection. If the patient has local tenderness or other signs of possible CRBSI, an opaque
dressing should be removed and the site inspected visually. Category II
Remove peripheral venous catheters if the patients develops signs of phlebitis (warmth, tenderness, erythema
or palpable venous cord), infection, or a malfunctioning catheter [36]. Category IB

48
Caring for the Caregiver ♥Peripheral IV Catheters and Blood Exposure: Is It an Issue? Recorded on May 1, 2012 In the US, healthcare workers insert over 300 million short peripheral intravenous (PIV) catheters every year. The insertion of a PIV catheter predisposes the nurse to certain occupational hazards, such as needlestick
injury and blood exposure.
Mucocutaneous Blood Exposure and Peripheral Catheters: Acknowledging the Risk, Documenting Occurrences Recorded on April 30, 2012 Discussions among nurses and two recent published surveys reveal anecdotal reports of blood exposure to mucous membranes during peripheral IV catheter insertion; however, an integrative literature review found no documented reports of these events. Reports of all percutaneous
injuries are about four times greater than those from all mucocutaneous
blood exposures, indicating the continued need for improvements in and correct use of engineered safety devices.
INS Knowledge Center (2012). Retrieved online @ http://knowledge.ins1.org/
49
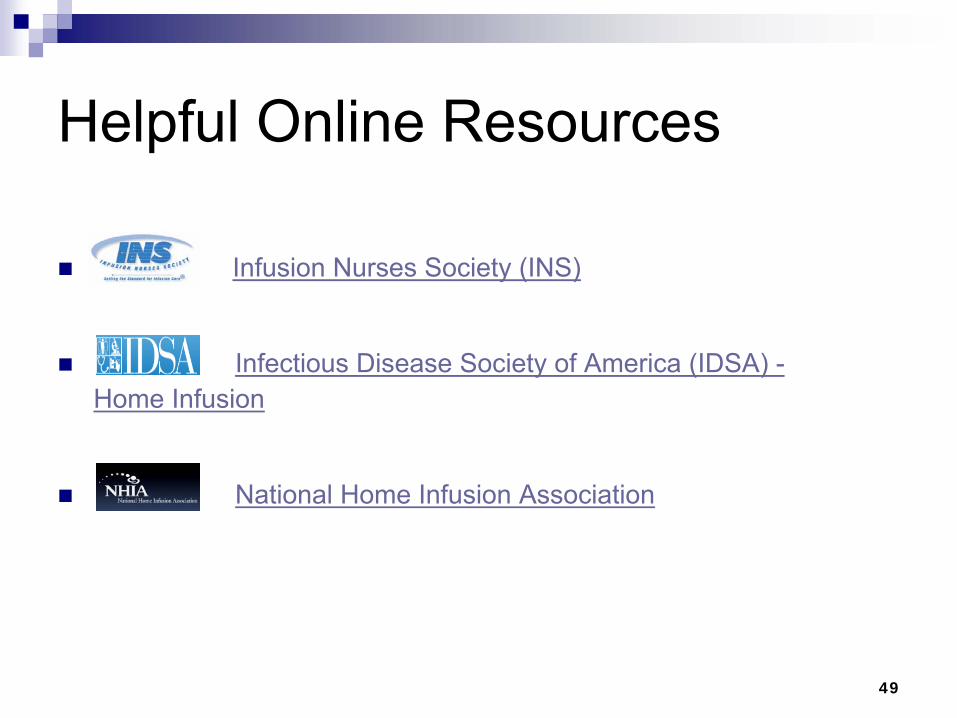
Helpful Online Resources
Infusion Nurses Society (INS)
Infectious Disease Society of America (IDSA) -
Home Infusion
National Home Infusion Association
50
References
•
Centers for disease control & prevention (CDC) and healthcare infection control practices advisory committee (HICPAC) (2011). Guidelines for the
prevention of intravascular catheter related infections. http://www.cdc.gov/hicpac/pdf/guidelines//bsi-guidelines-2011.pdf.
•
Hadaway, Lynn C. (2005). On the road to successful I.V. starts. Nursing
2003; Vol. 33, Supplement 1.
•
Infusion Nurse Society (2006). Policies and Procedures for Infusion Nursing (2nd
ed).
•
Infusion Nurses Society (2011). Infusion nurses standards of practice. Journal of Infusion Nursing, (Jan/Feb) 34(1S).
•
SJH IV Therapy V-A 45 Policy