performance based learning and assessment task ... · performance based learning and assessment...
TRANSCRIPT

Performance Based Learning and Assessment Task
Parallelogram Task I. ASSESSMENT TASK OVERVIEW & PURPOSE:
Students will analyze, modify and reanalyze a physical model of a parallelogram in the coordinate plane to help them to move from the concrete to the abstract in their understanding of the characteristics of such figures.
II. UNIT AUTHOR: Nathan Hansard, Community High School, Roanoke VA
III. COURSE: Geometry
IV. CONTENT STRAND: Geometry
V. OBJECTIVES: Students will discover the characteristics of parallelograms by applying their knowledge of slope, distance and midpoint to analyze concrete examples presented in the coordinate plane.
VI. REFERENCE/RESOURCE MATERIALS: None
VII. PRIMARY ASSESSMENT STRATEGIES: Parallelogram Handout, Parallelogram Concept Application Handout, Scoring Rubric
VIII. EVALUATION CRITERIA: Students' work is progressively evaluated throughout the activity using the Parallelogram Handout, while it is also assessed at the end using the Parallelogram Concept Application Handout. Rubrics are also used in scoring the handouts and task.
IX. INSTRUCTIONAL TIME: One ninety-minute class session
2
Discovering Characteristics of Parallelograms Using a Physical Model Strand Geometry Mathematical Objective(s) Students will discover the characteristics of parallelograms by applying their knowledge of slope, distance and midpoint to analyze concrete examples presented in the coordinate plane. This lesson is designed to encourage students to move from a concrete study of a specific case to an abstract understanding of a general case. Moreover, it is specifically designed as a discovery activity that does not require access to computers that may or may not be available on the day assigned to this topic.
Related SOL SOL G.9 (a, b, c) NCTM Standards • Analyze characteristics and properties of two- and three-dimensional geometric shapes
and develop mathematical arguments about geometric relationships • Analyze properties and determine attributes of two- and three-dimensional objects • Explore relationships (including congruence and similarity) among classes of two- and
three-dimensional geometric objects, make and test conjectures about them, and solve problems involving them
• Specify locations and describe spatial relationships using coordinate geometry and other representational systems
• Use Cartesian coordinates and other coordinate systems, such as navigational, polar, or spherical systems, to analyze geometric situations
• Investigate conjectures and solve problems involving two- and three-dimensional objects represented with Cartesian coordinates
Materials/Resources • Two different colors of tape (painter's tape is recommended as it is easy to peel off of
the floor, but masking or other tape will suffice)
Assumption of Prior Knowledge • Students should already be able to determine the slope of a line by means of either
counting slope or else using the definition of slope in the form of the slope equation and to use a protractor to measure angles.
• Students should be able to apply the distance and midpoint formulas.
3
• To succeed with this activity, students should have passed Algebra I and be operating on no lower than Analysis level on the VanHiele scale in terms of understanding angles and the properties of lines and line segments in the coordinate plane (see formulas above).
• Students should express their findings using appropriate units for angles, and should express slopes as rational expressions, not as decimals. Lengths should be in exact units ideally, but a calculator may be used to find decimal answers where appropriate.
• Students should know how to find slope using counting and/or formulaic means. • All of the properties of parallelograms discovered in this activity will apply to rectangles,
rhombuses and squares, so a solid understanding of these properties at the beginning is a huge advantage for the student.
Introduction: Setting Up the Mathematical Task • In this task/activity students should discover the properties of parallelograms. • This activity should take one block or its equivalent. Students should walk into the room with the room already prepared for the lesson, with as many coordinate planes as possible within reason already set up with the first parallelogram already included (second, so that they can be removed).Instructions for preparing the grid are included below:
• The teacher will have used masking tape of Color #1 to create coordinate plane axis on the floor of the classroom before class begins. As many as possible will be created to allow for a minimization of group size, with a minimum size of each area being 6x6 floor tiles, allowing for the creating of planes centered at the origin ranging from -5 to 5 on each axis with at least one floor tile between each set of axis.
• Onto each set of axis, the teacher will have created a parallelogram using tape of Color #2 (This MUST be placed second, so that it can be removed without disrupting the tape that represent the axes). The teacher will have placed one protractor into each area for student use.
• The teacher should meet the students at the door and ask them to think about what they see on the floor.
• At the beginning of class, the teacher asks the students what they see, using appropriate wait time and leading questions to elicit as much as possible from the students. All valid observations are written on the board.
• This lesson is meant to be a collaborative exercise, but the size of the groups is dictated by class size as well as the size and shape of the classroom or hall space available. Groups should be constructed by the classroom teacher to fit any differentiation or other instructional goals as they see fit.
4
• Students will study parallelograms in a context that should connect prior knowledge with new concepts for students of differing learning styles.
• Students should be encouraged to/helped to verbally express their discoveries as they occur by the teacher as they observe the discovery process.
• The teacher should offer leading questions to student groups that seem stuck, but should NOT provide answers to questions!
• Outstanding work that results from this activity should be posted publically (in the hallway or on a classroom bulletin board (with student permission).
Student Exploration Whole Class Sharing/Discussion
• Students should wander freely to explore the graphs on the floor of the classroom at the beginning of class and to share ideas about what they see.
Small Group Work • Once class discussion of things seen on the initial diagrams is complete: • Teacher assigns students to pre-determined groups and distributes the Parallelogram
Analysis Handout to the students for analysis of their assigned plot. • Students are instructed to add diagonals to their diagrams using tape of color #2 (or
better yet a third color, if available. • Students work together to compete the Parallelogram Analysis Handout. • Class discussion of what they discovered. • Each group should remove all tape representing parallelograms (color # 2). • Each group should make one parallelogram different from the first one on the plane in
front of them. The teacher must make sure that all student-generated diagrams are in fact parallelograms! Close monitoring and guidance is essential!
• Groups should be rotated "clockwise" to the next group's plane, add diagonals of the appropriate color and fill out the Parallelogram Analysis Handout.
• Teacher checks for success at this activity before moving on, re-teaching as necessary with groups as needed.
• Students rotate to the next plane "clockwise" once more and complete the Parallelogram Analysis Handout for their new diagram. Teacher should be moving quickly between groups to help with leading questions when errors occur.
• Repeat this process as much as time/teacher on the spot assessment allows/deems necessary to still allow for Individual Work
Individual Work • Students complete the Parallelogram Concept Application Handout. • Students complete the Make Your Own Quiz Handout for homework.

5
Student/Teacher Actions: • Students should be working collaboratively to discover the patterns/characteristics of
parallelograms. The teacher should be moving between groups as frequently as possible to address questions and/or help the students to correct their own errors throughout the lesson.
• The teacher should be on the lookout for figures that are not parallelograms, and using leading questions to help students correct these errors when and if they occur.
Monitoring Student Responses • Students should be actively engaged with the analysis of their differing parallelograms, and
should be actively sharing and analyzing each others' answers • Students should be actively analyzing and critiquing each others' work throughout • Topics that are the focus of student/teacher interaction: Slopes of parallel lines, angle and
segment relationships within parallelograms, including those of the diagonals • The teacher can interject linear expressions for constants for any group which masters the
ideas quickly during repeated creation of new setups with lines in the coordinate plane (congruent or supplementary pairs, as determined by the teacher)
• Students should be allowed at least 5 minutes of time after the closing activity to discuss the key points that they discovered, led by the teacher
• Students' work is collected for later analysis throughout the lesson
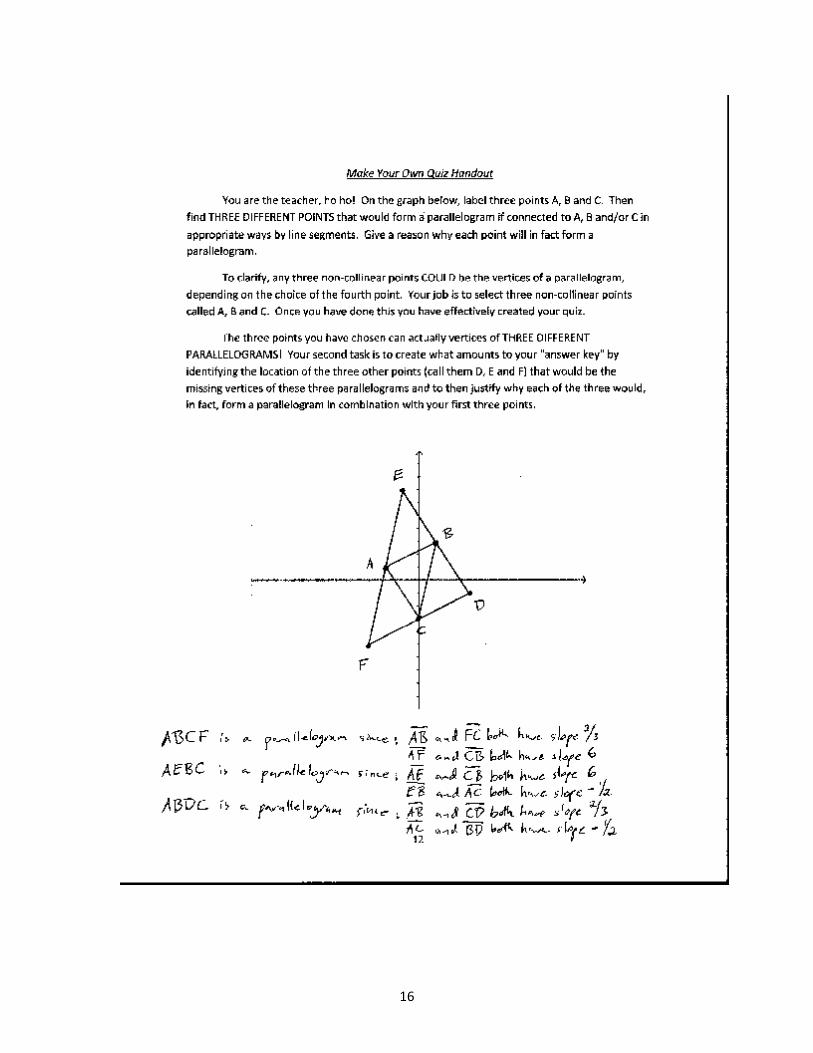
Assessment List and Benchmarks Students are to be evaluated during the discovery process by way of the Parallelogram Analysis Handouts and the Parallelogram Concept Application Handout, poor results on which might suggest re-teaching this concept to address a different set of learning modalities. Students' ability to creatively apply the concepts discovered during the activity in class will be assessed using the Make Your Own Quiz Handout. Students should be asked if the directions for this activity are clear. The teacher should feel free to further instruct students along the lines of: "Your new parallelograms might have names like ABDC, AEBC, or ABCF. Note how 3 of the 4 vertices in each parallelogram are A, B, and C." Scoring rubrics (which should also be given to the students with all assignments so that they can "score themselves" as they go using the same tool the teacher will be using) are included for each of the assessments. How to translate rubric scores to actual grades in the teacher's classroom is left up to the individual teacher.

6
Preparing the Floor Grid

7
Parallelogram Analysis Handout
Look at the set of lines on the floor in front of you. Answer the following questions in your own words, including appropriate units!
Draw a sketch of the figure on the floor above, marking congruencies and any parallel lines.
What do you think will happen when you add the diagonals? What will they do?
Use the midpoint formula to find the intersection point of the diagonals. Show your work here:
Use the distance formula (four times) to confirm that the expected congruencies happen when the diagonals bisect each other. Answers should be exact (no decimals).

8
Parallel Analysis Handout Scoring Rubric
2 1 0 Diagram Quality Diagram is accurate
and neatly drawn and includes all
congruencies/parallel marks
Diagram is accurate but sloppy and/or
missing some congruencies/parallel
marks
Diagram in inaccurate outright or else too
sloppily drawn to tell if it is accurate and/or
is missing most congruencies/parallel
marks Diagonal
Intersection/Midpoint Formula
Midpoint found correctly with work
shown.
Minor errors in the computation of the
midpoint, but work is shown
Major errors in the computation of the
midpoint (work shown) or else no work shown at all (which gets zero
points regardless of its accuracy)
Distance Formula Midpoint
Confirmation
All four distances calculated correctly
At least two are calculated correctly or
else all four are calculated with only
minor errors in execution
Less than two are calculated correctly,
other work either missing or else
containing serious errors

9
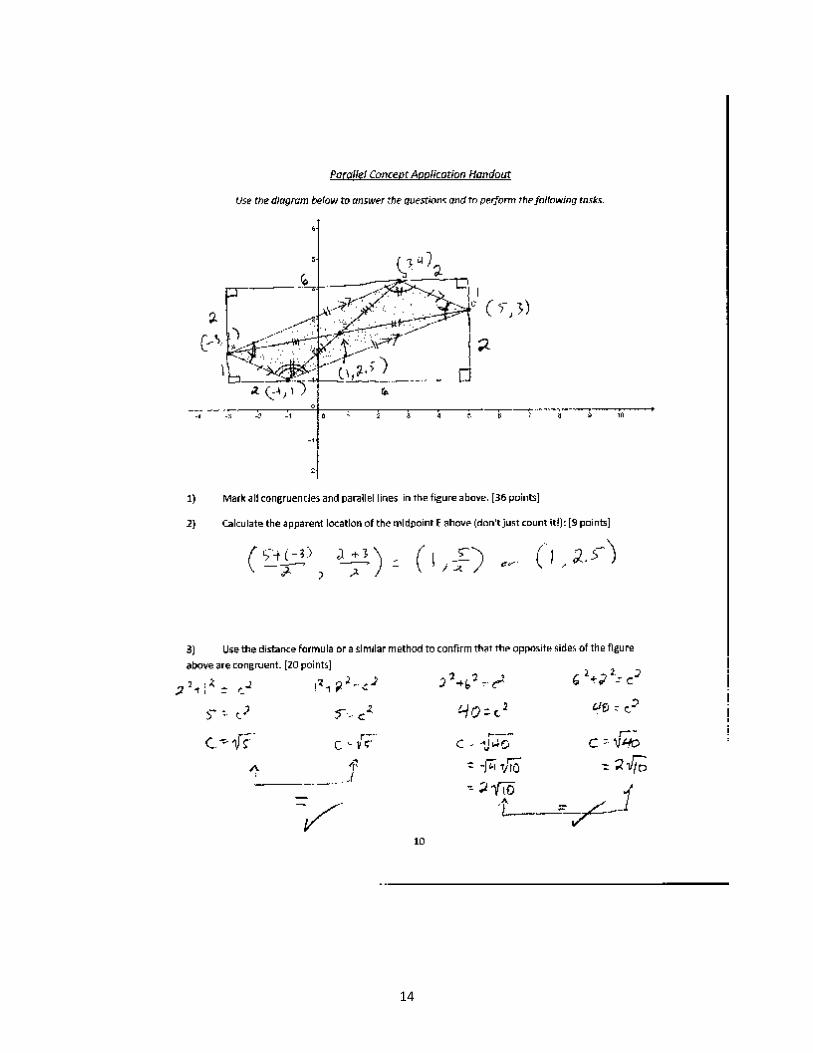
Parallel Concept Application Handout
Use the diagram below to answer the questions and to perform the following tasks.
1) Mark all congruencies and parallel lines in the figure above. [36 points]
2) Calculate the apparent location of the midpoint E above (don't just count it!): [9 points]
3) Use the distance formula or a similar method to confirm that the opposite sides of the figure above are congruent. [20 points]

10
4) Suppose that 𝑚∠𝐴𝐷𝐶 = 1350. Find the following angle measures (if possible): [5 points each]
𝑚∠𝐴𝐵𝐶 =
𝑚∠𝐵𝐶𝐷 =
𝑚∠𝐴𝐸𝐷 =
𝑚∠𝐷𝐴𝐵 =
5) Can we prove that the figure we were given above is a parallelogram using the definition of parallelograms? If so explain how and do so below. If not, explain why not. [15 points]

11
Make Your Own Quiz Handout
You are the teacher, ho ho! On the graph below, label three points A, B and C. Then find THREE DIFFERENT POINTS that would form a parallelogram if connected to A, B and/or C in appropriate ways by line segments. Give a reason why each point will in fact form a parallelogram.
To clarify, any three non-collinear points COULD be the vertices of a parallelogram, depending on the choice of the fourth point. Your job is to select three non-collinear points called A, B and C. Once you have done this you have effectively created your quiz.
The three points you have chosen can actually vertices of THREE DIFFERENT PARALLELOGRAMS! Your second task is to create what amounts to your "answer key" by identifying the location of the three other points (call them D, E and F) that would be the missing vertices of these three parallelograms and to then justify why each of the three would, in fact, form a parallelogram in combination with your first three points.
12
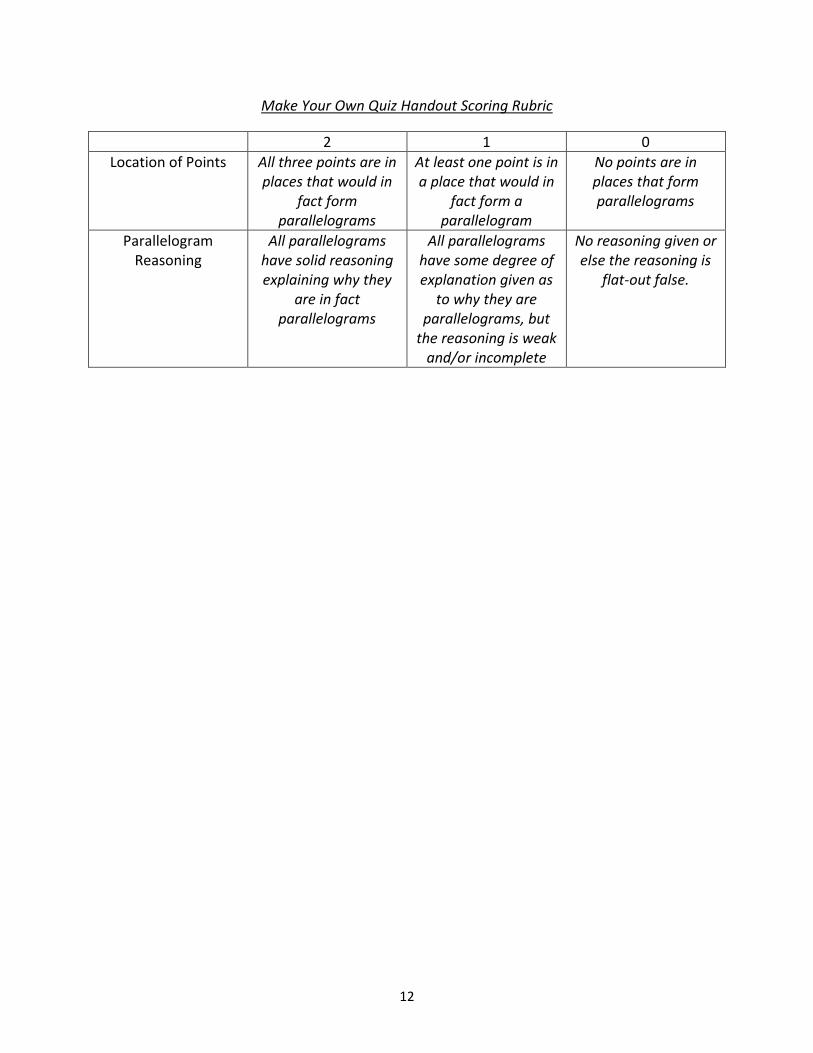
Make Your Own Quiz Handout Scoring Rubric
2 1 0 Location of Points All three points are in
places that would in fact form
parallelograms
At least one point is in a place that would in
fact form a parallelogram
No points are in places that form parallelograms
Parallelogram Reasoning
All parallelograms have solid reasoning explaining why they
are in fact parallelograms
All parallelograms have some degree of explanation given as
to why they are parallelograms, but
the reasoning is weak and/or incomplete
No reasoning given or else the reasoning is
flat-out false.

13
Benchmarks
14

15
16