patterned plywood bookcase speakers · instructables patterned plywood bookcase speakers by...
TRANSCRIPT
instructables
Patterned Plywood Bookcase Speakers
by amandaghassaei
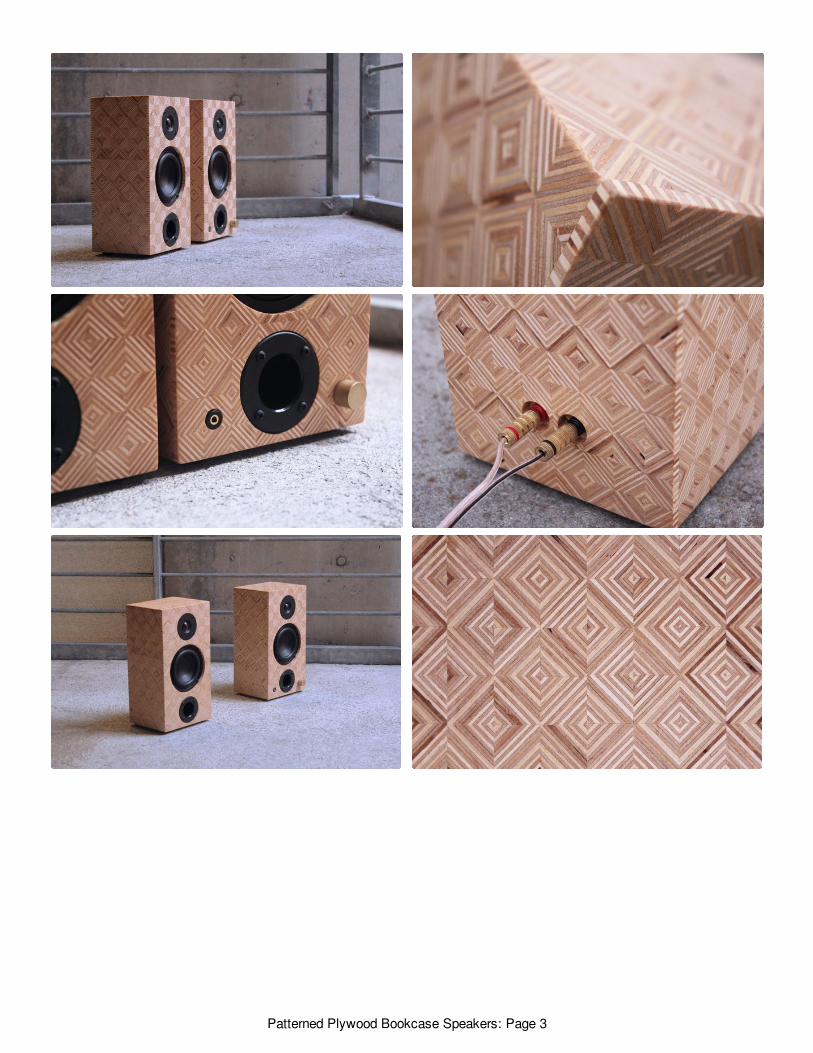
I made these funky plywood bookshelf speakers formy little sister who's headed off to college next year.My goals for this design were to build something thatlooks cool, gets reasonably loud, and has somedecent bass response in a relative small package. Inthe next steps I'll show some of the software tools Iused to spec out my parts and design a matchingenclosure to my speaker cones. This project was alsogreat practice for me in the woodshop - I used atechnique to get the diamond patterns in the outerpanels of the speaker enclosure that involves a lot ofcutting and gluing.
Supplies:
Note that most of this Amazon stuff can be found atyour local hardware store - I'd recommend lookingthere first.
(1x) Dayton Audio DTA-2 Class D Digital AudioAmplifier Module 2x15W Parts Express 300-385 -when I got this board it said it was a "Class T" amp,but it sounds like they are essentially the same thing.
(2x) Dayton Audio TCP115-4 4" Treated Paper ConeMidbass Woofer 4 Ohm Parts Express 295-415
(2x) Dayton Audio TD20F-4 3/4" Soft DomeNeodymium Tweeter 4 Ohm Parts Express 275-020
(1x) Port Tube 1 3/8" ID Adjustable Parts Express260-388
(2x) 0.8mH air core inductor Parts Express 257-044
(2x) 0.45 mH air core inductor Parts Express 257-034
(2x) 5.6 Ohm 10W resistor Parts Express 004-5.6
(2x) 4.7 uF polypropylene capacitor Parts Express027-422
(2x) 3.3 uF polypropylene capacitor Parts Express027-420
(1x) 12V 2000mA Switching Power Supply US andEU 2.1mm plug Parts Express
(1x) 2.1mm x 5.5mm panel mount jack Digikey 486-3380-ND
(1x) 2.1mm x 5.5mm plug Digikey CP3-1000-ND -optional if you wire power to board directly
(1x) 3.5mm Stereo Gold Plated Snap-In Jack PartsExpress 090-281 (would have liked a jack thatgrounds the L/R channels when nothing is connectedlike this: Digikey CP1-3515-ND - but this digikey partis a pain to install on such a thick panel)
(1x) 3" x 3" piece of metal shim - I cut out some smallpieces of this to help mount the snap in jack
(1x) 3.5mm stereo plug Digikey CP-3502-ND - this isoptional if you're ok removing the jack from theamplifier board and soldering wires in
(2x pair) banana jack binding post (Digikey J151-ND+ Digikey J152-ND) - some fancier options at PartsExpress
(1x) fancy knob - totally optional, I ended up turningmy own knob out of brass. I also like Newark forknobs, just make sure it mounts on a 6.35mm shaft.
(8x) rubber cabinet feet Parts Express 260-7706
Patterned Plywood Bookcase Speakers: Page 1

(1x) Acousta-Stuf Polyfill 1 lb. Bag Speaker CabinetSound Damping Material Parts Express 260-317 -only a small amount of the poly fill needed - you mightbe able to find a smaller quantity at a sewing store.
(2x) 30" x 30" sheet of 3/4" baltic birch plywood - it'svery important to use baltic birch ply for this project,this type of ply is made from birch veneer all the waythrough and is free of voids, which will give a nicefinal result. I had plenty of leftover using two 30"x30"sheets of 3/4" ply. I used the indoor-use ply, which ischeaper than exterior-grade.
(1x) 24" x 24" sheet of 1/8" plywood (for supportingmounting on front and back panels and makingwashers, there is plenty of leftover)
(24x screws) #6 0.75" pan head for mounting drivers,feet, and port mounts Parts Express 081-435
(1x) 8ft speaker wire 16 gauge Amazon and 2x pairbanana plugs Amazon (or 6ft banana cable, and extra20 gauge stranded wire for soldering electronics)
Other materials:
Titebond wood glue Amazon
Starbond medium or other CA superglue Amazon
Super 77 spray on adhesive Amazon
epoxy - for mounting metal shim to enclosure for snapin jack Amazon
electrical tape or heat shrink tubing - for protectingsolder joints
lead free solder - I use lead free solder for everythingnow and you should too!
copper clad perf board Amazon - for wiring upcrossovers
Minwax clear polyurethane finish Amazon
Matte black spray paint (optional) - used to color theinside of the port elbow joints so they would not bevisible from the outside.
steel wool pads 000 or 0000 or a high grit sandpaperfor final finishing
Tools:
soldering iron
drill press, drill index, forstner bit set
hand router - I used a shopbot, but a hand routersetup should also work for cutting the bigger holes
small foam brushes (for applying glue / finish)
table saw
orbital sander and sand paper - 120, 180, 240, 320grit pads Amazon
I used a 3D printer to make a custom elbowconnector to fit the long port in my enclosure. Otheroptions would be to get a flexible tube or use astandard plumbing joint
I used a laser cutter to cut some pieces of 1/8" ply tohelp with mounting - this is totally optional if you havea drill, bandsaw, and a belt sander, but helped speedsome steps up
18"-24" clamps (at least 4, preferably 8)
scrap wood - for test cuts and jigs
Patterned Plywood Bookcase Speakers: Page 2
Patterned Plywood Bookcase Speakers: Page 3
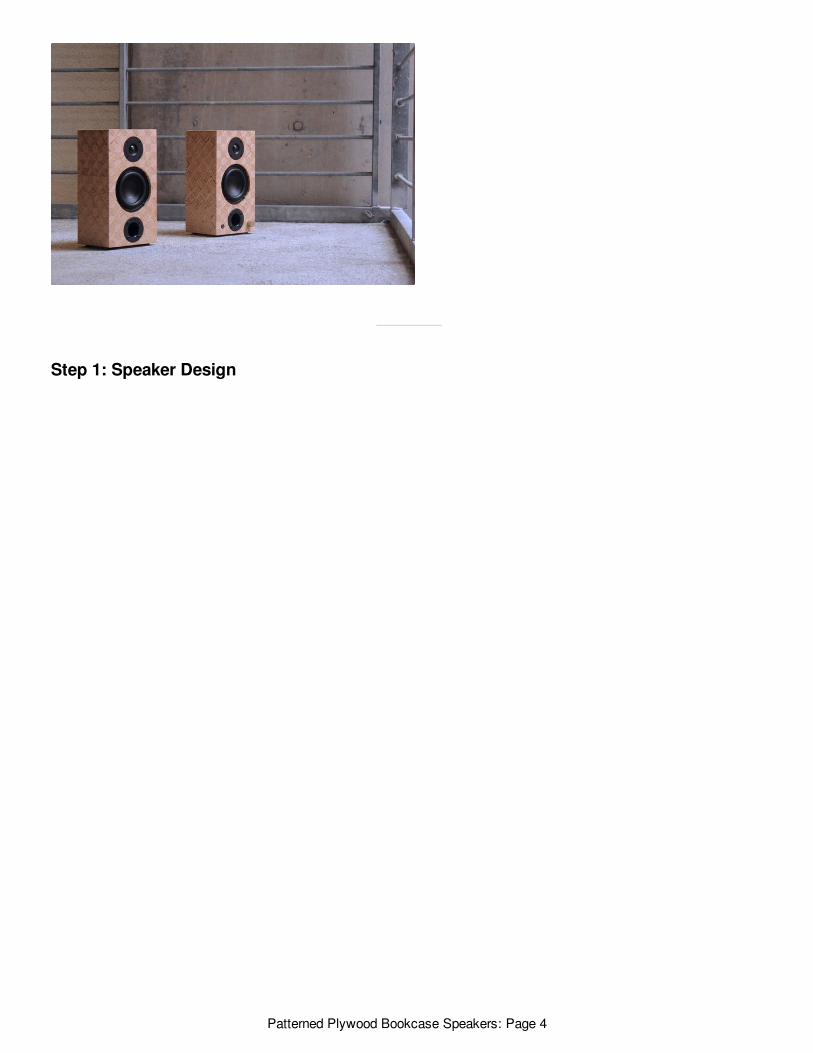
Step 1: Speaker Design
Patterned Plywood Bookcase Speakers: Page 4
This is the first time I've ever designed a speaker, andI learned a ton in the process. Here are somereferences I used for the technical parts of myspeaker design:
Speaker Basics
Figuring out the Proper Speaker Enclosure Size
How To Design Your Own Speakers
How to model enclosures with WinISD
WinISD – a step by step tutorial for beginners
How To Design A DIY Crossover Using FreeSoftware
Voight Speakers
Folded horn speaker
For this design, I wanted to make a versatile set ofbookcase speakers, each consisting of a woofer anda tweeter. These will be powered speakers, meaningthey have a built-in amplifier and can be connecteddirectly to a line input. The interface to the ampshould be simple and exposed on the front of one ofthe speakers. Not worrying too much about portabilitywith these - they will be plugged into the wall.
Getting a bit more into the technical specs - I want tokeep these speakers relatively small andinexpensive. I'm getting parts primarily from PartsExpress for this build as they seem to be a one stopshop for these types of projects.
First I picked out an amp. The main requirement forthis was that it should be a Class D amp - this willdraw less power and generate less heat. I liked theidea of getting an integrated bluetooth module, but Iwanted to use a bluetooth 4/5 board (over an older
protocol), and there weren't any options ~$20 onparts express.
2x15W amp Parts Express 300-385 - no bluetooth,but I liked that this has a separate volume knob withintegrated power switch. I will have to attach my ownpanel mount connectors for line in and power.
Amp Alternatives:
Bluetooth 4.2 + 2x30W amp Parts Express 320-641 -this seems like a good option, but it's new and has noreviews yet. I don't love the idea of a remote, as theyare easily lost and I'd need to have an IR receiver onthe front of the enclosure.
Bluetooth 2.1 + 2x15W amp Parts Express 325-100 -older Bluetooth protocol
Bluetooth 4.0 + 2x50W amp Parts Express 325-105 -looks great but a bit too expensive for this build
Next I picked out my drivers. The drivers will need tobe able to handle the 15W from my amp, and shouldbe relatively small in size, and not too expensive -remember, you have to buy 2X of everything.
I looked at woofers between 4-5" and tried to keepthe price at around $10 each. Originally, I wanted toget an 8 Ohm speaker, as these will run moreefficiently with my amp than a 4 Ohm - but in the endI used the 4 Ohm version after realizing I could savemoney on my crossover design (see below). In theend, I actually wish I'd used the 8 Ohm because itgets slightly better response into the lowerfrequencies - but I was a bit too late into the processbefore I realized this.
Dayton Audio TCP115-4 4" Treated Paper ConeMidbass Woofer 4 Ohm Parts Express 295-415 -these woofers had great reviews, have a range of 55to 5,000 Hz, and were on sale for only $10 each.
The woofers I've picked max out at about 5kHz, so I
Patterned Plywood Bookcase Speakers: Page 5
needed some tweeters to cover the high frequencies.I wanted my tweeters to have some overlap with thewoofers, and go all the way up to 20kHz.
Dayton Audio TD20F-4 3/4" Soft Dome NeodymiumTweeter 4 Ohm Parts Express 275-020 - thesetweeters have a range of 3k - 20kHz with a compactdesign. They're also currently on sale for $8 each.
Since I'm using a smaller woofer, I want to try toextend the bass with a ported enclosure design. Ireally love the folded horn designs that a lot of DIYbuilds are using, but it takes up a lot of space and Ifeel like I would want to really optimize the shape ofthe horn to do it right - I'll save that idea for later. TheVoight design is super elegant, but again, notcompact enough for this build. Instead, I'm going witha simple rectangular box design with a single port ineach speaker.
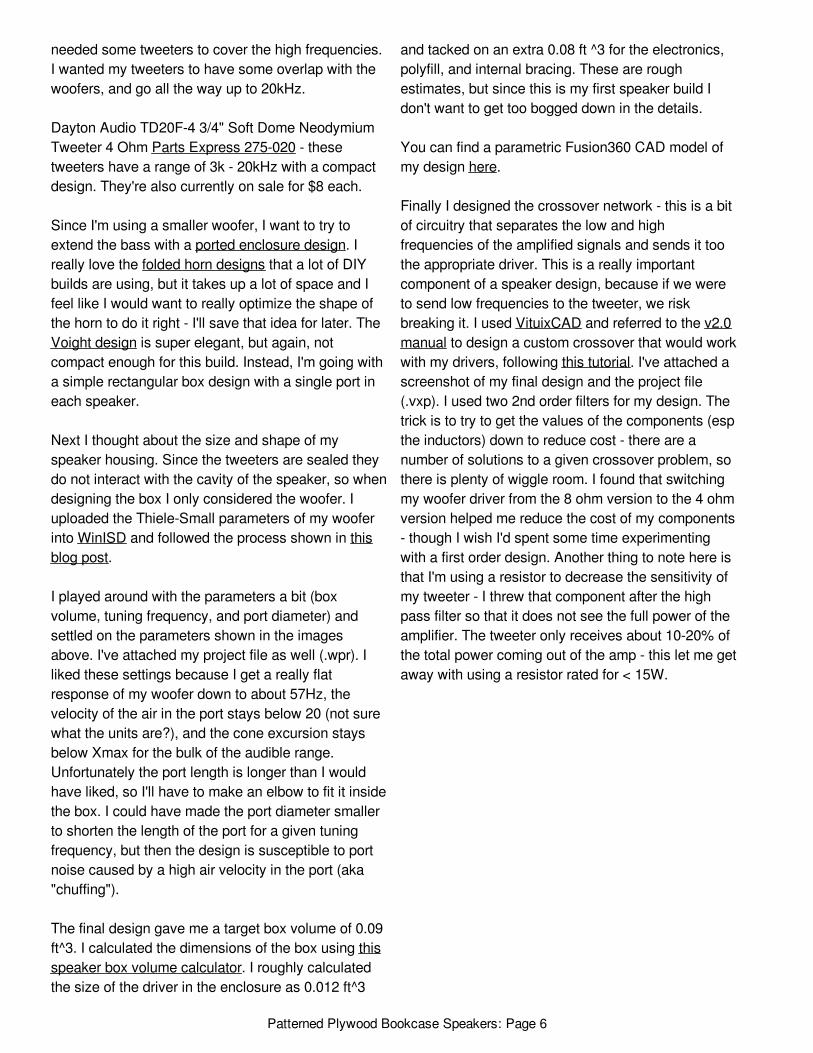
Next I thought about the size and shape of myspeaker housing. Since the tweeters are sealed theydo not interact with the cavity of the speaker, so whendesigning the box I only considered the woofer. Iuploaded the Thiele-Small parameters of my wooferinto WinISD and followed the process shown in thisblog post.
I played around with the parameters a bit (boxvolume, tuning frequency, and port diameter) andsettled on the parameters shown in the imagesabove. I've attached my project file as well (.wpr). Iliked these settings because I get a really flatresponse of my woofer down to about 57Hz, thevelocity of the air in the port stays below 20 (not surewhat the units are?), and the cone excursion staysbelow Xmax for the bulk of the audible range.Unfortunately the port length is longer than I wouldhave liked, so I'll have to make an elbow to fit it insidethe box. I could have made the port diameter smallerto shorten the length of the port for a given tuningfrequency, but then the design is susceptible to portnoise caused by a high air velocity in the port (aka"chuffing").
The final design gave me a target box volume of 0.09ft^3. I calculated the dimensions of the box using thisspeaker box volume calculator. I roughly calculatedthe size of the driver in the enclosure as 0.012 ft^3
and tacked on an extra 0.08 ft ^3 for the electronics,polyfill, and internal bracing. These are roughestimates, but since this is my first speaker build Idon't want to get too bogged down in the details.
You can find a parametric Fusion360 CAD model ofmy design here.
Finally I designed the crossover network - this is a bitof circuitry that separates the low and highfrequencies of the amplified signals and sends it toothe appropriate driver. This is a really importantcomponent of a speaker design, because if we wereto send low frequencies to the tweeter, we riskbreaking it. I used VituixCAD and referred to the v2.0manual to design a custom crossover that would workwith my drivers, following this tutorial. I've attached ascreenshot of my final design and the project file(.vxp). I used two 2nd order filters for my design. Thetrick is to try to get the values of the components (espthe inductors) down to reduce cost - there are anumber of solutions to a given crossover problem, sothere is plenty of wiggle room. I found that switchingmy woofer driver from the 8 ohm version to the 4 ohmversion helped me reduce the cost of my components- though I wish I'd spent some time experimentingwith a first order design. Another thing to note here isthat I'm using a resistor to decrease the sensitivity ofmy tweeter - I threw that component after the highpass filter so that it does not see the full power of theamplifier. The tweeter only receives about 10-20% ofthe total power coming out of the amp - this let me getaway with using a resistor rated for < 15W.
Patterned Plywood Bookcase Speakers: Page 6
Patterned Plywood Bookcase Speakers: Page 7

Step 2: Plywood Patterned Panels
https://www.instructables.com/ORIG/FG1/BO0Y/K2TCA3IZ/FG1BO0YK2TCA3IZ.unknown…Download
Patterned Plywood Bookcase Speakers: Page 8
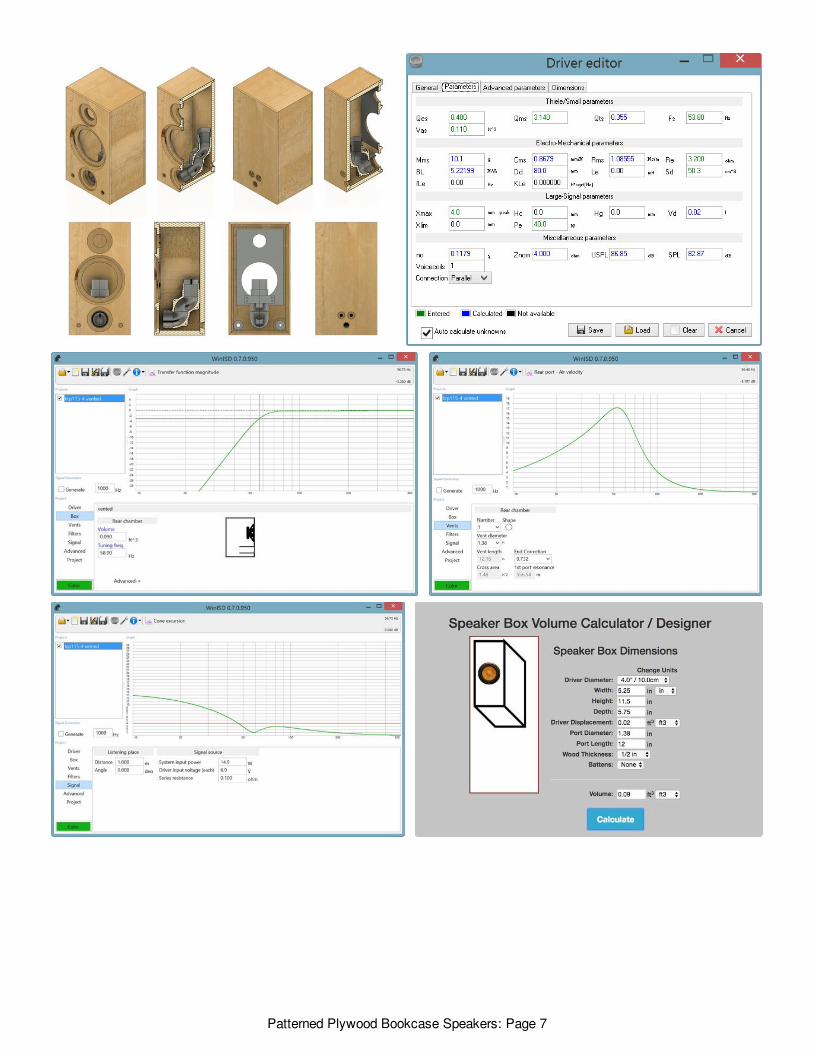
For the panels of the speaker housing, I wanted to trythis patterned plywood technique:
I've been doing something similar to make endgraincutting boards, so I thought this would be a niceextension of the techniques I've already beenlearning. You shouldn't use plywood to make acutting board as it contains lots of nasty glues and istoo porous/soft, but it produces amazing patterns forthese (non-food related) applications.
Alternatively, I think it could also be interesting toexplore this technique of bringing out curved, bandedpatterns from ply with a cnc router (also seen in thisbubble cabinet):
I followed Michael Alm's process pretty closely, hereare my notes:
The final dimensions I was aiming for for the largerpanels was ~ 11.25" x 5.25" x 0.5", but due to all thecutting and sanding, you'll want to overshoot this a bitto be safe.
The width of the first cuts corresponds to thethickness of the panels, I'm aiming for 0.5", so I cutthe first strips at 9/16" to give myself some wiggle
https://www.youtube.com/embed/XjxfVR2K_Ew
https://www.youtube.com/embed/s6jDjNvYZko
room during the glueups/sanding. Each of the strips is30" long at this stage.
Between each glueup I sanded down the front andback sides of the board to remove excess glue with120 grit - I wasn't too concerned about getting theboard super flat til the end. I was lucky to haveaccess to a drum sander, which sped up the processquite a bit (don't put the workpiece through the planer,the glues in the plywood will dull the blades quickly).
I cut the strips for the pattern 0.75" wide after eachglueup, this makes the diamonds 1.5" wide.
For the second (chevron) glueup, I was careful tokeep the strips in the same order that they were cutfrom the board. This helped increase the continuity ofthe pattern from piece to piece.
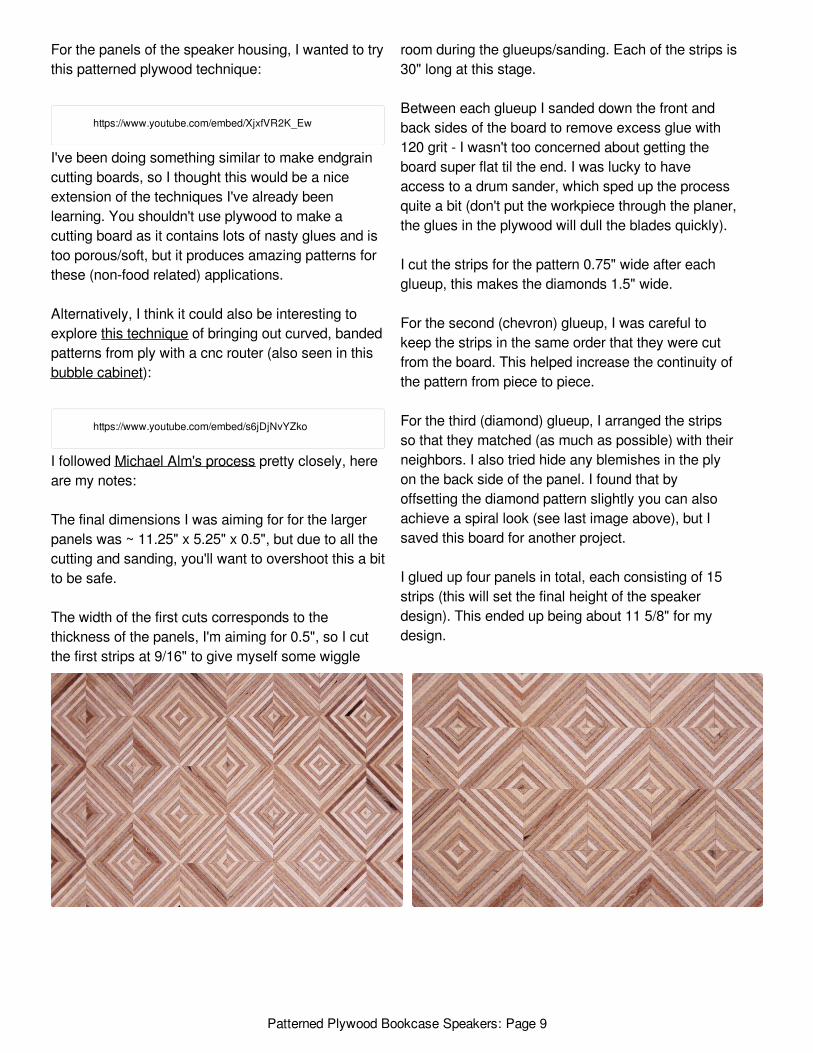
For the third (diamond) glueup, I arranged the stripsso that they matched (as much as possible) with theirneighbors. I also tried hide any blemishes in the plyon the back side of the panel. I found that byoffsetting the diamond pattern slightly you can alsoachieve a spiral look (see last image above), but Isaved this board for another project.
I glued up four panels in total, each consisting of 15strips (this will set the final height of the speakerdesign). This ended up being about 11 5/8" for mydesign.
Patterned Plywood Bookcase Speakers: Page 9
Step 3: Speaker Housing
Patterned Plywood Bookcase Speakers: Page 10
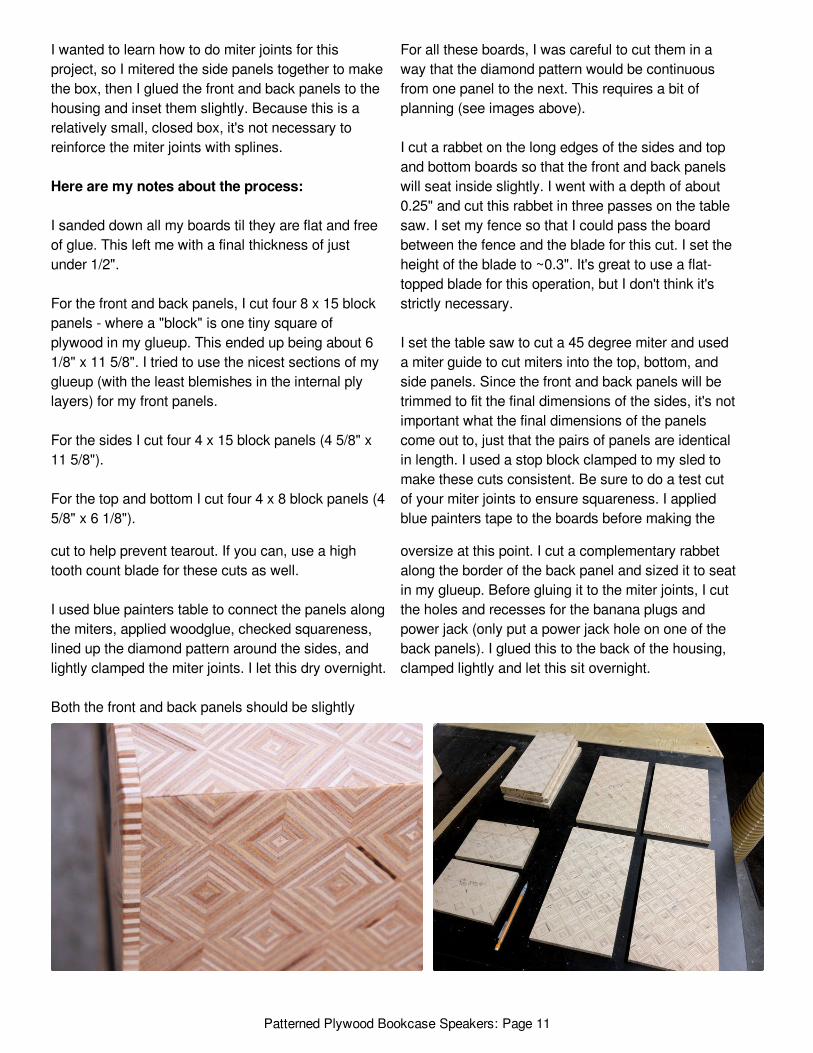
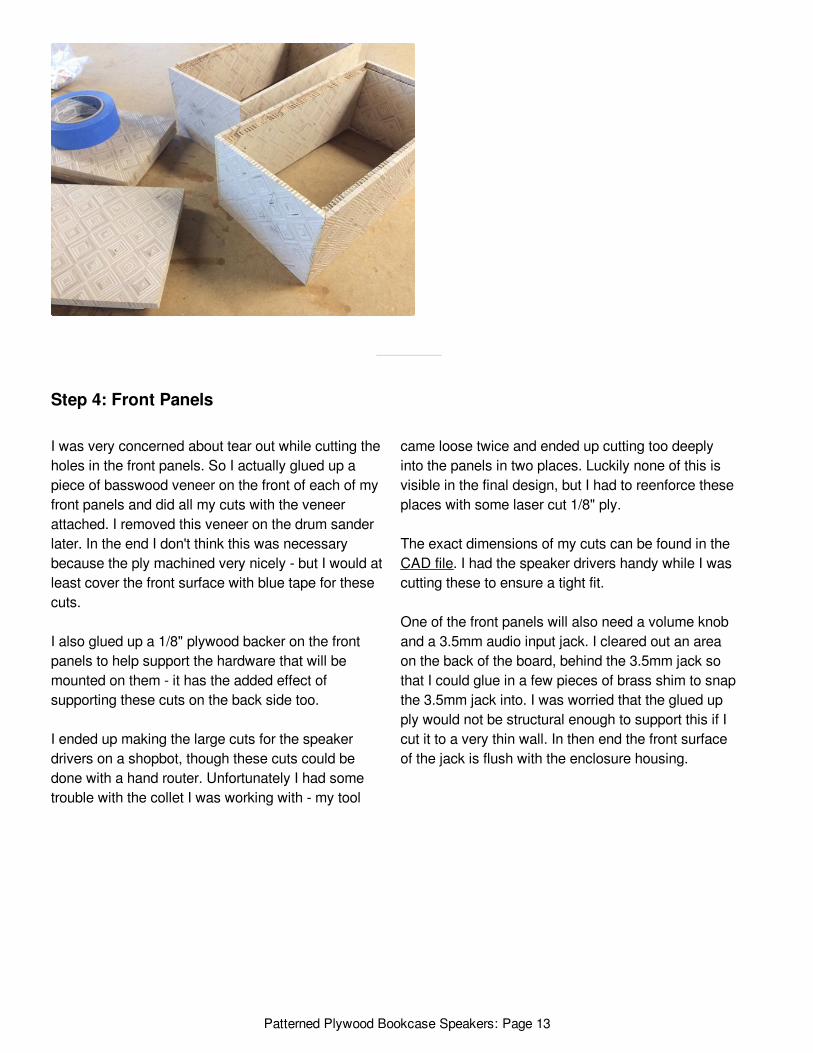
I wanted to learn how to do miter joints for thisproject, so I mitered the side panels together to makethe box, then I glued the front and back panels to thehousing and inset them slightly. Because this is arelatively small, closed box, it's not necessary toreinforce the miter joints with splines.
Here are my notes about the process:
I sanded down all my boards til they are flat and freeof glue. This left me with a final thickness of justunder 1/2".
For the front and back panels, I cut four 8 x 15 blockpanels - where a "block" is one tiny square ofplywood in my glueup. This ended up being about 61/8" x 11 5/8". I tried to use the nicest sections of myglueup (with the least blemishes in the internal plylayers) for my front panels.
For the sides I cut four 4 x 15 block panels (4 5/8" x11 5/8").
For the top and bottom I cut four 4 x 8 block panels (45/8" x 6 1/8").
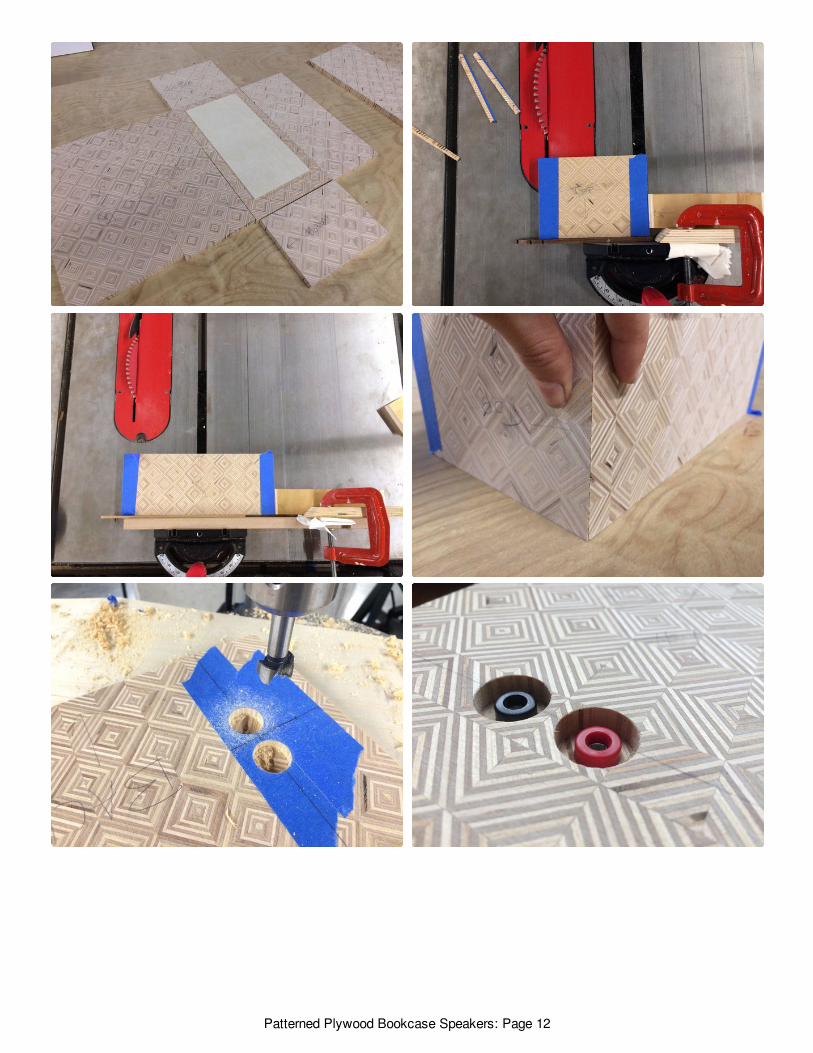
For all these boards, I was careful to cut them in away that the diamond pattern would be continuousfrom one panel to the next. This requires a bit ofplanning (see images above).
I cut a rabbet on the long edges of the sides and topand bottom boards so that the front and back panelswill seat inside slightly. I went with a depth of about0.25" and cut this rabbet in three passes on the tablesaw. I set my fence so that I could pass the boardbetween the fence and the blade for this cut. I set theheight of the blade to ~0.3". It's great to use a flat-topped blade for this operation, but I don't think it'sstrictly necessary.
I set the table saw to cut a 45 degree miter and useda miter guide to cut miters into the top, bottom, andside panels. Since the front and back panels will betrimmed to fit the final dimensions of the sides, it's notimportant what the final dimensions of the panelscome out to, just that the pairs of panels are identicalin length. I used a stop block clamped to my sled tomake these cuts consistent. Be sure to do a test cutof your miter joints to ensure squareness. I appliedblue painters tape to the boards before making the
cut to help prevent tearout. If you can, use a hightooth count blade for these cuts as well.
I used blue painters table to connect the panels alongthe miters, applied woodglue, checked squareness,lined up the diamond pattern around the sides, andlightly clamped the miter joints. I let this dry overnight.
Both the front and back panels should be slightly
oversize at this point. I cut a complementary rabbetalong the border of the back panel and sized it to seatin my glueup. Before gluing it to the miter joints, I cutthe holes and recesses for the banana plugs andpower jack (only put a power jack hole on one of theback panels). I glued this to the back of the housing,clamped lightly and let this sit overnight.
Patterned Plywood Bookcase Speakers: Page 11
Patterned Plywood Bookcase Speakers: Page 12
Step 4: Front Panels
I was very concerned about tear out while cutting theholes in the front panels. So I actually glued up apiece of basswood veneer on the front of each of myfront panels and did all my cuts with the veneerattached. I removed this veneer on the drum sanderlater. In the end I don't think this was necessarybecause the ply machined very nicely - but I would atleast cover the front surface with blue tape for thesecuts.
I also glued up a 1/8" plywood backer on the frontpanels to help support the hardware that will bemounted on them - it has the added effect ofsupporting these cuts on the back side too.
I ended up making the large cuts for the speakerdrivers on a shopbot, though these cuts could bedone with a hand router. Unfortunately I had sometrouble with the collet I was working with - my tool
came loose twice and ended up cutting too deeplyinto the panels in two places. Luckily none of this isvisible in the final design, but I had to reenforce theseplaces with some laser cut 1/8" ply.
The exact dimensions of my cuts can be found in theCAD file. I had the speaker drivers handy while I wascutting these to ensure a tight fit.
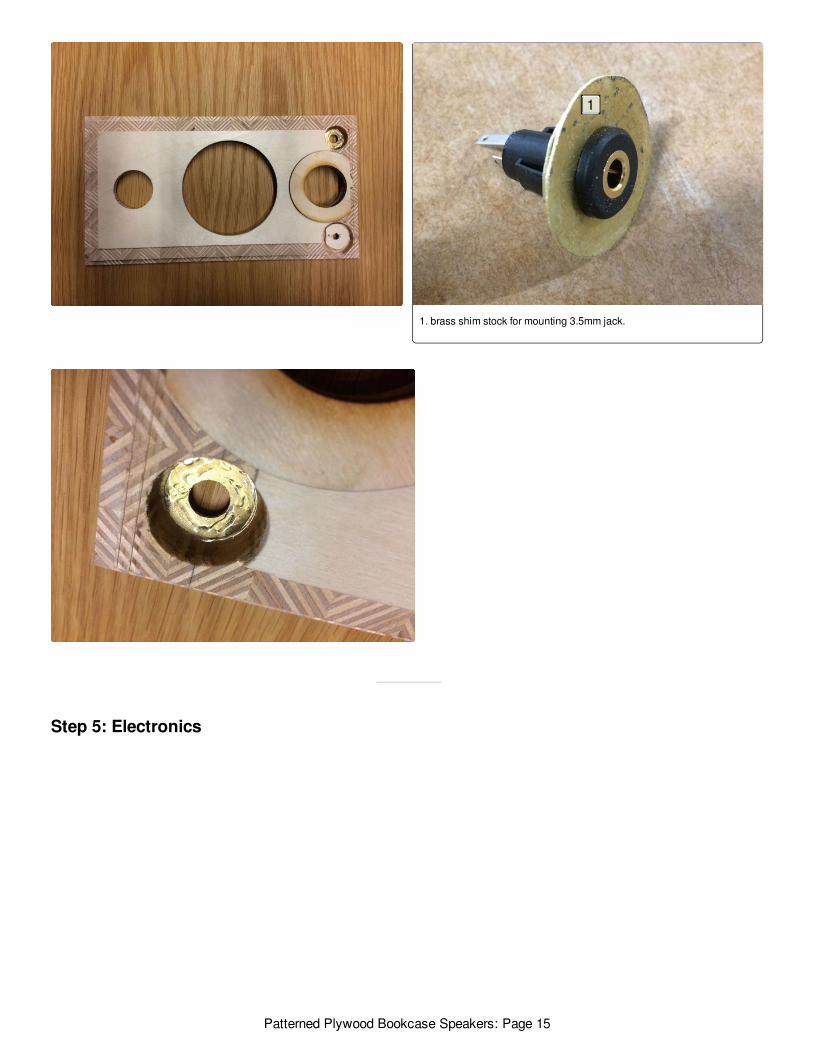
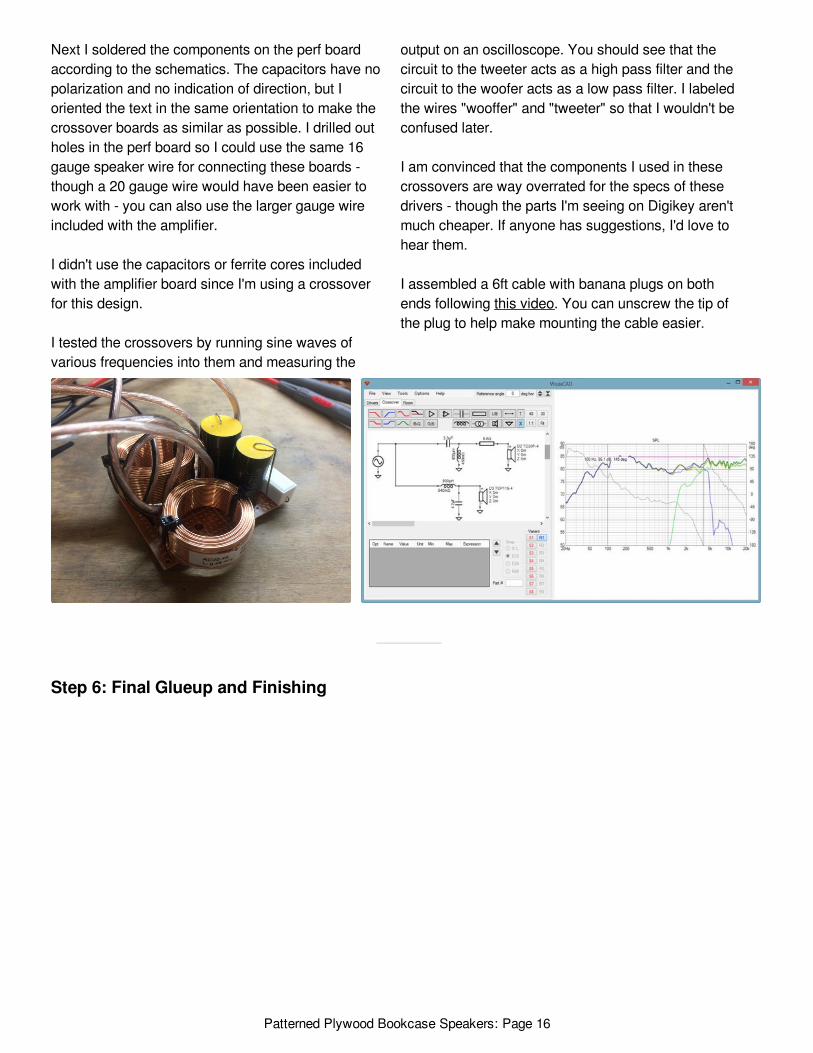
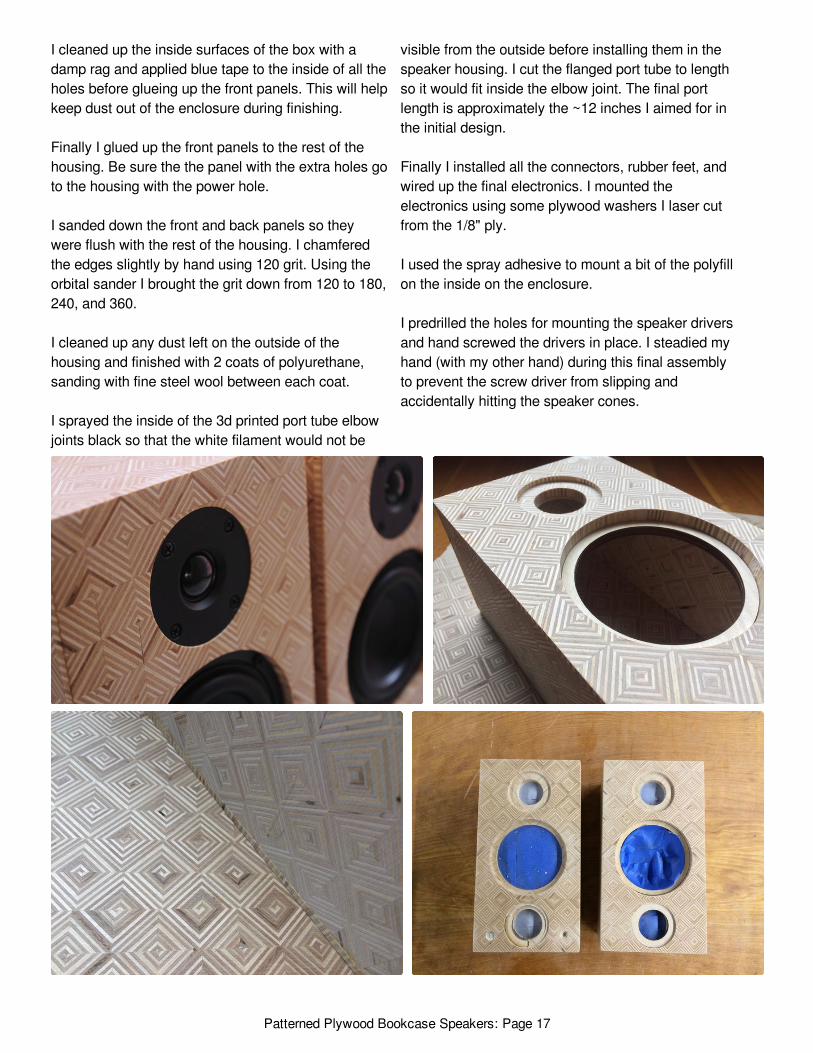
One of the front panels will also need a volume knoband a 3.5mm audio input jack. I cleared out an areaon the back of the board, behind the 3.5mm jack sothat I could glue in a few pieces of brass shim to snapthe 3.5mm jack into. I was worried that the glued upply would not be structural enough to support this if Icut it to a very thin wall. In then end the front surfaceof the jack is flush with the enclosure housing.
Patterned Plywood Bookcase Speakers: Page 13
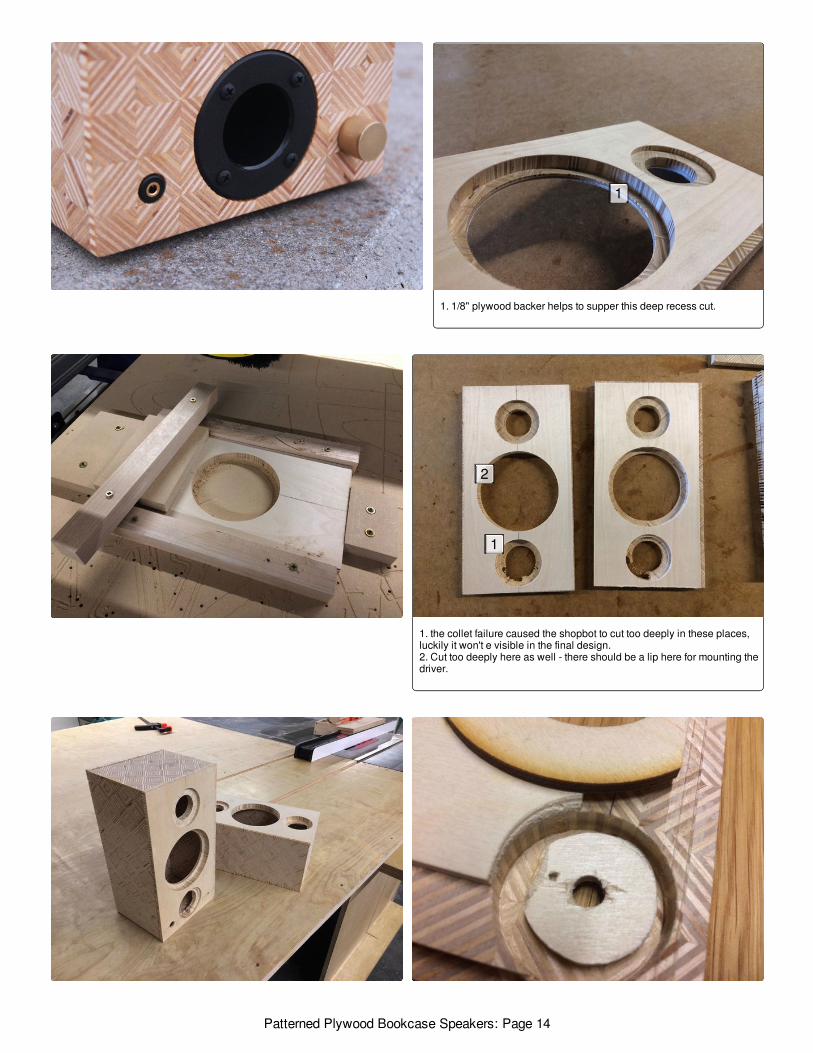
1. 1/8" plywood backer helps to supper this deep recess cut.
1. the collet failure caused the shopbot to cut too deeply in these places,luckily it won't e visible in the final design.2. Cut too deeply here as well - there should be a lip here for mounting thedriver.
1
1
2
Patterned Plywood Bookcase Speakers: Page 14
Step 5: Electronics
1. brass shim stock for mounting 3.5mm jack.
1
Patterned Plywood Bookcase Speakers: Page 15
Step 6: Final Glueup and Finishing
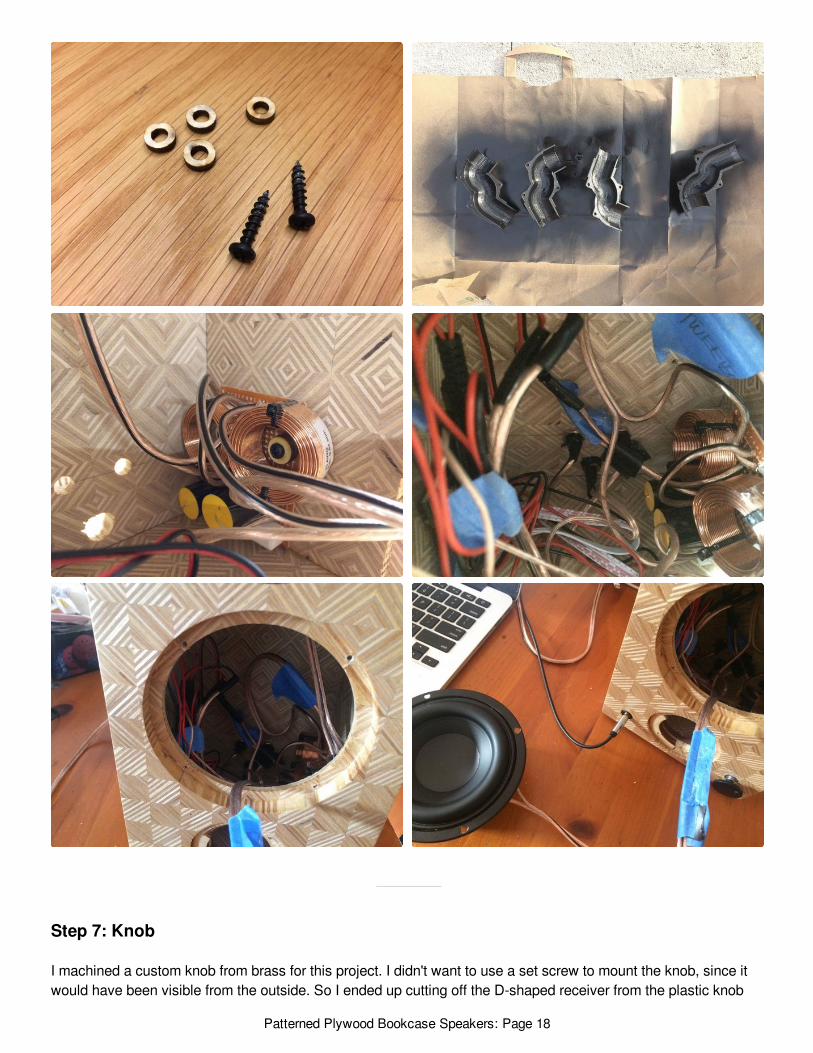
Next I soldered the components on the perf boardaccording to the schematics. The capacitors have nopolarization and no indication of direction, but Ioriented the text in the same orientation to make thecrossover boards as similar as possible. I drilled outholes in the perf board so I could use the same 16gauge speaker wire for connecting these boards -though a 20 gauge wire would have been easier towork with - you can also use the larger gauge wireincluded with the amplifier.
I didn't use the capacitors or ferrite cores includedwith the amplifier board since I'm using a crossoverfor this design.
I tested the crossovers by running sine waves ofvarious frequencies into them and measuring the
output on an oscilloscope. You should see that thecircuit to the tweeter acts as a high pass filter and thecircuit to the woofer acts as a low pass filter. I labeledthe wires "wooffer" and "tweeter" so that I wouldn't beconfused later.
I am convinced that the components I used in thesecrossovers are way overrated for the specs of thesedrivers - though the parts I'm seeing on Digikey aren'tmuch cheaper. If anyone has suggestions, I'd love tohear them.
I assembled a 6ft cable with banana plugs on bothends following this video. You can unscrew the tip ofthe plug to help make mounting the cable easier.
Patterned Plywood Bookcase Speakers: Page 16
I cleaned up the inside surfaces of the box with adamp rag and applied blue tape to the inside of all theholes before glueing up the front panels. This will helpkeep dust out of the enclosure during finishing.
Finally I glued up the front panels to the rest of thehousing. Be sure the the panel with the extra holes goto the housing with the power hole.
I sanded down the front and back panels so theywere flush with the rest of the housing. I chamferedthe edges slightly by hand using 120 grit. Using theorbital sander I brought the grit down from 120 to 180,240, and 360.
I cleaned up any dust left on the outside of thehousing and finished with 2 coats of polyurethane,sanding with fine steel wool between each coat.
I sprayed the inside of the 3d printed port tube elbowjoints black so that the white filament would not be
visible from the outside before installing them in thespeaker housing. I cut the flanged port tube to lengthso it would fit inside the elbow joint. The final portlength is approximately the ~12 inches I aimed for inthe initial design.
Finally I installed all the connectors, rubber feet, andwired up the final electronics. I mounted theelectronics using some plywood washers I laser cutfrom the 1/8" ply.
I used the spray adhesive to mount a bit of the polyfillon the inside on the enclosure.
I predrilled the holes for mounting the speaker driversand hand screwed the drivers in place. I steadied myhand (with my other hand) during this final assemblyto prevent the screw driver from slipping andaccidentally hitting the speaker cones.
Patterned Plywood Bookcase Speakers: Page 17
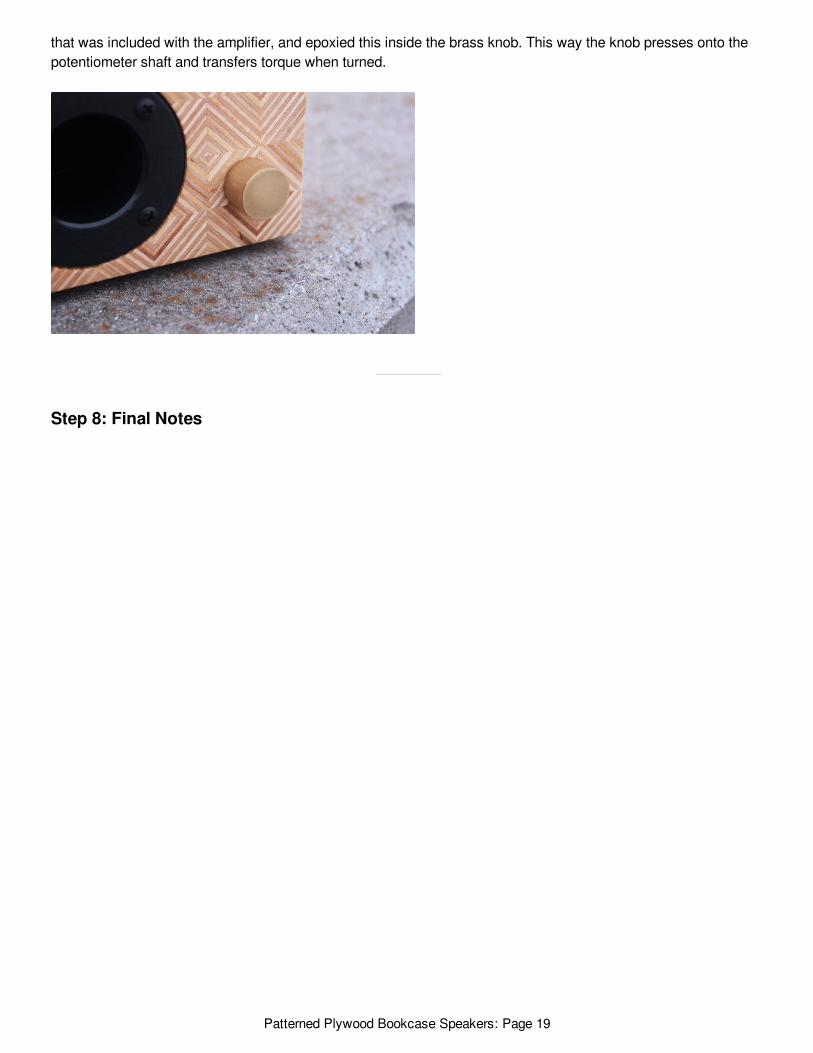
Step 7: Knob
I machined a custom knob from brass for this project. I didn't want to use a set screw to mount the knob, since itwould have been visible from the outside. So I ended up cutting off the D-shaped receiver from the plastic knob
Patterned Plywood Bookcase Speakers: Page 18
Step 8: Final Notes
that was included with the amplifier, and epoxied this inside the brass knob. This way the knob presses onto thepotentiometer shaft and transfers torque when turned.
Patterned Plywood Bookcase Speakers: Page 19
Dang this is so cool! The plywood glue up is super impressive! Good to see whats coming out ofyour workspace - miss ya!
Those are real nice. You should go into business with those. :)
In the end I was really happy with the final sound ofthese speakers. I didn't have any measuringequipment to test the final frequency response, but byear they sounded pretty flat down to about 55Hz -which is what I'd spec'ed in the design process. Icould hear some frequencies down at 50Hz, thoughthey were significantly attenuated.
One of the main things I would have changed aboutthe design was to make the speakers deeper andnarrower to better accommodate the componentsinside. In this design I barely had enough room toroute the port behind the woofer, and I had to makethe bend in the port a funky shape to dodge theelectronics that were mounted inside.
One of the main things I've learned in this build - DIYspeakers are generally more about the learningprocess and customizing the look/sound of a design,and not so much about saving money. Even though Iused 4x ~$10 drivers in this design, the total cost ofthe electronics was up around $120. That said, thereare a number of things you could do to save moneyon a speaker build, including:
Use full range drivers rather than dedicatedwoofers/tweeters - while full range drivers won'tcover the ends of the audio spectrum as well as adedicated tweeter/woofer setup, you can avoid usinga passover with full range drivers which willsignificantly reduce the cost. I was surprised that I
ended up spending as much on crossovercomponents as I did on my drivers - maybe I couldhave spent more time optimizing the crossover, but itwas very expensive at about $20-$25 each. I think asa next project I'd like to take this approach and focusmore effort on the design of the enclosure to helpboost the bass response of the driver.
Find a cheap crossover on clearance and matchyour speakers to it - another thing I wish I'd thoughtof from the onset was to start by looking for aclearance crossover on Parts Express (like this 4kHz2 way crossover for $3) and match the rest of mysetup to fit the the crossover (maybe even justmodifying one or two components on the existingpassover). By the time I found this part I was alreadytoo far through the build to go back.
Use a first order crossover - it would have beeninteresting to experiment with a first order crossover,which has less components (and is therefore lessexpensive) than the second order design I used. Ididn't have time to get into this, but maybe I will trynext time.
Use an external amp - about $45 of my parts werean amp, a power supply for the amp, and connectorsfor the amp. I wanted this to be a self-containedspeaker system with a built in amp - but it did drivethe price up quite a bit.
Patterned Plywood Bookcase Speakers: Page 20