patronage & equity - agtraxagtrax.com/portals/0/manuals/patmanual.pdf · patronage / equity...
TRANSCRIPT
Software Version 8.00.003 April 15, 2017
PATRONAGE / EQUITY
USER'S GUIDE
This document is non-technical and explains the operation of the Patronage / Equity programs. It is intended for both accounting staff and operators.
Software Version 8.00.003 April 15, 2017
COPYRIGHT© 2017 AgTrax®
Copyright© by AgTrax®
1632 E. 23rd Ave
PO Box 2044
Hutchinson, KS 67504-2044
The software described in this document is furnished under contract for use only on a single computer
system and may be copied only with the inclusion of the above copyright notice. The software is furnished
under a license and may be used or copied only in accordance with the terms of such license agreement.
The information in this document is subject to change without notice and should not be construed as a
commitment by AgTrax®. AgTrax® assumes no responsibility for any errors that may appear in this
document.
Title to the software shall at all times remain with AgTrax®, regardless of any modifications made by the
users. Software cannot be used on any other computer system without a License Agreement and
payment of royalty.
Software Version 8.00.003 April 15, 2017
TABLE OF CONTENTS
INTRODUCTION
PATRONAGE / EQUITY OVERVIEW .......................................................................................................... 1 PATRONAGE / EQUITY DATA FILES ........................................................................................................ 1
Patronage Detail File ................................................................................................................................. 1 Patronage Allocation Files ......................................................................................................................... 1 Check Payee File ...................................................................................................................................... 1 Equity Code Master File ............................................................................................................................ 2 Equity Balance File .................................................................................................................................... 2 Equity Detail File ........................................................................................................................................ 2
RECOMMENDED PROCEDURES ............................................................................................................... 3 Getting Started .......................................................................................................................................... 3 Daily Routine ............................................................................................................................................. 4 Calendar Year End .................................................................................................................................... 4 Fiscal Year End ......................................................................................................................................... 4
USER'S GUIDE U S E R ' S G U I D E.................................................................................................................................. 5 PATRONAGE / EQUITY MENU ................................................................................................................... 6 FILE MAINTENANCE 11. PATRONAGE GROUP(S) ..................................................................................................................... 7 12. EQUITY CODES ................................................................................................................................... 11 13. EQUITY ................................................................................................................................................. 14
(ADD MODE) ........................................................................................................................................... 16 (PRINT MODE) ........................................................................................................................................ 18 (PAYOUT MODE) .................................................................................................................................... 20 (SEQUENCE MODE) .............................................................................................................................. 23 (REDEEM MODE) ................................................................................................................................... 26 (CHECK CORRECTION) ........................................................................................................................ 31 (1099 CORRECTION) ............................................................................................................................. 39
14. ALLOCATION AND PAYMENT CONTROLS ...................................................................................... 42 DAILY ACTIVITY 21. PATRONAGE UPDATE ....................................................................................................................... 68
21.1 PATRONAGE UPDATE FROM SALES ANALYSIS ....................................................................... 69 21.2 PATRONAGE UPDATE FROM REGULAR HISTORY ................................................................... 71 21.3 PATRONAGE UPDATE FROM REGIONAL HISTORY .................................................................. 72
22. PATRONAGE MAINTENANCE ........................................................................................................... 73 23. PATRONAGE TRANSFERS ................................................................................................................ 75 24. PATRONAGE VOLUME / ALLOCATION REPORT ............................................................................ 77 25. PRINT CHECKS ................................................................................................................................... 89 26. UPDATE EQUITY ................................................................................................................................. 93 REPORTING 31. EQUITY LISTING .................................................................................................................................. 96 32. CHECK REGISTER ............................................................................................................................ 103 36. MASTER FILE LISTINGS................................................................................................................... 105
36.01 PATRONAGE CONSOLIDATION GROUPS .............................................................................. 106 36.02 EQUITY CODE MASTERS ......................................................................................................... 108 36.03 PATRONAGE MAINTENANCE ................................................................................................... 110
Software Version 8.00.003 April 15, 2017
MONTHLY / GENERAL 41. 1099 MENU ......................................................................................................................................... 112
41.1 BUILD 1099 DETAIL FILE ............................................................................................................. 114 41.2 AUDIT LISTING ............................................................................................................................. 118 41.3 MAINTENANCE ............................................................................................................................ 124 41.4 COMPANY MAINTENANCE ......................................................................................................... 131 41.5 1099 FORMS ................................................................................................................................. 132
42. PATRONAGE IMPORT/EXPORT ...................................................................................................... 136 43. UOM MAINTENANCE ........................................................................................................................ 142 UTILITIES UT. UTILITIES MENU ............................................................................................................................... 145
UT.2 – PATRONAGE AND EQUITY OPTIONS .................................................................................... 146 UT.4 – PURGE PATRONAGE VOLUME .............................................................................................. 150 UT.5 - PURGE EQUITY RECORDS ..................................................................................................... 152 UT.6 - CHECK FORMAT SAMPLER .................................................................................................... 153 UT.7 - QUANTITY ADJUSTMENT UTILITY .......................................................................................... 154
APPENDICIES APPENDIX I STANDARD CONVENTIONS .................................................................................... 156 APPENDIX II O/E AND C/A SETUP TO UPDATE SALES ANALYSIS ........................................... 167 APPENDIX III BALANCING SALES ANALYSIS TO GENERAL LEDGER ..................................... 171 APPENDIX IV UPDATING SALES ANALYSIS TO PATRONAGE ................................................... 174 APPENDIX V STEPS TO COMPLETE A PATRONAGE ALLOCATION .......................................... 176 APPENDIX VI CALENDAR YEAR END FORMS ............................................................................... 180 APPENDIX VII TRAXREPORT ........................................................................................................... 182
Patronage / Equity User’s Guide – Page - 1
Software Version 8.00.003 April 15, 2017
PATRONAGE / EQUITY OVERVIEW
The Patronage / Equity module serves a dual function. First, it is designed to receive data from the Sales Analysis module in a condensed format so that it is ready to do a patronage allocation. The module provides for all steps necessary to complete an allocation run including reports, check printing and updating member equity files. Secondly, it is designed to manage the tasks of tracking individual member equity accounts. This includes account maintenance, equity payouts either on an individual basis or as part of a retirement program and calendar yearend tax form preparation. Reporting functionality includes:
Reports that an auditor may require for completion of an audit. Those needed to complete a patronage allocation or equity payout. An Equity Investment Listing that may be run by numerous sort criteria.
PATRONAGE / EQUITY DATA FILES
Patronage / Equity uses several data files to store information. Patronage Detail File Information in this file is stored by:
Patronage Date (Normally first day of fiscal year)
Customer account number
Branch number
Patronage consolidation group number
Transaction type (Regular, Adjustment, Transfer, Storage accrual, Check)
Allocation date (Any date greater than zero is a history record, zero equals current record, -1 equals next year)
Amount
Quantity
Check number
Check date Patronage Allocation Files All of the prompt settings in PE11 (PATRONAGE GROUPS) and PE14 (ALLOCATION AND PAYMENT CONTROLS) are stored in four files. This allows the System to display settings from previous allocations when that same type of project is used again. Only changes to settings need to be made as opposed answering all prompts again. Check Payee File Information in this file is stored by:
Check date
Check number
Customer
Patronage / Equity User’s Guide – Page - 2
Software Version 8.00.003 April 15, 2017
Payee Name
Payee address
Payee city, state, zip code
Payee miscellaneous name Equity Code Master File This file stores all prompt answers by individual equity code as defined in PE12. Equity Balance File Whenever an operator goes into PE13, the equity information displayed after entering a customer account number is taken from the summary file. As the name implies only summary information by equity code and issued year is displayed on this screen. Information in this file is stored by:
Customer account number
Equity code number
Equity issued year
Certificate number
Amount Equity Detail File After the System has displayed a customer’s equity summary information, the operator may choose a sequence line to look at detail for that line or use a print option to view / print all detail. Information is this file is stored by:
Serial ID Number
Customer account number
Equity code
Equity year
Certificate Number
Transaction date
Transaction type
Sequence number
Description
Amount
Check number
Check date
Record created date
Patronage / Equity User’s Guide – Page - 3
Software Version 8.00.003 April 15, 2017
RECOMMENDED PROCEDURES
Getting Started Initially, this sequence of procedures should be followed to set up the PATRONAGE / EQUITY module:
Create all files required by the new Patronage / Equity using program “UT-1. INITIALIZE ALL FILES”. Add any patronage consolidation groups to be used in PE11. Patronage consolidation groups are used to condense information as it is updated from Sales Analysis. Inventory group masters as defined in IV11 are also used as Patronage consolidation group masters. The only difference to the System which numbers serve a dual purpose is whether they are set up in PE11. Each Inventory Product master (IV13) has a field labeled PAT GROUP. When records are updated to Patronage, the System reads this field to find matches for group numbers defined in the cross- reference table for each Patronage consolidation number. As matches are found, records are combined by customer and consolidation group. Any Inventory Product master that is to be included with other customer activity as part of their patronage volume should contain the appropriate consolidation group number. During the Patronage Allocation process the System has features to handle backup withholding. The program (PE24) checks a designated Accounts Receivable Miscellaneous Field. This field is setup in Accounts Receivable Utilities Menu option 4. It should be defined as a Yes / No response field. Any customers subject to backup withholding should have this miscellaneous field set YES in AR11 (CUSTOMER MASTER). Define any Equity Code masters to be used in PE12. Include an Equity Code to use for backup withholding. Any customer subject to backup withholding will have a portion of the cash proceeds payable to them added to this equity code. Operators then deposit this amount with IRS and zero the equity code to reflect that funds have been forwarded to the government. Pay special attention to prompts for:
QUALIFIED This tells the System whether new stock earned is reportable as income in the year that it is earned or the year that it is paid to the customer.
PAR The dollar value of one share of stock. MAXIMUM ISSUE The largest dollar amount of the current equity code that one customer
can own. Define all Patronage / Equity module settings in PEUT02 (P&E OPTIONS). Note that once PATRONAGE BY MONTH has been set, it cannot be changed without purging any existing patronage records. Organizations that are using Bank Reconciliation verify that setup has been completed in that module. A Bank Master is required to update check records. This may or may not be the same as another existing master. If check records are to update automatically then prompting in BRUT02 is set AUTO POST PATRONAGE & EQUITY = YES and a Bank Master number designated.
Patronage / Equity User’s Guide – Page - 4
Software Version 8.00.003 April 15, 2017
Otherwise, Bank Recon option 42 is used to update records periodically. Check records created through PE13 are updated to Bank Reconciliation as soon as they are accepted. Those created through PE25 are updated at the time PE26 is run. There is no ACH (customer direct deposit) capability in this module.
Daily Routine At different times during the year it may be necessary to maintain customer equity accounts due to stock redemptions or customer new equity purchases. All equity maintenance is done in PE13 (EQUITY). As soon as any record is accepted it is updated to the customer equity account. The Patronage / Equity Module does not interface with General Ledger so any maintenance performed in this module should have a like dollar amount entry made to the appropriate General Ledger numbers. Calendar Year End Use Menu option 41 to generate calendar year end tax forms for customers. Sub-menu options provide for building the 1099 file, any needed maintenance, printing forms and building a file for electronic IRS filing. Fiscal Year End After activity for the last accounting date of the fiscal year has been updated, records should be ready to update from Sales Analysis to Patronage. For a review of how the System updates records from Order Entry and Commodity Accounting to Sales Analysis, see Appendix II. Ideally information in Sales Analysis has been balanced to General Ledger during the year. For a discussion on this subject, see Appendix III. If Sales Analysis has not been balanced to General Ledger during the year, users have two options. One is to balance it now. The other is to update to Patronage and balance from there. Before updating to Patronage several items need to be checked there. Any activity from a previous fiscal year end must be updated (PE26). The yearend date in PEUT02 should reflect the fiscal year end date for the year just completed. For a more detailed discussion review Appendix IV. See Appendix V for a listing of steps to complete a Patronage allocation.
Patronage / Equity User’s Guide – Page - 5
Software Version 8.00.003 April 15, 2017
U S E R ' S G U I D E
Written with the operator in mind, this section of the User's Guide contains detailed instructions for
each Patronage / Equity program.
When displayed on-screen, the Patronage / Equity system appears as a menu. Various programs
are listed on this main menu. Each Patronage / Equity program is identified by a program number.
To access a program, enter the number of the desired program. When the operator exits a
program, the System redisplays the main Patronage / Equity menu.
For Standard Conventions (common keystrokes, prompts, printer use, cursor movement, etc.)
used in every program refer to Appendix I, STANDARD CONVENTIONS.
For an explanation of the menu-hopping feature used throughout the Sales Analysis system, refer to Appendix I, STANDARD CONVENTIONS - Menu Hopping.
Patronage / Equity User’s Guide – Page - 6
Software Version 8.00.003 April 15, 2017
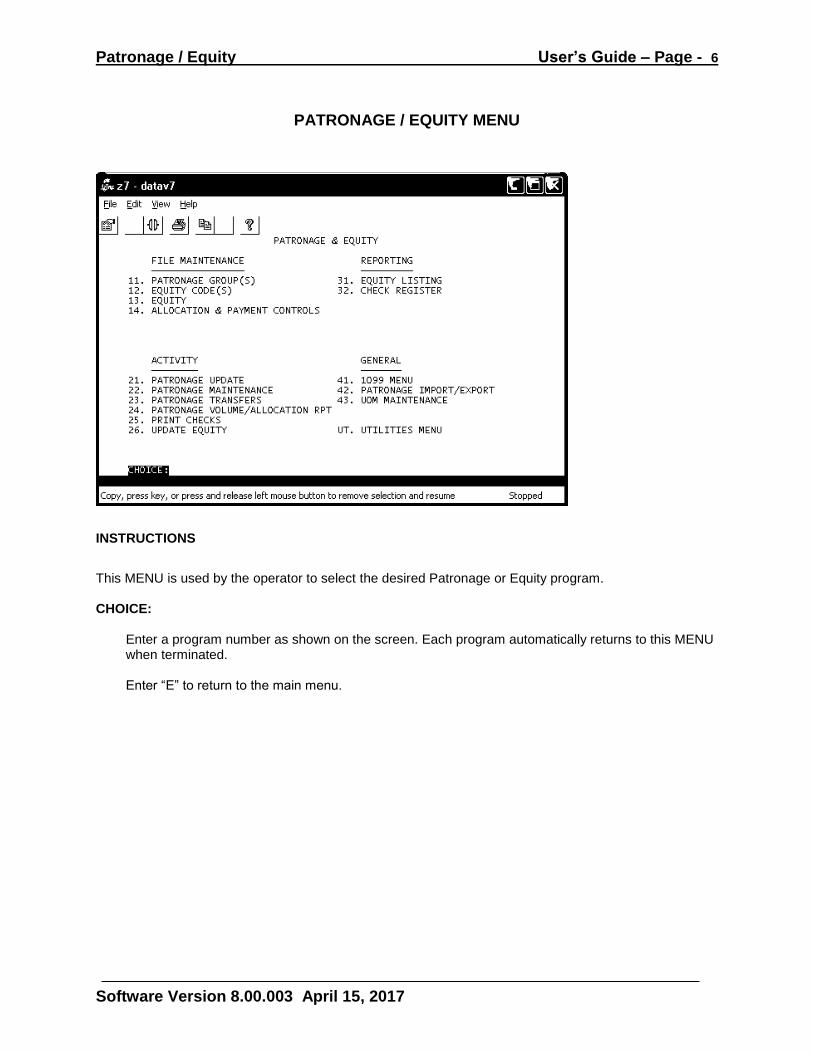
PATRONAGE / EQUITY MENU
INSTRUCTIONS
This MENU is used by the operator to select the desired Patronage or Equity program. CHOICE:
Enter a program number as shown on the screen. Each program automatically returns to this MENU when terminated.
Enter “E” to return to the main menu.
Patronage / Equity File Maintenance – Page - 7
Software Version 8.00.003 April 15, 2017
11. PATRONAGE GROUP(S)
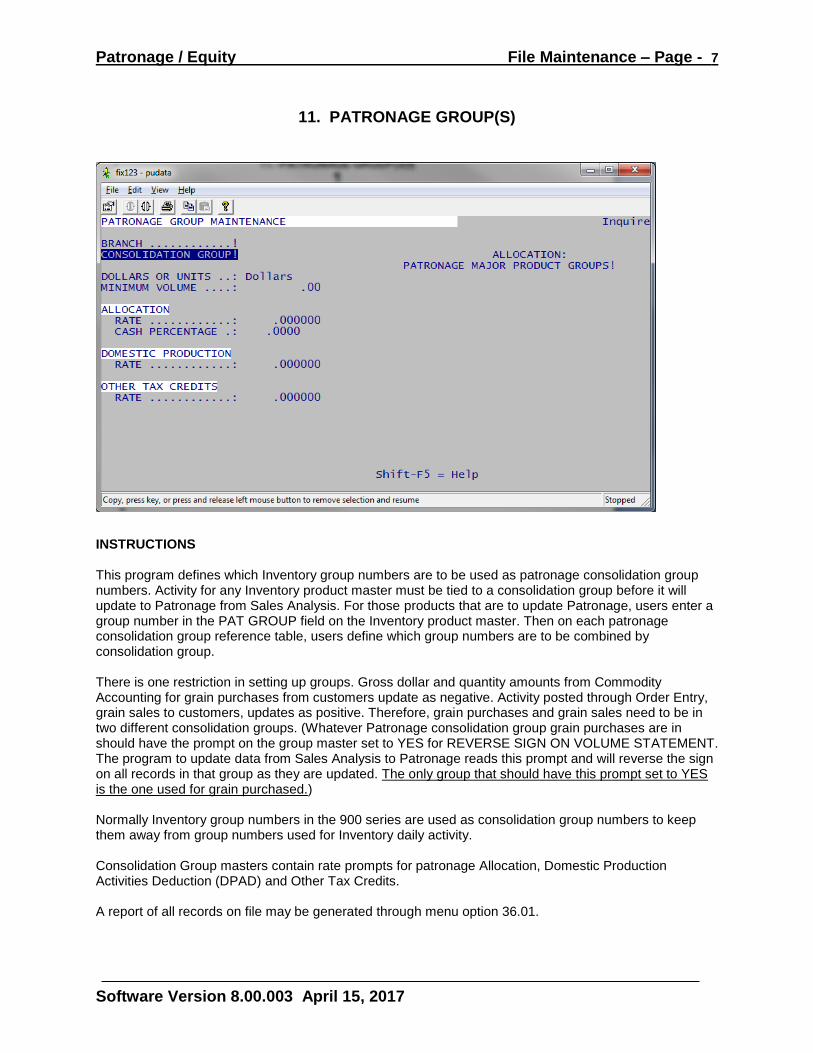
INSTRUCTIONS This program defines which Inventory group numbers are to be used as patronage consolidation group numbers. Activity for any Inventory product master must be tied to a consolidation group before it will update to Patronage from Sales Analysis. For those products that are to update Patronage, users enter a group number in the PAT GROUP field on the Inventory product master. Then on each patronage consolidation group reference table, users define which group numbers are to be combined by consolidation group. There is one restriction in setting up groups. Gross dollar and quantity amounts from Commodity Accounting for grain purchases from customers update as negative. Activity posted through Order Entry, grain sales to customers, updates as positive. Therefore, grain purchases and grain sales need to be in two different consolidation groups. (Whatever Patronage consolidation group grain purchases are in should have the prompt on the group master set to YES for REVERSE SIGN ON VOLUME STATEMENT. The program to update data from Sales Analysis to Patronage reads this prompt and will reverse the sign on all records in that group as they are updated. The only group that should have this prompt set to YES is the one used for grain purchased.) Normally Inventory group numbers in the 900 series are used as consolidation group numbers to keep them away from group numbers used for Inventory daily activity. Consolidation Group masters contain rate prompts for patronage Allocation, Domestic Production Activities Deduction (DPAD) and Other Tax Credits. A report of all records on file may be generated through menu option 36.01.

Patronage / Equity File Maintenance – Page - 8
Software Version 8.00.003 April 15, 2017
Any of the following prompts that has an exclamation point in it, indicates that a lookup window is available for valid responses. Operators should use the lookup key (SELECT KEY) on their keyboard to access the window. TRANSACTIONAL PROGRAMS SECURITY
Programs that allow an operator to directly add or maintain records in a file are referred to as Transactional Programs. They are quickly identified by their functions of Inquire, Add, Change and Delete. Each function is controlled by a separate flag in Security By Function. So an operator may be allowed to Inquire or Change existing records but not allowed to Add new records or Delete existing records. The Purchasing Module also recognizes two additional flag settings for Receive and Invoice.
TRANSACTIONAL PROGRAMS USE Transactional programs default to INQUIRE mode when a program is selected. Operators have the choice of choosing an alternate function immediately (Add, Change or Delete) or keying required data to display a particular record, then switching to the desired function (Change or Delete). A help window may be accessed by operators to view the functions available in a particular program.
BRANCH…!
Enter an Inventory branch number. This prompt will display only if patronage by branch has been defined in PEUT02. If patronage by branch is activated then each consolidation group must be defined at each Inventory branch.
CONSOLIDATION GROUP!
In any of the maintenance modes key the consolidation group number to be added / maintained. For inquiry mode touch <ENTER> and the lowest numbered group will display. Valid group numbers are 1 – 999.
DOLLARS OR UNITS…:
Patronage refund allocations may be calculated on dollar volume of business or quantity. Select which basis is to be used for this consolidation group.
MINIMUM VOLUME…:
If customers must meet some level of business volume before they can receive a refund for the current consolidation group, enter that amount. Groups set to pay based on dollars will interpret the amount as a dollar figure. Those set to pay on units will interpret it as quantity.
ALLOCATION RATE…:
Enter a refund rate. The System will handle up to 6 digits after a decimal point. For a refund of 51/2 % based on dollar volume enter 5.500000. To enter a refund rate of 51/2cents per unit key .055000. The System presumes that the UNIT OF MEASURE for records in Patronage are in the format to coincide with the rate entered. If they are not, the rate should be entered to match the UNIT OF MEASURE for the records or use PE43 to change the UNIT OF MEASURE to match the rate. If a particular group is not to be used in a specific Allocation run set the RATE to 0.00.
CASH PERCENTAGE…:
Key the percentage of refund that is to be paid in cash. A 30 percent cash portion is entered as 30.0000.
Patronage / Equity File Maintenance – Page - 9
Software Version 8.00.003 April 15, 2017
DOMESTIC PRODUCTION RATE…:
Enter a refund rate. The System will handle up to 6 digits after a decimal point. For a refund of 51/2 % based on dollar volume enter 5.500000. To enter a refund rate of 51/2cents per unit key .055000. The System presumes that the UNIT OF MEASURE for records in Patronage are in the format to coincide with the rate entered. If they are not, the rate should be entered to match the UNIT OF MEASURE for the records or use PE43 to change the UNIT OF MEASURE to match the rate. Only enter a rate for those Consolidation Groups that are to be used in a DPAD activity run.
OTHER TAX CREDITS
RATE…: Enter a refund rate. The System will handle up to 6 digits after a decimal point. For a refund of 51/2 % based on dollar volume enter 5.500000. To enter a refund rate of 51/2cents per unit key .055000. The System presumes that the UNIT OF MEASURE for records in Patronage are in the format to coincide with the rate entered. If they are not, the rate should be entered to match the UNIT OF MEASURE for the records or use PE43 to change the UNIT OF MEASURE to match the rate. Only enter a rate for those Consolidation Groups that are to be used in an Other Tax Credit activity run. Since there a possibility of several different Other Tax Credits to be calculated and reported each is run separately. The current one being calculated is defined in PE14 (ALLOCATION AND PAYMENT CONTROLS).
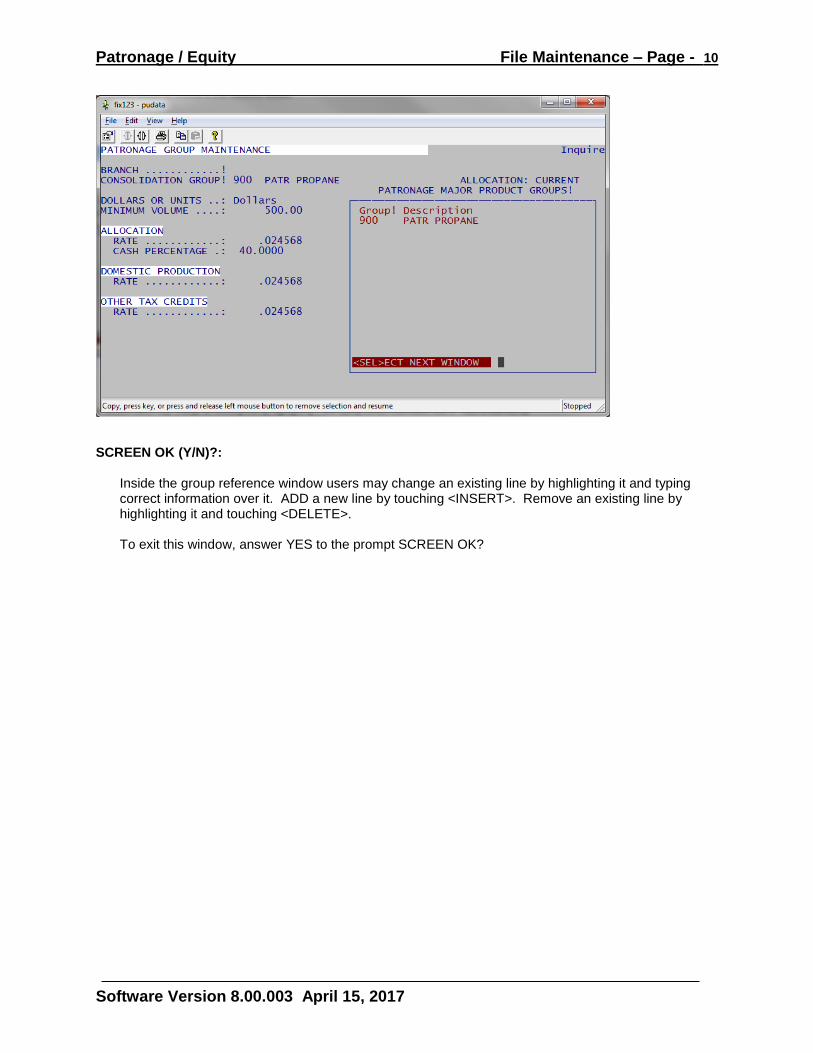
PATRONAGE MAJOR PRODUCT GROUPS
There are several numbering methods that can be used in maintaining the PAT GROUP field on an Inventory Product master. The first is to use the Inventory major group number on a product as the PAT GROUP number also. Secondly, the Patronage consolidation group number that activity is to update may be used. Which method an organization uses depends upon personal preference. During the process of pulling data into Patronage, the System needs a way to know what data goes with which consolidation group number. The reference table in this window fills that demand. Enter each number that is contained in the PAT GROUP field on any product master and is to be combined into the current consolidation group. Only valid Inventory group numbers should be entered in this reference window.
PATRONAGE MAJOR PRODUCT GROUP SCREEN
Patronage / Equity File Maintenance – Page - 10
Software Version 8.00.003 April 15, 2017
SCREEN OK (Y/N)?:
Inside the group reference window users may change an existing line by highlighting it and typing correct information over it. ADD a new line by touching <INSERT>. Remove an existing line by highlighting it and touching <DELETE>. To exit this window, answer YES to the prompt SCREEN OK?
Patronage / Equity File Maintenance – Page - 11
Software Version 8.00.003 April 15, 2017
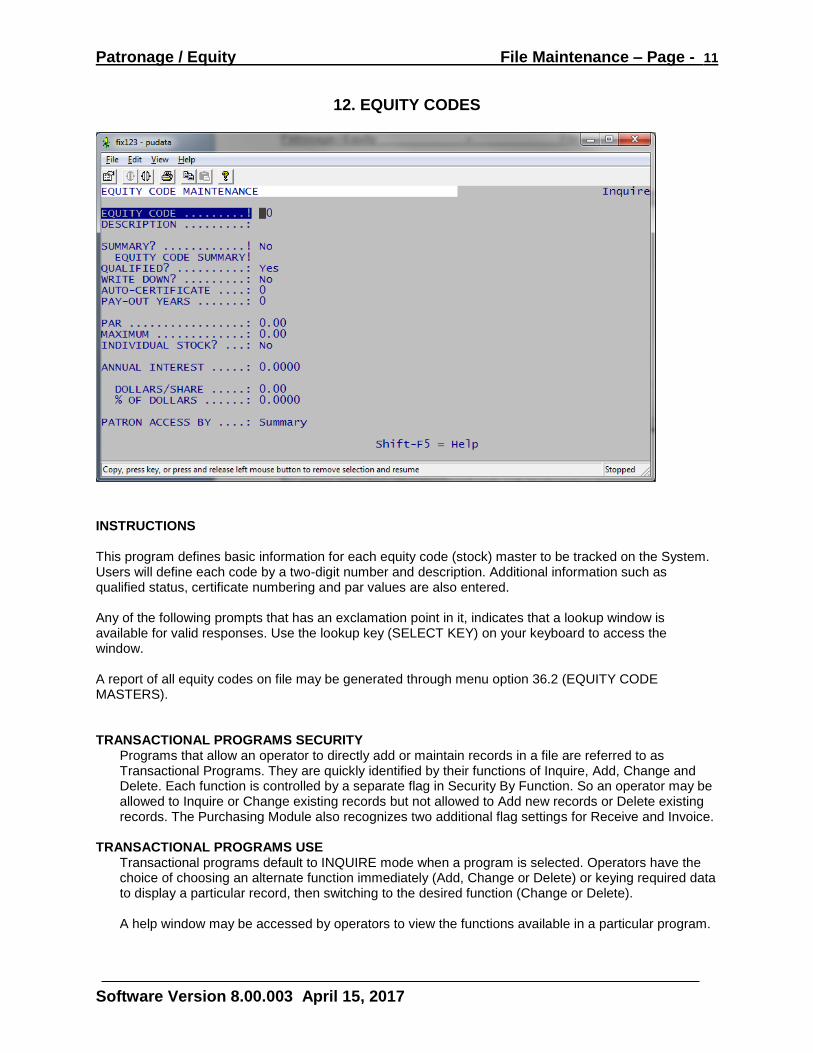
12. EQUITY CODES
INSTRUCTIONS This program defines basic information for each equity code (stock) master to be tracked on the System. Users will define each code by a two-digit number and description. Additional information such as qualified status, certificate numbering and par values are also entered. Any of the following prompts that has an exclamation point in it, indicates that a lookup window is available for valid responses. Use the lookup key (SELECT KEY) on your keyboard to access the window. A report of all equity codes on file may be generated through menu option 36.2 (EQUITY CODE MASTERS). TRANSACTIONAL PROGRAMS SECURITY
Programs that allow an operator to directly add or maintain records in a file are referred to as Transactional Programs. They are quickly identified by their functions of Inquire, Add, Change and Delete. Each function is controlled by a separate flag in Security By Function. So an operator may be allowed to Inquire or Change existing records but not allowed to Add new records or Delete existing records. The Purchasing Module also recognizes two additional flag settings for Receive and Invoice.
TRANSACTIONAL PROGRAMS USE Transactional programs default to INQUIRE mode when a program is selected. Operators have the choice of choosing an alternate function immediately (Add, Change or Delete) or keying required data to display a particular record, then switching to the desired function (Change or Delete). A help window may be accessed by operators to view the functions available in a particular program.
Patronage / Equity File Maintenance – Page - 12
Software Version 8.00.003 April 15, 2017
EQUITY CODE…!
Equity codes may be any number 1 – 99 that is not already in use. A help window is available. DESCRIPTION…:
Enter generic text to identify the equity code. The description may be up to 30 characters in length.
SUMMARY?…:
Summary codes are those designed to total up several other equity codes for a special type of function such as Equity reorganization. Summary codes never have any activity or balance of their own. Normally this prompt is NO.
QUALIFIED?…:
According to IRS tax status, equity codes are either qualified or non-qualified. Normally this will be qualified.
WRITE DOWN? …:
The only time this prompt will be set to YES is when an organization is doing an equity write down and the current code is involved in that write down. As soon as that process is complete this prompt should be changed to NO.
AUTO-CERTIFICATE..:
For those organizations issuing a pre-numbered stock certificate form to customers when they buy / earn stock, enter the number of the next certificate form. Otherwise, leave this prompt blank.
PAY-OUT YEARS…:
Currently this prompt is not being used.
PAR…:
If the current equity code has a par value per share of stock, enter that dollar amount. Leave the amount set to zero for other equity codes.
MAXIMUM…:
Stocks with PAR value will normally also have a maximum dollar amount that each customer can own. Key the largest dollar amount of the current stock that any customer can own. For stocks with no PAR value leave this prompt set to zero.
Patronage / Equity File Maintenance – Page - 13
Software Version 8.00.003 April 15, 2017
INDIVIDUAL STOCK?:
This prompt works in conjunction with AUTO-CERTIFICATE. Presume an equity code has PAR value of $50.00 dollars and maximum issue is $1000.00. If a customer earns more than one share in a year is the System to assign one certificate number for all shares earned or a separate certificate number for each share earned. If the latter is true, answer YES. Otherwise answer NO.
ANNUAL INTEREST..:
For those equity codes where interest is to be paid, enter the annual rate. An interest rate of five percent is entered as 5.0000. As part of the setup to make an interest payment (PE14), users are required to enter a calculation rate. So the ANNUAL INTEREST rate for this prompt may be left blank.
DOLLARS/SHARE % OF DOLLARS
Enter dividend rates in only one of the fields. A dollar amount per share of one dollar is entered as 1.00. To use a percent of outstanding equity dollars, key the percent to be used. Five percent is keyed as 5.0000.
PATRON ACCESS BY
Those organizations that allow customers to access their equity accounts via the internet can choose the amount of detail they are allowed to view. Choose the level of detail that the customer is allowed to view. CERTIFICATE is used as a program default and includes all detail.
SUMMARY – Total amount outstanding per equity code. YEAR – Amount outstanding by issued year of the equity code CERTIFICATE – This selection will display detail. The detail includes certificate number and remaining balance per certificate. NONE – Do not display any information for this equity code.
Organization not using PATRON ACCESS can ignore this prompt. Its’ setting makes no difference to any display or print of information within AgTrax.
Patronage / Equity File Maintenance – Page - 14
Software Version 8.00.003 April 15, 2017
13. EQUITY
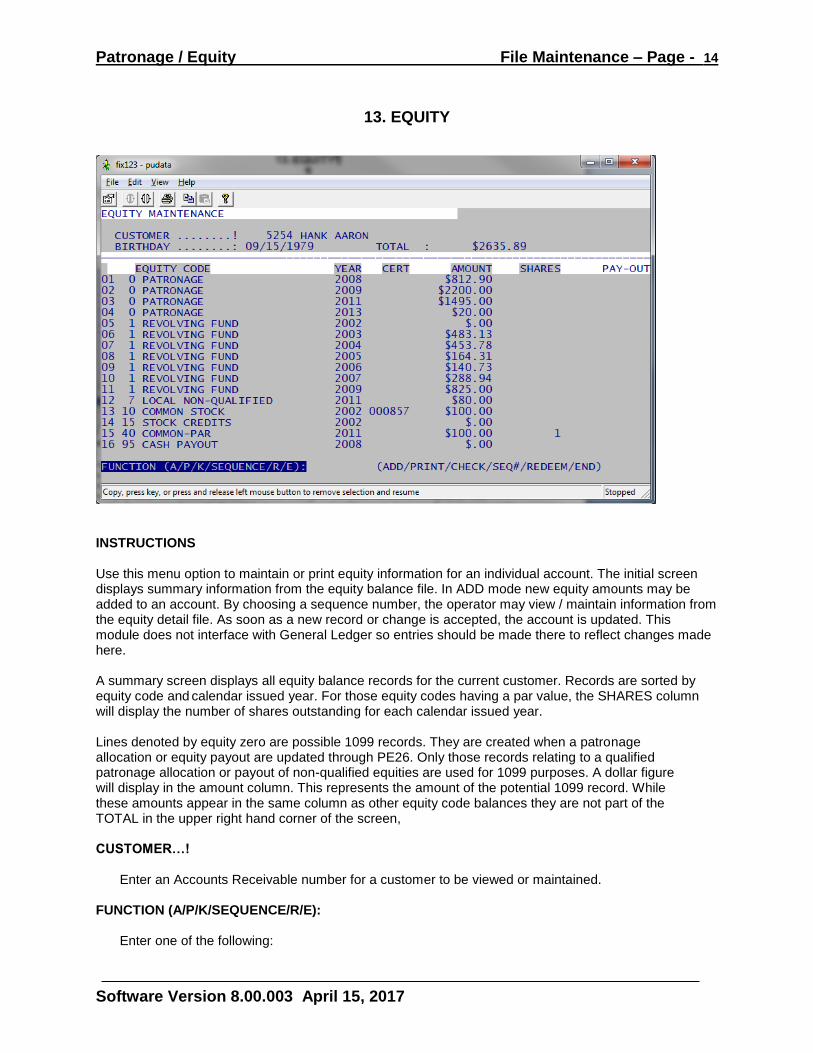
INSTRUCTIONS Use this menu option to maintain or print equity information for an individual account. The initial screen displays summary information from the equity balance file. In ADD mode new equity amounts may be added to an account. By choosing a sequence number, the operator may view / maintain information from the equity detail file. As soon as a new record or change is accepted, the account is updated. This module does not interface with General Ledger so entries should be made there to reflect changes made here. A summary screen displays all equity balance records for the current customer. Records are sorted by equity code and calendar issued year. For those equity codes having a par value, the SHARES column will display the number of shares outstanding for each calendar issued year. Lines denoted by equity zero are possible 1099 records. They are created when a patronage allocation or equity payout are updated through PE26. Only those records relating to a qualified patronage allocation or payout of non-qualified equities are used for 1099 purposes. A dollar figure will display in the amount column. This represents the amount of the potential 1099 record. While these amounts appear in the same column as other equity code balances they are not part of the TOTAL in the upper right hand corner of the screen, CUSTOMER…! Enter an Accounts Receivable number for a customer to be viewed or maintained. FUNCTION (A/P/K/SEQUENCE/R/E):
Enter one of the following:
Patronage / Equity File Maintenance – Page - 15
Software Version 8.00.003 April 15, 2017
A - ADD a new equity issue record. P - PRINT a listing of all records for the current account. K - CHECK payout of equity amounts.
S - SEQUENCE line number. Changes screen from summary display to specific equity code year detail records.
R - REDEEM a specific equity code for all outstanding years. E - END this program and return to previous menu.
Due to the number of prompts involved in each FUNCTION they will be covered separately in the following sections.

Patronage / Equity File Maintenance – Page - 16
Software Version 8.00.003 April 15, 2017
13. EQUITY (ADD MODE)
INSTRUCTIONS
The ADD mode allows an operator to insert new issue records for a specific equity code and calendar year.
EQUITY CODE…!
Enter the code to be added. Equity codes were previously defined in PE12. YEAR …:
Assign a calendar issue year to the record. The issue year is entered as YYYY. CERTIFICATE..:
Key the stock certificate number for this record if there is one. Otherwise, touch ENTER to leave it blank.
TRAN TYPE…:
The System will maintain this prompt based upon how the equity code is defined in PE12. Equity code zero allows the operator to choose: Qualified, Non-qualified, DPAD or Tax Credits.
Patronage / Equity File Maintenance – Page - 17
Software Version 8.00.003 April 15, 2017
DATE…:
Enter a calendar date to use an as accounting date. The System defaults to today’s date. Any date may be used that is one calendar day greater than the last time PE26 was ran and equal to or less than today’s date. The System will display a warning message for any date outside this range.
DESCRIPTION…:
Up to 30 characters may be entered to describe the reason for this transaction. AMOUNT…:
Enter the dollar amount including decimal point of this transaction. If this equity code has a par value the AMOUNT must be in equal increments of par value.
TAX CREDIT CODE
This prompt is only accessed when TRAN TYPE equals TAX CREDIT. Key the IRS Form code that corresponds to the current record. Up to four characters may be entered.
OK TO ADD? (Y/N/E)
Answer YES to accept the record and update the customer equity file. Select NO to change prompts before proceeding. Choose END to return to the customer balance screen with no action taken.
Patronage / Equity File Maintenance – Page - 18
Software Version 8.00.003 April 15, 2017
13. EQUITY (PRINT MODE)
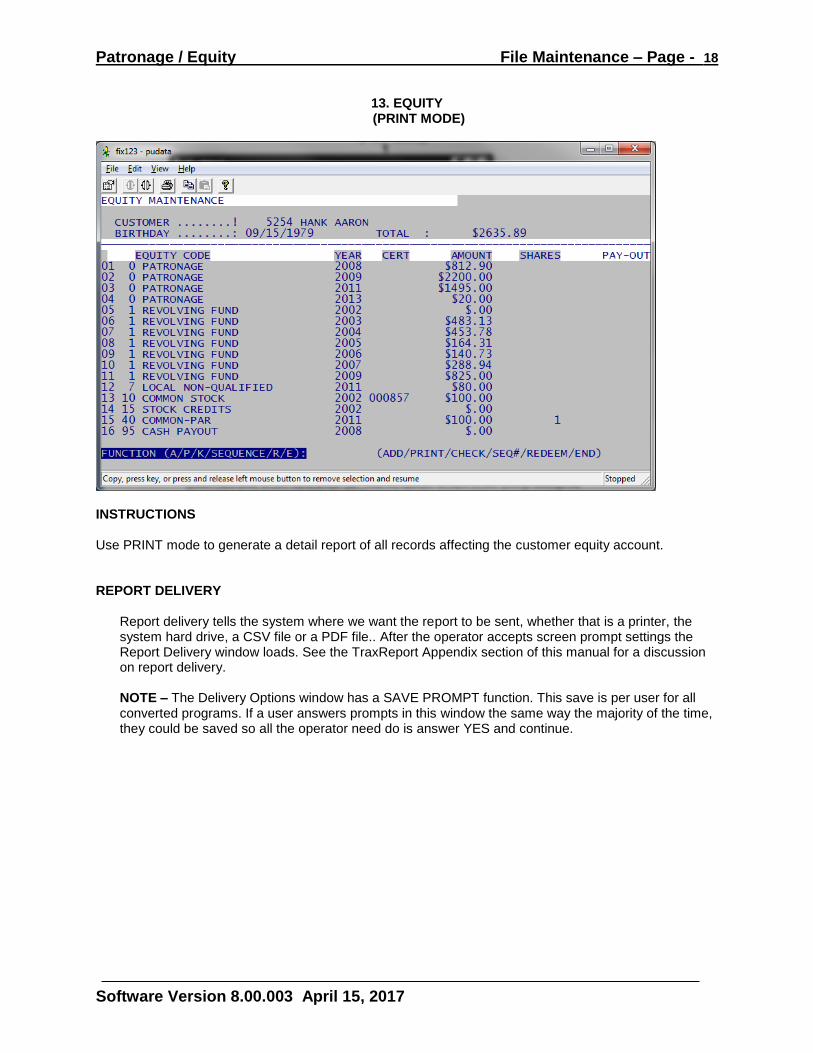
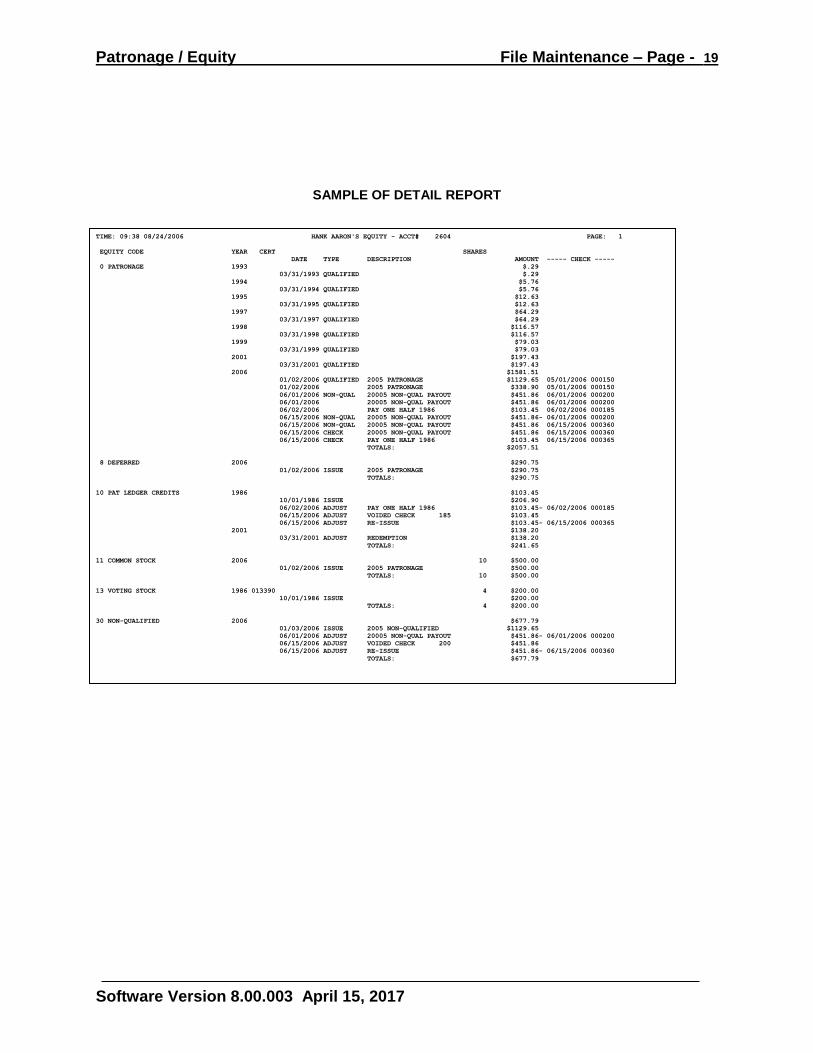
INSTRUCTIONS Use PRINT mode to generate a detail report of all records affecting the customer equity account. REPORT DELIVERY
Report delivery tells the system where we want the report to be sent, whether that is a printer, the system hard drive, a CSV file or a PDF file.. After the operator accepts screen prompt settings the Report Delivery window loads. See the TraxReport Appendix section of this manual for a discussion on report delivery. NOTE – The Delivery Options window has a SAVE PROMPT function. This save is per user for all converted programs. If a user answers prompts in this window the same way the majority of the time, they could be saved so all the operator need do is answer YES and continue.
Patronage / Equity File Maintenance – Page - 19
Software Version 8.00.003 April 15, 2017
SAMPLE OF DETAIL REPORT
TIME: 09:38 08/24/2006 HANK AARON'S EQUITY - ACCT# 2604 PAGE: 1
EQUITY CODE YEAR CERT SHARES
DATE TYPE DESCRIPTION AMOUNT ----- CHECK -----
0 PATRONAGE 1993 $.29
03/31/1993 QUALIFIED $.29
1994 $5.76
03/31/1994 QUALIFIED $5.76
1995 $12.63
03/31/1995 QUALIFIED $12.63
1997 $64.29
03/31/1997 QUALIFIED $64.29
1998 $116.57
03/31/1998 QUALIFIED $116.57
1999 $79.03
03/31/1999 QUALIFIED $79.03
2001 $197.43
03/31/2001 QUALIFIED $197.43
2006 $1581.51
01/02/2006 QUALIFIED 2005 PATRONAGE $1129.65 05/01/2006 000150
01/02/2006 2005 PATRONAGE $338.90 05/01/2006 000150
06/01/2006 NON-QUAL 20005 NON-QUAL PAYOUT $451.86 06/01/2006 000200
06/01/2006 20005 NON-QUAL PAYOUT $451.86 06/01/2006 000200
06/02/2006 PAY ONE HALF 1986 $103.45 06/02/2006 000185
06/15/2006 NON-QUAL 20005 NON-QUAL PAYOUT $451.86- 06/01/2006 000200
06/15/2006 NON-QUAL 20005 NON-QUAL PAYOUT $451.86 06/15/2006 000360
06/15/2006 CHECK 20005 NON-QUAL PAYOUT $451.86 06/15/2006 000360
06/15/2006 CHECK PAY ONE HALF 1986 $103.45 06/15/2006 000365
TOTALS: $2057.51
8 DEFERRED 2006 $290.75
01/02/2006 ISSUE 2005 PATRONAGE $290.75
TOTALS: $290.75
10 PAT LEDGER CREDITS 1986 $103.45
10/01/1986 ISSUE $206.90
06/02/2006 ADJUST PAY ONE HALF 1986 $103.45- 06/02/2006 000185
06/15/2006 ADJUST VOIDED CHECK 185 $103.45
06/15/2006 ADJUST RE-ISSUE $103.45- 06/15/2006 000365
2001 $138.20
03/31/2001 ADJUST REDEMPTION $138.20
TOTALS: $241.65
11 COMMON STOCK 2006 10 $500.00
01/02/2006 ISSUE 2005 PATRONAGE $500.00
TOTALS: 10 $500.00
13 VOTING STOCK 1986 013390 4 $200.00
10/01/1986 ISSUE $200.00
TOTALS: 4 $200.00
30 NON-QUALIFIED 2006 $677.79
01/03/2006 ISSUE 2005 NON-QUALIFIED $1129.65
06/01/2006 ADJUST 20005 NON-QUAL PAYOUT $451.86- 06/01/2006 000200
06/15/2006 ADJUST VOIDED CHECK 200 $451.86
06/15/2006 ADJUST RE-ISSUE $451.86- 06/15/2006 000360
TOTALS: $677.79
Patronage / Equity File Maintenance – Page - 20
Software Version 8.00.003 April 15, 2017
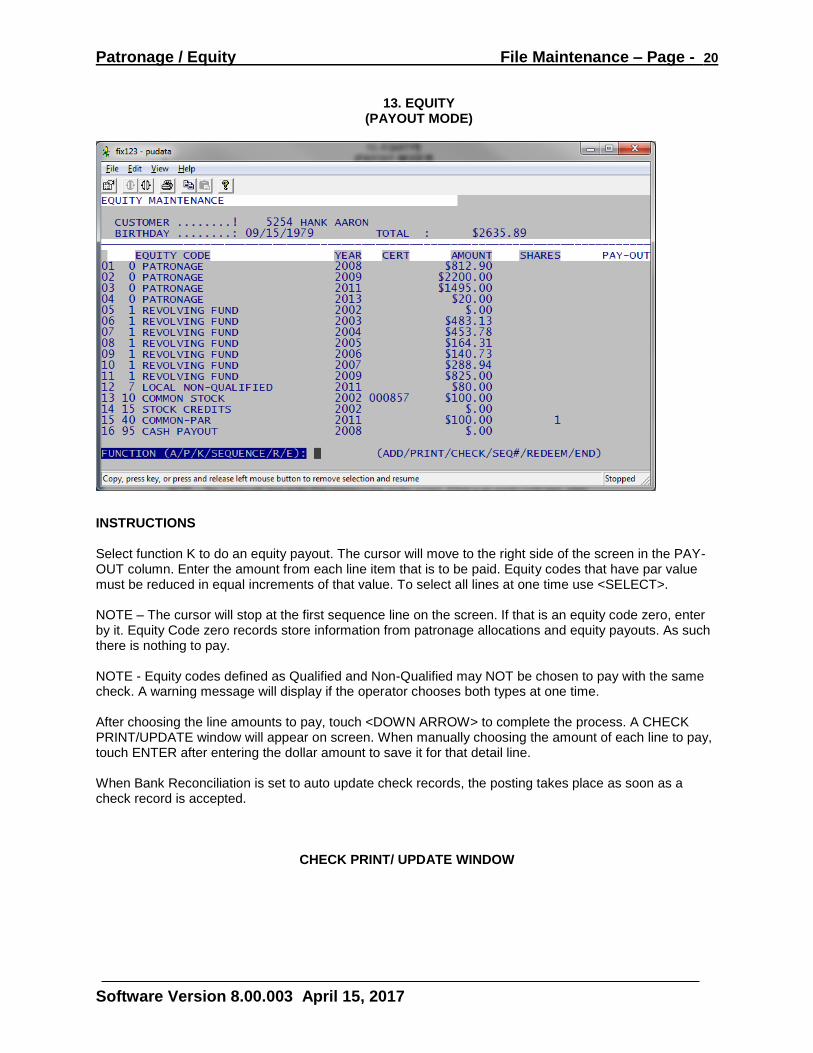
13. EQUITY (PAYOUT MODE)
INSTRUCTIONS Select function K to do an equity payout. The cursor will move to the right side of the screen in the PAY-OUT column. Enter the amount from each line item that is to be paid. Equity codes that have par value must be reduced in equal increments of that value. To select all lines at one time use <SELECT>. NOTE – The cursor will stop at the first sequence line on the screen. If that is an equity code zero, enter by it. Equity Code zero records store information from patronage allocations and equity payouts. As such there is nothing to pay. NOTE - Equity codes defined as Qualified and Non-Qualified may NOT be chosen to pay with the same check. A warning message will display if the operator chooses both types at one time. After choosing the line amounts to pay, touch <DOWN ARROW> to complete the process. A CHECK PRINT/UPDATE window will appear on screen. When manually choosing the amount of each line to pay, touch ENTER after entering the dollar amount to save it for that detail line. When Bank Reconciliation is set to auto update check records, the posting takes place as soon as a check record is accepted.
CHECK PRINT/ UPDATE WINDOW
Patronage / Equity File Maintenance – Page - 21
Software Version 8.00.003 April 15, 2017
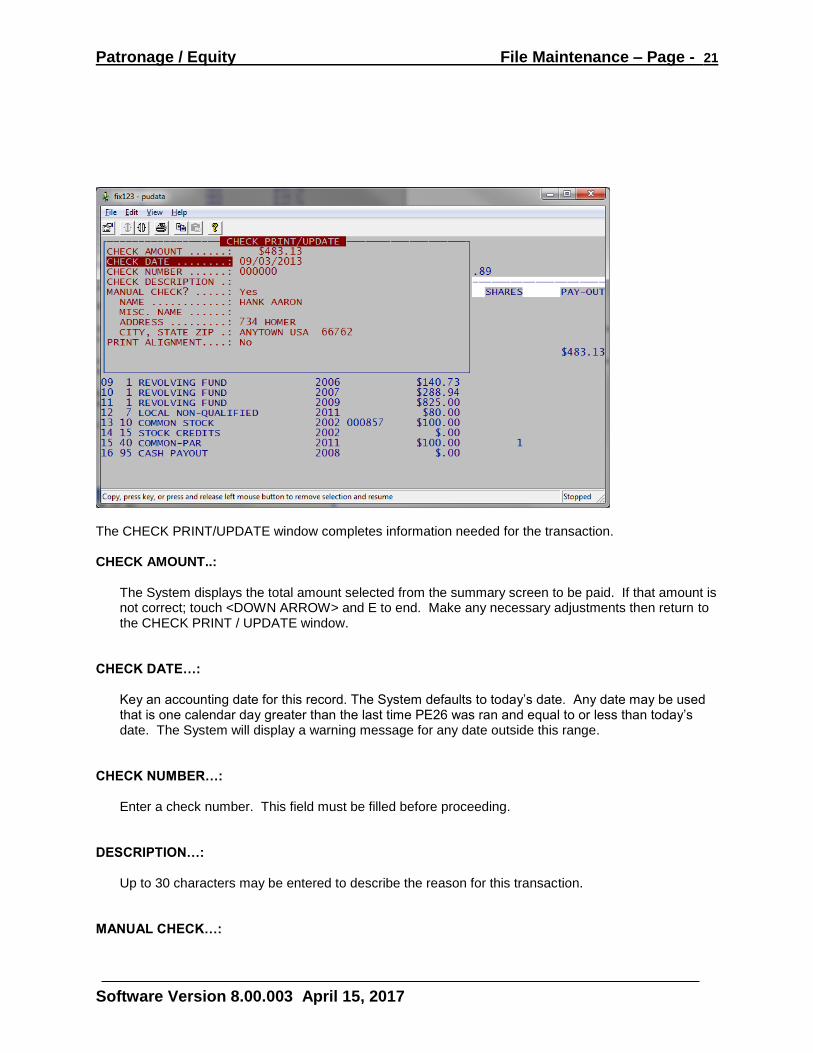
The CHECK PRINT/UPDATE window completes information needed for the transaction. CHECK AMOUNT..:
The System displays the total amount selected from the summary screen to be paid. If that amount is not correct; touch <DOWN ARROW> and E to end. Make any necessary adjustments then return to the CHECK PRINT / UPDATE window.
CHECK DATE…:
Key an accounting date for this record. The System defaults to today’s date. Any date may be used that is one calendar day greater than the last time PE26 was ran and equal to or less than today’s date. The System will display a warning message for any date outside this range.
CHECK NUMBER…:
Enter a check number. This field must be filled before proceeding. DESCRIPTION…:
Up to 30 characters may be entered to describe the reason for this transaction. MANUAL CHECK…:
Patronage / Equity File Maintenance – Page - 22
Software Version 8.00.003 April 15, 2017
If a check has already been written answer YES. A negative response will allow the operator to generate a check.
NAME…:
If payee information is different than that contained on the A/R master, enter the corrected information. Whatever information is contained in the name and address fields will print on a check. It is also saved on the check record in the detail file.
SCREEN OK? (Y/N/E):
Answer YES to accept the record. Select NO to change prompts before proceeding. Choose END to return to the customer balance screen with no action taken.
REPORT DELIVERY
Report delivery tells the system where we want the report to be sent, whether that is a printer, the system hard drive, a CSV file or a PDF file.. After the operator accepts screen prompt settings the Report Delivery window loads. See the TraxReport Appendix section of this manual for a discussion on report delivery. NOTE – The Delivery Options window has a SAVE PROMPT function. This save is per user for all converted programs. If a user answers prompts in this window the same way the majority of the time, they could be saved so all the operator need do is answer YES and continue.
Patronage / Equity File Maintenance – Page - 23
Software Version 8.00.003 April 15, 2017
13. EQUITY (SEQUENCE MODE)
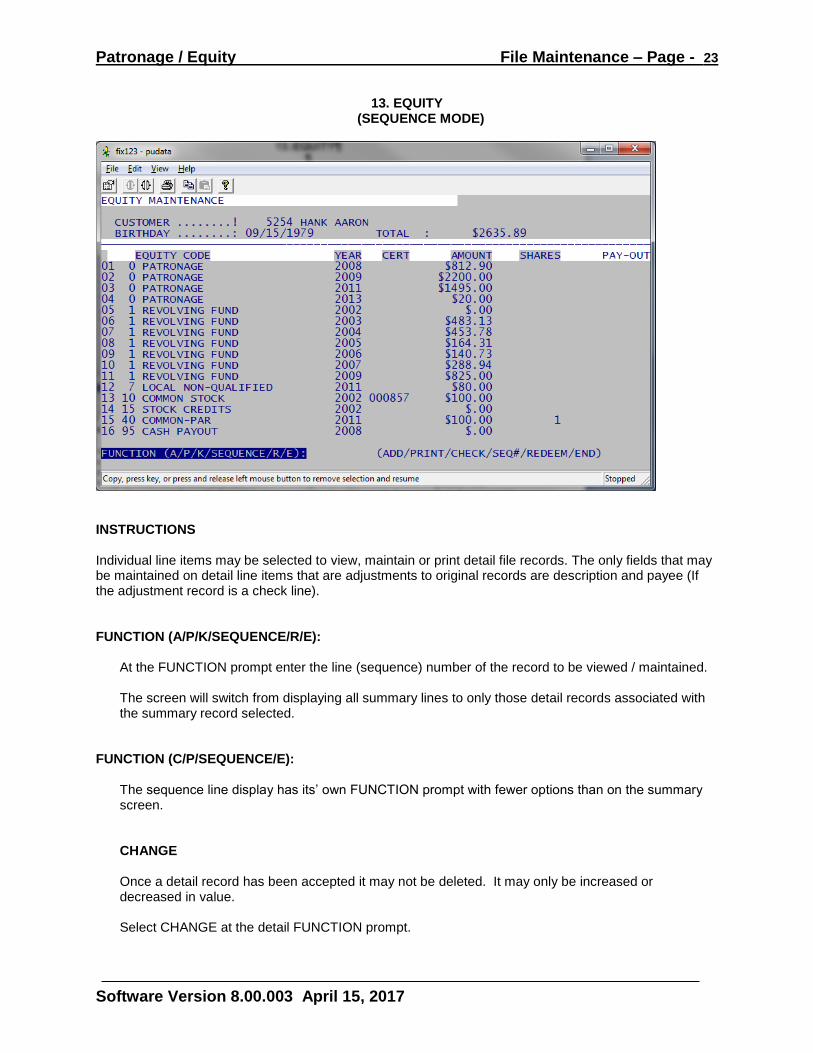
INSTRUCTIONS Individual line items may be selected to view, maintain or print detail file records. The only fields that may be maintained on detail line items that are adjustments to original records are description and payee (If the adjustment record is a check line). FUNCTION (A/P/K/SEQUENCE/R/E):
At the FUNCTION prompt enter the line (sequence) number of the record to be viewed / maintained. The screen will switch from displaying all summary lines to only those detail records associated with the summary record selected.
FUNCTION (C/P/SEQUENCE/E):
The sequence line display has its’ own FUNCTION prompt with fewer options than on the summary screen.
CHANGE
Once a detail record has been accepted it may not be deleted. It may only be increased or decreased in value.
Select CHANGE at the detail FUNCTION prompt.

Patronage / Equity File Maintenance – Page - 24
Software Version 8.00.003 April 15, 2017
EQUITY CODE YEAR CERTIFICATE QUALIFIED Each of these prompts relates to the original detail record and is maintained by the System. They may not be changed.
EQUITY ADJUSTMENT WINDOW
DATE Enter an accounting date. The System defaults to today’s date. CHECK NUMBER If this adjustment involves a check, enter that number here. For other adjustments, such as transfers, leave this field zero. PAYEE This field is skipped unless a check number is entered in the previous prompt. DESCRIPTION Up to 30 characters may be entered to describe the reason for this transaction. AMOUNT Key the dollar adjustment. A positive adjustment will increase the outstanding balance for this sequence line. A negative amount will decrease it.
Patronage / Equity File Maintenance – Page - 25
Software Version 8.00.003 April 15, 2017
OK TO CHANGE Answer YES to complete the change.
PRINT Selecting PRINT at the detail line will generate a report that includes only those records associated with the one summary record.
REPORT DELIVERY
Report delivery tells the system where we want the report to be sent, whether that is a printer, the system hard drive, a CSV file or a PDF file.. After the operator accepts screen prompt settings the Report Delivery window loads. See the TraxReport Appendix section of this manual for a discussion on report delivery.
NOTE – The Delivery Options window has a SAVE PROMPT function. This save is per user for all converted programs. If a user answers prompts in this window the same way the majority of the time, they could be saved so all the operator need do is answer YES and continue.
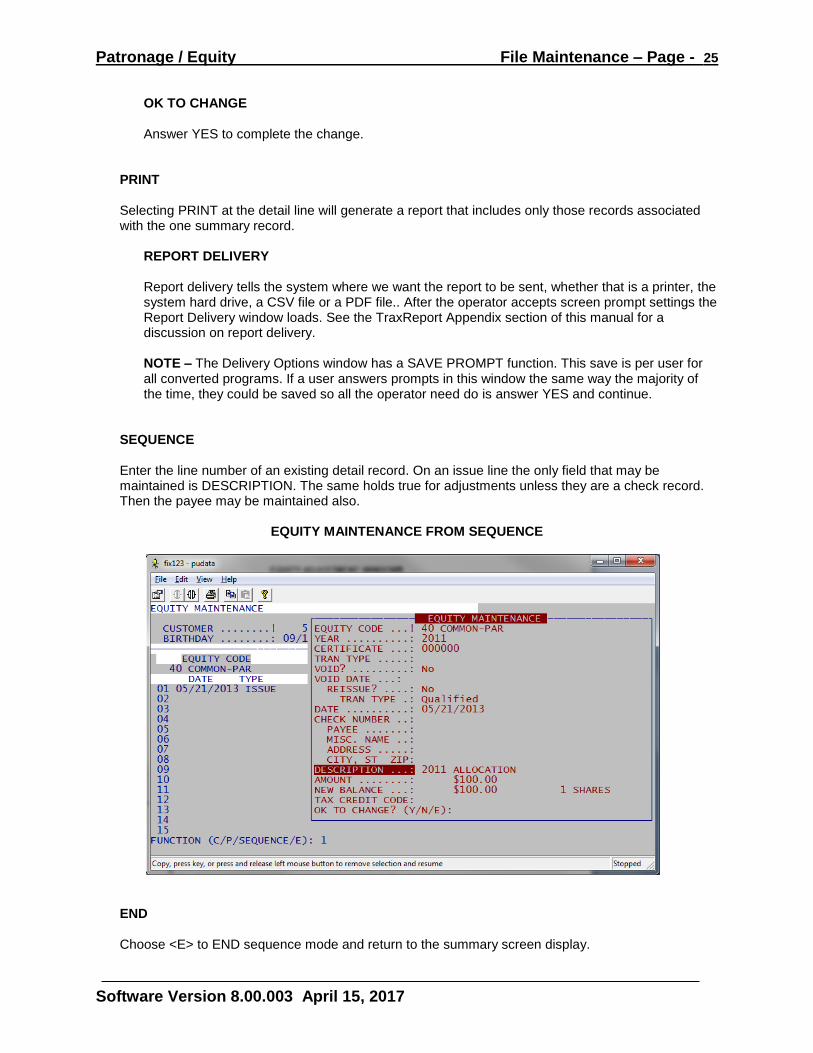
SEQUENCE Enter the line number of an existing detail record. On an issue line the only field that may be maintained is DESCRIPTION. The same holds true for adjustments unless they are a check record. Then the payee may be maintained also.
EQUITY MAINTENANCE FROM SEQUENCE
END Choose <E> to END sequence mode and return to the summary screen display.
Patronage / Equity File Maintenance – Page - 26
Software Version 8.00.003 April 15, 2017
13. EQUITY (REDEEM MODE)
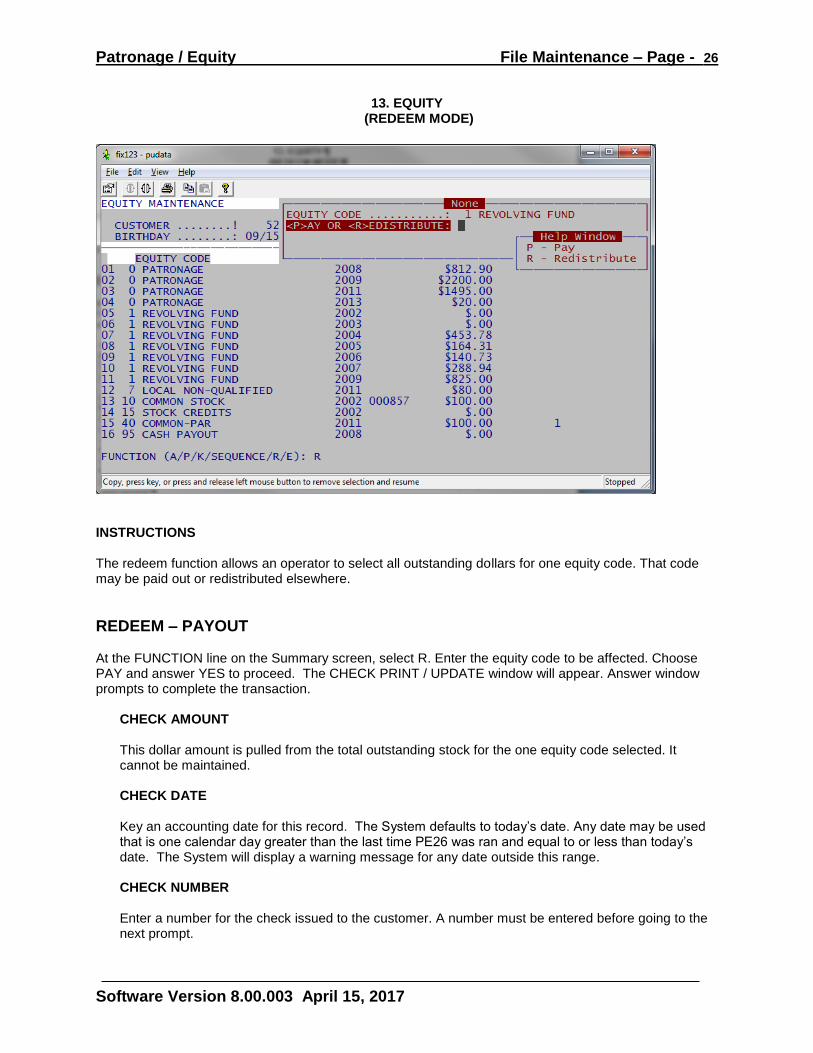
INSTRUCTIONS The redeem function allows an operator to select all outstanding dollars for one equity code. That code may be paid out or redistributed elsewhere.
REDEEM – PAYOUT At the FUNCTION line on the Summary screen, select R. Enter the equity code to be affected. Choose PAY and answer YES to proceed. The CHECK PRINT / UPDATE window will appear. Answer window prompts to complete the transaction.
CHECK AMOUNT This dollar amount is pulled from the total outstanding stock for the one equity code selected. It cannot be maintained.
CHECK DATE Key an accounting date for this record. The System defaults to today’s date. Any date may be used that is one calendar day greater than the last time PE26 was ran and equal to or less than today’s date. The System will display a warning message for any date outside this range. CHECK NUMBER Enter a number for the check issued to the customer. A number must be entered before going to the next prompt.
Patronage / Equity File Maintenance – Page - 27
Software Version 8.00.003 April 15, 2017
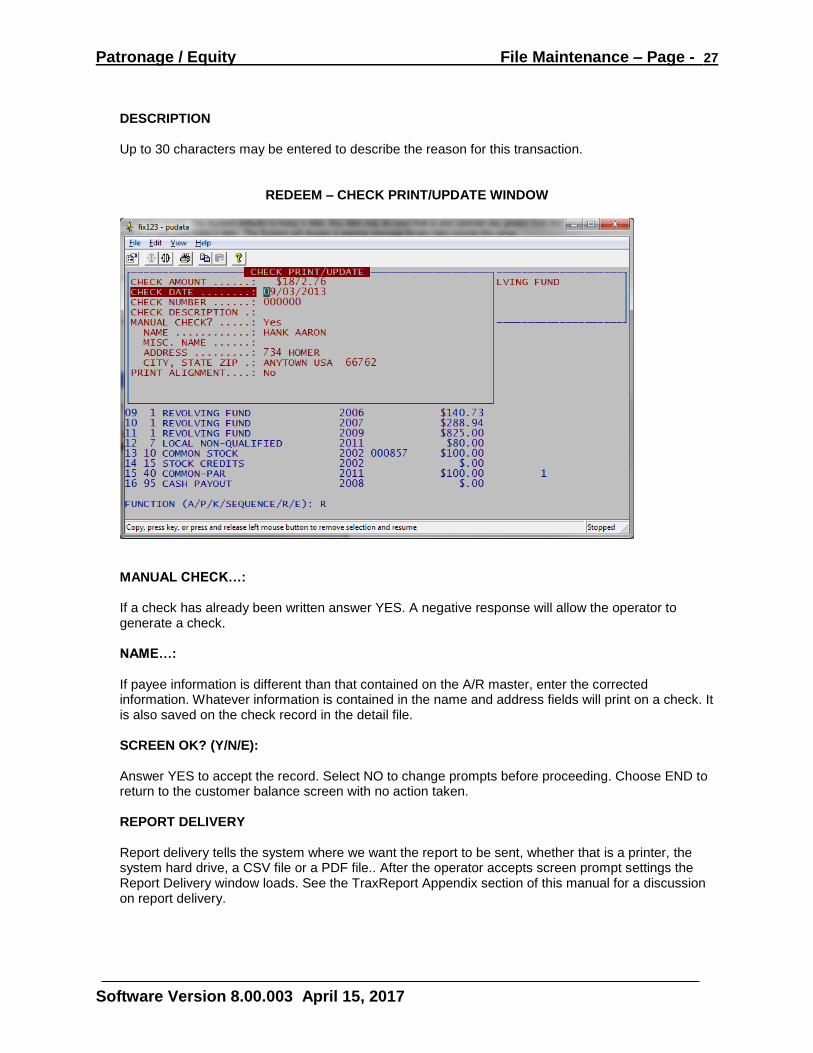
DESCRIPTION Up to 30 characters may be entered to describe the reason for this transaction.
REDEEM – CHECK PRINT/UPDATE WINDOW
MANUAL CHECK…: If a check has already been written answer YES. A negative response will allow the operator to generate a check. NAME…: If payee information is different than that contained on the A/R master, enter the corrected information. Whatever information is contained in the name and address fields will print on a check. It is also saved on the check record in the detail file. SCREEN OK? (Y/N/E): Answer YES to accept the record. Select NO to change prompts before proceeding. Choose END to return to the customer balance screen with no action taken. REPORT DELIVERY
Report delivery tells the system where we want the report to be sent, whether that is a printer, the system hard drive, a CSV file or a PDF file.. After the operator accepts screen prompt settings the Report Delivery window loads. See the TraxReport Appendix section of this manual for a discussion on report delivery.
Patronage / Equity File Maintenance – Page - 28
Software Version 8.00.003 April 15, 2017
NOTE – The Delivery Options window has a SAVE PROMPT function. This save is per user for all converted programs. If a user answers prompts in this window the same way the majority of the time, they could be saved so all the operator need do is answer YES and continue.
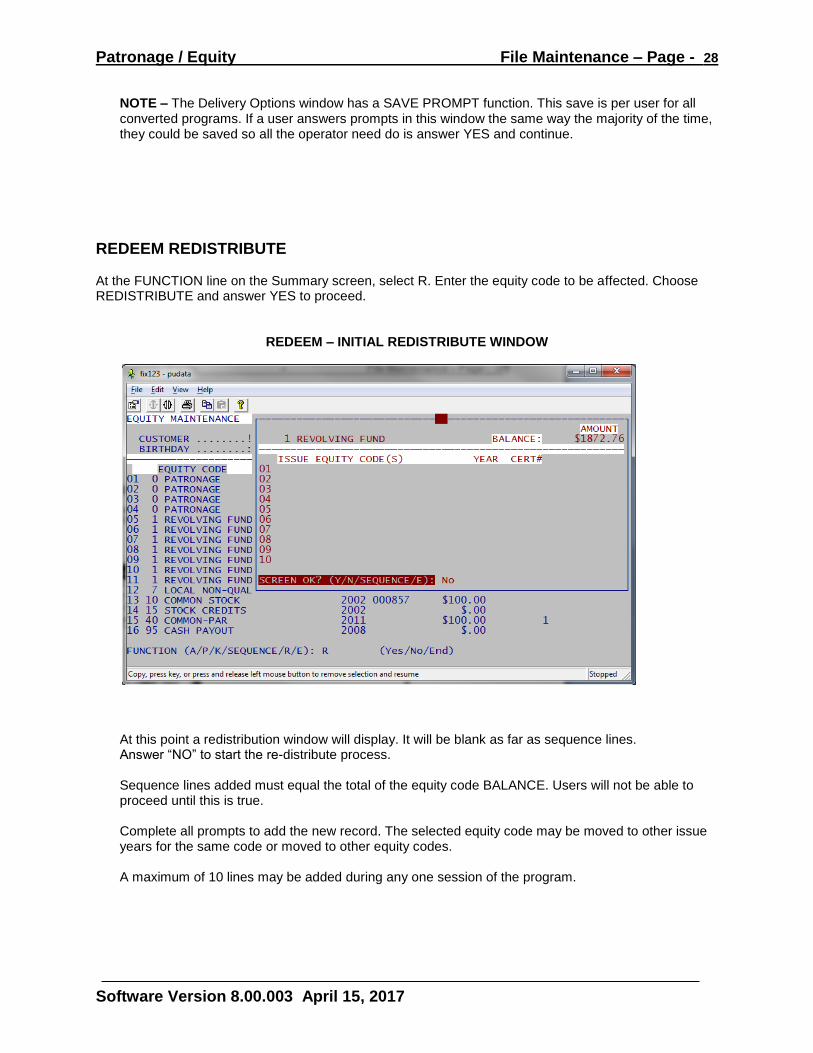
REDEEM REDISTRIBUTE At the FUNCTION line on the Summary screen, select R. Enter the equity code to be affected. Choose REDISTRIBUTE and answer YES to proceed.
REDEEM – INITIAL REDISTRIBUTE WINDOW
At this point a redistribution window will display. It will be blank as far as sequence lines. Answer “NO” to start the re-distribute process. Sequence lines added must equal the total of the equity code BALANCE. Users will not be able to proceed until this is true. Complete all prompts to add the new record. The selected equity code may be moved to other issue years for the same code or moved to other equity codes. A maximum of 10 lines may be added during any one session of the program.
Patronage / Equity File Maintenance – Page - 29
Software Version 8.00.003 April 15, 2017
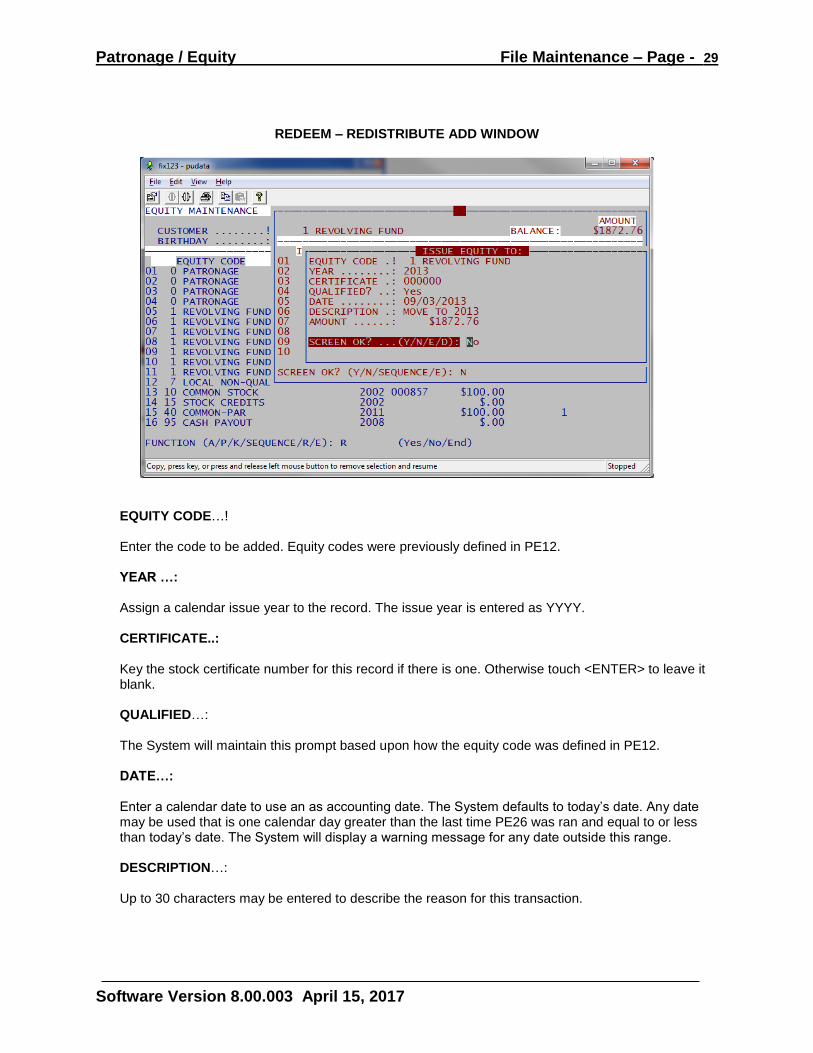
REDEEM – REDISTRIBUTE ADD WINDOW
EQUITY CODE…! Enter the code to be added. Equity codes were previously defined in PE12. YEAR …: Assign a calendar issue year to the record. The issue year is entered as YYYY. CERTIFICATE..: Key the stock certificate number for this record if there is one. Otherwise touch <ENTER> to leave it blank. QUALIFIED…: The System will maintain this prompt based upon how the equity code was defined in PE12. DATE…: Enter a calendar date to use an as accounting date. The System defaults to today’s date. Any date may be used that is one calendar day greater than the last time PE26 was ran and equal to or less than today’s date. The System will display a warning message for any date outside this range. DESCRIPTION…: Up to 30 characters may be entered to describe the reason for this transaction.
Patronage / Equity File Maintenance – Page - 30
Software Version 8.00.003 April 15, 2017
AMOUNT…: Enter the dollar amount including decimal point of this transaction. If this equity code has a par value the AMOUNT must be in equal increments of par value. OK TO ADD? (Y/N/E/D) Answer YES to accept the record and update the customer equity file. Select NO to change prompts before proceeding. Choose END to return to the redistribute window with no action taken. Once a line item has been added to the redistribution window, it may be deleted before accepting all changes. Simply choose <D> and the sequence number of the line to be removed. That line record will be removed from the listing.
Patronage / Equity File Maintenance – Page - 31
Software Version 8.00.003 April 15, 2017
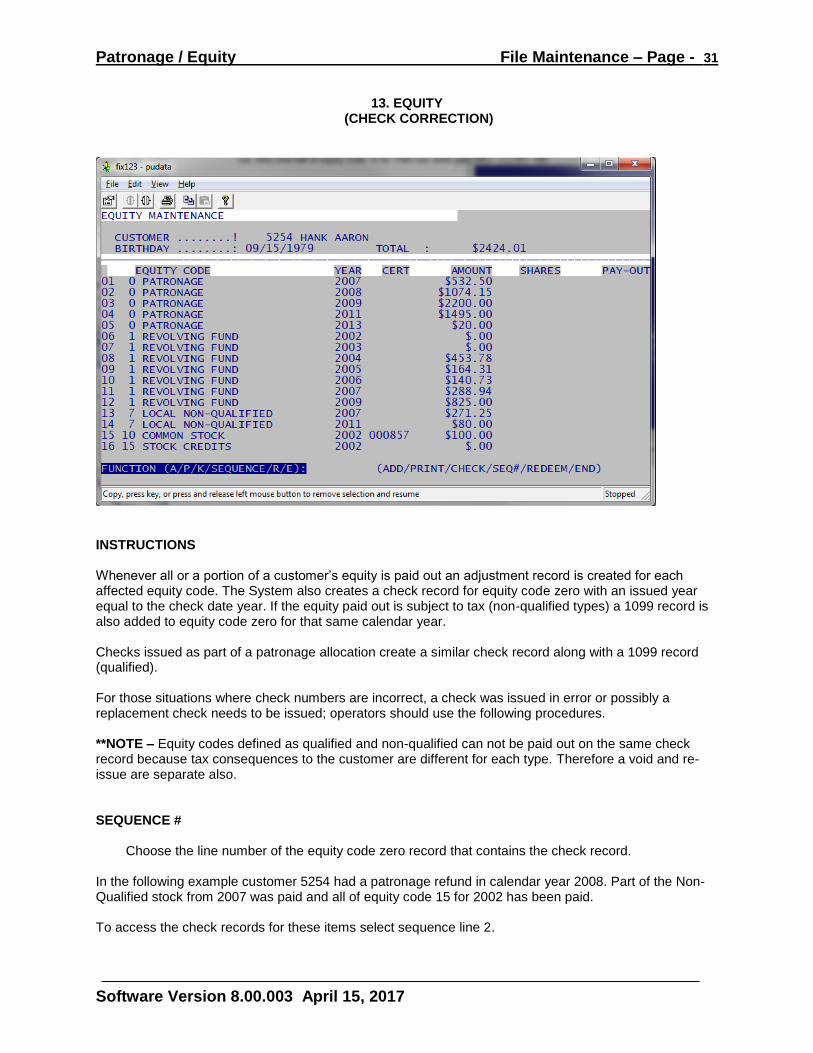
13. EQUITY (CHECK CORRECTION)
INSTRUCTIONS Whenever all or a portion of a customer’s equity is paid out an adjustment record is created for each affected equity code. The System also creates a check record for equity code zero with an issued year equal to the check date year. If the equity paid out is subject to tax (non-qualified types) a 1099 record is also added to equity code zero for that same calendar year. Checks issued as part of a patronage allocation create a similar check record along with a 1099 record (qualified). For those situations where check numbers are incorrect, a check was issued in error or possibly a replacement check needs to be issued; operators should use the following procedures. **NOTE – Equity codes defined as qualified and non-qualified can not be paid out on the same check record because tax consequences to the customer are different for each type. Therefore a void and re-issue are separate also. SEQUENCE #
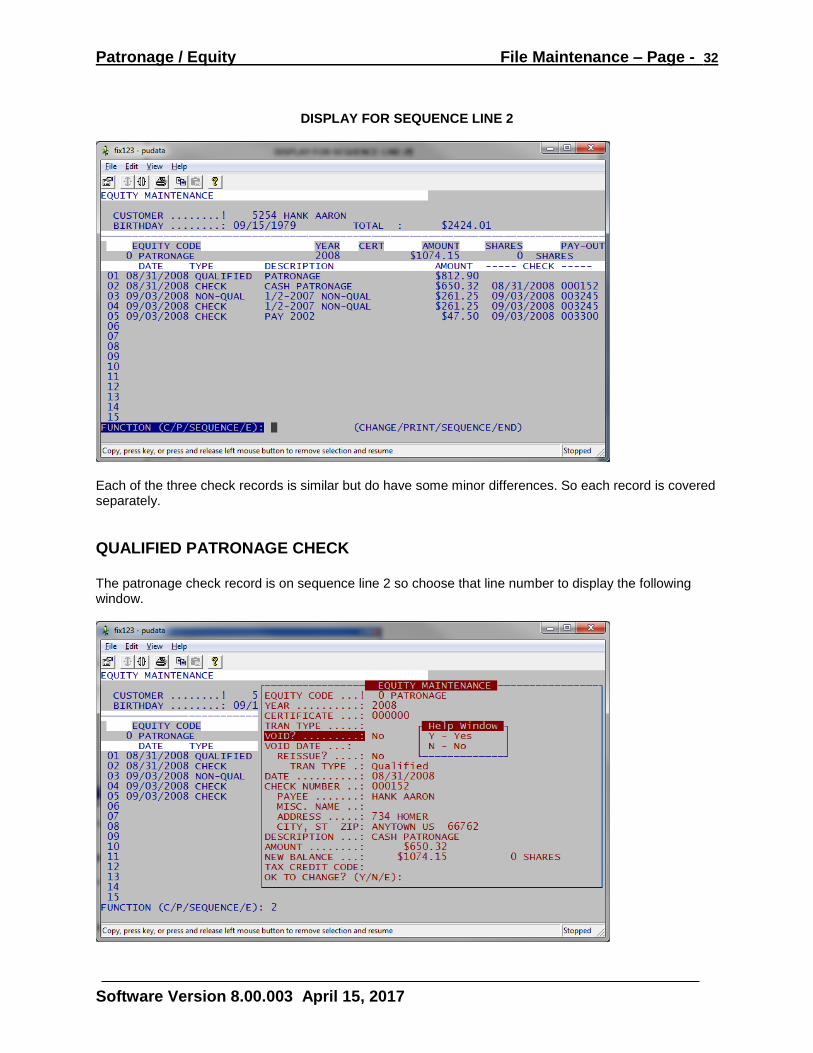
Choose the line number of the equity code zero record that contains the check record. In the following example customer 5254 had a patronage refund in calendar year 2008. Part of the Non-Qualified stock from 2007 was paid and all of equity code 15 for 2002 has been paid. To access the check records for these items select sequence line 2.
Patronage / Equity File Maintenance – Page - 32
Software Version 8.00.003 April 15, 2017
DISPLAY FOR SEQUENCE LINE 2
Each of the three check records is similar but do have some minor differences. So each record is covered separately.
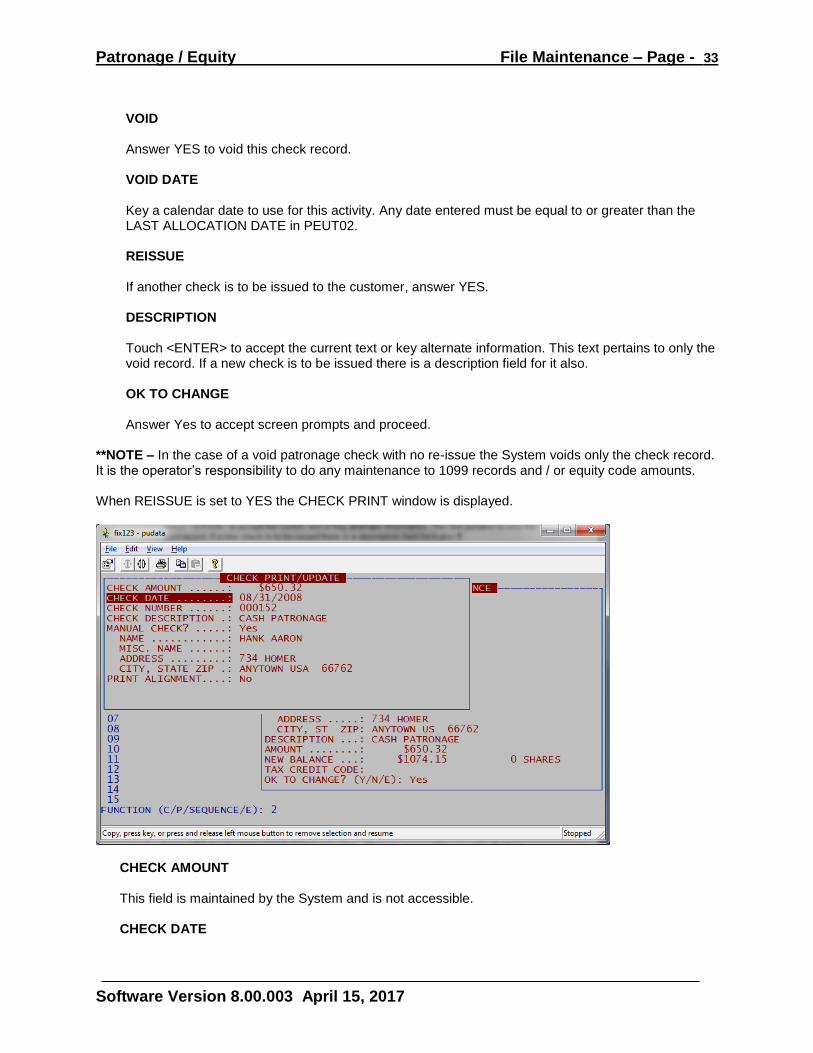
QUALIFIED PATRONAGE CHECK The patronage check record is on sequence line 2 so choose that line number to display the following window.
Patronage / Equity File Maintenance – Page - 33
Software Version 8.00.003 April 15, 2017
VOID Answer YES to void this check record. VOID DATE Key a calendar date to use for this activity. Any date entered must be equal to or greater than the LAST ALLOCATION DATE in PEUT02. REISSUE If another check is to be issued to the customer, answer YES. DESCRIPTION Touch <ENTER> to accept the current text or key alternate information. This text pertains to only the void record. If a new check is to be issued there is a description field for it also. OK TO CHANGE Answer Yes to accept screen prompts and proceed.
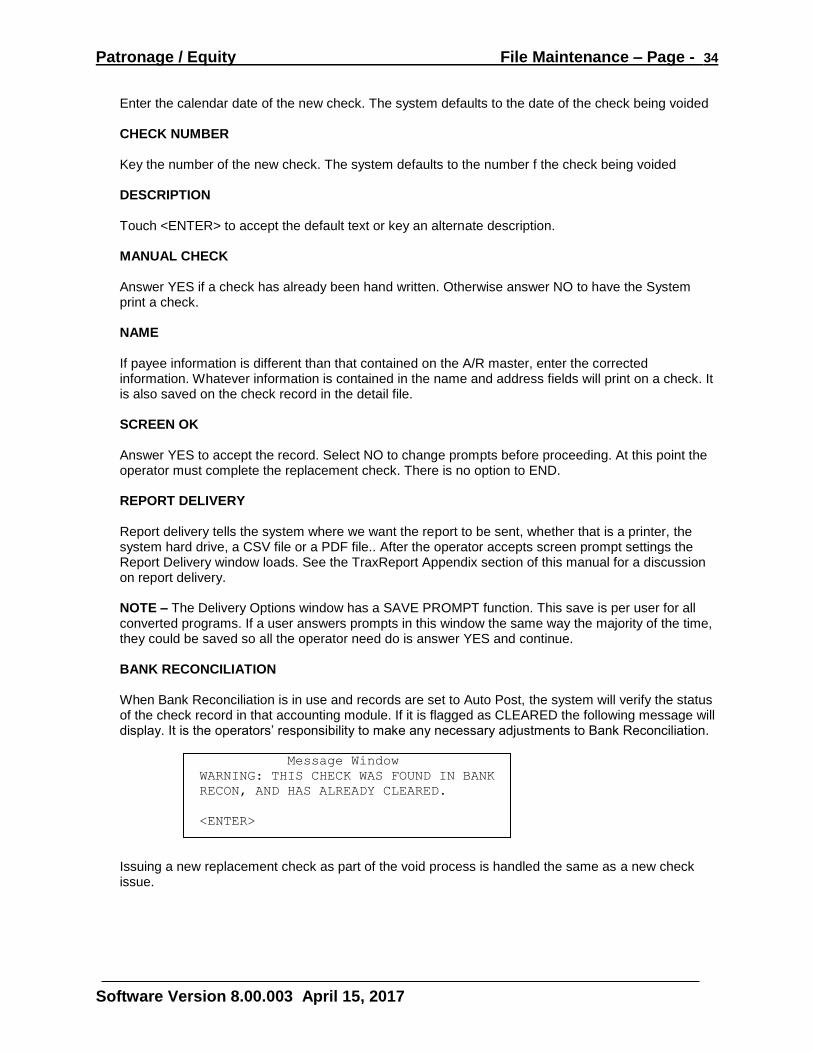
**NOTE – In the case of a void patronage check with no re-issue the System voids only the check record. It is the operator’s responsibility to do any maintenance to 1099 records and / or equity code amounts. When REISSUE is set to YES the CHECK PRINT window is displayed.
CHECK AMOUNT
This field is maintained by the System and is not accessible.
CHECK DATE
Patronage / Equity File Maintenance – Page - 34
Software Version 8.00.003 April 15, 2017
Enter the calendar date of the new check. The system defaults to the date of the check being voided
CHECK NUMBER
Key the number of the new check. The system defaults to the number f the check being voided
DESCRIPTION
Touch <ENTER> to accept the default text or key an alternate description.
MANUAL CHECK
Answer YES if a check has already been hand written. Otherwise answer NO to have the System print a check. NAME If payee information is different than that contained on the A/R master, enter the corrected information. Whatever information is contained in the name and address fields will print on a check. It is also saved on the check record in the detail file. SCREEN OK Answer YES to accept the record. Select NO to change prompts before proceeding. At this point the operator must complete the replacement check. There is no option to END. REPORT DELIVERY
Report delivery tells the system where we want the report to be sent, whether that is a printer, the system hard drive, a CSV file or a PDF file.. After the operator accepts screen prompt settings the Report Delivery window loads. See the TraxReport Appendix section of this manual for a discussion on report delivery. NOTE – The Delivery Options window has a SAVE PROMPT function. This save is per user for all converted programs. If a user answers prompts in this window the same way the majority of the time, they could be saved so all the operator need do is answer YES and continue. BANK RECONCILIATION When Bank Reconciliation is in use and records are set to Auto Post, the system will verify the status of the check record in that accounting module. If it is flagged as CLEARED the following message will display. It is the operators’ responsibility to make any necessary adjustments to Bank Reconciliation.
Message Window
WARNING: THIS CHECK WAS FOUND IN BANK
RECON, AND HAS ALREADY CLEARED.
<ENTER>
Issuing a new replacement check as part of the void process is handled the same as a new check issue.
Patronage / Equity File Maintenance – Page - 35
Software Version 8.00.003 April 15, 2017
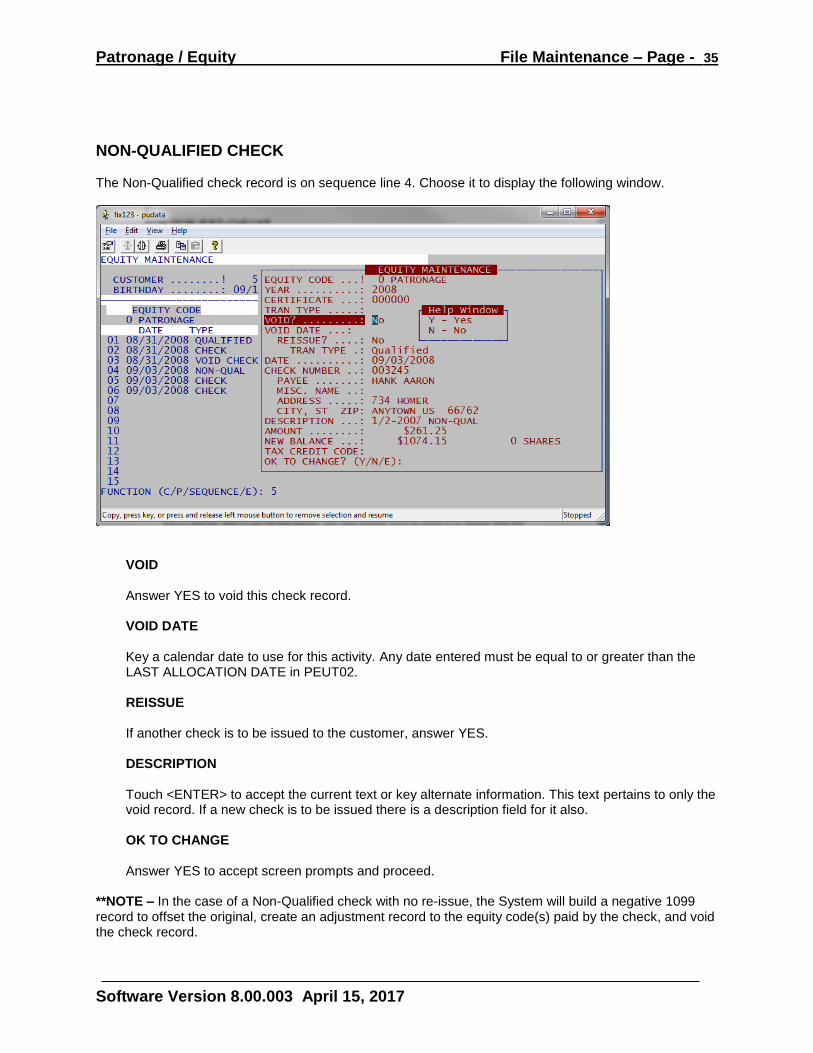
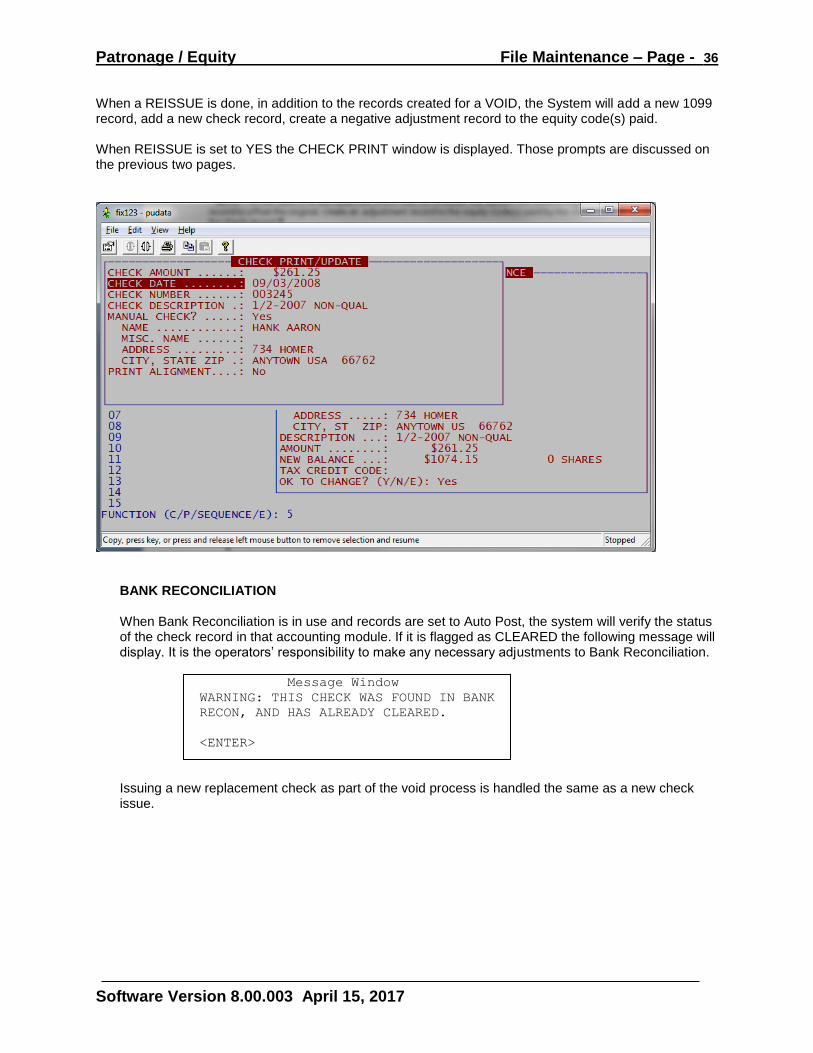
NON-QUALIFIED CHECK The Non-Qualified check record is on sequence line 4. Choose it to display the following window.
VOID Answer YES to void this check record. VOID DATE Key a calendar date to use for this activity. Any date entered must be equal to or greater than the LAST ALLOCATION DATE in PEUT02. REISSUE If another check is to be issued to the customer, answer YES. DESCRIPTION Touch <ENTER> to accept the current text or key alternate information. This text pertains to only the void record. If a new check is to be issued there is a description field for it also. OK TO CHANGE Answer YES to accept screen prompts and proceed.
**NOTE – In the case of a Non-Qualified check with no re-issue, the System will build a negative 1099 record to offset the original, create an adjustment record to the equity code(s) paid by the check, and void the check record.
Patronage / Equity File Maintenance – Page - 36
Software Version 8.00.003 April 15, 2017
When a REISSUE is done, in addition to the records created for a VOID, the System will add a new 1099 record, add a new check record, create a negative adjustment record to the equity code(s) paid. When REISSUE is set to YES the CHECK PRINT window is displayed. Those prompts are discussed on the previous two pages.
BANK RECONCILIATION When Bank Reconciliation is in use and records are set to Auto Post, the system will verify the status of the check record in that accounting module. If it is flagged as CLEARED the following message will display. It is the operators’ responsibility to make any necessary adjustments to Bank Reconciliation.
Message Window
WARNING: THIS CHECK WAS FOUND IN BANK
RECON, AND HAS ALREADY CLEARED.
<ENTER>
Issuing a new replacement check as part of the void process is handled the same as a new check issue.
Patronage / Equity File Maintenance – Page - 37
Software Version 8.00.003 April 15, 2017
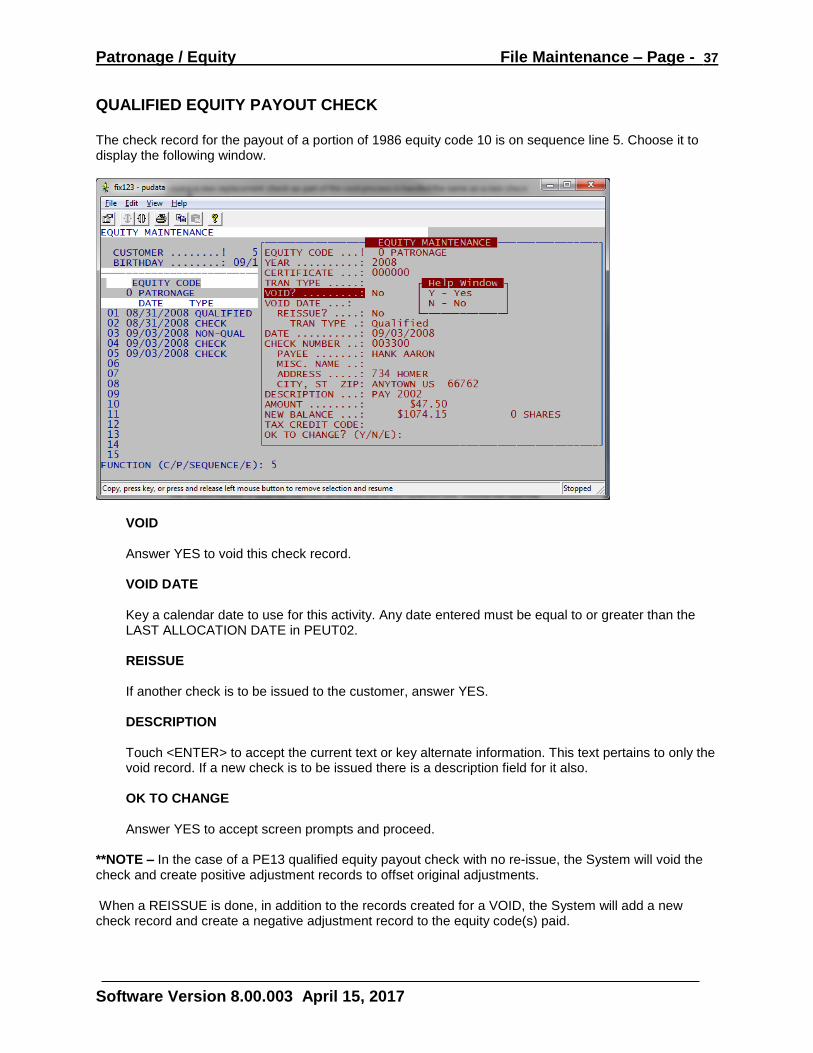
QUALIFIED EQUITY PAYOUT CHECK The check record for the payout of a portion of 1986 equity code 10 is on sequence line 5. Choose it to display the following window.
VOID Answer YES to void this check record. VOID DATE Key a calendar date to use for this activity. Any date entered must be equal to or greater than the LAST ALLOCATION DATE in PEUT02. REISSUE If another check is to be issued to the customer, answer YES. DESCRIPTION Touch <ENTER> to accept the current text or key alternate information. This text pertains to only the void record. If a new check is to be issued there is a description field for it also. OK TO CHANGE Answer YES to accept screen prompts and proceed.
**NOTE – In the case of a PE13 qualified equity payout check with no re-issue, the System will void the check and create positive adjustment records to offset original adjustments. When a REISSUE is done, in addition to the records created for a VOID, the System will add a new check record and create a negative adjustment record to the equity code(s) paid.
Patronage / Equity File Maintenance – Page - 38
Software Version 8.00.003 April 15, 2017
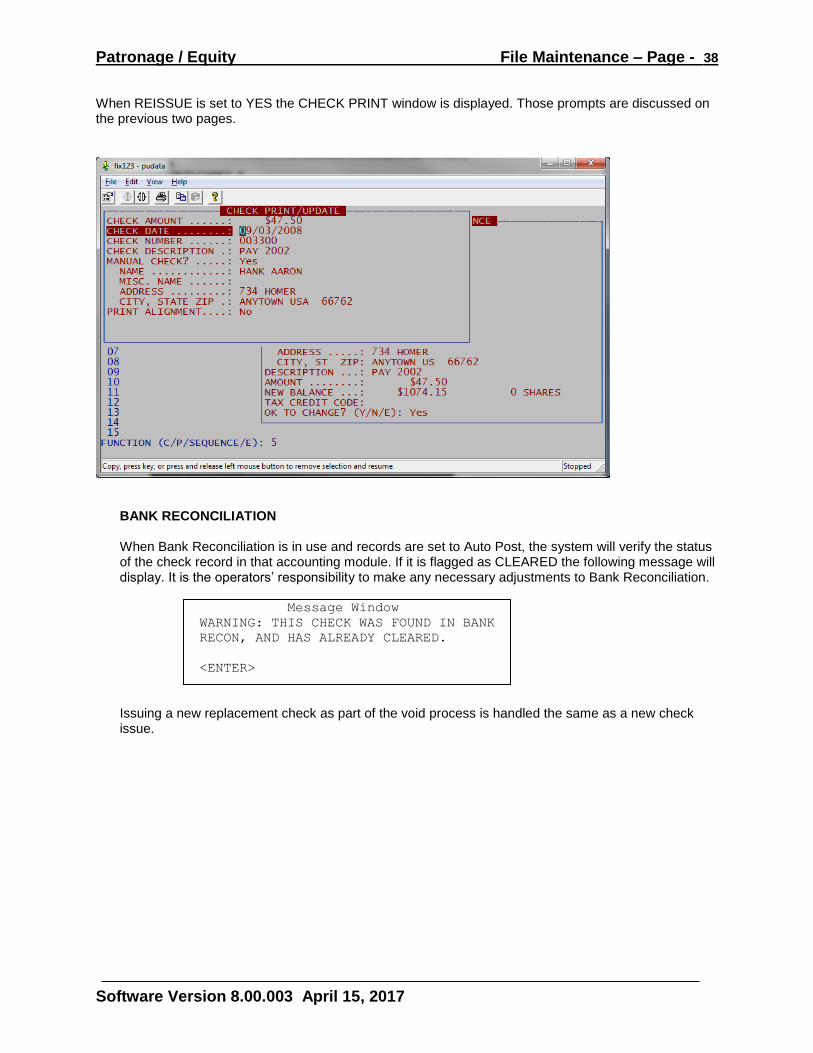
When REISSUE is set to YES the CHECK PRINT window is displayed. Those prompts are discussed on the previous two pages.
BANK RECONCILIATION When Bank Reconciliation is in use and records are set to Auto Post, the system will verify the status of the check record in that accounting module. If it is flagged as CLEARED the following message will display. It is the operators’ responsibility to make any necessary adjustments to Bank Reconciliation.
Message Window
WARNING: THIS CHECK WAS FOUND IN BANK
RECON, AND HAS ALREADY CLEARED.
<ENTER>
Issuing a new replacement check as part of the void process is handled the same as a new check issue.
Patronage / Equity File Maintenance – Page - 39
Software Version 8.00.003 April 15, 2017
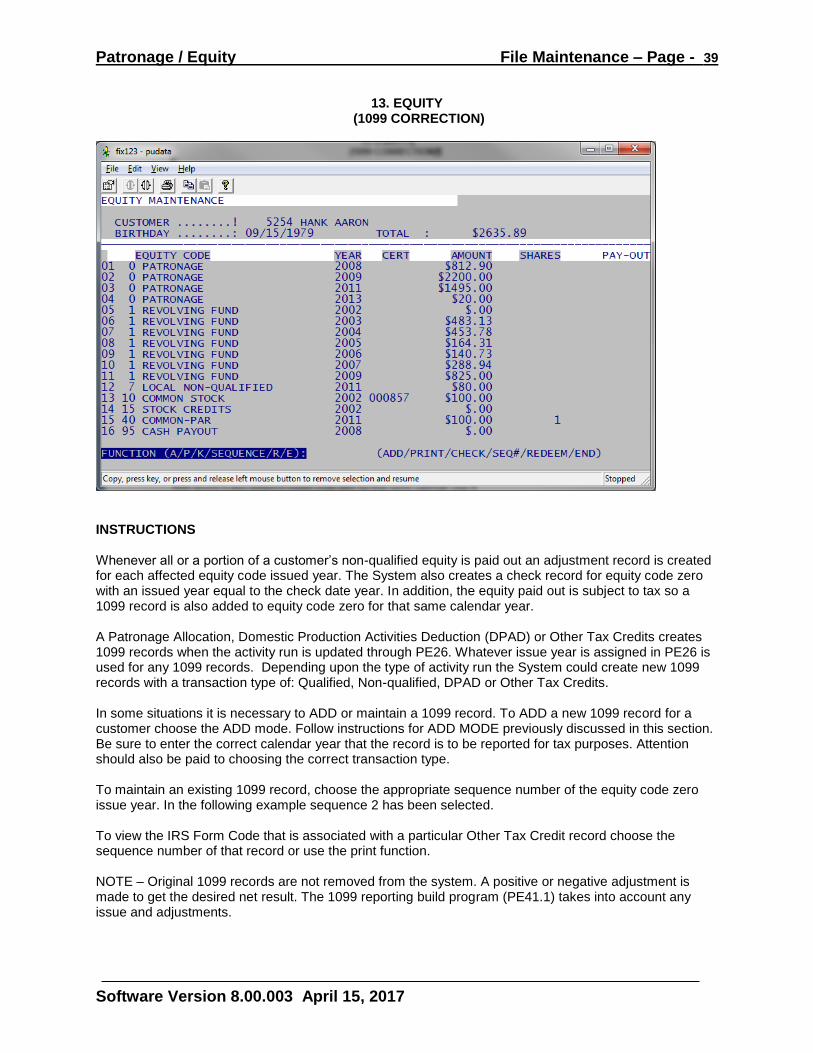
13. EQUITY (1099 CORRECTION)
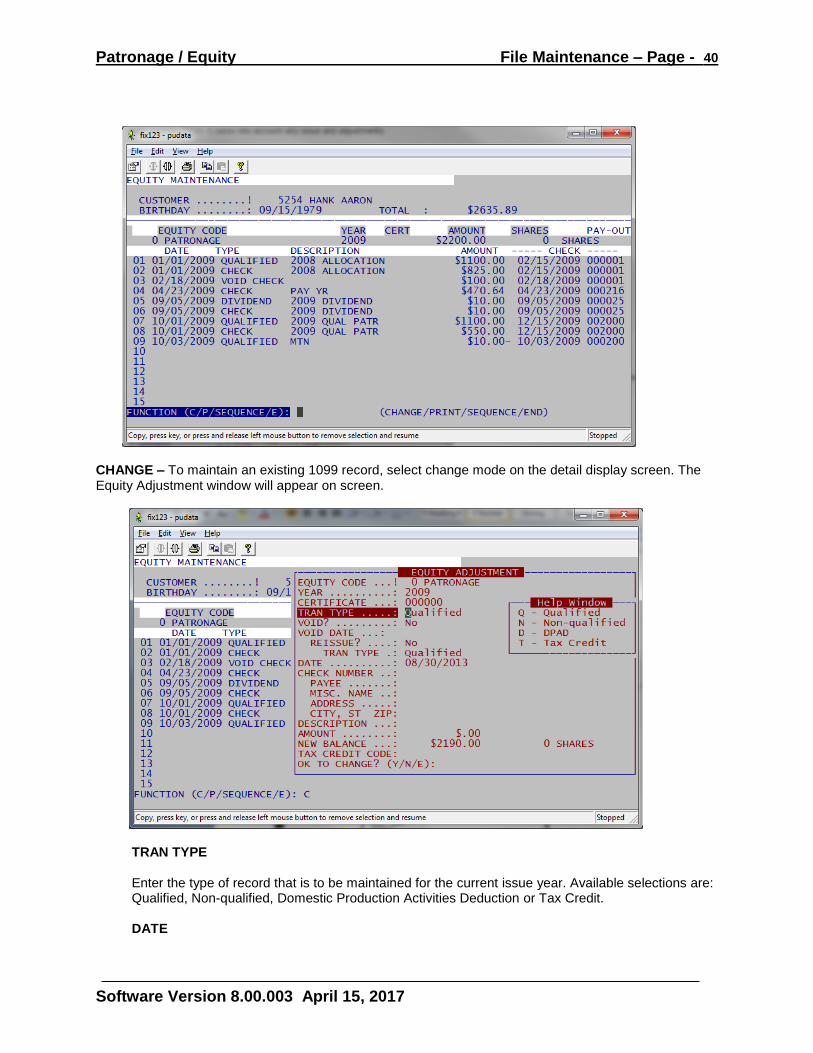
INSTRUCTIONS Whenever all or a portion of a customer’s non-qualified equity is paid out an adjustment record is created for each affected equity code issued year. The System also creates a check record for equity code zero with an issued year equal to the check date year. In addition, the equity paid out is subject to tax so a 1099 record is also added to equity code zero for that same calendar year. A Patronage Allocation, Domestic Production Activities Deduction (DPAD) or Other Tax Credits creates 1099 records when the activity run is updated through PE26. Whatever issue year is assigned in PE26 is used for any 1099 records. Depending upon the type of activity run the System could create new 1099 records with a transaction type of: Qualified, Non-qualified, DPAD or Other Tax Credits. In some situations it is necessary to ADD or maintain a 1099 record. To ADD a new 1099 record for a customer choose the ADD mode. Follow instructions for ADD MODE previously discussed in this section. Be sure to enter the correct calendar year that the record is to be reported for tax purposes. Attention should also be paid to choosing the correct transaction type. To maintain an existing 1099 record, choose the appropriate sequence number of the equity code zero issue year. In the following example sequence 2 has been selected. To view the IRS Form Code that is associated with a particular Other Tax Credit record choose the sequence number of that record or use the print function. NOTE – Original 1099 records are not removed from the system. A positive or negative adjustment is made to get the desired net result. The 1099 reporting build program (PE41.1) takes into account any issue and adjustments.
Patronage / Equity File Maintenance – Page - 40
Software Version 8.00.003 April 15, 2017
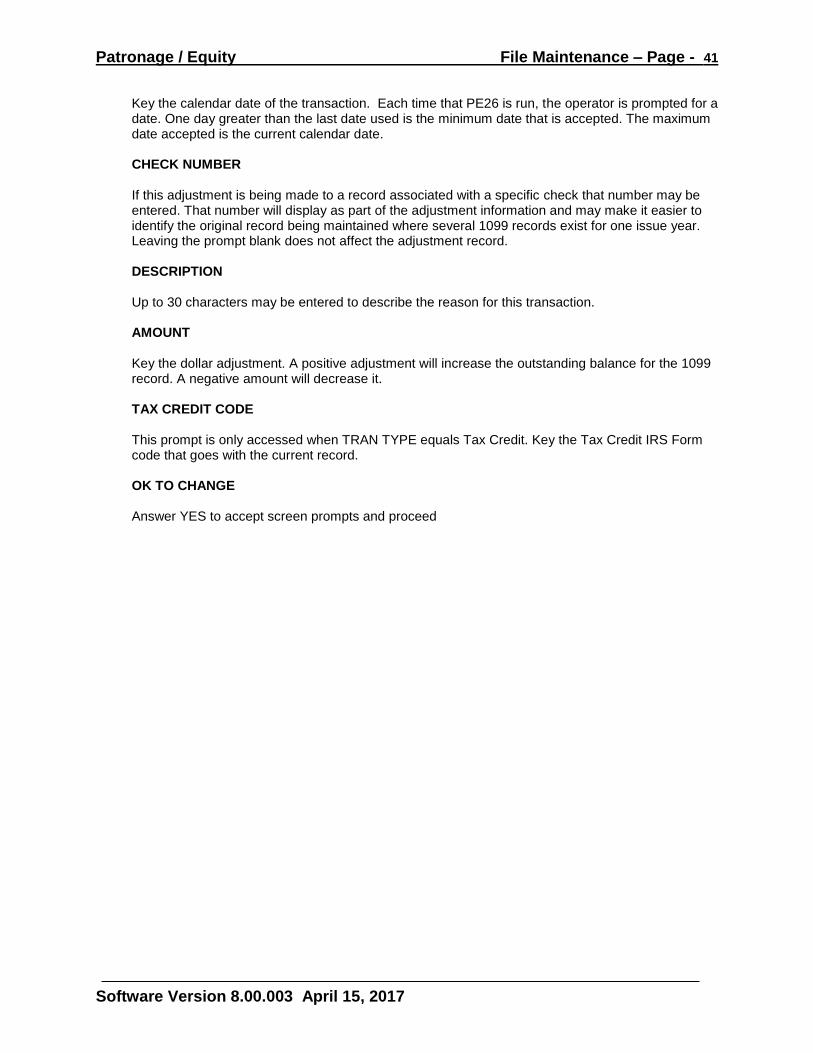
CHANGE – To maintain an existing 1099 record, select change mode on the detail display screen. The Equity Adjustment window will appear on screen.
TRAN TYPE
Enter the type of record that is to be maintained for the current issue year. Available selections are: Qualified, Non-qualified, Domestic Production Activities Deduction or Tax Credit. DATE
Patronage / Equity File Maintenance – Page - 41
Software Version 8.00.003 April 15, 2017
Key the calendar date of the transaction. Each time that PE26 is run, the operator is prompted for a date. One day greater than the last date used is the minimum date that is accepted. The maximum date accepted is the current calendar date. CHECK NUMBER If this adjustment is being made to a record associated with a specific check that number may be entered. That number will display as part of the adjustment information and may make it easier to identify the original record being maintained where several 1099 records exist for one issue year. Leaving the prompt blank does not affect the adjustment record. DESCRIPTION
Up to 30 characters may be entered to describe the reason for this transaction.
AMOUNT
Key the dollar adjustment. A positive adjustment will increase the outstanding balance for the 1099 record. A negative amount will decrease it. TAX CREDIT CODE This prompt is only accessed when TRAN TYPE equals Tax Credit. Key the Tax Credit IRS Form code that goes with the current record. OK TO CHANGE Answer YES to accept screen prompts and proceed
Patronage / Equity File Maintenance – Page - 42
Software Version 8.00.003 April 15, 2017
14. ALLOCATION AND PAYMENT CONTROLS
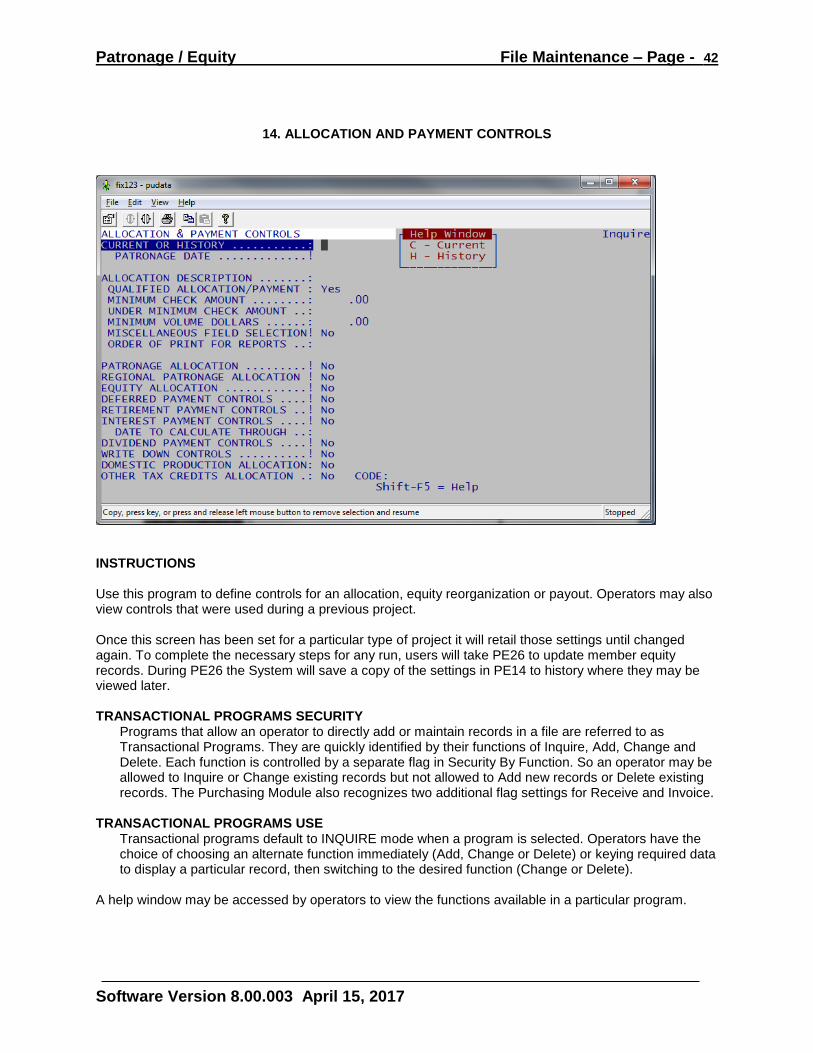
INSTRUCTIONS Use this program to define controls for an allocation, equity reorganization or payout. Operators may also view controls that were used during a previous project. Once this screen has been set for a particular type of project it will retail those settings until changed again. To complete the necessary steps for any run, users will take PE26 to update member equity records. During PE26 the System will save a copy of the settings in PE14 to history where they may be viewed later. TRANSACTIONAL PROGRAMS SECURITY
Programs that allow an operator to directly add or maintain records in a file are referred to as Transactional Programs. They are quickly identified by their functions of Inquire, Add, Change and Delete. Each function is controlled by a separate flag in Security By Function. So an operator may be allowed to Inquire or Change existing records but not allowed to Add new records or Delete existing records. The Purchasing Module also recognizes two additional flag settings for Receive and Invoice.
TRANSACTIONAL PROGRAMS USE Transactional programs default to INQUIRE mode when a program is selected. Operators have the choice of choosing an alternate function immediately (Add, Change or Delete) or keying required data to display a particular record, then switching to the desired function (Change or Delete).
A help window may be accessed by operators to view the functions available in a particular program.
Patronage / Equity File Maintenance – Page - 43
Software Version 8.00.003 April 15, 2017
CURRENT OR HISTORY…(C/H):
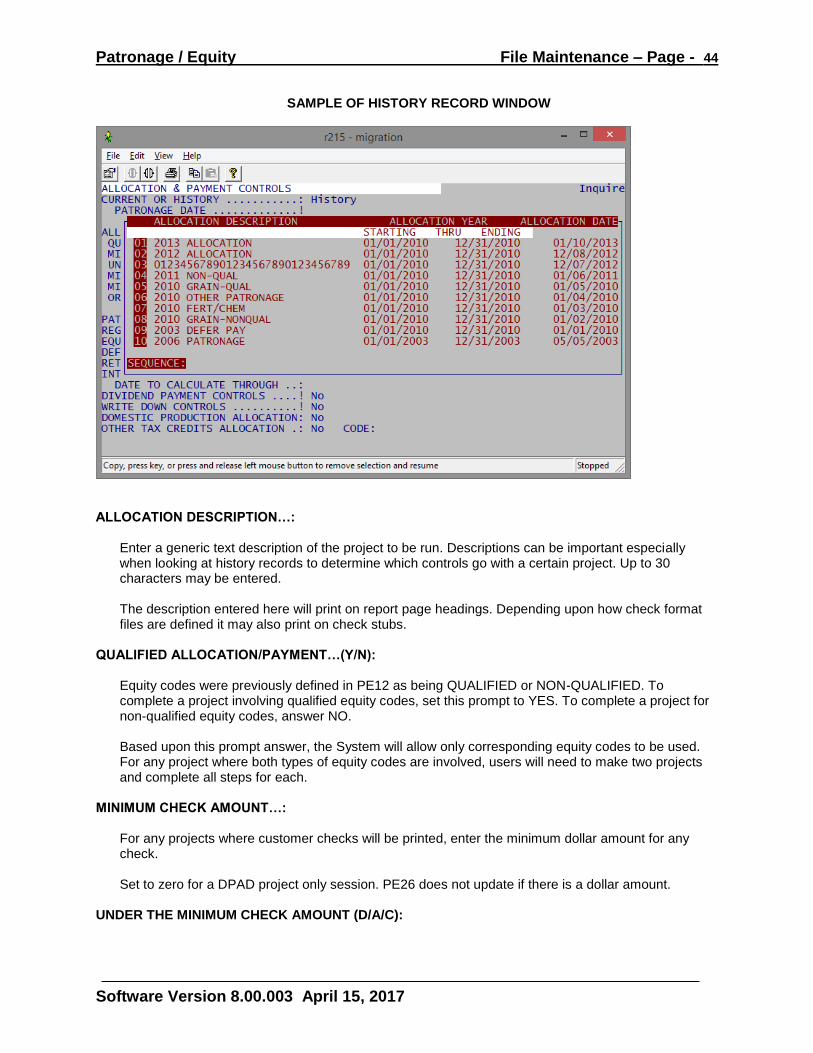
In change mode the System by-passes this prompt. Select either current or history records to view. When history is chosen, a window displaying all history records appears on screen. Enter the line number of the record to view. Records are sorted by dates in the ALLOCATION YEAR column. Any secondary screens that are associated with a program prompt may be displayed by touching <END>.
Patronage / Equity File Maintenance – Page - 44
Software Version 8.00.003 April 15, 2017
SAMPLE OF HISTORY RECORD WINDOW
ALLOCATION DESCRIPTION…:
Enter a generic text description of the project to be run. Descriptions can be important especially when looking at history records to determine which controls go with a certain project. Up to 30 characters may be entered. The description entered here will print on report page headings. Depending upon how check format files are defined it may also print on check stubs.
QUALIFIED ALLOCATION/PAYMENT…(Y/N):
Equity codes were previously defined in PE12 as being QUALIFIED or NON-QUALIFIED. To complete a project involving qualified equity codes, set this prompt to YES. To complete a project for non-qualified equity codes, answer NO. Based upon this prompt answer, the System will allow only corresponding equity codes to be used. For any project where both types of equity codes are involved, users will need to make two projects and complete all steps for each.
MINIMUM CHECK AMOUNT…:
For any projects where customer checks will be printed, enter the minimum dollar amount for any check. Set to zero for a DPAD project only session. PE26 does not update if there is a dollar amount.
UNDER THE MINIMUM CHECK AMOUNT (D/A/C):
Patronage / Equity File Maintenance – Page - 45
Software Version 8.00.003 April 15, 2017
For any customer whose cash portion is less than the minimum check amount, select how the System is to handle that customer. The choice selected may depend upon the type of project being run. For example, during a patronage allocation run users may want to issue all stock for those customers under the minimum check whereas during an equity retirement run they may want them dropped. DROP FROM ALLOCATION – Those customers below the minimum check will be deleted from the
project run. ALLOCATE TO EQUITIES - Any amounts below the minimum check will be issued as stock based
upon defined non-cash controls. CASH PAYOUT – Issue one hundred percent cash even though the customer does not meet the
minimum check requirement.
MINIMUM VOLUME DOLLARS…:
If customers have to purchase a minimum dollar amount of merchandise during the fiscal year in order to participate in a patronage allocation, enter that dollar amount here. Leave this prompt blank if there is no such requirement. There is also a MINIMUM VOLUME prompt in PE11 (PATRONAGE GROUPS). To contrast the two prompts – volume checking in PE11 is by individual patronage group per customer whereas volume checking here is based upon total amounts for all patronage consolidation groups by individual customer.
MISCELLANEOUS FIELD SELECTION…:
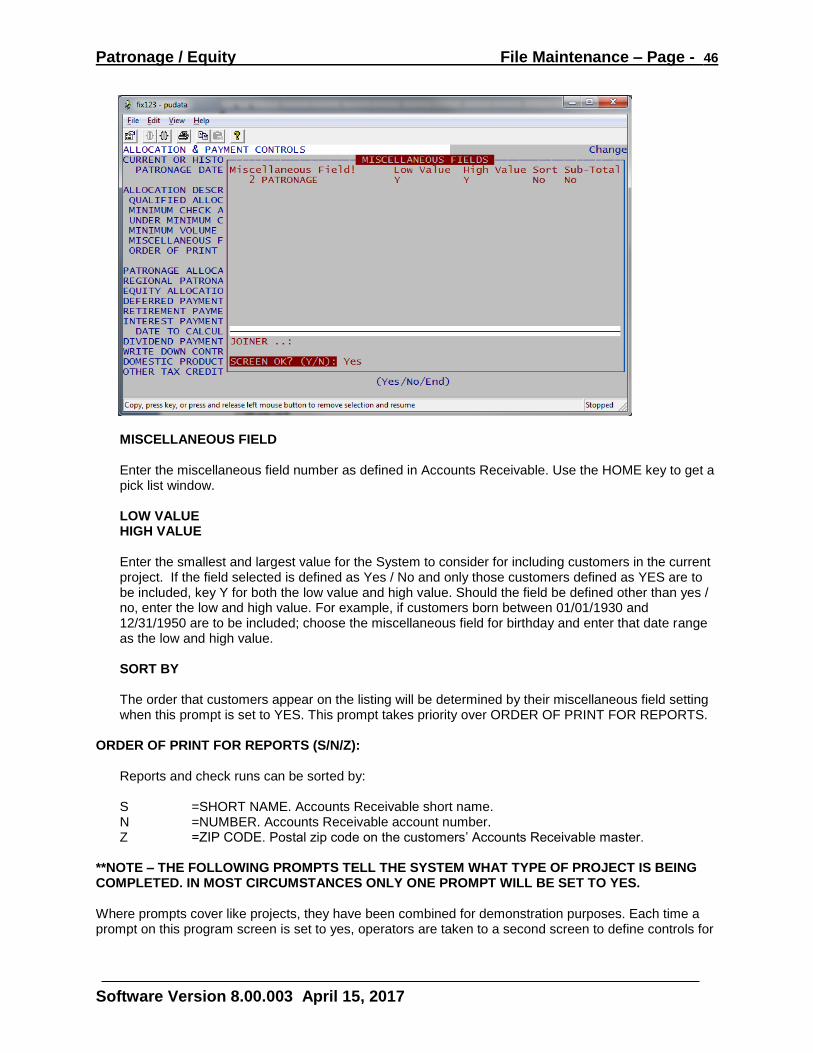
Operators may use any of the miscellaneous fields defined in Accounts Receivable as a criteria for a project. Answer YES to activate this feature. A Miscellaneous Field Selection window will display on the screen.
SCREEN OK (/N)?:
Answer No to select one of the miscellaneous fields.
SAMPLE MISCELLANEOUS FIELD WINDOW
Patronage / Equity File Maintenance – Page - 46
Software Version 8.00.003 April 15, 2017
MISCELLANEOUS FIELD Enter the miscellaneous field number as defined in Accounts Receivable. Use the HOME key to get a pick list window. LOW VALUE HIGH VALUE Enter the smallest and largest value for the System to consider for including customers in the current project. If the field selected is defined as Yes / No and only those customers defined as YES are to be included, key Y for both the low value and high value. Should the field be defined other than yes / no, enter the low and high value. For example, if customers born between 01/01/1930 and 12/31/1950 are to be included; choose the miscellaneous field for birthday and enter that date range as the low and high value. SORT BY The order that customers appear on the listing will be determined by their miscellaneous field setting when this prompt is set to YES. This prompt takes priority over ORDER OF PRINT FOR REPORTS.
ORDER OF PRINT FOR REPORTS (S/N/Z):
Reports and check runs can be sorted by:
S =SHORT NAME. Accounts Receivable short name. N =NUMBER. Accounts Receivable account number. Z =ZIP CODE. Postal zip code on the customers’ Accounts Receivable master.
**NOTE – THE FOLLOWING PROMPTS TELL THE SYSTEM WHAT TYPE OF PROJECT IS BEING COMPLETED. IN MOST CIRCUMSTANCES ONLY ONE PROMPT WILL BE SET TO YES. Where prompts cover like projects, they have been combined for demonstration purposes. Each time a prompt on this program screen is set to yes, operators are taken to a second screen to define controls for
Patronage / Equity File Maintenance – Page - 47
Software Version 8.00.003 April 15, 2017
that particular type of project. A simplified example of each type of project is presented with screen shots and comments. For assistance in setting up this screen contact Customer Support. Each time a particular set of instructions is used to complete a project, those are saved when PE26 is run. The next time that same type of project prompt is set to YES (e.g. PATRONAGE ALLOCATION), the System will pull in the last set of instructions. If for some reason the System does not pull in that set of instructions, or the operator wants to view a set of instructions, use INQUIRY mode. At the prompt for CURRENT OR HISTORY, select HISTORY. Choose the allocation desired from the list displayed. Use the <END> key to display each pop-up window’s prompts.
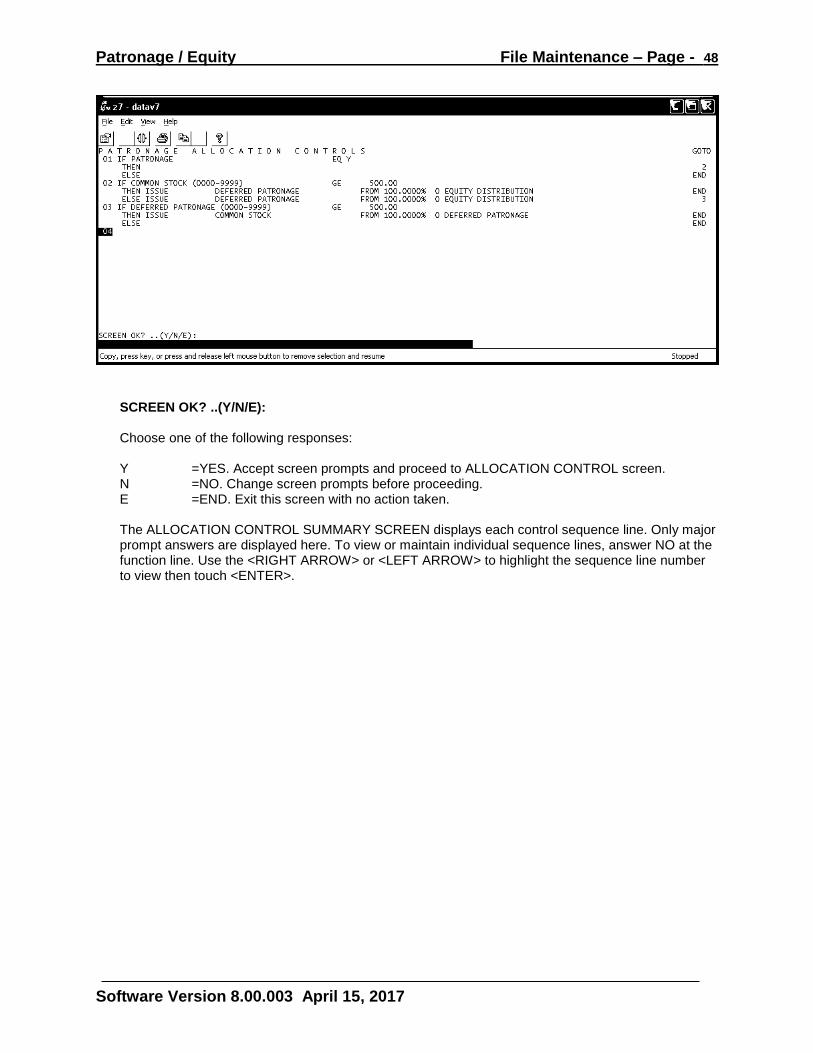
PATRONAGE ALLOCATION .........(Y/N): REGIONAL PATRONAGE ALLOCATION (Y/N): Use these prompts to make a patronage refund to customers at fiscal year end. Since a regional allocation uses the same customer business volume to do an allocation as a local project, they must be run at separate times. To complete both types of projects for the same fiscal year end requires a couple of extra steps. Contact Customer Support for assistance in defining procedures to meet your organizational needs. For any equity code having a par value or maximum issue amount, set those amounts in PE12 (EQUITY CODES). During PE26 (UPDATE EQUITY) operators will assign an EQUITY ISSUE YEAR. This calendar year is used to build an equity code zero record (1099 record). Be sure to use the year for which this income is to be reported for tax purposes. The following sample demonstrates controls for an organization having two stock types. Customers earn Common stock shares in one hundred dollar increments up to a total of five hundred dollars. Only those customers with their patronage flag set to YES are to be included in the allocation.
PATRONAGE ALLOCATION SUMMARY SCREEN
Patronage / Equity File Maintenance – Page - 48
Software Version 8.00.003 April 15, 2017
SCREEN OK? ..(Y/N/E):
Choose one of the following responses:
Y =YES. Accept screen prompts and proceed to ALLOCATION CONTROL screen. N =NO. Change screen prompts before proceeding. E =END. Exit this screen with no action taken.
The ALLOCATION CONTROL SUMMARY SCREEN displays each control sequence line. Only major prompt answers are displayed here. To view or maintain individual sequence lines, answer NO at the function line. Use the <RIGHT ARROW> or <LEFT ARROW> to highlight the sequence line number to view then touch <ENTER>.
Patronage / Equity File Maintenance – Page - 49
Software Version 8.00.003 April 15, 2017
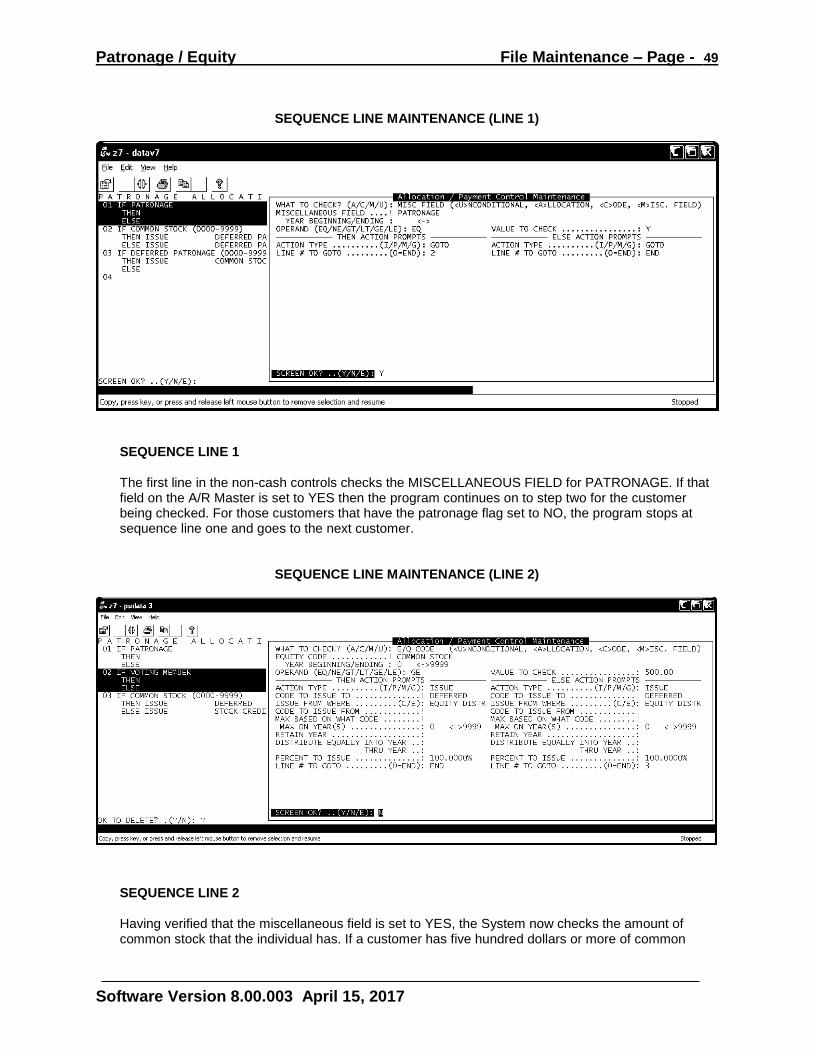
SEQUENCE LINE MAINTENANCE (LINE 1)
SEQUENCE LINE 1
The first line in the non-cash controls checks the MISCELLANEOUS FIELD for PATRONAGE. If that field on the A/R Master is set to YES then the program continues on to step two for the customer being checked. For those customers that have the patronage flag set to NO, the program stops at sequence line one and goes to the next customer.
SEQUENCE LINE MAINTENANCE (LINE 2)
SEQUENCE LINE 2 Having verified that the miscellaneous field is set to YES, the System now checks the amount of common stock that the individual has. If a customer has five hundred dollars or more of common
Patronage / Equity File Maintenance – Page - 50
Software Version 8.00.003 April 15, 2017
stock, deferred patronage is issued and the program goes on to the next customer (THEN ACTION PROMPTS). Since there are only two types of stock in this organization even though a customer has less than five hundred dollars in common stock, deferred patronage is still issued (ELSE ACTION PROMPTS). In this situation however the program moves on to sequence line three.
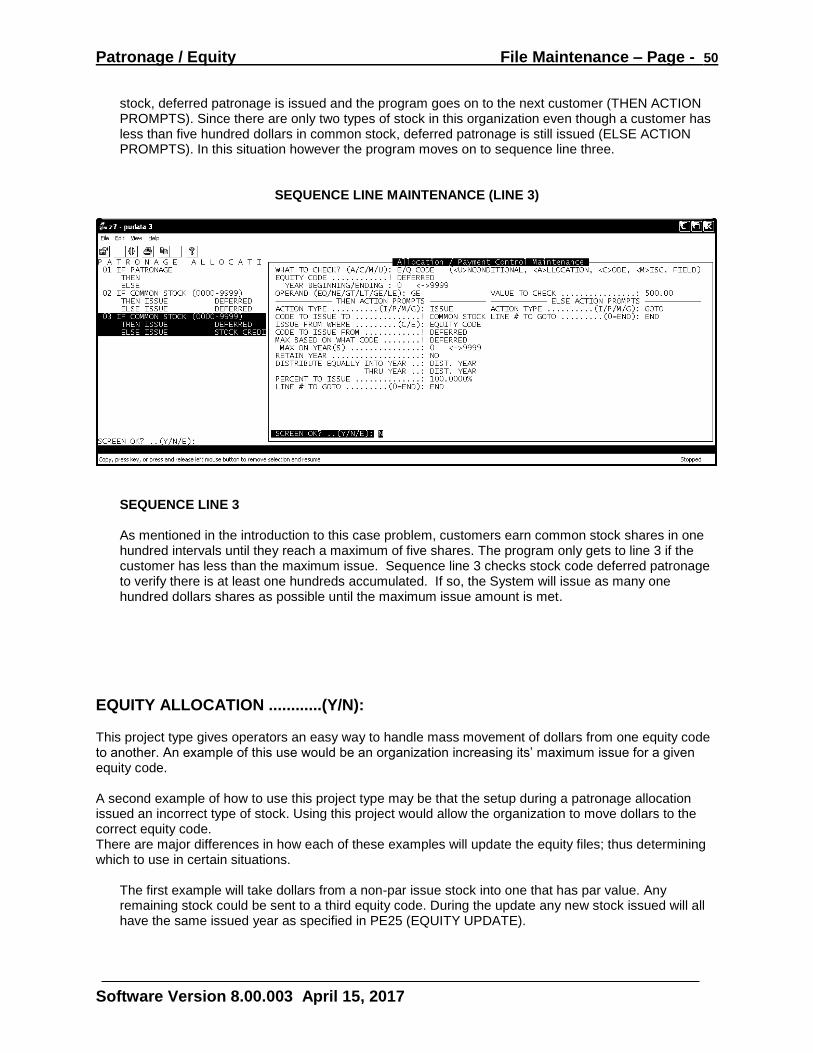
SEQUENCE LINE MAINTENANCE (LINE 3)
SEQUENCE LINE 3
As mentioned in the introduction to this case problem, customers earn common stock shares in one hundred intervals until they reach a maximum of five shares. The program only gets to line 3 if the customer has less than the maximum issue. Sequence line 3 checks stock code deferred patronage to verify there is at least one hundreds accumulated. If so, the System will issue as many one hundred dollars shares as possible until the maximum issue amount is met.
EQUITY ALLOCATION ............(Y/N): This project type gives operators an easy way to handle mass movement of dollars from one equity code to another. An example of this use would be an organization increasing its’ maximum issue for a given equity code. A second example of how to use this project type may be that the setup during a patronage allocation issued an incorrect type of stock. Using this project would allow the organization to move dollars to the correct equity code. There are major differences in how each of these examples will update the equity files; thus determining which to use in certain situations.
The first example will take dollars from a non-par issue stock into one that has par value. Any remaining stock could be sent to a third equity code. During the update any new stock issued will all have the same issued year as specified in PE25 (EQUITY UPDATE).

Patronage / Equity File Maintenance – Page - 51
Software Version 8.00.003 April 15, 2017
In contrast the second example will take equity dollars of a specific equity code and move them to a second equity code while retaining the original issue year and amount. To accomplish this, each equity code involved must be of the same par value or not have any par value.
For any equity code having a par value or maximum issue amount, set those amounts in PE12 (EQUITY CODES).
CASE EXAMPLE 1
In this case example the organization has decided to increase common stock from one hundred dollars to a new maximum of five hundred dollars. Customers have been earning their one share with the excess over one hundred going into deferred patronage. Equity amounts less than one hundred dollars go into patronage ledger credits.
EQUITY ALLOCATION SUMMARY SCREEN
SCREEN OK? ..(Y/N/E): Choose one of the following responses: Y =YES. Accept screen prompts and proceed to ALLOCATION CONTROL screen. N =NO. Change screen prompts before proceeding. E =END. Exit this screen with no action taken.
The EQUITY ALLOCATION CONTROL SUMMARY SCREEN displays each control sequence line. Only major prompt answers are displayed here. To view or maintain individual sequence lines, answer NO at the function line. Use the <RIGHT ARROW> or <LEFT ARROW> to highlight the sequence line number to view then touch <ENTER>.
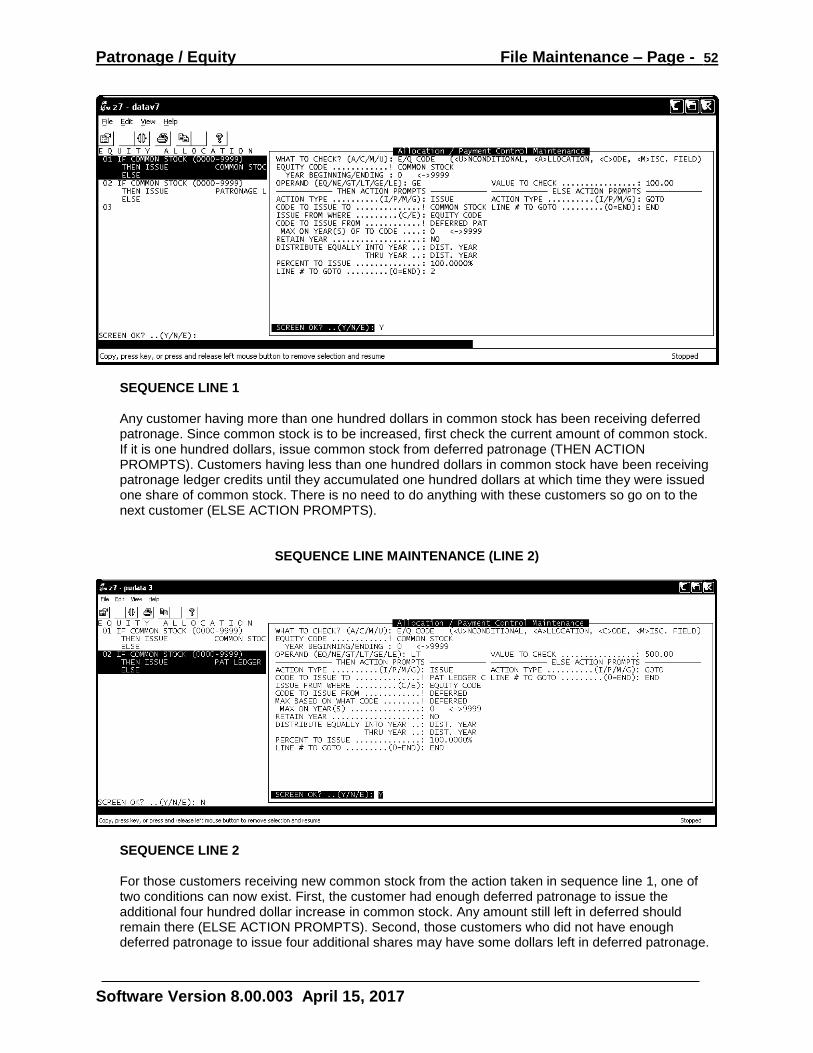
SEQUENCE LINE MAINTENANCE (LINE 1)
Patronage / Equity File Maintenance – Page - 52
Software Version 8.00.003 April 15, 2017
SEQUENCE LINE 1 Any customer having more than one hundred dollars in common stock has been receiving deferred patronage. Since common stock is to be increased, first check the current amount of common stock. If it is one hundred dollars, issue common stock from deferred patronage (THEN ACTION PROMPTS). Customers having less than one hundred dollars in common stock have been receiving patronage ledger credits until they accumulated one hundred dollars at which time they were issued one share of common stock. There is no need to do anything with these customers so go on to the next customer (ELSE ACTION PROMPTS).
SEQUENCE LINE MAINTENANCE (LINE 2)
SEQUENCE LINE 2 For those customers receiving new common stock from the action taken in sequence line 1, one of two conditions can now exist. First, the customer had enough deferred patronage to issue the additional four hundred dollar increase in common stock. Any amount still left in deferred should remain there (ELSE ACTION PROMPTS). Second, those customers who did not have enough deferred patronage to issue four additional shares may have some dollars left in deferred patronage.
Patronage / Equity File Maintenance – Page - 53
Software Version 8.00.003 April 15, 2017
These should now be in patronage ledger credits to accumulate toward another share of common stock (THEN ACTION PROMPTS).
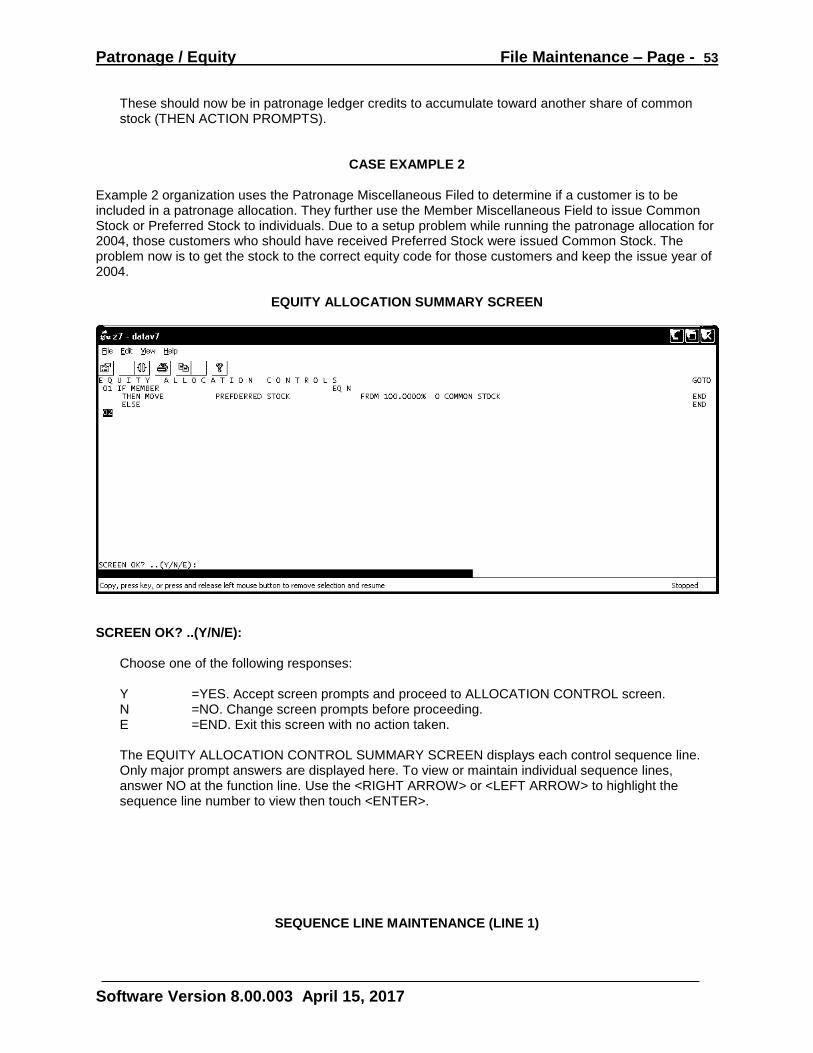
CASE EXAMPLE 2 Example 2 organization uses the Patronage Miscellaneous Filed to determine if a customer is to be included in a patronage allocation. They further use the Member Miscellaneous Field to issue Common Stock or Preferred Stock to individuals. Due to a setup problem while running the patronage allocation for 2004, those customers who should have received Preferred Stock were issued Common Stock. The problem now is to get the stock to the correct equity code for those customers and keep the issue year of 2004.
EQUITY ALLOCATION SUMMARY SCREEN
SCREEN OK? ..(Y/N/E): Choose one of the following responses: Y =YES. Accept screen prompts and proceed to ALLOCATION CONTROL screen. N =NO. Change screen prompts before proceeding. E =END. Exit this screen with no action taken.
The EQUITY ALLOCATION CONTROL SUMMARY SCREEN displays each control sequence line. Only major prompt answers are displayed here. To view or maintain individual sequence lines, answer NO at the function line. Use the <RIGHT ARROW> or <LEFT ARROW> to highlight the sequence line number to view then touch <ENTER>.
SEQUENCE LINE MAINTENANCE (LINE 1)
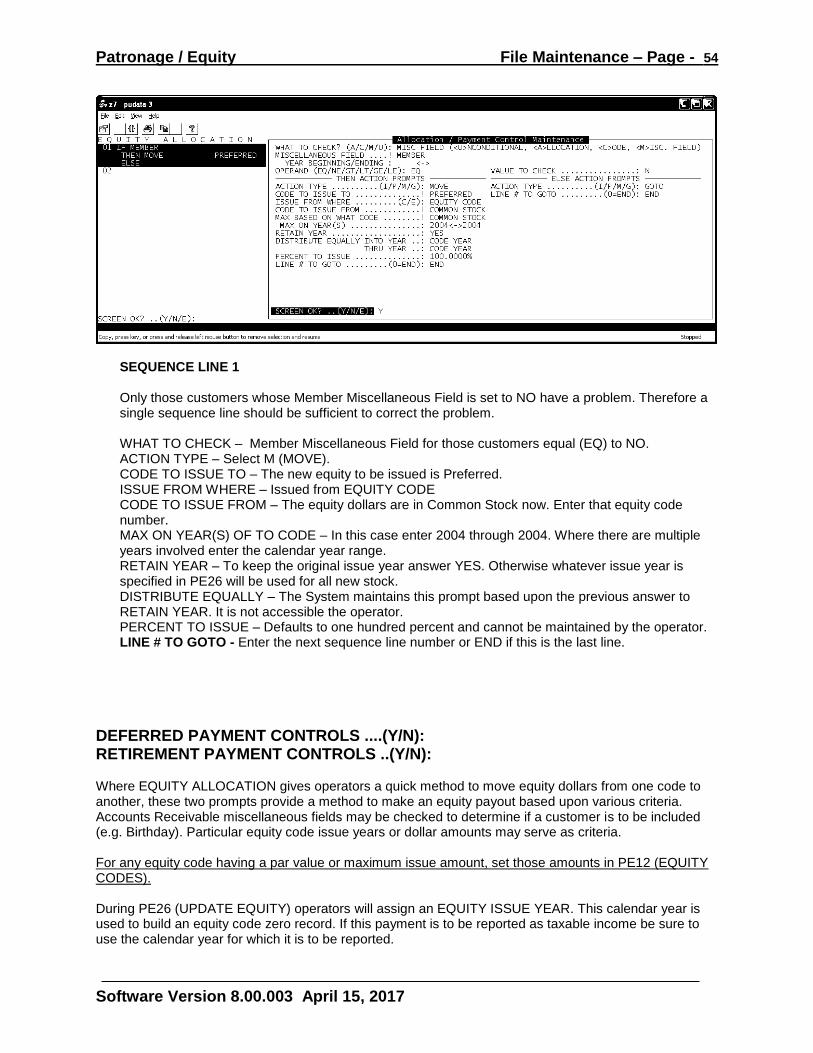
Patronage / Equity File Maintenance – Page - 54
Software Version 8.00.003 April 15, 2017
SEQUENCE LINE 1 Only those customers whose Member Miscellaneous Field is set to NO have a problem. Therefore a single sequence line should be sufficient to correct the problem. WHAT TO CHECK – Member Miscellaneous Field for those customers equal (EQ) to NO. ACTION TYPE – Select M (MOVE). CODE TO ISSUE TO – The new equity to be issued is Preferred. ISSUE FROM WHERE – Issued from EQUITY CODE CODE TO ISSUE FROM – The equity dollars are in Common Stock now. Enter that equity code number. MAX ON YEAR(S) OF TO CODE – In this case enter 2004 through 2004. Where there are multiple years involved enter the calendar year range. RETAIN YEAR – To keep the original issue year answer YES. Otherwise whatever issue year is specified in PE26 will be used for all new stock. DISTRIBUTE EQUALLY – The System maintains this prompt based upon the previous answer to RETAIN YEAR. It is not accessible the operator. PERCENT TO ISSUE – Defaults to one hundred percent and cannot be maintained by the operator. LINE # TO GOTO - Enter the next sequence line number or END if this is the last line.
DEFERRED PAYMENT CONTROLS ....(Y/N): RETIREMENT PAYMENT CONTROLS ..(Y/N): Where EQUITY ALLOCATION gives operators a quick method to move equity dollars from one code to another, these two prompts provide a method to make an equity payout based upon various criteria. Accounts Receivable miscellaneous fields may be checked to determine if a customer is to be included (e.g. Birthday). Particular equity code issue years or dollar amounts may serve as criteria. For any equity code having a par value or maximum issue amount, set those amounts in PE12 (EQUITY CODES). During PE26 (UPDATE EQUITY) operators will assign an EQUITY ISSUE YEAR. This calendar year is used to build an equity code zero record. If this payment is to be reported as taxable income be sure to use the calendar year for which it is to be reported.
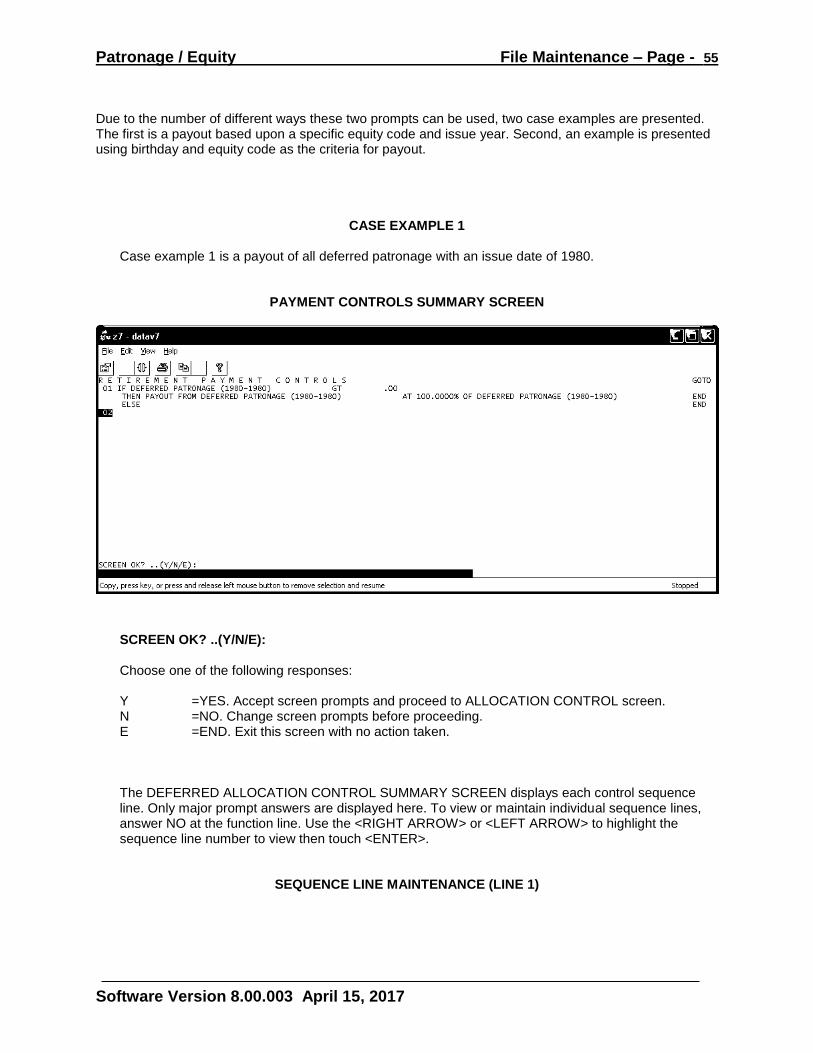
Patronage / Equity File Maintenance – Page - 55
Software Version 8.00.003 April 15, 2017
Due to the number of different ways these two prompts can be used, two case examples are presented. The first is a payout based upon a specific equity code and issue year. Second, an example is presented using birthday and equity code as the criteria for payout.
CASE EXAMPLE 1 Case example 1 is a payout of all deferred patronage with an issue date of 1980.
PAYMENT CONTROLS SUMMARY SCREEN
SCREEN OK? ..(Y/N/E): Choose one of the following responses: Y =YES. Accept screen prompts and proceed to ALLOCATION CONTROL screen. N =NO. Change screen prompts before proceeding. E =END. Exit this screen with no action taken.
The DEFERRED ALLOCATION CONTROL SUMMARY SCREEN displays each control sequence line. Only major prompt answers are displayed here. To view or maintain individual sequence lines, answer NO at the function line. Use the <RIGHT ARROW> or <LEFT ARROW> to highlight the sequence line number to view then touch <ENTER>.
SEQUENCE LINE MAINTENANCE (LINE 1)
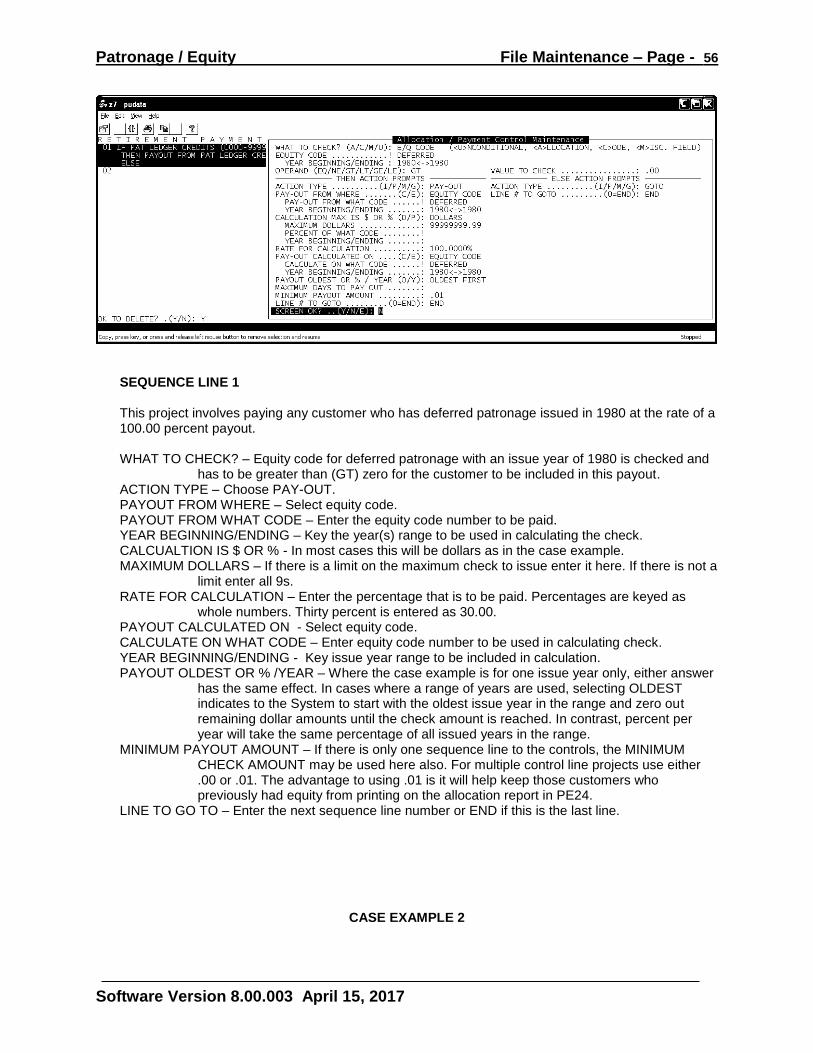
Patronage / Equity File Maintenance – Page - 56
Software Version 8.00.003 April 15, 2017
SEQUENCE LINE 1
This project involves paying any customer who has deferred patronage issued in 1980 at the rate of a 100.00 percent payout.
WHAT TO CHECK? – Equity code for deferred patronage with an issue year of 1980 is checked and
has to be greater than (GT) zero for the customer to be included in this payout. ACTION TYPE – Choose PAY-OUT. PAYOUT FROM WHERE – Select equity code. PAYOUT FROM WHAT CODE – Enter the equity code number to be paid. YEAR BEGINNING/ENDING – Key the year(s) range to be used in calculating the check. CALCUALTION IS $ OR % - In most cases this will be dollars as in the case example. MAXIMUM DOLLARS – If there is a limit on the maximum check to issue enter it here. If there is not a
limit enter all 9s. RATE FOR CALCULATION – Enter the percentage that is to be paid. Percentages are keyed as
whole numbers. Thirty percent is entered as 30.00. PAYOUT CALCULATED ON - Select equity code. CALCULATE ON WHAT CODE – Enter equity code number to be used in calculating check. YEAR BEGINNING/ENDING - Key issue year range to be included in calculation. PAYOUT OLDEST OR % /YEAR – Where the case example is for one issue year only, either answer
has the same effect. In cases where a range of years are used, selecting OLDEST indicates to the System to start with the oldest issue year in the range and zero out remaining dollar amounts until the check amount is reached. In contrast, percent per year will take the same percentage of all issued years in the range.
MINIMUM PAYOUT AMOUNT – If there is only one sequence line to the controls, the MINIMUM CHECK AMOUNT may be used here also. For multiple control line projects use either .00 or .01. The advantage to using .01 is it will help keep those customers who previously had equity from printing on the allocation report in PE24.
LINE TO GO TO – Enter the next sequence line number or END if this is the last line.
CASE EXAMPLE 2
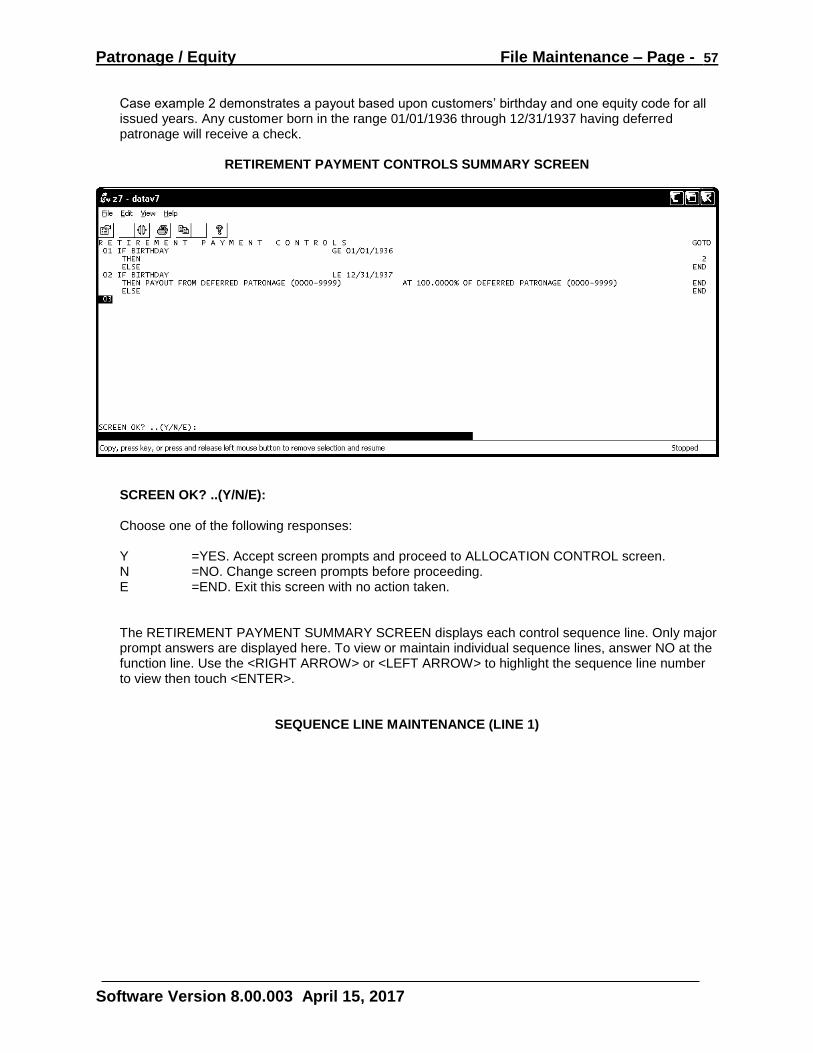
Patronage / Equity File Maintenance – Page - 57
Software Version 8.00.003 April 15, 2017
Case example 2 demonstrates a payout based upon customers’ birthday and one equity code for all issued years. Any customer born in the range 01/01/1936 through 12/31/1937 having deferred patronage will receive a check.
RETIREMENT PAYMENT CONTROLS SUMMARY SCREEN
SCREEN OK? ..(Y/N/E): Choose one of the following responses: Y =YES. Accept screen prompts and proceed to ALLOCATION CONTROL screen. N =NO. Change screen prompts before proceeding. E =END. Exit this screen with no action taken.
The RETIREMENT PAYMENT SUMMARY SCREEN displays each control sequence line. Only major prompt answers are displayed here. To view or maintain individual sequence lines, answer NO at the function line. Use the <RIGHT ARROW> or <LEFT ARROW> to highlight the sequence line number to view then touch <ENTER>.
SEQUENCE LINE MAINTENANCE (LINE 1)
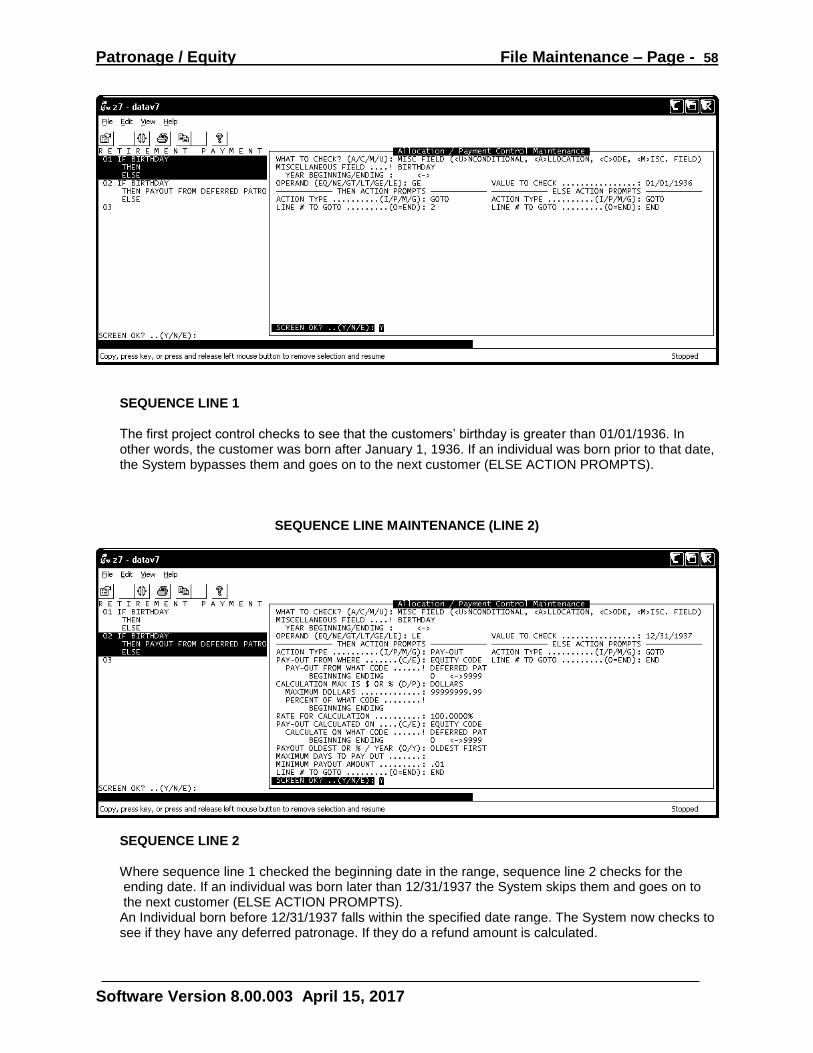
Patronage / Equity File Maintenance – Page - 58
Software Version 8.00.003 April 15, 2017
SEQUENCE LINE 1
The first project control checks to see that the customers’ birthday is greater than 01/01/1936. In other words, the customer was born after January 1, 1936. If an individual was born prior to that date, the System bypasses them and goes on to the next customer (ELSE ACTION PROMPTS).
SEQUENCE LINE MAINTENANCE (LINE 2)
SEQUENCE LINE 2
Where sequence line 1 checked the beginning date in the range, sequence line 2 checks for the ending date. If an individual was born later than 12/31/1937 the System skips them and goes on to the next customer (ELSE ACTION PROMPTS). An Individual born before 12/31/1937 falls within the specified date range. The System now checks to see if they have any deferred patronage. If they do a refund amount is calculated.
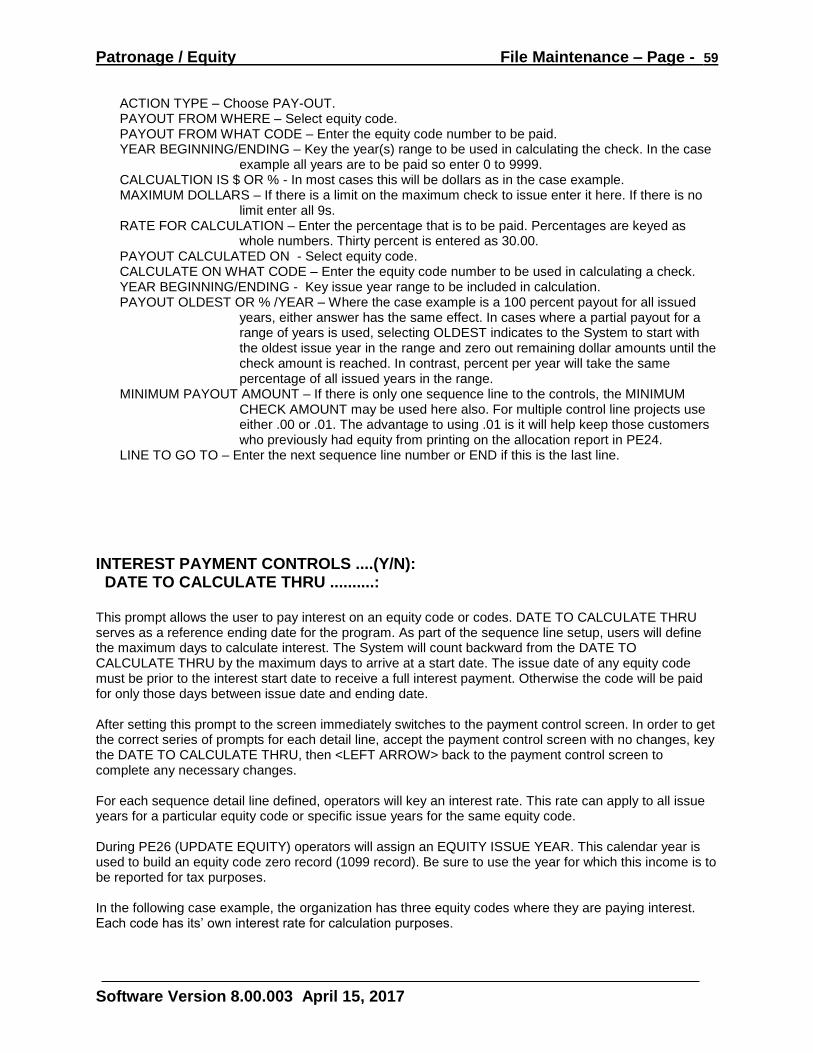
Patronage / Equity File Maintenance – Page - 59
Software Version 8.00.003 April 15, 2017
ACTION TYPE – Choose PAY-OUT. PAYOUT FROM WHERE – Select equity code. PAYOUT FROM WHAT CODE – Enter the equity code number to be paid. YEAR BEGINNING/ENDING – Key the year(s) range to be used in calculating the check. In the case
example all years are to be paid so enter 0 to 9999. CALCUALTION IS $ OR % - In most cases this will be dollars as in the case example. MAXIMUM DOLLARS – If there is a limit on the maximum check to issue enter it here. If there is no
limit enter all 9s. RATE FOR CALCULATION – Enter the percentage that is to be paid. Percentages are keyed as
whole numbers. Thirty percent is entered as 30.00. PAYOUT CALCULATED ON - Select equity code. CALCULATE ON WHAT CODE – Enter the equity code number to be used in calculating a check. YEAR BEGINNING/ENDING - Key issue year range to be included in calculation. PAYOUT OLDEST OR % /YEAR – Where the case example is a 100 percent payout for all issued
years, either answer has the same effect. In cases where a partial payout for a range of years is used, selecting OLDEST indicates to the System to start with the oldest issue year in the range and zero out remaining dollar amounts until the check amount is reached. In contrast, percent per year will take the same percentage of all issued years in the range.
MINIMUM PAYOUT AMOUNT – If there is only one sequence line to the controls, the MINIMUM CHECK AMOUNT may be used here also. For multiple control line projects use either .00 or .01. The advantage to using .01 is it will help keep those customers who previously had equity from printing on the allocation report in PE24.
LINE TO GO TO – Enter the next sequence line number or END if this is the last line.
INTEREST PAYMENT CONTROLS ....(Y/N): DATE TO CALCULATE THRU ..........: This prompt allows the user to pay interest on an equity code or codes. DATE TO CALCULATE THRU serves as a reference ending date for the program. As part of the sequence line setup, users will define the maximum days to calculate interest. The System will count backward from the DATE TO CALCULATE THRU by the maximum days to arrive at a start date. The issue date of any equity code must be prior to the interest start date to receive a full interest payment. Otherwise the code will be paid for only those days between issue date and ending date. After setting this prompt to the screen immediately switches to the payment control screen. In order to get the correct series of prompts for each detail line, accept the payment control screen with no changes, key the DATE TO CALCULATE THRU, then <LEFT ARROW> back to the payment control screen to complete any necessary changes. For each sequence detail line defined, operators will key an interest rate. This rate can apply to all issue years for a particular equity code or specific issue years for the same equity code. During PE26 (UPDATE EQUITY) operators will assign an EQUITY ISSUE YEAR. This calendar year is used to build an equity code zero record (1099 record). Be sure to use the year for which this income is to be reported for tax purposes. In the following case example, the organization has three equity codes where they are paying interest. Each code has its’ own interest rate for calculation purposes.
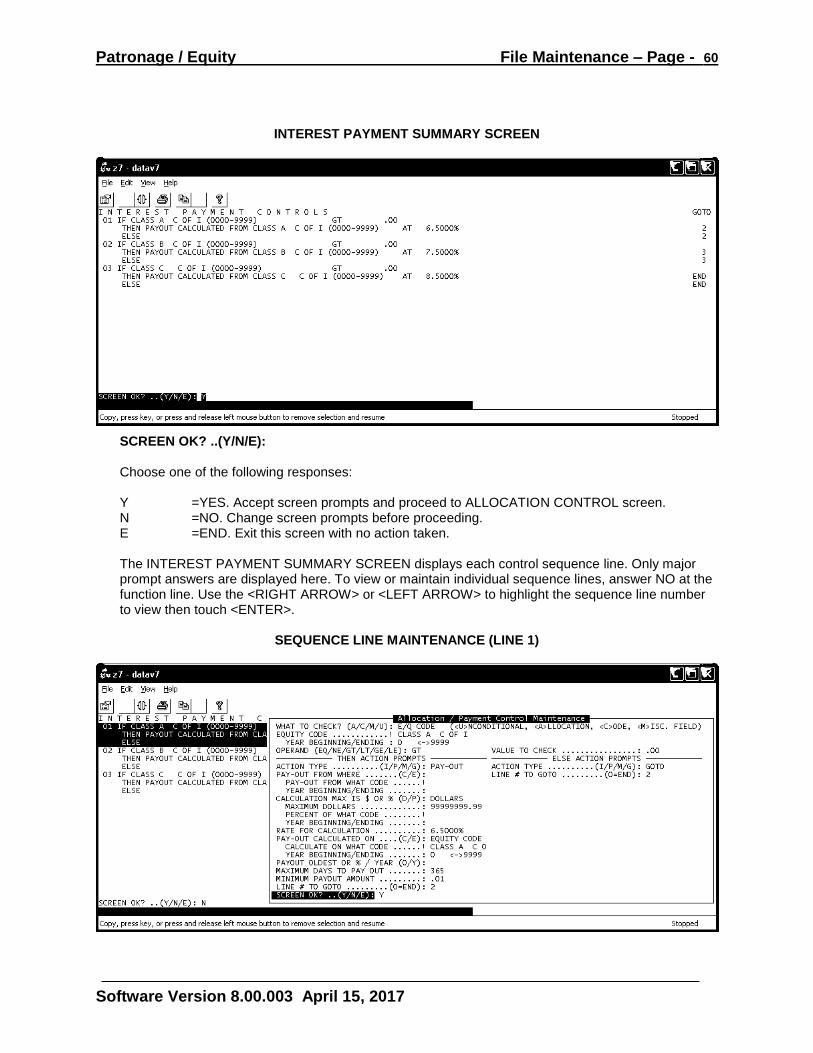
Patronage / Equity File Maintenance – Page - 60
Software Version 8.00.003 April 15, 2017
INTEREST PAYMENT SUMMARY SCREEN
SCREEN OK? ..(Y/N/E): Choose one of the following responses: Y =YES. Accept screen prompts and proceed to ALLOCATION CONTROL screen. N =NO. Change screen prompts before proceeding. E =END. Exit this screen with no action taken.
The INTEREST PAYMENT SUMMARY SCREEN displays each control sequence line. Only major prompt answers are displayed here. To view or maintain individual sequence lines, answer NO at the function line. Use the <RIGHT ARROW> or <LEFT ARROW> to highlight the sequence line number to view then touch <ENTER>.
SEQUENCE LINE MAINTENANCE (LINE 1)

Patronage / Equity File Maintenance – Page - 61
Software Version 8.00.003 April 15, 2017
SEQUENCE LINE 1 Check the first equity code to be paid interest. Select the issue year or years to be included for any amount greater than zero dollars remaining. In the THEN ACTION PROMPTS and ELSE ACTION PROMPTS note that they have been set to go to line 2. It is not likely that each customer has all three equity codes. So to include all customers having each of the three types, it is necessary to go to the second code after checking the first to see if a customer has that type. ACTION TYPE – Choose PAY-OUT. CALCUALTION IS $ OR % - In most cases this will be dollars as in the case example. MAXIMUM DOLLARS – If there is a limit on the maximum check to issue enter it here. If there is not a
limit enter all 9s. RATE FOR CALCULATION – Enter the percentage that is to be paid. Percentages are keyed as
whole numbers. An interest rate of six and one-half percent is entered as 6.5000. PAYOUT CALCULATED ON - Select equity code. CALCULATE ON WHAT CODE – Enter equity code number to be used in calculating a check. YEAR BEGINNING/ENDING - Key issue year range to be included in calculation. MAXIMUM DAYS TO PAYOUT – Enter the number of days to use in the calculation. In the case
example interest is paid once a year, so 365 has been entered. MINIMUM PAYOUT AMOUNT – If there is only one sequence line to the controls, the MINIMUM
CHECK AMOUNT may be used here also. For multiple control line projects use either .00 or .01. The advantage to using .01 is it will help keep those customers who previously had equity from printing on the allocation report in PE24.
LINE TO GO TO – Enter the next sequence line number or END if this is the last line. SEQUENCE LINE 2 AND SEQUENCE LINE 3 Each of these lines is the same as sequence line 1, except they are checking another equity code and sending the program on to the next line.
DIVIDEND PAYMENT CONTROLS ....(Y/N): This option allows the user to pay a dividend on stock shares. The function is not complete at this time to truly use setup as a dividend. In place of that setup similar to an interest calculation is used. The 1099 record created is recorded as a dividend for year end reporting purposes. Remove any par value on the equity code master while during this payment; then replace it when finished. Any Interest Rate or Dividend amount on an equity code master may be changed to zero as they are not used at this time. During PE26 (UPDATE EQUITY) operators will assign an EQUITY ISSUE YEAR. This calendar year is used to build an equity code zero record (1099 record). Be sure to use the year for which this income is to be reported for tax purposes.
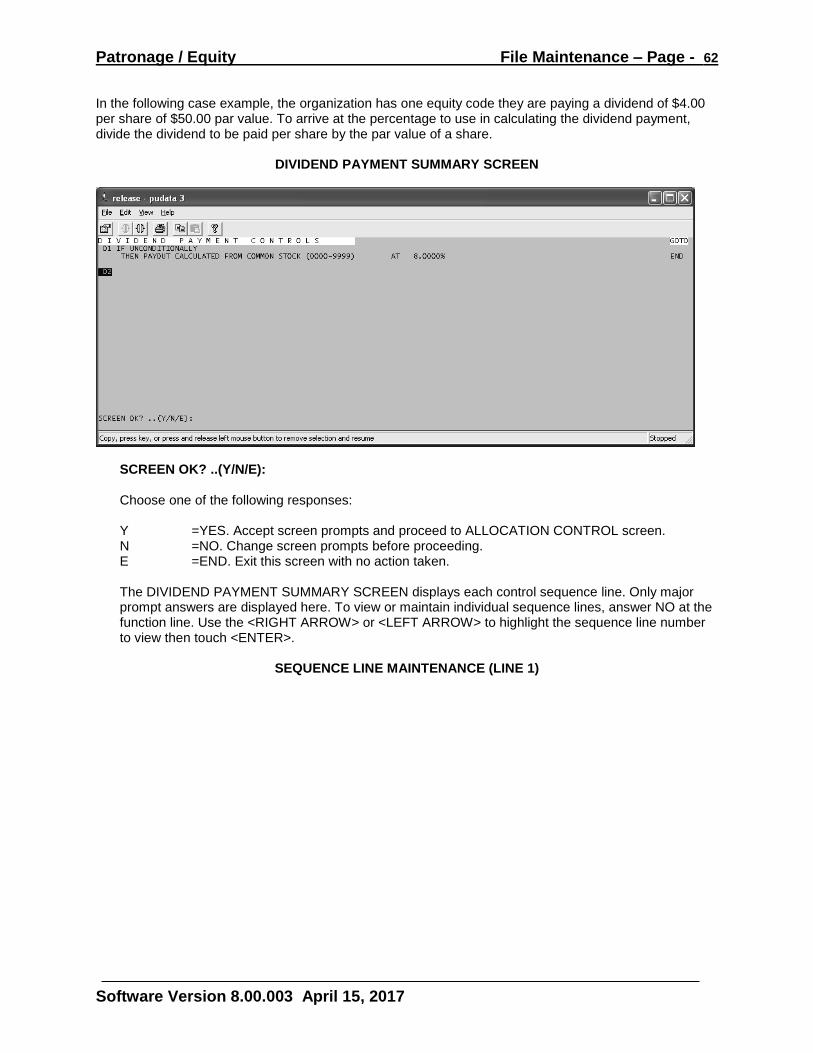
Patronage / Equity File Maintenance – Page - 62
Software Version 8.00.003 April 15, 2017
In the following case example, the organization has one equity code they are paying a dividend of $4.00 per share of $50.00 par value. To arrive at the percentage to use in calculating the dividend payment, divide the dividend to be paid per share by the par value of a share.
DIVIDEND PAYMENT SUMMARY SCREEN
SCREEN OK? ..(Y/N/E): Choose one of the following responses: Y =YES. Accept screen prompts and proceed to ALLOCATION CONTROL screen. N =NO. Change screen prompts before proceeding. E =END. Exit this screen with no action taken.
The DIVIDEND PAYMENT SUMMARY SCREEN displays each control sequence line. Only major prompt answers are displayed here. To view or maintain individual sequence lines, answer NO at the function line. Use the <RIGHT ARROW> or <LEFT ARROW> to highlight the sequence line number to view then touch <ENTER>.
SEQUENCE LINE MAINTENANCE (LINE 1)
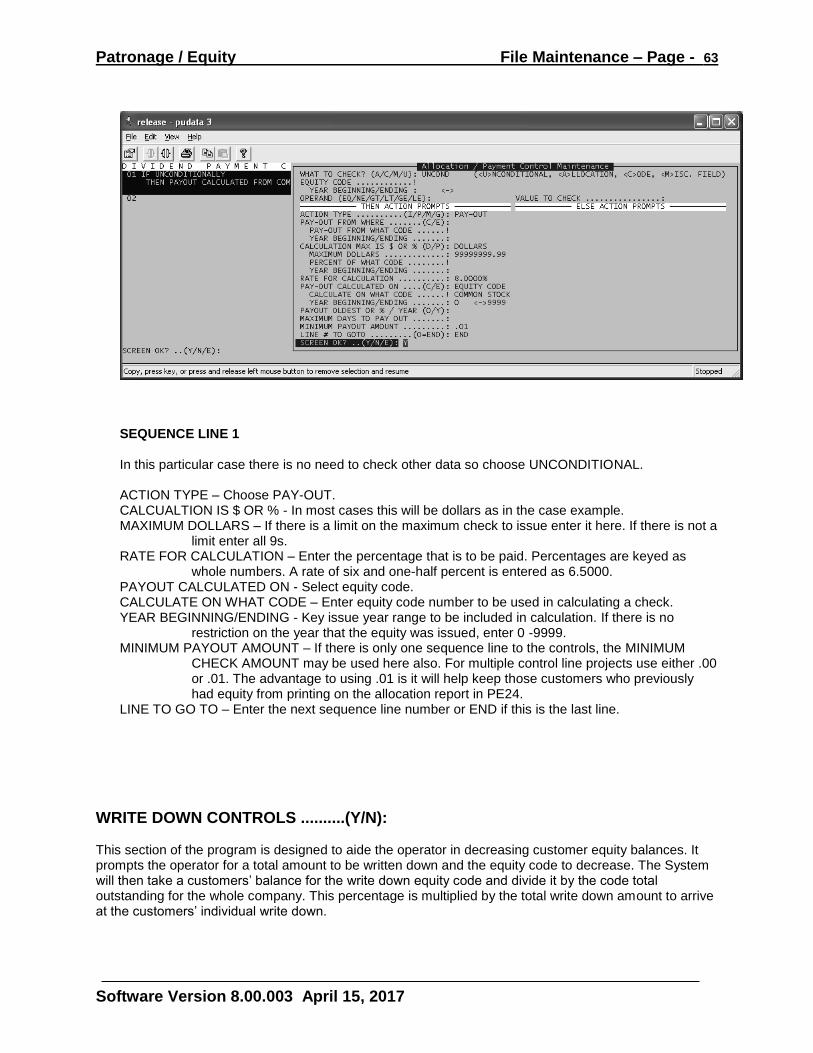
Patronage / Equity File Maintenance – Page - 63
Software Version 8.00.003 April 15, 2017
SEQUENCE LINE 1 In this particular case there is no need to check other data so choose UNCONDITIONAL. ACTION TYPE – Choose PAY-OUT. CALCUALTION IS $ OR % - In most cases this will be dollars as in the case example. MAXIMUM DOLLARS – If there is a limit on the maximum check to issue enter it here. If there is not a
limit enter all 9s. RATE FOR CALCULATION – Enter the percentage that is to be paid. Percentages are keyed as
whole numbers. A rate of six and one-half percent is entered as 6.5000. PAYOUT CALCULATED ON - Select equity code. CALCULATE ON WHAT CODE – Enter equity code number to be used in calculating a check. YEAR BEGINNING/ENDING - Key issue year range to be included in calculation. If there is no
restriction on the year that the equity was issued, enter 0 -9999. MINIMUM PAYOUT AMOUNT – If there is only one sequence line to the controls, the MINIMUM
CHECK AMOUNT may be used here also. For multiple control line projects use either .00 or .01. The advantage to using .01 is it will help keep those customers who previously had equity from printing on the allocation report in PE24.
LINE TO GO TO – Enter the next sequence line number or END if this is the last line.
WRITE DOWN CONTROLS ..........(Y/N): This section of the program is designed to aide the operator in decreasing customer equity balances. It prompts the operator for a total amount to be written down and the equity code to decrease. The System will then take a customers’ balance for the write down equity code and divide it by the code total outstanding for the whole company. This percentage is multiplied by the total write down amount to arrive at the customers’ individual write down.
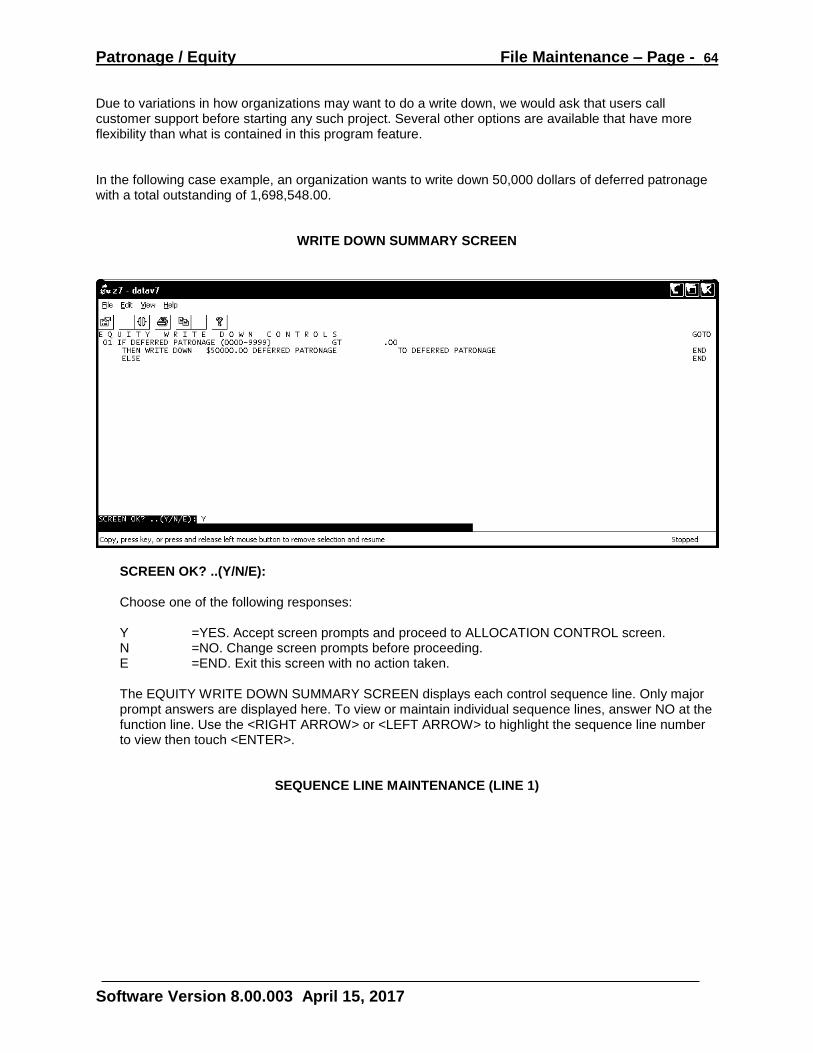
Patronage / Equity File Maintenance – Page - 64
Software Version 8.00.003 April 15, 2017
Due to variations in how organizations may want to do a write down, we would ask that users call customer support before starting any such project. Several other options are available that have more flexibility than what is contained in this program feature. In the following case example, an organization wants to write down 50,000 dollars of deferred patronage with a total outstanding of 1,698,548.00.
WRITE DOWN SUMMARY SCREEN
SCREEN OK? ..(Y/N/E): Choose one of the following responses: Y =YES. Accept screen prompts and proceed to ALLOCATION CONTROL screen. N =NO. Change screen prompts before proceeding. E =END. Exit this screen with no action taken.
The EQUITY WRITE DOWN SUMMARY SCREEN displays each control sequence line. Only major prompt answers are displayed here. To view or maintain individual sequence lines, answer NO at the function line. Use the <RIGHT ARROW> or <LEFT ARROW> to highlight the sequence line number to view then touch <ENTER>.
SEQUENCE LINE MAINTENANCE (LINE 1)
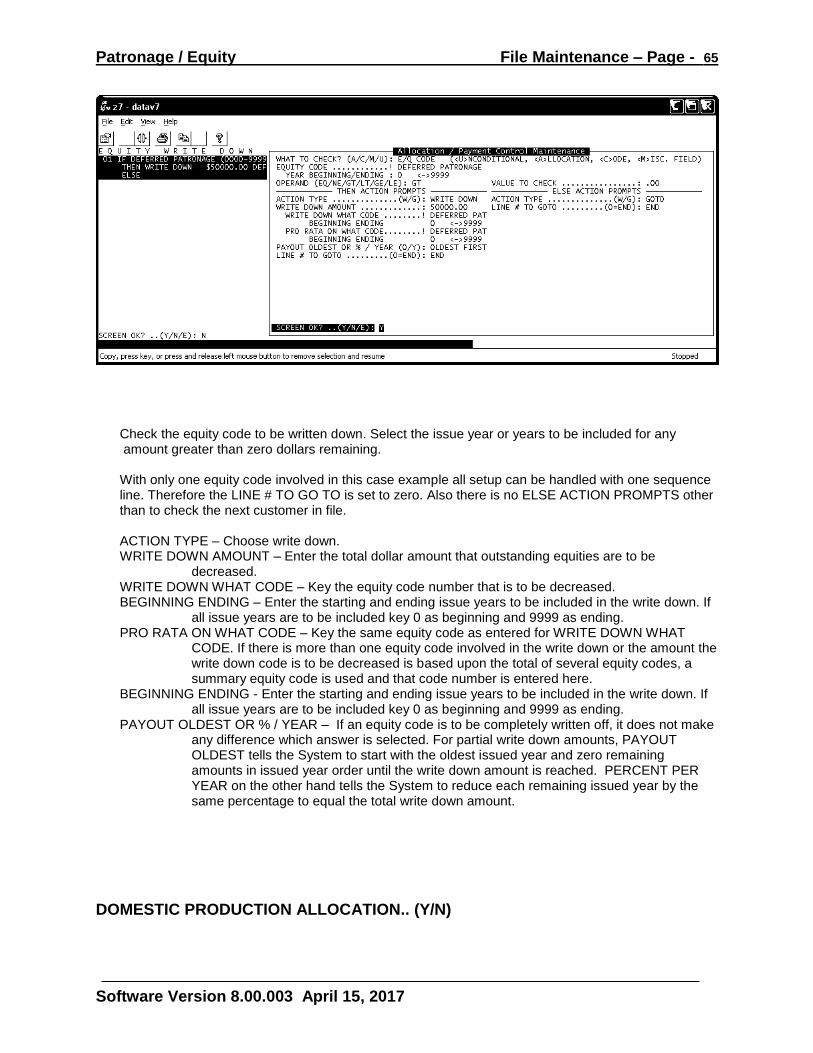
Patronage / Equity File Maintenance – Page - 65
Software Version 8.00.003 April 15, 2017
Check the equity code to be written down. Select the issue year or years to be included for any amount greater than zero dollars remaining. With only one equity code involved in this case example all setup can be handled with one sequence line. Therefore the LINE # TO GO TO is set to zero. Also there is no ELSE ACTION PROMPTS other than to check the next customer in file. ACTION TYPE – Choose write down. WRITE DOWN AMOUNT – Enter the total dollar amount that outstanding equities are to be
decreased. WRITE DOWN WHAT CODE – Key the equity code number that is to be decreased. BEGINNING ENDING – Enter the starting and ending issue years to be included in the write down. If
all issue years are to be included key 0 as beginning and 9999 as ending. PRO RATA ON WHAT CODE – Key the same equity code as entered for WRITE DOWN WHAT
CODE. If there is more than one equity code involved in the write down or the amount the write down code is to be decreased is based upon the total of several equity codes, a summary equity code is used and that code number is entered here.
BEGINNING ENDING - Enter the starting and ending issue years to be included in the write down. If all issue years are to be included key 0 as beginning and 9999 as ending.
PAYOUT OLDEST OR % / YEAR – If an equity code is to be completely written off, it does not make any difference which answer is selected. For partial write down amounts, PAYOUT OLDEST tells the System to start with the oldest issued year and zero remaining amounts in issued year order until the write down amount is reached. PERCENT PER YEAR on the other hand tells the System to reduce each remaining issued year by the same percentage to equal the total write down amount.
DOMESTIC PRODUCTION ALLOCATION.. (Y/N)
Patronage / Equity File Maintenance – Page - 66
Software Version 8.00.003 April 15, 2017
This section of the program allows the operator to create a Domestic Production Activities Deduction for members. DPAD records are stored as a type of 1099 record to be reported in box 6 of the 1099-PATR form. The formulas and processes used to pass Domestic Production Activity Deductions (DPAD) on to customers are the same as those used for a patronage allocation. A DPAD rate is established per patronage consolidation group that is to be used in the calculation. Patronage business volume for a fiscal year is used to get the amount to be reported for a tax calendar year. An Allocation calculation and report are run to get a total DPAD per customer. Updating equity files creates a DPAD 1099 record which is later built into the 1099 work file. A DPAD calculation may be run separately or in combination with another program project. Where DPAD is calculated after the completion of a patronage allocation, the business volume must be pulled from history to current (PE21.2) in order to use it for a DPAD calculation. The screen prompt is strictly a YES / NO question. When set to YES other programs know to use additional settings and create the special 1099 record. Other screen prompts in this program may be set the same as for a patronage allocation. Operators may want to pay particular attention to the following prompts.
ALLOCATION DESCRIPTION – Key a description so that the operator will know at a later date DPAD was included in this run. MINIMUM CHECK AMOUNT – There is no cash associated with DPAD. So if DPAD is run separately this prompt may be set to zero. UNDER MINIMUM CHECK AMOUNT – When run separately set to ALLOCATE. MISCELLANEOUS FIELD SELECTION – Set the same as for a patronage allocation. PATRONAGE ALLOCATION – When running DPAD separately be sure this prompt is NO. DOMESTIC PRODUCTION ALLOCATION – Answer YES for a DPAD run.
OTHER TAX CREDITS ALLOCATION This section of the program allows the operator to create an Other Tax Credit pass through for members. OTC records are stored as a type of 1099 record to be reported in box 10 of the 1099-PATR form. Each OTC is linked to an official IRS form number where it is to be reported. The formulas and processes used to pass Other Tax Credits on to customers are the same as those used for a patronage allocation. An Other Tax Credit rate is established per patronage consolidation group that is to be used in the calculation. Patronage business volume for a fiscal year is used to get the amount to be reported for a tax calendar year. An Allocation calculation and report are run to get a total OTC per customer. Updating equity files creates an OTC 1099 record which is later built into the 1099 work file. Set OTHER TAX CREDITS ALLOCATION to YES. Enter the tax form number where this credit is to be reported. The field is alphanumeric and 4 characters long. Other Tax Credits may be run in conjunction with a patronage allocation. It may not be run with a Domestic Production allocation. Only DPAD or one Other Tax Credit may be included in a single allocation run.
Patronage / Equity File Maintenance – Page - 67
Software Version 8.00.003 April 15, 2017
Other screen prompts in this program may be set the same as for a patronage allocation. Operators may want to pay particular attention to the following prompts.
ALLOCATION DESCRIPTION – Key a description so that the operator will know at a later date DPAD was included in this run. MINIMUM CHECK AMOUNT – There is no cash associated with DPAD. So if DPAD is run separately this prompt may be set to zero. UNDER MINIMUM CHECK AMOUNT – When run separately set to ALLOCATE. MISCELLANEOUS FIELD SELECTION – Set the same as for a patronage allocation. PATRONAGE ALLOCATION – When running DPAD separately be sure this prompt is NO. DOMESTIC PRODUCTION ALLOCATION – Answer YES for a DPAD run.
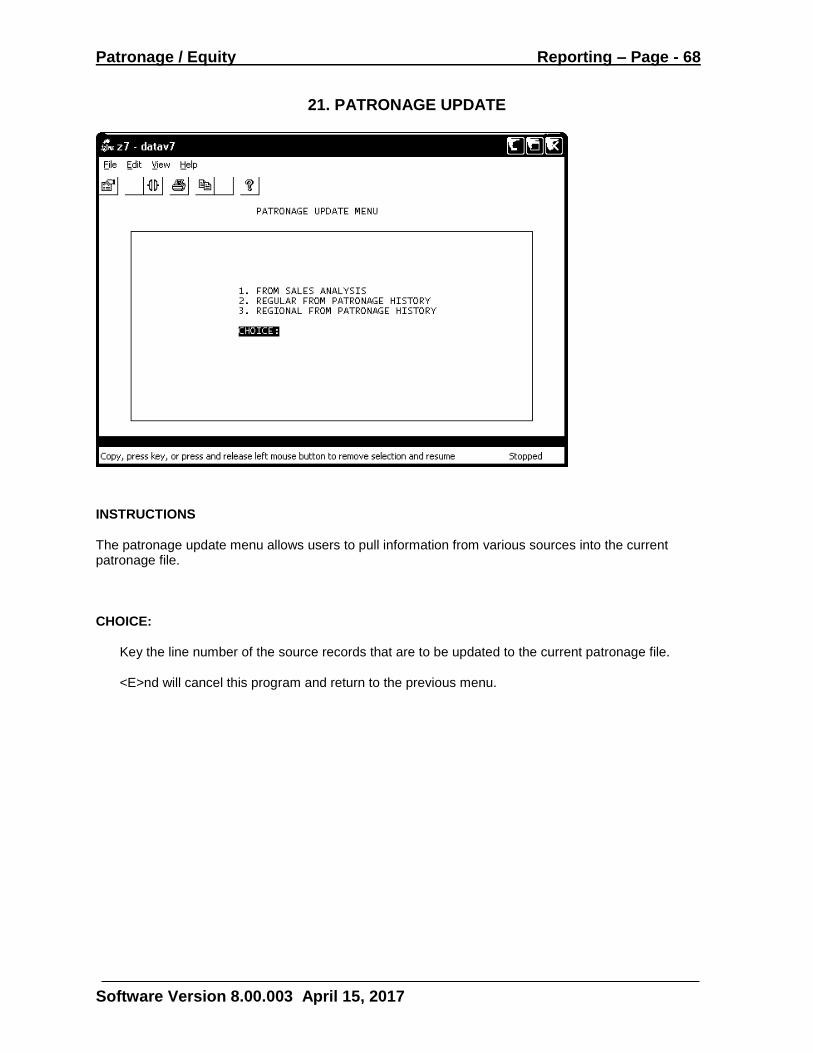
Patronage / Equity Reporting – Page - 68
Software Version 8.00.003 April 15, 2017
21. PATRONAGE UPDATE
INSTRUCTIONS The patronage update menu allows users to pull information from various sources into the current patronage file. CHOICE:
Key the line number of the source records that are to be updated to the current patronage file. <E>nd will cancel this program and return to the previous menu.
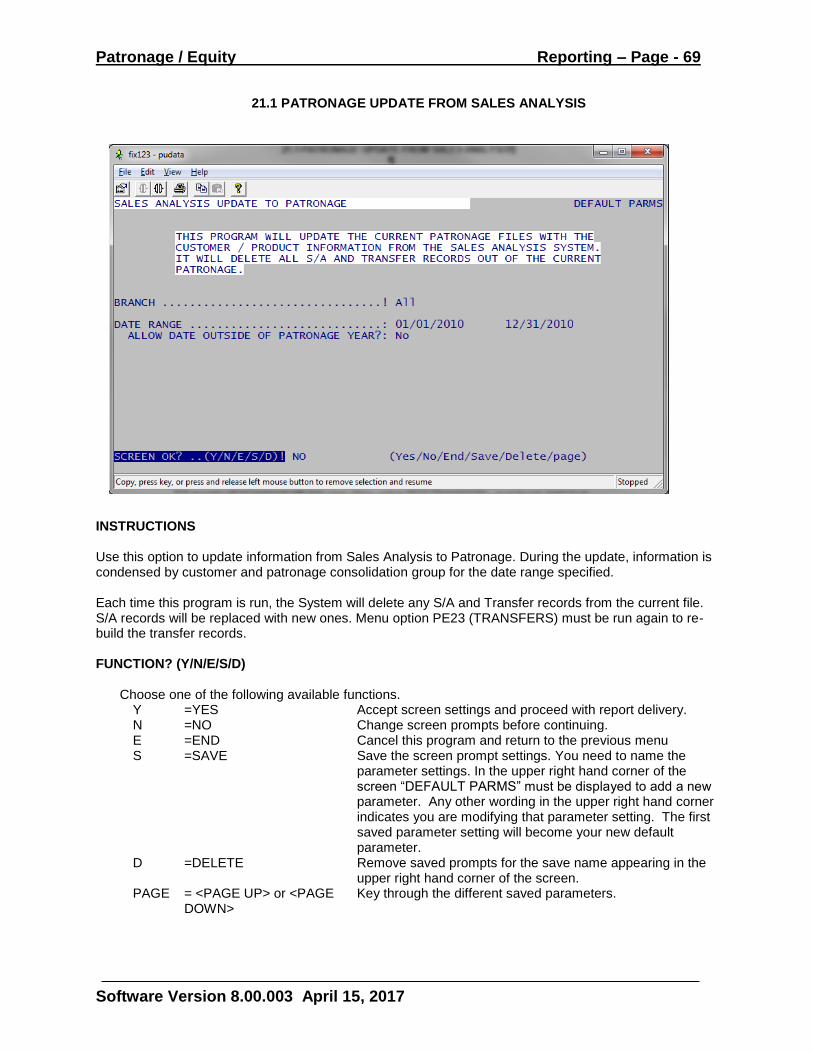
Patronage / Equity Reporting – Page - 69
Software Version 8.00.003 April 15, 2017
21.1 PATRONAGE UPDATE FROM SALES ANALYSIS
INSTRUCTIONS Use this option to update information from Sales Analysis to Patronage. During the update, information is condensed by customer and patronage consolidation group for the date range specified. Each time this program is run, the System will delete any S/A and Transfer records from the current file. S/A records will be replaced with new ones. Menu option PE23 (TRANSFERS) must be run again to re-build the transfer records. FUNCTION? (Y/N/E/S/D)
Choose one of the following available functions. Y =YES Accept screen settings and proceed with report delivery. N =NO Change screen prompts before continuing. E =END Cancel this program and return to the previous menu S =SAVE Save the screen prompt settings. You need to name the
parameter settings. In the upper right hand corner of the screen “DEFAULT PARMS” must be displayed to add a new parameter. Any other wording in the upper right hand corner indicates you are modifying that parameter setting. The first saved parameter setting will become your new default parameter.
D =DELETE Remove saved prompts for the save name appearing in the upper right hand corner of the screen.
PAGE = <PAGE UP> or <PAGE DOWN>
Key through the different saved parameters.
Patronage / Equity Reporting – Page - 70
Software Version 8.00.003 April 15, 2017
BRANCH
Information from Sales Analysis can be updated for specific Inventory Branches. In most situations this prompt will be left at the program default of ALL branches.
DATE RANGE
The date range should correspond to the fiscal year months to be updated to patronage. If for some reason they do not a couple of items should be checked before proceeding.
1) The allocation for the previous fiscal year may not have been updated through PE26. To verify
this, go to PE14. Stay in INQUIRE mode and choose <H>istory at the top of the screen. If a history record exists for the previous fiscal year, proceed to step 2. If a history record does not appear, then any steps not completed must be done before updating the fiscal year just ended.
2) In PEUT02 change the YEAR END date in the upper right hand corner to match the calendar date for the fiscal year just ended. To access this field type in DATE at the FUNCTION line (OK TO CHANGE?) and touch <ENTER>.
After completing these steps and returning to PE21.1, the date range should be correct.
ALLOW DATE OUTSIDE OF PATRONAGE YEAR
This prompts is only accessed when an operator changes the default date reange. If the operator elects to continue records will be updated to patronage. However the date attached to those records will match the year-end established in PEUT02, not the date entered in this program.

Patronage / Equity Reporting – Page - 71
Software Version 8.00.003 April 15, 2017
21.2 PATRONAGE UPDATE FROM REGULAR HISTORY
INSTRUCTIONS This program allows the user to pull patronage records from a history regular allocation run back into the current file. Once the records are in current another allocation may be run using the same business volumes as contained in history. History records are stored according to the date range of the fiscal year and accounting date used when running PE26. If there are any records in Current status at the time this program is run, the System will move them to a Next year status. After the allocation is complete they will be moved back to Current. PATRONAGE HISTORY DATE..FROM: TO:
Key the starting date of the history records to update to current. Touch <HOME> for a pick list of available history records.
OK TO CONTINUE? (Y/N/E): Enter one of the following: Y = YES. Accept prompt answers and proceed with update. N = NO. Change prompt answers before proceeding. E = END. Cancel this program and return to the previous menu.
Patronage / Equity Reporting – Page - 72
Software Version 8.00.003 April 15, 2017
21.3 PATRONAGE UPDATE FROM REGIONAL HISTORY
THIS MENU OPTION IS NOT FUNCTIONAL AT THIS TIME.
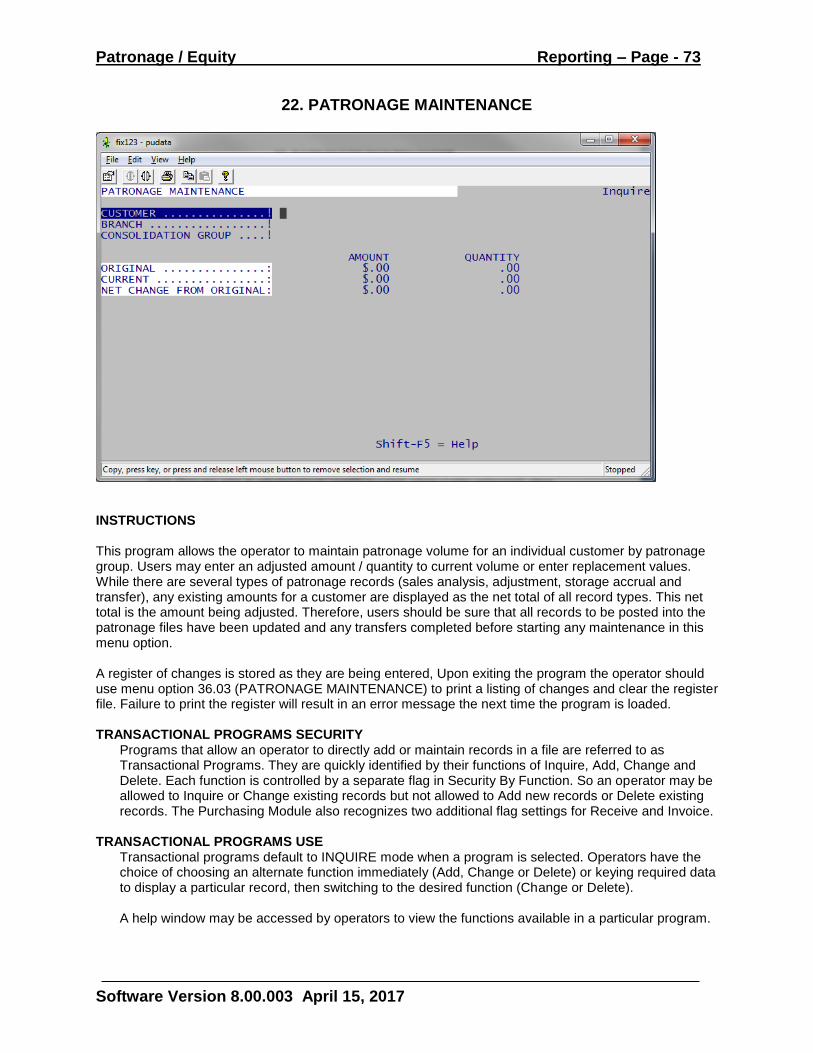
Patronage / Equity Reporting – Page - 73
Software Version 8.00.003 April 15, 2017
22. PATRONAGE MAINTENANCE
INSTRUCTIONS This program allows the operator to maintain patronage volume for an individual customer by patronage group. Users may enter an adjusted amount / quantity to current volume or enter replacement values. While there are several types of patronage records (sales analysis, adjustment, storage accrual and transfer), any existing amounts for a customer are displayed as the net total of all record types. This net total is the amount being adjusted. Therefore, users should be sure that all records to be posted into the patronage files have been updated and any transfers completed before starting any maintenance in this menu option. A register of changes is stored as they are being entered, Upon exiting the program the operator should use menu option 36.03 (PATRONAGE MAINTENANCE) to print a listing of changes and clear the register file. Failure to print the register will result in an error message the next time the program is loaded. TRANSACTIONAL PROGRAMS SECURITY
Programs that allow an operator to directly add or maintain records in a file are referred to as Transactional Programs. They are quickly identified by their functions of Inquire, Add, Change and Delete. Each function is controlled by a separate flag in Security By Function. So an operator may be allowed to Inquire or Change existing records but not allowed to Add new records or Delete existing records. The Purchasing Module also recognizes two additional flag settings for Receive and Invoice.
TRANSACTIONAL PROGRAMS USE Transactional programs default to INQUIRE mode when a program is selected. Operators have the choice of choosing an alternate function immediately (Add, Change or Delete) or keying required data to display a particular record, then switching to the desired function (Change or Delete). A help window may be accessed by operators to view the functions available in a particular program.
Patronage / Equity Reporting – Page - 74
Software Version 8.00.003 April 15, 2017
CUSTOMER…!
Enter the Accounts Receivable number of the customer to be maintained / viewed.
A short name lookup is available by entering part of the short name and touching <HOME>. BRANCH…!
This prompt displays only if patronage record keeping by branch is active.
Key the Inventory branch number of the record to be maintained. CONSOLIDATION GROUP…!
Key the patronage consolidation group of the record to be changed. CURRENT AMT QTY
Any dollar amount or quantity entered in these fields is a replacement for existing values. To adjust ORIGINAL values by a positive / negative amount, enter through these fields.
NET CHANGE FROM ORIGINAL AMT QTY
To adjust existing customer business volume; enter the adjusted amount / quantity. A positive entry will increase volume while a negative entry will decrease it.

Patronage / Equity Reporting – Page - 75
Software Version 8.00.003 April 15, 2017
23. PATRONAGE TRANSFERS
INSTRUCTIONS For those situations where all patronage business volume is to be moved from one account to another, use this program. It reads through the Accounts Receivable split file (AR17) for any splits defined as patronage, then creates transfer records decreasing the FROM account and increasing the TO account(s). Records are stored in the Accounts Receivable split file numerically. PE23 reads through the file one time. Users need to keep this in mind when setting up any patronage splits. If there is a situation where account 1000 splits to account 100, then it in turn is supposed to split to another account; the business volume will stay on account 100 since the System has already read that account and nothing was there. To handle these types of situations split account 1000 directly to the account numbers tied to split 100. If only a portion of business activity is to be moved to other accounts, set the split to those accounts with their respective shares. Then set the remaining percentage to go back to the original account. An alternative in this situation would be to use PE22 and manually move business volume between accounts. Since this program creates a new type of patronage record recognized as a transfer rather than zeroing out business volume, transfers may be run multiple times. Each time the program is run, it will first delete any previous transfer records then create new ones. A register report of transfers made is available for printing. The report may be printed without executing the transfer process.
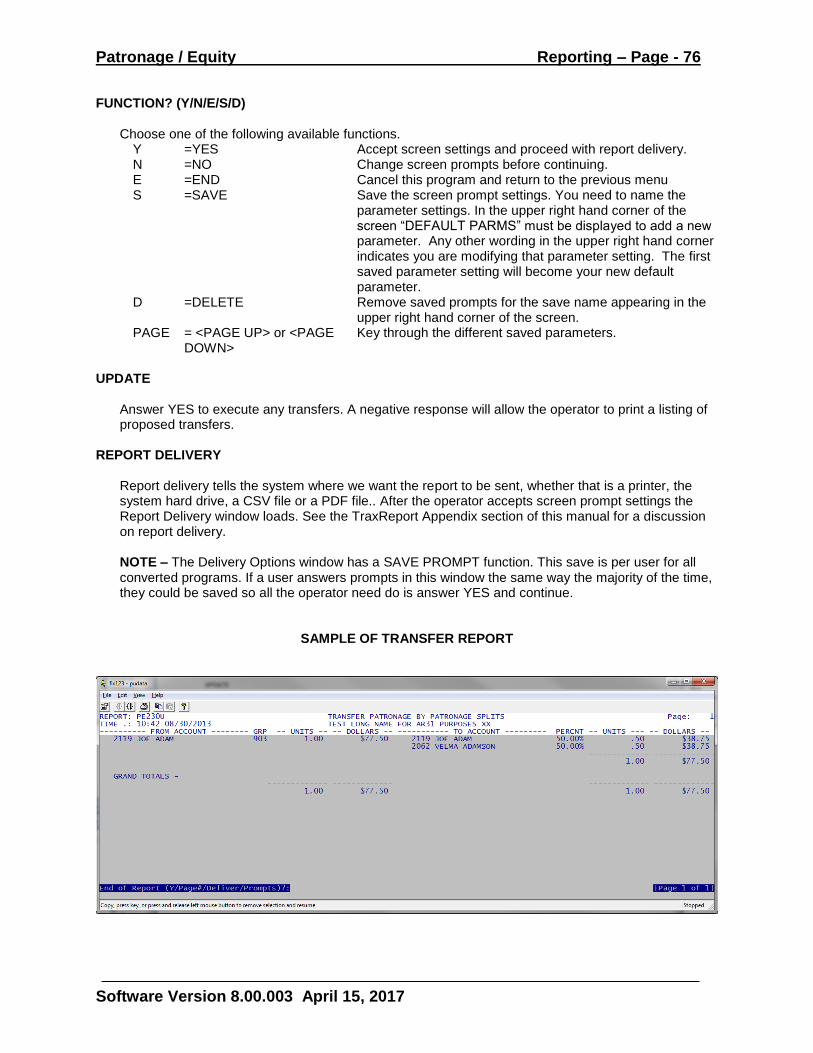
Patronage / Equity Reporting – Page - 76
Software Version 8.00.003 April 15, 2017
FUNCTION? (Y/N/E/S/D)
Choose one of the following available functions. Y =YES Accept screen settings and proceed with report delivery. N =NO Change screen prompts before continuing. E =END Cancel this program and return to the previous menu S =SAVE Save the screen prompt settings. You need to name the
parameter settings. In the upper right hand corner of the screen “DEFAULT PARMS” must be displayed to add a new parameter. Any other wording in the upper right hand corner indicates you are modifying that parameter setting. The first saved parameter setting will become your new default parameter.
D =DELETE Remove saved prompts for the save name appearing in the upper right hand corner of the screen.
PAGE = <PAGE UP> or <PAGE DOWN>
Key through the different saved parameters.
UPDATE
Answer YES to execute any transfers. A negative response will allow the operator to print a listing of proposed transfers.
REPORT DELIVERY
Report delivery tells the system where we want the report to be sent, whether that is a printer, the system hard drive, a CSV file or a PDF file.. After the operator accepts screen prompt settings the Report Delivery window loads. See the TraxReport Appendix section of this manual for a discussion on report delivery. NOTE – The Delivery Options window has a SAVE PROMPT function. This save is per user for all converted programs. If a user answers prompts in this window the same way the majority of the time, they could be saved so all the operator need do is answer YES and continue.
SAMPLE OF TRANSFER REPORT
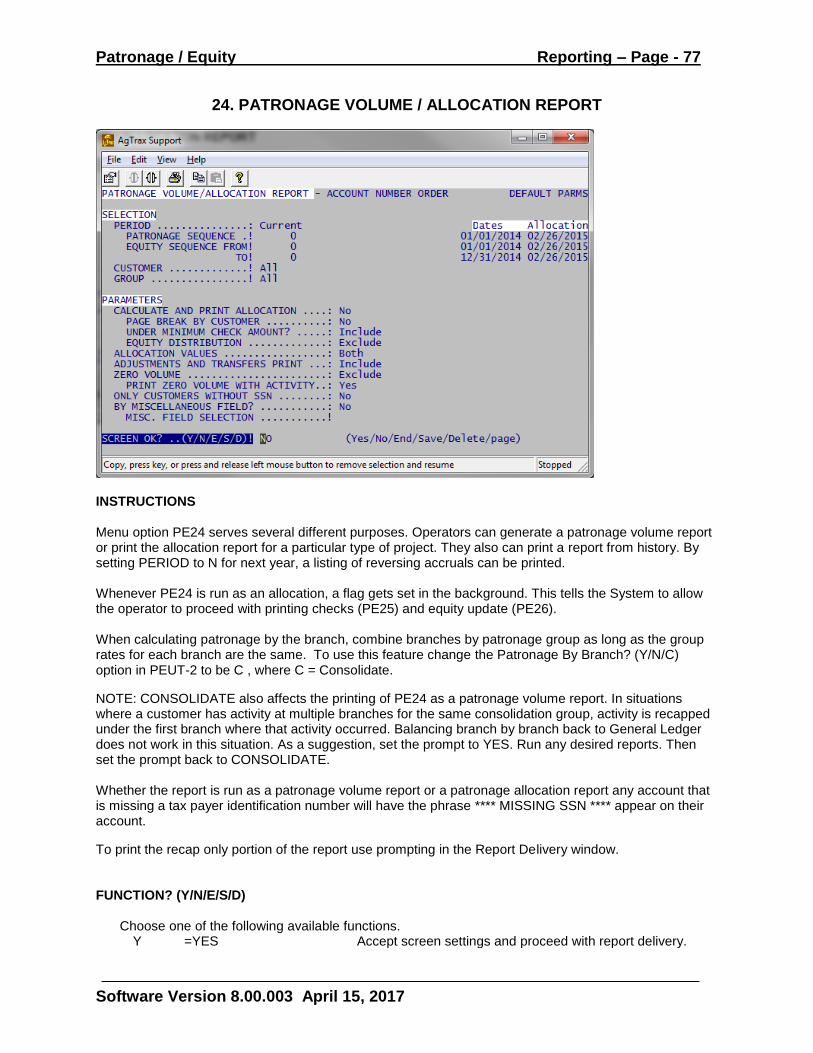
Patronage / Equity Reporting – Page - 77
Software Version 8.00.003 April 15, 2017
24. PATRONAGE VOLUME / ALLOCATION REPORT
INSTRUCTIONS Menu option PE24 serves several different purposes. Operators can generate a patronage volume report or print the allocation report for a particular type of project. They also can print a report from history. By setting PERIOD to N for next year, a listing of reversing accruals can be printed. Whenever PE24 is run as an allocation, a flag gets set in the background. This tells the System to allow the operator to proceed with printing checks (PE25) and equity update (PE26). When calculating patronage by the branch, combine branches by patronage group as long as the group rates for each branch are the same. To use this feature change the Patronage By Branch? (Y/N/C) option in PEUT-2 to be C , where C = Consolidate.
NOTE: CONSOLIDATE also affects the printing of PE24 as a patronage volume report. In situations where a customer has activity at multiple branches for the same consolidation group, activity is recapped under the first branch where that activity occurred. Balancing branch by branch back to General Ledger does not work in this situation. As a suggestion, set the prompt to YES. Run any desired reports. Then set the prompt back to CONSOLIDATE. Whether the report is run as a patronage volume report or a patronage allocation report any account that is missing a tax payer identification number will have the phrase **** MISSING SSN **** appear on their account.
To print the recap only portion of the report use prompting in the Report Delivery window. FUNCTION? (Y/N/E/S/D)
Choose one of the following available functions. Y =YES Accept screen settings and proceed with report delivery.
Patronage / Equity Reporting – Page - 78
Software Version 8.00.003 April 15, 2017
N =NO Change screen prompts before continuing. E =END Cancel this program and return to the previous menu S =SAVE Save the screen prompt settings. You need to name the
parameter settings. In the upper right hand corner of the screen “DEFAULT PARMS” must be displayed to add a new parameter. Any other wording in the upper right hand corner indicates you are modifying that parameter setting. The first saved parameter setting will become your new default parameter.
D =DELETE Remove saved prompts for the save name appearing in the upper right hand corner of the screen.
PAGE = <PAGE UP> or <PAGE DOWN>
Key through the different saved parameters.
**NOTE – DUE TO THE MULTIPLE FUNCTIONS OF THIS PROGRAM, PROMPTS WILL BE COVERED FIRST FOR PATRONAGE VOLUME REPORTS THEN ALLOCATION REPORTS.
PATRONAGE VOLUME REPORTS
Before an operator is ready to run a patronage report, information has to be updated from Sales Analysis. Depending upon local business practices, storage accruals from Commodity Accounting may need to be updated also. Check Appendix IV (UPDATING SALES ANALYSIS TO PATRONAGE) for a listing of items to be completed before running a patronage report. PERIOD
The Patronage module can distinguish records as belonging to current activity, history or an accrual that belongs to next year.
C = CURRENT.Even though we may be talking about activity relating to a previous General Ledger
fiscal year, it is the data we are working with currently. H = HISTORY. Activity that has been updated to patronage history using PE26 is classified as
HISTORY. To access any set of history records use <HOME> and select the set form the pick list window.
N = NEXT. When updating accruals to Patronage, the System posts entries into CURRENT and reversing entries into NEXT. Use Next to access those records.
PATRONAGE SEQUENCE
This prompt is by-passed except when HISTORY is selected in the previous prompt. Enter the patronage start date or use the <HOME> key to select the group of desired records. Normally a patronage start date for a group of records is the same date as the first day of the corresponding General Ledger fiscal year. In the pick list window refer to dates in the ALLOCATION YEAR column.
EQUITY SEQUENCE…FROM! TO!
As with PATRONAGE DATE, this prompt is by-passed unless HISTORY is selected. Choose the group of records to print. Refer to dates in the ALLOCATION DATE column to make a selection. In most cases the EQUITY SEQUENCE FROM and PATRONAGE SEQUENCE will be the same. However, if multiple projects were run using records with the same ALLOCATION YEAR,
Patronage / Equity Reporting – Page - 79
Software Version 8.00.003 April 15, 2017
those can be combined into one report by selecting the most recent to oldest ALLOCATION DATES for records with the same ALLOCATION YEAR.
**NOTE – Both PATRONAGE SEQUENCE and EQUITY SEQUENCE will default to zero when CURRENT is selected. CUSTOMER
The report may be generated for a specific customer, group of customers or select customers. To ignore customer as a selection criterion touch <ENTER> for all records matching other criteria.
GROUP
Information in patronage is stored by patronage consolidation groups previously defined in PE11. Each group where a customer has a record will be included on the report. Enter a group number, select groups or range of group numbers to include only that activity.
CALCULATE AND PRINT ALLOCATION
Answer NO to generate a patronage volume report. PAGE BREAK BY CUSTOMER
To break the report so one customer prints per page, answer YES. UNDER MINIMUM CHECK AMOUNT EQUITY DISTRIBUTION
These prompts are by-passed when running a patronage volume report. ALLOCATION VALUES
Consolidation groups may be set to allocate based upon dollar volume of business or quantity. In PE11, the user defines which method to use. Here the operator will select what amounts to include.
D = Dollars. Print only dollar amounts. U = UNITS. Print only quantities. B = BOTH. Print both dollar and quantity amounts. P = PAYOUT TYPE. Check the allocation method in PE11 and print only that value. If the allocation
method for a particular group is quantity, print only quantity. ADJUSTMENTS AND TRANSFERS PRINT
Any adjustments made through PE22 or transfers made through PE23 are normally included. To exclude them, choose E. By selecting O the operator can generate a listing of only those records.
ZERO VOLUME
For any consolidation group where a customer has business, that information is moved to history when PE26 is run. In Current the record still exits for that customer and consolidation group only the dollar amounts and quantities are zero. As a new fiscal years’ information is updated from Sales Analysis any business volume for the group will replace the zero dollar and quantity amounts. If the customer did not have any new business during the year, then dollar amount / quantity stay at zero.
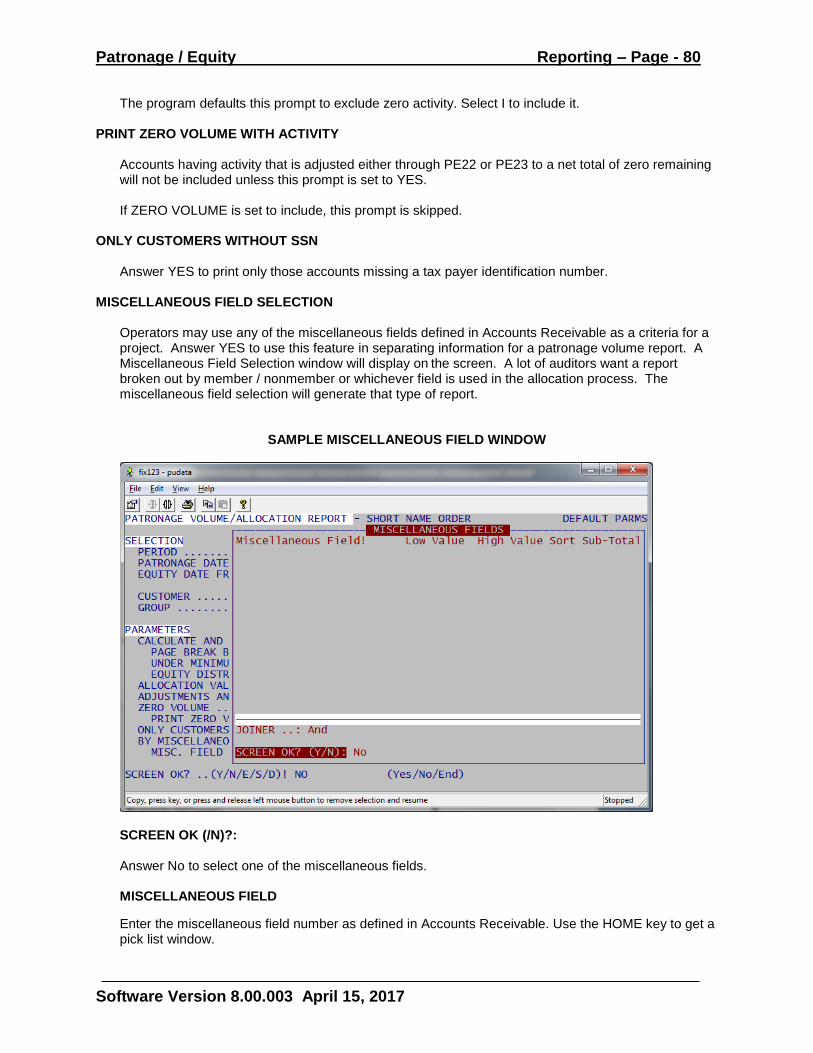
Patronage / Equity Reporting – Page - 80
Software Version 8.00.003 April 15, 2017
The program defaults this prompt to exclude zero activity. Select I to include it.
PRINT ZERO VOLUME WITH ACTIVITY
Accounts having activity that is adjusted either through PE22 or PE23 to a net total of zero remaining will not be included unless this prompt is set to YES.
If ZERO VOLUME is set to include, this prompt is skipped.
ONLY CUSTOMERS WITHOUT SSN
Answer YES to print only those accounts missing a tax payer identification number.
MISCELLANEOUS FIELD SELECTION
Operators may use any of the miscellaneous fields defined in Accounts Receivable as a criteria for a project. Answer YES to use this feature in separating information for a patronage volume report. A Miscellaneous Field Selection window will display on the screen. A lot of auditors want a report broken out by member / nonmember or whichever field is used in the allocation process. The miscellaneous field selection will generate that type of report.
SAMPLE MISCELLANEOUS FIELD WINDOW
SCREEN OK (/N)?:
Answer No to select one of the miscellaneous fields.
MISCELLANEOUS FIELD
Enter the miscellaneous field number as defined in Accounts Receivable. Use the HOME key to get a pick list window.
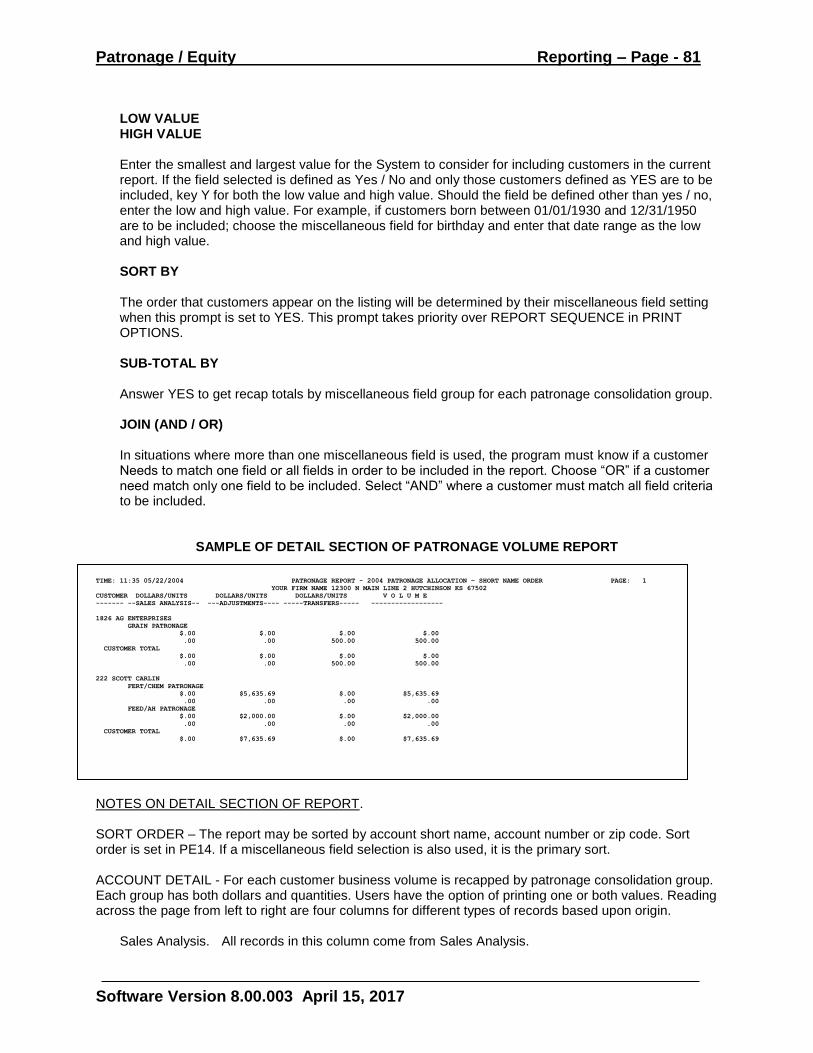
Patronage / Equity Reporting – Page - 81
Software Version 8.00.003 April 15, 2017
LOW VALUE HIGH VALUE
Enter the smallest and largest value for the System to consider for including customers in the current report. If the field selected is defined as Yes / No and only those customers defined as YES are to be included, key Y for both the low value and high value. Should the field be defined other than yes / no, enter the low and high value. For example, if customers born between 01/01/1930 and 12/31/1950 are to be included; choose the miscellaneous field for birthday and enter that date range as the low and high value.
SORT BY
The order that customers appear on the listing will be determined by their miscellaneous field setting when this prompt is set to YES. This prompt takes priority over REPORT SEQUENCE in PRINT OPTIONS.
SUB-TOTAL BY
Answer YES to get recap totals by miscellaneous field group for each patronage consolidation group. JOIN (AND / OR) In situations where more than one miscellaneous field is used, the program must know if a customer Needs to match one field or all fields in order to be included in the report. Choose “OR” if a customer need match only one field to be included. Select “AND” where a customer must match all field criteria to be included.
SAMPLE OF DETAIL SECTION OF PATRONAGE VOLUME REPORT
TIME: 11:35 05/22/2004 PATRONAGE REPORT - 2004 PATRONAGE ALLOCATION – SHORT NAME ORDER PAGE: 1
YOUR FIRM NAME 12300 N MAIN LINE 2 HUTCHINSON KS 67502
CUSTOMER DOLLARS/UNITS DOLLARS/UNITS DOLLARS/UNITS V O L U M E
------- --SALES ANALYSIS-- ---ADJUSTMENTS---- -----TRANSFERS----- ------------------
1826 AG ENTERPRISES
GRAIN PATRONAGE
$.00 $.00 $.00 $.00
.00 .00 500.00 500.00
CUSTOMER TOTAL
$.00 $.00 $.00 $.00
.00 .00 500.00 500.00
222 SCOTT CARLIN
FERT/CHEM PATRONAGE
$.00 $5,635.69 $.00 $5,635.69
.00 .00 .00 .00
FEED/AH PATRONAGE
$.00 $2,000.00 $.00 $2,000.00
.00 .00 .00 .00
CUSTOMER TOTAL
$.00 $7,635.69 $.00 $7,635.69
NOTES ON DETAIL SECTION OF REPORT. SORT ORDER – The report may be sorted by account short name, account number or zip code. Sort order is set in PE14. If a miscellaneous field selection is also used, it is the primary sort. ACCOUNT DETAIL - For each customer business volume is recapped by patronage consolidation group. Each group has both dollars and quantities. Users have the option of printing one or both values. Reading across the page from left to right are four columns for different types of records based upon origin.
Sales Analysis. All records in this column come from Sales Analysis.
Patronage / Equity Reporting – Page - 82
Software Version 8.00.003 April 15, 2017
Adjustments. The Adjustment column can contain records from entries made in PE22, accrual records from Commodity Accounting, or conversion records from a previous software system.
Transfers. Records created by PE23 print in this column. Positive numbers are transfers IN and negative numbers transfers OUT.
Volume. Net total for first three columns. Customer Total. Total for each column.
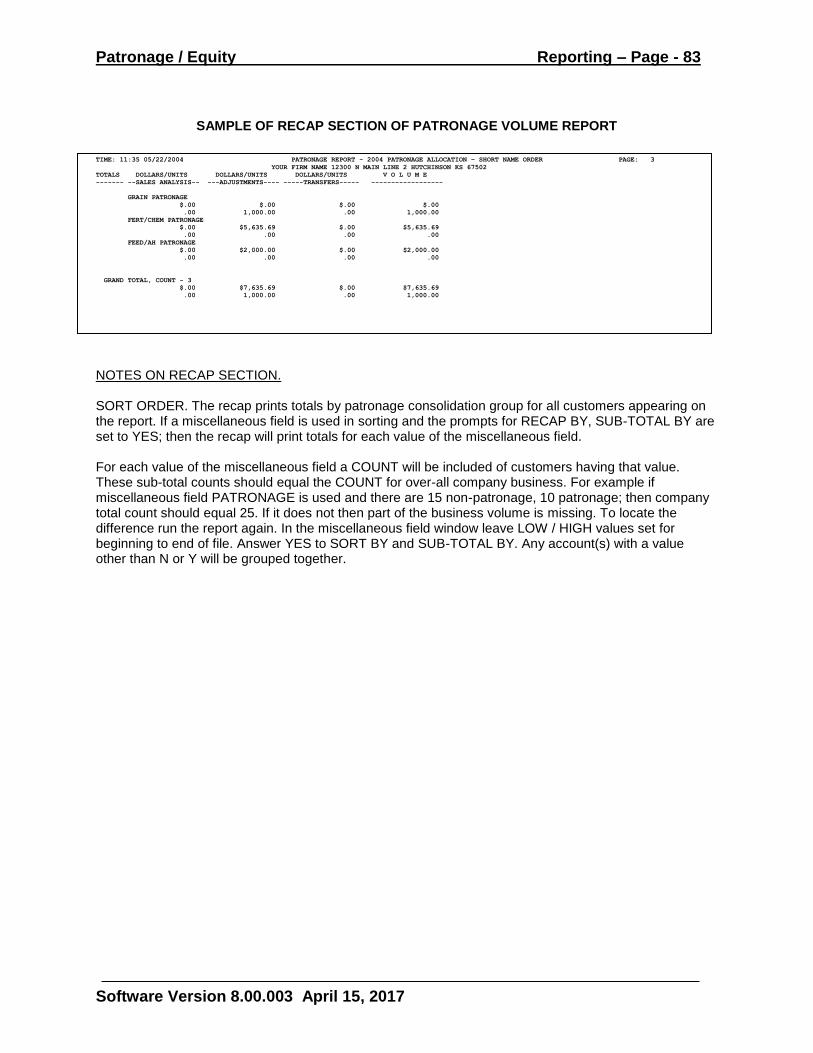
Patronage / Equity Reporting – Page - 83
Software Version 8.00.003 April 15, 2017
SAMPLE OF RECAP SECTION OF PATRONAGE VOLUME REPORT
TIME: 11:35 05/22/2004 PATRONAGE REPORT - 2004 PATRONAGE ALLOCATION – SHORT NAME ORDER PAGE: 3
YOUR FIRM NAME 12300 N MAIN LINE 2 HUTCHINSON KS 67502
TOTALS DOLLARS/UNITS DOLLARS/UNITS DOLLARS/UNITS V O L U M E
------- --SALES ANALYSIS-- ---ADJUSTMENTS---- -----TRANSFERS----- ------------------
GRAIN PATRONAGE
$.00 $.00 $.00 $.00
.00 1,000.00 .00 1,000.00
FERT/CHEM PATRONAGE
$.00 $5,635.69 $.00 $5,635.69
.00 .00 .00 .00
FEED/AH PATRONAGE
$.00 $2,000.00 $.00 $2,000.00
.00 .00 .00 .00
GRAND TOTAL, COUNT - 3
$.00 $7,635.69 $.00 $7,635.69
.00 1,000.00 .00 1,000.00
NOTES ON RECAP SECTION. SORT ORDER. The recap prints totals by patronage consolidation group for all customers appearing on the report. If a miscellaneous field is used in sorting and the prompts for RECAP BY, SUB-TOTAL BY are set to YES; then the recap will print totals for each value of the miscellaneous field. For each value of the miscellaneous field a COUNT will be included of customers having that value. These sub-total counts should equal the COUNT for over-all company business. For example if miscellaneous field PATRONAGE is used and there are 15 non-patronage, 10 patronage; then company total count should equal 25. If it does not then part of the business volume is missing. To locate the difference run the report again. In the miscellaneous field window leave LOW / HIGH values set for beginning to end of file. Answer YES to SORT BY and SUB-TOTAL BY. Any account(s) with a value other than N or Y will be grouped together.
Patronage / Equity Reporting – Page - 84
Software Version 8.00.003 April 15, 2017
ALLOCATION REPORTS
The term ALLOCATION is normally associated with a patronage refund. In the context of this program an ALLOCATION can be any project affecting a cash payment, change in equity stock or creation of a 1099 record for Domestic Production Activities Deduction. Prior to running an Allocation certain setup needs to be completed in PE11 and PE14. For a patronage allocation see Appendix V for a listing of steps to be completed before running this program. For other types of allocations, setup is done in PE14. See that manual section for instructions on setup.
Remember that an allocation report is only a mathematical computation. It does not update any records to any files. If setup or data problems are found in a run, those can be fixed and the allocation ran again. In printing a patronage volume report, the System does not care if a customers’ business volume for any patronage group is positive or negative. All amounts are added together and the net result printed at the end of the report. The Allocation run ignores any group with a negative amount. Therefore the total amount to allocate on could change from the patronage volume given the auditor. The end of an allocation report gives a listing of those customers who have negative volume in a consolidation group. Users will probably want to research these if they are of any significant amount and decide how to handle them. **NOTE – If you are using a miscellaneous field as one of the setup controls. Once you have a set of allocation numbers that you feel comfortable with, do not change any miscellaneous field settings in AR11 until after you have completed PE26. The System does a new series of calculations in each step PE24, PE25 and PE26. If flags are changed between steps, check amounts or those amounts updated to equity files could differ from those on an allocation report. Whenever PE24 is run as an allocation, a flag gets set in the background. This tells the System to allow the operator to proceed with printing checks (PE25) and equity update (PE26). If the operator accidentally goes back into PE24 without re-running the allocation, the flag gets turned off. At that point, the operator MUST run PE24 again as an allocation before they can proceed to PE25 or PE26. It is not necessary to physically print the entire report again. TOTAL PAGES ONLY may be printed or device 99 may be used. PERIOD
In most situations this prompt should be set to C for current. There may be isolated cases where an operator wants to print a copy of an allocation report from history. For those cases choose H.
PATRONAGE SEQUENCE EQUITY SEQUENCE .....FROM! TO!
These prompts are by-passed when period is set to CURRENT. Each date field will default to the first day of the General Ledger fiscal year just completed.
CUSTOMER
The report may be generated for a specific customer, group of customers or select customers. To ignore customer as a selection criterion touch <ENTER> for all records matching other criteria.
Patronage / Equity Reporting – Page - 85
Software Version 8.00.003 April 15, 2017
GROUP
Touch ENTER to include all patronage consolidation groups. Only those groups with business volume and a refund rate defined in PE11 will print on an allocation report.
Key a consolidation group, select groups or range of groups to include only those groups on the report.
CALCULATE AND PRINT ALLOCATION
Answer YES. When changing this prompt to YES, the System will change the next two prompts to preferred defaults.
PAGE BREAK BY CUSTOMER
Answer NO for office reports. If a copy of the report is to be given to each customer involved in the project, select YES so one-customer prints per page of paper.
UNDER MINIMUM CHECK AMOUNT
In certain projects users will want to establish a minimum dollar amount of check to be printed. That minimum is set in PE14 and will display to the right of this prompt. To have those customers who matched setup criteria but did not have enough business to generate a check print on the allocation report answer INCLUDE. An EXCLUDE response will print only those customers who are to receive a check. A Domestic Production Activities Deduction only allocation requires that this prompt be set to INCLUDE. Otherwise no customers will appear on the report. For a patronage allocation project where customers under the minimum check amount are to receive 100 percent stock, we would recommend that the final copy of the allocation report include customers under the minimum check amount. This will include them in the recap at the end of the allocation report and make it easier to balance the allocation recap to the update report (PE26).
**NOTE – For an allocation run the System will change remaining screen prompts to defaults that it wants
to use. Operators may <DOWN ARROW> and accept all defaults at this point. **NOTE – For allocation runs where there is no check involved operators will have to INCLUDE those
under the minimum check to get any accounts to print on the report. **NOTE – Depending upon adjustments made to checks for Backup Withholding it is possible that
EXTRA CASH in the recap portion of the report will customers that net back to less than the minimum check amount. If there is a difference between NET CHECK AMOUNT and total PAYOUT by equity code check for this situation.
EQUITY DISTRIBUTION
The equity distribution section of the report includes all equity codes where a customer has a balance and any changes to that balance. In most scenarios operators will want to include this information. By choosing E (exclude) equity information will not appear on an allocation report. To print only equity information select O. There is no equity issued with a DPAD only calculation. So this setting is a personal preference. Setting it to NO will shorten the report.
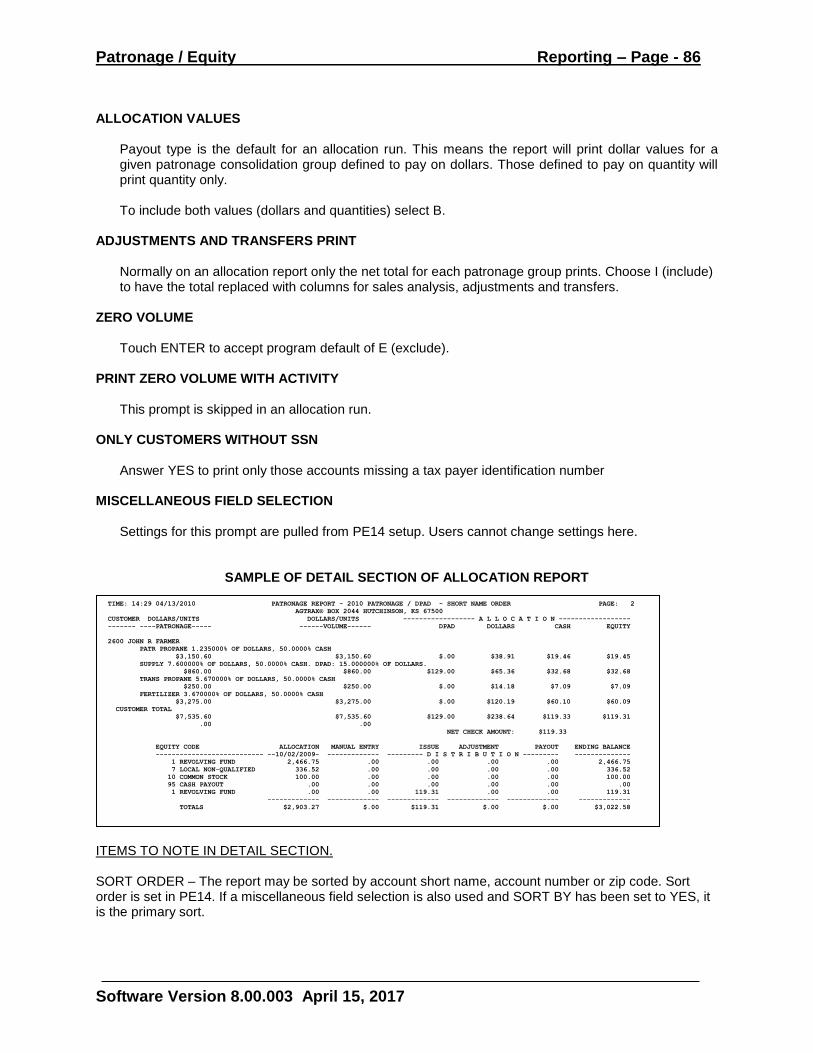
Patronage / Equity Reporting – Page - 86
Software Version 8.00.003 April 15, 2017
ALLOCATION VALUES
Payout type is the default for an allocation run. This means the report will print dollar values for a given patronage consolidation group defined to pay on dollars. Those defined to pay on quantity will print quantity only. To include both values (dollars and quantities) select B.
ADJUSTMENTS AND TRANSFERS PRINT
Normally on an allocation report only the net total for each patronage group prints. Choose I (include) to have the total replaced with columns for sales analysis, adjustments and transfers.
ZERO VOLUME
Touch ENTER to accept program default of E (exclude).
PRINT ZERO VOLUME WITH ACTIVITY
This prompt is skipped in an allocation run. ONLY CUSTOMERS WITHOUT SSN
Answer YES to print only those accounts missing a tax payer identification number
MISCELLANEOUS FIELD SELECTION
Settings for this prompt are pulled from PE14 setup. Users cannot change settings here.
SAMPLE OF DETAIL SECTION OF ALLOCATION REPORT TIME: 14:29 04/13/2010 PATRONAGE REPORT - 2010 PATRONAGE / DPAD - SHORT NAME ORDER PAGE: 2
AGTRAX® BOX 2044 HUTCHINSON, KS 67500
CUSTOMER DOLLARS/UNITS DOLLARS/UNITS ------------------ A L L O C A T I O N ------------------
------- ----PATRONAGE----- ------VOLUME------ DPAD DOLLARS CASH EQUITY
2600 JOHN R FARMER
PATR PROPANE 1.235000% OF DOLLARS, 50.0000% CASH
$3,150.60 $3,150.60 $.00 $38.91 $19.46 $19.45
SUPPLY 7.600000% OF DOLLARS, 50.0000% CASH. DPAD: 15.000000% OF DOLLARS.
$860.00 $860.00 $129.00 $65.36 $32.68 $32.68
TRANS PROPANE 5.670000% OF DOLLARS, 50.0000% CASH
$250.00 $250.00 $.00 $14.18 $7.09 $7.09
FERTILIZER 3.670000% OF DOLLARS, 50.0000% CASH
$3,275.00 $3,275.00 $.00 $120.19 $60.10 $60.09
CUSTOMER TOTAL
$7,535.60 $7,535.60 $129.00 $238.64 $119.33 $119.31
.00 .00
NET CHECK AMOUNT: $119.33
EQUITY CODE ALLOCATION MANUAL ENTRY ISSUE ADJUSTMENT PAYOUT ENDING BALANCE
--------------------------- --10/02/2009- ------------- --------- D I S T R I B U T I O N --------- --------------
1 REVOLVING FUND 2,466.75 .00 .00 .00 .00 2,466.75
7 LOCAL NON-QUALIFIED 336.52 .00 .00 .00 .00 336.52
10 COMMON STOCK 100.00 .00 .00 .00 .00 100.00
95 CASH PAYOUT .00 .00 .00 .00 .00 .00
1 REVOLVING FUND .00 .00 119.31 .00 .00 119.31
------------- ------------- ------------- ------------- ------------- -------------
TOTALS $2,903.27 $.00 $119.31 $.00 $.00 $3,022.58
ITEMS TO NOTE IN DETAIL SECTION. SORT ORDER – The report may be sorted by account short name, account number or zip code. Sort order is set in PE14. If a miscellaneous field selection is also used and SORT BY has been set to YES, it is the primary sort.
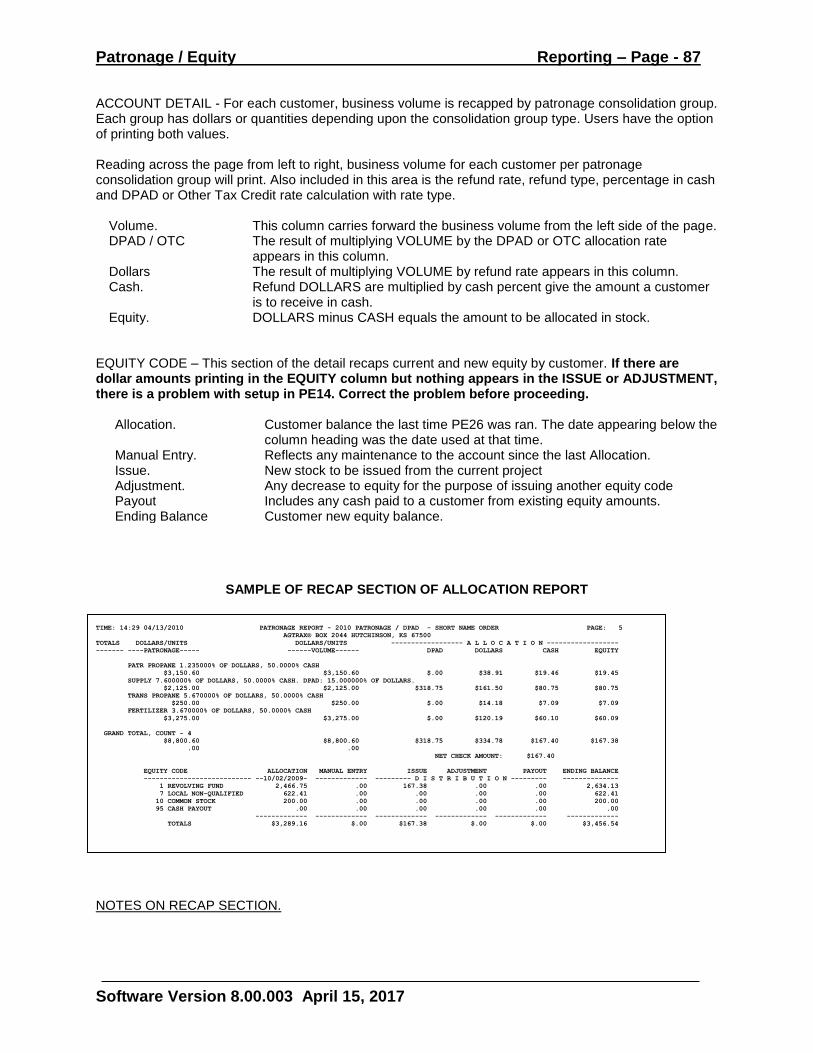
Patronage / Equity Reporting – Page - 87
Software Version 8.00.003 April 15, 2017
ACCOUNT DETAIL - For each customer, business volume is recapped by patronage consolidation group. Each group has dollars or quantities depending upon the consolidation group type. Users have the option of printing both values. Reading across the page from left to right, business volume for each customer per patronage consolidation group will print. Also included in this area is the refund rate, refund type, percentage in cash and DPAD or Other Tax Credit rate calculation with rate type.
Volume. This column carries forward the business volume from the left side of the page. DPAD / OTC The result of multiplying VOLUME by the DPAD or OTC allocation rate
appears in this column. Dollars The result of multiplying VOLUME by refund rate appears in this column. Cash. Refund DOLLARS are multiplied by cash percent give the amount a customer
is to receive in cash. Equity. DOLLARS minus CASH equals the amount to be allocated in stock.
EQUITY CODE – This section of the detail recaps current and new equity by customer. If there are dollar amounts printing in the EQUITY column but nothing appears in the ISSUE or ADJUSTMENT, there is a problem with setup in PE14. Correct the problem before proceeding.
Allocation. Customer balance the last time PE26 was ran. The date appearing below the column heading was the date used at that time.
Manual Entry. Reflects any maintenance to the account since the last Allocation. Issue. New stock to be issued from the current project Adjustment. Any decrease to equity for the purpose of issuing another equity code Payout Includes any cash paid to a customer from existing equity amounts. Ending Balance Customer new equity balance.
SAMPLE OF RECAP SECTION OF ALLOCATION REPORT
TIME: 14:29 04/13/2010 PATRONAGE REPORT - 2010 PATRONAGE / DPAD - SHORT NAME ORDER PAGE: 5
AGTRAX® BOX 2044 HUTCHINSON, KS 67500
TOTALS DOLLARS/UNITS DOLLARS/UNITS ------------------ A L L O C A T I O N ------------------
------- ----PATRONAGE----- ------VOLUME------ DPAD DOLLARS CASH EQUITY
PATR PROPANE 1.235000% OF DOLLARS, 50.0000% CASH
$3,150.60 $3,150.60 $.00 $38.91 $19.46 $19.45
SUPPLY 7.600000% OF DOLLARS, 50.0000% CASH. DPAD: 15.000000% OF DOLLARS.
$2,125.00 $2,125.00 $318.75 $161.50 $80.75 $80.75
TRANS PROPANE 5.670000% OF DOLLARS, 50.0000% CASH
$250.00 $250.00 $.00 $14.18 $7.09 $7.09
FERTILIZER 3.670000% OF DOLLARS, 50.0000% CASH
$3,275.00 $3,275.00 $.00 $120.19 $60.10 $60.09
GRAND TOTAL, COUNT - 4
$8,800.60 $8,800.60 $318.75 $334.78 $167.40 $167.38
.00 .00
NET CHECK AMOUNT: $167.40
EQUITY CODE ALLOCATION MANUAL ENTRY ISSUE ADJUSTMENT PAYOUT ENDING BALANCE
--------------------------- --10/02/2009- ------------- --------- D I S T R I B U T I O N --------- --------------
1 REVOLVING FUND 2,466.75 .00 167.38 .00 .00 2,634.13
7 LOCAL NON-QUALIFIED 622.41 .00 .00 .00 .00 622.41
10 COMMON STOCK 200.00 .00 .00 .00 .00 200.00
95 CASH PAYOUT .00 .00 .00 .00 .00 .00
------------- ------------- ------------- ------------- ------------- -------------
TOTALS $3,289.16 $.00 $167.38 $.00 $.00 $3,456.54
NOTES ON RECAP SECTION.
Patronage / Equity Reporting – Page - 88
Software Version 8.00.003 April 15, 2017
SORT ORDER. The recap prints totals by patronage consolidation group for all customers appearing on the report. Other information is presented in the same format as for individual customers. UNDER THE MIN GROUP VOLUME. Any customer who has negative volume in a patronage group will appear in this area of the report. These amounts should account for any difference between a patronage volume report and an allocation report. For any amounts that are significant, operators will want to decide how to handle those. UNDER THE MINIMUM CHECK AMOUNT. Any customer earning a refund but not enough to generate a check is listed in this section of the recap.
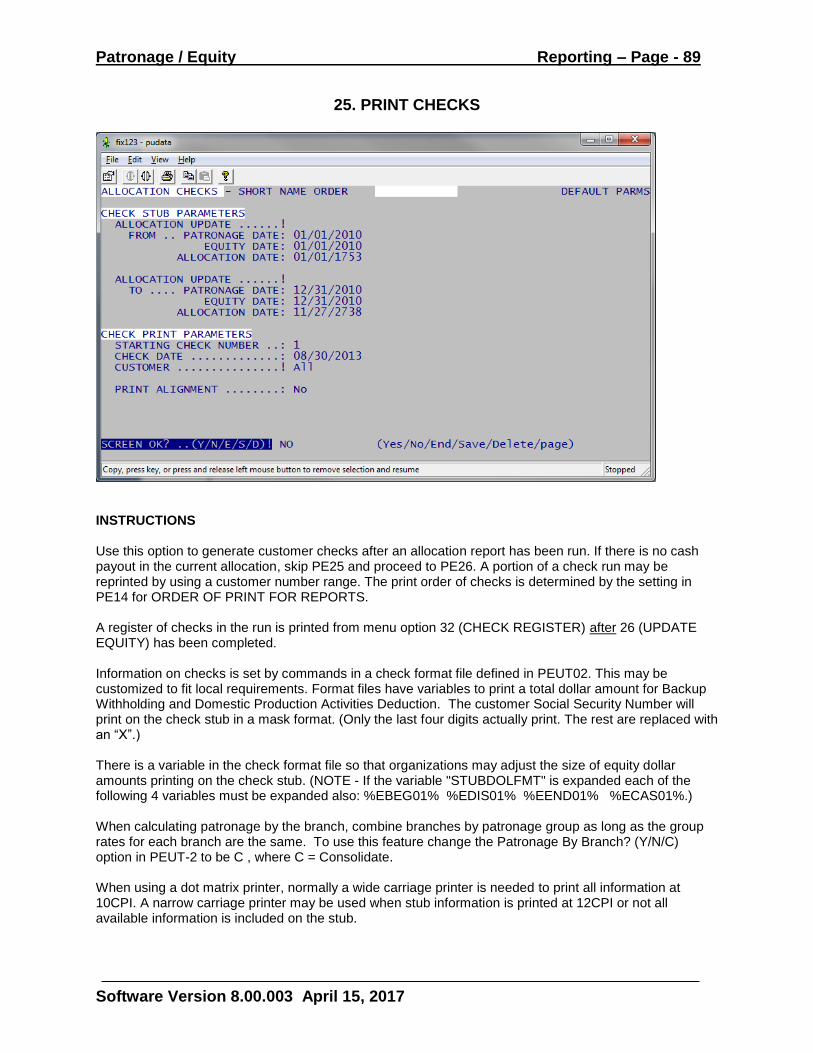
Patronage / Equity Reporting – Page - 89
Software Version 8.00.003 April 15, 2017
25. PRINT CHECKS
INSTRUCTIONS Use this option to generate customer checks after an allocation report has been run. If there is no cash payout in the current allocation, skip PE25 and proceed to PE26. A portion of a check run may be reprinted by using a customer number range. The print order of checks is determined by the setting in PE14 for ORDER OF PRINT FOR REPORTS. A register of checks in the run is printed from menu option 32 (CHECK REGISTER) after 26 (UPDATE EQUITY) has been completed. Information on checks is set by commands in a check format file defined in PEUT02. This may be customized to fit local requirements. Format files have variables to print a total dollar amount for Backup Withholding and Domestic Production Activities Deduction. The customer Social Security Number will print on the check stub in a mask format. (Only the last four digits actually print. The rest are replaced with an “X”.) There is a variable in the check format file so that organizations may adjust the size of equity dollar amounts printing on the check stub. (NOTE - If the variable "STUBDOLFMT" is expanded each of the following 4 variables must be expanded also: %EBEG01% %EDIS01% %EEND01% %ECAS01%.) When calculating patronage by the branch, combine branches by patronage group as long as the group rates for each branch are the same. To use this feature change the Patronage By Branch? (Y/N/C) option in PEUT-2 to be C , where C = Consolidate. When using a dot matrix printer, normally a wide carriage printer is needed to print all information at 10CPI. A narrow carriage printer may be used when stub information is printed at 12CPI or not all available information is included on the stub.
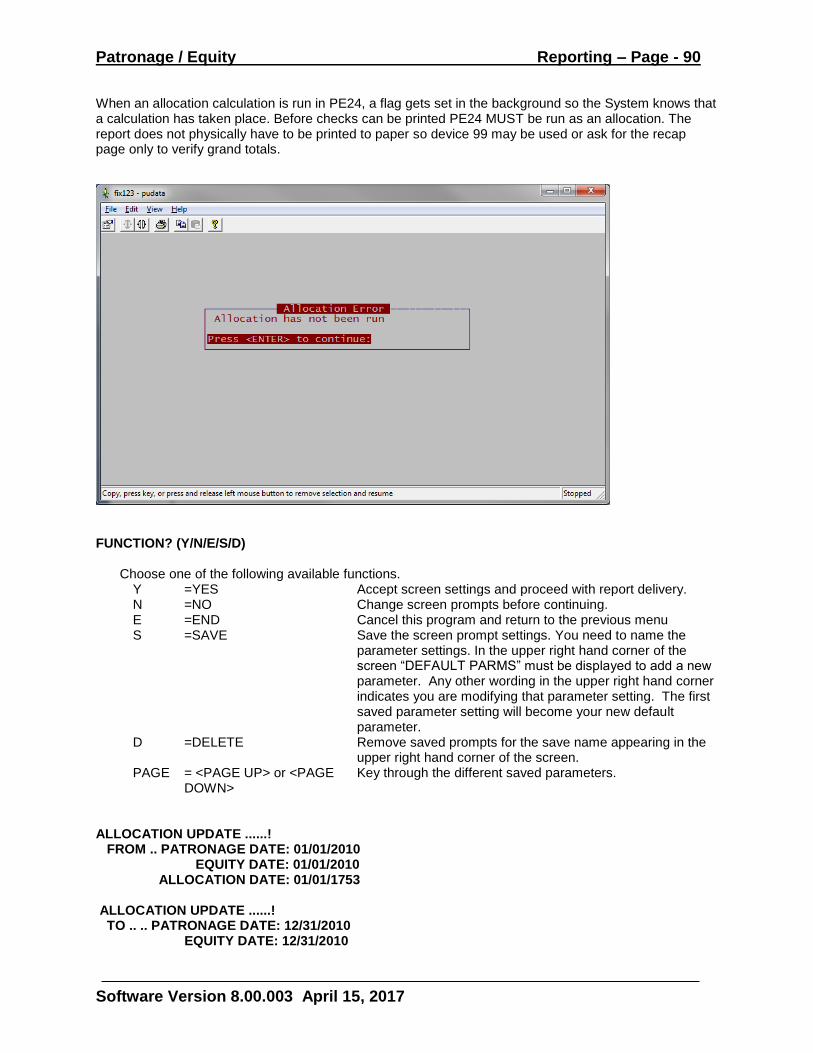
Patronage / Equity Reporting – Page - 90
Software Version 8.00.003 April 15, 2017
When an allocation calculation is run in PE24, a flag gets set in the background so the System knows that a calculation has taken place. Before checks can be printed PE24 MUST be run as an allocation. The report does not physically have to be printed to paper so device 99 may be used or ask for the recap page only to verify grand totals.
FUNCTION? (Y/N/E/S/D)
Choose one of the following available functions. Y =YES Accept screen settings and proceed with report delivery. N =NO Change screen prompts before continuing. E =END Cancel this program and return to the previous menu S =SAVE Save the screen prompt settings. You need to name the
parameter settings. In the upper right hand corner of the screen “DEFAULT PARMS” must be displayed to add a new parameter. Any other wording in the upper right hand corner indicates you are modifying that parameter setting. The first saved parameter setting will become your new default parameter.
D =DELETE Remove saved prompts for the save name appearing in the upper right hand corner of the screen.
PAGE = <PAGE UP> or <PAGE DOWN>
Key through the different saved parameters.
ALLOCATION UPDATE ......! FROM .. PATRONAGE DATE: 01/01/2010 EQUITY DATE: 01/01/2010 ALLOCATION DATE: 01/01/1753 ALLOCATION UPDATE ......! TO .. .. PATRONAGE DATE: 12/31/2010 EQUITY DATE: 12/31/2010
Patronage / Equity Reporting – Page - 91
Software Version 8.00.003 April 15, 2017
ALLOCATION DATE: 11/27/2738
These prompts may only be accessed when the check format file for check printing is set to use history information. To access history information and include it on a customer check it is necessary for the operator to choose those history allocation(s) that are to be included. Otherwise only current information is included on a check. Use <LEFT ARROW> to access the prompts. At the top ALLOCATION UPDATE use the <LOOKUP> key to display a listing of history allocations. When a single history allocation record is to be included choose that line number also for the second ALLOCATION UPDATE prompt. If several history records are to be included; at the top prompt for ALLOCATION UPDATE, use the <LOOKUP> key and choose the sequence number of the oldest history record to include. At the next prompt for ALLOCATION UPDATE choose the sequence number of the latest (newest) history record to include. This order of selection is used as the System displays history records in reverse order with the newest record being first. Prompts for PATRONAGE DATE and EQUITY are maintained by the system and are not accessible.
STARTING CHECK NUMBER ..:
Enter the preprinted form number on the first check. This may be maintained later if the check number on the screen does not match the check number in the printer.
CHECK DATE ..:
Key a calendar date to print on the checks. This may be any date so if checks are to be printed today and distributed at a later date, the distribution date may be used.
CUSTOMER NUMBER
On an initial check print, touch <ENTER> to accept program defaults of all customers. If there was a problem during a check run and only part of the checks need to be reprinted enter the customer number range. To start with a specific customer and go to END OF FILE, enter the FROM account number. Touch the <SPACE BAR> one time to replace the TO account with END OF FILE.
PRINT ALIGNMENT
When an operator wants to print a test alignment prior to the actual job they will: 1) Answer YES to print an alignment. 2) The program will move to Screen Ok and Report Delivery Options. 3) After those have been answered the alignment will be sent to the printer and the screen will
return to program prompting. 4) The prompt for Alignment will have a “N” value. If another test pattern is desired change the
value. Otherwise proceed to step 5. 5) Accept screen prompt settings and proceed to Delivery Options Window.
NOTE – Verify that starting check number advanced by 1 when printing an alignment. If it did not maintain the check number before proceeding.
REPORT DELIVERY
Patronage / Equity Reporting – Page - 92
Software Version 8.00.003 April 15, 2017
Report delivery tells the system where we want the report to be sent, whether that is a printer, the system hard drive, a CSV file or a PDF file.. After the operator accepts screen prompt settings the Report Delivery window loads. See the TraxReport Appendix section of this manual for a discussion on report delivery. NOTE – The Delivery Options window has a SAVE PROMPT function. This save is per user for all converted programs. If a user answers prompts in this window the same way the majority of the time, they could be saved so all the operator need do is answer YES and continue.
At this point the System will build the check records. This process will take approximately as long as the allocation process. It is important to remember that this step repeats part of the allocation process. So if customer miscellaneous field settings are changed or any settings in PE14 are changed, information on the checks may not match information on the allocation report.
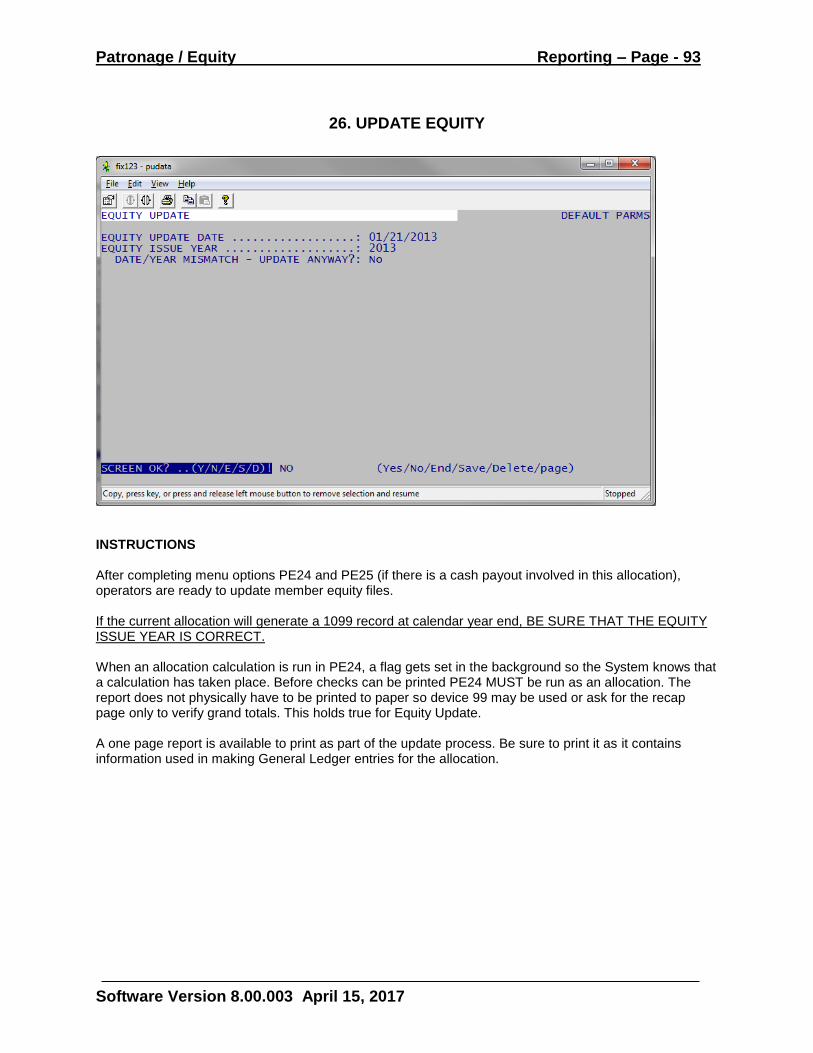
Patronage / Equity Reporting – Page - 93
Software Version 8.00.003 April 15, 2017
26. UPDATE EQUITY
INSTRUCTIONS After completing menu options PE24 and PE25 (if there is a cash payout involved in this allocation), operators are ready to update member equity files. If the current allocation will generate a 1099 record at calendar year end, BE SURE THAT THE EQUITY ISSUE YEAR IS CORRECT. When an allocation calculation is run in PE24, a flag gets set in the background so the System knows that a calculation has taken place. Before checks can be printed PE24 MUST be run as an allocation. The report does not physically have to be printed to paper so device 99 may be used or ask for the recap page only to verify grand totals. This holds true for Equity Update. A one page report is available to print as part of the update process. Be sure to print it as it contains information used in making General Ledger entries for the allocation.
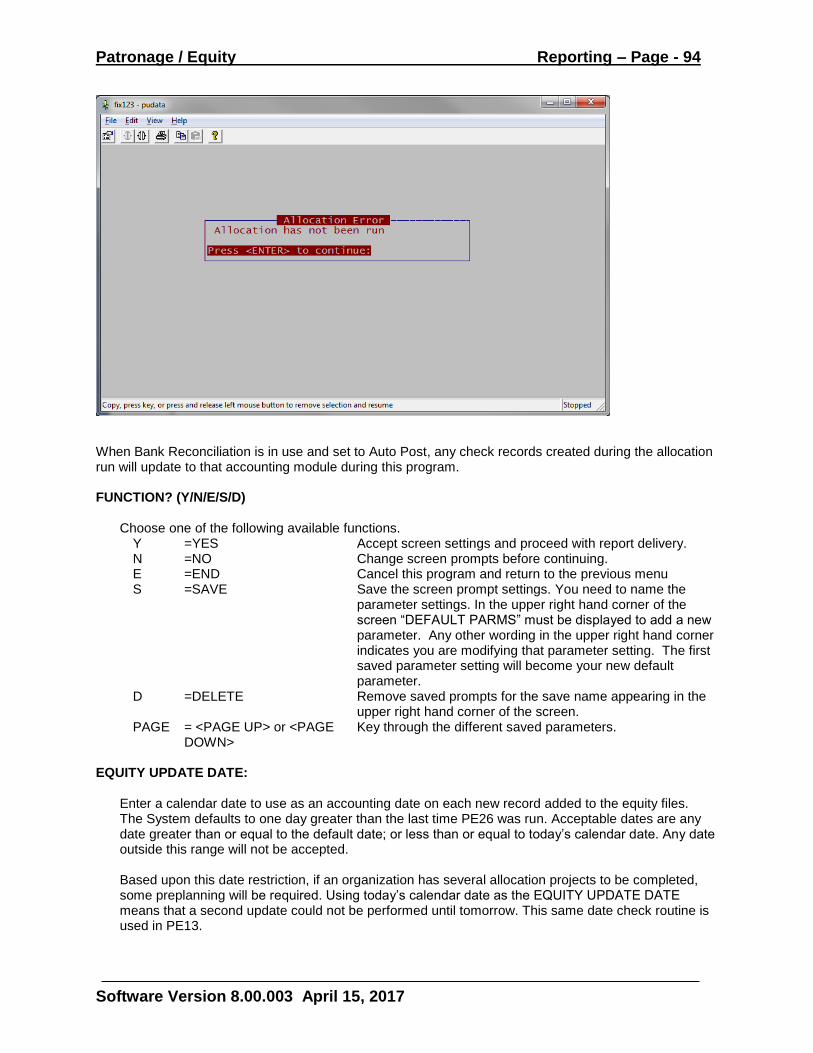
Patronage / Equity Reporting – Page - 94
Software Version 8.00.003 April 15, 2017
When Bank Reconciliation is in use and set to Auto Post, any check records created during the allocation run will update to that accounting module during this program. FUNCTION? (Y/N/E/S/D)
Choose one of the following available functions. Y =YES Accept screen settings and proceed with report delivery. N =NO Change screen prompts before continuing. E =END Cancel this program and return to the previous menu S =SAVE Save the screen prompt settings. You need to name the
parameter settings. In the upper right hand corner of the screen “DEFAULT PARMS” must be displayed to add a new parameter. Any other wording in the upper right hand corner indicates you are modifying that parameter setting. The first saved parameter setting will become your new default parameter.
D =DELETE Remove saved prompts for the save name appearing in the upper right hand corner of the screen.
PAGE = <PAGE UP> or <PAGE DOWN>
Key through the different saved parameters.
EQUITY UPDATE DATE:
Enter a calendar date to use as an accounting date on each new record added to the equity files. The System defaults to one day greater than the last time PE26 was run. Acceptable dates are any date greater than or equal to the default date; or less than or equal to today’s calendar date. Any date outside this range will not be accepted. Based upon this date restriction, if an organization has several allocation projects to be completed, some preplanning will be required. Using today’s calendar date as the EQUITY UPDATE DATE means that a second update could not be performed until tomorrow. This same date check routine is used in PE13.
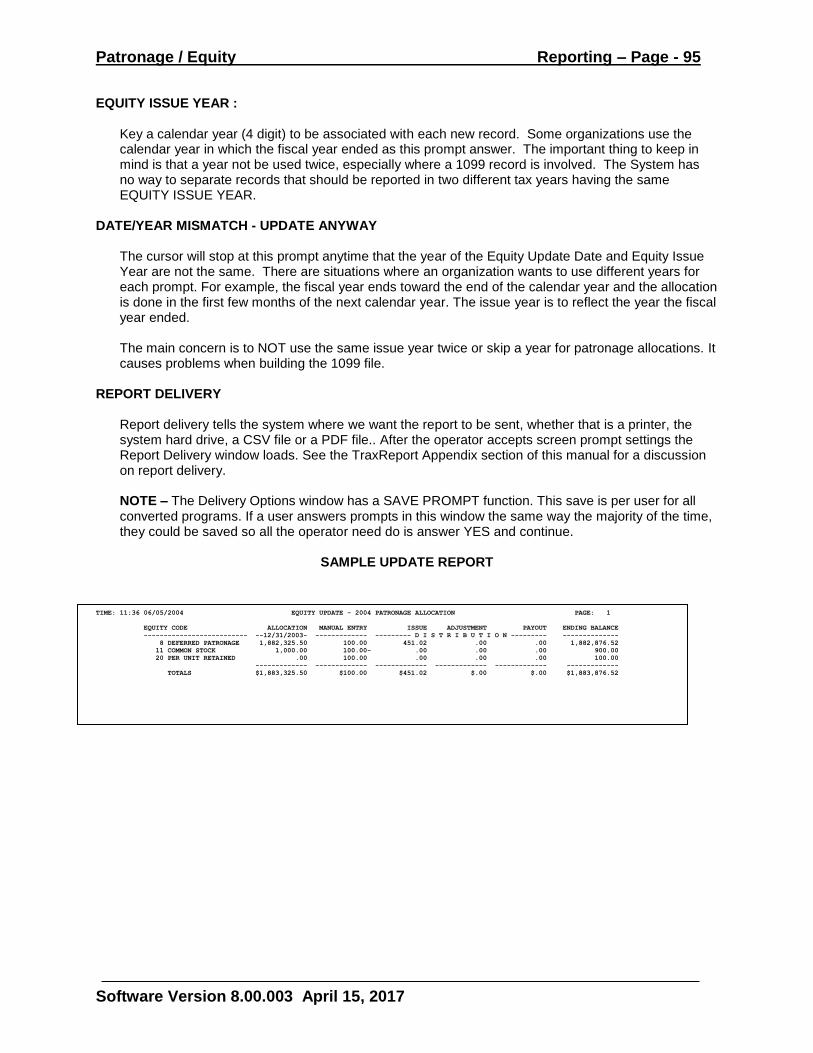
Patronage / Equity Reporting – Page - 95
Software Version 8.00.003 April 15, 2017
EQUITY ISSUE YEAR :
Key a calendar year (4 digit) to be associated with each new record. Some organizations use the calendar year in which the fiscal year ended as this prompt answer. The important thing to keep in mind is that a year not be used twice, especially where a 1099 record is involved. The System has no way to separate records that should be reported in two different tax years having the same EQUITY ISSUE YEAR.
DATE/YEAR MISMATCH - UPDATE ANYWAY
The cursor will stop at this prompt anytime that the year of the Equity Update Date and Equity Issue Year are not the same. There are situations where an organization wants to use different years for each prompt. For example, the fiscal year ends toward the end of the calendar year and the allocation is done in the first few months of the next calendar year. The issue year is to reflect the year the fiscal year ended. The main concern is to NOT use the same issue year twice or skip a year for patronage allocations. It causes problems when building the 1099 file.
REPORT DELIVERY
Report delivery tells the system where we want the report to be sent, whether that is a printer, the system hard drive, a CSV file or a PDF file.. After the operator accepts screen prompt settings the Report Delivery window loads. See the TraxReport Appendix section of this manual for a discussion on report delivery. NOTE – The Delivery Options window has a SAVE PROMPT function. This save is per user for all converted programs. If a user answers prompts in this window the same way the majority of the time, they could be saved so all the operator need do is answer YES and continue.
SAMPLE UPDATE REPORT
TIME: 11:36 06/05/2004 EQUITY UPDATE - 2004 PATRONAGE ALLOCATION PAGE: 1
EQUITY CODE ALLOCATION MANUAL ENTRY ISSUE ADJUSTMENT PAYOUT ENDING BALANCE
-------------------------- --12/31/2003- ------------- --------- D I S T R I B U T I O N --------- --------------
8 DEFERRED PATRONAGE 1,882,325.50 100.00 451.02 .00 .00 1,882,876.52
11 COMMON STOCK 1,000.00 100.00- .00 .00 .00 900.00
20 PER UNIT RETAINED .00 100.00 .00 .00 .00 100.00
------------- ------------- ------------- ------------- ------------- -------------
TOTALS $1,883,325.50 $100.00 $451.02 $.00 $.00 $1,883,876.52
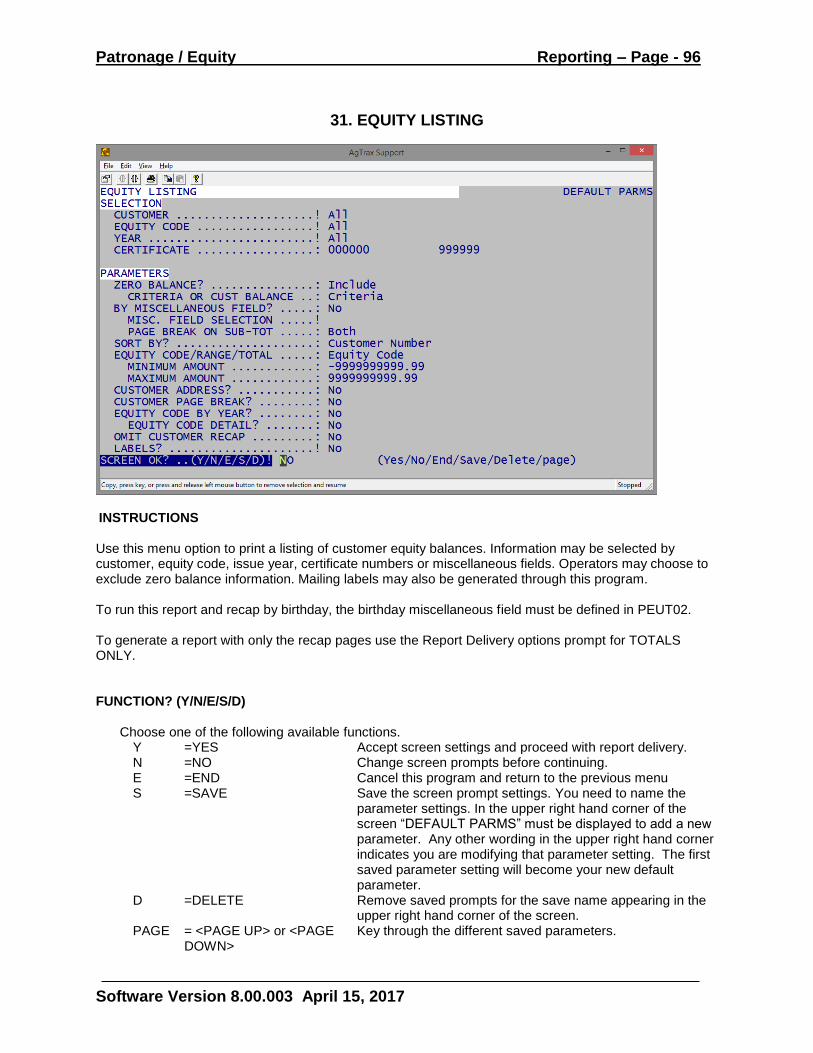
Patronage / Equity Reporting – Page - 96
Software Version 8.00.003 April 15, 2017
31. EQUITY LISTING
INSTRUCTIONS Use this menu option to print a listing of customer equity balances. Information may be selected by customer, equity code, issue year, certificate numbers or miscellaneous fields. Operators may choose to exclude zero balance information. Mailing labels may also be generated through this program. To run this report and recap by birthday, the birthday miscellaneous field must be defined in PEUT02. To generate a report with only the recap pages use the Report Delivery options prompt for TOTALS ONLY. FUNCTION? (Y/N/E/S/D)
Choose one of the following available functions. Y =YES Accept screen settings and proceed with report delivery. N =NO Change screen prompts before continuing. E =END Cancel this program and return to the previous menu S =SAVE Save the screen prompt settings. You need to name the
parameter settings. In the upper right hand corner of the screen “DEFAULT PARMS” must be displayed to add a new parameter. Any other wording in the upper right hand corner indicates you are modifying that parameter setting. The first saved parameter setting will become your new default parameter.
D =DELETE Remove saved prompts for the save name appearing in the upper right hand corner of the screen.
PAGE = <PAGE UP> or <PAGE DOWN>
Key through the different saved parameters.
Patronage / Equity Reporting – Page - 97
Software Version 8.00.003 April 15, 2017
SELECTION Note the next three prompts use a standard selection window. CUSTOMER
Key a customer account number, range of account numbers, select account numbers or touch <ENTER> for all accounts on file.
EQUITY CODE
Users may select a single equity code, range of codes, or specific equity codes to include on the report. Touch <ENTER> to accept program defaults of all equity codes on file.
YEAR
Touch <ENTER> to accept the program defaults of all issue years on file for the equity codes selected in the previous prompt. Otherwise key an issue year, range of years or specific years to print.
CERTIFICATE
For those equity codes having par value where stock certificate numbers are assigned to those issues, key a beginning and ending certificate number. Accepting the program defaults of all records on file will ignore CERTIFICATE as one of the selection criteria.
PARAMETERS ZERO BALANCE? .........(I/E/O):
Customers who had stock but the remaining balance is now zero may be included or excluded on the report.
I = INCLUDE. Print any customer activity where the remaining balance is zero for the equity
code(s) selected. E = EXCLUDE. Do not include any customer activity where the remaining balance is zero. If more
than one equity code has been selected, any customer with balances in one code but zero in another will have only the activity for remaining balances print.
O = ONLY. Print only the activity for selected equity codes where the remaining balance is zero. CRITERIA OR CUST. BAL. (C/B):
This prompt works in conjunction with the previous one. Simply put, is the System to check each equity code selected in EQUITY CODE for a zero balance or the customer’s total equity balance. If the latter is chosen, then a customer who has an overall outstanding balance will have activity for zero balance codes included on the report.
MISCELLANEOUS FIELD SELECTION?:
Operators may use any of the miscellaneous fields defined in Accounts Receivable as a criteria for report sorting. Answer YES to use this feature in separating information. A Miscellaneous Field Selection window will display on the screen.
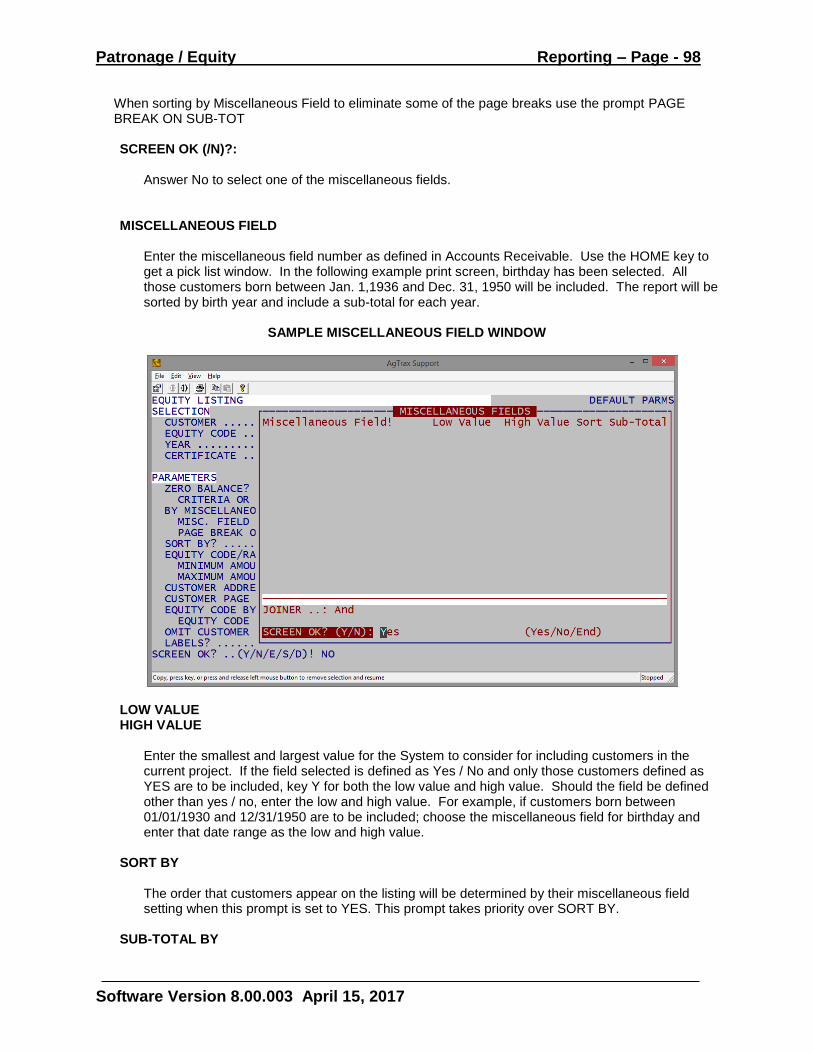
Patronage / Equity Reporting – Page - 98
Software Version 8.00.003 April 15, 2017
When sorting by Miscellaneous Field to eliminate some of the page breaks use the prompt PAGE BREAK ON SUB-TOT
SCREEN OK (/N)?:
Answer No to select one of the miscellaneous fields.
MISCELLANEOUS FIELD
Enter the miscellaneous field number as defined in Accounts Receivable. Use the HOME key to get a pick list window. In the following example print screen, birthday has been selected. All those customers born between Jan. 1,1936 and Dec. 31, 1950 will be included. The report will be sorted by birth year and include a sub-total for each year.
SAMPLE MISCELLANEOUS FIELD WINDOW
LOW VALUE HIGH VALUE
Enter the smallest and largest value for the System to consider for including customers in the current project. If the field selected is defined as Yes / No and only those customers defined as YES are to be included, key Y for both the low value and high value. Should the field be defined other than yes / no, enter the low and high value. For example, if customers born between 01/01/1930 and 12/31/1950 are to be included; choose the miscellaneous field for birthday and enter that date range as the low and high value.
SORT BY
The order that customers appear on the listing will be determined by their miscellaneous field setting when this prompt is set to YES. This prompt takes priority over SORT BY.
SUB-TOTAL BY
Patronage / Equity Reporting – Page - 99
Software Version 8.00.003 April 15, 2017
Answer YES to get a subtotal for value of the miscellaneous field selected.
JOIN(And/Or)
Where more than one miscellaneous field is selected, the System needs to know if a customer need only match one field (OR) to be included or they must match all criteria (AND) to be included.
**NOTE- The following prompt is skipped when MISCELLANEOUS FIELD SELECTION is set to NO. PG BREAK ON SUB-TOT(B/N/P/A):
Operators have several choices for making the break between one field value and the next stand out on the report.
B = BOTH. At the end of one value the System will go to the bottom of the current page, then form
feed a blank sheet before starting to print the next field value. N = NEITHER. Where the report finishes one field value it will skip a couple of lines then start printing
information for the next field value. P = PRIOR. Leaves a blank sheet before starting each new value of a miscellaneous field.
Depending where on the sheet of paper the ending information for one value prints, this option could closely resemble BOTH.
A = AFTER. Upon completing information for one value of a miscellaneous field, the System will form feed to the bottom of the current page. It will then start printing the next value information at the top of the next sheet.
SORT BY? ............(K/N/C/Z):
Information on the report may be sorted according to customer account number (K), customer short name (N), certificate number (C) or zip code (Z). If the MISCELLANEOUS FIELD SELECTION is used and SORT BY is set to YES in that window, it will be used as a primary sort. This prompt selection will be used as a secondary sort in those cases.
EQUITY CODE/RANGE/TOTAL(E/R/T):
At this prompt users will see the following HELP window. Where ZERO BALANCE gives operators a method to handle the printing of zero remaining information, this prompt handles those balances within a defined dollar range. For example, to generate a listing of those customers having more than five thousand dollars in total equity, choose T and set the dollar range at 5,000.00 to 999,999,999.99.
E = EQUITY CODE. This will check each issue year by equity code selected against the dollar range specified.
R = RANGE. Range checks the total outstanding of all equity codes selected against the dollar range specified.
T = TOTAL Total ignores the equity codes selected and checks the customer outstanding balance for all equity codes against the dollar range specified.
MINIMUM AMOUNT MAXIMUM AMOUNT
Define a dollar range to check outstanding balances against. It depends upon the previous prompt answer which type of total will be checked.
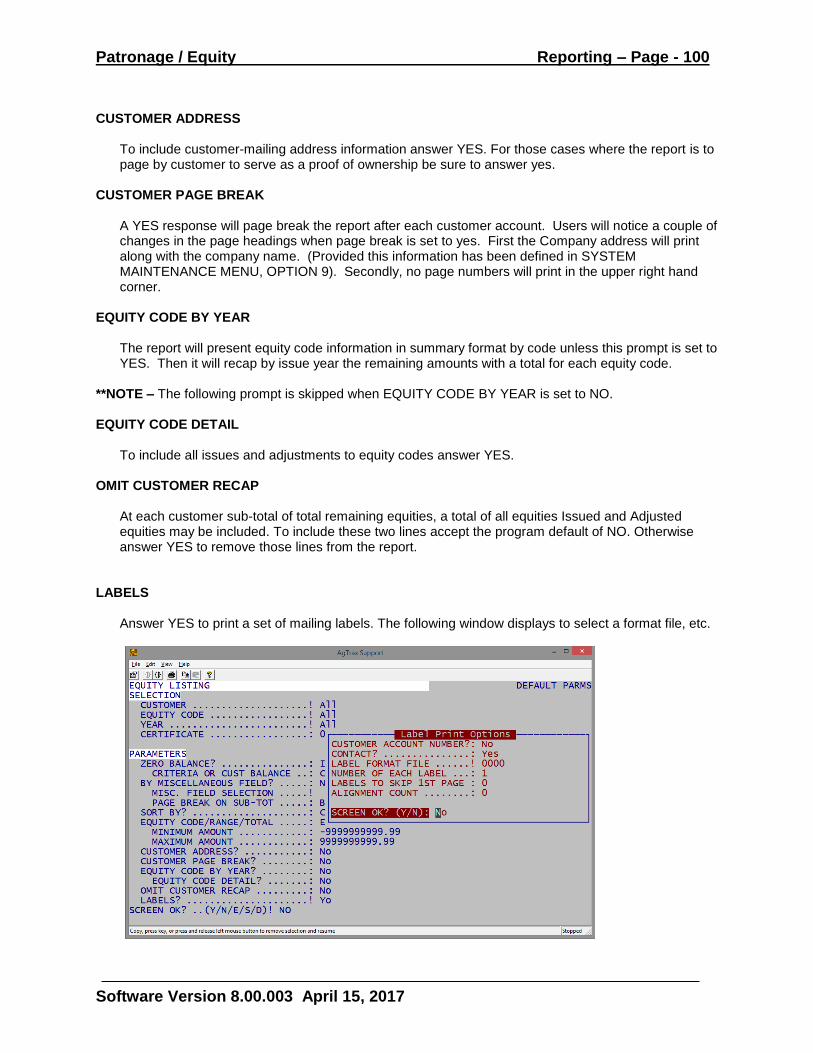
Patronage / Equity Reporting – Page - 100
Software Version 8.00.003 April 15, 2017
CUSTOMER ADDRESS
To include customer-mailing address information answer YES. For those cases where the report is to page by customer to serve as a proof of ownership be sure to answer yes.
CUSTOMER PAGE BREAK
A YES response will page break the report after each customer account. Users will notice a couple of changes in the page headings when page break is set to yes. First the Company address will print along with the company name. (Provided this information has been defined in SYSTEM MAINTENANCE MENU, OPTION 9). Secondly, no page numbers will print in the upper right hand corner.
EQUITY CODE BY YEAR
The report will present equity code information in summary format by code unless this prompt is set to YES. Then it will recap by issue year the remaining amounts with a total for each equity code.
**NOTE – The following prompt is skipped when EQUITY CODE BY YEAR is set to NO. EQUITY CODE DETAIL
To include all issues and adjustments to equity codes answer YES. OMIT CUSTOMER RECAP
At each customer sub-total of total remaining equities, a total of all equities Issued and Adjusted equities may be included. To include these two lines accept the program default of NO. Otherwise answer YES to remove those lines from the report.
LABELS
Answer YES to print a set of mailing labels. The following window displays to select a format file, etc.
Patronage / Equity Reporting – Page - 101
Software Version 8.00.003 April 15, 2017
LABEL PRINT OPTIONS
CUSTOMER ACCOUNT NUMBER Answer YES to include the customer account number on the label. Otherwise answer NO. CONTACT On each customer master (Accounts Receivable option 11) is a field for a main contact. Answer YES to include any information contained in that field. LABEL FORMAT FILE Choose the format file to match the labels being used. The operator can not exit this window without choosing a valid format file number. NUMBER OF EACH LABEL Enter the number of labels to print for each customer. Touch <ENTER> to accept the program default of 1 label per customer. LABELS TO SKIP 1ST PAGE
When using labels that are more than one column wide, operators may have a partial row left from a previous print job. Or in the case of labels for a laser printer, a partial sheet may be left. By indicating how many labels have been used, the print program knows where to start on the page. For continuous form labels 3 columns wide where a label in the first column has been used, key the number 1. On a sheet of laser labels that has the first five used, enter the number 5. This prompt can be accessed by <LEFT ARROW> or answering NO to PRINT LABELS.
ALIGNMENT COUNT
When an operator wants to print a test alignment prior to the actual job they will: 1) Enter the number of alignment patterns to print. 2) The program will move to Screen Ok and Report Delivery Options. 3) After those have been answered the alignment will be sent to the printer and the screen will
return to program prompting. 4) The prompt for Alignment will have a zero value. If another test pattern is desired change the
value. Otherwise proceed to step 5. 5) Accept screen prompt settings and proceed to Delivery Options Window.
REPORT DELIVERY
Report delivery tells the system where we want the report to be sent, whether that is a printer, the system hard drive, a CSV file or a PDF file.. After the operator accepts screen prompt settings the Report Delivery window loads. See the TraxReport Appendix section of this manual for a discussion on report delivery. NOTE – The Delivery Options window has a SAVE PROMPT function. This save is per user for all converted programs. If a user answers prompts in this window the same way the majority of the time, they could be saved so all the operator need do is answer YES and continue.
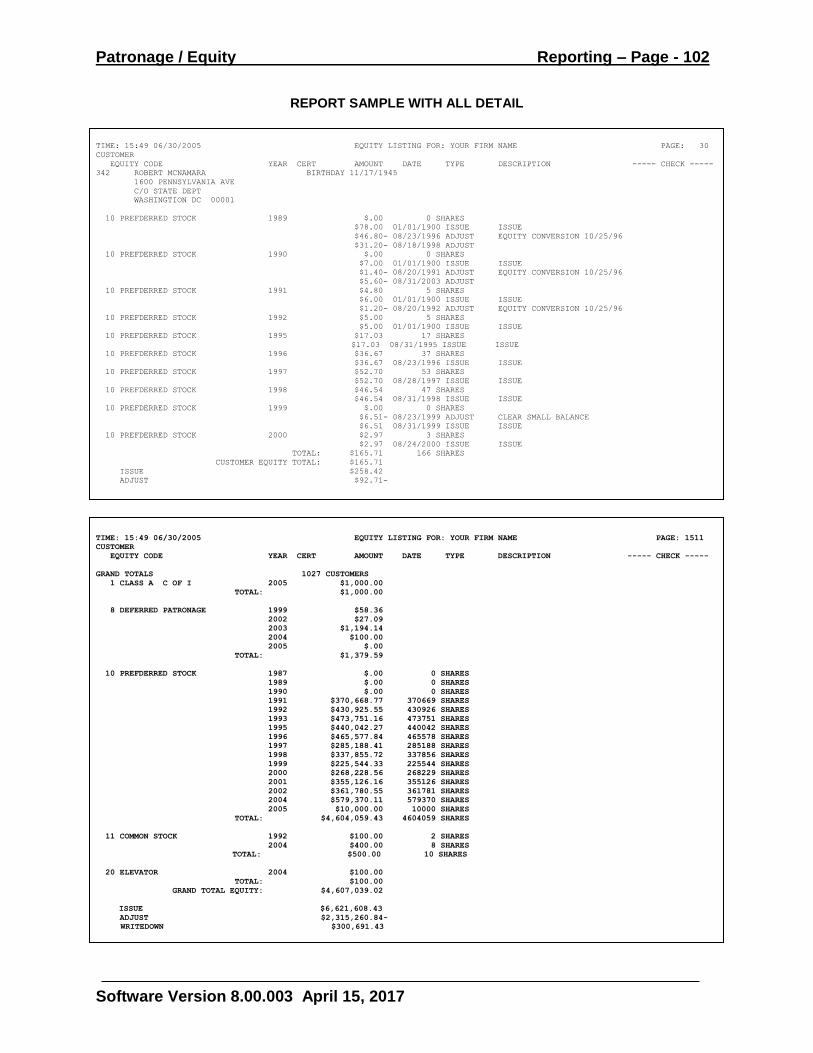
Patronage / Equity Reporting – Page - 102
Software Version 8.00.003 April 15, 2017
REPORT SAMPLE WITH ALL DETAIL
TIME: 15:49 06/30/2005 EQUITY LISTING FOR: YOUR FIRM NAME PAGE: 30
CUSTOMER
EQUITY CODE YEAR CERT AMOUNT DATE TYPE DESCRIPTION ----- CHECK -----
342 ROBERT MCNAMARA BIRTHDAY 11/17/1945
1600 PENNSYLVANIA AVE
C/O STATE DEPT
WASHINGTION DC 00001
10 PREFDERRED STOCK 1989 $.00 0 SHARES
$78.00 01/01/1900 ISSUE ISSUE
$46.80- 08/23/1996 ADJUST EQUITY CONVERSION 10/25/96
$31.20- 08/18/1998 ADJUST
10 PREFDERRED STOCK 1990 $.00 0 SHARES
$7.00 01/01/1900 ISSUE ISSUE
$1.40- 08/20/1991 ADJUST EQUITY CONVERSION 10/25/96
$5.60- 08/31/2003 ADJUST
10 PREFDERRED STOCK 1991 $4.80 5 SHARES
$6.00 01/01/1900 ISSUE ISSUE
$1.20- 08/20/1992 ADJUST EQUITY CONVERSION 10/25/96
10 PREFDERRED STOCK 1992 $5.00 5 SHARES
$5.00 01/01/1900 ISSUE ISSUE
10 PREFDERRED STOCK 1995 $17.03 17 SHARES
$17.03 08/31/1995 ISSUE ISSUE 10 PREFDERRED STOCK 1996 $36.67 37 SHARES
$36.67 08/23/1996 ISSUE ISSUE
10 PREFDERRED STOCK 1997 $52.70 53 SHARES
$52.70 08/28/1997 ISSUE ISSUE
10 PREFDERRED STOCK 1998 $46.54 47 SHARES
$46.54 08/31/1998 ISSUE ISSUE
10 PREFDERRED STOCK 1999 $.00 0 SHARES
$6.51- 08/23/1999 ADJUST CLEAR SMALL BALANCE
$6.51 08/31/1999 ISSUE ISSUE
10 PREFDERRED STOCK 2000 $2.97 3 SHARES
$2.97 08/24/2000 ISSUE ISSUE
TOTAL: $165.71 166 SHARES
CUSTOMER EQUITY TOTAL: $165.71
ISSUE $258.42
ADJUST $92.71-
TIME: 15:49 06/30/2005 EQUITY LISTING FOR: YOUR FIRM NAME PAGE: 1511
CUSTOMER
EQUITY CODE YEAR CERT AMOUNT DATE TYPE DESCRIPTION ----- CHECK -----
GRAND TOTALS 1027 CUSTOMERS
1 CLASS A C OF I 2005 $1,000.00
TOTAL: $1,000.00
8 DEFERRED PATRONAGE 1999 $58.36
2002 $27.09
2003 $1,194.14
2004 $100.00
2005 $.00
TOTAL: $1,379.59
10 PREFDERRED STOCK 1987 $.00 0 SHARES
1989 $.00 0 SHARES
1990 $.00 0 SHARES
1991 $370,668.77 370669 SHARES
1992 $430,925.55 430926 SHARES
1993 $473,751.16 473751 SHARES
1995 $440,042.27 440042 SHARES
1996 $465,577.84 465578 SHARES
1997 $285,188.41 285188 SHARES
1998 $337,855.72 337856 SHARES
1999 $225,544.33 225544 SHARES
2000 $268,228.56 268229 SHARES
2001 $355,126.16 355126 SHARES
2002 $361,780.55 361781 SHARES
2004 $579,370.11 579370 SHARES
2005 $10,000.00 10000 SHARES
TOTAL: $4,604,059.43 4604059 SHARES
11 COMMON STOCK 1992 $100.00 2 SHARES
2004 $400.00 8 SHARES
TOTAL: $500.00 10 SHARES
20 ELEVATOR 2004 $100.00
TOTAL: $100.00
GRAND TOTAL EQUITY: $4,607,039.02
ISSUE $6,621,608.43 ADJUST $2,315,260.84-
WRITEDOWN $300,691.43
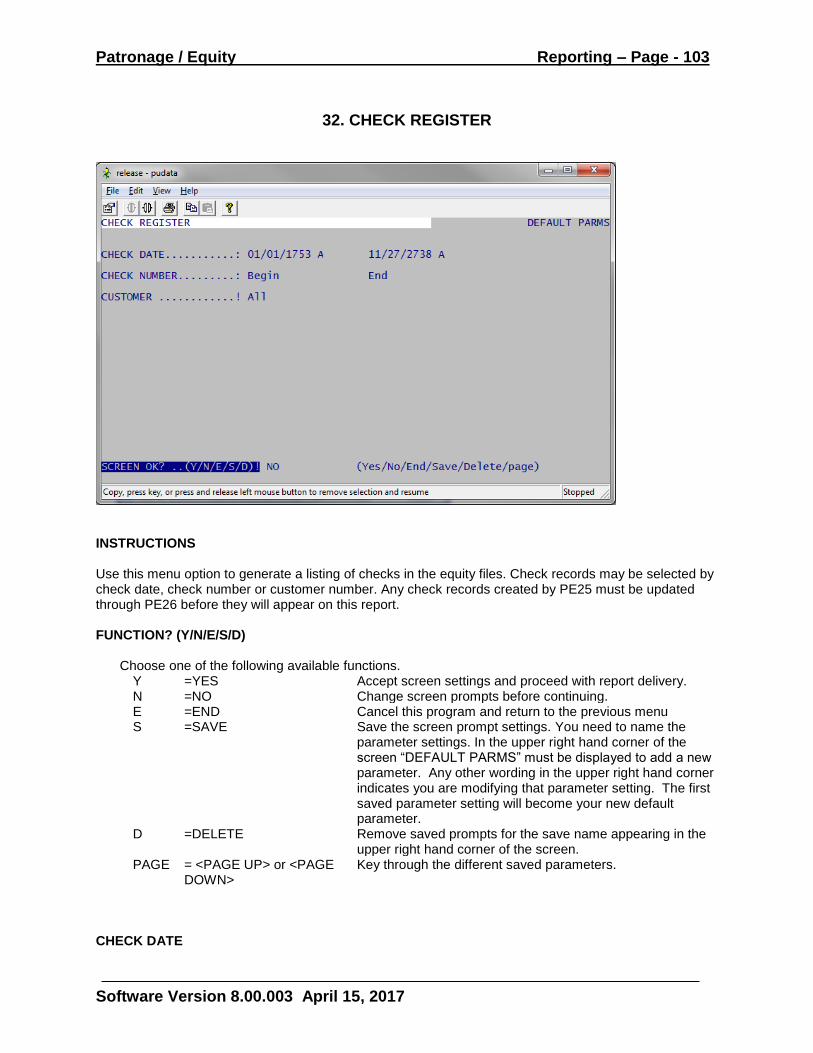
Patronage / Equity Reporting – Page - 103
Software Version 8.00.003 April 15, 2017
32. CHECK REGISTER
INSTRUCTIONS Use this menu option to generate a listing of checks in the equity files. Check records may be selected by check date, check number or customer number. Any check records created by PE25 must be updated through PE26 before they will appear on this report. FUNCTION? (Y/N/E/S/D)
Choose one of the following available functions. Y =YES Accept screen settings and proceed with report delivery. N =NO Change screen prompts before continuing. E =END Cancel this program and return to the previous menu S =SAVE Save the screen prompt settings. You need to name the
parameter settings. In the upper right hand corner of the screen “DEFAULT PARMS” must be displayed to add a new parameter. Any other wording in the upper right hand corner indicates you are modifying that parameter setting. The first saved parameter setting will become your new default parameter.
D =DELETE Remove saved prompts for the save name appearing in the upper right hand corner of the screen.
PAGE = <PAGE UP> or <PAGE DOWN>
Key through the different saved parameters.
CHECK DATE
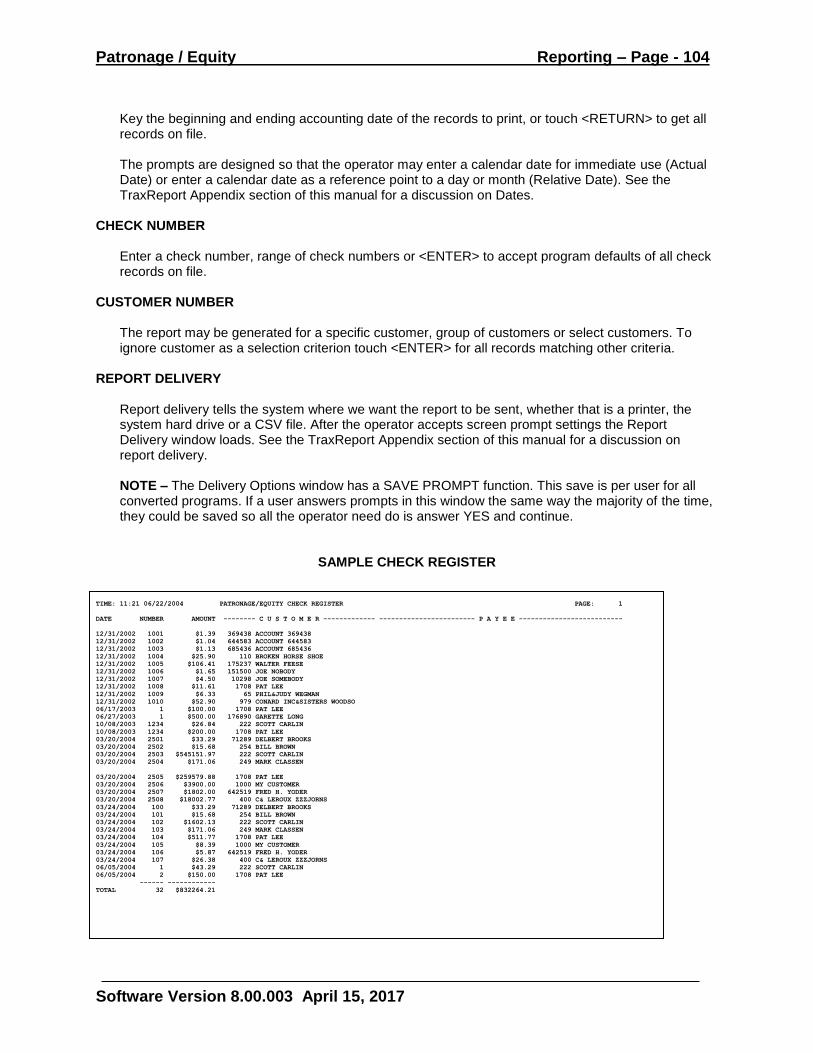
Patronage / Equity Reporting – Page - 104
Software Version 8.00.003 April 15, 2017
Key the beginning and ending accounting date of the records to print, or touch <RETURN> to get all records on file. The prompts are designed so that the operator may enter a calendar date for immediate use (Actual Date) or enter a calendar date as a reference point to a day or month (Relative Date). See the TraxReport Appendix section of this manual for a discussion on Dates.
CHECK NUMBER Enter a check number, range of check numbers or <ENTER> to accept program defaults of all check records on file.
CUSTOMER NUMBER
The report may be generated for a specific customer, group of customers or select customers. To ignore customer as a selection criterion touch <ENTER> for all records matching other criteria.
REPORT DELIVERY
Report delivery tells the system where we want the report to be sent, whether that is a printer, the system hard drive or a CSV file. After the operator accepts screen prompt settings the Report Delivery window loads. See the TraxReport Appendix section of this manual for a discussion on report delivery. NOTE – The Delivery Options window has a SAVE PROMPT function. This save is per user for all converted programs. If a user answers prompts in this window the same way the majority of the time, they could be saved so all the operator need do is answer YES and continue.
SAMPLE CHECK REGISTER
TIME: 11:21 06/22/2004 PATRONAGE/EQUITY CHECK REGISTER PAGE: 1
DATE NUMBER AMOUNT -------- C U S T O M E R ------------- ------------------------ P A Y E E --------------------------
12/31/2002 1001 $1.39 369438 ACCOUNT 369438
12/31/2002 1002 $1.04 644583 ACCOUNT 644583
12/31/2002 1003 $1.13 685436 ACCOUNT 685436
12/31/2002 1004 $25.90 110 BROKEN HORSE SHOE
12/31/2002 1005 $106.41 175237 WALTER FEESE
12/31/2002 1006 $1.65 151500 JOE NOBODY
12/31/2002 1007 $4.50 10298 JOE SOMEBODY
12/31/2002 1008 $11.61 1708 PAT LEE
12/31/2002 1009 $6.33 65 PHIL&JUDY WEGMAN
12/31/2002 1010 $52.90 979 CONARD INC&SISTERS WOODSO
06/17/2003 1 $100.00 1708 PAT LEE
06/27/2003 1 $500.00 176890 GARETTE LONG
10/08/2003 1234 $26.84 222 SCOTT CARLIN
10/08/2003 1234 $200.00 1708 PAT LEE
03/20/2004 2501 $33.29 71289 DELBERT BROOKS
03/20/2004 2502 $15.68 254 BILL BROWN
03/20/2004 2503 $545151.97 222 SCOTT CARLIN
03/20/2004 2504 $171.06 249 MARK CLASSEN
03/20/2004 2505 $259579.88 1708 PAT LEE
03/20/2004 2506 $3900.00 1000 MY CUSTOMER
03/20/2004 2507 $1802.00 642519 FRED H. YODER
03/20/2004 2508 $18002.77 400 C& LEROUX ZZZJORNS
03/24/2004 100 $33.29 71289 DELBERT BROOKS
03/24/2004 101 $15.68 254 BILL BROWN
03/24/2004 102 $1602.13 222 SCOTT CARLIN
03/24/2004 103 $171.06 249 MARK CLASSEN
03/24/2004 104 $511.77 1708 PAT LEE
03/24/2004 105 $8.39 1000 MY CUSTOMER
03/24/2004 106 $5.87 642519 FRED H. YODER
03/24/2004 107 $26.38 400 C& LEROUX ZZZJORNS
06/05/2004 1 $43.29 222 SCOTT CARLIN
06/05/2004 2 $150.00 1708 PAT LEE
------ ------------
TOTAL 32 $832264.21
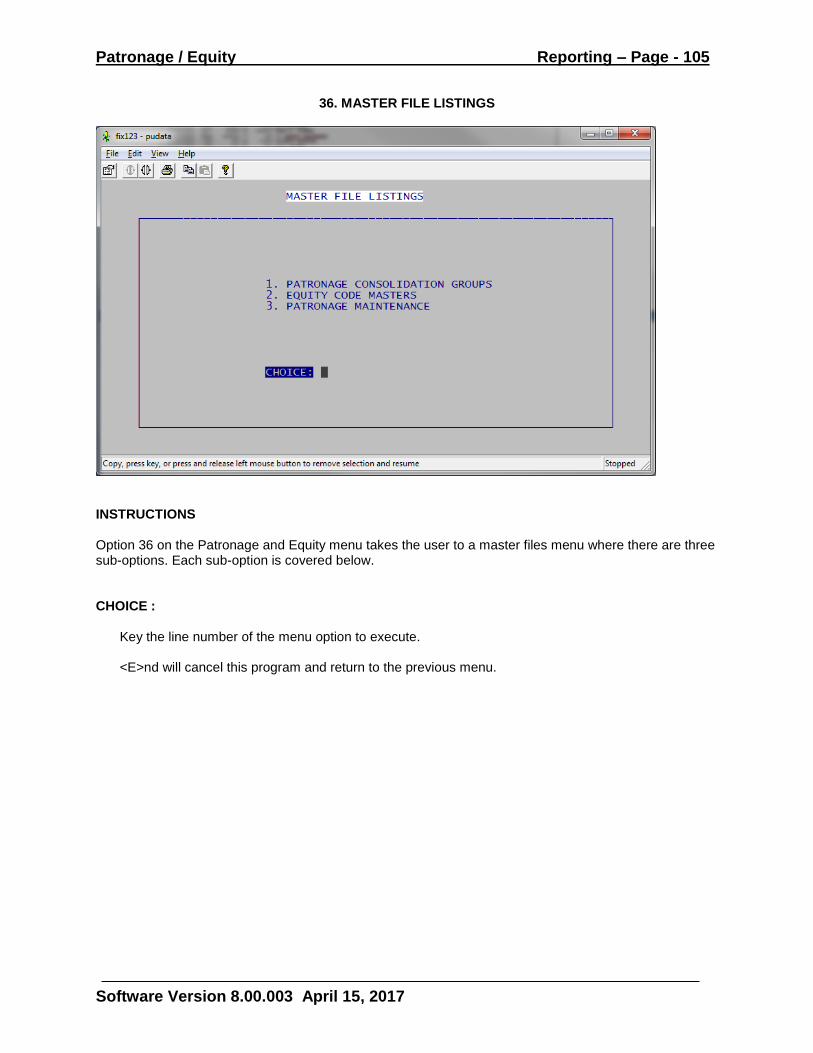
Patronage / Equity Reporting – Page - 105
Software Version 8.00.003 April 15, 2017
36. MASTER FILE LISTINGS
INSTRUCTIONS Option 36 on the Patronage and Equity menu takes the user to a master files menu where there are three sub-options. Each sub-option is covered below. CHOICE :
Key the line number of the menu option to execute.
<E>nd will cancel this program and return to the previous menu.
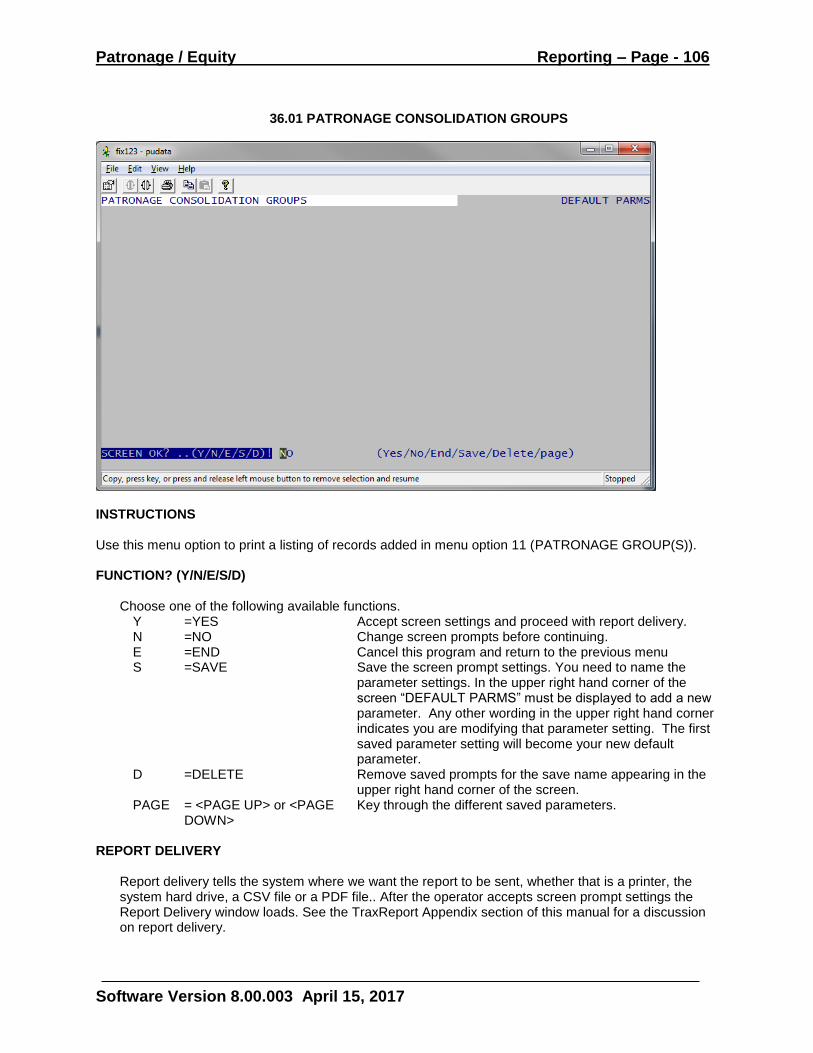
Patronage / Equity Reporting – Page - 106
Software Version 8.00.003 April 15, 2017
36.01 PATRONAGE CONSOLIDATION GROUPS
INSTRUCTIONS Use this menu option to print a listing of records added in menu option 11 (PATRONAGE GROUP(S)). FUNCTION? (Y/N/E/S/D)
Choose one of the following available functions. Y =YES Accept screen settings and proceed with report delivery. N =NO Change screen prompts before continuing. E =END Cancel this program and return to the previous menu S =SAVE Save the screen prompt settings. You need to name the
parameter settings. In the upper right hand corner of the screen “DEFAULT PARMS” must be displayed to add a new parameter. Any other wording in the upper right hand corner indicates you are modifying that parameter setting. The first saved parameter setting will become your new default parameter.
D =DELETE Remove saved prompts for the save name appearing in the upper right hand corner of the screen.
PAGE = <PAGE UP> or <PAGE DOWN>
Key through the different saved parameters.
REPORT DELIVERY
Report delivery tells the system where we want the report to be sent, whether that is a printer, the system hard drive, a CSV file or a PDF file.. After the operator accepts screen prompt settings the Report Delivery window loads. See the TraxReport Appendix section of this manual for a discussion on report delivery.
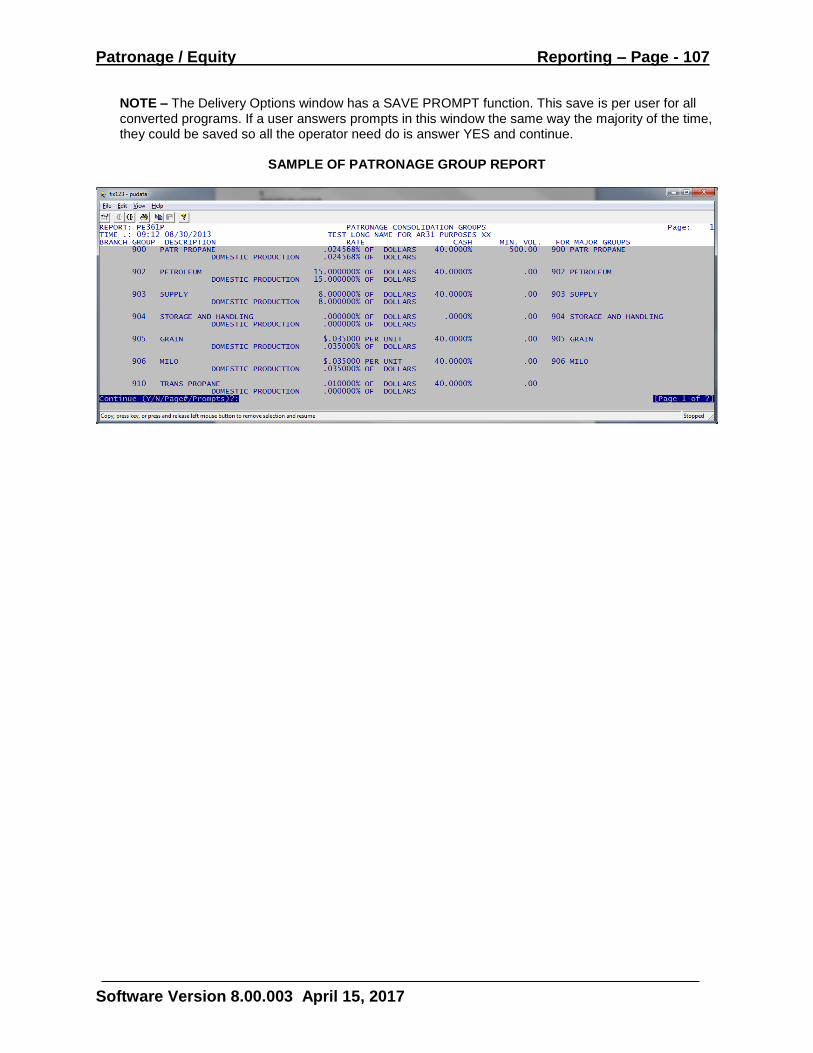
Patronage / Equity Reporting – Page - 107
Software Version 8.00.003 April 15, 2017
NOTE – The Delivery Options window has a SAVE PROMPT function. This save is per user for all converted programs. If a user answers prompts in this window the same way the majority of the time, they could be saved so all the operator need do is answer YES and continue.
SAMPLE OF PATRONAGE GROUP REPORT
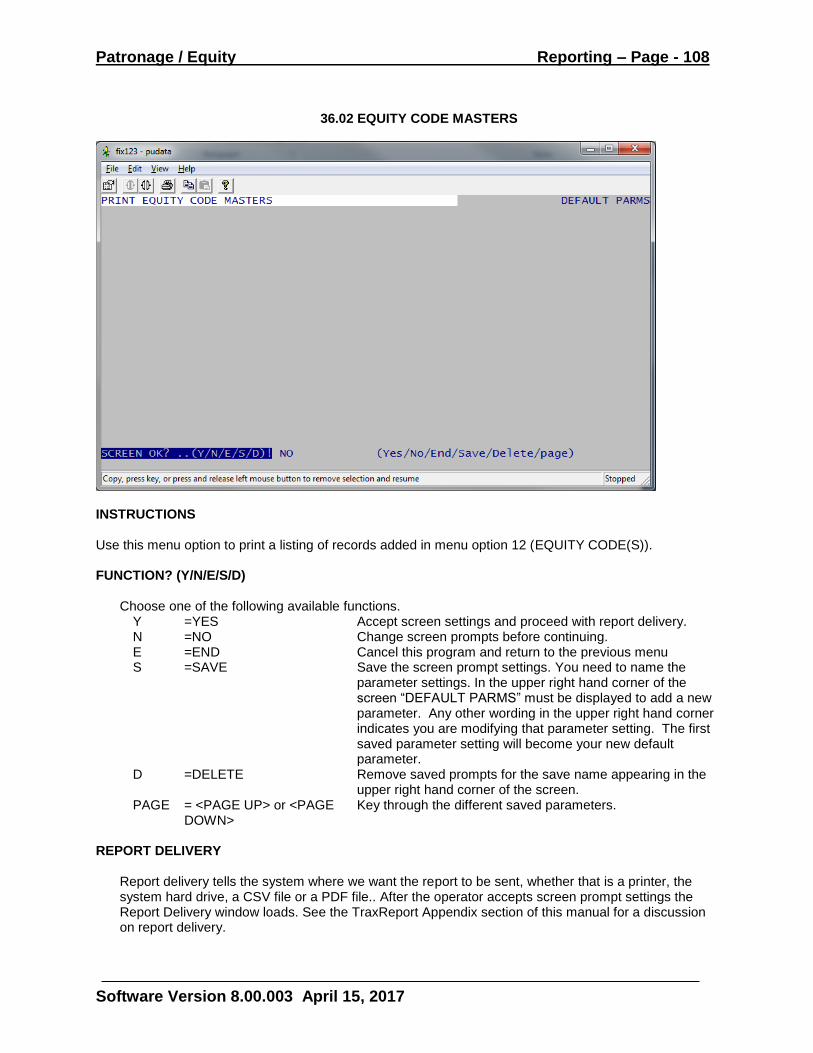
Patronage / Equity Reporting – Page - 108
Software Version 8.00.003 April 15, 2017
36.02 EQUITY CODE MASTERS
INSTRUCTIONS Use this menu option to print a listing of records added in menu option 12 (EQUITY CODE(S)). FUNCTION? (Y/N/E/S/D)
Choose one of the following available functions. Y =YES Accept screen settings and proceed with report delivery. N =NO Change screen prompts before continuing. E =END Cancel this program and return to the previous menu S =SAVE Save the screen prompt settings. You need to name the
parameter settings. In the upper right hand corner of the screen “DEFAULT PARMS” must be displayed to add a new parameter. Any other wording in the upper right hand corner indicates you are modifying that parameter setting. The first saved parameter setting will become your new default parameter.
D =DELETE Remove saved prompts for the save name appearing in the upper right hand corner of the screen.
PAGE = <PAGE UP> or <PAGE DOWN>
Key through the different saved parameters.
REPORT DELIVERY
Report delivery tells the system where we want the report to be sent, whether that is a printer, the system hard drive, a CSV file or a PDF file.. After the operator accepts screen prompt settings the Report Delivery window loads. See the TraxReport Appendix section of this manual for a discussion on report delivery.
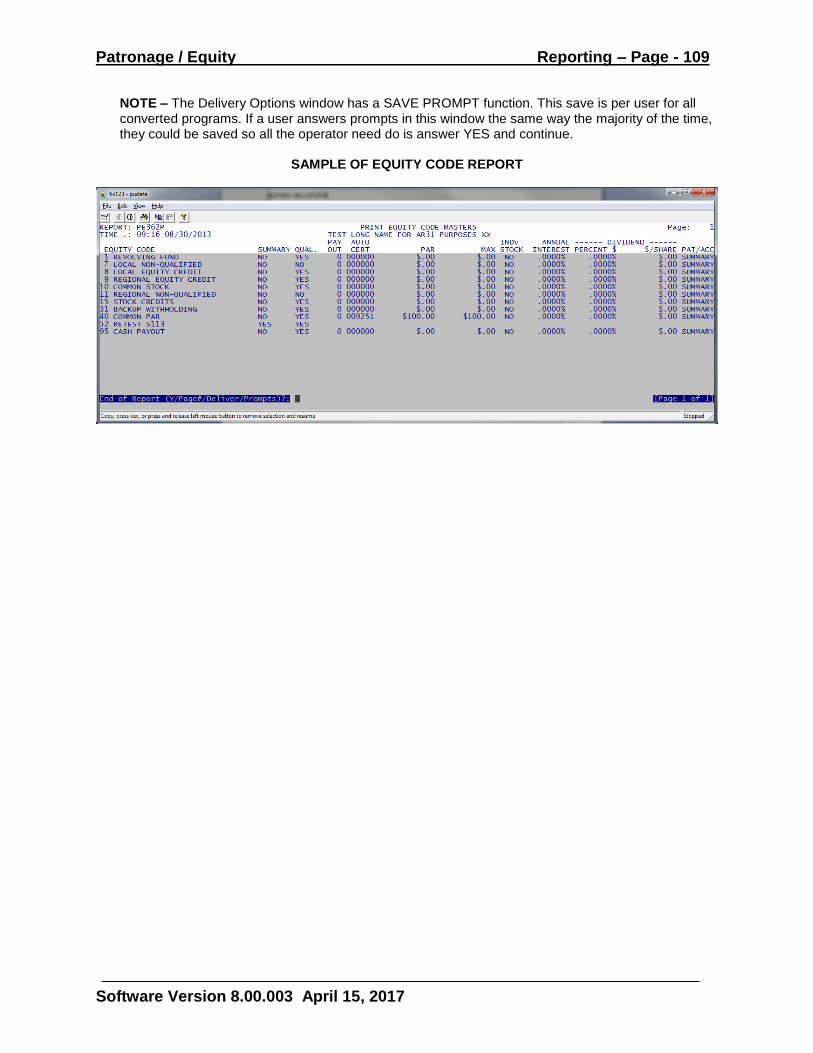
Patronage / Equity Reporting – Page - 109
Software Version 8.00.003 April 15, 2017
NOTE – The Delivery Options window has a SAVE PROMPT function. This save is per user for all converted programs. If a user answers prompts in this window the same way the majority of the time, they could be saved so all the operator need do is answer YES and continue.
SAMPLE OF EQUITY CODE REPORT
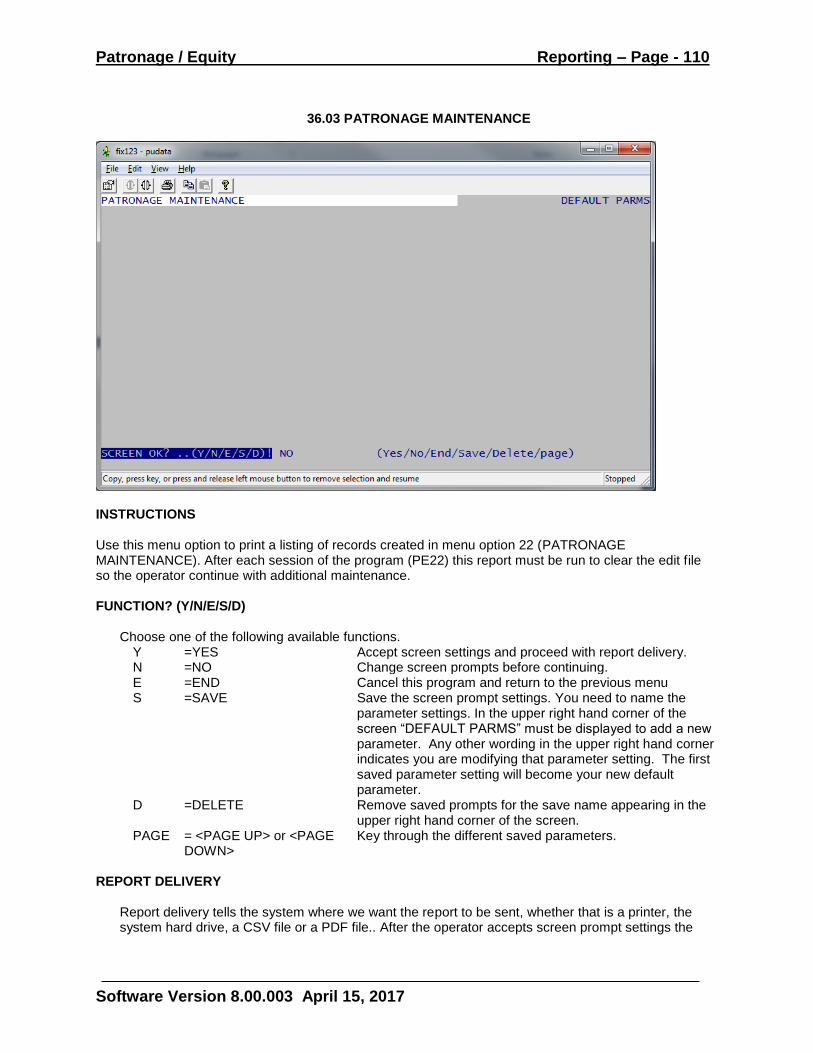
Patronage / Equity Reporting – Page - 110
Software Version 8.00.003 April 15, 2017
36.03 PATRONAGE MAINTENANCE
INSTRUCTIONS Use this menu option to print a listing of records created in menu option 22 (PATRONAGE MAINTENANCE). After each session of the program (PE22) this report must be run to clear the edit file so the operator continue with additional maintenance. FUNCTION? (Y/N/E/S/D)
Choose one of the following available functions. Y =YES Accept screen settings and proceed with report delivery. N =NO Change screen prompts before continuing. E =END Cancel this program and return to the previous menu S =SAVE Save the screen prompt settings. You need to name the
parameter settings. In the upper right hand corner of the screen “DEFAULT PARMS” must be displayed to add a new parameter. Any other wording in the upper right hand corner indicates you are modifying that parameter setting. The first saved parameter setting will become your new default parameter.
D =DELETE Remove saved prompts for the save name appearing in the upper right hand corner of the screen.
PAGE = <PAGE UP> or <PAGE DOWN>
Key through the different saved parameters.
REPORT DELIVERY
Report delivery tells the system where we want the report to be sent, whether that is a printer, the system hard drive, a CSV file or a PDF file.. After the operator accepts screen prompt settings the
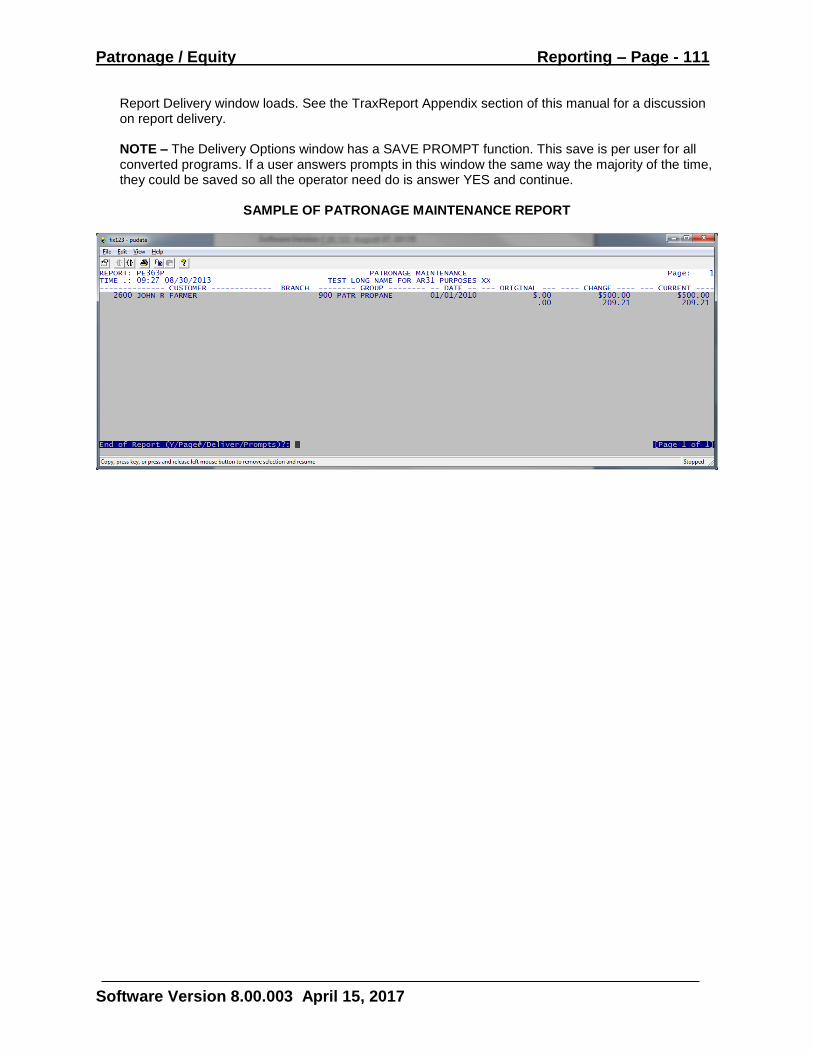
Patronage / Equity Reporting – Page - 111
Software Version 8.00.003 April 15, 2017
Report Delivery window loads. See the TraxReport Appendix section of this manual for a discussion on report delivery. NOTE – The Delivery Options window has a SAVE PROMPT function. This save is per user for all converted programs. If a user answers prompts in this window the same way the majority of the time, they could be saved so all the operator need do is answer YES and continue.
SAMPLE OF PATRONAGE MAINTENANCE REPORT
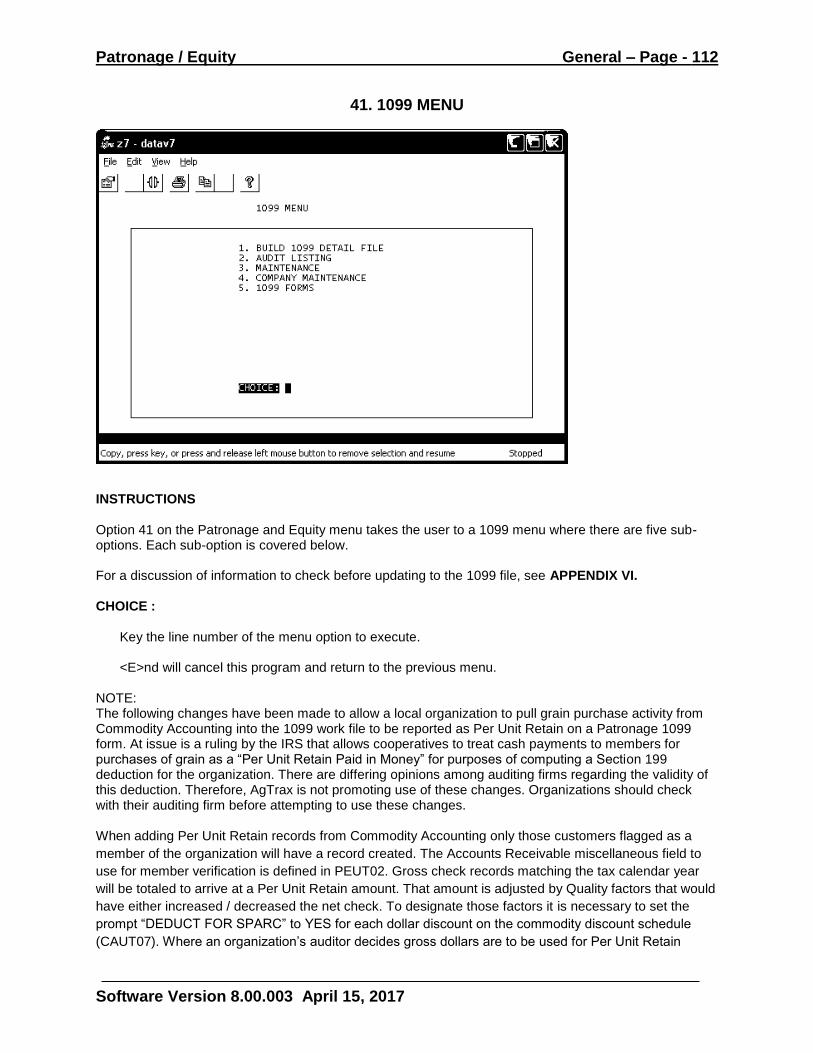
Patronage / Equity General – Page - 112
Software Version 8.00.003 April 15, 2017
41. 1099 MENU
INSTRUCTIONS Option 41 on the Patronage and Equity menu takes the user to a 1099 menu where there are five sub-options. Each sub-option is covered below. For a discussion of information to check before updating to the 1099 file, see APPENDIX VI. CHOICE :
Key the line number of the menu option to execute.
<E>nd will cancel this program and return to the previous menu. NOTE: The following changes have been made to allow a local organization to pull grain purchase activity from Commodity Accounting into the 1099 work file to be reported as Per Unit Retain on a Patronage 1099 form. At issue is a ruling by the IRS that allows cooperatives to treat cash payments to members for purchases of grain as a “Per Unit Retain Paid in Money” for purposes of computing a Section 199 deduction for the organization. There are differing opinions among auditing firms regarding the validity of this deduction. Therefore, AgTrax is not promoting use of these changes. Organizations should check with their auditing firm before attempting to use these changes. When adding Per Unit Retain records from Commodity Accounting only those customers flagged as a
member of the organization will have a record created. The Accounts Receivable miscellaneous field to
use for member verification is defined in PEUT02. Gross check records matching the tax calendar year
will be totaled to arrive at a Per Unit Retain amount. That amount is adjusted by Quality factors that would
have either increased / decreased the net check. To designate those factors it is necessary to set the
prompt “DEDUCT FOR SPARC” to YES for each dollar discount on the commodity discount schedule
(CAUT07). Where an organization’s auditor decides gross dollars are to be used for Per Unit Retain
Patronage / Equity General – Page - 113
Software Version 8.00.003 April 15, 2017
purposes do not maintain any factors on commodity discount schedules. Check Date as opposed to
Check Posting Date is used to build 1099 records for Per Unit Retains.
Any Purchase Contract Advance checks issued to a customer during the calendar year are included.
Adjustments or back out of records in a subsequent calendar year are reported in the subsequent year.
Should those adjustments result in a negative Per Unit Retain for the year, the account will be included on
an exception report. For a backed out check use Backed out Check Posting Date.
At the time that records are imported into another data set:
A. When loading 1099 information from another organization and a 1099 record already exists for a Customer/SSN; combine the records instead of error out.
B. During the LOAD process, if the program can’t find a local customer by matching the SSN,
then attempt to find a match by name. Only those records matched to local A/R masters with
the member flag set to YES will be imported. Those records not imported will be logged in an
audit file.
C. Logic was added to set federal ID when an import file does not contain one. This issue was
keeping import 1099 records from being combined with local 1099 records already in the
1099 file.
D. Change the LOAD function to honor the CLEAR 1099 FILE(Y/N) prompt. It will only clear if the CLEAR 1099 FILE prompt is set to YES prior to LOAD.
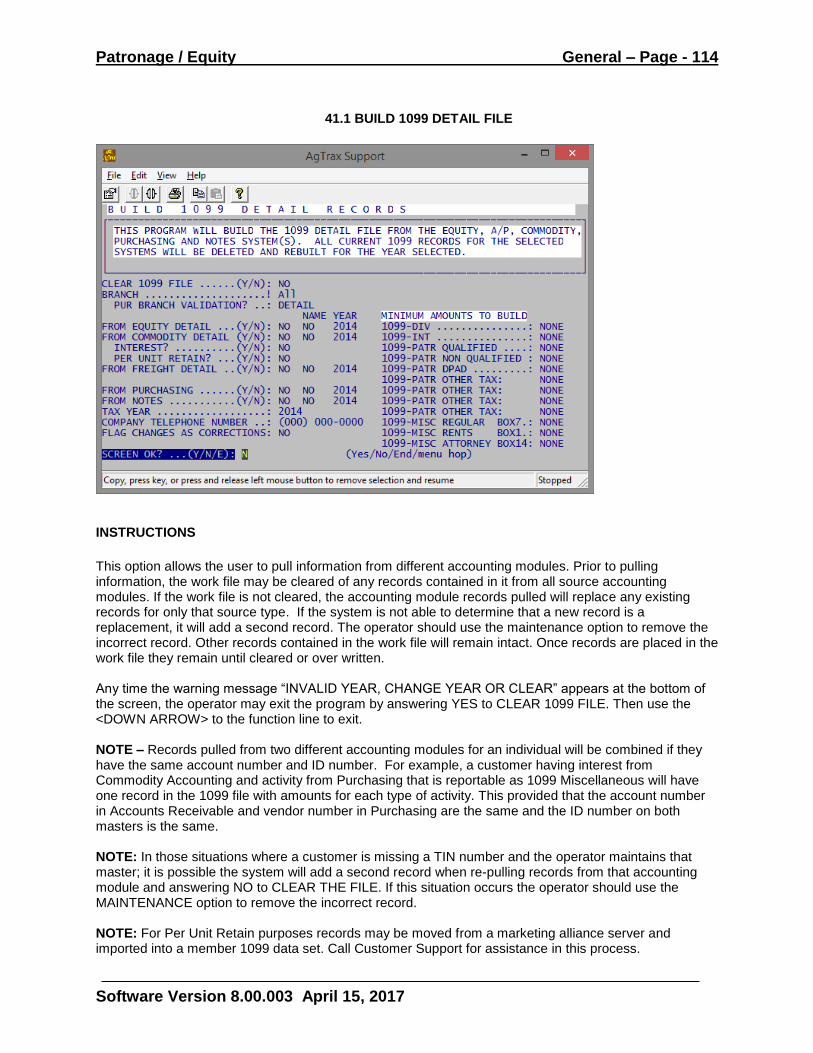
Patronage / Equity General – Page - 114
Software Version 8.00.003 April 15, 2017
41.1 BUILD 1099 DETAIL FILE
INSTRUCTIONS
This option allows the user to pull information from different accounting modules. Prior to pulling information, the work file may be cleared of any records contained in it from all source accounting modules. If the work file is not cleared, the accounting module records pulled will replace any existing records for only that source type. If the system is not able to determine that a new record is a replacement, it will add a second record. The operator should use the maintenance option to remove the incorrect record. Other records contained in the work file will remain intact. Once records are placed in the work file they remain until cleared or over written. Any time the warning message “INVALID YEAR, CHANGE YEAR OR CLEAR” appears at the bottom of the screen, the operator may exit the program by answering YES to CLEAR 1099 FILE. Then use the <DOWN ARROW> to the function line to exit. NOTE – Records pulled from two different accounting modules for an individual will be combined if they have the same account number and ID number. For example, a customer having interest from Commodity Accounting and activity from Purchasing that is reportable as 1099 Miscellaneous will have one record in the 1099 file with amounts for each type of activity. This provided that the account number in Accounts Receivable and vendor number in Purchasing are the same and the ID number on both masters is the same. NOTE: In those situations where a customer is missing a TIN number and the operator maintains that master; it is possible the system will add a second record when re-pulling records from that accounting module and answering NO to CLEAR THE FILE. If this situation occurs the operator should use the MAINTENANCE option to remove the incorrect record. NOTE: For Per Unit Retain purposes records may be moved from a marketing alliance server and imported into a member 1099 data set. Call Customer Support for assistance in this process.
Patronage / Equity General – Page - 115
Software Version 8.00.003 April 15, 2017
SCREEN OK? ...(Y/N/E):
Choose one of the following options:
Y =YES. Accept screen prompts and proceed with building the 1099 file. N =NO. Change screen prompts before proceeding. E =END. Cancel this program and return to the previous menu.
CLEAR 1099 FILE…(Y/N):
Any time that all existing records in the 1099 file are to be removed, answer YES. If records from a new source are being added to existing records, answer NO.
BRANCH
This prompt is only used in those situations where Per Unit Retain information is to be moved from one data set to another. Several items to be aware of are: 1) When building PUR for another organization the C/A Detail is accumulated by the branch where
the grain was delivered instead of the branch where a check was written. For advances the program will always use the branch where a contract was issued. This can be used by a marketing alliance to separate the 1099 information for the participating organizations.
2) At the time that records are imported into another data set:
A. When loading 1099 information from another organization and a 1099 record already exists for a Customer/SSN; combine the records instead of error out.
B. During the LOAD process, if the program can’t find a local customer by matching the SSN, then attempt to find an exact match by name.
C. The LOAD function honors the CLEAR 1099 FILE(Y/N) prompt. It will now only clear if the CLEAR 1099 FILE prompt is set to YES prior to LOAD.
PUR BRANCH VALIDATION
This prompt works in conjunction with the branch prompt. It allows specific Per Unit Retain records from Commodity Accounting to be chosen by branch number. That branch number can equate to an Originating Branch where a check was issued or a Detail Branch where commodities were delivered.
FROM EQUITY DETAIL (Y/N): FROM COMMODITY DETAIL (Y/N): INTEREST PER UNIT RETAIN FROM FREIGHT DETAIL (Y/N) : FROM PURCHASING (Y/N): FROM NOTES (Y/N):
For each accounting module that is to have records pulled into the 1099 file, set the prompt to YES. . Note that Freight Detail and Purchasing detail records are pulled for only those records with a 1099 type. NOTE - PE41-1 performs an additional read to determine if a detail line item in Purchasing is to be reported for 1099 purposes. 1) If the vendor master has a 1099 type – All detail lines with that 1099 type or blank will be totaled
for a 1099 amount. - Detail lines with an alternate 1099 type will be totaled by
that type for a 1099 amount.
Patronage / Equity General – Page - 116
Software Version 8.00.003 April 15, 2017
- Detail lines with a 1099 type of “X” will be ignored. 2) If the vendor master 1099 type is blank- All detail lines with a blank 1099 type will be ignored.
- Detail lines with an alternate 1099 type will be totaled by that type for a 1099 amount.
- Detail lines with a 1099 type of “X” will be ignore.
NAME
Any record type that is to use additional or alternate information for the 1099 payee, answer YES. Otherwise accept the program default of NO.
In the case of an Accounts Receivable master the System will include any information contained in the miscellaneous name field. For a Commodity Accounting Freight Hauler master the System will include information contained in Address line 1. In either case if Address 2 is blank information in the alternate field will be used as address street information.
Each Purchasing Vendor master has a field for a 1099 name. Any information contained in that field will replace the vendor name for 1099 purposes regardless of how the NAME prompt is answered. When NAME is set to YES, Address 1 on the Vendor master is used as additional mailing information. If Address 2 is blank it will be used as address street information. The portion of the program to pull freight information from Commodity Accounting reads the 1099 TYPE field on the Hauler Master. Only those Haulers that have a 1099 type will have a record built into the 1099 file. A setting on the Freight Hauler master determines if the Hauler Name or Check Name is used for the 1099 name and address
FISCAL YEAR
Enter the four-digit year that is attached to each record to be pulled into the 1099 file. Patronage 1099 information is pulled from the equity detail file. Equity records with a code zero, same calendar year specified and marked as qualified are totaled together. Any records marked as non-qualified are totaled together. Also any records marked as DPAD are totaled together. To maintain a 1099 record in the Equity module use menu option 13. Choose the sequence number of the record issue year and select “C” for change. Be sure to answer the prompt for TRAN TYPE. If the record being maintained is a non-qualified redemption answer the TRAN TYPE prompt as Non-qualified. If it is a DPAD record choose that option. Otherwise choose Qualified. Adjust the amount as needed. After information is in the 1099 work file, it may also be maintained using 1099 menu sub-option three. Information in the Commodity Accounting module is pulled from check records matching the calendar year specified. Only those check records that have information in the interest field will be included. If interest was added to a check by some other means (e.g. miscellaneous codes), the 1099 record will need to be maintained using 1099 MENU sub-option three. Per Unit Retain is pulled from Commodity Accounting check activity for the calendar year. The
program works backward to find the settlement records that a check pays. Gross settlement dollars
are adjusted by grading factors set to DEDUCT FOR SPARC=YES. Adjustments to settlement dollars
for storage or commodity assessments are ignored. Checks issued for purchases, defer payment
contracts and advances on purchase contracts are included. Check Date as opposed to Check
Posting Date is used to build 1099 records for Per Unit Retains. For a backed out check use Backed
out Check Posting Date.
Patronage / Equity General – Page - 117
Software Version 8.00.003 April 15, 2017
Only activity for those customers designated as members will be updated to the 1099 work file. A miscellaneous field is designated in PEUT02 to identify members. Commodity Accounting freight check information is pulled from that module’s detail file also. A match is made for all check records against the calendar year specified. In Purchasing, check dates matching the year specified are totaled for those vendors having a designated 1099 form. If you have a vendor that needs more than one form or 1099 information printing in a different box, the amount may be maintained in menu sub-option three.
TAX YEAR:
Enter the four-digit year to be used as the tax-reporting year. COMPANY TELEPHONE NUMBER:
Enter the telephone number where 1099 recipients may call if there is a problem with the 1099 form. Key this information as a solid string of digits including the area code.
FLAG CHANGES AS CORRECTIONS
If an operator needs to re-build 1099 records after forms have been printed and mailed, they can get the system to flag those records changed as corrections. The subsequent forms that are printed will include the word CORRECTED.
MINIMUM AMOUNTS TO BUILD 1099-DIV ...............: 1099-INT ...............: 1099-PATR QUALIFIED ....: 1099-PATR NON QUALIFIED : 1099-PATR DPAD: 1099 PATR OTHER TAX: 1099 PATR OTHER TAX: 1099 PATR OTHER TAX: 1099 PATR OTHER TAX: 1099-MISC REGULAR BOX7.: 1099-MISC RENTS BOX1.: 1099-MISC ATTORNEY BOX14:
Set any minimum dollar amounts for each 1099 type. Any accounts with less than the minimum will not have information pulled from the respective module, nor will they appear on the edit report or have a 1099 printed. An exception to this rule is anyone with backup withholding from patronage. Regardless of the total 1099 amount, they will have a 1099 record built.
1099- PATR OTHER TAX – Four prompts have been added to accommodate the pass through of other tax credits to customers. The credits are stored in Equity detail and linked to a tax form number. For the program to pull any Other Tax Credit records FROM EQUITY DETAIL must be YES and the form number must be entered for one of the four prompts. If there is to be a minimum dollar amount reported, set the amount or leave NONE.
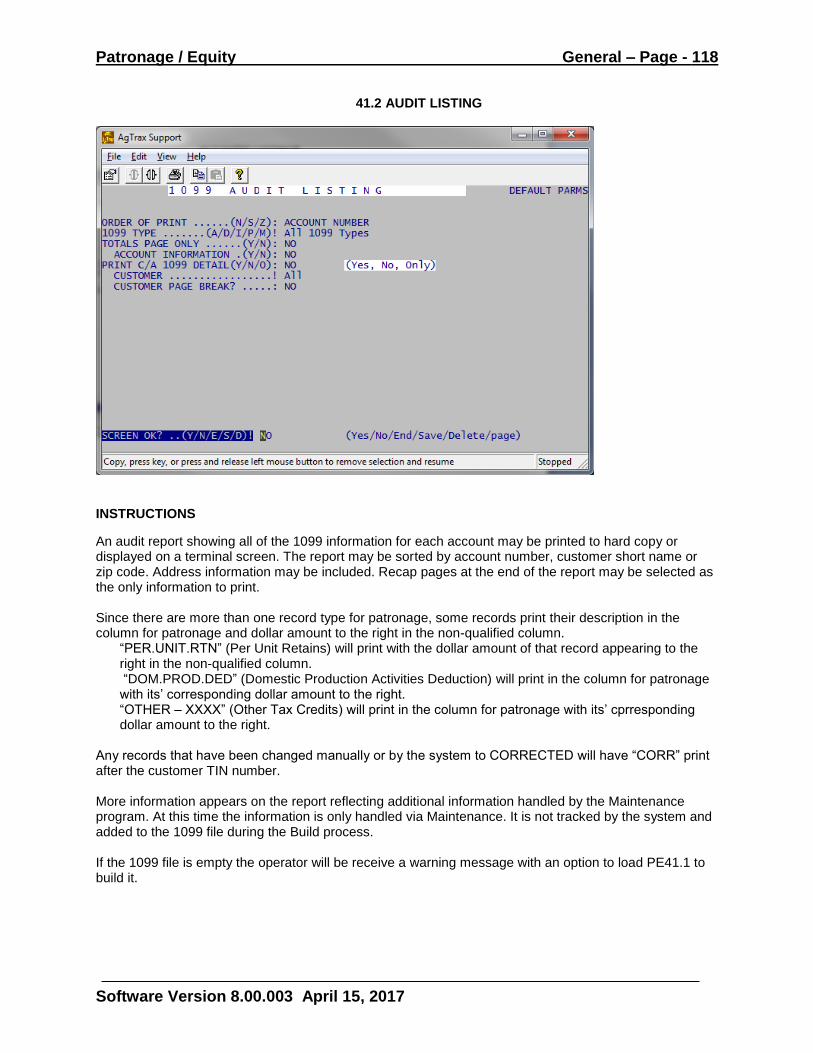
Patronage / Equity General – Page - 118
Software Version 8.00.003 April 15, 2017
41.2 AUDIT LISTING
INSTRUCTIONS
An audit report showing all of the 1099 information for each account may be printed to hard copy or displayed on a terminal screen. The report may be sorted by account number, customer short name or zip code. Address information may be included. Recap pages at the end of the report may be selected as the only information to print. Since there are more than one record type for patronage, some records print their description in the column for patronage and dollar amount to the right in the non-qualified column.
“PER.UNIT.RTN” (Per Unit Retains) will print with the dollar amount of that record appearing to the right in the non-qualified column. “DOM.PROD.DED” (Domestic Production Activities Deduction) will print in the column for patronage with its’ corresponding dollar amount to the right. “OTHER – XXXX” (Other Tax Credits) will print in the column for patronage with its’ cprresponding dollar amount to the right.
Any records that have been changed manually or by the system to CORRECTED will have “CORR” print after the customer TIN number. More information appears on the report reflecting additional information handled by the Maintenance program. At this time the information is only handled via Maintenance. It is not tracked by the system and added to the 1099 file during the Build process. If the 1099 file is empty the operator will be receive a warning message with an option to load PE41.1 to build it.
Patronage / Equity General – Page - 119
Software Version 8.00.003 April 15, 2017
SCREEN OK? .(Y/N/E/S):
Enter one of the following:
Y =YES Accept screen settings and proceed with report printing. N =NO Change screen prompts before continuing. E =END Cancel this program and return to the previous menu. S =SAVE Will save screen prompts and associate them with a save name. In the
upper right hand corner of the screen “DEFAULT PARMS” must be displayed to add a new parameter. Any other wording in the upper right hand corner indicates you are modifying that parameter setting. The first saved parameter setting will become your new default parameter.
D =DELETE Remove saved prompts for the save name appearing in the upper right hand corner of the screen. PAGE = <PAGE UP> or <PAGE DOWN> Key through the different saved parameters.
ORDER OF PRINT ......(N/S/Z):
Select the order that customer information is to appear on the report. Available options are: N = ACCOUNT NUMBER. Information will print in Customer Account Receivable account number
order. S = SHORT NAME. Customers will appear on the report in Accounts Receivable short name
order. Z = ZIP CODE. Each customers address zip code will be used as the sort criteria.
1099 TYPE
The audit may be printed for all 1099 types included in the file. Or a report may be generated for a specific 1099 record type. Touch ENTER to accept the program default of “A” for ALL. Key “D” for Dividend, “I” for Interest, “M” for Miscellaneous or “P” for Patronage. A help window is available by touching the HOME key.
TOTALS PAGE ONLY ......(Y/N):
Answering YES will print only the recap information. Normally this type of report will be 1 – 2 pages in length.
**NOTE – The following prompt is by-passed if TOTAL PAGES ONLY is set to YES. ACCOUNT INFORMATION .(Y/N):
Users have the option of including customer mailing address information. This will print in the same column as the customer name so the report will be more printed pages in length.
When printing ACCOUNT INFORMATION the INTEREST column will be broken out by module of origin (Equity, Commodity Accounting or Accounts Payable). Otherwise the amounts will be combined into one-dollar amount on the report.
PRINT C/A 1099 DETAIL .(Y/N/O):
The report includes detail that makes the dollar amount of 1099 Per Unit Retains
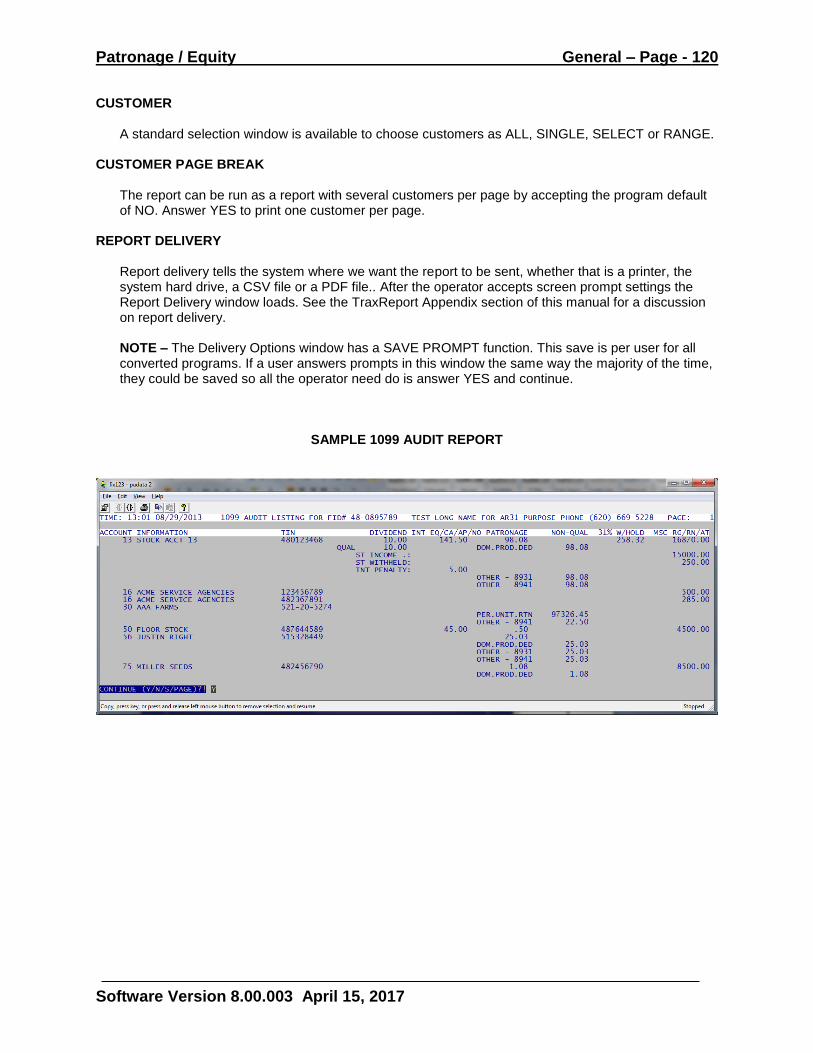
Patronage / Equity General – Page - 120
Software Version 8.00.003 April 15, 2017
CUSTOMER
A standard selection window is available to choose customers as ALL, SINGLE, SELECT or RANGE. CUSTOMER PAGE BREAK
The report can be run as a report with several customers per page by accepting the program default of NO. Answer YES to print one customer per page.
REPORT DELIVERY
Report delivery tells the system where we want the report to be sent, whether that is a printer, the system hard drive, a CSV file or a PDF file.. After the operator accepts screen prompt settings the Report Delivery window loads. See the TraxReport Appendix section of this manual for a discussion on report delivery. NOTE – The Delivery Options window has a SAVE PROMPT function. This save is per user for all converted programs. If a user answers prompts in this window the same way the majority of the time, they could be saved so all the operator need do is answer YES and continue.
SAMPLE 1099 AUDIT REPORT
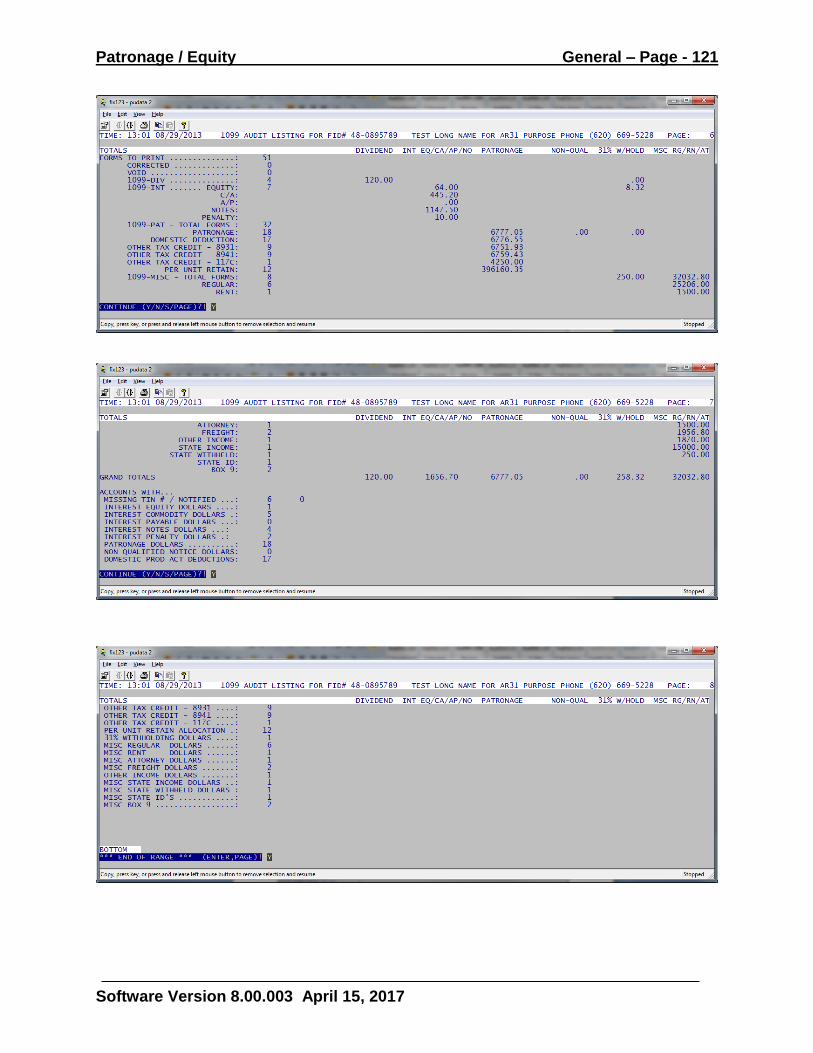
Patronage / Equity General – Page - 121
Software Version 8.00.003 April 15, 2017
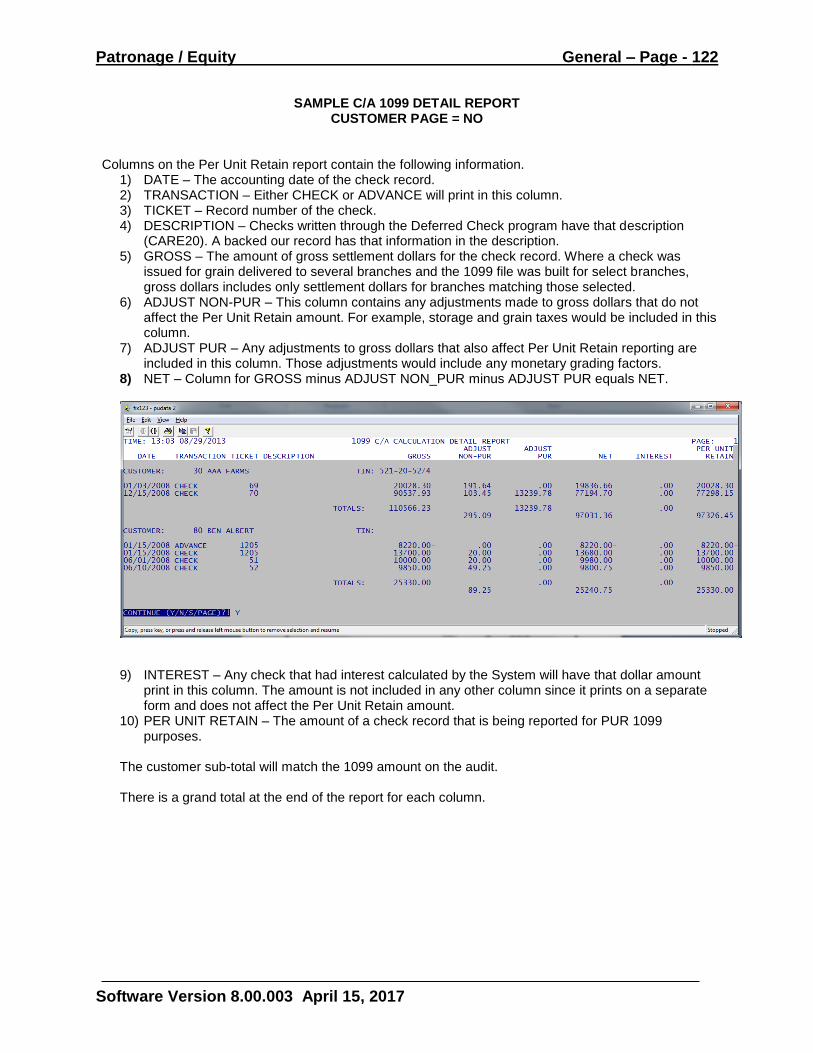
Patronage / Equity General – Page - 122
Software Version 8.00.003 April 15, 2017
SAMPLE C/A 1099 DETAIL REPORT CUSTOMER PAGE = NO
Columns on the Per Unit Retain report contain the following information.
1) DATE – The accounting date of the check record. 2) TRANSACTION – Either CHECK or ADVANCE will print in this column. 3) TICKET – Record number of the check. 4) DESCRIPTION – Checks written through the Deferred Check program have that description
(CARE20). A backed our record has that information in the description. 5) GROSS – The amount of gross settlement dollars for the check record. Where a check was
issued for grain delivered to several branches and the 1099 file was built for select branches, gross dollars includes only settlement dollars for branches matching those selected.
6) ADJUST NON-PUR – This column contains any adjustments made to gross dollars that do not affect the Per Unit Retain amount. For example, storage and grain taxes would be included in this column.
7) ADJUST PUR – Any adjustments to gross dollars that also affect Per Unit Retain reporting are included in this column. Those adjustments would include any monetary grading factors.
8) NET – Column for GROSS minus ADJUST NON_PUR minus ADJUST PUR equals NET.
9) INTEREST – Any check that had interest calculated by the System will have that dollar amount
print in this column. The amount is not included in any other column since it prints on a separate form and does not affect the Per Unit Retain amount.
10) PER UNIT RETAIN – The amount of a check record that is being reported for PUR 1099 purposes.
The customer sub-total will match the 1099 amount on the audit. There is a grand total at the end of the report for each column.
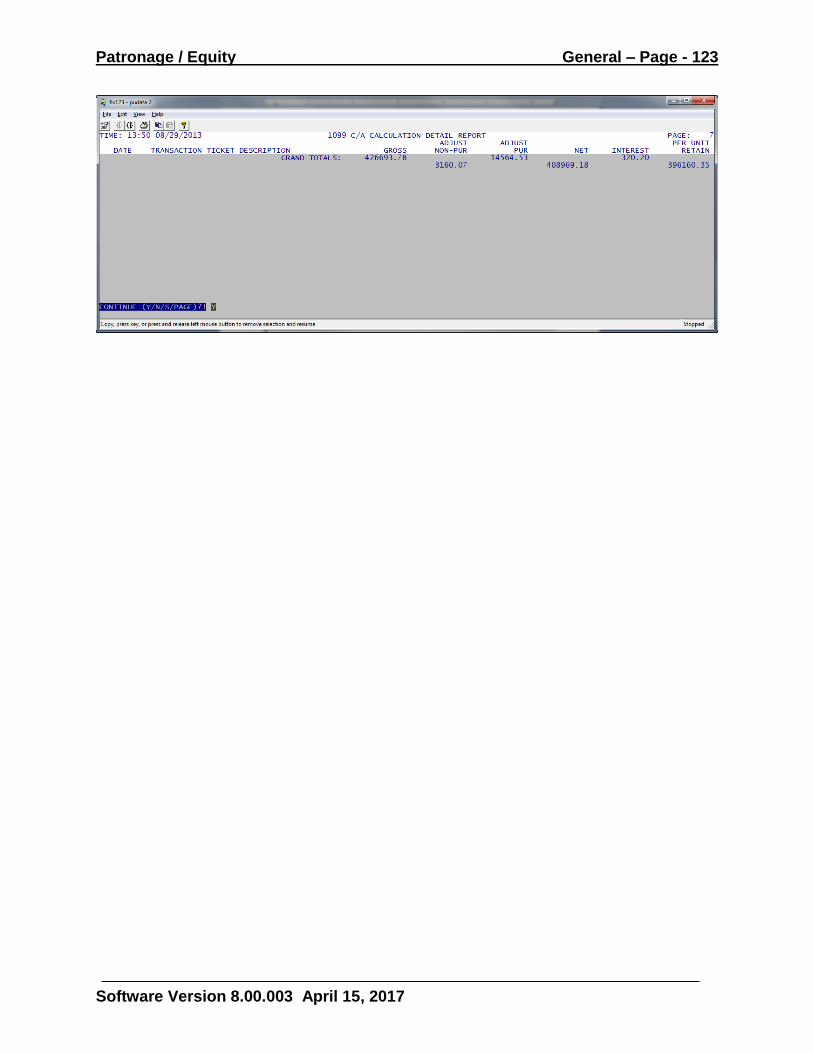
Patronage / Equity General – Page - 123
Software Version 8.00.003 April 15, 2017
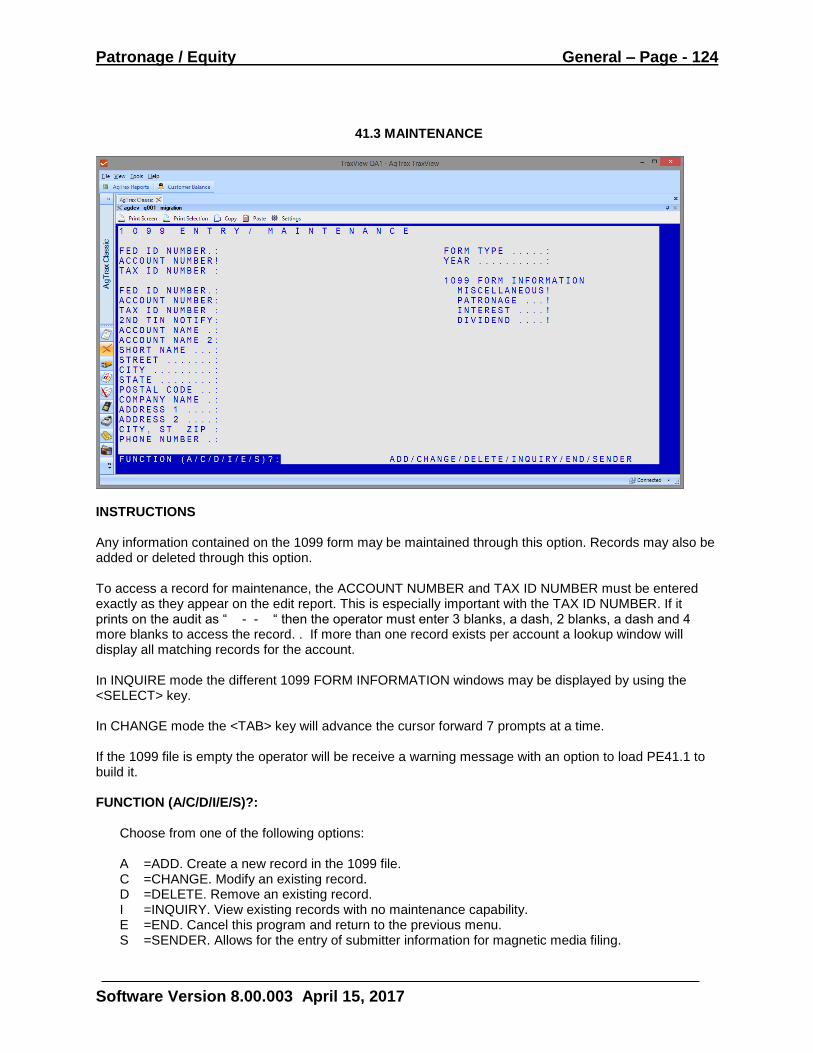
Patronage / Equity General – Page - 124
Software Version 8.00.003 April 15, 2017
41.3 MAINTENANCE
INSTRUCTIONS Any information contained on the 1099 form may be maintained through this option. Records may also be added or deleted through this option. To access a record for maintenance, the ACCOUNT NUMBER and TAX ID NUMBER must be entered exactly as they appear on the edit report. This is especially important with the TAX ID NUMBER. If it prints on the audit as “ - - “ then the operator must enter 3 blanks, a dash, 2 blanks, a dash and 4 more blanks to access the record. . If more than one record exists per account a lookup window will display all matching records for the account. In INQUIRE mode the different 1099 FORM INFORMATION windows may be displayed by using the <SELECT> key. In CHANGE mode the <TAB> key will advance the cursor forward 7 prompts at a time. If the 1099 file is empty the operator will be receive a warning message with an option to load PE41.1 to build it. FUNCTION (A/C/D/I/E/S)?:
Choose from one of the following options: A =ADD. Create a new record in the 1099 file. C =CHANGE. Modify an existing record. D =DELETE. Remove an existing record. I =INQUIRY. View existing records with no maintenance capability. E =END. Cancel this program and return to the previous menu. S =SENDER. Allows for the entry of submitter information for magnetic media filing.
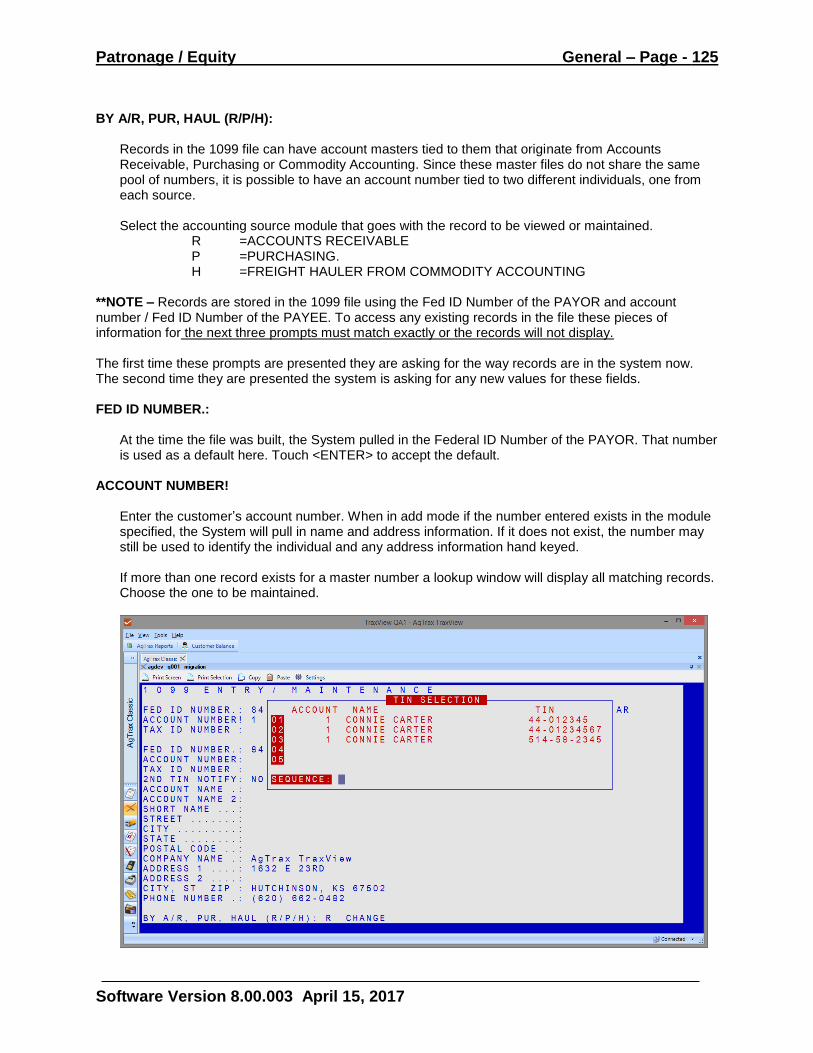
Patronage / Equity General – Page - 125
Software Version 8.00.003 April 15, 2017
BY A/R, PUR, HAUL (R/P/H):
Records in the 1099 file can have account masters tied to them that originate from Accounts Receivable, Purchasing or Commodity Accounting. Since these master files do not share the same pool of numbers, it is possible to have an account number tied to two different individuals, one from each source.
Select the accounting source module that goes with the record to be viewed or maintained.
R =ACCOUNTS RECEIVABLE P =PURCHASING. H =FREIGHT HAULER FROM COMMODITY ACCOUNTING
**NOTE – Records are stored in the 1099 file using the Fed ID Number of the PAYOR and account number / Fed ID Number of the PAYEE. To access any existing records in the file these pieces of information for the next three prompts must match exactly or the records will not display. The first time these prompts are presented they are asking for the way records are in the system now. The second time they are presented the system is asking for any new values for these fields. FED ID NUMBER.:
At the time the file was built, the System pulled in the Federal ID Number of the PAYOR. That number is used as a default here. Touch <ENTER> to accept the default.
ACCOUNT NUMBER!
Enter the customer’s account number. When in add mode if the number entered exists in the module specified, the System will pull in name and address information. If it does not exist, the number may still be used to identify the individual and any address information hand keyed. If more than one record exists for a master number a lookup window will display all matching records. Choose the one to be maintained.
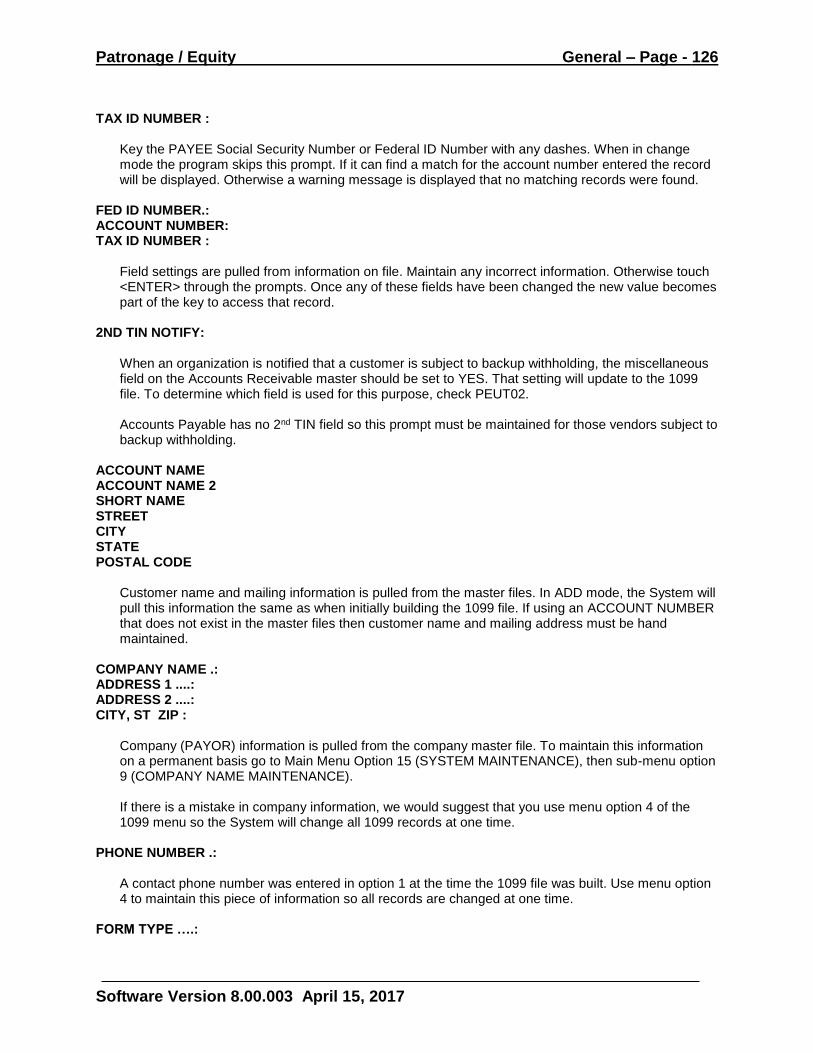
Patronage / Equity General – Page - 126
Software Version 8.00.003 April 15, 2017
TAX ID NUMBER :
Key the PAYEE Social Security Number or Federal ID Number with any dashes. When in change mode the program skips this prompt. If it can find a match for the account number entered the record will be displayed. Otherwise a warning message is displayed that no matching records were found.
FED ID NUMBER.: ACCOUNT NUMBER: TAX ID NUMBER :
Field settings are pulled from information on file. Maintain any incorrect information. Otherwise touch <ENTER> through the prompts. Once any of these fields have been changed the new value becomes part of the key to access that record.
2ND TIN NOTIFY:
When an organization is notified that a customer is subject to backup withholding, the miscellaneous field on the Accounts Receivable master should be set to YES. That setting will update to the 1099 file. To determine which field is used for this purpose, check PEUT02. Accounts Payable has no 2nd TIN field so this prompt must be maintained for those vendors subject to backup withholding.
ACCOUNT NAME ACCOUNT NAME 2 SHORT NAME STREET CITY STATE POSTAL CODE
Customer name and mailing information is pulled from the master files. In ADD mode, the System will pull this information the same as when initially building the 1099 file. If using an ACCOUNT NUMBER that does not exist in the master files then customer name and mailing address must be hand maintained.
COMPANY NAME .: ADDRESS 1 ....: ADDRESS 2 ....: CITY, ST ZIP :
Company (PAYOR) information is pulled from the company master file. To maintain this information on a permanent basis go to Main Menu Option 15 (SYSTEM MAINTENANCE), then sub-menu option 9 (COMPANY NAME MAINTENANCE). If there is a mistake in company information, we would suggest that you use menu option 4 of the 1099 menu so the System will change all 1099 records at one time.
PHONE NUMBER .:
A contact phone number was entered in option 1 at the time the 1099 file was built. Use menu option 4 to maintain this piece of information so all records are changed at one time.
FORM TYPE ….:
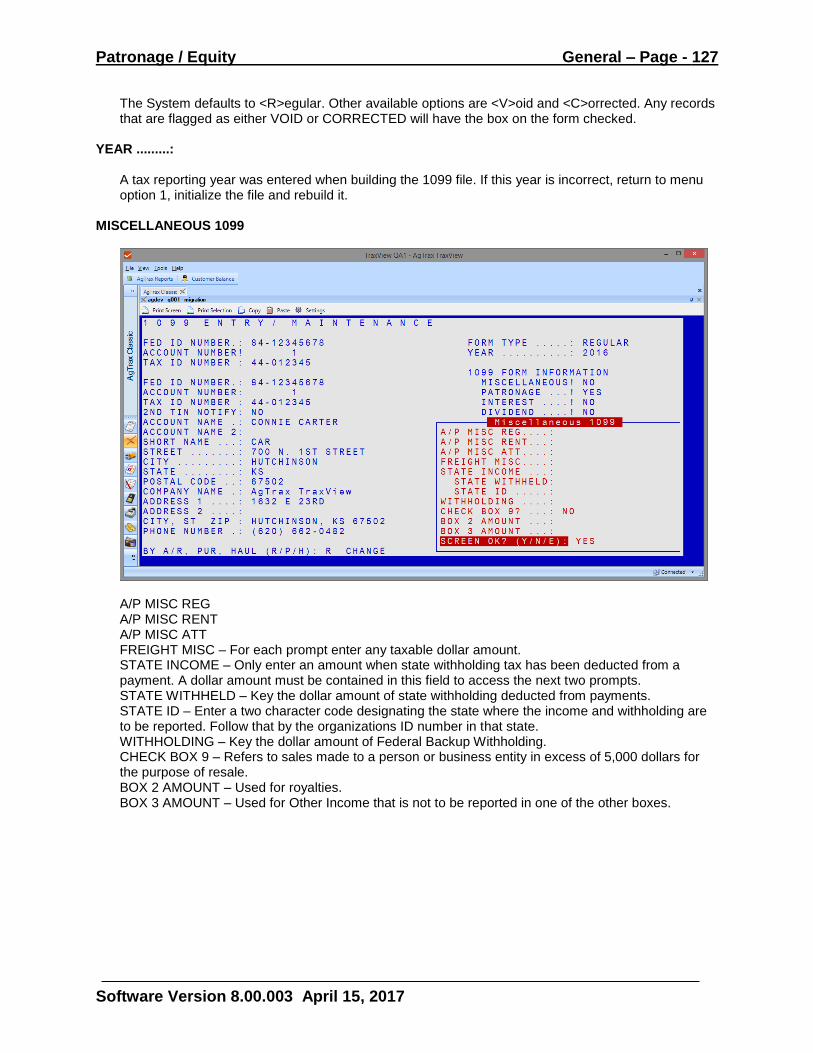
Patronage / Equity General – Page - 127
Software Version 8.00.003 April 15, 2017
The System defaults to <R>egular. Other available options are <V>oid and <C>orrected. Any records that are flagged as either VOID or CORRECTED will have the box on the form checked.
YEAR .........:
A tax reporting year was entered when building the 1099 file. If this year is incorrect, return to menu option 1, initialize the file and rebuild it.
MISCELLANEOUS 1099
A/P MISC REG A/P MISC RENT A/P MISC ATT FREIGHT MISC – For each prompt enter any taxable dollar amount. STATE INCOME – Only enter an amount when state withholding tax has been deducted from a payment. A dollar amount must be contained in this field to access the next two prompts. STATE WITHHELD – Key the dollar amount of state withholding deducted from payments. STATE ID – Enter a two character code designating the state where the income and withholding are to be reported. Follow that by the organizations ID number in that state. WITHHOLDING – Key the dollar amount of Federal Backup Withholding. CHECK BOX 9 – Refers to sales made to a person or business entity in excess of 5,000 dollars for the purpose of resale. BOX 2 AMOUNT – Used for royalties. BOX 3 AMOUNT – Used for Other Income that is not to be reported in one of the other boxes.
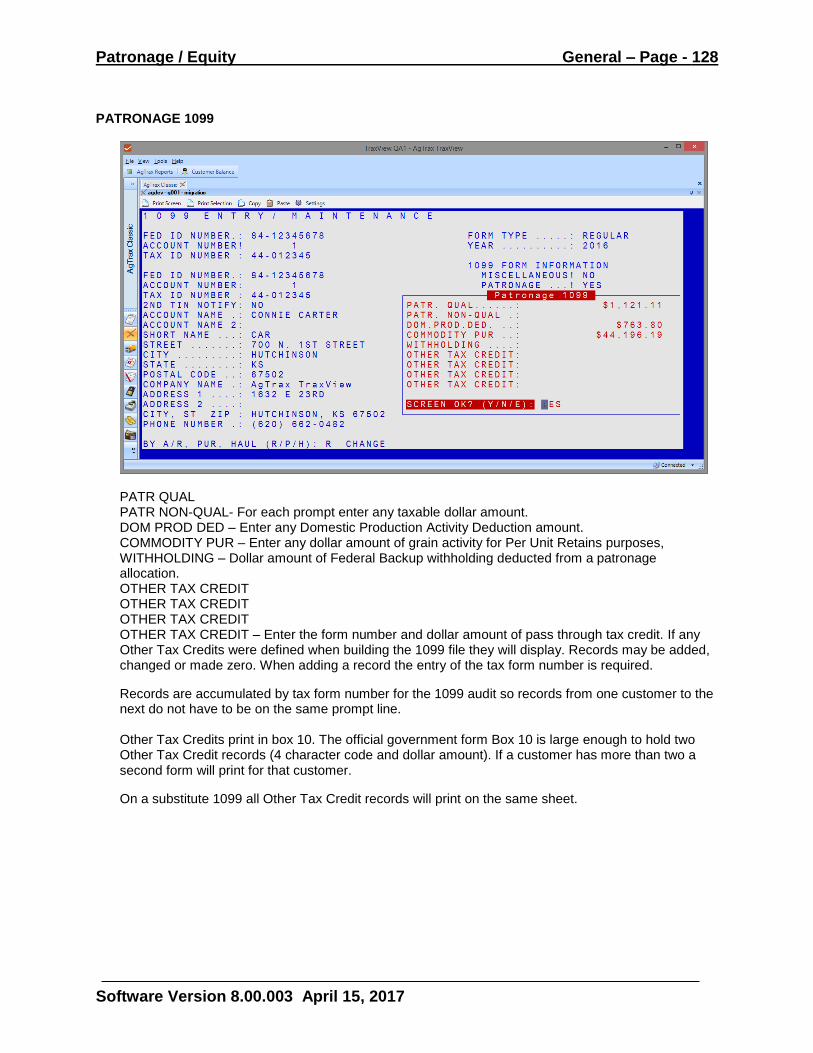
Patronage / Equity General – Page - 128
Software Version 8.00.003 April 15, 2017
PATRONAGE 1099
PATR QUAL PATR NON-QUAL- For each prompt enter any taxable dollar amount. DOM PROD DED – Enter any Domestic Production Activity Deduction amount. COMMODITY PUR – Enter any dollar amount of grain activity for Per Unit Retains purposes, WITHHOLDING – Dollar amount of Federal Backup withholding deducted from a patronage allocation. OTHER TAX CREDIT OTHER TAX CREDIT OTHER TAX CREDIT OTHER TAX CREDIT – Enter the form number and dollar amount of pass through tax credit. If any Other Tax Credits were defined when building the 1099 file they will display. Records may be added, changed or made zero. When adding a record the entry of the tax form number is required.
Records are accumulated by tax form number for the 1099 audit so records from one customer to the next do not have to be on the same prompt line. Other Tax Credits print in box 10. The official government form Box 10 is large enough to hold two Other Tax Credit records (4 character code and dollar amount). If a customer has more than two a second form will print for that customer.
On a substitute 1099 all Other Tax Credit records will print on the same sheet.

Patronage / Equity General – Page - 129
Software Version 8.00.003 April 15, 2017
INTEREST 1099
COMMODITY INT EQUITY INT A/P INT NOTES INT - - For each prompt enter any taxable dollar amount. Even though interest dollars may come from different sources they will be combined and reported as one total dollar amount on an INTEREST 1099 form. NOTES PENALTY – Dollar amount that was charged a customer for early withdrawal of funds. WITHHOLDING – Dollar amount of Federal Backup Withholding that was deducted from a note payment.
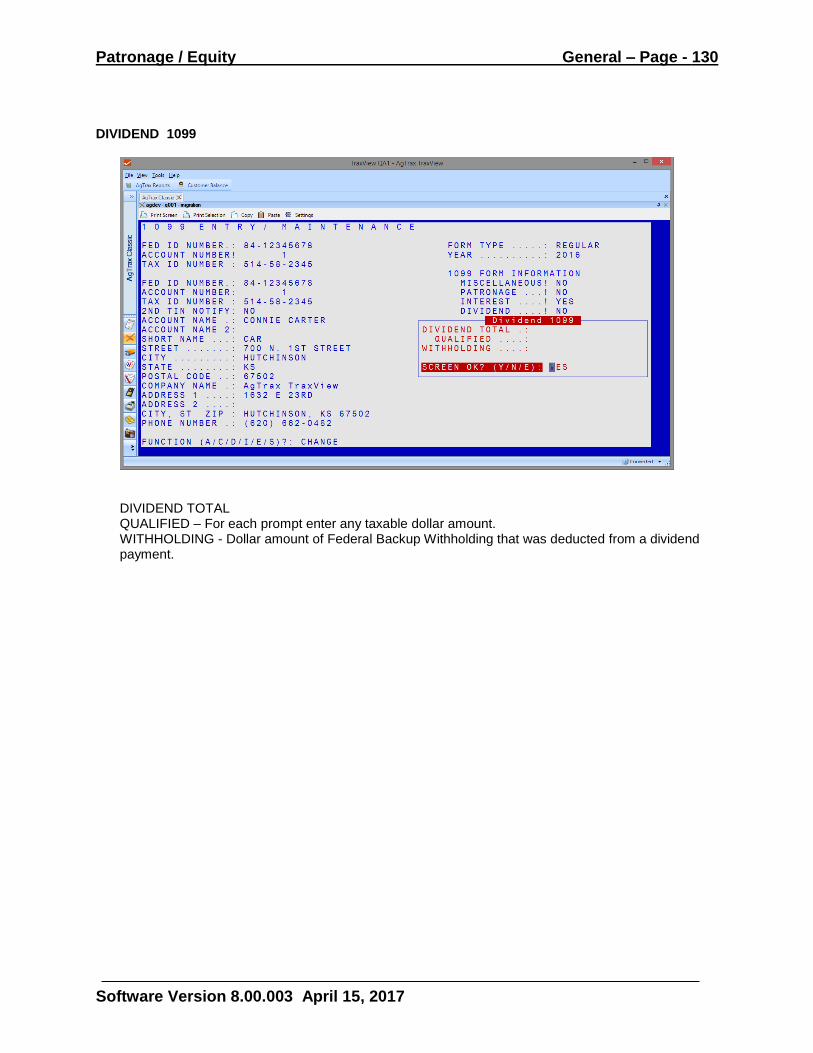
Patronage / Equity General – Page - 130
Software Version 8.00.003 April 15, 2017
DIVIDEND 1099
DIVIDEND TOTAL QUALIFIED – For each prompt enter any taxable dollar amount. WITHHOLDING - Dollar amount of Federal Backup Withholding that was deducted from a dividend payment.
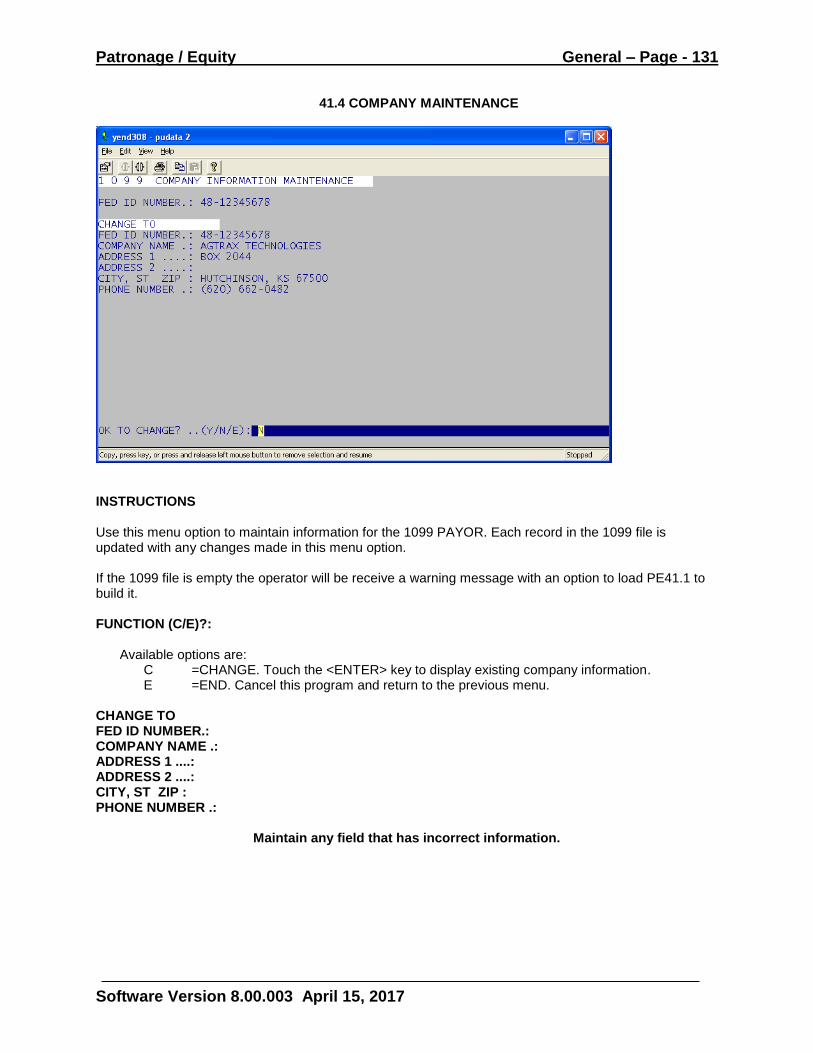
Patronage / Equity General – Page - 131
Software Version 8.00.003 April 15, 2017
41.4 COMPANY MAINTENANCE
INSTRUCTIONS Use this menu option to maintain information for the 1099 PAYOR. Each record in the 1099 file is updated with any changes made in this menu option. If the 1099 file is empty the operator will be receive a warning message with an option to load PE41.1 to build it. FUNCTION (C/E)?:
Available options are: C =CHANGE. Touch the <ENTER> key to display existing company information. E =END. Cancel this program and return to the previous menu.
CHANGE TO FED ID NUMBER.: COMPANY NAME .: ADDRESS 1 ....: ADDRESS 2 ....: CITY, ST ZIP : PHONE NUMBER .:
Maintain any field that has incorrect information.
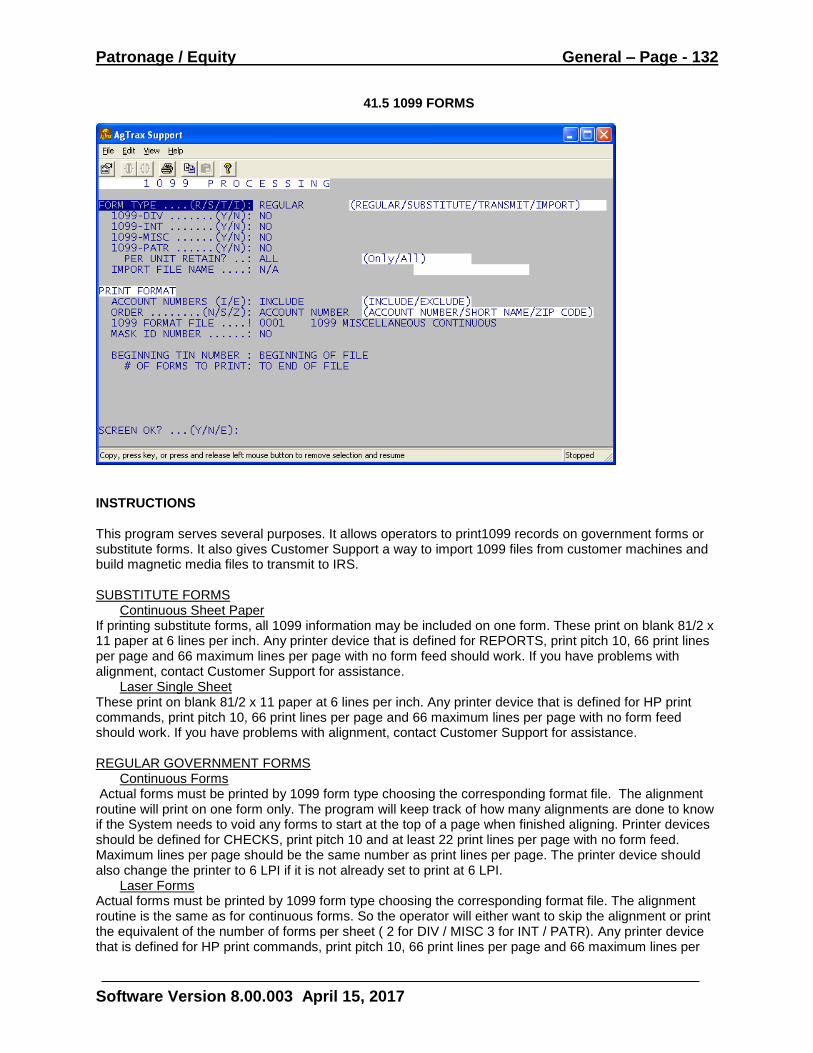
Patronage / Equity General – Page - 132
Software Version 8.00.003 April 15, 2017
41.5 1099 FORMS
INSTRUCTIONS This program serves several purposes. It allows operators to print1099 records on government forms or substitute forms. It also gives Customer Support a way to import 1099 files from customer machines and build magnetic media files to transmit to IRS. SUBSTITUTE FORMS
Continuous Sheet Paper If printing substitute forms, all 1099 information may be included on one form. These print on blank 81/2 x 11 paper at 6 lines per inch. Any printer device that is defined for REPORTS, print pitch 10, 66 print lines per page and 66 maximum lines per page with no form feed should work. If you have problems with alignment, contact Customer Support for assistance.
Laser Single Sheet These print on blank 81/2 x 11 paper at 6 lines per inch. Any printer device that is defined for HP print commands, print pitch 10, 66 print lines per page and 66 maximum lines per page with no form feed should work. If you have problems with alignment, contact Customer Support for assistance. REGULAR GOVERNMENT FORMS
Continuous Forms Actual forms must be printed by 1099 form type choosing the corresponding format file. The alignment routine will print on one form only. The program will keep track of how many alignments are done to know if the System needs to void any forms to start at the top of a page when finished aligning. Printer devices should be defined for CHECKS, print pitch 10 and at least 22 print lines per page with no form feed. Maximum lines per page should be the same number as print lines per page. The printer device should also change the printer to 6 LPI if it is not already set to print at 6 LPI.
Laser Forms Actual forms must be printed by 1099 form type choosing the corresponding format file. The alignment routine is the same as for continuous forms. So the operator will either want to skip the alignment or print the equivalent of the number of forms per sheet ( 2 for DIV / MISC 3 for INT / PATR). Any printer device that is defined for HP print commands, print pitch 10, 66 print lines per page and 66 maximum lines per

Patronage / Equity General – Page - 133
Software Version 8.00.003 April 15, 2017
page with no form feed should work. The printer device should also change the printer to 6 LPI if it is not already set to print at 6 LPI. Both regular and substitute forms may be printed in account number, short name or zip code order. The customer account number with your organization may be included as optional information. If you have printer problems and need to do a re-start, key the TIN number (including any dashes) of the form where to start printing. To avoid printing any duplicate regular 1099 forms, key the TIN number of the customer appearing at the top of the sheet where you want to re-start. Prior to doing a re-start check the print queue to make sure your first job is gone. If not, delete it from the queue. If the 1099 file is empty the operator will be receive a warning message with an option to load PE41.1 to build it.
FORM TYPE ..(R/S/T/I/):
Select the function that the program is to run. Available options are: R = REGULAR. Preprinted government forms. Each type of 1099 record must be printed
individually. S = SUBSTITUTE. Print 1099 information on blank paper. All form information may be printed on one
sheet of paper. T = TRANSMIT. Used to build a 1099 file for electronic filing. I = IMPORT. Used to bring a 1099 file into a different AgTrax machine.
1099-DIV .......(Y/N): 1099-INT .......(Y/N): 1099-MISC ......(Y/N): 1099-PATR ......(Y/N):
Select the type or types of 1099 records to print. Only one type may be selected when printing on regular forms or importing records. For other functions multiple types of 1099 records may be chosen.
PER UNIT RETAIN? This prompt is accessed only when 1099-PATR is set to YES.
To print all 1099-PATR forms regardless if they have Per Unit Retain answer ALL. Otherwise choose ONLY to print 1099-PATR forms that only have a Per Unit Retain Amount.
IMPORT FILE NAME ....:
Key the data file name containing the 1099 records. This file should reside in the public user directory.
PRINT FORMAT ACCOUNT NUMBERS (I/E):
Operators have the option of including customer account numbers on printed 1099 forms. The main advantage to including account numbers is lookup at some later time if there is a question. Select I to include account numbers.
ORDER
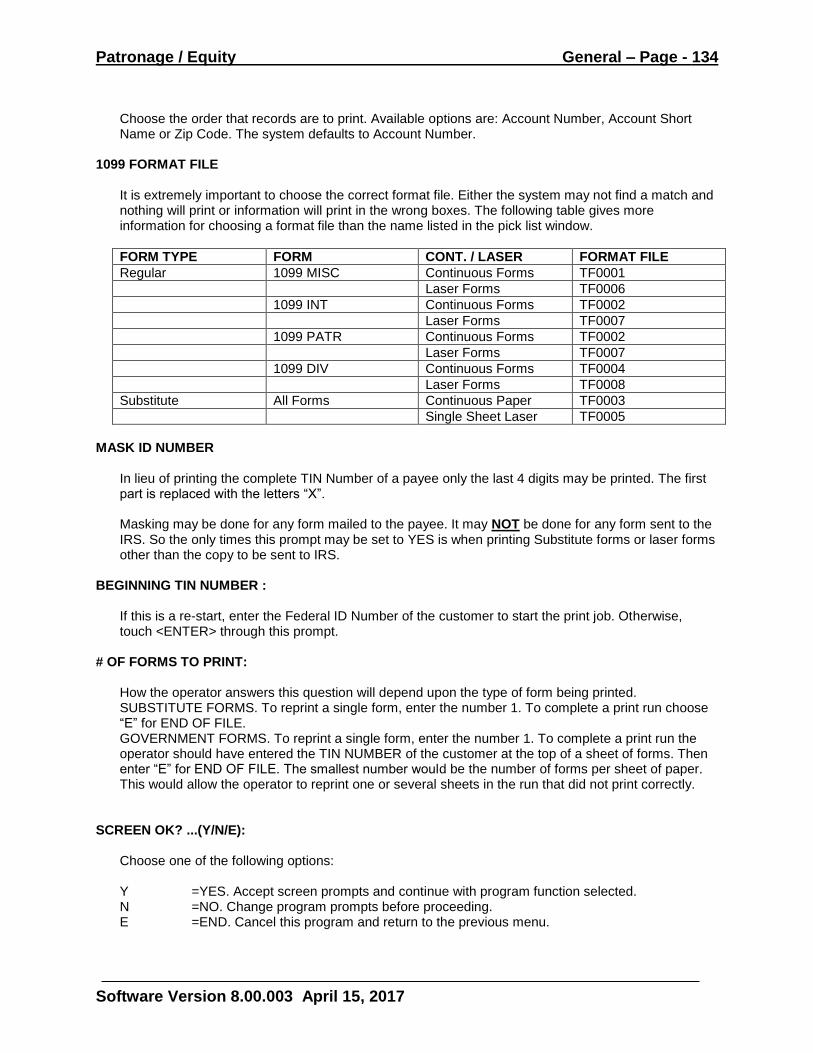
Patronage / Equity General – Page - 134
Software Version 8.00.003 April 15, 2017
Choose the order that records are to print. Available options are: Account Number, Account Short Name or Zip Code. The system defaults to Account Number.
1099 FORMAT FILE
It is extremely important to choose the correct format file. Either the system may not find a match and nothing will print or information will print in the wrong boxes. The following table gives more information for choosing a format file than the name listed in the pick list window.
FORM TYPE FORM CONT. / LASER FORMAT FILE
Regular 1099 MISC Continuous Forms TF0001
Laser Forms TF0006
1099 INT Continuous Forms TF0002
Laser Forms TF0007
1099 PATR Continuous Forms TF0002
Laser Forms TF0007
1099 DIV Continuous Forms TF0004
Laser Forms TF0008
Substitute All Forms Continuous Paper TF0003
Single Sheet Laser TF0005
MASK ID NUMBER
In lieu of printing the complete TIN Number of a payee only the last 4 digits may be printed. The first part is replaced with the letters “X”. Masking may be done for any form mailed to the payee. It may NOT be done for any form sent to the IRS. So the only times this prompt may be set to YES is when printing Substitute forms or laser forms other than the copy to be sent to IRS.
BEGINNING TIN NUMBER :
If this is a re-start, enter the Federal ID Number of the customer to start the print job. Otherwise, touch <ENTER> through this prompt.
# OF FORMS TO PRINT:
How the operator answers this question will depend upon the type of form being printed. SUBSTITUTE FORMS. To reprint a single form, enter the number 1. To complete a print run choose “E” for END OF FILE. GOVERNMENT FORMS. To reprint a single form, enter the number 1. To complete a print run the operator should have entered the TIN NUMBER of the customer at the top of a sheet of forms. Then enter “E” for END OF FILE. The smallest number would be the number of forms per sheet of paper. This would allow the operator to reprint one or several sheets in the run that did not print correctly.
SCREEN OK? ...(Y/N/E):
Choose one of the following options: Y =YES. Accept screen prompts and continue with program function selected. N =NO. Change program prompts before proceeding. E =END. Cancel this program and return to the previous menu.
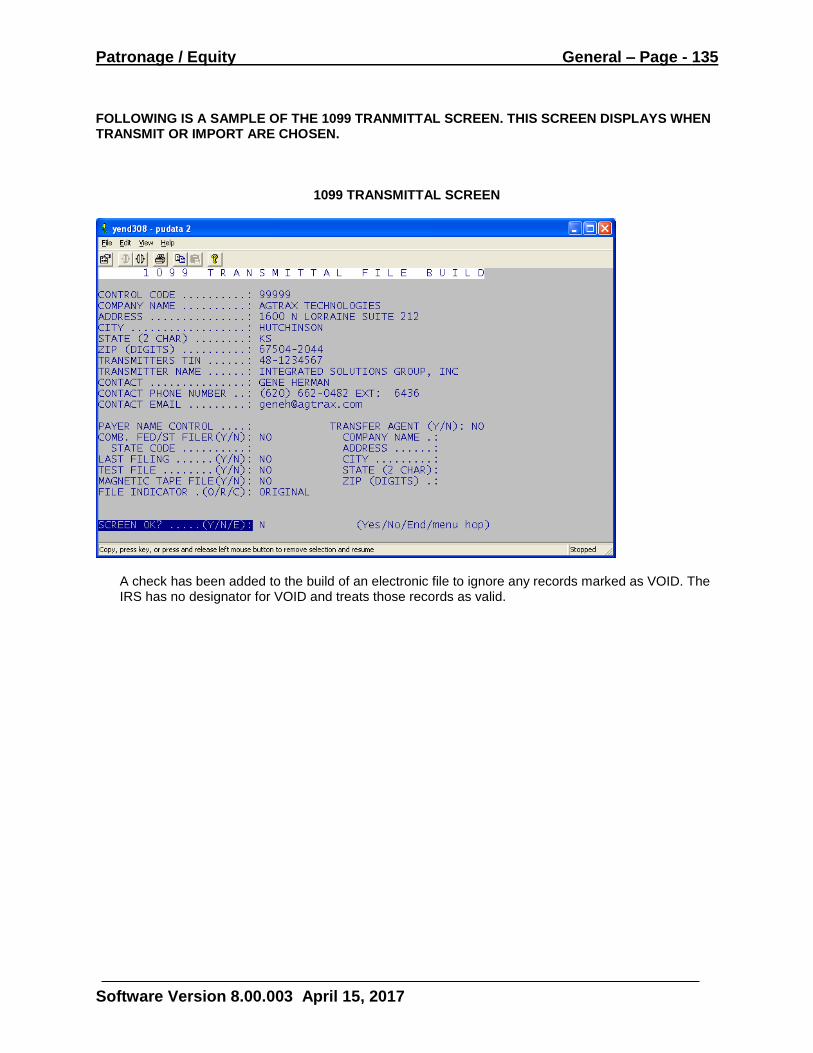
Patronage / Equity General – Page - 135
Software Version 8.00.003 April 15, 2017
FOLLOWING IS A SAMPLE OF THE 1099 TRANMITTAL SCREEN. THIS SCREEN DISPLAYS WHEN TRANSMIT OR IMPORT ARE CHOSEN.
1099 TRANSMITTAL SCREEN
A check has been added to the build of an electronic file to ignore any records marked as VOID. The IRS has no designator for VOID and treats those records as valid.
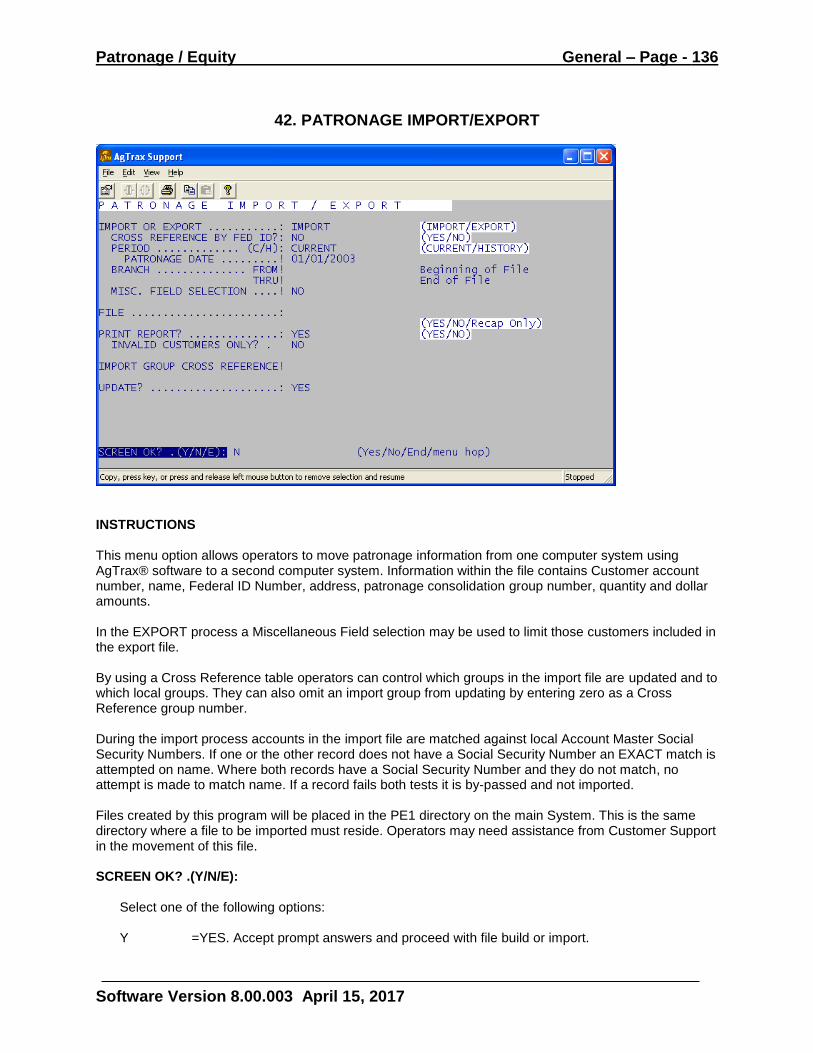
Patronage / Equity General – Page - 136
Software Version 8.00.003 April 15, 2017
42. PATRONAGE IMPORT/EXPORT
INSTRUCTIONS This menu option allows operators to move patronage information from one computer system using AgTrax® software to a second computer system. Information within the file contains Customer account number, name, Federal ID Number, address, patronage consolidation group number, quantity and dollar amounts. In the EXPORT process a Miscellaneous Field selection may be used to limit those customers included in the export file. By using a Cross Reference table operators can control which groups in the import file are updated and to which local groups. They can also omit an import group from updating by entering zero as a Cross Reference group number. During the import process accounts in the import file are matched against local Account Master Social Security Numbers. If one or the other record does not have a Social Security Number an EXACT match is attempted on name. Where both records have a Social Security Number and they do not match, no attempt is made to match name. If a record fails both tests it is by-passed and not imported. Files created by this program will be placed in the PE1 directory on the main System. This is the same directory where a file to be imported must reside. Operators may need assistance from Customer Support in the movement of this file. SCREEN OK? .(Y/N/E): Select one of the following options:
Y =YES. Accept prompt answers and proceed with file build or import.
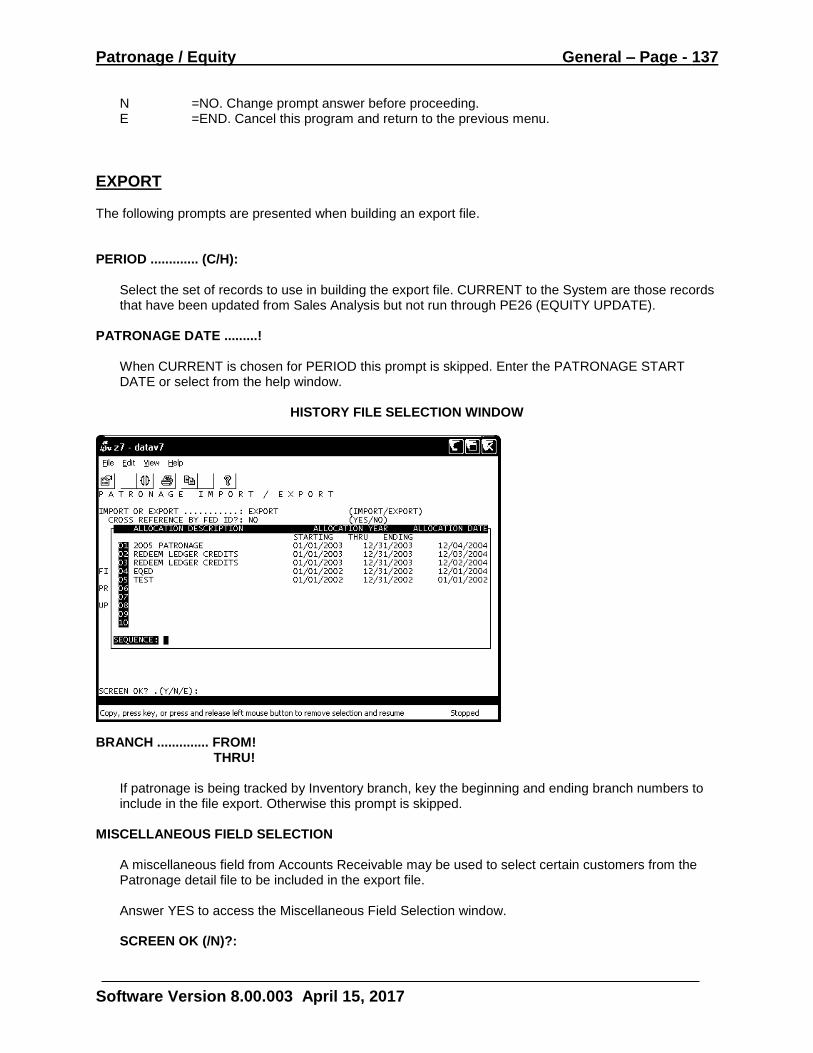
Patronage / Equity General – Page - 137
Software Version 8.00.003 April 15, 2017
N =NO. Change prompt answer before proceeding. E =END. Cancel this program and return to the previous menu.
EXPORT The following prompts are presented when building an export file. PERIOD ............. (C/H):
Select the set of records to use in building the export file. CURRENT to the System are those records that have been updated from Sales Analysis but not run through PE26 (EQUITY UPDATE).
PATRONAGE DATE .........!
When CURRENT is chosen for PERIOD this prompt is skipped. Enter the PATRONAGE START DATE or select from the help window.
HISTORY FILE SELECTION WINDOW
BRANCH .............. FROM! THRU!
If patronage is being tracked by Inventory branch, key the beginning and ending branch numbers to include in the file export. Otherwise this prompt is skipped.
MISCELLANEOUS FIELD SELECTION
A miscellaneous field from Accounts Receivable may be used to select certain customers from the Patronage detail file to be included in the export file. Answer YES to access the Miscellaneous Field Selection window. SCREEN OK (/N)?:
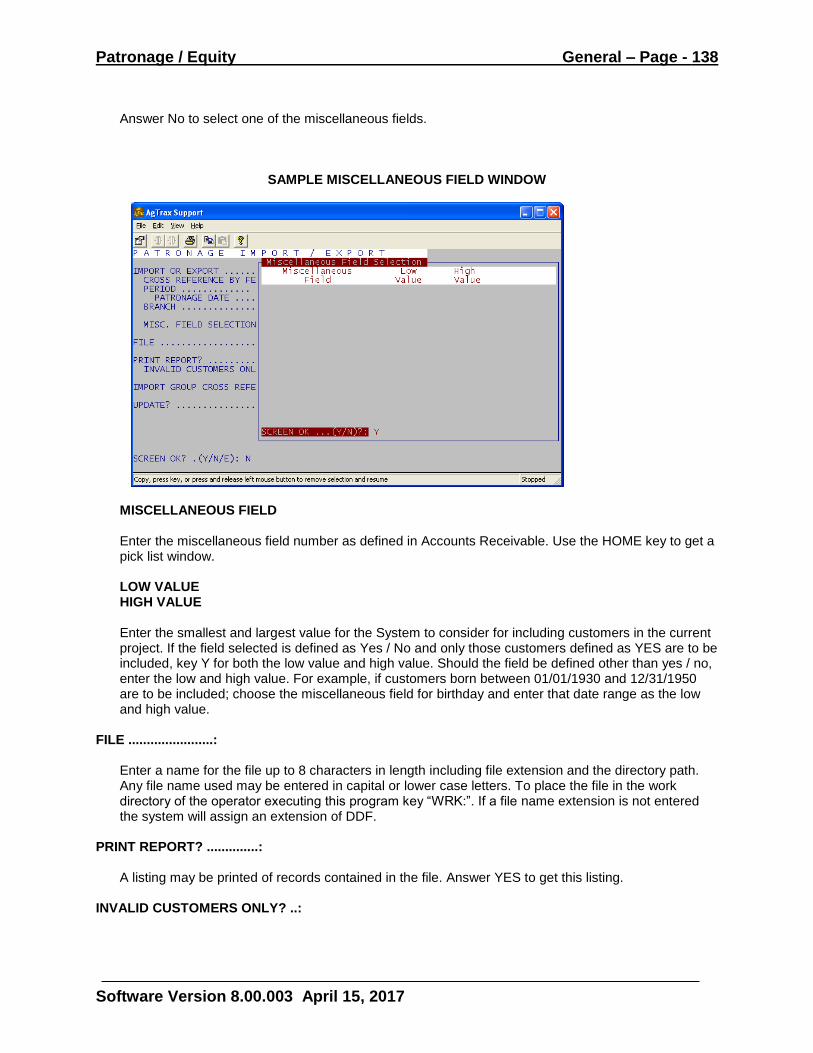
Patronage / Equity General – Page - 138
Software Version 8.00.003 April 15, 2017
Answer No to select one of the miscellaneous fields.
SAMPLE MISCELLANEOUS FIELD WINDOW
MISCELLANEOUS FIELD
Enter the miscellaneous field number as defined in Accounts Receivable. Use the HOME key to get a pick list window.
LOW VALUE HIGH VALUE
Enter the smallest and largest value for the System to consider for including customers in the current project. If the field selected is defined as Yes / No and only those customers defined as YES are to be included, key Y for both the low value and high value. Should the field be defined other than yes / no, enter the low and high value. For example, if customers born between 01/01/1930 and 12/31/1950 are to be included; choose the miscellaneous field for birthday and enter that date range as the low and high value.
FILE .......................:
Enter a name for the file up to 8 characters in length including file extension and the directory path. Any file name used may be entered in capital or lower case letters. To place the file in the work directory of the operator executing this program key “WRK:”. If a file name extension is not entered the system will assign an extension of DDF.
PRINT REPORT? ..............:
A listing may be printed of records contained in the file. Answer YES to get this listing. INVALID CUSTOMERS ONLY? ..:
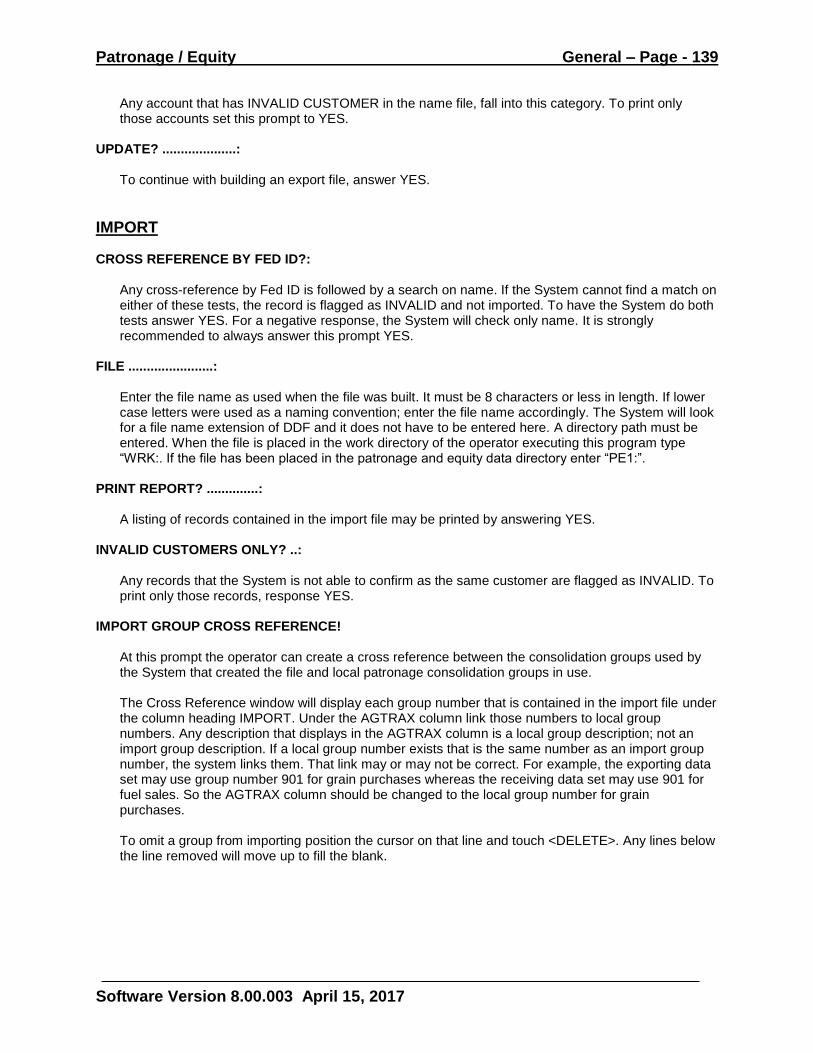
Patronage / Equity General – Page - 139
Software Version 8.00.003 April 15, 2017
Any account that has INVALID CUSTOMER in the name file, fall into this category. To print only those accounts set this prompt to YES.
UPDATE? ....................:
To continue with building an export file, answer YES.
IMPORT CROSS REFERENCE BY FED ID?:
Any cross-reference by Fed ID is followed by a search on name. If the System cannot find a match on either of these tests, the record is flagged as INVALID and not imported. To have the System do both tests answer YES. For a negative response, the System will check only name. It is strongly recommended to always answer this prompt YES.
FILE .......................:
Enter the file name as used when the file was built. It must be 8 characters or less in length. If lower case letters were used as a naming convention; enter the file name accordingly. The System will look for a file name extension of DDF and it does not have to be entered here. A directory path must be entered. When the file is placed in the work directory of the operator executing this program type “WRK:. If the file has been placed in the patronage and equity data directory enter “PE1:”.
PRINT REPORT? ..............:
A listing of records contained in the import file may be printed by answering YES. INVALID CUSTOMERS ONLY? ..:
Any records that the System is not able to confirm as the same customer are flagged as INVALID. To print only those records, response YES.
IMPORT GROUP CROSS REFERENCE!
At this prompt the operator can create a cross reference between the consolidation groups used by the System that created the file and local patronage consolidation groups in use. The Cross Reference window will display each group number that is contained in the import file under the column heading IMPORT. Under the AGTRAX column link those numbers to local group numbers. Any description that displays in the AGTRAX column is a local group description; not an import group description. If a local group number exists that is the same number as an import group number, the system links them. That link may or may not be correct. For example, the exporting data set may use group number 901 for grain purchases whereas the receiving data set may use 901 for fuel sales. So the AGTRAX column should be changed to the local group number for grain purchases. To omit a group from importing position the cursor on that line and touch <DELETE>. Any lines below the line removed will move up to fill the blank.
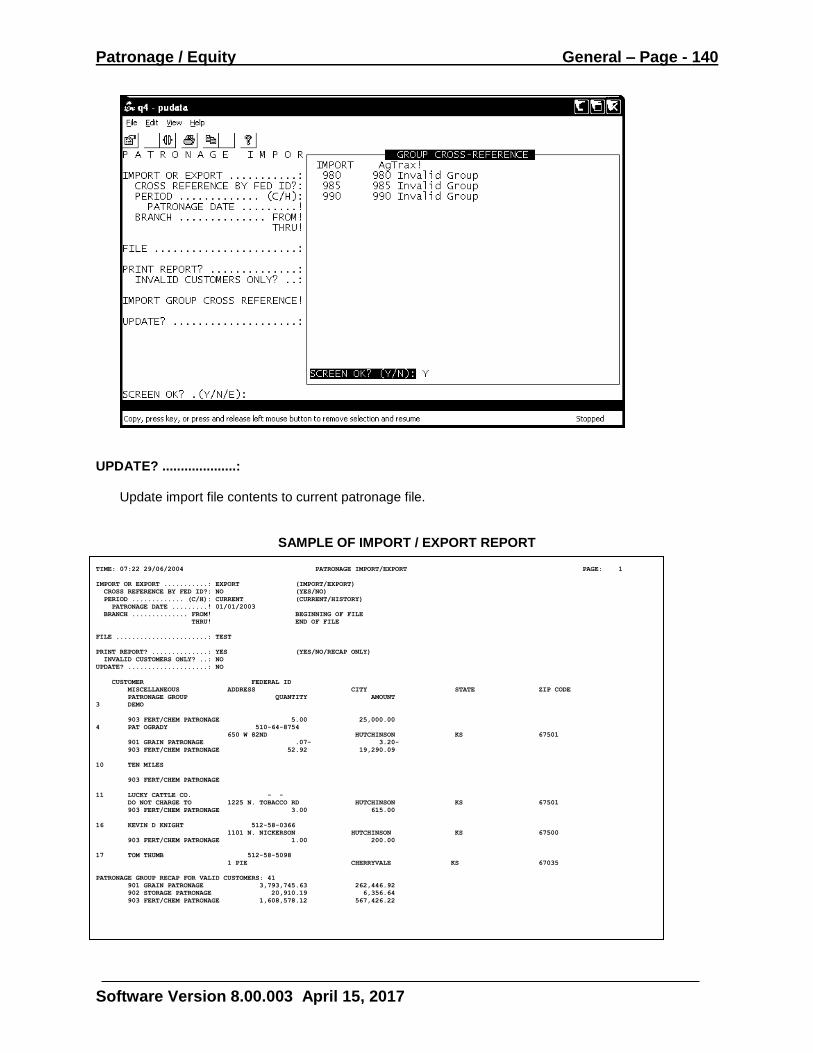
Patronage / Equity General – Page - 140
Software Version 8.00.003 April 15, 2017
UPDATE? ....................:
Update import file contents to current patronage file.
SAMPLE OF IMPORT / EXPORT REPORT
TIME: 07:22 29/06/2004 PATRONAGE IMPORT/EXPORT PAGE: 1
IMPORT OR EXPORT ...........: EXPORT (IMPORT/EXPORT)
CROSS REFERENCE BY FED ID?: NO (YES/NO)
PERIOD ............. (C/H): CURRENT (CURRENT/HISTORY)
PATRONAGE DATE .........! 01/01/2003
BRANCH .............. FROM! BEGINNING OF FILE
THRU! END OF FILE
FILE .......................: TEST
PRINT REPORT? ..............: YES (YES/NO/RECAP ONLY)
INVALID CUSTOMERS ONLY? ..: NO
UPDATE? ....................: NO
CUSTOMER FEDERAL ID
MISCELLANEOUS ADDRESS CITY STATE ZIP CODE
PATRONAGE GROUP QUANTITY AMOUNT
3 DEMO
903 FERT/CHEM PATRONAGE 5.00 25,000.00
4 PAT OGRADY 510-64-8754
650 W 82ND HUTCHINSON KS 67501
901 GRAIN PATRONAGE .07- 3.20-
903 FERT/CHEM PATRONAGE 52.92 19,290.09
10 TEN MILES
903 FERT/CHEM PATRONAGE
11 LUCKY CATTLE CO. - -
DO NOT CHARGE TO 1225 N. TOBACCO RD HUTCHINSON KS 67501
903 FERT/CHEM PATRONAGE 3.00 615.00
16 KEVIN D KNIGHT 512-58-0366
1101 N. NICKERSON HUTCHINSON KS 67500
903 FERT/CHEM PATRONAGE 1.00 200.00
17 TOM THUMB 512-58-5098
1 PIE CHERRYVALE KS 67035
PATRONAGE GROUP RECAP FOR VALID CUSTOMERS: 41
901 GRAIN PATRONAGE 3,793,745.63 262,446.92
902 STORAGE PATRONAGE 20,910.19 6,356.64
903 FERT/CHEM PATRONAGE 1,608,578.12 567,426.22
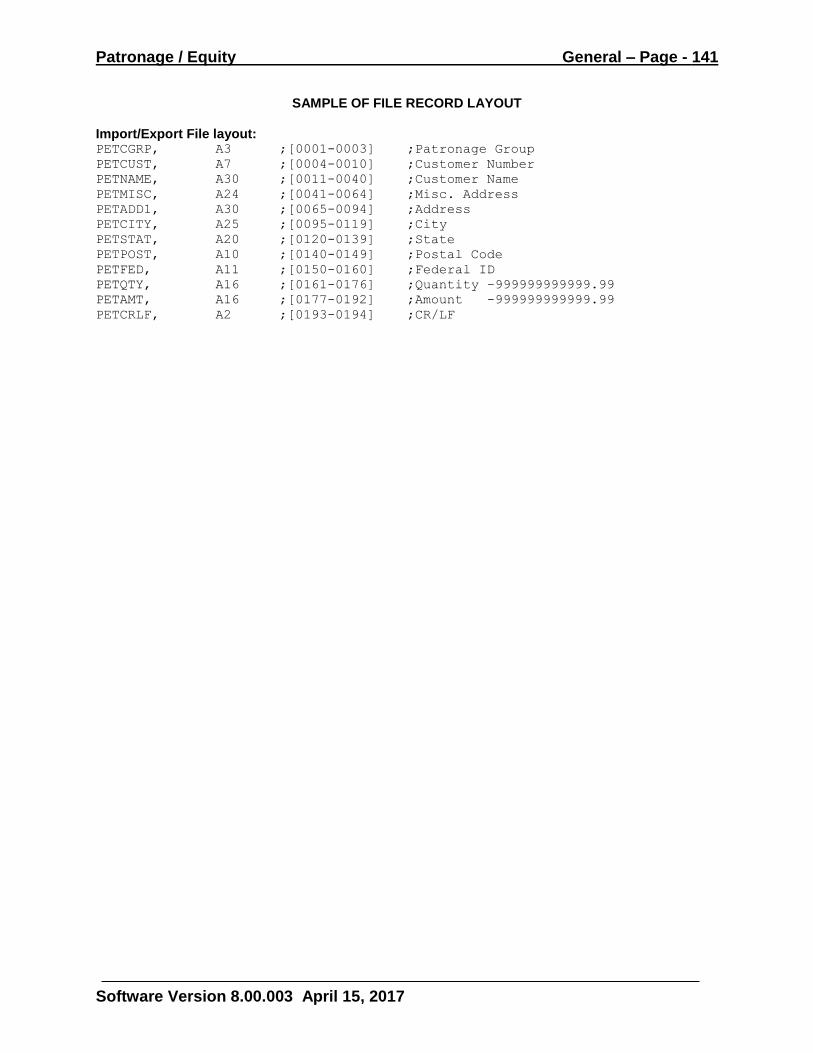
Patronage / Equity General – Page - 141
Software Version 8.00.003 April 15, 2017
SAMPLE OF FILE RECORD LAYOUT
Import/Export File layout: PETCGRP, A3 ;[0001-0003] ;Patronage Group
PETCUST, A7 ;[0004-0010] ;Customer Number
PETNAME, A30 ;[0011-0040] ;Customer Name
PETMISC, A24 ;[0041-0064] ;Misc. Address
PETADD1, A30 ;[0065-0094] ;Address
PETCITY, A25 ;[0095-0119] ;City
PETSTAT, A20 ;[0120-0139] ;State
PETPOST, A10 ;[0140-0149] ;Postal Code
PETFED, A11 ;[0150-0160] ;Federal ID
PETQTY, A16 ;[0161-0176] ;Quantity –999999999999.99
PETAMT, A16 ;[0177-0192] ;Amount -999999999999.99
PETCRLF, A2 ;[0193-0194] ;CR/LF
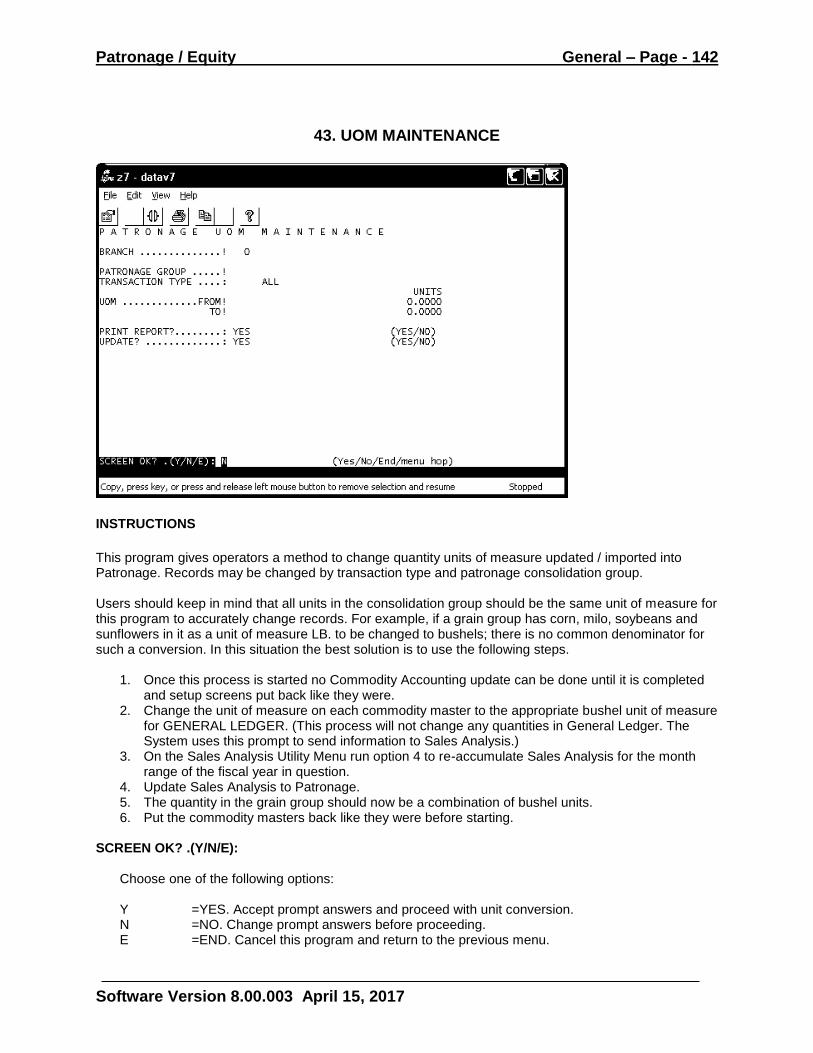
Patronage / Equity General – Page - 142
Software Version 8.00.003 April 15, 2017
43. UOM MAINTENANCE
INSTRUCTIONS
This program gives operators a method to change quantity units of measure updated / imported into Patronage. Records may be changed by transaction type and patronage consolidation group. Users should keep in mind that all units in the consolidation group should be the same unit of measure for this program to accurately change records. For example, if a grain group has corn, milo, soybeans and sunflowers in it as a unit of measure LB. to be changed to bushels; there is no common denominator for such a conversion. In this situation the best solution is to use the following steps.
1. Once this process is started no Commodity Accounting update can be done until it is completed and setup screens put back like they were.
2. Change the unit of measure on each commodity master to the appropriate bushel unit of measure for GENERAL LEDGER. (This process will not change any quantities in General Ledger. The System uses this prompt to send information to Sales Analysis.)
3. On the Sales Analysis Utility Menu run option 4 to re-accumulate Sales Analysis for the month range of the fiscal year in question.
4. Update Sales Analysis to Patronage. 5. The quantity in the grain group should now be a combination of bushel units. 6. Put the commodity masters back like they were before starting.
SCREEN OK? .(Y/N/E):
Choose one of the following options: Y =YES. Accept prompt answers and proceed with unit conversion. N =NO. Change prompt answers before proceeding. E =END. Cancel this program and return to the previous menu.
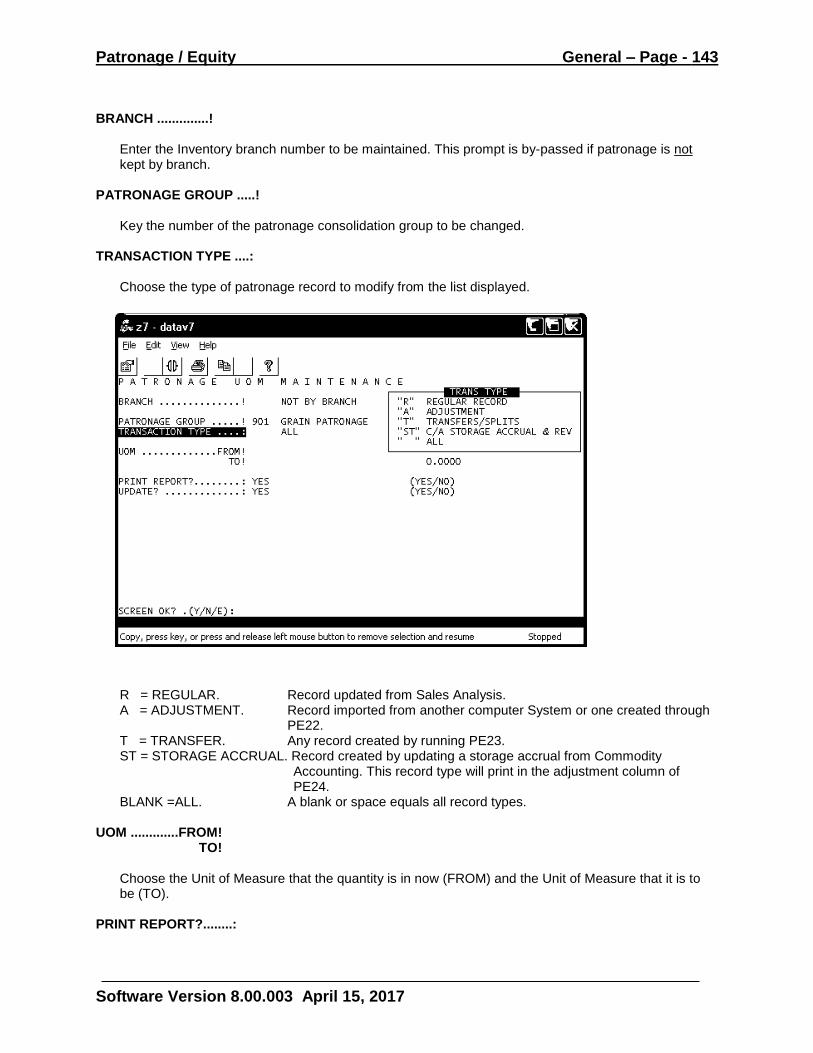
Patronage / Equity General – Page - 143
Software Version 8.00.003 April 15, 2017
BRANCH ..............!
Enter the Inventory branch number to be maintained. This prompt is by-passed if patronage is not kept by branch.
PATRONAGE GROUP .....!
Key the number of the patronage consolidation group to be changed. TRANSACTION TYPE ....:
Choose the type of patronage record to modify from the list displayed.
R = REGULAR. Record updated from Sales Analysis. A = ADJUSTMENT. Record imported from another computer System or one created through
PE22. T = TRANSFER. Any record created by running PE23. ST = STORAGE ACCRUAL. Record created by updating a storage accrual from Commodity
Accounting. This record type will print in the adjustment column of PE24.
BLANK =ALL. A blank or space equals all record types. UOM .............FROM! TO!
Choose the Unit of Measure that the quantity is in now (FROM) and the Unit of Measure that it is to be (TO).
PRINT REPORT?........:
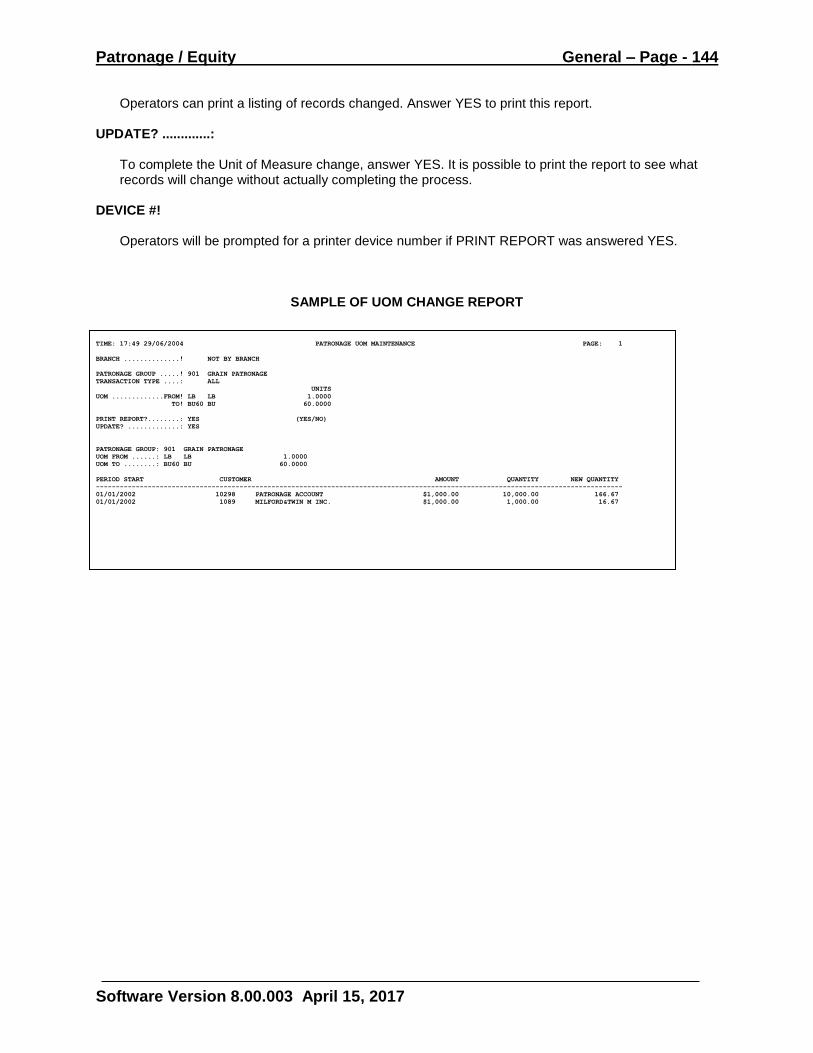
Patronage / Equity General – Page - 144
Software Version 8.00.003 April 15, 2017
Operators can print a listing of records changed. Answer YES to print this report. UPDATE? .............:
To complete the Unit of Measure change, answer YES. It is possible to print the report to see what records will change without actually completing the process.
DEVICE #!
Operators will be prompted for a printer device number if PRINT REPORT was answered YES.
SAMPLE OF UOM CHANGE REPORT
TIME: 17:49 29/06/2004 PATRONAGE UOM MAINTENANCE PAGE: 1
BRANCH ..............! NOT BY BRANCH
PATRONAGE GROUP .....! 901 GRAIN PATRONAGE
TRANSACTION TYPE ....: ALL
UNITS
UOM .............FROM! LB LB 1.0000
TO! BU60 BU 60.0000
PRINT REPORT?........: YES (YES/NO)
UPDATE? .............: YES
PATRONAGE GROUP: 901 GRAIN PATRONAGE
UOM FROM ......: LB LB 1.0000
UOM TO ........: BU60 BU 60.0000
PERIOD START CUSTOMER AMOUNT QUANTITY NEW QUANTITY
------------------------------------------------------------------------------------------------------------------------------------
01/01/2002 10298 PATRONAGE ACCOUNT $1,000.00 10,000.00 166.67
01/01/2002 1089 MILFORD&TWIN M INC. $1,000.00 1,000.00 16.67
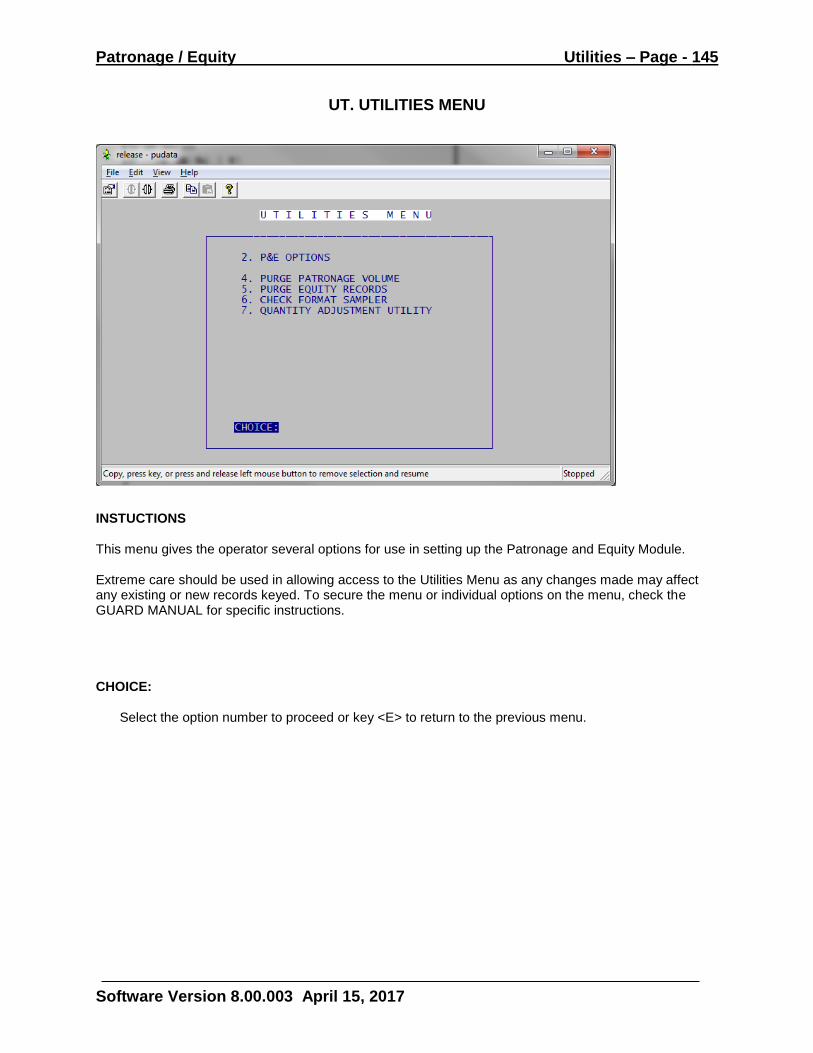
Patronage / Equity Utilities – Page - 145
Software Version 8.00.003 April 15, 2017
UT. UTILITIES MENU
INSTUCTIONS This menu gives the operator several options for use in setting up the Patronage and Equity Module. Extreme care should be used in allowing access to the Utilities Menu as any changes made may affect any existing or new records keyed. To secure the menu or individual options on the menu, check the GUARD MANUAL for specific instructions. CHOICE:
Select the option number to proceed or key <E> to return to the previous menu.

Patronage / Equity Utilities – Page - 146
Software Version 8.00.003 April 15, 2017
UT.2 – PATRONAGE AND EQUITY OPTIONS
INSTRUCTIONS This menu option allows the operator to define how much detail is to be kept for Patronage. It also defines additional information that is to print on selected reports. The screen contains a setting for YEAR END which controls what twelve month time frame the System considers to be CURRENT for Patronage. OK TO CHANGE? (Y/N/E):
Choose one of the following responses: Y =YES. Accept changes and return to the previous menu. N =NO. Change prompt answers before proceeding. E =END. Cancel this program and return to the previous menu with no action taken.
ACTIVATE SECURITY .......(Y/N):
This prompt must be YES before the System will start using any of the security features available in the GUARD programs. For an explanation of using different security functions consult the GUARD MANUAL.
CHECK FORMAT NUMBER ..........!
A format file gives the System a set of instructions on where to place information on a preprinted form. Several default format numbers on available. Which one to use will depend upon the size of the form and what information the organization wishes to see on the check stub. Format files can be
Patronage / Equity Utilities – Page - 147
Software Version 8.00.003 April 15, 2017
customized also to fit individual situations. For assistance in choosing a format file to fit your individual situation call Customer Support. A help window of available format files is available by touching the normal lookup key.
ALL EQ CODES ON CHECK ...(Y/N):
As mentioned in the previous prompt format files control most of the information that prints on a check stub. This prompt may be used as an additional control for how much equity information prints on a check stub. By responding NO, only those equity codes with activity for the current allocation will print. Otherwise all equity codes with a balance will be included on the check. (Note that if a format file is in use that does not print any detail on a check stub, this prompt setting is ignored.)
PATRONAGE BY BRANCH .....(Y/N/C):
Three methods of storing Patronage information are available to organizations. The first is to store information by company totals. To use this method set this prompt to NO. The second method of storing Patronage amounts is by individual Inventory branch. If an organization is going to pay patronage refunds by branch, then they will want to use this feature. While this may sound attractive organizations should keep in mind that extra detail means extra work. Each patronage consolidation group number must be set up in PE11 for each Inventory branch where activity is to be updated from Sales Analysis to Patronage. At allocation time each of the consolidation group masters must be maintained for a refund rate. On the Patronage check stub like consolidation groups with same refund rates can be combined. Otherwise each consolidation group with a refund will print separate.
A setting of CONSOLIDATE also keeps patronage business activity by Inventory branch by consolidation group. However PE24, PE25 and PE26 will combine those branches that have the same refund rate when doing an allocation. The difference this makes is where there may be negative amounts for a consolidation group at a branch CONSOLIDATE will use the net total of all branches to calculate a refund whereas YES will ignore the negative amounts. NOTE: CONSOLIDATE also affects the printing of PE24 as a patronage volume report. In situations where a customer has activity at multiple branches for the same consolidation group, activity is recapped under the first branch where that activity occurred. Balancing branch by branch back to General Ledger does not work in this situation. As a suggestion, set the prompt to YES. Run any desired reports. Then set the prompt back to CONSOLIDATE.
2ND TIN NOTICE W/H PERCENTAGE :
It is AgTrax understanding that this rate is set at 28.00 percent until December 31,2010. Your organization may want to verify this rate with your accountant.
2ND TIN NOTICE MISC. FLAG ..!
Enter the Accounts Receivable miscellaneous field that the System is to use in verifying that a customer is subject to backup withholding. Normally this field is defined as YES / NO response and the customers subject to withholding are set to YES.
2ND TIN 1099 MISC. FLAG
Patronage / Equity Utilities – Page - 148
Software Version 8.00.003 April 15, 2017
On each 1099 form is a box that may be filled with an “X” if the IRS has notified the organization twice within a three year period that the payee has provided an incorrect taxpayer identification number. If you “X” this box, the IRS will not send any further notices about this account. To have the 1099 program check a miscellaneous field that has been defined for this purpose enter the field number. The 1099 build program will check the setting of the field. If it is set to YES an “X” will be placed in the notification box. Whenever this prompt is blank, the 1099 build program will read the 2ND TIN NOTICE MISC FLAG. Any customer that is set to Yes to have backup withholding will have the 1099 notification box filled.
GROSS OR NET $$ FROM S/A (G/N):
With changes made in Sales Analysis after the Patronage / Equity module was written, amounts coming into patronage are NET dollars. So the setting for this prompt is no longer used. Operators may enter through it and accept the program default.
PRINT ADDRESS ON DETAIL REPORT: Answer YES to include customer mailing information on PE24 reports. When the address is included it prints to the right of customer name on the same line so no extra paper is used including this information on the report. BIRTHDAY MISC. FLAG
Enter the Miscellaneous Field defined in Accounts Receivable to track customer birthday. The Miscellaneous Field must exist here in order to have birthday print on an Equity Investment report (PE31) and to recap by birthday year.
MEMBER MISC. FLAG
This prompt setting is used when updating Commodity Accounting purchases to the 1099 file for Per Unit Retain reporting purposes. Otherwise it is ignored. Any customer that has this flag set to YES and activity during the calendar year specified in PE41.1 will have a Per Unit Retain record created for that activity
PATRON ACCESS ZERO BAL. CODES
This prompt has been added to allow the suppression of any equity code with a zero balance when a customer views their equity account over the internet. The System default is to include those equity codes. Organizations not using PATRON ACCESS can ignore this prompt. Its’ setting makes no difference to the display or printing of information in AgTrax.
BACKUP W/H EQUITY CODE!
Enter the Equity code number setup to track backup withholding. The System uses the following method to track backup withholding.
1) Whenever a payment is made that is subject to backup withholding the System checks each
customer’s miscellaneous field to see if it is set to yes. 2) For customers whose flag is yes, the designated W/H PERCENTAGE is deducted from the cash
portion of the payment. 3) The withheld amount is put into the BACKUP W/H EQUITY CODE.
Patronage / Equity Utilities – Page - 149
Software Version 8.00.003 April 15, 2017
4) At the end of the year, any amounts in the BACKUP W/H EQUITY CODE are updated to the 1099 file for tax reporting.
5) Once the 1099 file has been built and the organization has forwarded W/H funds to IRS, an adjustment should be made to the customer equity account (PE13) to reflect that the BACKUP W/H EQUITY CODE is now zero.
YEAR END –
The System uses this field to determine what twelve month time frame is considered to be CURRENT. This date should always be equal to the date of the organization’s last fiscal year end. If it is not it needs to be maintained prior to pulling any new information into Patronage from Sales Analysis.
To access this field, touch <DOWN ARROW> from any place on the screen. Type DATE at the OK TO CHANGE prompt. Enter the new year end date.
LAST ALLOCATION –
This field is maintained by the System. It reflects the EQUITY UPDATE DATE used the last time PE26 was run.
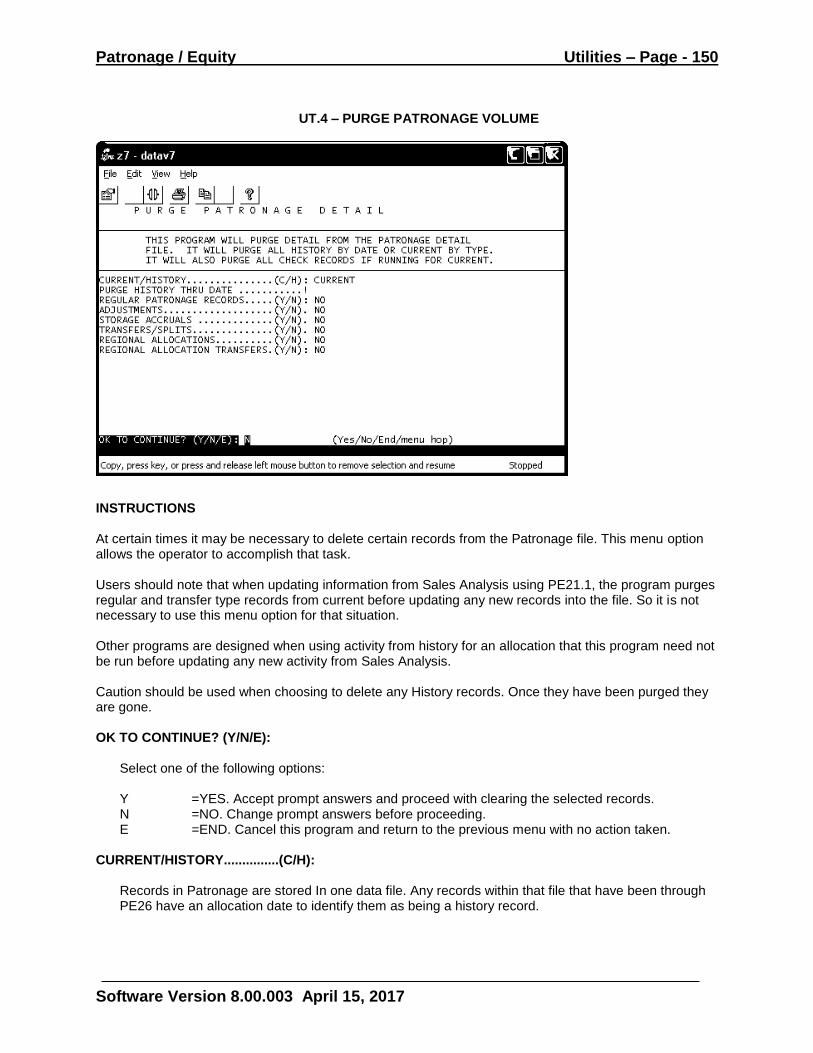
Patronage / Equity Utilities – Page - 150
Software Version 8.00.003 April 15, 2017
UT.4 – PURGE PATRONAGE VOLUME
INSTRUCTIONS At certain times it may be necessary to delete certain records from the Patronage file. This menu option allows the operator to accomplish that task. Users should note that when updating information from Sales Analysis using PE21.1, the program purges regular and transfer type records from current before updating any new records into the file. So it is not necessary to use this menu option for that situation. Other programs are designed when using activity from history for an allocation that this program need not be run before updating any new activity from Sales Analysis. Caution should be used when choosing to delete any History records. Once they have been purged they are gone. OK TO CONTINUE? (Y/N/E):
Select one of the following options: Y =YES. Accept prompt answers and proceed with clearing the selected records. N =NO. Change prompt answers before proceeding. E =END. Cancel this program and return to the previous menu with no action taken.
CURRENT/HISTORY...............(C/H):
Records in Patronage are stored In one data file. Any records within that file that have been through PE26 have an allocation date to identify them as being a history record.
Patronage / Equity Utilities – Page - 151
Software Version 8.00.003 April 15, 2017
Select the records to remove from the file. When <H>istory is selected the System will default several prompts to YES.
PURGE HISTORY THRU DATE ...........!
Each group of history records has a period beginning date and ending date. Normally these dates correspond to the date range of the organization fiscal year. This prompt is looking for the ending date of the period to be purged. Using the lookup key, select the sequence line number of the desired record group from the display window. Only those records matching the group selected will be purged.
REGULAR PATRONAGE RECORDS.....(Y/N): ADJUSTMENTS...................(Y/N). TRANSFERS/SPLITS..............(Y/N). REGIONAL ALLOCATIONS..........(Y/N). REGIONAL ALLOCATION TRANSFERS.(Y/N): STORAGE ACCRUALS .............(Y/N).
For each record type that is to be deleted, set the corresponding prompt to YES. Storage Accruals can be accessed only when Regular Patronage Records is set to NO.
Patronage / Equity Utilities – Page - 152
Software Version 8.00.003 April 15, 2017
UT.5 - PURGE EQUITY RECORDS Currently this option is not available.
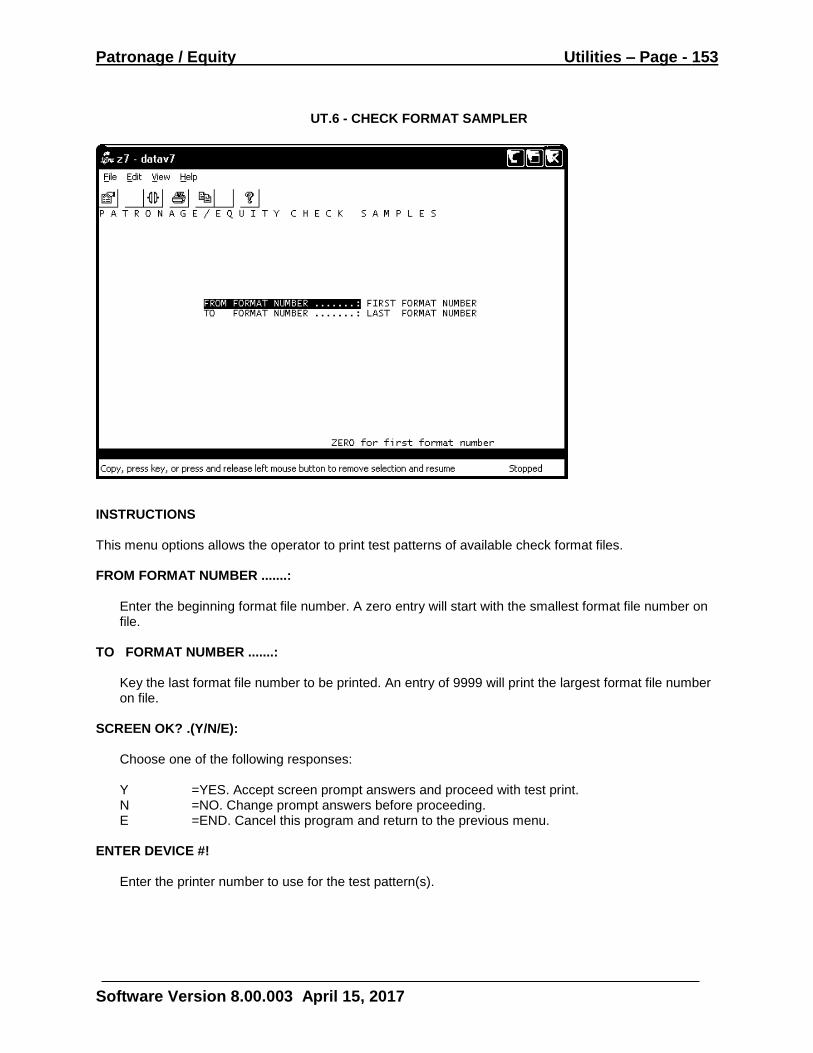
Patronage / Equity Utilities – Page - 153
Software Version 8.00.003 April 15, 2017
UT.6 - CHECK FORMAT SAMPLER
INSTRUCTIONS This menu options allows the operator to print test patterns of available check format files. FROM FORMAT NUMBER .......:
Enter the beginning format file number. A zero entry will start with the smallest format file number on file.
TO FORMAT NUMBER .......:
Key the last format file number to be printed. An entry of 9999 will print the largest format file number on file.
SCREEN OK? .(Y/N/E):
Choose one of the following responses:
Y =YES. Accept screen prompt answers and proceed with test print. N =NO. Change prompt answers before proceeding. E =END. Cancel this program and return to the previous menu.
ENTER DEVICE #!
Enter the printer number to use for the test pattern(s).
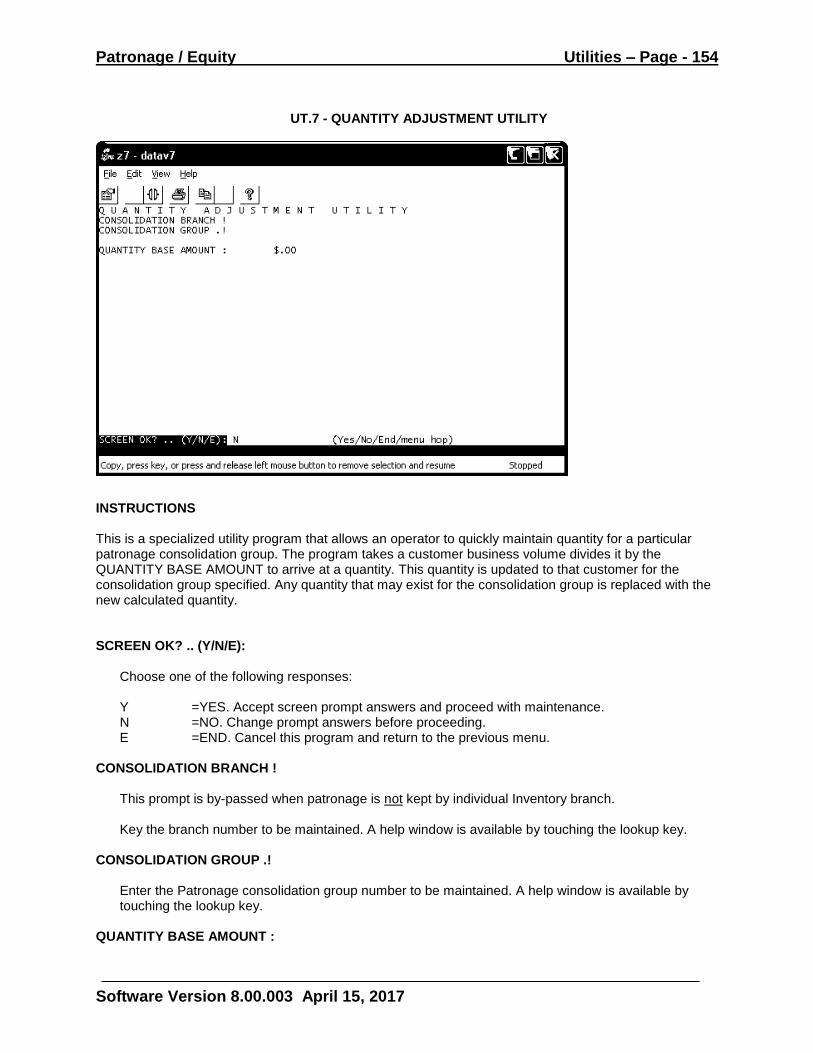
Patronage / Equity Utilities – Page - 154
Software Version 8.00.003 April 15, 2017
UT.7 - QUANTITY ADJUSTMENT UTILITY
INSTRUCTIONS This is a specialized utility program that allows an operator to quickly maintain quantity for a particular patronage consolidation group. The program takes a customer business volume divides it by the QUANTITY BASE AMOUNT to arrive at a quantity. This quantity is updated to that customer for the consolidation group specified. Any quantity that may exist for the consolidation group is replaced with the new calculated quantity. SCREEN OK? .. (Y/N/E):
Choose one of the following responses: Y =YES. Accept screen prompt answers and proceed with maintenance. N =NO. Change prompt answers before proceeding. E =END. Cancel this program and return to the previous menu.
CONSOLIDATION BRANCH !
This prompt is by-passed when patronage is not kept by individual Inventory branch. Key the branch number to be maintained. A help window is available by touching the lookup key.
CONSOLIDATION GROUP .!
Enter the Patronage consolidation group number to be maintained. A help window is available by touching the lookup key.
QUANTITY BASE AMOUNT :
Patronage / Equity Utilities – Page - 155
Software Version 8.00.003 April 15, 2017
Key the dollar amount per unit that the System is to use in calculating quantity. For example, if customer A has 100.00 dollars of business volume and the normal charge per unit is 10.00 dollars, enter the 10.00 amount.
Patronage / Equity Appendices – Page - 156
Software Version 8.00.003 April 15, 2017
APPENDIX I STANDARD CONVENTIONS
SETUP REPORTS Any program that allowed the operator to add records to setup files; then ask to print a setup report when exiting the program has changed. The setup report is now a separate menu option. CHAIN PROGRAMS When moving to a windows environment it is not possible to call multiple programs from within the same program. So each program will be loaded independently from a menu. For example in Accounts Receivable, AR21 (update for invoices to AR accounts) could be set to load AR22 (journal report) which in turn could be set to load AR28 (payment application). Operators can still print a journal of activity being updated in AR21 at the same time or they can choose AR22 later to print a journal. To apply payments to outstanding charge invoices they will select AR23 to do one customer at a time or AR28 to let the system mass apply any open payments. JOURNAL PROGRAMS Any program that prints a journal which can be purged has changed. The prompt to purge is now located on the program prompt screen with other prompts. There is no question after the journal prints. PROGRAM SECURITY Security checking for individual programs is standardized. For individual accounting modules if ACTIVATE SECURITY = YES and a security level is defined for a specific program within that module; then the security level of an operator must equal or exceed the security level of the program to access it. In situations where operator security does not meet requirements the program will not load. If a program is assigned a password, the operator must successfully enter that password to continue. SECURITY BY FUNCTION Some programs that allow the addition or maintenance of records use Security By Function. Security By Function allows an organization to control what an operator has permission to do while in a particular program. For example, an operator may need to view information contained on the Accounts Receivable Master but not be able to add or maintain records. We are in the process of adding Security By Function to all addition / maintenance programs. That process will not be complete with this release. Any program not having it at this time will be changed in a future release. The installation process will add each existing operator to the Security By Function file with permissions to perform any function in those programs using Security By Function. Organizations wishing to limit certain operators capabilities should CHANGE those functions to NO. DO NOT DELETE THE OPERATOR FROM THE SECURITY BY FUNCTION FILE. The next time an upgrade is installed they will be added back to the security file with full function capability. During the installation process if a program Security By Function record already exists for any operator it is left intact ACCRUAL OR UPDATE PROGRAMS SECURITY Programs that update records from one file to another via an Update or Accrual prompt use the UPDATE flag in Security By Function. When that flag is set to NO for a particular operator in a program they are not allowed access to the Update or Accrual prompts. TRANSACTIONAL PROGRAMS SECURITY Programs that allow an operator to directly add or maintain records in a file are referred to as Transactional Programs. They are quickly identified by their functions of Inquire, Add, Change and Delete. Each function is controlled by a separate flag in Security By Function. So an operator may be allowed to Inquire or Change existing records but not allowed to Add new records or Delete existing records. The Purchasing Module also recognizes two additional flag settings for Receive and Invoice.
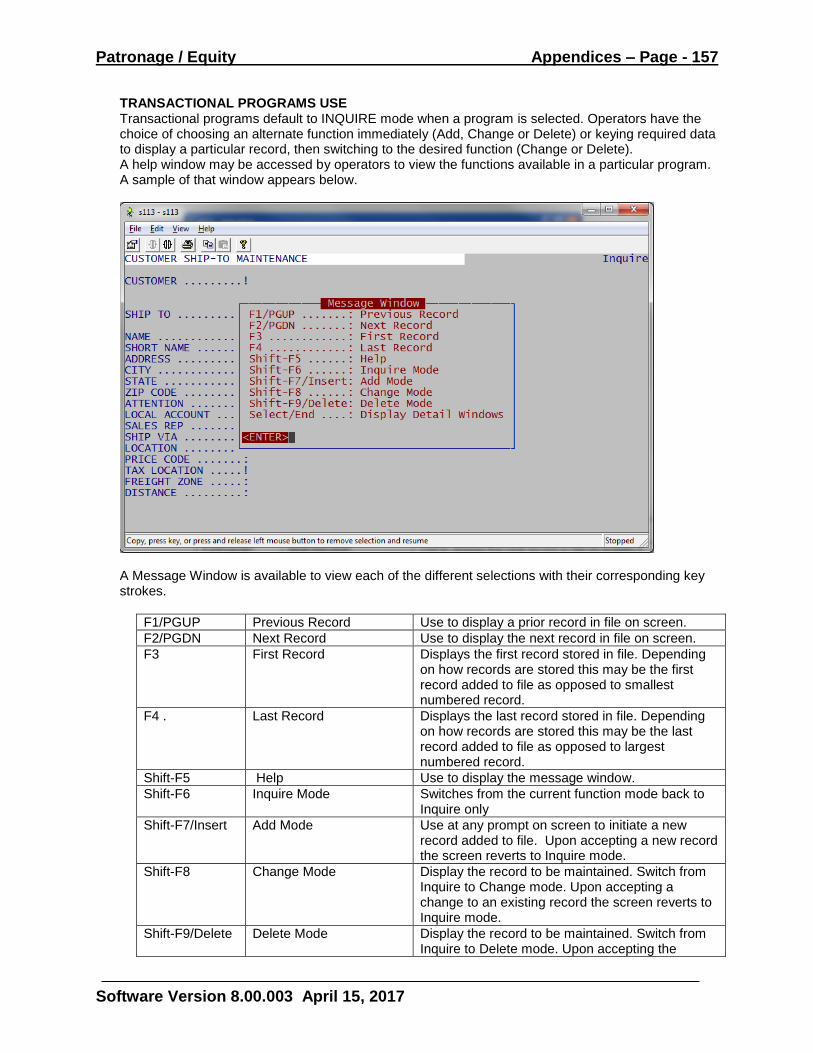
Patronage / Equity Appendices – Page - 157
Software Version 8.00.003 April 15, 2017
TRANSACTIONAL PROGRAMS USE Transactional programs default to INQUIRE mode when a program is selected. Operators have the choice of choosing an alternate function immediately (Add, Change or Delete) or keying required data to display a particular record, then switching to the desired function (Change or Delete). A help window may be accessed by operators to view the functions available in a particular program. A sample of that window appears below.
A Message Window is available to view each of the different selections with their corresponding key strokes.
F1/PGUP Previous Record Use to display a prior record in file on screen.
F2/PGDN Next Record Use to display the next record in file on screen.
F3 First Record Displays the first record stored in file. Depending on how records are stored this may be the first record added to file as opposed to smallest numbered record.
F4 . Last Record Displays the last record stored in file. Depending on how records are stored this may be the last record added to file as opposed to largest numbered record.
Shift-F5 Help Use to display the message window.
Shift-F6 Inquire Mode Switches from the current function mode back to Inquire only
Shift-F7/Insert Add Mode Use at any prompt on screen to initiate a new record added to file. Upon accepting a new record the screen reverts to Inquire mode.
Shift-F8 Change Mode Display the record to be maintained. Switch from Inquire to Change mode. Upon accepting a change to an existing record the screen reverts to Inquire mode.
Shift-F9/Delete Delete Mode Display the record to be maintained. Switch from Inquire to Delete mode. Upon accepting the
Patronage / Equity Appendices – Page - 158
Software Version 8.00.003 April 15, 2017
deletion of a record the screen reverts to Inquire mode.
Select/End Display Detail Windows Any hidden Detail Windows will appear on screen while in Inquire mode.
PRINT FORMS AND LABELS In a windows environment all prompting needs to be on screen as opposed to AgTrax Classic where some prompting did not appear until after the program had completed some processing. To make TraxView and Agtrax Classic the same; all prompting now appears on screen before the program performs any processes. If there are a large number of screen prompts some prompts may display in a window, but all will display prior to the operator accepting Screen Ok.
ALIGNMENT When an operator wants to print a test alignment prior to the actual job they will: 1) Enter the number of alignment patterns to print. 2) The program will move to Screen Ok and Report Delivery Options. 3) After those have been answered the alignment will be sent to the printer and the screen will
return to program prompting. 4) The prompt for Alignment will have a zero value. If another test pattern is desired change the
value. Otherwise proceed to step 5. 5) Accept screen prompt settings and proceed to Delivery Options Window.
LABELS
LABEL FORMAT FILE – Choose the number of the format file that corresponds to the labels being used.
NUMBER OF EACH LABEL – Up to 99 labels may be printed for each record included in the run. For multiple copies the first record will print that number of times; the second record will print that number of times and so on.
LABELS TO SKIP 1ST PAGE – If 2 or 3 across labels are used and the print is start at some point other than row 1 position 1 enter the number to be skipped.
PRINT TO CSV FILE An option has been added to the Report Delivery window that allows the operator to send a report directly to a CSV formatted file. This file is ready to open with Excel. It contains row one as column headings followed by a single row per report record. Generally speaking, CSV is not available for those programs using a format file to present the data. For example, Commodity Accounting Customer Detail Listing run as a report allows the use of a CSV. When run as Confirmation Letters it does not allow CSV. At the prompt for DELIVERY OPTIONS choose 4 = CSV. The resultant file is placed in the operators WORK folder on the main server. It is named by the menu option number and accounting application with a CSV extension. If the operator does not have a FTP connection from their PC to their WORK folder on the main server, they will want to call Support to have one setup. Using the FTP connection a CSV file may be pulled to the PC. PRINT TO PDF FORM An option has been added to the Report Delivery window that allows the operator to send a report directly to a PDF file. At the prompt for DELIVERY OPTIONS choose 5 = PDF. The resultant file is placed in the operators WORK folder on the main server. It is named by the menu option number and accounting application with a PDF extension. If the operator does not have a FTP connection from their PC to their WORK folder on the main server, they will want to call Support to have one setup. Using the FTP connection a PDF file may be pulled to the PC. This process works for those jobs using format files also. (Example could include Sales Analysis Volume Statements, Grain Confirmation letters and Accounts Receivable statements.) If the format file uses a PCL overlay, then some changes will need to be made to the format file for the PDF to
Patronage / Equity Appendices – Page - 159
Software Version 8.00.003 April 15, 2017
contain the data and PCL overlay. Contact Customer Support for assistance with this format file change. PRINT PAPERLESS Organizations using third party software to electronically store reports and documents have an option in Report Delivery for PAPERLESS. Presently this only works with Cabinet. If the option is selected and third party software is not available a warning displays. At the prompt for DELIVERY OPTIONS choose 6 = PAPERLESS. This will open the interface window where the operator will select a destination database, file folder and file name.
MENU HOPPING
The menu-hopping feature provides a quick and easy method of proceeding directly from one program to another without the necessity of returning to a menu. This is accomplished by entering the desired program's number at the appropriate field of any program. To "hop" to a program located in another system, enter the two-character system short name (see the cross-reference table below) and the program number, otherwise only the desired program number is necessary. The appropriate fields used for menu hopping are typically:
At any of the main menus or sub-menus. (i.e. Master File Listings Menu) After entry of the menu hopping code, the desired program will immediately appear on the screen, without the need to return to a menu. To exit any program and return to the Main Menu enter “E”. If security is activated, the operator will be prompted for the appropriate passwords before the "hopped to" program is displayed. The program locking feature is not adversely affected by menu hopping and will ensure that the system integrity is maintained before the "hopped to" program is accessed. To initiate the menu hop feature, programs must be registered with a System Program Number (or HOP CODE), using the "GUARD" SECURITY MAINTENANCE program (see your System Manager's Guide). Utility programs can be accessed by keying the Module Short Name then “UT”. (i.e. GLUT would jump you to the General Ledger Utility menu) DATE PROMPTS
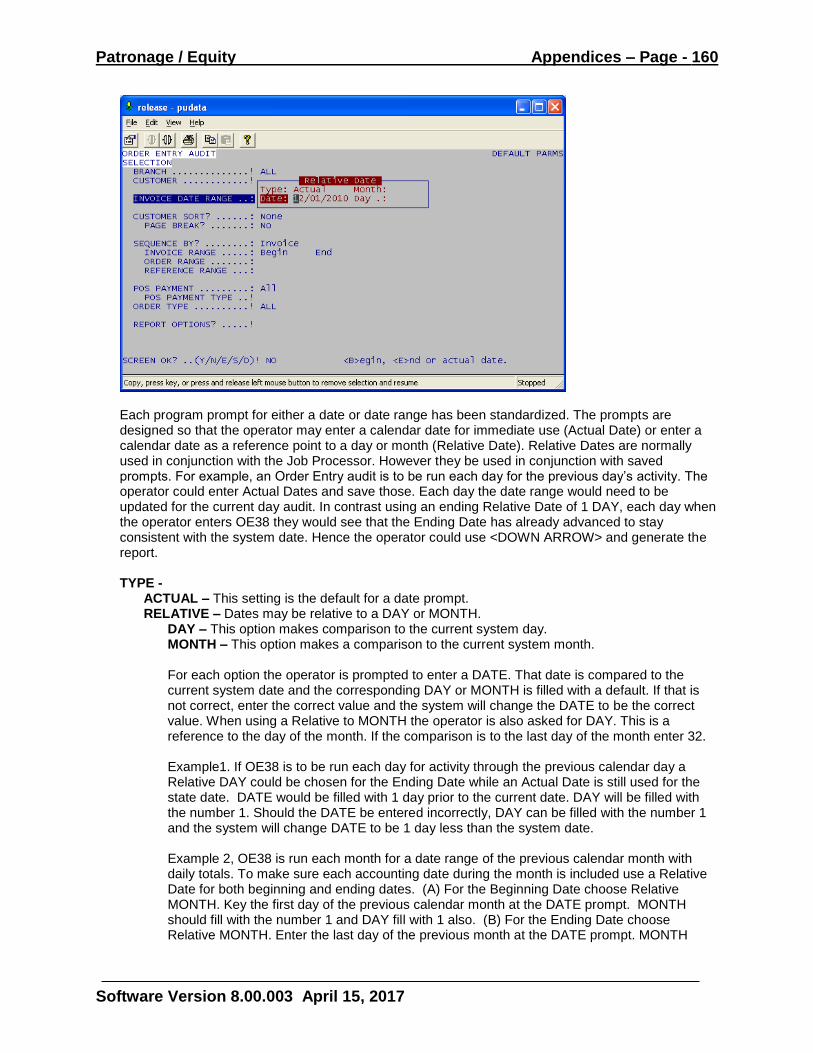
Patronage / Equity Appendices – Page - 160
Software Version 8.00.003 April 15, 2017
Each program prompt for either a date or date range has been standardized. The prompts are designed so that the operator may enter a calendar date for immediate use (Actual Date) or enter a calendar date as a reference point to a day or month (Relative Date). Relative Dates are normally used in conjunction with the Job Processor. However they be used in conjunction with saved prompts. For example, an Order Entry audit is to be run each day for the previous day’s activity. The operator could enter Actual Dates and save those. Each day the date range would need to be updated for the current day audit. In contrast using an ending Relative Date of 1 DAY, each day when the operator enters OE38 they would see that the Ending Date has already advanced to stay consistent with the system date. Hence the operator could use <DOWN ARROW> and generate the report. TYPE -
ACTUAL – This setting is the default for a date prompt. RELATIVE – Dates may be relative to a DAY or MONTH.
DAY – This option makes comparison to the current system day. MONTH – This option makes a comparison to the current system month. For each option the operator is prompted to enter a DATE. That date is compared to the current system date and the corresponding DAY or MONTH is filled with a default. If that is not correct, enter the correct value and the system will change the DATE to be the correct value. When using a Relative to MONTH the operator is also asked for DAY. This is a reference to the day of the month. If the comparison is to the last day of the month enter 32. Example1. If OE38 is to be run each day for activity through the previous calendar day a Relative DAY could be chosen for the Ending Date while an Actual Date is still used for the state date. DATE would be filled with 1 day prior to the current date. DAY will be filled with the number 1. Should the DATE be entered incorrectly, DAY can be filled with the number 1 and the system will change DATE to be 1 day less than the system date. Example 2, OE38 is run each month for a date range of the previous calendar month with daily totals. To make sure each accounting date during the month is included use a Relative Date for both beginning and ending dates. (A) For the Beginning Date choose Relative MONTH. Key the first day of the previous calendar month at the DATE prompt. MONTH should fill with the number 1 and DAY fill with 1 also. (B) For the Ending Date choose Relative MONTH. Enter the last day of the previous month at the DATE prompt. MONTH
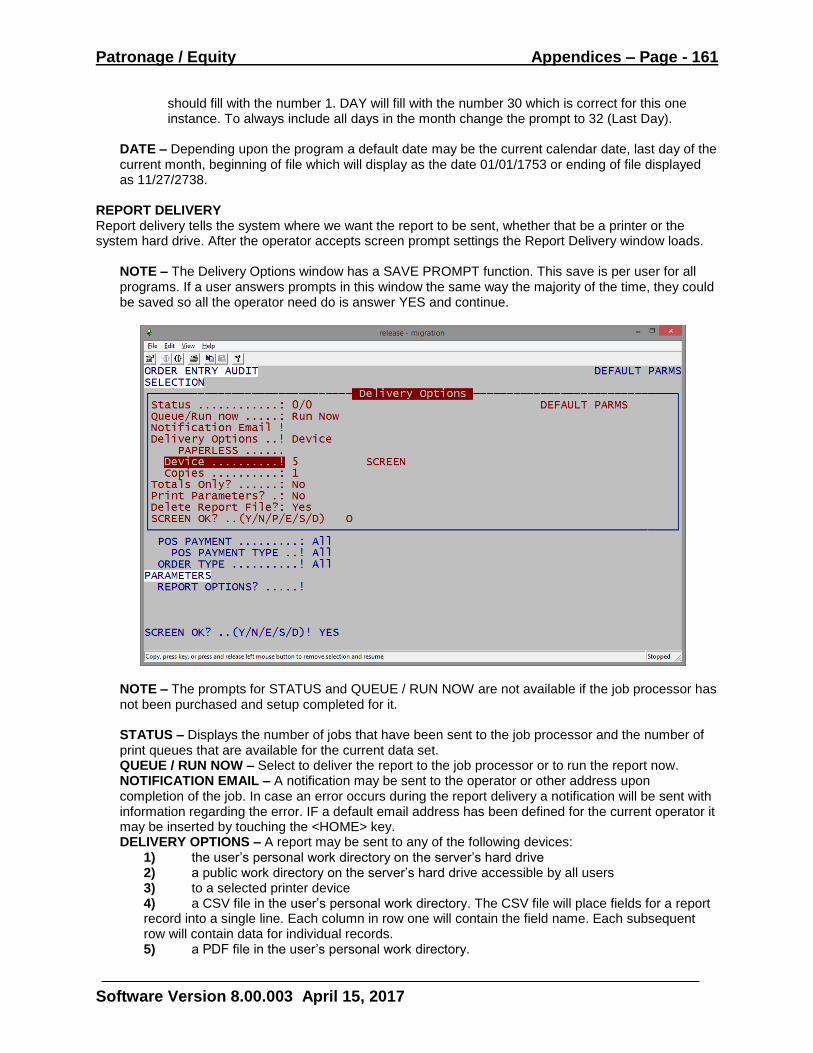
Patronage / Equity Appendices – Page - 161
Software Version 8.00.003 April 15, 2017
should fill with the number 1. DAY will fill with the number 30 which is correct for this one instance. To always include all days in the month change the prompt to 32 (Last Day).
DATE – Depending upon the program a default date may be the current calendar date, last day of the current month, beginning of file which will display as the date 01/01/1753 or ending of file displayed as 11/27/2738.
REPORT DELIVERY Report delivery tells the system where we want the report to be sent, whether that be a printer or the system hard drive. After the operator accepts screen prompt settings the Report Delivery window loads.
NOTE – The Delivery Options window has a SAVE PROMPT function. This save is per user for all programs. If a user answers prompts in this window the same way the majority of the time, they could be saved so all the operator need do is answer YES and continue.
NOTE – The prompts for STATUS and QUEUE / RUN NOW are not available if the job processor has not been purchased and setup completed for it.
STATUS – Displays the number of jobs that have been sent to the job processor and the number of print queues that are available for the current data set. QUEUE / RUN NOW – Select to deliver the report to the job processor or to run the report now. NOTIFICATION EMAIL – A notification may be sent to the operator or other address upon completion of the job. In case an error occurs during the report delivery a notification will be sent with information regarding the error. IF a default email address has been defined for the current operator it may be inserted by touching the <HOME> key. DELIVERY OPTIONS – A report may be sent to any of the following devices:
1) the user’s personal work directory on the server’s hard drive 2) a public work directory on the server’s hard drive accessible by all users 3) to a selected printer device 4) a CSV file in the user’s personal work directory. The CSV file will place fields for a report record into a single line. Each column in row one will contain the field name. Each subsequent row will contain data for individual records. 5) a PDF file in the user’s personal work directory.
Patronage / Equity Appendices – Page - 162
Software Version 8.00.003 April 15, 2017
6) Third party software for electronically storing reports and documents. An Interface opens to choose destination.
NOTE – When choosing Personal, Public, CSV File or PDF File several prompts are by-passed. DEVICE – Choose a device to print the report. All defined devices are available as they are in other programs. It was mentioned earlier that saving a report to Personal or Public is stored in a different format than when using device 4 and that those are only accessible through the TraxReport Menu. Device 4 may be used here to save the report so that it is accessible through PRTC. When sending a job to the Job Processor no RP (Pass Thru) or Video (Device 5, 7) are allowed. COPIES When defining a printer device it may be set for a specific number of copies or zero so that the operator may choose a number of copies when printing the report. Copies will default to 1 and may be changed as the need arises. TOTALS ONLY – If a program has prompts to generate detail or summary totals, a detail selection may be over-ridden by answering YES. PRINT PARAMETERS – Prompt settings are normally not included as part of the first page of the report. Answer YES to print a separate sheet that contains program prompt settings. Answer “S” to print parameters on the first page of the report. DELETE REPORT FILE – Even though a report is sent to a printer device, the operator may save a second copy for future use. To save a copy, change the prompt default setting to NO. The job is saved in the Private directory. SCREEN OK – The operator has several available choices.
YES – Accept screen prompts and proceed with the report delivery/ NO – Change screen prompts prior to proceeding. END – Cancel the delivery with no action taken. SAVE – Save screen prompts for use with all report delivery as a default. DELETE – Remove SAVED screen prompts for the Save name displayed in the upper right corner of the window.
REPORT ERRORS NOTE – There are three types of error messages that the operator may receive:
1. APPLICATION ERROR – Examples would be no records found matching prompt criteria. In the case of OE38 this could also be Invalid or Stop Post General Ledger numbers.
2. CRITICAL ERROR – A system problem that requires Customer Support assistance. 3. NON-CRITICAL ERROR – A system problem that may require Customer Support assistance.
For each type of error a report is not physically printed. A copy is saved to the operator’s PRIVATE directory. Go there to view the report and/ or error message. The operator PRIVATE directory is accessed via TraxReport Menu located on the main menu or using the following HOP keys.
TR – Takes the operator to the TraxReport Menu. TRJ – Takes the operator directly to the Job Processor menu option. TRR – Takes the operator directly to the Report Delivery menu option.
REPORT DISPLAY TO SCREEN All of the search features that are available when directly displaying a report to screen are available when displaying a report to screen through Report Delivery. There are also several additional options available.
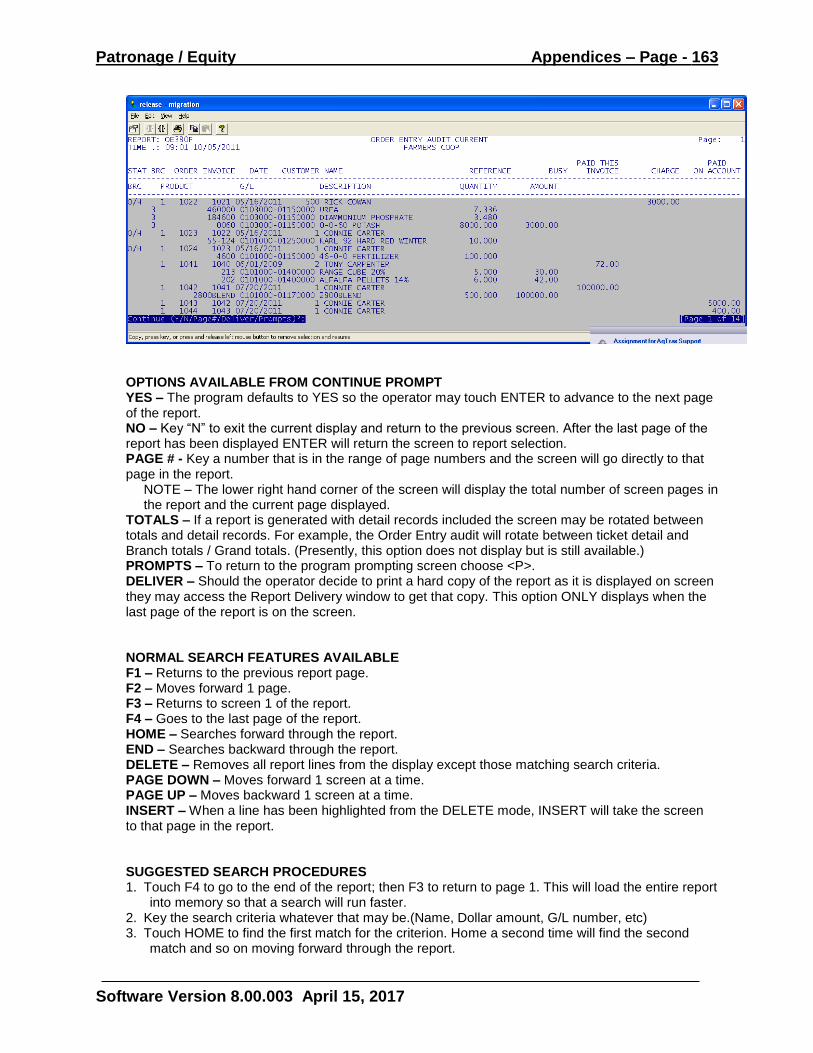
Patronage / Equity Appendices – Page - 163
Software Version 8.00.003 April 15, 2017
OPTIONS AVAILABLE FROM CONTINUE PROMPT YES – The program defaults to YES so the operator may touch ENTER to advance to the next page of the report. NO – Key “N” to exit the current display and return to the previous screen. After the last page of the report has been displayed ENTER will return the screen to report selection. PAGE # - Key a number that is in the range of page numbers and the screen will go directly to that page in the report.
NOTE – The lower right hand corner of the screen will display the total number of screen pages in the report and the current page displayed.
TOTALS – If a report is generated with detail records included the screen may be rotated between totals and detail records. For example, the Order Entry audit will rotate between ticket detail and Branch totals / Grand totals. (Presently, this option does not display but is still available.) PROMPTS – To return to the program prompting screen choose <P>. DELIVER – Should the operator decide to print a hard copy of the report as it is displayed on screen they may access the Report Delivery window to get that copy. This option ONLY displays when the last page of the report is on the screen. NORMAL SEARCH FEATURES AVAILABLE F1 – Returns to the previous report page. F2 – Moves forward 1 page. F3 – Returns to screen 1 of the report. F4 – Goes to the last page of the report. HOME – Searches forward through the report. END – Searches backward through the report. DELETE – Removes all report lines from the display except those matching search criteria. PAGE DOWN – Moves forward 1 screen at a time. PAGE UP – Moves backward 1 screen at a time. INSERT – When a line has been highlighted from the DELETE mode, INSERT will take the screen to that page in the report. SUGGESTED SEARCH PROCEDURES 1. Touch F4 to go to the end of the report; then F3 to return to page 1. This will load the entire report
into memory so that a search will run faster. 2. Key the search criteria whatever that may be.(Name, Dollar amount, G/L number, etc) 3. Touch HOME to find the first match for the criterion. Home a second time will find the second
match and so on moving forward through the report.
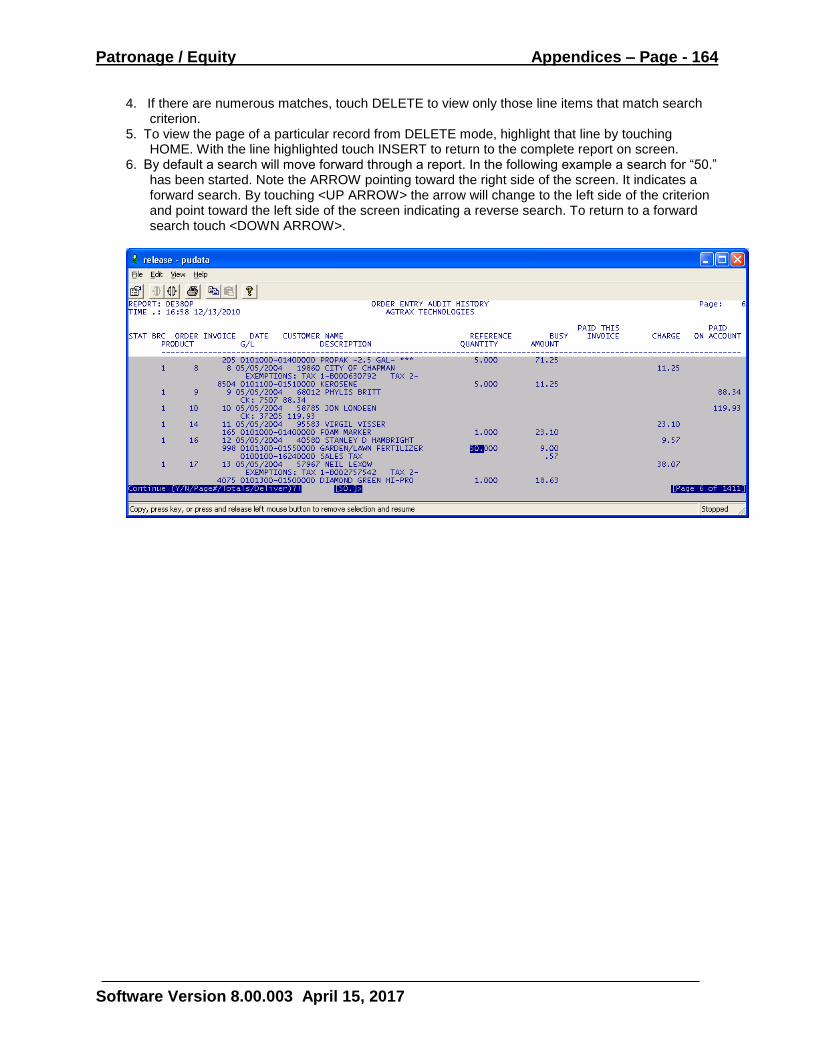
Patronage / Equity Appendices – Page - 164
Software Version 8.00.003 April 15, 2017
4. If there are numerous matches, touch DELETE to view only those line items that match search criterion.
5. To view the page of a particular record from DELETE mode, highlight that line by touching HOME. With the line highlighted touch INSERT to return to the complete report on screen.
6. By default a search will move forward through a report. In the following example a search for “50.” has been started. Note the ARROW pointing toward the right side of the screen. It indicates a forward search. By touching <UP ARROW> the arrow will change to the left side of the criterion and point toward the left side of the screen indicating a reverse search. To return to a forward search touch <DOWN ARROW>.
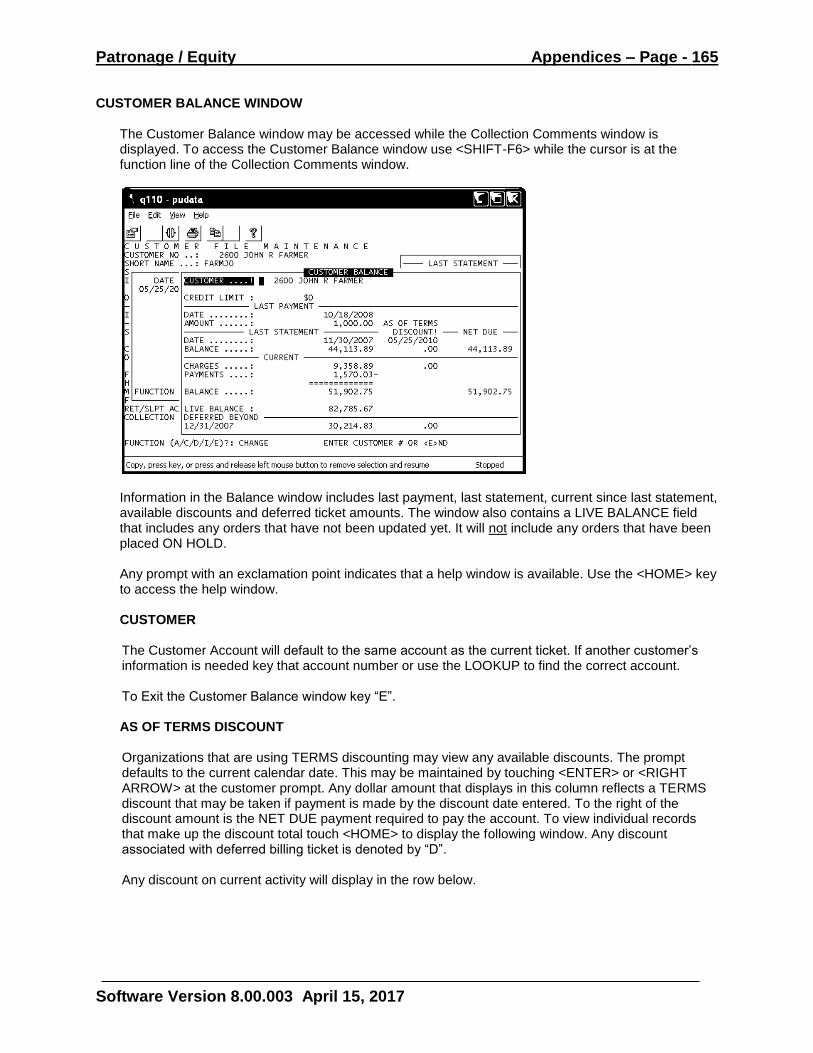
Patronage / Equity Appendices – Page - 165
Software Version 8.00.003 April 15, 2017
CUSTOMER BALANCE WINDOW
The Customer Balance window may be accessed while the Collection Comments window is displayed. To access the Customer Balance window use <SHIFT-F6> while the cursor is at the function line of the Collection Comments window.
Information in the Balance window includes last payment, last statement, current since last statement, available discounts and deferred ticket amounts. The window also contains a LIVE BALANCE field that includes any orders that have not been updated yet. It will not include any orders that have been placed ON HOLD.
Any prompt with an exclamation point indicates that a help window is available. Use the <HOME> key to access the help window.
CUSTOMER
The Customer Account will default to the same account as the current ticket. If another customer’s information is needed key that account number or use the LOOKUP to find the correct account. To Exit the Customer Balance window key “E”.
AS OF TERMS DISCOUNT
Organizations that are using TERMS discounting may view any available discounts. The prompt defaults to the current calendar date. This may be maintained by touching <ENTER> or <RIGHT ARROW> at the customer prompt. Any dollar amount that displays in this column reflects a TERMS discount that may be taken if payment is made by the discount date entered. To the right of the discount amount is the NET DUE payment required to pay the account. To view individual records that make up the discount total touch <HOME> to display the following window. Any discount associated with deferred billing ticket is denoted by “D”. Any discount on current activity will display in the row below.
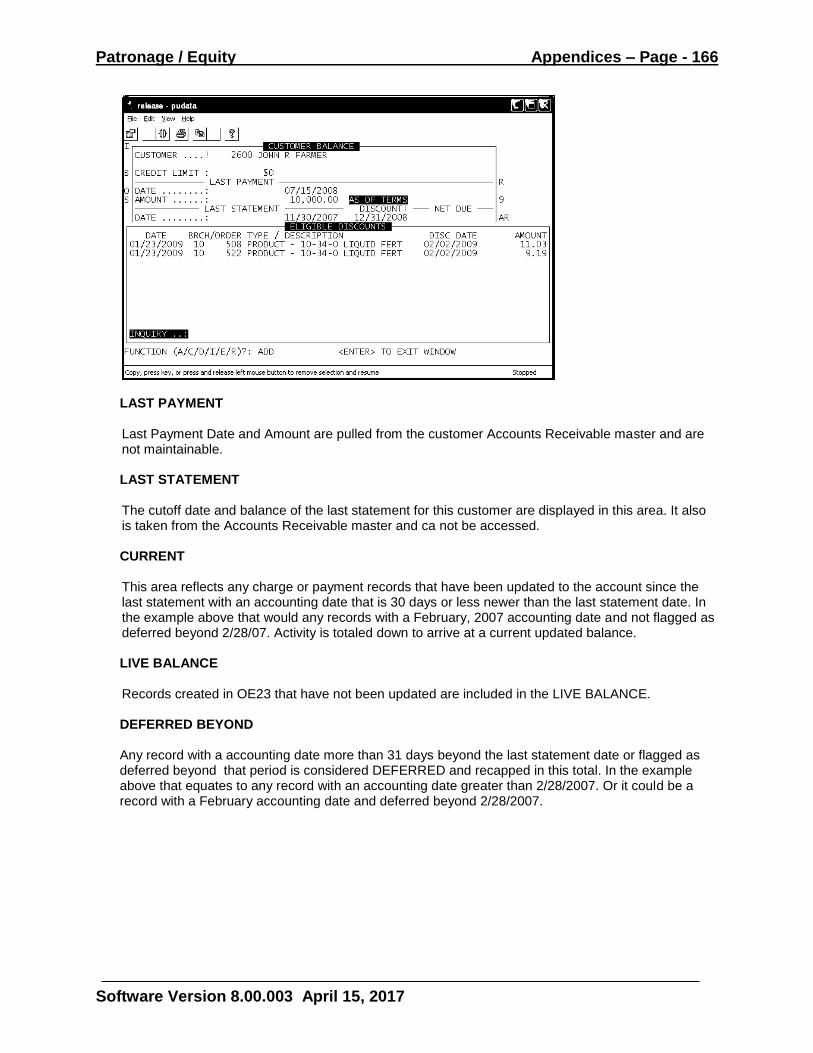
Patronage / Equity Appendices – Page - 166
Software Version 8.00.003 April 15, 2017
LAST PAYMENT
Last Payment Date and Amount are pulled from the customer Accounts Receivable master and are not maintainable.
LAST STATEMENT
The cutoff date and balance of the last statement for this customer are displayed in this area. It also is taken from the Accounts Receivable master and ca not be accessed.
CURRENT
This area reflects any charge or payment records that have been updated to the account since the last statement with an accounting date that is 30 days or less newer than the last statement date. In the example above that would any records with a February, 2007 accounting date and not flagged as deferred beyond 2/28/07. Activity is totaled down to arrive at a current updated balance.
LIVE BALANCE
Records created in OE23 that have not been updated are included in the LIVE BALANCE. DEFERRED BEYOND
Any record with a accounting date more than 31 days beyond the last statement date or flagged as deferred beyond that period is considered DEFERRED and recapped in this total. In the example above that equates to any record with an accounting date greater than 2/28/2007. Or it could be a record with a February accounting date and deferred beyond 2/28/2007.
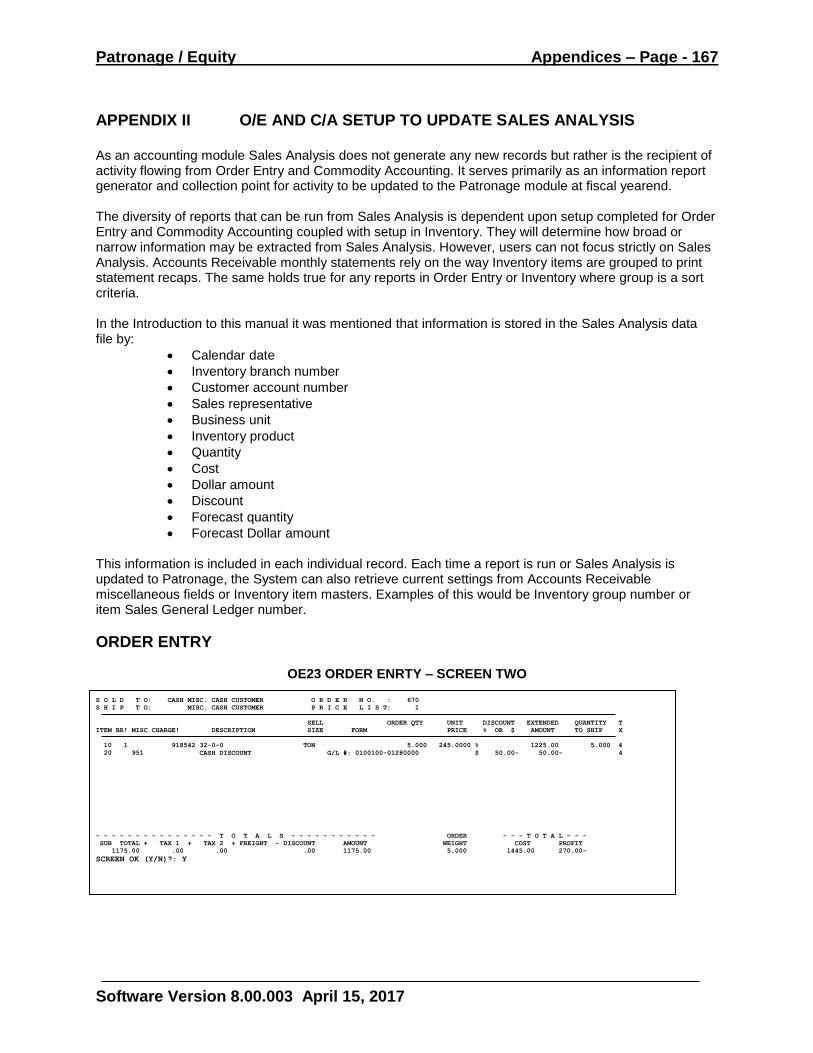
Patronage / Equity Appendices – Page - 167
Software Version 8.00.003 April 15, 2017
APPENDIX II O/E AND C/A SETUP TO UPDATE SALES ANALYSIS As an accounting module Sales Analysis does not generate any new records but rather is the recipient of activity flowing from Order Entry and Commodity Accounting. It serves primarily as an information report generator and collection point for activity to be updated to the Patronage module at fiscal yearend. The diversity of reports that can be run from Sales Analysis is dependent upon setup completed for Order Entry and Commodity Accounting coupled with setup in Inventory. They will determine how broad or narrow information may be extracted from Sales Analysis. However, users can not focus strictly on Sales Analysis. Accounts Receivable monthly statements rely on the way Inventory items are grouped to print statement recaps. The same holds true for any reports in Order Entry or Inventory where group is a sort criteria. In the Introduction to this manual it was mentioned that information is stored in the Sales Analysis data file by:
Calendar date
Inventory branch number
Customer account number
Sales representative
Business unit
Inventory product
Quantity
Cost
Dollar amount
Discount
Forecast quantity
Forecast Dollar amount
This information is included in each individual record. Each time a report is run or Sales Analysis is updated to Patronage, the System can also retrieve current settings from Accounts Receivable miscellaneous fields or Inventory item masters. Examples of this would be Inventory group number or item Sales General Ledger number.
ORDER ENTRY
OE23 ORDER ENRTY – SCREEN TWO S O L D T O: CASH MISC. CASH CUSTOMER O R D E R N O. : 670
S H I P T O: MISC. CASH CUSTOMER P R I C E L I S T: 1
SELL ORDER QTY UNIT DISCOUNT EXTENDED QUANTITY T
ITEM BR! MISC CHARGE! DESCRIPTION SIZE FORM PRICE % OR $ AMOUNT TO SHIP X
10 1 918542 32-0-0 TON 5.000 245.0000 % 1225.00 5.000 4
20 951 CASH DISCOUNT G/L #: 0100100-01280000 $ 50.00- 50.00- 4
- - - - - - - - - - - - - - - T O T A L S - - - - - - - - - - - ORDER - - - T O T A L - - -
SUB TOTAL + TAX 1 + TAX 2 + FREIGHT - DISCOUNT AMOUNT WEIGHT COST PROFIT
1175.00 .00 .00 .00 1175.00 5.000 1445.00 270.00-
SCREEN OK (Y/N)?: Y
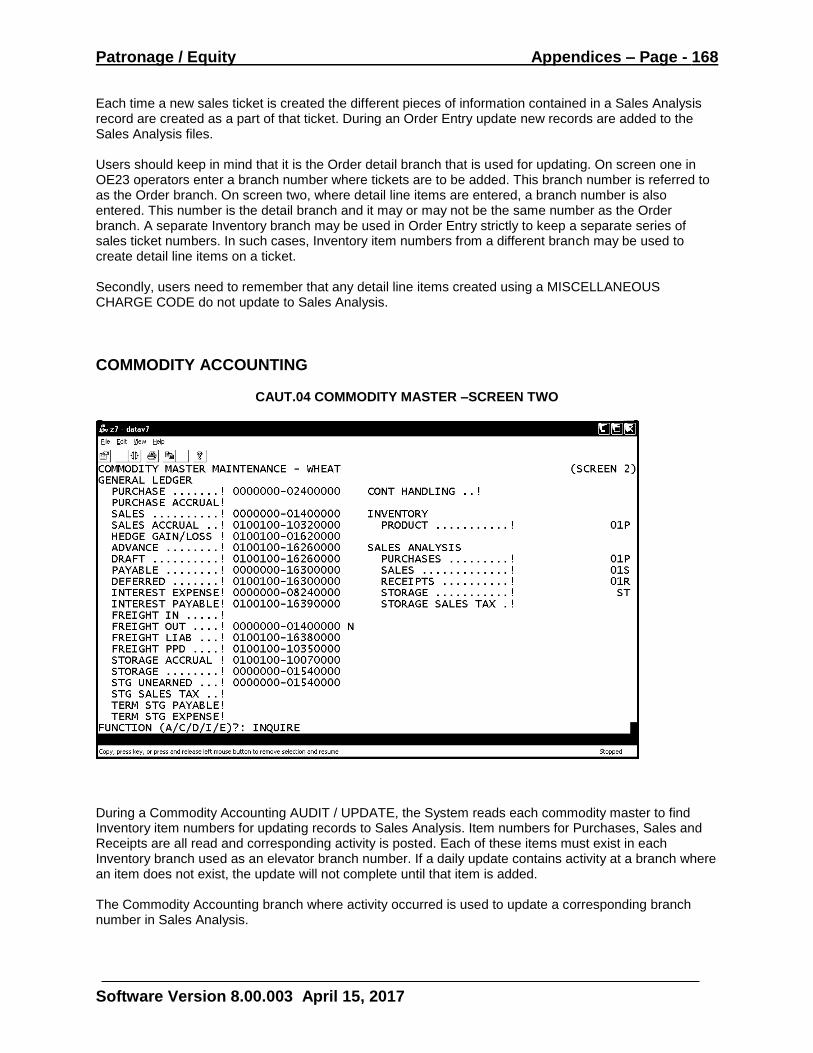
Patronage / Equity Appendices – Page - 168
Software Version 8.00.003 April 15, 2017
Each time a new sales ticket is created the different pieces of information contained in a Sales Analysis record are created as a part of that ticket. During an Order Entry update new records are added to the Sales Analysis files. Users should keep in mind that it is the Order detail branch that is used for updating. On screen one in OE23 operators enter a branch number where tickets are to be added. This branch number is referred to as the Order branch. On screen two, where detail line items are entered, a branch number is also entered. This number is the detail branch and it may or may not be the same number as the Order branch. A separate Inventory branch may be used in Order Entry strictly to keep a separate series of sales ticket numbers. In such cases, Inventory item numbers from a different branch may be used to create detail line items on a ticket. Secondly, users need to remember that any detail line items created using a MISCELLANEOUS CHARGE CODE do not update to Sales Analysis.
COMMODITY ACCOUNTING
CAUT.04 COMMODITY MASTER –SCREEN TWO
During a Commodity Accounting AUDIT / UPDATE, the System reads each commodity master to find Inventory item numbers for updating records to Sales Analysis. Item numbers for Purchases, Sales and Receipts are all read and corresponding activity is posted. Each of these items must exist in each Inventory branch used as an elevator branch number. If a daily update contains activity at a branch where an item does not exist, the update will not complete until that item is added. The Commodity Accounting branch where activity occurred is used to update a corresponding branch number in Sales Analysis.
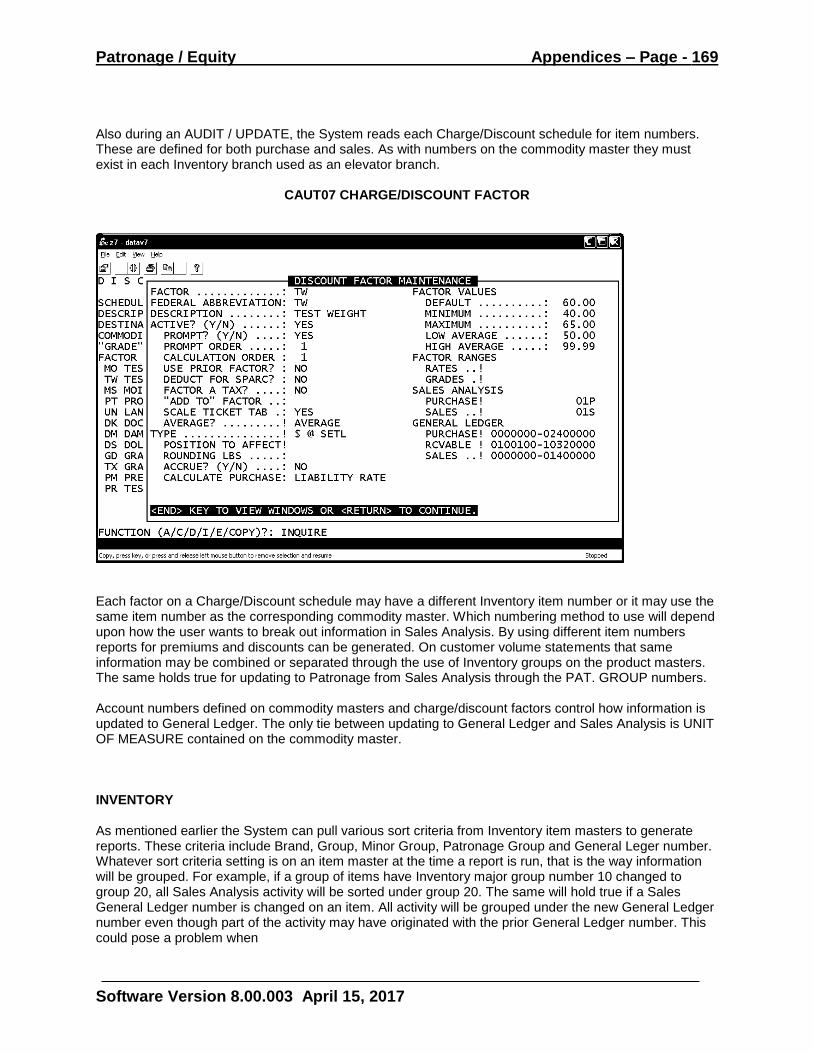
Patronage / Equity Appendices – Page - 169
Software Version 8.00.003 April 15, 2017
Also during an AUDIT / UPDATE, the System reads each Charge/Discount schedule for item numbers. These are defined for both purchase and sales. As with numbers on the commodity master they must exist in each Inventory branch used as an elevator branch.
CAUT07 CHARGE/DISCOUNT FACTOR
Each factor on a Charge/Discount schedule may have a different Inventory item number or it may use the same item number as the corresponding commodity master. Which numbering method to use will depend upon how the user wants to break out information in Sales Analysis. By using different item numbers reports for premiums and discounts can be generated. On customer volume statements that same information may be combined or separated through the use of Inventory groups on the product masters. The same holds true for updating to Patronage from Sales Analysis through the PAT. GROUP numbers. Account numbers defined on commodity masters and charge/discount factors control how information is updated to General Ledger. The only tie between updating to General Ledger and Sales Analysis is UNIT OF MEASURE contained on the commodity master. INVENTORY As mentioned earlier the System can pull various sort criteria from Inventory item masters to generate reports. These criteria include Brand, Group, Minor Group, Patronage Group and General Leger number. Whatever sort criteria setting is on an item master at the time a report is run, that is the way information will be grouped. For example, if a group of items have Inventory major group number 10 changed to group 20, all Sales Analysis activity will be sorted under group 20. The same will hold true if a Sales General Ledger number is changed on an item. All activity will be grouped under the new General Ledger number even though part of the activity may have originated with the prior General Ledger number. This could pose a problem when
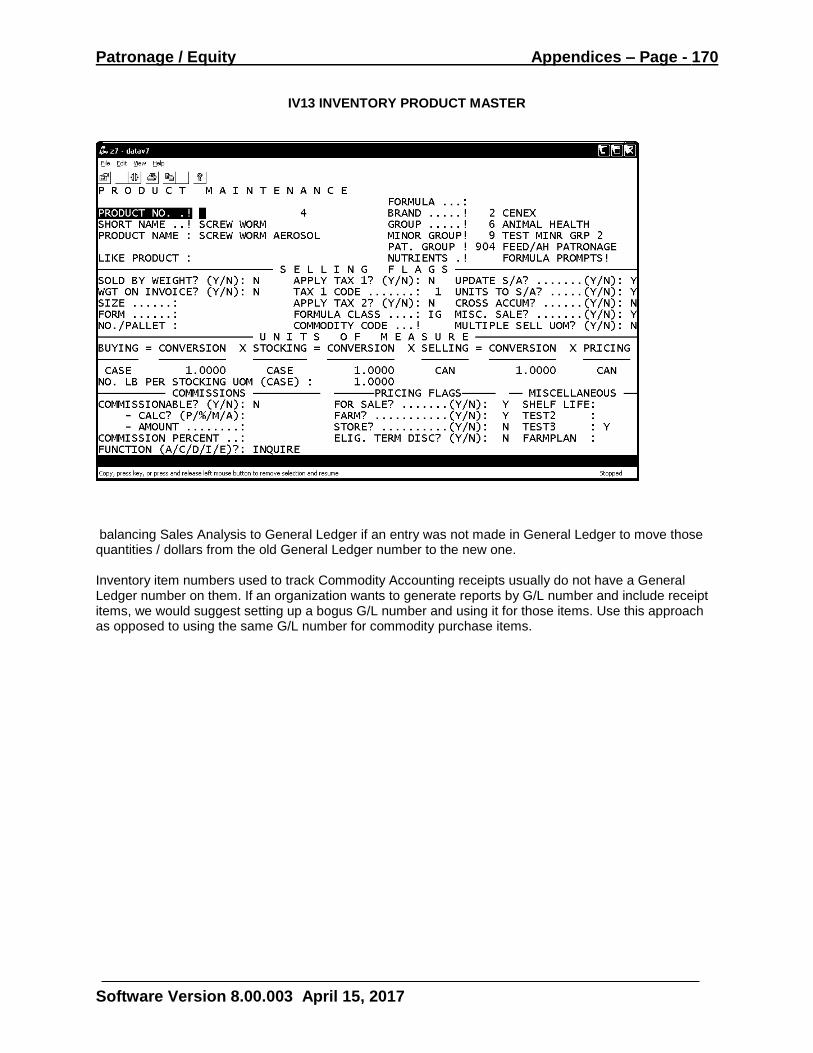
Patronage / Equity Appendices – Page - 170
Software Version 8.00.003 April 15, 2017
IV13 INVENTORY PRODUCT MASTER
balancing Sales Analysis to General Ledger if an entry was not made in General Ledger to move those quantities / dollars from the old General Ledger number to the new one. Inventory item numbers used to track Commodity Accounting receipts usually do not have a General Ledger number on them. If an organization wants to generate reports by G/L number and include receipt items, we would suggest setting up a bogus G/L number and using it for those items. Use this approach as opposed to using the same G/L number for commodity purchase items.
Patronage / Equity Appendices – Page - 171
Software Version 8.00.003 April 15, 2017
APPENDIX III BALANCING SALES ANALYSIS TO GENERAL LEDGER Periodically organizations will want to balance information in Sales Analysis to General Ledger. This process validates successful completion of daily updates and any changes in setup have been made in both modules. For Cooperative organizations it is highly recommended to do this on a regular basis, but especially at yearend before updating to Patronage. While balancing Sales Analysis to General Ledger and balancing Patronage to General Ledger may be looked at as two separate functions, they are closing intertwined. Probably the easiest way to balance Sales Analysis to General Ledger is sub-totally Sales Analysis activity by sales account numbers contained on each Inventory item master. Those sub-totals may then be compared to a General Ledger trial balance for the same time period. On the other hand, information that will be going to Patronage is to be condensed by patronage consolidation group numbers. Balancing to General Ledger using this method will more than likely involve the same items containing sales General Ledger numbers used in the first method. So users will want to validate not only that Sales Analysis activity agrees with General Ledger but also that activity updated to Patronage still is in agreement with General Ledger. The following list of reports are offered as suggestions of what to do to balance the two modules and how to follow up if quantities / amounts do not balance. Which reports or searching methods an operator uses will depend upon personal preference and individual circumstances. BALANCE TO GENERAL LEDGER PATRONAGE G/L BALANCE REPORT (SA35) – This is perhaps the best report to use for balancing and finding any setup problems. It gives a recap of Sales Analysis activity by General Ledger number and Patronage group. It also pulls in G/L amounts so everything is on one report. Depending upon program prompts settings, it will also list Inventory items that have a matching G/L number but no matching patronage group or a matching patronage group and no G/L number. CUSTOMER SALES (SA31) – The other Sales Analysis report to use is the Customer Sales report. Normally run this by G/L Account. However, it could be sorted first by patronage group followed by G/L Account. GENERAL LEDGER TRIAL BALANCE – On the General Ledger side use the TRIAL BALANCE report. Sort this report to get company totals. LOCATING DIFFERENCES 1. Remember that there are three types of records that update to General Ledger but do not affect Sales Analysis.
A. Any records entered through GL21 go directly to General Ledger and do not affect Sales Analysis.
B. Entries made in Accounts Payable update to G/L only. C. Any detail line items created on an Order Entry ticket using a MISCELLANEOUS CHARGE
CODE update to G/L and not Sales Analysis.
The first two types are reconciling items to be noted as reasons for differences. Use GENERAL LEDGER REPORT (GL33) to locate any record types like these. Be sure to answer NO to SUMMARIZE BY DAY so all detail records will print. The following example shows a GL21 entry and record from Accounts Payable posted to G/L account 0100100-01050000. In the TYPE column GLR denotes a record originating from General Ledger and APR or APC denotes a record originating from Accounts Payable.
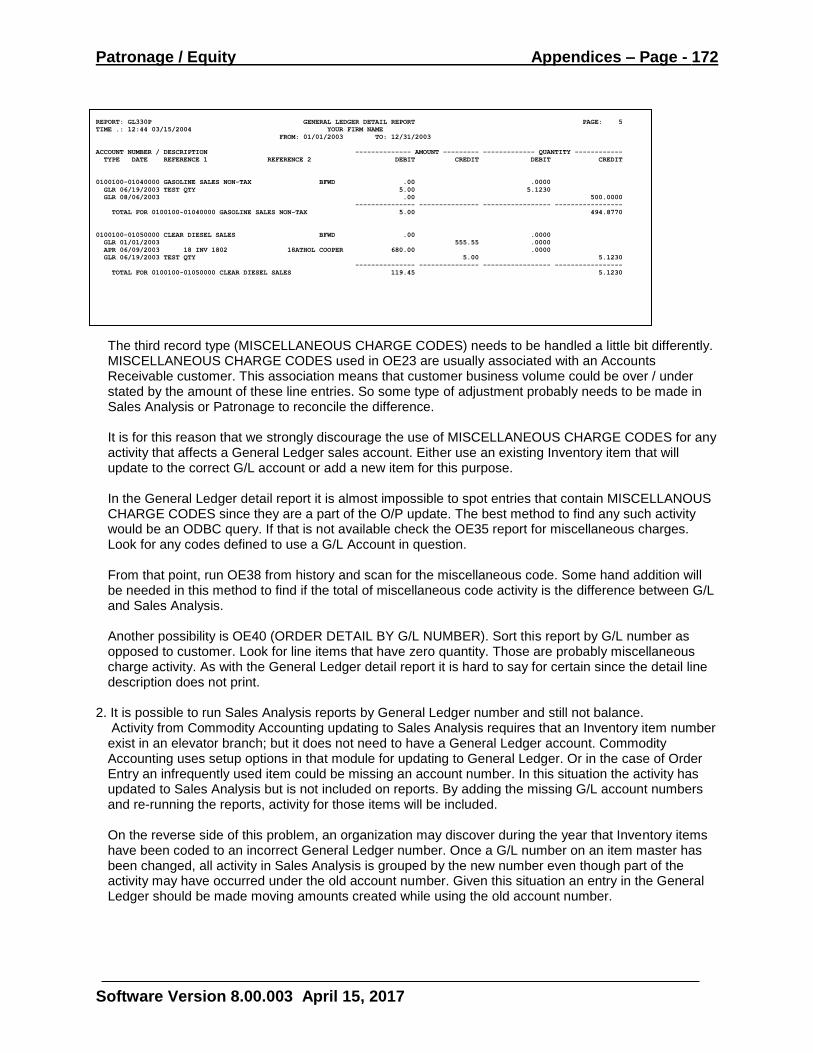
Patronage / Equity Appendices – Page - 172
Software Version 8.00.003 April 15, 2017
REPORT: GL330P GENERAL LEDGER DETAIL REPORT PAGE: 5
TIME .: 12:44 03/15/2004 YOUR FIRM NAME
FROM: 01/01/2003 TO: 12/31/2003
ACCOUNT NUMBER / DESCRIPTION -------------- AMOUNT --------- ------------- QUANTITY ------------
TYPE DATE REFERENCE 1 REFERENCE 2 DEBIT CREDIT DEBIT CREDIT
0100100-01040000 GASOLINE SALES NON-TAX BFWD .00 .0000
GLR 06/19/2003 TEST QTY 5.00 5.1230
GLR 08/06/2003 .00 500.0000
--------------- --------------- ----------------- -----------------
TOTAL FOR 0100100-01040000 GASOLINE SALES NON-TAX 5.00 494.8770
0100100-01050000 CLEAR DIESEL SALES BFWD .00 .0000
GLR 01/01/2003 555.55 .0000
APR 06/09/2003 18 INV 1802 18ATHOL COOPER 680.00 .0000
GLR 06/19/2003 TEST QTY 5.00 5.1230
--------------- --------------- ----------------- -----------------
TOTAL FOR 0100100-01050000 CLEAR DIESEL SALES 119.45 5.1230
The third record type (MISCELLANEOUS CHARGE CODES) needs to be handled a little bit differently. MISCELLANEOUS CHARGE CODES used in OE23 are usually associated with an Accounts Receivable customer. This association means that customer business volume could be over / under stated by the amount of these line entries. So some type of adjustment probably needs to be made in Sales Analysis or Patronage to reconcile the difference.
It is for this reason that we strongly discourage the use of MISCELLANEOUS CHARGE CODES for any activity that affects a General Ledger sales account. Either use an existing Inventory item that will update to the correct G/L account or add a new item for this purpose. In the General Ledger detail report it is almost impossible to spot entries that contain MISCELLANOUS CHARGE CODES since they are a part of the O/P update. The best method to find any such activity would be an ODBC query. If that is not available check the OE35 report for miscellaneous charges. Look for any codes defined to use a G/L Account in question. From that point, run OE38 from history and scan for the miscellaneous code. Some hand addition will be needed in this method to find if the total of miscellaneous code activity is the difference between G/L and Sales Analysis. Another possibility is OE40 (ORDER DETAIL BY G/L NUMBER). Sort this report by G/L number as opposed to customer. Look for line items that have zero quantity. Those are probably miscellaneous charge activity. As with the General Ledger detail report it is hard to say for certain since the detail line description does not print.
2. It is possible to run Sales Analysis reports by General Ledger number and still not balance. Activity from Commodity Accounting updating to Sales Analysis requires that an Inventory item number exist in an elevator branch; but it does not need to have a General Ledger account. Commodity Accounting uses setup options in that module for updating to General Ledger. Or in the case of Order Entry an infrequently used item could be missing an account number. In this situation the activity has updated to Sales Analysis but is not included on reports. By adding the missing G/L account numbers and re-running the reports, activity for those items will be included.
On the reverse side of this problem, an organization may discover during the year that Inventory items have been coded to an incorrect General Ledger number. Once a G/L number on an item master has been changed, all activity in Sales Analysis is grouped by the new number even though part of the activity may have occurred under the old account number. Given this situation an entry in the General Ledger should be made moving amounts created while using the old account number.
Patronage / Equity Appendices – Page - 173
Software Version 8.00.003 April 15, 2017
To check for invalid or missing General Ledger numbers use IV33.8 (ITEM LISTING). Run this report sorted by group since most items tied together by a major Inventory group will have the same General Ledger number.
3. As Inventory items become obsolete organizations may decide to remove them from the
System. The Inventory module does certain checking to make sure the item has no ON-HAND amount or any history. It does not, however, check Sales Analysis to look for any history. If only the item is deleted at the branch level, the System still has the product master to locate information such as group, brand and patronage group for sorting purposes. Should the product master also be deleted the only information left for any program to sort by is product number.
Use SA33 (DETAIL VERIFICATION) to search for invalid Inventory items. SA35 also has a prompt for invalid items. When this prompt is set to YES it will list any invalids found on the report. In order for activity to update to Patronage, the Inventory product master must exist.
4. When balancing to General Ledger by Patronage Group, SA35 is probably the best report
because it will include a listing of items that should have a particular patronage group. Operators may also want to use IV33.8. Run this report by group. Usually most items in any group will go to the same Patronage group.
Any products found to be in the wrong group may be corrected in IV13. After making any group changes, re-run the report and information should now be in the correct location.
In special situations where an organization is posting patronage and non-patronage business to the same General Ledger number; about the only thing that can be done is treat those amounts as reconciling differences. Use IV31 or SA31 to come up with a total dollar volume created by those items that are considered non-patronage.
5. In some cases a daily update may have failed to complete. Use the Sales Analysis utility program SAUT04 to rebuild information from Order Entry and Commodity Accounting. Employees may be in Order Entry and Commodity Accounting while this program is running. Do not update (OE25 or CA30) while running this program.
Patronage / Equity Appendices – Page - 174
Software Version 8.00.003 April 15, 2017
APPENDIX IV UPDATING SALES ANALYSIS TO PATRONAGE At the end of each fiscal year cooperative organizations will update Sales Analysis to the Patronage / Equity module. This will move information into place for a patronage allocation to customers and provide the auditor with information needed to complete their audit. Before sending any information to Patronage several things should be completed first. 1. All Inventory groups used as patronage consolidation groups must be defined in PE11. The reference
table should be current and contain the group number that is in the PAT GROUP field on each Inventory product master that is to update to the current consolidation group.
2. If this is the very first time to use the Patronage module, check the setup in PEUT02. 3. Information from the previous fiscal year should have been through the allocation process and
updated to patronage history. (Even if a patronage payout does not occur the business volume should go through a zero allocation so that it is updated to history. This is especially important for those organizations doing storage accruals to patronage each year.)
4. Change the yearend date in PEUT02 to reflect the fiscal year just completed. 5. Complete all daily updates in Order Entry and Commodity Accounting for the old fiscal year. After these steps have been completed, the operator is ready to move data to Patronage. 1. For those organizations doing a storage accrual to patronage each year, use the CUSTOMER DETAIL
REPORT (CA37.1) to move those amounts. If the Patronage Year-End date displayed right before updating to Sales Analysis is not correct – stop and go through the pre-update steps again.
2. PE21 will pull information from Sales Analysis into Patronage. This program may be run more than one
time. Records updated to Patronage are classified as coming from Sales Analysis. Each time PE21 is run all previous records are purged and replaced with new ones. If the date range is not correct – stop and go through the pre-update steps again.
3. Change the description in PE14 to reflect activity that will be on the PATRONAGE VOLUME REPORT
(PE24). 4. Run PE24 and balance to General Ledger. If this was previously done in Sales Analysis, amounts on
the Patronage Volume Report should be the same quantities / dollars. If not, use Appendix III to locate any differences.
5. Complete any transfers (PE23) and maintenance (PE22). 6. Auditors usually want a totals only report breaking out business volume by an Accounts Receivable
miscellaneous field such as patronage or member. Use PE24 for this purpose. Print TOTAL PAGES ONLY and sort by MISCELLANEOUS FIELD. In the miscellaneous field window be sure to the four questions as:
LOW VALUE N HIGH VALUE Y
Patronage / Equity Appendices – Page - 175
Software Version 8.00.003 April 15, 2017
SORT BY Y SUBTOTAL BY Y
This will produce a report that sub-totals all NO business by patronage consolidation group and all YES business volume the same way.
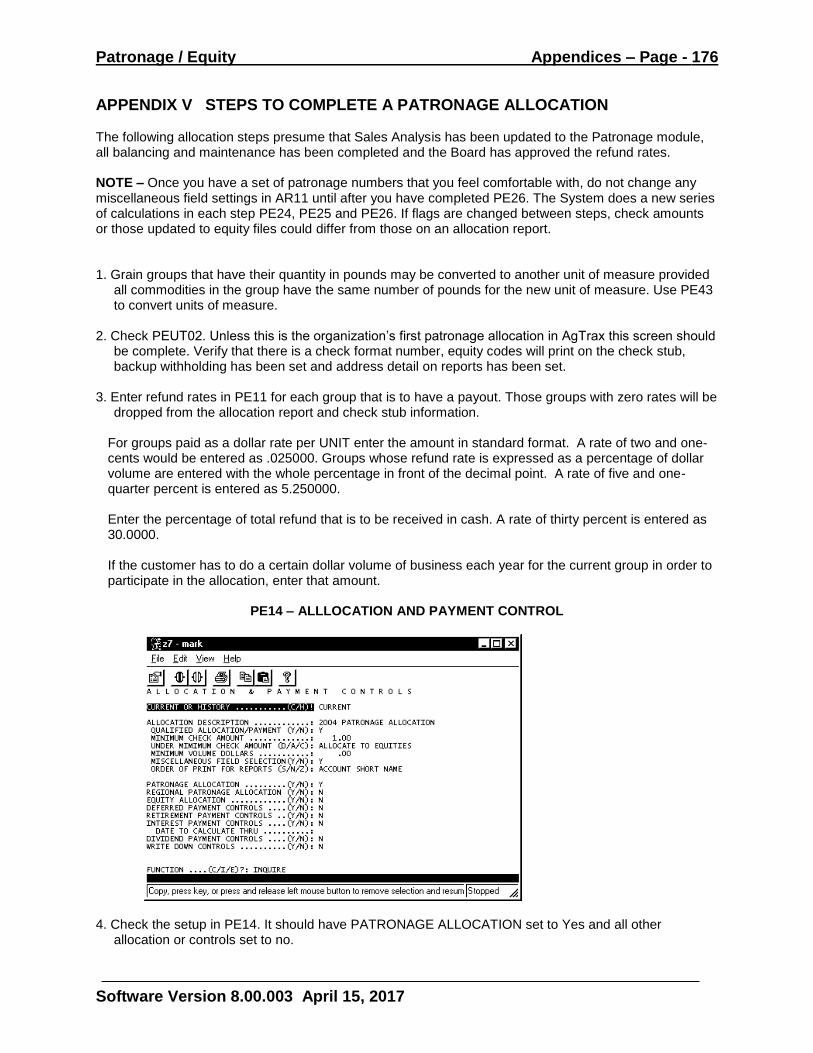
Patronage / Equity Appendices – Page - 176
Software Version 8.00.003 April 15, 2017
APPENDIX V STEPS TO COMPLETE A PATRONAGE ALLOCATION The following allocation steps presume that Sales Analysis has been updated to the Patronage module, all balancing and maintenance has been completed and the Board has approved the refund rates. NOTE – Once you have a set of patronage numbers that you feel comfortable with, do not change any miscellaneous field settings in AR11 until after you have completed PE26. The System does a new series of calculations in each step PE24, PE25 and PE26. If flags are changed between steps, check amounts or those updated to equity files could differ from those on an allocation report. 1. Grain groups that have their quantity in pounds may be converted to another unit of measure provided
all commodities in the group have the same number of pounds for the new unit of measure. Use PE43 to convert units of measure.
2. Check PEUT02. Unless this is the organization’s first patronage allocation in AgTrax this screen should
be complete. Verify that there is a check format number, equity codes will print on the check stub, backup withholding has been set and address detail on reports has been set.
3. Enter refund rates in PE11 for each group that is to have a payout. Those groups with zero rates will be
dropped from the allocation report and check stub information.
For groups paid as a dollar rate per UNIT enter the amount in standard format. A rate of two and one-cents would be entered as .025000. Groups whose refund rate is expressed as a percentage of dollar volume are entered with the whole percentage in front of the decimal point. A rate of five and one-quarter percent is entered as 5.250000. Enter the percentage of total refund that is to be received in cash. A rate of thirty percent is entered as 30.0000. If the customer has to do a certain dollar volume of business each year for the current group in order to participate in the allocation, enter that amount.
PE14 – ALLLOCATION AND PAYMENT CONTROL
4. Check the setup in PE14. It should have PATRONAGE ALLOCATION set to Yes and all other
allocation or controls set to no.
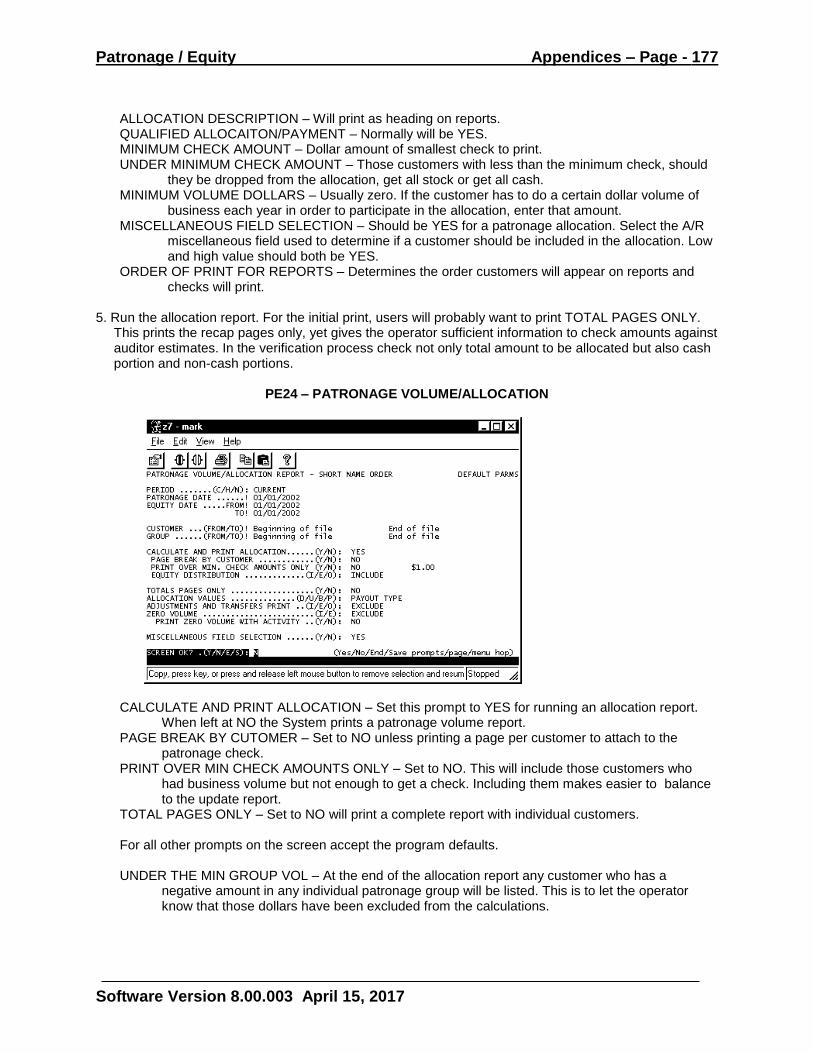
Patronage / Equity Appendices – Page - 177
Software Version 8.00.003 April 15, 2017
ALLOCATION DESCRIPTION – Will print as heading on reports. QUALIFIED ALLOCAITON/PAYMENT – Normally will be YES. MINIMUM CHECK AMOUNT – Dollar amount of smallest check to print. UNDER MINIMUM CHECK AMOUNT – Those customers with less than the minimum check, should
they be dropped from the allocation, get all stock or get all cash. MINIMUM VOLUME DOLLARS – Usually zero. If the customer has to do a certain dollar volume of
business each year in order to participate in the allocation, enter that amount. MISCELLANEOUS FIELD SELECTION – Should be YES for a patronage allocation. Select the A/R
miscellaneous field used to determine if a customer should be included in the allocation. Low and high value should both be YES.
ORDER OF PRINT FOR REPORTS – Determines the order customers will appear on reports and checks will print.
5. Run the allocation report. For the initial print, users will probably want to print TOTAL PAGES ONLY.
This prints the recap pages only, yet gives the operator sufficient information to check amounts against auditor estimates. In the verification process check not only total amount to be allocated but also cash portion and non-cash portions.
PE24 – PATRONAGE VOLUME/ALLOCATION
CALCULATE AND PRINT ALLOCATION – Set this prompt to YES for running an allocation report. When left at NO the System prints a patronage volume report.
PAGE BREAK BY CUTOMER – Set to NO unless printing a page per customer to attach to the patronage check.
PRINT OVER MIN CHECK AMOUNTS ONLY – Set to NO. This will include those customers who had business volume but not enough to get a check. Including them makes easier to balance to the update report.
TOTAL PAGES ONLY – Set to NO will print a complete report with individual customers. For all other prompts on the screen accept the program defaults. UNDER THE MIN GROUP VOL – At the end of the allocation report any customer who has a
negative amount in any individual patronage group will be listed. This is to let the operator know that those dollars have been excluded from the calculations.
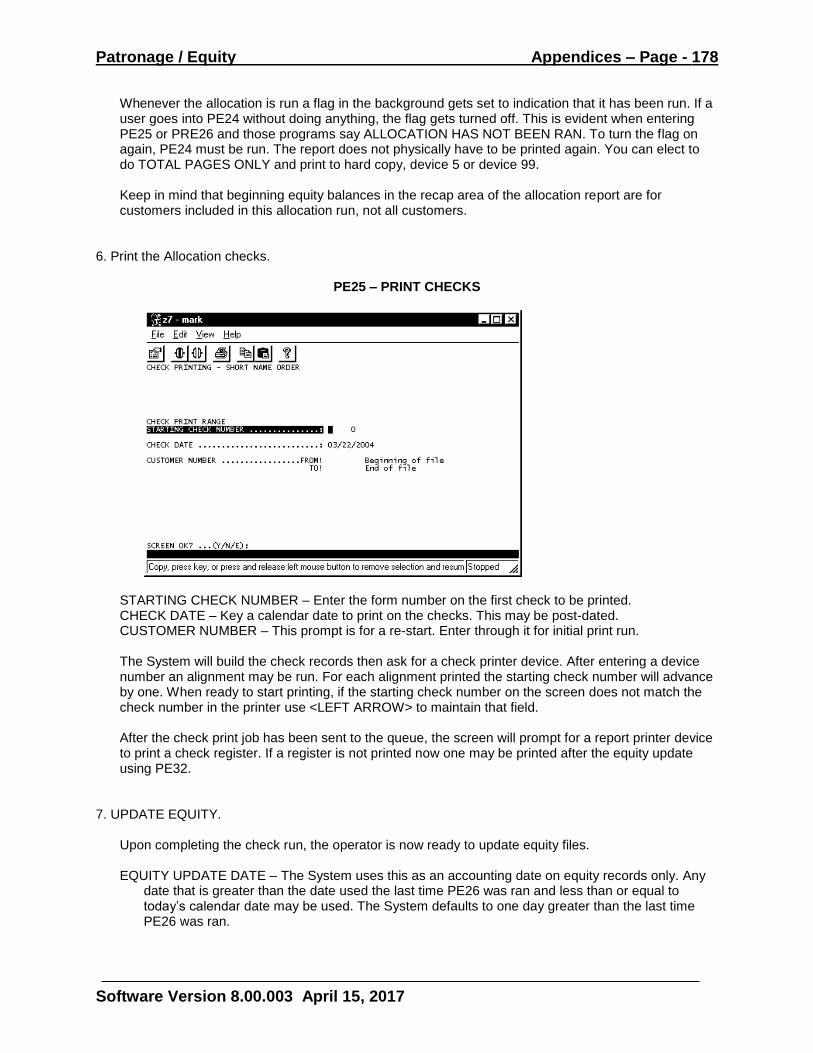
Patronage / Equity Appendices – Page - 178
Software Version 8.00.003 April 15, 2017
Whenever the allocation is run a flag in the background gets set to indication that it has been run. If a user goes into PE24 without doing anything, the flag gets turned off. This is evident when entering PE25 or PRE26 and those programs say ALLOCATION HAS NOT BEEN RAN. To turn the flag on again, PE24 must be run. The report does not physically have to be printed again. You can elect to do TOTAL PAGES ONLY and print to hard copy, device 5 or device 99.
Keep in mind that beginning equity balances in the recap area of the allocation report are for customers included in this allocation run, not all customers.
6. Print the Allocation checks.
PE25 – PRINT CHECKS
STARTING CHECK NUMBER – Enter the form number on the first check to be printed. CHECK DATE – Key a calendar date to print on the checks. This may be post-dated. CUSTOMER NUMBER – This prompt is for a re-start. Enter through it for initial print run. The System will build the check records then ask for a check printer device. After entering a device number an alignment may be run. For each alignment printed the starting check number will advance by one. When ready to start printing, if the starting check number on the screen does not match the check number in the printer use <LEFT ARROW> to maintain that field. After the check print job has been sent to the queue, the screen will prompt for a report printer device to print a check register. If a register is not printed now one may be printed after the equity update using PE32.
7. UPDATE EQUITY. Upon completing the check run, the operator is now ready to update equity files.
EQUITY UPDATE DATE – The System uses this as an accounting date on equity records only. Any date that is greater than the date used the last time PE26 was ran and less than or equal to today’s calendar date may be used. The System defaults to one day greater than the last time PE26 was ran.
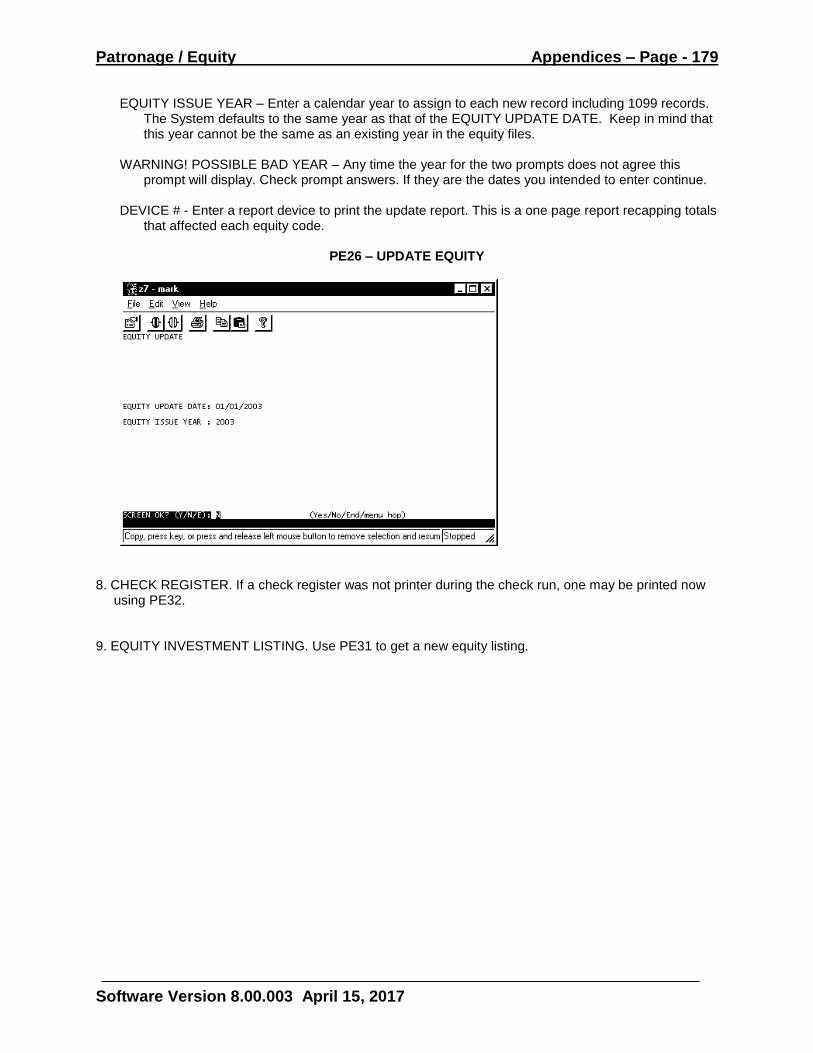
Patronage / Equity Appendices – Page - 179
Software Version 8.00.003 April 15, 2017
EQUITY ISSUE YEAR – Enter a calendar year to assign to each new record including 1099 records. The System defaults to the same year as that of the EQUITY UPDATE DATE. Keep in mind that this year cannot be the same as an existing year in the equity files.
WARNING! POSSIBLE BAD YEAR – Any time the year for the two prompts does not agree this
prompt will display. Check prompt answers. If they are the dates you intended to enter continue. DEVICE # - Enter a report device to print the update report. This is a one page report recapping totals
that affected each equity code.
PE26 – UPDATE EQUITY
8. CHECK REGISTER. If a check register was not printer during the check run, one may be printed now
using PE32. 9. EQUITY INVESTMENT LISTING. Use PE31 to get a new equity listing.
Patronage / Equity Appendices – Page - 180
Software Version 8.00.003 April 15, 2017
APPENDIX VI CALENDAR YEAR END FORMS
YEAREND ACCOUNTS PAYABLE PURCHASE PERIODS
For those organizations that want purchases periods on the Accounts payable Vendor Master to reflect activity for the current calendar year, they must yearend each January. To yearend the purchase periods use the following steps.
1) On Accounts Payable Utilities Menu check option 6 (DEFINE PURCHASE PERIODS) to make sure that the purchase periods are defined for the calendar year as opposed to fiscal year.
2) Take Utilities Menu Option 14 (YEAR-END PROCESSING). Follow the screen prompts.
1099 PRINTING
1099 Information may be pulled from several accounting modules (Commodity Accounting, Accounts Payable, Purchasing, Notes and Equity). The information may then be maintained before printing substitute or actual forms. Prior to pulling information from the different modules, check names and addresses for correct format. NOTE – Records pulled from two different accounting modules for an individual will be combined if they have the same account number and ID number. For example, a customer having interest from Commodity Accounting and activity from Purchasing that is reportable as 1099 Miscellaneous will have one record in the 1099 file with amounts for each type of activity. Provided that the account number in Accounts Receivable and vendor number in Purchasing are the same and the ID number on both masters is the same. ACCOUNTS RECEIVABLE - The first line of the A/R master probably already has the name in the format that you want. Street address should be on line three. City name goes on line four. State (two character state code only) and zip code should be on line five. Line two of the A/R master contains miscellaneous information which may be included as printed information on the 1099. Also check the Federal ID number for format. Any information contained in line 2 may optionally be included on the 1099 form. If the Account Name is not the name that corresponds with the Federal ID Number enter the ID Number name in the 1099 NAME field. Any information in the 1099 NAME field will replace Account Name for a 1099 record. ACCOUNTS PAYABLE - Vendor masters should have the name on line one, street address on line two, city on line three, two character state code on line four along with zip code. Check the Federal ID for format. In the 1099 field, choose INT (interest) or MISC (miscellaneous). Only those vendors with a designation in the 1099 field will have information generated when the pull program is run. COMMODITY ACCOUNTING – Freight Haulers should have the complete name in the NAME field. The street address can be located in ADDRESS 1 or ADDRESS 2 fields. The 1099 program will look first at ADDRESS 2. If it is blank, ADDRESS 1 will be read for the street address. Mailing CITY, STATE and ZIP CODE should each be in the appropriate field. If information is entered in both Address fields, it may optionally be included on the 1099 form. If information is contained in the CHECK fields it is used for 1099 purposes in place of the NAME information. Also the prompt for 1099 TYPE must be filled in for a record to be created for a hauler. PURCHASING MODULE – Vendor masters should have the complete name in the LAST NAME field or in the appropriate name field (LAST, FIRST, MIDDLE). The street address can be located in ADDRESS 1 or ADDRESS 2 fields. The 1099 program will look first at ADDRESS 2. If it is blank, ADDRESS 1 will be
Patronage / Equity Appendices – Page - 181
Software Version 8.00.003 April 15, 2017
read for the street address. Mailing CITY, STATE and ZIP CODE should each be in the appropriate field. If information is entered in both Address fields, it may optionally be included on the 1099 form. If the Vendor NAME field information is not the correct name to print on a 1099, the operator may enter an alternate name in the 1099 NAME field. The 1099 build program follows the following guidelines in determining what detail records to total together for 1099 purposes.
1) If the vendor master has a 1099 type – All detail lines with that 1099 type or blank will be totaled for a 1099 amount.
- Detail lines with an alternate 1099 type will be totaled by that type for a 1099 amount.
- Detail lines with a 1099 type of “X” will be ignored. 2) If the vendor master 1099 type is blank- All detail lines with a blank 1099 type will be
ignored. - Detail lines with an alternate 1099 type will be totaled by
that type for a 1099 amount. - Detail lines with a 1099 type of “X” will be ignored.
PAYOR NAME - Your Company name and address are gathered from COMPANY NAME MAINTENANCE located in menu option 9 on the SYSTEM MAINTENANCE menu. (On the main menu selection option 15) The official Company name goes in the name field. Street address is entered on address line one and City, State, Zip Code are entered on line three. Note that line three should be City/ comma/ space/ state/ space/ zip code. This is the same format that Commodity Accounting Confirmation Letters use. If for any reason this screen does not contain company information the 1099 programs will read the Payroll company master. CORPORATE FEDERAL ID – The Federal ID number is pulled from COMPANY NAME MAINTENANCE also. If for any reason this screen does not contain company information the 1099 programs will read the Payroll company master. 2nd TIN NOTICE AND BACKUP WITHHOLDING - On the Patronage and Equity Utilities Menu under option two (P&E OPTIONS), the user defines which miscellaneous field in A/R is used to designate 2ND TIN 1099 MISC. FLAG. Any customer that has this field set to YES will have the 2ND TIN NOTIFICATION BOX on the form filled with an “X” P&E OPTIONS also contains the equity code used to store backup withholding dollars until they are forwarded to IRS. After those withheld dollars are forwarded to IRS, the user may maintain the backup withholding equity code for each customer to zero. Do not do any such maintenance until after you have built your 1099 file. Adjustments to backup withholding codes are taken into consideration when building the 1099 file. There is no place on the A/P Vendor master or Purchasing Vendor master for 2nd TIN notice. Use 1099 Menu option 3 to maintain any necessary forms.
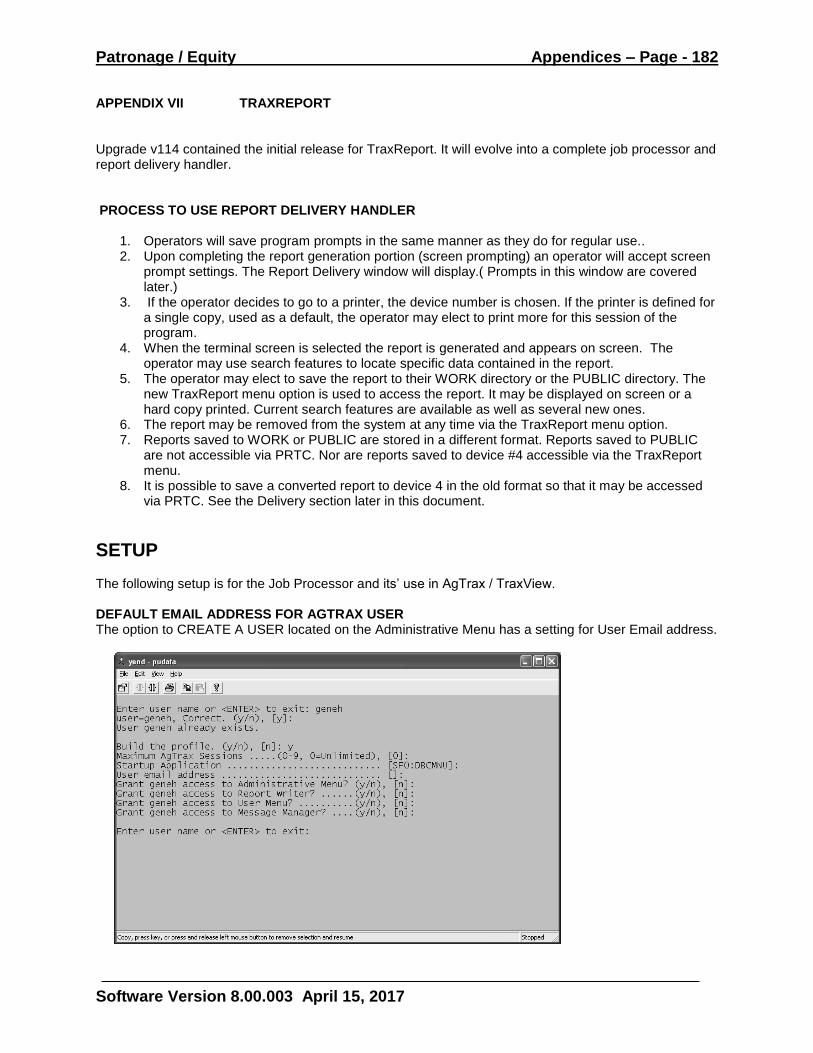
Patronage / Equity Appendices – Page - 182
Software Version 8.00.003 April 15, 2017
APPENDIX VII TRAXREPORT Upgrade v114 contained the initial release for TraxReport. It will evolve into a complete job processor and report delivery handler. PROCESS TO USE REPORT DELIVERY HANDLER
1. Operators will save program prompts in the same manner as they do for regular use.. 2. Upon completing the report generation portion (screen prompting) an operator will accept screen
prompt settings. The Report Delivery window will display.( Prompts in this window are covered later.)
3. If the operator decides to go to a printer, the device number is chosen. If the printer is defined for a single copy, used as a default, the operator may elect to print more for this session of the program.
4. When the terminal screen is selected the report is generated and appears on screen. The operator may use search features to locate specific data contained in the report.
5. The operator may elect to save the report to their WORK directory or the PUBLIC directory. The new TraxReport menu option is used to access the report. It may be displayed on screen or a hard copy printed. Current search features are available as well as several new ones.
6. The report may be removed from the system at any time via the TraxReport menu option. 7. Reports saved to WORK or PUBLIC are stored in a different format. Reports saved to PUBLIC
are not accessible via PRTC. Nor are reports saved to device #4 accessible via the TraxReport menu.
8. It is possible to save a converted report to device 4 in the old format so that it may be accessed via PRTC. See the Delivery section later in this document.
SETUP The following setup is for the Job Processor and its’ use in AgTrax / TraxView. DEFAULT EMAIL ADDRESS FOR AGTRAX USER The option to CREATE A USER located on the Administrative Menu has a setting for User Email address.
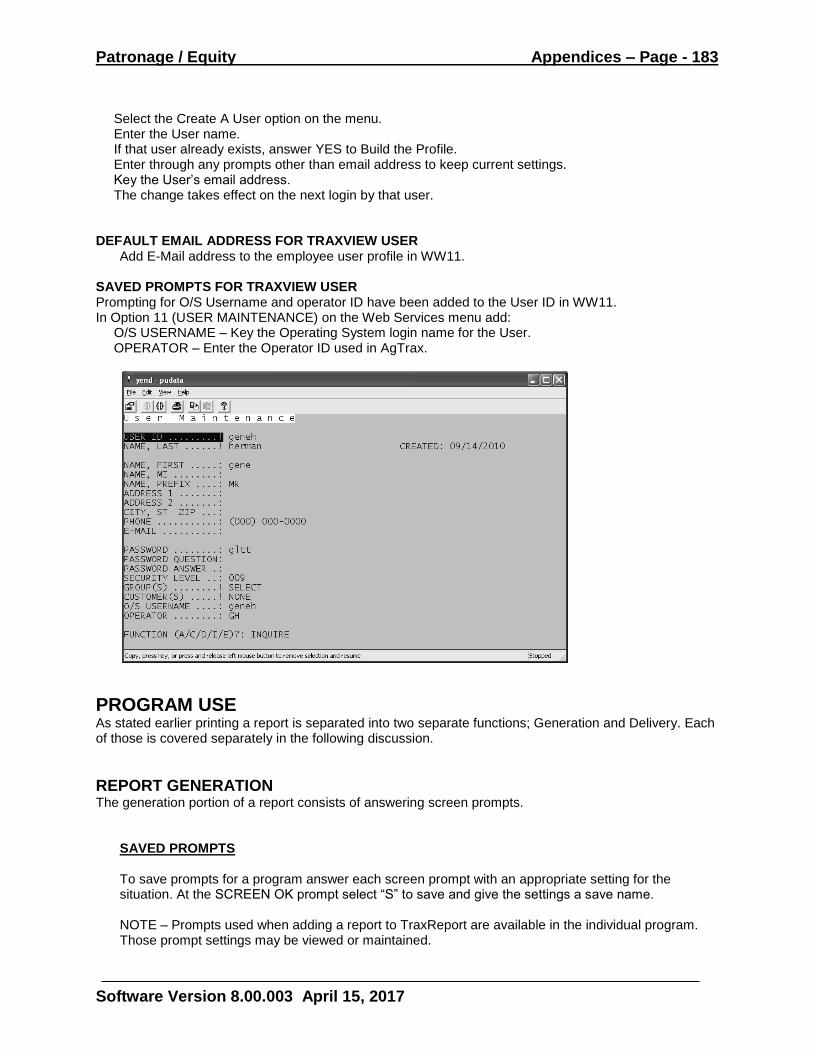
Patronage / Equity Appendices – Page - 183
Software Version 8.00.003 April 15, 2017
Select the Create A User option on the menu. Enter the User name. If that user already exists, answer YES to Build the Profile. Enter through any prompts other than email address to keep current settings. Key the User’s email address. The change takes effect on the next login by that user.
DEFAULT EMAIL ADDRESS FOR TRAXVIEW USER
Add E-Mail address to the employee user profile in WW11. SAVED PROMPTS FOR TRAXVIEW USER Prompting for O/S Username and operator ID have been added to the User ID in WW11. In Option 11 (USER MAINTENANCE) on the Web Services menu add:
O/S USERNAME – Key the Operating System login name for the User. OPERATOR – Enter the Operator ID used in AgTrax.
PROGRAM USE As stated earlier printing a report is separated into two separate functions; Generation and Delivery. Each of those is covered separately in the following discussion.
REPORT GENERATION The generation portion of a report consists of answering screen prompts.
SAVED PROMPTS To save prompts for a program answer each screen prompt with an appropriate setting for the situation. At the SCREEN OK prompt select “S” to save and give the settings a save name. NOTE – Prompts used when adding a report to TraxReport are available in the individual program. Those prompt settings may be viewed or maintained.
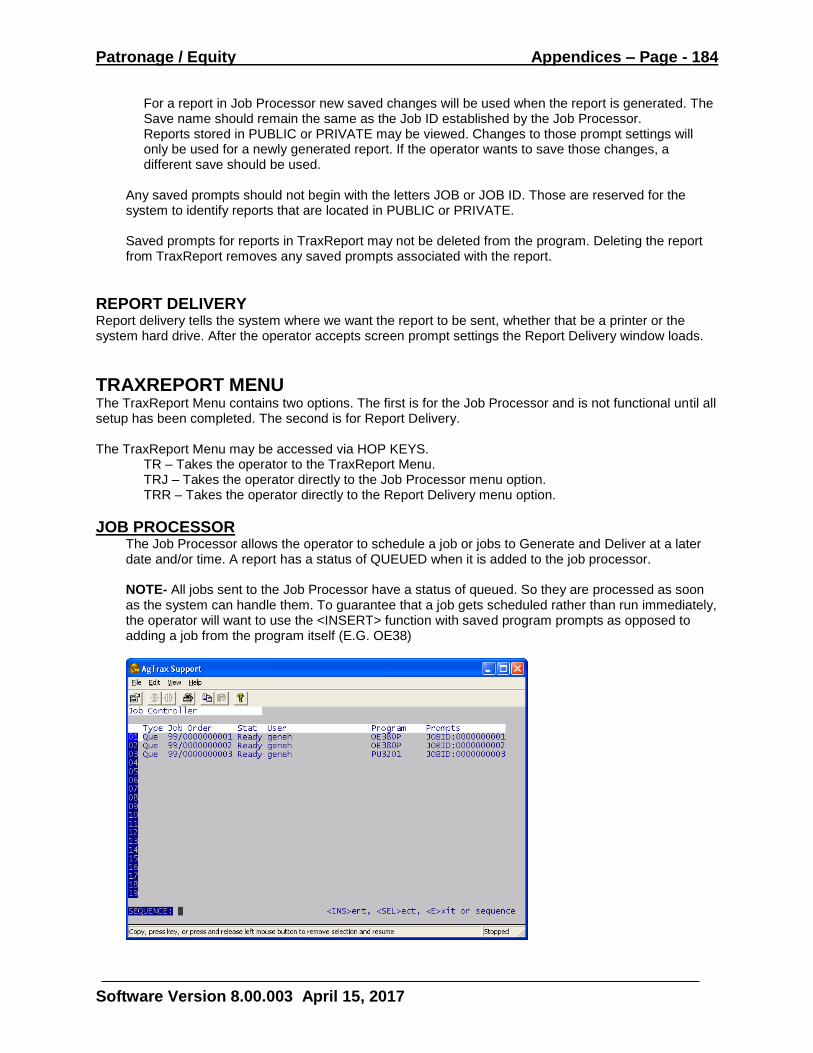
Patronage / Equity Appendices – Page - 184
Software Version 8.00.003 April 15, 2017
For a report in Job Processor new saved changes will be used when the report is generated. The Save name should remain the same as the Job ID established by the Job Processor. Reports stored in PUBLIC or PRIVATE may be viewed. Changes to those prompt settings will only be used for a newly generated report. If the operator wants to save those changes, a different save should be used.
Any saved prompts should not begin with the letters JOB or JOB ID. Those are reserved for the system to identify reports that are located in PUBLIC or PRIVATE. Saved prompts for reports in TraxReport may not be deleted from the program. Deleting the report from TraxReport removes any saved prompts associated with the report.
REPORT DELIVERY Report delivery tells the system where we want the report to be sent, whether that be a printer or the system hard drive. After the operator accepts screen prompt settings the Report Delivery window loads.
TRAXREPORT MENU The TraxReport Menu contains two options. The first is for the Job Processor and is not functional until all setup has been completed. The second is for Report Delivery. The TraxReport Menu may be accessed via HOP KEYS.
TR – Takes the operator to the TraxReport Menu. TRJ – Takes the operator directly to the Job Processor menu option. TRR – Takes the operator directly to the Report Delivery menu option.
JOB PROCESSOR The Job Processor allows the operator to schedule a job or jobs to Generate and Deliver at a later date and/or time. A report has a status of QUEUED when it is added to the job processor. NOTE- All jobs sent to the Job Processor have a status of queued. So they are processed as soon as the system can handle them. To guarantee that a job gets scheduled rather than run immediately, the operator will want to use the <INSERT> function with saved program prompts as opposed to adding a job from the program itself (E.G. OE38)
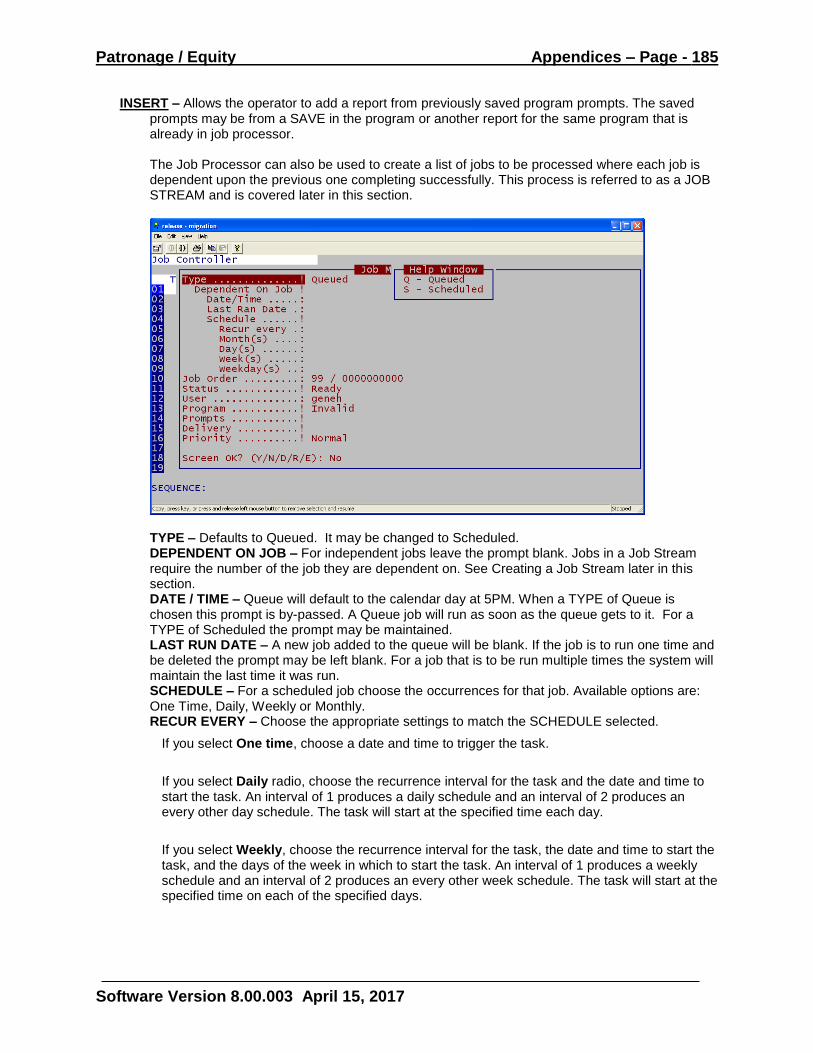
Patronage / Equity Appendices – Page - 185
Software Version 8.00.003 April 15, 2017
INSERT – Allows the operator to add a report from previously saved program prompts. The saved prompts may be from a SAVE in the program or another report for the same program that is already in job processor. The Job Processor can also be used to create a list of jobs to be processed where each job is dependent upon the previous one completing successfully. This process is referred to as a JOB STREAM and is covered later in this section.
TYPE – Defaults to Queued. It may be changed to Scheduled. DEPENDENT ON JOB – For independent jobs leave the prompt blank. Jobs in a Job Stream require the number of the job they are dependent on. See Creating a Job Stream later in this section. DATE / TIME – Queue will default to the calendar day at 5PM. When a TYPE of Queue is chosen this prompt is by-passed. A Queue job will run as soon as the queue gets to it. For a TYPE of Scheduled the prompt may be maintained. LAST RUN DATE – A new job added to the queue will be blank. If the job is to run one time and be deleted the prompt may be left blank. For a job that is to be run multiple times the system will maintain the last time it was run. SCHEDULE – For a scheduled job choose the occurrences for that job. Available options are: One Time, Daily, Weekly or Monthly. RECUR EVERY – Choose the appropriate settings to match the SCHEDULE selected.
If you select One time, choose a date and time to trigger the task.
If you select Daily radio, choose the recurrence interval for the task and the date and time to start the task. An interval of 1 produces a daily schedule and an interval of 2 produces an every other day schedule. The task will start at the specified time each day.
If you select Weekly, choose the recurrence interval for the task, the date and time to start the task, and the days of the week in which to start the task. An interval of 1 produces a weekly schedule and an interval of 2 produces an every other week schedule. The task will start at the specified time on each of the specified days.
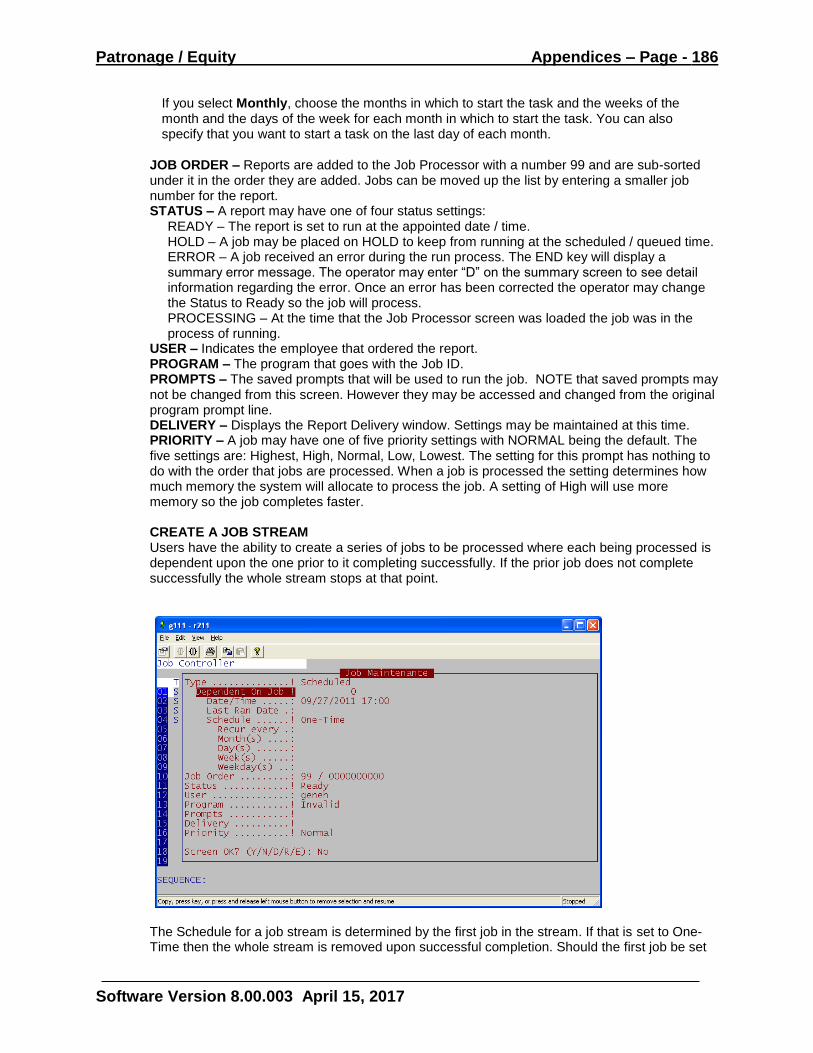
Patronage / Equity Appendices – Page - 186
Software Version 8.00.003 April 15, 2017
If you select Monthly, choose the months in which to start the task and the weeks of the month and the days of the week for each month in which to start the task. You can also specify that you want to start a task on the last day of each month.
JOB ORDER – Reports are added to the Job Processor with a number 99 and are sub-sorted under it in the order they are added. Jobs can be moved up the list by entering a smaller job number for the report. STATUS – A report may have one of four status settings:
READY – The report is set to run at the appointed date / time. HOLD – A job may be placed on HOLD to keep from running at the scheduled / queued time. ERROR – A job received an error during the run process. The END key will display a summary error message. The operator may enter “D” on the summary screen to see detail information regarding the error. Once an error has been corrected the operator may change the Status to Ready so the job will process. PROCESSING – At the time that the Job Processor screen was loaded the job was in the process of running.
USER – Indicates the employee that ordered the report. PROGRAM – The program that goes with the Job ID. PROMPTS – The saved prompts that will be used to run the job. NOTE that saved prompts may not be changed from this screen. However they may be accessed and changed from the original program prompt line. DELIVERY – Displays the Report Delivery window. Settings may be maintained at this time. PRIORITY – A job may have one of five priority settings with NORMAL being the default. The five settings are: Highest, High, Normal, Low, Lowest. The setting for this prompt has nothing to do with the order that jobs are processed. When a job is processed the setting determines how much memory the system will allocate to process the job. A setting of High will use more memory so the job completes faster. CREATE A JOB STREAM Users have the ability to create a series of jobs to be processed where each being processed is dependent upon the one prior to it completing successfully. If the prior job does not complete successfully the whole stream stops at that point.
The Schedule for a job stream is determined by the first job in the stream. If that is set to One-Time then the whole stream is removed upon successful completion. Should the first job be set
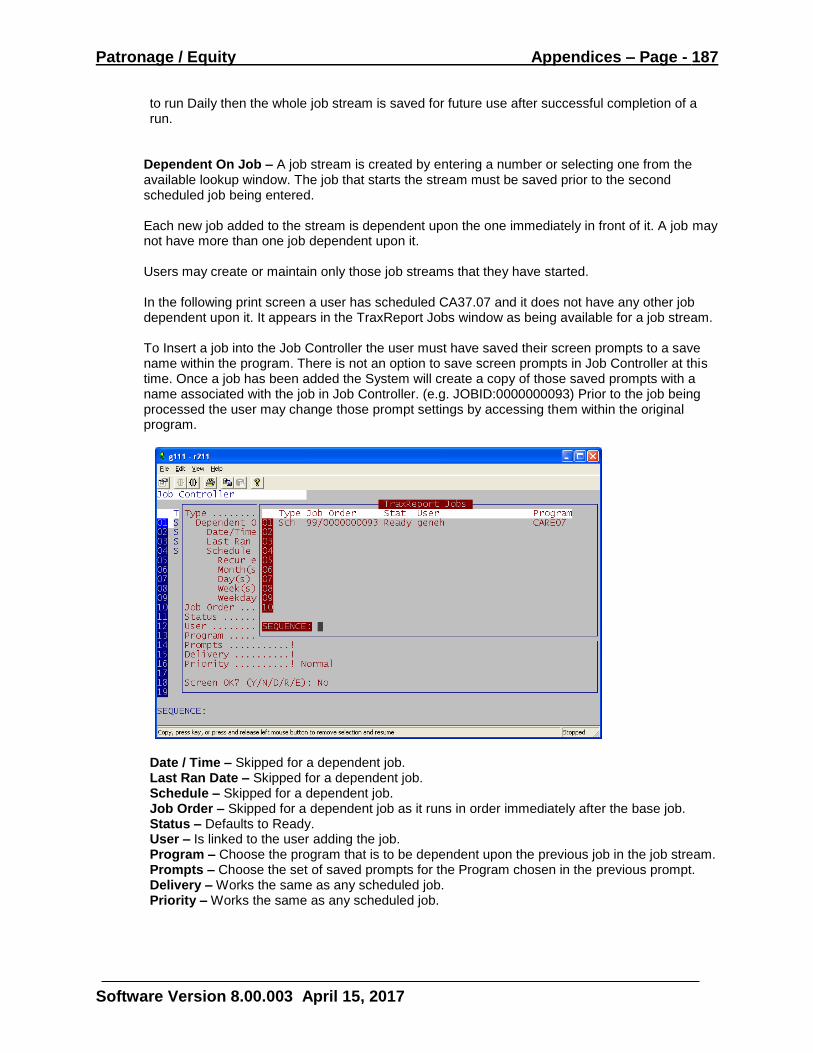
Patronage / Equity Appendices – Page - 187
Software Version 8.00.003 April 15, 2017
to run Daily then the whole job stream is saved for future use after successful completion of a run.
Dependent On Job – A job stream is created by entering a number or selecting one from the available lookup window. The job that starts the stream must be saved prior to the second scheduled job being entered. Each new job added to the stream is dependent upon the one immediately in front of it. A job may not have more than one job dependent upon it. Users may create or maintain only those job streams that they have started.
In the following print screen a user has scheduled CA37.07 and it does not have any other job dependent upon it. It appears in the TraxReport Jobs window as being available for a job stream.
To Insert a job into the Job Controller the user must have saved their screen prompts to a save name within the program. There is not an option to save screen prompts in Job Controller at this time. Once a job has been added the System will create a copy of those saved prompts with a name associated with the job in Job Controller. (e.g. JOBID:0000000093) Prior to the job being processed the user may change those prompt settings by accessing them within the original program.
Date / Time – Skipped for a dependent job. Last Ran Date – Skipped for a dependent job. Schedule – Skipped for a dependent job. Job Order – Skipped for a dependent job as it runs in order immediately after the base job. Status – Defaults to Ready. User – Is linked to the user adding the job. Program – Choose the program that is to be dependent upon the previous job in the job stream. Prompts – Choose the set of saved prompts for the Program chosen in the previous prompt. Delivery – Works the same as any scheduled job. Priority – Works the same as any scheduled job.
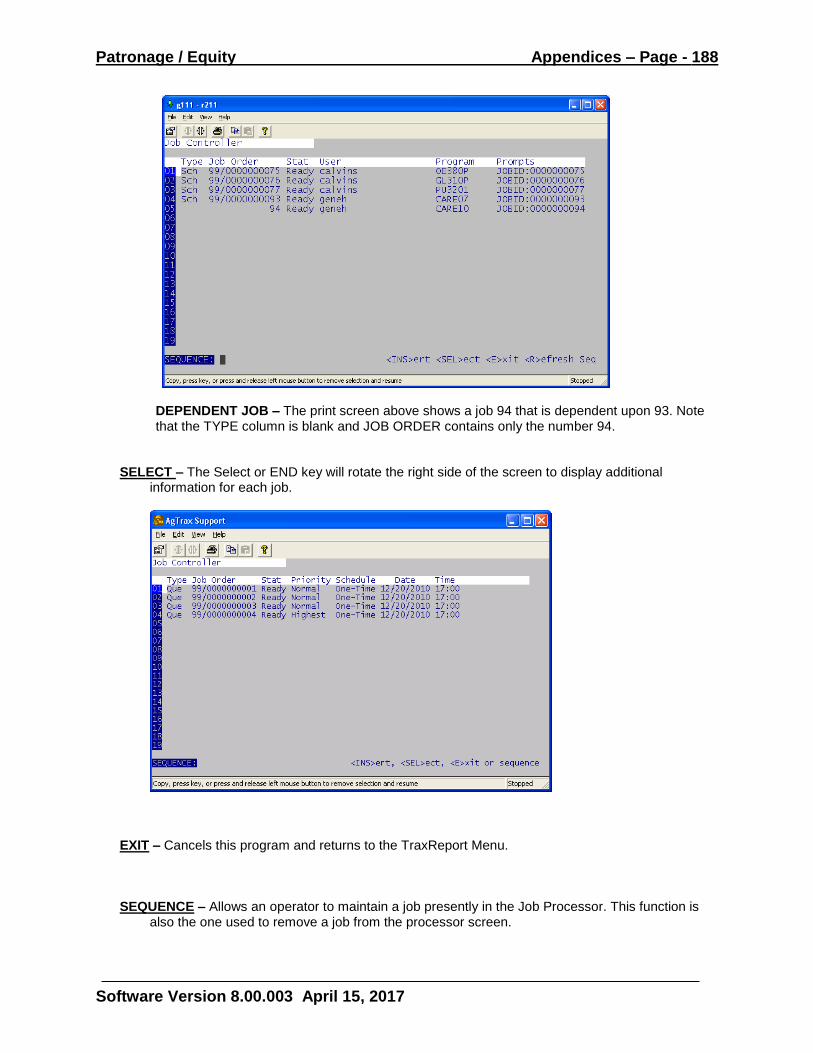
Patronage / Equity Appendices – Page - 188
Software Version 8.00.003 April 15, 2017
DEPENDENT JOB – The print screen above shows a job 94 that is dependent upon 93. Note that the TYPE column is blank and JOB ORDER contains only the number 94.
SELECT – The Select or END key will rotate the right side of the screen to display additional information for each job.
EXIT – Cancels this program and returns to the TraxReport Menu.
SEQUENCE – Allows an operator to maintain a job presently in the Job Processor. This function is also the one used to remove a job from the processor screen.
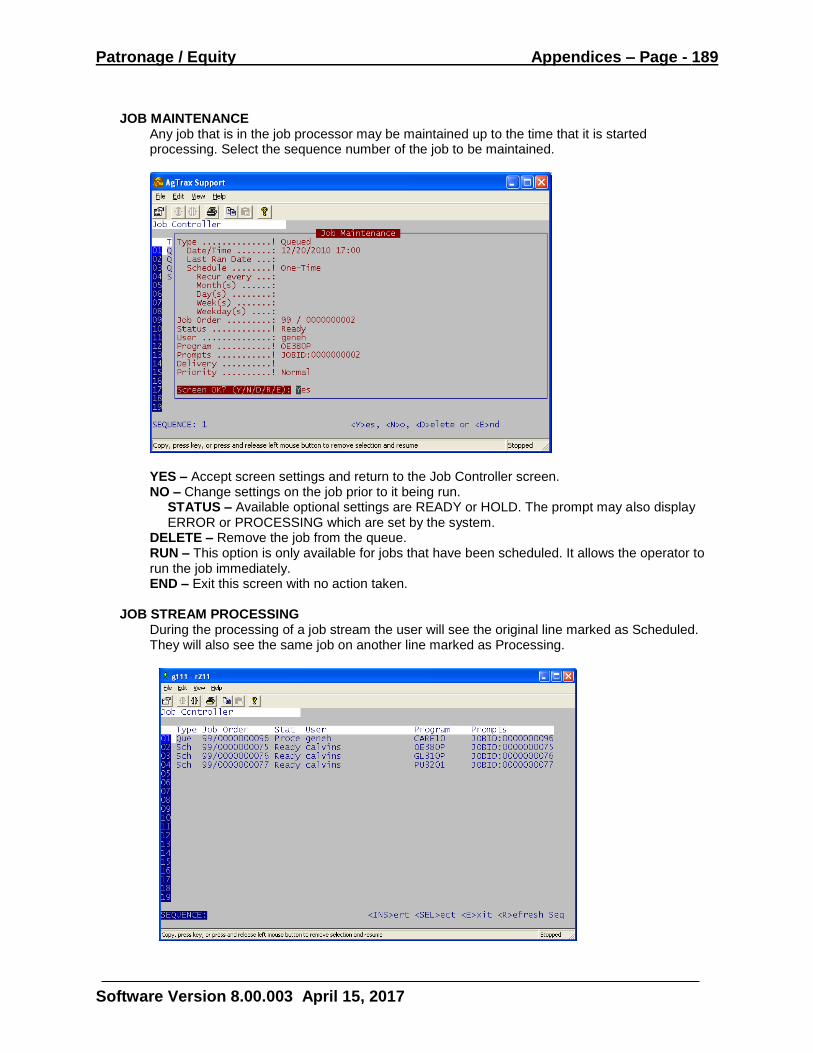
Patronage / Equity Appendices – Page - 189
Software Version 8.00.003 April 15, 2017
JOB MAINTENANCE
Any job that is in the job processor may be maintained up to the time that it is started processing. Select the sequence number of the job to be maintained.
YES – Accept screen settings and return to the Job Controller screen. NO – Change settings on the job prior to it being run.
STATUS – Available optional settings are READY or HOLD. The prompt may also display ERROR or PROCESSING which are set by the system.
DELETE – Remove the job from the queue. RUN – This option is only available for jobs that have been scheduled. It allows the operator to run the job immediately. END – Exit this screen with no action taken.
JOB STREAM PROCESSING
During the processing of a job stream the user will see the original line marked as Scheduled. They will also see the same job on another line marked as Processing.
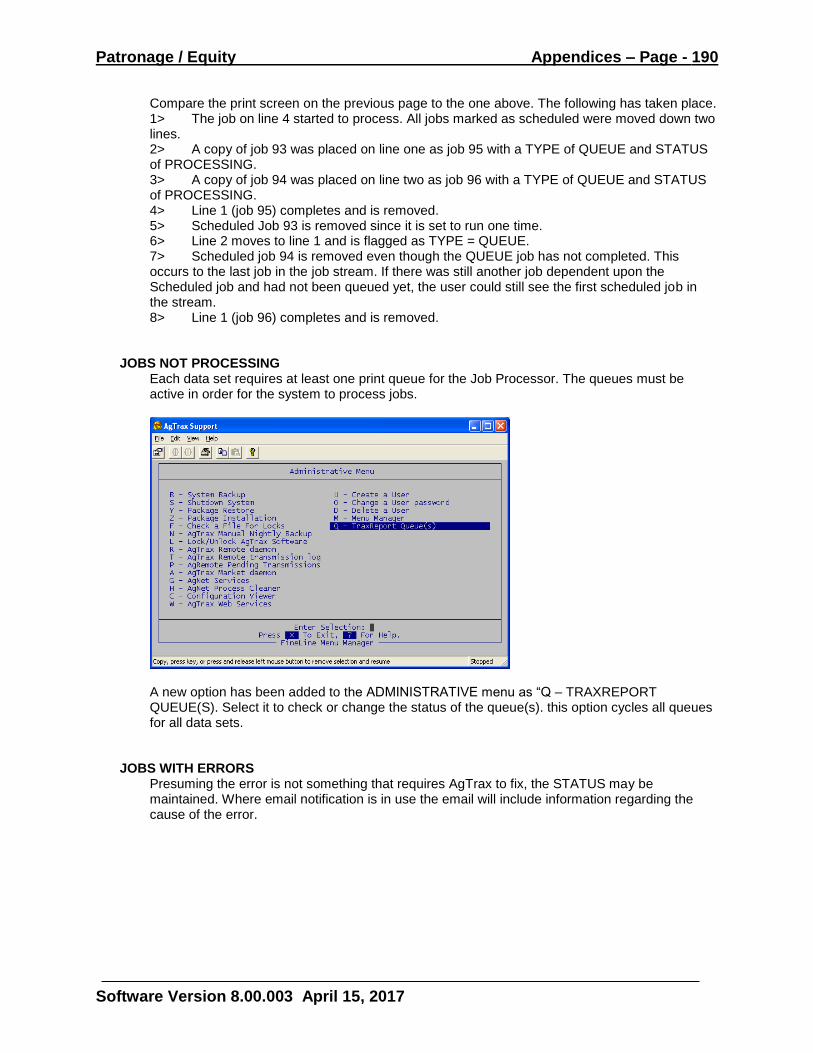
Patronage / Equity Appendices – Page - 190
Software Version 8.00.003 April 15, 2017
Compare the print screen on the previous page to the one above. The following has taken place. 1> The job on line 4 started to process. All jobs marked as scheduled were moved down two lines. 2> A copy of job 93 was placed on line one as job 95 with a TYPE of QUEUE and STATUS of PROCESSING. 3> A copy of job 94 was placed on line two as job 96 with a TYPE of QUEUE and STATUS of PROCESSING. 4> Line 1 (job 95) completes and is removed. 5> Scheduled Job 93 is removed since it is set to run one time. 6> Line 2 moves to line 1 and is flagged as TYPE = QUEUE. 7> Scheduled job 94 is removed even though the QUEUE job has not completed. This occurs to the last job in the job stream. If there was still another job dependent upon the Scheduled job and had not been queued yet, the user could still see the first scheduled job in the stream. 8> Line 1 (job 96) completes and is removed.
JOBS NOT PROCESSING Each data set requires at least one print queue for the Job Processor. The queues must be active in order for the system to process jobs.
A new option has been added to the ADMINISTRATIVE menu as “Q – TRAXREPORT QUEUE(S). Select it to check or change the status of the queue(s). this option cycles all queues for all data sets.
JOBS WITH ERRORS Presuming the error is not something that requires AgTrax to fix, the STATUS may be maintained. Where email notification is in use the email will include information regarding the cause of the error.
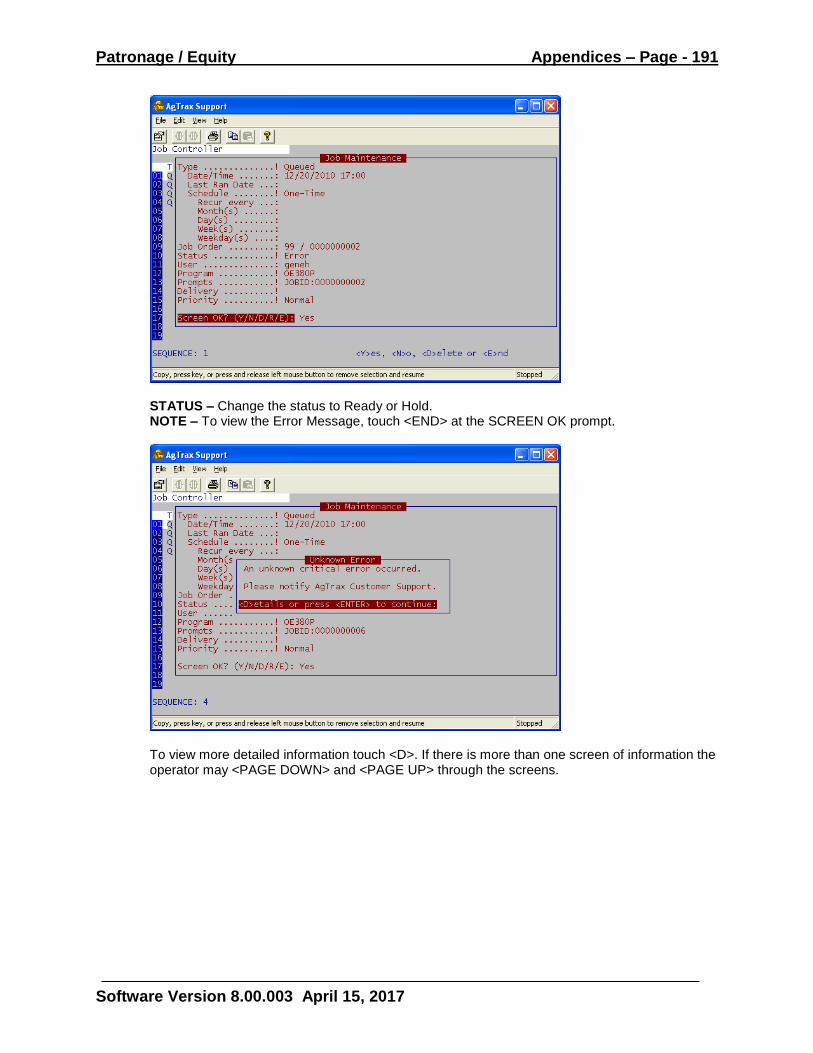
Patronage / Equity Appendices – Page - 191
Software Version 8.00.003 April 15, 2017
STATUS – Change the status to Ready or Hold. NOTE – To view the Error Message, touch <END> at the SCREEN OK prompt.
To view more detailed information touch <D>. If there is more than one screen of information the operator may <PAGE DOWN> and <PAGE UP> through the screens.
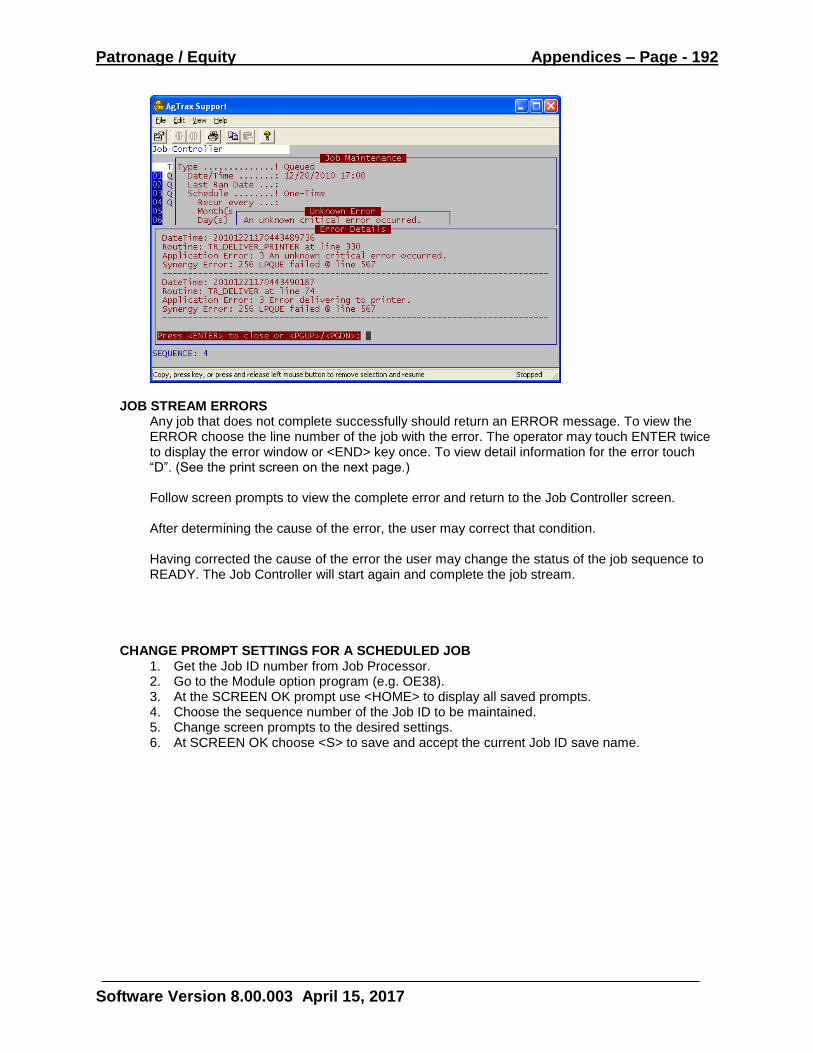
Patronage / Equity Appendices – Page - 192
Software Version 8.00.003 April 15, 2017
JOB STREAM ERRORS Any job that does not complete successfully should return an ERROR message. To view the ERROR choose the line number of the job with the error. The operator may touch ENTER twice to display the error window or <END> key once. To view detail information for the error touch “D”. (See the print screen on the next page.) Follow screen prompts to view the complete error and return to the Job Controller screen. After determining the cause of the error, the user may correct that condition. Having corrected the cause of the error the user may change the status of the job sequence to READY. The Job Controller will start again and complete the job stream.
CHANGE PROMPT SETTINGS FOR A SCHEDULED JOB 1. Get the Job ID number from Job Processor. 2. Go to the Module option program (e.g. OE38). 3. At the SCREEN OK prompt use <HOME> to display all saved prompts. 4. Choose the sequence number of the Job ID to be maintained. 5. Change screen prompts to the desired settings. 6. At SCREEN OK choose <S> to save and accept the current Job ID save name.
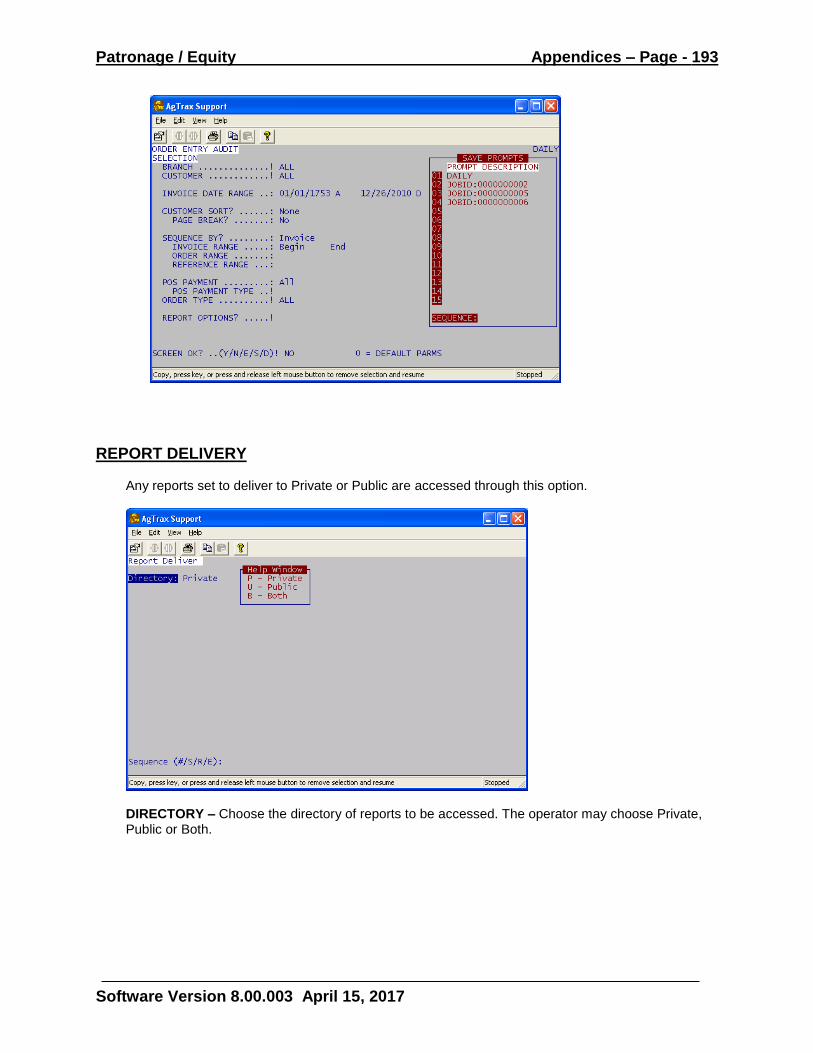
Patronage / Equity Appendices – Page - 193
Software Version 8.00.003 April 15, 2017
REPORT DELIVERY Any reports set to deliver to Private or Public are accessed through this option.
DIRECTORY – Choose the directory of reports to be accessed. The operator may choose Private, Public or Both.
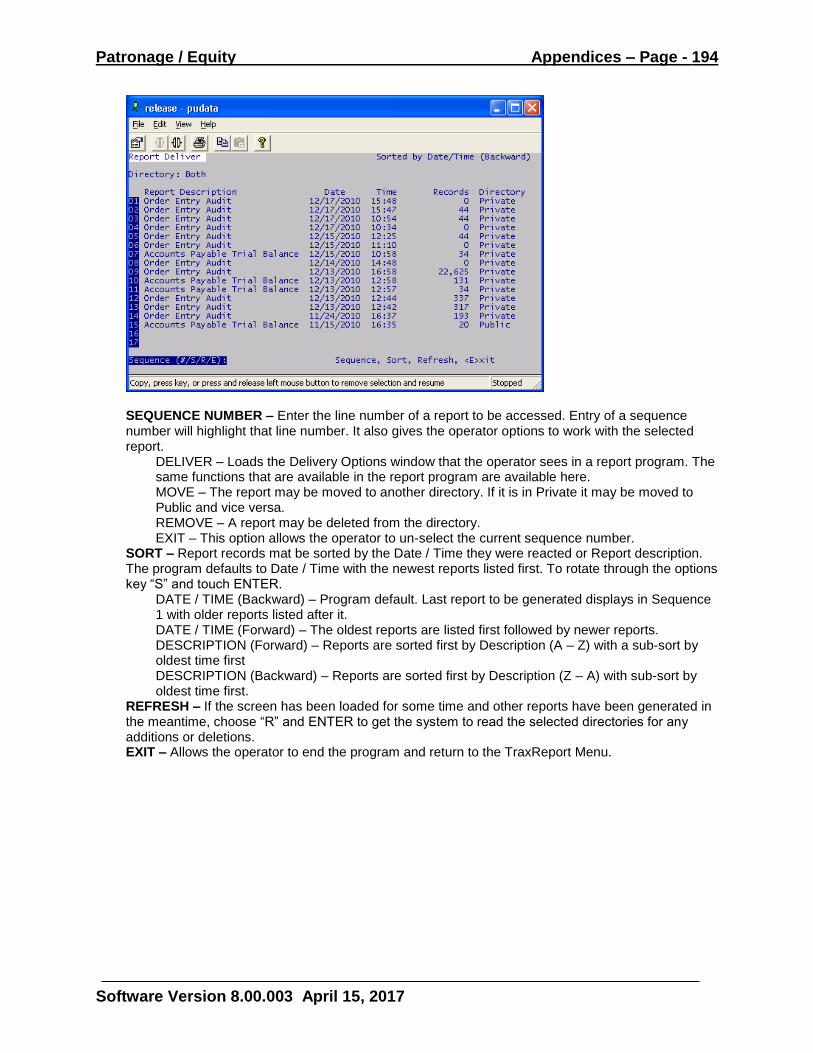
Patronage / Equity Appendices – Page - 194
Software Version 8.00.003 April 15, 2017
SEQUENCE NUMBER – Enter the line number of a report to be accessed. Entry of a sequence number will highlight that line number. It also gives the operator options to work with the selected report.
DELIVER – Loads the Delivery Options window that the operator sees in a report program. The same functions that are available in the report program are available here. MOVE – The report may be moved to another directory. If it is in Private it may be moved to Public and vice versa. REMOVE – A report may be deleted from the directory. EXIT – This option allows the operator to un-select the current sequence number.
SORT – Report records mat be sorted by the Date / Time they were reacted or Report description. The program defaults to Date / Time with the newest reports listed first. To rotate through the options key “S” and touch ENTER.
DATE / TIME (Backward) – Program default. Last report to be generated displays in Sequence 1 with older reports listed after it. DATE / TIME (Forward) – The oldest reports are listed first followed by newer reports. DESCRIPTION (Forward) – Reports are sorted first by Description (A – Z) with a sub-sort by oldest time first DESCRIPTION (Backward) – Reports are sorted first by Description (Z – A) with sub-sort by oldest time first.
REFRESH – If the screen has been loaded for some time and other reports have been generated in the meantime, choose “R” and ENTER to get the system to read the selected directories for any additions or deletions. EXIT – Allows the operator to end the program and return to the TraxReport Menu.