paragon migrate to uefi - paragon software...
TRANSCRIPT
PARAGON Software Group
Heinrich-von-Stephan-Str. 5c 79100 Freiburg, Germany
Tel. +49 (0) 761 59018201 Fax +49 (0) 761 59018130
Internet www.paragon-software.com Email [email protected]
Copyright© 1994-2011 Paragon Software Group. All rights reserved.
Paragon Migrate to UEFI
Reviewer’s Guide
1
Copyright© 1994-2011 Paragon Software Group. All rights reserved.
CONTENTS
Product Concept ................................................................................................................ 2
Primary Audience ................................................................................................................................... 2
Key Differentiators .................................................................................................................................. 2
Getting Started .................................................................................................................. 2
Recommended Target Environment ........................................................................................................ 2
Migrate to UEFI Installation .................................................................................................................... 3
First Start ................................................................................................................................................ 4
Migrating to uEFI .................................................................................................................................... 4
Collecting logs ......................................................................................................................................... 8
Conclusion ....................................................................................................................... 10
Questionnaire .................................................................................................................. 10
Additional Information .................................................................................................... 11
2
Copyright© 1994-2011 Paragon Software Group. All rights reserved.
Product Concept
Appearance of ultra high-capacity drives on the scene has given new interest to UEFI (Unified Extensible Firmware
Interface). Introduced back in 2005 by Intel to lift restrictions of the old MBR (Master Boot Record) and PC BIOS
(Basic Input/Output System), it was really slow to adopt. In fact even today only few manufactures can boast UEFI-
based motherboards in their product lines. However, new hard drives of more than 2.2TB in capacity have turned
out to be an impetus to change this situation once and for all. And the reason is easy to catch – besides other unique
features impossible for the traditional tandem of BIOS+MBR, only a UEFI-based platform enables to accommodate
Windows OS on a partition larger than 2.2TB.
Home and small-office users who try to move their 64-bit Windows Vista or Windows 7 software environments from
the dated MBR/BIOS configuration to a modern GPT/UEFI platform find that you can’t just change the partitioning
scheme and enable UEFI without reinstalling the operating system from scratch. The problem is that Windows Disk
Management supports conversion to GPT for empty drives only, so you’ve got no way of converting the system drive
to GPT without losing data. Besides Windows Management tools do not provide an option to adjust boot files for
UEFI, making it impossible for users transferring established data or system components within a single computer
directly from a BIOS boot mode to a UEFI-based mode.
Paragon Migrate to UEFI can help you tackle both issues with minimal effort. It’s a simple four-step Copy Hard Disk
Wizard that enables to transfer a 64-bit Windows Vista or Windows 7 initially installed on an MBR disk in the BIOS
mode to a GPT disk and the UEFI mode, thus opening up for the user all benefits of the GPT+UEFI configuration,
including support of a high-capacity 2.2TB+ hard drive for use as the primary system HDD.
Primary Audience
Owners of UEFI-compatible motherboards with a 64-bit Windows Vista or Windows 7, initially installed on an MBR
disk in the BIOS mode, who want to migrate their systems to a high-capacity 2.2TB+ drive with minimal effort.
Key Differentiators
Transfers system and data from the dated BIOS to a modern UEFI configuration;
Simple four-step wizard helps to set up and perform the operation;
Automatically adjusts Windows OS to start up in the UEFI mode;
Automatically creates a GPT partitioning scheme during migration;
Supports AFD (Advance Format Drive) disks (mixed 512B/4K sector scheme only, including virtual);
The source system remains intact and can be loaded in the BIOS mode at any time;
Copy operation is run without the system restart by employing Microsoft VSS technology;
Supports 64-bit Windows Vista and Windows 7.
Getting Started
Recommended Target Environment
Paragon Migrate to UEFI can operate smoothly on different computer configurations. Here are listed only necessary
requirements:
A UEFI-compatible motherboard;
3
Copyright© 1994-2011 Paragon Software Group. All rights reserved.
64-bit Windows Vista or Windows 7;
Two hard disks in the system, the target one is 2TB+ in capacity;
You are to be logged in as a system administrator to install the product.
Migrate to UEFI Installation
Before the installation, please make sure the system requirements are met. If everything is OK, please do the
following to install the product:
1. Click on the supplied setup file to initiate the installation.
2. The Welcome page will inform that the application is being installed. Click Next to continue.
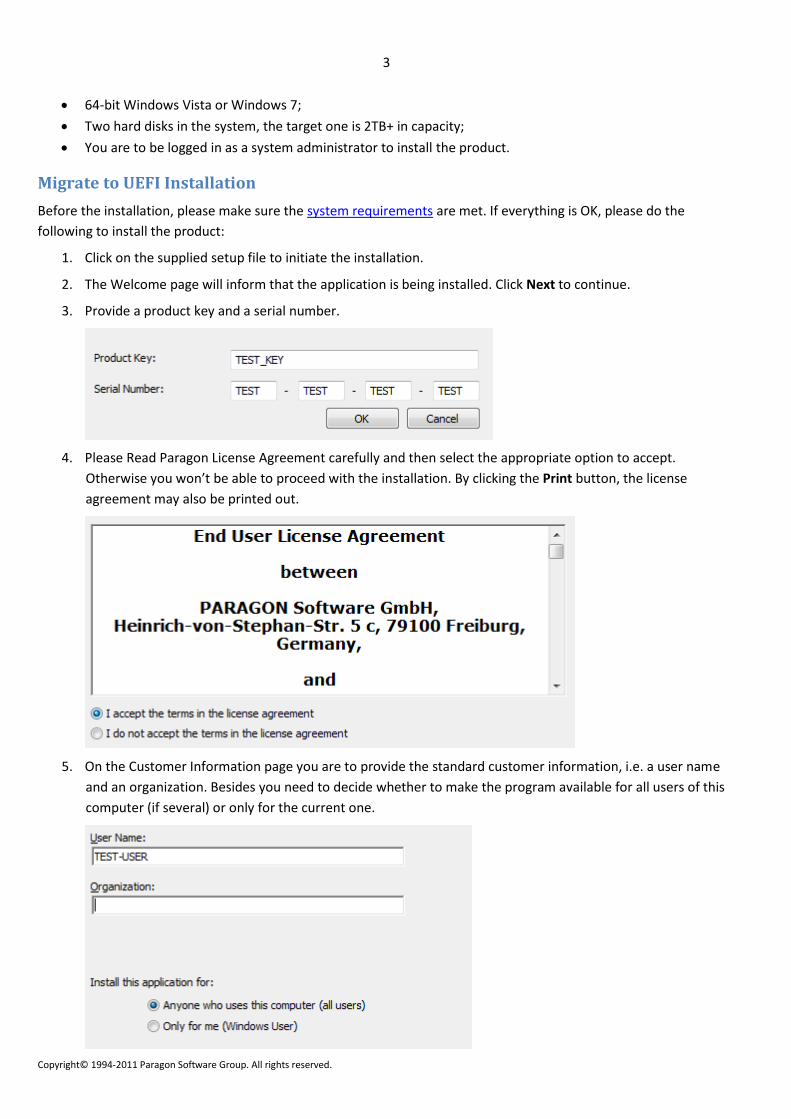
3. Provide a product key and a serial number.
4. Please Read Paragon License Agreement carefully and then select the appropriate option to accept.
Otherwise you won’t be able to proceed with the installation. By clicking the Print button, the license
agreement may also be printed out.
5. On the Customer Information page you are to provide the standard customer information, i.e. a user name
and an organization. Besides you need to decide whether to make the program available for all users of this
computer (if several) or only for the current one.

4
Copyright© 1994-2011 Paragon Software Group. All rights reserved.
6. On the next page, click Change to install the utility to a different location (by default C:\Program
Files\Paragon Software\Paragon Migrate to uEFI™\). Otherwise click Next to continue.
7. On the Ready to Install the Program page click Install to start the installation or Back to return to any of the
previous pages and modify the installation settings.
The Final page reports the end of the setup process. Click Finish to complete the wizard.
First Start
After installation you can launch the program either via the programs list in the Windows Start menu or by clicking
the corresponding shortcut on Desktop. The first component that will be displayed is called the Express Launcher.
With its help you can start migration of your system to uEFI, transfer files, prepare log files, or go to the program’s
home page.
Migrating to uEFI
1. Launch the program.
2. Click on Migrate to uEFI.
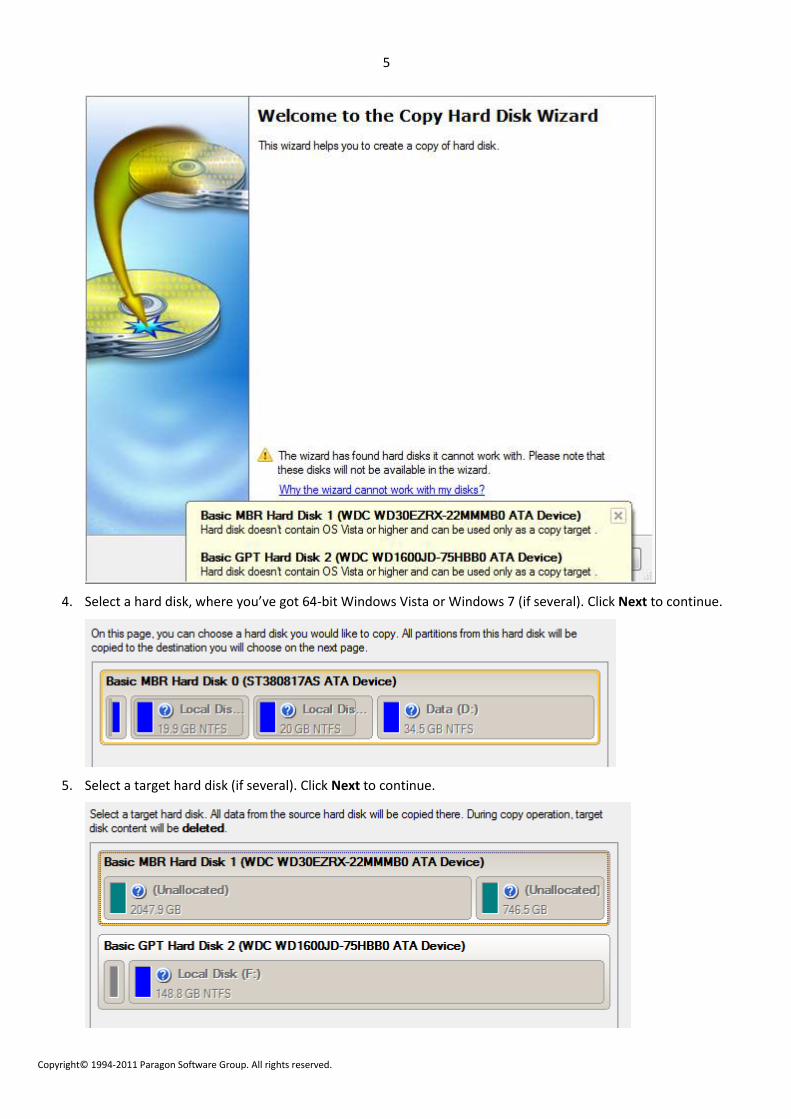
3. As a result you will see the first introductory page of Hard Disk Copy Wizard. Your system will be analyzed at
this stage and if it doesn’t meet the system requirements, operation will be aborted with a corresponding
warning. Besides the wizard will notify you on a hard disk, which should be used as the target for migration.
Click Next to continue.
5
Copyright© 1994-2011 Paragon Software Group. All rights reserved.
4. Select a hard disk, where you’ve got 64-bit Windows Vista or Windows 7 (if several). Click Next to continue.
5. Select a target hard disk (if several). Click Next to continue.

6
Copyright© 1994-2011 Paragon Software Group. All rights reserved.
6. Confirm your choice. Please note that all data on the target disk will be deleted during the upcoming
migration. Click Next to continue.
7. By default all partitions of the source disk will be copied with proportional resize according to the target disk
capacity. Anyway you can allocate some space for your needs at the end of the disk at this stage by moving
the slider. It will be available after the migration is over. Click Next to continue.
8. Confirm the changes and perform the migration.
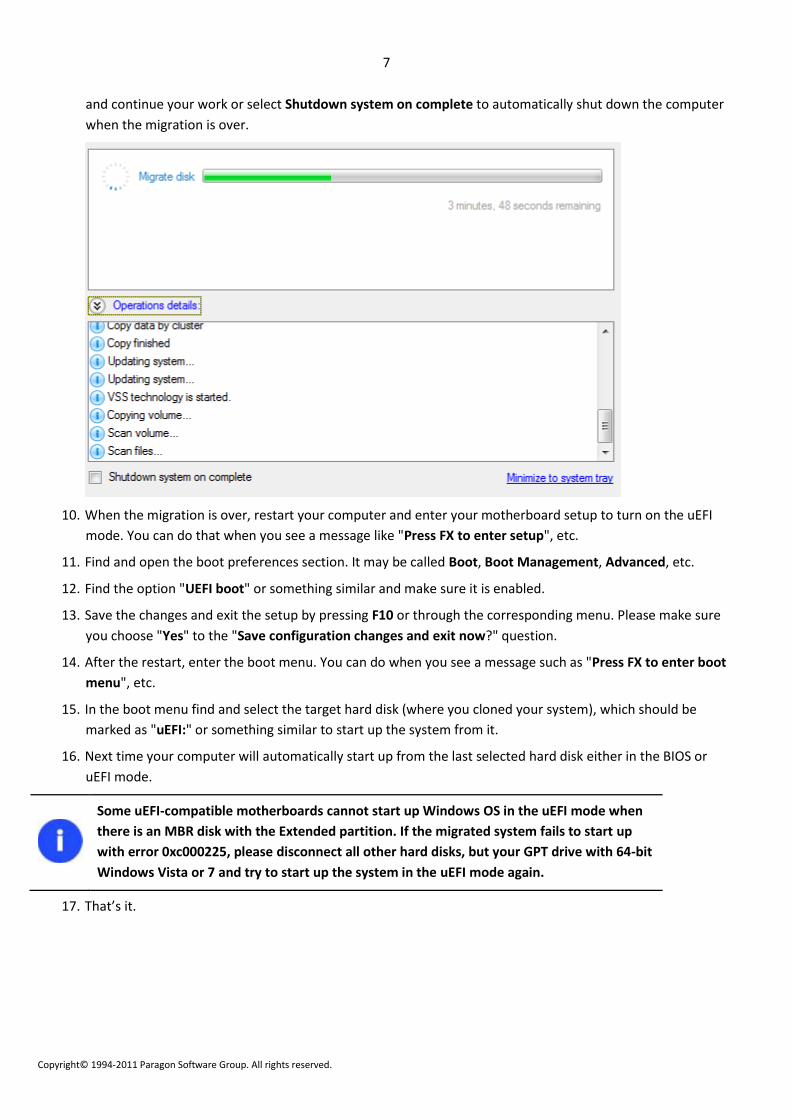
9. In the progress window you can see real time all actions executed at the moment. Depending on the amount
of data to copy the whole process may take a couple of hours to complete. Click Minimize to system tray
7
Copyright© 1994-2011 Paragon Software Group. All rights reserved.
and continue your work or select Shutdown system on complete to automatically shut down the computer
when the migration is over.
10. When the migration is over, restart your computer and enter your motherboard setup to turn on the uEFI
mode. You can do that when you see a message like "Press FX to enter setup", etc.
11. Find and open the boot preferences section. It may be called Boot, Boot Management, Advanced, etc.
12. Find the option "UEFI boot" or something similar and make sure it is enabled.
13. Save the changes and exit the setup by pressing F10 or through the corresponding menu. Please make sure
you choose "Yes" to the "Save configuration changes and exit now?" question.
14. After the restart, enter the boot menu. You can do when you see a message such as "Press FX to enter boot
menu", etc.
15. In the boot menu find and select the target hard disk (where you cloned your system), which should be
marked as "uEFI:" or something similar to start up the system from it.
16. Next time your computer will automatically start up from the last selected hard disk either in the BIOS or
uEFI mode.
Some uEFI-compatible motherboards cannot start up Windows OS in the uEFI mode when
there is an MBR disk with the Extended partition. If the migrated system fails to start up
with error 0xc000225, please disconnect all other hard disks, but your GPT drive with 64-bit
Windows Vista or 7 and try to start up the system in the uEFI mode again.
17. That’s it.
8
Copyright© 1994-2011 Paragon Software Group. All rights reserved.
Collecting logs
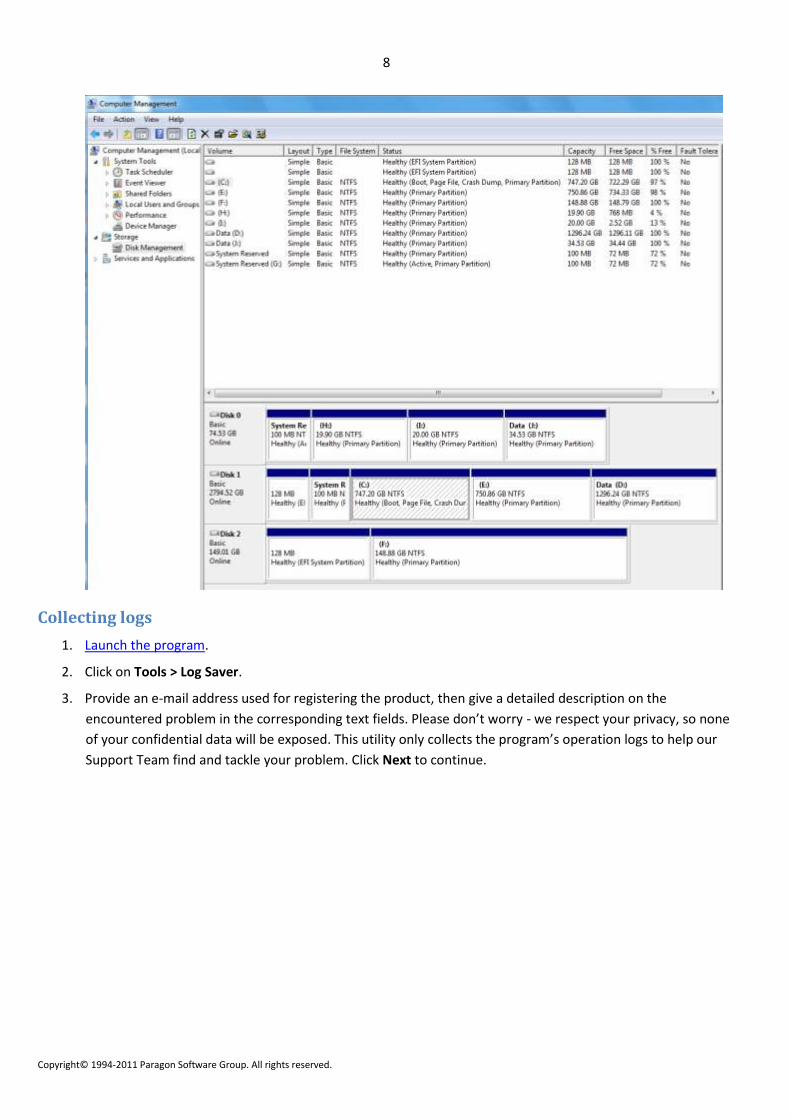
1. Launch the program.
2. Click on Tools > Log Saver.
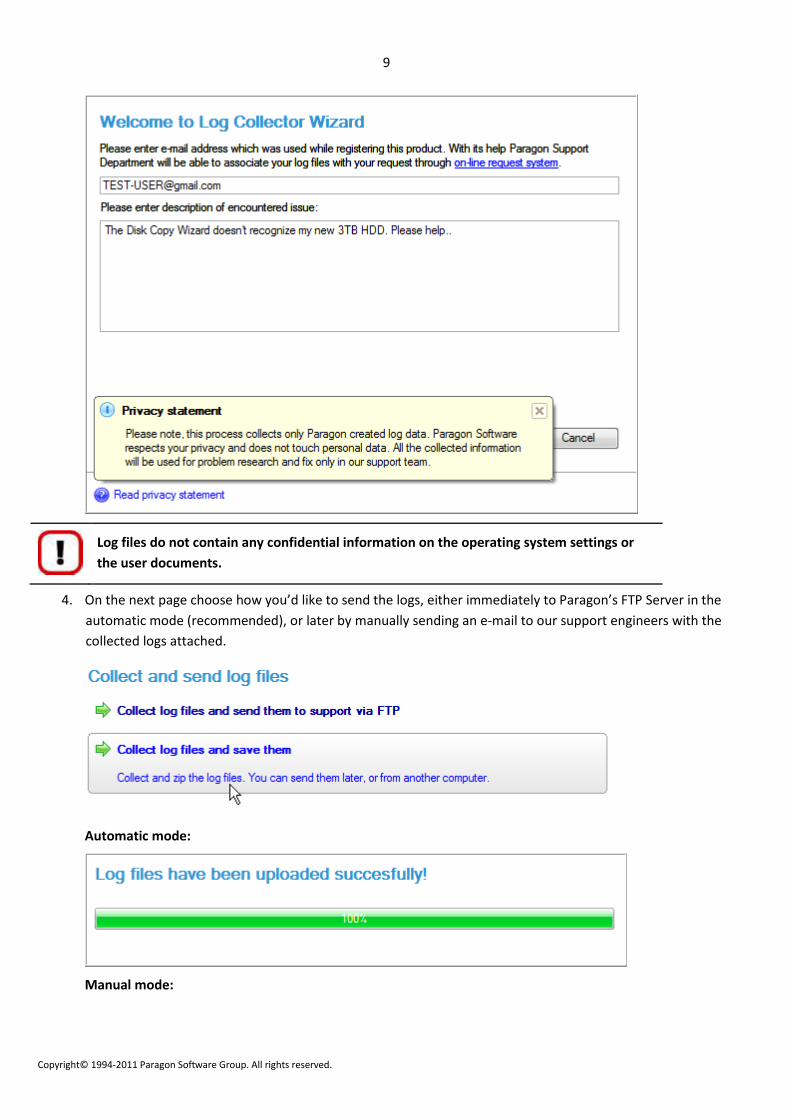
3. Provide an e-mail address used for registering the product, then give a detailed description on the
encountered problem in the corresponding text fields. Please don’t worry - we respect your privacy, so none
of your confidential data will be exposed. This utility only collects the program’s operation logs to help our
Support Team find and tackle your problem. Click Next to continue.
9
Copyright© 1994-2011 Paragon Software Group. All rights reserved.
Log files do not contain any confidential information on the operating system settings or
the user documents.
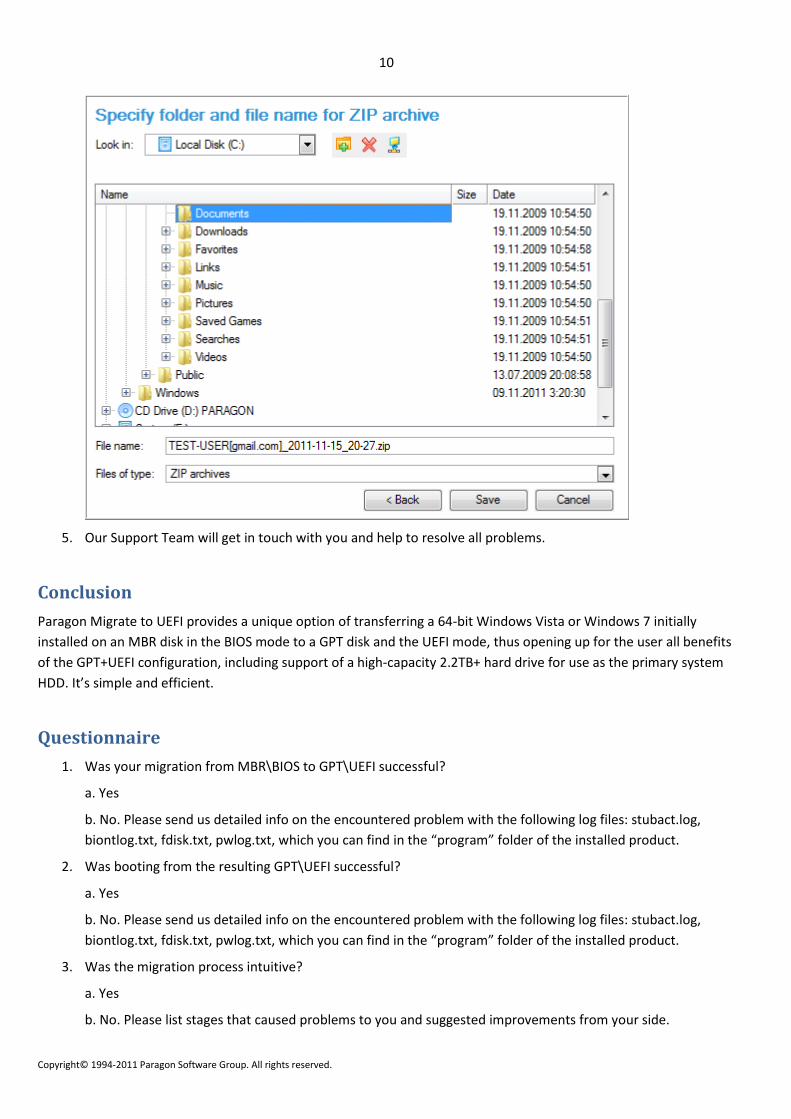
4. On the next page choose how you’d like to send the logs, either immediately to Paragon’s FTP Server in the
automatic mode (recommended), or later by manually sending an e-mail to our support engineers with the
collected logs attached.
Automatic mode:
Manual mode:
10
Copyright© 1994-2011 Paragon Software Group. All rights reserved.
5. Our Support Team will get in touch with you and help to resolve all problems.
Conclusion
Paragon Migrate to UEFI provides a unique option of transferring a 64-bit Windows Vista or Windows 7 initially
installed on an MBR disk in the BIOS mode to a GPT disk and the UEFI mode, thus opening up for the user all benefits
of the GPT+UEFI configuration, including support of a high-capacity 2.2TB+ hard drive for use as the primary system
HDD. It’s simple and efficient.
Questionnaire
1. Was your migration from MBR\BIOS to GPT\UEFI successful?
a. Yes
b. No. Please send us detailed info on the encountered problem with the following log files: stubact.log,
biontlog.txt, fdisk.txt, pwlog.txt, which you can find in the “program” folder of the installed product.
2. Was booting from the resulting GPT\UEFI successful?
a. Yes
b. No. Please send us detailed info on the encountered problem with the following log files: stubact.log,
biontlog.txt, fdisk.txt, pwlog.txt, which you can find in the “program” folder of the installed product.
3. Was the migration process intuitive?
a. Yes
b. No. Please list stages that caused problems to you and suggested improvements from your side.
11
Copyright© 1994-2011 Paragon Software Group. All rights reserved.
4. Were all program dialogs clear to you?
a. Yes
b. No. Please list all confusing dialogs, or better send us screenshot based examples.
5. Do you think that Migrate to UEFI needs additional features?
a. Yes. Please describe features you want to have in the next version.
b. No.
6. Do you think that functionality of Migrate to UEFI needs to be extended?
a. Yes. What else would you like this solution to do? (i.e. migration to a bigger drive, support of complex
configurations, etc.)
b. No. It is good already and complete.
Thank you for your participation - We'll look forward to your feedback!
Additional Information
Does your Windows support booting from UEFI?
Click on “Start”, then right click on “Computer”, then select “Properties”.
If “Windows Edition” is Windows 7 or Windows Vista and “System type” is 64-bit Operating System, then your
Windows supports the UEFI boot mode.
Does your motherboard support UEFI?
It’s easy to do. Generally, the newer your motherboard or PC is, the more likely it supports UEFI. Anyway, please find
technical specification on your motherboard on Vendor’s site and search for the UEFI support information.
Some manufacturers provide a list of the UEFI supported boards:
1. The list of MSI boards with the UEFI support:
http://www.msi.com/html/popup/MB/uefi/applied_model.html
2. The list of ASUS boards with the UEFI support:
http://event.asus.com/2011/mb/EFI_BIOS/
If your motherboard is not listed there you may refer to the list provided in the following document from the UEFI
website: http://www.uefi.org/news/uefi_industry/UEFIEvaluationPlatforms_2010.pdf