oracle openstack for oracle linux introduction to oracle openstack for oracle linux ... 4.3 example...
TRANSCRIPT

Oracle® OpenStack for Oracle Linux
Installation and Deployment Guide for Release 2.1
E73174-02April 2017

Oracle Legal Notices
Copyright © 2015, 2017, Oracle and/or its affiliates. All rights reserved.
This software and related documentation are provided under a license agreement containing restrictions on use and disclosure and are protectedby intellectual property laws. Except as expressly permitted in your license agreement or allowed by law, you may not use, copy, reproduce,translate, broadcast, modify, license, transmit, distribute, exhibit, perform, publish, or display any part, in any form, or by any means. Reverseengineering, disassembly, or decompilation of this software, unless required by law for interoperability, is prohibited.
The information contained herein is subject to change without notice and is not warranted to be error-free. If you find any errors, please report themto us in writing.
If this is software or related documentation that is delivered to the U.S. Government or anyone licensing it on behalf of the U.S. Government, thenthe following notice is applicable:
U.S. GOVERNMENT END USERS: Oracle programs, including any operating system, integrated software, any programs installed on the hardware,and/or documentation, delivered to U.S. Government end users are "commercial computer software" pursuant to the applicable Federal AcquisitionRegulation and agency-specific supplemental regulations. As such, use, duplication, disclosure, modification, and adaptation of the programs,including any operating system, integrated software, any programs installed on the hardware, and/or documentation, shall be subject to licenseterms and license restrictions applicable to the programs. No other rights are granted to the U.S. Government.
This software or hardware is developed for general use in a variety of information management applications. It is not developed or intended foruse in any inherently dangerous applications, including applications that may create a risk of personal injury. If you use this software or hardwarein dangerous applications, then you shall be responsible to take all appropriate fail-safe, backup, redundancy, and other measures to ensure itssafe use. Oracle Corporation and its affiliates disclaim any liability for any damages caused by use of this software or hardware in dangerousapplications.
Oracle and Java are registered trademarks of Oracle and/or its affiliates. Other names may be trademarks of their respective owners.
Intel and Intel Xeon are trademarks or registered trademarks of Intel Corporation. All SPARC trademarks are used under license and aretrademarks or registered trademarks of SPARC International, Inc. AMD, Opteron, the AMD logo, and the AMD Opteron logo are trademarks orregistered trademarks of Advanced Micro Devices. UNIX is a registered trademark of The Open Group.
This software or hardware and documentation may provide access to or information about content, products, and services from third parties.Oracle Corporation and its affiliates are not responsible for and expressly disclaim all warranties of any kind with respect to third-party content,products, and services unless otherwise set forth in an applicable agreement between you and Oracle. Oracle Corporation and its affiliates will notbe responsible for any loss, costs, or damages incurred due to your access to or use of third-party content, products, or services, except as setforth in an applicable agreement between you and Oracle.
Documentation Accessibility
For information about Oracle's commitment to accessibility, visit the Oracle Accessibility Program website athttp://www.oracle.com/pls/topic/lookup?ctx=acc&id=docacc.
Access to Oracle Support
Oracle customers that have purchased support have access to electronic support through My Oracle Support. For information, visithttp://www.oracle.com/pls/topic/lookup?ctx=acc&id=info or visit http://www.oracle.com/pls/topic/lookup?ctx=acc&id=trs if you are hearing impaired.
Abstract
Document generated on: 2017-04-04 (revision: 919)

iii
Table of ContentsPreface .............................................................................................................................................. v1 Introduction to Oracle OpenStack for Oracle Linux ........................................................................... 1
1.1 Introduction to OpenStack ..................................................................................................... 11.2 Introduction to Oracle VM Server .......................................................................................... 4
2 Getting Started ................................................................................................................................ 72.1 Getting Started with Deployment ........................................................................................... 72.2 Using Groups to Deploy Services .......................................................................................... 92.3 Using the kollacli Command ................................................................................................ 10
3 Preparing the Basic Environment ................................................................................................... 133.1 System Requirements ......................................................................................................... 133.2 OpenStack Data Storage .................................................................................................... 153.3 Host Network Requirements ................................................................................................ 163.4 Preparing Oracle Linux Nodes ............................................................................................ 183.5 Preparing Oracle VM Server Compute Nodes ...................................................................... 263.6 Preparing a Master Node .................................................................................................... 323.7 Setting up the Docker Registry ............................................................................................ 33
3.7.1 Setting up the Docker Registry Server ...................................................................... 333.7.2 Importing Images into the Docker Registry ................................................................ 37
4 Setting up a Deployment ............................................................................................................... 394.1 Setting up Target Nodes ..................................................................................................... 394.2 Setting up Services ............................................................................................................ 414.3 Example Setup for an Initial Deployment ............................................................................. 444.4 Setting Properties for Groups or Hosts ................................................................................ 48
4.4.1 Dealing With Variable Network Interface Names ........................................................ 504.5 Setting up Glance ............................................................................................................... 514.6 Setting up Nova ................................................................................................................. 52
4.6.1 Automatic Hypervisor Configuration .......................................................................... 524.6.2 Preparing a Compute Node ...................................................................................... 534.6.3 Setting the iSCSI Initiator Name ............................................................................... 534.6.4 Enabling iSCSI Multipath .......................................................................................... 54
4.7 Setting up Neutron ............................................................................................................. 544.7.1 Configuring VLAN Networks ..................................................................................... 54
4.8 Setting up Cinder ............................................................................................................... 554.8.1 Creating the cinder-volumes Volume Group .............................................................. 554.8.2 Configuring Alternative Volume Drivers for Cinder ..................................................... 564.8.3 Configuring the Cinder NFS Backup Driver ............................................................... 57
4.9 Setting up Swift .................................................................................................................. 574.10 Setting up Ceilometer ....................................................................................................... 594.11 Setting up Murano ............................................................................................................ 60
4.11.1 Creating Oracle Linux Murano-enabled Images ....................................................... 605 Deploying Services ........................................................................................................................ 65
5.1 Performing a Deployment ................................................................................................... 655.2 Making Configuration Changes After Deployment ................................................................. 675.3 Updating to a New Release of Oracle OpenStack for Oracle Linux ........................................ 675.4 Removing Services ............................................................................................................. 68
6 Using OpenStack CLIs .................................................................................................................. 696.1 Installing openstack-kolla-utils ............................................................................................. 696.2 Using docker-ostk ............................................................................................................... 706.3 Accessing the File System with docker-ostk ......................................................................... 71
7 Troubleshooting Deployment .......................................................................................................... 737.1 Debugging a Deployment .................................................................................................... 73

Oracle® OpenStack for Oracle Linux
iv
7.2 "Command Failed" Error When Starting the Ansible Container .............................................. 737.3 Collecting the Log Files ...................................................................................................... 747.4 Removing the Docker Images From a Node ........................................................................ 75
A kollacli Command-Line Reference .................................................................................................. 77

v
PrefaceThis document is part of the documentation library for Oracle OpenStack for Oracle Linux Release 2.1,which is available at:
http://www.oracle.com/technetwork/server-storage/openstack/linux/documentation/
The documentation library consists of the following items:
Oracle OpenStack for Oracle Linux Release Notes
The release notes provide a summary of the new features, changes, fixed bugs and known issues inOracle OpenStack for Oracle Linux. It contains last-minute information, which may not be included inthe main body of documentation, and information on Oracle OpenStack for Oracle Linux support. Readthis document before you install your environment.
Oracle OpenStack for Oracle Linux Installation and Deployment Guide
This document guides you through different options for installing and deploying Oracle OpenStackfor Oracle Linux. It is intended for system administrators, and assumes that you are familiar with theOracle Linux operating system, virtualization in general, and web technologies.
Further Information
You can get the latest information on Oracle OpenStack for Oracle Linux at:
http://www.oracle.com/us/technologies/linux/openstack/
OpenStack has a rich set of features and services. To find out more about existing and new OpenStackfeatures, see the OpenStack documentation available at:
http://docs.openstack.org/kilo/
Conventions
The following text conventions are used in this document:
Convention Meaning
boldface Boldface type indicates graphical user interface elements associated with anaction, or terms defined in text or the glossary.
italic Italic type indicates book titles, emphasis, or placeholder variables for whichyou supply particular values.
monospace Monospace type indicates commands within a paragraph, URLs, code inexamples, text that appears on the screen, or text that you enter.
Command Syntax
Command syntax appears in monospace font. The dollar character ($) and number sign (#) are commandprompts. You do not enter them as part of the command. Commands that any user, including the rootuser, can run are shown with the $ prompt:
$ command

Command Syntax
vi
Commands that must be run as the root user, or by a user with superuser privileges obtained throughanother utility such as sudo, are shown with the # prompt:
# command
The following command syntax conventions are used in this guide:
Convention Description
backslash \ A backslash is the Oracle Linux command continuation character. It is used incommand examples that are too long to fit on a single line. Enter the commandas displayed (with a backslash) or enter it on a single line without a backslash:
dd if=/dev/rdsk/c0t1d0s6 of=/dev/rst0 bs=10b \ count=10000
braces { } Braces indicate required items:
.DEFINE {macro1}
brackets [ ] Brackets indicate optional items:
cvtcrt termname [outfile]
ellipses ... Ellipses indicate an arbitrary number of similar items:
CHKVAL fieldname value1 value2 ... valueN
italics Italic type indicates a variable. Substitute a value for the variable:
library_name
vertical line | A vertical line indicates a choice within braces or brackets:
FILE filesize [K|M]

1
Chapter 1 Introduction to Oracle OpenStack for Oracle Linux
Table of Contents1.1 Introduction to OpenStack ............................................................................................................. 11.2 Introduction to Oracle VM Server .................................................................................................. 4
This chapter introduces you to Oracle OpenStack for Oracle Linux, to the OpenStack components andterminology.
1.1 Introduction to OpenStackOpenStack is a cloud computing software platform that controls large pools of compute, storage, andnetworking resources in a data center. With OpenStack, you can manage different types of hypervisors,network devices and services, storage components, and more, using a single API that creates a unifieddata center fabric. OpenStack is, therefore, a pluggable framework that allows vendors to write plug-ins toimplement a solution using their own technology, and which allows users to integrate their technology ofchoice.
OpenStack Services
OpenStack is built as a set of distributed services. These services communicate with each other, andare responsible for the various functions expected from virtualization/cloud management software. Thefollowing are some of the key OpenStack services:
• Nova: A compute service responsible for creating virtual machine instances and managing their lifecycle, as well as managing the hypervisor of choice. The hypervisors are pluggable to Nova, while theNova API remains the same, regardless of the underlying hypervisor.
• Neutron: A network service responsible for creating network connectivity and network services. It iscapable of connecting with vendor network hardware via plug-ins. Neutron comes with a set of defaultservices implemented by common tools. Network vendors can create plug-ins to replace any one of theservices with their own implementation, adding value to their users.
• Cinder: A block storage service responsible for creating and managing external storage, including blockdevices and NFS. It is capable of connecting to vendor storage hardware through plug-ins. Cinder hasseveral generic plug-ins, which can connect to NFS and iSCSI, for example. Vendors add value bycreating dedicated plug-ins for their storage devices.
• Swift: An object and Binary Large Object (BLOB) storage service responsible for managing object-based storage.
• Keystone: An identity management system responsible for user and service authentication. Keystone iscapable of integrating with third-party directory services such as LDAP.
• Glance: An image service responsible for managing images uploaded by users. Glance is not a storageservice, but it is responsible for saving image attributes, making a virtual catalog of the images.
• Heat: An orchestration service responsible for managing the life cycle of the OpenStack infrastructure(such as servers, floating IP addresses, volumes, security groups, and so on) and applications. UsesHeat Orchestration Templates (HOT) to describe the infrastructure for an application and provides anAPI for Amazon's AWS template format.
• Horizon: A dashboard that creates a GUI for users to control the OpenStack deployment. This is anextensible framework to which vendors can add features. Horizon uses the same APIs exposed to users.

OpenStack Nodes
2
• Murano: An application catalog service for publishing cloud-ready applications from a catalog. An agentis installed into an instance's operating system, which enables deployment of the applications directlyinto the guest. Murano also includes a plug-in to the Horizon dashboard.
• Ceilometer: A telemetry service that collects, normalizes and transforms data produced by OpenStackservices for various telemetry use cases, such as customer billing, resource tracking, metering, andalarming.
More details are available in the OpenStack Cloud Administrator Guide at:
http://docs.openstack.org/admin-guide-cloud/common/get_started_openstack_services.html
OpenStack has many more services that are responsible for various features and capabilities, and the fulllist can be found on the OpenStack website at:
http://www.openstack.org/
The list provided here is limited to those needed to get started with Oracle OpenStack for Oracle Linux.
OpenStack Nodes
There are a number of node types used in OpenStack. Nodes are a physical host computer, with anoperating system installed, with Oracle Linux using KVM (Kernel-based Virtual Machine), or Oracle VMServer. The main node types we discuss in this guide are:
• A controller node is a system running Oracle Linux, and is where most of the OpenStack services areinstalled. The term controller node is used to describe nodes that do not run virtual machine instances.The controller nodes may have all the non-compute services or only some of them. A controller nodemay also include the Oracle OpenStack for Oracle Linux CLI (kollacli), which is used to perform thedeployment of OpenStack services to other nodes.
• A compute node is a system running Oracle Linux using KVM, or Oracle VM Server. A compute noderuns the bare minimum of services to manage virtual machine instances.
• A database node is a system running Oracle Linux, and the services required to manage databases forimages and instances.
• A network node is a system running Oracle Linux, and runs the neutron network worker daemon.The neutron worker daemon provides services such as providing an IP address to a booting Novainstance.
• A storage node is a system running Oracle Linux and the services required to manage storage forimages and instances.
Some storage is not directly managed by the OpenStack services, but is instead managed by thestorage appliance. On the storage node, Cinder communicates with the storage appliance's API, and it isthe storage appliance that performs the storage management. For example, when using the Oracle ZFSStorage Appliance, the Cinder driver on the storage node communicates with the Oracle ZFS StorageAppliance NFS driver, and it is the ZFS driver which performs the storage management.
• A master node is a system running Oracle Linux and kollacli, used to deploy the OpenStack services tothe nodes. A master node is not an OpenStack node, although kollacli may be installed on a controllernode.
More detailed information on the node types is available in the OpenStack Operations Guide at:
http://docs.openstack.org/openstack-ops/content/example_architecture.html#node_types

OpenStack Instances
3
OpenStack Instances
OpenStack virtual machines are called instances, mostly because they are instances of an image that iscreated upon request and that is configured when launched. The main difference between OpenStack andtraditional virtualization technology is the way state is stored. With traditional virtualization technology, thestate of the virtual machine is persistent.
OpenStack can support both persistent and ephemeral models. In the ephemeral model, an instance islaunched from an image in the Image service, the image is copied to the run area, and when the copyis completed, the instance starts running. The size and connectivity of the instance are defined at thetime of launching the instance. When an instance is terminated, the original image remains intact, but thestate of the terminated instance is not retained. This ephemeral model is useful for scaling out quickly andmaintaining agility for users.
In the persistent model, the instance is launched from a persistent volume on a compute node, or from ablock storage volume, and not from the Image service. A volume can be any kind of persistent storage,including a file, a block device, an LVM partition, or any other form of persistent storage. In this case, whenthe instance is terminated, any session changes are retained and are present the next time an instance islaunched. In the persistent model, the size and connectivity of the instance are also defined at the time theinstance launches. In some sense, the persistent model in OpenStack is similar to the traditional approachto virtualization.
OpenStack Storage
The storage used in OpenStack can be either ephemeral or persistent. Ephemeral storage is deletedwhen an instance is terminated, while persistent storage remains intact. Persistent storage in OpenStackis referred to as a volume, regardless of the technology and device it is backed by. Persistent storagecan either be used to launch an instance, or it can be connected to an instance as a secondary storagedevice to retain state. An example of this is a database launched as an ephemeral instance, with a volumeconnected to it to save the data. When the instance is terminated, the volume retains the data and can beconnected to another instance as needed.
The OpenStack Cinder service is responsible for managing the volumes, and it offers a framework forvendors to create drivers. If a storage vendor wants to support OpenStack deployment and allow users tocreate volumes on the device, the vendor must create a Cinder driver that allows users to use the standardcalls to control the storage device.
OpenStack also supports object storage using the Swift service.
OpenStack Networking
The OpenStack networking service, Neutron, offers a complete software-defined networking (SDN)solution, along with various network services. The network services Neutron can support include routing,firewall, DNS, DHCP, load balancing, VPN, and more.
Neutron, like Cinder, offers a framework for vendors to write plug-ins for various services. For example, anetwork vendor might want to offer a custom load balancer instead of the default load balancer providedby Neutron. The plug-in framework offers a powerful tool to build sophisticated network topologies usingstandard APIs.
Network Isolation: Tenant Networks
Tenant networks are the basis for Neutron’s SDN capability. Neutron has full control of layer-2 isolation.This automatic management of layer-2 isolation is completely hidden from the user, providing a convenientabstraction layer required by SDN.

User Isolation: Multi-tenancy
4
To perform the layer-2 separation, Neutron supports three layer-2 isolation mechanisms: VLANs, VxLANs,and GRE (Generic Routing Encapsulation) tunnels. You must define which mechanism should be used andset up the physical topology as required. Neutron is responsible for allocating the resources as needed.For example, you would configure the VLAN switch, allocate the VLAN range, and configure the VLAN inNeutron. When you define a new network, Neutron automatically allocates a VLAN and takes care of theisolation. You do not have to manage VLANs, and do not need to be aware of which VLAN was assignedto the network.
Complete Software-Defined Network Solution
OpenStack, using Neutron, presents a complete SDN solution. You can define isolated networks with anyaddress space, and connect between those networks using virtual routers. You can define firewall ruleswithout the need to touch or change any element of the physical network topology. Furthermore, thereis a complete abstraction between the physical topology and the virtual networks, so that multiple virtualnetworks can share the same physical resources, without any security or address space concerns.
User Isolation: Multi-tenancy
Allowing multiple users to share the same physical environment while ensuring complete separationbetween them is a key feature of OpenStack. OpenStack is designed so that multiple tenants can sharephysical resources in a way that is transparent to the users. OpenStack offers ways to share virtualresources between tenants, but maintains complete separation where needed.
1.2 Introduction to Oracle VM ServerOracle VM Server is a component of the Oracle VM product. Oracle VM Server is based on the Xenhypervisor. Oracle VM Server can be managed using Oracle VM Manager, or it can be managed as astandalone product with OpenStack.
Xen is a bare-metal (type 1) hypervisor. The hypervisor is controlled from a privileged environment (whichis also itself a virtual machine) called Domain0, or Dom0. Dom0 controls the physical devices on thesystem, and connects them to the other virtual machines. Dom0 is also responsible for launching virtualmachines called domU(s) using tools run from the user space. When launching a virtual machine, Xenconnects domU to storage and network resources.
Figure 1.1 Oracle VM Server, the Xen Hypervisor and Virtual Machines
Since dom0 is itself a virtual machine, any memory assigned to it cannot be used for domUs. Sufficientdom0 memory is important for performance and correct operation, so it is important to adhere to theminimum memory requirements. See Section 3.1, “System Requirements” for information on the memoryrequirements for using Oracle VM Server as a compute node.

Introduction to Oracle VM Server
5
The libvirt driver is used to connect Oracle VM Server to OpenStack. The libvirt driver fully supports Xen.On an Oracle Linux based compute node, the libvirt driver runs in a Docker container. On an Oracle VMServer based compute node, the native libvirt driver is used (libvirt is not run in a container). All otherOpenStack compute node services are run in Docker containers on dom0.
The version of Oracle VM Server supported is Oracle VM Server Release 3.4, which uses Oracle’sUnbreakable Enterprise Kernel Release 4 (also known as UEK R4), an upstream Linux kernel hardenedand shipped by Oracle. As a result, Oracle VM Server uses the latest versions of hardware drivers andOpen vSwitch.

6

7
Chapter 2 Getting Started
Table of Contents2.1 Getting Started with Deployment ................................................................................................... 72.2 Using Groups to Deploy Services ................................................................................................. 92.3 Using the kollacli Command ........................................................................................................ 10
This chapter introduces you to the key concepts to get started with deploying Oracle OpenStack for OracleLinux.
2.1 Getting Started with DeploymentThe following is an overview of steps needed to deploy OpenStack services using Oracle OpenStack forOracle Linux.
1. Set up the basic OpenStack environment.
• Set up the target nodes.
Target nodes are the hosts that run OpenStack services. The services a target node runs determinesthe type of node it is, either controller, compute, database, network, and storage. You install andprepare Oracle Linux or Oracle VM Server on each target node.
• Set up the master node.
The master node is used to deploy OpenStack services to target nodes. Typically, you use acontroller node as a master node. But you can use a separate host if you prefer. You install theOpenStack Kolla command line interface (kollacli), and set up the kolla user. The kolla useris the Ansible SSH user that is used to deploy OpenStack services. You also add users to the kollagroup. Membership of this group enables users to set up, configure and deploy OpenStack servicesusing the kollacli command.
• Set up a Docker registry.
OpenStack services are deployed to target nodes as Docker containers. The Docker registry storesthe Oracle OpenStack for Oracle Linux Docker images. The Docker daemon running on each targetnode downloads the Docker images from the registry and uses them to create the Docker containers.The master node tells each target node which images they should download. You configure a Dockerregistry server and then load the Oracle OpenStack for Oracle Linux Docker images.
Chapter 3, Preparing the Basic Environment has details of what you need to do.
2. Set up the deployment.
• Add the target nodes to the deployment.
You add nodes to the Ansible inventory to identify the target nodes for deployment.
• Set up the kolla user on the target nodes.
You copy the SSH public key for the kolla user to the target nodes, and confirm that the kollauser can log in to each node. This ensures the kolla user is able to deploy OpenStack services tothe target nodes.

Getting Started with Deployment
8
• Assign the target nodes to groups.
Groups are used to associate the target nodes with OpenStack services. The default groups arecontrol, compute, database, network, and storage. You assign the target nodes to groups so thatall nodes in the same group run the same services. For more information, see Section 2.2, “UsingGroups to Deploy Services”.
• Enable the OpenStack services you want to deploy.
All OpenStack services are enabled by default, apart from the Swift object storage and theCeilometer telemetry services. However, you have full control over the services that are deployedand can enable or disable services by setting Kolla properties. For example, the enable_horizonproperty controls whether or not you want to deploy the OpenStack web-based interface.
• Configure the passwords for all services.
Typically, when you deploy an OpenStack service, a database is created for the service and thecredentials for the service admin user are registered with the Keystone service. You must setpasswords for the database and the service admin users. You only do this once.
• Configure the deployment by setting properties.
You set Kolla properties to configure how the OpenStack services operate once they are deployed.For example, the cinder_backup_driver property enables you to specify the storage driver usedto back up Cinder block storage volumes.
• Prepare to deploy OpenStack services.
Once you have prepared the basic environment, you might need to perform additional configuration,depending on the OpenStack services you intend to deploy.
For example, by default virtual machine instances use temporary storage that only exists forthe lifetime of the instance. Once the instance is deleted so is the storage. If you want to set uppersistent storage for virtual machines, you can configure the block storage devices for use withthe Cinder block storage service, or you can configure the rings that provide the location andorganization of your storage for the Swift object storage service.
Chapter 4, Setting up a Deployment has details of what you need to do.
3. Perform the deployment.
• Initial deployment
Initially, you want to deploy all the enabled OpenStack services to all hosts. When you deploy, theconfiguration files required for each service are assembled using a template and the configured Kollaproperties. The kolla user logs in to each target node, copies the service configuration files andstarts the Docker containers for the OpenStack services that the target node is configured to run.
• Update or expand the deployment
After your initial deployment, you might want to make configuration changes, to add or removeservices, to move services to different target nodes, or to add or remove target nodes. You can do allthis by redeploying services to specific groups or hosts, or by redeploying selected services. You areable to do this because the OpenStack data is stored separately from the Docker containers that runthe OpenStack services.

Using Groups to Deploy Services
9
Chapter 5, Deploying Services has details of what you need to do.
2.2 Using Groups to Deploy Services
Oracle OpenStack for Oracle Linux uses groups to associate the target nodes with OpenStack services.Target nodes in the same group run the same OpenStack services. The default groups are:
• control: Contains the control-related services, such as glance, keystone, ndbcluster, nova, rabbitmq.
• compute: Contains the compute services, such as nova-compute.
• database: Contains the database-related services.
• network: Contains the network-related services, such as haproxy, neutron.
• storage: Contains the storage services, such as cinder and swift.
A node can belong to more than one group and can run multiple OpenStack services.
The minimum supported deployment of OpenStack contains at least three nodes (as shown in Figure 2.1):
• Two controller nodes, each node belongs to the control, database, network and storage groups.
• One or more nodes belonging to the compute group.
Note
Single-node deployments (sometimes referred to as all-in-one deployments) are notsupported.
Figure 2.1 Minimum Supported Deployment
As your scaling and performance requirements change, you can increase the number of nodes and movegroups on to separate nodes to spread the workload, as shown in Figure 2.2:
Figure 2.2 Expanding Deployment
As your deployment expands, note the following "rules" for deployment:

Using the kollacli Command
10
• The nodes in the compute group must not be assigned to the control group.
• The control group must contain at least two nodes.
• The number of nodes in the database group must always be a multiple of two.
• Each group must contain at least two nodes to enable high availability.
There is no limit on the number of nodes in a deployment. Figure 2.3 shows a fully-expanded deploymentusing the default groups. There are at least two nodes for each group to maintain high availability, and thenumber of database nodes is a multiple of two.
Figure 2.3 Fully-Expanded Deployment
You are not restricted to using the default groups. You can change the services a group runs, or configureyour own groups. If you configure your own groups, be sure to remember the rules of deployment listedabove.
2.3 Using the kollacli Command
You run the kollacli command on the master node and use it to configure and deploy OpenStackservices to the target nodes. To run kollacli commands, you must be a member of the kolla group.
The kollacli command has a set of subcommands, which are organized by the objects that theymanage.
To configure the layout of your OpenStack deployment, you perform actions on groups, hosts and services,as follows:
• The kollacli group commands manage the associations between target nodes and the OpenStackservices they run. Target nodes in the same group run the same services.
Example command: kollacli group addhost adds a host to a group.
• The kollacli host commands manage the target nodes in a deployment.
Example command: kollacli host add adds a host to the list of target nodes.
• The kollacli service commands manage the OpenStack services.
Example command: kollacli service addgroup adds a service to a group.
To configure your OpenStack deployment, you configure values for passwords and properties, as follows:
• The kollacli password commands manage the passwords for the OpenStack components.
Example command: kollacli password set sets a value for a password.

Bash Command Completion
11
• The kollacli property commands manage the configuration settings for OpenStack services.
Example command: kollacli property set sets a value for a configuration property.
Once you have configured your deployment, you deploy OpenStack services with the kollacli deploycommand.
Help on how to use the kollacli command is available, as follows:
• To list all kollacli commands, use the kollacli help command.
• To list the related commands for an object, use the kollacli help object for example kollaclihelp host.
• To get help for a specific command, use the kollacli help subcommand command, wheresubcommand is the name of the command, for example kollacli host list or kollacliservice listgroups.
For a complete syntax reference for kollacli commands, see Appendix A, kollacli Command-LineReference.
Bash Command Completion
You can enable Bash command completion for the kollacli command, as follows:
1. Install the bash-completion package, if it is not already installed:
# yum install bash-completion
2. Use the kollacli complete command to generate the command completion function.
To display the function so you can copy and paste it into a file:
$ kollacli complete
To output the function to a file:
$ kollacli complete >/etc/bash_completion.d/kollacli
You need root privileges to write to the /etc/bash_completion.d directory.
3. Source the file to enable command completion:
$ source /etc/bash_completion.d/kollacli
Using the kollacli Shell
The kollacli shell enables you to enter several commands without having to type the kollaclicommand each time. You start the shell with the kollacli command. When you are in the kollaclishell, the prompt changes to (kollacli). From the shell prompt you can enter kollacli commands intheir short form, for example:
$ kollacli(kollacli) host list(kollacli) group listhosts
In addition to the help command, the kollacli shell also supports the -h and --help options forobtaining help with kollacli commands.

Formatting Command Output
12
To exit the kollacli shell and return to the operating system prompt, type exit, quit, or q.
Formatting Command Output
When you use kollacli commands, such as the kollacli property list command, to show whatyou have configured, these commands have a --format option which enable you to format the output tosuit your needs, as shown in the following table.
Option Format
csv Comma-separated values.
Use the --quote option with this format to control the useof quotes in the output:
• all: Quote all values.
• minimal: Optimized minimal quoting of values.
• none: No quoting of any values.
• nonnumeric: Quote only non-numeric values.
The default is nonnumeric.
html HTML table markup.
json JavaScript Object Notation.
table Simple ASCII display table.
This is the default output format.
Use the --max-width option with this format to set themaximum display width for each column. The value for thisoption must be an integer. The default is 0 (no maximumwidth).
value Space separated values with no headers.
This format may be useful to pipe output to an operatingsystem command.
yaml YAML format.
You can also use the --column option to select the columns that are included in the output. Use multiple--column options to select each column you want. The names of the columns change depending on thekollacli command used and the names are case sensitive. By default, all columns are included.

13
Chapter 3 Preparing the Basic Environment
Table of Contents3.1 System Requirements ................................................................................................................. 133.2 OpenStack Data Storage ............................................................................................................ 153.3 Host Network Requirements ........................................................................................................ 163.4 Preparing Oracle Linux Nodes .................................................................................................... 183.5 Preparing Oracle VM Server Compute Nodes .............................................................................. 263.6 Preparing a Master Node ............................................................................................................ 323.7 Setting up the Docker Registry ................................................................................................... 33
3.7.1 Setting up the Docker Registry Server .............................................................................. 333.7.2 Importing Images into the Docker Registry ........................................................................ 37
The systems in an OpenStack deployment are known as nodes. The nodes in a deployment are eitherOracle Linux nodes or Oracle VM Server compute nodes. To prepare nodes for deployment, you set up thesystem and configure the Docker Engine, as described in Section 3.4, “Preparing Oracle Linux Nodes” andSection 3.5, “Preparing Oracle VM Server Compute Nodes”.
You deploy OpenStack services from a master node using the kollacli command. Section 3.6,“Preparing a Master Node” describes how to set up a master node.
OpenStack services are deployed to each node as Docker containers. The containers are created fromDocker images, which are stored in a Docker registry. Section 3.7, “Setting up the Docker Registry”describes how to set up a Docker registry server and to import the Oracle OpenStack for Oracle Linuximages.
3.1 System RequirementsOracle OpenStack for Oracle Linux is supported on Oracle Linux (for all node types) and Oracle VM Server(as compute nodes only). Information on the supported hardware is available in the Hardware CertificationList for Oracle Linux and Oracle VM at:
http://linux.oracle.com/hardware-certifications
The storage hardware you use should be included in the hardware list. Oracle is working with its partnersto make sure customers have a choice of storage. For specific storage plug-ins, contact Oracle or the plug-in vendor.
You can download Oracle Linux and Oracle VM Server from the Oracle Software Delivery Cloud at:
https://edelivery.oracle.com/linux
The following table lists the minimum system requirements for each OpenStack node type:
Table 3.1 OpenStack Node Minimum System Requirements
Node Type Minimum System Requirements
Controller • 1 CPU
• 8 GB RAM
• 2 NICs
• Oracle Linux Release 7 Update 2 and later

System Requirements
14
Node Type Minimum System Requirements• Unbreakable Enterprise Kernel Release 4
• 64 GB btrfs file system mounted on /var/lib/docker
• 15 GB btrfs file system mounted on /var/lib/registry(if the node hosts the Docker registry)
Compute(Oracle Linux)
• 1 CPU
• 16 GB RAM
• 2 NICs (4 NICs recommended for best performance)
• Oracle Linux Release 7 Update 2 and later
• Unbreakable Enterprise Kernel Release 4
• 64 GB btrfs file system mounted on /var/lib/docker
Compute(Oracle VM Server)
• 1 CPU
• 16 GB RAM
• 2 NICs (4 NICs recommended for best performance)
• Oracle VM Server Release 3.4, on 64-bit x86 platforms (x86_64)
• Unbreakable Enterprise Kernel Release 4
• 64 GB btrfs file system mounted on /var/lib/docker
Database • 1 CPU
• 8 GB RAM
• 2 NICs
• Oracle Linux Release 7 Update 2 and later
• Unbreakable Enterprise Kernel Release 4
• 64 GB btrfs file system mounted on /var/lib/docker
Network • 1 CPU
• 8 GB RAM
• 3 NICs (4 NICs recommended for best performance)
• Oracle Linux Release 7 Update 2 and later
• Unbreakable Enterprise Kernel Release 4
• 64 GB btrfs file system mounted on /var/lib/docker
Storage • 1 CPU
• 8 GB RAM

OpenStack Data Storage
15
Node Type Minimum System Requirements• 2 NICs (3 NICs recommended for best performance)
• Oracle Linux Release 7 Update 2 and later
• Unbreakable Enterprise Kernel Release 4
• 64 GB btrfs file system mounted on /var/lib/docker
In addition to the OpenStack nodes, Oracle OpenStack for Oracle Linux requires a node to host a Dockerregistry and a node (known as a master node) from which you deploy OpenStack services using thekollacli command. Typically these are hosted on a controller node, but you can host these on separatenodes if you prefer. The following are the minimum requirements for separate nodes:
Table 3.2 Additional Node Minimum System Requirements
Node Type Minimum System Requirements
Master • 1 CPU
• 2 GB RAM
• 1 NIC
• Oracle Linux Release 7 Update 2 and later
• Unbreakable Enterprise Kernel Release 4
• 64 GB btrfs file system mounted on /var/lib/docker
Registry • 1 CPU
• 2 GB RAM
• 1 NIC
• Oracle Linux Release 7 Update 2 and later
• Unbreakable Enterprise Kernel Release 4
• 15 GB btrfs file system mounted on /var/lib/registry
3.2 OpenStack Data Storage
Many OpenStack services store their data in the /var/lib/kolla directory on the target nodes. If aservice needs to store data, the /var/lib/kolla directory is created automatically when the service isdeployed, and one or more subdirectories are created in /var/lib/kolla. The subdirectories are usedas data volumes for the service's Docker containers. For example when you deploy the Nova service, the/var/lib/kolla/var/lib/nova/instances directory is created on compute nodes and this is usedfor ephemeral storage for instances (virtual machines).
The following services currently store data outside the /var/lib/kolla directory:
• Glance: the /var/lib/glance directory on controller nodes.
• Nova: the /etc/iscsi and /etc/multipath directories on compute nodes.

Host Network Requirements
16
You must ensure that your target nodes have sufficient disk space to store OpenStack data, especially ifyou use ephemeral storage for instances.
You should create regular backups of your OpenStack data.
When you remove OpenStack services from nodes, the data is not removed unless you explicitly requestto remove it.
3.3 Host Network Requirements
In an OpenStack environment, the network traffic can be divided into the following networks:
Administration network
This network is not part of the OpenStack infrastructure. It provides Internet access for all nodes andis used for administration to install software packages and security updates from Oracle UnbreakableLinux Network or Oracle Yum Server, and to provide access to the Docker registry and other servicessuch as NTP and DNS.
Public network
This network provides the external access to OpenStack services. For instances (virtual machines),this network provides the route out to the external network and the IP addresses to enable inboundconnections to the instances. This network can also provide the public API endpoints to connect toOpenStack services.
Management/API network
This network is a private internal network used for communication between all the OpenStack servicesand for high availability. All nodes in the deployment must have an IPv4 address on this network.
Virtual machine network
This network is a private internal network that is used for communication between the OpenStackinstances (virtual machines), and also between the instances and the network nodes to provideinbound and outbound connections to the public network.
Storage network
This network is a private internal that is used for the communication between compute nodes andstorage nodes to access the storage.
Once you have decided how you want to implement these networks, you configure the network interfacesfor the networks and other network settings by setting properties with the kollacli property setcommand, as described in Section 4.2, “Setting up Services”.
Figure 3.1 shows the default network configuration and the properties that specify the network interfaceson the target nodes.

Host Network Requirements
17
Figure 3.1 Default Network Configuration
In the default configuration, the neutron_external_interface property specifies the name of thenetwork interface on the public network. To make it easier to get started with deploying OpenStackservices, the management/API, virtual machine, and storage networks are consolidated into a singlenetwork. The network_interface property specifies the name of the network interface on this network.This configuration requires the minimum number of network interfaces.
While consolidating the management/API, virtual machine, and storage networks into a single networkmakes it easier to deploy OpenStack services, for performance and security reasons it is best to separateand isolate these networks. Figure 3.2 shows a fully-expanded network configuration and the propertiesthat specify the network interfaces on the target nodes.
Figure 3.2 Expanded Network Configuration
With this configuration, the neutron_external_interface property specifies the name of the networkinterface on the public network, and there are separate properties for specifying the names of networkinterfaces on the management/API (api_interface), virtual machine (tunnel_interface), and

Preparing Oracle Linux Nodes
18
storage (storage_interface) networks. This configuration requires the maximum number of networkinterfaces.
If you are starting with a small OpenStack deployment, the network configuration is flexible so you do nothave to separate the management/API, virtual machine, and storage networks in one go. By default, theproperties for these networks are mapped to the network_interface property. So you could start withthe default consolidated network, and then separate the networks as your deployment expands.
You specify the network interface names on the target nodes using a single property for each network. Thisworks best where the hardware on the target nodes is identical. When this is not the case, you can handlethe variations by setting properties that are specific to groups or hosts, see Section 4.4, “Setting Propertiesfor Groups or Hosts”.
3.4 Preparing Oracle Linux NodesThis section describes how to prepare an Oracle Linux node for OpenStack. Section 3.5, “Preparing OracleVM Server Compute Nodes” describes how to prepare an Oracle VM Server node.
You can download the installation ISO for the latest version of Oracle Linux Release 7 from the OracleSoftware Delivery Cloud at:
https://edelivery.oracle.com/linux
You prepare an Oracle Linux node for OpenStack by enabling the required repositories and installing theOracle OpenStack for Oracle Linux preinstallation package. When you install the preinstallation package, itinstalls all the other required packages on the node. The packages can be installed using either the OracleUnbreakable Linux Network (ULN) or the Oracle Linux Yum Server. If you are using ULN, the followingprocedure assumes that you register the system with ULN during installation.
For more information about ULN and registering systems, see:
http://docs.oracle.com/cd/E52668_01/E39381/html/index.html
For more information on using the Oracle Linux Yum Server, see
http://docs.oracle.com/cd/E52668_01/E54669/html/ol7-yum.html
Oracle OpenStack for Oracle Linux Release 2.1 uses a version of Docker, which requires that youconfigure a system to use the Unbreakable Enterprise Kernel Release 4 (UEK R4) and boot the systemwith this kernel.
Oracle OpenStack for Oracle Linux requires a btrfs file system mounted on /var/lib/docker withat least 64GB available. The following provides instructions for setting up a btrfs file system using oneor more available devices. The device could be a disk partition, an LVM volume, a loopback device, amultipath device, or a LUN.
To prepare an Oracle Linux node:
1. Install Oracle Linux using the instructions in the Oracle Linux Installation Guide for Release 7 at:
http://docs.oracle.com/cd/E52668_01/E54695/html/index.html
Select Minimal install as the base environment for all node types.
As part of the install, you should create a btrfs file system mounted at /var/lib/docker. This filesystem requires a minimum of 64GB of disk space and is used to host a local copy of the OpenStackDocker images. If you prefer, you can create the file system after installation, as described in thefollowing steps.

Preparing Oracle Linux Nodes
19
If the node will also host the Docker registry, you should create an additional btrfs file system mountedat /var/lib/registry. This file system requires a minimum of 15GB of disk space. If you prefer,you can create the file system after installation, as described in Section 3.7, “Setting up the DockerRegistry”.
2. Disable SELinux.
In order to use the btrfs storage engine with Docker, you must either disable SELinux or set theSELinux mode to Permissive.
To check the current SELinux mode, use the getenforce command. If the output of this commandshows Enabled, you must disable SELinux as follows:
a. Edit /etc/selinux/config and set the value of the SELINUX directive to disabled.
Note
Do not use the setenforce command to change the SELinux mode, aschanges made with this command do not persist across reboots.
b. Reboot the system.
# systemctl reboot
3. Stop and disable the firewalld service.
If you require a system firewall, you can use iptables instead of firewalld.
# systemctl stop firewalld # systemctl disable firewalld
Confirm that the firewalld service is stopped and disabled.
# systemctl status firewalld # systemctl is-enabled firewalld
4. Create a btrfs file system mounted on /var/lib/docker.
You create a btrfs file system with the utilities available in the btrfs-progs package, which should beinstalled by default.
a. Create a btrfs file system on one or more block devices:
# mkfs.btrfs [-L label] block_device ...
where -L label is an optional label that can be used to mount the file system.
For example:
• To create a file system in a partition /dev/sdb1:
# mkfs.btrfs -L var-lib-docker /dev/sdb1
The partition must already exist. Use a utility such as fdisk (MBR partitions) or gdisk (GPTpartitions) to create one if needed.
• To create a file system across two disk devices, /dev/sdc and /dev/sdd:
# mkfs.btrfs -L var-lib-docker /dev/sd[cd]

Preparing Oracle Linux Nodes
20
The default configuration is to stripe the file system data (raid0) and to mirror the file systemmetadata (raid1) across the devices. Use the -d (data) and -m (metadata) options to specifythe required RAID configuration. For raid10, you must specify an even number of devices andthere must be at least four devices.
• To create a file system in a logical volume named docker in the ol volume group:
# mkfs.btrfs -L var-lib-docker /dev/ol/docker
The logical volume must already exist. Use Logical Volume Manager (LVM) to create one ifneeded.
More information on using mkfs.btrfs is available in the Oracle Linux Administrator's Guide forRelease 7 at:
http://docs.oracle.com/cd/E52668_01/E54669/html/ol7-create-btrfs.html
b. Obtain the UUID of the device containing the btrfs file system.
Use the blkid command to display the UUID of the device and make a note of this value, forexample:
# blkid /dev/sdb1/dev/sdb1: LABEL="var-lib-docker" UUID="460ed4d2-255f-4c1b-bb2a-588783ad72b1" \UUID_SUB="3b4562d6-b248-4c89-96c5-53d38b9b8b77" TYPE="btrfs"
If the btrfs file system is created across multiple devices, you can specify any of the devices toobtain the UUID. Alternatively you can use the btrfs filesystem show command to see theUUID. For a logical volume, specify the path to the logical volume as the device for example /dev/ol/docker. Ignore any UUID_SUB value displayed.
c. Edit the /etc/fstab file and add an entry to ensure the file system is mounted when the systemboots.
UUID=UUID_value /var/lib/docker btrfs defaults 1 2
Replace UUID_value with the UUID that you found in the previous step. If you created a label forthe btrfs file system, you can also use the label instead of the UUID, for example:
LABEL=label /var/lib/docker btrfs defaults 1 2
d. Create the /var/lib/docker directory.
# mkdir /var/lib/docker
e. Mount all the file systems listed in /etc/fstab.
# mount -a
f. Verify that the file system is mounted.
# dfFilesystem 1K-blocks Used Available Use% Mounted on.../dev/sdb1 ... ... ... 1% /var/lib/docker
5. (Optional) If you use a proxy server for Internet access, configure Yum with the proxy server settings.
Edit the /etc/yum.conf file and specify the proxy setting, for example:

Preparing Oracle Linux Nodes
21
proxy=http://proxysvr.example.com:3128
If the proxy server requires authentication, additionally specify the proxy_username, andproxy_password settings, for example:
proxy=http://proxysvr.example.com:3128proxy_username=usernameproxy_password=password
If you use the yum plug-in (yum-rhn-plugin) to access the ULN, specify the enableProxy andhttpProxy settings in the /etc/sysconfig/rhn/up2date file, for example:
enableProxy=1httpProxy=http://proxysvr.example.com:3128
If the proxy server requires authentication, additionally specify the enableProxyAuth, proxyUser,and proxyPassword settings, as follows:
enableProxy=1httpProxy=http://proxysvr.example.com:3128enableProxyAuth=1proxyUser=usernameproxyPassword=password
6. Make sure the system is up-to-date:
# yum update
7. Enable the required ULN channels or Yum repositories.
To enable the required ULN channels:
a. Log in to http://linux.oracle.com with your ULN user name and password.
b. On the Systems tab, click the link named for the system in the list of registered machines.
c. On the System Details page, click Manage Subscriptions.
d. On the System Summary page, use the left and right arrows to move channels to and from the listof subscribed channels.
Subscribe the system to the following channels:
• ol7_x86_64_UEKR4 - Unbreakable Enterprise Kernel Release 4 for Oracle Linux 7 (x86_64)
• ol7_x86_64_addons - Oracle Linux 7 Addons (x86_64)
• ol7_x86_64_openstack21 - Oracle OpenStack 2.1 (x86_64)
• ol7_x86_64_latest - Oracle Linux 7 Latest (x86_64)
• (Optional) ol7_x86_64_UEKR4_OFED - OFED supporting tool packages for UnbreakableEnterprise Kernel Release 4 on Oracle Linux 7 (x86_64)
Subscribe to this channel if you are using the OFED (OpenFabrics Enterprise Distribution)packages provided by Oracle. UEK R4 requires a different set of OFED packages to UEK R3.
Unsubscribe the system from the following channels:

Preparing Oracle Linux Nodes
22
• ol7_x86_64_UEKR3 - Unbreakable Enterprise Kernel Release 3 for Oracle Linux 7 (x86_64) -Latest
• ol7_x86_64_UEKR3_OFED20 - OFED supporting tool packages for Unbreakable EnterpriseKernel Release 3 on Oracle Linux 7 (x86_64)
e. Click Save Subscriptions.
To enable the required Yum repositories:
a. Check that you have the latest Oracle Linux Yum Server repository file.
Check that the /etc/yum.repos.d/public-yum-ol7.repo file contains an [ol7_UEKR4]section. If it does not, you do not have the most up-to-date version of the repository file.
To download the latest copy of the repository file:
# curl -L -o /etc/yum.repos.d/public-yum-ol7.repo \ http://yum.oracle.com/public-yum-ol7.repo
b. Edit the /etc/yum.repos.d/public-yum-ol7.repo file.
Enable the following repositories by setting enabled=1 in the following sections:
• [ol7_UEKR4]
• [ol7_addons]
• [ol7_openstack21]
• [ol7_latest]
• (Optional) [ol7_UEKR4_OFED]
Subscribe to this repository only if you have InfiniBand-capable devices and you are using theOFED (OpenFabrics Enterprise Distribution) packages provided by Oracle. UEK R4 requires adifferent set of OFED packages to UEK R3.
Disable the following repositories by setting enabled=0 in the following sections:
• [ol7_UEKR3]
• [ol7_UEKR3_OFED20]
8. Use the yum command to check the repository configuration.
Clean all yum cached files from all enabled repositories.
# yum clean all
List the configured repositories for the system.
# yum repolist
9. (Optional) Remove the Open vSwitch kernel module package.
To check if the kmod-openvswith-uek package is installed:
# yum list installed kmod-openvswitch-uek

Preparing Oracle Linux Nodes
23
If the kmod-openvswitch-uek package is installed, remove it:
# yum -y remove kmod-openvswitch-uek
You must remove the UEK R3 Open vSwitch kernel module package in order to resolve the packagedependencies for UEK R4. UEK R4 includes the Open vSwitch kernel module.
10. (Optional) Remove any existing OFED packages.
Only perform this step if you have InfiniBand-capable devices and you are using the OFED packagesprovided by Oracle. UEK R4 requires a different set of OFED packages to UEK R3.
For instructions on how to remove the OFED packages, see the release notes for your UEK R4release, available at http://docs.oracle.com/cd/E52668_01/index.html.
11. Install the Oracle OpenStack for Oracle Linux preinstallation package.
If you are preparing an Oracle Linux node for a new OpenStack deployment:
# yum install openstack-kolla-preinstall
If you are updating an Oracle Linux node for a new release of Oracle OpenStack for Oracle Linux:
# yum update openstack-kolla-preinstall
This ensures the system has the required packages for OpenStack Kolla deployments.
12. (Optional) Install the OFED packages for UEK R4 and enable the RDMA service.
Only perform this step if you have InfiniBand-capable devices and you are using the OFED packagesprovided by Oracle.
For instructions on how to install the OFED packages and enable the RDMA service, see the releasenotes for your UEK R4 release, available at http://docs.oracle.com/cd/E52668_01/index.html.
13. Reboot the system.
# systemctl reboot
14. Check the system has booted with the UEK R4 kernel.
# uname -r4.1.12-32.2.1.el7uek.x86_64
If the output of this command begins with 4.1.12, the system has booted with the UEK R4 kernel.
If the system has not booted with the UEK R4 kernel, you must edit your grub configuration to boot withthis kernel and reboot, as follows:
a. Display the menu entries that are defined in the GRUB 2 configuration file.
On UEFI-based systems, the configuration file is /boot/efi/EFI/redhat/grub.cfg.On BIOS-based systems, the configuration file is /boot/grub2/grub.cfg.
# grep '^menuentry' /boot/grub2/grub.cfg...menuentry 'Oracle Linux Server 7.2, with Unbreakable Enterprise Kernel 4.1.12-32.2.1.e ... {menuentry 'Oracle Linux Server (3.8.13-98.7.1.el7uek.x86_64 with Unbreakable Enterpris ... {...
Preparing Oracle Linux Nodes
24
In this example, the configuration file is for a BIOS-based system. GRUB 2 counts the menu entriesin the configuration file starting at 0 for the first entry. In this example, menu entry 0 is for a UEK R4kernel (4.1.12), and menu entry 1 is for a UEK R3 kernel (3.8.13).
b. Make the UEK R4 the default boot kernel.
In the following example, menu entry 0 is set as the default boot kernel for a BIOS-based system.
# grub2-set-default 0# grub2-mkconfig -o /boot/grub2/grub.cfg
In the following example, menu entry 0 is set as the default boot kernel for a UEFI-based system.
# grub2-set-default 0# grub2-mkconfig -o /boot/efi/EFI/redhat/grub.cfg
c. Reboot the system and confirm that UEK R4 is the boot kernel.
15. If you are using a web proxy, configure the docker service to use the proxy.
a. Create the drop-in file /etc/systemd/system/docker.service.d/http-proxy.conf withthe following content:
[Service]Environment="HTTP_PROXY=proxy_URL:port"Environment="HTTPS_PROXY=proxy_URL:port"
Replace proxy_URL and port with the appropriate URLs and port numbers for your web proxy.
If the host also runs the Docker registry that stores the Oracle OpenStack for Oracle Linux images,you should specify that local connections do not need to be proxied by setting the NO_PROXYenvironment variable:
[Service]Environment="HTTP_PROXY=proxy_URL:port" "NO_PROXY=localhost,127.0.0.1"Environment="HTTPS_PROXY=proxy_URL:port" "NO_PROXY=localhost,127.0.0.1"
b. Reload systemd manager configuration.
# systemctl daemon-reload
c. Restart the docker service.
# systemctl restart docker.service
d. Check that the docker service is running.
# systemctl status docker.service● docker.service - Docker Application Container Engine Loaded: loaded (/usr/lib/systemd/system/docker.service; enabled; vendor preset: disabled) Drop-In: /etc/systemd/system/docker.service.d └─docker-sysconfig.conf, http-proxy.conf Active: active (running) since Thu 2016-03-31 17:14:04 BST; 30s ago...
Check the Drop-In: line and ensure that all the required systemd drop-in files are listed.
Check that any environment variables you have configured, such as web proxy settings, are loaded:
# systemctl show docker --property Environment

Preparing Oracle Linux Nodes
25
Environment=HTTP_PROXY=http://proxy.example.com:80
If you have installed the mlocate package, it is recommended that you add /var/lib/docker tothe PRUNEPATHS entry in /etc/updatedb.conf to prevent updatedb from indexing directoriesbelow /var/lib/docker.
16. Synchronize the time.
Time synchronization is essential to avoid errors with OpenStack operations. Before deployingOpenStack, you should ensure that the time is synchronized on all nodes using the Network TimeProtocol (NTP).
It is best to configure the controller nodes to synchronize the time from more accurate (lower stratum)NTP servers and to configure the other nodes to synchronize the time from the controller nodes.
Further information on network time configuration can be found in the Oracle Linux AdministrationGuide for Release 7 at:
http://docs.oracle.com/cd/E52668_01/E54669/html/ol7-nettime.html
The following configuration assumes that the firewall rules for your internal networks enable you toaccess public or local NTP servers. Perform the following steps on all Oracle Linux nodes.
Time synchronization for Oracle VM Server compute nodes is described in Section 3.5, “PreparingOracle VM Server Compute Nodes”.
a. Install the chrony package.
# yum install chrony
b. Edit the /etc/chrony.conf file to configure the chronyd service.
On the controller nodes, configure the chronyd service to synchronize time from a pool of NTPservers and set the allow directive to enable the controller nodes to act as NTP servers for theother OpenStack nodes, for example:
server NTP_server_1server NTP_server_2server NTP_server_3allow 10.0.0/24
The NTP servers can be public NTP servers or your organization may have its own local NTPservers. In the above example, the allow directive specifies a subnet from which the controllernodes accept NTP requests. Alternatively, you can specify the other OpenStack nodes individuallywith multiple allow directives.
On all other nodes, configure the chronyd service to synchronize time from the controller nodes,for example:
server control1.example.com iburstserver control2.example.com iburst
c. Start the chronyd service and configure it to start following a system reboot.
# systemctl start chronyd# systemctl enable chronyd
d. Verify that chronyd is accessing the correct time sources.

Preparing Oracle VM Server Compute Nodes
26
# chronyc -a sources200 OK210 Number of sources = 2MS Name/IP address Stratum Poll Reach LastRx Last sample===============================================================================^* control1.example.com 3 6 17 40 +9494ns[ +21us] +/- 29ms....
On the controller nodes, the Name/IP address column in the command output should list theconfigured pool of NTP servers. On all other nodes, it should list the controller nodes.
e. Ensure that the time is synchronized on all nodes.
Use the chronyc -a tracking command to check the offset (the Last offset row):
# chronyc -a tracking200 OKReference ID : 10.0.0.11 (control1.example.com)Stratum : 3Ref time (UTC) : Fri Mar 4 16:19:50 2016System time : 0.000000007 seconds slow of NTP timeLast offset : -0.000088924 secondsRMS offset : 2.834978580 secondsFrequency : 3.692 ppm slowResidual freq : -0.006 ppmSkew : 0.222 ppmRoot delay : 0.047369 secondsRoot dispersion : 0.004273 secondsUpdate interval : 2.1 secondsLeap status : Normal
To force a node to synchronize its time:
# chronyc -a 'burst 4/4'200 OK200 OK# chronyc -a makestep200 OK200 OK
3.5 Preparing Oracle VM Server Compute NodesThis section describes how to prepare an Oracle VM Server compute node for OpenStack. Section 3.4,“Preparing Oracle Linux Nodes” describes how to prepare an Oracle Linux node.
You can download the installation ISO for Oracle VM Server Release 3.4, from the Oracle SoftwareDelivery Cloud at:https://edelivery.oracle.com/linux
To prepare an Oracle VM Server compute node:
1. Install Oracle VM Server for x86 using the instructions in the Oracle VM Installation and Upgrade Guidefor Release 3.4 at:
http://docs.oracle.com/cd/E64076_01/E64078/html/vmiug-ovs-install-x86.html
2. When the operating system is installed, select Alt+F2 to enter the login screen. Log in as the rootuser.
3. Increase the dom0 maximum memory allocation to 16GB.
Any RAM not in use by dom0 is available for use by domUs (virtual machines).

Preparing Oracle VM Server Compute Nodes
27
a. Edit the /etc/default/grub file on the Oracle VM Server and change the dom0_mem parameterto 16384M:
GRUB_CMDLINE_XEN="dom0_mem=max:16384M allowsuperpage"
b. Regenerate the grub.cfg file.
For example, in a BIOS installation, enter:
# grub2-mkconfig -o /boot/grub2/grub.cfg
In a UEFI installation, enter:
# grub2-mkconfig -o /boot/efi/EFI/redhat/grub.cfg
c. Restart the Oracle VM Server for the changes to take effect:
# reboot
4. Disable and stop the Oracle VM Agent service:
# chkconfig ovs-agent off # service ovs-agent stop
5. Download the latest Oracle Linux Release 6 Yum Server repository file:
# curl -L -o /etc/yum.repos.d/public-yum-ol6.repo \http://yum.oracle.com/public-yum-ol6.repo
6. Edit the /etc/yum.repos.d/public-yum-ol6.repo file. Enable the following repositories bysetting enabled=1 in the following sections:
• [ol6_addons]
• [ol6_UEKR4]
• [ol6_openstack21]
All other repositories should be disabled by setting enabled=0 in each section.
This repository contains the required packages for Oracle Linux Release 6, upon which Oracle VMServer is based. This repository also contains the preinstallation packages to set up Oracle OpenStackfor Oracle Linux on Oracle VM Server. This repository does not contain updates for Oracle VM Server.
7. If you access the Yum repositories using a proxy server, update the /etc/yum.conf file with theproxy server address. For more information on using the Oracle Linux Yum Server, see:
https://docs.oracle.com/cd/E37670_01/E41138/html/ol_yum.html
8. Use the yum command to check the repository configuration.
Clean all yum cached files from all enabled repositories.
# yum clean all
List the configured repositories for the system.
# yum repolist
9. Make sure the system is up-to-date:

Preparing Oracle VM Server Compute Nodes
28
# yum update
10. The iptables service is not running by default. If you enable the iptables service, you need tomake sure all the required ports are open. You can find a list of the required ports by issuing thefollowing command from the master node (after setting up all the required kollacli deploymentoptions).
# kollacli property list | grep port
For more information on using iptables, see the Oracle Linux Administrator's Guide for Release 6:
https://docs.oracle.com/cd/E37670_01/E41138/html/ol_firewall_sec.html
11. Create a partition for the Docker images. This partition must be at least 64 GB in size. The partition canbe created in a number of ways, depending on your hardware and storage configuration.
For simplicity, this example uses an Oracle VM Server installation on a single disk, accepting all thepartitioning defaults in the Oracle VM Server installer. Your installation and configuration may vary.
Example 3.1 In a UEFI-based installation:
a. Start the parted utility:
# partedGNU Parted 2.1Using /dev/sdaWelcome to GNU Parted! Type 'help' to view a list of commands.
b. List the existing partitions:
(parted) print ...Number Start End Size File system Name Flags1 ... ... ... fat16 boot2 ... ... ... ext43 ... ... ... ext44 ... ... ... linux-swap(v1)5 ... ... ...
c. Remove the last partition:
(parted) rm 5 Warning: WARNING: the kernel failed to re-read the partition table on /dev/sda(Device or resource busy). As a result, it may not reflect all of your changesuntil after reboot.
d. Create a new btrfs partition of at least 64 GB for the Docker images, for example:
(parted) mkpart btrfs 100GB 164GBWarning: WARNING: the kernel failed to re-read the partition table on /dev/sda(Device or resource busy). As a result, it may not reflect all of your changesuntil after reboot.
e. Create a partition with the remaining space for the Oracle VM Server local storage, for example:
(parted) mkpart extended 164GB 1200GB Warning: WARNING: the kernel failed to re-read the partition table on /dev/sda(Device or resource busy). As a result, it may not reflect all of your changesuntil after reboot.
f. The results should look something like this:

Preparing Oracle VM Server Compute Nodes
29
(parted) print ...Number Start End Size File system Name Flags1 ... ... ... fat16 boot2 ... ... ... ext43 ... ... ... ext44 ... ... ... linux-swap(v1)5 100GB 160GB 64GB btrfs6 160GB ... ... extended
g. Reboot the Oracle VM Server:
# reboot
Example 3.2 In a BIOS-based installation:
a. List the partitions using:
# fdisk -l... Device Boot Start End Blocks Id System/dev/sda1 * ... ... ... 83 Linux/dev/sda2 ... ... ... 83 Linux/dev/sda3 ... ... ... 82 Linux swap / Solaris/dev/sda4 ... ... ... 83 Linux...
As shown in this output, there are four primary partitions. A BIOS-based installation is restricted tofour primary partitions. To create another partition for Oracle OpenStack for Oracle Linux, delete thelast partition, and create a new extended partition, which can include a new logical partition for theDocker images.
b. Start the fdisk utility.
# fdisk /dev/sda
WARNING: DOS-compatible mode is deprecated. It's strongly recommended to switch off the mode (command 'c') and change display units to sectors (command 'u').
c. Remove the last partition created by the Oracle VM Server installer, this case it is the fourthpartition:
Command (m for help): dPartition number (1-4): 4
d. Write the changes to the partition table and exit:
Command (m for help): wThe partition table has been altered!
Calling ioctl() to re-read partition table.
WARNING: Re-reading the partition table failed with error 16: Device or resource busy.The kernel still uses the old table. The new table will be used atthe next reboot or after you run partprobe(8) or kpartx(8)Syncing disks.
e. Reboot the Oracle VM Server:
# reboot

Preparing Oracle VM Server Compute Nodes
30
f. Create an extended partition for the Oracle VM Server local storage:
# fdisk /dev/sda
WARNING: DOS-compatible mode is deprecated. It's strongly recommended to switch off the mode (command 'c') and change display units to sectors (command 'u').
Command (m for help): nCommand action e extended p primary partition (1-4)eSelected partition 4First cylinder (...-..., default ...): Using default value ...Last cylinder, +cylinders or +size{K,M,G} (...-..., default ...): Using default value ...
g. Create a logical partition for the Docker images, with a size of at least 64 GB:
Command (m for help): nFirst cylinder (...-..., default ...): Using default value ...Last cylinder, +cylinders or +size{K,M,G} (...-..., default ...): +64G
h. The results should look something like this:
Command (m for help): p... Device Boot Start End Blocks Id System/dev/sda1 * 1 ... ... 83 Linux/dev/sda2 ... ... ... 83 Linux/dev/sda3 ... ... ... 82 Linux swap / Solaris/dev/sda4 ... ... ... 5 Extended/dev/sda5 ... ... ... 83 Linux
i. Write the changes to the partition table and exit:
Command (m for help): wThe partition table has been altered!
Calling ioctl() to re-read partition table.
WARNING: Re-reading the partition table failed with error 16: Device or resource busy.The kernel still uses the old table. The new table will be used atthe next reboot or after you run partprobe(8) or kpartx(8)Syncing disks.
j. Reboot the Oracle VM Server:
# reboot
12. Create a btrfs file system on the new partition, mounted on /var/lib/docker.
A simple example follows. This example formats an existing partition on /dev/sda5, and mounts it on/var/lib/docker using the /etc/fstab file.
a. Create the btrfs file system on an existing device:
# mkfs.btrfs -f -L docker /dev/sda5

Preparing Oracle VM Server Compute Nodes
31
b. Use the blkid command to display the UUID of the device and make a note of this value, forexample:
# blkid /dev/sda5/dev/sda5: LABEL="docker" UUID="bb6912ae-e6c4-4ffd-bcdc-37c8c19eb7db" UUID_SUB="599202a1-fb2d-4352-916f-aee4d034d3bd" TYPE="btrfs"
c. Edit the /etc/fstab file and add an entry to ensure the file system is mounted when the systemboots:
UUID=bb6912ae-e6c4-4ffd-bcdc-37c8c19eb7db /var/lib/docker btrfs defaults 1 2
d. Create the /var/lib/docker directory:
# mkdir /var/lib/docker
e. Mount all the file systems listed in /etc/fstab:
# mount -a
f. You can verify the partition is mounted using:
# dfFilesystem 1K-blocks Used Available Use% Mounted on.../dev/sda5 ... ... ... 1% /var/lib/docker
More information on using mkfs.btrfs is available in the Oracle Linux Administrator's Guide forRelease 6 at:
https://docs.oracle.com/cd/E37670_01/E41138/html/ol_create_btrfs.html
13. Install the Oracle OpenStack for Oracle Linux preinstallation package from the Oracle Yum Server:
# yum install openstack-kolla-preinstall
14. If you are using a web proxy, configure the docker service to use the proxy.
a. Add the following content to the /etc/sysconfig/docker file:
HTTP_PROXY=proxy_URL:port http_proxy=$HTTP_PROXYHTTPS_PROXY=$HTTP_PROXYhttps_proxy=$HTTP_PROXY
Replace proxy_URL and port with the appropriate URLs and port numbers for your web proxy.
You may also want to specify that local connections do not need to be proxied by setting theNO_PROXY environment variable:
NO_PROXY=localhost,127.0.0.1no_proxy=localhost,127.0.0.1
Include a line to export these environment variables:
export HTTP_PROXY HTTPS_PROXY http_proxy https_proxy NO_PROXY no_proxy
b. Restart the docker service:
# service docker restart

Preparing a Master Node
32
15. Synchronize the host time with the controller nodes to avoid errors during OpenStack operations. Timesynchronization is discussed in more detail in Section 3.4, “Preparing Oracle Linux Nodes”.
a. To synchronize the host with the controller nodes, edit the /etc/ntp.conf file to configure thentpd service. Add the controller nodes to the file, for example:
server control1.example.comserver control2.example.com
b. Create the drift file, which is used to store the system's clock drift value.
# touch /var/lib/ntp/drift
Start the ntpd service and configure it to start following a system reboot.
# service ntpd start# chkconfig ntpd on
c. You can check the ntpd service is configured and synchronizing correctly using the ntpq andntpstat commands, for example:
# ntpq -p remote refid st t when poll reach delay offset jitter==============================================================================*control1 10.169.64.1 3 u 58 64 377 0.132 33.490 22.604 control2 .INIT. 16 u - 128 0 0.000 0.000 0.000# ntpstatsynchronised to NTP server (10.196.134.1) at stratum 4 time correct to within 120 ms polling server every 64 s
3.6 Preparing a Master Node
A master node is a host from which you deploy Oracle OpenStack for Oracle Linux to the target nodesusing the kollacli deploy command.
Typically, you use a controller node as a master node. You should prepare the node as described inSection 3.4, “Preparing Oracle Linux Nodes” before performing the following steps.
If you prefer, you can use a separate host. See Section 3.1, “System Requirements”, for the minimumrequirements for a separate host, and you should prepare the node as described in Section 3.4, “PreparingOracle Linux Nodes” before performing the following steps.
You should only configure a single node as a master node. In order to recover from a failure, you shouldensure that you have backups of the /etc/kolla and /usr/share/kolla directories.
To prepare a master node:
1. Install the OpenStack Kolla CLI (kollacli).
If you are preparing a master node for a new OpenStack deployment:
# yum install openstack-kollacli
If you are updating a master node for a new release of Oracle OpenStack for Oracle Linux:
# yum update openstack-kollacli
When you install the openstack-kollacli package, the following operations are performed on thenode:

Setting up the Docker Registry
33
• Create the kolla user.
The kolla user is the Ansible SSH user and is used to deploy OpenStack services to nodes. Theuser's home directory is set to /usr/share/kolla.
• Create SSH keys for the kolla user.
The SSH keys are created in the kolla user's home directory. The public key is copied to /etc/kolla/kollacli/id_rsa.pub on the node.
• Create the /etc/sudoers.d/kolla sudoers configuration file.
The settings in this file enable the kolla user to run commands, such as ansible and ansible-playbook, as root without prompting for a password.
• Create the kolla group.
The kolla group is for the users that run the kollacli command.
2. Add a user to the kolla group.
To add an existing user to the kolla group:
# usermod -aG kolla username
The user must log out and in again for the group setting to take effect.
Important
For security reasons, always run kollacli commands as this user. Never useroot or the kolla user.
3.7 Setting up the Docker RegistryA Docker registry is a store of Docker images. A Docker image is a read-only template, which is used tocreate a Docker container. A Docker registry is required to store the Oracle OpenStack for Oracle LinuxDocker images, which are used to deploy the OpenStack containers.
The following instructions assume that you set up the Docker registry on a controller node and thatDocker is already configured and running, as described in Section 3.4, “Preparing Oracle Linux Nodes”.If you prefer, you can use a separate host. See Section 3.1, “System Requirements”, for the minimumrequirements for a separate host.
3.7.1 Setting up the Docker Registry Server
Before you set up the Docker Registry server, note the following:
• The registry server is a Docker container application. The host must have an Internet connection in orderto download the registry image from the public Docker Hub Registry.
• The registry server runs on port 5000 by default. If you set up the registry on a controller node, youmust select a different free port on the host (for example port 5443) because port 5000 is used by theOpenStack Keystone service. The other nodes in your OpenStack deployment must be able to accessthe registry on this port.
• The registry host requires a valid Secure Sockets Layer (SSL) certificate and private key, similar to usingSSL for a web server.

Setting up the Docker Registry Server
34
If the host already has an SSL certificate, you can use that. However, if the SSL certificate was issuedby an intermediate Certificate Authority (CA), you must combine the host's SSL certificate with theintermediate CA's certificate to create a certificate bundle so that Docker can verify the host's SSLcertificate. For example:
# cat control1.example.com.crt intermediate-ca.pem > domain.crt
If the host does not already have an SSL certificate, the following instructions provide details for creatinga self-signed certificate for testing purposes.
• The registry server requires a btrfs file system mounted on /var/lib/registry with at least 15GBavailable. The following instructions provide details for setting up a btrfs file system using one or moreavailable devices. The device could be a disk partition, an LVM volume, a loopback device, a multipathdevice, or a LUN.
To set up a Docker registry server:
1. Create a btrfs file system for the registry.
You create a btrfs file system with the utilities available in the btrfs-progs package, which should beinstalled by default.
Create a btrfs file system on one or more block devices:
# mkfs.btrfs [-L label] block_device ...
where -L label is an optional label that can be used to mount the file system.
For example:
• To create a file system in a partition /dev/sdc1:
# mkfs.btrfs -L var-lib-registry /dev/sdc1
The partition must already exist. Use a utility such as fdisk (MBR partitions) or gdisk (GPTpartitions) to create one if needed.
• To create a file system across two disk devices, /dev/sdd and /dev/sde:
# mkfs.btrfs -L var-lib-registry /dev/sd[de]
The default configuration is to stripe the file system data (raid0) and to mirror the file systemmetadata (raid1) across the devices. Use the -d (data) and -m (metadata) options to specify therequired RAID configuration. For raid10, you must specify an even number of devices and theremust be at least four devices.
• To create a file system in a logical volume named docker-registry in the ol volume group:
# mkfs.btrfs -L var-lib-registry /dev/ol/docker-registry
The logical volume must already exist. Use Logical Volume Manager (LVM) to create one if needed.
More information on using mkfs.btrfs is available in the Oracle Linux Administrator's Guide forRelease 7 at:
http://docs.oracle.com/cd/E52668_01/E54669/html/ol7-create-btrfs.html
2. Mount the btrfs file system on /var/lib/registry.

Setting up the Docker Registry Server
35
a. Obtain the UUID of the device containing the btrfs file system.
Use the blkid command to display the UUID of the device and make a note of this value, forexample:
# blkid /dev/sdc1 /dev/sdc1: LABEL="var-lib-registry" UUID="50041443-b7c7-4675-95a3-bf3a30b96c17" \UUID_SUB="09de3cb1-2f9b-4bd8-8881-87e591841c75" TYPE="btrfs"
If the btrfs file system is created across multiple devices, you can specify any of the devices toobtain the UUID. Alternatively you can use the btrfs filesystem show command to see theUUID. For a logical volume, specify the path to the logical volume as the device for example /dev/ol/docker-registry. Ignore any UUID_SUB value displayed.
b. Edit the /etc/fstab file and add an entry to ensure the file system is mounted when the systemboots.
UUID=UUID_value /var/lib/registry btrfs defaults 1 2
Replace UUID_value with the UUID that you found in the previous step. If you created a label forthe btrfs file system, you can also use the label instead of the UUID, for example:
LABEL=label /var/lib/registry btrfs defaults 1 2
c. Create the /var/lib/registry directory.
# mkdir /var/lib/registry
d. Mount all the file systems listed in /etc/fstab.
# mount -a
e. Verify that the file system is mounted.
# dfFilesystem 1K-blocks Used Available Use% Mounted on.../dev/sdc1 ... ... ... 1% /var/lib/registry
3. Add the host's SSL certificate and private key to Docker.
a. Create the /var/lib/registry/conf.d directory.
# mkdir -p /var/lib/registry/conf.d
b. Copy the host's SSL certificate and private key to the /var/lib/registry/conf.d directory.
# cp certfile /var/lib/registry/conf.d/domain.crt# cp keyfile /var/lib/registry/conf.d/domain.key
where certfile is the full path to the host's SSL certificate and keyfile is the full path to thehost's private key. For example:
# cp /etc/pki/tls/certs/control1.example.com.crt \/var/lib/registry/conf.d/domain.crt# cp /etc/pki/tls/private/control1.example.com.key \/var/lib/registry/conf.d/domain.key
If the host does not have an SSL certificate and private key, you can create a self-signed certificatefor testing purposes, as follows:

Setting up the Docker Registry Server
36
# cd /var/lib/registry/conf.d
# openssl req -newkey rsa:4096 -nodes -sha256 -x509 -days 365 \-keyout domain.key -out domain.crtGenerating a 4096 bit RSA private key.............................................................................................................................................................................................++.................................................................................................................................................................................................................++writing new private key to 'domain.key'-----You are about to be asked to enter information that will be incorporatedinto your certificate request.What you are about to enter is what is called a Distinguished Name or a DN.There are quite a few fields but you can leave some blankFor some fields there will be a default value,If you enter '.', the field will be left blank.-----Country Name (2 letter code) [XX]:USState or Province Name (full name) []: MassachusettsLocality Name (eg, city) [Default City]:BostonOrganization Name (eg, company) [Default Company Ltd]:Example ComOrganizational Unit Name (eg, section) []:DevOps Common Name (eg, your name or your server's hostname) []:control1.example.comEmail Address []:[email protected]
# mkdir -p /etc/docker/certs.d/control1.example.com:port
# cp /var/lib/registry/conf.d/domain.crt \/etc/docker/certs.d/control1.example.com:port/ca.crt
The Common Name must be the same as the fully qualified domain name (FQDN) of the host.Replace port with the port number you selected for your Docker registry, for example 5443.
c. Change the file permissions on the private key:
# chmod 600 /var/lib/registry/conf.d/domain.key
4. Create the Docker registry container.
In the following example, port is the port number you selected for your Docker registry server, forexample 5443.
# docker run -d -p port:5000 --name registry --restart=always \ -v /var/lib/registry:/registry_data \ -e REGISTRY_STORAGE_FILESYSTEM_ROOTDIRECTORY=/registry_data \ -e REGISTRY_HTTP_TLS_KEY=/registry_data/conf.d/domain.key \ -e REGISTRY_HTTP_TLS_CERTIFICATE=/registry_data/conf.d/domain.crt \ registry:2.3Unable to find image 'registry:2.3' locally2.3: Pulling from library/registryfdd5d7827f33: Pull complete a3ed95caeb02: Pull complete a79b4a92697e: Pull complete 6cbb75c7cc30: Pull complete 4831699594bc: Pull complete Digest: sha256:0c8c2a39d64da5eef305f9b50e0d889d823d799414c5a1d42f9cfdab2462da19Status: Downloaded newer image for registry:2.33c2a7fae6db4dd7e163cab530e7c40209792afeded771f2853a4c4244a147d7b

Importing Images into the Docker Registry
37
The registry image is pulled from the public Docker Hub Registry and the Docker registry containeris started. The --restart=always option ensures that the registry container is started wheneverDocker is started.
5. If the registry host uses a self-signed SSL certificate, distribute the SSL certificate to all master andtarget nodes in your deployment.
Perform the following steps on each node, where registry_hostname is the name of the registryhost, and port is the port number you selected for your Docker registry server, for example 5443:
a. Create the /etc/docker/certs.d/registry_hostname:port directory.
# mkdir -p /etc/docker/certs.d/registry_hostname:port
b. Copy the SSL certificate from the registry host.
# scp root@registry_hostname:/etc/docker/certs.d/registry_hostname:port/ca.crt \/etc/docker/certs.d/registry_hostname:port/ca.crt
For example:
# mkdir -p /etc/docker/certs.d/control1.example.com:5443# scp \[email protected]:/etc/docker/certs.d/control1.example.com:5443/ca.crt \/etc/docker/certs.d/control1.example.com:5443/ca.crt
c. Restart the docker service.
# systemctl restart docker.service
3.7.2 Importing Images into the Docker Registry
Once you have set up a Docker registry server, you import the Oracle OpenStack for Oracle Linux Dockerimages into the registry so that they can be used to deploy OpenStack containers.
To import the Oracle OpenStack for Oracle Linux images into the Docker registry:
1. Ensure the unzip and bzip2 packages are installed on the host.
# yum install unzip bzip2
2. Download the Oracle OpenStack for Oracle Linux Docker images zip file from the Oracle SoftwareDelivery Cloud at https://edelivery.oracle.com/linux.
On Oracle Software Delivery Cloud, search by product for 'openstack' and then select OracleOpenStack for Oracle Linux.
Download the zip file to a temporary location on the host, such as /tmp.
3. Change to the temporary directory and unzip the Oracle OpenStack for Oracle Linux Docker images zipfile.
# cd /tmp# unzip ol-openstack-images-version.zipArchive: ol-openstack-images-version.zip inflating: import_to_registry.sh inflating: ol-openstack-images-version.tar.bz2 inflating: ol-openstack-images-version.sha256sum
The following files are unzipped to the directory:

Importing Images into the Docker Registry
38
• import_to_registry.sh: A script to load the images to the Docker registry.
• ol-openstack-images-version.sha256sum: A sha256sum hash file.
• ol-openstack-images-version.tar.bz2: Contains the Oracle OpenStack for Oracle LinuxDocker images files. Do not decompress this file.
4. Use the import_to_registry.sh script to import the Oracle OpenStack for Oracle Linux Dockerimages to the registry.
# ./import_to_registry.sh [-c] registry_hostname:port
where registry_hostname is the name of the host, and port is the port number you selected foryour Docker registry, for example 5443.
For example:
# ./import_to_registry.sh control1.example.com:5443Checking file integrity:ol-openstack-images-2.1.1.tar.bz2: OK
Please wait, this will take quite some time to complete!The push refers to a repository [control1.example.com:5443/oracle/ol-openstack-nova-base](len: 1)a8e1024207cf: Pushed ...63adc2d9636b: Pushed 2.1.1: digest: sha256:fd81fb1da57e6134a4aeb130eab8289e72a69642b582f0cdf06ac55c913a size: 9782
It may take some time to import the images to the Docker registry.
5. Confirm the registry is working.
Run the following command on each node in your deployment:
# docker pull registry_hostname:port/oracle/ol-openstack-base:2.1.12.1.1: Pulling from oracle/ol-openstack-basef359075ce4d8: Pull complete 63adc2d9636b: Pull complete befb6606d561: Pull complete 0820ef56f3c1: Pull complete 1280ba3080af: Pull complete d99cb6b1a071: Pull complete 3b37b5a7d26b: Pull complete 66688385d842: Pull complete 90c52512690d: Pull complete 59f148406044: Pull complete 18fcc7170d65: Pull complete fc3d5a774ca5: Pull complete f8a61519e470: Pull complete Digest: sha256:7d48bd1cd0bd23d610ffa49c575deda2cebf97f1e3977d00ea42c1f07761e8abStatus: Downloaded newer image for control1.example.com:5443/oracle/ol-openstack-base:2.1.1
This command confirms that the node can download a Docker image from the registry and verifies thatthere are no issues with access to the registry port or with the registry host's SSL certificate.

39
Chapter 4 Setting up a Deployment
Table of Contents4.1 Setting up Target Nodes ............................................................................................................. 394.2 Setting up Services .................................................................................................................... 414.3 Example Setup for an Initial Deployment ..................................................................................... 444.4 Setting Properties for Groups or Hosts ........................................................................................ 48
4.4.1 Dealing With Variable Network Interface Names ................................................................ 504.5 Setting up Glance ....................................................................................................................... 514.6 Setting up Nova ......................................................................................................................... 52
4.6.1 Automatic Hypervisor Configuration .................................................................................. 524.6.2 Preparing a Compute Node .............................................................................................. 534.6.3 Setting the iSCSI Initiator Name ....................................................................................... 534.6.4 Enabling iSCSI Multipath .................................................................................................. 54
4.7 Setting up Neutron ..................................................................................................................... 544.7.1 Configuring VLAN Networks ............................................................................................. 54
4.8 Setting up Cinder ....................................................................................................................... 554.8.1 Creating the cinder-volumes Volume Group ...................................................................... 554.8.2 Configuring Alternative Volume Drivers for Cinder ............................................................. 564.8.3 Configuring the Cinder NFS Backup Driver ....................................................................... 57
4.9 Setting up Swift .......................................................................................................................... 574.10 Setting up Ceilometer ............................................................................................................... 594.11 Setting up Murano .................................................................................................................... 60
4.11.1 Creating Oracle Linux Murano-enabled Images ............................................................... 60
Before you deploy OpenStack services, you need to configure the target nodes and services.
4.1 Setting up Target NodesBefore you can deploy OpenStack services, you need to add hosts to the list of target nodes and add themto groups to configure the OpenStack services that the nodes to run.
1. On the master node, log in as a user that is a member of the kolla group.
You add users to the kolla group as part of setting up a master node, see Section 3.6, “Preparing aMaster Node”.
All of the following steps use the kollacli command, and you must be a member of the kolla groupto use this command.
2. Add the target nodes to the deployment.
You add nodes to the deployment with the kollacli host add command.
$ kollacli host add host
where host is the fully qualified domain name or IP address of the host.
Use the kollacli host list command to check that you have added all the hosts.
3. Set up the kolla user on the target nodes.
You only need to perform this step once for each target node. Only repeat this step if you change theSSH keys for the kolla user.

Setting up Target Nodes
40
The kolla user is the Ansible SSH user that is used to deploy OpenStack services. You need to copythe SSH public key for the kolla user to each host, and confirm that the kolla user can log in to thehost using SSH keys.
You set up the kolla user with the kollacli host setup command.
$ kollacli host setup host
where host is the fully qualified domain name or IP address of the host.
You are prompted for a password value. By default, the password is for the root user on the targetnode.
If you want to use a different user to set up the kolla user, set the KOLLA_CLI_SETUP_USERenvironment variable before running the kollacli host setup command. The variable shouldcontain the user name of an alternative user on the target host. The user must already exist on thetarget host and have sufficient privileges to be able to write to the /usr/share/kolla/.ssh/authorized_keys file, which is owned by the kolla user and group.
If you want to set up multiple hosts with a single command, you can create a YAML file that containsthe names of the hosts to set up and the passwords to use. If the file specifies a user name for a host(optional), this is used instead of root or the user name in the KOLLA_CLI_SETUP_USER environmentvariable. For example, you might have a file named hosts.yml in the /myhome directory whichcontains:
---control1.example.com: password: passwordcontrol2.example.com: password: passwordcompute1.example.com: password: password uname: user_namecompute2.example.com: password: password uname: user_namecompute3.example.com: password: password uname: user_namecompute4.example.com: password: password uname: user_name
Caution
For security reasons, make sure you secure the file containing thesecredentials.
To set up the kolla user using a YAML file:
$ kollacli host setup --file /myhome/hosts.yml
When you have set up the kolla user, use the kollacli host check command to verify the user.
kollacli host check { host | all }
where host is the fully qualified domain name or IP address of the host, or all for all hosts.
4. Assign target nodes to each group.

Setting up Services
41
Groups are used to associate the target nodes with OpenStack services. Target nodes in the samegroup run the same OpenStack services. The default groups are control, compute, database, network,and storage.
You assign target nodes to groups with the kollacli group addhost command:
$ kollacli group addhost group_name host
where host is the fully qualified domain name or IP address of the host.
For example, to add a node to the control group:
$ kollacli group addhost control control1.example.com
A node can belong to more than one group and can run multiple OpenStack services. When you assignnodes to groups, remember the following "rules":
• The nodes in the compute group must not be assigned to the control group.
• The control group must contain at least two nodes.
• The number of nodes in the database group must always be a multiple of two.
• Each group must contain at least two nodes to enable high availability.
For more information on using groups, see Section 2.2, “Using Groups to Deploy Services”.
Use the kollacli group listhosts and the kollacli host list commands to check thatyou have assigned the hosts correctly.
4.2 Setting up Services
Before you can deploy OpenStack services, you need to enable the services you want to deploy, and thenconfigure the services by setting passwords and properties.
1. On the master node, log in as a user that is a member of the kolla group.
You add users to the kolla group as part of setting up a master node, see Section 3.6, “Preparing aMaster Node”.
All of the following steps use the kollacli command, and you must be a member of the kolla groupto use this command.
2. Enable the OpenStack services you want to deploy.
All OpenStack services are enabled by default, apart from the Swift object storage and the Ceilometertelemetry services.
You enable and disable services with the kollacli property set command:
$ kollacli property set enable_service_name yes|no
For example, to enable the Swift service and disable the Cinder service:
$ kollacli property set enable_swift yes$ kollacli property set enable_cinder no

Setting up Services
42
Many OpenStack services contain several components, and each component is deployed as aseparate Docker container. When a service is enabled, all of the service components (known assubservices) are also enabled by default. If required, you can enable and disable subservices with thekollacli property set command, although normally you do not need to do this.
To see a list of the available services and their subservices, use the kollacli service listcommand. Use the kollacli property list command to see the properties for enabling anddisabling services and subservices.
3. Configure the passwords for all services.
You only need to perform this step once.
Typically, when you deploy an OpenStack service, a database is created for the service and thecredentials for the service admin user are registered with the Keystone service. You must setpasswords for the database and the service admin user. Passwords for other OpenStack featuresmight also be required.
You set passwords with the kollacli password set command:
$ kollacli password set password_name
For example, for the Cinder service set the following passwords:
$ kollacli password set cinder_database_password$ kollacli password set cinder_keystone_password
You are prompted for a password, and to confirm the password. The password value is not displayedon screen. You might want to use a strong password generator to generate the passwords.
If you do not set passwords, the default password is used, which is "password". For security reasons,it is best to set passwords for all the password names listed in the following table, even if you do notdeploy all the OpenStack services.
Password Name Description
ceilometer_database_password Database password for the Ceilometer service.
ceilometer_keystone_password Password for the Ceilometer service user, named ceilometer by default.
cinder_database_password Database password for the Cinder service.
cinder_keystone_password Password for the Cinder service user, named cinder by default.
database_password Root password for the MySQL database.
glance_database_password Database password for the Glance service.
glance_keystone_password Password for the Glance service user, named glance by default.
heat_database_password Database password for the Heat service.
heat_domain_admin_password Password for the Heat ‘stack-domain-admin’ user.
heat_keystone_password Password for the Heat service user, named heat by default.
horizon_database_password Database password for the Horizon service.
keystone_admin_password Password for the Keystone admin user.
keystone_database_password Database password for the Keystone service.
murano_database_password Database password for the Murano service.
Setting up Services
43
Password Name Description
murano_keystone_password Password for the Murano service user, named murano by default.
neutron_database_password Database password for the Neutron service.
neutron_keystone_password Password for the Neutron service user, named neutron by default.
nova_database_password Database password for the Nova service.
nova_keystone_password Password for the Nova service user, named nova by default
rabbitmq_password Password for the RabbitMQ guest user.
swift_keystone_password Password for the Swift service user, named swift by default.
4. Configure the deployment by setting properties.
You set properties for services with the kollacli property set command:
$ kollacli property set property_name property_value
Use the kollacli property list command to see a list of the available properties. Someproperties are used in the configuration files for the OpenStack services when they are deployed.These properties usually contain the name of the service in the property name, for example names ofthe properties for the Glance image service start with "glance_".
For examples of setting properties for specific services, see Section 4.7.1, “Configuring VLANNetworks” and Section 4.10, “Setting up Ceilometer”.
When you set properties, they are global properties that can be applied to all hosts and OpenStackservices in your deployment. However, to enable you to tune your deployment, you can also setproperties that are specific to particular groups or individual hosts, see Section 4.4, “Setting Propertiesfor Groups or Hosts”.
For the majority of the properties, the default property values are sufficient.
The only properties that you must set are the network settings for the deployment. Be sure to reviewthe information in Section 3.3, “Host Network Requirements” before setting the following properties:
docker_registry
The host name or IP address, and the port number, of the server that runs your Docker registry, forexample myregistry.example.com:5000.
kolla_external_address
The DNS name or IP address to be used in the public OpenStack API endpoints. By default, thisproperty is set to the same value as kolla_internal_address.
For private cloud deployments, do not change the default setting (the kolla_internal_addressis used).
For public cloud deployments, this is a DNS name that resolves to a public IP address.The OpenStack operator is responsible for mapping the public IP address to thekolla_internal_address, for example through a firewall or load balancer.
By default, this value is used to populate part of each OpenStack service's public_url inKeystone. But you can configure the address for individual services if you prefer.

Example Setup for an Initial Deployment
44
kolla_internal_address
The IP address on the internal management/API network used to access OpenStack controlservices.
This is an unused IP address on the internal management/API network and is used by Keepalivedas the virtual IP (VIP) address. Keepalived maps the VIP address to the real IP address of thecontroller node that runs the current active HAProxy.
By default, this value is used to populate part of each OpenStack service's private_url andadmin_url in Keystone. But you can configure the address for individual services if you prefer.
network_interface
The name of the network interface (for example, em1) on all nodes which is connected to theinternal management/API network.
By default, this interface is also used for the virtual machine and storage network traffic. If youset up seperate networks for this traffic, set the name of the network interface on each networkby configuring the tunnel_interface (virtual machine network), and storage_interface(storage network) properties.
neutron_external_interface
The name of the network interface (for example, em2) on all network nodes which is connectedto the external network where the neutron public network will be created. This interface should nothave an IP address and should not be the same as the network_interface.
virtual_router_id
The virtual router ID used by Keepalived to manage the virtual IP address. The default ID is 51.
Only change this property if you have multiple OpenStack deployments on the same management/API network. Each deployment must have a unique virtual router ID.
If the nodes have differing network interface names, use group and host properties to set different interfacenames, see Section 4.4, “Setting Properties for Groups or Hosts”.
4.3 Example Setup for an Initial DeploymentThe following is an example of how to set up an initial OpenStack deployment which is enabled for highavailability. In this example:
• The default groups are used: control, compute, database, network, and storage.
• The deployment contains six nodes, four compute nodes, and the other two nodes run all other services.
• High availability is enabled because there are at least two nodes for each group.
• You want to deploy all the OpenStack services that are enabled by default except the Murano service,and you want to deploy the Ceilometer service, which is not enabled by default.
• All nodes are connected to the management/API network using the em1 network interface.
• The virtual IP address on the management/API network is 10.0.0.20.
• All the network nodes are connected to the public network using the em2 network interface.

Example Setup for an Initial Deployment
45
1. On the master node, log in as a user that is a member of the kolla group.
2. Add the target nodes to the deployment.
$ kollacli host add control1.example.com$ kollacli host add control2.example.com$ kollacli host add compute1.example.com$ kollacli host add compute2.example.com$ kollacli host add compute3.example.com$ kollacli host add compute4.example.com
3. Check that the target nodes are added.
$ kollacli host list+----------------------+--------+| Host | Groups |+----------------------+--------+| compute1.example.com | [] || compute2.example.com | [] || compute3.example.com | [] || compute4.example.com | [] || control1.example.com | [] || control2.example.com | [] |+----------------------+--------+
4. Set up the kolla user on the target nodes.
$ kollacli host setup control1.example.comroot password for control1.example.com: Starting setup of host (control1.example.com).Host (control1.example.com) setup succeeded.
$ kollacli host setup control2.example.com...$ kollacli host setup compute1.example.com...$ kollacli host setup compute2.example.com...$ kollacli host setup compute3.example.com...$ kollacli host setup compute4.example.com...
5. Check that the kolla user is set up correctly on the target nodes.
$ kollacli host check allHost (compute4.example.com): successHost (compute3.example.com): successHost (compute2.example.com): successHost (compute1.example.com): successHost (control2.example.com): successHost (control1.example.com): success
6. Assign target nodes to each group.
$ kollacli group addhost control control1.example.com$ kollacli group addhost control control2.example.com
$ kollacli group addhost database control1.example.com$ kollacli group addhost database control2.example.com
$ kollacli group addhost network control1.example.com$ kollacli group addhost network control2.example.com
$ kollacli group addhost storage control1.example.com$ kollacli group addhost storage control2.example.com

Example Setup for an Initial Deployment
46
$ kollacli group addhost compute compute1.example.com$ kollacli group addhost compute compute2.example.com$ kollacli group addhost compute compute3.example.com$ kollacli group addhost compute compute4.example.com
7. Check that the target nodes are assigned correctly.
$ kollacli group listhosts+----------+------------------------------------------------------------------------+| Group | Hosts |+----------+------------------------------------------------------------------------+| compute | ['compute1.example.com', 'compute2.example.com', || | 'compute3.example.com', 'compute4.example.com'] || control | ['control1.example.com', 'control2.example.com'] || database | ['control1.example.com', 'control2.example.com'] || network | ['control1.example.com', 'control2.example.com'] || storage | ['control1.example.com', 'control2.example.com'] |+----------+------------------------------------------------------------------------+
$ kollacli host list+----------------------+-----------------------------------------------+| Host | Groups |+----------------------+-----------------------------------------------+| compute1.example.com | ['compute'] || compute2.example.com | ['compute'] || compute3.example.com | ['compute'] || compute4.example.com | ['compute'] || control1.example.com | ['control', 'storage', 'network', 'database'] || control2.example.com | ['control', 'storage', 'network', 'database'] |+----------------------+-----------------------------------------------+
8. Enable the OpenStack services you want to deploy.
All OpenStack services are enabled by default, apart from the Swift object storage and the Ceilometertelemetry services. In this example, you want to disable the Murano service and enable the Ceilometerservice.
$ kollacli property set enable_murano no$ kollacli property set enable_ceilometer yes
9. Check that the correct services are enabled.
$ kollacli property list+-----+------------------------------------------+------------------------------------------+| OVR | Property Name | Property Value |+-----+------------------------------------------+------------------------------------------+...| --- | enable_ceilometer | yes || --- | enable_cinder | yes |...| --- | enable_glance | yes |...| --- | enable_haproxy | yes || --- | enable_heat | yes |...| --- | enable_horizon | yes || --- | enable_keystone | yes |...| --- | enable_memcached | yes || --- | enable_murano | no |...| --- | enable_mysqlcluster | yes |...| --- | enable_neutron | yes |...

Example Setup for an Initial Deployment
47
| --- | enable_nova | yes |...| --- | enable_rabbitmq | yes || --- | enable_swift | no |...+-----+------------------------------------------+------------------------------------------+
10. Configure the passwords for all services.
$ kollacli password set database_password
$ kollacli password set ceilometer_database_password$ kollacli password set ceilometer_keystone_password
$ kollacli password set cinder_database_password$ kollacli password set cinder_keystone_password
$ kollacli password set glance_database_password$ kollacli password set glance_keystone_password
$ kollacli password set heat_database_password $ kollacli password set heat_keystone_password $ kollacli password set heat_domain_admin_password
$ kollacli password set horizon_database_password
$ kollacli password set keystone_admin_password$ kollacli password set keystone_database_password
$ kollacli password set murano_database_password$ kollacli password set murano_keystone_password
$ kollacli password set neutron_database_password$ kollacli password set neutron_keystone_password
$ kollacli password set nova_database_password$ kollacli password set nova_keystone_password
$ kollacli password set rabbitmq_password
$ kollacli password set swift_keystone_password
11. Configure the deployment by setting properties.
The default property values are sufficient, so you only need to configure the network properties.
$ kollacli property set docker_registry registry.example.com:5000$ kollacli property set kolla_internal_address 10.0.0.20$ kollacli property set network_interface em1$ kollacli property set neutron_external_interface em2
12. Check that the properties are set.
$ kollacli property list --max-width 40+-----+------------------------------------------+------------------------------------------+| OVR | Property Name | Property Value |+-----+------------------------------------------+------------------------------------------+...| --- | docker_registry | registry.example.com:5000 |...| --- | kolla_internal_address | 10.0.0.20 |...| --- | network_interface | em1 |...| --- | neutron_external_interface | em2 |...

Setting Properties for Groups or Hosts
48
+-----+------------------------------------------+------------------------------------------+
4.4 Setting Properties for Groups or Hosts
Because OpenStack Kolla uses properties and templates to configure OpenStack services, deployingOpenStack Kolla containers works best where the deployment nodes are identical. However, where yourdeployment nodes are not identical, or you have custom configuration requirements, you can set propertiesthat are specific to groups or hosts.
When you use the kollacli property set command without any options, the properties are globalproperties that apply to all hosts and OpenStack services in your deployment. However, to enable you totune your deployment, you can use the --groups and --hosts options to set properties that are specificto particular groups or individual hosts.
The properties you set are used in the following order of precedence:
1. Host properties.
2. Group properties.
3. Global properties.
4. Default properties.
Group properties files are used in alphabetical order, for example properties set for the group namedcontrol have precedence over properties for the group named database.
To set properties for hosts or groups
1. Identify the name of the property that you want to set.
Use the kollacli property list command to see a list of properties. By default, only theproperties with values of less than 50 characters are shown. Use the --all option to list all properties,or set the KOLLA_PROP_LIST_LENGTH environmental variable with the maximum number ofcharacters you want.
2. (Optional) Set the global property value.
If the default value for the property is not what you require for the majority of the groups or hosts, youshould set the global property for your deployment:
$ kollacli property set property_name value
Use the kollacli property list command with the --long option to list default and globalproperties.
3. Set the property for individual groups or hosts.
To set the property for one or more groups:
$ kollacli property set property_name value --groups group_list
where group_list is a comma-separated list of group names. The names must match the names ofthe defined groups. Use the kollacli group listservices command to list the defined groups.
To set the property for one or more hosts:
$ kollacli property set property_name value --hosts host_list

Setting Properties for Groups or Hosts
49
where host_list is a comma-separated list of host names. The host names must match the namesof the hosts added to the deployment. Use the kollacli host list command to list the hosts.
You cannot use the --groups and --hosts options together.
To check host and group properties
• To check whether a property is overridden by a group or host property:
$ kollacli property list+-----+------------------------------------------+------------------------------------------+| OVR | Property Name | Property Value |+-----+------------------------------------------+------------------------------------------+...| *-- | openstack_release | 2.1.1 || --- | openvswitch_db_tag | {{ openstack_release }} |...+-----+------------------------------------------+------------------------------------------+
The OVR column in the output indicates whether a property has been set that overrides either a defaultproperty or a global property. The OVR column contains three characters:
• The first character is either "*" or "-", where "*" means the property is overridden by a global property,and "-" means the property is not overridden by a global property.
• The second character is either "G" or "-", where "G" means the property is overridden by a groupproperty, and "-" means the property is not overridden by a group property.
• The third character is either "H" or "-", where "H" means the property is overridden by a host property,and "-" means the property is not overridden by a host property.
• To check group properties:
$ kollacli property list --groups all|group_list
where group_list is a comma-separated list of group names.
• To check host properties:
$ kollacli property list --hosts all|host_list
where host_list is a comma-separated list of host names.
To remove properties for groups or hosts
• To remove a group property:
$ kollacli property clear property_name --groups all|group_list
where group_list is a comma-separated list of group names.
• To remove a host property:
$ kollacli property clear property_name --hosts all|host_list
where host_list is a comma-separated list of host names.

Dealing With Variable Network Interface Names
50
4.4.1 Dealing With Variable Network Interface Names
The following is an example of how to use global, group, and host properties to deal with the case whereyou need to use different interface names for the network_interface property.
1. Check the current value for the network_interface property.
$ kollacli property list+-----+------------------------------------------+------------------------------------------+| OVR | Property Name | Property Value |+-----+------------------------------------------+------------------------------------------+...| --- | network_interface | eth0 |...+-----+------------------------------------------+------------------------------------------+
The first "-" character in the OVR column indicates that eth0 is the default property value.
As the majority of your nodes are Oracle Linux nodes with a network interface named em1, it is best toset a global property with this value.
2. Set the global property value.
$ kollacli property set network_interface em1
3. Check that the global property value is applied.
$ kollacli property list+-----+------------------------------------------+------------------------------------------+| OVR | Property Name | Property Value |+-----+------------------------------------------+------------------------------------------+...| *-- | network_interface | em1 |...+-----+------------------------------------------+------------------------------------------+
The "*" character in the OVR column indicates that em1 is the global property value.
However, all your compute nodes are Oracle VM Server nodes with a network interface named eth0.As you are only using Oracle VM Server for your compute nodes, it is best to set a group property forthe compute group.
4. Set the property value for the compute group.
$ kollacli property set network_interface eth0 --groups compute
5. Check that the group property value is applied.
$ kollacli property list+-----+------------------------------------------+------------------------------------------+| OVR | Property Name | Property Value |+-----+------------------------------------------+------------------------------------------+...| *G- | network_interface | em1 |...+-----+------------------------------------------+------------------------------------------+
The "*" character in the OVR column indicates that em1 is still the global property value, but the "G"character indicates that the property has been set for one or more groups.
To check which groups have the property value set:
$ kollacli property list --groups all

Setting up Glance
51
+-----+-------------------+----------------+---------+| OVR | Property Name | Property Value | Group |+-----+-------------------+----------------+---------+| *G- | network_interface | eth0 | compute |+-----+-------------------+----------------+---------+
However, the storage node storage1.example.com needs to be configured to use the network interfacenamed em3, so you need to set a property specific to this host.
6. Set the property value for the storage1.example.com host.
$ kollacli property set network_interface em3 --hosts storage1.example.com
7. Check that the host property value is applied.
$ kollacli property list+-----+------------------------------------------+------------------------------------------+| OVR | Property Name | Property Value |+-----+------------------------------------------+------------------------------------------+...| *GH | network_interface | em1 |...+-----+------------------------------------------+------------------------------------------+
The "*" character in the OVR column indicates that em1 is still the global property value, and the "H"character indicates that the property has been set for one or more hosts.
To check which hosts have the property value set:
$ kollacli property list --hosts all+-----+-------------------+----------------+---------------------------+| OVR | Property Name | Property Value | Host |+-----+-------------------+----------------+---------------------------+| *GH | network_interface | em3 | storage1.example.com |+-----+-------------------+----------------+---------------------------+
When you deploy OpenStack with these settings, all hosts will use em1 as the setting for thenetwork_interface property apart from hosts that belong the compute group, which use eth0, andthe host storage1.example.com, which uses em3.
4.5 Setting up GlanceThe Glance image service is the OpenStack service used to manage virtual machine images. By default, itruns on controller nodes.
The Glance service uses the local file system to store virtual machine images and is not, by default,configured for high availability (HA). To enable HA for Glance, you can use a shared file system, such asNFS, mounted on /var/lib/glance on each Glance node.
Alternatively, you can deploy Glance to a single node. This avoids any HA issues with file-based storage,though it also means that Glance is not HA-enabled. To deploy Glance to a single node, create a groupwhich contains only Glance, and add one host to that group.
Using a Shared File System for Glance
The glance_api container mounts the /var/lib/glance directory on the host and uses it to store virtualmachine images. To provide for high availability, you can mount a shared file system on /var/lib/glance on each Glance host.
You must ensure that the file system is mounted before the Glance containers are started because theDocker daemon does not wait for file systems to be mounted before it starts the containers. You can

Setting up Nova
52
configure systemd to check that a file system is mounted before starting the Docker service. For example,if you have added an entry to /etc/fstab to mount an NFS file system at boot time, perform the followingsteps:
1. Configure systemd to mount the NFS file system before starting the docker service.
Create the drop-in file /etc/systemd/system/docker.service.d/nfs.conf with the followingcontent:
[Unit]After=remote-fs.target
2. Reload systemd manager configuration.
# systemctl daemon-reload
3. Restart the docker service.
# systemctl restart docker.service
4.6 Setting up Nova
The Nova compute service is responsible for managing the hypervisors and virtual machine instances. Youmight need to perform additional configuration before you deploy this service.
4.6.1 Automatic Hypervisor Configuration
For the Nova compute service, the virt_type option in the [libvirt] section of the nova.confconfiguration file sets the hypervisor that runs the instances in your deployment. KVM is the defaulthypervisor.
In an OpenStack deployment, it is possible to use a mixture of hypervisors as compute nodes. To simplifyconfiguration, when you deploy the Nova compute service to a node, the hypervisor is detected and thevirt_type option is configured automatically. The following table shows the virt_type option settingsand the conditions when they are used.
Setting Conditions
xen Platform: Linux
Distribution: Oracle VM Server
kvm Platform: Linux
Distribution: Oracle Linux Server
Virtualization support: enabled
qemu Platform: Linux
Distribution: Oracle Linux Server
Virtualization support: disabled
hyperv Platform: Microsoft Windows
To check whether virtualization support is enabled on the compute node, run the following command:
$ egrep '(vmx|svm)' /proc/cpuinfo

Preparing a Compute Node
53
If virtualization support is enabled, the output should contain vmx (for an Intel CPU) or svm (for an AMDCPU).
4.6.2 Preparing a Compute Node
Before you deploy Nova compute services to a compute node, perform the following:
• Ensure you have sufficient disk space, if you use ephemeral storage for instances (virtual machines).
The Nova data container uses the /var/lib/kolla/var/lib/nova/instances directory on thecompute node for ephemeral storage for instances. You must ensure there is sufficient disk space in thislocation for the amount of virtual machine data you intend to store.
• (Oracle Linux compute nodes only) Stop and disable the libvirtd service.
# systemctl stop libvirtd.service# systemctl disable libvirtd.service
If the libvirtd service is running, this prevents the nova_libvirt container from starting when youdeploy Nova services.
Do not perform this step on Oracle VM Server compute nodes.
• Stop iSCSI initiator processes.
You only need to perform this step if you are using Cinder block storage with a volume driver that usesthe iSCSI protocol.
By default, the Cinder block storage service uses local volumes managed by the Linux Logical VolumeManager (LVM). The Cinder LVM volume driver uses the iSCSI protocol to connect an instance toa volume and the nova_iscsid container handles the iSCSI session. If there are iSCSI initiatorprocesses running on the compute node, this prevents the nova_iscsid container from starting whenyou deploy Nova services.
First, unmount the file systems on any attached iSCSI disks and disconnect from all iSCSI targets. Thendo either of the following:
• Uninstall the iscsi-initiator-utils package.
# yum remove iscsi-initiator-utils
• Disable iSCSI services.
On Oracle Linux compute nodes:
# systemctl stop iscsid.socket iscsiuio.socket iscsid.service # systemctl disable iscsid.socket iscsiuio.socket iscsid.service
On Oracle VM Server compute nodes:
# service iscsid stop# chkconfig iscsid off
4.6.3 Setting the iSCSI Initiator Name
By default, the Cinder block storage service uses the iSCSI protocol to connect instances to volumes. Thenova_iscsid container runs on compute nodes and handles the iSCSI session using an iSCSI initiatorname that is generated when you deploy Nova compute services.

Enabling iSCSI Multipath
54
If you prefer, you can configure your own iSCSI initiator name. You set the iSCSI initiator namein the /etc/kolla/nova-iscsid/initiatorname.iscsi file on each compute node. If theinitiatorname.iscsi file does not exist, create it. The file has one line, which contains the name of theinitiator, in the format:
InitiatorName=iqn.yyyy-mm.naming-authority:unique_name
For example:
InitiatorName=iqn.1988-12.com.oracle:myiscsihost
4.6.4 Enabling iSCSI Multipath
The Nova compute service supports iSCSI multipath for failover purposes and increased performance.When multipath is enabled, the iSCSI initiator (the Compute node) is able to obtain a list of addresses fromthe storage node that the initiator can use as multiple paths to the iSCSI LUN (the Cinder volume).
To enable iSCSI multipath:
$ kollacli property set nova_iscsi_use_multipath true
4.7 Setting up Neutron
The Neutron network service enables you to create and attach interface devices managed by otherOpenStack services to networks.
4.7.1 Configuring VLAN Networks
With Neutron network services, the default tenant networking option is to use GRE/VxLANs. GRE/VxLANsare the preferred tenant networking option for enterprise deployments. If you prefer to use VLANs for yourtenant networks, you need to use the kollacli property set command to set the following propertiesbefore you perform the deployment:
neutron_tenant_type
The tenant network type. Valid options for this are vlan, gre and vxlan. The default is vxlan. Touse VLANs for tenant networks, set this to vlan.
neutron_vlan_physnet
The name of the VLAN network. The default is physnet1, which is generally used to name flatnetworks. To avoid confusion with a flat network, you should change this to something other than thedefault, for example, physnet2.
neutron_vlan_range
The range for VLAN IDs, in the format start_range:end_range. The default range is 1:1000.
neutron_vlan_bridge
The name for the VLAN network bridge. The default name is br-vlan.
neutron_vlan_interface
The VLAN traffic network interface name. The network interface must be available on each computeand network node, and by default must have the same name.

Setting up Cinder
55
If the nodes have differing network interface names, you can use group and host properties to setdifferent interface names, see Section 4.4, “Setting Properties for Groups or Hosts”.
The interface must not have an IP address (because it is a bridged interface) and it must not be thesame interface as either the network_interface or neutron_external_interface.
For example:
$ kollacli property set neutron_tenant_type vlan $ kollacli property set neutron_vlan_physnet physnet2$ kollacli property set neutron_vlan_range 1000:2000$ kollacli property set neutron_vlan_interface em3
4.8 Setting up CinderThe Cinder block storage service provides persistent block storage for OpenStack instances to use. TheCinder service is enabled by default.
Cinder requires some form of back-end storage. By default, Cinder uses volumes in a local volume groupmanaged by the Linux Logical Volume Manager (LVM). The local volume group must be named cinder-volumes and has to be configured manually. You can also enable Cinder to use specialized storageappliances by configuring vendor-specific volume drivers.
Cinder also provides a backup service, which enables you to automatically back up volumes to an externalstorage. By default, the external storage is an NFS share.
4.8.1 Creating the cinder-volumes Volume Group
By default, the Cinder block storage service uses local volumes managed by the Linux Logical VolumeManager (LVM). The Cinder service creates and manages the volumes in an LVM volume group calledcinder-volumes on the storage node. You have to manually create this volume group.
Perform the following steps on each storage node:
1. Install the LVM tools.
The LVM tools are usually installed by default. If they not installed, install them:
# yum install lvm2
2. Use the pvcreate command to set up the devices that you want to use as physical volumes with LVM.
If the devices contain any existing data, back up the data.
# pvcreate [options] device ...
For example, to set up /dev/sdb and /dev/sdc devices as physical volumes:
# pvcreate -v /dev/sd[bc] Set up physical volume for "/dev/sdb" with 41943040 available sectors Zeroing start of device /dev/sdb Writing physical volume data to disk "/dev/sdb" Physical volume "/dev/sdb" successfully created...
3. Use the vgcreate command to create the cinder-volumes volume group.
# vgcreate [options] cinder-volumes physical_volume ...
For example, to create the volume group from the physical volumes /dev/sdb and /dev/sdc:

Configuring Alternative Volume Drivers for Cinder
56
# vgcreate -v cinder-volumes /dev/sd[bc] Adding physical volume '/dev/sdb' to volume group 'cinder-volumes' Adding physical volume '/dev/sdc' to volume group 'cinder-volumes' Archiving volume group "cinder-volumes" metadata (seqno 0). Creating volume group backup "/etc/lvm/backup/cinder-volumes" (seqno 1). Volume group "cinder-volumes" successfully created
For more information, see the lvm(8), pvcreate(8), vgcreate(8), and other LVM manual pages.
4.8.2 Configuring Alternative Volume Drivers for Cinder
If you have dedicated storage appliances, you do not have to use the default Cinder LVM volume driver.
To use a different volume driver, you add the configuration settings for the driver to the /etc/kolla/config/cinder.conf file on the master node. If this file does not exist, create it.
The volume_driver configuration setting is used to specify the volume driver:
volume_driver = cinder.volume.drivers.driver_name
Note
Using an NFS driver for Cinder volumes is not supported.
For the Oracle ZFS Storage Appliance iSCSI driver, use:
volume_driver = cinder.volume.drivers.zfssa.zfssaiscsi.ZFSSAISCSIDriver
For more information about this driver, see http://docs.openstack.org/juno/config-reference/content/zfssa-volume-driver.html.
For Oracle Flash Storage Systems, use:
volume_driver = cinder.volume.drivers.ofs.ofs.OracleFSFibreChannelDriver
To download the Cinder volume driver for Oracle Flash Storage Systems, go to:
http://www.oracle.com/technetwork/server-storage/san-storage/downloads/index.html
For more information about the available Cinder volume drivers and their configuration settings, see theOpenStack Configuration Reference:
http://docs.openstack.org/kilo/config-reference/content/section_volume-drivers.html
The following is an example configuration for the Oracle ZFS Storage Appliance iSCSI driver:
[DEFAULT]enabled_backends = zfsISCSIdriver-1
[zfsISCSIdriver-1]volume_backend_name = zfsISCSIdriver-1volume_driver = cinder.volume.drivers.zfssa.zfssaiscsi.ZFSSAISCSIDriversan_ip = 10.10.10.10san_login = cindersan_password = passwordzfssa_pool = mypoolzfssa_project = myprojectzfssa_initiator_username = iqn.namezfssa_initiator_group = defaultzfssa_target_portal = 10.10.10.11:3260

Configuring the Cinder NFS Backup Driver
57
zfssa_target_interfaces = e1000g0
4.8.3 Configuring the Cinder NFS Backup Driver
The Cinder service provides the ability to back up Cinder volumes to an external storage. By default, thebackup driver is configured to use NFS. However, you need to configure the NFS share as the location forthe backups by setting a Kolla property.
On the master node run the following command:
$ kollacli property set cinder_backup_share host_name:path
where host_name is the fully qualified DNS name or IP address of the host that exports the NFS share,and path is the full path to the share on that host.
You can configure separate shares for individual hosts or groups, see Section 4.4, “Setting Properties forGroups or Hosts” for details.
By default, Cinder supports NFS version 4.1 or higher. If the NFS host uses an earlier version of NFS, thiscan cause errors. To configure Cinder to downgrade the NFS version, you can add configuration settingsto the /etc/kolla/config/cinder.conf file on the master node. If this file does not exist, create it.
If the NFS host supports NFS version 4, add the following to the configuration file:
[DEFAULT]backup_mount_options="vers=4,minorversion=0"
Otherwise, add the following to the configuration file:
[DEFAULT] backup_mount_options="vers=3"
4.9 Setting up Swift
Swift provides object-based persistent storage for virtual machines. Swift is disabled by default. In orderto use object-based persistent storage, you need to first create Swift rings, then enable Swift in thedeployment. The steps in this procedure are to be performed on a master node.
To set up Swift:
1. Create and rebalance the Swift ring manually.
You can use the following example configuration scripts as the basis for your Swift ring configuration.
The scripts create the following required files in the /etc/kolla/config/swift directory on themaster node:
• account.builder
• account.ring.gz
• container.builder
• container.ring.gz
• object.builder
• object.ring.gz
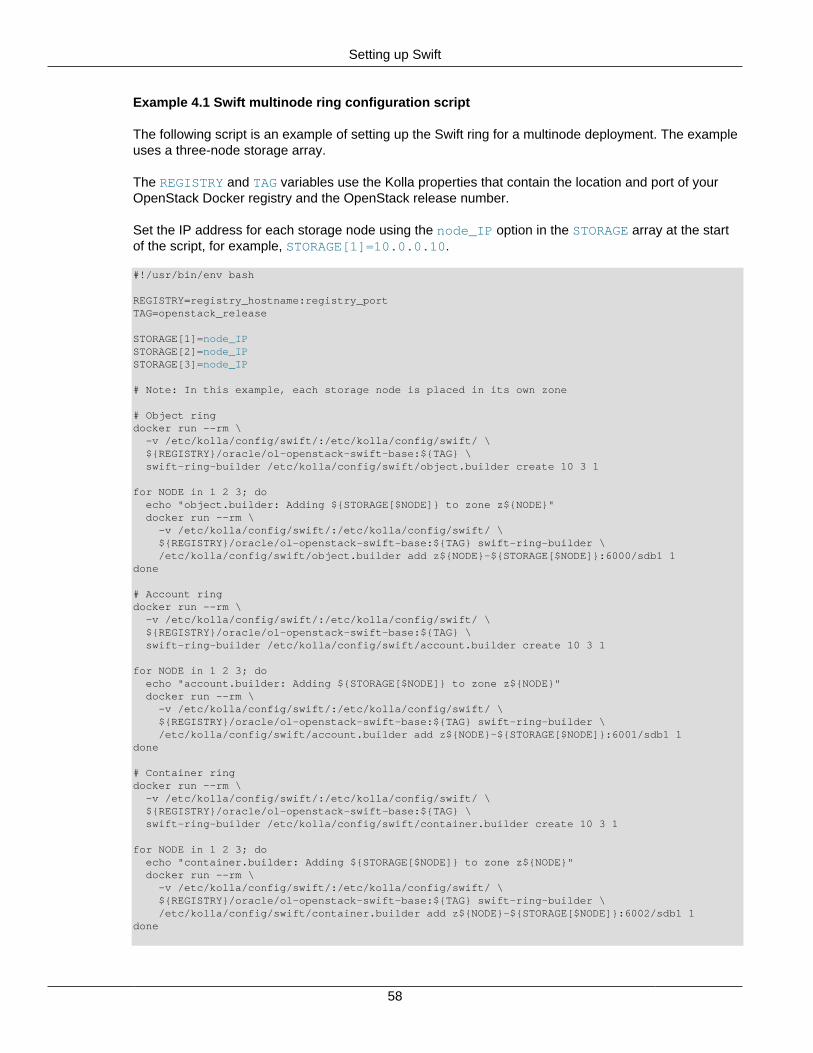
Setting up Swift
58
Example 4.1 Swift multinode ring configuration script
The following script is an example of setting up the Swift ring for a multinode deployment. The exampleuses a three-node storage array.
The REGISTRY and TAG variables use the Kolla properties that contain the location and port of yourOpenStack Docker registry and the OpenStack release number.
Set the IP address for each storage node using the node_IP option in the STORAGE array at the startof the script, for example, STORAGE[1]=10.0.0.10.
#!/usr/bin/env bash
REGISTRY=registry_hostname:registry_portTAG=openstack_release
STORAGE[1]=node_IPSTORAGE[2]=node_IPSTORAGE[3]=node_IP
# Note: In this example, each storage node is placed in its own zone
# Object ringdocker run --rm \ -v /etc/kolla/config/swift/:/etc/kolla/config/swift/ \ ${REGISTRY}/oracle/ol-openstack-swift-base:${TAG} \ swift-ring-builder /etc/kolla/config/swift/object.builder create 10 3 1
for NODE in 1 2 3; do echo "object.builder: Adding ${STORAGE[$NODE]} to zone z${NODE}" docker run --rm \ -v /etc/kolla/config/swift/:/etc/kolla/config/swift/ \ ${REGISTRY}/oracle/ol-openstack-swift-base:${TAG} swift-ring-builder \ /etc/kolla/config/swift/object.builder add z${NODE}-${STORAGE[$NODE]}:6000/sdb1 1done
# Account ringdocker run --rm \ -v /etc/kolla/config/swift/:/etc/kolla/config/swift/ \ ${REGISTRY}/oracle/ol-openstack-swift-base:${TAG} \ swift-ring-builder /etc/kolla/config/swift/account.builder create 10 3 1
for NODE in 1 2 3; do echo "account.builder: Adding ${STORAGE[$NODE]} to zone z${NODE}" docker run --rm \ -v /etc/kolla/config/swift/:/etc/kolla/config/swift/ \ ${REGISTRY}/oracle/ol-openstack-swift-base:${TAG} swift-ring-builder \ /etc/kolla/config/swift/account.builder add z${NODE}-${STORAGE[$NODE]}:6001/sdb1 1done
# Container ringdocker run --rm \ -v /etc/kolla/config/swift/:/etc/kolla/config/swift/ \ ${REGISTRY}/oracle/ol-openstack-swift-base:${TAG} \ swift-ring-builder /etc/kolla/config/swift/container.builder create 10 3 1
for NODE in 1 2 3; do echo "container.builder: Adding ${STORAGE[$NODE]} to zone z${NODE}" docker run --rm \ -v /etc/kolla/config/swift/:/etc/kolla/config/swift/ \ ${REGISTRY}/oracle/ol-openstack-swift-base:${TAG} swift-ring-builder \ /etc/kolla/config/swift/container.builder add z${NODE}-${STORAGE[$NODE]}:6002/sdb1 1done
Setting up Ceilometer
59
for ring in object account container; do docker run --rm \ -v /etc/kolla/config/swift/:/etc/kolla/config/swift/ \ ${REGISTRY}/oracle/ol-openstack-swift-base:${TAG} swift-ring-builder \ /etc/kolla/config/swift/${ring}.builder rebalancedone
2. Enable the Swift service:
$ kollacli property set enable_swift yes
For more information on configuring Swift, see the OpenStack Kolla documentation at:
http://docs.openstack.org/developer/kolla/swift-readme.html
4.10 Setting up CeilometerCeilometer is a telemetry service that collects, normalizes and transforms data produced by OpenStackservices. Ceilometer is disabled by default.
Ceilometer requires a database to operate. Oracle recommends that you use a separate database forCeilometer. The choice of database system, and how it is configured, is up to you. A database must becreated and available on the network. Oracle recommends using MySQL for this purpose. For informationon installing MySQL see:
http://dev.mysql.com/doc/refman/5.7/en/installing.html
To set up Ceilometer:
1. If you do not have a dedicated database for Ceilometer, create the database. For example, usingMySQL you could use the following MySQL commands to create the database and user:
mysql> create database ceilometer;mysql> grant all privileges on ceilometer.* to 'ceilometer'@'%' identified by 'password';
In this example, the database is named ceilometer, with a user named ceilometer. These are thedefault settings for the deployment property settings.
2. Use the kollacli property set command to set the Ceilometer database deployment properties.These properties are used to create the Ceilometer database connection string.
ceilometer_database_backend
The database type, either mysql or mongodb. The default is mysql.
ceilometer_database_address
The fully qualified host name or IP address of the database host.
If you do not have a dedicated database for Ceilometer, the default MySQL Cluster databaseon the first controller node should be used. In this case, set this value to be the host name or IPaddress of the first controller node.
The default is the value of the kolla_internal_address property. If you leave it as the default,it is highly likely that Ceilometer will fail to collect all data and will not produce correct or expectedresults.
ceilometer_database_port
The database port, usually 3306 for MySQL or 27017 for MongoDB. The default is 3306.

Setting up Murano
60
ceilometer_database_name
The name of the Ceilometer database. The default is ceilometer.
ceilometer_database_user
The name of the Ceilometer database user. The default is ceilometer.
In this example, MySQL is used as the Ceilometer database. A MySQL database has been creatednamed ceilometer, with a database user named ceilometer, and MySQL is available on port3306 on ceilometerdbhost.example.com. As the database is set up using the defaults for theCeilometer database deployment property settings, all that is required is to set the host on which thedatabase is running:
$ kollacli property set ceilometer_database_address ceilometerdbhost.example.com
3. Add the password for the Ceilometer database user:
$ kollacli password set ceilometer_database_password
You are prompted to enter and confirm the password. The password value is not displayed on screen.You might want to use a strong password generator to generate the passwords.
4. Enable the Ceilometer service:
$ kollacli property set enable_ceilometer yes
4.11 Setting up Murano
The Murano project provides a method of creating and deploying cloud-ready applications. In order to useMurano applications, you must:
• Deploy the Murano and Heat services (both enabled by default).
• Create or download Murano applications.
• Create images which include the Murano Agent.
• Create a Murano environment which includes one or more Murano-enabled images and applications,and deploy the environment.
This section shows you how to create an image, ready to use with Murano.
4.11.1 Creating Oracle Linux Murano-enabled Images
In order to deploy Murano applications to virtual machine instances, the Murano Agent must be installed inthe virtual machine. This section shows how to install the Murano Agent in Oracle Linux images. To createan image which includes the Murano Agent you can:
• Create an Oracle Linux image, and install the openstack-murano-agent package.
• Download an Oracle Linux image for OpenStack from the Oracle Software Delivery Cloud, mount theimage, and install the openstack-murano-agent package.
When you have created an image with the Murano Agent installed, you then load it into Glance with anadditional image property. The image can then be used in a Murano deployment.

Creating Oracle Linux Murano-enabled Images
61
Installing the Murano Agent in a virtual machine:
If you choose to create a virtual machine, you can install the openstack-murano-agent package from theOracle Yum Server. Log into the virtual machine and perform these actions:
1. Set up the yum repository location for the Murano Agent.
For Oracle Linux 7, the openstack-murano-agent package is in the [ol7_openstack21] repository.
For Oracle Linux 6, the openstack-murano-agent package is in the [ol6_openstack21] repository.
Make sure this repository is enabled in the /etc/yum.repos.d/*.repo file. For ease, the steps todownload this repository file are included.
For Oracle Linux 7:
# curl -L -o /etc/yum.repos.d/public-yum-ol7.repo \ http://yum.oracle.com/public-yum-ol7.repo
Make sure the [ol7_openstack21] and [ol7_addons] repositories are enabled.
For Oracle Linux 6:
# curl -L -o /etc/yum.repos.d/public-yum-ol6.repo \ http://yum.oracle.com/public-yum-ol6.repo
Make sure the [ol6_openstack21] and [ol6_addons] repositories are enabled.
2. Install the openstack-murano-agent package.
# yum install -y openstack-murano-agent
3. Install the cloud-init package.
# yum install -y cloud-init
Installing the Murano Agent in an image:
If you choose to use the Oracle Linux virtual machine images from the Oracle Software Delivery Cloud, thissection contains instructions on installing the Murano Agent into these images.
The following should be performed by a user with root privileges. The final steps to load the image intoGlance should be performed on a master node, so it may be easier to do all the steps from the masternode.
1. Oracle Linux virtual machine images for OpenStack are available on the Oracle Software DeliveryCloud, for both Oracle Linux 7 and Oracle Linux 6. Download the Oracle Linux virtual machine image(s)for OpenStack from the Oracle Software Delivery Cloud at:
https://edelivery.oracle.com/linux
2. Install the qemu-img package:
# yum install qemu-img
3. Load the qemu ndb module:
# modprobe nbd max_part=63
4. Share the virtual machine's disk:

Creating Oracle Linux Murano-enabled Images
62
# qemu-nbd -c /dev/nbd0 OracleLinux-version-x86_64.qcow2
5. Mount the virtual machine's disk. You can see a list of the partitions using:
# fdisk /dev/nbd0 -l
The Oracle Linux 6.7 and 7.2 image have two partitions: the boot partition, and the root partition. Thesystem files are stored on the second (root) partition. The root partition (/dev/nbd0p2) is the mountpoint to access the file system and install packages.
# mount /dev/nbd0p2 /mnt
6. Set the networking to resolve the host names required to do the package install.
On the Oracle Linux 7.2 image:
# cat /etc/resolv.conf > /mnt/root/etc/resolv.conf
On the Oracle Linux 6.7 image:
# cat /etc/resolv.conf > /mnt/etc/resolv.conf
7. Set up the yum repository location for the Murano Agent on the appropriate partition.
For Oracle Linux 7, the openstack-murano-agent package is in the [ol7_openstack21] repository.For the Oracle Linux 7.2 image, use:
# curl -L -o /mnt/root/etc/yum.repos.d/public-yum-ol7.repo \ http://yum.oracle.com/public-yum-ol7.repo
For Oracle Linux 6, the openstack-murano-agent package is in the [ol6_openstack21] repository.For the Oracle Linux 6.7 image use:
# curl -L -o /mnt/etc/yum.repos.d/public-yum-ol6.repo \ http://yum.oracle.com/public-yum-ol6.repo
Make sure the repository is enabled in the yum.repos.d/*.repo file using a text editor such as vi .
8. Install the openstack-murano-agent package.
For the Oracle Linux 7.2 image, use:
# chroot /mnt/root/ /bin/bash -c "/usr/bin/yum install -y openstack-murano-agent"
For the Oracle Linux 6.7 image use:
# chroot /mnt/ /bin/bash -c "/usr/bin/yum install -y openstack-murano-agent"
If you need to access the yum server using a proxy, set the http_proxy environment variable as well,for example:
# chroot /mnt/ /bin/bash -c "http_proxy=http://proxy.example.com:80 \ /usr/bin/yum install -y openstack-murano-agent"
9. Clean up any cached packages to reduce the image size.
For the Oracle Linux 7.2 image, use:
# chroot /mnt/root/ /bin/bash -c "/usr/bin/yum clean all"
For the Oracle Linux 6.7 image use:

Creating Oracle Linux Murano-enabled Images
63
# chroot /mnt/ /bin/bash -c "/usr/bin/yum clean all"
10. Remove the Yum repository files.
For the Oracle Linux 7.2 image, use:
# rm /mnt/root/etc/yum.repos.d/public-yum-ol7.repo
For the Oracle Linux 6.7 image use:
# rm /mnt/etc/yum.repos.d/public-yum-ol6.repo
11. Remove the networking changes:
For the Oracle Linux 7.2 image, use:
# cat > /mnt/root/etc/resolv.conf << __EOF____EOF__
For the Oracle Linux 6.7 image use:
# cat > /mnt/etc/resolv.conf << __EOF____EOF__
12. Unmount the image.
# umount /mnt/# qemu-nbd -d /dev/nbd0
Loading a Murano-enabled Image into Glance
1. After installing the Murano Agent, the image is ready to load into Glance. To let OpenStack know thatthis image can be used in a Murano deployment, make sure you include the --property parameteras shown.
--property murano_image_info='{"type": "linux", "title": "My Image Title"}'
For example:
$ glance image-create --name OL7-murano --is-public True --disk-format qcow2 \ --container-format bare \ --property murano_image_info='{"type": "linux", "title": "OL7-murano"}' \ --file /data/OracleLinux-7.2-x86_64.qcow2+------------------------------+------------------------------------------+| Property | Value |+------------------------------+------------------------------------------+| Property 'murano_image_info' | {"type": "linux", "title": "OL7-murano"} || checksum | 0c487c29f3dfeb080034dc9b2f5a3690 || container_format | bare || created_at | 2016-03-17T05:15:28.000000 || deleted | False || deleted_at | None || disk_format | qcow2 || id | 2610deca-7b4e-4cf3-9aaa-8b4c0562a75e || is_public | True || min_disk | 0 || min_ram | 0 || name | OL7-murano || owner | 41375e2937f04d7fa81b33f2ce134b2d || protected | False || size | 431329792 || status | active || updated_at | 2016-03-17T05:15:31.000000 |

Creating Oracle Linux Murano-enabled Images
64
| virtual_size | None |+------------------------------+------------------------------------------+
2. You can create a virtual machine instance using this image, as well as using the image in a Muranodeployment. For example, to deploy a virtual machine using this image, you could use:
$ nova boot --image OL7-murano --flavor m1.medium \ --nic net-id=4a922c1b-25a0-44ea-a476-7626ebe7738a OL7-murano-vm+--------------------------------------+----------------------------------------------------+| Property | Value |+--------------------------------------+----------------------------------------------------+| OS-DCF:diskConfig | MANUAL || OS-EXT-AZ:availability_zone | nova || OS-EXT-SRV-ATTR:host | - || OS-EXT-SRV-ATTR:hypervisor_hostname | - || OS-EXT-SRV-ATTR:instance_name | instance-0000001d || OS-EXT-STS:power_state | 0 || OS-EXT-STS:task_state | scheduling || OS-EXT-STS:vm_state | building || OS-SRV-USG:launched_at | - || OS-SRV-USG:terminated_at | - || accessIPv4 | || accessIPv6 | || adminPass | FNxRi3PH8AGd || config_drive | || created | 2016-03-15T02:58:11Z || flavor | m1.medium (3) || hostId | || id | 02749598-6da4-440b-8ea1-d58e986d2a04 || image | OL7-murano (da9ddf7d-fe7c-4b02-9a90-09300fd29b23) || key_name | - || metadata | {} || name | OL7-murano-vm || os-extended-volumes:volumes_attached | [] || progress | 0 || security_groups | default || status | BUILD || tenant_id | 41375e2937f04d7fa81b33f2ce134b2d || updated | 2016-03-15T02:58:10Z || user_id | cb96169f57ed4f6988ad749ed1f2efcb |+--------------------------------------+----------------------------------------------------+

65
Chapter 5 Deploying Services
Table of Contents5.1 Performing a Deployment ........................................................................................................... 655.2 Making Configuration Changes After Deployment ......................................................................... 675.3 Updating to a New Release of Oracle OpenStack for Oracle Linux ................................................ 675.4 Removing Services ..................................................................................................................... 68
Once you have set up your deployment, you use the kollacli command to deploy services to targetnodes.
5.1 Performing a Deployment
Before you deploy OpenStack services, ensure that you have set up your deployment, as described inChapter 4, Setting up a Deployment.
1. Ensure that the Docker Engine is running on the target nodes.
To check that the Docker Engine is running:
$ systemctl status docker.service● docker.service - Docker Application Container Engine Loaded: loaded (/usr/lib/systemd/system/docker.service; enabled; vendor preset: disabled) Drop-In: /etc/systemd/system/docker.service.d └─docker-sysconfig.conf, var-lib-docker-mount.conf Active: inactive (dead) since Tue 2016-03-29 13:20:53 BST; 2min 35s ago...
If the output of this command shows the status of the Docker service to be inactive (dead), startthe Docker Engine:
# systemctl start docker.service
2. On the master node, log in as a user that is a member of the kolla group.
You add users to the kolla group as part of setting up a master node, see Section 3.6, “Preparing aMaster Node”.
You deploy OpenStack services with the kollacli command, and you must be a member of thekolla group to use this command.
3. (Optional) Check that the target nodes are configured correctly and ready for the deployment.
$ kollacli host check all --predeploy
This command is only suitable for an initial deployment. Do not use this command if OpenStackservices have already been deployed.
If you are adding nodes to a deployment and they are currently not running any OpenStack services,you can check the nodes individually.
$ kollacli host check host --predeploy
where host is the fully qualified domain name or IP address of the node.

Performing a Deployment
66
The checks verify:
• The openstack-kolla-preinstall package version and the Docker Engine version.
• The required ports are available.
• The Docker service is running and that the libvirtd service is not running.
• The LVM volume group named cinder-volumes exists on storage nodes that use the LVM driverfor Cinder volumes (the default).
• The number of controller nodes (there must be a minimum of two).
If the check indicates a problem (you do not see a Success message), fix the problem beforeperforming the deployment.
4. Deploy OpenStack services to the target nodes.
Use the kollacli deploy command to deploy services.
To deploy all enabled OpenStack services to all hosts:
$ kollacli deploy
Use this command to use to perform an initial deployment.
You can control the deployment by specifying the groups, services or hosts that you want to deploy:
• To deploy all enabled OpenStack services in the control group to all hosts in the control group:
$ kollacli deploy --groups control
• To deploy OpenStack services to selected hosts, the services that are deployed are controlled by thegroups the individual hosts are assigned to:
$ kollacli deploy --hosts compute1.example.com,compute2.example.com
• To deploy selected services to all hosts in the control group:
$ kollacli deploy --services mysqlcluster,neutron,keystone --groups control
• To deploy selected services, the groups the services belong to control the hosts that run the services:
$ kollacli deploy --services heat,murano
You can also deploy services serially (one host at a time). In a high availability environment, this isuseful for updating existing services without interrupting them.
• To deploy all enabled services in the network and storage groups serially to all hosts in the networkand storage groups:
$ kollacli deploy --serial --groups network,storage
• Deploying all services serially to selected hosts, the services that are deployed are controlled by thegroups that the individual hosts are assigned to:
$ kollacli deploy --serial --hosts compute1.example.com,compute2.example.com
If the deployment fails, see Chapter 7, Troubleshooting Deployment.

Making Configuration Changes After Deployment
67
5.2 Making Configuration Changes After Deployment
If you make configuration changes to services after deployment, the configuration changes are notautomatically applied to the Docker containers when you redeploy the services. The configuration changesare only applied when the Docker containers are restarted. However, the kollacli command does notcurrently support restarting individual containers.
To deploy configuration changes:
1. Remove all services from the nodes that run the changed services.
Use the kollacli host destroy command, see Section 5.4, “Removing Services”. Do not use the--includedata option remove the OpenStack data.
2. Redeploy all services to the nodes.
Use kollacli deploy command, see Section 5.1, “Performing a Deployment”.
For compute nodes that are currently running instances, you must move the running instances to anothernode before performing these steps.
5.3 Updating to a New Release of Oracle OpenStack for Oracle Linux
Perform the following steps to update a deployment to a new release of Oracle OpenStack for OracleLinux.
1. Shut down all running instances in the deployment.
2. All nodes. Ensure you have a backup of the Docker file system mounted on /var/lib/docker.
3. Compute nodes. If you store ephemeral virtual machine data on the compute nodes, ensure you havea backup of the data mounted on /var/lib/kolla.
4. All nodes. Update the Oracle OpenStack for Oracle Linux preinstallation package and ensure theDocker Engine is configured correctly for the new release.
See Section 3.4, “Preparing Oracle Linux Nodes” for details.
5. Master node only. Update the Oracle OpenStack for Oracle Linux CLI (kollacli).
See Section 3.6, “Preparing a Master Node”.
6. Docker registry only. Import the Docker images for the new release to the Docker registry.
See Section 3.7.2, “Importing Images into the Docker Registry”.
7. Master node only. Update the openstack_release property.
By default, the property values set for the previous release are retained. You need to update theopenstack_release property so that the latest OpenStack Kolla Docker images are pulled from theregistry when you update.
$ kollacli property set openstack_release 2.1.1
8. Master node only. Run the kollacli upgrade command.
This command updates the OpenStack containers on all nodes.

Removing Services
68
By default, the data for the various OpenStack services are preserved when you update.
9. All network and compute nodes. Reboot the node.
For networking to function after the update, you must reboot these node types.
# systemctl reboot
5.4 Removing Services
You may want to remove the services from a node, for example because you want to replace the node orbecause you want to change the services it runs.
You remove services with kollacli host destroy command. This command removes all the Dockercontainers that run services. By default, it does not remove the data containers (and therefore the data onthe host).
When you remove services, bear in mind the deployment "rules":
• The nodes in the compute group must not be assigned to the control group.
• The control group must contain at least two nodes.
• The number of nodes in the database group must always be a multiple of two.
• Each group must contain at least two nodes to enable high availability.
To remove all services from a node:
$ kollacli host destroy compute1.example.com
By default, the containers are killed (docker kill) before they are removed. Use the --stop optionto perform a graceful shutdown (docker stop) of the containers before removing them. This might beslower.
To remove all services from all nodes:
$ kollacli host destroy all
To remove all services and the OpenStack data from a node:
$ kollacli host destroy --includedata control1.example.com
If you no longer want to include a node in a deployment, you must also remove it from the list of targetnodes:
$ kollacli host remove [ host | all ]
where host is the fully qualified domain name or IP address of the host, or all for all hosts.

69
Chapter 6 Using OpenStack CLIs
Table of Contents6.1 Installing openstack-kolla-utils ..................................................................................................... 696.2 Using docker-ostk ....................................................................................................................... 706.3 Accessing the File System with docker-ostk ................................................................................. 71
In order to access the OpenStack command line tools, such as nova, glance, and so on, a host must beinstalled with the python-openstack_project client packages. Installing these packages may causedependency problems with Docker and OpenStack client package versions. To make the installation of theOpenStack client tools easier, Oracle provides a single package for you which includes all the OpenStackCLI tools. The package name is openstack-kolla-utils . This package is provided with pre-tested packagedependencies, and enables you to submit OpenStack CLI commands via Docker to an OpenStack servicein a container. This single package includes all the OpenStack CLI packages, and a utility named docker-ostk, which wraps the sometimes lengthy Docker CLI commands needed to access the OpenStack CLI.
Oracle suggests you install the openstack-kolla-utils package on a master node .
If you do not want to use the docker-ostk utility to access the deployed containers, you can insteadinstall and use the OpenStack client packages. For information on installing the OpenStack clients, see:
http://docs.openstack.org/cli-reference/common/cli_install_openstack_command_line_clients.html
6.1 Installing openstack-kolla-utilsThis section shows you how to install and set up the openstack-kolla-utils package. This is the packagethat wraps the OpenStack CLI commands using a utility named docker-ostk.
To install openstack-kolla-utils :
1. Set up an Oracle Linux host as described in Section 3.6, “Preparing a Master Node”.
2. Install the openstack-kolla-utils package:
# yum install openstack-kolla-utils
The docker-ostk utility is now installed.
3. The user which runs the docker-ostk utility must be a member of the docker group. To add anexisting user to the docker group, enter:
# usermod -aG docker username
The user must log out and in again for the group setting to take effect.
Caution
Any member of the docker group has full (root) access to all containers inthe deployment. If you add an unprivileged user to the docker group, youshould consider the elevation in security granted with this access. Do not run thedocker-ostk utility as the root user.
4. Set the environment variables to use with docker-ostk. You can manually set the variables, ordownload a configuration file from Horizon.
The variables used by docker-ostk are listed in the following table:

Using docker-ostk
70
Environment Variable Purpose
OS_AUTH_URL Authentication URL.
OS_TENANT_NAME Keystone tenant name.
OS_USERNAME Keystone user name.
OS_PASSWORD Keystone password.
OS_PROJECT_NAME Keystone project name.
OS_PROJECT_DOMAIN_ID Keystone domain ID containing the project.
OS_USER_DOMAIN_ID Keystone user's domain ID.
ENV_FILE The location and name of a file which contains key/value pairs.Used to pass additional environment variables to docker-ostk.Each key/value pair should be on a new line.
OPENSTACK_UTILS_IMAGE Docker registry image name. The default is oracle/ol-openstack-utils:latest. You should not need to change this.
The list of variables in this table is not a complete list. For more information on OpenStack CommandLine variables, and a full list of variables you can use, see the OpenStack Keystone Command LineUtility documentation at:
http://docs.openstack.org/developer/python-keystoneclient/man/keystone.html
To manually set the environment variables, for each variable, enter:
$ export variable_name=variable_value
For example:
$ export OS_AUTH_URL=http://10.0.0.10:5000/v2.0$ export OS_TENANT_NAME=admin$ export OS_PROJECT_NAME=admin$ export OS_USERNAME=admin$ export OS_PASSWORD=password
To download a file which contains all the required environment variables:
a. Log into Horizon.
b. Select Project, select Compute, and then select Access & Security. Select the API Accesssubtab.
c. Click Download OpenStack RC File and save this file to the host on which the openstack-kolla-utils package is installed.
d. Source the file to load the environment variables:
$ source admin-openrc.shPlease enter your OpenStack Password:
You are prompted to enter the OpenStack admin password. Enter the password and theenvironment variables are set up and ready for use with docker-ostk.
6.2 Using docker-ostkTo use the docker-ostk utility, use the syntax:

Accessing the File System with docker-ostk
71
docker-ostk openstack_client openstack_client_argument [ -h | --help ]
openstack_client
An OpenStack CLI client, for example, nova.
openstack_client_argument
The argument for the OpenStack CLI client command, for example, list.
-h, --help
Display syntax help.
The docker-ostk utility wraps docker run commands, and includes the environment variables you set.So instead of needing to issue a command like:
$ docker run --rm -it --env ADMIN_USER=admin --env ADMIN_PASS=password ... openstack-utils nova list
You can use the more straight-forward command of:
$ docker-ostk nova list
For a list of OpenStack CLI commands and their arguments, see the OpenStack Command-Line InterfaceReference:
http://docs.openstack.org/cli-reference/content/
The first time you issue a docker-ostk command, the Docker registry is checked for a local copy of theol-openstack-utils image. If a local copy is not available, a copy is downloaded to your local copy of theregistry.
If the Docker registry cannot be found, make sure the registry location is set using the kollacliproperty set docker_registry command.
6.3 Accessing the File System with docker-ostk
To allow access to files on a container, the current working directory of the host running docker-ostkis bind-mounted into the container as /data. When you issue commands that require access to thecontainer's file system, you must prefix the local file name with /data/. For example, if you have an imagenamed cirros-0.3.4-x86_64-disk.img in the local working directory of the master node, you canuse the following command to create an image using Glance:
$ docker-ostk glance image-create --name cirros --is-public True --disk-format qcow2 \ --container-format bare --file /data/cirros-0.3.4-x86_64-disk.img

72

73
Chapter 7 Troubleshooting Deployment
Table of Contents7.1 Debugging a Deployment ............................................................................................................ 737.2 "Command Failed" Error When Starting the Ansible Container ...................................................... 737.3 Collecting the Log Files .............................................................................................................. 747.4 Removing the Docker Images From a Node ................................................................................ 75
This chapter contains some troubleshooting tips to help you with deployment.
7.1 Debugging a Deployment
If you experience errors when deploying services, use the following information to help debug the issue.
1. (Optional) Remove the services that are currently deployed on the target node(s).
It is cleaner to remove services before attempting a redeployment. See Section 5.4, “RemovingServices”.
2. Redeploy services with debug output.
The kollacli command has the following options which can be used for debugging purposes.
-v, --verbose
This option controls the verbosity of the output. You repeat the v, to increase the verbosity, so -vvgives you more than -v, and -vvv gives you more than -vv.
--debug
This option enables the display of traceback on errors.
--log-file
This option enables you capture output to a log file, appending content if the file already exists.
To deploy with increased verbosity:
$ kollacli deploy -vv
To deploy with increased verbosity, with traceback on errors, and logging output to a file:
$ kollacli deploy -vvv --debug --log-file log-out.txt
If you are unable to resolve the issue, you might need to gather the log files (see Section 7.3,“Collecting the Log Files”) and contact Oracle Support.
7.2 "Command Failed" Error When Starting the Ansible Container
When you perform a deployment, you might experience a Command failed error when starting theAnsible container, for example:
TASK [common : Starting Ansible container]

Collecting the Log Files
74
*************************************fatal: [ol7-c4]: FAILED! => {"changed": false, "failed": true, "msg":"ConnectionError(ProtocolError('Connection aborted.', error(2, 'No such file or directory')),)"}
PLAY RECAP*********************************************************************ol7-c4 : ok=3 changed=0 unreachable=0 failed=1Traceback (most recent call last): File "/usr/lib/python2.7/site-packages/kollacli/commands/deploy.py", line66, in take_action verbose_level) File "/usr/lib/python2.7/site-packages/kollacli/common/ansible/actions.py",line 89, in deploy playbook.run() File"/usr/lib/python2.7/site-packages/kollacli/common/ansible/playbook.py", line139, in run raise eCommandError: ERROR: Command failed. :
This occurs when the Docker Engine is not running on a target node. To resolve this issue:
1. Ensure that the Docker Engine is running on all target nodes.
To check that the Docker Engine is running:
$ systemctl status docker.service● docker.service - Docker Application Container Engine Loaded: loaded (/usr/lib/systemd/system/docker.service; enabled; vendor preset: disabled) Drop-In: /etc/systemd/system/docker.service.d └─docker-sysconfig.conf, var-lib-docker-mount.conf Active: inactive (dead) since Tue 2016-03-29 13:20:53 BST; 2min 35s ago...
If the output of this command shows the status of the Docker service to be inactive (dead), startthe Docker Engine:
# systemctl start docker.service
2. From the master node, deploy OpenStack services to the target nodes:
$ kollacli deploy
7.3 Collecting the Log Files
The log_collector.py script enables you collect the Docker log files from the containers in yourdeployment. The script is included in the openstack-kollacli package, which is installed on masternodes, and is located in /usr/share/kolla/kollacli/tools. You collect the log files from all nodes,or from selected nodes, as follows:
log_collector.py [ all | host1 [,host2,host3...] ] [ -h | --help ]
If you specify a host, the host must have been added to the deployment inventory using the kollaclihost add command. If a host is not accessible, the script ignores the host and processes the next host inthe list.
The script only collects logs from Docker containers whose image names start with "ol-openstack".
The script collects the logs files into a tar archive in /tmp and prints the name of the file to the screen. Thearchive contains a directory for each specified deployment node, and each directory contains the Dockerlog files for the containers deployed on that node.
The script also runs the kollacli dump command, which retrieves the configuration files and logs, andincludes the output of this command in the archive.

Removing the Docker Images From a Node
75
7.4 Removing the Docker Images From a Node
OpenStack services are deployed to target nodes as Docker containers. When you deploy services, theDocker daemon on the target node downloads the required Docker images from the Docker registry, anduses the images to create the containers.
You may want to remove all the images from a target node to ensure that fresh images are downloadedwhen you deploy services.
To remove all images, run the following command on the target node:
# docker rmi -f $(docker images -q)

76

77
Appendix A kollacli Command-Line Referencekollacli [ subcommand ][ --version ] [ -v | --verbose ] [ --log-file file_name ] [ -q | --quiet ][ -h | --help ] [ --debug ]
Starts the CLI shell, or runs CLI commands from the operating system prompt.
subcommand
A kollacli subcommand:
Subcommand Description
complete Print a Bash completion function.
deploy Deploy services.
dump Create a tar file of the configuration files and logs for debugging.
group add Add a group.
group addhost Add a host to a group.
group listhosts List all groups and the hosts in each group.
group listservices List all groups and the services in each group.
group remove Remove a group.
group removehost Remove a host from a group.
help Display help on using CLI commands.
host add Add a host to a deployment.
host check Check host configuration.
host destroy Remove services from host.
host list List hosts and the groups they belong to.
host remove Remove hosts from a deployment.
host setup Set up a host.
password clear Remove a password name and its value.
password list List all password names.
password set Set a password value.
property clear Clear a property.
property list List properties and their associated values.
property set Set a property.
service addgroup Add a service to a group.
service list List all services and their associated subservices.
service listgroups List all services and the groups they belong to.
service removegroup Remove a service from a group.
upgrade Upgrade a deployment.
--version
Display the CLI version number.

kollacli complete
78
-v, --verbose
Set the verbosity of the output when running a command. Repeat -v, to increase the verbosity, so -vvgives you more than -v, and -vvv gives you more than -vv.
--log-file
Set the file name to log debug and error output. This is disabled by default. The output is in verboseformat. If the log file exists, the results are appended to the existing file content.
-q, --quiet
Suppress all output, except warnings and errors.
-h, --help
Display CLI syntax help.
--debug
Display traceback on errors.
kollacli completekollacli complete [ --name function_name ] [ --shell bash | none ]
Print a Bash completion function.
--name
The name of the function to generate. The default function name is kollacli.
--shell
The shell type to use for the script. Use none for data only. The default is bash.
kollacli deploykollacli deploy [ --serial ] [ --services service_list ][ --groups group_list | --hosts host_list ]
Deploy services.
--serial
Deploy services serially (one host at a time).
--services
A comma-separated list of services.
--groups
A comma-separated list of groups.
--hosts
A comma-separated list of hosts.

kollacli dump
79
kollacli dumpkollacli dump
Create a tar file of the configuration files and logs for debugging.
kollacli group addkollacli group add group_name
Add a group.
group_name
The name of the group.
kollacli group addhostkollacli group addhost group_name host
Add a host to a group.
group_name
The name of the group.
host
The fully qualified domain name or IP address of the host.
kollacli group listhostskollacli group listhosts [ { -f | --format } csv | html | json | table | value | yaml ][ { -c | --column } column_name ] [ --max-width max_width ][ --quote all | minimal | none | nonnumeric ]
List all groups and the hosts in each group.
kollacli group listserviceskollacli group listservices [ { -f | --format } csv | html | json | table | value | yaml ][ { -c | --column } column_name ] [ --max-width max_width ][ --quote all | minimal | none | nonnumeric ]
List all groups and the services in each group.
kollacli group removekollacli group remove group_name
Remove a group.
group_name
The name of the group.

kollacli group removehost
80
kollacli group removehostkollacli group removehost group_name host
Remove a host from a group.
group_name
The name of the group.
host
The fully qualified domain name or IP address of the host.
kollacli helpkollacli help [ command ]
Display help on using CLI commands.
command
Help on a specific kollacli command.
kollacli host addkollacli host add host
Add a host to a deployment.
host
The fully qualified domain name or IP address of the host.
kollacli host checkkollacli host check { host | all } [ --predeploy ]
Check host configuration.
host | all
The fully qualified domain name or IP address of the host, or all for all hosts.
--predeploy
Perform predeployment check. Only use this option if no services are deployed to the host.
kollacli host destroykollacli host destroy { host | all } [ --stop ] [ --includedata ]
Remove services from host.
host | all
The fully qualified domain name or IP address of the host, or all for all hosts.

kollacli host list
81
--stop
Perform a graceful shutdown (docker stop) of the containers before removing them.
--includedata
Remove the OpenStack data.
kollacli host listkollacli host list [ host ][ { -f | --format } csv | html | json | table | value | yaml ][ { -c | --column } column_name ] [ --max-width max_width ][ --quote all | minimal | none | nonnumeric ]
List hosts and the groups they belong to.
host
The fully qualified domain name or IP address of the host. If no host is provided, all hosts are listed.
kollacli host removekollacli host remove [ host | all ]
Remove hosts from a deployment.
host | all
The fully qualified domain name or IP address of the host, or all for all hosts.
kollacli host setupkollacli host setup { host | { -f | --file } file_name }
Set up a host.
host
The fully qualified domain name or IP address of the host.
-f --file
Absolute path of a YAML format file that contains the hosts to set up and the credentials to use.
kollacli password clearkollacli password clear password_name
Remove a password name and its value.
password_name
The name of the password.
kollacli password listkollacli password list

kollacli password set
82
List all password names.
kollacli password setkollacli password set password_name
Set a password value.
password_name
The name of the password.
kollacli property clearkollacli property clear [ --groups group_list | --hosts host_list ] property_name
Clear a property.
property_name
The name of the property.
--groups
A comma-separated list of groups.
--hosts
A comma-separated list of hosts.
kollacli property listkollacli property list [ { -f | --format } csv | html | json | table | value | yaml ][ { -c | --column } column_name ] [ --max-width max_width ][ --quote all | minimal | none | nonnumeric ][ --all ] [ --long ][ --groups group_list | --hosts host_list ]
List properties and their associated values.
--all
List all properties and their values, regardless of their length.
--long
List properties, their current values, and their default values, if overridden by a global property.
--groups
A comma-separated list of groups.
--hosts
A comma-separated list of hosts.
kollacli property setSet a property.

kollacli service addgroup
83
kollacli property set [ --groups group_list | --hosts host_list ] property_name value
property_name
The name of the property.
value
The value to set for the property.
--groups
A comma-separated list of groups.
--hosts
A comma-separated list of hosts.
kollacli service addgroupkollacli service addgroup service_name group_name
Add a service to a group.
service_name
The name of the service.
group_name
The name of the group.
kollacli service listkollacli service list [ { -f | --format } csv | html | json | table | value | yaml ][ { -c | --column } column_name ] [ --max-width max_width ][ --quote all | minimal | none | nonnumeric ]
List all services and their associated subservices.
kollacli service listgroupskollacli service listgroups [ { -f | --format } csv | html | json | table | value | yaml ][ { -c | --column } column_name ] [ --max-width max_width ][ --quote all | minimal | none | nonnumeric ]
List all services and the groups they belong to.
kollacli service removegroupkollacli service removegroup service_name group_name
Remove a service from a group.
service_name
The name of the service.

kollacli upgrade
84
group_name
The name of the group.
kollacli upgradekollacli upgrade
Upgrade a deployment.