oracle hospitality inventory management user manual ... · oracle® hospitality inventory...
TRANSCRIPT

Oracle® Hospitality Inventory Management
User Manual Release 8.5 E66666-01
August 2016
Copyright © 2001, 2016, Oracle and/or its affiliates. All rights reserved.
This software and related documentation are provided under a license agreement containing restrictions on use and disclosure and are protected by intellectual property laws. Except as expressly permitted in your license agreement or allowed by law, you may not use, copy, reproduce, translate, broadcast, modify, license, transmit, distribute, exhibit, perform, publish, or display any part, in any form, or by any means. Reverse engineering, disassembly, or decompilation of this software, unless required by law for interoperability, is prohibited.
The information contained herein is subject to change without notice and is not warranted to be error-free. If you find any errors, please report them to us in writing.
If this software or related documentation is delivered to the U.S. Government or anyone licensing it on behalf of the U.S. Government, then the following notice is applicable:
U.S. GOVERNMENT END USERS: Oracle programs, including any operating system, integrated software, any programs installed on the hardware, and/or documentation, delivered to U.S. Government end users are "commercial computer software" pursuant to the applicable Federal Acquisition Regulation and agency-specific supplemental regulations. As such, use, duplication, disclosure, modification, and adaptation of the programs, including any operating system, integrated software, any programs installed on the hardware, and/or documentation, shall be subject to license terms and license restrictions applicable to the programs. No other rights are granted to the U.S. Government.
This software or hardware is developed for general use in a variety of information management applications. It is not developed or intended for use in any inherently dangerous applications, including applications that may create a risk of personal injury. If you use this software or hardware in dangerous applications, then you shall be responsible to take all appropriate fail-safe, backup, redundancy, and other measures to ensure its safe use. Oracle Corporation and its affiliates disclaim any liability for any damages caused by use of this software or hardware in dangerous applications.
Oracle and Java are registered trademarks of Oracle and/or its affiliates. Other names may be trademarks of their respective owners.
Intel and Intel Xeon are trademarks or registered trademarks of Intel Corporation. All SPARC trademarks are used under license and are trademarks or registered trademarks of SPARC International, Inc. AMD, Opteron, the AMD logo, and the AMD Opteron logo are trademarks or registered trademarks of Advanced Micro Devices. UNIX is a registered trademark of The Open Group.
This software or hardware and documentation may provide access to or information about content, products, and services from third parties. Oracle Corporation and its affiliates are not responsible for and expressly disclaim all warranties of any kind with respect to third-party content, products, and services unless otherwise set forth in an applicable agreement between you and Oracle. Oracle Corporation and its affiliates will not be responsible for any loss, costs, or damages incurred due to your access to or use of third-party content, products, or services, except as set forth in an applicable agreement between you and Oracle.
3
Contents Preface ................................................................................................................................. 6
Audience .................................................................................................................................... 6 Documentation ........................................................................................................................... 6 Revision History ........................................................................................................................ 6
1 Cost Centers ................................................................................................................... 7 Creating and Configuring a Cost Center .................................................................................... 7 Understanding Master Cost Centers .......................................................................................... 8 Setting a Master Cost Center ..................................................................................................... 9 Assigning Cost Centers to a Master Cost Center ....................................................................... 9 Copying Menu Item Links from a Master Cost Center to Assigned Cost Centers .................... 9 Deleting a Master Cost Center ................................................................................................... 9
2 Vendor Management .................................................................................................... 10 Understanding Vendor Price Variances ................................................................................... 10 Rejecting Price Variances ........................................................................................................ 10 Defining Vendor Account Formats .......................................................................................... 10
3 Recipes ......................................................................................................................... 11 Understanding Recipe Quantities ............................................................................................. 11 Deleting Recipe Ingredients ..................................................................................................... 11
4 Nutrient Management ................................................................................................... 12 Understanding Nutrient Catalogs ............................................................................................. 12 Understanding Nutrient Catalog Licensing .............................................................................. 12 Importing a Standard Catalog .................................................................................................. 12 Importing a Custom Catalog .................................................................................................... 12
5 Ordering ....................................................................................................................... 13 Understanding the Delivery Date ............................................................................................. 13 Configuring Orders to Accept Delivery Dates ......................................................................... 13 Defining Delivery Dates for Different Vendors Within an Order ............................................ 13 Understanding the Central Ordering Module ........................................................................... 13 Viewing B2B Orders ............................................................................................................... 13
6 Inventory Management ................................................................................................. 14 Understanding Inventory Counts ............................................................................................. 14 Understanding Manual Inventory Date Selection .................................................................... 14 Enabling Manual Inventory Date Selection for an Organization ............................................. 14 Adding Items and Recipes using the Item Groups Detail or Storage Location Detail ............. 14 Understanding Menu Item Linking .......................................................................................... 15 Understanding Menu Item Linking with Negative Quantities ................................................. 15 Linking a menu item with a negative quantity ......................................................................... 16
7 Inventory Transfer ....................................................................................................... 17 Understanding Cost Center Areas ............................................................................................ 17 Configuring Cost Centers to Transfer Inventory...................................................................... 17
4
Configuring Cost Centers to Request Inventory ...................................................................... 17 Creating a Transfer From Request ........................................................................................... 17 Understanding Transfer From Using List ................................................................................ 18 Creating a Transfer From Using List ....................................................................................... 18
8 Inventory Analytics ...................................................................................................... 19 Understanding the Forecast Out-of-Stock Module .................................................................. 19 Configuring the Calculate Average Usage Job ........................................................................ 19 Viewing an Inventory Forecast ................................................................................................ 19
9 Menus ........................................................................................................................... 21 Understanding Menu Groups ................................................................................................... 21 Enabling Menu Groups for an Organization ............................................................................ 21 Creating a Menu Group ........................................................................................................... 21 Understanding Event Menu Planning ...................................................................................... 21
Configuring the Event Menu Plan Overview and Details Pages ...................................... 21 Enabling Event Menu Planning for an Organization ........................................................ 22 Enabling Menu Planning by List ...................................................................................... 22 Creating an Event Menu Plan ........................................................................................... 22 Creating an Event Menu Plan in List Management .......................................................... 22 Creating an Event Menu from an Existing List ................................................................ 23 Adding Menu Items to an Event Menu Plan ..................................................................... 23 Defining the Planned Quantity for Menu Items in an Event Menu Plan .......................... 23 Changing the Menu Level for Menu Items in an Event Menu Plan ................................. 23 Deleting Menu Items from an Event Menu Plan .............................................................. 23 Understanding Event Menu Item Classifications .............................................................. 24 Understanding Event Menu Item Popularity .................................................................... 24 Understanding Event Menu Item Contribution ................................................................. 24 Viewing and Modifying Suspended Event Menu Plans ................................................... 24 Printing Receipts for Linked Recipes and Items in an Event Menu ................................. 24
10 Jobs .............................................................................................................................. 25 Understanding Jobs .................................................................................................................. 25 Calculating Average Usage ...................................................................................................... 25 Load Balancing ........................................................................................................................ 25 Configuring Servers for Load Balancing ................................................................................. 26 Monitoring Automation Service Instances and Jobs ................................................................ 27 Managing Jobs in a Load-Balanced Environment ................................................................... 28 Configuring the Automation Service ....................................................................................... 29 Purging Database Data ............................................................................................................. 29 Storing Job Logs Locally ......................................................................................................... 30
11 Visibility Criteria .......................................................................................................... 30 Understanding Visibility Criteria ............................................................................................. 30 Configuring Item List Visibility .............................................................................................. 30
12 Mobile Solutions ........................................................................................................... 31 Understanding Mobile Solutions 2010 .................................................................................... 31
5
Configuring Mobile Solutions to Interface with a Specific Organization ................................ 31
13 User Management ......................................................................................................... 32 Filtering User Access by Cost Center ...................................................................................... 32 Configuring User Access to Cost Centers without using the C/S Filter ................................... 32 Configuring User Access to Cost Center Management ........................................................... 32 Configuring User Access to Cost Center Areas for Transfers ................................................. 32 Configuring User Access to the Central Ordering Module ...................................................... 32 Configuring User Access to the Forecast Out of Stock Module .............................................. 33 Configuring User Access to the Transfer From List and Transfer To List Modules ............... 33

Preface 6
Preface This guide describes how to use Inventory Management (myinventory) features and functionality. The content in this guide reflect the content the articles originally published on the MICROS Members or Wiki pages. It has the MICROS branding associated with the product for that release.
Audience This document is intended for administrators and end users of the Enterprise Back Office Inventory Management (myinventory) module.
Documentation Oracle Hospitality product documentation is available on the Oracle Help Center at http://docs.oracle.com
Revision History Date Description of Change
September 2015 • Initial publication.
August 2016 • Updated to conform to 8.5 version numbering.
7 Cost Centers
1 Cost Centers Creating and Configuring a Cost Center
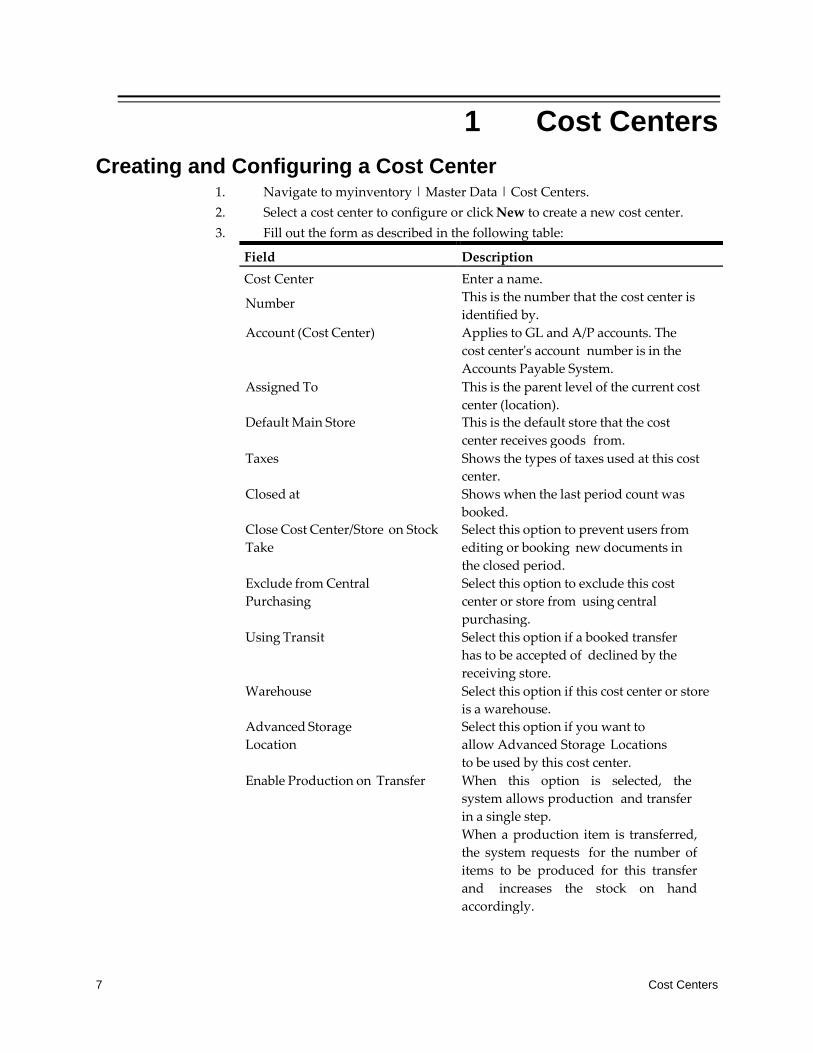
1. Navigate to myinventory | Master Data | Cost Centers. 2. Select a cost center to configure or click New to create a new cost center. 3. Fill out the form as described in the following table:
Field Description Cost Center Enter a name.
Number This is the number that the cost center is identified by.
Account (Cost Center) Applies to GL and A/P accounts. The cost center's account number is in the Accounts Payable System.
Assigned To This is the parent level of the current cost center (location).
Default Main Store This is the default store that the cost center receives goods from.
Taxes Shows the types of taxes used at this cost center.
Closed at Shows when the last period count was booked.
Close Cost Center/Store on Stock Take
Select this option to prevent users from editing or booking new documents in the closed period.
Exclude from Central Purchasing
Select this option to exclude this cost center or store from using central purchasing.
Using Transit Select this option if a booked transfer has to be accepted of declined by the receiving store.
Warehouse Select this option if this cost center or store is a warehouse.
Advanced Storage Location
Select this option if you want to allow Advanced Storage Locations to be used by this cost center.
Enable Production on Transfer When this option is selected, the system allows production and transfer in a single step. When a production item is transferred, the system requests for the number of items to be produced for this transfer and increases the stock on hand accordingly.
Cost Centers 8
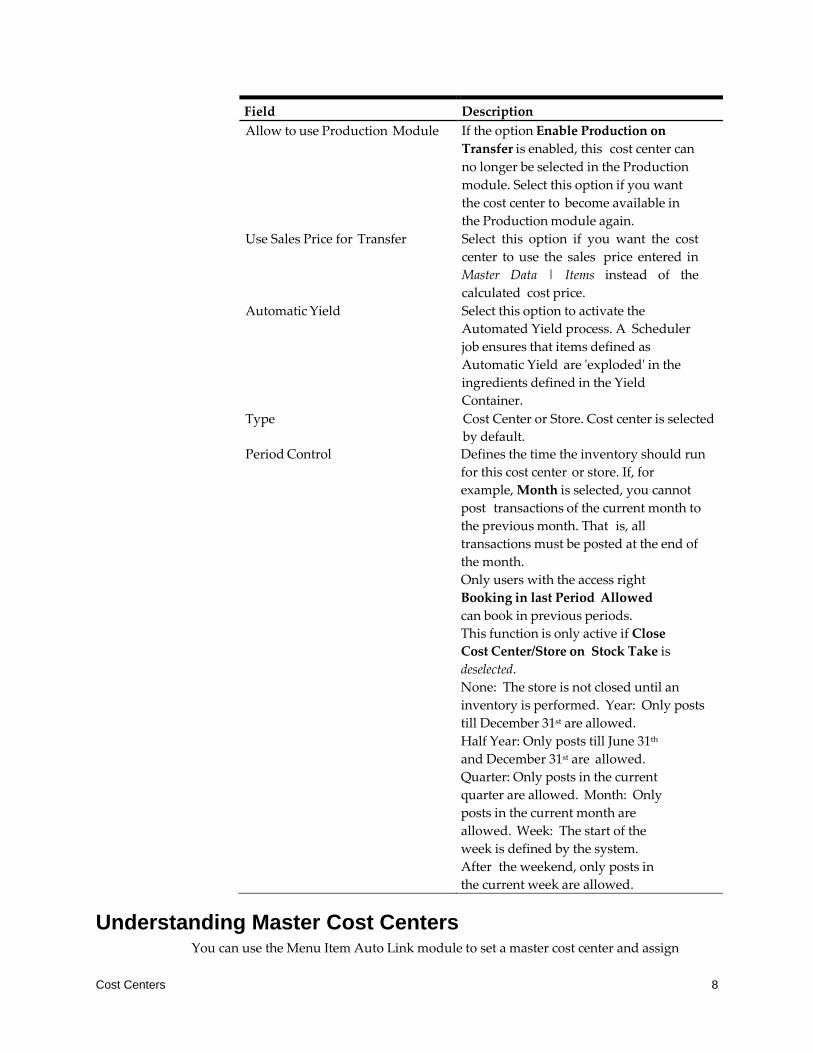
Field Description Allow to use Production Module If the option Enable Production on
Transfer is enabled, this cost center can no longer be selected in the Production module. Select this option if you want the cost center to become available in the Production module again.
Use Sales Price for Transfer Select this option if you want the cost center to use the sales price entered in Master Data | Items instead of the calculated cost price.
Automatic Yield Select this option to activate the Automated Yield process. A Scheduler job ensures that items defined as Automatic Yield are 'exploded' in the ingredients defined in the Yield Container.
Type Cost Center or Store. Cost center is selected by default.
Period Control Defines the time the inventory should run for this cost center or store. If, for example, Month is selected, you cannot post transactions of the current month to the previous month. That is, all transactions must be posted at the end of the month. Only users with the access right Booking in last Period Allowed can book in previous periods. This function is only active if Close Cost Center/Store on Stock Take is deselected. None: The store is not closed until an inventory is performed. Year: Only posts till December 31st are allowed. Half Year: Only posts till June 31th
and December 31st are allowed. Quarter: Only posts in the current quarter are allowed. Month: Only posts in the current month are allowed. Week: The start of the week is defined by the system. After the weekend, only posts in the current week are allowed.
Understanding Master Cost Centers You can use the Menu Item Auto Link module to set a master cost center and assign
9 Cost Centers
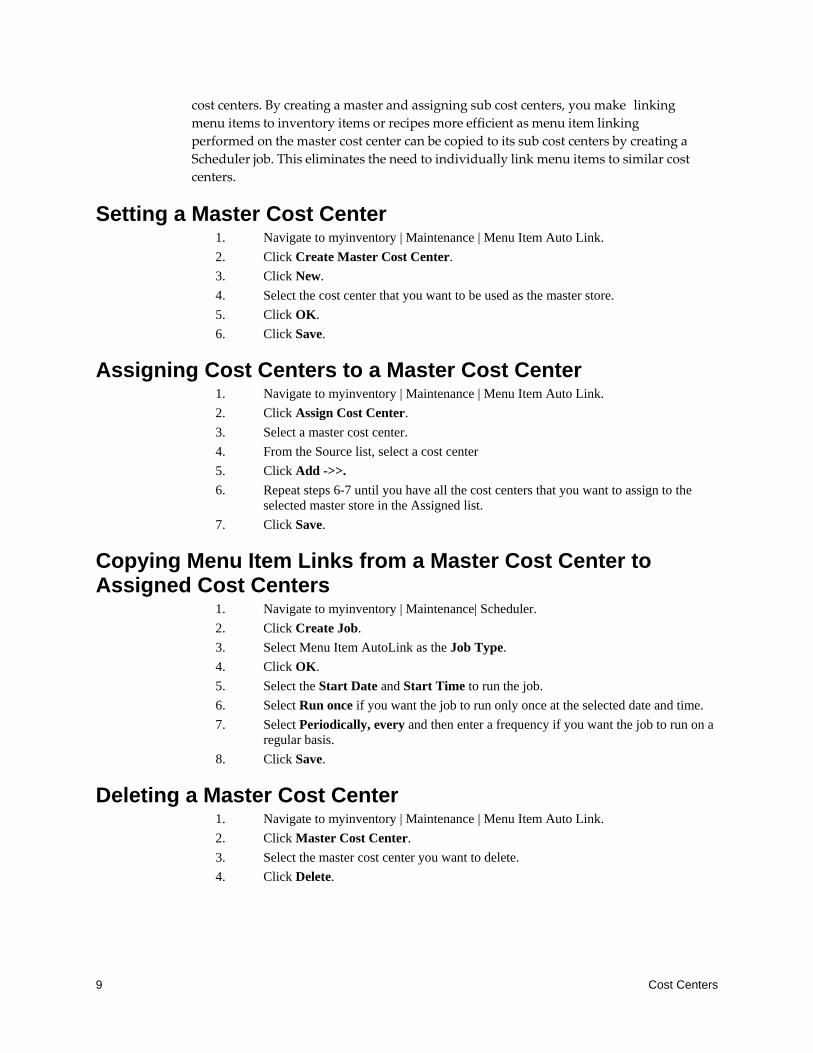
cost centers. By creating a master and assigning sub cost centers, you make linking menu items to inventory items or recipes more efficient as menu item linking performed on the master cost center can be copied to its sub cost centers by creating a Scheduler job. This eliminates the need to individually link menu items to similar cost centers.
Setting a Master Cost Center 1. Navigate to myinventory | Maintenance | Menu Item Auto Link. 2. Click Create Master Cost Center. 3. Click New. 4. Select the cost center that you want to be used as the master store. 5. Click OK. 6. Click Save.
Assigning Cost Centers to a Master Cost Center 1. Navigate to myinventory | Maintenance | Menu Item Auto Link. 2. Click Assign Cost Center. 3. Select a master cost center. 4. From the Source list, select a cost center 5. Click Add ->>. 6. Repeat steps 6-7 until you have all the cost centers that you want to assign to the
selected master store in the Assigned list. 7. Click Save.
Copying Menu Item Links from a Master Cost Center to Assigned Cost Centers
1. Navigate to myinventory | Maintenance| Scheduler. 2. Click Create Job. 3. Select Menu Item AutoLink as the Job Type. 4. Click OK. 5. Select the Start Date and Start Time to run the job. 6. Select Run once if you want the job to run only once at the selected date and time. 7. Select Periodically, every and then enter a frequency if you want the job to run on a
regular basis. 8. Click Save.
Deleting a Master Cost Center 1. Navigate to myinventory | Maintenance | Menu Item Auto Link. 2. Click Master Cost Center. 3. Select the master cost center you want to delete. 4. Click Delete.
Vendor Management 10
2 Vendor Management Understanding Vendor Price Variances
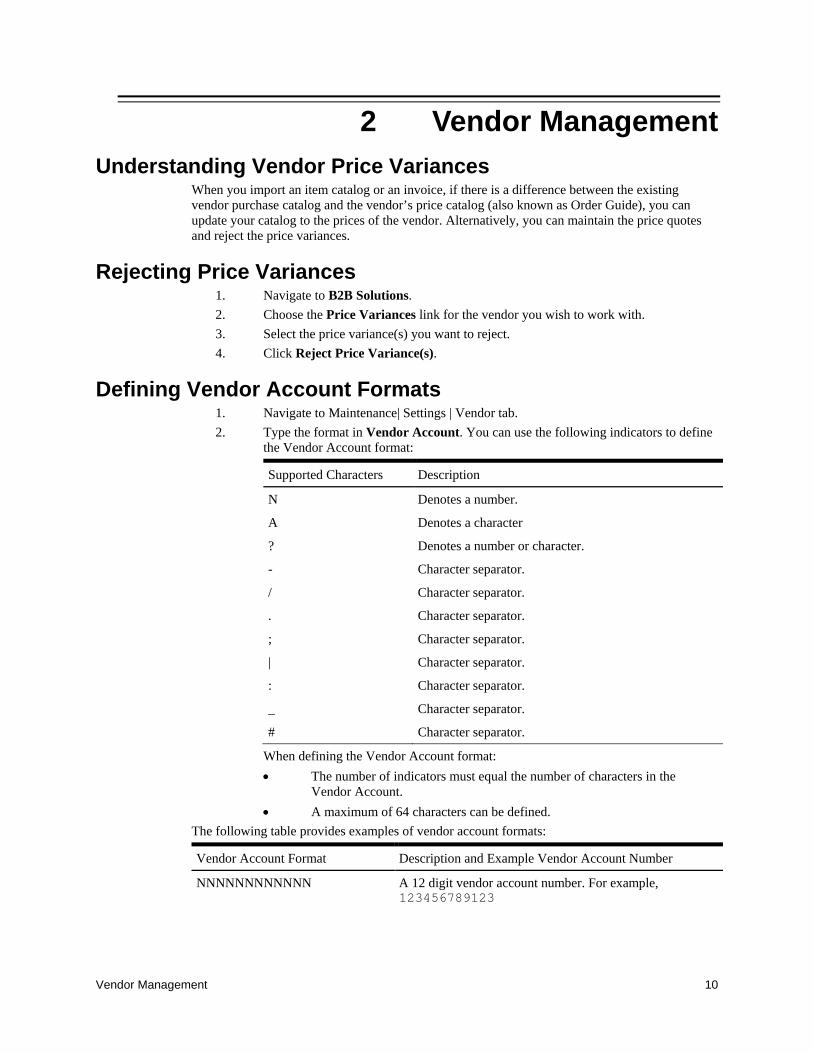
When you import an item catalog or an invoice, if there is a difference between the existing vendor purchase catalog and the vendor’s price catalog (also known as Order Guide), you can update your catalog to the prices of the vendor. Alternatively, you can maintain the price quotes and reject the price variances.
Rejecting Price Variances 1. Navigate to B2B Solutions. 2. Choose the Price Variances link for the vendor you wish to work with. 3. Select the price variance(s) you want to reject. 4. Click Reject Price Variance(s).
Defining Vendor Account Formats 1. Navigate to Maintenance| Settings | Vendor tab. 2. Type the format in Vendor Account. You can use the following indicators to define
the Vendor Account format:
Supported Characters Description
N Denotes a number.
A Denotes a character
? Denotes a number or character.
- Character separator.
/ Character separator.
. Character separator.
; Character separator.
| Character separator.
: Character separator.
_ Character separator.
# Character separator.
When defining the Vendor Account format: • The number of indicators must equal the number of characters in the
Vendor Account. • A maximum of 64 characters can be defined.
The following table provides examples of vendor account formats:
Vendor Account Format Description and Example Vendor Account Number
NNNNNNNNNNNN A 12 digit vendor account number. For example, 123456789123
11 Recipes
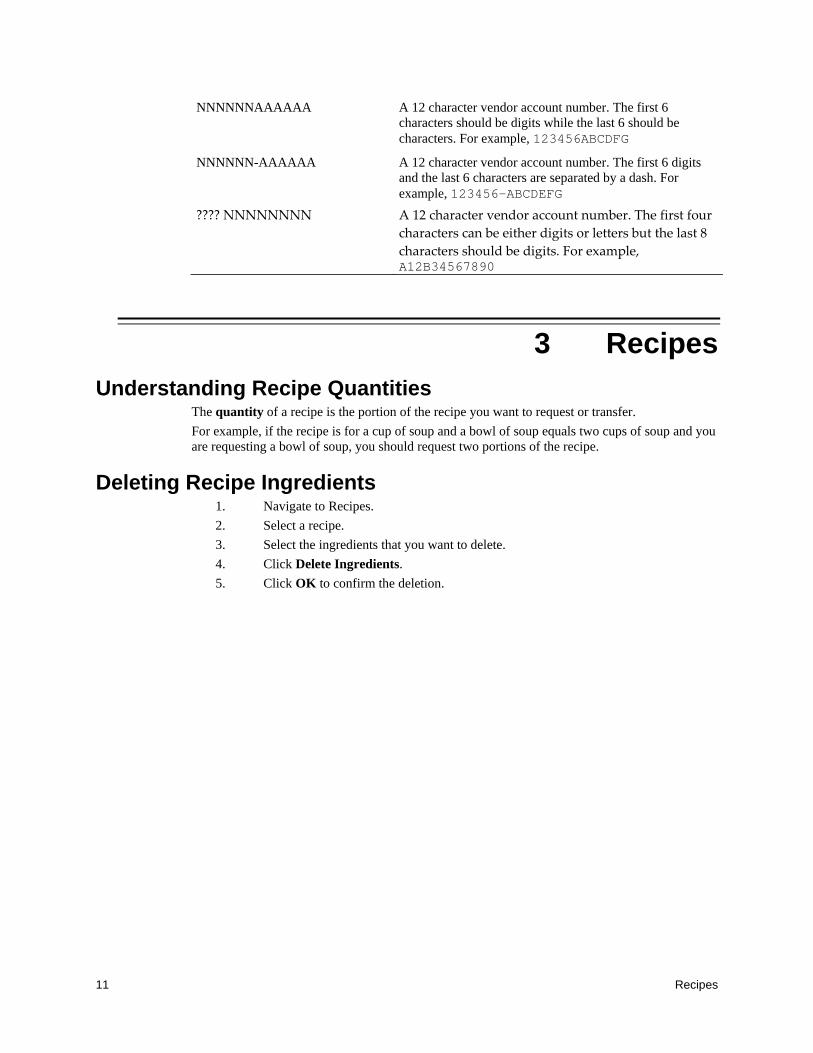
NNNNNNAAAAAA A 12 character vendor account number. The first 6 characters should be digits while the last 6 should be characters. For example, 123456ABCDFG
NNNNNN-AAAAAA A 12 character vendor account number. The first 6 digits and the last 6 characters are separated by a dash. For example, 123456-ABCDEFG
???? NNNNNNNN A 12 character vendor account number. The first four characters can be either digits or letters but the last 8 characters should be digits. For example, A12B34567890
3 Recipes Understanding Recipe Quantities
The quantity of a recipe is the portion of the recipe you want to request or transfer. For example, if the recipe is for a cup of soup and a bowl of soup equals two cups of soup and you are requesting a bowl of soup, you should request two portions of the recipe.
Deleting Recipe Ingredients 1. Navigate to Recipes. 2. Select a recipe. 3. Select the ingredients that you want to delete. 4. Click Delete Ingredients. 5. Click OK to confirm the deletion.
Nutrient Management 12
4 Nutrient Management Understanding Nutrient Catalogs
You can import two types of nutrient catalogs: • A Standard Catalog is one that has been created by an agency, such as the U.S.
Department of Agriculture (USDA). • A Custom Catalog is a nutrient catalog that has been created externally, for example
by an organization that contracted a third party to document the nutritional information for their menu offering.
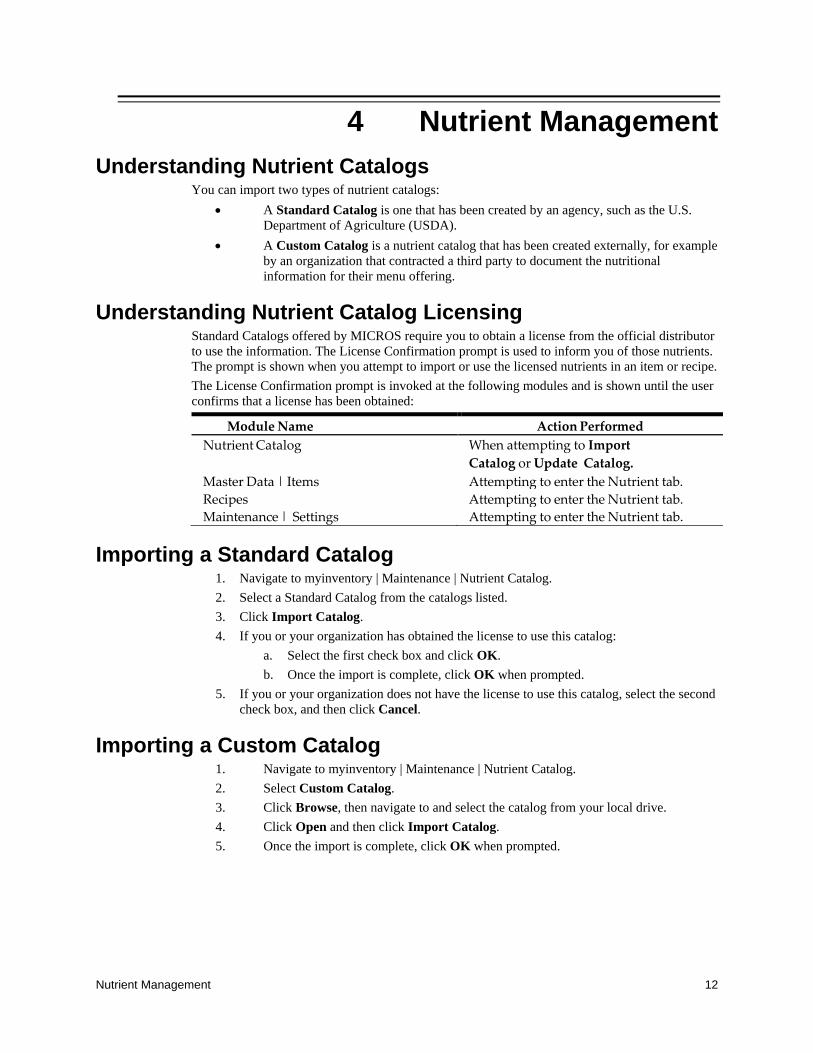
Understanding Nutrient Catalog Licensing Standard Catalogs offered by MICROS require you to obtain a license from the official distributor to use the information. The License Confirmation prompt is used to inform you of those nutrients. The prompt is shown when you attempt to import or use the licensed nutrients in an item or recipe. The License Confirmation prompt is invoked at the following modules and is shown until the user confirms that a license has been obtained:
Module Name Action Performed Nutrient Catalog When attempting to Import
Catalog or Update Catalog. Master Data | Items Attempting to enter the Nutrient tab. Recipes Attempting to enter the Nutrient tab. Maintenance | Settings Attempting to enter the Nutrient tab.
Importing a Standard Catalog 1. Navigate to myinventory | Maintenance | Nutrient Catalog. 2. Select a Standard Catalog from the catalogs listed. 3. Click Import Catalog. 4. If you or your organization has obtained the license to use this catalog:
a. Select the first check box and click OK. b. Once the import is complete, click OK when prompted.
5. If you or your organization does not have the license to use this catalog, select the second check box, and then click Cancel.
Importing a Custom Catalog 1. Navigate to myinventory | Maintenance | Nutrient Catalog. 2. Select Custom Catalog. 3. Click Browse, then navigate to and select the catalog from your local drive. 4. Click Open and then click Import Catalog. 5. Once the import is complete, click OK when prompted.
13 Ordering
5 Ordering Understanding the Delivery Date
The Delivery Date editor in the Ordering module is used to specify the date items are to be delivered. Only the current business date or any date in the future can be selected as the delivery date and you can define separate delivery dates for each different vendor in an order.
Configuring Orders to Accept Delivery Dates 1. Navigate to myinventory | Maintenance | Settings | Orders tab. 2. Select Use Line Item Delivery Date.
Defining Delivery Dates for Different Vendors Within an Order 1. Navigate to the Purchase Orders Detail page from any of the Ordering modules. 2. For each vendor:
a. Select the check box next to the items belonging to the same vendor that you want to set the delivery date.
b. Click Set Dates. c. Select a Delivery Date. d. Click OK.
Understanding the Central Ordering Module The Central Ordering Module shows all B2B Orders and their progress. This enables you to see:
• What stores have placed orders. • Which vendors have received the orders.
Viewing B2B Orders 1. Navigate to myinventory | Maintenance. 2. Click Central Ordering. 3. To filter the orders by delivery date:
a. Select the Order Date. b. Click Refresh.
4. To filter the orders by vendor: a. Enter a vendor’s name or click Vendor and select a vendor from the list. b. Click Refresh.
Inventory Management 14
6 Inventory Management Understanding Inventory Counts
You can create Inventory Counts through: • Count Cycle • List • Blank Inventory • Scheduling a job
Understanding Manual Inventory Date Selection The inventory date cannot be changed once an inventory count it created. If you need to change the inventory date, you have to delete the existing inventory, recreate the inventory count with the new date and reenter the data. Enforcing manual inventory date selection forces users to validate and select the correct date and reduces the chances of creating a count for an incorrect date. You can use the manual inventory date selection to make the Date field mandatory and leaves it unpopulated for you to select. You cannot create an inventory count until a date is selected; the Create button is grayed out and only becomes active when a date is selected. Manual inventory date selection is enforced in the following modules:
• Inventory by Count Cycle • Inventory by List • Blank Inventory
Manual selection follows the following rules: • You cannot select a backdate. • Depending on the Count Cycle template you have chosen:
o If you have selected End of Month, you cannot select a date in the middle of the month.
o If you have selected Daily/Weekly and have for example only selected Wednesday, you cannot select any Monday.
o If you have selected Financial Period, you cannot select a date outside of the selected financial period.
Enabling Manual Inventory Date Selection for an Organization
1. Navigate to myinventory |Maintenance | Settings | Inventory. 2. Select Do not Populate Date in Inventory Counts by Default.
Adding Items and Recipes using the Item Groups Detail or Storage Location Detail
1. Navigate to myinventory | Inventory | Suspended. 2. Select a document. 3. Click an Item Group to go to the Item Groups Detail page or click a Location to go
to the Storage Location Detail page. 4. If you want to add items the inventory:
15 Inventory Management
a. Click Add Item(s)/Unit(s). c. Place the cursor in the Item field and press Enter. d. Select the item you want to add and click OK. e. If you want to add additional units:
i. Place the cursor in the Additional Unit field and press Enter. ii. Select any additional units.
iii. Click OK. f. Select a Storage Location if you are using Advanced Storage Locations. g. Click OK to complete the entry for this item. a. Click Cancel to exit the Add Item(s)/Unit(s) dialog box. b. Click Refresh Count to show the items you added in the Inventory Count
Detail page. 5. If you want to add recipes to the inventory:
a. Click Add Recipe(s). b. Place the cursor in the Recipe field and press Enter. c. Select the recipe you want to add. d. Enter the QTY. e. Click OK to complete the entry for this recipe. f. Click Cancel to exit the Add Recipes dialog box. g. Click Refresh Count to show the ingredients of the recipes you added in
the Inventory Count Detail page. 6. If you to save the inventory count for future use as a list:
a. Click Save as List. b. Enter a name for the list. c. Click OK.
Understanding Menu Item Linking It is through linking menu items that myinventory accurately depletes the stock-on-hand of inventory items. You can link one menu item to multiple inventory items or recipes. That is, if an organization has a recipe that is sold multiple ways, you can link the menu item to different menu levels of that recipe. For example, a restaurant sells French fries in two different sizes: small and large. The restaurant has created a recipe for French fries, but the recipe is only applicable for a small size. A large fries is equal to two small fries. By linking the recipes and knowing the ratio, myinventory determines that when a large fries is sold, two portions of the small fries recipe must be depleted in order to account for the sale.
Understanding Menu Item Linking with Negative Quantities Instead of creating separate recipes for items with and without condiments, menu item linking allows you to use the same recipe created for adding the condiment but with a negative quantity. For example, imagine you have a menu item for cheeseburger that is linked to the cheeseburger recipe. The cheeseburger recipe contains:
• 1 ea. patty • 1 ea. bun • 1 ea. slice cheese • 1 oz. ketchup
Inventory Management 16
• 1 oz. mustard • 1 oz. onions
A server rings in: • Cheeseburger NO Ketchup.
Since the recipe for cheeseburger depletes 1 oz. of ketchup, you need to add it back so that ketchup is not depleted. Therefore, you would link the No Ketchup modifier to the ketchup 1 oz. recipe with a negative 1 quantity.
Linking a menu item with a negative quantity 1. Navigate to Menu Item Linking. 2. Search for the menu item that you want to link (for example, No Ketchup). 3. From the search results, select the menu item by clicking the menu item hyperlink. 4. Click Link Recipe. 5. Select the recipe (for example, ketchup). 6. Click OK. 7. Enter -1 for the QTY. 8. Click OK.
17 Inventory Transfer
7 Inventory Transfer Understanding Cost Center Areas
The Cost Center Areas module is where you determine which cost centers can transfer and request items from other cost centers. For example, cost center A can transfer items to cost center B. But cost center B can only transfer and request items from cost center C.
Configuring Cost Centers to Transfer Inventory 1. Navigate to myinventory | Maintenance | Cost Center Areas. 2. Select a cost center. 3. Select Transfer To. 4. Click Add Cost Centers. 5. For each recipient cost center:
a. Select a cost center. b. Select With Sub Cost Center if you want all cost centers below the selected
cost center to have the ability to receive transfers from the default cost center. c. Select Full Link if you want the selected cost center to have the ability to
receive items from the Transfer To cost center. For example, you want cost center A to have the ability to transfer items to cost center B and give cost center B the ability to receive items from cost center A.
d. Click Add.
Configuring Cost Centers to Request Inventory 2. Navigate to myinventory | Maintenance | Cost Center Areas. 3. Select a cost center. 4. Select Transfer From. 5. Click Add Cost Centers. 6. For each cost center that can be queried with a request:
a. Select a cost center. b. Select With Sub Cost Center if you want all cost centers below the
selected cost center to have the ability to transfer items to the default cost center.
c. Select Full Link if you want the selected cost center to have the ability to transfer items to the Transfer From cost center.
d. For example, you want cost center A to have the ability to receive items from cost center B and give cost center B the ability to transfer items to cost center A.
e. Click Add.
Creating a Transfer From Request 1. Navigate to Transfer From. 2. Enter the Request From Cost Center. 3. Select the date.
Inventory Transfer 18
4. Enter any pertinent information in Reference. 5. Click Create. 6. Click the transfer document you just created to enter the Transfers Detail page. 7. If you want to add menu items to the transfer document:
a. Click Add Item(s). b. Search for menu items using any of the filters. c. Select one or more menu items from the search result and click OK. d. Continue to add items or click Cancel. e. Enter the quantity you want to transfer of each item.
8. If you want to add recipes to the transfer document: a. Click Add Recipe. b. Enter the recipe name. c. If you want to view a list of all recipes in myinventory:
i. Place the cursor in the Recipe field and press Enter. ii. Choose the recipe you want to transfer and click OK.
b. Enter the quantity of portions of the recipe you want to transfer. c. Enter any additional information you want to be included with this recipe to
appear in the transfer document in the Info field. d. Select Round to Units if you want the recipe to be rounded to its nearest
base unit measurement when it is being delivered. e. Click OK. f. Continue to add recipes or click Cancel.
9. If you want to save the newly created list, click Save. 10. If you want to send the list to the relevant location, click Book.
Understanding Transfer From Using List You can use the Transfer From Using List module to create a transfer request from a cost center using a previously created Transfer From list or an already existing list of products.
Creating a Transfer From Using List 1. Navigate to myinventory | Transfers |Transfer From Using List. 2. Select an existing document from the list. 3. Click To Cost Center. 4. Select a new cost center from the list and click OK. 5. Click From Cost Center 6. Select a new cost center from the list and click OK. 7. Select the Date. 8. Click Create. 9. From the Transfers From Detail page, modify the existing items or add new items
and recipes. 11. If you want to save the newly created list, click Save. 12. If you want to send the list to the relevant location, click Book.
19 Inventory Analytics
8 Inventory Analytics Understanding the Forecast Out-of-Stock Module
The Forecast Out-of-Stock module predicts when inventory items run out based on the Calculation Method configured for an item or item group and the past sales of those items. The module forecasts item usage for the current business date and the next 13 days. If an item is out of stock, the count of that item shows as zero while those below zero are highlighted in red. To predict future inventory usage, a Calculate Average Usage job must be created in the Scheduler.
Configuring the Calculate Average Usage Job 1. Navigate to myinventory| Maintenance |Scheduler. 2. Click Create Job. 3. Select Calculate Average Usage as the Job Type and click OK. 4. Select the Start Date and Start Time to run the job. 5. Select Run once if you want the job to run only once at the selected date and time. 6. Select Periodically, every and define the frequency if you want the job to run on a
regular basis. 7. Select Send E-Mail Notification if you want an e-mail notification to be sent each
time this job executes. 8. Select Only if Job Fails if you want notifications to be sent only if the job fails 9. Select Job Owner if you want the notifications sent only to you: 10. Select Owner’s Role if you want the notifications sent to all users belonging to your
role. 11. Select Owner’s Cost Center if you want the notifications sent to all users in your
cost center.
Viewing an Inventory Forecast 1. Navigate to myinventory | Forecast Out-of-Stock. 2. Select a cost center. 3. If you want to see the forecast for an Item Group:
a. Click Item Group. b. Select an item group from the list. c. Click OK.
4. If you want to see the forecast for a particular item: a. Click Item. b. Select and item from the list. c. Click OK.
5. For the Delivery Date, select the date for which you want to see the forecast. 6. Select the necessary search filters:
a. Select Out-of-Stock if you only want to see out-of-stock items. b. Select Ignore Out of Stock if you do not want to see out-of-stock items. c. Select Less than Minimum if you only want to see items where the stock
on hand is less than the minimum amount.

Inventory Analytics 20
d. Select Show also Inactive if you want your search result to also include inactive items.
e. Select Display Store Unit if you want the item store unit to show. f. Select Display Base Unit if you want the item base units to show.
7. Click Refresh. 8. Click Export to Excel if you want to export the search results.
21 Menus
9 Menus Understanding Menu Groups
Menu Groups are essentially courses in a menu (for example, Starters, Main Course, Dessert, etc.). You can define up to 20 courses per menu group.
Enabling Menu Groups for an Organization 1. Navigate to myinventory | Maintenance | User Management. 2. Select a user from the list. 3. Click Manage User Right. 4. Under Module Group, click Master Data. 5. Under Menu Groups in Master Data/Function, select:
o Menu Groups o Save Menu Groups
Creating a Menu Group 1. Navigate to myinventory | Master Data | Menu Groups. 2. Click New. 3. Enter a name for the Menu Group. 4. (Optional) Enter the Menu Group No. 5. Define the menu groups. For example, Starter, Soups, Main Course, etc.
Understanding Event Menu Planning The Event Menu Planning feature allows you to:
• Plan future menus for your cost centers. • Measure the planned, expected, and actual profitability of a menu. • Determine what inventory items your cost center should be ordering.
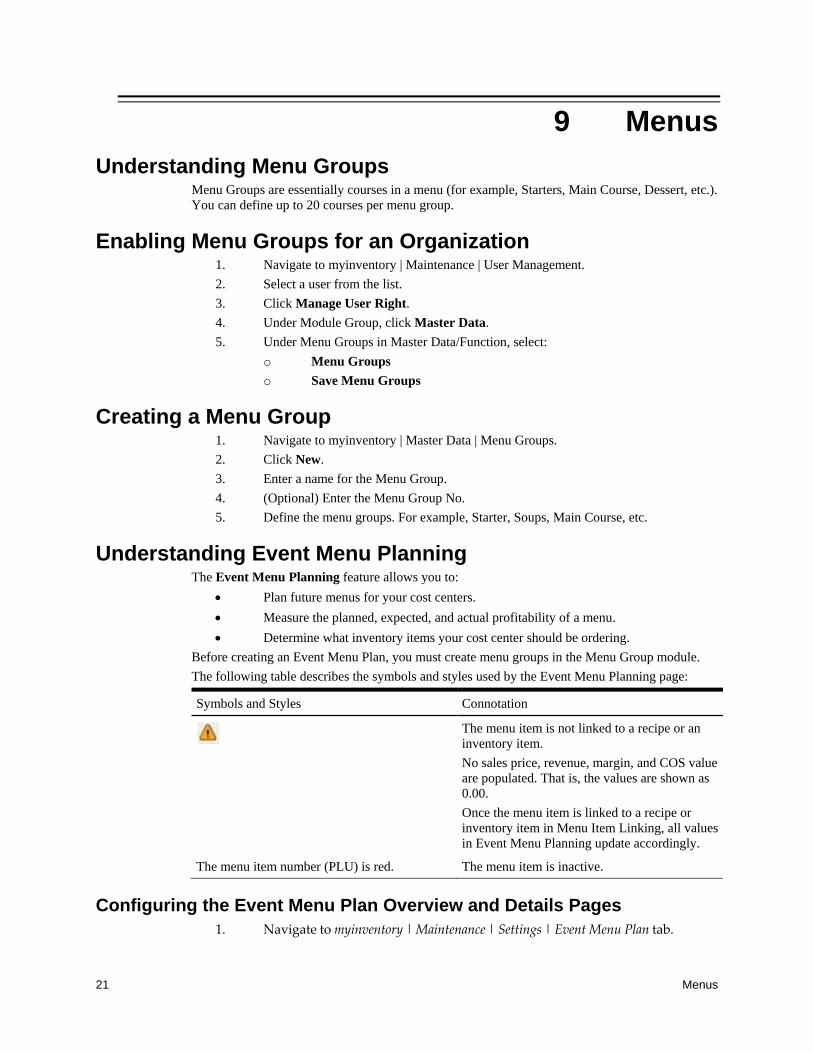
Before creating an Event Menu Plan, you must create menu groups in the Menu Group module. The following table describes the symbols and styles used by the Event Menu Planning page:
Symbols and Styles Connotation
The menu item is not linked to a recipe or an inventory item. No sales price, revenue, margin, and COS value are populated. That is, the values are shown as 0.00. Once the menu item is linked to a recipe or inventory item in Menu Item Linking, all values in Event Menu Planning update accordingly.
The menu item number (PLU) is red. The menu item is inactive.
Configuring the Event Menu Plan Overview and Details Pages 1. Navigate to myinventory | Maintenance | Settings | Event Menu Plan tab.
Menus 22
2. You can configure the: • Result Set Quantity to define the maximum number of records that can be
shown in the Event Menu Plan Overview page. You can configure the Event Menu Plan Overview page to show a maximum of 9999 records.
• Column Selection filter to select which menu item attributes show on the Event Menu Planning Details page. By default, the page only shows the POS, Course, Menu Item Name, and QTY columns.
• Sort Method to arrange the menu items: o Item Name: Sorts the menu items in alphabetical order. o Item Number: Sorts the menu items by their number. o Position: Sorts the menu items by their Point-of-Sale (POS)
position.
Enabling Event Menu Planning for an Organization 1. Navigate to myinventory | Maintenance | User Management. 2. Select a user from the list. 3. Click Manage User Right. 4. Under Module Group, click Production. 5. Under Menu Planning in Production/Function, select:
o Event Menu Planning o Save Event Menu Plan o Add/Delete Items to an Event Menu Plan Document
Enabling Menu Planning by List 1. Navigate to myinventory | Maintenance | User Management. 2. Select a user from the list. 3. Click Manage User Right. 4. Under Module Group, click System. 5. Under List Management in System/Function, select:
o Menu Plan List o Add Menu Items to Menu Plan created from List
Creating an Event Menu Plan 1. Navigate to myinventory | Event Menu Plan | Blank Event Menu Plan. 2. Select a Cost Center. 3. Select a Menu Group. 4. Enter the menu plan name. 5. In the From date editor, select the date this menu plan becomes active. 6. In the To date editor, select the date this menu plan becomes inactive. 7. Click Create.
Creating an Event Menu Plan in List Management 1. Navigate to myinventory | Maintenance | List Management. 2. Click Create List. 3. Enter the List Name, select Event Menu Plan List, and then click OK. 4. Enter the Cost Center.
23 Menus
5. (Optional) Enter a Reference. 6. Click OK. 7. Select Corporate List if you want to make this list available for all users. 8. Select Locked List if you want to lock this list.
Creating an Event Menu from an Existing List 1. Navigate to myinventory | Event Menu Planning | List. 2. Click Refresh. 3. Select an existing menu from the list. 4. Modify the event menu name, cost center, and menu active duration. 5. Click Create.
Adding Menu Items to an Event Menu Plan 1. In the Event Menu Planning Details page, click Add Menu Item(s). 2. Select a Menu Group. 3. Search for menu items using the family group, menu item number, menu item name,
recipe, or inventory item. 4. Click Refresh to show the search results. 5. Select one or more menu items and then click OK. 6. Click Load Sales to import the sales for the inserted menu items. 7. Click Yes to confirm and click Save. 8. Click Save as List if you want this menu to be saved for future use as a template or
list. 9. Click Suspend if you want to save the menu and return to the Overview window.
Defining the Planned Quantity for Menu Items in an Event Menu Plan 1. In the Event Menu Planning Details page, for each item enter the planned quantity in
the QTY column of the respective item. 2. Click Calculate to calculate the data and then click Save. 3. Click Save as List if you want this menu to be saved for future use as a template or
list. 4. Click Suspend if you want to save the menu and return to the Overview window.
Changing the Menu Level for Menu Items in an Event Menu Plan 1. In the Event Menu Planning Detail page, select one or more menu items. 2. Click Change Menu Level. 3. Select a new menu level from the list. 4. Click OK and then click Save. 5. Click Save as List if you want this menu to be saved for future use as a template or
list. 6. Click Suspend if you want to save the menu and return to the Overview window.
Deleting Menu Items from an Event Menu Plan 1. Navigate to myinventory | Menu Planning | Suspended. 2. Click Refresh. 3. Select a menu from the list.
24
4. In the Event Menu Planning Detail page, select one or more menu items. 5. Click Delete Menu Item(s) and then click Save. 6. Click Save as List if you want this menu to be saved for future use as a template or
list. 7. Click Suspend if you want to save the menu and return to the Overview window.
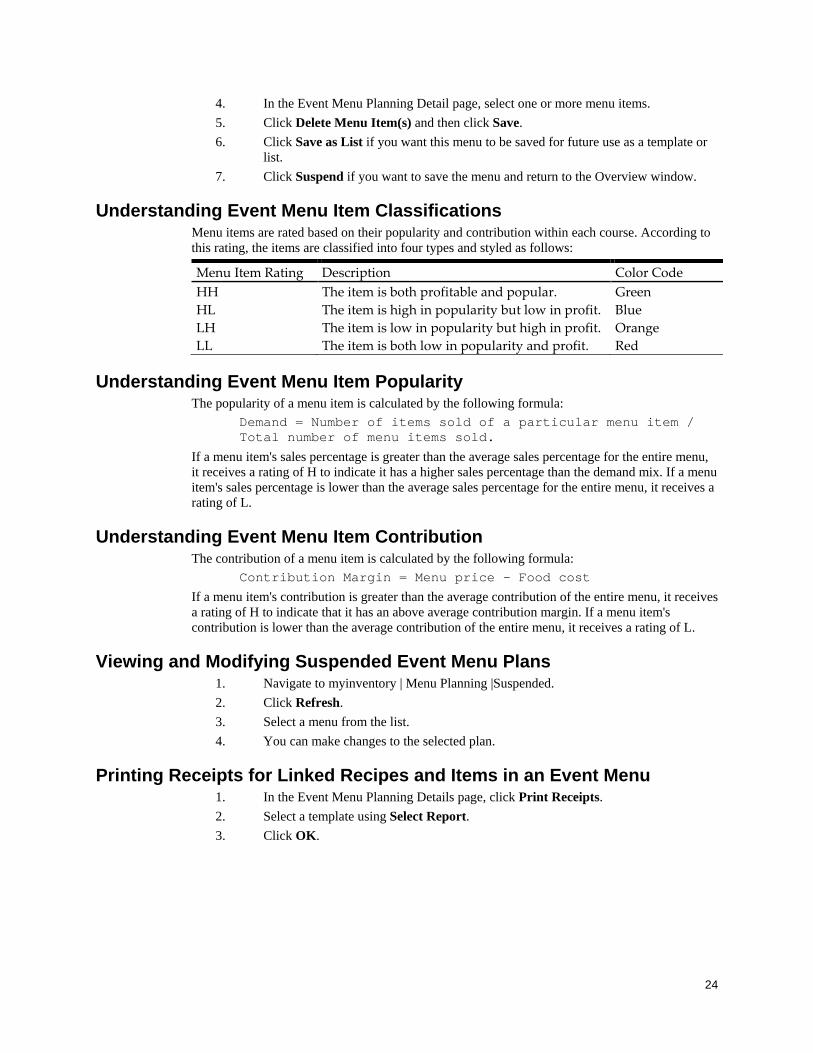
Understanding Event Menu Item Classifications Menu items are rated based on their popularity and contribution within each course. According to this rating, the items are classified into four types and styled as follows:
Menu Item Rating Description Color Code HH The item is both profitable and popular. Green HL The item is high in popularity but low in profit. Blue LH The item is low in popularity but high in profit. Orange LL The item is both low in popularity and profit. Red
Understanding Event Menu Item Popularity The popularity of a menu item is calculated by the following formula:
Demand = Number of items sold of a particular menu item / Total number of menu items sold.
If a menu item's sales percentage is greater than the average sales percentage for the entire menu, it receives a rating of H to indicate it has a higher sales percentage than the demand mix. If a menu item's sales percentage is lower than the average sales percentage for the entire menu, it receives a rating of L.
Understanding Event Menu Item Contribution The contribution of a menu item is calculated by the following formula:
Contribution Margin = Menu price - Food cost
If a menu item's contribution is greater than the average contribution of the entire menu, it receives a rating of H to indicate that it has an above average contribution margin. If a menu item's contribution is lower than the average contribution of the entire menu, it receives a rating of L.
Viewing and Modifying Suspended Event Menu Plans 1. Navigate to myinventory | Menu Planning |Suspended. 2. Click Refresh. 3. Select a menu from the list. 4. You can make changes to the selected plan.
Printing Receipts for Linked Recipes and Items in an Event Menu 1. In the Event Menu Planning Details page, click Print Receipts. 2. Select a template using Select Report. 3. Click OK.
25 Jobs
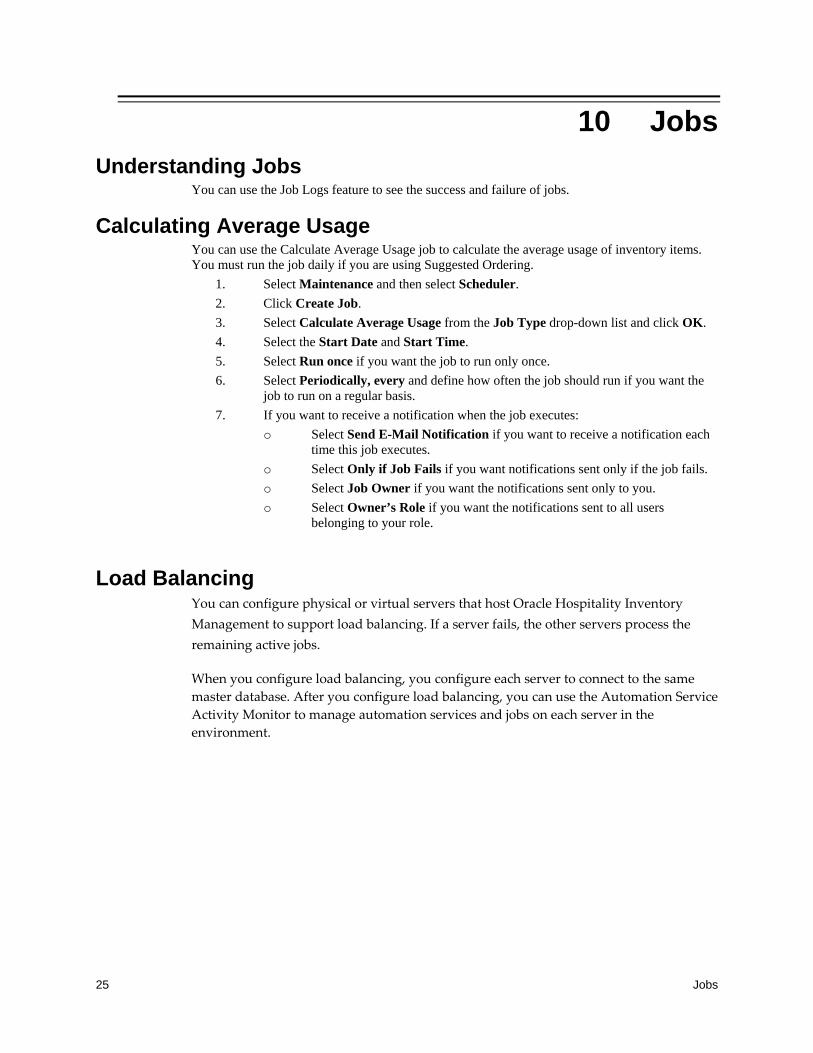
10 Jobs Understanding Jobs
You can use the Job Logs feature to see the success and failure of jobs.
Calculating Average Usage You can use the Calculate Average Usage job to calculate the average usage of inventory items. You must run the job daily if you are using Suggested Ordering.
1. Select Maintenance and then select Scheduler. 2. Click Create Job. 3. Select Calculate Average Usage from the Job Type drop-down list and click OK. 4. Select the Start Date and Start Time. 5. Select Run once if you want the job to run only once. 6. Select Periodically, every and define how often the job should run if you want the
job to run on a regular basis. 7. If you want to receive a notification when the job executes:
o Select Send E-Mail Notification if you want to receive a notification each time this job executes.
o Select Only if Job Fails if you want notifications sent only if the job fails. o Select Job Owner if you want the notifications sent only to you. o Select Owner’s Role if you want the notifications sent to all users
belonging to your role.
Load Balancing You can configure physical or virtual servers that host Oracle Hospitality Inventory Management to support load balancing. If a server fails, the other servers process the remaining active jobs.
When you configure load balancing, you configure each server to connect to the same master database. After you configure load balancing, you can use the Automation Service Activity Monitor to manage automation services and jobs on each server in the environment.
Jobs 26
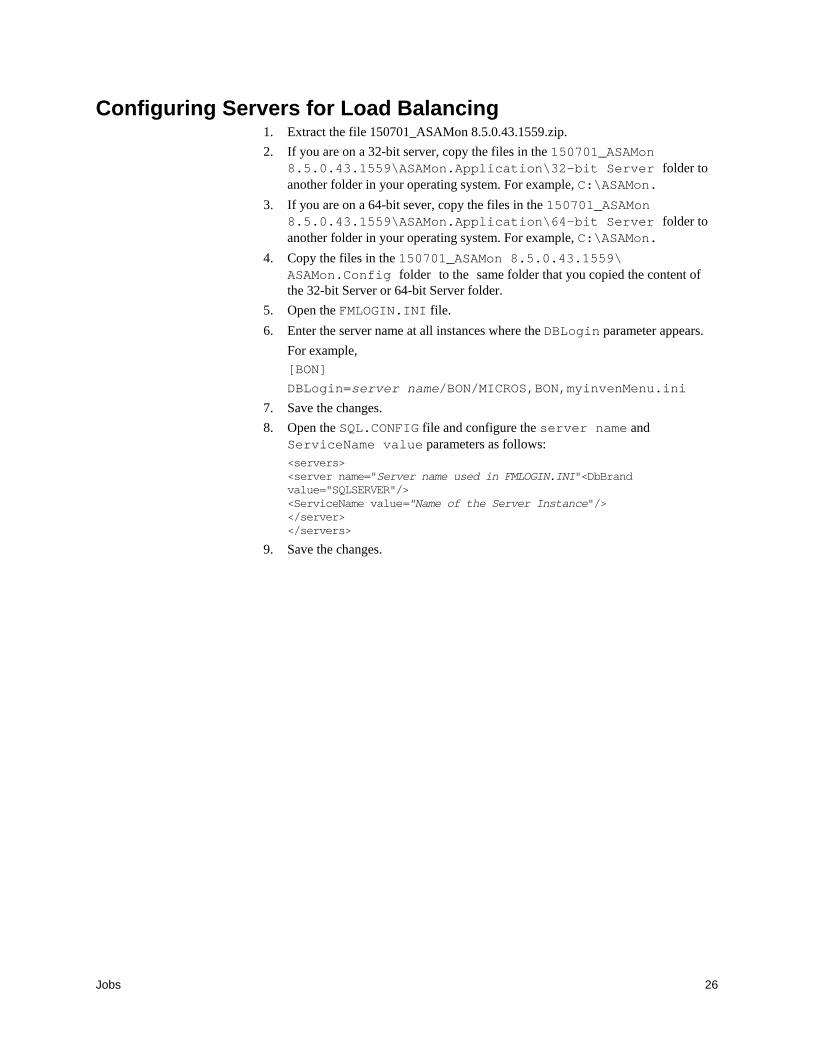
Configuring Servers for Load Balancing 1. Extract the file 150701_ASAMon 8.5.0.43.1559.zip. 2. If you are on a 32-bit server, copy the files in the 150701_ASAMon
8.5.0.43.1559\ASAMon.Application\32-bit Server folder to another folder in your operating system. For example, C:\ASAMon.
3. If you are on a 64-bit sever, copy the files in the 150701_ASAMon 8.5.0.43.1559\ASAMon.Application\64-bit Server folder to another folder in your operating system. For example, C:\ASAMon.
4. Copy the files in the 150701_ASAMon 8.5.0.43.1559\ ASAMon.Config folder to the same folder that you copied the content of the 32-bit Server or 64-bit Server folder.
5. Open the FMLOGIN.INI file. 6. Enter the server name at all instances where the DBLogin parameter appears.
For example, [BON]
DBLogin=server name/BON/MICROS,BON,myinvenMenu.ini
7. Save the changes. 8. Open the SQL.CONFIG file and configure the server name and
ServiceName value parameters as follows: <servers> <server name="Server name used in FMLOGIN.INI"<DbBrand value="SQLSERVER"/> <ServiceName value="Name of the Server Instance"/> </server> </servers>
9. Save the changes.
27 Jobs
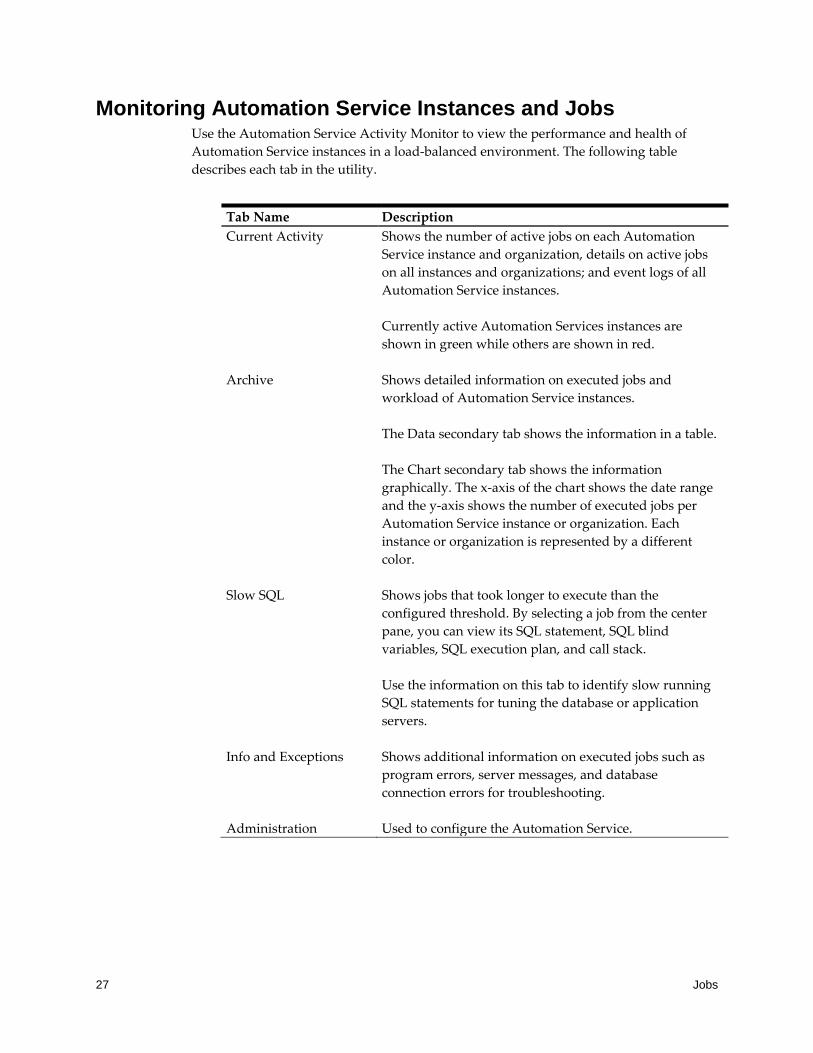
Monitoring Automation Service Instances and Jobs Use the Automation Service Activity Monitor to view the performance and health of Automation Service instances in a load-balanced environment. The following table describes each tab in the utility.
Tab Name Description Current Activity Shows the number of active jobs on each Automation
Service instance and organization, details on active jobs on all instances and organizations; and event logs of all Automation Service instances. Currently active Automation Services instances are shown in green while others are shown in red.
Archive Shows detailed information on executed jobs and workload of Automation Service instances. The Data secondary tab shows the information in a table. The Chart secondary tab shows the information graphically. The x-axis of the chart shows the date range and the y-axis shows the number of executed jobs per Automation Service instance or organization. Each instance or organization is represented by a different color.
Slow SQL Shows jobs that took longer to execute than the configured threshold. By selecting a job from the center pane, you can view its SQL statement, SQL blind variables, SQL execution plan, and call stack. Use the information on this tab to identify slow running SQL statements for tuning the database or application servers.
Info and Exceptions Shows additional information on executed jobs such as program errors, server messages, and database connection errors for troubleshooting.
Administration Used to configure the Automation Service.
Jobs 28
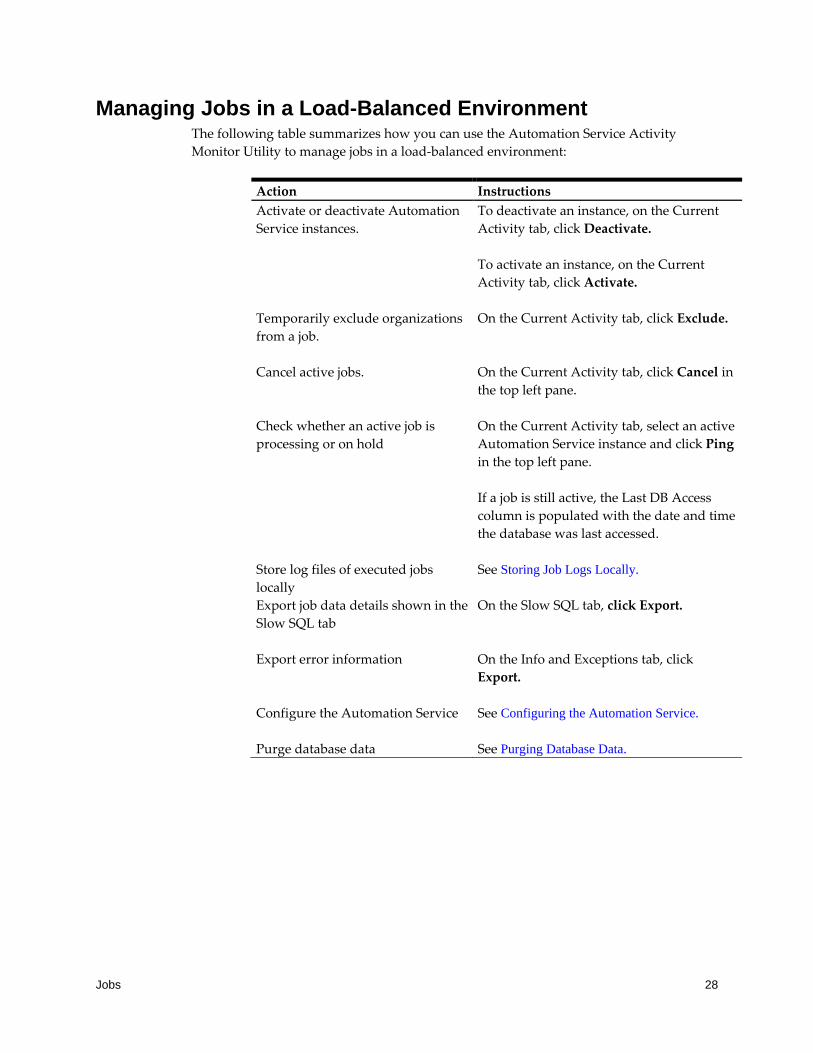
Managing Jobs in a Load-Balanced Environment The following table summarizes how you can use the Automation Service Activity Monitor Utility to manage jobs in a load-balanced environment:
Action Instructions Activate or deactivate Automation Service instances.
To deactivate an instance, on the Current Activity tab, click Deactivate. To activate an instance, on the Current Activity tab, click Activate.
Temporarily exclude organizations from a job.
On the Current Activity tab, click Exclude.
Cancel active jobs. On the Current Activity tab, click Cancel in the top left pane.
Check whether an active job is processing or on hold
On the Current Activity tab, select an active Automation Service instance and click Ping in the top left pane. If a job is still active, the Last DB Access column is populated with the date and time the database was last accessed.
Store log files of executed jobs locally
See Storing Job Logs Locally.
Export job data details shown in the Slow SQL tab
On the Slow SQL tab, click Export.
Export error information On the Info and Exceptions tab, click Export.
Configure the Automation Service See Configuring the Automation Service.
Purge database data See Purging Database Data.
29 Jobs
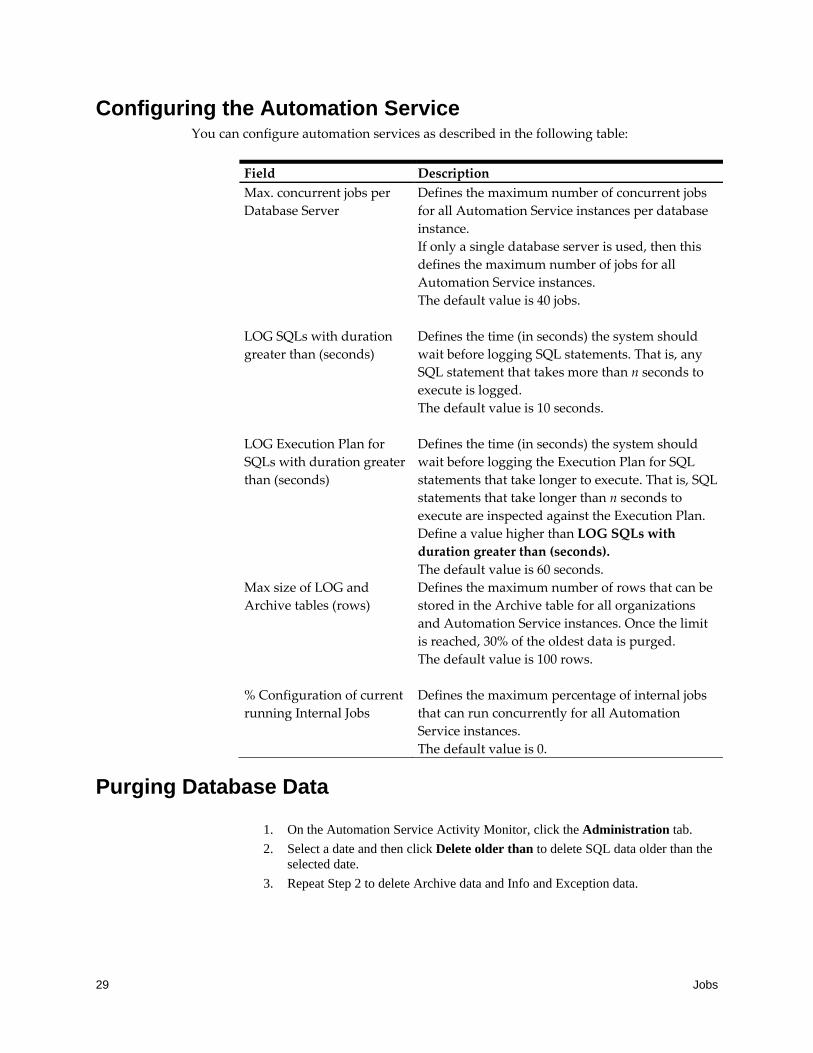
Configuring the Automation Service You can configure automation services as described in the following table:
Field Description Max. concurrent jobs per Database Server
Defines the maximum number of concurrent jobs for all Automation Service instances per database instance. If only a single database server is used, then this defines the maximum number of jobs for all Automation Service instances. The default value is 40 jobs.
LOG SQLs with duration greater than (seconds)
Defines the time (in seconds) the system should wait before logging SQL statements. That is, any SQL statement that takes more than n seconds to execute is logged. The default value is 10 seconds.
LOG Execution Plan for SQLs with duration greater than (seconds)
Defines the time (in seconds) the system should wait before logging the Execution Plan for SQL statements that take longer to execute. That is, SQL statements that take longer than n seconds to execute are inspected against the Execution Plan. Define a value higher than LOG SQLs with duration greater than (seconds). The default value is 60 seconds.
Max size of LOG and Archive tables (rows)
Defines the maximum number of rows that can be stored in the Archive table for all organizations and Automation Service instances. Once the limit is reached, 30% of the oldest data is purged. The default value is 100 rows.
% Configuration of current running Internal Jobs
Defines the maximum percentage of internal jobs that can run concurrently for all Automation Service instances. The default value is 0.
Purging Database Data
1. On the Automation Service Activity Monitor, click the Administration tab. 2. Select a date and then click Delete older than to delete SQL data older than the
selected date. 3. Repeat Step 2 to delete Archive data and Info and Exception data.
Visibility Criteria 30
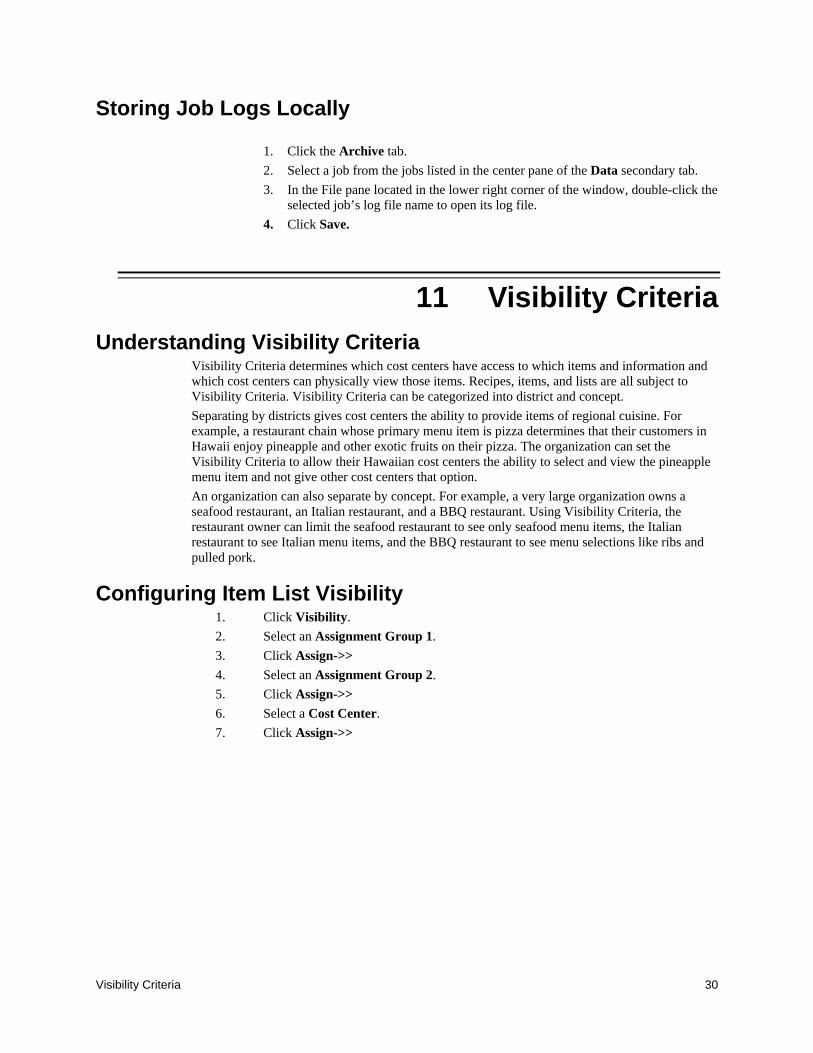
Storing Job Logs Locally
1. Click the Archive tab. 2. Select a job from the jobs listed in the center pane of the Data secondary tab. 3. In the File pane located in the lower right corner of the window, double-click the
selected job’s log file name to open its log file. 4. Click Save.
11 Visibility Criteria Understanding Visibility Criteria
Visibility Criteria determines which cost centers have access to which items and information and which cost centers can physically view those items. Recipes, items, and lists are all subject to Visibility Criteria. Visibility Criteria can be categorized into district and concept. Separating by districts gives cost centers the ability to provide items of regional cuisine. For example, a restaurant chain whose primary menu item is pizza determines that their customers in Hawaii enjoy pineapple and other exotic fruits on their pizza. The organization can set the Visibility Criteria to allow their Hawaiian cost centers the ability to select and view the pineapple menu item and not give other cost centers that option. An organization can also separate by concept. For example, a very large organization owns a seafood restaurant, an Italian restaurant, and a BBQ restaurant. Using Visibility Criteria, the restaurant owner can limit the seafood restaurant to see only seafood menu items, the Italian restaurant to see Italian menu items, and the BBQ restaurant to see menu selections like ribs and pulled pork.
Configuring Item List Visibility 1. Click Visibility. 2. Select an Assignment Group 1. 3. Click Assign->> 4. Select an Assignment Group 2. 5. Click Assign->> 6. Select a Cost Center. 7. Click Assign->>
31 Mobile Solutions
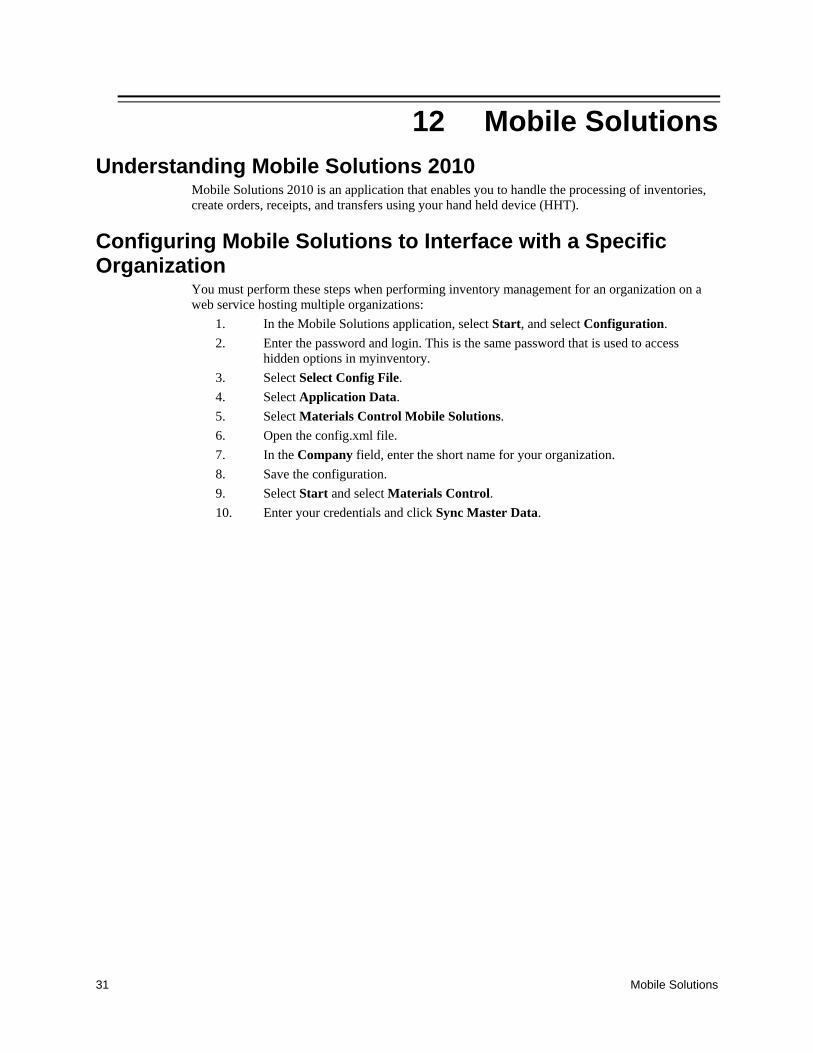
12 Mobile Solutions Understanding Mobile Solutions 2010
Mobile Solutions 2010 is an application that enables you to handle the processing of inventories, create orders, receipts, and transfers using your hand held device (HHT).
Configuring Mobile Solutions to Interface with a Specific Organization
You must perform these steps when performing inventory management for an organization on a web service hosting multiple organizations:
1. In the Mobile Solutions application, select Start, and select Configuration. 2. Enter the password and login. This is the same password that is used to access
hidden options in myinventory. 3. Select Select Config File. 4. Select Application Data. 5. Select Materials Control Mobile Solutions. 6. Open the config.xml file. 7. In the Company field, enter the short name for your organization. 8. Save the configuration. 9. Select Start and select Materials Control. 10. Enter your credentials and click Sync Master Data.
User Management 32
13 User Management Filtering User Access by Cost Center
You can use the C/S Filter to determine and control user access by cost center and store: 1. Navigate to myinventory | Maintenance | User Management. 2. Select a user from the list. 3. Select C/S Filter. 7. Click the button next to the C/S Filter field. 8. Place the curser on the Cost Center field and press Enter. 9. Select one or more cost centers. 10. Click Add. 11. Click OK to exit the Add Cost Centers dialog box.
Configuring User Access to Cost Centers without using the C/S Filter
1. Navigate to myinventory| Maintenance | User Management. 2. Select a user from the list. 3. Click Manage User Right. 4. Click the System Module Group. 5. Under List Management, select Use Cost Center Relationships in List
Management. This option allows users to create, edit, and save Requisition and Transfer lists in the List Management module for cost centers that are not assigned to them in their C/S Filter. The Request From dropdown list shows the default cost center and all cost centers linked to the default cost center in the Cost Center Area module.
Configuring User Access to Cost Center Management 1. Navigate to myinventory | Maintenance | User Management. 2. Select a user from the list. 3. Click Manage User Right. 4. Under Module Group, click Store. 5. Under Transfers, select Manage Cost Center Areas.
Configuring User Access to Cost Center Areas for Transfers Caution: Do not turn on the Use Cost Center Areas privilege until cost centers are set up. If this right is turned on prematurely, sites cannot perform any transfers.
1. Navigate to myinventory | Maintenance | User Management. 2. Select a user from the list. 3. Click Manage User Right. 4. Under Module Group, click Store. 5. Under Transfers, select Use Cost Center Areas.
Configuring User Access to the Central Ordering Module 1. Navigate to myinventory | Maintenance | User Management.
33 User Management
2. Select a user from the list. 3. Click Manage User Right. 4. Under Module Group, click Purchase. 5. Under Purchase Orders, select Purchase Manager for prepared Orders.
Configuring User Access to the Forecast Out of Stock Module
1. Navigate to myinventory | Maintenance | Settings. 2. On the General tab, select Calculate Average Usage for All Items. 3. Navigate to myinventory | Maintenance | User Management. 4. Select a user from the list. 5. Click Manage User Right. 6. Under Module Group, click Purchase. 7. Select Out-of-Stock.
Configuring User Access to the Transfer From List and Transfer To List Modules
1. Navigate to Navigate to myinventory | Maintenance | User Management. 2. Select a user from the list. 3. Click Manage User Right. 4. Under Module Group, click Store. 5. Under Transfers, select Create Transfer From List and Create Transfer To List.