oracle fusion middleware · oracle® fusion middleware oracle webcenter forms recognition designer...
TRANSCRIPT

Oracle® Fusion Middleware
Oracle WebCenter Forms Recognition Designer User's Guide
11g Release 1 (11.1.1)
E50187-02
November 2015
Documentation for WebCenter Forms Recognition Designer, that describes how to use the application to create, configure, modify and test projects.

Oracle WebCenter Forms Recognition 2 Designer User's Guide
Oracle Fusion Middleware Oracle WebCenter Forms Recognition Designer User's Guide, 11g Release 1 (11.1.1)
E50187-02
Copyright © 2009, 2015, Oracle and/or its affiliates. All rights reserved.
This software and related documentation are provided under a license agreement containing restrictions on use and disclosure and are protected by intellectual property laws. Except as expressly permitted in your license agreement or allowed by law, you may not use, copy, reproduce, translate, broadcast, modify, license, transmit, distribute, exhibit, perform, publish, or display any part, in any form, or by any means. Reverse engineering, disassembly, or decompilation of this software, unless required by law for interoperability, is prohibited.
The information contained herein is subject to change without notice and is not warranted to be error-free. If you find any errors, please report them to us in writing.
If this is software or related documentation that is delivered to the U.S. Government or anyone licensing it on behalf of the U.S. Government, then the following notice is applicable:
U.S. GOVERNMENT END USERS: Oracle programs, including any operating system, integrated software, any programs installed on the hardware, and/or documentation, delivered to U.S. Government end users are "commercial computer software" pursuant to the applicable Federal Acquisition Regulation and agency-specific supplemental regulations. As such, use, duplication, disclosure, modification, and adaptation of the programs, including any operating system, integrated software, any programs installed on the hardware, and/or documentation, shall be subject to license terms and license restrictions applicable to the programs. No other rights are granted to the U.S. Government.
This software or hardware is developed for general use in a variety of information management applications. It is not developed or intended for use in any inherently dangerous applications, including applications that may create a risk of personal injury. If you use this software or hardware in dangerous applications, then you shall be responsible to take all appropriate fail-safe, backup, redundancy, and other measures to ensure its safe use. Oracle Corporation and its affiliates disclaim any liability for any damages caused by use of this software or hardware in dangerous applications.
Oracle and Java are registered trademarks of Oracle and/or its affiliates. Other names may be trademarks of their respective owners.
Intel and Intel Xeon are trademarks or registered trademarks of Intel Corporation. All SPARC trademarks are used under license and are trademarks or registered trademarks of SPARC International, Inc. AMD, Opteron, the AMD logo, and the AMD Opteron logo are trademarks or registered trademarks of Advanced Micro Devices. UNIX is a registered trademark of The Open Group.
This software or hardware and documentation may provide access to or information about content, products, and services from third parties. Oracle Corporation and its affiliates are not responsible for and expressly disclaim all warranties of any kind with respect to third-party content, products, and services unless otherwise set forth in an applicable agreement between you and Oracle. Oracle Corporation and its affiliates will not be responsible for any loss, costs, or damages incurred due to your access to or use of third-party content, products, or services, except as set forth in an applicable agreement between you and Oracle.

Oracle WebCenter Forms Recognition 3 Designer User's Guide
Contents
1 What Is WebCenter Forms Recognition Designer ........................................................................ 10
2 About This Document........................................................................................................................ 11
2.1 Intended Audience ..................................................................................................................................... 11
2.2 Content Overview ...................................................................................................................................... 11
3 Project Migration ................................................................................................................................ 12
3.1 Migrate Projects to the Current Version .................................................................................................. 12 3.1.1 Projects with Table Analysis Engine to the Brainware Table Extraction Engine ............................................. 12 3.1.2 Projects with Template Classification Engine to the Brainware Layout Classification Engine...................... 13 3.1.3 Projects with Sax Basic to the WinWrap Scripting Engine ................................................................................. 14 3.1.4 Projects with Validation Script Code to New Validation Templates and Output Formatting ...................... 14 3.1.5 Migrate to the Supervised Learning Workflow ................................................................................................... 14
4 Basic Concepts and Techniques ....................................................................................................... 19
4.1 Start Designer .............................................................................................................................................. 19
4.2 About Roles, Users and Authentication .................................................................................................. 19
4.3 Login ............................................................................................................................................................ 20 4.3.1 Login to Designer .................................................................................................................................................... 20 4.3.2 Login to Verifier....................................................................................................................................................... 20
4.4 Create Users and Groups........................................................................................................................... 20 4.4.1 User Interface ........................................................................................................................................................... 20 4.4.2 Establish and Change Passwords .......................................................................................................................... 20 4.4.3 Create the Administrator Password ...................................................................................................................... 21 4.4.4 Establish User Groups ............................................................................................................................................ 21 4.4.5 Create Groups .......................................................................................................................................................... 21 4.4.6 Create and Manage User Accounts ....................................................................................................................... 22 4.4.7 Export Users, Roles and Groups to the Forms Recognition Database .............................................................. 23
4.5 Windows Based User Authentication ...................................................................................................... 24 4.5.1 Enable Windows Authentication ........................................................................................................................... 24 4.5.2 Import Windows Accounts .................................................................................................................................... 24 4.5.3 Windows Authentication Settings ......................................................................................................................... 24 4.5.4 Windows Authentication for Web Verifier .......................................................................................................... 25 4.5.5 Usage ......................................................................................................................................................................... 25
4.6 Configure Licensing Properties ................................................................................................................ 26 4.6.1 Description ............................................................................................................................................................... 26
4.7 Exit Designer ............................................................................................................................................... 26
4.8 What Are Modes? ....................................................................................................................................... 26 4.8.1 Document Selection Mode...................................................................................................................................... 26 4.8.2 Definition Mode ....................................................................................................................................................... 34 4.8.3 Normal Train Mode ................................................................................................................................................ 37 4.8.4 Verifier Train Mode ................................................................................................................................................. 39 4.8.5 Runtime Mode ......................................................................................................................................................... 41 4.8.6 Verifier Design Mode .............................................................................................................................................. 43 4.8.7 Verifier Test Mode ................................................................................................................................................... 44
4.9 Working with Projects ............................................................................................................................... 46 4.9.1 What Are Project Files? ........................................................................................................................................... 46 4.9.2 Create a Project ........................................................................................................................................................ 47 4.9.3 Save a Project ........................................................................................................................................................... 47

Oracle WebCenter Forms Recognition 4 Designer User's Guide
4.9.4 Open a Project .......................................................................................................................................................... 48 4.9.5 Use Version Control ................................................................................................................................................ 48 4.9.6 Set Global Project Variables ................................................................................................................................... 49 4.9.7 Portable Project Files ............................................................................................................................................... 50
4.10 Working with Documents ......................................................................................................................... 51 4.10.1 What Are Workdocs? .............................................................................................................................................. 51 4.10.2 View a Document .................................................................................................................................................... 51 4.10.3 Process a Document ................................................................................................................................................ 53 4.10.4 Learning .................................................................................................................................................................... 53 4.10.5 Compress a Learnset ............................................................................................................................................... 53 4.10.6 Highlight Processing Results ................................................................................................................................. 54
5 Setup the Classification ..................................................................................................................... 55
5.1 Advanced Classification ............................................................................................................................ 55
5.2 Prepare Sample and Test Documents ...................................................................................................... 56
5.3 Create a Project ........................................................................................................................................... 56
5.4 Create Classes ............................................................................................................................................. 56 5.4.1 Create a Classification Tree .................................................................................................................................... 57 5.4.2 Custom Class Names .............................................................................................................................................. 57
5.5 Edit Classes.................................................................................................................................................. 58
5.6 Select Classification Methods .................................................................................................................... 58
5.7 Configure Classification ............................................................................................................................ 59 5.7.1 Create a Learnset ..................................................................................................................................................... 59 5.7.2 Encrypt a Learnset ................................................................................................................................................... 60 5.7.3 Security Extensions for Learnset Encryption ....................................................................................................... 60 5.7.4 Edit Learnsets ........................................................................................................................................................... 61 5.7.5 Learning .................................................................................................................................................................... 63 5.7.6 Check the Learn Status of a Class .......................................................................................................................... 63
5.8 Configure Brainware Layout Classification Engine ............................................................................... 64 5.8.1 Overview and Purpose ........................................................................................................................................... 64 5.8.2 How It Works ........................................................................................................................................................... 64
5.9 Configure Language Classify Engine ...................................................................................................... 65 5.9.1 Overview and Purpose ........................................................................................................................................... 65 5.9.2 How It Works ........................................................................................................................................................... 65 5.9.3 Setup the Language Classify Engine ..................................................................................................................... 66 5.9.4 Extend and Adjust the Standard Learnset with New Languages ..................................................................... 66
5.10 Configure Phrase Classification ................................................................................................................ 67 5.10.1 Search Phrase ........................................................................................................................................................... 67 5.10.2 Candidates ................................................................................................................................................................ 68 5.10.3 Parameters ................................................................................................................................................................ 69
5.11 Configure Image Size Classification ........................................................................................................ 70 5.11.1 Specify Document Size............................................................................................................................................ 71
5.12 Configure Forms Classification ................................................................................................................ 71 5.12.1 Create Reading Zones ............................................................................................................................................. 71 5.12.2 Global OCR Zones in Forms Classification .......................................................................................................... 74
5.13 ASSA Classification Engine ....................................................................................................................... 74 5.13.1 ASSA Configuration ................................................................................................................................................ 75
5.14 Test the Classification ................................................................................................................................ 75 5.14.1 In Definition Mode .................................................................................................................................................. 76 5.14.2 In Train Mode .......................................................................................................................................................... 76 5.14.3 In Runtime Mode ..................................................................................................................................................... 76

Oracle WebCenter Forms Recognition 5 Designer User's Guide
5.15 Configure the ASSA Engine for Classification in Automatic Supervised Learning .......................... 78
5.16 Optimize the Classification ....................................................................................................................... 78 5.16.1 Resolve Problems with the OCR ............................................................................................................................ 78 5.16.2 Resolve Problems with the Classification Methods ............................................................................................ 78 5.16.3 Resolve Problems with the Learnset ..................................................................................................................... 78
6 Planning Applications ....................................................................................................................... 80
6.1 Identify the Document Import Formats .................................................................................................. 80
6.2 Identify the Document Classes ................................................................................................................. 80
6.3 Plan the Classification Methods ............................................................................................................... 81 6.3.1 Brainware Classification ......................................................................................................................................... 81 6.3.2 Phrase Classification ............................................................................................................................................... 81 6.3.3 Image Size Classification ........................................................................................................................................ 81 6.3.4 Forms Classification ................................................................................................................................................ 82 6.3.5 Brainware Layout Classification ............................................................................................................................ 82
6.4 Identify the Fields for Data Extraction ..................................................................................................... 82
6.5 Plan the Extraction Methods ..................................................................................................................... 82 6.5.1 Brainware Table Extraction .................................................................................................................................... 83 6.5.2 Table Analysis .......................................................................................................................................................... 83 6.5.3 Format Analysis ....................................................................................................................................................... 83 6.5.4 Zone Analysis .......................................................................................................................................................... 83 6.5.5 Associative Search Engine ...................................................................................................................................... 84
6.6 Planning the Verification ........................................................................................................................... 84
6.7 Planning Supervised Learning ................................................................................................................. 84
6.8 Planning the Document Export ................................................................................................................ 84
6.9 Planning the Page Separation ................................................................................................................... 84 6.9.1 Batch Properties ....................................................................................................................................................... 84 6.9.2 Multipage Detection ................................................................................................................................................ 85 6.9.3 Setup Multipage Detection ..................................................................................................................................... 85 6.9.4 Page Separation Learnset........................................................................................................................................ 86 6.9.5 How to Train the Engine ........................................................................................................................................ 86 6.9.6 Project Properties for Page Separation .................................................................................................................. 87
7 Setup the Validation .......................................................................................................................... 88
7.1 Validation Engine ....................................................................................................................................... 88
7.2 Basic Validation Concepts ......................................................................................................................... 88 7.2.1 Levels of Validation ................................................................................................................................................ 88 7.2.2 Terms and Commands You Should Know ........................................................................................................... 89 7.2.3 Available Validation Settings ................................................................................................................................. 89 7.2.4 Types of Field Validations ...................................................................................................................................... 89
7.3 Working with Validation Levels .............................................................................................................. 94 7.3.1 Working with Project-Level Settings ..................................................................................................................... 94 7.3.2 Working with Document-Level or Class-Level Validation ................................................................................ 94 7.3.3 Working with Field-Level Validation for Text ..................................................................................................... 97
7.4 Working with Validation Templates........................................................................................................ 98 7.4.1 Create Templates ..................................................................................................................................................... 98 7.4.2 Working with Validation Templates at the Field Level ...................................................................................... 98 7.4.3 Working with Validation Fields at the Class Level ............................................................................................. 99 7.4.4 Working with Validation Templates at the Project Level ................................................................................... 99
7.5 Introduction to Validation Scripts .......................................................................................................... 100
7.6 Stabilization and Enhancements of Standard Validation Engines ..................................................... 100

Oracle WebCenter Forms Recognition 6 Designer User's Guide
7.6.1 Description ............................................................................................................................................................. 100
8 Setup the Data Extraction ................................................................................................................ 104
8.1 Brainware Line Extraction Method ........................................................................................................ 104 8.1.1 Description ............................................................................................................................................................. 104 8.1.2 Usage ....................................................................................................................................................................... 105
8.2 Setting Up the Fields ................................................................................................................................ 105 8.2.1 Create Fields ........................................................................................................................................................... 105 8.2.2 Edit Fields ............................................................................................................................................................... 106
8.3 Select the Analysis Method ..................................................................................................................... 107
8.4 Setup Brainware Table Extraction .......................................................................................................... 107 8.4.1 About Brainware Table Extraction ...................................................................................................................... 108 8.4.2 Configure Generic Table Extraction .................................................................................................................... 110 8.4.3 Custom Column Names ....................................................................................................................................... 112 8.4.4 Usage ....................................................................................................................................................................... 113
8.5 Setup Format Analysis ............................................................................................................................. 113 8.5.1 Levenshtein Example ............................................................................................................................................ 114 8.5.2 Trigram Example ................................................................................................................................................... 114 8.5.3 Special Characters in Simple Expressions .......................................................................................................... 114 8.5.4 Define the Format Strings ..................................................................................................................................... 114 8.5.5 Define the Rules for String Construction from Words ...................................................................................... 117 8.5.6 Restrict the Analysis to Specific Areas ................................................................................................................ 118 8.5.7 Support for Character Encoding Tables.............................................................................................................. 118 8.5.8 Ability to Create Associate Search Engine Pools ............................................................................................... 119
8.6 Setup Zone Analysis ................................................................................................................................ 119 8.6.1 Create Reading Zones ........................................................................................................................................... 119 8.6.2 Edit Reading Zones ............................................................................................................................................... 120 8.6.3 Fix the Coordinate System for the Reading Zones ............................................................................................ 121 8.6.4 Map Reading Zones to Document Fields ........................................................................................................... 122
8.7 Setup Table Analysis ................................................................................................................................ 123 8.7.2 Define Table Columns .......................................................................................................................................... 125 8.7.3 Define Column Labels and Formats .................................................................................................................... 126 8.7.4 Define Header and Footer Lines .......................................................................................................................... 127 8.7.5 Determine Table Tops ........................................................................................................................................... 127 8.7.6 Define Column Layouts ........................................................................................................................................ 128 8.7.7 Determine Table Bottoms ..................................................................................................................................... 129 8.7.8 Manage Comment Lines ....................................................................................................................................... 129 8.7.9 Using Field Inheritance ......................................................................................................................................... 130 8.7.10 Column Mapping .................................................................................................................................................. 130
8.8 Configure Associative Search Analysis ................................................................................................. 131 8.8.1 Use of Associative Database Search Engine ....................................................................................................... 131 8.8.2 Creating Data Sources ........................................................................................................................................... 131 8.8.3 Import Reference Data for the Associative Search ............................................................................................ 135 8.8.4 Setup the Analysis ................................................................................................................................................. 136 8.8.5 Input of Documents .............................................................................................................................................. 139
8.9 Setup the Field Evaluation ...................................................................................................................... 139
8.10 Brainware Field Extraction Engine for Generic Fields Extraction ...................................................... 140 8.10.1 Description ............................................................................................................................................................. 140 8.10.2 Restrictions ............................................................................................................................................................. 141 8.10.3 Scripting .................................................................................................................................................................. 141 8.10.4 Usage and Notes .................................................................................................................................................... 141
8.11 Training of Header Fields in Normal Train Mode without Configuring Field Formats ................. 142

Oracle WebCenter Forms Recognition 7 Designer User's Guide
8.11.1 Description ............................................................................................................................................................. 142
8.12 About Learning the Extraction ............................................................................................................... 143 8.12.1 Creating Learnsets ................................................................................................................................................. 143 8.12.2 Editing Learnsets ................................................................................................................................................... 145 8.12.3 Learning .................................................................................................................................................................. 145 8.12.4 Check the Learn Status of a Field ........................................................................................................................ 145
8.13 Test the Extraction .................................................................................................................................... 146
8.14 Optimize the Extraction ........................................................................................................................... 148 8.14.1 Resolve Problems with Incomplete Configurations .......................................................................................... 148 8.14.2 Resolve Problems with the Learnset ................................................................................................................... 148 8.14.3 Resolve Problems with the OCR .......................................................................................................................... 148
8.15 Apply Extraction Retraining ................................................................................................................... 149 8.15.1 Description ............................................................................................................................................................. 149 8.15.2 Usage and Scripting .............................................................................................................................................. 149
9 Setup Supervised Learning ............................................................................................................. 151
9.1 Train the Base Class.................................................................................................................................. 151
9.2 Training Other Fields ............................................................................................................................... 152
9.3 Create Derived Document Classes ......................................................................................................... 152 9.3.1 Options for Creating Derived Classes in Designer ............................................................................................ 152
10 Advanced Recognition Settings ..................................................................................................... 154
10.1 Scope of Recognition Settings ................................................................................................................. 154 10.1.1 Project-Level Settings ............................................................................................................................................ 154 10.1.2 Page-Level Settings ............................................................................................................................................... 155 10.1.3 Zone-Level Settings ............................................................................................................................................... 156 10.1.4 Field-Level Settings ............................................................................................................................................... 156
10.2 Engine-Independent Settings .................................................................................................................. 157 10.2.1 General Tab ............................................................................................................................................................ 157 10.2.2 Preprocessing Tab ................................................................................................................................................. 157 10.2.3 Anchors Tab ........................................................................................................................................................... 158 10.2.4 Recognition Tab ..................................................................................................................................................... 158 10.2.5 Test Tab ................................................................................................................................................................... 159
10.3 FineReader OCR Engines ........................................................................................................................ 159 10.3.1 FineReader 10 and 11 ............................................................................................................................................ 159
10.4 Kadmos 5 Engine ...................................................................................................................................... 161 10.4.1 General Tab ............................................................................................................................................................ 161 10.4.2 Characters Tab ....................................................................................................................................................... 162 10.4.3 Digits Tab ............................................................................................................................................................... 162 10.4.4 Preprocessing Tab ................................................................................................................................................. 162 10.4.5 Position Tab ............................................................................................................................................................ 163
10.5 Cleqs Barcode Engine .............................................................................................................................. 163 10.5.1 General Tab ............................................................................................................................................................ 163 10.5.2 Restrictions Tab ..................................................................................................................................................... 164 10.5.3 Preprocessing Tab ................................................................................................................................................. 164
10.6 Cairo OMR Engine ................................................................................................................................... 165 10.6.1 OMR Zones ............................................................................................................................................................ 165 10.6.2 General Tab ............................................................................................................................................................ 166
10.7 OCR Field-Level Digit Booster ............................................................................................................... 166
11 Regular Expressions ......................................................................................................................... 168
11.1 What Are Regular Expressions? ............................................................................................................. 168

Oracle WebCenter Forms Recognition 8 Designer User's Guide
11.2 Literal Characters in Regular Expressions ............................................................................................ 168
11.3 Operators in Regular Expressions .......................................................................................................... 168
12 Advanced Evaluation Settings ....................................................................................................... 170
12.1 Project-Level Settings ............................................................................................................................... 170 12.1.1 Classification Interpretation and How It Works................................................................................................ 170 12.1.2 Project-Level Standard Classification and How It Works ................................................................................ 170 12.1.3 Project-Level Parent Classification and How It Works ..................................................................................... 171 12.1.4 Project-Level Default Classes and How They Work ......................................................................................... 171 12.1.5 Modify Project-Level Settings .............................................................................................................................. 172
12.2 Method-Level Classification Settings ..................................................................................................... 172 12.2.1 Method-Level Absolute Results and How They Work ..................................................................................... 172 12.2.2 Method-Level Multiple Views and How They Work ....................................................................................... 173 12.2.3 Modify Settings for Brainware Classification Methods .................................................................................... 174 12.2.4 Modify Brainware Layout Classification Settings at the Method Level ......................................................... 176 12.2.5 Modify Phrase Classification Settings at the Method Level ............................................................................. 176 12.2.6 Modify Image Size Classification Settings at the Method Level ...................................................................... 177 12.2.7 Modify Forms Classification Settings at the Method Level .............................................................................. 177
12.3 Class-Level Settings .................................................................................................................................. 178 12.3.1 Class-Level Sub-Tree Classification and How It Works ................................................................................... 178 12.3.2 Class-Level Redirection and How It Works ....................................................................................................... 178 12.3.3 Modify Class-Level Settings ................................................................................................................................. 178 12.3.4 Modify Settings for Brainware Layout Classification Methods ....................................................................... 179
12.4 Field-Level Settings .................................................................................................................................. 181 12.4.1 Field-Level Text Field Candidate Evaluation and How It Works ................................................................... 181 12.4.2 Modify Text Field Settings ................................................................................................................................... 181 12.4.3 Table Field Candidate Evaluation and How It Works ...................................................................................... 182 12.4.4 Modify Table Field Settings ................................................................................................................................. 182 12.4.5 Field-Level Digit Booster Candidate Evaluation ............................................................................................... 182
13 Setup the Verification ...................................................................................................................... 183
14 Create Verification Forms ............................................................................................................... 184
14.1 Manage Verification Projects .................................................................................................................. 184 14.1.1 Create a New Verification Project ....................................................................................................................... 184 14.1.2 Configure Project Validation Properties ............................................................................................................. 185 14.1.3 Setup Project Validation Properties..................................................................................................................... 185 14.1.4 Manage Verification Forms .................................................................................................................................. 185 14.1.5 Configure Form Validation Properties ............................................................................................................... 188 14.1.6 Configure the Verification Form Layout ............................................................................................................ 189 14.1.7 Select a Layout ....................................................................................................................................................... 189 14.1.8 Configure Form Grids ........................................................................................................................................... 190 14.1.9 Create Form Elements ........................................................................................................................................... 190 14.1.10 Create and Modify Form Fields ........................................................................................................................... 191 14.1.11 Edit Form Elements ............................................................................................................................................... 193 14.1.12 Set Field Validation Properties ............................................................................................................................ 194 14.1.13 Edit Text Fields ...................................................................................................................................................... 194 14.1.14 Auto-Completion ................................................................................................................................................... 195 14.1.15 Configure the Viewer Properties ......................................................................................................................... 197 14.1.16 Configure Table Properties .................................................................................................................................. 198 14.1.17 Configure Smart Indexing .................................................................................................................................... 200 14.1.18 Database Support for Smart Indexing ................................................................................................................. 201 14.1.19 Correcting Table Fields ......................................................................................................................................... 202 14.1.20 Shortcut Menu Configuration Actions ................................................................................................................ 203

Oracle WebCenter Forms Recognition 9 Designer User's Guide
14.1.21 Changing Colors and Fonts for Elements of Verification Forms ..................................................................... 204
14.2 Testing the Verification ............................................................................................................................ 204 14.2.1 Verifier Test Mode User Interface ....................................................................................................................... 204 14.2.2 Verifier Test Mode Color Coding ........................................................................................................................ 204 14.2.3 Verifier Test Mode Icons ....................................................................................................................................... 205 14.2.4 Verifier Test Mode Toolbar .................................................................................................................................. 205 14.2.5 Verifier Test Mode Keyboard Operation ............................................................................................................ 205 14.2.6 Testing the Visible Classes ................................................................................................................................... 206 14.2.7 Testing the Verification Form Layout ................................................................................................................. 206 14.2.8 Testing Validation Rules ....................................................................................................................................... 207 14.2.9 Testing Smart Indexing ......................................................................................................................................... 208 14.2.10 Testing Table Analysis and Correction ............................................................................................................... 209
15 Printing 211
16 Reusing Project Settings with Templates .................................................................................... 212
16.1 Create Templates ...................................................................................................................................... 212
16.2 Use Evaluation and Analysis Templates within Projects .................................................................... 212
16.3 Edit Analysis and Evaluation Templates .............................................................................................. 213 16.3.1 View Templates ..................................................................................................................................................... 213 16.3.2 Options for Editing ................................................................................................................................................ 213
16.4 Exchange Analysis Templates between Projects .................................................................................. 214 16.4.1 Export Templates to another Project ................................................................................................................... 214 16.4.2 Import Templates from another Project .............................................................................................................. 214
17 Setup the Document Export ............................................................................................................ 215
Appendix A Auxiliary Tools ............................................................................................................ 216
A.1. Auto-Generation of Template Local Projects in SLW .......................................................................... 216
A.2. Auto-Merging of SLW Learnsets ............................................................................................................ 216
Appendix B Regional and Currency Settings ............................................................................... 218
Appendix C Project Structure and File Extensions ...................................................................... 219
C.1. Non-Associative Projects ......................................................................................................................... 219
C.2. Associative Learning Projects ................................................................................................................. 219
C.3. File Extensions .......................................................................................................................................... 219

Oracle WebCenter Forms Recognition 10 Designer User's Guide
1 What Is WebCenter Forms Recognition Designer
Oracle WebCenter Forms Recognition allows you to process incoming documents automatically.
WebCenter Forms Recognition deals with documents that are electronically available. This includes scanned images, faxes, emails, and files. WebCenter Forms Recognition automatically classifies these documents and extracts meaningful information from them.
As part of the WebCenter Forms Recognition suite, Designer enables you to customize the automatic processing of incoming documents such as which document classes are relevant in your enterprise, what information is to extract from the classified documents, and how to verify the results.
To process large volumes of documents, WebCenter Forms Recognition organizes documents into batches, which are defined in the WebCenter Forms Recognition project file. The project files and stored settings are automatically passed to WebCenter Forms Recognition Runtime Server for production processing.
In addition, Designer enables you to test your custom application. All custom settings are saved as a WebCenter Forms Recognition project file. The finished project file is forwarded to the Runtime Server for processing.
WebCenter Forms Recognition Runtime Server runs unattended as a server process in the background. Several mechanisms ensure that the system is stable and can automatically recover from most error situations. You can start multiple instances of Runtime Server simultaneously in a network or on a single machine. These instances cooperate and allow for optimal load distribution.
Quality assurance and correction are done in WebCenter Forms Recognition Verifier. Quality assurance is also controlled by the project file. Batches that cannot be automatically processed in their entirety by WebCenter Forms Recognition Runtime Server are forwarded to Verifier for manual correction by operators who are subject matter experts in the type of document being processed.
Before you can implement WebCenter Forms Recognition, you must verify that the underlying network environment meets certain minimum platform and environmental requirements.

Oracle WebCenter Forms Recognition 11 Designer User's Guide
2 About This Document
2.1 Intended Audience
This documentation is for users who intend to create custom applications with WebCenter Forms Recognition Designer. It is expected that users will have experience and knowledge of Microsoft Windows operating systems and of Microsoft Windows applications.
2.2 Content Overview
This manual is organized into the following sections:
Section 4: Basic Concepts and Techniques contains information about the user interface and basic concepts you need to understand to work with WebCenter Forms Recognition Designer. This section contains information about the setup of user accounts and how to export them to the Forms Recognition database. This section also contains a functional description of controls you need to work with Designer. You should be familiar with this information before you start working with more advanced options of WebCenter Forms Recognition.
Section 5: Setup the Classification contains information on how to setup document classification in WebCenter Forms Recognition.
Section 6: Planning Applications outlines the basic steps of application planning.
Section 7: Setup the Validation addresses configuration of validation.
Section 8: Setup the Data Extraction contains information on how to set up data extraction in WebCenter Forms Recognition.
Section 9: Setup Supervised Learning provides information about Supervised Learning Workflow.
Section 10: Advanced Recognition Settings contains information about recognition techniques. You need this information to improve classification and extraction results.
Section 11: Regular Expressions contains information about regular expressions. You may need this information to improve extraction results obtained with format analysis.
Section 12: Advanced Evaluation Settings contains information about the evaluation and validation mechanism in WebCenter Forms Recognition. You need this information to improve classification and extraction results.
Section 14: Create Verification Forms provides information on how to set up forms to be used in WebCenter Forms Recognition Verifier (and Web Verifier), and how to test these forms.

Oracle WebCenter Forms Recognition 12 Designer User's Guide
3 Project Migration
Oracle WebCenter Forms Recognition version 11g Release 1 (11.1.1) is fully backward compatible with previous versions.
The first time you open a project created in an earlier version of WebCenter Forms Recognition, all the settings are set to default values. When a project is migrated to the new version, you do not need to change the settings in the script code. However, you can configure the settings to validate a field using the standard validation procedures.
3.1 Migrate Projects to the Current Version
In general, all project files are portable, so you can easily use existing applications. However, the current version of WebCenter Forms Recognition contains features that may not have been present in a previous version. The following features may require special attention:
Project authentication needs to be established for users and roles. Refer to Section 4.2: About Roles, Users and Authentication and Section 4.4: Create Users and Groups for more information.
For projects that use the Table Analysis Engine, review Section 3.1.1: Projects with Table Analysis Engine to the Brainware Table Extraction Engine.
Projects using the Template Classification engine must be migrated to use the Brainware Layout Classification engine. Refer to Section 3.1.2: Projects with Template Classification Engine to the Brainware Layout Classification Engine for further information.
Projects using the Sax Basic scripting engine are not supported. They must be migrated to use the WinWrap Basic scripting engine. Refer to Section 3.1.3: Projects with Sax Basic to the WinWrap Scripting Engine for further information.
For projects where validation script is used, review Section 3.1.4: Projects with Validation Script Code to New Validation Templates and Output Formatting.
For projects where Supervised Learning Workflow is used, refer to Section 3.1.5: Migrate to the Supervised Learning Workflow.
Special considerations should be made for the database and Web Verifier features.
3.1.1 Projects with Table Analysis Engine to the Brainware Table Extraction Engine
There are no known compatibility issues between the Table Analysis Engine and the Brainware Table Extraction. If it is necessary to migrate from the Table Analysis Engine to the Brainware Table Extraction, consider the following information.
You can convert the Table Analysis Engine to Brainware Table Extraction, and you can convert Brainware Table Extraction to the Table Analysis Engine. During the conversion from one engine to the other, all column names and definitions are copied. To convert a table from one engine to the other, perform the following steps:
1. In Definition Mode, click the Fields tab on the left side of the screen.
2. Select the Table field to convert.

Oracle WebCenter Forms Recognition 13 Designer User's Guide
3. On the Analysis Editor, select the new table analysis engine (either Brainware Table
Extraction or Table Analysis Engine). The common table settings, which contain column names and definitions, are copied from the original engine to the new engine.
4. If necessary, remove redundant extraction-related script code for the converted table field.
All scripts for correcting validation and extraction should consider a new case in which a table cell has multiple extracted lines. To set this up, system administrators must use the RowNumber property of the table object that returns the actual row number for every table line extracted with the Brainware Table Extraction engine.
For more details about batch processing, refer to the Oracle WebCenter Forms Recognition Scripting User’s Guide.
3.1.2 Projects with Template Classification Engine to the Brainware Layout Classification Engine
The Template Classification engine is no longer supported and is fully replaced by the Brainware Layout Classification engine. This is an essential change for Supervised Learning classes.
If you open a project that was created in a previous version and that uses the Template Classification engine for the first time, the following notification displays:
The obsolete Template Classify engine was in use in your project. The
system has automatically replaced it with the Brainware Layout
Classification engine. Your project has to be relearned and saved to
complete the upgrade.
Would you like to relearn and save your project now?
Click the Yes button on the notification dialog to relearn and save your project automatically. The Brainware Layout Classification engine is assigned to all of the classes automatically. You can check this in Learnset Input Mode.
If you click the Later button on the notification dialog, it does not trigger the migration. The project stays open and you are able to check your configuration. However, you will notice that the Brainware Layout Classification engine is already preconfigured for your classes. To continue, select one of the following options:
Close your project without saving if you do not want to use it with the new version.
Migrate your project to Brainware Layout Classification engine by completing the following steps:
1. Select Save Compress from the File menu.
2. Re-learn the project.
3. Save the project.
Note: The Brainware Layout Classification engine requires more sample documents in the learnset than the Template Classification engine. This happens when only one document is used to train the Template Classification engine. However, to achieve best classification weightings, it is important to have a sufficient number of documents in the learnset.
The Brainware Layout Classification engine requires at least two classes defined within a project. If you have a project with only one class, you are presented with an error

Oracle WebCenter Forms Recognition 14 Designer User's Guide
message when opening it in Designer for the first time. Refer to Section 5: Setup the Classification for more information.
3.1.3 Projects with Sax Basic to the WinWrap Scripting Engine
The Sax Basic scripting engine is no longer supported. Any existing projects that are using scripts created with Sax Basic need to be updated to use the WinWrap scripting engine.
If you open a project that uses Sax Basic, you are presented with a reminder message:
This project uses Sax Basic scripting engine, which is no longer
supported. The project settings will be changed to use WinWrap scripting
engine. Please test the compatibility of the project scripts with the
WinWrap scripting engine.
Press'Yes' to continue or 'Cancel' to not open the project.
Click the Yes button on the notification dialog to change the scripting engine to WinWrap. The project is not saved automatically.
Check your script for discrepancies. If you find any, you still have the option to skip the conversion to WinWrap and to open your project in a previous version of the product.
If you click the No button on the notification dialog, the project does not open. You can open it with an older version.
3.1.4 Projects with Validation Script Code to New Validation Templates and Output Formatting
Any validation code created in a previous version of WebCenter Forms Recognition is compatible with version 11g Release 1 (11.1.1). However, with Version 11.1.1.9.0, the new validation engine and its associated editor make it easier to set up these tasks by providing many new, robust ways to automate and simplify validation routines.
If you plan to use code created in a previous version, consider the following information:
If additional DLLs are used, test them after migration.
Use the Always Valid setting on the Validation Editor to skip validation for any field.
If you use the new validation methods for field-level or document-level validation, remove any redundant scripting that performed similar functions in a previous version.
If a field’s standard validation is set to Invalid, corresponding script events will not be fired.
The new automated field formatting occurs after a Field Validate event is fired if a field is completely valid. Formatting results can be then accessed by scripting the Export event using a new Formatted Text property for the field object. The old Text property still stores unformatted text, which could be accessed as well.
For more details, refer to the Basic Concepts and Techniques section in the Oracle WebCenter Forms Recognition Scripting User’s Guide.
3.1.5 Migrate to the Supervised Learning Workflow
You can apply the Supervised Learning Workflow to any part of a WebCenter Forms Recognition project, or add it to an existing project. However, the meaning and configuration of existing classes might coincide, and therefore conflict, with prospective classes.
Oracle WebCenter Forms Recognition 15 Designer User's Guide
When applying Supervised Learning Workflow to a project you should observe the following considerations and constraints:
The Supervised Learning Workflow automatically creates and learns new classes as sub-classes of a base document class. (A base document class is one that is not inherited from any other class.)
These automatically created and trained classes are always placed directly under the base document class to which the document used for auto-training is currently classified.
The Classification Field property that creates a document class cannot be empty.
The Associative Search Engine must be assigned as the analysis engine for this field.
The Associative Search Engine settings for the Classification Field must include definition of Document Class Format. This format must be defined in such a way that it ensures a unique name for every document class that could possibly be created. One way to ensure that the names are unique is to use the primary key (or any other unique field) from the database for the vendor pool as part of the class name.
The Supervised Learning Workflow must be enabled in Designer and Verifier.
For the new automatically learned classes, the Supervised Learning workflow uses the following configuration, which cannot be modified:
1. Brainware Layout Classification to automatically train Level 1 classification (usually called vendor-classification in the context of Forms Recognition projects used for invoice processing).
2. The Associative Search Engine to automatically detect a new class name, and, optionally, to automatically train Level 1 classification.
3. Brainware Extraction to train automatic extraction of header fields for fields that have Brainware Extraction and Format Analysis engines assigned for the parent base document class.
4. Brainware Table Extraction to train automatic extraction of header fields for fields that have Brainware Table Extraction engine assigned for the parent, base document class.
You must manually configure the classification for base document classes. Manual configuration can consist of automatic redirection to a base class, or through any available classification engine.
3.1.5.1 Setup the Migration
To migrate an existing project to the Supervised Learning Workflow, complete the following preparatory steps:
1. Make sure RTS is configured and running.
2. Load the project into Designer.
3. Establish logins and passwords.
4. Save the project and reopen it.
5. Log in to the project.
6. Make sure all DLLs called from script are available.
7. Switch to Definition Mode. Classify and analyze the current document.

Oracle WebCenter Forms Recognition 16 Designer User's Guide
8. Switch to Verifier Test Mode and test project-related validation.
For example, consider the following scenario. You have an existing vendor class, Oracle Invoice, that process invoices from supplier Oracle Corporation. You have a document class with the same purpose, but with a different name (such as, ORCL1234567) that can be created through the Supervised Learning Workflow, but may cause conflicts.
To avoid conflicts, it is necessary to take into account the following cases to combine non-SLW and SLW processed class nodes:
Case A. The existing set of classes does not coincide with the set of classes that the Supervised Learning Workflow might create.
Case B. The existing set of classes does coincide with the set of classes that the Supervised Learning Workflow might create. Automatic learning for these classes is not required.
Case C. The existing set of classes does coincide with the set of classes that the Supervised Learning Workflow might create. Automatic learning for these classes is required. In addition, these classes are Level 1 classes, meaning that they are derived from a base document class.
Case D. The existing classes do coincide with the set of classes that might be created by the Supervised Learning Workflow. Automatic learning for these classes is required. These classes are not on Level 1 in WebCenter Forms Recognition project classes' hierarchy or their base classes do not satisfy constraints for Supervised Learning, meaning that Classification Field settings are not correctly configured.
Criteria Case A Case B Case C Case D
Existing classes conflict with potential classes. No Yes Yes Yes
Automatic Learning required. n/a No Yes Yes
Level 1 class (derived from base class). n/a No Yes No
Base class do not satisfy requirements for SLW execution or classification field improperly configured.
n/a n/a n/a Yes
Note: Classes created by the Supervised Learning Workflow cannot have the same names as existing document classes. To ensure that this never happens, you must setup the Class Name Format in the Associative Search Engine settings in a unique way, so that existing class names and new class names never overlap. For more details about Supervised Learning Workflow constraints, refer to Section 6.7: Planning Supervised Learning.
Case A
This case is the easiest to handle. You only need to create new base classes or use existing base classes required for the Supervised Learning processing, and then run the Supervised Learning Workflow in conjunction with existing classification and extraction project configurations without any additional adjustments.
Case B
Case B occurs when you want to keep an existing document class with its learnset, scripting, and other setting, as is, and all documents should still be classified to this class. It is conceivable that Supervised Learning could create a new document class by automatic learning for this document. In that case, you must disable automatic learning for this document class.
Oracle WebCenter Forms Recognition 17 Designer User's Guide
To disable automatic class creation for a particular class, set the Vendor_Type field in the CSV file to 2 for the corresponding class search entry. For details, refer to Section 8.9: Configure Associative Search Analysis.
Note: If the Vendor_Type column is not part of the vendor pool, you must create or designate a new column in the vendor pool CSV file to be used for Associative Search Engine search database import. This field can have a value of 0, 1, or 2. By default, when the field is not available in the vendor pool, the system acts as if the Vendor_Type value is 0. A Vendor_Type value of 0 means that all documents with more than n% invalid fields are added to the learnset. For more details, refer to the Oracle WebCenter Forms Recognition Verifier User’s Guide.
You must re-launch the pool import in the Associative Search settings to establish the Classification Field column as the Vendor_Type field. Do not use this field as a search field.
In the scenario, there is an entry Oracle in the vendor pool, but learning is prohibited for this entry. Although no new document class for Oracle will be created, you still must ensure that the system classifies the documents to the ‘old’ document class, Oracle Invoices, and not to Invoices. For the example, those document classes are situated within different tree branches. To ensure correct classification, the following project configurations are possible. There are other possible configurations, depending on the specific project being migrated.
Move part of the document class tree to the new Invoices class. Automatic learning for Oracle Invoices is disabled and all the configurations (such as for the learnset) are retained. Because this part of the class hierarchy does not have to be trained, the derived document class does not have to at Level 1.
Do not change the document class hierarchy. For the document class Invoices do not select a classification, but do select one for the Companies branch. Additionally, set a default classification to Invoices. This means that if a document cannot be classified to the document class for which classification engines are selected, it will be classified to Invoices.
Use WinWrap Basic scripting to ensure that the document is classified to the correct document class.
Case C
If Supervised Learning must be enabled for an existing class that is a derived document class at level 1, and its base class satisfies constraints for Supervised Learning execution, Vendor_Type in the CSV file must be 0 for the corresponding class entry in this file.
In addition, the existing class name and the class name automatically generated by Supervised Learning Workflow and specified on the Associative Search Engine settings for Class Name Format must coincide with each other. To do this, either:
Rename the existing class so that its name coincides with the name that is generated through the Class Name Format for the corresponding entry in a CSV file.
Change Class Name Format so that the names are the same. This can only be applied if it can be done for all classes that Case C covers. In addition, uniqueness of all new document class names must be guaranteed.
Create a new (non-search) field in the CSV file and give this field a descriptive name. In the CSV file generation procedure for all classes described by Case C, use their class names to fill out the field. For all other classes, create a name according to field naming

Oracle WebCenter Forms Recognition 18 Designer User's Guide
conventions. Then, in the settings for the Associative Search Engine, specify the new column name as the Class Name Format.
The base document classes must satisfy the constraints for execution of the Supervised Learning Workflow, i.e. the Classification Field settings are configured correctly, the generic document class is at level 0 of the classification hierarchy and the Associative Search Engine is configured. For details, refer to Section 6.7: Planning Supervised Learning.
Case D
If the Supervised Learning Workflow must be enabled for a particular existing class that is not a Level 1 class, or its base class does not satisfy constraints for SLW execution, the Vendor_Type field value must be 0 for the corresponding class entry in this file.
In this case, follow the instructions covered for Case C.
In addition, the Case D class must be moved under another base class to ensure that the document class is now at Level 1. The easiest way to do this in Designer is to switch to the Classes view in Definition Mode and use drag & drop to move it to the required class. You can also implement a scripted procedure, use Project.MoveDocClass, and save the project.

Oracle WebCenter Forms Recognition 19 Designer User's Guide
4 Basic Concepts and Techniques
4.1 Start Designer
Launch WebCenter Forms Recognition Designer from the Windows Start menu as follows:
All Programs Oracle WebCenter Forms Recognition Designer
Note: You can run multiple instances of WebCenter Forms Recognition Designer simultaneously.
For more information on projects, refer to Section 4.9: Working with Projects.
4.2 About Roles, Users and Authentication
In WebCenter Forms Recognition, users are assigned to groups, and groups are assigned to roles.
Administrators and users must login to WebCenter Forms Recognition Designer and Verifier to load existing projects. The system authenticates the user name and password combination, and either denies authorization to the project, or allows user to perform the functions, which is set by their permissions for the project (assuming the functionality is enabled.)
Users can be assigned to one or more groups, and established groups can have one or more roles. A user must be a member of at least one group, and a group must have at least one role assigned to it.
There are six roles as described in the table below:
Role Abbreviation Description
Administrator ADM Used to manage users, groups, and user-to-group assignments. Administrators install the system, configure applications, and manage data. They also design and maintain projects. This role is the most powerful of the six roles, because it encompasses the permissions for all other groups.
Supervised Learning Manager
SLM Used to define, modify, and maintain the learnset. This functionality is accessible only through Verifier.
Supervised Learning Verifier
SLV Used to collect and manage local training data. Supervised Learning Verifiers are subject matter experts who can propose learnset candidates to improve system performance. This functionality is accessible only through Verifier.
Verifier VER Used to verify documents that could not be automatically processed. This functionality is accessible only through Verifier.
Verifier Settings SET Used to change the Forms Recognition Verifier configuration. This role is given to users who are considered to have enough knowledge of the application to make changes that will be beneficial to all Verifier users.
Verifier Filtering FLT Allows for more flexibility and security when working with the Verifier client. The filtering tab in Verifier is unmapped from the settings dialog box, so that FLT role users are able to filter batches even if they do not have the SET role.
Two criteria determine what users can do in Verifier, both of which are established in Designer:
The groups to which groups the users are assigned.
The functionality enabled for the project.

Oracle WebCenter Forms Recognition 20 Designer User's Guide
Users inherit the roles of the groups in which they are members. These roles dictate the components that can be used by members of each group. However, even if a user is authorized to perform certain tasks, the functionality is inaccessible unless it has been enabled in the project settings. For example, members of the Learnset Manager group are not able to use Verifier Train Mode unless it has been enabled in Settings. For more information, refer to Section 4.8.4: Verifier Train Mode.
Verifier can use a WebCenter Forms Recognition database focused user management. Refer to Section 4.4.7: Export Users, Roles and Groups to the Forms Recognition Database for more information.
4.3 Login
This section provides information on how to log in to Designer and Verifier.
4.3.1 Login to Designer
To use Designer, you must be assigned to a group that has the Administrator role. User without this authorization is unable to use Designer.
As an administrator, you must log in to any Designer project you load.
You do not have to log in when you create a project, but you are essentially logged in as an administrator when you save the new project.
When you save a new project, you are logged in as the Administrator user. No password is required the first time you log in to the new project. Your first action should be to change the Administrator user’s password.
4.3.2 Login to Verifier
Users must enter a username and password when loading a project in Verifier. Users who forget their passwords must contact their project administrator to have their password reset.
4.4 Create Users and Groups
This section provides information about how to create and manage users and groups.
4.4.1 User Interface
User accounts and group assignments are created using the Options menu, then selecting Users, Groups and Roles…
The user interface consists of three tabs:
Users
Groups
Change Password
4.4.2 Establish and Change Passwords
Passwords are created and modified on the Change Password tab. To change a password, complete the following steps:
1. From the Options menu, select Users, Groups and Roles…
2. Select the Change Password tab.

Oracle WebCenter Forms Recognition 21 Designer User's Guide
3. Select the appropriate user from the User Name dropdown.
4. Enter and confirm the password in the appropriate fields.
5. Click the OK button.
For more information on changing passwords, refer to Section 4.4.6.2: Change a User’s Password.
4.4.3 Create the Administrator Password
As an administrator, your first task is to change your password for each existing project. Otherwise, anyone can log in to your project and make changes that could potentially affect the entire workflow. To change your password, complete the following steps:
1. Load an existing project. Use Administrator (not case-sensitive) for user name, and leave the password blank.
2. From the Options menu, select Users, Groups and Roles…
3. On the Project Authentication Properties dialog, select the Change Password tab.
4. Select Administrator from the User Name dropdown.
5. Enter and confirm the password in the appropriate fields.
6. Click the OK button.
4.4.4 Establish User Groups
User groups are created and modified from the Options menu by selecting Users, Groups and
Roles… and then choosing the Groups tab.
4.4.5 Create Groups
By default, the first time the administrator logs in, the only existing user group is Administrator, and the only member of the group is the Administrator user.
To create new groups, complete the following steps:
1. Select the Groups tab.
2. Click the New button. The Add New Group dialog is displayed.
3. Enter a name for the new group in the Name field. The field is restricted to 20 alphanumeric characters.
4. For Description, select one of the four group roles options:
Administrator
Supervised Learning Manager
Verifier
Supervised Learning Verifier
5. Click the OK button.
4.4.5.1 Assign Roles to Groups
When you first create a group, you can only associate one of the four profiles to it. However, you can assign or remove roles from an already-established group.
To add a role to a group, complete the following steps:

Oracle WebCenter Forms Recognition 22 Designer User's Guide
1. Select the role in the Available Role list and click Add.
2. Click the OK button.
To remove a role, complete the following steps:
1. Select the role in the Assigned Role list and click Remove.
2. Click the OK button.
Note: You cannot delete the Administrator user or the ADM role. You can delete additional users or groups.
After you have established user groups, you are ready to assign users to them.
4.4.6 Create and Manage User Accounts
User accounts are created and modified from the Options menu by selecting Users, Groups and
Roles… and then choosing the Users tab.
On the Users tab, you can create or delete individual users, assign or remove users from groups, and import multiple users from an external file.
You can store Common Database Learnset against user settings.
Note: From version 11g Release 1 (11.1.1), all projects should have the Allow Database
Authentication option enabled, and the users should exist in the database to login to the system.
4.4.6.1 Create New User Accounts
To create new user accounts, complete the following steps:
1. On the User tab, click New. The Add New User dialog is displayed.
2. Enter a username for the user and assign a default password in the Name and Password fields respectively. User names cannot exceed 17 alphanumeric characters and passwords cannot exceed 20 alphanumeric characters.
3. Click OK.
After you have created a user account, you must assign it to at least one group. Users who are not assigned to a group are not able to log into the project.
To give the user the option of remembering their user name and password between WebCenter Forms Recognition Verifier logons, select the Enable Password Remembering for User Logon
Dialog checkbox
4.4.6.2 Change a User’s Password
To change a user’s password, complete the following steps:
1. On the Change Password tab, check the Decode Password checkbox.
2. Enter and confirm the new password in the New Password and Confirm New Password text boxes.
3. Click OK.

Oracle WebCenter Forms Recognition 23 Designer User's Guide
Note: This only works for users that were created within the current project file. Users created through Security Update are not visible to the WebCenter Forms Recognition Designer.
4.4.6.3 Assign Users to Groups
To assign a user to a group, complete the following steps:
1. Select a user from the Name dropdown.
2. In the Available Groups list, select a group and click Add.
3. To remove groups, select a group in the Assigned Groups list and click Remove.
4.4.6.4 Import and Export Users and Groups
The definitions of all users’ roles for a project can be exported in bulk to a binary file and then imported in bulk into another project. This is done within the Import and Export buttons on the Users tab of the Project Authentication dialog.
To export a list of users, complete the following steps:
1. On the Users tab, select the group to export and click Export to File.
2. Name the file and then click OK. By default, the file is saved as an authentication file with a .sec extension in the project root folder. You can change the target folder if necessary.
To import a list of users from another project, complete the following steps:
1. On the Users tab, click Import from File.
2. Select the appropriate file to import and click OK.
Note: You should not manually edit authentication files.
To import a user through the Security Update option, complete the following steps:
1. Enable the Allow Database authentication option.
2. Add the appropriate script to the project, as described in the UpdateSystemSecurity section of the Oracle WebCenter Forms Recognition Scripting User’s Guide.
3. Configure RTS to execute Update System Security with this project.
4. Run RTS and wait for the update event.
4.4.7 Export Users, Roles and Groups to the Forms Recognition Database
In Verifier, you have the ability to make the users, roles, and groups available in the WebCenter Forms Recognition database. This is necessary if a database platform is used by WebCenter Forms Recognition applications, like Web Verifier.
To make users, roles, and groups available in the database, use the Export to Database button in the project authentication dialog, which is available through the Users, Groups and Roles… option of the Options menus.
Note: Export only affects users and groups in the project being exported. Any other existing users or groups in the database are not affected.

Oracle WebCenter Forms Recognition 24 Designer User's Guide
4.5 Windows Based User Authentication
This section provides information on how to authenticate users in the Windows system.
4.5.1 Enable Windows Authentication
To enable Windows based authentication in WebCenter Forms Recognition for a desired project, open the corresponding project file in Designer, select the Users, Groups and Roles… from the Options menu, then select the Allow Windows Authentication checkbox on the Users tab of the Project Authentication Settings dialog.
You can enable Windows authentication and database authentication at the same time for different users.
4.5.2 Import Windows Accounts
There are two methods to import the users into the database:
The GUI-based Windows Import button.
The script-based SecurityUpdate method.
To import required Windows users through the graphical interface, complete the following steps:
1. On the Project Authentication Settings dialog, click Windows Import.
2. Click Locations to select the required Windows domain from which to import the user accounts.
3. Click Advanced to expand the extended search settings and click to locate the users in the selected domain. As soon as the users appear in the list view, you can either choose the desired ones (press and hold the CTRL key to apply multiple selections) or import all available users at once (select the first item in the list and then click Page Down until all items in the list are selected).
4. Click OK to confirm the selection. Now review the selected users.
5. Click OK to finish importing the Windows users into the WebCenter Forms Recognition project.
To import users with a script, use the SecurityUpdate method as described in Section 4.4.6.4: Import and Export Users and Groups.
Note: All newly imported users are, by default, assigned to a special Standard User group. This group, by default, has SLV, VER and FLT rights, which are rights required to run Verifier in Advanced Mode. You can adjust the standard user rights assignments for this group at any time according to the specific project requirements.
4.5.3 Windows Authentication Settings
After the project is saved, the Windows based authentication is activated. The next time this project file is opened in Verifier or Designer (or in any other WebCenter Forms Recognition application that requires project level authentication), the authentication sub-system always tries to log in automatically using the currently logged in Windows user.
To activate the automatic logon feature, you must select and activate the Allow Database
Authentication and Allow Windows Authentication checkboxes in the Designer's Project Authentication Settings for the project used in Verifier clients.

Oracle WebCenter Forms Recognition 25 Designer User's Guide
Note: To activate the Update Passwords in Database option in the Change Password tab of the Verifier, you must select the Allow Database Authentication checkbox.
For example, if the Verifier application is run on a workstation where ADM user is logged in, the Verifier logon is going to proceed automatically.
Since, by default, the Standard User group does not include administrative rights or the imported users, trying to log in with the same sample user in the Designer application leads to a warning message like the one below because Designer application requires administrative privileges:
User //<domain>/<username> is already through Windows authenticated, but
has no ADM privileges. Please login manually.
The warning message should be followed by a normal log on screen, so that the user can log on using one of the available internal project’s accounts.
Note: By default, newly imported users are imported with empty passwords and, therefore, the system does not allow them to log in as another Windows user with the normal Logon dialog unless the password for the Windows user is explicitly set in WebCenter Forms Recognition.
You can also modify individual user’s settings, for example, to assign administrative privileges to some specific users, such as to the same user located in the domain.
Now the user can logon to both Designer and Verifier applications automatically. The Verifier application displays the user as an administrator.
Note: In case the currently logged in user account is not a member of the pre-imported Windows users list, WebCenter Forms Recognition applications are expected to show the normal Logon dialog, where the user must enter a username and password. In such a case, all previously available logon features, like remembering the password, still remain applicable.
4.5.4 Windows Authentication for Web Verifier
To use Windows authentication for the Web Verifier login, complete the following steps:
1. Import the Windows accounts of the designated Web Verifier user to the project database through the Windows Import button or the Security Update method as described above.
2. Enable the Web server IIS Windows Authentication.
Note: Only domain users are able to login to the Web Verifier.
4.5.5 Usage
The Windows based user authentication feature can be used for the following purposes.
Simplification of the user logon procedure for Verifier and, modified, Web Verifier users. Users log in just once in Windows and then log in to the Verifier application with the same log on information automatically and for Verifier without any visual interaction.
Synchronization of Windows authentication and internal WebCenter Forms Recognition authentication processes. This makes initial setup of WebCenter Forms Recognition users easier

Oracle WebCenter Forms Recognition 26 Designer User's Guide
and faster to apply (all required Windows users can be imported into the WebCenter Forms Recognition subsystem automatically at once) and simplifies administration of user accounts in the overall customer environment.
4.6 Configure Licensing Properties
This section provides information about licensing property configurations.
4.6.1 Description
To configure the licensing properties, complete the following steps:
1. Select Options License from the menu in the WebCenter Forms Recognition Designer application.
2. In the License Settings dialog, adjust the primary shared licensing location.
3. Click OK.
Note: When using the WebCenter Forms Recognition database, batch root directory licensing cannot be used.
4.7 Exit Designer
To exit WebCenter Forms Recognition Designer, complete the following steps:
1. From the File menu, select Exit.
2. On the Confirmation message box, click OK.
4.8 What Are Modes?
WebCenter Forms Recognition Designer supports several modes of operation:
Document Selection Mode.
Definition Mode.
Normal Train Mode.
Verifier Train Mode.
Runtime Mode.
Verifier Design Mode.
Verifier Test Mode.
Each mode supports a particular set of tasks used during the design of a WebCenter Forms Recognition application. When you switch from one mode to another, the toolbar and the window below it change to provide the tools and controls used in the new mode.
4.8.1 Document Selection Mode
4.8.1.1 Purpose
Use this mode to select a document set that will be used in learning and testing.
4.8.1.2 Selection

Oracle WebCenter Forms Recognition 27 Designer User's Guide
To switch to Document Selection Mode, select one of the following options:
From the View menu, select the Document Selection Mode option.
On the toolbar, click the arrow beside the Switch to Document Input Selection button, then select the appropriate option (Directory, Learnset, or Batch) from the dropdown menu. Depending on the current input type, the appearance of this button varies.
If the paths for the Batch Root and Image Root are not correctly configured, the Batch menu option is disabled.
If you change the input type from the dropdown menu, Document Selection Mode is activated automatically.
4.8.1.3 Settings
The current document set can be:
A directory of files Use directories as the input type only if you already have the corresponding workdocs. You can also use files from directories to optimize your learnset.
If workdocs are not available, WebCenter Forms Recognition will create new workdocs for the TIFF files. This can be time consuming, because OCR has to take place.
A batch Runtime Server creates batches and works on them. Use batches as the primary input type for classification design. Processing results can only be saved persistently as workdocs with batches. Use reference batches with documents from given classes to verify the quality of the classification and extraction.
A part of the learnset Once you have defined a classification scheme, you need a learnset to train the classification and extraction. Use the learnset as document input to review your sample documents.
To specify the location of the learnset, complete the following steps:
1. On the Options menu, select Settings…
2. On the Settings dialog, select the Train Mode tab.
3. For Learn Set Manager, enter or browse to a Base Directory. To create a new directory, click the browse (…) button, then click New Directory and the path name.
To select an input type, complete the following steps:
1. On the Options menu, select Settings…
2. On the Settings dialog, select the Input Mode tab.
3. Specify the file format under Import Options.
You can select Image & Electronic Documents and enter the extension of the image file format, for example *.tif or similar.
You can also use workdocs without image files. In this case, select the Workdoc Files
(*.wdc) option.

Oracle WebCenter Forms Recognition 28 Designer User's Guide
Note: You cannot process non-image file types this way. Use batches to process non-image file types. Refer to the Oracle WebCenter Forms Recognition Runtime Server User’s Guide for details.
You can store WebCenter Forms Recognition core information in the Forms Recognition database. To use batches that are stored in the database, check the Use Database as Documents
and Statistics Source option, then select the desired job from the Select Job dropdown.
You can also create a new job by clicking the Create Job button and entering a name for the new job on the Create Job dialog.
Note: The database job name must not contain multi-byte characters.
To specify the location of batches that are stored on the file system, complete the following steps:
1. On the Options menu, select Settings…
2. On the Settings dialog, select the Input Mode tab.
3. Specify the location of the batch files in the Batch-Root Directory field.
4. For each batch file, there is a subdirectory containing the image files that will be processed. Specify the root of these subdirectories in the Image-Root Directory field. Typically, both root directories should be the same.
Note: You must define the batch location before you can select batches as input type.
4.8.1.4 User Interface
The user interface of Document Selection Mode enables you to refine your document selection. The three distinct areas of the user interface are as shown below:
Document Set Selection Depending on the settings, this area shows the following views:
A tree view of directories from the file system.
A list view of batches from the batch root directory or the database.
A list view of classes for which a learnset has been created.
Double-click one of the entries to display the contents of the current selection in the Document Selection area below.
Document Selection This area shows the documents from the selected document set. The panel can show any of the following options:
A list view of files from the selected directory.
A tree view of folders and documents from the selected batch.
A list view of files from the selected class.
Select one of the entries to display the selected document in the Document Display panel.
Document Display This panel displays the currently selected document.

Oracle WebCenter Forms Recognition 29 Designer User's Guide
4.8.1.5 Input Type: Directory
When using the Directory input type for Document Selection Mode, the user interface displays the following:
Directory Tree Tree view directory from the file system. Double-click one of the entries to display the content of the current selection in the panel beneath.
Workdoc/Other Files List List view of files from the selected directory. Click one of the entries to display the selected document.
Document Display This panel displays the currently selected document.
For drives or directories, you can perform any of the following actions.
Open a directory.
Create batches for this project from the directory.
Refresh the selected directory.
To create batches from a directory, complete the following steps:
1. Select a directory from the directory list.
2. Right-click the directory and select Import New Batch from Directory from the popup menu. WebCenter Forms Recognition inserts the selected batch in the defined batch directory or database.
4.8.1.6 Input Type: Batch
When using the Batch input type for Document Selection Mode, the user interface displays the following:
Batch List Contains batches in list view from the batch root directory or database. Double-click one of the entries to display the content of the batch in the panel beneath.
Document/Folder List Contains folders and documents in tree view from the selected batch. Click one of the entries to display the selected document.
Document Display This panel displays the currently selected document.
You have several options for working with batches and documents in Input Mode. For batches, you can complete any of the following actions:
Close a batch.
Create a batch.
Rename a batch.
Change a batch state.
Change a batch priority.

Oracle WebCenter Forms Recognition 30 Designer User's Guide
Add a folder.
Delete a batch.
For folders, you can complete any of the following options:
Rename a folder.
Delete a folder and documents from the list.
Add document.
For documents, you can complete any of the following options:
Change state of a document to a new value that you assign.
Delete the selected workdoc from the batch.
To select a batch option, right-click the desired batch and select the desired option from the popup menu.
To select a folder option, right-click the desired folder and select the desired option from the popup menu.
To select a document option, right-click the desired document and select the desired option from the popup menu.
You can also drag a folder to another batch or move a selected document to another folder within the same batch.
4.8.1.7 Input Type: Learnset
When using the Learnset input type for Document Selection Mode, the user interface displays the following:
Document Class View Contains classes in list view for which a learnset has been created. Double-click one of the entries to display the content of the current selection in the panel beneath.
Classification/Extraction Learnset
Contains files in list view from the selected learnset. Click one of the entries to display the selected document.
Document Display This panel displays the currently selected document.
For document classes, you can select one of the following options:
View Classification learnset. A list of documents and their classification learnset are shown.
View Extraction learnset. A list of documents and their extraction learnset are shown.
For Learnsets, you can perform one of the following actions:
Remove the selected document from the learnset. Documents in the class will have to be learned again.

Oracle WebCenter Forms Recognition 31 Designer User's Guide
Click the checkboxes for the classification or extraction engines. If a checkbox is selected, the document is added to the learnset of the document class for this engine. If the checkbox is cleared, the document is removed from the engine for this learnset. Documents in the class have to be learned again.
To select a document class option, right-click the desired class and select the desired option from the popup menu.
To select a learnset option, right-click the desired learnset and select the desired option from the popup menu.
4.8.1.8 Create Test Documents
After you establish your document settings, you can create test documents that will automatically select files from a chosen directory and place them in your batch directory.
To import a new batch, complete the following steps:
1. Click the arrow next to the Switch to Document Input Selection option.
2. From the list, select Directory as input type.
3. Select a directory from the directory list for the origin of your files.
4. Select Edit Import New Batch from Directory. WebCenter Forms Recognition inserts files into the batch directory. A progress bar appears during the insertion
4.8.1.9 Automatic Conversion of Documents during the Import Phase
On the Processing tab of the Settings dialog, it is possible to configure a couple of options that allows automatic conversion of documents during import into the WebCenter Forms Recognition system.
These options are available in the Runtime Server and Designer Import Option. The root option, Convert images into, allows you to select one of 39 currently supported image formats to convert the incoming document into.
Below is the detailed list of the currently supported image formats in which the converted documents can be saved to a disk:
ID Format Description File Extension
Supports Multipage
1 Brooktrout file, Image Type: Bitmap. BRK No
2 Brooktrout file. BRK No
3 Native bitmap file format of the Microsoft Windows environment. BMP No
4 Native bitmap file format of the Microsoft Windows environment, RLE-compressed. BMP No
5 Monochrome bitmap, to provide a standardized graphics interchange for electronic graphics and image processing applications.
CAL No
6 Windows Clipboard, RLE or uncompressed color bitmap. CLP No
7 Color table, RLE Monochrome, 24-bit RGB Bitmap. To allow the storage of multiple PCX files in one file.
DCX Yes
8 Encapsulated PostScript, monochrome Metafile Storage and interchange of single images.
EPS No
9 Image Object Content Architecture 4, 8, 16-bit palette gray-scale and color, G3 compression.
ICA No
10 Image Object Content Architecture 4, 8, 16-bit palette gray-scale and color, G4 ICA No
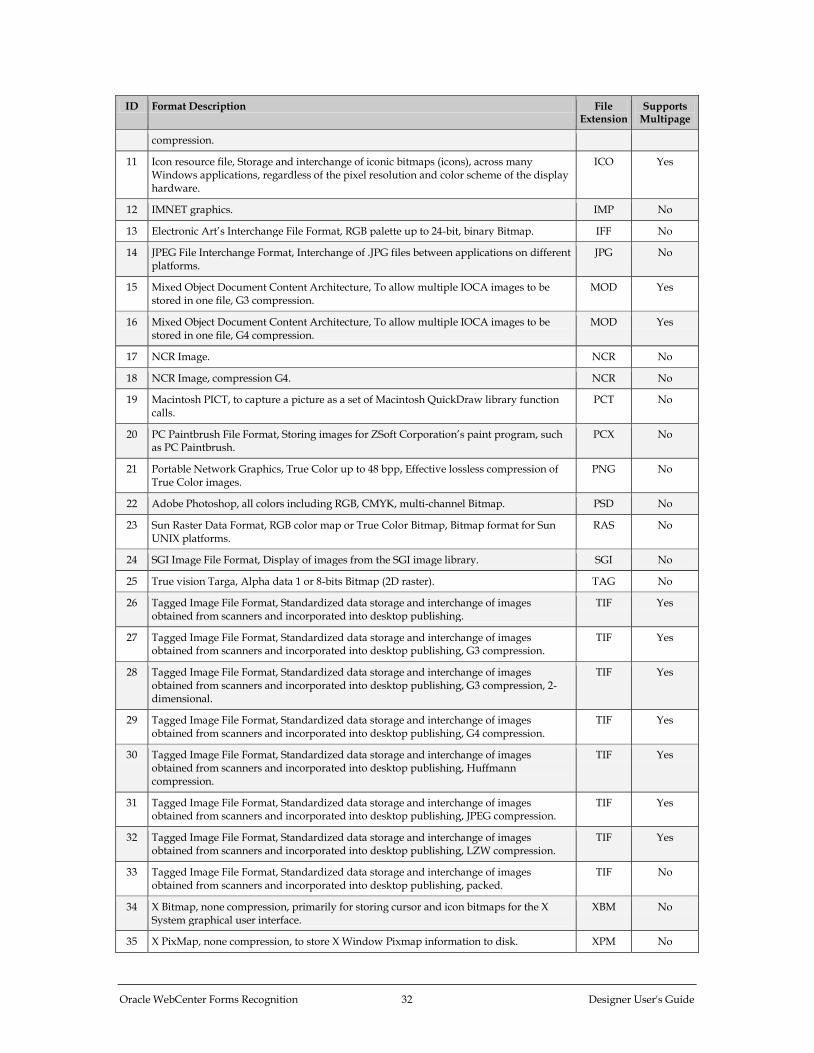
Oracle WebCenter Forms Recognition 32 Designer User's Guide
ID Format Description File Extension
Supports Multipage
compression.
11 Icon resource file, Storage and interchange of iconic bitmaps (icons), across many Windows applications, regardless of the pixel resolution and color scheme of the display hardware.
ICO Yes
12 IMNET graphics. IMP No
13 Electronic Art’s Interchange File Format, RGB palette up to 24-bit, binary Bitmap. IFF No
14 JPEG File Interchange Format, Interchange of .JPG files between applications on different platforms.
JPG No
15 Mixed Object Document Content Architecture, To allow multiple IOCA images to be stored in one file, G3 compression.
MOD Yes
16 Mixed Object Document Content Architecture, To allow multiple IOCA images to be stored in one file, G4 compression.
MOD Yes
17 NCR Image. NCR No
18 NCR Image, compression G4. NCR No
19 Macintosh PICT, to capture a picture as a set of Macintosh QuickDraw library function calls.
PCT No
20 PC Paintbrush File Format, Storing images for ZSoft Corporation’s paint program, such as PC Paintbrush.
PCX No
21 Portable Network Graphics, True Color up to 48 bpp, Effective lossless compression of True Color images.
PNG No
22 Adobe Photoshop, all colors including RGB, CMYK, multi-channel Bitmap. PSD No
23 Sun Raster Data Format, RGB color map or True Color Bitmap, Bitmap format for Sun UNIX platforms.
RAS No
24 SGI Image File Format, Display of images from the SGI image library. SGI No
25 True vision Targa, Alpha data 1 or 8-bits Bitmap (2D raster). TAG No
26 Tagged Image File Format, Standardized data storage and interchange of images obtained from scanners and incorporated into desktop publishing.
TIF Yes
27 Tagged Image File Format, Standardized data storage and interchange of images obtained from scanners and incorporated into desktop publishing, G3 compression.
TIF Yes
28 Tagged Image File Format, Standardized data storage and interchange of images obtained from scanners and incorporated into desktop publishing, G3 compression, 2-dimensional.
TIF Yes
29 Tagged Image File Format, Standardized data storage and interchange of images obtained from scanners and incorporated into desktop publishing, G4 compression.
TIF Yes
30 Tagged Image File Format, Standardized data storage and interchange of images obtained from scanners and incorporated into desktop publishing, Huffmann compression.
TIF Yes
31 Tagged Image File Format, Standardized data storage and interchange of images obtained from scanners and incorporated into desktop publishing, JPEG compression.
TIF Yes
32 Tagged Image File Format, Standardized data storage and interchange of images obtained from scanners and incorporated into desktop publishing, LZW compression.
TIF Yes
33 Tagged Image File Format, Standardized data storage and interchange of images obtained from scanners and incorporated into desktop publishing, packed.
TIF No
34 X Bitmap, none compression, primarily for storing cursor and icon bitmaps for the X System graphical user interface.
XBM No
35 X PixMap, none compression, to store X Window Pixmap information to disk. XPM No

Oracle WebCenter Forms Recognition 33 Designer User's Guide
ID Format Description File Extension
Supports Multipage
36 X Window Dump, 16, 24 or 32 True Color Bitmap, no compression, and storing screen dumps from the X Window System.
XWD No
37 Microsoft Windows Metafile, no compression. Convenient storage and interchange for applications run under MS Windows.
WMF No
39 JP2 JP2000 Format. JP2 No
The other two options, Automatically Convert Resolution to… and Convert Electronic
Documents into Images, can activate automatic conversion of image files’ resolution to user specified values, in DPI units (recommended values are 300 x 300 DPI) and automatic conversion of electronic documents to the same image format. Both of these options only have an effect when the Convert Images into… option is enabled.
The default values for these options are shown below:
Convert Images into… Unchecked to satisfy general backwards compatibility requirement. Recommended value is checked. The default value for the image format should be *.tif.
Automatically Convert Resolution to…
Checked. The default values for both x and y resolution is 300 DPI (dots per inch).
Convert Electronic Documents into Images
Unchecked.
The above mentioned options affect the following parts of processing in WebCenter Forms Recognition:
Importing of documents in Document Browsing Mode of the Designer application.
Importing of documents in the Runtime Server application.
During conversion, the original imported documents remain unchanged, while the documents attached to the WebCenter Forms Recognition’s workdocs associated with the imported files are converted to the desired image file format. If the desired format supports multipage document files, the imported pages of an image file or an electronic document are all stored in a single document file referenced by a single workdoc. Otherwise, the imported pages are split into individual document files and attached to the same single workdoc. For more information on multipage document files, refer to the Supports Multipage column in the previous table.
4.8.1.10 Usage
The importing options can be primarily used for the following purposes:
Stabilization of document processing in WebCenter Forms Recognition in relation to unification of the documents’ resolution (ideally 300 x 300 DPI for all learnset and extracted images) and, in some rare case, to prevent from degradation of extraction results when processing certain types of electronic documents where the corresponding subsystem in WebCenter Forms Recognition is not capable of delivering good quality results for some properties of the processed electronic files (i.e., in cases when image based processing with OCR post-processing appears to be better in terms of extraction quality).
Oracle WebCenter Forms Recognition 34 Designer User's Guide
Unification of processed documents, such as when different incoming formats are converted into a single document. This is most optimal in terms of temporary data storage and data processing.
Further archiving, when original documents will be archived in an external database along with the extracted data entries in one unified format.
4.8.2 Definition Mode
Definition Mode is the main working mode of WebCenter Forms Recognition Designer. To switch to Definition Mode, perform one of the following options:
From the View menu, select Definition Mode.
On the toolbar, click the Switch to Definition Mode button.
4.8.2.1 Purpose
Working in this mode allows you to:
Design the settings for the project.
Establish classification and data extraction.
Generate a default export file.
Execute an export during Classification and Extraction.
Test single documents or an entire document set.
4.8.2.2 Settings
In Definition Mode, you can automatically process an entire document set in a single run. To do this, you will need enough time to view the results for one document before the next one displays.
To set the processing delay, complete the following steps:
1. From the Options menu, select Settings… or, in the toolbar, click the Show Settings button.
2. In the Settings dialog, select the Definition Mode tab.
3. Under Definition Mode, use the slider control to set the number of seconds delay, or, alternatively, enter the desired number of seconds into the associated text field.
4.8.2.3 Support of Non-Western Languages
WebCenter Forms Recognition provides a generic approach to the support of non-western languages, where essential parts of the alphabet are not covered by letters of the English alphabet with the same key codes. For example, this includes the Greek, Polish, Russian, Chinese, Japanese and Korean languages.
An automatic phonetic translation is applied from non-western languages into English, and then an unambiguous conversion back to the original language. The conversion is applied for the following workflow steps in WebCenter Forms Recognition:
Classification
Extraction
Validation

Oracle WebCenter Forms Recognition 35 Designer User's Guide
Learning
These processes can be executed on a non-native computer, such as a United Kingdom (UK) or United States (US) workstation or server, to process documents that contain auxiliary information and information that is extracted in supported non-western languages.
The following WebCenter Forms Recognition engines allow phrases, format strings, and more to be entered with visual input using the characters of the currently supported non-western languages:
Phrase Classification engine
Table Analysis engine
Format Analysis engine
Associative Search engine (this engine includes the ability to import Unicode CSV files)
Configuring the Phrase Classification engine, Table Analysis engine and Format Analysis engine using phrases in the desired non-western language should be applied on the corresponding non-western computer or on any computer where this language is set as the system’s default Unicode language.
This is also applicable for all other WebCenter Forms Recognition engines that do not require any visual input in non-native languages like the Brainware Extraction engine, the Brainware and ASSA Classification engines, the Brainware Layout Classification engine, and so on.
After support for non-western languages is activated, the project has to be saved and re-learned.
While the support option for non-western languages always looks for a one-to-one character transformation, the Chinese, Japanese and Korean language support may lead to an increase in text length of the transliterated object. The multi-character representation is phonetically more precise but increases the original text length. The attributes of the SCBCroWorktext objects like TextLength refer to the original character length. The attribute TextProperty and the WinWrap scripting engine’s Len method return the length of the transliterated text. This limitation applies only during the transliteration phase, which usually corresponds to internal core classification and extraction and also involves some script events, like PostEvaluate, executed during the core extraction.
If you use Chinese, Japanese or Korean languages in your project, you need to enable the Use
Multi-Byte Encoding option on the Definition Mode tab of the project’s Settings dialog.
Refer to Section 4.8.5: Runtime Mode for export options.
4.8.2.4 User Interface
The user interface of Definition Mode is the core of WebCenter Forms Recognition Designer. The three distinct areas of the user interface are as shown below:
Project/Class/Field Definition Panel
Two tabs enable you to select a project, class or field to work on.
Document View Displays the most recently selected document.
Property Editors Displays the properties for the select project, class or field.
4.8.2.5 Project-Level Properties

Oracle WebCenter Forms Recognition 36 Designer User's Guide
Four types of project-level properties are available for definition when you select the .sdp file on the Class tab on the left side of the screen:
Project.
Classification.
Validation.
Supervised Learning.
All four property types can be accessed on dedicated tabs on the right side of the screen. These tabs are called editors.
To access these property editors, select Show Properties on the Edit menu.
4.8.2.6 Project Editor
The Project Editor contains general classification settings such as interpretation, thresholds, and distances for standard classification and parent classification, OCR, word segmentation, and storage.
4.8.2.7 Classification Editor
The Classification Editor enables you to assign a default class to which documents will be assigned if they cannot be automatically classified. It also displays the engines used to classify Document Classes. Refer to Section 5: Setup the Classification for information on using the Classification Editor.
4.8.2.8 Validation Editor
At the project level, the only validation setting available is whether to permit or forbid Forced Validation. Refer to Section 7: Setup the Validation for information on using the Validation Editor.
4.8.2.9 Supervised Learning Editor
Supervised Learning is configurable only at the project level. Refer to Section 5.15: Configure the ASSA Engine for Classification in Automatic Supervised Learning and Section 6.7: Planning Supervised Learning for information about configuring Supervised Learning.
4.8.2.10 Class-Level Properties
Three types of project-level properties are available for definition when you select a base class or derived class from the Class tab on the left side of the screen. These are described below:
Classification Editor At this level, the Classification Editor is used to select a classification engine for the document class, and to establish settings for the selected engine. Refer to Section 5: Setup the Classification for more information.
Document Class Editor The Document Class Editor is used to establish settings for the selected document class. Refer to Section 5: Setup the Classification for more information.
Validation Editor The Validation Editor is used to establish validation settings and to enable the Standard Validation Engine. Refer to Section 7: Setup the Validation for more information.

Oracle WebCenter Forms Recognition 37 Designer User's Guide
4.8.2.11 Field-Level Properties
Four types of field-level properties are available for definition when you select a field on the Field tab on the left side of your screen. These are described below:
Analysis Editor This editor is used to select the analysis (extraction) engine. Refer to Section 8: Setup the Data Extraction and the settings from the selected engine for more information.
Evaluation Editor This editor is used to select the evaluation engine, if this is necessary for the selected analysis engine.
Field Editor This editor is used to establish OCR settings for the selected field.
Validation Editor The Validation Editor is used to establish validation settings and to enable the Standard Validation Engine. Refer to Section 7: Setup the Validation for more information.
4.8.3 Normal Train Mode
4.8.3.1 Purpose: Classification Learnset
Use this mode to train classification using the properties defined in Definition Mode and the current document set selected in Document Selection Mode. Although learning is also available in Definition Mode, only Train Mode allows the creation of learnsets.
4.8.3.2 Selection: Classification Learnset
To switch to Normal Train Mode, complete the following step:
1. From the View menu, select the Train Mode option. Alternatively, click the arrow next to the Switch to Train Mode toolbar button, then select Normal Train Mode from the dropdown menu.
4.8.3.3 Settings: Classification Learnset
Train Mode requires particular settings that enable you to create a learnset for classification and data extraction.
To set the options for Train Mode, complete the following steps:
1. From the Options menu, select Settings… Alternatively, click the Show Settings toolbar button.
2. In the Settings dialog, select the Train Mode tab.
3. To create a learnset or add documents to it, check the Add Trained Documents to the
Learnset checkbox. Clear the checkbox only if you want to use Train Mode for demonstration purposes. By default, the checkbox is checked when you create a new project.
4. Select the Execute Classification for New Documents Only checkbox if you want Designer to classify each new document that is to be added to the learnset for data extraction. You can use this option if your sample documents do not belong to the same classes. Clear the checkbox if you work with sorted input.

Oracle WebCenter Forms Recognition 38 Designer User's Guide
5. If Review in Normal Train Mode Previously Extracted Values is activated, during learning in Normal Train Mode the system will use previously extracted values from the document and pre-fill form fields with them.
6. Under Learn Set Manager, specify a directory where the documents of the learnset will be stored. Every time you add a sample document to the learnset of a class, it will automatically be copied there.
4.8.3.4 User Interface: Classification Learnset
The user interface of Train Mode enables you to train the classification and extraction learnsets. The two distinct areas of the user interface for training the classification learnset are as shown below:
Class Correction The left panel contains two tabs, one for classes, and the other for fields. The Classes tab is where you can complete the following options:
Manually assign a document to a class.
Correct class assignments proposed by the program.
When the Classes tab is selected, the document is added to the classification learnset.
Document View Displays the currently selected document.
4.8.3.5 Purpose: Extraction Learnset
Use this mode to train extraction, using the properties defined in Definition Mode and the current document set selected in Document Selection Mode.
4.8.3.6 Selection: Extraction Learnset
To switch to Normal Train Mode, complete the following step:
1. From the View menu, select the Train Mode option. Alternatively, click the arrow next to the Switch to Train Mode toolbar button, then select Normal Train Mode from the dropdown menu.
4.8.3.7 Settings: Extraction Learnset
Train Mode requires particular settings that enable you to create a learnset for classification and data extraction.
To set the options for Train Mode, complete the following steps:
1. From the Options menu, select Settings… Alternatively, click the Show Settings toolbar button.
2. In the Settings dialog, select the Train Mode tab.
3. To create a learnset or add documents to it, check the Add Trained Documents to the
Learnset checkbox. Clear the checkbox only if you want to use Train Mode for demonstration purposes. By default, the checkbox is checked when you create a new project.
4. Select the Execute Classification for New Documents Only checkbox if you want Designer to classify each new document that is to be added to the learnset for data

Oracle WebCenter Forms Recognition 39 Designer User's Guide
extraction. You can use this option if your sample documents do not belong to the same classes. Clear the checkbox if you work with sorted input.
5. Under Learn Set Manager, specify a directory where the documents of the learnset will be stored. Every time you add a sample document to the learnset of a class, it will automatically be copied there.
4.8.3.8 User Interface: Extraction Learnset
The user interface of Train Mode enables you to train the classification and extraction learnsets. The two distinct areas of the user interface for training the extraction learnset are as shown below:
Field Correction The left panel contains two tabs, one for classes, and the other for fields. The Fields tab is where you can complete the following options:
Manually select the correct field for data extraction from several candidates.
Correct candidate selections for data extraction proposed by the program.
When a field on the Fields tab is selected, the document is added to the extraction learnset.
Document View Displays the currently selected document.
4.8.4 Verifier Train Mode
4.8.4.1 Purpose
Use this mode for Automatic Supervised Learning, which is an extension of Verifier that uses Associative Learning to extract supplier information.
Automatic Supervised Learning then:
Extracts this information to a base document class.
Learns the new class.
Migrates the local project to the global learnset.
The intent of Automatic Supervised Learning is to improve the global knowledgebase, the quality of documents, and the length of time it takes to design applications.
To use the Verifier Train Mode, you must have already created a verification form.
Use the Verifier Train Mode to check the extraction result. When a supplier is extracted correctly and this document is added to the learnset, a new class is created automatically. To do this, settings must be established for the project level in Definition Mode on the Supervised Learning editor, and on the class level on the Document Class tab the Classification Field must be set.
4.8.4.2 Selection
To switch to Normal Train Mode, complete the following step:

Oracle WebCenter Forms Recognition 40 Designer User's Guide
1. From the View menu, select the Verifier Train Mode option. Alternatively, click the arrow next to the Switch to Train Mode toolbar button, then select Verifier Train Mode from the dropdown menu.
4.8.4.3 Settings
To define the settings, complete the following steps:
1. From the Options menu, select Settings… Alternatively, click the Show settings toolbar button.
2. In the Settings dialog, select the Verifier Train Mode tab.
3. Select Enable Automatic Supervised Learning Workflow for This Project. If this checkbox is not checked, Supervised Learning is not available in the project.
4. Select the Save All Path Information Relative to the Project File checkbox.
5. Select the Apply Local Classification and Extraction Automatically checkbox. New classes are created using the supplier’s name. A learnset should also be created if you select this setting.
6. Select the Prompt if Script Forces or Rejects Insertion to the Learnset checkbox.
7. Under Put Document to Local Learnset, select one of the following options:
Only if Adding Activated by a User
Documents will only be added to the local learnset of the Verifier user manually requests it, by clicking the Add
Document to Learnset button in the Verifier toolbar.
Automatically if More Than…
Documents will be automatically added to the local learnset if more than the specified percentage of fields is identified as being invalid after extraction. The appropriate percentage is specified in the associated text field.
Always Prompt Before Adding
If checked, the Verifier user will be prompted before a document is automatically added to the local learnset.
8. Under Learn New Documents, select one of the following options:
Only by User Request Documents added to the local learnset are only learned when the Verifier user clicks the Learn Documents button in the Verifier toolbar.
Before Batch Closing Documents added to the local learnset are learned each time any batch is closed.
Immediately Documents added to the local learnset are learned immediately.
4.8.4.4 User Interface
The four areas of the Verifier Train Mode user interface are described below:

Oracle WebCenter Forms Recognition 41 Designer User's Guide
Form Area The form area contains a set of controls for correction and manual indexing.
Each control is assigned to a data extraction field. The viewers show the document areas that were extracted to fill the fields.
Current Input Area This area shows a magnification of the current form field and the associated viewer. It can be used for particularly convenient viewing and editing.
Note that the position of the form areas may vary according to the selected layout, or only a subset of form areas may be present.
User Info Area This area displays the class name of the current document, the name of the current field and, if applicable, a message indicating why the current field is invalid.
Document Area This area displays the current document.
4.8.5 Runtime Mode
To switch to Runtime Mode, complete the following step:
1. From the View menu, select the Runtime Mode option. Alternatively, click the Switch to
Runtime Mode toolbar button.
4.8.5.1 Purpose
Working in this Runtime Mode allows you to:
Simulate classification and extraction using the entire document set.
Test the export scripts.
Perform OCR on a document set that will be used in Definition Mode or Train Mode.
Note: Except for the OCR output and the corresponding images, the results of the Runtime Mode are not saved persistently.
4.8.5.2 Settings
For Runtime Mode, you need to define import and export options. In addition, you can either test classification only or classification plus extraction.
To set the options for Runtime Mode, complete the following steps:
1. From the Options menu, select Settings. Alternatively, click the Show Settings toolbar button. The Settings dialog is displayed.
2. On the Settings dialog, click the Runtime Mode tab.
3. Under Workflow Settings, select the desired options from the following:
Execute Classification Execute the classification of input automatically.
Redo OCR on Documents
Rerun the OCR process with selected settings.

Oracle WebCenter Forms Recognition 42 Designer User's Guide
Execute Extraction Execute the extraction of input automatically.
Execute Export Execute the export of documents automatically.
4. Under Export Options for Definition and Runtime Mode, select the desired options from the following:
Trigger Script Based Export
Start a predefined script that contains export instructions.
Copy Documents to Export Directory
Copy processed documents from the import to the export directory instead of moving them.
Generate Default Export File for Each Batch
Generate an ASCII file with the processing results. The export file will be recreated with each run. It will be written to the export directory. The file name is generated according to the naming convention <name of the import directory>.exp.
Generate PDF File on Export
Generate a PDF file with the processing results. The export file will be recreated with each run and written to the export directory. The file name is generated according to the naming convention <name of the import directory>.pdf.
Export Directory Specify a directory location where images and OCR output are stored after processing.
4.8.5.3 Compatibility Options
On the Settings dialog, there is an additional tab associated with the Runtime Mode; the Compatibility tab.
The following settings are available:
1. Under Inheritance Chronology - Event Sequence, check or clear the Top-Down (From Parent
to Derived Class) checkbox as appropriate. When this option is checked, the inheritance succession goes from the parent class to derived classes. When it is cleared, the inheritance succession is reversed and goes from the derived class to the parent class. This is known as bottom up.
Parent classes sometimes contain multiple derived classes that might also be parent classes themselves. If a document class is derived from one or more parent classes, each event for that class will also be executed in all parent document classes, starting at the most senior parent class.
Both bottom up and top down apply to available events.
For most users, the default setting of Top Down is the most appropriated. Change the settings for inheritance chronology event sequences only if there are scripts created for those events. However, unless there is a lot of code, it is probably easier to change the code, rather than change the event chronology.
Event chronology is a potential issue only for projects that contain script code for the events cited in the Oracle WebCenter Forms Recognition Scripting User’s Guide. It is preferable to change the event chronology for these projects.

Oracle WebCenter Forms Recognition 43 Designer User's Guide
2. Under Advanced Validation Option, select the desired options from the following:
Do Not Allow Script Overwriting of Standard Validation Output.
Do Not Fire Validation Events for a Class if 'Use Derived Validation' Flag Is Set.
In Verifier Validate Restricted Characters in All Cases and Not Only When Typing.
Fire 'OnAction' Script Event Recursively.
Allow Firing of FocusChanged Event When Loading the Verification Form.
4.8.5.4 User Interface
The four areas of the Runtime Mode user interface are described below:
Class Selection The class selection area contains a hierarchical representation of classes that are defined in the current project.
Classification Results Displays a list of all documents processed in the current batch and the classification result for each document.
Document Area This area displays the current document.
Field Extraction Results This area displays the fields defined for the class that the document belongs to, and the extracted values for each field for the current document.
4.8.6 Verifier Design Mode
To switch to Verifier Design Mode, complete the following step:
1. From the View menu, select the Verifier Design Mode option. Alternatively, click the arrow next to the Switch to Verifier Mode toolbar button, then select Verifier Design
Mode from the dropdown menu.
4.8.6.1 Purpose
Working in Verifier Design Mode allows you to:
1. Create forms that you can use in WebCenter Forms Recognition Verifier to manually correct extracted data and for manual indexing.
2. Activate or deactivate Force Validation of a field.
3. Set states for classification or extraction for testing a script in the Settings dialog.
4.8.6.2 User Interface
The six distinct areas of the user interface in Verifier Design Mode are as shown below:
Class Selection Contains a hierarchical representation of classes that are defined in the current project.
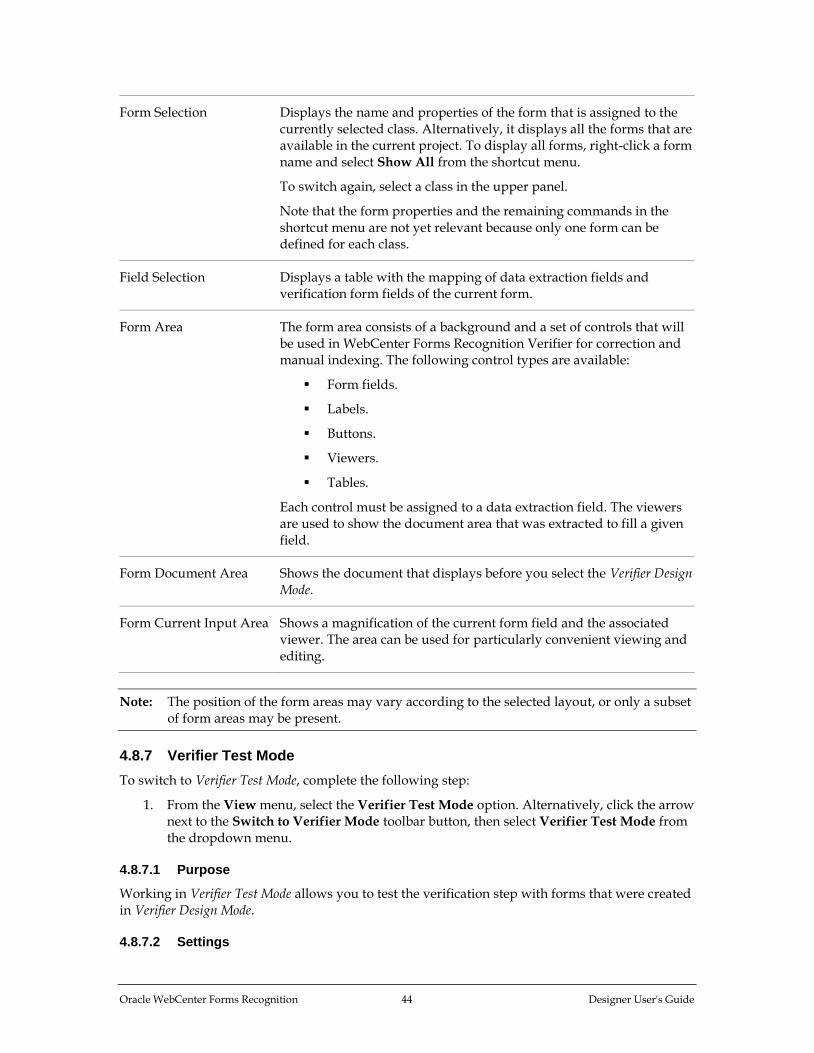
Oracle WebCenter Forms Recognition 44 Designer User's Guide
Form Selection Displays the name and properties of the form that is assigned to the currently selected class. Alternatively, it displays all the forms that are available in the current project. To display all forms, right-click a form name and select Show All from the shortcut menu.
To switch again, select a class in the upper panel.
Note that the form properties and the remaining commands in the shortcut menu are not yet relevant because only one form can be defined for each class.
Field Selection Displays a table with the mapping of data extraction fields and verification form fields of the current form.
Form Area The form area consists of a background and a set of controls that will be used in WebCenter Forms Recognition Verifier for correction and manual indexing. The following control types are available:
Form fields.
Labels.
Buttons.
Viewers.
Tables.
Each control must be assigned to a data extraction field. The viewers are used to show the document area that was extracted to fill a given field.
Form Document Area Shows the document that displays before you select the Verifier Design Mode.
Form Current Input Area Shows a magnification of the current form field and the associated viewer. The area can be used for particularly convenient viewing and editing.
Note: The position of the form areas may vary according to the selected layout, or only a subset of form areas may be present.
4.8.7 Verifier Test Mode
To switch to Verifier Test Mode, complete the following step:
1. From the View menu, select the Verifier Test Mode option. Alternatively, click the arrow next to the Switch to Verifier Mode toolbar button, then select Verifier Test Mode from the dropdown menu.
4.8.7.1 Purpose
Working in Verifier Test Mode allows you to test the verification step with forms that were created in Verifier Design Mode.
4.8.7.2 Settings

Oracle WebCenter Forms Recognition 45 Designer User's Guide
1. From the Options menu, select the Settings… option. Alternatively, click the Show
Settings toolbar button.
2. Select the Verifier Mode tab.
3. For Force Validation, select whether WebCenter Forms Recognition Verifier users can validate a field even if its content is invalid by definition:
Permitted The user can force validation by pressing the [Enter] key three times.
Forbidden The user cannot force validation.
4. Under Designer Test Mode Document Routing you can specify the state values to use if the project has script associated with the ScriptModule_RouteDocument event. You can use the states entered in this area to test your scripting in Verifier Test Mode.
These states will not be used in Verifier.
Enter values for the states you want to test in the corresponding text fields for the following events:
Classification Success State.
Classification Failure State.
Extraction Success State.
Extraction Failure State.
5. Check or clear the Allow Batch Renaming checkbox as required.
If selected, this option enables Verifier users to dynamically rename a batch when they send a document to a predefined exception state. Based on a name supplied by the user, Verifier creates an exception batch with the document and removes the original document from the source batch. The user can rename a batch by right-clicking on it on the Verifier summary screen.
Batch renaming gives Verifier users more flexibility in working with exception batch functionality. It also gives developers more freedom to manipulate batches through custom scripting.
To ensure traceability and consistency in combination with the use of statistical tools it is a benefit to store information of the moved documents. The following information is found in the Move Document event of the event log:
Old batch ID.
New batch ID.
Reason.
Document State.
4.8.7.3 User Interface
The four distinct areas of the user interface in Verifier Test Mode are as shown below:

Oracle WebCenter Forms Recognition 46 Designer User's Guide
Form Area The form area contains a set of controls for correction and manual indexing.
Form fields.
Labels.
Viewers.
Each control is assigned to a data extraction field. The viewers show the document areas that were extracted to fill the fields.
Current Input Area This area shows a magnification of the current form field and the associated viewer. It can be used for particularly convenient viewing and editing.
The position of the form areas may vary according to the selected layout, or only a subset of form areas may be present.
User Information Area This area displays the class name of the current document, the name of the current field and, if applicable, a message indicating why the current field is invalid.
Document Area Displays the current document.
4.9 Working with Projects
4.9.1 What Are Project Files?
In a WebCenter Forms Recognition project, the automatic analysis and processing of incoming documents relies on a group of settings and on trained knowledge. For each application, these settings are saved persistently in a project file. The project file stores the following information:
General settings such as the location of import and export directories.
Document classes and their hierarchical relationship.
Neural networks for full-text classification.
References to learnsets for full-text classification and their status.
Phrases and rules for rule-based classification.
Settings for image size classification.
Field names and field positions for data extraction.
Analysis settings and standard validation rules for data extraction.
Field recognition settings for data extraction.
Table recognition settings for data extraction.
Neural networks for data extraction and their status.
Form definitions for data verification in WebCenter Forms Recognition Verifier.
WinWrap Basic scripts for document classification, data extraction, data validation, data verification, and document export.

Oracle WebCenter Forms Recognition 47 Designer User's Guide
4.9.2 Create a Project
In WebCenter Forms Recognition Designer, there is always precisely one active project. There are two ways to create a project, depending on the application’s state.
If Designer is active:
From the File menu, select the New Project option, then follow the instructions on screen.
If Designer is not active or to start a new instance:
Start Designer through the Windows Start menu. This creates a new project automatically.
Note: Creating a new project does not mean there is already a project file. To create a project file, you first need to save the project.
4.9.3 Save a Project
When you have modified your current project and attempt to close it, Designer asks you to save changes that could be lost. If you want to save a project without closing it, use one of the following methods.
On the File menu, select Save Project. This saves an existing project file. If your project is new, you need to enter a file name. The project file is then saved with the extension .sdp.
Click the Save Project button on the toolbar.
You can also save your project under a new name. Select the File menu and then the Save Project
As… option. You need to specify a new file name.
Save and Compress is a third option available for saving your project. This functionality prevents the growth of a project file that is saved after a document class is removed.
Note: Neither the project file name, nor any folder names in its directory path, can contain any multi-byte characters.
4.9.3.1 Project Compression to Control File Size Growth
This feature is needed because saving a project file after removing a document class and its associated learnset causes the project file to grow or remain the same rather than to decrease.
Choosing Save and Compress allows you to complete the following options:
Save a temporary project file.
Replace the original file with this temporary file.
Remove the temporary project file.
Because Save and Compress is slower than Save or Save Project As…, you should only use this option when you release a project file for production, not when you are actively working on the project.
However, using Save and Compress does not cause the size of the project file to decrease from the size it was before the document class was deleted. Rather, it keeps the size the same as it was before the deletion. To actually decrease the size of the file, you need to use the Save Project As… option.

Oracle WebCenter Forms Recognition 48 Designer User's Guide
You can save a project with or without learn data. To elect either one, in the Save As dialog, select the file type dropdown, then select either <project name> (SDP) or <project name> Without
Learn Data (SDP).
4.9.4 Open a Project
If WebCenter Forms Recognition Designer is active, there are four ways to open a project:
From the File menu, select the Load Project… command, then browse to and select a project (.sdp) file from the file system and open it.
From the File menu, select one of the recent projects. These are listed at the bottom of the menu.
On the toolbar, click the Load Project button, and then select an SDP file from the file system and open it.
Run the Designer executable from a command line and specify the full path and filename for the project to open as a command line argument.
You can load or save a file with or without learn data. When loading a project, click the File Type dropdown box and select either WebCenter Forms Recognition Project (*.sdp) or WebCenter
Forms Recognition Project, Skip Learn Data (*.sdp).
4.9.5 Use Version Control
WebCenter Forms Recognition Designer features an integrated version control system. This feature is useful if you are designing complex applications. With version control, you can save your work or back it up in intermediate stages.
For example, you could design your application in stages. In the first stage, define the document classification. Once this part is working, create a version of your project. If anything goes wrong during the design of the extraction part, you can always go back to the version you created earlier.
By default, version control is off. You can activate it when you are about to save an intermediate stage.
To use version control, complete the following steps:
1. From the File menu, select the Versions… option.
2. In the Versions dialog box, complete the following actions:
To specify the maximum number of versions for the current project, enter an integer in the History Depth text field. Once the maximum number of versions is reached, you will not be able to create additional versions. In this case, increase the maximum number of versions or delete versions that are no longer required.
To create a new version, click Save as New and then enter a description for the new version.
To access a previously saved version of your project, select it from the list of versions and click Open.
To delete a previously saved version of your project, select it from the list of versions and click Delete.

Oracle WebCenter Forms Recognition 49 Designer User's Guide
4.9.6 Set Global Project Variables
The project settings tree is a miniature registry for WebCenter Forms Recognition. With it, you can:
Create keys that represent global variables.
Assign values to these keys.
Organize the keys in a hierarchy.
Edit key values directly in tree.
Manage sets of values for multiple clients or customers.
The variables are defined in Designer and employed in WinWrap Basic scripts. In Designer’s Runtime Mode, in Runtime Server and in Verifier, the appropriate set of key:value pairs becomes available when a client is selected.
4.9.6.1 Display the Client Keys Tree
To display the client keys tree, complete the following steps:
1. On the Options menu, select Settings… Alternatively, on the toolbar, select the Show
Settings button.
2. In the Settings dialog, select the Client Keys tab.
4.9.6.2 Manage Clients
By default, each WebCenter Forms Recognition project contains a standard client named Default. If your project is to be used for more than one client, you can create additional clients.
To create a client, complete the following steps:
1. In the Client Keys tab, click Add.
2. On the Add Client dialog, enter a name for the client and click OK.
3. To select a client, in the Client Keys tab, select an entry from the Active Client list box.
4. To delete a client, in the Client Keys tab, click Remove. The active client is deleted when you confirm the resulting notification.
5. To delete all clients, including their associated keys, in the Client Keys tab, click the Clear Settings button. The entire settings tree is deleted when you confirm the resulting notification.
4.9.6.3 Manage Keys
You can create a hierarchical structure of keys, consisting of root nodes and child nodes. The same keys are used for all clients.
To add a root node to the hierarchy of keys, complete the following steps:
1. In the Client Keys tab, right-click within the area in the center of the dialog box and select Add Root Key from the popup menu. The Add New Key dialog is displayed.
2. Enter a unique name for the key and click OK. The new key is inserted at the top level of the hierarchy.
To add a child node to the hierarchy of keys, complete the following steps:

Oracle WebCenter Forms Recognition 50 Designer User's Guide
1. On the Client Keys tab, right-click an existing key and select Add Child Key from the popup menu.
2. In the Add New Key dialog box, enter a unique name for the key and confirm with OK. The new key is inserted below the parent key.
To remove a key, complete the following steps:
1. On the Client Keys tab, right-click an existing key and select Remove Key from the popup menu.
2. Confirm that you want to delete the key.
4.9.6.4 Manage Values
An individual value can be specified for each defined key from the tree. This value is going to be used only for the currently selected Active Client.
1. Select the Client Keys tab.
2. Select a client from the Active Client dropdown.
3. Click the key you want to modify.
4. In the Value field, type the value that needs to be associated with the key name specified in the Key column.
5. Press the [Enter] key to accept the new value.
4.9.7 Portable Project Files
The project file is portable so that existing applications can easily be reused. WebCenter Forms Recognition Designer can work either with absolute or with relative references to the following directories:
Export directory.
Learnset directory.
Batch root directory.
Image file directory.
By default, absolute references are used. For full portability, you should use relative references.
To enable relative references:
1. From the Options menu, select Settings… Alternatively, click the Show settings toolbar button.
2. In the Settings dialog, on the Verifier Mode tab, check the Save All Path Information
Relative to the Project File checkbox.
To transfer a project, copy the project (.sdp) file and, if applicable, the documents from the learnset to the target directory. With absolute references, adjust the path settings in the project options.

Oracle WebCenter Forms Recognition 51 Designer User's Guide
4.10 Working with Documents
4.10.1 What Are Workdocs?
Starting with the image or file that is provided as input, WebCenter Forms Recognition processes the document and writes the processing result to a structure called a workdoc.
The workdoc is created during the initial OCR of an image or the initial filtering of a file. The OCR also includes a layout analysis that identifies words and blocks within the document. All subsequent processing steps use the workdoc and not the original file. While the document is being processed, each step adds its results to the workdoc. This includes the following results:
The document’s text.
The location of words.
The geometrical relationship between words.
The classification results.
The fields for data extraction.
The candidates for field contents.
The selected correct candidate for each field.
The fields’ validation status.
The workdoc is saved persistently as a .wdc file only if it is part of a batch. Otherwise, it only exists temporarily. It is saved in a compressed format, which allows for greater disk space.
The process of analyzing a document is complete when the workdoc is assigned to a document class and all the fields for extraction are filled and valid.
4.10.2 View a Document
After you select the document input, the corresponding set of documents displays in the Designer viewer. The viewer displays the image or file, and structures in the workdoc.
Document display is available in the following modes:
Document Selection Mode.
Definition Mode.
Train Mode.
Verifier Train Mode.
Runtime Mode.
Verifier Design Mode.
Verifier Test Mode.
The application’s status bar displays the total number of documents in the current set and the serial number of the current document. A navigation bar in the toolbar enables you to navigate through the document set:
Button Description
Move to the first document.
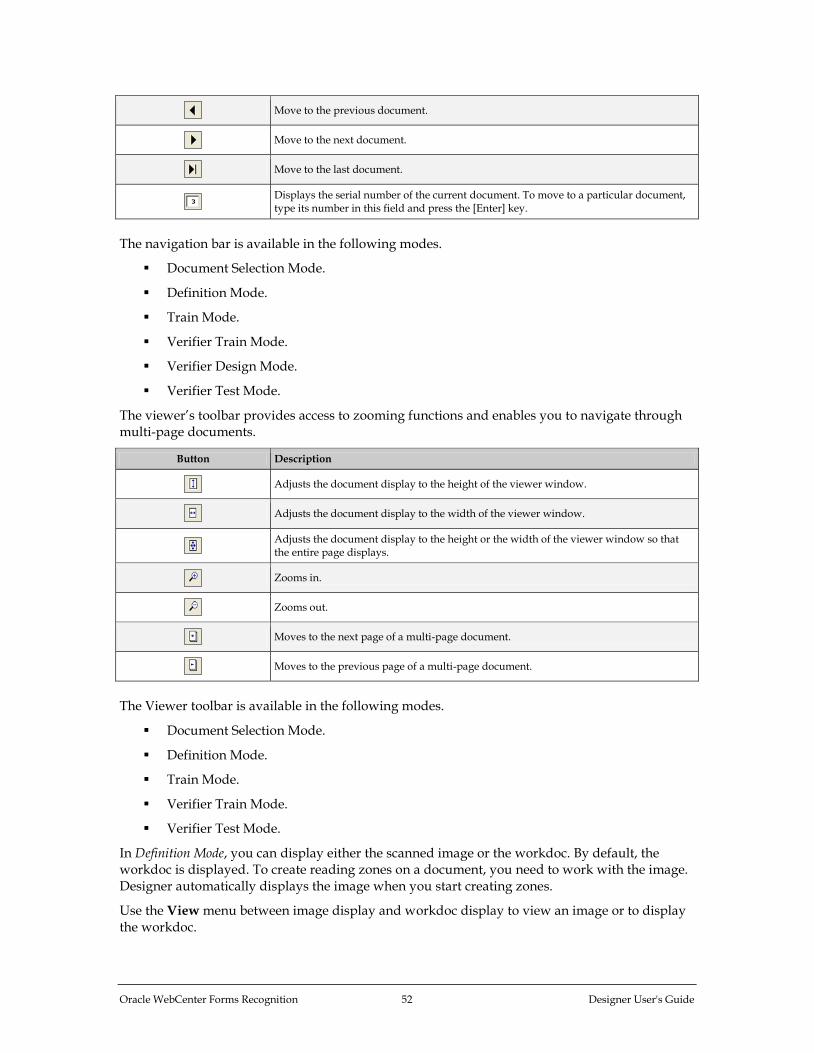
Oracle WebCenter Forms Recognition 52 Designer User's Guide
Move to the previous document.
Move to the next document.
Move to the last document.
Displays the serial number of the current document. To move to a particular document, type its number in this field and press the [Enter] key.
The navigation bar is available in the following modes.
Document Selection Mode.
Definition Mode.
Train Mode.
Verifier Train Mode.
Verifier Design Mode.
Verifier Test Mode.
The viewer’s toolbar provides access to zooming functions and enables you to navigate through multi-page documents.
Button Description
Adjusts the document display to the height of the viewer window.
Adjusts the document display to the width of the viewer window.
Adjusts the document display to the height or the width of the viewer window so that the entire page displays.
Zooms in.
Zooms out.
Moves to the next page of a multi-page document.
Moves to the previous page of a multi-page document.
The Viewer toolbar is available in the following modes.
Document Selection Mode.
Definition Mode.
Train Mode.
Verifier Train Mode.
Verifier Test Mode.
In Definition Mode, you can display either the scanned image or the workdoc. By default, the workdoc is displayed. To create reading zones on a document, you need to work with the image. Designer automatically displays the image when you start creating zones.
Use the View menu between image display and workdoc display to view an image or to display the workdoc.

Oracle WebCenter Forms Recognition 53 Designer User's Guide
Select Show Page to display the image.
Select Show Workdoc to display the workdoc.
You may need this to change the recognition settings for the entire document.
If workdocs are visible in the field list of Design Mode, the text is dimmed. When results of the execution display, the foreground is black.
4.10.3 Process a Document
The process selection group enables you to process single or multiple documents. Depending on the state of the program, processing may include the following features:
OCR (if there is no workdoc for the current document).
Classification (if there are classes).
Data extraction (if there are fields; in Runtime Mode or Train Mode, the Fields tab must also be active).
Document Export (only available in definition and Runtime Mode).
Verification (only available in Verifier Test Mode).
The processing status is shown in the status bar. Note that the initial OCR may take a while.
Button Description
Processes the current document. The button’s dropdown menu enables or disables the debug mode.
Processes the next document.
Processes documents in the current set starting with the current one.
Pauses the processing of documents.
Stops the processing of documents. Clears any results from previous runs.
Adds the current document to the Learnset of the selected class.
Starts the learning for the current project.
4.10.4 Learning
Learning is involved in classification and in data extraction. For classification, learning requires that you provide examples that indicate which documents belong to a specified class. For extraction, learning requires that you select the correct data from a set of extraction candidates.
WebCenter Forms Recognition Designer takes the examples you provide and creates learnsets from them. It then learns to produce the correct output from input that is similar to the learnset.
Use the Learning toolbar to create learnsets and trigger the learning.
4.10.5 Compress a Learnset
The prerequisite for this task is that Designer is in Definition Mode, Train Mode, or Verifier Train Mode.
To update a learnset with changes to the FieldID, complete the following steps:

Oracle WebCenter Forms Recognition 54 Designer User's Guide
1. From the Options menu, select Compress Learnset.
2. Click Yes to confirm the action.
4.10.6 Highlight Processing Results
The document highlighting toolbar lets you select highlighting options for the displayed documents. These buttons act as switches.
Highlighting visualizes structures that have been created during document processing. Therefore, this feature is only available when a workdoc exists. In addition, field and candidate highlighting is only available when fields are defined.
Button Description View Menu
Displays the document without highlighting.
Highlight Nothing
Highlights all words in the document in turquoise.
Words are a result of the OCR process. Each character is stored together with its position. To view the OCR result, point to a word with the mouse. The recognized word displays as a tooltip.
Highlight Words
Highlights all blocks in the document in yellow.
Blocks are groups of words identified in Definition Mode by their geometrical relationship.
Highlight Blocks
Highlights all candidates for the currently selected field in maroon.
A candidate is a possible value for a field identified in the processing step. To view the weight of the candidate, point to it with the mouse. The weight displays as a tooltip.
Highlight Candidates
Highlights all fields in the document.
If the field is valid it is highlighted in green, otherwise it is highlighted in red. To view the name of the field, point to it with the mouse. The name displays as a tooltip.
Highlight Fields
If table analysis is used, only the best table candidate can be highlighted. Table highlighting must not be triggered using toolbar buttons but is active by default. The behavior varies with the different modes:
In Definition Mode, table elements are highlighted during the definition process, and the entire table is highlighted when a document has been processed. Valid elements are highlighted in green. Invalid elements are red.
In Verifier Test Mode, the extracted table is available and can be used to control which elements of the document table are highlighted. Valid elements are highlighted in green. Invalid elements are red.

Oracle WebCenter Forms Recognition 55 Designer User's Guide
5 Setup the Classification
Setting up the document classification involves the following activities:
Creating a classification scheme.
Defining classification methods.
Setting parameters for these methods.
Testing.
Optimizing.
The evaluation of the target class is complex. A document can only be assigned to a class if a number of confidence values exceed predefined thresholds. Although you can influence the threshold values and the evaluation algorithms, the default settings are fine for most cases.
For further instructions on classification evaluation, refer to Section 12: Advanced Evaluation Settings.
For now, the following background knowledge is sufficient:
The confidence values indicate the degree of similarity between the properties of a document and the properties of a class.
A document can be classified if its confidence value with respect to a given class exceeds a predefined threshold. By default, this threshold is 70%.
In general, there is only one target class per document. If several classes have a high confidence with respect to a document, it must be possible to distinguish reliably. Therefore, a certain difference in confidence between the winning class and the second-best competitor is required as well. By default, this distance is 20%.
If multiple classification methods are applied to a given class, WebCenter Forms Recognition will compute a combined result. Normally, classification is based on this combined result.
It is also necessary to ensure that all documents to be processed within the same project have been scanned to the same resolution. If Brainware Table Extraction is to be used the resolution of all documents must be 300 DPI.
5.1 Advanced Classification
The Classification Matrix functionality can be configured in Designer for Verifier users. This feature will suggest several probable classes if the class result could not be determined by 100%. If more than one class is in the list, the class entry is supplemented by a value representing the determination probability. You will find the class with the highest probability on the top of the list.
You can make this functionality available in Verifier by checking Enable Advanced
Classification in Verifier on the Verifier Mode tab in the project’s Settings dialog. To access the Settings dialog, use the Options menu and select Settings…

Oracle WebCenter Forms Recognition 56 Designer User's Guide
5.2 Prepare Sample and Test Documents
Before you begin designing your application, you need to ensure that you have enough documents to setup your project and to test it.
Create separate directories for sample documents and test documents.
For each class, create a subdirectory within the sample directory. Each subdirectory should only contain documents that belong to the corresponding class.
Create separate batches for each subdirectory. The batches will be required as document input. When creating the batches, only the Import and OCR process steps should be carried out. For further instructions, refer to the Oracle WebCenter Forms Recognition Runtime Server User’s Guide.
5.3 Create a Project
To set up a new project, complete the following steps:
1. Start WebCenter Forms Recognition Designer.
2. Set the project options as defined in the following list.
Make sure that manually trained documents can be added to the learnset.
Specify or create a Definition Mode or Runtime Mode export directory. The software needs this directory to save processing results.
Specify or create a Train Mode base directory. The software will write copies of your sample documents to this directory.
Specify the batch root directory. The software will take the document input from there. The batch root directory name must not contain multi-byte characters.
Set all other options as desired.
3. Save the project file.
5.4 Create Classes
WebCenter Forms Recognition Designer enables you to create multi-level hierarchical classification schemes by means of base classes and derived classes. Base classes constitute the highest level of a classification tree. Derived classes are specializations of base classes.
When you create a class hierarchy, consider that:
Derived classes should be a true specialization of their parent class.
Classes that compete with each other should be disjoined.
Classes that compete with each other should be based on a similar level of abstraction.
Note: A working classification tree must contain at least two classes, but four or more classes are better.
The prerequisites for this task are:
Designer is in Definition Mode.
The panel on the left side of the window displays the Classes tab in the foreground.

Oracle WebCenter Forms Recognition 57 Designer User's Guide
5.4.1 Create a Classification Tree
To create a classification tree, complete the following steps:
1. To add a base class to your project, right-click any entry on the Classes tab. If your project does not yet contain classes, the only available entry is the root node, either labeled as <new project> or with the project file name.
2. On the popup menu, select the Insert Base DocClass option.
3. Enter a class name. Valid names consist of alphanumeric characters without spaces or special characters. Later, you can define a different display name in the document class properties. Refer to the Section 5.4.2: Custom Class Names for more information.
4. Click OK to confirm. The new class is inserted below the root class in alphabetical order.
5. Repeat steps 1 - 4 until all required base classes are created.
6. To add a derived class, right-click the prospective parent class. The parent may be either a base class or a derived class itself.
7. On the popup menu, select the Insert Derived DocClass option.
8. Enter a class name and confirm. The new class is inserted below the parent class in alphabetical order.
9. Repeat the steps 6 - 8 until all required derived classes are created.
5.4.2 Custom Class Names
Custom class names can be defined for each document class in the Designer application using the Display Name field, which is available on the Document Class property page of the selected document class’s settings.
Usage of custom class names can be enabled or disabled using the project node settings in Designer. Go to the Advanced tab of the project-level properties and check or clear the Show
Custom Class Names checkbox to enable or disable this option. By default, this option is enabled.
When the new custom class names are defined, this will affect both the Verifier and Designer applications, including the list view items and the status bar indicator of the currently selected class as follows:
The Fields view in Definition Mode of the Designer application, including both status bar indicators of the document class of the opened document.
The status bar indicator in Normal Train Mode and Verifier Test Mode of the Designer application.
The status bar indicator in Document Verification Mode of the Verifier application.
The Manual Classification view of the Verifier application, including the list of the available classes and the currently selected class.
Global Learnset Browsing Mode of the Learn Set Manager tool.
The other class view modes of WebCenter Forms Recognition applications remain unaffected.
This provides the end user with user-friendly object names as a replacement to for non-readable system names for classes. The feature can be especially important for some Supervised Learning configurations and usage of the Learn Set Manager tool, in case the reviewed system-generated class names are not readable at all.

Oracle WebCenter Forms Recognition 58 Designer User's Guide
5.5 Edit Classes
WebCenter Forms Recognition Designer provides commands for editing classes. Exercise caution when using them since you might lose some of the settings you have already made.
The prerequisites for this task are:
Designer is in Definition Mode.
The panel on the left side of the window displays the Classes tab in the foreground.
There must be classes to edit.
The following operations are supported:
The Delete DocClass command from the shortcut menu of a class deletes the class including all associated settings. In this case, you lose all trained knowledge for the project. Repeat the training.
Important: Do not reuse the name of a deleted, learned document class in the same project. Doing so may cause inconsistencies within the project. When you create a document class, a directory with the name of the class is created that contains the learnset documents for this class. This directory will remain when you delete the document class from the class hierarchy. If you create a new document class with this name, it appears as if learnset documents are available when they are not.
The Rename DocClass command from the shortcut menu of a class renames the class. In this case, you lose an existing learnset for the class and all trained knowledge for the project. Create a new learnset for the class and repeat the training.
Within a classification tree, you can move classes using drag-and-drop. In this case, you lose all trained knowledge for the project. Repeat the training. You may also have used inherited field properties. Check whether your settings are still consistent and meaningful.
5.6 Select Classification Methods
Once you have created classes, specify the classification methods for each class. You will probably try a single classification method first. Brainware is the recommended primary method. If you need to improve the results, you can use complementary methods. Classification methods can be combined freely.
The prerequisites for this task are:
Designer is in Definition Mode.
The panel on the left side of the window displays the Classes tab in the foreground.
On the right side of the window, the Classification Editor is selected.
To select one or more classification methods, complete the following steps:
1. On the Classes tab on the left side of the window, select a class.
2. In the Classification Editor, on the right side of the window, check the methods that you want to use for the selected class. Clear the corresponding check mark to exclude a previously selected classification method.

Oracle WebCenter Forms Recognition 59 Designer User's Guide
3. Repeat the previous steps until all classes have classification methods assigned.
5.7 Configure Classification
For Brainware classification, you do not have to define a complicated set of rules. All you have to do is to take a couple of sample documents and to assign them to the respective target classes manually. WebCenter Forms Recognition is then able to learn the way you classify the documents.
5.7.1 Create a Learnset
The set of sample documents you need to provide for classification is called the Classification Learnset. Carefully select the samples for each class, because the quality of your learnset is crucial for the success of the classification.
When you select the sample documents for the learnsets, consider the following:
You need a separate learnset for each class.
You need samples that truly represent the topic you want to cover.
Avoid documents containing multiple topics, since these documents cannot be classified exclusively to one class.
In general, do not use the same document in more than one learnset.
Avoid using similar documents for different classes.
Use only documents with good OCR results for the learnset. When in doubt, highlight the OCR results to review the documents. Never use handwritten documents.
You need at least five sample documents per class. The maximum number of samples per class is limited by memory.
The number of samples needed to create a good learnset depends on the classification task. The broader a field a class is supposed to cover; the more samples are required. For example, you will need more samples to cover the topic politics than you will need for invoices of a company.
Increase the number of samples if classes are very similar to each other.
Ideally, you should have an equal number of samples for each class.
The prerequisite for this task is that the project settings must allow manual addition of documents to the learnset.
To create learnsets, complete the following steps:
1. Switch to Document Selection Mode.
2. Select the first document from the batch that contains the documents for your learnset.
3. Switch to Train Mode. On the left side of the window, the Classes tab must be in the foreground.
4. The list in the lower section of the Classes tab indicates the number of documents in the learnsets.
5. If required, use the navigation buttons in the toolbar to browse to a document that you want to add to a learnset.

Oracle WebCenter Forms Recognition 60 Designer User's Guide
6. On the Classes tab, select a target class from the list box in the upper section.
7. In the toolbar, click the Add to Learnset button to add the current document to the classification learnset of the selected class. Designer writes a copy of the document to a protected directory structure that is reserved for learnsets. The entry in the Classification
Learnset column in the list in the lower section of the Classes tab indicates that a document has been added.
8. Repeat steps 5 - 7 until you have assigned enough samples from the current document set.
9. To add more documents from other document sets, complete this entire process.
10. Save the project. This saves all changes to the learnset and updates the project.
5.7.2 Encrypt a Learnset
If you wish to use confidential documents in a learnset, you can hide them from view by encrypting the learnset. You can use an encrypted learnset to train a project; however, you cannot read the workdoc files or the associated documents. When you use the Encrypt Learnset feature, WebCenter Forms Recognition encrypts an existing learnset and deletes all document files (images and CI documents).
Notes: Make a copy of the learnset and use it for the encryption before you proceed. You cannot undo this task.
Do not encrypt learnsets if you use image based classification engines. Relearning a learnset deletes the workdoc files for the encrypted images and causes a failure.
The prerequisite for this task is that Designer is in Definition Mode or Train Mode.
To encrypt a learnset:
1. From the Options menu, select Encrypt Learnset. A warning message appears.
2. Click Yes to encrypt the learnset. When the encryption process has finished, a notification is displayed.
All documents are accessible in the learnset. After encrypting a learnset, you can still add documents to it. You can also repeat the encryption step to encrypt the new documents.
5.7.3 Security Extensions for Learnset Encryption
5.7.3.1 Description
The encryption of learnsets can be activated for any WebCenter Forms Recognition project in the Designer application.
To activate the encryption, complete the following steps:
1. From the Options menu, select Encrypt Learnset. A warning message appears.
2. Click Yes to encrypt the learnset. When the encryption process has finished, a notification is displayed.
After encryption, reviewing of the learnset in WebCenter Forms Recognition will no longer show the images associated with learnset documents.

Oracle WebCenter Forms Recognition 61 Designer User's Guide
The result of the encryption process affects only the content of the learnset directories, where all workdoc files are going to be encrypted, and all the image files are removed from the disk. Make sure to create a backup of the learnset before applying the encryption process.
The encrypted documents can be still used by the WebCenter Forms Recognition applications in terms of retraining and classification and extraction, while the user cannot review them.
Before the encryption process is applied the learnset directory of a document class includes original image files and the workdoc document in a normal non-encrypted form. Internally, the workdoc contains ZIP streams that, in principle, can be unpacked and reviewed.
After the encryption has been applied, the learnset directories do not contain any images and the internal workdoc structure cannot be unzipped any longer, being modified through an encryption mechanism.
Notes: An encrypted learnset, and even a particular encrypted class of the learnset, can be further extended by new documents and relearned cumulatively. However, the OCR process, of course, cannot be reapplied any longer, because the original image data is unavailable.
Do not relearn learnsets which use image based classification engines. The relearning will fail in this case.
When desired, the encryption of the learnset documents can be applied with a redistributor-specific encryption key. The custom encryption key can be defined in the Windows Registry as a string value, as shown in the following example:
HKEY_LOCAL_MACHINE\SOFTWARE\[Wow6432Node\]Oracle\Cedar\EncryptLearnSetKey
The string value should not exceed 255 characters. If the custom encryption key is undefined when the encryption process is being started, the system will use an internal default key. The custom encryption key can be used in case it is required to get access to the encrypted documents later, for example, from custom script. For this purpose, the developer can call the EnableAccess method of the SCBCdrWorkdoc interface, using the custom encryption key as a parameter.
Important: If a custom encryption key is used to create the encrypted learnsets, setting up the registry key described above on the customer site where the encrypted learnset is used for extraction is not required if relearning of the entire project is going to be applied.
5.7.3.2 Usage
Encryption of learnsets can be used for secure redistribution of WebCenter Forms Recognition learnsets that contain critical customer data that cannot be given from one customer to another in open form.
The feature can be used for secure encryption of any WebCenter Forms Recognition learnsets, but it should be applied to so-called generic learnsets. When used for vendor learnsets, project designers should take into account that the class names are not encrypted and remain as they are. In other words, if the class names or Associative Search fields contain any customer information that has to be obscured, this must be done manually, for example, by renaming the redistributed classes or by neutralizing the database content of the Associative Search fields.
5.7.4 Edit Learnsets
Occasionally, a document is added to a learnset by mistake, or it is assigned to the wrong class.

Oracle WebCenter Forms Recognition 62 Designer User's Guide
To review the learnset:
1. Select Learn Set as document input in Document Selection Mode. A list view of classes is displayed.
2. Double-click one of the classes to display the documents in its learnset in a second list view below.
3. Using the list view of documents, you can now:
Browse through the documents. Click one of the documents to display it.
Delete a document from the learnset. Right-click the document and select Remove
from Learnset from the popup menu.
Move a document to the learnset of a different class using drag-and-drop.
Exclude a document from the learning for specified classification methods. Clear the check mark in the corresponding column. This method is also useful for temporarily removing a document from the learnset.
5.7.4.1 Manually Add New Documents to a Learnset
Although you can add new documents to a learnset at any time, you may find that the results are inconsistent when you add new documents to a learnset and then save the project without learning. This only happens when you use a project that has a history of learning, as the classification engine has a knowledge base from which to extract information.
Without proper learning, the information from the new documents will not be included in the classification. To remedy this, you can change a learnset by manually adding a document to it and then changing the working mode. The documents will automatically go through the learning process once the mode changes.
The prerequisite for this task is:
Your project settings must allow manual addition of documents to the learnset.
To add a document to a learnset manually, complete the following steps:
1. Switch to Document Selection Mode and select a document from the batch.
2. Switch to Train Mode. On the left side of the window, the Classes tab must be in the foreground.
The list in the lower section of the Classes tab indicates the number of documents in the learnsets. If required, use the navigation bar in the toolbar to browse to a document to be added to a learnset.
3. On the Classes tab, select a target class from the list box in the upper section.
4. In the toolbar, click the Add to Learnset button to add the current document to the classification learnset of the selected class. WebCenter Forms Recognition writes a copy of the document to a protected directory structure that is reserved for learnsets. The entry in the Classification Learnset column in the list in the lower section of the Classes tab indicates that a document has been added.
5. Repeat the previous steps until you finish adding all preferred documents.
6. Select a working mode. The system automatically learns the new documents.
7. Save the project.

Oracle WebCenter Forms Recognition 63 Designer User's Guide
Note: You would normally use this method for small projects and demonstrations when you are most likely to change the mode. For projects large projects in which learning would be a lengthy task, it is best to follow the normal learning procedure.
5.7.5 Learning
During Learning, WebCenter Forms Recognition uses your learnsets and the manually assigned target classes to identify the correlation between document input and target class. WebCenter Forms Recognition learns to classify documents automatically if they are similar to the documents in one of the learnsets.
Learning is required:
After you have set up your classification scheme and created learnsets.
When you have changed the classification tree by adding, deleting, moving or renaming classes.
When you have added or removed a classification method that relies on learning.
When you have changed any parameters affecting these classification methods.
When you have changed a learnset.
The prerequisites for this task are:
You must have set up a classification scheme with the minimum number of classes.
You must have specified classification methods that rely on learning.
You must have created appropriate learnsets with the minimum number of samples.
Designer runs in Train Mode or in Definition Mode.
To use the learn mode, complete the following steps.
1. If required, select the Options menu and then Incremental Learning to change the scope of learning. If this option is enabled, learning only covers changes to the learnset. If this option is disabled, the entire project will be learned.
2. In the toolbar, click the Learn Documents button.
Learning may take several minutes. The class that is currently learned is indicated in the status bar. Once finished, a success message displays.
5.7.6 Check the Learn Status of a Class
Learning always attempts to cover the entire classification tree. Only classes with insufficient learnsets are omitted. You can check at any time whether a class has already been learned or whether it requires re-learning.
The prerequisites for this task are:
Designer is in Definition Mode.
The panel on the left side of the window displays the Classes tab in the foreground.
On the right side of the window, the tabs with class or field properties are visible.

Oracle WebCenter Forms Recognition 64 Designer User's Guide
To check the learn status of a class, complete the following steps:
1. On the Classes tab, on the left side of the window, select a class.
2. In the Classification tab on the right side of the window, under Used Engines, select the Brainware Classify Engine method name.
3. Check the Classification Engine properties. It displays one of two states:
Class is trained and ready.
Class is currently not trained.
5.8 Configure Brainware Layout Classification Engine
Setting up Brainware Layout Classification is similar to setting up Brainware Classification. You just need to provide sample documents for learning.
If there is already a learnset for Brainware Classification, there is usually no need to create another one for Brainware Layout Classification.
To create a separate learnset for Brainware Layout Classification, proceed as described in Section 5.7.1: Create a Learnset. To carry out the learning, proceed as described in Section 5.7.5: Learning.
5.8.1 Overview and Purpose
The Brainware Layout Classification engine is an engine for the purpose of so-called layout classification using the powerful Brainware Classifier technology. While the Brainware Classification engine available in WebCenter Forms Recognition is used for content or type classification, the purpose of Brainware Layout Classification engine is to provide more precise classification between documents with similar templates, like, for example, invoices delivered from different vendors, where it is possible to reach more exact result by taking into account the positional information of the documents’ content and not only the textual content of the documents like in ASSA or Brainware content classification engines.
5.8.2 How It Works
The Brainware Layout Classification engine simply applies normal Brainware Classification. However, each word of both learned and extracted documents is not just used as-is, but extended with special character sequences that uniquely identify which zone of the document the word belongs to. Visually this idea can be represented as a document split to a number of zones. In the illustration below, the yellow area is the first page of the document and VAT is the word we are looking for.
A1 B1 C1
A2 VAT
B2
C2
Now the VAT word is going to be extended as VAT_BBBB_AAAA, identifying that we look for the word VAT only in the {B1; A2} region of the document. This then simply means that if for the learned layout class ‘A’ the word VAT was mostly located in region {C1; C2} and for other class ‘B’ it was usually {B1; A2} the system will prefer class ‘B’ while for normal Brainware Classification such a difference between the two classes would have been irrelevant.

Oracle WebCenter Forms Recognition 65 Designer User's Guide
5.9 Configure Language Classify Engine
5.9.1 Overview and Purpose
The Language Classify Engine automates the classification of processed documents by language.
The engine is supplied with predefined and pre-trained learnsets for nine languages:
Danish
English
Finnish
French
German
Greek
Russian
Spanish
Swedish
The English, French, German, Greek and Russian languages are specifically optimized for invoice processing.
New languages can be added easily if required, and the predefined languages are adjustable.
5.9.2 How It Works
The Language Classify Engine uses the ASSA content classification technology to distinguish between processed documents written in different languages. The engine imports the data in Unicode format and converts them to non-western language learnsets with a special phonetic English representation suitable for the core ASSA engine. After this conversion, the engine creates an ASSA classification pool that is then used for classification purposes. The pre-trained version of this pool is distributed along with WebCenter Forms Recognition setup and is available without having to learn anything, although it is adjustable if the customer would like to extend the predefined learnset.
When classifying the next incoming document, the system will use the available ASSA classification pool for the classification. During the classification, the engine ignores all numeric words found in the document since they are usually irrelevant in terms of language classification.
Note: To use the engine for the non-western languages the Activate Support of Non-Western
Languages option must be enabled for the project in the Definition tab of the Settings dialog. If you have documents with Chinese, Japanese or Korean languages, the multi-byte encoding must also be enabled.
During classification, the system will search for class language assignments to determine into which class the document is going to be classified. To create a new language assignment:
1. Select the desired class under the Classes view in Definition Mode in Designer.
2. Select the Classification tab.
3. Select Language Classify Engine in the Languages Available for this DocClass list.
If required, you can assign multiple languages to one document class.
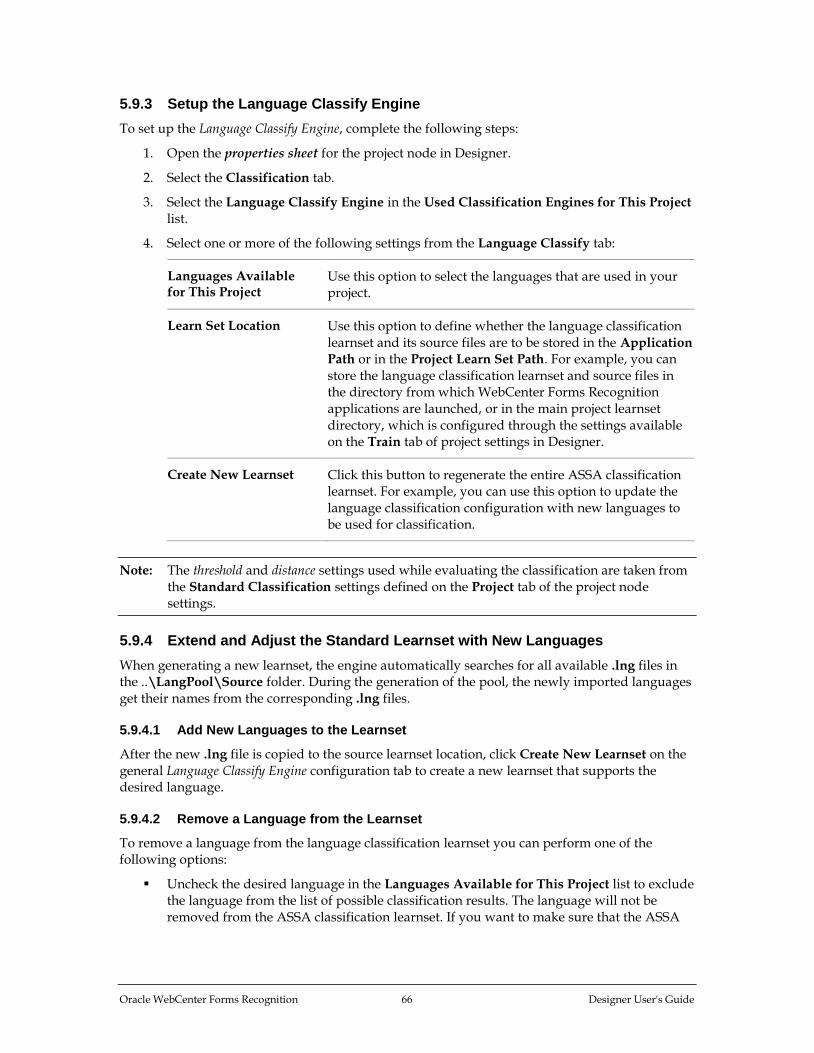
Oracle WebCenter Forms Recognition 66 Designer User's Guide
5.9.3 Setup the Language Classify Engine
To set up the Language Classify Engine, complete the following steps:
1. Open the properties sheet for the project node in Designer.
2. Select the Classification tab.
3. Select the Language Classify Engine in the Used Classification Engines for This Project list.
4. Select one or more of the following settings from the Language Classify tab:
Languages Available for This Project
Use this option to select the languages that are used in your project.
Learn Set Location Use this option to define whether the language classification learnset and its source files are to be stored in the Application
Path or in the Project Learn Set Path. For example, you can store the language classification learnset and source files in the directory from which WebCenter Forms Recognition applications are launched, or in the main project learnset directory, which is configured through the settings available on the Train tab of project settings in Designer.
Create New Learnset Click this button to regenerate the entire ASSA classification learnset. For example, you can use this option to update the language classification configuration with new languages to be used for classification.
Note: The threshold and distance settings used while evaluating the classification are taken from the Standard Classification settings defined on the Project tab of the project node settings.
5.9.4 Extend and Adjust the Standard Learnset with New Languages
When generating a new learnset, the engine automatically searches for all available .lng files in the ..\LangPool\Source folder. During the generation of the pool, the newly imported languages get their names from the corresponding .lng files.
5.9.4.1 Add New Languages to the Learnset
After the new .lng file is copied to the source learnset location, click Create New Learnset on the general Language Classify Engine configuration tab to create a new learnset that supports the desired language.
5.9.4.2 Remove a Language from the Learnset
To remove a language from the language classification learnset you can perform one of the following options:
Uncheck the desired language in the Languages Available for This Project list to exclude the language from the list of possible classification results. The language will not be removed from the ASSA classification learnset. If you want to make sure that the ASSA

Oracle WebCenter Forms Recognition 67 Designer User's Guide
pool does not contain any references to the language, click Create New Learnset to re-generate the entire language classification pool.
Remove the desired source language file from the ..\LangPool\Source subfolder of the learnset location directory, and then click Create New Learnset. The language will disappear from the list of available languages.
5.9.4.3 Modify Existing Language Learnsets
To modify the learnset for one (or more) of the existing languages, open the desired language .lng file in an appropriate application, apply your modification, and then use the procedure described in the Section 5.9.4.1: Add New Languages to the Learnset to replace the existing language source file with the modified custom one.
5.9.4.4 Classify Documents with the Language Classify Engine
WebCenter Forms Recognition uses the standard classification rules when applying the classification process with the Language Classify Engine. For example, to check the exact classification results and weights on a per-language basis, use the standard Class Result Matrix function available in Designer.
5.10 Configure Phrase Classification
To use phrase classification, you must specify certain keywords or phrases that lead to a particular class or exclude a document from a class.
5.10.1 Search Phrase
A search phrase consists of one or more search words (text strings). When a search phrase consists of multiple words, separated by spaces, it is called a search expression. As such, a space character cannot be used for any other purpose and cannot be searched for explicitly.
The following characters are special wildcard characters:
* Represents zero or more characters within a single word.
? Represents a single character (but not a space).
?? When preceded and followed by spaces, represents zero or one word. If ?? is included within a search word, it will represent two characters.
Similarly, these wildcard characters cannot be searched for explicitly.
As the engine searches for words that contain each search word, to add leading or trailing wildcard characters on the search word, as well as adjacent * characters, is not meaningful. Such characters are removed or ignored.
Note: The wildcard word, ??, can be entered manually, or can be configured through the Designer user interface by setting a Maximum distance to next word. This value is the distance between this search word and the next. For example, a value of 1 means the search words must be in adjacent words, and a value of 6 would allow for up to 5 words to appear between this and the next search word.

Oracle WebCenter Forms Recognition 68 Designer User's Guide
5.10.2 Candidates
When a search phrase consists of a single search word, any word in a document that contains the search word as a substring is identified as a candidate. The candidates for the selected search phrase will be highlighted on the document.
For each search word, an allowable number of errors (up to 8, depending upon the length of the search word) may be defined. An error may be a missing character, an inserted character, or a substituted character. The number of errors for a candidate is indicated in the tooltip for that highlighted candidate on the document.
It can be sometimes confusing how errors are applied. For example, if the search word is qntity and one error is allowed, the word quantity will be picked up as a candidate, because qntity matches substring antity with one error.
When searching for a search expression, the same method is applied to each search word ensuring that the Maximum distance to next word between search words is not exceeded.
Note: For search expressions with three or more search words, intermediate search words can be made optional through the Word Significance slider.
If the Significance of a search phrase is set to forbidden, and at least one reliable candidate is found, candidates will not be highlighted.
5.10.2.1 Phrase Weight
For each candidate, a weight is calculated based on the significance/strength settings for the search word(s), as well as the frequency of errors, if any. The weight for a search phrase is the maximum weight of all of its candidates, scaled according to the search phrase's Significance setting.
Note: The number of candidates for any of the search phrases does not affect phrase weight, though it is taken into account when using Phrase Engine for Classification.
This phrase weight can be seen in the tooltip of any one highlighted candidate in the document, generally a percentage between 1 and 100. However, in the case of a 'forbidden' search phrase for which all candidates are questionable, such as contain errors, the phrase weight may be less than zero.
5.10.2.2 Classification Value
When the Phrase Engine is used in the Classification step, the output is based upon the candidate weights and/or phrase weights.
If the document contains a forbidden search phrase, the classification is set to No for this engine. Otherwise, the engine returns a Classification value, generally between 0 and 100.
The method used to calculate the Classification value depends upon the function selected for each search phrase.
Button Description
Degressive: the sum of all candidate weights.
However, for any search phrase with one or more candidate, the effective weight of each subsequent candidate is reduced proportionally, e.g. a second candidate will count on half, a third candidate will count one third, and so on.

Oracle WebCenter Forms Recognition 69 Designer User's Guide
Linear: the sum of all candidate weights.
The full significance of the phrase is scored with every further occurrence.
Binary: the sum of all phrase weights.
A multiple occurrence is not scored higher than a single occurrence.
In all cases, weights are scaled by a factor of 100 to arrive at a Classification value. When the sum is greater than 100, the Classification value is set to 100.
5.10.3 Parameters
The parameters you can adjust are:
Tolerance Maximum number of typing errors allowed for this word. If the phrase contains the word invoice, for example, and the number of error characters has been specified at 2 for this word, the words invoke, involve and invite would also meet the requirements.
Word Strength The stronger the word, the more typing errors can occur until the word loses its meaning. A maximum strength stands for a word that retains full significance with the maximum number of permissible typing errors. In general, you should keep the default setting for the word strength.
Accept Only Case Sensitive Matching
Select this option to enforce case-sensitivity.
Relative Significance Use this option to set the proportional significance of the current word within the phrase.
For example, if your phrase is with kind regards, you could reduce the relative significance of the word with. As you move the associated slider, the weight will be shown to the right in plain text.
Maximum Distance Use this setting to specify whether your phrase will still be recognized if there are additional words between the current one and the next one specified.
For example, you could use a single definition for please pay by and please pay this amount by, with a maximum distance of 3. For consecutive words, the distance is 1.
Significance This setting affects the entire phrase. The significance may vary between absolute (i.e., a document belongs for sure in this class if the phrase is found) and forbidden (i.e., a document cannot belong in this class if the phrase is found). Be careful when using the extreme values. Use them only on very strong phrases and try to avoid them on single words.
Function Specifies the function that applies if a phrase is found more than once in the same document. This setting affects the entire phrase. To change the function, click the button.

Oracle WebCenter Forms Recognition 70 Designer User's Guide
The prerequisites for this task are:
You must have set up a classification scheme.
Phrase Classification is selected for at least one of the classes.
Designer is in Definition Mode.
The panel on the left side of the window displays the Classes tab in the foreground.
On the right side of the window, the tabs with class and field properties are visible.
5.10.3.1 Enter Phrases
To enter phrases for phrase classification, complete the following steps:
1. On the Classes tab, on the left side of the window, select a class.
2. Select the Classification tab.
3. Under Used Engines, select the Phrase Classify Engine method name.
4. In the Phrase Classify Engine property sheet, type a keyword or a phrase in the New
Phrase text field.
Alternatively, highlight words in the document and click a word to copy it into the New
Phrase text field.
To build phrases, click the next word. The new word is added to the existing entry with a space as a separator.
5. Click the Ins button to add the new phrase to the list of active phrases that display below. New phrases are added with medium significance.
6. To edit the significance, select an active phrase from the list and click Edit. The Phrase Settings dialog box displays. This dialog box contains a separate tab for each word in the phrase.
7. To delete a phrase, select it from the list of active phrases and click Del.
8. To write phrases and associated settings to an export file, click Export and specify a file name. This generates a .exp file. To import an existing .exp file, click Import and select it from the file system.
9. To test a phrase, select it from the list of active phrases and click Test. Click Test All to test all active phrases.
10. To highlight the occurrences of a phrase in the active document, make sure that all other highlighting options are turned off. Then select the phrase from the list of active phrases. Each occurrence is highlighted in green. To view the number of typing errors and the significance, point to the highlighted phrase.
Note: The maximum characters limit for search phrases is 32.
5.11 Configure Image Size Classification
To use image size specification, you must specify the document size for the corresponding class. It is also possible to specify a size range.
The prerequisites for this task are:

Oracle WebCenter Forms Recognition 71 Designer User's Guide
You must have set up a classification scheme.
Image size classification is selected for at least one of the classes.
Designer is in Definition Mode.
The panel on the left side of the window displays the Classes tab in the foreground.
On the right side of the window, the tabs with class and field properties are visible.
5.11.1 Specify Document Size
To specify the document size, complete the following steps:
1. On the Classes tab on the left side of the window, select a class.
2. On the Classification tab on the right side of the window, under Used Engines, select the Image Size Classification method name.
3. In the Image Size Classification property sheet, under Minimum Size, select one of the predefined sizes, or select Custom Size and enter the Height and Width in millimeters into the corresponding text fields.
4. Repeat the previous step for the Maximum Size option.
5. Under Tolerance, use the spin control to specify the error tolerance, as a percentage, that is applied when comparing sizes. This value is particularly important if your Maximum
Size and Minimum Size are equal.
5.12 Configure Forms Classification
To use Forms Classification, you must create reading zones on documents and compare the recognition results from these zones with known identifiers of a class of forms. You can also configure a Forms Classification on the project level if more than one class shares zones.
Reading zones are fixed areas on documents that contain information that is to be recognized. In WebCenter Forms Recognition, three different types of reading zones exist:
OCR
OMR.
Barcodes.
However, for Forms Classification, only OCR and barcode zones can be used.
For OCR zones, the contents of the reading zone are determined using optical character recognition. The textual content of the zone is the result of this process. For barcode zones, the contents of the reading zone are determined using barcode recognition. The number of strings represented by the barcode is the result of this process.
To learn about OMR zones, refer Section 10.8.1: OMR Zones.
5.12.1 Create Reading Zones
The prerequisites for this task are:
You must have set up a classification scheme.
Forms Classification is selected for at least one of the classes.
Designer is in Definition Mode.

Oracle WebCenter Forms Recognition 72 Designer User's Guide
The panel on the left side of the window displays the Classes tab in the foreground.
On the right side of the window, the tabs with class and field properties are visible.
Reading Zones must be visible.
You may use more than one reading zone on each form. To create reading zones, complete the following steps:
1. On the Classes tab on the left side of the window, select a class.
2. Load a document into the viewer that belongs to the selected class.
3. From the menu, select View Show Page. The viewer toolbar displays additional buttons for zone creation.
Button Description
Activates the selection tool.
Creates an OCR reading zone.
Creates an OMR reading zone.
Creates a barcode reading zone.
Creates an anchor.
4. In the viewer panel, click the relevant toolbar button to create an OCR zone or a barcode zone.
5. Click the document and drag to create a rectangular reading zone around the form identifier. Make the rectangle large enough to hold the identifier. It should not be much larger, though. The reading zone displays as a transparent rectangle with red borders. Each zone has a label that displays the name of the zone. The initial name is created from the word Zone and a consecutive number.
For more information, about creating and editing reading zones, refer to Section 8.6: Setup Zone Analysis and Section 10: Advanced Recognition Settings.
5.12.1.1 Configure Form Identifiers
To configure the form identifiers, complete the following steps. These form identifiers are applicable only for OCR zones:
1. On the Classification tab on the right side of the window, under Used Engines, select the Forms Classify Engine method name.
2. Click a cell of the Zone Name column and select a zone from the list of available reading zones.
3. In the Compare Text column, type the string that identifies your form. This string is compared to the recognition result from the reading zone.
4. In the Page Number column, click to specify whether the reading zone is on the first or on the last page of the document.
5. Repeat steps 2 - 4 for all reading zones that should be considered.

Oracle WebCenter Forms Recognition 73 Designer User's Guide
By default, the recognition result and form identifier are compared using an error-tolerant algorithm. To specify the comparison method in more detail, complete the following steps.
6. On the Forms Classify tab, click the row number to select a row.
7. Click Advanced.
8. In the Compare Text field, you can edit the comparison string. This may be required, depending on the comparison method you select.
9. In the Compare Method list, select one of the following methods:
String Compare A very simple method that returns a match for a literal occurrence of the comparison string.
Trigram An error-tolerant method that returns a match for a literal occurrence of the comparison string, but also for strings that can be derived from the specified one by fragmenting the text into groups of three characters called trigrams. The number of identical groups determines whether there is still a match.
Levenshtein Another error-tolerant method that returns a match for a literal occurrence of the comparison string, but also for strings that can be derived from the specified one by inserting, interchanging or deleting single characters. This is the default method.
Regular Expression A method that returns a match if the recognition result corresponds to a format pattern specified in the Compare
Text field.
Simple Expression A method that returns a match if the recognition result corresponds to a simple format pattern specified in the Compare Text field.
10. You may want to assign several forms with similar identifiers or several versions of the same form to the same class. In this case, it may be useful to ignore leading or trailing characters of the recognition string. You can set the number of characters that are to be neglected using the Ignore First and Ignore Last spin controls.
11. The Max. Compare Distance allows you to perform the comparison, neglecting leading or trailing characters of the comparison string. The compare distance is computed as follows:
Compare Distance = 1.00 - Number of Characters (Recognition String) / Number of Characters (Comparison String)
A match requires that the actual compare distance is less than or equal to the maximum compare distance.
For more information about the syntax of regular expressions, refer to Section 11: Regular Expressions.
On the Forms Classify tab, color-coding is applied to the comparison string to indicate the selected method:
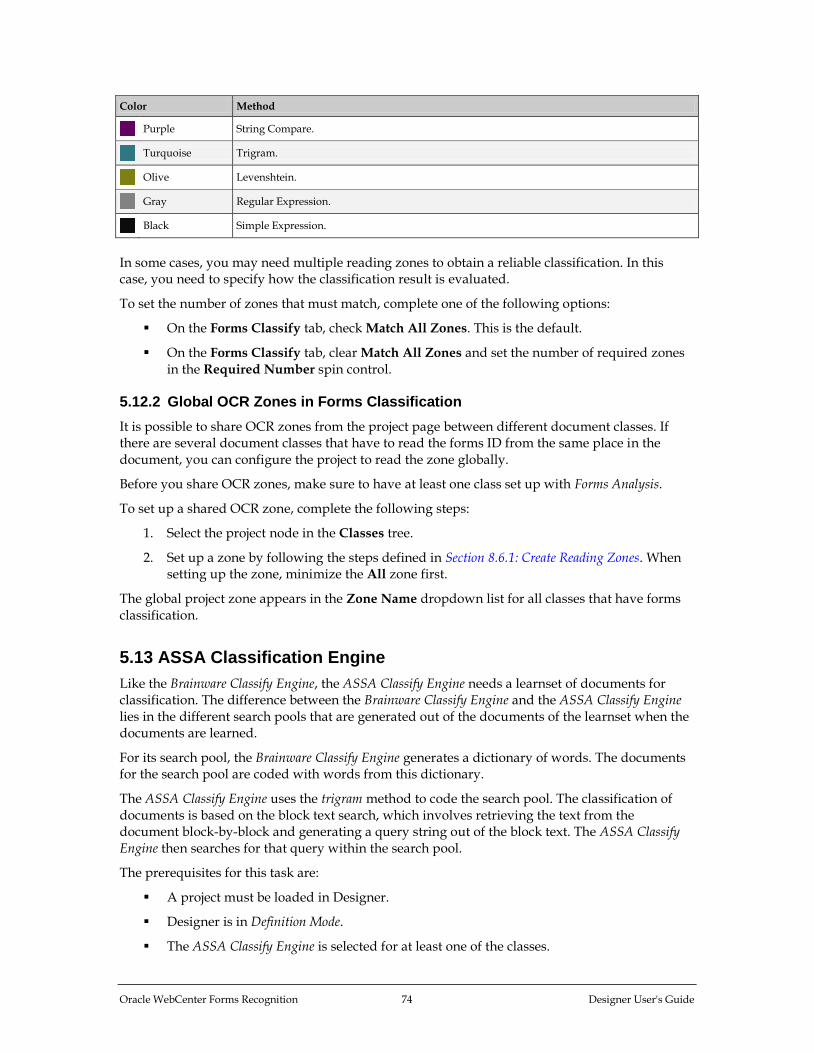
Oracle WebCenter Forms Recognition 74 Designer User's Guide
Color Method
Purple String Compare.
Turquoise Trigram.
Olive Levenshtein.
Gray Regular Expression.
Black Simple Expression.
In some cases, you may need multiple reading zones to obtain a reliable classification. In this case, you need to specify how the classification result is evaluated.
To set the number of zones that must match, complete one of the following options:
On the Forms Classify tab, check Match All Zones. This is the default.
On the Forms Classify tab, clear Match All Zones and set the number of required zones in the Required Number spin control.
5.12.2 Global OCR Zones in Forms Classification
It is possible to share OCR zones from the project page between different document classes. If there are several document classes that have to read the forms ID from the same place in the document, you can configure the project to read the zone globally.
Before you share OCR zones, make sure to have at least one class set up with Forms Analysis.
To set up a shared OCR zone, complete the following steps:
1. Select the project node in the Classes tree.
2. Set up a zone by following the steps defined in Section 8.6.1: Create Reading Zones. When setting up the zone, minimize the All zone first.
The global project zone appears in the Zone Name dropdown list for all classes that have forms classification.
5.13 ASSA Classification Engine
Like the Brainware Classify Engine, the ASSA Classify Engine needs a learnset of documents for classification. The difference between the Brainware Classify Engine and the ASSA Classify Engine lies in the different search pools that are generated out of the documents of the learnset when the documents are learned.
For its search pool, the Brainware Classify Engine generates a dictionary of words. The documents for the search pool are coded with words from this dictionary.
The ASSA Classify Engine uses the trigram method to code the search pool. The classification of documents is based on the block text search, which involves retrieving the text from the document block-by-block and generating a query string out of the block text. The ASSA Classify Engine then searches for that query within the search pool.
The prerequisites for this task are:
A project must be loaded in Designer.
Designer is in Definition Mode.
The ASSA Classify Engine is selected for at least one of the classes.

Oracle WebCenter Forms Recognition 75 Designer User's Guide
The panel on the left side of the window displays the Classes tab in the foreground.
On the right side of the window, the tabs with class and field properties are visible.
5.13.1 ASSA Configuration
The ASSA Classify Engine has three tabs for configuring project-level settings:
ASSA Classification Sets the confidence parameters.
Regions Restricts the area of the document to be classified.
Tuning Defines stretching and calibration that is relevant when the engine is combined with other classification engines, as well as aspects concerning the search speed versus quality.
5.13.1.1 Stretching
Stretching improves the results of Brainware Classification when combined with other classification engines. Stretching means to increase the distance between results given by the classification engine.
You can change the Stretching factor with the slide bar. The stretching factor, which increases the distance, can vary from 1.0 to 5.0. For example, if the stretching factor is 2.0, the classification result is as shown in the following table:
Class ID Percentage Before Stretching Percentage After Stretching
Class1 70% 70%
Class2 66% 62%
Class3 56% 46%
Class4 32% 8%
5.13.1.2 Calibration
Calibration fine-tunes the various classification engines. Calibration is based on the Calibration factor, which can vary from 0.1 to 1.5.
5.13.1.3 Quality / Speed
This option allows the project administrator to select a rapid classification, which sacrifices quality, or a slower classification, which offers greater accuracy. To elect rapid classification, you can set a percentage of the full block text. Or you can elect greater accuracy by creating a query based on the full block text, which takes additional time to compute.
5.14 Test the Classification
When a classification scheme has been set up and the classification methods have been defined and configured, the classification can be tested. The prerequisites for this task are:
There is an active document set.
There is a trained classification scheme.
To test the classification only, your project settings should exclude data extraction from runtime functionality.

Oracle WebCenter Forms Recognition 76 Designer User's Guide
There are several ways to test the classification, and these are described below.
5.14.1 In Definition Mode
Use one of the following buttons to determine target classes and confidence values:
Button Description
Processes the current document. The button’s dropdown menu enables or disables the debug mode.
Processes the next document.
Processes documents in the current set starting with the current one.
For unprocessed documents, the software displays Not Classified in the bottom-left edge of the window. After processing, the proposed class displays. If WebCenter Forms Recognition cannot assign the document, it displays Uncertain Classification.
To display an array of classification results for the previously processed document, click the Show/Hide Classification Results Matrix toolbar button.
For more information about how the confidence levels are obtained, refer to Section 12: Advanced Evaluation Settings.
If debug mode is enabled, a dialog box displays every time a document is being processed. It shows a tree view of possible target classes and confidence levels. In addition, the parameters for classification evaluation display. For more information about evaluation parameters, refer to Section 12: Advanced Evaluation Settings.
To close the dialog box, click Continue.
To quit debug mode, clear the Show This Dialog checkbox.
5.14.2 In Train Mode
Use the following button to determine target classes:
Button Description
Processes the current document. The button’s dropdown menu enables or disables the debug mode.
Just as in Definition Mode, for unprocessed documents, the software displays Not Classified in the bottom-left edge of the window. After processing, the proposed class displays. If WebCenter Forms Recognition cannot assign the document, it displays Uncertain Classification.
Debug Mode options in Train Mode are the same as for Definition Mode.
5.14.3 In Runtime Mode
Use one of the following buttons to determine target classes and confidence values:
Button Description
Processes the next document.
Processes documents in the current set starting with the current one.
Stops the processing of documents. Clears any results from previous runs.

Oracle WebCenter Forms Recognition 77 Designer User's Guide
The results are presented in a panel that displays summary results for all classes within the current project. It contains two separate tabs, one for a statistic view of average (mean) classification and extraction results, the other one for a tree view of the classification distribution. Both views are continuously updated at runtime.
The classification-related columns on the Statistic View tab have the following meaning:
Column Description
Class Hierarchy Class name and position within the classification scheme.
Count Number of documents assigned to a class, or total number of processed documents. Numbers are accumulated until processing is stopped.
Classification Level Average (mean) confidence for assignments to a class.
Classification Difference Comparison of actual classification results with results from a reference file. The first number represents the number of different classifications in this run; the second one represents the total number of classifications in this run. If there is a difference between test results and reference results, this is indicated by the red color.
The Statistic View tab lets you compare your classification results with results stored as reference files. To create a reference file, select one of the following options:
On the project Settings dialog, select the Runtime Mode tab and select the option to Generate Default Export File for Each Batch.
In Runtime Mode, right-click any class entry on the Statistic View tab and select Save As
Reference from the popup menu to write the current results to a reference file.
You can edit reference files, as well as the default export file, with a text editor, or you can use text editors to create a reference files from scratch. Each line in the file is tab-separated and represents the results of one document. The line structure is as follows:
<file name> <class name> <field 1> … <field n>
To select a reference file, select one of the following options:
Right-click any class entry on the Statistic View tab and select Load Reference from the popup menu, then browse to and select a reference file or the default export file.
Select the Compare With checkbox at the bottom of the Statistic View tab, then click the Browse button and then select a reference file.
To use a selected reference file for comparison with the subsequent runs, complete the following steps:
1. Right-click any class entry on the Statistic View tab and select Compare with Reference, then confirm.
2. Check the Compare With checkbox at the bottom of the panel.
The Class Tree View tab displays the distribution of class assignments. To show or hide a branch, double-click the corresponding root node.
If you click a class in either the Statistic View or the Class Tree View, refer to the panel for information regarding which documents have been assigned to the current class. The classification-related columns in this panel are defined in the following table.
Column Description
Classification Level Confidence for assignments to a class.
Ref. Classification Target class for this document as given in the reference file.

Oracle WebCenter Forms Recognition 78 Designer User's Guide
5.15 Configure the ASSA Engine for Classification in Automatic Supervised Learning
To configure classification with the ASSA Engine, complete the following steps:
1. In Definition Mode, click the Classes tab on the left side of the screen.
2. On the Classes tab, select a class.
3. On the Classification Editor, on the right side of the screen, under Method Name, select ASSA Classify Engine.
5.16 Optimize the Classification
Most classification problems are due to one of the following causes:
Insufficient OCR quality.
Insufficient learnset quality.
Inappropriate selection of classification methods.
5.16.1 Resolve Problems with the OCR
Use the highlighting options to identify whether there are problems with the OCR. If this is the case, proceed as follows:
The problem may be caused by the quality of your images. Make sure that your document input is properly prepared. For example, check scanner settings or fax export settings.
The default OCR settings may not be suitable to process your document input. For instructions on how to change these settings, refer to Section 10: Advanced Recognition Settings.
Changing the OCR settings at the project level is a severe intervention. Make sure that other reasons are excluded before you do this.
5.16.2 Resolve Problems with the Classification Methods
In Definition Mode, check the classification results of problematic documents. Identify the method that causes the problem. Determine whether classification fails because the confidence is too low or whether the distance is too low. Also, watch for large fluctuations.
If documents are classified to the wrong class, you need to change the learnset or the parameters for the method that returns the wrong result. Result fluctuations often indicate an inappropriate set of rules.
If too many documents are not classified at all, consider adding another classification method, or providing more samples for the learnset.
If this does not help either, you may have to change the settings for classification evaluation. Refer to Section 12: Advanced Evaluation Settings.
5.16.3 Resolve Problems with the Learnset
Check the contents of unclassified or wrongly classified documents and compare them with the documents in your learnset. Often, you just need to add unclassified documents to the learnset of

Oracle WebCenter Forms Recognition 79 Designer User's Guide
the target class to improve your results. When changing the learnset, consider the following general rules:
Add documents with a confidence below the threshold if their content fits into the selected class.
Add documents that were previously not classified correctly due to the initially insufficient learnset.
Use documents with an almost identical confidence for two or more classes. These documents are suitable to differentiate the classes.
Avoid documents with a high confidence. These documents do not improve the learnset, because they would already be classified correctly.

Oracle WebCenter Forms Recognition 80 Designer User's Guide
6 Planning Applications
In WebCenter Forms Recognition, every document is processed in a sequence of operations as shown in the following list:
1. Import.
2. OCR.
3. Layout analysis.
4. Classification with optional verification.
5. Data extraction with optional verification.
6. Optional Supervised Learning.
7. Export.
Each step requires a careful analysis of the current document input, the associated business processes, and some planning.
6.1 Identify the Document Import Formats
You can process scanned paper documents, faxes, files, or documents from mixed sources.
Paper documents are forwarded as TIFF images to WebCenter Forms Recognition. You need to ensure that the image quality is good enough to obtain reasonable OCR results. Black-and-white images with a resolution of 300 dpi work best. You may need to optimize your scanner’s settings to attain the resolution.
Although OCR optimization can be done in WebCenter Forms Recognition, there is no way to regain information that was lost during scanning.
To process files, a suitable filter for text extraction must be available. WebCenter Forms Recognition’s built-in filter can process the following documents:
ASCII documents.
Microsoft Word documents.
Microsoft Excel documents.
Microsoft PowerPoint documents.
HTML pages.
AmiPro documents, up to Version 3.1.
WordPerfect documents, up to Version 8.
Other file formats require individual testing. Before importing the document into WebCenter Forms Recognition, first convert it to a supported format.
6.2 Identify the Document Classes
Review your documents and look for:
Similar textual content

Oracle WebCenter Forms Recognition 81 Designer User's Guide
Reoccurring phrases
Reoccurring forms or letterhead paper
Characteristic document dimensions
These document properties can be employed in classification. Use them to define an initial classification hierarchy.
You cannot define a classification hierarchy based on document dimensions alone.
6.3 Plan the Classification Methods
WebCenter Forms Recognition offers several classification methods that can be used alone or in combination with each other.
Classification methods are specified at the class level. You can apply one or several classification methods to each class, and an evaluation algorithm will combine the results and decide whether a given document belongs to a particular class.
At this stage, you need only an idea of classification methods. To improve the initial classification results, you can easily add classification methods later.
6.3.1 Brainware Classification
To use this method, you yourself must be able to distinguish the documents by their content. The formal structure of the document is unimportant. The same is true for syntax or phrases, since only words are used as input.
For example, the following classification problems can be solved with Brainware classification:
Business correspondence by type (such as orders, invoices, or resumes).
Essays classified by author.
Customer requests classified by topic.
Movie descriptions classified by genre.
Brainware classification can be used as the only classification method.
6.3.2 Phrase Classification
Phrase classification uses words and phrases to identify the document class. Within certain error limits, the phrases or words must literally occur within the documents.
Phrase classification can be used as a very powerful complement to content classification since you can define certain keywords that must lead to a specific class.
Phrase classification can be used as the only classification method. However, this is not generally recommended, because it may require setting up and maintaining a potentially complex set of rules. Typically, phrase classification is used in conjunction with the Brainware Classification Engine.
Note: Phrase classification should not be used to train base classes.
6.3.3 Image Size Classification
Image size classification uses the physical size of documents to distinguish classes. This method will not be able to prove positively that a document is in a specific class. Instead, image size

Oracle WebCenter Forms Recognition 82 Designer User's Guide
classification is used to rule out classes and whole branches by excluding documents that do not match. This method is very fast. Use it to reduce a classification problem and to shorten the computing time all at once.
6.3.4 Forms Classification
Forms classification can be used to identify forms or other structured documents that have an identifier of the document class printed on them. If the identifier is placed at a fixed position on the document, reading this zone can quickly provide a classification result. Forms classification is well suited to assigning structured documents to a class and combining several forms in one class. However, the document input is usually too heterogeneous to use forms classification as a stand-alone method.
6.3.5 Brainware Layout Classification
The Brainware Classification engine is used for content or type classification. The Brainware Layout Classification engine provides a more precise classification between documents with similar templates. For example, considering invoices from different vendors it would be possible to reach a better result by taking into account the positional information of the documents’ content as well as the textual content of the documents.
The document is divided into a number of zones. Each piece of text is tagged to indicate in which zone it appears. This means that if for the learned layout class, the word VAT was mostly located in region the top left-hand corner, and for the another class, it was usually in the bottom right-hand corner, the system would prefer one classification over the other while for normal Brainware Classification such a difference between the two classes would be irrelevant.
6.4 Identify the Fields for Data Extraction
Extraction means that selected data from a document is automatically written to an extraction file. In general, classification is a precondition for extraction because the fields that need to be extracted are usually different for each class. If it is not necessary to distinguish different document classes and only extraction has to be performed, you can carry out a dummy classification with only one class that needs to be defined as the default. For more information, refer to Section 12.1.4: Project-Level Default Classes and How They Work.
For each class, identify the business processes that use the documents. Identify the data that is required by subsequent systems. Then define the set of fields that are to be filled per class.
6.5 Plan the Extraction Methods
Extraction of information from the document into a field occurs in two distinct steps:
Analysis In this step, the document content is analyzed and a set of possible values for a field is generated. These values are called candidates.
Evaluation In this step, the correct candidate is selected from the set of candidates.
WebCenter Forms Recognition supports several analysis methods. The best choice for the evaluation method depends on the selected analysis method. Analysis and evaluation methods are defined at the field level.
Although it is possible to combine several classification methods for each class, you can use only one analysis method and one evaluation method per field.

Oracle WebCenter Forms Recognition 83 Designer User's Guide
Evaluation is normally only necessary for the Format Analysis engine. It can also be used for Zone Analysis if various zones are defined. Other engines do not need an evaluation engine.
6.5.1 Brainware Table Extraction
Use this method to interactively train table extraction line-by-line (row-by-row.) This engine can learn which lines to extract, which lines not to extract, and which lines to use for learning; and which lines not to use. It can also learn line types and assign color-coding to them. This engine also recognizes when the learnset has changed. Further, the engine can extract columns and cell data. Refer to Section 8.4: Setup Brainware Table Extraction for more information.
Included within the Brainware Table Extraction is the extension for Generic Table Extraction that provides easy access and simple configuration of the extraction. For more information, refer to Section 8.4.2: Configure Generic Table Extraction.
6.5.2 Table Analysis
Note: This rules-based method is only supported for projects that were created in earlier versions, and should no longer be used for new projects. All new projects should use Brainware Table Extraction.
This method was used to extract a series of records that were organized in columns. As with Brainware Table Extraction, traditional Table Analysis yielded several candidates, but the one with the highest confidence is used automatically. Therefore, no evaluation step is required. To access the remaining candidates, you used custom evaluation methods implemented as WinWrap Basic scripts. For more information, refer to Section 8.7: Setup Table Analysis.
6.5.3 Format Analysis
Use this method to extract data that might be located at arbitrary positions in the documents. Format Analysis uses a formal description of the character string you are looking for. For each field, a set of search patterns can be defined. All strings within the document text that match at least one of the specified patterns are candidates. Typically, there are several candidates.
Format Analysis is usually combined with Brainware Evaluation. That is, the user can take a couple of examples and select the correct candidate from the possible ones. The software can then learn to select candidates automatically. Alternatively, format analysis can be combined with custom evaluation methods implemented as WinWrap Basic scripts.
6.5.4 Zone Analysis
Use this method to extract data located at fixed positions in a document. This requirement is usually met with classical forms. For each field, a reading zone or a set of reading zones on the document is defined. The recognition methods available for zone reading include OCR engines, barcode recognition, and optical mark detection (OMR). Typically, Zone Analysis yields a single candidate, but with multiple reading zones per field, a set of candidates can be obtained.
Zone Analysis only requires the evaluation step if there are multiple candidates. You can then use either Brainware Evaluation or custom evaluation methods implemented as WinWrap Basic scripts.
For more information, refer to Section 8.6: Setup Zone Analysis.

Oracle WebCenter Forms Recognition 84 Designer User's Guide
6.5.5 Associative Search Engine
Use this method to extract addresses, or as a classification engine in combination with Brainware Layout Classification. For more information, refer to Section 5.8: Configure Brainware Layout Classification Engine.
6.6 Planning the Verification
WebCenter Forms Recognition features a dedicated application for quality assurance, called Verifier. This application provides the means to check and correct uncertain or invalid results of automatic document classification and data extraction. In addition, it permits manual classification and indexing of documents.
For each class, decide which steps are to be carried out automatically, which steps are to be carried out manually, and which verification steps will be involved. If manual indexing is involved, decide whether this should be done with or without database support (i.e. Smart indexing).
Note: Verification can also be carried out in stages, and exception handling mechanisms can be implemented to account for special error situations.
Plan the verification forms that will be required and the validation rules that will be imposed on user input.
6.7 Planning Supervised Learning
Supervised Learning Workflow is used to automatically create and learn new document classes. This automatic process creates the new derived documents classes for a generic base document class. This document class is not inherited from any other document class. The derived document classes cannot have further derived document classes.
Supervised Learning Workflow must be enabled in both WebCenter Forms Recognition Designer and WebCenter Forms Recognition Verifier.
6.8 Planning the Document Export
By default, WebCenter Forms Recognition uses a specified export directory where documents and their associated workdocs are saved after processing. To change this behavior, use one of the available export connectors or custom export methods implemented as WinWrap scripts.
6.9 Planning the Page Separation
6.9.1 Batch Properties
To create a batch for the Page Separation feature, configure a Runtime Server instance to perform the Import and OCR processing steps.
The documents to import must consist of single-sided documents.
The import creates batches with one folder per document.
The workflow states should be different to the default workflow states. Otherwise, there will be conflicts with the other instances using Runtime Server that have their own state numbers.

Oracle WebCenter Forms Recognition 85 Designer User's Guide
6.9.2 Multipage Detection
Multipage detection uses phrases to find documents that belong together and makes multipage TIFF image documents from them. The documents are checked during the classification and extraction steps of batch processing. Multipage detection works only within each folder of the batch. You must scan the relevant documents in the correct order to the same folder.
Note: If pages of a document are spread to different folders, multipage detection will not work even when the folders belong to the same batch.
6.9.3 Setup Multipage Detection
Multipage detection is activated in WebCenter Forms Recognition Designer. The prerequisites for this task are:
Designer is in Definition Mode.
On the left side of the screen, the Classes tab is activated
On the Input tab for the project settings the option to Save Execution Results to
Workdoc is enabled. Otherwise, the changes cannot be stored.
6.9.3.1 Activate Multipage Detection
To activate multipage detection, complete the following steps:
1. On the Classes tab, right-click the project node to display a popup menu.
2. Select Show Multipage Detection from the popup menu.
3. On the Multipage Detection properties tab, select the Activate Multipage Detection checkbox.
4. Select a default for the start of detection, either First Page or Following Page, from the dropdown list.
5. To keep the page sizes similar, select Similar Page Size Required and select the Tolerance for the page size.
6. Select the Phrase Multipage Detection tab.
7. Select the Activate checkbox.
8. Set the Threshold and Distance values, if desired, for Multipage Detection. The default is 60 percent for Threshold, and 20 percent for Distance.
9. Select First Page, Subsequent Page, and Last Page tabs to define phrases for the different pages as appropriate.
10. To enter a phrase, edit the New Phrase text field.
11. Click the Ins button can insert the phrase with a default significance of medium and default value of any.
12. To modify settings for a phrase, either double-click a phrase or select it and click the Edit
button. For more information about editing phrases, refer to Section 5.10: Configure Phrase Classification.
6.9.3.2 Other Multipage Detection Settings

Oracle WebCenter Forms Recognition 86 Designer User's Guide
To run Multipage Detection, you must configure the following settings on the Workflow tab of the Runtime Server instance:
The Classification and Extraction step must be performed together.
Perform folder-based classification and extractions.
Note: Do not use the Document Grouping - 1 folder per document Import option.
For more information about Multipage Detection and Runtime Server settings, refer to the Oracle WebCenter Forms Recognition Runtime Server User’s Guide.
6.9.4 Page Separation Learnset
The Page Separation feature requires its own learnset. To prepare a learnset for Page Separation, a directory, which contains at least 50 fully extracted and validated documents. These must be single-sided images with work document (.wdc) files. To prepare these documents use a Verifier project containing a single base class and five defined fields given exactly in the following order:
1. InvoiceNumber
2. Date
3. Page
4. PageNumber
5. SenderID
6.9.4.1 Background of Page Separation Learnset
InvoiceNumber A principle identifier of a multi-page document. If the Invoice number changes between two pages, a new document will start.
Date Another criterion that can strengthen the determination of a multi-page document.
Page This field has to contain the page keyword to strengthen the page number extraction. For example, the Page keyword could be Page or Pg.Nr. or something similar; whatever is present on the document.
PageNumber If the document has pagination, a new document can be recognized when the pagination starts over.
SenderID The identifier of an invoice type. For example, the tax number of the vendor can be used to identify a unique invoice of multiple pages from the same vendor. If the SenderID changes between two pages, this signals that a new document has started.
Note: If some fields are not present on the trained document, leave these fields empty.
6.9.5 How to Train the Engine
The Page Separation engine is trained using the Verifier application. Each page of the document must be represented as a separate document. Open the first document (first page) in Verifier and

Oracle WebCenter Forms Recognition 87 Designer User's Guide
populate the fields using the selection tool feature. The position of the entered fields is essential in terms of further learning.
The next page must then be trained in the same way, as a separate document.
6.9.6 Project Properties for Page Separation
To prepare a new project for the Page Separation feature, only a few steps are necessary, and are described below.
6.9.6.1 Step 1: Insert Base Class
In Definition Mode, insert a single base class. This base class needs no definitions for classification. It is defined as the default class in the project properties:
1. Right-click the project name in the Classes tab.
2. Select Show Properties from the popup menu.
3. Select the Classification tab on the right side of the Designer window.
4. Select the name of the new base class from the Default Classification Result dropdown list.
This default setting is necessary, because the Page Separation feature is executed in the Extraction processing step. No special extraction settings are necessary.
6.9.6.2 Step 2: Activate Multipage Detection
To activate multipage detection, perform the following steps:
1. Right-click the project name in the Classes list of the Definition Mode.
2. Select Show Multipage Detection from the popup menu.
3. The Multipage Detection properties display on the right side of the window. Select the General tab.
4. Select the Activate Multipage Detection checkbox.
Ignore the Phrase Multipage Detection tab. For Page Separation, the Triton ADS Engine is being used.
5. Select the Triton ADS Engine tab.
6. Select the Activate checkbox.
7. Specify the path to the ADS Learn Folder
8. Save the project file.
For more information, refer to Section 6.9.4: Page Separation Learnset.

Oracle WebCenter Forms Recognition 88 Designer User's Guide
7 Setup the Validation
7.1 Validation Engine
WebCenter Forms Recognition’s robust standard validation and output formatting is intended to standardize the development and maintenance cycles for each implementation of WebCenter Forms Recognition. However, standard validation has not replaced scripted validation. Validation scripts are still supported. For a brief introduction to script validation, refer to Section 7.5: Introduction to Validation Scripts. For detailed information about scripting, refer to the Oracle WebCenter Forms Recognition Scripting User’s Guide.
7.2 Basic Validation Concepts
Validation is a quality assurance task that involves confirming whether a field extraction is correct or incorrect. Validation is configured in Designer’s Validation Editor, but the actual work is done in Runtime Server, Verifier, and Advanced Verifier.
Runtime Server loads the project at runtime and executes validation after extraction but before exporting the project. Documents that fail validation in Runtime Server are forwarded to Verifier for quality assurance. Verifier loads the settings and uses property sheets to display the validation settings. Validation is done with the Standard Validation Engine; currently the only engine available for validation.
Note: All validation settings are established with respect to the validation engine. This means that the Standard Validation Engine must be enabled for validation settings to be made or used.
Validation uses WebCenter Forms Recognition’s hierarchical organization of relationships between parent and child elements. These hierarchies make WebCenter Forms Recognition customizable and useful, but they also make the software more complex.
While Runtime Server is processing a batch or list of batches, each containing several documents, it first tries to classify the processed document. After classification, the extraction is performed for each field defined for this document class. The validation rules for a field can either be defined for this document class but can also be inherited from the parent class.
A document will be valid when all fields on the document are valid. If one field is invalid according to standard validation or script validation rules, the whole document is invalid. The script validation for a field is performed only when the standard validation is valid. If one document of a batch is invalid, the whole batch is passed to the Verifier for manual intervention.
7.2.1 Levels of Validation
Generally, validation properties are inherited along the parent-child hierarchy. Children automatically inherit their parent’s validation settings. You can accept inherited settings or override them. Inherited settings in the project, class, or document are homogenous, whereas overrides are useful for heterogeneous constructs.
There are three levels of validation:
Project. (For projects, the only validation setting you can make is whether to permit forced validation. You also store global settings using validation templates at this level.)

Oracle WebCenter Forms Recognition 89 Designer User's Guide
Class and Document.
Field. (Includes text field and table field.)
7.2.2 Terms and Commands You Should Know
Standard Validation Engine
The Standard Validation Engine enables you to use a graphical user interface to establish robust validation rules for documents or classes, and fields. The engine must be enabled in order for any validation to occur, or for you to establish validation settings.
Force Validation Force Validation allows you to force a field to be valid, even if it is invalid by definition. If force validation is permitted, the entity being validated is always valid, regardless of its content or specific settings. Default force validation means that the validation settings are taken from the parent.
Derived Validation Tells a child field, document, or class to inherit all validation settings from its parent. Derived validation can be used only on trained classes.
Character Filtering Character Filtering is available for all types of validation. This enables you to indicate which characters are valid and which are not, which characters should be removed during validation, and which should be replaced during validation. This tab also enables you to establish OCR settings and case conversion.
By default, all special characters are indicated for removal for date and amount fields, but you can modify character filtering to add other characters to the list. If the Remove Characters setting is blank, every character is acceptable.
You can add new characters to the list, or change the way the characters are interpreted. The final character filtering settings govern how the OCR engine handles the characters.
Output Formatting Output Formatting enables you to standardize how data output from WebCenter Forms Recognition appears when you export it. This is useful for adding homogeneity to the appearance of output results, or conforms to an enterprise’s requirements for data storage. Output formatting is available only for date and amount fields. Output formatting must be specifically enabled at the field level.
7.2.3 Available Validation Settings
Available validation settings vary based on whether you are establishing settings at the project level, the class level, the document level or the field level. Typically, the more specific the level, the more specific and complex the validation rules are.
7.2.4 Types of Field Validations
Five types of fields can be validated:
Text.
Amount.

Oracle WebCenter Forms Recognition 90 Designer User's Guide
Date.
Checkbox.
List.
Each of these types of fields can be validated for certain general characteristics, although the type of validation varies from field to field. Character filtering is available for all types of fields. Output formats can be set for amount and date fields, but not for others.
Force Validation Default: Accepts the parent-level settings.
Permitted: Allows force validation, regardless of the validation settings on the parent.
Forbidden: Prevents force validation, regardless of the settings on the parent.
At project level, the default value is Forbidden. At child level, the default value is Default.
Available Templates This selection box allows you to choose a template to validate the field with.
At project level, this settings is blank if no templates exist for the project, otherwise all templates available for the specific field type are shown.
Available Validation Engines
Only the Standard Validation Engine can be selected.
Copy Click this button to copy global settings to create local settings based on those global settings.
Save Click this button to save global settings.
Use Derived Validation Select this checkbox to use validation settings from the parent.
This option is not available at the project level. At the child level, it is only available for trained classes.
Always Valid Select this checkbox to make the field always valid, regardless of its contents or validation settings. No validation takes place.
The types of validation you can perform vary with the type of field validation you selected, as summarized in the following table:
Validation Type General Validation Character Filtering Output Formatting
Text Yes Yes No
Table Yes No No
Amount Yes Yes Yes
Date Yes Yes Yes
Checkbox Yes Yes No
List Yes Yes No

Oracle WebCenter Forms Recognition 91 Designer User's Guide
7.2.4.1 Validation Type: Text
The General validation settings specific to fields whose Validation Type is defined as Text are described below:
Multi-Line Converts multi-line data to a single, non-delimited, line.
Allow Empty Field Defines whether a text field can be empty.
7.2.4.2 Validation Type: Amount
The General validation settings specific to fields whose Validation Type is defined as Amount are described below:
Amount Range Establishes the setting for validating a range of values.
Minimum Value Fields with values below this range will not be validated.
Maximum Value Fields with values above this range will not be validated.
Region WebCenter Forms Recognition supports 27 regional settings, derived from default written languages.
Currency Symbol Selections vary based on the Region setting. For example, if you chose U.S. English for the region, the symbols for U.S. currency are available. If you chose Canadian English, the symbols for Canadian currency are used. All currency formats for the region are accepted as valid.
Positive Format Uses the currency settings for the Region you selected and standard currency formats for depicting positive numbers.
Negative Format Uses the currency settings for the Region you selected and standard currency formats for depicting negative numbers.
Decimal Symbol By default, the decimal symbol is a point, but you can specify another symbol and have it available in the list for later use. The character used for decimal symbol cannot be the same character used for the Digit Grouping Symbol.
Number of Digits After Decimal
You can specify the number of digits that may appear after the decimal symbol. This is useful for truncating decimal characters.
Digit Grouping Symbol The default setting is a comma, but you can also type in your own setting. This symbol cannot be the same as the Decimal Symbol.
Digit Grouping You can elect to have two or three characters per group or not to group digits at all.
7.2.4.3 Character Filtering for Amount Fields
The following characters will be removed by default:

Oracle WebCenter Forms Recognition 92 Designer User's Guide
: ;" ' & ? ~ ! @ # % ^ *.
You can add characters to this list or delete characters from it.
7.2.4.4 Output Formatting for Amount Fields
Region WebCenter Forms Recognition supports 27 regional settings, derived from default written languages.
Currency Symbol Selections vary based on the Region setting. For example, if you chose U.S. English for the region, the symbols for U.S. currency are available. If you chose Canadian English, the symbols for Canadian currency are used. All currency formats for the region are accepted as valid.
Positive Format Uses the currency settings for the Region you selected and standard currency formats for depicting positive numbers.
Negative Format Uses the currency settings for the Region you selected and standard currency formats for depicting negative numbers.
Decimal Symbol By default, the decimal symbol is a point, but you can specify another symbol and have it available in the list for later use. The character used for decimal symbol cannot be the same character used for the Digit Grouping Symbol.
7.2.4.5 Validation Type: Checkbox
The General validation settings specific to fields whose Validation Type is defined as Checkbox are described below:
Checkbox Caption Enables you to indicate whether a checkbox should be captioned Yes
/ No, Accept / Decline, True / False or some other value.
Checked Value Enables you to indicate whether a checkbox means Yes, True, Accept or some other value when it is checked. This setting should not conflict with Checkbox Caption.
Unchecked Value Enables you to indicate whether a checkbox means No, False, Decline or some other value when it is unchecked. This setting should not conflict with Checkbox Caption.
Default (Checked / Unchecked)
Enables you to indicate whether a checkbox should be selected or cleared by default.
7.2.4.6 Validation Type: List
The General validation settings specific to fields whose Validation Type is defined as List are described below:
Min Len Establishes a minimum valid field length.

Oracle WebCenter Forms Recognition 93 Designer User's Guide
Max Len Establishes a maximum valid field length.
Insert / Delete List Items Create or remove list rows.
Allow List Values Only Only values that appear on the list will be interpreted as valid.
Fill List of Suppliers This option is only available for fields which are designed to use the Associative Search Engine.
Sort List Items Arranges items in the list in alphanumeric order.
7.2.4.7 Validation Type: Date
The General validation settings specific to fields whose Validation Type is defined as Date are described below:
Enable Date Range Dates within the range are interpreted as valid.
From Date Earliest valid date.
To Date Latest valid date.
No Future Date Permitted
Dates in the future are not valid.
Sample Read-only field showing how the date displays based on regional and format settings.
Region WebCenter Forms Recognition supports 27 regional settings, derived from default written languages.
Formats Formats dates using a list of valid formats that are acceptable for that field.
7.2.4.8 Output Format for Dates
The table below shows the Output Formatting settings that are available for dates:
Enable Output Formatting
Select this checkbox to customize the field text using output formatting.
Region One of the 27 regional settings derived from the languages that WebCenter Forms Recognition supports.
Format Sets output formats for date strings.
Sample Read-only field showing how the settings for format will actually appear.
7.2.4.9 Character Filtering for Dates

Oracle WebCenter Forms Recognition 94 Designer User's Guide
The following characters are removed by default:
: ; " ' & ? ~ ! @ # % ^ *
You can add or delete characters for this setting.
7.2.4.10 Tables
Table validation is another type of field validation. Below table shows the Validation settings available for table fields:
Type Indicates whether the table column should be validated as text, amount, checkbox, list, or date.
Template Assigns a template to the field.
Read Only Determines whether data in the table row can be modified.
7.3 Working with Validation Levels
7.3.1 Working with Project-Level Settings
The only validation settings available at the project level are whether to permit or forbid forced validation.
7.3.1.1 Settings Available at the Project Level
At the project level, you can:
Indicate whether Force Validation should be permitted or forbidden as a default for documents and fields. You can also assign validation templates.
The prerequisites for this task are:
Designer is in Definition Mode.
In the panel on the left side of the window, the Classes tab is active.
On the right side of the window, the project property sheet is visible.
The Validation tab is active.
To set project-level validation, complete the following step:
On the validation editor, select whether to permit or forbid Force Validation for the project. You can override this setting for specific entities at lower levels of the parent/child hierarchy.
7.3.2 Working with Document-Level or Class-Level Validation
7.3.2.1 Settings Available at the Document or Class Level
At the document or class level, you can:
Override or accept the parent-level settings for force validation.
Enable the Standard Validation Engine. Validation will not be performed on the document or class unless the Standard Validation Engine is enabled.
Accept all validation settings derived from a parent or from the child class.

Oracle WebCenter Forms Recognition 95 Designer User's Guide
Establish general validation rules for the document.
Note: At this level, you can establish validation rules using amount fields, date fields, and table fields. You cannot establish validation settings for any other type of fields.
7.3.2.2 Prerequisites for Document-Level or Class-Level Validation
The prerequisites for this task are:
A document is selected and visible in the viewer in the middle of the window.
Note: The document does not have to be visible for the functionality to work, but having a document in the viewer makes it easier to visualize this task.
Designer is in Definition Mode.
In the panel on the left side of the window, the Classes tab is active.
On the right side of the window, the document or class property sheet is visible.
The Validation tab is selected.
You can also save your settings as a template by clicking Save As Template.
7.3.2.3 Manage Document-Level or Class-Level Validation
To set document-level or class-level validation, complete the following steps.
1. On the left side of the screen, select a document or class.
2. On the validation editor, select Standard Validation Engine. If you do not select Standard Validation, no validation is performed on the document or class.
3. For Force Validation, select Default, Permitted, or Forbidden as appropriate.
If you select Default, the setting for Force Validation for documents is inherited from the parent or project.
If you select Permitted, Force Validation is permitted for the document or class as a whole, regardless of whether or not you permitted it on the parent.
If you select Forbidden, Force Validation is prevented for the document or class, regardless of whether you permitted or forbade it on the parent.
4. Select a document-level template. You can also copy a template or create a template by saving your settings as a template.
Note: If you selected Standard Validation Engine, the General Validation Rules tab is enabled.
7.3.2.4 Establish Validation Rules at the Document or Class Level
Note: This functionality works only on amount, date and table fields.
To configure validation rules at the document level or the class level, perform the following steps:
1. On the Classes tab on the left side of the screen, select a class.

Oracle WebCenter Forms Recognition 96 Designer User's Guide
2. On the Validation Editor, make sure the Standard Validation Engine is selected. When it is selected, the General secondary tab is enabled. This is the tab you will use to create validation rules at the document or class level. These rules enable you to compare one field to another, establish data criteria, and perform certain mathematical and logical functions.
3. To build an expression, select a field, click one of the function buttons:
SUM Sums all table rules for a column.
MAX Sets the maximum value for a column.
MIN Sets the minimum value for a column.
COUNT Counts the number of rows in a column.
AVG Averages table rows.
ABS ABS function.
4. Select an operator:
= Equal to.
> Greater than.
< Less than.
* Multiplied by.
/ Divided by.
+ Plus.
- Minus
( Open group for expression.
) Close group for expression.
! Not equal to. Must always be followed by an equal sign.
&& AND.
|| OR.
5. Add the parameters to the expression.
6. Click the Add button to move the expression to the list of Validation Rules.
Oracle WebCenter Forms Recognition 97 Designer User's Guide
7.3.3 Working with Field-Level Validation for Text
Field-level validation allows you to accept the parent-level settings for forced validation, enable the Standard Validation Engine, and set general validation rules for the selected field.
7.3.3.1 Settings Available at the Field Level for Text Validation
At the field level for text fields, you can:
Override or accept the document-level settings for forced validation.
Enable the Standard Validation Engine. Validation will not be performed on the selected field unless the Standard Validation Engine is enabled.
Establish general validation settings and character filtering for the selected field.
At the field level for table fields, you can:
Accept the parent-level settings for forced validation.
Enable the Standard Validation Engine. Validation will not be performed on the selected field unless the Standard Validation Engine is enabled.
Set general validation rules for the selected field.
The perquisites for this task are:
Designer is in Definition Mode.
In the panel on the left side of the window, the Fields tab is active.
On the right side of the window, the Properties pane is visible.
The Validation tab is active.
7.3.3.2 Set Validation for Text Fields
To set field-level validation on text fields, complete the following steps:
1. On the left side of the screen, make sure the Field tab is active.
2. Select a text box.
3. On the validation editor, select either the General tab or the Character Filtering tab.
7.3.3.3 Set Validation for Table Fields
To set field-level validation on table fields, complete the following steps:
1. On the Fields tab on the left side of the screen, right-click a field.
2. Click Table to change the field from a text field to a table field.
3. On the Validation Editor, establish the validation rules for the field.
Make sure that the Validation Type is set to Table.
For Force Validation, select Default, Permitted, or Forbidden as appropriate.
Decide whether to check Use Derived Validation (available only for trained classes.)
Decide whether to check Always Valid. This forces WebCenter Forms Recognition to interpret all columns in the table as valid, regardless of their contents or any inherited settings. It also prevents you from establishing specific settings for each row.
Oracle WebCenter Forms Recognition 98 Designer User's Guide
On the General tab, notice that the columns of your table are available. Select a validation type for each row, and if available, select a template.
7.4 Working with Validation Templates
Validation templates are based on a similar concept as analysis and evaluation templates. As with analysis and evaluation templates, you can and should reuse validation templates within a project or globally across projects.
Before you can use validation templates, they must be available in your project. If none is available, you will need to either import them or create them.
7.4.1 Create Templates
You create templates for specific kinds of validation at the field level and then apply them at various parent or child levels throughout the project. You can apply templates at the field level, the document/class level, or the project level.
The prerequisites for creating templates are:
A document is selected and visible in the viewer. The document does not have to be visible for the functionality to work, but being able to see the document helps you visualize how the validation templates should be created.
Designer is in Definition Mode.
On the left side of the screen, the Fields tab is active.
On the right side of the screen, the Validation Editor is active.
7.4.1.1 Create Validation Templates for Fields
To create validation templates for fields, complete the following steps:
1. On the Fields tab on the left side of the screen, select a field.
2. On the Validation tab, establish validation settings for the field.
3. Click the Save button. The New Template dialog is displayed.
4. Give the template a descriptive name and click the OK button.
7.4.1.2 Create Validations Templates for Classes
Note: Template names are case-sensitive.
To create validation templates for fields, complete the following steps:
1. On the Classes tab on the left side of the screen, select a class.
2. On the Validation tab, establish validation settings for the class.
3. Click Save.
4. Give the template a descriptive name and then click OK.
7.4.2 Working with Validation Templates at the Field Level
You can apply a field validation template created in another document in your project to any field in any document within the same project.

Oracle WebCenter Forms Recognition 99 Designer User's Guide
To do this, first select a document and then select a field on the document. Make sure you have the Validation Type set correctly for the field; the available templates depend on the Validation
Type. For example, amount templates are not available for text fields.
Select a Validation Type for that field and click Copy. This turns the template into validation settings for the specific field you are working on.
Any changes you make to the validation settings at this point will apply only to the field on hand, and not to the template. However, you can save the settings into a new template or overwrite the existing template.
Your template is now saved in the project file and can be used for validation of similar classes throughout the project, but only at the field level.
7.4.3 Working with Validation Fields at the Class Level
The templates you create at the class level are stored as custom templates.
7.4.4 Working with Validation Templates at the Project Level
To manage validation templates at the project level, perform one of the following actions:
Right-click the project and select Show Validation Templates from the shortcut menu.
On the Edit menu, select Project, and then select Show Validation Templates.
On the Validation Templates property sheet on the right side of the window, you can:
Import templates from other projects.
Export templates for use in other projects.
Delete templates.
Rename templates.
7.4.4.1 Assign Templates
To assign a template, first select a validation type. Next, select the template you want to assign for that field type. Any changes you make apply only to the project and not to the template itself.
7.4.4.2 Import Templates
To import a template, select a validation type and click Import. Browse to a template and click OK. Clear the checkboxes for the templates you do not want to import and then click OK.
Note: Any changes you make to an imported template apply only to the project.
7.4.4.3 Export Templates
To export a template, click Export. Clear the checkboxes for the templates you do not want to export and then click OK. Browse to the root folder of the target project and click Save. All the selected templates are exported in bulk and saved as a .exp file.
7.4.4.4 Delete Templates
To delete a template, select a Validation Type and a template to delete, then click Delete.
Note: You cannot delete a template that is in use.

Oracle WebCenter Forms Recognition 100 Designer User's Guide
7.4.4.5 Rename Templates
To rename a template, select a Validation Type and a template to rename, then click Rename.
Note: You cannot rename a template that is in use.
7.5 Introduction to Validation Scripts
You may need to customize Validation beyond what you can do with the Standard Validation Engine. Designer includes the WinWrap Basic scripting language that can be used for validation, analysis, and evaluation tasks. To use WinWrap Basic effectively, you must have a programming background. Experience in VB Script or VBA is helpful, as WinWrap Basic is VBA-compatible.
This section serves only as a brief introduction to script validation and its availability. For a complete discussion of this topic, refer to the Oracle WebCenter Forms Recognition Scripting User’s Guide.
Note: Script validation overrides standard, GUI-based validation.
To open the script editor, switch to Definition Mode, then click the button for script editing in the toolbar or use the menu Edit Show Script.
Script validation can be accomplished for projects, documents, fields, table cells, table rows, and entire tables.
Note: Scripting can be used to write warnings and informational messages to the Runtime Server log files.
WebCenter Forms Recognition is certified on WinWrap Basic version 9.0.0.56
7.6 Stabilization and Enhancements of Standard Validation Engines
7.6.1 Description
This section describes the features of the Standard Validation Engine.
7.6.1.1 Feature to Control the Amount of Invalidated Fields
A project-level option, called When Validation Rule Fails, Mark Only One Field as Invalid, allows control of the amount of fields that are getting set to invalid in case a document level validation expression fails.
This option is set in the project properties Advanced tab and, by default, is not enabled. This means that should a validation rule such as NetAmount + VAT = GrossAmount fail, the validation subsystem will make all three fields invalid. If this option is selected then only one of these three fields will be marked as invalid.
Notes: If the option is selected, and a rule with both table columns and header fields fails (for example, SUM(Table.TotalPrice) = GrossAmount), then the validation subsystem will attempt to invalidate one of the available header fields in the expression and not the table cells.

Oracle WebCenter Forms Recognition 101 Designer User's Guide
When making a table column invalid according to a document level validation rule (expression), the validation engine will mark only the first cell of the column as invalid.
7.6.1.2 Error Descriptions in Case of Validation Failures
The validation descriptions point to the failed validation rule allowing the Verifier user to quickly understand what went wrong. For example, assume the rule:
ABS (NetAmount+VAT-GrossAmount) < 0.02
The validation engine provides a clear description in Verifier:
Please correct according to the rule: ABS (NetAmount+VAT-Total) <0.02
In the case where the feature to control the amount of invalidated fields is enabled, assume the failure of the expression:
SUM(Table.TotalPrice) = NetAmount
This leads to the following description in Verifier:
Please correct according to the rule: SUM(Table.TP)=NetAmount
Another example is invalidation of the fields’ formats that proceeds to the document level validation.
Assume a cell’s content of 97,63 is invalid, because according to the defined amount template, only the US format for the decimal separator sign is allowed (i.e. a period character). Now the system displays the appropriate error message that indicates the incorrect content of this table cell that needs to be replaced with 97.63.
Format does not match any active input format
7.6.1.3 Commands for Document-Level Validation Expressions
An ABS command is available when configuring document-level validation expressions (rules). This command evaluates the absolute value of the enclosed expression and simplifies entering very common commands like:
((NetAmount+VAT-Total)<0.02)&&((NetAmount+VAT-Total)>(-0.02))
Instead, you can use a simple representation like:
ABS(NetAmount+VAT-Total)<0.02
Another important extension is the != term that can be used as not equal to, and the ! character, which can be also utilized as a NOT operator.
Note: When specifying constant values in the document-level validation expressions always use English format for the decimal part of the real number. The integral part of the real number should be given without any delimiters in between. The decimal part can include any reasonable amount of digits after the decimal point, for example, 20300.5467.
7.6.1.4 Features and Error Messages Available for Document-Level Validation Rules Definition
When defining document-level validation expressions, Designer provides a column supplying the list of available class fields with the type of the field, preventing potential configuration errors.
Also, when using a field in a validation expression, the validation subsystem provides appropriate warning messages. For example, if a user attempts to use a Text field in a

Oracle WebCenter Forms Recognition 102 Designer User's Guide
mathematical expression, the system will show a warning message and will not allow the user to update the expression.
7.6.1.5 Use of Document-Level Validation for the Inherited Classes
Document level validation rules are applied cumulatively from parent to child and not only for the affected class node.
If it is desired to apply document-level validation rules for inherited classes, you must enable the Use Derived Validation option for the required derived classes. By default, for all newly created classes this option is selected automatically. For projects where this option is not selected, this remains unchanged after any migration to the new version to support backwards compatibility.
7.6.1.6 Definition of Complex Validation Formats
One or more complex validation formats can be defined through Designer for the format definition of Amount fields.
Clicking on the language selection drop-down box allows you to choose the desired basic validation format, which can be then extended with multiple further definitions. The basic format settings can be copied all at once by clicking the << All << button, and then extended with the required custom ones.
The text field to the left of the << All << button represents the name of the currently edited format definition. Modify it if you would like to add an extra format.
The pip character is used to separate the formatting variants.
When no expression is used as a formatting option, this means absence of any sign. For example, for the Currency Symbol field this means that currency value like 2,000.00 without a currency symbol will be accepted.
With the << buttons you can add custom formatting options to the corresponding cumulative format definitions.
Absence of any symbols in a cumulative format definition edit box means that all options available in the corresponding dropdown list at the right side will be supported.
7.6.1.7 Robust Unified Output Formatting
A robust unified output formatting can be configured on the Output Format property page for the Amount fields.
The resolved formatted value is stored in a special FormattedText string property of the SCBCdrField object. The same property is also available for table cells and can be accessed through the CellFormattedText property as shown below:
pTable.CellFormattedText(Column, Row)
The properties can be accessed from within WebCenter Forms Recognition’s custom script events, such as the Document_Export event or the Validate_Document event.
7.6.1.8 Value Property for Simplified Scripting of Extended Validation Routines
A Value property is available for both table cells and header fields and can be used to significantly simplify access to the automatically extracted data from within custom script. This property contains a field's value in the variable type depending on the field validation type.

Oracle WebCenter Forms Recognition 103 Designer User's Guide
The Value property is variant and returns a date for date fields, currency for amount fields, a Boolean value for checkbox fields, the index of the list item for the list fields or text for the other field types.
The Value property for the header fields is accessible as pField.Value and for the table cells as pTable.CellValue (Column, Row).
The following script sample that demonstrates usage of the properties in a custom script:
Private Sub Document_Validate(pWorkdoc As SCBCdrPROJLib.SCBCdrWorkdoc,
pValid As Boolean)
Dim dblValue As Double
Dim strFormattedValue As String
dblValue = pWorkdoc.Fields.ItemByName("Total").Value
strFormattedValue = pWorkdoc.Fields.ItemByName("Total").FormattedText
MsgBox "Value = " & CStr(dblValue) & vbCrLf & "Formatted Text = " &
strFormattedValue
End Sub

Oracle WebCenter Forms Recognition 104 Designer User's Guide
8 Setup the Data Extraction
Setting up the data extraction involves:
Creating data fields.
Defining analysis methods to obtain candidates.
Defining evaluation methods to select the correct candidate.
Setting parameters for these methods.
Testing the extraction.
Optimizing the extraction.
In most cases, the following background knowledge is sufficient for setting up data extraction:
A candidate can only be assigned to a field if its weight exceeds a predefined threshold. You can influence the threshold values and the evaluation algorithms, but in most cases, the default settings should be appropriate.
The weight indicates the degree of similarity between the properties of a candidate and the properties of user-selected candidates.
Data can be extracted if the weight of the best candidate with respect to a given field exceeds a predefined threshold. By default, this threshold is 50 percent.
In general, there is only one successful candidate per field and document. If several candidates have a high weight with respect to a field and document, it must be possible to distinguish reliably. Therefore, a certain difference in weight between the winning candidate and the second-best competitor is required as well. By default, this distance is 10 percent.
For more information about candidate evaluation, refer to Section 12.4: Field-Level Settings.
8.1 Brainware Line Extraction Method
8.1.1 Description
The method can be enabled in the WebCenter Forms Recognition Designer application’s Settings dialog. On the Processing tab, select Brainware Line Extraction under the Line Extraction Settings group.
The following line extraction engines are available:
Brainware Line Extraction.
Standard Line Extraction.
Advanced Line Extraction (Beta).
Note This option is not recommended for use.
When selected, the option affects all WebCenter Forms Recognition applications that invoke OCR processing or re-launch internal post-processing through the script statement:

Oracle WebCenter Forms Recognition 105 Designer User's Guide
pWorkdoc.RebuildBasicObjects
As with the Standard Line Extraction method, Brainware Line Extraction is invoked automatically immediately after applying OCR recognition and detection of word objects. If Brainware Line Extraction is activated, the Standard Line Extraction method will not be applied at all as Brainware Line Extraction completely replaces it. Brainware Line Extraction delivers the results in the same way, by extracting the results as a collection of SCBCdrTextBlock objects accessible through the workdoc interface from within custom script, as shown in the following example:
pWorkdoc.Textline lLineIndex
Brainware Line Extraction is activated by default for all newly created projects, but is not enabled when migrating projects from the old versions to ensure the backwards compatibility is unaffected in any way.
8.1.2 Usage
Brainware Line Extraction takes advantage of the Brainware Table Extraction Engine and provides significantly better quality of lines recognition as compared with the Standard Line Extraction method. It is generally recommended to use Brainware Line Extraction. Moreover, in some cases, this may appear to be a mandatory setting if, for some project’s document samples, the defined Format Analysis extraction delivers incorrect results due to low-quality lines extraction. Note that the Format Analysis engine uses internal line objects for formats recognition.
Standard Line Extraction is supported to ensure that backwards compatibility is not negatively affected in any way.
8.2 Setting Up the Fields
8.2.1 Create Fields
Fields are structures that hold the data extracted from the documents. They are set up at the class level. Fields and their properties are inherited along branches in the classification tree; that is, all classes derived from a parent will use the parent’s field definitions.
At the child level, you can override field properties or add more fields, but you cannot delete inherited fields. Consider this when defining your fields.
There are two types of fields:
Text fields, which can be used with Format Analysis and Zone Analysis.
Table fields, which can only be used with Table Analysis.
For each class, you can define a maximum of one table field. The prerequisites for this task are:
Designer is in Definition Mode.
The panel on the left side of the window displays the Classes tab in the foreground.
The class you want to create fields for already exists.
8.2.1.1 Create Fields for a Class
To create fields for a class, complete the following steps:
1. On the Classes tab, double-click the class for which you want to create a field. The Fields tab displays in the foreground.
2. Right-click on the Fields tab background.

Oracle WebCenter Forms Recognition 106 Designer User's Guide
3. From the popup menu, select Insert Field Definition…
4. In the Add Field dialog box, enter a field name. Valid names consist of alphanumeric characters without spaces or special characters. Later, you can define a different display name in the field’s properties.
5. Click OK to confirm. New fields are inserted below existing ones in the order in which they were created.
8.2.1.2 Table Fields
By default, all new fields are created as text fields. To add a table to a form, complete the following steps:
1. On the Classes tab, double-click the class for which you want to create a field. The Fields tab displays in the foreground.
2. Right-click on the Fields tab background.
3. From the popup menu, select Insert Field Definition…
4. In the Add Field dialog box, enter a field name. Valid names consist of alphanumeric characters without spaces or special characters. Later, you can define a different display name in the field’s properties.
5. Click OK to confirm. New fields are inserted below existing ones in the order in which they were created.
6. Right-click the new field and select Table from the popup menu. The field changes to a button with the table icon in the center.
7. Select the field and show its properties.
8. Click the Analysis tab on the properties pane.
9. Select Brainware Table Extraction from the Available Analysis Engines dropdown list.
8.2.1.3 Custom Field Names
Custom field names can be defined for each field definition of any document class. In the field’s Properties pane, select the Field tab and specify the custom name in the Display Name field.
The defined Display Names primarily affect verification mode of in the Verifier application, showing the configured custom name for the currently selected field element in the left bottom area of the status bar, instead of the original system name.
Additionally, this setting affects some minor features of WebCenter Forms Recognition, for example, the forms printing function.
Note: The Display Name settings defined for a parent class are inherited for all of its sub-classes.
8.2.2 Edit Fields
Designer provides commands for editing fields. Exercise caution when using them since you might lose some of the settings you have already made.
The prerequisites for this task are:
Designer is in Definition Mode.

Oracle WebCenter Forms Recognition 107 Designer User's Guide
The panel on the left side of the window displays the Fields tab in the foreground.
There must be fields to edit.
8.2.2.1 Select a Field to Edit
To select the field that you want to edit, complete the following steps:
1. Double-click the field or the field name. Now the field name is highlighted and the cursor is positioned in the selected field.
2. To edit the selected field, click the Edit menu and then select the Field Definition option, or right-click directly on the field or field name.
3. Select one of the following options:
To delete the field and all associated strings, select the Delete Field Definition option from the shortcut menu. In this case, you lose all trained knowledge for the data extraction. Repeat the training.
To rename the fields, select the Rename Field Definition option from the shortcut menu. In this case, you lose an existing extraction learnset for the field and all trained knowledge for the project. If required, create a new learnset for the field and repeat the training.
To change the field type, select the Text or Table option from the shortcut menu as appropriate.
To check for analyzed table content, press the [Shift] key and click the mouse button on the table icon in the field.
8.3 Select the Analysis Method
After you have created fields and assigned a language, specify the analysis method for each of them. The prerequisites for this task are:
Designer is in Definition Mode.
The panel on the left side of the window displays the Fields tab in the foreground.
On the right side of the window, the tabs with class and field properties are visible.
The Analysis tab displays in the foreground.
To select the analysis method for all fields of a class, perform the following steps:
1. On the Fields tab on the left side of the window, select a field.
2. On the Analysis tab on the right side of the window, select the method that you want to use from the Available Analysis Engines list box.
3. Repeat the previous steps until all fields have analysis methods assigned.
8.4 Setup Brainware Table Extraction
Brainware Table Extraction contains the fast and easy-to-use Generic Table Extraction. This allows the user to configure generic table extraction for any project type in an easy and comfortable manner.
The Brainware Table Extraction Engine is a powerful table extraction engine that is intended to:

Oracle WebCenter Forms Recognition 108 Designer User's Guide
Reduce the amount of time required to configure data extraction from tables.
Reduce the amount of time required for table verification rates.
Improve table data recognition rates.
Indirectly reuse verified table data for incremental performance and quality improvements, thereby reducing support and installation time and increasing overall quality.
8.4.1 About Brainware Table Extraction
The learning process for the Brainware Table Extraction engine consists of two phases:
Learning lines.
Learning mappings of columns.
To use Brainware Table Extraction all documents must have been scanned at a resolution of 300 dpi.
The Brainware Table Extraction and Brainware Field Extraction engines’ external Learnsets are stored in a secure, encrypted form.
8.4.1.1 Learning Lines
The Brainware Table Extraction engine considers the following main types of the lines:
Primary Line A line that defines table structure. The engine applies advanced and precise similarity analysis for all primary lines. It is important that all primary lines are well-structured and that they look similar in many of the rows to extract. The engine easily supports an unlimited number of types of primary lines for one table definition. The primary line must contain at least four words. Otherwise, the engine will not learn it. In addition, the primary line must be the first line in the table row.
Secondary Line A line between primary lines. The engine applies smooth similarity analysis for these types of lines, which is possible because Brainware Table Extraction only searches the area between two neighboring primary lines. This allows the engine to extract data that varies widely, which often happens with multi-line descriptions. There is also no limit to the number of words in secondary lines, and no limit to the number of secondary lines. However, a document's page must have at least one primary line; otherwise, secondary lines on this page are not extracted.
Wrong Line A primary line that is learned as a negative line sample. In other words, all lines classified by the engine as members of one particular wrong line class are not extracted. In principle, it is possible to learn an unlimited number of wrong lines, though the current restriction is that this will only take effect during in-document learning. Cross-document learning (that is, learning the whole document after all the fields are completely valid) may not automatically train the wrong lines.

Oracle WebCenter Forms Recognition 109 Designer User's Guide
After it learns any type of line, the Brainware Table Extraction engine automatically creates and manages a new line class (cluster). Afterward, all lines in the document considered by the engine to be members of the line class (similar to the learned line sample) will be extracted, or not extracted in the case of wrong lines.
It is possible to learn an unlimited number of different line classes. However, the overall quality may suffer if too many lines are learned.
Learning lines can be applied in lines learning (or lines highlighting) mode. Mapping of the column data in the lines can be done in column mapping learning (or columns highlighting) mode. The user can switch between learning (highlighting) modes with the Switch Table
Highlighting menu option in the Options menu in Verifier, or with the popup menu options
Show Lines and Show Columns of the document viewer in Verifier or Designer.
To learn a line, the engine requires that the line to contains a minimal number of words. The Minimal Number of Words value defines the minimal number of words that makes a line eligible for learning. Set this value according to the demands of the project documents.
The minimal primary lines threshold can be adjusted, if for example the correct primary line is not being extracted, by changing the Minimal Threshold on the Advanced property page of the Brainware Table Extraction engine’s setting. The default value is 40%.
8.4.1.2 Learning Column Mapping
When learning the mapping for columns, the user trains the engine on how the data from the extracted lines must be mapped to the user's table data.
For primary lines, this mapping can be defined differently for different line classes. For example, if a user learned two different line samples that went to two different lines classes internally in one document, the user can then map Unit Price in the document to the Unit Price data column, and the Total Price to the Total Price for the first line sample. For all lines of the second line type, the user can map Unit Price to Total Price, and Total Price to Unit Price. For the next document, the Brainware Table Extraction engine will always use the first set of mapping rules for the lines classified to the first line type, and the second set of mapping rules for the lines classified as the second line type.
If you have several Brainware Table Extraction tables in one class, the learnset is shared between these tables. In other words, if you used interactive learning for one Brainware Table Extraction table, cross-document learning (which happens if the system added the document to the learnset after document validation) is applied for all Brainware Table Extraction tables in the document.
8.4.1.3 Pre-Train Brainware Table Extraction
To extract a table before training, complete the following steps:
1. Switch to Definition Mode.
2. From the Options menu, select Pre-train Brainware Table Extraction.
8.4.1.4 Configure Brainware Table Extraction
To set up a table field and define column names for Brainware Table Extraction, complete the following steps:
1. Switch to Definition Mode.
2. On the Classes tab on the left side of the screen, select a parent class.
3. On the left side of the screen, click the Fields tab.

Oracle WebCenter Forms Recognition 110 Designer User's Guide
4. Insert a new field. Right-click anywhere on the tab, select Add Field Definition from the popup menu, and then give the new field a name.
5. Right-click the field and select Table from the popup menu to change it from a text field to a table field.
6. Right-click in the table field and select Show Properties from the popup menu. The properties pane displays on the right.
7. On the Analysis tab, under Available Analysis Engines, select Brainware Table
Extraction. The settings for the Brainware Table Extraction Engine are displayed.
8. On the Columns tab, insert the columns to include in the extracted table. To do this, click the Insert Columns button.
9. Enter a name for the column.
10. Check the Column Required checkbox if the column must not contain null values.
11. Check the Multiline Cells checkbox if the engine should not convert multiline text to a single line.
12. Clear the Visible checkbox if you want to hide the column.
13. Repeat steps 8 - 12 to add more columns as required.
14. Select the Labels & Formats tab.
15. In the Column Name field, use the arrow buttons to scroll through the columns you have created. Where appropriate, perform these additional steps for each column:
Add column labels in the Label property box only for generic extraction.
Under Column Formats, insert desired formats and select Format Comparison from the second column. Refer to Section 8.5: Setup Format Analysis and Section 11: Regular Expressions to learn how to write expressions.
8.4.2 Configure Generic Table Extraction
The generic mode of Brainware Table Extraction performs without prior scripting or training. The extraction is based on the matching of column labels and additionally works with simple mathematical correlation between columns. Furthermore, it increases the speed of the extraction process.
To use the Generic Table Extraction feature, complete the following steps:
1. Configure the table columns as described above in Section 8.4.1.4: Configure Brainware Table Extraction.
2. Enable Generic Table Extraction by assigning Column Labels. Refer to Section 8.4.2.1: Column Labels for more information. The generic mode is activated automatically as soon as a table field gets the first column label configured.
3. Apply Numeric Correlation optionally. For more information, refer to Section 8.4.2.2: Numeric Correlation of Columns.
8.4.2.1 Column Labels
Generic Table Extraction identifies the table header line with the help of the column labels. The column headers that match with defined Column Labels will be mapped. Matches will be placed in the data table under the column name that is defined in the column list.

Oracle WebCenter Forms Recognition 111 Designer User's Guide
To ensure that the engine finds adequate matches, define all column headers that are expected in the documents as Column Labels of the corresponding Column Name. For example, for the column name Quantity define the column labels Amount, Qty, Quantity, Quantity Shipped, etc.
The search for column labels is a fuzzy search providing some results even for misspelled or poorly OCR’d words.
Note: A label needs at least three characters otherwise it will be ignored. The ideal length of a one-word label line expression is four characters or more.
Do not use the same label word under different column names.
For multi-line headers, only the line that is judged as most appropriate is used for matching.
To set column labels, complete the following steps:
1. Select the Labels & Formats tab.
2. Select a Column Name using the left and right arrows.
3. Click the Insert Labels button and enter the Column Label.
4. Repeat the previous step until all Column Labels for the selected Column Name appear on the list.
5. Repeat the previous steps for all other Column Names that should appear in the extracted table.
Note: Delete all Column Labels to disable the Generic Table Extraction.
8.4.2.2 Numeric Correlation of Columns
The Numeric Correlation of the Generic Table Extraction uses the mathematical interdependency of values to assign the correct values to the corresponding columns. The first three columns with the numbers 0, 1 and 2 in the column list on the Column tab will be checked for correlation.
The correlation follows the scheme: 0 × 1 = 2.
A common example for an Invoices project is Single Price × Amount = Total Price. The columns need to be ordered in the correct sequence, for example:
0. Single Price.
1. Amount.
2. Total Price.
Only use the Numeric Correlation feature when the columns are expected to correlate in most documents. It is recommended to disable Numeric Correlation in cases where the majority of the processed documents do not have a numeric dependency between table columns. This feature is disabled by default.
To enable Numeric Correlation, complete the following steps:
1. Select the Advanced tab of the Brainware Table Extraction properties.
2. Select the Correlation (Enable/Disable) checkbox.
3. Select the Column tab.

Oracle WebCenter Forms Recognition 112 Designer User's Guide
4. Sort the rows by Column Name in the desired order. To move the rows up or down, select one by clicking on it and press the up/down arrows on the top right of the table. Make sure that the three columns selected for correlation are at the top of the list, followed by all other columns.
8.4.2.3 Limitations
All documents must be scanned at 300 dpi for generic extraction.
Generic Table Extraction ignores labels with less than three characters.
The user cannot control the identification of a label line (table header line) or the selection of the columns that are going to be mapped to the data table through a threshold approach. The confidence of their detection cannot be controlled by the threshold settings.
To learn a line, the engine requires the line to contain a minimal number of words. The Minimal Number of Words value defines that minimal number of words that makes a line eligible for learning. Set this value according to the demands of the project documents.
The label line expressions can consist of multiple words, but there is no difference between specifying two expressions, for example line and number, and one single expression line number.
8.4.3 Custom Column Names
Designer provides settings to set up custom column names for verification table objects. To set the desired table column display names, complete the following steps:
1. Open the project in the Designer application.
2. Select the required class in Definition Mode.
3. Switch to the Verifier Design Mode and select the desired table object.
4. Right-click the table and select Properties from the popup menu. The Forms Designer displays the table object’s properties.
5. Click Column Settings.
6. To modify the desired column names, select the column row and under the Display
Name enter the required column name.
7. Click OK.
Note: The display column name remains the same as the standard system name if you leave the Display Name field empty.
When the new Display Name fields are configured, the Forms Designer updates the controls’ names immediately.
The configured column display names affect the Verifier application and Verifier Test Mode and Verifier Train Mode in Designer, when representing the table’s column header.
It also shows display names when using column mapping control for Brainware Table Extraction interactive learning, and when using normal column mapping and swapping operations.
Oracle WebCenter Forms Recognition 113 Designer User's Guide
8.4.4 Usage
The table column names configured in the settings of Brainware Table Extraction and the Table Analysis engine have internal meaning (as a property of the engines’ interfaces) and cannot be easily adjusted or modified dynamically from within custom script. The settings in Designer allow assigning of user-readable column names for the corresponding system column names to be shown to a Verifier user.
This feature can be used for dynamic translation of verification forms into different languages, when it is desired to be supplied with a multilingual Verifier installation in context of a single shared project file.
8.5 Setup Format Analysis
Format Analysis is suitable for extracting data that is located at arbitrary positions on the documents. It is the primary analysis method and can be used with unstructured documents and with structured documents such as forms.
Format Analysis is a search within the document text for strings that match certain predefined patterns. Configuring this method requires that you define the patterns, i.e. the format strings. The following methods to find strings are supported:
String Compare A very simple method that returns a match for a literal occurrence of the comparison string.
Trigram An error-tolerant method that returns a match for a literal occurrence of the comparison string, but also for strings that can be derived from the specified one by fragmenting the text into groups of three characters called trigrams. The number of identical groups determines whether there is still a match.
Use this method to account for OCR errors in your document.
Levenshtein Another error-tolerant method that returns a match for a literal occurrence of the comparison string, but also for strings that can be derived from the specified one by inserting, interchanging or deleting single characters. This is the default method.
Use this method to account for typical typographical errors like character interchange.
Regular Expression A method that returns a match if the recognition result corresponds to a format pattern specified.
Regular expressions can be used to precisely specify complex format patterns. Designer supports a subset of regular expressions, as described in Section 11: Regular Expressions.
Simple Expression A method that returns a match if the recognition result corresponds to a simple format pattern specified.
The string you are looking for may consist of only one word only or several words. Whether the string is finally found in the document also depends on rules as to how it is constructed from

Oracle WebCenter Forms Recognition 114 Designer User's Guide
words. Default rules are set for this and should work in most cases. If your format string looks fine, but you still cannot find candidates, you may have to adjust them.
8.5.1 Levenshtein Example
The following table shows an example of the Levenshtein error-tolerant search:
Zero Errors 1 Error 2 Errors
invoice invoike invoke
involce involve
8.5.2 Trigram Example
The following table shows an example of the Trigram error-tolerant search:
Word 1st Trigram 2nd Trigram 3rd Trigram
brain bra rai ain
train tra rai ain
8.5.3 Special Characters in Simple Expressions
The following table describes the special characters that are used in simple expressions:
Character Description
# Represents any number. For example:
### matches 123
@ Represents any upper-case or lower-case letter. For example:
@@@@ matches Love
@# matches U2
? Represents any alphanumeric character. For example:
?rain matches brain and train
' ' Indicates the start or end of a word. For example:
'ABC' matches ABC, but not ABCD
[ ] Indicates a number or range of repetitions of the previous character. For example:
#[3] matches any three-digit number like 123
a[1,2] matches a and aa
me[1,2] matches met and meet
8.5.4 Define the Format Strings
For each field, a set of format strings can be defined. Before you begin, consider the following information:
You should review your documents and, for each field, create a list of the strings that are to be extracted. This way, it is easier to identify the patterns to search for.
Do not try to find precisely one candidate; try to generate a set. Learning works better if there are both correct and false examples.
Try to anticipate other likely formats. If the correct candidate has no chance to be identified, the need for manual correction will increase.
The prerequisites for this task are:

Oracle WebCenter Forms Recognition 115 Designer User's Guide
Designer is in Definition Mode.
The panel on the left side of the window displays the Fields tab in the foreground.
A field is selected for which format analysis has been defined.
The viewer displays a document from the class.
On the right side of the window, the tabs with class and field properties are visible.
The Analysis tab displays in the foreground.
To define format strings, complete the following steps:
1. On the Analysis tab, select the Format Analysis tab at the bottom.
Initially, most of the controls in this tab are disabled. You need to specify the format string before you can adjust the search method.
2. In the Format Strings table, the last row is always empty. Click the row number and type a search string. Press the [Enter] key to add a new row. The string remains selected. You can now make further adjustments.
3. If required, select a different search method from the Compare Method list box. By default, Simple Expression is set.
4. If required, select the Find Designator option. In this case, the format analysis looks for your search string, but the candidate is a different string that has a well-defined geometrical relationship to the search string.
For example, you can search for the string Phone to extract the subsequent information, which typically is a phone number. In the Designator Type list box, you can select from the following options:
Word Below Example: Customer
Word Above Example: UK
This Block Example: Billing

Oracle WebCenter Forms Recognition 116 Designer User's Guide
Previous Word Example: University
Next Word Example: email
End of Line Example: Fax
Next Line Example: Format
Next Paragraph Example: Format
Next Block Example: Format
5. Under Prefix and Suffix, you can enter characters or syllables that are part of a word, but are ignored when found at the beginning or the end of the word.
For example, you can look for 22,99, and $22,99 will match.
6. Under Ignore Characters, you can enter characters that are part of a word, but are ignored when found anywhere within the word.
For example, you can look for 213-4789, and 2134789 will match.
7. To define additional strings for the current field, repeat the steps above. Note that you can combine search methods freely. However, a word can only be member of one candidate. The format strings will be evaluated in the same order as listed in the Format Strings table. To change the order, click a row number and drag the corresponding string to its new position. To delete a string, click the row number and press the [Delete] key.

Oracle WebCenter Forms Recognition 117 Designer User's Guide
Note: Test the analysis step with candidate highlighting to check early whether you have defined the suitable format strings. However, be careful if you use field inheritance. The extraction test always involves a classification step. You can easily end up changing the child class settings by mistake. Always check the class name that displays in the bottom-left edge of the window. This is the class you are currently editing.
Format Analysis normally yields several candidates. Therefore, a candidate evaluation must take place.
8.5.5 Define the Rules for String Construction from Words
Mainly due to the OCR, a candidate may be fragmented into several words, or several words may have been concatenated. Therefore, the string search also covers combinations and subsets of words. The corresponding rules are valid for all format strings assigned to a given field.
The prerequisites for this task are:
Designer is in Definition Mode.
The panel on the left side of the window displays the Fields tab in the foreground.
A field is selected for which Format Analysis has been defined.
The viewer displays a document from the respective class.
On the right side of the window, the tabs with class and field properties are visible.
The Analysis tab displays in the foreground.
8.5.5.1 Define Rules for Words
To define rules for string construction from words, complete the following steps:
1. On the Analysis tab, select the General tab at the bottom.
2. Configure the properties as described below:
Max. Compare Distance
This feature allows you to extract a search string from a word, neglecting a certain number of characters at the beginning and at the end. The compare distance is computed as follows:
Compare Distance = 1.00 - Number of Characters (Search String) / Number of Characters (Word)
A match requires that the actual compare distance is less than or equal to the maximum compare distance. For example:
Search String: 1234 (4 characters)
Max. Compare Distance: 0.30
Word 1: $1234 (5 characters)
Compare Distance 1: 1.00 – (4/5) = 0.20 This is a match as 0.20 < 0.30
Word 2: $1234.00 (8 characters)
Compare Distance 2: 1.00 – (4/8) = 0.50 This is not a match as 0.20 > 0.30

Oracle WebCenter Forms Recognition 118 Designer User's Guide
Max. Word Count Allows you to extract strings that consist of multiple words.
By default, the hyphen character is a word separator. Therefore, the phone number 123-456-7890 consists of three words. To get a match in the Format Analysis, a maximum word count of 3 or more is required.
Max. Gap Between Words
Specifies the maximum distance in millimeters that permits word concatenation during the search. Note that the requirements strongly depend on font size.
Max. Candidate Length
Specifies the maximum length in millimeters that a candidate is allowed to be. A candidate that exceeds the maximum length is not accepted.
Compare Case Sensitive
Select this option to make the candidate search case-sensitive.
By default, spaces between concatenated words are deleted, so the search string 123 456 7890 will be extracted as 1234567890.
Keep Spaces Between Connected Words
Select this option if you want to keep the spaces. In this case, enter the spaces in your format string as well.
8.5.6 Restrict the Analysis to Specific Areas
You can restrict the text that is analyzed to specific areas of the document. This may increase processing speed and accuracy.
The prerequisites for this task are:
Designer is in Definition Mode.
The panel on the left side of the window displays the Fields tab in the foreground.
A field is selected for which format analysis has been defined.
The viewer displays a document from the respective class.
On the right side of the window, the tabs with class and field properties are visible.
The Analysis tab displays in the foreground.
8.5.6.1 Restrict Analysis Areas
To restrict the analysis to certain areas within the documents, complete the following steps:
1. On the Analysis tab, select the Regions tab at the bottom.
2. Select the Restrict Engine to Region checkbox.
3. Select the pages that are affected by the restriction.
4. For each selected page, enter the regions that are to be taken into account.
8.5.7 Support for Character Encoding Tables
WebCenter Forms Recognition document processing extends the previously introduced non-Western languages processing approach with selective support of character encoding tables

Oracle WebCenter Forms Recognition 119 Designer User's Guide
ISO/IEC 8859-2, -5 and -9, particularly implementing full phonetic translation support of Polish, Czech and Turkish languages.
8.5.7.1 Usage
The feature is clearly very important to expend WebCenter Forms Recognition installation on the projects running in the countries like Poland, Turkey and Czech Republic.
8.5.8 Ability to Create Associate Search Engine Pools
The Associative Search Engine supports non-Western languages when importing from an ODBC data source.
8.5.8.1 Usage
This non-Western languages support makes it possible to import the Associative Database Search pools for non-Western languages directly from a database.
8.6 Setup Zone Analysis
Zone Analysis is suitable for extracting data located at fixed positions within the documents, such as with classical forms.
8.6.1 Create Reading Zones
Reading zones are fixed areas in documents that contain information you want to extract. Three types of reading zones can be used:
OCR The contents of the reading zone are determined using optical character recognition. The textual content of the zone is the result of this process.
Barcode The contents of the reading zone are determined using barcode recognition. The number or strings represented by the barcode is the result of this process.
OMR The contents of the reading zone are determined using optical mark recognition. The degree of blackness within the zone is used as indicator. A Boolean value is the result of this process.
The prerequisites for this task are:
Designer is in Definition Mode.
The panel on the left side of the window displays the Fields tab in the foreground.
A field is selected for which Zone Analysis has been defined.
The viewer displays a document from the respective class.
If Zone Analysis has been defined for the active field, the viewer displays the page representation of the active document rather than the workdoc representation. In this case, the viewer toolbar contains additional buttons for zone creation:
Button Description

Oracle WebCenter Forms Recognition 120 Designer User's Guide
Activates the selection tool.
Creates an OCR reading zone.
Creates an OMR reading zone.
Creates a barcode reading zone.
Creates an anchor.
To create reading zones, complete the following steps:
1. In the viewer panel, click the respective toolbar button to create an OCR zone, an OMR zone or a barcode zone.
2. Click the document and drag to create a rectangular reading zone. The rectangle needs to be large enough to hold the prospective contents. It should not be much larger, though.
The reading zones display as transparent rectangles with red borders. Each zone has a label that displays the name of the zone. The initial name is created from the word Zone and a consecutive number.
The currently selected reading zone displays with a gray background and solid red handles at each corner.
8.6.2 Edit Reading Zones
WebCenter Forms Recognition Designer provides commands that allow you to edit reading zones.
The prerequisites for this task are:
The panel on the left side of the window displays the Fields tab in the foreground.
A field is selected for which Zone Analysis has been defined.
The viewer displays a document from the respective class.
There must be zones on the document to edit.
The following operations are supported:
You can move the currently selected zone using the mouse.
You can resize the currently selected zone using one of the following methods:
Drag the handles at each corner.
Adjust the size of the reading zone to the size of the entire page by right-clicking on the zone and selecting Fit to Image Size from the popup menu.
You can display the zone’s properties by right-clicking on the zone and selecting Properties from the popup menu. On the General tab, the following parameters are available for resizing:
Units Specifies the units used for geometric parameters in pixels, inches, or millimetres.
Fit to Image Height Adjusts the height of the zone to the height of the page.

Oracle WebCenter Forms Recognition 121 Designer User's Guide
Fit to Image Width Adjusts the width of the zone to the width of the page.
Left Sets the distance of the reading zone to the left edge of the page.
Top Sets the distance of the reading zone to the top edge of the page.
Width Sets the width of the reading zone.
Height Sets the height of the reading zone.
You can rename the currently selected zone by right-clicking on the zone and selecting Properties from the popup menu. On the General tab, enter a new name into the Name field.
You can delete the currently selected zone by pressing the [Delete] key.
Note: If multiple reading zones are mapped to a single data field, a candidate evaluation must take place. This usually involves learning. If you change the properties of your reading zones after the learning, you lose all trained knowledge for the extraction. Repeat the training.
8.6.3 Fix the Coordinate System for the Reading Zones
It is quite common that paper documents are scanned at an angle. From page to page, there will be fluctuations of the page position. However, Zone Analysis can only be successful if the relative position of reading zones on documents is constant over the entire document set. Anchors can be used to look for prominent geometric features on the document, such as the page corners. After they are found, anchors can provide a fixed coordinate system for the reading zones, i.e. reading zone positions are determined relatively to anchor positions. This can balance fluctuations of several millimeters.
The prerequisites for this task are:
Designer is in Definition Mode.
The panel on the left side of the window displays the Fields tab in the foreground.
A field is selected for the Zone Analysis that has been defined.
The viewer displays a document from the respective class.
8.6.3.1 Create and Use Anchors
To create and use anchors, complete the following steps:
1. In the Viewer panel, click the toolbar button that creates anchors.
2. Click in the image and drag to create a rectangular zone. This zone should be proportional to the geometric feature that you want to locate.
For example, if all the documents in your class contain a 50 mm line in the footer area, your anchor should not have a side length of 5 or 250 mm. The anchor position should be close to the geometric feature you want to use.

Oracle WebCenter Forms Recognition 122 Designer User's Guide
Anchors display as transparent rectangles with blue borders. Each anchor has a label that displays its name. The initial name is created from the word Anchor and a consecutive number.
The currently selected anchor displays with a gray background and solid blue handles at each corner.
3. To specify the anchor type, right-click the anchor and select Properties from the popup menu. The anchor’s property sheet displays. The following parameters can be adjusted:
Name Set the anchor’s label.
Left Sets the distance of the reading zone to the left edge of the page.
Top Sets the distance of anchor from the top edge of the page.
Width Sets the width of the anchor.
Height Sets the height of the anchor.
Anchor Type Sets the basic anchor type, i. e. the shape the anchor is looking for. Available are:
Image Corners.
Lines.
Box Corners.
T shapes.
Crosses.
Properties Specifies the relevant edges for the selected anchor type. Each basic anchor type has its own set of properties. For example, if the basic shape is a line, it can be a horizontal or a vertical line. If the basic shape is a corner, there are four to choose from.
4. When everything is set, click Learn and close the property sheet.
5. To create more anchors, repeat the previous steps.
6. Right-click on a reading zone and select Properties from the popup menu.
7. Select the Anchor tab.
8. Move one or more anchors from the Available Anchors list box to the Used Anchors list box using the buttons between the lists. Only explicitly used anchors provide a geometrical reference for the current reading zone.
9. To fix more reading zones, repeat steps 6 - 8.
8.6.4 Map Reading Zones to Document Fields
To extract data from configured reading zones, you need to assign them to data fields. The prerequisites for this task are:

Oracle WebCenter Forms Recognition 123 Designer User's Guide
Designer is in Definition Mode.
The panel on the left side of the window displays the Fields tab in the foreground.
For the field, the Zone Analysis Engine is the selected analysis engine.
The viewer displays a document from the respective class.
On the document, the reading zones have been defined.
On the right side of the window, the tabs with class and field properties are visible.
The Analysis tab displays in the foreground.
8.6.4.1 Map Data Fields and Reading Zones
To map data fields and reading zones, complete the following steps:
1. On the Fields tab on the left side of the window, select the field to map to a reading zone.
2. On the Zone Analysis tab on the right side of the window, click a cell in the Zone Name
column.
3. From the list of available reading zones, select the appropriate zone to map to the field.
4. In the Page Number column, click to specify whether the reading zone is on the first or on the last page of the document.
5. To create multiple candidates from zone analysis, repeat the previous steps, using the next table rows.
Note: If multiple reading zones are mapped to a single data field, a candidate evaluation must take place.
8.7 Setup Table Analysis
Important: The use of traditional table analysis is supported to provide backward compatibility with older projects. All new projects should be created using Brainware Table Extraction.
This section provides information about table analysis for project administrators working with legacy projects. Table Analysis was used to extract data from document tables. In principal, there are two approaches to traditional table analysis:
Fixed Layout If the position of table elements is constant, you can use their coordinates to locate the table and its elements. This resembles the Zone Analysis of text fields.
Variable Layout If the position of table elements varies, or to analyze different table layouts with a single set of settings, you can use column labels and formats to locate a set of table candidates. This resembles the Format Analysis of text fields.
It is also possible to mix both approaches.

Oracle WebCenter Forms Recognition 124 Designer User's Guide
WebCenter Forms Recognition allows you to extract a single table from each document. This table can span multiple pages, provided that the table layout does not change over the entire range. To be accessible by Table Analysis, tables must consist of the following elements:
Columns.
Rows.
Cells.
A table presents data in a structured layout. The basic elements of tables are columns and rows of data. Each row and column is made up of one or more cells. The cell is the most basic table element.
Most tables represent an enumeration of records, with each record listing a number of properties. The most common table layout organizes the listing of different properties in columns, while individual records are represented by table rows.
In some cases, one line is not sufficient to fit all the text that belongs into a table cell. In that case, a line feed occurs within the cell. This happens, however, only in particular columns. It is, for example, frequently encountered in columns containing the description of an item.
Note: Some tables have too many columns to place them all on one page side by side. In this case, some documents have layouts where the columns are interleaved in the table rows. Reading tables with interleaved columns is currently not supported.
Some tables have empty rows. Reading tables with empty rows is only supported, if the table bottom is clearly indicated by a footer line.
8.7.1.1 Labels
It is good practice to equip each table column with a label to indicate the corresponding property. In most cases, all column labels are positioned at about the same horizontal position, i.e. they belong to one text line. This line is called the label line. In some cases, the labels extend over more than one text line. This is, for example, frequently encountered in industry invoices.
The label line plays a central role for the automatic table analysis, providing:
The start position of the table.
The preliminary table layout.
The preliminary mapping of the table columns.
WebCenter Forms Recognition can process single-line as well as multi-line labels.
To properly assign a cell to a column, some degree of overlap with the label must exist. If a label overlaps with cells of different columns, the column is created using the cells with more overlap.
Since the label detection is vital for table recognition, the OCR quality is very important to obtain good results. Normally, light labels on a dark background are more difficult to read than vice versa.
8.7.1.2 Header and Footer Lines
Frequently, tables contain a header line above the label line. If available, the header line may be used for detection of the table start position, either as an alternative to, or in addition to, the label line.

Oracle WebCenter Forms Recognition 125 Designer User's Guide
Footer lines are located below a table. An example of a footer line is a row that contains the sum of all column cell entries. If available, footer lines can be used to detect the end of a table, instead of, or in addition to, further criteria.
8.7.1.3 Comments
Comments, such as free text in tables, are automatically ignored if two requirements are met:
There are at least two lines with cells above the comment.
There is at least one line with cells below the comment.
Otherwise, comment lines will interfere with the table analysis.
8.7.1.4 Graphical Lines
In some cases, tables contain vertical or horizontal graphical lines. Horizontal lines can be used to detect the end of a table, instead of, or in addition to, further criteria. Vertical lines can indicate the segmentation of columns, but are currently not evaluated.
To configure the table analysis, you need to define a settings table. This is a table containing the columns you want to retrieve from the document, along with a number of properties for each column. The tables within the document are called the document tables.
The prerequisites for this task are:
Designer is in Definition Mode.
On the left side of the window, the Fields tab is activated.
A field is selected for which Table Analysis has been defined.
The viewer displays a document from the respective class.
On the right side of the window, the tabs with class and field properties are visible, and the Analysis tab is in the foreground.
During table analysis, WebCenter Forms Recognition performs the following actions:
Identifies the document table that best matches the settings table.
Analyzes the rows and columns of the document table.
Maps the columns of the document table to those of the settings table.
Extracts the content of the document table.
Each part of the analysis can create its own set of candidates. In the user interface, only the table candidate with maximum confidence is returned so that learning is not required. However, the workdoc contains a list of all table candidates, sorted by confidence. These can be accessed from scripts.
8.7.2 Define Table Columns
The first step in defining new table settings is to specify the columns to be searched for. Each column must be assigned a name, which can be used to access the column data from script (alternatively to use the column index), and a set of properties. Defining tables for a derived class enables the checkboxes.
Note: Column names and column labels can be different from each other.

Oracle WebCenter Forms Recognition 126 Designer User's Guide
To define the table columns, complete the following steps:
1. On the Analysis tab, select Table Analysis Engine under Available Analysis Engines.
2. Select the Columns tab.
3. In the Insert / Delete Columns list, create and sort columns using the following buttons:
Button Description
Adds a new entry at the bottom of the list. At the insertion point, type a name for the entry.
Deletes the selected entry without displaying a confirmation message.
Moves the selected entry one position up in the list.
Moves the selected entry one position down in the list.
4. For each column, specify the properties by selecting the corresponding checkbox. There are three principal properties of each column:
Column Required The column is required in all document tables, in contrast to being optional.
Entry Required Entries are required for each cell of the column.
Multiline Cells The cell content can extend over more than one text line.
Column Visible Indicates that the column displays on the Verifier form when this checkbox is selected. If not, you will not see this table column. You can set the visible property also in script to display this table column only when it contains a special content.
During verification of tables, the user navigates between invalid cells by pressing the [Enter] key. If no entries are required in a column, empty cells are valid, even though the document table contains corresponding input. To avoid losing information while keeping the ability to accept empty cells, you can make input mandatory for a column, but permit forced validation in the verification step.
This is a pre-validation option. If it is selected for a table cell, it returns an invalid table cell when no entry is found. The result of the pre-validation will be discarded if the table cell is set to valid within a script.
8.7.3 Define Column Labels and Formats
For each column, you can specify:
A set of labels that will be used to identify the column. Labels are required.
A set of format strings that will be used to determine whether the column cells have a valid content. Format strings are optional.
To define column labels and formats, complete the following steps:
1. On the Analysis tab, select the Labels & Formats tab.

Oracle WebCenter Forms Recognition 127 Designer User's Guide
2. Select a column using the arrow buttons next to the Column Name field.
3. In the Insert / Delete Labels list, define a set of labels using the following buttons:
Button Description
Adds a new entry at the bottom of the list. At the insertion point, type a name for the entry.
Deletes the selected entry without displaying a confirmation message.
For multi-line labels, no special settings are required as they are automatically combined to one label during table analysis.
4. In the Insert / Delete Format list, you can define a set of format strings. Enter the format string in the Format column. When the format is inserted you can change the compare type by clicking with the mouse into the corresponding compare type field and selecting the type from the combo box list.
Note: Formats must be inserted first before you change the compare type. Otherwise, the field will be deleted.
5. Select a comparison type in the Compare Type column.
6. Repeat the previous steps until labels and format strings are defined for all table columns.
8.7.4 Define Header and Footer Lines
You can specify a set of headers and footers for the table. Headers and footers can be used to determine a table’s top and bottom. Normally, defining them is optional, but might make the task of table recognition easier. If your tables contain empty rows, you need footer. Otherwise, there is no way to determine the table bottom.
To define table headers and footers, complete the following steps:
1. On the Analysis tab, click the Header & Footer tab.
2. In the Insert / Delete Labels list, define a set of labels using the following buttons:
Button Description
Adds a new entry at the bottom of the list. At the insertion point, type a name for the entry.
Deletes the selected entry without displaying a confirmation message.
3. In the Insert / Delete Footers list, define a set of labels using the same buttons.
8.7.5 Determine Table Tops
For each table, you need to specify the algorithms used to search the top. There are three options:
Searching the label line based on the labels defined for each column.
Searching the header based on the list of header strings defined.
Specifying a fixed position as distance from the top of page.
These methods can also be combined. To determine the table top, complete the following steps:

Oracle WebCenter Forms Recognition 128 Designer User's Guide
1. On the Analysis tab, click the Top of Table tab.
2. Select one or more of the following options:
Check Search Label Line.
Check Search Header.
This setting is only recommended in combination with a fixed column layout. Use with the Header & Footer tab to determine the table top and bottom.
Check Use Fix Position and specify the distance from the top of page in millimeters both for the first and for all subsequent pages.
If you analyze the document, the specified position will be highlighted in the document area. This setting is only recommended in combination with a fixed column layout.
Check Search Edges.
This setting when checked enables Table Analysis to find table columns by searching for edges. As it finds columns, you would select the columns that you defined for the table on the Column tab. To make this mapping, use either script, or for invoices, the Column Mapping tab that has mapping with fields that are predefined. Within the script, you can navigate through the cells of the columns to check the content. The combo box on this tab contains the column names that are defined on the column tab. You can select the column name that corresponds to the Description, Price, and so on. You can define the table columns that you want to write to the workdoc on the Column tab. With multiple options, the analysis stops when the first criterion is met.
3. Optionally, you can specify to skip a number of text lines below the table top by typing a number into the Skip text field. This should only be applied to tables with a fixed layout.
8.7.6 Define Column Layouts
For each table, specify the algorithms used to determine the column layout. There are two options:
Layout analysis, based on the labels of the label line and the entries of the individual rows.
Fixed layout, using positions for the left and right border of each column.
To define the column layout, complete the following steps:
1. On the Analysis tab, select the Column Layout tab.
2. Complete one of the following options:
For variable layout, select the Variable Column Position option. Optionally, you can check Create New Table Candidates. This is useful when a column is not represented by a label. However, it implies the creation of a large number of candidates, thus effecting the time required for the table analysis.
For fixed layout, select the Fixed Column Position option. In the table at the bottom of the tab, specify the distance of the left and right column borders from the left border of the page in millimeters. These ranges are highlighted in the document area.

Oracle WebCenter Forms Recognition 129 Designer User's Guide
8.7.7 Determine Table Bottoms
For each table, you need to specify the algorithms used to search the bottom. The available options are:
Searching for variations in the text line distance.
Searching a graphical line.
Searching the footer based on the list of footer strings defined.
Searching for empty cells in a control column.
These methods can also be combined. To determine the table bottom, complete the following steps:
1. On the Analysis tab, click the End of Table tab.
2. Select one or more of the following options:
Check Change of Textline Distance if the table ends when the text line distance changes by more than 50%.
Check Textline Distance Larger... and enter a value into the associated text field if the table ends when the text line distance exceeds a predefined threshold.
Check Horizontal Lines if a horizontal line indicates the end of the table.
Check Detected Table Footer if one of the footers defined previously indicates the end of the table. This option must be checked if your tables contain empty rows.
Check Missing Entry in Control Column if an empty cell in specified columns indicates the end of the table. In the table at the bottom of the tab, mark the Used checkbox for at least one column.
With multiple options, the analysis stops when the first criterion is met.
8.7.8 Manage Comment Lines
Comment lines are automatically ignored if two requirements are met:
There are at least two lines with cells above the comment.
There is at least one line with cells below the comment.
8.7.8.1 Detect Comment Lines
To detect comment lines, complete the following steps:
1. On the Analysis tab, select the Comment lines tab.
2. Select one or both of the following options:
Select Overlapping Column Borders if entries spanning multiple columns indicate a comment. In the table at the bottom of the tab, mark the Used checkbox for at least one column.
Select Empty Cells in Control Columns if empty cells in specified columns indicate a comment. In the table at the bottom of the tab, mark the Used checkbox for at least one column.
With multiple options, the analysis stops when the first criterion is met.

Oracle WebCenter Forms Recognition 130 Designer User's Guide
8.7.9 Using Field Inheritance
To allow a coupling between parent and child settings, the concept of inheritance has been introduced. Simply stated, child classes inherit all fields from their parents. If the Table Analysis engine is selected for the table field in the child class, a copy of the parent settings is created, which may be further modified. For this purpose, the table settings have been subdivided into three groups.
Column Settings The definition of the number of columns and their names.
Extraction Settings All parameters controlling the extraction algorithms.
Validation Settings The definitions of formats for the individual columns.
Depending on the inheritance settings, the corresponding controls in the table settings tabs will be disabled.
Note: If a child class is created manually, without passing the Supervised Learning Workflow process, it is necessary to activate the Brainware Table Extraction engine for the table field at the child class level.
8.7.9.1 Using Field Inheritance with Tables
To use field inheritance with tables, complete the following steps:
1. On the Analysis tab, select the Columns tab.
2. Check Derive Column Names to use the same set of columns as the parent class. All controls related to adding, deleting, renaming and sorting columns will now be disabled. The Derive Column Definition and Derive Column Validation Formats checkboxes will be enabled.
3. Optionally, select Derive Column Definition to inherit column settings.
4. Optionally, select Derive Column Validation Formats to inherit validation settings.
8.7.10 Column Mapping
After you select the columns from which you would extract information for the workdoc in the Columns tab, you can search for certain table columns in a batch. This is most commonly used if you are working with invoices. To search for columns, click Search Edges in the top of Table tab and then use the Column Mapping feature in Table Analysis. For more information, refer to Section 8.7.5: Determine Table Tops.
8.7.10.1 Map Table Columns
To map table columns, complete the following steps:
1. On the Analysis tab, click the Column Mapping tab.
2. Select the dropdown arrows to choose the item that best describes your column. When mapping columns for invoices, usually the table columns description, quantity, single price, and total price are the most relevant. In this case, you can use the default mapping methods that are defined on the tab. Special mapping methods are used to identify the correct table columns. For more information, refer to Section 8.7.2: Define Table Columns.
3. Click OK.

Oracle WebCenter Forms Recognition 131 Designer User's Guide
Another possibility for defining table columns is to define the mapping within a script.
If the mapping is incorrect, it must be corrected for the verification. For more information, refer to Section 14.1.19: Correcting Table Fields.
8.8 Configure Associative Search Analysis
The Associative Search Engine is used for classification and vendor/address extraction. It searches a data source, typically either a semi-colon delimited spreadsheet or a database. This data source, which is also sometimes referred to as a search pool, is used to match data in the search pool to workdoc data used in classification. In many applications, this will be a vendor name. The Classname Format and Field Content Format are defined after the data from the data source has been imported.
The data source can be created in any spreadsheet application, word processing program, or text editor.
The table in the General tab shows the attributes that are found in the data source.
In the ID column, set the supplier’s ID to establish this field as the primary key for your associative search.
The Associative Search Engine performs a full search by default. To filter certain attributes, configure the Multi-Column Attribute search extension by checking the appropriate columns in the Filter column. For more information, refer Section 8.8.4: Setup the Analysis.
8.8.1 Use of Associative Database Search Engine
To set the Associative Search Engine properties, switch to Definition Mode, and display the class and field properties. Click the Analysis tab, select Associative Search Engine from the dropdown list of Available Analysis Engines. The Used Core Engine dropdown list has two values:
Brainware V2.
Brainware V3.
By default Brainware V3 is selected. If loaded ADS settings are from version that does not include the Brainware V3 engine, then the default value will be Brainware V2. This is to support backwards compatibility. In Designer the setting will be positioned at Analysis .
There is also a registry key that can be used to force all Associative Search Engine fields in all projects on a Windows system to use a specific version of the core Brainware engine:
HKEY_LOCAL_MACHINE\SOFTWARE\[Wow6432Node\]Oracle\Cedar
Create a DWORD value with the name ASEngineVersion under the key specified above and set it to 3 for Brainware V3, or 2 for Brainware V2.
8.8.2 Creating Data Sources
Configuring data sources for Automatic Supervised Learning is a process that requires steps in both Windows Explorer and Designer.
8.8.2.1 Windows Explorer Steps
1. In Windows Explorer, create a project folder
2. Under that, create the following folders:
Batches

Oracle WebCenter Forms Recognition 132 Designer User's Guide
Common
Export
Global
Input
Miscellaneous
Vendor Pool
These folder names are suggestions; you can use whatever schema fits your project best.
3. Under Global and Common, create folders for each of the derived classes that will be created by WebCenter Forms Recognition based on the name of the first field.
Note: Folder names must not contain multi-byte characters.
8.8.2.2 Create a Reference File from a Spreadsheet or Text Editor
1. In a spreadsheet application or text editor, create a semi-colon delimited file with the following fields:
Vendor_ID;Internal_ID;Vendor_Name;Vendor;Vendor_Type;Vendor_Address;
Vendor_City;Vendor_State;Vendor_ZIP
The following fields are mandatory:
Vendor ID It is a unique sequential designation for each record in the file.
Internal_ID It must be a unique numerical designation for the vendor name.
Vendor_Name Is a short form of the vendor’s full name.
Vendor Is the full name of the vendor.
Vendor_Type This is an optional field. Vendor Type is used to influence a Supervised Learning setting that indicates the threshold for invalid fields, that, if exceeded, will force a document, or, by extension, members of a document class, to be learned. In most cases, this value is set to 40 percent. The value for Vendor_Type can be either 0, 1 or 2, with 0 being the default value and the value that is assumed if there is no Vendor_Type field in the CSV file. A value of 0 for Vendor_Type forces all documents classified by that vendor name to be added to the local learnset. A value of 2 indicates that no document in the class can be added to the learnset. A value of 1 indicates that only the first document in the class can be added to the learnset.
You can designate another field as Vendor Type, as long as the values are correct.

Oracle WebCenter Forms Recognition 133 Designer User's Guide
Note: The actual name of the columns in the header of the CSV file can be different, but the content must match the data that would be expected for columns that have the names shown in the example.
Ensure that field names do not contain periods or other special characters.
You can choose to have header rows or not; this will affect a WebCenter Forms Recognition setting later.
2. Save the file with a .csv extension in the project root folder. This file is the lookup table that WebCenter Forms Recognition uses for Associative Learning.
Note: An address must be on the document that matches the address in the CSV file.
The CSV file name must not contain any multi-byte characters.
8.8.2.3 Create a Reference File Using a Database Connection
An alternative to creating the CSV file is to use data from a similarly constructed database table or view, and establishing an ODBC connection to it.
8.8.2.4 WebCenter Forms Recognition Designer Steps
In Designer, create and save a new project as you normally would. Use the following settings:
1. From the main menu, select Options Settings… The Settings dialog is displayed.
2. Select the Input Mode tab.
3. Under the Import Options, select Image & Electronic Documents and specify the associated file extension as *.tif.
4. Set the Batch Root Directory and the Image Root Directory to the folder you created for batches.
5. Check the Save Execution Results to Workdoc checkbox.
6. Select the Train Mode tab.
7. Check the Add Trained Documents to the Learnset checkbox.
8. Set the Base Directory to the folder you created for the local project.
9. Select the Runtime Mode tab.
10. Ensure that the Execute Classification and Execute Extraction checkboxes are both checked. Accept all other default settings on this tab.
11. Select the Verifier Train Mode tab.
12. Check the Enable Automatic Supervised Learning Workflow for This Project checkbox.
13. Check the Apply Local Classification and Extraction Automatically checkbox.
14. Under the Put Document to Local Learnset options, select Only if Adding Activated by a
User.
15. Ensure that the Save All Path Information Relative to the Project File checkbox is not checked. With this option disabled, you must ensure that all paths specified in previous steps are full directory paths.
16. Click OK to apply the settings and close the Settings dialog.

Oracle WebCenter Forms Recognition 134 Designer User's Guide
8.8.2.5 Define the Project
To define a project, complete the following steps:
1. Switch to Definition Mode.
2. Right-click the project node in the Classes tree and select Show Properties from the popup menu.
3. Select the Project tab.
4. Leave all default settings for Classification Interpretation, Parent Classification, and Word Segmentation Characters.
8.8.2.6 Setting OCR Options
1. Switch to Definition Mode.
2. Right-click the project node in the Classes tree and select Show Properties from the popup menu.
3. Select the Project tab.
4. Click the OCR Settings… button. The OCR Properties dialog is displayed.
5. On the Preprocessing Options tab, select the following recommended settings:
Box & Comb Removal.
Clean Border.
Despeckle.
Lines Manager.
To make the selections, select the items above from the Available Methods list and click the button for each to move it to the Selected Methods list.
Note: Despeckling is a process that removes dots and visual dust from your documents. This process sometimes detects decimal points and removes them. If your documents are generally light, do your first preprocessing on them without despeckling to test the results. If the quality is still poor, enable despeckling and preprocess them again.
If applicable to your environment, you can also select Binarisation to convert grayscale images to black-and-white, and Invert for reversing white-on-black pages to black-on-white pages.
8.8.2.7 Set Specific OCR Tolerances
On the Preprocessing Options tab of the OCR Settings dialog, set the specific tolerances for each of the OCR settings you chose. To do this, select a method in the Selected Methods column to display the appropriate settings options for that method.
8.8.2.8 Establish OCR Recognition Settings
1. On the OCR Settings dialog, select the Recognition tab.
2. For Recognition Type, select OCR.
3. Under Available Engines, select FineReader 11.
4. On the Recognition tab, there are three additional tabs:

Oracle WebCenter Forms Recognition 135 Designer User's Guide
General.
Recognition.
Languages.
5. Select the Recognition sub-tab.
6. Under the Mode settings, select Automatic, unless all your documents come from typewriters or dot-matrix printers. In that case, select the appropriate Mode option.
7. On the Language tab, select the required languages from the Installed list and move them to the Used list by clicking the button. Digits and English are selected by default.
8. Click OK to apply the settings and close the OCR Settings dialog.
8.8.2.9 Set the Base Document Class
1. Select the Classes tab in Definition Mode.
2. Right-click the project node and select Insert Base DocClass from the popup menu. The Create New Base DocClass dialog is displayed.
3. Enter a name for the class and click OK. The new document class is added to the tree on the Classes tab.
8.8.2.10 Define the Reference Field
1. Select the class in the Classes tab, then select the Fields tab. Alternatively, you can double-click the class in the tree to display the Fields tab.
2. Right-click anywhere on the Fields tab and select Insert Field Definition… from the popup menu. The Add Field dialog is displayed.
3. Enter a name for the field and click OK. The new field is added to the Fields tab.
4. Right-click in the field on the Fields tab and select Show Properties from the popup menu. The field’s properties pane is displayed on the right side of the window.
5. On the Analysis tab, select Associative Search Engine from the Available Analysis
Engines selection box.
8.8.3 Import Reference Data for the Associative Search
8.8.3.1 Import Settings
The Import tab gathers settings for the Import Source and the Import Destination.
For Import Source select whether data from the supplier pool (reference file) should be imported manually or automatically. For manual import, specify either the CSV file path or the ODBC source.
Import Destination determines where the reference file will be saved. The recommended default setting is Save Supplier Pool Inside Project.
8.8.3.2 Import Reference Data from a CSV File
Note: The upper size limit for a CSV file is 150MB. The CSV file name must not contain multi-byte characters.

Oracle WebCenter Forms Recognition 136 Designer User's Guide
1. On the Analysis Editor, select the Import tab.
2. Select the Import from a Semicolon-Separated CSV File option.
3. For Import Source, browse to the CSV file to be imported.
4. If the CSV file is located in a different folder to the project file, deselect the Path Relative
to Project File option.
5. If your CSV file has header rows, select the Import Field Names from First Row option. If your file does not have header rows, leave this checkbox unchecked.
6. Click the Import button.
7. When the import is complete, a notification is displayed stating how many records were imported.
8.8.3.3 Import Reference Data through ODBC
To establish an ODBC connection for your reference data:
1. In the Analysis Editor, click the Import tab.
2. Choose Import from ODBC Data Source.
3. Supply the source, login information, and SQL statement to access the data for reference.
8.8.4 Setup the Analysis
1. In the Analysis Editor, click the General tab.
2. Locate the table with the fields from your CSV file.
3. On this table, set ID for Vendor ID to establish this field as the primary key for your associative search by selecting the round radio button. Leave the default settings for the fields to search on.
4. Enable the Multi-Column Attribute search extension of the Associative Search Engine by checking the boxes of appropriate fields in the Filter column. A data source re-import is needed when settings are changed.
5. Enter a format for the Class Name Format.
6. Enter a format for Field Contents Format.
7. Optional. Select the Advanced tab and enable Address Analysis and determine which address fields should be included or excluded.
8.8.4.1 Multi-Column Attribute Search
This search extension limits the vendor search to certain attribute values. The search filter shows only results with the same value for an attribute, for example, the value Washington for the city. Attribute values are always case-sensitive. Perform a data source re-import after changing settings. It is not advised to select all rows.
The attribute values are set in custom script. To achieve this, you must first call the ClearFilterAttributes method, then, for every attribute, you must call the AddFilterAttribute method, as shown in the following example:
.ClearFilterAttributes()
.AddFilterAttribute(“Attribute Name 1”, “Attribute Value 1”)
.AddFilterAttribute(“Attribute Name 1”, “Attribute Value 2”)

Oracle WebCenter Forms Recognition 137 Designer User's Guide
.AddFilterAttribute(“Attribute Name 2”, “Attribute Value 1”)
Filtering multiple values of one attribute using an OR operation is supported for the first attribute only. The different attributes are connected with the AND operator.
The extension can be used for the Verifier vendor search or with the Runtime Server pre-extract event.
To use the extension with the Verifier search button, configure the .SearchField or the .AnalyzeField call as shown in the following script example:
Dim theSupplierSettings As Object
Dim theAdsSettings As CDRADSLib.SCBCdrSupExSettings
Set theSupplierSettings = FieldAnalysissettings
Set theAdsSettings = theSupplierSettings
theAdsSettings.ClearFilterAttributes
theAdsSettings.AddFilterAttribute "SupplierName", "VAN"
theAdsSettings.AddFilterAttribute "SupplierName", "VAN3"
For Associative Search filtering with Runtime Server, configure the extension in the VendorName or VendorASSA field pre-extract event. This enables the filtering before the attribute search is implemented in the extraction:
Private Sub VendorName_PreExtract(pField As SCBCdrPROJLib.SCBCdrField,
pWorkdoc As SCBCdrPROJLib.SCBCdrWorkdoc)
Dim theSupplierSettings As CDRADSLib.SCBCdrSupExSettings
Dim theDocClass As SCBCdrDocClass
Dim theAnalysisSettings As ISCBCdrAnalysisSettings
Dim theObject As Object
Set theDocClass=Project.AllClasses.ItemByName(pWorkdoc.DocClassName)
theDocClass.GetFieldAnalysisSettings "VendorName","German",
theAnalysisSettings
Set theObject = theAnalysisSettings
Set theSupplierSettings = theObject
theSupplierSettings.ClearFilterAttributes()
theSupplierSettings.AddFilterAttribute "SupplierName", "VAN"
theSupplierSettings.AddFilterAttribute "SupplierName", "VAN3"
End Sub
The Multi-Column Attribute search is supported by the Brainware V3 core engine.
8.8.4.2 Advanced Settings
Advanced settings enable you to establish settings for candidate detection and validation thresholds.
To establish these settings, complete the following steps:
1. Click the Advanced tab.
2. Adjust the settings for Threshold and Distance in the General settings group.
3. Define the search area size for First Page, Subsequent Pages and Last Page in the Search Areas settings group.

Oracle WebCenter Forms Recognition 138 Designer User's Guide
If you add a configuration for subsequent pages or the last page for the first time, a dialog box provides the option to adopt the First Page settings.
Each of the respective tabs features an icon representing the current search area configuration. The sheet representation icon under Values in % displays in direct correlation the defined values.
Note: If a document has only one page, it is considered as the first one. If a document has only two pages, they are considered as the first and the last ones.
4. Change the default settings for Height and Width if the address and vendor name are not in the default page area. If they are not, the following settings are recommended:
Set the Height and Width values to 100 percent in the Search Areas group.
Set Threshold to 30 percent and Distance to 10 percent in the General group.
5. Select the Enable Candidate Evaluation checkbox in the Sorting and Filtering of Search Results settings group to activate the second pass evaluation.
6. When Enable Candidate Evaluation is enabled, select one of the following options as appropriate:
Above Configured Search Areas
Use this option to run the candidates evaluation using not the entire text of the document but only on the combined text from the search areas configured to run the first pass of extraction.
First Page Only Use this option to run the candidates evaluation using not the entire text of the document but only the text available on its first page.
All Pages of Document Use this option to run the candidates evaluation using the text of the entire document.
For new projects, the Enable Candidate Evaluation feature is enabled by default, and the All
Pages of Document option is selected.
If you open an existing project for the first time after upgrading WebCenter Forms Recognition, and the Evaluation Candidates on First Page Only option was unchecked for this project, by default the Enable Candidate Evaluation is enabled, and the All Pages of Document option is selected. If the Evaluation Candidates on First Page Only option is enabled, the First Page Only
option is selected.
The Enable Candidate Evaluation option is not selected when the Address Analysis is in use in the existing project.
Note: The Associative Search Engine search can be also configured through script. Refer to the Oracle WebCenter Forms Recognition Scripting User’s Guide.
8.8.4.3 Establish Settings for Class Name Format and Field Contents Format
To establish the settings, complete the following steps:

Oracle WebCenter Forms Recognition 139 Designer User's Guide
1. Return to the Fields tab on the left side of the screen and insert any additional fields that need to be learned.
2. Select the Classes tab.
3. Select the project node.
4. On the Classification tab, on the right side of the screen, select your base document class as the Default Classification Result. This setting prompts WebCenter Forms Recognition to assign all documents to this class if Associative Learning fails to classify them.
5. Select the Supervised Learning tab.
6. Select the Do Smart Decision option.
8.8.5 Input of Documents
To input documents, complete the following processes in order:
1. Switch to Document Input Mode.
2. Select the documents from their directory.
3. Set validations at the document and field level
8.9 Setup the Field Evaluation
WebCenter Forms Recognition supports two methods for candidate evaluation:
Custom methods implemented as WinWrap Basic scripts.
Evaluation using Brainware engines.
Setting up the evaluation method is not required, if either of the following is true:
You use custom methods .
You use zone analysis with a 1:1 zone/field relationship.
In all other cases, the evaluation method must be specified. During evaluation, WebCenter Forms Recognition analyzes the areas around each candidate for characteristic properties that can be learned.
The prerequisites for this task are:
Designer is in Definition Mode.
The panel on the left side of the window displays the Fields tab in the foreground.
On the right side of the window, the tabs with class and field properties are visible.
To set the evaluation method, complete the following steps.
1. In the Fields tab on the left side of the window, select a field.
2. On the right side of the window, click the Evaluation tab.
3. Under Available Evaluation Engines, select Brainware Extraction.
4. To specify the geometry of the area around the candidate that is to be analyzed, click the Microlayout tab at the bottom of the window. Note that microlayout settings only have a small influence on extraction results. They need many samples to be distinguished. In most cases, the default setting is sufficient.

Oracle WebCenter Forms Recognition 140 Designer User's Guide
5. Select one of the following options:
Option Description
Table-Based The context of the candidate is taken from a top-asymmetric region around the candidate, the line to the left and the column above. This configuration is the best for candidates in tables. This is the default microlayout.
Left-Top Oriented The context of the candidate is taken from a left-asymmetric region around the candidate and the line to the left. This configuration is the best for candidates in captions or after colons.
Symmetric The context of the candidate is taken from a symmetric region around the candidate. This configuration is the best for candidates in running text.
Line Oriented The context of the candidate is taken from the region to the left and to the right of the candidate. This configuration is the best for candidates in lines.
8.10 Brainware Field Extraction Engine for Generic Fields Extraction
8.10.1 Description
The Brainware Field Extraction engine introduces a dimension in automatic indexing of header field data on a generic level, i.e. when multiple logical document classes are handled with a single internal knowledgebase. The engine provides field extraction based on statistical evaluation of:
Surrounding keywords around the learned field.
Format of the learned field.
Typical location of the learned field.
Correlation between different fields learned in context of one document class.
All the information above is learned automatically. The engine also autonomously extracts candidates while time-consuming specification of regular expressions through the Format Analysis Engine is no longer required for the processing.
The engine fully supports Supervised Learning Workflow.
The Brainware Field Extraction engine can be configured and trained in the same way as the Brainware Extraction engine. For more information, refer to Section 12.4: Field-Level Settings for more details.
The engine can be assigned to any header field of a document class using the Evaluation tab of the field definition settings and selecting Brainware Field Extraction from the list of available engines.
When the engine is assigned, it can be configured similar to the Brainware Extraction Engine. As for the Brainware Extraction Engine the Brainware Field Extraction settings view also shows the brief learned status for the selected field.
There are some differences related to configuring of the Brainware Field Extraction engine as opposed to the Brainware Extraction Engine:
Format Analysis engine pre-processing and time-consuming configuration is not required for the Brainware Field Extraction engine function. Refer to Section 8.10.2: Restrictions and Section 8.10.3: Scripting for more details, particularly in regards to the case, when the candidates extracted by the Format Analysis should be kept as a part of the extraction’s outcome.
This engine does not support microlayout settings.

Oracle WebCenter Forms Recognition 141 Designer User's Guide
There is one extra checkbox setting called Amount. This setting should be checked for those fields that have to be treated as amounts. In this case, as one of the internal extraction conditions the engine will consider all amount fields as the ones with potential numeric correlation.
8.10.2 Restrictions
Unless specifically handled, the Brainware Field Extraction engine deletes all previously available candidate objects (e.g., the ones created by the preceding execution of the Format Analysis engine) and creates and evaluates self-extracted candidates.
8.10.3 Scripting
The following script sample can be used if for any reason it is desired that the extracted Brainware Field Extraction candidates are to be replaced with the ones extracted by the Format Analysis engine, or if both kinds of candidates should be kept in the candidates array:
Private Sub Date_PostEvaluate(pField As SCBCdrPROJLib.SCBCdrField,
pWorkdoc As SCBCdrPROJLib.SCBCdrWorkdoc)
Dim i As Long
For i = pWorkdoc.Fields.ItemByName("Date").CandidateCount - 1 To 0 Step -
1
' Comment the code line below if you'd like to keep both types of
candidates (from FAE and BFE)
pWorkdoc.Fields.ItemByName("Date").RemoveCandidate(i)
Next i
pWorkdoc.DocState = CDRDocStateClassified
pWorkdoc.Fields.ItemByName("Date").FieldState = CDRFieldStateReset
Project.AllClasses.ItemByName("Invoices").AnalyzeField pWorkdoc, "Date"
End Sub
8.10.4 Usage and Notes
Due to quality, performance, and capacity of the disk space required per one class’ Brainware Field Extraction learnset, it is not recommended to use the Brainware Field Extraction engine for vendor-level training, i.e., when a class of similar documents with very similar layout should be trained with just a few documents to achieve acceptable extraction results for particular high-volume vendor class.
The general recommendation is to use the engine for generic training only, i.e., for data extraction from non-categorized documents. In this case, the engine must be trained with at least 10 documents per extracted field, while the ideal amount of documents per field is 50 – 100 samples. Good OCR quality for the trained documents is preferred but not a mandatory requirement.
Also, exceptional learnset samples in terms of both document quality and layout uniqueness are generally acceptable.
Even though the engine is integrated in Supervised Learning Workflow, due to the above mentioned reasons, it is advisable to use the Brainware Extraction Engine for automatic vendor-level training. For this purpose, it is recommended to assign the Brainware Extraction Engine to the header fields of the root classes, using a special dedicated class for generic extraction through the Brainware Field Extraction engine. For example, the following classes’ hierarchy:
Invoices

Oracle WebCenter Forms Recognition 142 Designer User's Guide
Generic
VendorClass1
…
VendorClassN
Void
In this example, the Invoices class is the root template class for Supervised Learning Workflow training, while the Generic class defines generic extraction through the Brainware Field Extraction engine. The standard classification result for invoices must be set to Generic, so that in case a document has not been classified to one of available vendor classes with precise layout extraction, it goes to Generic class with a generic extraction pattern defined. After the generic processing has been applied, the classification result must be set back to Invoices in case further Supervised Learning Workflow processing is to be maintained. This can be achieved by placing the following script code into the PostExtract event’s handler of the Generic document class:
Private Sub Document_PostExtract(pWorkdoc As SCBCdrPROJLib.SCBCdrWorkdoc)
pWorkdoc.DocClassName = "Invoices"
End Sub
In some project configurations, when vendor classification succeeds but does not deliver any results for some selected fields, it may also be appropriate to take an advantage of the Retain
Previous Extraction Results option and define double extraction processing to combine generic extraction with vendor level extraction.
Note: The Brainware Table Extraction and Brainware Field Extraction engines’ external learnsets are stored in a secure encrypted.
8.11 Training of Header Fields in Normal Train Mode without Configuring Field Formats
8.11.1 Description
Training of header fields in Normal Train Mode of Designer can be applied without any Format Analysis preprocessing.
Open the required (already OCR’d) document in Normal Train Mode with the desired class name assigned, select a header field in any highlighting mode, for example, Highlight All Words, with either the Brainware Extraction or Brainware Field Extraction engine assigned. Use mouse rubber-banding to select the desired words from the document.
The system will then select the available words with their best matching position.
Now double-click the selected area. Internally the system will create the candidate object and apply the field assignment as required for further training.
8.11.1.1 Usage
This feature was primarily designed to allow quick learning of Brainware Field Extraction engine without necessity to define header field formats through the Format Analysis engine’s regular expressions and without a need to configure Supervised Learning Workflow to use Verifier Train Mode for the purpose of Brainware Field Extraction learning.

Oracle WebCenter Forms Recognition 143 Designer User's Guide
This feature can be used for training of the former Brainware Extraction engine, as well. On the other hand, unless specifically desired, it is not recommended to utilize it for the Brainware Extraction engine for the following reasons:
Further extraction with the Brainware Extraction engine requires availability of the expected extraction result among the pre-extracted (through Format Analysis engine) candidates. The engine only evaluates the existing candidates assigning them individual weights. These weights are then used by the general extraction subsystem to assign the final extraction result. Therefore, if extraction result was not among the auto-extracted candidates initially and was just created at runtime during learning, the probability that the same case will occur for a hypothetical similar document to extract is very high. This will then lead to complete unavailability of the correct extraction result.
When a document is being trained with Brainware Extraction, the engine processes the learned field’s content using it as the single member of an internal Correct Results class and using all its other available candidates as multiple members of an internal Wrong Results class. The further extraction process is close to smart classification between these two classes. Thus, it is clear that overall quality of Brainware Extraction engine’s outcome also depends on quality of the Wrong Results class content. This content, in case no candidates were available prior to start of the document learning procedure, will be reduced to just one single member for the Wrong Results class, which is going to be the first available word in the document. While such content is sufficient for training and extraction in general, it is not optimal in terms of quality.
8.12 About Learning the Extraction
For Brainware evaluation, you have to take a small number of sample documents and manually assign some candidates to the respective field. WebCenter Forms Recognition is then able to learn the way the data should be extracted.
8.12.1 Creating Learnsets
The set of sample documents that you need to provide for data extraction is called the extraction learnset. Carefully select the samples as the quality of your learnset is crucial for the success of the extraction.
When you select the sample documents for the learnsets, consider the following:
Use only documents with good OCR results for the learnset. When in doubt, highlight the OCR results to review the documents.
Never use handwritten documents.
Use only documents that generate candidates for all relevant fields.
Where possible, prefer documents that generate more than one candidate for each field. The system analyzes the neighboring words of candidates. It not only learns positive indicators for successful candidates, but also negative indicators.
The number of samples needed to create a good extraction learnset depends on the task. In general, you need more samples to cover extraction than to cover classification.
The prerequisites for this task are:
Your project settings must allow for manual addition of documents to the learnset.
Your project settings must permit data extraction as runtime functionality.

Oracle WebCenter Forms Recognition 144 Designer User's Guide
Learning data extraction is done class-by-class. Therefore, you should prepare homogeneous sets of sample documents where all documents within a set belong to the same class.
You can either learn all fields defined for a class at once, or one field at a time. In the first case, your project settings should support selection of the first field when switching to the next document, in the second case your project settings should make sure that the field selection is not changed when switching to the next document.
8.12.1.1 Create Learnsets for All Fields in a Class
To create learnsets for all fields in a class, complete the following steps:
1. Switch to Document Selection Mode.
2. Select the first document from the batch that contains the documents for your learnset.
3. Switch to Train Mode. On the left side of the window, the Classes tab is in the foreground.
4. In the list in the lower section of the Classes tab, double-click the class you want to train. If you use field inheritance, select the parent class. The Fields tab displays the fields of the selected class. The fields are empty and the first field is selected. Candidate highlighting is enabled automatically.
5. In the toolbar, click Classify/Analyze <current document> to highlight all candidates for the first field on the document.
6. To select the correct candidate, click it. The candidate’s text is written to the field, and the field’s background color changes to green. The next field is selected automatically, and its candidates are highlighted automatically. When all document fields have a value, the document is automatically added to the extraction learnset. The program continues automatically with the next document and the first field. Continue choosing candidates until you have enough samples.
7. You can check the number of documents in the extraction learnset on the Classes tab.
8.12.1.2 Create Learnsets for a Single Field
To create Learnsets for a single field in a class, complete the following steps:
1. Switch to Document Selection Mode.
2. Select the first document from the batch that contains the documents for your learnset.
3. Switch to Train Mode. On the left side of the window, the Classes tab is in the foreground.
4. In the list in the lower section of the Classes tab, double-click the class you want to train. In the Fields tab, the fields of the selected class display. The fields are empty and the first field is selected. Candidate highlighting is enabled automatically.
5. On the Fields tab, select the field.
6. On the toolbar, click Classify/Analyze <current document> to highlight all candidates for the selected field on the document.
7. To select the correct candidate, click it. The candidate’s text is written to the field, and the field’s background color changes to green.
8. In the toolbar, click Add Document to Learnset to add the current document to the extraction learnset. Designer continues automatically with the next document and the selected field.

Oracle WebCenter Forms Recognition 145 Designer User's Guide
9. Repeat the previous two steps until you have enough samples.
Your sample documents may not always be perfect. To correct any imperfections, select any of the following options:
You can skip fields or redo training of a field by manually selecting a new field. In this case, click the Classify/Analyze button for manual analysis and click the Add
Document to Learnset button to manually add the current document to the extraction learnset. You may have to confirm that you want to use the document with some fields still being empty.
You can use words to fill the fields that were not found as candidates. Highlight all words, click the word you want to add and confirm the following message box. Note that in this case you still have to adjust your analysis settings to make sure the candidate will be found in the future.
8.12.2 Editing Learnsets
You can edit the extraction learnset in the same way as you would edit the classification learnset. Simply select Learnset as document input, then right-click a class and select View Extraction
Learnset from the popup menu.
8.12.3 Learning
During the learning process, WebCenter Forms Recognition takes your learnsets and the manually assigned candidates. It identifies the correlation between successful candidates, unwanted candidates and their environment. It thus learns to extract data automatically if they are similar to the ones that you have selected.
Learning is required:
After you set up your extraction scheme and created learnsets.
When you have changed field definitions by adding, deleting, moving or renaming fields.
When you have changed any parameters affecting the analysis and evaluation methods.
When you have changed a learnset.
Note: Classification and extraction are usually learned together. To learn extraction, proceed as described for classification. For more information, refer to Section 5.7.5: Learning.
8.12.4 Check the Learn Status of a Field
You can check at any time whether a field has already been learned or whether it requires relearning. The prerequisites for this task are:
Designer is in Definition Mode.
The panel on the left side of the window displays the Classes tab in the foreground.
On the right side of the window, the tabs with class and field properties are visible.
To check the learn status of a field, complete the following steps.
1. On the Classes tab on the left side of the window, double-click a class.
2. On the Fields tab, select a field.

Oracle WebCenter Forms Recognition 146 Designer User's Guide
3. Click the Evaluation tab on the right side of the window.
4. Click the Brainware Extraction tab. It displays the learn status.
8.13 Test the Extraction
When the fields have been set up, and the analysis and evaluation methods have been defined and configured, the extraction can be tested.
The prerequisites for this task are:
There is an active document set.
The classification must work.
If Brainware extraction is required, the evaluation must have been trained.
The project settings must allow data extraction as runtime functionality.
There are several methods to test the extraction, as described below.
8.13.1.1 In Definition Mode
If the Classes tab is in the foreground, only classification is tested.
If the Fields tab is in the foreground, classification and extraction is tested.
Use one of the following highlighting options to determine candidates, weights and validity:
Button Description View Menu
Highlights all candidates for the currently selected field in maroon.
A candidate is a possible value for a field identified in the processing step. To view the weight of the candidate, point to it with the mouse. The weight displays as a tooltip.
Highlight Candidates
Highlights all fields in the document.
If the field is valid it is highlighted in green, otherwise it is highlighted in red. To view the name of the field, point to it with the mouse. The name displays as a tooltip.
Highlight Fields
Use one of the following buttons to analyze the documents. The test results display on the Fields tab on the left side of the window.
Button Description
Processes the current document. The button’s dropdown menu enables or disables the debug mode.
Processes the next document.
Processes documents in the current set starting with the current one.
Possible results on the field level are:
The Field Is Empty This happens if no candidate was found or no candidate had the required weight.

Oracle WebCenter Forms Recognition 147 Designer User's Guide
The Field Is Invalid This is indicated by the red background color and happens if the best candidate had the required weight, but not the required distance or the best candidate did not meet standard or script-based validation requirements.
The Field Is Valid This is indicated by the white background color.
8.13.1.2 In Runtime Mode
Use one of the following buttons to analyze the documents:
Button Description
Processes documents in the current set starting with the current one.
Pauses the processing of documents.
Stops the processing of documents. Clears any results from previous runs.
The extraction-related columns in the Statistic View tab have the following meaning:
Avg. Classif. Level Actual number of classifications vs. maximum number of classifications for the selected class in percent.
Classification Diff. Class-level comparison of actual extraction results with results from a reference file. The first number represents the number of differences and the second one represents the total number of extractions. If there is a difference between test results and reference results, this is indicated by a red color.
The extraction-related columns in the panel to the lower left have the following meaning:
Column Description
Field Recognition Rate Actual number of extractions vs. maximum number of extractions for the selected document in percent.
Extraction Diff. Document-level comparison of actual extraction results with results from a reference file. The first number represents the number of differences and the second one represents the total number of extractions. If there is a difference between test results and reference results, this is indicated by a red color.
The panel to the lower right displays the field values determined for the current document and compares them with the results for the reference documents.
Valid results have a check mark.
Invalid results have a cross.
Differences between the test result and the reference result are indicated by the red color of the text.
8.13.1.3 In Verifier Test Mode
If you use table analysis and want to check the extraction results, do this in Verifier Test Mode. The test options described above only tell you whether a table was found at all, and whether the

Oracle WebCenter Forms Recognition 148 Designer User's Guide
extracted result was valid. What data was actually written to the table cells is only visible in Verifier Test Mode.
8.14 Optimize the Extraction
Most extraction problems are due to one of the following causes:
Incomplete configuration.
Insufficient quality of the learnset.
Insufficient quality of the OCR.
8.14.1 Resolve Problems with Incomplete Configurations
Incomplete configuration will most likely result in empty fields for all documents in a test set. The problem may be restricted to certain fields.
For a given field, use candidate highlighting to check whether your analysis settings deliver enough candidates.
For a given field, check the candidates’ weights.
If they are all 0, check whether the evaluation method has been specified at all.
Check whether the evaluation has been learned.
If you used field inheritance, there might be a problem with parent and child configuration. Check both configurations.
8.14.2 Resolve Problems with the Learnset
Problems with the learnset will most likely result in low average extraction levels with empty and invalid fields. For some documents in the test set, the extraction will work, for others not. The problem will most likely affect all fields that use the learnset.
Check the candidates’ weights and the distances. If your weights and distances are too low, you need more samples.
Add candidates which were previously not classified correctly due to the initially insufficient learnset.
Use candidates from the same document with an almost identical weight. These candidates are suitable to differentiate.
Avoid candidates with a high weight. These candidates do not improve the learnset, because they would already be selected correctly.
8.14.3 Resolve Problems with the OCR
Problems occurring in the OCR will make the extracted data unusable. If you use a standard validation (No Rejects), you will obtain low average extraction levels with many invalid fields.
The problem may be caused by the quality of the images. Make sure that the document input is properly prepared. For example, check scanner settings or fax export settings.
The default OCR settings may not be suitable to process the document input. If candidates are found with many unrecognized characters, change the OCR settings at the zone level or at the field level. If the OCR is so bad that you cannot find candidates, you

Oracle WebCenter Forms Recognition 149 Designer User's Guide
may have to change the OCR settings at the project level. For instructions on how to change OCR settings, refer to Section 10: Advanced Recognition Settings.
8.15 Apply Extraction Retraining
8.15.1 Description
The feature can be activated on a project level and, as soon as activated, affects all applications that apply extraction processing in WebCenter Forms Recognition. It can be turned by selecting the When Processing Document Always Retain Previous Extraction Results option in the Processing tab of the project Settings dialog.
When activated, the system always combines new extraction results with those previously available in the working document. For example, if a workdoc contained fields A, B, and C, and then extraction is applied to extract fields C, D, and E, the system will attach missing fields A and B to the updated workdoc, so that it finally contains C, D, E, A, and B. In this connection, a smart rollback will be applied for the content of field C, in case the new extraction result appeared to be empty. The roll-back, as well as attaching the old fields will be applied retaining all the secondary properties of the field objects (like attached candidate objects or enclosed tables) and not only the extraction result itself.
8.15.2 Usage and Scripting
The Retain Previous Extraction Results feature can be activated if double (or triple) document processing is required. This can be configured either through two separate projects or through a secondary extraction initiated directly from the first project’s custom script.
For example, extraction for header fields A, B and C should be applied with one of the subclasses of a parent class called Header Fields, that defines the extraction scheme for all three above mentioned fields. The secondary extraction is applied for another table field T and it has to be separately applied through a different class called Table Fields that includes definition and extraction scheme for the field T only. There are two possible approaches for processing documents in this scenario:
Project P1 contains the definition of a class hierarchy with the root Header Fields class. The Retain Previous Extraction Results feature is disabled. A Runtime Server instance applies an extraction workflow step with P1 redirecting the documents to state 551 in both failure and success cases.
Another Runtime Server instance applies extraction with the second project P2 that contains the definition of the Table Fields class. The Retain Previous Extraction Results feature is enabled for project P2. This Runtime Server instance has 551 as its input extraction state and 552 and 700 output workflow states for extraction failure and success respectively. The resulting workdocs contain all desired fields A, B, C and T.
There is just one project P1 that contains both class hierarchies; one with Header Fields and one with Table Fields. By default, it always applies extraction through the first hierarchy but, if required, can also launch the second level processing through a script like the example shown below.
Private Sub Document_PostExtract(pWorkdoc As SCBCdrPROJLib.SCBCdrWorkdoc)
On Error GoTo ERROR_HANDLER
Project.AllClasses.ItemByName("Table Fields").Extract pWorkdoc

Oracle WebCenter Forms Recognition 150 Designer User's Guide
Exit Sub
ERROR_HANDLER:
Project.LogScriptMessageEx CDRTypeError, CDRSeveritySystemMonitoring,
"Second level extraction has failed."
End Sub

Oracle WebCenter Forms Recognition 151 Designer User's Guide
9 Setup Supervised Learning
The Supervised Learning Workflow is used to automatically create and learn new document classes. This automatic process creates the new derived document classes for a base document class. This document class is not inherited from any other document class.
The derived document classes cannot have further derived document classes.
In addition, Supervised Learning Workflow must be enabled in both WebCenter Forms Recognition Designer and WebCenter Forms Recognition Verifier.
Remember that you must learn any documents that you add to the local learnset before they are released. Otherwise, the subclass will not be created in the project. In addition, the local project must be saved in order for the subclass to be created in the global project.
9.1 Train the Base Class
A generic or base document class is a generic category into which all the documents being processed will fit. An example would be Invoices.
The classification for this generic class is not trained automatically and, therefore, must be pre-configured manually. To complete this action, complete the following steps:
1. Configure the classification step by either assigning ASSA, Brainware, or any other available classification engine, or using this generic document class as the default classification result.
To select a classification engine, click the generic document class name in Definition Mode and select Show Properties from the Edit menu. On the Classification Editor on the right side of the screen, select a classification engine.
To define a document class as default classification result, click the project node in Definition Mode and select Show Properties from the Edit menu. On the Classification Editor on the right side of the screen, notice the dropdown box for Default Classification
Result. Select your generic document class for this setting.
The Supervised Learning Workflow can only be applied for base classes and their direct subclasses. Only administrator-selected base classes can become Supervised Learning Workflow nodes that define how their sub-nodes will be automatically created, learned, etc. The simplest way to define a project’s Supervised Learning Workflow node classification is through its default classification result. The method works if there is only one Supervised Learning Workflow node.
Establishing multiple classification results can be done through a script. In Designer, establish a default classification result, then use the Document_PostExtract event in the scripting module to set pWorkdoc.DocClassName to a different class. This technique enables you to keep the generic extraction pointed toward the default class, while moving the validation script to a different class. This can be configured and tuned manually through the various classification engines.
2. Insert at least one header field for which the Associative Search Engine is selected as the analysis engine.
Oracle WebCenter Forms Recognition 152 Designer User's Guide
3. Set the Class Name Format on the Analysis Editor. The header field is the one that will be used to find the document class name used to create a new derived document class if the class does not already exist, and then to automatically classify the document.
4. Additionally, the Classification field on document class-level must be defined. Select the Document Class tab on the right side of the screen, and notice the dropdown box for Classification field. Select the generic document class for this setting from the dropdown list.
9.2 Training Other Fields
For all other text fields that are defined for a generic document class, besides the one for which the Associative Search Engine is selected, you must use the Format Analysis Engine for analysis and the Brainware Extraction Engine for the evaluation engine.
If you have table fields, you must use Brainware Table Extraction for those fields.
Note: In WebCenter Forms Recognition, field names cannot contain periods or other special characters. Field name cannot contain multi-byte characters.
9.3 Create Derived Document Classes
9.3.1 Options for Creating Derived Classes in Designer
9.3.1.1 How the Derived Classes Are Created
You do not have to manually configure the derived document classes; they will be created automatically when the documents are added to the learnset.
All you need to do in order for the derived classes to be created are select Verifier Train Mode from the View menu, check the extraction results, and add the documents to the learnset.
When the documents are added to the learnset, a new derived document class is automatically created. The new document class name corresponds to the settings established for the document-level settings of the field Class Name Format on the Analysis Editor. Therefore, this must be defined in a way that ensures uniqueness of every document class name that could be created, that means that the ID, or any other unique field, should be part of the Class Name Format.
Though not obligatory, it can be useful to train some additional fields for the generic class now. This would mean that there would already be extraction results for the new class, and the Verification form would therefore already be partially populated.
To train the generic document class now, switch to Train Mode. If there is only one generic document class, you can set it as the default classification result. When this option is set, all documents are classified to the generic document class and only the extraction results have to be checked.
9.3.1.2 How WebCenter Forms Recognition Does the Classification
For the new automatically learned classes the system uses fixed and pre-determined engines that cannot be adjusted. Namely, Supervised Learning Workflow uses:
Brainware Layout Classification to automatically train level 1 classification.
Associative Search Engine to automatically detect a new class name, and, optionally, to automatically train level 1 classification.
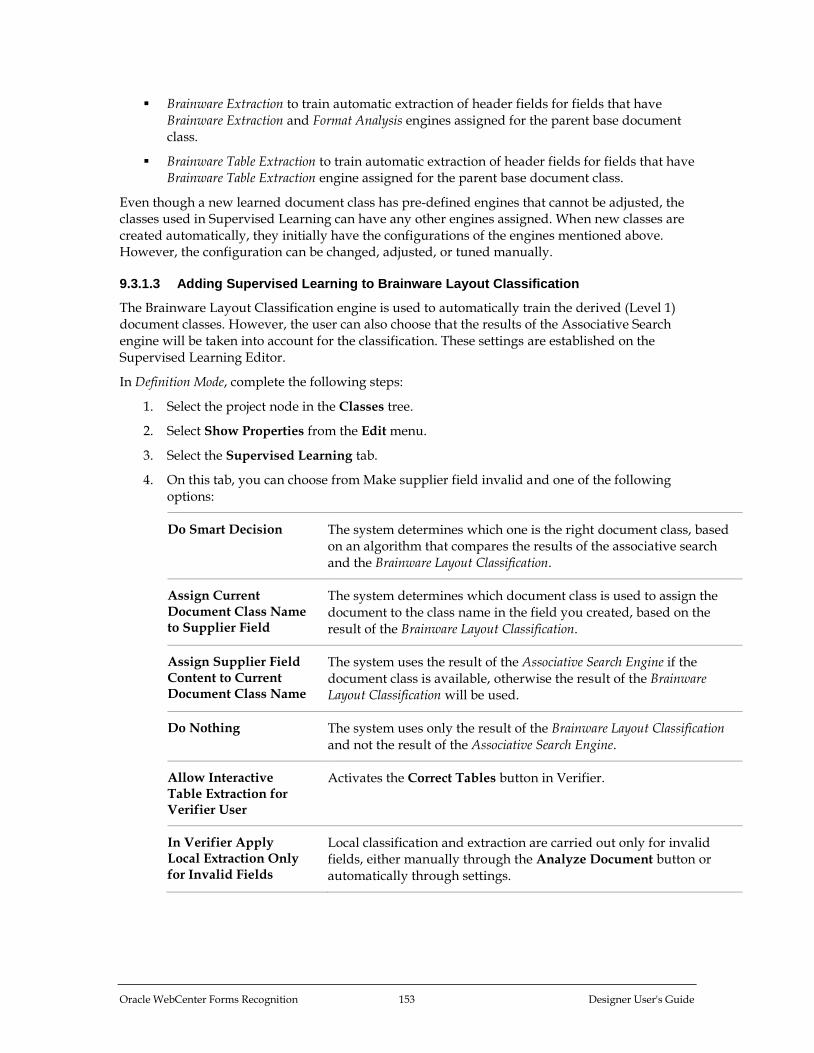
Oracle WebCenter Forms Recognition 153 Designer User's Guide
Brainware Extraction to train automatic extraction of header fields for fields that have Brainware Extraction and Format Analysis engines assigned for the parent base document class.
Brainware Table Extraction to train automatic extraction of header fields for fields that have Brainware Table Extraction engine assigned for the parent base document class.
Even though a new learned document class has pre-defined engines that cannot be adjusted, the classes used in Supervised Learning can have any other engines assigned. When new classes are created automatically, they initially have the configurations of the engines mentioned above. However, the configuration can be changed, adjusted, or tuned manually.
9.3.1.3 Adding Supervised Learning to Brainware Layout Classification
The Brainware Layout Classification engine is used to automatically train the derived (Level 1) document classes. However, the user can also choose that the results of the Associative Search engine will be taken into account for the classification. These settings are established on the Supervised Learning Editor.
In Definition Mode, complete the following steps:
1. Select the project node in the Classes tree.
2. Select Show Properties from the Edit menu.
3. Select the Supervised Learning tab.
4. On this tab, you can choose from Make supplier field invalid and one of the following options:
Do Smart Decision The system determines which one is the right document class, based on an algorithm that compares the results of the associative search and the Brainware Layout Classification.
Assign Current Document Class Name to Supplier Field
The system determines which document class is used to assign the document to the class name in the field you created, based on the result of the Brainware Layout Classification.
Assign Supplier Field Content to Current Document Class Name
The system uses the result of the Associative Search Engine if the document class is available, otherwise the result of the Brainware Layout Classification will be used.
Do Nothing The system uses only the result of the Brainware Layout Classification and not the result of the Associative Search Engine.
Allow Interactive Table Extraction for Verifier User
Activates the Correct Tables button in Verifier.
In Verifier Apply Local Extraction Only for Invalid Fields
Local classification and extraction are carried out only for invalid fields, either manually through the Analyze Document button or automatically through settings.

Oracle WebCenter Forms Recognition 154 Designer User's Guide
10 Advanced Recognition Settings
In WebCenter Forms Recognition, you can use the following recognition techniques:
OCR (Optical Character Recognition).
Barcode Recognition.
OMR (Optical Mark Recognition).
OCR is applied to provide text input for the classification step. In the extraction step, either of the recognition techniques can be used.
Depending on the recognition method, WebCenter Forms Recognition provides several recognition engines you can select from:
For OCR:
FineReader 11.
FineReader 10.
Kadmos5 OCR/ICR Engine.
For OMR:
Cairo OMR Engine.
For Barcode Recognition:
Cleqs Barcode Engine.
Recognition is performed on demand during the classification and extraction steps. On demand means recognition can be performed as requested, any number of times. The result is stored in the workdoc.
Each engine has its default parameter set that should work well in most cases. However, to enable you to select the optimum parameters for your problem, if this should be required, you can customize the recognition settings independently on several levels for each processing step that involves recognition.
10.1 Scope of Recognition Settings
10.1.1 Project-Level Settings
Project-level settings affect:
The classification step.
Extraction steps using Format Analysis.
Extraction steps using Address Analysis.
Extraction steps using Zone Analysis, provided that no different settings have been specified at the zone level.
Project-level settings affect every document processed with the project. They influence both quality and performance. Therefore, exercise caution when changing them.

Oracle WebCenter Forms Recognition 155 Designer User's Guide
However, you should consider editing project-level settings if your classification does not work properly due to OCR problems, or if you have OCR-related problems getting candidates from Format Analysis or Address Analysis. You also should edit the project-level settings to change the default engines for each recognition type.
The prerequisites for this task are:
Designer is in Definition Mode.
On the Classes tab on the left side of the window, the entry representing your project is selected.
On the right side of the window, the tabs with class and field properties are visible.
The Project tab displays in the foreground.
10.1.1.1 Available Options
The following options are available:
To change preprocessing and recognition setting, click the OCR Settings… button. This displays the OCR Settings dialog.
To change the rules for word segmentation, edit the enumeration of characters in the Word Segmentation Characters property.
Note: Use extreme caution with this. You should have a couple of sample documents on hand and use the highlighting options to immediately check the consequences of your changes. Keep in mind that classification and extraction methods that rely on learning use a dictionary created from the words in your documents. If learning has already taken place, it needs to be repeated.
10.1.2 Page-Level Settings
The project-level recognition settings are taken from, and written to, a special reading zone, the All zone. This zone represents the entire page and is normally not visible.
To display the All zone, complete the following steps:
1. Switch to Definition Mode.
2. On the Classes tab, select the project node.
3. From the View menu, select Show Page. In the viewer, the All zone displays as a red bordered rectangle.
4. Click the All zone to select it. The zone is now grey shadowed.
5. Right-click the All zone and select Properties from the popup menu. This displays the Zone Properties dialog box for the All zone.
Note: You should not edit these properties, since some of the displayed options do not make sense when applied to the entire document set. Edit at the project-level. Synchronization between project-level settings and page-level settings is done automatically.

Oracle WebCenter Forms Recognition 156 Designer User's Guide
10.1.3 Zone-Level Settings
Zone-level settings affect extraction steps using Zone Analysis. Locally, they override project-level settings. You can use a different set of parameters for each reading zone.
You should edit zone-level settings if you are experiencing recognition-related problems to extract the correct data.
At the zone level, you can normally use a variety of preprocessing and recognition options that improve your results. Due to the small reading area, the loss in performance is comparably small.
The prerequisites for this task are:
Designer is in Definition Mode.
The panel on the left side of the window displays the Fields tab in the foreground.
A field is selected for which Zone Analysis has been defined.
The viewer displays a document from the respective class.
There must be zones on the document to edit.
10.1.3.1 Edit Zone-Level Settings
To edit zone-level settings, complete the following steps.
1. Select the reading zone.
2. Right-click the zone and select Properties from the popup menu. This displays the Zone Settings Properties dialog.
10.1.4 Field-Level Settings
Field-level settings affect extraction steps using Format Analysis or Address Analysis. It can be used to read the field again after the best candidate has been selected. By this time, the format and the geometry of the field is well known. Therefore, the OCR quality can be improved dramatically by using a different OCR engine or by imposing certain restrictions through classifiers.
The prerequisites for this task are:
Designer is in Definition Mode.
The panel on the left side of the window displays the Fields tab in the foreground.
The respective field is selected.
On the right side of the window, the tabs with class and field properties are visible.
The Fields tab displays in the foreground.
10.1.4.1 Edit Field-Level Recognition Settings
The following field-level recognition settings are available:
If the current field is a derived field, you can use inherited OCR settings of the parent class. Inheritance is the default behavior. To override the parent class settings, clear the Use Derived OCR Settings checkbox. This enables the remaining OCR parameters.
Check the Read Field Again checkbox to activate OCR optimization.
Click the OCR Settings… button to display the Field OCR Settings Properties dialog.

Oracle WebCenter Forms Recognition 157 Designer User's Guide
Check the Boost Field checkbox to activate the Digit Booster. The Digit Booster provides optimized OCR results for defective digits.
Check the results of field boosting by looking on the highlighting of candidates.
10.2 Engine-Independent Settings
10.2.1 General Tab
To edit size and position of the reading zone, complete the following steps:
1. Select the General tab.
2. To define the size and position of the reading zone, select from the following options:
Name Specify the name of the reading zone. By default, All is the reading zone for the entire page.
Units Specify the units used for geometric parameters in pixels, inches, or millimeters.
Fit to Image Height Adjust the height of the zone to the height of the page.
Fit to Image Width Adjust the width of the zone to the width of the page.
Left Specify the distance of the reading zone to the left edge of the page.
Top Specify the distance of the reading zone to the top edge of the page.
Width Specify the width of the reading zone.
Height Specify the height of the reading zone.
10.2.2 Preprocessing Tab
To edit preprocessing options, complete the following steps.
1. Select the Preprocessing tab.
2. Enable one or more of the following preprocessing methods from the Available Methods list:
Despeckle Remove speckles from your documents. Speckles are made up of groups of black pixels surrounded by white pixels or vice versa.
Lines Manager Remove horizontal or vertical lines from your document.
Clean Border Improve the quality of images that have a dark border as, for example, often generated in photo copies.
3. Click the button to move the selected entries to the Selected Methods list.

Oracle WebCenter Forms Recognition 158 Designer User's Guide
10.2.2.1 Disable Preprocessing Methods
To disable preprocessing methods, complete the following steps:
1. Under Selected Methods, select one or multiple entries.
2. Click the button to remove the selected entries from Selected Methods.
10.2.2.2 Order Preprocessing Methods
Preprocessing methods are applied in the same order as listed in the Selected Methods list. To order preprocessing methods, complete the following steps:
1. Under Selected Methods, select an entry.
2. Click the button to move the method up or click the button to move it down.
10.2.2.3 Configure the Line Manager
To configure the line manager, complete the following steps:
1. Under Selected Methods, select Lines Manager.
2. On the General tab, check Remove Hor. Lines to remove horizontal lines. Enter a minimum line length in millimeters in the Horizontal Line text box.
3. On the General tab, select Remove Ver. Lines to remove vertical lines. Enter a minimum line length in millimeters in the Vertical Line text box.
10.2.2.4 Test the Effect of Preprocessing Methods
To test the effect of preprocessing methods, complete the following steps:
1. Make sure the current document is visible and not hidden behind the dialog box.
2. Complete one of the following actions:
Test a single method. Under Selected Methods, select an entry and click Single Step.
Test all selected methods. Click All Steps. View the document to check the preprocessing effects. The time required for preprocessing displays under Test.
3. For further tests, click Reset before you proceed.
Note: If performance is an issue, check the sum of recognition time and preprocessing time. Even if preprocessing takes a while, recognition may be faster after preprocessing.
10.2.3 Anchors Tab
To assign anchors to the current reading zone, select the Anchors tab.
10.2.3.1 Available Operations
The following operations are possible:
To assign anchors, select them from the Available Anchors list and click the button.
To delete assignments, select anchors from the Selected Anchors list click the button.
10.2.4 Recognition Tab
To edit recognition settings, select the Recognition tab.

Oracle WebCenter Forms Recognition 159 Designer User's Guide
To select a recognition engine, complete the following steps:
1. Under Recognition Type, select OCR, OMR or Barcode.
2. Under Available Engines, select the recognition engine.
3. To use the selected engine as default engine for the current recognition type, select Use as
Default Engine.
10.2.5 Test Tab
To test the recognition results with the current document, select the Test tab.
To perform the test, complete one of the following options:
If no zone is selected, in the Zone Names list box, click the zone name.
If there is a zone selected, click Read Zone.
The recognition result displays in the Reco Result text box. Below, the execution time and, if applicable, the degree of blackness displays.
Note: Avoid recognition tests with entire pages.
10.3 FineReader OCR Engines
WebCenter Forms Recognition features the OCR engines FineReader 10 and FineReader 11. They optimize the enterprise documents with poor or marginal printer quality, such as documents printed with dot matrix or chain printers.
It is not recommended that two different FineReader engine versions participate in one process. Potential process failure might occur.
10.3.1 FineReader 10 and 11
10.3.1.1 General Tab
Recognition Trade Off is a tradeoff between performance and OCR accuracy, and has the following options:
Most Accurate If selected, recognition has less error rate but a higher processing time. This is the default mode.
Balanced If selected, recognition is in between Most Accurate and Fast.
Fast If selected, recognition is quicker but less accurate.
The following Rotation options are available:
Detect Orientation Select this to automatically detect whether pages are in portrait or landscape orientation.
Deskew Select this to automatically fix the alignment of badly scanned pages.
The following Enhancement options are available:
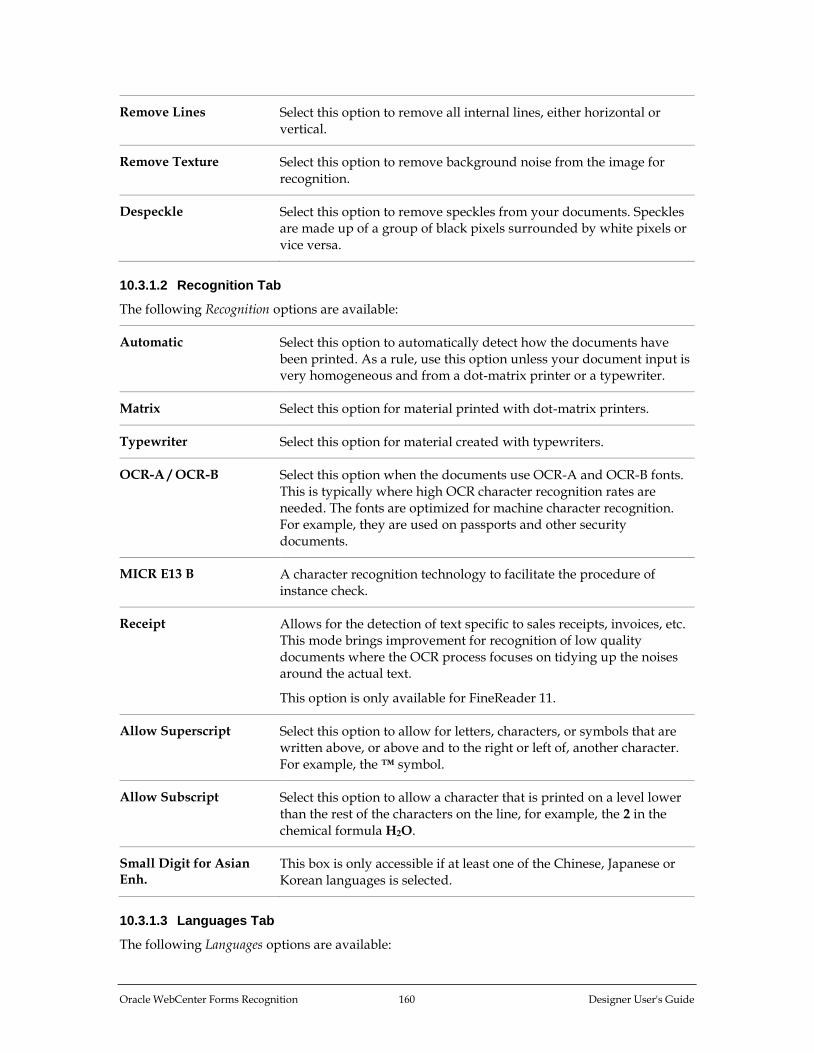
Oracle WebCenter Forms Recognition 160 Designer User's Guide
Remove Lines Select this option to remove all internal lines, either horizontal or vertical.
Remove Texture Select this option to remove background noise from the image for recognition.
Despeckle Select this option to remove speckles from your documents. Speckles are made up of a group of black pixels surrounded by white pixels or vice versa.
10.3.1.2 Recognition Tab
The following Recognition options are available:
Automatic Select this option to automatically detect how the documents have been printed. As a rule, use this option unless your document input is very homogeneous and from a dot-matrix printer or a typewriter.
Matrix Select this option for material printed with dot-matrix printers.
Typewriter Select this option for material created with typewriters.
OCR-A / OCR-B Select this option when the documents use OCR-A and OCR-B fonts. This is typically where high OCR character recognition rates are needed. The fonts are optimized for machine character recognition. For example, they are used on passports and other security documents.
MICR E13 B A character recognition technology to facilitate the procedure of instance check.
Receipt Allows for the detection of text specific to sales receipts, invoices, etc. This mode brings improvement for recognition of low quality documents where the OCR process focuses on tidying up the noises around the actual text.
This option is only available for FineReader 11.
Allow Superscript Select this option to allow for letters, characters, or symbols that are written above, or above and to the right or left of, another character. For example, the ™ symbol.
Allow Subscript Select this option to allow a character that is printed on a level lower than the rest of the characters on the line, for example, the 2 in the chemical formula H2O.
Small Digit for Asian Enh.
This box is only accessible if at least one of the Chinese, Japanese or Korean languages is selected.
10.3.1.3 Languages Tab
The following Languages options are available:

Oracle WebCenter Forms Recognition 161 Designer User's Guide
Installed Set of languages installed on the system.
Used Recognition will be processed with the corresponding language data files (language database). Select multiple languages only if you are processing multilingual documents.
The character set included in the output text depends upon the selected languages. For example, if Digits is inserted in the used-languages list, the OCR result can contain the following characters:
«()+,-./0123456789:=#$([{^?€ %).]}°¼½¾»—‹›
If English is inserted in the used-languages list, the OCR result can contain the following characters:
!"#$%&'()*+,-./0123456789:;<=>?@ABCDEFGHIJKLMNOPQRSTUVWXYZ
[\]_abcdefghijklmnopqrstuvwxyz{|}~£¥§©«¬®°±»—„•€™
10.4 Kadmos 5 Engine
The Kadmos 5 engine is optimized for recognition of handwritten document forms and material containing handwritten zones. It offers support and optimization for different languages.
10.4.1 General Tab
The following Recognition options are available:
Hand Alphanumeric German, Europe, UK, US
Select for German, European, UK or US hand-written material containing alphanumeric characters.
CMC7, E13B, Farrington F7B Normfont
Select for material written with CMC7, E13B (US checks), F7B (ID cards) fonts.
OCRA, OCRB Select for material written with dedicated OCR fonts.
Hand + Machine Print, Numeric
Select for material containing handwritten or machine-printed numbers and currency symbols, but no other alpha characters.
Hand + Machine Print, Europe, US Numeric
Select for European or US documents.
Machine, Alphanum, German, UK, US
Select for UK, US, and German machine-printed material containing alphanumeric characters.
Other general options are available:

Oracle WebCenter Forms Recognition 162 Designer User's Guide
Confidence Level Use the slider to specify the threshold for accepting characters. Characters recognized below the required confidence level are termed as rejects, characters recognized above the confidence level are termed as valid. High confidence level causes more reject, but there will be fewer errors in the accepted results. The confidence level will also affect performance. Generally, it takes about 10 times longer to read with the lowest confidence level than with the highest.
Recognition Trade Off Select the type of optimization assigned to the ICR process. The Most accurate parameter provides higher accuracy with lower speed.
10.4.2 Characters Tab
Restrict the range of valid characters. The offered character set depends on the classifier that was selected before.
In the upper section, the Valid Characters tab displays a button for each possible character of the selected classifier. A pressed button corresponds to a valid character.
In the bottom section, there are checkboxes that enable you to edit entire character groups in one step. If a checkbox is selected, the corresponding character group is valid.
Use the All and None buttons to edit the entire character set in one step. By clicking All, all characters are marked as valid. By clicking None, all characters are marked as invalid.
10.4.3 Digits Tab
Define the digits that are eligible to be found on the document. Use the All and None buttons to select and deselect all digits.
10.4.4 Preprocessing Tab
Note: The Kadmos preprocessing features are implemented for special usage only. In most cases, it is recommended to use the engine-independent preprocessing features as described in Section 10.2: Engine-Independent Settings.
Edit the following Noise Removal settings:
Automatic The Automatic setting for noise removal is based on an algorithm that will produce best results for many scenarios depending on the characters’ position, size and segmentation. For checks (cheques) use the Automatic setting. Only adjust the settings manually if specific values are needed for well known cases.

Oracle WebCenter Forms Recognition 163 Designer User's Guide
Relative [%], Absolute [pixel]
Select one of these options to reduce background noise on your documents manually. You need to select the Enabled checkbox and to specify the maximum size of spots that are removed, either using the pixel scale or as a fraction of the line thickness of the found characters. The size parameters are:
Diameter: Maximum diameter of a spot.
Thickness: Maximum horizontal length of a spot.
Length: Maximum vertical length of a spot.
On this tab you can also configure object removal to remove lines or other geometrical shapes that could interfere with the OCR from the documents. For specific documents, it is recommended to use engine-independent preprocessing features first.
10.4.5 Position Tab
To specify settings with respect to word and line surroundings, select the Position tab.
Three options are available:
Character Segmentation If the characters in the zone are within equal or proportional distance, select Equal Distance or Proportional respectively. The Automatic setting is used by default.
If the characters do not touch, check the No Touching Char. checkbox. If ligatures are expected in the zone, deselect No Ligatures.
Character Distance Speed up processing by specifying the horizontal character distance in quantity of image pixels. Keep in mind that the character distance is resolution dependent. To activate the option, check the Defined
checkbox. Specify the minimum and the maximum distance in image pixels using the associated text field.
Character Position Select one of the options to take the position of a character within a line into account. The scale goes from irrelevant (Ignore) up to very relevant (Strong Weight).
10.5 Cleqs Barcode Engine
The Cleqs Barcode Engine is a barcode engine compatible with WebCenter Forms Recognition.
10.5.1 General Tab
The following options are available:
Confidence Currently not enabled.
Min. / Max. Number of Characters
Enter the minimum or maximum length of the barcode in characters.

Oracle WebCenter Forms Recognition 164 Designer User's Guide
Return Only Decodable Barcodes
Check this option to accept barcodes only if all characters are recognized, i.e. no rejects.
Max. Number of Barcodes
Enter the maximum number of barcodes to be recognized within the reading zone. The default is 10, which can usually be reduced to speed up processing.
10.5.2 Restrictions Tab
The following options are available:
Code Type Select whether you want to recognize barcodes or patch codes. A patch code is a pattern of horizontal black bars separated by spaces and typically placed near the leading edge of a paper document. Patch codes are used to separate documents.
Types of Barcodes to Be Recognized
Use the checkboxes to select barcode types that you expect to find. Do not check more options than required as this will slow down processing and affect accuracy.
Orientation Select the appropriate option to specify whether all barcodes or patch codes are oriented horizontally, vertically or both.
Ink Color Select the appropriate option to detect white barcodes on a black background, black barcodes on a white background or both.
10.5.3 Preprocessing Tab
The following options are available:
No Isolated Pixels Select this option to automatically remove small speckles from the reading zone.
No Hor. Single Pixel Gaps
Select this option to automatically fill small gaps in horizontal lines. This option is recommend for processing barcodes with a corresponding orientation.
No Ver. Single Pixel Gaps
Select this option to automatically fill small gaps in vertical lines. This option is recommend processing barcodes with a corresponding orientation.
Erosion The erosion filter thins down lines by setting any black pixel to white if it is located at a specified direction to at least one white pixel in the source image. To specify the direction, select from the following options:
Horizontal.
Vertical.
Isotropic (all directions).

Oracle WebCenter Forms Recognition 165 Designer User's Guide
Dilation The dilation filter thickens lines by setting any white pixel to black if it is located at a specified direction to at least one black pixel in the source image. To specify the direction, select from the following options:
Horizontal.
Vertical.
Isotropic (all directions).
10.6 Cairo OMR Engine
10.6.1 OMR Zones
Using the Cairo OMR Engine, you can determine the contents of OMR reading zone using optical mark recognition. The purpose of this process is to detect whether a checkbox on a document is marked or not. This is done by analyzing the black to white ratio of the defined zones. Therefore, an OMR reading zone can contain only one checkbox. If you have more than one checkbox on the document, you have to create an OMR reading zone for each of them.
The prerequisites for this task are:
Designer is in Definition Mode.
On the Classes tab on the left panel of the window, a class is selected.
10.6.1.1 Create OMR Reading Zones
To create reading zones, complete the following steps:
1. Load a document into the viewer that belongs to the selected class.
2. From the menu, select View Show Page. The viewer toolbar displays additional buttons for zone creation.
Button Description
Activates the selection tool.
Creates an OCR reading zone.
Creates an OMR reading zone.
Creates a barcode reading zone.
Creates an anchor.
3. In the viewer panel, click the respective toolbar button to create an OMR zone.
4. Click the document and drag to create a rectangular reading zone around the checkbox. The reading zone displays as transparent rectangles with red borders. Each zone has a label that displays the name of the zone. The initial name is created from the word Zone and a consecutive number.

Oracle WebCenter Forms Recognition 166 Designer User's Guide
10.6.2 General Tab
You need to specify threshold values to distinguish unchecked from checked areas. Perform the following steps:
1. Switch to Definition Mode.
2. On the Classes tab on the left panel of the window, select a class.
3. Select the Fields tab on the left panel of the window.
4. On the right side of the window, select the Fields tab.
5. Click the OCR Settings… button.
6. Select OMR as the recognition type.
7. On the General tab you can see the settings for the Cairo OMR engine. The following options are available to determine unchecked and checked areas:
Lower [%] Lower limit for degree of blackness in percent.
Upper [%] Upper limit for degree of blackness in percent.
Return Value A number or a character string. This value is returned if the measured degree of blackness is between the lower and the upper limit for Unchecked or Checked, as appropriate.
Search for OMR Box When selected, an algorithm searches for a black square box within the defined zone. For better recognition results, the recognition is then applied for this square box zone. If nothing was found, search for a check mark will be executed within the originally defined zone.
If it cannot be decided whether the OMR zone is checked or not, such as for all degrees of blackness outside the ranges specified, a question mark is returned, similar to the behavior of OCR engines with unrecognized characters. The OMR zone should not be smaller than the specified zone, and there should not be more than one rectangle in the specified zone.
In particular, if your OMR zones are filled in manually, do not choose too high values for the upper limit of checked OMR zones. A very high degree of blackness may rather indicate that a manual entry has been corrected. If this can be safely excluded, you can also configure the OMR recognition to never return question marks.
10.7 OCR Field-Level Digit Booster
The Digit Booster boosts digit-to-digit for alphanumeric fields and alpha-to-digit for numeric fields. The digit-to-digit booster provides optimized digit recognition. The alpha-to-digit booster also repairs digits that where recognized as letters.
The Boost Field option enables the alpha-to-digit and digit-to-digit boosting. Use this feature to correct a wrong recognition of numbers as letters. It should be used on numeric fields only, such as Amounts or PO Number.
The Boost Digits Only option enables digit-to-digit boosting. Use this feature to correct a wrong recognition of numbers as numbers. It should be used on alpha-numeric fields like Invoice Number or Date.

Oracle WebCenter Forms Recognition 167 Designer User's Guide
Boosted objects are worktexts for fields, candidates and table cells. The workdoc itself remains unchanged. Multipage documents are supported but the engine speed may drop for multipage documents with a lot of fields and candidates. Too high resolutions and too low resolutions lead to boost failure.
The boost process takes place in the Document_PostExtract event by default. If extra boosting is needed between the Analysis and Evaluation processes of the Extraction a registry value can be added as follows:
HKEY_LOCAL_MACHINE\SOFTWARE\[Wow6432Node\]Oracle\Cedar
Create a DWORD value with the name ExtraBoostingPriorToEvaluationEnabled under the key specified above and set it to 1.
The Boost Digits Only option does not affect table fields. This limitation can be circumvented using script. For table fields use the column-level property pTable.IsColumnNumeric at the very end of the Document_PostExtract event. Set the isColumnNumeric property to False if alpha-to-digit boosting is not allowed. Refer to the following example for a correct configuration of a table with regard to character boosting:
Private Sub Document_PostExtract(pWorkdoc As SCBCdrPROJLib.SCBCdrWorkdoc)
Dim pField As SCBCdrField
Set pField = pWorkdoc.Fields.ItemByName("LineItems")
pField.Table(pField.ActiveTableIndex).IsColumnNumeric("Date") = False
pField.Table(pField.ActiveTableIndex).IsColumnNumeric("UnitPrice") = True
pField.Table(pField.ActiveTableIndex).IsColumnNumeric("Quantity") = True
pField.Table(pField.ActiveTableIndex).IsColumnNumeric("Total") = True
End Sub
The Format Analysis Engine delivers candidates for the Brainware Extraction Engine, so that re-learning is not required for Booster migration. For digit-to-digit boosting, relearning is not useful, although it can be helpful for alpha-to-digit boosting.

Oracle WebCenter Forms Recognition 168 Designer User's Guide
11 Regular Expressions
11.1 What Are Regular Expressions?
Regular expressions are a generalized pattern language that WebCenter Forms Recognition uses for format analysis. With regular expressions, strings that match a specified pattern can be identified in a document’s text. Although regular expressions look cryptic, they are easy to learn.
Try using regular expressions if you have problems getting the correct candidates for field extraction with simple expressions. Regular expressions precisely describe the candidates you are looking for.
11.2 Literal Characters in Regular Expressions
Two types of characters are used in regular expressions:
Literal.
Special.
Literal characters are made up of normal text characters, such as letters or numbers, and of all symbols that are not used as operators.
Special characters are symbols that can be used as operators, for example:
* - [ ] ^ { } \ .
If a special character appears in a regular expression as a literal character, it must usually be marked so that it is treated as a literal character and not as an operator. To use a special character as a literal character, place a backslash in front of the symbol, or enclose the symbol with square brackets.
11.3 Operators in Regular Expressions
Operators consist of one or more special characters:
Operator Description
Match-self Operator
This operator is represented by any literal character. Its definition is included for completeness only. It matches the character itself.
Concatenation Operator
This operator is not represented by any character. It concatenates two regular expressions.
. Match-Any-Character Operator
This operator is represented by a period. It matches any single printing or non-printing character.
Example:
a.b matches any three-character string beginning with a and ending with b.
* Match-Zero-or-More Operator
This operator is represented by an asterisk. It is always used following a literal character or a special character. It repeats the smallest possible preceding regular expression as many times as necessary to match the pattern, including one repetition and zero

Oracle WebCenter Forms Recognition 169 Designer User's Guide
Operator Description
repetitions.
Examples:
o* matches any string made up of zero or more o’s. fo* matches f, fo, foo and so on.
\{count\}
\{min,\}
\{min, max\}
Interval Operators
The Open Interval Operator is represented by \{. The Close Interval Operator is represented by \}. Interval operators repeat the smallest possible preceding regular expression a specified number of times:
\{count\} matches exactly <count> occurrences of the preceding regular expression. \{min,\} matches at least <min> occurrences of the preceding regular expression. \{min,max\} matches between <min> and <max> occurrences of the preceding regular expression. The interval is invalid if <min> is greater than <max>, or any of <count>, <min> or <max> is outside the range 0 - 256.
[ ]
[^ ]
Character Class Operators
[ and ] are used in regular expressions as special characters to indicate a character class. A character class matches a single character, regardless of how many characters or character ranges are defined in the character class. Characters contained in the class can be listed individually. Alternatively, character ranges can be specified using the - range operator. A character class can contain as many individual characters as needed, and can contain multiple character ranges. A negated character class can also be specified. A negated character class consists of any character except the characters and/or ranges listed in the character class. A negated character class includes the ^ metacharacter as the first character in list. Most special characters lose any special meaning inside a character class. The following characters still have a special meaning at certain positions within an expression:
] closes the character class unless it is the first character. \ quotes the next character unless it is the last character before the closing bracket. - represents the range operator unless it is the first character after the opening bracket or the last character before the closing bracket. Empty character classes are invalid.
- Range Operator
The range operator is represented by a hyphen -. It specifies a range of characters when used inside a character class.
Examples:
a-f matches any character between a and f. A-Z matches any capital letter. a-z matches any lower-case letter. 0-9 matches any number.
\ Escape Operator
The escape operator is represented by a backslash. It is used to quote certain special characters. If you need to use the literal value of a special character within an expression, then a backslash should be inserted before that special character to signal that the following character is to be treated literally.

Oracle WebCenter Forms Recognition 170 Designer User's Guide
12 Advanced Evaluation Settings
12.1 Project-Level Settings
12.1.1 Classification Interpretation and How It Works
Assume there are given classes, a given document, and several classification methods that return confidence levels. It is unlikely that all methods will return the same confidence level. To get the best estimate on what the confidence really is, we need to compute a combined result.
WebCenter Forms Recognition supports three ways to do this:
The Maximum method.
The Average method.
The Weighted Distance method.
12.1.1.1 The Maximum Method
In this method, only the maximum confidence level of a class is taken into account. This is the default setting.
12.1.1.2 The Average Method
The average (mean) of all confidence levels for a class is taken into account.
12.1.1.3 The Weighted Distance Method
The maximum of all results for all classes is taken as a reference. For each result, the distance to this reference is calculated. For each class, the distances are added. This sum is subtracted from the maximum result obtained for that class.
12.1.2 Project-Level Standard Classification and How It Works
Standard Classification uses two values defined at the project level to decide whether a document can be classified or not:
A minimum confidence level called a threshold.
A minimum difference in confidence between the best class and the second-best competitor called distance.
Both requirements must be met to classify a document.
Assume a document is classified with the following result:
Class A: 88%
Class B: 67%
Class C: 63%
Now assume that the default values for threshold and distance are applied:
Threshold: 70
Distance: 20

Oracle WebCenter Forms Recognition 171 Designer User's Guide
Class A is the best class. Confidence for Class A is above the threshold.
Class B is the second-best class. The distance to Class A is 21. This is above the required distance.
The document will be assigned to Class A.
Next assume another document is classified with the following result:
Class A: 78%
Class B: 63.5%
Class C: 62.5%
Again, Class A is the best class. Confidence for Class A is above the threshold.
Class B is the second-best class, but for this document the distance to Class A is 14.5. This is below the required distance.
This document cannot be classified using standard classification.
Finally, assume another document is classified with the following result, but this time the Weighted Distance method has been applied:
Class A: 68%
Class B: 18%
Class C: 8%
Class A is the best class but confidence for Class A is below the threshold.
Distances to the next classes are very high.
The document cannot be classified using standard classification
If you use the weighted distance method, you should work with smaller thresholds to obtain a satisfactory fraction of classified documents.
12.1.3 Project-Level Parent Classification and How It Works
So far, no hierarchical elements were taken into account for classification. However, if classification is not possible using the flat mechanism, hierarchical elements may resolve the conflict.
One of the available hierarchical methods is parent classification. If parent and child classes compete for the same documents, the documents will rather be assigned to the children. If there are several children with similar confidence levels, the parents can decide which class is the correct one.
Parent classification uses two additional values defined at the project level:
A parent threshold (50 percent by default).
A parent distance (10 percent by default).
12.1.4 Project-Level Default Classes and How They Work
Normally, all documents that cannot be assigned to a particular class are marked as Not
Classified in Designer’s Runtime Mode.
During production, they are marked by the Runtime Server with a particular status value indicating that classification was not successful. The corresponding documents will not be processed any further.

Oracle WebCenter Forms Recognition 172 Designer User's Guide
To prevent this, you can define a default class for each project that will be assumed if classification fails. You can also use this feature to create applications without classification, but with extraction.
12.1.5 Modify Project-Level Settings
The prerequisites for this task are:
Designer is in Definition Mode.
On the Classes tab on the left side of the window, the project node is selected.
On the right side of the window, the tabs with class and field properties are visible.
On the Classification tab, the following options are available:
To set a default class, select an entry from the Default Classification Result dropdown.
On the Project tab, the following options are available:
To change the algorithm to obtain combined results for given classes, selects an entry from the Classification Interpretation list box.
To change Threshold or Distance for Standard Classification, use the sliders or type values into the corresponding text boxes.
To change Threshold or Distance for Parent Classification, use the sliders or type values into the corresponding text boxes.
12.2 Method-Level Classification Settings
12.2.1 Method-Level Absolute Results and How They Work
For a certain classes and documents, each classification method may return different result types. Possible result types are:
Confidence This document belongs to a specified class with a probability that is given in percent.
Yes This document is definitely in this class.
Maybe This document might belong to this class.
No This document does definitely not belong to this class.
The various classification methods are not equally reliable. For example, it is dangerous to decide that a document is an invoice based only on the fact that it is a certain size. The table below presents the possible results for each classification method. It also shows which result type is returned by default.
Method Result Default or Configured
Brainware Classification Confidence
Yes
No
Default
Configured
Configured

Oracle WebCenter Forms Recognition 173 Designer User's Guide
Method Result Default or Configured
ASSA Confidence
Yes
No
Default
Configured
Configured
Phrase Classification Confidence
Yes
No
Default
Configured
Configured
Image Size Classification Maybe
No
Default
Default
Form Classification Yes
Maybe
Confidence
Default
Default
Configured
Layout Classification Confidence
Yes
No
Default
Configured
Configured
Brainware Layout Classification Maybe
No
Confidence
Configured
Configured
Default
Language Classification Maybe
No
Confidence
Configured
Configured
Default
Yes and No are called absolute results. If the program is configured accordingly, they are obtained if confidence levels returned by one of the methods are either very high or very low.
If a method returns Yes for a class, the combined result will be Yes. Classification of the document will stop at this stage. All other classes will be excluded automatically.
If a method returns No for a class, the combined result will be No. Within the current branch, classification of the document will stop at this stage. All child classes will be excluded automatically.
You can use absolute results to speed up the entire classification process. Image Size Classification is a suitable method to exclude entire branches very quickly. Brainware Layout Classification can be used to positively confirm formal classes very quickly. The same is true for Forms Classification.
12.2.2 Method-Level Multiple Views and How They Work
By default, in WebCenter Forms Recognition, each document can only be assigned to one class. However, WebCenter Forms Recognition also supports the concept of multiple views, i.e. a single set of documents can be classified several times, each time according to different criteria. Within a single view, a document cannot belong to more than one class. However, a document may well belong to more than one class if the classes are in different views. You could, for example, first classify news by topic and then classify the same news by geographical region. Multiple views may also be required to process documents with multiple topics.
Assume a document is processed with the following classification results:
Class A – View 1: 90%

Oracle WebCenter Forms Recognition 174 Designer User's Guide
Class B – View 1: 69%
Class C – View 2: 60%
Class D – View 2: 80%
Also assume that the default values for threshold and distance are applied:
Threshold: 70
Distance: 20
Class A is the best class from View 1. Confidence for Class A is above the threshold.
Class B is the second-best class in View 1. The distance to Class A is 31. This is above the required distance.
Class D is the best class from View 2. Confidence for class D is above the threshold.
Class C is the second-best class in View 2. The distance to Class D is 20. This is just the required distance.
The document is assigned to Class A and to Class D.
A more complex application of views is the creation of a cascading classification scheme. In this case, you need to assign parent classes and child classes to different views. Document redirection from the parent class to the subordinated view occurs automatically.
For example, you can use the fast formal classification methods (Brainware Layout Classification, Image Size Classification) to roughly sort your documents. Then apply the semantic classification methods (Brainware Classification, Phrase Classification) to pre-sorted documents to determine the target classes. You will need fewer classes and improve the performance at the same time.
12.2.3 Modify Settings for Brainware Classification Methods
The prerequisites for this task are:
Designer is in Definition Mode.
The panel on the left side of the window displays the Classes tab in the foreground.
The panel on the right side of the window with the class and field properties is visible.
12.2.3.1 Create a View
To create a view, complete the following steps:
1. On the Classes tab, select the project node. The Classification tab displays on the right side of the window.
2. Under Used Classification Engines, select Brainware Classify Engine. A corresponding tab displays below the list box.
3. On the Brainware Classify Engine tab, click Insert. The New Brainware View dialog displays.
4. In the text box, enter a name for the new view. The name must not contain spaces.
5. Click OK. The new view displays in the Brainware View list box.
For instructions on how to assign classes to views, refer to Section 12.3.3: Modify Class-Level Settings.

Oracle WebCenter Forms Recognition 175 Designer User's Guide
Each WebCenter Forms Recognition project automatically contains a view called DefaultGroup. Without user intervention, all classes use this view.
12.2.3.2 Change Evaluation Settings
To change the evaluation settings for a view, complete the following steps:
1. On the Classes tab, click the project node. The Classification tab displays on the right side of the window.
2. Under Used Classification Engine, select Brainware Classify Engine. A corresponding tab is displays below the list box.
3. Select the view from the Brainware View list box.
4. Under Settings for view, use the sliders or text boxes to set the following values for absolute classification:
Yes Threshold Minimum confidence for a class within the view to return Yes.
Yes Distance Minimum distance to the second-best class within the view to return Yes.
No Threshold Maximum confidence for a class within the view to return No.
5. Under Word Statistic, you can specify parameters for words that are to be included in the view’s dictionary that embodies the base for learning. As a rule, you do not have to change these values.
Min. Word Length Minimum number of characters in words. Shorter words will not be taken into account.
Min. Word Frequency Minimum number of occurrences in the learnsets of this view. Words that occur less frequently will not be considered.
You can restrict the text base for dictionary creation to certain areas within the document. This may speed up processing as no full-page OCR is carried out. To use this advantage, make sure that the Runtime Server settings do not override your restrictions. For further information on OCR settings in Runtime Server, refer to the Oracle WebCenter Forms Recognition Runtime Server User’s Guide.
12.2.3.3 Restrict Dictionary Creation
To restrict the dictionary creation to certain areas within the documents, complete the following steps:
1. On the Classes tab, click the project node. The Classification tab displays on the right side of the window.
2. Under Used Classification Engines, select Brainware Classify Engine. A corresponding tab displays below the list box.
3. Select a view from the Brainware View list box.
4. Select the Regions tab.

Oracle WebCenter Forms Recognition 176 Designer User's Guide
5. Select the Restrict Engine to Region checkbox.
6. Select the pages that are affected by the restriction.
7. For each selected page, enter the regions that are to be taken into account.
12.2.4 Modify Brainware Layout Classification Settings at the Method Level
The prerequisites for this task are:
Designer is in Definition Mode.
The panel on the left side of the window displays the Classes tab in the foreground.
The panel on the right side of the window with the class and field properties is visible.
12.2.4.1 Change Settings
To change the settings for this method, complete the following steps:
1. On the Classes tab, select the project node. The Classification tab displays on the right side of the window.
2. Under Used Classification Engines, select Brainware Layout Classification. The appropriate tab displays below the list box.
12.2.5 Modify Phrase Classification Settings at the Method Level
The prerequisites for this task are:
Designer is in Definition Mode.
The panel on the left side of the window displays the Classes tab in the foreground.
The panel on the right side of the window shows the Classification, Document Class, and Validation tabs.
12.2.5.1 Change Settings
To change the evaluation settings for this method, complete the following steps:
1. On the Classes tab, select the project node. The Classification tab displays on the right side of the window.
2. Under Used Classification Engines, select Phrase Classify Engine. The corresponding tab displays below the list box.
12.2.5.2 Edit Phrase Classification
On this tab, you can insert, delete, edit, test, import, and export lists of phrases to search for.
12.2.5.3 Insert and Delete Phrases
There are two ways to insert phrases; by typing them in the New Phrase field, or by selecting a word from a document. For the second method:
1. Click the Highlight All Words button on the toolbar.
2. On the document, select a word or phrase. The word now populates the New Phrase field. If you click another word, it will be appended to the phrase.
Whether you type your phrases or select them from a document, click the Insert button to add the phrase to the Active Phrase Grid.

Oracle WebCenter Forms Recognition 177 Designer User's Guide
To delete a phrase from the grid, select the phrase and click the Delete button.
12.2.5.4 Edit a Phrase
Editing a phrase enables you to increase the complexity of phrase analysis. You can set Word strength, tolerance, case sensitivity, enhanced word postulation (under function) and enhanced significance settings – absolute and extra high.
12.2.5.5 Restrict Analysis Areas
You can restrict the text that is analyzed to certain areas within the document, for any of the phrases you have included. This may speed up processing as no full-page OCR is carried out. To actually use this advantage, make sure that the Runtime Server settings do not override your restrictions.
To restrict the method to certain areas within the documents:
1. On the Phrases Grid, select a phrase to restrict.
2. In the Position column, click the position of the phrase. The default is Any. By changing the selection, you can restrict OCR to the top half, bottom half, left half, or right half of the document. If any part of the phrase extends into the selected half, then it will be detected.
12.2.5.6 Establish Significance Settings
1. On the Phrases grid, select a phrase.
2. In the Significance column, click the current significance setting for the phrase. The default is Medium. By changing the selection, you can vary how much weight the phrase will carry during analysis. The settings are High, Medium, Low, and Forbidden.
12.2.5.7 Sharing Phrase Classification Words and Settings with Other Projects
The Import button enables you to import classification settings from other projects in which the phrases were saved as export (.exp) files. Likewise, using the Export button, you can save phrases to share with other projects. Import and export is done at the class level.
12.2.6 Modify Image Size Classification Settings at the Method Level
At this level, no modifications are possible to Image Size Classification.
12.2.7 Modify Forms Classification Settings at the Method Level
The prerequisites for this task are:
Designer is in Definition Mode.
The panel on the left side of the window displays the Classes tab in the foreground.
The panel on the right side of the window with the class and field properties is visible.
12.2.7.1 Change Evaluation Settings
To change the evaluation settings for this method, complete the following steps:
1. On the Classes tab, click the project node. The Classification tab displays on the right side of the window.
2. Under Used Classification Engines, select Forms Classify Engine. The corresponding tab displays below the list box.

Oracle WebCenter Forms Recognition 178 Designer User's Guide
3. Select one of the following options:
Binary Classification Possible atomic results of forms classification are Yes and Maybe. This is the default.
Weighted Classification Forms Classification returns a confidence as atomic result.
12.3 Class-Level Settings
12.3.1 Class-Level Sub-Tree Classification and How It Works
Sub-tree classification is a means to push classification from parent to child classes by defining reduced requirements for classification into the sub-tree.
Sub-tree classification uses two additional values defined at the class level:
A sub-tree threshold (60 percent by default).
A sub-tree distance (10 percent by default).
It is also possible to entirely exclude the parent class as valid classification result.
12.3.2 Class-Level Redirection and How It Works
Redirection is something very simple: you just define that in case of classification to a Class A, the documents will in fact be assigned to a different Class B. Use this to combine several classes or in cascading classification schemes.
12.3.3 Modify Class-Level Settings
The prerequisites for this task are:
Designer is in Definition Mode.
The panel on the left side of the window displays the Classes tab in the foreground.
The panel on the right side of the window with the class and field properties is visible.
A suitable classification tree exists. When working with multiple views, you can, for example, create a base class for each view and insert derived classes below.
12.3.3.1 Change Class-Level Settings
To change the class-level settings, complete the following steps:
1. On the Classes tab on the left side of the window, select a class.
2. On the right side of the window, select the Classification tab.
3. To assign the class to a view, click the Brainware Classify Engine method name
4. In the Brainware Classify Engine tab, select a view from the list box.
5. On the right side of the window, select the Document Class tab.
6. To use a different display name for the class, enter it into the corresponding text box.
7. To exclude the class as classification result, clear the This DocClass Is a Valid
Classification Result checkbox.
8. To hide the class in Verifier, clear the Visible in Correction checkbox.

Oracle WebCenter Forms Recognition 179 Designer User's Guide
9. To push classification to the children of this class, check the Force Sub-Tree
Classification checkbox. To change Threshold or Distance for sub-tree classification, use the sliders or type values into the corresponding text boxes.
10. To redirect classification results, select a target class from the list box at the bottom of the tab.
11. To apply a static page count to all documents of this class, check the Static Page Count checkbox and specify the number of pages using the spin control.
12.3.4 Modify Settings for Brainware Layout Classification Methods
The prerequisites for this task are:
Designer is in Definition Mode.
The panel on the left side of the window displays the Classes tab in the foreground.
The panel on the right side of the window with the class and field properties is visible.
12.3.4.1 Create a View
To create a view, complete the following steps:
1. On the Classes tab, select the project node. The Classification tab displays on the right side of the window.
2. Under Used Classification Engines, select Brainware Layout Classify Engine. A corresponding tab displays below the list box.
3. On the Brainware Layout Classify Engine tab, click Insert. The New Brainware View dialog displays.
4. In the New Brainware View dialog, in the text box, enter a name for the new view. The name cannot contain spaces.
5. Click OK. The new view displays in the Brainware View list box.
For instructions on how to assign classes to views, refer to Section 12.3.3: Modify Class-Level Settings.
Each WebCenter Forms Recognition project automatically contains a view called DefaultGroup. Without user intervention, all classes use this view.
12.3.4.2 Change Evaluation Settings
To change the evaluation settings for a view, complete the following steps:
1. On the Classes tab, select the project node. The Classification tab displays on the right side of the window.
2. In the Classification tab, under Used Classification Engines, select Brainware Layout
Classify Engine. A corresponding tab displays below the list box.
3. Select the view from the Brainware View list box.
4. Under Settings for view, use the sliders or text boxes to set the following values for absolute classification:
Yes Threshold Minimum confidence for a class within the view to return Yes.

Oracle WebCenter Forms Recognition 180 Designer User's Guide
Yes Distance Minimum distance to the second-best class within the view to return Yes.
No Threshold Maximum confidence for a class within the view to return No.
12.3.4.3 Restrict Dictionary Creation
To restrict the dictionary creation to certain areas within the documents, complete the following steps:
1. On the Classes tab, click the project node. The Classification tab displays on the right side of the window.
2. In the Classification tab, under Used Classification Engines, select Brainware Layout
Classify Engine. A corresponding tab displays below the list box.
3. Select a view from the Brainware View list box.
4. Click the Regions tab.
5. Select the Restrict engine to region checkbox.
6. Select the pages that are affected by the restriction.
7. For each selected page, enter the regions that are to be taken into account.
12.3.4.4 Extend Brainware Layout Classification Specific Settings
To change the extended settings for the Brainware Layout Classification engine, complete the following steps:
1. Click the Extended tab.
2. Under Extended Settings, set the following values:
Horizontal Covering Frequency
The number of zones each document is divided into across the page.
Vertical Covering Frequency
The number of zones each document is divided into down the page.
Do Not Differentiate Between Digits
Treat 123 and 987 as the same sequence of digits of the same length. Use this option when most numbers do not have specific meaning, for example, in the tables of a typical invoice document. Leave this option unchecked if the project’s documents contain specific sequences of digits that can be critical for layout classification e.g., bank account information specific to each vendor class.
Attach Delimiters to Words
Check this option, in most cases, delimiters are essential to distinguish between words. An American format date, for example, may be better treated as a single differentiating word (00/00/000) in the classification’s surrounding compared with 3 noise words 00, 00 and 0000.

Oracle WebCenter Forms Recognition 181 Designer User's Guide
Note: The changes in settings take effect only after the project has been saved and re-learned.
12.4 Field-Level Settings
12.4.1 Field-Level Text Field Candidate Evaluation and How It Works
Text field candidate evaluation works like classification evaluation. For example, you have a given text field, a given document, and Brainware Extraction as an evaluation method that returns weights for each candidate.
Candidate evaluation uses two values defined at the field level to decide whether there is a valid candidate or not:
A minimum weight called threshold (by default 50%).
A minimum difference in weight between the best candidate and the second-best competitor called distance (by default 10%).
Both requirements must be met to extract a valid candidate.
Consider the following example:
Weight of Candidate A Weight of Candidate C Weight of Candidate C
Field A 0.45 0.36 0.28
Field B 0.30 1.00 0.00
Field C 0.55 0.49 n/a
For Field A, there is no valid candidate. The weight of Candidate A is below the threshold, and the distance to Candidate B is below the minimum distance.
For Field B, Candidate B is a valid candidate. Its weight is above the threshold. In addition, the distance to the second-best competitor, Candidate A, is above the minimum distance.
For Field C, there is no valid candidate. The weight of Candidate A is above the threshold, but the distance to Candidate B is below the minimum distance.
12.4.2 Modify Text Field Settings
The prerequisites for this task are:
Designer is in Definition Mode.
The panel on the left side of the window displays the Fields tab in the foreground.
On the right side of the window, the tabs with class and field properties are visible.
12.4.2.1 Modify Evaluation Settings
To modify the evaluation settings for a field, complete the following steps:
1. On the left side of the window, select Fields.
2. Click the Evaluation tab on the right side of the window.
3. On the Brainware Extraction tab, to change the Threshold or Distance for Brainware
Extraction, use the sliders or type values into the corresponding text boxes.
4. Click the Field tab on the right side of the window. The validation parameters display in the Validation group at the bottom of the tab.

Oracle WebCenter Forms Recognition 182 Designer User's Guide
5. If the current field is a derived field, you can use inherited validation settings of the parent class. To do this, check Use Derived Validation. This disables the remaining validation parameters.
6. If any field content should be treated as valid, select Always Valid. This disables the remaining validation parameters.
7. To mark fields as invalid if they contain uncertain OCR results, select No Rejects. Use the slider to set the confidence required to accept characters.
8. To set a minimum length for valid field content, select Min. Length and set the required number of characters using the associated spin control. This option can also be used to make a field mandatory.
9. To set a maximum length for valid field content, check Max. Length and set the permitted number of characters using the associated spin control.
12.4.3 Table Field Candidate Evaluation and How It Works
In table analysis, each candidate is evaluated using the criteria listed below:
Table Property Range of Results
Fraction of default columns identified. 0.0 – 1.0
Fraction of table columns mapped. 0.0 – 1.0
Fraction of entries found in cells which require entries. 0.0 – 1.0
Fraction of neighboring cells without overlap (column view).
0.0 – 1.0
Fraction of neighboring cells without overlap (row view). 0.0 – 1.0
Fraction of correct formats. 0.0 – 1.0
For each table candidate, the total significance is determined as the average of the results per property. All table candidates, which reach a certain threshold for the total significance, are transferred to the workdoc, ordered by the total significance. By default, the candidate with the highest significance is used for data extraction.
12.4.4 Modify Table Field Settings
During table analysis, field-level validation settings defined through the user interface are ignored. However, the evaluation can be influenced using WinWrap Basic scripts.
12.4.5 Field-Level Digit Booster Candidate Evaluation
The use of the Digit Booster in the text field OCR optimization enables an extended Candidate Highlighting Mode. Three colors indicate the boost result reliability:
Green: Boosted and boosted secure. This result will be adopted. The tooltip shows the action results and behavior.
Yellow: Engine is not sure. The character is not going to be converted, the decision has to be approved manually.
Red: Engine is absolutely unsure. The character is not going to be converted.
Note: Advanced highlighting for booster results review is not supported for table cell boosting.

Oracle WebCenter Forms Recognition 183 Designer User's Guide
13 Setup the Verification
WebCenter Forms Recognition features a dedicated application for quality assurance called Verifier. This application provides a way to check and correct the results of automatic document classification and data extraction. In addition, it enables you to manually index documents.
Verifier users are in charge of validating the documents, which are presented as batches. Whether a batch is valid or not determined using the following rules:
A batch is valid if all of its documents are valid.
A document is valid if it has a valid classification result and if it has a valid extraction or indexing result.
An extraction result is valid if all the fields are filled with valid content.
The Verifier user is presented with all invalid or uncertain results from a given batch and needs to correct and confirm them. Normally, results that are invalid by definition cannot be confirmed by the user, but in the project definition, you can allow the user to validate invalid field results in exceptional cases. This procedure is called forced validation.
To enable you to adjust Verifier to the requirements of your project, two modes are available in Designer:
The Verifier Design Mode, in which you set up forms to use in the verification step.
The Verifier Test Mode, in which you can dynamically simulate verification.
The Verifier user interface for classification verification can use the same form all the time, so nothing needs to be defined there. What you need to create are the forms that will be used for verification of data extraction or for manual indexing. This step can be simplified by using default forms, but it can also be a complex task if there are special requirements. In addition to the features offered through the user interface, you can implement custom verification routines in WinWrap Basic scripts.
In WebCenter Forms Recognition, verification steps take place when a batch of documents reaches a predefined state that is represented by an integer number. The state changes again when verification is complete. States are used to distinguish valid and invalid results. For more information about input and output states, consult these manuals:
Oracle WebCenter Forms Recognition Runtime Server User’s Guide: The settings of this module determine the input and output states in the entire WebCenter Forms Recognition workflow.
Oracle WebCenter Forms Recognition Verifier User’s Guide: The settings of this module determine the input and output states of verification steps.

Oracle WebCenter Forms Recognition 184 Designer User's Guide
14 Create Verification Forms
14.1 Manage Verification Projects
WebCenter Forms Recognition Designer organizes verification forms in verification projects. It uses the following structure:
Each WebCenter Forms Recognition Designer project can contain one verification project.
Each verification project contains a set of forms that are assigned to document classes.
Each document class has one form that will be used by default. The remaining forms are only used when a document that requires validation is in a certain pre-defined state.
Each verification has up to four areas:
1. Form field area.
2. Current input area.
3. Document display area.
4. User information area.
A form field area can contain the following elements:
Form fields.
Labels.
Viewers.
Tables.
Buttons.
A form field is a text field that can specified as:
Text Field.
List Box.
Check Box.
Amount Field.
Date Field.
All elements of a verification project have properties that can be edited.
WebCenter Forms Recognition Designer provides several functions for administering verification projects.
The prerequisites for this task are:
Designer is in Verifier Design Mode.
Classes and fields are already defined.
14.1.1 Create a New Verification Project
Switching to this mode creates a new verification project and makes it available.

Oracle WebCenter Forms Recognition 185 Designer User's Guide
An empty verification project does contain any forms. If you create a new project, an existing project, including its forms, will be deleted when you confirm.
14.1.2 Configure Project Validation Properties
In Designer, you can set validation properties:
At the project level.
At the form level.
At the field level.
The most general validation properties can be set at the project level, but you can partially override the project-level settings at the form and field level and make more specific settings there.
The prerequisites for this task are:
Designer is in Verifier Design Mode.
Classes and fields are already defined.
14.1.3 Setup Project Validation Properties
To set the project validation properties, complete the following steps:
1. In the class selection panel at the upper left edge of the window, right-click the root node that represents the project.
2. From the popup menu, select Project Properties. The Validation Settings dialog displays.
3. Under Force Validation, select whether Verifier users can validate a field, even if its content is invalid by definition:
Permitted The user can force validation by pressing the [Enter] key three times.
Forbidden The user cannot force validation.
4. Under Designer Test Mode Document Routing, if you have script code associated with the ScriptModule_RouteDocument event, you can use the states entered in this area to test your scripting in Designer’s Verifier Test Mode. These states are not used in Verifier.
14.1.4 Manage Verification Forms
There are four ways to create verification forms in Designer:
You can create empty forms first and add the form elements then.
You can create default forms that automatically contain a form field, a label, and a viewer for each field that will be visible in Verifier.
You can create one form at a time.
You can create forms for all classes in one step.
The prerequisites for these tasks are:
Designer is in Verifier Design Mode.

Oracle WebCenter Forms Recognition 186 Designer User's Guide
Classes and fields are already defined.
14.1.4.1 Create an Empty Form
To create a single empty form, complete the following steps:
1. In the class selection panel at the upper-left edge of the window, select a document class.
2. Complete one of the following actions:
From the menu, select Edit DocClass Insert Empty Form.
From the popup menu of the document class, select Insert Empty Form.
Click the dropdown arrow associated with the Insert New Default Verification
Form button and select Insert Empty Form.
14.1.4.2 Create Default Forms
To create a single default form, complete the following steps:
1. In the class selection panel at the upper left edge of the window, select a document class.
2. Complete one of the following options:
From the menu, select Edit DocClass Insert Default Form.
On the shortcut menu of the document class, select Insert Default Form.
Click the dropdown arrow next to the New Default Verification Form toolbar button and select Insert Default Form.
To create a new verification project with one default form per document class, complete one of the following options:
From the menu, select Edit Project Insert Default Forms.
In the class selection panel at the upper-left edge of the window, right-click the project node, then from the popup menu, select New Default Forms.
In the toolbar, click the Insert New Default Verification Forms for All DocClass button.
Note: If you create a new project, an existing project including its forms will be deleted when you confirm.
14.1.4.3 Display Forms
To view a table of all forms contained in the current project, complete one of the following options:
On the menu, select Edit Verification Form Show All.
Right-click an entry in the form selection panel or on the panel’s background if no entries are available. On the popup menu, select Show All.
To view a table of all forms associated with a certain class, complete the following step:
In the class selection panel at the upper-left edge of the window, click the class concerned.
The table of forms contains the following columns:

Oracle WebCenter Forms Recognition 187 Designer User's Guide
Form Name Displays the name of the form. It is generated automatically and consists of the prefix Form, the name of the associated document class, and a consecutive number.
Default Displays Yes if the form is the default form of a document class, and nothing if this is not the case. Default forms are used for each input state, unless another form has been explicitly assigned to an input state.
In Filter Displays the input state assigned to a form, or -1 if no special input state has been selected.
Out Filter Displays the output state assigned to a form, or -1 if no special output state has been selected. Output states are relevant if partial validation of documents is allowed and useful in the context of exception handling.
Assigned To Displays the name of the associated document class.
To display a form, perform one of the following actions:
Select a document class in the upper-left panel to display its first form.
Select a form from the table of forms.
To display a form in maximum size, perform one of the following actions:
From the menu, select View Verifier Design Mode Maximize Verification
Form.
In the toolbar, click Maximize Verification Form View.
When the grid is disabled and the form is maximized, you can preview the form to determine how it will look at runtime.
14.1.4.4 Delete Forms
To delete a single form, complete the following steps:
1. In the form selection panel on the left side of the window, select a form.
2. Complete one of the following actions:
From the menu, select Edit Verification Form Delete Form.
From the shortcut menu of the form, select Delete Form.
In the toolbar, click the Delete Verification Form button.
To delete all forms associated with a project, complete one of the following actions:
From the menu, select Edit Project Delete All Forms.
In the class selection panel, at the upper-left edge of the window, right-click the project node and select Delete All Forms from the popup menu.
In the toolbar, click the Delete All Verification Forms button.

Oracle WebCenter Forms Recognition 188 Designer User's Guide
14.1.5 Configure Form Validation Properties
The prerequisites for this task are:
Designer is in Verifier Design Mode.
At least one form is created.
14.1.5.1 Set Form Validation Properties
To set the form validation properties, complete the following steps:
1. Display a form and make sure that no form elements are selected.
2. Complete one of the following options:
In the vertical toolbar, at the right edge of the window, click the Show Selected
Object Properties button.
Right-click the form’s background and select Properties from the popup menu.
3. In the Properties dialog box, enter the following information:
Name Displays the name of the form. This field is read-only.
Assigned DocClass Displays the name of the associated document class. This field is read-only.
Process Step Filter To use this form only for documents with a given state, select one of the pre-defined states from the list, or enter a value into the field. For default forms, keep the initial value -1.
Default Form Select this box to use the form as the default form, such as in all verification steps without a special predefined input state.
Document Validation Mode
Select Complete Validation Required if only one user verifies an entire batch or Partial Validation Allowed if several users validate a batch in stages. If complete validation is required, the Verifier user must validate all the fields in the documents of a batch before being able to release the batch. If partial validation is allowed, only the fields on the form must be validated. With partial validation, you can employ multiple forms, i.e. one for each stage. You can set an output state for partially validated documents in Designer, which overrides the output state set in Verifier.
4. Click Validation Settings to establish the following settings:
Validation Engine Select Standard Validation Engine to enable validation. Validation does not occur on the form unless the engine is enabled.

Oracle WebCenter Forms Recognition 189 Designer User's Guide
Force Validation Mode Select whether forced validation is forbidden or permitted with this form. To force validation of a field, the Verifier user must press the [Enter] key three times. The Default option inherits the project-level validation setting.
Process Step Filter To use this form only for documents with a given state, select one of the pre-defined states from the list, or enter a value into the field. For default forms, keep the initial value -1.
Default Form Select this box to use the form as the default form, such as in all verification steps without a special predefined input state.
Document Validation Mode
Select Complete Validation Required if only one user verifies an entire batch or Partial Validation Allowed if several users validate a batch in stages. If complete validation is required, the Verifier user must validate all the fields in the documents of a batch before being able to release the batch. If partial validation is allowed, only the fields on the form must be validated. With partial validation, you can employ multiple forms, i.e. one for each stage. You can set an output state for partially validated documents in Designer, which overrides the output state set in Verifier.
For more information about the Validation Editor, refer to Section 7: Setup the Validation.
14.1.6 Configure the Verification Form Layout
Each verification form is made up of up to four areas:
Form Field Area This area contains all or a subset of fields that have been defined for a given class.
Current Input Area This area contains a magnified version of the current field.
Document Display Area
This area shows the current document, possibly with candidates highlighted.
User Information Area This area works like a status bar. You can display custom messages here that explain to the user why a field is invalid and provide hints about the correct way to invalid results.
Regarding the arrangement of these areas, you can select from among five pre-defined layouts.
14.1.7 Select a Layout
To select a layout, click the appropriate button in the vertical toolbar on the right side of the window. The new layout is applied to the current form.
A splitter divides the form field area and the document display. You can move the splitter to adjust the size of these areas. The status bar displays the percentage of the window occupied by the upper or the left part, respectively.

Oracle WebCenter Forms Recognition 190 Designer User's Guide
Note: The splitter is only available in Verifier Design Mode; not in Verifier Test Mode and not in WebCenter Forms Recognition Verifier.
Button Description
Top: Document display area. Center: Form field area. Bottom: Current input area.
Left: Form field area. Right: Document display area. Bottom: Current input area.
Left: Form field area. Right: Document display area.
Top: Document display area. Bottom: Form field area.
Top: Document display area. Bottom: Current input area.
14.1.8 Configure Form Grids
To enable you to align form elements, the background of a form has a grid, which can be enabled or disabled. In addition, the grid size can be adjusted. Grid settings are valid for all the forms in a project.
The prerequisites for these tasks are:
Designer is in Verifier Design Mode.
A form is selected.
14.1.8.1 Enable or Disable a Grid
To enable or disable the grid, click the Grid button in the vertical toolbar on the right side of the window.
14.1.8.2 Increase or Reduce Distance
To increase or reduce the distance between grid lines, click the Enlarge Grid button or the Shrink
Grid button, respectively, in the vertical toolbar on the right side of the window.
14.1.9 Create Form Elements
A form has three main elements:
Label.
Viewer.
Form Field.
From a form field, you can select a text field or table field. Using a text field or table field, you can create checkboxes or combo boxes. You can also add a button to a form to fire actions.
The various elements are described below:
Forms Fields Controls that are used to display and edit extracted data and to enter data during manual indexing. You can use form fields to create checkboxes and combo boxes.

Oracle WebCenter Forms Recognition 191 Designer User's Guide
Checkboxes A toggle selection affecting data input applied when you have one of two values to choose from, such as on/off or yes/no. Checkboxes are derived from form fields. You can set it up the caption with the text desired and select the default view.
Combo Boxes Contains a selection list to use when verifying an item on the document. Used during manual verification, this selection works with automatic completion.
Labels Optional captions that help users to identify form fields, viewers and tables.
Viewers Snippets of document areas, normally those that were extracted to fill fields or tables.
Buttons Fire actions for script events.
Tables Relevant when table extraction is configured. The Verifier form supports multiple tables. However, even if you defined multiple tables, you can only display the first table on the verification form. You can display different tables on different forms.
Designer lets you add these elements to custom forms. The prerequisites for these tasks are:
Designer is in Verifier Design Mode.
The form you want to design is selected.
14.1.10 Create and Modify Form Fields
14.1.10.1 Create Form Fields
To add a form field to a form, complete one of the following options:
Drag and drop a data field from the field selection panel at the bottom-left edge of the window to the target position on the form. By default, the field type is a text field.
To define a special field type such as a combo box or checkbox, right-click the form field select Properties from the popup menu, or click the Show Selected Object Properties button on the vertical toolbar.
14.1.10.2 Modify Form Fields
To improve verification results, you may want to change the way Verifier users interact with verification forms. This is done by accessing the Validation Editor, discussed in depth in Section 7: Setup the Validation.
14.1.10.3 Convert a Text Field to another Field Type
With the Validation Editor, you can change any field you created to a list box, amount field, date field, checkbox or back to a text field. You can also set validation properties for each of these field types.
It is also possible to change a text field to a table field, but the procedure is somewhat different than the one discussed here for the other field types.

Oracle WebCenter Forms Recognition 192 Designer User's Guide
To modify field types, complete the following steps:
1. Create a new field or select an empty field.
2. In the vertical toolbar at the right edge of the window, click the Show Selected Object
Properties button.
3. In the Properties dialog, click the Validation Settings button.
4. In the Validation Type dropdown, select a field type, for example, select List to convert the field to a dropdown list.
The settings available will change depending on your selection. The following steps are relevant to the list field type.
5. Select either Do Not Allow Values That Are Not on the List or Search and Show
Nearest Value Automatically.
6. Add items to the list that pertain to the selected field. You can add and remove items at any time, or clear the list and start over.
7. Select Sort Strings Alphabetically for easy selection when verifying.
8. Click OK. The combo box appears next to the selected field. Select the arrow button next to the box to view the selections.
14.1.10.4 Create Checkboxes
Checkboxes are a type of form field. To create a checkbox, complete the following steps:
1. Select an empty field or create a new empty field.
2. In the vertical toolbar at the right edge of the window, click the Show Selected Object
Properties button.
3. On the Properties dialog box, click Validation Settings. The Validation Settings dialog is displayed.
4. Under Validation Type, select Checkbox.
5. Enter the Checked Value, which is the text that appears when the checkbox is selected.
6. Enter the Unchecked Value, which is the text that appears when the checkbox is not selected.
7. Click OK to apply the settings and close the Validation Settings dialog.
8. Click OK to close the Properties dialog. The checkbox appears next to the selected field.
14.1.10.5 Create Labels
To add a label to a form, complete the following steps:
1. In the vertical toolbar on the right side of the window, click the Add New Label Element button. The mouse pointer changes.
2. Click inside the form and drag the frame to the desired position and size. When you release the mouse button the Change Caption dialog is displayed.
3. Enter a caption for the label and click OK.
To change the caption, right-click on the label element and select Change Caption from the popup menu.

Oracle WebCenter Forms Recognition 193 Designer User's Guide
To delete a label from the form, select the label element then click the Delete Selected
Elements button on the vertical toolbar.
14.1.10.6 Create Viewers
To add a viewer to a form, complete the following steps:
1. In the vertical toolbar, on the right side of the window, click the Add New Viewer
Element button. The mouse pointer changes.
2. Click inside the form and drag the frame to the desired position and size.
3. To assign a field to be viewed, right-click the viewer element and select Properties from the popup menu. Refer to Section 14.1.15: Configure the Viewer Properties for more information.
14.1.10.7 Create Buttons
To add a button to a form, complete the following steps:
1. To create a new button, in the vertical toolbar on the right side of the window, click the Add New Button button. The mouse pointer changes.
2. Click inside the form and drag the frame to the desired position and size.
3. To name the button, right-click the button and select Change Caption from the popup menu.
4. In the Change Caption dialog box, enter a name in the box and click OK. The Change Caption dialog is displayed.
5. Enter a caption for the label and click OK.
14.1.10.8 View Tables
You can only have tables in a form if table extraction is configured for the corresponding document class. A form can have more than one table. However, even if you defined multiple tables, you can only display the first table on the verification form. You can display different tables on different forms.
If your tables do not need verification, you can make your columns invisible. The invisible columns must be valid to validate the entire table.
14.1.11 Edit Form Elements
Designer provides some commands for editing form elements. The prerequisites for these tasks are:
Designer is in Verifier Design Mode.
The form containing the elements is selected.
The following operations are supported for all elements:
You can move a selected element using the mouse.
You can resize a selected element by dragging the handles at each corner or by setting the size and position in the property box.
You can delete a selected element using one of the following methods.
Press the [Delete] key.

Oracle WebCenter Forms Recognition 194 Designer User's Guide
Click the Delete Selected Elements button in the vertical toolbar
14.1.12 Set Field Validation Properties
The prerequisites for this task are:
Designer is in Verifier Design Mode.
At least one form with one form field is created.
14.1.12.1 Set the Properties
To set the field validation properties, complete the following steps:
1. Select a form field.
2. In the vertical toolbar at the right edge of the window, click Show Selected Object
Properties.
3. In the Properties dialog box, enter the following information:
Name Displays the name of the form field. This property is read-only.
Assigned Field Displays the name of the associated data field. This property is read-only.
Size and Position Affects form layout. Using numerical values rather than drag and drop enables you to design your form with greater precision. However, in most cases, the default values, derived from the location you assigned to the field when you dragged it onto the form, are sufficient.
Read Only Select this option to show static and dynamic complementary information to aid in manual verification.
Auto-Completion This option helps to speed up typing. When you start to type, auto-text completes the word, providing the best match among all of the words or candidates available after OCR and format analysis phases.
Tab Index This controls which verification form field gains focus next when the [Tab] key is pressed. Fields are visited from low to high tab index. If the specified index is already in use by another verification field, its tab index and, when required, subsequent fields, will be incremented by one automatically.
Validation Settings Click this button to make further enhancements.
For more information about these settings, refer to Section 7: Setup the Validation.
14.1.13 Edit Text Fields
Designer includes automated features for editing text fields that can help users enter and correct text faster. You can use automatic character entry when the auto-completion option is selected in
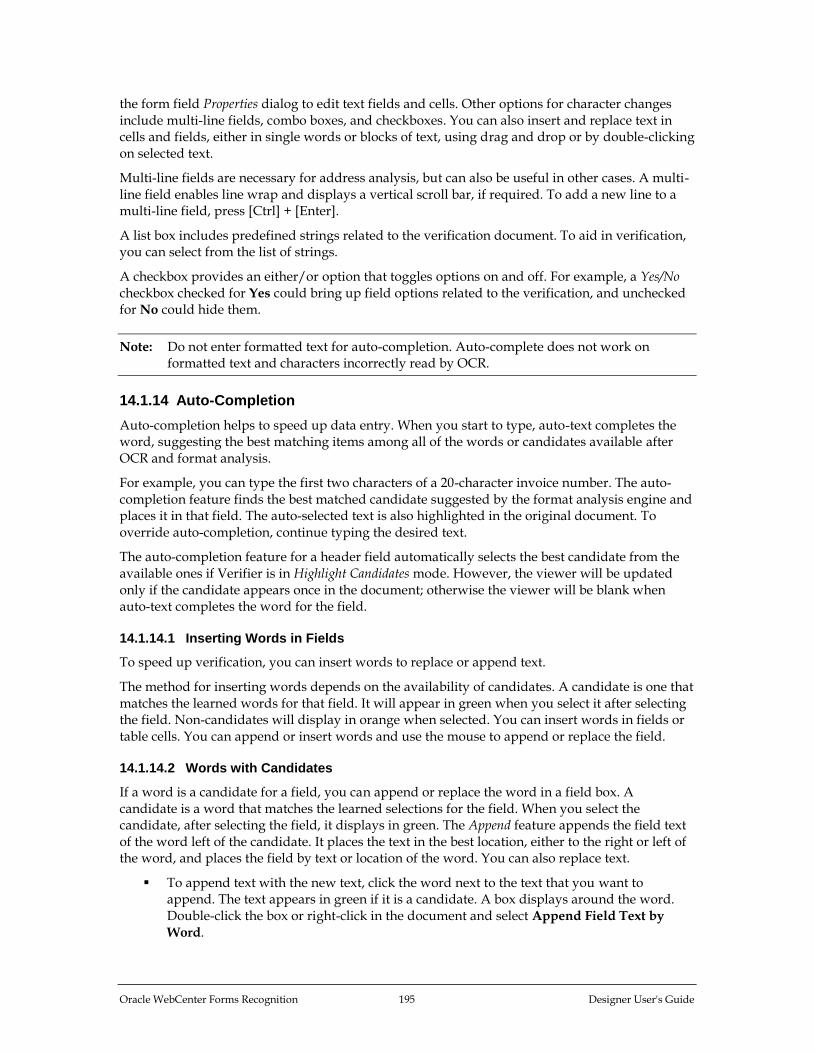
Oracle WebCenter Forms Recognition 195 Designer User's Guide
the form field Properties dialog to edit text fields and cells. Other options for character changes include multi-line fields, combo boxes, and checkboxes. You can also insert and replace text in cells and fields, either in single words or blocks of text, using drag and drop or by double-clicking on selected text.
Multi-line fields are necessary for address analysis, but can also be useful in other cases. A multi-line field enables line wrap and displays a vertical scroll bar, if required. To add a new line to a multi-line field, press [Ctrl] + [Enter].
A list box includes predefined strings related to the verification document. To aid in verification, you can select from the list of strings.
A checkbox provides an either/or option that toggles options on and off. For example, a Yes/No checkbox checked for Yes could bring up field options related to the verification, and unchecked for No could hide them.
Note: Do not enter formatted text for auto-completion. Auto-complete does not work on formatted text and characters incorrectly read by OCR.
14.1.14 Auto-Completion
Auto-completion helps to speed up data entry. When you start to type, auto-text completes the word, suggesting the best matching items among all of the words or candidates available after OCR and format analysis.
For example, you can type the first two characters of a 20-character invoice number. The auto-completion feature finds the best matched candidate suggested by the format analysis engine and places it in that field. The auto-selected text is also highlighted in the original document. To override auto-completion, continue typing the desired text.
The auto-completion feature for a header field automatically selects the best candidate from the available ones if Verifier is in Highlight Candidates mode. However, the viewer will be updated only if the candidate appears once in the document; otherwise the viewer will be blank when auto-text completes the word for the field.
14.1.14.1 Inserting Words in Fields
To speed up verification, you can insert words to replace or append text.
The method for inserting words depends on the availability of candidates. A candidate is one that matches the learned words for that field. It will appear in green when you select it after selecting the field. Non-candidates will display in orange when selected. You can insert words in fields or table cells. You can append or insert words and use the mouse to append or replace the field.
14.1.14.2 Words with Candidates
If a word is a candidate for a field, you can append or replace the word in a field box. A candidate is a word that matches the learned selections for the field. When you select the candidate, after selecting the field, it displays in green. The Append feature appends the field text of the word left of the candidate. It places the text in the best location, either to the right or left of the word, and places the field by text or location of the word. You can also replace text.
To append text with the new text, click the word next to the text that you want to append. The text appears in green if it is a candidate. A box displays around the word. Double-click the box or right-click in the document and select Append Field Text by
Word.

Oracle WebCenter Forms Recognition 196 Designer User's Guide
To replace a word, click the desired word. A box displays around the word. Double-click the desired candidate, and drag the word to the specified field, or right-click in the document and select Replace Field Text by Candidate from the shortcut menu.
Note: You can insert only one candidate per field per document verification session.
Check to make sure that this word fits the format analysis rules defined for that particular field. If not, the word is highlighted in orange. In this case, it would not be a good candidate for the field.
14.1.14.3 Words without Candidates
Even if the word does not belong to any candidates for the field, you can append or replace a word with a new one. Appending places the text in the best location, either right or left of the word, by text or location of the word. Or you can replace the field text and location by the text and location of a word. A word that does not belong to any candidates for that field will display in orange when selected. To use a word that is not a candidate for field, complete one of the following options:
To append text with the new text, drag a box around the desired word. Double-click on the word in the box or right-click in the document and select Append Field Text by
Word.
To replace text, select the word with the mouse. A box will appear around the word. Double-click it, or select Replace Field Text by Candidate in the shortcut menu.
Note: You can insert only one candidate per field per document verification session.
Make sure that this word fits the format analysis rules defined for that field. If not, the word is highlighted in orange (and with a border of orange exclamation marks if validity icons are enabled) to help distinguish it. If so, it would not be a good candidate for the field.
14.1.14.4 Insert Blocks of Text
Inserting large blocks of text with minimal mouse movement is helpful when you have multiple word data verification elements for fields such as address information or cell descriptions. Before you can insert blocks of text, first select the settings in the Workflow dialog to immediately copy information. To insert large blocks of text, complete the following steps:
1. Click and drag over the desired text in the image viewer.
2. Release the mouse button. A rectangle appears around the text.
3. Adjust the rectangle, if necessary, by selecting the nodes at any corner.
4. Drag and drop the rectangle to the field or table cell. A copy of the rectangle appears over the field or table cell. Optionally, you can double-click on the rectangle. The text in the rectangle replaces the text in the field or table cell.
Note: You can move or resize this rectangle by clicking in the area in the image viewer. When the rectangle appears, select the nodes to resize it, or drag it using the drag and drop method described above.

Oracle WebCenter Forms Recognition 197 Designer User's Guide
14.1.15 Configure the Viewer Properties
Viewers can be used flexibly. By default, each viewer is assigned to exactly one data field. Several viewers can be assigned to one data field, providing different views on the same zone of the document. One viewer can be used to visualize several fields, depending on the field selection at runtime. The viewer assignment and geometry are configured in the viewer’s property sheet.
The prerequisites for this task are:
The program is in Verifier Design Mode.
At least one viewer is created.
14.1.15.1 Set Viewer Content Properties
To set the viewer content properties, complete the following steps:
1. Select the viewer concerned.
2. Complete one of the following options:
Right-click the viewer and select Properties from the popup menu.
In the vertical toolbar, at the right edge of the window, click the Show Selected
Object Properties button.
3. In the Properties dialog box, enter the following information:
Name Displays the name of the viewer. This property is read-only.
Assigned Field Displays the name of the associated data field and lets you change the selection. This field can also be empty if the content that displays depends on the selected document only or on the field that is selected by the user at runtime.
Whole Image If this option is selected, the viewer covers the entire page of the current document. You need to specify the page number in the Page field.
Fixed Zone If this option is selected, the viewer covers a fixed area of a page of the current document. You need to specify the page number in the Page field. In addition, you need to specify the distance of the viewer area from the top and left edge of the page, and the width and height of the area. These parameters are expressed as percentages of the height or width, respectively, of the entire page.
Field If this option is selected, the viewer covers the area of the document that contains the words used to fill the associated field. This works no matter whether the field assignment is set at design time or at runtime.

Oracle WebCenter Forms Recognition 198 Designer User's Guide
Field in Zone If this option is selected, the viewer covers a rectangle around the area of the document that contains the words used to fill the associated field. This works no matter whether the field assignment is set at design time or at runtime. In the View Mode Zone group, the dimensions of the rectangle are expressed as percentages of the height or width, respectively, of the entire page.
Field in Line If this option is selected, the viewer covers the lines around the area of the document that contains the words used to fill the associated field. This works no matter whether the field assignment was set at design time or at runtime.
Border Where this makes sense, you can specify that a white border displays around the area covered by the viewer. The dimensions of the border are expressed as percentages of the height or width, respectively, of the entire area.
Size and Position Set the size of the viewer and the position of the viewer on the form.
What you see in the viewer depends not only on the viewer properties, but also on the viewer dimensions. The viewer always covers the area specified in the property sheet, but actually shows a larger section of the page that matches the viewer dimensions. This way, the document areas are possibly shown as minimized way, but they are never distorted. To obtain the best results, the viewer dimensions should closely resemble the geometry of the area that is to be shown.
14.1.16 Configure Table Properties
When table extraction is configured, the table validation properties need to be set. In table validation, the single table cells behave like fields in regular data extraction. The prerequisites for this task are:
The program is in Verifier Design Mode.
A form is selected that has a table field.
The table has been enabled.
14.1.16.1 Set Table Validation Properties
To set the table validation properties, complete the following steps:
1. Select the table.
2. Complete one of the following actions:
Right-click the table and select Properties from the popup menu.
In the vertical toolbar, at the right edge of the window, click the Show Selected
Object Properties button.
3. Fill in the property sheet using the following options.

Oracle WebCenter Forms Recognition 199 Designer User's Guide
Name Displays the name of the table. This field is read-only and currently always empty.
Assigned Field Displays the name of the associated table field. Currently, only one table per document class can be configured.
Automatic Column widths are optimized automatically from the column content and restricted by a maximum value which is given in pixels. The user can change the column width at runtime, but after document change, the automatic setting will be used again.
Fixed Columns have a fixed width given in pixels, which is the same for all columns except the last one. The user can change the column width at runtime, but after document change, the fixed setting will be used again.
Manual The user can set the column width at runtime.
Cell Selection Mode Determines the order in which invalid cells receive focus when the user navigates through the table at runtime. If the order is line by line, the focus moves from left to right up to the end of a row, and then to the next row. If the order is column by column, the focus moves from top to bottom up to the end of a column, and then to the next column.
Table Properties Options include Read Only, Auto-Completion, Cell Position
Check, and Columns Settings.
Read Only sets a lock on the table against edits.
Auto-completion enables faster verification of information. Auto completion methods might include checkboxes or combo boxes, as well as automatic word completion when entering text.
Column settings include individual column settings, rather than settings for the entire table. For example, you can select a single column to be read-only, rather than the whole table.
14.1.16.2 Set Column Properties
To set the table validation properties, complete the following steps:
1. Select the table.
2. Click Column Settings.
3. Select the column name to change and use the blue up and down arrow buttons to set the desired order.

Oracle WebCenter Forms Recognition 200 Designer User's Guide
14.1.17 Configure Smart Indexing
Smart indexing is a method to fill fields using entries from a database table. It can be used in the automatic extraction step as well as during verification and manual indexing. In smart indexing, two types of fields are distinguished:
Smart Index Field The information related to this field must be available both in the documents that are to be processed, and in the database table. Often, a unique identifier such as invoice number or customer number is used for this purpose.
Index Lookup Fields The information related to these fields must only be available in the database table, but not in the documents. This is because these fields are filled using a database lookup with the value of the smart index field as parameter. The lookup returns the table rows that will be used to fill the lookup fields.
If used manually, the form for smart indexing should have the smart index field positioned above the lookup fields. Otherwise, the form’s tab order will disturb the workflow.
The prerequisites for this task are:
Designer is in Verifier Design Mode.
A form is selected that has at least two form fields.
The database exists that contains a table with corresponding columns.
There is an OLE DB provider for the database system you use.
14.1.17.1 Configure Smart Indexing
To configure smart indexing, complete the following steps:
1. Select the form field that will be used as a smart index field.
2. In the vertical toolbar, at the right edge of the window, click the Define Smart Indexing
button. The Smart Indexing Definition dialog displays. It shows the available fields. The smart index field is highlighted in yellow and marked with a key icon.
3. Click Select Data Source. The Data Link Properties dialog displays.
4. In the Provider tab, select the appropriate OLE DB provider for the type of data you want to access.
5. Click Next.
6. Use the Connection tab to specify how to connect to your data. The Connection tab is provider-specific and displays only the connection properties required by the OLE DB provider of your choice. For more information, click Help.
7. Click OK. The Smart Indexing Definition dialog redisplays.
8. Select a database table from the Select database table list box.
9. Click a cell in the Database Field column. A list containing the names of all columns of the selected table displays. Map columns to:
The smart index field.

Oracle WebCenter Forms Recognition 201 Designer User's Guide
All lookup fields. Smart indexing fills each field that is assigned to a database column.
10. Optionally, double-click each additional field that you want to use as an index field. The corresponding fields are marked with key icons. Note that search criteria are evaluated using AND joins, i.e. there must be a matching row for both index values.
11. A database lookup using one index term may return multiple results. In interactive mode, a dialog opens where the user can select the appropriate record. To limit the number of results, type an entry into the Maximum # of SmartIndex Hits... text field, or accept the default.
12. Under Further Settings, specify where and when smart indexing should be performed:
Use in Automatic Extraction
Smart indexing is performed during the automatic extraction step by Runtime Server.
Use in Manual Field Validation
Smart indexing is available during the extraction verification or the manual indexing step in Verifier.
Start Smart Indexing If this option is checked, the lookup is performed on validation. For example, the lookup is performed on validation when the user presses the [Enter] key in the index field. Otherwise, the user needs to press [Alt] + [F12] to trigger smart indexing.
Reconfirm Smart Indexing
If this option is checked, the user has the opportunity to check and correct the values retrieved from the database (recommended). Otherwise, the retrieved values are validated automatically.
Accept Multiple Hits If this option is checked, a valid lookup result may consist of multiple values.
Accept Different If this option is checked, a valid lookup result with multiple values may have been obtained using different index fields.
14.1.17.2 View Smart Indexing Fields
When editing the form, the Smart Index field displays in yellow with the word SmartIndex.
To delete the smart indexing definition, complete the following steps:
1. Select the form field that is used as smart index field.
2. In the vertical toolbar at the right edge of the window, click the Delete Smart Index
button. The smart index definition is deleted instantly.
14.1.18 Database Support for Smart Indexing
In smart indexing, there are two types of fields:
Index Field.
Index Lookup Fields.
14.1.18.1 Index Field

Oracle WebCenter Forms Recognition 202 Designer User's Guide
The information related to this field must be available both in the documents that are to be processed, and in the database table. Often, a unique identifier such as invoice number or customer number is used for this purpose.
14.1.18.2 Index Lookup Fields
The information related to these fields must only be available in the database table, but not in the documents. This is because these fields are filled using a database lookup with the value of the smart index field as parameter. The lookup returns the table rows that will be used to fill the lookup fields.
Although Designer and Verifier support the use of a database with Smart Indexing, a problem arises when using a stand-alone database package such as Microsoft Access. As a result of this ODBC constraint, WebCenter Forms Recognition does not support the use of Smart Indexing with stand-alone databases such as Microsoft Access.
14.1.19 Correcting Table Fields
If the field is a table field, you can correct invalid cells as if they were text fields.
14.1.19.1 Using Auto-Complete
This feature allows to automatically select the best candidate from the available words, which works within Highlight Candidates mode. Auto completion works in table cells as well as with text fields. When you type two or more characters, auto complete will suggest a word or phrase for that cell. The candidate appears in green if the field is valid and orange if the field is invalid.
14.1.19.2 Insert Words in Table Cells
You can insert single words or append existing text in table cells.
14.1.19.3 Words that Are Candidates for Cells
If the word belongs in a cell area, you can append or replace a word in a cell. The append feature takes the current word behind the candidate and appends it to the cell text. It places the text in the best location, either right or left of the word, and cell location by text or location of the word. The word belonging to a cell area will highlight in green when selected. Or, you can replace text.
To append text with the new text, you would double-click the desired word, or right-click in the image viewer and select Append Cell Text by Word. If you have candidates, you can double-click the desired candidate to replace it, or right-click in the document, and then select Select Cell from the popup menu.
In the search region, word candidates are all words that are not covered (by location) by other table cells and that have the same beginnings as the whole text of the cell.
14.1.19.4 Words that Are Not Candidates for a Cell
If the word does not belong to cell areas, it will display in orange when selected. Even if it is not a candidate, you can append or replace the word. Appending places the text in the best location, either right or left of the word, by text or location of the word, or you can replace the cell text and location by the text and location of a word. To append text with the new text, you would double-click the desired word, or right-click in the image viewer and select Append Cell Text by Word. To replace text, select the word, hold down the [Ctrl] key and click the left mouse button, or select Replace Cell Text by Word in the shortcut menu.
14.1.19.5 Correcting Table Structure

Oracle WebCenter Forms Recognition 203 Designer User's Guide
You may need to correct the table structure. Table rows, cells, and columns have shortcut menus with options for modifying the table structure. To invoke them, right-click on the row, cell, or column label.
The available commands are summarized in the table below:
Shortcut Menu Command Description
Column Unmap Clears all data for the selected verification column and turns the state of the corresponding column of the recognized table back to unmapped. To view an unmapped column, double-click on the table header in the verification form. All unmapped columns are highlighted in red.
Column Map Adds the column selected from the shortcut menu, or you can right-click on an unmapped column to map it to a column in the verification form.
Column Swap Exchanges the position of the current column and the one selected from the dropdown menu.
Row Insert Inserts an empty row above the current one.
Row Delete Deletes the current row.
Row Duplicate Duplicates the current row.
Row Append Appends an empty row at the bottom of the table.
Row Merge Merges cells in a row.
Cell Insert Cell Inserts an empty cell above the selected cell while shifting the cells below down.
Cell Delete Cell Deletes the selected cell. The cells below are shifted up.
14.1.20 Shortcut Menu Configuration Actions
Actions are triggers for scripted events that you can create to perform project-specific tasks. For example, you can trigger any allowed modification of objects, or you can set an action to open an application or invoke third-party COM interface methods.
You can use buttons or keyboard shortcuts to activate an action.
To configure an action, complete the following steps:
1. Select the Add New Button Element button and create a button on your form.
2. To reflect the preferred action, right-click the button and provide a name for the button in the Change Caption dialog.
3. Click the Show Action List button.
4. In the Define Actions dialog, click Insert to add an action.
5. Click the Action label and enter a name for your action.
6. Click Description and enter a description of your action.
7. Click Button and select the name of the button that you want to link to the action.
8. Click Accelerator to display the Accelerator Properties dialog.
9. Select the type of keyboard combination for the accelerator, if desired.
10. Open the script editor by pressing the Show Script button in the main menu.
11. Compose an event handler for a Document_OnAction event.
12. Switch to Verifier Test Mode and test the action.

Oracle WebCenter Forms Recognition 204 Designer User's Guide
14.1.21 Changing Colors and Fonts for Elements of Verification Forms
WebCenter Forms Recognition supports a set of script methods to dynamically or statically adjust fonts, colors, and background colors for verification forms and their verification elements. Refer to the Oracle WebCenter Forms Recognition Scripting User’s Guide for more details.
14.2 Testing the Verification
The Verifier Test Mode provides a complete environment for the simulation of classification and extraction verification. This includes the corresponding state evaluations and transitions. However, changes of the workdoc are not saved persistently. They are kept in memory only and discarded when the document input changes.
14.2.1 Verifier Test Mode User Interface
The user interface that displays depends on your current settings. It can be determined dynamically, using the document class and state. This leads to one of the following results:
The classification user interface displays.
The extraction/indexing user interface displays using the form corresponding to the current document’s state.
There is no matching form, such as an empty user interface displays.
If Force Document is pressed, the selected form displays and is used for extraction, independent from the document properties.
14.2.2 Verifier Test Mode Color Coding
In Verifier Test Mode, color coding is used to support the quality assurance process. The appearance of the field area tells us something about the validity of the extracted data:
A green background indicates a valid extraction result.
A red background indicates an invalid extraction result.
A question mark indicates illegible characters.
A red character indicates rejects, i.e. WebCenter Forms Recognition is in doubt whether the character was read correctly.
Similar information can be obtained from the document area:
A green highlight indicates a valid extraction result.
A red highlight indicates an invalid extraction result.
A yellow highlight indicates a candidate.
Depending on the current selection in the field area, document highlighting can be applied to the following items:
Document areas associated with text fields.
Document areas associated with entire tables.
Document areas associated with table columns.
Document areas associated with table rows.

Oracle WebCenter Forms Recognition 205 Designer User's Guide
Document areas associated with table cells.
14.2.3 Verifier Test Mode Icons
In the field area, the following icons are used to indicate the nature of the field:
Icon Description
Indicates the currently selected field.
Indicates a smart index field that can be filled by a database lookup. This icon is visible only when a smart index field is selected.
Indicates a smart index field that can be used to start a lookup. This icon is visible no matter whether a smart index field is selected or not.
14.2.4 Verifier Test Mode Toolbar
Use the following buttons to control form and document display during the verification procedure:
Button Description
If this button appears pressed, the program always keeps the focus on the document area that is associated with the currently selected field. If required, the document section displayed in the viewer changes accordingly on field change.
If this button appears pressed, the next documents display with the currently selected magnification. Otherwise, the default magnification is used after document change.
If this button appears pressed, the next document displays when you validate the current one. Otherwise no document change will take place, unless triggered through the navigation bar. Note that, in contrast to WebCenter Forms Recognition Verifier, valid documents are not skipped in Verifier Test Mode.
If this button appears pressed, the next document is verified using the current form. Otherwise, document state and class assignment are used to determine the appropriate form on document change.
14.2.5 Verifier Test Mode Keyboard Operation
In Verifier Test Mode, navigation and validation is mainly done using keyboard operations. Compared to Verifier, a reduced set of keyboard operations is available.
The following operations can be used in classification mode:
Keyboard Shortcut Description
If you know the correct class name, you may type its first characters and wait until the systems automatically displays the full class name.
[] Moves one class up in the selection list.
[] Moves one class down in the selection list.
[Enter] Validates the classification result and displays the current document in extraction / indexing mode.
[Tab] Moves to the next field in the current document or to the first field after document change.
[Shift] + [Tab] Moves to the previous field in the current document.
[Alt] + [F12] Starts the database lookup, if smart indexing is configured.
[Ctrl] + [Delete] Deletes the end of the line.
[Ctrl] + [Backspace] Deletes the entire field content.

Oracle WebCenter Forms Recognition 206 Designer User's Guide
Keyboard Shortcut Description
[Ctrl] + [Enter] Inserts a new line into a multi-line field.
[Enter] Validates the current rejected character or field and moves to the next invalid character field. Depending on your current settings, this may involve a document change. Validation may also trigger smart indexing.
14.2.6 Testing the Visible Classes
Testing the classification verification is simple. All you need to check is whether classes that are not supposed to appear in Verifier are actually hidden.
Prepare as document input:
Unclassified documents. The quality of the documents is not important, you could for instance just use some TIFF images from the file system.
To run a test:
1. Load the documents and switch to Verifier Test Mode. Because the current document is unclassified, the classification user interface displays.
2. To check the visible classes, open the list box at the bottom of the window.
3. Select a class and press [Enter]. This classifies the document manually. The program then checks whether there is a form available for the selected class. If a form is available, the extraction is performed, and the document and its extraction results display using this form.
14.2.7 Testing the Verification Form Layout
You should test whether your verification form layout works under normal circumstances, that is, with documents that extract correctly.
Prepare as document input:
Classified documents. To work with documents that do not cause particular problems, you can take the documents from the learnset.
Create separate batches for each document class to test single forms, and another batch with mixed content to test whether the correct form displays for each class.
If you permit partial validation and have multiple forms per class, where each form is associated with a given state, you can edit the batch control file and modify the document state to force verification with a given form. This only lets you pretend that actually finished processing steps have not yet been performed, but not vice versa. Also, you need to make sure that batch states, folder states and document states remain consistent. For detailed information about the structure of the batch control file, refer to the Oracle WebCenter Forms Recognition Runtime Server User’s Guide.
Use the following toolbar settings in Verifier Test Mode:
Default settings are sufficient in most cases.
To test a single form if your document input is heterogeneous concerning the classes, force validation with this form.
To resolve special problems which only occur with some documents, do not navigate to the next document on validation.

Oracle WebCenter Forms Recognition 207 Designer User's Guide
To run a test:
1. Load the documents and switch to Verifier Test Mode. Since the current document is classified, the extraction / indexing user interface displays.
2. Press the [Tab] key to activate the first field. The arrow icon appears next to the field.
3. Check whether:
The field has the required size.
You have multiline edits where you need them.
The associated viewer shows the appropriate document area.
The relevant information in the viewer is readable.
4. Use the [Tab] key to move to the next fields and check them as well.
5. When the last field is checked, press the [Enter] key. This validates the document. The field background appears in yellow, and the mouse pointer assumes the shape of an hourglass. After the document is validated, the next document is loaded into the viewer area.
6. Repeat this procedure for a number of documents to make sure that you cover all relevant cases.
14.2.8 Testing Validation Rules
You should test whether your validation rules are functional. The list below provides an overview of possible limitations concerning field content:
Handling of OCR rejects.
Permitted number of characters.
Range of valid characters.
Restriction to uppercase / lowercase characters.
Handling of forced validation.
Custom validation rules implemented as WinWrap Basic scripts.
Prepare as document input:
Classified documents.
To run tests where you deliberately enter invalid input, you can use documents that extract correctly. You can, for instance, reuse the batches created previously to test the form layout.
To test the handling of OCR rejects and of empty fields, create a corresponding set with OCR problems, for instance by scanning with a lower resolution.
Use the following toolbar settings in Verifier Test Mode:
To test as many violations as possible with a limited number of documents, do not navigate to the next document on validation.
To run a test:

Oracle WebCenter Forms Recognition 208 Designer User's Guide
1. Load the documents and switch to Verifier Test Mode. Since the current document is classified, the extraction / indexing user interface displays.
2. Press the [Tab] key to activate the first field. The arrow icon appears next to the field.
3. Test the field validation rules as follows, and observe the messages that display in the status bar:
If the field contains OCR rejects, correct them and use the [Enter] key to confirm each corrected character. You should not be able to validate the field if rejects are forbidden.
If applicable, enter strings that are too long or too short. You should not be able to validate the field unless the number of characters is within the valid range.
If applicable, enter some invalid characters. They should be discarded automatically.
If applicable, enter some characters in the wrong case. They should be converted automatically.
If possible, enter some input that is invalid and try a forced validation by pressing the [Enter] key three times. If this is permitted, a message box displays. Select No to interrupt the forced validation.
4. Without validating the field, use the [Tab] key to move to the next fields and test their validation rules as well.
14.2.9 Testing Smart Indexing
You should manually test whether the Smart Indexing feature is working as expected. To do this, turn off automatic smart indexing while you are testing. You should have access to the database used for the lookup.
Prepare as document input:
Extracted documents that have been generated with the automatic lookup turned off. To work with documents that do not cause particular problems, you can for instance take the documents from the learnset. Test each class concerned separately.
To run a test, use the default toolbar settings in Verifier Test Mode and complete the following steps:
1. Load the documents and switch to Verifier Test Mode. Because the current document is classified with an invalid extraction result, the extraction / indexing user interface displays.
2. Activate a smart index field that can be used to start a lookup. The arrow icon, the key icon, and the database icon appear next to the field. All other fields that can be filled using database lookup are marked with a database icon.
3. Run a search with the value that has been extracted, or enter a value that should return a single result. Then press [Alt] + [F12] to trigger the lookup. This should fill the lookup fields.
4. Run a search that should return multiple results. This can, for instance, be a wildcard search, using the * character to represent multiple characters, or the ? character to represent a single character. Two different results are acceptable in this case:
If multiple results are forbidden, a dialog should display from which you can select the appropriate record. The lookup fields are then filled accordingly.

Oracle WebCenter Forms Recognition 209 Designer User's Guide
If multiple results are allowed, the lookup fields will be filled with multiple values. In this case, you need multiline fields to display the results properly.
5. Run a search that yields no results. You should see a corresponding error message.
If you need automatic smart indexing, do not forget to change the settings again when your tests are finished.
14.2.10 Testing Table Analysis and Correction
The preparations for table analysis test are essentially the same as for general extraction tests. The list below provides an overview of possible limitations concerning table content:
Default columns.
Cells with required entries.
Valid column formats.
Handling of forced validation.
Custom validation rules implemented as WinWrap Basic scripts.
Prepare as document input:
Classified or extracted documents.
Create separate batches for all document classes that use common table settings.
To run a test, complete the following steps.
1. Load the documents and switch to Verifier Test Mode. Since the current document is classified, the extraction / indexing user interface displays.
2. The most basic test checks the presence of the table field. If some table fields are missing, you will have to improve the table analysis settings, or provide a mechanism how these cases are handled. A simple method to make sure that table fields exist (which can then be corrected) is the use of default columns.
3. The table field provides additional highlighting options:
Clicking the button in the upper-left corner of the field highlights the entire document table.
Clicking a column label in the field area highlights the document column.
Clicking a row label in the field area highlights the document row.
Clicking a cell in the field area highlights the document cell.
Valid areas appear in green, invalid areas in red.
4. Use the highlighting options for the following tests:
Check whether table tops and bottoms have been detected correctly.
Check for default columns. They must be available in valid tables. If a default column is missing, the corresponding table must be invalid.
Check for mandatory cells. They must be filled in valid tables. If a mandatory cell is empty, the corresponding table, column, and row must be invalid.

Oracle WebCenter Forms Recognition 210 Designer User's Guide
Check whether column formats have been applied correctly. If cells have an incorrect format, the corresponding table, column, and row must be invalid.
Check whether forced validation of invalid tables is possible.
5. The column labels’ shortcut menu allows you to correct the column structure of tables. It contains the following commands:
Command Description
Unmap Column Removes the current column.
Swap Column Exchanges the position of the current column and the one selected from the drop-down menu.
6. The row labels’ shortcut menu allows you to correct the row structure of tables. It contains the following commands:
Command Description
Insert Row Inserts an empty row above the current one.
Delete Row Deletes the current row.
Duplicate Row Duplicates the current row.
Append Row Appends an empty row at the bottom of the table.
1. Fill the cells with correct values and validate the table by pressing the [Enter] key.

Oracle WebCenter Forms Recognition 211 Designer User's Guide
15 Printing
You can print documents from WebCenter Forms Recognition Designer, including pages with highlights.
To print a document:
1. On the min menu, click File and then Print…
2. On the Print dialog box, select the appropriate print settings and click OK.

Oracle WebCenter Forms Recognition 212 Designer User's Guide
16 Reusing Project Settings with Templates
In data extraction, after your analysis and evaluation settings for a field are working, you can reuse them elsewhere within or outside your project. For example, if the format analysis has been configured to find a date, it could be useful to take the same definition in any other project where dates have to be extracted. To achieve this, WebCenter Forms Recognition Designer allows analysis and evaluation settings to be saved as templates. You can also create templates for table definitions.
16.1 Create Templates
The prerequisites for this task are:
Designer is in Definition Mode.
The panel on the left side of the window displays the Fields tab in the foreground.
A field is selected for which settings have been defined that will be reused.
On the right side of the window, the tabs with class and field properties are visible.
To create analysis templates, the Analysis tab must be in the foreground.
To create evaluation templates, the Evaluation tab must be in the foreground.
To create templates, complete the following steps:
1. Click Save as Template.
2. In the New Template dialog, enter a name for the template and click OK. The template is saved internally within the project.
16.2 Use Evaluation and Analysis Templates within Projects
There are two ways to use a template within a project:
As defined.
As a starting point for further adjustments.
The prerequisites for both methods are:
Designer is in Definition Mode.
The panel on the left side of the window displays the Fields tab in the foreground.
A field is selected.
On the right side of the window, the tabs with class and field properties are visible.
To use an existing analysis template, the Analysis tab must be in the foreground.
To use an existing evaluation template, the Evaluation tab must be in the foreground.
16.2.1.1 Use Existing Templates
To use an existing template as defined, complete the following step:
1. Select a template from the Available Templates list. This overwrites all previous settings. In addition, the tabs for analysis and evaluation settings will be hidden.

Oracle WebCenter Forms Recognition 213 Designer User's Guide
To use an existing template and adjust it, complete the following steps:
1. Select it from the Available Templates list box.
2. Click Copy Template. This updates the tabs for analysis or evaluation settings beneath with the settings from the template. You can modify the settings. However, this will not be reflected within the template.
16.3 Edit Analysis and Evaluation Templates
In WebCenter Forms Recognition Designer, templates are stored and managed on the project level. To edit them, you need to display the project properties.
The prerequisites for this task are:
Designer is in Definition Mode.
The panel on the left side of the window displays the Classes tab in the foreground.
On the right side of the window, the tabs with class and field properties are visible.
16.3.1 View Templates
To view the templates, complete the following steps:
1. On the Classes tab, right-click the entry representing your project.
2. From the popup menu, select one of the following options.
Select Show Analysis Templates to display the tab of analysis templates.
Select Show Evaluation Templates to display the tab of evaluation templates.
16.3.2 Options for Editing
Three editing options are available within these tabs:
Rename.
Delete.
Change the Settings.
These options are described below:
Rename To rename a template, select it from the Available Templates list and click Rename. Enter the new name in the resulting dialog.
You can only rename templates that are currently not in use.
Delete To delete a template, select it from the Available Templates list and click Delete. Confirm in the resulting dialog.
You can only delete templates that are currently not in use.
User Info Area You can change all settings that are saved with the template. To change the template settings, select it from the Available Templates list and edit in the tabs that display beneath.
All fields using a template will immediately work with the new settings.

Oracle WebCenter Forms Recognition 214 Designer User's Guide
16.4 Exchange Analysis Templates between Projects
You can save analysis templates as files and use them in other projects. This feature is not supported for evaluation templates.
The prerequisites for this task are:
Designer is in Definition Mode.
The panel on the left side of the window displays the Classes tab in the foreground.
On the right side of the window, class and field properties are visible.
16.4.1 Export Templates to another Project
To export templates to another project, complete the following steps:
1. On the Classes tab, right-click the entry representing your project to display a shortcut menu.
2. Select Show Analysis Templates to display the tab of analysis templates.
3. On the Analysis Templates tab, on the right side of the window, click Export.
4. To exclude templates from the export, in the Export Analysis Templates dialog box, clear the corresponding checkboxes and click OK to start the export.
5. In the Save File As dialog, enter a file name and click Save. The template export file is written to the file system with the extension .exp.
16.4.2 Import Templates from another Project
To import templates, complete the following steps:
1. On the Classes tab, right-click the entry representing your project to display a shortcut menu.
2. Select Show Analysis Templates to display the tab of analysis templates.
3. On the Analysis Templates tab on the right side of the window, click Import. The Open dialog is displayed.
4. Select a template export file with the extension .exp and click Open.
5. The templates from the file are imported and displayed in the Available Analysis
Templates list box.
Note: Designer automatically recognizes the template type contained in the export file. If it is the wrong type, the template is not imported.
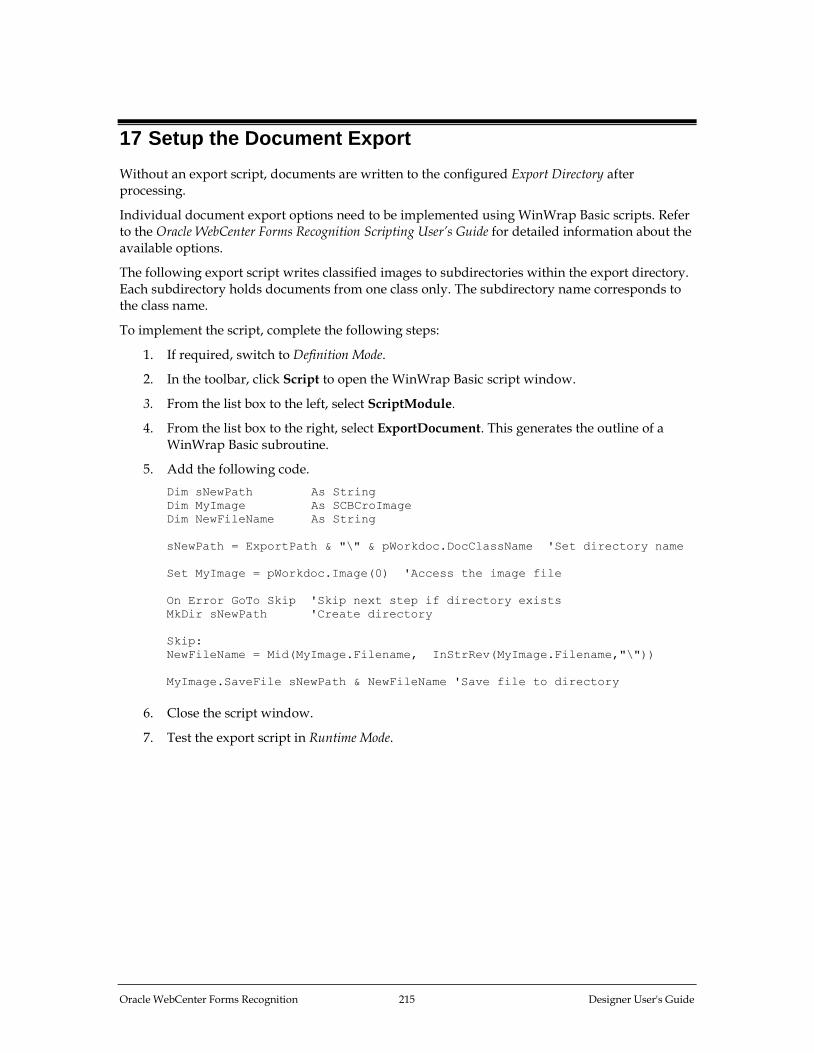
Oracle WebCenter Forms Recognition 215 Designer User's Guide
17 Setup the Document Export
Without an export script, documents are written to the configured Export Directory after processing.
Individual document export options need to be implemented using WinWrap Basic scripts. Refer to the Oracle WebCenter Forms Recognition Scripting User’s Guide for detailed information about the available options.
The following export script writes classified images to subdirectories within the export directory. Each subdirectory holds documents from one class only. The subdirectory name corresponds to the class name.
To implement the script, complete the following steps:
1. If required, switch to Definition Mode.
2. In the toolbar, click Script to open the WinWrap Basic script window.
3. From the list box to the left, select ScriptModule.
4. From the list box to the right, select ExportDocument. This generates the outline of a WinWrap Basic subroutine.
5. Add the following code.
Dim sNewPath As String
Dim MyImage As SCBCroImage
Dim NewFileName As String
sNewPath = ExportPath & "\" & pWorkdoc.DocClassName 'Set directory name
Set MyImage = pWorkdoc.Image(0) 'Access the image file
On Error GoTo Skip 'Skip next step if directory exists
MkDir sNewPath 'Create directory
Skip:
NewFileName = Mid(MyImage.Filename, InStrRev(MyImage.Filename,"\"))
MyImage.SaveFile sNewPath & NewFileName 'Save file to directory
6. Close the script window.
7. Test the export script in Runtime Mode.

Oracle WebCenter Forms Recognition 216 Designer User's Guide
Appendix A Auxiliary Tools
A.1. Auto-Generation of Template Local Projects in SLW
Overall learnset management within a company’s infrastructure could be essentially simplified through a couple of additional tools as presented below.
You may wish to create a new local project out from an existing global one, keeping either the entire settings of your base class, your learnset and your script, or, maybe, some other reasonable combination of your choice. This task could be easily performed using the SLW Export Local Project tool that can be launched through the Windows Start menu, as follows:
Start Programs Oracle WebCenter Forms Recognition Tools SLW Export Local Project Tool
The first dialog allows you to search and choose a project to use as the source.
The next dialog is an internal structure (P as project; B as base class) of the selected one and provides a possibility to select the appropriate settings to be kept or withdrawn.
Cancel quits this step and returns the user to the first dialog.
Export gives a possibility to name a target project and save it for future use. After saving, return to the first dialog to proceed with next source projects, if any. While exporting, the tool automatically analyzes and creates the corresponding learnset directories and learnsets, based on a new name of the target project, or prompts for a replacement, if a name of the target project already exists.
Save Project in the first dialog saves the entire export project configuration as a part of the global project’s stream and exits.
This tool can be used for automation of the creation of template local projects (to be used by Verifier workstations) out of the primary global one for use with Supervised Learning Workflow. As a result, it will minimize the corresponding effort required each time a new local project needs to be created.
A.2. Auto-Merging of SLW Learnsets
An administrator supporting a highly distributed system of different workstations could be easily confronted with maintenance of a high number of separate knowledgebases, created at different locations, at different times, and so on. Thus in some cases it might be required to be able to merge the learnsets from different project files, being able to provide some additional considerations. This merging method has to be intelligent enough to be able to select some learnset settings for a particular document within a class to be either merged or withdrawn. This goal can be achieved with an auxiliary tool, named Merge SLW Learnsets. The tool can be launched through the Windows Start menu, as follows:
Start Programs Oracle WebCenter Forms Recognition Tools Merge SLW Learnsets
First, scan projects to discover and analyze the structures of concern. The Merge button stays disabled for the very first, and is enabled after a successful scan, if there are some logical steps to be followed. If there is nothing to be merged, the Merge button will remain disabled. Select Exit to quit this tool.

Oracle WebCenter Forms Recognition 217 Designer User's Guide
Important: The Merge SLW Learnsets tool is designed to work only with Supervised Learning Workflow projects, which are the instances of the same global project. In this connection, only the Supervised Learning Workflow vendor classes can be populated and/or updated through this tool. In the project contains any classes that are not created automatically by Supervised Learning Workflow, these classes cannot be upgraded through the tool.
This can be used for quick merging of multiple Supervised Learning Workflow sub-projects, overtaking the SLW knowledge without usage of the Learn Set Manager tool. For example, to quickly correct corresponding configuration errors related to disconnected local Verifier workstations.

Oracle WebCenter Forms Recognition 218 Designer User's Guide
Appendix B Regional and Currency Settings
This appendix lists settings for region and currencies used in Validation and Output Formatting:
Region Currency Supported Symbols
Dutch Euro, Guilder NLG, fl, €
Dutch-Belgium Euro, Franc BEF, BF, €
English Euro, Dollar USD, $, €
English-Australia Euro, Dollar AUD, $, €
English-Canada Euro, Dollar CAD, $, €
English-New Zealand Euro, Dollar NZD, $, €
English-United Kingdom Euro, Pound GBP, €
English-United States Dollar USD, $, €
French Euro, Franc FRF, F, €
French-Belgium Euro, Franc BEF, BF, €
French-Canada Euro, Dollar CAD, $, €
French-Switzerland Euro Franc CHF, SFR, €
German Deutsche Mark, Euro DEM, DM, €
German-Liechtenstein Deutsche Mark, Euro DEM, DM, €
German-Luxembourg Deutsche Mark, Euro DEM, DM, €
German-Swiss Euro, Franc CHF, SFr, €
Italian Euro Lira ITL, L, €
Italian-Swiss Euro, Franc CHF, SFr, €
Neutral Euro €
Norwegian Euro, Kroner NOK, k
Polish Euro Zloty €
Russian Euro €
Spanish Peseta ESP, pta
Spanish-Mexico Peso MXN, ls
Spanish-Modern Peseta $, ESP, pta
Swedish Euro, Krona SEK, KR, €

Oracle WebCenter Forms Recognition 219 Designer User's Guide
Appendix C Project Structure and File Extensions
This appendix illustrates a typical project’s folder structure and the types of files and file extensions in use. Each project has its own folder structure. The root folder for the project carries the same name as the project name (the .sdp file you created for the project.) Folder structures for projects that did not use associative learning differ from those that do use associative learning.
C.1. Non-Associative Projects
In non-associative projects, the project (*.sdp) file, , templates and comma-delimited reference files (CSV), such as vendor pools, are stored at the project root. Below the project root, all projects have batch folders, export folders and learn folders. The primary batch folder holds batch state files, batch control files, lock files, .sdb files and .sdl files. Batch folders contain secondary folders for each batch in the project. These folders hold the workdocs and image files for each document in the batch. The learn folder contains all the learnsets for the project. Each of these learnset folders contains the images and workdocs in the learnset. The export folder contains exported files.
C.2. Associative Learning Projects
The folder structure of Associative Learning Projects is more granular. As with the project root for non-associative projects, the project root contains the project file, the export files, templates, and CSV files.
The project root also should consist of the following folders:
Batches
Common Learnset
Export
Global Project
Input
Local Project
Misc.
Vendor Pool
C.3. File Extensions
File Extension File Type File Location
SDP Project file. Project Root
EXP Exported templates. Project Root
CSV Comma-delimited reference files. Project Root
DAT Batch Folder
500 (or some other number) Batch state files with the state of the number assigned.
Batch Folder
SDB Batch Folder

Oracle WebCenter Forms Recognition 220 Designer User's Guide
File Extension File Type File Location
SDL Batch Folder, Learn Folder
WDC Workdoc. Specific Batch Folder, Learn Folder
TIF Tagged Image Format Files. Specific Batch Folder
ID0 Learned image file. Learn Folder
STS Project status information. Vendor Pool Folder
TMP Temporary file. Vendor Pool Folder
ATT Vendor Pool Folder
DCT Vendor Pool Folder
DFF Vendor Pool Folder
DLY Vendor Pool Folder