oracle demantra installation guide
TRANSCRIPT

Oracle® DemantraInstallation GuideRelease 12.2 Part No. E22516-11
September 2015

Oracle Demantra Installation Guide, Release 12.2
Part No. E22516-11
Copyright © 2014, 2015, Oracle and/or its affiliates. All rights reserved.
Primary Author: Jason Lansdowne
This software and related documentation are provided under a license agreement containing restrictions on use and disclosure and are protected by intellectual property laws. Except as expressly permitted in your license agreement or allowed by law, you may not use, copy, reproduce, translate, broadcast, modify, license, transmit, distribute, exhibit, perform, publish, or display any part, in any form, or by any means. Reverse engineering, disassembly, or decompilation of this software, unless required by law for interoperability, is prohibited.
The information contained herein is subject to change without notice and is not warranted to be error-free. If you find any errors, please report them to us in writing.
If this is software or related documentation that is delivered to the U.S. Government or anyone licensing it on behalf of the U.S. Government, the following notice is applicable:
U.S. GOVERNMENT END USERS: Oracle programs, including any operating system, integrated software, any programs installed on the hardware, and/or documentation, delivered to U.S. Government end users are "commercial computer software" pursuant to the applicable Federal Acquisition Regulation and agency-specific supplemental regulations. As such, use, duplication, disclosure, modification, and adaptation of the programs, including any operating system, integrated software, any programs installed on the hardware, and/or documentation, shall be subject to license terms and license restrictions applicable to the programs. No other rights are granted to the U.S. Government.
This software or hardware is developed for general use in a variety of information management applications. It is not developed or intended for use in any inherently dangerous applications, including applications that may create a risk of personal injury. If you use this software or hardware in dangerous applications, then you shall be responsible to take all appropriate fail-safe, backup, redundancy, and other measures to ensure its safe use. Oracle Corporation and its affiliates disclaim any liability for any damages caused by use of this software or hardware in dangerous applications.
Oracle and Java are registered trademarks of Oracle and/or its affiliates. Other names may be trademarks of their respective owners.
Intel and Intel Xeon are trademarks or registered trademarks of Intel Corporation. All SPARC trademarks are used under license and are trademarks or registered trademarks of SPARC International, Inc. AMD, Opteron, the AMD logo, and the AMD Opteron logo are trademarks or registered trademarks of Advanced Micro Devices. UNIX is a registered trademark of The Open Group.
This software or hardware and documentation may provide access to or information about content, products, and services from third parties. Oracle Corporation and its affiliates are not responsible for and expressly disclaim all warranties of any kind with respect to third-party content, products, and services unless otherwise set forth in an applicable agreement between you and Oracle. Oracle Corporation and its affiliates will not be responsible for any loss, costs, or damages incurred due to your access to or use of third-party content, products, or services, except as set forth in an applicable agreement between you and Oracle.

iii
Contents
Send Us Your Comments
Preface
1 OverviewPurpose...................................................................................................................................... 1-1Scope.......................................................................................................................................... 1-1
2 System RequirementsClient Requirements................................................................................................................. 2-164- and 32-Bit Oracle Client Requirements.............................................................................. 2-3Using Other Software................................................................................................................ 2-4Software Requirements for Servers.......................................................................................... 2-4Oracle Demantra Analytical Engine......................................................................................... 2-8Trade Promotion Optimization (TPO) Engine......................................................................... 2-9Hardware Architecture............................................................................................................ 2-10Hardware Requirements for the Servers................................................................................ 2-11Network Requirements........................................................................................................... 2-14
3 Preparing for Installations and UpgradesPre-7.3.0.1 Upgrade Path............................................................................................................ 3-1Installer Options Worksheet..................................................................................................... 3-1Basic Preparation Checklist.................................................................................................... 3-10Upgrade Preparation Checklist............................................................................................... 3-13

iv
4 Installing and Upgrading Oracle DemantraOverview................................................................................................................................... 4-1About the Installer.................................................................................................................... 4-1Running the Installer................................................................................................................ 4-4Review List of High Priority Patches...................................................................................... 4-27
5 Post-Install or Upgrade StepsChanging the Client JRE Version (Optional)........................................................................... 5-1Checking the Log Files and Tables........................................................................................... 5-2Revoking Demantra User Privileges.........................................................................................5-2Affect of Upgrading on Parameters.......................................................................................... 5-2Affect of Upgrading on Customizations...................................................................................5-3Upgrading and Multiple Language Support (MLS)................................................................. 5-3Verifying the Database Upgrade.............................................................................................. 5-5Application Upgrade Using the Business Application Language (BAL).................................5-5Upgrading from 7.1 and Higher................................................................................................ 5-6Upgrading from Before 7.1...................................................................................................... 5-12
6 Configuring Your Database, Web Server and BrowserStreamlining the Oracle Database............................................................................................ 6-1Running SYS_GRANTS.SQL Script.........................................................................................6-3Configuring the Web Client Startup........................................................................................ 6-4Configuring Web Applications for SSL and Firewalls............................................................ 6-4Configuring the Oracle Demantra Web Platform Server......................................................... 6-5Configuring WebSphere........................................................................................................... 6-7Windows Script for First-Time Installation............................................................................. 6-7Mozilla Firefox Startup Configuration Setting........................................................................ 6-7Setting Browser Locale.............................................................................................................. 6-8Remote System Configuration.................................................................................................. 6-8Configuring APS_PARAMS..................................................................................................... 6-8
7 Deploying Demantra on UNIX, Solaris or LinuxAbout the Installer.................................................................................................................... 7-1Deploying the Demantra Web Application on UNIX.............................................................. 7-3Deploying the Demantra Analytical Engine on Linux.............................................................7-7Deploying the Demantra Analytical Engine on Solaris......................................................... 7-30

v
8 Configuring Demantra ApplicationsUpdating Settlement Levels for Oracle Demantra Deductions and Settlement Management(DSM)........................................................................................................................................ 8-1Configure Promotion Optimization (PMO) on Linux (Optional)............................................8-1
9 Starting Oracle DemantraStarting the Web-based Products.............................................................................................. 9-1Demantra URLs......................................................................................................................... 9-2Starting the Desktop Products.................................................................................................. 9-2
10 Uninstalling Oracle DemantraUninstalling Demantra............................................................................................................10-1
11 TipsAbout Demantra Configuration Settings............................................................................... 11-1Key Settings Controlled by the Installer................................................................................ 11-2Redirecting Demantra to a Different Database...................................................................... 11-4Java Tips.................................................................................................................................. 11-4Tomcat Tips............................................................................................................................. 11-6Running the Engine from Workflow...................................................................................... 11-7Data Cleanup........................................................................................................................... 11-9
Index


vii
Send Us Your Comments
Oracle Demantra Installation Guide, Release 12.2Part No. E22516-11
Oracle welcomes customers' comments and suggestions on the quality and usefulness of this document. Your feedback is important, and helps us to best meet your needs as a user of our products. For example:
• Are the implementation steps correct and complete? • Did you understand the context of the procedures? • Did you find any errors in the information? • Does the structure of the information help you with your tasks? • Do you need different information or graphics? If so, where, and in what format? • Are the examples correct? Do you need more examples?
If you find any errors or have any other suggestions for improvement, then please tell us your name, the name of the company who has licensed our products, the title and part number of the documentation andthe chapter, section, and page number (if available).
Note: Before sending us your comments, you might like to check that you have the latest version of the document and if any concerns are already addressed. To do this, access the new Oracle E-Business Suite Release Online Documentation CD available on My Oracle Support and www.oracle.com. It contains the most current Documentation Library plus all documents revised or released recently.
Send your comments to us using the electronic mail address: [email protected]
Please give your name, address, electronic mail address, and telephone number (optional).
If you need assistance with Oracle software, then please contact your support representative or Oracle Support Services.
If you require training or instruction in using Oracle software, then please contact your Oracle local officeand inquire about our Oracle University offerings. A list of Oracle offices is available on our Web site at www.oracle.com.

ix
Preface
Intended AudienceWelcome to Release 12.2 of the Oracle Demantra Installation Guide.
This guide is intended for users of Oracle Demantra.
See Related Information Sources on page x for more Oracle E-Business Suite product information.
Documentation Accessibility For information about Oracle's commitment to accessibility, visit the Oracle Accessibility Program website at http://www.oracle.com/pls/topic/lookup?ctx=acc&id=docacc.
Access to Oracle SupportOracle customers that have purchased support have access to electronic support through My Oracle Support. For information, visit http://www.oracle.com/pls/topic/lookup?ctx=acc&id=info or visit http://www.oracle.com/pls/topic/lookup?ctx=acc&id=trs if you are hearing impaired.
Structure1 Overview2 System Requirements3 Preparing for Installations and Upgrades4 Installing and Upgrading Oracle Demantra5 Post-Install or Upgrade Steps6 Configuring Your Database, Web Server and Browser7 Deploying Demantra on UNIX, Solaris or Linux8 Configuring Demantra Applications9 Starting Oracle Demantra

x
10 Uninstalling Oracle Demantra11 Tips
Related Information SourcesOracle Demantra products share business and setup information with other Oracle Applications products. Therefore, refer to other user guides when you set up and use Oracle Demantra. In particular, refer to the Oracle Demantra Implementation Guide for more information about how to set up and customize Demantra for your environment, Oracle Demantra Analytical Engine Guide for more information about tuning the Analytical Engine, and Oracle Demantra Integration Guide for detailed information about the various integrations supported. All guides can be accessed from My Oracle Support Note 443969.1 – Oracle Demantra Documentation Library.
Integration Repository The Oracle Integration Repository is a compilation of information about the service endpoints exposed by the Oracle E-Business Suite of applications. It provides a complete catalog of Oracle E-Business Suite's business service interfaces. The tool lets users easily discover and deploy the appropriate business service interface for integration with any system, application, or business partner.
The Oracle Integration Repository is shipped as part of the Oracle E-Business Suite. As your instance is patched, the repository is automatically updated with content appropriate for the precise revisions of interfaces in your environment.
Do Not Use Database Tools to Modify Oracle E-Business Suite DataOracle STRONGLY RECOMMENDS that you never use SQL*Plus, Oracle Data Browser, database triggers, or any other tool to modify Oracle E-Business Suite data unless otherwise instructed.
Oracle provides powerful tools you can use to create, store, change, retrieve, and maintain information in an Oracle database. But if you use Oracle tools such as SQL*Plus to modify Oracle E-Business Suite data, you risk destroying the integrity of your data and you lose the ability to audit changes to your data.
Because Oracle E-Business Suite tables are interrelated, any change you make using an Oracle E-Business Suite form can update many tables at once. But when you modify Oracle E-Business Suite data using anything other than Oracle E-Business Suite, you may change a row in one table without making corresponding changes in related tables.If your tables get out of synchronization with each other, you risk retrieving erroneous information and you risk unpredictable results throughout Oracle E-Business Suite.
When you use Oracle E-Business Suite to modify your data, Oracle E-Business Suite automatically checks that your changes are valid. Oracle E-Business Suite also keeps track of who changes information. If you enter information into database tables using database tools, you may store invalid information. You also lose the ability to track who

xi
has changed your information because SQL*Plus and other database tools do not keep arecord of changes.


Overview 1-1
1Overview
PurposeThis document provides a complete, up-to-date description of Oracle Demantra installation for Release 12.2.4. The most current version of this document is available on My Oracle Support Note 443969.1 – Oracle Demantra Documentation Library. You should read and understand all tasks described here before you begin your installation.
ScopeIn this release, there is integration between Oracle Hyperion and Oracle Demantra Salesand Operations Planning (S&OP). To install the integration points and configure the Oracle Data Integrator (ODI) components, see the Oracle Application Integration Architecture 2.5: Installation and Upgrade Guide located at My Oracle Support Note 959726.1.
In this release, the integration between Oracle JD Edwards EnterpriseOne 9.0 and Oracle Demantra Demand Management (DM), Predictive Trade Planning (PTP), and Deductions and Settlement Management (DSM) is changed. To install the integration points, configure the Oracle Data Integrator (ODI) components and EnterpriseOne batch processor, see the Oracle Value Chain Planning Integration Base Pack 3.1 - Implementation Guide located at http://download.oracle.com/docs/cd/E21374_01/index.htm.
For a list of high priority patches for Oracle Demantra, see My Oracle Support Note 470574.1. This note contains important information for JD Edwards integrations.


System Requirements 2-1
2System Requirements
This chapter covers the following topics:
• Client Requirements
• 64- and 32-Bit Oracle Client Requirements
• Using Other Software
• Software Requirements for Servers
• Oracle Demantra Analytical Engine
• Trade Promotion Optimization (TPO) Engine
• Hardware Architecture
• Hardware Requirements for the Servers
• Network Requirements
Client RequirementsDepending on which Oracle Demantra software the users need, these are the minimum requirements for their machines.
All Desktop Products Web-based Products Apart from Oracle Demantra Anywhere
Oracle Demantra Anywhere
1 CPU at 1.3 GHz or faster 1 CPU at 1.3 GHz or faster Any hardware that supports the browser
512 MB RAM minimum (1 GBRAM recommended) and 500 MB of free disk space
512 MB RAM minimum (1 GBRAM recommended) and 500 MB of free disk space
512 MB RAM minimum (1 GBRAM recommended) and 500 MB of free disk space

2-2 Oracle Demantra Installation Guide
All Desktop Products Web-based Products Apart from Oracle Demantra Anywhere
Oracle Demantra Anywhere
Minimum screen resolution of1280 x 1024 (preferred: 1400 x1050)
Minimum screen resolution of1280 x 1024 (preferred: 1400 x1050)
Minimum screen resolution of1280 x 1024 (preferred: 1400 x1050)
Locale: <your locale>
The locale generally controls the date, time, and number displays.
Locale: <your locale>
The locale generally controls the date, time, and number displays.
Locale: <your locale>
The locale generally controls the date, time, and number displays.
- • Microsoft Internet Explorer versions 10.x, or11.x on Microsoft Windows 2000, WindowsServer 2003, 2008 and 2012, Vista, Windows 7, Windows 8,, or Solaris 10or 11 with Java version 1.7.
• Mozilla Firefox versions 26 and later on Microsoft Windows 2000, Vista, or Windows 7, Windows 8 with Java version 1.7.
• Mac OS X Mavericks, andlater.
• Google Chrome version 32 or 33 on Microsoft Windows 2000, WindowsServer 2003, 2008, and 2012, Vista, Windows 7, Windows 8.
• Apple Safari 7 on Mac OSX Mavericks or later withJava version 1.7.
Please see Known Apple Mac OS X Limitations, page 2-3 for more information.
• Microsoft Internet Explorer versions 10.x, or11.x on Microsoft Windows 2000, WindowsServer 2003, 2008, and 2012, Vista, Windows 7, Windows 8, or Solaris 10 or 11 with Java version 1.7.
• Mozilla Firefox versions 26 and later on Microsoft Windows 2000, Vista, or Windows 7, Windows 8 with Java version 1.7.
• Mac OS X Mavericks, andlater.
• Google Chrome version 32 or 33 on Microsoft Windows 2000, WindowsServer 2003, 2008, and 2012, Vista, Windows 7, Windows 8, Windows 12.
• Apple Safari 7 on Mac OSX Mavericks or later , with Java version 1.7.
Please see Known Apple Mac OS X Limitations, page 2-3 for more information.

System Requirements 2-3
All Desktop Products Web-based Products Apart from Oracle Demantra Anywhere
Oracle Demantra Anywhere
- JRE* (installed automatically) -
- Client software for terminal server, same version as on Web server (if terminal serveris used.
-
Note: Use caution when downloading and installing any add-ons to theMozilla Firefox Web browser. Some add-ons can, for example, compromise application security or cause issues when running Demantra worksheets. These customizations are not supported by Oracle.
Known Apple Mac OS X LimitationsThe Oracle Demantra administrative utilities (Business Modeler, Chaining Management, Member Management, Engine Administrator) are not supported on the Mac OS X operating system. These utilities are supported only on Windows platforms. This means the Demantra Silent Installer in Collaborator Workbench is not supported on the Mac operating system. See Oracle Demantra Administrative Utilities, page 2-8 for details.
Only the web browsers listed in the table above are supported. Apple Mac support is limited to the Demantra client. Database and application server software is not supported on Mac OS X. See Software Requirements for the Servers, page 2-4.
Additionally, ending a Demantra session using the browser's X icon may cause unexpected errors, and it is therefore not recommended to end a session in this manner.Always click the Logout link to properly end a Demantra session.
64- and 32-Bit Oracle Client RequirementsA 64-bit application server is supported, and requires 64-bit Java and the environment variable LD_LIBRARY_PATH must point to a 64-bit libjvm.so.
Generally, the only 32-bit restrictions are that the administrative and configuration tools on Windows require a 32-bit Oracle client to connect to the database. The administrative and configuration tools include:
• Installer

2-4 Oracle Demantra Installation Guide
• Business Modeler
• Member Management
• Chaining Management
Using Other SoftwareOracle Demantra supports the Windows Terminal Services. It also supports Excel integration for XP, 2003, 2007 and 2010 for Dynamic Open Link (DOL). Open Office 3 is supported for export.
Note: Dynamic Open Link (DOL) is not yet certified on Microsoft Officefor Mac. However, Demantra's 'Export to Excel' option generates XLS files that can be opened by most Mac-based applications that support this format.
Software Requirements for ServersThis section lists the software stacks that support the Oracle Demantra Web Platform Server, Administrative Utilities, and Analytical Engine. For the latest, most up-to-date information on supported platforms, refer to the Certifications section on My Oracle Support.
Oracle Demantra Web Platform ServerThese are the stacks on which Oracle Demantra receives rigorous testing. Other variations are possible. In principle, Oracle supports any:
• Database operating system for the database server that the database software supports
• Application server operating system for the application server that the application server software supports
Refer to certification details for Oracle VM support for Oracle WebLogic and Oracle database).
Both the Analytical Engine and Trade Promotion Optimization engine are also certified on Oracle VM using any of the Demantra-certified Windows platforms and Linux.
In this release, VMWare is not officially supported. Please see My Oracle Support Note 249212.1 for Oracle's policy on VMWare image support.
Oracle Demantra supports the following software:

System Requirements 2-5
Entity Supported Product and Version
Application Server • Oracle WebLogic 11g (10.3.6 or higher) and 12c
• Tomcat 6.x, 7.x, or 8.x.
• IBM WebSphere 8.5.5
Java • JDK 1.7 for server
• JVM as included with application server installation
Note: Available Java heap memory must be at least 512 MB to create and run the JVM.
Database • Oracle 12c R1 (12.1)
Note: For details about required configuration steps, see Additional Steps for Configuring Oracle 12c., page 2-6
• Oracle 11gR2, latest version (Enterprise Edition or Standard Edition, see note below table)
• Oracle 11gR2 certified on Exadata
• Oracle Real Application Clusters (RAC) Oracle Exadata platform
Note: If you are using Oracle JRockit, refer to My Oracle Support note 978098.1 for important configuration guidelines. Additionally, if you are using JRockit and will be deploying the 64-bit analytical engine, refer to My Oracle Support Note 1576829.1 [https://support.oracle.com/CSP/main/article?cmd=show&type=1576829.1&type=NOT] for deployment details.
Note: The database health check procedures are supported on both the Standard Edition (SE) and Enterprise Edition (EE) of the Oracle database. However, the Enterprise Edition is required to leverage the online table reorganization functionality. Additionally, the Standard

2-6 Oracle Demantra Installation Guide
Edition does not include the database functions parallel query/DML or database partitioning. For details on how these functions can be used toimprove database performance, see Database Health Check, Database Partitioning for the Analytical Engine, and the UseParallelDML procedures in the Oracle Demantra Implementation Guide.
Caution: There is a known issue when using parallel hints to improve Demantra performance on Oracle 11g version 11.2.0.1 and earlier. If your Oracle 11g version is earlier than 11.2.0.1, refer to My Oracle Support note 1249314.1 before installing Demantra.
Additional Steps for Configuring Oracle 12c Pluggable DatabasesA Pluggable Database (PDB) is a new, optional multi-tenancy feature of Oracle 12c. Thisfeature enables a single container database (CDB) to contain multiple pluggable databases. The Demantra Installer does not automatically create or configure a PDB, Demantra with Oracle 12c, a PDB must be defined before running the Oracle Demantra Installer to install a new or upgrade an existing installation. Note that PDB is not mandatory for using Oracle Demantra, and the following steps are only required if you are using a PDB. For information on how to create a PDB, see http://docs.oracle.com/cd/E16655_01/server.121/e17209/statements_6009.htm.
You must also create an entry in your TNSNAMES file and enter the PDB name as the SERVICE_NAME before running Oracle Demantra Installer.
For example, assume the PDB you want to use is called "PDBORCL". In this case, create a new entry in your TNSNAMES file as follows:pdborcl = (DESCRIPTION = (ADDRESS_LIST = (ADDRESS = (PROTOCOL = TCP)(HOST10064.my-domain.com)(PORT = 1521)) ) (CONNECT_DATA = (SERVER=DEDICATED) (SERVICE_NAME = PDBORCL.MY-DOMAIN.COM) ) )
Running the Oracle Demantra Installer
After creating the TNSNAMES entry as described above, run the Oracle Demantra Installer.
In the 'DBA Details' screen, specify the pluggable database you want to use in the 'TNS Name' field. Using the example above as a guideline, you would enter 'pdborcl' here.
In the 'Configure JDBC Connection' screen, specify the pluggable database you want to use. For the example above, you would enter:

System Requirements 2-7
• Host Machine (DNS or IP address): host10064.my-domain.com
• Service Name: PDBORCL.MY-DOMAIN.COM
For more information about the Oracle 12c Database, please refer to Oracle 12c documentation.
Oracle Database ServersThese are the Oracle Demantra components that the Oracle database supports:
• Oracle Demantra Demand Management
• Oracle Demantra Advanced Forecasting and Demand Modeling
• Oracle Demantra Sales and Operations Planning
• Oracle Demantra Predictive Trade Planning
• Oracle Demantra Trade Promotion Optimization
• Oracle Demantra Settlement Management
These are the Oracle Demantra integrations that the Oracle database supports:
• Oracle Demantra Demand Management / Oracle eBusiness Suite integration
• Oracle Demantra Demand Management / Oracle EBS Service Parts Planning
• Oracle Demantra Integration with EBS Advanced Planning Command Center
• Oracle Demantra Sales and Operations Planning / Oracle eBusiness Suite integration
• Oracle Demantra Sales and Operations Planning / Oracle Hyperion Planning integration
• Oracle Demantra Demand Management / Oracle EnterpriseOne integration
• Oracle Demantra Predictive Trade Planning / Oracle EnterpriseOne integration
• Oracle Demantra Settlement Management / Oracle EnterpriseOne integration
• Oracle Demantra Demand Management / Oracle Peoplesoft
• Oracle Demantra Demand Management with Asset-Intensive Planning Applications
• Oracle Demantra integration with Demand Signal Repository

2-8 Oracle Demantra Installation Guide
Oracle does not support Microsoft SQL Server in this release. To learn which Demantra versions support SQL Server, please review previous versions of the Installation Guide and Release Notes on My Oracle Support.
Oracle Demantra Administrative UtilitiesThe Oracle Demantra Administrative Utilities (Business Modeler, Chaining Management, Member Management, and Engine Administrator) are supported on the following Windows versions:
• Windows 2000
• Windows XP
• Windows Vista
• Windows 7
• Windows 8
• Windows Server 2003
• Windows Server 2008
• Windows Server 2012
See also 32-bit Oracle Client Requirement, page 2-3 in this section.
Oracle Demantra Analytical EngineOracle supports the Analytical Engine on Windows, Solaris 10 and 11, and Linux.
You can install, configure, and run the Analytical Engine on all Windows stacks including Windows 2008.
Oracle Enterprise Linux OEL4, OEL5 or OEL6 are supported.
Special Linux instructions when deploying the Demantra Analytical Engine:
• The Oracle instant client is provided, so it is not necessary to install it separately.
• The 64 bit engine must be deployed on a 64-bit operating system, use 64-bit Java, and use a 64-bit application server (Tomcat, WebLogic, or WebSphere).
• Engine Administrator is not available on Linux (it is only supported on Windows). However, it is possible to access Engine Administrator to modify engine configuration settings. For details, see Modify Engine Settings using Engine Administrator on Linux, page 7-26.
For additional details, see Deploying Demantra on UNIX, Solaris or Linux, page 7-1.

System Requirements 2-9
For information on deploying the Demantra Analytical Engine on Linux, see Deploying the Demantra Analytical Engine on Linux, page 7-7.
Trade Promotion Optimization (TPO) EngineThe Demantra Trade Promotion Optimization (TPO) Engine has been tested and certified on the following:
Entity Supported Versions (32-bit or 64-bit)
Operating System • Windows 2003 and 2008
• Oracle Enterprise Linux (OEL), versions 4, 5 and 6
• SUSE Linux 10 (SP3)
• Solaris 10 and 11
Note: The TPO engine supports version 12of both the ILOG CPLEX and OPL libraries.
Application Server • Tomcat
• WebLogic
• IBM WebSphere
• IBM WebSphere Express
Database TPO engine supports any of the databases listed in Oracle Demantra Web Platform Server, page 2-4.
* Both the 32-bit and 64-bit versions of the operating systems listed above are supported. However, please note that the TPO engine runs on a 64-bit application server. For more information, see 32-bit Oracle Client Requirements, page 2-3.
Note: If you are deploying the TPO engine on Linux, see Configure Promotion Optimization (PMO) on Linux, page 8-1

2-10 Oracle Demantra Installation Guide
Hardware ArchitectureFor solution architecture, the most important consideration is the size of the implementation:
• Small implementations have 5-50 users and a relatively low volume of data.
• Medium implementations have 50-150 users.
• Large implementations have hundreds of users across multiple time zones, complexdata structures, and a relatively high volume of data.
For larger systems, consider running the database and application server on a UNIX platform such as Linux, Solaris, HPUX, or AIX and be sure to size the hardware accordingly. Demantra is a data process-intensive application and database clustering using Oracle database Real Application Clusters (RAC) is supported. The application server is not the load point in the Demantra application architecture, so J2EE clustering is not supported.
Note: RAC supports several methods of connection configurations, andnot all forms are currently supported by the Demantra Web-based applications. (The analytical engine, Business Modeler, and Member Management/Chaining applications support all forms of RAC configuration through TNSname configuration.). The Demantra Web applications support only a single VIP host name configuration form. For more information see "Overview of Connecting to Oracle Database Using Services and VIP Addresses" in the Oracle® Real Application Clusters Administration and Deployment Guide 11g Release 2 (11.2).
Two-Tier and Multi-Tier ArchitecturesThe architecture of Oracle Demantra implementations fall into two main categories:
• Two-tier architecture: All the server components and the Analytical Engine are on asingle, dedicated machine; client software is on other machines. This type of architecture is sufficient for small to medium implementations.
• Multi-tier architecture (required for large implementations): In the most general case, each server component listed previously is on a different dedicated machine; client software is on other machines. A typical variation is for one machine to run the database server, and for a second machine to run the Analytical Engine and the rest of the server software.

System Requirements 2-11
Architectures Using the Distributed EngineCommonly you use one machine as the server for the Analytical Engine, and you run one instance of the engine (single-instance mode). If your system includes the Distributed Engine, other variants are possible:
• Multiple-instance mode: One machine acts as the server for the Analytical Engine and runs many instances of the engine. This requires a multi-CPU machine. In somesituations when using a machine based on Intel Xeon hardware, it is possible to run more than one instance per CPU.
• Distributed mode: A cluster of equally powered machines are configured to run oneinstance of the Analytical Engine server. The minimum recommended system is Pentium 4 1Ghz and 128MB RAM for each machine.
• Mixed mode: A cluster of unequally powered machines are configured to run one or more instances of the Analytical Engine server. The selected number of instances per machine is done during configuration. Faster machines may be configured to run more instances of the engine. For the minimum recommended system, refer to the table below.
Hardware Requirements for the ServersThis section lists sample hardware requirements for the servers used in an Oracle Demantra installation, as well as for the Analytical Engine. These are basic guidelines; please contact your account representative or Oracle Support Services for detailed guidelines.
Requirements for Two-Tier SolutionFor a two-tier solution, you must use the Windows stack or a variation, because Oracle Demantra Administrative Utilities (the Business Modeler and other desktop utilities) are supported only on Windows. You can run these administrative utilities using Collaborator Workbench on any Windows client. These are the minimum hardware requirements.
Entity Windows Stacks UNIX Stack
Processor Four Pentium 4 processors, 1 GHz
Contact Oracle Support Services
Memory Dedicated server with 4 GB ofmemory
At least 1 GB

2-12 Oracle Demantra Installation Guide
Entity Windows Stacks UNIX Stack
Disk 80 GB disk space consisting of:
• Minimum 8 disks at RAID level 5
• 2 channel RAID controller
6 GB disk space
General Comments Regarding Multi-Tier SolutionIn a multi-tier solution, the servers and the Analytical Engine are potentially all on different machines. Note the following general comments:
• The hardware requirements are different for the different components and depend upon the operating system/software stack.
• In each case, a dedicated server is recommended.
• Oracle Demantra is a relational system, in which many records (potentially all) can be pulled up at the same time, rather than a single record at a time. It therefore requires larger and faster hardware than a transactional database would.
• Oracle Demantra does not support the J2EE clustering feature, because the Web Platform Server cache is not designed to be shared by multiple machines.
• Using fewer machines does not necessarily provide a cost savings. When a given machine runs multiple solution components, that machine generally must have more disk space, more memory, and greater speed than if it ran fewer components.
Database ServerThe table below shows the database server requirements.
Entity Windows Stacks UNIX Stack
Processor Four Pentium 4 processors (with extension ability to 8), 2.5 GHz
Contact Oracle Support

System Requirements 2-13
Entity Windows Stacks UNIX Stack
Memory At least 16 GB At least 16 GB
Disk 160 GB disk space consisting of:
• High-end storage system,for example SAN
• Minimum 8 disks at RAID level 10
• 2 channel RAID controller
160 GB disk space consisting of:
• High-end storage system (for example, SAN)
• Minimum 8 disks at RAID level 10
• 2 channel RAID controller
Application ServerThe table below shows the application server requirements.
Entity Windows Stacks UNIX Stack
Processor Two Pentium 4 Xeon processors (with extension ability to four), 1 GHz
Contact Oracle Support
Memory (depends on numberof concurrent users)
3 GB 3 GB
Disk 20 GB disk space, configured RAID 1+0
20 GB disk space, configured RAID 1+0
Analytical EngineThe table below shows the Analytical Engine requirements.
Entity Windows Stacks Linux Stacks
Processor Pentium 4 processor, 1 GHz Contact Oracle Support

2-14 Oracle Demantra Installation Guide
Entity Windows Stacks Linux Stacks
Memory (depends on numberof concurrent users)
At least 1 GB At least 1 GB
Disk 6 GB disk space 6 GB disk space
If your system includes the Distributed Engine, refer to Architectures Using the Distributed Engine, page 2-10.
Oracle Demantra Administrative UtilitiesThe table below shows the Oracle Demantra Administrative Utilities requirements.
Entity Windows Stacks
Processor Two Pentium 4 Xeon processors (with extension ability to four), 1 GHz
Memory 2 GB of memory (depends on number of concurrent users)
Disk 20 GB disk space, configured RAID 1+0
Network RequirementsFor a Web-based solution, the WAN requirements vary by implementation; here are some guidelines:
• Connect the servers by high-speed network lines (1 GBps).
• For a web-based solution, the WAN requirements may vary by implementation andwill depend on whether the environment is shared, the size of the data set, performance expectations, and so on. However, Oracle recommends high-speed network lines capable of at least 1 GBps.
• For client-server requirements, Oracle recommends 100 Gigabit Ethernet (100 Gbit/s).
Note: Oracle Demantra is SAN aware.
Preparing for Installations and Upgrades 3-1
3Preparing for Installations and Upgrades
This chapter covers the following topics:
• Pre-7.3.0.1 Upgrade Path
• Installer Options Worksheet
• Basic Preparation Checklist
• Upgrade Preparation Checklist
Pre-7.3.0.1 Upgrade PathIf you are running a pre-7.3.0.1 version of Oracle Demantra, you must upgrade to 7.3.0.1first and then upgrade to the latest version.
For more information, see Installing and Upgrading Oracle Demantra in the Oracle Demantra Installation guide.
Installer Options WorksheetNote: Oracle does not support Microsoft SQL Server in this release. Please monitor My Oracle Support for versions supporting SQL Server.
To make installation quick and simple, use the following worksheet to collect the information that the Installer requires.
Screen Item Examples
DBA Information DBA username system
DBA Information Password manager

3-2 Oracle Demantra Installation Guide
Screen Item Examples
DBA Information TNS Name wysiwyg
Configure Oracle Database User
User demo
Configure Oracle Database User
Password d
Configure JDBC Connection* Server name (host machine or IP address on which database resides)
wysiwyg
Configure JDBC Connection* Port 1521
Configure JDBC Connection* Oracle SID usco
Database Options Export by user dp
Select Tablespaces
Important: The default directory is the only tablespace used by Demantra. All tablespaces specified should be the same.
For default data TS_DP
Select Tablespaces For temporary data TS_DP
Select Tablespaces For sales data TS_DP
Select Tablespaces For index data TS_DP
Select Tablespaces For simulation data TS_DP
Select Tablespaces For simulation index data TS_DP
Select Tablespaces For sales data engine TS_DP
Select Tablespaces For sales data engine index TS_DP

Preparing for Installations and Upgrades 3-3
Screen Item Examples
Specify Web Address Root address http://www/mycompany.com
https://www.mycompany.com
http://localhost:8080
Specify Web Address Virtual directory demantra
Designate Administrator Account
Mail server mayflower.demantra.net
Designate Administrator Account
Administrator e-mail address [email protected]
Designate Administrator Account
Administrator username admin
Designate Administrator Account
Administrator password admin
Note: The Demantra installer automatically configures the JDBC connection only for the Apache Jakarta Tomcat application server. If you are deploying Demantra with WebLogic, or WebSphere, see Configure JDBC Connection, page 3-5.
DBA InformationThe Installer must usually access your database as the database administrator so that it can create a new database user to store Demantra data (or modify an existing database user for that purpose). There are two options:
• Enter a user with full SYSDBA privileges. Allow the Installer to automatically run a script that enables user password encryption and performs additional database configuration.
• Do not enter a user with SYSDBA privileges. You will be prompted to run the SYS_GRANTS.SQL script manually at the end of the installation. Oracle recommends this option. For details, see Running SYS_GRANTS.SQL Script, page 6-3.
You will need to provide the basic information below:

3-4 Oracle Demantra Installation Guide
Item Details Example
DBA username Username that has DBA access to the database
system
Password Password for that user manager
TNS Name Use the TNS name as specified in the tnsnames.ora file. To verify that you have the correct TNS name, enter the DOS command tnsping<TNS_name>.
If the command returns successfully, you have the correct TNS name.
Note that the TNS name is also referred to as the service name; it is often the same as the host name.
wysiwyg
Configure Oracle Database UserFor your solution, the Oracle Demantra data is stored in a database user (for example, called dp). One of the most important considerations is deciding how to set up this database user. You have the following options:
If this database user is new, you can do either of the following:
• Load the Oracle data model and demo that is supplied with the Installer.
• Load a database dump file that was created from another Oracle database.
If you already have an Oracle database, you can do any of the following:
• Replace the database user, which removes it entirely and replaces it with the Oracle data model and demo that is supplied with the Installer.
• Upgrade the database user, which updates the schema and various default settings (such as parameter values).
• Do nothing to the database user.
The Installer can create this database user for you, or you can create it ahead of time. If you create the database user, be sure to give the user DBA access.

Preparing for Installations and Upgrades 3-5
For the Demantra database user, you will need the following information.
Item Details Example
User Username where you will store the Oracle Demantra data
demo
Password Password for that username d
Configure JDBC ConnectionDemantra uses a JDBC connection to access the database. When running the installer, specify the information in the table below to configure this connection for the Apache Jakarta Tomcat application server.
Item Details Examples
Server name Specify the host machine or IPaddress on which the database resides
wysiwyg
Port Specify the port to which the database is listening.
If you are using Windows XP (not supported formally), avoid using the default port number.
1521

3-6 Oracle Demantra Installation Guide
Item Details Examples
Oracle SID Specify the Oracle SID or service name (Service_Name in the TNSNames.ora file).
Note that the SID or service name is also called the database name; it is often the same as the host name.
Note: If you are using Oracle 12c, enter the service name instead of theSID. See Additional Steps to Configure Oracle 12c, page 2-6.
usco
If you are deploying Demantra with WebLogic, or WebSphere, you must configure the data source after installing or upgrading. Oracle recommends performing this setup before deploying the Demantra WAR file.
For all supported application servers, the JNDI should be set to jdbc/DemantraDS. Note that JNDI is case sensitive. For additional details, please refer your Web application server's version-specific documentation.
For general information about JDBC and connection URLs, see Oracle Database JDBC Developer's Guide and Reference 10g.
Database OptionsIn most cases, the Installer loads a database dump file.
Item Details Example
Database to import Choose one of the following:
• STANDARD
• CUSTOM: Your own database dump file that was exported from another Oracle database
-

Preparing for Installations and Upgrades 3-7
Item Details Example
Export by user Name of the database user who created this dump file. Needed only if you are importing a custom database.
dp
Select TablespacesOracle Demantra stores its data in the dataspace specified during the installation.
Specify Web AddressFor the Web-based products, Oracle Demantra uses Web addresses that start with a core URL that you specify. You specify this URL in two parts as shown in the example below:
Item Details Example
Root Address All Demantra Web addresses start with this URL. This address does not include the virtual directory.
Instead of http, you can use https for SSL security; see alsoConfiguring Web Applications for SSL and Firewalls, page 6-4
http://www.mycompany.com
https://www.mycompany.com
http://localhost:8080
Virtual Directory The virtual directory is addedto the root address in all Oracle Demantra URLs. This is case sensitive.
demantra
These two items are used together in all Oracle Demantra Web addresses. For example, the Web address for Collaborator Workbench is as follows:
http://<server name>/<virtual directory>/portal/loginpage.jsp
For example:
http://frodo/demantra/portal/loginpage.jsp

3-8 Oracle Demantra Installation Guide
Designate Administrator AccountIf you are using any of the Oracle Demantra Web-based software, Oracle Demantra can automatically send email on specific occasions, for example, within workflows.
To enable this functionality, you should set up an administrator email account on an SMTP server; this account will be the originator of all Oracle Demantra's automatic messages. You must make sure that Oracle Demantra has the needed permissions on the mail server.
Then, when you run the Installer, you will provide the following details of that account
Item Details Example
Mail server Specify the SMTP server that is hosting the e-mail service
frodo.demantra.net
Administrator e-mail address Specify the e-mail address of the administrator e-mail account
Administrator username Specify the administrator username; this is usually the network username of the administrator
admin
Administrator password Specify the administrator username; this is also usually the network username of the administrator
admin
You can also set up the administrator email account after running the Installer. See the fine-tuning information in the Oracle Demantra Implementation Guide.
Log ConfigurationYou can configure Installer logging settings either in the Installer screen or as you run it from the command line.
To modify the log configuration settings when running the Installer screens, double-click setup.exe to launch the Installer and then click Configure Log. Then, select from the following:
• Default Log Configuration File (default setting): The Installer creates an installation directory defined by the environment variable %temp%. Once installation is complete, you can review the log file Oracle_Demantra_Spectrum.log from the

Preparing for Installations and Upgrades 3-9
%temp% location. For details, see Checking the Log Files and Tables, page 5-2.
• Custom Log Configuration File: Select this option if you want to specify a file name and location where the log file will be located.
• Custom Settings: Select this option to specify a file name and logging level (FATAL,ERROR, WARN, INFO, DEBUG, or TRACE).
To provide the command line arguments, use either of these methods:
• Command line: Run the Installer from the command line and pass arguments:
${installer path}/install -D${argument}=${value}
For example:
install -DLOG_CONF_DIR="C:\conf" -DBACKUP_LOG_FILE=Y
• Enhanced setup: On the setup menu, click Install Demantra Spectrum, then click Configure Log. Enter the arguments into the Log Configuration dialog.
The arguments are as follows:
• Default (enhanced setup only): Use the default values.
• Custom Log Configuration File (command line LOG_CONF_DIR): Specifies the directory where the Installer should find the log file. If you use the command line method and the directory has spaces or special characters, enclose (value) in double quotation marks.
• Custom Settings > Log File Name (command line LOG_FILENAME): Specifies the fully-qualified filename of the log.
• Custom Settings > Log Level (command line LOG_LEVEL): Specifies the contents ofthe log file. If you use the command line method, use FATAL, ERROR, WARN, INFO, DEBUG, or TRACE.
• Backup > Backup Log File (command line BACKUP_LOG_FILE): Specifies whether the Installer should back up the log file. If you use the command line method to enable log backup, use Y, YES, or TRUE; to disable log backup, do not submit the argument.
The order of precedence for initializing the log file is as follows:
• Custom Log Configuration File passed and file found: Uses the values in that configuration file.
• Custom Log Configuration File passed and file not found: Uses the default values but will override them with values of any passed arguments.
• Custom Log Configuration File not passed: Uses the default values but will

3-10 Oracle Demantra Installation Guide
override them with values of any other passed arguments.
• No arguments passed: Uses the default configuration file values.
• No arguments passed and default configuration fine not found: Uses the default values.
Basic Preparation ChecklistIn addition to collecting information needed for the Installer, be sure to complete the following steps below in any order.
Item Details
Decide SSL needs Decide whether you will need to use SSL protocol for all pages. If so, obtain a VeriSign certificate or equivalent certificate authority.
Hardware and software requirements See System Requirements, page 2-ix.
Oracle recommends that the machine on which you will run the Installer has at least 16GB of RAM. Install any patches or service patches for the third-party software that you use, including the database software.
Java Check carefully for Java (JRE or JDK) versions that are older or newer than supported by Oracle Demantra. Remove these.

Preparing for Installations and Upgrades 3-11
Item Details
Oracle (if used) If installing Demantra in a multi-byte language (Korean, Chinese, Japanese, or Russian), set the following initialization parameters on the Oracle database:
• NLS_LENGTH_SEMANTICS = BYTE·
• NLS_CHARACTERSET = AL32UTF8
• NLS_LANG = language_territory.characterset
Important: The NLS_LENGTH_SEMANTICS parameter must be set to BYTE on the database to provide compatibility with Oracle EBS. However, the Demantra products refer to the same parameter in the Demantra schema table DB_PARAMS, and in this table the parameter must be set to 'CHAR.' After installing Demantra, be sure to check the value of NLS_LENGTH_SEMANTICS in DB_PARAMS. If it is not set to 'CHAR,' then run the following command:
UPDATE db_params SET pval='CHAR' WHERE pname = 'nls_length_semantics';COMMIT;
More information on these parameters is in:
• Oracle Database Installation Guide 11g Release 1 (11.1) for Microsoft Windows > Configuring Oracle Database Globalization Support
• Oracle Database Globalization Support Guide11g Release 1 (11.1) > Supporting Multilingual Databases with Unicode This setup is optional for English-only installations.
Set the compatibility parameter in the init.ora file to 8.1.7 or higher.
Make sure the NLS_DATE_FORMAT

3-12 Oracle Demantra Installation Guide
Item Details
environment variable is set appropriately, the same as in the database. A typical format is MM-DD-YYYY HH24:MI:SS
If you are performing a new installation, create tablespaces within Oracle for use by theOracle Demantra database user. Oracle recommends that you set up tablespaces with the following names:
• TS_SALES_DATA
• TS_SALES_DATA_X
• TS_SALES_DATA_ENGINE
• TS_SALES_DATA_ENGINE_X
If you are not familiar with Oracle tablespaces,consult an Oracle administrator or Oracle Support. If you use these standard names and map them in the standard way, it is easier for you to share your database with Oracle Support. See Installer Options Worksheet, page 3-1.
You will need up to eight tablespaces. These four contain the data that is most commonly shared with Oracle Demantra.
Caution: There is a known issue when using parallel hints to improve Demantra performance on Oracle 11g version 11.2.0.1 and earlier. If your Oracle 11g version is earlier than 11.2.0.1, refer to My Oracle Support Note 1249314.1 before installing Demantra.
Administrator e-mail account Set up the e-mail account as needed, see Designate Administrator Account, page 3-7.
Terminal Services (if used) Install this using Microsoft Windows Control Panel > Add/Remove programs.

Preparing for Installations and Upgrades 3-13
Item Details
Java (on each client machine) Use the Java Plug-in control panel to:
• Clear the Java cache and any competing Java certificates.
• Set the maximum Java cache to 100 MB (or higher).
Windows settings (on each client machine) Locale: <your locale>
The locale generally controls the date, time, and number displays.
Review common installation issues Read and understand My Oracle Support Note 430913.1, Common issues or problems encountered when running the Oracle Demantra Installation.
Upgrade Preparation ChecklistBefore upgrading Oracle Demantra, complete the following additional steps described in the table below.
Item Details
System path Remove previous installations from the system PATH variable. (Leaving them does not necessarily cause a problem, but ultimately the variable can become too long and the later additions can't be seen.)
Backup installation folder Before applying a new patch, backup the Oracle Demantra installation folder on Windows.
Backup WAR file Before deploying the Demantra web application after applying a patch on the application server, take a backup of the current web deployment war file.

3-14 Oracle Demantra Installation Guide
Item Details
Back up database Save a dump of the database user that currently stored the Oracle Demantra data.
Windows themes Change your Windows theme to "Windows Classic" from the available Basic and High Contrast themes. If not selected, your upgradeconversion may hang and not complete. From the Desktop, right-click and choose Properties to personalize your display themes.
Define parameter to grant custom users accessto new seeded series (optional)
If you want all users to have access to new seeded series after upgrading, define the SYNCHRONIZE_USER_SERIES parameter in the SYS_PARAMS table before upgrading Demantra. See Automatically Provide CustomUsers with Access to New Seeded Series, page5-8 for more information.

Installing and Upgrading Oracle Demantra 4-1
4Installing and Upgrading Oracle Demantra
This chapter covers the following topics:
• Overview
• About the Installer
• Running the Installer
• Review List of High Priority Patches
OverviewIf you are running a pre-7.3.0.1 version of Oracle Demantra, you must upgrade to 7.3.0.1first and then upgrade to the latest version.
For more information, see the Oracle Demantra Installation guide.
If you are upgrading from release 7.3.0 and are using CTO functionality, see Upgrading Software and Data to Support Configure to Order, page 5-10.
Note: After running the Installer, be sure to review sections in Configuring Your Database, Web Server and Browser, page 6-ix and Deploying Demantra on UNIX, Solaris or Linux, page 7-1.
Oracle does not support Microsoft SQL Server in this release. Monitor My Oracle Support for versions supporting SQL Server.
About the InstallerThe Installer displays depend on the following options:
• Whether the Installer detects a previous installation
• Choices you make in the Installer

4-2 Oracle Demantra Installation Guide
When running the Installer, you can choose from the following options:
• Typical -- Installs typical components.
• Complete -- Installs all software.
• DM -- Installs Oracle Demantra Demand Management.
• AFDM -- Installs Oracle Demantra Advanced Forecasting and Demand Management.
• S&OP -- Installs Oracle Demantra Sales & Operations Planning.
• PTP -- Installs Oracle Demantra Predictive Trade Planning.
• TPO -- Installs Oracle Demantra Trade Promotion Optimization.
• DSM -- Installs Oracle Demantra Deductions and Settlement Management.
• CDP -- Installs Oracle In-memory Consumption-Driven Planning
• Administrative Tools -- Installs administrative desktop tools.
• Install Database -- Installs import and upgrade database components.
• Custom -- Choose the items to install.
Note: CDP can only be installed if the target database is Exadata or SPARC SuperCluster.
Selecting any subset of these applications during install will activate that functionality only and deactivate other functionality. Therefore, every time you run the Oracle Demantra Installer, select all desired applications. For example:
• You run the install and select Oracle Demantra Sales and Operations Planning.
• The Oracle Demantra Installer activates the functionality of Oracle Demantra Sales and Operations Planning.
• Later, you run the install and select Oracle Demantra Demand Management.
• The Oracle Demantra Installer activates the functionality of Oracle Demantra Demand Management and deactivates the functionality of Oracle Demantra Sales and Operations Planning.
If you are using the Installer to import a custom DMP file and experiencing difficulties, please ensure the directory the DMP file is in does not include any spaces in its name. For example, C:\Tmp is better than C:\My Files\.

Installing and Upgrading Oracle Demantra 4-3
In order to make the installation process clear, this manual lists the installation steps in a table, with information about the conditions under which you see each step. This allows you to skim easily to the next step that applies to you.
In general, to proceed from step to step, click Next. You can also return to previous screens, if you have not yet reached the step where the Installer begins copying files.
Oracle Demantra classifies applications as:
• Primary: Available on their own
• Secondary: Available in conjunction with primary applications
This table shows the primary and secondary applications.
Primary Application Secondary Application
Oracle Demantra Demand Management Oracle Demantra Advanced Forecasting and Demand Modeling (AFDM)
Oracle Demantra Demand Management Oracle Demantra Real-Time Sales & Operations Planning (S&OP)
Oracle Demantra Predictive Trade Planning Oracle Demantra Trade Promotion Optimization
Oracle Demantra Predictive Trade Planning Oracle Demantra Settlement Management
This table describes certain Oracle Demantra functionality that is available only when you install certain applications or modules.
Functionality Installation Dependency
Nodal tuning - Oracle Demantra Advanced Forecasting and Demand Modeling (AFDM)
- Oracle Demantra Trade Promotion Optimization
Unlimited causal factors Oracle Demantra Advanced Forecasting and Demand Modeling (AFDM)
Oracle Demantra Predictive Trade Planning (PTP)

4-4 Oracle Demantra Installation Guide
Functionality Installation Dependency
Advanced forecasting methods (ARIX, MRIDGE, DMULT, LOGISTIC, ARLOGISTIC, and ICMREGR)
Oracle Demantra Advanced Forecasting and Demand Modeling (AFDM)
Oracle Demantra Predictive Trade Planning (PTP)
Shape modeling Oracle Demantra Advanced Forecasting and Demand Modeling (AFDM)
Oracle Demantra Predictive Trade Planning (PTP)
Dynamic open link to Microsoft Excel and other business intelligence tools (see note below)
- Oracle Demantra Predictive Trade Planning (PTP)
- Oracle Demantra Sales & Operations Planning (S&OP)
Oracle Demantra Anywhere (HTML view) - Oracle Demantra Predictive Trade Planning (PTP)
- Oracle Demantra Sales & Operations Planning (S&OP)
Client expression functions (FSUM and FPOS) Oracle Demantra Real-Time Sales & Operations Planning S&OP)
Note: Dynamic Open Link (DOL) is not yet certified on Microsoft Officefor Mac. However, Demantra's 'Export to Excel' option generates XLS files that can be opened by most Mac-based applications that support this format.
It is part of a typical installation.
Running the InstallerNote: If you will be leveraging Service Parts Forecasting (SPF) functionality, refer to Upgrading Software and Data to Support Service Parts Forecasting in 7.3.1, page 5-8 before running the installer.
To run the Installer, perform the following steps:

Installing and Upgrading Oracle Demantra 4-5
1. See Preparing for Installation or Upgrades and complete the worksheets. They explain all the information needed by the Installer.
2. Make sure that the database is running. The Installer requires access to the database.
3. Make sure all applications (including virus-checking programs) are closed.
4. Check the screen resolution. The Installer requires a screen resolution of at least 800x600 dpi. An error may occur if the resolution is lower, particularly if you are installing remotely via an application such as Citrix.
5. The Installer creates an installation directory defined by the environment variable %temp%. Once installation is complete, you can review the log file Oracle_Demantra_Spectrum.log from the %temp% location. For details, see Checking the Log Files and Tables, page 5-2.
6. Download the installation .zip file from Oracle Support and extract the files.
7. If you run the Installer on Microsoft Windows Vista, do the following:
• Right-click the file setup.exe and select Properties.
• Navigate to the Compatibility tab.
• Select Run this program in compatibility mode for: and choose Windows XP.
• Click Apply, then click OK.
The Installer displays these screens, one after the other. Complete the screens that apply to you.
8. Specify general information.
Screen When Screen is Displayed Action/Notes
Introduction Always Click Next

4-6 Oracle Demantra Installation Guide
Screen When Screen is Displayed Action/Notes
Select Unix/Linux/Solaris Deployment
Always Select the relevant check boxif you wish to install and configure the Web Application on UNIX, or theAnalytical Engine on Linux or Solaris.
For details of additional configuration steps, see Deploying Demantra on UNIX, Solaris or Linux, page7-1.
Select Exadata/Exalogic Deployment
Always Select the checkboxes below if you are either deploying Oracle Demantra Database schema on Exadata, SPARC SuperCluster and/or deploying the Oracle Demantra middle tier on Exalogic, SPARC SuperCluster.
Selecting the first checkbox is required to enable the option of CDP module installation. After the install is complete, manual configuration will be required to deploy Demantra on Exadata/Exalogic/SPARC Supercluster. For additional information, see Deploying Demantra on UNIX, Solaris or Linux, page 7-1.

Installing and Upgrading Oracle Demantra 4-7
Screen When Screen is Displayed Action/Notes
Choose Installation Set Always Choose the type of installation to perform and select the components that you want to install. This option controls:
• Typical: Installs typical foundation components.
• Complete: Installs all available Demantra components.
• <components>: Installs the component(s).
• Administrative Tools: Installs only the desktop utilities such asthe Business Modeler and Engine Administrator.
• Install Database: Imports a database dump file but does not install any files.
• Custom – Allows you toselect the components to be installed.
Review Details of Installation Set
If you choose Custom Browse the hierarchy and specify the items to install. To avoid errors when importing a database schema, be sure that the Demantra Foundation Tools and Basic Database Object options are selected.

4-8 Oracle Demantra Installation Guide
Screen When Screen is Displayed Action/Notes
Choose Install Folder If you are installing files Specify the directory to install software into. The path must be no more than 40 characters long and must not include brackets.
Specify Shortcut Location If you are installing files Specify the location of program shortcuts.
If you install more than one version of Demantra, give each installation a distance name (for example, Oracle1 and Oracle2) so that each shortcut works properly.
To make the shortcuts available to all users of this machine, click Create Icons for All Users.
Select Oracle Client If multiple clients are detected by the installer
Defaults to the configurationfiles folder located directly under the install directory ($INSTALL\ConfigurationFiles). Select Oracle database version.
Select Database Home If more than one copy of the database software is installed
Select the database home that Oracle Demantra will use.
9. Specify how to access the database as a DBA.

Installing and Upgrading Oracle Demantra 4-9
Screen When Screen is Displayed Action/Notes
DBA Details Always Specify how to access the database as a database administrator:
• DBA username: DBA username
• Password: Password
• TNS Name: TNS name of database. If you are using Oracle 12c, enter the name of the pluggable database thatyou want to use. For more information, see Additional Steps for Configuring Oracle 12c,page 2-6.
Note: To allow the Installer to automatically run a script that enables user password encryption and performs additional database configuration, enter a user that has full SYSDBA privileges. If you do not enter a user with SYSDBA privileges, you will be prompted to run this script manually at the end of the installation (this method is recommended). SYS and SYSDBA typically have sufficient privileges,while SYSTEM does not. For details, see Running SYS_GRANTS.SQL Script, page 6-3.
10. Specify user, schema, and JDBC configuration details.

4-10 Oracle Demantra Installation Guide
Screen When Screen is Displayed Action/Notes
User/Schema Details Always Specify the user that will store the Oracle Demantra data. You do not have to create this database user ahead of time:
• User: Database user name.
• Password: Associated password.
Installing and Upgrading Oracle Demantra 4-11
Screen When Screen is Displayed Action/Notes
Configure JDBC Configuration
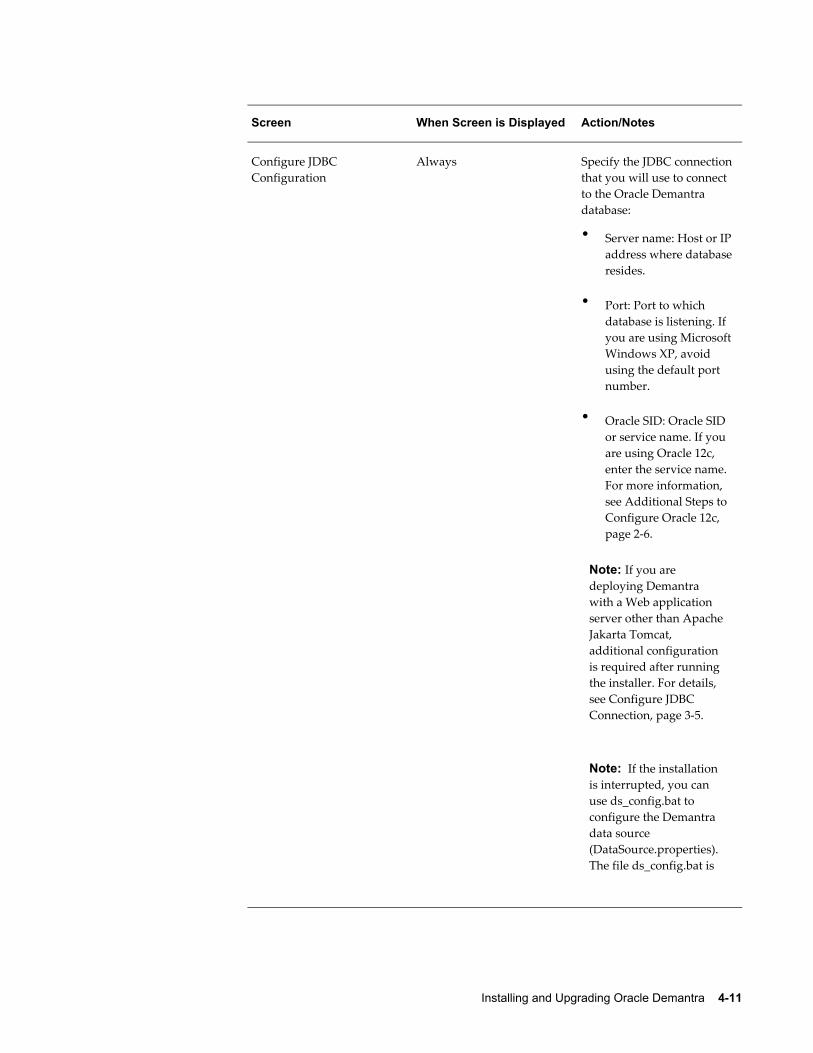
Always Specify the JDBC connectionthat you will use to connect to the Oracle Demantra database:
• Server name: Host or IPaddress where databaseresides.
• Port: Port to which database is listening. If you are using MicrosoftWindows XP, avoid using the default port number.
• Oracle SID: Oracle SID or service name. If you are using Oracle 12c, enter the service name. For more information, see Additional Steps to Configure Oracle 12c, page 2-6.
Note: If you are deploying Demantra with a Web application server other than Apache Jakarta Tomcat, additional configuration is required after running the installer. For details, see Configure JDBC Connection, page 3-5.
Note: If the installation is interrupted, you can use ds_config.bat to configure the Demantra data source (DataSource.properties). The file ds_config.bat is

4-12 Oracle Demantra Installation Guide
Screen When Screen is Displayed Action/Notes
located in $INSTALL\DemandPlanner\Integration.
11. Specify the schema options.

Installing and Upgrading Oracle Demantra 4-13
Screen When Screen is Displayed Action/Notes
Schema Options If the database user already exists.
Specify what to do with the existing database user:
• Upgrade Schema: Runs a database procedure that updates the schemaand default definitions for the specified user. It will not be possible to reverse this change. This option is available only if the database user is a valid Oracle Demantra database instance from a previous version of Oracle Demantra.
• Replace schema with new application file: Completely removes the existing data for thisuser and installs the newest schema and data. It will not be possible to reverse this change. You generally use this option only for demo installations.
• Install software withoutmodifying schema: Leaves the database user unchanged.
4-14 Oracle Demantra Installation Guide
Screen When Screen is Displayed Action/Notes
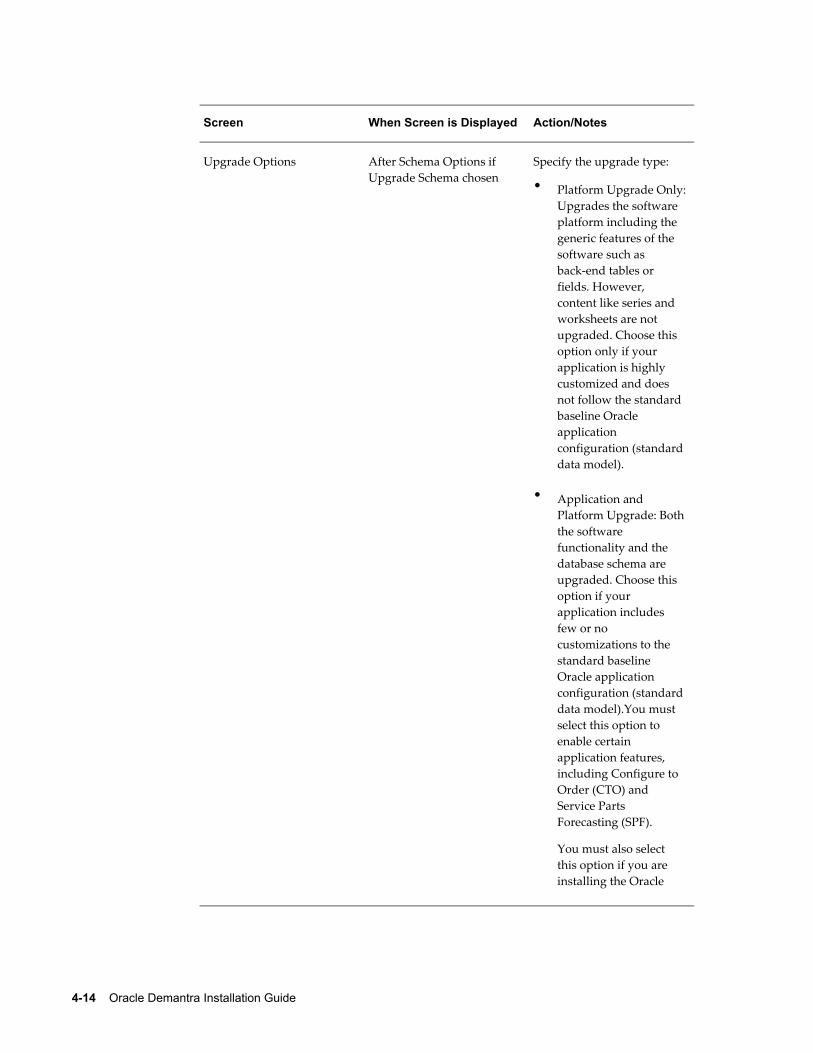
Upgrade Options After Schema Options if Upgrade Schema chosen
Specify the upgrade type:
• Platform Upgrade Only:Upgrades the software platform including the generic features of the software such as back-end tables or fields. However, content like series and worksheets are not upgraded. Choose this option only if your application is highly customized and does not follow the standard baseline Oracle application configuration (standard data model).
• Application and Platform Upgrade: Boththe software functionality and the database schema are upgraded. Choose this option if your application includes few or no customizations to the standard baseline Oracle application configuration (standard data model).You must select this option to enable certain application features, including Configure to Order (CTO) and Service Parts Forecasting (SPF).
You must also select this option if you are installing the Oracle

Installing and Upgrading Oracle Demantra 4-15
Screen When Screen is Displayed Action/Notes
In-Memory Consumption-Driven Planning (CDP) module.
See Additional Upgrade Steps, page 5-ix for more information on upgrading from different application versions.
Note: An application upgrade assigns all of theavailable series to user dm of the Oracle Demantra Demand Management application.This ensures that all new series are available to at least one username after the upgrade. To restrict access to these series afterupgrading, remove them from specific usernames using Business Modeler (Security > Create/ModifyUser).
4-16 Oracle Demantra Installation Guide
Screen When Screen is Displayed Action/Notes
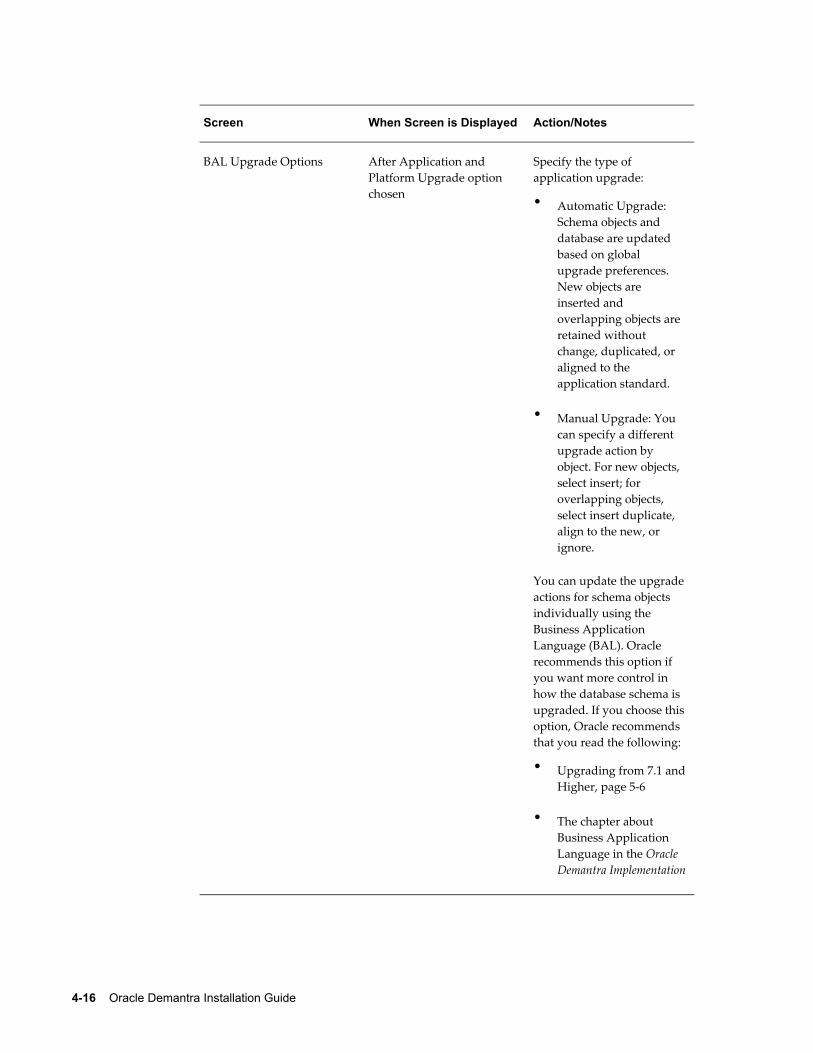
BAL Upgrade Options After Application and Platform Upgrade option chosen
Specify the type of application upgrade:
• Automatic Upgrade: Schema objects and database are updated based on global upgrade preferences. New objects are inserted and overlapping objects are retained without change, duplicated, or aligned to the application standard.
• Manual Upgrade: You can specify a different upgrade action by object. For new objects, select insert; for overlapping objects, select insert duplicate, align to the new, or ignore.
You can update the upgradeactions for schema objects individually using the Business Application Language (BAL). Oracle recommends this option if you want more control in how the database schema is upgraded. If you choose thisoption, Oracle recommends that you read the following:
• Upgrading from 7.1 andHigher, page 5-6
• The chapter about Business Application Language in the Oracle Demantra Implementation
Installing and Upgrading Oracle Demantra 4-17
Screen When Screen is Displayed Action/Notes
Guide.
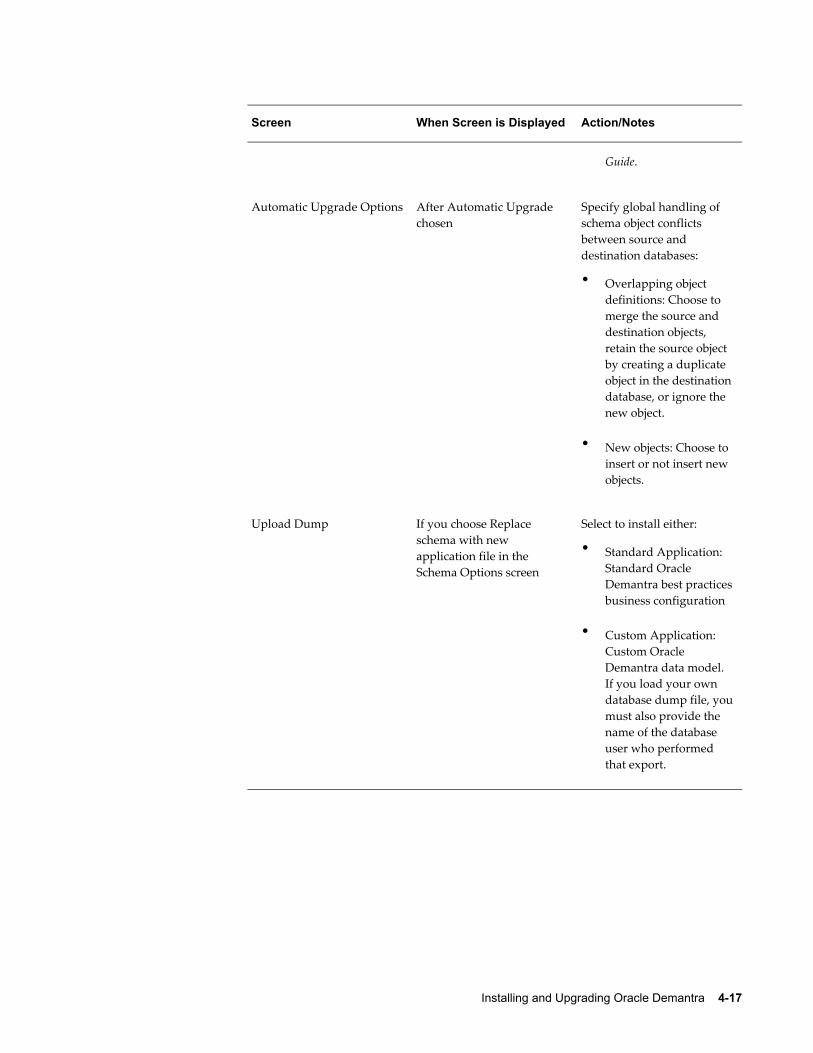
Automatic Upgrade Options After Automatic Upgrade chosen
Specify global handling of schema object conflicts between source and destination databases:
• Overlapping object definitions: Choose to merge the source and destination objects, retain the source object by creating a duplicate object in the destinationdatabase, or ignore the new object.
• New objects: Choose to insert or not insert new objects.
Upload Dump If you choose Replace schema with new application file in the Schema Options screen
Select to install either:
• Standard Application: Standard Oracle Demantra best practicesbusiness configuration
• Custom Application: Custom Oracle Demantra data model. If you load your own database dump file, youmust also provide the name of the database user who performed that export.

4-18 Oracle Demantra Installation Guide
Screen When Screen is Displayed Action/Notes
JVM Configuration (pop-up dialog)
If Custom Application is selected in the Upload Dump screen and you are using a 32-bit JVM
Specify the following JVM settings:
JVM Path - If you are upgrading a large schema and are using a 32-bit JVM, then the JVM Path should beupdated to refer to a 64-bit JVM.
Max Memory Allocation (memory in GB) - You should allocate at least 4GB of RAM.
Note: If the error message "Could not create the Java Virtual Machine" appears, exit the Demantra installer, and then perform the following:
1. From the Windows client, go to Start > Control Panel > System > Advanced.
2. Click Environment Variables.
3. In the System Variables section, click New, enter " _JAVA_OPTIONS" as the Variable Name, and set its value to -Xmx512M.
4. Click OK to save the changes.
5. Re-run the Demantrainstaller.

Installing and Upgrading Oracle Demantra 4-19
Screen When Screen is Displayed Action/Notes
Select Tablespaces If replacing a database user or if database user does not exist.
Specify the default tablespace you planned in the Installer Options Worksheet.
Important: The default data tablespace is the only tablespace used by Demantra.

4-20 Oracle Demantra Installation Guide
Screen When Screen is Displayed Action/Notes
Language Selection Always Select one or more languages for your Oracle Demantra installation. The default language is English and the other choices are:
• Chinese Simplified
• Chinese Traditional
• Canadian French
• Japanese
• Korean
• Portuguese (Latin America)
• Russian
• Spanish (Latin America)
• French
• German
• Turkish
• Italian
• Dutch
If you need to add or remove languages after upgrading or installing, rerun the Installer. For more information, see:
• Upgrading and Multiple Language Support (MLS), page 5-3.

Installing and Upgrading Oracle Demantra 4-21
Screen When Screen is Displayed Action/Notes
• "Multiple Language Support" in the Oracle Demantra ImplementationGuide
The Installer is available only in U.S. English.
12. Specify details for the Oracle Demantra web site (if installing web-based software).
Screen When Screen is Displayed Action/Notes
Specify Web Address If installing web-based software
Specify the starting point of all Oracle Demantra Web addresses. You specify two basic parts that are used together:
• Root Address is the rootURL of the Web site.
• Virtual Directory is the next section of the Oracle Demantra URL. This is case sensitive.
The bottom part of this screen shows you how theseare used together. See Installer Options Worksheet,page 3-1.
Note: The Installer uses the database server nameto initialize the root address that is generally suitable only for demo installations.
13. Optionally specify details of Oracle Demantra administrator e-mail account.

4-22 Oracle Demantra Installation Guide
Screen When Screen is Displayed Action/Notes
Designate Administrator Account
Always Click one of the radio buttons to indicate whether to configure Oracle Demantra so that it can automatically send e-mail from within workflows. Specify the account details.
See Designate AdministratorAccount, page 3-7 for more information.

Installing and Upgrading Oracle Demantra 4-23
Screen When Screen is Displayed Action/Notes
Engine Registration Always Select the engine execution mode. You specify the security setting in which to execute the engine2k Com server.
The engine 2k com server is registered as a part of the Microsoft Distributed Component Object Model (DCOM) that supports communication among objects on different computers, on a local area network (LAN), a wide area network (WAN), or on the Internet. Select the appropriate option:
• User execution (default): The currently logged in user. To execute the engine froma remote manager, a user with the required access rights must be logged in. This is the equivalent of DCOM setting Interactive User.
• Automated execution: The engine will use the identity of the launching process (either remotely or locally). Use this settingto run the engine from Microsoft Windows scheduler or workflow. This is the equivalent ofDCOM setting Launching User.
To change this setting post-install:
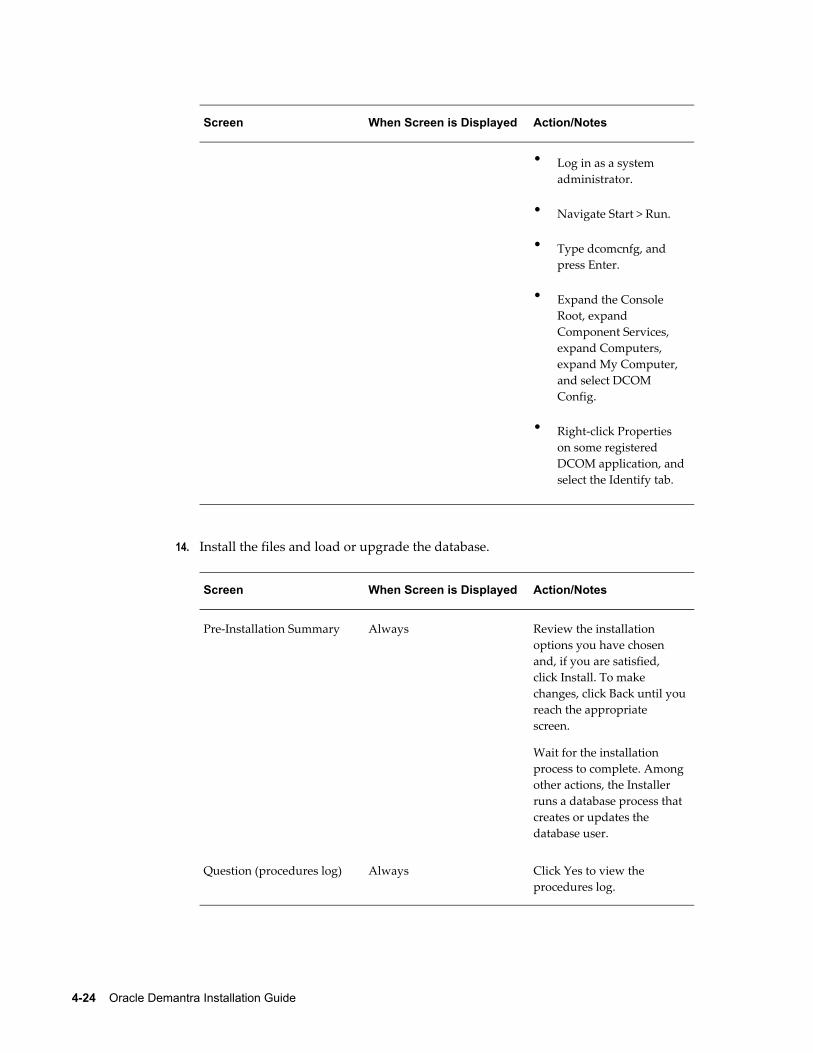
4-24 Oracle Demantra Installation Guide
Screen When Screen is Displayed Action/Notes
• Log in as a system administrator.
• Navigate Start > Run.
• Type dcomcnfg, and press Enter.
• Expand the Console Root, expand Component Services, expand Computers, expand My Computer, and select DCOM Config.
• Right-click Properties on some registered DCOM application, andselect the Identify tab.
14. Install the files and load or upgrade the database.
Screen When Screen is Displayed Action/Notes
Pre-Installation Summary Always Review the installation options you have chosen and, if you are satisfied, click Install. To make changes, click Back until youreach the appropriate screen.
Wait for the installation process to complete. Amongother actions, the Installer runs a database process that creates or updates the database user.
Question (procedures log) Always Click Yes to view the procedures log.

Installing and Upgrading Oracle Demantra 4-25
Screen When Screen is Displayed Action/Notes
Information If you choose to view the procedures log
Scan for any problems. In a particular, check for any procedures, functions, or views that are noted as invalid:
• If you are installing a new system, all procedures, functions, and views should be valid.
• If you are upgrading an existing system, the Installer will consider any existing custom procedures, functions, or views as invalid. Carefully check the list to be sure that you recognize the items as custom items.
• If you see an error referring to the table mdp_matrix, you will have to set the system date in the correct format (as described in Basic Preparation Checklist, page 3-10) and then run the Installer again.
You can also view the log afterwards; see Checking theLog Files and Tables, page 5-2.
15. Install Java.

4-26 Oracle Demantra Installation Guide
Screen When Screen is Displayed Action/Notes
Question (Java) If Java is not yet installed Click Yes to install Java components. The Oracle Installer launches the installer for JRE.
After Java is installed, you are returned to the Oracle Demantra installation.
If you decide not to install Java you can install it later from http://www.java.com.
16. Specify the application password for the primary application owner(s).
Screen When Screen is Displayed Action/Notes
User Details New installations
Demantra upgrade installations where additional components are being added.
If installing or upgrading to 12.2.4 and later you will be prompted to enter a default password for the SysAdmin user. If you are upgrading from a previous release and a user called 'SysAdmin' already exists, this user will be appended with a number,for example "SysAdmin1." For details about this user, see the Oracle Demantra Implementation Guide.
New installationss: For each software component installed, specify a passwordfor the primary application/component owner. Confirm the password. Only those components selected as part of the install set are shown.
Demantra upgrades: Specifythe passwords for any new software components being installed. The pre-upgrade software components retain their existing passwords, and are not displayed. For example, if you had only Demand Management before but are installing S&OP as part of your upgrade, you'll be promptedto enter a password for only S&OP.
Passwords must adhere to the following rules:

Installing and Upgrading Oracle Demantra 4-27
• Length must be 8-12 characters.
• At least one character must be upper case.
• At least one digit or special character must be included.
• Password should not be a Security Dictionary Word. Disallowed words are stored in the table: SECURITY_DICTIONARY.
17. Specify final details.
Screen When Screen is Displayed Action/Notes
InstallShield Wizard Complete
Always Click the check box if you want to view the release notes. Click Finish to exit theInstaller.
Review List of High Priority PatchesFor a list of high priority patches for Oracle Demantra, see My Oracle Support Note 470574.1 [https://support.oracle.com/CSP/main/article?cmd=show&id=470574.1&type=NOT].

Post-Install or Upgrade Steps 5-1
5Post-Install or Upgrade Steps
This chapter covers the following topics:
• Changing the Client JRE Version (Optional)
• Checking the Log Files and Tables
• Revoking Demantra User Privileges
• Affect of Upgrading on Parameters
• Affect of Upgrading on Customizations
• Upgrading and Multiple Language Support (MLS)
• Verifying the Database Upgrade
• Application Upgrade Using the Business Application Language (BAL)
• Upgrading from 7.1 and Higher
• Upgrading from Before 7.1
Changing the Client JRE Version (Optional)In this release, Oracle recommends using the latest version of Java 6 or 7. The version installed on the client does not have to be the same as the version that you use on the server. However, all clients must use the same JRE version. To change the JRE version on the client machine, download and install the required Java plug-in. For details, see Java Tips, page 11-4.
Note: The JRE defaults to the latest version installed. For example, if you have both Java 6 and 7 installed on the same machine, Demantra will be executed with 7 unless you have disabled that particular versionin the Java control panel.

5-2 Oracle Demantra Installation Guide
Checking the Log Files and TablesTo check the installation logs:
1. Check the basic installer log file: C:\tmp\Demantra-install.log.
2. Check the database log files written by the Installer. Depending on the installation, the Installer writes some or all of the following log files into Demantra_root\Demand Planner\Database Objects\database_type_name:
• import.log (Information on the import process of the dump file)
• For Oracle: run_build_procedures.LST (Information on the loading of the procedures into the new user.) and other *.LST files.
3. Check the db_exception_log table.
If you upgraded the database user, also check the following:
• The upgrade.log file provides details on the database upgrade process. This file is inthe same directory as the other Installer log files.
• version_detail table is updated to the new version only if the upgrade procedure finishes successfully.
Revoking Demantra User PrivilegesAs part of the Demantra installation, the following privilege is set in the Oracle database by the Demantra installation process:
SQL > GRANT CREATE ANY DIRECTORY TO demantra_user;
This privilege is needed for setting up JD Edwards EnterpriseOne integration.
If you are not planning to use JD Edwards integration, run the following command after setup:
SQL> REVOKE CREATE ANY DIRECTORY FROM demantra_user;
If you are planning to use JD Edwards integration, run the above command after your JD Edwards integration is working, not immediately after installation.
Affect of Upgrading on ParametersThe Oracle Demantra Installer upgrade procedure does not change the current values ofany parameters, although it may change the default value of a parameter. The individual upgrade sections of this document specify any suggested manual parameter changes.

Post-Install or Upgrade Steps 5-3
It does add new parameters for the new release and sets their default values.
Affect of Upgrading on CustomizationsThe Oracle Demantra Installer does not make any changes to your custom procedures, functions, or views. It is your responsibility to make adjustments to your custom features as needed so that they work with the new release. For information on preserving customizations during an upgrade, see the Business Applications Language information in the Oracle Demantra Implementation Guide.
Upgrading and Multiple Language Support (MLS)These are some examples of how Oracle Demantra works with languages when you upgrade.
Non-translated Release to Translated ReleaseYou install an Oracle Demantra non-translated release (before release 7.3.0) and begin your implementation in U.S. English. During this process, you maintain the standard application and add some new content (either in U.S. English, or using the limited non-U.S. English capabilities for worksheet and series names).
Then, you upgrade to a translated release (release 7.3.0 and later) to take advantage of the translations of standard application objects and platform menus and labels. You select a language other than U.S. English.
As a result of the upgrade, the following occurs:
• Standard, unmodified application objects, for example, series, worksheet, content, workflow, integration interfaces, and methods, are available in the default language.
• Standard, modified application objects are available in the default language if they upgrade. Oracle Demantra identifies standard objects with an internal application identifier; therefore, the standard translation of series name and hint supersede your modifications. You must restore your modifications after the upgrades.
• Customizations in U.S. English remain in U.S. English. You must translate these manually.
Partially Translated Release to Fully Translated ReleaseYou install an Oracle Demantra non-translated release (before release 7.3.0), with patches to allow creation of certain objects (for example, worksheets and series) in a non-U.S. English language. You implement new content in the non-U.S. English language and also modify standard application strings to non-U.S. English.

5-4 Oracle Demantra Installation Guide
Then, you upgrade to a translated release (release 7.3.0 and later) to take advantage of the full user interface translation to the non-U.S English language and you select the same language as that of your partially translated release.
As a result of the upgrade, the following occurs:
• Standard, unmodified application objects--(series, worksheet, content, workflow, integration interfaces, methods)--are available in the default language.
• Standard, modified application objects are available in the default language if they upgrade. Oracle Demantra identifies standard objects with an internal application identifier; therefore, the standard translation of series name and hint supersede your modifications. You must restore your modifications after the upgrades.
• Customizations in the non-U.S. English language remain in the non-U.S. English language.
• Customizations in U.S. English remain in U.S. English. You must translate these manually.
Translated Release to a Higher Translated ReleaseYou install and implement an Oracle Demantra translated release. You make slight modifications to the standard application, for example, add new series, slightly change the name of a worksheet or two, or add some new worksheets and workflows.
Then, you run the Installer to upgrade to a higher translated release and choose the same language while preserving your own modifications.
As a result of the upgrade, the following occurs:
• Standard, unmodified application objects--(series, worksheet, content, workflow, integration interfaces, methods)--continue to be available in the default language.
• Standard, modified application objects are available in the default language if they upgrade. Oracle Demantra identifies standard objects with an internal application identifier; therefore, the standard translation of series name and hint supersede your modifications. You must restore your modifications after the upgrades.
• New standard application objects are available in the default language.
• Customizations in the default language remain in the default language.
Changing LanguageYou rollout a model in one region and language and want to use that same model in another region and language.
You copy the original regional schema, import it into a new instance, strip it of data,

Post-Install or Upgrade Steps 5-5
and run the Installer against this schema, choosing a new language.
As a result of the upgrade, the following occurs:
• Standard, unmodified application objects (for example, series, worksheet, content, workflow, integration interfaces, and methods) are available in the new default language.
• Standard, modified application objects are available in the new default language.
• All new standard application objects will be available in the new default language.
• Customizations in the original language remain in the original default language. You must translate these manually.
Note: Oracle Demantra release 12.2 and later handles currency symbols differently than in the 7.3.x release. In the 7.3.x releases, the currency symbol reflected the locale that was defined on the end user's client machine (for example, if the user was based in the US, the USD currency symbol ($) was used). In implementations spanning multiple countries and locales this could result with the same value being shownwith different symbols presenting incorrect information. In release 12.2 and later the currency symbol does not change by the user locale. Instead, the currency symbol set in the Business Modeler is used for all users.
Verifying the Database UpgradeIf you upgraded the database user, make sure that upgrade ran correctly. See Checking the Log Files and Tables., page 5-2
Application Upgrade Using the Business Application Language (BAL)If you perform an application upgrade and new engine profiles are added, be sure to review the following parameters to ensure they are set correctly.
• last_date
• last_date_backup
If you are not sure what these parameters should be set to, Oracle recommends using the settings of the 'Base' engine profile. Additionally, after performing an application upgrade to move your data model to either a daily or a monthly system, the following parameters should be evaluated in the same manner:
• AverageHorizon

5-6 Oracle Demantra Installation Guide
• HistoryLength
• MinLengthForDetect
• PromotionStartDate
• StartAverage
• TestPeriod
• TrendPeriod
• dying_time
• hist_glob_prop
• lead
• mature_age
• season
• start_date
• test_samp_len
• timeunit
Note: "Timeunit" is not visible using Business Modeler and must be reviewed and modified using a tool such as SQL Developer.
Upgrading from 7.1 and HigherApplication upgrades to release 12.2 are supported from release 7.1 and later.
Refer to Upgrade Preparation Checklist, page 3-13 before you begin.
The upgrading of the schema occurs during the installation process. Once you arrive at the Schema Options screen, your choices are as follows:
• If your application is highly customized and does not follow the standard baseline Oracle application configuration (standard data model), Oracle recommends that you upgrade the platform only. This upgrades only the software functionality and does not change the application configurations in the database schema.
• If your application includes a few or no customizations to the standard baseline Oracle application configuration (standard data model), Oracle recommends that

Post-Install or Upgrade Steps 5-7
you upgrade both the platform and application.
If you are upgrading both the platform and application, you can decide either to run an automatic upgrade or a manual upgrade based on these criteria:
• Automatic Upgrade: You have few or no customizations, you don't need to select upgrade actions for each individual object, and you are satisfied with basing your upgrade on a set of default upgrade preferences.
• Manual Upgrade: You have some customizations or if you want to have control over how the objects are upgraded.
For automatic upgrade:
• On the BAL Upgrade Options screen, choose Automatic Upgrade. The BAL Explorer upgrades the schema in the background.
• When it is done, it launches Business Modeler; you can apply configuration changesto the destination schema. From the Configuration menu, select Validate BAL Import. Then, activate the BAL configurations.
• When you are done, the installation process continues.
For manual upgrade:
• On the BAL Upgrade Options screen, choose Manual Upgrade.
• Use the BAL Explorer utility to analyze the relationship between objects, compare schemas, and specify how individual objects are upgraded when conflicts occur between the schemas. You can specify a different default upgrade action by object. For more information, see "Upgrading Using Oracle Demantra Business Application Language" in the Oracle Demantra Implementation Guide.
• When you are finished upgrading the schema, BAL Explorer launches Business Modeler; you can apply configuration changes to the destination schema. From the Configuration menu, select Validate BAL Import. Then, activate the BAL configurations.
• When you are done, the installation process continues.
Important: To prevent issues with client expressions that may refer to seeded series names, any seeded series names that were changed will revert back to their original text during the upgrade. Therefore, if you renamed seeded series, you must restore the modification after the upgrade is complete.
Note: If you are upgrading to 12.2 or later, any seeded series names that

5-8 Oracle Demantra Installation Guide
contain restricted characters like slash (/) or hyphen (-) will no longer have these characters after the upgrade.
Automatically Provide Users Created in the Business Modeler with Access to New Seeded Series
Using the SQL insert statement, the SYS_PARAMS table can be updated to include the SYNCHRONIZE_USER_SERIES parameter that automatically provides users created inthe Business Modeler with access to new seeded series upon upgrading. This parametermust be set prior to upgrading to the latest version of Demantra, or else all the new seeded series will only be available to the component owners (such as dm). Without adding the SYNCHRONIZE_USERS_SERIES parameter, the administrator must manually configure all other users to provide them with access to the new series.
Below is the syntax for this parameter:insert into SYS_PARAMS (PNAME, PVAL, DESCRIPTION) VALUES 'SYNCHRONIZE_USER_SERIES', 'DCM_PRODUCT:157, DCM_PRODUCT:178', 'Providesusers created in Business Modeler with access to all new seeded series for specified components when upgrading');
Where:
• PNAME = SYNCHRONIZE_USER_SERIES
• PVAL = DCM_PRODUCT:157, DCM_PRODUCT:178
• DESCRIPTION = Provides users created in Business Modeler with access to all new seeded series for specified components when upgrading
This statement provides all users created in Business Modeler with access to any new seeded series for both the Demand Management and Sales and Operations Planning components (application IDs 157 and 178, respectively). The description shown here is just an example; you can enter different text if desired, but note that this column cannot exceed 255 characters. If you define this parameter, it persists in the Demantra schema and is respected during future upgrades.
Upgrading Software and Data to Support Service Parts ForecastingThe following steps are necessary to support Service Parts Forecasting when upgrading software and data from a pre-7.3.1 version of Demantra:
• Review the Engine Profiles
• Modify the Init Params Table Name
• Enable the SPF Rolling Profile Group
Post-Install or Upgrade Steps 5-9
Reviewing the Engine ProfilesBefore installing or upgrading Demantra version 7.3.1, you must review any engine profiles to ensure they are not referencing init_params_XXX tables used by some of our new engine profiles provided in release 7.3.1.
1. Using SQL Developer or similar tool, run the following command: select * from engine_profiles;
2. Note the values in column INIT_PARAMS_TABLE_NAME.
If any profiles are pointing to the tables INIT_PARAMS_121, INIT_PARAMS_122, INIT_PARAMS_141, and INIT_PARAMS_142, the table referenced to by these engine profiles must be modified to point to a new table name.
Note: When upgrading to this release, you must select the "Application and Platform Upgrade" option (Upgrade Options screen) to enable SPF functionality. SPF will not be enabled if you choose the "Platform Only"option.
Modifying the Init Params Table NameAfter reviewing your existing engine profiles, if any of your profiles are referencing INIT_PARAMS_121, INIT_PARAMS_122, INIT_PARAMS_141 or INIT_PARAMS_142, do the following to change your existing table names:
1. Log in to Business Modeler.
2. From the Parameters menu, choose System Parameters, then Engine.
3. Find the appropriate engine profile and click Edit.
4. Rename the table in the "Init Params Table Name" field. Enter a table name that is not currently in use. For example, change INIT_PARAMS_121 to INIT_PARAMS_222.
Enabling the SPF Rolling Profile GroupThe seeded "SPF" Rolling Profile Group is disabled by default. After installing or upgrading, you must perform the following steps to ensure that SPF forecasts are archived.
1. Log into the database using SQL Developer or similar application.
2. In the ROLLING_GROUPS table, enable the "SPF" rolling profile group by setting IS_ACTIVE to '1'.

5-10 Oracle Demantra Installation Guide
Note: When multiple profile groups are enabled, Oracle does not recommend running profile groups from the analytical engine (via INSERT_UNITS). Instead, schedule them to run separately via a workflow that executes the EXECUTE_PROFILES procedure and passes a specific rolling group ID. To disable execution of profile groups by the engine, set the engine parameter RunInsertUnits to 3.
For more information, refer to the Oracle Demantra Analytical Engine Guide.
Upgrading Software and Data to Support Configure to OrderIn release 7.3.0.1 and later, two new internal Configure to Order (CTO) levels are available: CTO Parent and CTO Child. These new levels define the CTO Tree. These levels are used instead of the 'Parent Item' and 'Item' levels used in release 7.3.0 (the first Demantra release that supported CTO).
Depending on your current Demantra version, you may need to perform the steps in this section to upgrade CTO structures and (optionally) upgrade your CTO data.
If you are upgrading from release 7.3.0, then you must perform the steps in this section.
You do NOT have to perform the steps in this section if:
1. You are upgrading from a pre-7.3.0 version of Oracle Demantra
Or
2. You are upgrading from release 7.3.0.1 or later
Note: Demantra release 7.3.0.1 and later also provides an automatic setting for enabling the CTO Tree view without the need to manually include CTO Parent level and CTO Child levels in worksheets. Depending on your needs, you may want to remove the Parent Item from current CTO worksheets. When using the context menu on the Item-level Show CTO Tree, the system automatically includes and hides the CTO Parent level and CTO Child levels and displays the item as a CTO Tree.
Prerequisites:
• If you are not using standard collections, please review the new structures for the integration tables: BIIO_CTO_LEVEL and BIIO_CTO_CHILD.
• If you will be reloading fresh data and want to preserve overrides, Oracle recommends exporting all overrides with an integration interface. For example, create an interface at the "Base Model", "Parent Item", "Item", and any additional item or location dimensions, and include series such as Base Override, Forecast

Post-Install or Upgrade Steps 5-11
Dependent Demand Override, and so on. These overrides can then be restored afterfresh data reload with an import integration interface.
To Upgrade Software and Application to Support CTO Functionality:
If you are upgrading from release 7.3.0, the upgrade process contains two stages:
1. Software and metadata upgrade - This is achieved by selecting 'Application and Platform' when running the installer.
2. Data upgrade - This is a manual process that upgrades your data for the new CTO Levels and provides a mechanism to use existing data without the need to reload new data.
Important: Data upgrade is not necessary if you are planning to reload a new full data set.
Stage One: Software and Metadata Updating:
1. Make sure you have a working backup.
2. Back up user overrides manually or by creating an integration interface as described in the Prerequisites above.
3. Run the Demantra Installer. In the Upgrade Options page, be sure to select the 'Application and Platform Upgrade' option. See Upgrading from 7.1 and Higher for more details. Important: When the upgrade is complete, perform the next step only if you are NOT planning to reload a new CTO data set. This step should be performed before starting Demantra.
Stage Two: Manually Updating Data
1. If you are not planning to reload all CTO data, upgrade existing CTO data using theprocedure APPPROC_UPDATE_CTO_LEVEL_7301. This procedure will generate data for the "CTO Child" level using data from "Parent Item" and "Item" levels. It also populates Demantra internal tables for CTO (T_EP_CTO, T_EP_CTO_MATRIX,T_EP_CTO_DATA).
This procedure utilizes the Oracle database job queue. By default this spawns 10 jobs in the USER_JOBS tables. On systems that can support more parallels jobs, you can extend the number of jobs in JOB_QUEUE_PROCESSES and execute the procedure with more jobs.
Execute procedure with default 10 jobs:
exec APPPROC_UPDATE_CTO_LEVEL_7301;
Execute procedure with 20 jobs:
exec APPPROC_UPDATE_CTO_LEVEL_7301( 20 );

5-12 Oracle Demantra Installation Guide
Monitor job completion until no jobs are listed in the USER_JOBS table:
select * from user_jobs
2. Create the new Demantra.war and deploy to your application server.
For more information, see "Configure to Order" in the Oracle Demantra Integration Guide.
Upgrading from Before 7.1If you want to upgrade from a version earlier than 7.1, Oracle recommends that you update to an intermediate release like 7.3.0.2, and then upgrade to the current version.

Configuring Your Database, Web Server and Browser 6-1
6Configuring Your Database, Web Server and
Browser
This chapter covers the following topics:
• Streamlining the Oracle Database
• Running SYS_GRANTS.SQL Script
• Configuring the Web Client Startup
• Configuring Web Applications for SSL and Firewalls
• Configuring the Oracle Demantra Web Platform Server
• Configuring WebSphere
• Windows Script for First-Time Installation
• Mozilla Firefox Startup Configuration Setting
• Setting Browser Locale
• Remote System Configuration
• Configuring APS_PARAMS
Streamlining the Oracle DatabaseIf you loaded a large database dump file, Oracle recommends that you run database procedure REBUILD_SCHEMA to make the database run more quickly, before you start using Oracle Demantra. This procedure requires tablespaces equal in size to the current tablespaces.
REBUILD_SCHEMA performs these tasks:
• Rebuilds table indexes
• Rebuilds sales_data and mdp_matrix, large, core tables used by Oracle Demantra

6-2 Oracle Demantra Installation Guide
• Analyzes all the tables in the schema
For performance reasons, it is also useful to move each large table into its own tablespace. The Installer places some of the tables into their own tablespaces, dependingon your choices, but you may have additional large tables. The following sample SQL moves the table TABLENAME and its index into the tablespace called TS_TABLENAME:
Exampledeclare
sqlstr varchar2(2000);
begin
sqlstr := 'alter table TABLENAME move tablespace TS_TABLENAME';
dynamic_ddl(sqlstr);
for idx in (select index_name from user_indexes where table_name= 'TABLENAME')
loop
sqlstr := 'alter index '||idx.index_name||' rebuild tablespace
TS_SALES_DATA_TEST_X';
dynamic_ddl(sqlstr);
end loop;
After moving tables to different tablespaces, you should run ANALYZE_SCHEMA again.
Configuring the Database for Use With Specific ProductsThe Installer provides options to perform additional configuration steps that make the database work with certain Demantra products. You can perform these configuration steps afterwards instead, if necessary.
Deductions and Settlement Management (DSM)See Update Settlement Levels for Oracle Demantra Deductions and Settlement Management (DSM), page 8-1 for details.
Predictive Trade Planning (PTP)If implementing Predictive Trade Planning (PTP), configure the Analytical Engine appropriately for Promotion Effectiveness. If you are also implementing Trade Promotion Optimization (TPO), configure the optimization methods as needed. For details, see the Oracle Demantra Analytical Engine Guide.

Configuring Your Database, Web Server and Browser 6-3
Running SYS_GRANTS.SQL ScriptYou need to run this script manually after installing or upgrading Demantra only if youdid not specify a database user with full SYSDBA privileges when running the Installer.In this scenario, the Installer displays a message at the end of the installation/upgrade prompting you to run this script.
SYS_GRANTS.sql performs the following:
• Adds 'EXECUTE' privileges to access DBMS_CRYPTO (UPGRADE_PASSWORDS): Provides the highest level of user password encryption.
• Adds 'EXECUTE' privileges to access DBMS_LOCK: Provides as SLEEP operation for improved concurrency.
• Adds 'EXECUTE' privileges to access V_$PARAMETER so that Oracle Demantra can better adapt to your database's configuration.
• (10g only) Adds 'GRANT' privileges to access the package UTL_HTTP, which enables Oracle Demantra to send notification messages to the application server and engine.
• (11g only) Adds an ACL to enable HTTP communications for Oracle Demantra to send notification messages to the application server and engine.
Syntax:
C:\DEMANTRA_INSTALL_DIRECTORY\Demand Planner\Database Objects\Oracle Server\admin> sqlplus SYS@SERVER as sysdba @sys_grants.sql DB_USER ACL_for_WebServerURL ACL_for_EngineServerURL
Where:
• DEMANTRA_INSTALL_DIRECTORY is the location of the unzipped Demantra installation file
• SYS is the DB user with SYSDBA privileges · SERVER is the DB server TNS name
• DB_USER is the Demantra database user name (must be entered in upper case)
• ACL_for_WebServerURL is the full path to the access control list (ACL) for the WebServer URL. If you pass the name ACL_DEFAULT it will use the ACL named /sys/acls/demantra.xml. The ACL will be created if it does not exist.
• ACL_for_EngineServerURL is the full path to the access control list for the Engine Server URL. If you pass the name ACL_DEFAULT it will use the ACL named /sys/acls/demantra.xml. The ACL will be created if it does not exist.

6-4 Oracle Demantra Installation Guide
Configuring the Web Client StartupThe Web client includes Demand Planner Web, Promotion Effectiveness, and Settlement Management. It uses the Sun Java plug-in.
Verify that the plug-in version you specified in the Java Control Panel is correct. See Java Tips, page 11-4.
Configuring Web Applications for SSL and FirewallsTo use SSL security or if users need to work through a firewall, perform the following procedure:
1. When you install Oracle Demantra, be sure to configure all URLs with https insteadof http.
2. Switch off the HTTP server on port 80. The procedure to perform this is dependent on the Web server.
3. Configure the Web server for SSL support. You will need to obtain a VeriSign certificate or equivalent certificate authority.
4. Configure the firewalls to allow connections to port 443.
5. Optional: Configure the firewall to disallow all communication to port 80 instead ofdisabling it on the Web server.
6. If you have a firewall between the Web Platform Server and the database, you will also need to open the port that is defined for the connection between the Application Server and the database. For Oracle, this port is 1521 by default.
7. If you change any of the default port numbers, make sure to also change them in the Oracle Demantra URLs, the Web server, and the firewall. See Other Configuration Files in this document.
8. If you want to enable mutual (client) SSL Authentication, set the client.ssl.authentication parameter in to "1" (true). You define this parameter in Business Modeler > Parameters > System Parameters > Application Server > DP Web. By default, this parameter is false, which means only standard (server) SSL authentication is supported.
After client SSL authentication is enabled, a pop-up dialog box appears prompting you to insert keystore, truststore locations and passwords. Once validated, Demantra will save these parameters in an encrypted file under the user.home/demantra directory for future logins.

Configuring Your Database, Web Server and Browser 6-5
Note: Demantra supports both standard and mutual (client) SSL Authentication. In IE 7.x, the Java plugin cannot obtain user credentials from the browser and users will be prompted to enter this information for every applet within the current Demantra page(in Collaborator Workbench, there may be between 2-4 applets).
To avoid this issue, it is recommended that the web server administrator exclude the Demantra .jar files from the Web Server Basic Authentication rules. To do this, add the following filter to the <files> directive in httpd-sll.conf:
<Files ~ "^(\.jar"> </Files>
Configuring the Oracle Demantra Web Platform ServerYou may need to adjust the Web Platform Server parameters settings, shown below. To edit these parameters, use the Business Modeler. See the Oracle Demantra Analytical Engine Guide.
Parameter Recommended Setting and Notes
MaxDBConnections Number of concurrent users multiplied by 2
DBIdleTimeOut 300000 (5 minutes)
This setting frees up unused database connections more quickly, because they overstress the database.

6-6 Oracle Demantra Installation Guide
Parameter Recommended Setting and Notes
threadpool.update.data.manual.size: Update threadpool data manual size.
threadpool.update.table.manual.size: Numberof parallel manual update tables that the Applications server can handle per process.
threadpool.update.comb.manual.size: Number of parallel manual update combinations that the Applications server can handle per table.
threadpool.update.record.manual.size: Number of parallel manual update records that the Applications server can handle per combination.
threadpool.update.data.batch.size: Update threadpool data batch size.
threadpool.update.table.batch.size: Number ofparallel batch (Integration/Ble) update tables that the Applications server can handle per process.
threadpool.update.comb.batch.size: Number of parallel batch (Integration/Ble) update combinations that the Applications server can handle per table.threadpool.update.record.batch.size: Number of parallel batch (Integration/Ble) update records that the Applications server can handle per combination.
Batch and manual update parameters
threadpool.level_method.size Use a size that is less than MaxDBConnectionsand that also leaves space for other system processes.
threadpood.copy_paste.size Use a size that is less than MaxDBConnectionsand that also leaves space for other system processes.
threadpool.query_run.size Use a size that is less than MaxDBConnectionsand that also leaves space for other system processes.

Configuring Your Database, Web Server and Browser 6-7
Parameter Recommended Setting and Notes
threadpool.level_method.timeout 300000 (5 minutes)
This setting frees up unused threads.
Configuring WebSphere
IBM WebSphere 6.1 Security ConfigurationsYou may need to run some security configuration changes to use Workflow Manager with Oracle Demantra. See Configuring the was.policy File [http://publib.boulder.ibm.com/infocenter/wasinfo/v6r1/index.jsp?topic=/com.ibm.websphere.express.doc/info/exp/ae/tsec_waspolicyfile.html] on the IBM Web site.
Configuring WebSphere to Use Demantra GraphsGraphs do not work with WebSphere. To work around this problem, rename the WebSphere archive file WebSphere_directory/AppServer/lib/chart.jar.
Rename the file using a different extension. This will allow WebSphere to use the chart class from the Demantra JAR file.
Windows Script for First-Time InstallationOn older Windows NT versions, you may get errors when you run the Analytical Engine regarding 2K DLL missing.
To solve this, run the file mdac_typ.exe before running the Analytical Engine. It is in folder ../analytical engine/bin.
Mozilla Firefox Startup Configuration SettingWhen using the Firefox Web browser, if a Demantra user closes the browser using the Xicon, it is possible to restore the session by re-launching a new Firefox browser. In this scenario, the login page is not displayed and the user is not required to enter a username and password.
Caution: Use caution when downloading and installing any add-ons to the Mozilla Firefox Web browser. Some add-ons can, for example, compromise application security or cause issues when running Demantra worksheets. These customizations are not supported by

6-8 Oracle Demantra Installation Guide
Oracle.
It is the responsibility of your organization and your users to prevent unauthorized access to Oracle Demantra by configuring Firefox correctly.
Modify Firefox configuration settings as follows:
1. Select Tools > Options > Startup > Main tab.
2. Verify that the When Firefox Starts setting is NOT set to Show my windows and tabs from last time. Change this setting as required.
3. Navigate to the Security tab and verify that Remember password for sites is clear.
4. Save your changes.
Setting Browser LocaleOracle requires that you or your users set the browser locale. The applet locale is based on the browser locale.
If you have set browser locale, Oracle Demantra can manage both the portal and applet.With client machine locale alone, Oracle Demantra can manage applets, but cannot determine the locale for portal parts.
If an applet starts as standalone, Oracle Demantra uses the client machine locale.
The instructions for setting the browser locale are in the Oracle Demantra User's Guide > First Time Login.
Remote System ConfigurationIf you access Oracle Demantra from a remote system, for example, Oracle E-Business Suite, specify the URL that points to the landing page after you log out of the remote system.
Set parameter ExternalLogoutUrl; it has no default value. In Business Modeler, navigateto Parameters > System Parameters, navigate to System tab. In field Value, enter the URL.
Configuring APS_PARAMSWhen you upgrade, Oracle Demantra Installer runs an upgrade script that makes structural changes and populates data.
Prior to release 7.3.0, the script gathers product configuration data, creates configuration file appserver.properties, and puts the configuration data there.
Configuring Your Database, Web Server and Browser 6-9
When you upgrade from a pre-7.3.0 version to release 7.3.0 or later, the script gathers product configuration data from configuration file appserver.properties, deletes configuration file appserver.properties, and puts the configuration data into table APS_PARAMS. This process is not visible when you are running the Oracle Demantra Installer.
If the script fails to delete configuration file appserver.properties, it displays a warning message, with the full directory path to the file that asks you to manually delete it after installation. If the script fails to update table APS_PARAMS, it displays Business Modeler, System Parameters window. See the Oracle Demantra Analytical Engine Guide for information about the following parameters, then specify values for them.
• workflow.group
• server.generalurl
• database.password
When you have finished, the installation process continues.


Deploying Demantra on UNIX, Solaris or Linux 7-1
7Deploying Demantra on UNIX, Solaris or
Linux
This chapter covers the following topics:
• About the Installer
• Deploying the Demantra Web Application on UNIX
• Deploying the Demantra Analytical Engine on Linux
• Deploying the Demantra Analytical Engine on Solaris
About the InstallerTo install Oracle Demantra on a UNIX, Linux or Solaris machine, run the Installer on a Windows machine. During the installation, choose whether to deploy the Demantra Web application on UNIX, or the Analytical Engine on Linux or Solaris:
Important: If you have already installed Demantra on a Windows machine, do not delete Demantra from Windows and then configure the web and engine on UNIX/Linux. The Windows install is still necessary for future patch applications and upgrades. For more information, see My Oracle Support Note #1389868.1 -- Demantra Engine on Linux Install Upgrade Troubleshooting.

7-2 Oracle Demantra Installation Guide
If you selected Deploy Demantra Web Application on UNIX, the Installer places a zip archive of the files required to install the Web on UNIX. It places it on the Windows machine as <Demantra Install Root>\Linux Delivery\.Oracle_Demantra_Unix_Web.tar.gz. It contains the following folders and files:
• Web
• Integration
• readme.txt
See Deploy Demantra Web Application on UNIX, page 7-3 for more information.
If you selected Deploy Demantra Analytical Engine on Linux, the Installer places a zip archive of the files required to install the Engine on Linux. It places it on the Windows machine as <Demantra Install Root>\Linux Delivery\.Oracle_Demantra_Linux_Engine.tar.gz. It contains the following folders and files:
• Engine
• tools
• readme.txt
See Deploying the Demantra Analytical Engine on Linux, page 7-7 for more information.

Deploying Demantra on UNIX, Solaris or Linux 7-3
If you selected Deploy Demantra Analytical Engine on Solaris, the Installer places a zip archive of the files required to install the Engine on Solaris. It places it on the Windows machine as <Demantra Install Root>\Linux Delivery\.Oracle_Demantra_Solaris_Engine.tar.gz. It contains the following folders andfiles:
• Engine
• tools
• readme.txt
See Deploy Demantra Analytical Engine on Solaris, page 7-30 for more information.
Deploying the Demantra Web Application on UNIXTo deploy the Demantra web application on UNIX, do the following:
• Configure the Demantra Web Application
• Configure the Standard Integration Tool (APS Standalone) on UNIX (Optional)
Configure the Demantra Web Application1. Deploy the .war file. The application WAR file is created during application
building process and delivered by the Windows Installer. Copy it to a location accessible by a supported Java container, (for example, WebLogic, and WebSphere) and follow the specific proprietary deployment process for a standard Web application deployment using your application server.
2. Use the Data Source Configuration Tool to make the necessary updates. Use this tool to define the database connection details to use while executing the APS Standalone. Run the ds_config.sh file. It opens window Data Source Configuration for defining the database connection details. Complete the following fields:
• Database Type: Oracle
• Server Name: Database which contains the Schema.
• User Name: The Database Schema Name.
• Password Name: Schema's Password.
• Database Name: The SERVICE_NAME/SID
• Port Number: Port for connection to Database.
If you are using command line, see Configure the Standalone Integration Tool (APS

7-4 Oracle Demantra Installation Guide
Standalone) on UNIX (Optional), page 7-4 in this section.
Click Save to populate the file DataSource.properties.
3. Use the Schema Parameters Configuration Tool to make the necessary updates.
This tool defines system and application parameters used while running some processes (for example, workflow and simulation).
Run file sp_config.sh. The Schema Parameters Configuration appears. Complete thefollowing fields:
• Application Server URL: The root context of the Demantra Application Server. Used for notifications from the engine, the desktop, and the database store procedures.
• Workflow Groups: Groups of workflow users who can log in to this application.
• Designate Administrator Account: Indicates whether mail settings are configured.
• Mail Server: The name of the mail server.
• Administrator Email Address: E-mail address of the system administrator or database administrator.
• Audit Email Address: E-mail of the employee who will audit the processes performed in the application.
• Table Spaces: The logical storage unit for the tables and indexes of a schema.
If you are using command line, see Configure the Standalone Integration Tool (APS Standalone) on UNIX (Optional), page 7-4 in this section.
Click Save to update tables SYS_PARAMS and APS_PARAMS.
Configure the Standard Integration Tool (APS Standalone) on UNIX (Optional)If you want to use the standalone integration tool (APS Standalone) on UNIX to executeintegration interfaces (instead of on Microsoft Windows or through a workflow), perform this configuration.
1. Save and unzip the Smoke Test Linux folder in the Linux machine. You can locate the Integration and tools folders anywhere on the Linux machine and they do not need to be under the same directory. However, you need to keep the structure of these folders as described in these instructions.
2. Navigate to folder tools and open file ds_config.sh.

Deploying Demantra on UNIX, Solaris or Linux 7-5
• For the value of variable _CD, enter the full path of the tools folder (for example, /usr/DemantraApps/tools).
• For the value of variable _JAVA_HOME, either enter the appropriate JDK's path (for example, /opt/java1.6/jdk), or leave it empty and define environment variable JAVA_HOME.
• Optionally, for the value of variable JAVA_OPTS, enter the Java runtime options (for example, -Xmx512m).
3. Make file ds_config.sh executable. Run command: chmod u+x ds_config.sh.
4. Populate the connection details using either the user interface or the command line.
If you are using the user interface:
• Open the Data Source Configuration Tool.
• Run command: ./ds_config.sh
• Fill the appropriate connection details described in section Configure the Web Application on UNIX, page 7-3.
If you are using the command line, enter and run the command, as shown in the example below.
For example:
./ds_config.sh DBMS=ORA Servername=rws60059rems.us.oracle.com
Tnsname=mickey LogId=std_730A LogPassword=mdp Database=ma0mu211
DBPort=1565 File=/usr/Demantra_SA_Test/lib/DS.ini
Navigate to folder tools/conf and verify that it contains file DataSource.properties. The Schema Parameters Configuration Tool uses this file.
Please note the following:
• The parameters are not case sensitive.
• Each parameter in the command line must contain a value.
• The parameter File can contain a relative path.
• You can choose a name for file DataSource.properties (for example, DataSource.properties, ds.ini).
• If parameter File is not in the command line, the default creation folder is

7-6 Oracle Demantra Installation Guide
conf and the default name is DataSource.properties.
• You need a space between each set of parameter and value.
5. Navigate to folder tools and open file sp_config.sh.
• For the value of variable _CD, enter the full path of the tools folder (for example, /usr/DemantraApps/tools).
• For the value of variable _JAVA_HOME, either enter the appropriate JDK's path (for example, /opt/java1.7/jdk), or leave it empty and define environment variable JAVA_HOME.
• Optionally, for the value of variable JAVA_OPTS, enter the Java runtime options (for example, -Xmx512m).
6. Make file sp_config.sh executable. Run command: chmod u+x sp_config.sh.
7. Populate the schema parameters using either the user interface or the command line.
If you are using the user interface:
• Open the Schema Parameters Configuration Tool
• Run command: ./sp_config.sh
• Fill the appropriate URL, workflow groups, mail settings, and tablespaces described in Configure the Web Application on UNIX, page 7-3.
If you are using the command line, enter and run the command below.
For example:
./sp_config.sh AppServerURL=http://mufasa/Demantra
workflow.group=p_portal,Collaboration,Collaborator,
"Demand Analyst",SOP Mail=true mail.server=my.server.com
[email protected] [email protected]
tablespace=DEV_D indexspace=DEV_X simulationspace=DEV_D
simulationindexspace=DEV_X sales_data_engine_space=DEV_D
sales_data_engine_index_space=DEV_X
Navigate to tables SYS_PARAMS and APS_PARAMS and verify that the parameters are updated.
Please note the following:
• The parameters are not case sensitive.

Deploying Demantra on UNIX, Solaris or Linux 7-7
• Each parameter in the command line must contain a value.
• The parameters are not mandatory.
• You need a space between each set of parameter and value.
• If the value contains a space, use inverted commas to wrap it.
8. Copy file DataSource.properties. Navigate to folder tools/conf (or the folder you used) and copy it (or the name you used) to folder Integration/conf.
9. Navigate to folder Integration and open file aps.sh.
• For the value of variable _CD, enter the full path of the tools folder (for example, /usr/DemantraApps/Integration).
• For the value of variable _JAVA_HOME, either enter the appropriate JDK's path (for example, /opt/java1.7/jdk), or leave it empty and define environment variable JAVA_HOME.
• Optionally, for the value of variable JAVA_OPTS, enter the Java runtime options (for example, -Xmx512m).
10. Make file aps.sh executable. Run command: chmod u+x aps.sh.
11. Run the APS Standalone. Use the following syntax:
./aps.sh [EXPORT_DATA/IMPORT_DATA/EXPORT_LEVEL/IMPORT_LEVEL] "
[Integration Name]" "[ Query/Level Name]"
For example, ./aps.sh EXPORT_DATA "Exp_integration" "Exp_profile"
Deploying the Demantra Analytical Engine on LinuxFollow these instructions when deploying the Demantra Analytical Engine on Linux:
• The Oracle instant client is provided, so it is not necessary to install it separately.
• The engine can be deployed on either a 32-bit or 64-bit Linux platform.
• Engine Administrator is not available on Linux (it is only supported on Windows). However, it is possible to access Engine Administrator to modify engine configuration settings. For details, see Modify Engine Settings using Engine Administrator on Linux, page 7-26.

7-8 Oracle Demantra Installation Guide
Note: Only one Engine Manager can be deployed on each application server instance. Each machine deployed with an engine can only be used by the specific instance of Engine Manager for which it was deployed.
For example, machine A1 to A10 are blades for engines. Machines B1 and B2 each have an application server deployed with an Engine Manager on it, one used for production and the other for testing. BladesA1 through A10 should be distinctly divided between B1 and B2, so that no one machine is used by both B1 and B2. Assigning A1 to A5 to B1 and A6 to A10 to B2 is acceptable, but assigning A1 through A5 to B1 and A5 through A10 to B2 is not acceptable because A5 would be used by both B1 and B2.
The number of engines that are started on each machine is not a significant issue, as long as each machine has enough CPU/memory. However one physical machine should not be used to start engines by two different Engine Managers.
Oracle recommends that you configure the number of engines on a particular machine to match the number of cores. For example, if on machine B3, there are two processors with 4 cores each, you can configure up to 8 engines to run in parallel on that machine.
This section covers the following topics:
• Linking to Libraries (Prerequisite)
• Automated Deployment for Tomcat and WebLogic Using the Setup.sh Script
• Manual Deployment for Websphere and other Application Servers
• Configuring the Engine System Parameters in Business Modeler
• Starting the Engine
• Modifying Engine Settings using Engine Administrator on Linux
Deploying the 64-bit Linux Engine The 64-bit Linux version of the Analytical Engine (version 7.3.1.5 and later) must run ona 64-bit version of Linux. The 64-bit version will not run on a 32-bit Linux box. In addition, the Application Server must be running on a 64-bit Java Virtual Machine.
To deploy the 64-bit Analytical Engine:
• If not already installed, install the 64-bit Oracle Client. .

Deploying Demantra on UNIX, Solaris or Linux 7-9
• Run the batch file RegEng64bit.bat. This file is located in \Demantra_Installation\Demand Planner\Analytical Engines
The code that the 64-bit engine requires is located in the \Analytical Engines\bin directory and the 32-bit files are located in the \Analytical Engines\bin32 directory.Therefore, no changes to the PATH directory are required.
• Note: Use the RegEng32.bat batch file to revert the engine deployment back to the default 32-bit version.
Linking to Libraries (Prerequisite)When you unpack archive Engine.tar.gz, the process creates the following directories under Engine <INSTALL_ROOT>:
• bin: Includes configuration files (for example Settings.xml) and some application server management scripts (for example, Tomcat start-stop utilities).
• lib: Includes all engine executables and libraries and all third party libraries and utilities.
For the engine to run properly, the libstdc++-libc6.1-2.so.3 must be detected, downloaded and placed under /usr/lib or $ENGINE_ROOT/lib directories. Alternatively, you can detect /usr/lib/libstdc++-libc6.2-2.so library and simply make a symbolic link.
Prior to the installation, do one of the following:
• Manually create a symbolic link
• Install the additional library or RPM package
To Manually Create a Symbolic Link:
With the Oracle Linux 6 Operating System, you can create a symbolic link using this command:link.ln -s /usr/lib/libstdc++-libc6.2-2.so.3 /usr/lib/libstdc++-libc6.1-2.so.3
To Install the Additional Library or RPM Package:
The best practice is to locate and install the backward-compatible RPM supplied by RedHat. All these steps should be done as a super user (root) on each one of the hosts designated to run the engine, engine manager and engine workers. To download and deploy additional libraries or RPM (standard C++ library for RedHat 7.x), do the following:

7-10 Oracle Demantra Installation Guide
1. From your browser, load the website http://rpm.pbone.net/index.php3/stat/2/simple/2
2. Select the check box for RedHat 7.x, and then enter the following in the Search field:
compat-libstdc++-rh62-1.i386
3. Click Search.
4. Download then manually copy/move the library libstdc++-libc6.1-2.so.3 to the /usr/lib or <ENGINE_ROOT>/lib directory. Oracle recommends this method because installing older compatible RPM versions can be problematic.
Alternatively, download the library and install it as ROOT compat-libstdc++-rh62-1.i386.rpm package.
5. Change to the <ROOT DIRECTORY>/bin and make all scripts executable:
cd bin
chmod +x *.sh
6. Deploy Demantra on the application server using either the Setup.sh script (for Tomcat or WebLogic) or manually (for WebSphere).
For more information, see:
• Automated Deployment for Tomcat and WebLogic Using the Setup.sh Script, page 7-10
• Manual Deployment for WebSphere, page 7-19
Automated Deployment for Tomcat and WebLogic Using the Setup.sh ScriptBecause the engine installation process on linux operating systems can be complicated, the engine environment configuration, creation of the data source file (ds.ini), start of engine starter daemons on all configured machines, and deployment to specific application servers can be done from one single shell without forcing you to move to different shells, log into remote machines and open browsers for deployment.
The Setup.sh script is interactive, gathering all needed or missing information from either the system or from your input. It applies inherited scripts with the 's' skip option at each stage, and starts and stops the application servers if needed. Each stage can be skipped and be done later manually.
As a super user (root) on each one of the hosts designated to run the engine, engine manager, and engine workers, do the following:
• Run the Setup.sh script to install, configure and deploy the Engine Manager on Linux.

Deploying Demantra on UNIX, Solaris or Linux 7-11
• Run the configureVariables.sh script on the engine worker hosts after running the Setup.sh script (which configures the Engine Manager on the local host).
Running the Setup.sh ScriptAfter unzipping the Oracle Demantra Engine zip file, do the following:
1. Move to the "bin" directory.cd bin;
2. Add the executable permission to the Setup.sh script.chmod +x Setup.sh
3. Run Setup.sh../Setup.sh
Note: The ./Setup.sh script should be run from the bin directory or else it will stop at the beginning, ask you to move to the bin directory and rerun the script.
The following steps are involved with the script:
Step 1: Selecting the Destination Application Server
The Setup.sh script prompts you: Which Application server do you plan to install engineManager.war into?
Available options:
1 -- Tomcat
2 -- WebLogic
Note: Although the OAS may be shown as an option in the script, it's not a current option.
If you choose Tomcat and the CATALINA_HOME environment variable has not been defined, the script displays the following prompt: Supply Catalina_Home
Provide the full path to the Tomcat installation root (CATALINA_HOME).
Note: This setting is not stored after the script execution , so next time the script is called, it will ask for the CATALINA_HOME again. In order to avoid asking for all root installation directories when running the Setup.sh script, you can store those settings in $USER/.bashrc or $USER/.bash_profile

7-12 Oracle Demantra Installation Guide
If you chose WebLogic, the script displays the following prompt: Supply WL_HOME, example: 'hhome/weblog10/Oracle/Middleware
Provide the full path for the WebLogic base directory.WL_DOMAIN and WL_SERVER environment variables are set relative to the supplied $WL_HOME as follows:
• WL_DOMAIN=$WL_HOME/user_projects/domain/base_domain
• WL_SERVER=$WL_HOME/wlserver_version/server
Note: The $WL_HOME, $WL_DOMAIN and $WL_SERVER variables are defined for internal use and will not be exported to the system after the script execution finishes.
Step 2: Setting Environment Variables
The script displays the following prompt:---> Configuring Environment variables
After selecting the destination application server, the Setup.sh script calls the configureVariables.sh script responsible for setting all environment settings needed for the engine on the local host (ENGINE_ROOT, JAVA_HOME, ORACLE_HOME,PATH, LD_LIBRARY_PATH). All those environment settings are configured relative to 'bin', the current execution directory.
• ENGINE_ROOT is automatically set to the one level above to 'bin' without prompting.
• JAVA_HOME is set to the predefined $JAVA_HOME , or you will be prompted if $JAVA_HOME is not configured.
• ORACLE_HOME is set to $ENGINE_ROOT/lib/ORACLE_HOME.
• PATH is set to $ENGINE_ROOT/lib;$PATH.
• LD_LIBRARY_PATH is set to $ENGINE_ROOT/lib;$LD_LIBRARY_PATH.
Note: You can skip setting the environment variables by pressing 's'. If you choose to set your environment variables later, you can run the configureVariables.sh script from the bin directory.
All defined environment variables are exported to the $HOME/.bash_profile file. All those settings are automatically applied after machine reboot or by manually parsing using:source $HOME/.bash_profile

Deploying Demantra on UNIX, Solaris or Linux 7-13
Note: Please note that no environment variables will be set for new shells if the machine has not been rebooted.
Step 3: Configuring the Data Source File (ds.ini)
The script displays the following prompt:---> Configuring data source (ds.ini) file
The ds.ini file is the encrypted data source file used when the engine is run. The output ds.ini file is automatically created under $ENGINE_ROOT/bin directory.
Warning: If the ds.ini file already exists in the $ENGINE_ROOT/bin directory, it will be overwritten.
Press 's' to skip this step.
The script displays the following prompts to enter the information corresponding to theTNS setting and SCHEMA information:
Prompts Definition
Supply DB Host Name Enter the database host
Supply schema name (username) Enter the schema to be run by the engine
Supply schema password for username
Enter the schema password
Supply SID/SERVICE_NAME Enter the SID/Service Name for the database TNS
Supply Database Port Enter the database port
Step 4: Starting the Engine Starter Daemons
The script displays the following prompt:---> Starting/Restarting EngineStarter utilities on all machines throughSSH
Engine Starter is a daemon program responsible for listening to the predefined TCP port and starting the engine processes on remote machines. Where engines will be executed is defined in $ENGINE_ROOT/bin/Settings.xml file under the ComputerNames section. For example:

7-14 Oracle Demantra Installation Guide
<Entry> <Key argument="ComputerNames"/> <Value type="string" argument="localhost,my_other_machine,10.192.154.32"/></Entry><Entry>
The example above informs Engine Manager that on localhost, my_other_machine and 10.192.154.32 are installed engines that can be used. Engine Manager sends the start engine request to those machines using the port defined in $ENGINE_ROOT/bin/Settings.xml file under the EngineUnixPortConfig section. For example:<Entry> <Key argument="EngineUnixPortConfig"/> <Value type="int" argument="12345"/></Entry><Entry>
Engine Manager assumes that on each one of the hosts (for example, localhost, my_other_machine and 10.192.154.32), there are Engine Starter utilities running and listening to the port specified in the EngineUnixPortConfig section.
The Setup script enables you to restart the Engine Starter daemons from the Engine Manager host through SSH without actually logging into the specified hosts.
The Setup.sh script runs the restartEngStartersAll.sh script that opens the Settings.xml file in GEDIT editor so that you can configure all the necessary settings. When you closethe GEDIT editor and press any keyboard key, the script continues by parsing the Settings.xml file and retrieving the remote computer names and desired port information from the Settings.xml file. Finally, the restartEngStartersAll.sh prompts youto supply the SSH connection information for each one of desired hosts and executes therestartEngStarter.sh <port> script on each one of remote machines to restart the Engine Starter.
The script displays the following prompts to enter the information corresponding to theport and name of your host computers:
Prompts Definition
Listener Port Enter the port being used for communication.
For each host, you are prompted for the information in the following rows:
Computer Names List all host names separated by a comma (for example, localhost, wsilia, 10.192.154.32).
Enter username for machine computer name
Enter the username for the host computer specified by the computer name.
username@computer name's password Enter the password for the host specified.

Deploying Demantra on UNIX, Solaris or Linux 7-15
Prompts Definition
Kills existing Engine Starter process The Engine Starter for the host specified is started or restarted.
If you have identified more host computers, you will now be prompted for each one's username and password with the result that the Engine Starter(s) on each host computer will be started or restarted.
As with the other options in the Setup.sh script, you can press 's' to skip starting/restarting the Engine Starter utility on all the machines through SSH. If skipped, manually log into each one of remote hosts defined in Settings.xml and restart the Engine Starter.
Note: It's important to validate that the Engine is installed on each remote machine and the ENGINE_ROOT variable is configured, pointing to the relevant engine installation path.
Step 5: Deployment
For the Engine execution, the $ENGINE_ROOT/lib/engineManager.war application must be deployed into the application server. The automatic deployment is performed by the Setup.sh script. The deployment can be performed for either Tomcat or WebLogic.
You can press 's' to skip the deployment option. To deploy later, you manually open theapplication server console and deploy the engineManager.war.
For Tomcat Deployment, the EngineManagerIntoTomcat.sh script starts. The script prompts you for the following information:
Prompt Definition
Supply CATALINA_HOME If not set in a variable, specify for the deployedapplication.

7-16 Oracle Demantra Installation Guide
Prompt Definition
Supply Enging Manager Context Name. Current [default]CONTEXT
Enter the application name that should be concatenated into the link used for requests forthis application from the browser. For example, if the default is engineManager, you can use TomcatEngineManager instead. The example below displays the context used in theURL link:: http://wsilia.il.oracle.com:8880/TomcatEngineManager/EngineManager StarterServlet...
Tomcat Deployment
If the Tomcat application server is not running, the script starts Tomcat.
Deployment creates the $CATALINA_HOME/conf/Catalina/localhost/$CONTEXT.xml file with information the $ENGINE_ROOT/lib/engineManager.war application needs for deployment. After creation of the $CATALINA_HOME/conf/Catalina/localhost/$CONTEXT.xml file, Tomcat is restarted. At the end of deployment Setup.sh displays all the links to be used for managing the installed Engine daemons.
For example, if "TomcatEngineManager" was used as the deployment context name, a sample link look like the following: http://wsilia.il.oracle.com:8080/TomcatEngineManager/EngineManagerStarterServlet?command=start&mode=1&profile_id=1
The deployment xml file might be created at following path: /home/weblog10/tomcat/conf/Catalina/localhost/TomcatEngineManager.xml
WebLogic Deployment
If you specified WebLogic as your application server at the beginning of the Setup.sh script process, the EngineManagerIntoWeblogic.sh deployment script begins. The WebLogic deployment script deployEngineManagerIntoWeblogic.sh prompts you for the following information:
Prompt Definition
Supply Weblogic Server Username Enter the WebLogic server username.
Supply Weblogic Server Password Enter the WebLogic server password.
Supply Weblogic Server Port Accept the default port set earlier by the Setup.sh script or change the WebLogic port.

Deploying Demantra on UNIX, Solaris or Linux 7-17
Prompt Definition
Supply Engine Manager Context Name. Current [default]
Accept the default context name or change the context name. The context name is the application name that should be concatenated into the link used for various requests for this application from the browser. For example, if the default is engineManager, you can use WeblogicEngineManager instead. The examplebelow displays the context used in the URL link:: http://wsilia.il.oracle.com:8880/WeblogicEngineManager/EngineManager StarterServlet...
The script copies $ENGINE_ROOT/lib/Plan.xml_GOLDEN to $ENGINE_ROOT/lib/Plan.xml and $ENGINE_ROOT/lib/plan/WEB-INF/weblogic.xml_GOLDEN to $ENGINE_ROOT/lib/plan/WEB-INF/weblogic.xml and modifies them with the relevantdeployment information.
Then the script uses the WebLogic deployer to deploy the $ENGINE_ROOT/lib/engineManager.war application. The WebLogic.Deployer can only work if the WebLogic server is running. The deployEngineManagerIntoWeblogic.sh script detects if the WebLogic server is not running and starts it prior to deployment. Deployment starts only when the WebLogic server reaches the RUNNING state.
After finishing the WebLogic deployment process, all engine Management links are displayed.

7-18 Oracle Demantra Installation Guide
Use Following links to work with engine :
Start Batch Engine:http://wsilia.il.oracle.com:7001/engineManager/EngineManagerStarterServlet?command=start&mode=1&profile_id=1
Start Simulation Engine:http://wsilia.il.oracle.com:7001/engineManager/EngineManagerStarterServlet?command=start&mode=99&profile_id=99
Re-Start Batch Engine:http://wsilia.il.oracle.com:7001/engineManager/EngineManagerStarterServlet?command=restart&mode=1&profile_id=1
Re-Start Simulation Engine:http://wsilia.il.oracle.com:7001/engineManager/EngineManagerStarterServlet?command=restart&mode=99&profile_id=99
Stop Engine:http://wsilia.il.oracle.com:7001/engineManager/EngineManagerStarterServlet?command=stop
Engine Status:http://wsilia.il.oracle.com:7001/engineManager/EngineManagerStarterServlet?command=status
Engine Diagnostics:http://wsilia.il.oracle.com:7001/engineManager/EngineManagerStarterServlet?command=diag
*****************************************************************************
Note: Pay attention to the Troubleshooting section displayed. In order to enable command line deployments, the tunneling option should be activated. This can be done in the WebLogic HTTP:Environment -> Servers -> Admin Server -> Protocols -> HTTP -> Enable Tunneling
The deployment process may also fail if you try to deploy the application with same context root as another deployed application. Another reason that the deployment may fail is if the Archived Real Path is disabled in the WebLogic server. To enable the Archived Real Path option, use the following path:base_domain -> Configuration -> Web Applications -> Archived Real Path Enabled
After deployment , the deployed application can be watched through the WebLogic Console.
To configure WebLogic to handle JSTL (JSP Standard Tag Library) tags, do the following:
1. In the WebLogic console, go to Deployments > Install.
2. Choose the following location and file:
Deploying Demantra on UNIX, Solaris or Linux 7-19
/home/oracle/Middleware/wlserver_10.3/common/deployable-libraries/jstl-1.2.war
3. Click Next.
4. Select Install the deployment as a library.
5. Click Next to the end.
Remote Worker Engine Host ConfigurationAll steps described above are required for the Engine Manager Configuration. To configure the Engine on a remote host that's run by Engine Manager, do the following:
1. Download and extract the Oracle Demantra Engine installation archive file.
2. Go to the "bin" dibrariese-lirectory.
3. Run the configureVariables.sh script and respond to the prompts.
Note: The ./configureVariables.sh should be applied from the bin directory or else it will stop at the beginning asking the user to move to 'bin' and rerun the script.
Manual Deployment for WebSphereIf you are deploying on another supported application server, such as WebSphere, you will need to complete a number of steps manually to complete the configuration and deployment of the Engine Manager.
Note: Installing the RPM compat-libstdc++-rh62-1.i386 is a prerequisite for configuring the Engine Manager manually or automatically using the Setup.sh script. See Linking to Libraries (Prerequisite), page 7-9 for more details.
The manual steps include:
1. Configuring Environment Variables
2. Creating the Engine Data Source File (ds.ini)
3. Configuring the Engine Starter Daemons
4. Deploying on Application Server

7-20 Oracle Demantra Installation Guide
Configuring Environment VariablesDefine some environment variables into your $HOME/.bash_profile file or in the shell definitions file that you used.
Some environment variables may already be defined, for example, ORACLE_HOME and JAVA_HOME, but review their values.
Redefine ENGINE_ROOT and append the correct definitions for LD_LIBRARY_PATH and PATH.
Run the <INSTALL_ROOT>/bin/configureVariables.sh script to configure your variables in the $HOME/.bash_profile file after prompting you for input.
Point JAVA_HOME to Java 1.6 or higher.
<INSTALL_ROOT>/lib/ORACLE_HOME/rdbms/mesg includes some Oracle message definitions required by sqlldr (SQL Loader).
For more information about the process of running the configureVariables.sh script, see Step 2: Setting Environment Variables, page 7-12
Creating the Engine Data Source File (ds.ini)Run the following script:
./createDSIniEngineRoot.sh
When prompted, enter:
• Full path to the tools directory which includes ds_config.sh
• DB host name: Server name - Full host name of database server (also TNS name).
• Schema name - Database user name
• Schema password - Database user password
• Database SID/Service_Name - The SID/service name for the database.
• Database port number - The datbase port number.
• Full path to the ds.ini file - <ROOT DIRECTORY>/bin
For more details about running the createDSInEngineRoot.sh script, see Step 3: Configuring the Data Source File (ds.ini), page 7-13.
Configuring the Settings.xml File and Launching the Engine Starter DaemonsYou can run the restartEngStartersAll.sh script directly to start/restart the Engine Starterdaemons on all worker hosts that were configured in Settings.xml.
See Step 4: Starting the Engine Starter Daemons, page 7-13 for more details on how to

Deploying Demantra on UNIX, Solaris or Linux 7-21
manually configure the Settings.xml file to specify each computer host's name, username and password, and how to manually run the restartEngStartersAll.sh script. The Settings.xml file is located in $ENGINE_ROOT/bin/ directory.
Deploying on an Application ServerTo deploy the engine on Linux on another application server such as WebSphere, perform a manual deployment of $ENGINE_ROOT/lib/engineManager.war into WebSphere (or other application server).
Configuring the Engine System Parameters in Business ModelerThe engine works as an operating system service, similar to telnet and FTP.
Perform the following to configure the engine to run on Linux.
Update the following system parameters:
• EnginePlatform: The operating system platform on which the engine is executed. (Set to 1 for Linux.)
• EngineBaseUrl: The base URL to be used to execute the engine.
You can update these parameters either in Business Modeler (Parameters > System Parameters, System tab), OR by performing the following update statements:
UPDATE SYS_PARAMS SET pval = '1' WHERE lower(pname) = 'engineplatform'
UPDATE SYS_PARAMS SET pval = '#URL#' WHERE lower(pname) = 'enginebaseurl'
Note: Be sure to replace the #URL# token with the actual URL of the engine manager.
For example:
http://server.us.oracle.com:9999/engineManager/
where 'server.us.oracle.com' is the URL part of the environment server and '9999' is the correct port.
Starting the EngineThis section describes how to run the engine and diagnose any engine problems. The following topics are covered:
• Starting the Engine Starter Server
• Running the Engine

7-22 Oracle Demantra Installation Guide
• Diagnostics Mode
• Engine Log Files
• Engine Troubleshooting
Starting the Engine Starter ServerThe Engine Starter server is a simple TCP server that listens to a defined port and starts the engine when a valid request arrives as input through the TCP pipe. It is a standalone process, independent from the operating system.
Start it manually or from an automated CRON task.
The Engine Starter server is located under <INSTALL_ROOT>/lib/EngineStarter as Engine.exe. It takes one command-line parameter, the port number it should listen to (the default is port 12345). Verify that the port number passed to Engine Starter is the same as the EngineUnixPortConfig parameter defined in the $ENGINE_ROOT/bin/Settings.xml file. This port updates the EngineUnixPortConfig parameter in Settings.xml and supplies the updated <portnum> parameter to Engine Starter.
For example, if your port number is 12345, run Engine Starter using the following command:
~/.bash_profile
cd <INSTALL_ROOT>/lib
./EngineStarter 12345 &
To stop Engine Starter, use the following command:
ps -ef | grep EngineStarter | grep -v grep | awk '{print $2}' | xargs kill -9
Running the EngineAfter configuring the Engine Manager, manually start the Engine Starter server as described above. You can then run the Engine.
If you used the Setup.sh script to deploy the Engine Manager and skipped some of the sections, any missed steps must be done manually. For example, if you skipped the deployment section, you must perform all engineManager.war deployment steps manually. If you skipped the Engine Starter launching section, you must manually access each one of the worker hosts and run the Engine Starter utility on it manually.
On Linux platforms, the engine is Application Server compatible. You can use a browser to start, stop, and restart the Engine Manager.
Engine Manager Starter Servlet parameters are as follows:
• Command: Start, stop, restart, and status. Restart is not valid if the Engine Manager is not running; start is not valid if the Engine Manager is running. The status

Deploying Demantra on UNIX, Solaris or Linux 7-23
command is valid when the engine is running and shows engine execution status:
• -1 -- working
• 1 -- failed
• 0 -- success
• 2 -- Engine run failed.
If the engine run has failed, run the following command:source~/.bash_profile
The status will be shown in browser after engine launching.
• mode: 1 is for batch mode, 99 is for simulation
• profile_id: 1 is for INIT_PARAMS_1 as override profile
Sample CommandsStart Engine Manager in Batch Mode:
http://<Server>:<port>/<ContextName>/EngineManagerStarterServlet?command=start&mode=1&profile_id=1
Restarting the Engine in Batch mode:
Note: Use this method if the Engine is already running. If the Engine is not running, this command will have no effect.
http://<Application Server Host>:<Application Server Port>/<ContextName>/EngineManagerStarterServlet?command=restart&mode=1&profile_id=1
Stop Engine Manager in Batch Mode:
http://<Server>:<port>/<ContextName>/EngineManagerStarterServlet?command=stop&mode=1&profile_id=1
Stop Engine Manager in Simulation Mode:
http://<Server>:<port>/<ContextName>/EngineManagerStarterServlet?command=start&mode=99&profile_id=1
Restart Engine Manager in Simulation Mode:
http://<Server>:<port>/<ContextName>/EngineManagerStarterServlet?command=restart&mode=99&profile_id=1
Request Engine Run Status (Status = -1 - Engine running. 0 - Engine run succeeded. 1 - Engine run failed.)
http://<Server>:<port>/<ContextName>/EngineManagerStarterServlet?command=status

7-24 Oracle Demantra Installation Guide
Diagnostics ModeIf your engine doesn't execute properly after deployment, the engine can be run in diagnostics mode from your browser as shown in the example below: http://wsilia.il.oracle.com:7001/engineManager/EngineManagerStarterServlet?command=diag
The link to the diagnostics option is provided during deployment.
In the diagnostics mode, Engine Manager checks the following:
• Configured environment variables
• Properly configured and readable ds.ini and Settings.xml files
• Missing dependency libraries
• Communication to the database using the configured ds.ini file
All results are reported to your browser
If there is no missing dependency, all files exist and the connection to the desired schema can be established using the OCCI layer. You can continue using the regular engine run modes.
Engine Log FilesEngine Log files will be created under $ENGINE_ROOT/engine2k directory. Refer to the EngineManager and Engine2k logs.
If the log files don't appear, please see EngineManagerPreRunLog.txt file. This file is created in the Web Application run directory.
• If deploying on WebLogic, this file will be created under $WL_HOME/user_projects/domains/base_domain
• If deploying on Tomcat, this file will be created under $ENGINE_ROOT/bin
Engine TroubleshootingFor more information about Engine Errors, please review EngineManagerPreRunLog.txt file (see "Engine Log Files" for the location of this file, which varies by application server). Also please review Engine and Engine Manager logfiles created under $ENGINE_ROOT/engine2k directory.
The following is a list of known problems and how to resolve them:
Error message "500 Internal Server Error" appears in the browser while running the engine:
• Check that $LD_LIBRARY_PATH variable contains path to $ENGINE_ROOT/lib in ~/.bash_porofile file and in Application Server Settings.

Deploying Demantra on UNIX, Solaris or Linux 7-25
• Check that compat-libstdc-rh62-1.i386.rpm package is installed.
• Restart the application server from the shell with all Environment variables defined.
EngineManager logs are not created under $ENGINE_ROOT/engine2k directory:
• Check that ds.ini file was created.
• Check that TNSName and SID definitions in ds.ini are correct. TNSNAME should point to the host where the database is running.
• Check that there is no tnsnames.ora file under $ORACLE_HOME/network/admin. If the file exists here, delete it.
• Check that the library $ENGINE_ROOT/lib/libociei.so exists.
EngineManager logs are created but the error message "ORA-12514: TNS:listener does not currently know of service requested in connect descriptor" appears in the Engine Manager log:
Check the $ENGINE_ROOT/ds.ini file. The tnsname entry should point to the database host. Enter full database host name. The database entry should point to Database Instance SID.
Engine Manager logs are created, but the error message " ORA-12705: invalid or unknown NLSparameter value specified" appears in Engine manager log:
Check NLS language settings. Set NLS_LANG = AMERICAN_AMERICA.AL32UTF8 environment variable in Application Server environment variables section and in ~/.bash_profiles file.
Engine Manager started but fails and tries to reconnect:
Set AnalyseMDP flag to 0 in INIT_PARAMS_0 Table
SQLLDR-related errors appear in Engine Manager log file.
Verify that $ORACLE_HOME variable points to $ENGINE_ROOT/lib/ORACLE_HOME.
Engine Manager works but fails to run the engine:
• Check that the Engine Starter Utility is running. For example: ps -ef | grep EngineStarter.
• If the engine is running, stop it using the following command: ps -ef | grep EngineStarter | grep -v grep | awk '{print $2}' | xargs kill -9
• Restart Engine Starter: cd $ENGINE_ROOT/lib; ./EngineStarter <portnum> and check that the port number passed to the Engine Starter is the same as specified in $ENGINE_ROOT/bin/Settings.xml file under the EngineUnixPortConfig parameter.
• Restart the Engine from your Web browser (see Sample Commands, page 7-23).

7-26 Oracle Demantra Installation Guide
Engine fails registration on Windows 2008:
In later version of Windows like 2008, user in the Administrators group is assigned two separate tokens. The first token contains all privileges typically awarded to an administrator, and the second is a restricted token similar to what a standard user would receive.
The restricted token needs to be disabled manually by performing the following steps:
1. Click Start, and then click Control Panel.
2. In the Control Panel, click User Accounts.
3. In the User Accounts window, click User Accounts.
4. In the User Accounts tasks window, click Turn User Account Control on or off.
5. If the User Account Control is currently configured in Admin Approval Mode, the User Account Control message appears. Click Continue.
6. Clear the Use User Account Control (UAC) to help protect your computer check box, and then click OK.
7. Click Restart Now to apply the change right away, or click Restart Later and close the User Accounts tasks window.
8. Register the Engine as usual.
Modifying Engine Settings using Engine Administrator on LinuxEngine Administrator is supported only on Windows. However, you can access Engine Administrator to modify engine configuration settings by mapping the directories between the Windows and Linux servers. This section includes instructions about:
• Configuring Samba to Map Directories
• Launching Engine Administrator
Configuring Samba to Map Directories When deploying the engine on Linux, if you want to access Engine Administrator to modify engine configuration settings you must map the directories between the Windows and Linux servers. This mapping is required because Engine Administrator issupported only on Windows. Alternatively, you can edit the settings.xml file on the Linux server. Different functionality is available when using Engine Administrator or editing the XML.
Samba is a Linux utility that is commonly used to map directories across Windows and Linux servers. In most Linux distributions, Samba is a built-in utility and doesn't

Deploying Demantra on UNIX, Solaris or Linux 7-27
require any special installation. When performing Samba configuration, log in as ROOT.
1. Create the password file for Samba based on the system users and passwords file. Run the following:
cat /etc/passwd | mdsmbpasswd.sh > /etc/samba/smbpasswd
2. Edit the Samba configuration file /etc/samba/smb.conf. Set the following:
encrypt password = yes
smb passwd file = /etc/samba/smbpasswd
3. Restart Samba service from SYSTEM > Services.
4. Run Samba graphical interface from SYSTEM > Samba.
5. From the Preferences menu, choose Basic, and then set the workgroup name that the current computer belongs to.
6. From the Preferences menu, choose Security, and then set the following options:
• Authentication Mode to True.
• Encrypt Passwords to Yes.
• Guest Account to a Linux Account that you will access from Microsoft Windows.
7. Define File system share as follows:
1. Click Add Share button.
2. Set Directory to the selected guest user home directory.
3. Share Name to the selected guest user name.
4. Set Writable to True.
5. Set Access to Allow Access to everyone, or select a user from the list.
8. Restart Samba Service. On Windows, map a network drive with supply Linux machine IP address and shared directory path. For example:
\\10.172.244.80\oracle
9. While accessing the map, supply the Linux password for your selected guest user.
The preceding definitions are valid for RedHat and Enterprise Linux machines.
Oracle recommends that you map the engine user home directory to Microsoft

7-28 Oracle Demantra Installation Guide
Windows. Engine files are located under that user's home directory. For example, the engine user on the Linux machine is oracle; map Samba to /home/oracle so that you can access that directory and its subdirectories from Microsoft Windows.
The location of engine installations is $ENGINE_ROOT/bin and $ENGINE_ROOT/lib.
File Settings.xml is in /home/oracle/Engine/bin. To modify engine settings using Engine Administrator on Linux on Microsoft Windows, open the Settings.xml file from Linux through the mapped drive and edit it using any text editor.
Launching Engine AdministratorYou cannot launch the Analytical Engine by calling it from Engine Administrator. You can use the following methods:
• A workflow that calls a shellscript on the Linux machine
• A direct call to the shellscript
The table below shows Engine Administrator functions that are available in a Linux deployment using Windows directory mapping.
Functionality Supported (Yes/No), with Explanation
Define blades and number of engines to be run
Yes
Register the Engine Yes, on the Linux machine
Define Engine profile used during run No, specify in shellscript
Execute Engine in batch or simulation mode No, accomplish in shellscript and specify the node to use
Modify Engine logs and logging levels Yes
Enable loggins of Engine processors by editingXML
Yes
View branch size No
View Engine progress No, because the Engine was not run from Engine Administrator
Modify settings file, XML directory, and schema file path
Yes

Deploying Demantra on UNIX, Solaris or Linux 7-29
Functionality Supported (Yes/No), with Explanation
Create worksheets during specific occurrence No
Define whether TextPro should run No
Define Engine output std or file Yes
Modify path of Engine log Yes
Find available engines No
If the Linux to Windows mapping is not feasible due to technical constraints or organizational security policies, you can edit the engine XMLs to configure the majority of Engine run configurations. The table below shows Engine Administrator functions that are available in a Linux deployment when you are editing the engine XMLs.
Functionality Supported (Yes/No), with Explanation
Define blades and number of engines to be run
Yes
Register the Engine No
Define Engine profile used during run No, specify in shellscript
Execute Engine in batch or simulation mode No, accomplish in shellscript and specify the node to use
Modify Engine logs and logging levels Yes
Enable logging of Engine processors by editing XML
No, edit the XML manually
View branch size No
View Engine progress No, use SQL
Modify settings file, XML directory, and schema file path
Yes, by mapping to the Linux directory

7-30 Oracle Demantra Installation Guide
Functionality Supported (Yes/No), with Explanation
Create worksheets during specific occurrence No
Define whether TextPro should run No
Define Engine output std or file Yes
Modify path of Engine log Yes
Find available engines No
Deploying the Demantra Analytical Engine on SolarisPreliminary Requirements:
• Review Solaris versions supported for the Analytical Engine. See Oracle Demantra Analytical Engine, page 2-8.
• All installations should be accessible for the Engine user.
• Install Oracle Client 10. The analytical engine will not function with Oracle Client 11.
• Not all the necessary utilities are included with the Engine installation. For example, SQLLDR is not part of the installation pack. Instead, the SQLLDR utility isincluded in the Oracle Client installation when you specify a custom installation, and select the Oracle Database Utilities product component.
• Install Java 1.6 or 1.7 (latest version).
To configure the engine on Solaris, perform the following procedures:
• Configure Engine Manager
• Deploy on Application Server
• Run the Engine
Configure the Engine ManagerThe following steps are involved with configuring the Engine Manager:
• Move and Expand Zip Files from Windows

Deploying Demantra on UNIX, Solaris or Linux 7-31
• Configure Variables
• Start Engine Starter
• Create Data Source
Move and Expand Zip Files from WindowsThe engine files must be moved from Windows to Solaris as following:
1. Move Oracle_Demantra_Solaris_Engine.tag.gz file from Windows to Solaris
2. Connect to Solaris (Putty, Telnet, SSH)
3. Gunzip Oracle_Demantra_Solaris_Engine.tar.gz
4. tar svf Oracle_Demantra_Solaris_Engine.tar
5. cd Engine/bin/
6. chmod 755 bin/* lib/* ../tools/*
Configure VariablesRun the ./configureVariables.sh script to update the ~/.bash_profile file with the correct variables. An example:[bin] $ ./configureVariables.shSupply ENGINE_ROOT.Current [/export/home/weblog10/Ilia/Engine]/export/home/weblog10/Danielle/EngineSupply ORACLE_HOME. Current [/export/home/weblog10/OracleClient/Client]/export/home/weblog10/OracleClient/ClientSupply JAVA_HOME to Java 1.6 or Later. Current [/usr/jdk/instances/jdk1.6.0] /usr/jdk/instances/jdk1.6.0
Reparse the environment variables:source ~/.bash_profile
Start Engine Starter[bin] $ cd ../lib/[lib] $ ./EngineStarter 12345 &
where 12345 is a port number defined in $ENGINE_ROOT/bin/Settings.xml in the following section:<Entry> <Key argument="EngineUnixPortConfig"/> <Value type="int" argument="12345"/></Entry><Entry>

7-32 Oracle Demantra Installation Guide
Create Data SourceCreate a data source to be used by the engine by running the createDSInEngineRoot.sh script. Supply the information in italics:[bin] $ ./createDSInEngineRoots.shSupply path to ds_config.sh utility/export/home/weblog10/Danielle/toolsSupply server namemargeSupply TNS namemargeSupply schema namedani_732b43bSupply schema passwdmdpSupply Database (orc9/orc10/orc11)orc11Supply Database Port1521Supply ds.ini file destination FULL path/export/home/weblog10/Danielle/Engine/bin
To execute:./ds_config.sh DBMS=ORA servername=marge Tnsname=marge logid=dani_732b43b logpassword=mdp Database=orc11 DBPorT=1521file=/export/home/weblog10/Danielle/Engine/bin/ds.ini
Oracle Demantra Data Source Configuration Tool
Using JAVA_HOME: /usr/jdk/instances/jdk1.6.0
Check If Got Java Version 1.6.0_XX OR 1.7.0_XX.Current Java Version Supported.
Oracle Demantra Data Source Configuration Process Started...2011-08-25 11:57:04,019 IDT [main] DEBUG appserver.system: Configurationfile loaded>/export/home/weblog10/Danielle/tools/conf/logconf.lcf2011-08-25 11:57:04,023 IDT [main] DEBUG appserver.system: Logs will be dumped to /export/home/weblog10/Danielle/tools/logs/collaborator.log2011-08-25 11:57:04,024 IDT [main] DEBUG appserver.system: Logs will be dumped to/export/home/weblog10/Danielle/tools/logs/integration.log2011-08-25 11:57:04,066 IDT [main] DEBUG appserver.system: The DB Connection details were savedOracle Demantra Data Source Configuration Process Ended...
Deploy on Application ServerEngine Manager can be deployed on WebLogic and Tomcat.
An example on WebLogic:
1. Open browser to WebLogic configuration console: http://brian:7001/console/weblogic:weblogic1

Deploying Demantra on UNIX, Solaris or Linux 7-33
2. Navigate to base_domain > Configuration > Web Application > Archived Real Path Enabled. Should be enabled.
3. Verify that "Archived Real Path" is enabled and then save any changes.
4. Activate the changes (e.g., in the Admin console, click Activate Changes).
5. In the Domain Structure, navigate to Deployments, then click Lock & Edit.-> Install -> select the needed engineManager.war file.
6. Choose to install a new application or module (e.g., click Install).
7. Enter the full directory path to engineManager.war.
8. Select engineManager.war, and then click Next.
9. Choose to install the deployment as an application, and then click Next.
10. Enter a name for the deployment (e.g. "engineManager"), and then click Finish.
11. Activate the changes (e.g. in the Admin console, click Activate Changes).
12. In Domain Structure, navigate to Deployments, then click Lock & Edit.
13. Select the engineManager Web application from the list of available deployments, then select Start > Servicing All Requests.
14. Start the deployment (e.g. click Yes), and then release the configuration (e.g. click Release Configuration).
15. When the application status = Active, Engine Manager is ready for use. Refer to the steps below to complete the deployment.
Run the EngineTo start the engine:http://brian:7001/engineManager/EngineManagerStarterServlet?command=start&mode=1&profile_id=1
To start the simulation engine:http://brian:7001/engineManager/EngineManagerStarterServlet?command=start&mode=99&profile_id=99
To get the current run status:http://brian:7001/engineManager/EngineManagerStarterServlet?command=status
To stop an engine run:http://brian:7001/engineManager/EngineManagerStarterServlet?command=stop


Configuring Demantra Applications 8-1
8Configuring Demantra Applications
This chapter covers the following topics:
• Updating Settlement Levels for Oracle Demantra Deductions and Settlement Management (DSM)
• Configure Promotion Optimization (PMO) on Linux (Optional)
Updating Settlement Levels for Oracle Demantra Deductions and Settlement Management (DSM)
Oracle Demantra Deductions and Settlement Management associates settlements with an item and a location level. It ships configured to an existing item and location level. If you want to change this information, you must run the procedure API_CONFIG_SETTLEMENT.
This procedure performs the following tasks:
• Updates the item and location levels with which settlements should be associated (by updating the parameters SettlementLocationExtension and SettlementProductExtension)
• Upgrades the Settlement Location alias level to point to the new location level.
• Ensures that all standard procedures reflect the new settlement levels.
For details, see the Oracle Demantra Implementation Guide > Configuring DSM > Setting up Database Structures.
Configure Promotion Optimization (PMO) on Linux (Optional)If you want to run the Promotion Optimization process on Linux (instead of on Microsoft Windows):
• Append an additional value to parameter LD_LIBRARY_PATH. Append

8-2 Oracle Demantra Installation Guide
<application_root>/optimization/dll/x86_linux32.
• Set the value of ILJCONFIG to HandleTableSize=1
• Set the value of ODMS_JVM_LIBRARY_OVERRIDE to /lib/i386/server/libjvm.so
For more information about the Linux versions supported, please see Trade Promotion Optimization (TPO) Engine, page 2-9.

Starting Oracle Demantra 9-1
9Starting Oracle Demantra
This chapter covers the following topics:
• Starting the Web-based Products
• Demantra URLs
• Starting the Desktop Products
Starting the Web-based ProductsTo verify the installation of the Web-based products, start the Web server and log onto each Web product.
Starting the Web ServerFor details on how to start the Web server, refer to your Web server documentation.
Logging onto the Web-based ProductsTo verify that the Web-based products are running correctly, log onto some of the URLslisted in Demantra URLs. For a short test, perform the following:
1. Open Microsoft Internet Explorer or Mozilla Firefox and enter the URL for Collaborator Workbench.
2. In the Log On dialog box, enter the component owner username dm and its password.
3. You can change the application language display from the drop-down field. Demantra remembers your language choice for future use on the same computer.
4. Click Login.
5. In My Worksheets, click any worksheet. This launches the Oracle Demantra

9-2 Oracle Demantra Installation Guide
Worksheets Window applet.
6. Optionally, click Yes if you want the system to always trust content from this source.
Demantra URLsYou can use uniform resource locators (URLs) to access most Oracle Demantra functions.
See the Oracle Demantra Implementation Guide for more information.
Starting the Desktop ProductsYou should also try starting at least one desktop product (such as the Business Modeler)to be sure it comes up. For example, if you chose to put product shortcuts on the Startupmenu when running the Demantra installer, do the following:
1. On the Start menu, click Programs.
2. Click Demantra > Demantra Spectrum release.
3. Choose the required Oracle Demantra product.
4. Enter user name and password of one of the component owners in the database (such as dm/password defined during installation).

Uninstalling Oracle Demantra 10-1
10Uninstalling Oracle Demantra
This chapter covers the following topics:
• Uninstalling Demantra
Uninstalling DemantraThe Demantra software is not listed in the Control Panel > Add/Remove Programs utility. If you plan to reinstall Demantra, you can overwrite your current install.
You can either use a freeware application that can detect and uninstall the Demantra program, or you can do the following to manually remove Demantra from your system:
1. Make sure that none of the Oracle Demantra software is running, including all background items such as the Analytical Engine.
2. Remove Oracle software from the system Path variable so shown below.
• On the Windows Start menu, click Settings > Control Panel > System.
• Click System.
• Select the Advanced tab.
• Click Environment Variables.
• In the System Variables section, click Path and then click Edit.
• Carefully remove any Oracle Demantra additions to this variable, leaving other parts unchanged.
3. Manually delete the Oracle Demantra files from the machine.
4. In the registry, search for the HKEY_CURRENT_USER\Software key for Demantra and delete it.

10-2 Oracle Demantra Installation Guide
5. Log in to the database as the database administrator and delete the Oracle Demantra database user.
6. Delete any Demantra shortcuts from the desktop or program groups.

Tips 11-1
11Tips
This chapter covers the following topics:
• About Demantra Configuration Settings
• Key Settings Controlled by the Installer
• Redirecting Demantra to a Different Database
• Java Tips
• Tomcat Tips
• Running the Engine from Workflow
• Data Cleanup
About Demantra Configuration SettingsThe core Oracle Demantra configuration details are stored in multiple locations:
• The desktop executables (Business Modeler, Demand Planner, Analytical Engine, and so on) get the configuration information from file Demantra_root\Demand Planner\Security Management\ds.ini. Parts of this are encrypted and must be edited with a utility provided by Oracle Demantra (encryption.exe); see RedirectingDemantra to a Different Database, page 11-4.
• The Web-based products get configuration information from the APS_PARAMS table (accessed using Business Modeler) that is on the machine where the Web server is installed.
• Other settings are stored in the Oracle Demantra database, in the form of parameters. You can also edit these through Business Modeler.
• The Web-based products also use configuration information in the XML files.

11-2 Oracle Demantra Installation Guide
Key Settings Controlled by the InstallerThis section summarizes the key settings that the Installer controls and indicates where those settings are stored. In this table, *** means that it is encrypted in the ds.ini file. NAmeans that the item is not applicable.
Installer Screen Installer Option in APS_PARAMS Table
in ds.ini
DBA Information DBA username (to access database as DBA and load data)
NA NA
DBA Information Password NA NA
DBA Information Password NA Tnsname
Configure Oracle Database User
Database type NA DB Type
Configure Oracle Database User
User (to store Oracle Demantra data)
DBType LogID***
Configure Oracle Database User
Password DBUser LogPassword***
Configure JDBC Connection*
Server name (host machine or IP address on which database resides)
DBName ServerName
Configure JDBC Connection*
Port DBPort DBPort
Configure JDBC Connection*
Oracle SID DBName DBName
Specify Web Address Root address and virtual directory
server.generalurl NA
Note: The Demantra installer automatically configures the JDBC connection only for the Apache Jakarta Tomcat application server. If you are deploying Demantra with WebLogic or WebSphere, see

Tips 11-3
Configure JDBC Connection, page 3-5.
APSMode ParameterThe APSMode parameter (stored only in the ds.ini file) controls whether to use the Stand-Alone Integration Tool (aps.exe). This tool consists of a subset of the APS, packaged as an executable file.
The Installer automatically sets this parameter. This parameter is defined as follows:
• 0: Do not use Stand-Alone Integration Tool. When you use encryption.exe to edit ds.ini, only the General tab is displayed.
• 1: Use the Stand-Alone Integration Tool (Demantra_root/Demand Planner/Integration/aps.exe). Also, when you use encryption.exe to edit ds.ini, the ASP Stand Alone tab is displayed, in addition to the General tab.
For information on using aps.exe, refer to the Oracle Demantra Implementation Guide.
Other ParametersThe Installer also sets parameters for the following purposes:
• The tablespaces that Oracle Demantra should use.
• The configuration of the administrator email account.
For these parameters, see the fine-tuning information in the Oracle Demantra Implementation Guide.
JAVA_HOME System Environment VariableIf the client machine does not have JDK version 1.6 or 1.7 installed, the Installer prompts you to download and install it. After installation, set JAVA_HOME to the JDK installation directory (for example, C:\Program Files\Java\jdk1.6.0_16).
Other Configuration FilesThe Installer also makes edits to the files mentioned below. If you make a change to a port or protocol or other, you must be sure to make the change in the following files:
• Demantra_root/Collaborator/virtual_directory/WEB-INF/web.xml
• The internet shortcuts in directory Demantra_root/Collaborator/Links.
• If you are using Tomcat: Demantra_root/Collaborator/Tomcat/conf/ server.xml (refers to the Demantra host and port, as well as the path to the Demantra virtual

11-4 Oracle Demantra Installation Guide
directory).
Note: When you start Tomcat, Tomcat creates or updates the file Demantra_root/Collaborator/Tomcat/conf/Catalina/localhost/ virtual_directory.xml, as needed.
• If you are using WebSphere:
• WAS_HOME/installedApps/host_name/demantra.war/demantra.war/WEB-INF/web.xml
• WAS_HOME/config/cells/host_name/applications/demantra.war/ deployments/demantra/demantra.war/WEB-INF/web.xml
Back up any file before making edits, and then carefully search and replace as needed.
Redirecting Demantra to a Different DatabaseIn Demantra 7.3.0 and later, the database connection (and data source configuration) is controlled by the Java Naming Directory Interface (JNDI).
If you are using the Apache Jakarta Tomcat application server, perform the following steps to redirect Demantra to a different database:
1. Using a text editor, open the file server.xml. This file is located in Demantra_install\Collaborator\Tomcat\conf.
2. Locate the section that begins with "Resource name="jdbc/DemantraDS."
3. Change the "url" parameter to specify the host name and SID of the new database. For example: url="jdbc:oracle:thin:@DB_hostname.mycompany.com:1521:DB_SID"
4. Change the "username" and "password" parameters as required. For example: username="demantra_prod1" password="DP123"
5. Save your changes.
6. Restart Tomcat.
If you are not using Apache Jakarta Tomcat, refer to your application server's version-specific documentation to learn how to modify the database hostname, username, password, and SID (system identifier) specified by the JNDI.
Java TipsThis section contains background information about how Oracle Demantra uses Java.

Tips 11-5
The Oracle Demantra Web client (Demand Planner Web, Promotion Effectiveness, or Settlement Management) uses JRE. Each machine that runs the Web client should have JRE, which Demantra automatically downloads when necessary.
Note: JDK is needed:
• Only if you are using Tomcat.
• On the machine that runs Tomcat, not on the client machines.
Java Versions and Older Demantra InstallationsIn theory, JRE versions are generally backwards compatible. If you are using an older version of the Web client, you can use the same JRE as the current Demantra. This means that, from a single machine, you can log into different Oracle Demantra installations, even if they use different versions of Java. In such a case, each Oracle Demantra version is likely to have a different version of the JAR files.
Tips for a Clean Java InstallationIt is possible, but tricky, to keep multiple versions of Java running on a single machine. Oracle recommends that you carefully remove all Java versions other than the current version used by Oracle Demantra. To remove them, use the Add or Remove Programs from the Control Panel.
It is also useful to check your PATH system environment variable. Java is added to this, and you should make sure it includes only the Java that you intend to use. Note that Oracle provides Java as well; you do not need to uninstall these, but you should probably remove those versions from the PATH system environment variable.
Finally, you should make sure that Internet Explorer is configured to use the correct Java version as follows:
1. Click Tools > Internet Options.
2. Click the Advanced tab.
3. Within the Java item, make sure that the correct version of Java is selected for use with applets, as specified in this manual.
Out of Memory Error MessageVerify memory settings:
1. From the Windows Start menu, choose Settings, Control Panel, and then Java. The Java Control Panel dialog box appears.

11-6 Oracle Demantra Installation Guide
2. Click the Java Tab.
3. From the Java Applet Runtime Settings section, click View.
4. Verify that the value of the field Java Runtime Parameters is at least -Xmx256M and is based on the client machine hardware/RAM capacity. Oracle recommends value -Xmx512M for heavy-duty client side use.
Tomcat TipsOracle Demantra supports Tomcat Web Server version 5.5 and higher and requires the latest version of Java 1.6 or 1.7. For this release, Oracle tested with Apache Jakarta Tomcat 6.x.
Installing Tomcat in a Demonstration EnvironmentThis section briefly notes the differences between installing Tomcat in a production environment and installing Tomcat in a demonstration environment.
1. Apache Jakarta Tomcat 6.0 requires Sun JDK 1.6 or 1.7, latest version. You can get it for free from http://java.com. You do not have to pre-install it, but you should makesure you do not have an earlier version of JRE on the machine. If you do, uninstall it.
2. Run the Installer as usual, except choose Demo for Web Server type.
3. If prompted, specify the desired value for the JAVA_HOME system environment variable. The Installer prompts you for this if more than one Java is installed on the machine.
Changing the Default Tomcat PortThe Tomcat default port is 8080. The Installer does not change the default configuration for the port. This must be done manually in the file Demantra_root/ Collaborator/Tomcat/conf/server.xml.
Note: If you do use the 8080 port, note that the Oracle XDB database user tries to use that port. See troubleshooting information in the Oracle Demantra Implementation Guide.
Starting the Server if Using Tomcat in a Demonstration EnvironmentIf you chose the Demo Web Server type for a demonstration environment, the Installer adds Start menu options to start and stop Tomcat. To start Tomcat:

Tips 11-7
1. From the Windows Start menu, select Programs.
2. Click Demantra > Demantra Spectrum release > Start Web Server.
Clearing the Tomcat CacheClear the Tomcat cache after you upgrade your Oracle Demantra version. To clear the Tomcat cache, delete the directory Demantra_root/Collaborator/ Tomcat/work/standalone/localhost. You may need to do this if you receive the Object Error message, discussed in the Oracle Demantra Implementation Guide.
Renaming the Installation Root DirectoryIt is safest to reinstall Oracle Demantra rather than to rename the root directory where itis installed. However, if you are using Tomcat, you can rename the Oracle Demantra root directory and redirect Tomcat. To redirect Tomcat, edit the file Demantra_root/Collaborator/Tomcat/conf/server.xml. In this file, edit the parameter docBase. This parameter should specify the full path to the Oracle Demantra virtual directory.
Writing the Tomcat Log to a FileBy default, the Tomcat log is written to the console. To reconfigure Tomcat to write its log to a file, edit the file Demantra_root/Collaborator/Tomcat/conf/server.xml.
Find the Logger section and edit it as follows:
<Logger name="tc_log"
path="logs/tomcat.log"
verbosityLevel = "INFORMATION" /> f
Running the Engine from WorkflowIf you run Engine2k from a workflow, you may encounter the following message: "The server process could not be started because the configured identity is incorrect. Check the username and password."
The error message comes from DCOM. Engine2k uses Component Services that defaults to using the currently logged on user (Interactive User). The message occurs when a user is not logged into the server. When a user is not logged into the server, youcan specify a user account for the packages in Component Services with admin permissions.
1. Select Start > Run. Type dcomcnfg in the Open field, and click OK.

11-8 Oracle Demantra Installation Guide
2. Expand Component Services > Computers > My Computer > DCOM Config.
3. Right-click Engine2k and select Properties.
4. Select the Identity tab, select This user option (if not already selected), input the correct user name and password.

Tips 11-9
Data CleanupThe data cleanup database package facilitates cleansing of extraneous data. This procedure is only intended for use by experienced consultants and should never be run on a production schema. It can be used to remove data from small, test systems prior to a full production data load.
It performs cleanup of the following:
• Temporary objects
• Level data
• Integration-related settings
Running Data CleanupWarning: Back up the schema before running this package.

11-10 Oracle Demantra Installation Guide
Before running the package:
• Make sure there are no active connections to the schema before executing these procedures.
• Make sure the application server is shutdown before executing these procedures.
After running the package, issue a COMMIT to make sure all transactions are committed.
Notes about running the package:
• Alias levels may create infinite loops on the level tree; currently the process will stop deleting data once it looped more times than the number of levels in the system.
• There are some levels that are protected from being deleted, see table PROTECTED_OBJECTS in the schema.
• Objects that are not currently cleaned up are Worksheets, Users, Groups, Integration Profiles, Series, Series Groups, and Workflows.
Cleaning Up Temporary ObjectsThis also calls clean_schema_int.
Procedure:
DATA_CLEANUP.clean_schema_temps(commit_point NUMBER DEFAULT DEFAULT_COMMIT_POINT );
Demantra objects affected:
DB_EXCEPTION_LOG, INTEG_STATUS, AUDIT_PROFILES, AUDIT_TRAIL, AUDIT_PROFILE_USERS, E1_SALES, E1_BRANCH, E1_CUSTOMER, E1_ITEM, E1_ITEM_BRANCH, T_SRC_ITEM_TMPL, T_SRC_ITEM_TMPL_ERR, T_SRC_LOC_TMPL, T_SRC_LOC_TMPL_ERR, T_SRC_SALES_TMPL, T_SRC_LOC_TMPL_ERR
DROP_TEMPS(0) is the standard procedure to drop temporary tables created by worksheet runs. See additional objects in clean_schema_int.
Command:
EXECUTE DATA_CLEANUP.CLEAN_SCHEMA_TEMPS; COMMIT;
Cleaning Up Level Data
This should not delete the default member 0 in each level.
Procedure:
DATA_CLEANUP.clean_level_data( commit_point NUMBER DEFAULT DEFAULT_COMMIT_POINT );
Demantra objects affected:

Tips 11-11
SALES_DATA, MDP_MATRIX and the General Level data and matrix tables PROMOTION, PROMOTION_DATA and PROMOTION_MATRIX.
Recursively deletes all members for level data except protected levels in PROTECTED_OBJECTS table and the default member.
Command:
EXECUTE DATA_CLEANUP.CLEAN_LEVEL_DATA; COMMIT;
Cleaning Up Integration-Related SettingsThese are mainly created by Oracle e-Business Suite collections.
Procedure:
DATA_CLEANUP.clean_schema_int(commit_point NUMBER DEFAULT DEFAULT_COMMIT_POINT);
Oracle Demantra objects affected:
DISPLAY_UNITS, REAL_VALUES (only update), DCM_PRODUCTS_UNITS, DCM_PRODUCTS_INDEX, INDEXES_FOR_UNITS, AVAIL_UNITS
Deletes levels from TGROUP_RES and removes the column from INPUTS.
Command:
EXECUTE DATA_CLEANUP.CLEAN_SCHEMA_INT; COMMIT;


Index-1
Index
Aadministrative utilities, 2-8administrator account, 3-7analytical engine, 2-8Apple Mac OS X limitations, 2-3APS_PARAMS, 6-8APSMode parameter, 11-3
BBAL, 5-5browser
setting locale, 6-8Business Application Language, 5-5
Cchecklist
basic preparation, 3-10upgrade preparation, 3-13
client requirements, 2-132-bit Oracle client, 2-3
configuration settings, 11-1Configure to Order
upgrading software and data, 5-10configureVariables.sh script, 7-12
Linux, 7-13Solaris, 7-31
createDSInEngineRoot.sh scriptSolaris, 7-31
createDSIniEngineRoot.sh scriptLinux, 7-20
customizations, 5-3
Ddatabase upgrade
verifying, 5-5data cleanup, 11-9DBA information, 3-3Deductions and Settlement Management
configuring the database, 6-2updating settlement levels, 8-1
Demantra web platform serverconfiguring, 6-5
desktop productsstarting, 9-2
Eengine
running from workflow, 11-7Engine Administrator
running on Linux, 7-26EngineManagerIntoTomcat.sh script, 7-15EngineManagerIntoWeblogic.sh script, 7-16
FFirefox
startup configuration setting, 6-7firewalls, 6-4
Hhardware architecture, 2-10
distributed engine, 2-10two-tier and multi-tier, 2-10
Index-2
hardware requirementsadministrative utilities, 2-14analytical engine, 2-13application server, 2-13database server, 2-12multi-tier, 2-12servers, 2-11two-tier solution, 2-11
Iinit_params_table_name, 5-9
modifying, 5-9install
key settings, 11-2Linux, 7-1Solaris, 7-1UNIX, 7-1
installerabout, 4-1administrator account, 3-7database options, 3-6database user, 3-4DBA information, 3-3jdbc connection, 3-5log configuration, 3-8running, 4-4tablespaces, 3-7web address, 3-7worksheet, 3-1
Jjava
tips, 11-4JAVA_HOME, 11-3JDBC connection, 3-5JD Edwards EnterpriseOne integration, 5-2JRE
changing client version, 5-1
Llanguage
upgrade, 5-3Linux
configureVariables.sh script, 7-12, 7-13configuring data source file, 7-13
configuring Engine on remote host, 7-19configuring Engine System Parameters, 7-21configuring promotional optimization, 8-1configuring Samba, 7-26createDSIniEngineRoot.sh script, 7-20deploy engine, 7-7diagnostics mode, 7-24engine log files, 7-24EngineManagerIntoTomcat.sh script, 7-15EngineManagerIntoWeblogic.sh script, 7-16engine troubleshooting, 7-24install, 7-1linking libraries, 7-9manual deployment for WebSphere, 7-19restartEngStarter.sh script, 7-14restartEngStartersAll.sh script, 7-14running Engine Administrator, 7-26setting environment variables, 7-12Settings.xml file, 7-14Setup.sh script, 7-10starting Engine, 7-21starting Engine Starter daemons, 7-13Tomcat automated deployment, 7-10WebLogic automated deployment, 7-10
logconfiguration, 3-8
log files, 5-2
Nnetwork requirements, 2-14
OOracle 12c, 2-6Oracle database
streamlining, 6-1
Pparameter
APSMode, 11-3parameters, 5-2, 6-5patches
high priority, 4-27pluggable databases, 2-6preparation checklist, 3-10Promotion Optimization

Index-3
configuring on Linux, 8-1
Rredirecting to a different database, 11-4remote system
configuration, 6-8restartEngStarter.sh script, 7-14restartEngStartersAll.sh script, 7-14revoke Demantra user privileges, 5-2
SSamba
configuration, 7-26server requirements
database servers, 2-7Demantra web platform server, 2-4software, 2-4
Service Parts Forecastingrolling profile group, 5-9upgrading software and data to support, 5-8
Settings.xmlSolaris, 7-31
Settings.xml fileLinux, 7-14
settlement levels, 8-1Setup.sh script, 7-10Solaris
configure Engine Manager, 7-30configure variables, 7-31configureVariables.sh script, 7-31create data source, 7-31createDSInEngineRoot.sh script, 7-31deploying engine, 7-30install, 7-1running Engine, 7-33starting EngineStarter, 7-31
SSL, 6-4standalone integration tool
on UNIX, 7-4starting desktop products, 9-2starting web-based products, 9-1SYS_GRANTS.SQL script, 6-3system parameters
Linux, 7-21
Ttablespaces, 3-7Tomcat tips, 11-6TPO engine, 2-9
Uuninstalling, 10-1UNIX
configure web application, 7-3install, 7-1standalone integration tool, 7-4
upgrade7.1 and higher, 5-6from before 7.1, 5-12preparation checklist, 3-13
urls, 9-2
Wweb address, 3-7web-based products
starting, 9-1web client
configuring, 6-4WebSphere
configuring, 6-7Windows NT
first-time install script, 6-7workflow
running engine, 11-7
