oracle approvals management setup and testing process.docx
TRANSCRIPT
Oracle Approvals Management (AME) setup and testing processPOSTED BY ABHIJIT ⋅ MARCH 31, 2012 ⋅ 34 COMMENTSFILED UNDER ACTION TYPE, AME: INSTALLED, BUSINESS ANALYST, CONDITION, RULES, SUPERVISORY
Oracle Approvals Management or AME, as it is called in general, is a module of Oracle
Applications that contains the hierarchy list for all seeded/standard workflows. We can
configure individual approval lists for each workflow in this module. To enable the workflows
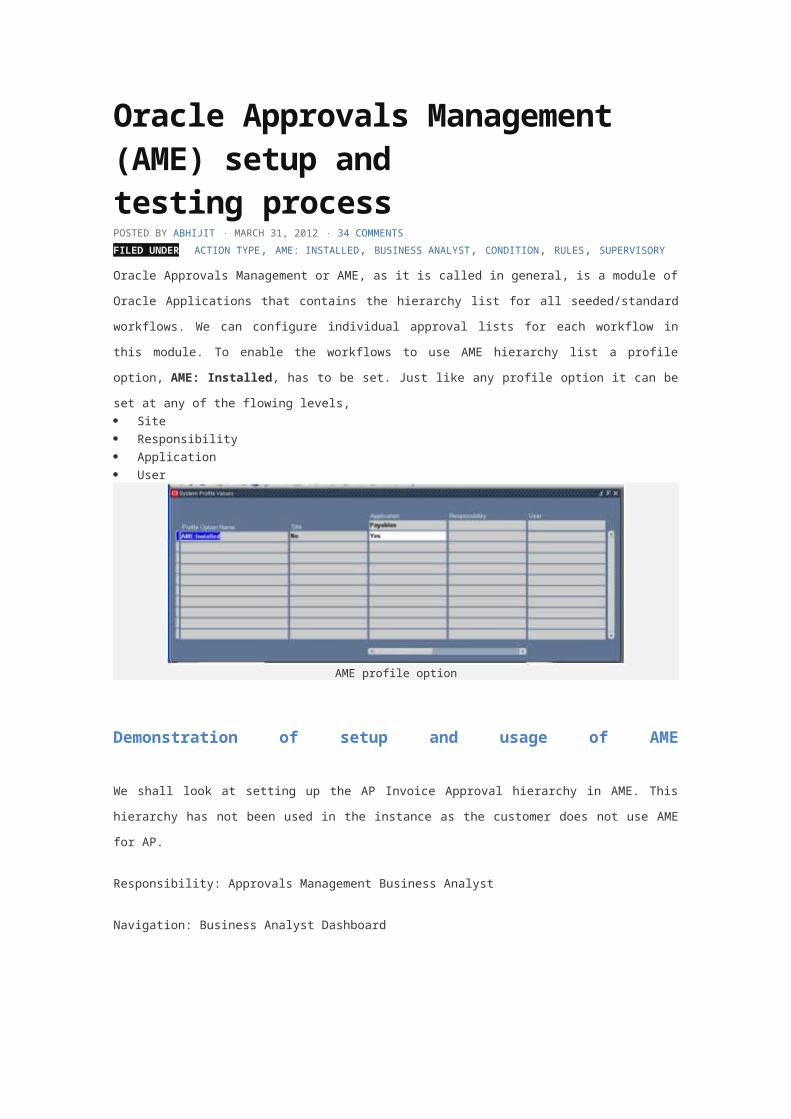
to use AME hierarchy list a profile option, AME: Installed, has to be set. Just like any profile
option it can be set at any of the flowing levels,
Site
Responsibility
Application
User
AME profile option
Demonstration of setup and usage of AME
We shall look at setting up the AP Invoice Approval hierarchy in AME. This hierarchy has not
been used in the instance as the customer does not use AME for AP.
Responsibility: Approvals Management Business Analyst
Navigation: Business Analyst Dashboard

Enter %invoice% and press tab
Attributes
Click on Attributes
We are selecting Attribute, SUPPLIER_INVOICE_AMOUNT. Click Next on the attributes are to
find the this attribute
Clicking on this attribute gives the details of the attribute,

You can see how Oracle derives the value of the attribute. Let us go back to the Attributes
screen by clicking Return to Attributes link at the bottom left of the screen.
If you want to modify the logic that Oracle uses on this attribute you can click on Update icon
(the pencil icon) for this attribute.
Note the input parameter for the query. The condition, ai.invoice_id = :transactionId, means
that the input to the AME rule will be validated against the invoice_id from the ap_invoices_all
table. Thus the input into AME rule for this transaction will be invoice_id. We shall use this for
testing AME later on. Make the change to the query and press Apply button.
Conditions
We shall now add a condition. Click on Conditions.

Click on Create button and select,
Condition Type: Ordinary
Attribute: SUPPLIER_INVOICE_AMOUNT
Let’s add the condition that an invoice should be sent to 1 selected approver if the invoice
amount is between AED 1000 and AED 5000.
Use the drop down lists to create the condition. Click Apply.

You can see the confirmation message on top that the condition has been added to the list.
Action Types
Now we have created a condition, we have to create an Action Type. Click on Action
Types link on the top menu.
We will select an existing Action Type. Click Use Existing Action Type button.

Click on the Next button until you see “Supervisory level“. Select this Action Type
Click on Continue button.
Click Finish button.
Rules
The Action Type is now created. We now need to create a Rule. Click on the Rules tab to the
top right menu.
Click on Create button to create a new rule.
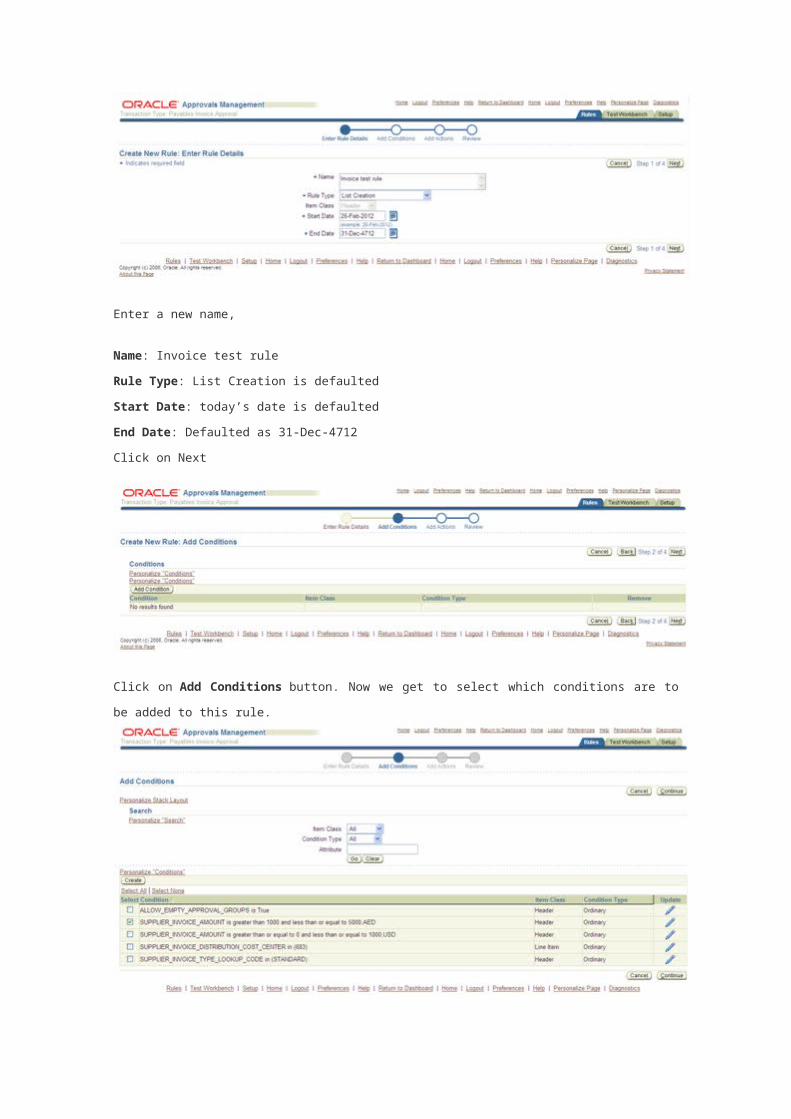
Enter a new name,
Name: Invoice test rule
Rule Type: List Creation is defaulted
Start Date: today’s date is defaulted
End Date: Defaulted as 31-Dec-4712
Click on Next
Click on Add Conditions button. Now we get to select which conditions are to be added to
this rule.

Let us select the condition we created named, “SUPPLIER_INVOICE_AMOUNT is greater than
1000 and less than or equal to 5000,AED“. Select this condition and click Continue button.
Check the details and click on Next
Action Type is populated automatically as this is the Action Type that was selected earlier
for this transaction type. Select an Action from the list of values. Select the Action from the
List of Values.

We select “Requires approvals up to the first two superiors“
Click Next
Review and click Finish

Now the rule is ready to be tested and deployed.
Test the AME setup
Let us test the rule before we start using it in the transaction.
First we shall create a test invoice for testing the AME rule.
Navigation: Payables Administrator
Navigation: Invoices > Entry > Invoices
We have put a condition in AME for currency, AED, and amount between 1000 and 5000.
Hence we have created an invoice with the following details,
Invoice number: TEST-AME
Invoice currency: AED
Invoice amount: 1500
Go to back to Business Analyst Dashboard in Approvals Management Business Analyst
responsibility.

Click on Test icon corresponding to Payables Invoice Approval transaction type.
Click on Run Real Transaction Test.
Enter the transaction id 720374. This is the invoice_id from the ap_invoices_all table
(explained in Attributes section above). The invoice amount is between AED 1000 and AED
5000, (AED1500 for the invoice we have created) i.e. as per the condition we have set in
AME.

Click Go
Now the AME transaction data is shown on this page. We also have a warning message from
Oracle. The message is “The Line Item attribute
SUPPLIER_INVOICE_DISTRIBUTION_ASSETS_TRACKING_FLAG has invalid usage for
item 278866“. Approver list may not be generated if this attribute used in
conditions”.
We need to look into the
attribute SUPPLIER_INVOICE_DISTRIBUTION_ASSETS_TRACKING_FLAG.
Let us check this attribute.
Click on Setup tab on the top menu. Then click on Attributes underneath the top
menu. Select the attribute by entering the name in Search form in the middle of
the form.

Click Update
Select the query from the Value field and paste it in SQL.
123456
SELECT assets_tracking_flag FROM ap_invoice_distributions_all WHERE invoice_id = :transactionid AND invoice_distribution_id IN (SELECT invoice_distribution_id FROM ap_invoice_distributions_all WHERE invoice_id = :transactionid)ORDER BY invoice_distribution_id
Execute the sql and pass the invoice_id, 130384 (that was being used for the AME test).
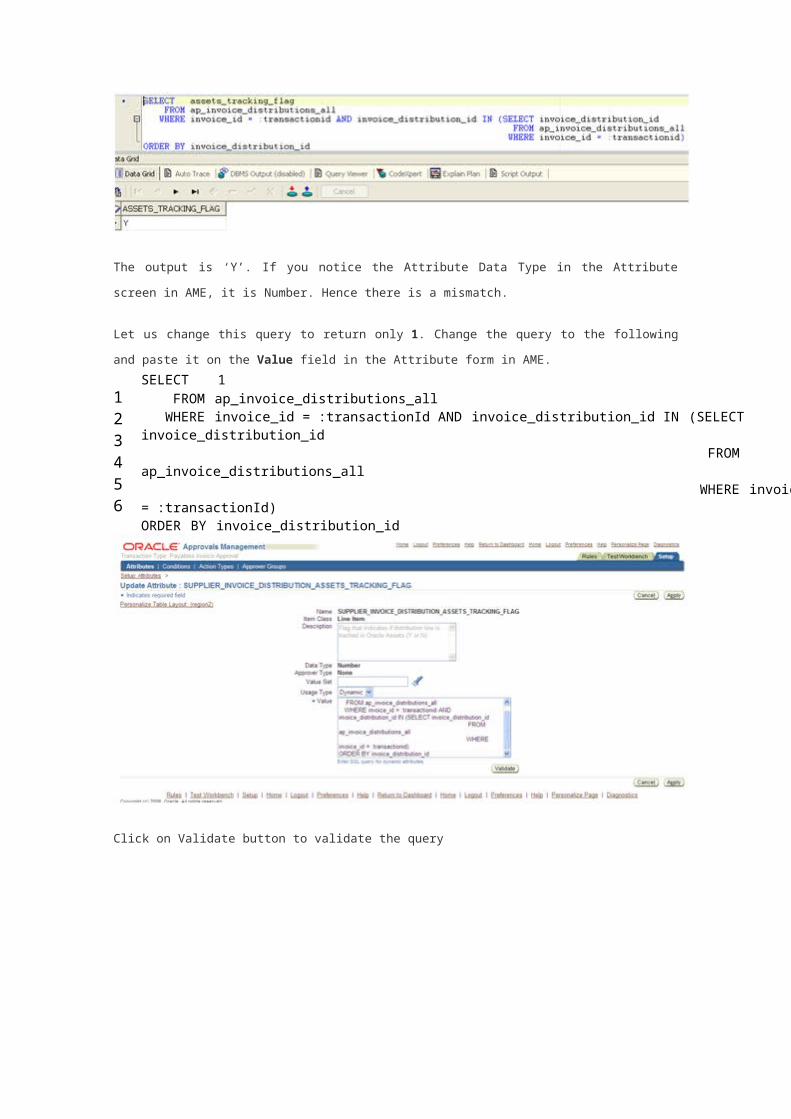
The output is ‘Y’. If you notice the Attribute Data Type in the Attribute screen in AME, it is
Number. Hence there is a mismatch.
Let us change this query to return only 1. Change the query to the following and paste it on
the Value field in the Attribute form in AME.
123456
SELECT 1 FROM ap_invoice_distributions_all WHERE invoice_id = :transactionId AND invoice_distribution_id IN (SELECT invoice_distribution_id FROM ap_invoice_distributions_all WHERE invoice_id = :transactionId)ORDER BY invoice_distribution_id
Click on Validate button to validate the query

The message on top shows that the query is valid. Click on Apply. Go back to the Test
Workbench page by clicking on Test Workbench tab on the top right menu. Click on Run
Real Transaction Test (1) button.
Enter the same transaction Id, 130384, and click on Go.
Click on Run Test Case (2) button.
Oracle throws an error, “This transaction’s requestor lacks a person ID, so AME cannot
locate the requestor’s supervisor to begin the chain of authority“. This means
the requester_id field has to be populated in the table.
Let us populate the requester_id field for this invoice. For demonstration we shall perform
this action using an update statement. Go back to the AP invoices form and query for the
invoice. Click on Folder > Show field. Query for Re%

Select Requester from the value set.
Set the value for Requester. This can be any active employee. The hierarchy of this
employee will be used up to 2 levels.
Save the form. Go back to Test Workbench in AME. Enter Transaction Id: 720374. Click
on Run Test Case (1) button.

Now click on Run Test Case (2) button
Now the approver list comes up for AME as the requester has been set for the invoice.
We can get AME rule details by clicking on the + or Show buttons.

We get to see the AME rule information. Now by clicking Show button for the 2 nd approver, i.e.
the approver on top.
Now check the 1st approver
The AME rule is now setup. Once the Invoice is sent for approval after setting the requester
name the flow will be similar to what we tested now. The same logic applies to all AME
approval rules.
We have used a very simple example to illustrate setting up AME rules. The same method is
used to create AME rules for all transactions. Certain setup options have not been used, like
Approval Groups, etc. Once AME setup is clear using the extra options will be very easy.
We have tested the approval list for the AP invoice workflow through AME. Once we send the
invoice for approval, the workflow will be executed and the approval notifications will be sent
in the same hierarchy.