oracle 10gr2 rac on vmware
DESCRIPTION
In this Document I will cover step by step Oracle RAC installation and configuration on single laptop/desktop using VMWare Server (using two virtual machines, virtual network cards and virtual shared disk for Oracle RAC database shared files system).TRANSCRIPT
1
Oracle10gR2 RAC Installation on VMWare
Author: Ramesh S RajCreation Date: June 13, 2010Last Updated:
2
Table of ContentsIntroduction .................................................................3
Download Software ...........................................................4
VMware Server Installation ..................................................4
Virtual Machine Setup .......................................................4
Create Shared Disks/Virtual Network .........................................45
Configure Virtual Disks ....................................................45
Configure Virtual Network ..................................................59
Format and configure the Virtual Disks .....................................65
Clone the Virtual Machine ...................................................69
Configure User Equivalency .................................................78
Create RSA and DSA key on each node ........................................78
Add keys to authorized key file (authorized_keys) ..........................79
Install Clusterware ........................................................81
Create an ASM Instance and Install the Database Software ..................104
Install and configure Oracle Home and Database ............................112
Post Installation Check. ...................................................128
TroubleShooting ............................................................131
Oracle Clusterware Files Issues ...........................................131
Cluster Verification Utility ..............................................131
VLM Window Size on Red Hat Enterprise Linux 4.0 ...........................132
Oracle XML Developer's Kit Compiler Support ...............................132
Link Error During genorasdksh on Red Hat Enterprise Linux 4.0 .............132
Removing Metrics for Wait Classes Removes Them Permanently ..............132
SRVCTL and VIPCA Utilities Set the LD_ASSUME_KERNEL Parameter .............132
Mapping of 127.0.0.2 to the Local Hostname ..............................133
Installation, Configuration, and Upgrade Issues ............................134
Oracle Universal Installer Operating System Prerequisite Check on SUSE LinuxEnterprise Server 10 ....................................................134
Installing Oracle Cluster Ready Services on SUSE Linux Enterprise Server 10..........................................................................134
Adding a Node to a Shared Oracle Clusterware Configuration ................135
Installing Enterprise Security Manager ....................................135
Upgrading Oracle Clusterware 10.1.x to Oracle Clusterware 10.2 ............135
extjob Executable Required Directory Permissions ........................135
Modifying a Virtual IP Address Node Application ...........................135
Raw Devices on Red Hat Enterprise Linux 4.0 ...............................136
Reference ..................................................................137
3
Introduction
In this Document I will cover step by step Oracle RAC installation andconfiguration on single laptop/desktop using VMWare Server (using two virtualmachines, virtual network cards and virtual shared disk for Oracle RAC databaseshared files system).
One of the biggest obstacles preventing people from setting up test RACenvironments is the requirement for shared storage. In a productionenvironment, shared storage is often provided by a SAN or high-end NAS device,but both of these options are very expensive when all you want to do is getsome experience installing and using RAC. A cheaper alternative is to use aFireWire disk enclosure to allow two machines to access the same disk(s), butthat still costs money and requires two servers. A third option is to useVMware Server to fake the shared storage.
Using VMware Server you can run multiple Virtual Machines (VMs) on a singleserver, allowing you to run both RAC nodes on a single machine. In addition, itallows you to set up shared virtual disks, overcoming the obstacle of expensiveshared storage.
Before you launch into this installation, here are a few things to consider.
The finished system includes the host operating system, two guestoperating systems, two sets of Oracle Clusterware, two ASM instances andtwo Database instances all on a single server. As you can imagine, thisrequires a significant amount of disk space, CPU and memory. When I useda dual Intel Core Duo CPU @ 2.80GHz 2.79 GHz , 3.5 GB of RAM it workedfine. I tried this installation on a lesser configuration machine itfailed.
This procedure provides a bare bones installation to get the RAC working.There is no redundancy in the Clusterware installation or the ASMinstallation. To add this, simply create double the amount of shareddisks and select the "Normal" redundancy option when it is offered. Ofcourse, this will take more disk space.
During the virtual disk creation, I always choose not to preallocate thedisk space. This makes virtual disk access slower during theinstallation, but saves on wasted disk space.
This should not be considered, a production-ready system. It's simply toallow you to get used to installing and using RAC.
4
Download Software
Software required in building your own Oracle RAC Database
1. Oracle Enterprise Linux Release 5.5
2. VMWare
3. Oracle Clusterware 10g Release 2
4. Oracle Database 10g Release 2
VMware Server Installation
I used Windows XP as the host and Oracle Enterprise Lunix as the guestoperating systems. Regardless of the host OS, the setup of the virtual machinesshould be similar.
Virtual Machine Setup
Now we must define the two virtual RAC nodes. We can save time by defining oneVM, then cloning it when it is installed.
Create a New Virtual Machine by “Ctrl + N” or File -> New -> Virtual Machine(From Console Tool Bar)
5
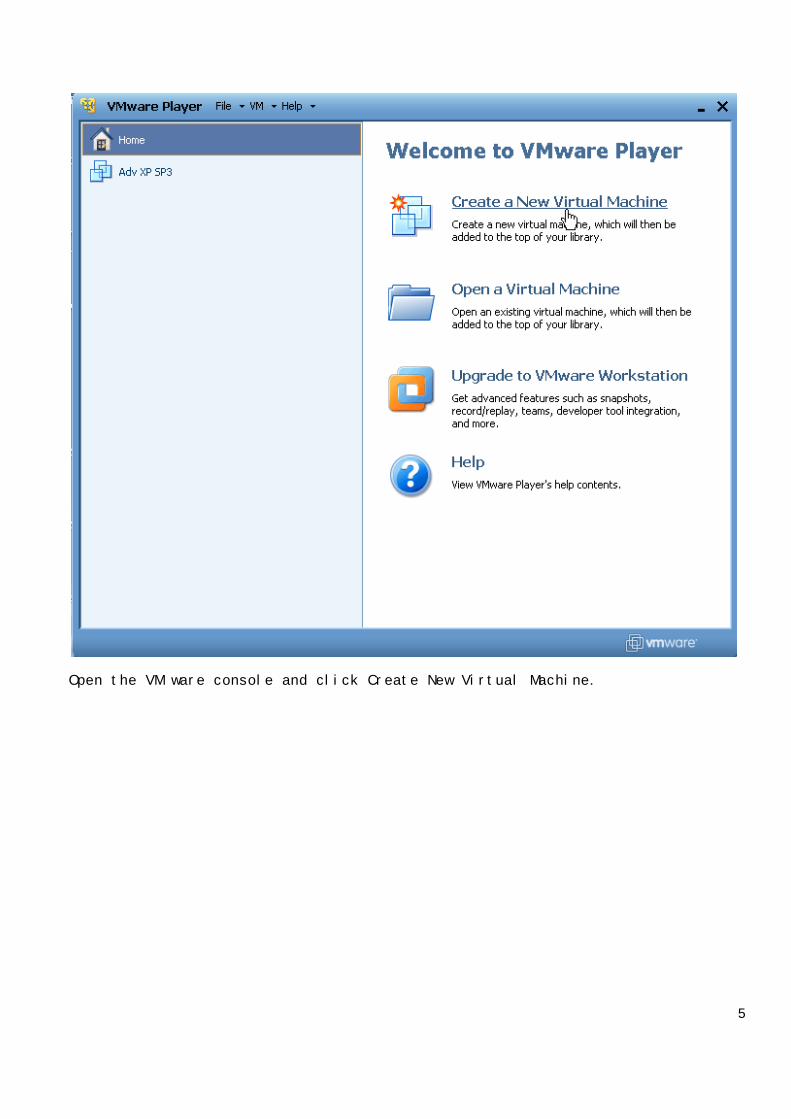
Open the VM ware console and click Create New Virtual Machine.
6
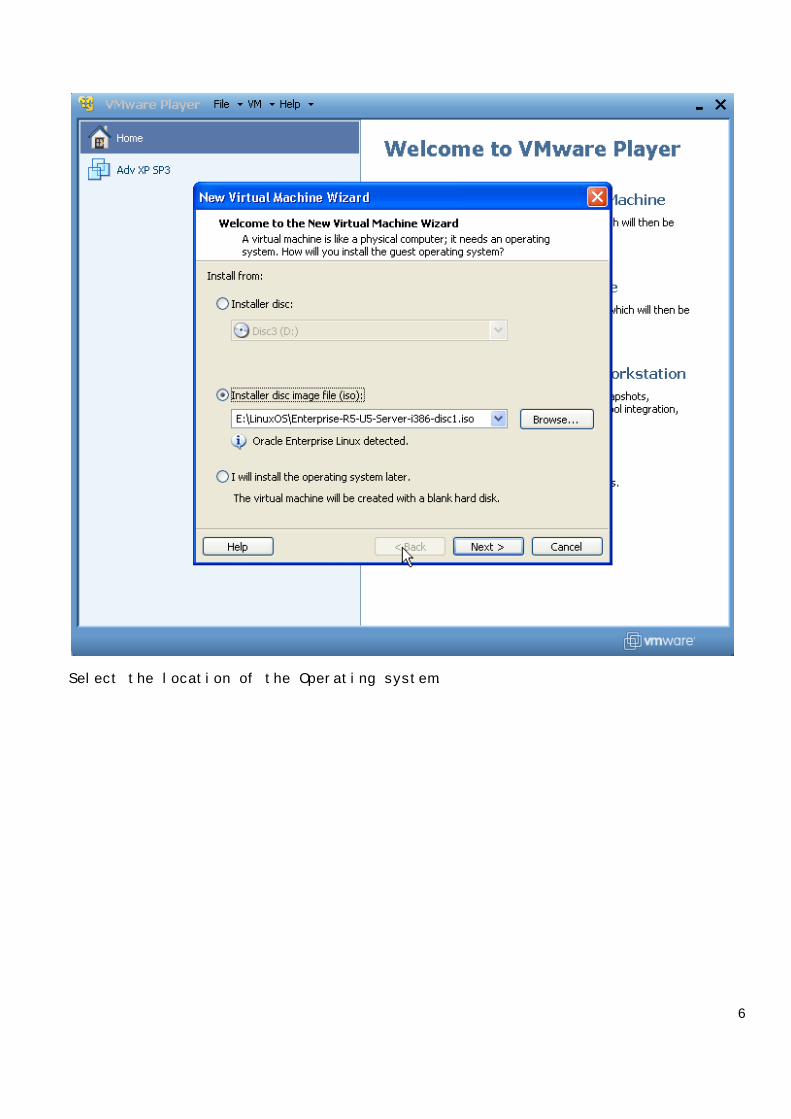
Select the location of the Operating system.
7
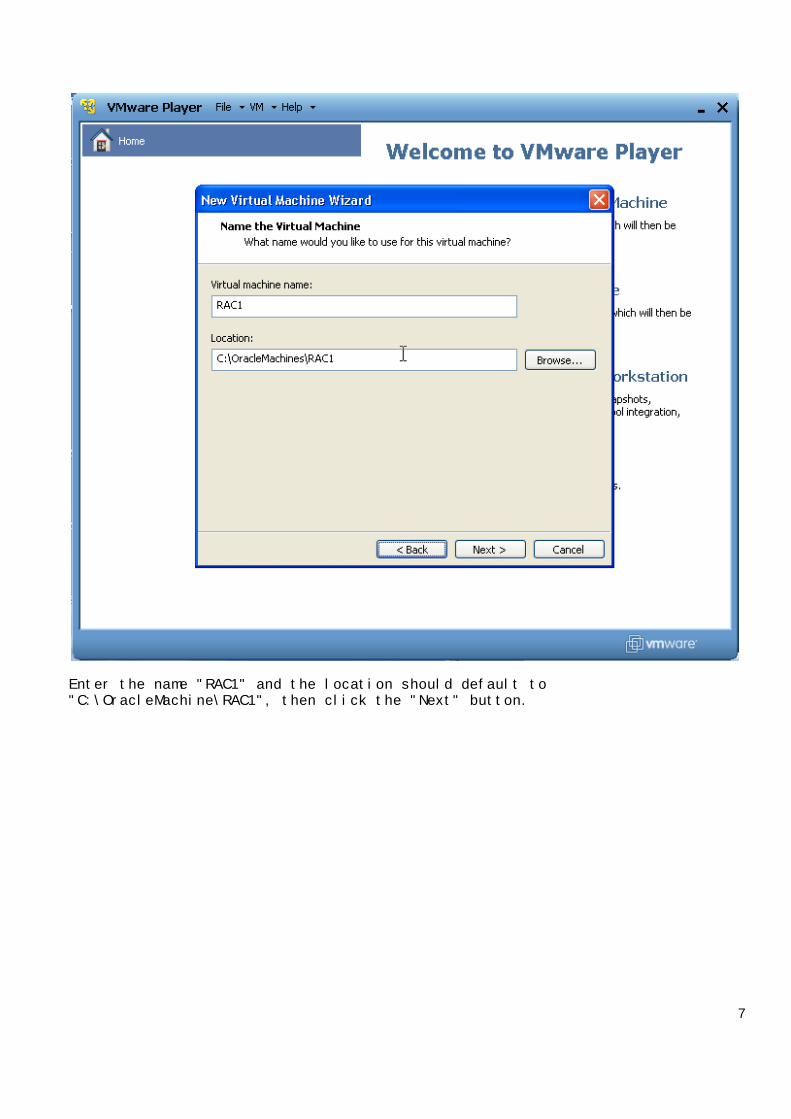
Enter the name "RAC1" and the location should default to"C:\OracleMachine\RAC1", then click the "Next" button.
8
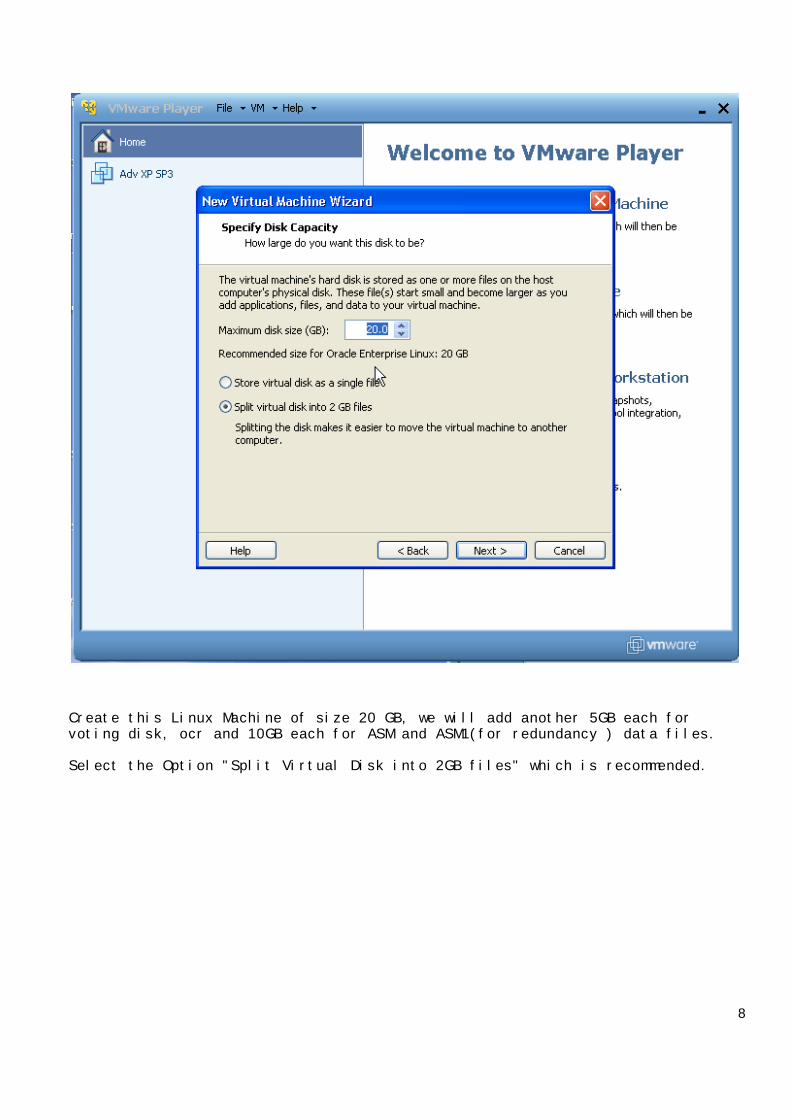
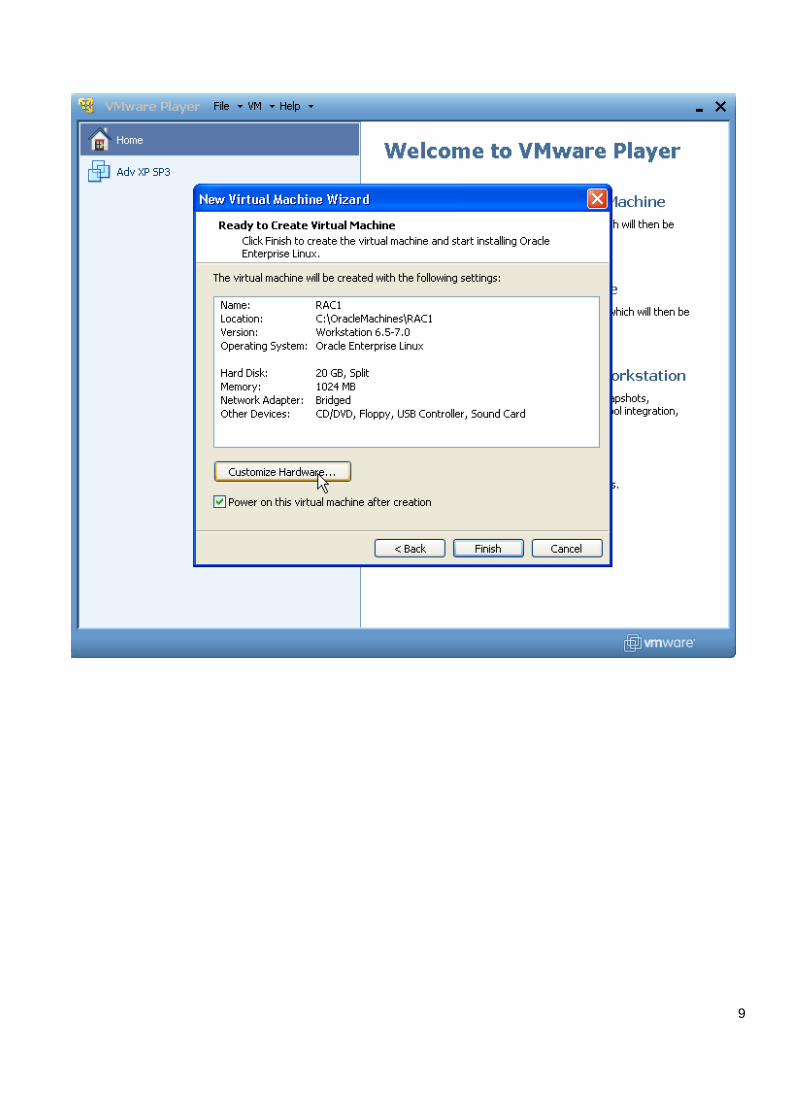
Create this Linux Machine of size 20 GB, we will add another 5GB each forvoting disk, ocr and 10GB each for ASM and ASM1(for redundancy ) data files.
Select the Option "Split Virtual Disk into 2GB files" which is recommended.
9
10
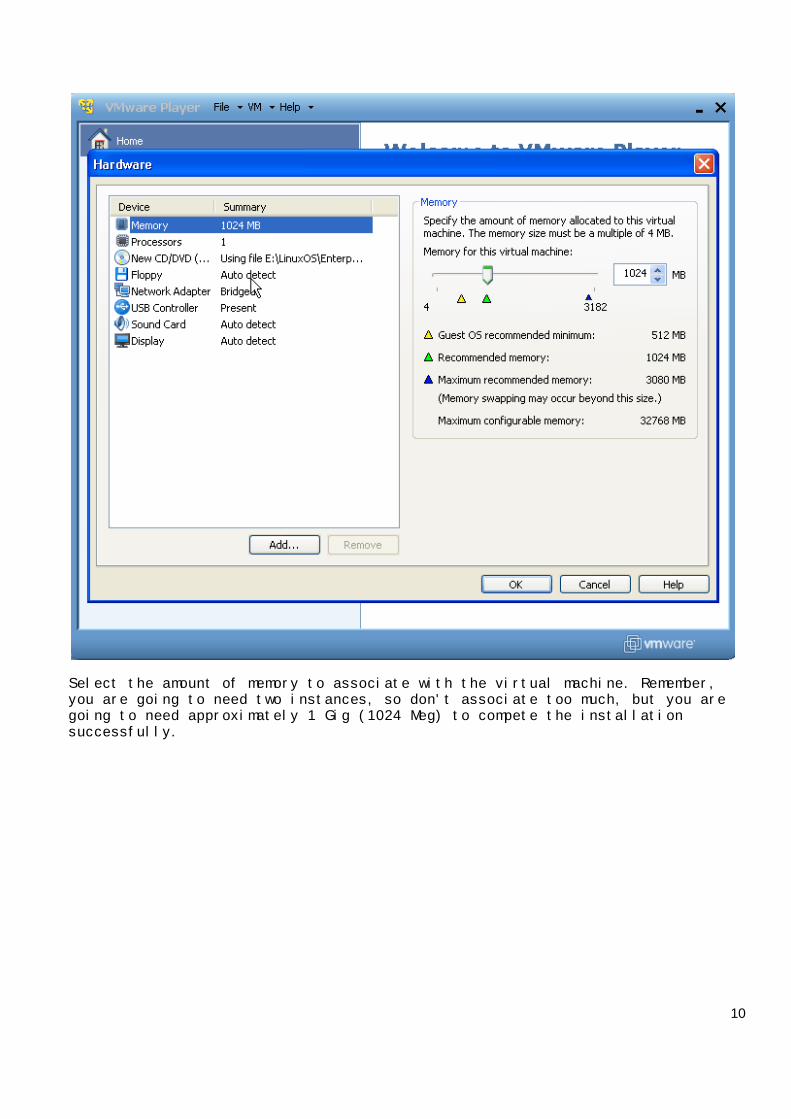
Select the amount of memory to associate with the virtual machine. Remember,you are going to need two instances, so don't associate too much, but you aregoing to need approximately 1 Gig (1024 Meg) to compete the installationsuccessfully.
11
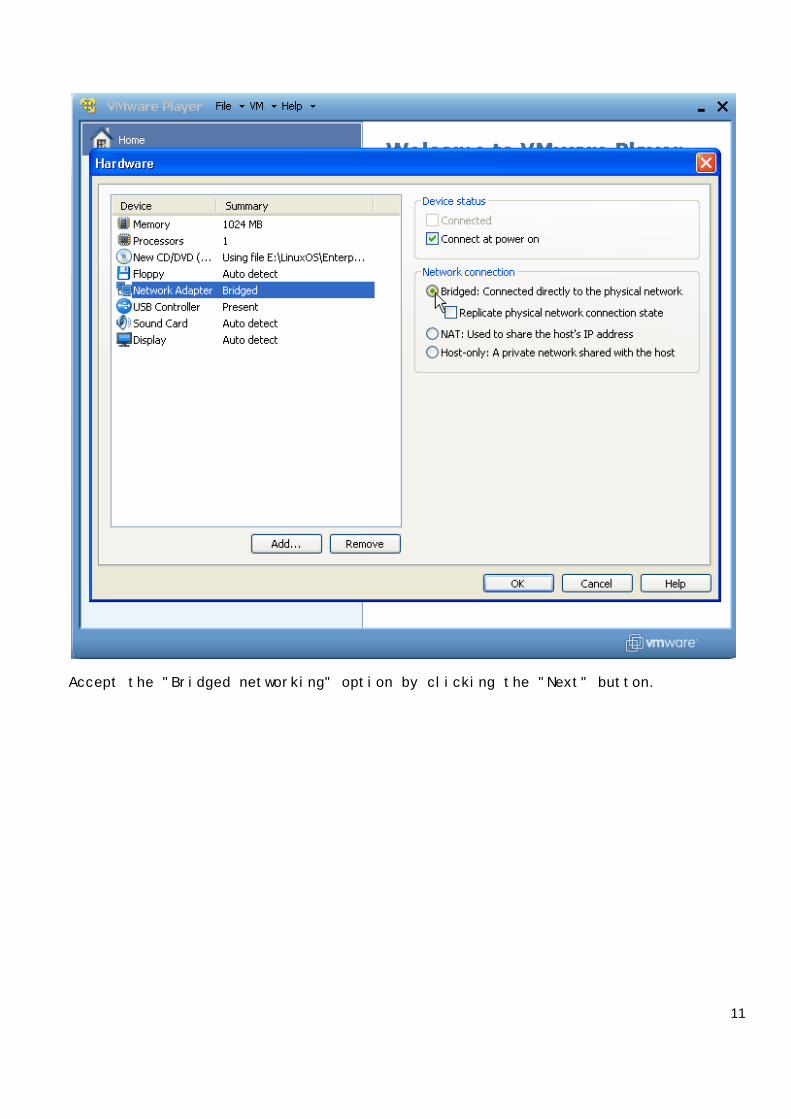
Accept the "Bridged networking" option by clicking the "Next" button.
12
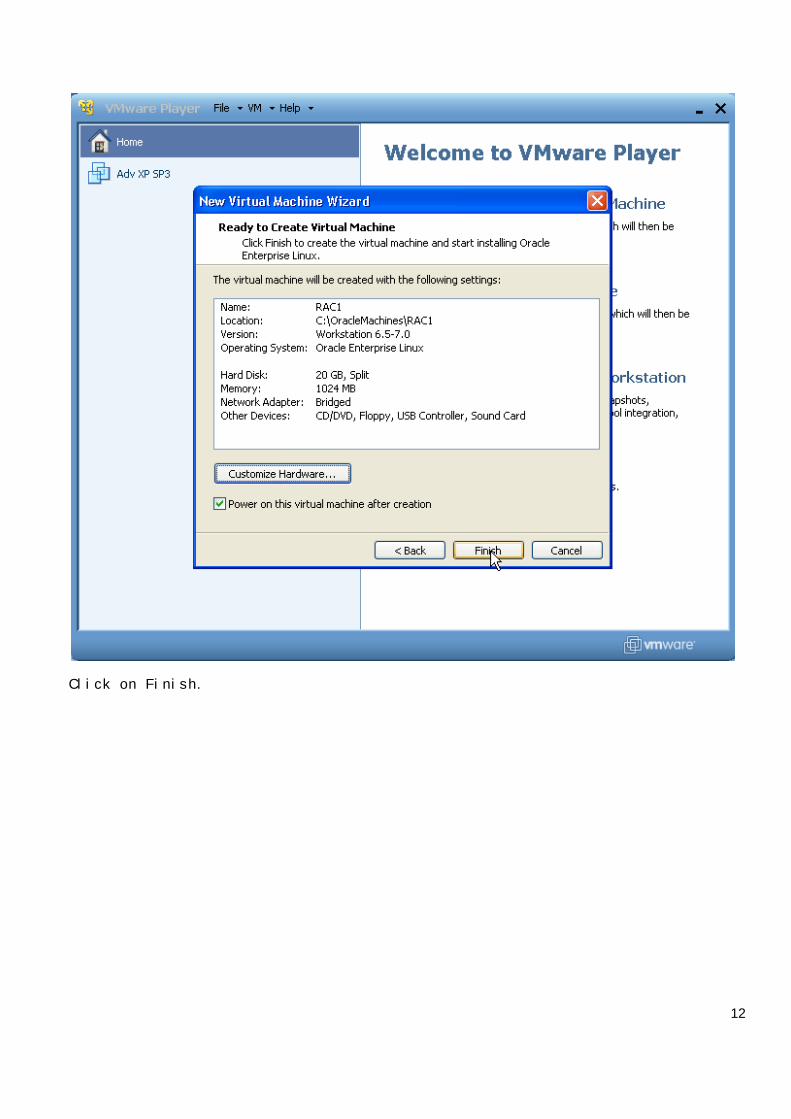
Click on Finish.
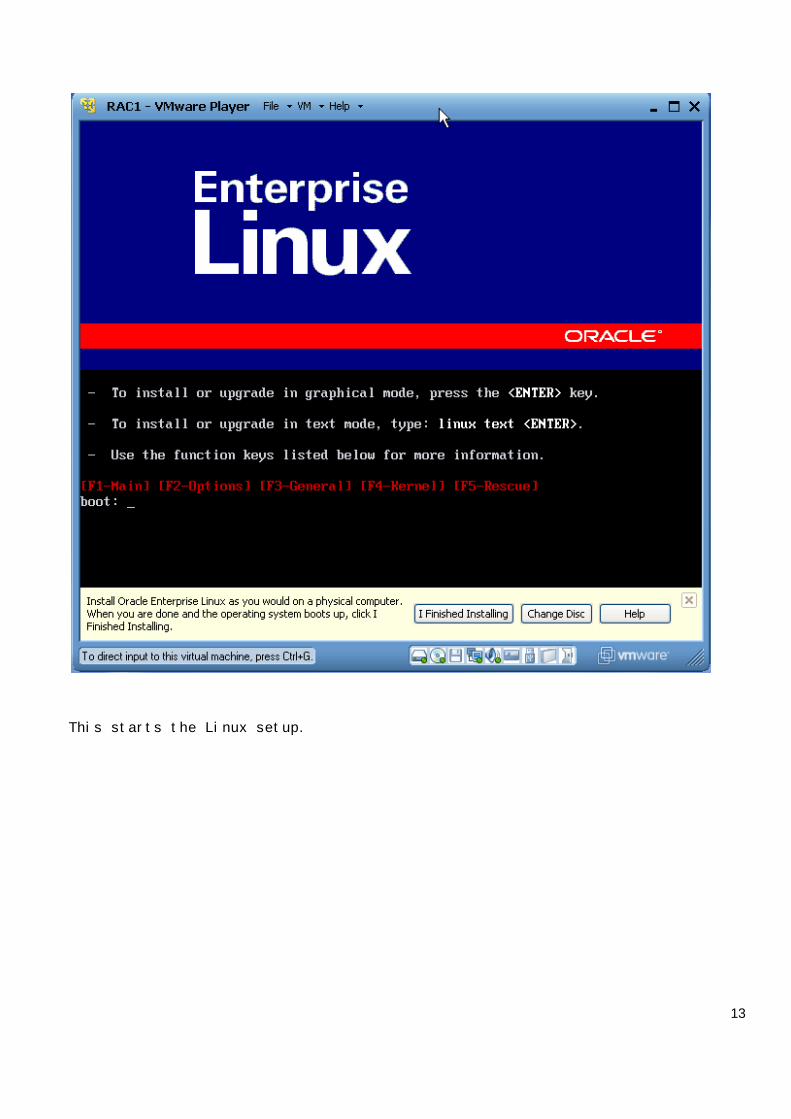
13
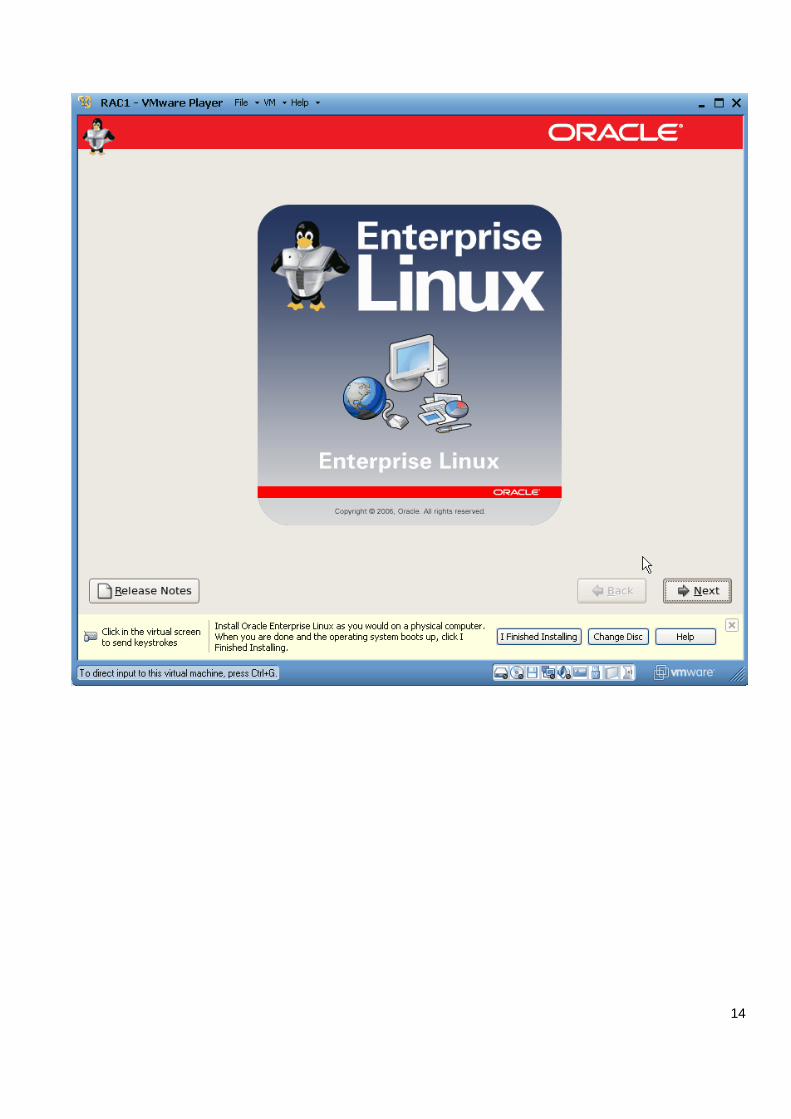
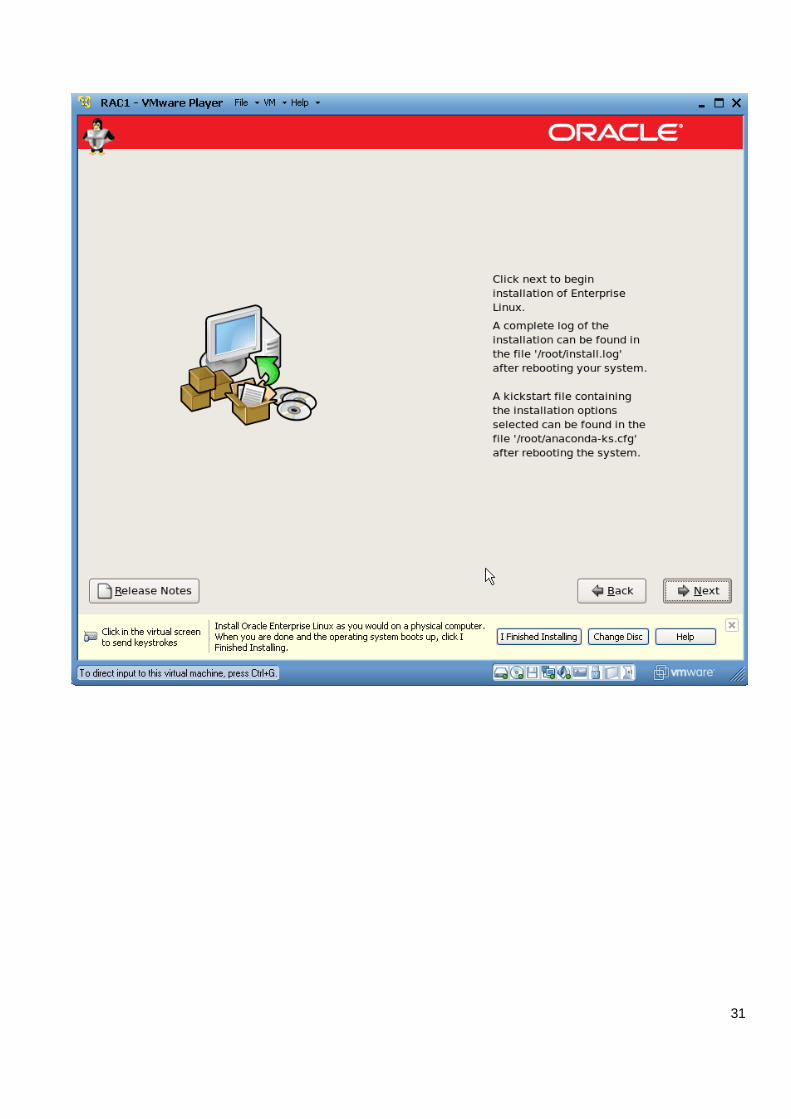
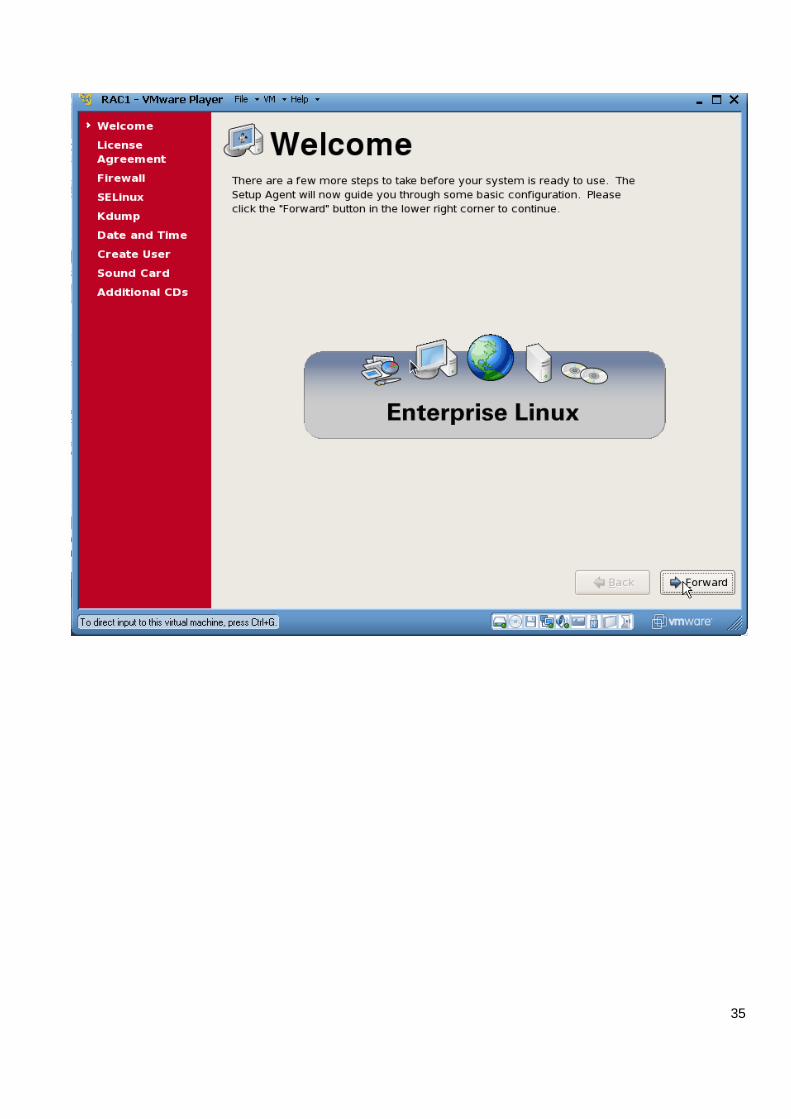
This starts the Linux setup.
14
15
16
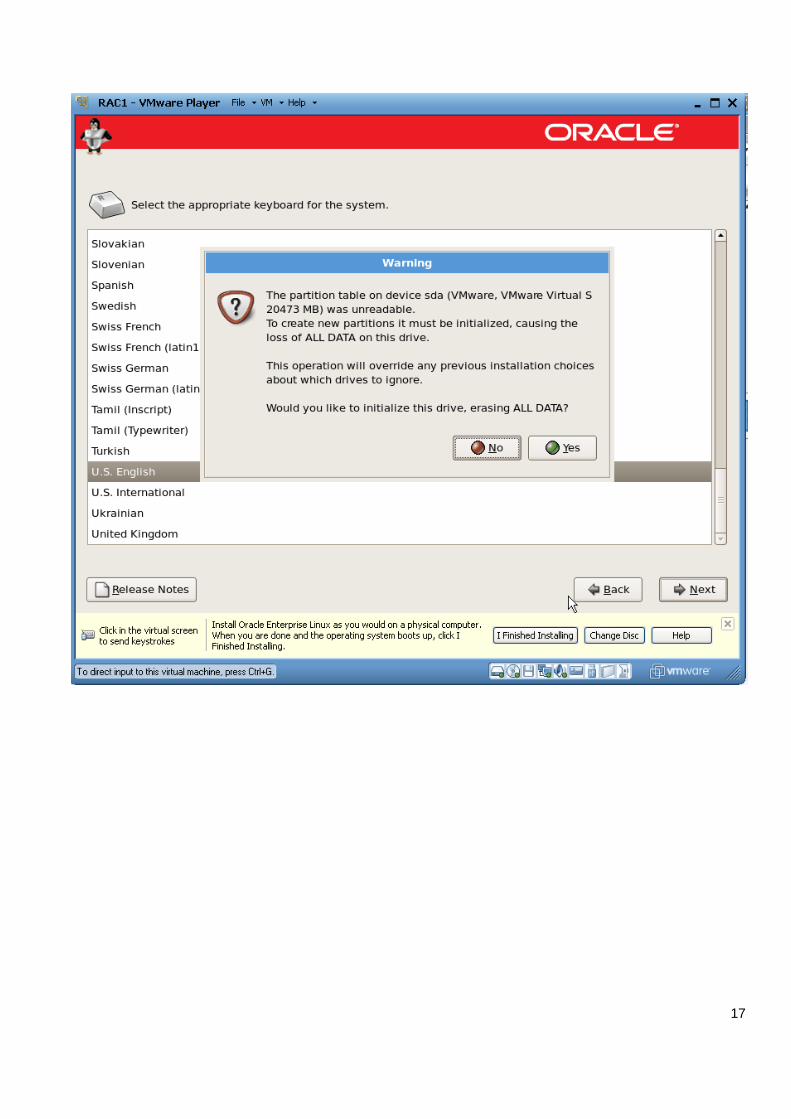
17
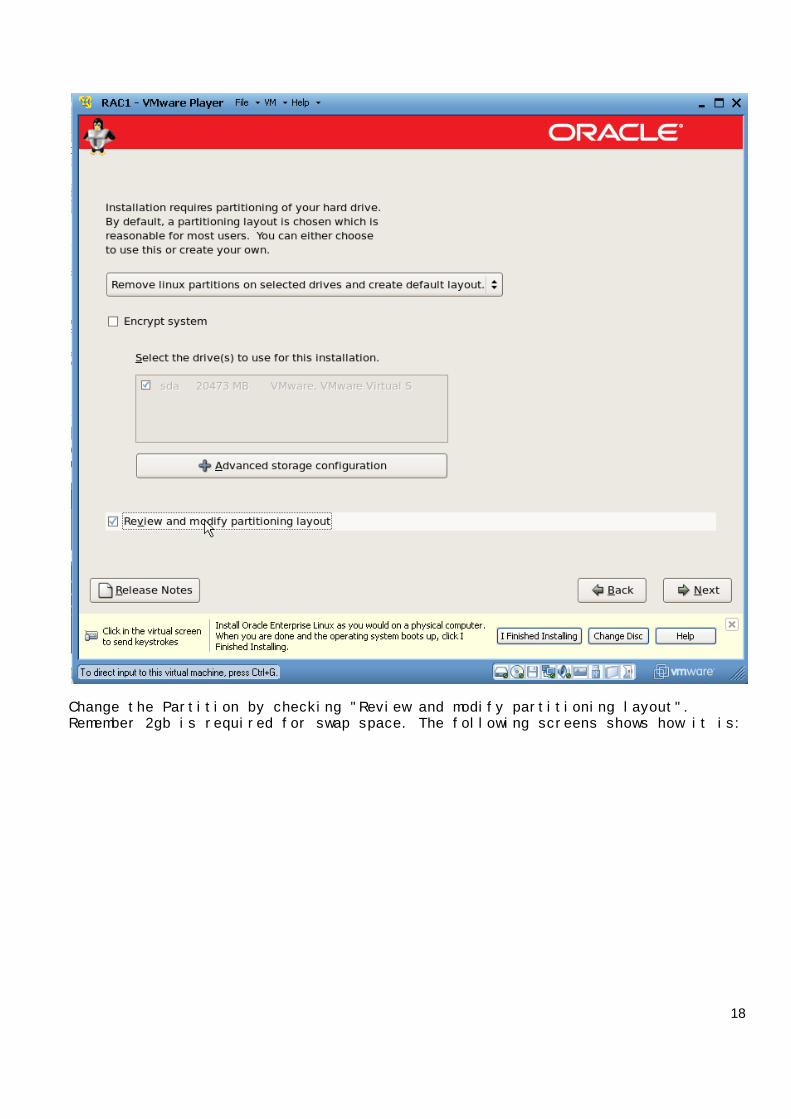
18
Change the Partition by checking "Review and modify partitioning layout".Remember 2gb is required for swap space. The following screens shows how it is:
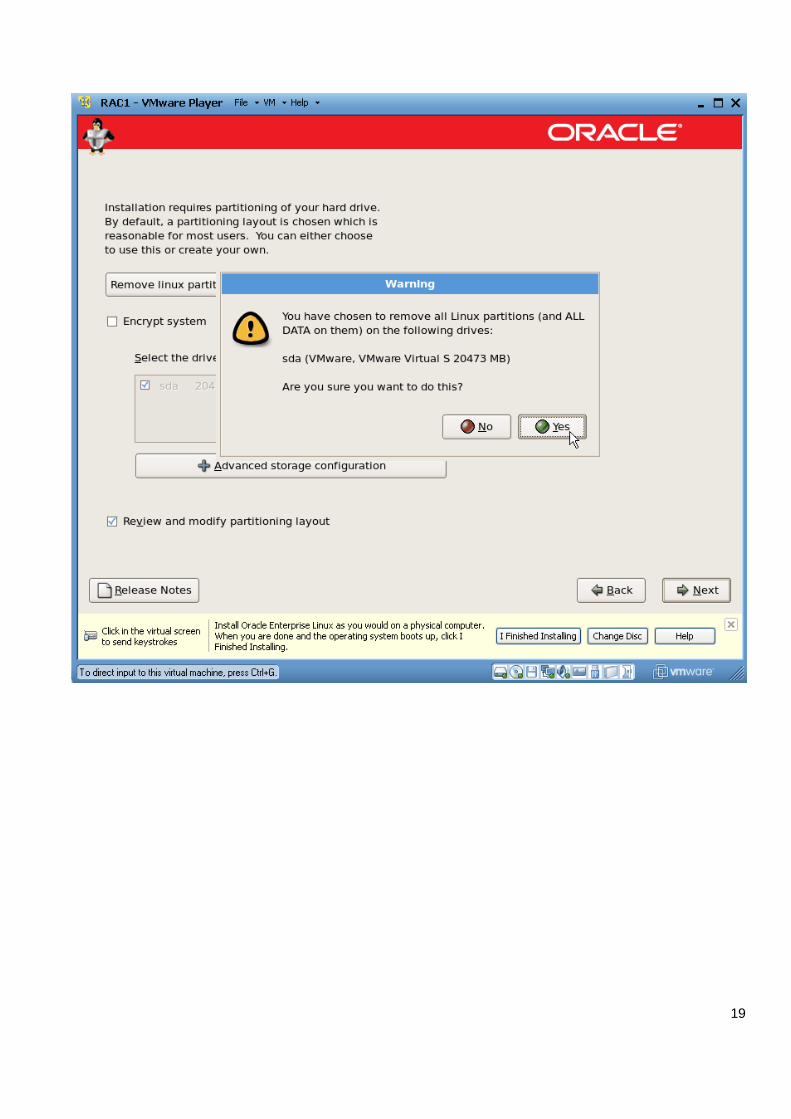
19
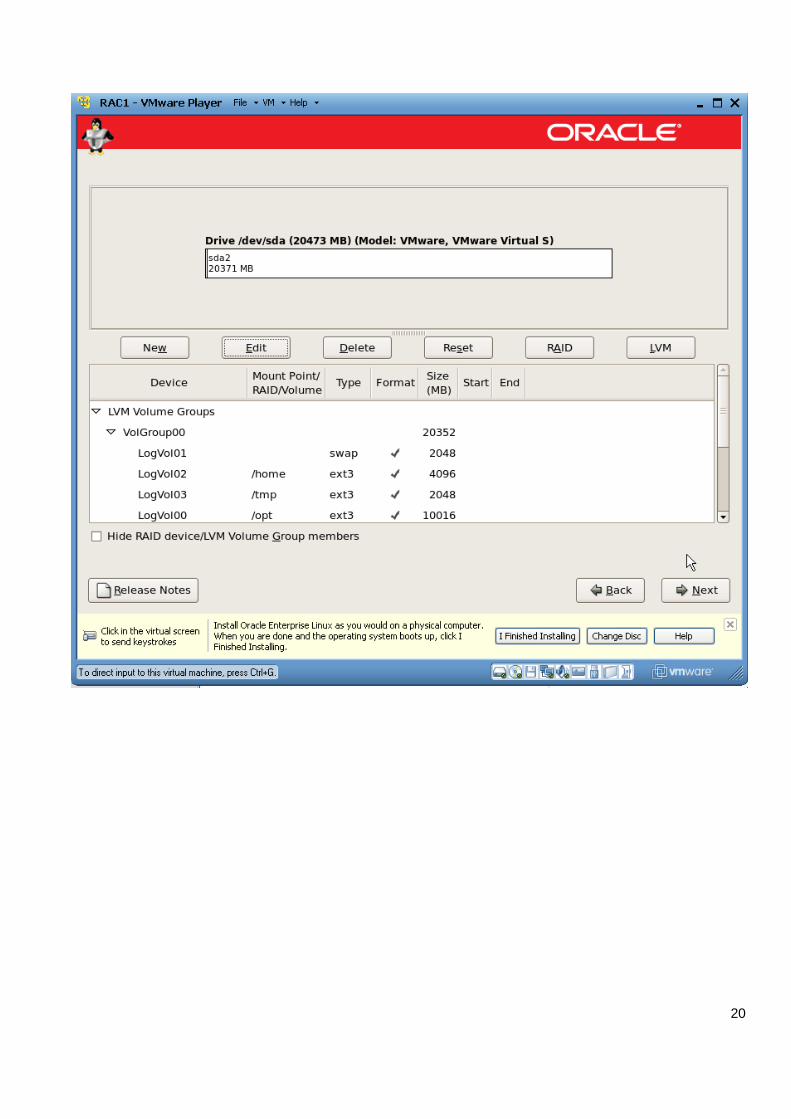
20
21
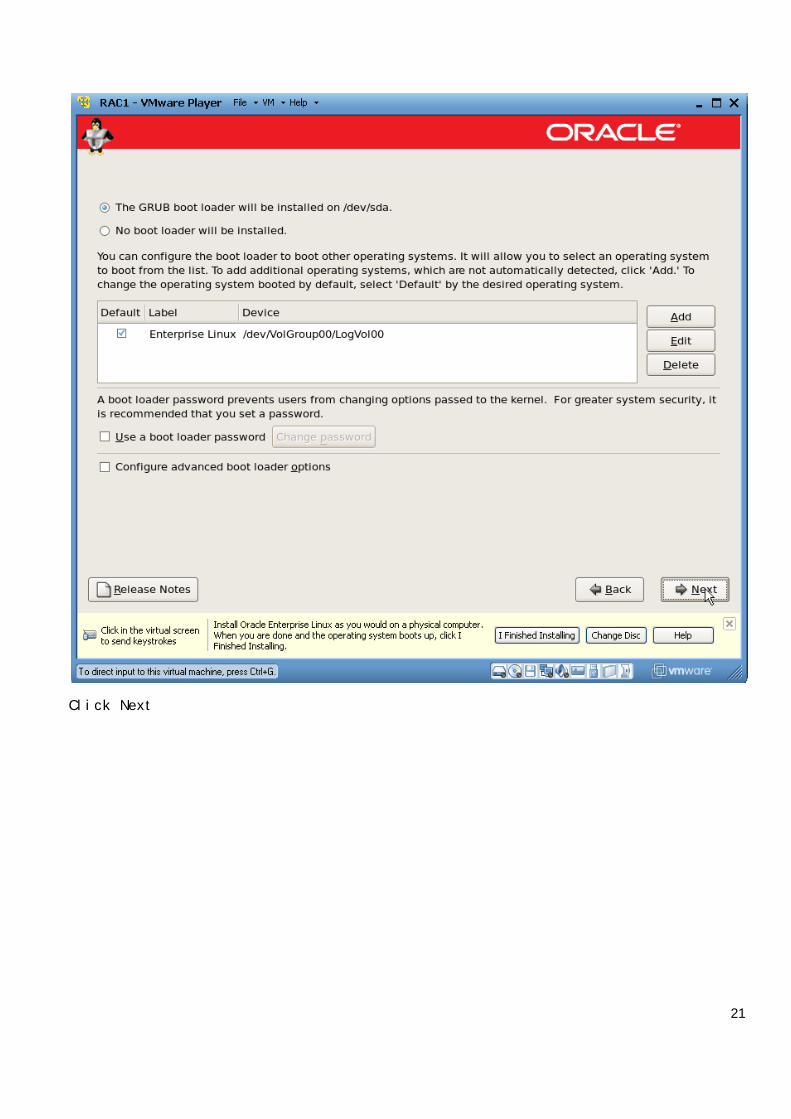
Click Next
22
Cli
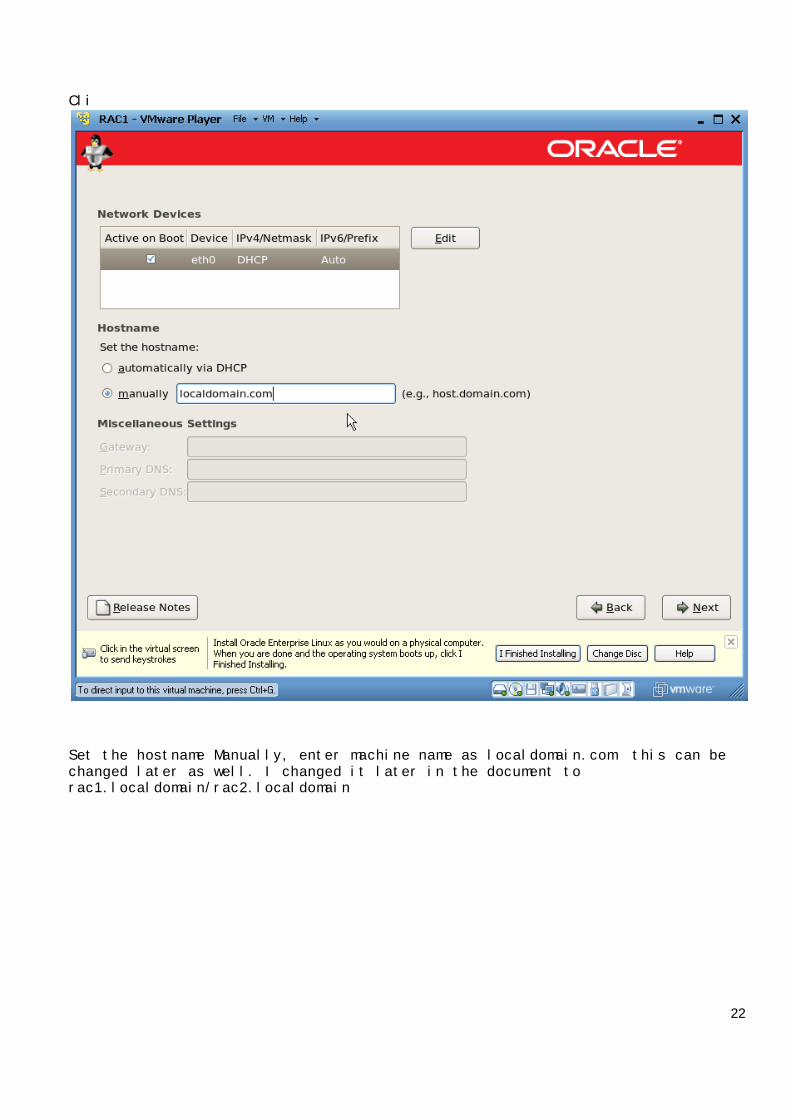
Set the hostname Manually, enter machine name as localdomain.com this can bechanged later as well. I changed it later in the document torac1.localdomain/rac2.localdomain

23
24
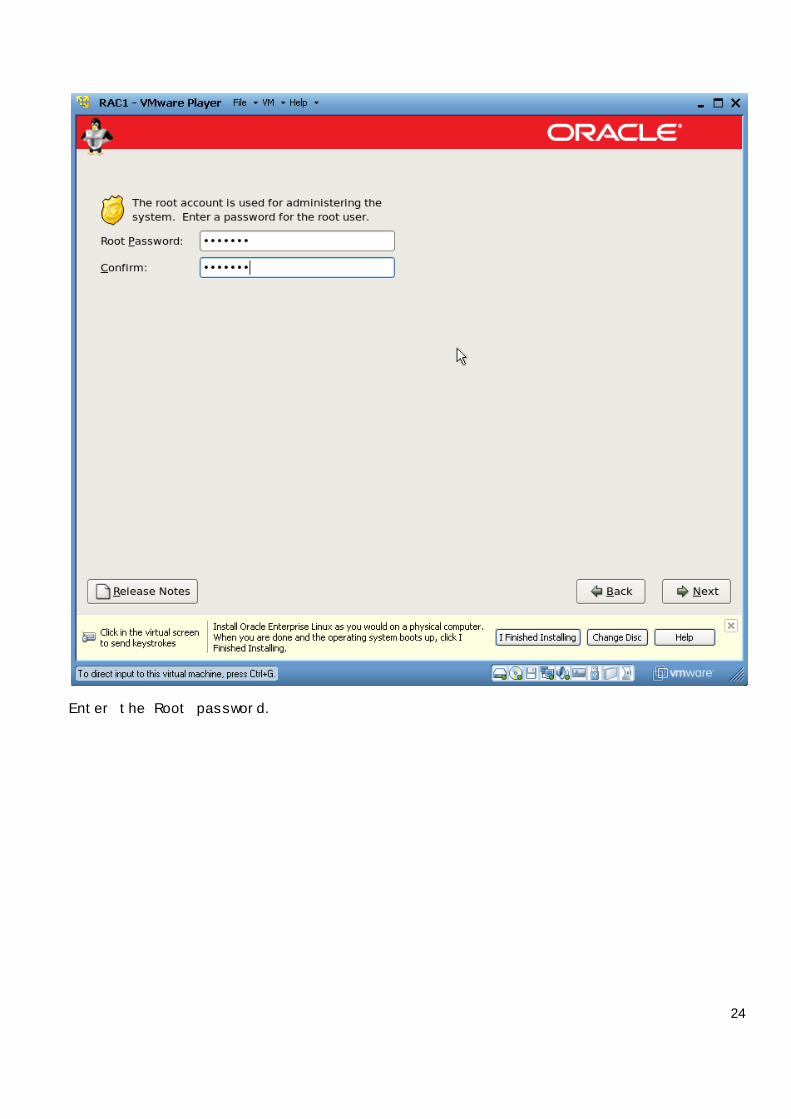
Enter the Root password.
25
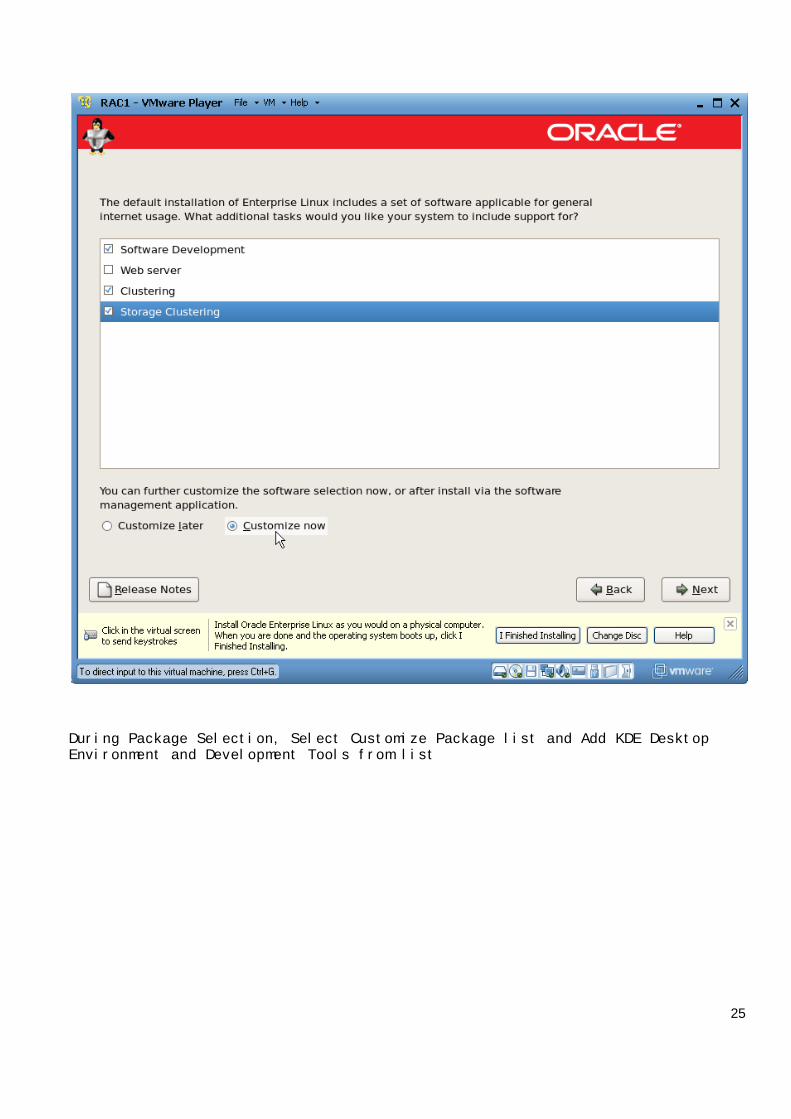
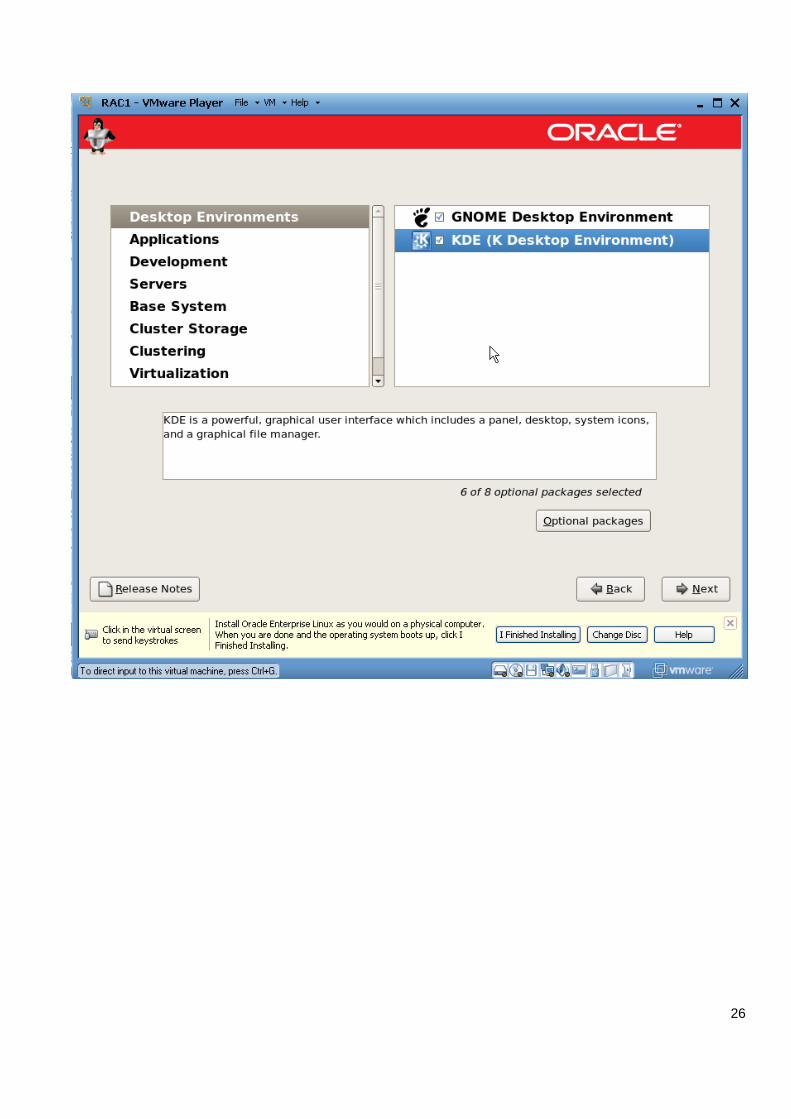
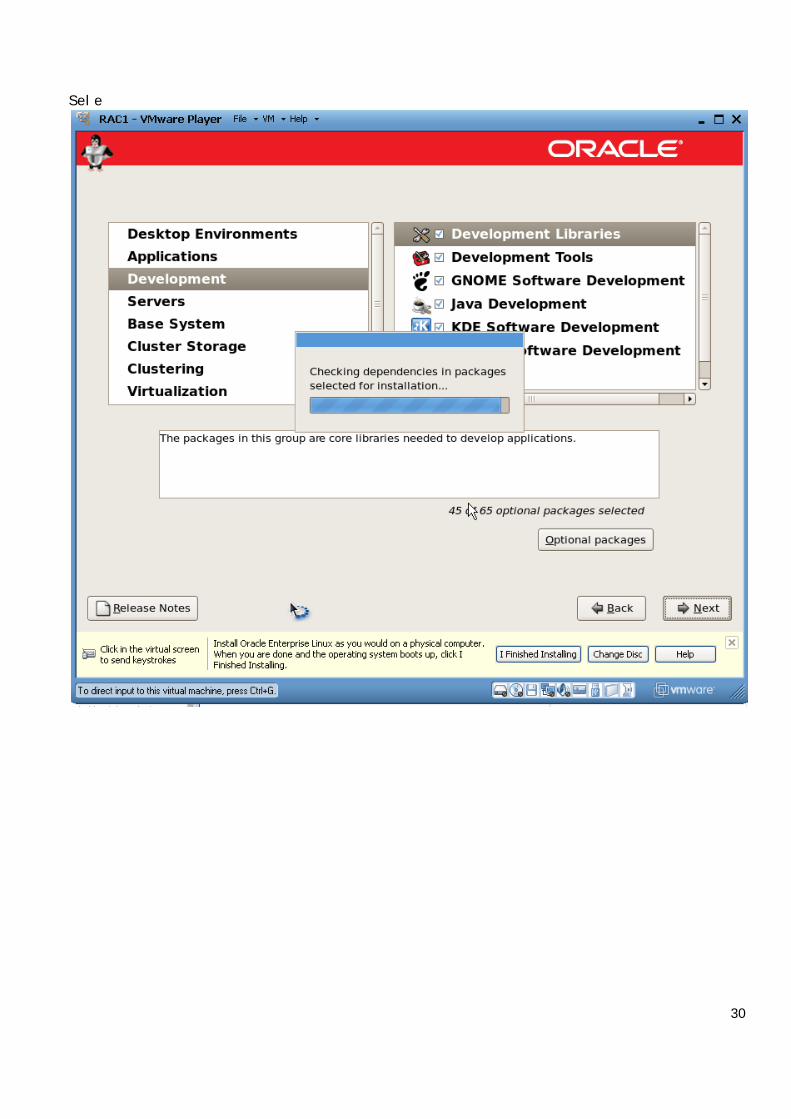
During Package Selection, Select Customize Package list and Add KDE DesktopEnvironment and Development Tools from list
26
27

28
29
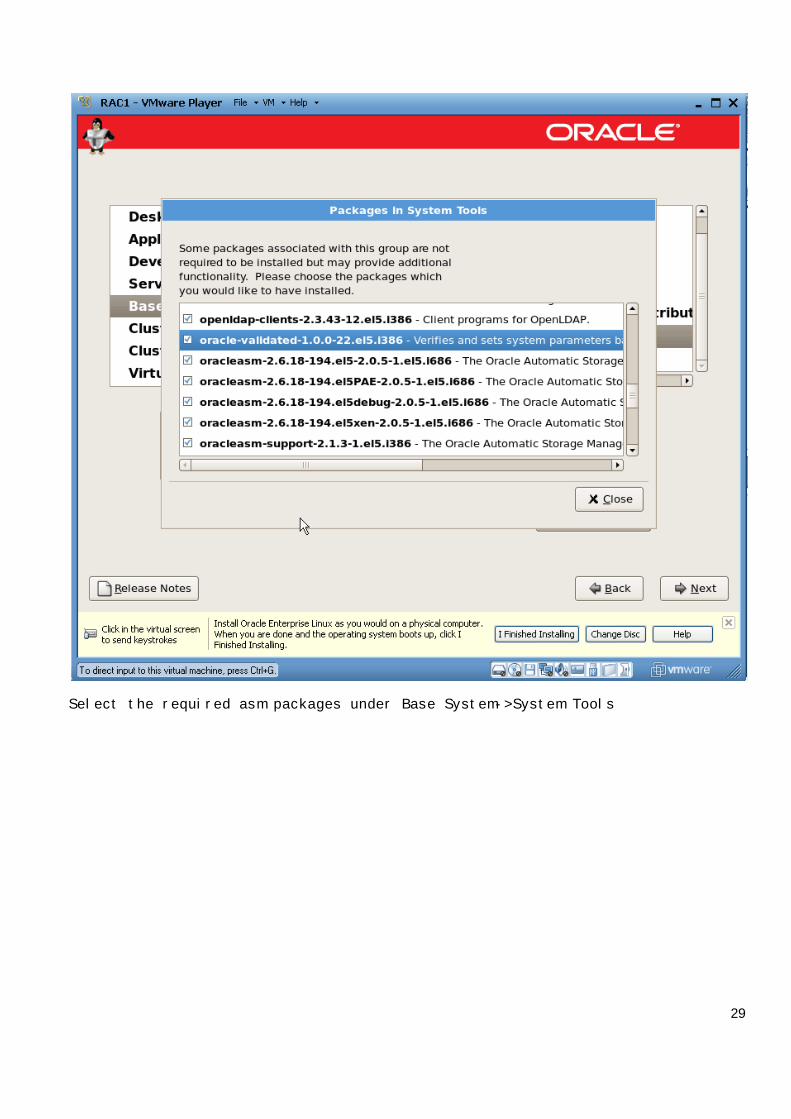
Select the required asm packages under Base System->System Tools
30
Sele
31
32
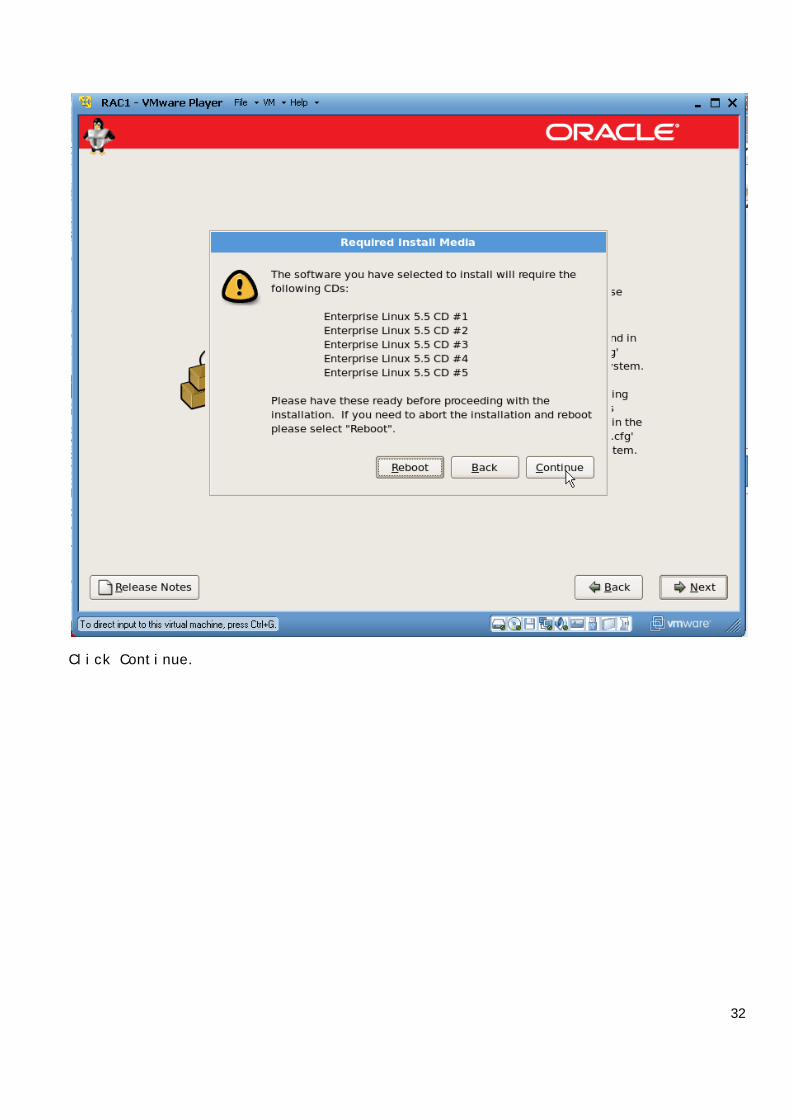
Click Continue.
33
34
35

36

37
Disable the Firewall.
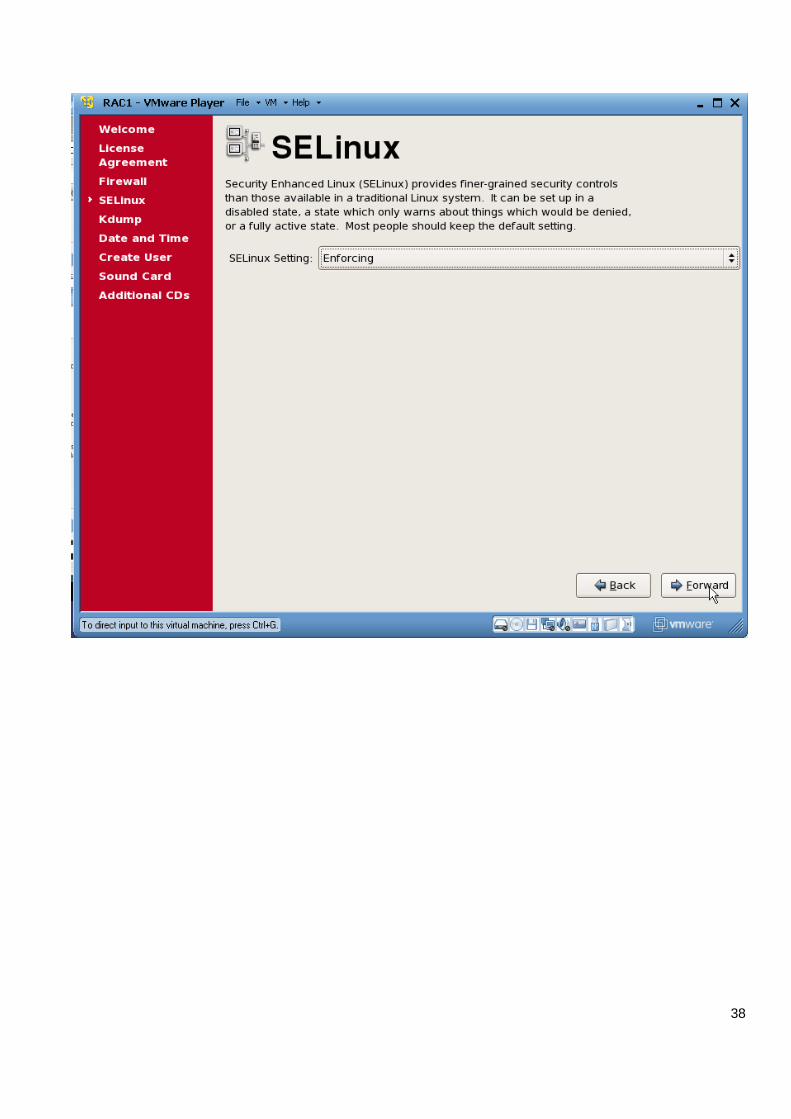
38
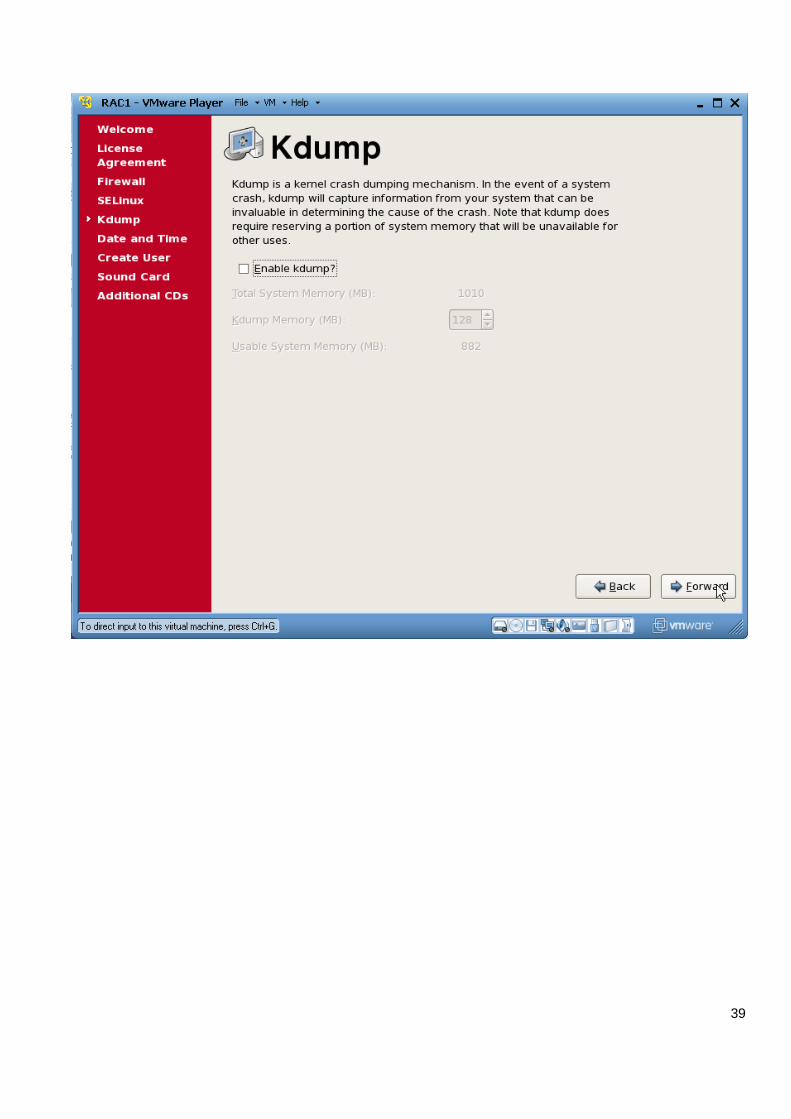
39
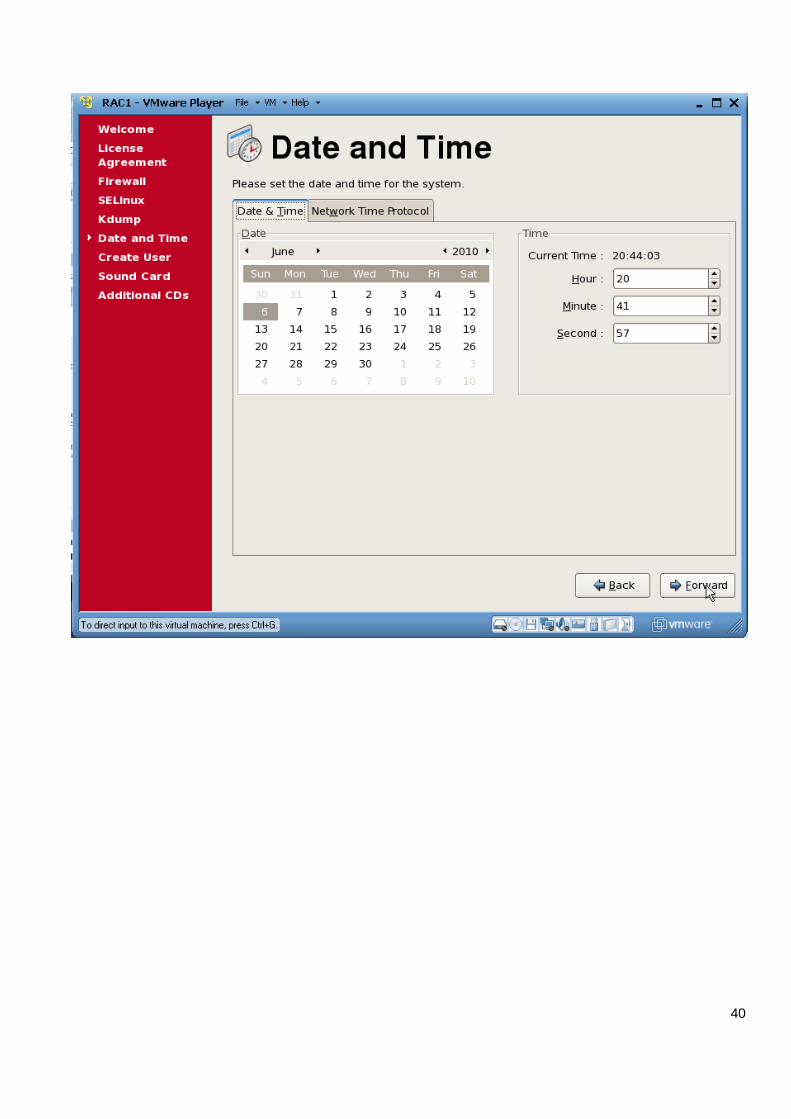
40
41
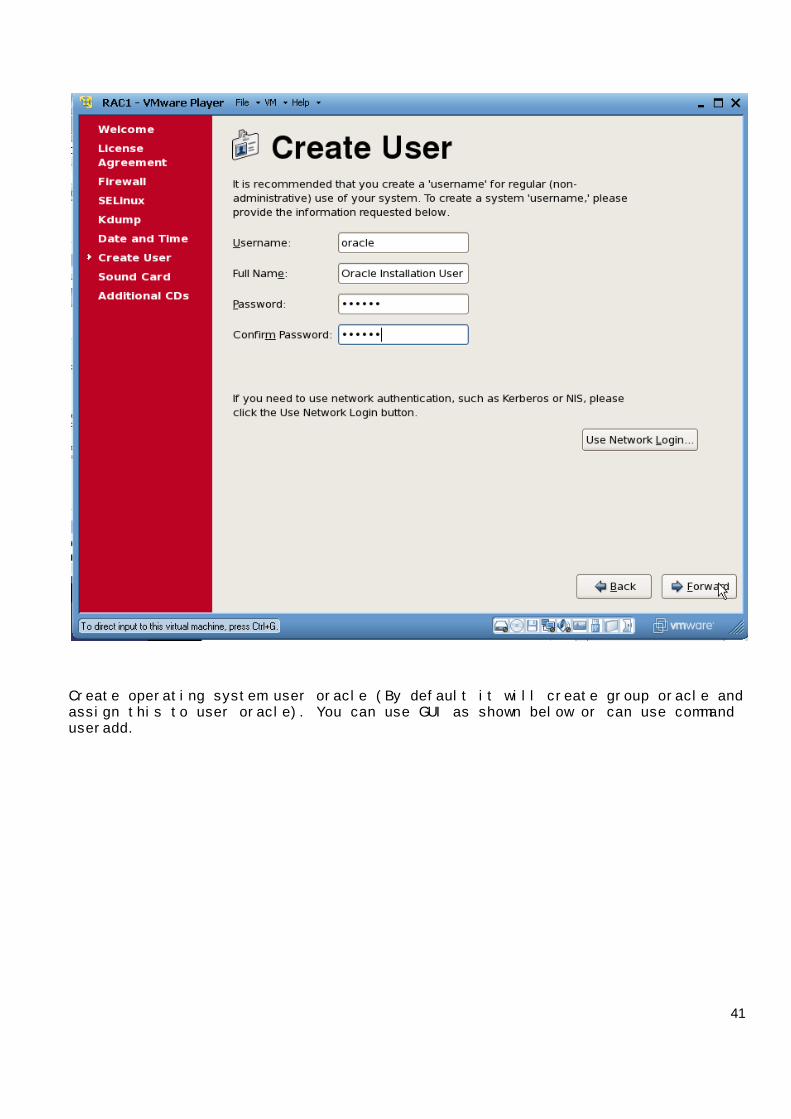
Create operating system user oracle (By default it will create group oracle andassign this to user oracle). You can use GUI as shown below or can use commanduseradd.
42
43

44
Node1 is up and running now.

45
Create Shared Disks/Virtual Network
Configure Virtual Disks
We will install required linux operating package for clusterware & database,additional hard disk (voting disk, ocr ,ASM, ASM1(for redundancy), network cardfor interconnect and configure newly added hard disk and network card.
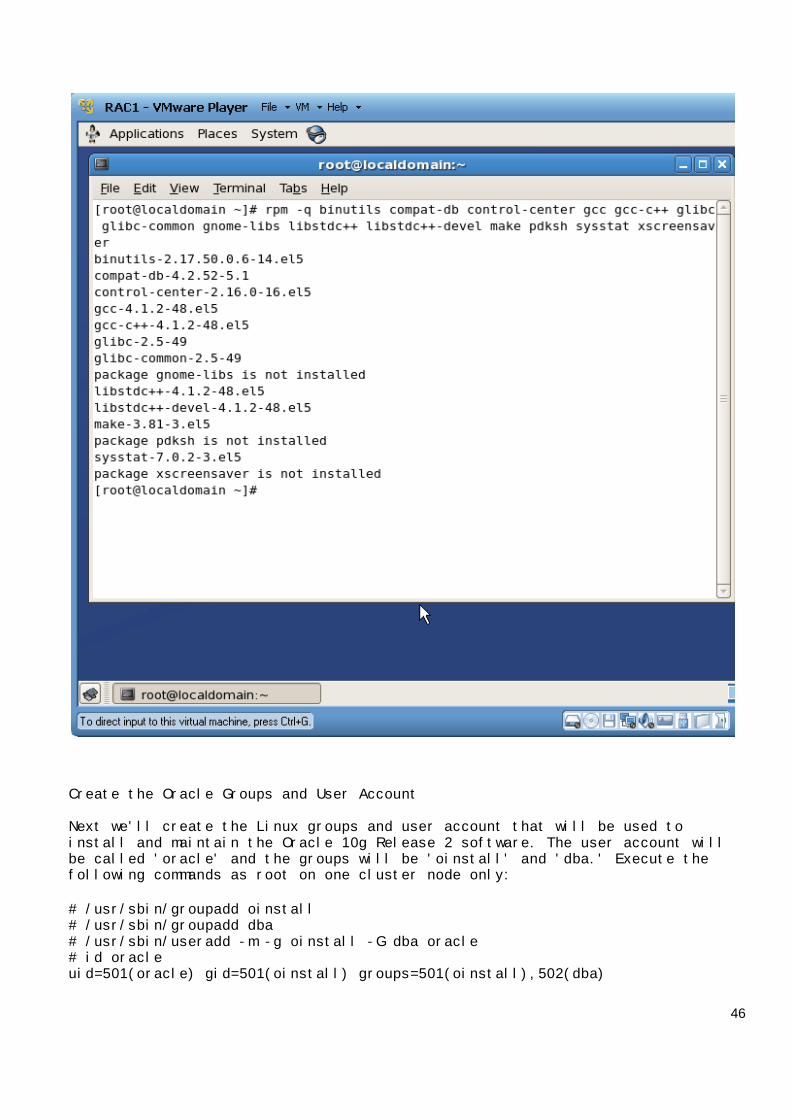
Verify the Installed Packages
# rpm -q binutils compat-db control-center gcc gcc-c++ glibc glibc-common \gnome-libs libstdc++ libstdc++-devel make pdksh sysstat xscreensaver
46
Create the Oracle Groups and User Account
Next we'll create the Linux groups and user account that will be used toinstall and maintain the Oracle 10g Release 2 software. The user account willbe called 'oracle' and the groups will be 'oinstall' and 'dba.' Execute thefollowing commands as root on one cluster node only:
# /usr/sbin/groupadd oinstall# /usr/sbin/groupadd dba# /usr/sbin/useradd -m -g oinstall -G dba oracle# id oracleuid=501(oracle) gid=501(oinstall) groups=501(oinstall),502(dba)
47
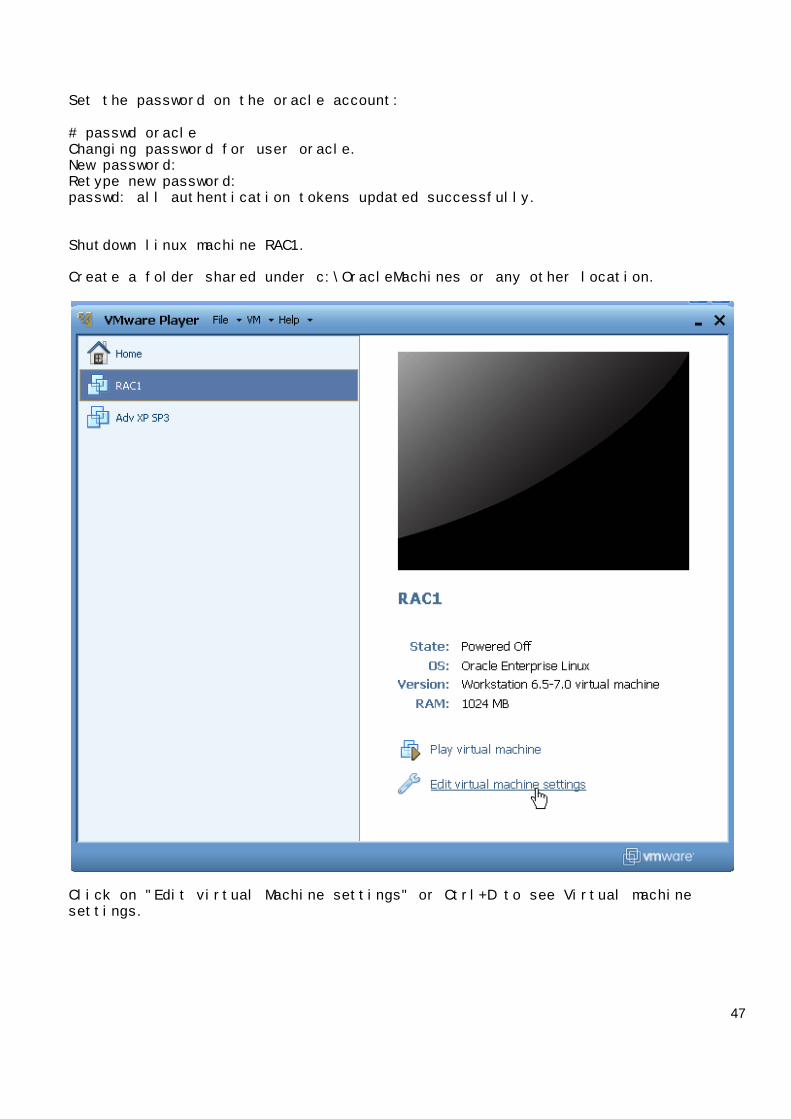
Set the password on the oracle account:
# passwd oracleChanging password for user oracle.New password:Retype new password:passwd: all authentication tokens updated successfully.
Shutdown linux machine RAC1.
Create a folder shared under c:\OracleMachines or any other location.
Click on "Edit virtual Machine settings" or Ctrl+D to see Virtual machinesettings.
48
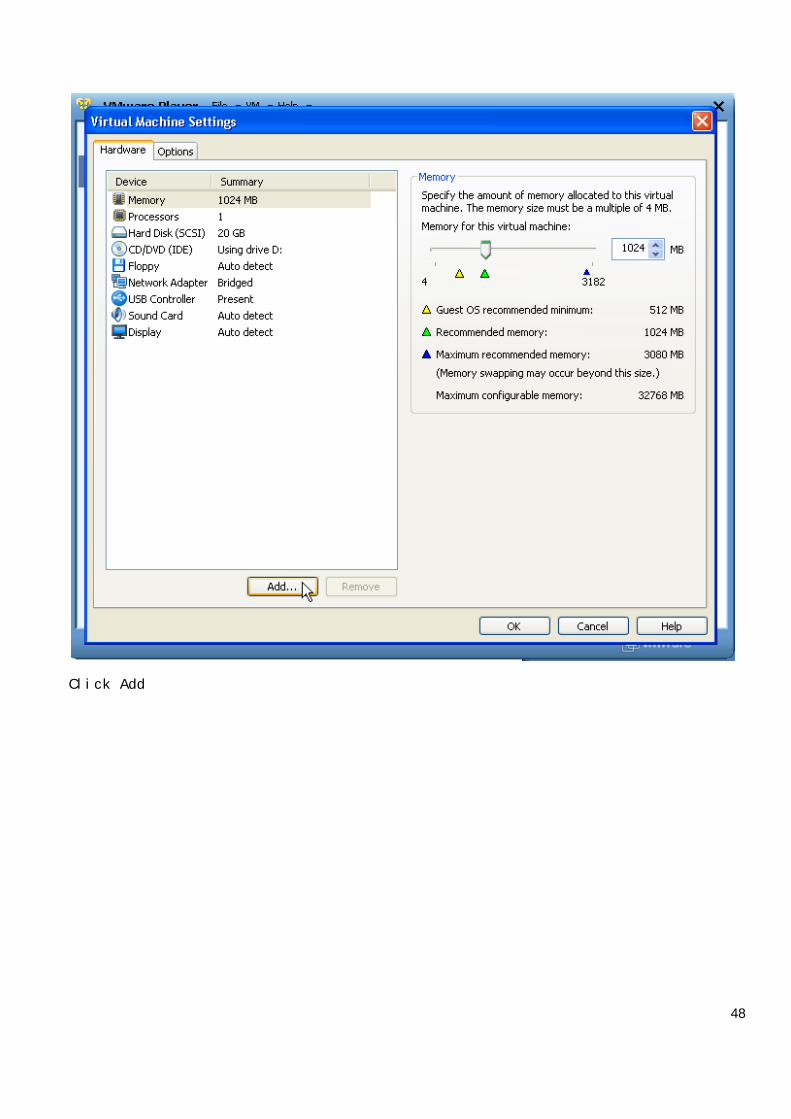
Click Add
49
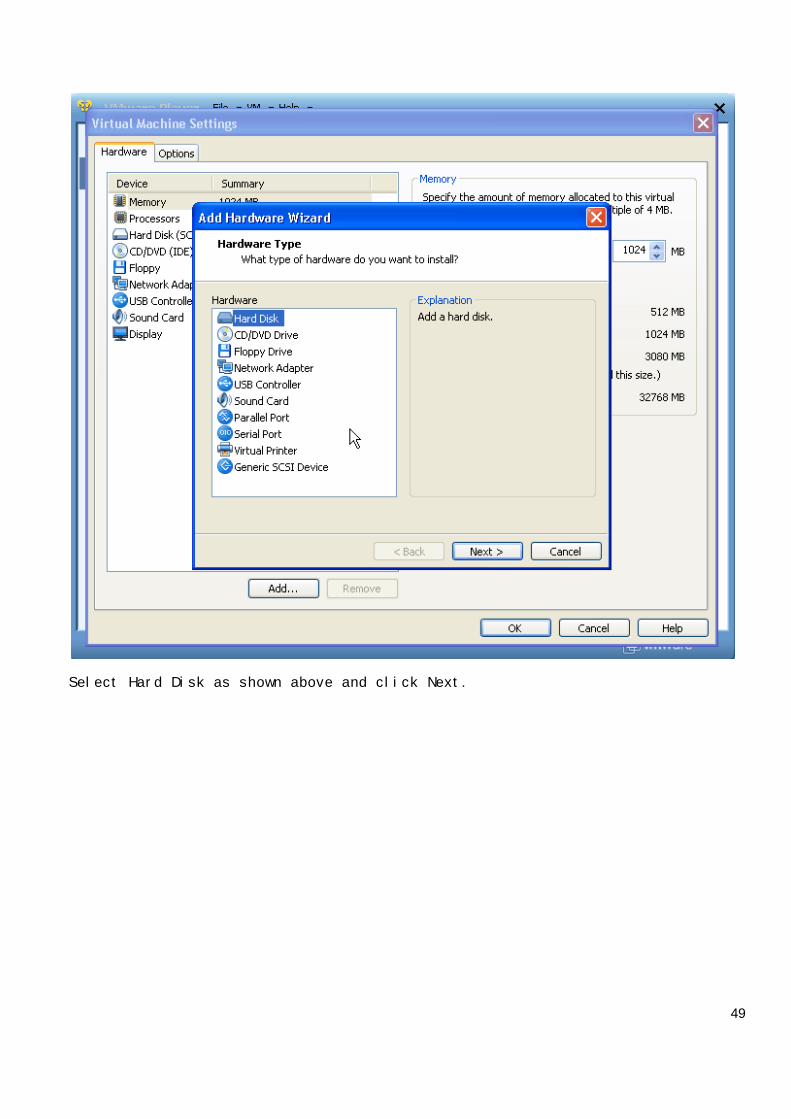
Select Hard Disk as shown above and click Next.
50
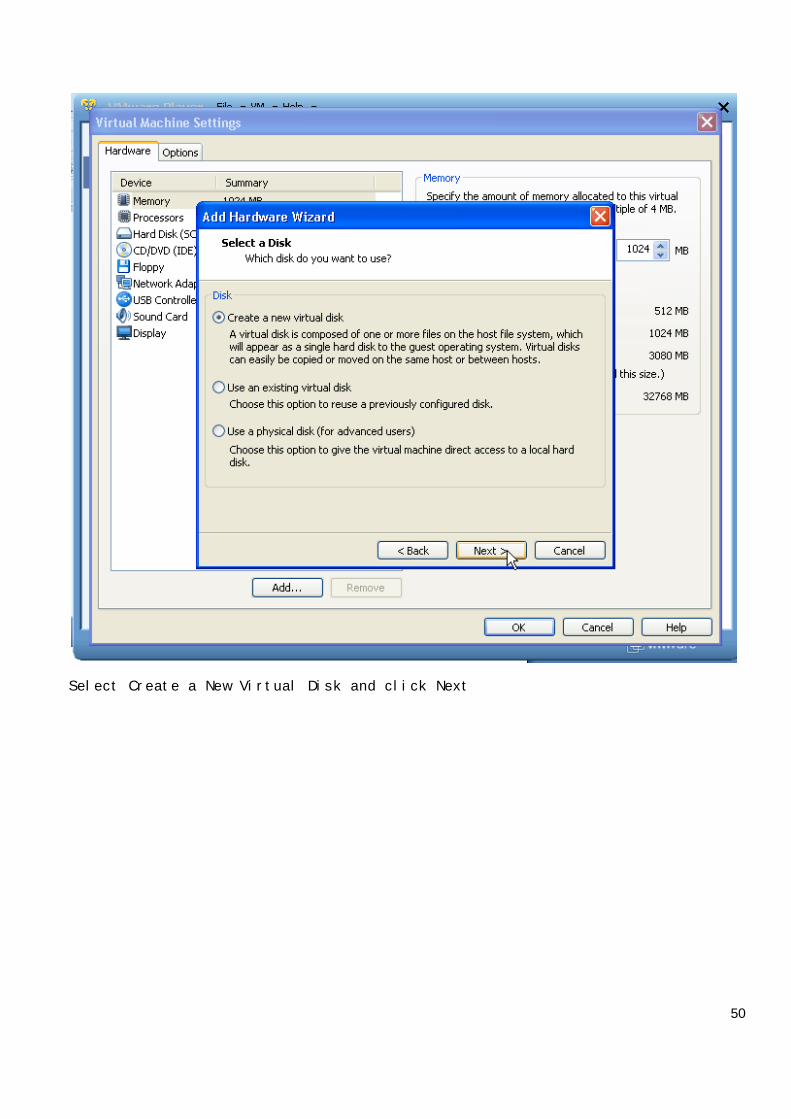
Select Create a New Virtual Disk and click Next
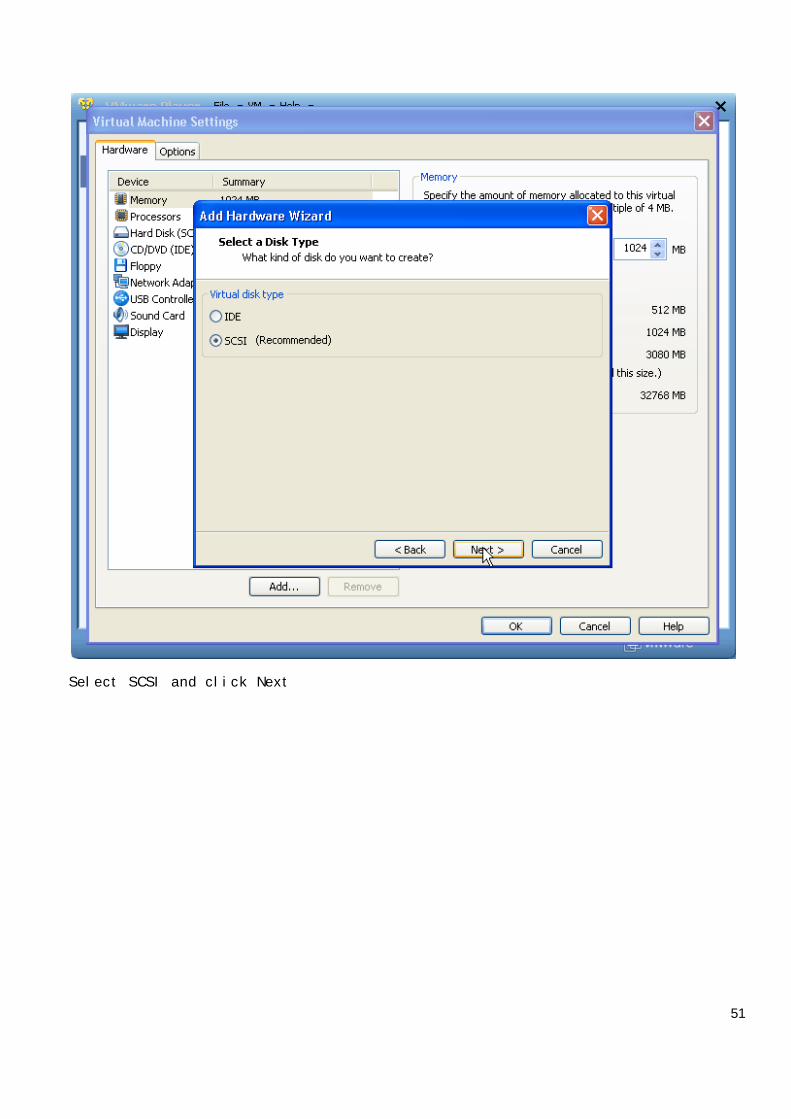
51
Select SCSI and click Next
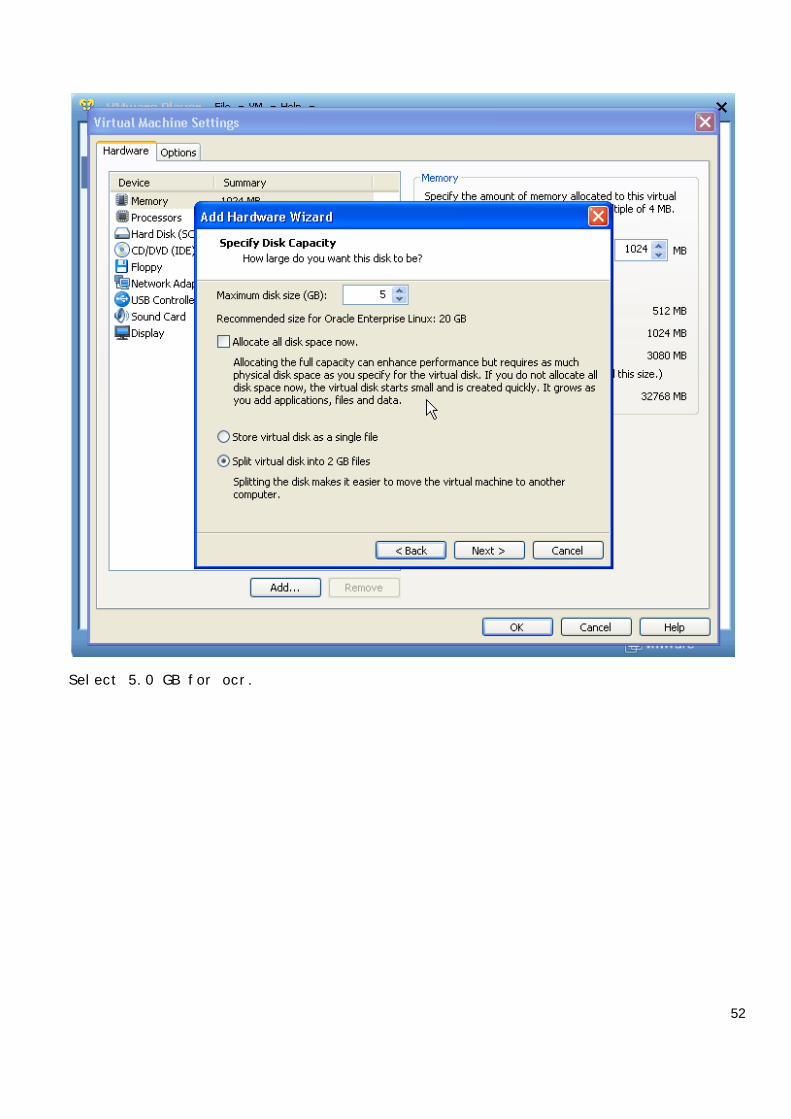
52
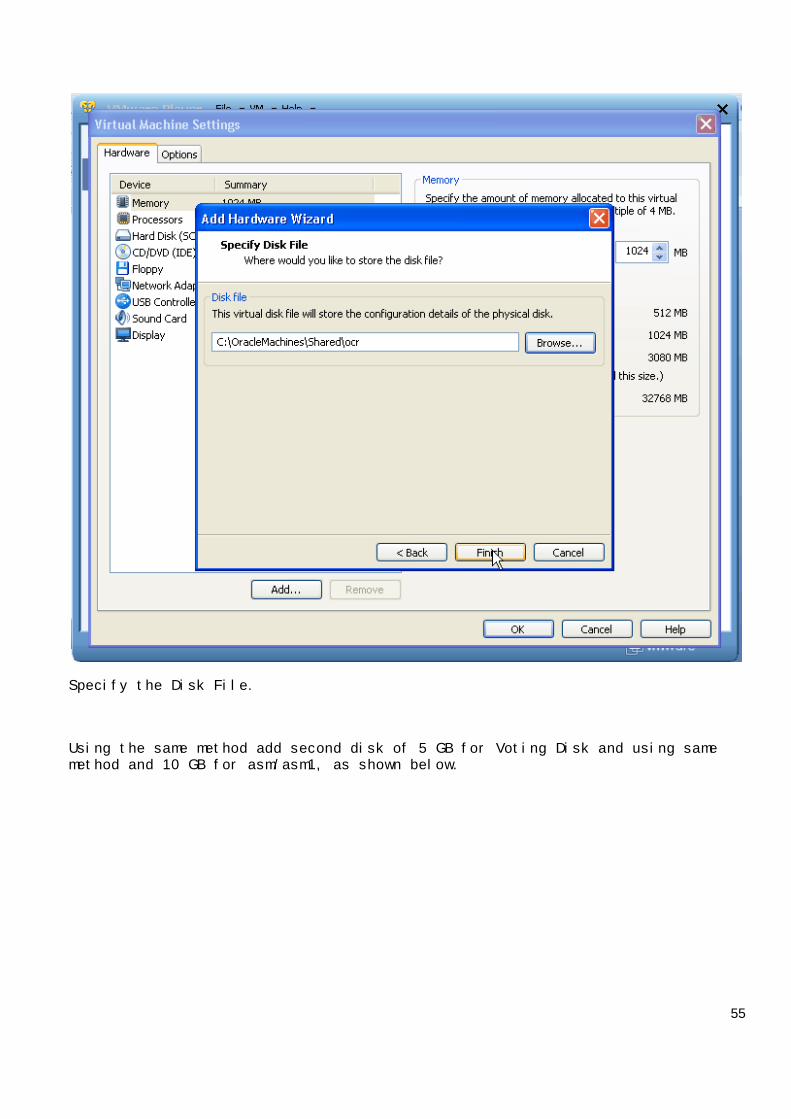
Select 5.0 GB for ocr.
53
54
55
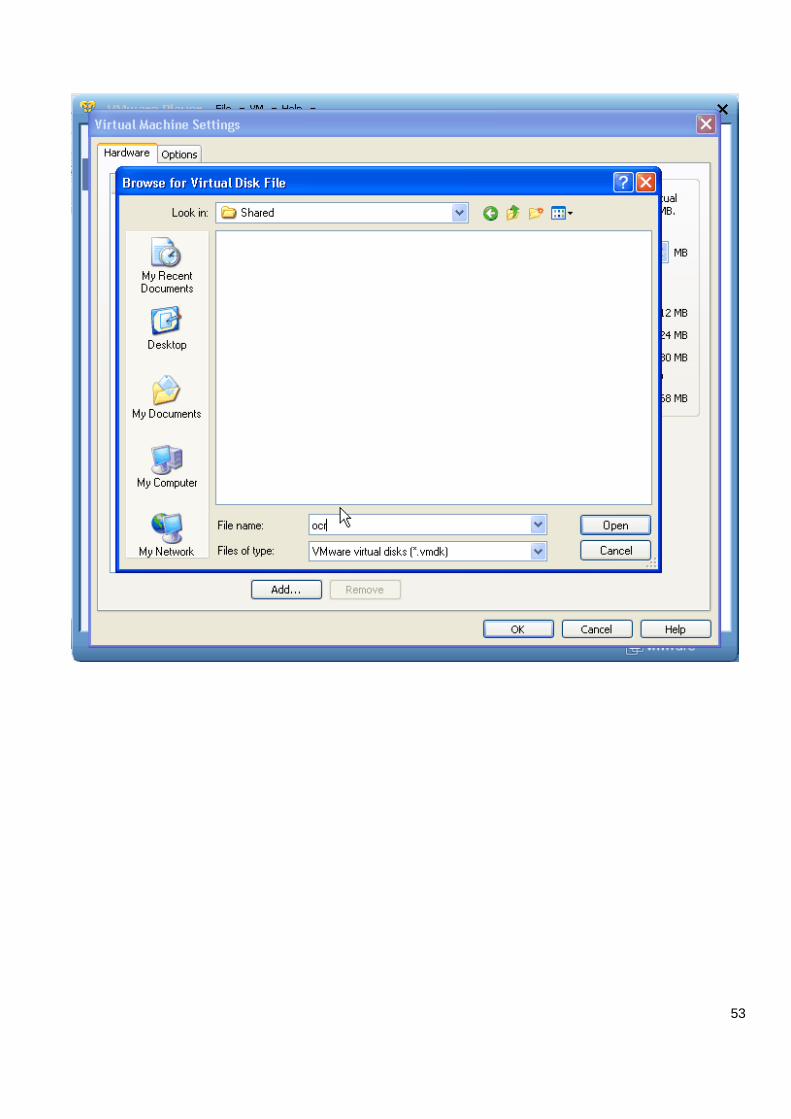
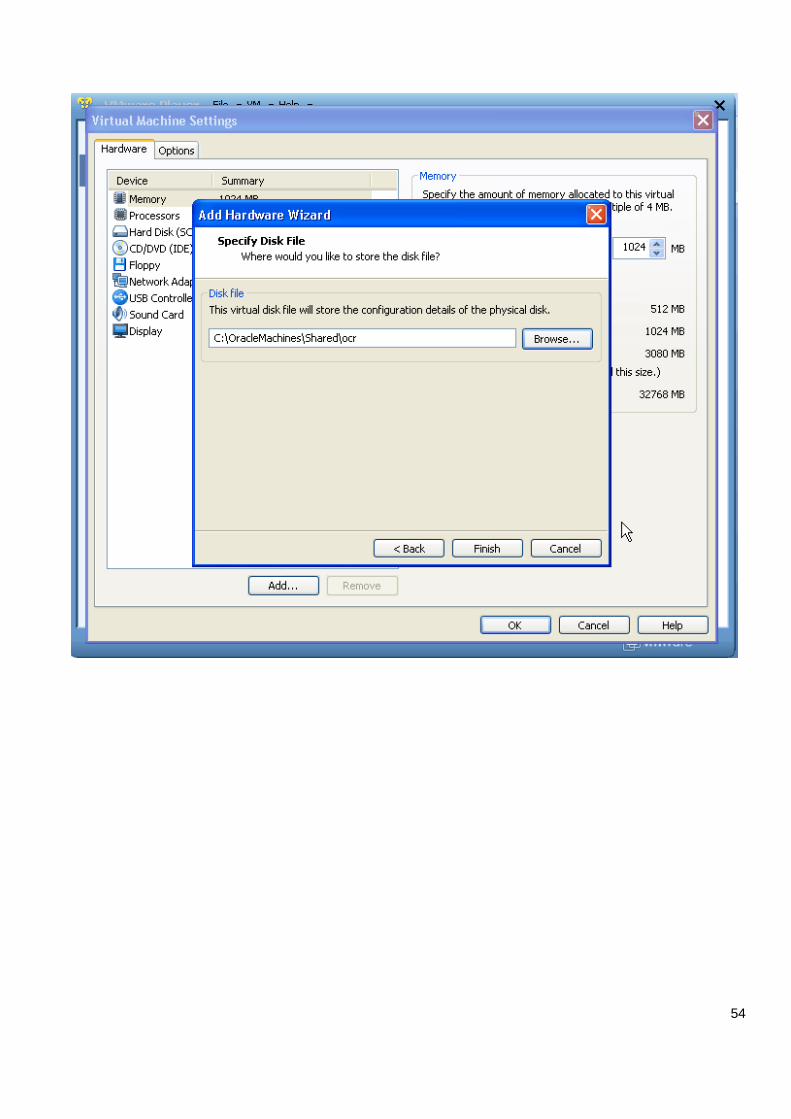
Specify the Disk File.
Using the same method add second disk of 5 GB for Voting Disk and using samemethod and 10 GB for asm/asm1, as shown below.
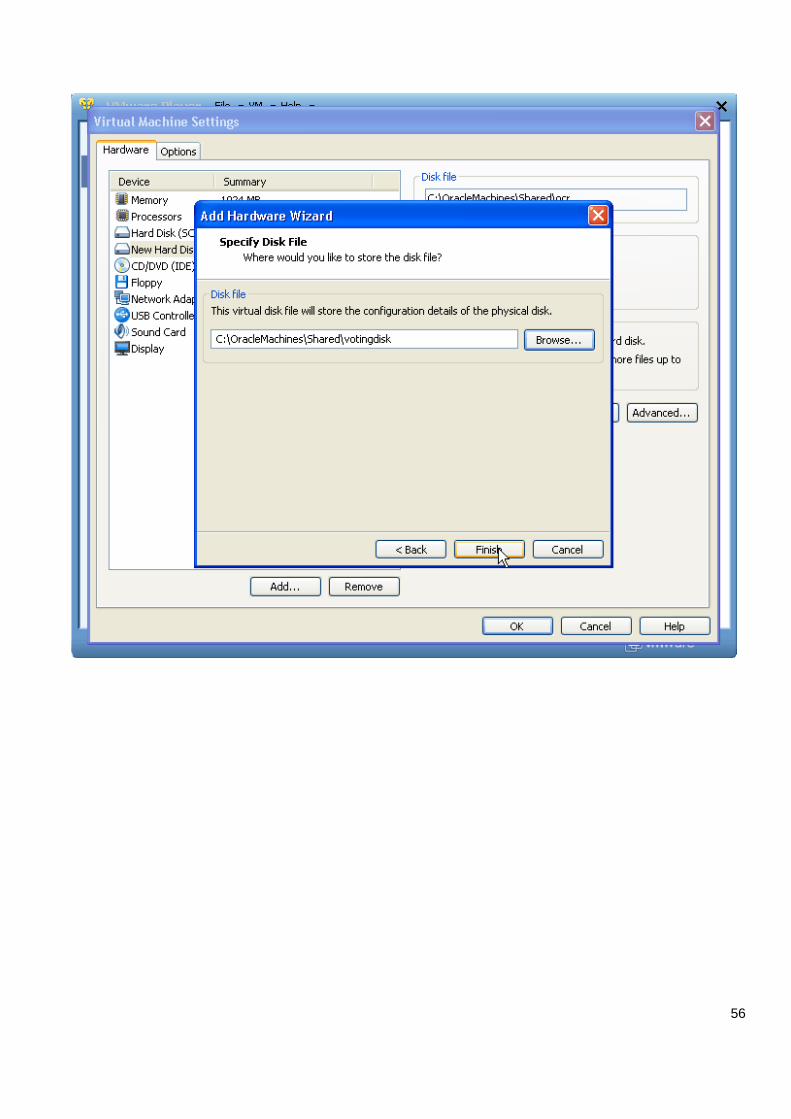
56
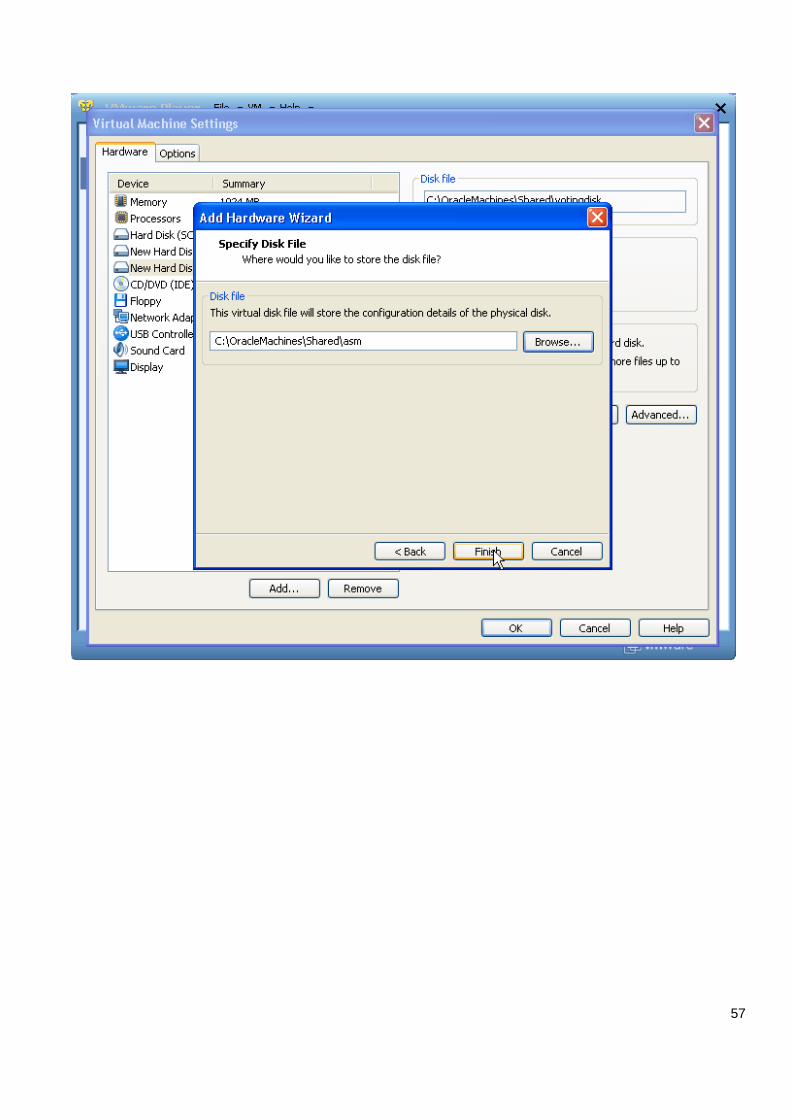
57
58
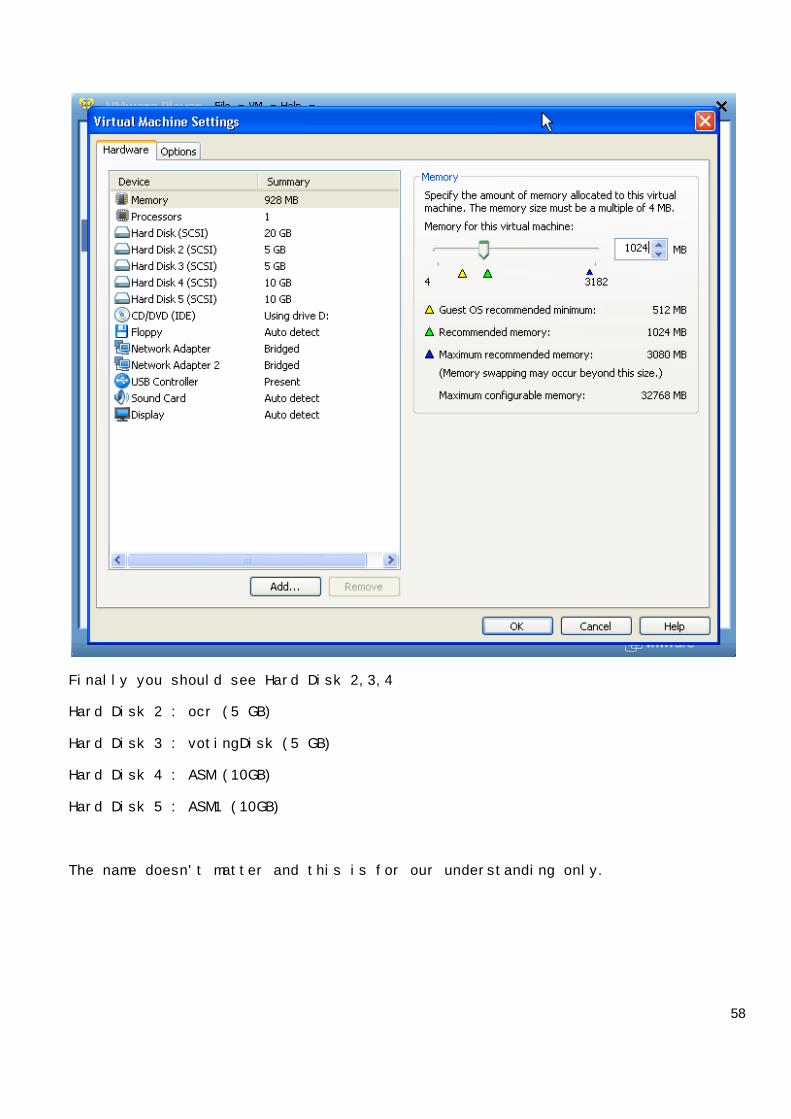
Finally you should see Hard Disk 2,3,4
Hard Disk 2 : ocr (5 GB)
Hard Disk 3 : votingDisk (5 GB)
Hard Disk 4 : ASM (10GB)
Hard Disk 5 : ASM1 (10GB)
The name doesn't matter and this is for our understanding only.
59
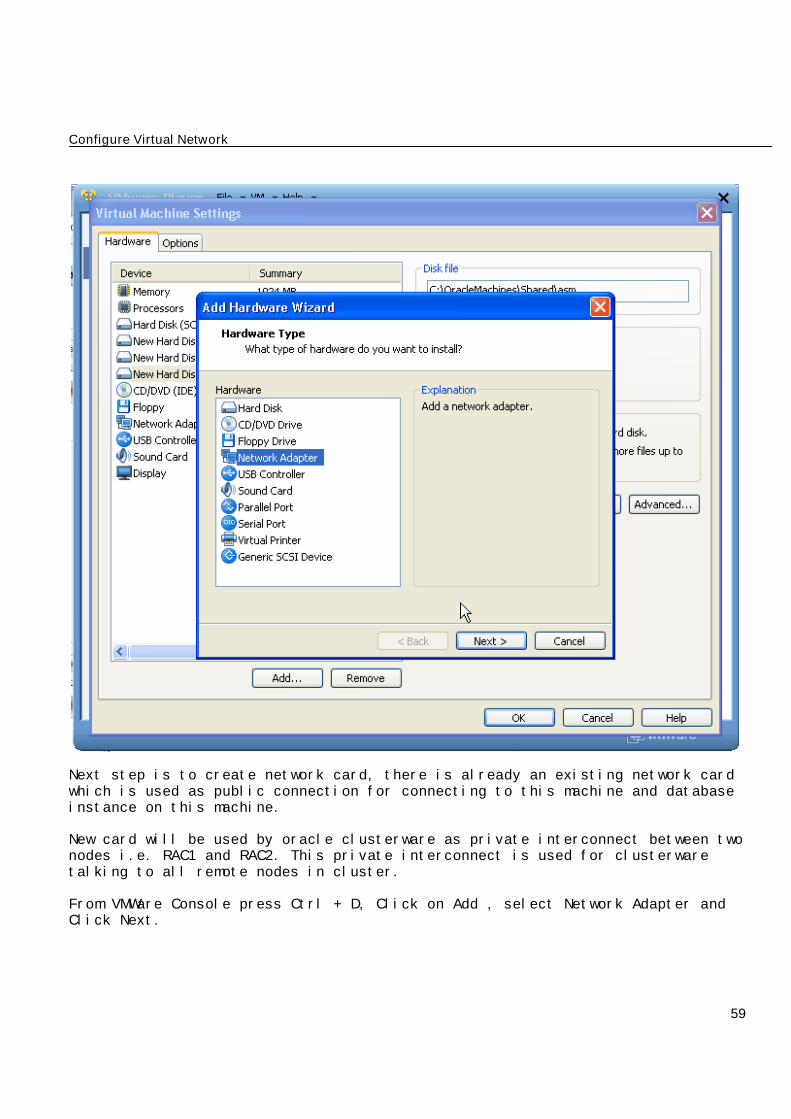
Configure Virtual Network
Next step is to create network card, there is already an existing network cardwhich is used as public connection for connecting to this machine and databaseinstance on this machine.
New card will be used by oracle clusterware as private interconnect between twonodes i.e. RAC1 and RAC2. This private interconnect is used for clusterwaretalking to all remote nodes in cluster.
From VMWare Console press Ctrl + D, Click on Add , select Network Adapter andClick Next.
60
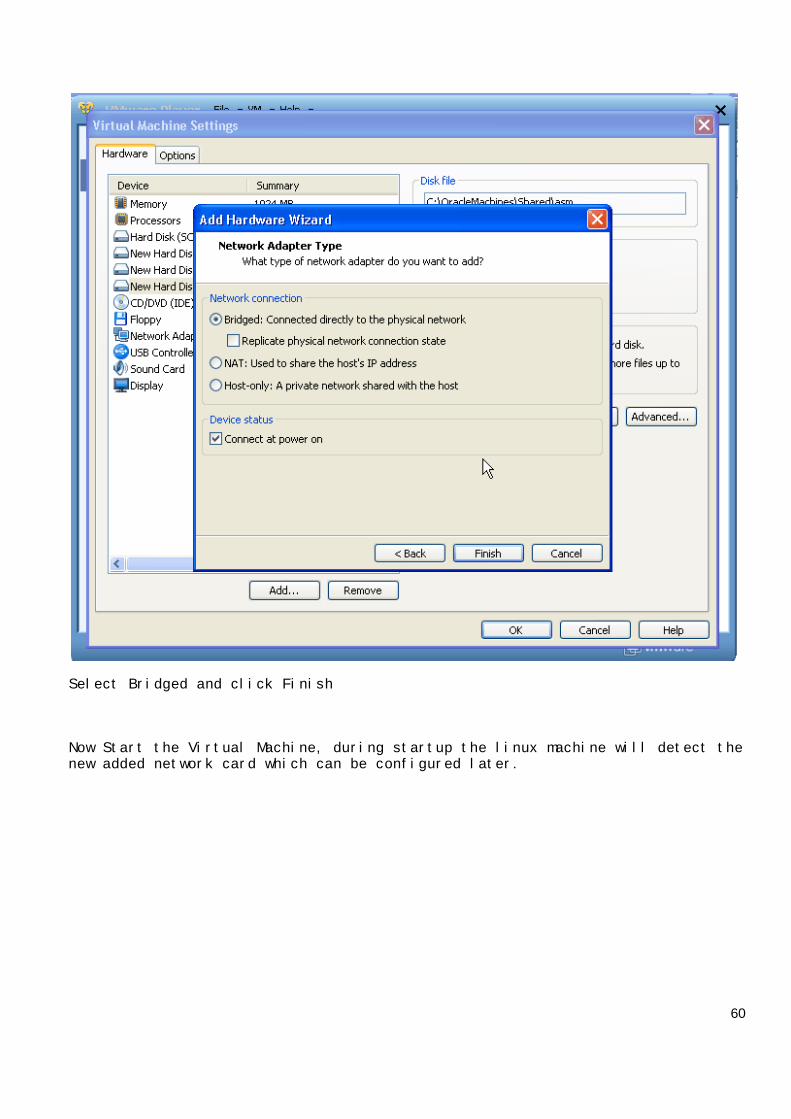
Select Bridged and click Finish
Now Start the Virtual Machine, during startup the linux machine will detect thenew added network card which can be configured later.
61
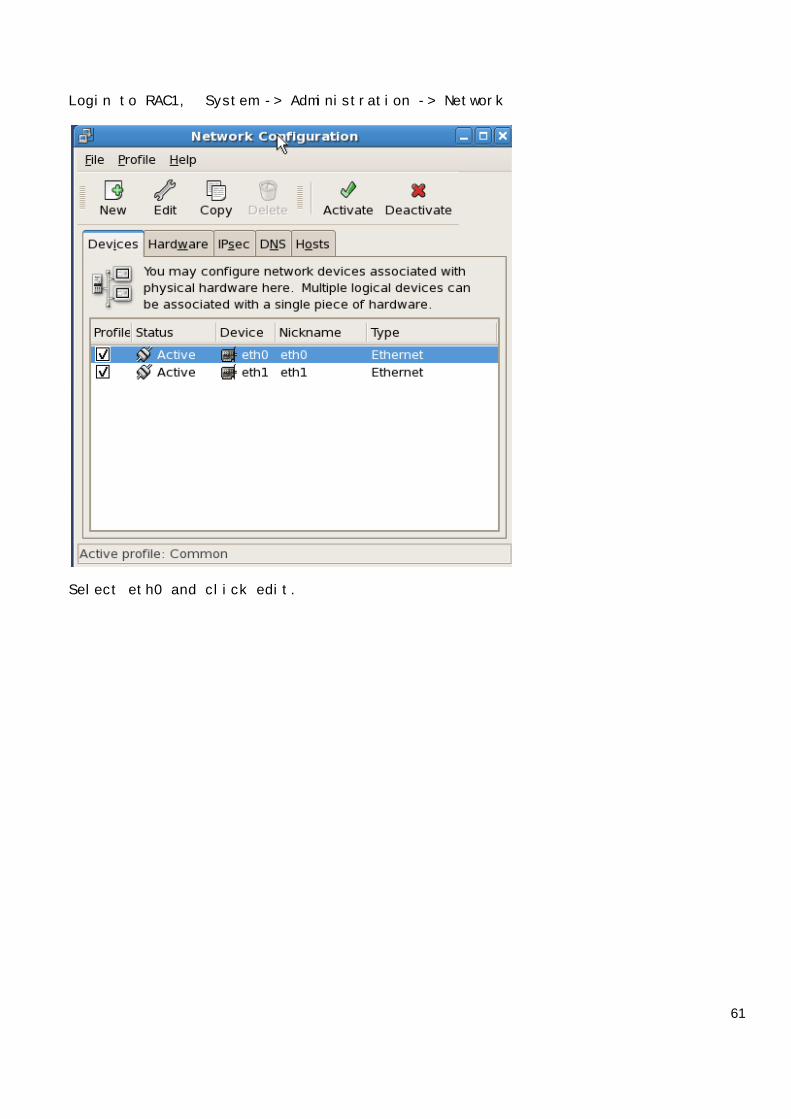
Login to RAC1, System -> Administration -> Network
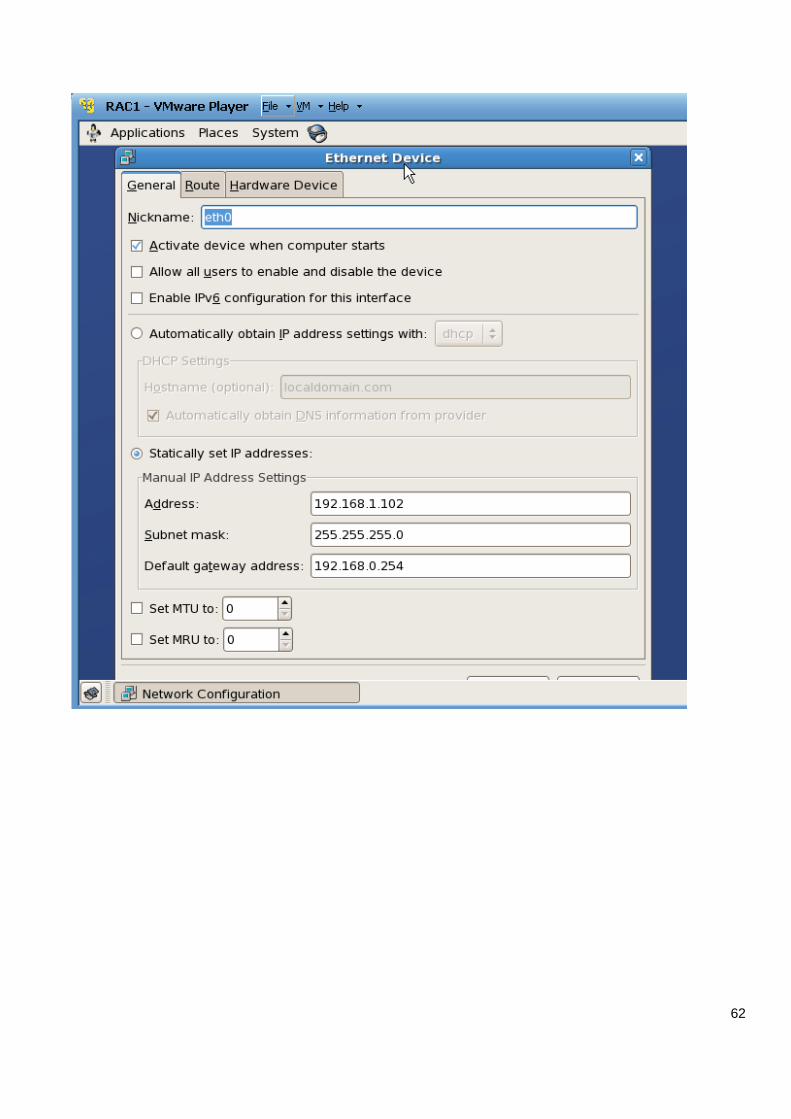
Select eth0 and click edit.
62
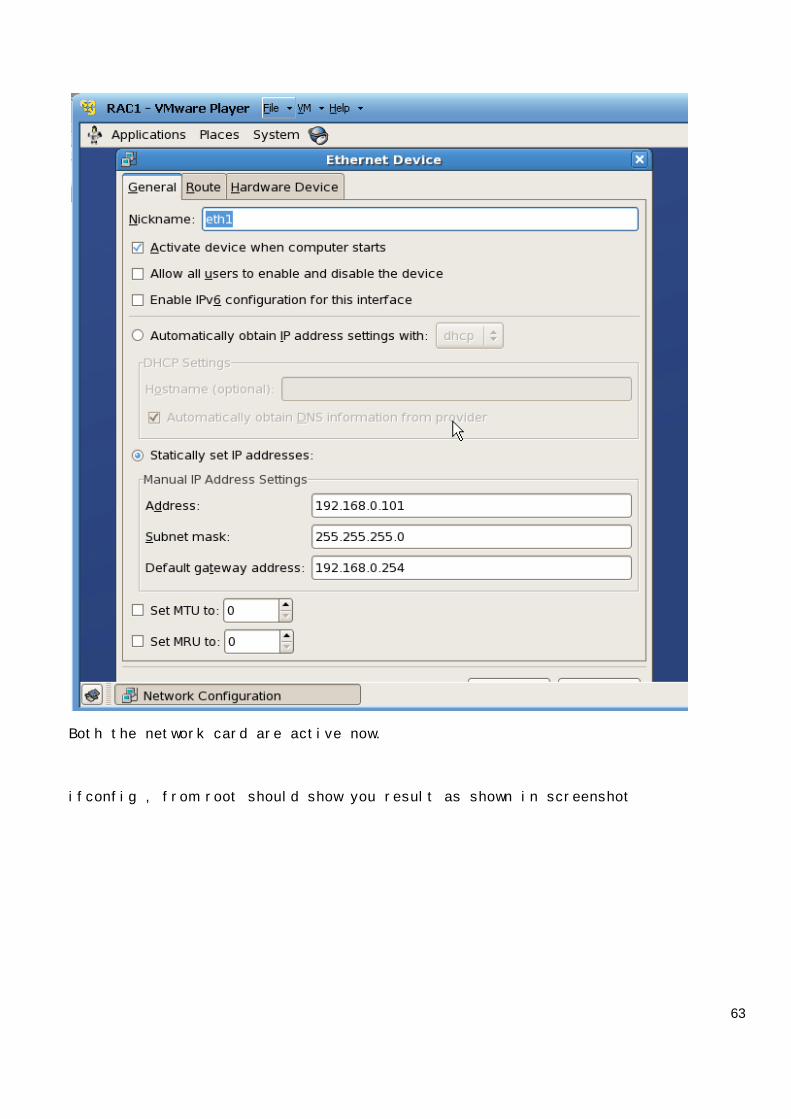
63
Both the network card are active now.
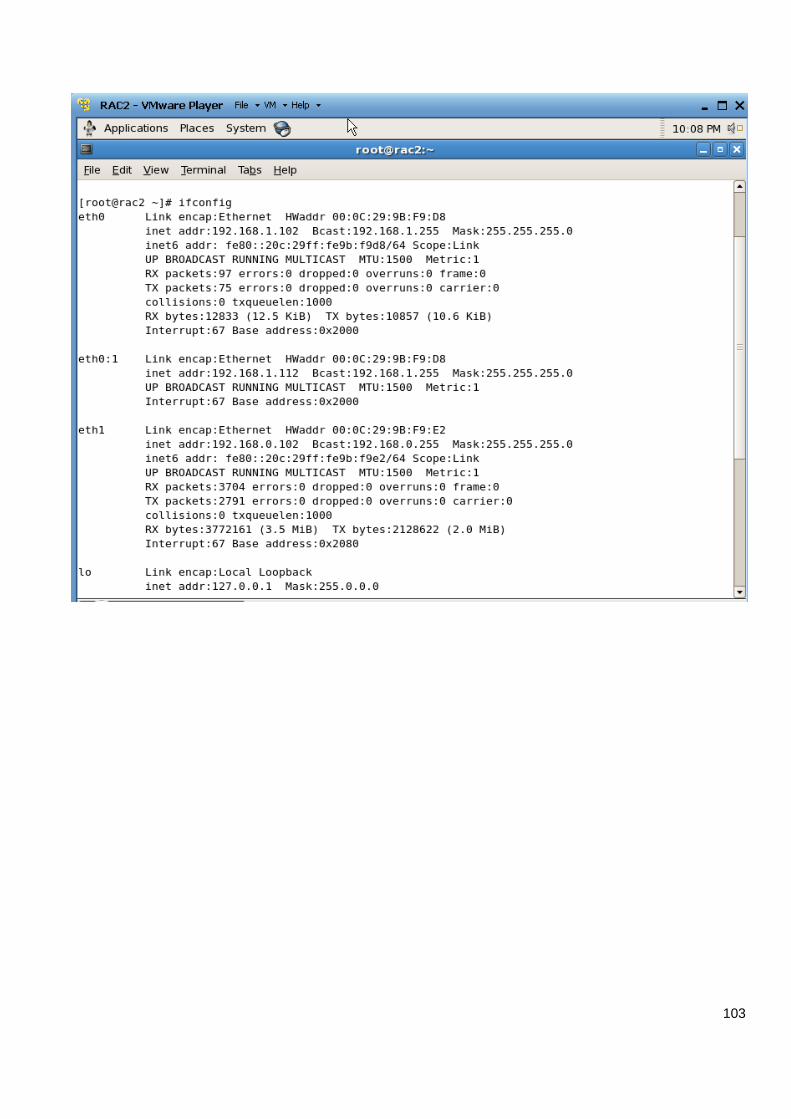
ifconfig , from root should show you result as shown in screenshot
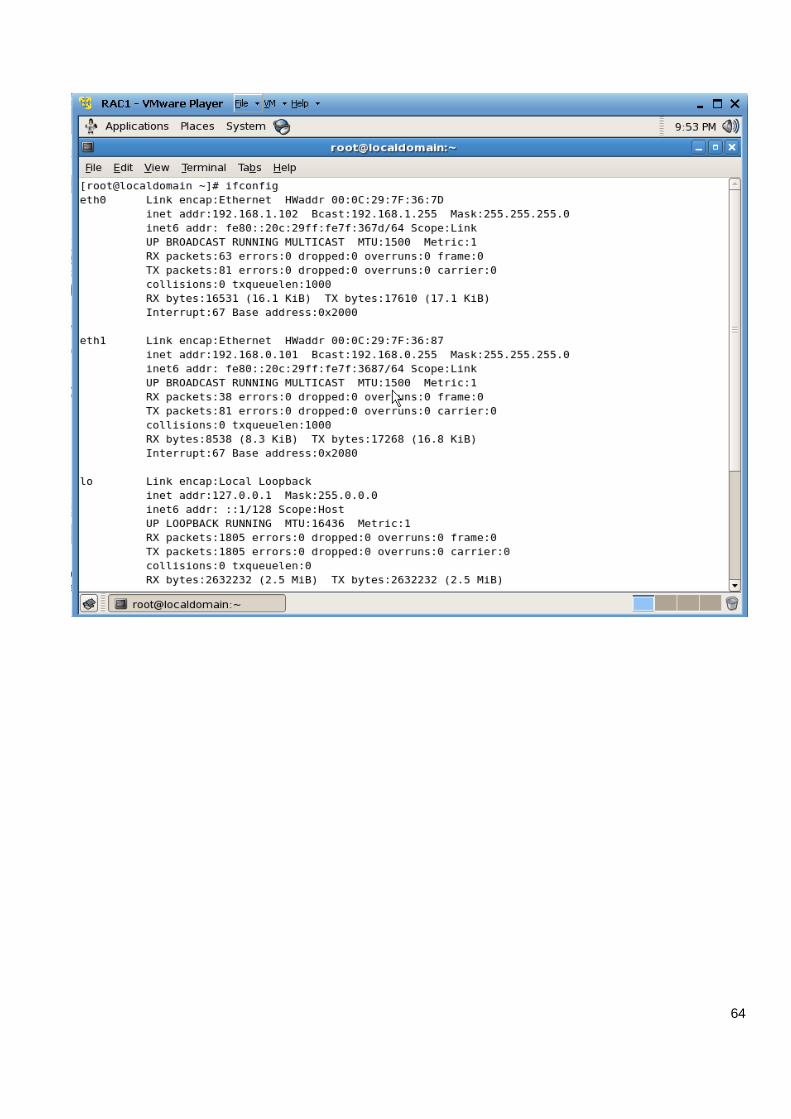
64
65
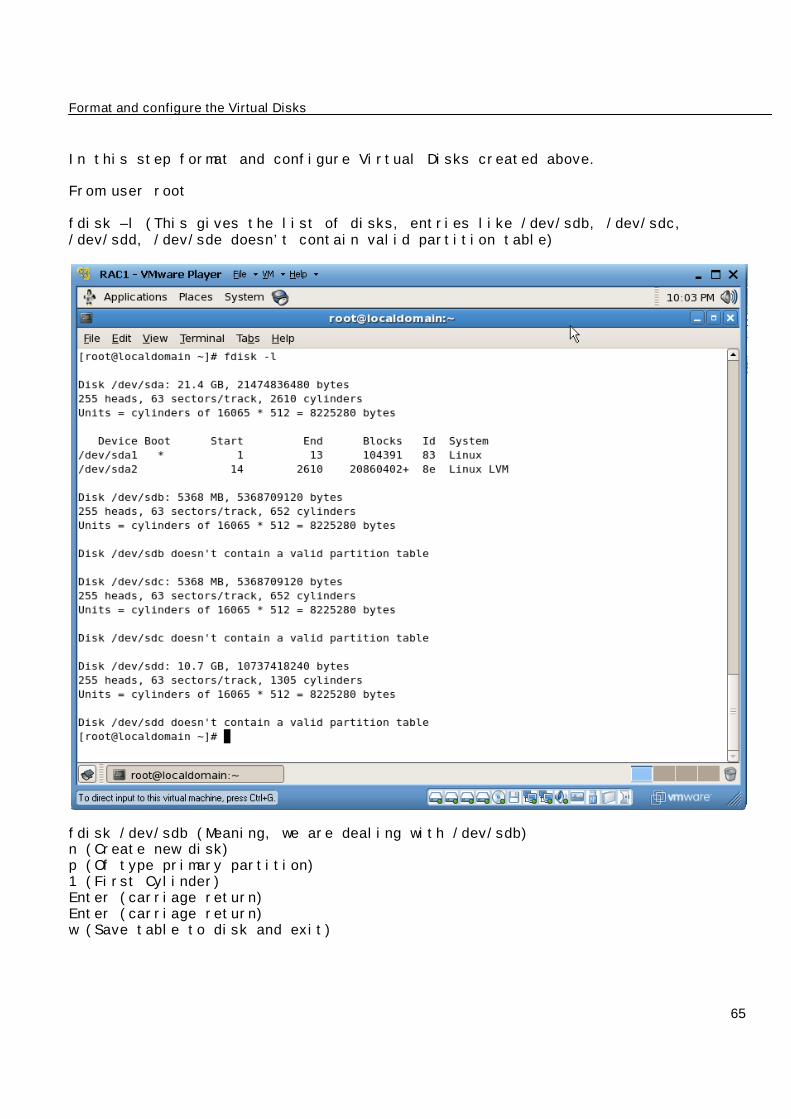
Format and configure the Virtual Disks
In this step format and configure Virtual Disks created above.
From user root
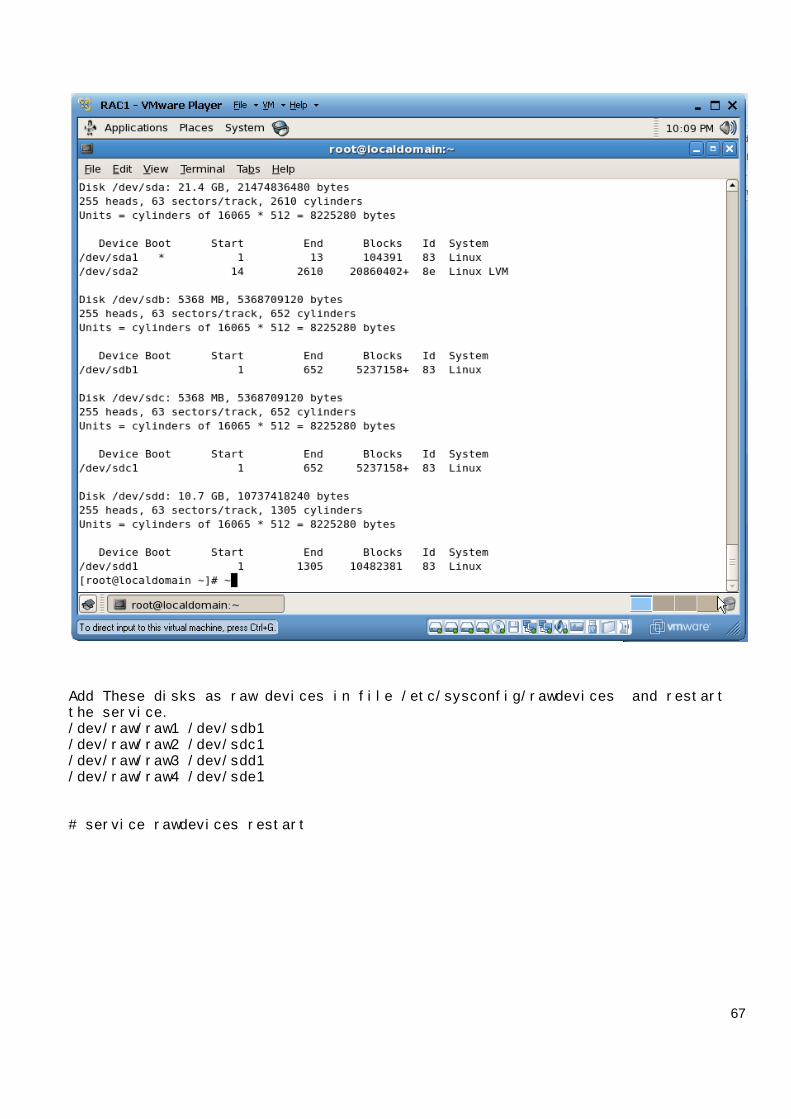
fdisk –l (This gives the list of disks, entries like /dev/sdb, /dev/sdc,/dev/sdd, /dev/sde doesn’t contain valid partition table)
fdisk /dev/sdb (Meaning, we are dealing with /dev/sdb)n (Create new disk)p (Of type primary partition)1 (First Cylinder)Enter (carriage return)Enter (carriage return)w (Save table to disk and exit)
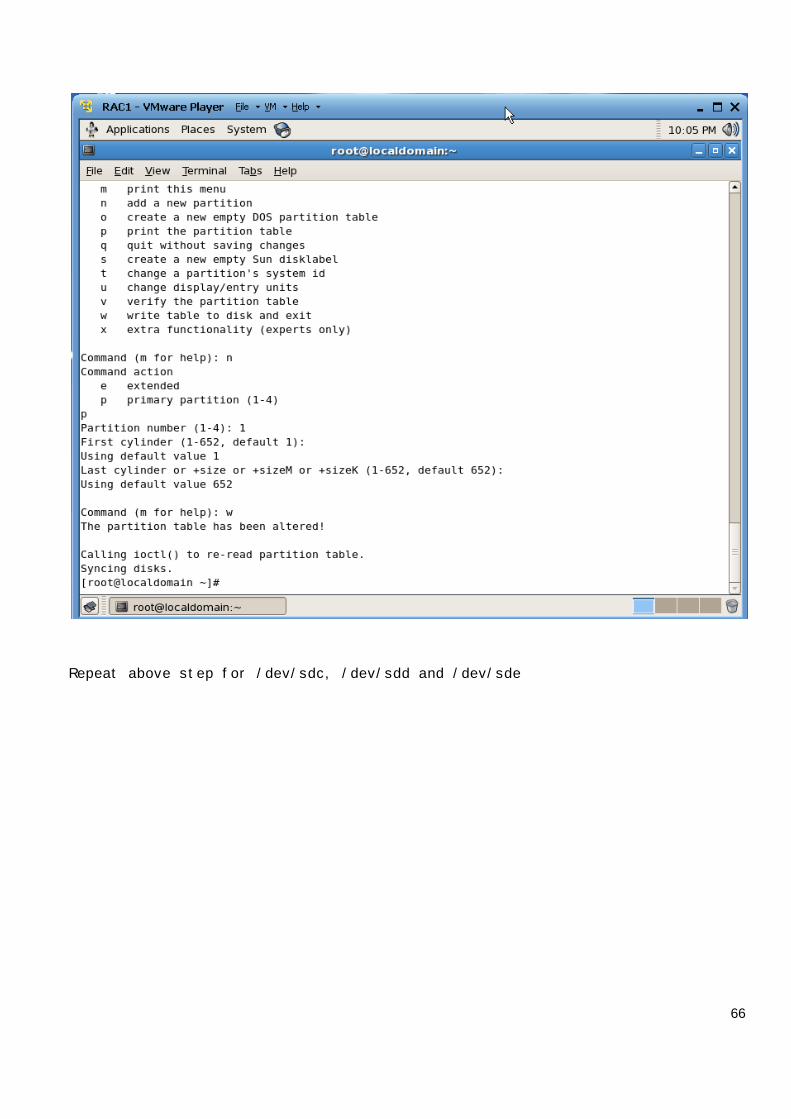
66
Repeat above step for /dev/sdc, /dev/sdd and /dev/sde
67
Add These disks as raw devices in file /etc/sysconfig/rawdevices and restartthe service./dev/raw/raw1 /dev/sdb1/dev/raw/raw2 /dev/sdc1/dev/raw/raw3 /dev/sdd1/dev/raw/raw4 /dev/sde1
# service rawdevices restart
68
Create directory /opt/oracle/oradata (For storing voting disk, ocr and ASM)
#mkdir –p /opt/oracle/oradata
Create symbolic link pointing to these raw devices, just to make sure which oneis for what.
#ln –s /dev/raw/raw1 /apps/oracle/oradata/ocr#ln –s /dev/raw/raw2 /apps/oracle/oradata/votingdisk#ln –s /dev/raw/raw3 /apps/oracle/oradata/asm#ln –s /dev/raw/raw4 /apps/oracle/oradata/asm1
Change ownership of these directories to oracle:oracle
If group oracle dosen't exists, create one as
# groupadd oracle
#chown oracle:oracle /dev/raw/raw1#chown oracle:oracle /dev/raw/raw2#chown oracle:oracle /dev/raw/raw3#chown oracle:oracle /dev/raw/raw4
Note: When you restart a Red Hat Enterprise Linux system, raw devices revert totheir original owners and permissions by default. If you are using raw deviceswith this operating system for your Oracle files, for example, for ASM storageor Oracle Clusterware files, you need to override this default behavior. To dothis, add an entry to the /etc/rc.d/rc.local file for each raw devicecontaining the chmod and chown commands required to reset them to the requiredvalues.
Edit /etc/rc.d/rc.local and add the following as root user.
chown oracle:oracle /dev/raw/raw1chown oracle:oracle /dev/raw/raw2chown oracle:oracle /dev/raw/raw3chown oracle:oracle /dev/raw/raw4
chmod 660 /dev/raw/raw1chmod 660 /dev/raw/raw2chmod 660 /dev/raw/raw3chmod 660 /dev/raw/raw4
Shutdown RAC1.
69
Clone the Virtual Machine
Copy the RAC1 virtual machine (Folder) to RAC2 (Folder)
Edit the RAC1 and RAC2 configurations file.
It will be if type VMware Virtual machine configuration(.vmx) and update thefollowing.
This will avoid locking the shared files and two linux machines RAC1 and RAC2can start together.
disk.locking = "FALSE"diskLib.dataCacheMaxSize = "0"diskLib.dataCacheMaxReadAheadSize = "0"diskLib.dataCacheMinReadAheadSize = "0"diskLib.dataCachePageSize = "4096"diskLib.maxUnsyncedWrites = "0"
Now on RAC2, update the display name. Change displayName = "RAC1" todisplayName = "RAC2"
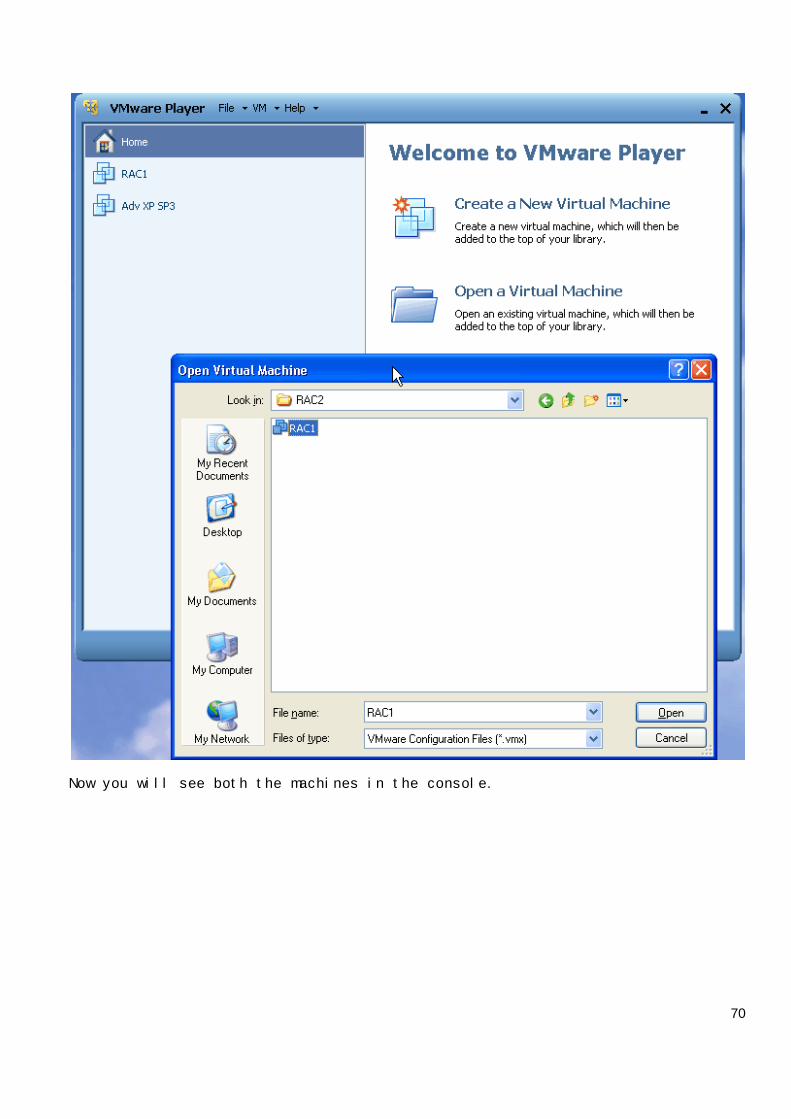
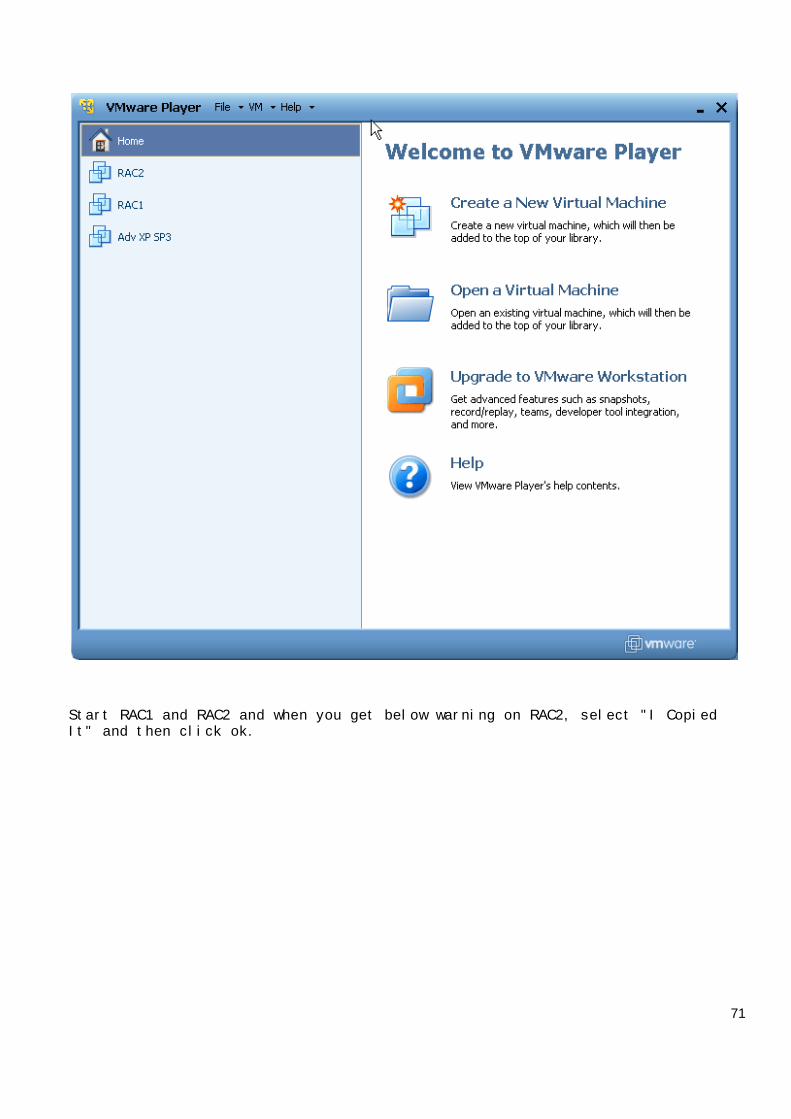
On VMWare Server Console, Click on "Open a Virtual Machine" or "Ctrl + O"
70
Now you will see both the machines in the console.
71
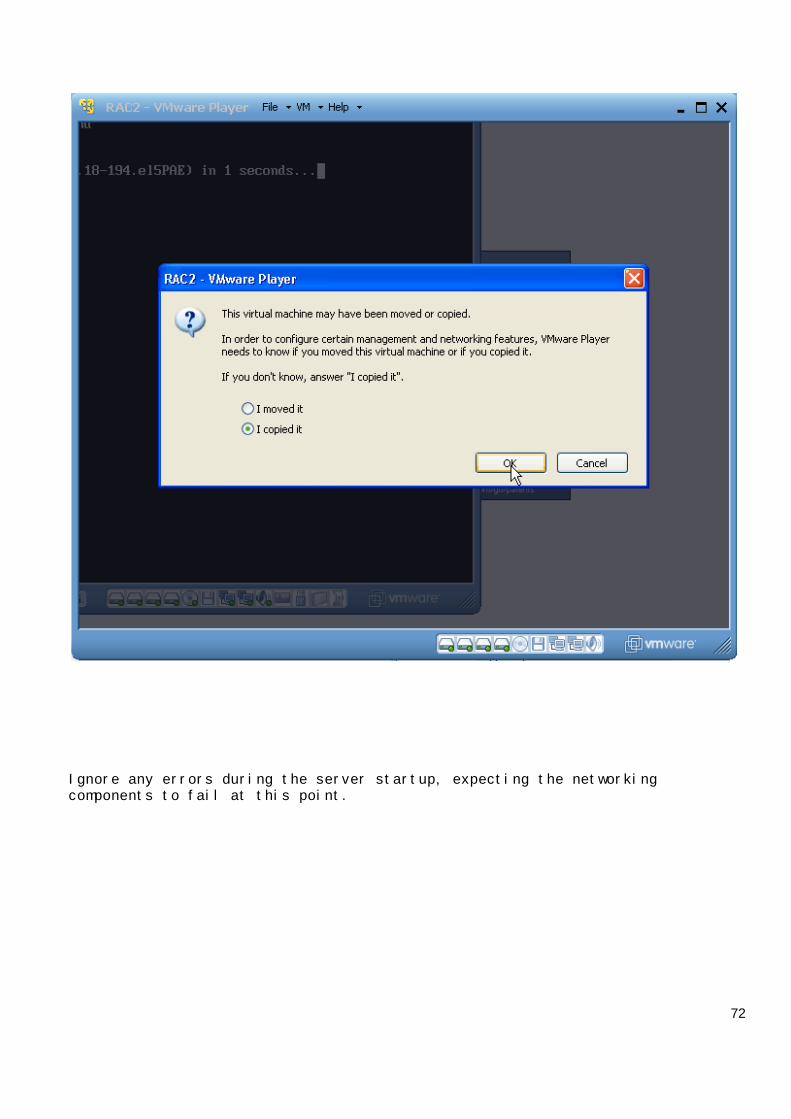
Start RAC1 and RAC2 and when you get below warning on RAC2, select "I CopiedIt" and then click ok.
72
Ignore any errors during the server startup, expecting the networkingcomponents to fail at this point.
73
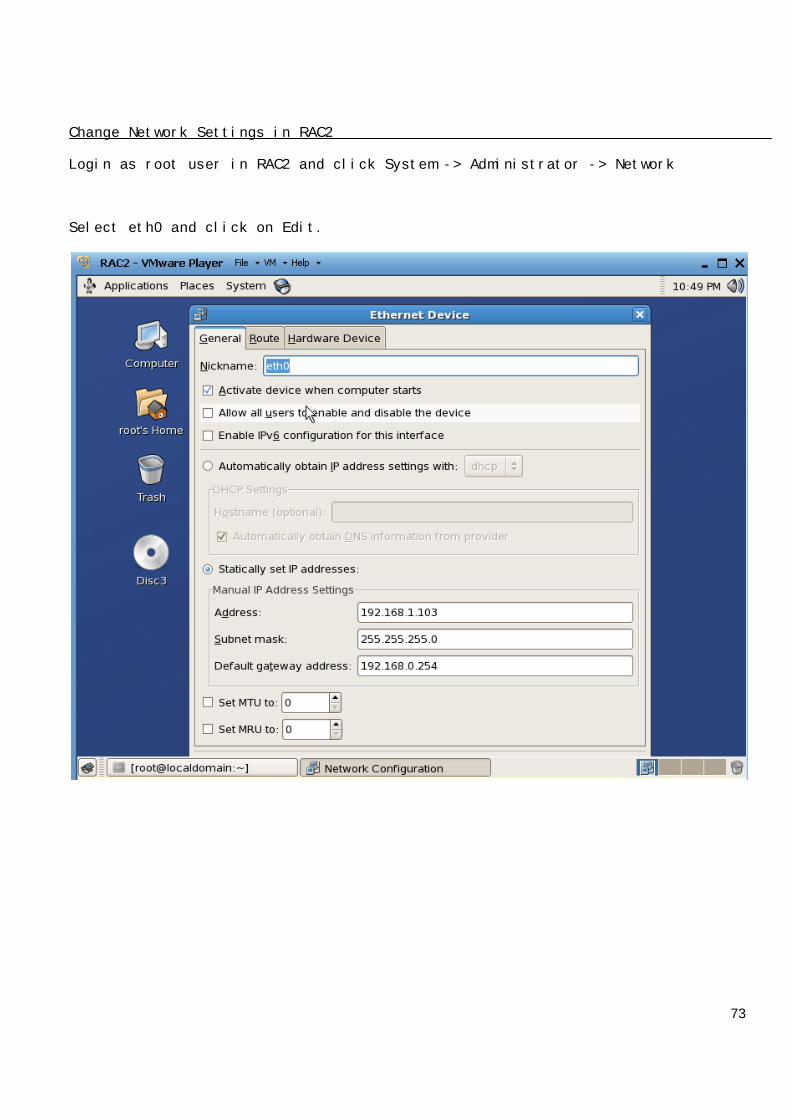
Change Network Settings in RAC2
Login as root user in RAC2 and click System -> Administrator -> Network
Select eth0 and click on Edit.
74
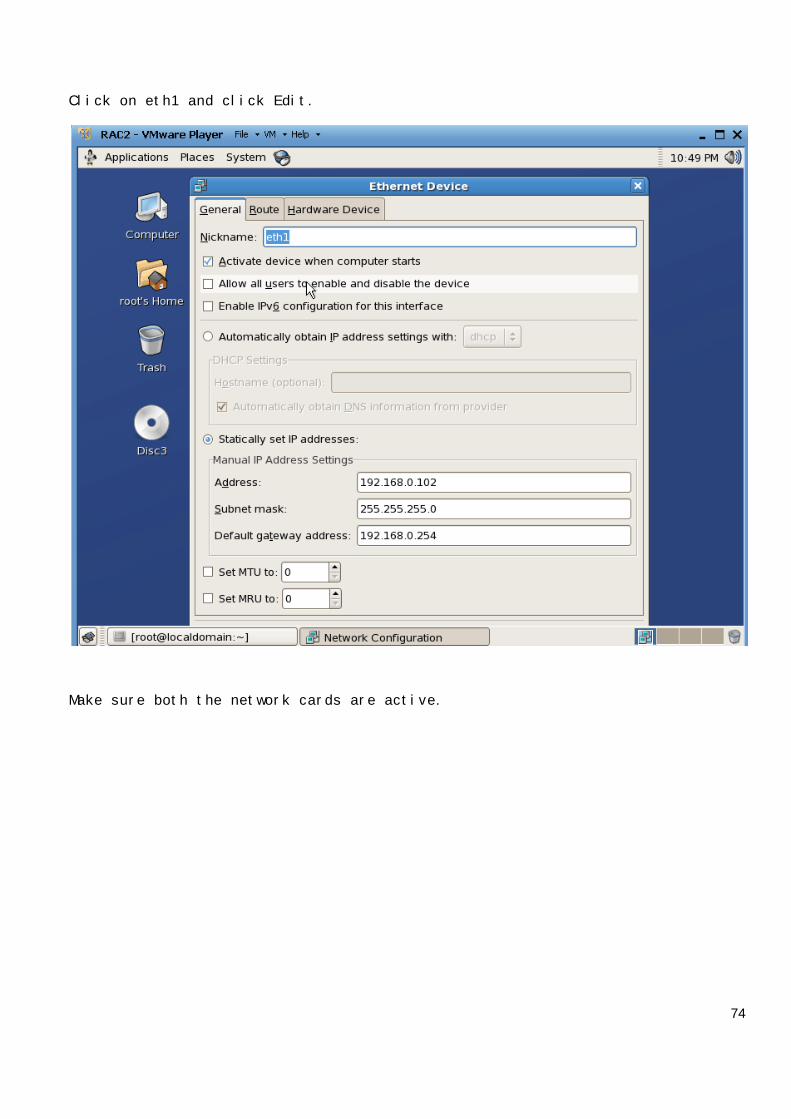
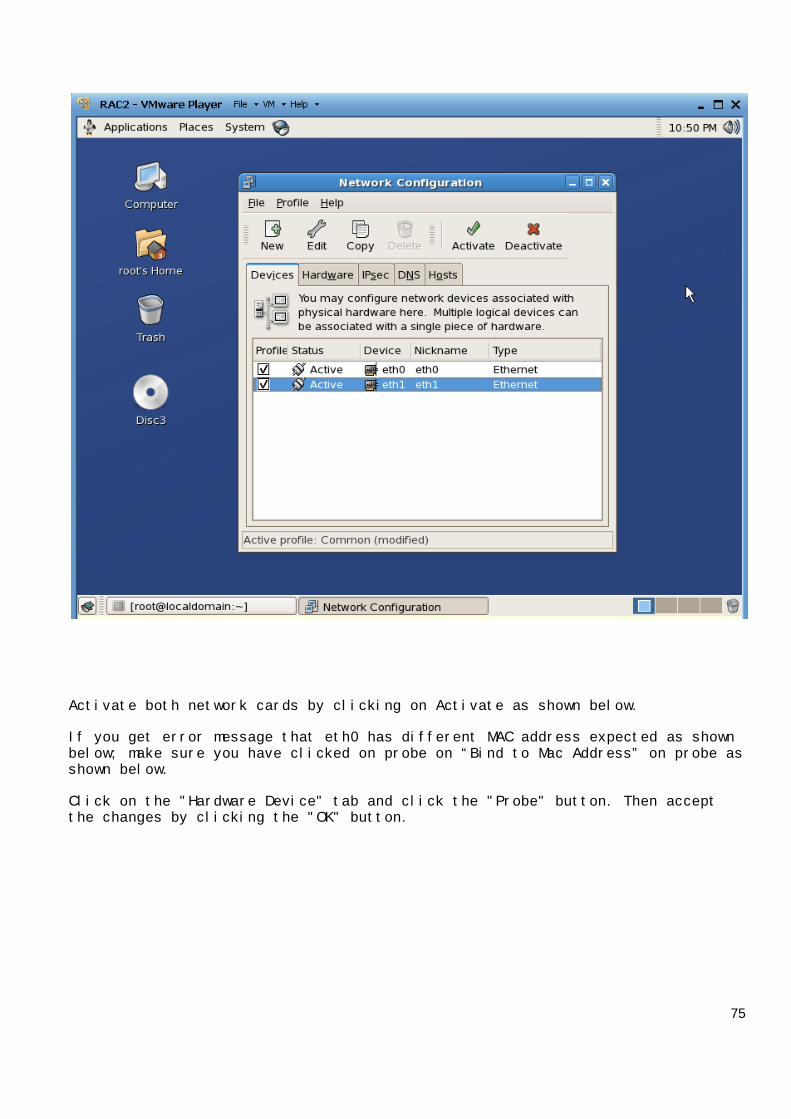
Click on eth1 and click Edit.
Make sure both the network cards are active.
75
Activate both network cards by clicking on Activate as shown below.
If you get error message that eth0 has different MAC address expected as shownbelow; make sure you have clicked on probe on “Bind to Mac Address” on probe asshown below.
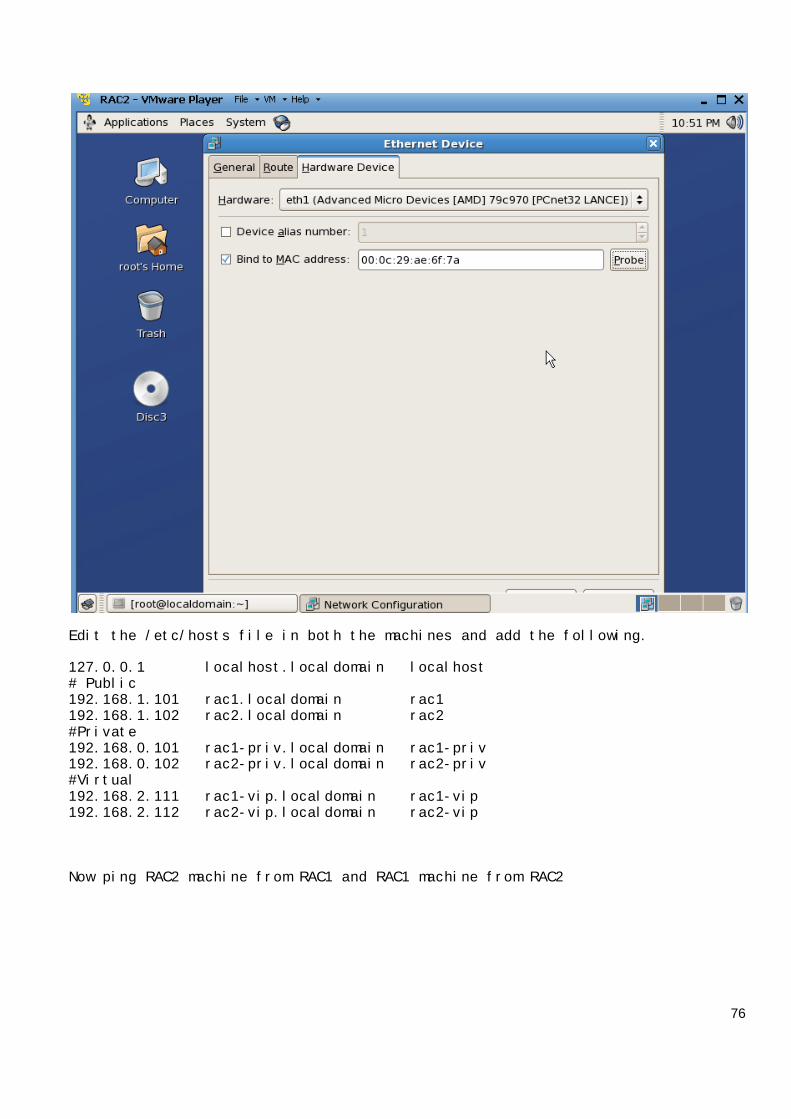
Click on the "Hardware Device" tab and click the "Probe" button. Then acceptthe changes by clicking the "OK" button.
76
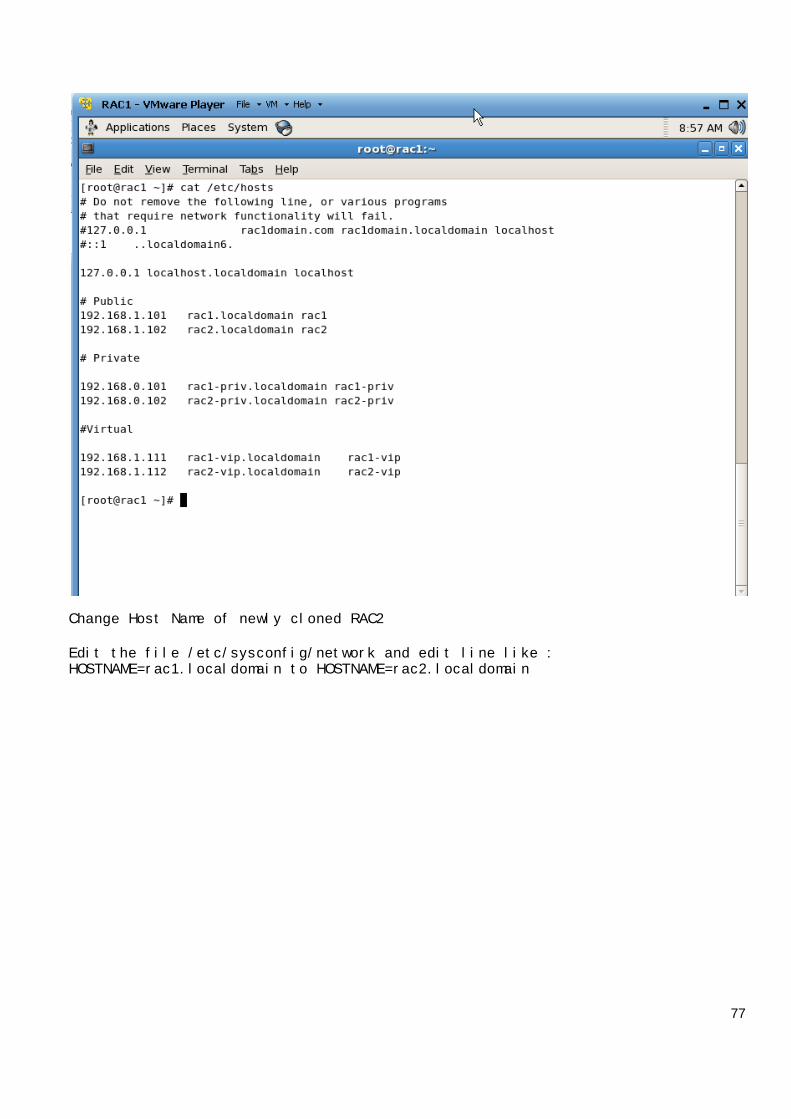
Edit the /etc/hosts file in both the machines and add the following.
127.0.0.1 localhost.localdomain localhost# Public192.168.1.101 rac1.localdomain rac1192.168.1.102 rac2.localdomain rac2#Private192.168.0.101 rac1-priv.localdomain rac1-priv192.168.0.102 rac2-priv.localdomain rac2-priv#Virtual192.168.2.111 rac1-vip.localdomain rac1-vip192.168.2.112 rac2-vip.localdomain rac2-vip
Now ping RAC2 machine from RAC1 and RAC1 machine from RAC2
77
Change Host Name of newly cloned RAC2
Edit the file /etc/sysconfig/network and edit line like :HOSTNAME=rac1.localdomain to HOSTNAME=rac2.localdomain
78
Configure User Equivalency
Before you can install Oracle RAC 10g, you must configure secure shell (SSH)for the UNIX user account you plan to use to install Oracle Clusterware 10g andthe Oracle Database 10g software. The installation and configuration tasksdescribed in this section will need to be performed on both Oracle RAC nodes.As configured earlier in this article, the software owner for OracleClusterware 10g and the Oracle Database 10g software will be "oracle".
The goal here is to setup user equivalence for the oracle UNIX user account.User equivalence enables the oracle UNIX user account to access all other nodesin the cluster (running commands and copying files) without the need for apassword.
Login as user oracle in machine RAC1
Make sure sshd daemon is running (eg: pgrep sshd), If not start it from rootuser like
#service start sshd
Create RSA and DSA key on each node
From oracle user go to user home directory by typing :
#cd
#mkdir .ssh
Note that there is dot before ssh which means this is hidden directory
#chmod 700 .ssh#ssh-keygen –t rsa#ssh-keygen –t dsa
At the prompts:
Accept the default location for the key files (press [ENTER]). Enter and confirm a pass phrase. This should be different from the oracle
UNIX user account password however it is not a requirement.
This command will write the public key to the ../.ssh/id_rsa.pub file and theprivate key to the ../.ssh/id_rsa file. Note that you should never distributethe private key to anyone!
Repeat the above steps for both Oracle RAC nodes in the cluster.

79
Add keys to authorized key file (authorized_keys)
Now that both Oracle RAC nodes contain a public and private key for RSA, youwill need to create an authorized key file on one of the nodes. An authorizedkey file is nothing more than a single file that contains a copy of everyone's(every node's) RSA public key. Once the authorized key file contains all of thepublic keys, it is then distributed to all other nodes in the cluster.
Complete the following steps on one of the nodes in the cluster to create andthen distribute the authorized key file.
In RAC1
80
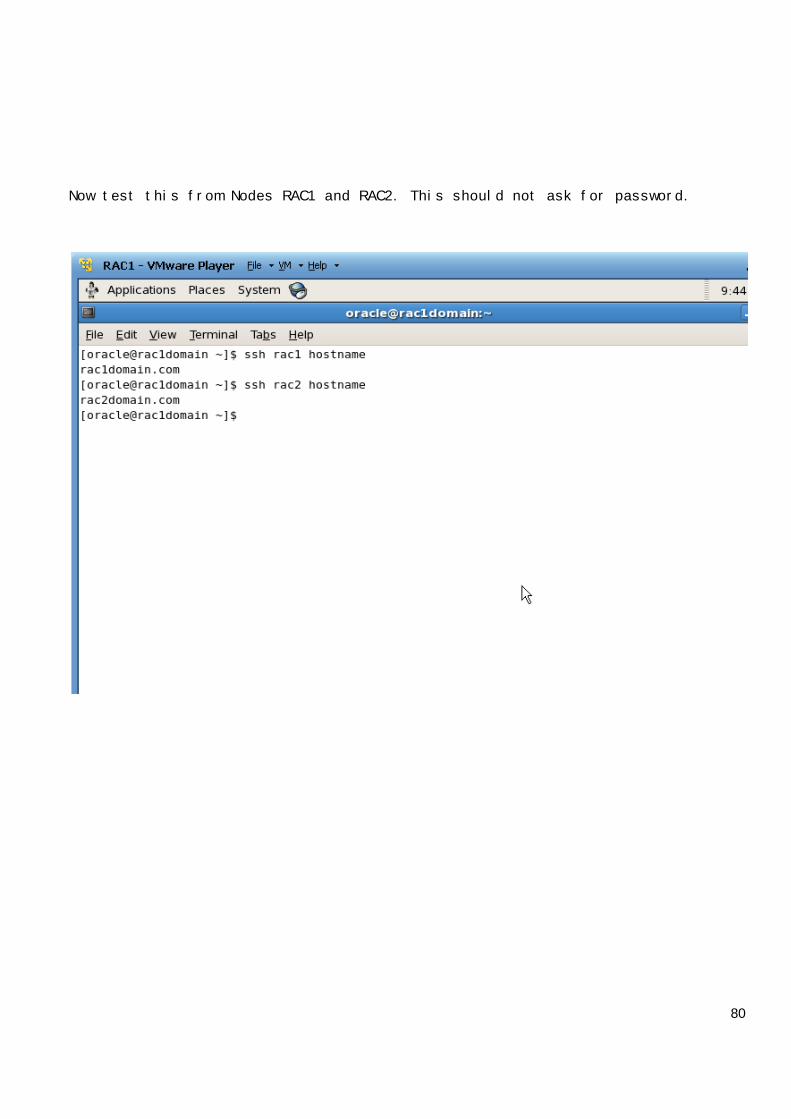
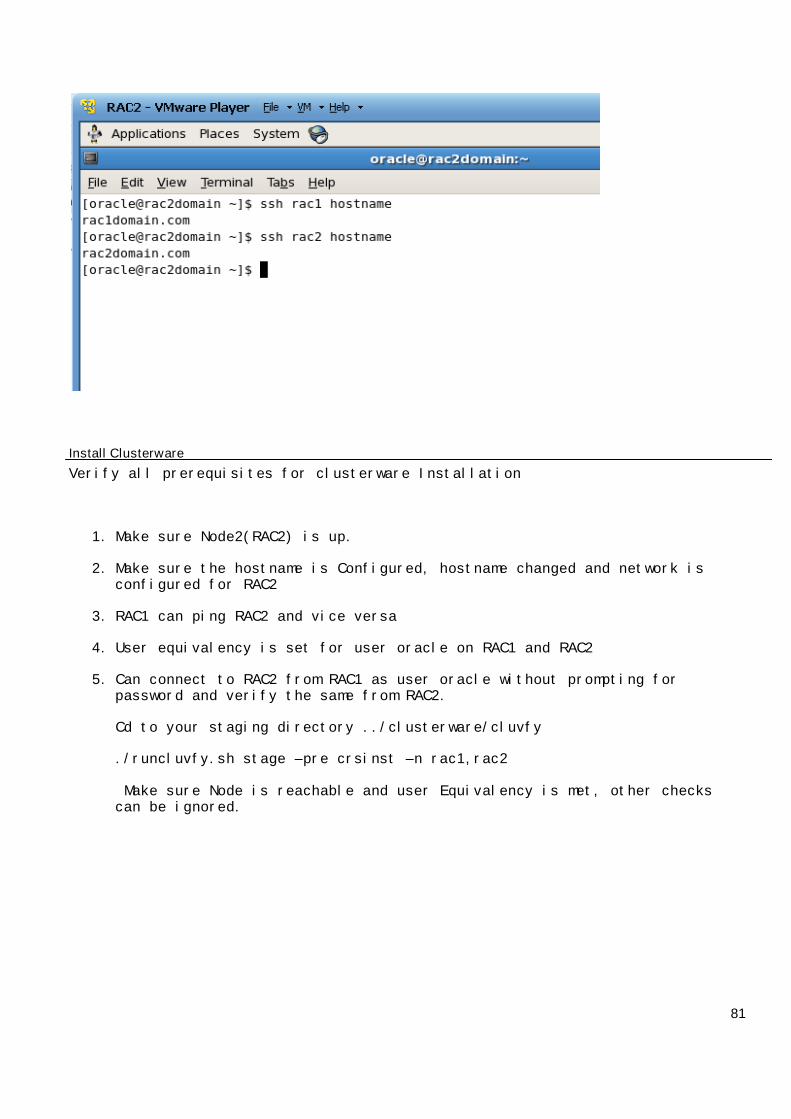
Now test this from Nodes RAC1 and RAC2. This should not ask for password.
81
Install Clusterware
Verify all prerequisites for clusterware Installation
1. Make sure Node2(RAC2) is up.
2. Make sure the hostname is Configured, hostname changed and network isconfigured for RAC2
3. RAC1 can ping RAC2 and vice versa
4. User equivalency is set for user oracle on RAC1 and RAC2
5. Can connect to RAC2 from RAC1 as user oracle without prompting forpassword and verify the same from RAC2.
Cd to your staging directory ../clusterware/cluvfy
./runcluvfy.sh stage –pre crsinst –n rac1,rac2
Make sure Node is reachable and user Equivalency is met, other checkscan be ignored.
82
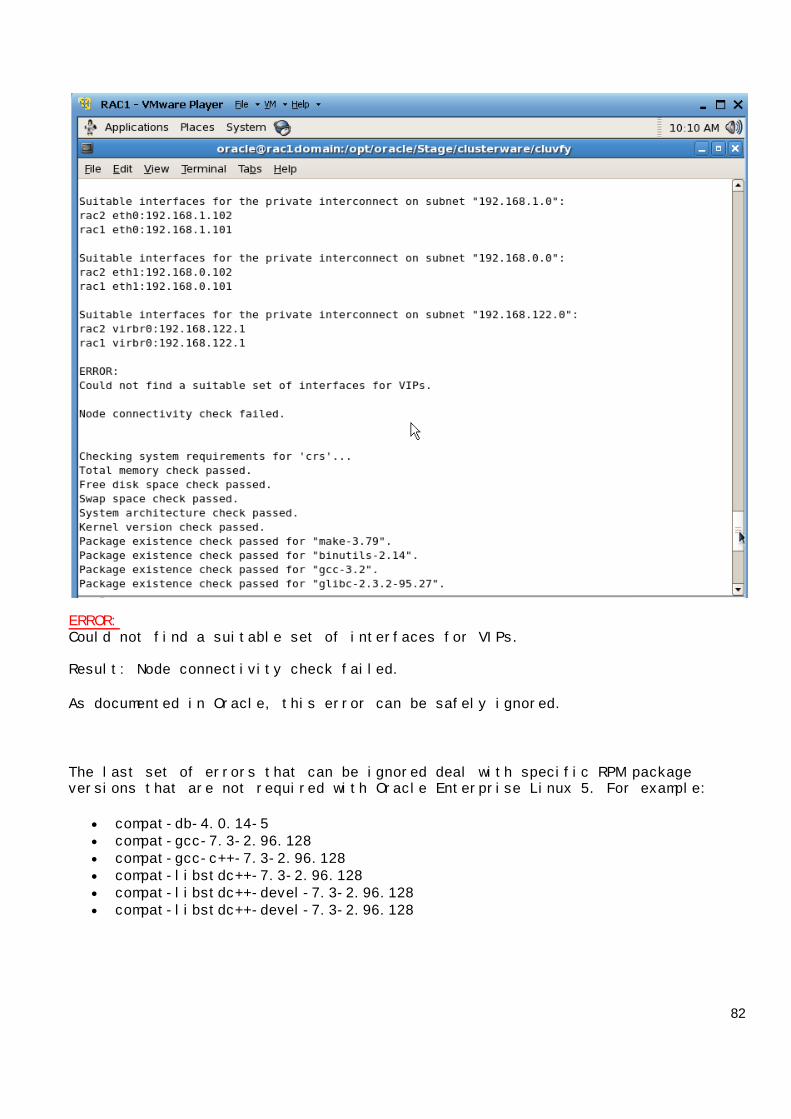
ERROR:Could not find a suitable set of interfaces for VIPs.
Result: Node connectivity check failed.
As documented in Oracle, this error can be safely ignored.
The last set of errors that can be ignored deal with specific RPM packageversions that are not required with Oracle Enterprise Linux 5. For example:
compat-db-4.0.14-5 compat-gcc-7.3-2.96.128 compat-gcc-c++-7.3-2.96.128 compat-libstdc++-7.3-2.96.128 compat-libstdc++-devel-7.3-2.96.128 compat-libstdc++-devel-7.3-2.96.128
83
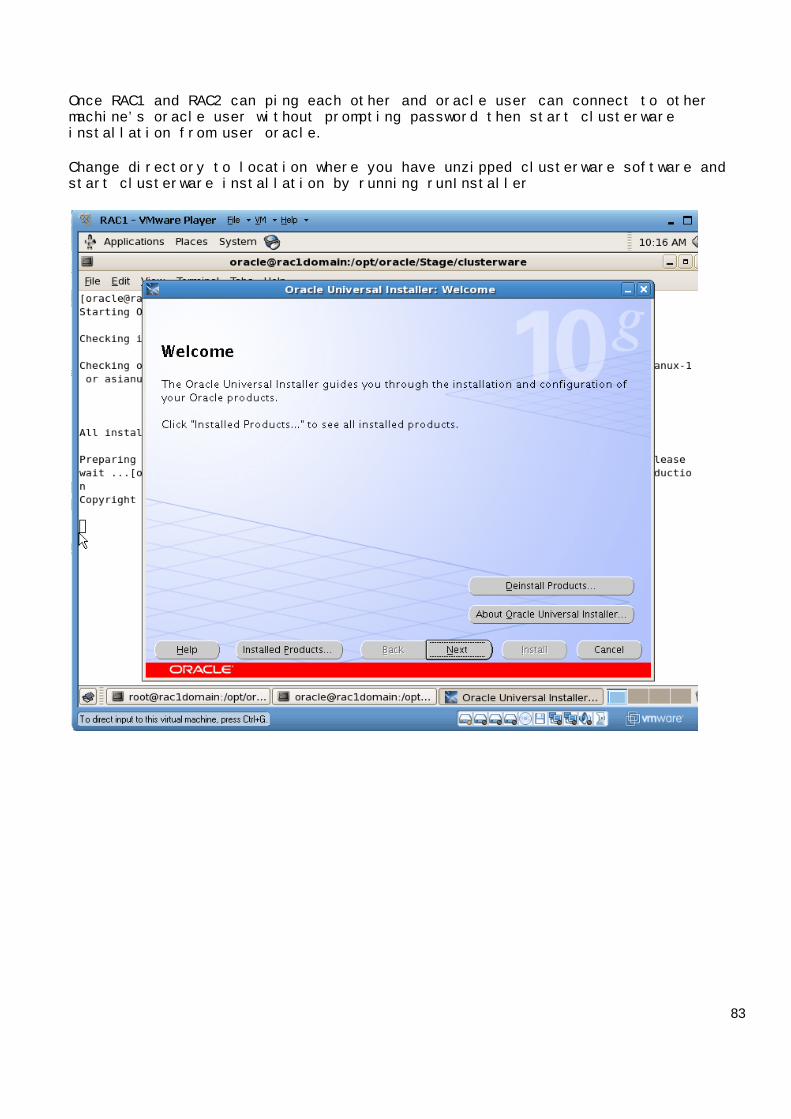
Once RAC1 and RAC2 can ping each other and oracle user can connect to othermachine’s oracle user without prompting password then start clusterwareinstallation from user oracle.
Change directory to location where you have unzipped clusterware software andstart clusterware installation by running runInstaller
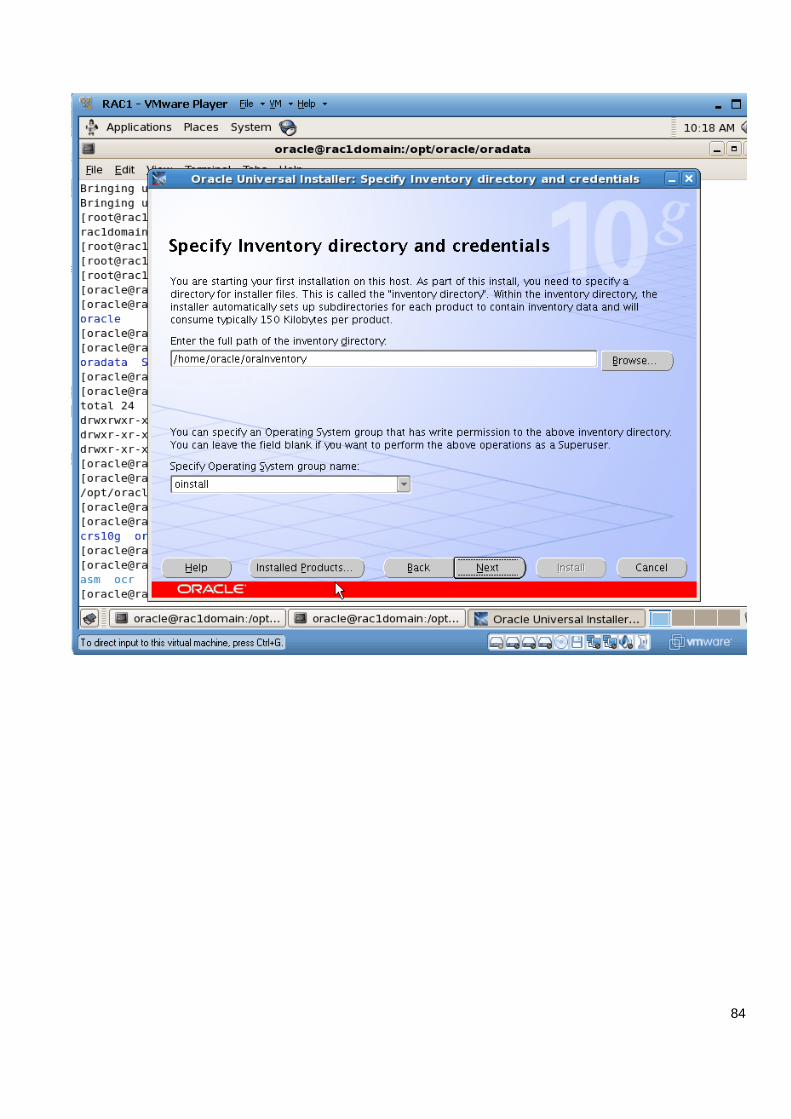
84

85
86
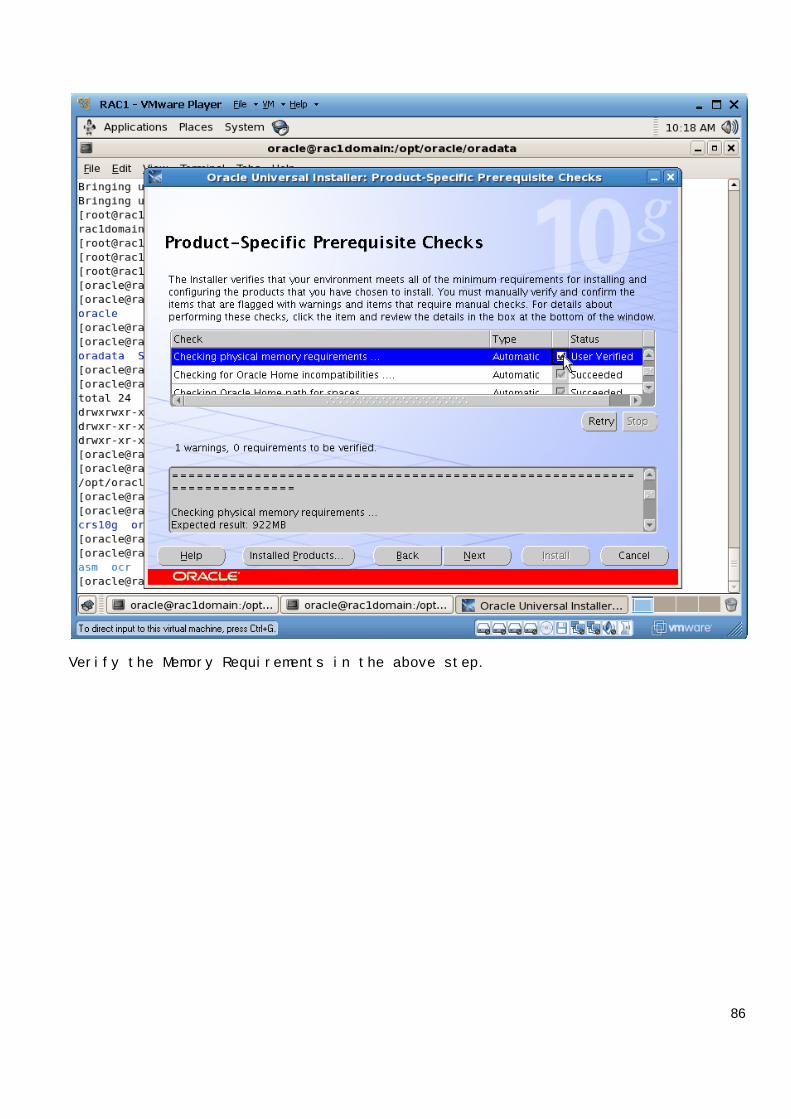
Verify the Memory Requirements in the above step.
87
88
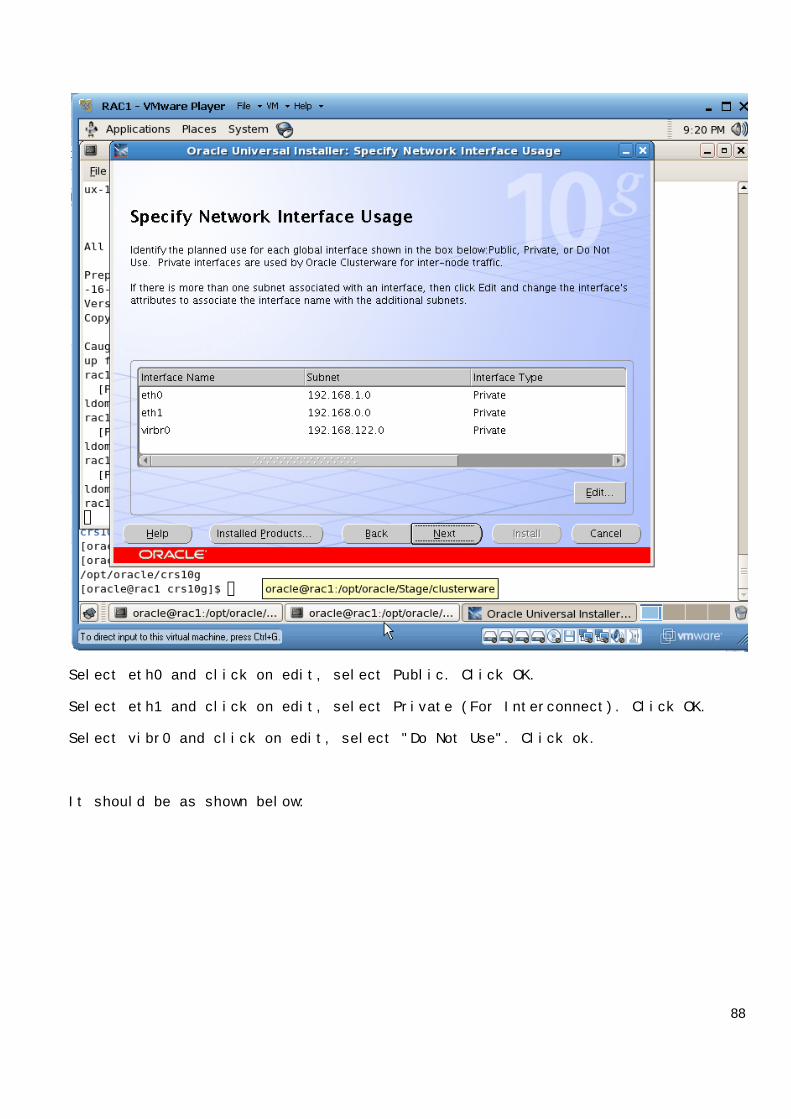
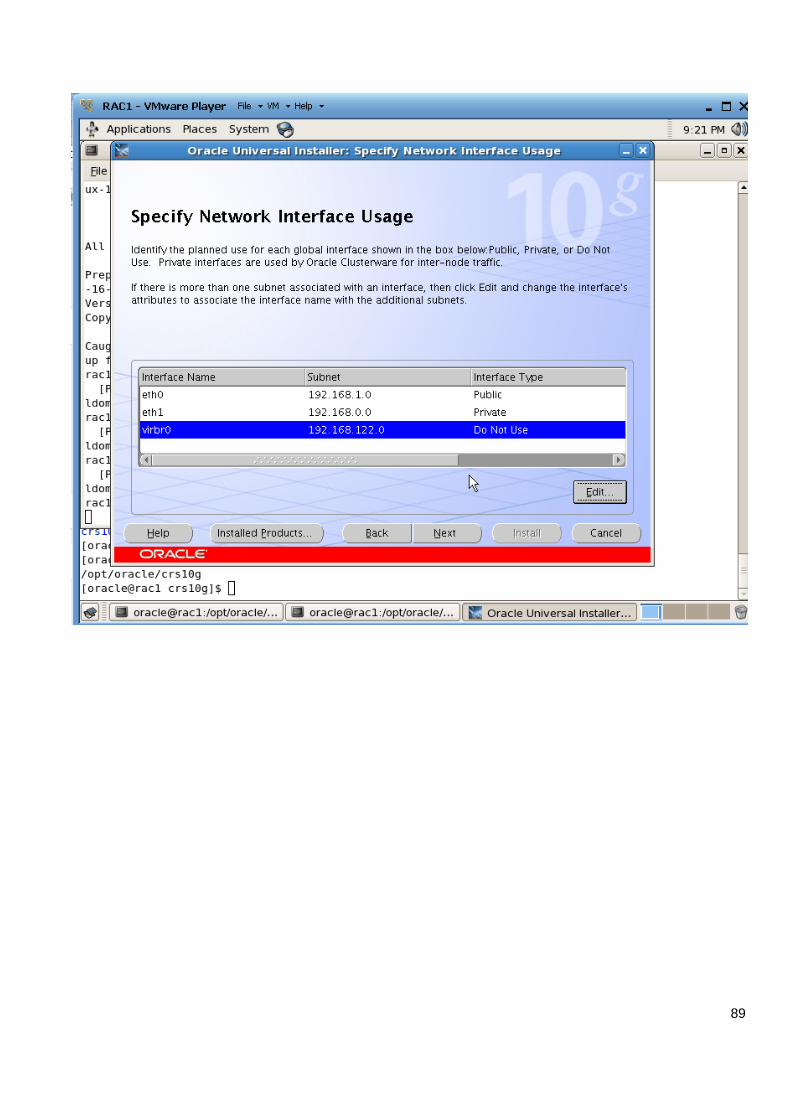
Select eth0 and click on edit, select Public. Click OK.
Select eth1 and click on edit, select Private (For Interconnect). Click OK.
Select vibr0 and click on edit, select "Do Not Use". Click ok.
It should be as shown below:
89
90
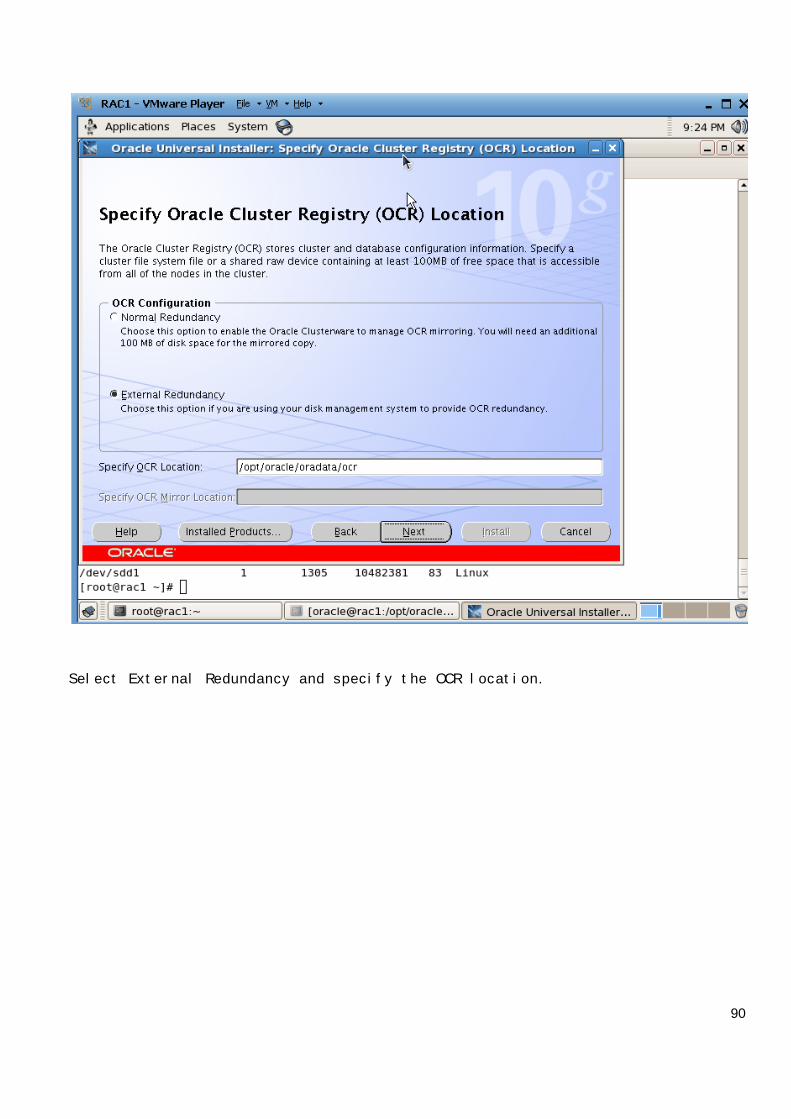
Select External Redundancy and specify the OCR location.
91
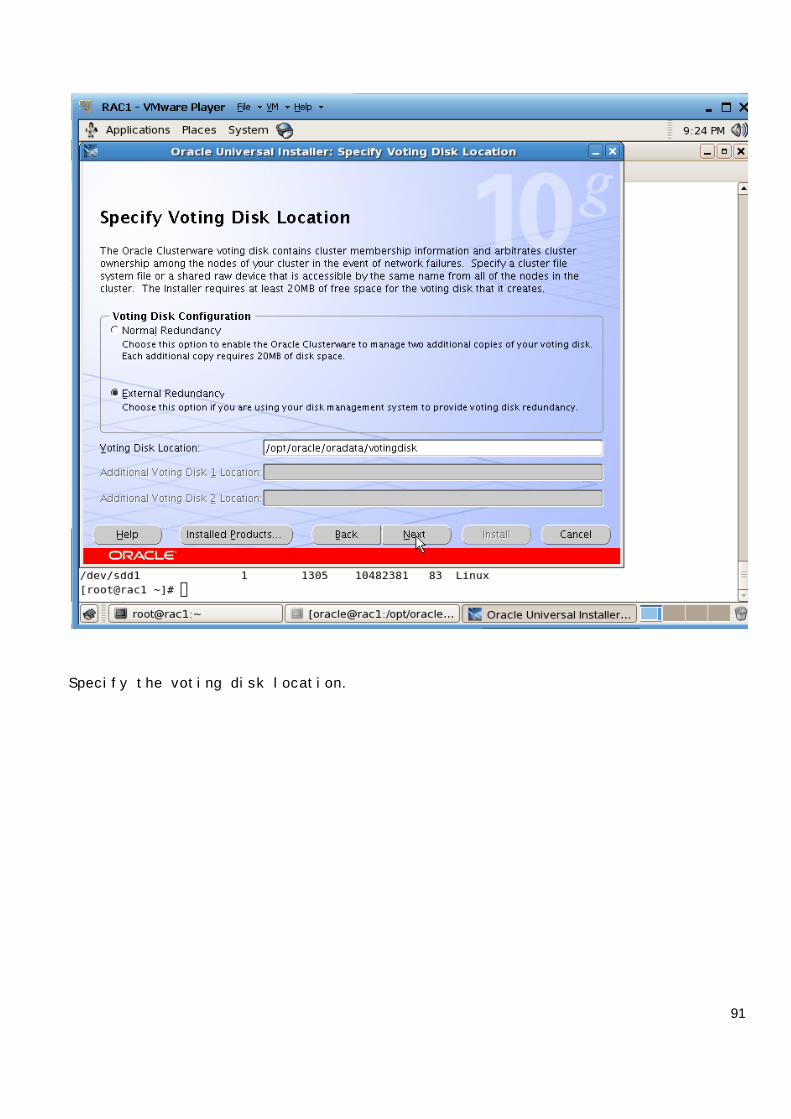
Specify the voting disk location.
92
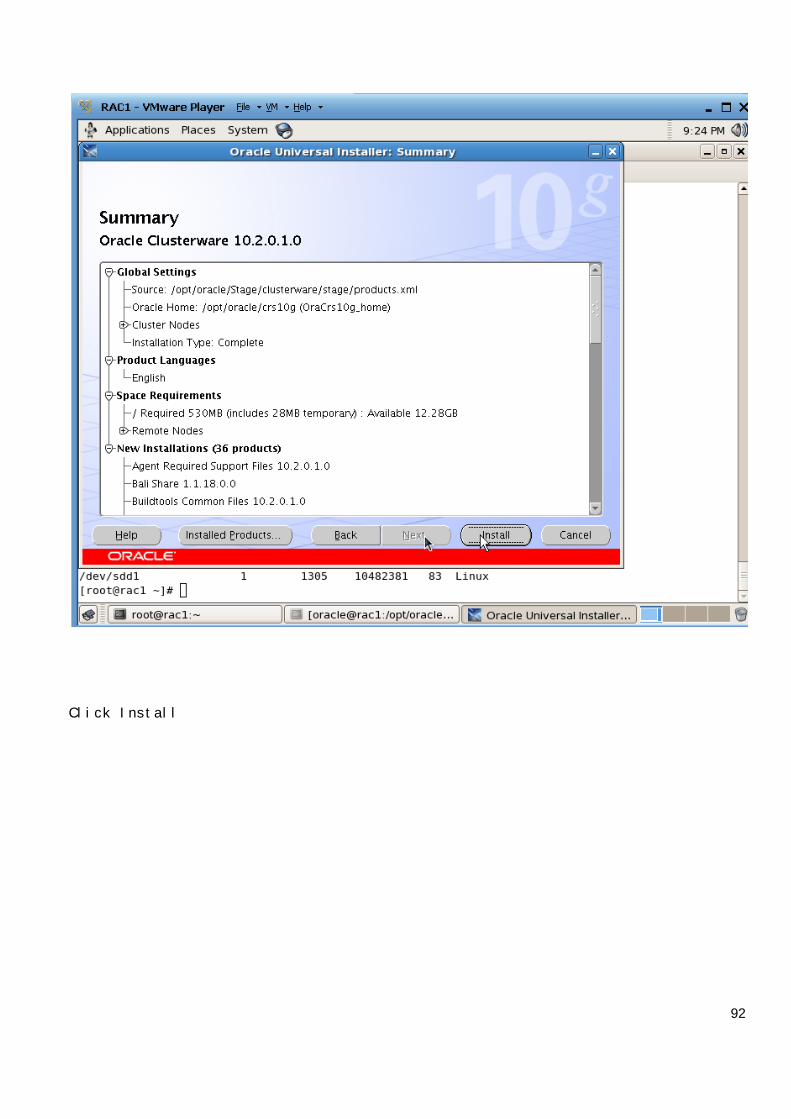
Click Install

93
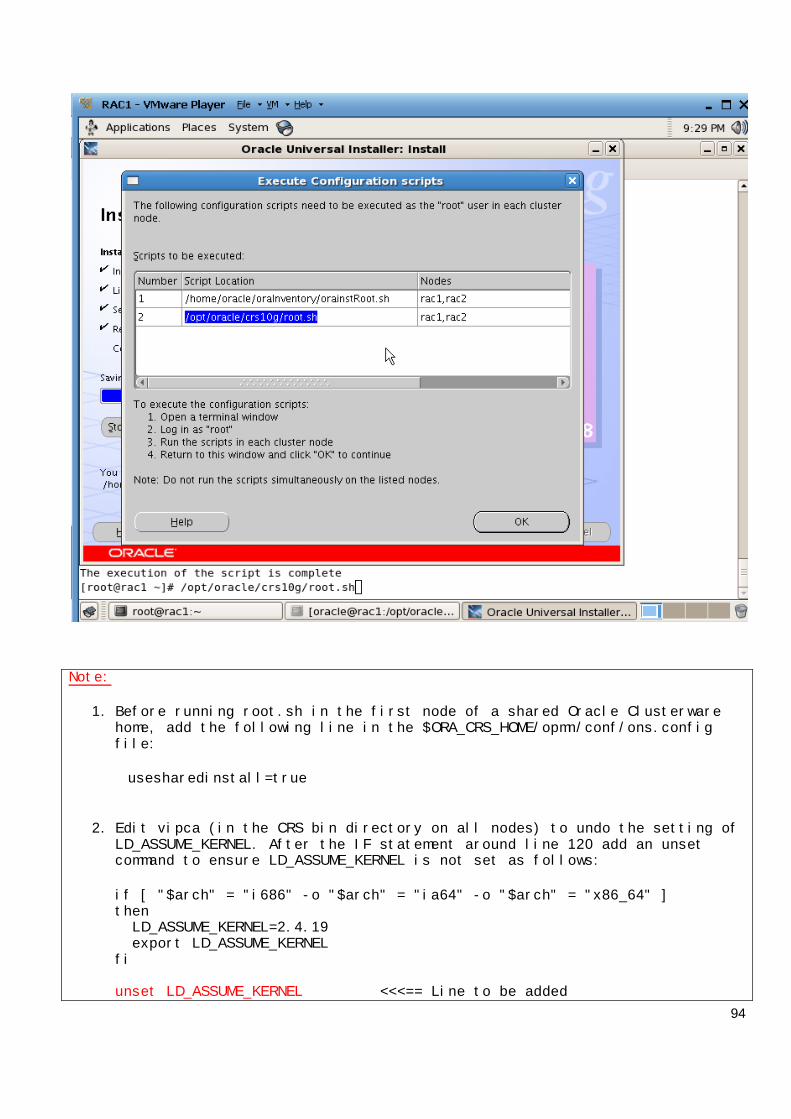
94
Note:
1. Before running root.sh in the first node of a shared Oracle Clusterwarehome, add the following line in the $ORA_CRS_HOME/opmn/conf/ons.configfile:
usesharedinstall=true
2. Edit vipca (in the CRS bin directory on all nodes) to undo the setting ofLD_ASSUME_KERNEL. After the IF statement around line 120 add an unsetcommand to ensure LD_ASSUME_KERNEL is not set as follows:
if [ "$arch" = "i686" -o "$arch" = "ia64" -o "$arch" = "x86_64" ]thenLD_ASSUME_KERNEL=2.4.19export LD_ASSUME_KERNEL
fi
unset LD_ASSUME_KERNEL <<<== Line to be added
95
Similarly for srvctl (in both the CRS and, when installed, RDBMS and ASMbin directories on all nodes), unset LD_ASSUME_KERNEL by adding one line,around line 168 should look like this:
LD_ASSUME_KERNEL=2.4.19export LD_ASSUME_KERNEL
unset LD_ASSUME_KERNEL
The final part of the script ran the Virtual IP Configuration Assistant (VIPCA)in silent mode, but it failed. This is because my public IP addresses areactually within the "192.168.255.255" range which is a private IP range. If youwere using "legal" IP addresses you would not see this and you could ignore thefollowing VIPCA steps.
Run the VIPCA manually as the root user on the RAC2 node using the followingcommand.
# cd /opt/oracle/crs10g/bin# ./vipca
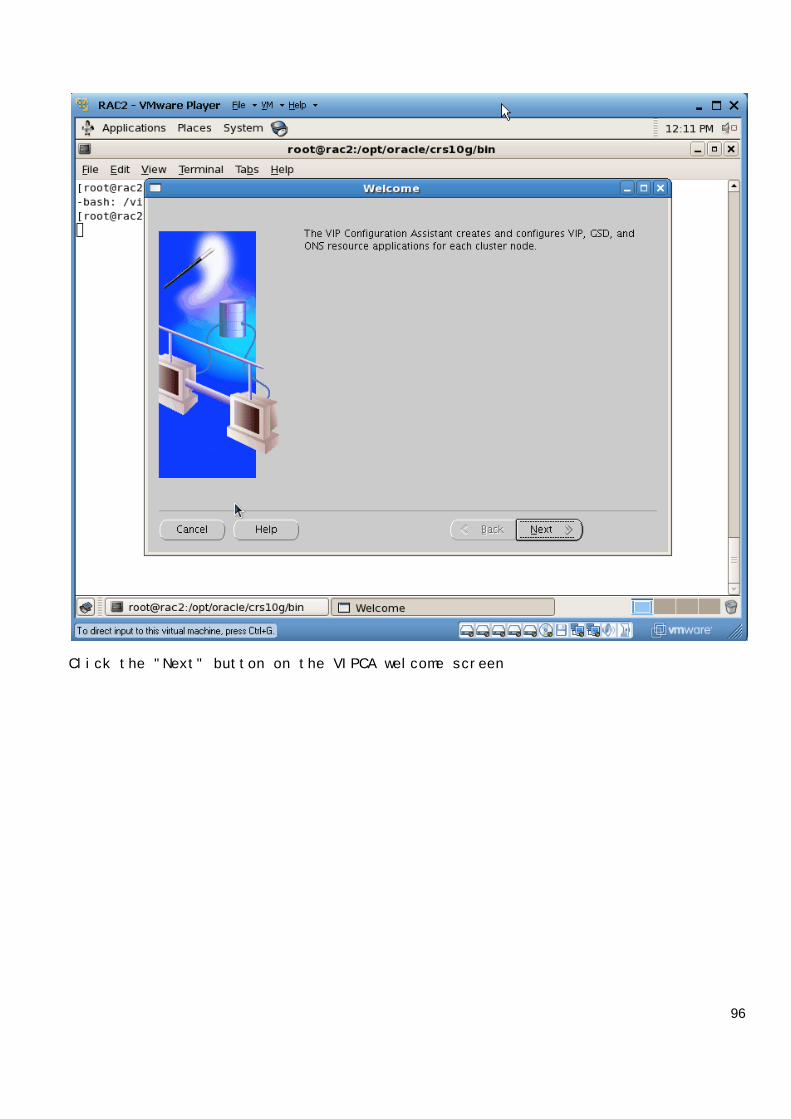
96
Click the "Next" button on the VIPCA welcome screen
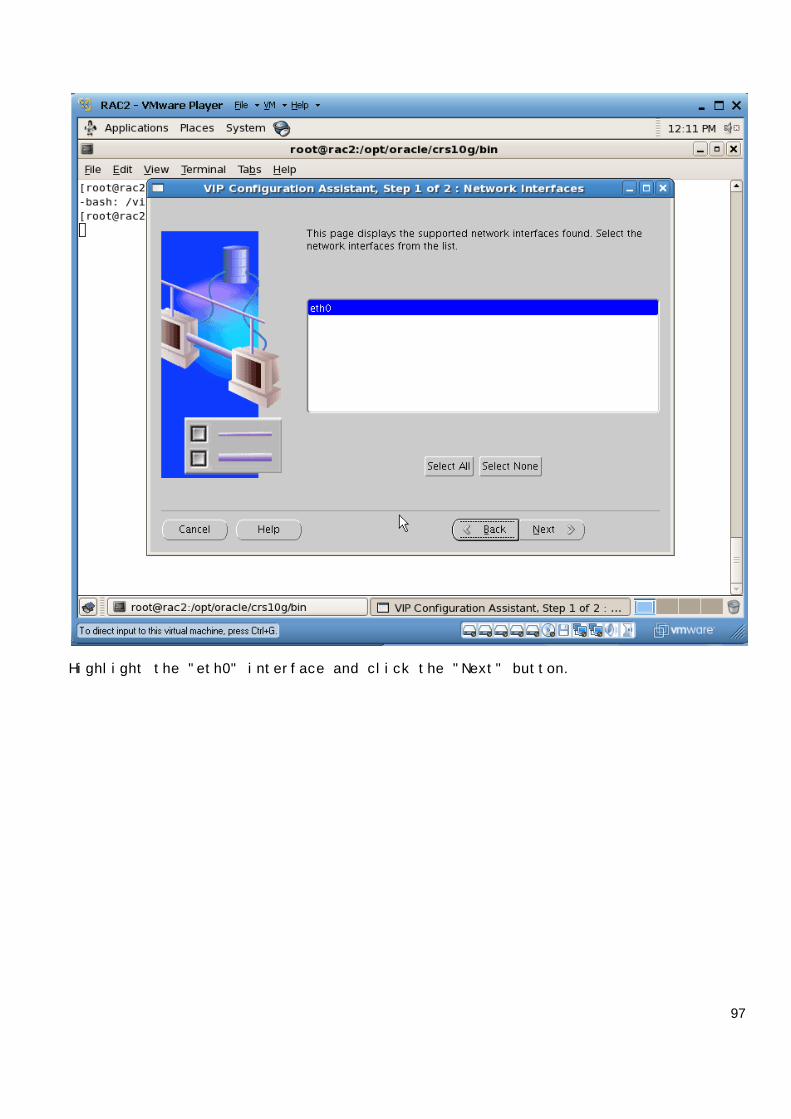
97
Highlight the "eth0" interface and click the "Next" button.
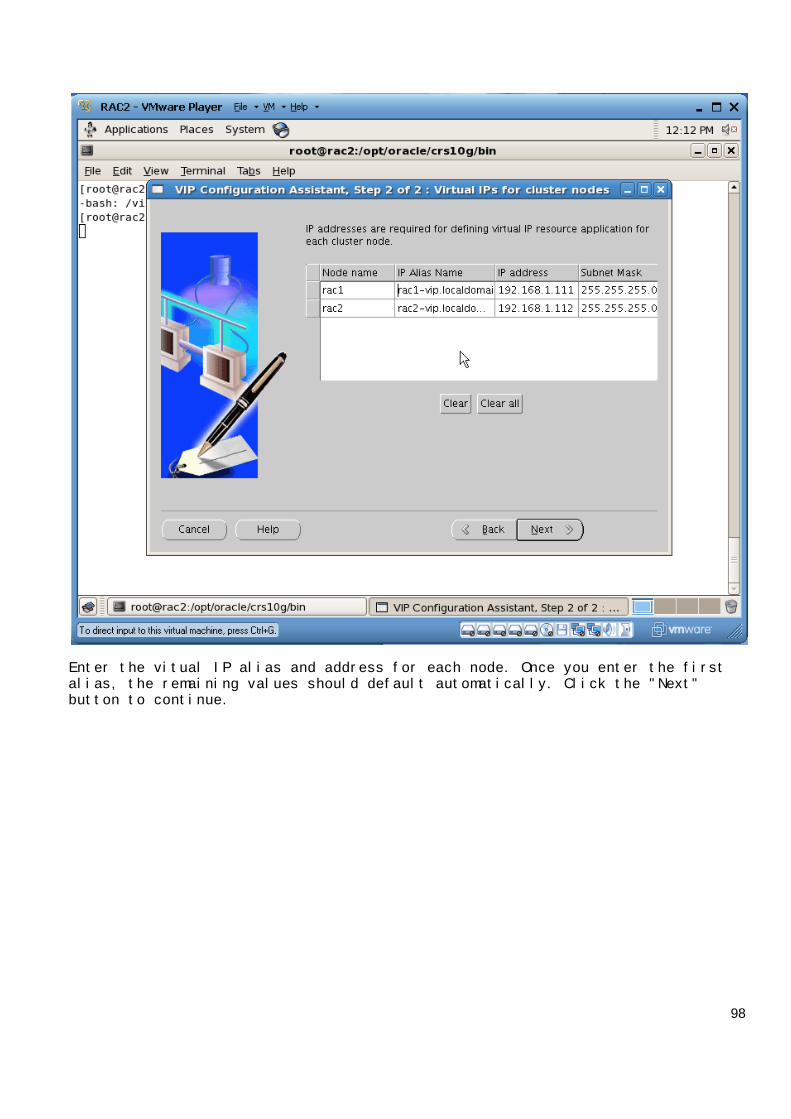
98
Enter the vitual IP alias and address for each node. Once you enter the firstalias, the remaining values should default automatically. Click the "Next"button to continue.
99
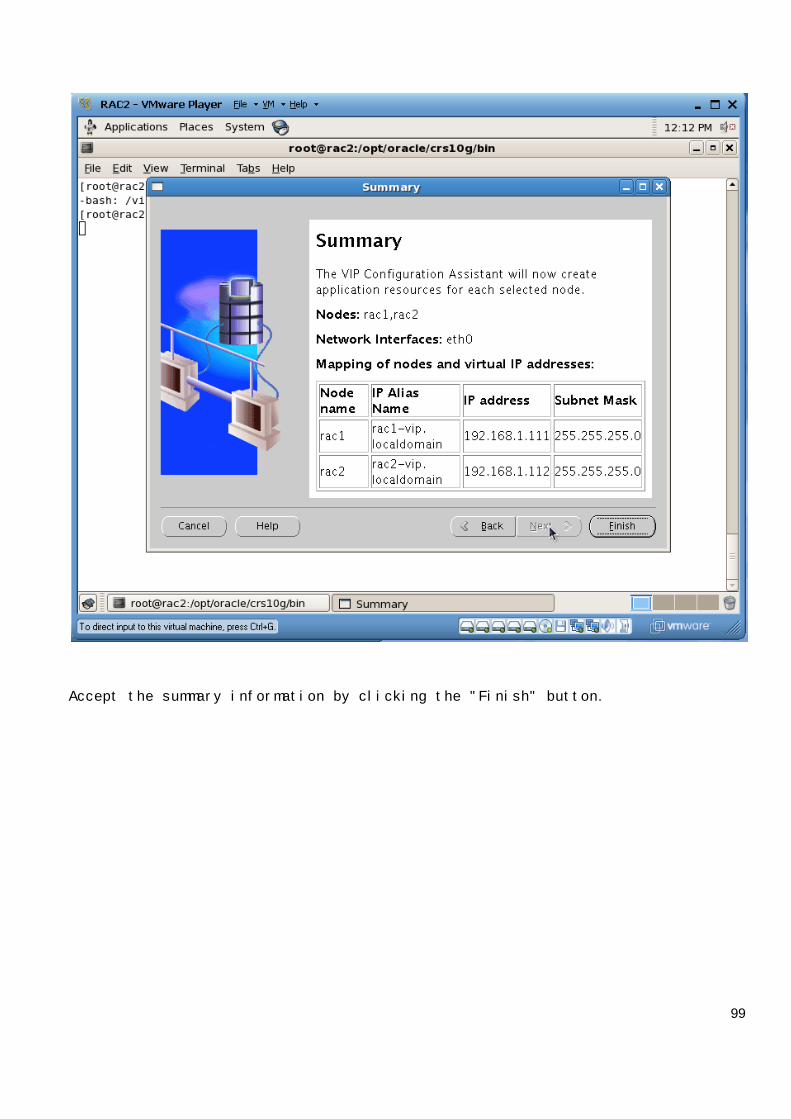
Accept the summary information by clicking the "Finish" button.

100
Wait until the configuration is complete, then click the "OK" button.
101
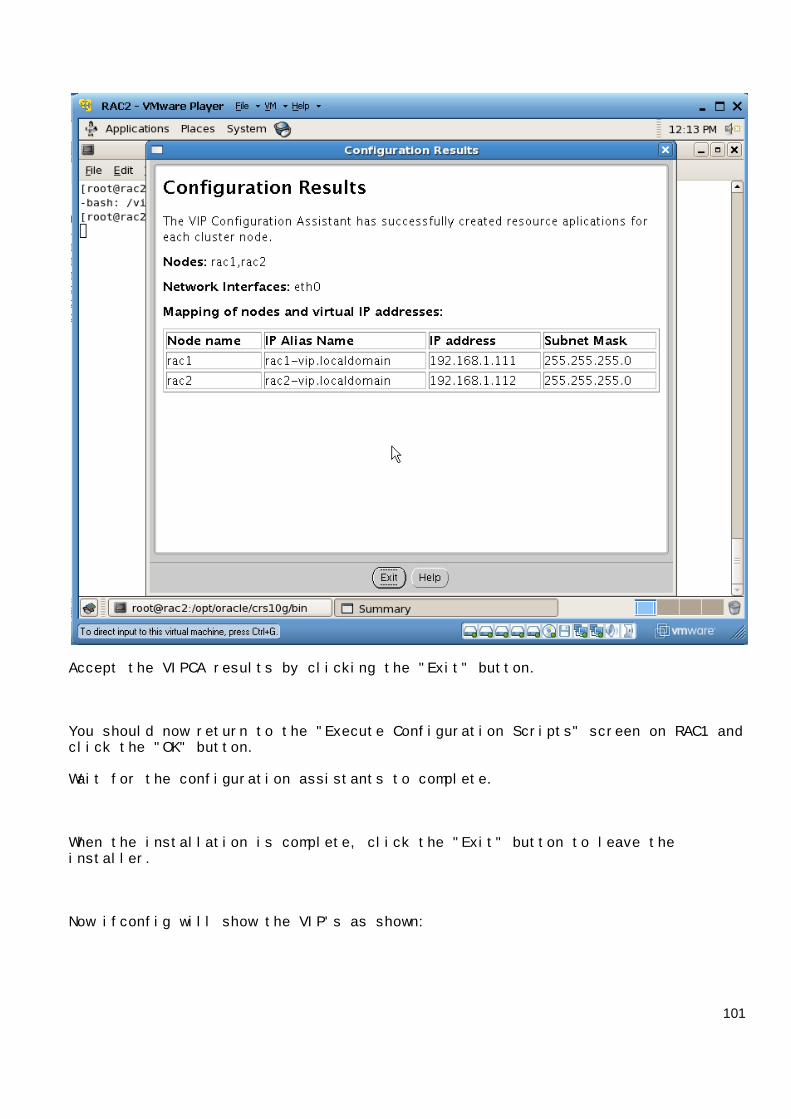
Accept the VIPCA results by clicking the "Exit" button.
You should now return to the "Execute Configuration Scripts" screen on RAC1 andclick the "OK" button.
Wait for the configuration assistants to complete.
When the installation is complete, click the "Exit" button to leave theinstaller.
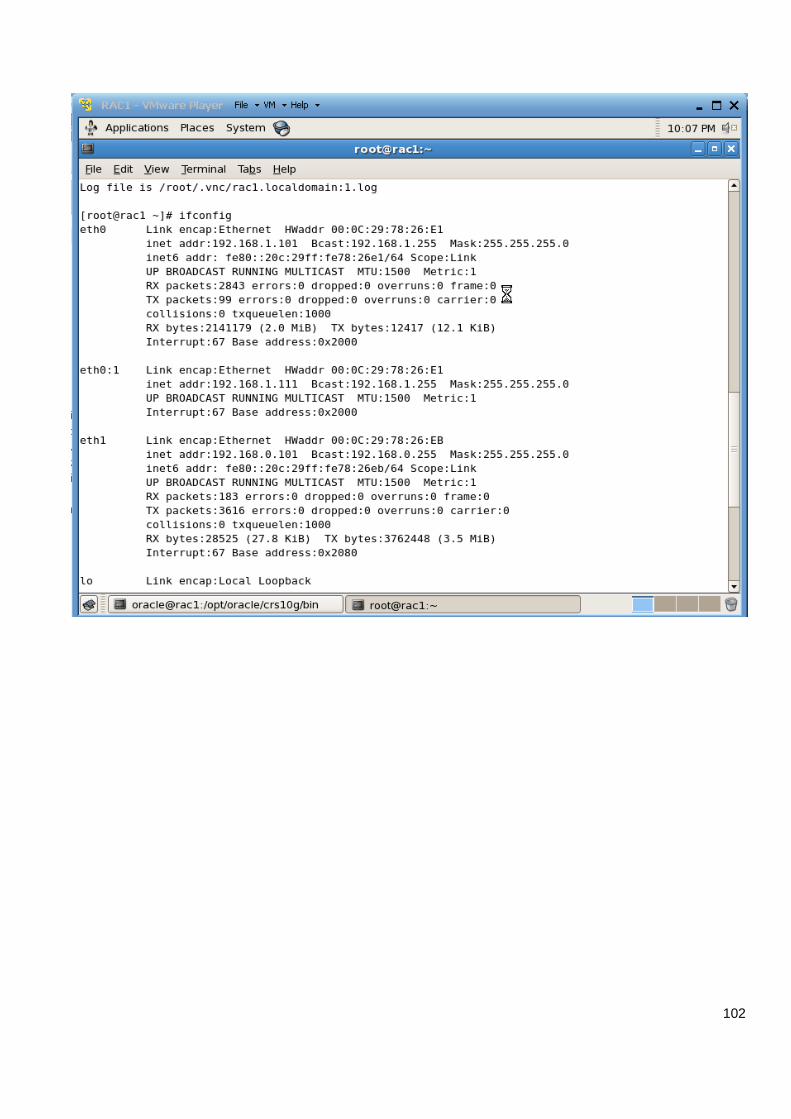
Now ifconfig will show the VIP's as shown:
102
103

104
Create an ASM Instance and Install the Database Software
Start the RAC1 and RAC2 virtual machines, login to RAC1 as the oracle user andstart the Oracle installer.
105
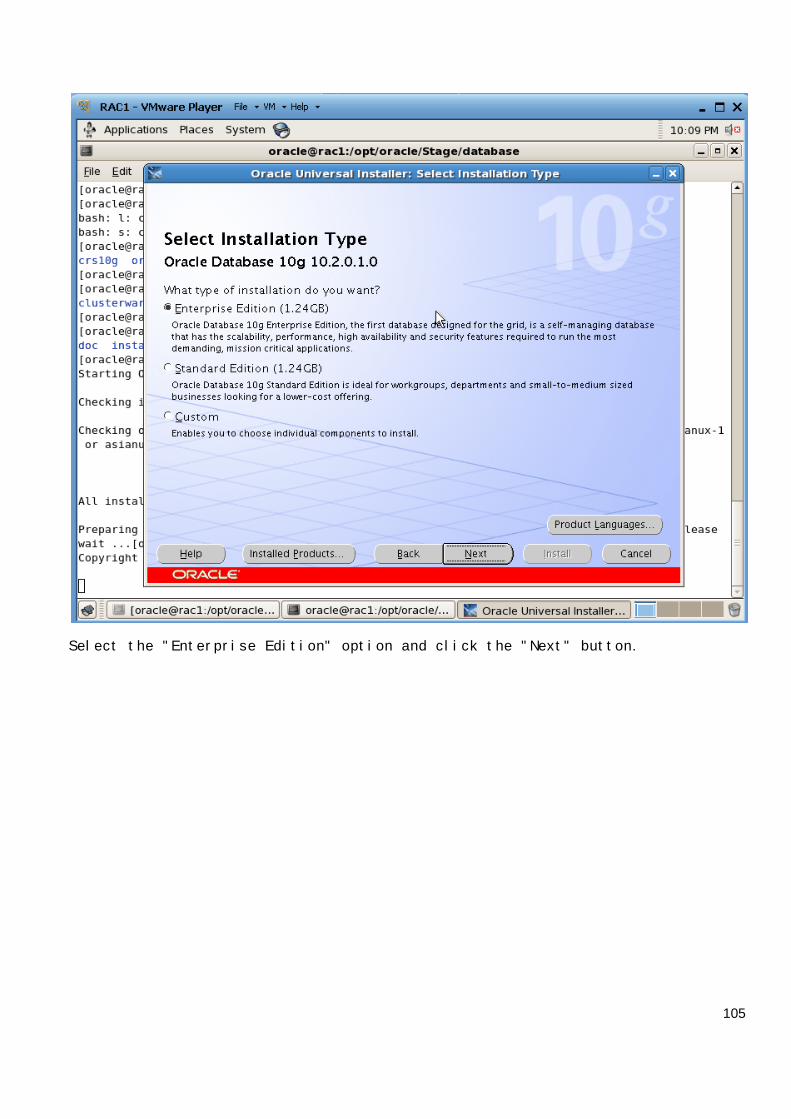
Select the "Enterprise Edition" option and click the "Next" button.
106
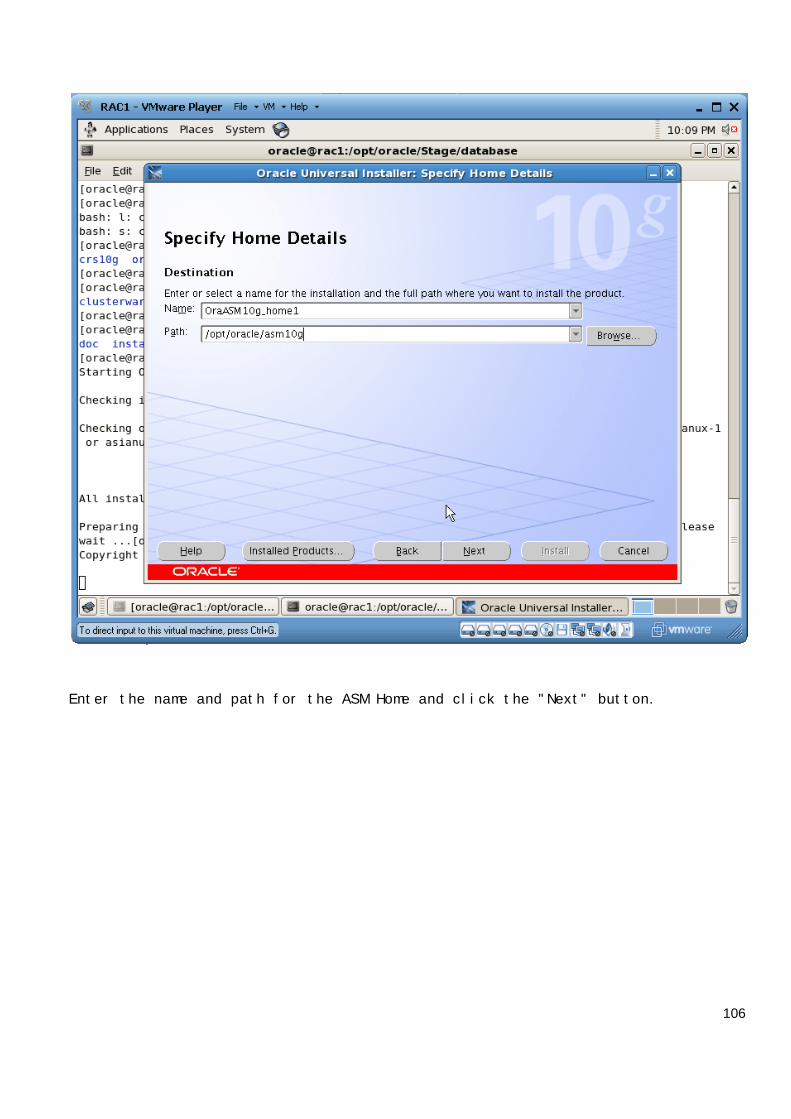
Enter the name and path for the ASM Home and click the "Next" button.
107
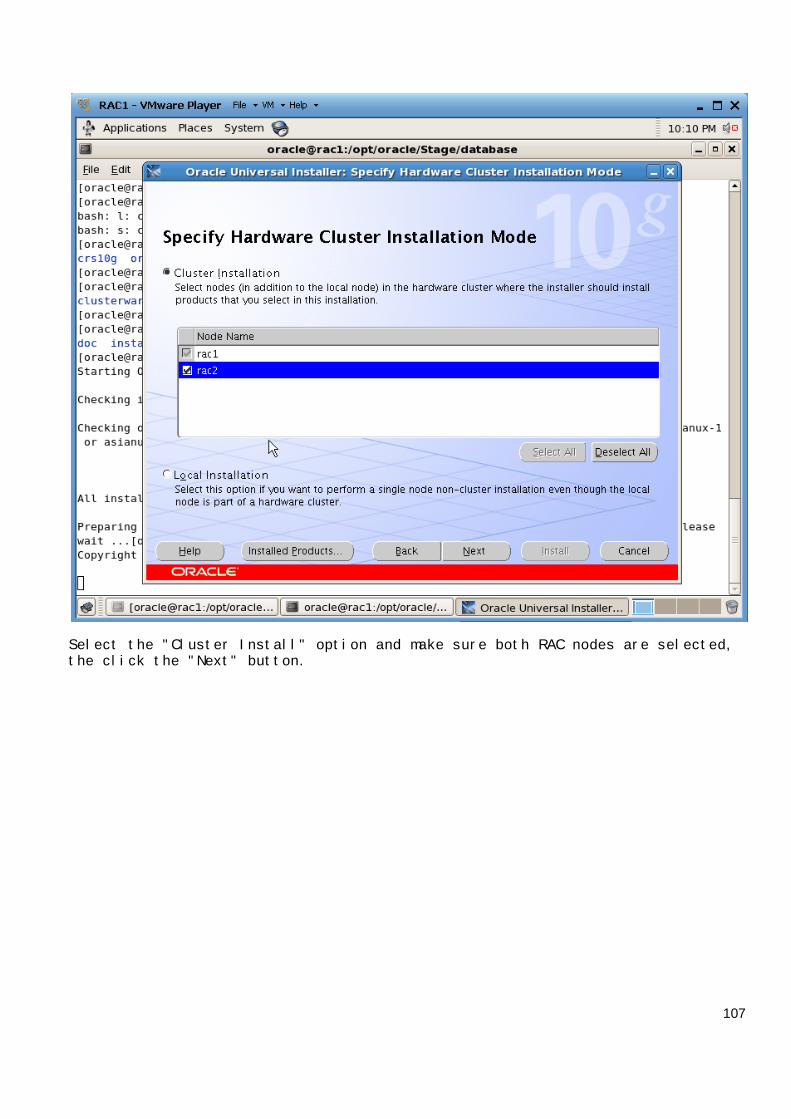
Select the "Cluster Install" option and make sure both RAC nodes are selected,the click the "Next" button.
108
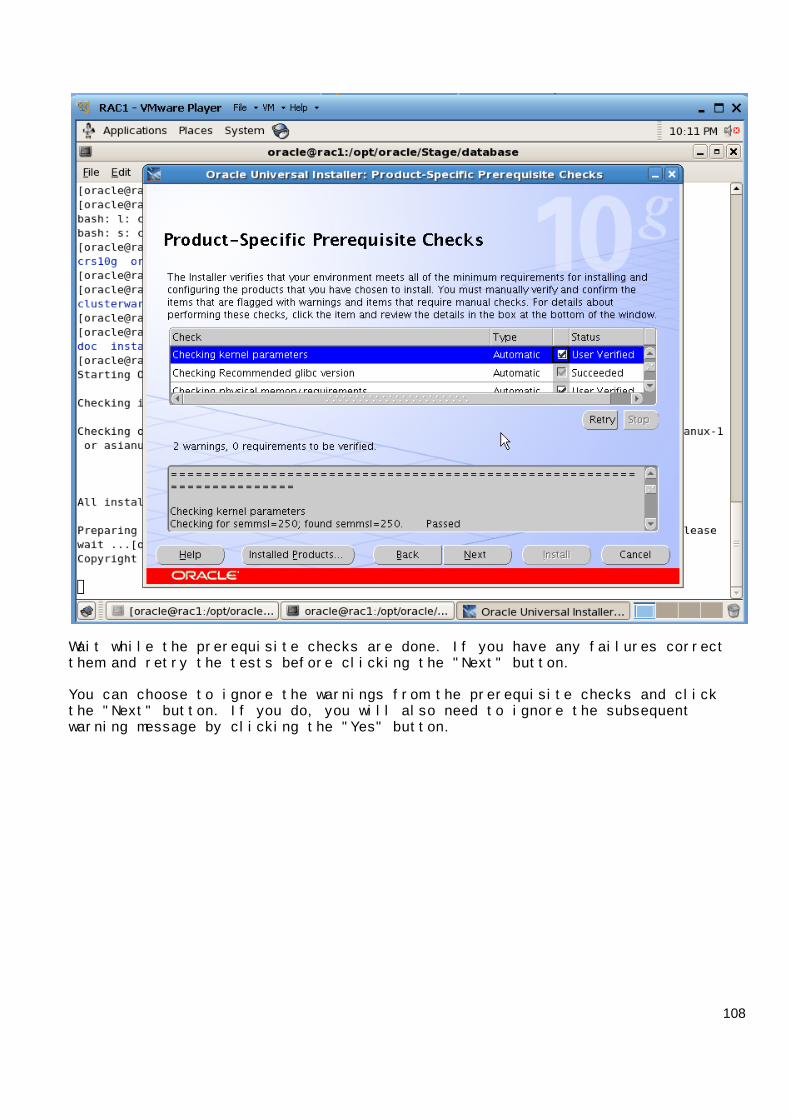
Wait while the prerequisite checks are done. If you have any failures correctthem and retry the tests before clicking the "Next" button.
You can choose to ignore the warnings from the prerequisite checks and clickthe "Next" button. If you do, you will also need to ignore the subsequentwarning message by clicking the "Yes" button.
109
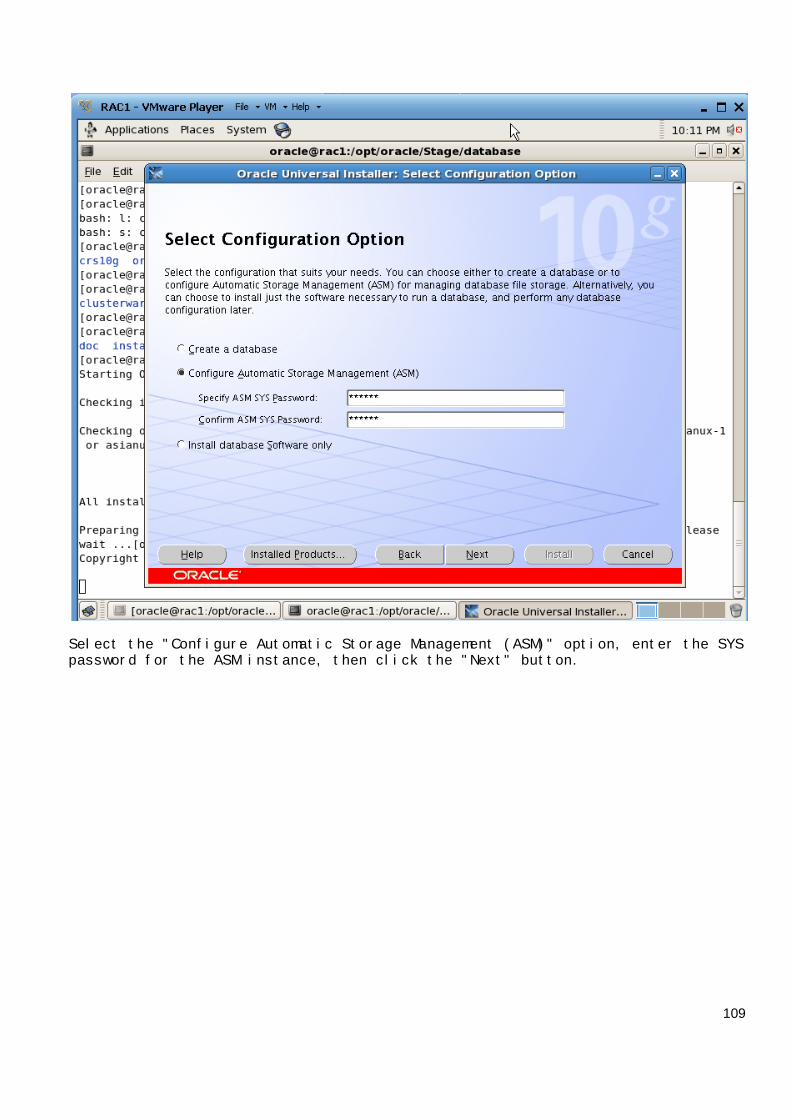
Select the "Configure Automatic Storage Management (ASM)" option, enter the SYSpassword for the ASM instance, then click the "Next" button.
110
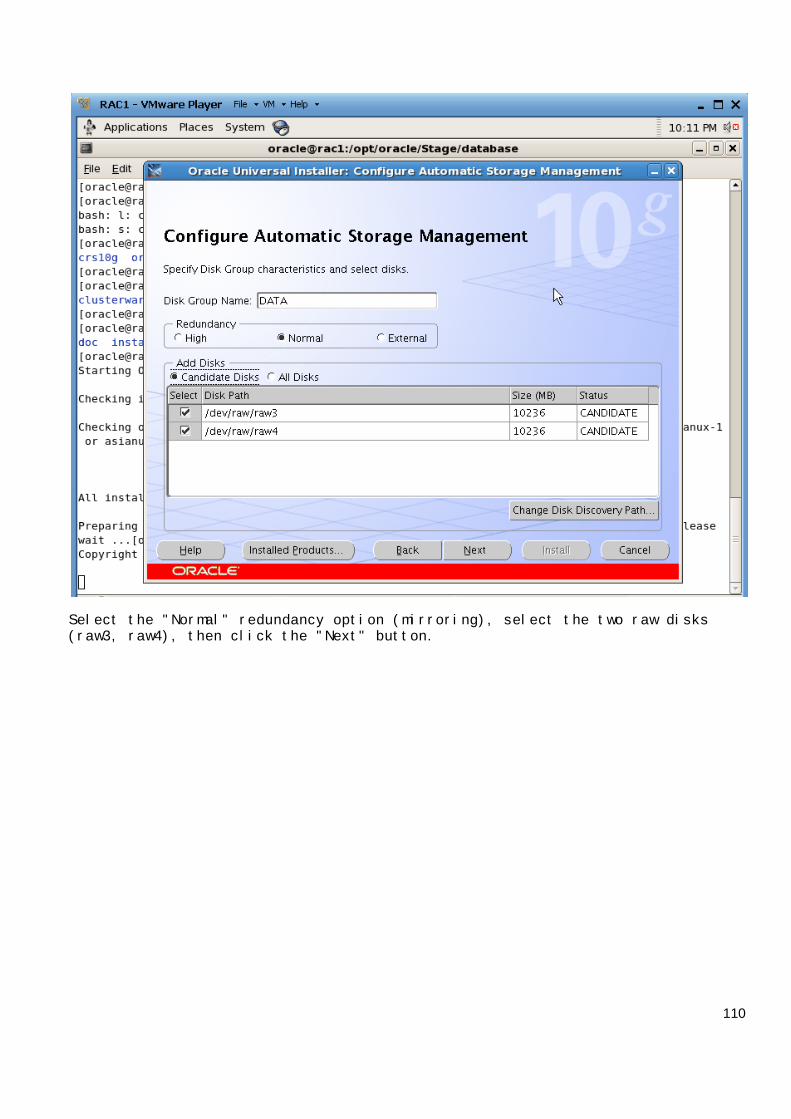
Select the "Normal" redundancy option (mirroring), select the two raw disks(raw3, raw4), then click the "Next" button.
111
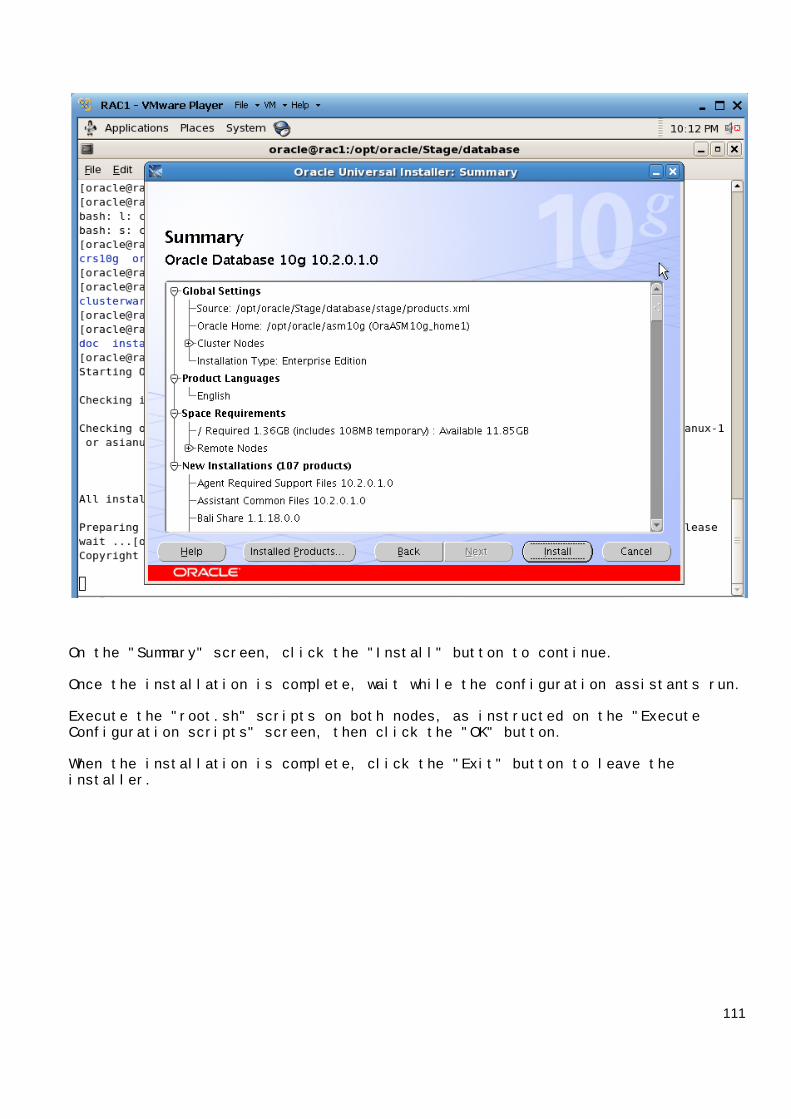
On the "Summary" screen, click the "Install" button to continue.
Once the installation is complete, wait while the configuration assistants run.
Execute the "root.sh" scripts on both nodes, as instructed on the "ExecuteConfiguration scripts" screen, then click the "OK" button.
When the installation is complete, click the "Exit" button to leave theinstaller.
112
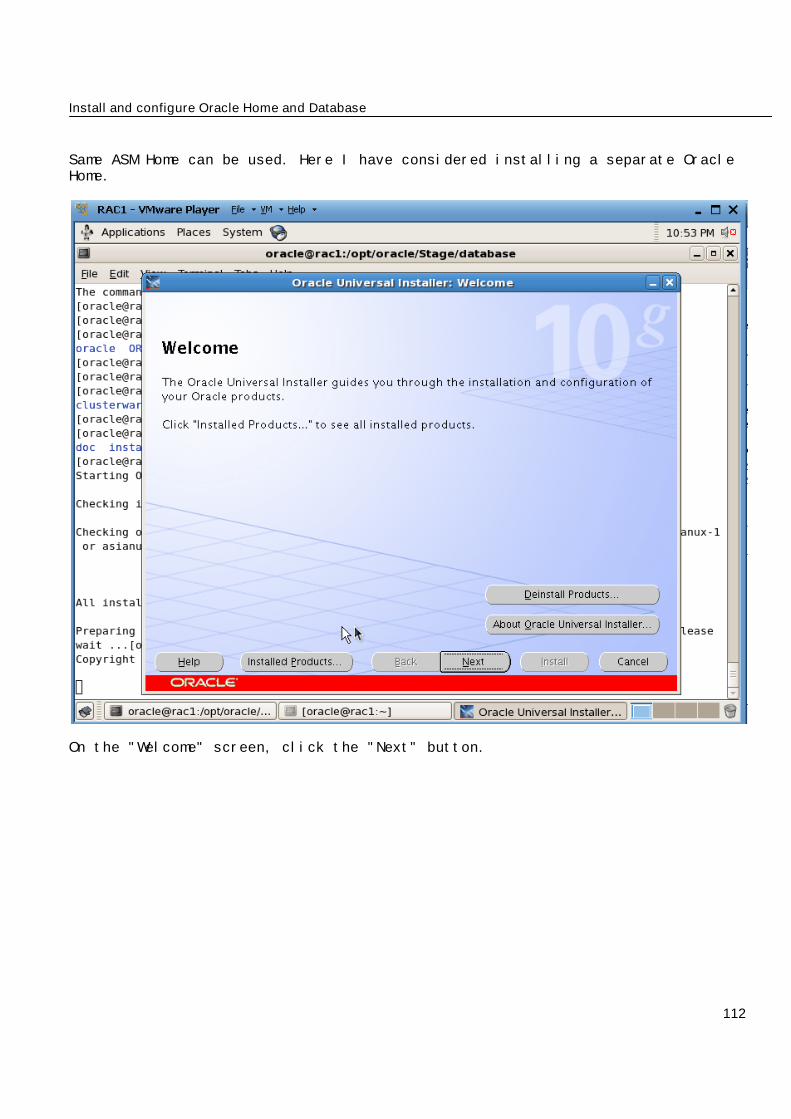
Install and configure Oracle Home and Database
Same ASM Home can be used. Here I have considered installing a separate OracleHome.
On the "Welcome" screen, click the "Next" button.
113
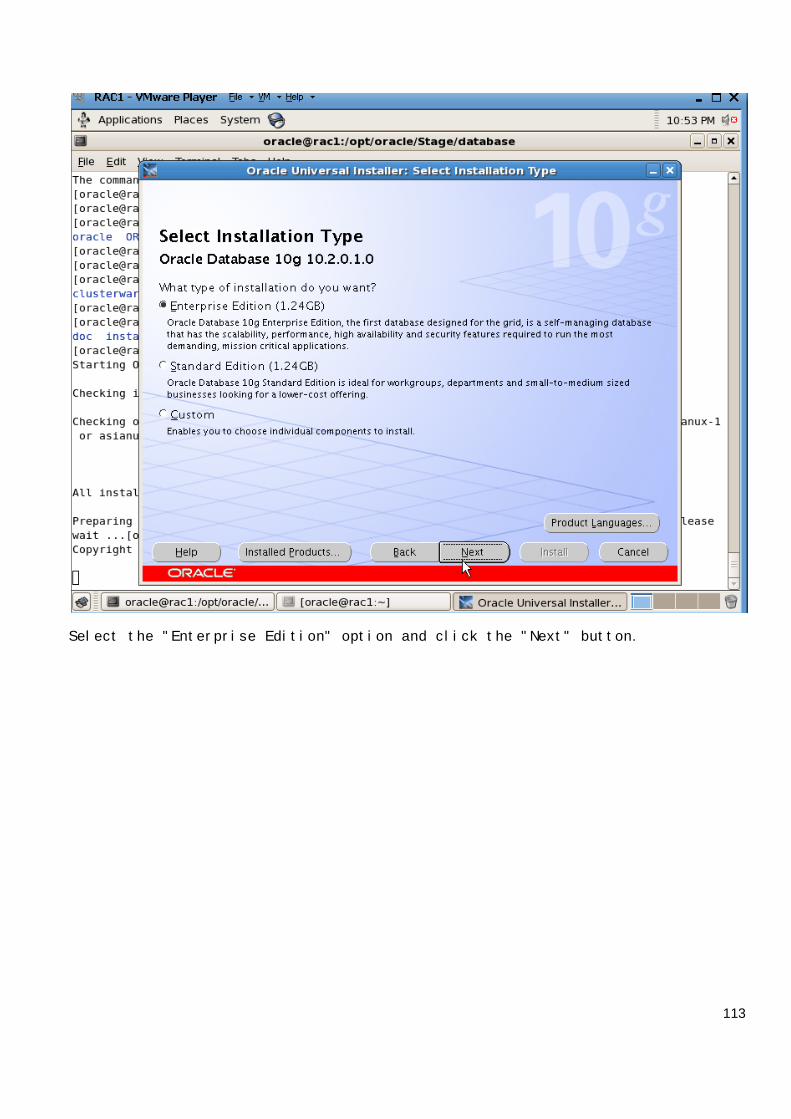
Select the "Enterprise Edition" option and click the "Next" button.
114
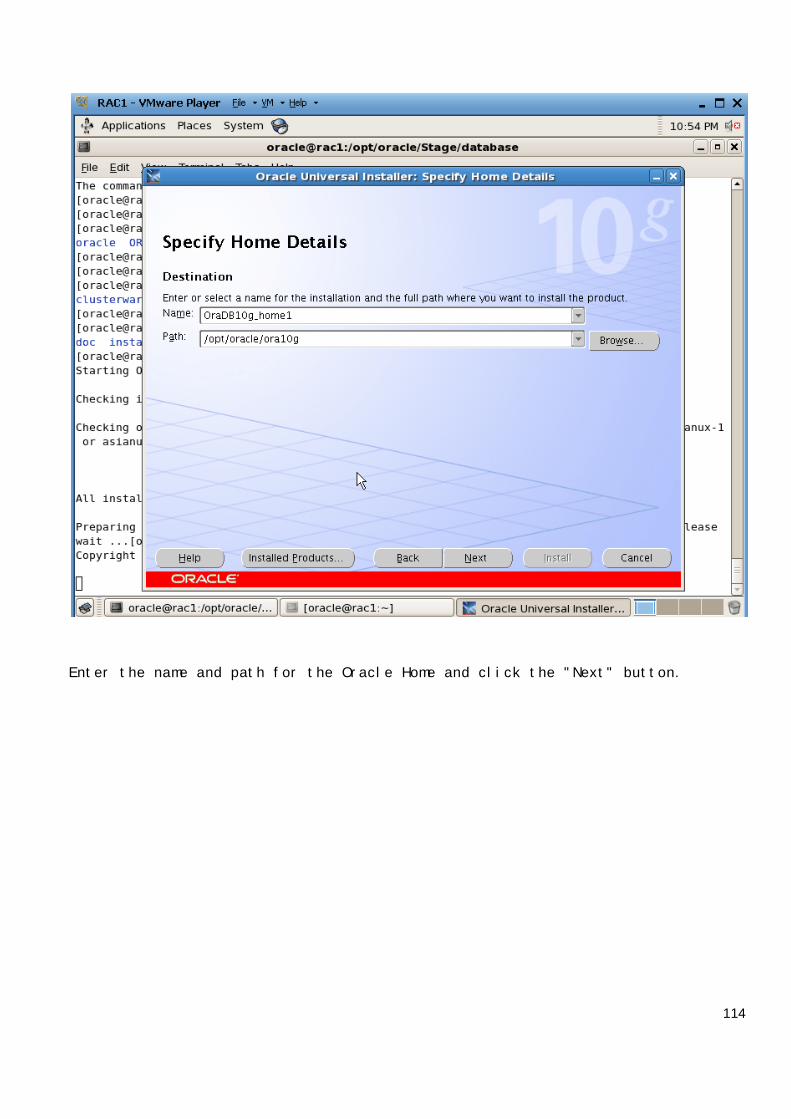
Enter the name and path for the Oracle Home and click the "Next" button.
115
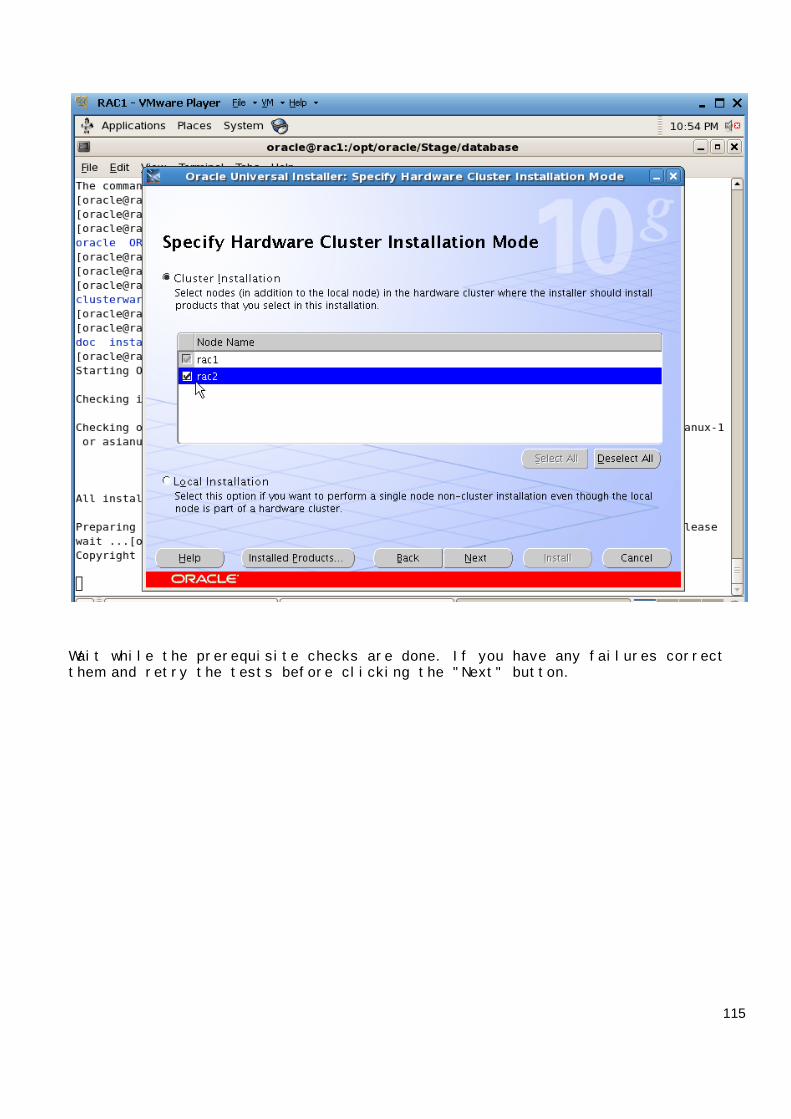
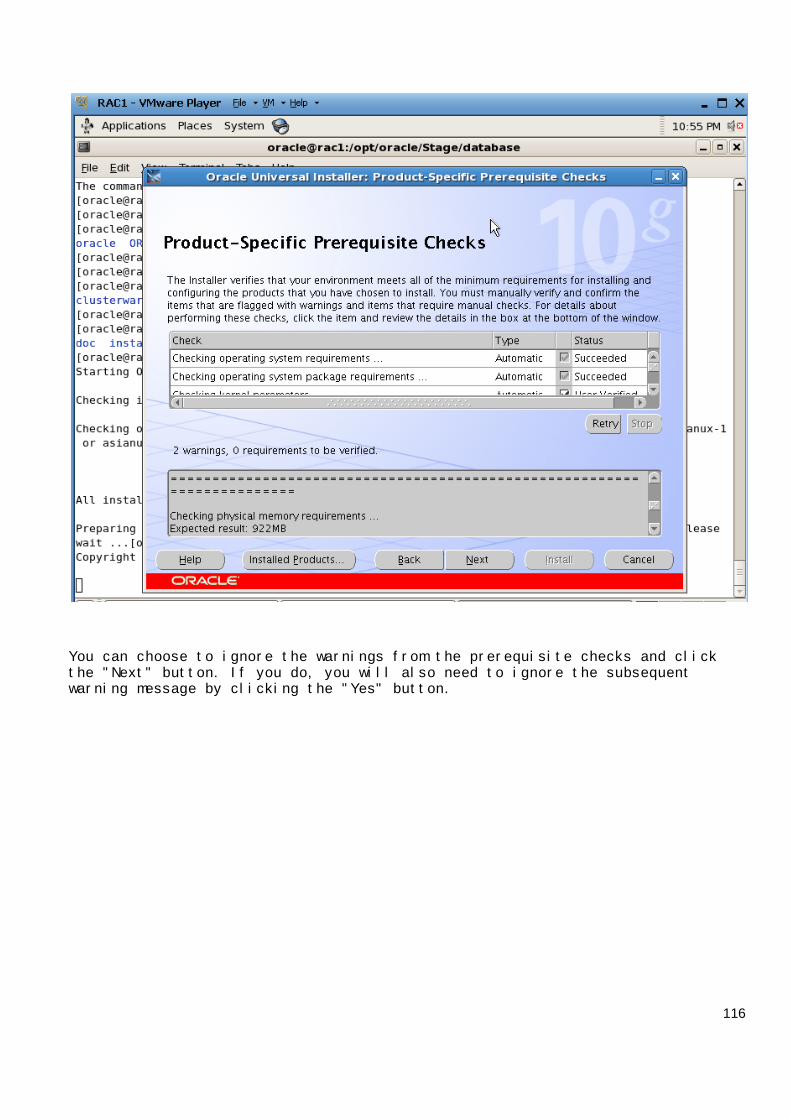
Wait while the prerequisite checks are done. If you have any failures correctthem and retry the tests before clicking the "Next" button.
116
You can choose to ignore the warnings from the prerequisite checks and clickthe "Next" button. If you do, you will also need to ignore the subsequentwarning message by clicking the "Yes" button.
117
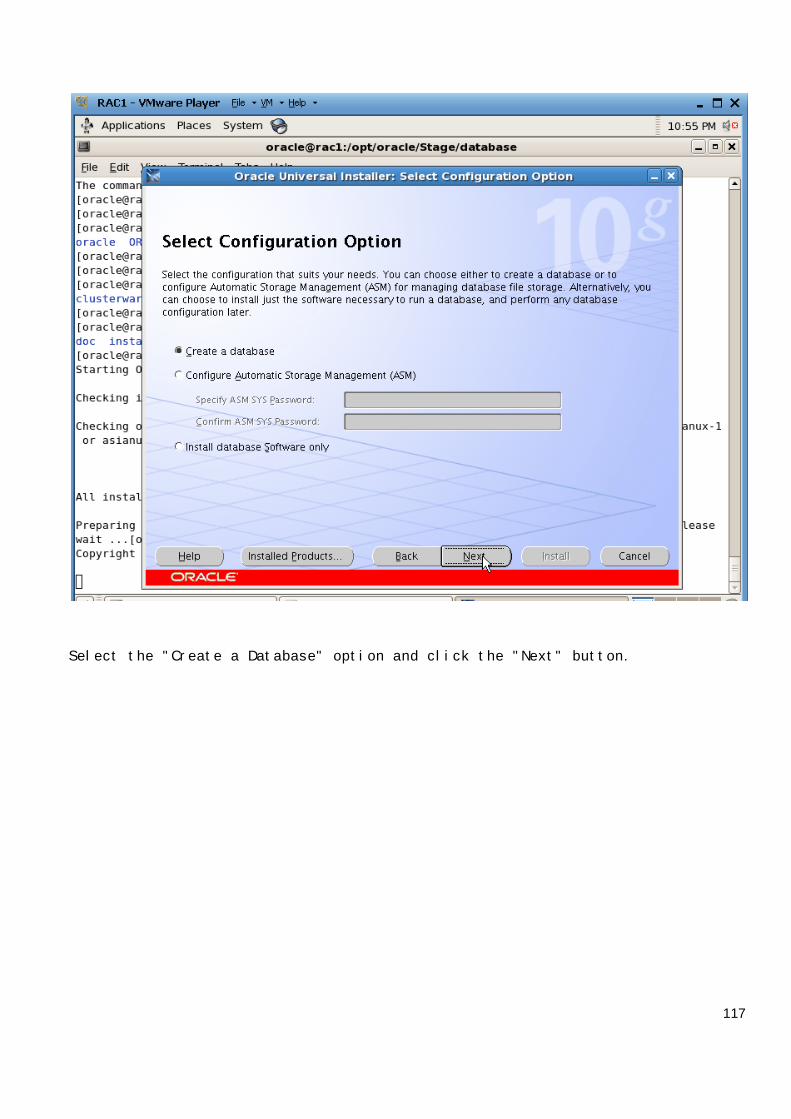
Select the "Create a Database" option and click the "Next" button.
118
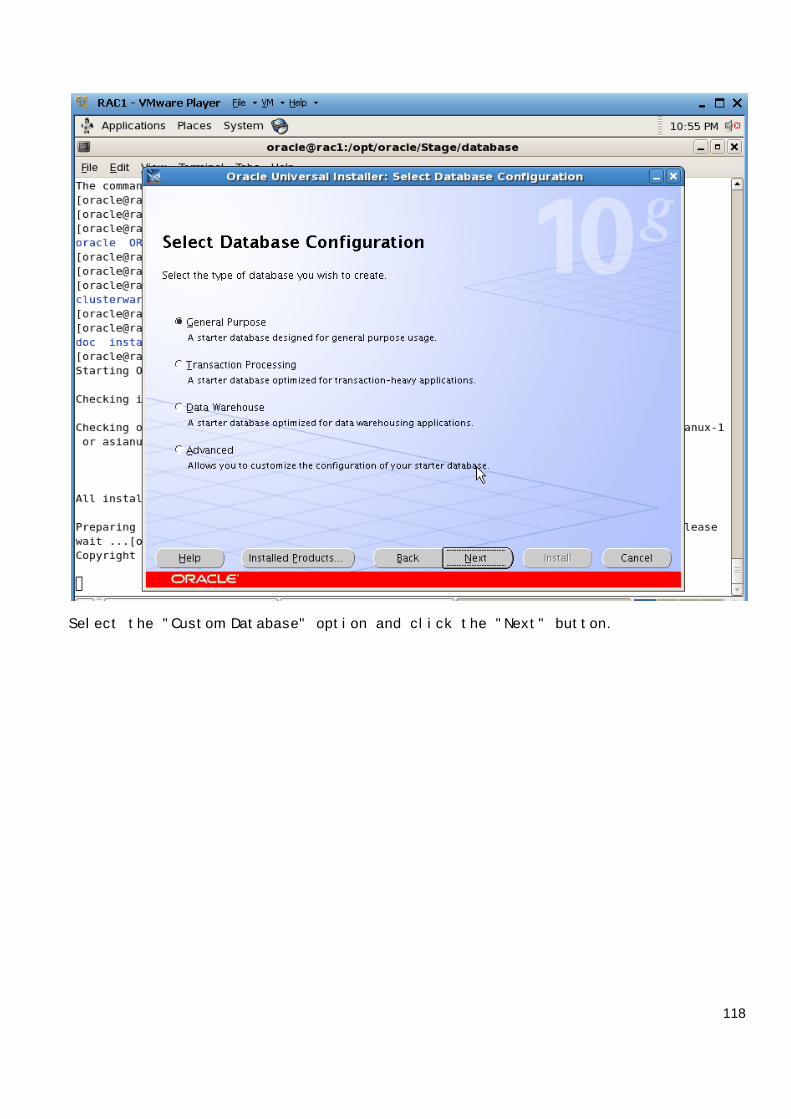
Select the "Custom Database" option and click the "Next" button.
119
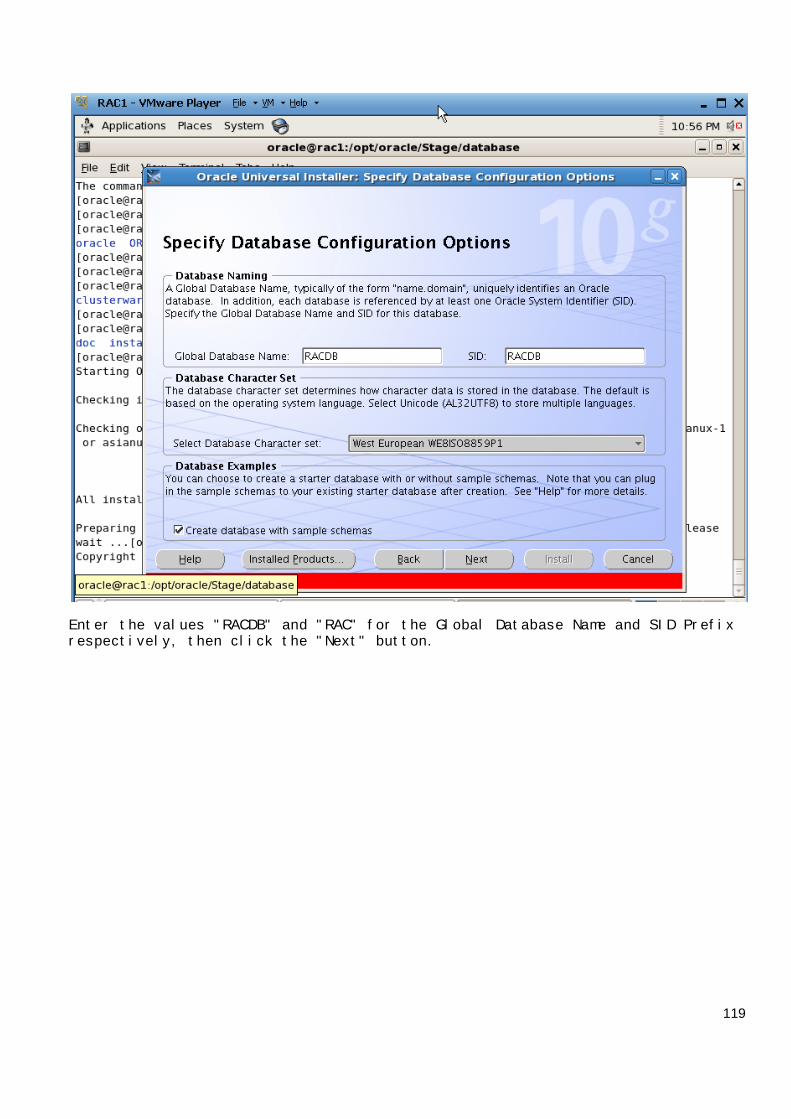
Enter the values "RACDB" and "RAC" for the Global Database Name and SID Prefixrespectively, then click the "Next" button.
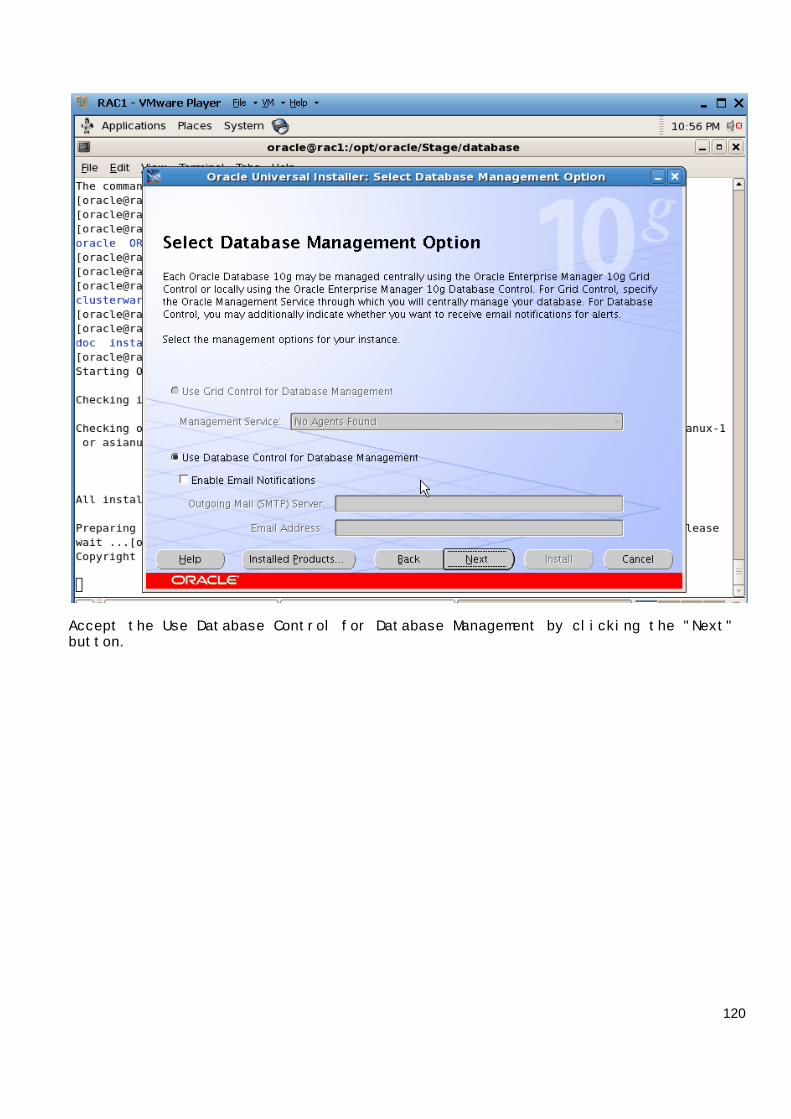
120
Accept the Use Database Control for Database Management by clicking the "Next"button.
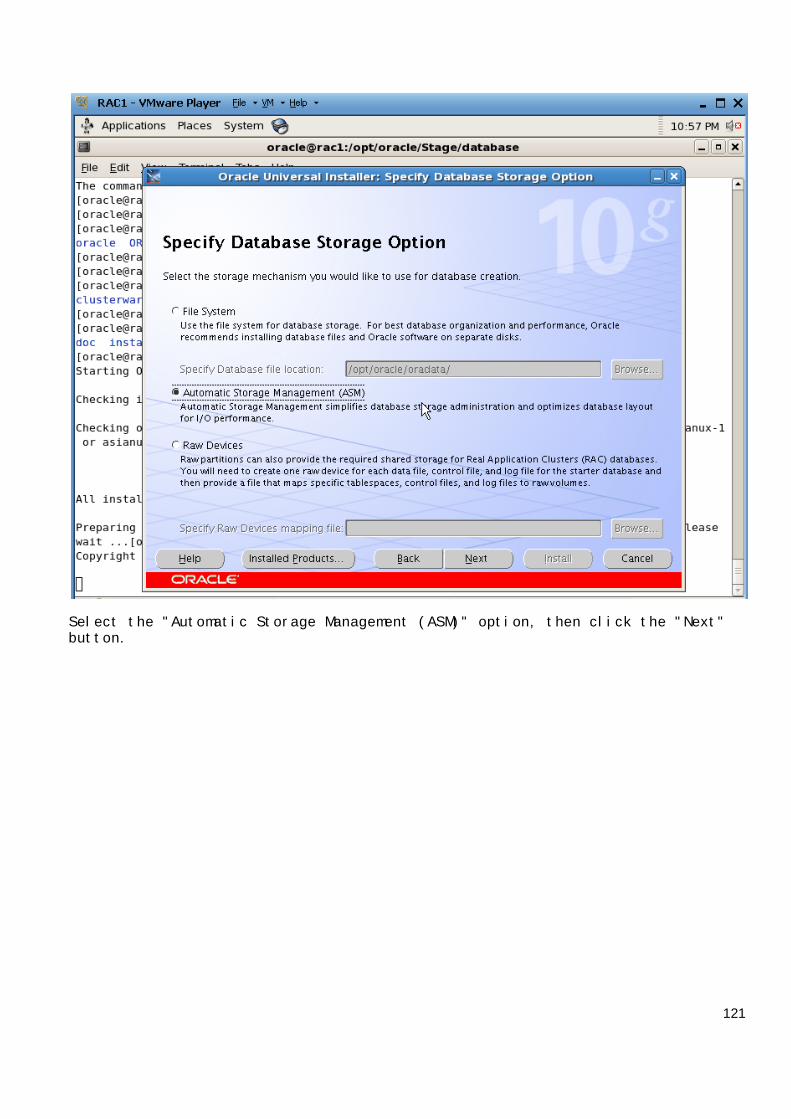
121
Select the "Automatic Storage Management (ASM)" option, then click the "Next"button.
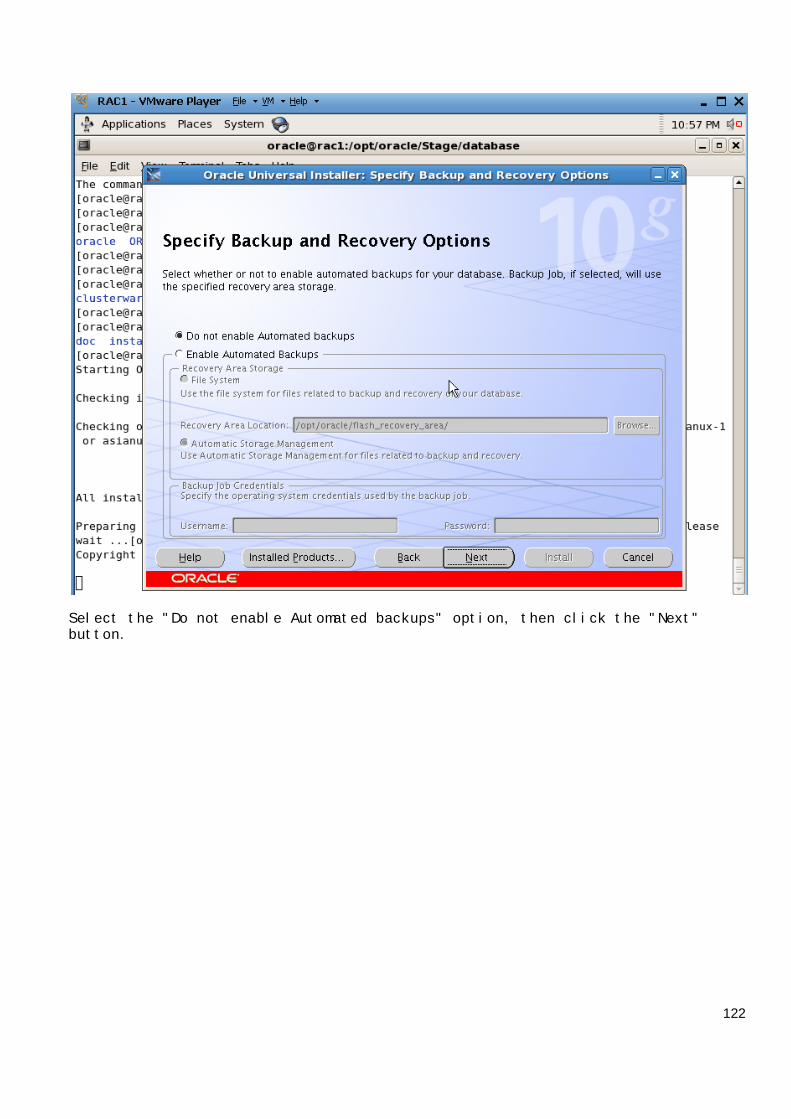
122
Select the "Do not enable Automated backups" option, then click the "Next"button.
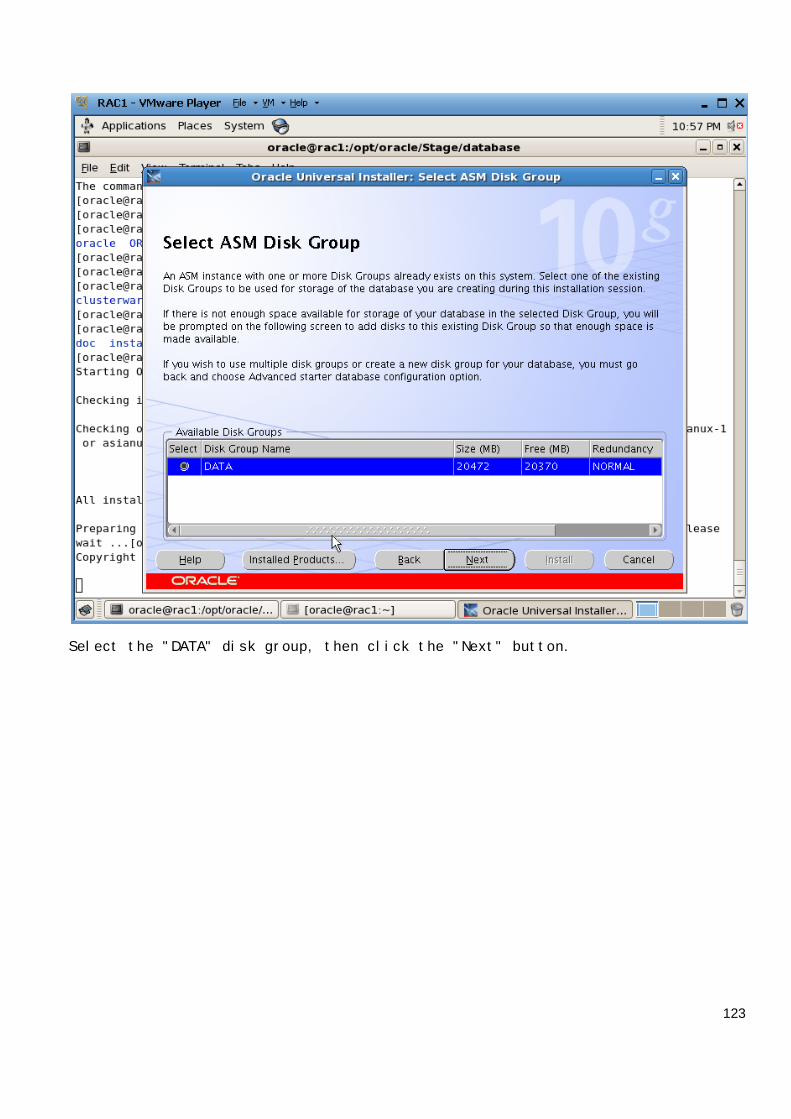
123
Select the "DATA" disk group, then click the "Next" button.
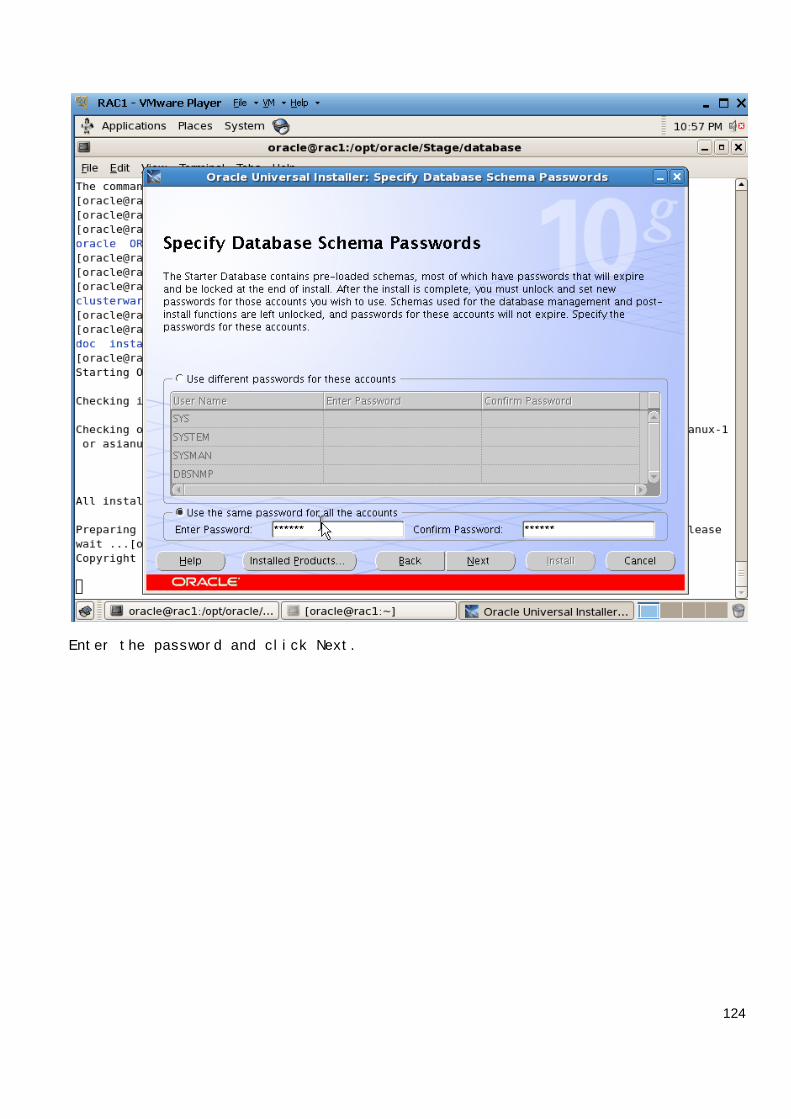
124
Enter the password and click Next.
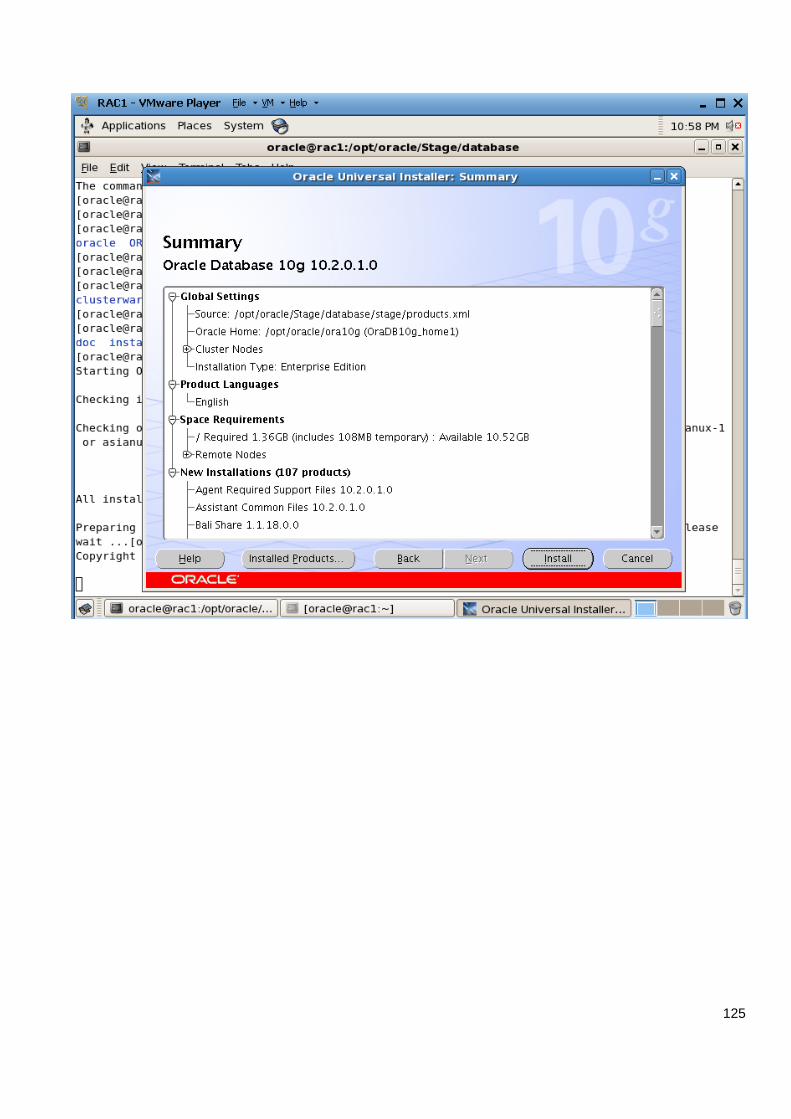
125
126

127
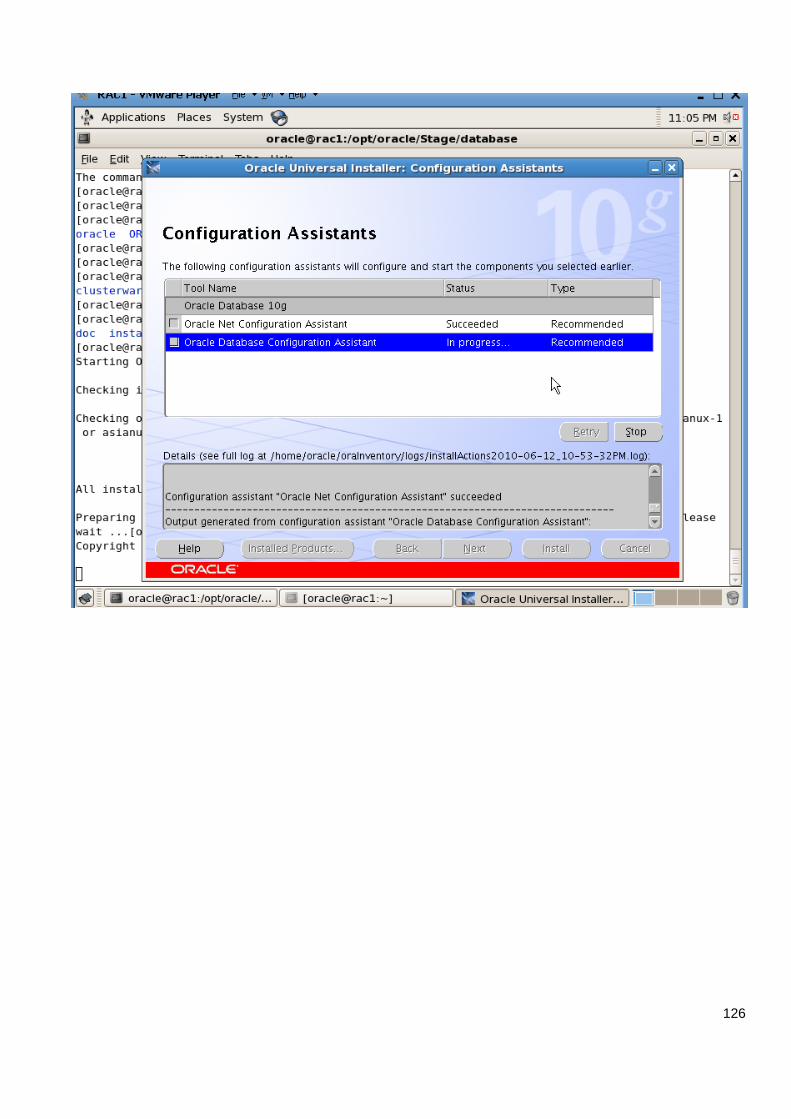
Once the installation is complete, wait while the configuration assistants run.
Execute the "root.sh" scripts on both nodes, as instructed on the "ExecuteConfiguration scripts" screen, then click the "OK" button.
When the installation is complete, click the "Exit" button to leave theinstaller.
The RAC database creation is now complete.
128
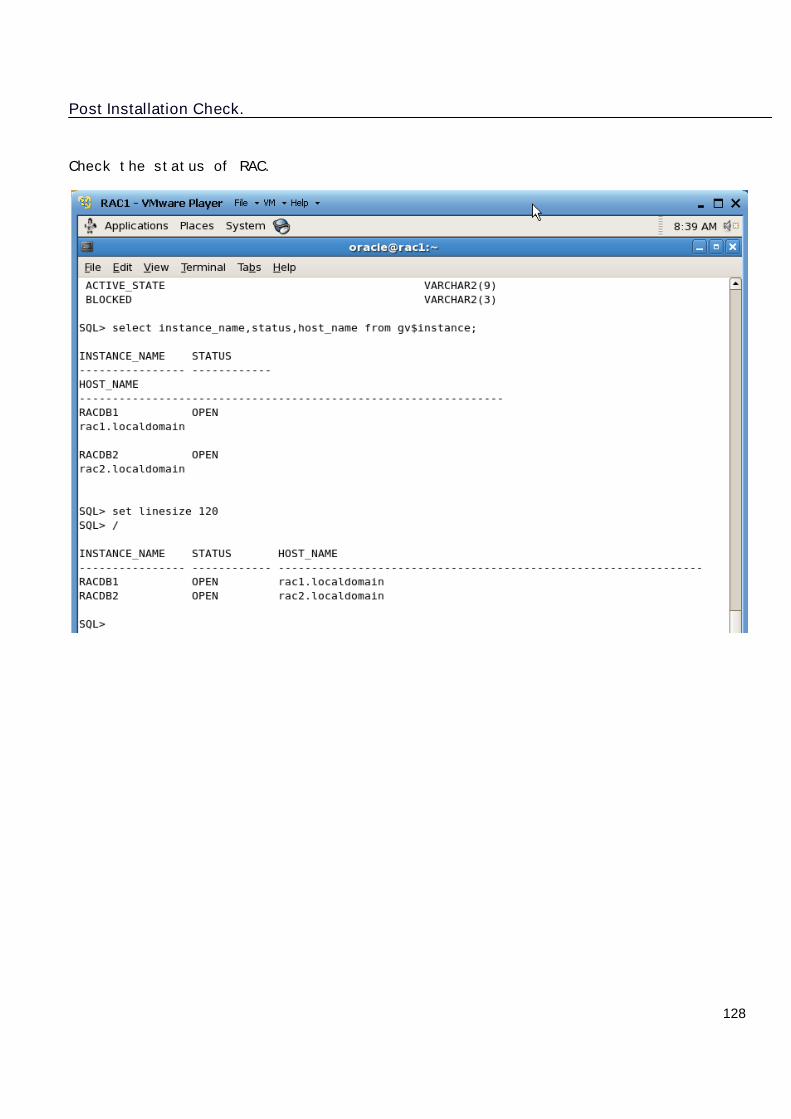
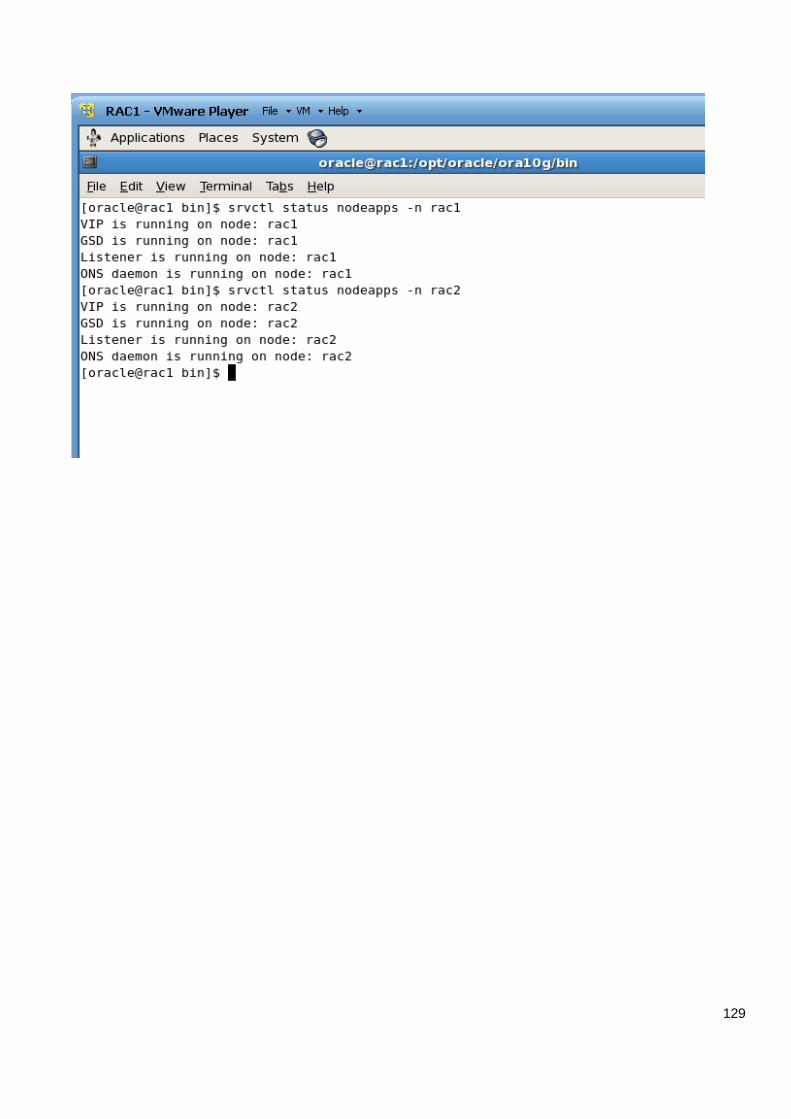
Post Installation Check.
Check the status of RAC.
129
130
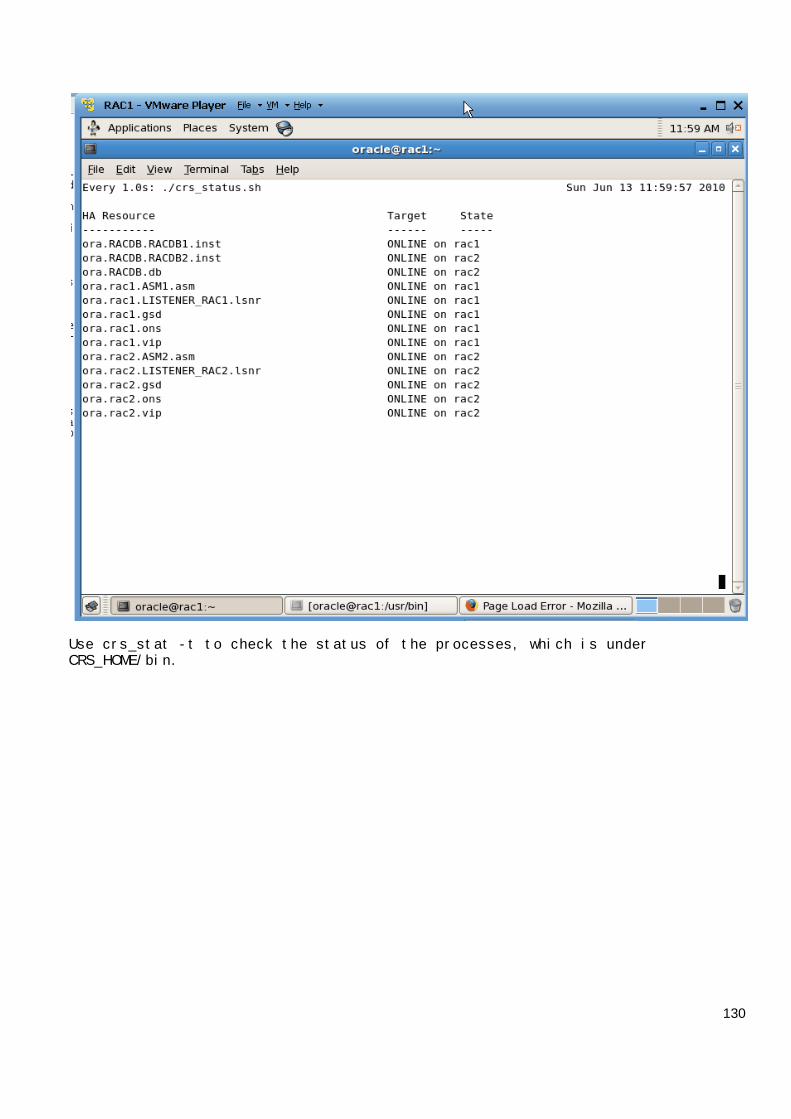
Use crs_stat -t to check the status of the processes, which is underCRS_HOME/bin.
131
TroubleShooting
Oracle Clusterware Files Issues
The following note applies if you are using Red Hat Enterprise Linux 4.0 orSUSE Linux Enterprise Server 10 and using raw devices to store the OracleCluster Registry (OCR) and the voting disk for Oracle Clusterware, or using rawdevices for Automatic Storage Management (ASM) database files. For each rawdevice used for the purposes listed, you must add two entries in the/etc/rc.d/rc.local file on Red Hat Enterprise Linux 4.0 or the/etc/init.d/after.local file on SUSE Linux Enterprise Server 10 after runningthe root.sh script following the installation of Oracle Clusterware.
For each OCR file, the entries should look as follows, where oinstall is theOracle install group and /dev/raw/rawn is an individual device file:
chown root:oinstall /dev/raw/rawnchmod 640 /dev/raw/rawnmar
For each voting disk file, the entries should look as follows, where oracle isthe Oracle user, oinstall is the Oracle install group, and /dev/raw/rawn is anindividual device file:
chown oracle:oinstall /dev/raw/rawnchmod 644 /dev/raw/rawnmar
For each ASM file, the entries should look as follows, where oracle is theOracle user, oinstall is the Oracle install group, and /dev/raw/rawn is anindividual device file:
chown oracle:oinstall /dev/raw/rawnchmod 660 /dev/raw/rawnmar
Cluster Verification Utility
This section lists the issues with Cluster Verification Utility on Red HatEnterprise Linux 4.0 and SUSE Linux Enterprise Server 9:
Cluster Verification Utility (CVU) does not support shared checks for rawdisks used for Oracle Cluster File System version 2 on Red Hat EnterpriseLinux 4.0 and SUSE Linux Enterprise Server 9.
The preinstallation stage verification checks for Oracle Clusterware andOracle Real Applications Clusters and reports missing packages. Ignorethe following missing packages and continue with the installation:
compat-gcc-7.3-2.96.128 compat-gcc-c++-7.3-2.96.128 compat-libstdc++-7.3-2.96.128 compat-libstdc++-devel-7.3-2.96.128
132
VLM Window Size on Red Hat Enterprise Linux 4.0
To use hugepages or to accommodate the VLM window size on Red Hat EnterpriseLinux 4.0, you must increase the default maximum size of the per-process lockedmemory. To increase the per-process max locked memory limit, add the followinglines to the /etc/security/limits.conf file, where oracle is the user thatadministers the database:
oracle soft memlock 3145728 oracle hard memlock 3145728
Oracle XML Developer's Kit Compiler Support
On Red Hat Enterprise Linux 4.0, Oracle XML Developer's Kit (XDK) is notsupported with GCC. XDK is supported with Intel C++ compiler (ICC).
Link Error During genorasdksh on Red Hat Enterprise Linux 4.0
Installing Oracle Database 10g release 2 (10.2.0.1) on Red Hat Enterprise Linux4.0 Update 1 (2.6.9-11.ELsmp) produces a link error during creation ofliborasdkbase.so.10.2. The following error message is displayed:
INFO: gcc:INFO: /usr/lib/libstdc++.so.5: No such file or directoryINFO:INFO: $OH/bin/genorasdksh: Failed to link liborasdkbase.so.10.2
This is because Oracle Database 10g release 2 (10.2) requires Red HatEnterprise Linux 3.0 libraries (/usr/lib/libstdc++.so.5).
Workaround: Install the compatible libraries as follows:
rpm -ql compat-libstdc++-33-3.2.3-47.3
This issue is tracked with Oracle bug 4605635.
Removing Metrics for Wait Classes Removes Them Permanently
Do not remove the key values for the wait class metrics. Doing so removes thempermanently and currently there is no easy way to recover them.
This issue is tracked with Oracle bug 4602952.
SRVCTL and VIPCA Utilities Set the LD_ASSUME_KERNEL Parameter
The SRVCTL and VIPCA utilities shipped with Oracle Database 10g release 2 andOracle Clusterware software set the environmental variable LD_ASSUME_KERNEL. OnSUSE Linux Enterprise Server 10, because the older Linux threads API has beenremoved from GLIBC, setting this parameter causes the SRVCTL and VIPCAutilities to exit with the following error:
133
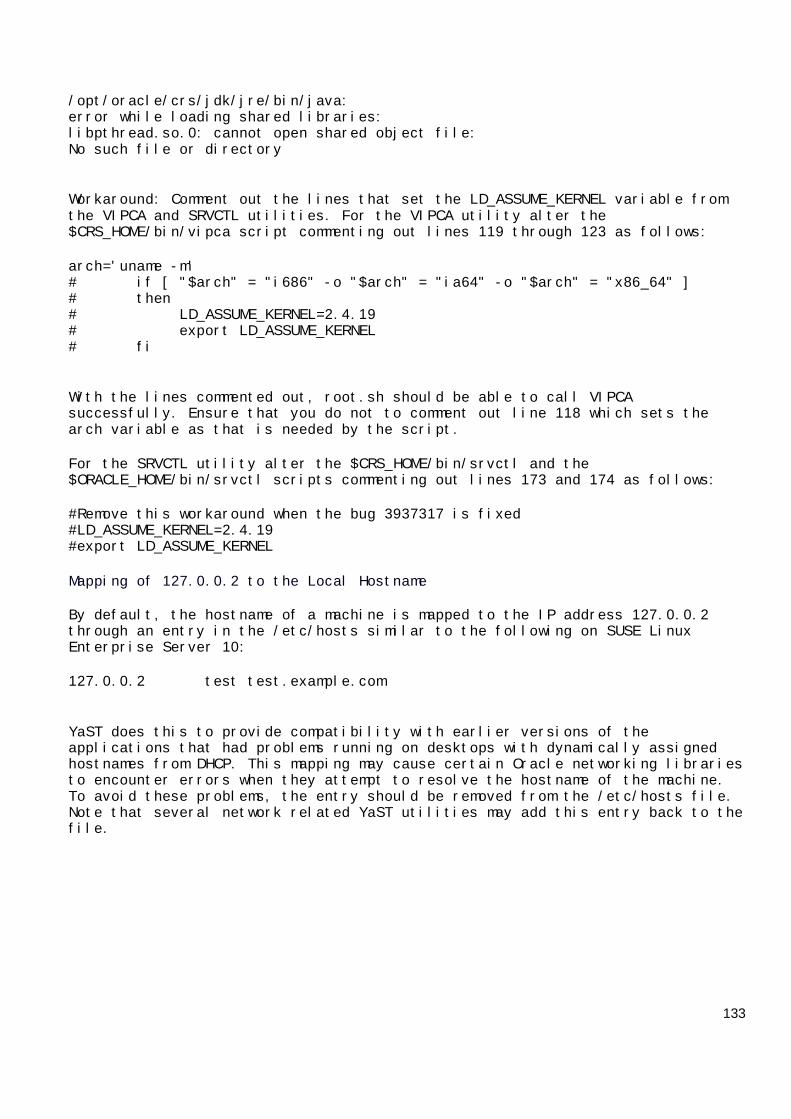
/opt/oracle/crs/jdk/jre/bin/java:error while loading shared libraries:libpthread.so.0: cannot open shared object file:No such file or directory
Workaround: Comment out the lines that set the LD_ASSUME_KERNEL variable fromthe VIPCA and SRVCTL utilities. For the VIPCA utility alter the$CRS_HOME/bin/vipca script commenting out lines 119 through 123 as follows:
arch='uname -m'# if [ "$arch" = "i686" -o "$arch" = "ia64" -o "$arch" = "x86_64" ]# then# LD_ASSUME_KERNEL=2.4.19# export LD_ASSUME_KERNEL# fi
With the lines commented out, root.sh should be able to call VIPCAsuccessfully. Ensure that you do not to comment out line 118 which sets thearch variable as that is needed by the script.
For the SRVCTL utility alter the $CRS_HOME/bin/srvctl and the$ORACLE_HOME/bin/srvctl scripts commenting out lines 173 and 174 as follows:
#Remove this workaround when the bug 3937317 is fixed#LD_ASSUME_KERNEL=2.4.19#export LD_ASSUME_KERNEL
Mapping of 127.0.0.2 to the Local Hostname
By default, the hostname of a machine is mapped to the IP address 127.0.0.2through an entry in the /etc/hosts similar to the following on SUSE LinuxEnterprise Server 10:
127.0.0.2 test test.example.com
YaST does this to provide compatibility with earlier versions of theapplications that had problems running on desktops with dynamically assignedhostnames from DHCP. This mapping may cause certain Oracle networking librariesto encounter errors when they attempt to resolve the hostname of the machine.To avoid these problems, the entry should be removed from the /etc/hosts file.Note that several network related YaST utilities may add this entry back to thefile.

134
Installation, Configuration, and Upgrade Issues
Oracle Universal Installer Operating System Prerequisite Check on SUSE Linux
Enterprise Server 10
If you are installing Oracle Database 10g on SUSE Linux Enterprise Server 10,the current version of Oracle Universal Installer does not recognized SLES10 asa supported operating system and does not perform the installation.
Workaround #1: Run the Oracle Universal Installer using the ignoreSysPrereqsflag which causes the installer to skip the operating system check and continuewith the installation:
./runinstaller -ignoreSysPrereqs
As a side effect, the installer also skips other checks during theinstallation.
Workaround #2: The installation will pass the operating system prerequisitechecks if you change each 10 to 9 in the /etc/SuSE-release file. Ensure thatyou replace the original values in the /etc/SuSE-release file after the Oracleinstallation is complete.
This causes the installer to consider the system to be running SUSE LinuxEnterprise Server 9 and the operating system check passes. The changes to the/etc/SuSE-release file should be reverted after the installation of all Oraclesoftware is complete as some YaST tools require the original content.
Installing Oracle Cluster Ready Services on SUSE Linux Enterprise Server 10
Near the end of the installation of Oracle Cluster Ready Services, OracleUniversal Installer prompts for the $CRS_HOME/root.sh script to be run on allof the nodes in the cluster. When the root.sh script is run on the last node inthe cluster, the script calls the VIPCA utility, which fails. Refer to the"SRVCTL and VIPCA Utilities Set the LD_ASSUME_KERNEL Parameter" section formore details.
Workaround: Before running the root.sh script on the last node in the cluster,alter the $CRS_HOME/bin/vipca script commenting out lines 119 through 123:
arch='uname -m'# if [ "$arch" = "i686" -o "$arch" = "ia64" -o "$arch" = "x86_64" ]# then# LD_ASSUME_KERNEL=2.4.19# export LD_ASSUME_KERNEL# fi
With the lines commented out, root.sh should be able to call VIPCAsuccessfully. Ensure that you do not comment out line 118, which sets the archvariable as that is needed by the root.sh script.

135
Adding a Node to a Shared Oracle Clusterware Configuration
Before running root.sh in the first node of a shared Oracle Clusterware home,add the following line in the $ORA_CRS_HOME/opmn/conf/ons.config file:
usesharedinstall=true
This issue is tracked with Oracle bug 4454562.
Installing Enterprise Security Manager
To install Oracle Security Manager, install Oracle Client and then select theAdministrator installation type.
Upgrading Oracle Clusterware 10.1.x to Oracle Clusterware 10.2
When upgrading from 10.1.x to 10.2, Oracle Clusterware will not start if thehost name directory under the /etc/oracle/scls_scr directory includes thedomain name. The following error message is displayed when you run therootupgrade.sh script.
A file or directory in the path name does not exist./etc/init.cssd[509]: /etc/oracle/scls_scr/host_name/root/cssrun: 0403-005Cannot create the specified file.
Workaround: Move the /etc/oracle/scls_scr/hostname.domain_name directory to/etc/oracle/scls_scr/hostname and rerun the rootupgrade.sh script.
This issue is tracked with Oracle bug 4472284.
extjob Executable Required Directory Permissions
To enable the extjob executable to locate required libraries, the$ORACLE_HOME/lib directory and all of its parent directories must have executepermissions for group and other.
Modifying a Virtual IP Address Node Application
Use the srvctl modify nodeapps command to modify the name, IP address, ornetmask of an existing virtual IP address (VIP) resource. Use the -A argumentto include the existing interfaces for the VIP:
srvctl modify nodeapps -n mynode1 -A 100.200.300.40/255.255.255.0/eth0
This issue is tracked with Oracle bug 4500688.

136
Raw Devices on Red Hat Enterprise Linux 4.0
When you restart a Red Hat Enterprise Linux 4.0 system, raw devices revert totheir original owners and permissions by default. If you are using raw deviceswith this operating system for your Oracle files, for example, for ASM storageor Oracle Clusterware files, you need to override this default behavior. To dothis, add an entry to the /etc/rc.d/rc.local file for each raw devicecontaining the chmod and chown commands required to reset them to the requiredvalues.
As an example, here are sample entries in a /etc/rc.d/rc.local file thatcontrol the restart behavior of raw devices for two ASM disk files(/dev/raw/raw6 and /dev/raw/raw7), two Oracle Cluster Registry files(/dev/raw/raw1 and /dev/raw/raw2), and three Oracle Clusterware voting disks(/dev/raw/raw3, /dev/raw/raw4, and /dev/raw/raw5):
# ASMchown oracle:dba /dev/raw/raw6chown oracle:dba /dev/raw/raw7chmod 660 /dev/raw/raw6chmod 660 /dev/raw/raw7# OCRchown root:oinstall /dev/raw/raw1chown root:oinstall /dev/raw/raw2chmod 660 /dev/raw/raw1chmod 660 /dev/raw/raw2# Voting Diskschown oracle:oinstall /dev/raw/raw3chown oracle:oinstall /dev/raw/raw4chown oracle:oinstall /dev/raw/raw5chmod 644 /dev/raw/raw3chmod 644 /dev/raw/raw4chmod 644 /dev/raw/raw5

137
Reference
www.oracle.com
www.oracle-base.com
Oracle Support