opt overviewresources-educ.sites.olt.ubc.ca/files/2018/08/opt-master... · 2018-08-07 · opt...
TRANSCRIPT

OPT Overview Faculty of Education
OPT Overview - Introduction
Account Codes OPT Reporting Tools
Assigning a Delegate
*This manual is intended to be used for Faculty of Education only for Training purposesJune 2018
Introduction
Staff
Faculty
Initiator
Delegate
Financial Officer
1 Over 1 Approver
FMS Signing Authority
Departmental Approver: (AdminManager/Head)
Users: Roles:

What type of payments?
OPT: UBC Visa Reconciliation
Vendor Payments
Non-travel reimbursements
Travel reimbursements(only Travel Claims)
Non-OPT: Travel Advance & Clearance
Wire Transfers
Independent Contractor (no B/N orGST#) payments & restricted accountcodes:713001/713005/753000/565000/521000/598000


Account CodesFaculty of Education

List of Commonly Used Account Codes General Expenses
General Expenses:640000 Operational supplies & expense 640001 Office supplies641000 Postage641300 Couriers641530 Subscriptions & publications641531 Books and periodicals641600 Printing and copying642230 Course fees646100 Catering646106 Food & beverage647339 Audio, video & photography653000 Computer supplies653100 Computer software <$50000654000 Professional development655000 Advertising655001 Advertising-Recruitment656000 Meals & entertainment658501 Cellular & telecommunications684000 Membership fees712100 Participation services713000 Professional fees 762100 Utilties764000 Rental-Telephone equipment764003 ISDN and internet connection765000 Long Distance810000 Furniture820000 Equipment820100 Audio & Video equipment830000 Desktop computer & printer

List of Commonly Used Account Codes Travel Expenses
Travel Expenses:
611000 Field trips&Other - Air Fare
612000 Field trips&Other - Other Transportation (Taxi, bus, parking)
613000 Field trips&Other - Meals (Meals per Diem)
614000 Field trips&Other - Accomodation
621000 Conferences- Air Fare
622000 Conferences- Other Transportation (Taxi, bus, parking)
623000 Conferences - Meals
624000 Conferences - Accomodation
627000 Conferences - Registration
634000 Relocation & moving

OPT Reporting ToolFaculty of Education

*Click “UBC OPT Reporting” in the leftmenu bar to access the list of alleforms by date by dept:
1. Select the date range2. Click “Select All”3. Click “All Values”4. Click Save5. Click “List of Eforms by Date by
Dept
The report generates a list of all eformsunder the selected dept ID and dates. The report includes the current status of outstanding eforms and completed eforms.

To access list of outstanding UBC Visa Transactions by Dept ID:
Steps:1. Select the appropriate date range2. Click “Select All”3. Click “All Values”4. Save5. Click “CC – Outstanding Trans by
DP”
The report generates all outstanding UBC Visa transactions to be reconciled with aging schedule and details of transaction.

Assigning a DelegateFaculty of Education

1. Log into the MSP portal2. Under “Online Payment Tool”,
select “OPT Employee Centre”

Select “Manage Delegates”

Click magnifying glass to search for a delegate

1. Use the drop-down tab to searchby name
2. Find the employee and click ontheir name

1. Once the employeeis loaded on thedelegate page,select “OPT” and/or“VISA”
2. Click “Save” tocomplete theprocess

Vendor PaymentsFaculty of Education
*This manual is intended to be used for Faculty of Education only for Training purposesJuly 2018

1. Open “UBC Online Payment Tool” in FMS2. Click “Request for Reimbursement and
Payment” under “Department Centre”

Click “Goods and Services Expense Reimbursement” for non-travel expenses

Review invoice details; obtain either Head/Admin Manager’s signature or email confirmation
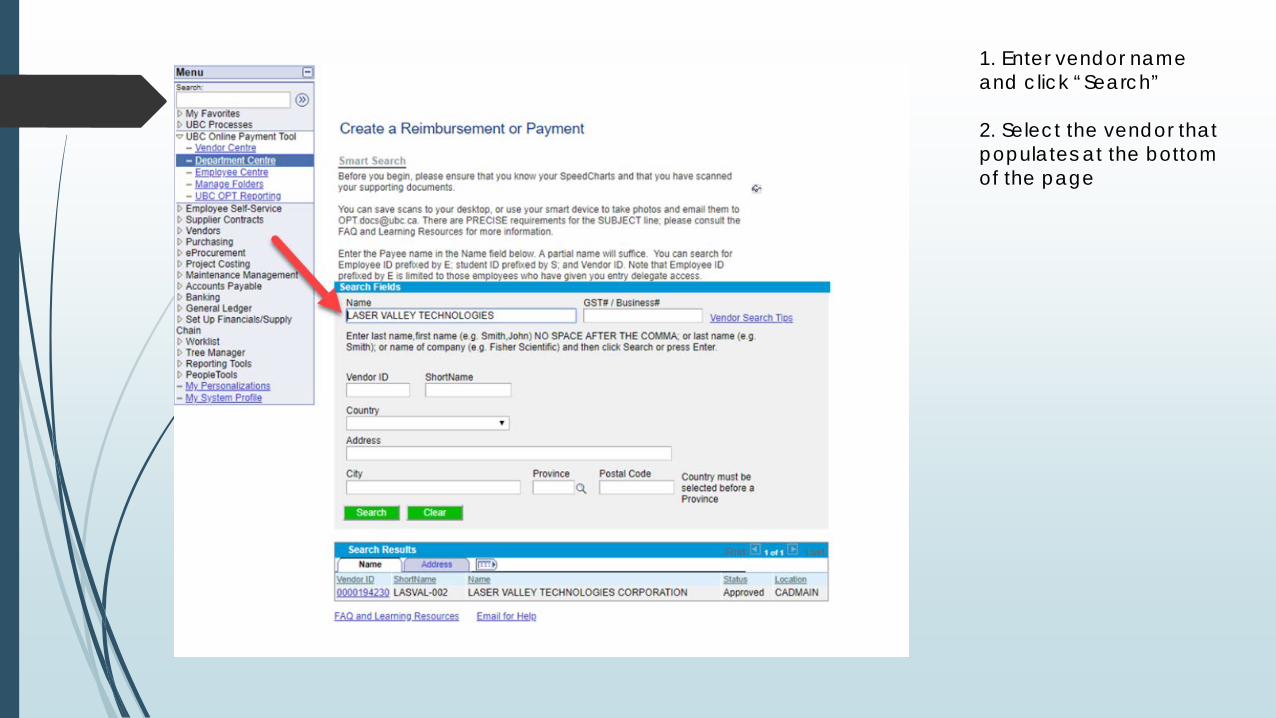
1. Enter vendor nameand click “Search”
2. Select the vendor thatpopulates at the bottomof the page

Provide a general reason for the payment

1. Fill under “Invoice Details”:
a. Invoice numberb. Invoice datec. Gross invoice amountd. Tax methode. Speedchart details
2. Press “Apply”
3. Fill under “Distribution”:a. Account codeb. Amount before taxc. Tax code
4. Click “Calculate”

Confirm the payment method(System will default to either cheque or direct deposit)

1. Attach copy of invoice in “Attachments” section (if invoice approved via email -attach email approval)
2. Check the “Certification Signature” box
3. Add detailed comments in comment box for communication to the next approver

Review the next approver and click “Submit”

Submission confirmation appears, with options to view the eForm, close the eForm or go to the worklist

Viewing the eForm : provides summary of the eFormsubmitted to the next approver

Personal Reimbursement for Non-Travel ExpenseFaculty of Education

1. Open “UBC Online Payment Tool” in FMS
2. Click “Request for Reimbursement and Payment” under “Employee Centre”

Select “Goods and Services Expense Reimbursement” for non-travel related expenses

Review receipt details
*Note – Hard copy receipts will be required to be sent to theFinance Office

1. Under “Payment Reason”, provide a general statement outlining the nature of the expense
2. Folders are not required for use for non-travel related expenses

1. Under “Invoice Details” :
a. Invoice number will automatically generateb. Enter invoice date, gross receipt amount, speedchart details and tax method
2. Once fields are complete, click “Apply”

1. Fields will then generate under the “Distribution” section
2. Enter account code and distribution percentage
3. Confirm that all receipts are present for the request

Payment method will automatically default to EFT for UBC employees

1. Under “Attachments”, upload a copy of the receipt
2. Uncheck the “Certification Signature” box to certify the information on the eForm
3. Under “Comments”, provide information to the next approver on the nature of the expense

1. Review and confirm approvers
2. Use the magnifying glass to override the one-over if required
3. If all information is correct, click “Submit” to submit the eForm

1. Once the eForm is submitted, the initiator can view the next step in the approval process
2. Click “View This Form” to view a summary page of the eForm

On the summary page, review the information submitted
For hard copy receipt reimbursements : print out the summary page, attach it to the receipt and send it to the Finance Office

On the next page of the eForm summary, the “Who can work this form?” link provides information on the next approver

Personal Reimbursement for Travel ExpenseFaculty of Education

1. Open “UBC Online Payment Tool” in FMS
2. Click “Request for Reimbursement and Payment” under “Employee Centre”

Select “Employee Travel Expense Reimbursement” for travel related expenses

Review receipt details
*Note – Hard copy receipts will be required to be sent to theFinance Office

For all travel expenses, a folder needs to be created.
The folder can either be:
a. A travel related to a conference/event (ex.AERA Conference)
b. Multiple travels (ex. Conferences & research inLondon, July 2018)
Therefore, same folder can be used for multiple trips. Once folder is created, click “next”

1. Choose Yes, if one speed chart will be used for all expenses
2. Choose appropriate expense types (*Note: do not tick off meals as this will generate a list of per diems for the entire trip dates. Meals can be added manually in the next page)

1. Under “Travel Expenses”, fill the transaction amount and whether the receipt for the expense is missing and/or if consumed in BC
2. Under “Missing Receipts”, certify that all original receipts are available for submission
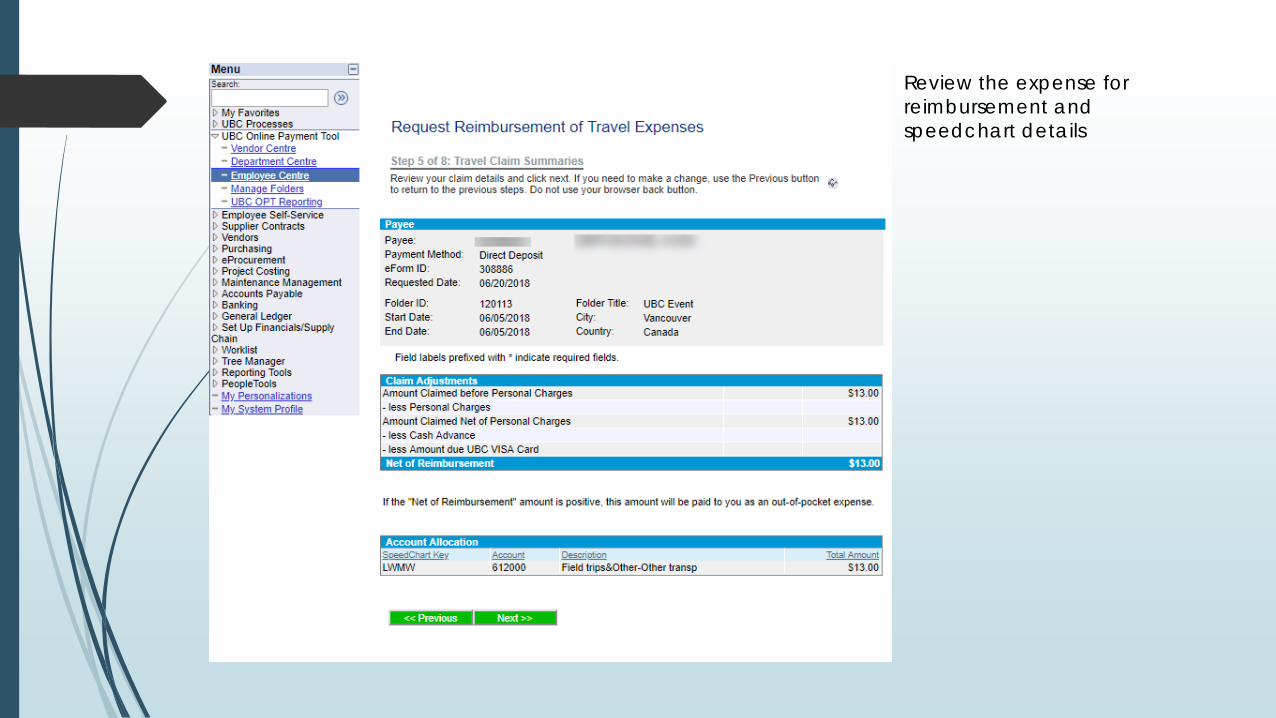
Review the expense for reimbursement and speedchart details

Payment method will automatically default to EFT for UBC employees

1. Under “Attachments”, attach a copy of the receipt
2. Check off the “Certification Signature” box to certify the expenses being reimbursed
3. Under “Comments” provide information on the nature of the expense for the next approver

1. Review and confirm approvers
2. Use the magnifying glass to override the one-over if required
3. If all information is correct, click“Submit” to submit the eForm

1. Once the eForm issubmitted, the initiatorcan view the next stepin the approval process
2. Click “View This Form”to view a summarypage of the eForm

On the summary page, review the information submitted
For hard copy receipt reimbursements : print out the summary page, attach it to the receipt and send it to the Finance Office

Visa Reconciliation for Non-Travel Expense
Faculty of Education
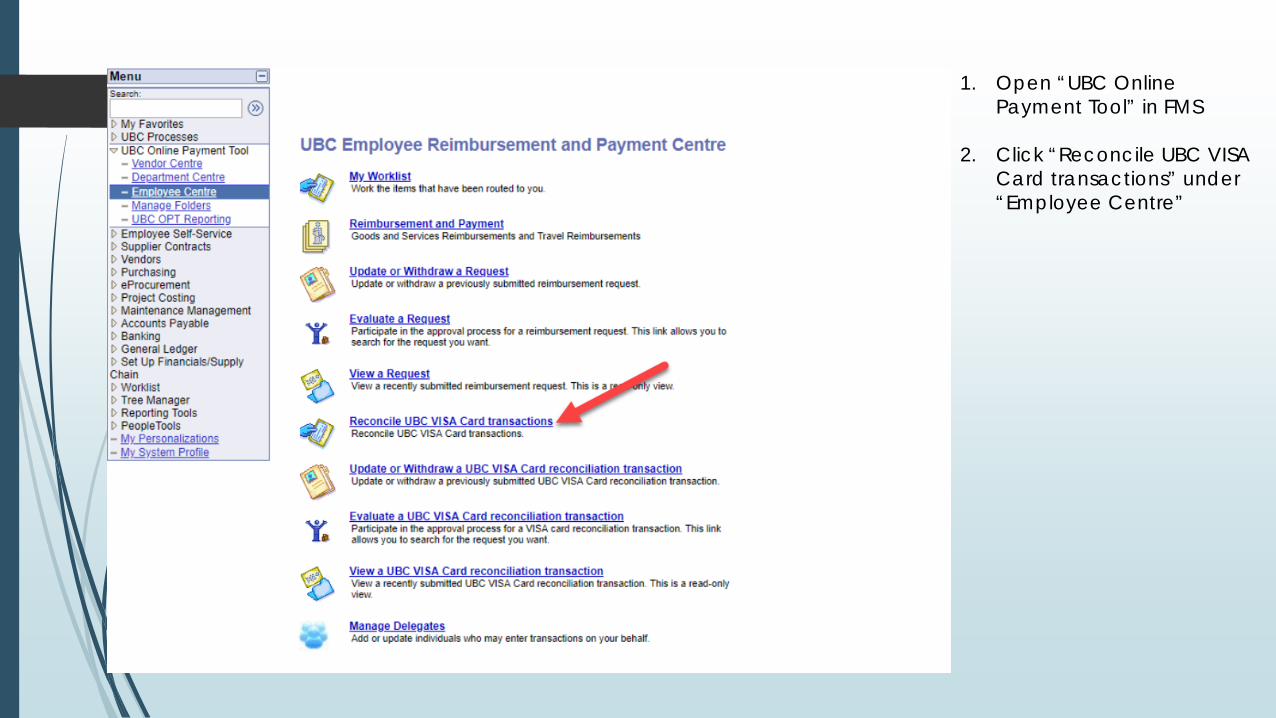
1. Open “UBC OnlinePayment Tool” in FMS
2. Click “Reconcile UBC VISACard transactions” under“Employee Centre”

Click to beside “Employee ID” to access appropriate cardholder’s Visa Reconciliation List

*Summary of all VISA transactions will appear. Review the transaction(s) to reconcile.
After confirming the expense(s) to reconcile :1. Change the “Status” drop-down to
“Reviewed”2. Click “Submit Reviewed”

Review receipt details

1. Fill the account code for the expense
2. Select whether the item is a personal expense or consumed in BC
3. If the original receipt is missing, select “Missing Receipt”
4. Attach a copy of the receipt under “Attachments”
5. Check the “Certification Signature” box
6. Add “detailed” comments in comment box for communication to the next approver

Review the next approver and the one-over approver and click “Submit”
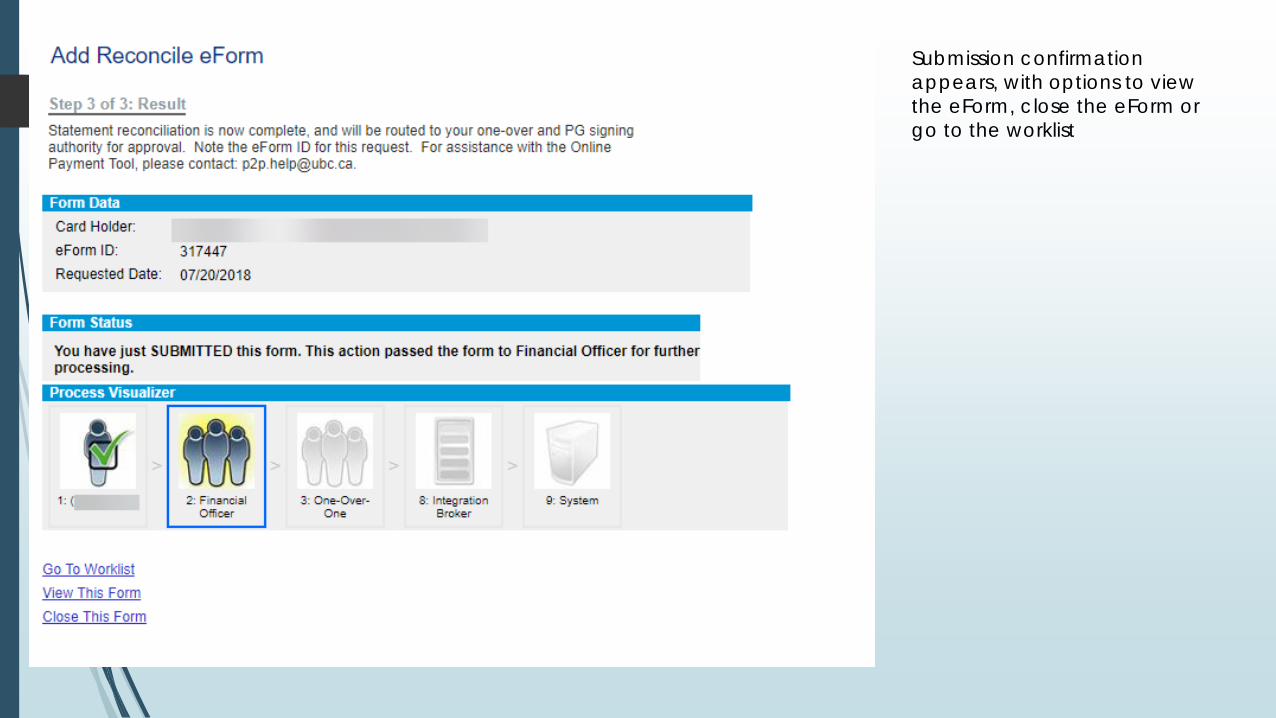
Submission confirmation appears, with options to view the eForm, close the eForm or go to the worklist

Viewing the eForm : provides summary of the eFormsubmitted to the next approver
For hard copy receipts: print out the summary page, attach it to the receipt and send it to the Finance Office

Visa Reconciliation for Travel Expense
Faculty of Education

Click “Reconcile UBC Visa Transactions”

1. Click beside“Employee ID” toaccess the appropriateCardholder’sReconciliation List
2. Click “Search”

The list shows all outstanding transactions to be reconciled. In this scenario, only select the ones that are travel-related:
1. Select the drop down menu under status column and change status of each travel related expense in your list to“Wallet.”
2. Click “Go to Travel Claim”

*For all travel expenses, afolder needs to be created.
The folder can either be: 1. A travel related to a
conference/event (ex.AERA Conference)
2. Multiple travels (ex.Conferences & Research inLondon, July 2018)
Therefore, same folder can be used for multiple trips. Once folder is created, click “next”.

1. Choose Yes, if one speedchart will be used for allexpenses
2. Choose appropriate expensetypes to auto-populateaccount codes in the nextpage. (*Tip: do not tick offmeals if travel dates arelonger period as this willgenerate a list of per diemsfor the entire trip folder dates.Meals can be addedmanually in the next page byclicking + sign in the lineitem).

*Click “Wallet” to match and reconcile each travel related visa expense that you“walletted” from the Reconciliation List.

*List of travel-related visa expenses walletted. Clickeach transaction to reconcile.
Note: If, however, the expense was prepaid and the transaction date does not fall under the travel folder dates, an error message will appear. (ex. Airfare bought prior to actual travel dates). It is just an alert message, please disregard and continue.

Click “Dist” to enter additional information such as Alternate Vendor ID, multiple speed chart information, and expense amount distribution.

1. Click “Alt ID” in the boxbelow
2. Enter the employee number

1. Click on the “+” icon to add asecond line manually
2. When lines are addedmanually, you must:a. choose expense categoryb. enter speed chartc. account coded. click wallet to pulltransactions

1. Click “browse” to upload thereceipts (*Note: the maximumcharacters for the file name is25).
2. Tick off “CertificationSignature.”
3. Leave comments in thecomment box – provide anyadditional/requiredinformation for the nextapprovers for betterunderstanding about theexpense.

1. If the highlighted “One-over”field does not reflect theappropriate One-over, click
2. To look up youralternative/correct One-overtype last name -> comma -> firstname (Ex. smith,james)

Click “View This Form” to access the eform summary page

1. This is the summary of thereconciled eform for the travelportion of Visa Reconciliation
2. Print this page and attachoriginal receipts and submit tothe Finance Office
3. If all receipts are online, there isno need to print this page orthe receipts. Please mark“Online Receipts Only” in thecomment section.

Summary of workflow for submitted eform. Click “who can work this form” to see the name of the next approving role user.

Reconciling Credit/Refund VISA TransactionsFaculty of Education

1. Enter the VISA Reconciliation page in OPT
2. Select “reviewed” for all credits and click “Submit Reviewed”

Gather and review credit receipts
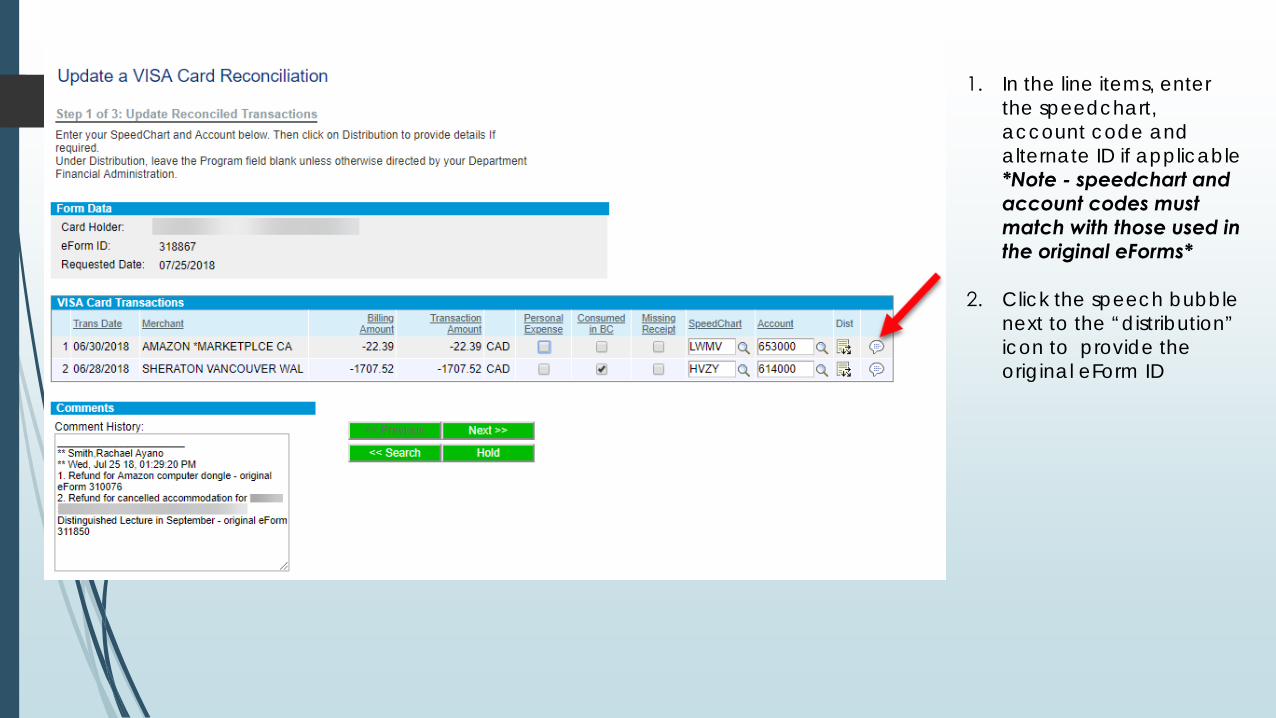
1. In the line items, enter the speedchart, account code and alternate ID if applicable*Note - speedchart and account codes must match with those used in the original eForms*
2. Click the speech bubble next to the “distribution” icon to provide the original eForm ID

Enter the original eForm ID of the expense in the speech bubble

1. Attach relevant refund receipts
2. Check off the Certification signature box
3. Add comments to provide detailed information on the nature of the refund and the original eForm IDs

Review approvers and submit the eForm