operator's manual (epa) 225h60 225h75 - husqvarna.com€¦ · 2 – english symbol explanation...
TRANSCRIPT

Operator's manual (EPA)
Please read these instructions carefully and makesure you understand them before using the machine. English
225H60225H75

2 – English
SYMBOL EXPLANATION
WARNING! The hedge trimmer can bedangerous!Careless or incorrect use can result inserious, even fatal injury.
Read through the Operator‘s Manualcarefully and understand the contentbefore using the hedge trimmer.
Always use• Ear protection• Approved eye protection
Symbols
• This product is in accordance withapplicable EC directives.
• Always wear approved protective gloves.
• Cutting tool. Do not touch the toolwithout first switching off the engine.
Checks and/or maintenance should becarried out with the engine switched off,with the stop switch in the STOPposition.
Always use approved protective gloves.
Regular cleaning required.
Ocular control.
Approved eye protection must always beused.
Other symbols/decals on the machine refer tospecial certification requirements for certainmarkets.
Noise emission to the environmentaccording to the European Community’sDirective.The machine’s emission is specified inchapter Technical data and on label.
English – 3
List of contents
SYMBOL EXPLANATIONSymbols ............................................................................... 2
CONTENTSList of contents .................................................................... 3
SAFETY INSTRUCTIONSPersonal protective equipment ............................................. 4The machine’s protective equipment .................................... 4Control, maintenance and service of the hedge trimmer’s
protective equipment ..................................................... 6General safety instructions ................................................... 8General working instructions for hedge trimmer .................. 9
WHAT IS WHAT?What is what on the hedge trimmer? ................................. 11
FUEL HANDLINGFuel mixture ...................................................................... 12Fuelling.............................................................................. 12
START AND STOPControl before starting ....................................................... 13Start and stop ..................................................................... 13
MAINTENANCECarburetor ......................................................................... 14Muffler .............................................................................. 15Cooling system .................................................................. 15Air filter ............................................................................. 16Spark plug .......................................................................... 16Gearbox ............................................................................. 16Lubrication ........................................................................ 16Maintenance schedule ........................................................ 17
TECHNICAL DATA225H60 ............................................................................. 18225H75 ............................................................................. 18
EMISSION CONTROL WARRANTY STATEMENTYour warranty rights and obligations .................................. 19
CONTENTS
Husqvarna AB has a policy of continuous productdevelopment and therefore reserves the right to modify thedesign and appearance of products without prior notice.
!
IMPORTANT ENGINE INFORMATIONHUSQVARNA AB HUSKVARNA SWEDEN
TWC
REFER TO OPERATOR`S MANUAL FORMAINTENANCE SPECIFICATIONS AND ADJUSTMENTS.
FOR SMALL NON - ROAD ENGINES. EPTHIS ENGINE CONFORMS TO U.S. PH1A
This label certifies that the product has been approved inaccordance with American exhaust emissions requirementsEPA PH1.
WARNING!Under no circumstances may the designof the machine be modified without thepermission of the manufacturer. Alwaysuse genuine accessories. Non-authorizedmodifications and/or accessories canresult in serious personal injury or thedeath of the operator or others.
Your warranty does not cover damage orliability caused by the use of non-authorized accessories or replacementparts.
Maintenance, replacement, or repair of the emission controldevices and systems may be performed by any nonroadengine repair establishment or individual.
4 – English
The machine’s protective equipment
This section describes the hedge trimmer’s protective equip-ment, its function and how checks and maintenance arecarried out to ensure that it operates correctly. (See the chapter”What is what” to locate where this equipment is positioned onyour machine.)
IMPORTANT INFORMATION
• Incorrect or careless use of a hedge trimmer canturn it into a dangerous tool that can causeserious or even fatal injury. It is extremelyimportant that you read and understand thismanual.
• When using a hedge trimmer, protectiveequipment approved by the appropriateauthorities must be used. Personal protectiveequipment does not eliminate the risk ofaccidents, however, it can reduce the effects of aninjury in the event of an accident. Ask your dealerfor help when choosing protective equipment.
Personal protective eqipment
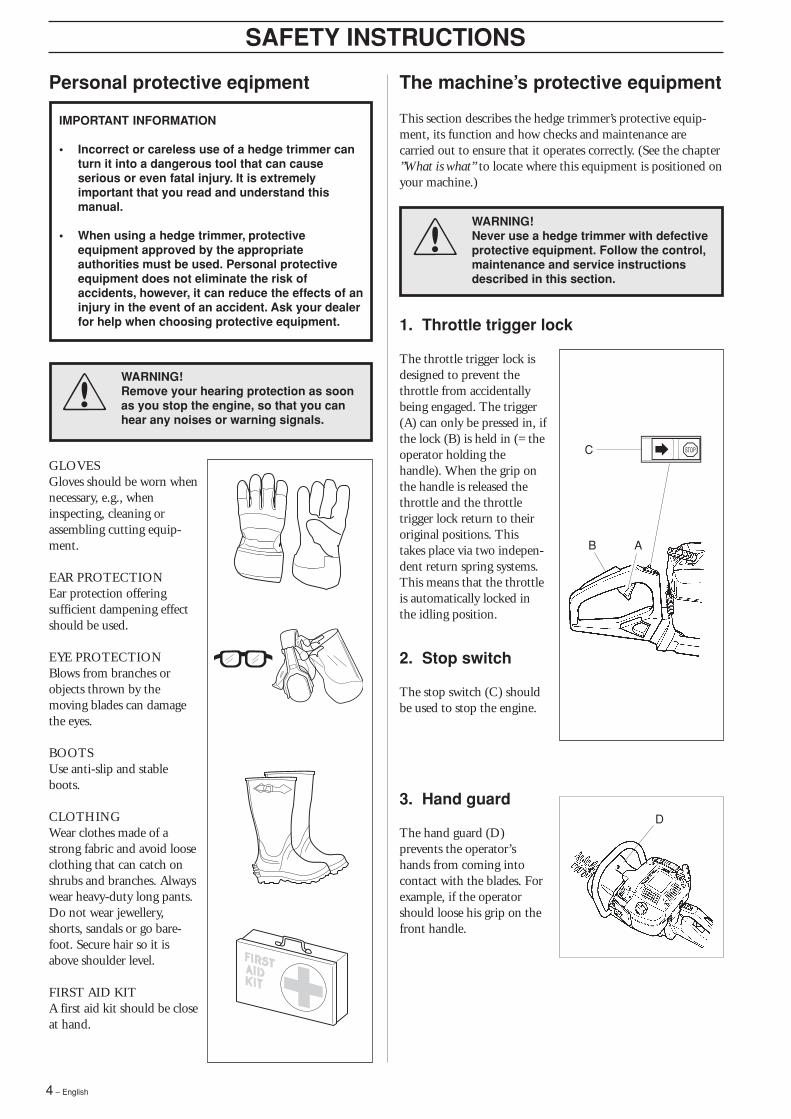
GLOVESGloves should be worn whennecessary, e.g., wheninspecting, cleaning orassembling cutting equip-ment.
EAR PROTECTIONEar protection offeringsufficient dampening effectshould be used.
EYE PROTECTIONBlows from branches orobjects thrown by themoving blades can damagethe eyes.
BOOTSUse anti-slip and stableboots.
CLOTHINGWear clothes made of astrong fabric and avoid looseclothing that can catch onshrubs and branches. Alwayswear heavy-duty long pants.Do not wear jewellery,shorts, sandals or go bare-foot. Secure hair so it isabove shoulder level.
FIRST AID KITA first aid kit should be closeat hand.
SAFETY INSTRUCTIONS
1. Throttle trigger lock
The throttle trigger lock isdesigned to prevent thethrottle from accidentallybeing engaged. The trigger(A) can only be pressed in, ifthe lock (B) is held in (= theoperator holding thehandle). When the grip onthe handle is released thethrottle and the throttletrigger lock return to theiroriginal positions. Thistakes place via two indepen-dent return spring systems.This means that the throttleis automatically locked inthe idling position.
2. Stop switch
The stop switch (C) shouldbe used to stop the engine.
3. Hand guard
The hand guard (D)prevents the operator’shands from coming intocontact with the blades. Forexample, if the operatorshould loose his grip on thefront handle.
"
AB
C
D
WARNING!Never use a hedge trimmer with defectiveprotective equipment. Follow the control,maintenance and service instructionsdescribed in this section.
!
WARNING!Remove your hearing protection as soonas you stop the engine, so that you canhear any noises or warning signals.
!
English – 5
4. Vibration damping system
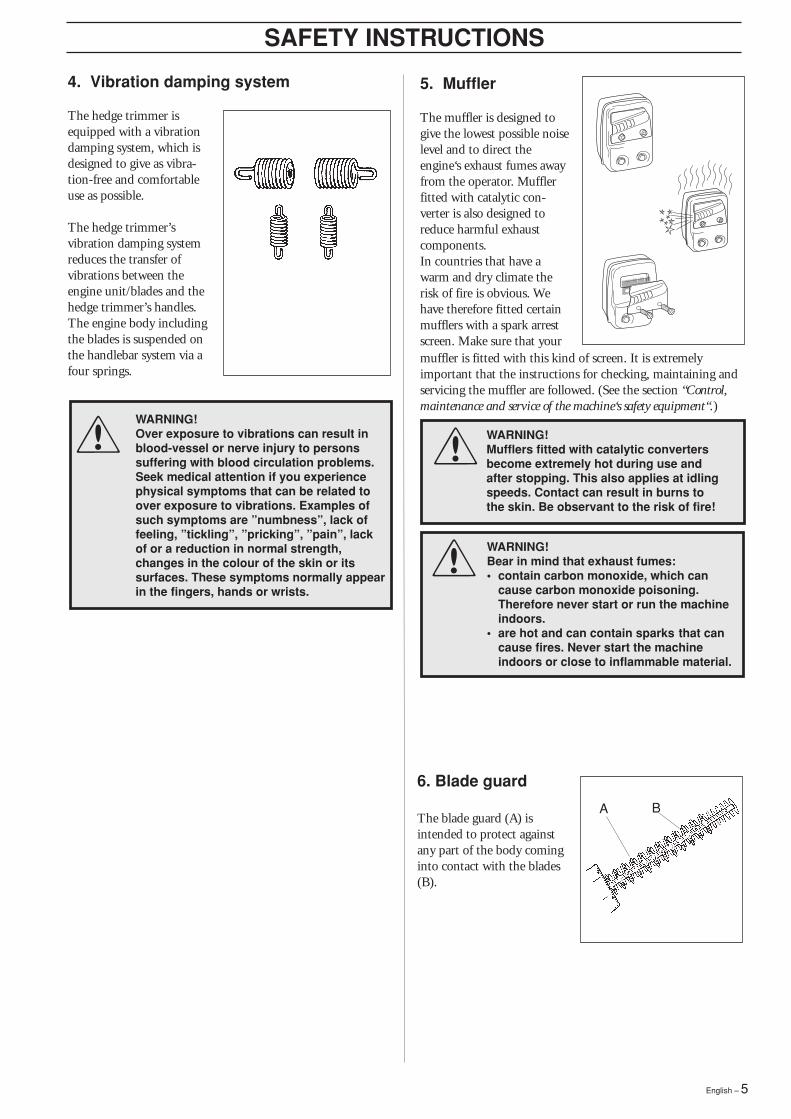
The hedge trimmer isequipped with a vibrationdamping system, which isdesigned to give as vibra-tion-free and comfortableuse as possible.
The hedge trimmer’svibration damping systemreduces the transfer ofvibrations between theengine unit/blades and thehedge trimmer’s handles.The engine body includingthe blades is suspended onthe handlebar system via afour springs.
SAFETY INSTRUCTIONS
!
WARNING!Over exposure to vibrations can result inblood-vessel or nerve injury to personssuffering with blood circulation problems.Seek medical attention if you experiencephysical symptoms that can be related toover exposure to vibrations. Examples ofsuch symptoms are ”numbness”, lack offeeling, ”tickling”, ”pricking”, ”pain”, lackof or a reduction in normal strength,changes in the colour of the skin or itssurfaces. These symptoms normally appearin the fingers, hands or wrists.
6. Blade guard
The blade guard (A) isintended to protect againstany part of the body cominginto contact with the blades(B).
BA
5. Muffler
The muffler is designed togive the lowest possible noiselevel and to direct theengine‘s exhaust fumes awayfrom the operator. Mufflerfitted with catalytic con-verter is also designed toreduce harmful exhaustcomponents.In countries that have awarm and dry climate therisk of fire is obvious. Wehave therefore fitted certainmufflers with a spark arrestscreen. Make sure that yourmuffler is fitted with this kind of screen. It is extremelyimportant that the instructions for checking, maintaining andservicing the muffler are followed. (See the section “Control,maintenance and service of the machine‘s safety equipment“.)
!
WARNING!Mufflers fitted with catalytic convertersbecome extremely hot during use andafter stopping. This also applies at idlingspeeds. Contact can result in burns tothe skin. Be observant to the risk of fire!
!
WARNING!Bear in mind that exhaust fumes:• contain carbon monoxide, which can
cause carbon monoxide poisoning.Therefore never start or run the machineindoors.
• are hot and can contain sparks that cancause fires. Never start the machineindoors or close to inflammable material.
6 – English
SAFETY INSTRUCTIONS
WARNING!Never use a machine with defective safetyequipment. The safety equipment shouldbe maintained as described in thissection. If your machine does not meetany of these controls you should contactyour service workshop.
!
WARNING!Always stop the engine before startingwork on any part of the cuttingequipment. This continues to rotate evenafter the throttle has been released.Ensure that the cutting equipment hasstopped completely and remove the cablefrom the spark plug before you start towork on it.
!
Control, maintenance and service ofthe hedge trimmer’s protectiveequipment
2. Stop switch
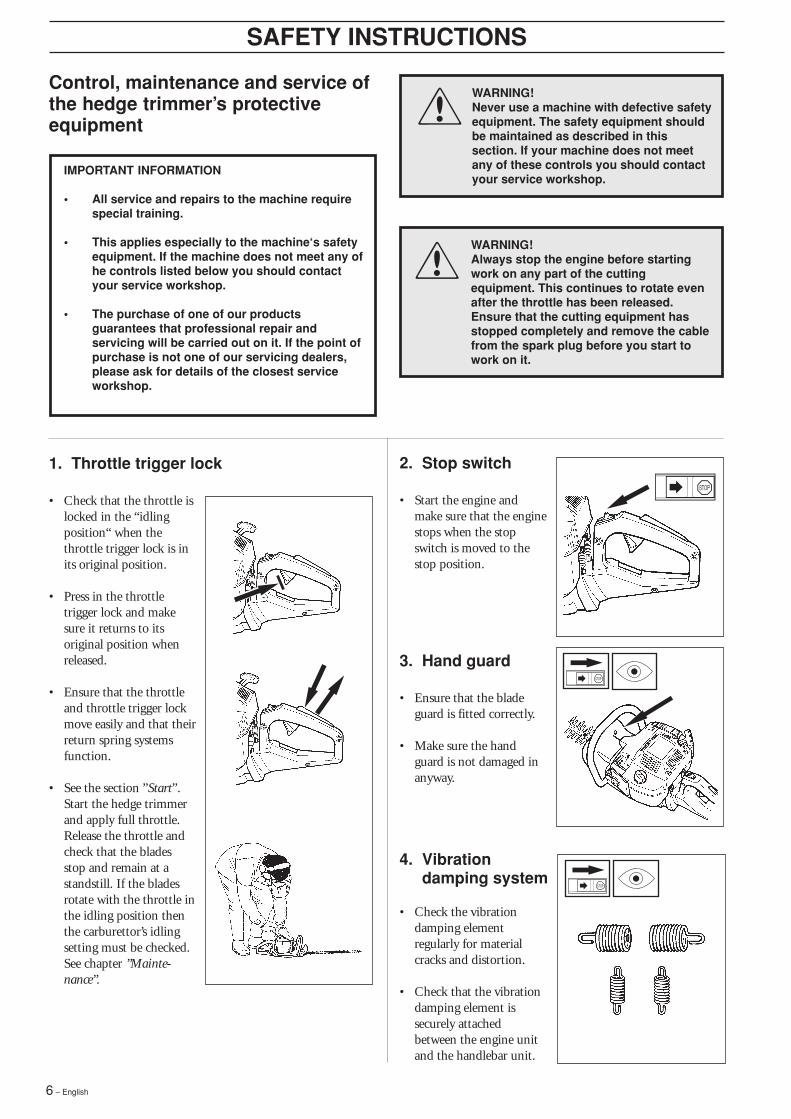
• Start the engine andmake sure that the enginestops when the stopswitch is moved to thestop position.
3. Hand guard
• Ensure that the bladeguard is fitted correctly.
• Make sure the handguard is not damaged inanyway.
4. Vibrationdamping system
• Check the vibrationdamping elementregularly for materialcracks and distortion.
• Check that the vibrationdamping element issecurely attachedbetween the engine unitand the handlebar unit.
IMPORTANT INFORMATION
• All service and repairs to the machine requirespecial training.
• This applies especially to the machine‘s safetyequipment. If the machine does not meet any ofhe controls listed below you should contactyour service workshop.
• The purchase of one of our productsguarantees that professional repair andservicing will be carried out on it. If the point ofpurchase is not one of our servicing dealers,please ask for details of the closest serviceworkshop.
1. Throttle trigger lock
• Check that the throttle islocked in the “idlingposition“ when thethrottle trigger lock is inits original position.
• Press in the throttletrigger lock and makesure it returns to itsoriginal position whenreleased.
• Ensure that the throttleand throttle trigger lockmove easily and that theirreturn spring systemsfunction.
• See the section ”Start”.Start the hedge trimmerand apply full throttle.Release the throttle andcheck that the bladesstop and remain at astandstill. If the bladesrotate with the throttle inthe idling position thenthe carburettor’s idlingsetting must be checked.See chapter ”Mainte-nance”.
"
English – 7
SAFETY INSTRUCTIONS
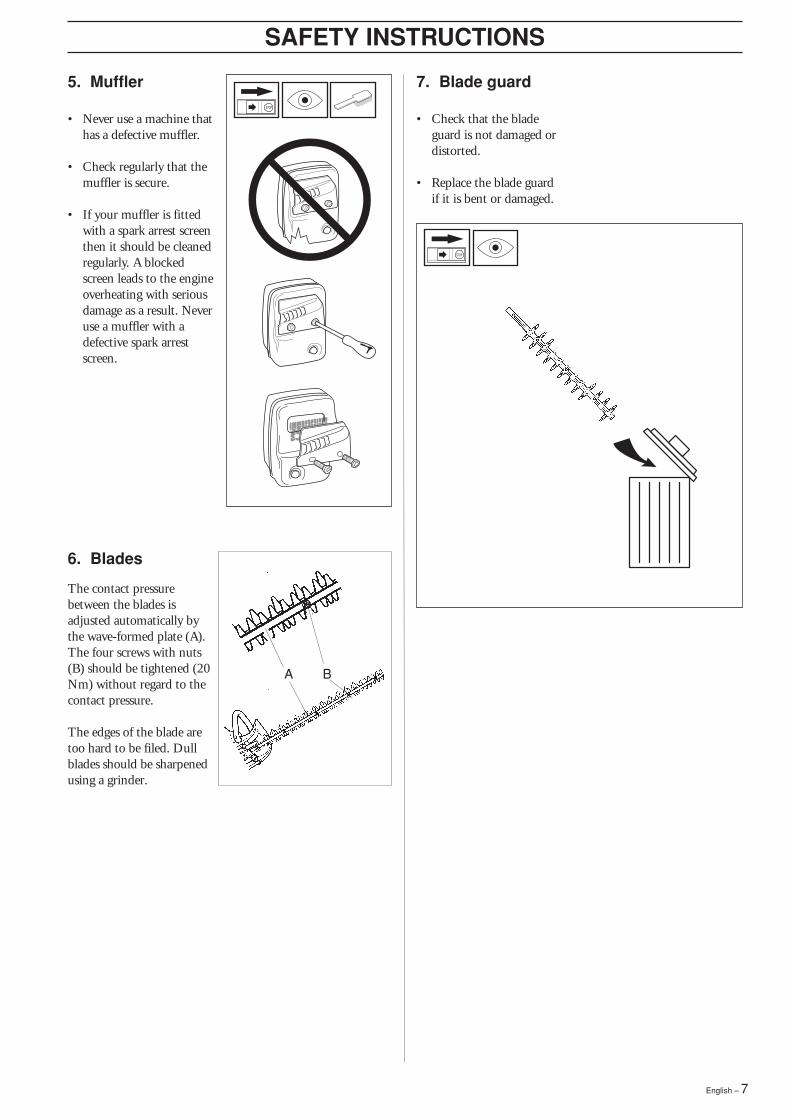
5. Muffler
• Never use a machine thathas a defective muffler.
• Check regularly that themuffler is secure.
• If your muffler is fittedwith a spark arrest screenthen it should be cleanedregularly. A blockedscreen leads to the engineoverheating with seriousdamage as a result. Neveruse a muffler with adefective spark arrestscreen.
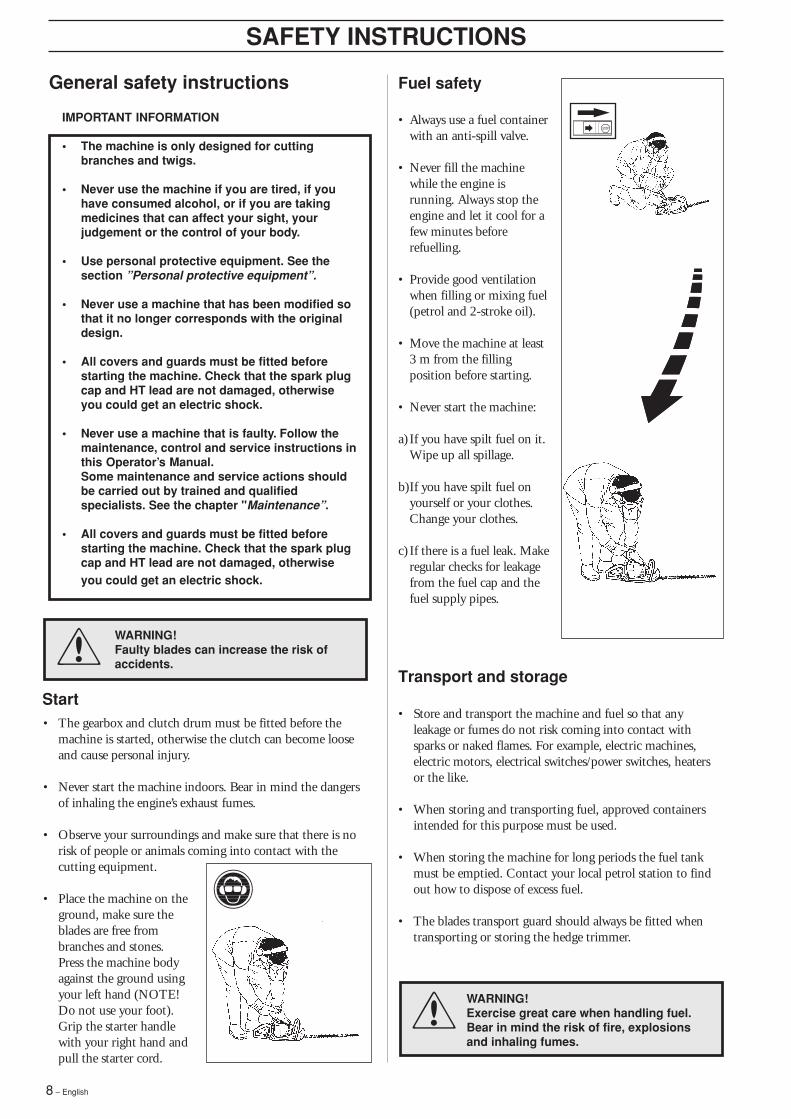
6. Blades
The contact pressurebetween the blades isadjusted automatically bythe wave-formed plate (A).The four screws with nuts(B) should be tightened (20Nm) without regard to thecontact pressure.
The edges of the blade aretoo hard to be filed. Dullblades should be sharpenedusing a grinder.
A B
7. Blade guard
• Check that the bladeguard is not damaged ordistorted.
• Replace the blade guardif it is bent or damaged.
8 – English
IMPORTANT INFORMATION
• The machine is only designed for cuttingbranches and twigs.
• Never use the machine if you are tired, if youhave consumed alcohol, or if you are takingmedicines that can affect your sight, yourjudgement or the control of your body.
• Use personal protective equipment. See thesection ”Personal protective equipment”.
• Never use a machine that has been modified sothat it no longer corresponds with the originaldesign.
• All covers and guards must be fitted beforestarting the machine. Check that the spark plugcap and HT lead are not damaged, otherwiseyou could get an electric shock.
• Never use a machine that is faulty. Follow themaintenance, control and service instructions inthis Operator’s Manual.Some maintenance and service actions shouldbe carried out by trained and qualifiedspecialists. See the chapter "Maintenance”.
• All covers and guards must be fitted beforestarting the machine. Check that the spark plugcap and HT lead are not damaged, otherwiseyou could get an electric shock.
Fuel safety
• Always use a fuel containerwith an anti-spill valve.
• Never fill the machinewhile the engine isrunning. Always stop theengine and let it cool for afew minutes beforerefuelling.
• Provide good ventilationwhen filling or mixing fuel(petrol and 2-stroke oil).
• Move the machine at least3 m from the fillingposition before starting.
• Never start the machine:
a) If you have spilt fuel on it.Wipe up all spillage.
b)If you have spilt fuel onyourself or your clothes.Change your clothes.
c) If there is a fuel leak. Makeregular checks for leakagefrom the fuel cap and thefuel supply pipes.
SAFETY INSTRUCTIONS
General safety instructions
• The gearbox and clutch drum must be fitted before themachine is started, otherwise the clutch can become looseand cause personal injury.
• Never start the machine indoors. Bear in mind the dangersof inhaling the engine’s exhaust fumes.
• Observe your surroundings and make sure that there is norisk of people or animals coming into contact with thecutting equipment.
• Place the machine on theground, make sure theblades are free frombranches and stones.Press the machine bodyagainst the ground usingyour left hand (NOTE!Do not use your foot).Grip the starter handlewith your right hand andpull the starter cord.
StartTransport and storage
• Store and transport the machine and fuel so that anyleakage or fumes do not risk coming into contact withsparks or naked flames. For example, electric machines,electric motors, electrical switches/power switches, heatersor the like.
• When storing and transporting fuel, approved containersintended for this purpose must be used.
• When storing the machine for long periods the fuel tankmust be emptied. Contact your local petrol station to findout how to dispose of excess fuel.
• The blades transport guard should always be fitted whentransporting or storing the hedge trimmer.
WARNING!Exercise great care when handling fuel.Bear in mind the risk of fire, explosionsand inhaling fumes.
WARNING!Faulty blades can increase the risk ofaccidents.!
!

English – 9
SAFETY INSTRUCTIONS
Safety instructions whenusing the hedge trimmer
!
Protective instructions while working
• Always ensure you have asafe and firm workingposition.
• Always use both hands tohold the machine. Holdthe machine on the right-hand side of the body.
• Make sure that yourhands and feet cannotcome into contact withthe blades when theengine is running.
• When the engine isswitched off, keep yourhands and feet away fromthe blades until they havestopped.
• Do not cut too close to the ground. Stones and otherobjects can be thrown.
• If any object is hit or if vibrations occur stop the machineimmediately. Remove the spark plug cable from the sparkplug. Check that the machine is not damaged. Repair anydamage.
• Never allow children touse the machine.
• Ensure no one comeswithin 15 metres whileworking.
• Never allow anyone to usethe machine without firstbeing absolutely sure thatthey understand thecontents of the Operator’sManual.
• Never work on a ladder,stool or any other raisedposition that is not fullysecured.
WARNING!Cutting tool. Do not touch the toolwithout first switching off the engine.
!
NOTE! Read the Operator’s Manual carefully before usingthe hedge trimmer.
Protective instructions regarding thesurroundings
Personal protection
• Always wear boots, and theother safety equipmentdescribed in the section”Personal protectiveequipment”.
• Always wear workingclothes and thick, longtrousers.
• Never wear loose fittingclothes or jewellery
• Hair should be put up iflonger than shoulderlength.
WARNING!The hedge trimmer can cause seriouspersonal injury. Read the safetyinstructions carefully. Learn how to usethe machine.

10 – English
Basic working techniques
• The hedge trimmer’s rearhandle can be set in threepositions by pulling outthe catch. See figure.When the handle isadjusted the hedgetrimmer should be idlingor not running.
• While working thehandle should always befacing upwards irrespec-tive of how the hedgetrimmer is directed.
• When trimming a hedgethe engine should alwaysbe turned away from thehedge.
• The hedge trimmershould be held as close tothe body as possible toget the best balance.
• Make sure that the tipdoes not touch theground.
• Do not try to force thework, but move at asteady speed so that allthe stems are cut evenly.
Protective instructions whenwork is completed
• The transport guard should always be fitted to the bladeswhen the machine is not in use.
• Ensure the blades have stopped and remove the spark plugcable from the spark plug before carrying out cleaning,repairs or an inspection.
• Always wear heavy dutygloves when repairing theblades. The blades areextremely sharp and caneasily causes cuts.
• Store the machine out ofreach from children.
• Only use original spareparts when carrying outrepairs.
SAFETY INSTRUCTIONS

English – 11
WHAT IS WHAT?
13. Throttle trigger
14. Fuel tank
15. Fuel cap
16. Air filter cover
17. Choke
18. Hand guard
20. Tube of grease
21. Allen key
22. Spark plug spanner
23. Blade cover (Transport)
24. Air purge
What is what on the hedge trimmer?
1. Operator’s Manual
2. Grease filler cap
3. Gearbox
4. Blades
5. Blade guard
6. Loop handle
7. Cylinder cover
8. Starter handle
9. Stop switch
10. Throttle trigger lock
11. Adjustable handle
12. Lock for handle
20
2 3
23
1
21
22
18
17
16
1514
13
12
11
9
8
7
65
4
10
24
12 – English
FUEL HANDLING
Fuel mixture
• Clean around the fuelcap. Contamination inthe tank can disruptoperations.
• Ensure that the fuel iswell mixed by shaking thecontainer before fillingthe tank.
WARNING!Always provide good ventilation whenhandling fuel.!
Fuelling
WARNING!The following precautions reduce the riskof fire:Do not smoke or place any sources ofheat in the vicinity of the fuel. Neverrefuel when the engine is running.Always stop the engine and let it cool fora few minutes before refuelling. Open thefuel cap slowly when fuelling so that anyover pressure is released slowly. Tightenthe fuel cap carefully after refuelling.Always move the machine from thefuelling place before starting.
!
!
WARNING!The catalytic converter muffler gets very hotduring and after use. This also appliesduring idling. Be aware of the fire hazard,especially when handling the saw nearflammable substances or vapours.
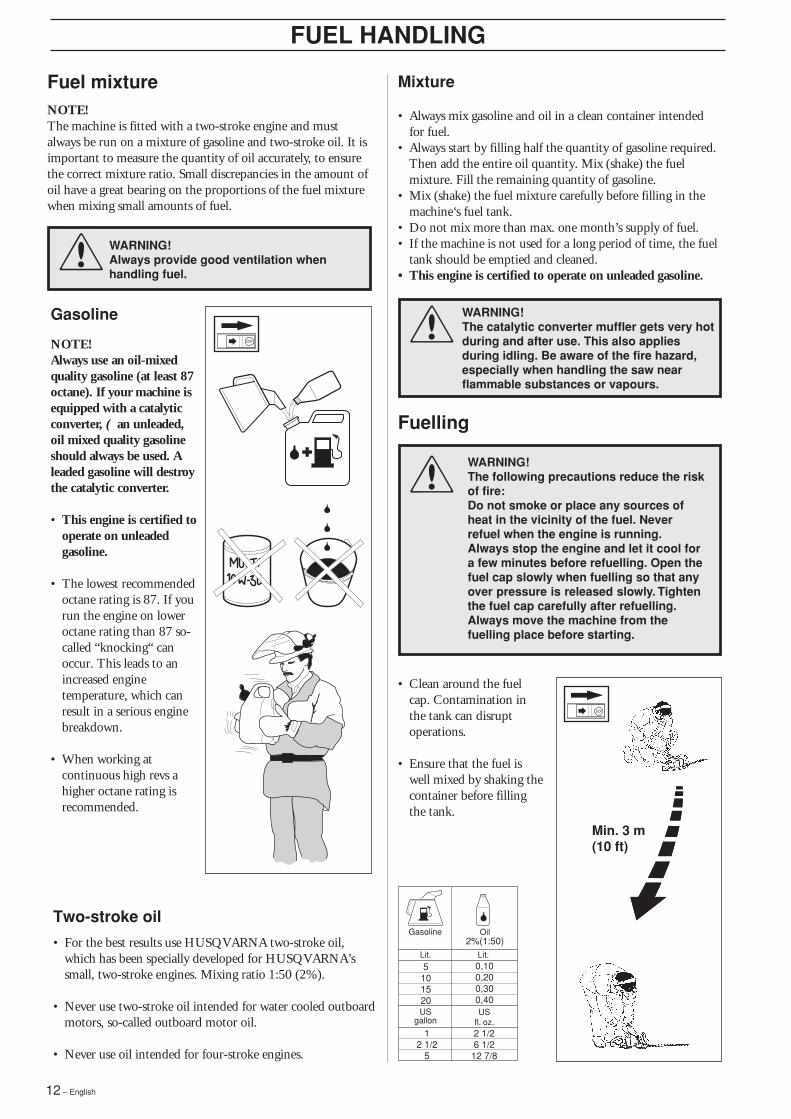
5101520
0,100,200,300,40
Gasoline Oil2%(1:50)
12 1/2
5
2 1/26 1/2
12 7/8
USgallon
USfl. oz.
Lit. Lit.
NOTE!The machine is fitted with a two-stroke engine and mustalways be run on a mixture of gasoline and two-stroke oil. It isimportant to measure the quantity of oil accurately, to ensurethe correct mixture ratio. Small discrepancies in the amount ofoil have a great bearing on the proportions of the fuel mixturewhen mixing small amounts of fuel.
Mixture
• Always mix gasoline and oil in a clean container intendedfor fuel.
• Always start by filling half the quantity of gasoline required.Then add the entire oil quantity. Mix (shake) the fuelmixture. Fill the remaining quantity of gasoline.
• Mix (shake) the fuel mixture carefully before filling in themachine‘s fuel tank.
• Do not mix more than max. one month’s supply of fuel.• If the machine is not used for a long period of time, the fuel
tank should be emptied and cleaned.• This engine is certified to operate on unleaded gasoline.
Min. 3 m(10 ft)
Two-stroke oil
• For the best results use HUSQVARNA two-stroke oil,which has been specially developed for HUSQVARNA’ssmall, two-stroke engines. Mixing ratio 1:50 (2%).
• Never use two-stroke oil intended for water cooled outboardmotors, so-called outboard motor oil.
• Never use oil intended for four-stroke engines.
Gasoline
NOTE!Always use an oil-mixedquality gasoline (at least 87octane). If your machine isequipped with a catalyticconverter, ( an unleaded,oil mixed quality gasolineshould always be used. Aleaded gasoline will destroythe catalytic converter.
• This engine is certified tooperate on unleadedgasoline.
• The lowest recommendedoctane rating is 87. If yourun the engine on loweroctane rating than 87 so-called “knocking“ canoccur. This leads to anincreased enginetemperature, which canresult in a serious enginebreakdown.
• When working atcontinuous high revs ahigher octane rating isrecommended.
English – 13
Warm engine
IGNITION:Set the stop switch to thestart position.
CHOKE:Set the choke control in thechoke position and thenback again to its originalposition (B)In this way only the startthrottle is applied with nochoke.
AIR PURGE:Press the air purgediaphragm repeatedly untilfuel begins to fill thediaphragm. The diaphragmneed not be completelyfilled.
START AND STOP
Control before starting
• Inspect the working area. Remove objects that can bethrown.
• Check the blades. Neveruse blades that are dull,cracked or damaged.
• Check that the hedgetrimmer is in fullworking order. Checkthat all nuts and bolts aretightened correctly.
• Make sure the gearbox is lubricated correctly. See thesection ”Lubricating the blades”.
• Ensure the blades always stop when the engine is idling.• Only use the machine for what it is intended for.• Ensure that the handle and safety functions are in order.
Never use a machine that lacks a part or has been modifiedoutside of the specifications.
Start and stop
A
WARNING!The gearbox and clutch drum must befitted before the machine is started,otherwise the clutch can become looseand cause personal injury.
Always move the hedge trimmer about 3metres from the filling position beforestarting. Place the machine on a flatsurface. Bear in mind that the blades startto move when the engine is started. Makesure the blades cannot come into contactwith any object. Make sure that no unau-thorised persons are in the working area,otherwise there is a risk of seriouspersonal injury.
!
Start
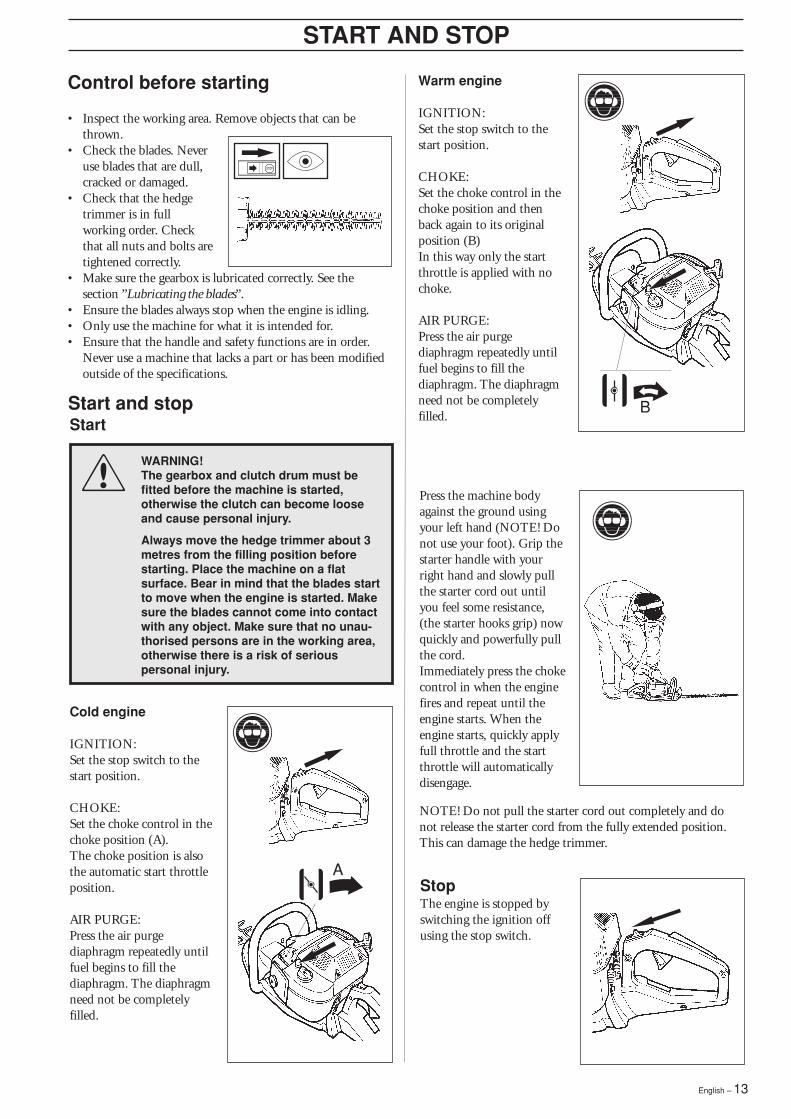
Cold engine
IGNITION:Set the stop switch to thestart position.
CHOKE:Set the choke control in thechoke position (A).The choke position is alsothe automatic start throttleposition.
AIR PURGE:Press the air purgediaphragm repeatedly untilfuel begins to fill thediaphragm. The diaphragmneed not be completelyfilled.
StopThe engine is stopped byswitching the ignition offusing the stop switch.
Press the machine bodyagainst the ground usingyour left hand (NOTE! Donot use your foot). Grip thestarter handle with yourright hand and slowly pullthe starter cord out untilyou feel some resistance,(the starter hooks grip) nowquickly and powerfully pullthe cord.Immediately press the chokecontrol in when the enginefires and repeat until theengine starts. When theengine starts, quickly applyfull throttle and the startthrottle will automaticallydisengage.
NOTE! Do not pull the starter cord out completely and donot release the starter cord from the fully extended position.This can damage the hedge trimmer.
B
14 – English
MAINTENANCE
CarburetorYour Husqvarna product has been designed andmanufactured to specifications that reduce harmfulemissions.After your unit has been run 8-10 tanks of fuel the enginehas broken in. To ensure that your unit is at peakperformance and producing the least amount of harmfulemissions after break in, have your authorized servicingdealer, who has a revolution counter at his disposal, to adjustyour carburetor for optimum operating conditions.
Basic setting• The carburetor is set to its basic setting when test run at the
factory. The basic setting is richer than the optimal settingand should be kept during the machine’s first workinghours. Thereafter the carburetor should be finely adjusted.Fine adjustment should be carried out by a skilledtechnician.
NOTE! If the cutting attachment rotates/moves while theengine is idling the T-screw should be turned anti-clockwiseuntil the cutting attachment stops.Recommended idling speed is: 2 700 rpm.Recommended max. speed: See “technical data”.
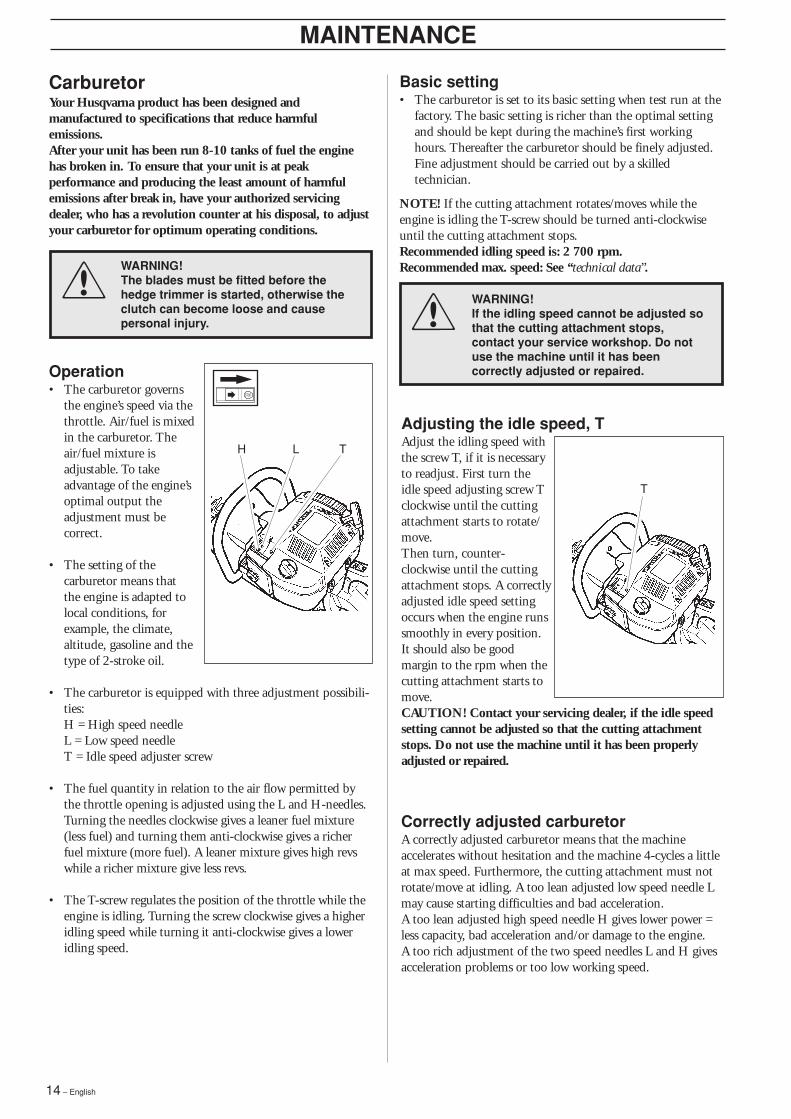
Operation• The carburetor governs
the engine’s speed via thethrottle. Air/fuel is mixedin the carburetor. Theair/fuel mixture isadjustable. To takeadvantage of the engine’soptimal output theadjustment must becorrect.
• The setting of thecarburetor means thatthe engine is adapted tolocal conditions, forexample, the climate,altitude, gasoline and thetype of 2-stroke oil.
• The carburetor is equipped with three adjustment possibili-ties:H = High speed needleL = Low speed needleT = Idle speed adjuster screw
• The fuel quantity in relation to the air flow permitted bythe throttle opening is adjusted using the L and H-needles.Turning the needles clockwise gives a leaner fuel mixture(less fuel) and turning them anti-clockwise gives a richerfuel mixture (more fuel). A leaner mixture gives high revswhile a richer mixture give less revs.
• The T-screw regulates the position of the throttle while theengine is idling. Turning the screw clockwise gives a higheridling speed while turning it anti-clockwise gives a loweridling speed.
WARNING!The blades must be fitted before thehedge trimmer is started, otherwise theclutch can become loose and causepersonal injury.
WARNING!If the idling speed cannot be adjusted sothat the cutting attachment stops,contact your service workshop. Do notuse the machine until it has beencorrectly adjusted or repaired.
!
!
H L T
T
Adjusting the idle speed, TAdjust the idling speed withthe screw T, if it is necessaryto readjust. First turn theidle speed adjusting screw Tclockwise until the cuttingattachment starts to rotate/move.Then turn, counter-clockwise until the cuttingattachment stops. A correctlyadjusted idle speed settingoccurs when the engine runssmoothly in every position.It should also be goodmargin to the rpm when thecutting attachment starts tomove.CAUTION! Contact your servicing dealer, if the idle speedsetting cannot be adjusted so that the cutting attachmentstops. Do not use the machine until it has been properlyadjusted or repaired.
Correctly adjusted carburetorA correctly adjusted carburetor means that the machineaccelerates without hesitation and the machine 4-cycles a littleat max speed. Furthermore, the cutting attachment must notrotate/move at idling. A too lean adjusted low speed needle Lmay cause starting difficulties and bad acceleration.A too lean adjusted high speed needle H gives lower power =less capacity, bad acceleration and/or damage to the engine.A too rich adjustment of the two speed needles L and H givesacceleration problems or too low working speed.
English – 15
MAINTENANCE
1 2 3 4
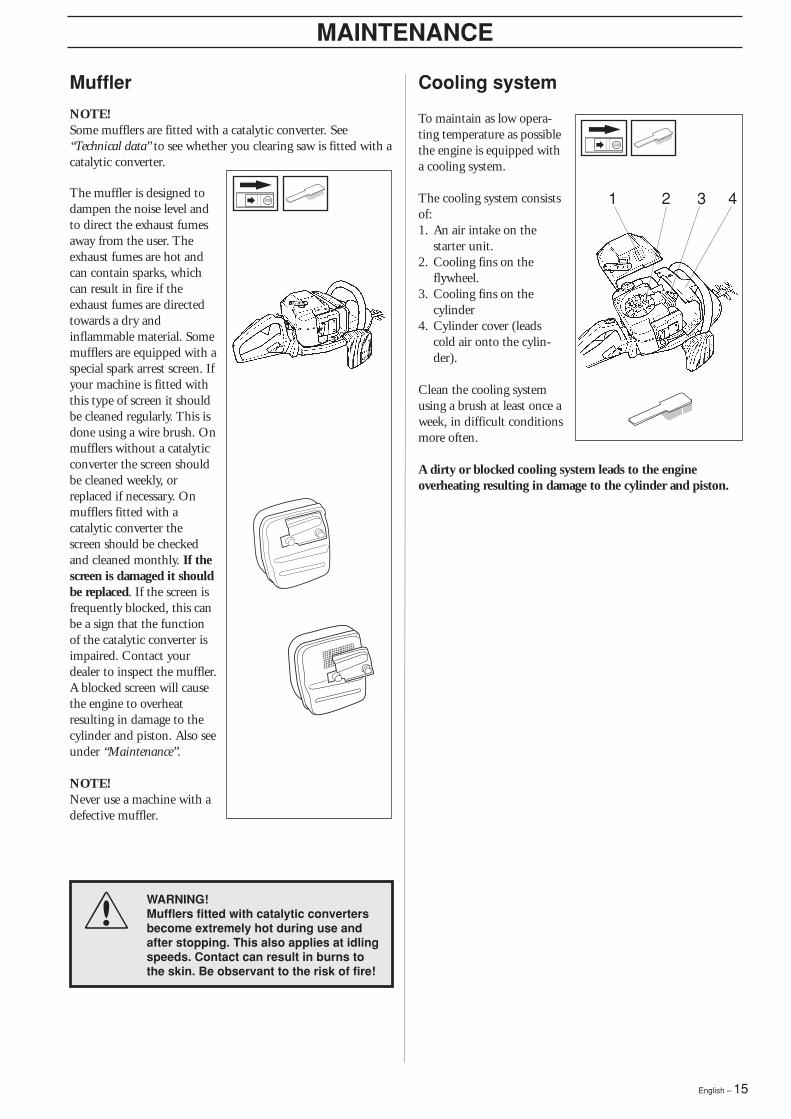
Cooling system
To maintain as low opera-ting temperature as possiblethe engine is equipped witha cooling system.
The cooling system consistsof:1. An air intake on the
starter unit.2. Cooling fins on the
flywheel.3. Cooling fins on the
cylinder4. Cylinder cover (leads
cold air onto the cylin-der).
Clean the cooling systemusing a brush at least once aweek, in difficult conditionsmore often.
A dirty or blocked cooling system leads to the engineoverheating resulting in damage to the cylinder and piston.
Muffler
NOTE!Some mufflers are fitted with a catalytic converter. See“Technical data” to see whether you clearing saw is fitted with acatalytic converter.
The muffler is designed todampen the noise level andto direct the exhaust fumesaway from the user. Theexhaust fumes are hot andcan contain sparks, whichcan result in fire if theexhaust fumes are directedtowards a dry andinflammable material. Somemufflers are equipped with aspecial spark arrest screen. Ifyour machine is fitted withthis type of screen it shouldbe cleaned regularly. This isdone using a wire brush. Onmufflers without a catalyticconverter the screen shouldbe cleaned weekly, orreplaced if necessary. Onmufflers fitted with acatalytic converter thescreen should be checkedand cleaned monthly. If thescreen is damaged it shouldbe replaced. If the screen isfrequently blocked, this canbe a sign that the functionof the catalytic converter isimpaired. Contact yourdealer to inspect the muffler.A blocked screen will causethe engine to overheatresulting in damage to thecylinder and piston. Also seeunder “Maintenance”.
NOTE!Never use a machine with adefective muffler.
WARNING!Mufflers fitted with catalytic convertersbecome extremely hot during use andafter stopping. This also applies at idlingspeeds. Contact can result in burns tothe skin. Be observant to the risk of fire!
!
16 – English
MAINTENANCE
Spark plugThe condition of the spark plug is affected by:• An incorrect carburetor setting.• An incorrect fuel mixture (too much or faulty oil).• A dirty air filter.These factors cause deposits on the spark plug electrode thatmay result in malfunction or starting difficulties.
If the machine is low onpower, difficult to start orruns poorly while idlingalways check the spark plugfirst before taking otheraction.
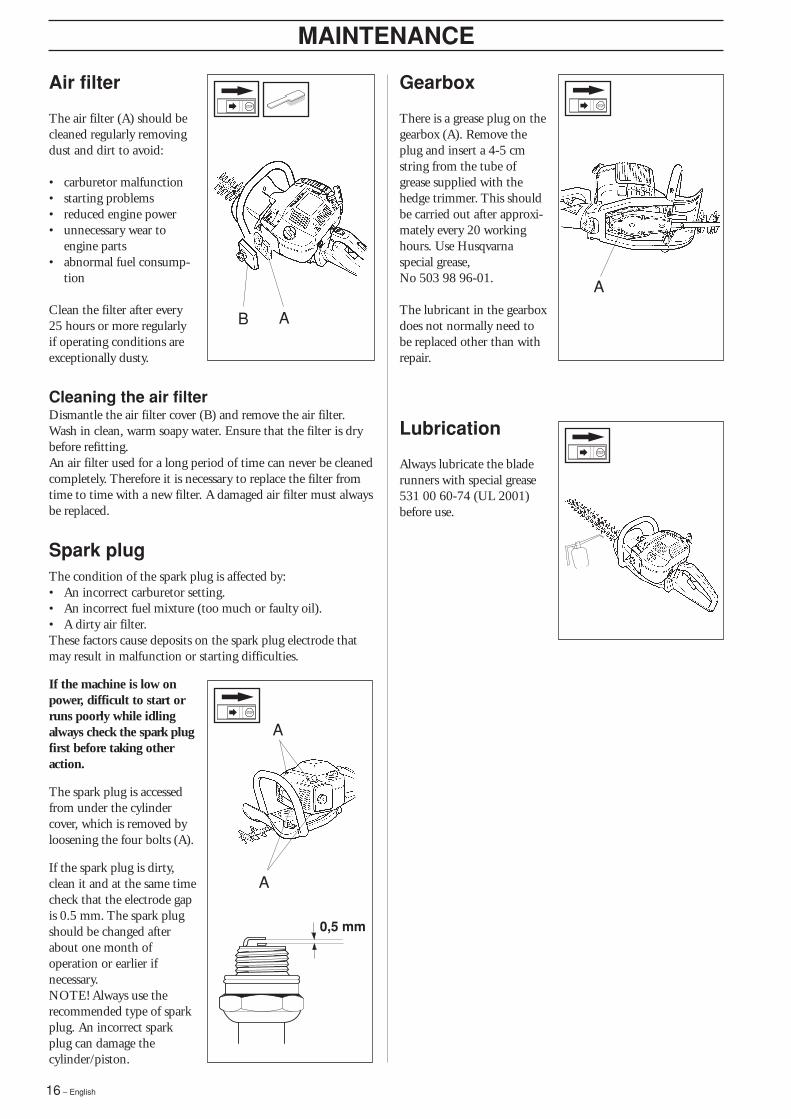
The spark plug is accessedfrom under the cylindercover, which is removed byloosening the four bolts (A).
If the spark plug is dirty,clean it and at the same timecheck that the electrode gapis 0.5 mm. The spark plugshould be changed afterabout one month ofoperation or earlier ifnecessary.NOTE! Always use therecommended type of sparkplug. An incorrect sparkplug can damage thecylinder/piston.
Air filter
The air filter (A) should becleaned regularly removingdust and dirt to avoid:
• carburetor malfunction• starting problems• reduced engine power• unnecessary wear to
engine parts• abnormal fuel consump-
tion
Clean the filter after every25 hours or more regularlyif operating conditions areexceptionally dusty.
Cleaning the air filterDismantle the air filter cover (B) and remove the air filter.Wash in clean, warm soapy water. Ensure that the filter is drybefore refitting.An air filter used for a long period of time can never be cleanedcompletely. Therefore it is necessary to replace the filter fromtime to time with a new filter. A damaged air filter must alwaysbe replaced.
A
A
Gearbox
There is a grease plug on thegearbox (A). Remove theplug and insert a 4-5 cmstring from the tube ofgrease supplied with thehedge trimmer. This shouldbe carried out after approxi-mately every 20 workinghours. Use Husqvarnaspecial grease,No 503 98 96-01.
The lubricant in the gearboxdoes not normally need tobe replaced other than withrepair.
Lubrication
Always lubricate the bladerunners with special grease531 00 60-74 (UL 2001)before use.
A
0,5 mm
AB

English – 17
Maintenance scheduleBelow you will find some general maintenance instructions.
Daily maintenance• Check throttle trigger and throttle trigger lockout function.• Check stop switch function.• Check that blade does not move at idling.• Clean the exterior of the machine.• Check that the harness is undamaged.• Check the blade guard for damage or cracks.• Change the guard in case of impacts or cracks.• Check that the blade is properly centred, sharp, and without
cracks.• Check the hand guard for cracks and chips or damage.
Replace if necessary.• Check that the blade screws are sufficiently tightened.• Make sure that the blade transport guard is undamaged and
that it can be securely fitted.• Check that nuts and screws are sufficiently tightened.
Weekly maintenance• Check the starter, especially cord and return spring.• Make sure that the vibration damping elements are not
damaged.• Clean the carburetor area.• Clean the exterior of the spark plug.• Remove it and check the electrode gap.• Adjust it to 0,5 mm (.020"), or change the spark plug.• Clean the cooling fins on the cylinder and check that the air
intake at the starter is not clogged.• Fill the gearbox with grease. This should be carried out after
approximately every 20 working hours.• Clean the air filter.• Clean or replace the muffler’s spark arrest screen (not on
mufflers with a catalytic converter).
Monthly maintenance• Clean the fuel tank.• Clean the exterior of the carburetor and the space around it.• Clean the fan and the space around it.• Check fuel hose for cracks or other damage. Change if
necessary.• Change fuel filter in fuel tank.• Check clutch, clutch spring and clutch drum for wear.
Change if necessary.• Check electrical wires and connections.• Change the spark plug.• Change the airfilter.• Check and clean the muffler’s spark arrest screen if necessary
(only mufflers with a catalytic converter).
MAINTENANCE

18 – English
1,55/25,41,34/341,10/282 70011 000-11 7000,9 kW/ 9 000 rpmYesYes
Walbro MB/CDChampion RCJ 7Y0,02/0,5
Walbro WT0,85/0,4
12,1/5,5
95,1
2,3/2,03,0/2,3
Double sided6002 480
1,55/25,41,34/341,10/282 70011 000-11 7000,9 kW/ 9 000 rpmYesYes
Walbro MB/CDChampion RCJ 7Y0,02/0,5
Walbro WT0,85/0,4
12,6/5,7
95,1
2,2/1,52,2/1,5
Double sided7502 480
225H60 225H75Technical data
EngineDisplacement, cu in/cm3
Cylinder bore, inch/mmStroke length, inch/mmIdling speed, rpmRecommended max. speed rpmMax. engine output, acc. to ISO 8893Catalytic converter mufflerSpeed-regulated ignition system
Ignition systemManufacturer/type of ignition systemSpark plugElectrod gap, inch/mm
Fuel lubrication systemManufacturer/type of carburetorFuel tank capacity, US pint/litres
WeightWeight without fuel, LBS/kg
Sound levels (See note 1)Equivalent sound pressure levels at the user’s ear ,measured acc. to EN ISO 11806 and ISO 7917,dB(A):
Vibration levelsVibration levels on the handles measured acc. toEN ISO 11806 and ISO 7916, m/s2
Idling, rear/front handles:Max. speed , rear/front handles:
BladesType:Length, mm:Blade speed, Cut/min:
TECHNICAL DATA
Note 1: Equivalent sound pressure level is calculated as the time-weighted energy total for sound pressure levels under variousworking conditions with the following time distribution: 1/2 idle and 1/2 max. speed.
´+H'o¶5:¨

English – 19
EMISSION CONTROL WARRANTY STATEMENT
YOUR WARRANTY RIGHTS ANDOBLIGATIONS
The EPA (The US Environmental Protection Agency),Environment Canada and Husqvarna Forest & Garden arepleased to explain the emissions control system warrantyon your 2001 and later small nonroad engine. In U.S. andCanada, new small nonroad engines must be designed,built and equipped to meet the federal stringent anti-smogstandards. Husqvarna Forest & Garden must warrant theemission control system on your small nonroad engine forthe periods of time listed below provided there has been noabuse, neglect or improper maintenance of your unit. Youremission control system includes Parts such as thecarburetor and the ignition system.Where a warrantable condition exists, Husqvarna Forest &Garden will repair your small nonroad engine at no cost toyou. Expenses covered under warranty include diagnosis,parts and labor.
MANUFACTURER’S WARRANTYCOVERAGEThe 2001 and later small nonroad engines are warrantedfor two years. If any emission related part on your engine(as listed above) is defective, the part will be repaired orreplaced by Husqvarna Forest & Garden.
OWNER’S WARRANTYRESPONSIBILITIESAs the small nonroad engine owner, you are responsiblefor the performance of the required maintenance listed inyour Operator’s Manual. Husqvarna Forest & Gardenrecommends that you retain all receipts coveringmaintenance on your small nonroad engine, but HusqvarnaForest & Garden cannot deny warranty solely for the lackof receipts or for your failure to ensure the performance ofall scheduled maintenance.As the small nonroad engine owner, you should, however,be aware that Husqvarna Forest & Garden may deny youwarranty coverage if your small nonroad engine or a part ofit has failed due to abuse, neglect, improper maintenance,unapproved modifications or the use of parts not made orapproved by the original equipment manufacturer.You are responsible for presenting your small nonroadengine to a Husqvarna Forest & Garden authorizedservicing dealer as soon as a problem exists. The warrantyrepairs should be completed in a reasonable amount oftime, not to exceed 30 days.If you have any questions regarding your warranty rightsand responsibilities, you should contact your nearestauthorized servicing dealer or call Husqvarna Forest &Garden at 1-800-487-5963.
WARRANTY COMMENCEMENT DATEThe warranty period begins on the date small nonroadengine is delivered.
LENGTH OF COVERAGEHusqvarna Forest & Garden warrants to the initial ownerand each subsequent purchaser that the engine is freefrom defects in materials and workmanship which causethe failure of a warranted part for a period of two years.
WHAT IS COVEREDREPAIR OR REPLACEMENT OF PARTSRepair or replacement of any warranted part will beperformed at no charge to the owner at an approvedHusqvarna Forest & Garden servicing dealer. If you haveany questions regarding your warranty rights andresponsibilities, you should contact your nearest authorizedservicing dealer or call Husqvarna Forest & Garden at1-800-487-5963.WARRANTY PERIODAny warranted part which is not scheduled for replacementas required maintenance, or which is scheduled only forregular inspection to the effect of ”repair or replace asnecessary” shall be warranted for 2 years. Any warrantedpart which is scheduled for replacement as requiredmaintenance shall be warranted for the period of time up tothe first scheduled replacement point for that part.DIAGNOSISThe owner shall not be charged for diagnostic labor whichleads to the determination that a warranted part isdefective, if the diagnostic work is performed at anapproved Husqvarna Forest & Garden servicing dealer.CONSEQUENTIAL DAMAGESHusqvarna Forest & Garden may be liable for damages toother engine components caused by the failure of awarranted part still under warranty.
WHAT IS NOT COVEREDAll failures caused by abuse, neglect or impropermaintenance are not covered.ADD -ON OR MODIFIED PARTSThe use of add-on or modified parts can be grounds fordisallowing a warranty claim. Husqvarna Forest & Gardenis not liable to cover failures of warranted parts caused bythe use of add-on or modified parts.
HOW TO FILE A CLAIMIf you have any questions regarding your warranty rightsand responsibilities, you should contact your nearestauthorized servicing dealer or call Husqvarna Forest &Garden at 1-800-487-5963.
WHERE TO GET WARRANTY SERVICEWarranty services or repairs shall be provided at allHusqvarna Forest & Garden authorized servicing dealers.
MAINTENANCE, REPLACEMENT ANDREPAIR OF EMISSION-RELATED PARTSAny Husqvarna Forest & Garden approved replacementpart used in the performance of any warranty maintenanceor repairs on emission-related parts, will be providedwithout charge to the owner if the part is under warranty.
EMISSION CONTROL WARRANTYPARTS LIST1. Carburetor and internal parts2. Intake pipe, airfilter holder and carburetor bolts.3. Airfilter and fuelfilter covered up to maintainance schedule.4. Ignition System
a) Spark Plug, covered up to maintenance scheduleb) Ignition Module
5. Muffler with catalytic converter.
MAINTENANCE STATEMENTThe owner is responsible for the performance of all requiredmaintenance, as defined in the operator’s manual.

2002W03´+H'o¶5:¨
114 00 77-95