openstack cloud computing cookbook - third edition - sample chapter
TRANSCRIPT
Free Sample
In this package, you will find: • The authors biography • A preview chapter from the book, Chapter 6 'Using OpenStack Object Storage' • A synopsis of the book’s content • More information on OpenStack Cloud Computing Cookbook Third Edition
About the Authors
Kevin Jackson is married and has three children. He is an experienced IT professional working with business and enterprises of all sizes at Rackspace as an OpenStack and private cloud specialist. Kevin has been working with OpenStack since early 2011 and has extensive experience of various fl avors of Linux, Unix, and hosting environments. Kevin can be found on Twitter at @itarchitectkev.
Kevin authored the fi rst edition and coauthored the second edition of the OpenStack Cloud Computing Cookbook, Packt Publishing. Kevin also coauthored OpenStack Foundation's OpenStack Architecture Design Guide during a 5-day book sprint in California.
Cody Bunch is a principal architect in the Rackspace Private Cloud group based out of San Antonio, Texas. Cody has been working with OpenStack since early 2012, coauthored the second edition of this book and also coauthored OpenStack Security Guide. Cody has extensive experience with virtualized and cloud environments in various-sized enterprises and hosting environments. Cody can be found on Twitter at @cody_bunch.
Egle Sigler is an OpenStack Foundation board member and a principal architect in the Rackspace Private Cloud group based out of San Antonio, Texas. Egle holds an M.S. degree in computer science. She started her career as a software developer and still has a soft spot for all the people who write, test, and deploy code, since she has had the chance to do all of those tasks throughout her career. Egle dreams about a day when writing, testing, and deploying code will be a seamless and easy process—bug and frustration free for all. Egle believes that knowledge should be shared and has tried to do this by writing this book, giving talks and workshops at conferences, and blogging. Egle can be found on Twitter at @eglute.
She has coauthored DevOps for VMware Administrators (VMware Press Technology).
PrefaceOpenStack is open source software for building public and private clouds. It is now a global success and is developed and supported by thousands of people around the globe; backed by leading players in the cloud space today. This book is specifi cally designed to quickly help you get up to speed with OpenStack and give you the confi dence and understanding to roll it out into your own data centers. From test installations of OpenStack running under VirtualBox to automated installation recipes that help you scale out production environments, this book covers a wide range of topics that help you install and confi gure a private cloud. This book will show you the following:
How to install and confi gure all the core components of OpenStack to run an environment that can be managed and operated just like Rackspace, HP Helion, and other cloud environments
How to master the complete private cloud stack; from scaling out Compute resources to managing object storage services for highly redundant, highly available storages
Practical, real-world examples of each service built upon in each chapter, allowing you to progress with the confi dence that they will work in your own environments
The OpenStack Cloud Computing Cookbook gives you clear, step-by-step instructions to install and run your own private cloud successfully. It is full of practical and applicable recipes that enable you to use the latest capabilities of OpenStack and implement them.
What this book coversChapter 1, Keystone – OpenStack Identity Service, takes you through the installation and confi guration of Keystone, which underpins all of the other OpenStack services.
Chapter 2, Glance – OpenStack Image Service, teaches you how to install, confi gure, and use the Image service within an OpenStack environment.
Chapter 3, Neutron – OpenStack Networking, helps you install and confi gure OpenStack networking, including new features such as DVR.
Preface
Chapter 4, Nova – OpenStack Compute, teaches you how to set up and use OpenStack Compute along with examples to get you started by running OpenStack Compute within a VirtualBox environment.
Chapter 5, Swift – OpenStack Object Storage, teaches you how to confi gure and use OpenStack Object Storage along with examples showing this service running within a VirtualBox environment.
Chapter 6, Using OpenStack Object Storage, teaches you how to use the storage service to store and retrieve fi les and objects.
Chapter 7, Administering OpenStack Object Storage, takes you through how to use tools and techniques that can be used to run OpenStack Storage within data centers.
Chapter 8, Cinder – OpenStack Block Storage, teaches you how to install and confi gure the persistent block storage service for use, by using instances running in an OpenStack Compute environment.
Chapter 9, More OpenStack, explores other features of OpenStack such as Neutron's LBaaS and FWaaS services, Ceilometer, and Heat.
Chapter 10, Using the OpenStack Dashboard, teaches you how to install and use the web user interface to perform tasks such as creating users, modifying security groups, and launching instances.
Chapter 11, Production OpenStack, shows you how to use Ansible for automated installations and introduces you to tools and techniques for making OpenStack services resilient and highly available.
191
6Using OpenStack
Object Storage
In this chapter, we will cover the following recipes:
Installing the swift client tool
Creating containers
Uploading objects
Uploading large objects
Listing containers and objects
Downloading objects
Deleting containers and objects
Using OpenStack Object Storage ACLs
Using Container Synchronization between two Swift Clusters
IntroductionNow that we have an OpenStack Object Storage environment running, we can use it to store our fi les. To do this, we can use the swift client tool. This allows us to operate our OpenStack Object Storage environment by allowing us to create containers, upload fi les, retrieve them, and set required permissions on them, as appropriate.
Using OpenStack Object Storage
192
Installing the swift client toolIn order to operate our OpenStack Object Storage environment, we need to install an appropriate tool on our client. Swift ships with the swift tool, which allows us to upload, download, and modify fi les in our OpenStack Object Storage environment.
Getting readyEnsure you are logged in to a Ubuntu host that has access to our OpenStack environment on the 192.168.100.0/24 public network. This host will be used to run client tools against the OpenStack environment created. If you are using the accompanying Vagrant environment, you can use the controller node. It has the python-swiftclient package that provides the swift command-line client.
If you created this node with Vagrant, you can execute the following command:
vagrant ssh controller
Ensure you have set the following credentials (adjust the path to your certifi cates and key fi le to match your environment if not using the Vagrant environment):
export OS_TENANT_NAME=cookbookexport OS_USERNAME=adminexport OS_PASSWORD=openstackexport OS_AUTH_URL=https://192.168.100.200:5000/v2.0/export OS_NO_CACHE=1export OS_KEY=/vagrant/cakey.pemexport OS_CACERT=/vagrant/ca.pem
How to do it...We download and install the swift client conveniently from the Ubuntu repositories using the familiar apt-get utility as follows:
1. Installation of the swift client is done by installing the swift package as well as requiring the Python libraries for the OpenStack Identity Service: Keystone. We do this using the following commands:
sudo apt-get update
sudo apt-get install python-swiftclient python-keystone
Chapter 6
193
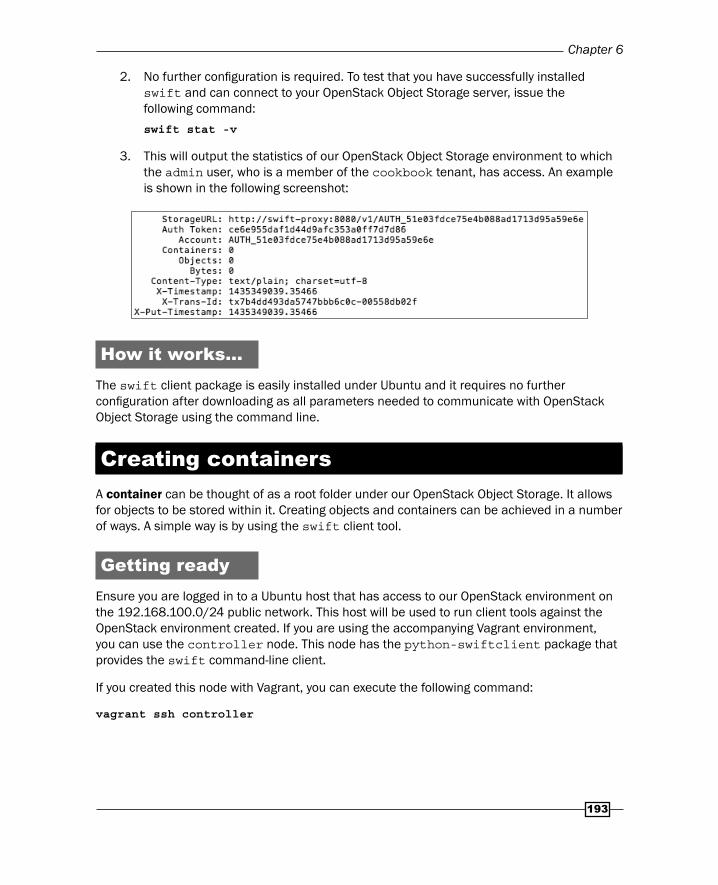
2. No further confi guration is required. To test that you have successfully installed swift and can connect to your OpenStack Object Storage server, issue the following command:
swift stat -v
3. This will output the statistics of our OpenStack Object Storage environment to which the admin user, who is a member of the cookbook tenant, has access. An example is shown in the following screenshot:
How it works…The swift client package is easily installed under Ubuntu and it requires no further confi guration after downloading as all parameters needed to communicate with OpenStack Object Storage using the command line.
Creating containersA container can be thought of as a root folder under our OpenStack Object Storage. It allows for objects to be stored within it. Creating objects and containers can be achieved in a number of ways. A simple way is by using the swift client tool.
Getting readyEnsure you are logged in to a Ubuntu host that has access to our OpenStack environment on the 192.168.100.0/24 public network. This host will be used to run client tools against the OpenStack environment created. If you are using the accompanying Vagrant environment, you can use the controller node. This node has the python-swiftclient package that provides the swift command-line client.
If you created this node with Vagrant, you can execute the following command:
vagrant ssh controller

Using OpenStack Object Storage
194
Ensure you have set the following credentials (adjust the path to your certifi cates and key fi le to match your environment if not using the Vagrant environment):
export OS_TENANT_NAME=cookbookexport OS_USERNAME=adminexport OS_PASSWORD=openstackexport OS_AUTH_URL=https://192.168.100.200:5000/v2.0/export OS_NO_CACHE=1export OS_KEY=/vagrant/cakey.pemexport OS_CACERT=/vagrant/ca.pem
How to do it...Carry out the following steps to create a container under OpenStack Object Storage:
1. To create a container named test under our OpenStack Object Storage server using the swift tool, we use the following command:
swift post test
2. We can verify the creation of our container by listing the containers in our OpenStack Object Storage environment. To list containers, execute the following command:
swift list test
This will simply list the containers in our OpenStack Object Storage environment, as shown in the following section:
How it works...Creation of containers using the supplied swift tool is very simple. The syntax uses the post parameter for this purpose:
swift post container_name
Uploading objectsObjects are the fi les or directories that are stored within a container. You can upload objects in a number of ways. A simple way is by using the swift client tool. This allows you to create, delete, and modify containers and objects in the OpenStack Object Storage environment. Individual objects up to 5 GB in size can be uploaded to OpenStack Object Storage using the methods described in this recipe.
Chapter 6
195
Getting readyEnsure you are logged in to a Ubuntu host that has access to our OpenStack environment on the 192.168.100.0/24 public network. This host will be used to run client tools against the OpenStack environment created. If you are using the accompanying Vagrant environment, as described in the Preface, you can use the controller node. This node has the python-swiftclient package that provides the swift command-line client.
If you created this node with Vagrant, you can execute the following command:
vagrant ssh controller
Ensure you have set the following credentials (adjust the path to your certifi cates and key fi le to match your environment if not using the Vagrant environment):
export OS_TENANT_NAME=cookbookexport OS_USERNAME=adminexport OS_PASSWORD=openstackexport OS_AUTH_URL=https://192.168.100.200:5000/v2.0/export OS_NO_CACHE=1export OS_KEY=/vagrant/cakey.pemexport OS_CACERT=/vagrant/ca.pem
How to do it...Carry out the following steps to upload objects in our OpenStack Object Storage environment.
Uploading fi lesUse the following steps to upload fi les:
1. Create a 500 MB fi le under /tmp as an example fi le that will be uploaded:
dd if=/dev/zero of=/tmp/example-500Mb bs=1M count=500
2. Upload this fi le to your OpenStack Object Storage account using the following command:
swift upload test /tmp/example-500Mb
Using OpenStack Object Storage
196
Uploading directories and their contents Use the following steps to upload directories:
1. Create a directory and two fi les to upload to our OpenStack Object Storage environment:
mkdir /tmp/test
dd if=/dev/zero of=/tmp/test/test1 bs=1M count=20
dd if=/dev/zero of=/tmp/test/test2 bs=1M count=20
2. To upload directories and their contents, we issue the same command but just specify the directory. The fi les within the directory are recursively uploaded. The command is as follows:
swift upload test /tmp/test
Uploading multiple objectsWe can upload a number of objects using a single command. To do this, we simply specify each of them on our command line. To upload our test1 and test2 fi les, we issue the following command:
swift upload test /tmp/test/test1 /tmp/another/test2
How it works...Uploading fi les to our OpenStack Object Storage environment is simple with the help of the swift client tool. We can upload individual fi les or complete directories. The syntax is as follows:
swift upload container_name file|directory {file|directory … }
Note that, when uploading fi les, the objects that are created are of the form that we specify to the swift client, including the full paths. For example, uploading /tmp/example-500Mb uploads that object as tmp/example-500Mb. This is because OpenStack Object Storage is not the traditional tree-based hierarchical fi le system that our computers and desktops usually employ, where paths are delimited by a single slash (/ or \). OpenStack Object Storage consists of a fl at set of objects that exist in containers where that slash forms the object name itself.
Chapter 6
197
Uploading large objectsIndividual objects up to 5 GB in size can be uploaded to OpenStack Object Storage. However, by splitting the objects into segments, the download size of a single object is virtually unlimited. Segments of the larger object are uploaded and a special manifest fi le is created that, when downloaded, sends all the segments concatenated as a single object. By splitting objects into smaller chunks, you also gain effi ciency by allowing parallel uploads.
Getting readyEnsure you are logged in to a Ubuntu host that has access to our OpenStack environment on the 192.168.100.0/24 public network. This host will be used to run client tools against the OpenStack environment created. If you are using the accompanying Vagrant environment, as described in the Preface, you can use the controller node. It has the python-swiftclient package that provides the swift command line client.
If you created this node with Vagrant, you can execute the following command:
vagrant ssh controller
Ensure you have set the following credentials (adjust the path to your certifi cates and key fi le to match your environment if not using the Vagrant environment):
export OS_TENANT_NAME=cookbookexport OS_USERNAME=adminexport OS_PASSWORD=openstackexport OS_AUTH_URL=https://192.168.100.200:5000/v2.0/export OS_NO_CACHE=1export OS_KEY=/vagrant/cakey.pemexport OS_CACERT=/vagrant/ca.pem
How to do it...Carry out the following steps to upload large objects split into smaller segments:
1. Create a 1 GB fi le under /tmp as an example fi le to upload:
dd if=/dev/zero of=/tmp/example-1Gb bs=1M count=1024
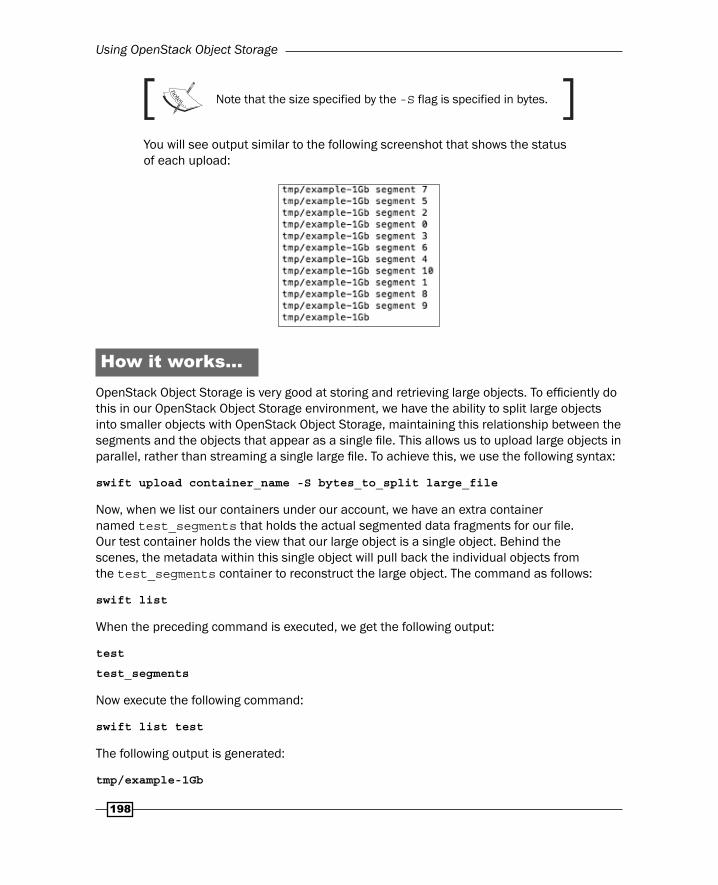
2. Rather than uploading this fi le as a single object, we will utilize segmenting to split this into smaller chunks (in this case, 100-MB segments). To do this, we specify the size of the segments with the -S option, as follows:
swift upload test -S 102400000 /tmp/example-1Gb
Using OpenStack Object Storage
198
Note that the size specified by the -S flag is specified in bytes.
You will see output similar to the following screenshot that shows the status of each upload:
How it works...OpenStack Object Storage is very good at storing and retrieving large objects. To effi ciently do this in our OpenStack Object Storage environment, we have the ability to split large objects into smaller objects with OpenStack Object Storage, maintaining this relationship between the segments and the objects that appear as a single fi le. This allows us to upload large objects in parallel, rather than streaming a single large fi le. To achieve this, we use the following syntax:
swift upload container_name -S bytes_to_split large_file
Now, when we list our containers under our account, we have an extra container named test_segments that holds the actual segmented data fragments for our fi le. Our test container holds the view that our large object is a single object. Behind the scenes, the metadata within this single object will pull back the individual objects from the test_segments container to reconstruct the large object. The command as follows:
swift list
When the preceding command is executed, we get the following output:
test
test_segments
Now execute the following command:
swift list test
The following output is generated:
tmp/example-1Gb
Chapter 6
199
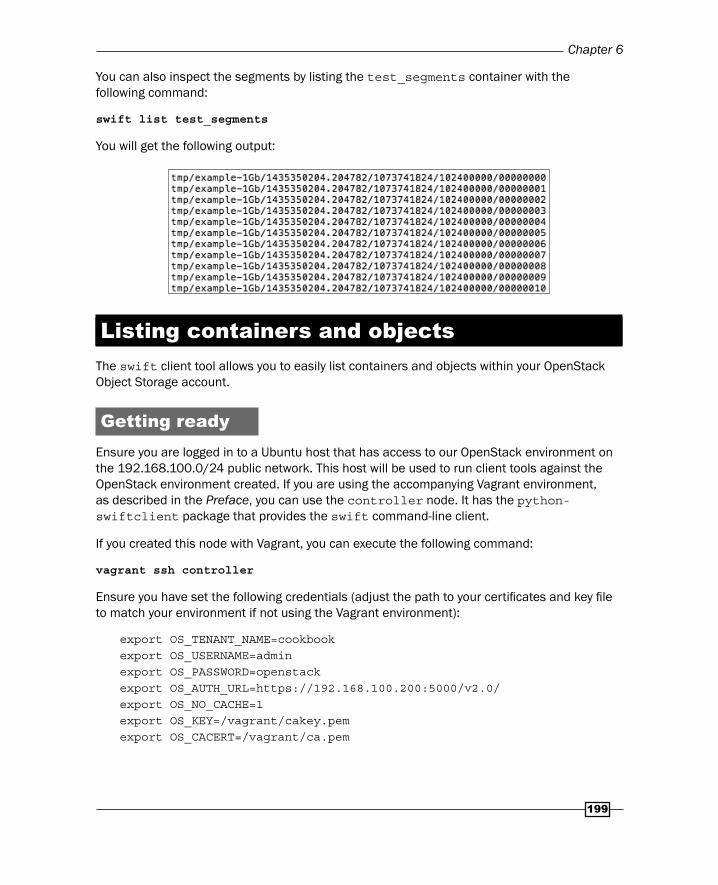
You can also inspect the segments by listing the test_segments container with the following command:
swift list test_segments
You will get the following output:
Listing containers and objectsThe swift client tool allows you to easily list containers and objects within your OpenStack Object Storage account.
Getting readyEnsure you are logged in to a Ubuntu host that has access to our OpenStack environment on the 192.168.100.0/24 public network. This host will be used to run client tools against the OpenStack environment created. If you are using the accompanying Vagrant environment, as described in the Preface, you can use the controller node. It has the python-swiftclient package that provides the swift command-line client.
If you created this node with Vagrant, you can execute the following command:
vagrant ssh controller
Ensure you have set the following credentials (adjust the path to your certifi cates and key fi le to match your environment if not using the Vagrant environment):
export OS_TENANT_NAME=cookbookexport OS_USERNAME=adminexport OS_PASSWORD=openstackexport OS_AUTH_URL=https://192.168.100.200:5000/v2.0/export OS_NO_CACHE=1export OS_KEY=/vagrant/cakey.pemexport OS_CACERT=/vagrant/ca.pem
Using OpenStack Object Storage
200
How to do it...Carry out the following to list objects within our OpenStack Object Storage environment.
Listing all objects in a containerLet's list all the objects in a container:
1. In the preceding recipes, we uploaded a small number of fi les. To simply list the objects within our test container, we issue the following command:
swift list test
The preceding command will give you an output like this:
Listing specifi c object paths in a containerLet's list all the specifi c object paths in a container:
1. To list just the fi les within the tmp/test path, we specify this with the -p parameter:
swift list -p tmp/test test
The preceding command will list our two fi les:
tmp/test/test1tmp/test/test2
2. We can put partial matches in the -p parameter too. For example, we issue the following command to list all fi les starting with tmp/ex:
swift list -p tmp/ex test
The preceding command will list fi les that match the string we specifi ed:
tmp/example-500Mb
How it works...The swift tool is a basic but versatile utility that allows us to do many of the things we want to do with fi les. Listing them in a way that suits the user is also possible. To simply list the contents of our container, use the following syntax:
swift list {container_name}
Chapter 6
201
To list a fi le in a particular path within the container, we add in the -p parameter to the syntax:
swift list -p path {container_name}
Downloading objectsNow that we have confi gured OpenStack Object Storage, we can also retrieve the stored objects using our swift client.
Getting readyEnsure you are logged in to a Ubuntu host that has access to our OpenStack environment on the 192.168.100.0/24 public network. This host will be used to run client tools against the OpenStack environment created. If you are using the accompanying Vagrant environment, as described in the Preface, you can use the controller node. This has the python-swiftclient package installed that provides the swift command-line client.
If you created this node with Vagrant, you can execute the following command:
vagrant ssh controller
Ensure you have set the following credentials (adjust the path to your certifi cates and key fi le to match your environment if not using the Vagrant environment):
export OS_TENANT_NAME=cookbookexport OS_USERNAME=adminexport OS_PASSWORD=openstackexport OS_AUTH_URL=https://192.168.100.200:5000/v2.0/export OS_NO_CACHE=1export OS_KEY=/vagrant/cakey.pemexport OS_CACERT=/vagrant/ca.pem
How to do it...We will download objects from our OpenStack Object Storage environment using different swift client options.
Downloading objectsTo download the tmp/test/test1 object, we issue the following command:
swift download test tmp/test/test1
Using OpenStack Object Storage
202
The preceding command downloads the object to our fi lesystem. As we downloaded a fi le with the full path, this directory structure is preserved. So, we end up with a new directory structure of tmp/test with a fi le called test1.
Downloading objects with the -o parameterTo download the fi le without preserving the fi le structure, or to simply rename it to something else, we specify the -o parameter:
swift download test tmp/test/test1 -o test1
Downloading all objects from a containerWe can also download complete containers to our local fi lesystem. To do this, we simply specify the container we want to download:
swift download test
The preceding command will download all objects found under the test container.
Downloading all objects from our OpenStack Object Storage accountWe can download all objects that reside under our OpenStack Object Storage account. If we have multiple containers, all objects from all containers will be downloaded. We do this with the --all parameter:
swift download --all
The preceding command will download all objects with full paths preceded by the container name, as shown here:
How it works...The swift client is a basic but versatile tool that allows us to do many of the things we want to do with fi les. You can download objects and containers using the following syntax:
swift download container_name {object … }
To download an object and rename the fi le on the local fi lesystem, we use the -o parameter to specify a different local fi lename:
swift download container_name object -o renamed_object
Chapter 6
203
To download all objects from our account (for example, from all containers), we specify the following syntax:
swift download --all
Deleting containers and objectsThe swift client tool allows us to directly delete containers and objects within our OpenStack Object Storage environment.
Getting readyEnsure you are logged in to a Ubuntu host that has access to our OpenStack environment on the 192.168.100.0/24 public network. This host will be used to run client tools against the OpenStack environment created. If you are using the accompanying Vagrant environment, as described in the Preface, you can use the controller node. It has the python-swiftclient package that provides the swift command-line client.
If you created this node with Vagrant, you can execute the following command:
vagrant ssh controller
Ensure you have set the following credentials (adjust the path to your certifi cates and key fi le to match your environment if not using the Vagrant environment):
export OS_TENANT_NAME=cookbookexport OS_USERNAME=adminexport OS_PASSWORD=openstackexport OS_AUTH_URL=https://192.168.100.200:5000/v2.0/export OS_NO_CACHE=1export OS_KEY=/vagrant/cakey.pemexport OS_CACERT=/vagrant/ca.pem
How to do it...We will delete objects in our OpenStack Object Storage environment using different swift client options.
Using OpenStack Object Storage
204
Deleting objectsTo delete the object tmp/test/test1, we issue the following command:
swift delete test tmp/test/test1
This deletes the tmp/test/test1 object from the test container.
Deleting multiple objectsTo delete the tmp/test/test2 and tmp/example-500Mb objects, we issue the following command:
swift delete test tmp/test/test2 tmp/example-500Mb
This deletes the tmp/test/test2 and tmp/example-500Mb objects from the test container.
Deleting containersTo delete our test container, we issue the following command:
swift delete test
This will delete the container, any objects under this container, and any segment objects if the object was split when originally uploaded.
Deleting everything from our accountTo delete all containers and objects in our account, we issue the following command:
swift delete --all
This will delete all containers and any objects under these containers.
How it works...The swift client is a basic but versatile tool that allows us to do many of the things we want to do with fi les. You can delete objects and containers using the following syntax:
swift delete {container_name} {object … }
To download all objects from our account (for example, from all containers), we use the following syntax:
swift delete --all
Chapter 6
205
Using OpenStack Object Storage ACLsAccess Control Lists (ACLs) allow us to have greater control over individual objects and containers without requiring full read/write access to a particular container. With ACLs, you can expose containers globally or restrict them to individual tenants and users.
Getting readyEnsure you are logged in to a Ubuntu host that has access to our OpenStack environment on the 192.168.100.0/24 public network. This host will be used to run client tools against the OpenStack environment created. If you are using the accompanying Vagrant environment, as described in the Preface, you can use the controller node. It has the python-swiftclient package installed that provides the swift command-line client.
If you created this node with Vagrant, you can execute the following command:
vagrant ssh controller
Ensure you have set the following credentials (adjust the path to your certifi cates and key fi le to match your environment if not using the Vagrant environment):
export OS_TENANT_NAME=cookbookexport OS_USERNAME=adminexport OS_PASSWORD=openstackexport OS_AUTH_URL=https://192.168.100.200:5000/v2.0/export OS_NO_CACHE=1export OS_KEY=/vagrant/cakey.pemexport OS_CACERT=/vagrant/ca.pem
How to do it...Carry out the following steps:
1. We will fi rst create an account in our OpenStack Identity Server that is only a Member in the cookbook tenant. We will call this user user. The code is as follows:
export ENDPOINT=192.168.100.200export SERVICE_TOKEN=ADMINexport SERVICE_ENDPOINT=https://${ENDPOINT}:35357/v2.0export OS_KEY=/vagrant/cakey.pem
Using OpenStack Object Storage
206
export OS_CACERT=/vagrant/ca.pem
# First get TENANT_ID related to our 'cookbook' tenantTENANT_ID=$(keystone tenant-list \ | awk ' / cookbook / {print $2}')
# We then create the user specifying the TENANT_ID keystone user-create \ --name test_user \ --tenant_id $TENANT_ID \ --pass openstack \ --email user@localhost \ --enabled true
# We get this new user's IDUSER_ID=$(keystone user-list | awk ' / user / {print $2}')
# We get the ID of the 'Member' roleROLE_ID=$(keystone role-list \ | awk ' / Member / {print $2}')
# Finally add the user to the 'Member' role in cookbook keystone user-role-add \ --user $USER_ID \ --role $ROLE_ID \ --tenant_id $TENANT_ID
2. After creating our new user, we will now create a container using a user that has admin privileges (and therefore a container that our new user initially doesn't have access to), as follows:
swift post testACL
3. We will then set this container to be read-only for our user named test_user:
swift post –r test_user testACL
4. We will upload a fi le to this container using our new user:
swift upload testACL /tmp/test/test1
Chapter 6
207
This brings back an "HTTP 403 Forbidden" message similar like this:
Object HEAD failed: https://proxy-server:8080/v1/AUTH_53d87d9b66794904aa2c84c17274392b/testACL/tmp/test/test1 403 Forbidden
5. We will now give write access to the testACL container for our user by allowing write access to the container:
swift post –w test_user –r test_user testACL
6. When we try to upload the fi le again, it is successful:
swift upload testACL /tmp/test/test1
How it worksGranting access control is done on a container basis and is achieved at the user level. When a user creates a container, other users can be granted that access by adding them to the container. The users will then be granted read and write access to containers, for example:
swift post -w user -r user container
Using Container Synchronization between two Swift Clusters
Replicating container content from one Swift Cluster to another in a remote location is a useful feature for disaster recovery and running active/active datacenters. This feature allows a user to upload objects as normal to a particular container, and have those contents upload to a nominated container in a remote cluster automatically.
Getting readyEnsure you are logged in to both swift proxy servers that will be used for the replication. An example of this feature can be found with the Swift Vagrant environment at https://github.com/OpenStackCookbook/VagrantSwift. If you created these nodes with this environment, ensure that you have both swift and swift2 running and you have a shell on both by executing the following command:
vagrant ssh swift
vagrant ssh swift2
Using OpenStack Object Storage
208
How to do it...To set up Container Sync replication, carry out the following steps:
1. On both Proxy Servers, edit /etc/swift/proxy-server.conf to add in the container_sync to the pipeline:
[pipeline:main]# Order of execution of modules defined belowpipeline = catch_errors healthcheck cache container_sync authtoken keystone proxy-server[filter:container_sync]use = egg:swift#container_sync
2. On each Proxy Server, create /etc/swift/container-sync-realms.conf with the following contents:
[realm1]key = realm1keycluster_swift = http://swift:8080/v1/cluster_swift2 = http://swift2:8080/v1/
3. On each Proxy Server, issue the following command to pick up the changes:
swift-init proxy-server restart
4. On the fi rst Swift cluster (swift), identify the account on the second cluster (swift2), where the fi rst cluster will sync:
swift --insecure -V2.0 -A https://swift2:5000/v2.0 -U cookbook:admin -K openstack
The preceding command shows an output similar to the following (note the Account: line):
Chapter 6
209
Note that we're using the --insecure flag on this command as Swift2 is running a self-signed certificate and we don't have access to the generated CA file from our Swift node. If you copy this file across so it is accessible, you can omit this flag.
5. Set up a container called container1 on the fi rst swift cluster that synchronizes content to a container called container2 on the second cluster, swift2:
swift -V2.0 -A https://controller:5000/v2.0
-U cookbook:admin -K openstack post
-t '//realm1/swift2/AUTH_d81683a9a2dd46cf9cac88c5b8eaca1a/container2'
-k 'myKey' container1
6. Set up the container2 container referenced in the previous step on the second cluster that can also synchronize content back to container1 on the fi rst cluster (two-way sync) as follows. Note that we're running this command from the node called swift and remotely creating the container on swift2:
swift --insecure -V2.0 -A https://swift2:5000/v2.0
-U cookbook:admin
-K openstack
post container2
7. Upload a fi le to container1 on swift1:
swift -V2.0 -A https://controller:5000/v2.0
-U cookbook:admin -K openstack
upload container1 my_example_file
8. You can now view the contents on container2 on swift2 that will show the same fi les listed in container1 on swift.
If the file hasn't appeared yet on container2 on the second swift cluster, run the following:
swift-init container-sync once
Using OpenStack Object Storage
210
How it works...Container Synchronization is an excellent feature when multiple datacenters are running and our disaster recovery plan requires data to be kept consistent in each datacenter. Container sync operates at the container level, so we can control where our data is synced to.
To enable this feature, we modify the pipeline in the /etc/swift/proxy-server.conf fi le to notify Swift to run Container Sync jobs.
Once confi gured, we create a fi le called /etc/swift/container-sync-realms.conf that has the following structure:
[realm_name]key = realm_name_keycluster_name_of_cluster = http://swift1_proxy_server:8080/v1/cluster_name_of_cluster2 = http://swift2_proxy_server:8080/v1/
This structure is important and is referenced when we create the synchronization on the containers shown in the following syntax:
swift post
-t '//realm_name/name_of_cluster2/AUTH_UUID/container_name'
-k 'mykey' container_name_to_be_syncd
The AUTH_UUID comes from the following command shown that gives us the Swift account associated with the user on the remote (receiving) Swift:
swift -V2.0 -A https://cluster2:5000/v2.0
-U tenant:user -K password
stat
The key is then used—along with the key references in the /etc/swift/container-sync-realms.conf fi le—to create our shared secret that is used for authentication between the containers.
As a result of this confi guration, when we upload a fi le to the container created on our fi rst cluster that has been instructed to sync with the second, the fi le will automatically sync in the background.
Chapter 6
211
There's more…Container Synchronization is one approach that allows different Swift clusters to replicate data between them. Another approach is using Global Clusters. For more information, visit https://swiftstack.com/blog/2013/07/02/swift-1-9-0-release/.
Where to buy this book You can buy OpenStack Cloud Computing Cookbook Third Edition from the Packt Publishing website. Alternatively, you can buy the book from Amazon, BN.com, Computer Manuals and most internet book retailers.
Click here for ordering and shipping details.
www.PacktPub.com
Stay Connected:
Get more information OpenStack Cloud Computing Cookbook Third Edition