online e-iec help
TRANSCRIPT
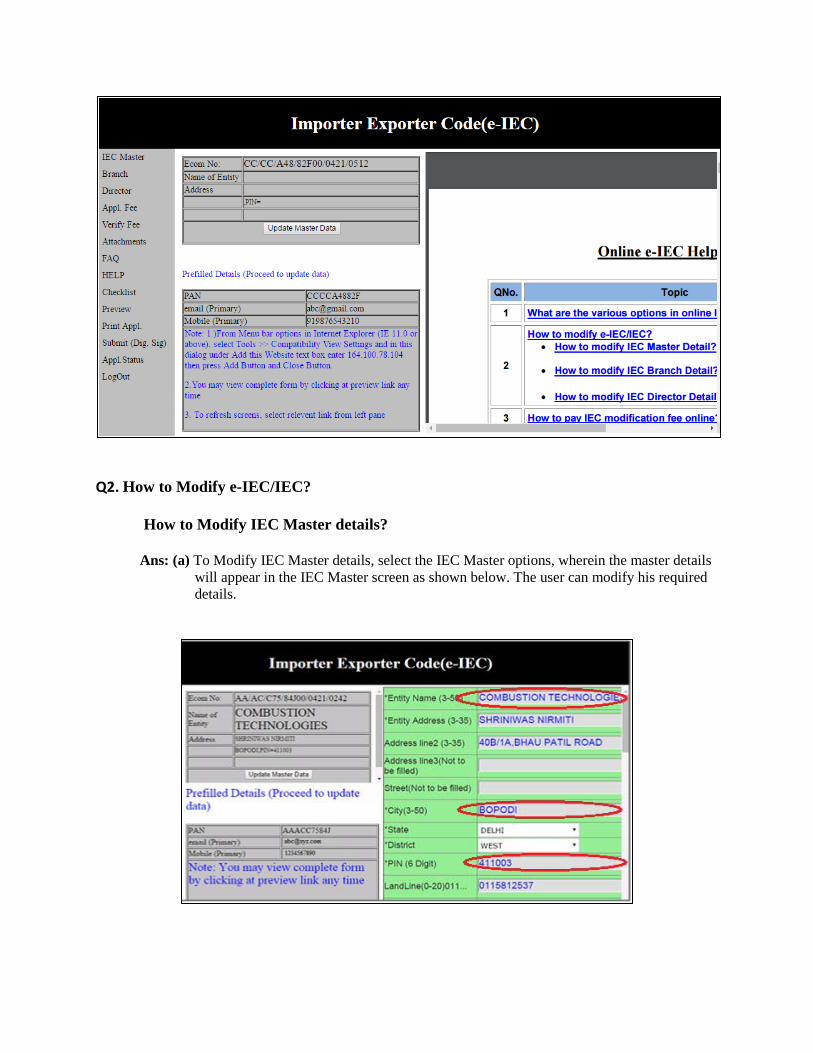
Online e-IEC Help
QNo. Topic
1 What are the various options in online IEC Application?
2
How to modify e-IEC/IEC? • How to modify IEC Master Detail?
• How to modify IEC Branch Detail?
• How to modify IEC Director Detail?
3 How to pay IEC modification fee online?
4 How to verify IEC modification fee online?
5 How to attach documents?
6 How to preview my details?
7 How to submit application without Digital Signature?
8 How to submit application with Digital Signature?
Q1. What are the various options in online IEC Application?
Ans: (a) On DGFT website http://dgft.gov.in
(b) Click on Importer Exporter Code (IEC) and select Online IEC Application, then system will display following screen.
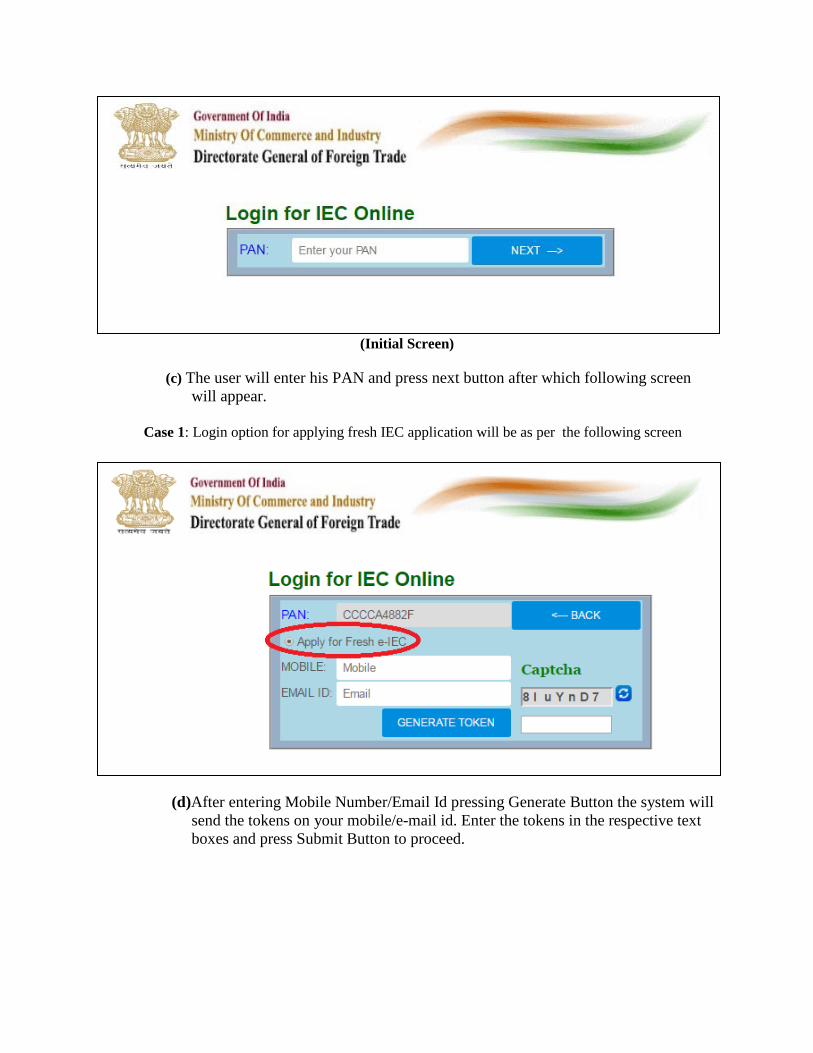
(Initial Screen)
(c) The user will enter his PAN and press next button after which following screen will appear.
Case 1: Login option for applying fresh IEC application will be as per the following screen
(d)After entering Mobile Number/Email Id pressing Generate Button the system will send the tokens on your mobile/e-mail id. Enter the tokens in the respective text boxes and press Submit Button to proceed.
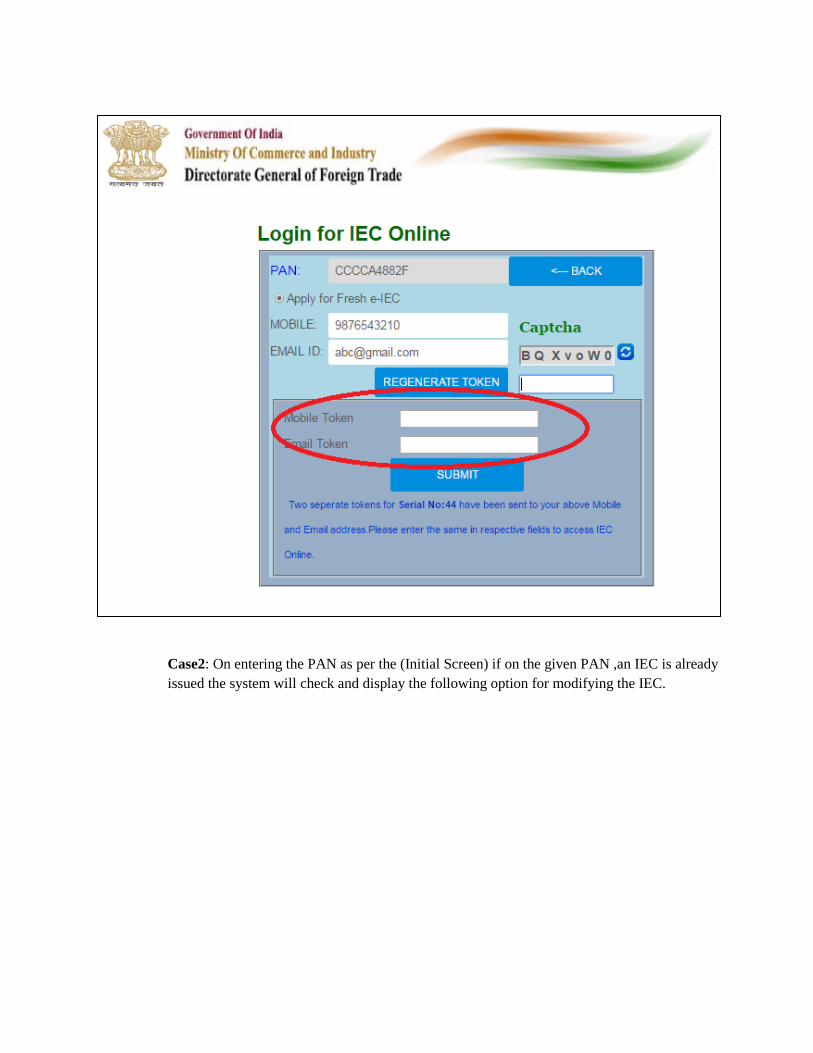
Case2: On entering the PAN as per the (Initial Screen) if on the given PAN ,an IEC is already issued the system will check and display the following option for modifying the IEC.
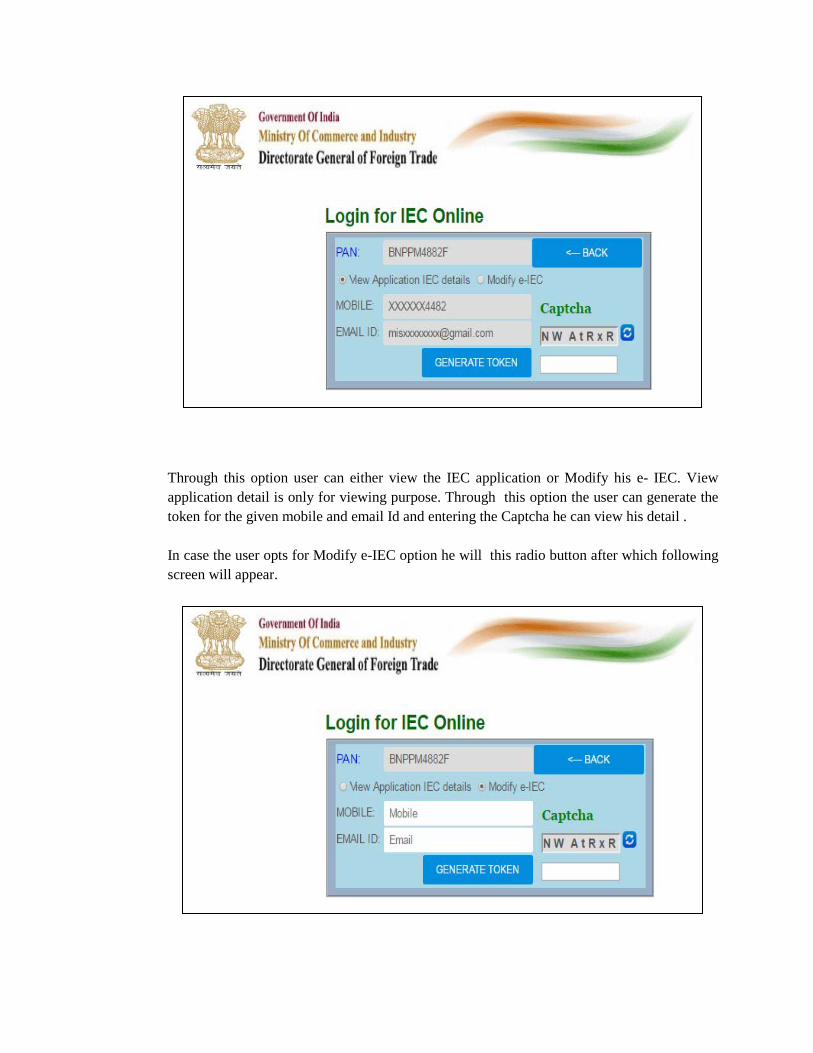
Through this option user can either view the IEC application or Modify his e- IEC. View application detail is only for viewing purpose. Through this option the user can generate the token for the given mobile and email Id and entering the Captcha he can view his detail . In case the user opts for Modify e-IEC option he will this radio button after which following screen will appear.

Once Modify e-IEC option is selected the will enter his mobile/email Id and along with Captcha. After pressing generate button the following screen will appear.
Case 3: If the user wishes to migrate his old IEC on the given PAN then after entering the PAN in Initial Screen the system will automatically detect this PAN for Migrating his old IEC as per the new e-IEC format .The following screen will appear.

On entering the token no. in mobile token and email token textbox and pressing the submit button the system will automatically migrate the users IEC to new IEC format. Case 4: In case the user is not able to complete/submit his e-IEC application on entering the PAN as per the (Initial Screen) the system will automatically prompt the user to the following screen.
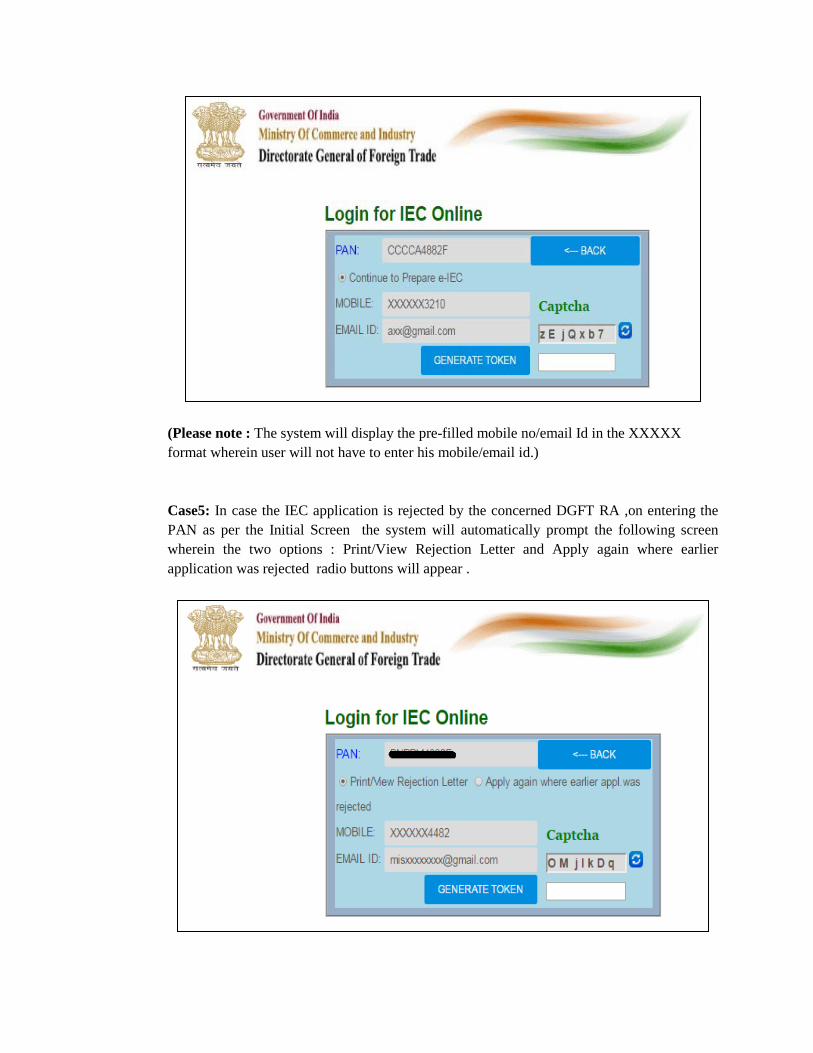
(Please note : The system will display the pre-filled mobile no/email Id in the XXXXX format wherein user will not have to enter his mobile/email id.) Case5: In case the IEC application is rejected by the concerned DGFT RA ,on entering the PAN as per the Initial Screen the system will automatically prompt the following screen wherein the two options : Print/View Rejection Letter and Apply again where earlier application was rejected radio buttons will appear .
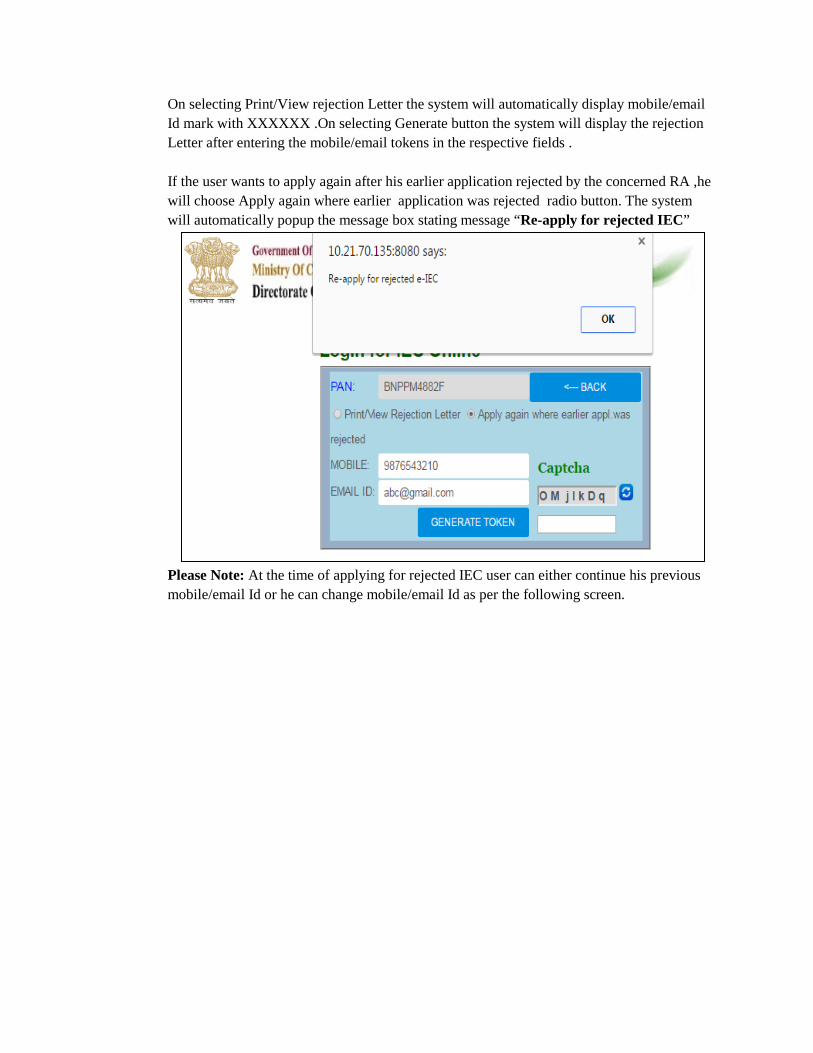
On selecting Print/View rejection Letter the system will automatically display mobile/email Id mark with XXXXXX .On selecting Generate button the system will display the rejection Letter after entering the mobile/email tokens in the respective fields . If the user wants to apply again after his earlier application rejected by the concerned RA ,he will choose Apply again where earlier application was rejected radio button. The system will automatically popup the message box stating message “Re-apply for rejected IEC”
Please Note: At the time of applying for rejected IEC user can either continue his previous mobile/email Id or he can change mobile/email Id as per the following screen.
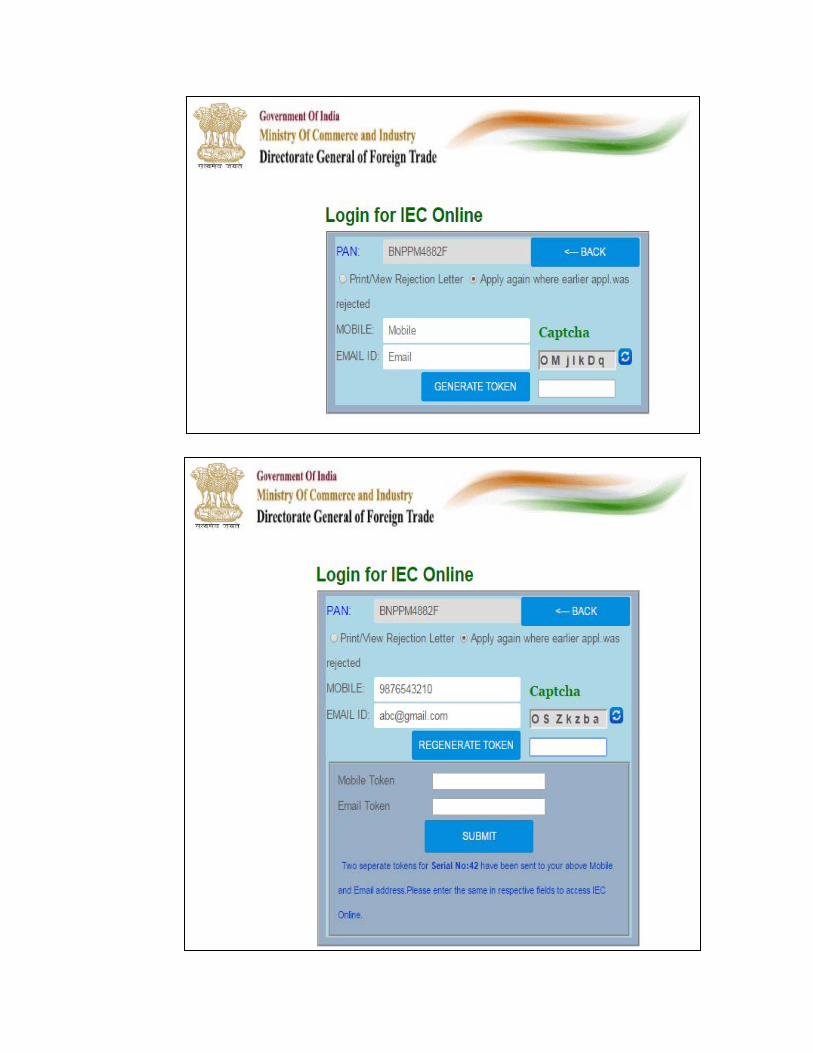
Please Note:
(i) It is mandatory that the token numbers entered must be same as received in mobile and email id, otherwise the system will not allow you to login.
(ii) If due to some technical reason you have not received either email token or mobile token, then you can regenerate the token by clicking on Regenerate Token button as shown in the below figure and follow the same procedure
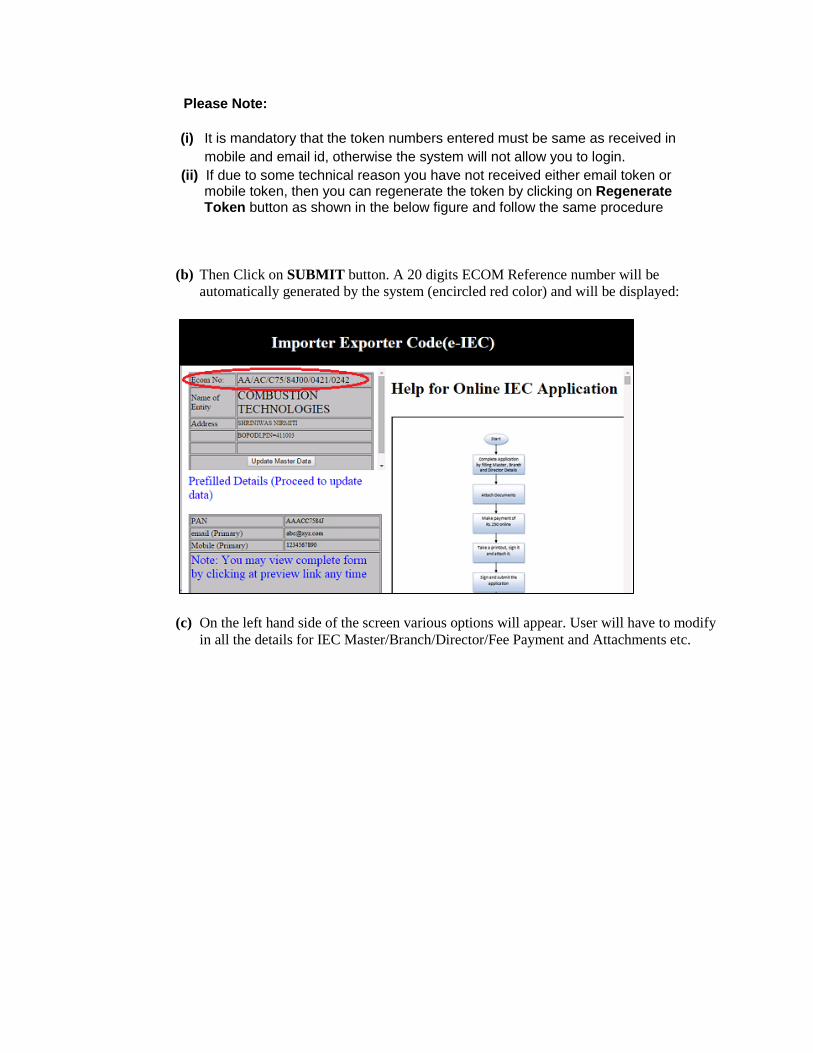
(b) Then Click on SUBMIT button. A 20 digits ECOM Reference number will be automatically generated by the system (encircled red color) and will be displayed:
(c) On the left hand side of the screen various options will appear. User will have to modify in all the details for IEC Master/Branch/Director/Fee Payment and Attachments etc.
Q2. How to Modify e-IEC/IEC?
How to Modify IEC Master details?
Ans: (a) To Modify IEC Master details, select the IEC Master options, wherein the master details will appear in the IEC Master screen as shown below. The user can modify his required details.
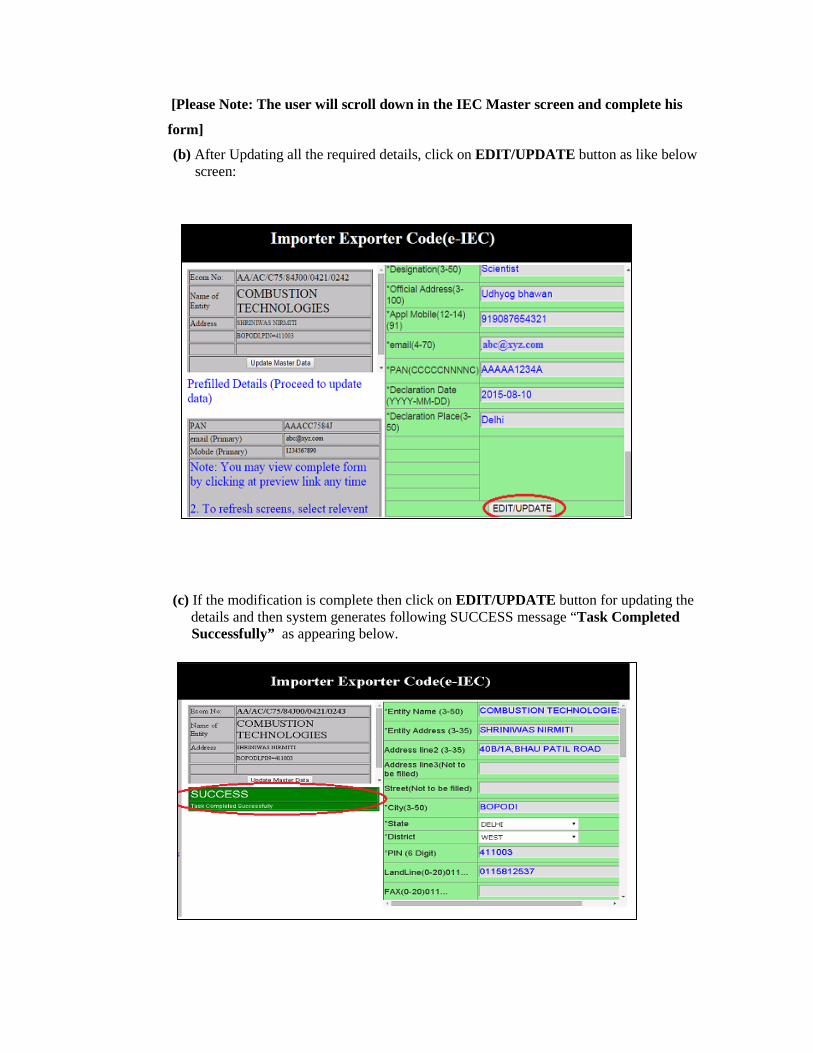
[Please Note: The user will scroll down in the IEC Master screen and complete his
form]
(b) After Updating all the required details, click on EDIT/UPDATE button as like below screen:
(c) If the modification is complete then click on EDIT/UPDATE button for updating the details and then system generates following SUCCESS message “Task Completed Successfully” as appearing below.
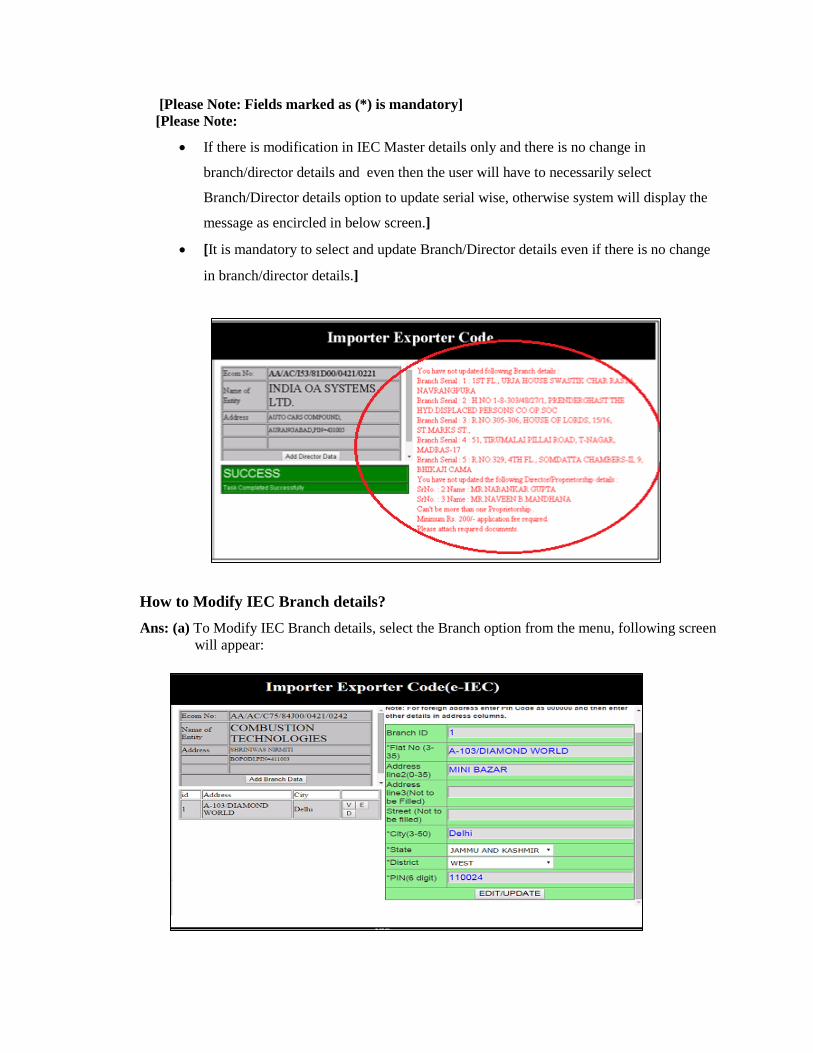
[Please Note: Fields marked as (*) is mandatory] [Please Note:
• If there is modification in IEC Master details only and there is no change in
branch/director details and even then the user will have to necessarily select
Branch/Director details option to update serial wise, otherwise system will display the
message as encircled in below screen.]
• [It is mandatory to select and update Branch/Director details even if there is no change
in branch/director details.]
How to Modify IEC Branch details? Ans: (a) To Modify IEC Branch details, select the Branch option from the menu, following screen will appear:
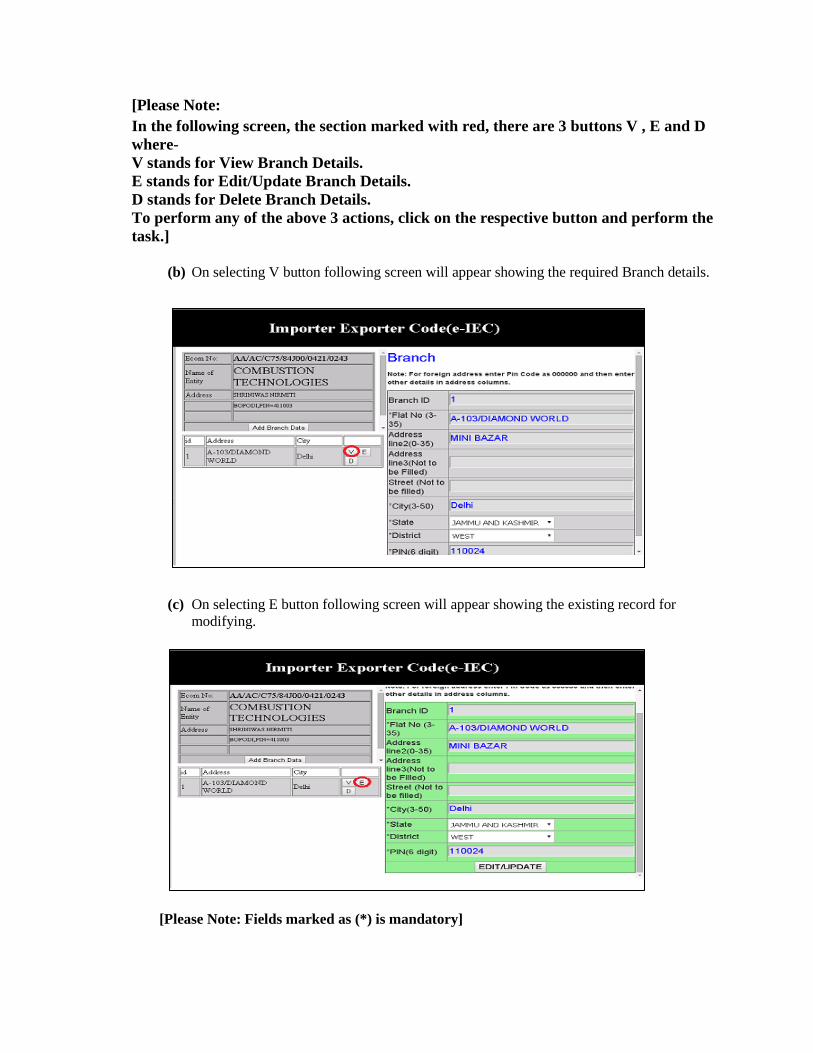
[Please Note: In the following screen, the section marked with red, there are 3 buttons V , E and D where- V stands for View Branch Details. E stands for Edit/Update Branch Details. D stands for Delete Branch Details. To perform any of the above 3 actions, click on the respective button and perform the task.]
(b) On selecting V button following screen will appear showing the required Branch details.
(c) On selecting E button following screen will appear showing the existing record for modifying.
[Please Note: Fields marked as (*) is mandatory]

(d) After updating all the required details in the branch data, press EDIT/UPDATE button, a Successful Message “Task Completed successfully” will be displayed as per serial no. in the screen below:
(e) On Selecting D button the system generates following screen for deleting the Branch
record.
(f) For deleting existing branch record press DELETE button then following Successful message will appear.
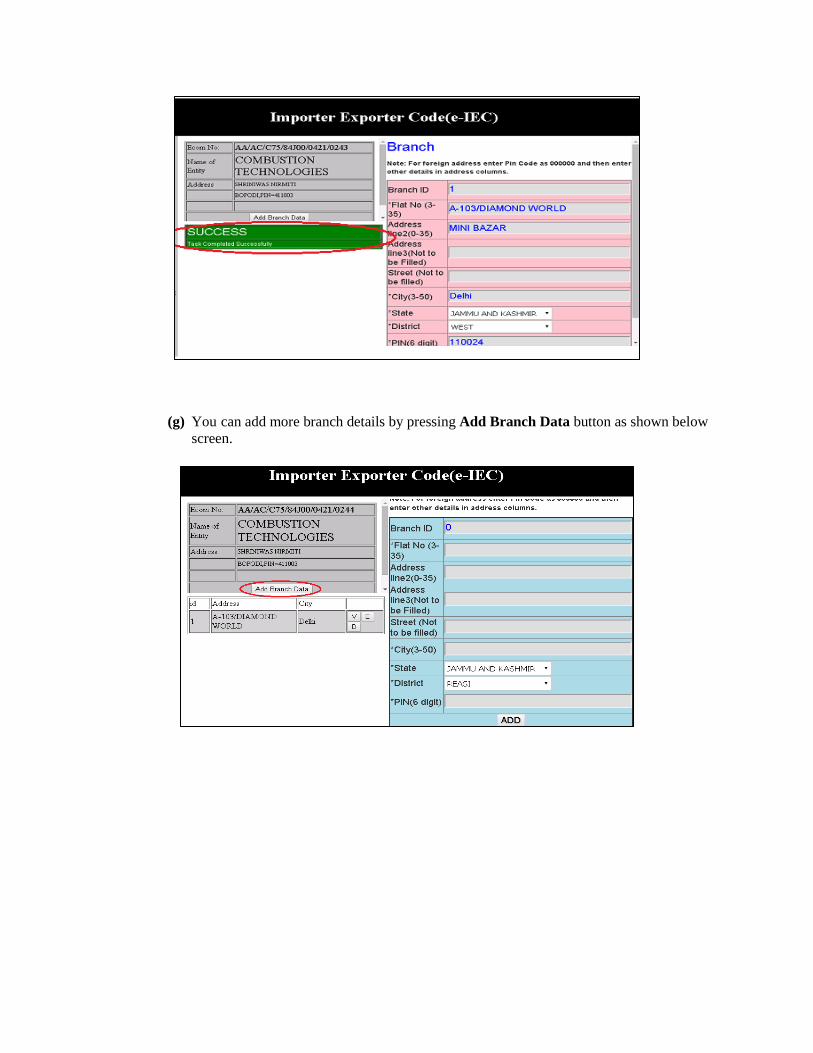
(g) You can add more branch details by pressing Add Branch Data button as shown below screen.

(h) After pressing Add Branch Data button and fill all the details then press ADD button As shown in screen
(i) After updating the required Branch details press ADD button, a successful message generated by the system as like following screen.
How to Modify IEC Director details?
Ans: (a) To Modify IEC Director details, select the Director option from the menu, following screen will appear:
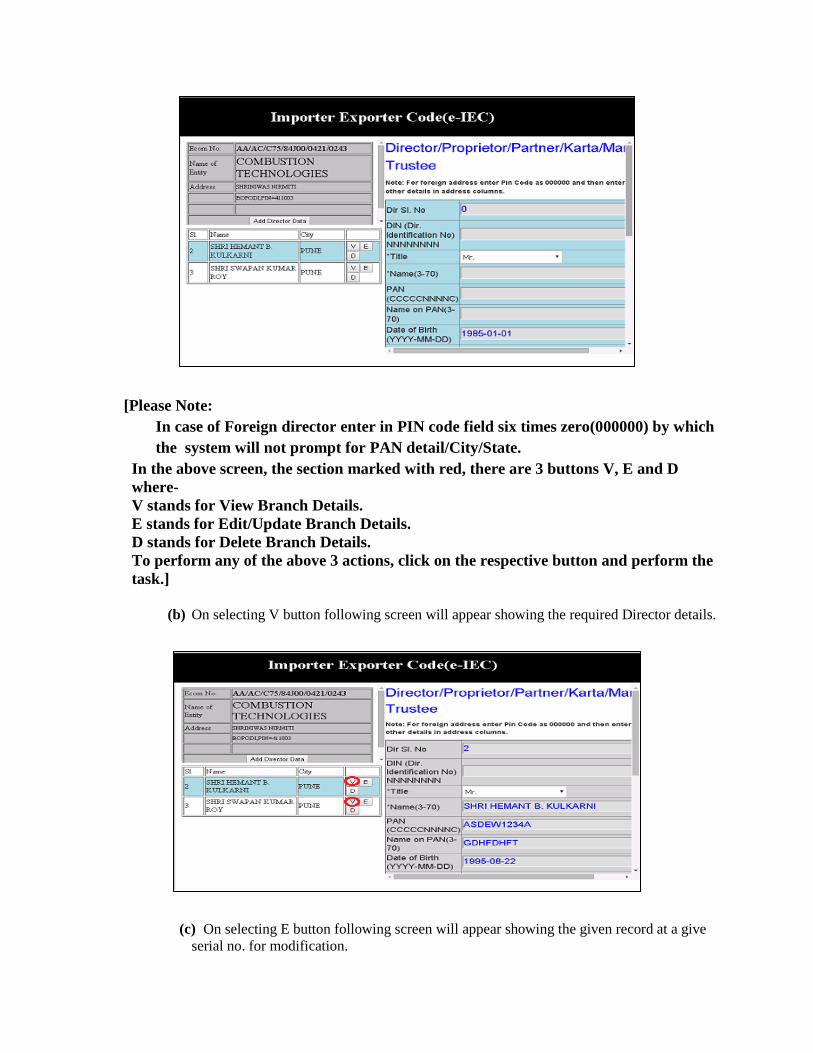
[Please Note: In case of Foreign director enter in PIN code field six times zero(000000) by which the system will not prompt for PAN detail/City/State.
In the above screen, the section marked with red, there are 3 buttons V, E and D where- V stands for View Branch Details. E stands for Edit/Update Branch Details. D stands for Delete Branch Details. To perform any of the above 3 actions, click on the respective button and perform the task.]
(b) On selecting V button following screen will appear showing the required Director details.
(c) On selecting E button following screen will appear showing the given record at a give serial no. for modification.
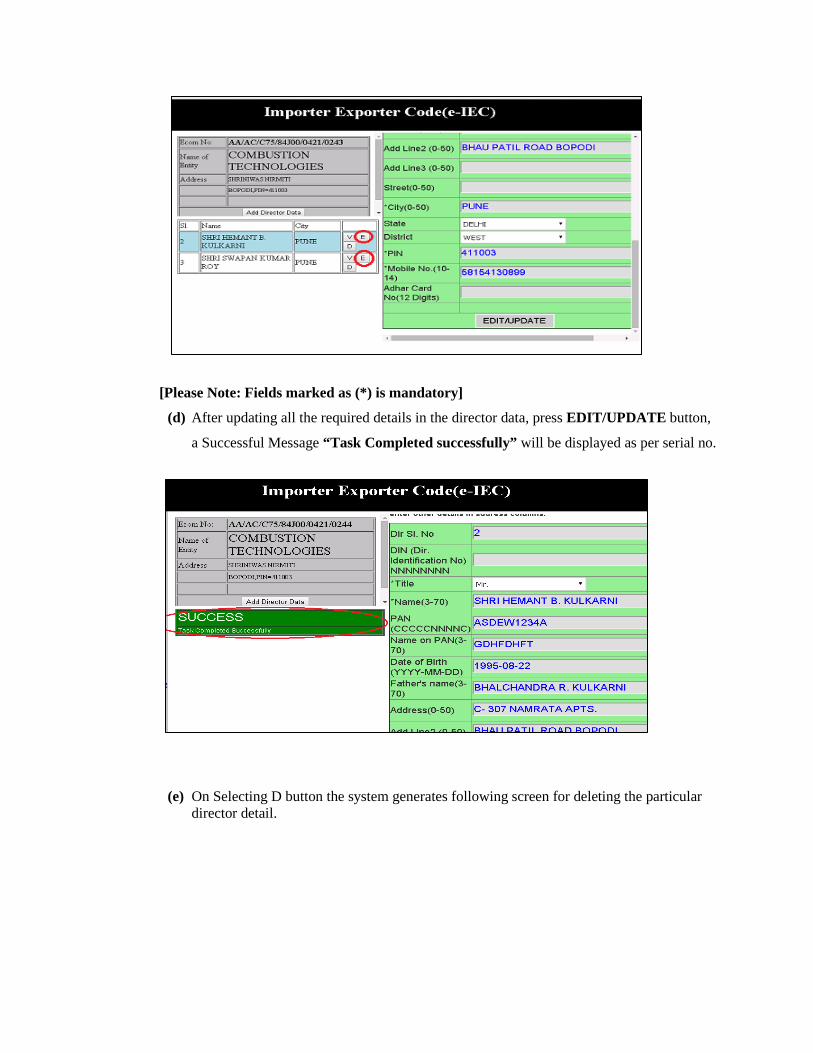
[Please Note: Fields marked as (*) is mandatory]
(d) After updating all the required details in the director data, press EDIT/UPDATE button,
a Successful Message “Task Completed successfully” will be displayed as per serial no.
(e) On Selecting D button the system generates following screen for deleting the particular director detail.
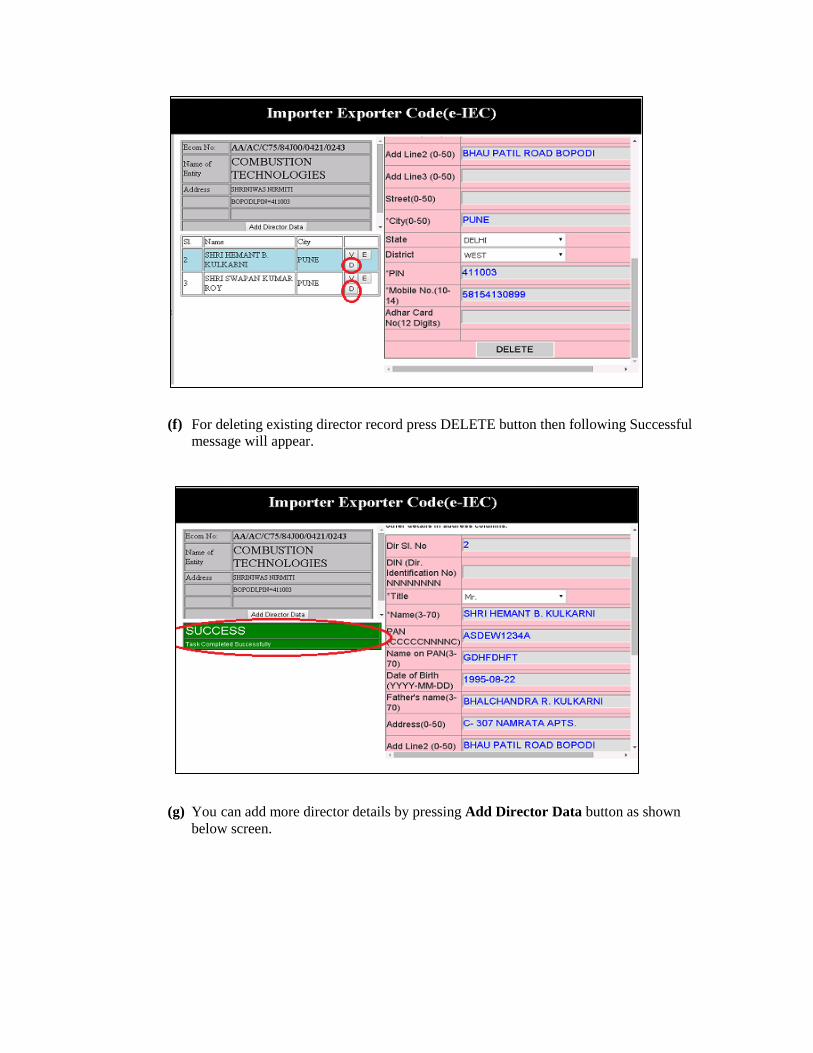
(f) For deleting existing director record press DELETE button then following Successful message will appear.
(g) You can add more director details by pressing Add Director Data button as shown below screen.
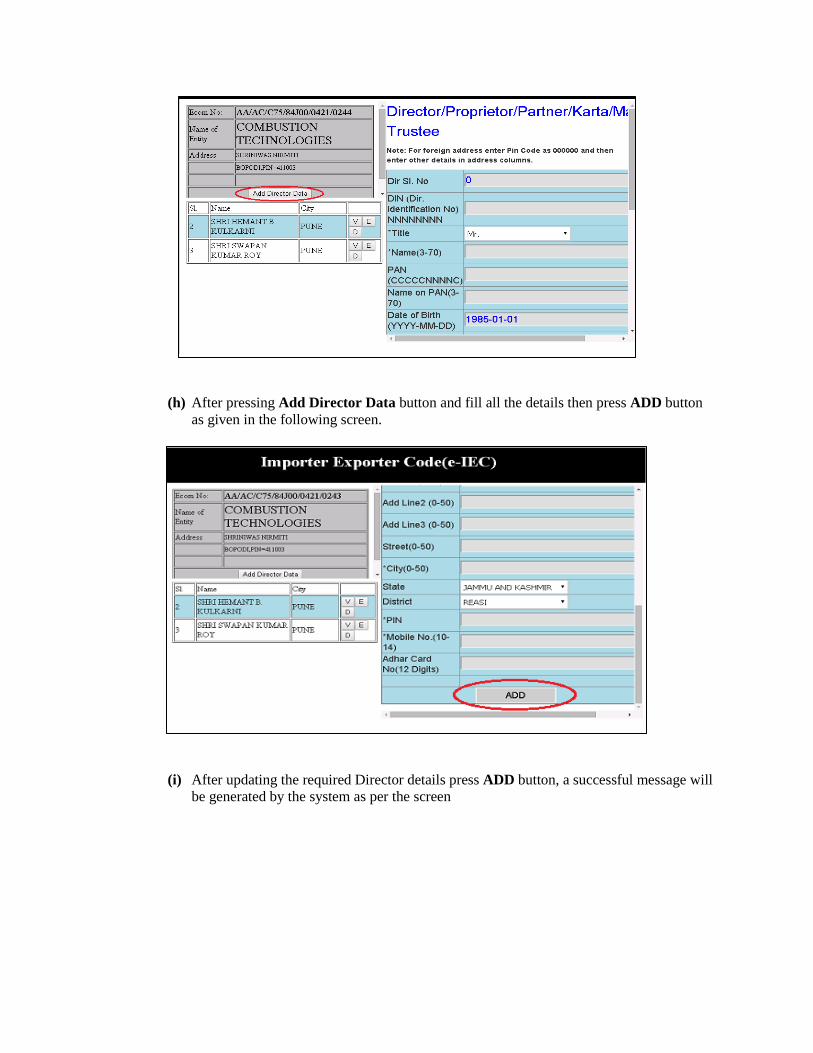
(h) After pressing Add Director Data button and fill all the details then press ADD button
as given in the following screen.
(i) After updating the required Director details press ADD button, a successful message will
be generated by the system as per the screen
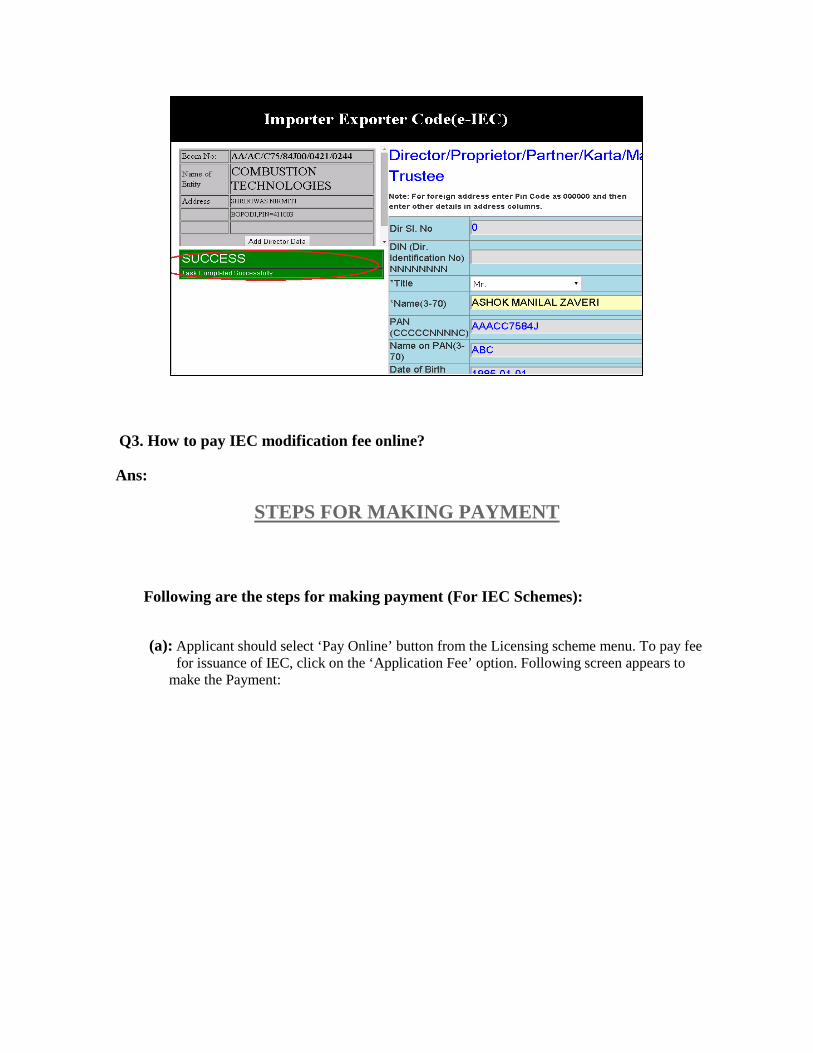
Q3. How to pay IEC modification fee online?
Ans:
STEPS FOR MAKING PAYMENT
Following are the steps for making payment (For IEC Schemes):
(a): Applicant should select ‘Pay Online’ button from the Licensing scheme menu. To pay fee for issuance of IEC, click on the ‘Application Fee’ option. Following screen appears to make the Payment:
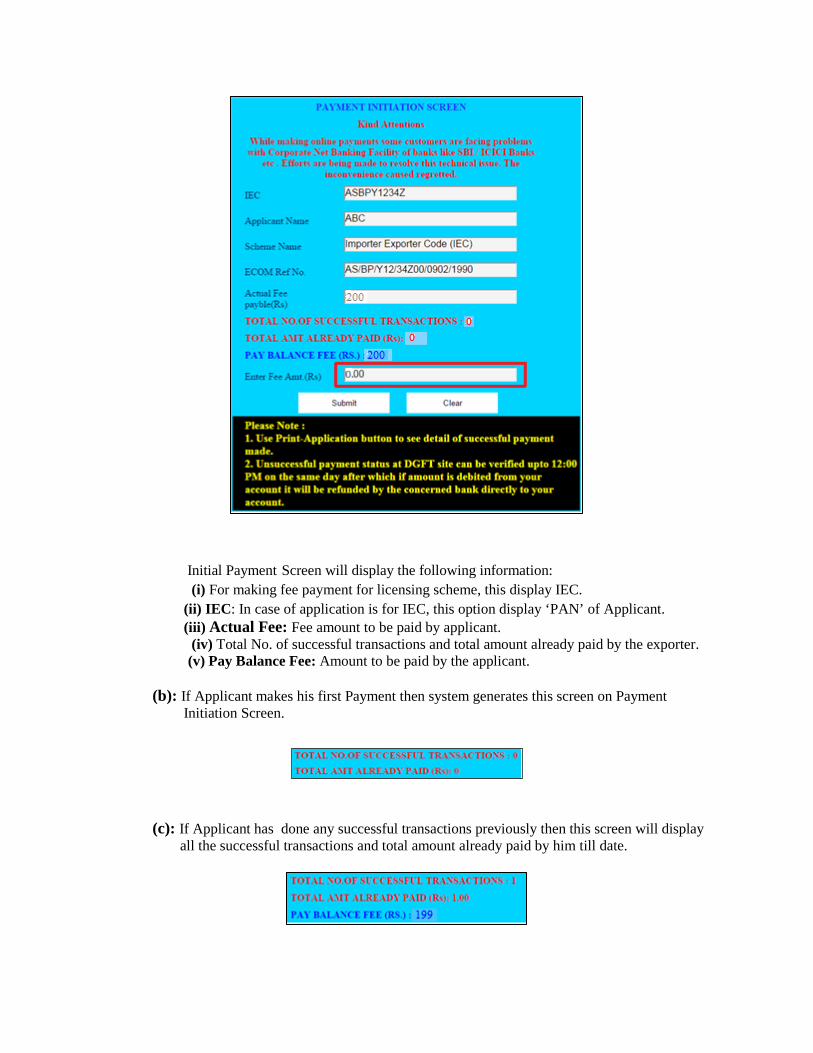
Initial Payment Screen will display the following information: (i) For making fee payment for licensing scheme, this display IEC.
(ii) IEC: In case of application is for IEC, this option display ‘PAN’ of Applicant. (iii) Actual Fee: Fee amount to be paid by applicant.
(iv) Total No. of successful transactions and total amount already paid by the exporter. (v) Pay Balance Fee: Amount to be paid by the applicant.
(b): If Applicant makes his first Payment then system generates this screen on Payment Initiation Screen.
(c): If Applicant has done any successful transactions previously then this screen will display all the successful transactions and total amount already paid by him till date.
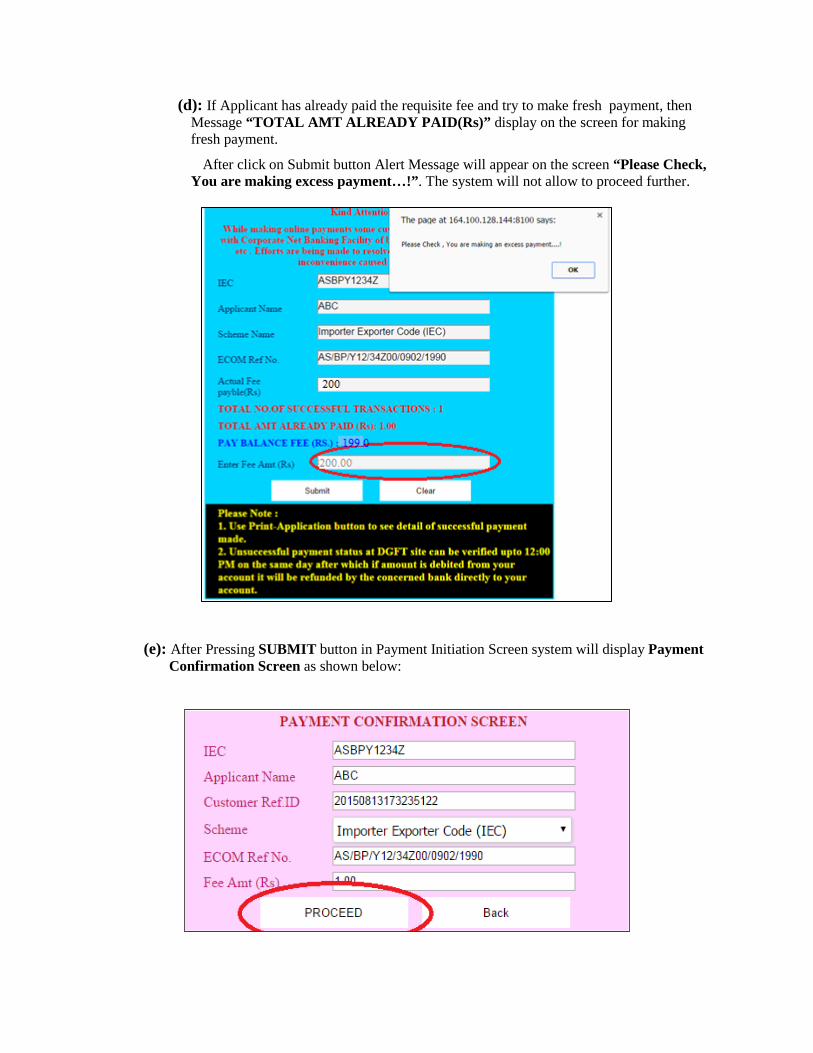
(d): If Applicant has already paid the requisite fee and try to make fresh payment, then Message “TOTAL AMT ALREADY PAID(Rs)” display on the screen for making fresh payment.
After click on Submit button Alert Message will appear on the screen “Please Check, You are making excess payment…!”. The system will not allow to proceed further.
(e): After Pressing SUBMIT button in Payment Initiation Screen system will display Payment Confirmation Screen as shown below:
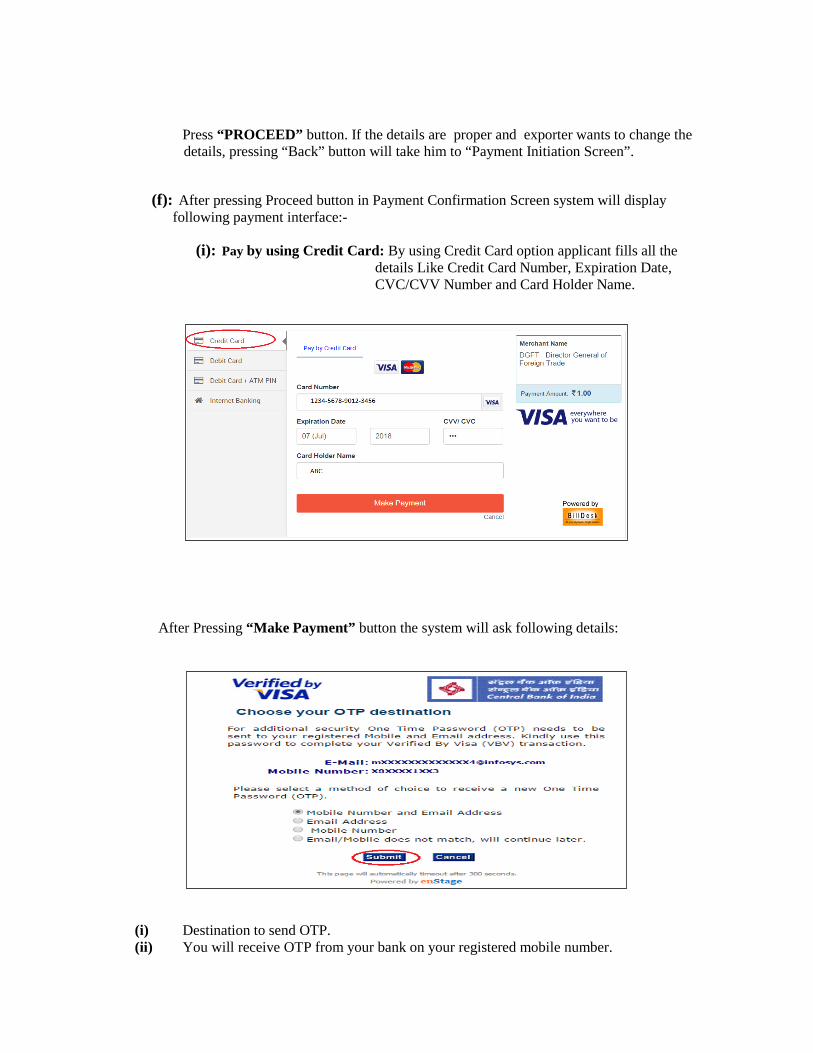
Press “PROCEED” button. If the details are proper and exporter wants to change the details, pressing “Back” button will take him to “Payment Initiation Screen”. (f): After pressing Proceed button in Payment Confirmation Screen system will display following payment interface:-
(i): Pay by using Credit Card: By using Credit Card option applicant fills all the details Like Credit Card Number, Expiration Date, CVC/CVV Number and Card Holder Name.
After Pressing “Make Payment” button the system will ask following details:
(i) Destination to send OTP. (ii) You will receive OTP from your bank on your registered mobile number.

(iii) Input the OTP as shown below.
Applicant will enter his one time password and then press submit button. The payment status of the transaction will be shown below screens:
In case of Successful Transaction:
In case of Unsuccessful Transaction:
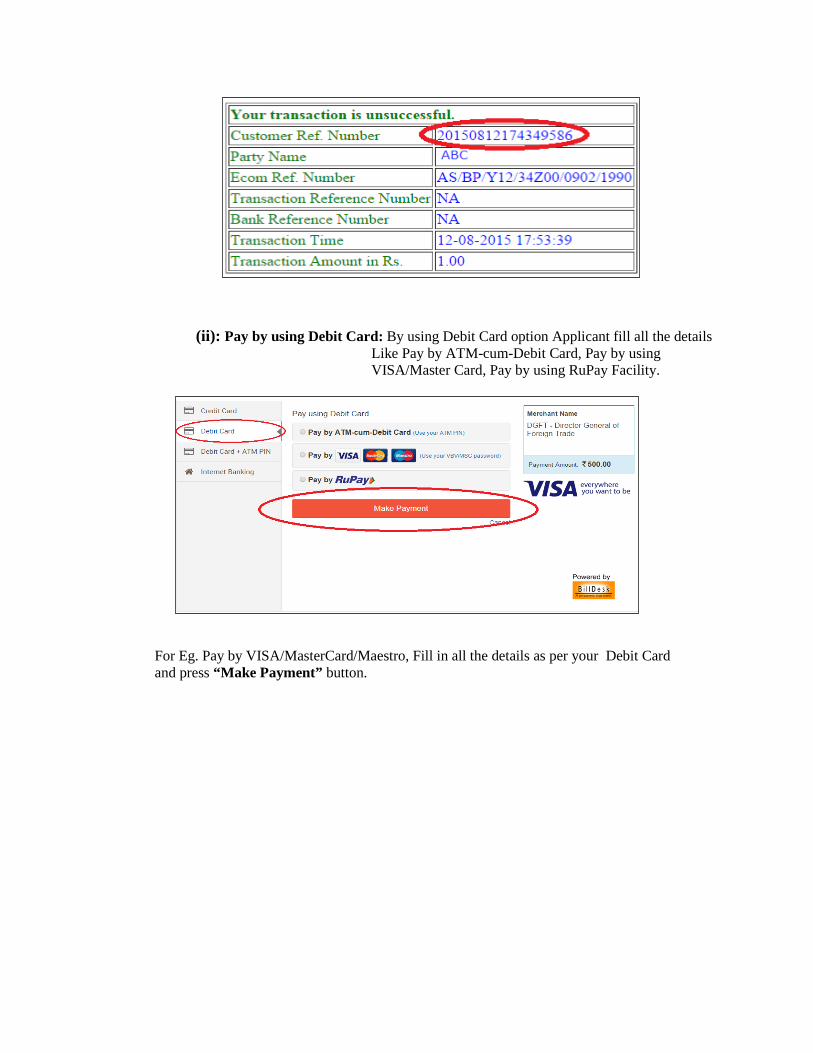
(ii): Pay by using Debit Card: By using Debit Card option Applicant fill all the details Like Pay by ATM-cum-Debit Card, Pay by using VISA/Master Card, Pay by using RuPay Facility.
For Eg. Pay by VISA/MasterCard/Maestro, Fill in all the details as per your Debit Card and press “Make Payment” button.
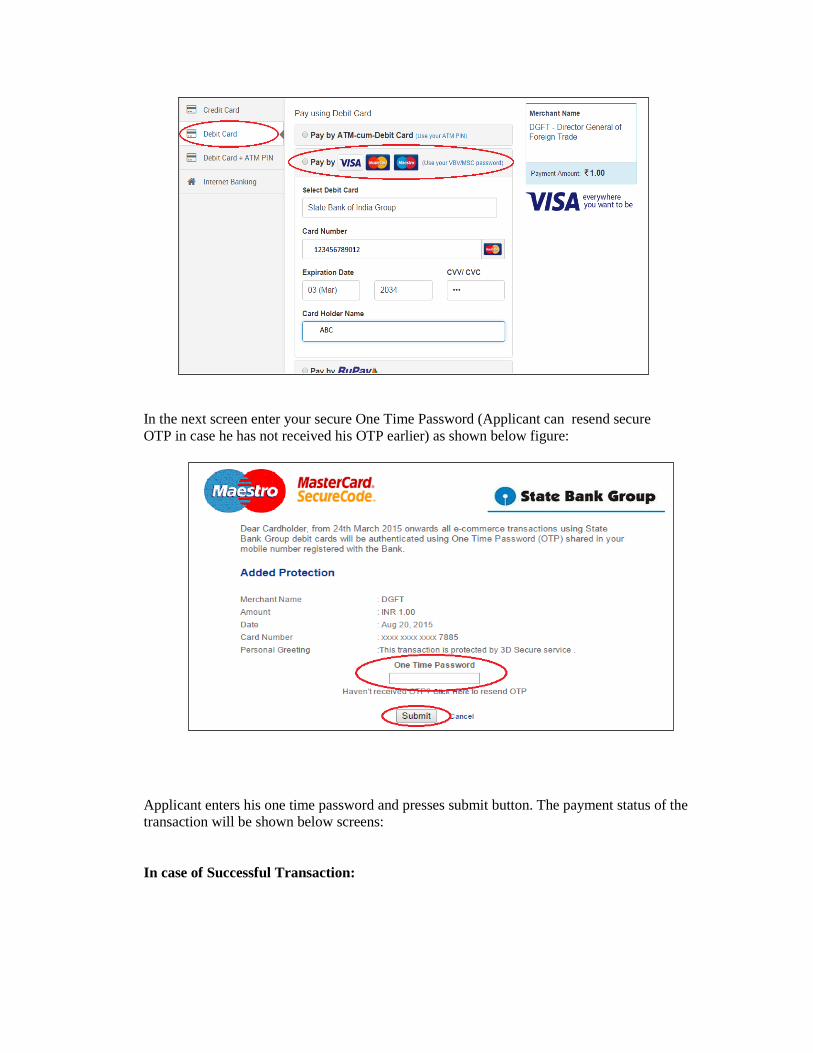
In the next screen enter your secure One Time Password (Applicant can resend secure OTP in case he has not received his OTP earlier) as shown below figure:
Applicant enters his one time password and presses submit button. The payment status of the transaction will be shown below screens:
In case of Successful Transaction:
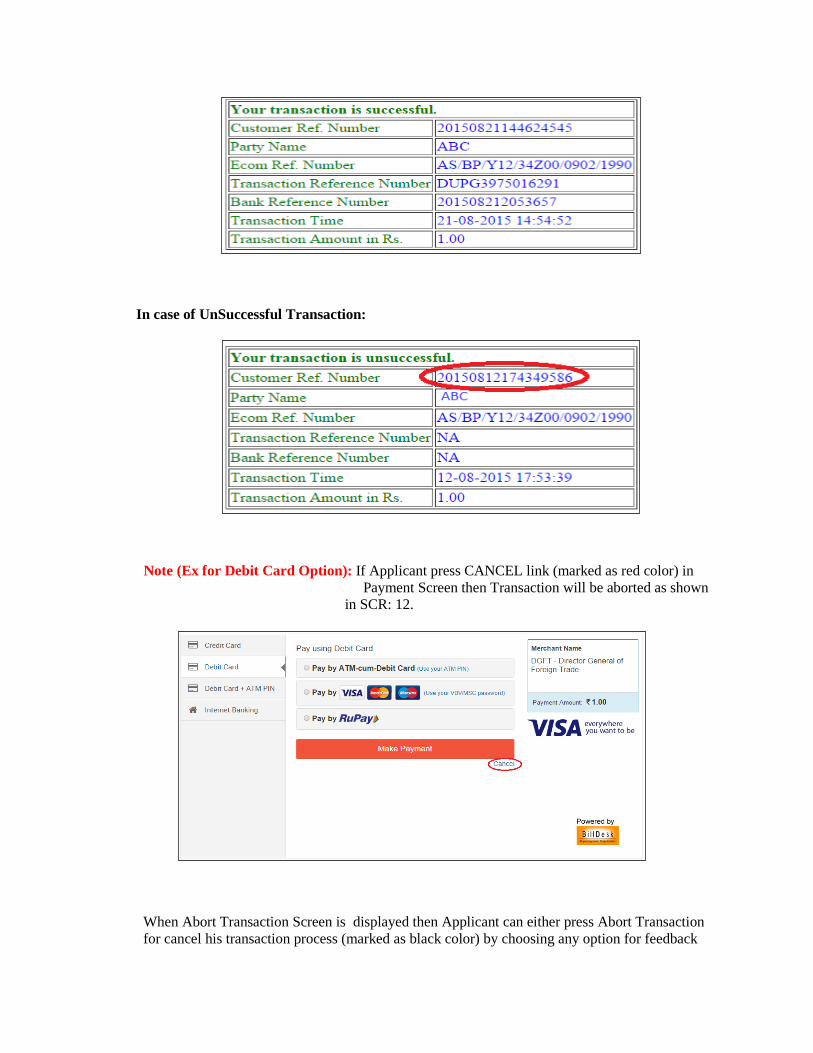
In case of UnSuccessful Transaction:
Note (Ex for Debit Card Option): If Applicant press CANCEL link (marked as red color) in Payment Screen then Transaction will be aborted as shown in SCR: 12.
When Abort Transaction Screen is displayed then Applicant can either press Abort Transaction for cancel his transaction process (marked as black color) by choosing any option for feedback
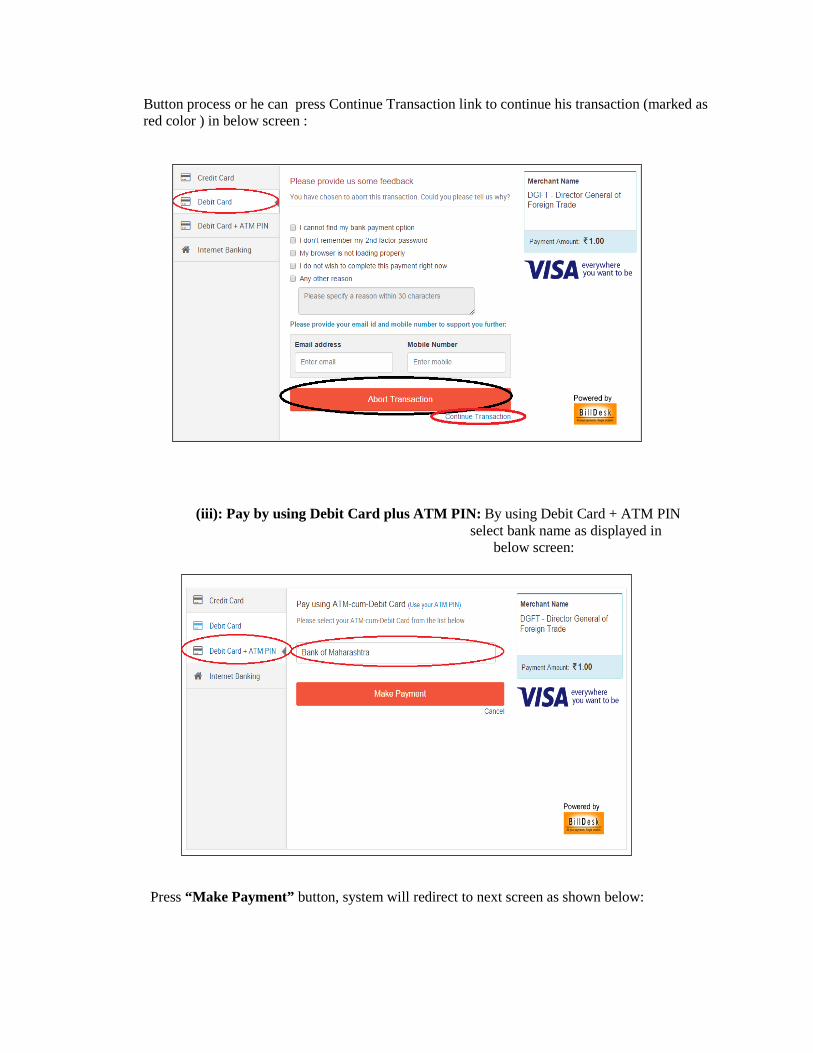
Button process or he can press Continue Transaction link to continue his transaction (marked as red color ) in below screen :
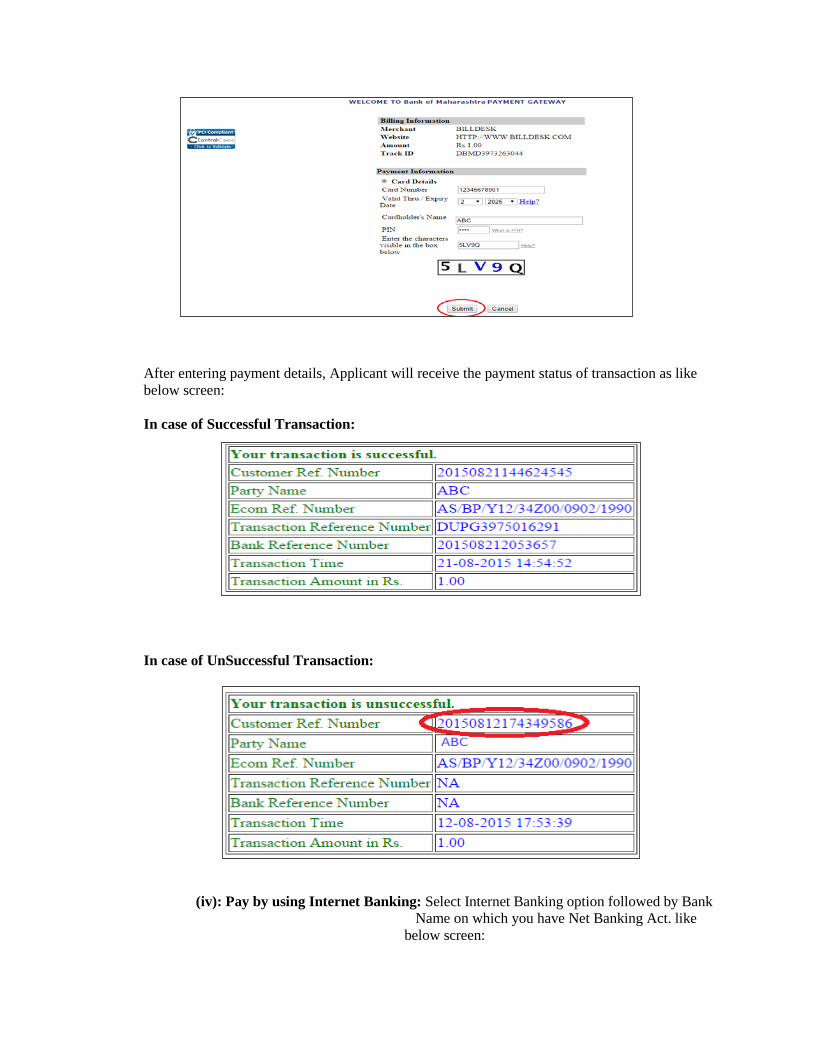
(iii): Pay by using Debit Card plus ATM PIN: By using Debit Card + ATM PIN select bank name as displayed in below screen:
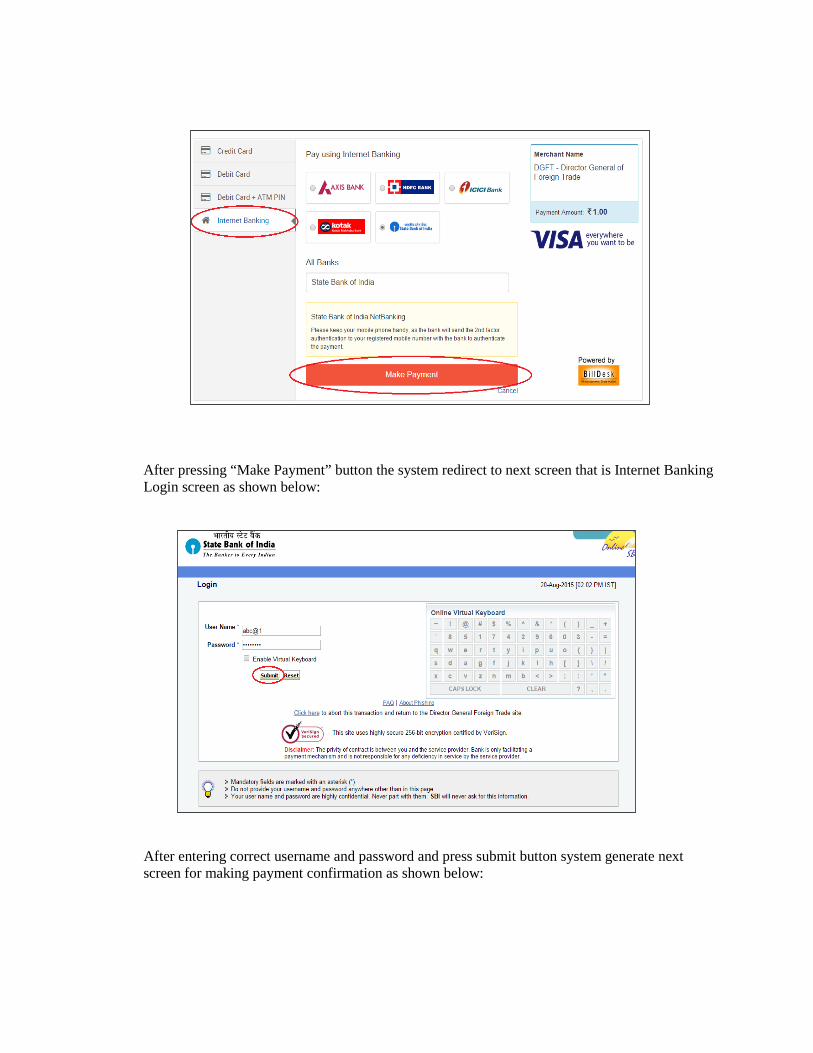
Press “Make Payment” button, system will redirect to next screen as shown below:
After entering payment details, Applicant will receive the payment status of transaction as like below screen:
In case of Successful Transaction:
In case of UnSuccessful Transaction:
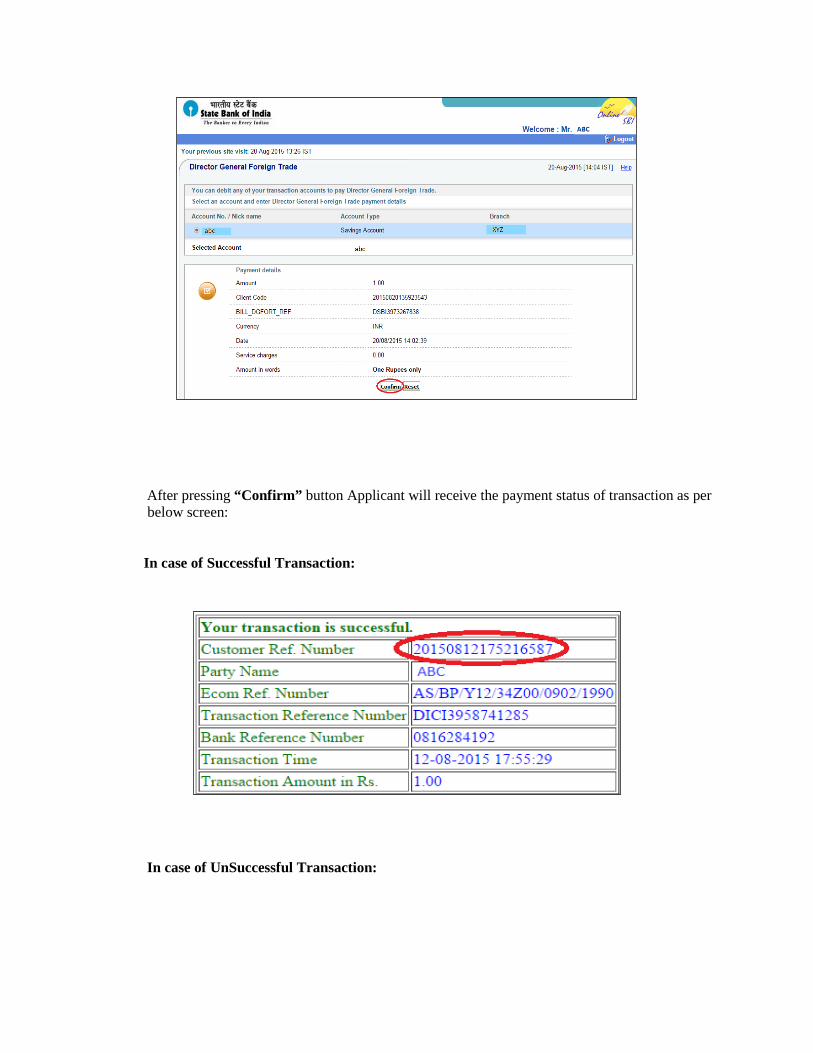
(iv): Pay by using Internet Banking: Select Internet Banking option followed by Bank Name on which you have Net Banking Act. like below screen:
After pressing “Make Payment” button the system redirect to next screen that is Internet Banking Login screen as shown below:
After entering correct username and password and press submit button system generate next screen for making payment confirmation as shown below:
After pressing “Confirm” button Applicant will receive the payment status of transaction as per below screen: In case of Successful Transaction:
In case of UnSuccessful Transaction:

Q4. How to verify IEC modification fee online?
Ans:
STEPS FOR VERIFYING THE PAYMENT
Following are the Steps to Verify the Payment :
(a): Press ‘Verify Pay” option from ECOM application Dialog. In Case of IEC click “Verify Fee” link.
(b): If Applicant has not made any payment previously then following message will appears:
(c): System will display all the transactions made by Applicant on the same day as shown below:
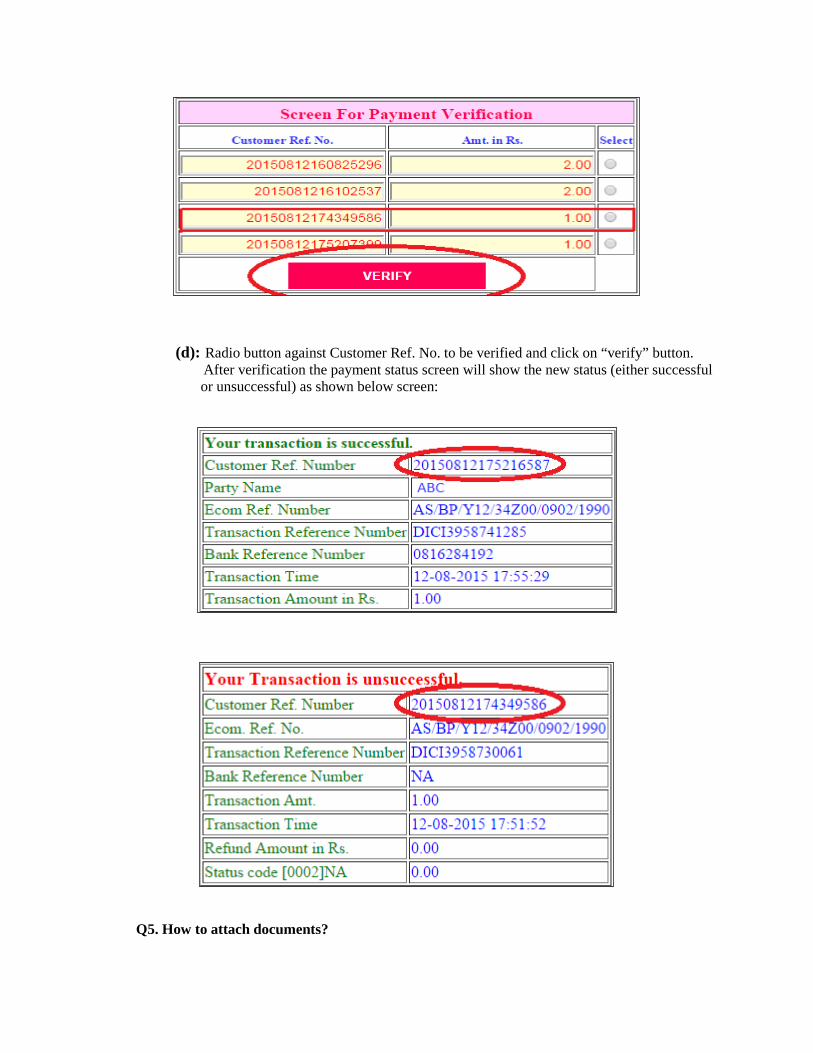
(d): Radio button against Customer Ref. No. to be verified and click on “verify” button. After verification the payment status screen will show the new status (either successful or unsuccessful) as shown below screen:
Q5. How to attach documents?

Ans: (a) For attaching the documents select the option, Attachments from the menu, following screen will appear:
(b) Select the document category and document type from the dropdown list box.
Below is the table showing the document code and their allowed formats.
DOCUMENT CODE
DOCUMENT NAME FILE TYPE DOCUMENT TYPE
PHOTOF Applicant photo GIF Mandatory PANCAR applicant pancard GIF Mandatory PASPRT applicant passport GIF Optional VOTRID applicant voterid GIF/PDF Optional DRVLIC appicant driving license GIF/PDF Optional ADAHAR applicant aadhaar card GIF/PDF Optional SALEDE applicant saledeed PDF Optional BANKCR bank certificate PDF Optional REGNCR registration certificate PDF Optional MOUNDR Memorandum of understanding PDF Optional PARTDE partnership deed PDF Optional CANCHQ Cancelled cheque GIF/PDF Optional
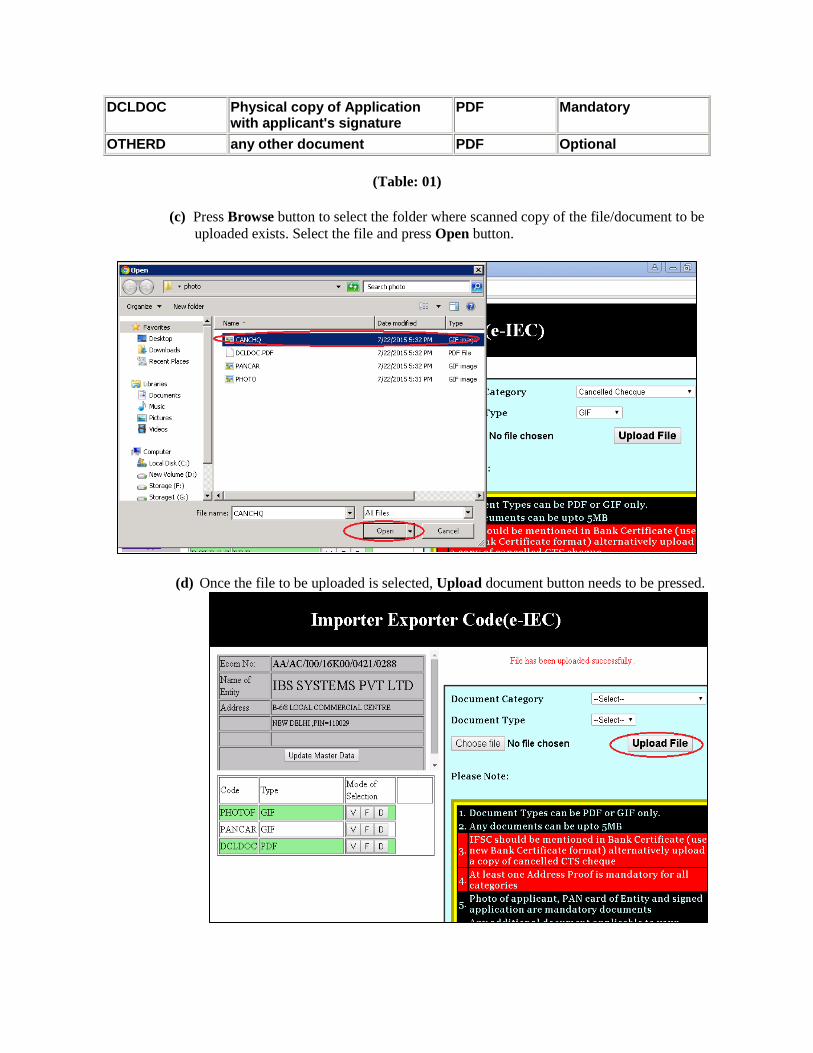
DCLDOC Physical copy of Application with applicant's signature
PDF Mandatory
OTHERD any other document PDF Optional
(Table: 01)
(c) Press Browse button to select the folder where scanned copy of the file/document to be uploaded exists. Select the file and press Open button.
(d) Once the file to be uploaded is selected, Upload document button needs to be pressed.
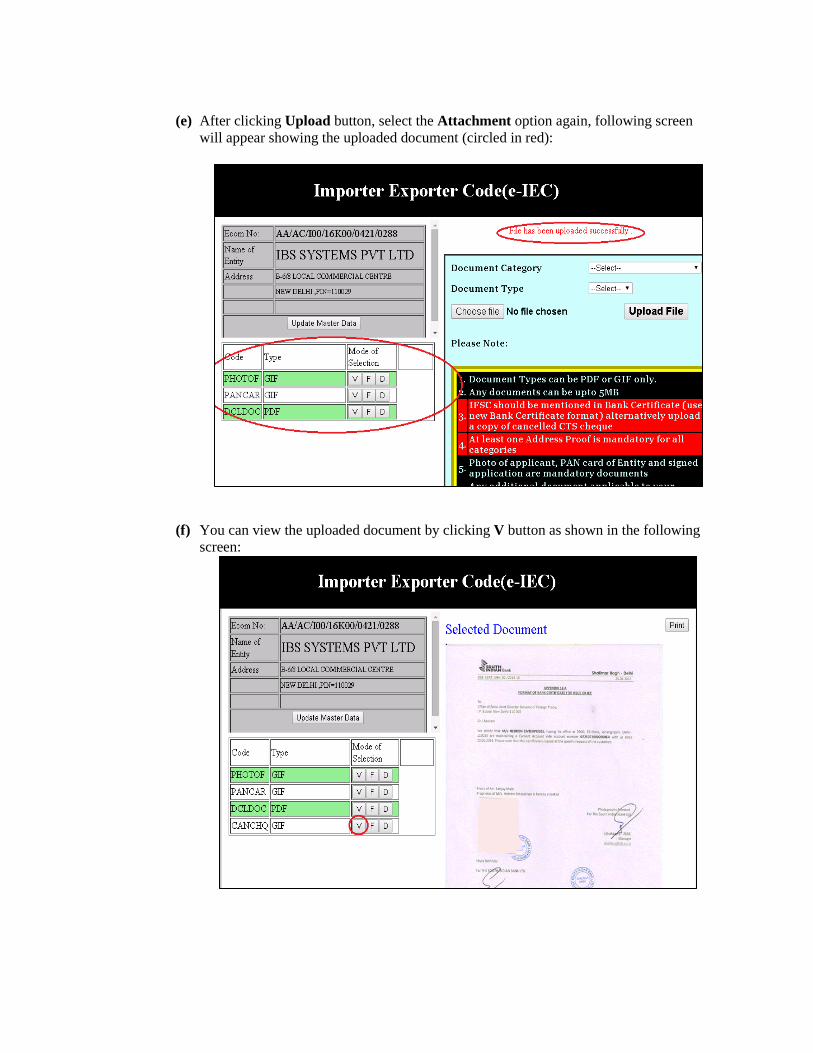
(e) After clicking Upload button, select the Attachment option again, following screen
will appear showing the uploaded document (circled in red):
(f) You can view the uploaded document by clicking V button as shown in the following screen:
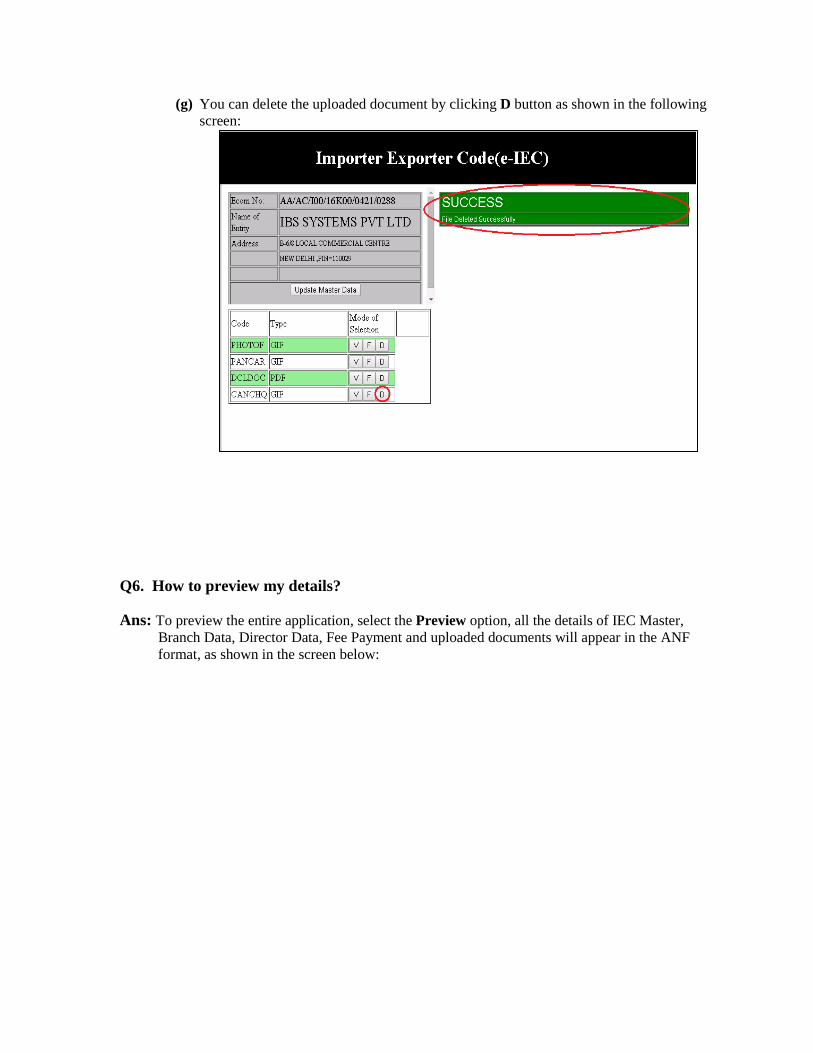
(g) You can delete the uploaded document by clicking D button as shown in the following screen:
Q6. How to preview my details?
Ans: To preview the entire application, select the Preview option, all the details of IEC Master, Branch Data, Director Data, Fee Payment and uploaded documents will appear in the ANF format, as shown in the screen below:
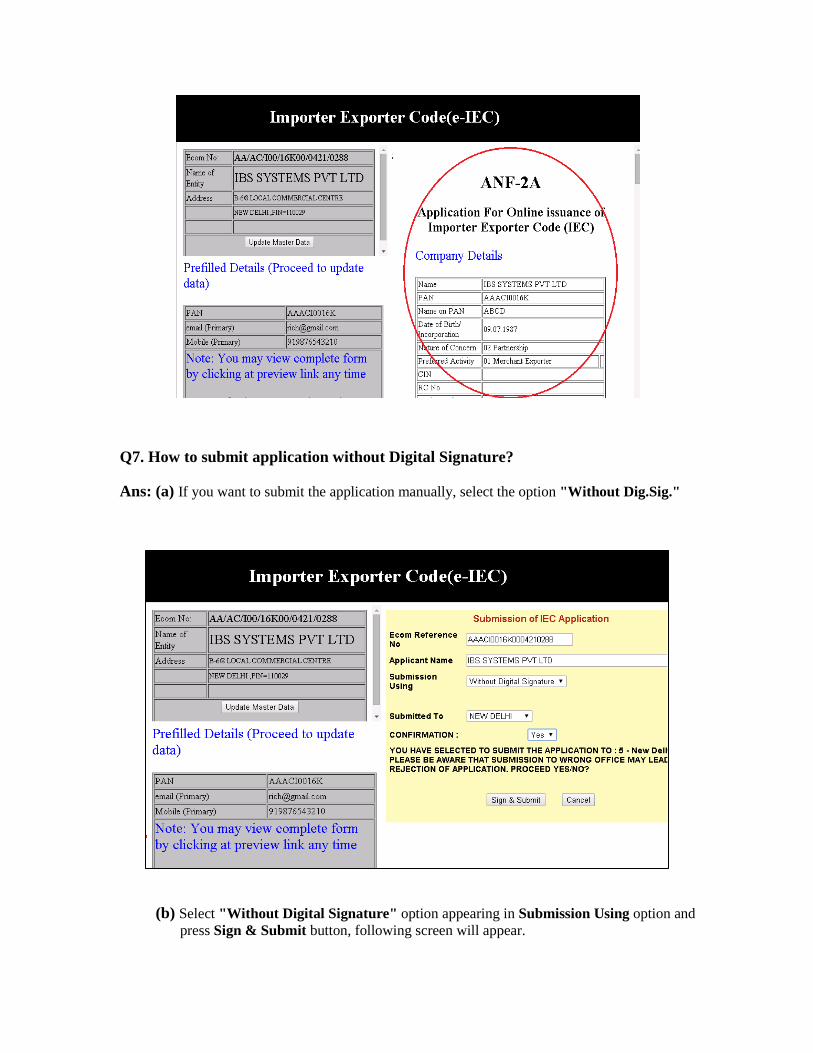
Q7. How to submit application without Digital Signature?
Ans: (a) If you want to submit the application manually, select the option "Without Dig.Sig."
(b) Select "Without Digital Signature" option appearing in Submission Using option and press Sign & Submit button, following screen will appear.

(c) After pressing Sign & Submit button, following screen will appear.
(d) After Submitting the application (without digital signature), you may logout of the IEC Application process by clicking on the Logout option.
Q8. How to submit application with Digital Signature?
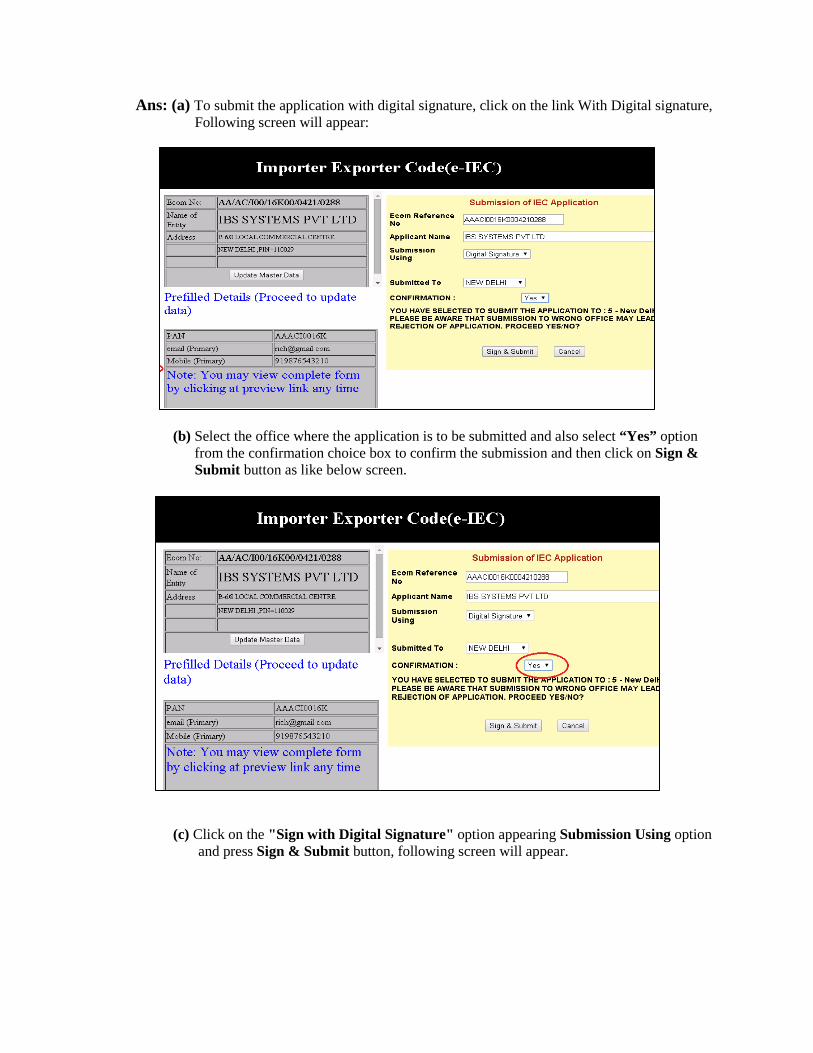
Ans: (a) To submit the application with digital signature, click on the link With Digital signature, Following screen will appear:
(b) Select the office where the application is to be submitted and also select “Yes” option from the confirmation choice box to confirm the submission and then click on Sign & Submit button as like below screen.
(c) Click on the "Sign with Digital Signature" option appearing Submission Using option and press Sign & Submit button, following screen will appear.
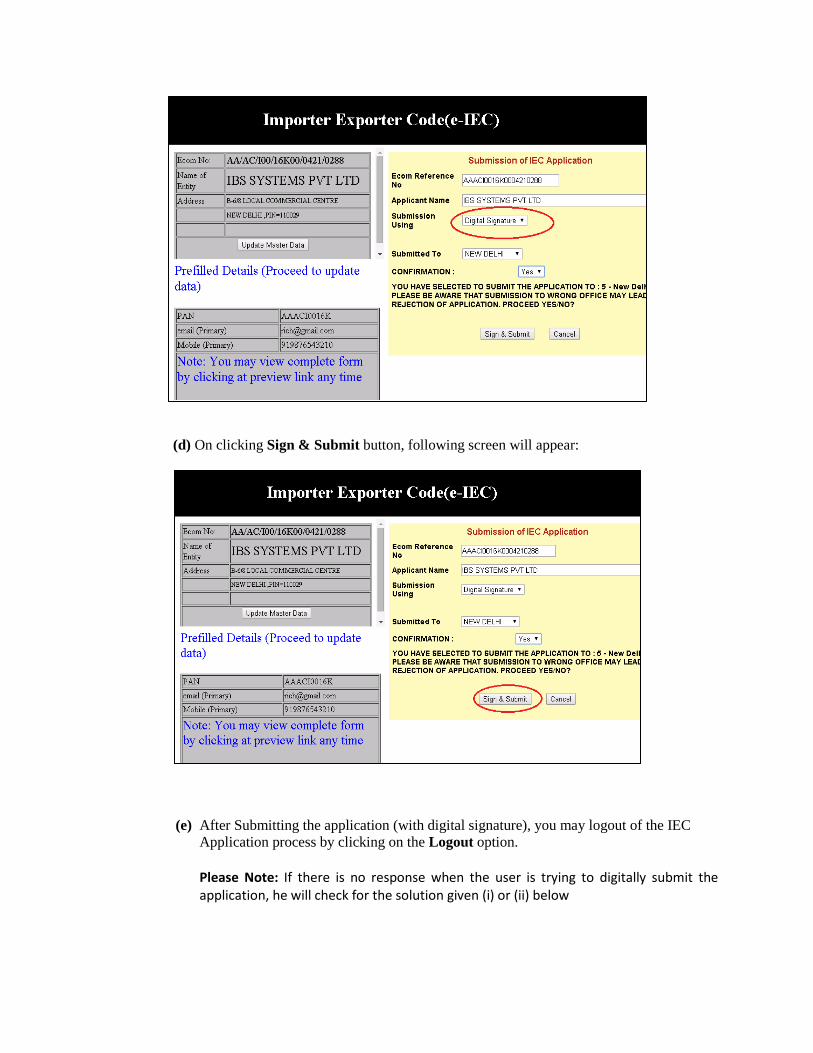
(d) On clicking Sign & Submit button, following screen will appear:
(e) After Submitting the application (with digital signature), you may logout of the IEC Application process by clicking on the Logout option. Please Note: If there is no response when the user is trying to digitally submit the application, he will check for the solution given (i) or (ii) below
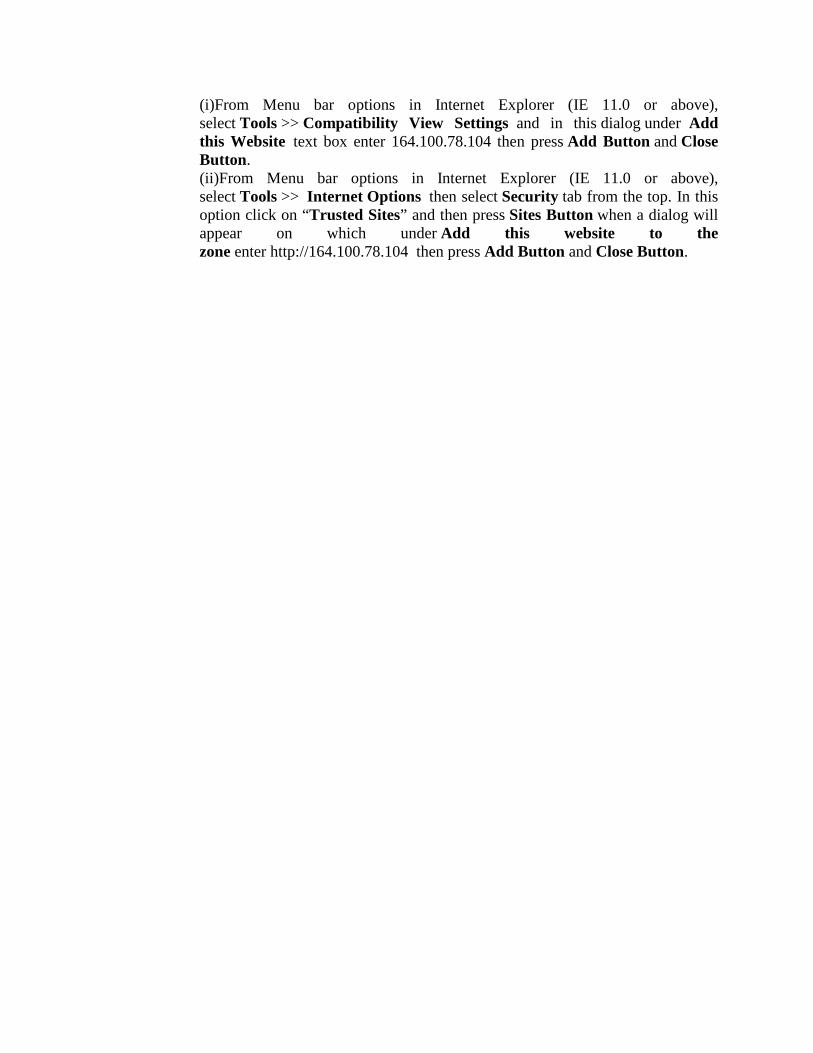
(i)From Menu bar options in Internet Explorer (IE 11.0 or above), select Tools >> Compatibility View Settings and in this dialog under Add this Website text box enter 164.100.78.104 then press Add Button and Close Button. (ii)From Menu bar options in Internet Explorer (IE 11.0 or above), select Tools >> Internet Options then select Security tab from the top. In this option click on “Trusted Sites” and then press Sites Button when a dialog will appear on which under Add this website to the zone enter http://164.100.78.104 then press Add Button and Close Button.