oauth with on-premise report+ web...
TRANSCRIPT

ReportPlus Server – OAuth On-Premise ReportPlus Server Installation 1.0
OAuth with On-Premise
ReportPlus Server Installation Guide

ReportPlus Help Reference 1 | 2 1
Disclaimer THE INFORMATION CONTAINED IN THIS DOCUMENT IS PROVIDED “AS IS” WITHOUT ANY EXPRESS
REPRESENTATIONS OF WARRANTIES. IN ADDITION, INFRAGISTCS, INC. DISCLAIMS ALL IMPLIED
REPRESENTATIONS AND WARRANTIES, INCLUDING ANY WARRANTY OF MERCHANTABILITY, FITNESS FOR
A PARTICULAR PURPOSE, OR NON-INFRINGEMENT OF THIRD PARTY INTELLECTURAL PROPERTY RIGHTS.
ReportPlus™ Server v5.1 – OAuth with On-Premise ReportPlus Server Installation 1.0
All text and figures included in this publication are the exclusive property of Infragistics, Inc., and may
not be copied, reproduced, or used in any way without the express permission in writing of Infragistics,
Inc. Information in this document is subject to change without notice and does not represent a
commitment on the part of Infragistics, Inc. may have patents or pending patent applications covering
subject matter in this document. The furnishing of this document does not give you any license to these
patents except as expressly provided in any written license agreement from Infragistics, Inc.
Infragistics, Inc. and SharePlus are trademarks of Infragistics in the United States and/or other countries.
This document also contains registered trademarks, trademarks and service marks that are owned by
their respective owners. Infragistics, Inc. disclaims any responsibility for specifying marks that are owned
by their respective companies or organizations.
©2017 Infragistics, Inc. All rights reserved.

ReportPlus Help Reference 2 | 2 1
Table of Contents
Introduction .................................................................................................................................................. 3
Chapter 1 Hurdles with On-Premise Installation .......................................................................................... 4
Hurdles with On-Premise Installation ....................................................................................................... 5
Chapter 2 Introduction to OAuth .................................................................................................................. 6
Introduction to OAuth ............................................................................................................................... 7
Chapter 3 ReportPlus Server and Google Analytics ....................................................................................... 9
ReportPlus Server App Registration ........................................................................................................ 10
for Google Analytics ................................................................................................................................ 10
ReportPlus Server App Configuration ...................................................................................................... 13
for Google Analytics ................................................................................................................................ 13
Authorize ReportPlus Server ................................................................................................................... 15
for Google Analytics Data Retrieval ........................................................................................................ 15
Appendices Appendix 1: Further resources for OAuth .............................................................................. 18
Appendix 1: Additional Resources for OAuth ......................................................................................... 19
Appendix 2: Document Changelog .......................................................................................................... 20
ReportPlus Help Reference 3 | 2 1
Introduction In order to limit access to a user’s data and secure potentially sensitive user information, such as a user’s
credentials, many of today’s popular API’s implement what is known as the Open Authorization (OAuth)
protocol. The protocol gives the user the ability to quickly block access to his/her protected data and the
ability to grant access to said data without having to share their personal credentials with third-parties
(who may, or may not be, potentially malicious and/or properly secured).
The purpose of this document is to give an overview of the OAuth protocol and to explain how
ReportPlus Server handles it in order to retrieve a user’s data from a secured API. However, before we
dive into any in-depth explanation of OAuth, we’ll first explore some of the current hurdles with setting
up OAuth for multiple on-premise installations.

ReportPlus Help Reference 4 | 2 1
Chapter 1 Hurdles with On-Premise Installation

ReportPlus Help Reference 5 | 2 1
Hurdles with On-Premise Installation
Registering ReportPlus Server with Authorization Servers One of the biggest hurdles with an on-premise installation is the need to register the application
(explained further below in Beginning OAuth) with each API provider that supports OAuth (for example,
1.0, 1.0a, 2.0). When we talk about a single installation, the registration process tends to be
straightforward, and managing multiple registrations for a single app is relatively uncomplicated.
Nevertheless, if there’s a need to manage many registrations for many installations then it is easy to see
how managing registrations can quickly become a problem in scalability and security.
Creating an API Developer account Another hurdle with on-premise installation is the differing procedures for creating developer accounts
with the API provider. In order to begin registering a client application for OAuth authorization,
sometimes it is necessary to create an account for the API that we are trying to access. The
requirements for creating this type of account is provider specific. Sometimes the process can be as
simple as providing an email, other times, access is guarded by a pay-wall, and sometimes API access is
divided into levels for which the consumer must gradually be “upgraded” to achieve full unrestricted
access (less common).
Transport Layer Security (TLS) requirement for redirect URI’s Lastly, as far as the OAuth implementation recommendations are concerned, any redirect URI that
receives sensitive information is NOT required to be secure (i.e encrypted), nevertheless, TLS is
recommended. Most 3rd party API’s make this a REQUIREMENT, in which case all on-premise
installations must properly configure the hosting server (IIS) for secure connections via TLS.
Public Top-Level Domain requirement for redirect URI’s Lastly, some 3rd party API’s will only allow the domain name of a given redirect URI to end with a public
top-level domain (TLD) such as .com or .org. In this case, any server installation that cannot be reached
via a URI with a compatible domain name, will need to have its bindings altered accordingly, that is, so
that it can be reached via a URI that ends with public TLD.
ReportPlus Help Reference 6 | 2 1
Chapter 2 Introduction to OAuth

ReportPlus Help Reference 7 | 2 1
Introduction to OAuth
Now that we have outlined some of the hurdles with an on-premise installation, we can dive into
learning about OAuth and how ReportPlus Server handles the flow for a typical user trying to access
data. First we’ll start with an overview of the technology, then we’ll detail the registration process for a
typical API (e.g. Google Analytics API), next we’ll define how to configure the web app, and finally we’ll
step through the process of authorizing the app.
What is OAuth? OAuth is a standard protocol that enables a third-party application like a web application to obtain
limited access to an HTTP service (e.g. REST Web API) on behalf of a resource owner. This is
accomplished by orchestrating an approval action between the resource owner, an authorization server,
and the third-party application where the owner, via the authorization server, grants the third-party
application access to protected resources typically on another server (the HTTP Service). “Because the
resource owner only authenticates with the authorization server, the resource owner’s credentials are
never shared with the client”, thus eliminating the need for the application to itself store and secure the
owner’s credentials ("The OAuth 2.0 Authorization Framework”). After the resource owner completes
the authorization step, a unique access token is issued to the application, which the application can later
use to retrieve resources from a given resource server (HTTP Service). The following diagram lays out
the sequence of steps that occur in a typical OAuth 2.0 flow. In the section titled Authorize ReportPlus
Server for Google Analytics Data Retrieval, we will cover how ReportPlus Server handles OAuth in more
detail.
OAuth 2.0 flow to access typical Google API
1) End-user wishes to access some remote resources and Initiates flow.
2) Application redirects to external webpage (in external authorization server) where user is
presented with a sign-in page (if not already signed-in) and prompted for credentials.
3) User enters credentials and authorizes access to protected resources.
4) Authorization server returns authorization code to application.
5) Application exchanges authorization code for user-specific access token.
6) Application stores access token for later use.
7) Application consumes API endpoint (HTTP Service) by passing along appropriate parameters and
access token.

ReportPlus Help Reference 8 | 2 1
Beginning OAuth Before any application is able to initiate an OAuth protocol, it first must be registered with an
appropriate authorization server. At a high level, registration in general follows the same basic steps.
1) The app administrator logs into the registration page.
2) The administrator provides some basic information about the type of application being
registered.
3) The administrator submits the information and in return is granted a set of identifying
credentials.
The information that is provided is mostly standard and it usually involves divulging things like the type
of application (e.g. desktop, mobile, web), a URL endpoint where an access token should be forwarded
to, and some other miscellaneous information such as application name and/or application description.
The exact process varies from server to server and one needs to consult the proper documentation to
find out provider-specific instructions, nevertheless, despite the exact registration process, ultimately
the goal is to define the identity of the application that needs access to an API and to retrieve a set of
app-identifying credentials to initiate OAuth.
Prevailing Approach for Registering an On-Premise Application for OAuth
Given the complexities of the OAuth protocol and the potential pitfalls inherit with developing secure
solutions, most third-party vendors choose to let every on-premise installation manage its own
registration rather than creating a solution that eliminates this step. That is to say, each installation
should register, obtain, and maintain its own set of API credentials and access tokens as needed instead
of depending on a central body to do so. The least costly way to achieve this at this time, would be to
give the app administrator easy and ample access to third-party OAuth configuration documentation,
and the tools to configure the application for consuming OAuth protected APIs.

ReportPlus Help Reference 9 | 2 1
Chapter 3 ReportPlus Server and Google Analytics
ReportPlus Help Reference 10 | 2 1
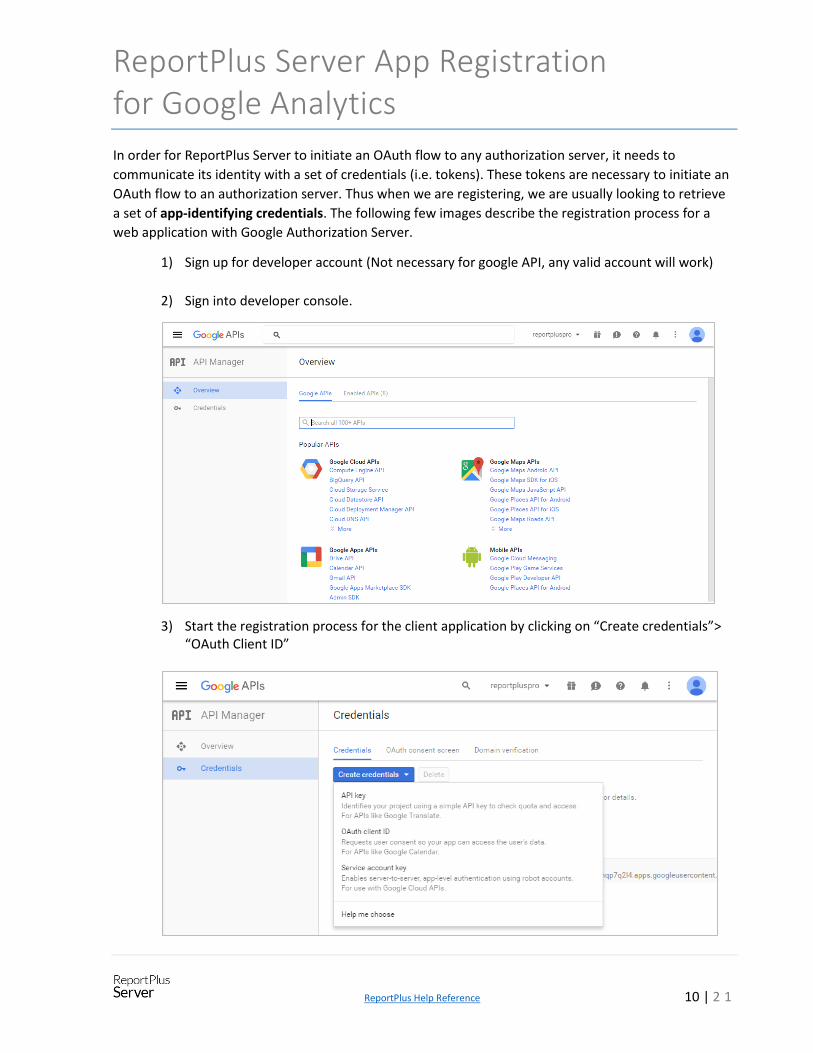
ReportPlus Server App Registration for Google Analytics
In order for ReportPlus Server to initiate an OAuth flow to any authorization server, it needs to
communicate its identity with a set of credentials (i.e. tokens). These tokens are necessary to initiate an
OAuth flow to an authorization server. Thus when we are registering, we are usually looking to retrieve
a set of app-identifying credentials. The following few images describe the registration process for a
web application with Google Authorization Server.
1) Sign up for developer account (Not necessary for google API, any valid account will work)
2) Sign into developer console.
3) Start the registration process for the client application by clicking on “Create credentials”> “OAuth Client ID”

ReportPlus Help Reference 11 | 2 1
4) Configure the Redirect URL where the authorization server should send an authorization response (a). This is where the authorization server will forward an authorization code to the application that may be exchanged for an access token. The URL is static constant for OAuth 2.0 (non-dynamic), however, you may define more than one URL. The application defines what the Redirect URL should be when it initiates OAuth, if this URL does not match any of URLs defined during registration, the authorization server, will not authorize further requests, and the OAuth flow will not complete (b).
a) For ReportPlus Server, the Redirect URL can only be in the following format and to the
following path https://{domain}/api/dashboards/authorized. Redirect URL’s must redirect to a secure endpoint using TLS (i.e. transport protocol must be https) except if it’s to a local machine (e.g. http://localhost). Redirect URL’s cannot contain wildcards. Redirect URL’s must have a domain name that ends in with a public top-level domain such as .com or .org.
b) This is not a requirement for OAuth 1.0a. OAuth 1.0a calls to an authorization server must be cryptographically “signed” based on the contents of the request, allowing the app to define callbacks dynamically.
ReportPlus Help Reference 12 | 2 1
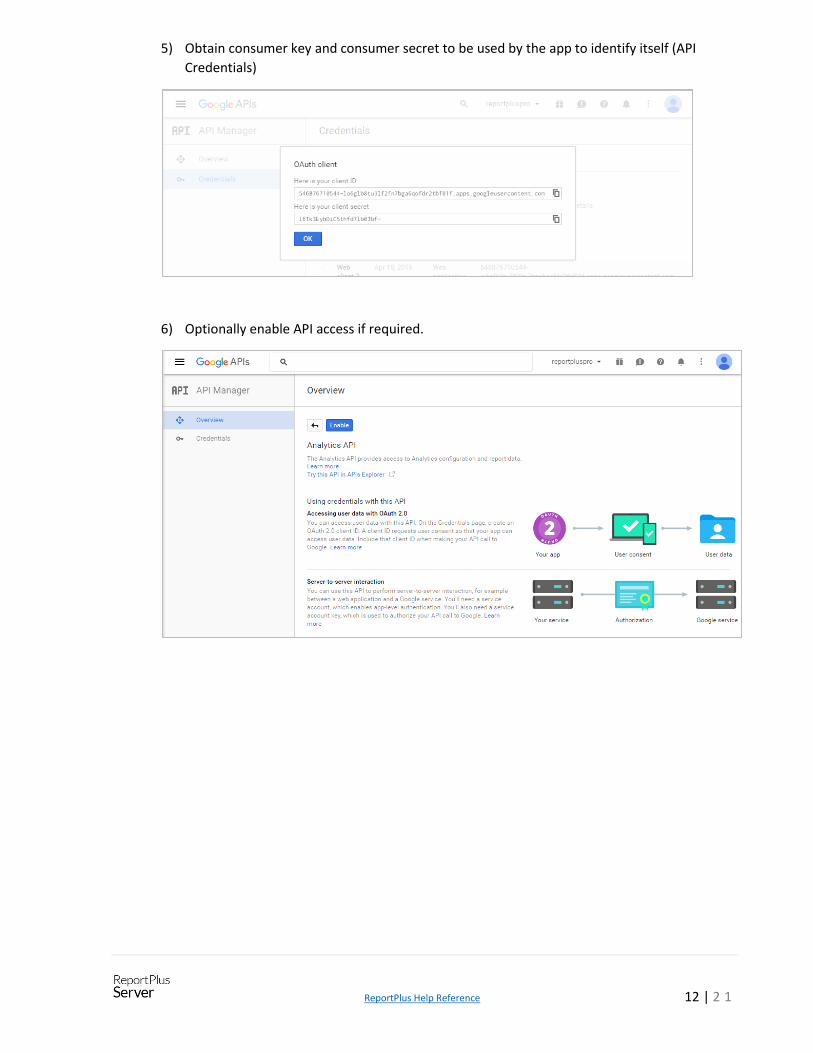
5) Obtain consumer key and consumer secret to be used by the app to identify itself (API
Credentials)
6) Optionally enable API access if required.
ReportPlus Help Reference 13 | 2 1
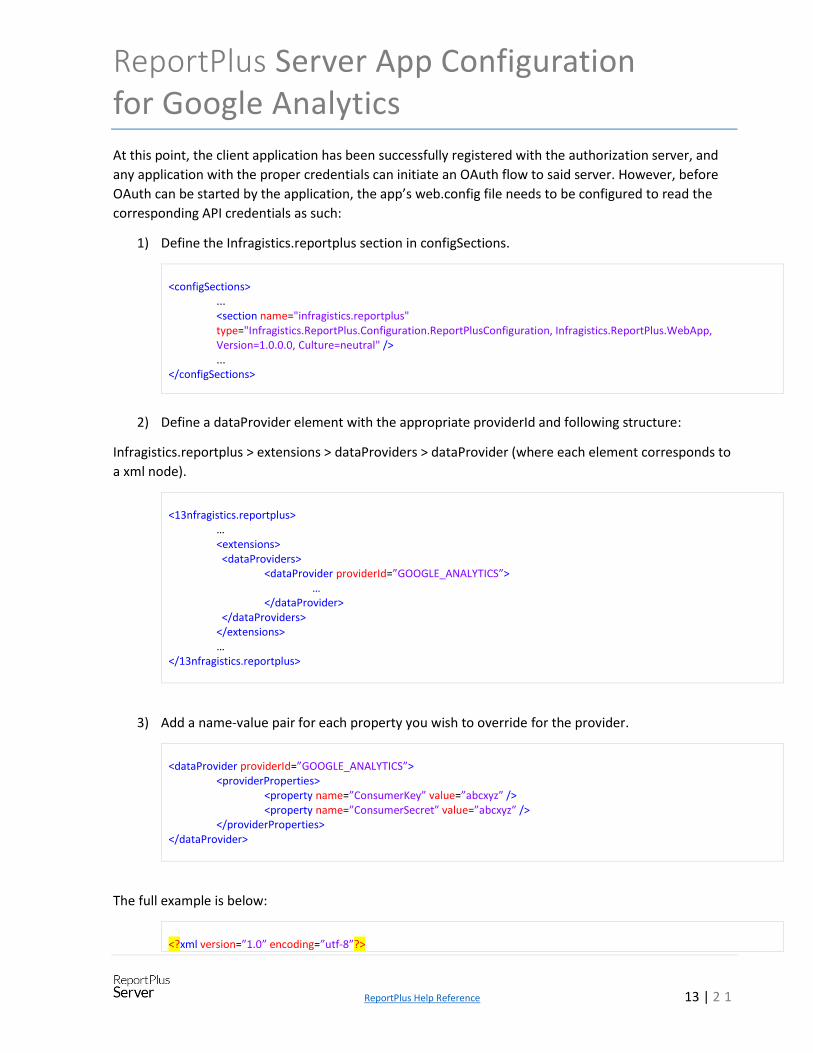
ReportPlus Server App Configuration for Google Analytics
At this point, the client application has been successfully registered with the authorization server, and
any application with the proper credentials can initiate an OAuth flow to said server. However, before
OAuth can be started by the application, the app’s web.config file needs to be configured to read the
corresponding API credentials as such:
1) Define the Infragistics.reportplus section in configSections.
<configSections> ... <section name="infragistics.reportplus"
type="Infragistics.ReportPlus.Configuration.ReportPlusConfiguration, Infragistics.ReportPlus.WebApp, Version=1.0.0.0, Culture=neutral" />
... </configSections>
2) Define a dataProvider element with the appropriate providerId and following structure:
Infragistics.reportplus > extensions > dataProviders > dataProvider (where each element corresponds to
a xml node).
<13nfragistics.reportplus> … <extensions> <dataProviders> <dataProvider providerId=”GOOGLE_ANALYTICS”>
… </dataProvider> </dataProviders> </extensions> … </13nfragistics.reportplus>
3) Add a name-value pair for each property you wish to override for the provider.
<dataProvider providerId=”GOOGLE_ANALYTICS”>
<providerProperties> <property name=”ConsumerKey” value=”abcxyz” /> <property name=”ConsumerSecret” value=”abcxyz” />
</providerProperties> </dataProvider>
The full example is below:
<?xml version=”1.0” encoding=”utf-8”?>
ReportPlus Help Reference 14 | 2 1
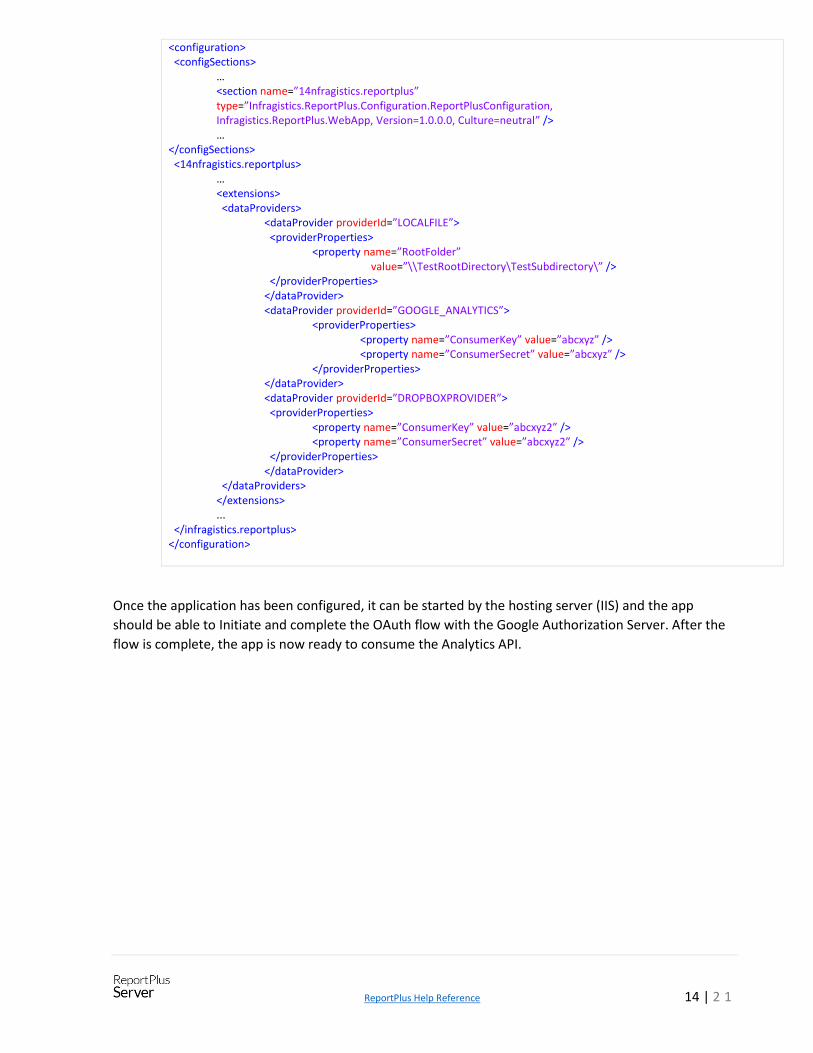
<configuration> <configSections> … <section name=”14nfragistics.reportplus”
type=”Infragistics.ReportPlus.Configuration.ReportPlusConfiguration, Infragistics.ReportPlus.WebApp, Version=1.0.0.0, Culture=neutral” />
… </configSections> <14nfragistics.reportplus> … <extensions> <dataProviders> <dataProvider providerId=”LOCALFILE”> <providerProperties> <property name=”RootFolder”
value=”\\TestRootDirectory\TestSubdirectory\” /> </providerProperties> </dataProvider> <dataProvider providerId=”GOOGLE_ANALYTICS”> <providerProperties> <property name=”ConsumerKey” value=”abcxyz” /> <property name=”ConsumerSecret” value=”abcxyz” /> </providerProperties> </dataProvider> <dataProvider providerId=”DROPBOXPROVIDER”> <providerProperties> <property name=”ConsumerKey” value=”abcxyz2” /> <property name=”ConsumerSecret” value=”abcxyz2” /> </providerProperties> </dataProvider> </dataProviders> </extensions> ... </infragistics.reportplus> </configuration>
Once the application has been configured, it can be started by the hosting server (IIS) and the app
should be able to Initiate and complete the OAuth flow with the Google Authorization Server. After the
flow is complete, the app is now ready to consume the Analytics API.

ReportPlus Help Reference 15 | 2 1
Authorize ReportPlus Server for Google Analytics Data Retrieval
Lastly, we’ll detail how any end-user would go about seeing data in a previously generated report.
ReportPlus Server does not have the ability to author reports at this time, thus a report that uses Google
Analytics data would have to have already been created in either ReportPlus Mobile or ReportPlus
Desktop.
1) Navigate to report and click on it.
2) Click “Sources” on the top right of the page.
3) Click on the Datasource that you wish to connect. Google Analytics for this example.

ReportPlus Help Reference 16 | 2 1
4) After you are redirected to the authorization server, enter your personal account credentials.
5) Authorize third-party access.

ReportPlus Help Reference 17 | 2 1
6) View your report.

ReportPlus Help Reference 18 | 2 1
Appendices Appendix 1: Further resources for OAuth Appendix 2: Document Changelog
ReportPlus Help Reference 19 | 2 1
Appendix 1: Additional Resources for OAuth
• “The OAuth 1.0 Protocol.”
• "The OAuth 2.0 Authorization Framework."
• “OAuth.”
• “Using OAuth 2.0 to Access Google APIs.”

ReportPlus Help Reference 20 | 2 1
Appendix 2: Document Changelog
Version Chapter Section Description
1.0 All chapters All sections Document creation.