nvivo for beginners - grimbeek.com.augrimbeek.com.au/papers/nvivo first steps.pdf• the first step...
TRANSCRIPT

Text analysis
NVivohttp://www.qsrinternational.com/

First steps 2
Starting points
• The first step in using NVivo is to create a project

First steps 3
New project wizard
• NVivo begins the process of setting up a project via a menu-guided interface

First steps 4
New project wizard
• You are prompted to provide a project name

First steps 5
Document explorer
• This major interface guides and provides links that allow you to work with documents, with nodes, with attributes, and with sets, and also sooner or later to create and explore models

First steps 6
Make a project document
• The first step in any project is to locate and import documents, to make proxy documents, or to construct new documents
• You begin doing so by clicking on Make a project documentbutton

First steps 7
Locate and import text or rtf documents
• NVivo “reads” text or rich text documents
• The advantage with rich text is that you can use colours and styles to mark up the document from within NVivo
• The advantage in using NVivo rather than NUD*istis that you don’t need to specify the unit of analysis (sentence, paragraph, etc)

First steps 8
Obtaining document name
• Having selected a document and clicked OK, you are now prompted to name the document in one of a number of ways
• The default is to use the source name

First steps 9
Creating Nodes (categories)
• NVivo offers two major options for specifying categories:
• Node explorer allows the analyst to specify and order a set of categories prior to viewing the document (or while viewing the document)
• Document explorer allows the analyst to specify categories based on extracts observed within the document.

First steps 10
Node explorer
• After importing project documents, you are ready to begin the analytic process
• Node explorer allows you to make, explore, code, and generally explore all node attributes and sets
• Node explorer provides a modifiable top-down view of the node matrix

First steps 11
Creating Nodes: Top-down coding
• The first stage in text analysis is to identify and specify nodes (categories)
• NVivo allows one to specify categories in advance by using the Create Node interface to create Free nodes, Tree nodes, and Case nodes
– Free nodes gather up emergent ideas
– Tree nodes gather up hierarchically ordered categories
– Case nodes capture other material (including participants)

First steps 12
Free nodes
• In the Free tab's Title and Description edit fields, type a title (different from the title of any other free node) and optionally a description
• To classify the new node as an extract, click the Extract checkbox to insert a tick in it
• Click Create. The new node will appear in the left-hand list pane

First steps 13
Tree nodes
• In Title and Descriptionedit fields, type a title (different from title of any other free node) and an optional description
• In address field, new number for new node allocated automatically
• To classify new node as an extract, click Create Extract checkbox (to create hyperlink)
• Click Create to produce new node in left-hand list pane

First steps 14
Tree nodes: Child and sibling nodes
• In Tree tab, can create child nodes by double-clicking on parent nodes to gain access to secondary levels
• Create nodes as per usual
• Node addresses are shown to assist navigation
• Multiple nodes at same level referred to as sibling nodes

First steps 15
Case type node
• Click the Case Type Node option button to create nodes that contain sets of cases (e.g., participants)
• The Case tab also allows you to create child or sibling nodes in the list pane on the left-hand side if required

First steps 16
Explore all project nodes
• Having created an initial set of nodes, it is possible to view, edit, rearrange, and add to them, etc.

First steps 17
Explore all project nodes• The node explorer
allows you to survey your node kingdom
• Sub-levels of the default display can be made visible by double-clicking on parent nodes (categories)
• Selecting a node allows you to edit that node’s properties via the Properties button
First steps 18
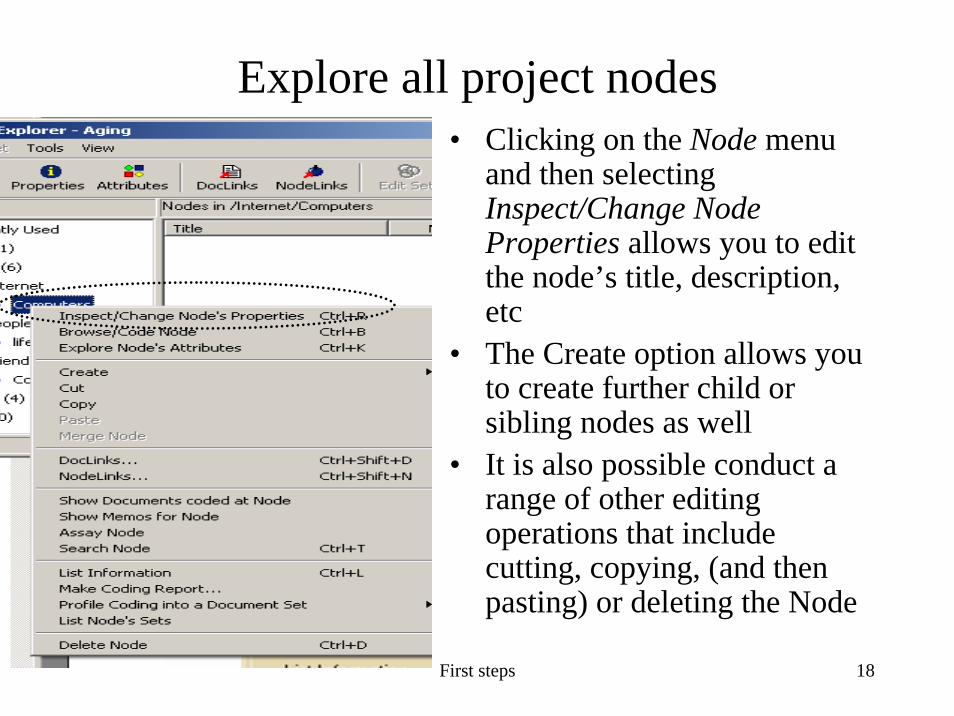
Explore all project nodes• Clicking on the Node menu
and then selecting Inspect/Change Node Properties allows you to edit the node’s title, description, etc
• The Create option allows you to create further child or sibling nodes as well
• It is also possible conduct a range of other editing operations that include cutting, copying, (and then pasting) or deleting the Node

First steps 19
Explore all project nodes
• In theory, the document links button allows you to link specific nodes to specific documents or make notes (memos)
– BE WARNED, these links, once made, can only be removed from within the document explorer (Explore documents option)

First steps 20
Make or change a node attribute
• As well as making and editing nodes, it is possible to make or change (or explore) node attributes

First steps 21
Make or change a node attribute

First steps 22
Case nodes and attributes
• In theory, it is possible to link selected demographic attributes with particular nodes (e.g., the participants and interviewer cases)

First steps 23
Explore all node attributes
• This linkage of attributes and their values with the various nodes provides cross-referencing information that could be useful to the analysis

First steps 24
Coding a document: Bottom-up coding
• To commence coding manually, it is necessary to shift back from the Node explorer to the Document explorer and select the Browse option

First steps 25
Explore a document
• This option allows one to review the range of available documents
• From within this window, you could add or remove documents

First steps 26
Browse a document: Step 1
• Clicking OK allows you to choose one or more document to code manually

First steps 27
Browse a document: Step 2
• Clicking OKallows you to choose a document to code manually

First steps 28
Browse a document: Using the Coder• Selecting the Coder
at the bottom right hand side of the browser window opens the Node Explorer window
• The coder:– Provides information
about pre-constructed and newly added nodes
– Can be used to code directly from text in the document browser

First steps 29
Browse a document: Using Document browser Code button
• One can link specific chunks of text to specific nodes by:– Selecting text in the
document browser– Selecting one of the
nodes listed in the drop-down list of already used nodes at the bottom of the document browser
– Clicking Code at bottom of the document browser

First steps 30
Browse a document: Using In-Vivo
• One can use specific chunks of text to create additional free nodes by:– Selecting text in
the document browser
– Clicking In-Vivo at bottom of the document browser

First steps 31
Browse a document: Using Node explorer Code button
• One can link specific chunks of text to nodes already linked to text by:– Selecting text in the
document browser, a node in the node explorer
– Clicking Code in the Node explorer

First steps 32
Browse a document: Using UnCode button
• One can remove the links between specific chunks of text and specific nodes by:– Selecting text in the
document browser– Clicking UnCode at
bottom of the document browser

First steps 33
Document browser: Using Search document• The Search
document option can be selected via the Document Browser’s Document pull-down menu

First steps 34
Document browser: Using Search document
• One can link specific chunks of text to specific nodes by:
– Opting to search for text
– nominating an existing node name as the storage point for search results
– Choosing to merge results with the coding of the specified node instead of creating a new node
1 2
3

First steps 35
Document browser: Using Search document
• You will be asked to save Browser changes
• You will be given information about the completed search and asked whether you want this node shown in Explorer

First steps 36
Document browser: Using Search document
• The node of interest will be highlighted in the Node explorer and other details listed in the pane below and to the right, and also in a slot at the foot of the window
• Search results will also be summarised in the Node Browser

First steps 37
Document browser: Using colour coding
• One can highlight specific chunks of text without linking them to specific nodes by:– Adding colour and
other formatting directly from within the Document Browser

First steps 38
Document browser: Using Make Text report• A sixth
alternative is to use Make Textreport to produce a numbered document for manual coding and later electronic entry

First steps 39
Document browser: Coding options
• The default setting includes the options of including section and paragraph numbers and Datalink details

First steps 40
Document browser: Text report
• The text report, accessed via the document menu, numbers the text and allows you to do further manual coding– Note that the blank
lines between paragraphs, etc, have been numbered

First steps 41
Document browser: View coding stripes
• Having completed some coding, you might want to check the density and evenness of the coding
• One way to do so is to select View Coding Stripes via the View menu

First steps 42
Document browser: View coding stripes
• Coded portions of text here are shown in terms of their allocation to specific nodes
• The text report when printed can show coding stripes as well

First steps 43
Reviewing the node explorer: A work in progress
• At this point, the node explorer contains a collection of free nodes, some of which could be re-allocated to specific tree nodes– For instance, free nodes
such as calculators, computers, and Internetcould be merged with or linked to the tree node, Computers

First steps 44
Reviewing the node explorer: A work in progress• Right-clicking the
term computers in the collection of free nodes offers a range of options, including shifting it from that part of the display– One option might
be to merge its links with those for the tree node, computers

First steps 45
Reviewing the node explorer: A work in progress
• Cut or copied information is stored in the computer clip-board
• This information can be pasted elsewhere or merged with another node– In this instance, free
node reference to computers have been merged with the tree node, computers

First steps 46
Reviewing the node explorer: A work in progress
• The resulting set of links for the tree node, computer, after merging the free node, computers, can be inspected by clicking the Node browser
First steps 47
Final thoughts about NVivo
• NUD*ist offers a range of options beyond those outlined so far
• It is clear that coding even one document thoroughly could take a while
• It is highly possible that the coding categories in use would be refined along the way
• A range of documents, including notes, photos, etc, can be appended, and included in this coding process