nvc furniture making & upholsterynbte.gov.ng/downloads/nvc in furniture making and...
TRANSCRIPT

NVC Furniture Making & Upholstery: 2009
i
NATIONAL BOARD FOR TECHNICAL EDUCATION
NATIONAL VOCATIONAL CERTIFICATE (NVC)
IN
FURNITURE MAKING & UPHOLSTERY CURRICULUM AND COURSE SPECIFICATIONS
2009
Produced by the National Board for Technical Education (NBTE)
Plot B, Bida Road, P.M.B. 2239, Kaduna Nigeria

NVC Furniture Making & Upholstery: 2009
ii
FORWARD

NVC Furniture Making & Upholstery: 2009
iii
INTRODUCTION

NVC Furniture Making & Upholstery: 2009
iv
TABLE OF CONTENTS S/N ITEM PAGE
1 Forward
2 Introduction
3 Table of Content
4 General Information
5 Curriculum Table 1
6 Course Outlines
i. VFM 101 General Woodwork 2
ii. GMW 101 General Metal Work I 25
iii. GMW 102 General Metal Work II 41
iv. VFM 112 Introduction to Furniture Making 51
v. VFM 121 Machine Woodworking I 57
vi. VFM 211 Machine Woodworking II 67
vii. VFM 212 Furniture Making and Construction I 75
viii. VFM 221 Furniture Making and Construction II 82
ix. VFM 311 Furniture Making and Construction III 88
x. VFM 312 Upholstery Design and Construction 94
xi. VFM 321 Advanced Furniture Making and Construction 102
7 List of minimum resources 108
9 List of Participants 115

NVC Furniture Making & Upholstery: 2009
v
NATIONAL VOCATIONAL CERTIFICATE IN FURNITURE MAKING AND UPHOLSTERY
PROGRAMME NOMENCLATURE National Vocational Certificate in Furniture Making and Upholstery
GOAL AND OBJECTIVES
GOAL
Produce competent hands with good knowledge and practical skills for a successful career in furniture making and upholstery.
OBJECTIVES
A product of NVC in Furniture making and upholstery should be able to:
a) Understand the general and specific techniques in Furniture making and upholstery b) Construct and erect different types of furniture c) Draw and interpret constructional drawings relative to Furniture making d) Apply portable hand and machine tools to process wood, wood products and metal in furniture making e) Work as a skilled furniture maker, either in Self-employment or in paid employment.
ENTRY REQUIREMENTS
The entry requirements for National Vocational Certificate (NVC) in Furniture Making and Upholstery are:
a) Basic Education products (Post-JSS) student with requisite credits in Junior WAEC or NECO b) Post-Secondary student who are unable to gain access to higher education or IEIs, who may have less than 5 credits

NVC Furniture Making & Upholstery: 2009
vi
STRUCTURE OF PROGRAMME :
The National Vocational Certificate (NVC) in Furniture Making and Upholstery programme is in flexible modular form, and is structured to have three parts (i.e. NVC Part I, NVC Part II, and NVC Final) each taken in a span of one year. Each part shall have a cogent and flexible structure and content that would allow the trainee a practical working skill unit and the possibility to exit at that level. Each part incorporates six months intensive training in the school and three months of Supervised Industrial Work Experience Scheme (SIWES).
EVALUATION SCHEME:
The National Vocation Certificate Examination must be externally moderated. The Following guidelines shall apply in grading a student:
Theory: 20% Practical: 50% SIWES: 30%
If there are group practical/projects, trainees must be assessed periodically on individual basis and records kept. Note that trainees are to be assessed on completion of every module.
All failed courses should be re-sited for until when the candidate is able to clear them. The grading system shall be:
Distinction: 70% - 100% Credit: 55% – 69% Pass: 40% – 54% Fail: 0% – 39%

NVC Furniture Making & Upholstery: 2009
1
CURRICULUM TABLE The programme should have an intake of 25 trainees per stream to a maximum of three streams per session.
MODULE YEAR 1 YEAR 2 YEAR 3
S/N
COURSE CODE
COURSE NAME TERM
1 TERM
2
TERM 3
TERM 1
TERM 2
TERM 3
TERM 1
TERM 2
TERM 3
T P T P T P T P T P T P 1 Mathematics 2 2 2 2 2 2 2 English 2 2 2 2 2 2 3 Physics 2 2 2 1 2 1 2 1 2 1 4 Chemistry 2 2 2 1 2 1 2 1 2 1 5 Economics 2 2 2 2 2 2 6 Entrepreneurship 2 2 2 2 7 Technical Drawing 3 3 3 3 8 Computer Studies 1 2 1 2 1 2 1 2 1 2 1 2 9 VFM 101 General Woodwork 2 4 10 GMW 101 General Metal Work I 1 3 11 GMW 102 General Metal Work II 1 3 12 VFM 112 Introduction to Furniture Making 2 4 13 VFM 121 Machine Woodworking I 2 6 14 VFM 211 Machine Woodworking II 2 6 15 VFM 212 Furniture Making & Construction I 2 4 2 4 16 VFM 221 Furniture Making & Construction II 2 4 2 4 17 VFM 311 Furniture Making & Construction III 2 6 18 VFM 312 Upholstery Construction
IND
US
TR
IAL
AT
TA
CH
ME
NT
IND
US
TR
IAL
AT
TA
CH
ME
NT
2 4 2 4
IND
US
TR
IAL
AT
TA
CH
ME
NT
19 VFM 321 Advanced Furniture Making & Construction 2 6 14 12 16 16 17 17 17 15 19 18 17 14 26 32 34 32 37 31

NVC Furniture Making & Upholstery: 2009
2
PROGRAMME: NATIONAL VOCATIONAL CERTIFICATE IN FU RNITURE MAKING AND UPHOLSTERY
COURSE NAME: GENERAL WOOD WORK
COURSE CODE: VFM 101
DURATION: 2 – 0 – 4
UNITS: 6 UNITS
GOAL: This module is designed to introduce the trainee in timber trades to the basic woodwork materials and processes.
GENERAL OBJECTIVES: On completion of this module the trainee will be able to: -
1) Understand general workshop safety rules and be able to apply them in a wood workshop.
2) Know common wood work hand tools, equipment and their uses.
3) Understand the basic process of timber preparation.
4) Know how to mark out stock to given specifications.
5) Understand the working principles of common portable electric power tools.
6) Understand the working principles of basic wood working machines.
7) Understand the basic principles of carcase and frame construction.
8) Understand the basic principles of carcase and frame construction.
9) Know common adhesives used in woodwork construction, their preparation and applications.
10) Know common fittings and fastenings used in woodwork construction.

NVC Furniture Making & Upholstery: 2009
3
11) Understand the purpose of finishing woodwork items.

NVC Furniture Making & Upholstery: 2009
4
PROGRAMME: VOCATIONAL ENTERPRISE CERTIFICATE IN FURNITURE DE SIGN AND UPHOLSTERY COURSE: GENERAL WOOD WORK COURSE CODE: VFM 101 CONTACT HOURS: 2 – 0 – 4 GOAL: THIS MODULE IS DESIGNED TO INTRODUCE THE TRAINEE IN TIMBER TRADES TO THE BASIC WOODWORK MATERIALS AN D PROCESSES. COURSE SPECIFICATION: THEORETICAL CONTENT COURSE SPECIFICATION: PRACTICAL CONTENT GENERAL OBJECTIVE 1.0: UNDERSTAND GENERAL WORKSHOP SAFETY RULES AND BE AB LE TO APPLY THEM IN A WOOD WORKSHOP. Week Specific Learning Objectives Teacher’s Activities Learning Resources Specific Learning Objective Teacher’s Activities Learning Resources 1.1 Identify various safety
rules in wood workshop under the following headings: - a) General Machine shop
safety. b) Electrical equipment
safety c) Mechanical fault
safety d) Safe machine
operation.
1.2 List sources of hazards in a wood workshop such as: - a) Improper handing and
using hand tools, power tools and machines.
b) Stepping on or striking obstructions left on the floor or benches in the workshop
c) Careless lifting, moving and storing materials, jobs, tools and machines in the workshop.
d) Using inflammable liquids or materials
e) Inhaling vapour or fumes.
• Explain the safety rules obtainable in wood workshop under the under-listed heading: a) General Machine
shop safety. b) Electrical
equipment safety c) Mechanical fault
safety d) Safe machine
operation
• Explain with examples how accidents can occur through the various items listed in 1.2.
• Explain the nature of the accidents that can occur from the situations listed above and how they can be prevented.
• Explain the need to be safety conscious in the workshop.
Chalkboard
Lesson notes
Pictures/Postures of accidents in the workshop
First aid kits
Fire Extinguishers
Safety wears e.g. Over-all (non-flowing dress), Safety boots, Goggles, Hand gloves etc.
• Identify safety wears and equipment in a wood workshop e.g. Over-all (non-flowing dress), Safety boots, Goggles, Hand gloves, First-aid kit, Fire Extinguishers etc.
• Identify basic provisions in the First aid box.
• Show student basic safety wears and equipment in a wood workshop e.g. Over-all (non-flowing dress), Safety boots, Goggles, Hand gloves, First-aid kit, Fire Extinguishers etc.
• Teach students how to use First-aid facilities in the event of accident within the workshop and around the workshop environment.
• Introduce students to the location of fire extinguishers.
• Use films, pictures to teach student the use of fire extinguishers in the case of emergency.
Chalkboard
Charts
Illustrations
First aid kits
Fire Extinguishers
Pictures/postures of accidents in the workshop
Basic tools obtainable in the wood workshop
Safety wears e.g. Over-all (non-flowing dress), Safety boots, Goggles, Hand gloves etc.

NVC Furniture Making & Upholstery: 2009
5
1.3 Outline the nature of the accidents that can occur from the situations listed above and how they can be prevented.
1.4 Name safety wears and equipment essential in a wood workshop and their application in working situation.
1.5 Identify safety rules relating to the following working situations: a) Clothing and health
hazards. b) Workshop hygiene c) Movement and other
behavior of students in the workshop
d) Working Materials handling
e) Tool handling, storage and usage.
f) Machine operation. g) Fires out-break.
1.6 Describe appropriate procedure to follow in the event of accident or danger in the workshop. A typical procedure is as follows: a) Application of First–
aid to the victim. b) Identification of the
cause of the accident. c) Removal or
rectification of the cause of accident
• Give examples of safety wears and equipment in a wood workshop and their uses. Examples include; Overall dress (non flowing type), safety boots, eye-goggles, fire extinguishers, sand buckets, water buckets, etc.
• Explain in detail, the safety rules relating to the following working situation: - a) Clothing and health
hazards. b) Workshop hygiene c) Movement and
other behavior of workers in a workshop
d) Working Materials handling
e) Tool handling, storage and usage.
f) Machine operation. g) Fire out-break
• Give a detailed explanation of the procedure to follow in the event of accident within the workshop and around the workshop
• Demonstrate to student how to effect treatment of accidents arising from sources of hazards in the wood workshop listed in 1.2.

NVC Furniture Making & Upholstery: 2009
6
d) Reporting the incident to the appropriate authority.
e) Keeping record of accidents for use by the appropriate authority of the school or industry.
environment.
GENERAL OBJECTIVE 2.0: KNOW COMMON WOODWORK HAND TOOLS AND THEIR USES. 2.1 State the categories of
woodwork hand tools namely: a) Holding and
supporting tools. b) Geometrical/marking
tools c) Percussion and
impelling tools d) Cutting tools
2.2 List examples of each category of woodwork hand tools listed above such as: a) Holding & supporting
tools e.g. the cramps, braces, etc.
b) Geometrical/marking tools e.g. try squares, dividers and gauges.
c) Percussion & impelling tools e.g. hammers, screw drivers, etc.
d) Cutting tools e.g. saws, planes, chisels, etc.
2.3 State the application of various hand tools listed
• Classify woodwork hand tools into the following categories: a) Holding and
supporting tools. b) Geometrical/marki
ng tools c) Percussion &
impelling tools d) Cutting tools
• Give examples of each category of woodwork hand tool and their applications.
• Explain the uses of various woodwork hand tools listed in 2.2.
• Explain safety precautions to be observed while using woodwork hand tools for furniture making.
• Explain with examples the proper procedure of maintaining the woodwork hand tools.
Chalkboard
Lesson notes
Pictures/Posters
Sketches/Diagrams
Wall Charts
• Identify various tools belonging to each category of woodwork hand tools listed in 2.2.
• Name essential parts of each woodwork hand tool identified above.
• Sketch different tools listed in 2.2.
• Use various woodwork hand tools to carry out specific operations in furniture making.
• Carry out basic servicing and maintenance of hand tools used in woodwork.
• Show student examples of woodwork hand tools belonging to the following categories: a) Holding &
supporting tools e.g. the cramps, braces, etc.
b) Geometrical/marking tools e.g. try squares, dividers and gauges.
c) Percussion & impelling tools e.g. hammers, screw drivers, etc.
d) Cutting tools e.g. saws, planes, chisels, etc.
• Demonstrate the uses of various woodwork hand tools in furniture making.
• Demonstrate proper
Chalkboard
Pictures/Posters
Sketches/Diagrams
Wall Charts
Real objects of woodwork hand tools e.g.
a. Holding & supporting tools e.g. the cramps, braces, etc.
b. Geometrical/marking tools e.g. try squares, dividers, gauges.
c. Percussion & impelling tools e.g. hammers, screw drivers, etc.
d. Cutting tools e.g. saws, planes, chisels, etc.

NVC Furniture Making & Upholstery: 2009
7
above in woodwork practice.
2.4 State the necessary safety precautions to be observed while using hand tools in woodwork practice.
2.5 Describe basic procedure of maintaining the woodwork hand tools.
procedure for carrying out basic maintenance of woodwork hand tools such as: -
a) Adequate sharpening of cutters
b) Cleaning tools before and after use
c) Lubricating all tools before and after use for easy operation and to avoid rust.
GENERAL OBJECTIVE 3.0: UNDERSTAND THE BASIC PROCESS OF TIMBER PREPARATION. 3.1 List the tools used for
timber preparation.
3.2 List the steps involved in timber preparation e.g.: Select and plane the a) Face side b) Face edge c) Thicknessing d) Width e) End f) length
3.3 Explain necessary safety precautions involved in timber processing.
• Explain the principles of cutting and planing of wood to sizes using hand tools.
• Explain the tools used for timber preparation listed in 3.1.
• Explain the steps involved in timber preparation listed in 3.2.
• Explain the choice of tools appropriate for each step of timber preparation listed in 3.2.
• Explain necessary safety precautions involved in timber processing.
Chalkboard
Lesson notes
Pictures/Posters
Sketches/Diagrams
Wall Charts
• Select timber for wood work construction.
• Identify tools used for timber preparation.
• Saw and plane timber to given length, width and thickness.
• Select and plane the prepared timber according to the following items a) Face side b) Face edge c) Thicknessing d) Width e) End f) Length
• Plane timber to size, following the proper
• Select timber with student for wood work construction.
• Show student tools used for timber preparation.
• Show student workshop processes involved in timber processes.
• Demonstrate the sawing and planing operations on a selected timber.
• Show student how
Chalkboard
Lesson notes
Pictures/Posters
Sketches/Diagrams
Wall Charts
Woodwork tools e.g. Marking out tools, Cutting tools, Planing tools.
Logs of Timber
Cut pieces of wood

NVC Furniture Making & Upholstery: 2009
8
sequence i.e. a) Plane the face side
and mark b) Plane the face edge
and mark. c) Gauge to correct
width and remove waste.
d) Gauge to correct thickness and remove waste
e) Plane one end f) Cut and plane the
measured length to given specification.
• Indicate safety precautions to be observed while carrying out timber processing.
to select and plane the face side, face edge, thicknessing, width, end, length of the prepared timber for woodwork construction.
• Guide student to carry out planing of timber following the proper sequence highlighted in the corresponding student’s practical learning outcome.
• Take student on industrial visits to observe timber processing in detail.
• Indicate safety precautions necessary to be observed while carrying out timber processing.
GENERAL OBJECTIVE 4.0: KNOW HOW TO INTERPRET WORKING DRAWINGS AND MARK OU T STOCK TO GIVEN SPECIFICATIONS. 4.1 Identify sketches of various
projects in woodwork.
4.2 Identify working drawings of various projects in woodwork.
• Teach student how to make simple sketches as well as working drawings of various projects in woodwork.
• Explain the
Chalkboard
Lesson notes
Pictures/posters
Wall charts
• Select tools for marking out.
• Mark out stock to given specification.
• Make simple working
• Demonstrate marking out operations using the appropriate tools.
• Teach student how
Chalk board
Sketches
Real objects of wood working tools

NVC Furniture Making & Upholstery: 2009
9
4.3 Identify the differences between 4.1 and 4.2 above.
4.4Interpret simple working drawings of woodwork constructions.
4.5 Identify conventional representations for timber fastenings etc. on a working drawing.
composition of a working drawing of any woodwork construction.
• Differentiate between a sketch and a working drawing of any woodwork construction.
• Explain with examples of real working drawings how to interpret drawings in woodwork constructions.
• Illustrate how to represent timber fastenings on a working drawing.
Sketches
Working drawings
Samples of woodwork constructions to be used for exercises in working drawings.
Drawing kits and materials
drawings of wood work construction.
• Represent timber fastenings on a working drawing.
to make simple working drawings of woodwork construction.
• Show student how to represent timber fastenings on a working drawing.
Pictures/posters
Wall charts
Working drawings
Samples of woodwork constructions to be used for exercises in working drawings.
Drawing kits and materials
GENERAL OBJECTIVE 5.0: UNDERSTAND THE WORKING PRINCIPLES OF COMMON PORTAB LE ELECTRIC POWER TOOLS. 5.1 List the common portable
electric power tools a) Portable saw b) Potable planer c) Portable drill d) Portable sander e) Jig saw.
5.2Describe the operational principles of each portable electric power tools listed above.
5.3 State the uses of each portable electric power tools listed in 5.1e.g.
• Give examples of portable electric power tools namely: a) Portable saw b) Potable planer c) Portable drill d) Portable sander e) Jig saw.
• Present samples of portable electric power tolls for the student to see.
• Explain the principles of operation of each
Chalkboard
Lesson notes
Sketches/Diagrams
Pictures/Posters
Wall charts
• Identify each portable electric power tools listed in 5.1.
• Identify the essential parts of each portable electric power tool.
• Carry out specific woodwork operations using the appropriate portable electric power tool applying all necessary safety precautions e.g.: a) Portable saw for
sawing.
• Show student each portable electric power tool listed in 5.1 and guide them to name their essential parts.
• Demonstrate the operation of each portable electric power tool in carrying out its specific duties such as; planing, sawing, mitring, drilling holes, cutting
Chalk board/
Sketches /Diagrams
Pictures/Posters
Wall charts
Samples of Portable electric power tools such as: � Portable saw � Potable planer � Portable drill � Portable sander � Jig saw.

NVC Furniture Making & Upholstery: 2009
10
a) Portable saw for sawing.
b) Portable planer for planing
c) portable drill for drilling d) Portable sander for
sanding e) Jig saw for sawing
shapes and curves. f) Portable router for
making moldings, grooves, rebating, etc.
portable electric power tools listed above.
• Explain the application of each portable electric power tools.
b) Portable planer for planing
c) Portable drill for drilling
d) Portable sander for sanding.
e) Jig saw for sawing shapes and curves.
f) Portable router for making moldings grooves, rebating, etc.
• Perform operations out with the portable electric power tools include; sand papering, mitring, cutting circles, curves, shapes, grooving, rebating.
• Carry out basic servicing and maintenance of the available portable electric power tools.
circles, sand papering, rebating, etc.
• Guide student to carry out basic servicing and maintenance of the available portable electric power tools.
Working materials e.g. cut pieces of wood
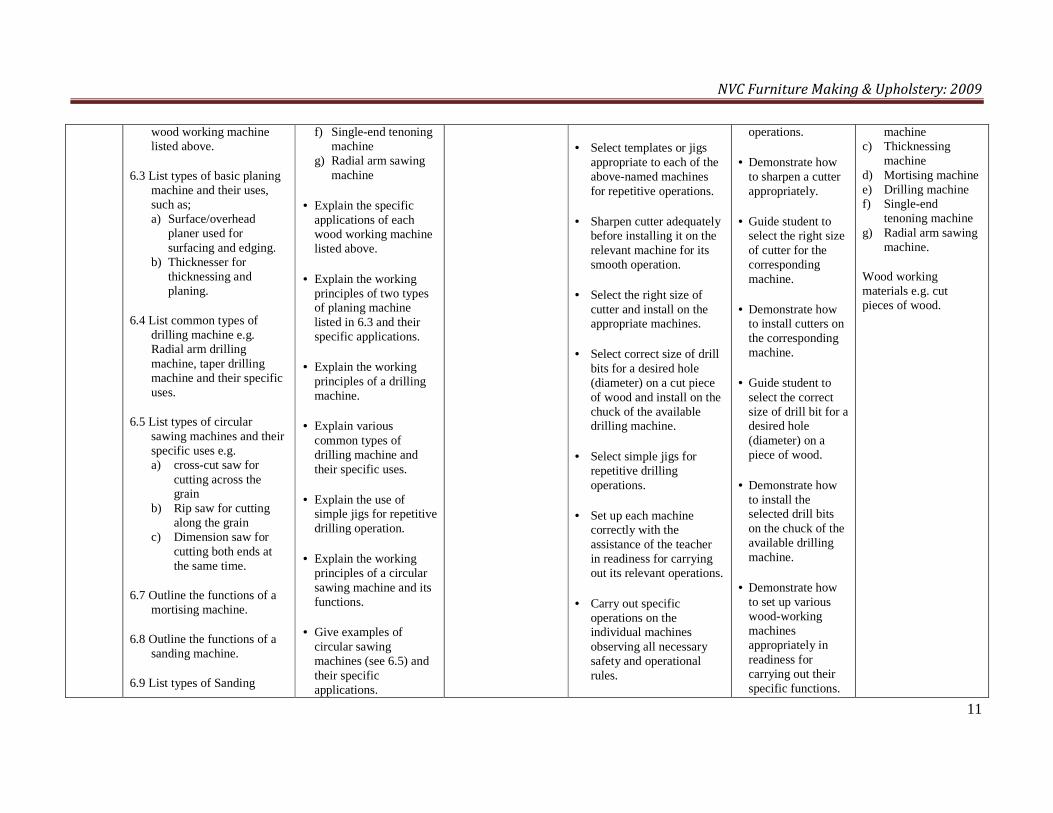
GENERAL OBJECTIVE 6.0: UNDERSTAND THE WORKING PRINCIPLES OF BASIC WOOD WO RKING MACHINES. 6.1 List the basic wood-
working machines namely; a) Circular sawing
machine b) Surface planing
machine c) Thicknessing machine d) Mortising machine e) Drilling machine f) Single-end tenoning
machine g) Radial arm sawing
machine.
6.2 State the basic uses of each
• Explain the purpose of machinery use in woodwork.
• Give examples of basic wood-working machines e.g.: a) Circular sawing
machine b) Surface planing
machine c) Thicknessing
machine d) Mortising machine e) Drilling machine
Chalkboard
Lesson notes
Sketches/Diagrams
Pictures/Posters
Wall charts
• Identify the essential parts of the under-listed wood working machines; a) Circular sawing
machine b) Surface planing
machine c) Thicknessing
machine d) Mortising machine e) Drilling machine f) Single-end tenoning
machine g) Radial arm saw
planing machine.
• Show student the various wood working machines listed in 6.1.
• Guide student to name the essential parts of each wood working machine.
• Show student the templates or jigs appropriate to each of the machine for repetitive
Chalkboard
Lesson notes
Sketches/Diagrams
Pictures/Posters
Wall charts
Various types of wood working machines e.g. a) Circular sawing
machine b) Surface planing
NVC Furniture Making & Upholstery: 2009
11
wood working machine listed above.
6.3 List types of basic planing machine and their uses, such as; a) Surface/overhead
planer used for surfacing and edging.
b) Thicknesser for thicknessing and planing.
6.4 List common types of drilling machine e.g. Radial arm drilling machine, taper drilling machine and their specific uses.
6.5 List types of circular sawing machines and their specific uses e.g. a) cross-cut saw for
cutting across the grain
b) Rip saw for cutting along the grain
c) Dimension saw for cutting both ends at the same time.
6.7 Outline the functions of a mortising machine.
6.8 Outline the functions of a sanding machine.
6.9 List types of Sanding
f) Single-end tenoning machine
g) Radial arm sawing machine
• Explain the specific applications of each wood working machine listed above.
• Explain the working principles of two types of planing machine listed in 6.3 and their specific applications.
• Explain the working principles of a drilling machine.
• Explain various common types of drilling machine and their specific uses.
• Explain the use of simple jigs for repetitive drilling operation.
• Explain the working principles of a circular sawing machine and its functions.
• Give examples of circular sawing machines (see 6.5) and their specific applications.
• Select templates or jigs appropriate to each of the above-named machines for repetitive operations.
• Sharpen cutter adequately before installing it on the relevant machine for its smooth operation.
• Select the right size of cutter and install on the appropriate machines.
• Select correct size of drill bits for a desired hole (diameter) on a cut piece of wood and install on the chuck of the available drilling machine.
• Select simple jigs for repetitive drilling operations.
• Set up each machine correctly with the assistance of the teacher in readiness for carrying out its relevant operations.
• Carry out specific operations on the individual machines observing all necessary safety and operational rules.
operations.
• Demonstrate how to sharpen a cutter appropriately.
• Guide student to select the right size of cutter for the corresponding machine.
• Demonstrate how to install cutters on the corresponding machine.
• Guide student to select the correct size of drill bit for a desired hole (diameter) on a piece of wood.
• Demonstrate how to install the selected drill bits on the chuck of the available drilling machine.
• Demonstrate how to set up various wood-working machines appropriately in readiness for carrying out their specific functions.
machine c) Thicknessing
machine d) Mortising machine e) Drilling machine f) Single-end
tenoning machine g) Radial arm sawing
machine.
Wood working materials e.g. cut pieces of wood.

NVC Furniture Making & Upholstery: 2009
12
machine e.g. a) Overhead travelling
belt sander b) Disc and bobbing
sander c) Drum sander
6.10 Differentiate between a chain cutter and hollow chisel used in a mortising machine.
6.11 State safety and operational rules to observe while working in the listed wood working machines.
6.12 State basic servicing and maintenance operations to be carried on the individual wood working machines e.g. cleaning and greasing before and after use.
• Explain the functions of a circular sawing machine such as: - a) Ripping to required
width b) Cutting to required
length c) Mitring d) Rebating e) beveling etc
• Explain the working principles of a mortising machine and its functions.
• Explain the working principles of a sanding machine and its functions.
• Explain the applications of each of the under-listed sanding machine: a) Overhead travelling
belt sander b) Disc and bobbing
sander c) Drum sander.
• Explain the basic differences between a chain cutter and hollow chisel used in a mortising machine.
• Explain all safety and operational rules
• Carry out basic servicing and maintenance of the various wood working machines e.g. cleaning and greasing before and after use.
• Demonstrate how to operate various wood working machines for their specific functions observing all necessary safety and operational rules.
• Demonstrate how to carry out repetitive drilling operations using simple jigs mounted on the available drilling machine.
• Guide student to carry out basic maintenance of the various wood working machines.

NVC Furniture Making & Upholstery: 2009
13
applicable to the use of above-mentioned wood working machines.
• State basic servicing and maintenance operations to be carried on the individual wood working machines e.g. cleaning and greasing before and after use.
GENERAL OBJECTIVE7.0:UNDERSTAND THE BASIC PRINCIPLES OF CARCASE AND FRAM E CONSTRUCTION 7.1 List common carcase joints
used in woodwork construction e.g. a) Widening joints b) Butt joints c) Dowel joints d) Tongue and groove
joints e) Slot-screw joints f) Angle joints g) Mitre joint h) Lap joint i) Dovetail joint j) Through dovetail joint k) Lap dovetail joint l) Cross halving joints m) Housing joints n) Through housing
joints o) Stop housing joint,
etc.
7.2 State the uses of various carcase joints listed above.
• Explain the basic principles of carcase construction.
• Give examples of common carcase joints used in wood work construction.
• Make sketches of common carcase joints used in woodwork on the chalkboard for student to copy.
• Show student models of common carcase joints and their respective applications.
• Explain the principles of frame construction.
• Make sketches of
Chalkboard
Lesson notes
Sketches/Diagrams
Pictures/Posters
Wall charts
Models of carcase joints
Wood materials
• Identify various joints used in a particular carcase construction.
• Construct common joints used in carcase construction by hand process.
• Apply the constructed joints in a particular carcase construction.
• Test a constructed carcase for squareness using appropriate tools.
• Produce the following frame joints by hand process: - a) Butt & Dowel joints b) Mortise & Tenon
joints c) Mitre joints
• Show student common joints used on selected car-case items
• Demonstrate how to construct common joints used in car-case construction.
• Demonstrate how to construct simple car-case items using appropriate car-case joints.
• Make simple car-case moldings using appropriate car-case joints.
• Show student appropriate tools
Chalkboard
Lesson notes
Sketches/Diagrams
Pictures/Posters
Wall charts
Models of carcase joints
Wood materials
Tools for making the constructing the joints such as -Tenon saw, -Chisels -Try square -Plane etc
Materials for ripping edges of manufactured

NVC Furniture Making & Upholstery: 2009
14
7.3 Sketch common carcase joints.
7.4 Identify joints used in frame construction.
7.5 Sketch common framing joints.
7.6 State possible uses of framing joints.
7.7 List factors that must be considered in frame construction such as: a) Rigidity b) Jointing method c) Squareness of frame
in all directions.
7.8 Describe the application of the under-listed frame joints made by hand process: a) Butt & dowel joints b) Mortise & Tenon
joints c) Mitre joints
7.9 State the purpose of lipping in car-case construction.
7.10 Name the materials used for lipping edges of manufactured boards such as: a) Veneer b) Solid wood.
various framing joints on the chalkboard for student to copy.
• Explain factors that must be considered in frame construction, e.g. a) Rigidity b) Jointing method c) Squareness of
frame in all directions.
• Explain the principles of triangulation in relation to the rigidity of a square frame construction.
• Explain the composition and application of the following frame joints made by hand process: a) Butt & dowel joints b) Mortice & Tenon joints c) Mitre joints
• Explain the reason for lipping edges of car-case items.
• Give examples of materials used in lipping e.g. veneer, solid wood and their
• Assemble frame components using appropriate frame joints
• Test the assembled frame for squareness using appropriate tools.
• Lip edges of manufactured boards using; a) Veneer b) Solid wood
• Identify safety precautions to be observed while constructing joints for carcase and frame construction.
• Identify safety precautions to be observed while carrying out lipping of manufactured board.
used for testing squareness of a car- case construction.
• Demonstrate how to test a car-case construction for squareness.
• Show student models of frame joints and their respective applications.
• Demonstrate how to produce the under-listed frame joints by hand process: a) Butt & Dowel
joints b) Mortise &
Tenon joints c) Mitre &
Feather joints
• Demonstrate how to assemble frame components using the appropriate frame joints.
• Demonstrate how to test the assembled frame for squareness using appropriate
board such as veneer, solid wood

NVC Furniture Making & Upholstery: 2009
15
7.11 State the application of the lipping materials listed above in wood work construction.
7.12 State necessary safety precautions to be observed while constructing joints for carcase and frame construction.
7.13 Show student safety precautions to be observed while carrying out lipping of manufactured board.
respective applications.
• Explain the necessary safety precautions to be observed while constructing joints for carcase and frame construction.
• Explain the safety precautions to be observed while carrying out lipping of manufactured board.
tools.
• Demonstrate how to lip edges of manufactured boards using veneer and solid wood.
• Show student necessary safety precautions to be observed while constructing joints for carcase and frame construction.
• Show student safety precautions to be observed while carrying out lipping of manufactured board.
GENERAL OBJECTIVE 8.0: KNOW VARIOUS MATERIALS USED IN WOODWORK CONSTRUCTI ON. 8.1Classify timber into two
groups namely: a) Hard wood b) Soft wood
8.2 State the main structural characteristics of hard wood and soft wood.
8.3 Differentiate between hard wood and soft wood.
8.4 Define conversion of
• Explain the growth of timber, how it is felled and cut into logs for conversion.
• Explain the basic classification of wood into hard wood and soft wood and their differences.
• Explain the structural characteristics of hard
Chalkboard
Lesson notes
Sketches/Diagrams
Pictures/Posters
Wall charts
• Identify samples of wood belonging to hard wood and soft wood groups.
• Identify samples of manufactured boards e.g. a) Plywood b) Lamin board c) Block board d) Chip board, etc.
• Identify cut samples of Nigerian timbers e.g.
• Illustrate with annotated sketches how a log of wood is converted to timber by the following methods:
a) through & through sawing
b) quarter sawing c) Back sawing.
• Present specimen
Chalkboard
Lesson notes
Sketches/Diagrams
Pictures/Posters
Wall charts
Samples of cut pieces of Nigerian timber.

NVC Furniture Making & Upholstery: 2009
16
timber.
8.5 State the purpose of conversion of timber.
8.6 Name the methods of converting logs into timber viz: a) through & through
sawing b) quarter sawing c) back sawing, etc
8.7 State the merits and demerits of each type of conversion method listed in 8.6.
8.8 State the purpose of seasoning timber.
8.9 Differentiate between the two methods of seasoning timber namely: a) kiln seasons b) natural/air seasoning
8.10 State the merits and demerits of each method of seasoning timber listed in 8.9 above.
8.11 Name timber defects such as: a) splits b) warp c) twist d) case hardening e) Collapse, etc.
wood and soft wood.
• Explain the meaning of conversion of timber and its purposes.
• Explain the various methods of converting logs into timber listed in 8.6, noting their merits and demerits.
• Explain the meaning of seasoning timber and its purpose.
• Explain the differences between natural seasoning and artificial seasoning of timber.
• Explain various methods of seasoning timber listed in 8.6.
• Explain the merits and demerits of kiln seasoning, natural/air seasoning and back sawing; noting their specific applications.
• Explain the needs for proper stacking of boards in the process of seasoning timber.
• Explain the nature of various timber defects
a) Mahogany, b) Obeche c) Cedar d) Afara e) Abura, etc.
• Identify various timber defects listed in 8.11 on an infected timber samples, their causes and possible prevention.
• Identify the necessary precaution to be observed while carrying out conversion of log to timber as well as during seasoning of timber.
of hard wood and soft wood for the student to see.
• Guide student to separate hard wood and soft wood.
• Present specimen of board leaves and spiky leaves e.g. Gmelina and whistling pine leaves.
• Use chalkboard, charts and diagrams to illustrate methods of seasoning.
• Use chalkboard, charts and diagrams to illustrate types of timber defects listed in 8.11.
• Present samples of timber with defects and guide student to identify the type of defect, their causes and possible prevention.
• Present cut
Under-listed Nigerian trees found in the forest while the student is on field trip: a) Mahogany, b) Obeche c) Cedar d) Afara e) Abura, etc.
Samples of manufactured boards used in furniture making e.g. a) Plywood b) Lamin board c) Block board
d) Chip board, etc.

NVC Furniture Making & Upholstery: 2009
17
8.12 Identify causes of timber defect such as:
a) Fungus (dry rot) b) White ants c) Wood borers, etc.
8.13 Name various Nigerian timbers and their locations e.g.:
a) Mahogany, b) Obeche c) Cedar d) Afara e) Abura, etc
8.14 Outline the characteristics as well as the uses of various Nigerian timbers listed above.
8.15 List types of manufactured boards used in woodwork construction e.g.
a) Plywood b) Lamina board c) Block board d) Chip/Particle board,
etc
816 Outline the structural properties of the common manufactured board listed in 8.15.
8.17 State where each manufactured board listed in 8.15 is used.
listed in 8.11, their causes listed in 8.12 as well as their possible prevention.
• Give examples of Nigerian timbers, their locations and specific applications.
• Examples of Nigerian timbers should include; a) Mahogany b) Obeche c) Cedar d) Afara e) Abura, etc.
• Explain the characteristics of Nigerian timber listed above, in relation to their structural properties, grain size, figure, colour, density, etc.
• Explain the characteristics and structural properties of common manufactured boards.
• Examples of the manufactured board should include: - a) Plywood b) Lamin board c) Block board
samples of Nigerian timbers e.g.
a) Mahogany, b) Obeche c) Cedar d) Afara e) Abura, etc.
• Present samples of manufactured board namely; Plywood, Block board, Lamin board, Chip board.
• Illustrate with annotated diagrams, the cross section of each manufactured board viz.
a. Plywood b. Lamin board c. Block board b) Chip board, etc
• Take student on field trip to chosen forests to see various Nigerian timbers listed above as well to observe the felling of the trees and subsequent conversion of the logs into timber.

NVC Furniture Making & Upholstery: 2009
18
8.18 State the advantages of manufactured boards over solid wood.
8.19 State the necessary precaution to be observed while carrying out conversion of log to timber as well as during seasoning of timber.
d) Chip/Particleboard, etc
• Explain the applications of common manufactured board listed above.
• Explain the advantages of manufactured board over solid wood.
• Explain the necessary precaution to be observed while carrying out conversion of log to timber as well as during seasoning of timber.
• Take student to local timber sheds to see how timbers are stacked for air seasoning.
• Indicate all safety rules to be observed in the course of conversion of log to timber.
• Indicate all safety rules applicable to seasoning of timber.
GENERAL OBJECTIVE 9.0: KNOW COMMON ADHESIVES USED IN WOODWORK CONSTRUCTIO N, THEIR PREPARATION AND APPLICATIONS 9.1 Classify adhesives used in
woodwork construction into interior and exterior types as follows: a) Interior adhesives
include animal, vegetable and thermoplastic glues (p.v.c, ponal), etc.
b) Exterior adhesives include phenol formaldehyde (cascamite), epoxy resin (araldite), etc.
9.2 State the applications of the interior adhesives as well as the exterior adhesives listed above.
• Explain the principles of adhesion in woodwork construction.
• Explain some technical terms related to the use of adhesives in woodwork construction e.g. Pot life, Shelve life, etc.
• Explain the criteria for the basic classification of adhesives into interior and external types.
• Give examples of interior adhesives and
Chalkboard
Lesson notes
Sketches/Diagrams
Pictures/Posters
Wall charts
• Identify various kinds of interior adhesives e.g. animal, vegetable and thermoplastic glues (p.v.c, ponal).
• Identify various kinds of external adhesives such as; phenol formaldehyde (cascamite), epoxy resin (araldite).
• Identify the composition of various samples of both interior and external adhesives.
• Identify real cases where various internal adhesives are used.
• Show student samples of interior adhesives listed in 9.1.
• Show student samples of external adhesives listed in 9.1.
• Guide student to identify the composition of various samples of both internal and external adhesives.
• Show student real cases of the
Chalkboard
Sketches/Diagrams
Pictures/Posters
Wall charts
Samples of adhesives such as:
Interior adhesives which include; animal, vegetable and thermoplastic glues (p.v.c, ponal), etc.
Exterior adhesives which include; phenol formaldehyde

NVC Furniture Making & Upholstery: 2009
19
9.3 State the composition of various adhesives listed in 9.1 above.
also, the external adhesives and their specific applications.
• Explain the composition of various types of adhesives listed in 9.1.
• Identify real cases where various external adhesives are used.
• Prepare various kinds of adhesives for use in woodwork construction observing all necessary safety rules.
• Use appropriate adhesive in woodwork construction applying all necessary safety rules.
application of interior adhesives.
• Show student real cases of the application of external adhesives.
• Demonstrate how to prepare various kinds of external and internal adhesives to be used in woodwork construction.
• Demonstrate how to use appropriate adhesive (both internal and external types) in woodwork construction while observing all necessary safety rules.
(cascamite), epoxy resin (araldite), etc.
Working materials e.g. wood.
Real wood constructions where adhesives are used.
GENERAL OBJECTIVE 10.0: KNOW COMMON FITTINGS AND FASTENINGS USED IN WOODWO RK CONSTRUCTION. 10.1 List fastening accessories
used in woodwork construction such as: -
a) Screws b) Nails c) Corrugated fasteners d) Bolts and nuts, etc
10.2 List holding and pulling accessories used in woodwork construction
• Give examples of fastening accessories, see 10.1.
• Give examples of holding and pulling accessories, see 10.2.
• Explain the properties of the materials e.g. brass, mild steel,
Chalkboard
Lesson notes
Sketches/Diagrams
Pictures/Posters
Wall charts
• Identify various kinds of fastening accessories listed in 10.1.
• Identify various kinds of holding and pulling accessories listed in 10.2.
• Identify the materials used in making common fittings e.g. brass, mild
• Show student samples of fastening accessories used in wood work construction such as: a) Screws b) Nails c) Corrugated
fasteners
Chalkboard
Sketches/Diagrams
Pictures/Posters
Wall charts
Real samples of fastening accessories used in woodwork

NVC Furniture Making & Upholstery: 2009
20
such as: a) Hinges b) Handles c) Locks d) Catches e) Stays, etc
10.3 State the properties of materials used for making common fittings. These materials should include brass, mild steel, aluminium, plastics, etc.
10.4 State the applications of fastening accessories and also holding & pulling accessories.
10.5Describe how fasteners are used to hold two parts together.
aluminium, plastics used in making common fittings.
• Explain the reason for a choice of material e.g. brass, mild steel, aluminum, plastics in making common fittings.
• Use charts, chalkboard and sketches to illustrate the use of common fittings e.g. Butt hinges in woodwork construction.
• Use charts, chalkboard and sketches to illustrate the use of common fastenings e.g. locks in woodwork construction.
• Use chart, chalkboard and sketches to illustrate how fasteners are used to hold two parts together in woodwork construction.
steel, aluminuim, plastics, etc.
• Identify real cases where various kinds of fastening accessories are used.
• Identify real cases where various kinds of holding and pulling accessories are used.
• Select appropriate fittings and fastenings applicable to chosen woodwork construction.
• Use appropriate fasteners to hold two parts together in woodwork construction.
• Fix appropriate fastening accessories listed in 10.1 in a chosen woodwork construction applying the necessary safety precautions.
• Fix appropriate holding and pulling accessories listed in 10.2 in a chosen woodwork construction applying the necessary safety precautions.
d) Bolts and nuts
• Show student samples of holding and pulling accessories used in woodwork construction such as: a) Hinges b) Handles c) Locks d) Catches e) Stays.
• Guide student to identify the applications of various kinds of fastening accessories listed above.
• Guide student to identify the applications of various kinds of holding and pulling accessories listed above.
• Guide student to select appropriate fittings and fastenings applicable to chosen woodwork
construction e.g. a. Screws b. Nails c. Corrugated
fasteners d. Bolts and nuts, etc
Real samples of holding and pulling accessories used in woodwork construction e.g. a. Hinges b. Handles c. Locks d. Catches e. Stays, etc
Working materials e.g. wood.
Real wood constructions where various fastening accessories are used.
Real wood constructions where various holding & pulling accessories are used.
NVC Furniture Making & Upholstery: 2009
21
construction.
• Demonstrate how fasteners are used to hold two parts together.
• Demonstrate the uses of various kinds of fastening accessories in woodwork construction applying the necessary safety precautions.
• Demonstrate the uses of various kinds of holding and pulling accessories in woodwork construction applying the necessary safety precautions.
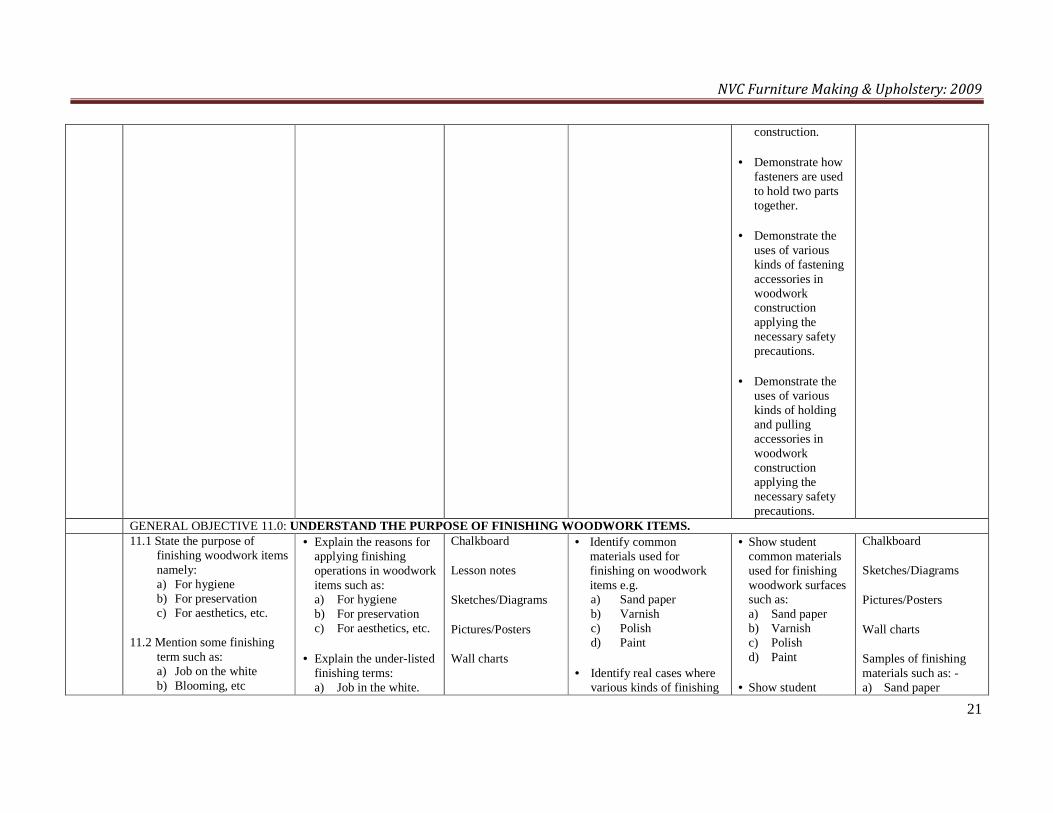
GENERAL OBJECTIVE 11.0: UNDERSTAND THE PURPOSE OF FINISHING WOODWORK ITEMS . 11.1 State the purpose of
finishing woodwork items namely: a) For hygiene b) For preservation c) For aesthetics, etc.
11.2 Mention some finishing term such as: a) Job on the white b) Blooming, etc
• Explain the reasons for applying finishing operations in woodwork items such as: a) For hygiene b) For preservation c) For aesthetics, etc.
• Explain the under-listed finishing terms: a) Job in the white.
Chalkboard
Lesson notes
Sketches/Diagrams
Pictures/Posters
Wall charts
• Identify common materials used for finishing on woodwork items e.g. a) Sand paper b) Varnish c) Polish d) Paint
• Identify real cases where various kinds of finishing
• Show student common materials used for finishing woodwork surfaces such as: a) Sand paper b) Varnish c) Polish d) Paint
• Show student
Chalkboard
Sketches/Diagrams
Pictures/Posters
Wall charts
Samples of finishing materials such as: - a) Sand paper

NVC Furniture Making & Upholstery: 2009
22
11.3 Name common materials used for finishing woodwork surfaces e.g; a) Sand paper b) Varnish c) Polish d) Paints, etc
11.4 State the composition of each material used in finishing woodwork surfaces listed above.
11.5 Describe various applications of each finishing material listed in 11.3 above.
11.6 Outline the criteria for choosing particular finishing material on a given woodwork construction.
11.7 Describe appropriate procedure for carrying out finishing operations on woodwork items i.e. a) Scraping b) Sanding c) Priming or coating d) Re-sanding e) Final finishing e.g.
painting
11.8 State the necessary safety rules to observe while carrying out finishing
a. Blooming, etc.
• Give examples of common materials used in finishing woodwork items namely; a) Sand paper b) Varnish c) Polish d) Paint
• Explain the composition of various finishing materials listed above.
• Explain the specific applications of various types of finishing materials in woodwork construction.
• Explain the reason for selecting particular finishing material for a given job.
• Explain in detail the under- listed steps involved in carrying out finishing operation on a given woodwork item: a) scraping b) sanding c) priming or coating d) Re-sanding e) Final finishing e.g.
painting
• State the necessary
materials listed above are used.
• Select appropriate finishing material to be used on chosen woodwork construction and the equipment needed for its application.
• Carry out finishing operation on a woodwork item following the appropriate procedure listed in 11.5 and observing all necessary safety rules.
• Carry out basic maintenance for finishing equipment.
various applications of finishing materials listed above are used on woodwork items.
• Guide student to select appropriate finishing material to be used on chosen woodwork construction and the equipment needed for its application.
• Demonstrate the appropriate procedure of carrying out finishing operations on woodwork items observing all necessary safety rules.
• Show student how to carry out basic maintenance of finishing equipment.
b) Varnish c) Polish d) Paints, etc
Working materials e.g. wood.
Real wood constructions where various finishing materials are used.
NVC Furniture Making & Upholstery: 2009
23
operations on woodwork items.
safety rules to observe while carrying out finishing operations on woodwork items

NVC Furniture Making & Upholstery: 2009
24
ASSESSMENT STRUCTURE
TYPE OF ASSESSMENT PURPOSE AND NATURE OF ASSESSMENT (GWW 101) WEIGHING Examination Final Examination (written) to assess knowledge and understanding 10 Test At least 2 progress tests for feed back. 10 Practical At least 5 home works to be assessed by the teacher 80 TOTAL WEIGHT 100
RECOMMENDED TEXTBOOKS AND REFERENCES
NAME: WOODWORK IN THEORY AND PRACTICE AUTHOR: JOHN A. WALTON PUBLISHER: GEORGE G HARRAD & CO LTD
NAME: WOODWORK FOR SCHOOLS AND COLLEGES AUTHOR: JOHN CLIFFORD PUBLISHER:

NVC Furniture Making & Upholstery: 2009
25
PROGRAMME: NATIONAL VOCATIONAL CERTIFICATE IN FU RNITURE MAKING AND UPHOLSTERY
COURSE NAME: GENERAL METAL WORK I
COURSE CODE: GMW 101
DURATION: 1 – 0 – 3
UNITS: 4 UNITS
GOAL: This module is designed to introduce the trainee to the fundamentals of general metal work processes including fixing of mechanical parts and production of simple engineering components.
GENERAL OBJECTIVES: On completion of this module the trainee will be able to: -
1) Understand workshop safety rules and their applications in machine shop.
2) Know the physical properties, manufacturing process and application of ferrous and non-ferrous metals in common use.
3) Know how to select and use common measuring, marking out, cutting and striking tools in production of metal works.
4) Understand the basic working principles of drilling machine.
5) Understand the application of various types of screw threads and rivets and be able to rivet and cut screw manually.
6) Understand the ISO system of tolerances and be able to fit their application in engineering production.
7) Know how to produce simple engineering components on the bench.
8) Understand the essential features and working principles of a center-lathe and be able to carry out basic operations on it such as; turning, step turning, taper turning, knurling, chamfering and undercutting.

NVC Furniture Making & Upholstery: 2009
26
PROGRAMME: VOCATIONAL ENTERPRISE CERTIFICATE IN FURNITURE MA KING AND UPHOLSTERY COURSE: GENERAL METAL WORK I COURSE CODE: GMW 101 CONTACT HOURS: 1 – 0 – 3 GOAL: THIS MODULE IS DESIGNED TO INTRODUCE THE TRAINEE TO THE FUNDAMENTALS OF GENERAL METAL WORK PROCESSES INCLUDING
FIXING OF MECHANICAL PARTS AND PRODUCTION OF SIMPLE ENGINEERING COMPONENTS. COURSE SPECIFICATION: THEORETICAL CONTENT COURSE SPECIFICATION: PRACTICAL CONTENT GENERAL OBJECTIVE: 1.0: UNDERSTAND WORKSHOP SAFETY RULES AND THEIR APPLICAT IONS IN MACHINE SHOP. Week Specific Learning Objective Teacher’s Activities Learning Resources Specific Learning Objective Teacher’s Activities Learning Resources 1.1 Identify various safety
rules in general metal workshop under the following headings: - a) General Machine shop
safety. b) Electrical equipment
safety c) Mechanical fault
safety d) Safe machine
operation
1.2 State sources of hazards in a machine shop and how to prevent them e.g. a) Improper handling and
using hand tools, portable electric power tools and machines.
b) Stepping on or striking obstructions left on floors or benches.
c) Careless lifting, moving and storing materials or jobs.
d) Using inflammable or corrosive liquids and gases.
e) Inhaling vapours or fumes, etc
• Explain the safety rules obtainable in general metal workshop under the under-listed headings: a) General Machine
shop safety. b) Electrical
equipment safety c) Mechanical fault
safety d) Safe machine
operation
• Explain with examples the various sources of hazards in a machine shop listed in 1.2.
• Explain the application of workshop and factory safety regulations in the machine shop.
• Explain the relevance of safety wears and equipment listed in 1.4 and their applications.
Chalkboard
Lesson notes
Postures/Posters
Wall charts
Sketches/Diagrams
Samples of safety wears and equipment such as; Overall, eye goggles, hand gloves, safety boots, helmet, fire extinguishers, sand bucket, First-aid box, etc.
• Identify various workshop safety wears and equipment e.g. ; -Overall -Eye goggles -Hand gloves -Safety boots -Helmet -Fire extinguishers -Sand bucket -First Aid box, etc.
• Identify common workshop hand tools, portable electric power tools and machines.
• Exercise caution in handling hand tools, portable electric power tools and machines in the workshop to avoid accidents.
• Exercise caution in lifting, moving and storing materials and jobs in the workshop to avoid accidents.
• Show student the under-listed safety wears and equipment: -Overall -Eye goggles -Hand gloves -Safety boots -Helmet -Fire extinguishers -Sand bucket -First Aid box,
etc.
• Show student common workshop hand tools, portable electric power tools and machines.
• Demonstrate safe ways of handling hand tools, portable electric power tools and machines in the workshop to avoid accidents.
• Show student safe ways of lifting, moving and storing
Chalkboard
Postures/Posters
Wall charts
Sketches/Diagrams
Samples of safety wears and equipment such as; Overall, eye goggles, hand gloves, safety boots, helmet, fire extinguishers, sand bucket, First-aid box, etc.
Samples of workshop hand tools, portable electric power tools and machines to demonstrate their safe handling.
Television & Video machines.
Relevant Posters of workshop accidents, theirs causes prevention, control

NVC Furniture Making & Upholstery: 2009
27
1.3 Outline the purpose of applying workshop and factory safety regulations in the machine shop.
1.4 List safety wears and equipment essential in the machine shop e.g. Overall, eye goggles, hand gloves, safety boots, helmet, fire extinguishers, sand bucket, First-aid box, etc.
1.5 State the application of the above named safety wears and equipment in working situations.
1.6 Outline safety rules and regulations relating to the following conditions: a. Clothing and health
hazards. b. Workshop hygiene c. Movement and other
behavior of workers in the workshop.
d. Materials handling in the workshop.
e. Tool handling, storage and usage.
f. Machine operation g. Fire protection
1.7 Describe appropriate procedure to follow in the event of a workshop accident; Examples of the
• Explain with examples the safety rules and regulations relating to the under-listed conditions : -
a. Clothing and health hazards.
b. Workshop hygiene c. Movement and other
behavior of workers in the workshop.
d. Materials handling in the workshop.
e. Tool handling, storage and usage.
f. Machine operation g. Fire protection.
• Give detailed explanation of appropriate remedial measures to be taken in the event of a workshop accident.
• Explain the relevance of recording workshop accidents and their treatment e.g. for management use and for reference purposes.
• Observe the application of first aid treatment in cases of minor cuts, electric shock, burns in the workshop.
• Apply First aid treatment (when necessary) in the cases of minor cuts, electric shock, burns, etc within or outside the workshop.
• Make wall chart and posters of workshop accidents, their causes, prevention and control.
materials in the workshops to avoid accidents.
• Show films/documentaries on industrial safety.
• Show films/documentaries on workshop & industrial accidents, highlighting their causes, prevention, control and treatment.
• Demonstrate how to apply First aid treatment in the cases of minor cuts, electric shock, burns, etc.
• Demonstrate how to treat emergency cases like artificial respiration, cold compress, etc.
• Assist student to make wall charts and posters of workshop accidents, their causes, prevention and control, for display in the
and treatment.

NVC Furniture Making & Upholstery: 2009
28
procedure may include; d) Application of First
aid to the victim e) Removal or
rectification of the cause of the accident to avoid hurting another person.
f) Reporting the accident to the appropriate authority.
g) Keeping a record of the accident for management use and for reference.
workshop.
GENERAL OBJECTIVE 2.0: KNOW THE PHYSICAL PROPERTIES, MANUFACTURING PROCES S AND APPLICATION OF FERROUS AND NON-FERROUS METALS IN COMMON USE.
2.1 List the physical properties of metals, e.g. ductility, malleability, strength, toughness, brittleness, elasticity, plasticity.
2.2 Describe the physical properties of metals listed above.
2.3 Name the basic classification, composition and properties of carbon steel e.g. plain carbon steel, dead mild steel, medium carbon steel, high carbon steel.
2.4 Name the basic classification, composition and properties of cast iron e.g. grey cast iron, white
• Explain the meaning of the following physical properties of metals: ductility, malleability, strength, toughness, brittleness, elasticity and plasticity.
• Explain the basic classification, composition and properties of the following engineering materials: a) Carbon Steel family b) Cast Iron family c) Alloy Steel
• Give specific examples of engineering materials and components made from the under-listed
Chalkboard
Lesson notes
Posters/Charts
Pictures
Audio-visual aids
• Separate various classes of carbon steels and their applications namely: a) Carbon steel, b) Dead mild steel, c) Medium carbon steel, d) High carbon steel.
• Separate various classes of cast iron and their applications namely; -grey cast iron, -white cast iron, -malleable cast iron, -spheroid graphite cast iron (ductile/nodular iron)
-chilled iron -alloyed cast iron
• Separate various classes of alloy steel and their applications namely;
Guide student to sort various classes of steel and their applications. Guide student to sort various classes of cast iron and their applications. Guide student to sort various classes of alloy steel and their applications. Guide student to sort various kinds of non-ferrous metals and their applications. Take student on industrial visit to observe various processes of steel making listed in 2.6.
Chalkboard
Lesson notes
Posters/Charts
Pictures
Video tapes
Field trip/Excursion
Samples of real objects of engineering materials belonging to the under-listed families: a) Carbon Steel
family b) Cast Iron family c) Alloy Steel

NVC Furniture Making & Upholstery: 2009
29
cast iron, malleable cast iron, spherodial graphite iron (nodular/ductile iron), chilled iron and alloyed cast iron.
2.5 Name the basic classification, composition and properties of alloy steel e.g. high speed steel, high tensile steels, stainless steel, tool steels, manganese steel etc.
2.6 Outline the three fundamental processes of steel making i.e. a) The Cupola process of
manufacture of cast iron.
b) The Blast Furnace process of manufacture of pig iron.
c) The Direct Reduction process of manufacture of steel.
2.7 Name the plants in Nigeria where the above named steel making processes are obtained e.g. a) Cupola process is
available in most Foundries producing cast iron e.g. Railway companies.
b) Blast Furnace plant is available in Ajaokuta
classification of engineering materials: - -Carbon Steel family -Cast Iron family -Alloy Steel
• Explain the following steel production processes; a) Cupola process of
producing cast iron in most cast iron foundries using Cupola furnace e.g. Railway Co-operation.
b) The Blast Furnace process of producing pig iron, available in Ajaokuta, Kogi State.
c) The Direct Reduction process of production of steel, available in Aladja, Delta State.
• Explain the physical properties and applications of the following non-ferrous metals; Copper, Tin, Zinc, Lead, Aluminium and Aluminum alloys e.g. brass (muntz metal, cartridge brass, gilding, etc), bronze (manganese bronze, tin metal, bell metal,
-high speed steel, -high tensile steel, -stainless steel, -tool steel -manganese steel -mild steel
• Identify various processes of steel making, their locations, end –products and applications.
• Identify various examples of non-ferrous metals listed in 2.8 and their applications.
Samples of engineering components made from the under-listed non-ferous metals; Copper, Tin, Zinc, Lead, Aluminium and Aluminum alloys e.g. brass (muntz metal, cartridge brass, gilding, etc), bronze (manganese bronze, tinmetal, bell metal, aluminuim bronze, phosphor bronze).

NVC Furniture Making & Upholstery: 2009
30
Steel Company, Kogi State.
c) Direct Reduction plant is available in Ovwain-Aladja, near Warri, Delta State.
2.8. Describe the physical properties and applications of non-ferrous metals listed below:-
Copper, Tin, Zinc, Lead, Aluminium and Aluminum alloys e.g. brass (muntz metal, cartridge brass, gilding, etc), bronze (manganese bronze, tinmetal, bell metal, aluminuim bronze, phosphor bronze).
aluminuim bronze, phosphor bronze)
GENERAL OBJECTIVE 3.0: KNOW HOW TO SELECT AND USE COMMON MEASURING, MARKI NG OUT, CUTTING AND STRIKING TOOLS IN PRODUCTION OF METAL WORKS.
3.1 Describe “line” measurement.
3.2Describe “end” measurement
3.3 Differentiate between “line” measurement and “end” measurement.
3.4 Outline the uses of datum points, datum lines and datum face in marking out.
3.5 State the functions and
• Illustrate “line” measurement and “end” measurement.
• Explain with examples the differences between “line” measurement and “end” measurement.
• Explain with examples the uses of datum points, datum lines and datum faces in marking out.
Chalkboard
Lesson notes
Pictures/charts
Sketches/Diagrams
Marking out tools: - datum points, datum lines, datum faces, chalk or marking solution, center or dot punch, scribing block or measurement
• Make a “line” measurement.
• Make an “end” measurement.
• Use datum points, datum lines and datum faces for marking out.
• Identify the tools listed in 3.5 and their applications.
• Identify various types of files listed in 3.6 and their
• Demonstrate how to make “line” measurement and “end” measurement.
• Demonstrate how to use datum points, datum lines and datum faces for marking out.
• Demonstrate the uses of the tools listed in 3.5 for
Chalkboard
Lesson notes
Pictures/Charts
Sketches/Diagrams
Marking out tools: - datum points, datum lines, datum faces, chalk or marking solution, center or dot punch, scribing block or measurement
NVC Furniture Making & Upholstery: 2009
31
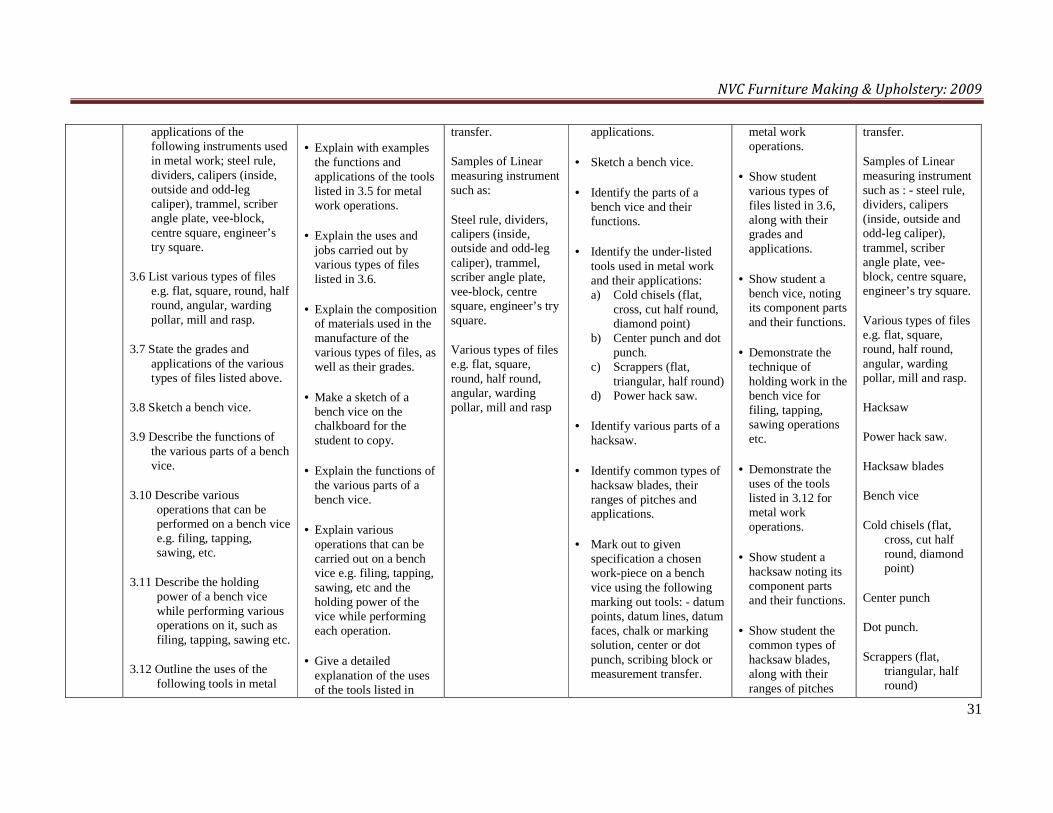
applications of the following instruments used in metal work; steel rule, dividers, calipers (inside, outside and odd-leg caliper), trammel, scriber angle plate, vee-block, centre square, engineer’s try square.
3.6 List various types of files e.g. flat, square, round, half round, angular, warding pollar, mill and rasp.
3.7 State the grades and applications of the various types of files listed above.
3.8 Sketch a bench vice.
3.9 Describe the functions of the various parts of a bench vice.
3.10 Describe various operations that can be performed on a bench vice e.g. filing, tapping, sawing, etc.
3.11 Describe the holding power of a bench vice while performing various operations on it, such as filing, tapping, sawing etc.
3.12 Outline the uses of the following tools in metal
• Explain with examples the functions and applications of the tools listed in 3.5 for metal work operations.
• Explain the uses and jobs carried out by various types of files listed in 3.6.
• Explain the composition of materials used in the manufacture of the various types of files, as well as their grades.
• Make a sketch of a bench vice on the chalkboard for the student to copy.
• Explain the functions of the various parts of a bench vice.
• Explain various operations that can be carried out on a bench vice e.g. filing, tapping, sawing, etc and the holding power of the vice while performing each operation.
• Give a detailed explanation of the uses of the tools listed in
transfer.
Samples of Linear measuring instrument such as:
Steel rule, dividers, calipers (inside, outside and odd-leg caliper), trammel, scriber angle plate, vee-block, centre square, engineer’s try square.
Various types of files e.g. flat, square, round, half round, angular, warding pollar, mill and rasp
applications.
• Sketch a bench vice.
• Identify the parts of a bench vice and their functions.
• Identify the under-listed tools used in metal work and their applications: a) Cold chisels (flat,
cross, cut half round, diamond point)
b) Center punch and dot punch.
c) Scrappers (flat, triangular, half round)
d) Power hack saw.
• Identify various parts of a hacksaw.
• Identify common types of hacksaw blades, their ranges of pitches and applications.
• Mark out to given specification a chosen work-piece on a bench vice using the following marking out tools: - datum points, datum lines, datum faces, chalk or marking solution, center or dot punch, scribing block or measurement transfer.
metal work operations.
• Show student various types of files listed in 3.6, along with their grades and applications.
• Show student a bench vice, noting its component parts and their functions.
• Demonstrate the technique of holding work in the bench vice for filing, tapping, sawing operations etc.
• Demonstrate the uses of the tools listed in 3.12 for metal work operations.
• Show student a hacksaw noting its component parts and their functions.
• Show student the common types of hacksaw blades, along with their ranges of pitches
transfer.
Samples of Linear measuring instrument such as : - steel rule, dividers, calipers (inside, outside and odd-leg caliper), trammel, scriber angle plate, vee-block, centre square, engineer’s try square.
Various types of files e.g. flat, square, round, half round, angular, warding pollar, mill and rasp.
Hacksaw
Power hack saw.
Hacksaw blades
Bench vice
Cold chisels (flat, cross, cut half round, diamond point)
Center punch
Dot punch.
Scrappers (flat, triangular, half round)

NVC Furniture Making & Upholstery: 2009
32
works. a) Cold chisels (flat,
cross, cut half round, diamond point)
b) Center punch and dot punch.
c) Scrappers (flat, triangular, half round)
d) Power hack saw.
3.13 Describe various parts of a hack saw and their functions.
3.14 Mention the common types of hacksaw blades, their ranges of pitches and applications.
3.15 State the safety precautions to be observed while working on a bench vice.
3.12 in metal works.
• Name various parts of a hacksaw and their functions.
• Explain common types of hacksaw blades, their ranges of pitches and applications.
• Explain the necessary safety measures applicable to working on a bench vice and using hand tools for metal works.
and applications.
• Demonstrate the marking out procedures on a bench vice works using datum lines, datum faces, chalk or marking solution, center or dot punch, scribing block or measurement transfer.
Power hack saw
GENERAL OBJECTIVE 4.0: UNDERSTAND THE BASIC WORKING PRINCIPLES OF DRILLIN G MACHINE. 4.1 List various types of
drilling machine.
4.2 Describe the main features of various types of drilling machines e.g. a) Bench drilling machine b) Pillar drilling machine c) Portable power drilling
machine
4.3 Describe the effects of the following faults in a ground twist drill bit: a) point angle too acute
• Enumerate various types of drilling machine.
• Make sketches of various types of drilling machines listed in 4.2.
• Explain where each of the following types of drills are best suited: a) twist drill (taper
shank, parallel shank and jobbers
Chalkboard
Lesson notes
Pictures/charts
Sketches/Diagrams
• Identify various types of drilling machine.
• Identify the accessories of a drilling machine e.g. twist drill bit.
• Sharpen a twist drill correctly to manufacturer’s specification
• Set up a drilling machine ready for use.
• Operate a drilling machine
• Show student different types of drilling machine.
• Show student common accessories of drilling machines.
• Demonstrate how a twist drill can be sharpened correctly to manufacturer’s specification.
Chalkboard
Pictures/charts
Sketches/Diagrams
Various types of drilling machine namely: a) Bench drilling
machine b) Pillar drilling
machine c) Portable power
drilling machine

NVC Furniture Making & Upholstery: 2009
33
b) point angle too obtuse c) cutting edges at unequal
angles d) insufficient lip
clearance e) excessive lip clearance
4.4 Outline the causes and remedies of the following drilling faults: a) drill breaking b) drill coloured blue c) walls of drilled hole left
rough d) chipped cutting lips, etc
4.5 State the purpose of reaming in metal works.
4.6 Describe different types of hand and machine reamers.
4.7 State safety precautions to be taken when tapping on the bench.
4.8 Calculate spindle revolution or cutting speed for specified size of drill using the formular below: - S = (πdN)/1000 Where S = cutting speed (m/min) N = revolution/minute D = diameter of drill (mm) Π = 3.142
drill and their relative merits),
b) flat drill, c) countersink drill, d) counter bore drill, e) Combination
centre drill.
• Explain with examples the effects of the drilling faults listed in 4.3 in a ground twist drill bit.
• Explain the causes and remedies of the following drilling faults:
a) drill breaking b) drill coloured blue c) walls of drilled hole
left rough d) Chipped cutting lips.
• Explain the purpose of reaming.
• Explain the main features of different types of hand and machine reamers.
• Explain the necessary safety precautions to be taken when tapping on the bench.
• Illustrate calculations
in a given job situation.
• Perform with the above facilities, the following operations observing the necessary safety rules: a) Drilling blind holes b) Drilling round stock c) Counter-boring and
counter-sinking d) Drilling large diameter
holes e) Cut internal (through
and blind) and external threads by hand reaming method.
• Demonstrate how to set up and operate a drilling machine for a given situation.
• Note; Setting up drilling machine should include; a) Change of
spindle speed b) Adjustment of
drilling table to required height and angle
c) Holding of work on drilling table to required height and angle using appropriate clamping device.
d) Proper installation of the drill bit in the chuck of the machine.
• Demonstrate with already set up drilling machine how to perform all the drilling operations listed in the corresponding
Samples of drilling bits
Hand reamers
Machine reamers
Bench vice
Metal pieces for drilling operations

NVC Furniture Making & Upholstery: 2009
34
of spindle revolution or cutting speed for specified drill size using the formular shown in 4.8 i.e.
S = (πdN)/1000 Where S = cutting speed
(m/min) N = revolution/minute D = diameter of drill
(mm) Π = 3.142
student’s practical learning outcome.
• Demonstrate the operation sequence to follow in cutting internal (through and blind) and external threads by hand reaming method.
GENERAL OBJECTIVE 5.0: UNDERSTAND THE APPLICATIONS OF VARIOUS TYPES OF SCREW THREADS AND RIVETS AND BE ABLE TO RIVET AND CUT SCREWS MANUALLY.
5.1 Name various thread forms, such as: a) the ISO metric thread b) the unified thread c) Whitworth and British
fine threads d) British Association
(BA) thread e) British Standard pipe f) Square thread g) Acme thread h) Buttress thread
5.2 State the applications of the various thread forms listed above.
5.3 Outline the functions of the following tapping accessories in metal work: a) taps (taper tap, second
tap, plug) b) tap wrench c) Die and die stock.
• Make sketches of the various thread forms listed in 5.1.
• Use diagrams to explain the uses of various thread forms.
• Use diagrams to explain the functions and uses the following tapping accessories in metal works; taps, tap wrench, die and die stock.
• Explain the meaning of tapping size or tapping drill and estimate its value in a given situation using the formular below; T = D - P Where T = tapping diameter
Chalk board
Lesson notes
Sketches/Diagrams
Pictures/Posters
Wall Charts
• Sketch the thread forms below: a) The ISO metric thread b) The unified thread c) Whitworth and British
fine threads d) British Association
(BA) thread e) British Standard pipe f) Square thread g) Acme thread h) Buttress thread
• Identify the following tapping accessories and their functions: a) taps (taper tap, second
tap, plug) b) tap wrench c) Die and die stock. • Identify the following
rivet sets and their applications: -
a) Snap and pan head b) Mushroom and
• Show student sketches, diagrams and pictures of various thread forms listed in 5.1.
• Demonstrate the uses of the under-listed tapping accessories in metal works; a) taps (taper
tap, second tap, plug)
b) tap wrench c) Die and die
stock.
• Show student pictures and real situations of the applications of the under-listed rivet
Chalk board Sketches/Diagrams Pictures/Posters Wall Charts Samples of real objects e.g. screws Samples of thread forms. Tapping accessories e.g. taps, tap wrench, die and die stock. Different types of rivet set e.g.: a) Snap and pan
head b) Mushroom and
counter-sunk head c) Flat head d) Dod rivet.

NVC Furniture Making & Upholstery: 2009
35
5.4 Calculate the value of tapping size or tapping drill using the formular below: T = D - P Where T = tapping diameter D = thread top diameter P = pitch
5.5 List different types of rivets sets such as: - a) Snap and pan head b) Mushroom and
counter-sunk head c) Flat head d) Dod rivet.
5.6 Differentiate among the above listed types of rivets.
5.7 State the uses of each type of rivet set listed in 5.5.
5.8 Calculate the diameter of rivet and riveting allowance in given work situations.
5.9 State all safety rules to observe when tapping on the bench.
D = thread top diameter
P = pitch.
• Describe different types of rivet sets listed below: a) Snap and pan head b) Mushroom and
counter-sunk head c) Flat head d) Dod rivet.
• Give the differences among various types of rivet sets listed above.
• Make a sketch of each type of rivet set listed above.
• Explain the uses of each type of rivet set.
• Illustrate how to calculate the diameter of a rivet and riveting allowance in given work situations.
• Explain the necessary precautions to be taken when tapping on the bench.
counter-sunk head c) Flat head d) Dod rivet.
• Sketch each type of rivet set listed above.
• Rivet metals together in any given situations, observing all safety and operational precautions.
set: a) Snap and pan
head b) Mushroom and
counter-sunk head
c) Flat head d) Dod rivet.
• Guide student to make sketches of the above listed rivet sets.
• Demonstrate how riveting can be done on metals observing all necessary safety rules.
GENERAL OBJECTIVE 6.0: UNDERSTAND THE ISO SYSTEM OF TOLERANCES AND BE ABL E TO FIT THEIR APPLICATION IN ENGINEERING PRODUCTION.
6.1 Define ISO
6.2 Differentiate among the
• Give the full meaning of ISO i.e. International Standard Organization
Chalkboard
Lesson notes

NVC Furniture Making & Upholstery: 2009
36
following measurement terms: a) nominal size b) limits (upper and
lower) c) tolerance (unilateral
and bilateral) d) fit (clearance,
transition interference).
6.3 State the importance of tolerance and fits in engineering production
6.4 Describe briefly the ISO system of limits and fits in engineering production.
6.5 Determine by calculation the amount of tolerance and types of fit in given situations.
• Explain the purpose of having ISO system of measurements.
• Give detailed explanation to differentiate among nominal size, limits, tolerance and fits.
• Use diagrams to explain the importance of tolerance and fits in engineering production.
• Explain in detail the ISO system of limits and fits as well as their applications in engineering production.
• Illustrate calculations on the amount of tolerance and types of fits to be allowed in given situations.
Sketches/Diagrams Wall charts on ISO system of tolerances, limits and fits.
GENERAL OBJECTIVE 7.0: UNDERSTAND ESSENTIAL FEATURES AND WORKING PRINCIPL ES OF A CENTER-LATHE AND BE ABLE TO CARRY OUT BASIC OPERATIONS ON IT SUCH AS TURNING, STEPPED TURNING, TAPER TURNING, KNURLING, CHAMFERING AND UNDERCUTTING.
7.1 List the essential features of a center lathe such as; lathe bed, head stock, tail stock, saddle or carriage, etc.
7.2 State the functions of the parts of the center lathe listed above.
• Describe the essential features of a center lathe listed in 7.1 and their functions.
• Explain the working principle of a center lathe.
Chalkboard
Lesson notes
Sketches/Diagrams
Wall Charts
Pictures/Posters
• Identify the essential features of a center lathe machine such as: lathe bed, head stock, tail stock, saddle or carriage, etc and their functions.
• Identify center lathe accessories and their uses
• Show student a center lathe machine and point out its main component parts and their functions.
• Show student
Chalkboard
Sketches/Diagrams
Wall Charts
Pictures/Posters
Point tools

NVC Furniture Making & Upholstery: 2009
37
7.3 Describe the working principle of a center lathe.
7.4 List center lathe accessories and their functions. The accessories include; catch or driving plate, face plate, lathe dog or carrier, lathe centers, fixed and travelling steadies.
7.5 List the essential features of a capstan lathe.
7.6 Differentiate between center lathe and capstan lathe, in terms of their main features and functions.
7.7 Name types of cutting fluids used for lathe turning and operations.
7.8 State the composition of cutting fluids used for lathe turning and operations as well as the purpose of their application.
7.9 Describe common tools used on the lathe machine and the materials used in their manufacture. The tools include; butt-brazed tool, tipped tool, bit and holder and the materials include, plain carbon steel, high speed steel, satellite,
• Explain the functions and uses of center lathe accessories listed in 7.4.
• Describe the essential features of a capstan lathe.
• Give detailed explanation on the differences between center lathe and capstan lathe, in terms of their main features and functions.
• Explain the purpose of applying cutting fluids for lathe turning and operations.
• Enumerate types of cutting fluid used for lathe turning and operations as well as their compositions.
• Explain the functions of the common tools used on the lathe machine listed in 7.9 as well as the materials used in their manufacture.
• Explain with sketches, the functions of tool
e.g. catch or driving plate, face plate, lathe dog or carrier, lathe centers, fixed and travelling steadies.
• Identify the differences between center lathe and capstan lathe. In terms of their main features and functions.
• Identify types of cutting fluids to be used for lathe turning and operations as well as their compositions.
• Sharpen cutting tool for use in carrying out plain turning, shouldering, parting off and facing operations on the center lathe.
• Set up rough and turned stock in 3-jaw-chuck.
• Select appropriate cutting tool for the center lathe and set them up to center height for turning or facing operations.
• Carry out chuck work involving facing, step turning, undercutting raduising, chamfering, parting off and knurling on the center lathe.
center lathe accessories e.g. catch or driving plate, face plate, lathe dog or carrier, lathe centers, fixed and travelling steadies and where they are used.
• Guide student to identify the differences between center lathe and capstan lathe. In terms of their main features and functions.
• Show student different types of cutting fluid used for lathe turning and operations.
• Guide student to sharpen cutting tool for the purpose of carrying out the following operations on the lathe machine; plain cutting, shouldering, parting off and facing.
Grinding machine
Center lathe machine
Capstan lathe machine
Center lathe accessories e.g. Catch or driving plate, face plate, lathe dog or carrier, lathe centers, fixed and travelling steadies.
Various types of cutting fluid used for center lathe turning and operations.
3-jaw-chuck used on the center lathe
point tools used on the center lathe
common tools used on the center lathe for varied operations such as; -Round nose turning tool,
-fine finishing tool, -form tool, -parting off tool, -boring tool,
Bar of good length

NVC Furniture Making & Upholstery: 2009
38
cemented carbide, diamond, etc.
7.10 State the functions of tool angles (rake clearance) and their values for different metals to be machined.
7.11 Differentiate among the under-listed tool shapes and their uses – a) round nose rougher, b) fine finishing c) side finishing d) knife tool e) form tool f) parting off tool g) boring tool, etc
7.12 Describe the effects of wrong setting of cutting tool on the lathe machine such as; vibration and chatter of the job, tool rubbing against each other or another object, digging into the job, etc.
7.13 Define cutting speed and feed with respect to lathe operations.
7.14 Calculate the cutting speed and feed for given turning operations.
7.15 State precautions to be observed when working on the lathe machine.
angles (rake clearance), and their values for different metals to be machined.
• Give detailed explanation on the differences among the under-listed tool shapes and their uses: - a) round nose
rougher, b) fine finishing c) side finishing d) knife tool e) form tool f) parting off tool g) boring tool, etc
• Explain with sketches and diagrams the effects of wrong setting of cutting tool on the lathe machine such as; vibration and chatter of the job, tool rubbing against each other or another object, digging into the job, etc.
• Give the definition of cutting speed and feed with respect to lathe operations.
• Work examples on the calculation of cutting speed and feed for
• Note: Components should be produced to specified tolerance and finish observing all safety rules.
• Estimate the rate of metal removal and time required for carrying out specified turning operations.
• Set up the lathe machine and carry out turning operations between centers.
• Produce simple components involving taper turning using the compound slide.
• Compute required taper dimensions from given data using the formular for taper ratio below: Taper ratio = (d2 – d1)/L or Tan φ/2 = (d2 – d1)/2 Where φ = taper angle d1 = small end diameter d2 = large end diameter L = length of taper.
• Carry out basic maintenance of the lathe machine e.g. cleaning before and after use, greasing before and after use, removing the socket
• Demonstrate how to set up rough and turned stock in a 3-jaw-chuck.
• Guide student to select appropriate cutting tools and set them up to center height for lathe work (turning or facing).
• Demonstrate how to operate a lathe machine for the following operations: Plain cutting, shouldering, parting off and facing.
• Demonstrate how to make simple precision fitting project like hexagonal mild steel bar making push fit through a mild steel plate.
• Prepare simple exercises that will guide student to produce components
and 4mm diameter.
Live/dead centers catch plates.

NVC Furniture Making & Upholstery: 2009
39
given turning operations.
• Explain in detail, the safety precautions to be carried out when working on the Lathe machine.
from electric source, proper sharpening of tools etc.
involving taper turning using compound slide.
• Work exercises to compute the required taper dimensions using the formular for taper ration below:
Taper ratio = (d2 – d1)/L OR Tan φ/2 = (d2 – d1)/2 Where φ = taper angle d1 = small end diameter d2 = large end diameter L = length of taper.
• Guide student to observe all safety and operational precautions in metal works while carrying out exercises on the center lathe.
• Guide student to carry out basic maintenance of the center lathe.
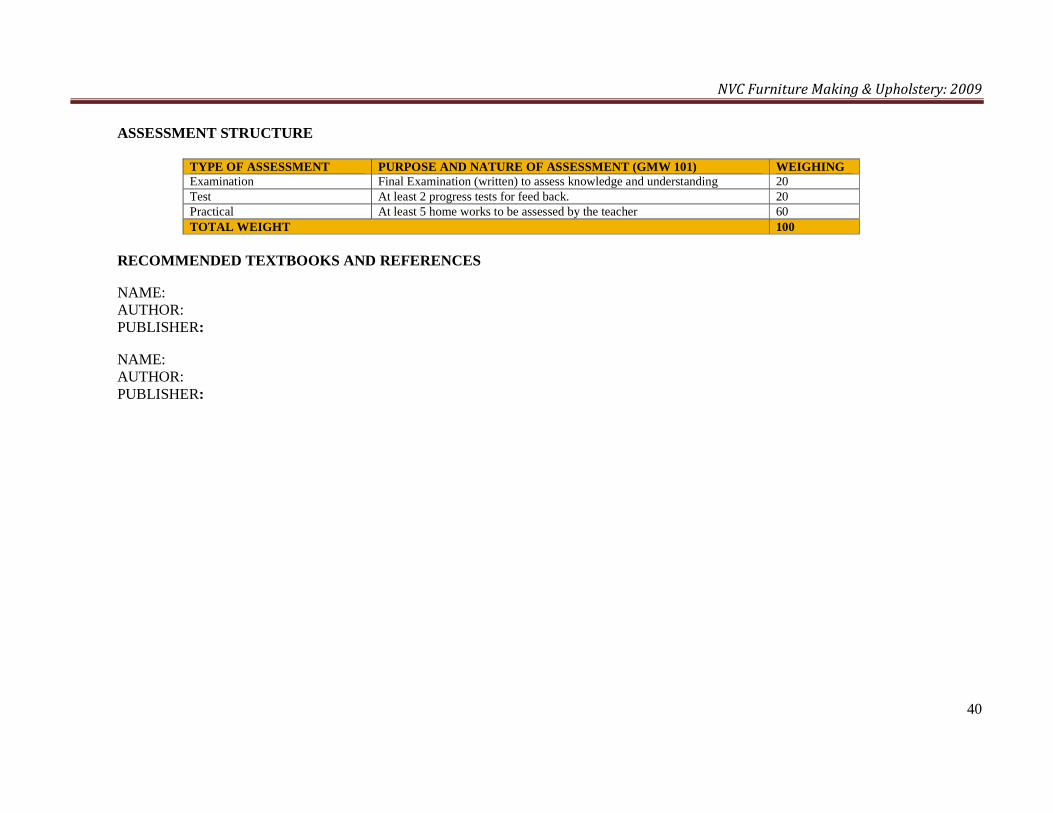
NVC Furniture Making & Upholstery: 2009
40
ASSESSMENT STRUCTURE
TYPE OF ASSESSMENT PURPOSE AND NATURE OF ASSESSMENT (GMW 101) WEIGHING Examination Final Examination (written) to assess knowledge and understanding 20 Test At least 2 progress tests for feed back. 20 Practical At least 5 home works to be assessed by the teacher 60 TOTAL WEIGHT 100
RECOMMENDED TEXTBOOKS AND REFERENCES
NAME: AUTHOR: PUBLISHER:
NAME: AUTHOR: PUBLISHER:

NVC Furniture Making & Upholstery: 2009
41
PROGRAMME: NATIONAL VOCATIONAL CERTIFICATE IN FU RNITURE MAKING AND UPHOLSTERY
COURSE NAME: GENERAL METAL WORK II
COURSE CODE: GMW 102
DURATION: 1 – 0 – 3
UNITS: 4 UNITS
GOAL: This module is designed to introduce the trainee to fundamental heat treatment processes, forging, gas and arc welding.
GENERAL OBJECTIVES: On completion of this module the trainee will be able to: -
1) Understand the basic principles and processes of heat treatment of metals.
2) Understand the techniques of producing simple engineering components by forging.
3) Understand the basic principles and techniques of gas and arc welding.

NVC Furniture Making & Upholstery: 2009
42
PROGRAMME: VOCATIONAL ENTERPRISE CERTIFICATE IN FURNITURE DES IGN AND UPHOLSTERY COURSE: GENERAL METAL WORK II COURSE CODE: GMW 102 CONTACT HOURS: 1 – 0 – 3 GOAL: THIS MODULE IS DESIGNED TO INTRODUCE THE TRAINEE TO FUNDAMENTAL HEAT TREATMENT PROCESSES, FORGING, G AS AND ARC
WELDING. COURSE SPECIFICATION: THEORETICAL CONTENT COURSE SPECIFICATION: PRACTICAL CONTENT GENERAL OBJECTIVE 1.0: UNDERSTAND THE BASIC PRINCIPLES AND PROCESSES OF HEAT TREATMENT OF METALS. Week Special Learning Objective Teachers Activities Learning Resources Special Learning Objective Teachers Activities Learning Resources 1.1 List various heat treatment
processes namely: - a) Tempering b) Annealing c) Normalizing d) Hardening e) Case Hardening, etc
1.2 State the purpose of carrying out the respective heat treatment processes listed above on work-pieces.
1.3 State the operation temperature of each heat treatment process listed in 1.1 above.
1.4 Describe the types of furnaces used for heat treatment processes.
1.5 State the critical stages (temperature range) of each heat treatment process.
1.6 Describe the structural behavior of a selected work-piece at the critical
• Enumerate the heat treatment processes carried on engineering materials namely; a) Tempering b) Annealing c) Normalizing d) Hardening e) Case Hardening
• Explain the reason for carrying out each of the heat treatment process listed above on a chosen work-piece.
• Explain the operation temperature for each of the above listed heat treatment process.
• Explain the types and condition of furnaces used for heat treatment processes.
• Explain in detail, the structural behavior of engineering material e.g. plain carbon steel
Chalkboard
Lesson notes
Picture/Posters
Sketches/Diagrams
Wall Charts
• Identify various heat treatment furnaces for carrying out the under-listed heat treatment processes: a) Tempering b) Annealing c) Normalizing d) Hardening e) Case Hardening
• Observe the application of various heat treatment processes on selected work-pieces in the workshop or factories.
• Identify the critical stages of each heat treatment process and the resultant structural behavior of the work-piece at the various stages.
• Identify all necessary safety precautions to be observed while carrying out various heat treatment processes in the workshop and factories.
• Show student pictures/posters of various heat treatment furnaces.
• Show student real heat treatment furnaces available in the metal workshop and factories.
• Operate various heat treatment furnaces for the student to see the operation temperature and critical stages of each heat treatment process.
• Carry out the under-listed heat treatment processes for the student to see the procedure and the critical stages of each process: a) Tempering
Chalkboard
Picture/Posters
Sketches/Diagrams
Wall Charts
Various types Heat treatment furnaces
Pyrometer for measuring the temperature of the furnace atmosphere.
Tongs for bringing out the heat treated work-pieces out of the furnaces.
Materials used in heat treatment processes e.g carbon, nitrogen elements used in case hardening heat treatment process.
Field trips to factories to see the various heat treatment

NVC Furniture Making & Upholstery: 2009
43
stages of each heat treatment process.
1.7 Describe briefly the procedure for carrying out the under-listed heat treatment processes on engineering materials: - a) Tempering b) Annealing c) Normalizing d) Hardening e) Case Hardening
1.8 State the purpose of hardening a work-piece,
1.9 State the purpose of softening a work-piece
1.10 State the purpose of case-hardening work-piece and the element used in bringing the case hardness i.e. carbon, nitrogen.
1.11 Describe the composition of the materials that should be given heat treatment process e.g. plain carbon steel, mild steel, etc.
1.12 Outline the safety precautions to be observed while carrying out various heat treatment processes.
as it is heated from room temperature to about 1000oC.
• Explain the critical stages of each heat treatment process noting the temperature range of each stage and the resultant structural behavior of the work-piece.
• Explain in detail, the procedure for carrying out each of the heat treatment process listed below: a) Tempering b) Annealing c) Normalizing d) Hardening e) Case Hardening
• Explain what is meant by hardening of a work-piece and the heat treatment processes applicable to it.
• Explain what is meant by softening of a work-piece and the heat treatment processes applicable to it.
• Explain the reason for
• Identify work-pieces that had undergone softening by annealing heat treatment process based on the reduction of hardness of the selected work-pieces while cutting them with hack saw.
• Identify work-pieces that had undergone case hardening heat treatment by filing to determine the thickness of the surface hardness
b) Annealing c) Normalizing d) Hardening e) Case
Hardening
• Take student on industrial visit to observe the various heat treatment processes mentioned above.
• Indicate the necessary safety precautions to be observed while carrying out various heat treatment processes in the workshop and factories.
• Use hack saw to test the reduction of hardness of work-pieces that has undergone annealing (softening) processes.
• Use appropriate test e.g. filing to test the hardness of case-hardened work-pieces.
processes.

NVC Furniture Making & Upholstery: 2009
44
carrying out case hardening process, the choice of work-pieces to be case-hardened e.g. plain carbon steel, mild steel and the materials used in bringing about the case hardening i.e. carbon, nitrogen.
• Explain the necessary safety precautions to be observed while carrying out various heat treatment processes
GENERAL OBJECTIVE 2.0: UNDERSTAND THE TECHNIQUES OF PRODUCING SIMPLE ENGI NEERING COMPONENTS BY FORGING. 2.1 Define forging in metal
work.
2.2 Name States in Nigeria where Blacksmith practices (forging operations) are most predominant.
2.3 List engineering components that can be forged e.g. hoes, cutlasses, axe, nuts and bolts, etc.
2.4 State the composition of the materials used in producing work-pieces subjected to forging process and the reason for choice of the materials.
2.5 Outline the working
• Give the definition of forging in metal work.
• Narrate the origin of forging application on engineering components in the world.
• Mention the pioneering States in Nigeria engaged in Blacksmith’s (forging) operations.
• Give examples of engineering components that can be forged (e.g. hoe, cutlasses, axe, cooking pot, bolts & nuts etc) and the materials used in
Chalkboard
Lesson notes
Pictures/Posters
Sketches/Diagrams
Wall charts
• Identify the essential features of Blacksmith’s forge.
• Identify engineering components that can be forged such as hoes, cutlasses, axe, cooking pot, bolts & nuts, etc.
• Identify various forging tools listed below: -
• anvil, swage block, leg vice, forging hammers, hot & cold sets, set hammer, punches & drifts, hardie, fullers, top & bottom swages, flatter, tongs (open mouth, closed mouth, hollow bit), etc.
• Show student pictures and real samples of blacksmith’s forge.
• Show student the essential features of a Blacksmith’s forge.
• Show student various engineering components that can be forged as well as those that are already forged.
• Show student various forging
Chalkboard
Pictures/Posters
Sketches/Diagrams
Wall charts
Samples of common forging tools such as; anvil, swage block, leg vice, forging hammers, hot & cold sets, set hammer, punches & drifts, hardie, fullers, top & bottom swages, flatter, tongs (open mouth, closed mouth, hollow bit).

NVC Furniture Making & Upholstery: 2009
45
principles of forging operation on engineering components.
2.6 List the main features of a blacksmith’s forge.
2.7 Describe the working principle of a Blacksmith’s forge.
2.8 List common forging tools such as; anvil, swage block, leg vice, forging hammers, hot & cold sets, set hammer, punches & drifts, hardie, fullers, top & bottom swages, flatter, tongs (open mouth, closed mouth, hollow bit), etc.
2.9 State the functions of the various forging tools listed in 2.7 above.
2.10 State the advantages of forging engineering components.
2.11 State the limitations of forging operation on engineering components.
2.12 State the purpose of carrying out forging operations on engineering component such as to soften the material for subsequent cutting,
producing them.
• Explain the working principle of forging operation on engineering components.
• Explain the functions of various forging tools listed in 2.8.
• Explain the reasons for carrying out forging operations on engineering components such as to soften the materials for subsequent cutting, drilling, turning operations, etc.
• Explain the appropriate conditions for carrying out forging operations on engineering components.
• Describe the main features of a Blacksmith’s forge.
• Make sketches of various Blacksmith‘s forges and their components for the student to see.
• Explain the working principle of a
• Identify the applications of various forging tools listed above.
• Select appropriate forging tools listed above for a given forging operation.
• Produce to specification given engineering components by forging process.
• Observe various forging process on different engineering components in a Blacksmith’s workshop.
• Identify relevant heat treatment processes to be carried out on a component that had undergone forging operation depending on its applications e.g. annealing, tempering, etc.
• Identify safety precautions to be undertaken while carrying out forging operations and the subsequent heat treatment processes.
tools listed below; anvil, swage block, leg vice, forging hammers, hot & cold sets, set hammer, punches & drifts, hardie, fullers, top & bottom swages, flatter, tongs (open mouth, closed mouth, hollow bit), etc.
• Show student real applications of various forging tools listed above.
• Guide student to select appropriate forging tools for given forging operation.
• Demonstrate with the appropriate forging tools how to produce given engineering components to specification.
• Take student to a Blacksmith’s workshop to observe various forging processes on selected
Field trips to Blacksmith’s workshop to see forging operations and factories to see consequent heat treatment processes.

NVC Furniture Making & Upholstery: 2009
46
drilling, turning operations, etc.
2.13 Describe briefly the procedure of carrying out forging operations on engineering components.
2.14 Describe relevant heat treatment processes to be carried out on forged components e.g., annealing, tempering, etc.
2.15 State the necessary safety precautions to be observed while carrying out forging operations on engineering components and subsequent heat treatment processes.
Blacksmith’s forge.
• Explain the application of Blacksmith‘s forging tools in the production process.
• Explain the advantages of forging engineering components.
• Explain the limitations of forging operations on engineering components.
• Explain relevant heat treatment processes to be carried out on forged components e.g. annealing, tempering, etc.
• Explain the necessary safety precautions to be observed while carrying out forging operations on engineering components and subsequent heat treatment processes.
engineering components.
• Show student relevant heat treatment processes to be carried out on forged components e.g. annealing, tempering, etc.
• Indicate safety rules to be observed while carrying out forging operations and subsequent heat treatment processes.
GENERAL OBJECTIVE 3.0: UNDERSTAND THE BASIC PRINCIPLES AND TECHNIQUES OF GAS AND ARC WELDING. 3.1 List the equipment required
for carrying out gas welding and arc welding exercises.
3.2 List gas welding accessories such as; gas cylinder,
• Describe the equipment required for carrying out gas welding and arc welding exercises.
• Give examples of gas welding and arc
Chalkboard
Lesson notes
Sketches/Diagrams
Pictures/Posters of
• Identify gas welding equipment and accessories listed in 3.2.
• Identify arc welding equipment and accessories listed in 3.3.
• Show student gas welding equipment and accessories listed in 3.2.
• Show student arc
Chalkboard
Sketches/Diagrams
Pictures/Posters of both gas welding and arc welding

NVC Furniture Making & Upholstery: 2009
47
gases, etc.
3.3 List arc welding accessories e.g. electrode, etc.
3.4 State the purposes of carrying out gas welding and arc welding on engineering materials.
3.5 Differentiate between gas and arc welding processes.
3.6 Describe engineering applications best suited for either gas welding or arc welding process.
3.7 State the advantages and disadvantages of gas welding method.
3.8 State the advantages and disadvantages of arc welding method.
3.9 Outline the procedure for carrying out gas welding exercise.
3.10 Outline the procedure for carrying out arc welding exercise.
3.11 Differentiate among the shapes and uses of the under-listed tools in both gas welding and arc welding processes: -
welding accessories.
• Explain the uses of various gas welding accessories listed in 3.2 and also, arc welding accessories listed in 3.3.
• Explain the reasons for carrying out arc welding and gas welding exercises on engineering materials.
• Explain the differences between gas welding and arc welding processes.
• Explain applications where gas welding process is best suited and why.
• Explain the applications where arc welding is best suited and why.
• Explain the advantages and disadvantages of gas welding work.
• Explain the advantages and disadvantages of arc welding work.
• Explain in detail the procedure for carrying out gas welding
both gas welding & arc welding equipment and their accessories.
Wall charts of both gas and arc welding equipment and safety guide.
• Identify engineering applications where gas welding process was used.
• Identify engineering applications where arc welding process was used.
• Set up gas welding equipment and accessories for welding operation in a given situation.
• Set up arc welding equipment and accessories for welding operations in a given situation.
• Note: The setting up of the welding equipment should include choice of nozzles for gas welding equipment and electrode for arc welding equipment. Adjustment of gas pressure/flame for gas welding or voltage for arc welding.
• Prepare joints for both gas welding and arc welding operation in given work situations.
• Carry out gas welding operation on selected work-pieces applying all necessary safety rules.
welding equipment and accessories listed in 3.3.
• Show student engineering applications where gas welding process was used.
• Show student engineering applications where arc welding process was used.
• Demonstrate how to set up both gas welding equipment/accessories and arc welding equipment/accessories in readiness for carrying out their respective welding operations.
• Demonstrate how to prepare joints for both gas welding and arc welding processes in given work situations.
• Demonstrate gas
equipment and their accessories.
Wall charts of both gas and arc welding processes and safety guide.
Welding gases for gas welding i.e. Oxygen and Acetylene gases contained in their respective cylinders with regulators.
Electrodes for arc welding process.
Goggles
Face shield
Hand gloves
Tongs for holding the welded components.
Diagrams and charts of various welding joints
Samples of prepared joints for both gas welding and arc welding processes.
Field trips to factories to see various

NVC Furniture Making & Upholstery: 2009
48
a) round nose rougher b) fine finishing c) side finishing d) knife tool e) form tool f) parting tool g) boring tool
3.12 Outline the safety precautions to be observed while carrying out both gas and arc welding processes e.g. a) Use of goggles and
face shields to protect the eyes and the face.
b) Welding components inside a welding booth.
c) Using hand gloves and tongs in handling the welded components, etc.
exercise.
• Explain in detail the procedure for carrying out arc welding exercise.
• Explain the uses and differences among shapes of the tools listed in 3.11.
• Explain in detail the necessary safety precautions to be observed while carrying out both gas and arc welding processes e.g. a) Use of goggles and
face shields to protect the eyes and the face.
b) Welding components inside a welding booth
c) Using hand gloves and tongs in handling the welded components, etc.
• Carry out arc welding operation on selected work-pieces applying all necessary safety rules.
• Note; all welding must be done in a welding booth and wearing appropriate safety wears.
• Apply the use of the under-listed tools in carrying out welding operations: - a) round nose rougher b) fine finishing c) side finishing d) knife tool e) form tool f) parting tool g) boring tool
• Carry out basic servicing and maintenance of both gas welding and arc welding equipment and their accessories.
welding operation on selected work-pieces applying all necessary safety rules.
• Demonstrate arc welding operation on selected work-pieces applying all necessary safety rules.
• Guide student to weld various component using both gas and arc welding processes applying all safety precautions.
• Note; all welding must be done in a welding booth and wearing appropriate safety wears.
• Demonstrate the use of the under-listed tools in carrying out welding operations: a) round nose
rougher b) fine finishing c) side finishing d) knife tool
welding equipment and their uses.

NVC Furniture Making & Upholstery: 2009
49
e) form tool f) parting tool g) boring tool
• Take student to factories to see varied welding equipment and their uses.
• Show student how to carry out basic servicing and maintenance of both gas welding and arc welding equipment and their accessories.

NVC Furniture Making & Upholstery: 2009
50
ASSESSMENT STRUCTURE
TYPE OF ASSESSMENT PURPOSE AND NATURE OF ASSESSMENT (GMW 102) WEIGHING Examination Final Examination (written) to assess knowledge and understanding 20 Test At least 2 progress tests for feed back. 20 Practical At least 5 home works to be assessed by the teacher 60 TOTAL WEIGHT 100
RECOMMENDED TEXTBOOKS AND REFERENCES
NAME: AUTHOR: PUBLISHER:
NAME: AUTHOR: PUBLISHER:

NVC Furniture Making & Upholstery: 2009
51
PROGRAMME: NATIONAL VOCATIONAL CERTIFICATE IN FU RNITURE MAKING AND UPHOLSTERY
COURSE NAME: INTRODUCTION TO FURNITURE MAKING
COURSE CODE: VFM 112
DURATION: 2 – 0 – 4
UNITS: 6 UNITS
GOAL: This module is designed to develop trainee’s knowledge and skills in application of safety in the use of wood working machines and in the preparation of timber for furniture construction
GENERAL OBJECTIVES: On completion of this module the trainee will be able to: -
1) Understand the history of furniture.
2) Understand basic workshop safety rules and regulations
3) Understand the uses of woodwork bench and its appliances
4) Understand woodworking tools and their uses
5) Understand the preparation of timber for constructional work

NVC Furniture Making & Upholstery: 2009
52
PROGRAMME: VOCATIONAL ENTERPRISE CERTIFICATE IN FURNITURE MA KING AND UPHOLSTERY COURSE: INTRODUCTION TO FURNITURE MAKING COURSE CODE: VFM 112 CONTACT HOURS: 2 – 0 – 4 GOAL: THIS MODULE IS DESIGNED TO DEVELOP TRAINEE’S KNO WLEDGE AND SKILLS IN APPLICATION OF SAFETY IN THE U SE OF WOOD
WORKING MACHINES AND IN THE PREPARATION OF TIMBER F OR FURNITURE CONSTRUCTION. COURSE SPECIFICATION: THEORETICAL CONTENT COURSE SPECIFICATION: PRACTICAL CONTENT GENERAL OBJECTIVE 1.0: UNDERSTAND THE HISTORY OF FURNITURE Week Special Learning Objective Teachers Activities Learning Resources Special Learning Objective Teachers Activities Learning Resources 1.1 Outline the history of
furniture
1.2 Discuss why and how furniture making came to existence
1.3 State the factors that influenced furniture production in the dark ages
1.4 Identify the countries that influenced production of furniture
• Narrate the existence and development of furniture
• Explain the factors that influenced furniture production in the dark ages.
• Narrate the contributions made by various countries like Britain, Dutch, Italy, Greece and France towards furniture production.
White board with markers
Chalkboard
Lesson notes
GENERAL OBJECTIVE 2.0: UNDERSTAND BASIC WORKSHOP SAFETY AND REGULATIONS 2.1 Define Safety
2.2 Discuss rules and regulations applicable to a wood workshop.
2.3 State the two major groups of safety habits
• Safe working conditions • Safe working techniques
• Give the definition of safety
• Explain rules and regulations to be observed in a wood workshop
• Classify safety habits into two major components;
White board with markers
Chalkboard
Lesson notes
Safety boards

NVC Furniture Making & Upholstery: 2009
53
2.4 List safety habits in the wood workshop
-Safe working conditions -Safe working techniques
• Explain the under-listed safety habits applicable to a wood workshop:
a) Personal safety habits
b) Workshop safety habit
c) Hand tools safety habits
d) Carrying and storing of hand tools safety habits.
e) Using hand tools safety habits
GENERAL OBJECTIVE 3.0: UNDERSTAND THE USES OF WOODWORK BENCH AND ITS APPLIANCES 3.1 Describe the woodwork
bench and its appliances
3.2 Outline types of construction of woodwork bench
3.3 List the tools that comprise woodwork bench
3.4 Outline the uses of a woodwork bench
• Explain the composition of a woodwork bench and its appliances.
• Explain various types of construction of woodwork bench e.g. a. Single type b. Double type
• Explain various tools that comprise woodwork bench e.g. a. The bench b. The bench vice c. The bench hook d. The bench hole-fast e. The bench stop f. The bench well g. The tools cupboard
Chalkboard
Lesson notes
Sketches
• Identify various appliances of a wood work bench such as; the bench, bench vice, bench hook, bench hole-fast, bench stop, bench well, tools cupboard, etc.
• Carry out constructional work on a woodwork bench such as; planing, sawing, cutting, rebating and grooving
• Guide student to identify various appliances of a woodwork bench and their uses.
• Demonstrate how to use woodwork bench to carry out constructional work e.g. planing, sawing, cutting, rebating and grooving
Chalkboard
Various equipment and hand tools for constructional works on a woodwork bench.
Woodwork bench appliances such as; a. The bench a. The bench vice b. The bench hook c. The bench hole-
fast d. The bench stop e. The bench well f. The tools cupboard

NVC Furniture Making & Upholstery: 2009
54
• Explain various uses of
a woodwork bench. GENERAL OBJECTIVE 4.0: UNDERSTAND WOODWORKING TOOLS AND THEIR USES 4.1 Define woodworking tools
4.2 Enumerate woodworking tools
4.3 State with examples the four groups of wood working tools
4.4 Outline the various uses of each group of woodworking tools
• Give the definition of woodworking tools.
• Give examples of woodworking tools found in a wood workshop.
• Explain the four groups of wood working tools namely: a) Holding and
supporting tools b) Geometrical tools c) Cutting tools d) Percussion &
impelling tools
• Explain the uses of the four groups of wood working tools listed above.
Chalkboard
Lesson notes
Sketches
• Identify woodworking tools in a wood workshop
• Identify the four groups of woodworking tools listed below and their examples; i.e.
a) Holding and supporting tools
b) Geometrical tools c) Cutting tools d) Percussion & impelling
tools
• Use appropriate wood working tools to perform a given operation.
• Show student various woodworking tools in a wood workshop
• Classify various wood working tools into the four main groups of woodworking tools earlier identified.
• Demonstrate the uses of various woodworking tools available in a wood workshop.
Chalk board
Sketches
Real objects of wood working tools
GENERAL OBJECTIVE 5.0: CARRY OUT PREPARATION OF TIMBER FOR CONSTRUCTIONAL WORK 5.1 Describe a growing timber
tree and its structure
5.2 Differentiate types of timber trees by their botanical names and classifications a. Coniferous trees (also
called soft wood) b. Deciduous trees (also
called hardwood)
• Explain the growth structure of a timber tree
• Describe different types of timber trees listed in 5.2
• Explain various types of Nigerian wood specimen used for furniture making.
Chalkboard/whiteboards
Lesson notes
Sketches
Specimen of wood species used for furniture making e.g.
Massonia Abura
• Handle tools and materials properly during the preparation of timber following the teacher guidance.
• Classify timber trees into softwood and hardwood, giving their botanical names
• Identify different types of
• Demonstrate the methods of handling tools and materials involved in the preparation of timber.
• Guide student to classify timber trees into softwood and hardwood, noting
*Chalk board/ white boards,
*Sketches
*Real objects of wood working tools e.g.
Smooth jack plane Straight edge Try square Marking gauge

NVC Furniture Making & Upholstery: 2009
55
5.3 List different types of Nigerian wood specimen used for furniture making such as; Massonia Abura Afara (White and Black) Mahogany African wallnut (Cedar) Agba Eki, etc
5.4 Outline the processes of timber conversion e.g. • Live sawing (through
& through sawing) • Back sawing • Quarter sawing.
5.5 Define preparation of timber
5.6 Outline the six steps involved in preparation of timber i.e. choosing and working on: a. Face Side b. Face Edge c. Thicknessing d. Width e. End f. Length
5.7 Discuss the term used when planing timber diagonally on a wider board i.e. a) Traverse planing, etc
• Explain the process of timber conversion viz: -Live sawing (through & through sawing)
- Back sawing -Quarter sawing
• Describe in details the preparation of timber
• Explain the six steps involved in preparation of timber listed in 5.2
• Explain the term; traverse planing in relation to planing timber diagonally on a wider board.
Afara (White &Black) Mahogany African wallnut (Cedar)
Agba Eki, etc
*A sample of fresh cut timber
Nigerian wood specimen used for furniture making e.g. Massonia Abura Afara (White &Black) Mahogany African wallnut (Cedar)
Agba Eki, etc
• Carry out (while on industrial visit) timber conversion by various methods such as;
*Live sawing (through & through sawing) *Back sawing • *Quarter sawing
• Use standard methods and tools to test for straightness, squareness and smoothness on a prepared timber.
their botanical names.
• Show student different types of Nigerian wood specimen listed in 5.6, used for furniture making.
• Take student on a guided tour to saw mills to observe and participate in sawing of timber into marketable sizes by any of the three methods listed in 5.7 obtained in the saw mills.
• Demonstrate the standard methods of testing for straightness, squareness and smoothness on a prepared timber.
Pencil
*Specimen of wood species used for furniture making e.g.
Massonia Abura Afara (White &Black) Mahogany African wallnut (Cedar) Agba Eki, etc
*A sample of fresh cut timber

NVC Furniture Making & Upholstery: 2009
56
ASSESSMENT STRUCTURE
TYPE OF ASSESSMENT PURPOSE AND NATURE OF ASSESSMENT (VFM 112) WEIGHING Examination Final Examination (written) to assess knowledge and understanding 10 Test At least 2 progress tests for feed back. 10 Practical At least 5 home works to be assessed by the teacher 80 TOTAL WEIGHT 100
RECOMMENDED TEXTBOOKS AND REFERENCES
NAME: WOODWORK IN THEORY AND PRACTICE AUTHOR: JOHN A. WALTON PUBLISHER: GEORGE G. HARRAD & CO LTD
NAME: WOODWORK FOR SCHOOLS AND COLLEGES AUTHOR: JOHN CLIFFORD PUBLISHER:

NVC Furniture Making & Upholstery: 2009
57
PROGRAMME: NATIONAL VOCATIONAL CERTIFICATE IN FU RNITURE MAKING AND UPHOLSTERY
COURSE NAME: MACHINE WOODWORKING I
COURSE CODE: VFM 121
DURATION: 2 – 0 – 6
UNITS: 8 UNITS
GOAL: This module is designed to develop trainee’s knowledge and skills in the use of woodworking machines for furniture construction.
GENERAL OBJECTIVES: On completion of this module the trainee will be able to: -
1) Understand the main features, functions and maintenance of cross cutting machine.
2) Understand the main features, functions and maintenance of a circular rip sawing machine.
3) Understand the main features, functions and maintenance of a surface planing machine.
4) Understand the main features, functions and maintenance of a thicknessing and combination
planing machine.
5) Understand the main features, functions and maintenance of a narrow band sawing machine.
6) Know the purpose, preparation and application of ‘setting out rods’, route sheets and cutting list.

NVC Furniture Making & Upholstery: 2009
58
PROGRAMME: VOCATIONAL ENTERPRISE CERTIFICATE IN FURNITURE MA KING AND UPHOLSTERY COURSE: MACHINE WOODWORKING I COURSE CODE: VFM 121 CONTACT HOURS: 2 – 0 – 6 GOAL: THIS MODULE IS DESIGNED TO DEVELOP TRAINEE’S KNOW LEDGE AND SKILLS IN THE USE OF WOODWORKING MACHINES FOR FURNITURE
CONSTRUCTION. COURSE SPECIFICATION: THEORETICAL CONTENT COURSE SPECIFICATION: PRACTICAL CONTENT WEEK GENERAL OBJECTIVE 1.0: UNDERSTAND THE MAIN FEATURES, FUNCTIONS AND MAINTEN ANCE OF CROSS-CUT SAWING MACHINE .
Special Learning Objectives Teacher’s Activities Learning Resources Special Learning Objectives Teacher’s Activities Learning Resources
1-3 1.1 Describe the main features of a cross-cut sawing machine.
1.2 Describe the properties of materials used in the manufacture of the component parts of the machine and justify their use.
1.3 Outline the functions of a cross-cut sawing machine.
1.4 Name various cutters and accessories for cross-cut sawing machine e.g. saw-blades, cutters for trenching.
1.5 State necessary precautions to be taken when using a cross-cut sawing machine.
1.6 State possible hazards related to the use of the machine and their causes.
1.7 Describe the basic servicing and maintenance of a cross-
• Explain the main features of a cross-cut sawing machine.
• Explain the properties of the materials used in manufacturing the components parts of the machine.
• Give examples of the functions of a cross-cut sawing machine.
• Explain the working principles of the operations performed by a cross-cut sawing machine.
• Explain necessary safety measures to take when using a cross-cut sawing machine.
• Explain the
Chalkboard
Lesson notes
Wall chart
Posters
• Identify the components of cross-cut sawing machine and the materials used in manufacturing them.
• Identify various cutters and accessories for a cross-cut sawing machine such as: - Saw blades - Cutters for trenching.
• Sharpen saw blade accurately for use on a cross-cut sawing machine.
• Mount and dismount machine cutters correctly e.g. saw blade on a cross-cut sawing machine.
• Set up and use the machine to carry out its range of functions e.g. -cutting operations (straight and angular),
-trenching operations, etc, while observing appropriate safety measures.
• Show student a cross-cut sawing machine and its component parts.
• Show student various cutters and accessories used on a cross-cut sawing machine.
• Demonstrate how to sharpen saw blade for use on the machine.
• Demonstrate how to mount and dismount cutters e.g. saw blade on the machine.
• Demonstrate the use of a cross-cut sawing machine to perform specific tasks such as cutting operations, trenching operations etc, while observing all
Cross-cut sawing machine.
Accessories used by cross-cut sawing machine such as; Saw blades, cutters for trenching, etc
Materials, e.g. wood etc.

NVC Furniture Making & Upholstery: 2009
59
cut sawing machine. functions of various cutters and accessories used by a cross-cut sawing machine.
• Explain the potential causes of hazards that can occur while using a cross-cut sawing machine.
• Explain the methods of carrying out basic servicing and maintenance of a cross-cut sawing machine and necessary precautions to observe while using it.
• Carry out routine servicing and maintenance operations on the machine e.g. routine cleaning after use, regular greasing and oiling
operational and safety precautions.
• Guide student to carry out necessary routine servicing and maintenance on the machine.
GENERAL OBJECTIVE 2.0: UNDERSTAND THE MAIN FEATURES, FUNCTIONS AND MAINTEN ANCE OF A CIRCULAR RIP SAWING MACHINE. 4 – 5 2.1 Describe the main features
of a circular rip sawing machine.
2.2 Describe materials used in the manufacture of the components parts of the machine and justify their use.
2.3 List various accessories of a circular rip sawing machine such as; saw blade, riving knife, etc.
2.4 Describe the functions of a
• Explain the main features of circular rip saw machine.
• Explain the components parts of a circular rip sawing machine and the materials used in making them.
• Give examples of the accessories of a circular rip sawing machine and their
Chalk board
Lesson note
Charts
Sketches
• Identify the main parts of a circular rip sawing machine and the materials used in their manufacture.
• Identify various accessories used on a circular rip sawing machine.
• Set and sharpen blades proficiently.
• Set and sharpen saw blades and riving knife
• Show student a real circular rip sawing machine and guide them to identify its component parts as well as the materials used in their manufacture.
• Show student the accessories used on a circular rip sawing machine such as; saw blade, riving knife, etc.
Chalkboard
Saw blade
Riving knife
Circular rip sawing machine
Wood
Fence
Crown Guard

NVC Furniture Making & Upholstery: 2009
60
circular rip sawing machine.
2.5 State necessary safety and operational precautions to be observed when using the machine such as; a) Correct use of guards. b) Proper use of goggles,
etc.
2.5 Outline basic maintenance and servicing works to be carried on a circular rip sawing machine
uses.
• Explain the scope of operation of a circular rip sawing machine e.g.
a. Trenching b. Grooving c. Rebating d. Tenoning e. Mitring, etc
• Explain the possible hazards associated with the use of the machine, their potential causes, prevention and treatment.
• Explain the methods of maintaining and servicing a circular rip sawing machine such as; regular greasing and oiling.
proficiently.
• Mount and dismount machine cutter correctly, e.g. saw blade, riving knife etc, on the circular rip sawing machine.
• Fix and adjust the riving knife correctly on the machine.
• Set up and use the circular rip sawing machine for the following operations. -rip sawing -grooving -rebating -tenoning -mitring, etc
• Identify jigs and fixtures used in combination with a circular rip sawing machine for intricate and repetitive jobs, e.g. tapering, mitering, etc in machine wood working.
• Undertake routine servicing and maintenance of circular rip sawing machine, e.g. cleaning after use, regular greasing and oiling, etc
• Guide student to set and sharpen saw blade and riving knife for use on the machine.
• Demonstrate how to mount and dismount cutters (saw blade, riving knife) on a circular rip sawing machine.
• Demonstrate the uses of the circular rip sawing machine to perform specific jobs like rip sawing, grooving, rebating, tenoning, mitring, etc, observing all operational and safety precautions.
• Show student jigs and fixtures used in intricate and repetitive jobs e.g. tapering, mitering in machine wood working.
• Guide student to carry out necessary routine service and maintenance on the machine.
Push Stick
GENERAL OBJECTIVE 3.0: UNDERSTAND THE MAIN FEATURES, FUNCTIONS AND MAINT ENANCE OF SURFACE PLANING MACHINE.

NVC Furniture Making & Upholstery: 2009
61
8 3.1 Describe the main features of surface planing machine.
3.2 Name the major parts of a surface planing machine and their functions.
3.3 State materials used in manufacturing the component parts of the machine.
3.4 Outline the functions of a surface planing machine, such as; -surfacing -tapering -chamfering -bevelling -through & stopped rebating, etc.
3.4 Outline the necessary precautions to take while using a surface planing machine.
3.5 Describe the routine maintenance and servicing to be carried on a surface planner; such as cleaning the dust, oiling the parts, etc.
• Explain the main features of a surface planing machine.
• Explain the functions of the component parts of the machine and the materials used in manufacturing them.
• Explain the uses of a surface planing machine such as: -surfacing -tapering -chamfering -bevelling -through and stopped Rebating, etc
• Explain the principle of operations of a surface planing machine in performing all its duties listed above.
• Explain possible hazards that can arise with the use of surface planing machine, their causes, prevention and treatment.
• Explain the basic
Chalkboard
Lesson notes
Posters/pictures
Sketches/diagrams
• Identify the component parts of a surface planing machine and the materials used in manufacturing them.
• Mount and dismount cutters correctly on a surface planing machine.
• Grind, hone and set cutters for use in a surface planing machine.
• Perform the following operations with the surface planer: -Surfacing and edging -Tapering -Chamfering -Through and stopped rebating.
• Undertake routine service and maintenance of the machine.
• Show student a surface planing machine and guide them to identify its component parts as well as the materials used in manufacturing them.
• Guide the student in operation of the surface planing machine to perform specific jobs listed in 3.4 observing all necessary safety and operational precautions.
• Guide student to carry out necessary routine service and maintenance on a surface planing machine
Chalkboard
Pictures/Posters
Sketches/diagrams
Surface planing machine and its
Saw blade
Wood

NVC Furniture Making & Upholstery: 2009
62
maintenance and servicing to be carried on a surface planner e.g. constant cleaning and oiling.
GENERAL OBJECTIVE 4.0: UNDERSTAND THE MAIN FEATURES, FUNCTIONS AND MAINT ENANCE OF THICKNESSING AND COMBINATION PLANING MACHINE.
9 4.1 Describe the main features of thicknessing and combination planing machine.
4.2 List the various materials used in the manufacture of the component parts and justify their use.
4.3 State the functions of the major components of the machines.
4.4 Describe the basic
operations of a thicknessing and combination planing machine.
4.5 State possible hazards related to the use of the thicknessing and combination planing machine and their potential causes.
4.6 Outline the safety and operational precautions to be observed when operating the thicknessing and combination planing machine e.g.
• Explain the main features of the thicknessing and combination planing machine and the materials used in manufacturing them.
• State the functions of the component parts of the machine.
• Explain the basic operations and uses of a thicknessing and combination planing machine.
• Explain the working principles of the machine in carrying out its basic operations.
• Explain likely accidents that can occur while using the machine, their potential causes, prevention and solution.
Chalkboard
Lesson note.
Wall chart
Posters/Pictures
Sketches/Diagrams
• Identify component parts of a thicknessing and combination planing machine and the materials used in their manufacture.
• Sharpen and set cutters using -Patient device -Wooden straight edge
• Mount and dismount the cutters correctly on the machine.
• Carry out specific operation on a thicknessing and combination planing machine, observing all safety and operational rules.
• Undertake routine service and maintenance of a thicknessing and combination planing machines.
• Show student a thickness and combination panning machine and its component parts.
• Guide student to sharpen and set cutters for the machine, using patent device and wooden straight edge.
• Demonstrate how to mount and dismount cutters correctly on a thicknessing and combination planing machine.
• Demonstrate the operation of a thicknessing and combination machine in performing specific jobs observing all necessary operational and
Chalkboard
Wall chart
Posters/Pictures
Sketches/Diagrams
Thicknessing &
Combination
Planing machine
Wood

NVC Furniture Making & Upholstery: 2009
63
- using sharp and balanced cutter
- maintaining correct operation posture
- isolating power source soon after operation etc.
4.7 Describe basic servicing and maintenance of the machine.
• Explain the safety precautions to be observed when working on the machine, see 4.6.
• Explain basic maintenance of the machine.
safety requirements.
• Guide student to carry out necessary routine servicing and maintenance of the machine.
GENERAL OBJECTIVE: 5.0: UNDERSTAND THE MAIN FEATURES, FUNCTIONS AND MAINTE NANCE OF A NARROW-BAND SAWING MACHINE.
10 – 11 5.1 Describe the main features of a narrow band sawing machine.
5.2 Name the component parts of the narrow band sawing machine.
5.3 State the materials used in making the parts of the machine.
5.4 Outline the functions of the parts of the narrow band sawing machine.
5.5 Describe the operations performed by a narrow band sawing machine.
5.6 Outline the safety and operational precautions to be observed when operating the narrow-band machine.
5.7 Describe the procedure of carrying out routine service and maintenance of a
• Explain the main features of a narrow band sawing machine.
• Explain the various parts of a machine and the materials used in manufacturing them.
• Explain the functions of the various parts of the machine.
• Explain the scope of operations and working principles of a narrow band sawing machine.
• Explain the safety precautions to be observed when working on the narrow-band sawing
Chalk Board
Lesson note
Sketches/Diagrams
Posters/Pictures
• Identify their main features of a narrow band sawing machine and the materials used in manufacturing the parts.
• Mount and dismount band saw blade accurately on the wheels of the machine.
• Identify jigs applicable to a narrow-band sawing machine for use in producing repetitive jobs.
• Set up and sharpen narrow band saw blade (manually or with sharpening machine).
• Braze or butt-weld broken saw blade.
• Calculate the length of the narrow band saw blade.
• Set up and use the machine for various band-sawing
• Show student a narrow band sawing machine and its components parts.
• Guide student to set up and sharpen narrow band saw blade (manually or with sharpening machine).
• Demonstrate how to mount and dismount saw blade on the wheels of the machine.
• Demonstrate how to braze or butt weld a broken saw blade.
• Work some examples of calculations to
Chalk Board
Sketches/Diagrams
Posters/Picture
Narrow-band sawing machine and its accessories
Materials used in manufacturing the parts of the machine.
Jigs used on the machine for repetitive jobs.
Working materials for the machine such as wood.
Saw blade
Cutter
Brazing machine

NVC Furniture Making & Upholstery: 2009
64
narrow-band sawing machine.
machine such as; -ensuring that the
wheels are clean,
-isolating power before fixing the saw blade,
-ensuring that both the top and bottom wheels are properly covered before operating the machine, etc.
• Explain routine service and maintenance of a narrow-band sawing machine.
operations, while observing all safety and operational rules.
• Undertake routine service and maintenance of a narrow band sawing machine.
determine the length of a narrow-band saw blade.
• Guide student to carry out specific operations on a narrow-band sawing machine observing all safety and operational precautions.
• Guide student to carry out routine serving and maintenance of a narrow-band sawing machine.
Welding machine for joining the broken saw blade.
GENERA OBJECTIVE 6.0: KNOW THE PURPOSE, PREPARATION AND APPLICATION OF ‘SETTING OUT ROD’ ROUTE SHEET AND CUTTING LIST
12 6.1 Define the following terms; rod, route sheet and cutting list.
6.2 Differentiate between rod and route sheet.
6.3 Differentiate between the application of ‘setting out rod’ and route sheet.
6.4 State the advantages and limitations of rods and route sheet.
6.5 State the advantages of cutting out list.
• Explain the following wood working terms
- Rod - Route sheet - Cutting list
• Explain the differences between ‘setting out rod’ and route sheet, and also, their applications.
• Explain the purpose of ‘setting out rod’ and route sheet, their advantages and
Chalkboard
Lesson notes
Posters/Pictures Sketches/Diagrams
Wall chart
• Differentiate between height and width rod. (Note that all height and width rods are usually produced full size).
• Prepare a ‘setting-out rod’ for purpose of production work in a workshop.
• Produce a standard ‘setting-out rod’ for common woodwork joinery or furniture items such as door, stool, kitchen unit and bookshelf.
• Prepare route sheet for the production of the above
• Demonstrate how to prepare ‘setting-out rod’, route sheet to specification for the production of joinery and furniture items such as door, stool, kitchen unit, bookshelf, etc.
• Demonstrate how to prepare typical cutting list for each item of the woodwork listed above following a
Chalkboard
Sketches/Diagrams
Pictures/Posters
Wall chart
Samples of rods.
Route sheet
Cutting list

NVC Furniture Making & Upholstery: 2009
65
limitations.
• Explain the purpose of making cutting list and its importance in determining the cost of a job.
listed joinery and furniture items.
• Make a cutting list for each item of woodwork to be produced.
standard procedure.

NVC Furniture Making & Upholstery: 2009
66
ASSESSMENT STRUCTURE
TYPE OF ASSESSMENT PURPOSE AND NATURE OF ASSESSMENT (VFM 121) WEIGHING Examination Final Examination (written) to assess knowledge and understanding 10 Test At least 2 progress tests for feed back. 10 Practical At least 5 home works to be assessed by the teacher 80 TOTAL WEIGHT 100
RECOMMENDED TEXTBOOKS AND REFERENCES
NAME: WOODWORK IN THEORY AND PRACTICE AUTHOR: JOHN A. WALTON PUBLISHER: GEORGE G. HARRAD & CO LTD
NAME: WOODWORK FOR SCHOOLS AND COLLEGES AUTHOR: JOHN CLIFFORD PUBLISHER:

NVC Furniture Making & Upholstery: 2009
67
PROGRAMME: NATIONAL VOCATIONAL CERTIFICATE IN FU RNITURE MAKING AND UPHOLSTERY
COURSE NAME: MACHINE WOODWORKING II
COURSE CODE: VFM 211
DURATION: 2 – 0 – 6
UNITS: 8 UNITS
GOAL: This module is designed to develop the trainee’s knowledge and skills in the use of advanced woodworking machines, and portable electric power tools for furniture construction.
GENERAL OBJECTIVES: On completion of this module the trainee will be able to:
1) Understand the main features, functions, operations and maintenance of mortising machine.
2) Understand the main features, functions, operations and maintenance of a single-end tenoning
machine.
3) Understand the principles of operation of various sanding machines.
4) Understand the main features, principles of operations of portable electric power tools.
5) Understand the principles of frame construction and common joints used in furniture making.

NVC Furniture Making & Upholstery: 2009
68
PROGRAMME: VOCATIONAL ENTERPRISE CERTIFICATE IN FURNITURE MA KING AND UPHOLSTERY COURSE: MACHINE WOOD WORKING II COURSE CODE: VFM 211 CONTACT HOURS: 2 – 0 – 6 GOAL: THIS MODULE IS DESIGNED TO DEVELOP TRAINEE’S KNO WLEDGE AND SKILLS IN THE USE OF ADVANCED WOODWORKIN G MACHINES
AND PORTABLE ELECTRIC POWER TOOLS FOR FURNITURE CON STRUCTION. COURSE SPECIFICATION: THEORETICAL CONTENT. COURSE SPECIFICATION: PRACTICAL CONTENT. Week GENERAL OBJECTIVE 1.0: UNDERSTAND THE MAIN FEATURES, FUNCTIONS, OPERATION S AND MAINTENANCE OF A MORTISING
MACHINE. Special Learning Objectives Teacher’s Activities Learning Resources Special Learning Objectives Teacher’s Activities Learning Resources 1 – 3 1.1 Describe the main features
of a mortising machine.
1.2 Sketch a general design of the machine.
1.3 Outline the functions of a mortising machine e.g. boring hole for tenoning.
1.4 Differentiate between the two types of cutters used on the machine
a. Hollow chisel cutter
b. Chain cutter
1.5 State the type of jobs most suitable for each cutter listed above.
1.6 Describe the types of clamping devices and attachments used by the mortising machine.
1.7 State all safety and operational precautions to
• Explain the component parts of a mortising machine and materials used in manufacturing them.
• Use diagrams to explain the layout of the machine.
• Explain the scope of operations of a mortising machine.
• Give the differences between hollow chisel cutter and chain cutter and their uses on a mortising machine.
• Explain types of jobs that can be carried out by each type of cutter mentioned above.
• Explain type of
Lesson notes
Chalkboard
Pictures/diagrams
Templates
• Identify various parts of a mortising machine and the materials used in manufacturing them.
• Select appropriate hollow chisel cutter or chain cutter for the mortising machine.
• Install and remove the selected cutters correctly from the machine.
• Grind and sharpen mortise chisel or chain for use on the machine.
• Set up the machine correctly for use.
• Carry out normal and repetitive mortising operations to given specifications while applying safety and operational precautions related to the use of the machine.
• Show student a mortising machine and its components parts.
• Guide student to select appropriate hollow chisel cutter or chain cutter for the mortising machine.
• Demonstrate how to sharpen appropriate cutters as well as to install and remove them from a mortising machine.
• Demonstrate how to grind and sharpen a mortise chisel of chain for use on a mortising machine.
• Demonstrate how to set up the
The mortising machine.
Materials for operations in the machine
Wood Templates
Mortise chisel or chain
Hollow chisel cutter
Chain cutter

NVC Furniture Making & Upholstery: 2009
69
be observed with the use of a mortising machine.
1.8 Describe routine serving and maintenance to be carried on a mortising machine.
clamping devices and attachments for the mortising machine.
• Explain safety and operational precautions applicable to the use of the machine and the basic servicing and maintenance to be carried out by the users.
• Undertake routine serving and maintenance of the machine.
machine and perform various stages of operations from normal to repetitive jobs, observing all safety and operational rules.
• Guide student to carry out routine servicing and maintenance of the machine.
GENERAL OBJECTIVE 2.0: UNDERSTAND THE MAIN FEATURES, FUNCTIONS, OPERATIO NS AND MAINTENANCE OF A SINGLE-END TENONING MACHINE.
4 – 5 2.1 Describe the main features of a single-end tenoning machine.
2.2 Describe the component parts of the machine and their functions.
2.2 Outline the functions of a single-end tenoning machine e.g creatng tenoning on the end of each piece as specification demands.
2.3 List the common tools and accessories of a single-end tenoning machine e.g. spur cutter.
2.4 State the functions of various tools and accessories of the machine listed above.
• Explain the main features of a single-end tenoning machine..
• Explain the functions of the main parts of the machine.
• Explain the scope
of operation of a single-end tenoning machine e.g. creating a tenoning on the end a work-piece.
• Explain the
functions of common tools and accessories applicable to a
Chalkboard
Lesson notes
Pictures/Posters
Sketches/Diagrams
Templates
• Identify the common parts of a single-end tenoning machine and their functions.
• Sharpen mortise chisel or chain for use on a single-end tenoning machine.
• Set vertical and horizontal head adjustment on the machine.
• Set scribing cutter to produce moulds.
• Develop shape of scribing cutter from the moulding operation.
• Adapt the machine for trenching, square tenoning and comb joints, etc.
• Show student a single-end tenoning machine and point out its component parts and their functions.
• Demonstrate how to sharpen mortise chisel or chain for use on a single end tenoning machine.
• Assist student to set up the single-end tenoning machine ready for operations.
• Show student suitable jigs used for repetitive job on a singe-end
Chalkboard
Pictures/Posters
Sketches/Diagrams
The single end tenoning machine.
Materials for woodwork, etc
Templates
Jigs applicable to a single-end tenoning machine.
Mortise chisel or chain
Scribing cutter
Samples of working

NVC Furniture Making & Upholstery: 2009
70
single-end tenoning machine • Balance each pair of cutters
on the balancing machine.
• Identify suitable jigs for repetitive jobs on a tenoning machine.
• Set up single-end tenoning machine and produce mitre tenons, applying all safety and operational precautions related to the use of the machine.
• Undertake routine servicing and maintenance of the machine.
tenoning machine.
• Demonstrate how to perform various stages of operation mentioned in the student’s practical activities, on a single-end tenoning machine observing all safety and operational rules.
• Guide student to undertake routine servicing and maintenance of the machine.
drawing.
GENERAL OBJECTIVE 3.0: UNDERSTAND THE PRINCIPLES OF OPERATION OF VARIOUS SANDING MACHINE. 8 3.1 Name different types of
sanding machine.
3.2 Outline the principles of operation of the following sanding machines: -Overhead traveling belt sander.
-Disc and bobbing sander. -Drum Sander
3.3 State necessary operational precautions related to the use of the sanding machines.
4.4 Discuss the importance of the exhaust system in a sanding machine.
• Enumerate different types of sanding machine: -Overhead traveling belt sander.
-Disc and bobbing sander.
-Drum Sander.
• Give detailed information to explain the principles of operation of each of the sanding machine.
• Illustrate with sketches/posters the working principles
Chalkboard
Lesson notes
Pictures/charts of various types of sanding machine listed in 3.2.
• Identify various types of sanding machine: a. overhead traveling belt
sander b. Disc and bobbing sander c. Drum sander
• Carry out the operations of various types of sanding machines.
• Take student to industries, woodworking shops to see various types of sanding machine listed in 3.2 and observe their operations.
Pictures/charts of various types of sanding machine: a. overhead traveling
belt sander b. Disc and bobbing
sander c. Drum sander
Real sanding machines in factories or woodworking shops.
Excursion to observe the operations of the sanding machine.

NVC Furniture Making & Upholstery: 2009
71
of each of the sanding machine.
• Explain the necessary precautions required while working with any sanding machine.
• Explain the importance of the exhaust system in relation to the use of any sanding machine.
GENERAL OBJECTIVE 4.0: UNDERSTAND THE MAIN FEATURES, FUNCTIONS, OPERATION S AND MAINTENANCE OF PORTABLE ELECTRIC POWER TOOLS.
6 -7 4.1 List the common portable electric power tools used in woodwork production e.g. a) Portable saw b) Portable planer c) Portable sander d) Portable jig saw e) Portable drilling
machine. f) Portable router machine
4.2 Outline the basic functions of each tool listed in items 4.1 above.
4.3 Discuss the limitations of portable electric power tools in furniture making.
• Give examples of common portable electric power tools used in woodwork production such as: a) Portable saw b) Portable planer c) Portable sander d) Portable jig saw e) Portable drilling
machine. f) Portable router
machine
• Explain the basic functions and uses of each portable electric power tool listed above.
• Explain the
Chalkboard *Lesson notes
Sketches/Diagrams
Pictures/charts of Portable electric power tools
Real Portable electric power tools e.g.
Portable saw,
Portable planer
Portable sander,
Portable jig saw
Portable drilling
• Identify the electric power tools listed below and their uses; -Portable saw -Portable planer -Portable sander -Portable jig saw -Portable drilling machine. -Portable router machine
• Use the above listed portable electric power tools to carryout various operations such as -sawing, -planing, -sandering, -cutting curve & shapes, -boring holes of various diameter
• Show student various electric portable power tools listed in 4.1
• Demonstrate proper use of portable electric power tools to carry out various operations such as: -sawing -planing -sanding -cutting curve & shapes
-boring holes of various diameters
Chalkboard
Sketches/Diagrams
Pictures/charts of Portable electric power tools
Real portable electric power tools e.g. Portable saw
Portable planer
Portable sander
Portable jig saw
Portable drilling machine, etc

NVC Furniture Making & Upholstery: 2009
72
working principles involved in the operations of each portable electric power tool listed above, e.g. all the tools are portable, hence, they are known as electric hand tools.
• Present pictures as well as real samples of the various power tools for the student to see.
machine, etc
GENERAL OBJECTIVE 5.0: UNDERSTAND THE PRINCIPLES OF FRAME CONSTRUCTION AN D COMMON JOINTS USED IN FURNITURE MAKING.
5.1 Outline the principles of frame construction.
5.2 List factors that must be considered in frame construction such as: a) Rigidity b) Jointing method c) Squareness of frame in
all directions.
5.3 Outline the principles of triangulation in relation to the rigidity of a square construction.
5.4 List various frame joints for a frame construction e.g. -mitre joint, -lap joint, -dovetail joint,
• Explain the principles of frame construction.
• Explain various factors that can considered in frame construction listed in 5.2.
• Explain the principles of triangulation in relation to the rigidity of a square construction.
• Explain various frame joints applicable to a given frame
Chalkboard
Lesson notes
Pictures/Charts of the common joints
Pictures/Charts of frame construction e.g. cabinet door, picture frame etc.
Sketches/Diagrams
• Sketch various frame joints applicable for a given frame construction such as: -mitre joint, -lap joint -dovetail joint, -butt joint, etc
• Construct various frame joints listed above.
• Prepare components for a chosen frame construction e.g. cabinet door, picture frame etc.
• Assemble the prepared components of the chosen frame construction.
• Test the assembled frame
• Make sketches of various frame joints applicable for a given frame job such as: -mitre joint, -lap joint -dovetail joint, -butt joint, etc
• Demonstrate the construction of various frame joints listed above.
• Demonstrate how to prepare components for a frame construction such as cabinet door, picture frame
Chalkboard
Relevant machines and hand tools for frame construction e.g: -Saw, -Plane, -Try square, -Mitre square etc.
Wood materials
Drawing kit and materials.
Working drawings
Relevant sketches/diagrams of common joints listed in 5.4

NVC Furniture Making & Upholstery: 2009
73
-butt joint, etc construction listed in 5.4.
construction for squareness and out of wind.
• Clean assembled frame and prepare surface ready for finishing.
etc.
• Show how to assemble the prepared components of the chosen frame construction.
• Demonstrate how to test an assembled frame construction for squareness and out of wind.
• Show how to clean the assembled surface ready for finishing.
Chosen frame construction e.g. cabinet door, picture frame, etc.

NVC Furniture Making & Upholstery: 2009
74
ASSESSMENT STRUCTURE
TYPE OF ASSESSMENT PURPOSE AND NATURE OF ASSESSMENT (VFM 211) WEIGHING Examination Final Examination (written) to assess knowledge and understanding 10 Test At least 2 progress tests for feed back. 10 Practical At least 5 home works to be assessed by the teacher 80 TOTAL WEIGHT 100
RECOMMENDED TEXTBOOKS AND REFERENCES
NAME: WOODWORK IN THEORY AND PRACTICE AUTHOR: JOHN A. WALTON PUBLISHER: GEORGE G. HARRAD & CO LTD
NAME: WOODWORK FOR SCHOOLS AND COLLEGES AUTHOR: JOHN CLIFFORD PUBLISHER:

NVC Furniture Making & Upholstery: 2009
75
PROGRAMME: NATIONAL VOCATIONAL CERTIFICATE IN FU RNITURE MAKING AND UPHOLSTERY
COURSE NAME: FURNITURE MAKING AND CONSTRUCTION I
COURSE CODE: VFM 212
DURATION: 2 – 0 – 4
UNITS: 6 UNITS
GOAL: This module is designed to give the trainee essential knowledge and skills to enable him develop working drawings and construct various woodworking joints used in frame construction.
GENERAL OBJECTIVES: On completion of this module the trainee will be able to:
1) Understand the uses of different types of lines in generating working drawing
2) Understand angles of projection used in working drawing and design
3) Understand the methods used in presenting working drawings.
4) Understand dimensioning in working drawing and making of cutting list from the working drawing.
5) Understand woodworking joints used in frame construction.
6) Know the construction techniques of basic woodworking joints for frame construction.

NVC Furniture Making & Upholstery: 2009
76
PROGRAMME: VOCATIONAL ENTERPRISE CERTIFICATE IN FURNITURE MA KING AND UPHOLSTERY COURSE: FURNITURE MAKING & CONSTRUCTION I COURSE CODE: VFM 212 CONTACT HOURS: 2 – 0 – 4 GOAL: THIS MODULE IS DESIGNED TO PROVIDE THE TRAINEE ESS ENTIAL KNOWLEDGE AND SKILLS TO ENABLE HIM DEVELOP W ORKING
DRAWINGS AND CONSTRUCT VARIOUS WOOD WORKING JOINTS USED IN FRAME CONSTRUCTION. MODULE SPECIFICATION: THEORETICAL CONTENT MODULE SPECIFICATION: PRACTICAL CONTENT Week GENERAL OBJECTIVE 1.0: UNDERSTAND THE USES OF DIFFERENT TYPES OF LINES IN GENERATING WORKING DRAWING. Special Learning Objectives Teacher’s Activities Learning Resources Special Learning Objectives Teacher’s Activities Learning Resources 1 – 3 1.1 Define design with respect to
working drawing of any furniture construction.
1.2 Outline various types of lines used in working drawing for constructional works e.g. a) Thick line b) Thin line c) Thin line, short dashes d) Thin, straight, zigzag line e) Thin chain line thickened
at each end
1.3 State the uses of various types of lines listed above.
1.4 Describe how to make lettering on a working drawing.
• Give the definition of design in relation to working drawing of any furniture construction.
• Explain various types of lines listed in 4.2 and their uses.
• Explain how to make lettering on a working drawing.
Chalkboard
Lesson notes
Drawing kit & materials
Working drawings
• Identify various application of each type of line listed below in a working drawing: a) Thick line b) Thin line c) Thin line, short dashes d) Thin, straight, zigzag
line e) Thin chain line
thickened at each end
• Make lettering on a working drawing.
• Illustrate the uses of each type of line listed in 1.2 in a working drawing.
• Show how to make lettering on a working drawing.
Chalk board
Drawing kit & Materials
Working drawings
GENERAL OBJECTIVE 2.0: UNDERSTAND ANGLES OF PROJECTION USED IN WORKING DR AWING AND DESIGN 4 – 5 2.1 List the angles of projection
used in working drawing and design i.e. -3rd angle projection -1st angle projection.
2.2 Differentiate between 3rd angle projection and 1st angle projection in any drawing or design.
• Explain the two angles of projection used in working drawing namely: -3rd angle -1st angle projections and differentiate between them.
Chalk board
Lesson notes
Drawing kit &
Materials
Working drawings
• Identify the two angles of projections used in a working drawing namely: -3rd angle projection -1st angle projection.
• Identify the differences between 3rd angle projection and 1st angle projection in a working drawing.
• Illustrate the two angles of projections used in a working drawing i.e. 3rd angle & 1st angle projections.
• Guide student to identify the differences
Chalk board
Drawing kit
& Materials
Working drawings

NVC Furniture Making & Upholstery: 2009
77
2.3 Discuss the uses and importance of scale in working drawings such as: -Ratio 1 : 2 -Ratio 1 : 5 -Ratio 1 : 10 -Ratio 1 : 20, etc
• Explain the importance of using scale in working drawings e.g.:
-Ratio 1 : 2 -Ratio 1 : 5 -Ratio 1 : 10 -Ratio 1 : 20, etc
• Identify various scales applicable to a working drawings e.g.: -Ratio 1 : 2 -Ratio 1 : 5 -Ratio 1 : 10 -Ratio 1 : 20, etc
between the two angles of projection in a working drawing.
GENERAL OBJECTIVE 3.0: UNDERSTAND THE METHODS USED IN PRESENTING A WORKIN G DRAWING. 6 – 7 3.1 Outline the three standard
methods used in presenting working drawings namely; a) Isometric view b) Oblique view c) Perspective view
3.2 Outline the components of each method of presenting working drawing listed above, such as: -The angles used in each view.
3.3 Outline various views in working drawings a) Front elevation b) Side elevation c) Side-sectional elevation d) Plan e) Pictorial view f) Constructional details
• Explain the three standard methods used in presenting working drawing listed in 3.1.
• Explain details of angles used in the three methods of presenting working drawing listed in 3.1.
Chalk board
Lesson notes
Drawing kit
& Materials
Working drawings
• Sketch a working drawing using each of the three standard method of its presentation namely; - Isometric view -Oblique view -Perspective view
• Translate the sketches made above to working drawings for each selected item such as, stools, tables, cabinets etc
• Identify the various angles of inclination (set squares) in a working drawing
• Identify various types of elevations applicable to a working drawing such as; a) Front elevation b) Side elevation c) Side-sectional elevation d) Plan e) Pictorial view f) Constructional details
• Illustrate the three standard method of presenting working drawing listed in 1.1 on selected items such as stools, tables, cabinets etc.
• Demonstrate the uses of various angles of inclination (set squares) on a working drawing.
• Illustrate the formation of working drawing which include the following: -front elevation -side elevation -side sectional elevation,
-pictorial view.
Chalk board
Drawing kit
& Materials
Working drawings

NVC Furniture Making & Upholstery: 2009
78
GENERAL OBJECTIVE: 4.0: UNDERSTAND DIMENSIONING IN WORKING DRAWING AND MA KING CUTTING LIST FROM A WORKING
DRAWING. 8 4.1 Discuss the uses and
importance of dimensioning in working drawing.
4.2 Discuss the preparation of cutting list from a working drawing of selected furniture items such as stool, table, cabinet, etc.
• Explain the purpose of dimensioning in working drawing.
• Explain how to prepare a cutting list from a working drawing of a selected object such as stool, table, cabinet, etc.
Chalk board
Lesson notes
Drawing kits & materials
Sketches
Working drawings
Pictures of real furniture items e.g. stool, table, cabinet, etc.
• Apply dimensioning in the working drawing of a given object e.g. stools, tables, cabinets etc.
• Prepare a cutting list on a specific given object from its working drawing.
• Illustrate the application of dimensioning in the working drawings of real objects.
• Demonstrate how to prepare cutting list from the working drawing of a specific given object e.g. stool, table, cabinet.
Chalk board
Drawing kits & materials
Sketches
Working drawings
Real furniture objects e.g. stool, table, cabinet, etc.
GENERAL OBJECTIVE 5.0: UNDERSTAND WOODWORKING JOINTS USED IN FRAME CONST RUCTION. 6 -7 5.1 List the three groups of wood
working joints namely; a) Framing joints b) Angle joints c) Widening joint.
5.2 List examples of each group of wood working joints named above e.g.
a) Framing Joints -Tee halving joint -Tee briddle joint -Cross halving joint -Dovetail tee halving joint -Angle mitre joint -Mortise & Tenon joints (various types)
b) Angle Joints.
• Explain the basis of classifying woodworking joints into three main groups listed in 5.1.
• Classify all woodworking joints into each of the three main groups listed in 5.1.
• Explain the application of various types of woodworking joints listed in 5.2 for furniture construction.
Chalk board
Lesson notes
Drawing kit & materials
Sketches
Working Drawing
Pictures/Charts of various kinds of joints
Pictures of real furniture objects
• Identify the three groups of woodworking joints namely: a) framing joints b) angle joints c) widening joints
• Identify the examples of each group of joint, see 5.2.
• Construct various woodworking joints listed in 5.2.
• Identify the application of different kinds of woodworking joints listed in 5.2, in furniture construction.
• Illustrate with the aid of sketches/charts the various groups of wood working joints listed in 5.1 and their specific examples as listed in 5.2.
• Demonstrate how to construct different kinds of woodworking joints, touching the three groups afore-mentioned.
• Show student where and how the
Chalk board
Drawing kit & materials
Sketches
Working Drawing
Pictures/Charts of various kinds of joints
Pictures of real furniture objects.

NVC Furniture Making & Upholstery: 2009
79
-Common through dovetail joint
-Single lap dovetail joint -Double lap dovetail joint -Secret mitre dovetail joint -Simple butt joint
c) Widening joint -Dowelling joint -Tongue & Groove joint -Rebated joint -Fastening joint (corrugated box fastener)
5.3 Describe the uses of various kinds of wood working joints in furniture making.
different kinds of joints are used in frame construction of furniture items.
GENERAL OBJECTIVE 6.0: KNOW THE TECHNIQUES OF CONSTRUCTING BASIC WOODWORK ING JOINTS FOR FRAME CONSTRUCTION. 8 6.1 Describe various joints used
in woodworking for frame construction see details in 5.2.
• Explain the uses of various types of wood working joints in frame construction.
Chalkboard
Sketches/diagrams of various kinds of wood working joints
Pictures/charts of various kinds of joints
• Construct various kinds of joints related to a given object.
• Produce samples from each of the three groups of woodworking joints following the relevant procedure.
• Produce specific joints assigned by the teacher.
• Demonstrate how to construct various woodworking joints related to a given object e.g. stools, desk, drawers, cabinet, etc.
• Demonstrate the standard procedure of producing samples from the three groups of wood working joint.
• Give assignment to student to produce specific woodworking
Chalkboard
Hand tools & equipment
Real samples of prepared joints,
Sketches/diagrams of various kinds of wood working joints
Pictures/charts of various kinds of joints
NVC Furniture Making & Upholstery: 2009
80
joints following standard procedure.

NVC Furniture Making & Upholstery: 2009
81
ASSESSMENT STRUCTURE
TYPE OF ASSESSMENT PURPOSE AND NATURE OF ASSESSMENT (VFM 212) WEIGHING Examination Final Examination (written) to assess knowledge and understanding 10 Test At least 2 progress tests for feed back. 10 Practical At least 5 home works to be assessed by the teacher 80 TOTAL WEIGHT 100
RECOMMENDED TEXTBOOKS AND REFERENCES
NAME: WOODWORK IN THEORY AND PRACTICE AUTHOR: JOHN A. WALTON PUBLISHER: GEORGE G HARRAD & CO LTD
NAME: WOODWORK FOR SCHOOLS AND COLLEGES AUTHOR: JOHN CLIFFORD PUBLISHER:

NVC Furniture Making & Upholstery: 2009
82
PROGRAMME: NATIONAL VOCATIONAL CERTIFICATE IN FU RNITURE MAKING AND UPHOLSTERY
COURSE NAME: FURNITURE MAKING AND CONSTRUCTION I I
COURSE CODE: VFM 221
DURATION: 2 – 0 – 4
UNITS: 6 UNITS
GOAL: This module is designed to equip the trainee with adequate knowledge and skills to enable him design and construct chairs and tables.
GENERAL OBJECTIVES: On completion of this module the trainee will be able to:
1) Understand the construction methods of producing chairs and tables.
2) Understand the principles of finishing wood and metal surfaces of chairs and tables.
3) Understand the principles of finishing wood and metal surfaces of chairs and tables.
4) Know the application of finishing on a chair or table.
5) Understand fittings and fastening accessories used in furniture making.

NVC Furniture Making & Upholstery: 2009
83
PROGRAMME: VOCATIONAL ENTERPRISE CERTIFICATE IN FURNITURE MAK ING AND UPHOLSTERY COURSE: FURNITURE MAKING AND CONSTRUCTION II COURSE CODE: VFM 221 CONTACT HOURS: 2 – 0 – 4 GOAL: THIS MODULE IS DESIGNED TO PROVIDE THE TRAINEE A DEQUATE KNOWLEDGE AND SKILLS TO ENABLE HIM DESIGN A ND CONSTRUCT
CHAIRS AND TABLES. COURSE SPECIFICATION: THEORETICAL CONTENTS COURSE SPECIFICATION: PRACTICAL CONTENTS GENERAL OBJECTIVE 1.0: UNDERSTAND THE CONSTRUCTION METHODS OF PRODUCING C HAIRS AND TABLES Week Specific Learning Objectives Teacher’s Activities Learning Resources Specific Learning Objectives Teacher’s Activities Learning Resources 1.1 Describe various types of
chairs e.g., dining chair, easy chair, rocking chair, office chair, etc.
1.2 Describe various types of tables e.g. office desk, dining table, worktop table (computer table), conference table etc.
1.3 Outline sequence operation of producing a chosen chair.
1.4 Outline sequence operation of producing a chosen table.
1.5 Itemize cutting list for any chosen chair and table.
• Explain with the aid of diagrams typical dining chair, office chair, easy chair, rocking chair, dining table, office desk, worktop table (computer table), conference table, etc.
• Explain in detail the sequence operation of producing a chosen chair
• Explain in detail the sequence operation of producing a chosen table
• Explain the composition of a cutting list for each of the chosen chair and table.
Chalk board/ white board
Lesson notes
Sketches
Drawings
Drawing kits and materials
• Use templates for marking out and shaping any chosen design of chairs and tables.
• Prepare production drawings (working drawings) of chosen chairs and tables
• Make cutting list for any chosen chair and table from its working drawing.
• Select and mark out joints for chosen tables and chairs such as mortise and tenon joints, dowelling joints etc
• Assemble the prepared units of the chosen furniture with adhesive and fasteners.
• Use angle brackets to fortify the joints.
• Scrape and sand-paper assembled item in readiness for finishing
• Produce samples of templates of the chosen chairs and tables with participation of student
• Guide student to prepare production drawing (working drawing) of chosen chairs and tables.
• Prepare cutting list for chosen chair and table from its working drawing.
• Demonstrate how to select and mark out required joints for any chosen chair and table
• Demonstrate how to assemble the prepared units of any item with adhesive and fasteners
Chalk board/ white board
Sketches
Drawings
Hand tools & Equipments for wood working
Templates
Drawing kits and materials

NVC Furniture Making & Upholstery: 2009
84
• Guide student to scrape and sand-paper the assembled item.
GENERAL OBJECTIVE 2.0: UNDERSTAND THE PRINCIPLE OF FINISHING WOOD AND MET AL SURFACES OF CHAIRS AND TABLES 2.1 Discuss the purpose of
finishing on wood and metal surfaces of chairs and tables such as: -For preservation, -For hygiene -For aesthetics.
2.2 List types of finishing materials e.g. -Lacquer -Sanding sealer -French polish -Stain (warm and cold) -Thinner solvent -Paint of various colours -Abrasive paper, etc
2.3 Describe methods of applying finishing on wood and metal surfaces of chairs and tables such as: - -Brush application -Rag or tag application -Spraying application
2.4 Discuss the procedure of finishing application
-Scraping -Sanding -Priming or coating -Re-sanding for smoothness -Final finishing (e.g. painting)
• Explain the reason for carrying out finishing on wood and metal surfaces of chairs and tables i.e.: -For preservation, -For hygiene -For aesthetics
• Explain various types of finishing materials listed in 2.2 and their uses.
• Explain the various methods of applying finishing on wood and metal surfaces of chairs and tables listed in 2.3
• Explain in detail the procedure involved in applying finishing as listed in 2.4
Chalk board/white board
Lesson notes
Pictures/Posters
Sketches/Diagrams
Wall chart
Real objects for finishing e.g. -Lacquer -Sanding sealer -French polish -Stain (warm & cold) -Thinner solvent -Paint of various colours
• Identify materials used in finishing wood or metal surfaces of chairs and tables e.g.: -Lacquer -Sanding sealer -French polish -Stain (warm and cold) -Thinner solvent -Paint of various colours -Abrasive paper, etc.
• Prepare wood surface and metal surface of a chosen chair and table for finishing following the standard procedure namely: -Scraping -Sanding -Priming or coating -Re-sanding for smoothness -Final finishing (e.g. painting)
• Carry out the application of final finishing on a wood surface and metal surface of a chosen furniture item by the following methods: -Brush application -Rag or tag application -Spraying application
Show student various materials used in finishing wood or metal surfaces l of chairs and tables listed in 2.2
Demonstrate how to prepare wood surface and metal surface of a chosen chair and table for finishing following standard procedure as laid out in 2.4
Demonstrate how to apply final finishing on a wood surface and a metal surface of chosen furniture item by the following methods: -Brush application -Rag or tag application -Spraying application
Chalk board/white board
Pictures/Posters
Sketches/Diagrams
Wall chart
Real objects for finishing e.g. -Lacquer -Sanding sealer -French polish -Stain (warm & cold) -Thinner solvent -Paint of various colours
Brush
Spraying equipment
Rag or tag rubber

NVC Furniture Making & Upholstery: 2009
85
GENERAL OBJECTIVE3.0: KNOW THE APPLICATION OF FINISHING ON FURNITURE ITE MS. 3.1 Discuss the procedure for
applying final finishing on assembled chair and table surfaces i.e. -scraping -sanding -priming or coating -Re-sanding -Final finishing
3.2 Discuss the uses of the under-listed finishing materials during final finishing of wood surface and metal surface: -Lacquer -Sanding sealer -French polish -Stain (warm & cold) -Thinner solvent -Paint of various colours.
• Explain the procedure involved in finishing of assembled chairs and tables
• Explain the composition of materials used for final finishing of wood surface and metal surface and their application.
Chalk board/white board
Lesson notes
Pictures/Posters
Sketches/Diagrams
Wall chart
Real objects for finishing e.g.: -Lacquer -Sanding sealer -French polish -Stain (warm & cold) -Thinner solvent -Paint of various colours
• Prepare surfaces of a chairs and tables for finishing by: -Scraping -sanding -priming or coating -Re-sanding -Final finishing
• Apply wood finish by hand (e.g. use of brush & tag) and by spraying.
• Finish the prepared surface by spraying and polishing.
• Guide student to prepare surfaces of chairs and tables for finishing following the standard procedure listed in 3.1
• Demonstrate how to apply wood finish by hand (use of brush and tag) and by spraying.
• Guide student to finish the prepared surface by spraying and by polishing.
Chalk board/white board
Pictures/Posters
Sketches/Diagrams
Wall chart
Real objects for finishing e.g. -Lacquer -Sanding sealer -French polish -Stain (warm & cold) -Thinner solvent -Paint of various colours
Brush
Spraying equipment
Rag or tag rubber GENERAL OBJECTIVE 4.0: UNDERSTAND FITTINGS AND FASTENING ACCESSORIES USED IN FURNITURE MAKING 4.1 List fastening accessories and
their uses e.g. screws, nails, corrugated box fasteners, bolts and nuts, etc
4.2 List holding and pulling accessories e.g. hinges, handles, locks, catches, stays etc.
4.3 Differentiate between fastening accessories and
• Explain the uses of fastening accessories and also, holding and pulling accessories listed in 4.1 and 4.2
• Explain how fasteners are used to hold two parts together.
Chalk board/white board
Lesson notes
Pictures/Posters
Sketches/Diagrams
Wall chart
Fastening accessories
• Identify different types of fastening accessories and also, holding and pulling accessories listed in 4.1 and 4.2.
• Make freehand sketches of different types of fastening accessories and also, holding and pulling accessories listed in 4.1and 4.2.
• Show different fitting & fastening accessories in 4.1 & 4.2
• Illustrate sketches of fastening, and also, holding & pulling accessories in 4.1 & 4.2.
• Demonstrate how
Chalk board/white board
Lesson notes
Pictures/Posters
Sketches/Diagrams
Wall chart
Fastening accessories

NVC Furniture Making & Upholstery: 2009
86
holding & pulling accessories.
4.4 State the properties of the materials used for common fittings and fastening, examples of the materials are brass, mild steel, aluminium, plastics etc.
• Explain the differences between two types of accessories mentioned in 4.3
• Explain the properties of the materials used for common fittings and fastenings.
e.g. screws, nails, corrugated box, bolts and nuts
Holding and pulling accessories e.g. hinges, handles, locks, catches, stays etc.
• Use different kinds of fasteners to hold two parts together.
• Select appropriate fittings and fasteners for fittings/fixing finished furniture items.
fittings and fasteners are used to hold two parts together.
• Show student how to select appropriate fittings and fasteners for fitting/fixing finished furniture.
e.g. screws, nails, corrugated box, bolts and nuts
Holding and pulling accessories e.g. hinges, handles, locks, catches, stays etc.
Materials for woodwork & metalwork i.e. wood, metal

NVC Furniture Making & Upholstery: 2009
87
ASSESSMENT STRUCTURE
TYPE OF ASSESSMENT PURPOSE AND NATURE OF ASSESSMENT (VFM 221) WEIGHING Examination Final Examination (written) to assess knowledge and understanding 10 Test At least 2 progress tests for feed back. 10 Practical At least 5 home works to be assessed by the teacher 80 TOTAL WEIGHT 100
RECOMMENDED TEXTBOOKS AND REFERENCES
NAME: WOODWORK IN THEORY AND PRACTICE AUTHOR: JOHN A. WALTON PUBLISHER: GEORGE G. HARRAD & CO LTD
NAME: WOODWORK FOR SCHOOLS AND COLLEGES AUTHOR: JOHN CLIFFORD PUBLISHER:

NVC Furniture Making & Upholstery: 2009
88
PROGRAMME: NATIONAL VOCATIONAL CERTIFICATE IN FU RNITURE MAKING AND UPHOLSTERY
COURSE NAME: FURNITURE MAKING AND CONSTRUCTION I II
COURSE CODE: VFM 311
DURATION: 2 – 0 – 6
UNITS: 8 UNITS
GOAL: This module is designed to equip the trainee with the knowledge and skills to enable him construct carcase and cabinet
GENERAL OBJECTIVES: On completion of this module the trainee will be able to:
1) Understand the design and construction procedure of carcase and cabinet.
2) Understand carcase and construction.
3) Understand lipping and veneering operation on carcase and cabinet constructions.

NVC Furniture Making & Upholstery: 2009
89
PROGRAMME: VOCATIONAL ENTERPRISE INSTITUTION CERTIFICATE IN FURNITURE MAKING AND UPHOLSTERY COURSE: FURNITURE MAKING AND CONSTRUCTION III COURSE CODE: VFM 311 CONTACT HOURS: 2 – 0 – 6 GOAL: THIS MODULE IS DESIGNED TO PROVIDE THE TRAINEE WI TH THE KNOWLEDGE AND SKILLS TO ENABLE HIM CONSTRUCT CARCASE AND
CABINET. COURSE SPECIFICATION: THEORETICAL CONTENT. COURSE SPECIFICATION: PRACTICAL CONTENT. WEEK GENERAL OBJECTIVE 1.0: UNDERSTAND THE DESIGN AND CONSTRUCTION PROCEDURE OF CARCASE AND CABINET. Specific Learning Objectives Teacher’s Activities Learning Resources Specific Learning Objective Teacher’s Activities Learning Resources 1-3 1.1 Discuss the materials
required for furniture making e.g. timber, plywood of various sizes in thickness (6mm, 12mm, 18mm) plywood blockboard, particle board (18mm).
1.2 Distinguish between natural and man-made board materials.
1.3 Outline the composition of all natural and man-made board materials listed in 1.1.
1.4 Outline the application of all natural and man-made board listed in 1.1 in furniture making.
• Give an overview of the composition & uses of various materials used in furniture making listed in 1.1.
• Categorize the various materials used for furniture making into natural and man made board i.e. a. Natural board
e.g. timber b. Man-made
boards e.g. block board, particle board, & plywood, etc
• Give lecture to distinguish between natural and man-made materials used for furniture making.
• Explain in detail the composition and application of
Chalk board
Lesson notes
Pictures/Posters
Wall Chart
Sketches/Diagrams
• Identify various materials required for furniture making e.g. timber, plywood (6mm, 12mm, 18mm), particle board (18mm), plywood block board
• Identify various sizes of plywood and their applications
• Identify real objects made from natural and man-made board
• Show student various materials used in furniture making listed in 1.1
• Display samples of natural and man-made boards of different sizes
• Guide student to identify real objects made from natural and man-made board
Chalk board
Pictures/Posters
Wall Chart
Sketches/Diagrams
Real objects of materials used in furniture making e.g.: -timber, -plywood (6mm, 12mm, 18mm) -particle board (18mm) -block board

NVC Furniture Making & Upholstery: 2009
90
all natural and man-made board listed in 1.1.
GENERAL OBJECTIVE 2.0: UNDERSTAND CARCASE AND CABINET CONSTRUCTION 2.1 List different types of
carcase construction e.g. side board, etc.
2.2 List different types of cabinet e.g. wardrobe, side board, chest of drawers etc.
2.3 Differentiate between carcase and cabinet construction.
2.4 Discuss the materials used in constructing chosen type of carcase e.g. side board.
2.5 Outline the procedure of constructing a chosen type of carcase e.g. side bard.
• Describe different types of cabinet listed in 2.1.
• Explain what differentiate a carcase construction from a cabinet construction
• Explain the materials’ composition and construction procedure required in producing a chosen carcase (i.e. side board)
Chalk board
Lesson notes
Pictures/Posters of carcase and cabinet constructions.
Wall Chart
Sketches/Diagrams
• Identify various carcase construction as well as cabinet constructions.
• Identify different types of cabinet e.g. wardrobe, side board chest of drawers, etc.
• Design a chosen type of carcase construction e.g. side board and cabinet e.g. wardrobe.
• Develop working drawing for any chosen carcase e.g. side bard) and cabinet (e.g. wardrobe)
• Prepare cutting list from the working drawings of the chosen carcase and cabinet.
• Select and prepare the joints appropriate for the construction of the chosen carcase and cabinet
• Assemble the carcase and cabinet constructions with adhesive and glue blocks.
• Show student examples of a carcase construction e.g. side board.
• Show student different types of cabinet listed in 2.2.
• Guide student to separate carcase constructions from cabinet constructions.
• Assist student to design a chosen type of carcase construction e.g. side board and cabinet e.g. wardrobe and to develop their working drawings.
• Guide student to prepare cutting list from the developed working drawings of carcase and cabinet.
• Guide student in the selection and preparation of joints required for the
Chalk board
Pictures/Posters
Wall Chart
Sketches/Diagrams
Real objects of materials used in furniture making e.g.: -timber, -plywood (6mm, 12mm, 18mm) -particle board (18mm) -block board
Real samples of carcase construction e.g. side board.
Real samples of cabinet construction e.g. wardrobe, chest of drawers, etc.

NVC Furniture Making & Upholstery: 2009
91
chosen carcase and cabinet
• Demonstrate how to assemble the carcase and cabinet constructions with adhesive and glue blocks.
GENERAL OBJECTIVE 3.0: UNDERSTAND LIPPING AND VENEERING OPERATION ON CARC ASE AND CABINET CONSTRUCTIONS. 6 -7 3.1 Outline the reasons for
applying lipping in carcase and cabinet constructions.
3.2 Describe parts of a carcase and cabinet constructions that are required to be lipped and.
3.2 Describe the materials used for lipping e.g veneer and wood.
3.3 Discuss appropriate finishing to be carried on the lipped carcase and cabinet constructions.
• Explain the purpose of lipping in carcase and cabinet constructions.
• Explain parts of a carcase and cabinet constructions that are required to be lipped.
• Explain the uses of veneer and wood in lipping carcase and cabinet constructions.
• Explain necessary finishing operations to be carried out on lipped carcase & cabinet construction.
Chalk board
Lesson notes
Pictures/Posters of carcase and cabinet constructions.
Wall Chart
Sketches/Diagrams
• Identify the cases of lipping applications on real objects e.g. carcase and cabinet constructions.
• Identify lipping done with wood and veneer on carcase and cabinet constructions.
• Apply lipping with wood and veneer on specified carcase and cabinet constructions.
• Scrape and glaze-paper the lipped carcase and cabinet constructions ready for finishing.
• Carry out appropriate finishing on the prepared surface of the lipped carcase and cabinet constructions.
• Show student parts of real objects (carcase and cabinet) that had undergone ripping operation
• Show student parts carcase and cabinet constructions that are lipped with wood and veneer.
• Demonstrate the application of lipping with wood and veneer on specified carcase and cabinet constructions.
• Guide student to scrape and glaze-paper the lipped carcase and cabinet constructions ready for finishing.
• Guide student to apply appropriate
Chalk board
Pictures/Posters
Wall Chart
Sketches/Diagrams
Real objects of materials used in furniture making e.g. -timber, -plywood (6mm, 12mm, 18mm) -particle board (18mm) -block board
Real samples of carcase construction e.g. side board.
Real samples of cabinet construction e.g. wardrobe, chest of drawers, etc.
Lipping materials e.g. wood & veneer.

NVC Furniture Making & Upholstery: 2009
92
finishing on the prepared surface of the lipped carcase and cabinet constructions.

NVC Furniture Making & Upholstery: 2009
93
ASSESSMENT STRUCTURE
TYPE OF ASSESSMENT PURPOSE AND NATURE OF ASSESSMENT (VFM 311) WEIGHING Examination Final Examination (written) to assess knowledge and understanding 10 Test At least 2 progress tests for feed back. 10 Practical At least 5 home works to be assessed by the teacher 80 TOTAL WEIGHT 100
RECOMMENDED TEXTBOOKS AND REFERENCES
NAME: WOODWORK IN THEORY AND PRACTICE AUTHOR: JOHN A. WALTON PUBLISHER: GEORGE G. HARRAD & CO LTD
NAME: WOODWORK FOR SCHOOLS AND COLLEGES AUTHOR: JOHN CLIFFORD PUBLISHER:

NVC Furniture Making & Upholstery: 2009
94
PROGRAMME: NATIONAL VOCATIONAL CERTIFICATE IN FU RNITURE MAKING AND UPHOLSTERY
COURSE NAME: UPHOLSTERY DESIGN & CONSTRUCTION
COURSE CODE: VFM 312
DURATION: 2 – 0 – 4
UNITS: 6 UNITS
GOAL: This module is designed to equip the trainee with the knowledge and skills to enable him design and construct complete upholstered furniture
GENERAL OBJECTIVES: On completion of this module the trainee will be able to:
1) Understand the design and construction of upholstery carcase
2) Understand basic principles of upholstery construction
3) Understand the method of constructing upholstered furniture
4) Understand methods of covering and fixing upholstery construction with fabric and leather

NVC Furniture Making & Upholstery: 2009
95
PROGRAMME: VOCATIONAL ENTERPRISE CERTIFICATE IN FURNITURE MA KING AND UPHOLSTERY COURSE: UPHOLSTERY DESIGN & CONSTRUCTION COURSE CODE: VFM 312 CONTACT HOURS: 2 – 0 – 4 GOAL: THIS MODULE IS DESIGNED TO PROVIDE THE TRAINEE W ITH THE KNOWLEDGE AND SKILLS TO ENABLE HIM DESIGN A ND CONSTRUCT
COMPLETE UPHOLSTERED FURNITURE. COURSE SPECIFICATION: THEORETICAL CONTENTS. COURSE SPECIFICATION: PRACTICAL CONTENTS. WEEK GENERAL OBJECTIVE 1.0: UNDERSTAND THE DESIGN AND CONSTRUCTION OF UPHOLSTER Y CARCASE. Specific Learning Objectives Teacher’s Activities Learning Resources Specific Learning Objectives Teacher’s Activities Learning Resources
1-3 1.1 List various hand tools used in the construction of upholstery carcase such as. -Hammer -Scissor -Web-stretcher -Needles & awls -Ripping knife -Chisels -Mallet -Staple machine -Knife -Measuring tape, etc
1.2 Describe the materials used in construction of upholstery carcase listed above and their uses.
1.3 Describe various designs available in upholstery carcase construction such as; armed design and armless design.
1.4 List the components of the carcase of upholstery construction e.g. rails, pillets, front & back rails, templates etc.
• Explain the uses of various hand tools listed in 1.1 in the construction of upholstery carcase.
• Explain the material used in construction of upholstery carcase.
• Explain various designs in upholstery carcase construction such as armed design and armless design.
• Explain the components of the carcase of upholstery construction listed in 1.4.
• Explain the tolerance allowed for stuffing,
Chalkboard
Lesson notes
Sketches/Diagrams
Pictures/Posters
Wall charts
Drawing kit and materials
Samples of upholstery materials, tools.
• Identify various tools used in construction of upholstery carcase listed in 1.1.
• Identify various materials used in the construction of upholstery carcase.
• Translate idea of upholstery carcase to sketches.
• Translate sketches of upholstery carcase to pictorial drawings
• Develop pictorial drawing above into working drawing
• Develop various parts of upholstery carcase construction from the working drawing i.e. form templates of different shapes.
• Identify the tolerance applied during stuffing, springing and covering carcase construction
• Show student various tools and materials used in the construction of upholstery carcase.
• Illustrate how ideas of upholstery carcase construction are translated into sketches and pictorial drawing in isometric oblique, perspective projections.
• Guide student to develop working drawings from the pictorial drawings earlier made.
• Demonstrate how to develop templates of different shapes from the working drawing of the
Chalkboard
Sketches/Diagrams
Pictures/Posters
Wall charts
Drawing kit and materials
Samples of upholstery materials
Samples of hand tools used in upholstery carcase construction such as: -Hammer -Scissor -Web-stretcher -Needles & awls -Ripping knife -Chisels -Mallet -Staple -Knife -Measuring tape

NVC Furniture Making & Upholstery: 2009
96
1.5 Describe the tolerance allowed for stuffing, springing and covering in upholstery construction.
springing and covering in upholstery construction.
upholstery carcase construction.
• Show student the tolerance allowed during stuffing, springing and covering upholstery carcase construction
GENERAL OBJECTIVE 2.0: UNDERSTAND BASIC PRINCIPLES OF UPHOLSTERY CONSTRUCTION 4 – 5 2.1 Outline the basic principle of
upholstery construction noting the fundamental components in constructing upholstery.
2.2 Outline the requirements in framing of chairs to support types of upholstery construction.
2.3 Outline the purpose of frames in upholstery construction.
2.4 Name the main types of adhesive and fasteners used in upholstery e.g. rubber based solution, polyurethane, tack nails, stud staple pins.
2.5 The characteristics of the various kinds of upholstery springing and suspension.
2.6 Describe the operational methods and uses of the upholstery powered hand
• Explain the basic principle of upholstery construction.
• Explain in details the requirements in framing of chairs to support types of upholstery construction.
• Explain the purpose of framing in upholstery construction.
• Explain the factors necessary to achieve strength and rigidity in upholstery construction.
• Explain the uses of various adhesive and fasteners
Chalkboard
Lesson notes
Sketches/Diagrams
Pictures/Posters
Wall charts
Drawing kit and materials
Samples of upholstery materials
Edging machine and its accessories.
Adhesive and fasteners used in assembling upholstery construction e.g. rubber based solution, polyurethane, tack nails, stud staple pins
• Identify the fundamental components involved in upholstery construction
• Use upholstery hand tools to carry out frame construction.
• Identify types of adhesives and fasteners used in upholstery such as: -rubber based solution, -polyurethane, -tack nails, -stud staple pins.
• Use appropriate adhesives and fasteners listed above in constructing upholstered furniture.
• Identify types of sewing machine used in upholstery construction i.e. edging machine.
• Identify parts of upholstery
• Illustrate with the aid of sketches and templates of various shapes, the basic principles of upholstery construction.
• Demonstrate the uses of upholstery hand tools in frame construction of upholstered furniture.
• Show student various upholstery adhesives and fasteners listed in 2.4
• Guide student to use adhesives and fasteners in upholstery construction.
Chalkboard
Sketches/Diagrams
Pictures/Posters
Wall charts
Drawing kit and materials
Samples of upholstery materials
Edging machine and its accessories e.g. -Pipe foot -Gathering foot -Zip fastener foot
Adhesive and fasteners used in assembling upholstery construction e.g. rubber based solution, polyurethane, tack nails, stud staple pins.

NVC Furniture Making & Upholstery: 2009
97
tools such as: -Stapling gun (pneumatic & electric)
-Powered cutters -Foam cutter -Drills (pneumatic & electric)
-Electric iron -Button mould
2.7 Describe the operation of upholstery sewing machine (i.e. edging machine) and its attachments.
implored in upholstery construction listed in 2.4.
• Explain the characteristics of various kinds of upholstery springing and suspension.
• Explain the uses and operational methods of the upholstery powered hand tools listed in 2.6.
• Explain the operation of upholstery sewing machine (i.e. edging machine) and its attachments.
sewing machine (i.e. edging machine) and the attachments such as: -Pipe foot -Gathering foot -Zip fastener foot
• Show student types of sewing machine used in upholstery construction i.e. edging machine, its components and attachments.
• Guide student in the identification of the parts of edging machine (used in sewing fabrics of upholstery construction) and its accessories.
Upholstery powered hand tools e.g. -Stapling gun (pneumatic & electric) -Powered cutters -Foam cutter -Drills (pneumatic & electric) -Electric iron -Button mould
GENERAL OBJECTIVE 3.0: UNDERSTAND THE METHOD OF CONSTRUCTING UPHOLSTERED FURNITURE
6 -7 3.1 Discuss fundamental steps involved in upholstery construction namely; translating ideas to sketches and then to pictorial drawing and finally to working drawing (also known as blue print).
3.2 Describe a typical design of an upholstery furniture e.g. armed chair, poof, etc.
• Explain the stages of producing upholstery construction furniture listed in 3.1.
• Use sketches/diagrams to interpret typical design of upholstery
Chalkboard
Lesson notes
Sketches/Diagrams
Pictures/Posters
Wall charts
Drawing kit and materials
• Design upholstery furniture e.g. armed chair, poof, etc.
• Interpret the design (blue print) of the upholstery furniture developed above indicating all parts of the construction form nominal to finished stages
• Identify all parts of the prepared blue print for the
• Supervise student in the design of upholstery furniture following the standard procedure.
• Guide student to interpret the prepared blue print of the upholstery furniture indicating all parts of the
Chalkboard
Sketches/Diagrams
Pictures/Posters
Wall charts
Drawing kit and materials
Samples of upholstery

NVC Furniture Making & Upholstery: 2009
98
3.3 State the sequence of assembling the carcase of upholstery furniture e.g. armed chair, poof, etc.
3.4 Describe methods of applying webbing e.g. by spacing, by weaving etc, to upholstered furniture.
3.5 Discuss the reason for stuffing the carcase of an upholstery construction and the materials used to do the stuffing.
furniture e.g. armed chair, poof, etc.
• Explain the sequence of assembling the carcase of upholstery furniture e.g. .armed chair, poof, etc.
• Explain the various methods of applying webbing in upholstered furniture i.e. by spacing and by weaving.
• Explain the reason for stuffing the carcase of an upholstery construction
• Explain the materials used in stuffing the carcase of an upholstery construction e.g. foam, cotton wool, asbestos etc.
Samples of upholstery materials
Edging machine and its accessories.
Adhesive and fasteners used in assembling upholstery construction e.g. rubber based solution, polyurethane, tack nails, stud staple pins
Materials for stuffing carcase of upholstery construction e.g. foam, cotton wool, asbestos, etc.
construction of upholstered furniture
• Assemble all the prepared parts to form the carcase of the upholstered furniture.
• Apply webbing on the assembled upholstery construction by spacing and b weaving on the back rest and seat platform
• Stuff foam into required part of the carcase for comfort.
construction.
• Show student each part of the prepared blue print ready for assembling of the upholstered furniture.
• Demonstrate the assembling of the upholstered furniture nailing each part in sequential order.
• Demonstrate webbing on assembled upholstery by spacing and by weaving on the necessary parts of the carcase.
• Show student the materials used in stuffing the carcase of upholstery construction e.g. foam, cotton wool, hessian, jute bag, cardboard, ply wood, etc.
• Guide student to stuff the required parts of carcase with foam
materials
Edging machine and its accessories.
Adhesive and fasteners used in assembling upholstery construction.
Upholstery powered hand tools
Materials for stuffing carcase of upholstery construction e.g. foam, cotton wool, asbestos, etc.

NVC Furniture Making & Upholstery: 2009
99
GENERAL OBJECTIVE 4.0: UNDERSTAND METHODS OF COVERING AND FIXING UPHOLSTE RY CONSTRUCTION WITH FABRIC AND
LEATHER 8 4.1 Discuss the need for accurate
measurement and allowing correct sewing tolerance in covering any upholstery construction.
4.2 Name materials used in covering upholstery construction e.g. fabric, leather, calico, etc.
4.3 Describe the sequence of covering upholstery construction with fabric or leather (leatherette).
4.4 Describe the mechanism of fixing upholstery fittings, which include; -Cover bottom -Castors -Guide, etc
• Explain the importance of ensuring accurate measurement of materials used in covering upholstery construction and the need to provide correct sewing allowances.
• Explain the uses and application of different materials used in upholstery construction listed in 4.2 (i.e. fabric, leather, calico).
• Explain the sequence of covering upholstery construction with fabric or leather.
• Explain the purpose of fixing upholstery fittings e.g. cover bottom, castors, guide, etc and the mechanism of fixing them.
Chalkboard
Lesson notes
Sketches/Diagrams
Pictures/Posters
Wall charts
Drawing kit and materials
Samples of upholstery covering materials such as; -fabric, -leather, -calico, etc
Edging machine and its accessories.
Adhesive and fasteners used in assembling upholstery construction
Upholstery fittings such as: -cover bottom, -castors, -guide.
• Identify types of materials used in covering upholstery construction e.g. leather, fabric, calico etc
• Stretch the covering material e.g. leather, fabric, calico, etc, in readiness for cutting
• Identify sewing allowance to be provided on the cut pieces of the covering materials.
• Cut to size and shape the covering materials following the prepared templates, providing the identified sewing allowances in the cut pieces.
• Sew to pattern the cut pieces of the covering materials observing Y-cut marks and notching.
• Sort various patterns sewed for different parts of the chair such as armrest, seat and back.
• Fix the sewed fabric or leather on the assembled upholstery work.
• Show student different types of upholstery covering materials listed e.g. leather, fabric, calico, etc.
• Show how to stretch the upholstery covering materials listed above in order to remove the arises and avoid unnecessary tolerance during cutting.
• Guide student to allow for sewing allowances while cutting to size and shape the covering materials following the prepared templates.
• Illustrate the necessary sewing allowances to be provided while cutting any part of the covering material following the prepared templates.
Chalkboard
Sketches/Diagrams
Pictures/Posters
Wall charts
Drawing kit and materials
Samples of upholstery covering materials such as: - -fabric -leather -calico
Edging machine and its accessories.
Adhesive and fasteners used in assembling upholstery construction.
Upholstery fittings such as: -cover bottom, -castors, -guide.
Hand tools for assembling upholstery construction and fixing the accessories.
NVC Furniture Making & Upholstery: 2009
100
• Identify fittings to be fixed on the upholstered furniture such as; -Cover bottom -Castors -Guide
• Identify cases where the above named fittings are used on upholstered furniture.
• Fix the upholstery fittings above on the upholstered furniture using the appropriate tools.
• Demonstrate how to sew the cut pieces of the covering materials observing y-cut marks and notching.
• Guide student to sort various patterns sewed for the parts of the chair, such as; armrest, seat & back.
• Demonstrate how to fix the sewed fabric or leather on the assembled upholstery furniture.
• Show student the fittings used in covering upholstery furniture e.g. cover bottom, castors, guide, etc.
• Demonstrate the mechanism of fixing the upholstery fitting mentioned above on the upholstered furniture.

NVC Furniture Making & Upholstery: 2009
101
ASSESSMENT STRUCTURE
TYPE OF ASSESSMENT PURPOSE AND NATURE OF ASSESSMENT (VFM 312) WEIGHING Examination Final Examination (written) to assess knowledge and understanding 10 Test At least 2 progress tests for feed back. 10 Practical At least 5 home works to be assessed by the teacher 80 TOTAL WEIGHT 100
RECOMMENDED TEXTBOOKS AND REFERENCES
1) NAME: WOODWORK IN THEORY AND PRACTICE AUTHOR: JOHN CLIFFORD PUBLISHER:
2) NAME: WOODWORK TECHNOLOGY AUTHOR: JOHN STREFORD PUBLISHER:
3) NAME: WOODWORK FOR SCHOOLS AND COLLEGES AUTHOR: G. N. GREEN PUBLISHER:
4) NAME: WOODWORK TECHNOLOGY AUTHOR: CHAPMAN PUBLISHER:
5) NAME: GENERAL METAL WORK AUTHOR: THOMAS PUBLISHER:

NVC Furniture Making & Upholstery: 2009
102
PROGRAMME: NATIONAL VOCATIONAL CERTIFICATE IN FU RNITURE MAKING AND UPHOLSTERY
COURSE NAME: ADVANCED FURNITURE MAKING & CONSTRU CTION
COURSE CODE: VFM 321
DURATION: 2 – 0 – 6
UNITS: 8 UNITS
GOAL: This module is designed to equip the trainee with further knowledge and skills to enable him design and produce complex furniture items and jigs for repetitive jobs in furniture construction.
GENERAL OBJECTIVES: On completion of this module the trainee will be able to:
1) Understand various complex furniture items and their uses.
2) Understand methods of constructing built-in furniture.
3) Understand uses of jigs, fixtures and mould for various jobs in furniture construction.

NVC Furniture Making & Upholstery: 2009
103
PROGRAMME: VOCATIONAL ENTERPRISE CERTIFICATE IN FURNITURE MA KING AND UPHOLSTERY COURSE: ADVANCE FURNITURE MAKING & CONSTRUCTION COURSE CODE: VFM 321 CONTACT HOURS: 2 – 0 – 6 GOAL: THIS MODULE IS DESIGNED TO PROVIDE THE TRAINEE W ITH FURTHER KNOWLEDGE AND SKILLS TO ENABLE HIM DESI GN AND PRODUCE
COMPLEX FURNITURE ITEMS AND JIGS FOR REPETITIVE JOB S IN FURNITURE CONSTRUCTION. COURSE SPECIFICATION: THEORETICAL CONTENTS COURSE SPECIFICATION: PRACTICAL CONTENTS GENERAL OBJECTIVE 1.0: UNDERSTAND VARIOUS COMPLEX FURNITURE ITEMS AND THE IR USES Week Specific Learning Objectives Teacher’s Activities Learning Resources Specific Learning Objectives Teacher’s Activities Learning Resources 1.1 Describe various types of
complex furniture e.g.: a) Conference tables b) Extending tables c) Executive tables & chairs d) Convertible chair e) Cocktail cabinet f) Writing table g) Corner cabinet, etc
1.2 Describe the geometrical shapes of the furniture listed in 1.1 above.
1.3 Describe the application of knockdown fittings used in furniture construction.
1.4 Describe the uses of the following fittings and fixture attachments in complex furniture construction: a) Swivel base b) Convertible and
collapsible attachments to bar counter and reception counter.
c) Drawer rollers, etc
• Explain with the aid of diagrams and pictures the components and uses of various types of furniture listed in 1.1
• Give an overview of the geometrical shapes of various furniture as listed in 1.1
• Explain the purpose, working principles and application of knockdown fittings in furniture construction.
• Explain the uses of the under-listed fittings and fixture attachments in furniture construction; -Swivel base -Convertible and collapsible
Chalkboard
Lesson notes
Pictures/Posters
Sketches/Diagrams
Wall charts
Drawing kits and materials
Models of built-in furniture various complex furniture listed in 1.1
• Identify various furniture listed in 1.1
• Differentiate among the listed furniture in 1.1 by their geometrical shapes.
• Make various sketches of the following furniture: -Cocktail cabinet -Beds -Corner cabinet -Cupboard
• Translate various sketches into pictorial diagram and subsequent working diagram (also called production diagram).
• Produce blue print from the working drawing for use in constructing the furniture.
• Identify different types of knock down fittings and their various uses.
• Identify the applications of
• Show student blue print of the furniture as well as the real objects or models.
• Illustrate with diagrams, pictures and real objects, the geometrical shape of each furniture listed in 1.1
• Guide student to make sketches of the following: -Cocktail cabinet -Beds -Corner cabinet -Cupboard
• Guide student to develop the sketches of the furniture made above to pictorial diagram and subsequent working diagram, which can be
Chalkboard
Pictures/Posters
Sketches/Diagrams
Wall charts
Drawing kits and materials
Models & real samples of the following complex furniture:
a) Conference tables
b) Extending tables
c) Executive tables & chairs
d) Convertible chair
e) Cocktail cabinet
f) Writing table g) Corner cabinet
Samples of Knockdown fittings.

NVC Furniture Making & Upholstery: 2009
104
attachments to bar counter and reception counter.
the under listed fittings and fixture attachments on furniture items namely: -Swivel base -Convertible and collapsible attachments to bar counter and reception counter.
printed as blue print for use in the construction works.
• Show student various knockdown fittings and their uses.
• Illustrate with the aid of sketches and real objects the method of fixing fittings and fixture attachments listed in 1.4.
Samples of fittings and fixture attachments used in complex furniture construction such as:
a) Swivel base
b) Convertible and collapsible attachments to bar counter and reception counter
GENERAL OBJECTIVE 2.0: UNDERSTAND METHODS OF CONSTRUCTING BUILT-IN FURNIT URE 4 – 5 2.1 Mention different types of
built-in furniture such as: -Wall paneling or partitioning
-In-built wardrobe, etc
2.2 List the materials used in constructing built-in furniture mentioned in 3.1 such as: -Wall plugs or masonry
walls -nails, -Noggin wood.
2.3 Describe the procedure for preparing groundwork for paneling or partitioning built-in furniture
• Explain the features of the following built-in furniture; -Wall paneling or
partitioning -In-built -wardrobe.
• Explain the uses of various materials listed in 3.2 for the construction of built-in furniture.
• Explain the procedure for preparing groundwork for partitioning the afore-mentioned built–in furniture.
Chalkboard
Lesson notes
Pictures/Posters
Sketches/Diagrams
wall charts
Drawing kits and materials
Models of built-in furniture such as : -wall-paneling or
partitioning, -In-built wardrobe
Samples of materials used in constructing built-in furniture e.g.
• Identify various built-in furniture e.g.: a) wall paneling or partitioning b) wardrobe etc
• Identify various materials used in constructing built-in furniture such as -Wall plugs or masonry walls nails
-Noggin used
• Prepare ground work for paneling or partitioning built-in furniture using the necessary materials identified above.
• Show student various built-in furniture listed in 3.1
• Show student various materials used in constructing built-in furniture listed in 3.2.
• Demonstrate the standard procedure of preparing groundwork for partitioning or partitioning built-in furniture.
Chalkboard
Pictures/Posters
Sketches/Diagrams
wall charts
Drawing kits and materials
Models & Real samples of built-in furniture such as : -wall-paneling or partitioning,
-In-built wardrobe.
Samples of materials used in constructing built-in furniture e.g. -Wall plugs or

NVC Furniture Making & Upholstery: 2009
105
-Wall plugs or masonry walls nails,
-Noggin wood.
masonry walls nails, -Noggin wood.
GENERAL OBJECTIVE 3.0: UNDERSTAND USES OF JIGS, FIXTURES AND MOULD FOR REPETITIVE JOBS IN FURNITURE CONSTRUCTION. 3.1 State the uses of jigs, fixtures
and moulds in furniture construction.
3.2 Describe cases where jigs, fixtures and moulds are used in furniture construction e.g. in the production of repetitive jobs for speedy production, accuracy, material and human control.
3.3 Describe the materials used in -Constructing jigs, fixtures and mould and justify their uses. The materials include:
-Plaster of Paris -Wood -plywood, cardboard, plastic, etc
3.4 Describe methods of producing jigs and moulds for furniture construction.
• Explain the purpose and uses of jigs, fixtures and moulds in furniture construction
• Give examples of the application of jigs, fixtures and moulds in furniture construction, see 2.2.
• Explain the materials used in the construction of jigs, fixtures and mould for furniture construction.
• Explain different methods of producing jigs and moulds for various uses.
Chalkboard
Lesson notes
Pictures/Posters
Sketches/Diagrams
wall charts
Drawing kits and materials
Models of jigs, fixtures and moulds
• Identify various jigs, fixtures and moulds applicable to a particular design of furniture e.g.; chair (comprising back leg, front leg, arm rest, etc.)
• Make sketches of the identified jigs of the chosen furniture as listed above.
• Construct templates from the developed sketches above for the purpose of marking out specific shapes of the chosen furniture.
• Identify the materials used in producing jigs, fixtures and moulds for furniture construction.
• Produce suitable jigs, fixtures and moulds for repetitive jobs in furniture construction.
• Show student various jigs, fixtures and moulds applicable to a particular design of furniture e.g. chair (comprising back leg, front leg, arm rest, etc.)
• Guide student to make sketches of the identified jigs of the chair (comprising back leg, front leg, arm rest, etc.)
• Guide student to construct templates from the developed sketches of the chosen furniture for the purpose of marking out specific shapes of the furniture.
• Show student the materials used in producing jigs, fixtures and moulds for furniture construction and justify their uses.
Chalkboard
Lesson notes
Pictures/Posters
Sketches/Diagrams
wall charts
Drawing kits and materials
Models of jigs, fixtures and moulds
Real samples of jigs, fixtures and moulds
Materials for producing jigs, fixtures and moulds such as: -Plaster of Paris -Wood -Cement
Tools for the construction of jigs, fixtures and mould
Water for mixing the Plaster of Paris and cement used in producing the moulds

NVC Furniture Making & Upholstery: 2009
106
• Demonstrate how to produce different jigs, fixtures and moulds for repetitive jobs in furniture construction.

NVC Furniture Making & Upholstery: 2009
107
ASSESSMENT STRUCTURE
TYPE OF ASSESSMENT PURPOSE AND NATURE OF ASSESSMENT (VFM 321) WEIGHING Examination Final Examination (written) to assess knowledge and understanding 10 Test At least 2 progress tests for feed back. 10 Practical At least 5 home works to be assessed by the teacher 80 TOTAL WEIGHT 100
RECOMMENDED TEXTBOOKS AND REFERENCES
1) NAME: WOODWORK IN THEORY AND PRACTICE AUTHOR: JOHN CLIFFORD PUBLISHER:
2) NAME: WOODWORK TECHNOLOGY AUTHOR: JOHN STREFORD PUBLISHER:
3) NAME: WOODWORK FOR SCHOOLS AND COLLEGES AUTHOR: G. N. GREEN PUBLISHER:
4) NAME: WOODWORK TECHNOLOGY AUTHOR: CHAPMAN PUBLISHER:
5) NAME: GENERAL METAL WORK AUTHOR: THOMAS PUBLISHER:

NVC Furniture Making & Upholstery: 2009
108
LIST OF MINIMUM RESOURCES A. Holding and Supporting Hand Tools
S/No. Tools Description Min. Qty Unit 1 The Bench 18 Nos 2 The bench Vice 36 √ 3 G-Gramp 18 √ 4 F-Cramp 18 √ 5 Sash-Cramp 18 √ 6 Bench hold fast 18 √ 7 Mitre Gramp 18 √ 8 Mitre Box 18 √
B. Percussion & Impelling Hand Tools S/No. Tools Description Min. Qty Unit 1 Warrington Hammar 18 Nos 2 Claw Hammar 18 √ 3 Tack Hammar 18 √ 4 Magnet tack Hammar 18 √ 5 Iron bar 10 √ 6 Pincers 18 √ 7 Cutter pincers 18 √ 8 Screw dfrivers (Hat & Star) 18 Set. 9 Wooden/Rubber Mallet 18 Nos. 10 Spanners 18 Set. 11 Oil Can 18 Nos.

NVC Furniture Making & Upholstery: 2009
109
C. Cutting Tools S/No. Tools Description Min. Qty Unit 1 Jack plane (Metal/Wooden) 18 Nos 2 Smoothing Plane (Metal/Wooden) 18 √ 3 Block plane (Metal) 18 √ 4 Bullnose Plane (Metal) 18 √ 5 Datch Plane (Wooden) 18 √ 6 Spoke Shave 18 √ 7 Plough plane (Metal) 18 √ 8 Cabinet hand scraper 18 √ 9 Chisels:
Mortise Beveled edge Firmer
18 18 18
√ √ √
10 Drilling bits 10 Set. 11 Gimlets 18 Nos. 12 Bradawl 18 √ 13 Expansion bit 10 Set. 14 Nail bit 18 Nos. 15 Wood drill 18 √ 16 Concrete bits 10 √ 17 Nail punch 18 √ 18 Raps files (various grade) 10 Set. 19 Angular files 18 Nos. 20 Upholsterer’s knives 10 √ 21 Scissors 18 Set. 22 Upholsterers ripping chisel 18 Nos. 23 Oil stone 18 √ 24 Cross cut saw 18 √ 25 Panel saw 18 √ 26 Rip saw 18 √ 27 Dovetail saw 18 √

NVC Furniture Making & Upholstery: 2009
110
28 Tenon saw 18 √ 29 Light back saw 18 √ 30 Net of saws 18 √ 31 Compass saw 10 √ 32 Bow saw 10 √ 33 Key hole saw 10 √ 34 Fret saw 18 √ 35 Coping saw 10 √
D. Geometrical Tools
S/No. Tools Description Min. Qty Unit 1 Measuring Tape 18 Nos 2 Tape rule 18 √ 3 Marking knives 18 √ 4 Marking gauge 18 √ 5 Mortise gauge 18 √ 6 Try square 18 √ 7 Mitre square 18 √ 8 Combination square 18 √ 9 Sliding bevel square 18 √ 10 Iron square 18 √ 11 Straight edge (metal) 18 √ 12 Wing compass 10 √ 13 Calipers (in & out) 10 √ 14 The Brace 18 √ 15 Upholstery Needle (Various type) 10 Set. 16 Wood worker pencil 60 Nos.
E. Woodworking Machines S/No. Tools Description Min. Qty Unit 1 Cross cut sawing machine 1 Nos

NVC Furniture Making & Upholstery: 2009
111
2 Circular sawing machine 1 √ 3 Surface planing machine 1 √ 4 Thicknessing planing machine 1 √ 5 Spindle moulding machine 1 √ 6 Band sawing machine 1 √ 7 Mortise Machine 1 √ 8 Lathe turning machine 1 √ 9 Dimension sawing machine 1 √ 10 Spraying machine 1 √ 11 Spraying gun 2 √ 12 Upholstery sewing machine 1 √ 13 Belt Sanding machine 1 √
F. Portable power tools S/No. Tools Description Min. Qty Unit 1 Jig saw portable power tool 3 Nos 2 Router portable power tool 3 √ 3 Sanding portable power tool 3 √ 4 Drilling portable power tool 3 √ 5 Grinding portable power tool 3 √ 6 Spraying portable power tool 3 √
G. Consumables items
S/No Description Qty Required 1 Various Wood materials (materials sizes)
-1”x12”x12” – 25x305x3.5m -1 ½ ”x12”x12” – 36x305x3.5m 2”x12”x12” – 50x305x3.5m -2”x12”x12” – 50x305x3.5m

NVC Furniture Making & Upholstery: 2009
112
2 Plywood various sizes -6mmx1.2x2.4m -12mmx1.2x2.4m -18mmx1.2x2.4m
3 Particle board -12mmx1.2x2.4m -18mmx1.2x2.4m
4 Block board -18mmx1.2x2.4m
5 Wood veneers – rolls 6 Foam of various thicknesses
-12mm
-25mm
-36mm
-50mm
Cushions of various thicknesses -100mm
-150mm
7 Fabrics of various types 8 Leather of various types 9 Webbing rubber in rolls 10 Calico 11 Hessian/jute bag 12 Springs of various types 13 Adhesives -e.g
Glue Evostic
14 Nails of various inches e.g 2”, 1½”, 1”, ¾” 15 Tack nails in packets 16 Screws of various types and sizes 17 Corrugated box fasteners 18 Hinges of various types & sizes

NVC Furniture Making & Upholstery: 2009
113
19 Sand/glass paper of various grades 20 Lacquer – in gallons 21 Sanding sealer – in gallons 22 Thinner – in gallons 23 Varnishing - in gallons 24 Retarder - in gallons 25 Handles of various types & sizes 26 Locks of various types & sizes 27 Stain (cold & warm) in gallons 28 Staple pins 29 Nuts &bolts of various types & sizes 30 Castors of various types 31 Drawer glide of various sizes 32 Swivel base 33 Paints of various types in gallons 34 Under coat of various colours & types in
gallons

NVC Furniture Making & Upholstery: 2009
114
LIST OF PARTICIPANTS S/N NAMES ADDRESS ‘PHONE NO E-MAIL 1. Engr. (Dr) Nuru Yakubu Executive Secretary, NBTE Kaduna 2. Dr M.S Abubakar Director of Programmes, NBTE Kaduna 3. Mal. Lawan Abdulkarim Ag Dept Director, Technical Colleges, NBTE, Kaduna 08037013711 [email protected] 4. Mr. L. A. Lawal Foundation for Skills, Lagos. 08034061531 [email protected] 5. Ahmed Tijjani Jibo Science and Technical School Board, Kano State 08054445674 6. Ibrahim Yusuf KFCC Ltd, Kaduna South, Kaduna 08036950563 7. Arc Ogoh Ngbede NBTE, Kaduna 08035961546 [email protected] 8. Engr. (Mrs.) Ngozi Okelekwe NBTE, Kaduna 08033941915 [email protected] 9. Mr. Ndu U. M. Basic & Sec Education Dept., FME, Abuja 08027821749 [email protected]