nuk vapo rapid dampf-vaporisator nuk vapo rapid steam ... · nuk vapo rapid dampf-vaporisator nuk...
TRANSCRIPT
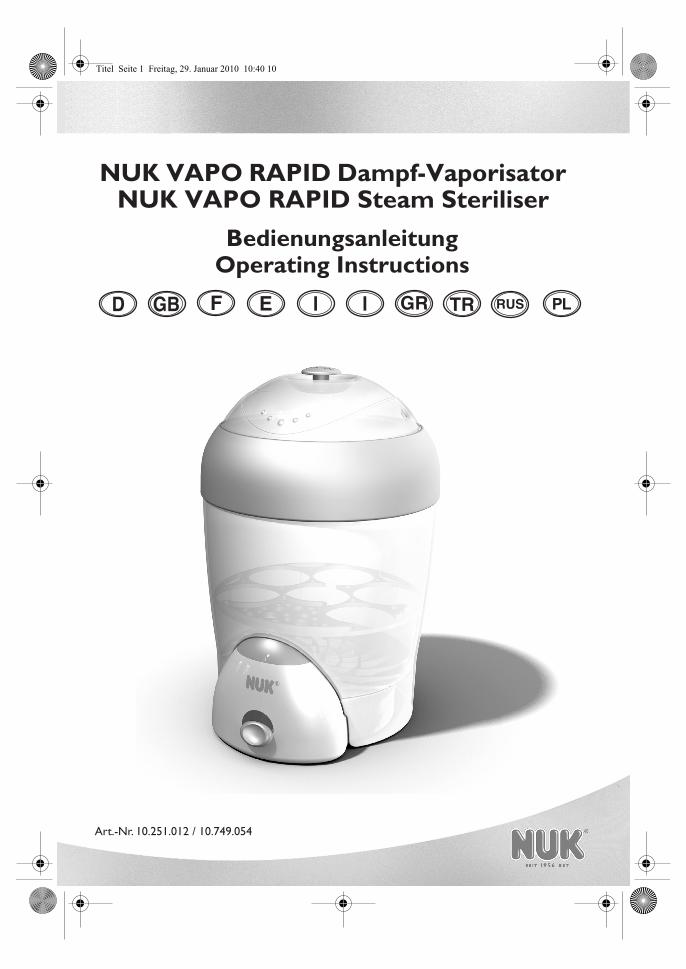
NUK VAPO RAPID Dampf-VaporisatorNUK VAPO RAPID Steam Steriliser
Art.-Nr. 10.251.012 / 10.749.054
BedienungsanleitungOperating Instructions
Titel Seite 1 Freitag, 29. Januar 2010 10:40 10

Deutsch
Bitte Ausklappseite beachten . . . . . . . . . . . . . . . . . . . . . . . . . . . . . . . . . . . . . . . . . . . . . . . 4
English
Please see inside cover fold-out page . . . . . . . . . . . . . . . . . . . . . . . . . . . . . . . . . . . . . . . 13
Français
Veuillez tenir compte des informations fournies sur les rabats . . . . . . . . . . . . . . . . . . . 22
Español
Observar la portada plegable. . . . . . . . . . . . . . . . . . . . . . . . . . . . . . . . . . . . . . . . . . . . . . 31
Português
É favor observar a folha desdobrável. . . . . . . . . . . . . . . . . . . . . . . . . . . . . . . . . . . . . . . . 40
Italiano
Leggere attentamente la pagina pieghevole . . . . . . . . . . . . . . . . . . . . . . . . . . . . . . . . . . . 49
Ελληνικά
Παρακαλούμε προσέξτε την ξεδιπλούμενη σελίδα . . . . . . . . . . . . . . . . . . . . . . . . .
58
Türkçe
Lütfen açılan resimli sayfayı dikkate alınız. . . . . . . . . . . . . . . . . . . . . . . . . . . . . . . . . 68
�������
��. ����� � ��� �� . . . . . . . . . . . . . . . . . . . . . . . . . . . . . . . . . . . . . . . . . . . . . 77
Polski
Przy czytaniu proszę otworzyć rozkładaną stronę okładki . . . . . . . . . . . . . . . . . . . . 87
P
PL
Vaporisator 09/08 Seite 1 Dienstag, 7. Oktober 2008 7:54 07

A B C
D E F
G H I
Vaporisator 09/08 Seite 1 Dienstag, 7. Oktober 2008 7:54 07

4
5
8
10
2
1
3
6
7
9
Vaporisator 09/08 Seite 1 Dienstag, 7. Oktober 2008 7:54 07
Vaporisator 09/08 Seite 2 Dienstag, 7. Oktober 2008 7:54 07

Vaporisator 09/08 Seite 2 Dienstag, 7. Oktober 2008 7:54 07

3
Inhalt
1. Wichtige Hinweise vor dem ersten Gebrauch . . . . . . . . . . . . . . . . . . . . . 42. Gerätebeschreibung . . . . . . . . . . . . . . . . . . . . . . . . . . . . . . . . . . . . . . 4
2.1 Verwendungszweck. . . . . . . . . . . . . . . . . . . . . . . . . . . . . . . . . . . . . . . . . . . . . . . . . . . 42.2 Modelle . . . . . . . . . . . . . . . . . . . . . . . . . . . . . . . . . . . . . . . . . . . . . . . . . . . . . . . . . . . . 42.3 Lieferumfang . . . . . . . . . . . . . . . . . . . . . . . . . . . . . . . . . . . . . . . . . . . . . . . . . . . . . . . . 42.4 Funktionsbeschreibung . . . . . . . . . . . . . . . . . . . . . . . . . . . . . . . . . . . . . . . . . . . . . . . . 4
3. Sicherheitshinweise . . . . . . . . . . . . . . . . . . . . . . . . . . . . . . . . . . . . . . 5
3.1 Begriffserklärung . . . . . . . . . . . . . . . . . . . . . . . . . . . . . . . . . . . . . . . . . . . . . . . . . . . . . 53.2 Allgemeine Hinweise. . . . . . . . . . . . . . . . . . . . . . . . . . . . . . . . . . . . . . . . . . . . . . . . . . 53.3 Schutz vor Verbrennungen und Verbrühungen . . . . . . . . . . . . . . . . . . . . . . . . . . . . . . 63.4 Schutz vor elektrischem Schlag . . . . . . . . . . . . . . . . . . . . . . . . . . . . . . . . . . . . . . . . . 63.5 Schutz vor Brandgefahr. . . . . . . . . . . . . . . . . . . . . . . . . . . . . . . . . . . . . . . . . . . . . . . . 73.6 Zur Sicherheit Ihres Kindes . . . . . . . . . . . . . . . . . . . . . . . . . . . . . . . . . . . . . . . . . . . . 7
4. Bestandteile des Vaporisators . . . . . . . . . . . . . . . . . . . . . . . . . . . . . . . 75. Desinfektion von Babyflaschen, Saugern und Zubehör . . . . . . . . . . . . . . . 8
5.1 Allgemeines zur Desinfektion. . . . . . . . . . . . . . . . . . . . . . . . . . . . . . . . . . . . . . . . . . . 85.2 Desinfektion . . . . . . . . . . . . . . . . . . . . . . . . . . . . . . . . . . . . . . . . . . . . . . . . . . . . . . . . 85.3 Beachten Sie bitte: . . . . . . . . . . . . . . . . . . . . . . . . . . . . . . . . . . . . . . . . . . . . . . . . . . . 9
6. Reinigung und Pflege des Gerätes. . . . . . . . . . . . . . . . . . . . . . . . . . . . . 9
6.1 Reinigung . . . . . . . . . . . . . . . . . . . . . . . . . . . . . . . . . . . . . . . . . . . . . . . . . . . . . . . . . . . 96.2 Entkalken . . . . . . . . . . . . . . . . . . . . . . . . . . . . . . . . . . . . . . . . . . . . . . . . . . . . . . . . . . . 9
7. Störungen und deren Beseitigung. . . . . . . . . . . . . . . . . . . . . . . . . . . . 108. Technische Daten . . . . . . . . . . . . . . . . . . . . . . . . . . . . . . . . . . . . . . . 109. Entsorgung . . . . . . . . . . . . . . . . . . . . . . . . . . . . . . . . . . . . . . . . . . . 11
9.1 Gerät . . . . . . . . . . . . . . . . . . . . . . . . . . . . . . . . . . . . . . . . . . . . . . . . . . . . . . . . . . . . . 119.2 Verpackung . . . . . . . . . . . . . . . . . . . . . . . . . . . . . . . . . . . . . . . . . . . . . . . . . . . . . . . . 11
10. Garantie . . . . . . . . . . . . . . . . . . . . . . . . . . . . . . . . . . . . . . . . . . . . . 11
Vaporisator 09/08 Seite 3 Dienstag, 7. Oktober 2008 7:54 07

4
Liebe Eltern
Sie haben sich für unseren Vaporisator entschie-den und damit für Qualität und Sicherheit. Jetztdesinfizieren Sie bis zu sechs FIRST CHOICE-Weithalsflaschen und Flaschenzubehör ganzleicht und zuverlässig. KrankheitserregendeKeime, gegen die sich ein Neugeborenes noch
nicht ausreichend wehren kann, werden so voll-ständig abgetötet. Die desinfizierten Teile sindsofort wieder einsetzbar.Wir wünschen Ihrem Baby eine gesundeEntwicklung.
1. Wichtige Hinweise vor dem ersten Gebrauch
Diese Bedienungsanleitung hilft Ihnen, IhrenVaporisator sicher und wirtschaftlich zu gebrau-chen. Jede Person, die dieses Gerät aufstellt, bedient,reinigt oder entsorgt, muss den vollständigenInhalt dieser Bedienungsanleitung zur Kenntnisgenommen und verstanden haben.
Bewahren Sie daher diese Bedienungsanleitunggut auf, damit Sie sie jederzeit zur Verfügunghaben.Wenn Sie Ihr Gerät einmal verkaufen oder ver-schenken, geben Sie bitte diese Bedienungsanlei-tung mit, damit auch der nächste Besitzer dasGerät sicher benutzen kann.
2. Gerätebeschreibung
2.1 Verwendungszweck
Mit diesem NUK VAPO RAPID Dampf-Vapori-sator können Sie Babyflaschen und Flaschenzu-behör desinfizieren.Die zu desinfizierenden Teile müssen kochfestsein, da die Temperatur beim Desinfizie-ren über 90 °C beträgt.Dieses Gerät darf nur in geschlossenen, trocke-nen Räumen benutzt werden.Dieses Gerät ist für den Einsatz in Privathaus-halten und nicht für den gewerblichen Einsatzgeeignet.
2.2 Modelle
Das Gerät wird in zwei Varianten geliefert:1. Europäisches Modell, mit 2-PIN-Stecker,Artikel-Nr. 10.251.0122. Britisches Modell, mit 3-PIN-Stecker, Artikel-Nr. 10.749.054In der Bedienung und Funktion gibt es keineUnterschiede zwischen diesen Varianten.
2.3 Lieferumfang
• 1 NUK VAPO RAPID Dampf-Vaporisator,komplett
• 1 Flaschenzange• 1 integrierter Wasser-Messbecher• 1 Bedienungsanleitung
2.4 Funktionsbeschreibung
Dieser Vaporisator wird elektrisch beheizt. Dasin ihm befindliche Wasser wird zum Kochengebracht. In der dabei entstehenden Hitze derDampf-Atmosphäre werden Keime abgetötetund damit die Babyflaschen sowie das Flaschen-zubehör desinfiziert.
Vaporisator 09/08 Seite 4 Dienstag, 7. Oktober 2008 7:54 07

5
3. Sicherheitshinweise
Dieses Gerät ist nach dem modernen Stand derTechnik konstruiert und gefertigt. Alle entspre-chenden europäischen Sicherheitsrichtlinienwurden beachtet und das Gerät der Norm ent-sprechend geprüft. Dennoch können von derar-tigen Geräten auch Gefahren ausgehen.5 Minuten sollte Ihnen Ihre Sicherheit wert sein!Länger dauert es nicht, unsere Sicherheitshin-weise durchzulesen. Vermutlich kennen Sie diemeisten Hinweise schon, lesen Sie diese bittetrotzdem durch, da der eine oder andere Hin-weis doch neu für Sie sein wird und Sie vorSchaden bewahren kann.
3.1 Begriffserklärung
Folgende Signalbegriffe finden Sie in dieserBedienungsanleitung:
Warnung!
Hohes Risiko: Missachtung der War-nung kann Schaden für Leib und Lebenverursachen.
Vorsicht!
Mittleres Risiko: Missachtung der Warnungkann einen Sachschaden verursachen.
Hinweis:
Geringes Risiko: Sachverhalte, die im Umgangmit dem Gerät beachtet werden sollten.
3.2 Allgemeine Hinweise
• Lesen Sie vor dem Gebrauch bitte sorgfältigdiese Bedienungsanleitung. Sie ist Bestand-teil des Gerätes und muss jederzeit verfüg-bar sein.
• Verwenden Sie das Gerät nur für denbeschriebenen Verwendungszweck (siehe„2.1 Verwendungszweck“ auf Seite 4).
Warnung!
Die Missachtung folgender Warnungenkönnten zu Verletzungen führen.
• Dieses Gerät ist nicht dafür bestimmt, durchPersonen (einschließlich Kinder) mit einge-schränkten physischen, sensorischen oder
geistigen Fähigkeiten oder mit mangelnderErfahrung und/oder mangelndem Wissenbenutzt zu werden, es sei denn, sie werdendurch eine für ihre Sicherheit zuständige Per-son beaufsichtigt oder erhielten von ihrAnweisungen, wie das Gerät zu benutzen ist.Kinder sollten beaufsichtigt werden, umsicherzustellen, dass sie nicht mit dem Gerätspielen.
• Achten Sie darauf, dass das Netzkabel niezur Stolperfalle wird oder sich jemand darinverfangen oder darauftreten kann.
Vorsicht!
Die Missachtung folgenderWarnungen können zu einem Schaden amGerät führen.• Überprüfen Sie, ob die erforderliche Netz-
spannung (siehe Typenschild am Gerät) mitIhrer Netzspannung übereinstimmt.
• Das Gerät darf ausschließlich auf einemfesten, ebenen, trockenen und nicht brenn-baren Untergrund aufgestellt werden.
• Das Gerät nicht in der Nähe von heißen Flä-chen, in beheizten Öfen oder in der Nähevon Gas- oder Elektrogeräten aufstellen, dadas Gerät dadurch beschädigt werdenkönnte.
• Setzen Sie das Gerät nie ohne Wasser inBetrieb, da es sonst überhitzen könnte.
• Lassen Sie das Gerät während des Betriebesniemals unbeaufsichtigt.
• Trennen Sie nach dem Gebrauch das Gerätvom Netz, damit es nicht unbeabsichtigteingeschaltet werden kann.
Hinweise:
• Füllen Sie nie mehr als 70 ml Wasser ein, da
die Funktion sonst beeinträchtigt werdenkönnte.
• Bitte beachten Sie, dass jeglicher Anspruchauf Garantie und Haftung erlischt, wennZubehörteile verwendet werden, die nicht
Vaporisator 09/08 Seite 5 Dienstag, 7. Oktober 2008 7:54 07

6
in dieser Bedienungsanleitung empfohlenwerden oder wenn bei Reparaturen nichtausschließlich Originalersatzteile verwen-det werden. Dies gilt auch für Reparaturen,die durch nichtqualifizierte Personen durch-geführt werden. Die Kontakt-Adressefinden Sie am Ende dieser Bedienungsanlei-tung.
• Bei eventuellen Funktionsstörungen darf dieInstandsetzung des Gerätes nur durch einequalifizierte Person erfolgen. Ansonstenerlischt jeglicher Garantieanspruch.
3.3 Schutz vor Verbrennungen und Verbrühungen
Warnung!
Da das Gerät mit hohenTemperaturen arbeitet, kann die Miss-achtung folgender Warnungen zu Ver-brennungen oder Verbrühungen führen.
• Die Geräteoberflächen werden währenddes Betriebes sehr heiß. Daher nur am dafürvorgesehenen Griff oder den Schalternberühren.
• Den Vaporisator während des Betriebesnicht transportieren. Wenn Sie das heißeGerät transportieren wollen, schalten Sie esaus, ziehen den Netzstecker und warten ab,bis sich das Gerät abgekühlt hat. Ansonstenkönnten Sie sich an der heißen Oberflächeverbrennen.
• Die Flaschen sind direkt nach der Desinfek-tion sehr heiß und sollten nur mit der beilie-genden Flaschenzange entnommen werden.
3.4 Schutz vor elektrischem Schlag
Warnung!
Die folgenden Sicherheits-hinweise sollen Sie vor einem elektri-schen Schlag schützen.
• Benutzen Sie das Gerät nur, wenn Gerätund Netzkabel intakt sind.
• Wenn das Netzkabel beschädigt ist, muss esdurch den Hersteller, seinen Kundendienstoder eine ähnlich qualifizierte Person
ersetzt werden, um Gefährdungen zu ver-meiden.
• In das Gerät dürfen, außer in den dafür vor-gesehenen Behälter, keinesfalls Wasser oderandere Flüssigkeiten gelangen. Daher:
– niemals im Freien einsetzen– niemals mit Flüssigkeit gefüllte Gefäße,
wie Trinkgläser, Vasen etc. auf das Gerätstellen
– niemals in sehr feuchter Umgebung ein-setzen
– nicht direkt neben einem Spülbeckenbetreiben.
Falls doch einmal Flüssigkeit in das Gerätgelangt, ziehen Sie sofort den Netzsteckerund lassen das Gerät von qualifiziertemFachpersonal reparieren. Die Kontakt-Adresse finden Sie am Ende dieser Bedie-nungsanleitung.
• Fassen Sie das Gerät, das Netzkabel oderden Netzstecker niemals mit feuchten Hän-den an.
• Ziehen Sie das Netzkabel stets am Steckerheraus. Ziehen Sie niemals am Kabel selber.
• Achten Sie darauf, dass das Netzkabel niegeknickt oder gequetscht wird.
• Halten Sie das Netzkabel von heißen Flä-chen (z.B. Herdplatte) fern.
• Die Benutzung von Verlängerungskabelnsollten Sie vermeiden. Sie ist nur unter ganzbestimmten Voraussetzungen gestattet:
– Das Verlängerungskabel muss für dieStromstärke des Gerätes geeignet sein.
– Das Verlängerungskabel darf nicht „flie-gend“ verlegt sein: es darf nicht zur Stol-perfalle werden oder von Kindernerreichbar sein.
– Das Verlängerungskabel darf keinesfallsbeschädigt sein.
– Es dürfen keine weiteren Geräte als die-ses Gerät an der Netzsteckdose ange-schlossen werden, da es sonst zu einerÜberlastung des Stromnetzes kommenkann (Verbot von Mehrfachsteckdosen!).
Vaporisator 09/08 Seite 6 Dienstag, 7. Oktober 2008 7:54 07

7
3.5 Schutz vor Brandgefahr
Warnung!
Da das Gerät mit hohenTemperaturen arbeitet, beachten Siedie folgenden Sicherheitshinweise,damit kein Brand entstehen kann.
• Während des Betriebes dürfen sich keinebrennbaren Gegenstände (z.B. Vorhänge,Papier usw.) in unmittelbarer Umgebung desGerätes befinden.
• Benutzen Sie das Gerät niemals dazu, Texti-lien oder andere Dinge auf, über oder vordem Gerät zu trocknen.
• Um eine Überhitzung zu vermeiden, darfdas Gerät niemals abgedeckt werden.
• Das Gerät darf niemals direkt unter einerWandsteckdose aufgestellt werden, da dieentstehende Hitze zu Schäden an der elek-trischen Installation führen könnte.
• Lassen Sie das Gerät nie unbeaufsichtigt lau-fen. Schäden kündigen sich fast immer durchintensive Geruchsbildung an. Ziehen Sie indiesem Falle sofort den Netzstecker undlassen Sie das Gerät überprüfen. Die Kon-takt-Adresse finden Sie am Ende dieserBedienungsanleitung.
3.6 Zur Sicherheit Ihres Kindes
Warnung!
Kinder können Gefahrenoft nicht richtig einschätzen und sichdadurch Verletzungen zuziehen. Beach-ten Sie daher:
• Dieses Produkt darf nur unter Aufsicht vonErwachsenen verwendet werden um sicher-zustellen, dass Kinder nicht mit dem Gerätspielen.
• Achten Sie sorgfältig darauf, dass sich dasGerät immer außerhalb der Reichweite vonKindern befindet.
• Achten Sie darauf, dass Kinder niemals dasGerät am Kabel herunterziehen können.
• Achten Sie darauf, dass die Verpackungsfolienicht zur tödlichen Falle für Kinder wird.Verpackungsfolien sind kein Spielzeug.
4. Bestandteile des Vaporisators
1
Deckel mit Griff
2
Dampfauslass
3
Zubehörkorb
4
Flaschenhalter
5
Dampfbehälter
6
Heizsockel
7
Ein-/Ausschalter
8
Kontrolllampe
9
Messbecher (im Gerät integriert)
10
FlaschenzangeOhne Abbildung: Unter dem Gerät befindet sichdas Netzkabel in einer Kabelaufwicklung.
Vaporisator 09/08 Seite 7 Dienstag, 7. Oktober 2008 7:54 07

8
5. Desinfektion von Babyflaschen, Saugern und Zubehör
5.1 Allgemeines zur Desinfektion
Neugeborene haben anfangs noch nichtgenügend Abwehrstoffe, um sich selbstausreichend gegen Krankheitserreger(pathogene Keime) zu schützen.Bei der Zubereitung der Säuglingsnah-rung sind keimfreie Sauger und Babyfla-schen daher eine wichtige Voraussetzung.Schon kleinste Nahrungsmittelreste anden Saugern und Babyflaschen könnenleicht zu einer gesundheitsgefährdendenBakterienbildung führen. Deshalb solltendie Teile vor jeder Desinfektion zusätzlichgereinigt werden. Der Vaporisator arbeitet mit der Heiß-Desin-fektions-Methode. Dabei wird Wasser auf über90 °C erhitzt und verdampft. Die so entste-hende Hitze desinfiziert die eingelegten Teileschnell und zuverlässig. Die Sauger und Babyfla-schen kommen also nur mit Hitze und Wasser-dampf in Berührung.Durch die geringe Menge Wasser, die der Vapo-risator zur Desinfektion verbraucht, wird auchnur wenig Strom benötigt.
5.2 Desinfektion
Vorsicht!
Alle zu desinfizierenden Teile müssengründlich gespült und von sämtlichen Nahrungs-resten befreit werden.Die Abbildungen
A
bis
I
zur Desinfektion findenSie auf der Ausklappseite. 1. Nehmen Sie den Messbecher
9
aus demHeizsockel
6
(Abb.
A
).2. Geben Sie mit Hilfe des Messbechers
9
insge-samt 70 ml Leitungswasser in den Heizsockel
6
(Abb.
A
).
Hinweis:
70 ml entsprechen zwei Messbe-chern mit einer Wassermenge von je 35 ml.
3. Setzen Sie den Dampfbehälter
5
auf denHeizsockel
6
(Abb.
B
).
4. Setzen Sie den Flaschenhalter
4
in denDampfbehälter (Abb.
C
).
Vorsicht!
Desinfizieren Sie die Flaschen stetsoffen und in Einzelteile zerlegt, da sonstMaterialverformungen auftreten können.5. Stellen Sie die Babyflaschen unverschlossen
über Kopf in den Flaschenhalter
4
(Abb.
D
).
Hinweis:
Stapeln Sie die Verschlusskappenmöglichst im Flaschenhalter
4
. So sparen SiePlatz im Zubehörkorb (Abb.
E
).6. Setzen Sie den Zubehörkorb
3
auf denDampfbehälter (Abb.
F
).7. Legen Sie das Zubehör in den Zubehörkorb
3
(Abb.
G
).8. Setzen Sie den Deckel
1 auf den Zubehör-korb 3 (Abb. H).
9. Stecken Sie den Netzstecker in eine geeig-nete Netzsteckdose.Hinweis: Falls die Kontrolllampe 8 jetztschon leuchtet, wurde der Ein-Schalter 7bereits versehentlich betätigt.
10.Schalten Sie das Gerät mit dem Ein-Schalter7 ein. Die Kontrolllampe 8 leuchtet (Abb. I).
Der Vaporisator schaltet sich nach der Desin-fektion automatisch ab und die Kontrolllampeerlischt.
Vaporisator 09/08 Seite 8 Dienstag, 7. Oktober 2008 7:54 07

9
Warnung! Direkt nach dem Ausschalten befindetsich noch heißer Dampf in dem Gerät,der teilweise aus dem Dampfauslassausströmt. Achten Sie daher darauf,sich nicht zu verbrühen indem Sie dasGerät mindestens 3 Minuten lang aus-kühlen lassen.Die Flaschen sind direkt nach derDesinfektion sehr heiß und sollten nurmit der beiliegenden Flaschenzangeentnommen werden.
Vorsicht! Ziehen Sie nach jedem Gebrauch denNetzstecker aus der Steckdose, damit das Gerätnicht versehentlich eingeschaltet werden kann.
5.3 Beachten Sie bitte:• Eine Desinfektion dauert mit einer Wasser-
menge von 70 ml ca. 8 Minuten.• Eine Desinfektion ist nur garantiert, wenn
der Desinfektionsvorgang nicht unterbro-chen und nicht verkürzt wird.
• Verwenden Sie ausschließlich normales Lei-tungswasser ohne weitere Zusätze.
• Sorgen Sie für eine regelmäßige Entkalkunggemäß Abschnitt „6.2 Entkalken”, damit dieFunktionsfähigkeit erhalten bleibt.
6. Reinigung und Pflege des Gerätes6.1 Reinigung
Warnung!Ziehen Sie immer den Netzstecker,bevor Sie das Gerät reinigen.Reinigen Sie das Gerät nur im abge-kühlten Zustand.
Vorsicht! Verwenden Sie keine scharfen Reini-gungs- oder Scheuermittel, da diese die Ober-flächen angreifen können.1. Nehmen Sie den Deckel 1, den Zubehör-
korb 3, den Flaschenhalter 4 sowie denDampfbehälter 5 vom Heizsockel 6 ab.
Vorsicht! Der Heizsockel 6 darf niemals inWasser getaucht werden, da er elektrische Bau-teile enthält, die dadurch beschädigt werdenkönnen.2. Wischen Sie den Heizsockel 6 nach jeder
Benutzung mit einem feuchten Tuch ab.3. Reinigen Sie den Deckel 1, den Zubehörkorb
3, den Flaschenhalter 4 sowie den Dampfbe-hälter 5 entweder mit Spülwasser oder inder Spülmaschine.
6.2 EntkalkenDurch das regelmäßige Auswischen des Geräteswird die Verkalkung reduziert. Nach einiger Zeitwird sich dennoch durch den Kochvorgang Kalkim Heizsockel des Vaporisators absetzen. Verkalkungen können die Leistung beim Desinfi-zieren erheblich verschlechtern. Hinweis: Bei leichten Verkalkungen benutzenSie am besten das hier beschriebene Verfahrenmit Haushaltsessig:1. Zum Entkalken 35 ml heißes Wasser mit
35 ml Haushaltsessig mischen und in denHeizsockel 6 einfüllen.
2. Die Lösung 30 Minuten einwirken lassen undweggießen.
3. Das Gerät anschließend mit einem feuchtenTuch auswischen.
Bei starken Verkalkungen sollten Sie einenhandelsüblichen Entkalker verwenden. BeachtenSie dabei die Anwendungshinweise für den Ent-kalker.
Vaporisator 09/08 Seite 9 Dienstag, 7. Oktober 2008 7:54 07

10
7. Störungen und deren Beseitigung
8. Technische DatenEuropäisches Modell, mit 2-PIN-Stecker(Artikel-Nr. 10.251.012): Spannung: 220 - 240 V~/50 Hz Leistungsaufnahme: 550 Watt
Britisches Modell, mit 3-PIN-Stecker(Artikel-Nr. 10.749.054)Spannung: 220 - 240 V~/50 Hz Leistungsaufnahme: 550 Watt
Störung Ursache BeseitigungDesinfektion dauert zu lange Zu viel Wasser eingefüllt Messen Sie genau 70 ml für eine optimale
Desinfektion abHeizsockel ist verkalkt Heizsockel entkalken (siehe „6.2 Entkalken“
auf Seite 9)Gerät lässt sich nicht einschalten, Kontrolllampe 8 leuchtet nicht
Stromversorgung nicht vorhanden
Netzstecker korrekt einsteckenMit anderem Gerät überprüfen, ob Steckdose Spannung hat
Gerät lässt sich nach vorherigem Gebrauch nicht wieder einschal-ten, Kontrolllampe 8 leuchtet
Überhitzungsschutz ist aktiv 15 Minuten warten, bis Gerät abgekühlt ist
6 FIRST CHOICE-Flaschen passen nicht in das Gerät
Teile sind ungünstig verteilt Flaschen überkopf und ohne Zubehör in den Flaschenhalter stellenVerschlusskappen im Flaschenhalter stapeln und dann den Zubehörkorb aufsetzen
Flaschen sind nach der Desinfek-tion sehr heiß
Flaschen wurden mit über 90 °C desinfiziert
Flaschen etwas abkühlen lassenFlaschenzange benutzen
Flaschen und Zubehör zeigen nach der Desinfektion weiße Spuren
Gerät ist verkalkt Gerät entkalken (siehe Abschnitt 6.2 auf Seite 9)
Am Rande des Zubehörkorbes strömt Dampf aus
Gerät wurde falsch zusammengesetzt
Gerät korrekt zusammenbauen (siehe Abschnitt 5.2 auf Seite 8)
Flaschen und Zubehörteile wurden ungünstig verteilt
Teile so verteilen, dass Gerät vollständig schließt (siehe Abschnitt 5.2 auf Seite 8)
Vaporisator 09/08 Seite 10 Dienstag, 7. Oktober 2008 7:54 07

11
9. Entsorgung9.1 Gerät
Das Symbol der durchgestriche-nen Abfalltonne auf Rädern bedeu-tet, dass das Produkt in derEuropäischen Union einergetrennten Müllsammlung zuge-führt werden muss. Dies gilt fürdas Produkt und alle mit diesem
Symbol gekennzeichneten Zubehörteile.Gekennzeichnete Produkte dürfen nicht überden normalen Hausmüll entsorgt werden, son-dern müssen an einer Annahmestelle für das
Recycling von elektrischen und elektronischenGeräten abgegeben werden. Recycling hilft, denVerbrauch von Rohstoffen zu reduzieren unddie Umwelt zu entlasten.
9.2 VerpackungWenn Sie die Verpackung entsorgen möchten,achten Sie auf die entsprechenden Umweltvor-schriften in Ihrem Land. Entsorgen Sie die Ver-packung in Deutschland über eine Sammlungdes Dualen Systems (Grüner Punkt).
10. GarantieBei sorgfältiger Behandlung und Beachtung derBedienungsanleitung gewährleistet der Herstel-ler 2 Jahre Garantie ab Kaufdatum.Wir verpflichten uns, das Gerät kostenlosinstandzusetzen, soweit es sich um Material-oder Konstruktionsfehler handelt. WeitereAnsprüche sind ausgeschlossen.Schäden, die sich aus der unsachgemäßenBenutzung des Gerätes ergeben, werden nichtersetzt. Zuleitung und Stecker sind von derGarantie ausgeschlossen, soweit es sich um Ver-schleiß handelt. Innerhalb der ersten 2 Jahre abKaufdatum beseitigen wir die als berechtigtanerkannten Mängel ohne Abrechnung der ent-
standenen Nebenkosten. Die Kostenübernahmeist vorher zu klären. Dazu wenden Sie sich bittean den NUK Eltern-Service, Telefonnummer01801/62 72 46 (0,04 EUR/min).Die Einsendung des Gerätes muss in jedem Fallunter Beifügung des Garantiescheines oder desKaufbeleges erfolgen.Ohne Nachweis des Kaufdatums erfolgt eineKostenanrechnung ohne Rückfrage. Die Rück-sendung erfolgt dann per Nachnahme.Garantieschein bitte sofort beim Kauf ausfüllenlassen und sorgfältig aufbewahren. Verlorengegangene Garantiescheine werden nichtersetzt.Den Garantieschein finden Sie am Ende diesesHeftes.
Vaporisator 09/08 Seite 11 Dienstag, 7. Oktober 2008 7:54 07
12
Contents
1. Important information before using for the first time . . . . . . . . . . . . . . . . 132. Description . . . . . . . . . . . . . . . . . . . . . . . . . . . . . . . . . . . . . . . . . . . . . . 13
2.1 Purpose . . . . . . . . . . . . . . . . . . . . . . . . . . . . . . . . . . . . . . . . . . . . . . . . . . . . . . . . . . . . . . . 132.2 Model . . . . . . . . . . . . . . . . . . . . . . . . . . . . . . . . . . . . . . . . . . . . . . . . . . . . . . . . . . . . . . . . 132.3 Contents . . . . . . . . . . . . . . . . . . . . . . . . . . . . . . . . . . . . . . . . . . . . . . . . . . . . . . . . . . . . . . 132.4 Functional description . . . . . . . . . . . . . . . . . . . . . . . . . . . . . . . . . . . . . . . . . . . . . . . . . . . 13
3. Safety instructions . . . . . . . . . . . . . . . . . . . . . . . . . . . . . . . . . . . . . . . . . 14
3.1 Explanation of terms. . . . . . . . . . . . . . . . . . . . . . . . . . . . . . . . . . . . . . . . . . . . . . . . . . . . . 143.2 General information . . . . . . . . . . . . . . . . . . . . . . . . . . . . . . . . . . . . . . . . . . . . . . . . . . . . . 143.3 Protection against burning and scalding . . . . . . . . . . . . . . . . . . . . . . . . . . . . . . . . . . . . . . 153.4 Protection against electric shock . . . . . . . . . . . . . . . . . . . . . . . . . . . . . . . . . . . . . . . . . . . 153.5 Protection against risk of fire . . . . . . . . . . . . . . . . . . . . . . . . . . . . . . . . . . . . . . . . . . . . . . 163.6 For the safety of your child . . . . . . . . . . . . . . . . . . . . . . . . . . . . . . . . . . . . . . . . . . . . . . . 16
4. Components of the steam steriliser . . . . . . . . . . . . . . . . . . . . . . . . . . . . . 165. Disinfection of feeding bottles, teats and accessories . . . . . . . . . . . . . . . . . 17
5.1 General information on disinfecting . . . . . . . . . . . . . . . . . . . . . . . . . . . . . . . . . . . . . . . . . 175.2 Disinfection . . . . . . . . . . . . . . . . . . . . . . . . . . . . . . . . . . . . . . . . . . . . . . . . . . . . . . . . . . . . 175.3 Please observe the following: . . . . . . . . . . . . . . . . . . . . . . . . . . . . . . . . . . . . . . . . . . . . . . 17
6. Cleaning and care of the equipment . . . . . . . . . . . . . . . . . . . . . . . . . . . . . 18
6.1 Cleaning. . . . . . . . . . . . . . . . . . . . . . . . . . . . . . . . . . . . . . . . . . . . . . . . . . . . . . . . . . . . . . . 186.2 Descaling . . . . . . . . . . . . . . . . . . . . . . . . . . . . . . . . . . . . . . . . . . . . . . . . . . . . . . . . . . . . . . 18
7. Faults and their rectification . . . . . . . . . . . . . . . . . . . . . . . . . . . . . . . . . . 198. Technical data . . . . . . . . . . . . . . . . . . . . . . . . . . . . . . . . . . . . . . . . . . . . 199. Disposal . . . . . . . . . . . . . . . . . . . . . . . . . . . . . . . . . . . . . . . . . . . . . . . . 20
9.1 Equipment . . . . . . . . . . . . . . . . . . . . . . . . . . . . . . . . . . . . . . . . . . . . . . . . . . . . . . . . . . . . . 209.2 Packaging . . . . . . . . . . . . . . . . . . . . . . . . . . . . . . . . . . . . . . . . . . . . . . . . . . . . . . . . . . . . . . 20
10. Warranty . . . . . . . . . . . . . . . . . . . . . . . . . . . . . . . . . . . . . . . . . . . . . . . 20
Vaporisator 09/08 Seite 12 Dienstag, 7. Oktober 2008 8:17 08

13
Dear Parents
You have chosen the NUK VAPO RAPID SteamSteriliser therefore also quality and safety. Nowyou can disinfect up to six FIRST CHOICEwide-neck bottles and accessories simply andeffectively. Pathogenic germs are killed off com-pletely. A newborn baby is unable to fight these,
as the immune system is not fully developed.The disinfected components can be used againimmediately.We wish your baby a healthy development.
1. Important information before using for the first time
These operating instructions will help you touse your steriliser safely and economically. Anyone setting up, using, cleaning or disposingof this device needs to take note of and com-pletely understand these instructions.
You should therefore keep these instructions ina convenient place to enable you to access themwhen required.If, at some point, you wish to either sell thesteriliser or give it away, please also pass onthese instructions, so that the next owner canuse the device safely.
2. Description
2.1 Purpose
This NUK VAPO RAPID Steam Steriliser isdesigned for disinfecting feeding bottles andaccessories.The components being disinfected must be ableto withstand boiling water, as a temperature ofover 90 °C is attained during the process.This device may only be used in a closed, dryenvironment.It is meant for use solely in private households;it is not suitable for commercial purposes.
2.2 Model
This device is available in two variants:1. European Model, with 2-PIN plug,Article No. 10.251.0122. British Model, with 3- PIN plug,Article No. 10.749.054There is no difference in either the operation orfunction of these two models.
2.3 Contents
• 1 NUK VAPO RAPID Steam Steriliser,complete
• 1 pair of tongs• 1 integrated measuring jug• 1 set of operating instructions
2.4 Functional description
This steam steriliser is heated electrically. Thewater inside the steriliser is heated to boilingpoint. Germs are killed off in the steam atmos-phere, thus disinfecting feeding bottles andaccessories.
Vaporisator 09/08 Seite 13 Dienstag, 7. Oktober 2008 8:17 08

14
3. Safety instructions
This device is designed and built to state-of-the-art technology. All relevant European safetydirectives have been observed and the devicehas been tested in accordance with the relevantstandard. However, there are potential hazardsfrom using this type of equipment.Please read these instructions to ensure yourown safety! It will take no longer than 5 min-utes. You will probably already be familiar withmuch of the information, but please do still readit, as there will be one or two instructions thatare new to you and which may help preventinjury or damage.
3.1 Explanation of terms
The following signs are used in these operatinginstructions:
Warning!
High risk: Non-observance of thewarning may result in minor orserious injury.
Beware!
Medium risk: Non-observance of the warningmay result in damage.
N.B.:
Low risk: Information on how to handle thedevice should be observed.
3.2 General information
• These operating instructions should be readcarefully before use. They are part of thisequipment and must be kept readily availa-ble at all times.
• The device should be used solely for theintended purpose as described (see“2.1 Purpose” on page 13).
Warning!
Non-observance of the followingwarnings may result in injury.
• This equipment is not intended for use bypersons (including children) with limitedphysical, sensory or mental abilities or with
insufficient experience and/or insufficientknowledge, unless the person concerned iseither supervised by a person responsiblefor his/her safety, or receives instructionsfrom this person as to how to use theequipment. Children should be supervisedin order to ensure that they do not playwith the device.
• You should ensure that the mains cable isnever in a position where someone can tripon it, become caught in it or walk on it.
Beware! Non-observance of the followingwarnings may result in damage to theequipment.
• Check whether the required voltage agreeswith your local voltage (see nameplate ondevice).
• The device must always be placed on a sur-face that is firm, even, dry, heat-resistantand non-flammable.
• The device should never be placed in thevicinity of hot surfaces, in heated ovens orin the vicinity of gas or electrical appliances,as this may cause damage to the device.
• Never operate the device without water, asit could overheat.
• Never leave the device unattended when inuse.
• After use unplug the device from the mainsto prevent it from being inadvertentlyswitched on.
N.B.:
• Never pour more than 70 ml of water intothe device, as this may impair functionaloperation.
• Please observe the fact that any claim underwarranty and liability will be declared void ifaccessories are used that are not recom-mended in these operating instructions or,in the case of repairs, if original parts arenot used exclusively. This also applies to
Vaporisator 09/08 Seite 14 Dienstag, 7. Oktober 2008 8:17 08
15
repairs undertaken by non-qualified per-sons. The contact address is to be found atthe end of these operating instructions.
• In the event of a breakdown, maintenancework on the device may only be undertakenby a qualified person. If this is not adheredto, any claims under warranty will bedeclared null and void.
3.3 Protection against burning and scalding
Warning! As the device operates athigh temperatures,
non-observanceof the following warnings can result inburns or scalds.
• The surfaces of the steriliser becomeextremely hot during operation. Thereforeonly touch the handle or switches.
• Do not move the steriliser while in opera-tion. If you do need to move the devicewhen hot, switch it off first, remove theplug and wait until it cools down. Otherwisethe surface could cause scalding.
• The bottles are extremely hot after disinfec-tion and should only be handled using theenclosed tongs.
3.4 Protection against electric shock
Warning! The following safetyinstructions
should protect youagainst an electric shock.
• Only use the device if both device andmains lead are intact.
• If the mains lead is damaged it must bereplaced by the manufacturer, his customerservice engineer or a similarly qualified per-son to prevent potential danger.
• On no account should water or any otherfluid be allowed to enter the equipment,except in the intended receptacle. For thisreason:
– Never use outside – Never place receptacles containing fluid,
such as glasses containing drinks, vasesetc. on top of the device
– Never use in a humid environment – Do not use next to a sink.In the event that fluid gets into the device,immediately remove the plug and have thedevice repaired by qualified personnel. Thecontact address is to be found at the end ofthese operating instructions
• Never touch the device, the mains lead orthe plug with wet hands.
• Always remove the lead from the plug.Never pull on the lead itself.
• Ensure that the lead never becomes bent ofsquashed.
• Keep the lead away from hot surfaces (e.g.cooker hobs).
• Avoid the use of extension leads. Theseshould only be used in specific cases:
– The extension lead must be suitable forthe current specified for the device.
– The extension lead must not be laid"freely”: it must be secured so as to pre-vent accidents and must be kept out ofthe reach of children.
– The extension lead must on no accountbe damaged.
– No other equipment should be pluggedinto the socket at the same time, as thiswill overload the mains supply (i.e. nomulti-pin sockets to be used!).
Vaporisator 09/08 Seite 15 Dienstag, 7. Oktober 2008 8:17 08

16
3.5 Protection against risk of fire
Warning! As the device operates athigh
temperatures, the followingsafety instructions should be observedto prevent a fire from occurring.
• There should be no flammable items (e.g.curtains, paper etc.) in the immediatevicinity of the device while in operation.
• Never place textiles or other items on topof, above or below the device to dry.
• To prevent overheating the device shouldnever be covered.
• The device should never be placed directlybelow a wall socket, as the heat generatedcould result in damage to the electricalinstallation.
• Never leave the device unattended while inuse. A strong smell of burning will nearlyalways mean damage. If this occurs youshould immediately unplug the device andhave it checked over. The contact address isto be found at the end of these operatinginstructions.
3.6 For the safety of your child
Warning! Children often do notrecognise danger
and can thereforesustain injury. For this reason pleaseobserve the following:
• This product may only be used under super-vision from adults, in order to ensure thatchildren do not play with the device.
• Always ensure that the device is kept out ofthe reach of children.
• Always ensure that children are never ableto pull on the cable.
• Always ensure that the plastic packagingdoes not pose a fatal risk to children.Packaging is not meant as a toy.
4. Components of the steam steriliser
1
Lid with handle
2
Steam outlet valve
3
Basket for accessories
4
Bottle holder
5
Steam receptacle
6
Base
7
On/Off switch
8
Control light
9
Measuring jug (integrated into device)
10
TongsNot shown: the mains lead is to be found onthe underside of the device in a cable wind.
Vaporisator 09/08 Seite 16 Dienstag, 7. Oktober 2008 8:17 08

17
5. Disinfection of feeding bottles, teats and accessories
5.1 General information on disinfecting
Newborn babies do not initially have sufficientantibodies to be able to protect themselvesfrom pathogenic germs. For this reason it is vitalthat disinfected teats and bottles are used whenpreparing infant feeds. Even the most minutefood particles left on teats and feeding bottlescan easily lead to a build-up of bacteria, which isa health hazard to infants. Components shouldtherefore also be cleaned each time before dis-infecting. The steam steriliser uses heat to disin-fect the components. Water is heated to above90 °C and is converted into steam. The heatgenerated therefore disinfects the componentsinside the steriliser swiftly and reliably. This waythe teats and feeding bottles only come intocontact with heat and steam. As the steam ster-iliser uses very little water, only minimal poweris required too.
5.2 Disinfection
Beware:
All components being disinfected mustbe washed thoroughly and be free of any foodresidues. The drawings
A
to
I
for the disinfecting processcan be found on the unfolded page. 1. Remove the measuring jug
9
from the base
6
(Fig.
A
). 2. Using the jug
9
measure 70ml of tap waterand pour into the base
6
(Fig.
A
).
N.B.:
70 ml corresponds to two beakers fullof water (2x 35ml).
3. Place the steam receptacle
5
on the base
6
(Fig.
B
). 4. Place the bottle holder
4
in the steam recep-tacle (Fig.
C
).
Beware:
Always disinfect the bottles open anddismantled, otherwise the material can becomemisshapen.
5. Place the open bottles in the holder
4
(Fig.
D
).
N.B.:
Stack the lids if possible in the holder
4
. This will save space in the accessoriesbasket (Fig.
E
).6. Place the accessories basket
3
on top of thesteam receptacle (Fig.
F
). 7. Lay the accessories in the basket
3
(Fig.
G
). 8. Place the lid
1
on top of the basket
3
(Fig.
H
). 9. Insert the mains plug into a suitable socket.
N.B.:
If the control light
8
is already lit, thismeans the On switch
7
has already beeninadvertently activated.
10.Switch the device on using the On switch
7
. The control light
8
will light up (Fig.
I
). The steam steriliser will switch off automaticallyafter disinfecting and the control light will goout.
Warning!
Directly after switching off, the devicewill still contain steam, which will, tosome extent, escape through thesteam outlet valve. You should there-fore take care not to scald yourself.Allow the equipment to cool downwhile sealed for at least three minutes.Directly after disinfecting the bottleswill be very hot and should only beremoved using the tongs supplied.
Beware!
The plug should be removed from thesocket after each use to ensure that the devicecannot be inadvertently switched on.
5.3 Please observe the following:
• The disinfection process lasts approx.8 minutes using 70 ml of water.
• Disinfection is only guaranteed if theprocess is not interrupted and the time isnot reduced.
Vaporisator 09/08 Seite 17 Dienstag, 7. Oktober 2008 8:17 08

18
• You should use only normal tap water with-out added chemicals.
• Ensure that the equipment is descaled on aregular basis in accordance with "6.2 Des-caling" to ensure the steriliser continues tofunction correctly.
6. Cleaning and care of the equipment
6.1 Cleaning
Warning!
Always detach the plug before cleaningthe device.Only ever clean the device once it hascooled down.
Beware! Do not use strong cleaning orscouring agents,
as these can attack the sur-faces.1. Remove lid
1
, accessory basket
3
, bottleholder
4
as well as steam receptacle
5
frombase
6
.
Beware! The base 6
must never be immersedin water, as it contains electrical components,which could become damaged.2. Wipe base
6
with a damp cloth after eachuse.
3. Clean lid 1, accessory basket 3, bottle holder4 as well as steam receptacle 5 either withwashing-up liquid or in the dishwasher.
6.2 DescalingWashing out the device on a regular basis willhelp to reduce scaling. However, eventually theboiling process will cause a deposit of limescalein the base of the steam steriliser. This limescale can have a detrimental effect onthe disinfecting process. N.B.: With minor scaling we recommendyou follow the procedure described below usinghousehold vinegar:1. To descale mix 35 ml hot water with 35 ml
household vinegar and pour into the base 6. 2. Leave to solution to work in for 30 minutes
and then discard. 3. Wipe the device with a damp cloth.With heavy scaling you should use a proprie-tary descaler. Please observe the relevantinstructions for use.
Vaporisator 09/08 Seite 18 Dienstag, 7. Oktober 2008 8:17 08

19
7. Faults and their rectification
8. Technical dataEuropean Model, with 2-PIN plug (Article No. 10.251.012): Voltage: 220 - 240 V~/50 Hz Power consumption: 550 Watt
British Model, with 3-PIN plug (Article N. 10.749.054):Voltage: 220 - 240 V~/50 Hz Power consumption: 550 Watt
Fault Cause Rectification measuresDisinfection takes too long Too much water in receptacle Measure exactly 70 ml for optimum
disinfectionBase is heavily scaled Descale base (see “6.2 Descaling” on
page 18)The device does not switch on, Control light 8 does not light up
No power supply Push plug in correctly Check with other equipment as to whether the socket has power supply
The device does not switch on again after use, control light 8 is lit up
Overheat protection is active Wait 15 minutes for the device to cool down.
6 FIRST CHOICE bottles do not fit into the device
Components not placed in correctly
Place bottles upside down in the bottle holder and without accessories.Stack lids in bottle holder and then place the basket on top
Bottles are very hot after disin-fecting
Bottles are disinfected at above 90 °C
Allow bottles to cool down Use the tongs supplied
Bottles and accessories show white marks after disinfecting
Device has limescale deposits Descale device (see “6.2 Descaling” on page 18)
Steam is flowing out of the accessory holder
Device has not been assem-bled correctly
Assemble device correctly (see “5.2 Disinfection” on page 17)
Bottles and accessories are not suitably positioned in holder
Separate the components so that the device seals completely (see “5.2 Disinfection” on page 17)
Vaporisator 09/08 Seite 19 Dienstag, 7. Oktober 2008 8:17 08
20
9. Disposal9.1 Equipment
The symbol of the crossed-through wheelie bin means, withinthe European Union, that theproduct is subject to a separatewaste collection. This applies tothe product and all accessoriesmarked with this symbol. Products
labelled as such must not be disposed of withthe normal household waste collections; they
must be taken to a recycling bank for electricaland electronic equipment. Recycling helps toreduce the use of raw materials und is eco-friendly.
9.2 PackagingWhen you wish to dispose of the packaging,please observe the relevant environmental regu-lations for your country.
10. WarrantyWhen used with care and observing the operat-ing instructions the manufacturer will guaranteethe product for 2 years from the date of pur-chase.We agree to repair the device free of charge,providing it is either a material or design fault.All other claims are excluded.Any damage resulting from improper use of thedevice will not be rectified. Leads and plugs areexcluded from the warranty if caused by wear.Within the first 2 years from the date of pur-chase we will rectify without additional chargeany faults recognised as being justified. All costsare to be clarified in advance.
When returning the device the warranty certifi-cate or proof of purchase must be enclosed atall times.Without proof of purchase you will be charged.The goods will be returned via COD.Please complete the warranty certificate imme-diately after purchase and keep in a safe place.Warranty certificates that are mislaid will notbe replaced.The Warranty Certificate is to be found at theend of this booklet.
Vaporisator 09/08 Seite 20 Dienstag, 7. Oktober 2008 8:17 08

21
Sommaire1. Remarques importantes avant la première utilisation. . . . . . . . . . . . . . . . . 222. Description de l’appareil . . . . . . . . . . . . . . . . . . . . . . . . . . . . . . . . . . . . . 22
2.1 Usage prévu . . . . . . . . . . . . . . . . . . . . . . . . . . . . . . . . . . . . . . . . . . . . . . . . . . . . . . . . . . . 222.2 Modèles. . . . . . . . . . . . . . . . . . . . . . . . . . . . . . . . . . . . . . . . . . . . . . . . . . . . . . . . . . . . . . . 222.3 Contenu de la livraison. . . . . . . . . . . . . . . . . . . . . . . . . . . . . . . . . . . . . . . . . . . . . . . . . . . 222.4 Description du fonctionnement . . . . . . . . . . . . . . . . . . . . . . . . . . . . . . . . . . . . . . . . . . . . 22
3. Consignes de sécurité . . . . . . . . . . . . . . . . . . . . . . . . . . . . . . . . . . . . . . . 233.1 Explication des termes . . . . . . . . . . . . . . . . . . . . . . . . . . . . . . . . . . . . . . . . . . . . . . . . . . . 233.2 Remarques générales . . . . . . . . . . . . . . . . . . . . . . . . . . . . . . . . . . . . . . . . . . . . . . . . . . . . 233.3 Protection contre les brûlures . . . . . . . . . . . . . . . . . . . . . . . . . . . . . . . . . . . . . . . . . . . . . 243.4 Protection contre le choc électrique . . . . . . . . . . . . . . . . . . . . . . . . . . . . . . . . . . . . . . . . 243.5 Protection contre le risque d'incendie . . . . . . . . . . . . . . . . . . . . . . . . . . . . . . . . . . . . . . . 253.6 Pour la sécurité de votre enfant . . . . . . . . . . . . . . . . . . . . . . . . . . . . . . . . . . . . . . . . . . . . 25
4. Eléments du stérilisateur vapeur . . . . . . . . . . . . . . . . . . . . . . . . . . . . . . . 255. Désinfection des biberons, tétines et accessoires . . . . . . . . . . . . . . . . . . . . 26
5.1 Remarques générales sur la désinfection . . . . . . . . . . . . . . . . . . . . . . . . . . . . . . . . . . . . . 265.2 Désinfection . . . . . . . . . . . . . . . . . . . . . . . . . . . . . . . . . . . . . . . . . . . . . . . . . . . . . . . . . . . 265.3 Veuillez observer les points suivants: . . . . . . . . . . . . . . . . . . . . . . . . . . . . . . . . . . . . . . . . 27
6. Nettoyage et entretien de l'appareil . . . . . . . . . . . . . . . . . . . . . . . . . . . . . 276.1 Nettoyage . . . . . . . . . . . . . . . . . . . . . . . . . . . . . . . . . . . . . . . . . . . . . . . . . . . . . . . . . . . . . 276.2 Détartrage. . . . . . . . . . . . . . . . . . . . . . . . . . . . . . . . . . . . . . . . . . . . . . . . . . . . . . . . . . . . . 27
7. Dysfonctionnements et solutions . . . . . . . . . . . . . . . . . . . . . . . . . . . . . . . 288. Caractéristiques techniques. . . . . . . . . . . . . . . . . . . . . . . . . . . . . . . . . . . 289. Elimination . . . . . . . . . . . . . . . . . . . . . . . . . . . . . . . . . . . . . . . . . . . . . . 29
9.1 Appareil . . . . . . . . . . . . . . . . . . . . . . . . . . . . . . . . . . . . . . . . . . . . . . . . . . . . . . . . . . . . . . . 299.2 Emballage. . . . . . . . . . . . . . . . . . . . . . . . . . . . . . . . . . . . . . . . . . . . . . . . . . . . . . . . . . . . . . 29
10. Garantie . . . . . . . . . . . . . . . . . . . . . . . . . . . . . . . . . . . . . . . . . . . . . . . . 29
Vaporisator 09/08 Seite 21 Dienstag, 7. Oktober 2008 8:17 08

22
Chers parents,Vous avez opté pour notre stérilisateur vapeuret fait ainsi le choix de la qualité et de lasécurité. Vous pouvez désormais désinfecterjusqu'à six biberons à col large FIRST CHOICEainsi que leurs accessoires de manière simple etfiable. La désinfection permet en effet d'éliminerentièrement les germes pathogènes contre
lesquels un nouveau-né n'est pas encore capablede se défendre. De plus, les élémentsdésinfectés peuvent être immédiatementutilisés.Nous souhaitons un développement sain à votrebébé.
1. Remarques importantes avant la première utilisationLa présente notice d'emploi vous indiquecomment utiliser votre stérilisateur vapeur demanière sûre et économique. Toute personne qui assemble, utilise, nettoie ouélimine cet appareil doit avoir pris connaissanceet compris l'intégralité du contenu de laprésente notice d'emploi.
Conservez soigneusement cette notice d'emploiafin de pouvoir vous y référer à tout moment. Si vous vendez ou offrez votre appareil à untiers, veuillez joindre cette notice d'emploi àl'appareil afin que le nouvel acquéreur puisseégalement l'utiliser en toute sécurité.
2. Description de l’appareil2.1 Usage prévuLe stérilisateur vapeur NUK VAPO RAPID vouspermet de désinfecter des biberons et desaccessoires de biberon.Les éléments à désinfecter doivent résister àl'ébullition car la température de désinfectiondépasse 90 °C.Cet appareil ne doit être utilisé que dans desespaces fermés et secs.Cet appareil est destiné à un usage privé et nonà un usage commercial.
2.2 ModèlesL'appareil existe dans deux versions :1. Modèle européen avec fiche secteur2 broches, n° d'article 10.251.0122. Modèle britannique avec fiche secteur3 broches, n° d'article 10.749.054L'utilisation et le fonctionnement de l'appareilne varient pas d'un modèle à l'autre.
2.3 Contenu de la livraison• 1 stérilisateur vapeur NUK VAPO RAPID,
complet• 1 pince à biberons• 1 dosette à eau intégrée• 1 notice d'emploi
2.4 Description du fonctionnementLe stérilisateur vapeur est chaufféélectriquement. L'eau versée dans l'appareil estportée à ébullition. La vapeur chaude ainsigénérée élimine les germes et désinfecte lesbiberons et leurs accessoires.
Vaporisator 09/08 Seite 22 Dienstag, 7. Oktober 2008 8:17 08

23
3. Consignes de sécuritéCet appareil est construit et fabriqué selonl'état actuel de la technique. Toutes lesdirectives de sécurité européennes applicablesont été respectées et l'appareil a été testéconformément aux normes correspondantes.Les appareils de ce type peuvent cependants'avérer dangereux.Votre sécurité mérite bien quelques minutesd'attention! Juste le temps de lire nos consignesde sécurité. Vous connaissez probablement déjàla plupart de ces consignes, mais nous vousrecommandons pourtant de les lire. Certainesconsignes pourraient être nouvelles pour vouset permettre de prévenir d'éventuelsdommages.
3.1 Explication des termesLes termes suivants sont utilisés dans laprésente notice d'emploi:
Avertissement! Risque élevé: Le non-respect de cetavertissement peut entraîner desrisques de blessures corporelles et demort.
Attention! Risque moyen: Le non-respect de cetavertissement peut entraîner des dommagesmatériels.Remarque: Risque faible: Faits à observer lors de lamanipulation de l'appareil.
3.2 Remarques générales• Veuillez lire attentivement cette notice
d’emploi avant l’utilisation. Elle fait partieintégrante de l’appareil et doit êtredisponible à tout moment.
• Utilisez l'appareil uniquement pour l’usageprévu et conformément à la notice d’emploi(voir « 2.1 Usage prévu » à la page 22).
Avertissement! Le non-respect des avertissementssuivants peut entraîner des blessures.
• Cet appareil n'est pas destiné à être utilisépar des personnes (y compris des enfants)présentant des capacités physiques,sensorielles ou mentales limitées oudisposant d'une expérience et/ou deconnaissances insuffisantes, à moins qu'unepersonne responsable de leur sécurité neles assiste ou leur donne des instructionssur la manière d'utiliser l'appareil. Ne paslaisser l'appareil sans surveillance à la portéedes enfants, ceux-ci risqueraient de joueravec.
• Veillez à ce que le câble secteur nereprésente pas un obstacle sur lequel unepersonne pourrait trébucher, se prendre lespieds ou marcher.
Attention! Le non-respect desavertissements suivants peut entraîner desdommages de l'appareil.• Vérifiez que la tension secteur requise (voir
plaque signalétique sous l´appareil)correspond à votre tension secteur locale.
• L’appareil doit être posé uniquement surune surface fixe, plane, sèche et noninflammable.
• Ne pas placer l'appareil à proximité desurfaces chaudes, dans un four chaud ou àproximité d'appareils à gaz ou électriques;l'appareil pourrait être endommagé.
• Ne jamais faire fonctionner l'appareil sanseau en raison du risque de surchauffe.
• Ne jamais laisser l’appareil sans surveillancependant le fonctionnement.
• Débranchez la fiche secteur de votreappareil après utilisation afin d'éviter toutemise en marche accidentelle.
Vaporisator 09/08 Seite 23 Dienstag, 7. Oktober 2008 8:17 08

24
Remarque: • Ne jamais verser plus de 70 ml d'eau dans
l'appareil, ceci risquerait d'en entraver lefonctionnement.
• Notez que le fabricant décline touteresponsabilité et n’accorde aucune garantieen cas d’utilisation d’accessoires autres queceux recommandés dans la présente noticed’emploi ou de réparations effectuées enn’utilisant pas exclusivement des pièces derechange d’origine. Cela s’appliqueégalement aux réparations effectuées pardes personnes non qualifiées. Une adresseest indiquée à la fin de la présente noticed’emploi.
• En cas d’éventuels dysfonctionnements, laréparation de l’appareil peut être effectuéeuniquement par une personne qualifiée.Dans le cas contraire, la garantie ne sera pasappliquée.
3.3 Protection contre les brûluresAvertissement! Etant donné quel'appareil fonctionne à destempératures élevées, le non-respectdes avertissements suivants peutentraîner des brûlures.
• Les surfaces de l'appareil deviennent trèschaudes pendant le fonctionnement. Netoucher l'appareil qu'au niveau de la poignéeprévue à cet effet ou des interrupteurs.
• Ne pas déplacer le stérilisateur vapeur encours de fonctionnement. Si vous souhaitezdéplacer l'appareil chaud, éteignez-le,débranchez la fiche secteur et attendez quel'appareil ait refroidi. Vous risqueriez devous brûler au contact des surfaceschaudes.
• Immédiatement après la désinfection, lesbiberons sont très chauds et ne doiventêtre retirés qu'au moyen de la pince àbiberons fournie avec l'appareil.
3.4 Protection contre le choc électrique
Avertissement! Les consignes desécurité suivantes doivent vousprotéger contre tout choc électrique.
• N'utilisez cet appareil que si l'appareil et lecâble secteur sont intacts.
• Lorsque le câble secteur est endommagé, ildoit être remplacé par le fabricant, sonS.A.V. ou une personne qualifiée afind’éviter des mises en danger.
• Ne pas introduire d'eau ou d'autres liquidesà l'intérieur de l'appareil en dehors duréservoir prévu à cet effet. Enconséquence :
– ne jamais utiliser en extérieur– ne jamais poser de récipients contenant
de l'eau, comme par exemple un verred'eau ou un vase, sur l'appareil
– ne jamais utiliser dans un environnementtrès humide
– ne pas faire fonctionner à proximité d'unévier.
Si malgré ces précautions, un liquide pénètredans l'appareil, débranchez immédiatementla fiche secteur et faites réparer l'appareilpar un personnel qualifié. Une adresse estindiquée à la fin de la présente noticed’emploi.
• Ne jamais saisir l'appareil, le câble secteurou la fiche secteur avec des mains humides.
• Toujours retirer le câble secteur au niveaude la fiche secteur. Ne jamais tirer sur lecâble.
• Veillez à ne pas plier ou tordre le câblesecteur.
• Maintenez le câble secteur à l'écart dessurfaces chaudes (par ex. plaque decuisson).
Vaporisator 09/08 Seite 24 Dienstag, 7. Oktober 2008 8:17 08

25
• Evitez d'utiliser une rallonge électrique.L'utilisation d'une rallonge n'est autoriséeque dans certaines conditions :
– La rallonge électrique doit être adaptée àl'intensité de courant de l'appareil.
– La rallonge électrique ne doit pas pendrelibrement : elle ne doit pas représenterun obstacle sur lequel une personnepourrait trébucher ni être à la portée desenfants.
– La rallonge électrique ne doit pas êtreendommagée.
– Aucun autre appareil ne doit être branchéà la prise secteur en raison du risque desurcharge du réseau électrique (interdic-tion d'utiliser des prises multiples!).
3.5 Protection contre le risque d'incendie
Avertissement! Etant donné quel'appareil fonctionne à destempératures élevées, veillez àrespecter les consignes de sécuritésuivantes pour prévenir tout risqued'incendie.
• Ne pas faire fonctionner l'appareil àproximité directe d'objets inflammables (parex. rideaux, papiers, etc.).
• Ne jamais l'utiliser pour faire sécher destextiles ou d'autres matériaux sur, au-dessusou devant l'appareil.
• Pour éviter tout risque de surchauffe, nejamais couvrir l'appareil.
• L'appareil ne doit jamais être placé en-dessous d'une prise murale car la chaleurgénérée pourrait endommager l'installationélectrique.
• Ne jamais laisser l’appareil sans surveillance.Des dommages s'accompagnent presquetoujours d'un fort dégagement d'odeur.Dans ce cas, débranchez immédiatement lafiche secteur et faites contrôler l'appareil.Une adresse est indiquée à la fin de laprésente notice d’emploi.
3.6 Pour la sécurité de votre enfantAvertissement! Les enfants nepeuvent pas estimer correctement lesdangers et par conséquent peuvent seblesser. Respectez les points suivants :
• Ce produit ne doit être utilisé que sous lasurveillance d'adultes afin de garantir quedes enfants ne jouent pas avec l'appareil.
• Veillez à ce que l’appareil se trouve toujourshors de portée des enfants.
• Veillez à ce que les enfants ne puissentjamais tirer sur le câble de l'appareil.
• Veillez à ne pas laisser jouer les enfants avecle film d’emballage ; danger de mort!
4. Eléments du stérilisateur vapeur1 Couvercle avec poignée2 Evacuation de la vapeur3 Panier pour accessoires4 Panier pour biberons5 Cuve6 Socle chauffant
7 Interrupteur marche / arrêt8 Voyant de contrôle lumineux9 Dosette à eau (intégrée à l'appareil)10 Pince à biberonsNon illustré: un enrouleur de câble sousl'appareil.
Vaporisator 09/08 Seite 25 Dienstag, 7. Oktober 2008 8:17 08
26
5. Désinfection des biberons, tétines et accessoires5.1 Remarques générales sur la
désinfection Au cours des premiers mois, les nouveau-nésne disposent pas d'anticorps suffisants pour seprotéger efficacement contre les agentspathogènes (germes pathogènes). Il est doncprimordial d'utiliser des tétines et des biberonsdésinfectés pour la préparation de la nourrituredu nourrisson. La présence du moindre résidude produit alimentaire sur les tétines ou lesbiberons peut aisément entraîner ledéveloppement de bactéries présentant undanger pour la santé. C'est pourquoi ceséléments doivent être soigneusement lavésavant chaque désinfection. Le stérilisateurvapeur fonctionne selon le principe de ladésinfection à chaud. L'eau est portée à plus de90 °C et transformée en vapeur. La chaleur ainsiproduite désinfecte les éléments placés dansl'appareil de manière rapide et fiable. Les tétineset les biberons n'entrent donc en contactqu'avec la chaleur et la vapeur d'eau. L'appareilconsomme peu d'électricité compte tenu de lafaible quantité d'eau requise pour ladésinfection.
5.2 DésinfectionAttention ! Tous les éléments à désinfecterdoivent être soigneusement lavés etdébarrassés de tout résidu alimentaire. Les illustrations A à I relatives à la désinfectionsont disponibles sur la page dépliante. 1. Retirez la dosette à eau 9 du socle chauffant
6 (ill. A). 2. Mesurez 70 ml d'eau du robinet à l'aide de la
dosette 9 et versez cette quantité d'eau dansle socle chauffant 6 (ill. A). Remarque : Une quantité d'eau de 70 mlcorrespond à deux dosettes remplies à35 ml.
3. Placez la cuve 5 sur le socle chauffant 6 (ill. B).
4. Placez le panier pour biberons 4 dans la cuve(ill. C).
Attention! Toujours stériliser les biberonsouverts et démontés en pièces détachées pourprévenir toute déformation des matériaux. 5. Placez les biberons ouverts, la tête en bas
dans le panier pour biberons 4 (ill. D). Remarque : Empilez si possible lescapuchons sur le panier pour biberons 4.Vous gagnerez ainsi de la place dans la panierpour accessoires (ill. E).
6. Placez le panier pour accessoires 3 sur lacuve (ill. F).
7. Placez les accessoires dans le panier pouraccessoires 3 (ill. G).
8. Positionnez le couvercle 1 sur le panier pouraccessoires 3 (ill. H).
9. Branchez la fiche secteur dans une prisesecteur adaptée. Remarque : Si le voyant de contrôlelumineux 8 est déjà allumé, cela signifie quel'interrupteur de marche 7 a été actionnépar inadvertance.
10.Allumez l'appareil à l'aide de l'interrupteurde marche 7. Le voyant de contrôle lumineux 8 s'allume(ill. I).
Le stérilisateur vapeur s'arrête automatique-ment à la fin du processus de désinfection et levoyant de contrôle lumineux s'éteint.
Vaporisator 09/08 Seite 26 Dienstag, 7. Oktober 2008 8:17 08

27
Avertissement ! Immédiatement après l'arrêt, l'appareilcontient encore de la vapeur chaudequi s'échappe en partie par le dispositifd'évacuation de la vapeur. Veillez à nepas vous brûler. Laissez l'appareilrefroidir pendant au moins troisminutes.Immédiatement après la désinfection,les biberons sont très chauds et nedoivent être retirés qu'au moyen de lapince à biberons fournie avecl'appareil.
Attention ! Après chaque utilisation, débranchezla fiche secteur de la prise afin d'éviter toute miseen marche accidentelle de l'appareil.
5.3 Veuillez observer les points suivants:
• Une désinfection avec une quantité d'eau de70 ml dure environ 8 minutes.
• La désinfection n'est garantie que si leprocessus de désinfection n'est pasinterrompu ou écourté.
• Utiliser uniquement de l'eau du robinet sansaucun additif.
• Veiller à effectuer un détartrage régulierconformément au paragraphe « 6.2Détartrage » afin que l’appareil puissecontinuer à fonctionner normalement.
6. Nettoyage et entretien de l'appareil6.1 Nettoyage
Avertissement ! Débranchez toujours la fiche secteuravant de nettoyer l'appareil.Nettoyez l'appareil uniquementlorsqu'il est à froid.
Attention ! Ne pas utiliser de produitsdétergents ou abrasifs qui pourraientendommager les surfaces de l'appareil.1. Retirez le couvercle 1, le panier pour
accessoires 3, le panier pour biberons 4 et lacuve 5 du socle chauffant 6.
Attention ! Ne jamais plonger le soclechauffant 6 dans l'eau, ceci pourraitendommager des composants électriques.2. Essuyez le socle chauffant 6 avec un chiffon
humide après chaque utilisation.3. Nettoyez le couvercle 1, le panier pour
accessoires 3, le panier pour biberons 4 et lacuve 5 à la main ou au lave-vaisselle.
6.2 DétartrageEssuyez régulièrement l'appareil afin de réduirela formation de calcaire. Au bout de quelquetemps, du calcaire se dépose sur le soclechauffant du stérilisateur à cause du processusd'ébullition. Les dépôts de calcaire peuvent réduireconsidérablement la puissance lors de ladésinfection. Remarque : En cas de légers dépôts decalcaire, il est préférable d’utiliser le processusdécrit ci-dessous en employant du vinaigre:1. Mélangez 35 ml d'eau chaude avec 35 ml de
vinaigre blanc et versez le tout dans le soclechauffant 6.
2. Laissez agir la solution pendant 30 minutespuis jetez-la.
3. Utilisez ensuite un chiffon humide pournettoyer l'appareil.
En cas de forts dépôts de calcaire, vous devezutiliser un détartrant en vente dans lecommerce. Respectez les consignes d’utilisationdu détartrant.
Vaporisator 09/08 Seite 27 Dienstag, 7. Oktober 2008 8:17 08

28
7. Dysfonctionnements et solutions
8. Caractéristiques techniquesModèle européen avec fiche secteur2 broches (n° d'article 10.251.012) : Tension : 220 - 240 V~/50 Hz Puissance absorbée : 550 Watt
Modèle britannique avec fiche secteur 3broches (n° d'article 10.749.054) :Tension : 220 - 240 V~/50 Hz Puissance absorbée : 550 Watt
Dysfonctionnement Cause SolutionLa désinfection dure trop longtemps
Il y a trop d'eau dans l'appareil
Versez une quantité exacte de 70 ml d'eau pour une désinfection optimale
Le socle chauffant est entartré
Procédez au détartrage du socle chauffant (voir « 6.2 Détartrage » à la page 27)
Impossible de mettre l'appareil en marche, le voyant de contrôle lumineux 8 ne s'allume pas
L'alimentation électrique ne fonctionne pas
Branchez correctement la fiche secteurA l'aide d'un autre appareil, vérifiez la tension à la prise
Impossible de remettre l'appareil en marche après une utilisation, le voyant de contrôle lumineux 8 s'allume
La protection contre la surchauffe est activée
Attendez 15 minutes jusqu'à ce que l'appareil ait refroidi
Impossible de placer les 6 biberons FIRST CHOICE dans l'appareil
Les éléments ne sont pas bien disposés
Posez les biberons la tête en bas et sans accessoire dans le panier pour biberonsEmpilez les capuchons les uns sur les autres dans le panier pour biberons puis placez le panier pour accessoires
Les biberons sont très chauds après la désinfection
Les biberons sont désinfectés à une température supérieure à 90 °C
Laissez les biberons refroidirUtilisez la pince à biberons
Il y a des traces blanches sur les biberons et les accessoires après la désinfection
L'appareil est entartré Procédez au détartrage de l'appareil (voir « 6.2 Détartrage » à la page 27)
De la vapeur s'échappe au niveau du panier pour accessoires
L'appareil a été mal assemblé Assemblez l'appareil correctement (voir « 5.2 Désinfection » à la page 26)
Les biberons et les accessoires ont été mal disposés
Disposez les éléments de sorte que l'appareil puisse fermer correctement (voir « 5.2 Désinfection » à la page 26)
Vaporisator 09/08 Seite 28 Dienstag, 7. Oktober 2008 8:17 08
29
9. Elimination9.1 Appareil
Le symbole de la poubelle surroues barrée d’une croix signifieque le produit doit faire l’objetd’une collecte sélective au sein del’Union européenne. Celas’applique au produit ainsi qu’àtous les accessoires marqués de
ce symbole. Les produits portant ce symbole nepeuvent pas être mis au rebut dans les déchetsménagers, mais ils doivent être remis à un point
de collecte pour le recyclage des appareilsélectriques et électroniques. Le recyclagepermet de réduire la consommation dematières premières et la pollution del’environnement.
9.2 EmballageSi vous souhaitez éliminer l'emballage, veillez àrespecter les prescriptions en matière deprotection de l'environnement en vigueur dansvotre pays.
10. GarantieUne garantie de 2 ans vous est offerte, sousréserve de la bonne utilisation de l’appareil,dans les conditions indiquées sur le moded’emploi.Nous nous engageons à réparer gratuitementl’appareil en cas de vices de matériel ou defabrication. Tout autre dommage est exclu de lagarantie.Les dommages résultant d’une utilisation nonconforme de l’appareil ne sont pas couverts. Lecordon d’alimentation et le connecteur sontexclus de la garantie, dans la mesure où il s’agitd’une usure normale. Au cours des 2 premièresannées à compter de la date d’achat, nousremédions aux défauts reconnus comme tels
sans facturer les frais accessoires. La prise encharge des frais doit être déterminée aupréalable. Il est nécessaire de renvoyer l’appareilaccompagné du bon de garantie ou de la preuved’achat.Sans justificatif, l’appareil vous sera retournécontre remboursement de la facture. Le renvois'effectue contre remboursement.Veuillez faire compléter le bon de garantieimmédiatement au moment de l’achat et leconserver avec soin. Les certificats de garantieégarés ne sont pas remplacés.Vous trouverez le bon de garantie à la fin de celivret.
Vaporisator 09/08 Seite 29 Dienstag, 7. Oktober 2008 8:17 08

30
Indice1. Notas importantes antes del primer uso. . . . . . . . . . . . . . . . . . . . . . . . . . 312. Descripción del aparato . . . . . . . . . . . . . . . . . . . . . . . . . . . . . . . . . . . . . 31
2.1 Uso previsto . . . . . . . . . . . . . . . . . . . . . . . . . . . . . . . . . . . . . . . . . . . . . . . . . . . . . . . . . . . 312.2 Modelos. . . . . . . . . . . . . . . . . . . . . . . . . . . . . . . . . . . . . . . . . . . . . . . . . . . . . . . . . . . . . . . 312.3 Piezas suministradas . . . . . . . . . . . . . . . . . . . . . . . . . . . . . . . . . . . . . . . . . . . . . . . . . . . . . 312.4 Descripción del funcionamiento. . . . . . . . . . . . . . . . . . . . . . . . . . . . . . . . . . . . . . . . . . . . 31
3. Indicaciones de seguridad . . . . . . . . . . . . . . . . . . . . . . . . . . . . . . . . . . . . 323.1 Explicación de conceptos . . . . . . . . . . . . . . . . . . . . . . . . . . . . . . . . . . . . . . . . . . . . . . . . . 323.2 Indicaciones generales . . . . . . . . . . . . . . . . . . . . . . . . . . . . . . . . . . . . . . . . . . . . . . . . . . . 323.3 Protección frente a las quemaduras y las escaldaduras . . . . . . . . . . . . . . . . . . . . . . . . . . 333.4 Protección frente a descarga eléctrica . . . . . . . . . . . . . . . . . . . . . . . . . . . . . . . . . . . . . . . 333.5 Protección frente al peligro de incendio . . . . . . . . . . . . . . . . . . . . . . . . . . . . . . . . . . . . . 343.6 Para la seguridad de su bebé . . . . . . . . . . . . . . . . . . . . . . . . . . . . . . . . . . . . . . . . . . . . . . 34
4. Componentes del vaporizador . . . . . . . . . . . . . . . . . . . . . . . . . . . . . . . . . 345. Desinfección de biberones, tetinas y accesorios . . . . . . . . . . . . . . . . . . . . . 35
5.1 Generalidades sobre la desinfección . . . . . . . . . . . . . . . . . . . . . . . . . . . . . . . . . . . . . . . . 355.2 Desinfección . . . . . . . . . . . . . . . . . . . . . . . . . . . . . . . . . . . . . . . . . . . . . . . . . . . . . . . . . . . 355.3 Tenga en cuenta: . . . . . . . . . . . . . . . . . . . . . . . . . . . . . . . . . . . . . . . . . . . . . . . . . . . . . . . . 36
6. Limpieza y cuidado del aparato . . . . . . . . . . . . . . . . . . . . . . . . . . . . . . . . 366.1 Limpieza . . . . . . . . . . . . . . . . . . . . . . . . . . . . . . . . . . . . . . . . . . . . . . . . . . . . . . . . . . . . . . 366.2 Desincrustar la cal . . . . . . . . . . . . . . . . . . . . . . . . . . . . . . . . . . . . . . . . . . . . . . . . . . . . . . 36
7. Fallos y su solución . . . . . . . . . . . . . . . . . . . . . . . . . . . . . . . . . . . . . . . . 378. Datos técnicos . . . . . . . . . . . . . . . . . . . . . . . . . . . . . . . . . . . . . . . . . . . . 379. Eliminación . . . . . . . . . . . . . . . . . . . . . . . . . . . . . . . . . . . . . . . . . . . . . . 38
9.1 Aparato . . . . . . . . . . . . . . . . . . . . . . . . . . . . . . . . . . . . . . . . . . . . . . . . . . . . . . . . . . . . . . . 389.2 Envase . . . . . . . . . . . . . . . . . . . . . . . . . . . . . . . . . . . . . . . . . . . . . . . . . . . . . . . . . . . . . . . . 38
10. Garantía . . . . . . . . . . . . . . . . . . . . . . . . . . . . . . . . . . . . . . . . . . . . . . . . 38
Vaporisator 09/08 Seite 30 Dienstag, 7. Oktober 2008 8:17 08

31
Queridos padresUstedes se han decidido por nuestrovaporizador y, con ello, por la calidad y laseguridad. Ahora desinfectará de forma muysencilla y segura hasta seis biberones de bocaancha FIRST CHOICE y los accesorios parabiberones. De este modo se matan totalmente
los gérmenes patógenos, contra los que unrecién nacido todavía no se puede defendersuficientemente. Las piezas desinfectadas sepueden volver a utilizar inmediatamente.Le deseamos a su bebé un sano desarrollo.
1. Notas importantes antes del primer usoEstas instrucciones de uso le ayudarán a utilizarsu vaporizador de forma segura y económica. Toda persona que instale, maneje, limpie oelimine este aparato, debe haber tomadoconocimiento y entendido todo el contenido deestas instrucciones de uso.
Por ello, guarde bien estas instrucciones de uso,para poder disponer de ellas en todo momento.Si vende o regala su aparato, entregue con élestas instrucciones de uso, para que el siguientepropietario pueda utilizarlo también de formasegura.
2. Descripción del aparato2.1 Uso previstoCon este esterilizador a vapor NUK VAPORAPID puede desinfectar biberones yaccesorios de biberones.Las piezas a desinfectar deben ser resistentes ala cocción, ya que la temperatura supera los90 °C durante la desinfección.Este aparato sólo debe utilizarse en recintossecos y cerrados.Este aparato sólo es apropiado para el usodoméstico privado y no para fines industriales.
2.2 ModelosEl aparato se suministra en dos variantes:1. Modelo europeo, con enchufe de 2 PIN,n.º de artículo 10.251.0122. Modelo británico, con enchufe de 3 PIN,n.º de artículo 10.749.054Por lo que respecta al manejo y elfuncionamiento, no existe ninguna diferenciaentre las dos variantes.
2.3 Piezas suministradas• 1 esterilizador a vapor NUK VAPO
RAPID, completo• 1 pinza para biberones• 1 vaso medidor para agua, integrado• 1 instrucciones de uso
2.4 Descripción del funcionamientoEste vaporizador se calienta eléctricamente. Elagua de su interior se calienta hasta ebullición.El calor desarrollado por la atmósfera de vaporque se ha producido mata los gérmenes y, conello, desinfecta los biberones y sus accesorios.
Vaporisator 09/08 Seite 31 Dienstag, 7. Oktober 2008 8:17 08

32
3. Indicaciones de seguridadEste aparato está construido y fabricado segúnel actual estado de la técnica. Se han seguidotodas las correspondientes directivas europeasde seguridad y el aparato se ha verificado deacuerdo con la norma. No obstante, de estetipo de aparatos pueden surgir tambiénpeligros.¡Vale la pena que dedique 5 minutos a suseguridad! No precisará más tiempo para leernuestras indicaciones de seguridad.Probablemente ya conoce la mayoría de lasindicaciones, a pesar de todo léalas, ya quealguna que otra de ellas será nueva para usted yle puede proteger contra daños.
3.1 Explicación de conceptosEn estas instrucciones de uso encontrará lossiguientes conceptos señalizados:
¡Advertencia!Riesgo elevado: La no observancia dela advertencia puede causar dañofísico e incluso la muerte.
¡Precaución!Riesgo medio: La no observancia de laadvertencia puede causar daño material.Nota:Riesgo reducido: Comportamientos técnicosque se deben observar al manipular el aparato.
3.2 Indicaciones generales• Antes del uso, lea atentamente estas
instrucciones de uso. Éstas forman parte delaparato y tienen que estar a mano en todomomento.
• Utilice el aparato solamente para el usoprevisto descrito (ver "2.1 Uso previsto" enla página 31).
¡Advertencia!La no observancia de las siguientesadvertencias puede ser causa delesiones.
• Este aparato no está destinado a serutilizado por personas (incluidos niños) concapacidades físicas, sensoriales o intelectualeslimitadas o con insuficiente experiencia y/ocon insuficiente conocimiento, a no ser quesean supervisadas por una personaencargada de su seguridad o hayan recibidode ella instrucciones sobre cómo se debeutilizar el aparato. Se debe vigilar a losniños, para asegurar que no jueguen con elaparato.
• Preste atención a que el cable de la rednunca sea causante de tropiezos, ni quenadie se pueda enredar con él o pisarlo.
¡Precaución! La no observancia de lassiguientes advertencias podría ser causa dedaño en el aparato.• Compruebe si la tensión de red necesaria
(ver placa de características en el aparato)coincide con su tensión de red.
• El aparato sólo debe colocarse sobre unabase firme, plana, seca y no inflamable.
• No colocar el aparato cerca de superficiesmuy calientes, en hornos calientes o cercade aparatos eléctricos o de gas, ya que elaparato podría resultar dañado por ello.
• No ponga nunca el aparato enfuncionamiento sin agua, ya que se podríacalentar excesivamente.
• No deje nunca el aparato sin vigilanciadurante su utilización.
• Desconecte el aparato de la red después desu utilización, para que no pueda serconectado accidentalmente.
Vaporisator 09/08 Seite 32 Dienstag, 7. Oktober 2008 8:17 08

33
Notas:• No vierta nunca más de 70 ml de agua, ya
que de lo contrario podría perjudicar alfuncionamiento.
• Tenga en cuenta que se extingue cualquierderecho de garantía y responsabilidad encaso de utilizar accesorios que no seanrecomendados en estas instrucciones deuso o de no emplear únicamente repuestosoriginales en caso de reparaciones. Lomismo es aplicable en caso de ejecución delas reparaciones por personas nocualificadas. Al final de estas instruccionesde uso encontrará la dirección de contacto.
• En caso de eventuales fallos defuncionamiento, la reparación del aparatodebe ser ejecutada únicamente por unapersona cualificada. De lo contrario, seextingue todo derecho de garantía.
3.3 Protección frente a las quemadu-ras y las escaldaduras
¡Advertencia! Dado que el aparatotrabaja con temperaturas elevadas, lano observancia de las siguientesadvertencias puede ser causa dequemaduras o escaldaduras.
• Las superficies del aparato se calientanmucho durante el funcionamiento. Por estemotivo, sólo se puede tocar el mangoprevisto para ello o los interruptores.
• No transportar el vaporizador durante elfuncionamiento. Si quiere transportar elaparato caliente, desconéctelo, desconecteel enchufe de la red y espere a que se hayaenfriado el aparato. De lo contrario, sepodría quemar con la superficie caliente.
• Inmediatamente después de la desinfecciónlos biberones están muy calientes y sólo sedeben sacar con la pinza para biberones quese adjunta.
3.4 Protección frente a descarga eléctrica
¡Advertencia! Las siguientesindicaciones de seguridad le protegeránde una descarga eléctrica.
• Utilice el aparato solamente cuando esténintactos el aparato y el cable de la red.
• Si el cable de red está dañado, deberá sersustituido por el fabricante, el serviciotécnico o una persona cualificada, a fin deprevenir riesgos.
• En el aparato no debe entrar en ningún casoagua u otros líquidos, excepto en elrecipiente previsto para ello. Por ello:
– no emplearlo nunca a la intemperie– no colocar nunca sobre el aparato
recipientes llenos de líquido, como vasosde agua, floreros etc.
– no emplearlo nunca en un ambiente muyhúmedo
– no hacerlo funcionar directamente juntoa un fregadero.
En caso de que llegara a penetrar líquido enel aparato, desconecte inmediatamente elenchufe de la red y haga reparar el aparatopor personal experto cualificado. Al final deestas instrucciones de uso encontrará ladirección de contacto.
• No toque nunca el aparato, el cable de lared o el enchufe de la red con las manosmojadas.
• Desconecte el cable de la red tirandosiempre del enchufe. No tire nunca delpropio cable.
• Preste atención a que el cable de la red noresulte doblado o aplastado.
• Mantenga el cable de la red alejado de lassuperficies calientes (p. ej. placas de cocina).
• Se debe evitar el empleo de cables deprolongación. Sólo es permisible bajocondiciones muy determinadas:
Vaporisator 09/08 Seite 33 Dienstag, 7. Oktober 2008 8:17 08
34
– El cable de prolongación debe seradecuado para la intensidad de corrientedel aparato.
– El cable de prolongación no debe estarinstalado de forma "volante": no debe sercausante de tropiezos ni estar al alcancede los niños.
– El cable de prolongación no debe estarnunca dañado.
– En la toma de corriente de la red no debeestar conectado ningún otro aparato queéste, ya que de lo contrario se podríaproducir una sobrecarga de la redeléctrica (prohibición de los enchufesmúltiples).
3.5 Protección frente al peligro de incendio
¡Advertencia! Dado que el aparatotrabaja con temperaturas elevadas,siga las siguientes indicaciones deseguridad, para que no se puedaproducir ningún incendio.
• Durante el funcionamiento no se debenencontrar objetos inflamables (p. ej.cortinas, papel etc.) en la inmediata cercaníadel aparato.
• No utilice nunca el aparato para secar sobreél o delante de él tejidos u otros objetos.
• Para evitar un recalentamiento el aparatono se debe tapar nunca.
• El aparato no se debe colocar nuncadirectamente debajo de una toma decorriente mural, ya que el calor queproduce podría causar daños en lainstalación eléctrica.
• No haga funcionar nunca el aparato sinvigilancia. Los daños se manifiestan casisiempre por un intenso olor. En este casodesconecte inmediatamente el enchufe de lared y haga revisar el aparato. Al final deestas instrucciones de uso encontrará ladirección de contacto.
3.6 Para la seguridad de su bebé¡Advertencia! Con frecuencia, losniños no son capaces de apreciar elpeligro correctamente y esto hace quese lesionen. Por tanto, debe tener encuenta que:
• Este producto sólo debe utilizarse bajosupervisión de un adulto, para asegurar quelos niños no jueguen con el aparato.
• Preste mucha atención a que el aparato seencuentre siempre fuera del alcance de losniños.
• Preste atención a que los niños no puedannunca hacer caer el aparato tirando delcable.
• Tenga cuidado de que el plástico del envaseno represente un peligro mortal para losniños. Los plásticos del envase no son unjuguete.
4. Componentes del vaporizador1 Tapa con mango2 Salida de vapor3 Cesta para accesorios4 Soporte para biberones5 Recipiente del vapor6 Base calefactora7 Conector/Desconector8 Lámpara de control
9 Vaso medidor (integrado en el aparato)10 Pinza para biberonesNo aparece en la ilustración: Debajo delaparato se encuentra el cable de la red en unenrollador de cable.
Vaporisator 09/08 Seite 34 Dienstag, 7. Oktober 2008 8:17 08
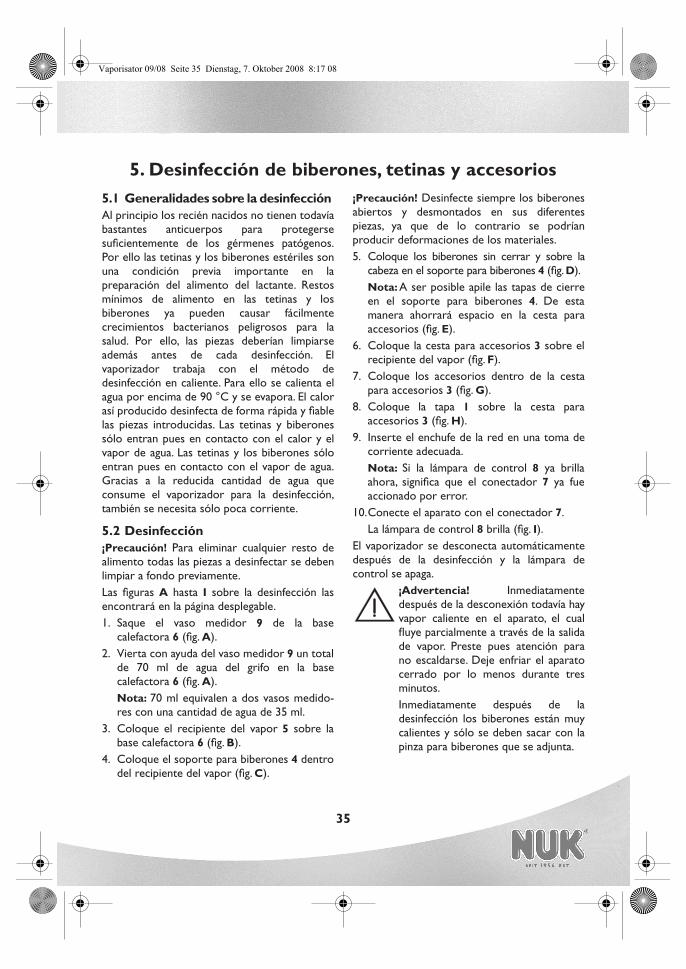
35
5. Desinfección de biberones, tetinas y accesorios5.1 Generalidades sobre la desinfección Al principio los recién nacidos no tienen todavíabastantes anticuerpos para protegersesuficientemente de los gérmenes patógenos.Por ello las tetinas y los biberones estériles sonuna condición previa importante en lapreparación del alimento del lactante. Restosmínimos de alimento en las tetinas y losbiberones ya pueden causar fácilmentecrecimientos bacterianos peligrosos para lasalud. Por ello, las piezas deberían limpiarseademás antes de cada desinfección. Elvaporizador trabaja con el método dedesinfección en caliente. Para ello se calienta elagua por encima de 90 °C y se evapora. El calorasí producido desinfecta de forma rápida y fiablelas piezas introducidas. Las tetinas y biberonessólo entran pues en contacto con el calor y elvapor de agua. Las tetinas y los biberones sóloentran pues en contacto con el vapor de agua.Gracias a la reducida cantidad de agua queconsume el vaporizador para la desinfección,también se necesita sólo poca corriente.
5.2 Desinfección ¡Precaución! Para eliminar cualquier resto dealimento todas las piezas a desinfectar se debenlimpiar a fondo previamente. Las figuras A hasta I sobre la desinfección lasencontrará en la página desplegable. 1. Saque el vaso medidor 9 de la base
calefactora 6 (fig. A). 2. Vierta con ayuda del vaso medidor 9 un total
de 70 ml de agua del grifo en la basecalefactora 6 (fig. A). Nota: 70 ml equivalen a dos vasos medido-res con una cantidad de agua de 35 ml.
3. Coloque el recipiente del vapor 5 sobre labase calefactora 6 (fig. B).
4. Coloque el soporte para biberones 4 dentrodel recipiente del vapor (fig. C).
¡Precaución! Desinfecte siempre los biberonesabiertos y desmontados en sus diferentespiezas, ya que de lo contrario se podríanproducir deformaciones de los materiales. 5. Coloque los biberones sin cerrar y sobre la
cabeza en el soporte para biberones 4 (fig. D). Nota: A ser posible apile las tapas de cierreen el soporte para biberones 4. De estamanera ahorrará espacio en la cesta paraaccesorios (fig. E).
6. Coloque la cesta para accesorios 3 sobre elrecipiente del vapor (fig. F).
7. Coloque los accesorios dentro de la cestapara accesorios 3 (fig. G).
8. Coloque la tapa 1 sobre la cesta paraaccesorios 3 (fig. H).
9. Inserte el enchufe de la red en una toma decorriente adecuada. Nota: Si la lámpara de control 8 ya brillaahora, significa que el conectador 7 ya fueaccionado por error.
10.Conecte el aparato con el conectador 7. La lámpara de control 8 brilla (fig. I).
El vaporizador se desconecta automáticamentedespués de la desinfección y la lámpara decontrol se apaga.
¡Advertencia! Inmediatamentedespués de la desconexión todavía hayvapor caliente en el aparato, el cualfluye parcialmente a través de la salidade vapor. Preste pues atención parano escaldarse. Deje enfriar el aparatocerrado por lo menos durante tresminutos.Inmediatamente después de ladesinfección los biberones están muycalientes y sólo se deben sacar con lapinza para biberones que se adjunta.
Vaporisator 09/08 Seite 35 Dienstag, 7. Oktober 2008 8:17 08
36
¡Precaución! Para que el aparato no pueda serconectado por error desconecte el enchufe dela toma de corriente después de cada uso.
5.3 Tenga en cuenta:• Una desinfección dura aprox. 8 minutos con
una cantidad de agua de 70 ml.
• Una desinfección sólo está garantizadacuando el proceso de desinfección no seinterrumpe ni se acorta.
• Utilice exclusivamente agua corrientenormal sin ningún aditivo.
• Para que se mantenga la capacidad funcionalrealice regularmente una desincrustación dela cal según se indica en la sección "6.2Desincrustar la cal".
6. Limpieza y cuidado del aparato6.1 Limpieza
¡Advertencia!Desconecte siempre el enchufe de lared, antes de limpiar el aparato.Limpie al aparato solamente cuandoesté frío.
¡Precaución! No utilice productos de limpiezaagresivos ni productos abrasivos, ya que estospodrían corroer las superficies.1. Retire la tapa 1, la cesta para accesorios 3, el
soporte para biberones 4 y el recipiente delvapor 5 de la base calefactora 6.
Precaución! La base calefactora 6 no debesumergirse nunca en el agua, ya que contienecomponentes eléctricos que se podrían dañarpor ello.2. Limpie la base calefactora 6 con un paño
húmedo después de cada uso.3. Limpie la tapa 1, la cesta para accesorios 3,
el soporte para biberones 4 y el recipientedel vapor 5 ya sea con agua de lavar o en ellavavajillas.
6.2 Desincrustar la calLimpiando regularmente el aparato se reduce suincrustación con cal. No obstante, al cabo dealgún tiempo se depositará cal en la basecalefactora del vaporizador, a causa del procesode ebullición. Las incrustaciones de cal pueden empeorarconsiderablemente el rendimiento durante ladesinfección. Nota: En caso de incrustaciones de cal ligeraslo mejor es que utilice el procedimiento convinagre doméstico que aquí se describe:1. Para desincrustar la cal, mezcle 35 ml de
agua caliente con 35 ml de vinagredoméstico y viértalos en la base calefactora6.
2. Dejar actuar la solución durante 30 minutosy retirarla.
3. Seguidamente limpiar el aparato con un pañohúmedo.
En caso de incrustaciones de cal gruesasdeberá utilizar un producto desincrustante delos habituales en el comercio. Siga lasindicaciones de uso del productodesincrustante.
Vaporisator 09/08 Seite 36 Dienstag, 7. Oktober 2008 8:17 08
37
7. Fallos y su solución
8. Datos técnicosModelo europeo, con enchufe de 2 PIN(n.º de artículo 10.251.012): Tensión: 220 - 240 V~/50 Hz Consumo de potencia: 550 Watt
Modelo británico, con enchufe de 3 PIN(n.º de artículo 10.749.054)Tensión: 220 - 240 V~/50 Hz Consumo de potencia: 550 Watt
Fallo Causa SoluciónLa desinfección dura demasiado Se ha vertido demasiada agua Mida exactamente 70 ml para lograr una
desinfección óptimaLa base calefactora está incrustada con cal
Desincrustar la base calefactora (ver "6.2 Desincrustar la cal" en la página 36)
No se puede conectar el aparato, la lámpara de control 8 no brilla
No existe alimentación de corriente
Insertar correctamente el enchufe de la redComprobar con otro aparato si hay tensión en la toma de corriente
El aparato no se puede volver a conectar después de haberlo utilizado, la lámpara de control 8 brilla
Está activada la protección contra el sobrecalentamiento
Esperar 15 minutos, hasta que se haya enfriado el aparato
No caben 6 biberones FIRST CHOICE en el aparato
Las piezas están distribuidas de forma desfavorable
Colocar los biberones sobre la cabeza en el soporte para biberones y sin accesoriosApilar las tapas de cierre en el soporte para biberones y después colocar encima la cesta para accesorios
Después de la desinfección los biberones están muy calientes
Los biberones se han desinfectado a más de 90 °C
Dejar enfriar un poco los biberonesUtilizar la pinza para biberones
Los biberones y los accesorios presentan manchas blancas después de la desinfección
El aparato está incrustado de cal
Desincrustar la cal del aparato (ver "6.2 Desincrustar la cal" en la página 36)
Sale vapor por el borde de la cesta para accesorios
Se ha ensamblado incorrectamente el aparato
Ensamblar correctamente el aparato (ver "5.2 Desinfección" en la página 35)
Los biberones y los accesorios se han distribuido desfavorablemente
Distribuir las piezas de manera que el aparato cierre por completo (ver "5.2 Desinfección" en la página 35)
Vaporisator 09/08 Seite 37 Dienstag, 7. Oktober 2008 8:17 08

38
9. Eliminación9.1 Aparato
El símbolo de un contenedor deresiduos sobre ruedas cruzadosignifica que en Unión Europea elproducto debe ser depositado enun recipiente de basura aparte.Esto es aplicable al producto y atodos los accesorios marcados
con ese símbolo. Los productos marcados nodeben ser eliminados con la basura domestica
normal, sino que deben ser entregados en unpunto de recogida para el reciclaje de aparatoseléctricos y electrónicos. El reciclaje contribuyea reducir el consumo de materias primas yrespetar el entorno.
9.2 EnvaseSi desea eliminar el envase, siga lascorrespondientes normas medioambientales desu país.
10. GarantíaBSi se maneja con cuidado y se siguen lasinstrucciones de uso, el fabricante otorga unagarantía de 2 años a partir de la fecha decompra.Nos comprometemos a reparar gratuitamenteel aparato si se trata de defectos de material ode construcción. Queda excluido cualquier otroderecho.La garantía no cubre los daños que resulten deluso inadecuado del aparato. El cable dealimentación y el enchufe están excluidos de lagarantía, siempre que se trate de desgaste. Enlos primeros 2 años siguientes a la fecha decompra repararemos los defectos en el marcode reclamaciones reconocidas como justificadassin facturar los gastos accesorios causados.Debe aclararse previamente quién asume loscostes. El envío del aparato deberá realizase encualquier caso acompañado del certificado degarantía o del comprobante de compra.Si no se demuestra la fecha de compra, seproducirá una facturación de costes sinconsulta. La devolución se producirá entoncescontra reembolso.
Haga rellenar el certificado de garantía en elmomento de la compra y consérvelocuidadosamente. No se sustituirán loscertificados de garantía perdidos.Al final de este folleto encontrará el certificadode garantía.
En cumplimiento de lo establecido en la LeyOrgánica 15/99 de 13 de diciembre deProtección de Datos de Carácter Personal susdatos serán tratados por Roche Diagnostics, SL(Avda. Generalitat, s/n 08174 Sant Cugat delVallès), prestando usted su consentimientoexpreso para el tratamiento de los mismos conla finalidad de gestionar las garantías de losproductos adquiridos así como de informarle denuestros productos y servicios y realizarencuestas de satisfacción. Usted podrá ejercersus derechos mediante comunicación escrita aRoche Diagnostics, SL. En el caso que Vd. Nodesee recibir comunicaciones comerciales denuestros productos y servicios, por favor,indíquelo expresamente en la casilla de másabajo:No deseo recibir comunicaciones comercialesde Roche Diagnostics, SL
Vaporisator 09/08 Seite 38 Dienstag, 7. Oktober 2008 8:17 08

39
Índice1. Indicações importantes antes da primeira utilização . . . . . . . . . . . . . . . . . 402. Descrição do aparelho . . . . . . . . . . . . . . . . . . . . . . . . . . . . . . . . . . . . . . 40
2.1 Campo de aplicação . . . . . . . . . . . . . . . . . . . . . . . . . . . . . . . . . . . . . . . . . . . . . . . . . . . . . 402.2 Modelos. . . . . . . . . . . . . . . . . . . . . . . . . . . . . . . . . . . . . . . . . . . . . . . . . . . . . . . . . . . . . . . 402.3 Volume de entrega . . . . . . . . . . . . . . . . . . . . . . . . . . . . . . . . . . . . . . . . . . . . . . . . . . . . . . 402.4 Descrição do funcionamento . . . . . . . . . . . . . . . . . . . . . . . . . . . . . . . . . . . . . . . . . . . . . . 40
3. Instruções de segurança . . . . . . . . . . . . . . . . . . . . . . . . . . . . . . . . . . . . . 413.1 Esclarecimento dos termos . . . . . . . . . . . . . . . . . . . . . . . . . . . . . . . . . . . . . . . . . . . . . . . 413.2 Indicações gerais . . . . . . . . . . . . . . . . . . . . . . . . . . . . . . . . . . . . . . . . . . . . . . . . . . . . . . . . 413.3 Protecção contra queimaduras e escaldões. . . . . . . . . . . . . . . . . . . . . . . . . . . . . . . . . . . 423.4 Protecção contra choque eléctrico . . . . . . . . . . . . . . . . . . . . . . . . . . . . . . . . . . . . . . . . . 423.5 Protecção contra incêndios . . . . . . . . . . . . . . . . . . . . . . . . . . . . . . . . . . . . . . . . . . . . . . . 433.6 Para a segurança do seu filho . . . . . . . . . . . . . . . . . . . . . . . . . . . . . . . . . . . . . . . . . . . . . . 43
4. Partes integrantes do esterilizador . . . . . . . . . . . . . . . . . . . . . . . . . . . . . 435. Desinfecção de biberões, tetinas e acessórios. . . . . . . . . . . . . . . . . . . . . . . 44
5.1 Informações gerais relativas à desinfecção. . . . . . . . . . . . . . . . . . . . . . . . . . . . . . . . . . . . 445.2 Desinfecção. . . . . . . . . . . . . . . . . . . . . . . . . . . . . . . . . . . . . . . . . . . . . . . . . . . . . . . . . . . . 445.3 Respeite o seguinte: . . . . . . . . . . . . . . . . . . . . . . . . . . . . . . . . . . . . . . . . . . . . . . . . . . . . . 45
6. Limpeza e cuidados do aparelho . . . . . . . . . . . . . . . . . . . . . . . . . . . . . . . 456.1 Limpeza . . . . . . . . . . . . . . . . . . . . . . . . . . . . . . . . . . . . . . . . . . . . . . . . . . . . . . . . . . . . . . . 456.2 Descalcificar . . . . . . . . . . . . . . . . . . . . . . . . . . . . . . . . . . . . . . . . . . . . . . . . . . . . . . . . . . . 45
7. Falhas e respectiva eliminação . . . . . . . . . . . . . . . . . . . . . . . . . . . . . . . . . 468. Dados técnicos. . . . . . . . . . . . . . . . . . . . . . . . . . . . . . . . . . . . . . . . . . . . 469. Eliminação . . . . . . . . . . . . . . . . . . . . . . . . . . . . . . . . . . . . . . . . . . . . . . 47
9.1 Aparelho . . . . . . . . . . . . . . . . . . . . . . . . . . . . . . . . . . . . . . . . . . . . . . . . . . . . . . . . . . . . . . 479.2 Embalagem . . . . . . . . . . . . . . . . . . . . . . . . . . . . . . . . . . . . . . . . . . . . . . . . . . . . . . . . . . . . 47
10. Garantia . . . . . . . . . . . . . . . . . . . . . . . . . . . . . . . . . . . . . . . . . . . . . . . . 47
Vaporisator 09/08 Seite 39 Dienstag, 7. Oktober 2008 8:17 08

40
Queridos paisDecidiu-se pelo nosso esterilizador e, destemodo, por qualidade e segurança. Agora podedesinfectar de forma muito rápida e fiável atéseis biberões de gargalo largo FIRST CHOICE eos respectivos acessórios. Germes patogénicos,contra os quais um recém-nascido ainda nãotem protecção imunológica suficiente, são,
deste modo, totalmente eliminados. As peçasdesinfectadas estão imediatamente prontas aserem reutilizadas.Desejamos que o seu bebé tenha umdesenvolvimento saudável.
1. Indicações importantes antes da primeira utilizaçãoEste manual de operação ajuda-o a utilizar o seuvaporizador de forma segura e económica. Todas as pessoas, que montam, operam, limpamou eliminam este aparelho, têm de ler eentender todo o manual de operação.
Por isso, guarde-o bem, para que esteja sempreà mão.Se alguma vez vender ou oferecer o seuaparelho, entregue igualmente este manual deoperação, para que também o próximoproprietário possa utilizar o aparelho comsegurança.
2. Descrição do aparelho2.1 Campo de aplicaçãoCom este esterilizador a vapor NUK VAPORAPID pode desinfectar biberões e osrespectivos acessórios.As peças a desinfectar têm de ser resistentes àcozedura, uma vez que a temperatura durante adesinfecção excede os 90 °C.Este aparelho só pode ser utilizado em espaçosfechados e secos.Este aparelho é adequado para o uso domésticoe não para o uso industrial.
2.2 ModelosO aparelho está disponível em duas variantes:1. Modelo europeu, com ficha de 2 PINOS, ref.ª 10.251.0122. Modelo britânico, com ficha de 3 PINOS, ref.ª 10.749.054No que respeita a operação e o funcionamentonão existem diferenças entre estas variantes.
2.3 Volume de entrega• 1 esterilizador a vapor NUK VAPO
RAPID, completo• 1 pinça• 1 recipiente graduado integrado para
água• 1 manual de operação
2.4 Descrição do funcionamentoEste esterilizador é aquecido electricamente. Aágua que se encontra no esterilizador éaquecida até ferver. Os germes são eliminadosno calor resultante da atmosfera de vapor e,deste modo, os biberões, bem como osrespectivos acessórios, são desinfectados
Vaporisator 09/08 Seite 40 Dienstag, 7. Oktober 2008 8:17 08

41
3. Instruções de segurançaEste aparelho é construído e fabricado deacordo com o estado actual da tecnologia.Todas as respectivas directivas europeias desegurança são respeitadas e o aparelho foitestado de acordo com a norma. Mesmo assim,este tipo de aparelhos também poderepresentar perigos.Não descure a sua segurança e dispense 5minutos do seu tempo! Bastam 5 minutos paraler as nossas instruções de segurança.Provavelmente já conhece a maioria dasinstruções, mas volte a lê-las, tendo em contaque, mesmo assim, haverá uma ou outrainstrução que ainda não conhece e que o podeproteger de danos.
3.1 Esclarecimento dos termosOs seguintes termos de aviso encontram-seneste manual de operação:
Aviso!Risco elevado: A não observância doaviso pode provocar um dano físico eletal.
Cuidado!Risco médio: A não observância do aviso podeprovocar um dano material.Nota:Risco reduzido: Condições que devem serrespeitadas ao manusear o aparelho.
3.2 Indicações gerais• Antes da utilização, leia atentamente este
manual de operação. O manual é parteintegrante do aparelho e tem de estarsempre disponível.
• Use o aparelho apenas no campo deaplicação descrito (ver "2.1 Campo deaplicação" na página 40).
Aviso!A não observância dos seguintesavisos poderá provocar ferimentos.
• Este aparelho não se destina a ser utilizadopor pessoas (incluindo crianças) comcapacidades psíquicas, sensoriais ou mentaislimitadas ou com experiência e/ouconhecimento insuficiente, a não ser queestejam supervisionadas por uma pessoaresponsável pela sua segurança ou tenhamrecebido instruções, por essa pessoa,acerca da utilização correcta do aparelho.As crianças devem ser supervisionadas, paragarantir que não brinquem com o aparelho.
• Certifique-se de que nunca existe perigo dealguém tropeçar ou ficar preso no cabo derede, nem de pisar o cabo.
Cuidado! A não observância dos seguintesavisos pode danificar o aparelho.• Verifique se a tensão de rede necessária
(ver chapa de características no aparelho)corresponde à sua.
• O aparelho só pode ser colocado sobreuma superfície fixa, plana, seca e nãoinflamável.
• Não coloque o aparelho na proximidade desuperfícies quentes, dentro de fornosaquecidos ou junto a aparelhos eléctricosou a gás, uma vez que, deste modo, oaparelho pode ficar danificado.
• Nunca coloque o aparelho emfuncionamento sem água, caso contrário,este pode sobreaquecer.
• Nunca deixe o aparelho a funcionar semvigilância.
• Após a utilização, desligue o aparelho darede, para que não possa ser ligadoinadvertidamente.
Vaporisator 09/08 Seite 41 Dienstag, 7. Oktober 2008 8:17 08

42
Notas: • Nunca insira mais de 70 ml de água, sob
pena de influenciar o funcionamento. • Os direitos de garantia e a responsabilidade
são anulados se forem utilizados acessóriosque não os recomendados neste manual deoperação ou se não forem usadas peçassobressalentes originais em caso dereparação. Isto também se aplica no caso dereparações efectuadas por pessoal nãoqualificado. O endereço de contactoencontra-se no fim deste manual deoperação.
• Em caso de algumas falhas defuncionamento, a reparação do aparelho sópode ser efectuada por uma pessoaqualificada. Caso contrário, a garantia éanulada.
3.3 Protecção contra queimaduras e escaldões
Aviso! Como o aparelho funciona comtemperaturas elevadas, a nãoobservância dos seguintes avisos podeprovocar queimaduras ou escaldões.
• As superfícies de aparelho ficam muitoquentes durante o funcionamento. Por isso,toque apenas na pega prevista para o efeitoou nos interruptores.
• Não transporte o esterilizador durante ofuncionamento. Caso pretenda transportaro aparelho quente, desligue-o, retire a fichada tomada e aguarde até que o aparelhotenha arrefecido. Caso contrário, poderáqueimar-se na superfície quente.
• Logo após a desinfecção, os biberões estãomuito quentes e só devem ser retiradoscom a pinça fornecida.
3.4 Protecção contra choque eléctrico
Aviso! As seguintes instruções desegurança visam protegê-lo de umchoque eléctrico.
• Utilize o aparelho apenas se este e o cabode rede estiverem intactos.
• Se o cabo de rede estiver danificado, tem deser substituído pelo fabricante, pelorespectivo serviço de assistência técnica oupor uma pessoa com qualificaçõessemelhantes, a fim de evitar perigos.
• Nunca pode entrar água ou outro líquidoqualquer no aparelho, excepto norecipiente previsto para o efeito. Por isso:
– nunca o utilize no exterior– nunca coloque recipientes, como copos,
vasos, etc., cheios de líquido sobre o apa-relho
– nunca o utilize num ambiente muitohúmido
– nunca o opere directamente ao lado deum lava-loiça.
Se, mesmo assim, entrar líquido no aparelho,retire imediatamente a ficha da tomada emande reparar o aparelho por um técnicoqualificado. O endereço de contacto encon-tra-se no fim deste manual de operação.
• Nunca toque no aparelho, no cabo de redeou na ficha com as mãos húmidas.
• Retire o cabo de rede sempre pela ficha.Nunca puxe no próprio cabo.
• Certifique-se de que o cabo de rede nuncaé dobrado ou entalado.
• Mantenha o cabo de rede afastado desuperfícies quentes (p. ex. placa de fogão).
• Deve evitar utilizar cabos de extensão. Asua utilização só é permitida em condiçõesmuito específicas:
– O cabo de extensão tem de ser adequadopara a intensidade de corrente do apare-lho.
Vaporisator 09/08 Seite 42 Dienstag, 7. Oktober 2008 8:17 08

43
– O cabo de extensão não pode estar nomeio do caminho: não pode existir operigo de alguém tropeçar no cabo e estenão pode estar ao alcance de crianças.
– O cabo de extensão não pode estar dani-ficado.
– Não podem ser ligados outros aparelhosà tomada, para além deste aparelho, sobpena de provocar uma sobrecarga narede eléctrica (proibição de tomadas múl-tiplas!).
3.5 Protecção contra incêndiosAviso! Como o aparelho funcionacom temperaturas elevadas, respeiteas seguintes instruções de segurançapara não haver perigo de incêndio.
• Durante o funcionamento não pode haverobjectos inflamáveis (p. ex. cortinados,papel, etc.) na proximidade imediata doaparelho.
• Nunca utilize o aparelho para secar têxteisou outros objectos em cima, por cima ou àfrente do aparelho.
• A fim de evitar um sobreaquecimento, oaparelho nunca pode ser tapado.
• O aparelho nunca pode ser colocadodirectamente por baixo de uma tomada deparede, uma vez que o calor resultantepode causar danos na instalação eléctrica.
• Nunca deixo o aparelho a funcionar semvigilância. Os danos podem ser, quasesempre, detectados por uma formaçãointensa de odores. Neste caso, retireimediatamente a ficha e mande verificar oaparelho. O endereço de contactoencontra-se no fim deste manual deoperação.
3.6 Para a segurança do seu filhoAviso! A maior parte das vezes, ascrianças não conseguem avaliar osperigos correctamente podendo, porisso, sofrer ferimentos. Porconseguinte, tenha em atenção que:
• Este produto só pode ser utilizado sob avigilância de adultos, para garantir que ascrianças não brinquem com o aparelho.
• Assegure-se sempre de que o aparelho seencontra fora do alcance das crianças.
• Certifique-se de que as crianças não possampuxar o aparelho para baixo através docabo.
• Tenha em atenção que a película daembalagem pode ser fatal para as crianças.As películas da embalagem não sãobrinquedos.
4. Partes integrantes do esterilizador1 Tampa com pega2 Saída de vapor3 Cesto de acessórios4 Suporte para biberões5 Recipiente de vapor6 Base de aquecimento
7 Interruptor para ligar/desligar8 Luz piloto9 Recipiente graduado (integrado no aparelho)10 PinçaSem figura: por baixo do aparelho encontra-seo cabo de rede num respectivo enrolamento.
Vaporisator 09/08 Seite 43 Dienstag, 7. Oktober 2008 8:17 08

44
5. Desinfecção de biberões, tetinas e acessórios5.1 Informações gerais relativas à
desinfecção No início da sua vida, os recém-nascidos aindanão têm anticorpos suficientes para seprotegerem de forma suficiente contra agentespatogénicos (germes patogénicos). Por isso, éindispensável que as tetinas e os biberõesestejam isentos de germes, durante apreparação dos alimentos para recém-nascidos.Bastam pequenos restos de alimentos nastetinas e nos biberões para desencadearfacilmente uma formação de bactériasprejudicial para a saúde. Por isso, as peçasdevem ser limpas adicionalmente, antes de cadadesinfecção. O esterilizador funciona com ométodo de desinfecção quente. Neste método,a água é aquecida acima dos 90 °C etransforma-se em vapor. O calor resultantedesinfecta de forma rápida e fiável as peçasinseridas. As tetinas e os biberões só entramportanto em contacto com calor e vapor deágua. As tetinas e os biberões só entramportanto em contacto com vapor de água.Graças à quantidade reduzida de água que oesterilizador consome para a desinfecção,também não é necessária muita electricidade.
5.2 DesinfecçãoCuidado! Todas as peças a desinfectar têm deser bem lavadas e limpas de todos os restos dealimentos. As figuras A a I relativas à desinfecção,encontram-se na página desdobrável. 1. Retire o recipiente graduado 9 da base de
aquecimento 6 (fig. A). 2. Com a ajuda do recipiente graduado 9 insira
ao todo 70 ml de água da torneira na base deaquecimento 6 (fig. A).Nota: 70 ml correspondem a dois recipien-tes graduados com 35 ml de água respectiva-mente.
3. Coloque o recipiente de vapor 5 sobre abase de aquecimento 6 (fig. B).
4. Insira o suporte para biberões 4 no recipi-ente de vapor (fig. C).
Cuidado! Desinfecte os biberões sempreabertos e desmontados nos componentesindividuais, uma vez que podem surgirdeformações no material. 5. Coloque os biberões abertos virados para
baixo no suporte para biberões 4 (fig. D).Nota: Empilhe as tampas de fecho preferen-cialmente no suporte para biberões 4. Destaforma, poupa espaço no cesto de acessórios(fig. E).
6. Coloque o cesto de acessórios 3 sobre orecipiente de vapor (fig. F).
7. Coloque os acessórios dentro do cesto deacessórios 3 (fig. G).
8. Coloque a tampa 1 sobre o cesto de aces-sórios 3 (fig. H).
9. Insira a ficha numa tomada adequada. Nota: Se a luz piloto 8 já se encontrar acesa,é porque o interruptor para ligar 7 já foi pre-mido inadvertidamente.
10.Ligue o aparelho com o interruptor paraligar 7. A luz piloto 8 acende (fig. I).
O esterilizador desliga-se automaticamenteapós a desinfecção e a luz piloto apaga-se.
Aviso! Logo após o desligamento ainda seencontra vapor quente no aparelho,que sai parcialmente através da saídade vapor. Por isso, tenha atenção paranão se queimar. Deixe o aparelhoarrefecer fechado, durante pelomenos três minutos.Logo após a desinfecção, os biberõesestão muito quentes e só devem serretirados com a pinça fornecida.
Vaporisator 09/08 Seite 44 Dienstag, 7. Oktober 2008 8:17 08
45
Cuidado! Após cada utilização, retire a ficha datomada, para que não seja possível ligar oaparelho inadvertidamente.
5.3 Respeite o seguinte:• Com uma quantidade de água de 70 ml uma
desinfecção dura aprox. 8 minutos.• Uma desinfecção apenas é garantida se o
processo de desinfecção não for
interrompido ou a duração do mesmo nãofor reduzida.
• Utilize apenas água normal da torneira semoutros aditivos.
• Efectue regularmente uma descalcificação,de acordo com a secção "6.2 Descalcificar",para que seja mantida a funcionalidade.
6. Limpeza e cuidados do aparelho6.1 Limpeza
Aviso!Retire sempre a ficha da tomada antesde limpar o aparelho.Limpe o aparelho apenas quando esteestiver frio.
Cuidado! Não utilize produtos de limpeza ouprodutos abrasivos, uma vez que estes podemdanificar a superfície.1. Retire a tampa 1, o cesto de acessórios 3, o
suporte para biberões 4 bem como o recipi-ente de vapor 5 da base de aquecimento 6.
Cuidado! A base de aquecimento 6 nunca podeser mergulhada em água, uma vez que contémcomponentes eléctricos, que podem ficardanificados deste modo.2. Após cada utilização, limpe a base de aqueci-
mento 6 com um pano húmido.3. 3. Limpe a tampa 1, o cesto de acessórios 3,
o suporte para biberões 4 bem como o reci-piente de vapor 5 ou com água com deter-gente ou na máquina de lavar loiça.
6.2 DescalcificarA descalcificação é reduzida através da limpezaregular do interior do aparelho. Depois dealgum tempo, depositar-se-á, mesmo assim,calcário na base de aquecimento doesterilizador, devido ao processo de cozedura. As descalcificações podem diminuirconsideravelmente a potência durante adesinfecção. Nota: Em caso de descalcificações ligeiras omelhor será utilizar o processo com vinagre,aqui descrito:1. Para a descalcificação misture 35 ml de água
quente com 35 ml de vinagre e verta amistura para dentro da base de aquecimento6.
2. Deixe a solução actuar durante 30 minutos edepois deite-a fora.
3. A seguir, limpe o aparelho com um panohúmido.
Em caso de descalcificações acentuadas deveutilizar um produto de descalcificaçãoconvencional. Respeite as instruções deutilização do produto de descalcificação.
Vaporisator 09/08 Seite 45 Dienstag, 7. Oktober 2008 8:17 08

46
7. Falhas e respectiva eliminação
8. Dados técnicosModelo europeu, com ficha de 2 PINOS(ref.ª 10.251.012): Tensão: 220 - 240 V~/50 Hz Potência absorvida: 550 Watt
Modelo britânico, com ficha de 3 PINOS(ref.ª 10.749.054)Tensão: 220 - 240 V~/50 Hz Potência absorvida: 550 Watt
Falha Causa EliminaçãoA desinfecção demora demasiado tempo
Encontra-se inserida demasiada água
Meça exactamente 70 ml para uma desinfecção ideal
A base de aquecimento tem calcário
Descalcifique a base de aquecimento (ver "6.2 Descalcificar" na página 45)
Não é possível ligar o aparelho, a luz piloto 8 não está acesa
Não há alimentação de corrente
Insira correctamente a fichaVerifique com outros aparelhos, se a tomada tem tensão
Não é possível voltar a ligar o aparelho após uma utilização anterior, a luz piloto 8 está acesa
A protecção contra sobreaquecimento está activa
Aguarde 15 minutos até o aparelho estar frio
Não cabem 6 biberões FIRST CHOICE no aparelho
As peças estão distribuídas de forma desfavorável
Coloque os biberões virados para baixo e sem acessórios no suporte para biberõesEmpilhe as tampas de fecho no suporte para biberões e depois coloque o cesto de acessórios por cima
Os biberões estão muito quentes após a desinfecção
Os biberões foram desinfectados a mais de 90 °C
Deixe arrefecer um pouco os biberõesUtilize a pinça
Os biberões e acessórios mostram indícios brancos após a desinfecção
O aparelho tem calcário Descalcifique o aparelho (ver "6.2 Descalcificar" na página 45)
No rebordo do cesto de acessórios sai vapor
O aparelho foi montado incorrectamente
Monte o aparelho correctamente (ver "5.2 Desinfecção" na página 44)
Os biberões e acessórios foram distribuídos de forma desfavorável
Distribua as peças de forma a que o aparelho feche totalmente (ver "5.2 Desinfecção" na página 44)
Vaporisator 09/08 Seite 46 Dienstag, 7. Oktober 2008 8:17 08
47
9. Eliminação9.1 Aparelho
O símbolo do contentor de lixosobre rodas riscado significa que oproduto tem de ser encaminhadopara reciclagem dentro da UniãoEuropeia. Isto aplica-se aoproduto e a todos os acessóriosostentando esse símbolo. Os
produtos assinalados não podem sermisturados com o lixo doméstico normal, massim encaminhados para reciclagem de aparelhoseléctricos e electrónicos. A reciclagem ajuda areduzir o consumo de matéria-prima e a pouparo meio ambiente.
9.2 EmbalagemCaso pretenda eliminar a embalagem, respeiteas respectivas normas ambientais do seu país.
10. GarantiaO aparelho dispõe de uma garantia dofabricante de 2 anos, a contar a partir da datade aquisição, se este for tratado em condições eem conformidade com o manual de operação.Assumimos a reparação gratuita do aparelho,caso se trate de falhas de material ou deconstrução Ficam excluídas quaisquer outrasreivindicações.Danos resultantes de uma utilização inadequadado aparelho não são reembolsados. O cabo e aficha encontram-se excluídos da garantia se o
problema for atribuível ao desgaste. Dentro dosprimeiros 2 anos, a contar a partir da data deaquisição, eliminamos todas as falhasdevidamente reconhecidas sem quaisquercustos adicionais. A aceitação dos custos tem deser previamente esclarecida. O envio do aparelho tem de vir sempreacompanhado pelo certificado de garantia oupelo comprovativo de compra.
Vaporisator 09/08 Seite 47 Dienstag, 7. Oktober 2008 8:17 08
48
Indice1. Avvertenze importanti per il primo utilizzo . . . . . . . . . . . . . . . . . . . . . . . 492. Descrizione dell’apparecchio . . . . . . . . . . . . . . . . . . . . . . . . . . . . . . . . . . 49
2.1 Scopo di applicazione . . . . . . . . . . . . . . . . . . . . . . . . . . . . . . . . . . . . . . . . . . . . . . . . . . . . 492.2 Modelli. . . . . . . . . . . . . . . . . . . . . . . . . . . . . . . . . . . . . . . . . . . . . . . . . . . . . . . . . . . . . . . . 492.3 Dotazione di fornitura . . . . . . . . . . . . . . . . . . . . . . . . . . . . . . . . . . . . . . . . . . . . . . . . . . . 492.4 Descrizione del funzionamento . . . . . . . . . . . . . . . . . . . . . . . . . . . . . . . . . . . . . . . . . . . . 49
3. Avvertenze di sicurezza. . . . . . . . . . . . . . . . . . . . . . . . . . . . . . . . . . . . . . 503.1 Spiegazione dei termini utilizzati . . . . . . . . . . . . . . . . . . . . . . . . . . . . . . . . . . . . . . . . . . . 503.2 Avvertenze generali . . . . . . . . . . . . . . . . . . . . . . . . . . . . . . . . . . . . . . . . . . . . . . . . . . . . . 503.3 Protezione contro ustioni e scottature . . . . . . . . . . . . . . . . . . . . . . . . . . . . . . . . . . . . . . 513.4 Protezione contro le scosse elettriche . . . . . . . . . . . . . . . . . . . . . . . . . . . . . . . . . . . . . . 513.5 Protezione contro gli incendi . . . . . . . . . . . . . . . . . . . . . . . . . . . . . . . . . . . . . . . . . . . . . . 523.6 Per la sicurezza del vostro bambino. . . . . . . . . . . . . . . . . . . . . . . . . . . . . . . . . . . . . . . . . 52
4. Componenti dello sterilizzatore a vapore . . . . . . . . . . . . . . . . . . . . . . . . . 525. Sanitizzazione di biberon, tettarelle ed accessori . . . . . . . . . . . . . . . . . . . . 53
5.1 Generalità di sanitizzazione . . . . . . . . . . . . . . . . . . . . . . . . . . . . . . . . . . . . . . . . . . . . . . . 535.2 Sanitizzazione . . . . . . . . . . . . . . . . . . . . . . . . . . . . . . . . . . . . . . . . . . . . . . . . . . . . . . . . . . 535.3 Osserva: . . . . . . . . . . . . . . . . . . . . . . . . . . . . . . . . . . . . . . . . . . . . . . . . . . . . . . . . . . . . . . 54
6. Pulizia e manutenzione dell’apparecchio . . . . . . . . . . . . . . . . . . . . . . . . . . 546.1 Pulizia . . . . . . . . . . . . . . . . . . . . . . . . . . . . . . . . . . . . . . . . . . . . . . . . . . . . . . . . . . . . . . . . 546.2 Decalcificazione . . . . . . . . . . . . . . . . . . . . . . . . . . . . . . . . . . . . . . . . . . . . . . . . . . . . . . . . 54
7. Guida all’eliminazione dei guasti . . . . . . . . . . . . . . . . . . . . . . . . . . . . . . . 558. Scheda tecnica . . . . . . . . . . . . . . . . . . . . . . . . . . . . . . . . . . . . . . . . . . . . 559. Smaltimento . . . . . . . . . . . . . . . . . . . . . . . . . . . . . . . . . . . . . . . . . . . . . 56
9.1 Apparecchi . . . . . . . . . . . . . . . . . . . . . . . . . . . . . . . . . . . . . . . . . . . . . . . . . . . . . . . . . . . . 569.2 Imballaggio. . . . . . . . . . . . . . . . . . . . . . . . . . . . . . . . . . . . . . . . . . . . . . . . . . . . . . . . . . . . . 56
10. Garanzia . . . . . . . . . . . . . . . . . . . . . . . . . . . . . . . . . . . . . . . . . . . . . . . . 56
Vaporisator 09/08 Seite 48 Dienstag, 7. Oktober 2008 8:17 08

49
Cari genitori,scegliendo il nostro sterilizzatore vaporizzatoreavete optato per la qualità e la sicurezza. Con ilvostro nuovo prodotto potrete igienizzare finoa sei biberon a collo largo FIRST CHOICE ed irispettivi accessori in modo semplicissimo edaffidabile eliminando completamente i germi
patogeni contro i quali il vostro bebé non èancora in grado di difendersi a sufficienza. Unavolta sterilizzati, i componenti possono essereutilizzati immediatamente.Auguriamo al vostro bebè di crescere sano!
1. Avvertenze importanti per il primo utilizzoLe presenti istruzioni per l’uso vi consentirannodi utilizzare il vostro nuovo sterilizzatore avapore in modo sicuro ed economico. Chiunque installi, utilizzi, pulisca o smaltiscal’apparecchio deve aver letto per intero e capitoquanto contenuto nelle presenti istruzioni perl’uso.
Le istruzioni per l’uso dovranno esserecustodite con cura ed essere sempre disponibiliper la consultazione.Se decidete di vendere o di regalare il vostroapparecchio, allegate anche le istruzioni perl’uso, affinché il prossimo proprietario possaconsultarle ogniqualvolta ne avesse bisogno.
2. Descrizione dell’apparecchio2.1 Scopo di applicazioneCon il presente sterilizzatore vaporizzatoreNUK VAPO RAPID si possono sanitizzare ibiberon ed i relativi accessori.I componenti da sterilizzare devono essereresistenti alla temperatura di ebollizione, poichéla sanitizzazione avviene ad oltre 90 °C.L’apparecchio deve essere utilizzatoesclusivamente in luoghi chiusi ed asciutti.L’apparecchio è idoneo all’uso domestico e nonè previsto per usi commerciali.
2.2 ModelliL’apparecchio è disponibile in due versioni:1. modello europeo, con spina a 2 pin, articolo n. 10.251.0122. modello inglese, con spina a 3 pin, articolo n. 10.749.054Entrambi i modelli non si differenziano né perutilizzo né per metodo di funzionamento.
2.3 Dotazione di fornitura• 1 sterilizzatore a vapore NUK VAPO
RAPID, completo• 1 pinza igienica per biberon• 1 misurino dell’acqua incorporato• 1 manuale d’uso
2.4 Descrizione del funzionamentoLo sterilizzatore a vapore viene riscaldatotramite corrente. L’acqua in esso contenutaviene portata ad ebollizione. Il calore presentenell’atmosfera satura di vapore uccide i germidisinfettando sia i biberon che i relativiaccessori.
Vaporisator 09/08 Seite 49 Dienstag, 7. Oktober 2008 8:17 08
50
3. Avvertenze di sicurezzaIl presente apparecchio è stato costruito eprodotto secondo le ultime nozioni tecnichedisponibili. Sono state osservate tutte ledirettive europee riguardanti la sicurezza el’apparecchio è stato testato secondo lenormative vigenti. Tuttavia, apparecchi di questotipo possono essere fonte di pericolo.Per la vostra sicurezza e quella dei vostribambini, vi preghiamo di dedicarci 5 minuti delvostro tempo e di leggere attentamente lenostre avvertenze di sicurezza! Probabilmentene conoscete già la maggior parte, tuttavia vipreghiamo di leggerle per intero perchépotrebbero consentirvi di prevenire eventualidanni ed infortuni.
3.1 Spiegazione dei termini utilizzatiNelle presenti istruzioni per l’uso troverete leseguenti segnalazioni:
Attenzione!Rischio elevato: l’inosservanza diquesta avvertenza può esserepericolosa per la salute e la vita.
Cautela!Rischio moderato: l’inosservanza di questaavvertenza può provocare danni alle cose.Nota:Basso rischio: suggerimenti ed informazioni daosservare durante l’uso dell’apparecchio.
3.2 Avvertenze generali• Leggere attentamente le presenti istruzioni
prima dell’uso. Esse costituiscono parteintegrante dell’apparecchio e devonosempre essere tenute a portata di mano.
• L’apparecchio deve essere utilizzatoesclusivamente per lo scopo di applicazioneprescritto (vedere “2.1 Scopo diapplicazione” a pagina 49).
Attenzione! L’inosservanza delle seguentiavvertenze può essere causa diinfortuni.
• Il presente apparecchio non deve essereutilizzato da persone (compresi i bambini)con capacità motorie, sensoriali o psichichelimitate o con un’esperienza limitata e/onozioni insufficienti a meno che non sianosorvegliate da una persona competente perla loro sicurezza o abbiano ricevuto daquesta istruzioni su come utilizzarel’apparecchio. Sorvegliare sempre i bambiniper assicurarsi che non giochino conl’apparecchio.
• Accertarsi che il cavo di alimentazione nonsia di intralcio per evitare cadute ed evitareche qualcuno possa calpestarlo.
Cautela! L’inosservanza delle seguentiavvertenze può essere causa di danniall’apparecchio.• Verificare che la tensione di rete (v. targhetta
di omologazione dell’apparecchio) corri-sponda alla tensione domestica.
• Collocare l’apparecchio esclusivamente suuna superficie di appoggio fissa, orizzontale,asciutta e non infiammabile.
• Non collocare l’apparecchio in prossimità disuperfici calde, in forni riscaldati o nellevicinanze di apparecchi a gas o elettrici,poiché si potrebbe danneggiare.
• Non utilizzare mai l’apparecchio senzaacqua poiché potrebbe surriscaldarsi.
• Non lasciare mai l’apparecchio incustoditodurante il funzionamento.
• Staccare l’apparecchio dalla rete di correntedopo l’uso per evitare che possa essereriacceso inavvertitamente e senzasorveglianza.
Vaporisator 09/08 Seite 50 Dienstag, 7. Oktober 2008 8:17 08

51
Note: • Non riempire mai l’apparecchio con oltre
70 ml di acqua poiché ciò potrebbecomprometterne il corretto funzionamento.
• Attenzione: ogni rivendicazione di garanziae responsabilità decade in caso di impiego dicomponenti non raccomandati nellepresenti istruzioni d’uso o in caso diimpiego di ricambi non originali pereventuali riparazioni. Queste condizioni siapplicano anche per interventisull’apparecchio non eseguiti da personaletecnico qualificato. Gli indirizzi di contattosono riportati alla fine delle presentiistruzioni per l’uso.
• In caso di eventuali malfunzionamenti, lariparazione dell’apparecchio deve essereeseguita esclusivamente da personalequalificato. In caso contrario, decadequalsiasi diritto alla garanzia.
3.3 Protezione contro ustioni e scottature
Attenzione! L’apparecchio funziona atemperature elevate e l’inosservanzadelle seguenti avvertenze può averecome conseguenza ustioni oscottature.
• Durante il funzionamento, le superficidell’apparecchio si surriscaldano, pertanto sipossono toccare unicamente l’appositaimpugnatura ed i pulsanti.
• Non spostare né trasportare losterilizzatore durante il funzionamento. Pertrasportare l’apparecchio ancora caldooccorre spegnerlo, staccare la spina dallapresa di corrente e attendere finchél’apparecchio si sarà raffreddato. In casocontrario ci si può ustionare toccando lesuperfici surriscaldate.
• Subito dopo la sterilizzazione, i biberonsono estremamente caldi e devono esseretolti utilizzando l’apposita pinza igienica acorredo.
3.4 Protezione contro le scosse elettriche
Attenzione! Le seguenti avvertenze disicurezza vi proteggono da eventualiscosse elettriche.
• L’apparecchio deve essere utilizzato solo selo stesso e il cavo di alimentazione sonointatti.
• Se il cavo di rete è danneggiato, per evitarepericoli deve essere sostituito dalproduttore, dal relativo servizio diassistenza clienti o da una personaparimenti qualificata.
• Eccetto nei contenitori appositi,nell’apparecchio non devono penetrareacqua o altri liquidi. Pertanto:
– non utilizzare mai l’apparecchio all’aperto– non appoggiare mai sull’apparecchio reci-
pienti contenenti liquidi, come bicchieri,vasi ecc.
– non utilizzare mai in ambienti moltoumidi
– non utilizzare mai l’apparecchio vicino adun lavabo.
Se dovesse accidentalmente penetrareliquido nell’apparecchio, staccare immediata-mente la spina e fare riparare da personalequalificato. Gli indirizzi di contatto sonoriportati alla fine delle presenti istruzioni perl’uso.
• Non afferrare mai l’apparecchio, il cavo dialimentazione o la spina con le manibagnate.
• Staccare sempre il cavo di alimentazionetirando la spina. Non tirare mai il cavo.
• Accertarsi che il cavo di alimentazione nonsia piegato o schiacciato.
• Tenere il cavo di alimentazione lontano dasuperfici calde (ad esempio la piastra dellacucina).
• Evitare l’utilizzo di cavi di prolunga. I cavi diprolunga sono consentiti solo alle seguenticondizioni:
Vaporisator 09/08 Seite 51 Dienstag, 7. Oktober 2008 8:17 08

52
– Il cavo di prolunga deve essere idoneoall’intensità di corrente dell’apparecchio.
– Il cavo di prolunga non deve essere"sospeso”, ossia non deve essere di intral-cio né essere raggiungibile dai bambini.
– Il cavo di prolunga non deve essere dan-neggiato in alcun modo.
– Alla presa di corrente non devono esserecollegati altri apparecchi oltre al presente,altrimenti si può provocare il sovracca-rico della rete di corrente (è vietato l’usodi prese multiple!).
3.5 Protezione contro gli incendiAttenzione! Poiché l’apparecchiofunziona a temperature elevate, perevitare incendi si devono osservare leseguenti avvertenze di sicurezza.
• Durante il funzionamento non si devonotrovare oggetti infiammabili (ad esempiotende, carta ecc.) nelle dirette vicinanzedell’apparecchio.
• Non utilizzare mai l’apparecchio perasciugare tessuti o altri oggetti sopra odavanti all’apparecchio.
• Non coprire mai l’apparecchio per evitaresurriscaldamenti.
• L’apparecchio non deve mai esserecollocato direttamente sotto una presa amuro, perché il calore generato puòprovocare danni all’impianto elettrico.
• Non lasciare mai l’apparecchio incustoditodurante il funzionamento. Eventuali dannivengono solitamente segnalati da odoripungenti. In questo caso, staccareimmediatamente la spina e rivolgersi ad unelettricista specializzato. Gli indirizzi dicontatto sono riportati alla fine dellepresenti istruzioni per l’uso.
3.6 Per la sicurezza del vostro bambino
Attenzione! I bambini spesso nonsono in grado di valutarecorrettamente i pericoli e corronoquindi il rischio di procurarsi lesioni.Occorre pertanto osservare leseguenti indicazioni:
• Il prodotto deve essere utilizzato solo sottola sorveglianza di un adulto per assicurarsiche i bambini non giochino conl’apparecchio.
• Accertarsi scrupolosamente chel’apparecchio sia sempre fuori dalla portatadei bambini.
• Accertarsi che i bambini non possano farcadere l’apparecchio tirando il cavo dialimentazione.
• Attenzione: il cellofan dell’imballo puòessere causa di soffocamento per i bambini.Non lasciare che sia utilizzato comegiocattolo.
4. Componenti dello sterilizzatore a vapore1 Coperchio con impugnatura2 Apertura di uscita del vapore3 Cestello porta-accessori4 Portabiberon5 Contenitore vapore6 Base riscaldante
7 Pulsante acceso/spento8 Indicatore luminoso9 Misurino (integrato nell’apparecchio)10 Pinza igienica per biberonSenza figura: sotto l’apparecchio è presente ilcavo di alimentazione in un apposito avvolgicavo.
Vaporisator 09/08 Seite 52 Dienstag, 7. Oktober 2008 8:17 08
53
5. Sanitizzazione di biberon, tettarelle ed accessori5.1 Generalità di sanitizzazione All’inizio, il sistema immunitario dei neonati nonè ancora in grado di difendersi da solo daeventuali germi patogeni. Per questo durante lapreparazione degli alimenti del lattante èimportante utilizzare tettarelle e biberoncorrettamente sterilizzati. Già piccoli residui dialimenti sulla tettarella o nel biberon possonofacilmente causare la formazione di batteri egermi pericolosi e nocivi per la salute del bebè.Per questo occorre pulire i componenti ancheprima di ogni sterilizzazione. Lo sterilizzatore avapore funziona secondo il principio dellasterilizzazione a caldo: l’acqua viene riscaldataad una temperatura superiore a 90°C edevapora. Il calore così generato sanitizzarapidamente e con sicurezza i componentiinseriti. Le tettarelle ed i biberon, quindi,vengono solo a contatto con calore e vaporeacqueo. Considerata la ridotta quantità di acquautilizzata dallo sterilizzatore vaporizzatore perla sanitizzazione, il consumo di corrente èminimo.
5.2 SanitizzazioneCautela! Tutti i componenti da sterilizzaredevono essere lavati accuratamente e puliti daqualsiasi residuo di cibo. Le figure da A ad I sulla sanitizzazione sonoriportate alla pagina pieghevole. 1. Estrarre il misurino 9 dalla base riscaldante 6
(Fig. A). 2. Utilizzando il misurino 9, versare complessi-
vamente 70 ml di acqua potabile nella baseriscaldante 6 (Fig. A). Nota: 70 ml corrispondono a due misurinicon una quantità di acqua di 35 ml ognuno.
3. Appoggiare il contenitore del vapore 5 sullabase riscaldante 6 (Fig. B).
4. Inserire il portabiberon 4 nel contenitore delvapore (Fig. C).
Cautela! I biberon devono essere sempresterilizzati aperti e scomposti nelle loro parti,altrimenti si possono deformare i materiali. 5. Inserire i biberon capovolti ed aperti
nell’apposito portabiberon 4 (Fig. D). Nota: Se possibile, impilare i tappi nel porta-biberon 4. In questo modo resta più spazionel cestello porta-accessori (Fig. E).
6. Collocare il cestello porta-accessori 3 sulcontenitore del vapore (Fig. F).
7. Inserire gli accessori nel cestello porta-accessori 3 (Fig. G).
8. Posizionare il coperchio 1 sul cestello porta-accessori 3 (Fig. H).
9. Inserire la spina di rete in una presa dicorrente adatta. Nota: Se l’indicazione luminosa 8 si è giàaccesa, significa che è già stato inseritoinavvertitamente il pulsante acceso/spento 7.
10.Accendere l’apparecchio con il pulsanteacceso/spento 7. L’indicazione luminosa 8 si accende (Fig. I).
Lo sterilizzatore a vapore si spegneautomaticamente al termine della sterilizzazionee l’indicazione luminosa si spegne.
Attenzione! Subito dopo lospegnimento, nell’apparecchio èancora presente vapore caldo chefuoriesce in parte dall’apertura diuscita del vapore. Attenzione a nonscottarsi! L’apparecchio deveraffreddarsi per almeno tre minutirestando chiuso.Subito dopo la sterilizzazione, ibiberon sono estremamente caldi edevono essere tolti utilizzandol’apposita pinza igienica a corredo.
Vaporisator 09/08 Seite 53 Dienstag, 7. Oktober 2008 8:17 08

54
Cautela! Staccare la spina dell’apparecchio dallapresa di corrente dopo ogni uso per evitare chelo sterilizzatore a vapore venga riaccesoinavvertitamente.
5.3 Osserva:• Un ciclo di sterilizzazione con una quantità
d’acqua di 70 ml dura ca. 8 minuti.• La sterilizzazione è garantita solo se il ciclo
non viene interrotto e viene eseguito pertutta la durata prescritta.
• Utilizzare esclusivamente normale acquapotabile senza ulteriori additivi.
• Effettuare un ciclo di decalcificazioneregolare come indicato al paragrafo "6.2Decalcificazione" per garantire un correttofunzionamento dell’apparecchio nel tempo.
6. Pulizia e manutenzione dell’apparecchio6.1 Pulizia
Attenzione! Prima di pulire l’apparecchio si devesempre staccare la spina.La pulizia deve avvenire solo dopo chel’apparecchio si è raffreddato.
Cautela! Non utilizzare mai detergentiaggressivi o abrasivi poiché possono deteriorarele superfici dell’apparecchio.1. Togliere il coperchio 1, il cestello porta-
accessori 3, il portabiberon 4 ed il conteni-tore del vapore 5 dalla base riscaldante 6.
Cautela! La base riscaldante 6 non deve maiessere immersa in acqua, poiché si possonodanneggiare i componenti elettrici in essacontenuti.2. Strofinare la base riscaldante 6 con un panno
umido dopo ogni utilizzo.3. Pulire il coperchio 1, il cestello porta-acces-
sori 3, il portabiberon 4 ed il contenitore delvapore 5 con acqua corrente oppure in lava-stoviglie.
6.2 DecalcificazioneUna pulizia regolare dell’apparecchio riduce laformazione di depositi di calcare. Con il tempo,tuttavia, la ripetuta ebollizione dell’acquaprovoca il depositarsi di calcare sulla baseriscaldante dello sterilizzatore a vapore. I depositi di calcare possono pregiudicarel’efficacia della sterilizzazione. Nota: Se i depositi di calcare sono lievi siconsiglia di adottare il metodo di pulizia quidescritto con l’aceto:1. Per decalcificare, miscelare 35 ml di acqua
calda con 35 ml di normale aceto e versarenella base riscaldante 6.
2. Lasciare agire la soluzione per 30 minuti epoi svuotare.
3. A questo punto, pulire l’apparecchio strofi-nandolo con un panno umido.
Se i depositi di calcare sono resistenti si dovràutilizzare uno dei prodotti anticalcare reperibiliin commercio osservandone le istruzioni perl’uso.
Vaporisator 09/08 Seite 54 Dienstag, 7. Oktober 2008 8:17 08

55
7. Guida all’eliminazione dei guasti
8. Scheda tecnicaModello europeo, con spina a 2 pin(articolo n. 10.251.012): Tensione: 220 - 240 V~/50 Hz Potenza assorbita: 550 Watt
Modello inglese, con spina a 3 pin(articolo n. 10.749.054)Tensione: 220 - 240 V~/50 Hz Potenza assorbita: 550 Watt
Guasto Causa RimedioLa sterilizzazione dura troppo a lungo
È stata versata troppa acqua Misurare con precisione 70 ml per una steri-lizzazione ottimale
La base riscaldante presenta depositi di calcare
Decalcificare la base riscaldante (vedere “6.2 Decalcificazione” a pagina 54)
L’apparecchio non si accende, l’indicazione luminosa 8 non si accende
Manca alimentazione di corrente
Inserire correttamente la spina di reteControllare con un altro apparecchio se vi è tensione nella presa di corrente
L’apparecchio non si riaccende dopo l’ultimo utilizzo, l’indica-zione luminosa 8 è accesa
Si è inserita la protezione contro il surriscaldamento
Attendere 15 minuti per lasciare raffreddare l’apparecchio
Non è possibile collocare 6 bibe-ron FIRST CHOICE nell’apparec-chio
I biberon non sono stati distribuiti correttamente
Inserire i biberon nel portabiberon capovolti e senza accessoriImpilare i tappi nel portabiberon e poi posi-zionare il cestello porta-accessori
I biberon scottano dopo la steri-lizzazione
I biberon sono stati sanitizzati ad una temperatura superiore a 90 °C
Lasciare raffreddare i biberon alcuni minutiUtilizzare la pinza igienica per biberon
I biberon e gli accessori presen-tano macchie bianche dopo la sterilizzazione
L’apparecchio è calcificato Decalcificare l’apparecchio (vedere “6.2 Decalcificazione” a pagina 54)
Dal bordo del cestello porta-accessori fuoriesce vapore
L’apparecchio non è stato assemblato correttamente
Montare correttamente l’apparecchio (vedere “5.2 Sanitizzazione” a pagina 53)
Biberon e accessori non sono stati distribuiti correttamente
Ripartire i componenti in modo che l’appa-recchio si chiuda completamente (vedere “5.2 Sanitizzazione” a pagina 53)
Vaporisator 09/08 Seite 55 Dienstag, 7. Oktober 2008 8:17 08

56
9. Smaltimento9.1 Apparecchi
Il simbolo della croce apposta sulbidone per rifiuti su ruote indicache il prodotto, all’interno delterritorio dell’Unione Europea,deve essere indirizzato ad unaraccolta di rifiuti differenziata. Taledisposizione si applica per il
prodotto e per tutti gli accessori contrassegnatida questo simbolo. I prodotti recanti talecontrassegno non devono essere smaltiti
insieme ai normali rifiuti domestici, bensìconsegnati ad un apposito centro di raccoltaper il riciclaggio di apparecchiature elettriche edelettroniche. Il riciclaggio consente di ridurre ilconsumo di materie prime salvaguardandol’ambiente.
9.2 ImballaggioSe desiderate smaltire anche l’imballaggio sietepregati di osservare le norme ambientali vigentinel vostro Paese.
10. GaranziaSe utilizzato correttamente e in conformità alleistruzioni per l’uso, il produttore garantiscel’apparecchio per 2 anni dalla data d’acquisto.Ci impegniamo ad eseguire riparazionisull’apparecchio a titolo gratuito, purché esse sirendano necessarie per vizi del materiale o difabbricazione. Sono esclusi altri diritti.I danni derivanti dall’uso impropriodell’apparecchio non vengono risarciti. Cavo dialimentazione e spina sono esclusi dalla garanziain caso di usura. Nei primi 2 anni dalla datad’acquisto, ci impegniamo ad eliminare i difettiriconosciuti come legittimi senza addebito deicosti supplementari sostenuti, previo accordosull’assunzione delle spese.
L’apparecchio deve comunque essere inviatoallegando il certificato di garanzia o lo scontrinocon la data di acquisto.Senza la dimostrazione della data d’acquisto, icosti di riparazione verranno addebitati senzaulteriore avviso. La restituzione avrà luogo incontrassegno.Il certificato di garanzia deve essere compilatoimmediatamente al momento dell’acquisto econservato con cura. I certificati di garanziasmarriti non verranno sostituiti.Il certificato di garanzia è riportato alla fine delpresente manuale.
Vaporisator 09/08 Seite 56 Dienstag, 7. Oktober 2008 8:17 08

57
Περιεχόμενα1. Σημαντικές υποδείξεις πριν την πρώτη χρήση . . . . . . . . . . . . . . . . . . 58
2. Περιγραφή συσκευής . . . . . . . . . . . . . . . . . . . . . . . . . . . . . . . . . . . . . . . 582.1 Σκοπός χρήσης . . . . . . . . . . . . . . . . . . . . . . . . . . . . . . . . . . . . . . . . . . . . . . . . . 582.2 Μοντέλα . . . . . . . . . . . . . . . . . . . . . . . . . . . . . . . . . . . . . . . . . . . . . . . . . . . . . . 582.3 Περιεχόμενο συσκευασίας . . . . . . . . . . . . . . . . . . . . . . . . . . . . . . . . . . . . . . . . 582.4 Περιγραφή λειτουργίας . . . . . . . . . . . . . . . . . . . . . . . . . . . . . . . . . . . . . . . . . . . 58
3. Υποδείξεις ασφαλείας . . . . . . . . . . . . . . . . . . . . . . . . . . . . . . . . . . . . . . 593.1 Ερμηνεία όρων . . . . . . . . . . . . . . . . . . . . . . . . . . . . . . . . . . . . . . . . . . . . . . . . . 593.2 Γενικές υποδείξεις . . . . . . . . . . . . . . . . . . . . . . . . . . . . . . . . . . . . . . . . . . . . . . . 593.3 Προστασία από εγκαύματα και ζεματίσματα . . . . . . . . . . . . . . . . . . . . . . . . . 603.4 Προστασία από ηλεκτροπληξία . . . . . . . . . . . . . . . . . . . . . . . . . . . . . . . . . . . . 603.5 Προστασία από φωτιά . . . . . . . . . . . . . . . . . . . . . . . . . . . . . . . . . . . . . . . . . . . 613.6 Για την ασφάλεια του παιδιού σας . . . . . . . . . . . . . . . . . . . . . . . . . . . . . . . . . . 61
4. Εξαρτήματα του αποστειρωτήρα . . . . . . . . . . . . . . . . . . . . . . . . . . . . . 62
5. Αποστείρωση μπιμπερό, θήλαστρων και αξεσουάρ . . . . . . . . . . . . . . 625.1 Γενικά για την αποστείρωση . . . . . . . . . . . . . . . . . . . . . . . . . . . . . . . . . . . . . . . 625.2 Αποστείρωση . . . . . . . . . . . . . . . . . . . . . . . . . . . . . . . . . . . . . . . . . . . . . . . . . . . 625.3 Παρακαλούμε προσέξτε: . . . . . . . . . . . . . . . . . . . . . . . . . . . . . . . . . . . . . . . . . 63
6. Καθαρισμός και φροντίδα της συσκευής . . . . . . . . . . . . . . . . . . . . . . . 646.1 Καθαρισμός . . . . . . . . . . . . . . . . . . . . . . . . . . . . . . . . . . . . . . . . . . . . . . . . . . . . 646.2 Αφαίρεση αλάτων . . . . . . . . . . . . . . . . . . . . . . . . . . . . . . . . . . . . . . . . . . . . . . . 64
7. Βλάβες και η αποκατάστασή τους . . . . . . . . . . . . . . . . . . . . . . . . . . . . 65
8. Τεχνικά στοιχεία . . . . . . . . . . . . . . . . . . . . . . . . . . . . . . . . . . . . . . . . . . . 65
9. Απόρριψη . . . . . . . . . . . . . . . . . . . . . . . . . . . . . . . . . . . . . . . . . . . . . . . . . 669.1 Συσκευή . . . . . . . . . . . . . . . . . . . . . . . . . . . . . . . . . . . . . . . . . . . . . . . . . . . . . . . 669.2 Συσκευασία . . . . . . . . . . . . . . . . . . . . . . . . . . . . . . . . . . . . . . . . . . . . . . . . . . . . 66
10. Εγγύηση . . . . . . . . . . . . . . . . . . . . . . . . . . . . . . . . . . . . . . . . . . . . . . . . . . 66
Vaporisator 09/08 Seite 57 Dienstag, 7. Oktober 2008 8:17 08
58
Αγαπητοί ΓονείςΣας ευχαριστούμε που επιλέξατε τοναποστειρωτήρα μας και κατά συνέπεια τηνποιότητα και την ασφάλεια. Με αυτό τοπροϊόν μπορείτε να αποστειρώσετε έως καιέξι φαρδύλαιμα μπιμπερό FIRST CHOICEόπως και αξεσουάρ για μπιμπερό πολύεύκολα και αξιόπιστα. Έτσι οι παθογόνοιοργανισμοί εξαλείφονται ολοκληρωτικά. Ένα
νεογέννητο μωρό δεν μπορεί να αμυνθείαποτελεσματικά σε αυτούς τουςμικροοργανισμούς, καθώς το ανοσοποιητικότου σύστημα δεν είναι πλήρως ανεπτυγμένο.Τα αποστειρωμένα τμήματα μπορούν ναεπαναχρησιμοποιηθούν αμέσως.
Ευχόμαστε μία υγιή ανάπτυξη για το μωρόσας.
1. Σημαντικές υποδείξεις πριν την πρώτη χρήσηΑυτές οι οδηγίες χρήσης σας βοηθούν ναχρησιμοποιήσετε με ασφάλεια και οικονομίατον αποστειρωτήρα σας.
Κάθε άτομο, το οποίο τοποθετεί, χειρίζεται,καθαρίζει ή απορρίπτει αυτή τη συσκευή, θαπρέπει να έχει μελετήσει και κατανοήσει όλοτο περιεχόμενο αυτών των οδηγιών χρήσης.
Για αυτό θα πρέπει να φυλάξετε αυτές τιςοδηγίες χρήσης σε ασφαλές σημείο, ώστε ναείναι διαθέσιμες οποιαδήποτε στιγμή.
Αν πουλήσετε ή δωρίσετε τη συσκευή σας,φροντίστε να παραδώσετε μαζί και αυτές τιςοδηγίες χρήσης ώστε και ο επόμενος κάτοχοςτης συσκευής να μπορέσει να τηχρησιμοποιήσει με ασφάλεια.
2. Περιγραφή συσκευής
2.1 Σκοπός χρήσηςΜε αυτό τον αποστειρωτήρα ατμού NUKVAPO RAPID μπορείτε να αποστειρώσετεμπιμπερό και αξεσουάρ για μπιμπερό.
Τα τμήματα που αποστειρώνονται πρέπει ναέχουν αντοχή στο βρασμό, γιατί ηθερμοκρασία κατά την αποστείρωσηυπερβαίνει τους 90 °C.
Αυτή η συσκευή επιτρέπεται ναχρησιμοποιείται μόνο σε κλειστούς χώρουςχωρίς υγρασία.
Αυτή η συσκευή είναι κατάλληλη για χρήση σεκατοικίες και όχι για επαγγελματική χρήση.
2.2 ΜοντέλαΗ συσκευή παραδίδεται σε δύο παραλλαγές:
1. Ευρωπαϊκό μοντέλο, με φις με 2 PIN, αρ. προϊόντος 10.251.012
2. Βρετανικό μοντέλο, με φις με 3 PIN, αρ. προϊόντος 10.749.054
Στο χειρισμό και τη λειτουργία δεν υπάρχειδιαφορά μεταξύ των δύο παραλλαγών.
2.3 Περιεχόμενο συσκευασίας• 1 αποστειρωτήρας ατμού NUK VAPO RAPID• 1 λαβίδα για μπιμπερό• 1 ενσωματωμένο δοχείο μέτρησης νερού• 1 εγχειρίδιο οδηγιών χρήσης
2.4 Περιγραφή λειτουργίαςΑυτός ο αποστειρωτήρας θερμαίνεταιηλεκτρικά. Το νερό που βρίσκεται στοεσωτερικό του, φτάνει σε βρασμό. Με τηνυπερβολική θερμότητα που προκύπτει απότους ατμούς, σκοτώνονται όλοι οιμικροοργανισμοί και με αυτό τον τρόποαποστειρώνονται τα μπιμπερό καθώς και τααξεσουάρ των μπιμπερό.
Vaporisator 09/08 Seite 58 Dienstag, 7. Oktober 2008 8:17 08

59
3. Υποδείξεις ασφαλείαςΑυτή η συσκευή σχεδιάστηκε καικατασκευάστηκε με βάση την τελευταία λέξητης τεχνολογίας. Έχουν τηρηθεί όλες οισχετικές ευρωπαϊκές οδηγίες ασφαλείας καιη συσκευή έχει ελεγχθεί σύμφωνα με τοπρότυπο. Ωστόσο, ακόμα και από τέτοιουείδους συσκευές απορρέουν κίνδυνοι.
5 λεπτά αξίζουν για την ασφάλειά σας! Δενθα χρειαστείτε περισσότερο χρόνο για ναδιαβάσετε αυτές τις υποδείξεις ασφαλείας.Πιθανώς ήδη γνωρίζετε τις περισσότερες απόαυτές τις υποδείξεις, παρόλα αυτά σαςπαρακαλούμε να τις διαβάσετε, γιατί κάποιααπό αυτές τις υποδείξεις μπορεί να είναικαινούρια για εσάς και να σας προφυλάξειαπό τραυματισμούς ή ζημιές..
3.1 Ερμηνεία όρωνΣε αυτές τις οδηγίες χρήσης θα βρείτε τουςακόλουθους όρους σήμανση:
Προειδοποίηση!Μεγάλος κίνδυνος: Η παράβλεψητης προειδοποίησης μπορεί ναπροκαλέσει σωματικές βλάβες καικίνδυνο για τη ζωή.
Προσοχή!Μέτριος κίνδυνος: Η παράβλεψη τηςπροειδοποίησης μπορεί να προκαλέσει υλικήζημιά.
Υπόδειξη:Μικρός κίνδυνος: Καταστάσεις που θαπρέπει να ληφθούν υπόψη κατά τη χρήση τηςσυσκευής.
3.2 Γενικές υποδείξεις• Πριν τη χρήση της συσκευής, διαβάστε
προσεκτικά αυτές τις οδηγίες χρήσης.Αποτελούν συστατικό μέρος τηςσυσκευής και πρέπει να είναι ανά πάσαστιγμή διαθέσιμες.
• •Χρησιμοποιήστε τη συσκευή μόνο για τοναναφερόμενο σκοπό χρήσης (βλέπε«2.1 Σκοπός χρήσης» σε σελίδα 58).
Προειδοποίηση!Η παράβλεψη των ακόλουθωνπροειδοποιήσεων μπορεί ναοδηγήσει σε τραυματισμούς.
• Αυτή η συσκευή δεν προορίζεται γιαχρήση από άτομα (συμπεριλαμβανομένωνπαιδιών) με περιορισμένες φυσικές,αισθητικές ή πνευματικές ικανότητες ή μεελλειπή πείρα και/ή ελλειπή γνώση, εκτόςαν επιτηρούνται από ένα υπεύθυνο γιατην ασφάλειά τους άτομο ή λαμβάνουνοδηγίες από αυτό σχετικά με τον τρόποχρήσης της συσκευής. Τα παιδιά θαπρέπει να παρακολουθούνται, για ναεξασφαλίζεται ότι δεν παίζουν με τησυσκευή.
• Προσέξτε ώστε το καλώδιο ρεύματος ναμην γίνει ποτέ μία παγίδα στην οποίακάποιος μπορεί να σκοντάψει, ναμπερδευτεί ή να πατήσει.
Προσοχή! Η παράβλεψη των ακόλουθωνπροειδοποιήσεων μπορεί να οδηγήσει σεβλάβη της συσκευής.
• Ελέγξτε αν η απαιτούμενη τάση δικτύου(βλ. πινακίδα τύπου της συσκευής)συμφωνεί με την τάση δικτύου του χώρουσας.
• Η συσκευή επιτρέπεται να τοποθετείταιαποκλειστικά σε σταθερή, επίπεδη,στεγνή και μη εύφλεκτη επιφάνεια.
• Η συσκευή δεν πρέπει να τοποθετείταικοντά σε καυτές επιφάνειες, σε θερμούςφούρνους ή κοντά σε συσκευές αερίου ήηλεκτρικές συσκευές, γιατί μπορεί ναυποστεί βλάβη.
• Μην λειτουργείτε ποτέ τη συσκευή χωρίςνερό, γιατί μπορεί να υπερθερμανθεί.
• Μην αφήνετε ποτέ τη συσκευή χωρίςεπίβλεψη κατά τη διάρκεια τηςλειτουργίας.
Vaporisator 09/08 Seite 59 Dienstag, 7. Oktober 2008 8:17 08
60
• Μετά τη χρήση φροντίστε νααποσυνδέετε τη συσκευή από τοηλεκτρικό δίκτυο, για να μην μπορεί ναενεργοποιηθεί ακούσια.
Υποδείξεις:
• Ποτέ μην προσθέτετε άνω από 70 mlνερού, διαφορετικά μπορεί ναεπηρεαστεί αρνητικά η λειτουργία.
• Παρακαλούμε προσέξτε ότι κάθε αξίωσηγια εγγύηση και ευθύνη εκπίπτει, ανχρησιμοποιηθούν εξαρτήματα τα οποίαδεν προτείνονται στις παρούσες οδηγίεςχρήσης, ή αν κατά την εκτέλεσηεπισκευών δεν χρησιμοποιηθούναποκλειστικά γνήσια ανταλλακτικά. Αυτόισχύει επίσης για επισκευές, οι οποίεςεκτελούνται από μη εξειδικευμένοπροσωπικό. Η διεύθυνση επικοινωνίαςαναφέρεται στο τέλος αυτών των οδηγιώνχρήσης.
• Σε περίπτωση λειτουργικών διαταραχών, ηεπισκευή της συσκευής επιτρέπεται ναδιεξάγεται μόνο από εξειδικευμένοάτομο. Διαφορετικά εκπίπτει κάθε αξίωσηγια εγγύηση.
3.3 Προστασία από εγκαύματα και ζεματίσματα
Προειδοποίηση! Επειδή ησυσκευή λειτουργεί σε υψηλέςθερμοκρασίες, η παράβλεψη τωνακόλουθων προειδοποιήσεων μπορείνα οδηγήσει σε εγκαύματα ή
ζεματίσματα.
• Οι επιφάνειες της συσκευής θερμαίνονταιπολύ κατά τη λειτουργία. Για αυτό θαπρέπει να την αγγίζετε μόνο από τηνπροβλεπόμενη λαβή ή τους διακόπτες.
• Ο αποστειρωτήρας δεν πρέπει ναμεταφέρεται κατά τη λειτουργία. Ανθέλετε να μεταφέρετε την καυτήσυσκευή, απενεργοποιήστε την,αποσυνδέστε το φις του καλωδίουρεύματος και περιμένετε μέχρι να
κρυώσει η συσκευή. Διαφορετικά μπορείνα καείτε από τις καυτές επιφάνειες.
• Αμέσως μετά την αποστείρωση, ταμπιμπερό είναι καυτά και πρέπει νααφαιρούνται μόνο με την παρεχόμενηλαβίδα για μπιμπερό.
3.4 Προστασία από ηλεκτροπληξίαΠροειδοποίηση! Οι ακόλουθεςυποδείξεις ασφαλείαςπροφυλάσσουν από ηλεκτροπληξία.
• Χρησιμοποιείτε τη συσκευή, μόνο αν ησυσκευή και το καλώδιο ρεύματος είναιάθικτα.
• Αν το καλώδιο ρεύματος έχει υποστείζημιά, θα πρέπει για την αποφυγήκινδύνων να αντικαθίσταται από τονκατασκευαστή, την ΕξυπηρέτησηΠελατών ή παρεμφερές εξειδικευμένοάτομο.
• Εκτός από το προβλεπόμενο δοχείο, ησυσκευή σε καμία περίπτωση δεν πρέπεινα έρχεται σε επαφή με νερό ή άλλαυγρά. Συνεπώς:
–μην την τοποθετείτε ποτέ σε ανοιχτόχώρο
–μην τοποθετείτε ποτέ δοχεία γεμάτα μευγρό, όπως ποτήρια, βάζα, κλπ., επάνωστη συσκευή
–μην την τοποθετείτε ποτέ σε περιβάλλονμε υγρασία
–μην την λειτουργείτε ακριβώς δίπλα απόένα νεροχύτη.
Αν, ωστόσο, η συσκευή έρθει σε επαφή μευγρό, αποσυνδέστε αμέσως το φις τουκαλωδίου ρεύματος και παραδώστε τησυσκευή σε εξειδικευμένο τεχνικόπροσωπικό για επισκευή. Η διεύθυνσηεπικοινωνίας αναφέρεται στο τέλος αυτώντων οδηγιών χρήσης.
• Ποτέ μην πιάνετε τη συσκευή, το καλώδιορεύματος ή το φις του καλωδίουρεύματος με υγρά χέρια.
Vaporisator 09/08 Seite 60 Dienstag, 7. Oktober 2008 8:17 08

61
• Φροντίστε να αποσυνδέετε το καλώδιορεύματος πάντα από την πρίζα του. Ποτέμην τραβάτε το ίδιο το καλώδιο.
• Προσέξτε ότι το καλώδιο δεν πρέπει ποτένα τσακίζει ή να μαγκώνει.
• Κρατήστε το καλώδιο ρεύματος μακριάαπό θερμές επιφάνειες (π.χ. εστίακουζίνας).
• Θα πρέπει να αποφεύγετε τη χρήσημπαλαντέζας. Επιτρέπεται μόνο με πολύσυγκεκριμένες προϋποθέσεις:
–Η μπαλαντέζα πρέπει να είναικατάλληλη για την ισχύ ρεύματος τηςσυσκευής.
–Η μπαλαντέζα δεν πρέπει νατοποθετείται αιωρούμενα: δεν πρέπει ναγίνεται παγίδα στην οποία κάποιοςμπορεί να σκοντάψει, ή να έχουνπρόσβαση παιδιά σε αυτή.
–Η μπαλαντέζα δεν πρέπει σε καμίαπερίπτωση να έχει υποστεί ζημιά.
–Στην ηλεκτρική πρίζα δεν πρέπει νασυνδέονται και άλλες συσκευές μαζί μεαυτή τη συσκευή, γιατί μπορεί ναπροκύψει υπερφόρτωση του ηλεκτρικούδικτύου (απαγόρευση πολύπριζων!).
3.5 Προστασία από φωτιάΠροειδοποίηση! Επειδή ησυσκευή λειτουργεί σε υψηλέςθερμοκρασίες, προσέξτε τιςακόλουθες υποδείξεις ασφαλείαςγια να μην προκύψει φωτιά.
• •Κατά τη λειτουργία δεν επιτρέπεται ναβρίσκονται εύφλεκτα αντικείμενα (π.χ.κουρτίνες, χαρτί, κλπ.) κοντά στησυσκευή.
• Μην χρησιμοποιείτε ποτέ τη συσκευή γιανα στεγνώνετε υφάσματα ή άλλαπράγματα πάνω σε/επάνω από/μπροστάαπό αυτή.
• Για να αποφεύγετε την υπερθέρμανσητης συσκευής, μην την καλύπτετε ποτέ.
• Η συσκευή δεν επιτρέπεται νατοποθετείται ποτέ κάτω από μία πρίζατοίχου, γιατί η θερμότητα που προκύπτειμπορεί να οδηγήσει σε βλάβες στηνηλεκτρική εγκατάσταση.
• Ποτέ μην αφήνετε τη συσκευή ναλειτουργεί χωρίς επίβλεψη. Οι βλάβεςδηλώνονται σχεδόν πάντα με δημιουργίαέντονης οσμής. Σε αυτή την περίπτωση,αποσυνδέστε αμέσως το φις τουκαλωδίου ρεύματος και παραδώστε τησυσκευή για έλεγχο. Η διεύθυνσηεπικοινωνίας αναφέρεται στο τέλοςαυτών των οδηγιών χρήσης.
3.6 Για την ασφάλεια του παιδιού σας
Προειδοποίηση! Τα παιδιά συχνάδεν εκτιμούν σωστά τουςκινδύνους και άρα μπορεί ναυποστούν τραυματισμούς. Συνεπώςπρέπει να προσέχετε:
• Αυτό το προϊόν επιτρέπεται ναχρησιμοποιείται μόνο με την επίβλεψηενήλικα, για να εξασφαλίζεται ότι ταπαιδιά δεν χρησιμοποιούν τη συσκευή γιαπαιχνίδι.
• Προσέξτε επιμελώς ώστε η συσκευή ναβρίσκεται πάντα μακριά από τηνεμβέλεια παιδιών.
• Προσέξτε ώστε τα παιδιά να μην μπορούνποτέ να τραβούν από το καλώδιο τησυσκευή προς τα κάτω.
• Προσέξτε ώστε το φύλλο συσκευασίας ναμην αποτελέσει θανατηφόρα παγίδα γιαπαιδιά. Τα φύλλα συσκευασίας δεν είναιπαιχνίδι.
Vaporisator 09/08 Seite 61 Dienstag, 7. Oktober 2008 8:17 08

62
4. Εξαρτήματα του αποστειρωτήρα1 Καπάκι με λαβή2 Έξοδος ατμού3 Καλάθι αξεσουάρ4 Στήριγμα μπιμπερό5 Δοχείο ατμού6 Θερμαντική βάση7 Διακόπτης On/Off
8 Λυχνία ελέγχου9 Δοχείο μέτρησης (ενσωματωμένο στη
συσκευή)10 Λαβίδα μπιμπερό
Χωρίς εικόνα: Κάτω από τη συσκευήβρίσκεται το καλώδιο ρεύματος και μία θήκηκαλωδίου.
5. Αποστείρωση μπιμπερό, θήλαστρων και αξεσουάρ
5.1 Γενικά για την αποστείρωσηΣτην αρχή τα νεογέννητα δεν έχουν επαρκήαντισώματα, για να προστατευθούν μόνατους από τους παθογόνους οργανισμούς.Σημαντική προϋπόθεση στην προετοιμασίατης τροφής του βρέφους, είναι η απουσίαπαθογόνων οργανισμών από τις θηλές και ταμπιμπερό. Ακόμα και τα παραμικράυπολείμματα τροφίμων στις θηλές και ταμπιμπερό, μπορούν εύκολα να οδηγήσουν σεμία επικίνδυνη για την υγεία δημιουργίαβακτηριδίων. Για αυτό, τα εξαρτήματα θαπρέπει να καθαρίζονται καλά πριν από κάθεαποστείρωση. Ο αποστειρωτήρας λειτουργείμε τη μέθοδο της καυτής αποστείρωσης. Σεαυτή την περίπτωση, το νερό θερμαίνεται σεάνω από 90 °C και εξατμίζεται. Ηπροκύπτουσα θερμότητα αποστειρώνει ταεξαρτήματα μέσα στη συσκευή γρήγορα καιαξιόπιστα. Συνεπώς, οι θηλές και τα μπιμπερόέρχονται σε επαφή μόνο με τη θερμότητα καιτους υδρατμούς. Χάρη στη μικρή ποσότητανερού, την οποία χρησιμοποιεί οαποστειρωτήρας για την αποστείρωση,απαιτείται λίγο ρεύμα.
5.2 ΑποστείρωσηΠροσοχή! Όλα τα εξαρτήματα προςαποστείρωση πρέπει να ξεπλένονται καλά καινα καθαρίζονται από όλα τα υπολείμματατροφών.
Οι εικόνες A έως I για την αποστείρωσηπαρουσιάζονται στο αναδιπλωμένοεσώφυλλο.
1. Αφαιρέστε το δοχείο μέτρησης 9 από τηνυποδοχή θέρμανσης 6 (Εικ. A).
2. Με τη βοήθεια του δοχείου μέτρησης 9προσθέστε συνολικά 70 ml νερού βρύσηςστην θερμαντική βάση 6 (Εικ. A).
Υπόδειξη: 70 ml αντιστοιχούν σε δύοδοχεία μέτρησης, κάθε ένα μεχωρητικότητα νερού 35 ml.
3. Τοποθετήστε το δοχείο ατμού 5 στηνθερμαντική βάση 6 (Εικ. B).
4. Τοποθετήστε το στήριγμα μπιμπερό 4 στοδοχείο ατμού (Εικ. C).
Προσοχή! Τα μπιμπερό πρέπει νααποστειρώνονται ανοιχτά καιαποσυναρμολογημένα σε μεμονωμένατεμάχια, διαφορετικά μπορεί να προκύψουνπαραμορφώσεις υλικού.
5. Τοποθετείτε τα μπιμπερό χωρίς καπάκι καιαπό το λαιμό στο στήριγμα μπιμπερό 4(Εικ. D).
Vaporisator 09/08 Seite 62 Dienstag, 7. Oktober 2008 8:17 08

63
Υπόδειξη: Στοιβάξτε τα καπάκια το έναπάνω στο άλλο όσο το δυνατό καλύτεραστο στήριγμα μπιμπερό 4. Έτσιεξοικονομείτε χώρο στο καλάθι αξεσουάρ(Εικ. E).
6. Τοποθετήστε το καλάθι αξεσουάρ 3 στοδοχείο ατμού (Εικ. F).
7. Τοποθετήστε τα αξεσουάρ στο καλάθιαξεσουάρ 3 (Εικ. G).
8. Τοποθετήστε το καπάκι 1 στο καλάθιαξεσουάρ 3 (Εικ. H).
9. Τοποθετήστε το φις του καλωδίουρεύματος σε μία κατάλληλη ηλεκτρικήπρίζα.
Υπόδειξη: Αν η λυχνία ελέγχου 8 ανάβειτώρα, έχει ήδη πατηθεί ακούσια οδιακόπτης On 7.
10.Ενεργοποιήστε τη συσκευή με το διακόπτηOn 7.
Η λυχνία ελέγχου 8 ανάβει (Εικ. I).
Μετά την αποστείρωση, ο αποστειρωτήραςαπενεργοποιείται αυτόματα και η λυχνίαελέγχου σβήνει.
Προειδοποίηση! Αμέσως μετά την απενεργοποίησηυπάρχει ακόμα καυτός ατμός μέσαστη συσκευή, από τον οποίο ένατμήμα διαφεύγει από την έξοδοατμού. Για αυτό, προσέχετε ώστε ναμην ζεματιστείτε. Αφήστε τησυσκευή κλειστή τουλάχιστον τρίαλεπτά για να κρυώσει.
Αμέσως μετά την αποστείρωση, ταμπιμπερό είναι καυτά και πρέπει νααφαιρούνται μόνο με τηνπαρεχόμενη λαβίδα για μπιμπερό.
Προσοχή! Μετά από κάθε χρήση φροντίστενα αποσυνδέετε το φις του καλωδίουρεύματος από την πρίζα, ώστε η συσκευή ναμην μπορεί να ενεργοποιηθεί ακούσια.
5.3 Παρακαλούμε προσέξτε:• Μία αποστείρωση με ποσότητα νερού
70 ml διαρκεί περ. 8 λεπτά.• Η αποστείρωση είναι εγγυημένη, αν η
διαδικασία αποστείρωσης δεν διακοπείκαι δεν μειωθεί ο χρόνος της.
• Χρησιμοποιείτε αποκλειστικά κανονικόνερό βρύσης χωρίς περαιτέρω πρόσθετα.
• Εξασφαλίστε μία τακτική αφαίρεση τωναλάτων, σύμφωνα με την ενότητα «6.2Αφαίρεση αλάτων», για να διατηρείται ηλειτουργική ικανότητα.
Vaporisator 09/08 Seite 63 Dienstag, 7. Oktober 2008 8:17 08

64
6. Καθαρισμός και φροντίδα της συσκευής
6.1 ΚαθαρισμόςΠροειδοποίηση!Πριν τον καθαρισμό της συσκευήςπρέπει πάντα να αποσυνδέετε τοφις του καλωδίου ρεύματος.
Φροντίστε να καθαρίζετε τησυσκευή μόνο εφόσον έχει κρυώσει.
Προσοχή! Μην χρησιμοποιείτε σκληράμέσα καθαρισμού ή τριψίματος, γιατί μπορείνα βλάψουν τις επιφάνειες.
1. Αφαιρέστε το καπάκι 1, το καλάθιαξεσουάρ 3, το στήριγμα μπιμπερό 4καθώς και το δοχείο ατμού 5 από τηνθερμαντική βάση 6.
Προσοχή! Η θερμαντική βάση 6 δεν πρέπειποτέ να βυθίζεται σε νερό, γιατίπεριλαμβάνει ηλεκτρικά εξαρτήματα πουμπορεί να υποστούν βλάβη.
2. Μετά από κάθε χρήση πρέπει νασκουπίζετε την θερμαντική βάση 6 με ένανωπό πανί.
3. Καθαρίστε το καπάκι 1, το καλάθιαξεσουάρ 3, το στήριγμα μπιμπερό 4καθώς και το δοχείο ατμού 5 είτε με υγρόπιάτων ή στο πλυντήριο πιάτων.
6.2 Αφαίρεση αλάτωνΜε το τακτικό σκούπισμα της συσκευής, ησυγκέντρωση αλάτων μειώνεται. Μετά απόκάποιο χρόνο, ωστόσο, επικάθονται άλαταστην θερματική βάση του αποστειρωτήραλόγω της διαδικασίας βρασμού.
Οι αποθέσεις αλάτων μπορεί να μειώσουνσημαντικά την απόδοση στην αποστείρωση.
Υπόδειξη: Για ελαφριές συγκεντρώσειςαλάτων καλύτερα να χρησιμοποιείτε τημέθοδο με κοινό ξύδι που περιγράφεται εδώ:
1. Για αφαίρεση των αλάτων αναμίξτε 35 mlκαυτό νερό με 35 ml κοινό ξύδι καιπροσθέστε τα στην θερμαντική βάση 6.
2. Αφήστε το διάλυμα να δράσει 30 λεπτάκαι αδειάστε το.
3. Στη συνέχεια σκουπίστε τη συσκευή μεένα νωπό πανί.
Για έντονες συγκεντρώσεις αλάτων θαπρέπει να χρησιμοποιείτε ένα μέσοαφαίρεσης αλάτων που κυκλοφορεί στοεμπόριο. Προσέξτε τις υποδείξεις χρήσης γιατο μέσο αφαίρεσης αλάτων.
Vaporisator 09/08 Seite 64 Dienstag, 7. Oktober 2008 8:17 08

65
7. Βλάβες και η αποκατάστασή τους
8. Τεχνικά στοιχείαΕυρωπαϊκό μοντέλο, με φις με 2 PIN (αρ. προϊόντος 10.251.012):
Τάση: 220 - 240 V~/50 Hz
Κατανάλωση ενέργειας: 550 Watt
Βρετανικό μοντέλο, με φις με 3 PIN (αρ. προϊόντος 10.749.054)
Τάση: 220 - 240 V~/50 Hz
Κατανάλωση ενέργειας: 550 Watt
Βλάβη Αιτία ΑποκατάστασηΗ αποστείρωση διαρκεί πολύ Έχει προστεθεί πολύ νερό Για βέλτιστη αποστείρωση μετρήστε
ακριβώς 70 mlΗ θερμαντική βάση έχει άλατα
Αφαιρέστε τα άλατα από την θερμαντική βάση (βλέπε «6.2 Αφαίρεση αλάτων» σε σελίδα 64)
Η συσκευή δεν ενεργοποιείται, η λυχνία ελέγχου 8 δεν ανάβει
Δεν υπάρχει παροχή ρεύματος
Συνδέστε σωστά το φις του καλωδίου ρεύματοςΕλέγξτε με άλλες συσκευές, αν η πρίζα έχει τάση
Η συσκευή δεν ενεργοποιείται ξανά μετά από προηγούμενη χρήση, η λυχνία ελέγχου 8 ανάβει
Η προστασία από υπερθέρμανση είναι ενεργή
Περιμένετε 15 λεπτά μέχρι να κρυώσει η συσκευή
Τα 6 μπιμπερό FIRST CHOICE δεν ταιριάζουν στη συσκευή
Τα τμήματα δεν έχουν κατανεμηθεί σωστά
Τοποθετήστε τα μπιμπερό από το λαιμό και χωρίς αξεσουάρ στο στήριγμα μπιμπερόΣτοιβάξτε τα καπάκια το ένα πάνω στο άλλο στο στήριγμα μπιμπερό και κατόπιν τοποθετήστε το καλάθι αξεσουάρ
Τα μπιμπερό είναι καυτά μετά την αποστείρωση
Τα μπιμπερό έχουν αποστειρωθεί σε περισσότερους από 90 °C
Αφήστε τα μπιμπερό να κρυώσουν Χρησιμοποιήστε τη λαβίδα μπιμπερό
Τα μπιμπερό και τα αξεσουάρ εμφανίζουν άσπρα ίχνη μετά την αποστείρωση
Η συσκευή έχει άλατα Αφαιρέστε τα άλατα από τη συσκευή (βλέπε «6.2 Αφαίρεση αλάτων» σε σελίδα 64)
Από το χείλος του καλαθιού αξεσουάρ βγαίνει ατμός
Η συσκευή έχει συναρμολογηθεί λάθος
Συναρμολογήστε σωστά τη συσκευή (βλέπε «5.2 Αποστείρωση» σε σελίδα 62)
Τα μπιμπερό και τα εξαρτήματα δεν έχουν κατανεμηθεί σωστά
Κατανείμετε τα τμήματα έτσι, ώστε η συσκευή να κλείνει εντελώς (βλέπε «5.2 Αποστείρωση» σε σελίδα 62)
Vaporisator 09/08 Seite 65 Dienstag, 7. Oktober 2008 8:17 08

66
9. Απόρριψη
9.1 ΣυσκευήΤο σύμβολο του διαγραμμένουδοχείου απορριμμάτων σετροχούς, σημαίνει ότι το προϊόνθα πρέπει να απορρίπτεται στηνΕυρωπαϊκή Ένωση σε ξεχωριστήσυλλογή απορριμμάτων. Αυτόισχύει για το προϊόν και όλα τα
εξαρτήματα που χαρακτηρίζονται με αυτό τοσύμβολο. Τα προϊόντα που φέρουν αυτή τησήμανση δεν επιτρέπεται να απορρίπτονταιμαζί με τα συνηθισμένα οικιακά
απορρίμματα, αλλά πρέπει να παραδίδονταισε ειδικά σημεία για ανακύκλωση ηλεκτρικώνκαι ηλεκτρονικών συσκευών. Η ανακύκλωσησυμβάλλει στη μείωση κατανάλωσης πρώτωνυλών, ώστε να μην επιβαρύνεται τοπεριβάλλον.
9.2 ΣυσκευασίαΓια να απορρίψετε τη συσκευασία, προσέξτετις σχετικές προδιαγραφές για το περιβάλλονπου ισχύουν στη χώρα σας.
10. ΕγγύησηΜε προσεκτικό χειρισμό και τήρηση τωνοδηγιών χρήσης, ο κατασκευαστής παρέχειεγγύηση 2 ετών από την ημερομηνία αγοράς.
Υποχρεούμαστε να επισκευάσουμε δωρεάντη συσκευή, εφόσον πρόκειται για σφάλμαυλικού ή κατασκευής. Περαιτέρω αξιώσειςαποκλείονται.
Οι ζημίες που οφείλονται σε ακατάλληληχρήση της συσκευής, δεν καλύπτονται. Τοηλεκτρικό καλώδιο και το φις αποκλείονταιαπό την εγγύηση, εφόσον έχουν υποστείαπλά φθορά. Εντός των 2 πρώτων ετών μετάτην ημερομηνία αγοράς, αποκαθιστούμεκάθε ελάττωμα που θεωρούμε νόμιμο χωρίςνα συνυπολογίζουμε τα προκύπτοντα έξοδα.Η ανάληψη των εξόδων θα πρέπει ναδιασαφηνίζεται εκ των προτέρων.
Η αποστολή της συσκευής πρέπει σε κάθεπερίπτωση να πραγματοποιείται μεεπισύναψη του εντύπου εγγύησης ή τηςαπόδειξης αγοράς.
Χωρίς απόδειξη της ημερομηνίας αγοράς, ηχρέωση των εξόδων γίνεται χωρίςδιευκρινιστικές ερωτήσεις. Η επιστροφή στονιδιοκτήτη γίνεται με αντικαταβολή.
Παρακαλούμε να συμπληρώσετε το έντυποεγγύησης ήδη από την αγορά και να τοφυλάξετε σε ασφαλές μέρος. Σε περίπτωσηαπώλειας του εντύπου εγγύησης, το έντυποδεν αντικαθίσταται.
Το έντυπο εγγύησης βρίσκεται στο τέλοςαυτού του φυλλαδίου.
Vaporisator 09/08 Seite 66 Dienstag, 7. Oktober 2008 8:17 08

67
İçindekiler
1. İlk kez kullanmadan önce dikkat edilecek önemli bilgiler . . . . . . . . . . . . 68
2. Cihazın tanımı . . . . . . . . . . . . . . . . . . . . . . . . . . . . . . . . . . . . . . . . . . . . . . . 68
2.1 Kullanım amacı . . . . . . . . . . . . . . . . . . . . . . . . . . . . . . . . . . . . . . . . . . . . . . . 682.2 Modeller . . . . . . . . . . . . . . . . . . . . . . . . . . . . . . . . . . . . . . . . . . . . . . . . . . . . 682.3 Teslimat kapsamı . . . . . . . . . . . . . . . . . . . . . . . . . . . . . . . . . . . . . . . . . . . . . 682.4 Fonksiyonel tanımı . . . . . . . . . . . . . . . . . . . . . . . . . . . . . . . . . . . . . . . . . . . . 68
3. Güvenlik talimatları . . . . . . . . . . . . . . . . . . . . . . . . . . . . . . . . . . . . . . . . . . . 69
3.1 Terim açıklamaları . . . . . . . . . . . . . . . . . . . . . . . . . . . . . . . . . . . . . . . . . . . . . 693.2 Genel bilgiler . . . . . . . . . . . . . . . . . . . . . . . . . . . . . . . . . . . . . . . . . . . . . . . . . 693.3 Yanma ve haşlanmaya karşı korunma . . . . . . . . . . . . . . . . . . . . . . . . . . . . . 703.4 Elektrik çarpmasına karşı korunma. . . . . . . . . . . . . . . . . . . . . . . . . . . . . . . . 703.5 Yangın tehlikesine karşı korunma . . . . . . . . . . . . . . . . . . . . . . . . . . . . . . . . . 713.6 Çocuğunuzun emniyeti için . . . . . . . . . . . . . . . . . . . . . . . . . . . . . . . . . . . . . . 71
4. Sterilizatörü oluşturan parçalar . . . . . . . . . . . . . . . . . . . . . . . . . . . . . . . . . 71
5. Bebek biberonlarının, biberon emziklerinin ve aksesuarların dezenfekte edilmesi . . . . . . . . . . . . . . . . . . . . . . . . . . . . . . 72
5.1 Dezenfekte etme işlemi ile ilgili genel bilgiler . . . . . . . . . . . . . . . . . . . . . . . . 725.2 Sterilizasyon . . . . . . . . . . . . . . . . . . . . . . . . . . . . . . . . . . . . . . . . . . . . . . . . . 725.3 Lütfen şu konulara dikkat ediniz: . . . . . . . . . . . . . . . . . . . . . . . . . . . . . . . . . . 73
6. Cihazın temizlenmesi, korunması ve bakımı. . . . . . . . . . . . . . . . . . . . . . . 73
6.1 Temizlenmesi . . . . . . . . . . . . . . . . . . . . . . . . . . . . . . . . . . . . . . . . . . . . . . . . 736.2 Kireçten arındırma. . . . . . . . . . . . . . . . . . . . . . . . . . . . . . . . . . . . . . . . . . . . . 73
7. Arızalar ve arıza giderilmesi . . . . . . . . . . . . . . . . . . . . . . . . . . . . . . . . . . . . 74
8. Teknik bilgiler . . . . . . . . . . . . . . . . . . . . . . . . . . . . . . . . . . . . . . . . . . . . . . . 75
9. Atılması . . . . . . . . . . . . . . . . . . . . . . . . . . . . . . . . . . . . . . . . . . . . . . . . . . . . 75
9.1 Cihaz . . . . . . . . . . . . . . . . . . . . . . . . . . . . . . . . . . . . . . . . . . . . . . . . . . . . . . . 759.2 Ambalaj . . . . . . . . . . . . . . . . . . . . . . . . . . . . . . . . . . . . . . . . . . . . . . . . . . . . . 75
10. Garanti . . . . . . . . . . . . . . . . . . . . . . . . . . . . . . . . . . . . . . . . . . . . . . . . . . . . . 75
Vaporisator 09/08 Seite 67 Dienstag, 7. Oktober 2008 8:01 08

68
Sevgili anne ve babalar,
Bizim sterilizatörümüzü alma kararı verdiniz veböylelikle kaliteyi ve güvenliği seçmiş oldunuz.Şimdi azami altı FIRST CHOICE geniş ağızlıbiberonu ve biberon aksesuarlarını çok kolayve güvenilir şekilde dezenfekte edebilirsiniz.Yeni doğmuş bebeklerin bünyesinin henüz
yeterince karşı koyamadığı vehastalanmalarına sebep olan mikroplar, busayede tamamen imha edilir. Dezenfekteedilen parçalar hemen yeniden kullanılabilir.
Bebeğinizin sağlıklı bir şekilde gelişmesinidiliyoruz.
1. İlk kez kullanmadan önce dikkat edilecek önemli bilgiler
Bu kullanma kılavuzu, size sterilizatörünüzügüvenli ve ekonomik olarak kullanmanızdayardımcı olacaktır.
Bu cihazı kuran, kullanan, temizleyen veyaatan herkes, bu kullanma kılavuzunun içeriğinitamamen biliyor ve anlamış olmalıdır.
Bu nedenle, kullanım kılavuzunu her zamankullanıma hazır bulundurmak için, itinaylasaklayınız.
Eğer cihazınızı günün birinde satacak veyabaşka birine hediye edecek olursanız, bukullanım kılavuzunu da cihazın yeni sahibinevererek, onun da cihazı güvenlikullanabilmesini sağlayınız.
2. Cihazın tanımı
2.1 Kullanım amacı
NUK VAPO RAPID buharlı sterilizatör ile,bebek biberonlarını ve biberon aksesuarlarınıdezenfekte edebilirsiniz.
Dezenfekte edilecek parçalar su içindekaynatılmaya karşı dayanıklı olmalıdır, çünküdezenfekte etme esnasında ulaşılan sıcaklıkderecesi 90°C’den daha yüksek olur.
Bu cihaz sadece kapalı ve kuru yerlerdekullanılmalıdır.
Bu cihaz, evde özel kullanımınız içindir veticari amaçlı kullanılmaya uygun değildir.
2.2 Modeller
Bu cihaz iki çeşit olarak mevcuttur:
1. Avrupa modeli, 2-PIN soketli, artikel no. 10.251.012
2. İngiliz modeli, 3-PIN soketli, artikel no. 10.749.054
Bu iki çeşit arasında kullanım ve işlevaçısından herhangi bir fark yoktur.
2.3 Teslimat kapsamı
• 1 NUK VAPO RAPID buharlı sterilizatör,komple
• 1 biberon maşası• 1 entegre su ölçme bardağı• 1 kullanım kılavuzu
2.4 Fonksiyonel tanımı
Bu sterilizatör elektrik ile ısıtılır. İçindeki suyunkaynaması sağlanır. Bu esnada buharlıortamda oluşan sıcaklık sayesinde mikroplarölür ve böylelikle bebek biberonları ve biberonaksesuarları dezenfekte edilir.
Vaporisator 09/08 Seite 68 Dienstag, 7. Oktober 2008 8:01 08

69
3. Güvenlik talimatları
Bu cihaz, güncel teknik koşullar doğrultusundatasarlanmış ve imal edilmiştir. İlgili tüm Avrupagüvenlik direktiflerine uygundur ve cihaz ilgilinormlara göre test edilmiştir. Yine de bu türcihazların kullanımı olası tehlikelere nedenolabilir.
Güvenliğiniz için lütfen bu talimatlarıokuyunuz. 5 dakikadan daha fazlasürmeyecektir. Verilen bilgilerin çoğunu biliyorolabilirsiniz, fakat yine de okuyunuz, çünküiçeriğindeki bazı talimatlar sizin için yeniolabilir ve yaralanmanıza veya ürünün hasargörmesine karşı koruyabilir.
3.1 Terim açıklamaları
Bu kullanma kılavuzunda aşağıdaki işaretleribulabilirsiniz:
Uyarı!
Yüksek risk: Uyarıya uyulmaması,küçük ya da ciddi yaralanmalaraneden olabilir.
Dikkat!
Orta risk: Uyarıa uyulmaması, ürünün zarargörmesine neden olabilir.
Bilgi:
Düşük risk: Cihaz ile çalışırken dikkatealınması gereken durum ve davranışlarhakkında bilgi verilir.
3.2 Genel bilgiler
• Kullanmaya başlamadan önce, lütfen bukullanım kılavuzunu dikkatlice okuyunuz.Kullanım kılavuzu cihazın bir parçasıdır veher zaman hazır bulundurulmalıdır.
• Cihazı sadece kullanım kılavuzundabelirtilen amaçlar için kullanınız (bkz.“2.1 Kullanım amacı” Sayfa 68).
Uyarı!
Müteakip uyarılara dikkatedilmemesi, yaralanmalara nedenolabilir.
• Bu cihaz, kısıtlı fiziksel, algısal veya ruhsalözelliklere sahip veya deneyimsiz ve/veyaeksik bilgiye sahip kişiler (çocuklar dahil)tarafından kullanılmaya uygun değildir;ancak bu tür kişiler, güvenliklerikonusunda yetkilendirilmiş bir kişiningözetimi altında olurlarsa veya bu yetkilikişiler tarafından cihazın nasılkullanılacağı konusunda kendilerine bilgive talimatlar verilirse, cihazı kullanabilirler.Çocuklar, cihaz ile oynamamalarınısağlamak için denetlenmelidir.
• Elektrik kablosunun takılıp düşme ihtimaliteşkil etmemesine, kablonun kimseyedolanmamasına veya üzerinebasılmamasına dikkat ediniz.
Dikkat!
Müteakip uyarılara dikkatedilmemesi, cihazda bir hasara nedenolabilir.
• Gerekli şebeke geriliminin (cihazdaki tipetiketine veya levhasına bakınız),bulunduğunuz yerdeki şebeke gerilimineuygun olup olmadığını kontrol ediniz.
• Cihaz sadece sağlam, düzgün, kuru,sıcağa dayanıklı ve yanmayan bir yüzeyüzerine yerleştirilmelidir.
• Cihaz, sıcak yüzeylerin yakınına, ısıtılansobaların yanına veya gazlı ya da elektriklicihazların yakınına kurulmamalıdır, çünkücihaz bu sebepten dolayı zarar görebilir.
• Cihazı kesinlikle susuz çalıştırmayınız,aksi halde aşırı ısınma söz konusu olabilir.
• Cihazı, devredeyken kesinlikle gözetimsizbırakmayınız.
• Kullanma işleminden sonra, cihazı fişindençekerek, istenmeden devreye sokulmasınıönleyiniz.
Vaporisator 09/08 Seite 69 Dienstag, 7. Oktober 2008 8:01 08
70
Bilgiler:
• Cihazın işlevselliğine zararverebileceğinden dolayı, kesinlikle 70ml’den fazla su.
• Bu kullanma kılavuzunda tavsiyeedilmeyen aksesuar parçalarıkullanıldığında veya onarımçalışmalarında sadece orijinal yedekparçalar kullanılmadığında, her türlügaranti hakkınızın ve sorumluluğumuzungeçerliliğini kaybettiğini lütfen dikkatealınız. Bu uygulama, onarım çalışmalarınınyetkili veya kalifiye olmayan elemanlartarafından yapılması durumu için degeçerlidir. İletişim adresi için, bu kullanmakılavuzunun sonuna bakınız.
• Muhtemel fonksiyon arızalarında, cihazınonarımı sadece yetkili ve kalifiye bireleman tarafından yapılmalıdır. Aksi haldeher türlü garanti hakkını kaybedersiniz.
3.3 Yanma ve haşlanmaya karşı korunma
Uyarı!
Cihaz yüksek ısı dereceleriile çalıştığı için,
aşağıdaki uyarılaradikkat edilmemesi, yanma veyahaşlanmalara neden olabilir.
• Cihazın yüzeyi, cihaz çalışırken çok sıcakolur. Bu nedenle, sadece bu işlem içinöngörülmüş kulpa veya düğmeleredokununuz.
• Sterilizatörü, çalışırken taşımayınız, sevketmeyiniz. Eğer sıcak cihazı taşımakdurumundaysanız, önce cihazı kapatınız,elektrik fişini prizden çekip çıkarınız vecihazın soğumasını bekleyiniz. Aksi haldesıcak yüzey haşlanmaya neden olabilir.
• Biberonlar, dezenfeksiyon işlemindenhemen sonra çok sıcaktır ve sadececihazla birlikte verilen biberon maşası iletutulup çıkarılmalıdır.
3.4 Elektrik çarpmasına karşı korunma
Uyarı!
Aşağıdaki güvenlik bilgi veuyarıları,
sizin elektrik çarpmasınakarşı korunmanız içindir.
• Cihazı sadece kendisi ve elektrik kablosutam olduğu zaman kullanınız.
• Elektrik kablosu hasarlı olduğu takdirde,muhtemel tehlikelerin önlenmesi için,kablonun cihaz üreticisi, üreticinin yetkiliservisi veya benzeri kalifiye personeltarafından değiştirilmelidir.
• İçine su doldurulması için öngörülmüşkabın haricinde, cihazın içine kesinlikle suveya başka bir sıvı girmemelidir. Bunedenle:
–Kesinlikle dışarıda kullanmayınız–Kesinlikle bardak, vazo vs. gibi sıvı dolu
kapları cihazın üzerine yerleştirmeyiniz–Kesinlikle çok nemli ortamlarda
kullanmayınız–Eviyenin yanında çalıştırmayınız.
Eğer herhangi bir zaman cihazın içine sugirecek olursa, hemen elektrik kablosunuçekip prizden çıkarınız ve cihazın kalifiyeuzman personel tarafından onarılmasınısağlayınız. İletişim adresi için, bu kullanmakılavuzunun sonuna bakınız.
• Cihazı, elektrik kablosunu veya elektrikfişini kesinlikle nemli veya ıslak eller iletutmayınız.
• Elektrik kablosunu daima fişinden tutarakprizden çekip çıkarınız. Kesinliklekablodan tutup çekmeyiniz.
• Elektrik kablosunun kesinliklekatlanmamasına veya ezilmemesinedikkat ediniz.
• Elektrik kablosunu sıcak yüzeylerden (örn.ocak) uzak tutunuz.
• Uzatma kabloları kullanılmasını önlemeyeözen gösteriniz. Uzatma kablosukullanılmasına sadece çok özel koşullardaizin verilir:
Vaporisator 09/08 Seite 70 Dienstag, 7. Oktober 2008 8:01 08

71
–Uzatma kablosu, cihazın elektrik akımgücüne uygun olmalıdır.
–Uzatma kablosu „serbest“ şekildeyerleştirilmemelidir: Takılıp düşmeihtimaline sebep olmamalıdır veçocukların erişemeyeceği yerde olmalıdır.
–Uzatma kablosu kesinlikle hasarlıolmamalıdır.
–Bu cihazın bağlandığı prize başkacihazlar bağlanmamalıdır, aksi haldeelektrik şebekesinde aşırı yüklenme sözkonusu olabilir (birden fazla prizlidüzeneklerin kullanılmasının yasakolması!).
3.5 Yangın tehlikesine karşı korunma
Uyarı!
Cihaz yüksek ısı dereceleriile çalıştığı için,
yangın çıkmasınıönlemek amacıyla, aşağıdakigüvenlik bilgi ve uyarılarına dikkatediniz.
• Cihazın çalıştırılması esnasında, cihazaçok yakın alanda yanıcı cisimler (örn. tül,perde, kağıt vs.) bulundurulmamalıdır.
• Tekstil eşyalarını veya başka cisimlerikesinlikle cihazın üzerinde, üst tarafındaveya önünde kurutmayınız.
• Aşırı ısınmanın önlenmesi için, cihazınüzeri kesinlikle örtülmemelidir.
• Cihaz kesinlikle doğrudan duvara monteedilmiş bir prizin altına kurulmamalıdır,çünkü cihaz çalıştırılınca oluşan ısı,elektrik donanımında hasara nedenolabilir.
• Cihazı kesinlikle gözetimsizçalıştırmayınız. Hasarlar çok kez yoğunkoku oluşması ile kendini belli eder. Böylebir durumda hemen elektrik fişini prizdençekip çıkarınız ve cihazın kontroledilmesini sağlayınız. İletişim adresi için,bu kullanma kılavuzunun sonuna bakınız.
3.6 Çocuğunuzun emniyeti için
Uyarı!
Çocuklar tehlikeleri çoğukez doğru algılayamaz
ve bunedenle kendilerini yaralayabilirler.Bu nedenle, lütfen şu konulara dikkatediniz:
• Bu ürün, çocukların cihaz ile oynamasınınönlenmesi için, sadece yetişkin kişileringözetimi altında kullanılmalıdır.
• Cihazın daima çocukların erişemeyeceğişekilde muhafaza edilmesine itinayladikkat ediniz.
• Çocukların cihazı kesinlikle elektrikkablosundan tutarak aşağı çekememesinedikkat ediniz.
• Ambalaj poşetlerinin çocuklar için ölümcülbir tuzak olmamasına dikkat ediniz.Ambalaj poşetleri oyuncak değildir.
4. Sterilizatörü oluşturan parçalar
1
Kulplu kapak
2
Buhar çıkış valfı
3
Aksesuar sepeti
4
Biberon tutucu
5
Buhar kabı
6
Isıtma tabanı
7
Açma/Kapatma düğmesi
8
Kontrol lambası
9
Ölçme bardağı (cihaz içine entegre edilmiştir)
10
Biberon maşası
Resimsiz: Elektrik kablosu, cihazın altkısmında bir kablo sarma düzeneği içindedir.
Vaporisator 09/08 Seite 71 Dienstag, 7. Oktober 2008 8:01 08

72
5. Bebek biberonlarının, biberon emziklerinin veaksesuarların dezenfekte edilmesi
5.1 Dezenfekte etme işlemi ile ilgili genel bilgiler
Yeni doğmuş bebekler başlangıçta,hastalıklara sebep olan mikroplara (hastalığaneden olan mikroplar / patojenik mikroplar)karşı yeterince bağışıklığa sahip değildir. Bunedenle, küçük bebekler için mamahazırlanırken, sterilize edilmiş biberonemziklerinin ve biberonların kullanılmasışarttır. Biberon emziklerinde ve biberonlardaçok küçük besin artıkları dahi olsa, bebeklerinsağlığı açısından tehlikeli olabilecek bakterileroluşması söz konusu olabilir. Bu nedenle,parçaları her sterilizasyon işleminden önce ekolarak temizlemeniz gerekir. Buharlısterilizatör, sterilizasyon işlemi sırasında buharkullanır. Bu esnada su 90 °C’den daha fazlaısıtılır ve buhara dönüştürülür. Bu şekildeoluşan ısı, cihaza yerleştirilen parçaları hızlı vegüvenilir şekilde dezenfekte eder. Bu şekilde,biberon emziklerinin ve biberonların sadece ısıve su buharı ile teması söz konusudur.Sterilizatörün dezenfekte etme işlemi içintükettiği su az miktarda olduğu için elektrikgücüne de az ihtiyaç vardır.
5.2 Sterilizasyon
Dikkat!
Dezenfekte edilecek tüm parçalar,itinayla durulanmalı ve tüm besin artıklarındanarındırılmalıdır.
Dezenfeksiyon resimleri
A
-
I
için, açılabilensayfaya bakınız.
1. Ölçme bardağını
9
ısıtma tabanından
6
alınız (Res.
A
).
2. Ölçme bardağının
9
yardımı ile toplam 70ml musluk suyunu ısıtma tabanına
6
doldurunuz (Res.
A
).
Bilgi:
70 ml, herbiri 35 ml su miktarı içereniki ölçme bardağına eşittir.
3. Buhar kabını
5
ısıtma tabanı
6
üzerineyerleştiriniz (Res.
B
).
4. Biberon tutucuyu
4
buhar kabının içineyerleştiriniz (Res.
C
).
Dikkat!
Biberonları daima açık şekilde veparçalarına ayrılmış olarak dezenfekte ediniz,aksi halde malzemede deformasyonlaroluşabilir.
5. Biberonları açık ve baş aşağı şekildebiberon tutucu
4
üzerine yerleştiriniz (Res.
D
).
Bilgi:
Biberon ağız kapaklarını mümkünolduğu kadar biberon tutucu
4
içine diziniz.Böylelikle aksesuar sepetinde (Res.
E
)yerden tasarruf sağlamış olursunuz.
6. Aksesuar sepetini
3
buhar kabının (Res.
F
)üzerine yerleştiriniz.
7. Aksesuarları, aksesuar sepetinin
3
içineyerleştiriniz (Res.
G
).
8. Kapağı
1
aksesuar sepetinin
3
üzerineyerleştiriniz (Res.
H
).
9. Elektrik fişini uygun bir elektrik prizinetakınız.
Bilgi:
Eğer kontrol lambası
8
şimdidenyanarsa, açma düğmesi
7
istenmedenaçılmış demektir.
10.Cihazı açma düğmesi
7
ile açınız.
Kontrol lambası
8
yanar (Res.
I
).
Sterilizatör, dezenfeksiyon işleminden sonraotomatik olarak kapanır ve kontrol lambasısöner.
Vaporisator 09/08 Seite 72 Dienstag, 7. Oktober 2008 8:01 08

73
Uyarı!
Cihazın içinde, kapatıldıktan hemensonra daha sıcak buharbulunmaktadır ve bu buhar kısmenbuhar çıkışından dışarı çıkar. Bubuhardan dolayı haşlanmamayadikkat ediniz. Cihazın en az üçdakika kapalı şekilde soğumasınıbekleyiniz.
Biberonlar, dezenfeksiyon işlemindenhemen sonra çok sıcaktır ve sadececihazla beraber verilen biberonmaşası ile tutulup çıkarılmalıdır.
Dikkat!
Cihazın istenmeden devreyesokulmasını önlemek için, her kullanımdansonra elektrik fişini prizden çekip çıkarınız.
5.3 Lütfen şu konulara dikkat ediniz:
• Bir dezenfeksiyon işlemi, 70 ml su ileyaklaşık 8 dakika sürer.
• Bir dezenfeksiyon işleminin garantiliuygulanabilmesi için, dezenfeksiyonişlemine ara verilmemesi vekısaltılmaması şarttır.
• Sadece, herhangi bir katkı maddesi ilaveedilmemiş, normal musluk suyu kullanınız.
• Muntazam aralıklarla, “6.2 Kireçtenarındırma” bölümünde açıklandığı gibi birkireçten arındırma işlemi yapılmasınısağlayarak, cihazın işlerliğini koruyunuz.
6. Cihazın temizlenmesi, korunması ve bakımı
6.1 Temizlenmesi
Uyarı!
Cihazı temizlemeden önce daimaelektrik fişini prizden çekip çıkarınız.
Cihazı sadece soğuduktan sonratemizleyiniz.
Dikkat!
Keskin veya çok tesirli temizlememaddeleri veya ovalama gerektirenmalzemeler
kullanmayınız, çünkü bu türmaddeler cihaz yüzeyini zedeleyebilir.
1. Kapağı
1
, aksesuar sepetini
3
, biberontutucuyu
4 ve buhar kabını 5 ısıtmatabanından 6 çıkarınız.
Dikkat! Isıtma tabanı 6 kesinlikle suyasokulmamalıdır, aksi halde zarar görebilir,çünkü içinde elektrikli parçalar vardır.
2. Isıtma tabanını 6 her kullanımdan sonranemli bir bez ile siliniz.
3. Kapağı 1, aksesuar sepetini 3, biberontutucuyu 4 ve buhar kabını 5 bulaşıkdeterjanlı su ile ya da bulaşık makinesindeyıkayınız.
6.2 Kireçten arındırmaCihazın muntazam aralıklar ile silinmesi, dahaaz kireç tutmasını sağlar. Fakat belli bir süresonra, su kaynatma işleminden dolayı,sterilizatörün ısıtma tabanının içinde kireçtabakası veya tortusu oluşacaktır.
Kireçlenmeler, dezenfekte etme işlemindecihazın gücünü ve performasını oldukçadüşürebilir.
Bilgi: Hafif kireçlenmelerde normal sirke ileburada tarif edilen kireçten arındırmayöntemini uygulamanız tavsiye edilir:
1. Kireçten arındırma işlemi için 35 ml sıcaksuyu ve 35 ml normal sirkeyi birbirinekarıştırınız ve ısıtma tabanının 6 içinedoldurunuz.
2. Bu karışımın 30 dakika etki göstermesinibekleyiniz ve ardından dökünüz.
3. Ardından cihazı nemli bir bez ile siliptemizleyiniz.
Vaporisator 09/08 Seite 73 Dienstag, 7. Oktober 2008 8:01 08
74
Yoğun kireçlenmelerde özel bir kireçtenarındırma maddesi kullanınız. Bu işlemde,kireçten arındırma maddesinin kullanma bilgive uyarılarına dikkat ediniz.
7. Arızalar ve arıza giderilmesiArıza Nedeni Giderilmesi
Sterilizasyon işlemi çok uzun sürüyor
Çok fazla su doldurulmuş Optimal bir dezenfeksiyon işlemi için tam 70 ml su ölçünüz
Isıtma tabanı kireç tutmuş Isıtma tabanının kirecini gideriniz (bkz. “6.2 Kireçten arındırma” Sayfa 73)
Cihaz devreye sokulamıyor, kontrol lambası 8 yanmıyor
Elektrik akımı yok Elektrik fişini prize doğru takınızBaşka bir cihaz ile, elektrik prizinde elektrik olup olmadığını kontrol ediniz
Cihaz, kullanıldıktan sonra tekrar devreye sokulamıyor, kontrol lambası 8 yanıyor
Aşırı ısınmaya karşı koruma düzeni devrede
Cihazın soğuması için, 15 dakika bekleyiniz
6 adet FIRST CHOICE biberon cihaza sığmıyor
Parçalar uygunsuz dağıtılmış
Biberonları biberon tutucuya baş aşağı ve aksesuarsız yerleştirinizKapatma kapaklarını biberon tutucuya diziniz ve sonra aksesuar sepetini üzerine yerleştiriniz
Biberonlar, dezenfeksiyon işleminden sonra çok sıcak
Biberonlar 90 °C üzerinde bir ısı ile dezenfekte edilmiştir
Biberonların biraz soğumasını bekleyinizBiberon maşasını kullanınız
Biberonlar ve aksesuarlar üzerinde dezenfeksiyon işleminden sonra beyaz lekeler veya izler var
Cihaz kireç tutmuş Cihazın kirecini gideriniz (bkz. “6.2 Kireçten arındırma” Sayfa 73)
Aksesuar sepetinin kenarından dışarı buhar fışkırıyor
Cihaz yanlış monte edilmiş Cihazı doğru monte ediniz (bkz. “5.2 Sterilizasyon” Sayfa 72)
Biberonlar ve aksesuar parçaları uygunsuz dağıtılmış
Parçaları öyle dağıtınız ki, cihaz tamamen kapanabilsin (bkz. “5.2 Sterilizasyon” Sayfa 72)
Vaporisator 09/08 Seite 74 Dienstag, 7. Oktober 2008 8:01 08

75
8. Teknik bilgilerAvrupa modeli, 2 PIN soketli (Artikel No. 10.251.012): Elektrik gerilimi: 220 - 240 V~/50 Hz
Harcadığı güç: 550 Watt
İngiliz modeli, 3 PIN soketli (Artikel No. 10.749.054)Elektrik gerilimi: 220 - 240 V~/50 Hz
Harcadığı güç: 550 Watt
9. Atılması9.1 Cihaz
Üzeri çizili tekerlekli çöp kutusuişareti, ürünün Avrupa Birliğisınırları dahilinde, ilgilikategorideki çöplerin toplandığıyere teslim edilmesi gerektiğinigöstermektedir. Bu husus, ürünve bu işarete sahip tüm aksesuar
parçaları için geçerlidir. Bu işarete sahipürünlerin normal evsel çöplere atılması yasak
olup, elektrikli ve elektronik cihazların geridönüşüm işlemini yapan toplama tesislerineteslim edilmesi gerekir. Geri dönüşüm, hammaddelerinin tüketilmesinin azaltılmasını veçevreye daha az zarar verilmesinisağlamaktadır.
9.2 AmbalajAmbalajı atmak istiyorsanız, lütfen ülkenizdekiilgili çevre yönetmeliklerine dikkat ediniz.
10. GarantiCihazın itinalı kullanılması ve kullanmakılavuzunda verilmiş olan bilgi ve uyarılaradikkat edilmesi halinde, cihaz üreticisi 2 yılgaranti sunmaktadır ve bu garanti hakkı satınalma tarihinden itibaren geçerlidir.
Cihazda söz konusu olan bir hata veya arıza,bir malzeme veya yapısal ya da tasarımhatasından kaynaklanıyorsa, cihaz ücretsizolarak onarılır. Bunun dışındaki hata vearızalar garanti kapsamı dışındadır, ücret talepedilebilir.
Cihazın usulüne aykırı kullanımındankaynaklanan hasarlar ve arızalar için hak talepedilemez ve bunlar garanti kapsamı
dışındadır. Kablo ve fiş, aşınma ile ilgili birsorun olduğunda garanti kapsamına dahildeğildir.
Cihazın onarılması için, cihaz ilgili adresekesinlikle garanti belgesi ve orijinal satın almabelgesi (ilgili satış fişi) ile birliktegönderilmelidir.
Satın alma tarihinin kanıtlanmaması halinde,ilgili masraflar için tekrar bilgi verilmedenfatura kesilir. Bu durumda, cihaz müşteriyeödemeli olarak geri gönderilir.
Garanti belgesini, cihazı satın aldığınızdayetkiliye lütfen hemen doldurtunuz ve bubelgeyi itinayla saklayınız. Kaybedilen garantibelgelerinin yerine yenisi verilmez.
Vaporisator 09/08 Seite 75 Dienstag, 7. Oktober 2008 8:01 08

76
��������
1. ����� ����� ����� ������ �������. . . . . . . . . . . . . . . . . 77
2. ����� ������. . . . . . . . . . . . . . . . . . . . . . . . . . . . . . . . . . . . . . . . . . 77
2.1 ���������� . . . . . . . . . . . . . . . . . . . . . . . . . . . . . . . . . . . . . . . . . . . . . . . . . . . 772.2 ����. . . . . . . . . . . . . . . . . . . . . . . . . . . . . . . . . . . . . . . . . . . . . . . . . . . . . . . 772.3 ���� ������� . . . . . . . . . . . . . . . . . . . . . . . . . . . . . . . . . . . . . . . . . . . . . . . 772.4 ������� �������� �������� . . . . . . . . . . . . . . . . . . . . . . . . . . . . . . . . . . . . 77
3. ������ �� ����� ���������� . . . . . . . . . . . . . . . . . . . . . . . . . . . 78
3.1 �������� ������ . . . . . . . . . . . . . . . . . . . . . . . . . . . . . . . . . . . . . . . . . . . . . 783.2 ���� �������� . . . . . . . . . . . . . . . . . . . . . . . . . . . . . . . . . . . . . . . . . . . . . . . 783.3 ������ � ��� � !��������� . . . . . . . . . . . . . . . . . . . . . . . . . . . . . . . . . 793.4 ������ � "����������� ����� . . . . . . . . . . . . . . . . . . . . . . . . . . . . . . . . . . 793.5 ������� ����������� ���������� . . . . . . . . . . . . . . . . . . . . . . . . . . 803.6 #�� ���������� $�!�� �������. . . . . . . . . . . . . . . . . . . . . . . . . . . . . . . . 80
4. ����� ����������� . . . . . . . . . . . . . . . . . . . . . . . . . . . . . . . . . . . . . . 81
5. �������� ������ � �������, ����� ������������ . . . . 81
5.1 ���� �������� �����%����� . . . . . . . . . . . . . . . . . . . . . . . . . . . . . . . . . . . 815.2 #����%����� . . . . . . . . . . . . . . . . . . . . . . . . . . . . . . . . . . . . . . . . . . . . . . . . . . . 815.3 &����� �����: . . . . . . . . . . . . . . . . . . . . . . . . . . . . . . . . . . . . . . . . . . . . . . . . . 82
6. !���� ��� �� ������� . . . . . . . . . . . . . . . . . . . . . . . . . . . . . . . . . . 83
6.1 '����� . . . . . . . . . . . . . . . . . . . . . . . . . . . . . . . . . . . . . . . . . . . . . . . . . . . . . . . 836.2 (������� ������ . . . . . . . . . . . . . . . . . . . . . . . . . . . . . . . . . . . . . . . . . . . . . . . 83
7. "������� � ������. . . . . . . . . . . . . . . . . . . . . . . . . . . . . . . . . . 84
8. #������� ����������� . . . . . . . . . . . . . . . . . . . . . . . . . . . . . . . . 85
9. ������� . . . . . . . . . . . . . . . . . . . . . . . . . . . . . . . . . . . . . . . . . . . . . . . . 85
9.1 �����. . . . . . . . . . . . . . . . . . . . . . . . . . . . . . . . . . . . . . . . . . . . . . . . . . . . . . . 859.2 (������ . . . . . . . . . . . . . . . . . . . . . . . . . . . . . . . . . . . . . . . . . . . . . . . . . . . . . 85
10. $����� . . . . . . . . . . . . . . . . . . . . . . . . . . . . . . . . . . . . . . . . . . . . . . . . . . 85
Bedienung RUS Seite 76 Freitag, 29. Januar 2010 10:41 10

77
����%� ������!
$) �������� ��! ����� ����������� ���� ���)� �)����� ����������)� ��������)� �����. *����+ $) ��������� � ������ �����%�������+ � !�������)���� � !����� ���)!�� FIRSTCHOICE � �, �������������. *���������, ����������)� �����), �
���), ��������)� ��� ����������� ������� �������, �����+/�������/���. #����%��������)��������) ����� �� ���) �����+�����/. ����+ $�! ���)! ������ ����)�.
1. ����� ����� ����� ������ �������
#����� ���������� � ���������/ �����$�� ������� � "���� ��+����+��$�!�� ������������. ;���)�, �� ������������� �����,��+������ ��, ������ ��� �����������,����� ��������+� �������+�� ������ ����������� � ���������/ �����+ ��.
<������ ���������/ � ���������/ � ����������� �����, ��� �� ���) �� �������)�� � $�� �� ����. =��� $) ������� ��� ������ $�! �����,�� �����+��, ���������, �������+ � �������������/ � ���������/, ��� �� ���)��)� �������� ����� �� ���������+����+�� ������.
2. ����� ������
2.1 "������
> ���+/ ����� ����������������� NUK VAPO RAPID $) ����������%�������+ ������� ���)���� � �,�������������.#����%�������)� �������) ����) �)�+������� � ��������/, ��� ��� �������������� �����%��������� �������� ����90 °C.#���)� ����� �����!����� ����+����+��+� � ����)�),, ��,�, ��������,.#���)� ����� ������������ ��+� �������+������ � ���!��, ������, � �������������� ��� ��%�������+������������.
2.2 '����
����� ����������� � ���, ��������,:1. =��������� ����+ � ���,�������������, ���� ��������: 10.251.012
2. ?��������� ����+ � ���,�������������, ���� ��������: 10.749.054#���)� ����� �� �����/��� ���� � ������ ���� %������� � ���������/.
2.3 ��(�� �������
• 1 ����� ����������� NUK VAPORAPID, �����
• 1 ����) ��� ���)����• 1 ������������)� ����)� ������ ���
��)• 1 ���������� � ���������/
2.4 ����� ����� �������
#���)� ����������� ����� "������������������. ��,������� � ��� ���������� � �������. �����/����� ���"�� ������ ��� ��������� �����) � ������)� �����%������� ������� ���)����, ������ �, �������������.
Bedienung RUS Seite 77 Freitag, 29. Januar 2010 10:41 10
78
3. ������ �� ����� ����������
#���)� ����� ��������� � �������������� ��������)� ��,������. $�����������/��� ���������� ���)���������� ���/���), � ������������ � ���������� � �������������.� ������� �� "�, ����)� �����)���� �����������+ ������+.(������ 5 ����� � ������+�� ��� ���)�$�!� ���������+! $�� �� �����������+!�� ������� �� �������� ��!�,�������� � ����������. $����, $)��� �����) � ��+!������ ��������, �,������� �� "�, ������� �,, ���������,��� ���. ��� �)�+, � ��� ��� ��������������� ��� $�� ��)� � ����� $���������+ ������ ��� �������� �����.
3.1 )����� �����
$ ����� ���������� � ���������/ $)������� �����/��� ���������:
����!
$)���� ������+ �����:�����/����� ����� ������������ ������� ����� ����+/��� �������� � �����+��� ��,��.
��������!
>������ ������+ �����: �����/���������� �������� ���� ���������������+�)� �����.
)������:
������ ������+ �����: �������, �����)� ���,��� ������+ �������� ����������� � ������.
3.2 ��*� �����
• ����� ����+������� ������,��������+� ������� �����/���������/ � ���������/. ���������� �� ������� ����+/ ������ �)�+ ������ �� ����.
• &���+����� ����� ��+� ���������� � ����� �������������������/ (��. ������2.1 “����������” �� ���. 77).
����!
�����/����� �����/��,�������� ���� �������� ��������/ �����.
• #���)� ������ �� �����!�������+����+�� ����� (� �� ����� ������) � ���������)�� %���������� ���������)�� ���������� ��� �����/��� �������� �)�� �/����������), ������, �� ����/��������, �������, ���� �� ����������������� �����/��� �� �,���������+ ��� ��� �� ������ ���� �������� � ��+�����/������. �� ��������� ����� ����������� � �� �����!���� �� �����+ �������.
• >����� �����+ ����� �)�+�������� ���, ���) ���� ��� �����������, �� ��������� � �� ���������� ���.
��������! "�����+��� ���� +*� ����� ����� ������ ���������+ ������.
• �����+��, ����������� �����,���� ������ ���������� (��.��%�����/ ���������� �� ������)����������+��� ���������/ � ����.
• ����� �����!����� ������������+��+� �� ������/, ����/, ��,�/ ������������/��/�� ����,���+.
• ������ �� �������������� ����������� �����, ����,�����, ����),��� "�����������, ������, ���������� �� � �����/ ��,���, ���"� ���� �������� � ���������/����� ������������.
• ������ �� ���/����� ����� ��� ��),��� ��� � ���� ��������+��.
• ������ �� ��������� ���/����)������ ��� ��������.
Bedienung RUS Seite 78 Freitag, 29. Januar 2010 10:41 10
79
• ���� ����+������ ����� ����������/���+ � "���������, ��� �����) � �� �)� ���/��� �������.
)������:
• ������ �� ��������� ���� 70 ����), ��� ��� "� ���� ��������������+ �� ����� ������.
• ����� ������+ � ��������, �� �)�� ����� ������������� � ����������� ���������)� ���������,���� ����+������+ ����� ������, �������������)� � ����� ����������� ���������/, ��� ���� � ����������� �)�� ���������) ���������+�)� ������)� �����. L�������� ����� � ������,�)�������� �������%��������)��������. M����, � ����� $)����� ������+��, ��,����� � ��������� ���������� � ���������/.
• ��� �����), ������������,����� ������ ����� �)�����+�������%��������)�� ������. $������� ������ ��� ���������)��������+���� ��������/���.
3.3 -�*�� �� ���%�� �/������
����! #�� ��� ������������� �� ��������������� ��,
�����/����������/��, �������� ������������ � �������/ ��� �!��������/.
• ����,���+ ������ ��� ����� ���+���+� �����������. �"��������������+ ��+� � ����������������� "�� ����� ��� ����� ���./�)��/�����.
• �� ��������� ����������� � ������� ����). =��� $�� ���,�������������+ ������ �����,�)��/���� ��, �)�+�� ����� �� ������� �������+, ��� ����� ��)���. $������� ������ $) ����� ����+�� �����/ ����,���+.
• >���� ���� �����%����� ���)�������+ ������, � �"��� �, ��������)�����+ ��+� � ���+/ �������� ���)����.
3.4 -�*�� �� ;����������%� ����
����! ���� +*� ������� ����������
������� $�� �"����������� �����.
• &���+����� ����� ��+� � ��������, ���� � � ������ �����+�������).
• =��� ������ �����+ ��������, � �����, ���������� �� ���������,��� ������+ ���������/, ���������� ������ ��� �����������%���������� ����.
• $ ����� �� � ��� ������ �� ������������+ ��� ��� ������ ������+,���� �������������� ��� "��������.
• �"���:–������ �� ����+����� ����� ��
��)�)� ����–������ �� ����+�� �� �����
��������)� ������+/ ������,�����, ��� ������), ���) � �.�.
–������ �� ����+����� ����� � ���+�����), ������,
–������ �� ����+����� ����� ������������).
=��� � ����� ���-���� ����� ���,��������� �)�+�� ����� �� ������,������ ����� � ����������%���������� ����. M����, ������ $) ����� ������+��,��,����� � ���� ����� ���������� ����������/.
• ������ �� ��������+ ������,������ ������ ��� ����� �����)��������.
• $����� �)������� ������ �����+ ��������, ������ �� �����. ������ �������� �� �����+.
Bedienung RUS Seite 79 Freitag, 29. Januar 2010 10:41 10

80
• >������ �� ���, ���) ������ �����+������ �� ����������� ��� �� �)������.
• #������ ������ �����+ ����� ������, ����,����� (��������, �����,���� ����)).
• &�������� ����+������ �����������.&, �����!����� ����+����+ ��+� ����� ���������), ������,:
–(��������+ ����� �)�+ ��������������� ����+������ ��� ���� ���,���,���� ��� ����) ������.
–(��������+ �� ����� �)�+ ������„� ����,�“: ��������� �� ���,���) ���� �� �� �������+�� ���,��� � ��������� ��� ����� �����.
–(��������+ �� ����� �)�+ �� � ��������� ��������.
–; ������ ������ �� ����) �)�+����/���) ������ �����), ����������������, � ������� ������������ ���������� "��������� (�������!����� ����+����+����������)� ������!).
3.5 )����� ������������� ����������
����! )���� �������� ��������� �������� ��,
���������� ����������� �����,������� �)�����+ �����/����������� � ����������.
• $ ����� ����) ������ � ���������������� ������� �� ����)��,���+�� ���� ���������/������������) (��������, ���������,������).
• ������ �� ��!��� ������� �� ����� ��������� �������) �� ������ ��������� � ���.
• #�� �� ���) �������+ ���������������������, ������ �� ����)�������.
• ������ �� ����+�� ����� ��������, ��� ��� �)���������������, ������/��� ��� �����
������������, ���� �������� � �����������/.
• ������ �� ��������� ���/����)������ ��� ��������. ����)��������� ���������� ������ ���������� �������� ������ ����,. $ ����������� ��������� �)�+�� ����� �������� � ������ ����� �� �������.M����, � ����� $) �����������+��, ��,����� � ���� ��������������� � ���������/.
3.6 ��� ���������� ��/�%� ������
����! ��� ����� � ������� �����<� ����<����< + �������<
� �"������� ������� ���� �����). $����� � "��� ���,��� ����)���+�����/���:
• #���)� ����� �����!���������+����+ ��+� �� �������������),, ���) ���������+��, ������ �� ����/� � ������.
• $�������+� ������� �� ���, ���)����� ������ ��,����� ���������� ��� ����� �����.
• >������ �� ���, ���) ���� �� ������������+ �����, ������ �� �����+.
• >������ �� ���, ���) ��������������� �� ����� ��� ����� �������+����������. (�������� ������ – "� ������!��.
Bedienung RUS Seite 80 Freitag, 29. Januar 2010 10:41 10
81
4. ����� �����������
1
;�)!�� � �����
2
�������� ��� �)����� ����
3
;����� ��� ��������������
4
#�������+ ��� ���)����
5
���������
6
����������+�)� "������
7
;���� ���/�����/�)��/�����
8
;����+��� �������
9
���)� ������ (����������� � �����)
10
W���) ��� ���)������ ��������: �� ������ ��,������������)� ������ �����+.
5. �������� ������ � �������, ����� ������������
5.1 ��*� ������ � �������
$ �����+�)� ����� � ��������), ������������ ������� � �������� ��� ��,���) � �������� ������� �������+ ����� ����������� ������ (����������),������). �"��� ����)� ������� �������������� ������ ������� ��������������+���+ ��� � ������, ���)����.#��� �����!�� ������ ���� �� ����, �������, ���)����, ���� ���� �������� ���������/ ����), ��� ����+���������. �"��� ����� ���������������%����� ��� �������) ���,�����������+� ���)�+. ���������������� ������� � �������� �����������%�����. ��� "�� ��� ����������� �����������) ���� 90 °C � ������������ ����. $�����/��� �)���� ����������������%������� ������)� �������)�)��� � ������. *���� �����, ���� �������� ���)���� ���������/� ��+� �����)� ����. ?������� ����+!����������� ��), ���,����� ��������%�����, ���,� "�����"������ ������������.
5.2 ��������
��������!
$�� �������), ��������������%�����, ����) �)�+ ������+����)�) � �����) � ������ ����.X������
A
-
I
, �� ���), �������������� �����%�����, ��������) ���������. 1. &�������� ����)� ������
9
������������+�� "�������
6
(���.
A
).2. > ���+/ ����� �������
9
������� �����������+�)� "������
6
� ����������� 70 �� �������� ��)(���.
A
).
)������:
70 �� ���������/� ��������)� �������� ����� 35 ��.
3. (�������� ���������
5
������������+�)� "������
6
(���.
B
). 4. $����+�� ��������+ ��� ���)����
4
���������� (���.
C
).
��������!
$����� �����%�����������)���� ���)�)�� � ��������)�� ������+�)� �����, ��� ��� � ������������� ������ ��%������ ���������. 5. X�������� ������)�)� �������
���)���� ���)!�� ���� � ������������ ���)����
4
(���.
D
).
)������:
� �������� ��������)!�� ���)���� ���� � ����� ��������� �, � ��������+ ���
Bedienung RUS Seite 81 Freitag, 29. Januar 2010 10:41 10
82
���)����
4
. *���� �����, $)�"������ ���� � ������ ����������������� (���.
E
).6. (�������� ������ ���
��������������
3
�� ���������(���.
F
).7. X�������� ������������� ������,
���)���� � ������ �����������������
3
(���.
G
). 8. ������� ������ ��� ��������������
3
��)!��
1
(���.
H
).9. $����+�� ����� � ���������/��/
������.
)������:
���� � "�� �������������+ �����+��� �������
8
, ����/�����+
7
�)� ����� � "�� �!����.
10.$��/���� ����� � ���+/���/������
7
.;����+��� ������� ���������
8
(���.
I
).���� ������� �����%����� ���������������� �)��/������ ������������ ������+��� ������� �������.
����!
������������� ���� ��, �������� ���/�����, � ��� �����,����� ������ ���, ���)�������� �),��� �� �������� ����)����� ����,�. ?��+�������). #�� �� ���)�������+ !���������, ����������� ��)�+ � ������� ����������, �����. >���� ���� �����%��������)���� ���+ ������, ��"��� �, ������� �)�����+��+� � ���+/ ����� ������)����.
��������!
���� ����� ����+������������ �)������� ����� �� ������, ����� ���) �������+ ���/����� ������ �!����.
5.3 =����� ��� :
• ��� ����+������ 70 �� ��)�����%����� ������ ������� 8 �����.
• #����%����� ������������� ��+� ��� ������, ���� ������ �����%������� �)� ������� ��� �������.
• &���+����� ��+� �)���/ ��� ���� ����� ��� ����,-��� �����.
• #�� �,������� ������ � ��������������� �������� �������� �����+������ ��������� � ������� "6.2(������� ������".
Bedienung RUS Seite 82 Freitag, 29. Januar 2010 10:41 10

83
6. !���� ��� �� �������
6.1 !����
����!
����� ������ ������ �������)������� ����� �� ������.'������ ����� ��+� �,�������� �������.
��������! "� �������� ���� ��������� ��+*� ��������,
��� ����� ���� �������+ ����,���+.1. >������ ��)!��
1
, ��� �����������������
3
, ��������+ ������)����
4
, � ����� ���������
5
�����������+�� "�������
6
.
��������!
������ �� ��������
�%�������<�� ;����� 6 � ���, ��� ���"� ���� �������� � ���������/"������������, �� ���), � �����. 2. ��������� ����������+�)� "������ 6
������ ���%���� ���� ���������+������.
3. ������ ��)!�� 1, ��� ����������������� 3, ��������+ ������)���� 4, � ����� ��������� 5 ����+/ �������� ��� �)�+� ����)��� �� � ��������� ��!���.
6.2 ������ ���X�������� ��������� ������ �������������+ ��������� ������. � ���������� ���������� ������� ������+���� ������� �����+ ��� ����������� �� ����������+�� "�������������������. ������� ������ ������������+� ������+ "%%��������+ ����)������ ��� �����%�����. )������: �� ����</����������� ��� ���!� ��������+����+ ������)� ���� ������������ � ����������� ����� ������:1. #�� �������� ������ ���!���� 35 ��
������ ��) � 35 �� ����� ������ �������� ������ � ����������+�)�"������ 6.
2. #���� ������� ������+�� � �������30 �����, ����� ������ ��.
3. $ ����/����� ������� ����� ���������%����.
)� ��<�� ��� ���,�������+����+ ���/����� � �������������� ��� �������� ������. >��/�������� "�� �������� � ���������/ ����),�������.
Bedienung RUS Seite 83 Freitag, 29. Januar 2010 10:41 10

84
7. "������� � ������"�������� )��� �������
#����%����� ������ ���!�� ���
����� ���!�� ��� ��)
#�� ������+�� �����%����� �������� ��� 70 ��
?�+!� ��� ������ �� ����������+�� "�������
(������ �����+ � ����������+�� "������� (��. ������ 6.2 “(������� ������” �� ���. 83)
����� �� ���/������, �����+��� ������� 8 �� ����
���������� "������������
������+� �����+�� ����� � �����������+�� � ���+/ ����� ������, ������� �� � ������ ����������
����� �� ���/������ ���� ����)����� ����+������, �����+��� ������� 8 ����
$��/���� ������ � ���������
������� 15 �����, ��� ����� ��)���
$ ����� �� �����/��� 6 ���)���� FIRST CHOICE
�������) ��, �����������)
�����+�� ���)���� � ��������+ ���)!�� ����, ��� �������������� >����� ��)!�� ���)���� ���� � ����� � �������� �, � ��������+ ��� ���)����, ����� ��������� ������ ��� ��������������
���� �����%����� ���)���� ���+ ������
?��)���� �����%���������+ ��� ����������� ���� 90 °C
������� ���)����&���+����� ����) ��� ���)����
���� �����%����� �� ���)����, � �������������, ���)� �����
?�+!� ��� ������ � ������
(������ �����+ �� ������ (��. ������ 6.2 “(������� ������” �� ���. 83)
�� ���/ �����) ��� �������������� �),��� ���
����� �)� ��������+� �����
>������ ����� ������+� (��. ������ 5.2 “#����%�����” �� ���. 81)
?��)���� � ������������� �)�� ��, �����������)
X����������� �������) ����� �����, ���) ����� �����+/ ����)����� (��. ������ 5.2 “#����%�����” �� ���. 81)
Bedienung RUS Seite 84 Freitag, 29. Januar 2010 10:41 10
85
8. #������� �����������>���������� �����< � �� �������������� (���� ���� ��: 10.251.012):����������: 220 - 240 $~/50 Z� ����������� �����+: 550 $���
J������� �����< � ����������������� (���� ���� ��: 10.749.054):����������: 220 - 240 $~/50 Z� ����������� �����+: 550 $���
9. �������
9.1 )����>���� ������������������ ���� �� �����,�������, �� � ������,=�������� >/�� ������������� ����+������������. L� ������� ������� ������/ � � ����
������)� ������ � ����)� ������.&������, �������)� ����� �����,���+�� �)����)���+ � �)��)� �)���
����, �, ���� ������+ ��� ���������� ������) ������ �)�!�, � �����������"�����������, � "�������), ������.#����� ���������� ������ ������+���� ���������� �)�+� � �������������� �� �����/��/ �����.
9.2 ��������#�� ���������� ������� ������� ����)���+���������/��� ����������� $�!�������) � ,���� �����/��� ����).
10. $�������� ������� �������� � ������ ����/����� ���������� � ���������/����������+ ������������ �������/ �� 2��� � ��� ����������� ������.) �������� �������� �����������+�����, ���� ���+ ���� ��%������������� ��� !����, ����������.�������� ����, ��������� ����/���.������������, �����!�� � �����+���������������� �������� � ������, ���������/���. Z������� �� ����������������� ���� ����� � !������. $ �����������), 2 ��� � ������ ������ ����������������� �) ��������� �������)������������� ��� �)��������� ����� ���������)� ���,�). ���)��� ���,��������� �����������+��� ���������/.
��� �����)��� ������ ���������/���,��� �������+ ���������)� ������� ��������/ ������.?�� ������������ ���) ������ ���� ������� �)���������� ��� ����������. $"�� ������ ����� �)�)�������������)� �������.Z��������)� ���� ���,��� �������+����� �� ��� ������. ?����� ,������ ��.(������)� ���������)� ����) ��������������/���.Z��������)� ���� ��,����� � ��������� ��!/�).
Bedienung RUS Seite 85 Freitag, 29. Januar 2010 10:41 10

86
Spis treści1. Istotne wskazówki przed pierwszym użyciem . . . . . . . . . . . . . . . . . . . . . 872. Opis urządzenia. . . . . . . . . . . . . . . . . . . . . . . . . . . . . . . . . . . . . . . . . . . . . . 87
2.1 Zastosowanie . . . . . . . . . . . . . . . . . . . . . . . . . . . . . . . . . . . . . . . . . 872.2 Modele . . . . . . . . . . . . . . . . . . . . . . . . . . . . . . . . . . . . . . . . . . . . . . 872.3 Opakowanie zawiera . . . . . . . . . . . . . . . . . . . . . . . . . . . . . . . . . . . 872.4 Opis działania. . . . . . . . . . . . . . . . . . . . . . . . . . . . . . . . . . . . . . . . . 87
3. Wskazówki bezpieczeństwa. . . . . . . . . . . . . . . . . . . . . . . . . . . . . . . . . . . . 883.1 Objaśnienie pojęć. . . . . . . . . . . . . . . . . . . . . . . . . . . . . . . . . . . . . . 883.2 Informacje ogólne. . . . . . . . . . . . . . . . . . . . . . . . . . . . . . . . . . . . . . 883.3 Ochrona przed poparzeniem . . . . . . . . . . . . . . . . . . . . . . . . . . . . . 893.4 Ochrona przed porażeniem prądem. . . . . . . . . . . . . . . . . . . . . . . . 893.5 Ochrona przed pożarem. . . . . . . . . . . . . . . . . . . . . . . . . . . . . . . . . 903.6 Dla bezpieczeństwa dziecka . . . . . . . . . . . . . . . . . . . . . . . . . . . . . 90
4. Elementy składowe sterylizatora parowego. . . . . . . . . . . . . . . . . . . . . . . 915. Dezynfekcja butelek dla niemowląt, smoczków i akcesoriów. . . . . . . . . 91
5.1 Ogólne informacje dotyczące dezynfekcji . . . . . . . . . . . . . . . . . . . . 915.2 Dezynfekcja . . . . . . . . . . . . . . . . . . . . . . . . . . . . . . . . . . . . . . . . . . . 915.3 Uwagi . . . . . . . . . . . . . . . . . . . . . . . . . . . . . . . . . . . . . . . . . . . . . . . 92
6. Czyszczenie i konserwacja urządzenia. . . . . . . . . . . . . . . . . . . . . . . . . . . 936.1 Czyszczenie . . . . . . . . . . . . . . . . . . . . . . . . . . . . . . . . . . . . . . . . . . 936.2 Usuwanie kamienia . . . . . . . . . . . . . . . . . . . . . . . . . . . . . . . . . . . . 93
7. Usterki i ich usuwanie . . . . . . . . . . . . . . . . . . . . . . . . . . . . . . . . . . . . . . . . 948. Dane techniczne . . . . . . . . . . . . . . . . . . . . . . . . . . . . . . . . . . . . . . . . . . . . . 959. Utylizacja . . . . . . . . . . . . . . . . . . . . . . . . . . . . . . . . . . . . . . . . . . . . . . . . . . . 95
9.1 Urządzenie . . . . . . . . . . . . . . . . . . . . . . . . . . . . . . . . . . . . . . . . . . . 959.2 Opakowanie . . . . . . . . . . . . . . . . . . . . . . . . . . . . . . . . . . . . . . . . . . 95
10. Gwarancja . . . . . . . . . . . . . . . . . . . . . . . . . . . . . . . . . . . . . . . . . . . . . . . . . . 95
Vaporisator 09/08 Seite 86 Dienstag, 7. Oktober 2008 8:01 08

87
Drodzy RodziceZdecydowali się Państwo na nasz sterylizatorparowy a tym samym na jakość ibezpieczeństwo. Teraz mogą Państwo łatwo iniezawodnie zdezynfekować do sześciu butelekz szeroką szyjką FIRST CHOICE wraz zakcesoriami. Zarazki chorobotwórcze zostająw ten sposób całkowicie zniszczone.
Noworodek nie jest jeszcze w staniedostatecznie się przed nimi bronić, ponieważjego układ odpornościowy nie jest jeszcze wpełni rozwinięty. Zdezynfekowane częścimogą być natychmiast ponownie użyte.Życzymy Państwa dziecku zdrowego rozwoju.
1. Istotne wskazówki przed pierwszym użyciemInstrukcja ta pomoże Państwu wbezpiecznym i ekonomicznym użytkowaniusterylizatora parowego. Każda osoba, która to urządzenie składa,obsługuje, czyści lub utylizuje, musizapoznać się z instrukcją i zrozumiećcałą jej treść.
Dlatego instrukcję tę należy starannieprzechowywać, aby stale była pod ręką.Jeżeli Państwo swoje urządzeniesprzedadzą lub komuś podarują, należydołączyć tę instrukcję obsługi, abynastępny użytkownik mógł bezpieczniekorzystać z urządzenia.
2. Opis urządzenia2.1 ZastosowanieZa pomocą sterylizatora parowego NUKVAPO RAPID można dezynfekowaćbutelki dla niemowląt i akcesoria dobutelek.Wszystkie części do zdezynfekowaniamuszą się nadawać do gotowania,ponieważ temperatura podczasdezynfekcji wynosi ponad 90°C.Z produktu można korzystać tylko wzamkniętych i suchych pomieszczeniach.Urządzenie jest przeznaczone do użytku wwarunkach domowych, a nie do użytkukomercyjnego.
2.2 ModeleUrządzenie jest dostępne w dwóch wersjach:1. Model europejski - z wtyczką z 2bolcami, nr artykułu: 10.251.0122. Model brytyjski - z wtyczką z 3 bolcami,nr artykułu: 10.749.054
W zakresie obsługi i działania modele tenie różnią się między sobą.
2.3 Opakowanie zawiera• 1 sterylizator parowy NUK VAPO
RAPID, komplet• 1 szczypce do butelek• 1 wbudowane naczynie z miarką na
wodę• 1 instrukcję obsługi
2.4 Opis działaniaSterylizator jest zasilany elektrycznie.Znajdująca się w nim woda jestdoprowadzana do wrzenia. Powstającaprzy tym para wodna zabija zarazki,sterylizując tym samym butelki dlaniemowląt wraz z akcesoriami.
Vaporisator 09/08 Seite 87 Dienstag, 7. Oktober 2008 8:01 08

88
3. Wskazówki bezpieczeństwaUrządzenie zostało skonstruowane iwykonane według najnowocześniejszejtechnologii i zgodnie ze wszystkimiodpowiednimi europejskimi dyrektywamibezpieczeństwa, a następnie zostałosprawdzone na zgodność z odpowiedniąnormą. Urządzenia tego typu mogą byćjednak źródłem zagrożeń.Dla własnego bezpieczeństwa należyprzeczytać niniejsze wskazówki! Niepotrwa to dłużej niż 5 minut. Prawdopodobniewiększość z tych zaleceń jest już Państwuznana, mimo to prosimy o ich przeczytanie,gdyż jakaś wskazówka może jednak być dlaPaństwa nowa i może uchronić Państwa przedszkodą.
3.1 Objaśnienie pojęćW instrukcji obsługi używane są następująceoznaczenia:
Ostrzeżenie! Wysokie ryzyko: Nieprzestrzeganieostrzeżenia może spowodowaćniewielkie lub poważne obrażeniaciała.
Uwaga! Średnie ryzyko: Nieprzestrzeganie ostrzeżeniamoże spowodować szkody rzeczowe.Wskazówka: Małe ryzyko: Wskazówki dotycząceposługiwania się urządzeniem.
3.2 Informacje ogólne• Przed użyciem należy zapoznać się
uważnie z niniejszą instrukcją obsługi. Jestona elementem wyposażenia urządzenia imusi być stale pod ręką.
• Urządzenie należy stosować tylko zgodniez opisanym przeznaczeniem (patrz punkt“2.1 Zastosowanie” na stronie 87).
Ostrzeżenie! Nieprzestrzeganie następującychostrzeżeń może spowodować urazy.•Urządzenie nie jest przeznaczone
do użytku przez osoby (dorosłe i dzieci)o ograniczonych możliwościach fizycznych,sensorycznych lub umysłowych bądźz niedostatecznym doświadczeniem i/lubwiedzą, chyba że są one nadzorowaneprzez osobę odpowiedzialną za ichbezpieczeństwo lub otrzymały od niejwskazówki dotyczące używaniaurządzenia. Dzieci powinny być podopieką, żeby nie dopuścić, aby bawiły sięurządzeniem.
• Zwracać uwagę, żeby kabel sieciowyznajdował się w takim miejscu, aby niemożna się było o niego potknąć, zaplątaćsię w niego czy nadepnąć na niego.
Uwaga! Nieprzestrzeganie następującychostrzeżeń może spowodować uszkodzenieurządzenia.• Sprawdzić, czy wymagane napięcie
sieciowe (patrz tabliczka znamionowaurządzenia) jest zgodne z lokalnymnapięciem sieciowym.
• Urządzenie można stawiać tylko napodłożu twardym, równym, suchymi niepalnym.
• Nie stawiać urządzenia w pobliżugorących powierzchni, urządzeńgazowych lub elektrycznych czyw nagrzanych piekarnikach, gdyżurządzenie może zostać uszkodzone.
• Nigdy nie uruchamiać urządzenia bezwody, gdyż mogłoby dojść do przegrzania.
• Nigdy nie pozostawiać urządzeniapodczas pracy bez nadzoru.
Vaporisator 09/08 Seite 88 Dienstag, 7. Oktober 2008 8:01 08

89
• Po użyciu odłączyć urządzenie od sieci,aby nie można go było nieumyślniewłączyć.
Wskazówki: • Nigdy nie nalewać więcej niż 70 ml wody,
gdyż mogłoby to zaburzyć działanieurządzenia.
• Prosimy pamiętać, że używanieakcesoriów, które nie są zalecane w tejinstrukcji obsługi, lub – w razie naprawy –nieoryginalnych części, powoduje utratęwszelkich praw związanych z gwarancją irękojmią. Dotyczy to również naprawprzeprowadzanych przez niewykwalifikowaneosoby. Adres kontaktowy znajduje się nakońcu instrukcji.
• W przypadku ewentualnych ustereknaprawę urządzenia może przeprowadzićtylko wykwalifikowana osoba. Wprzeciwnym razie prawo do gwarancjiwygasa.
3.3 Ochrona przed poparzeniemOstrzeżenie! Ponieważ podczaspracy urządzenia wewnątrzwystępują wysokie temperatury,nieprzestrzeganie następującychostrzeżeń może doprowadzić dopoparzeń.
• Powierzchnie urządzenia podczas pracybardzo się nagrzewają. Dlatego dotykaćmożna tylko uchwytu lub wyłączników.
• Nie przenosić sterylizatora parowegopodczas pracy. Jeżeli gorące urządzeniemusi być przeniesione, należy je najpierwwyłączyć, wyciągnąć wtyczkę sieciową iodczekać, aż urządzenie ostygnie. Wprzeciwnym razie można się oparzyćgorącą powierzchnią.
• Butelki bezpośrednio po dezynfekcji sąbardzo gorące i należy je wyjmować tylkodołączonymi szczypcami do butelek.
3.4 Ochrona przed porażeniem prądem
Ostrzeżenie! Następującewskazówki bezpieczeństwa mająPaństwa uchronić przed porażeniemprądem.
• Urządzenia można używać tylko wtedy,gdy zarówno urządzenie, jak i kabelsieciowy są w stanie nienaruszonym.
• Jeśli kabel sieciowy jest uszkodzony, to dlabezpieczeństwa musi on zostaćnaprawiony przez producenta, jegoserwisanta lub inną wykwalifikowanąosobę.
• Do urządzenia, poza przewidzianym dotego pojemnikiem, w żadnym wypadku niemoże dostać się woda lub inne płyny.Dlatego:
–nigdy nie używać urządzenia na dworze–nigdy nie stawiać na urządzeniu
napełnionych płynem naczyń, takich jakszklanki, wazony itd.
–nigdy nie używać urządzenia w bardzowilgotnym otoczeniu
–nie używać bezpośrednio obokzlewozmywaka.
Jeżeli jednak płyn dostanie się dourządzenia, natychmiast odłączyćurządzenie od sieci i oddać je do naprawyprzez wykwalifikowany personel. Adreskontaktowy znajduje się na końcu instrukcji.
• Nigdy nie dotykać urządzenia, kablasieciowego ani wtyczki sieciowejwilgotnymi rękami.
• Kabel sieciowy wyciągać zawsze zawtyczkę. Nigdy nie ciągnąć za sam kabel.
• Zwrócić uwagę, aby kabel sieciowy nie byłzałamany lub zgnieciony.
• Kabel sieciowy trzymać z dala odgorących powierzchni (np. płytykuchenne).
Vaporisator 09/08 Seite 89 Dienstag, 7. Oktober 2008 8:01 08

90
• Unikać używania przedłużaczy.Korzystanie z nich jest dozwolone tylkow ściśle określonych warunkach:
–Przedłużacz musi być odpowiedni donatężenia prądu urządzenia.
–Przedłużacz nie może leżeć gdziekolwiek– należy go zabezpieczyć tak, aby niemożna się było o niego potknąć i abydzieci nie mogły go dosięgnąć.
–Przedłużacz w żadnym wypadku niemoże być uszkodzony.
–Nie wolno przyłączać do gniazdasieciowego innych urządzeń jednocześnieze sterylizatorem, gdyż może dojść doprzeciążenia sieci elektrycznej (niekorzystać z gniazd wtykowychwielokrotnych!).
3.5 Ochrona przed pożaremOstrzeżenie! Ponieważ podczaspracy urządzenia wewnątrzwystępują wysokie temperatury,należy przestrzegać następującychwskazówek bezpieczeństwa, aby niedoprowadzić do pożaru.
• Podczas pracy urządzenia w jegobezpośrednim otoczeniu nie mogą sięznajdować przedmioty palne (np. zasłony,papier itd.).
• Nigdy nie umieszczać na urządzeniu, nadnim lub pod nim żadnych materiałów lubinnych przedmiotów w celu wysuszenia.
• Aby uniknąć przegrzania, nigdy nieprzykrywać urządzenia.
• Nigdy nie stawiać urządzeniabezpośrednio pod gniazdem wtykowymnaściennym, gdyż powstające ciepło możeuszkodzić instalację elektryczną.
• Nigdy nie pozostawiać urządzeniapodczas pracy bez nadzoru. Jeśli czućsilny swąd, prawie zawsze oznacza to, żedoszło do uszkodzenia. W takimprzypadku natychmiast odłączyćurządzenie od sieci i oddać je do
sprawdzenia. Adres kontaktowy znajdujesię na końcu instrukcji.
3.6 Dla bezpieczeństwa dzieckaOstrzeżenie! Dzieci często nie sąw stanie prawidłowo ocenićniebezpieczeństwa i przez to mogądoznawać urazów. Należyprzestrzegać poniższych wskazówek:
• Produkt może być używany tylko podnadzorem dorosłych, żeby nie dopuścić,żeby dzieci bawiły się urządzeniem.
• Pamiętać, aby urządzenie zawszeznajdowało się w miejscu niedostępnym dladzieci.
• Zawsze zwracać uwagę, aby dzieci niemogły dosięgnąć kabla i pociągnąć zaniego.
• Zawsze zwracać uwagę, aby folia zopakowania nie stała się śmiertelnąpułapką dla dzieci. Opakowanie nie jestzabawką.
Vaporisator 09/08 Seite 90 Dienstag, 7. Oktober 2008 8:01 08
91
4. Elementy składowe sterylizatora parowego
1
pokrywka z uchwytem
2
wylot pary
3
koszyk na akcesoria
4
podtrzymywacz do butelek
5
zbiornik na parę
6
podstawa
7
włącznik/wyłącznik
8
lampka kontrolna
9
naczynie z miarką (stanowiące część urządzenia)
10
szczypce do butelekbez rysunku: kabel sieciowy znajduje siępod urządzeniem w nawijarce kabla
5. Dezynfekcja butelek dla niemowląt, smoczków i akcesoriów
5.1 Ogólne informacje dotyczące dezynfekcji
Noworodki na początku nie mają jeszczedostatecznie dużo przeciwciał, aby mogłysame chronić się przed zarazkamichorobotwórczymi. Dlatego przyprzygotowywaniu pokarmu dla niemowlątszczególnie ważne jest używaniesterylnych smoczków i butelek. Jużnajmniejsze resztki pokarmu nasmoczkach i butelkach mogą prowadzićdo rozwoju bakterii, które mogą byćgroźne dla dzieci. Dlatego elementy te przedkażdą dezynfekcją należy wcześniej umyć.Sterylizacja następuje w wyniku działaniaciepła. Woda jest nagrzewana do temperaturyponad 90°C i zamienia się w parę. Takpowstające ciepło szybko i niezawodniedezynfekuje części znajdujące się wewnątrzsterylizatora. Smoczki i butelki dla niemowlątstykają się więc tylko z ciepłem i parą wodną.A ponieważ sterylizator zużywa niewielką ilośćwody do dezynfekcji, zużywa także niewieleenergii elektrycznej.
5.2 Dezynfekcja
Uwaga:
Wszystkie części do dezynfekcjinależy starannie wypłukać i oczyścićz wszelkich resztek pokarmu. Na rozkładanej stronie okładki znajdują sięrysunki od
A
do
I
przedstawiające etapyprocesu dezynfekcji.1. Wyjąć naczynie z miarką
9
z podstawy
6
(rys.
A
).2. Za pomocą naczynia z miarką
9
wlać 70 mlwody do podstawy
6
(rys.
A
).
Wskazówka:
70 ml odpowiada dwómpełnym naczyniom z miarką (2 x 35 ml).
3. Nałożyć zbiornik na parę
5
na podstawę
6
(rys.
B
). 4. Włożyć podtrzymywacz do butelek
4
dozbiornika na parę (rys.
C
).
Uwaga!
Butelki należy dezynfekowaćzawsze otwarte i rozłożone na części,gdyż w przeciwnym razie może dojść doodkształcenia materiału.
Bedienung POL Seite 91 Dienstag, 7. Oktober 2008 9:46 09

92
5. Wstawić otwarte butelki dla niemowlątotworem w dół do podtrzymywacza dobutelek 4 (rys. D). Wskazówka: W miarę możliwości osłonkiułożyć jedna na drugiej w podtrzymywaczu4, aby zaoszczędzić miejsce w koszyku naakcesoria (rys. E).
6. Nałożyć koszyk na akcesoria 3 na zbiornikna parę (rys. F).
7. Włożyć akcesoria do koszyka 3 (rys. G).8. Nałożyć pokrywkę 1 na koszyk na
akcesoria 3 (rys. H).9. Włożyć wtyczkę do odpowiedniego gniazda
sieciowego.Wskazówka: Jeżeli lampka kontrolna 8 jużteraz się świeci, oznacza to, że włącznik 7został nieumyślnie wciśnięty.
10.Włączyć urządzenie włącznikiem 7.Lampka kontrolna 8 zaświeci się (rys. I).
Sterylizator parowy wyłącza się automatyczniepo zakończeniu dezynfekcji, a lampkakontrolna gaśnie.
Ostrzeżenie! Bezpośrednio po wyłączeniu sięurządzenia wewnątrz znajduje sięjeszcze gorąca para, która częściowouchodzi z wylotu pary. Dlatego należyuważać, żeby się nie sparzyć. Należypozostawić urządzenie zamknięteprzez co najmniej trzy minuty aż dowystudzenia.Butelki bezpośrednio po dezynfekcjisą bardzo gorące i należy jewyjmować tylko dołączonymiszczypcami do butelek.
Uwaga! Po każdym użyciu wyciągnąć wtyczkęz gniazdka, aby urządzenie nie mogło zostaćprzypadkowo włączone.
5.3 Uwagi• Dezynfekcja przy użyciu 70 ml wody trwa
ok. 8 minut.• Dezynfekcja tylko wtedy jest skuteczna,
gdy proces sterylizacji nie zostanieprzerwany ani skrócony.
• Stosować wyłącznie normalną wodęz kranu bez żadnych chemicznychdodatków.
• Aby urządzenie sprawnie działało,należy regularnie usuwać z niegokamień (patrz punkt “6.2 Usuwaniekamienia” na stronie 93).
Vaporisator 09/08 Seite 92 Dienstag, 7. Oktober 2008 8:01 08

93
6. Czyszczenie i konserwacja urządzenia6.1 Czyszczenie
Ostrzeżenie! Przed przystąpieniem do czyszczeniaurządzenia należy zawszewyciągnąć wtyczkę z gniazdka.Czyścić urządzenie tylko wtedy, gdyjest całkiem wystudzone.
Uwaga! Nie stosować silnych lubścierających środków czyszczących,ponieważ mogą one uszkodzićpowierzchnię.1. Zdjąć pokrywkę 1, koszyk na akcesoria 3,
podtrzymywacz do butelek 4 oraz zbiornikna parę 5 z podstawy 6.
Uwaga! Podstawy 6 nigdy nie wolnozanurzać w wodzie, gdyż zawiera onaelementy elektryczne, które mogą zostaćuszkodzone.2. Wytrzeć podstawę 6 po każdym użyciu
wilgotną szmatką.3. Umyć pokrywę 1, koszyk na akcesoria 3,
podtrzymywacz do butelek 4 oraz zbiornikna parę 5 płynem do mycia naczyń albo wzmywarce do naczyń.
6.2 Usuwanie kamieniaRegularne mycie urządzenia redukujeosadzanie się kamienia. Jednak po pewnymczasie wskutek procesu gotowaniaw podstawie sterylizatora parowegoosadza się kamień. Kamień może znacznie zmniejszyćskuteczność dezynfekcji. Wskazówka: Przy nieznacznych osadachnajlepiej stosować opisaną poniżejmetodę przy użyciu octu używanegow gospodarstwach domowych:1. W celu usunięcia osadu zmieszać 35 ml
gorącej wody z 35 ml domowego octu iwlać do podstawy 6.
2. Pozostawić roztwór w podstawie przez30 minut, a następnie wylać go.
3. Wytrzeć urządzenie wilgotną szmatką.Przy znacznych osadach stosowaćspecjalne środki do odkamieniania.Należy przy tym przestrzegać instrukcjiużytkowania środka.
Vaporisator 09/08 Seite 93 Dienstag, 7. Oktober 2008 8:01 08

94
7. Usterki i ich usuwanieUsterka Przyczyna Postępowanie
Dezynfekcja trwa za długo Nalano za dużo wody Odmierzyć dokładnie 70 ml w celu optymalnej dezynfekcji
W podstawie jest za dużo osadzonego kamienia
Usunąć kamień z podstawy (patrz punkt “6.2 Usuwanie kamienia” na stronie 93)
Urządzenia nie można włączyć, lampka kontrolna 8 nie świeci się
Brak zasilania Prawidłowo włożyć wtyczkę sieciowąSprawdzić, czy w gniazdku jest napięcie, podłączając do niego inne urządzenie
Urządzenia po uprzednim użyciu nie można ponownie włączyć, lampka kontrolna 8 świeci się
Ochrona przed przegrzaniem jest aktywna
Odczekać 15 minut do ostudzenia urządzenia
W urządzeniu nie mieści się 6 butelek FIRST CHOICE
Części są nieodpowiednio rozłożone
Wstawić butelki do podtrzymywacza do butelek otworem w dół i bez akcesoriówOsłonki ułożyć jedna na drugiej w podtrzymywaczu do butelek, a następnie nałożyć koszyk na akcesoria
Butelki po dezynfekcji są bardzo gorące
Butelki zostały zdezynfekowane w temp. ponad 90°C
Pozostawić butelki do ostudzeniaUżywać szczypców do butelek
Butelki i akcesoria po dezynfekcji mają białe ślady
Wewnątrz urządzenia jest osadzony kamień
Usunąć kamień z urządzenia (patrz punkt “6.2 Usuwanie kamienia” na stronie 93)
Na brzegu koszyka na akcesoria wylatuje para
Urządzenie zostało nieprawidłowo złożone
Złożyć urządzenie prawidłowo (patrz punkt “5.2 Dezynfekcja” na stronie 91)
Butelki i akcesoria zostały nieodpowiednio rozłożone
Rozłożyć części tak, aby urządzenie było szczelnie zamknięte (patrz punkt “5.2 Dezynfekcja” na stronie 91)
Vaporisator 09/08 Seite 94 Dienstag, 7. Oktober 2008 8:01 08
95
8. Dane techniczneModel europejski - z wtyczką z 2 bolcami,(nr artykułu: 10.251.012): Napięcie: 220 - 240 V~/50 Hz Zużycie mocy: 550 W
Model brytyjski - z wtyczką z 3 bolcami (nr artykułu: 10.749.054):Napięcie: 220 - 240 V~/50 Hz Zużycie mocy: 550 W
9. Utylizacja9.1 Urządzenie
Symbol przekreślonego śmietnikana kółkach oznacza, że w UniiEuropejskiej produkt należyoddać do specjalnego punktuzbiórki. Dotyczy to produktui wszystkich akcesoriówoznaczonych tym symbolem. Tak
oznaczonych produktów nie wolno wyrzucaćdo domowego kosza na śmieci, ale trzeba je
oddać do punktu recyklingu urządzeńelektrycznych i elektronicznych. Recyklingpomaga zredukować zużycie surowców ichronić środowisko.
9.2 OpakowanieAby wyrzucić opakowanie, należyprzestrzegać odpowiednich przepisówdotyczących ochrony środowiskaobowiązujących w danym kraju.
10. GwarancjaPod warunkiem ostrożnego obchodzeniasię z urządzeniem i przestrzegania instrukcjiobsługi producent udziela dwuletniejgwarancji od momentu nabyciaurządzenia.Producent zobowiązuje się do bezpłatnejnaprawy urządzenia w przypadku wadmateriałowych lub konstrukcyjnych. Wszelkieinne roszczenia są wykluczone.Producent nie odpowiada za szkodywynikające z nieprawidłowego użytkowaniaurządzenia. Gwarancja nie obejmujezużycia przewodów i wtyczek. W ciągupierwszych 2 lat od daty zakupuproducent zobowiązuje się do usunięciawszystkich usterek wynikającychz uzasadnionych reklamacji bez
dodatkowych opłat. Przejęcie kosztównależy najpierw uzgodnić. Urządzenie musi być odesłane w każdymprzypadku wraz z wypełnioną kartągwarancyjną lub dowodem zakupu.W przypadku braku dowodu zakupu klientzostanie obciążony kosztami naprawy, aurządzenie zostanie odesłane zazaliczeniem pocztowym.Karta gwarancyjna powinna zostaćwypełniona w chwili zakupu i należy jąstarannie przechowywać. Nie ma możliwościwystawienia duplikatu zagubionej kartygwarancyjnej.Karta gwarancyjna znajduje się na końcu tegozeszytu.
Vaporisator 09/08 Seite 95 Dienstag, 7. Oktober 2008 8:01 08

Εγγυητική βεβαίωσηΠαρακαλώ λάβετε υπόψη σας τους όρουςεγγύησης στη σελίδα 66
ModellModelModèle ModeloModelo
ModelloΜοντέλοModel'����<Model
KaufdatumDate of PurchaseDate d’achat Fecha de compraData de compra
Data di acquistoΑγοραστήςSatın alma tarihi���� ��� ��Data zakupu
KäuferPurchaserNom de l’acheteur ClienteClienteAcquirenteΣφραγίδα αντιπροσώπουSatın alan)�� �����<Kupujący
HändlerstempelDealer's stampCachet du vendeur Sello del vendedorCarimbo do vendedorTimbro del rivenditoreΗμερομηνία αγοράςSatıcının kaşesiK���� ��������Pieczątka sklepu
$������� ����������� � �������� ���������)� ������, �������)� �� ���. 85
Karta gwarancyjnaProsimy o przestrzeganie warunków gwarancji na stronie 95
PL
Garanti belgesiSayfa 75’deki garanti koşullarına dikkat edilmelidir
GarantiescheinBeachten Sie bitte die Garantiebestimmungen auf Seite 11
Warranty notePlease observe conditions of guarantee on page 20
Bon de garantieRespecter les dispositions de la garantie de la page 29
GarantíaRogamos tenga en cuenta las condiciones de garantíaespecificadas en la página 38
E
Certificado de garantiaObserve as disposições relativas à garantia, na pág. 47
P
Certificato di garanzia Osservate le condizioni di garanzia a pagina 56
Vaporisator 09/08 Seite 96 Dienstag, 7. Oktober 2008 8:01 08

Contact addresses
GermanyAustria
MAPA GmbHIndustriestraße 21-2527404 Zeven
+49 180 1 62 72 46 0,04
€
/Min.e-mail: [email protected]
France
Allègre Puériculture SNC41 rue Edouard Martel, B.P. 19742013 Saint Etienne, Cedex 2France
Great Britain
Mapa Spontex UK Ltd.Berkeley Business ParkWainwright RoadWorcester WR4 9ZS
+44 845 300 2467www.nukbaby.co.uk
GR - Greece (South)
ΑΦΟΙ Κ. ΤΖΕΒΕΛΕΚΟΥ Ο.Ε.
Θράκης 34171 21 Ν. ΣμύρνηΑθήνα
210 93 22 165Φαξ: 210 93 50 870
e-mail: [email protected]
GR - Greece (North)
ΦΑΡΜΑΠΟ ΕΕ-Χ.ΤΖΗΜΟ & ΣΙΑ
30 ΧΛΜ ΘΕΣ/ΝÏΚΗΣ-ΚΑΛΟΧΩΡΙΟΥΤΘ 291 - ΚΑΛΟΧΩΡÏ 57009
2310 751 525Φαξ: 2310 789 621
E-mail: [email protected]
Italy
MAPA GmbHIndustriestraße 21-25D-27404 ZevenGermaniae-mail: [email protected]
Poland
BABY LANDDariusz Staniszewskial. Stanów Zjednoczonych 67/D704-028 Warszawa
+48 (0) 22 810 30 54/ +48 (0) 22 773 36 - 76 (-78, -79, -81)
Portugal
Roche Sistemas de Diagnósticos, Lda.Estrada Nacional, 249-12720-413 Amadora
+351 21 425 70 00Fax: +351 21 417 28 95www.nuk.pt
Russia
A.�. ����� ������ ������ ���� ������������� ����� . ������ � ������ �.16 ����.2���� 391-392117292 ������
Spain
Roche Diagnostics SLAv. Generalitat, s/n08174 Sant Cugat del VallèsBarcelona
+34 93 583 40 00Fax: +34 93 583 43 40www.nuk.com.es
Turkey
Atak Dış Tic. A.Ş., Büyükdere Cad.Maya Akar Center Kat:20 Daire:78 34394 EsentepeIstanbulwww.bebekbilgi.com
☎
☎
☎
☎
☎☎
☎
☎
Garantieschein Seite 97 Freitag, 29. Januar 2010 10:46 10
VAPO RAPID DAMPF-VAPORISATOR
• Sichere Desinfektion von Flaschen und Zubehör in nur 8 Minuten (mit 550 Watt Leistung).
• Geeignet für bis zu 6 FIRST CHOICE Weithalsflaschen und die meisten handelsüblichen Flaschen.
• Noch effektiver: Die entstehende Hitze desinfiziert die eingelegten Teile schnell und zuverlässig.
• Besonders schonende Heißdesinfektion auf Wasserdampfbasis ganz ohne Chemikalien.
• Modernes, ergonomisches Design – besonders bedienerfreundlich.
REV 101
MAPA GmbHIndustriestraße 21-2527404 ZevenGermany www.nuk.com
VAPO RAPID ESTERILIZADOR A VAPOR
• Desinfección segura de los biberones y los accesorios en sólo 8 minutos (con una potencia de 550 vatios)
• Adecuado para un máximo de 6 biberones FIRST CHOICE de boca ancha y para la mayoría de los biberones convencionales
• Aún más efectivo: El calor generado esteriliza los componentes rápido y con seguridad.
• Un método ideal de esterilización en el que se usa vapor caliente. No requiere ningún producto químico.
• Diseño moderno y ergonómico, muy fácil de manejar
VAPO RAPID STERILISATEUR VAPEUR
• Désinfection des biberons et accessoires en seulement 8 minutes (à une puissance de 550 Watt)
• Contient jusqu'à 6 biberons col large FIRST CHOICE et la plupart des biberons du commerce
• Encore plus efficace : la vapeur générée désinfecte les composants de façon rapide et efficace
• Une méthode de désinfection particulièrement douce qui utilise la vapeur chaude et ne requiert pas d'additifs chimiques.
• Design moderne, ergonomique – particulièrement simple d'utilisation
VAPO RAPID ESTERILIZADOR A VAPOR
• Desinfecção segura de biberões e acessórios em apenas 8 minutos (com 550 Watt de potência)
• Adequa-se a um máximo de 6 biberões de gargalo largo FIRST CHOICE e à maior parte dos biberões convencionais.
• Muito eficaz: o calor gerado esteriliza os componentes de forma rápida e fiável
• Utiliza um método particularmente suave de esterilização, através de vapor quente e sem recurso a qualquer químico
• O design moderno e ergonómico facilita o manuseamento
VAPO RAPID VAPORIZZATORE VAPORE
• Disinfezione sicura di biberon e accessori in soli 8 minuti (con 550 W di potenza)
• Adatto per contenere fino a 6 biberon a collo largo FIRST CHOICE e per la maggior parte dei biberon disponibili in commercio
• Sempre più efficace:il calore generato sterilizza i componenti velocemente e in modo affidabile
• Una sterilizzazione particolarmente delicata con vapore bollente che non richiede alcun additivo chimico.
• Design moderno ed ergonomico – particolarmente semplice da usare
VAPO RAPID STEAM STERILIZER
• Bottles and accessories reliably disinfected in only 8 minutes (at 550 W power)
• Suitable for up to 6 FIRST CHOICE wide-necked bottles and most commercially-available bottles
• Even more effective: the heat generated disinfects the components quickly and reliably.
• A particularly gentle method of disinfecting using hot steam and requiring no chemicals at all.
• Modern, ergonomic design – especially user-friendly
VAPO RAPID ΑΠΟΣΤΕΙΡΩΤΗΡΑΣ ΑΤΜΟΥ
• Ασφαλής αποστείρωση μπιμπερό και αξεσουάρ μόνο σε 8 λεπτά (με ισχύ 550 Watt)
• Κατάλληλος για έως και 6 φαρδύλαιμα μπιμπερό FIRST CHOICE και για τα περισσότερα διαθέσιμα μπιμπερό εμπορίου
• Άκομα πιο αποτελεσματικός: Η θερμοκρασία που παράγεται επιτυχγάνει γρήγορη και αποτελεσματική αποστείρωση όλων των εξαρτημάτων
• Μια ιδιαίτερα ευγενική μέθοδος αποστείρωσης με ζεστό αέρα που δεν χρησιμοποιεί καθόλου χημικά
• Mοντέρνο, εργονομικό σχέδιο – εξαιρετικά εύχρηστο
VAPO RAPID BUHARLI STERİLİZATÖR
• Biberonlar ve aksesuarlar sadece 8 dakikada güvenli bir şekilde dezenfekte edilir (550 Watt güç ile).
• Azami 6 FIRST CHOICE geniş ağızlı biberon için ve satışa sunulan normal biberonların çoğu için uygundur.
• Daha verimli: Oluşan ısı, yerleştirilen parçaları hızlı ve güvenilir şekilde dezenfekte eder.
• Kesinlikle kimyasal madde gerektirmez, su buharı kullanımı yoluyla hassas sterilizasyon yöntemidir.
• Modern, ergonomik dizayn – özellikle kullanıcı dostudur.
������� ����� ��� VAPO RAPID
• �������� ������ � ��������� �������������� ����� � 8 ���� (�������� 550 ����).
• ��� ������ ������� 6 ��������� � ����� ��������� FIRST CHOICE �������� ��������� ������! ���������.
• �� ����� �����������: ��������! ��"���� ��#$����%�� $���#��� ��&����'��%(�"! ��"��� � ����)��.
• �"������ ����)��! ��&�����'�! " $�#��*( ���!+��� ���!���� $���, ��& �"$��*&�����! -�#������.
• "���������� #���������� ���� – ����� ����� � ���������.
STERYLIZATOR PAROWY VAPO RAPID
• Niezawodna dezynfekcja butelek i akcesoriów w ciągu zaledwie 8 minut (moc urządzenia –550 W).
• Umożliwia sterylizację do 6 butelek NUK FIRST CHOICE z szeroką szyjką, jak i większości innych butelek dostępnych w handlu.
• Jeszcze bardziej efektywny – para wodna sterylizuje szybko i pewnie.
• Szczególnie delikatna metoda dezynfekcji za pomocą gorącej pary wodnej bez użycia żadnych substancji chemicznych.
• Modne, ergonomiczne wzornictwo – szczególnie przyjazne dla użytkownika.
NUK is a registered trademark owned by MAPA GmbH/Germany
U4 Seite 98 Freitag, 29. Januar 2010 10:52 10