nanyang technological university(ntu) account... · 5 light account registration to create an...
TRANSCRIPT
Nanyang Technological University(NTU)
This User Guide is created for Light Account Suppliers trading with NTU using Ariba Network
It contains key steps for transacting purchase orders, order confirmations, ship notices, invoices with
NTU through the Ariba Network
Buying and Invoicing
Light Account Suppliers
2
1. Account Registration
2. Account Access
3. Account Configuration
Contents
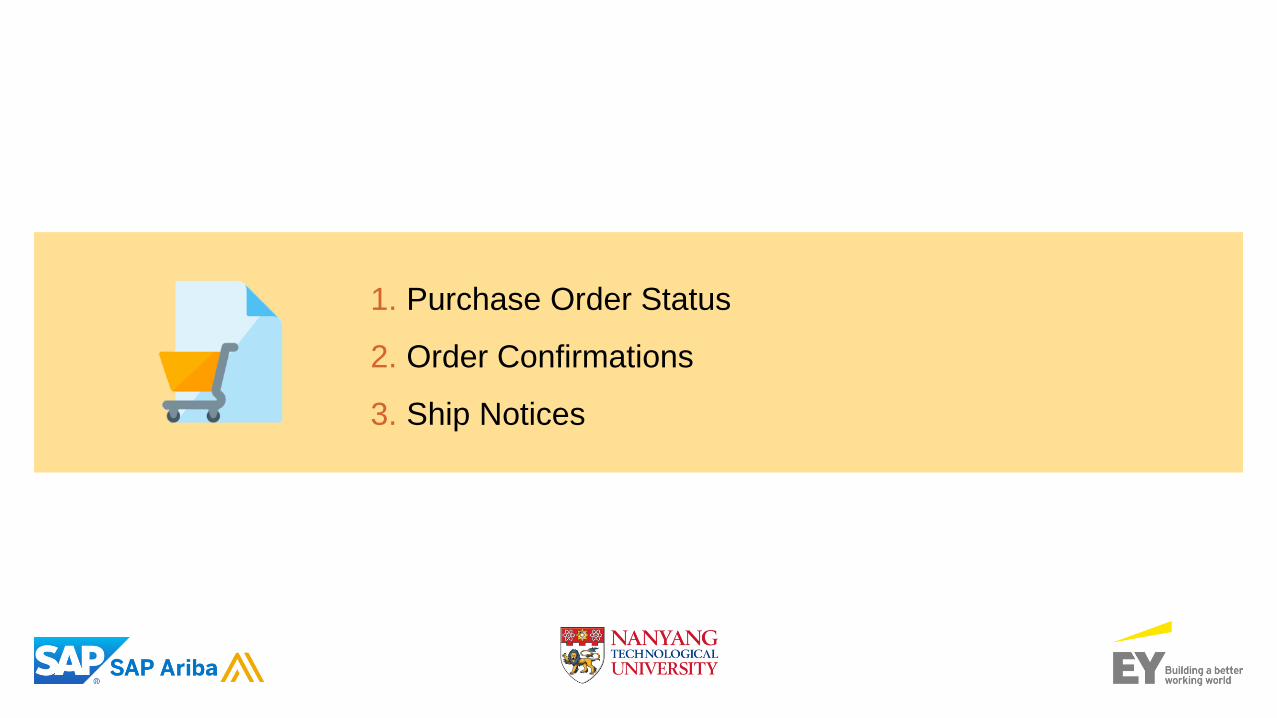
1. Purchase Order Status
2. Order Confirmations
3. Ship Notices
1. Invoice Practices
2. Creating Invoices (Non-GST Suppliers
and GST Suppliers)
3. Modifying Invoices
4. Invoice Status
5. Line Item Credit Memo
► Ariba Network Support
Account Registration Procurement-to-Pay (P2P)
Ariba Support
1 2
3
3
Account Registration1
1. Account Registration
2. Account Access
3. Account Configuration
1. Account Registration
2. Account Access
5
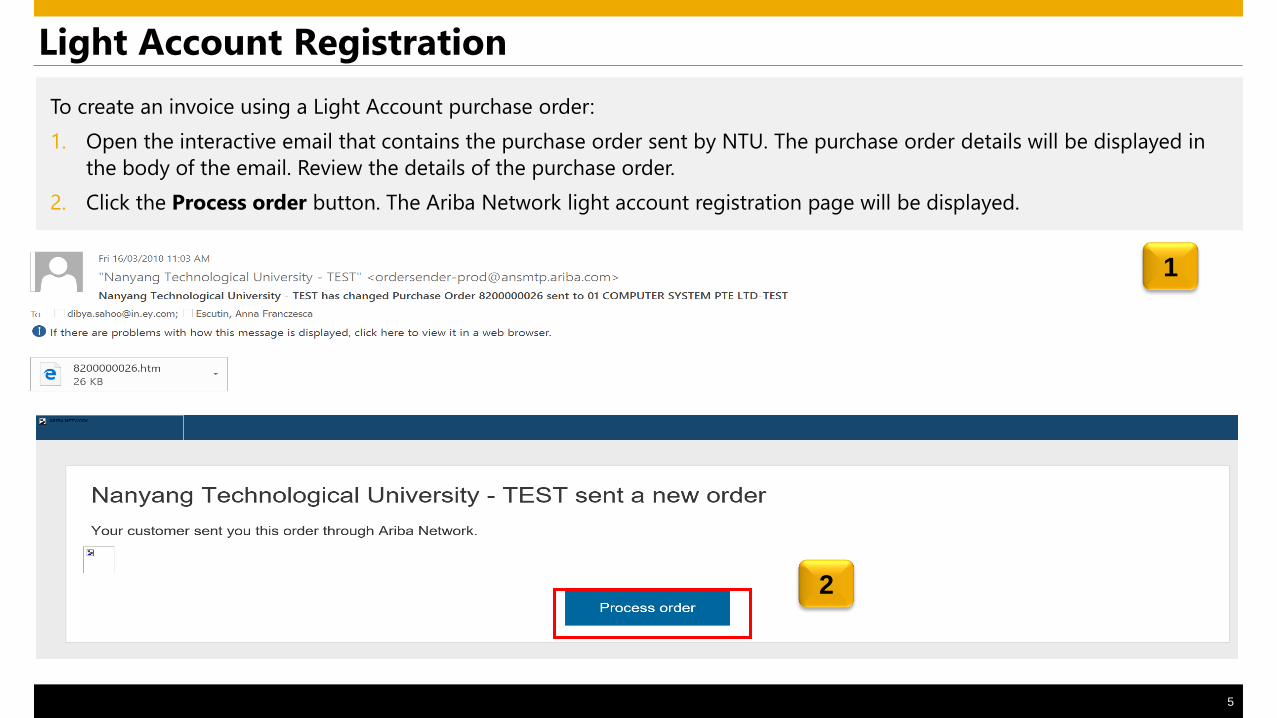
Light Account Registration
To create an invoice using a Light Account purchase order:
1. Open the interactive email that contains the purchase order sent by NTU. The purchase order details will be displayed in
the body of the email. Review the details of the purchase order.
2. Click the Process order button. The Ariba Network light account registration page will be displayed.
2
1
6
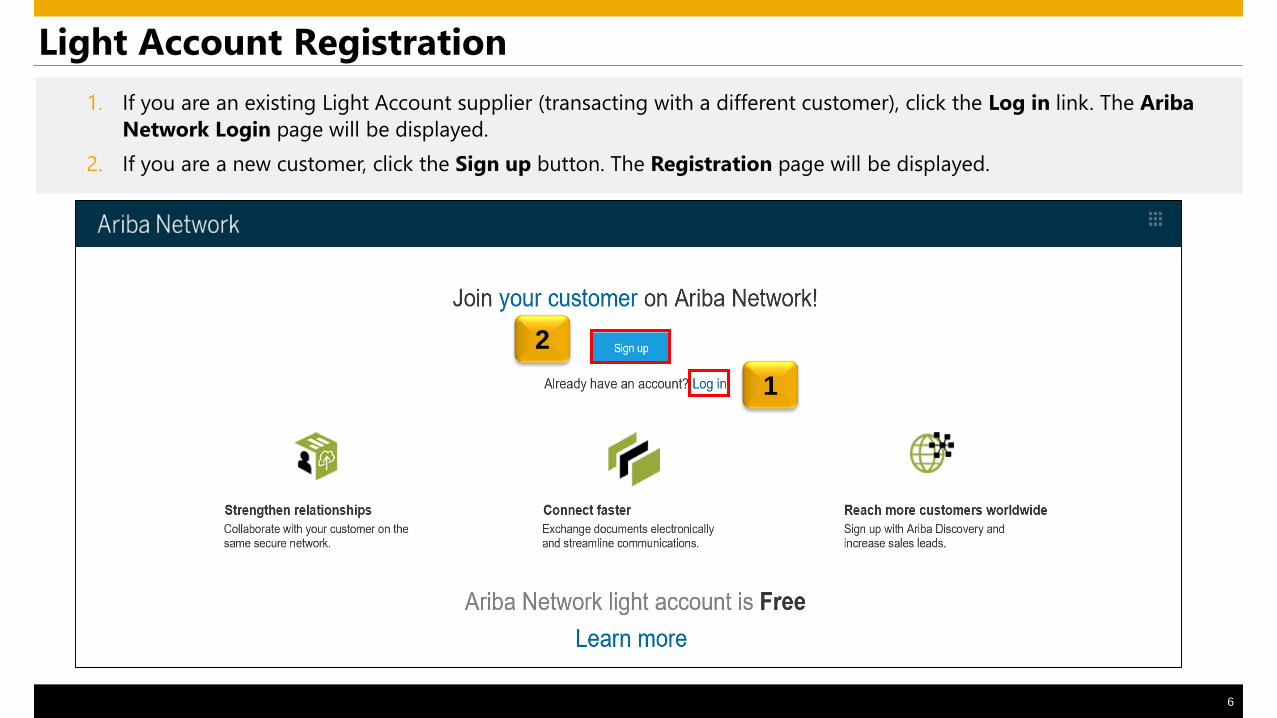
Light Account Registration
1. If you are an existing Light Account supplier (transacting with a different customer), click the Log in link. The Ariba
Network Login page will be displayed.
2. If you are a new customer, click the Sign up button. The Registration page will be displayed.
2
1
7
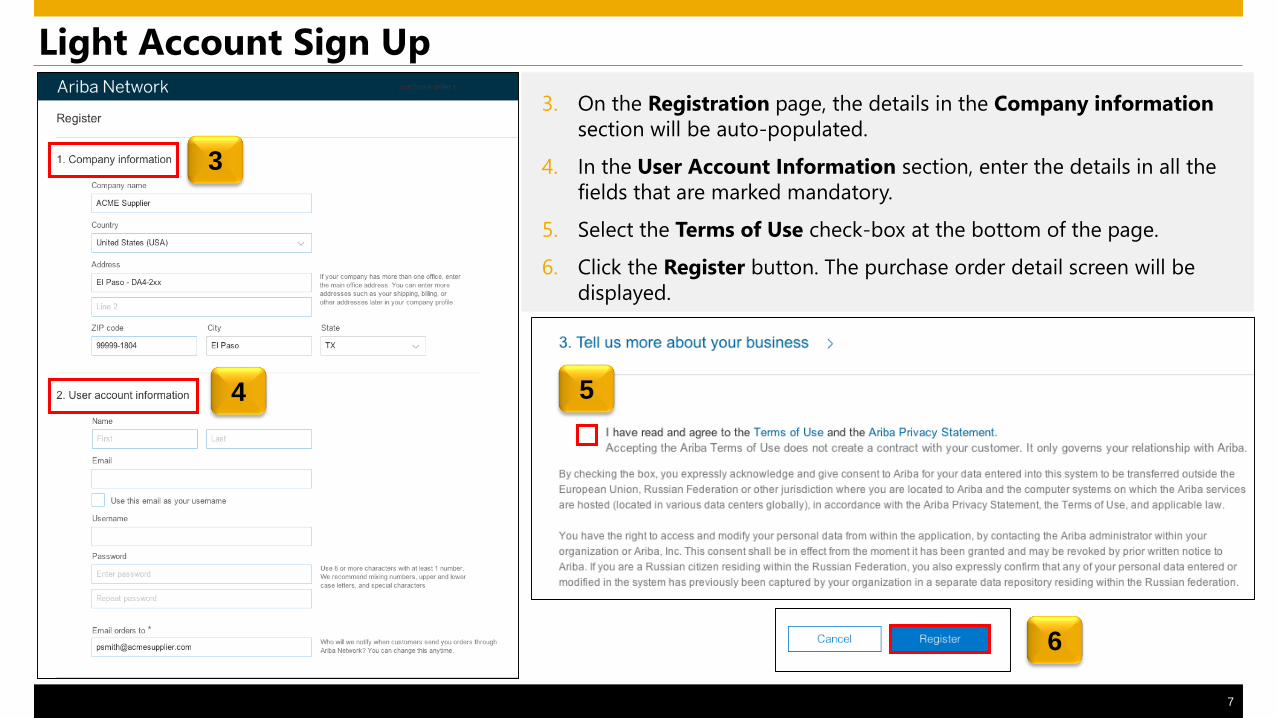
Light Account Sign Up
3. On the Registration page, the details in the Company information
section will be auto-populated.
4. In the User Account Information section, enter the details in all the
fields that are marked mandatory.
5. Select the Terms of Use check-box at the bottom of the page.
6. Click the Register button. The purchase order detail screen will be
displayed.
3
4 5
6
8
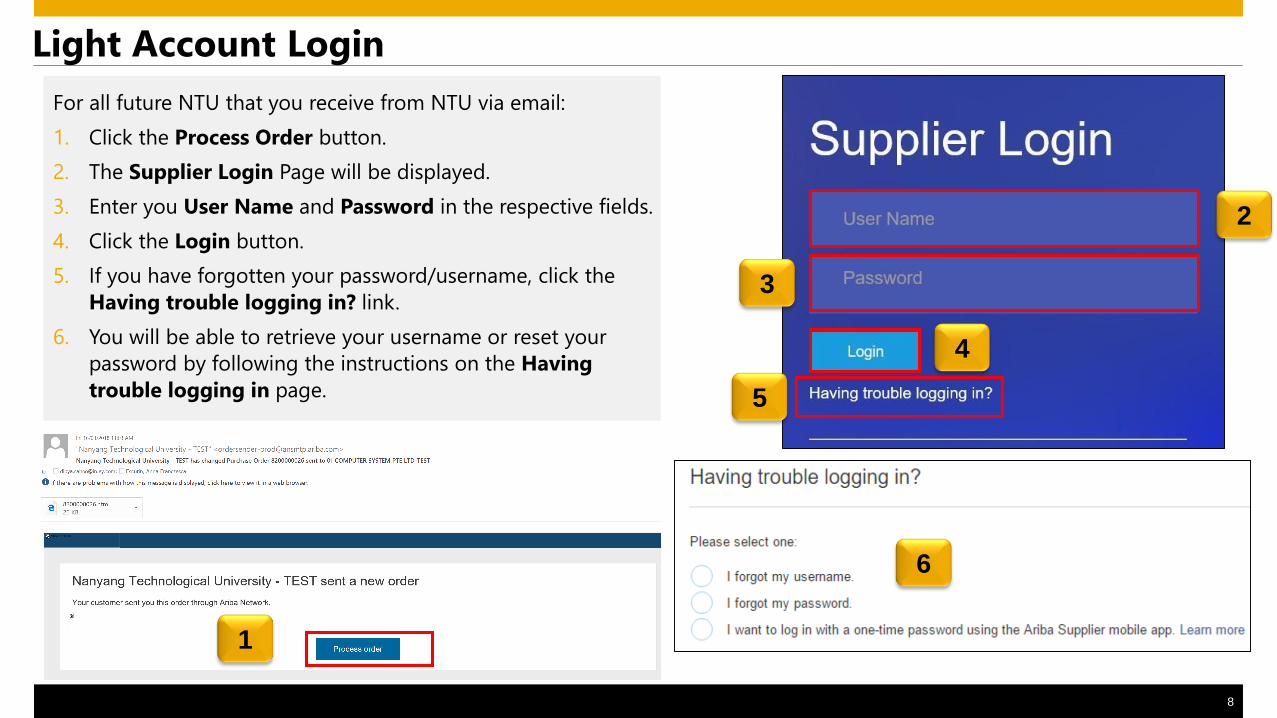
Light Account Login
For all future NTU that you receive from NTU via email:
1. Click the Process Order button.
2. The Supplier Login Page will be displayed.
3. Enter you User Name and Password in the respective fields.
4. Click the Login button.
5. If you have forgotten your password/username, click the
Having trouble logging in? link.
6. You will be able to retrieve your username or reset your
password by following the instructions on the Having
trouble logging in page.
1
3
2
4
5
6
9
Account Interface
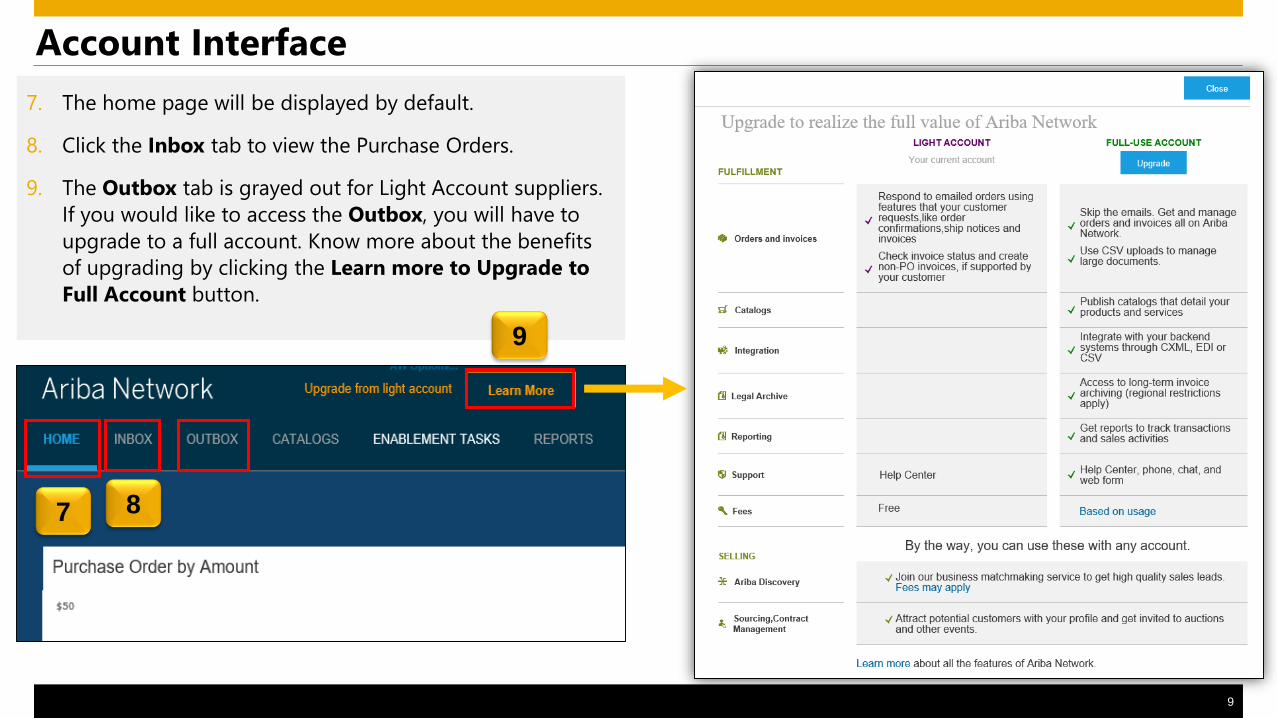
7. The home page will be displayed by default.
8. Click the Inbox tab to view the Purchase Orders.
9. The Outbox tab is grayed out for Light Account suppliers.
If you would like to access the Outbox, you will have to
upgrade to a full account. Know more about the benefits
of upgrading by clicking the Learn more to Upgrade to
Full Account button.
7 8
9
10
Account Interface
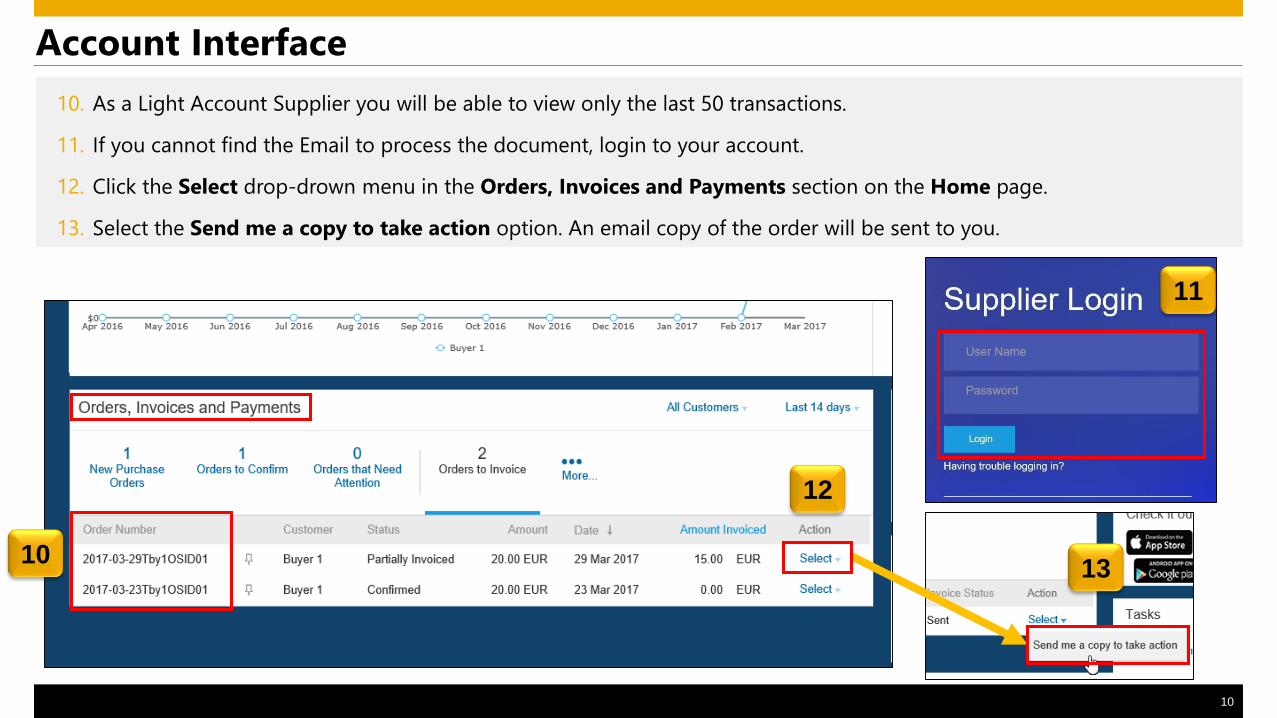
10. As a Light Account Supplier you will be able to view only the last 50 transactions.
11. If you cannot find the Email to process the document, login to your account.
12. Click the Select drop-drown menu in the Orders, Invoices and Payments section on the Home page.
13. Select the Send me a copy to take action option. An email copy of the order will be sent to you.
10
11
12
13
2. Account Configurationa) Notifications
b) Configure Electronic Order Routing and
notifications
c) Configure Electronic Invoice Routing
12
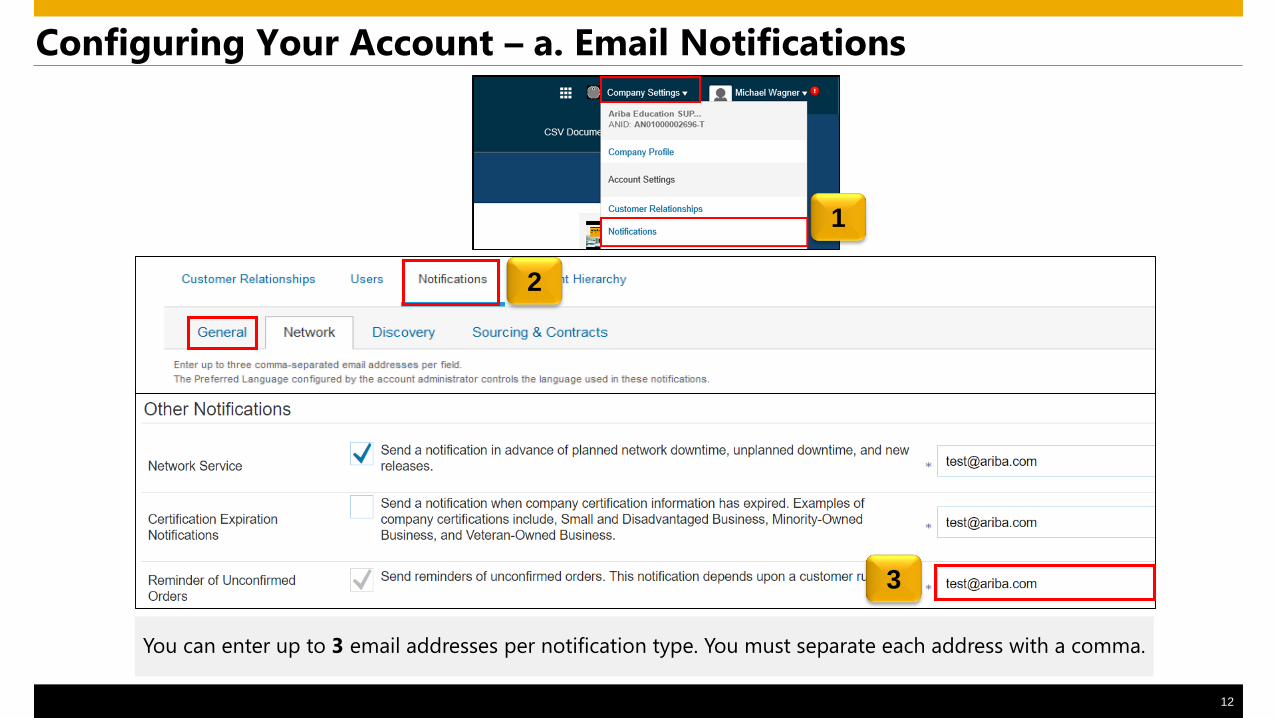
Configuring Your Account – a. Email Notifications
You can enter up to 3 email addresses per notification type. You must separate each address with a comma.
1
2
3
13
1
2
3 4
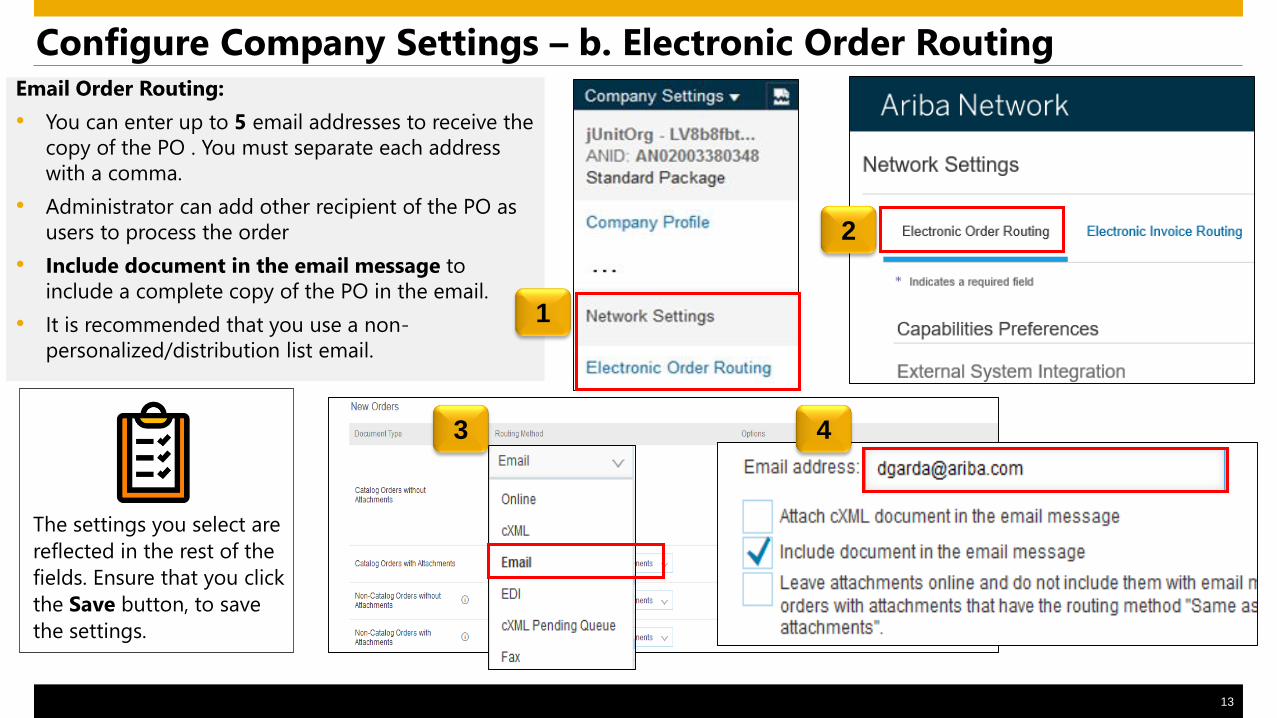
Email Order Routing:
• You can enter up to 5 email addresses to receive the
copy of the PO . You must separate each address
with a comma.
• Administrator can add other recipient of the PO as
users to process the order
• Include document in the email message to
include a complete copy of the PO in the email.
• It is recommended that you use a non-
personalized/distribution list email.
The settings you select are
reflected in the rest of the
fields. Ensure that you click
the Save button, to save
the settings.
Configure Company Settings – b. Electronic Order Routing
14
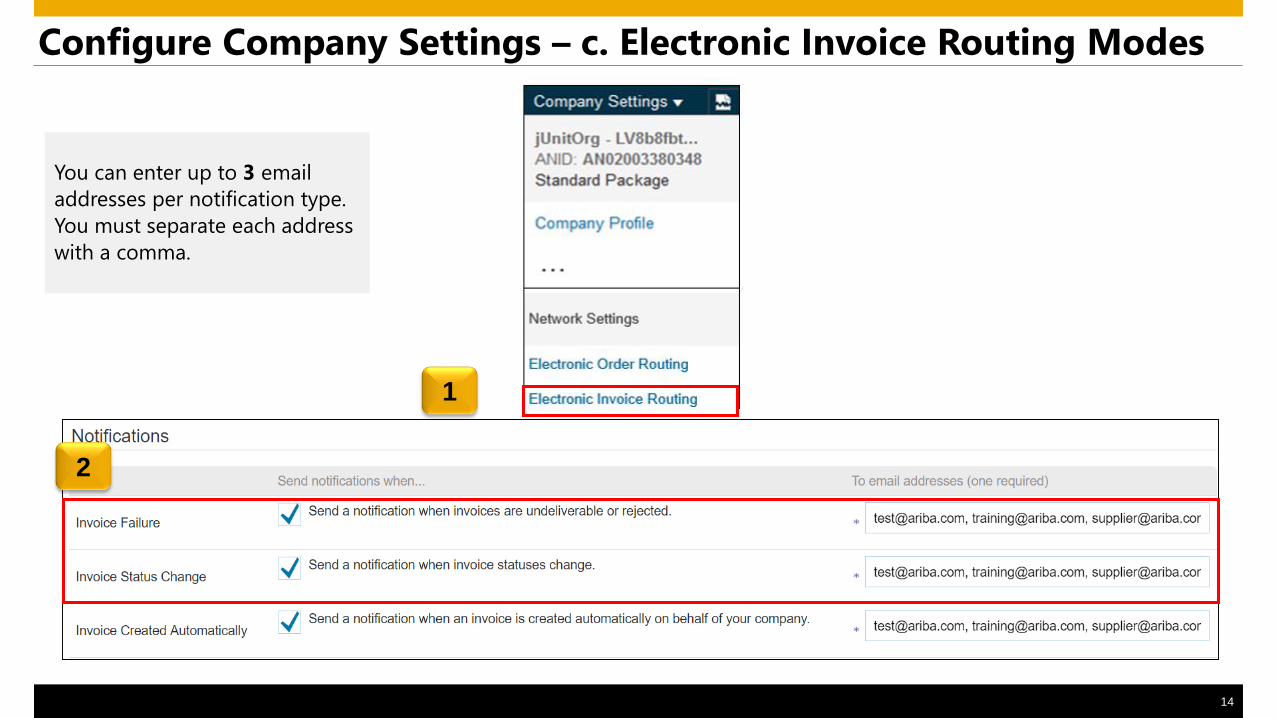
Configure Company Settings – c. Electronic Invoice Routing Modes
You can enter up to 3 email
addresses per notification type.
You must separate each address
with a comma.
2
1
15
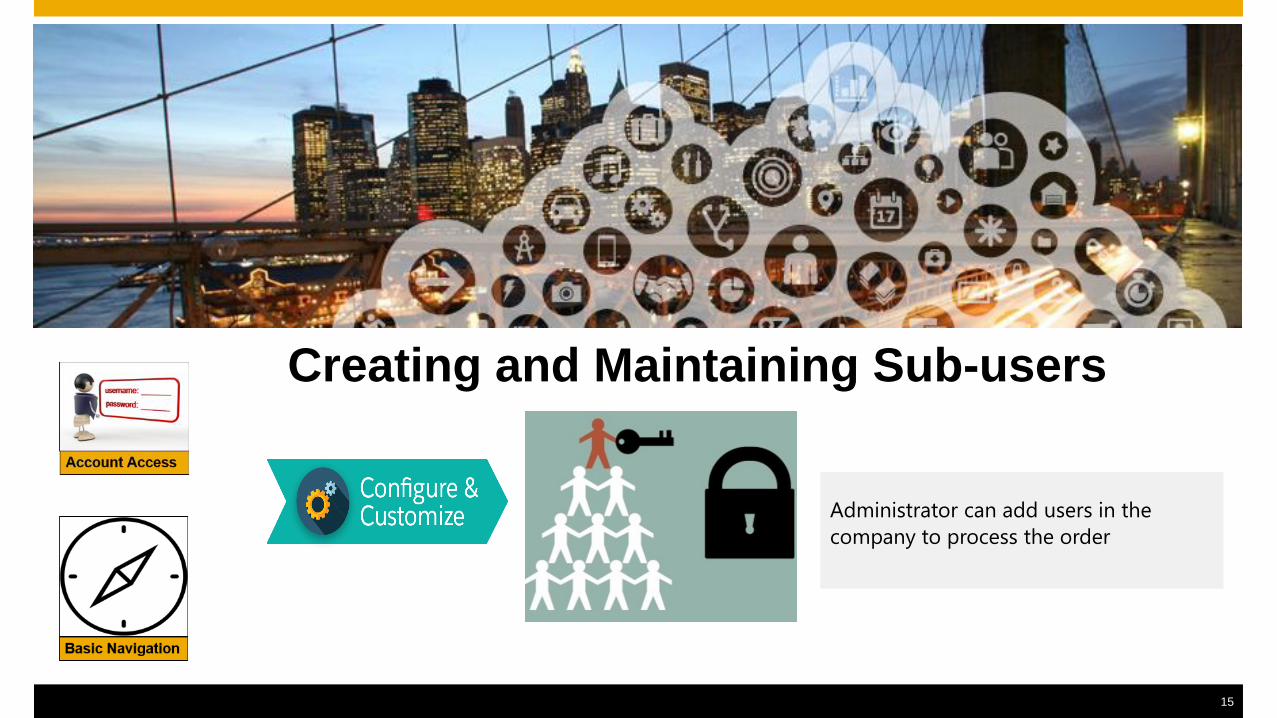
Creating and Maintaining Sub-users
Administrator can add users in the
company to process the order
16
Administrators and Users
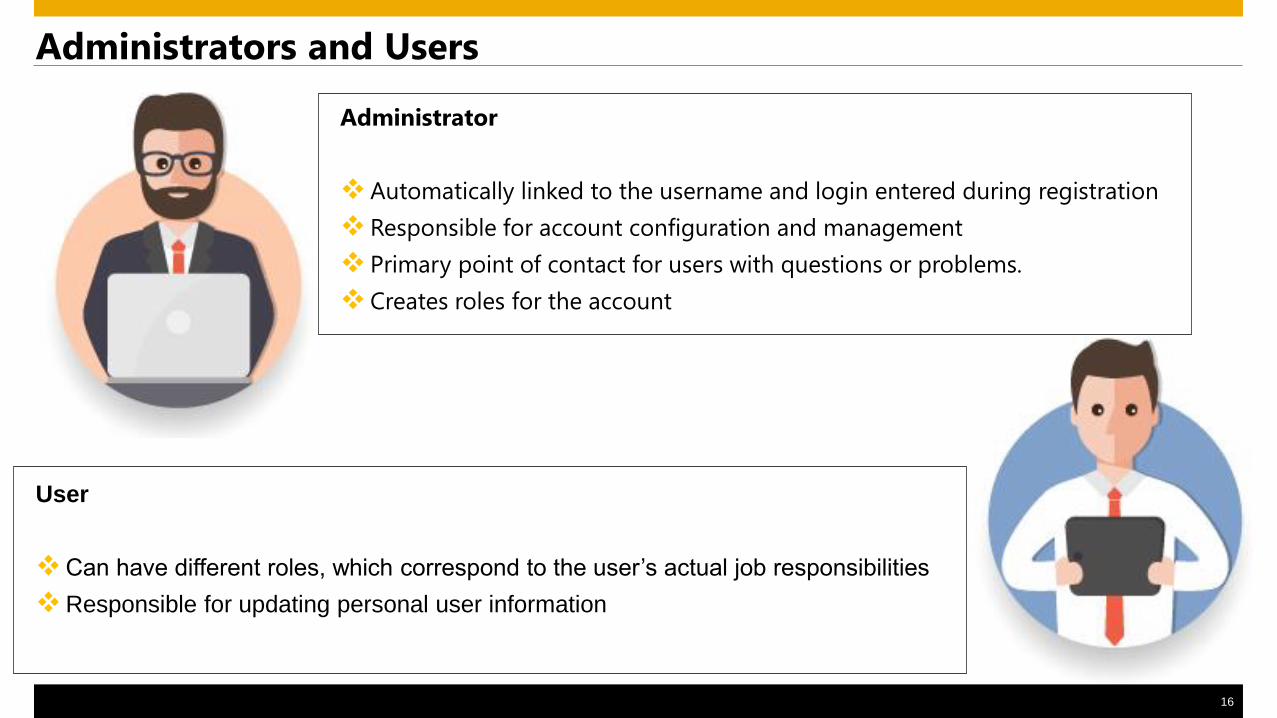
Administrator
Automatically linked to the username and login entered during registration
Responsible for account configuration and management
Primary point of contact for users with questions or problems.
Creates roles for the account
User
Can have different roles, which correspond to the user’s actual job responsibilities
Responsible for updating personal user information
17
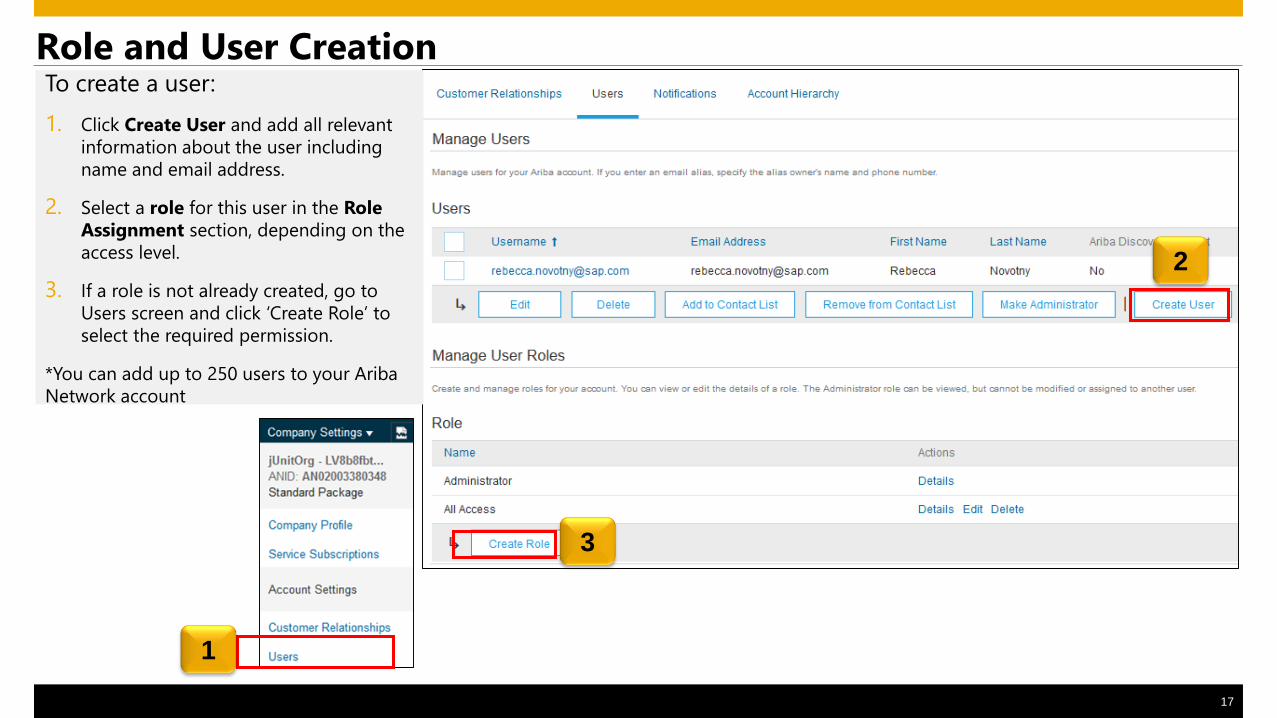
Role and User Creation
1
2
3
To create a user:
1. Click Create User and add all relevant
information about the user including
name and email address.
2. Select a role for this user in the Role
Assignment section, depending on the
access level.
3. If a role is not already created, go to
Users screen and click ‘Create Role’ to
select the required permission.
*You can add up to 250 users to your Ariba
Network account
18
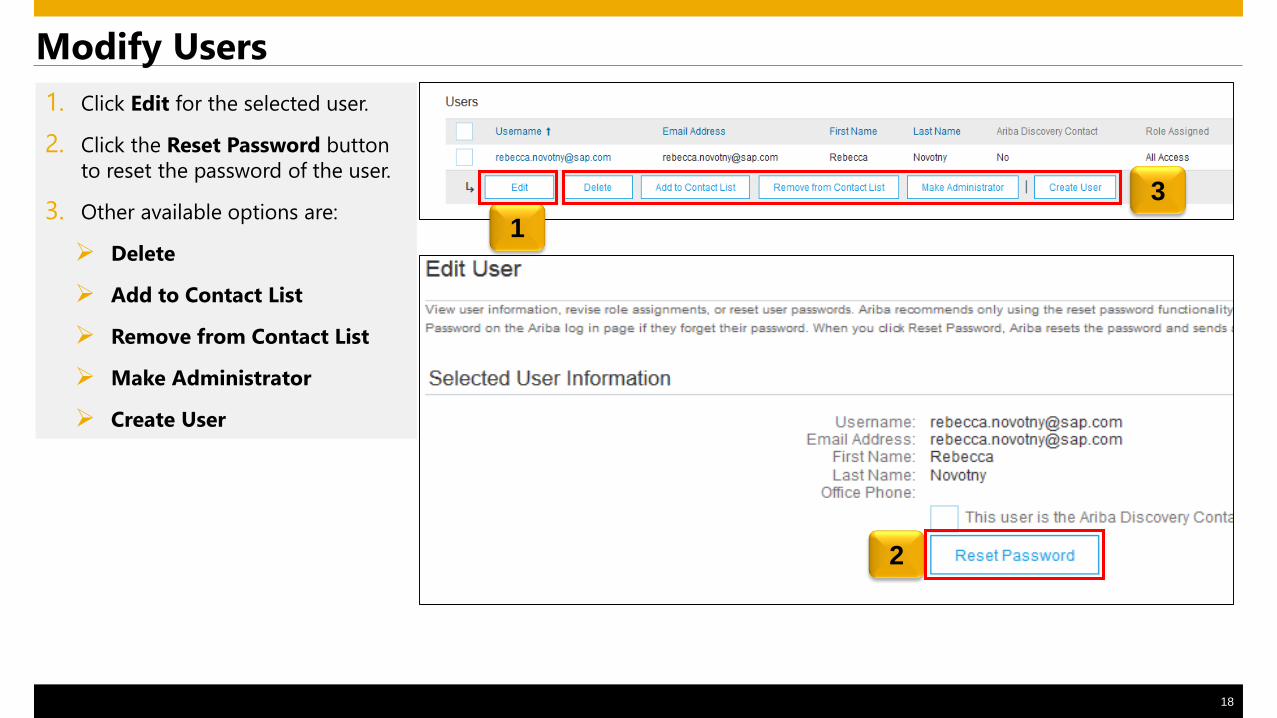
1. Click Edit for the selected user.
2. Click the Reset Password button
to reset the password of the user.
3. Other available options are:
Delete
Add to Contact List
Remove from Contact List
Make Administrator
Create User
Modify Users
1
2
3
19
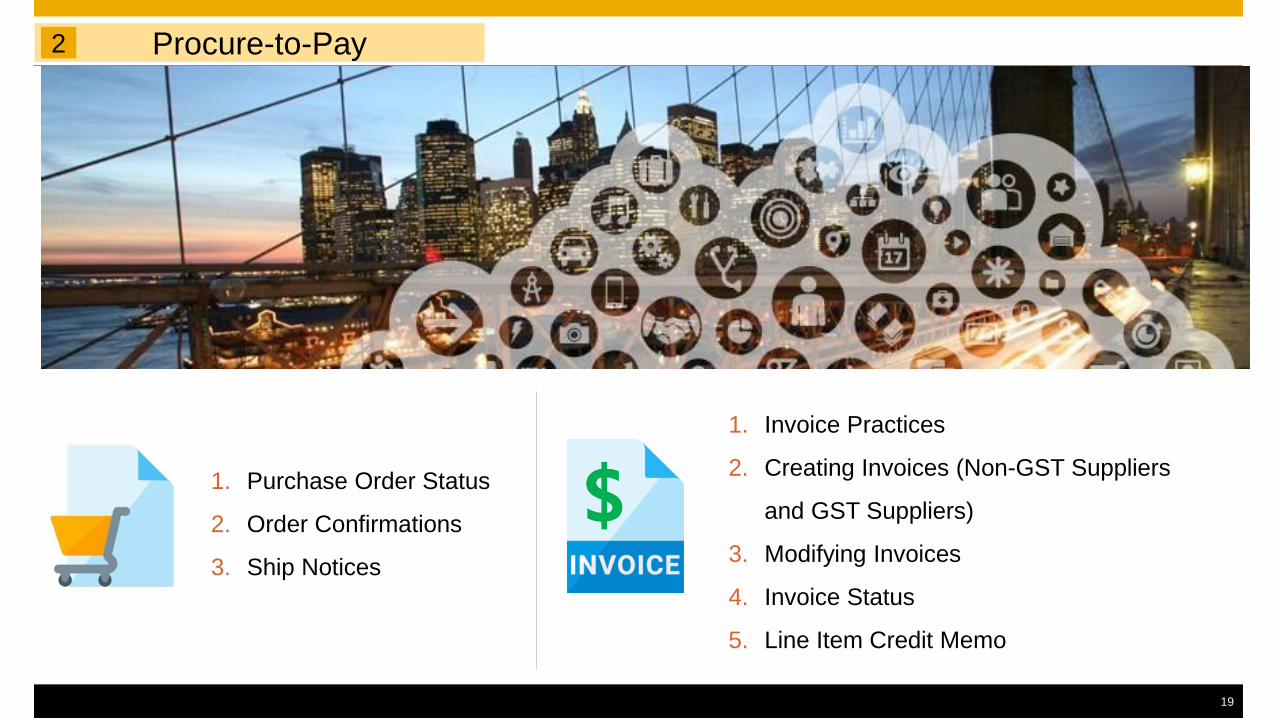
Procure-to-Pay2
1. Purchase Order Status
2. Order Confirmations
3. Ship Notices
1. Invoice Practices
2. Creating Invoices (Non-GST Suppliers
and GST Suppliers)
3. Modifying Invoices
4. Invoice Status
5. Line Item Credit Memo
20
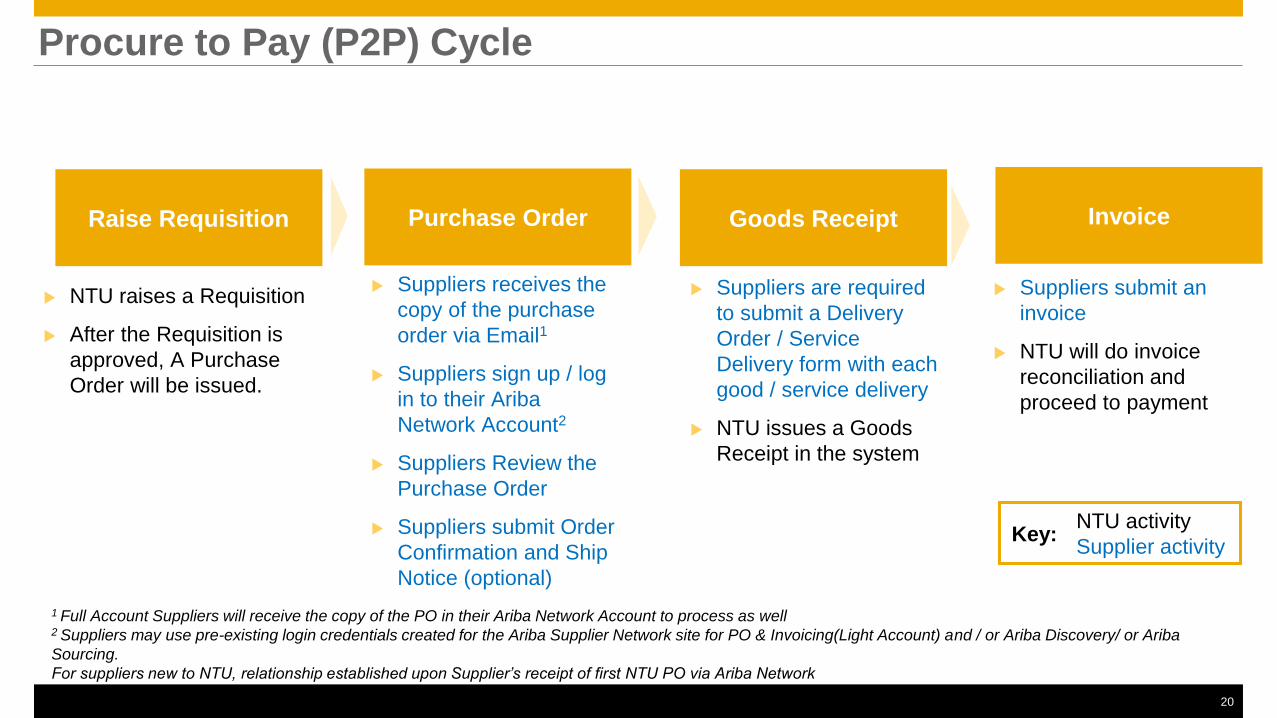
Procure to Pay (P2P) Cycle
Nov 2013, ARIBA Inc. All rights reserved
Raise Requisition Purchase Order Invoice
NTU raises a Requisition
After the Requisition is
approved, A Purchase
Order will be issued.
Suppliers receives the
copy of the purchase
order via Email1
Suppliers sign up / log
in to their Ariba
Network Account2
Suppliers Review the
Purchase Order
Suppliers submit Order
Confirmation and Ship
Notice (optional)
Suppliers submit an
invoice
NTU will do invoice
reconciliation and
proceed to payment
1 Full Account Suppliers will receive the copy of the PO in their Ariba Network Account to process as well2 Suppliers may use pre-existing login credentials created for the Ariba Supplier Network site for PO & Invoicing(Light Account) and / or Ariba Discovery/ or Ariba
Sourcing.
For suppliers new to NTU, relationship established upon Supplier’s receipt of first NTU PO via Ariba Network
Goods Receipt
Suppliers are required
to submit a Delivery
Order / Service
Delivery form with each
good / service delivery
NTU issues a Goods
Receipt in the system
NTU activity
Supplier activityKey:
1. Purchase Order Status
2. Order Confirmations
3. Ship Notices
22
1. Purchase Order Status
23
View Purchase Orders via Interactive Email
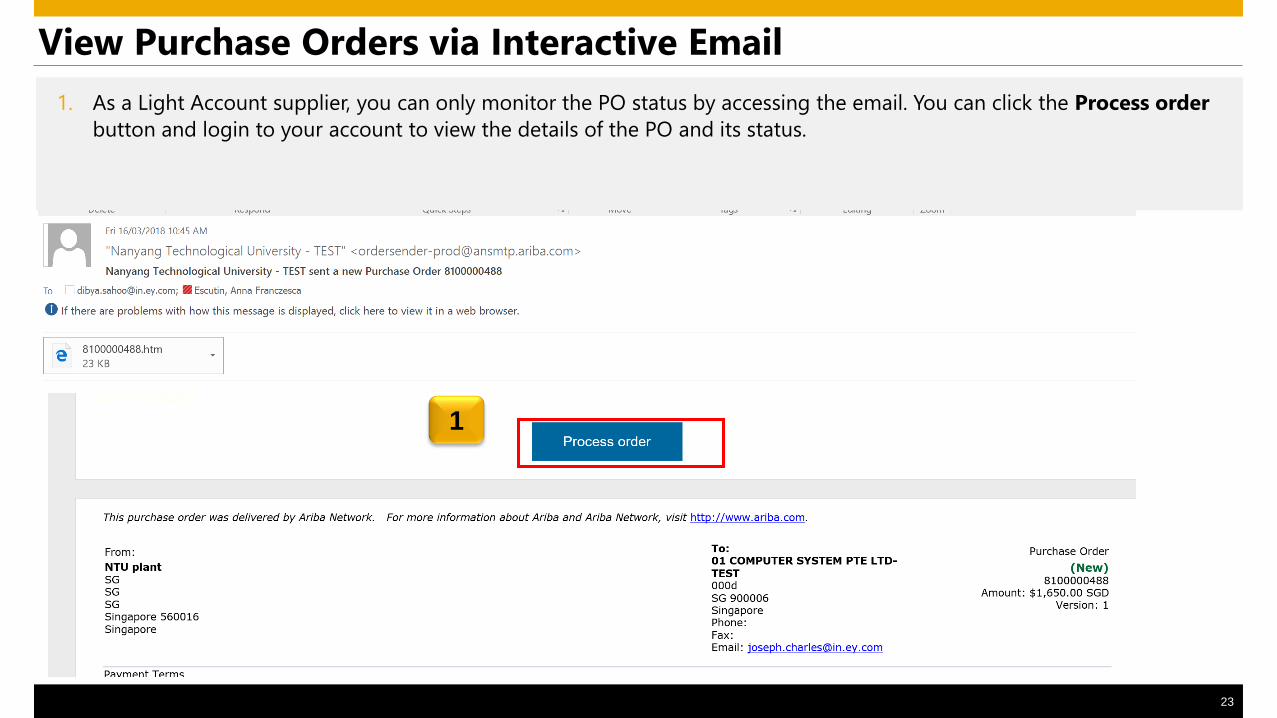
1. As a Light Account supplier, you can only monitor the PO status by accessing the email. You can click the Process order
button and login to your account to view the details of the PO and its status.
1
24
View Purchase Orders via Interactive Email (Contd.)
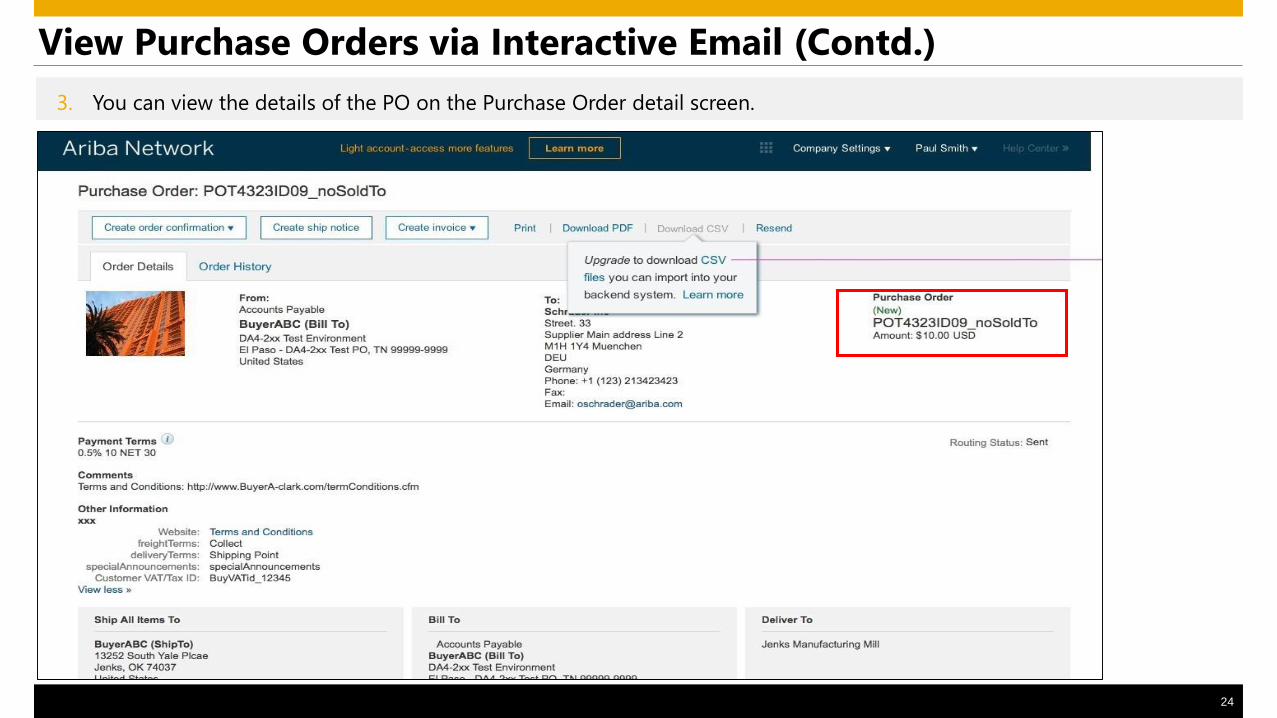
3. You can view the details of the PO on the Purchase Order detail screen.
25
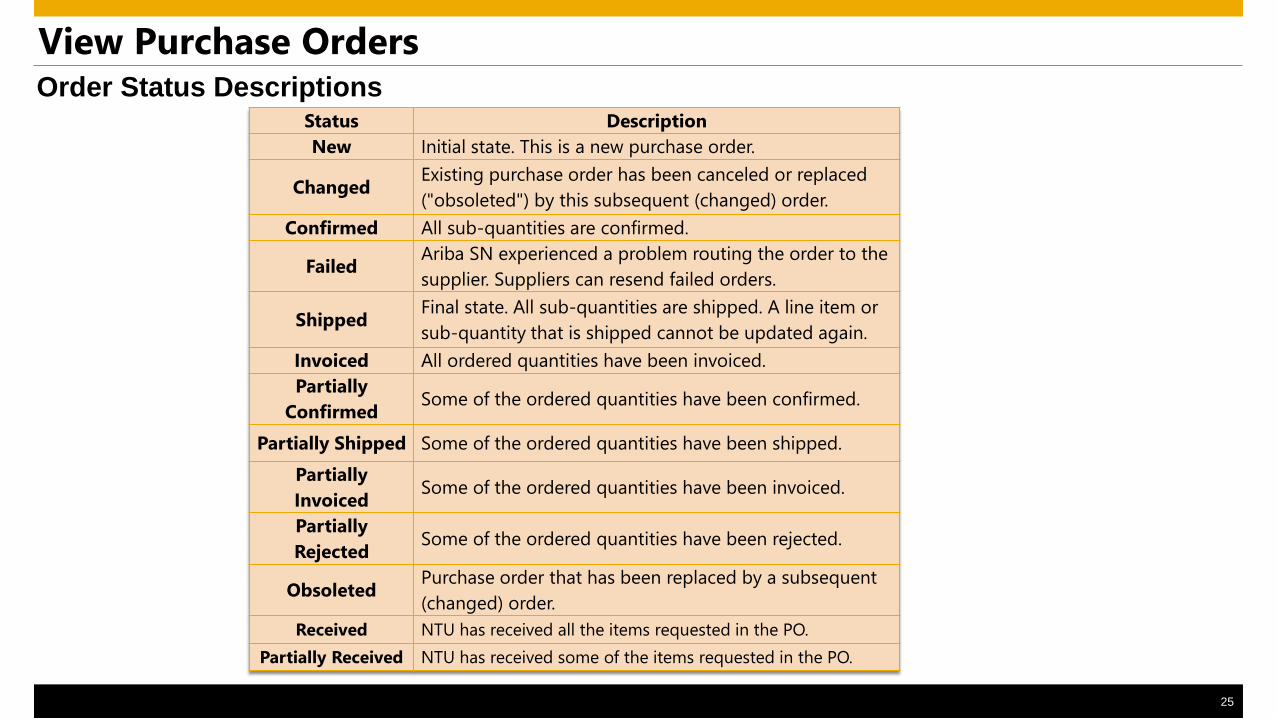
View Purchase OrdersOrder Status Descriptions
Status Description
New Initial state. This is a new purchase order.
ChangedExisting purchase order has been canceled or replaced
("obsoleted") by this subsequent (changed) order.
Confirmed All sub-quantities are confirmed.
FailedAriba SN experienced a problem routing the order to the
supplier. Suppliers can resend failed orders.
ShippedFinal state. All sub-quantities are shipped. A line item or
sub-quantity that is shipped cannot be updated again.
Invoiced All ordered quantities have been invoiced.
Partially
ConfirmedSome of the ordered quantities have been confirmed.
Partially Shipped Some of the ordered quantities have been shipped.
Partially
InvoicedSome of the ordered quantities have been invoiced.
Partially
RejectedSome of the ordered quantities have been rejected.
ObsoletedPurchase order that has been replaced by a subsequent
(changed) order.
Received NTU has received all the items requested in the PO.
Partially Received NTU has received some of the items requested in the PO.
26
2. Order Confirmations

27
Before You Begin…
Order Confirmation is not mandatory for NTU from NTU
Before confirming an order, please make sure to check all pricing and other items are correct. Items such as
Price, Delivery Date, UOM, should be confirmed.
A confirmation of “Accepted” means that you agree with the costs and terms sent to you by NTU in the PO
If pricing or other details are incorrect you can reject the line-item or the entire order. Make sure to put notes in
the header section and contact your NTU buyer to inform them of a rejection. You can not change price or
quantity on the OC. Any change in price or quantity will come in the Order Change if NTU approves the
changes requested
To access PO confirmation button, go to your Email containing the PO number and click “process order”
28
Order Confirmation Creation
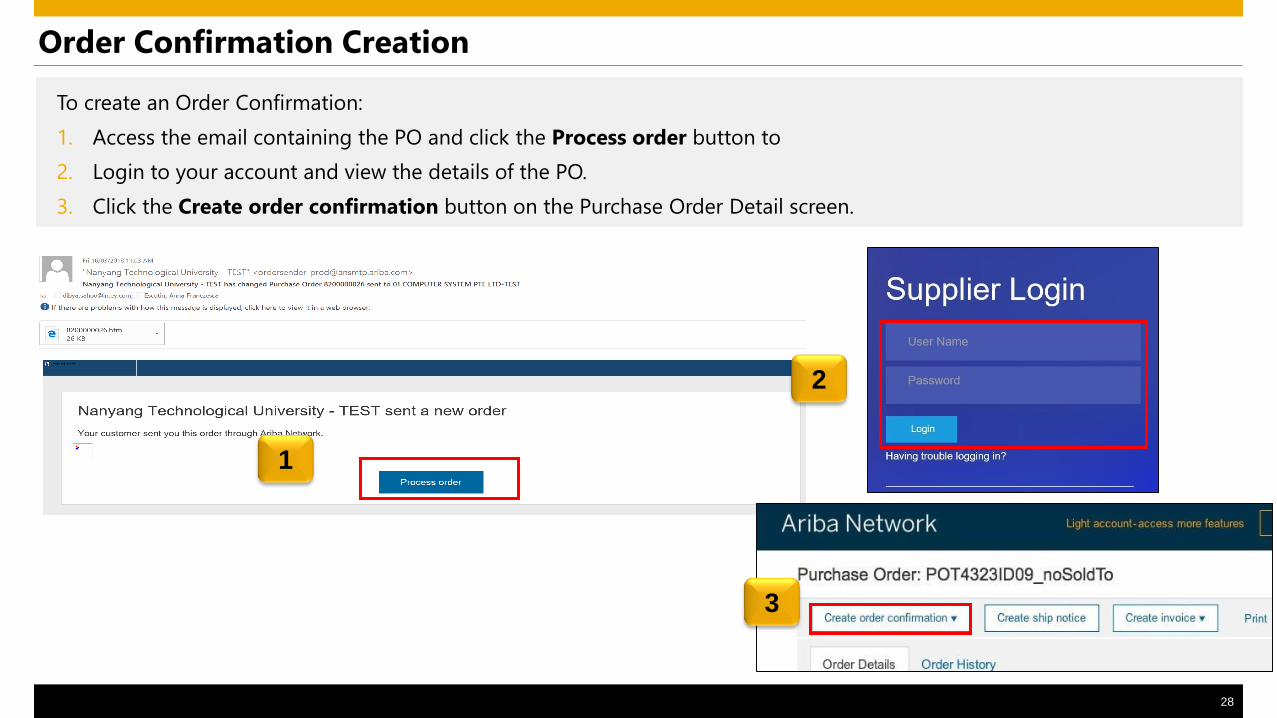
To create an Order Confirmation:
1. Access the email containing the PO and click the Process order button to
2. Login to your account and view the details of the PO.
3. Click the Create order confirmation button on the Purchase Order Detail screen.
1
3
2
29
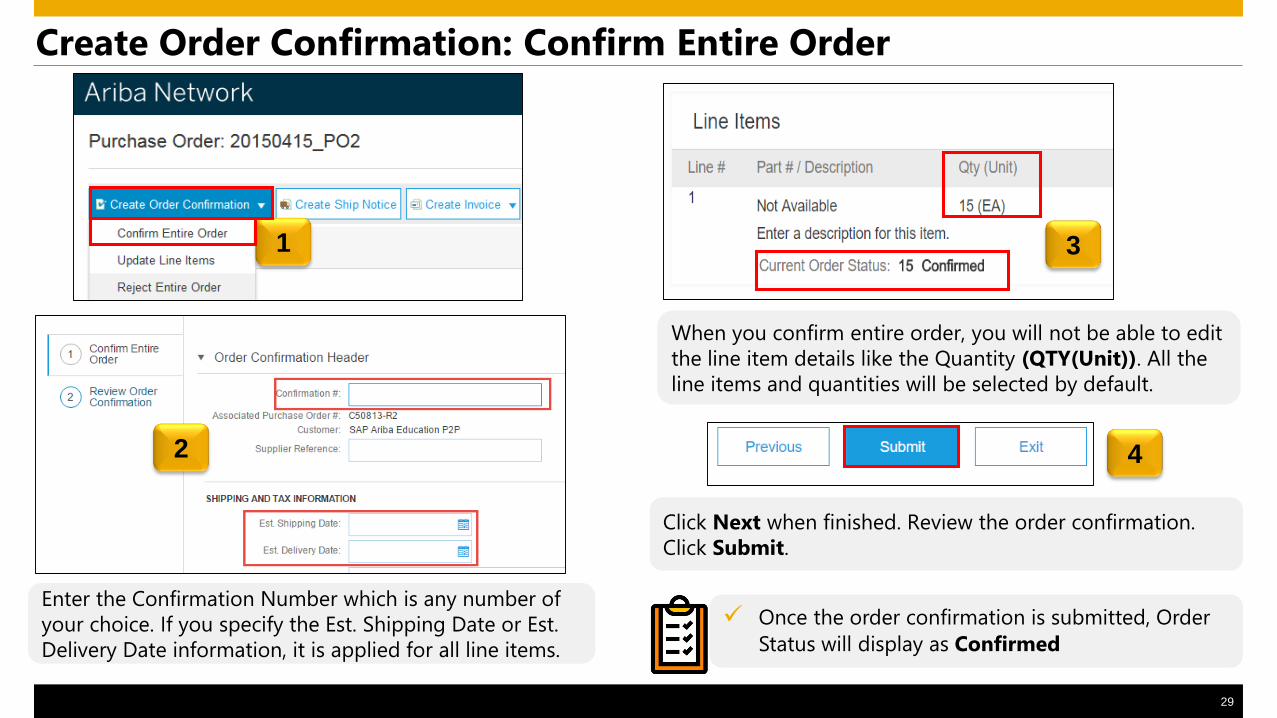
Create Order Confirmation: Confirm Entire Order
1
Enter the Confirmation Number which is any number of
your choice. If you specify the Est. Shipping Date or Est.
Delivery Date information, it is applied for all line items.
2 4
Click Next when finished. Review the order confirmation.
Click Submit.
When you confirm entire order, you will not be able to edit
the line item details like the Quantity (QTY(Unit)). All the
line items and quantities will be selected by default.
3
Once the order confirmation is submitted, Order
Status will display as Confirmed
30
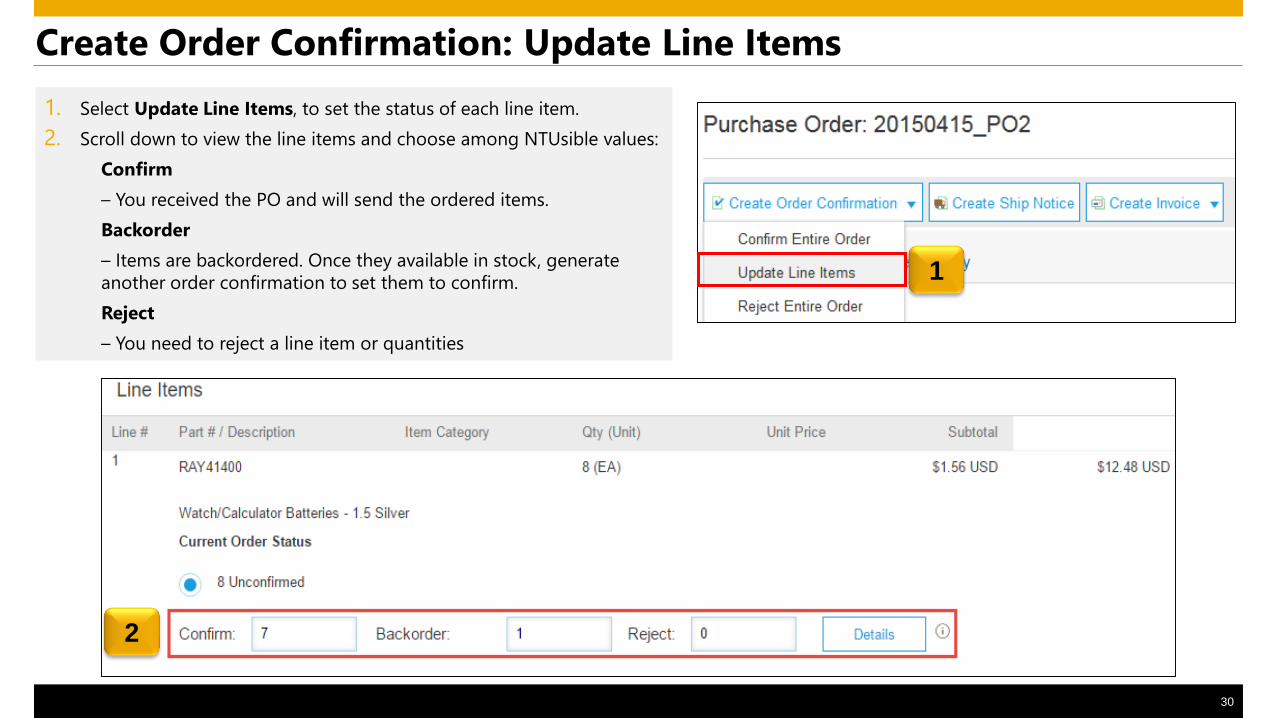
Create Order Confirmation: Update Line Items
1
2
1. Select Update Line Items, to set the status of each line item.
2. Scroll down to view the line items and choose among NTUsible values:
Confirm
– You received the PO and will send the ordered items.
Backorder
– Items are backordered. Once they available in stock, generate
another order confirmation to set them to confirm.
Reject
– You need to reject a line item or quantities

31
Confirm Order: Update Line Items - Backorder
1. Enter the quantity backordered in the
Backorder field and click Details.
2. Enter the Comments and Estimated
Shipping and Delivery Dates for the
backordered items on the Status Details
page.
3. Click OK when done to submit. 1
2
3
32
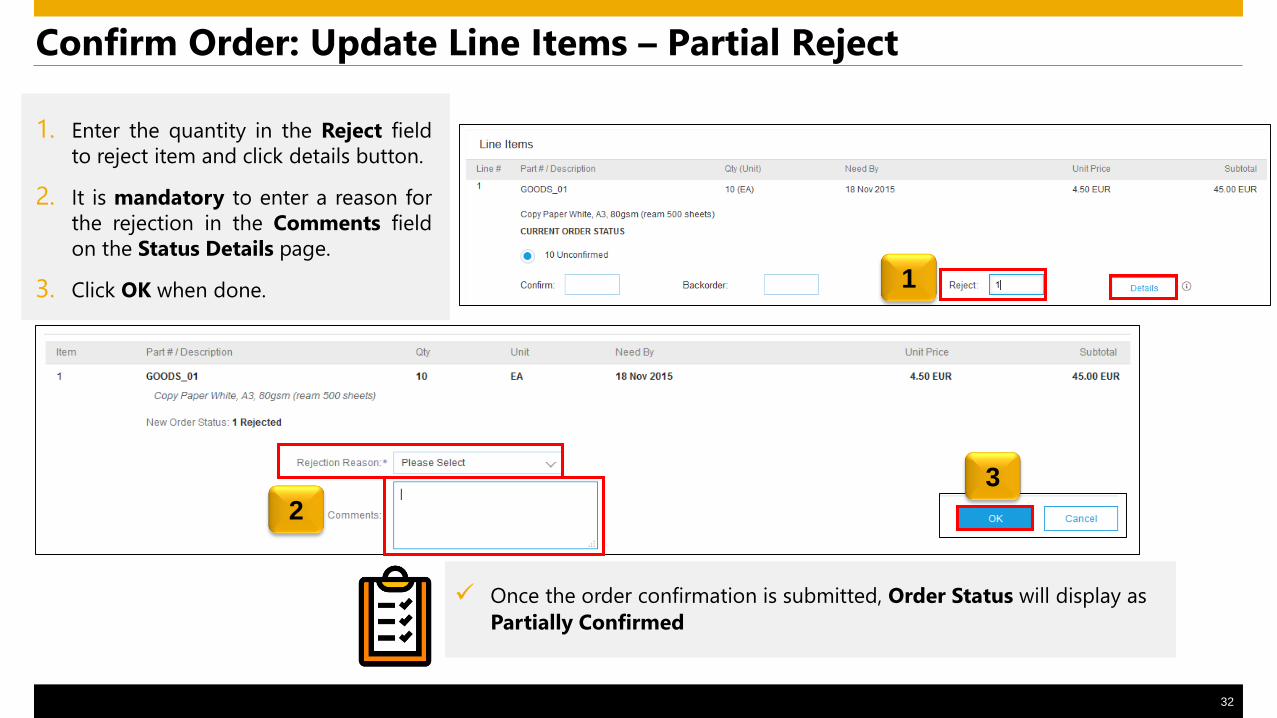
Confirm Order: Update Line Items – Partial Reject
1. Enter the quantity in the Reject field
to reject item and click details button.
2. It is mandatory to enter a reason for
the rejection in the Comments field
on the Status Details page.
3. Click OK when done. 1
2
3
Once the order confirmation is submitted, Order Status will display as
Partially Confirmed
33
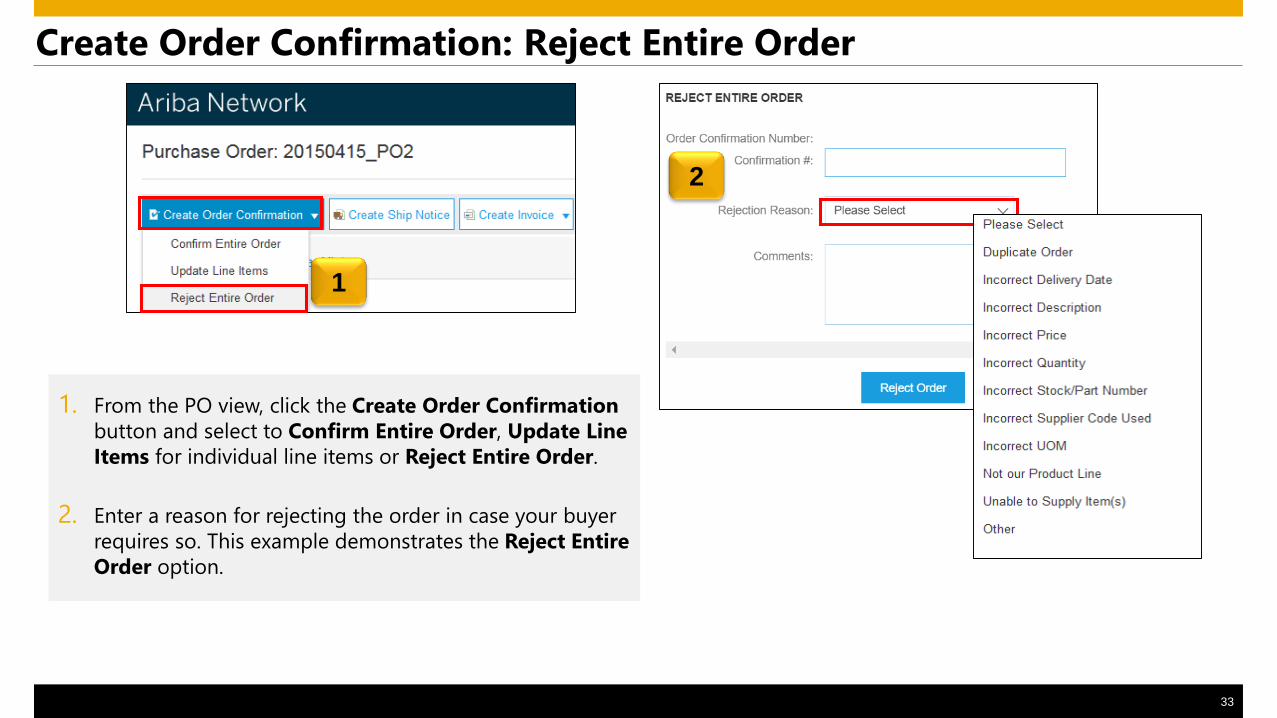
Create Order Confirmation: Reject Entire Order
1
2
1. From the PO view, click the Create Order Confirmation
button and select to Confirm Entire Order, Update Line
Items for individual line items or Reject Entire Order.
2. Enter a reason for rejecting the order in case your buyer
requires so. This example demonstrates the Reject Entire
Order option.

34
3. Ship Notices
35
Before You Begin…
Ship Notices are not mandatory for NTU from NTU
Advanced Ship Notices (ASNs) are requested for material NTU.
You cannot change the amount to be shipped – it is inherited from the PO.
If you need to ship a greater amount than the amount mentioned on the PO then, you will need to contact your
NTU representative.
To access Ship Notice button, go to your Email containing the PO number and click “process order”
36
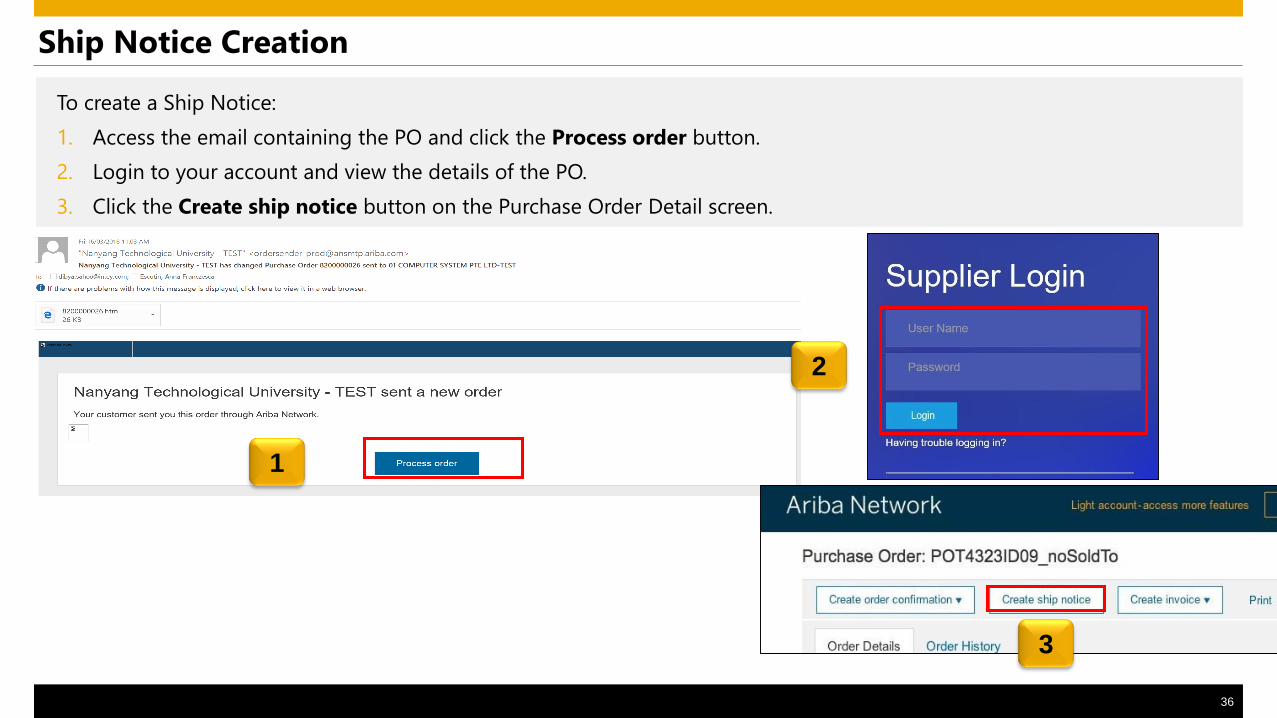
Ship Notice Creation
To create a Ship Notice:
1. Access the email containing the PO and click the Process order button.
2. Login to your account and view the details of the PO.
3. Click the Create ship notice button on the Purchase Order Detail screen.
1
3
2
37
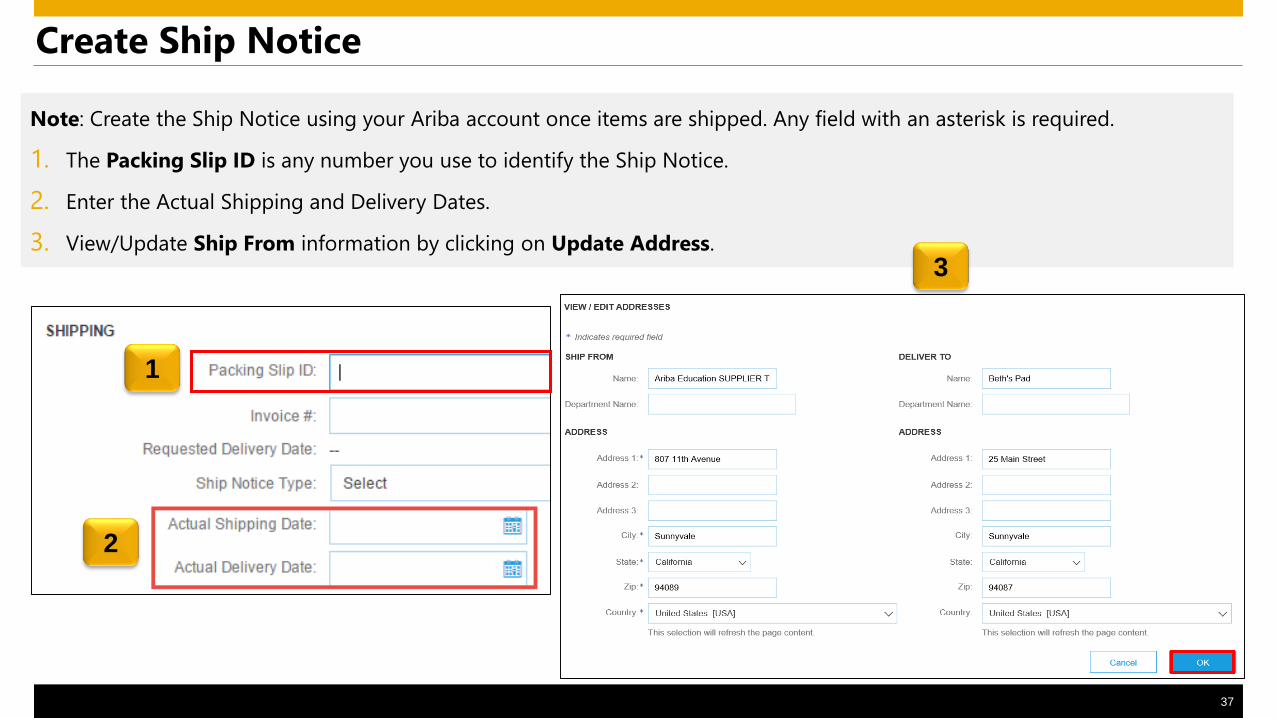
Note: Create the Ship Notice using your Ariba account once items are shipped. Any field with an asterisk is required.
1. The Packing Slip ID is any number you use to identify the Ship Notice.
2. Enter the Actual Shipping and Delivery Dates.
3. View/Update Ship From information by clicking on Update Address.
Create Ship Notice
1
2
3
38
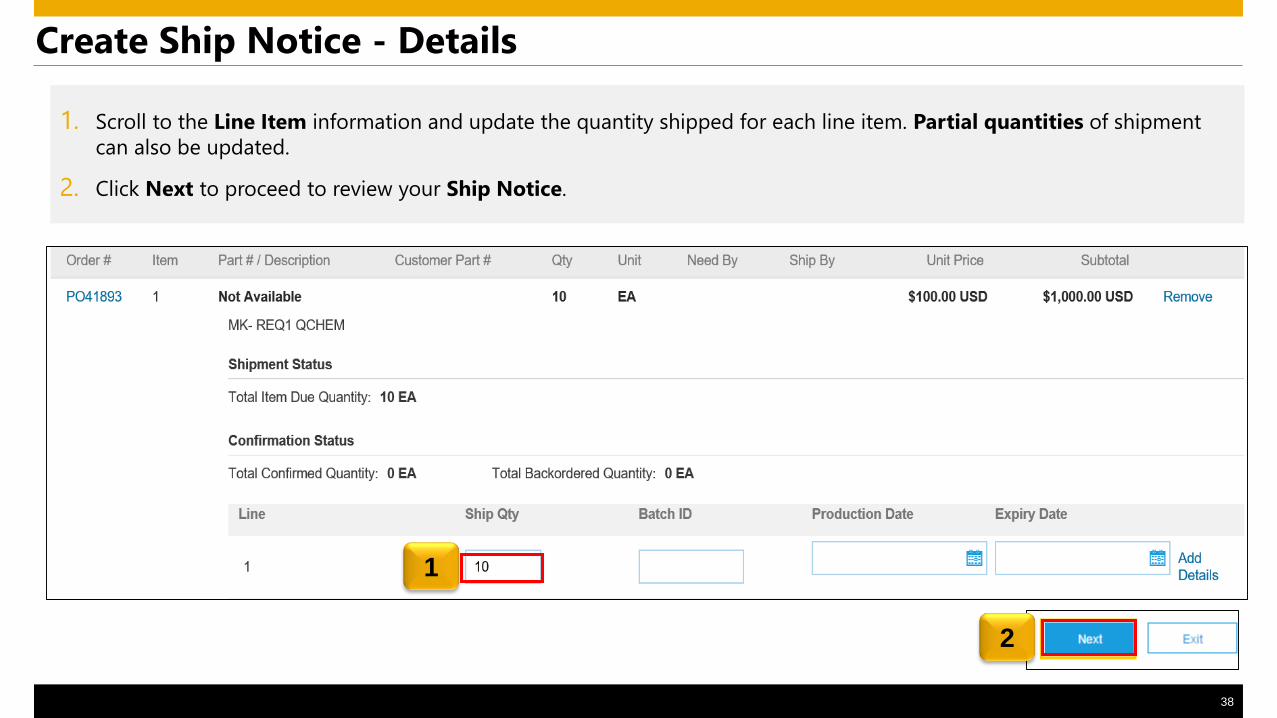
1. Scroll to the Line Item information and update the quantity shipped for each line item. Partial quantities of shipment
can also be updated.
2. Click Next to proceed to review your Ship Notice.
Create Ship Notice - Details
1
2
39
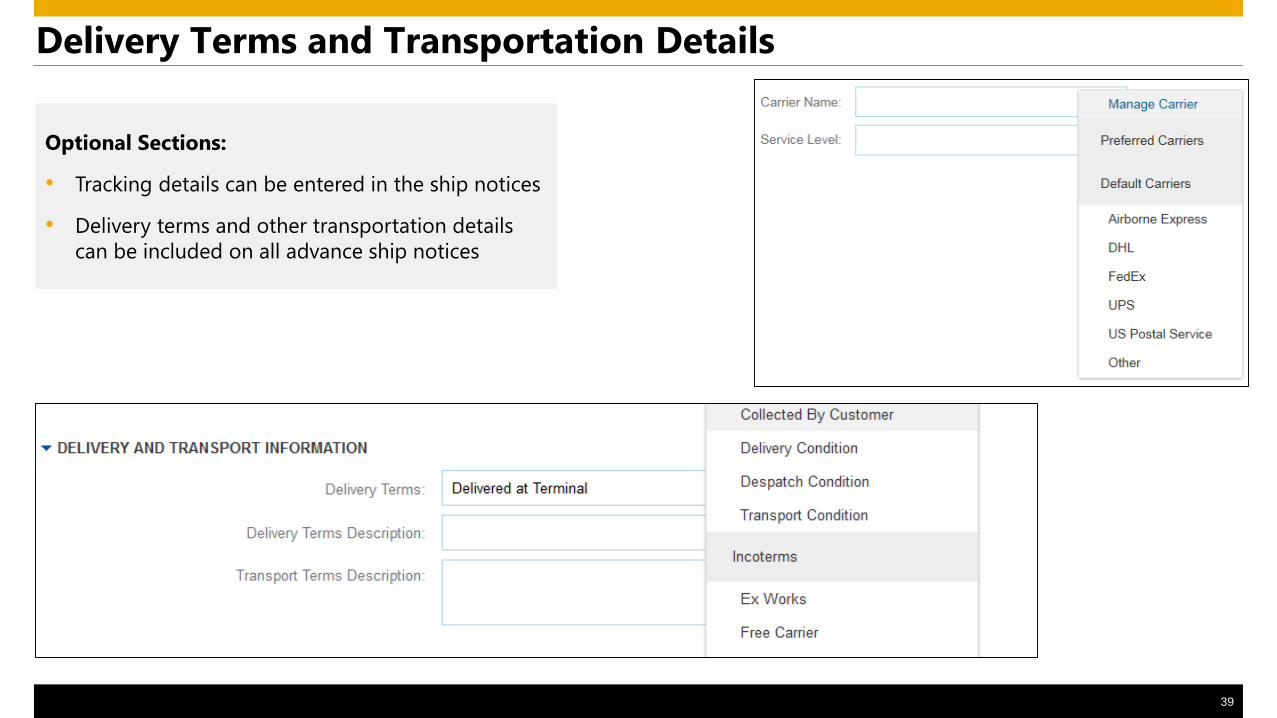
Optional Sections:
• Tracking details can be entered in the ship notices
• Delivery terms and other transportation details
can be included on all advance ship notices
Delivery Terms and Transportation Details
40
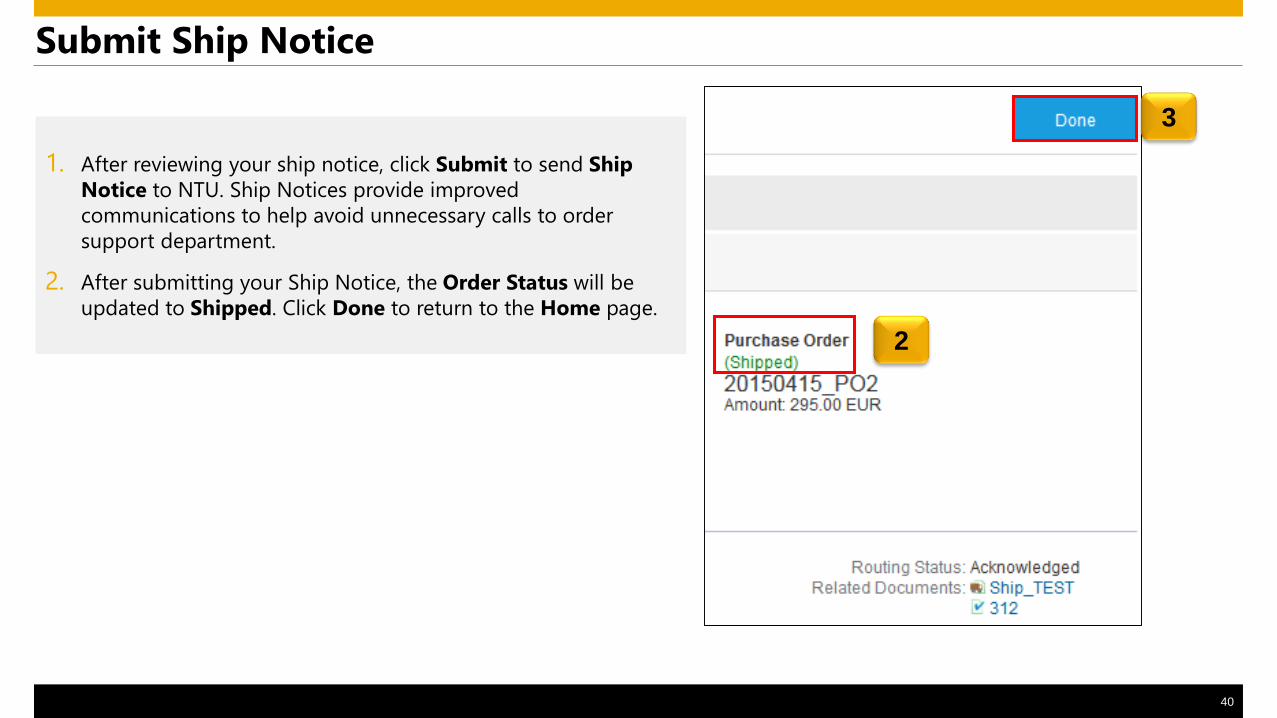
1. After reviewing your ship notice, click Submit to send Ship
Notice to NTU. Ship Notices provide improved
communications to help avoid unnecessary calls to order
support department.
2. After submitting your Ship Notice, the Order Status will be
updated to Shipped. Click Done to return to the Home page.
Submit Ship Notice
2
3
1. Invoice Practices
2. Creating Invoices (Non-GST Suppliers and GST Suppliers)
3. Modifying Invoices
4. Invoice Status
5. Line Item Credit Memo
42
1. Invoice Practices
2. Creating Invoices
3. Invoice status
43
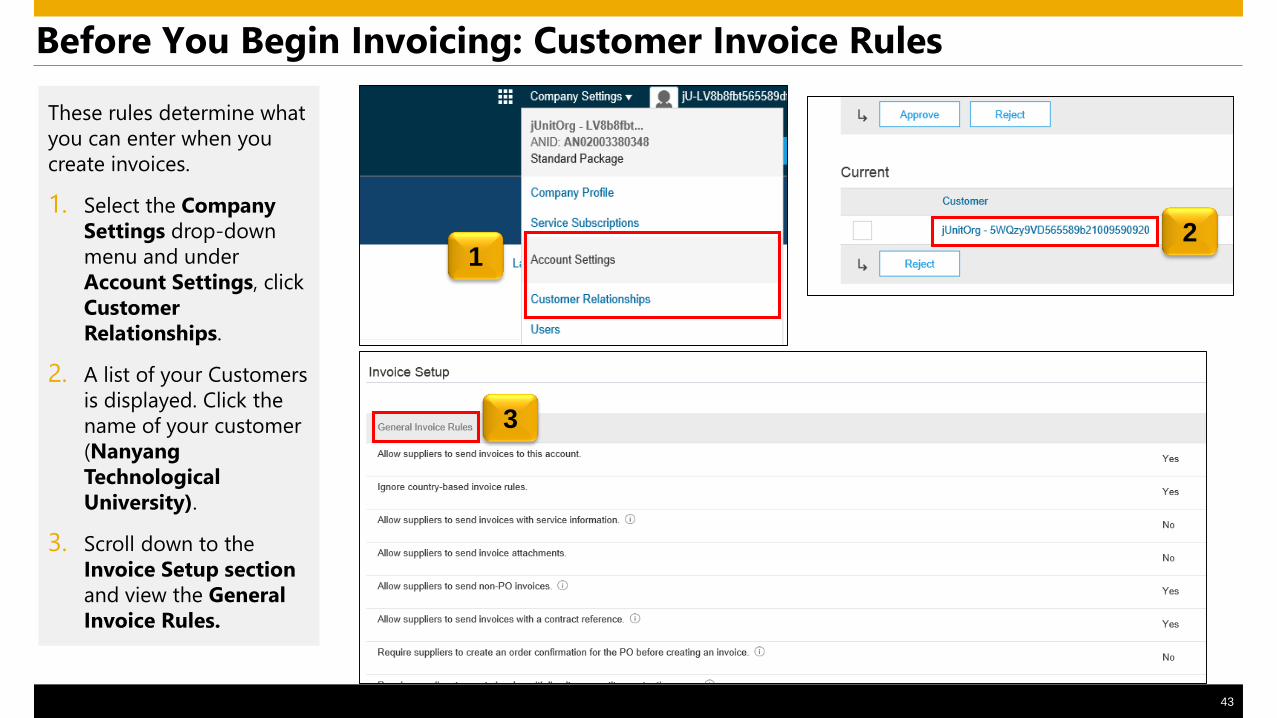
These rules determine what
you can enter when you
create invoices.
1. Select the Company
Settings drop-down
menu and under
Account Settings, click
Customer
Relationships.
2. A list of your Customers
is displayed. Click the
name of your customer
(Nanyang
Technological
University).
3. Scroll down to the
Invoice Setup section
and view the General
Invoice Rules.
Before You Begin Invoicing: Customer Invoice Rules
12
3
44
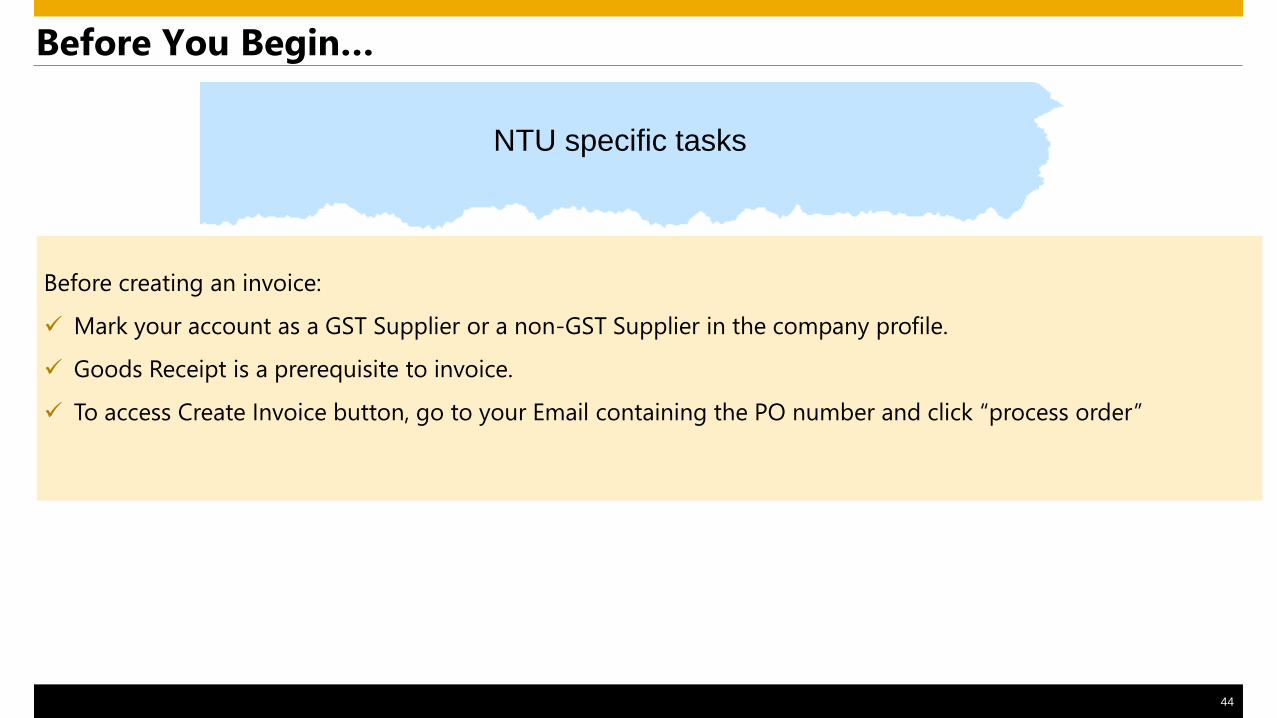
Before You Begin…
NTU specific tasks
Before creating an invoice:
Mark your account as a GST Supplier or a non-GST Supplier in the company profile.
Goods Receipt is a prerequisite to invoice.
To access Create Invoice button, go to your Email containing the PO number and click “process order”
45
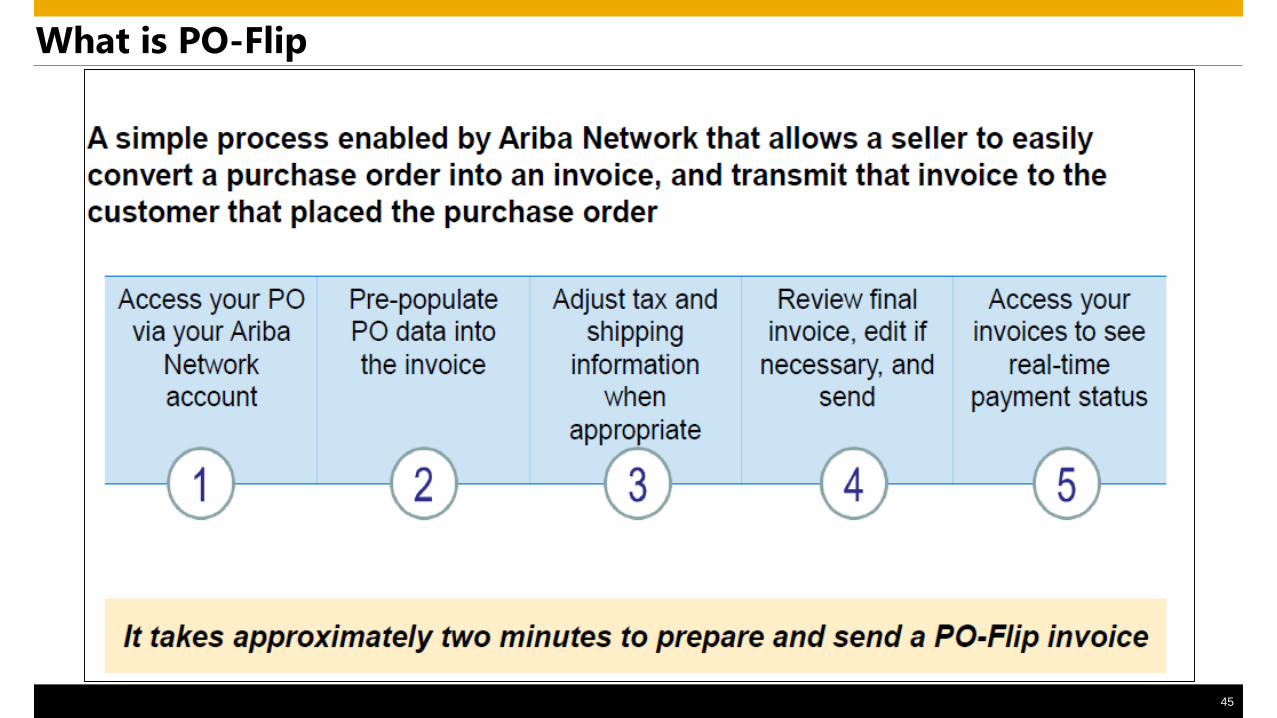
What is PO-Flip
46
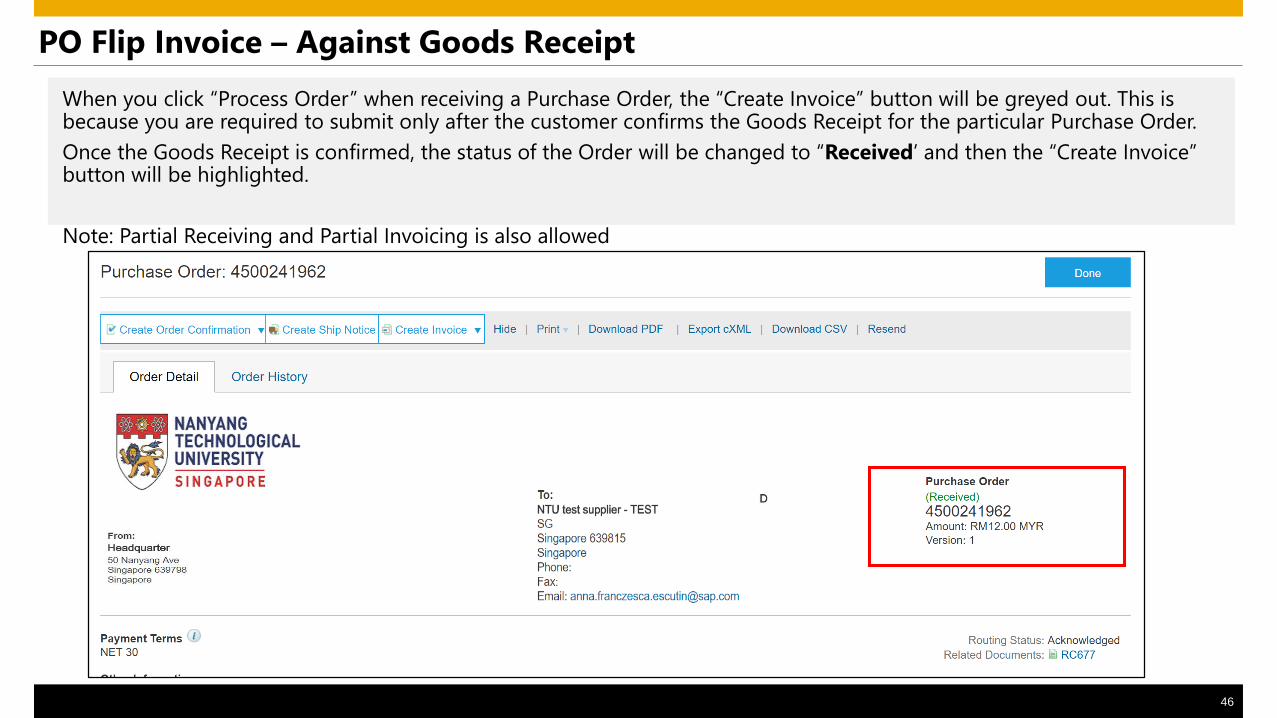
PO Flip Invoice – Against Goods Receipt
When you click “Process Order” when receiving a Purchase Order, the “Create Invoice” button will be greyed out. This is because you are required to submit only after the customer confirms the Goods Receipt for the particular Purchase Order.
Once the Goods Receipt is confirmed, the status of the Order will be changed to “Received’ and then the “Create Invoice” button will be highlighted.
Note: Partial Receiving and Partial Invoicing is also allowed
Invoicing Procedure for
Non-GST Suppliers
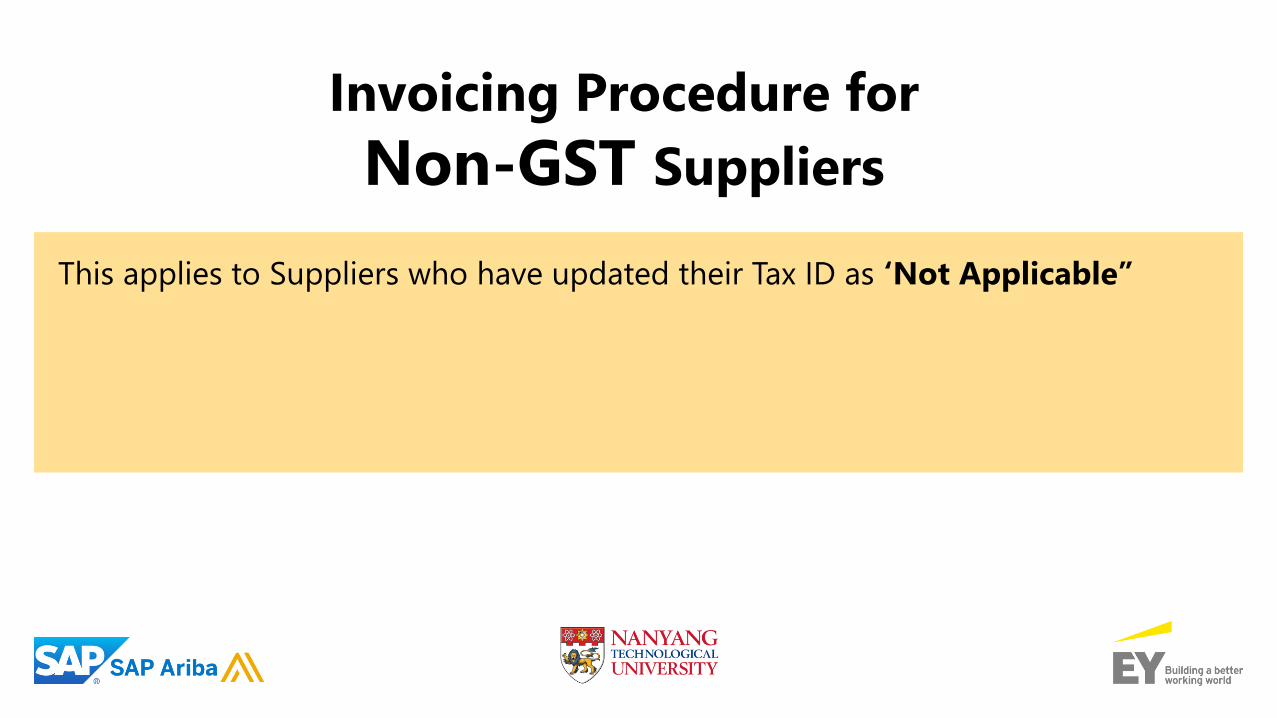
This applies to Suppliers who have updated their Tax ID as ‘Not Applicable”
48
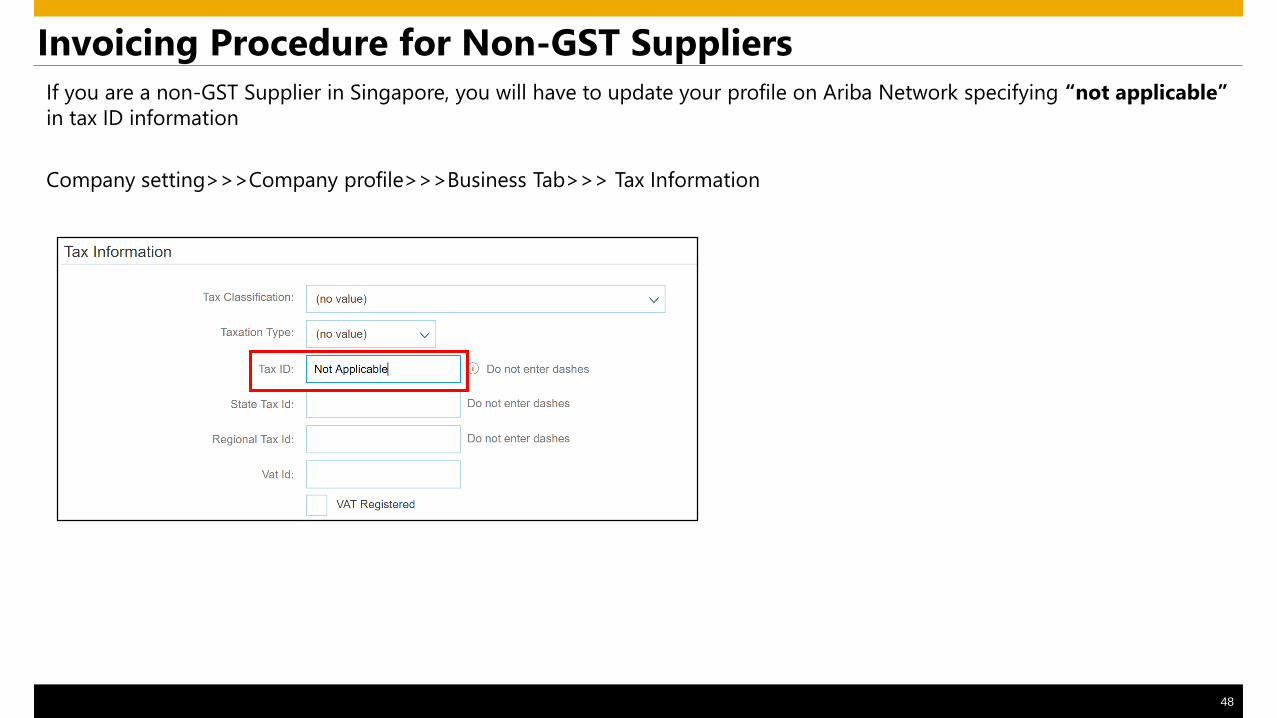
Invoicing Procedure for Non-GST Suppliers
If you are a non-GST Supplier in Singapore, you will have to update your profile on Ariba Network specifying “not applicable”
in tax ID information
Company setting>>>Company profile>>>Business Tab>>> Tax Information
49
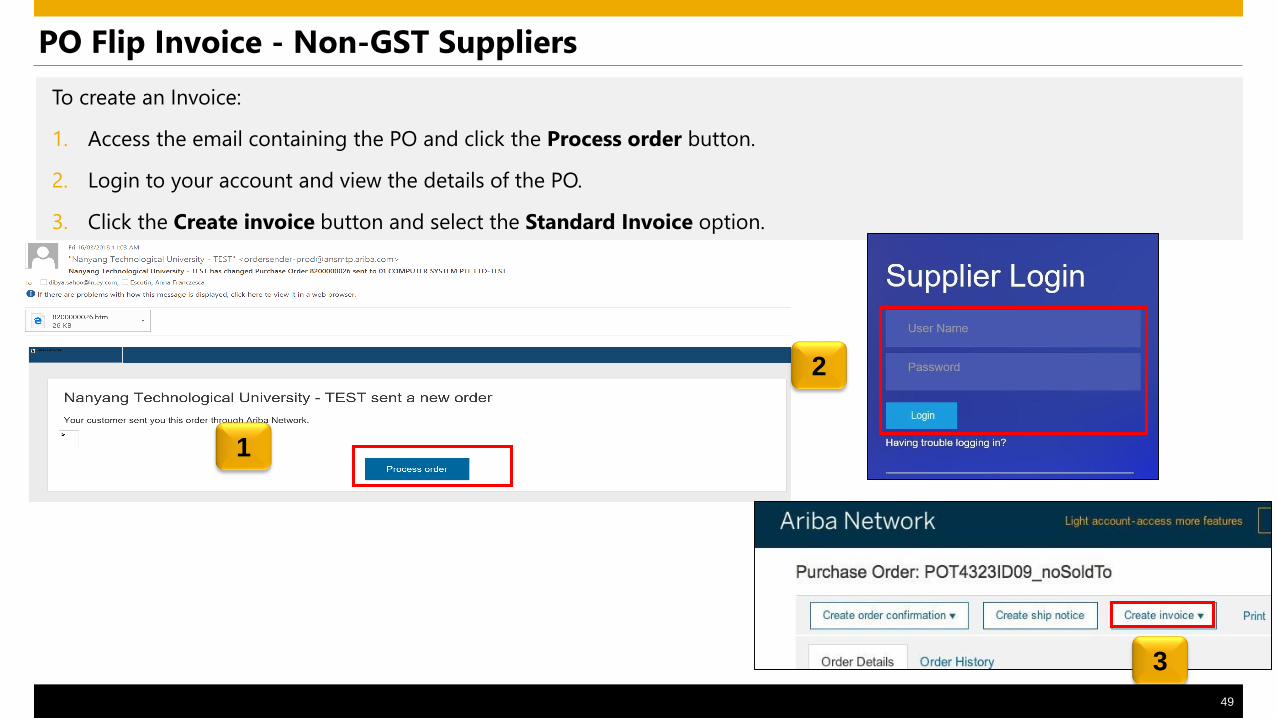
PO Flip Invoice - Non-GST Suppliers
To create an Invoice:
1. Access the email containing the PO and click the Process order button.
2. Login to your account and view the details of the PO.
3. Click the Create invoice button and select the Standard Invoice option.
1
3
2
50
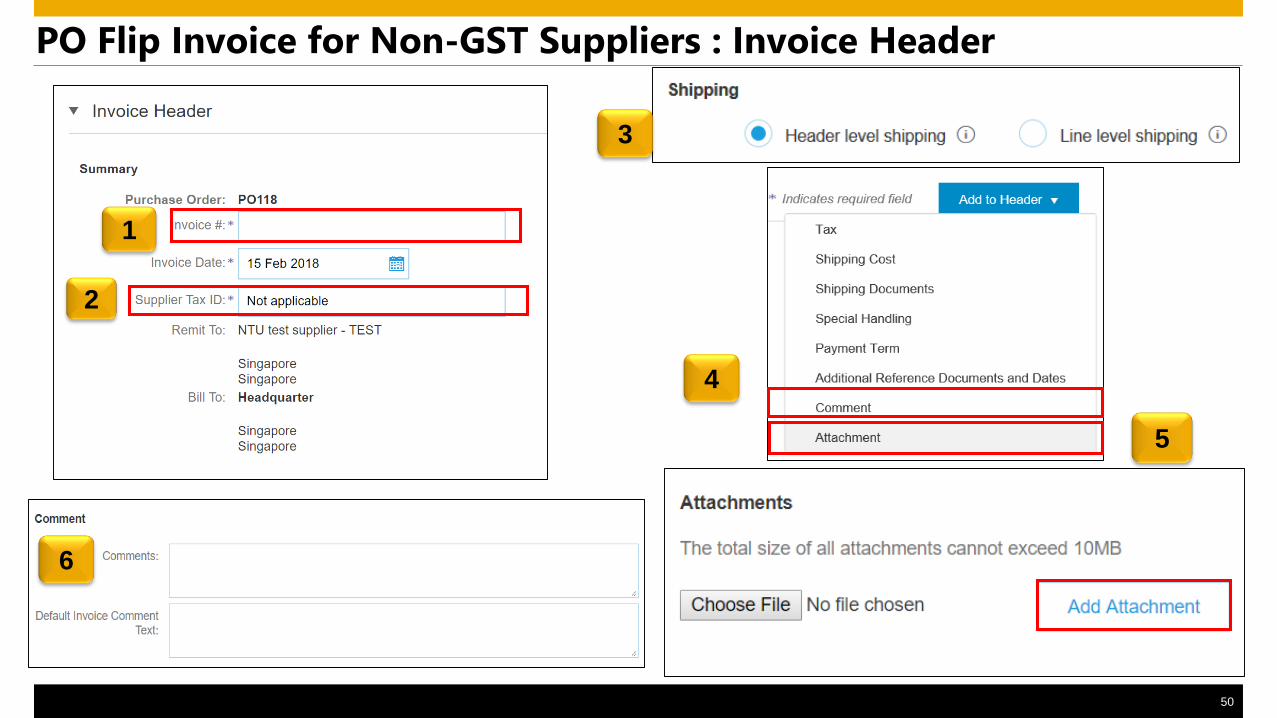
PO Flip Invoice for Non-GST Suppliers : Invoice Header
1
3
2
4
5
6
51
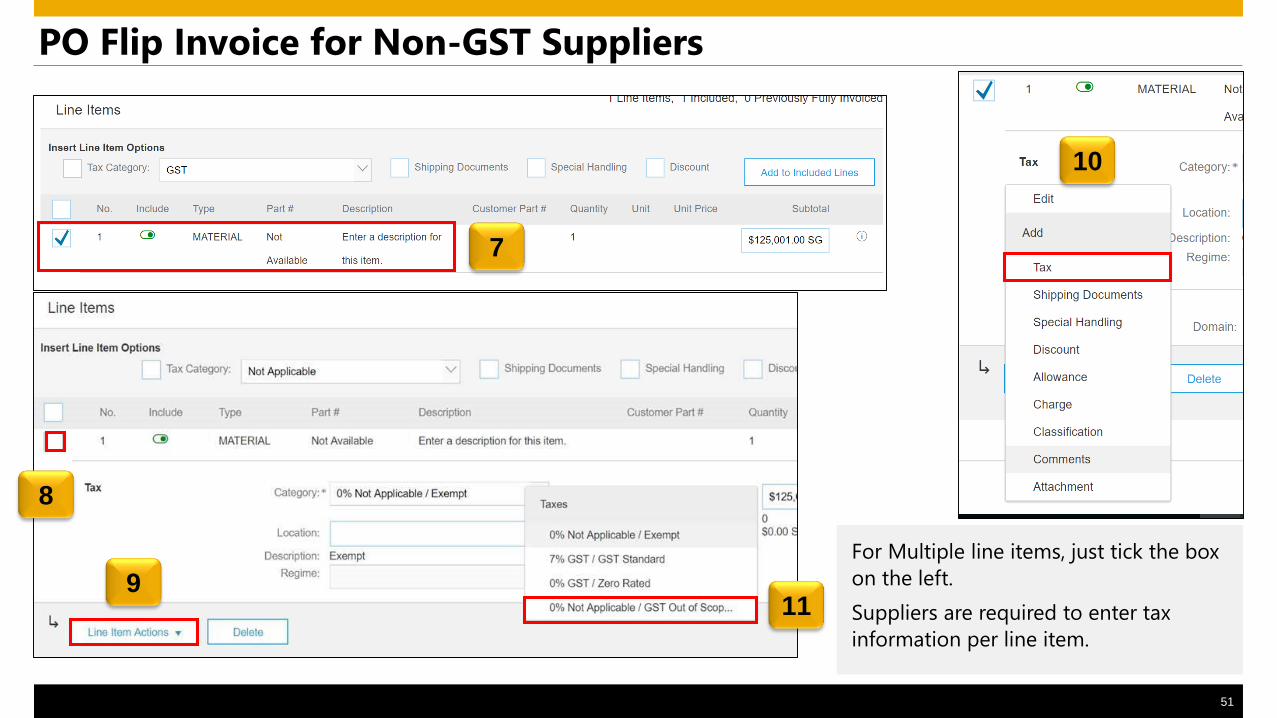
PO Flip Invoice for Non-GST Suppliers
For Multiple line items, just tick the box
on the left.
Suppliers are required to enter tax
information per line item.
7
8
9
10
11
52
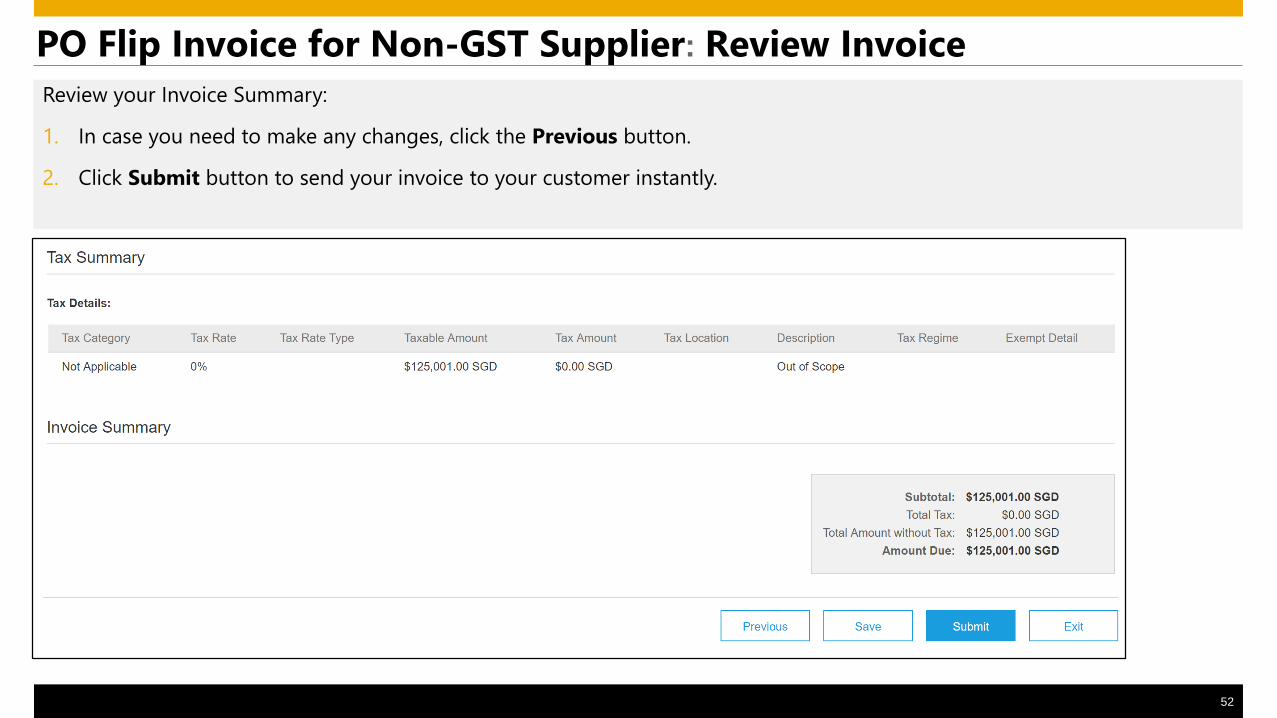
Review your Invoice Summary:
1. In case you need to make any changes, click the Previous button.
2. Click Submit button to send your invoice to your customer instantly.
PO Flip Invoice for Non-GST Supplier: Review Invoice
53
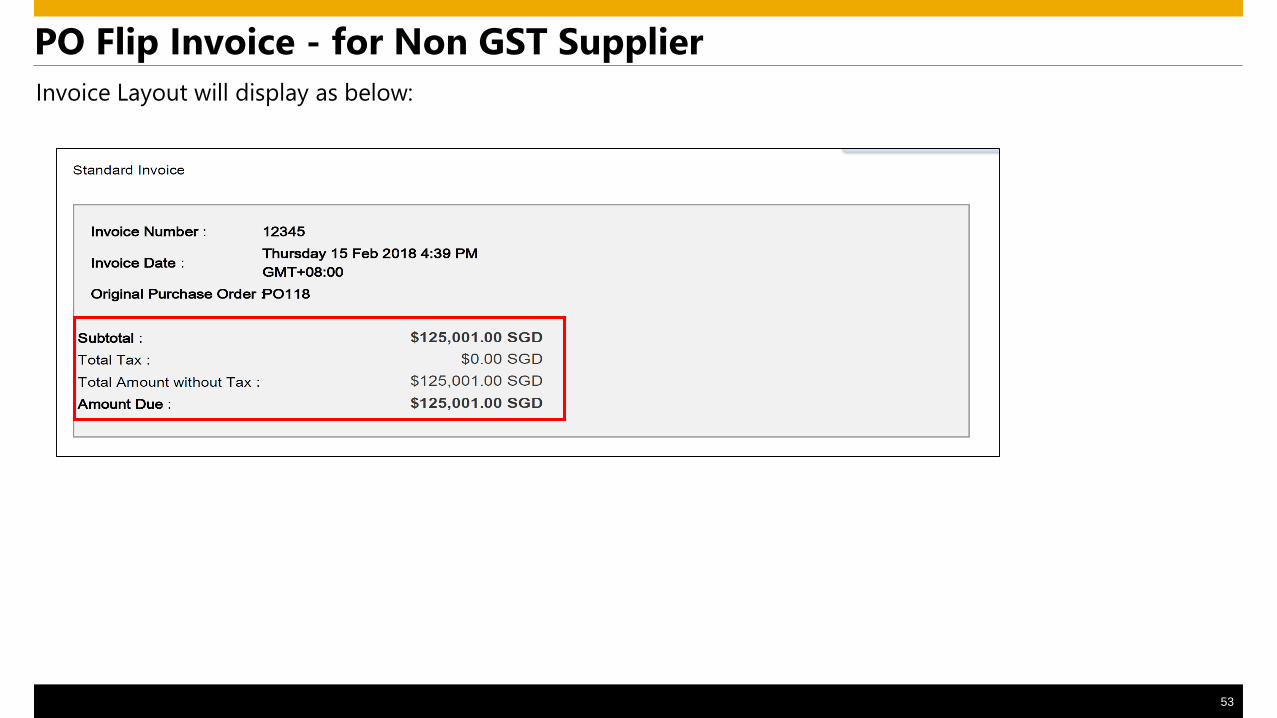
PO Flip Invoice - for Non GST Supplier
Invoice Layout will display as below:
Invoicing Procedure for
GST Suppliers
This applies to Suppliers who have updated their Tax ID in Company Profile
55
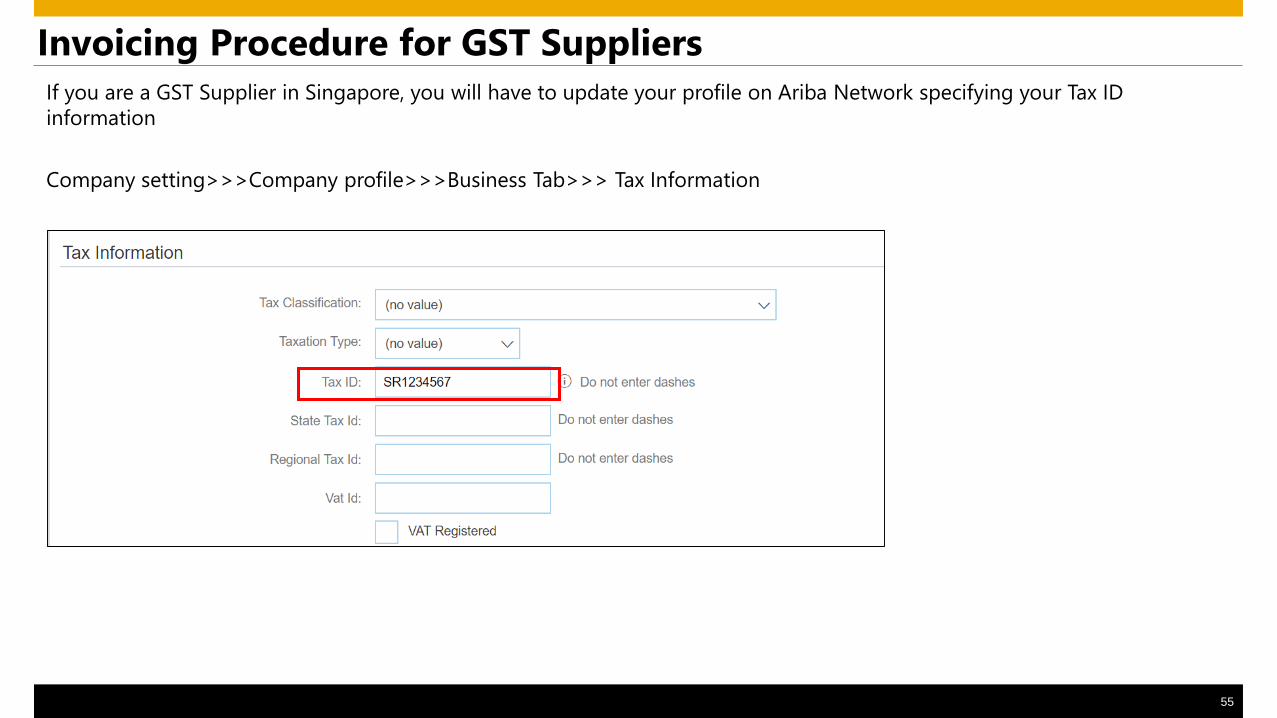
Invoicing Procedure for GST Suppliers
If you are a GST Supplier in Singapore, you will have to update your profile on Ariba Network specifying your Tax ID
information
Company setting>>>Company profile>>>Business Tab>>> Tax Information
56
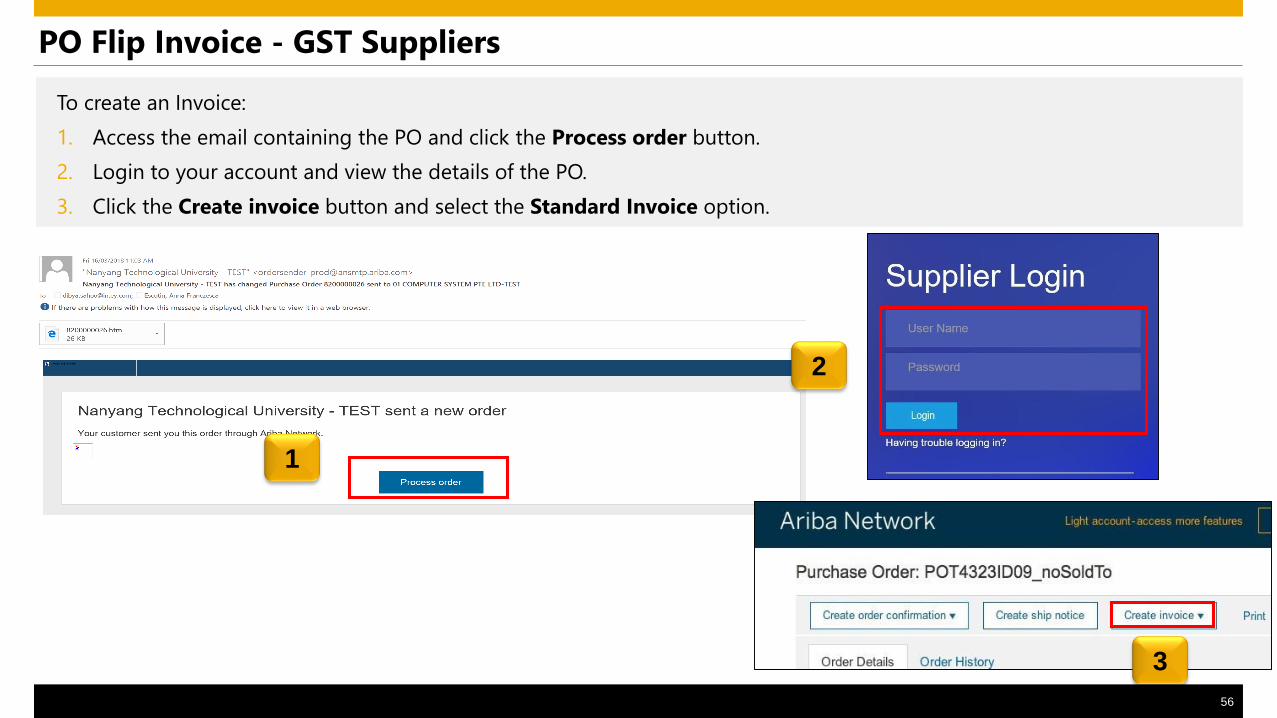
PO Flip Invoice - GST Suppliers
To create an Invoice:
1. Access the email containing the PO and click the Process order button.
2. Login to your account and view the details of the PO.
3. Click the Create invoice button and select the Standard Invoice option.
1
3
2
57
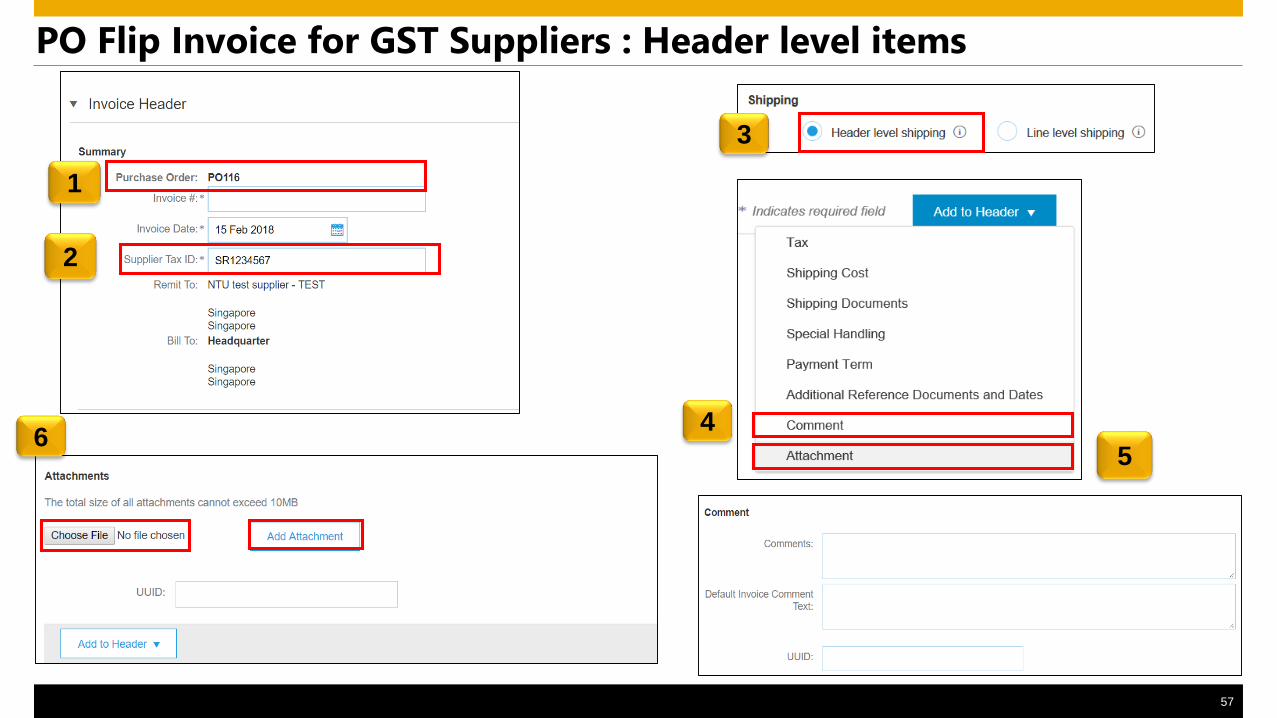
PO Flip Invoice for GST Suppliers : Header level items
1
3
2
5
46
58
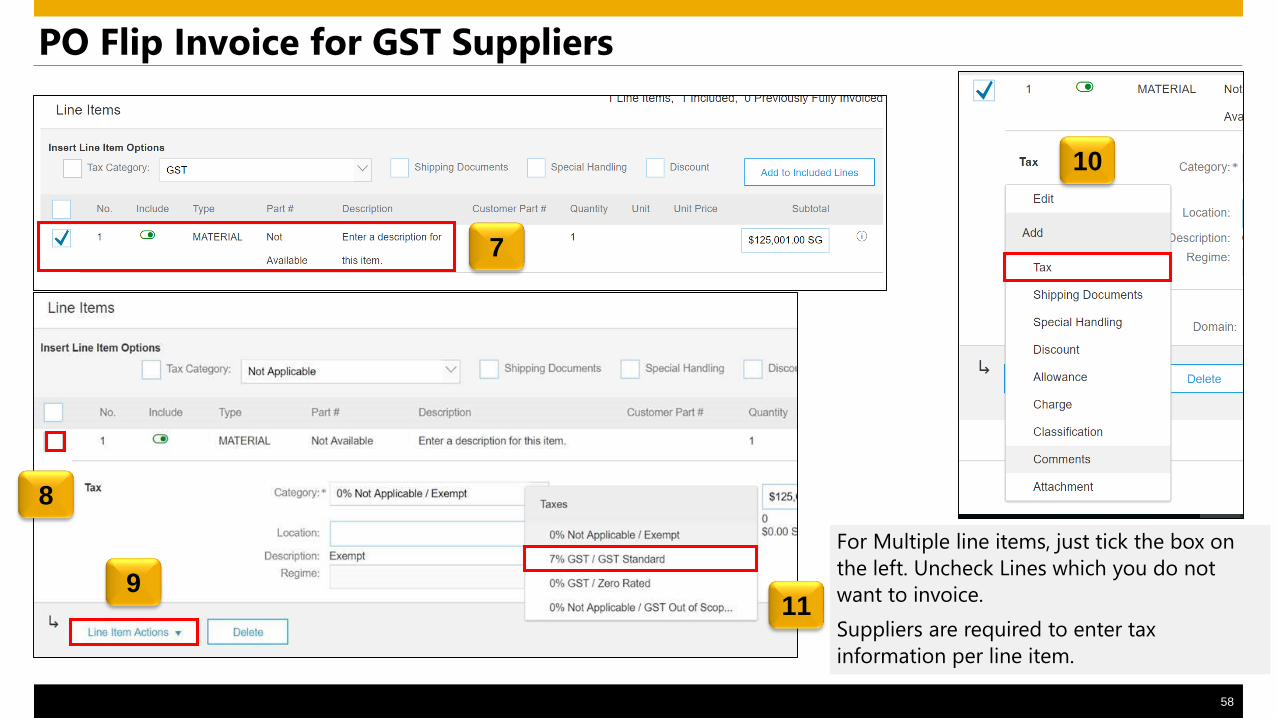
PO Flip Invoice for GST Suppliers
For Multiple line items, just tick the box on
the left. Uncheck Lines which you do not
want to invoice.
Suppliers are required to enter tax
information per line item.
7
8
9
10
11

59
PO Flip Invoice for GST Supplier
Invoice Layout will display as below:
60
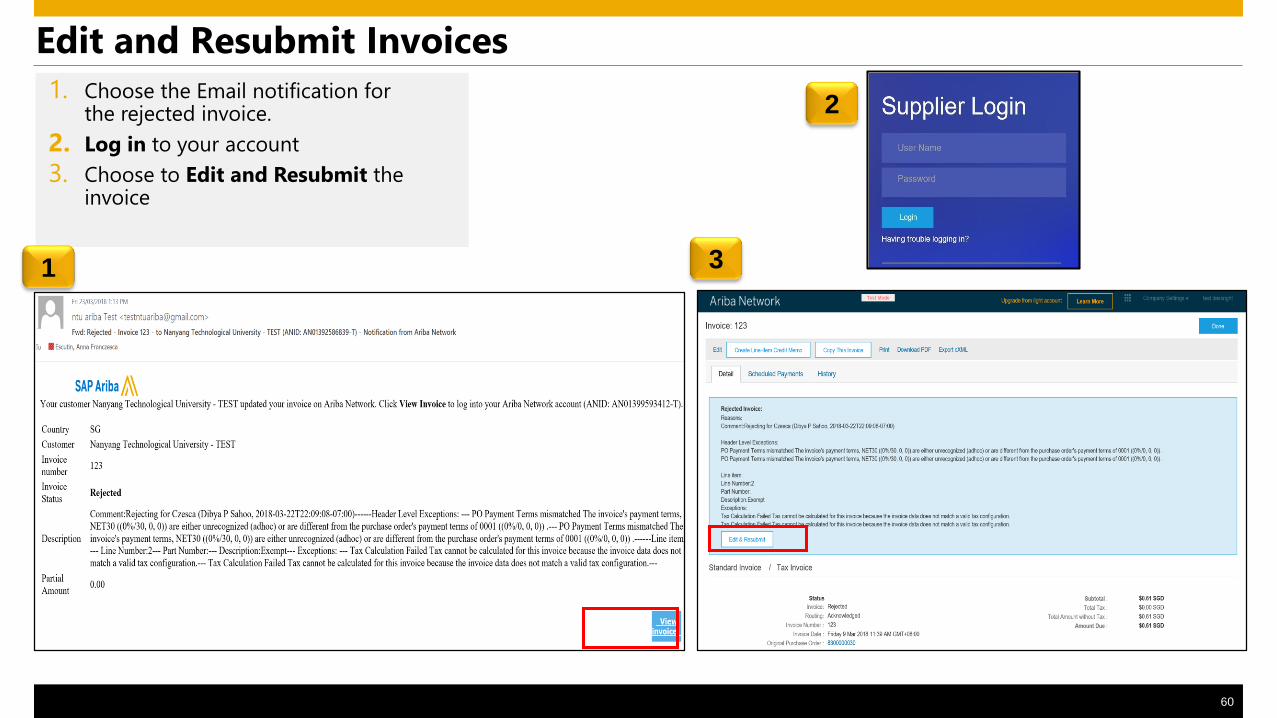
Edit and Resubmit Invoices
1. Choose the Email notification for the rejected invoice.
2. Log in to your account
3. Choose to Edit and Resubmit the invoice
1
2
3
61
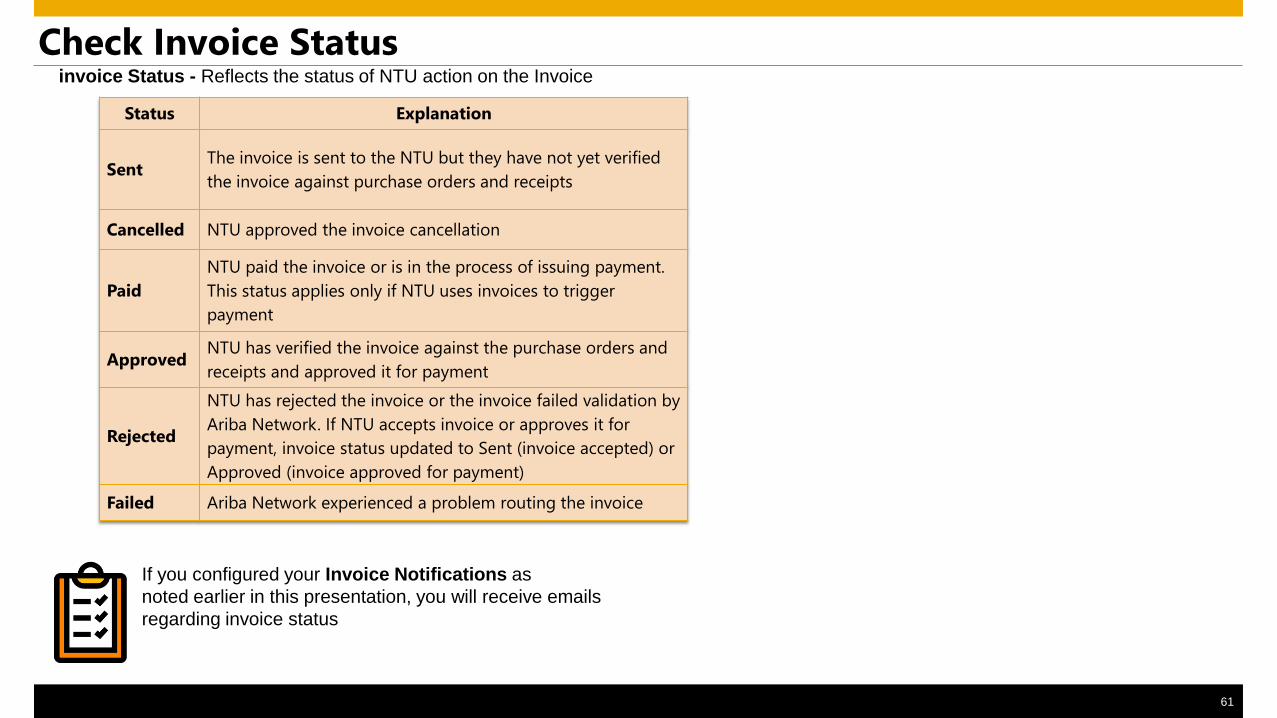
Check Invoice Status
Status Explanation
SentThe invoice is sent to the NTU but they have not yet verified
the invoice against purchase orders and receipts
Cancelled NTU approved the invoice cancellation
Paid
NTU paid the invoice or is in the process of issuing payment.
This status applies only if NTU uses invoices to trigger
payment
ApprovedNTU has verified the invoice against the purchase orders and
receipts and approved it for payment
Rejected
NTU has rejected the invoice or the invoice failed validation by
Ariba Network. If NTU accepts invoice or approves it for
payment, invoice status updated to Sent (invoice accepted) or
Approved (invoice approved for payment)
Failed Ariba Network experienced a problem routing the invoice
If you configured your Invoice Notifications as
noted earlier in this presentation, you will receive emails
regarding invoice status
invoice Status - Reflects the status of NTU action on the Invoice

62
5. Line Item Credit Memo
63
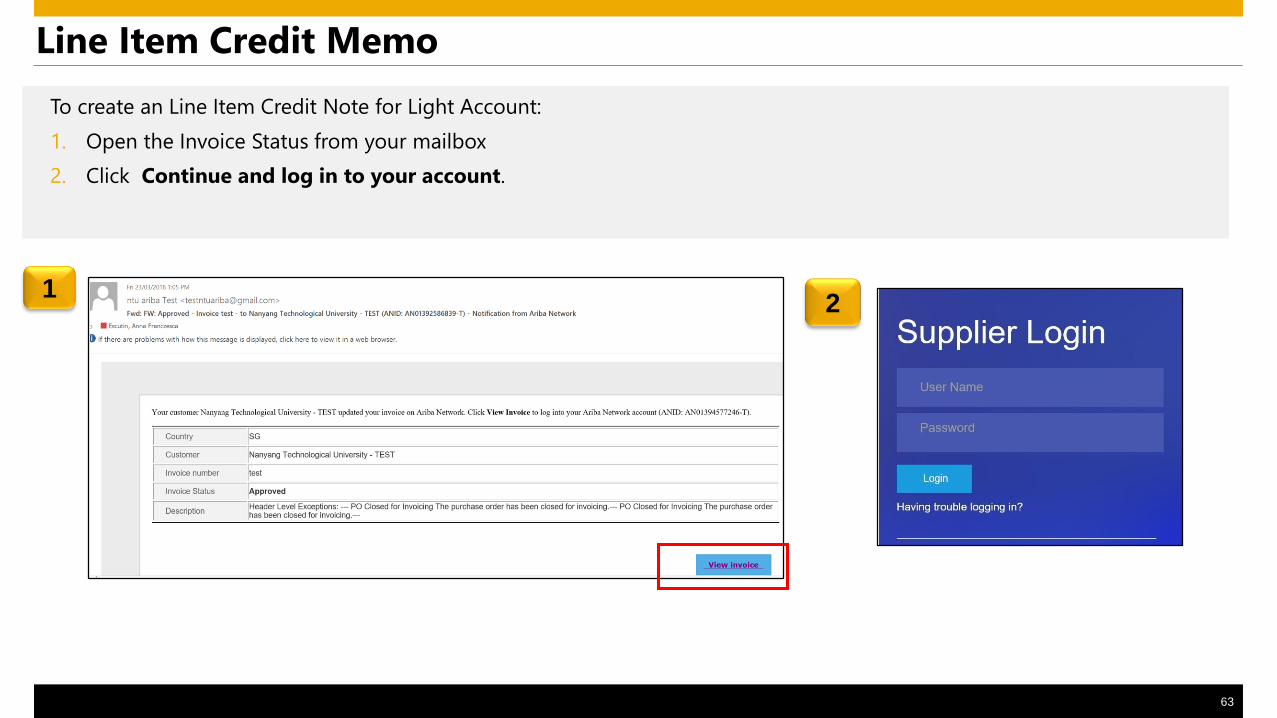
Line Item Credit Memo
To create an Line Item Credit Note for Light Account:
1. Open the Invoice Status from your mailbox
2. Click Continue and log in to your account.
21
64
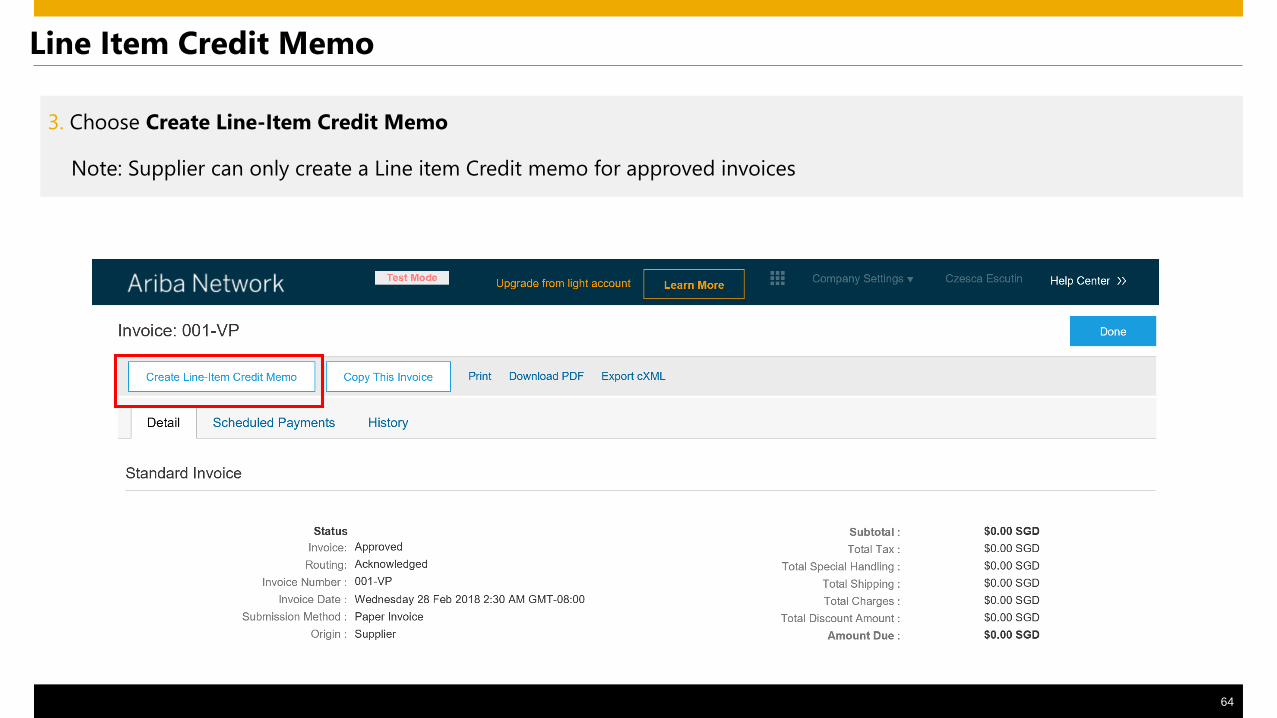
3. Choose Create Line-Item Credit Memo
Note: Supplier can only create a Line item Credit memo for approved invoices
Line Item Credit Memo
65
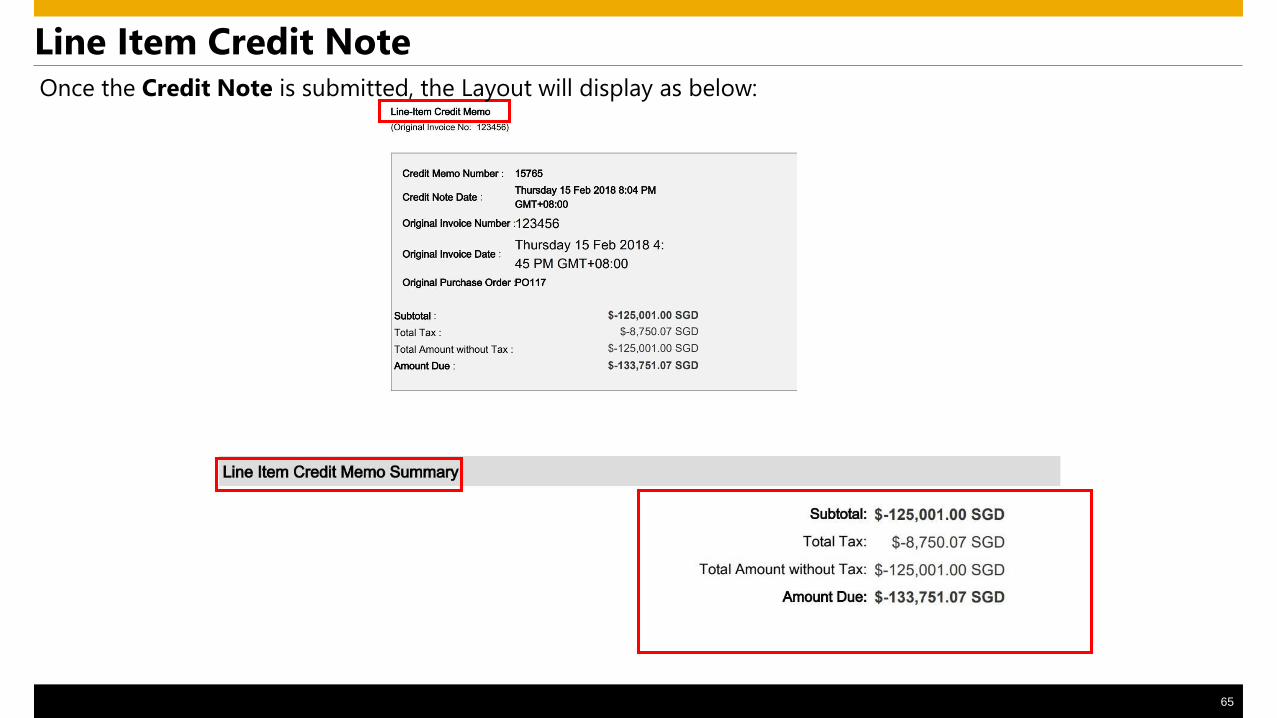
Line Item Credit NoteOnce the Credit Note is submitted, the Layout will display as below:
66
NTU Specific Rules - Invoicing:
1. Suppliers are required to update their tax information in their profile. For Non GST suppliers, enter “Not
Applicable”
2. Suppliers are required to include only received quantities on invoices.
3. Suppliers are required to enter tax information per line item(both GST and NON GST suppliers). Non GST
suppliers must indicate “GST Out Of scope” in the tax category
4. Tax amounts will be copied from the Purchase Order. However, Suppliers are provided with an option to edit
the taxes and choose from your list of valid tax values. Suppliers are required to ensure Tax amounts are
displayed in local currency.
5. Suppliers are allowed to use any invoice number. Suppliers are allowed to reuse invoice numbers from failed
and rejected invoices.
6. Suppliers are required to provide a reason for each line-item credit memo. Attachments are not required.
7. Suppliers are not allowed to cancel invoices they create. If the invoice has been approved, suppliers need to
create a credit memo. If it has not been approved, contact the buyer to reject the invoice so suppliers can
edit and resubmit
8. Suppliers are not allowed to submit NON PO invoices via Ariba network
67
Ariba Support4
1.Ariba Network Support
68
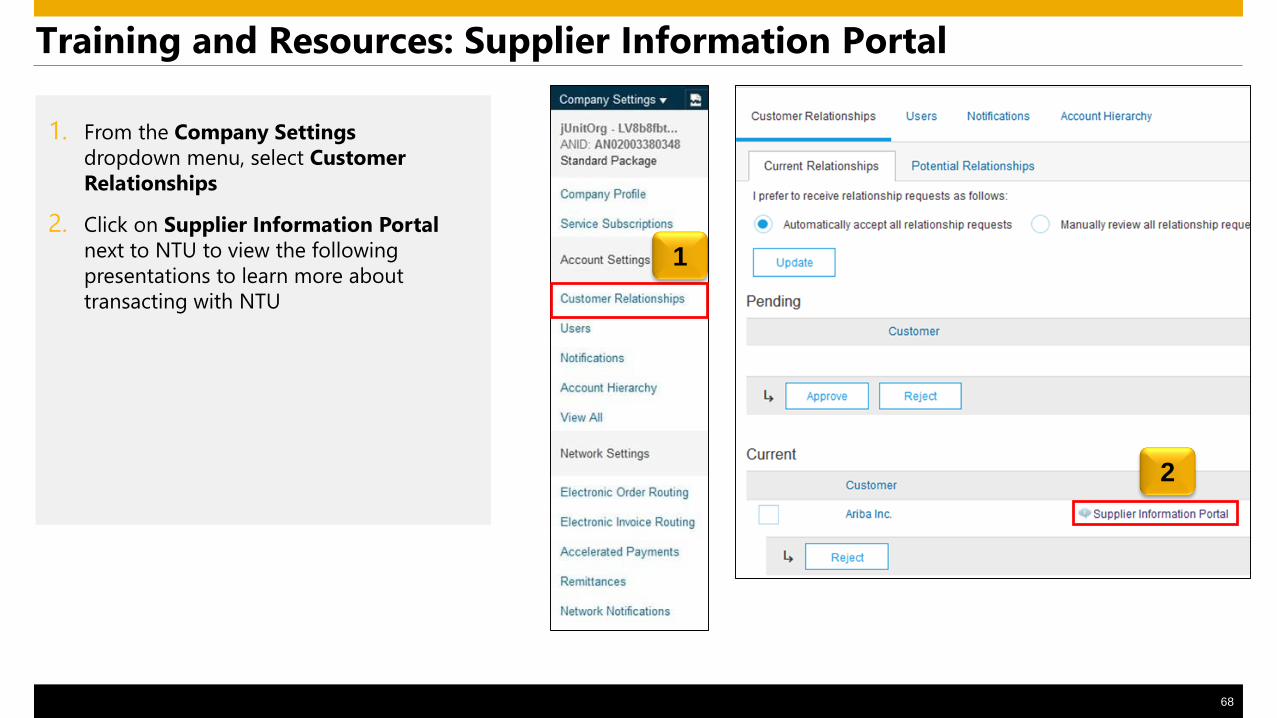
Training and Resources: Supplier Information Portal
1. From the Company Settings
dropdown menu, select Customer
Relationships
2. Click on Supplier Information Portal
next to NTU to view the following
presentations to learn more about
transacting with NTU
1
2
69
Supplier Support (BAU)
Technical(Ariba Customer Support)
1. Portal related technical issues(eg.
website down)
2. Password reset
3. Upgrade to Full Account
How can suppliers access?
Please refer to next to next slides
Business Related(NTU)
1. Request a copy of PO for Light Account
2. Functional questions (Order Confirmation,
Advance Ship Notice, Goods Receipt,
Invoicing)
3. Any other business related queries
Who to contact?
70
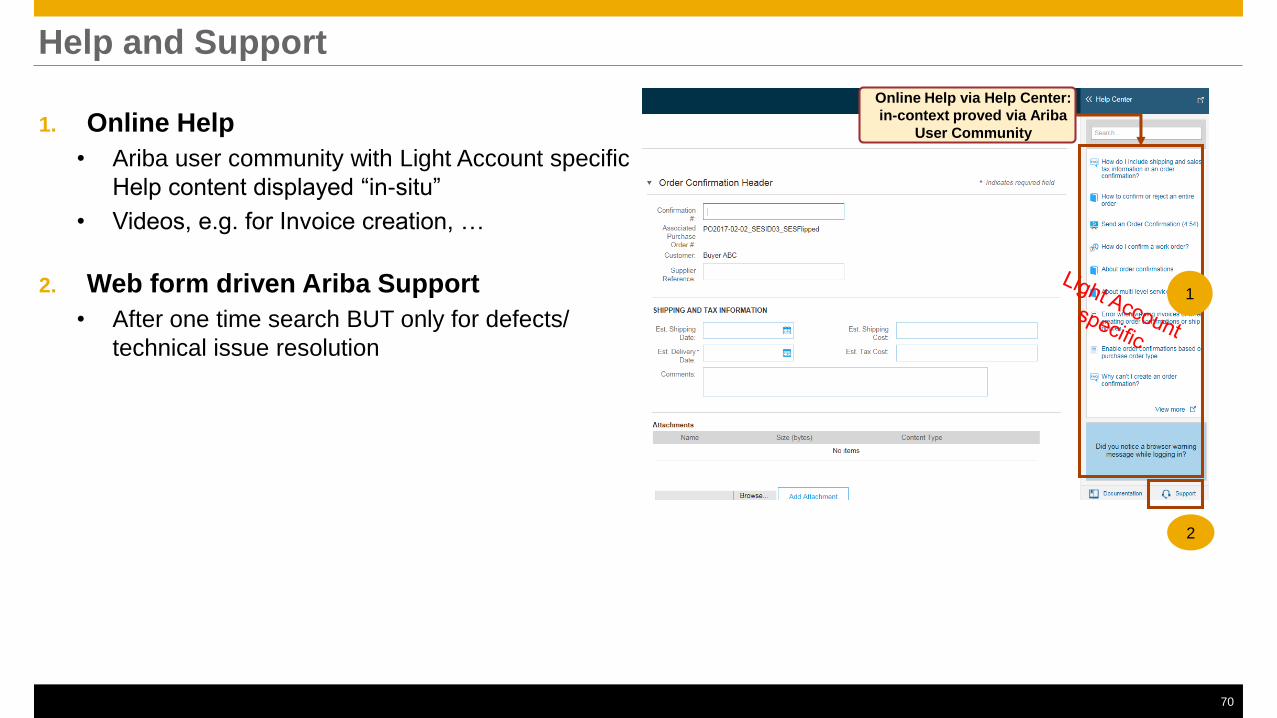
Help and Support
1. Online Help
• Ariba user community with Light Account specific
Help content displayed “in-situ”
• Videos, e.g. for Invoice creation, …
2. Web form driven Ariba Support
• After one time search BUT only for defects/
technical issue resolution
Online Help via Help Center:
in-context proved via Ariba
User Community
1
2
71
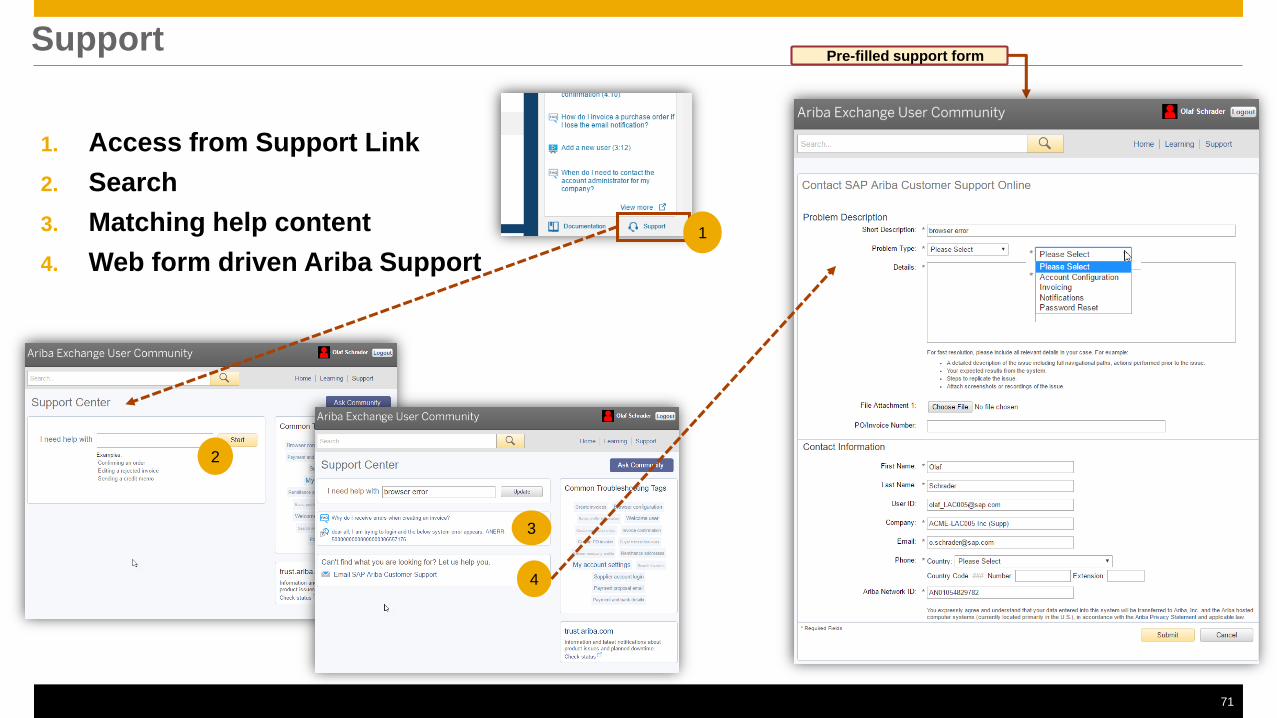
Support
1. Access from Support Link
2. Search
3. Matching help content
4. Web form driven Ariba Support
Pre-filled support form
2
1
3
4

Thank you