mystery of the marking gauge - popular … of the marking gauge 36 popular woodworking december 2006...
TRANSCRIPT
Mystery of the Marking Gauge
PoPular WoodWorking December 200636
The simple marking gauge, often over-looked, even taken for granted, is criti-
cal in the hand-tool shop. It allows you to create uniform surfaces quickly with planes, to accurately transfer measurements from one board to another and to help duplicate measurements across similar parts.
Inventories of 18th-century toolmakers show that they made gauges for sale, but the inventories also show quantities of marking-gauge pins that woodworkers would use to build their own gauges. Despite the fact that these pins are no longer commonly found for sale, you can build a gauge – a gauge superior to mass-produced gauges – with common shop sundries and wood from your offcut pile.
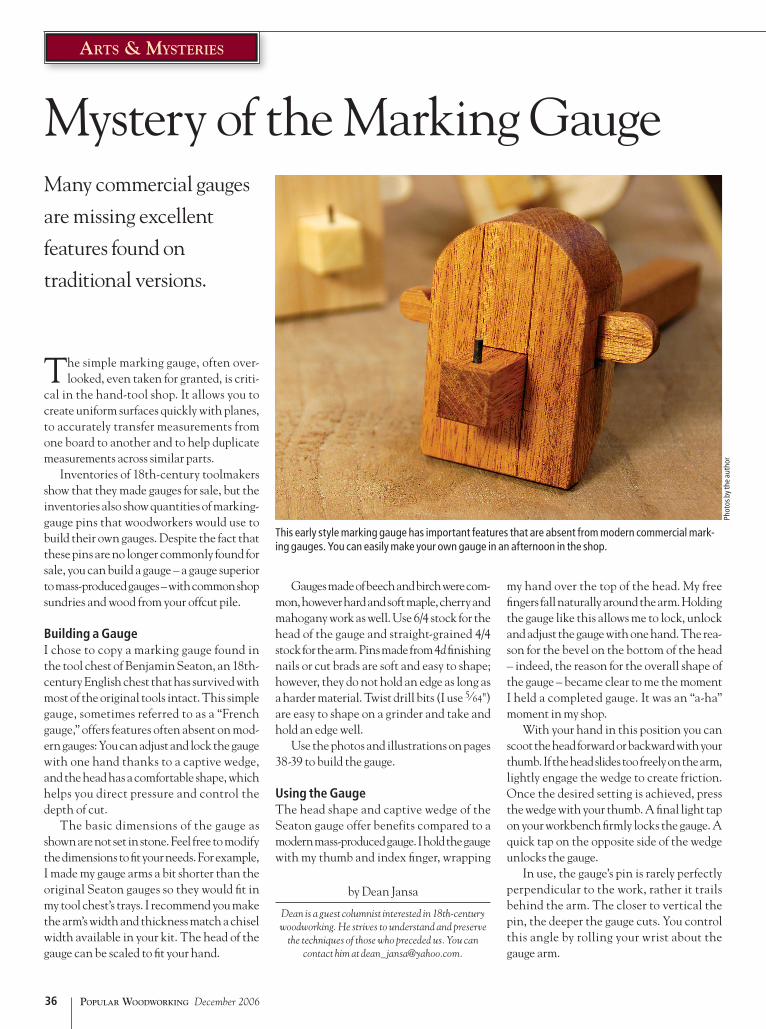
Building a GaugeI chose to copy a marking gauge found in the tool chest of Benjamin Seaton, an 18th-century English chest that has survived with most of the original tools intact. This simple gauge, sometimes referred to as a “French gauge,” offers features often absent on mod-ern gauges: You can adjust and lock the gauge with one hand thanks to a captive wedge, and the head has a comfortable shape, which helps you direct pressure and control the depth of cut.
The basic dimensions of the gauge as shown are not set in stone. Feel free to modify the dimensions to fit your needs. For example, I made my gauge arms a bit shorter than the original Seaton gauges so they would fit in my tool chest’s trays. I recommend you make the arm’s width and thickness match a chisel width available in your kit. The head of the gauge can be scaled to fit your hand.
by Dean Jansa
Dean is a guest columnist interested in 18th-century woodworking. He strives to understand and preserve
the techniques of those who preceded us. You can contact him at [email protected].
my hand over the top of the head. My free fingers fall naturally around the arm. Holding the gauge like this allows me to lock, unlock and adjust the gauge with one hand. The rea-son for the bevel on the bottom of the head – indeed, the reason for the overall shape of the gauge – became clear to me the moment I held a completed gauge. It was an “a-ha” moment in my shop.
With your hand in this position you can scoot the head forward or backward with your thumb. If the head slides too freely on the arm, lightly engage the wedge to create friction. Once the desired setting is achieved, press the wedge with your thumb. A final light tap on your workbench firmly locks the gauge. A quick tap on the opposite side of the wedge unlocks the gauge.
In use, the gauge’s pin is rarely perfectly perpendicular to the work, rather it trails behind the arm. The closer to vertical the pin, the deeper the gauge cuts. You control this angle by rolling your wrist about the gauge arm.
Gauges made of beech and birch were com-mon, however hard and soft maple, cherry and mahogany work as well. Use 6/4 stock for the head of the gauge and straight-grained 4/4 stock for the arm. Pins made from 4d finishing nails or cut brads are soft and easy to shape; however, they do not hold an edge as long as a harder material. Twist drill bits (I use 5⁄64") are easy to shape on a grinder and take and hold an edge well.
Use the photos and illustrations on pages 38-39 to build the gauge.
Using the GaugeThe head shape and captive wedge of the Seaton gauge offer benefits compared to a modern mass-produced gauge. I hold the gauge with my thumb and index finger, wrapping
Phot
os b
y the
aut
hor
This early style marking gauge has important features that are absent from modern commercial mark-ing gauges. You can easily make your own gauge in an afternoon in the shop.
arts & Mysteries
Many commercial gauges are missing excellent features found on traditional versions.
popularwoodworking.com 37
When making long-grain marks I make my first pass with the pin barely engaged with the wood. If a deeper mark is required – in coarse-grained wood for example – I make a second pass with a more aggressive angle of attack. Cross-grain marking requires a lighter touch to avoid tear-out. Despite shaping my pins like small knives, I still use a very low angle of attack for cross-grain marking.
You can use this wrist-rolling technique to speed up marking mortises. Mark the start and end points of the mortise with a marking knife. Next set the gauge to the appropriate offset from the face. With the gauge’s pin very lightly touching the wood, drag the gauge until you feel the pin drop into the mortise
start point. Roll your wrist to deepen the cut and mark until you feel the pin intersect with the mortise endpoint.
Gauging, Not MeasuringGauging is the use of a tool to transfer a mea-surement from one board or surface to another. For example, in casework you set a marking gauge with the mating board when marking dovetail baselines. Using a gauge to lay out dovetail baselines eliminates errors by avoid-ing transferring measurements from a ruler.
Creating Uniform SurfacesUniformly thick boards can be quickly made by hand using this gauge as a guide. Begin by
TypeS of GaUGeSThere are dozens of types of gauges, though only a few are still made today. Here are some of the more useful ones you might encounter at flea markets or in tool catalogs.
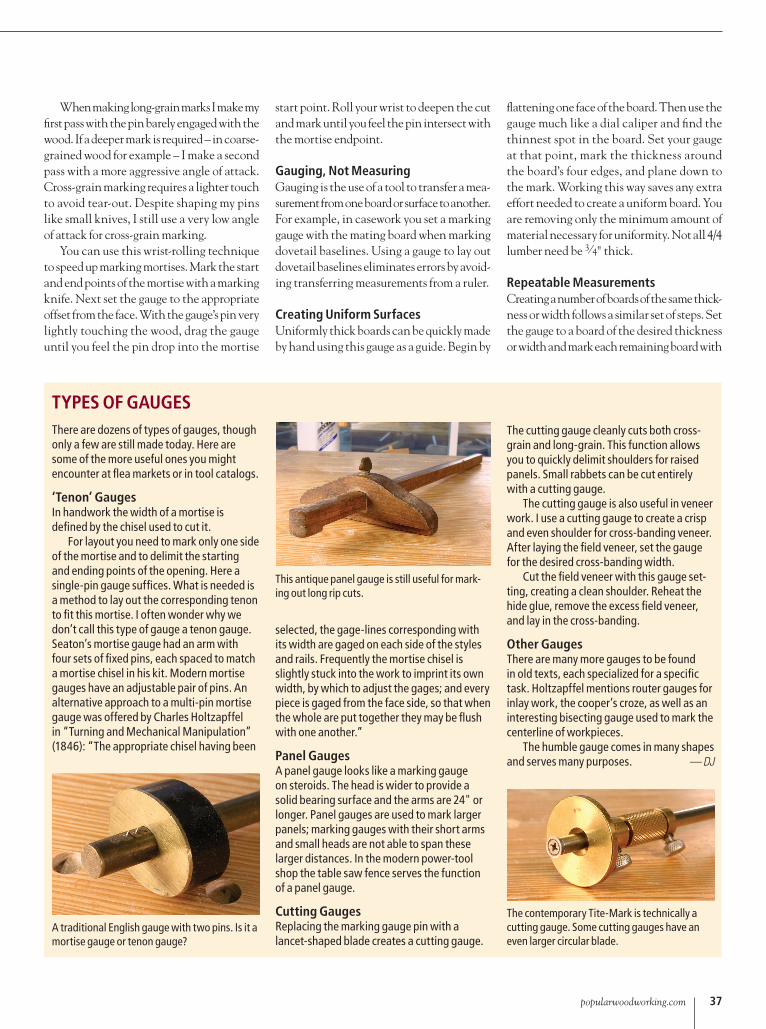
‘Tenon’ GaugesIn handwork the width of a mortise is defined by the chisel used to cut it.
For layout you need to mark only one side of the mortise and to delimit the starting and ending points of the opening. Here a single-pin gauge suffices. What is needed is a method to lay out the corresponding tenon to fit this mortise. I often wonder why we don’t call this type of gauge a tenon gauge. Seaton’s mortise gauge had an arm with four sets of fixed pins, each spaced to match a mortise chisel in his kit. Modern mortise gauges have an adjustable pair of pins. An alternative approach to a multi-pin mortise gauge was offered by Charles Holtzapffel in “Turning and Mechanical Manipulation” (1846): “The appropriate chisel having been
selected, the gage-lines corresponding with its width are gaged on each side of the styles and rails. Frequently the mortise chisel is slightly stuck into the work to imprint its own width, by which to adjust the gages; and every piece is gaged from the face side, so that when the whole are put together they may be flush with one another.”
panel GaugesA panel gauge looks like a marking gauge on steroids. The head is wider to provide a solid bearing surface and the arms are 24" or longer. Panel gauges are used to mark larger panels; marking gauges with their short arms and small heads are not able to span these larger distances. In the modern power-tool shop the table saw fence serves the function of a panel gauge.
Cutting GaugesReplacing the marking gauge pin with a lancet-shaped blade creates a cutting gauge.
flattening one face of the board. Then use the gauge much like a dial caliper and find the thinnest spot in the board. Set your gauge at that point, mark the thickness around the board’s four edges, and plane down to the mark. Working this way saves any extra effort needed to create a uniform board. You are removing only the minimum amount of material necessary for uniformity. Not all 4/4 lumber need be 3⁄4" thick.
Repeatable MeasurementsCreating a number of boards of the same thick-ness or width follows a similar set of steps. Set the gauge to a board of the desired thickness or width and mark each remaining board with
A traditional English gauge with two pins. Is it a mortise gauge or tenon gauge?
This antique panel gauge is still useful for mark-ing out long rip cuts.
The contemporary Tite-Mark is technically a cutting gauge. Some cutting gauges have an even larger circular blade.
The cutting gauge cleanly cuts both cross-grain and long-grain. This function allows you to quickly delimit shoulders for raised panels. Small rabbets can be cut entirely with a cutting gauge.
The cutting gauge is also useful in veneer work. I use a cutting gauge to create a crisp and even shoulder for cross-banding veneer. After laying the field veneer, set the gauge for the desired cross-banding width.
Cut the field veneer with this gauge set-ting, creating a clean shoulder. Reheat the hide glue, remove the excess field veneer, and lay in the cross-banding.
other GaugesThere are many more gauges to be found in old texts, each specialized for a specific task. Holtzapffel mentions router gauges for inlay work, the cooper’s croze, as well as an interesting bisecting gauge used to mark the centerline of workpieces.
The humble gauge comes in many shapes and serves many purposes. —DJ
arts & Mysteries
PoPular WoodWorking December 200638
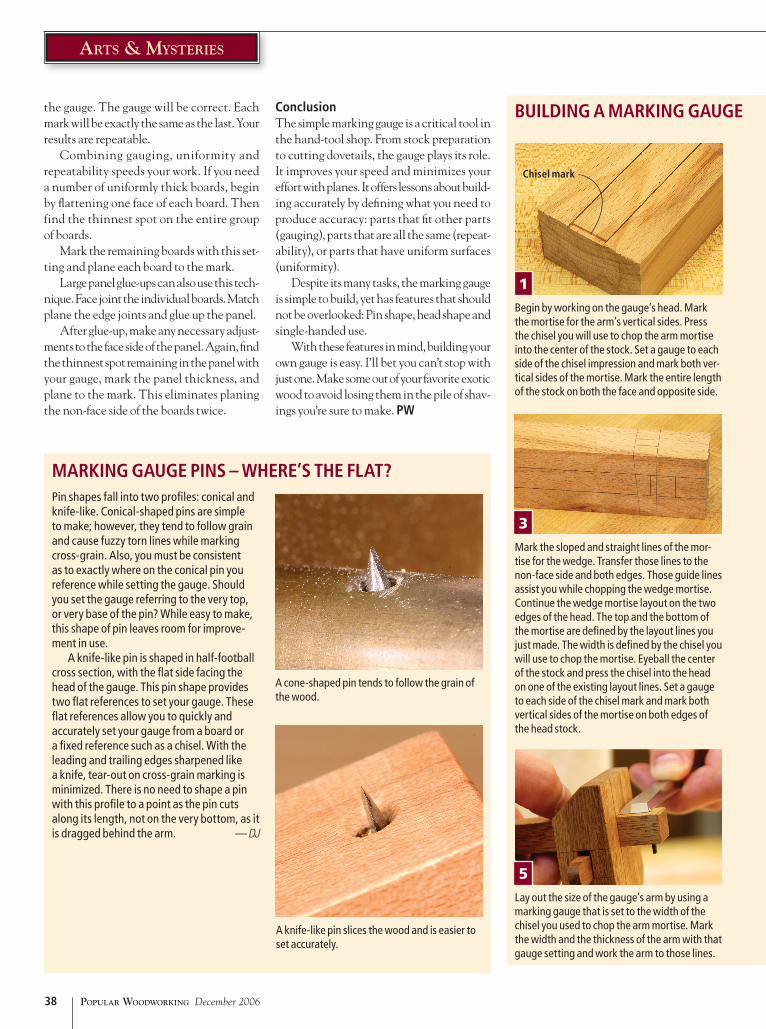
Begin by working on the gauge’s head. Mark the mortise for the arm’s vertical sides. Press the chisel you will use to chop the arm mortise into the center of the stock. Set a gauge to each side of the chisel impression and mark both ver-tical sides of the mortise. Mark the entire length of the stock on both the face and opposite side.
Mark the sloped and straight lines of the mor-tise for the wedge. Transfer those lines to the non-face side and both edges. Those guide lines assist you while chopping the wedge mortise. Continue the wedge mortise layout on the two edges of the head. The top and the bottom of the mortise are defined by the layout lines you just made. The width is defined by the chisel you will use to chop the mortise. Eyeball the center of the stock and press the chisel into the head on one of the existing layout lines. Set a gauge to each side of the chisel mark and mark both vertical sides of the mortise on both edges of the head stock.
Lay out the size of the gauge’s arm by using a marking gauge that is set to the width of the chisel you used to chop the arm mortise. Mark the width and the thickness of the arm with that gauge setting and work the arm to those lines.
BUildiNG a MaRkiNG GaUGe
Pin shapes fall into two profiles: conical and knife-like. Conical-shaped pins are simple to make; however, they tend to follow grain and cause fuzzy torn lines while marking cross-grain. Also, you must be consistent as to exactly where on the conical pin you reference while setting the gauge. Should you set the gauge referring to the very top, or very base of the pin? While easy to make, this shape of pin leaves room for improve-ment in use.
A knife-like pin is shaped in half-football cross section, with the flat side facing the head of the gauge. This pin shape provides two flat references to set your gauge. These flat references allow you to quickly and accurately set your gauge from a board or a fixed reference such as a chisel. With the leading and trailing edges sharpened like a knife, tear-out on cross-grain marking is minimized. There is no need to shape a pin with this profile to a point as the pin cuts along its length, not on the very bottom, as it is dragged behind the arm. —DJ
Chisel mark
the gauge. The gauge will be correct. Each mark will be exactly the same as the last. Your results are repeatable.
Combining gauging, uniformity and repeatability speeds your work. If you need a number of uniformly thick boards, begin by flattening one face of each board. Then find the thinnest spot on the entire group of boards.
Mark the remaining boards with this set-ting and plane each board to the mark.
Large panel glue-ups can also use this tech-nique. Face joint the individual boards. Match plane the edge joints and glue up the panel.
After glue-up, make any necessary adjust-ments to the face side of the panel. Again, find the thinnest spot remaining in the panel with your gauge, mark the panel thickness, and plane to the mark. This eliminates planing the non-face side of the boards twice.
ConclusionThe simple marking gauge is a critical tool in the hand-tool shop. From stock preparation to cutting dovetails, the gauge plays its role. It improves your speed and minimizes your effort with planes. It offers lessons about build-ing accurately by defining what you need to produce accuracy: parts that fit other parts (gauging), parts that are all the same (repeat-ability), or parts that have uniform surfaces (uniformity).
Despite its many tasks, the marking gauge is simple to build, yet has features that should not be overlooked: Pin shape, head shape and single-handed use.
With these features in mind, building your own gauge is easy. I’ll bet you can’t stop with just one. Make some out of your favorite exotic wood to avoid losing them in the pile of shav-ings you’re sure to make. pW
MaRkiNG GaUGe piNS – WheRe’S The flaT?
A knife-like pin slices the wood and is easier to set accurately.
A cone-shaped pin tends to follow the grain of the wood.
1
3
5
popularwoodworking.com 39
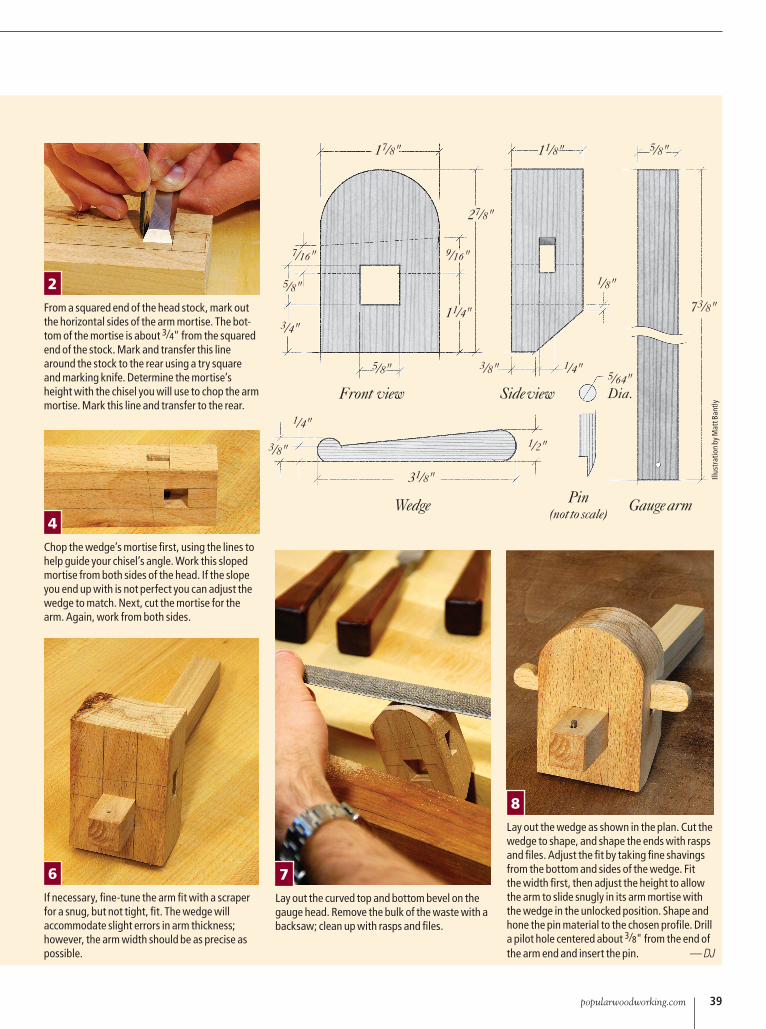
From a squared end of the head stock, mark out the horizontal sides of the arm mortise. The bot-tom of the mortise is about 3⁄4" from the squared end of the stock. Mark and transfer this line around the stock to the rear using a try square and marking knife. Determine the mortise’s height with the chisel you will use to chop the arm mortise. Mark this line and transfer to the rear.
Chop the wedge’s mortise first, using the lines to help guide your chisel’s angle. Work this sloped mortise from both sides of the head. If the slope you end up with is not perfect you can adjust the wedge to match. Next, cut the mortise for the arm. Again, work from both sides.
Lay out the curved top and bottom bevel on the gauge head. Remove the bulk of the waste with a backsaw; clean up with rasps and files.
If necessary, fine-tune the arm fit with a scraper for a snug, but not tight, fit. The wedge will accommodate slight errors in arm thickness; however, the arm width should be as precise as possible.
Lay out the wedge as shown in the plan. Cut the wedge to shape, and shape the ends with rasps and files. Adjust the fit by taking fine shavings from the bottom and sides of the wedge. Fit the width first, then adjust the height to allow the arm to slide snugly in its arm mortise with the wedge in the unlocked position. Shape and hone the pin material to the chosen profile. Drill a pilot hole centered about 3⁄8" from the end of the arm end and insert the pin. —DJ
Front view
Wedge Pin(not to scale)
Gauge arm
Side view
Illus
trat
ion
by M
att B
antly
2
4
6 7
8