my bernina - media.rainpos.com bernina sewing machine workbook 1 ... • met = metallica ... are...
TRANSCRIPT
©2015 BERNINA of America. Permission granted to copy and distribute in original form only. Content may not be altered or used in any other form or under any other branding.
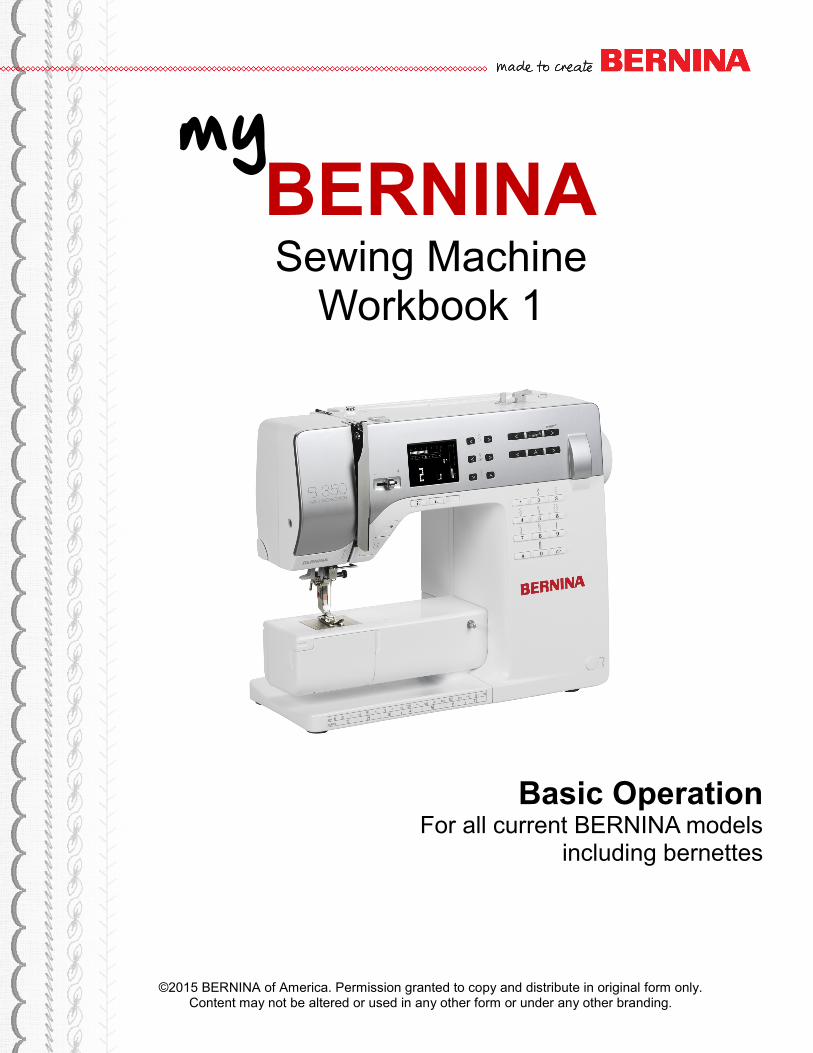
my BERNINA Sewing Machine
Workbook 1
Basic Operation For all current BERNINA models
including bernettes
2 052815
Workbook 1—Basic Operation
Introduction ..................................................................................................................... 3
Sewing Machine Needles ................................................................................................ 4
Thread ............................................................................................................................ 6
Presser Feet ................................................................................................................... 7
Securing Stitches ............................................................................................................ 8
Turning Corners and Needle Stop ................................................................................... 9
Zigzag Stitch ................................................................................................................. 10
Blind Hem ..................................................................................................................... 11
Triple Straight Stitch ...................................................................................................... 12
Vari-Overlock Stitch ...................................................................................................... 13
Stretch Stitch................................................................................................................. 14
Gathering Over Cord ..................................................................................................... 15
Buttonholes ................................................................................................................... 16
Manual Buttonholes ...................................................................................................... 17
Automatic Buttonholes .................................................................................................. 18
Attaching Buttons ......................................................................................................... 20
Stitching Zippers ........................................................................................................... 21
Stitch, Function, and Foot Charts .................................................................................. 22
Table of Contents
The information in this workbook applies to all current BERNINA and bernette sewing machines. Note: Some exercises apply only to models equipped with the highlighted feature.
3 Series
5 Series
8 Series
7 Series
BERNINA 215
BERNINA 1008
bernettes
3 052815
Workbook 1—Basic Operation Introduction
This workbook is designed to be used as a step-by-step guide to familiarize you with the basic operation of your BERNINA or bernette sewing machine. Once you have completed the exercises designated for your machine, attach the sewn samples to the information pages (or add an extra mounting page as a facing page) and insert the pages into plastic page protectors to store in a 3-ring binder. They can then be used as a reference tool in the future as you use your machine and explore the creative possibilities it affords. Pages 21-23 of this workbook have several charts that are useful when working through the stitching exercises on pages 8-20. Stitch numbers, presser feet, and machine functions are listed for all current BERNINA and bernette models. This will help you determine if your machine can be used for the exercise, and it will make it faster for you to locate particular stitches. Each stitch exercise page has a graphic of the stitch(es) used so you can quickly find it on the chart and on your machine. Each page that has a stitching exercise ends with a “Sew How” box. This mini-quiz will let you test your knowledge and review the points the exercise is covering. Taking the class is just the first step. Using the information on a regular basis will help make it become part of your sewing skill set, and before long it becomes something you don’t even have to think about as you use your BERNINA machine. BERNINA strives to provide its customers with quality sewing machines, as well as informative publications and classes. Along with providing My BERNINA Classes, your local BERNINA dealer stocks BERNINA reference books such as Feet-ures and The Serger Technique Reference Book. Plus, BERNINA of America has websites offering free projects and a variety of articles and postings that appeal to all types of stitchers, no matter which machines are their favorites. Visit these BERNINA web sites where you can share ideas and inspiration with other BERNINA enthusiasts!
www.bernina.com
www.weallsew.com
4 052815
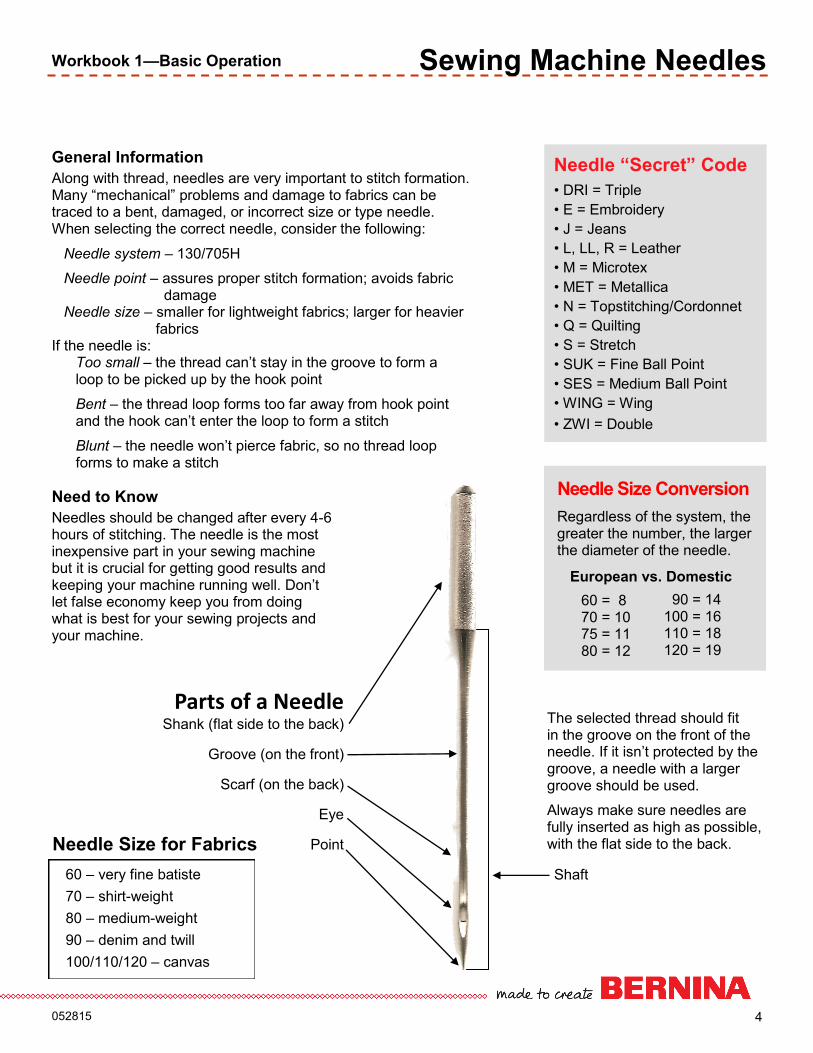
Workbook 1—Basic Operation Sewing Machine Needles
General Information
Along with thread, needles are very important to stitch formation. Many “mechanical” problems and damage to fabrics can be traced to a bent, damaged, or incorrect size or type needle. When selecting the correct needle, consider the following:
Needle system – 130/705H
Needle point – assures proper stitch formation; avoids fabric damage Needle size – smaller for lightweight fabrics; larger for heavier
fabrics If the needle is:
Too small – the thread can’t stay in the groove to form a loop to be picked up by the hook point
Bent – the thread loop forms too far away from hook point and the hook can’t enter the loop to form a stitch
Blunt – the needle won’t pierce fabric, so no thread loop forms to make a stitch
Need to Know
Needles should be changed after every 4-6 hours of stitching. The needle is the most inexpensive part in your sewing machine but it is crucial for getting good results and keeping your machine running well. Don’t let false economy keep you from doing what is best for your sewing projects and your machine.
Needle “Secret” Code
• DRI = Triple
• E = Embroidery
• J = Jeans
• L, LL, R = Leather
• M = Microtex
• MET = Metallica
• N = Topstitching/Cordonnet
• Q = Quilting
• S = Stretch
• SUK = Fine Ball Point
• SES = Medium Ball Point
• WING = Wing
• ZWI = Double
The selected thread should fit in the groove on the front of the needle. If it isn’t protected by the groove, a needle with a larger groove should be used.
Always make sure needles are fully inserted as high as possible, with the flat side to the back.
Regardless of the system, the greater the number, the larger the diameter of the needle.
60 = 8 70 = 10 75 = 11 80 = 12
90 = 14 100 = 16 110 = 18 120 = 19
European vs. Domestic
Needle Size Conversion
Parts of a Needle Shank (flat side to the back)
Groove (on the front)
Scarf (on the back)
Eye
Point
Shaft 60 – very fine batiste
70 – shirt-weight
80 – medium-weight
90 – denim and twill
100/110/120 – canvas
Needle Size for Fabrics
5 052815
Workbook 1—Basic Operation Sewing Machine Needles
Type Sizes Description
Ballpoint
60-100
Has a rounded point. Size 70 for lingerie, nylon, jersey; 80 for t-shirt; 90 for sweatshirt fleece.
Stretch 70-90 A Stretch needle has a more rounded point than a Ballpoint, and a blue
anti-cling coating which helps to prevent skipped stitches in knits and
elastic. Sometimes used on Ultrasuede, vinyl, and plastic.
Universal 60-120 A compromise between a Sharp and a Ballpoint; used on both wovens
and knits.
Double
1.6/70- 8.0/100
Two needles attached to one shank. For pintucks, hems, and decorative
work. Available in Universal, Stretch, Jeans, Metallica, and Embroidery
needles.
Triple 2.5/90 3.0/90
Three needles attached to one shank. Used to create mock smocking and other decorative effects
Jeans
70-110 Has a sharp point and a shaft that is less prone to flex. The sharpness of the needle is better for use on denim and woven fabrics.
Leather 80-100 Point is a sharp cutting wedge. Used for leather only. Not for vinyl or simulated leathers.
Microtex
/ Sharp
60-90
Sharp point; thin shaft. Specially designed for microfiber fabrics.
Quilting 75 & 90 Thin, tapered point eliminates potential damage to fabric when seaming
and cross-seaming.
Topstitch
70-100 A sharp point with a large eye and deep groove. For use with heavier fabrics – the large groove cradles heavier threads.
Embroidery 75 & 90 Sharp needle with large eye and groove; has a coating and a larger scarf.
Prevents shredding of rayon or metallic threads. Two threads may be
used through the eye.
Metafil 80 Similar to Embroidery needle with large eye and deep groove. Made
of a heat-resistant alloy with a friction-reducing coating. Suitable for
manufactured fibers such as polyester, acrylic, and nylon.
Wing 100 & 110
Sharp-pointed needle with a non-cutting metal wedge on each side.
Makes a hole without cutting the threads of the fabric. Used for
decorative and heirloom work, such as hemstitching.
Double Wing 100 One Universal needle and one Wing needle attached to a single shank.
Metallica 70-100 Designed for metallic threads; has a large eye and deep groove.
6 052815
Workbook 1—Basic Operation Thread
To achieve quality stitches, a sewing machine needs three things: suitable thread, correct size needle, and properly adjusted thread tensions. Poor quality or the wrong type of thread can cause inferior stitches on any machine. Inferior thread results in crooked and looped stitches, puckered seams, frayed thread, and/or needle breakage. Did you know that thread passes through the eye of the needle approximately 37 times in a “seesaw” action before it forms a single stitch?
Long staple threads are stronger and smoother than short staple threads. (Staple refers to the length of fibers used to twist together to form a single ply). Most bargain-priced threads are usually short staple and will deposit more lint and fuzz into your sewing machine, potentially causing tension inconsistencies and possibly even damage to your machine over the long term. Using long staple threads also result in less snagging and fraying as you sew.
Ply refers to the number of strands twisted together to make a single thread. The number of plies are usually indicated by a number after the weight of the thread such as 50/3, which means a 3-ply, 50-wt. thread. The lower the weight, the heavier the thread; conversely, higher numbers indicate fine or lightweight thread.
Fibers
Fiber refers to the type of material used to produce the thread.
Polyester Good for clothing construction on man-made, natural or blended fab-rics. Tolerates high temperatures. Polyester embroidery thread has a high sheen; excellent for embroidery, very abrasion resistant, and will not fade.
Cotton 2 ply Mettler 60/2; excellent for French heirloom stitching, delicate machine embroidery, piecing and darning.
Mettler 50/2; excellent for clothing construction on natural fibers. Tighter twist than embroidery cotton thread and less puckering on problem fab-rics. Cotton thread stretches less than polyester.
Mettler 30/2; loose twist for a soft, shiny look in machine embroidery, appliqué, and buttonholes.
Rayon A lustrous embroidery thread; weaker than cotton, it is used for decorative work only.
Silk Used on silk and wool fabrics, this strong, lustrous fiber is good for construction and decorative details such as buttonholes. Also used for
Guidelines for Thread Weights 12 wt.— Couching, bobbinwork
30 wt.— Embroidery, bobbinwork
40 wt.— General construction, quilting, embroidery
50 wt.— General construction, piecing, bobbin thread
60 wt.— Lingerie, heirloom, appliqué, bobbin thread
80 wt.— Extra-fine lingerie, heirloom
The exercises in this workbook are designed to be sewn with Mettler thread. Use one of the following in any color of medium
value:
• Metrosene Polyester • Silk-finished 50-wt. cotton
7 052815
Workbook 1—Basic Operation Presser Feet
BERNINA Presser Feet: ▪ are precision engineered for specific functions
▪ are Swiss-engineered for the highest quality
▪ are one-piece metal feet, making them sturdy and durable
▪ are easy to change with one hand, requiring no special tools
▪ have a white shank, making it easier to see the eye of the needle, resulting in easier threading
▪ are, in some cases, modeled after commercial feet used in factories to increase speed and production with professional results
▪ do the job intended in relation to all types of sewing (example: quilting, garment-making, home dec, etc.)
▪ are supported by the best and most complete educational materials in the industry including reference books detailing each feet and its uses.
Understanding the Numbers/Letters BERNINA presser feet are numbered and may have one or two additional versions with a letter that follows the number, such as Edgestitch Foot #10C or Jeans Foot #8D.
Number Only—The number without a letter refers to a foot engineered for BERNINA models that have a CB Hook and a maximum stitch width of 5.5mm. These feet may also be compatible with models that have a 9mm width when a 9mm width is not desired, such as when making pintucks with feet #30, 31, 32, or 33.
The Letter “C”—When a foot number is followed by a “C”, it indicates a version of the foot made for models that have rotary hook systems and a maximum stitch width of 9mm. The “C” stands for coded and refers to the sensor on the foot that works with the electronics of the machine to engage the wider stitch width. The sole of the “C” foot is usually larger to fit the wider feed dog of the rotary hook machines. Exceptions: Overlock Foot #2/2A: 2A is larger to fit the wider feed dog but does not have a sensor for a wider stitch because the overlock stitches are not used at wide widths. Extra Wide Gathering Foot #16C: 16C is larger to fit the wider feed dog but does not have a sensor for a wider stitch width.
The Letter “D”—The feet that have a number followed by a “D” are designed to work with the 8 Series and 7 Series Dual Feed feature. After attaching the foot, the Dual Feed mechanism is positioned in the cutout on the back of the foot, engaging the BERNINA Dual Feed system. It is recommended that the D-Feet be used only when the BERNINA Dual Feed Feature is engaged. Easy-On/Easy-Off Soles—The BERNINA 350, 330, 215,1008 and bernette models have simple-to-use, easy-on/easy-off metal soles that attach to a standard shank. The BERNINA models are also compatible with the one-piece full-shank presser feet available as optional accessories for all BERNINA machines.
8 052815
Workbook 1—Basic Operation Securing Stitches
Fold each piece of fabric in half lengthwise to be 2” x 6”. Stitch
one or both of the exercises below depending on the features
of your model.
Exercise 1: Straight Stitch/Reverse
Find the ⅝” guide line on the stitch plate. Fold one piece of fabric
in half lengthwise. Place it under the presser foot, and align one
6” edge with the ⅝” guide line.
Select the straight stitch. Sew a few stitches forward, then press
or lift the Quick Reverse Button/Lever; sew a few stitches
backward; the machine will sew in reverse until the Quick
Reverse Button/Lever is released. Continue stitching the seam;
secure the end in the same way.
Exercise 2: Securing Stitch
Fold the second piece of fabric; align the raw edges with the
guide. Place it under the presser foot and align one 6” edge with
the ⅝” guide line.
Select the Securing Stitch. Begin to sew; machine will
automatically secure the stitching, then continue stitching
forward. At the end of the seam, press and release the Quick
Reverse button. The machine will automatically secure the
stitching, then stop.
Fabric: Firm woven fabric, two pieces, 4” x 6” each
Needle: 80/12 Universal
Needle Position: Center
BERNINA Presser Foot: Reverse Pattern Foot #1/1C/1D with optional Quilting Seam Guide or optional Seam Guides with Rulers
bernette Presser Foot: Zigzag/Universal Foot
Securing Stitch: Five straight stitches forward and back at beginning; five stitches backward and forward at end.
Quilter’s Securing Stitch: Several very short stitches at the beginning and end.
Securing stitches
Reverse stitching
Do you know how to:
▪ Select straight stitch?
▪ Sew in reverse?
▪ End a seam with the Securing Stitch?
9 052815
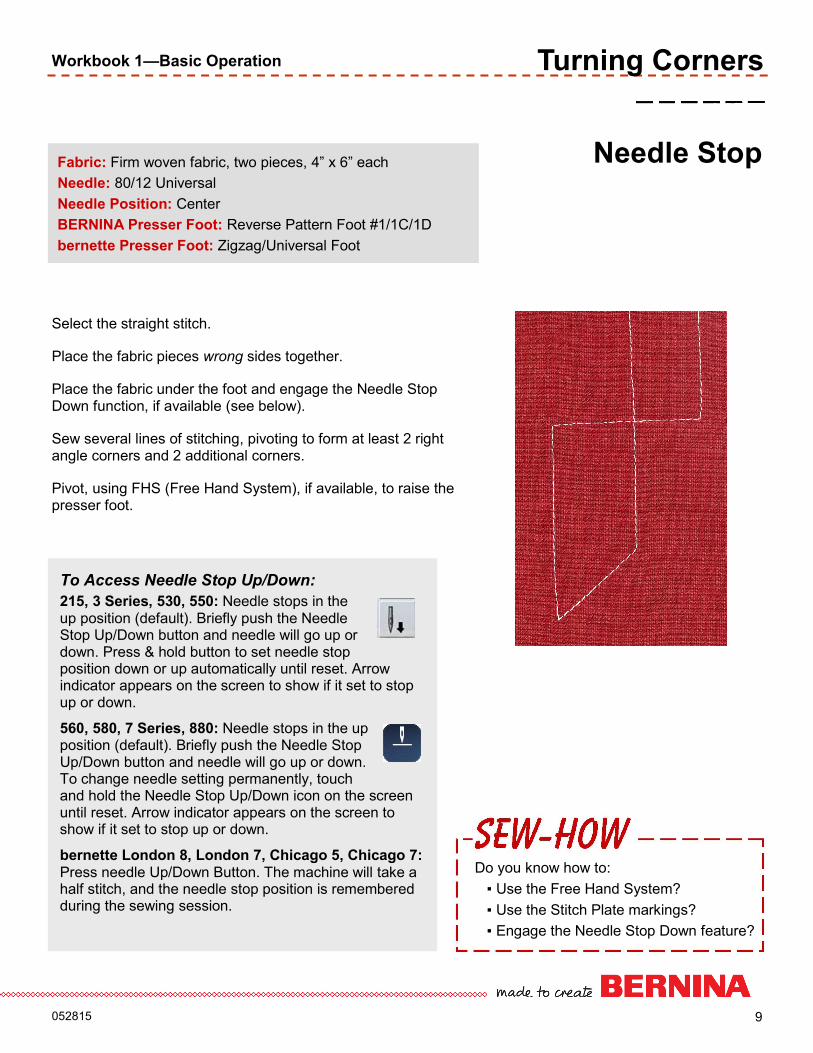
Workbook 1—Basic Operation Turning Corners
To Access Needle Stop Up/Down:
215, 3 Series, 530, 550: Needle stops in the up position (default). Briefly push the Needle Stop Up/Down button and needle will go up or down. Press & hold button to set needle stop position down or up automatically until reset. Arrow indicator appears on the screen to show if it set to stop up or down.
560, 580, 7 Series, 880: Needle stops in the up position (default). Briefly push the Needle Stop Up/Down button and needle will go up or down. To change needle setting permanently, touch and hold the Needle Stop Up/Down icon on the screen until reset. Arrow indicator appears on the screen to show if it set to stop up or down.
bernette London 8, London 7, Chicago 5, Chicago 7: Press needle Up/Down Button. The machine will take a half stitch, and the needle stop position is remembered during the sewing session.
Select the straight stitch.
Place the fabric pieces wrong sides together.
Place the fabric under the foot and engage the Needle Stop Down function, if available (see below).
Sew several lines of stitching, pivoting to form at least 2 right angle corners and 2 additional corners.
Pivot, using FHS (Free Hand System), if available, to raise the presser foot.
Fabric: Firm woven fabric, two pieces, 4” x 6” each
Needle: 80/12 Universal
Needle Position: Center
BERNINA Presser Foot: Reverse Pattern Foot #1/1C/1D
bernette Presser Foot: Zigzag/Universal Foot
Do you know how to:
▪ Use the Free Hand System?
▪ Use the Stitch Plate markings?
▪ Engage the Needle Stop Down feature?
Needle Stop
10 052815
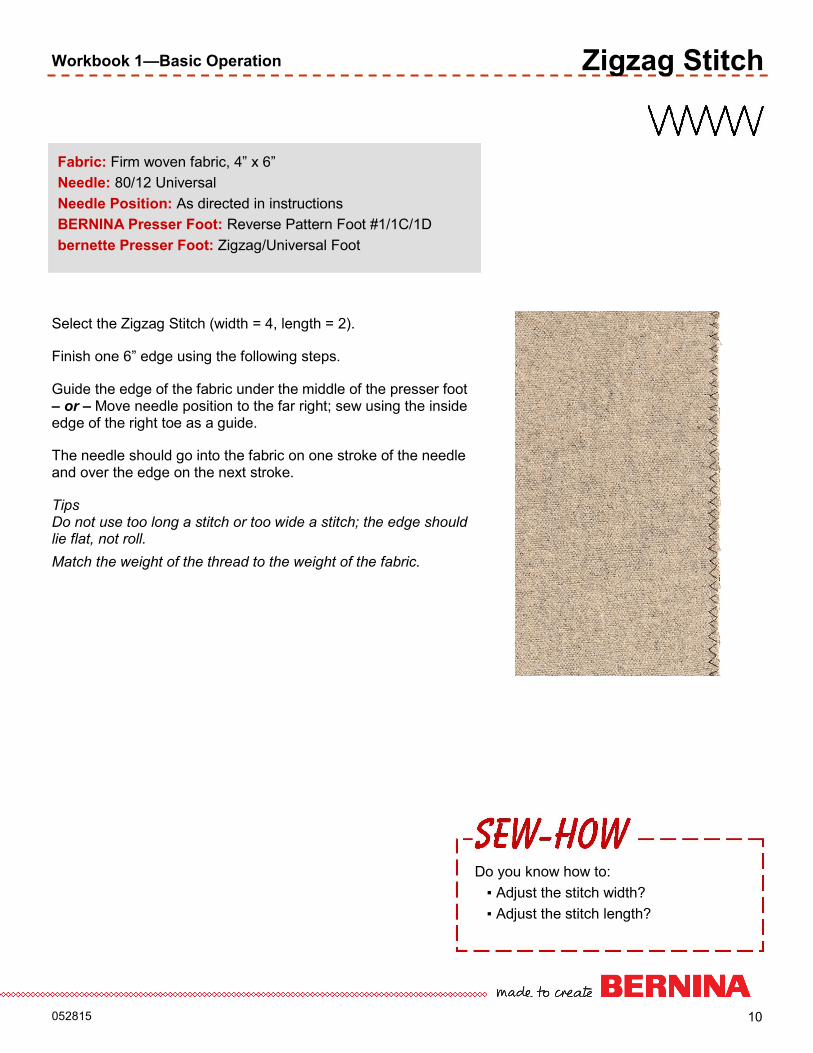
Workbook 1—Basic Operation Zigzag Stitch
Select the Zigzag Stitch (width = 4, length = 2).
Finish one 6” edge using the following steps.
Guide the edge of the fabric under the middle of the presser foot – or – Move needle position to the far right; sew using the inside edge of the right toe as a guide.
The needle should go into the fabric on one stroke of the needle and over the edge on the next stroke.
Tips Do not use too long a stitch or too wide a stitch; the edge should lie flat, not roll.
Match the weight of the thread to the weight of the fabric.
Fabric: Firm woven fabric, 4” x 6”
Needle: 80/12 Universal
Needle Position: As directed in instructions
BERNINA Presser Foot: Reverse Pattern Foot #1/1C/1D
bernette Presser Foot: Zigzag/Universal Foot
Do you know how to:
▪ Adjust the stitch width?
▪ Adjust the stitch length?
11 052815
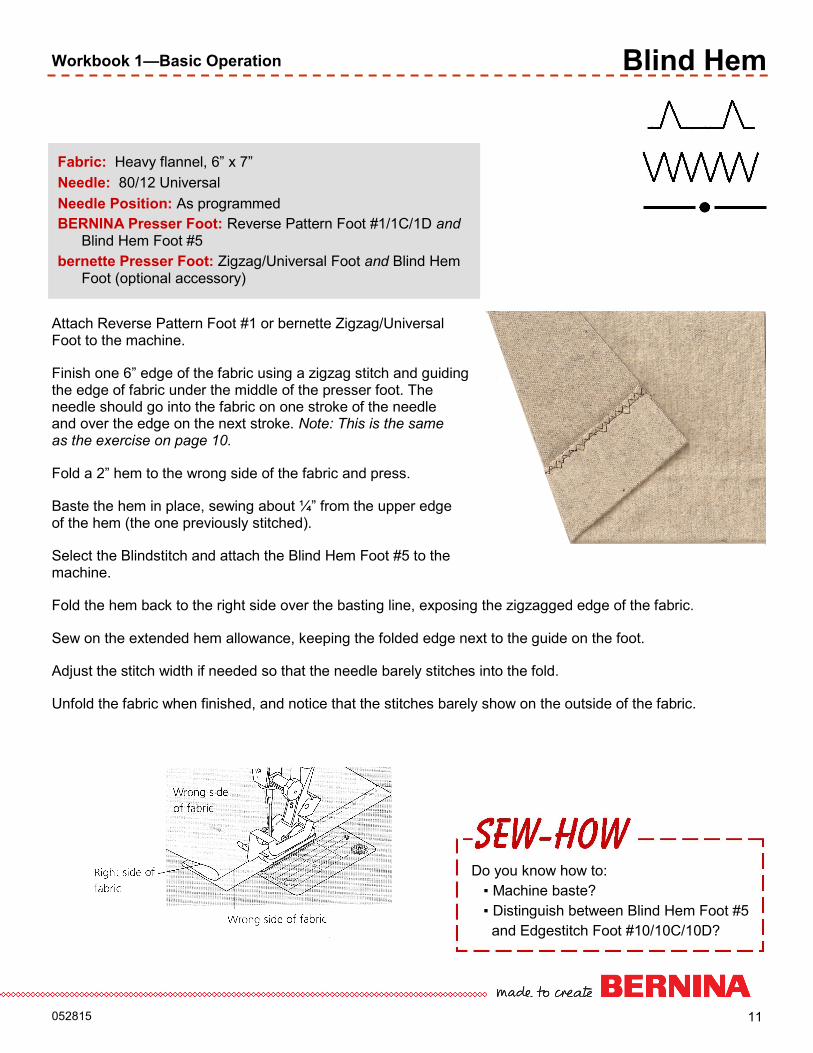
Workbook 1—Basic Operation Blind Hem
Attach Reverse Pattern Foot #1 or bernette Zigzag/Universal Foot to the machine.
Finish one 6” edge of the fabric using a zigzag stitch and guiding the edge of fabric under the middle of the presser foot. The needle should go into the fabric on one stroke of the needle and over the edge on the next stroke. Note: This is the same as the exercise on page 10.
Fold a 2” hem to the wrong side of the fabric and press.
Baste the hem in place, sewing about ¼” from the upper edge of the hem (the one previously stitched).
Select the Blindstitch and attach the Blind Hem Foot #5 to the machine.
Fold the hem back to the right side over the basting line, exposing the zigzagged edge of the fabric.
Sew on the extended hem allowance, keeping the folded edge next to the guide on the foot.
Adjust the stitch width if needed so that the needle barely stitches into the fold.
Unfold the fabric when finished, and notice that the stitches barely show on the outside of the fabric.
Fabric: Heavy flannel, 6” x 7”
Needle: 80/12 Universal
Needle Position: As programmed
BERNINA Presser Foot: Reverse Pattern Foot #1/1C/1D and Blind Hem Foot #5
bernette Presser Foot: Zigzag/Universal Foot and Blind Hem Foot (optional accessory)
Do you know how to:
▪ Machine baste?
▪ Distinguish between Blind Hem Foot #5
and Edgestitch Foot #10/10C/10D?
12 052815
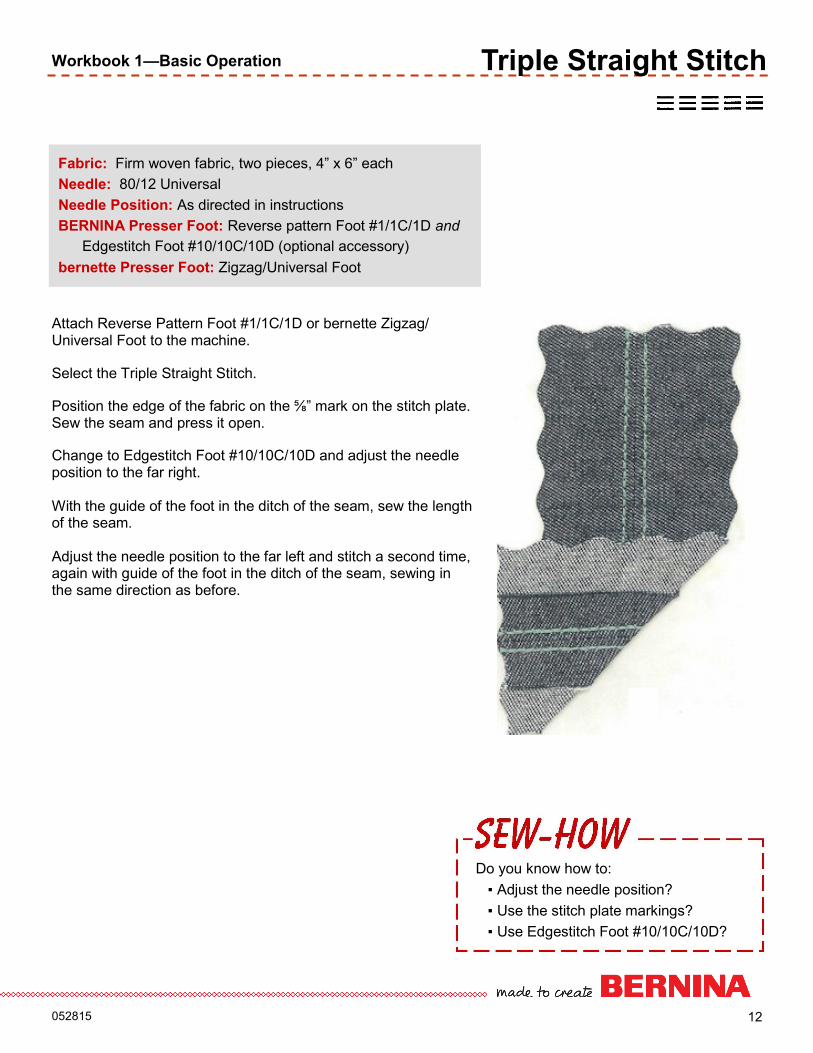
Workbook 1—Basic Operation Triple Straight Stitch
Fabric: Firm woven fabric, two pieces, 4” x 6” each
Needle: 80/12 Universal
Needle Position: As directed in instructions
BERNINA Presser Foot: Reverse pattern Foot #1/1C/1D and
Edgestitch Foot #10/10C/10D (optional accessory)
bernette Presser Foot: Zigzag/Universal Foot
Attach Reverse Pattern Foot #1/1C/1D or bernette Zigzag/Universal Foot to the machine.
Select the Triple Straight Stitch.
Position the edge of the fabric on the ⅝” mark on the stitch plate. Sew the seam and press it open.
Change to Edgestitch Foot #10/10C/10D and adjust the needle position to the far right. With the guide of the foot in the ditch of the seam, sew the length of the seam. Adjust the needle position to the far left and stitch a second time, again with guide of the foot in the ditch of the seam, sewing in the same direction as before.
Do you know how to:
▪ Adjust the needle position?
▪ Use the stitch plate markings?
▪ Use Edgestitch Foot #10/10C/10D?
13 052815
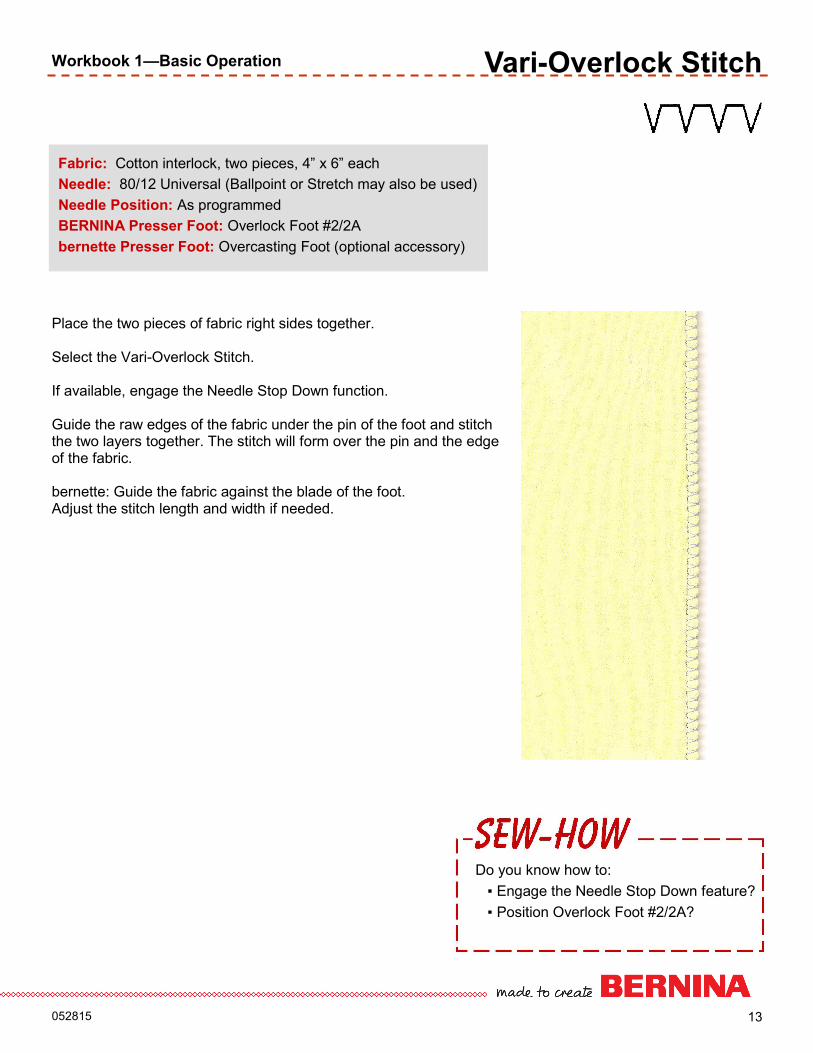
Workbook 1—Basic Operation Vari-Overlock Stitch
Place the two pieces of fabric right sides together. Select the Vari-Overlock Stitch. If available, engage the Needle Stop Down function. Guide the raw edges of the fabric under the pin of the foot and stitch the two layers together. The stitch will form over the pin and the edge of the fabric. bernette: Guide the fabric against the blade of the foot. Adjust the stitch length and width if needed.
Fabric: Cotton interlock, two pieces, 4” x 6” each
Needle: 80/12 Universal (Ballpoint or Stretch may also be used)
Needle Position: As programmed
BERNINA Presser Foot: Overlock Foot #2/2A
bernette Presser Foot: Overcasting Foot (optional accessory)
Do you know how to:
▪ Engage the Needle Stop Down feature?
▪ Position Overlock Foot #2/2A?

14 052815
Workbook 1—Basic Operation
Select the Super Stretch stitch.
Place the fabric pieces right sides together.
Position the edge of the fabric on the ⅝” marking on the stitch plate; sew the seam and press it open.
Note: If the fabric is pulling and stretching as it is sewn, adjust the presser foot pressure to a lower number to lighten the pressure of the foot on the fabric and eliminate the stretching. Note: Foot Pressure adjustment is not available on the 215, 1008, or 3 Series models.
Fabric: Spandex, two pieces, 2” x 6” each
Needle: 80/12 Universal (Ballpoint may also be used)
Needle Position: As programmed
BERNINA Presser Foot: Reverse pattern Foot #1/1C/1D
bernette Presser Foot: Zigzag/Universal Foot
Do you know how to:
▪ Adjust the presser foot pressure?
Stretch Stitch
15 052815
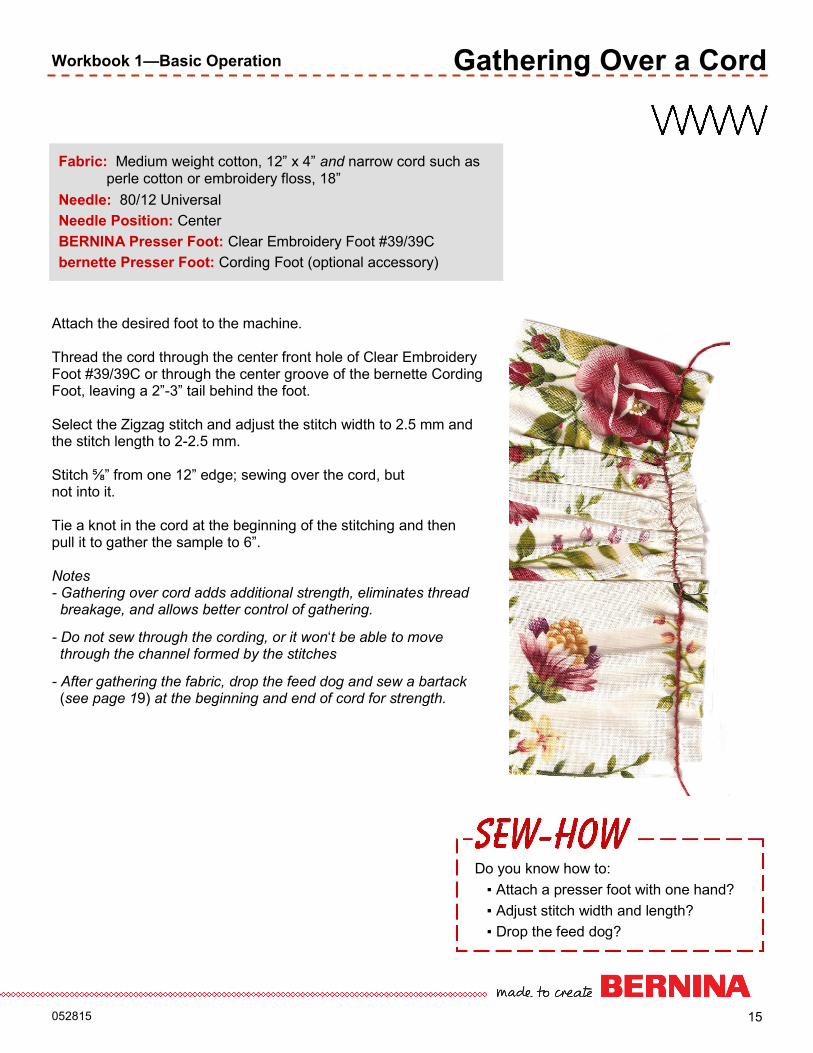
Workbook 1—Basic Operation Gathering Over a Cord
Attach the desired foot to the machine. Thread the cord through the center front hole of Clear Embroidery Foot #39/39C or through the center groove of the bernette Cording Foot, leaving a 2”-3” tail behind the foot. Select the Zigzag stitch and adjust the stitch width to 2.5 mm and the stitch length to 2-2.5 mm. Stitch ⅝” from one 12” edge; sewing over the cord, but not into it. Tie a knot in the cord at the beginning of the stitching and then pull it to gather the sample to 6”. Notes - Gathering over cord adds additional strength, eliminates thread breakage, and allows better control of gathering.
- Do not sew through the cording, or it won‘t be able to move through the channel formed by the stitches
- After gathering the fabric, drop the feed dog and sew a bartack (see page 19) at the beginning and end of cord for strength.
Fabric: Medium weight cotton, 12” x 4” and narrow cord such as perle cotton or embroidery floss, 18”
Needle: 80/12 Universal
Needle Position: Center
BERNINA Presser Foot: Clear Embroidery Foot #39/39C
bernette Presser Foot: Cording Foot (optional accessory)
Do you know how to:
▪ Attach a presser foot with one hand?
▪ Adjust stitch width and length?
▪ Drop the feed dog?
16 052815
Workbook 1—Basic Operation Buttonholes
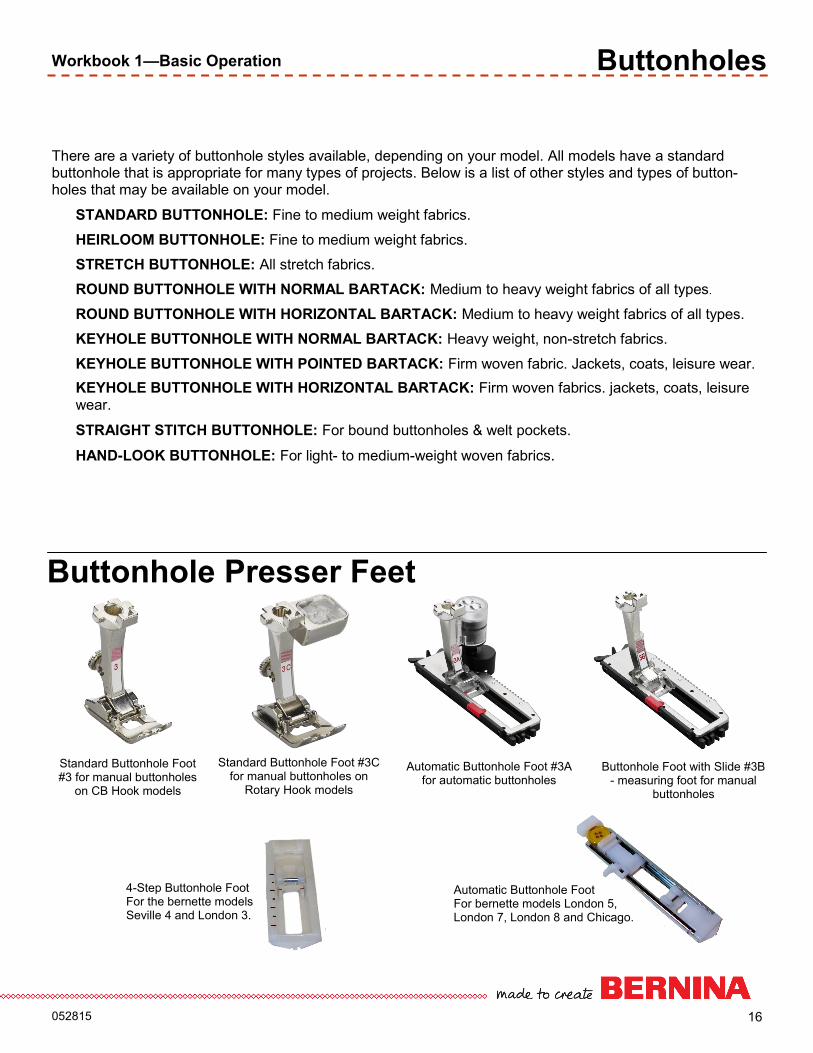
Standard Buttonhole Foot #3 for manual buttonholes
on CB Hook models
Standard Buttonhole Foot #3C for manual buttonholes on
Rotary Hook models
Automatic Buttonhole Foot #3A for automatic buttonholes
4-Step Buttonhole Foot For the bernette models Seville 4 and London 3.
Buttonhole Presser Feet
Automatic Buttonhole Foot For bernette models London 5, London 7, London 8 and Chicago.
There are a variety of buttonhole styles available, depending on your model. All models have a standard buttonhole that is appropriate for many types of projects. Below is a list of other styles and types of button-holes that may be available on your model.
STANDARD BUTTONHOLE: Fine to medium weight fabrics.
HEIRLOOM BUTTONHOLE: Fine to medium weight fabrics.
STRETCH BUTTONHOLE: All stretch fabrics.
ROUND BUTTONHOLE WITH NORMAL BARTACK: Medium to heavy weight fabrics of all types.
ROUND BUTTONHOLE WITH HORIZONTAL BARTACK: Medium to heavy weight fabrics of all types.
KEYHOLE BUTTONHOLE WITH NORMAL BARTACK: Heavy weight, non-stretch fabrics.
KEYHOLE BUTTONHOLE WITH POINTED BARTACK: Firm woven fabric. Jackets, coats, leisure wear.
KEYHOLE BUTTONHOLE WITH HORIZONTAL BARTACK: Firm woven fabrics. jackets, coats, leisure wear.
STRAIGHT STITCH BUTTONHOLE: For bound buttonholes & welt pockets.
HAND-LOOK BUTTONHOLE: For light- to medium-weight woven fabrics.
Buttonhole Foot with Slide #3B - measuring foot for manual
buttonholes

17 052815
Workbook 1—Basic Operation Manual Buttonholes
Fabric: Heavy flannel, 6” x 6” and Lightweight tear-away stabilizer, 3” x 6” and Narrow cord (perle cotton, embroidery floss, etc.), 18”
Needle: 80/12 Universal
Needle Position: As programmed
BERNINA Presser Foot: Standard Buttonhole Foot #3/3C
bernette Presser Foot: Seville 4 and London 3: 4-step Buttonhole Foot Note: For making buttonholes with bernette models London 5, London 7, London 8, Chicago 5, and Chicago 7, see Automatic Buttonholes on the following page.
fold
Seville 4
London 3
Fold the fabric in half to 3” x 6”; press. Insert the stabilizer between the layers. Draw a line 1½” from the fold along the 6” length. Draw a second line 1” from the first line. Mark two short lines, between the fold and the drawn line, spaced about 1½”-2” apart.
Standard Buttonhole—BERNINA Select the Standard buttonhole; select the “man” function from the function toolbar, if applicable. Position the foot over the first short line, aligning the fold of the fabric with the ⅝” marking on the stitch plate, behind the foot. Engage Step #1. Sew the first side of the buttonhole. Stop at the drawn line; select step #2. Continue with remaining steps.
Standard Buttonhole—Seville 4 and London 3 Select the buttonhole and adjust the stitch settings: SW = 5 and SL = buttonhole. Position the foot over the first short line, aligning the needle with the 1½” line. Select the steps in order and sew them as shown in the diagrams. When the stitching is complete, remove the fabric from under the foot. Bring thread tails to the back and tie off.
Corded Buttonhole Fold the cord in half and loop the middle around the center “toe” of the foot (For the bernette – loop the cord at the back of the foot; lock it in the front grooves and tie the ends in front.) Stitch the buttonhole on the second Line as before, then carefully remove the fabric from under the foot. Pull the cord ends until the loop is pulled up under the buttonhole; trim the ends of cord. If working on a knit fabric, knot the cord ends together before trimming.
Tension Tips A slightly tighter bobbin tension gives a beautiful full look to your buttonholes. The best way to achieve this:
CB Hook Machines: Thread the bobbin thread through the hole in the finger of the bobbin case.
Rotary Hook Machines: Use the embroidery bobbin case and thread the "pigtail."
7 Series Machines: No bobbin adjustments 8 Series Machines: Thread for embroidery.
Do you know how to:
▪ Measure a button for buttonhole size?
▪ Select a buttonhole?
▪ Stitch a buttonhole?
18 052815
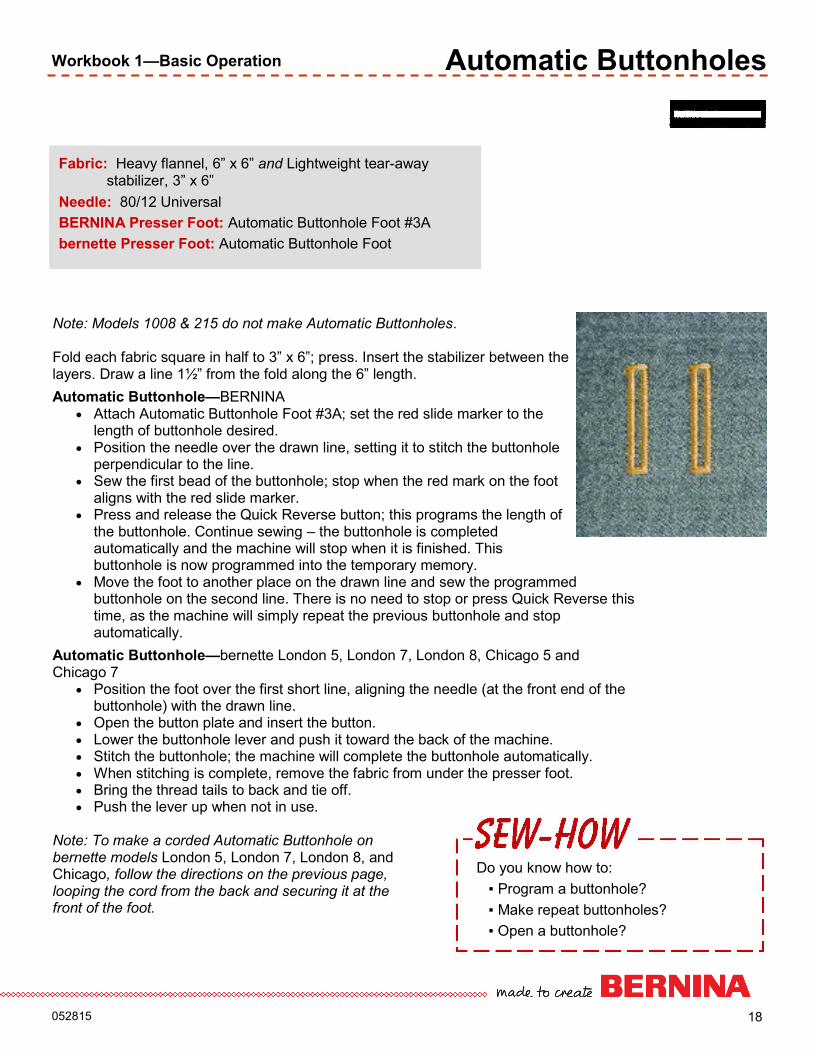
Workbook 1—Basic Operation Automatic Buttonholes
Note: Models 1008 & 215 do not make Automatic Buttonholes. Fold each fabric square in half to 3” x 6”; press. Insert the stabilizer between the layers. Draw a line 1½” from the fold along the 6” length.
Automatic Buttonhole—BERNINA Attach Automatic Buttonhole Foot #3A; set the red slide marker to the
length of buttonhole desired. Position the needle over the drawn line, setting it to stitch the buttonhole
perpendicular to the line. Sew the first bead of the buttonhole; stop when the red mark on the foot
aligns with the red slide marker. Press and release the Quick Reverse button; this programs the length of
the buttonhole. Continue sewing – the buttonhole is completed automatically and the machine will stop when it is finished. This buttonhole is now programmed into the temporary memory.
Move the foot to another place on the drawn line and sew the programmed buttonhole on the second line. There is no need to stop or press Quick Reverse this time, as the machine will simply repeat the previous buttonhole and stop automatically.
Automatic Buttonhole—bernette London 5, London 7, London 8, Chicago 5 and Chicago 7
Position the foot over the first short line, aligning the needle (at the front end of the buttonhole) with the drawn line.
Open the button plate and insert the button. Lower the buttonhole lever and push it toward the back of the machine. Stitch the buttonhole; the machine will complete the buttonhole automatically. When stitching is complete, remove the fabric from under the presser foot. Bring the thread tails to back and tie off. Push the lever up when not in use.
Note: To make a corded Automatic Buttonhole on bernette models London 5, London 7, London 8, and Chicago, follow the directions on the previous page, looping the cord from the back and securing it at the front of the foot.
Fabric: Heavy flannel, 6” x 6” and Lightweight tear-away stabilizer, 3” x 6”
Needle: 80/12 Universal
BERNINA Presser Foot: Automatic Buttonhole Foot #3A
bernette Presser Foot: Automatic Buttonhole Foot
Do you know how to:
▪ Program a buttonhole?
▪ Make repeat buttonholes?
▪ Open a buttonhole?
19 052815
Workbook 1—Basic Operation Automatic Buttonholes
On-screen Buttonhole Measuring Buttonhole Slit Width Adjustment
Note: On-screen Buttonhole Measuring and Buttonhole Slit Width Adjustment are available on Models 880, 7 Series, 580, and 560. Fold each fabric square in half to 3” x 6”; press. Insert the stabilizer between the layers. Draw a line 1½” from the fold along the 6” length.
Automatic Buttonhole - On-screen Buttonhole Measuring—BERNINA Attach Automatic Buttonhole Foot #3A. Select the Standard Buttonhole. Expand the information Screen and select the Buttonhole Stitch Length. Hold Button on screen. Use Multi-function Knobs to encircle the button. Length is calculated directly from the button diameter. 2 mm are
automatically added for button ease/thickness. Sew the buttonhole - no need to set the length with the Quick Reverse.
Buttonhole is repeatable without re-setting. Automatic Buttonhole - Slit Width Adjustment—BERNINA
Attach Automatic Buttonhole Foot #3A. Select the Standard Buttonhole and set the length using Buttonhole
Measuring method. Expand Information Screen. Select Buttonhole Slit Width. Adjust Buttonhole Slit Width to accommodate thick or unusual buttons.
Use Multi-function Knobs to adjust the width. Sew the buttonhole - no need to set the length with the Quick Reverse.
Buttonhole is repeatable without re-setting.
Note: Buttonhole Bead Width and Stitch Density are also adjustable using the Multi-function Knobs in the sewing view.
Fabric: Heavy flannel, 6” x 6” and Lightweight tear-away stabilizer, 3” x 6”
Button: ¾” (19 mm/30L) two-hole button
Needle: 80/12 Universal
BERNINA Presser Foot: Automatic Buttonhole Foot #3A
Do you know how to:
▪ Program a buttonhole on-screen?
▪ Adjust the buttonhole slit width?
▪ Adjust the buttonhole bead width?

20 052815
Workbook 1—Basic Operation Attaching Buttons
Lower the feed dog, then attach the Button Sew-On Foot to the machine. Select the Button Sew-On stitch, if available. The Universal or Zigzag stitch can also be used by setting the stitch length at 0.0 mm. Fold the fabric in half to 4” x 4”; press. Insert the stabilizer between the layers of fabric. Technique #1 – With Thread Shank Optional: Use a glue stick to hold the button in place. BERNINA only: For a long shank, adjust the pin on Button Sew-On Foot #18 to the highest position. Note: A short shank is appropriate for dress-and blouse-weight fabrics; a long shank for coat- and jacket-weight materials. Check the distance between the holes of the button by turning the hand wheel. To avoid breaking the needle, adjust the stitch width if necessary so that the left and right swings of the needle fall into the holes of the button. Hold the thread tails as you begin to sew. If using the Button Sew-on stitch, the machine stops automatically when the program is complete; the thread tails are secured as part of the program. BERNINA or bernette: Use the Universal or Zigzag stitch, sew 6-8 stitches, and stop. Bring the thread tails to the wrong side of the fabric and knot them together; trim the excess thread.
Technique #2 – Without Thread Shank Using the lowest shank setting and the instructions above, attach a charm(s) or snap or hook and eye. Stitch a ribbon with this technique (the stitch makes a bartack) and then tie the ribbon into a bow.
Fabric: Firm woven fabric, 4” x 8” and Lightweight tear-away stabilizer, 4” x 4”
Button: ¾” (19 mm/30L) two-hole button
Needle: 80/12 Universal
BERNINA Presser Foot: Button Sew-On Foot #18 (optional)
Do you know how to:
▪ Lower the feed dog?
▪ Adjust the shank on Button Sew-On
Foot #18?
21 052815
Workbook 1—Basic Operation Stitching Zippers
Fabric: Firm woven fabric, two pieces, 4” x 8” each and 4”-7” neckline zipper
Needle: 80/12 Universal
BERNINA Presser Foot: Reverse Pattern Foot #1/1C/1D and Zipper Feet #4 and Zipper Foot with Guide #54 (optional accessory)
bernette Presser Foot: Zigzag/Universal foot and Zipper Foot
Attaching the Zipper to Garment
Place fabric pieces right sides together. Using a straight stitch, sew a ¾” seam from one short end up to where the zipper stop will be about 2”. Baste the rest of the seam, sewing 2-3 stitches in reverse at the end to secure the seam; return to a straight stitch length of 2.5 mm.
Press the seam allowances open. Place the right side of the zipper against the seam allowances with the zipper teeth centered over the seam. Pin or baste each side of zipper to the seam allowances only.
Change to a zipper foot; adjust the needle position (bernette users slide the zipper foot) to the right or left as needed to stitch close to the zipper teeth. Sew through the zipper tape and the seam allowance only, from bottom to top on each side of the zipper. Pin or baste through all layers to hold the sewn zipper to the project.
Topstitching the Zipper—BERNINA
Change to Zipper Foot with Guide #54.
Left Side: Adjust the seam guide to one notch to the right of center. Adjust the needle position to the far left. Sewing from the right side of the fabric and starting at the lower edge, sink the needle into the seam. Sew out about ⅜ ”, stop, pivot and make sure the seam guide is lying in the ditch of the seam. Sew up the left side of the zipper, stitching through all layers.
Right Side: Adjust the guide one notch to left of center; move the needle position to the far right. Repeat the above steps on the right side of the zipper.
Do you know how to:
▪ Machine baste a seam?
▪ Adjust the needle positions?
▪ Adjust the sliding guide or sole?
Topstitching the Zipper—bernette
Left Side: Adjust the foot to the left of center. Sewing from the right side of the fabric and starting at the lower edge, sink the needle into the seam. Sew out about ⅜ ”, stop, pivot and make sure the edge of the foot is lying in the ditch of the seam. Sew up the left side of the zipper.
Right Side: Adjust foot to right of center. Repeat the above steps, starting at seam and sewing to the right of the zipper.
05
28
15
Wo
rkb
oo
k 1
—B
as
ic O
pe
ratio
n
Th
e fo
llow
ing
stitc
hes a
re u
se
d in
Wo
rkb
oo
k 1
: Ba
sic
Op
era
tion
. Th
e c
hart g
ive
s th
e s
titch n
um
ber fo
r each
mo
de
l (-- ind
ica
tes th
at th
e s
titch
is
not a
va
ilable
).
Stitc
h C
hart
* The s
titches o
n b
ern
ette
model S
eville
4 (fo
rmerly
46) a
re n
ot n
um
bere
d o
n th
e m
achin
e b
ut a
re in
dic
ate
d o
n th
e c
hart in
the o
rder th
ey a
pp
ear o
n th
e fro
nt o
f th
e m
achin
e.
8
Series
5 S
erie
s
3 S
erie
s
2 S
eries 1000
Series
Be
rne
tte
7 S
erie
s
Stitc
h
88
0
79
0
78
0
77
0
QE
7
50
QE
7
40
58
0
56
0
55
0
53
0
38
0
35
0
PE
3
30
21
5
10
08
Lo
nd
on
3
Lo
nd
on
5
Lo
nd
on
7
Lo
nd
on
8
Seville 4
* C
hicag
o
5 & 7
71
0
B
astin
g
21
21
21
21
21
30
21
30
30
30
23
21
-- --
-- --
-- --
-- --
-- 3
0
B
lind
stitc
h
9
9
9
9
9
9
9
9
9
9
7
7
7
5
3
6
13
7
7
7
9
9
B
utto
n
Sew
-On
6
0
60
60
60
60
60
60
60
60
60
14
12
11
-- --
-- --
-- --
-- A
97
60
Q
uilte
r’s
Secu
ring
1
32
4
13
24
13
24
13
24
13
24
13
24
13
24
13
24
13
24
13
24
10
4
75
-- --
-- --
-- --
-- --
-- 1
32
4
S
ecu
ring
5
5
5
5
5
5
5
5
5
5
5
5
5
--
-- --
-- --
-- --
-- 5
S
tan
da
rd
Bu
tton
ho
le
51
51
51
51
51
51
51
51
51
51
0
0
0
11
dia
l d
ial
1
10
10
dia
l 0
5
1
S
traig
ht
1
1
1
1
1
1
1
1
1
1
1
1
1
1
1
1&
2
2
1&
2
1&
2
1&
2
1&
2
1
S
tretc
h
11
1
1
11
11
11
11
11
11
11
11
9
9
9
-- --
-- 1
6
9
9
5
4
11
T
riple
S
traig
ht
6
6
6
6
6
6
6
6
6
6
6
6
6
4
5
11
&1
2
17
3
3
-- 3
6
U
niv
ers
al
15
15
15
15
15
15
15
15
15
15
19
17
14
-- 4
8
6
1
4
14
-- --
15
V
ari-
Overlo
ck
3
3
3
3
3
3
3
3
3
3
3
3
3
-- 3
7
5
8
8
6
8
3
Z
igzag
2
2
2
2
2
2
2
2
2
2
2
2
2
2
2
3
3
4
4
3
5
2
— ▪ —
22
05
28
15
Wo
rkb
oo
k 1
—B
as
ic O
pe
ratio
n
8
Series
5 S
erie
s
3 S
erie
s
2 S
eries 1000
Series
be
rne
tte
7 S
erie
s
Fe
atu
re / F
un
ctio
n
880
790
780
770
QE
750
QE
740
580
560
550
530
380
350
PE
330
215
1008
Lo
nd
on
3
Lo
nd
on
5
Lo
nd
on
7
Lo
nd
on
8
Seville 4
Ch
icago
5 &
&
710
Au
tom
atic
Need
le
Th
read
er
yes
yes
yes
yes
yes
yes
yes
yes
yes
yes
yes
yes
yes
yes
no
yes
yes
yes
yes
no
yes
yes
Au
tom
atic
On
e-
Ste
p B
utto
nh
ole
yes
yes
yes
yes
yes
yes
yes
yes
yes
yes
yes
yes
yes
no
no
no
yes
yes
yes
no
yes
yes
Fe
ed
Do
g
Up
/Do
wn
yes
yes
yes
yes
yes
yes
yes
yes
yes
yes
yes
yes
yes
yes
yes
cover
yes
yes
yes
cover
yes
yes
Fre
e H
an
d S
yste
m
yes
yes
yes
yes
yes
yes
yes
yes
yes
yes
yes
opt
opt
no
no
no
no
no
no
no
no
yes
Ho
pp
er
Mech
an
ism
yes
yes
yes
yes
yes
yes
yes
yes
yes
yes
yes
yes
yes
yes
yes
no
no
no
no
no
no
yes
Maxim
um
S
titch
Wid
th
9 mm
9 m
m
9 mm
9 m
m
9 mm
9 m
m
9 mm
9 m
m
5.5 mm
5.5 m
m
5.5 mm
5.5 m
m
5.5 mm
5.5 m
m
5.5 mm
5 m
m
5 mm
7 m
m
7 mm
5 m
m
7 mm
9 m
m
Need
le P
os
ition
s
11
11
11
11
11
11
11
11
11
11
9
9
9
9
5
2
3
5
5
2
5
11
Need
le S
top
U
p/D
ow
n
yes
yes
yes
yes
yes
yes
yes
yes
yes
yes
yes
yes
yes
yes
no
no
no
yes
yes
no
yes
yes
On
-scre
en
Bu
tton
-h
ole
Me
asu
ring
yes
yes
yes
yes
yes
yes
yes
yes
no
no
no
no
no
no
no
no
no
no
no
no
no
yes
Pre
sser F
oo
t P
ressu
re
yes
yes
yes
yes
yes
yes
yes
yes
yes
yes
yes
yes
yes
no
no
yes
yes
yes
yes
yes
yes
yes
Slid
e-o
n T
ab
le o
r S
na
p-o
n B
ox
yes
yes
yes
yes
yes
yes
yes
yes
yes
yes
yes
yes
opt
yes
yes
yes
yes
yes
yes
yes
yes
yes
Th
e fo
llow
ing
featu
res a
nd fu
nctio
ns a
re u
se
d in
Work
book 1
: Ba
sic
Op
era
tion
.
Mach
ine F
eatu
res &
Fu
nctio
ns
23
05
28
15
Wo
rkb
oo
k 1
—B
as
ic O
pe
ratio
n
8
Series
5 S
erie
s
3 S
erie
s
2
Series
10
00
Series
be
rne
tte
7 S
erie
s
Pre
sse
r Fe
et
880
790
780
770
QE
750
QE
710
580
560
550
QE
530
380
350
PE
330
215
1008
Lo
nd
on
3
Lo
nd
on
5
Lo
nd
on
7
Lo
nd
on
8
Seville 4
Ch
icago
5 &
7 740
Revers
e P
atte
rn F
oo
t #1/1
C/1
D
1C
, 1D
1C
, 1D
1C
, 1D
1C
, 1D
1C
, 1D
1C
, 1D
1C
1C
1
1
1
1
1
1
1
J
J
T
T
X
T
1C
, 1D
Overlo
ck F
oo
t #2/2
A
2A
2A
2A
--
-- --
2A
2A
--
2
2
-- 2
2
2
opt
G
E
E
-- E
--
Sta
nd
ard
Bu
tton
ho
le
Fo
ot #
3/3
C
3C
--
-- --
-- --
--
-- --
-- --
-- 3
3
B
X
--
Au
to B
utto
nh
ole
Fo
ot
#3
A
3A
3A
3A
3A
3A
3A
3A
3A
3A
3A
3A
3A
3A
--
D
D
D
D
3A
Zip
pe
r Fo
ot #
4/4
D
4D
4D
4D
4D
4D
4D
4
4
4
4
4
4
4
4
4
I I
opt
I X
I
4D
Blin
d H
em
Fo
ot #
5
5
5
5
-- 5
5
5
5
5
5
5
5
5
5
5
opt
opt
F
F
-- F
--
Jean
s F
oo
t #8/8
D
-- 8D
8D
--
-- --
8
-- --
-- 8
-- --
-- --
-- --
-- --
-- --
--
Darn
ing
Fo
ot #
9
-- --
-- --
-- --
-- --
-- --
-- --
-- --
-- opt
opt
opt
X
-- X
--
Bu
tton
Sew
-On
Fo
ot #
18
18
-- --
-- --
-- --
-- --
-- --
-- --
-- --
X
X
X
X
X
H
--
Op
en
Em
bro
ide
ry F
oo
t #20/2
0C
/20D
20C
20C
20C
20C
20C
--
20C
20C
20
-- 20
20
-- --
-- opt*
X*
A*
A*
-- A
* 20C
Em
bro
ide
ry F
oo
t #26
26
26
26
26
w/em
b 26
w/em
b --
26
26
w/em
b --
-- --
-- --
-- --
-- --
-- --
-- X
--
Patc
hw
ork
Fo
ot #
37/3
7D
o
r #97/9
7D
--
-- --
97D
37D
--
-- --
37
-- --
37
-- --
-- --
-- --
-- --
-- --
Sid
ew
ays M
otio
n F
oo
t #40C
40C
40C
40C
BE
RN
INA
Stitc
h
Reg
ula
tor #
42
42
42
42
42
42
-- 42
-- 42
--
--
Walk
ing
Fo
ot #
50
--
-- --
-- --
-- --
-- 50
-- --
50
-- --
-- --
-- --
-- --
-- --
Pre
sser F
oo
t Ch
art
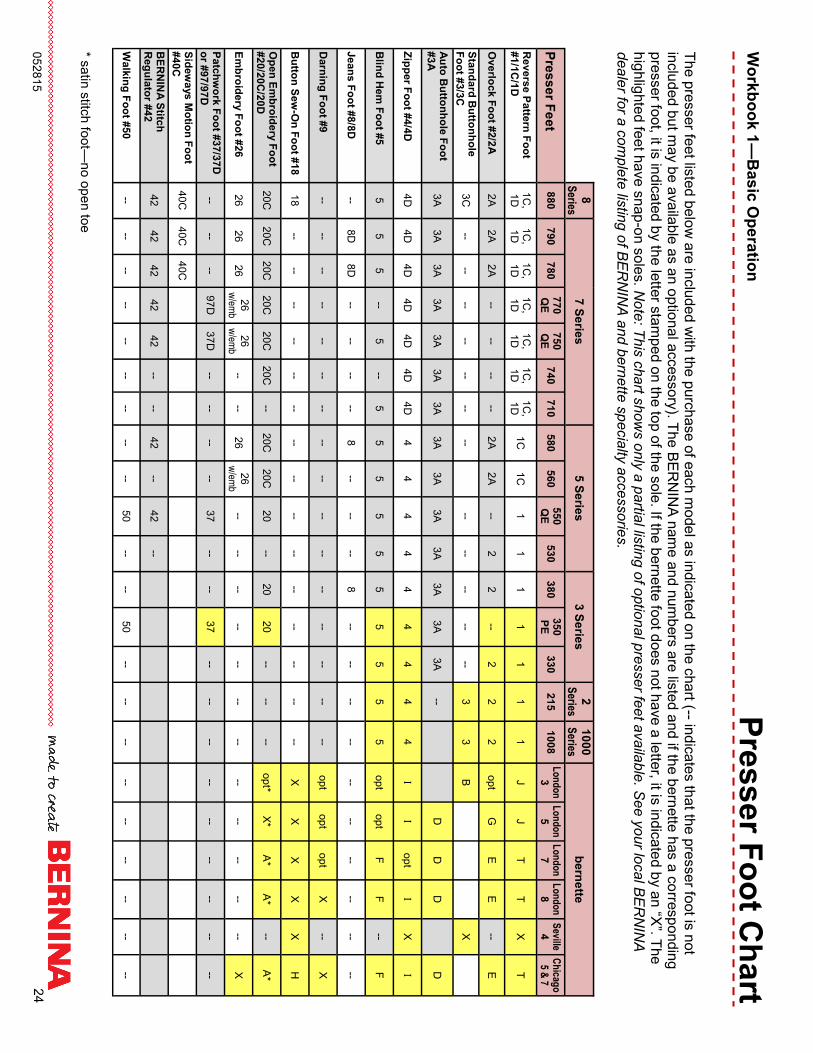
Th
e p
resser fe
et lis
ted b
elo
w a
re in
clu
de
d w
ith th
e p
urc
hase o
f each m
ode
l as in
dic
ate
d o
n th
e c
ha
rt (-- indic
ate
s th
at th
e p
resse
r foot is
not
inclu
de
d b
ut m
ay b
e a
va
ilable
as a
n o
ptio
na
l accesso
ry). T
he B
ER
NIN
A n
am
e a
nd n
um
bers
are
liste
d a
nd
if the b
ern
ette
has a
co
rresp
on
din
g
pre
sse
r foot, it is
indic
ate
d b
y th
e le
tter s
tam
pe
d o
n th
e to
p o
f the s
ole
. If the
be
rnette
foot d
oes n
ot h
ave
a le
tter, it is
indic
ate
d b
y a
n “X
”. Th
e
hig
hlig
hte
d fe
et h
ave
sn
ap
-on s
ole
s. N
ote
: This
cha
rt sh
ow
s o
nly
a p
artia
l listin
g o
f optio
na
l pre
sser fe
et a
vaila
ble
. Se
e y
our lo
cal B
ER
NIN
A
dea
ler fo
r a c
om
ple
te lis
ting o
f BE
RN
INA
and
bern
ette
sp
ecia
lty a
ccessorie
s.
24
* satin
stitc
h fo
ot—
no
op
en to
e