multifunctional digital systems user …business.toshiba.com/downloads/kb/f1ulds/6494/eb2a-user...4...
TRANSCRIPT
MULTIFUNCTIONAL DIGITAL SYSTEMS
User Management Guide


SOFTWARE LICENSE AGREEMENT 1
SOFTWARE LICENSE AGREEMENT
INSTALLING OR OTHERWISE USING THIS SOFTWARE PRODUCT CONSTITUTES YOUR ACCEPTANCE OF THE FOLLOWING TERMS AND CONDITIONS (UNLESS A SEPARATE LICENSE IS PROVIDED BY THE SUPPLIER OF APPLICABLE SOFTWARE IN WHICH CASE SUCH SEPARATE LICENSE SHALL APPLY). IF YOU DO NOT ACCEPT THESE TERMS, YOU MAY NOT INSTALL OR USE THIS SOFTWARE, AND YOU MUST PROMPTLY RETURN THE SOFTWARE TO THE LOCATION WHERE YOU OBTAINED IT.
THE SOFTWARE INSTALLED ON THIS PRODUCT INCLUDES NUMEROUS INDIVIDUAL SOFTWARE COMPONENTS, EACH HAVING ITS OWN APPLICABLE END USER LICENSE AGREEMENT (“EULA”). INFORMATION RELATING TO THE EULAS MAY BE FOUND IN AN ELECTRONIC FILE INCLUDED ON THE USER DOCUMENTATION CD-ROM INCLUDED HEREWITH; HOWEVER, ALL SOFTWARE AND DOCUMENTATION DEVELOPED OR CRE-ATED BY OR FOR TOSHIBA TEC CORPORATION (“TTEC”) ARE PROPRIETARY PROD-UCTS OF TTEC AND ARE PROTECTED BY COPYRIGHT LAWS, INTERNATIONAL TREATY PROVISIONS, AND OTHER APPLICABLE LAWS.
Grant of LicenseThis is a legal agreement between you, the end-user (“You”), and TTEC and its suppliers. This software, fonts (including their typefaces) and related documentation (“Software”) is licensed for use with the system CPU on which it was installed (“System”) in accordance with the terms con-tained in this Agreement. This Software is proprietary to TTEC and/or its suppliers.
TTEC and its suppliers disclaim responsibility for the installation and/or use of this Software, and for the results obtained by using this Software. You may use one copy of the Software as installed on a single System, and may not copy the Software for any reason except as neces-sary to use the Software on a single System. Any copies of the Software shall be subject to the conditions of this Agreement.
You may not, nor cause or permit any third party to, modify, adapt, merge, translate, reverse compile, reverse assemble, or reverse engineer the Software. You may not use the Software, except in accordance with this license. No title to the intellectual property in the Software is transferred to you and full ownership is retained by TTEC or its suppliers. Source code of the Software is not licensed to you. You will be held legally responsible for any copyright infringe-ment, unauthorized transfer, reproduction or use of the Software or its documentation.
TermThis license is effective until terminated by TTEC or upon your failure to comply with any term of this Agreement. Upon termination, you agree to destroy all copies of the Software and its docu-mentation.
You may terminate this license at any time by destroying the Software and its documentation and all copies.
Disclaimer of WarrantyTHIS SOFTWARE IS PROVIDED “AS IS” WITHOUT WARRANTY OF ANY KIND, EITHER EXPRESS OR IMPLIED, INCLUDING, BUT NOT LIMITED TO, THE IMPLIED WARRANTIES OF MERCHANTABILITY, FITNESS FOR A PARTICULAR PURPOSE, TITLE, AND NON-INFRINGEMENT. TTEC AND ITS SUPPLIERS DISCLAIM ANY WARRANTY RELATING TO THE QUALITY AND PERFORMANCE OF THE SOFTWARE. IF THE SOFTWARE PROVES DEFECTIVE, YOU (AND NOT TTEC OR ITS SUPPLIERS) SHALL BE RESPONSIBLE FOR THE ENTIRE COST OF ALL NECESSARY SERVICING, REPAIR OR CORRECTION. TTEC AND ITS SUPPLIERS DO NOT WARRANT THAT THE FUNCTIONS CONTAINED IN THE SOFTWARE WILL MEET YOUR REQUIREMENTS OR THAT THE OPERATION OF THE SOFTWARE WILL BE UNINTERRUPTED OR ERROR FREE.
2 SOFTWARE LICENSE AGREEMENT
ALL INFORMATION CONTAINED HEREIN THAT IS PROVIDED BY TTEC AND ITS AFFILI-ATES PURSUANT TO A EULA IS PROVIDED “AS IS” WITHOUT WARRANTY OF ANY KIND, EITHER EXPRESS OR IMPLIED.
Limitation of LiabilityIN NO EVENT WILL TTEC OR ITS SUPPLIERS BE LIABLE TO YOU FOR ANY DAMAGES, WHETHER IN CONTRACT, TORT, OR OTHERWISE (EXCEPT PERSONAL INJURY OR DEATH RESULTING FROM NEGLIGENCE ON THE PART OF TTEC OR ITS SUPPLIERS), INCLUDING WITHOUT LIMITATION ANY LOST PROFITS, LOST DATA, LOST SAVINGS OR OTHER INCIDENTAL, SPECIAL OR CONSEQUENTIAL DAMAGES ARISING OUT OF THE USE OR INABILITY TO USE THE SOFTWARE, EVEN IF TTEC OR ITS SUPPLIERS HAVE BEEN ADVISED OF THE POSSIBILITY OF SUCH DAMAGES, NOR FOR THIRD PARTY CLAIMS.
U.S. Government Restricted RightsThe Software is provided with RESTRICTED RIGHTS. Use, duplication or disclosure by the U.S. Government is subject to restrictions set forth in subdivision (b) (3) (ii) or (c) (i) (ii) of the Rights in Technical Data and Computer Software Clause set forth in 252.227-7013, or 52.227-19 (c) (2) of the DOD FAR, as appropriate. Contractor/Manufacturer is TOSHIBA TEC Corporation, 6-78, Minami-cho, Mishima-shi, Shizuoka-ken, 411-8520, Japan.
GeneralYou may not sublicense, lease, rent, assign or transfer this license or the Software. Any attempt to sublicense, lease, rent, assign or transfer any of the rights, duties or obligations hereunder is void. You agree that you do not intend to, and will not ship, transmit (directly or indirectly) the Software, including any copies of the Software, or any technical data contained in the Software or its media, or any direct product thereof, to any country or destination prohibited by the United States Government. This license shall be governed by the laws of Japan or, at the election of a Supplier of TTEC concerned with a dispute arising from or relating to this Agreement, the laws of the Country designated from time to time by the relevant Supplier of TTEC. If any provision or portion of this Agreement shall be found to be illegal, invalid or unenforceable, the remaining provisions or portions shall remain in full force and effect.
YOU ACKNOWLEDGE THAT YOU HAVE READ THIS LICENSE AGREEMENT AND THAT YOU UNDERSTAND ITS PROVISIONS. YOU AGREE TO BE BOUND BY ITS TERMS AND CONDITIONS. YOU FURTHER AGREE THAT THIS LICENSE AGREEMENT CONTAINS THE COMPLETE AND EXCLUSIVE AGREEMENT BETWEEN YOU AND TTEC AND ITS SUPPLI-ERS AND SUPERSEDES ANY PROPOSAL OR PRIOR AGREEMENT, ORAL OR WRITTEN, OR ANY OTHER COMMUNICATION RELATING TO THE SUBJECT MATTER OF THIS LICENSE AGREEMENT.
TOSHIBA TEC Corporation, 6-78, Minami-cho, Mishima-shi, Shizuoka-ken, 411-8520, Japan.

TRADEMARKS AND COPYRIGHT 3
TRADEMARKS AND COPYRIGHT
TrademarksThe official name of Windows 98 is Microsoft Windows 98 Operating System.The official name of Windows Me is Microsoft Windows Me Operating System.The official name of Windows NT is Microsoft Windows NT Operating System.The official name of Windows 2000 is Microsoft Windows 2000 Operating System.The official name of Windows XP is Microsoft Windows XP Operating System.The official name of Windows Vista is Microsoft Windows Vista Operating System.The official name of Windows Server 2003 is Microsoft Windows Server 2003 Operating System.Microsoft, Windows, Windows NT, and the brand names and product names of other Microsoft products are trademarks of Microsoft Corporation in the US and other countries.Apple, AppleTalk, Macintosh, Mac, TrueType, and LaserWriter are trademarks of Apple Inc. in the US and other countries.PostScript is a trademark of Adobe Systems Incorporated.Netscape is a trademark of Netscape Communications Corporation.IBM, AT and AIX are trademarks of International Business Machines Corporation.NOVELL, NetWare, and NDS are trademarks of Novell, Inc.TopAccess is a trademark of Toshiba Tec Corporation.Other company names and product names in this manual are the trademarks of their respec-tive companies.
Copyright© 2007 TOSHIBA TEC CORPORATION All rights reservedUnder the copyright laws, this manual cannot be reproduced in any form without prior written permission of TTEC. No patent liability is assumed, however, with respect to the use of the infor-mation contained herein.

4 Preface
Preface
Thank you for purchasing TOSHIBA Multifunctional Digital Systems or Multifunctional Digital Color Systems. This User Management Guide explains the instructions how to manage the equipment with user management functions, such as department management, User Manage-ment Setting, and User Authentication for Scan to E-mail.
About This GuideThis manual explains describes how to manage this equipment using the functions of “Depart-ment Management”, “User Management Setting” and “User Authentication for Scan to E-mail”.
ConventionsThe term “this equipment” in this manual refers to the TOSHIBA Multifunctional Digital Sys-tems or Multifunctional Digital Color Systems.The term “e-Filing” in this manual is an abbreviation of “electronic filing”.
Lineup of Our ManualsThank you for purchasing the TOSHIBA Multifunctional Digital Systems or Multifunctional Digital Color Systems.We have provided you with these manuals for the operation of this equipment. Select and read the manual best suited to your needs.
Quick Start GuideThis Quick Start Guide describes the initial setup method of this equip-ment and accessories of this product such as operator’s manuals and CD-ROMs.
Operator’s Manual for Basic FunctionsThis Operator’s Manual for Basic for Functions describes how to use the basic functions of this equipment mainly focusing on the copying func-tion.Also this manual contains safety precautions for users to be observed. Be sure to read it first carefully.
User Functions GuideThis User Functions Guide describes the functions and settings under the [USER FUNCTIONS] button on the control panel of this equipment.

Preface 5
Color Guide (only for the color model)This color Guide simply explains the functions such as “copy density adjustment”, “color adjustment”, “copy editing”, "image editing” and “image processing” in color. This guide also includes the basic knowl-edge of color.
Other guides are provided by the User Documentation CD-ROM in PDF files:TopAccess GuideThis TopAccess Guide explains how to operate and set up the network functions such as the network scanning function and job management, using the TopAccess (Web-based utility) from client computers.
Network Administration GuideThis Network Administration Guide explains the guidelines for setting up network servers to provide various network services, and troubleshoot-ing for network administrators.
Printing GuideThis Printing Guide explains how to install the client software for printing from Microsoft Windows, Apple Mac OS, and UNIX computers, and print to the equipment.
Scanning GuideThis Scanning Guide explains how to operate the scanning function of this equipment.
6 Preface
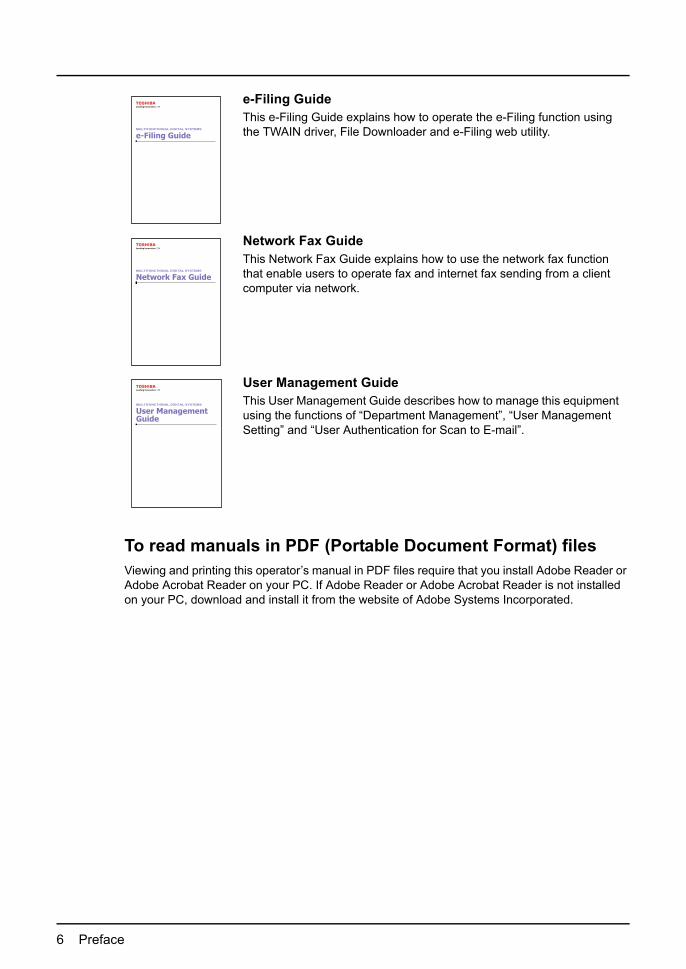
To read manuals in PDF (Portable Document Format) filesViewing and printing this operator’s manual in PDF files require that you install Adobe Reader or Adobe Acrobat Reader on your PC. If Adobe Reader or Adobe Acrobat Reader is not installed on your PC, download and install it from the website of Adobe Systems Incorporated.
e-Filing GuideThis e-Filing Guide explains how to operate the e-Filing function using the TWAIN driver, File Downloader and e-Filing web utility.
Network Fax GuideThis Network Fax Guide explains how to use the network fax function that enable users to operate fax and internet fax sending from a client computer via network.
User Management GuideThis User Management Guide describes how to manage this equipment using the functions of “Department Management”, “User Management Setting” and “User Authentication for Scan to E-mail”.
Preface 7
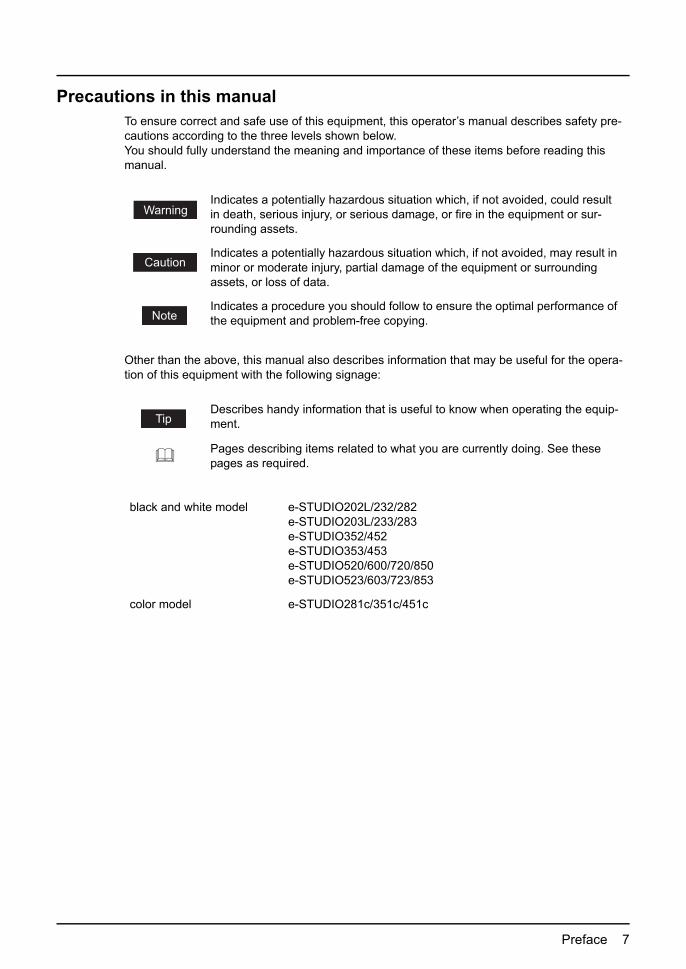
Precautions in this manualTo ensure correct and safe use of this equipment, this operator’s manual describes safety pre-cautions according to the three levels shown below.You should fully understand the meaning and importance of these items before reading this manual.
Other than the above, this manual also describes information that may be useful for the opera-tion of this equipment with the following signage:
Indicates a potentially hazardous situation which, if not avoided, could result in death, serious injury, or serious damage, or fire in the equipment or sur-rounding assets.
Indicates a potentially hazardous situation which, if not avoided, may result in minor or moderate injury, partial damage of the equipment or surrounding assets, or loss of data.
Indicates a procedure you should follow to ensure the optimal performance of the equipment and problem-free copying.
Describes handy information that is useful to know when operating the equip-ment.
Pages describing items related to what you are currently doing. See these pages as required.
black and white model e-STUDIO202L/232/282e-STUDIO203L/233/283e-STUDIO352/452e-STUDIO353/453e-STUDIO520/600/720/850e-STUDIO523/603/723/853
color model e-STUDIO281c/351c/451c


TABLE OF CONTENTS 9
TABLE OF CONTENTS
SOFTWARE LICENSE AGREEMENT ..........................................................1
TRADEMARKS AND COPYRIGHT...............................................................3
Preface...........................................................................................................4About This Guide.......................................................................................4
Conventions .........................................................................................4Lineup of Our Manuals ..............................................................................4
To read manuals in PDF (Portable Document Format) files ................6Precautions in this manual ........................................................................7
Chapter 1 Setting up User Management
Enabling Department Management ..........................................................12
Setting up User Management Setting.......................................................14Enabling User Management Setting........................................................15
Enabling Windows Domain Authentication.........................................16Enabling LDAP Authentication ...........................................................21Enabling MFP Local Authentication ...................................................26
Managing User Information .....................................................................28How to Login to Touch Panel ..................................................................46
Setting up User Authentication for Scan to E-mail .................................50
INDEX .........................................................................................................................................57


1.Setting up User Management
In the User Management tab page, you can enable or disable the department management, configure the User Management Setting, and configure the User Authentication for Scan to E-mail.
Enabling Department Management.......................................................................12Setting up User Management Setting ...................................................................14
Enabling User Management Setting .................................................................................................15Managing User Information...............................................................................................................28How to Login to Touch Panel ............................................................................................................46
Setting up User Authentication for Scan to E-mail..............................................50

1 Setting up User Management
12 Enabling Department Management
Enabling Department Management
The department management is disabled as the default setting. When you want to manage the counters for every department, enable the department management. If the department manage-ment is enabled, the department code input screen will be displayed in the Touch Panel Display when you perform copying, scanning, faxing, and e-Filing box operations to manage the opera-tions separately every department. The printing can be also managed using the department code.
To enable the department management, at least one department code must be registered. Before enabling the department management, register the department code that you require.When you want to enable the User Management Setting, you do not have to enable the Department Management first. The Department Management will be automatically enable when the User Management Setting is enabled. However, no department code has been registered, you cannot enable the User Management Setting. In that case, please register the department code before enabling the User Management Setting.Enabling or disabling the department management can be operated in the General sub-menu page in the Setup menu page.Enabling or disabling the department management can be operated using the Control Panel. For instructions using the Control Panel, see User Functions Guide.
Enabling the department management
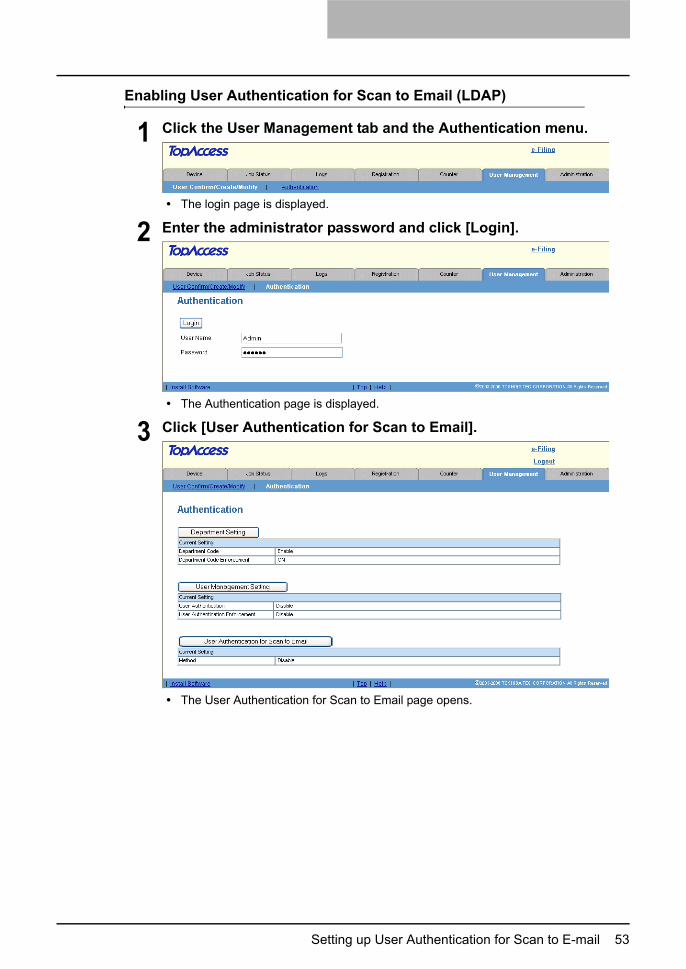
1 Click the User Management tab and the Authentication menu.
The login page is displayed.
2 Enter the administrator password and click [Login].
The Authentication page is displayed.

Enabling Department Management 13
3 Click [Department Setting].
The Department Setting page opens.
4 Specify the following items and click [Finish].
Department CodeSelect whether the department management is enabled or disabled.
When the User Management Setting is enabled, the Department Code option cannot be disabled.
Department Code EnforcementSelect whether invalid jobs, which a department code is not specified or invalid department code is specified, are printed or stored in the invalid job list when the department code is enabled.ON — Select this to not print the invalid jobs and store them in the invalid job list.Print — Select this to print the invalid jobs.Delete — Select this to delete the invalid jobs without storing them in the invalid job list.
If the Department Code Enforcement is set to ON and the SNMP communication is enabled in the printer driver, the user will be prompted to enter the correct department code if an invalid department code was entered in the printer driver.The Department Code Enforcement setting is not applied when the User Manage-ment Setting is enabled.

1 Setting up User Management
14 Setting up User Management Setting
Setting up User Management Setting
When the User Management Setting is enabled, users must enter the user name and password before operating this equipment. Therefore, you can secure the equipment from the unexpected users.
When the User Management Setting is enabled, the following functions will be available.The counters for each user can be managed.The limitations for each user can be set.Up to 10000 users can be registered.The user name and password will be required to operate the [COPY], [SCAN], [e-FILING], [FAX], [TEMPLATE], [USER FUNCTIONS], and [JOB STATUS] buttons.The user name and password will be required to operate the e-Filing web utility.The print jobs can be accepted only from the computer of which the login user name can be attested. (When the Windows Domain Authentication or LDAP Authentication is used, the computer must also join the domain.)When the Windows Domain or LDAP Authentication is used, the user information will be reg-istered automatically in the equipment when a user enters the user name and password in the User Authentication screen and then enter the department code.
The following table shows which function will use the User Management Setting.
Operation Authentication Remarks
Control Panel COPY Yes
SCAN Yes
e-FILING Yes
FAX Yes
EXTENSION No
JOB STATUS Yes
ACCESS No
INTERRUPT Yes
TEMPLATE Yes
USER FUNCTIONS Yes
Web TopAccess No
e-Filing Yes
Client Software Printer DriverN/W-Fax Driver
Yes(User Name Only)
The computer must login the domain.
File Downloader No
TWAIN Driver No
Backup/Restore No
AddressBook Viewer No
Remote Scan No
Setting up User Management Setting 15
Please remember the following limitations and considerations for the User Management Setting.- The jobs cannot be printed or deleted from TopAccess. When you want to print or delete the
jobs, please perform the operation from the [JOB STATUS] button on the Control Panel.- When the Windows Domain or LDAP Authentication is enabled, the password setting in the
User Information will not be used for the authentication. Do not specify the password for the User Information when the Windows Domain or LDAP Authentication is used.
- When the user’s jobs are in progress or the user currently log in the touch panel, the user information cannot be deleted or you cannot reset the user’s counters.
- The print jobs sent from Mac OS X 10.3.x or earlier are processed as invalid jobs depending on the Department Code Enforcement setting. When the printing is performed on Mac OS X 10.3.x to 10.4.x, the printing job is displayed with a user name "OSX User" on the Touch Panel Display of the equipment.
Before registering the user information, enable the User Management Setting. P.15 “Enabling User Management Setting”
After you enable the User Management Setting, register the user information. P.28 “Managing User Information”
Enabling User Management SettingThis equipment supports the following methods for the User Management Setting.
Windows Domain AuthenticationWhen your network manages the network users using the Windows Domain, this equipment can be managed using the Windows Domain Authentication.When this is configured, users must enter the user name and password that is registered in the Windows Domain to perform any operations on the Control Panel of this equipment.
P.16 “Enabling Windows Domain Authentication”LDAP AuthenticationWhen your network manages the network users using the LDAP, this equipment can be managed using the LDAP Authentication.When this is configured, users must enter the user name and password that is registered in the LDAP server to perform any operations on the Control Panel of this equipment.
P.21 “Enabling LDAP Authentication”MFP Local AuthenticationWhen you do not have any network authentication systems in your network, you can use the MFP Local Authentication.When this is configured, users must enter the user name and password that is registered in the MFP to perform any operations on the Control Panel of this equipment.
P.26 “Enabling MFP Local Authentication”
If you want to change the authentication method, please change the domain name and pass-word settings of the User Information as required. It’s easy to change the settings of the User Information using the Export/Import function.
P.37 “Exporting User Information and Counters” P.40 “Importing User Information”

1 Setting up User Management
16 Setting up User Management Setting
Enabling Windows Domain AuthenticationTo use the Windows Domain Authentication, you must have Windows Domain Authentication system in your network.
When the Windows Domain Authentication is enabled, the SNMP Communication must be enabled for printing.
Enabling Windows Domain Authentication
1 Click the User Management tab and the Authentication menu.
The login page is displayed.
2 Enter the administrator password and click [Login].
The Authentication page is displayed.
3 Click [User Management Setting].
The User Management Setting page opens.
Setting up User Management Setting 17
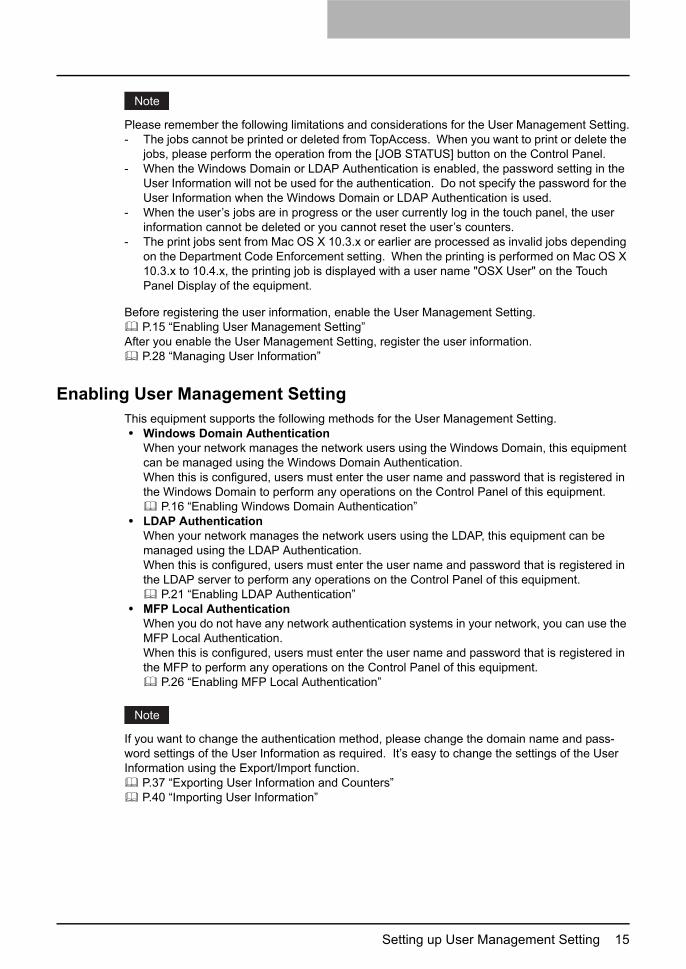
4 Select “Windows Domain Authentication”.
The confirmation dialog box appears.
You can disable the User Management Setting by selecting “Disable” and click [Next].
5 Click [OK].
6 Select how to process a print job whose user authentication has failed in the User Authentication Enforcement drop down box, and then click [Next].
In the “User Authentication Enforcement” drop down box, select whether invalid jobs, which an authentication failed, are printed or stored in the invalid job list.- ON — Select this to not print the invalid jobs and store them in the invalid job list.- Print — Select this to print the invalid jobs.- Delete — Select this to delete the invalid jobs without storing them in the invalid
job list.
If you want to automatically register user information that is entered by users in the authentication screen on the touch panel, TopAccess, and e-Filing web utility, check the “Create User Information Automatically” check box.If you want to gest user operations, check the “Enable Guest User” check box.

1 Setting up User Management
18 Setting up User Management Setting
7 Enter domain names for the network in the Domain Name 1, Domain Name 2 and Domain Name 3 fields, and then click [Detail Setting].
You can specify up to 3 domain names. You must specify at least one domain name to enable the Windows Domain Authentication.
8 Click [NT Domain], and Enter the following items. Then click [Next].
Domain Name — The domain name entered in Step 7 is displayed.PDC — Enter the server name or IP address of the Primary Domain Controller.BDC — Enter the server name or IP address of the Backup Domain Controller as you required.
If the wrong primary or backup domain controller is specified, the [ENTER] button in the USER AUTHENTICATION screen on the touch panel is highlighted while this equipment searches for the primary or backup domain controller for 2 to 4 minutes. In that case, correct the primary or backup domain controller setting after the beep will sound and the alert message will be displayed on the touch panel.

Setting up User Management Setting 19
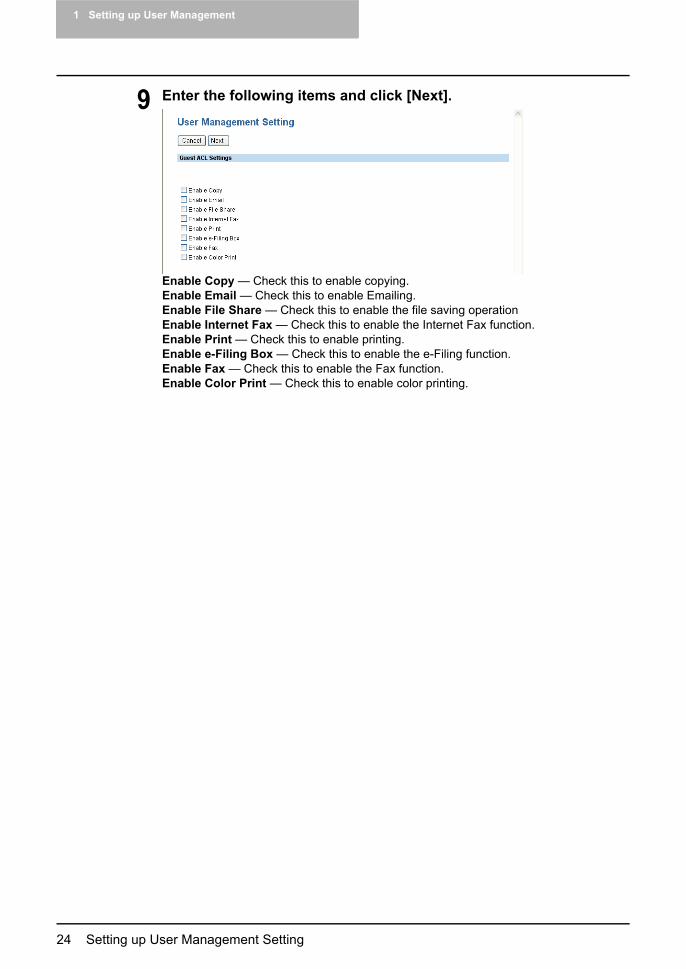
9 Specify the following items and click [Next].
Role Based Access — Select whether the Role Based Access Control is enabled or not.LDAP Server — Select the LDAP server that manages the Role Based Access Control.
When you enable Role Based Access Control, you must export the role based data setting file embedded in this equipment or another equipment of the e-STUDIO3510C series, the e-STUDIO451c series, the e-STUDIO850 series, the e-STUDIO853 series, the e-STUDIO452 series, the e-STUDIO453 series, the e-STUDIO282 series and the e-STUDIO283 series. Then edit this file into a form that required for LDAP server setting and import it into the equipment.The LDAP server to be used for the authentication must be configured in the Direc-tory Service submenu page in the Maintenance menu. When you configure the Active Directory in Windows server, please specify the domain administrator or account operator for the user name.If you checked the “Enable Guest User” checkbox in Step 6, the Guest ACL Settings page is displayed. Go to the next step. If you did not check it, go to Step 11.
10 Enter the following items and click [Next].
Enable Copy — Check this to enable copying. Enable Email — Check this to enable Emailing. Enable File Share — Check this to enable the file saving operation Enable Internet Fax — Check this to enable the Internet Fax function.Enable Print — Check this to enable printing.Enable e-Filing Box — Check this to enable the e-Filing function. Enable Fax — Check this to enable the Fax function. Enable Color Print — Check this to enable color printing.

1 Setting up User Management
20 Setting up User Management Setting
11 Specify how the From Address is set for Scan to Email.
When the User Authentication for Scan to Email is not enabled, these settings are not used for Scan to Email.
Setting Address is 'User Name + @ + Mail Domain Name' — Select this to set the From Address as “User Name@Mail Domain Name”, whose “User Name” is the user name that is entered on the Touch Panel Display for the authentication, and “Mail Domain Name” is the domain name that is entered in the “Mail Domain Name” field.When this is selected, enter the domain name in the “Mail Domain Name” field.Setting Address is searching from 'User Name' of LDAP — Select this to set the From Address as the email address that is searched from the LDAP server.When this is selected, this equipment will search the user name, which is entered on the Touch Panel Display for the authentication, from the records of the attribute type in the LDAP server that you specify in the “LDAP Server” drop down box and “Attribute type of ‘User Name’” field.If the user name is found, this equipment sets the From Address as the email address of the user name registered in the LDAP server.If the user name is not found in the LDAP server, this equipment sets the From Address as the “User Name@Mail Domain Name”, whose “User Name” is the user name that is entered on the Touch Panel Display for the authentication, and “Mail Domain Name” is the domain name that is entered in the “Mail Domain Name” field.When this is selected, select the LDAP server in the “LDAP Server” drop down box, enter the attribute type to search the user name in the “Attribute type of ‘User Name’” field, and the domain name that is used when the user name is not found in the “Mail Domain Name” field.From Address is acquired from Email setting — Select this to set the From Address as the email address set in the Email setting.From Address cannot be edited in Scan to Email — Check this box if you do not want to allow users to edit the From Address.
12 Click [Finish].The Windows Domain Authentication is enabled.

Setting up User Management Setting 21
Enabling LDAP AuthenticationTo enable the LDAP Authentication, you must have LDAP directory service in your network.
Before enabling the LDAP Authentication, please see “Setting up LDAP Authentication Ser-vice” in the Network Administration Guide.To enable LDAP with SSL, please see the description for LDAP Session in TopAccess Guide.
Enabling LDAP Authentication
1 Click the User Management tab and the Authentication menu.
The login page is displayed.
2 Enter the administrator password and click [Login].
The Authentication page is displayed.
3 Click [User Management Setting].
The User Management Setting page opens.
1 Setting up User Management
22 Setting up User Management Setting
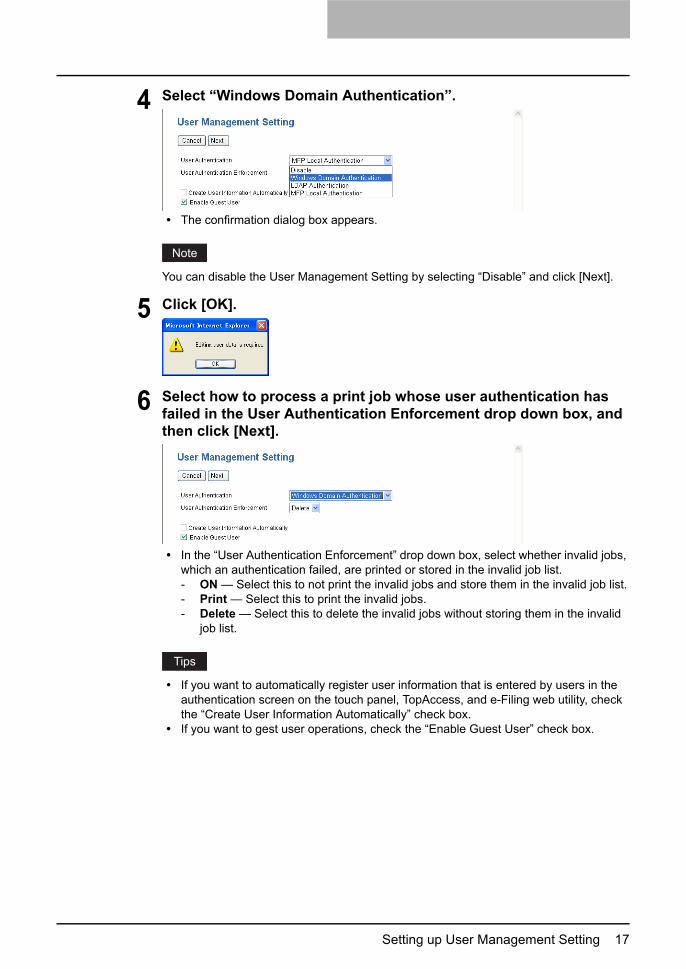
4 Select “LDAP Authentication”.
The confirmation dialog box appears.
You can disable the User Management Setting by selecting “Disable” and click [Next].
5 Click [OK].
6 Select how to process a print job whose user authentication has failed in the User Authentication Enforcement drop down box, and then click [Next].
In the “User Authentication Enforcement” drop down box, select whether invalid jobs, which an authentication failed, are printed or stored in the invalid job list.- ON — Select this to not print the invalid jobs and store them in the invalid job list.- Print — Select this to print the invalid jobs.- Delete — Select this to delete the invalid jobs without storing them in the invalid
job list.
If you want to automatically register user information that is entered by users in the authentication screen on the touch panel, TopAccess, and e-Filing web utility, check the “Create User Information Automatically” check box.If you want to enable the gest user operations, check the “Enable Guest User” check box.

Setting up User Management Setting 23
7 Select the LDAP server to be used for the authentication and select the type of the LDAP server. Then click [Detail Setting].
Windows Server — Select this when LDAP is running on Windows server.LDAP Server (Other than Windows Server) — Select this when the LDAP is running the server other than Windows server. When this is selected, you have to specify the attribute type of ‘User Name’.
The LDAP server to be used for the authentication must be configured in the Directory Service submenu page in the Maintenance menu.
8 Specify the following items and click [Next].
Role Based Access — Select whether the Role Based Access Control is enabled or not.LDAP Server — Select the LDAP server that manages the Role Based Access Control.
When you enable Role Based Access Control, you must export the role based data setting file embedded in this equipment or another equipment of the e-STUDIO3510C series, the e-STUDIO451c series, the e-STUDIO850 series, the e-STUDIO853 series, the e-STUDIO452 series, the e-STUDIO453 series, the e-STUDIO282 series and the e-STUDIO283 series. Then edit this file into a form that required for LDAP server setting and import it into the equipment.The LDAP server to be used for the authentication must be configured in the Direc-tory Service submenu page in the Maintenance menu. When you configure the Active Directory in Windows server, please specify the domain administrator or account operator for the user name.If you checked the “Enable Guest User” checkbox in Step 6, the Guest ACL Settings page is displayed. Go to the next step. If you did not check it, go to Step 10.
1 Setting up User Management
24 Setting up User Management Setting
9 Enter the following items and click [Next].
Enable Copy — Check this to enable copying. Enable Email — Check this to enable Emailing. Enable File Share — Check this to enable the file saving operation Enable Internet Fax — Check this to enable the Internet Fax function.Enable Print — Check this to enable printing.Enable e-Filing Box — Check this to enable the e-Filing function. Enable Fax — Check this to enable the Fax function. Enable Color Print — Check this to enable color printing.

Setting up User Management Setting 25
10 Specify how the From Address is set for Scan to Email.
When the User Authentication for Scan to Email is not enabled, these settings are not used for Scan to Email.
Setting Address is 'User Name + @ + Mail Domain Name' — Select this to set the From Address as “User Name@Mail Domain Name”, whose “User Name” is the user name that is entered on the Touch Panel Display for the authentication, and “Mail Domain Name” is the domain name that is entered in the “Mail Domain Name” field.When this is selected, enter the domain name in the “Mail Domain Name” field.Setting Address is searching from 'User Name' of LDAP — Select this to set the From Address as the email address that is searched from the LDAP server.When this is selected, this equipment will search the user name, which is entered on the Touch Panel Display for the authentication, from the records of the attribute type in the LDAP server that you specify in the “LDAP Server” drop down box and “Attribute type of ‘User Name’” field.If the user name is found, this equipment sets the From Address as the email address of the user name registered in the LDAP server.If the user name is not found in the LDAP server, this equipment sets the From Address as the “User Name@Mail Domain Name”, whose “User Name” is the user name that is entered on the Touch Panel Display for the authentication, and “Mail Domain Name” is the domain name that is entered in the “Mail Domain Name” field.When this is selected, select the LDAP server in the “LDAP Server” drop down box, enter the attribute type to search the user name in the “Attribute type of ‘User Name’” field, and the domain name that is used when the user name is not found in the “Mail Domain Name” field.From Address is acquired from Email setting — Select this to set the From Address as the email address set in the Email setting.From Address cannot be edited in Scan to Email — Check this box if you do not want to allow users to edit the From Address.
11 Click [Finish].The LDAP Authentication is enabled.

1 Setting up User Management
26 Setting up User Management Setting
Enabling MFP Local AuthenticationWhen no network authentication system is configured in your network, you can enable the MFP Local Authentication.The MFP Local Authentication uses the account information that is registered in this equipment for the authentication. Therefore, you must register the user account information first before enabling the MFP Local Authentication. This equipment also manages the counters for each user if the MFP Local Authentication is enabled.
P.28 “Creating or modifying user information”After you register the user information, enable the MFP Local Authentication.
P.26 “Enabling MFP Local Authentication”
Enabling MFP Local Authentication
1 Click the User Management tab and the Authentication menu.
The login page is displayed.
2 Enter the administrator password and click [Login].
The Authentication page is displayed.
3 Click [User Management Setting].
The User Management Setting page opens.

Setting up User Management Setting 27
4 Select “MFP Local Authentication” in the “User Authentication” drop down box, and select how invalid jobs are processed in the “User Authentication Enforcement” drop down box. Then click [Next].
The MFP Local Authentication is enabled.In the “User Authentication Enforcement” drop down box, select whether invalid jobs, which an authentication failed, are printed or stored in the invalid job list.- ON — Select this to not print the invalid jobs and store them in the invalid job list.- Print — Select this to print the invalid jobs.- Delete — Select this to delete the invalid jobs without storing them in the invalid
job list.
You can disable the User Management Setting by selecting “Disable” and click [Next].If you want to gest user operations, check the “Enable Guest User” check box. Go to the next step.
5 Enter the following items and click [Next].
Enable Copy — Check this to enable copying. Enable Email — Check this to enable Emailing. Enable File Share — Check this to enable the file saving operation Enable Internet Fax — Check this to enable the Internet Fax function.Enable Print — Check this to enable printing.Enable e-Filing Box — Check this to enable the e-Filing function. Enable Fax — Check this to enable the Fax function. Enable Color Print — Check this to enable color printing.
1 Setting up User Management
28 Setting up User Management Setting
Managing User InformationAfter enabling the User Management Setting, you must register the user information In the User Confirm/Create/Modify page.In this page, you can do:
P.28 “Creating or modifying user information” P.31 “Deleting user information” P.32 “Deleting all user information” P.33 “Resetting the counters for specific users” P.35 “Resetting the counters for all users” P.37 “Exporting User Information and Counters” P.40 “Importing User Information”
The registered users can view the own user information in the User Confirm/Create/Modify page. Users can also change the own password (only when the Local MFP Authentication is enabled).
P.43 “Viewing the own user information by a user” P.44 “Changing a password by a user (Local MFP Authentication only)”
When the Windows Domain or LDAP Authentication is used and the “Create User Informa-tion Automatically” option is enabled when enabling the User Management Setting, the user information can be registered automatically in the equipment when a user enters the user name and password in the User Authentication screen and then enter the department code.There is “Undefined” user information that is registered as the default. This user information is used to count the Invalid jobs. You can view the counter information of this user informa-tion, but cannot modify or delete this default user information.
Creating or modifying user information
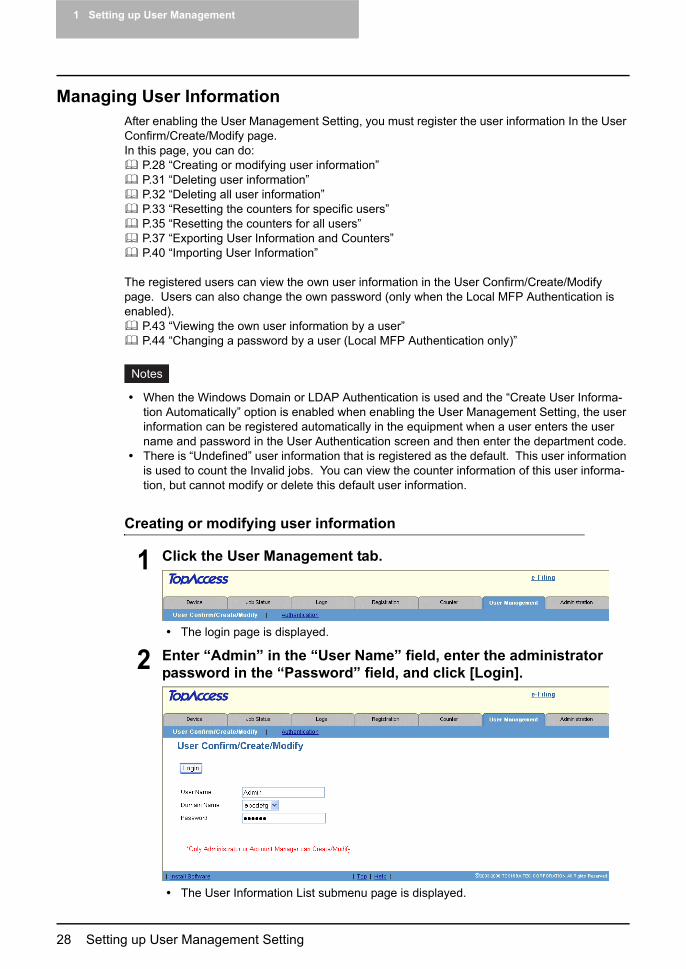
1 Click the User Management tab.
The login page is displayed.
2 Enter “Admin” in the “User Name” field, enter the administrator password in the “Password” field, and click [Login].
The User Information List submenu page is displayed.
Setting up User Management Setting 29
Users can also login using the user name, domain name (required only when Win-dows Domain Authentication is enabled), and password that has been set as the Account Manager in the User Information.You do not have to select the “Domain Name” field when you log in as the Administra-tor.
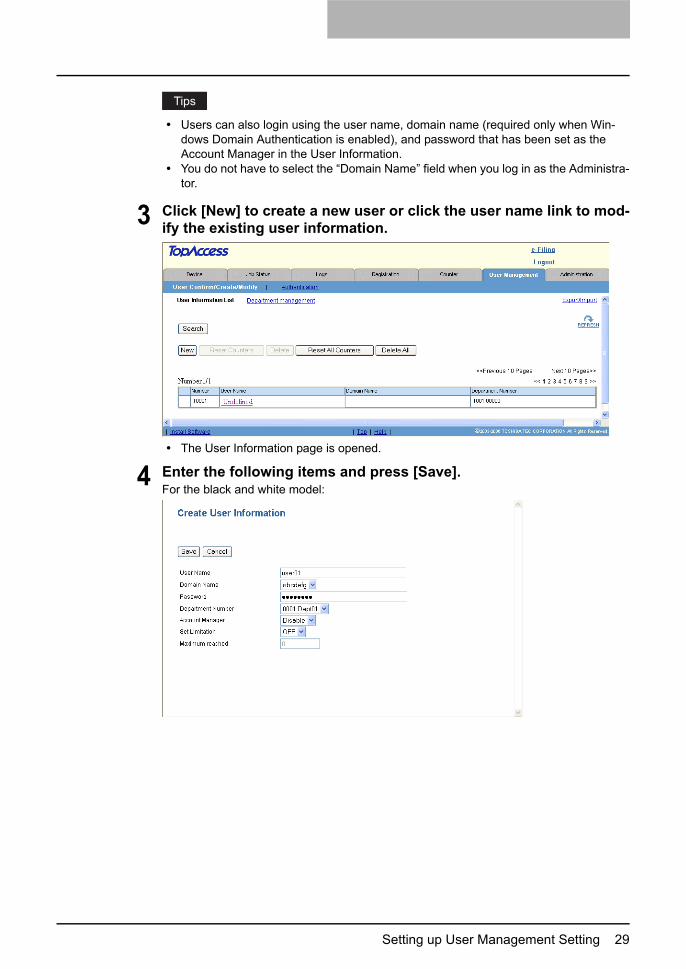
3 Click [New] to create a new user or click the user name link to mod-ify the existing user information.
The User Information page is opened.
4 Enter the following items and press [Save].For the black and white model:
1 Setting up User Management
30 Setting up User Management Setting
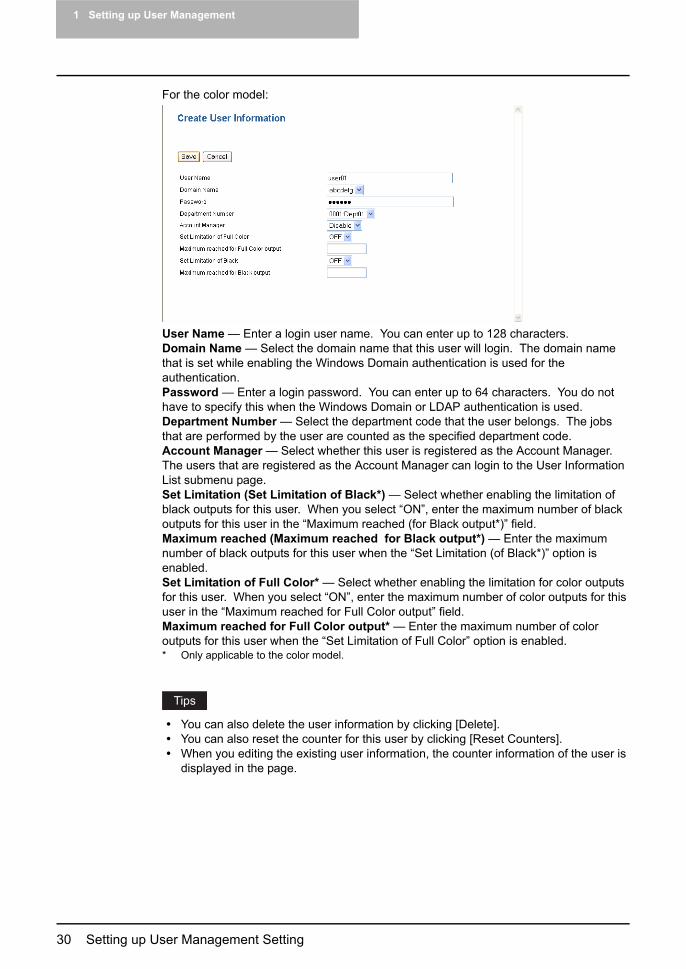
For the color model:
User Name — Enter a login user name. You can enter up to 128 characters.Domain Name — Select the domain name that this user will login. The domain name that is set while enabling the Windows Domain authentication is used for the authentication.Password — Enter a login password. You can enter up to 64 characters. You do not have to specify this when the Windows Domain or LDAP authentication is used.Department Number — Select the department code that the user belongs. The jobs that are performed by the user are counted as the specified department code.Account Manager — Select whether this user is registered as the Account Manager. The users that are registered as the Account Manager can login to the User Information List submenu page.Set Limitation (Set Limitation of Black*) — Select whether enabling the limitation of black outputs for this user. When you select “ON”, enter the maximum number of black outputs for this user in the “Maximum reached (for Black output*)” field.Maximum reached (Maximum reached for Black output*) — Enter the maximum number of black outputs for this user when the “Set Limitation (of Black*)” option is enabled.Set Limitation of Full Color* — Select whether enabling the limitation for color outputs for this user. When you select “ON”, enter the maximum number of color outputs for this user in the “Maximum reached for Full Color output” field.Maximum reached for Full Color output* — Enter the maximum number of color outputs for this user when the “Set Limitation of Full Color” option is enabled.* Only applicable to the color model.
You can also delete the user information by clicking [Delete].You can also reset the counter for this user by clicking [Reset Counters].When you editing the existing user information, the counter information of the user is displayed in the page.

Setting up User Management Setting 31
Deleting user information
When the user’s jobs are in progress or the user currently log in the touch panel, the user information cannot be deleted.The “Undefined” user information cannot be deleted.
1 Click the User Management tab.
The login page is displayed.
2 Enter “Admin” in the “User Name” field, enter the administrator password in the “Password” field, and click [Login].
The User Information List submenu page is displayed.
Users can also login using the user name, domain name (required only when Win-dows Domain Authentication is enabled), and password that has been set as the Account Manager in the User Information.You do not have to select the “Domain Name” field when you log in as the Administrator.
3 Check the boxes of users that you want to delete and click [Delete].
The confirmation dialog box appears.

1 Setting up User Management
32 Setting up User Management Setting
4 Click [OK] to delete the user information.
The selected users are deleted.
Deleting all user information
When the user’s jobs are in progress or the user currently log in the touch panel, the user information cannot be deleted.The “Undefined” user information cannot be deleted.
1 Click the User Management tab.
The login page is displayed.
2 Enter “Admin” in the “User Name” field, enter the administrator password in the “Password” field, and click [Login].
The User Information List submenu page is displayed.
Users can also login using the user name, domain name (required only when Win-dows Domain Authentication is enabled), and password that has been set as the Account Manager in the User Information.You do not have to select the “Domain Name” field when you log in as the Administra-tor.

Setting up User Management Setting 33
3 Click [Delete All].
The confirmation dialog box appears.
4 Click [OK] to delete all user information.
The counters of selected users are cleared.
Resetting the counters for specific users
When the user’s jobs are in progress or the user currently log in the touch panel, you cannot reset the user’s counters.
1 Click the User Management tab.
The login page is displayed.

1 Setting up User Management
34 Setting up User Management Setting
2 Enter “Admin” in the “User Name” field, enter the administrator password in the “Password” field, and click [Login].
The User Information List submenu page is displayed.
Users can also login using the user name, domain name (required only when Win-dows Domain Authentication is enabled), and password that has been set as the Account Manager in the User Information.You do not have to select the “Domain Name” field when you log in as the Administra-tor.
3 Check the boxes of users that you want to reset counters and click [Reset Counters].
The confirmation dialog box appears.
4 Click [OK] to reset the counters.
The counters of selected users are cleared.

Setting up User Management Setting 35
Resetting the counters for all users
When the user’s jobs are in progress or the user currently log in the touch panel, you cannot reset the user’s counters.
1 Click the User Management tab.
The login page is displayed.
2 Enter “Admin” in the “User Name” field, enter the administrator password in the “Password” field, and click [Login].
The User Information List submenu page is displayed.
Users can also login using the user name, domain name (required only when Win-dows Domain Authentication is enabled), and password that has been set as the Account Manager in the User Information.You do not have to select the “Domain Name” field when you log in as the Administra-tor.
1 Setting up User Management
36 Setting up User Management Setting
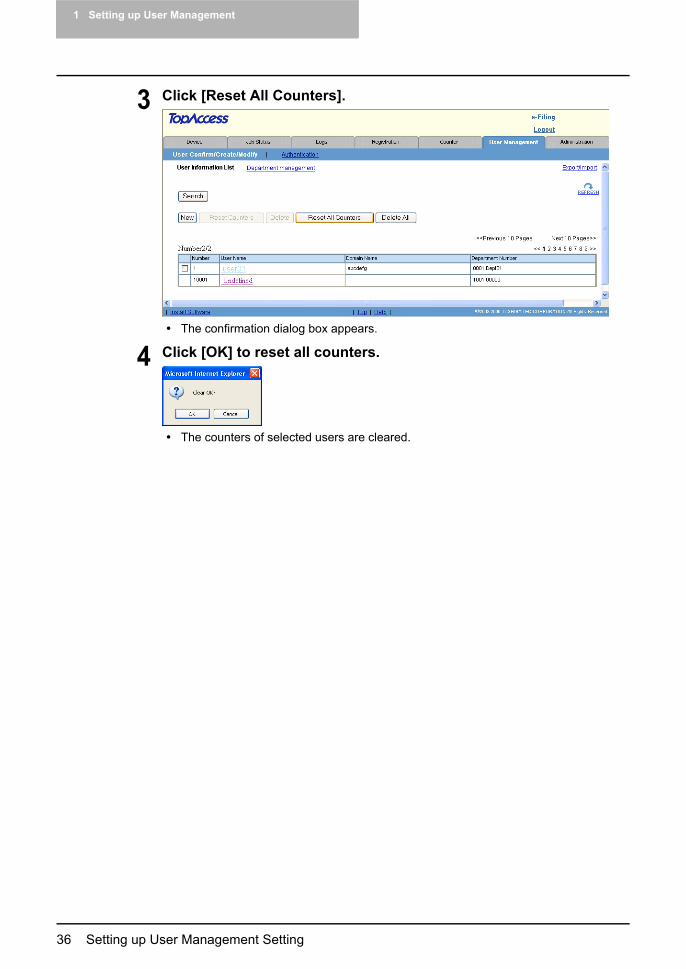
3 Click [Reset All Counters].
The confirmation dialog box appears.
4 Click [OK] to reset all counters.
The counters of selected users are cleared.
Setting up User Management Setting 37
Exporting User Information and Counters
The user information can be exported as a CSV file for use in other equipment.
1 Click the User Management tab.
The login page is displayed.
2 Enter “Admin” in the “User Name” field, enter the administrator password in the “Password” field, and click [Login].
The User Information List submenu page is displayed.
Users can also login using the user name, domain name (required only when Win-dows Domain Authentication is enabled), and password that has been set as the Account Manager in the User Information.You do not have to select the “Domain Name” field when you log in as the Administra-tor.
3 Click the “Export/Import” link at the upper right of the page.
The Export/Import window appears.

1 Setting up User Management
38 Setting up User Management Setting
4 Click [Create New File] of which you want to export.
Export (Small/Large Counter) — Click [Create New File] of this area to export the counter information only.Export (User Information) — Click [Create New File] of this area to export the user information only.Export (User Information + All Counter) — Click [Create New File] of this area to export the counter information and user information.
If you previously exported user information data, the exported file link and information are displayed in the page. You can click the link to save the previously exported file.
5 Right-click the File Name link and select [Save Target As...].
The Save As dialog box appears.
If the File Name link is not displayed or not updated, close the window and try again. Creating a new file may take a few minutes.
Setting up User Management Setting 39
6 Select the file location and select “All Files” in the “Save as type” drop down box. Then click [Save].
The CSV file that contains the user information data is saved in a selected location.

1 Setting up User Management
40 Setting up User Management Setting
Importing User Information
You can import user information from a file that has been exported from another device such as e-STUDIO3510c Series, e-STUDIO451c Series, e-STUDIO850 Series, e-STUDIO853 Series, e-STUDIO452 Series, e-STUDIO453 Series, e-STUDIO282 Series and e-STUDIO283 Series. The imported file must be the comma delimited CSV file and created in the suitable format for the user information data.
When the user information data is imported, the old data will be cleared and overwritten with the new data.Before importing the user information data, please confirm that there is no print job, no scan job, and no fax job. The user information data cannot be imported if there are any jobs that have been processed. If importing the user information data takes a long time, perform restoring the data after the equipment turns in a Sleep/Auto Shut Off mode. It may take a long time when there are too many user information or the data includes the too long user name or domain name.Before importing the CSV file, please confirm that all required data for each item is entered in the CSV file. The required items vary depending on the authentication type.* Yes = Required, No = Not Required
* Only applicable to the color model.
When user sends a print job while importing the user information, the alert message will be displayed to tell that the equipment cannot receive the print job. When this equipment receives a fax while importing the user information, this equipment cannot start receiving the fax so that it continues ringing.
Items Windows Domain LDAP Local Supplements
UserId Yes Yes Yes
Username Yes Yes Yes
Password No No Yes The value must be deleted for Win-dows Domain or LDAP.
Domainname Yes No No The value must be deleted for LDAP or Local.
Department Code Yes Yes Yes
Access ManagerNo No No
When the value is blank, the value is set to “0”.0 = Disable, 1 = Enable
RolebaseNo No No
When the value is blank, the value is set to “0”.0 = Disable, 1 = Enable
Set Limitation (Set Limitation of Black*) No No No
When the value is blank or invalid value is entered, the value is set to “OFF”.
Maximum reached (Maximum reached for Black output*)
No No No
Set limitation of full color* No No No
When the value is blank or invalid value is entered, the value is set to “OFF”.
Maximum reached for Full Color output* No No No
Setting up User Management Setting 41
1 Click the User Management tab.
The login page is displayed.
2 Enter “Admin” in the “User Name” field, enter the administrator password in the “Password” field, and click [Login].
The User Information List submenu page is displayed.
Users can also login using the user name, domain name (required only when Win-dows Domain Authentication is enabled), and password that has been set as the Account Manager in the User Information.You do not have to select the “Domain Name” field when you log in as the Administra-tor.
3 Click the “Export/Import” link at the upper right of the page.
The Export/Import window appears.

1 Setting up User Management
42 Setting up User Management Setting
4 Click Import menu and click [Browse...].
The Choose file dialog box appears.
5 Select the CSV file that contains user information data and click [Open].
6 Click [Import].
The data is imported to the User Information list page.
Setting up User Management Setting 43
Viewing the own user information by a user
Users can view the own user information by login the User Confirm/Create/Modify page. When the Role Based Access Control is enabled, users can also confirm the functions to be allowed.
1 Click the User Management tab.
The login page is displayed.
2 Enter your user name in the “User Name” field, select a domain name (required only when Windows Domain Authentication is enabled), enter the your password in the “Password” field, and click [Login].
3 The User Information page is displayed.

1 Setting up User Management
44 Setting up User Management Setting
Changing a password by a user (Local MFP Authentication only)
When the Local MFP Authentication is enabled, not only an administrator or account managers but also each registered user can change the password himself.
1 Click the User Management tab.
The login page is displayed.
2 Enter your user name in the “User Name” field, enter the your pass-word in the “Password” field, and click [Login].
The User Information page is displayed.
3 Click [Change Password].
The Change Password window appears.

Setting up User Management Setting 45
4 Enter the following items and click [Save].
Old Password — Enter your login password.New Password — Enter a new login password. You can enter up to 64 characters.Retype Password — Enter a new login password again.
5 Click [OK].
The password is changed.

1 Setting up User Management
46 Setting up User Management Setting
How to Login to Touch PanelIn the user management function, the users of the equipment can be limited or the past record of each user can be managed. When the equipment is managed under this function, turn the power of the equipment ON and enter the information required (e.g. user name, password) to use the equipment. The menu for entering user information also appears when you pressed the [ACCESS] button on the control panel or automatic function clear has worked. Enter the infor-mation following the procedure below.
If guest user is enabled in the user management, the [GUEST] button is displayed on the touch panel. Press the [GUEST] button to login as a guest user. For the types of functions available, consult the administrator.
MFP local Authentication, LDAP Authentication
Windows Domain Authentication
1 The menu for user authentication appears.MFP local Authentication, LDAP Authentication
Setting up User Management Setting 47
Windows Domain Authentication
The domain name previously set by the network administrator is displayed in [DOMAIN].
If the preferred domain name is not displayed in [DOMAIN], press the [DOMAIN] button and then select the preferred domain name.
2 Press the [USER NAME] button.
3 Enter the user name (maximum 128 letters) and then press the [ENTER] button.

1 Setting up User Management
48 Setting up User Management Setting
4 Press the [PASSWORD] button.
5 Enter the password (maximum 64 letters) and then press the [ENTER] button.
6 Press the [ENTER] button.
The menu will switch and the equipment will be ready to be used.If the user information is incorrectly entered, the menu will not switch. In this case, press the [FUNCTION CLEAR] button and then enter it again.
When the Windows Domain or LDAP authentication is used, the Entering the Depart-ment Code screen will be displayed if the entered user information is not registered in the equipment. In that case, the user information will be automatically registered when you enter the department code.
Setting up User Management Setting 49
Displaying the available number of copiesFor the Multifunctional Digital Systems:How many copies the user and the department have remaining is displayed, respectively.The number appears for 5 seconds on the upper right of the screen.USER: Available number of copies for the userDEPARTMENT: Available number of copies for the department
The available number of copies is displayed only when both the department and user manage-ment functions are enabled.
For the color model:The amount is determined by how many copies the user ( ) or the department ( ) has remaining and the smaller of the two numbers is displayed.The number appears for 5 seconds on the upper right of the screen.COLOR: Available number of copies for color copyingBLACK: Available number of copies for black-and-white copying
The available number of copies is displayed only when both the department and user manage-ment functions are enabled.
The display differs depending on the management setting of this equipment.
When copying is finishedWhen you finish all operations, press the [ACCESS] button to prevent unauthorized use of the equipment. The display returns to the one for entering user information.
1 Setting up User Management
50 Setting up User Authentication for Scan to E-mail
Setting up User Authentication for Scan to E-mail
When the User Authentication for Scan to Email is enabled, users must enter the user name and password before performing Scan to E-mail.You can select either the SMTP or LDAP for User Authentication for Scan to Email.
SMTP AuthenticationThis equipment can be managed using the SMTP Authentication.When this is configured, users must enter the user name and password that is registered in the SMTP server to perform Scan to E-mail on the Control Panel of this equipment.
P.50 “Enabling User Authentication for Scan to Email (SMTP)”LDAP AuthenticationWhen your network manages the network users using the LDAP, this equipment can be managed using the LDAP Authentication.When this is configured, users must enter the user name and password that is registered in the LDAP server to perform Scan to E-mail on the Control Panel of this equipment.
P.53 “Enabling User Authentication for Scan to Email (LDAP)”
When the User Authentication for Scan to Email is enabled, the Email Notification may not be sent to the administrator. Please make sure to set the login name and password in the SMTP Client settings.
Enabling User Authentication for Scan to Email (SMTP)
1 Click the User Management tab and the Authentication menu.
The login page is displayed.
2 Enter the administrator password and click [Login].
The Authentication page is displayed.
Setting up User Authentication for Scan to E-mail 51
3 Click [User Authentication for Scan to Email].
The User Authentication for Scan to Email page opens.
4 Select “SMTP” in the “Method” drop down box and click [Next].
This equipment can set the authentication for Scan to Email, but cannot set the authentication for Internet Fax transmission. If you do not want to allow users to per-form the Internet Fax transmission, check the “Internet Fax Not Allowed” check box. When you check on this box, users no longer perform the Internet Fax transmission.When you want to disable the User Authentication for Scan to Email, select “Disable” in the “Method” and click [Next].
5 Enter the IP address or FQDN (Fully Qualified Domain Name) of the SMTP server and select the authentication type in the “Authentica-tion” drop down box. Then click [Next].
If you have set the SMTP Client settings in the Network setup page, the setting values of the SMTP Client settings in the Network setup page are reflected in these settings.

1 Setting up User Management
52 Setting up User Authentication for Scan to E-mail
6 Specify how the From Address is set for Scan to Email.
Setting Address is 'User Name + @ + Mail Domain Name' — Select this to set the From Address as “User Name@Mail Domain Name”, whose “User Name” is the user name that is entered on the Touch Panel Display for the authentication, and “Mail Domain Name” is the domain name that is entered in the “Mail Domain Name” field.When this is selected, enter the domain name in the “Mail Domain Name” field.Setting Address is searching from 'User Name' of LDAP — Select this to set the From Address as the email address that is searched from the LDAP server.When this is selected, this equipment will search the user name, which is entered on the Touch Panel Display for the authentication, from the records of the attribute type in the LDAP server that you specify in the “LDAP Server” drop down box and “Attribute type of ‘User Name’” field.If the user name is found, this equipment sets the From Address as the email address of the user name registered in the LDAP server.If the user name is not found in the LDAP server, this equipment sets the From Address as the “User Name@Mail Domain Name”, whose “User Name” is the user name that is entered on the Touch Panel Display for the authentication, and “Mail Domain Name” is the domain name that is entered in the “Mail Domain Name” field.When this is selected, select the LDAP server in the “LDAP Server” drop down box, enter the attribute type to search the user name in the “Attribute type of ‘User Name’” field, and the domain name that is used when the user name is not found in the “Mail Domain Name” field.From Address is acquired from Email setting — Select this to set the From Address as the email address set in the Email setting.From Address cannot be edited in Scan to Email — Check this box if you do not want to allow users to edit the From Address.
7 Click [Finish].The User Authentication for Scan to Email is enabled.
Setting up User Authentication for Scan to E-mail 53
Enabling User Authentication for Scan to Email (LDAP)
1 Click the User Management tab and the Authentication menu.
The login page is displayed.
2 Enter the administrator password and click [Login].
The Authentication page is displayed.
3 Click [User Authentication for Scan to Email].
The User Authentication for Scan to Email page opens.
1 Setting up User Management
54 Setting up User Authentication for Scan to E-mail
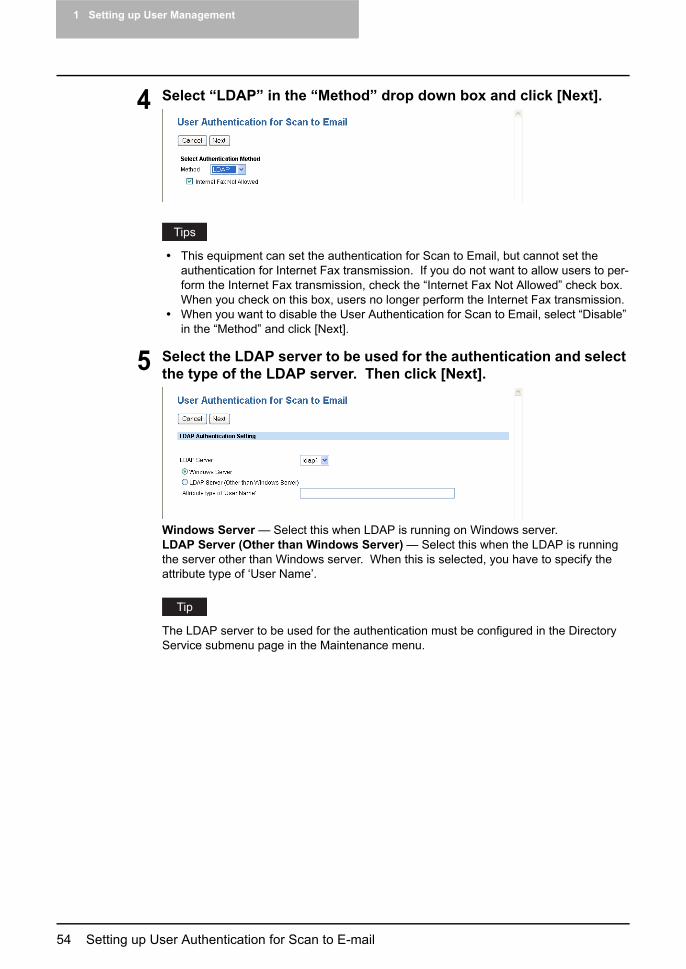
4 Select “LDAP” in the “Method” drop down box and click [Next].
This equipment can set the authentication for Scan to Email, but cannot set the authentication for Internet Fax transmission. If you do not want to allow users to per-form the Internet Fax transmission, check the “Internet Fax Not Allowed” check box. When you check on this box, users no longer perform the Internet Fax transmission.When you want to disable the User Authentication for Scan to Email, select “Disable” in the “Method” and click [Next].
5 Select the LDAP server to be used for the authentication and select the type of the LDAP server. Then click [Next].
Windows Server — Select this when LDAP is running on Windows server.LDAP Server (Other than Windows Server) — Select this when the LDAP is running the server other than Windows server. When this is selected, you have to specify the attribute type of ‘User Name’.
The LDAP server to be used for the authentication must be configured in the Directory Service submenu page in the Maintenance menu.
Setting up User Authentication for Scan to E-mail 55
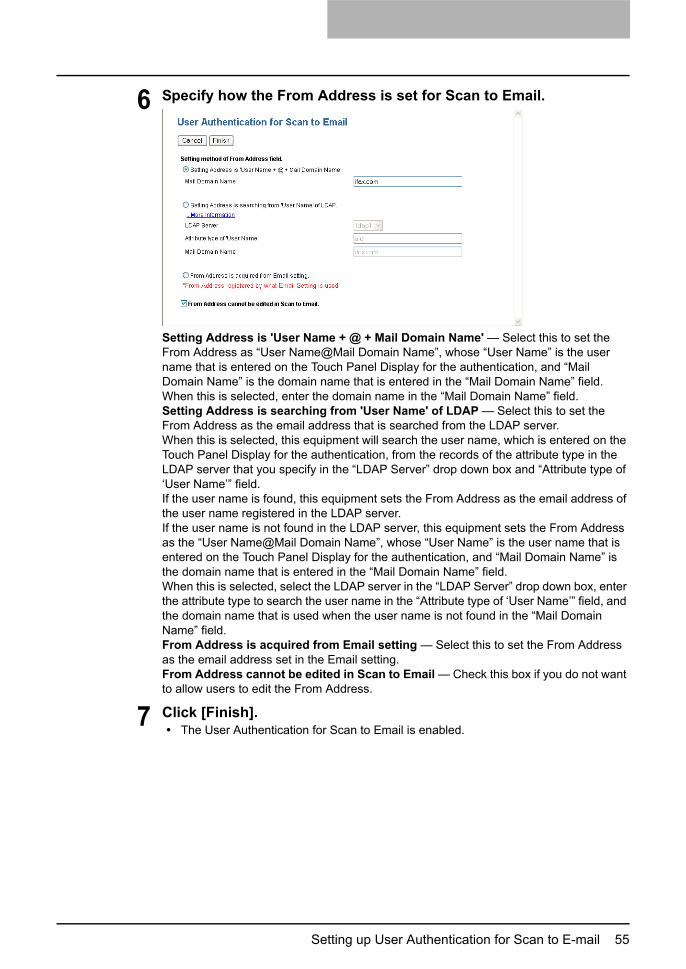
6 Specify how the From Address is set for Scan to Email.
Setting Address is 'User Name + @ + Mail Domain Name' — Select this to set the From Address as “User Name@Mail Domain Name”, whose “User Name” is the user name that is entered on the Touch Panel Display for the authentication, and “Mail Domain Name” is the domain name that is entered in the “Mail Domain Name” field.When this is selected, enter the domain name in the “Mail Domain Name” field.Setting Address is searching from 'User Name' of LDAP — Select this to set the From Address as the email address that is searched from the LDAP server.When this is selected, this equipment will search the user name, which is entered on the Touch Panel Display for the authentication, from the records of the attribute type in the LDAP server that you specify in the “LDAP Server” drop down box and “Attribute type of ‘User Name’” field.If the user name is found, this equipment sets the From Address as the email address of the user name registered in the LDAP server.If the user name is not found in the LDAP server, this equipment sets the From Address as the “User Name@Mail Domain Name”, whose “User Name” is the user name that is entered on the Touch Panel Display for the authentication, and “Mail Domain Name” is the domain name that is entered in the “Mail Domain Name” field.When this is selected, select the LDAP server in the “LDAP Server” drop down box, enter the attribute type to search the user name in the “Attribute type of ‘User Name’” field, and the domain name that is used when the user name is not found in the “Mail Domain Name” field.From Address is acquired from Email setting — Select this to set the From Address as the email address set in the Email setting.From Address cannot be edited in Scan to Email — Check this box if you do not want to allow users to edit the From Address.
7 Click [Finish].The User Authentication for Scan to Email is enabled.


INDEX 57
INDEX
AAccount Manager ........................................ 30
BBDC .......................................................... 18
DDepartment Code ....................................... 13Department Code Enforcement .................... 13Department Number .................................... 30Domain Name ............................................ 18
EEnable Color Print .......................... 19, 24, 27Enable Copy ................................. 19, 24, 27Enable e-Filing Box ........................ 19, 24, 27Enable Email ................................. 19, 24, 27Enable Fax .................................... 19, 24, 27Enable File Share .......................... 19, 24, 27Enable Internet Fax ........................ 19, 24, 27Enable Print .................................. 19, 24, 27
LLDAP Authentication ................................... 15LDAP authentication .................................... 46
MMaximum reached ...................................... 30Maximum reached for Black output ............... 30Maximum reached for Full Color output ......... 30MFP Local Authentication ............................ 15MFP local Authentication ............................. 46
PPDC .......................................................... 18
RRole Based Access ...............................19, 23
SSet Limitation ............................................. 30Set Limitation of Black ................................. 30Set Limitation of Full Color ........................... 30
UUser Authentication Enforcement .................. 27User Authentication for Scan to Email .....51, 53User Management Setting .............. 16, 21, 26
WWindows Domain Authentication ............15, 47


DP-2050/2340/2840DP-3540/4540
DP-5200/6000/7200/8500FC-281C/351C/451C
OME07010100
2-17-2, HIGASHIGOTANDA, SHINAGAWA-KU, TOKYO, 141-8664, JAPAN
MULTIFUNCTIONAL DIGITAL SYSTEMSUser Management Guide
©2007 TOSHIBA TEC CORPORATION All rights reservedR070720E1100-TTEC
2007-10