multifunctional digital systems operator's manual...
TRANSCRIPT

MULTIFUNCTIONAL DIGITAL SYSTEMS
Operator's Manual for Wireless LAN Module
GN-1050

©2008, 2009 TOSHIBA TEC CORPORATION All rights reservedUnder the copyright laws, this manual cannot be reproduced in any form without prior written permission of TTEC. No patent liability is assumed, however, with respect to the use of the information contained herein.

Preface 1
Preface
Thank you for purchasing TOSHIBA Multifunctional Digital Systems or Multifunctional Digital Color Systems. This manual explains the instructions for Wireless LAN Module GN-1050. Read this manual before using your Multifunctional Digital Systems or Multifunctional Digital Color Systems. Keep this manual within easy reach, and use it to configure an environment that makes best use of the e-STUDIO’s functions.
How to read this manual
Symbols in this manualIn this manual, some important items are described with the symbols shown below. Be sure to read these items before using this equipment.
Other than the above, this manual also describes information that may be useful for the operation of this equipment with the following signage:
Model and series names in this manualIn this manual, each model name is replaced with the series name as shown below.
Explanation for control panel and touch panelIllustrations for the control panel and the touch panel shown in this manual are those of the e-STUDIO455 Series. The control panel and the touch panel, including buttons and their functions, are common to all of the e-STUDIO4520C Series, e-STUDIO455 Series and e-STUDIO855 Series. The shape and location of some buttons on the control panel and the dimension of the touch panel of the e-STUDIO6530C Series differ from those of other series, however, the names and functions of the buttons and parts are the same.The details on the touch panel menus may differ depending on the operating environment such as whether options are installed.The illustration screens used in this manual are for paper in the A/B format. If you use paper in the LT format, the display or the order of buttons in the illustrations may differ from that of your equipment.
Indicates a potentially hazardous situation which, if not avoided, could result in death, serious injury, or serious damage, or fire in the equipment or surrounding objects.
Indicates a potentially hazardous situation which, if not avoided, may result in minor or moderate injury, partial damage to the equipment or surrounding objects, or loss of data.
Indicates information to which you should pay attention when operating the equipment.
Describes handy information that is useful to know when operating the equipment.
Pages describing items related to what you are currently doing. See these pages as required.
Model name Series name in this manuale-STUDIO5520C/6520C/6530C e-STUDIO6530C Series
e-STUDIO2020C/2330C/2820C/2830C/3520C/3530C/4520C e-STUDIO4520C Series
e-STUDIO205L/255/305/355/455 e-STUDIO455 Series
e-STUDIO555/655/755/855 e-STUDIO855 Series

2 Preface
TrademarksThe official name of Windows 2000 is Microsoft Windows 2000 Operating System.The official name of Windows XP is Microsoft Windows XP Operating System.The official name of Windows Vista is Microsoft Windows Vista Operating System.The official name of Windows 7 is Microsoft Windows 7 Operating System.The official name of Windows Server 2003 is Microsoft Windows Server 2003 Operating System.The official name of Windows Server 2008 is Microsoft Windows Server 2008 Operating System.Microsoft, Windows, Windows NT, and the brand names and product names of other Microsoft products are trademarks of Microsoft Corporation in the US and other countries.Apple, AppleTalk, Macintosh, Mac, Mac OS, Safari, and TrueType are trademarks of Apple Inc. in the US and other countries.Adobe, Adobe Acrobat, Adobe Reader, Adobe Acrobat Reader, and PostScript are trademarks of Adobe Systems Incorporated.Mozilla, Firefox and Firefox logo are trademarks or registered trademarks of Mozilla Foundation in the U.S. and other countries.IBM, AT and AIX are trademarks of International Business Machines Corporation.NOVELL, NetWare, and NDS are trademarks of Novell, Inc.TopAccess is a trademark of Toshiba Tec Corporation.Other company names and product names in this manual are the trademarks of their respective companies.

Precautions 3
Precautions
Precautions for UseThis product is classified as “wireless equipment for stations of low-power data transmissions systems” under the Wireless Telegraphy Act, and does not require a radio transmission license. The law prohibits modification of the interior of this product.
About TOSHIBA Wireless SolutionThe Wireless LAN Module is a wireless network Module that complies with the IEEE 802.11 standard on wireless LANs (Revision B/G). The Wireless LAN Module supports data rates up to 54 Mbit/s.
Wi-Fi (Wireless Fidelity) certified by the Wi-Fi Alliance. This means that your Wireless hardware will communicate with other vendors’ IEEE 802.11 B/G compliant wireless LAN product.Fully compatible with any of other wireless LAN system based on Direct Sequence Spread Spectrum (DSSS)/Orthogonal Frequency Division Multiplexing (OFDM) radio technology that complies with the IEEE 802.11 standard on wireless LANs (Revision B/G).
Wireless InteroperabilityThe TOSHIBA Wireless LAN products are designed to be interoperable with any Wireless LAN products that is based on Direct Sequence Spread Spectrum (DSSS)/Orthogonal Frequency Division Multiplexing (OFDM) radio technology, and is compliant to:
The IEEE 802.11 Standard on Wireless LANs (Revision B/G), as defined and approved by the Institute of Electrical and Electronics Engineers.The Wireless Fidelity (Wi-Fi) certification as defined by the Wi-Fi Alliance.
Wireless LAN and your HealthWireless LAN products, like other radio devices, emit radio frequency electromagnetic energy. The level of energy emitted by Wireless LAN devices however is far much less than the electromagnetic energy emitted by wireless devices like for example mobile phones.Because Wireless LAN products operate within the guidelines found in radio frequency safety standards and recommendations, TOSHIBA believes Wireless LAN is safe for use by consumers. These standards and recommendations reflect the consensus of the scientific community and result from deliberations of panels and committees of scientists who continually review and interpret the extensive research literature.In some situations or environments, the use of Wireless LAN may be restricted by the proprietor of the building or responsible representatives of the organization. These situations may for example include:
Using the Wireless LAN equipment on board of aeroplanes, orIn any other environment where the risk of interference to other devices or services is perceived or identified as harmful.
If you are uncertain of the policy that applies on the use of wireless devices in a specific organization or environment (e.g. airports), you are encouraged to ask for authorization to use the Wireless LAN device prior to turning on the equipment.
Safety Instruction for Wireless ProductsIf your computer has wireless function, all safety instructions must be read carefully and must be fully understood, before attempting to use our Wireless Products.This manual contains the safety instructions that must be observed in order to avoid potential hazards that could result in personal injuries or could damage your Wireless Products.
Limitation of LiabilityFor damage occurring due to an earthquake or thunder, fire beyond our responsibility, action by third party, other accident, intentional or accidental mistakes by a user, misuse, use under abnormal conditions, we do not take any responsibility.For incidental damage (loss of business profit, business interruption, etc.) occurring due to use or disability of the product, we do not take any responsibility.For damage occurring due to non observance of the contents described in the instruction manual, we do not take any responsibility.For damage occurring due to erroneous operation or hang up caused by use in combination with products not related to our company, we do not take any responsibility.

4 Precautions
WARNING
NOTEDo not use the product in the following places:Places near a microwave oven where a magnetic field generates and places where static electricity or radio interference generates.Depending on environment, radio waves can not reach to the product.
Bluetooth™ and Wireless LAN devices operate within the same radio frequency range and may interfere with one another. If you use Bluetooth™ and Wireless LAN devices simultaneously, you may occasionally experience a less than optimal network performance or even lose your network connection.
Keep this product away from a cardiac pacemaker at least 22 cm.Radio waves can potentially affect cardiac pacemaker operation, thereby causing respiratory troubles.Do not use the product inside a medical facility or near medical electric equipment.Radio waves can potentially affect medical electric equipment, thereby causing an accident due to malfunction.Do not use the product near an automatic door, fire alarm or other automatic control equipment.Radio waves can potentially affect automatic control equipment, thereby causing an accident due to malfunction.Monitor possible radio interference or other troubles to other equipment while the product is used. If any effect is caused, do not use the product.Otherwise, radio waves can potentially affect other equipment, thereby causing an accident due to malfunction.

Precautions 5
Regulatory InformationThe TOSHIBA Wireless LAN must be installed and used in strict accordance with the manufacturer’s instructions as described in the user documentation that comes with the product. This device complies with the following radio frequency and safety standards.
Standards below are certified under the operation with the provided antenna (GN-3010). Do not use this product with other antennas.
Canada - Industry Canada (IC)This device complies with RSS 210 of Industry Canada.Operation is subject to the following two conditions: (1) this device may not cause interference, and (2) this device must accept any interference, including interference that may cause undesired operation of this device.L’utilisation de ce dispositif est autorisée seulement aux conditions suivantes: (1) il ne doit pas produire de brouillage et (2) l’utilisateur du dispositif doit étre prét à accepter tout brouillage radioélectrique reçu, même si ce brouillage est susceptible de compromettre le fonctionnement du dispositif.
The term “IC” before the equipment certification number only signifies that the Industry Canada technical specifications were met.
Europe - EU Declaration of ConformityThis device complies with the essential requirements of the R&TTE Directive 1999/5/EC with essential test suites as per standards:
EN 300 328:Electromagnetic compatibility and Radio Spectrum Matters (ERM); Wideband Transmission systems; Data transmission equipment operating in the 2,4 GHz ISM band and using spread spectrum modulation techniques
EN 301 489-17:Electromagnetic compatibility and Radio Spectrum Matters (ERM); ElectroMagnetic Compatibility (EMC) standard for radio equipment and services; Part 17: Specific conditions for 2,4 GHz wideband transmission systems and 5 GHz high performance RLAN equipment
EN 60950-1:Safety of information technology equipment, including electrical business equipment
EN 50385:Product standard to demonstrate the compliance of radiobase stations and fixed terminal stations for wireless telecommunication systems with the basic restrictions or the reference levels related to human exposure to radio frequency electromagnetic fields (110 MHz - 40 GHz)
Hereby, TOSHIBA TEC, declares that this GN-1050 is in compliance with the essential requirements and other relevant provisions of Directive 1999/5/EC.
TOSHIBA TEC vakuuttaa täten että GN-1050 tyyppinen laite on direktiivin 1999/5/EY oleellisten vaatimusten ja sitä koskevien direktiivin muiden ehtojen mukainen.
Hierbij verklaart TOSHIBA TEC dat het toestel GN-1050 in overeenstemming is met de essentiële eisen en de andere relevante bepalingen van richtlijn 1999/5/EG
Bij deze verklaart TOSHIBA TEC dat deze GN-1050 voldoet aan de essentiële eisen en aan de overige relevante bepalingen van Richtlijn 1999/5/EC.
Par la présente TOSHIBA TEC déclare que l'appareil GN-1050 est conforme aux exigences essentielles et aux autres dispositions pertinentes de la directive 1999/5/CE
Par la présente, TOSHIBA TEC déclare que ce GN-1050 est conforme aux exigences essentielles et aux autres dispositions de la directive 1999/5/CE qui lui sont applicables
Härmed intygar TOSHIBA TEC att denna GN-1050 står I överensstämmelse med de väsentliga egenskapskrav och övriga relevanta bestämmelser som framgår av direktiv 1999/5/EG.
Undertegnede TOSHIBA TEC erklarer herved, at følgende udstyr GN-1050 overholder de væsentlige krav og øvrige relevante krav i direktiv 1999/5/EF
Hiermit erklärt TOSHIBA TEC, dass sich dieser/diese/dieses GN-1050 in Übereinstimmung mit den grundlegenden Anforderungen und den anderen relevanten Vorschriften der Richtlinie 1999/5/EG befindet". (BMWi)

6 Precautions
USA-Federal Communications Commission (FCC)This equipment has been tested and found to comply with the limits for a Class B digital device, pursuant to Part 15 of FCC Rules. These limits are designed to provide reasonable protection against harmful interference in a residential installation. This equipment generates, uses, and can radiate radio frequency energy. If not installed and used in accordance with the instructions, it may cause harmful interference to radio communications. However, there is no guarantee that interference will not occur in a particular installation.
If this equipment does cause harmful interference to radio or television reception, which can be determined by tuning the equipment off and on, the user is encouraged to try and correct the interference by one or more of the following measures:
Reorient or relocate the receiving antenna.Increase the distance between the equipment and the receiver.Connect the equipment to outlet on a circuit different from that to which the receiver is connected.Consult the dealer or an experienced radio/TV technician for help.
This equipment complies with part 15 of the FCC rules. Operation is subject to the following two conditions:(1) This device may not cause harmful interference, and(2) This device must accept any interference received, including interference that may cause undesired operation.Any changes or modifications not expressly approved by the party responsible for compliance could void the user's authority to operate the equipment.
LabellingToshiba TEC Wireless LAN Module GN-1050 labelled as below.
FCC ID: BJI-GN1050The proposed FCC ID label format is to be placed on the module. If FCC ID is not visible when the module is installed into the system, “Contains FCC ID:BJI-GN1050” shall be placed on the outside of final host system.
Caution: Exposure to Radio Frequency Radiation.To comply with FCC RF exposure compliance requirements, a separation distance of at least 20 cm must be maintained between the antenna of this device and all persons. This device must not be co-located or operating in conjunction with any other antenna or transmitter.
Hiermit erklärt TOSHIBA TEC die Übereinstimmung des Gerätes GN-1050 mit den grundlegenden Anforderungen und den anderen relevanten Festlegungen der Richtlinie 1999/5/EG. (Wien)
ΜΕ ΤΗΝ ΠΑΡΟΥΣΑ TOSHIBA TEC ∆ΗΛΩΝΕΙ ΟΤΙ GN-1050 ΣΥΜΜΟΡΦΩΝΕΤΑΙ ΠΡΟΣ ΤΙΣ ΟΥΣΙΩ∆ΕΙΣ ΑΠΑΙΤΗΣΕΙΣ ΚΑΙ ΤΙΣ ΛΟΙΠΕΣ ΣΧΕΤΙΚΕΣ ∆ΙΑΤΑΞΕΙΣ ΤΗΣ Ο∆ΗΓΙΑΣ 1999/5/EK
Con la presente TOSHIBA TEC dichiara che questo GN-1050 è conforme ai requisiti essenziali ed alle altre disposizioni pertinenti stabilite dalla direttiva 1999/5/CE.
Por medio de la presente TOSHIBA TEC declara que el GN-1050 cumple con los requisitos esenciales y cualesquiera otras disposiciones aplicables o exigibles de la Directiva 1999/5/CE
TOSHIBA TEC declara que este GN-1050 está conforme com os requisitos essenciais e outras disposicões da Directiva 1999/5/CE.
Thoshiba TEC Corpration timto prohlasuje, ze GN-1050 je ve shode se zakladnimi pozadavky a s dalsimi prislusnymi ustanoveni Narizeni vlady c. 426/2000 Sb.
Toshiba TEC Corporation declarã prin prezenta cã adaptorul fãrã fir LAN model GN-1050 este în conformitate cu cerinþele esenþiale ºi cu alte prevederi corespunzãtoare ale Directivei 1999/5/EC
Toshiba TEC Corporation µ µ GN-1050
µ µ LAN µµ µ
1999/5/E
Toshiba TEC Corporation, GN-1050 model Kablosuz LAN Adaptörünün 1999/5/EC
Tüzü ünün temel gereksinimlerine ve di er ilgili uygulamalara uydu unu beyan eder.

Precautions 7
Regulatory Notice for Channel Use in FranceThe number of channels that can be used for wireless LAN differs from country to country. In France however, user only 4 channels (channel 10, 11, 12, 13) when using wireless networks.
Channel 10 (2457 MHz)Channel 11 (2462 MHz)Channel 12 (2467 MHz)Channel 13 (2472 MHz)
Singapore Portion
Approved Countries/Regions for use for the Toshiba Wireless LANThis equipment is approved to the radio standard by the specific countries/regions. Please ask Toshiba authorized dealer or service engineer.
NOTES!The unauthorized reproduction of this document, in whole or in part, is prohibited.The specifications, designs, and other contents of this document are subject to change without notice.The contents of this document are believed to be accurate, however if any discrepancies noted should be brought to the attention of TOSHIBA authorized dealer or service engineer.Notwithstanding the foregoing, the manufacturer is unable to accept any claims for losses or lost profits, etc. Resulting from the use of this product.TOSHIBA TEC will not guarantee the machine performance if you perform any setting other than specified in this manual.
France limited to 2446.5-2483.5 MHz Indoor use.Belgium limited to 2400-2483.5 MHz Indoor, 2460-2483.5 MHz Outdoor use.


CONTENTS 9
CONTENTS
Preface....................................................................................................................................... 1
Precautions ............................................................................................................................... 3
Chapter 1 SETTING UP WIRELESS NETWORK
Before Setting Up Wireless Network .................................................................................... 12Planning for installation ....................................................................................................... 12
Determine the network type ........................................................................................... 12Determine the SSID ....................................................................................................... 13Determine the security mode ......................................................................................... 13
Setting Up the Infrastructure Mode ...................................................................................... 15Select network type ............................................................................................................. 15Specify SSID ....................................................................................................................... 18
Selecting the SSID from the available network list......................................................... 18Entering the SSID manually ........................................................................................... 19
Select security mode ........................................................................................................... 21Selecting WPA/WPA2 security mode with EAP-TLS protocol........................................ 21Selecting WPA/WPA2 security mode with PEAP protocol ............................................. 27Selecting WPAPSK/WPA2PSK security mode .............................................................. 31Selecting WEP security mode ........................................................................................ 33Selecting no security mode ............................................................................................ 35
Setting up the Ad Hoc Mode.................................................................................................. 37Select network type ............................................................................................................. 37Specify SSID ....................................................................................................................... 40Select security mode ........................................................................................................... 42
Selecting WEP security mode ........................................................................................ 42Selecting no security mode ............................................................................................ 44
Disabling Wireless Network .................................................................................................. 46
Chapter 2 APPENDIX
Specification ........................................................................................................................... 50
Troubleshooting ..................................................................................................................... 51
Glossary .................................................................................................................................. 52
INDEX ..................................................................................................................................................................... 55

10 CONTENTS

1.SETTING UP WIRELESS NETWORK
This chapter describes about the preparations before setting up the wireless settings of the equipment.
Before Setting Up Wireless Network .................................................................................... 12Planning for installation ........................................................................................................................................12
Setting Up the Infrastructure Mode ...................................................................................... 15Select network type ..............................................................................................................................................15Specify SSID ........................................................................................................................................................18Select security mode ............................................................................................................................................21
Setting up the Ad Hoc Mode ................................................................................................. 37Select network type ..............................................................................................................................................37Specify SSID ........................................................................................................................................................40Select security mode ............................................................................................................................................42
Disabling Wireless Network .................................................................................................. 46

1 SETTING UP WIRELESS NETWORK
12 Before Setting Up Wireless Network
Before Setting Up Wireless Network
This product is a Wireless LAN Module using the 2.4 GHz spectrum diffusion system, and is compatible with IEEE Standard 802.11g and 802.11b for wireless LAN.
When the Wireless LAN is enabled, users can perform the following printing through the Wireless LAN:Raw TCP Printing from Windows computersLPR Printing from Windows computersLPR Printing from Macintosh computersLPR Printing from UNIX/Linux workstation
The instructions on how set up the client computers for Wi-Fi printing is same as the instructions for wired network printing. For instructions on how to set up the client computers, please see Software Installation Guide.
To access the equipment through the Wireless LAN from the client computers, the client computers must have the Wireless LAN Module.When you enable the wireless network, the existing NIC (Network Interface Card) will be disabled. This equipment cannot connect the wired network and wireless network at the same time.When the Wireless LAN Module is installed in the e-STUDIO455 Series / e-STUDIO855 Series, the equipment enters into the Sleep mode, though the Super Sleep mode is enabled in the Energy Saver function.
Planning for installationBefore setting up the Wireless LAN Module for your wireless LAN, read through this section to understand the information that you require to set up the equipment in your wireless LAN.
Determine the network typeThis Wireless LAN Module supports Infrastructure Mode and Ad Hoc Mode.
Infrastructure Mode
In the Infrastructure Mode, client computers can access to the equipment through a wireless network via an Access Point. The Infrastructure Mode is suitable for the wireless network that many client computers are connected at the same time.The Access Point will be required to establish the wireless network in the Infrastructure Mode.
Ad Hoc Mode
In the Ad Hoc Mode, client computers can access to the equipment directory through a wireless network without an Access Point. The Ad Hoc Mode is not suitable for the wireless network that many computers are connected, however, it is easy to establish the wireless network because the Access Point is not required.
Access Point

1.SETTING UP WIRELESS NETWORK
Before Setting Up Wireless Network 13
1 SETTING UP WIRELESS NETWORK
Determine the SSIDIn the wireless network, the same SSID (Service Set ID) must be assigned in each wireless device. Only wireless devices that have the same SSID assigned to them can communicate with each other through the wireless network.
In the Infrastructure Mode, the SSID is usually set in the Access Point. Therefore, you must set the same SSID in this equipment to communicate through the wireless network via the Access Point.
In the Ad Hoc Mode, you must assign the same SSID that is assigned to other client computers. To access the devices each other in the Ad Hoc Mode, the same SSID must be assigned to each device.
Determine the security modeThis equipment supports the following wireless security modes.
WPA/WPA2Using the WPA/WPA2, you can restrict the access to the wireless network using the RADIUS server. The WPA/WPA2 is available only when the wireless network is established in the Infrastructure Mode.There are two protocols for the WPA/WPA2, EAP-TLS or PEAP.When using the EAP-TLS authentication, you must install user certification file (must be either DER, BASE64, or PKCS#7 encoding format) and CA certification file (must be exported as a private key in PKCS#7 encoding format) in the equipment. This equipment uses the user certification file to authenticate the access rights to the wireless network, and the RADIUS server authenticate this equipment using the user ID and password.When using the PEAP, you must install the CA certification file (must be either DER, BASE64, or PKCS#7 encoding format) in the equipment. This equipment uses the user name and password to authenticate the access rights to the wireless network, and the RADIUS server authenticate this equipment using the CA certification file.
This equipment supports following RADIUS server.For EAP-TLS: Windows Server 2000, Windows Server 2003, Steel-belted RadiusFor PEAP: Windows Server 2000, Windows Server 2003
WPAPSK/WPA2PSKThe WPAPSK/WPA2PSK is an authentication method using the PSK (Pre-Shared Key) between the Access Point and other wireless devices. The WPAPSK/WPA2PSK authentication is available only when the wireless network is established in the Infrastructure Mode.To access the wireless network using the WPAPSK/WPA2PSK authentication, the same PSK Path Phrase must be assigned in both the Access Point and other wireless devices. If the PSKs are same between the Access Point and other wireless devices, the Access Point allows them to access the wireless network through the Access Point.The WPAPSK/WPA2PSK has stronger security than WEP because the data encryption is improved over WEP. This equipment supports TKIP and AES (CCMP) encryption for the WPAPSK/WPA2PSK authentication.The TKIP provides a different key for per packet with a message integrity check. This key will be changed for every fixed interval.The AES is the next-generation cryptography algorithm that the U.S. government improves to replace the DES and 3DES.This authentication method is suitable for a small wireless network and easy to add the security because the authentication server is not required unlike the WPA/WPA2.
When using WPAPSK/WPA2PSK, it is recommended to use a secure password for WPAPSK/WPA2PSK.
EAP-TLS PEAP
1 Establish the communication between the AP.
2 Confirm the CA certification between the RADIUS server and the equipment.
3 Send the user certification to the RADIUS server to authenticatethe user certification.
1 Establish the communication between the AP.
2 Confirm the CA certification between the RADIUS server and the equipment.
3 Send the user name and password to the RADIUS server for authentication.
CA 12
3
RADIUSServerRADIUSServer Access
Point
CAUser
CA 12
3CA
RADIUSServerRADIUSServer Access
Point

1 SETTING UP WIRELESS NETWORK
14 Before Setting Up Wireless Network
WEPThe WEP is a data encryption method using the WEP key between the Access Point and other wireless devices. Compared with WPA/WPA2 and WPAPSK/WPA2PSK, the WEP is less security. If the wireless network is configured in the Infrastructure Mode and the Access Point supports WPA/WPA2 or WPAPSK/WPA2PSK, it is recommended to use WPA/WPA2 or WPAPSK/WPA2PSK rather than WEP.The WEP authentication is available for both the Infrastructure Mode and Ad Hoc Mode.

1 SETTING UP WIRELESS NETWORK
Setting Up the Infrastructure Mode 15
Setting Up the Infrastructure Mode
The wireless settings can be operated from the Control Panel of this equipment.When setting up the equipment for the wireless network in the Infrastructure Mode, follow the steps below.1. Select the network type
P.15 “Select network type”2. Specify the SSID
P.18 “Specify SSID”3. Select the security mode
P.21 “Select security mode”
Select network typeFirst access the WIRELESS SETTING screen from the ADMIN menu from the Touch Panel Display to select the network type for the wireless network.
If you are not sure what network type to select, see the following section to determine the network type first. P.12 “Determine the network type”
1 Press the [USER FUNCTIONS] button on the control panel to enter the User Functions menu.
2 Press the [ADMIN].The ADMINISTRATOR PASSWORD screen is displayed.
3 Press the [PASSWORD].
The input screen is displayed.
4 Enter the administrator password and press the [OK].
The ADMIN menu is displayed.

1 SETTING UP WIRELESS NETWORK
16 Setting Up the Infrastructure Mode
5 Press the [WIRELESS SETTINGS].
The WIRELESS SETTINGS menu is displayed.
6 Press the [WIRELESS SETTINGS].
The WIRELESS SETTINGS screen is displayed.
It may take a time to display the WIRELESS SETTINGS screen.
7 Press the [ON] and press the [NEXT].
The NETWORK TYPE screen is displayed.

1.SETTING UP WIRELESS NETWORK
Setting Up the Infrastructure Mode 17
1 SETTING UP WIRELESS NETWORK
8 Press the [INFRASTRUCTURE] and press the [NEXT].
9 The SSID SETTINGS screen displayed.
Continue to the procedure for specifying the SSID. P.18 “Specify SSID”

1 SETTING UP WIRELESS NETWORK
18 Setting Up the Infrastructure Mode
Specify SSIDWhen you select the Infrastructure Mode for the network type, you can specify the SSID by selecting the available network list or manually entering the SSID.
P.18 “Selecting the SSID from the available network list” P.19 “Entering the SSID manually”
If you are not sure how the SSID must be specified, see the following section to determine the SSID. P.13 “Determine the SSID”
Selecting the SSID from the available network listThis equipment can search the available SSID automatically from the wireless network. Then you can select the SSID from the list.
1 Press the [AVAILABLE NETWORK].
The AVAILABLE NETWORK screen is displayed.
2 Select the SSID that this equipment will connect and press the [OK].
The screen returns to the SSID SETTINGS screen.
The available network may not displayed according to the communication environmental conditions.If the desired SSID is not displayed, please specify the SSID manually.
P.19 “Entering the SSID manually”This Wireless LAN supports only channel 1 to 11. This equipment cannot connect the Access Point that uses the other channel than these channels. Please make sure to set the channel between 1 to 11 in the Access Point.

1.SETTING UP WIRELESS NETWORK
Setting Up the Infrastructure Mode 19
1 SETTING UP WIRELESS NETWORK
3 Press the [NEXT].
4 The WIRELESS LAN SECURITY SETTINGS screen is displayed.
Continue to the procedure for specifying the security mode. P.21 “Select security mode”
Entering the SSID manually
1 Press the [SSID].
The letter entry screen is displayed.

1 SETTING UP WIRELESS NETWORK
20 Setting Up the Infrastructure Mode
2 Enter the SSID using the keyboard and digital keys and press the [OK].
The screen returns to the SSID SETTINGS screen.
3 Press the [NEXT].
4 The WIRELESS LAN SECURITY SETTINGS screen is displayed.
Continue to the procedure for specifying the security mode. P.21 “Select security mode”

1.SETTING UP WIRELESS NETWORK
Setting Up the Infrastructure Mode 21
1 SETTING UP WIRELESS NETWORK
Select security modeAfter specifying the SSID, you must select the security mode for your wireless network.The procedure to configure the security mode varies depending on the security mode that you select.
P.21 “Selecting WPA/WPA2 security mode with EAP-TLS protocol” P.27 “Selecting WPA/WPA2 security mode with PEAP protocol” P.31 “Selecting WPAPSK/WPA2PSK security mode” P.33 “Selecting WEP security mode” P.35 “Selecting no security mode”
If you are not sure what security mode to select, see the following section to determine the security mode. P.13 “Determine the security mode”
Selecting WPA/WPA2 security mode with EAP-TLS protocolUsing the WPA/WPA2 with the EAP-TLS protocol, you must install user certification file and CA certification file in the equipment. This equipment uses the user certification file to authenticate the access rights to the wireless network, and the RADIUS server authenticate this equipment using the CA certification file.
When using the WPA/WPA2 with the EAP-TLS protocol, you must install the CA certification file and user certification file in the equipment using TopAccess first. For instructions on how to install the CA certification and user certification files using TopAccess, refer to TopAccess Guide.
1 Press the [WPA] or [WPA2] and press the [NEXT].
The AUTHENTICATION SETTINGS screen is displayed.
When the [WPA] or [WPA2] is selected, TKIP or AES(CCMP) can be selected.

1 SETTING UP WIRELESS NETWORK
22 Setting Up the Infrastructure Mode
2 Press the [EAP-TLS] and press the [NEXT].
The WIRELESS AUTHENTICATION (EAP-TLS) screen is displayed.
Setting PMK cacheWhen the [WPA2] is selected in step 1, the PMK cache can be switched to ON or OFF. When the [WPA] is selected, the item for setting PMK cache is not displayed.
3 Press the [EAP USER NAME].
The letter entry screen is displayed.
4 Enter the EAP user name using the keyboard and digital keys and press the [OK].
The screen returns to the WIRELESS AUTHENTICATION (EAP-TLS) screen.
In the EAP USER NAME, enter the user name in “User Name@FQDN” format.Example: [email protected]
1.SETTING UP WIRELESS NETWORK
Setting Up the Infrastructure Mode 23
1 SETTING UP WIRELESS NETWORK
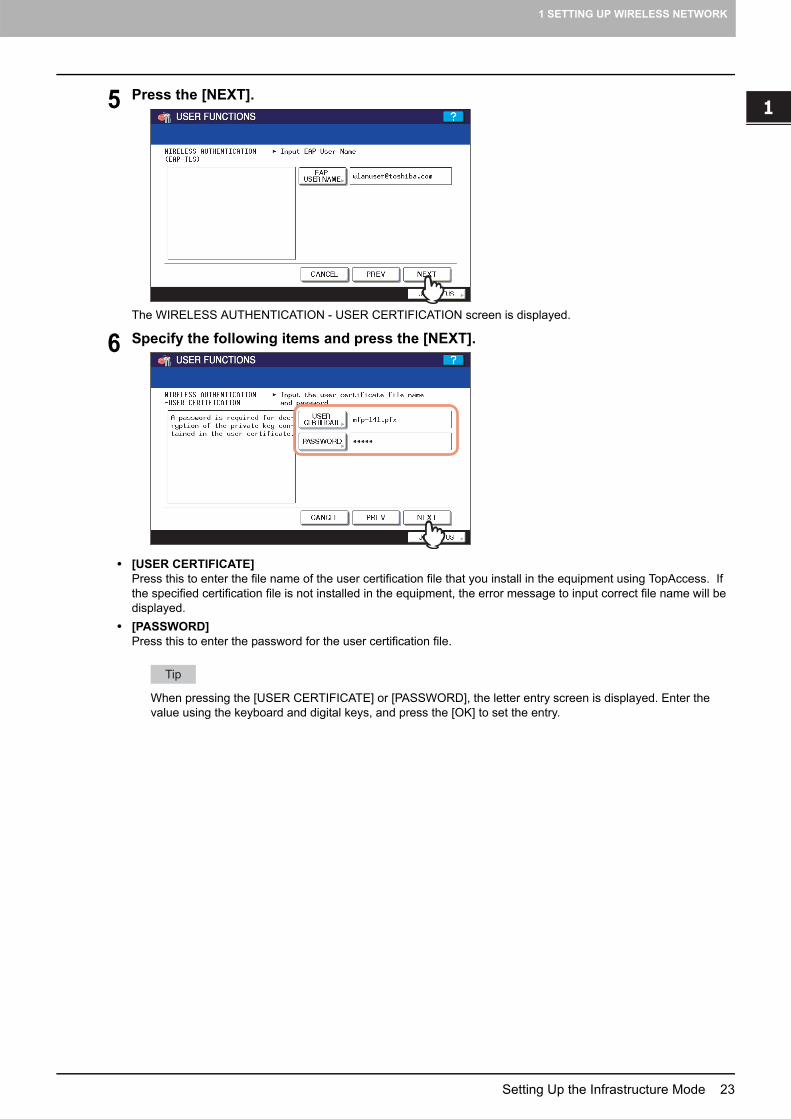
5 Press the [NEXT].
The WIRELESS AUTHENTICATION - USER CERTIFICATION screen is displayed.
6 Specify the following items and press the [NEXT].
[USER CERTIFICATE]Press this to enter the file name of the user certification file that you install in the equipment using TopAccess. If the specified certification file is not installed in the equipment, the error message to input correct file name will be displayed.[PASSWORD]Press this to enter the password for the user certification file.
When pressing the [USER CERTIFICATE] or [PASSWORD], the letter entry screen is displayed. Enter the value using the keyboard and digital keys, and press the [OK] to set the entry.

1 SETTING UP WIRELESS NETWORK
24 Setting Up the Infrastructure Mode
7 Specify the following items and press the [NEXT].
ENCODING FORMATSelect the encoding format of the CA certification file.[CA CERTIFICATE]Press this to enter the file name of the CA certification file that you install in the equipment using TopAccess. If the specified certification file is not installed in the equipment, the error message to input correct file name will be displayed.
When pressing the [CA CERTIFICATE], the letter entry screen is displayed. Enter the value using the keyboard and digital keys, and press the [OK] to set the entry.
8 Specify the following items and press the [NEXT].
FULL AGREEMENT of SERVER NAMESelect the [ON] to confirm whether the RADIUS server name in the server certification file and the input RADIUS server name is same or not. When the [ON] is selected, press the [RADIUS SERVER NAME] to enter the RADIUS server name.
In the RADIUS SERVER NAME, enter the user name in “Server Name@FQDN” format.Example: [email protected]
ENCRYPTION INTENSITYSelect the encryption intensity.

1.SETTING UP WIRELESS NETWORK
Setting Up the Infrastructure Mode 25
1 SETTING UP WIRELESS NETWORK
9 Specify the following items and press the [NEXT].
ENCRYPTION BETWEEN AP AND STA.Select the encryption type that is used for the communication between Access Point and this equipment.[TKIP] — Select this to use TKIP encryption. The TKIP provides a different key for per packet with a message integrity check. This key will be changed for every fixed interval.[AES(CCMP)] — Select this to use AES encryption. The AES is the next-generation cryptography algorithm that the U.S. government improves to replace the DES and 3DES.
When WPA or WPA2 is selected for the security mode, only [TKIP] or [AES(CCMP)] can be selected.
The encryption intensity between each encryption is:AES(CCMP) > TKIP
10 Specify the following items and press the [NEXT].
TRANSMIT POWERSelect the low transmit power if you want to limit the area that the wireless communication is enabled. If you do not have to limit the area, select [100%].TRANSMIT RATESelect the transmit data capacity for wireless communication. If you do not have to specify the fixed rate, select [AUTO]. When [AUTO] is selected, this equipment will use appropriate rate depending on the condition.Generally select [AUTO]. The communication may fail unexpectedly if you select a static transmit rate.

1 SETTING UP WIRELESS NETWORK
26 Setting Up the Infrastructure Mode
11 Confirm the settings and press the [FINISH].
The shutdown screen is displayed.
If you want to change the settings, press the [PREV] to move back to the screen that you want to change and then repeat the operation.
12 Press the [YES] to shutdown the equipment.
The wireless settings apply after restarting the equipment.

1.SETTING UP WIRELESS NETWORK
Setting Up the Infrastructure Mode 27
1 SETTING UP WIRELESS NETWORK
Selecting WPA/WPA2 security mode with PEAP protocolUsing the WPA/WPA2 with the PEAP protocol, you must install the CA certification file in the equipment. This equipment uses the user name and password to authenticate the access rights to the wireless network, and the RADIUS server authenticate this equipment using the CA certification file.
When using the WPA/WPA2 with the PEAP protocol, you must install the CA certification file in the equipment using TopAccess first. For instructions on how to install the CA certification using TopAccess, refer to TopAccess Guide.
1 Press the [WPA] or [WPA2] and press the [NEXT].
The AUTHENTICATION SETTINGS screen is displayed.
When the [WPA] or [WPA2] is selected, TKIP or AES(CCMP) can be selected.
2 Press the [PEAP] and press the [NEXT].
The WIRELESS AUTHENTICATION (EAP-TLS) screen is displayed.
Setting PMK cacheWhen the [WPA2] is selected in step 1, the PMK cache can be switched to ON or OFF. When the [WPA] is selected, the item for setting PMK cache is not displayed.

1 SETTING UP WIRELESS NETWORK
28 Setting Up the Infrastructure Mode
3 Enter the following items and press the [NEXT].
[EAP USER NAME]Press this to enter the EAP user name that is used for the authentication.
In the EAP USER NAME, enter the user name in “User Name@FQDN” format.Example: [email protected]
[EAP PASSWORD]Press this to enter the EAP password that is used for the authentication.[RETYPE PASS]Press this to enter the EAP password again that you enter in the EAP PASSWORD field.
When pressing each button, the letter entry screen is displayed. Enter the value using the keyboard and digital keys, and press the [OK] to set the entry.
4 Specify the following items and press the [NEXT].
ENCODING FORMATSelect the encoding format of the CA certification file.[CA CERTIFICATE]Press this to enter the file name of the CA certification file that you install in the equipment using TopAccess. If the specified certification file is not installed in the equipment, the error message to input correct file name will be displayed.
When pressing the [CA CERTIFICATE], the letter entry screen is displayed. Enter the value using the keyboard and digital keys, and press the [OK] to set the entry.

1.SETTING UP WIRELESS NETWORK
Setting Up the Infrastructure Mode 29
1 SETTING UP WIRELESS NETWORK
5 Specify the following items and press the [NEXT].
FULL AGREEMENT of SERVER NAMESelect the [ON] to confirm whether the RADIUS server name in the server certification file and the input RADIUS server name is same or not. When the [ON] button is selected, press the [RADIUS SERVER NAME] to enter the RADIUS server name.
In the RADIUS SERVER NAME, enter the user name in “Server Name@FQDN” format.Example: [email protected]
ENCRYPTION INTENSITYSelect the encryption intensity. When the PEAP protocol is selected, only [LOW] can be selected.
6 Specify the following items and press the [NEXT].
ENCRYPTION BETWEEN AP AND STA.Select the encryption type that is used for the communication between Access Point and this equipment.[TKIP] — Select this to use TKIP encryption. The TKIP provides a different key for per packet with a message integrity check. This key will be changed for every fixed interval.[AES(CCMP)] — Select this to use AES encryption. The AES is the next-generation cryptography algorithm that the U.S. government improves to replace the DES and 3DES.
When WPA or WPA2 is selected for the security mode, only [TKIP] or [AES(CCMP)] can be selected.
The encryption intensity between each encryption is:AES(CCMP) > TKIP

1 SETTING UP WIRELESS NETWORK
30 Setting Up the Infrastructure Mode
7 Specify the following items and press the [NEXT].
TRANSMIT POWERSelect the low transmit power if you want to limit the area that the wireless communication is enabled. If you do not have to limit the area, select [100%].TRANSMIT RATESelect the transmit data capacity for wireless communication. If you do not have to specify the fixed rate, select [AUTO]. When [AUTO] is selected, this equipment will use appropriate rate depending on the condition.Generally select [AUTO]. The communication may fail unexpectedly if you select a static transmit rate.
8 Confirm the settings and press the [FINISH].
The shutdown screen is displayed.
If you want to change the settings, press the [PREV] to move back to the screen that you want to change and then repeat the operation.
9 Press the [YES] to shutdown the equipment.
The wireless settings apply after restarting the equipment.

1.SETTING UP WIRELESS NETWORK
Setting Up the Infrastructure Mode 31
1 SETTING UP WIRELESS NETWORK
Selecting WPAPSK/WPA2PSK security modeThe WPAPSK/WPA2PSK is an authentication method using the PSK (Pre-Shared Key) between the Access Point and other wireless devices.To access the wireless network using the WPAPSK/WPA2PSK authentication, the same PSK Path Phrase must be assigned in both the Access Point and other wireless devices. If the PSKs are same between the Access Point and other wireless devices, the Access Point allows them to access the wireless network through the Access Point.
1 Press the [WPAPSK] or [WPA2PSK] and press the [NEXT].
The WIRELESS ENCRYPTION WPA-PSK screen is displayed.
2 Enter the following items and press the [NEXT].
WIRELESS ENCRYPTION TYPESelect the encryption type for the PSK.[TKIP] — Select this to use TKIP encryption. The TKIP provides a different key for per packet with a message integrity check. This key will be changed for every fixed interval.[AES(CCMP)] — Select this to use AES encryption. The AES is the next-generation cryptography algorithm that the U.S. government improves to replace the DES and 3DES.[PSK PASS PHRASE]Press this to enter the PSK Pass Phrase. The PSK is created by using the this pass phrase. You must enter the same pass phrase that is set in the Access Point. The PSK Pass Phrase must be between 8 to 63 characters long.
When pressing the [PSK PASS PHRASE], the letter entry screen is displayed. Enter the value using the keyboard and digital keys, and press the [OK] to set the entry.

1 SETTING UP WIRELESS NETWORK
32 Setting Up the Infrastructure Mode
3 Specify the following items and press the [NEXT].
TRANSMIT POWERSelect the low transmit power if you want to limit the area that the wireless communication is enabled. If you do not have to limit the area, select [100%].TRANSMIT RATESelect the transmit data capacity for wireless communication. If you do not have to specify the fixed rate, select [AUTO]. When [AUTO] is selected, this equipment will use appropriate rate depending on the condition.Generally select [AUTO]. The communication may fail unexpectedly if you select a static transmit rate.
4 Confirm the settings and press the [FINISH].
The shutdown screen is displayed.
If you want to change the settings, press the [PREV] to move back to the screen that you want to change and then repeat the operation.
5 Press the [YES] to shutdown the equipment.
The wireless settings apply after restarting the equipment.

1.SETTING UP WIRELESS NETWORK
Setting Up the Infrastructure Mode 33
1 SETTING UP WIRELESS NETWORK
Selecting WEP security modeThe WEP is a data encryption method using the WEP key between the Access Point and other wireless devices. Compared with WPA/WPA2 and WPAPSK/WPA2PSK, the WEP is less security. If the wireless network is configured in the Infrastructure Mode and the Access Point supports WPA/WPA2 or WPAPSK/WPA2PSK, it is recommended to use WPA/WPA2 or WPAPSK/WPA2PSK rather than WEP.
1 Press the [WEP] button and press the [NEXT].
The WIRELESS ENCRYPTION - WEP screen is displayed.
2 Enter the following items and press the [NEXT].
WEP ENCRYPTIONSelect the bit length of the WEP key.KEY ENTRY METHODSelect the character code for the WEP key.[WEP KEY]Press this to enter the WEP key.The maximum length of WEP key varies depending on the WEP Encryption and Key Entry Method.
When pressing the [WEP], the letter entry screen is displayed. Enter the value using the keyboard and digital keys, and press the [OK] to set the entry.
64 bit 128 bit 152 bit
HEX: 10 26 32
ASCII: 5 13 16

1 SETTING UP WIRELESS NETWORK
34 Setting Up the Infrastructure Mode
3 Specify the following items and press the [NEXT].
TRANSMIT POWERSelect the low transmit power if you want to limit the area that the wireless communication is enabled. If you do not have to limit the area, select [100%].TRANSMIT RATESelect the transmit data capacity for wireless communication. If you do not have to specify the fixed rate, select [AUTO]. When [AUTO] is selected, this equipment will use appropriate rate depending on the condition.Generally select [AUTO]. The communication may fail unexpectedly if you select a static transmit rate.
4 Confirm the settings and press the [FINISH].
The shutdown screen is displayed.
If you want to change the settings, press the [PREV] to move back to the screen that you want to change and then repeat the operation.
5 Press the [YES] to shutdown the equipment.
The wireless settings apply after restarting the equipment.

1.SETTING UP WIRELESS NETWORK
Setting Up the Infrastructure Mode 35
1 SETTING UP WIRELESS NETWORK
Selecting no security modeYou can also set no security for wireless access.
If you do not set no security, anyone how knows the SSID can connect to the wireless network. Therefore, it is recommended to set the security if it is possible.
1 Press the [NONE] and press the [NEXT].
The TRANSMIT POWER and RATE SETTING screen is displayed.
2 Specify the following items and press the [NEXT].
TRANSMIT POWERSelect the low transmit power if you want to limit the area that the wireless communication is enabled. If you do not have to limit the area, select [100%].TRANSMIT RATESelect the transmit data capacity for wireless communication. If you do not have to specify the fixed rate, select [AUTO]. When [AUTO] is selected, this equipment will use appropriate rate depending on the condition.Generally select [AUTO]. The communication may fail unexpectedly if you select a static transmit rate.

1 SETTING UP WIRELESS NETWORK
36 Setting Up the Infrastructure Mode
3 Confirm the settings and press the [FINISH].
The shutdown screen is displayed.
If you want to change the settings, press the [PREV] to move back to the screen that you want to change and then repeat the operation.
4 Press the [YES] to shutdown the equipment.
The wireless settings apply after restarting the equipment.

1 SETTING UP WIRELESS NETWORK
Setting up the Ad Hoc Mode 37
Setting up the Ad Hoc Mode
The wireless settings can be operated from the Control Panel of this equipment.When setting up the equipment for the wireless network in the Infrastructure Mode, follow the steps below.1. Select the network type
P.37 “Select network type”2. Specify the SSID
P.40 “Specify SSID”3. Select the security mode
P.42 “Select security mode”
Select network typeFirst access the WIRELESS SETTING screen from the ADMIN menu from the Touch Panel Display to select the network type for the wireless network.
If you are not sure what network type to select, see the following section to determine the network type first. P.12 “Determine the network type”
1 Press the [USER FUNCTIONS] button on the control panel to enter the User Functions menu.
2 Press the [ADMIN].The ADMINISTRATOR PASSWORD screen is displayed.
3 Press the [PASSWORD].
The input screen is displayed.
4 Enter the administrator password and press the [OK].
The ADMIN menu is displayed.

1 SETTING UP WIRELESS NETWORK
38 Setting up the Ad Hoc Mode
5 Press the [WIRELESS SETTINGS].
The WIRELESS SETTINGS menu is displayed.
6 Press the [WIRELESS SETTINGS].
The WIRELESS SETTINGS screen is displayed.
7 Press the [ON] and press the [NEXT].
The NETWORK TYPE screen is displayed.

1.SETTING UP WIRELESS NETWORK
Setting up the Ad Hoc Mode 39
1 SETTING UP WIRELESS NETWORK
8 Press the [AD HOC] and press the [NEXT].
You can specify the between 1 to 11 for the channel. However, if there is a channel that has already been used for Ad Hoc network, use the same channel.
9 The SSID SETTINGS screen displayed.
Continue to the procedure for specifying the SSID. P.18 “Specify SSID”

1 SETTING UP WIRELESS NETWORK
40 Setting up the Ad Hoc Mode
Specify SSIDWhen you select the Ad Hoc Mode for the network type, you can specify the SSID by entering the SSID manually.
If you are not sure how the SSID must be specified, see the following section to determine the SSID. P.13 “Determine the SSID”
1 Press the [SSID].
The letter entry screen is displayed.
2 Enter the SSID using the keyboard and digital keys and press the [ENTER] button.
The screen returns to the SSID SETTINGS screen.
3 Press the [NEXT].

1.SETTING UP WIRELESS NETWORK
Setting up the Ad Hoc Mode 41
1 SETTING UP WIRELESS NETWORK
4 The WIRELESS LAN SECURITY SETTINGS screen is displayed.
Continue to the procedure for specifying the security mode. P.21 “Select security mode”

1 SETTING UP WIRELESS NETWORK
42 Setting up the Ad Hoc Mode
Select security modeAfter specifying the SSID, you must select the security mode for your wireless network.The procedure to configure the security mode varies depending on the security mode that you select.
P.42 “Selecting WEP security mode” P.44 “Selecting no security mode”
If the Ad Hoc Mode, only WEP or NONE can be selected for the security mode.If you are not sure what security mode to select, see the following section to determine the security mode.
P.13 “Determine the security mode”
Selecting WEP security modeThe WEP is a data encryption method using the WEP key between the Access Point and other wireless devices.
1 Press the [WEP] and press the [NEXT].
The WIRELESS ENCRYPTION - WEP screen is displayed.
2 Enter the following items and press the [NEXT].
WEP ENCRYPTIONSelect the bit length of the WEP key.KEY ENTRY METHODSelect the character code for the WEP key.[WEP KEY]Press this to enter the WEP key.The maximum length of WEP key varies depending on the WEP Encryption and Key Entry Method.
When pressing the [WEP KEY button, the letter entry screen is displayed. Enter the value using the keyboard and digital keys, and press the [OK] to set the entry.
64 bit 128 bit 152 bit
HEX: 10 26 32
ASCII: 5 13 16

1.SETTING UP WIRELESS NETWORK
Setting up the Ad Hoc Mode 43
1 SETTING UP WIRELESS NETWORK
3 Select the transmit power and press the [NEXT].
Select the low transmit power if you want to limit the area that the wireless communication is enabled. If you do not have to limit the area, select [100%].
4 Confirm the settings and press the [FINISH].
The shutdown screen is displayed.
If you want to change the settings, press the [PREV] to move back to the screen that you want to change and then repeat the operation.
5 Press the [YES] to shutdown the equipment.
The wireless settings apply after restarting the equipment.

1 SETTING UP WIRELESS NETWORK
44 Setting up the Ad Hoc Mode
Selecting no security modeYou can also set no security for wireless access.
If you do not set no security, anyone how knows the SSID can connect to the wireless network. Therefore, it is recommended to set the security if it is possible.
1 Press the [NONE] and press the [NEXT].
The TRANSMIT POWER and RATE SETTING screen is displayed.
2 Select the transmit power and press the [NEXT] button.
Select the low transmit power if you want to limit the area that the wireless communication is enabled. If you do not have to limit the area, select [100%].
3 Confirm the settings and press the [FINISH] button.
The shutdown screen is displayed.
If you want to change the settings, press the [PREV] to move back to the screen that you want to change and then repeat the operation.

1.SETTING UP WIRELESS NETWORK
Setting up the Ad Hoc Mode 45
1 SETTING UP WIRELESS NETWORK
4 Press the [YES] to shutdown the equipment.
The wireless settings apply after restarting the equipment.

1 SETTING UP WIRELESS NETWORK
46 Disabling Wireless Network
Disabling Wireless Network
When you enable the wireless network, the on-board NIC (Network Interface Card) will be disabled.If you want to connect the equipment to wired network via the on-board NIC, you must disable the wireless network.
1 Press the [USER FUNCTIONS] button on the control panel to enter the User Functions menu.
2 Press the [ADMIN].The ADMINISTRATOR PASSWORD screen is displayed.
3 Press the [PASSWORD] button.
The input screen is displayed.
4 Enter the administrator password and press the [OK].
The ADMIN menu is displayed.
5 Press the [WIRELESS SETTINGS].
The WIRELESS SETTINGS menu is displayed.

1.SETTING UP WIRELESS NETWORK
Disabling Wireless Network 47
1 SETTING UP WIRELESS NETWORK
6 Press the [WIRELESS SETTINGS].
The WIRELESS SETTINGS screen is displayed.
7 Press the [OFF] and press the [NEXT].
The NETWORK TYPE screen is displayed.
8 Press the [FINISH].
The shutdown screen is displayed.
9 Press the [YES] to shutdown the equipment.
The wireless settings apply after restarting the equipment.


2.APPENDIX
This chapter describes the specification and glossary of terms.
Specification ........................................................................................................................... 50Troubleshooting ..................................................................................................................... 51Glossary.................................................................................................................................. 52

2 APPENDIX
50 Specification
Specification
Item DescriptionTransmission Format IEEE 1802.11g standard
Direct Sequence Spread Spectrum (DSSS)Orthogonal Frequency Division Multiplexing (OFDM)
Data Transmission Speed 54, 24, 11, 5.5, 2, 1 Mbps (fixed/automatic)
Access Method CSMA/CA
Transmission Packet IEEE 802.11g frame
Wireless Category Low-power data transmission system (2400 to 2472 MHz)
Aerial Power 10 mW/MHz or below
Security Static WEPKey Length: 64 bit, 128 bit, 152 bit
WPA/WPA2: PSK (TKIP, AES(CCMP))WPA/WPA2: TLS/PEAP (TKIP, AES(CCMP))PMK Cache 2 (Two access point PMK can be cached when WPA2 is selected.)
*1 Supported RADIUS serverSteel-belted Radius Windows Server 2000/Windows Server 2003
*2 Supported RADIUS serverWindows Server 2000/Windows Server 2003
Operation Mode Infrastructure Mode, Ad Hoc Mode
Wireless ON/OFF Available
Wired LAN/Wireless LAN Simultaneous Operation
Not Available
Wireless LAN/Bluetooth Simultaneous Operation
Available

2 APPENDIX
Troubleshooting 51
Troubleshooting
When Error Messages are DisplayedIf any error messages are displayed on the touch panel, see the following table to troubleshoot the problems for the Wireless LAN.
When Cannot Connect to TOSHIBA MFPWhen you cannot connect to this equipment, reboot it *. If you still cannot, check the following requirements:
The user certificate is not expired.The access point settings and network settings are correctly set.
* Press and hold the [POWER] button for at least 1 second to shutdown the equipment and then press it again.
Error Message TroubleshootingBad certificate Unsupported certificate is installed. Reinstall the appropriate certificate. This
equipment supports md5RSA and sha1RSA certificate only.
Bad record mac SSL Key exchange failed. Turn the power OFF and then ON to restart the equipment.
Certificate expired The certificate has been expired. Make sure that the time is set correctly or whether the certificate is expired.
Certificate revoke The certificate has been revoked. Ask your network administrator.
Certificate unknown The installed CA certificate cannot work as server certificate. Make sure to install a correct CA certificate.
Decompression failure This equipment does not support the SSL compression. Please disable the SSL compression on the RADIUS server.
Handshake failure Unsupported encryption may be set on the server. Make sure to use the supported encryption method.
Illegal parameter Unsupported version of the TLS protocol may be used. Make sure to use the supported version of the TLS protocol.
No certificate No certificate is installed or you do not specify the certificate file name. Make sure to install the certificate and specify the certificate file name correctly.
Peer error certificate Installed CA certificate cannot verify the server certificate in the RADIUS server. Make sure to install a correct CA certificate.
Peer error no certificate The RADIUS server operates the communication with the certificate using the TLS protocol.
Peer no cipher The RADIUS server requests the unsupported encryption for this equipment.
Peer error unsupported certificate type
This equipment uses the certificate that the RADIUS server does not support.
Peer unexpected message The RADIUS server sends the message that is not TLS standard. Confirm the settings on the RADIUS server.
Unknown remote error type The RADIUS server sends the alert message of illegal TLS.
Unsupported certificate This equipment uses the certificate that the RADIUS server does not support.
Unknown ca Installed CA certificate cannot verify the server certificate in the RADIUS server. Make sure to install a correct CA certificate.
Unable to connect Ask the administrator.

2 APPENDIX
52 Glossary
Glossary
Ad hoc modeA type of network for wireless LAN communications. In this mode a network is easily built because no access point is required. However, this mode is not available for multiple simultaneous communications due to its poor extensibility; in other words, it is unsuitable for wireless LAN communication connecting many devices.
AP (Access Point)Stands for Access Point. Access points are required to relay terminals for a communication in the Infrastructure mode, explained later in this section.
ChannelA segment for 2.4 GHz frequency bandwidth for wireless LAN communications. When more than one access point exists in a narrow area in the Infrastructure mode, different channels are required for each in order to avoid radio wave interference. Communications among devices with different channels are not available even if their SSIDs (explained later in this section) are the same.
CSMA/CA (Carrier Sense Multiple Access with Collision Avoidance)A type of access controlling method for wireless LAN communications. In this method terminals constantly monitor their communication status with each other. When one terminal is communicating, others stop their communications and wait until they confirm that an available access route comes up, in order to avoid the collision of communication signals as much as possible.
DSSS (Direct Sequence Spread Spectrum)A type of signal transmission system for wireless LAN communications. As one of the characteristics of this system, less noise occurs during communication and thus DSSS communication interferes with other communications less, because signals are spread to a wide spectrum with a small amount of electric power. Also this system uses the Pseudo Noise Code for the modulation and demodulation of signals, so a confidential communication with less risk of being intercepted is available.
IEEE (Institute of Electrical and Electronics Engineers)An organization that promotes studies for electronic related fields. The major activities of IEEE are holding academic conferences and publishing technical papers. Also its internal committees establish and recommend technical standards. The IEEE802 LAN/MAN Standard Committee of IEEE is in charge of technical standards for wireless LAN communications.
IEEE802.11b / IEEE802.11gTechnical standards established by IEEE for wireless LAN communications with a 2.4 GHz frequency bandwidth.
Infrastructure modeA type of network for wireless LAN communications. This mode is suitable for a wireless LAN communication connecting more than one device because a simultaneous communication among these devices is available by installing access points. Also interface ports embedded in each access point can extend the range of communication by integrating wireless LAN and wired LAN.
OFDM (Orthogonal Frequency Division Multiplexing)A type of communication system for wireless LAN communications. This is one of the multi-carrier systems that transmits signals through multiple carriers with different center frequencies and makes these carriers orthogonal so that they will not interfere each other, and thus efficient communications will be available within a narrow bandwidth.
PMK (Pairwise Master Key) cacheA function to cache PMKs, base information for encryption keys, to multiple access points. By caching the PMKs, the period of time for authentication is greatly reduced for a terminal which once succeeded its authentication. Therefore in a case in which an access point is switched during communication due to the movement of a terminal, for example, the period for which the communication is paused will be minimized.
PSK (Pre-Shared Key) passphrase“PSK” is a preset encryption key shared with terminals and “passphrase” is a character string required for PSK authentication. A passphrase consists of a number of words (phrase), while a general password is only a short single word. This means passphrases have a stronger tolerance toward security invasion than passwords.
RADIUS (Remote Authentication Dial In User Service)A protocol for network service authentication. This protocol originally developed for authentication for dial-up connections is now used for authentications for various network services. The RADIUS server is an authentication server supporting RADIUS protocols. This server efficiently controls access to a network because the authentication information of network users and their accessing statuses are centrally controlled.

2.APPENDIX
Glossary 53
2 APPENDIX
SSID (Service Set ID)A network ID for wireless LAN communications. To identify terminals or access points that belong to the same wireless LAN network, the same SSID must be set for each device. Communications among devices with different SSIDs are not available.


INDEX 55
INDEX
AAD HOC ...................................................................39Ad Hoc Mode ............................................................12AES (CCMP) .............................................................13AVAILABLE NETWORK .............................................18
CCA CERTIFICATE .............................................. 24, 28
EEAP PASSWORD ......................................................28EAP USER NAME .............................................. 22, 28EAP-TLS ............................................................ 13, 22ENCODING FORMAT ......................................... 24, 28ENCRYPTION BETWEEN AP AND STA. .............. 25, 29ENCRYPTION INTENSITY .................................. 24, 29
FFULL AGREEMENT of SERVER NAME ................ 24, 29
IINFRASTRUCTURE ..................................................17Infrastructure Mode ....................................................12
KKEY ENTRY METHOD ........................................ 33, 42
NNONE ................................................................ 35, 44
PPEAP ................................................................ 13, 27PSK PASS PHRASE ..................................................31
TTKIP .........................................................................13TRANSMIT POWER ........................25, 30, 32, 34, 35TRANSMIT RATE ............................25, 30, 32, 34, 35
UUSER CERTIFICATE .................................................23
WWEP ............................................................14, 33, 42WEP ENCRYPTION ............................................ 33, 42WEP KEY .......................................................... 33, 42WIRELESS ENCRYPTION TYPE ................................31WPA ............................................................13, 21, 27WPAPSK ........................................................... 13, 31

56 INDEX

GN-1050OME080038D0

2-17-2, HIGASHIGOTANDA, SHINAGAWA-KU, TOKYO, 141-8664, JAPAN
MULTIFUNCTIONAL DIGITAL SYSTEMSOperator’s Manual for Wireless LAN Module
GN-1050
©2008, 2009 TOSHIBA TEC CORPORATION All rights reservedR071220F2104-TTEC
Ver04 2009-12