morocco portfolio
TRANSCRIPT
Brief:I will be designing and creating a model of a hotel room for a holiday destination in Morocco, the room will accommodate up to 4 people. The room will be used for relaxing/sleeping, showering and any other things that people may need to do. The model will be base on Moroccan designs and culture, it will need to have good living conditions and also be private at the same time.
Situation Statement:When people go on holiday they need a place to stay, I will be designing and creating a model of a hotel room for people going on holiday in Morocco. They need a hotel room for everyday use such as showering, sleeping relaxing etc. so there will need to be something for them to clean themselves with such as a shower/bath and there must be enough space for up to four people to rest in the room. The room will also be used for the storage of the users belongings, such as their passports/personal items and clothes, so in the model I need to show space for the users items, such as a wardrobe/cupboard. The room will also be a place for the users to relax and possibly have a drink or prepare to go out. The design of the hotel room will be created upon traditional Moroccan designs to make the user feel as if they are on holiday and not like they are at home, so the design and patterns of a lot of the features in the room will be different from the users home country. I will place the hotel room in Marrakesh as this is a popular holiday destination, and has good views of the country, such as the Atlas Mountains. The reason I am making a model is to create an accurate representation of what the final product would look like to the users. Hotel rooms have many different features, every hotel must have a bed, a dressing table, a mirror, a wardrobe, a safe, a TV, somewhere to sit and the bathroom of a hotel must have a shower/bath, a hairdryer, a toilet, sink and a place to store towels. I will have to ensure that my model has all of these features in them. To make my design more appealing, I will place a pool on the balcony. This will make the users feel more comfortable and relaxed as it gives them their own personal pool to relax in without having to share with the rest of the people in the hotel.Project Objectives:The main objectives of this project are to create a model of a spacious hotel room for its users, to make them feel as if they are safe and have good privacy while in the room, gives users the ability to securely store their belongings and make them feel comfortable and relaxed while in the room.
Shaiheim Allen 3018Reigate College 64220
Shaiheim Allen 3018Reigate College 64220
Purpose – what is the aim or end-use for your project?The purpose of the model is to show the users of the product what the final room would look like on a smaller scale, using materials and textures that resemble what the product would be made from in real life.Form – what shape or style must your building / landscape take?My room should take a simple shape such as a square or rectangle; it must also have a Moroccan style to it, using certain traditional architectural design features to represent the country, this is to make the user feel as if they are actually in another country and by using traditional design elements this would represent the country to the user. The reason for a simple shape is so that many of the rooms can fit on one floor of the hotel and also because it makes it easier to get furniture for a room that have flat walls and not ones that are curved, for example.Function – what must your building / landscape specifically do? There may be a number of functions, list them all.The model itself must be an accurate representation of what I want the hotel room to look like if it were to be created.User requirements – what qualities must the building / landscapes have to make it attractive to client & user groups?The requirements of the model are that it must show the user what the room will look like, it must reflect the materials that it would be made from in real life. The actual model must not have any sharp edges or dangerous parts to it which may cause harm to anyone looking at it. The model must also have accurate measurements but scaled down.Performance requirements – what technical considerations need to be achieved within this project?The model must be the correct size and scaled down correctly, it needs to have all of the features that the real room would have in it as well.Materials & components – what materials and components should be used to aid performance?The materials used in the model would have to reflect the materials that would be used in real life, this would include MDF to represent wood, Fabrics/cloths to represent fabrics and carpets and acrylic or acetate to represent glass or mirrors.Sustainability - decisions based on the environmental costs of extraction & processing the selected materials, the products manufacture, lifespan & disposal.The model would be made from lots of recyclable and cheaper materials so the whole process would not cost too much and its lifespan is not expected to be extremely long but could last a good amount of time, because the model needs to be seen by people.Size – what physical dimensions are required? How many people are using the space? What activities are taken place? Are there regulations that determine the minimum size of the space?The model would be a scale of around 1/20, and the baseboard will be no bigger than 600x600millSafety – what factors need to be considered to make the building / landscape safe for the user group?The model needs to be safe for the user, such as not having any sharp edges in the materials, or any potentially dangerous materials. Quality – how can a high quality product be assured?A high quality product can be assured by using higher quality materials and joining methods to create the Model.Scale of production – how many are to be made? What manufacturing processes might be used?Only one will be made as it is a model of how the real thing would look, so it would be created using one off production.Cost – what are the considerations in determining cost?The model will be very cheap as the materials being used are not that expensive and also the machinery being used is free to use.
On this page is my specification, which is what I plan to achieve with my project and how I am going to do it.
From the specification you can see what the purpose of my model is, how I will try to create it and what materials I will use.
Shaiheim Allen 3018Reigate College 64220
Purpose – what is the aim or end-use for your project?The aim of my product is to give people a place to stay, sleep, store belongings and clothes in and also for people to be able to relax and use bathroom when they are on holiday. The room will accommodate up to 4 people at one time, so it must be a moderately big room. The room will also be a 4.5*/5* hotel room, so it will need to be relatively high quality to reflect this.Form – what shape or style must your building / landscape take?My room should take a simple shape such as a square or rectangle; it must also have a Moroccan style to it, using certain traditional architectural design features to represent the country, this is to make the user feel as if they are actually in another country and by using traditional design elements this would represent the country to the user. The reason for a simple shape is so that many of the rooms can fit on one floor of the hotel and also because it makes it easier to get furniture for a room that have flat walls and not ones that are curved, for example.Function – what must your building / landscape specifically do? There may be a number of functions, list them all.My room must have a bathroom; which itself must have a toilet, sink, shower (which could be a walk in, standard or bath/shower), towel rack and a mirror it should have a hair dryer in it as well. The main room must have a bed, safe, dressing table and a mirror. It must also have storage space such as a wardrobe, small cabinet for items and space to put suitcases, it should have a shoe rack for the users to store shoes as well. The room will also have a balcony on it as well. User requirements – what qualities must the building / landscapes have to make it attractive to client & user groups?The room must look nice and be clean; it must also use colours similar to that of the country in its design and it must also have certain Moorish architectural features incorporated into the design of it as well, this is to make it feel like the user is in another country.Performance requirements – what technical considerations need to be achieved within this project?The room needs to be able to store enough people in it comfortably and give them all a place to stay, so the beds need to be a decent size, along with a good room size and height, so the room must be able to fit pretty much anyone in the room regardless of size, this is because when going to a hotel the rooms are not separated based on the size of a person, however a more expensive room will be bigger so larger people would need to buy these rooms, and because my room is going to be quite high quality it needs to fit most people into it.Materials & components – what materials and components should be used to aid performance?A range of materials are needed for the room to perform its purpose well. For example, comfortable fabrics will be used for the beds and pillows etc. high quality wallpaper will be used so that the walls stay looking as nice as possible for as long as possible, it would be helpful if this was easily cleanable. The room would also use tiles a lot, as this can be used as the flooring and the walls for the bathroom so a lot of the surface of the room could be covered in tiles. Materials such as woods, veneers and plastics will be used for the other furniture such as the wardrobe and dressing table.Sustainability - decisions based on the environmental costs of extraction & processing the selected materials, the products manufacture, lifespan & disposal.The room would be moderately expensive to make as the product will need to last a long time so high quality products are needed in order to achieve this. So high quality woods and other materials will be needed for the components such as the wardrobe and dressing table. Also the tiles will need to be quite tough in order to avoid the breaking/cracking, and because the hotel room would be used a lot making the product durable is very important so that constant maintenance of broken parts is not needed.Size – what physical dimensions are required? How many people are using the space? What activities are taken place? Are there regulations that determine the minimum size of the space?4 people are using the room, so it will need to be able to fit this amount of people in the room and a great amount of space is not needed as they are only relaxing in the room but moving space is a good thing to have. This is because the user wants to feel comfortable and if there is not a lot of space then they might not feel as comfortable as if there was more moving space.Safety – what factors need to be considered to make the building / landscape safe for the user group?None of the items inside the room should be damaged or faulty, the room should be secure and there should be appropriate locks on all of the doors. The balcony railing must be a certain height to make sure people do not fall off of it because it is too low as well.Quality – how can a high quality product be assured?A high quality product can be assured by using high quality materials and using more skilled workers to create the different parts of the room. For example, a fabric chair in the room would make it feel more high quality than if there was a wooden chair in the room, and if there was a fabric chair it would need to be high quality so that it doesn’t get damaged too badly over wear and tear.Scale of production – how many are to be made? What manufacturing processes might be used?Only one room like this is to be made as rooms in hotels look slightly different to each other, so one off production would most likely be used in order to build this room, different processes would be needed for different components in the room.Cost – what are the considerations in determining cost?The considerations into how much this room would cost would be how much people are going to pay to stay in it (a room which is more expensive to make would mean it is more expensive to stay in and it will have higher maintenance costs) and how long the product is meant to last (hotel rooms are a long term product, so it would be quite expensive in order to keep it nice for as long as possible).
This is the second page of my specification, where I will talk about what my actual product needs to do, instead of the model.
From the specification you can see what the purpose of my real product is, how I will try to create it and what materials I will use.
Shaiheim Allen 3018Reigate College 64220
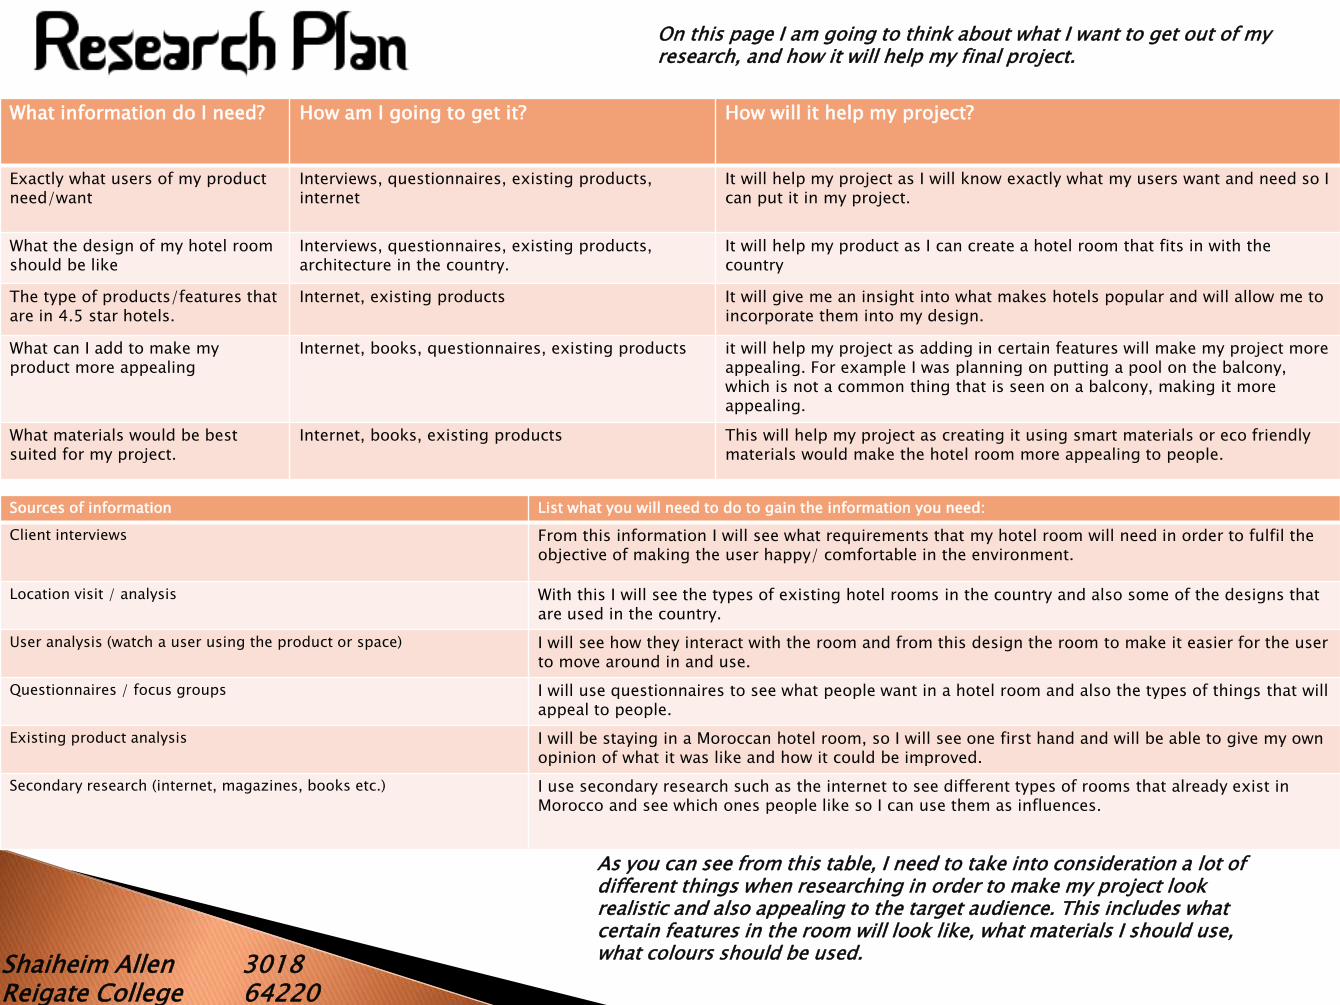
What information do I need? How am I going to get it? How will it help my project?
Exactly what users of my product need/want
Interviews, questionnaires, existing products, internet
It will help my project as I will know exactly what my users want and need so I can put it in my project.
What the design of my hotel roomshould be like
Interviews, questionnaires, existing products, architecture in the country.
It will help my product as I can create a hotel room that fits in with the country
The type of products/features that are in 4.5 star hotels.
Internet, existing products It will give me an insight into what makes hotels popular and will allow me to incorporate them into my design.
What can I add to make my product more appealing
Internet, books, questionnaires, existing products it will help my project as adding in certain features will make my project more appealing. For example I was planning on putting a pool on the balcony, which is not a common thing that is seen on a balcony, making it more appealing.
What materials would be best suited for my project.
Internet, books, existing products This will help my project as creating it using smart materials or eco friendly materials would make the hotel room more appealing to people.
On this page I am going to think about what I want to get out of my research, and how it will help my final project.
As you can see from this table, I need to take into consideration a lot of different things when researching in order to make my project look realistic and also appealing to the target audience. This includes what certain features in the room will look like, what materials I should use, what colours should be used.
Sources of information List what you will need to do to gain the information you need:
Client interviews From this information I will see what requirements that my hotel room will need in order to fulfil the objective of making the user happy/ comfortable in the environment.
Location visit / analysis With this I will see the types of existing hotel rooms in the country and also some of the designs that are used in the country.
User analysis (watch a user using the product or space) I will see how they interact with the room and from this design the room to make it easier for the user to move around in and use.
Questionnaires / focus groups I will use questionnaires to see what people want in a hotel room and also the types of things that will appeal to people.
Existing product analysis I will be staying in a Moroccan hotel room, so I will see one first hand and will be able to give my own opinion of what it was like and how it could be improved.
Secondary research (internet, magazines, books etc.) I use secondary research such as the internet to see different types of rooms that already exist in Morocco and see which ones people like so I can use them as influences.
Shaiheim Allen 3018Reigate College 64220
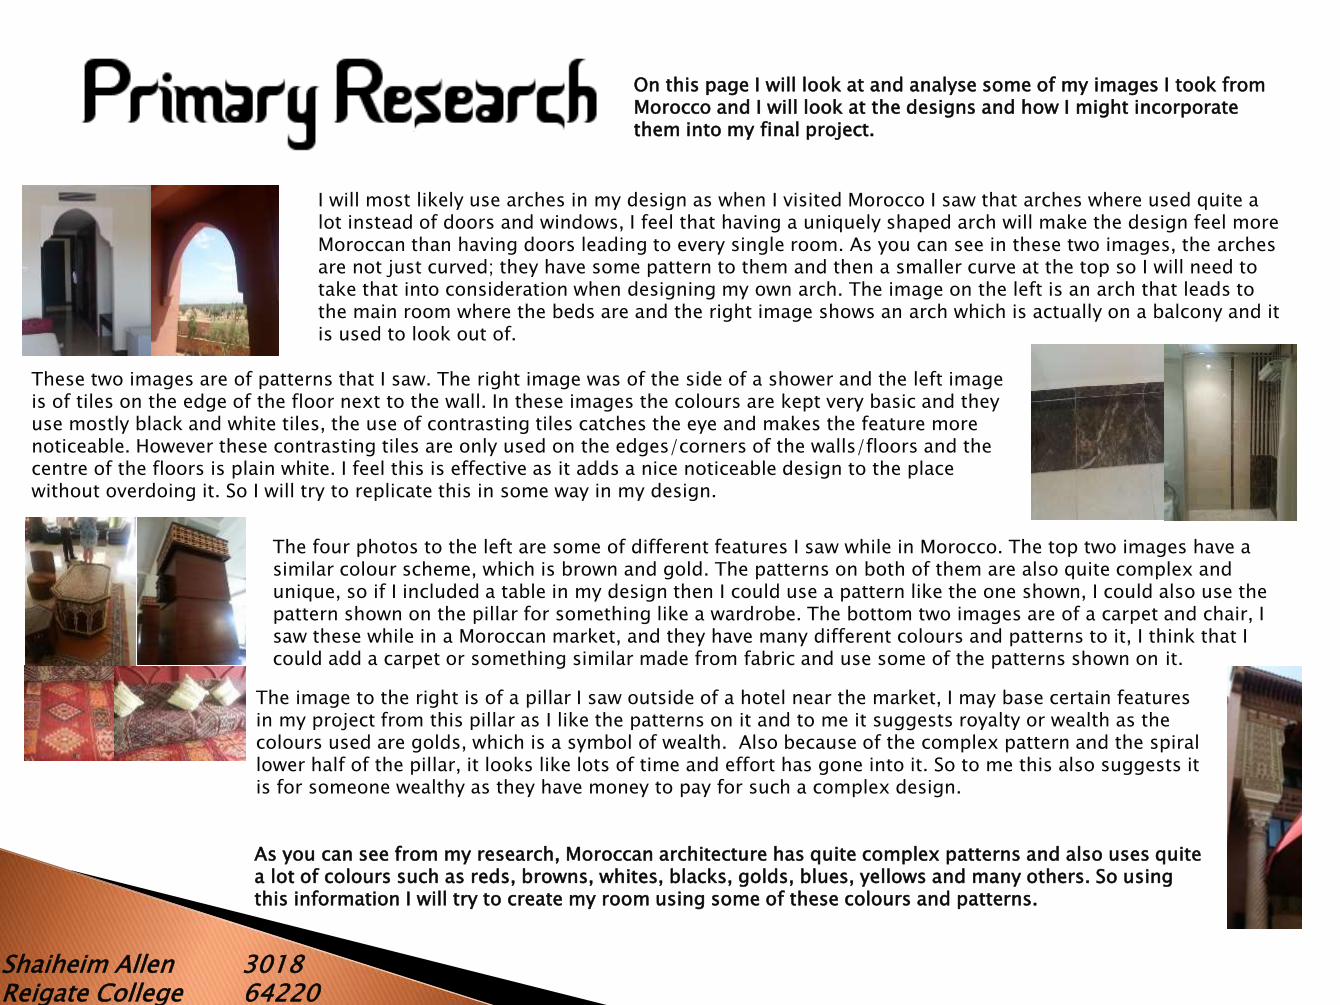
I will most likely use arches in my design as when I visited Morocco I saw that arches where used quite a lot instead of doors and windows, I feel that having a uniquely shaped arch will make the design feel more Moroccan than having doors leading to every single room. As you can see in these two images, the arches are not just curved; they have some pattern to them and then a smaller curve at the top so I will need to take that into consideration when designing my own arch. The image on the left is an arch that leads to the main room where the beds are and the right image shows an arch which is actually on a balcony and it is used to look out of.
These two images are of patterns that I saw. The right image was of the side of a shower and the left image is of tiles on the edge of the floor next to the wall. In these images the colours are kept very basic and they use mostly black and white tiles, the use of contrasting tiles catches the eye and makes the feature more noticeable. However these contrasting tiles are only used on the edges/corners of the walls/floors and the centre of the floors is plain white. I feel this is effective as it adds a nice noticeable design to the place without overdoing it. So I will try to replicate this in some way in my design.
The four photos to the left are some of different features I saw while in Morocco. The top two images have a similar colour scheme, which is brown and gold. The patterns on both of them are also quite complex and unique, so if I included a table in my design then I could use a pattern like the one shown, I could also use the pattern shown on the pillar for something like a wardrobe. The bottom two images are of a carpet and chair, I saw these while in a Moroccan market, and they have many different colours and patterns to it, I think that I could add a carpet or something similar made from fabric and use some of the patterns shown on it.
The image to the right is of a pillar I saw outside of a hotel near the market, I may base certain features in my project from this pillar as I like the patterns on it and to me it suggests royalty or wealth as the colours used are golds, which is a symbol of wealth. Also because of the complex pattern and the spiral lower half of the pillar, it looks like lots of time and effort has gone into it. So to me this also suggests it is for someone wealthy as they have money to pay for such a complex design.
On this page I will look at and analyse some of my images I took from Morocco and I will look at the designs and how I might incorporate them into my final project.
As you can see from my research, Moroccan architecture has quite complex patterns and also uses quite a lot of colours such as reds, browns, whites, blacks, golds, blues, yellows and many others. So using this information I will try to create my room using some of these colours and patterns.
Shaiheim Allen 3018Reigate College 64220
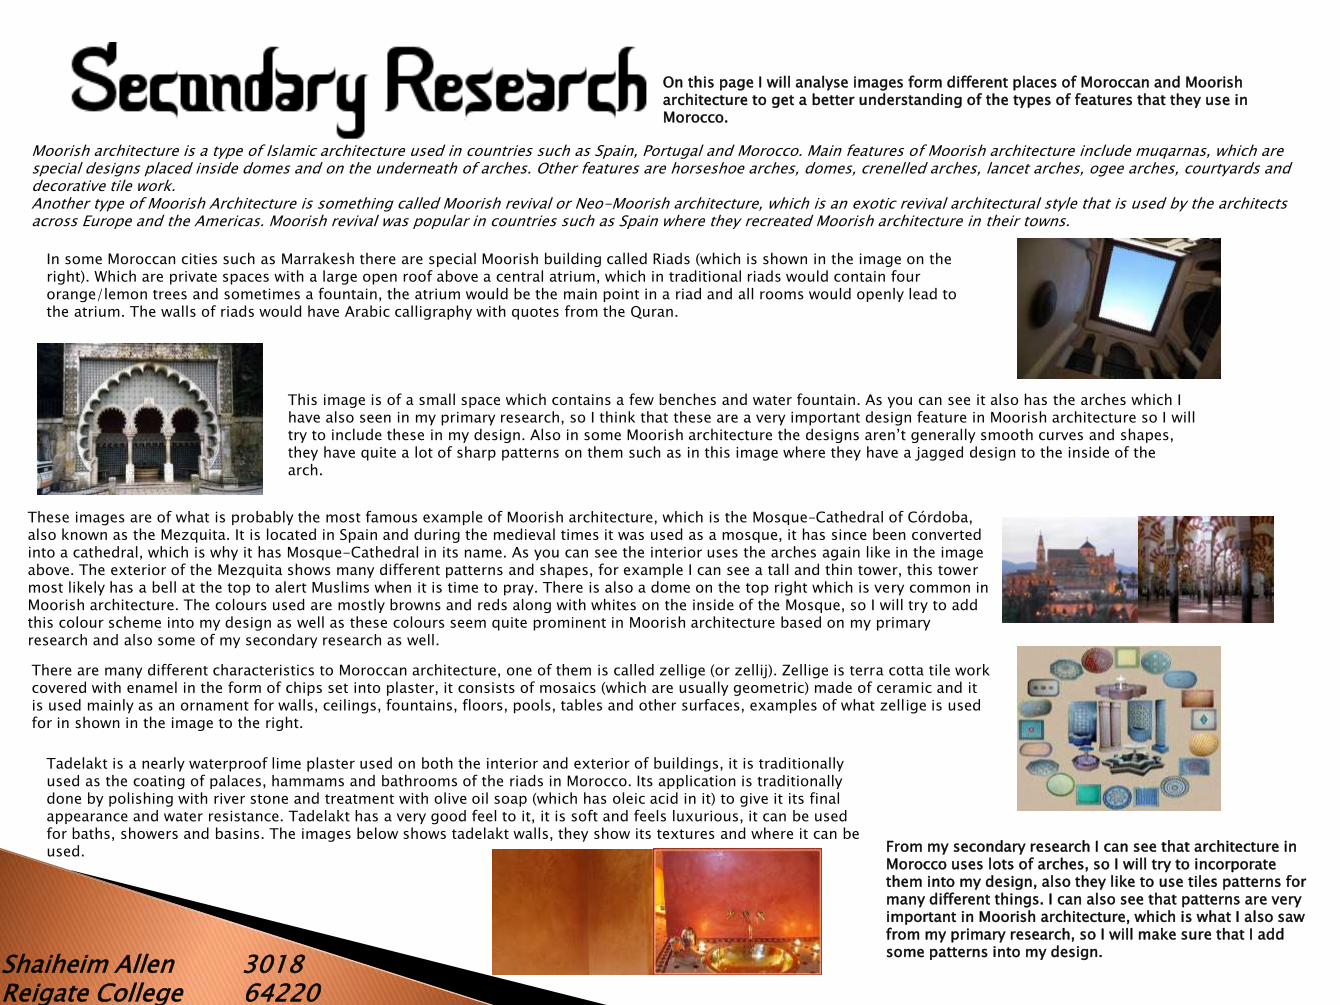
Moorish architecture is a type of Islamic architecture used in countries such as Spain, Portugal and Morocco. Main features of Moorish architecture include muqarnas, which are special designs placed inside domes and on the underneath of arches. Other features are horseshoe arches, domes, crenelled arches, lancet arches, ogee arches, courtyards and decorative tile work. Another type of Moorish Architecture is something called Moorish revival or Neo-Moorish architecture, which is an exotic revival architectural style that is used by the architects across Europe and the Americas. Moorish revival was popular in countries such as Spain where they recreated Moorish architecture in their towns.
In some Moroccan cities such as Marrakesh there are special Moorish building called Riads (which is shown in the image on theright). Which are private spaces with a large open roof above a central atrium, which in traditional riads would contain fourorange/lemon trees and sometimes a fountain, the atrium would be the main point in a riad and all rooms would openly lead to the atrium. The walls of riads would have Arabic calligraphy with quotes from the Quran.
This image is of a small space which contains a few benches and water fountain. As you can see it also has the arches which Ihave also seen in my primary research, so I think that these are a very important design feature in Moorish architecture so I will try to include these in my design. Also in some Moorish architecture the designs aren’t generally smooth curves and shapes, they have quite a lot of sharp patterns on them such as in this image where they have a jagged design to the inside of the arch.
These images are of what is probably the most famous example of Moorish architecture, which is the Mosque–Cathedral of Córdoba, also known as the Mezquita. It is located in Spain and during the medieval times it was used as a mosque, it has since been converted into a cathedral, which is why it has Mosque-Cathedral in its name. As you can see the interior uses the arches again like in the image above. The exterior of the Mezquita shows many different patterns and shapes, for example I can see a tall and thin tower, this tower most likely has a bell at the top to alert Muslims when it is time to pray. There is also a dome on the top right which is very common in Moorish architecture. The colours used are mostly browns and reds along with whites on the inside of the Mosque, so I will try to add this colour scheme into my design as well as these colours seem quite prominent in Moorish architecture based on my primary research and also some of my secondary research as well.
There are many different characteristics to Moroccan architecture, one of them is called zellige (or zellij). Zellige is terra cotta tile work covered with enamel in the form of chips set into plaster, it consists of mosaics (which are usually geometric) made of ceramic and it is used mainly as an ornament for walls, ceilings, fountains, floors, pools, tables and other surfaces, examples of what zellige is used for in shown in the image to the right.
Tadelakt is a nearly waterproof lime plaster used on both the interior and exterior of buildings, it is traditionally used as the coating of palaces, hammams and bathrooms of the riads in Morocco. Its application is traditionally done by polishing with river stone and treatment with olive oil soap (which has oleic acid in it) to give it its final appearance and water resistance. Tadelakt has a very good feel to it, it is soft and feels luxurious, it can be used for baths, showers and basins. The images below shows tadelakt walls, they show its textures and where it can be used.
On this page I will analyse images form different places of Moroccan and Moorish architecture to get a better understanding of the types of features that they use in Morocco.
From my secondary research I can see that architecture in Morocco uses lots of arches, so I will try to incorporate them into my design, also they like to use tiles patterns for many different things. I can also see that patterns are very important in Moorish architecture, which is what I also saw from my primary research, so I will make sure that I add some patterns into my design.
Shaiheim Allen 3018Reigate College 64220
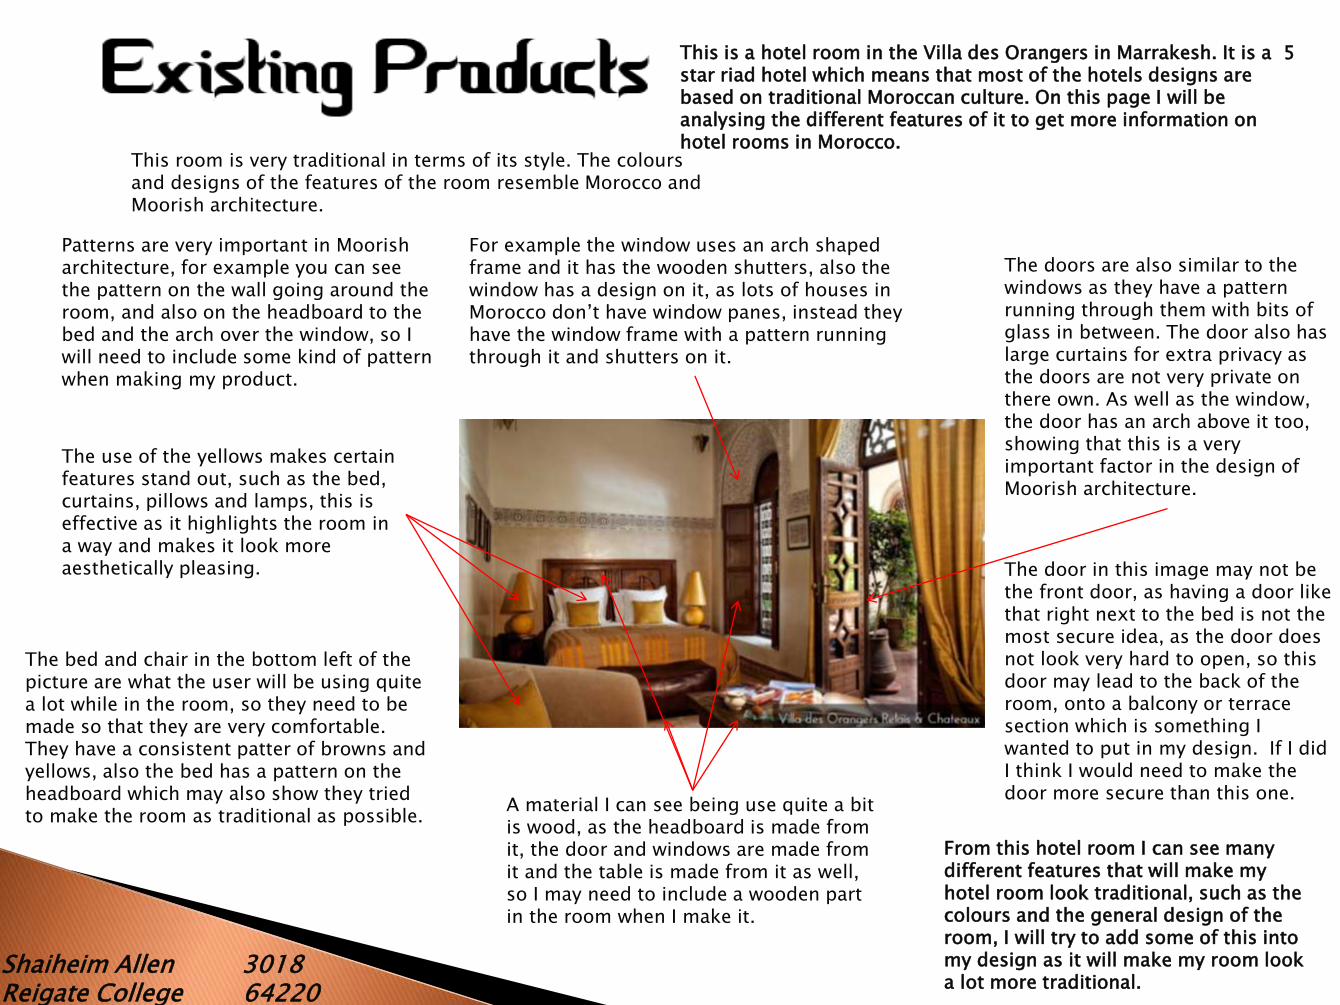
This is a hotel room in the Villa des Orangers in Marrakesh. It is a 5 star riad hotel which means that most of the hotels designs are based on traditional Moroccan culture. On this page I will be analysing the different features of it to get more information on hotel rooms in Morocco.
This room is very traditional in terms of its style. The colours and designs of the features of the room resemble Morocco and Moorish architecture.
For example the window uses an arch shaped frame and it has the wooden shutters, also the window has a design on it, as lots of houses in Morocco don’t have window panes, instead they have the window frame with a pattern running through it and shutters on it.
The doors are also similar to the windows as they have a pattern running through them with bits of glass in between. The door also has large curtains for extra privacy as the doors are not very private on there own. As well as the window, the door has an arch above it too, showing that this is a very important factor in the design of Moorish architecture.
The use of the yellows makes certain features stand out, such as the bed, curtains, pillows and lamps, this is effective as it highlights the room in a way and makes it look more aesthetically pleasing.
The bed and chair in the bottom left of the picture are what the user will be using quite a lot while in the room, so they need to be made so that they are very comfortable. They have a consistent patter of browns and yellows, also the bed has a pattern on the headboard which may also show they tried to make the room as traditional as possible.
Patterns are very important in Moorish architecture, for example you can see the pattern on the wall going around the room, and also on the headboard to the bed and the arch over the window, so I will need to include some kind of pattern when making my product.
A material I can see being use quite a bit is wood, as the headboard is made from it, the door and windows are made from it and the table is made from it as well, so I may need to include a wooden part in the room when I make it.
The door in this image may not be the front door, as having a door like that right next to the bed is not the most secure idea, as the door does not look very hard to open, so this door may lead to the back of the room, onto a balcony or terrace section which is something I wanted to put in my design. If I did I think I would need to make the door more secure than this one.
From this hotel room I can see many different features that will make my hotel room look traditional, such as the colours and the general design of the room, I will try to add some of this into my design as it will make my room look a lot more traditional.
Shaiheim Allen 3018Reigate College 64220
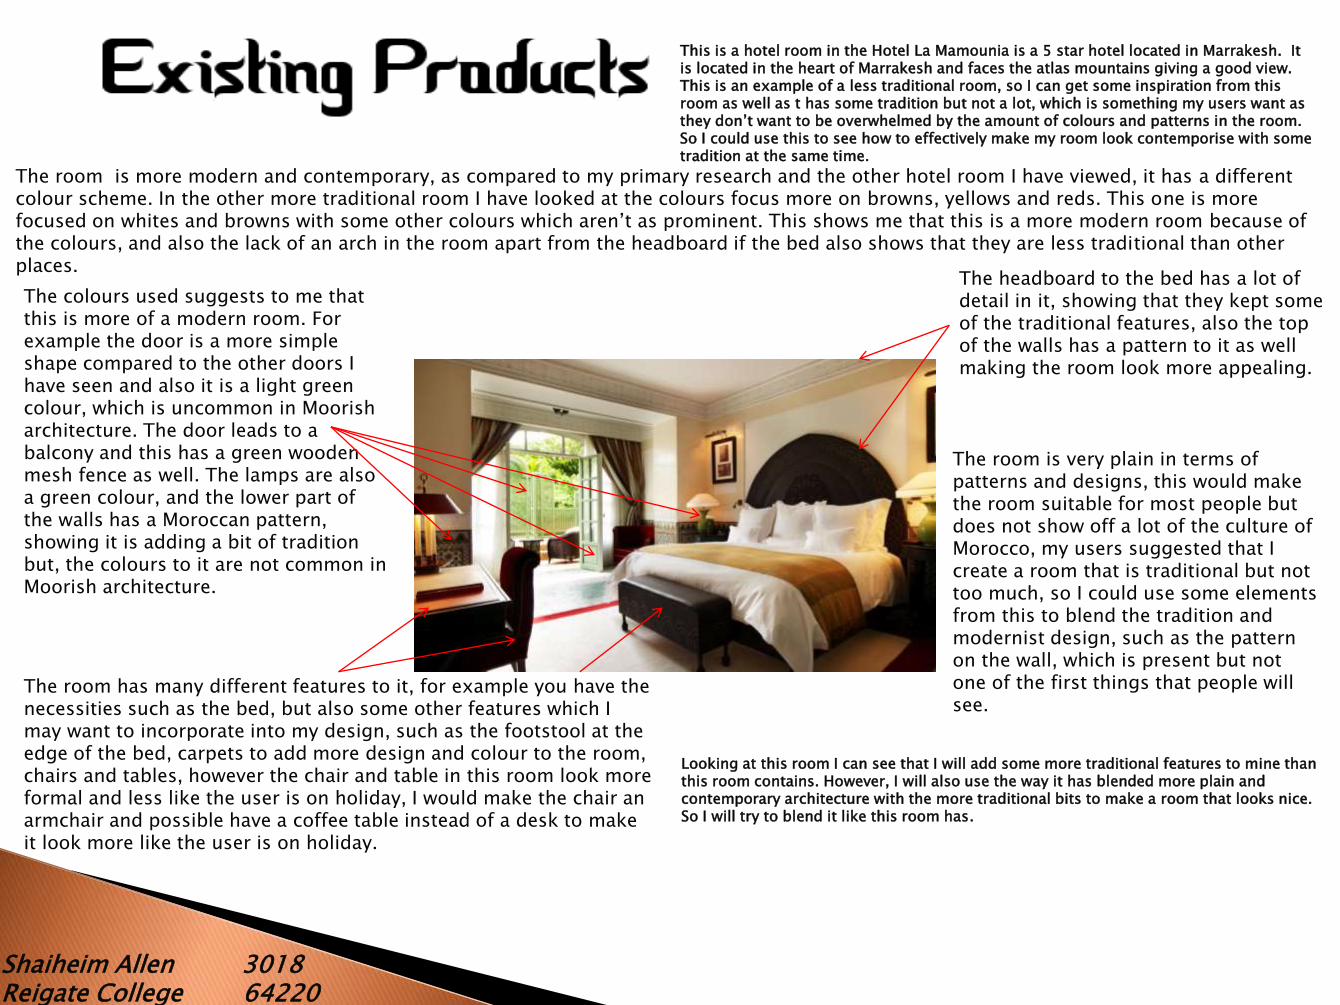
This is a hotel room in the Hotel La Mamounia is a 5 star hotel located in Marrakesh. It is located in the heart of Marrakesh and faces the atlas mountains giving a good view. This is an example of a less traditional room, so I can get some inspiration from this room as well as t has some tradition but not a lot, which is something my users want as they don’t want to be overwhelmed by the amount of colours and patterns in the room. So I could use this to see how to effectively make my room look contemporise with some tradition at the same time.
The room is more modern and contemporary, as compared to my primary research and the other hotel room I have viewed, it has a different colour scheme. In the other more traditional room I have looked at the colours focus more on browns, yellows and reds. This one is more focused on whites and browns with some other colours which aren’t as prominent. This shows me that this is a more modern room because of the colours, and also the lack of an arch in the room apart from the headboard if the bed also shows that they are less traditional than other places.
The headboard to the bed has a lot of detail in it, showing that they kept some of the traditional features, also the top of the walls has a pattern to it as well making the room look more appealing.
The colours used suggests to me that this is more of a modern room. For example the door is a more simple shape compared to the other doors I have seen and also it is a light green colour, which is uncommon in Moorish architecture. The door leads to a balcony and this has a green wooden mesh fence as well. The lamps are also a green colour, and the lower part of the walls has a Moroccan pattern, showing it is adding a bit of tradition but, the colours to it are not common in Moorish architecture.
The room is very plain in terms of patterns and designs, this would make the room suitable for most people but does not show off a lot of the culture of Morocco, my users suggested that I create a room that is traditional but not too much, so I could use some elements from this to blend the tradition and modernist design, such as the pattern on the wall, which is present but not one of the first things that people will see.
The room has many different features to it, for example you have the necessities such as the bed, but also some other features which I may want to incorporate into my design, such as the footstool at the edge of the bed, carpets to add more design and colour to the room, chairs and tables, however the chair and table in this room look more formal and less like the user is on holiday, I would make the chair an armchair and possible have a coffee table instead of a desk to make it look more like the user is on holiday.
Looking at this room I can see that I will add some more traditional features to mine than this room contains. However, I will also use the way it has blended more plain and contemporary architecture with the more traditional bits to make a room that looks nice. So I will try to blend it like this room has.

Shaiheim Allen 3018Reigate College 64220
On this page I am going to look at an architectural model of a holiday home made by a previous student, this is so I can get inspiration from it and also have better knowledge on what materials to use.
The image above shows the model without the roof, they used detachable parts to show what each floor of the model will look like. Lots of the model is made from similar materials, for example the walls are made from MDF painted white, the windows are made from acrylic with thin pieces of wood around the outside to represent frames.
This is an image of the interior of the house, from this you can see the use of different materials to create this model and make it look realistic. For example they used fabric to make the floor look like carpet, which is effective because the fabric and carpet have a similar look and texture to them making it useful for this purpose. They also used acrylic to create some of the furniture like the table and MDF to create most of the other parts such as the chairs, which were then covered over to look more comfortable and realistic. There are also paintings, a TV and other ornaments on the wall to make this look realistic.
From this image you can see the whole project as it is completely built, including the roof. You can see the terrace section of the house and the way they created the look of a pool.
This architectural model is similar to what mine will be, however this model has a larger scale than mine, my model will have a scale of around 1/20 and this model is a scale of around 1/50, because the model is showing a bigger project than mine the scale needs to be greater.
Because my design will have a pool in it as well it is good to look at how some other people did theirs, they used the vacuum forming machine over some rocks to create a rippled effect, then they stuck it on the baseboard after painting the bottom of it blue, so it looks like water, I will most likely do this as it is a simple and effective way of creating a water effect.
From this model I can see the different materials to use for the interior of my model, and different ways to create realistic looking items, from using the vacuum forming machine to create a pool, to using fabric to represent the flooring and also using MDF to create walls and other features in the model.
Shaiheim Allen 3018Reigate College 64220
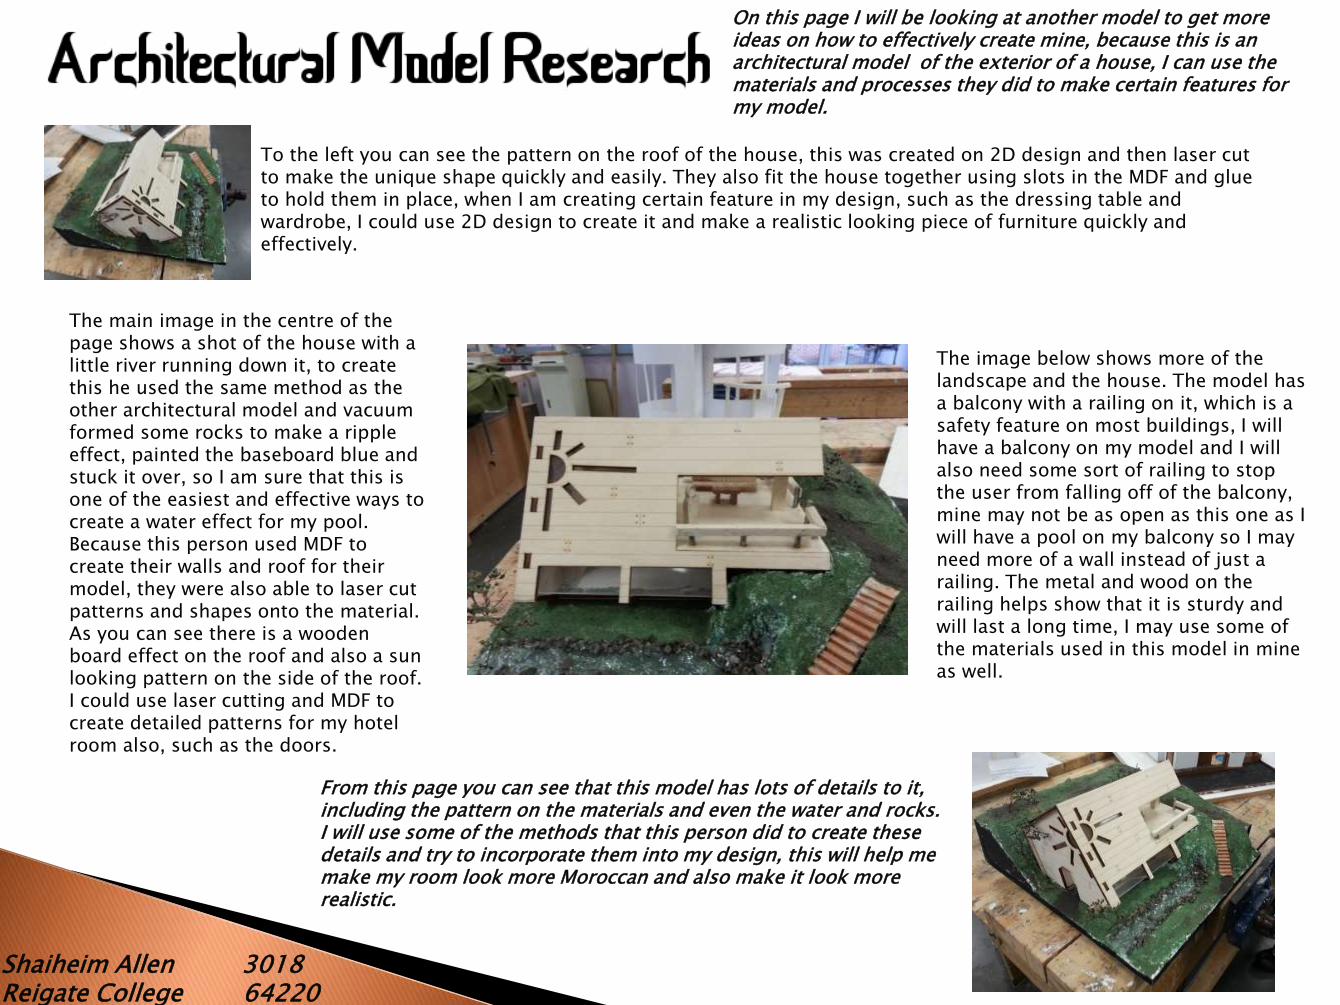
On this page I will be looking at another model to get more ideas on how to effectively create mine, because this is an architectural model of the exterior of a house, I can use the materials and processes they did to make certain features for my model.
To the left you can see the pattern on the roof of the house, this was created on 2D design and then laser cut to make the unique shape quickly and easily. They also fit the house together using slots in the MDF and glue to hold them in place, when I am creating certain feature in my design, such as the dressing table and wardrobe, I could use 2D design to create it and make a realistic looking piece of furniture quickly and effectively.
The main image in the centre of the page shows a shot of the house with a little river running down it, to create this he used the same method as the other architectural model and vacuum formed some rocks to make a ripple effect, painted the baseboard blue and stuck it over, so I am sure that this is one of the easiest and effective ways to create a water effect for my pool.Because this person used MDF to create their walls and roof for their model, they were also able to laser cut patterns and shapes onto the material. As you can see there is a wooden board effect on the roof and also a sun looking pattern on the side of the roof. I could use laser cutting and MDF to create detailed patterns for my hotel room also, such as the doors.
The image below shows more of the landscape and the house. The model has a balcony with a railing on it, which is a safety feature on most buildings, I will have a balcony on my model and I will also need some sort of railing to stop the user from falling off of the balcony, mine may not be as open as this one as I will have a pool on my balcony so I may need more of a wall instead of just a railing. The metal and wood on the railing helps show that it is sturdy and will last a long time, I may use some of the materials used in this model in mine as well.
From this page you can see that this model has lots of details to it, including the pattern on the materials and even the water and rocks. I will use some of the methods that this person did to create these details and try to incorporate them into my design, this will help me make my room look more Moroccan and also make it look more realistic.
Shaiheim Allen 3018Reigate College 64220
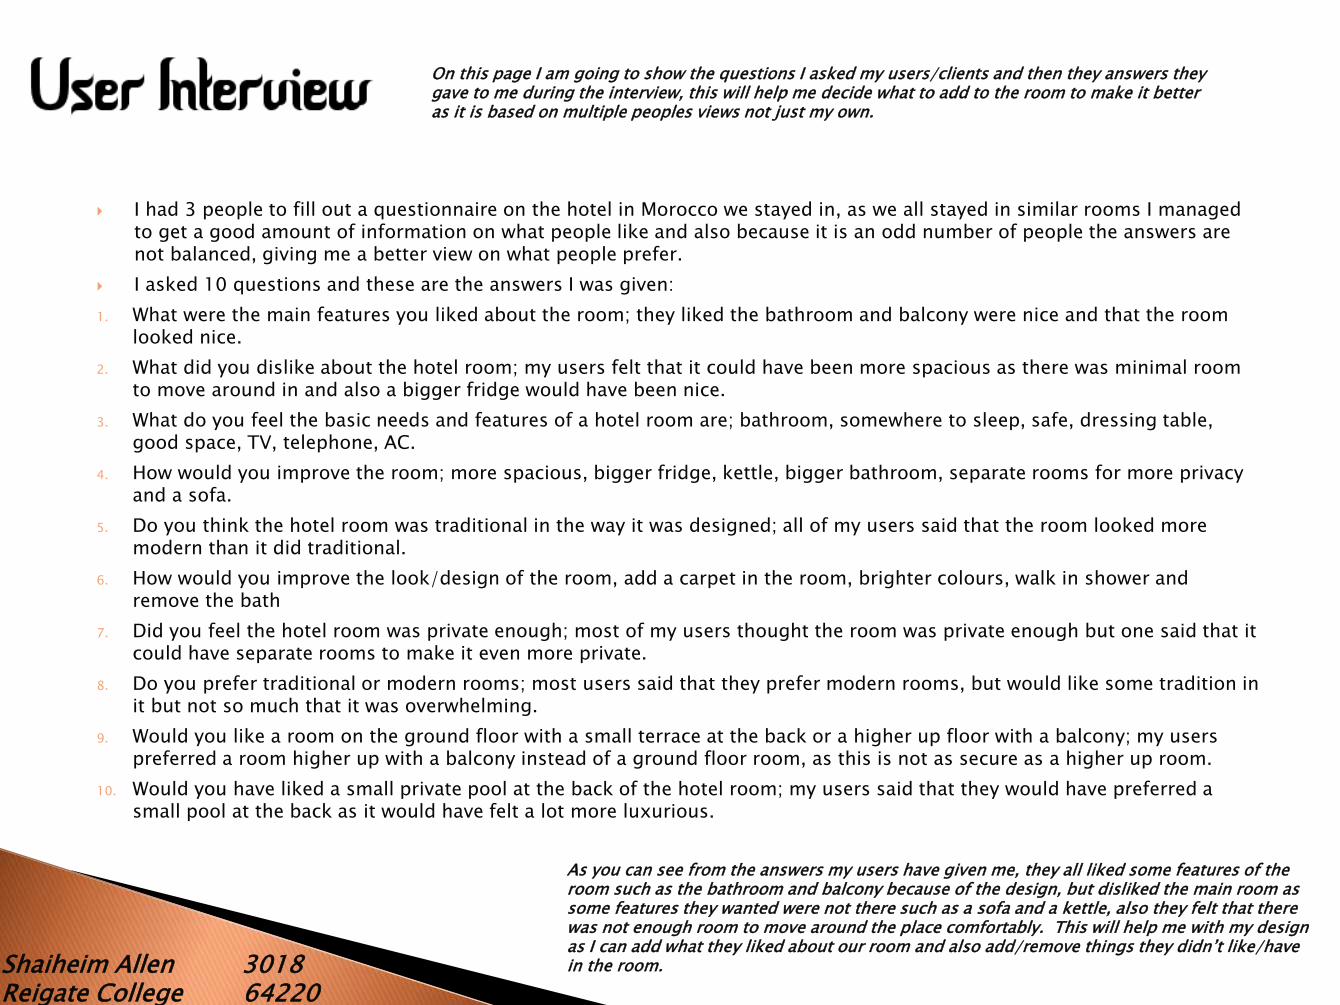
I had 3 people to fill out a questionnaire on the hotel in Morocco we stayed in, as we all stayed in similar rooms I managed to get a good amount of information on what people like and also because it is an odd number of people the answers are not balanced, giving me a better view on what people prefer.
I asked 10 questions and these are the answers I was given:
1. What were the main features you liked about the room; they liked the bathroom and balcony were nice and that the room looked nice.
2. What did you dislike about the hotel room; my users felt that it could have been more spacious as there was minimal room to move around in and also a bigger fridge would have been nice.
3. What do you feel the basic needs and features of a hotel room are; bathroom, somewhere to sleep, safe, dressing table, good space, TV, telephone, AC.
4. How would you improve the room; more spacious, bigger fridge, kettle, bigger bathroom, separate rooms for more privacy and a sofa.
5. Do you think the hotel room was traditional in the way it was designed; all of my users said that the room looked more modern than it did traditional.
6. How would you improve the look/design of the room, add a carpet in the room, brighter colours, walk in shower and remove the bath
7. Did you feel the hotel room was private enough; most of my users thought the room was private enough but one said that it could have separate rooms to make it even more private.
8. Do you prefer traditional or modern rooms; most users said that they prefer modern rooms, but would like some tradition in it but not so much that it was overwhelming.
9. Would you like a room on the ground floor with a small terrace at the back or a higher up floor with a balcony; my users preferred a room higher up with a balcony instead of a ground floor room, as this is not as secure as a higher up room.
10. Would you have liked a small private pool at the back of the hotel room; my users said that they would have preferred a small pool at the back as it would have felt a lot more luxurious.
On this page I am going to show the questions I asked my users/clients and then they answers they gave to me during the interview, this will help me decide what to add to the room to make it better as it is based on multiple peoples views not just my own.
As you can see from the answers my users have given me, they all liked some features of the room such as the bathroom and balcony because of the design, but disliked the main room as some features they wanted were not there such as a sofa and a kettle, also they felt that there was not enough room to move around the place comfortably. This will help me with my design as I can add what they liked about our room and also add/remove things they didn’t like/have in the room.
Shaiheim Allen 3018Reigate College 64220
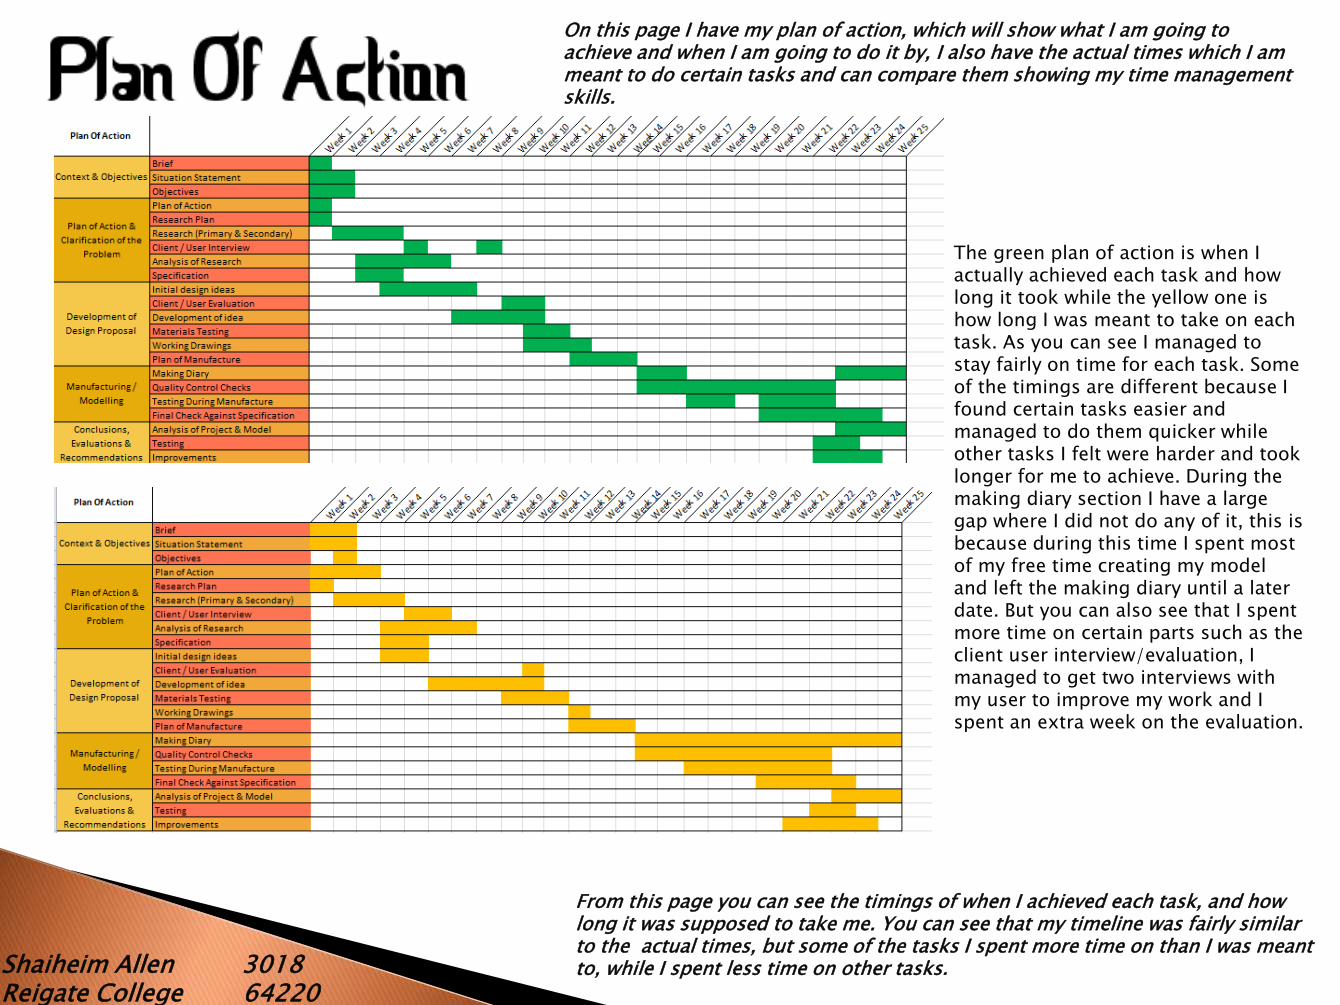
On this page I have my plan of action, which will show what I am going to achieve and when I am going to do it by, I also have the actual times which I am meant to do certain tasks and can compare them showing my time management skills.
The green plan of action is when I actually achieved each task and how long it took while the yellow one is how long I was meant to take on each task. As you can see I managed to stay fairly on time for each task. Some of the timings are different because I found certain tasks easier and managed to do them quicker while other tasks I felt were harder and took longer for me to achieve. During the making diary section I have a large gap where I did not do any of it, this is because during this time I spent most of my free time creating my model and left the making diary until a later date. But you can also see that I spent more time on certain parts such as the client user interview/evaluation, I managed to get two interviews with my user to improve my work and I spent an extra week on the evaluation.
From this page you can see the timings of when I achieved each task, and how long it was supposed to take me. You can see that my timeline was fairly similar to the actual times, but some of the tasks I spent more time on than I was meant to, while I spent less time on other tasks.
Shaiheim Allen 3018Reigate College 64220
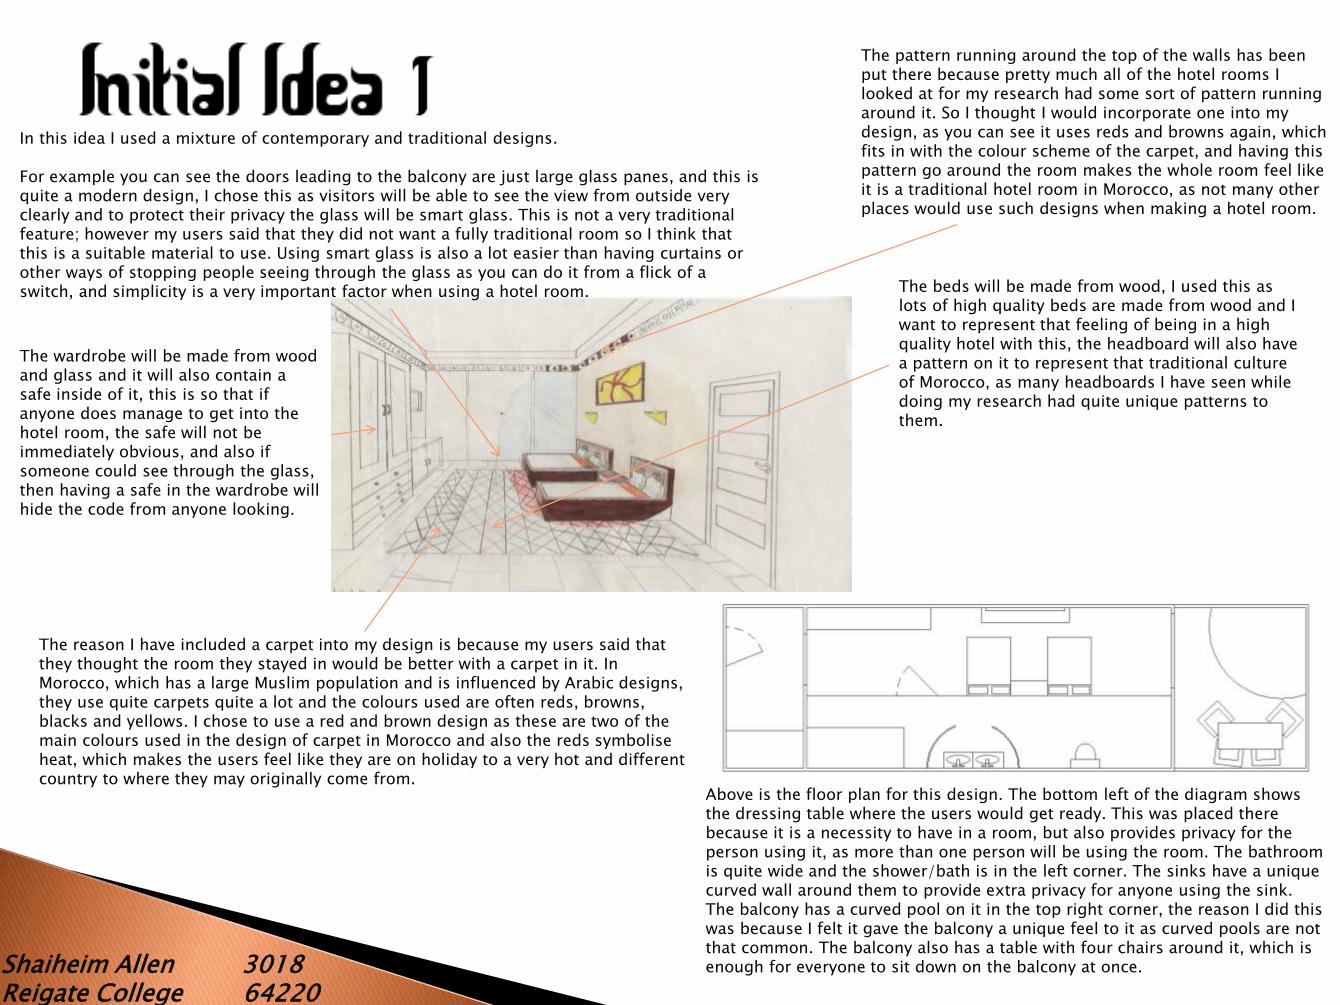
The wardrobe will be made from wood and glass and it will also contain a safe inside of it, this is so that if anyone does manage to get into the hotel room, the safe will not be immediately obvious, and also if someone could see through the glass, then having a safe in the wardrobe will hide the code from anyone looking.
In this idea I used a mixture of contemporary and traditional designs.
For example you can see the doors leading to the balcony are just large glass panes, and this is quite a modern design, I chose this as visitors will be able to see the view from outside very clearly and to protect their privacy the glass will be smart glass. This is not a very traditional feature; however my users said that they did not want a fully traditional room so I think that this is a suitable material to use. Using smart glass is also a lot easier than having curtains or other ways of stopping people seeing through the glass as you can do it from a flick of a switch, and simplicity is a very important factor when using a hotel room. The beds will be made from wood, I used this as
lots of high quality beds are made from wood and I want to represent that feeling of being in a high quality hotel with this, the headboard will also have a pattern on it to represent that traditional culture of Morocco, as many headboards I have seen while doing my research had quite unique patterns to them.
The reason I have included a carpet into my design is because my users said that they thought the room they stayed in would be better with a carpet in it. In Morocco, which has a large Muslim population and is influenced by Arabic designs, they use quite carpets quite a lot and the colours used are often reds, browns, blacks and yellows. I chose to use a red and brown design as these are two of the main colours used in the design of carpet in Morocco and also the reds symbolise heat, which makes the users feel like they are on holiday to a very hot and different country to where they may originally come from.
The pattern running around the top of the walls has been put there because pretty much all of the hotel rooms I looked at for my research had some sort of pattern running around it. So I thought I would incorporate one into my design, as you can see it uses reds and browns again, which fits in with the colour scheme of the carpet, and having this pattern go around the room makes the whole room feel like it is a traditional hotel room in Morocco, as not many other places would use such designs when making a hotel room.
Above is the floor plan for this design. The bottom left of the diagram shows the dressing table where the users would get ready. This was placed there because it is a necessity to have in a room, but also provides privacy for the person using it, as more than one person will be using the room. The bathroom is quite wide and the shower/bath is in the left corner. The sinks have a unique curved wall around them to provide extra privacy for anyone using the sink. The balcony has a curved pool on it in the top right corner, the reason I did this was because I felt it gave the balcony a unique feel to it as curved pools are not that common. The balcony also has a table with four chairs around it, which is enough for everyone to sit down on the balcony at once.
Shaiheim Allen 3018Reigate College 64220
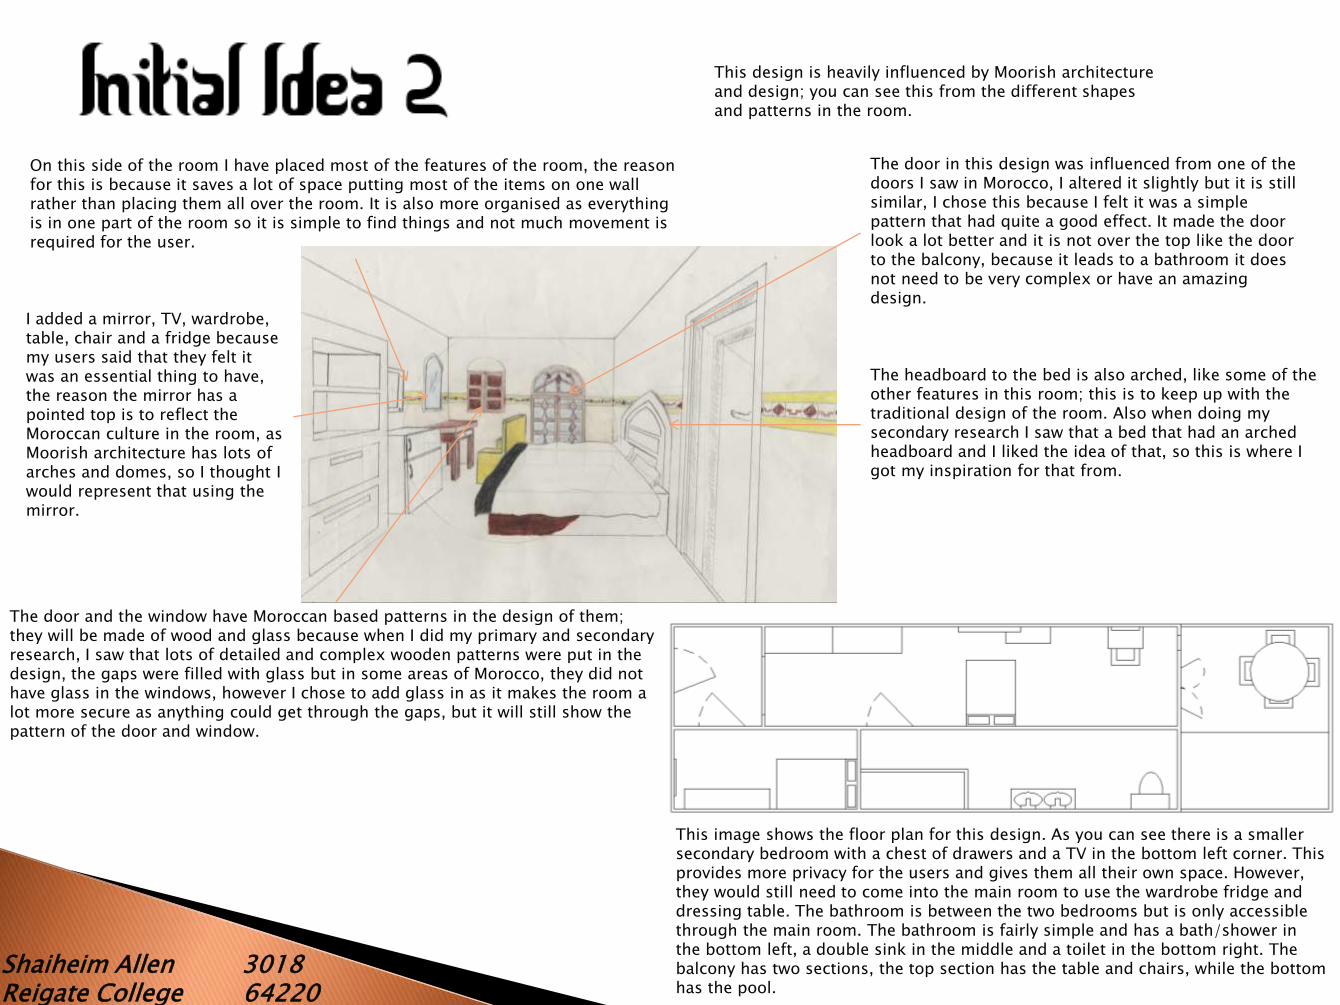
This design is heavily influenced by Moorish architecture and design; you can see this from the different shapes and patterns in the room.
The headboard to the bed is also arched, like some of the other features in this room; this is to keep up with the traditional design of the room. Also when doing my secondary research I saw that a bed that had an arched headboard and I liked the idea of that, so this is where I got my inspiration for that from.
The door in this design was influenced from one of the doors I saw in Morocco, I altered it slightly but it is still similar, I chose this because I felt it was a simple pattern that had quite a good effect. It made the door look a lot better and it is not over the top like the door to the balcony, because it leads to a bathroom it does not need to be very complex or have an amazing design.
The door and the window have Moroccan based patterns in the design of them; they will be made of wood and glass because when I did my primary and secondary research, I saw that lots of detailed and complex wooden patterns were put in the design, the gaps were filled with glass but in some areas of Morocco, they did not have glass in the windows, however I chose to add glass in as it makes the room a lot more secure as anything could get through the gaps, but it will still show the pattern of the door and window.
On this side of the room I have placed most of the features of the room, the reason for this is because it saves a lot of space putting most of the items on one wall rather than placing them all over the room. It is also more organised as everything is in one part of the room so it is simple to find things and not much movement is required for the user.
I added a mirror, TV, wardrobe, table, chair and a fridge because my users said that they felt it was an essential thing to have, the reason the mirror has a pointed top is to reflect the Moroccan culture in the room, as Moorish architecture has lots of arches and domes, so I thought I would represent that using the mirror.
This image shows the floor plan for this design. As you can see there is a smaller secondary bedroom with a chest of drawers and a TV in the bottom left corner. This provides more privacy for the users and gives them all their own space. However, they would still need to come into the main room to use the wardrobe fridge and dressing table. The bathroom is between the two bedrooms but is only accessible through the main room. The bathroom is fairly simple and has a bath/shower in the bottom left, a double sink in the middle and a toilet in the bottom right. The balcony has two sections, the top section has the table and chairs, while the bottom has the pool.
Shaiheim Allen 3018Reigate College 64220
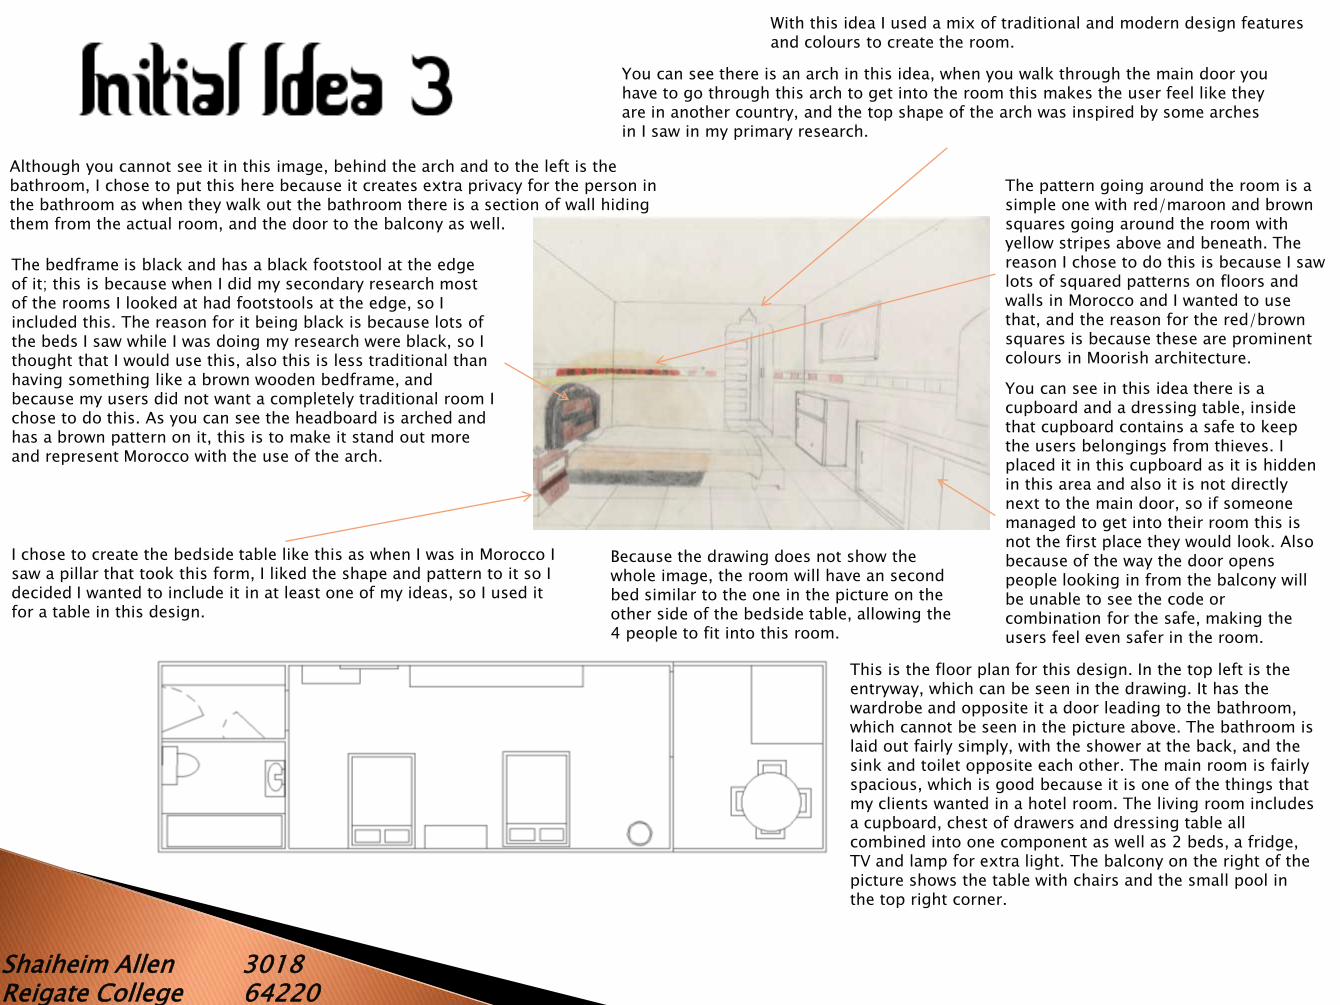
With this idea I used a mix of traditional and modern design features and colours to create the room.
You can see in this idea there is a cupboard and a dressing table, inside that cupboard contains a safe to keep the users belongings from thieves. I placed it in this cupboard as it is hidden in this area and also it is not directly next to the main door, so if someone managed to get into their room this is not the first place they would look. Also because of the way the door opens people looking in from the balcony will be unable to see the code or combination for the safe, making the users feel even safer in the room.
Although you cannot see it in this image, behind the arch and to the left is the bathroom, I chose to put this here because it creates extra privacy for the person in the bathroom as when they walk out the bathroom there is a section of wall hiding them from the actual room, and the door to the balcony as well.
You can see there is an arch in this idea, when you walk through the main door you have to go through this arch to get into the room this makes the user feel like they are in another country, and the top shape of the arch was inspired by some arches in I saw in my primary research.
Because the drawing does not show the whole image, the room will have an second bed similar to the one in the picture on the other side of the bedside table, allowing the 4 people to fit into this room.
I chose to create the bedside table like this as when I was in Morocco I saw a pillar that took this form, I liked the shape and pattern to it so I decided I wanted to include it in at least one of my ideas, so I used it for a table in this design.
The bedframe is black and has a black footstool at the edge of it; this is because when I did my secondary research most of the rooms I looked at had footstools at the edge, so I included this. The reason for it being black is because lots of the beds I saw while I was doing my research were black, so I thought that I would use this, also this is less traditional than having something like a brown wooden bedframe, and because my users did not want a completely traditional room I chose to do this. As you can see the headboard is arched and has a brown pattern on it, this is to make it stand out more and represent Morocco with the use of the arch.
The pattern going around the room is a simple one with red/maroon and brown squares going around the room with yellow stripes above and beneath. The reason I chose to do this is because I saw lots of squared patterns on floors and walls in Morocco and I wanted to use that, and the reason for the red/brown squares is because these are prominent colours in Moorish architecture.
This is the floor plan for this design. In the top left is the entryway, which can be seen in the drawing. It has the wardrobe and opposite it a door leading to the bathroom, which cannot be seen in the picture above. The bathroom is laid out fairly simply, with the shower at the back, and the sink and toilet opposite each other. The main room is fairly spacious, which is good because it is one of the things that my clients wanted in a hotel room. The living room includes a cupboard, chest of drawers and dressing table all combined into one component as well as 2 beds, a fridge, TV and lamp for extra light. The balcony on the right of the picture shows the table with chairs and the small pool in the top right corner.
Shaiheim Allen 3018Reigate College 64220
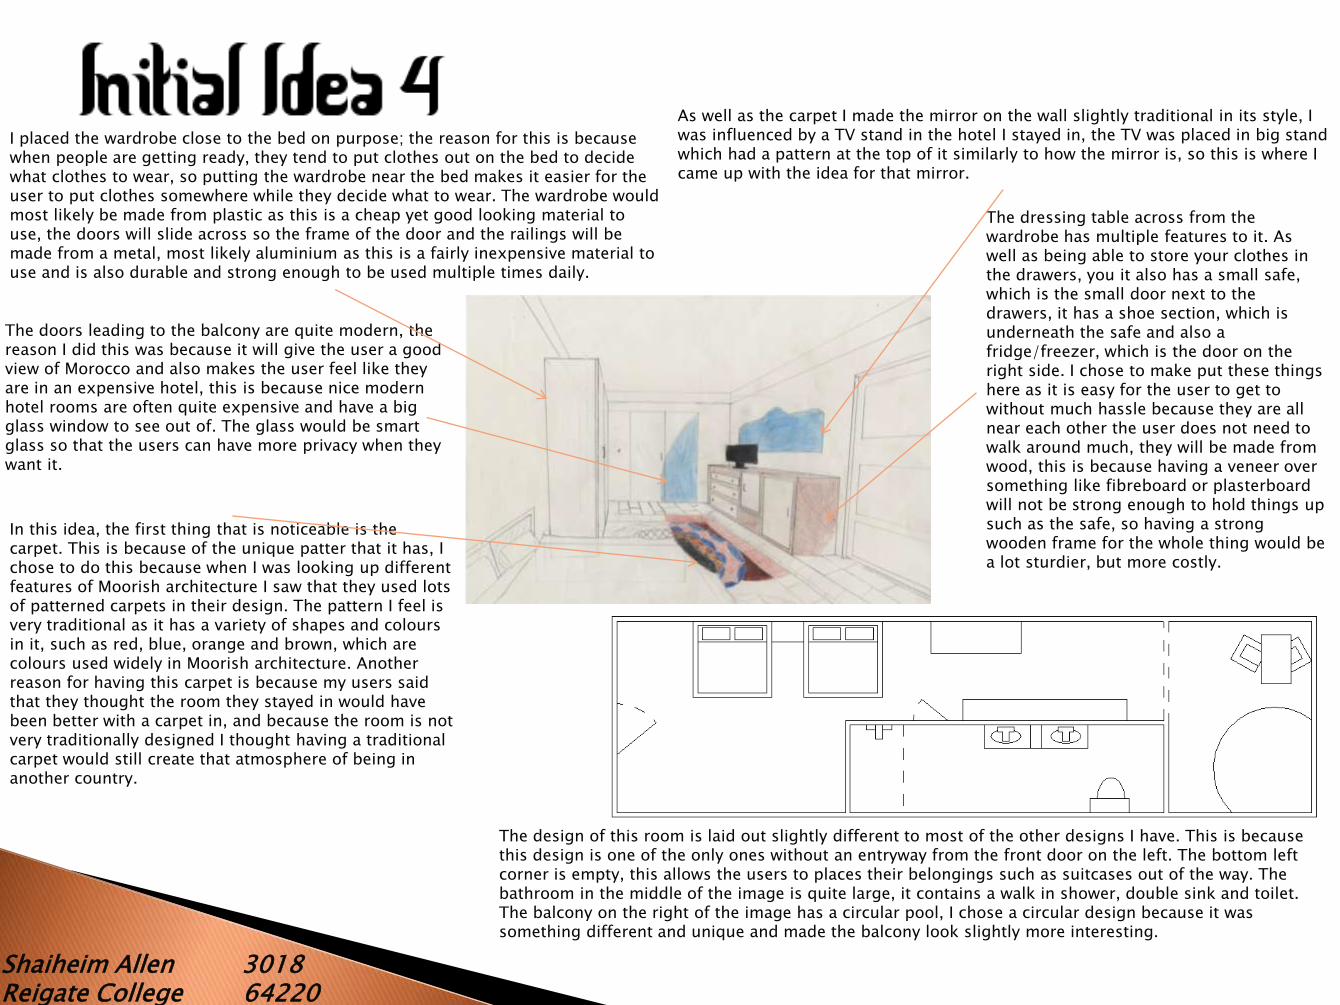
In this idea, the first thing that is noticeable is the carpet. This is because of the unique patter that it has, I chose to do this because when I was looking up different features of Moorish architecture I saw that they used lots of patterned carpets in their design. The pattern I feel is very traditional as it has a variety of shapes and colours in it, such as red, blue, orange and brown, which are colours used widely in Moorish architecture. Another reason for having this carpet is because my users said that they thought the room they stayed in would have been better with a carpet in, and because the room is not very traditionally designed I thought having a traditional carpet would still create that atmosphere of being in another country.
The doors leading to the balcony are quite modern, the reason I did this was because it will give the user a good view of Morocco and also makes the user feel like they are in an expensive hotel, this is because nice modern hotel rooms are often quite expensive and have a big glass window to see out of. The glass would be smart glass so that the users can have more privacy when they want it.
The dressing table across from the wardrobe has multiple features to it. As well as being able to store your clothes in the drawers, you it also has a small safe, which is the small door next to the drawers, it has a shoe section, which is underneath the safe and also a fridge/freezer, which is the door on the right side. I chose to make put these things here as it is easy for the user to get to without much hassle because they are all near each other the user does not need to walk around much, they will be made from wood, this is because having a veneer over something like fibreboard or plasterboard will not be strong enough to hold things up such as the safe, so having a strong wooden frame for the whole thing would be a lot sturdier, but more costly.
I placed the wardrobe close to the bed on purpose; the reason for this is because when people are getting ready, they tend to put clothes out on the bed to decide what clothes to wear, so putting the wardrobe near the bed makes it easier for the user to put clothes somewhere while they decide what to wear. The wardrobe would most likely be made from plastic as this is a cheap yet good looking material to use, the doors will slide across so the frame of the door and the railings will be made from a metal, most likely aluminium as this is a fairly inexpensive material to use and is also durable and strong enough to be used multiple times daily.
As well as the carpet I made the mirror on the wall slightly traditional in its style, I was influenced by a TV stand in the hotel I stayed in, the TV was placed in big stand which had a pattern at the top of it similarly to how the mirror is, so this is where I came up with the idea for that mirror.
The design of this room is laid out slightly different to most of the other designs I have. This is because this design is one of the only ones without an entryway from the front door on the left. The bottom left corner is empty, this allows the users to places their belongings such as suitcases out of the way. The bathroom in the middle of the image is quite large, it contains a walk in shower, double sink and toilet. The balcony on the right of the image has a circular pool, I chose a circular design because it was something different and unique and made the balcony look slightly more interesting.
Shaiheim Allen 3018Reigate College 64220
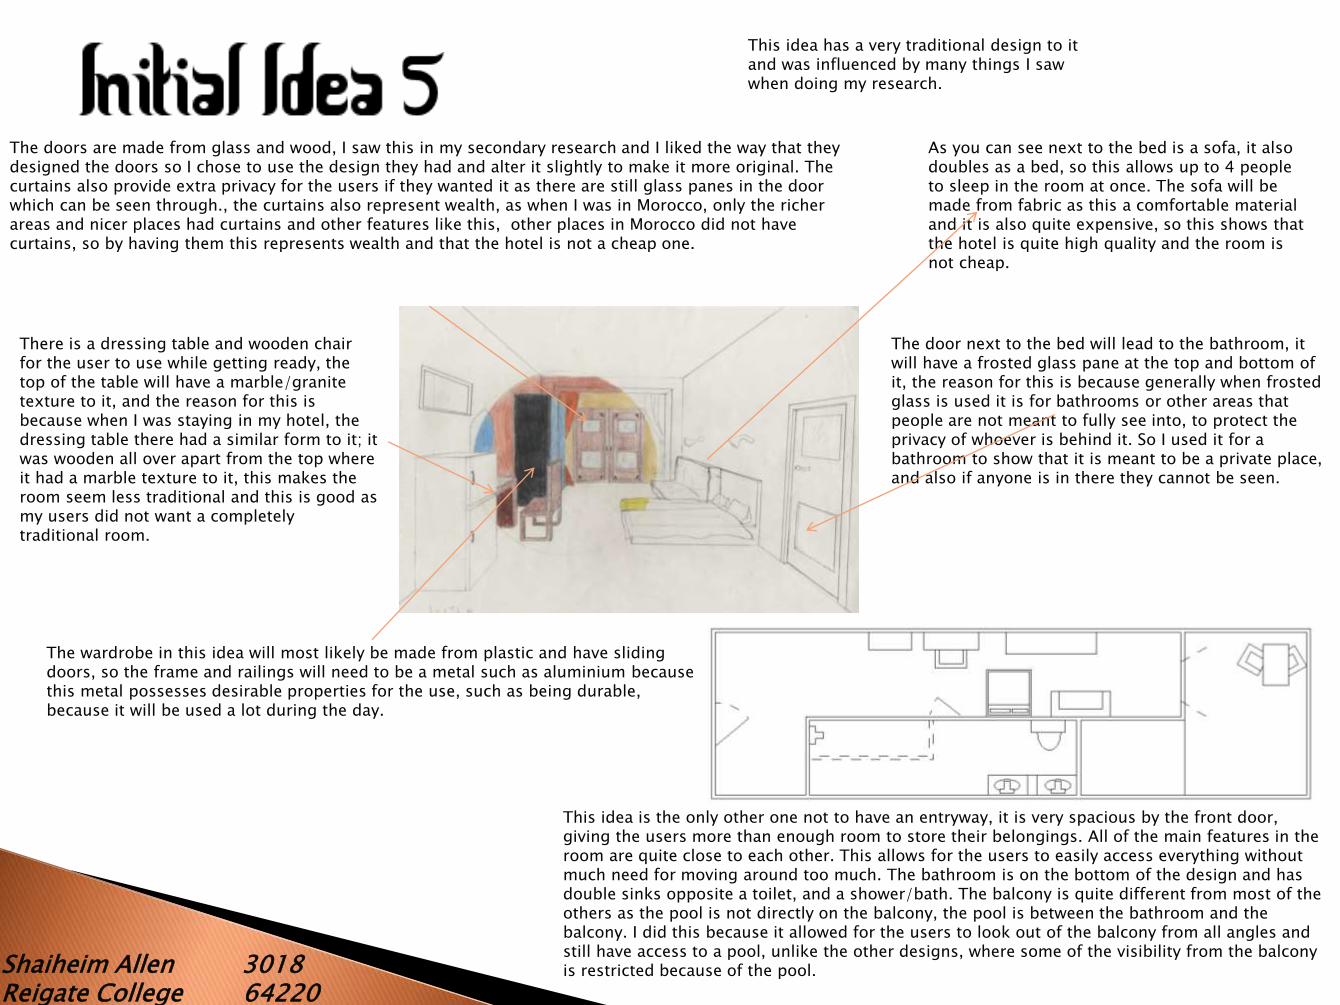
This idea has a very traditional design to it and was influenced by many things I saw when doing my research.
The door next to the bed will lead to the bathroom, it will have a frosted glass pane at the top and bottom of it, the reason for this is because generally when frosted glass is used it is for bathrooms or other areas that people are not meant to fully see into, to protect the privacy of whoever is behind it. So I used it for a bathroom to show that it is meant to be a private place, and also if anyone is in there they cannot be seen.
There is a dressing table and wooden chair for the user to use while getting ready, the top of the table will have a marble/granite texture to it, and the reason for this is because when I was staying in my hotel, the dressing table there had a similar form to it; it was wooden all over apart from the top where it had a marble texture to it, this makes the room seem less traditional and this is good as my users did not want a completely traditional room.
As you can see next to the bed is a sofa, it also doubles as a bed, so this allows up to 4 people to sleep in the room at once. The sofa will be made from fabric as this a comfortable material and it is also quite expensive, so this shows that the hotel is quite high quality and the room is not cheap.
The wardrobe in this idea will most likely be made from plastic and have sliding doors, so the frame and railings will need to be a metal such as aluminium because this metal possesses desirable properties for the use, such as being durable, because it will be used a lot during the day.
The doors are made from glass and wood, I saw this in my secondary research and I liked the way that they designed the doors so I chose to use the design they had and alter it slightly to make it more original. The curtains also provide extra privacy for the users if they wanted it as there are still glass panes in the door which can be seen through., the curtains also represent wealth, as when I was in Morocco, only the richer areas and nicer places had curtains and other features like this, other places in Morocco did not have curtains, so by having them this represents wealth and that the hotel is not a cheap one.
This idea is the only other one not to have an entryway, it is very spacious by the front door, giving the users more than enough room to store their belongings. All of the main features in the room are quite close to each other. This allows for the users to easily access everything without much need for moving around too much. The bathroom is on the bottom of the design and has double sinks opposite a toilet, and a shower/bath. The balcony is quite different from most of the others as the pool is not directly on the balcony, the pool is between the bathroom and the balcony. I did this because it allowed for the users to look out of the balcony from all angles and still have access to a pool, unlike the other designs, where some of the visibility from the balcony is restricted because of the pool.

Shaiheim Allen 3018Reigate College 64220
This idea uses a mix of traditional elements as well as modern ones.
The pattern at the bottom of the bed covers has been used quite a lot in Moorish architecture, I saw it quite a few times around the hotel I stayed in, however most of the time it was used on walls, I decided to incorporate this design onto the covers as it is a fairly simple design and having it on the covers makes them look a lot nicer than having no pattern on them at all.
The arch leading to the main room has a unique pattern at the top of it, I saw a similar pattern to this in my hotel room and it was where I got inspiration for this design from. It has a rounded shape similar to a dome at the top, and because domes are used in the architecture of Morocco quite a lot it shows the different architectural designs from Morocco including domes and arches.
On the wall there is a painting of a lion, I chose to put this there because it gives the room more tradition as Morocco’s national animal is a lion, so having this shows the tradition of the country and some of its symbolism.
Opposite the wardrobe is where the bathroom will be, this is to create extra privacy for the user as it is not a part of the main room.
The wardrobe has a mirror on one of the doors; this is so that when picking an outfit, the user can see what it looks like before they put it on, so they can change different aspects of their outfit quickly and easily as they will know what it will look like before they put it on.
As you can see the wardrobe is between the arch and the door, this is to fill the gap between the two. The wardrobe will most likely be made from wood, with an expensive veneer over it to make it look a lot more high quality. Next to the wardrobe is a shelf, this will be to store the users suitcases and shoes so that they do not get in the way when they unpack everything.
The pattern on the door and on the headboard are the same, the reason I did this was to give the room a certain look, if all of the patterns in the room were completely different it would be overwhelming for people, so by making them the same the user will not feel completely out of place in the room. I got the inspiration for this design from one of the doors I saw while I was in Morocco, so I used it on a door in my design and also the headboard.
From the floor plan above, you can see what the rest of the room looks like. The bathroom has dividers between the toilet, sink and shower, this is to ensure extra privacy if more than one person is in the bathroom at a time. You can see from the balcony that the pool will be situated in the corner with the table and chairs in the other one.
Shaiheim Allen 3018Reigate College 64220
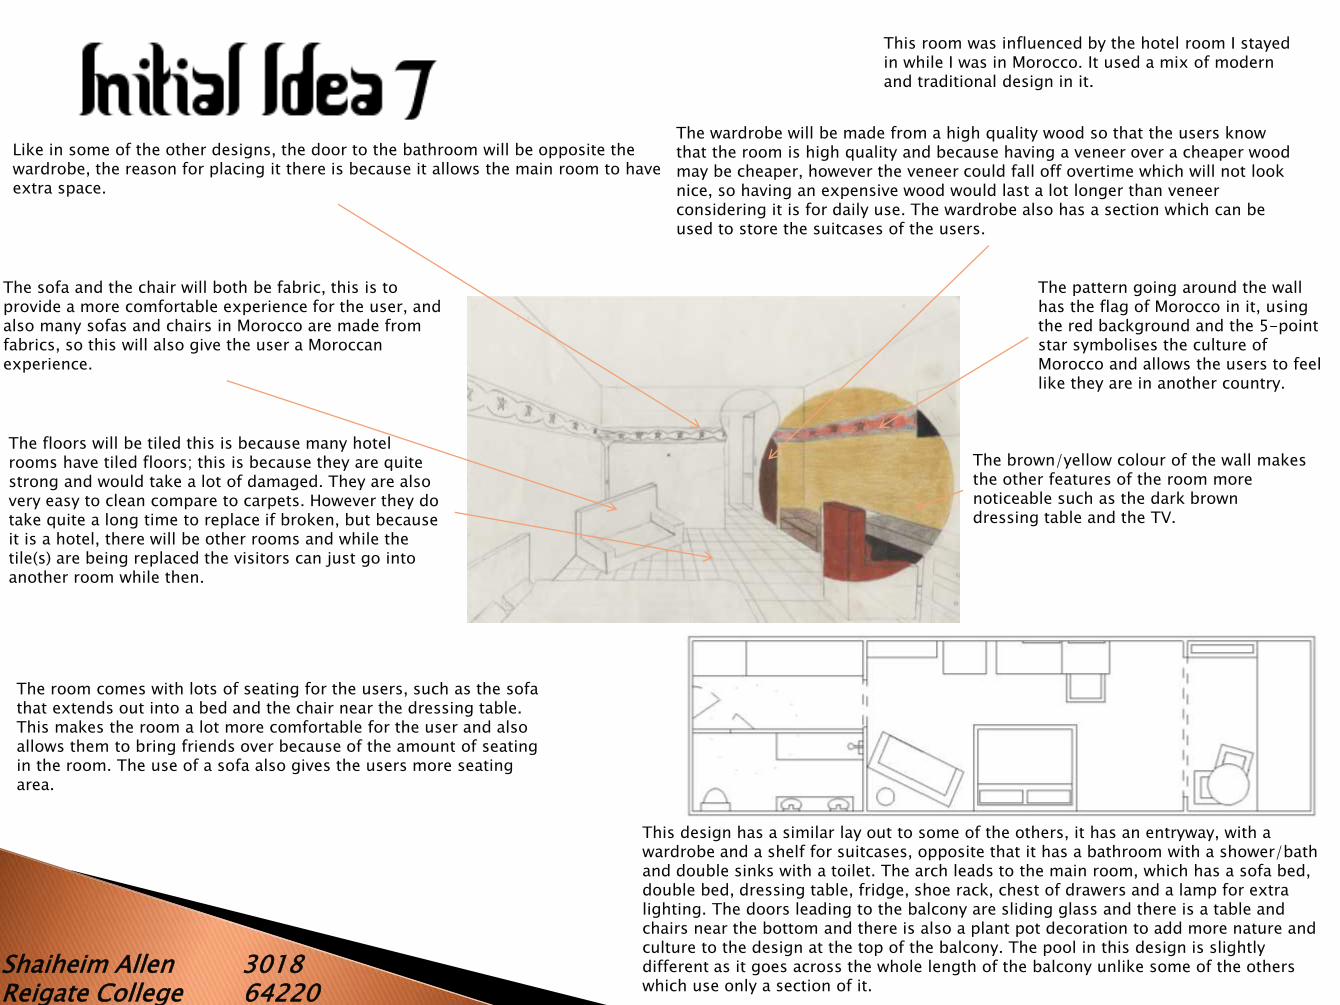
This room was influenced by the hotel room I stayed in while I was in Morocco. It used a mix of modern and traditional design in it.
The floors will be tiled this is because many hotel rooms have tiled floors; this is because they are quite strong and would take a lot of damaged. They are also very easy to clean compare to carpets. However they do take quite a long time to replace if broken, but because it is a hotel, there will be other rooms and while the tile(s) are being replaced the visitors can just go into another room while then.
The sofa and the chair will both be fabric, this is to provide a more comfortable experience for the user, and also many sofas and chairs in Morocco are made from fabrics, so this will also give the user a Moroccan experience.
Like in some of the other designs, the door to the bathroom will be opposite the wardrobe, the reason for placing it there is because it allows the main room to have extra space.
The wardrobe will be made from a high quality wood so that the users know that the room is high quality and because having a veneer over a cheaper wood may be cheaper, however the veneer could fall off overtime which will not look nice, so having an expensive wood would last a lot longer than veneer considering it is for daily use. The wardrobe also has a section which can be used to store the suitcases of the users.
The room comes with lots of seating for the users, such as the sofa that extends out into a bed and the chair near the dressing table. This makes the room a lot more comfortable for the user and also allows them to bring friends over because of the amount of seating in the room. The use of a sofa also gives the users more seating area.
The brown/yellow colour of the wall makes the other features of the room more noticeable such as the dark brown dressing table and the TV.
The pattern going around the wall has the flag of Morocco in it, using the red background and the 5-point star symbolises the culture of Morocco and allows the users to feel like they are in another country.
This design has a similar lay out to some of the others, it has an entryway, with a wardrobe and a shelf for suitcases, opposite that it has a bathroom with a shower/bath and double sinks with a toilet. The arch leads to the main room, which has a sofa bed, double bed, dressing table, fridge, shoe rack, chest of drawers and a lamp for extra lighting. The doors leading to the balcony are sliding glass and there is a table and chairs near the bottom and there is also a plant pot decoration to add more nature and culture to the design at the top of the balcony. The pool in this design is slightly different as it goes across the whole length of the balcony unlike some of the others which use only a section of it.
Shaiheim Allen 3018Reigate College 64220
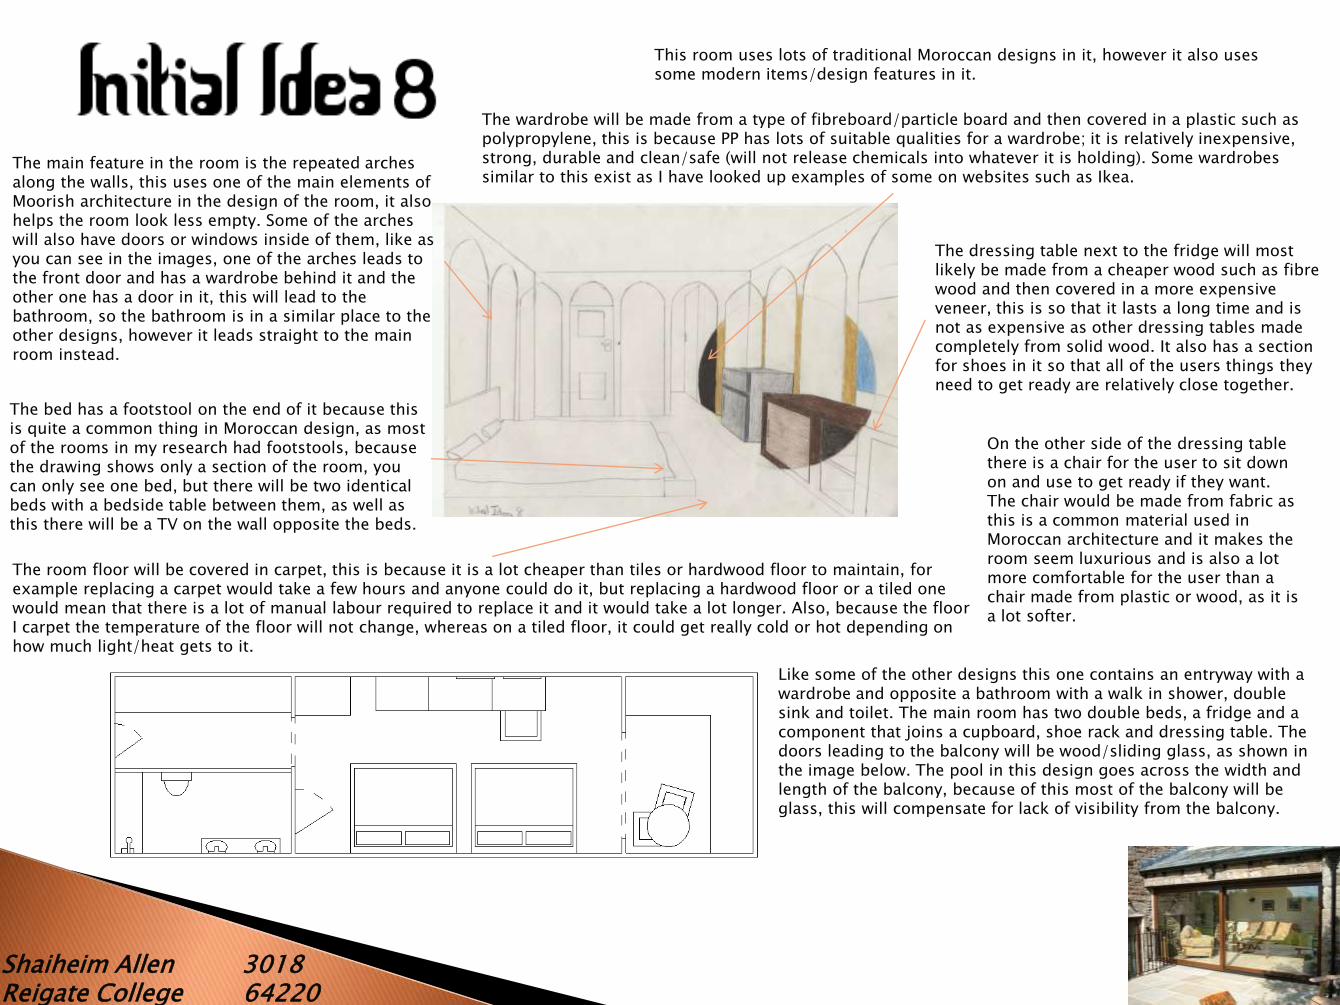
On the other side of the dressing table there is a chair for the user to sit down on and use to get ready if they want. The chair would be made from fabric as this is a common material used in Moroccan architecture and it makes the room seem luxurious and is also a lot more comfortable for the user than a chair made from plastic or wood, as it is a lot softer.
The bed has a footstool on the end of it because this is quite a common thing in Moroccan design, as most of the rooms in my research had footstools, because the drawing shows only a section of the room, you can only see one bed, but there will be two identical beds with a bedside table between them, as well as this there will be a TV on the wall opposite the beds.
The room floor will be covered in carpet, this is because it is a lot cheaper than tiles or hardwood floor to maintain, for example replacing a carpet would take a few hours and anyone could do it, but replacing a hardwood floor or a tiled one would mean that there is a lot of manual labour required to replace it and it would take a lot longer. Also, because the floor I carpet the temperature of the floor will not change, whereas on a tiled floor, it could get really cold or hot depending onhow much light/heat gets to it.
The dressing table next to the fridge will most likely be made from a cheaper wood such as fibre wood and then covered in a more expensive veneer, this is so that it lasts a long time and is not as expensive as other dressing tables made completely from solid wood. It also has a section for shoes in it so that all of the users things they need to get ready are relatively close together.
The wardrobe will be made from a type of fibreboard/particle board and then covered in a plastic such as polypropylene, this is because PP has lots of suitable qualities for a wardrobe; it is relatively inexpensive, strong, durable and clean/safe (will not release chemicals into whatever it is holding). Some wardrobes similar to this exist as I have looked up examples of some on websites such as Ikea.
The main feature in the room is the repeated arches along the walls, this uses one of the main elements of Moorish architecture in the design of the room, it also helps the room look less empty. Some of the arches will also have doors or windows inside of them, like as you can see in the images, one of the arches leads to the front door and has a wardrobe behind it and the other one has a door in it, this will lead to the bathroom, so the bathroom is in a similar place to the other designs, however it leads straight to the main room instead.
This room uses lots of traditional Moroccan designs in it, however it also uses some modern items/design features in it.
Like some of the other designs this one contains an entryway with a wardrobe and opposite a bathroom with a walk in shower, double sink and toilet. The main room has two double beds, a fridge and a component that joins a cupboard, shoe rack and dressing table. The doors leading to the balcony will be wood/sliding glass, as shown in the image below. The pool in this design goes across the width and length of the balcony, because of this most of the balcony will be glass, this will compensate for lack of visibility from the balcony.

Shaiheim Allen 3018Reigate College 64220
The idea that my user chose is my sixth design.This design does fit the specification as it has all of the things a hotel room should have, such as a bathroom, storage space, safe,dressing table and a place to sleep. However it could include more things that hotel rooms can have, for example a sofa and table with a few chairs. The room would be able to store up to 4 people comfortably and fits most of the other specification points, as it reflects a high quality room because of the materials and designs used in it.
Essential Changes: • Expansion of room• Added sofa• Added table• Rearranging features such as the TV and mirror
Change the form of the lights above the beds.
Move the TV into a new location so that it can be seen from most of the room, not just that one bed
This may mean I need to change the layout of the dressing table, as the mirror is in the place where the TV could go, so I would need to shuffle different features around to get them all in a good place.
I will need to make the room wider to allow space for the sofa and the table.
my users said that there needs to be enough room for at least 2 people to sit down on, because not everyone can sit on the beds all the time.
I will need to look back at some of my research and see what some of the smaller lights and lamps look like, so that I can use them in my room, as my users said that they would like lamps near the back doors and also that the light above the bed could be improved.
I could also look at some more traditional art of Morocco, as one of the reasons that they liked this room a lot is because of the unique painting on the wall, and they would like to have a few more of these along the room, so I could look at more of the culture of Morocco and see some of the things that make up the country, as the lion is the countries national animal, so I could look at some other things like this.
On this page I am going to look at the idea that my users chose and the way they suggested I develop it.
As you can see there are a few changes I need to make to my design in order to make my design better, this includes the size, addition of certain features and the rearrangement of the room.
Shaiheim Allen 3018Reigate College 64220
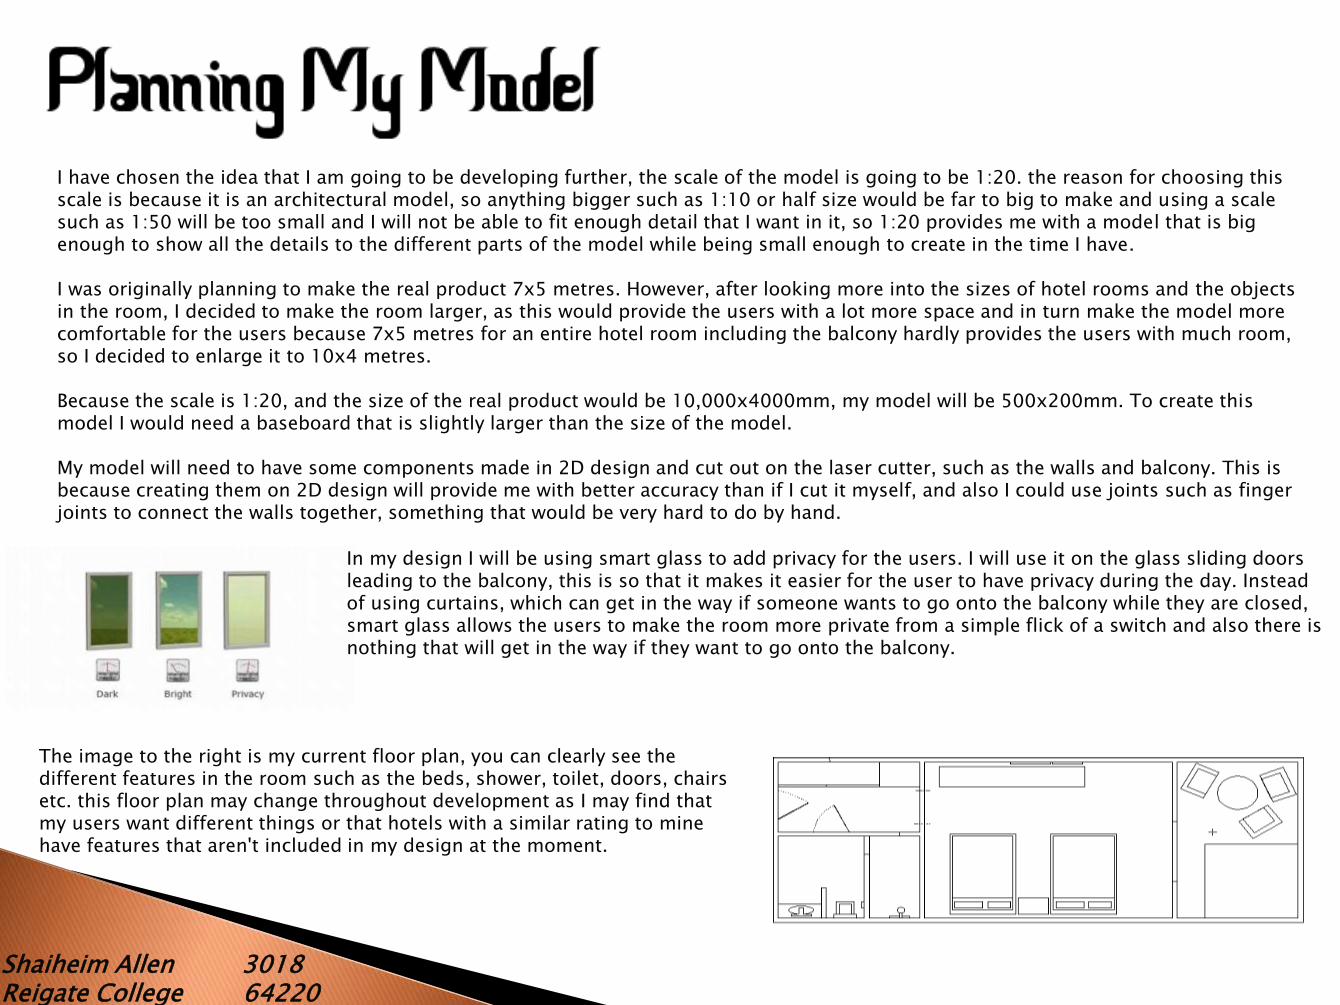
I have chosen the idea that I am going to be developing further, the scale of the model is going to be 1:20. the reason for choosing this scale is because it is an architectural model, so anything bigger such as 1:10 or half size would be far to big to make and using a scale such as 1:50 will be too small and I will not be able to fit enough detail that I want in it, so 1:20 provides me with a model that is big enough to show all the details to the different parts of the model while being small enough to create in the time I have.
I was originally planning to make the real product 7x5 metres. However, after looking more into the sizes of hotel rooms and the objects in the room, I decided to make the room larger, as this would provide the users with a lot more space and in turn make the model more comfortable for the users because 7x5 metres for an entire hotel room including the balcony hardly provides the users with much room, so I decided to enlarge it to 10x4 metres.
Because the scale is 1:20, and the size of the real product would be 10,000x4000mm, my model will be 500x200mm. To create this model I would need a baseboard that is slightly larger than the size of the model.
My model will need to have some components made in 2D design and cut out on the laser cutter, such as the walls and balcony. This is because creating them on 2D design will provide me with better accuracy than if I cut it myself, and also I could use joints such as finger joints to connect the walls together, something that would be very hard to do by hand.
In my design I will be using smart glass to add privacy for the users. I will use it on the glass sliding doors leading to the balcony, this is so that it makes it easier for the user to have privacy during the day. Instead of using curtains, which can get in the way if someone wants to go onto the balcony while they are closed, smart glass allows the users to make the room more private from a simple flick of a switch and also there is nothing that will get in the way if they want to go onto the balcony.
The image to the right is my current floor plan, you can clearly see the different features in the room such as the beds, shower, toilet, doors, chairs etc. this floor plan may change throughout development as I may find that my users want different things or that hotels with a similar rating to mine have features that aren't included in my design at the moment.
Shaiheim Allen 3018Reigate College 64220
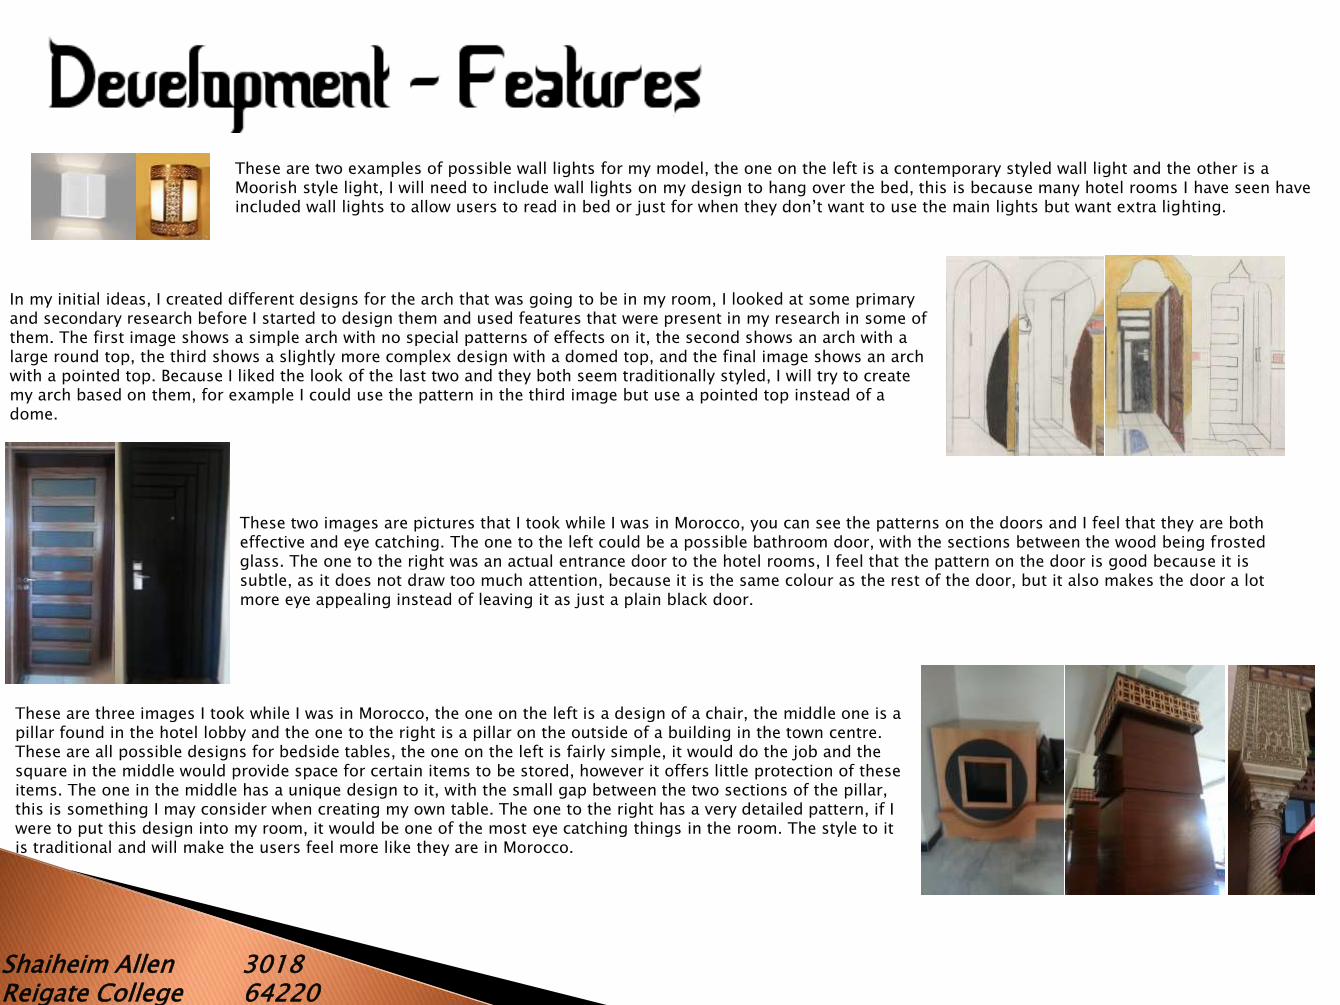
These are two examples of possible wall lights for my model, the one on the left is a contemporary styled wall light and the other is a Moorish style light, I will need to include wall lights on my design to hang over the bed, this is because many hotel rooms I have seen have included wall lights to allow users to read in bed or just for when they don’t want to use the main lights but want extra lighting.
In my initial ideas, I created different designs for the arch that was going to be in my room, I looked at some primary and secondary research before I started to design them and used features that were present in my research in some of them. The first image shows a simple arch with no special patterns of effects on it, the second shows an arch with a large round top, the third shows a slightly more complex design with a domed top, and the final image shows an arch with a pointed top. Because I liked the look of the last two and they both seem traditionally styled, I will try to create my arch based on them, for example I could use the pattern in the third image but use a pointed top instead of a dome.
These two images are pictures that I took while I was in Morocco, you can see the patterns on the doors and I feel that they are both effective and eye catching. The one to the left could be a possible bathroom door, with the sections between the wood being frosted glass. The one to the right was an actual entrance door to the hotel rooms, I feel that the pattern on the door is good because it is subtle, as it does not draw too much attention, because it is the same colour as the rest of the door, but it also makes the door a lot more eye appealing instead of leaving it as just a plain black door.
These are three images I took while I was in Morocco, the one on the left is a design of a chair, the middle one is a pillar found in the hotel lobby and the one to the right is a pillar on the outside of a building in the town centre. These are all possible designs for bedside tables, the one on the left is fairly simple, it would do the job and the square in the middle would provide space for certain items to be stored, however it offers little protection of these items. The one in the middle has a unique design to it, with the small gap between the two sections of the pillar, this is something I may consider when creating my own table. The one to the right has a very detailed pattern, if I were to put this design into my room, it would be one of the most eye catching things in the room. The style to it is traditional and will make the users feel more like they are in Morocco.
Shaiheim Allen 3018Reigate College 64220
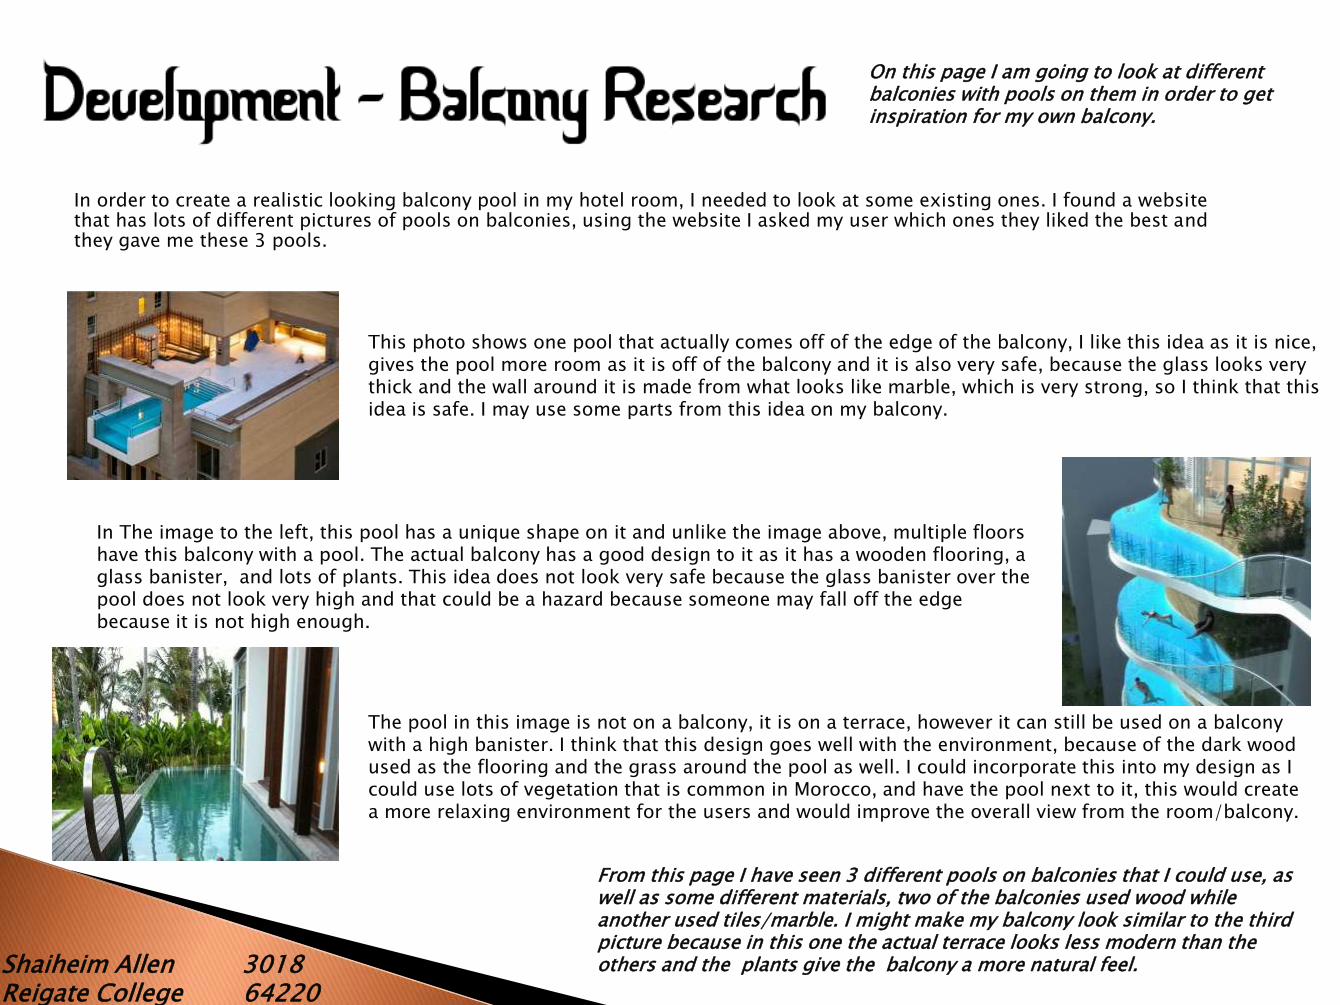
In order to create a realistic looking balcony pool in my hotel room, I needed to look at some existing ones. I found a website that has lots of different pictures of pools on balconies, using the website I asked my user which ones they liked the best and they gave me these 3 pools.
This photo shows one pool that actually comes off of the edge of the balcony, I like this idea as it is nice, gives the pool more room as it is off of the balcony and it is also very safe, because the glass looks very thick and the wall around it is made from what looks like marble, which is very strong, so I think that this idea is safe. I may use some parts from this idea on my balcony.
In The image to the left, this pool has a unique shape on it and unlike the image above, multiple floors have this balcony with a pool. The actual balcony has a good design to it as it has a wooden flooring, a glass banister, and lots of plants. This idea does not look very safe because the glass banister over the pool does not look very high and that could be a hazard because someone may fall off the edge because it is not high enough.
The pool in this image is not on a balcony, it is on a terrace, however it can still be used on a balcony with a high banister. I think that this design goes well with the environment, because of the dark wood used as the flooring and the grass around the pool as well. I could incorporate this into my design as I could use lots of vegetation that is common in Morocco, and have the pool next to it, this would create a more relaxing environment for the users and would improve the overall view from the room/balcony.
On this page I am going to look at different balconies with pools on them in order to get inspiration for my own balcony.
From this page I have seen 3 different pools on balconies that I could use, as well as some different materials, two of the balconies used wood while another used tiles/marble. I might make my balcony look similar to the third picture because in this one the actual terrace looks less modern than the others and the plants give the balcony a more natural feel.

Shaiheim Allen 3018Reigate College 64220
I created a 3D model to see what the real thing would look like and also to improve upon my users review of my drawings.
One of the things that the users said about my drawing was that the room seemed quite small, I was originally going to make it 7x5 metres, however after creating a plan roughly that size I saw that when I laid everything out, it was too small and it got quite cramped in the room. So I changed the size to 10x4 metres including the balcony, and this is roughly the size of this 3D model. As you can see, there is lots of room in the model for my user to walk around in and everything fits into the room fine.
Another one of the improvements that my user suggested was that adding a sofa would have made the room more comfortable. I used a downloadable model from the sketch up warehouse for the sofa, I placed it in the corner of the room and found that because I enlarged the room the sofa fit comfortably in the room , I also added a coffee table as I saw coffee tables in some of my secondary research so I decided to add this in as well.
More improvements that my users gave me were that there could have been extra bedside tables on the ends of the bed. And also the lights above the bed could have been changed. As you can see from this image, I changed the design of the bed lights and also added a couple more bedside tables.
Most of the elements in this design will not look like this on the final product, I used the skecthup warehouse to get quick and ready made features such as the TV, bed, toilet, bathroom, sink, wardrobe and other furniture. So this model is only a rough copy of what my final project will look like.
On this page I am showing the 3D model that I created of my project, I used the improvements that my users gave me based on my drawing to create this model.
This page has helped me as it give me critical feedback from my users as they saw and changed any features they didn’t like such as changing the size/shape of the room,
Shaiheim Allen 3018Reigate College 64220
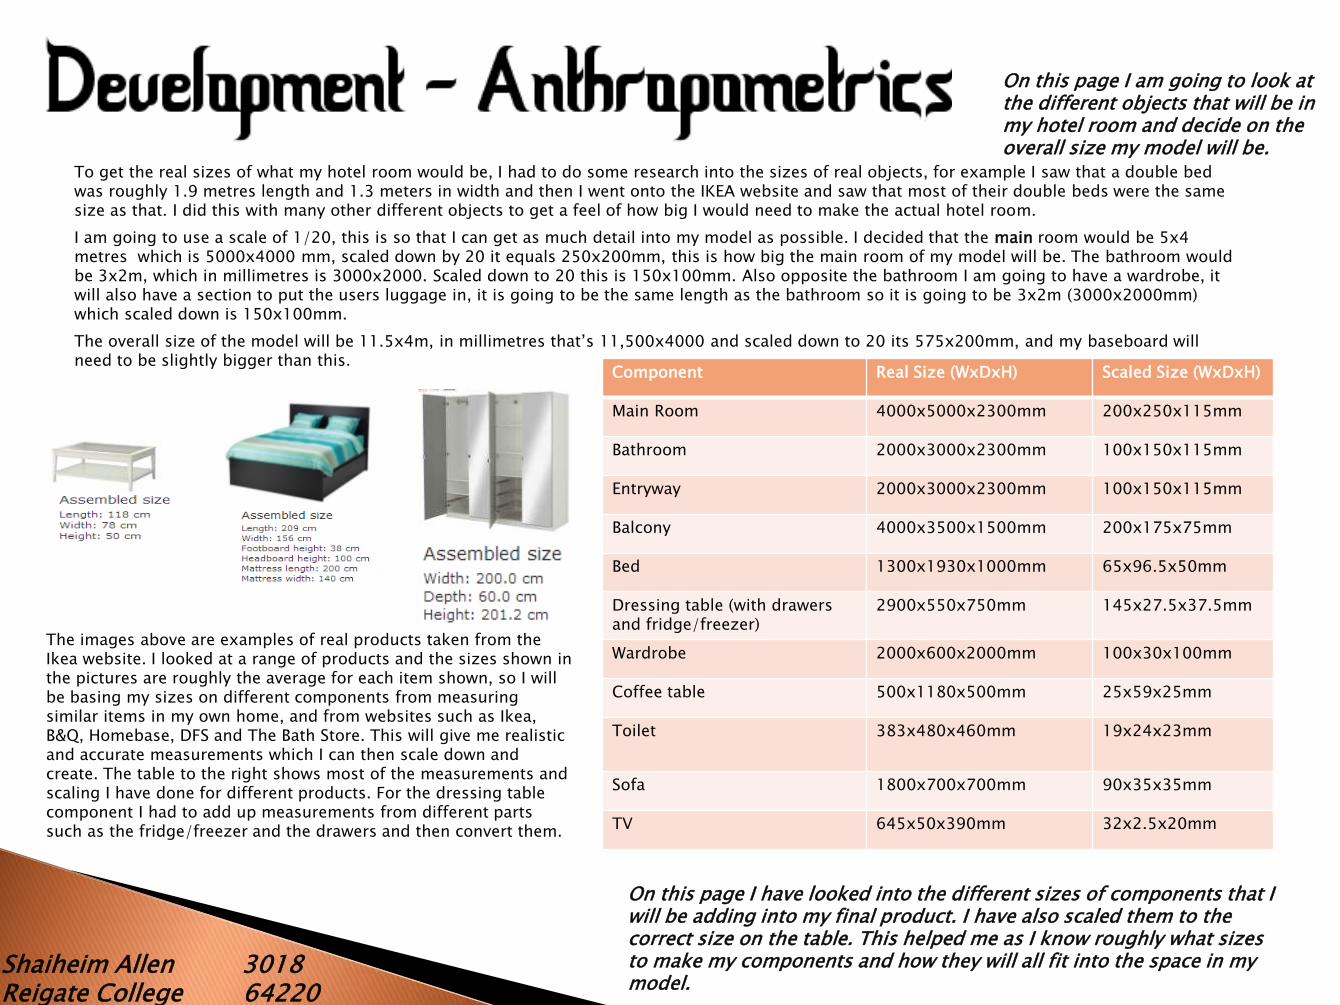
To get the real sizes of what my hotel room would be, I had to do some research into the sizes of real objects, for example I saw that a double bed was roughly 1.9 metres length and 1.3 meters in width and then I went onto the IKEA website and saw that most of their double beds were the same size as that. I did this with many other different objects to get a feel of how big I would need to make the actual hotel room.
I am going to use a scale of 1/20, this is so that I can get as much detail into my model as possible. I decided that the main room would be 5x4 metres which is 5000x4000 mm, scaled down by 20 it equals 250x200mm, this is how big the main room of my model will be. The bathroom would be 3x2m, which in millimetres is 3000x2000. Scaled down to 20 this is 150x100mm. Also opposite the bathroom I am going to have a wardrobe, it will also have a section to put the users luggage in, it is going to be the same length as the bathroom so it is going to be 3x2m (3000x2000mm) which scaled down is 150x100mm.
The overall size of the model will be 11.5x4m, in millimetres that’s 11,500x4000 and scaled down to 20 its 575x200mm, and my baseboard will need to be slightly bigger than this.
On this page I am going to look at the different objects that will be in my hotel room and decide on the overall size my model will be.
Component Real Size (WxDxH) Scaled Size (WxDxH)
Main Room 4000x5000x2300mm 200x250x115mm
Bathroom 2000x3000x2300mm 100x150x115mm
Entryway 2000x3000x2300mm 100x150x115mm
Balcony 4000x3500x1500mm 200x175x75mm
Bed 1300x1930x1000mm 65x96.5x50mm
Dressing table (with drawers and fridge/freezer)
2900x550x750mm 145x27.5x37.5mm
Wardrobe 2000x600x2000mm 100x30x100mm
Coffee table 500x1180x500mm 25x59x25mm
Toilet 383x480x460mm 19x24x23mm
Sofa 1800x700x700mm 90x35x35mm
TV 645x50x390mm 32x2.5x20mm
On this page I have looked into the different sizes of components that I will be adding into my final product. I have also scaled them to the correct size on the table. This helped me as I know roughly what sizes to make my components and how they will all fit into the space in my model.
The images above are examples of real products taken from the Ikea website. I looked at a range of products and the sizes shown in the pictures are roughly the average for each item shown, so I will be basing my sizes on different components from measuring similar items in my own home, and from websites such as Ikea, B&Q, Homebase, DFS and The Bath Store. This will give me realistic and accurate measurements which I can then scale down and create. The table to the right shows most of the measurements and scaling I have done for different products. For the dressing table component I had to add up measurements from different parts such as the fridge/freezer and the drawers and then convert them.
Shaiheim Allen 3018Reigate College 64220
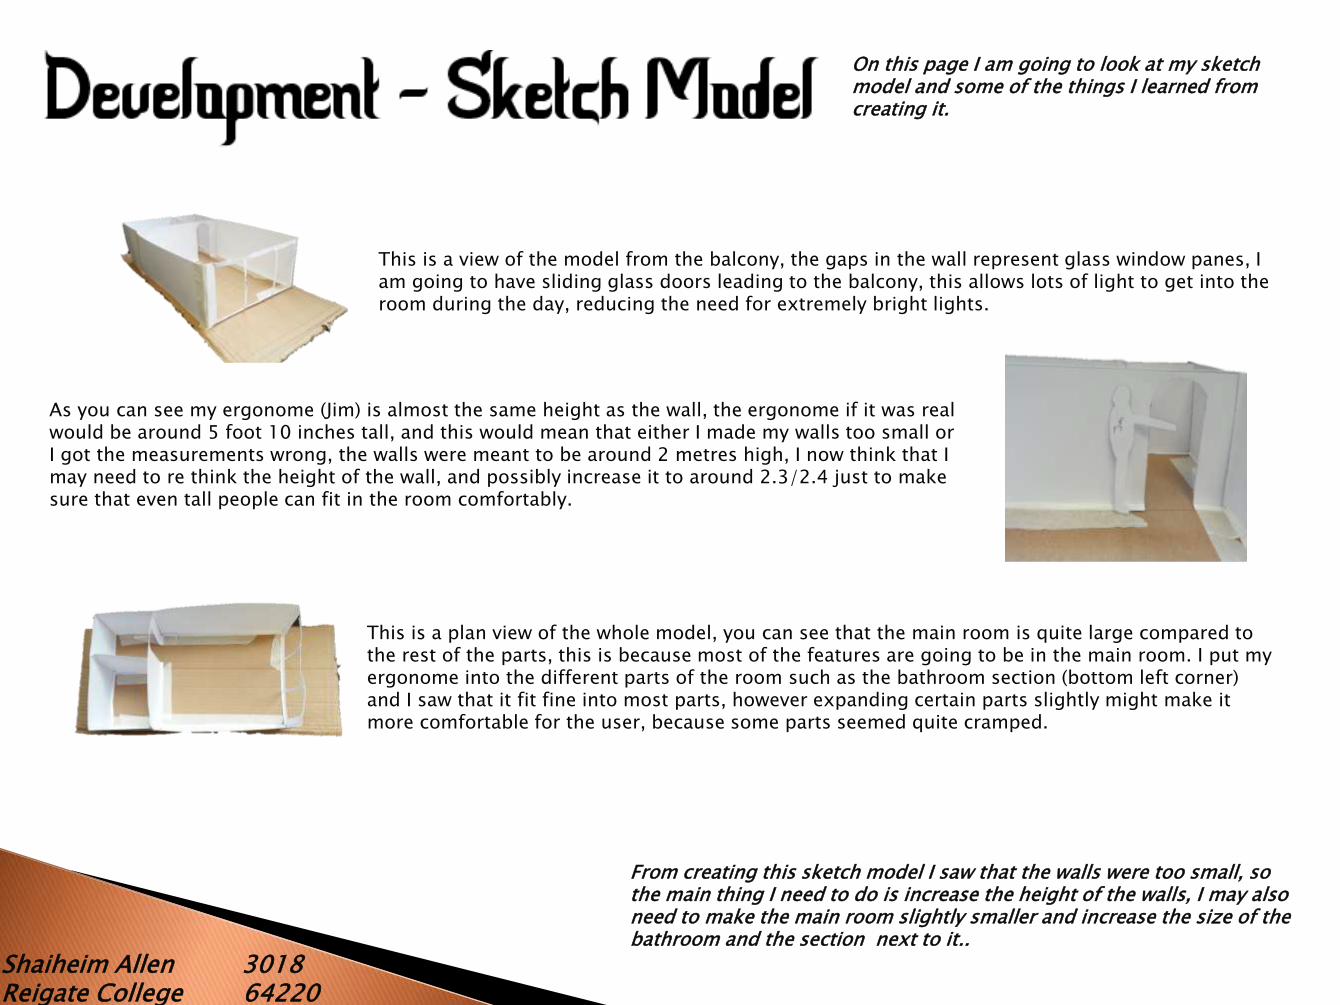
On this page I am going to look at my sketch model and some of the things I learned from creating it.
From creating this sketch model I saw that the walls were too small, so the main thing I need to do is increase the height of the walls, I may also need to make the main room slightly smaller and increase the size of the bathroom and the section next to it..
This is a view of the model from the balcony, the gaps in the wall represent glass window panes, I am going to have sliding glass doors leading to the balcony, this allows lots of light to get into the room during the day, reducing the need for extremely bright lights.
As you can see my ergonome (Jim) is almost the same height as the wall, the ergonome if it was real would be around 5 foot 10 inches tall, and this would mean that either I made my walls too small or I got the measurements wrong, the walls were meant to be around 2 metres high, I now think that I may need to re think the height of the wall, and possibly increase it to around 2.3/2.4 just to make sure that even tall people can fit in the room comfortably.
This is a plan view of the whole model, you can see that the main room is quite large compared to the rest of the parts, this is because most of the features are going to be in the main room. I put my ergonome into the different parts of the room such as the bathroom section (bottom left corner) and I saw that it fit fine into most parts, however expanding certain parts slightly might make it more comfortable for the user, because some parts seemed quite cramped.
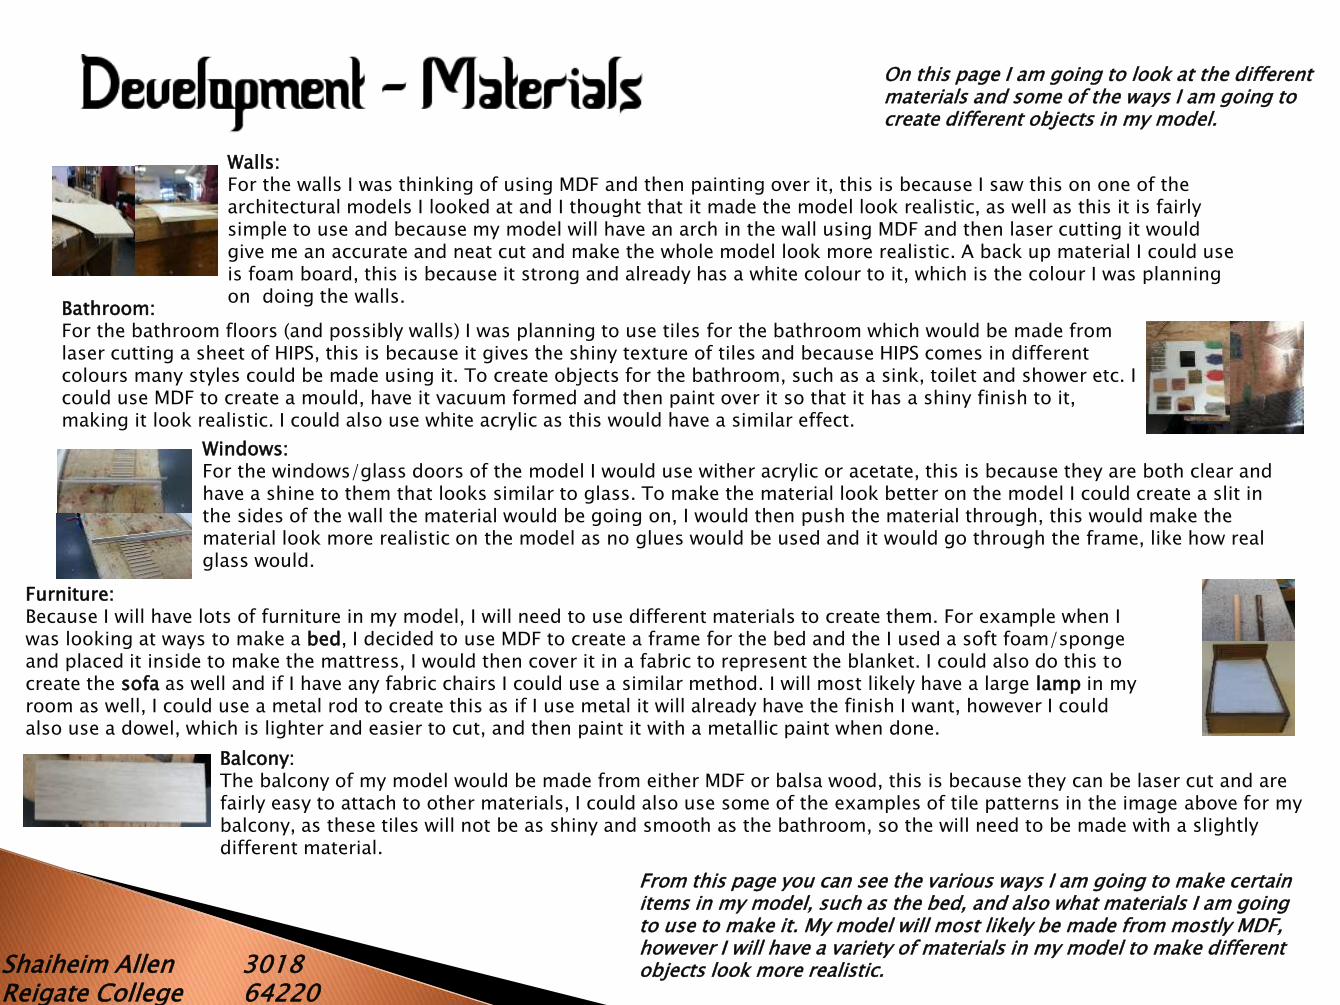
Shaiheim Allen 3018Reigate College 64220
Walls:For the walls I was thinking of using MDF and then painting over it, this is because I saw this on one of the architectural models I looked at and I thought that it made the model look realistic, as well as this it is fairly simple to use and because my model will have an arch in the wall using MDF and then laser cutting it would give me an accurate and neat cut and make the whole model look more realistic. A back up material I could use is foam board, this is because it strong and already has a white colour to it, which is the colour I was planning on doing the walls.
Bathroom:For the bathroom floors (and possibly walls) I was planning to use tiles for the bathroom which would be made from laser cutting a sheet of HIPS, this is because it gives the shiny texture of tiles and because HIPS comes in different colours many styles could be made using it. To create objects for the bathroom, such as a sink, toilet and shower etc. I could use MDF to create a mould, have it vacuum formed and then paint over it so that it has a shiny finish to it, making it look realistic. I could also use white acrylic as this would have a similar effect.
Windows:For the windows/glass doors of the model I would use wither acrylic or acetate, this is because they are both clear and have a shine to them that looks similar to glass. To make the material look better on the model I could create a slit in the sides of the wall the material would be going on, I would then push the material through, this would make the material look more realistic on the model as no glues would be used and it would go through the frame, like how real glass would.
Furniture:Because I will have lots of furniture in my model, I will need to use different materials to create them. For example when I was looking at ways to make a bed, I decided to use MDF to create a frame for the bed and the I used a soft foam/sponge and placed it inside to make the mattress, I would then cover it in a fabric to represent the blanket. I could also do this to create the sofa as well and if I have any fabric chairs I could use a similar method. I will most likely have a large lamp in my room as well, I could use a metal rod to create this as if I use metal it will already have the finish I want, however I could also use a dowel, which is lighter and easier to cut, and then paint it with a metallic paint when done.
Balcony:The balcony of my model would be made from either MDF or balsa wood, this is because they can be laser cut and are fairly easy to attach to other materials, I could also use some of the examples of tile patterns in the image above for my balcony, as these tiles will not be as shiny and smooth as the bathroom, so the will need to be made with a slightly different material.
On this page I am going to look at the different materials and some of the ways I am going to create different objects in my model.
From this page you can see the various ways I am going to make certain items in my model, such as the bed, and also what materials I am going to use to make it. My model will most likely be made from mostly MDF, however I will have a variety of materials in my model to make different objects look more realistic.
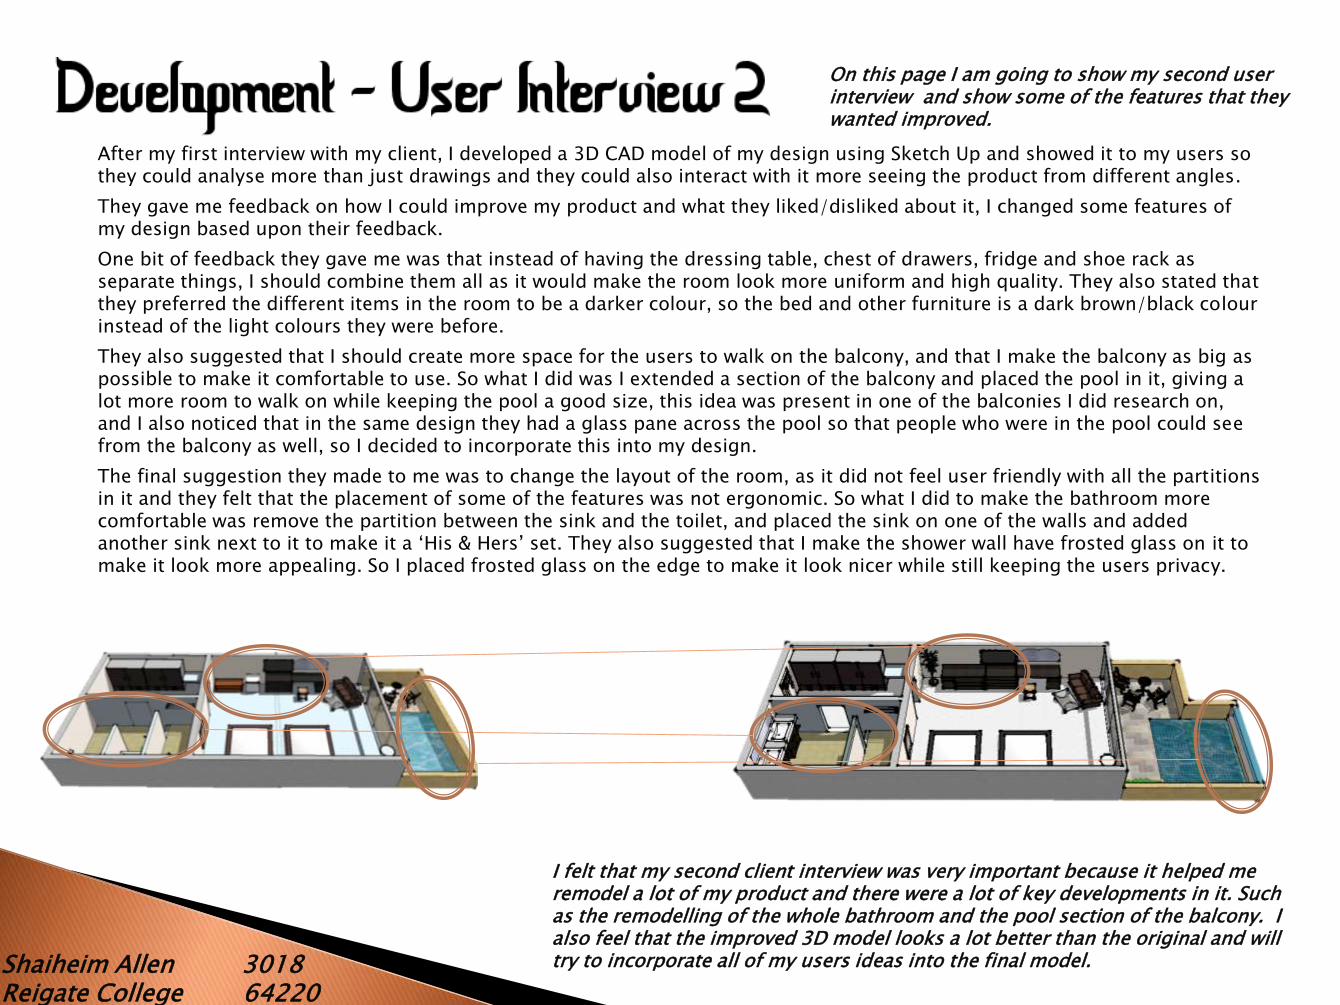
Shaiheim Allen 3018Reigate College 64220
On this page I am going to show my second user interview and show some of the features that they wanted improved.
I felt that my second client interview was very important because it helped me remodel a lot of my product and there were a lot of key developments in it. Such as the remodelling of the whole bathroom and the pool section of the balcony. I also feel that the improved 3D model looks a lot better than the original and will try to incorporate all of my users ideas into the final model.
After my first interview with my client, I developed a 3D CAD model of my design using Sketch Up and showed it to my users sothey could analyse more than just drawings and they could also interact with it more seeing the product from different angles.
They gave me feedback on how I could improve my product and what they liked/disliked about it, I changed some features of my design based upon their feedback.
One bit of feedback they gave me was that instead of having the dressing table, chest of drawers, fridge and shoe rack as separate things, I should combine them all as it would make the room look more uniform and high quality. They also stated that they preferred the different items in the room to be a darker colour, so the bed and other furniture is a dark brown/black colour instead of the light colours they were before.
They also suggested that I should create more space for the users to walk on the balcony, and that I make the balcony as big as possible to make it comfortable to use. So what I did was I extended a section of the balcony and placed the pool in it, giving a lot more room to walk on while keeping the pool a good size, this idea was present in one of the balconies I did research on,and I also noticed that in the same design they had a glass pane across the pool so that people who were in the pool could see from the balcony as well, so I decided to incorporate this into my design.
The final suggestion they made to me was to change the layout of the room, as it did not feel user friendly with all the partitions in it and they felt that the placement of some of the features was not ergonomic. So what I did to make the bathroom more comfortable was remove the partition between the sink and the toilet, and placed the sink on one of the walls and added another sink next to it to make it a ‘His & Hers’ set. They also suggested that I make the shower wall have frosted glass on it to make it look more appealing. So I placed frosted glass on the edge to make it look nicer while still keeping the users privacy.

Shaiheim Allen 3018Reigate College 64220
To ensure that the model can be seen clearly from different angles, the top of the model will be detachable, the top will just be a piece of wood/MDF to protect the interior of the model and to show people what it would look like from the inside with a roof on.
Many of the components will be created on 2D design, this includes the bed, dressing table, drawers, fridge and other elements, this is because the correct detail can be put on the components and they will be more accurate than if I was to cut it out by hand. To make certain features fit together I may need to use joints such as finger joints and glue to ensure that they hold together.
To make the pool I will vacuum form over rocks or something else that can represent waves, I will also paint the underneath blue. I was this on one of the architectural models I researched and saw it was very effective so I will incorporate it into my design. To create the stone tile effect on the balcony, I will print out an image of it on plain paper and stick it down onto the balcony. This will give a slightly rough feel to it and also look like stone tiles,
To make the walls I may need to use 2D design, this is because certain walls have features such as the arch leading to the main room and the gap where the glass door will lead onto the balcony, and if I do create it on 2D design I can create a joint on the walls which will allow them to fit together better. As well as this a design could be added to the wall to make it look more decorative.
To create the features that resemble porcelain in the bathroom I will need to create a mould and have them vacuum formed over with a white plastic, this will make the features look more realistic. To make a tile effect on the floor, I am going to laser cut some HIPS, and this will represent tiles, on my materials testing page you can see that I took a photo of this being done and it worked successfully.
On this page I am showing my final design and annotating it, showing how I will create it and what methods I will use to create it.
I will need to use a variety of materials for different components. For example, the bed and the sofa will be made from an MDF frame, with sponge/foam on the inside and will be covered in a suitable material afterwards, this makes them look and feel realistic when being looked at individually.
The final floor plan to this design is shown below. As you can see it has slight changes to it from the original floor plan, and some features have changed such as the shape of the balcony, location of the pool, addition of the sofa and the changed layout of the bathroom.
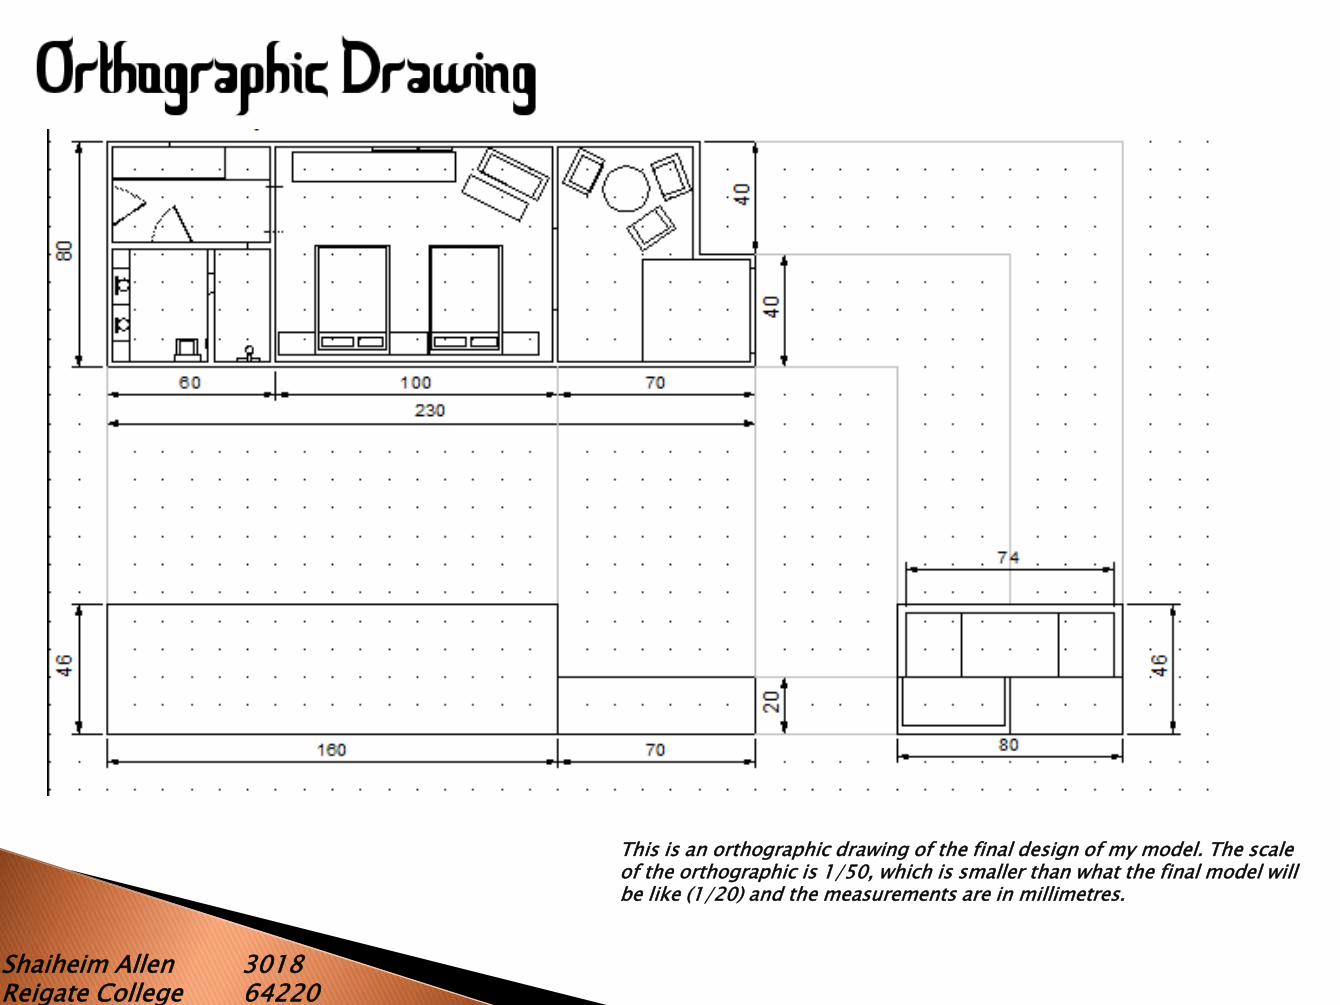
Shaiheim Allen 3018Reigate College 64220
This is an orthographic drawing of the final design of my model. The scale of the orthographic is 1/50, which is smaller than what the final model will be like (1/20) and the measurements are in millimetres.
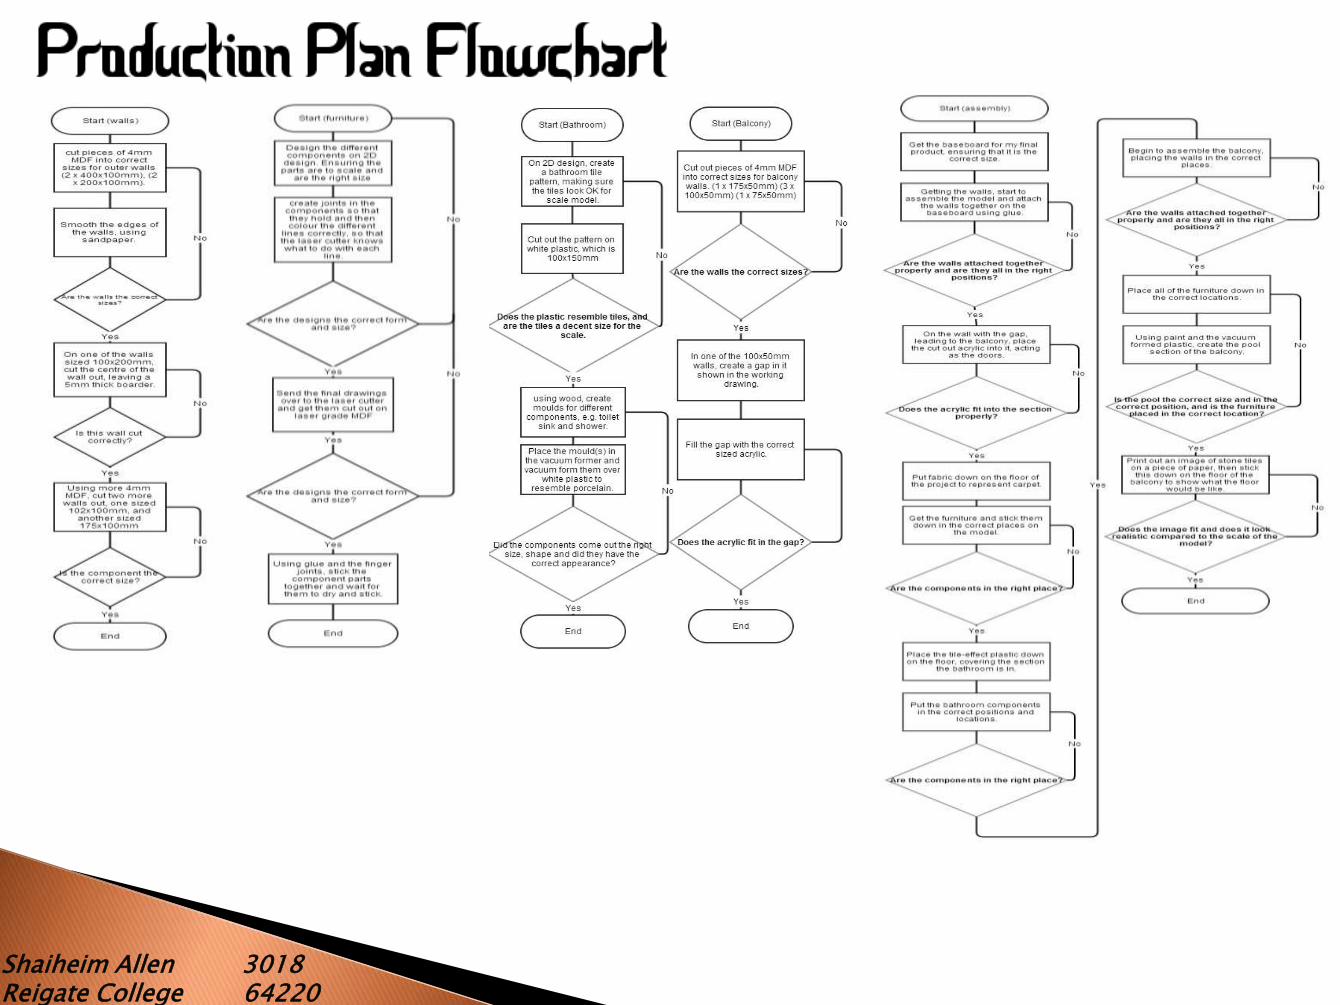
Shaiheim Allen 3018Reigate College 64220
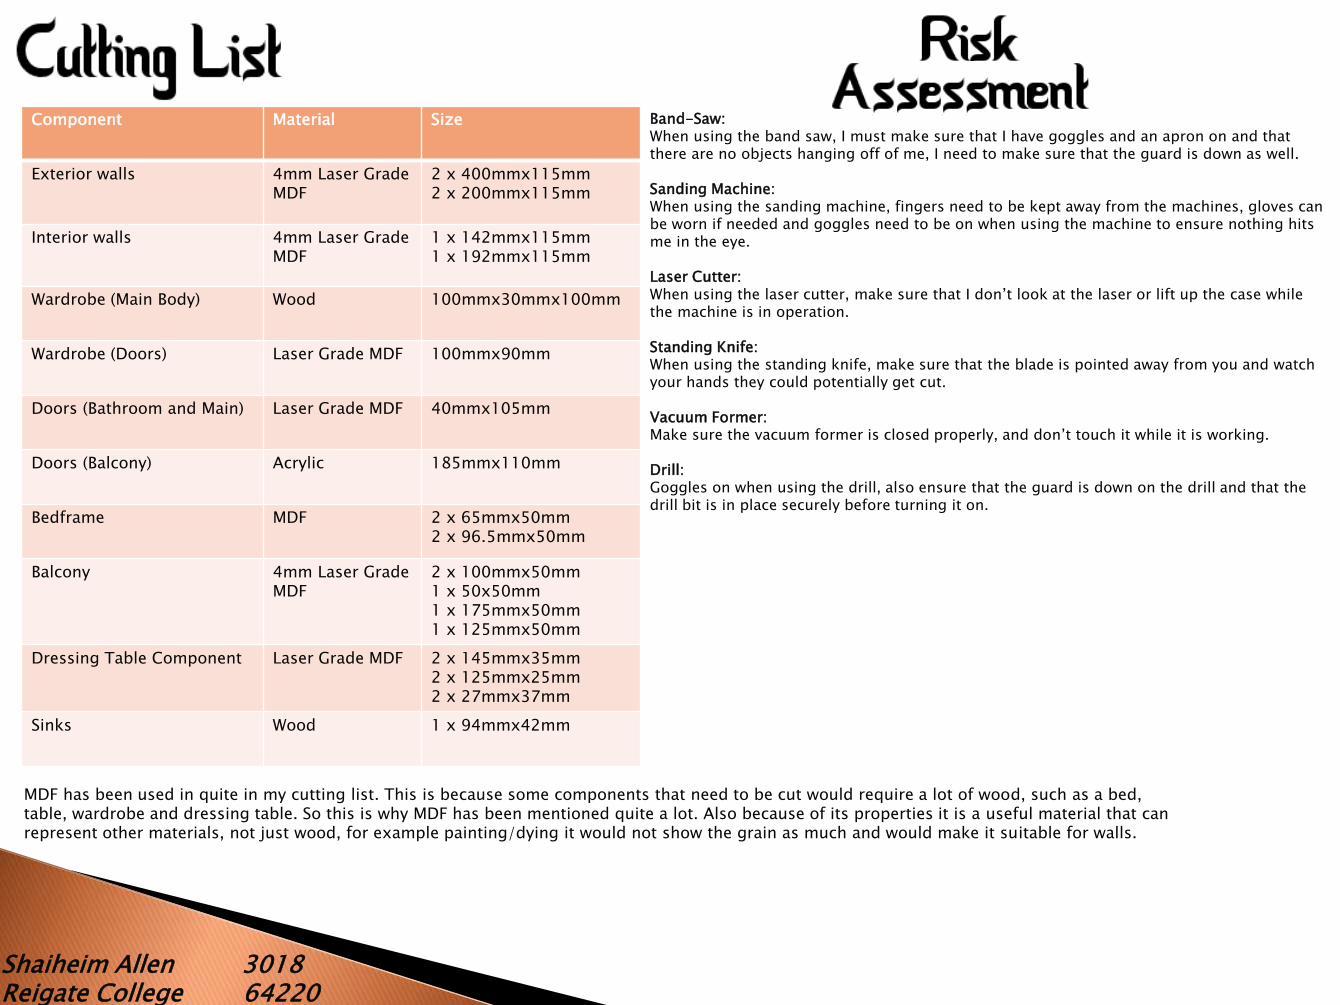
Shaiheim Allen 3018Reigate College 64220
Component Material Size
Exterior walls 4mm Laser Grade MDF
2 x 400mmx115mm2 x 200mmx115mm
Interior walls 4mm Laser Grade MDF
1 x 142mmx115mm1 x 192mmx115mm
Wardrobe (Main Body) Wood 100mmx30mmx100mm
Wardrobe (Doors) Laser Grade MDF 100mmx90mm
Doors (Bathroom and Main) Laser Grade MDF 40mmx105mm
Doors (Balcony) Acrylic 185mmx110mm
Bedframe MDF 2 x 65mmx50mm2 x 96.5mmx50mm
Balcony 4mm Laser Grade MDF
2 x 100mmx50mm1 x 50x50mm1 x 175mmx50mm1 x 125mmx50mm
Dressing Table Component Laser Grade MDF 2 x 145mmx35mm2 x 125mmx25mm2 x 27mmx37mm
Sinks Wood 1 x 94mmx42mm
MDF has been used in quite in my cutting list. This is because some components that need to be cut would require a lot of wood, such as a bed, table, wardrobe and dressing table. So this is why MDF has been mentioned quite a lot. Also because of its properties it is a useful material that can represent other materials, not just wood, for example painting/dying it would not show the grain as much and would make it suitable for walls.
Band-Saw:When using the band saw, I must make sure that I have goggles and an apron on and that there are no objects hanging off of me, I need to make sure that the guard is down as well.
Sanding Machine:When using the sanding machine, fingers need to be kept away from the machines, gloves can be worn if needed and goggles need to be on when using the machine to ensure nothing hits me in the eye.
Laser Cutter:When using the laser cutter, make sure that I don’t look at the laser or lift up the case while the machine is in operation.
Standing Knife:When using the standing knife, make sure that the blade is pointed away from you and watch your hands they could potentially get cut.
Vacuum Former:Make sure the vacuum former is closed properly, and don’t touch it while it is working.
Drill:Goggles on when using the drill, also ensure that the guard is down on the drill and that the drill bit is in place securely before turning it on.
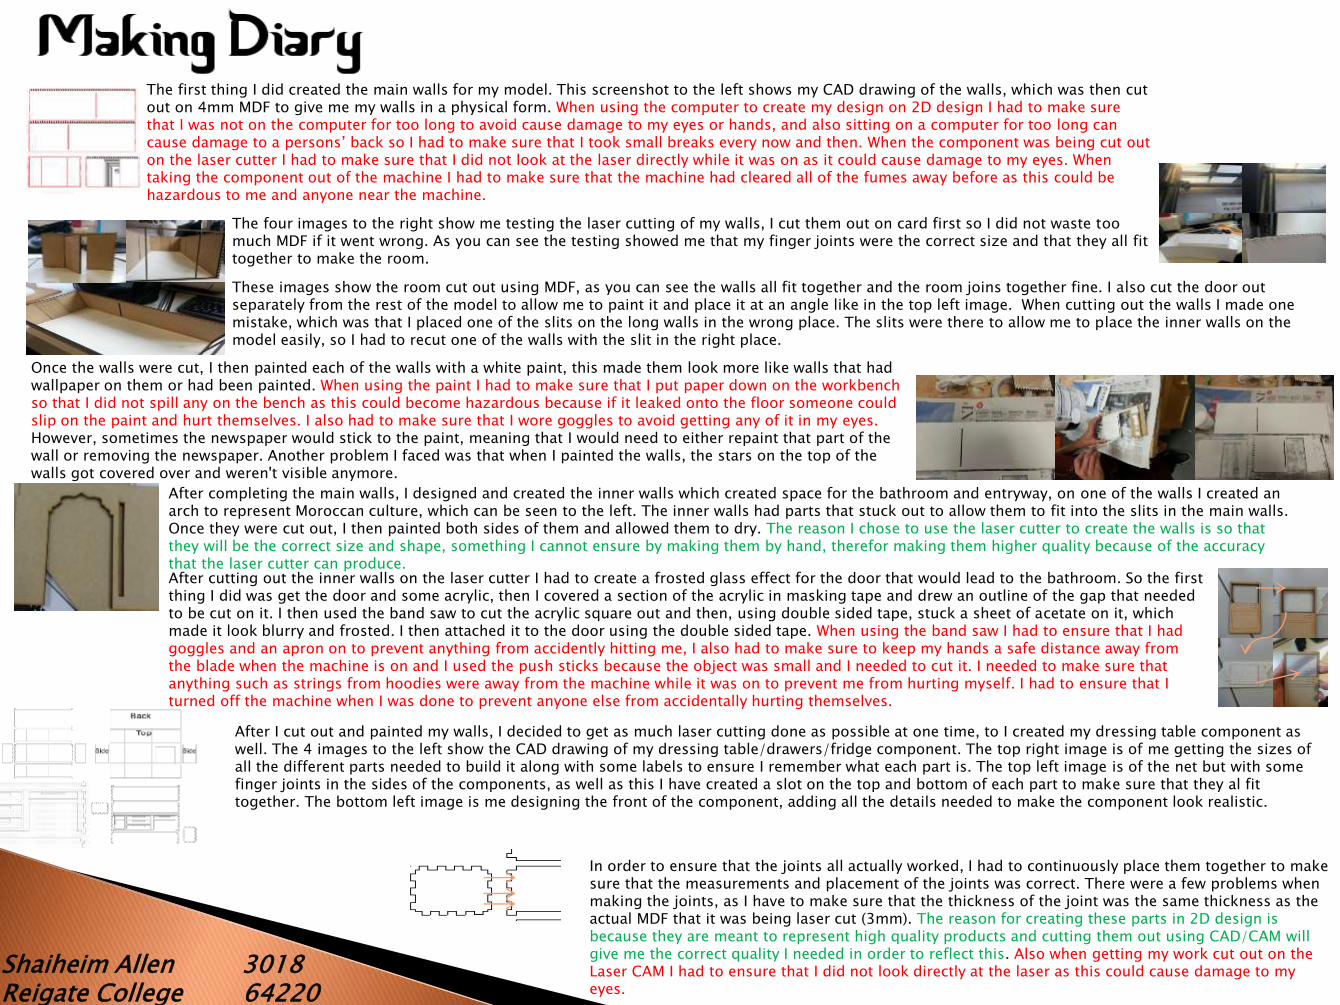
Shaiheim Allen 3018Reigate College 64220
The four images to the right show me testing the laser cutting of my walls, I cut them out on card first so I did not waste too much MDF if it went wrong. As you can see the testing showed me that my finger joints were the correct size and that they all fit together to make the room.
These images show the room cut out using MDF, as you can see the walls all fit together and the room joins together fine. I also cut the door out separately from the rest of the model to allow me to paint it and place it at an angle like in the top left image. When cutting out the walls I made one mistake, which was that I placed one of the slits on the long walls in the wrong place. The slits were there to allow me to place the inner walls on the model easily, so I had to recut one of the walls with the slit in the right place.
After cutting out the inner walls on the laser cutter I had to create a frosted glass effect for the door that would lead to the bathroom. So the first thing I did was get the door and some acrylic, then I covered a section of the acrylic in masking tape and drew an outline of the gap that needed to be cut on it. I then used the band saw to cut the acrylic square out and then, using double sided tape, stuck a sheet of acetate on it, which made it look blurry and frosted. I then attached it to the door using the double sided tape. When using the band saw I had to ensure that I had goggles and an apron on to prevent anything from accidently hitting me, I also had to make sure to keep my hands a safe distance away from the blade when the machine is on and I used the push sticks because the object was small and I needed to cut it. I needed to make sure that anything such as strings from hoodies were away from the machine while it was on to prevent me from hurting myself. I had to ensure that I turned off the machine when I was done to prevent anyone else from accidentally hurting themselves.
Once the walls were cut, I then painted each of the walls with a white paint, this made them look more like walls that had wallpaper on them or had been painted. When using the paint I had to make sure that I put paper down on the workbench so that I did not spill any on the bench as this could become hazardous because if it leaked onto the floor someone could slip on the paint and hurt themselves. I also had to make sure that I wore goggles to avoid getting any of it in my eyes. However, sometimes the newspaper would stick to the paint, meaning that I would need to either repaint that part of the wall or removing the newspaper. Another problem I faced was that when I painted the walls, the stars on the top of the walls got covered over and weren't visible anymore.
After completing the main walls, I designed and created the inner walls which created space for the bathroom and entryway, on one of the walls I created an arch to represent Moroccan culture, which can be seen to the left. The inner walls had parts that stuck out to allow them to fit into the slits in the main walls. Once they were cut out, I then painted both sides of them and allowed them to dry. The reason I chose to use the laser cutter to create the walls is so that they will be the correct size and shape, something I cannot ensure by making them by hand, therefor making them higher quality because of the accuracy that the laser cutter can produce.
The first thing I did created the main walls for my model. This screenshot to the left shows my CAD drawing of the walls, which was then cut out on 4mm MDF to give me my walls in a physical form. When using the computer to create my design on 2D design I had to make sure that I was not on the computer for too long to avoid cause damage to my eyes or hands, and also sitting on a computer for too long can cause damage to a persons’ back so I had to make sure that I took small breaks every now and then. When the component was being cut out on the laser cutter I had to make sure that I did not look at the laser directly while it was on as it could cause damage to my eyes. When taking the component out of the machine I had to make sure that the machine had cleared all of the fumes away before as this could be hazardous to me and anyone near the machine.
After I cut out and painted my walls, I decided to get as much laser cutting done as possible at one time, to I created my dressing table component as well. The 4 images to the left show the CAD drawing of my dressing table/drawers/fridge component. The top right image is of me getting the sizes of all the different parts needed to build it along with some labels to ensure I remember what each part is. The top left image is of the net but with some finger joints in the sides of the components, as well as this I have created a slot on the top and bottom of each part to make sure that they al fit together. The bottom left image is me designing the front of the component, adding all the details needed to make the component look realistic.
In order to ensure that the joints all actually worked, I had to continuously place them together to make sure that the measurements and placement of the joints was correct. There were a few problems when making the joints, as I have to make sure that the thickness of the joint was the same thickness as the actual MDF that it was being laser cut (3mm). The reason for creating these parts in 2D design is because they are meant to represent high quality products and cutting them out using CAD/CAM will give me the correct quality I needed in order to reflect this. Also when getting my work cut out on the Laser CAM I had to ensure that I did not look directly at the laser as this could cause damage to my eyes.
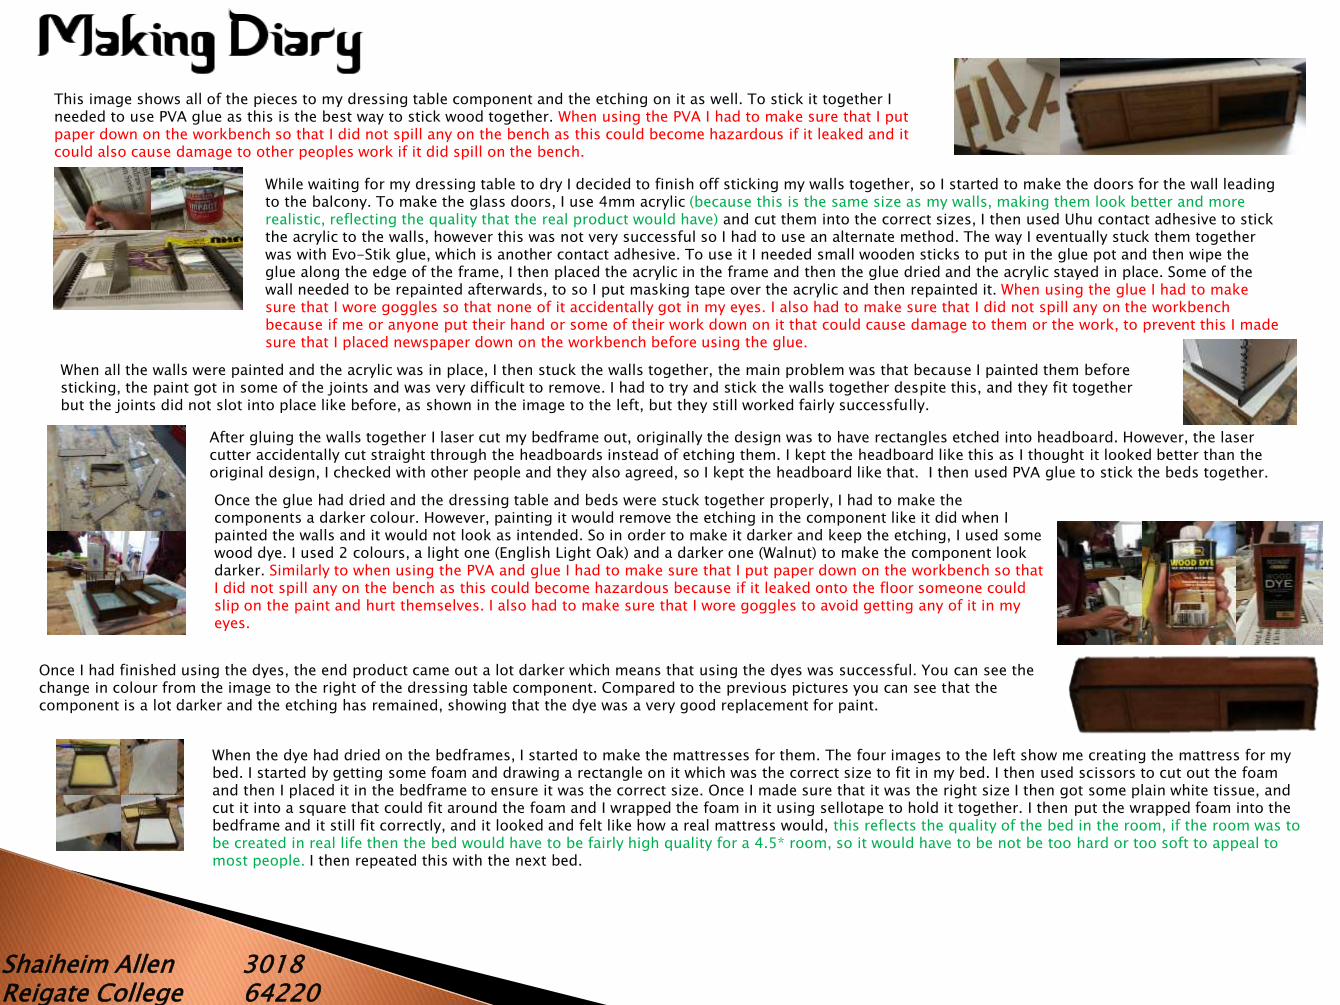
Shaiheim Allen 3018Reigate College 64220
This image shows all of the pieces to my dressing table component and the etching on it as well. To stick it together I needed to use PVA glue as this is the best way to stick wood together. When using the PVA I had to make sure that I put paper down on the workbench so that I did not spill any on the bench as this could become hazardous if it leaked and it could also cause damage to other peoples work if it did spill on the bench.
While waiting for my dressing table to dry I decided to finish off sticking my walls together, so I started to make the doors for the wall leading to the balcony. To make the glass doors, I use 4mm acrylic (because this is the same size as my walls, making them look better and more realistic, reflecting the quality that the real product would have) and cut them into the correct sizes, I then used Uhu contact adhesive to stick the acrylic to the walls, however this was not very successful so I had to use an alternate method. The way I eventually stuck them together was with Evo-Stik glue, which is another contact adhesive. To use it I needed small wooden sticks to put in the glue pot and then wipe the glue along the edge of the frame, I then placed the acrylic in the frame and then the glue dried and the acrylic stayed in place. Some of the wall needed to be repainted afterwards, to so I put masking tape over the acrylic and then repainted it. When using the glue I had to make sure that I wore goggles so that none of it accidentally got in my eyes. I also had to make sure that I did not spill any on the workbench because if me or anyone put their hand or some of their work down on it that could cause damage to them or the work, to prevent this I made sure that I placed newspaper down on the workbench before using the glue.
When all the walls were painted and the acrylic was in place, I then stuck the walls together, the main problem was that because I painted them before sticking, the paint got in some of the joints and was very difficult to remove. I had to try and stick the walls together despite this, and they fit together but the joints did not slot into place like before, as shown in the image to the left, but they still worked fairly successfully.
After gluing the walls together I laser cut my bedframe out, originally the design was to have rectangles etched into headboard. However, the laser cutter accidentally cut straight through the headboards instead of etching them. I kept the headboard like this as I thought it looked better than the original design, I checked with other people and they also agreed, so I kept the headboard like that. I then used PVA glue to stick the beds together.
Once the glue had dried and the dressing table and beds were stuck together properly, I had to make the components a darker colour. However, painting it would remove the etching in the component like it did when I painted the walls and it would not look as intended. So in order to make it darker and keep the etching, I used some wood dye. I used 2 colours, a light one (English Light Oak) and a darker one (Walnut) to make the component look darker. Similarly to when using the PVA and glue I had to make sure that I put paper down on the workbench so that I did not spill any on the bench as this could become hazardous because if it leaked onto the floor someone could slip on the paint and hurt themselves. I also had to make sure that I wore goggles to avoid getting any of it in my eyes.
Once I had finished using the dyes, the end product came out a lot darker which means that using the dyes was successful. You can see the change in colour from the image to the right of the dressing table component. Compared to the previous pictures you can see that the component is a lot darker and the etching has remained, showing that the dye was a very good replacement for paint.
When the dye had dried on the bedframes, I started to make the mattresses for them. The four images to the left show me creating the mattress for my bed. I started by getting some foam and drawing a rectangle on it which was the correct size to fit in my bed. I then used scissors to cut out the foam and then I placed it in the bedframe to ensure it was the correct size. Once I made sure that it was the right size I then got some plain white tissue, and cut it into a square that could fit around the foam and I wrapped the foam in it using sellotape to hold it together. I then put the wrapped foam into the bedframe and it still fit correctly, and it looked and felt like how a real mattress would, this reflects the quality of the bed in the room, if the room was to be created in real life then the bed would have to be fairly high quality for a 4.5* room, so it would have to be not be too hard or too soft to appeal to most people. I then repeated this with the next bed.
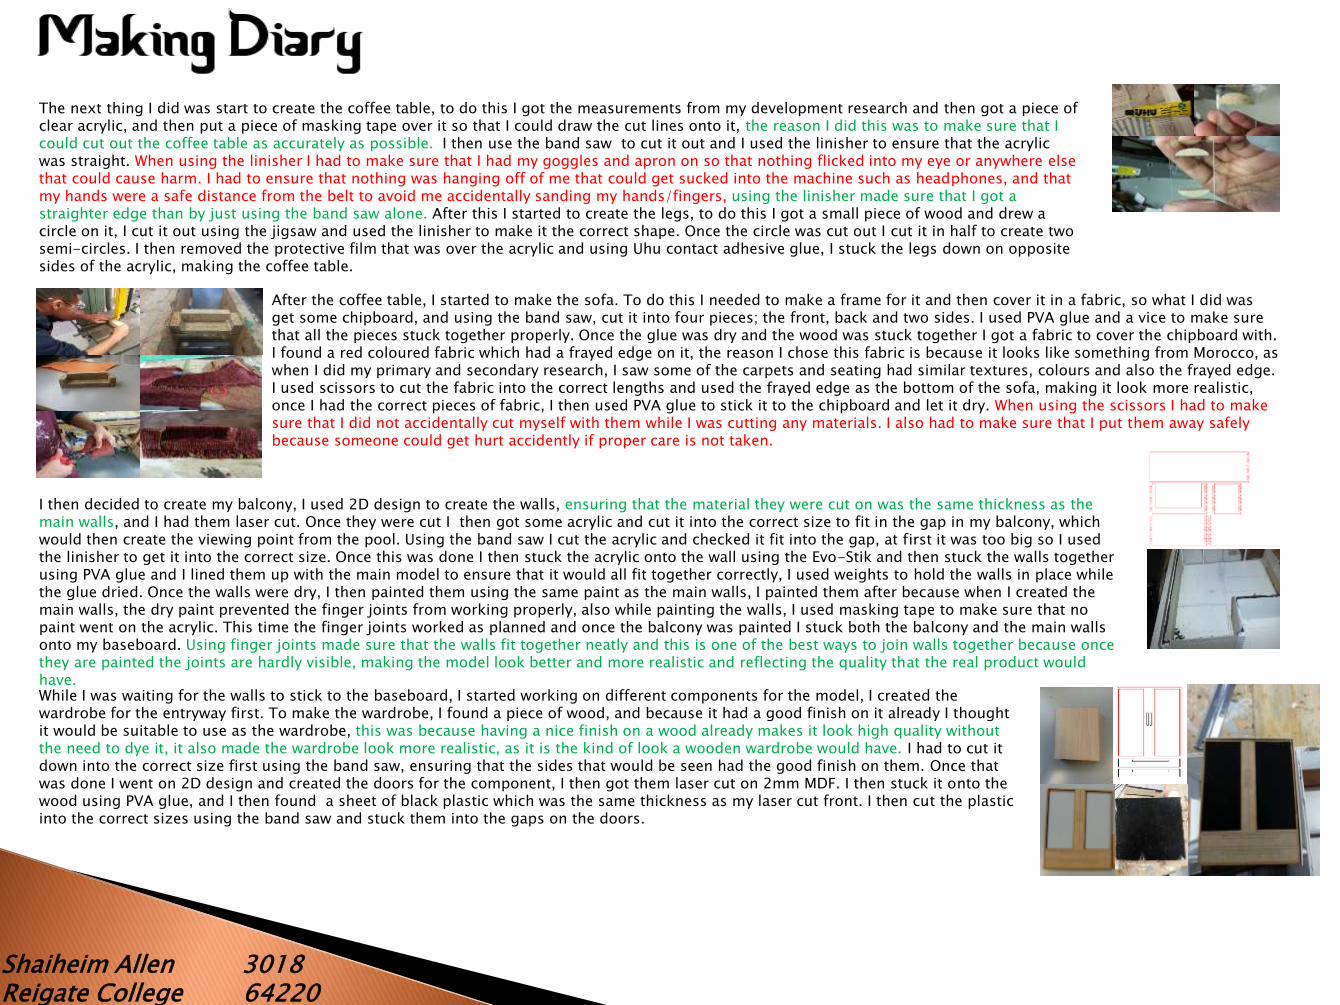
Shaiheim Allen 3018Reigate College 64220
The next thing I did was start to create the coffee table, to do this I got the measurements from my development research and then got a piece of clear acrylic, and then put a piece of masking tape over it so that I could draw the cut lines onto it, the reason I did this was to make sure that I could cut out the coffee table as accurately as possible. I then use the band saw to cut it out and I used the linisher to ensure that the acrylic was straight. When using the linisher I had to make sure that I had my goggles and apron on so that nothing flicked into my eye or anywhere else that could cause harm. I had to ensure that nothing was hanging off of me that could get sucked into the machine such as headphones, and that my hands were a safe distance from the belt to avoid me accidentally sanding my hands/fingers, using the linisher made sure that I got a straighter edge than by just using the band saw alone. After this I started to create the legs, to do this I got a small piece of wood and drew a circle on it, I cut it out using the jigsaw and used the linisher to make it the correct shape. Once the circle was cut out I cut it in half to create two semi-circles. I then removed the protective film that was over the acrylic and using Uhu contact adhesive glue, I stuck the legs down on opposite sides of the acrylic, making the coffee table.
After the coffee table, I started to make the sofa. To do this I needed to make a frame for it and then cover it in a fabric, so what I did was get some chipboard, and using the band saw, cut it into four pieces; the front, back and two sides. I used PVA glue and a vice to make sure that all the pieces stuck together properly. Once the glue was dry and the wood was stuck together I got a fabric to cover the chipboard with. I found a red coloured fabric which had a frayed edge on it, the reason I chose this fabric is because it looks like something from Morocco, as when I did my primary and secondary research, I saw some of the carpets and seating had similar textures, colours and also the frayed edge. I used scissors to cut the fabric into the correct lengths and used the frayed edge as the bottom of the sofa, making it look more realistic, once I had the correct pieces of fabric, I then used PVA glue to stick it to the chipboard and let it dry. When using the scissors I had to make sure that I did not accidentally cut myself with them while I was cutting any materials. I also had to make sure that I put them away safely because someone could get hurt accidently if proper care is not taken.
I then decided to create my balcony, I used 2D design to create the walls, ensuring that the material they were cut on was the same thickness as the main walls, and I had them laser cut. Once they were cut I then got some acrylic and cut it into the correct size to fit in the gap in my balcony, which would then create the viewing point from the pool. Using the band saw I cut the acrylic and checked it fit into the gap, at first it was too big so I used the linisher to get it into the correct size. Once this was done I then stuck the acrylic onto the wall using the Evo-Stik and then stuck the walls together using PVA glue and I lined them up with the main model to ensure that it would all fit together correctly, I used weights to hold the walls in place while the glue dried. Once the walls were dry, I then painted them using the same paint as the main walls, I painted them after because when I created the main walls, the dry paint prevented the finger joints from working properly, also while painting the walls, I used masking tape to make sure that no paint went on the acrylic. This time the finger joints worked as planned and once the balcony was painted I stuck both the balcony and the main walls onto my baseboard. Using finger joints made sure that the walls fit together neatly and this is one of the best ways to join walls together because once they are painted the joints are hardly visible, making the model look better and more realistic and reflecting the quality that the real product would have.While I was waiting for the walls to stick to the baseboard, I started working on different components for the model, I created the wardrobe for the entryway first. To make the wardrobe, I found a piece of wood, and because it had a good finish on it already I thought it would be suitable to use as the wardrobe, this was because having a nice finish on a wood already makes it look high quality without the need to dye it, it also made the wardrobe look more realistic, as it is the kind of look a wooden wardrobe would have. I had to cut it down into the correct size first using the band saw, ensuring that the sides that would be seen had the good finish on them. Once that was done I went on 2D design and created the doors for the component, I then got them laser cut on 2mm MDF. I then stuck it onto the wood using PVA glue, and I then found a sheet of black plastic which was the same thickness as my laser cut front. I then cut the plastic into the correct sizes using the band saw and stuck them into the gaps on the doors.
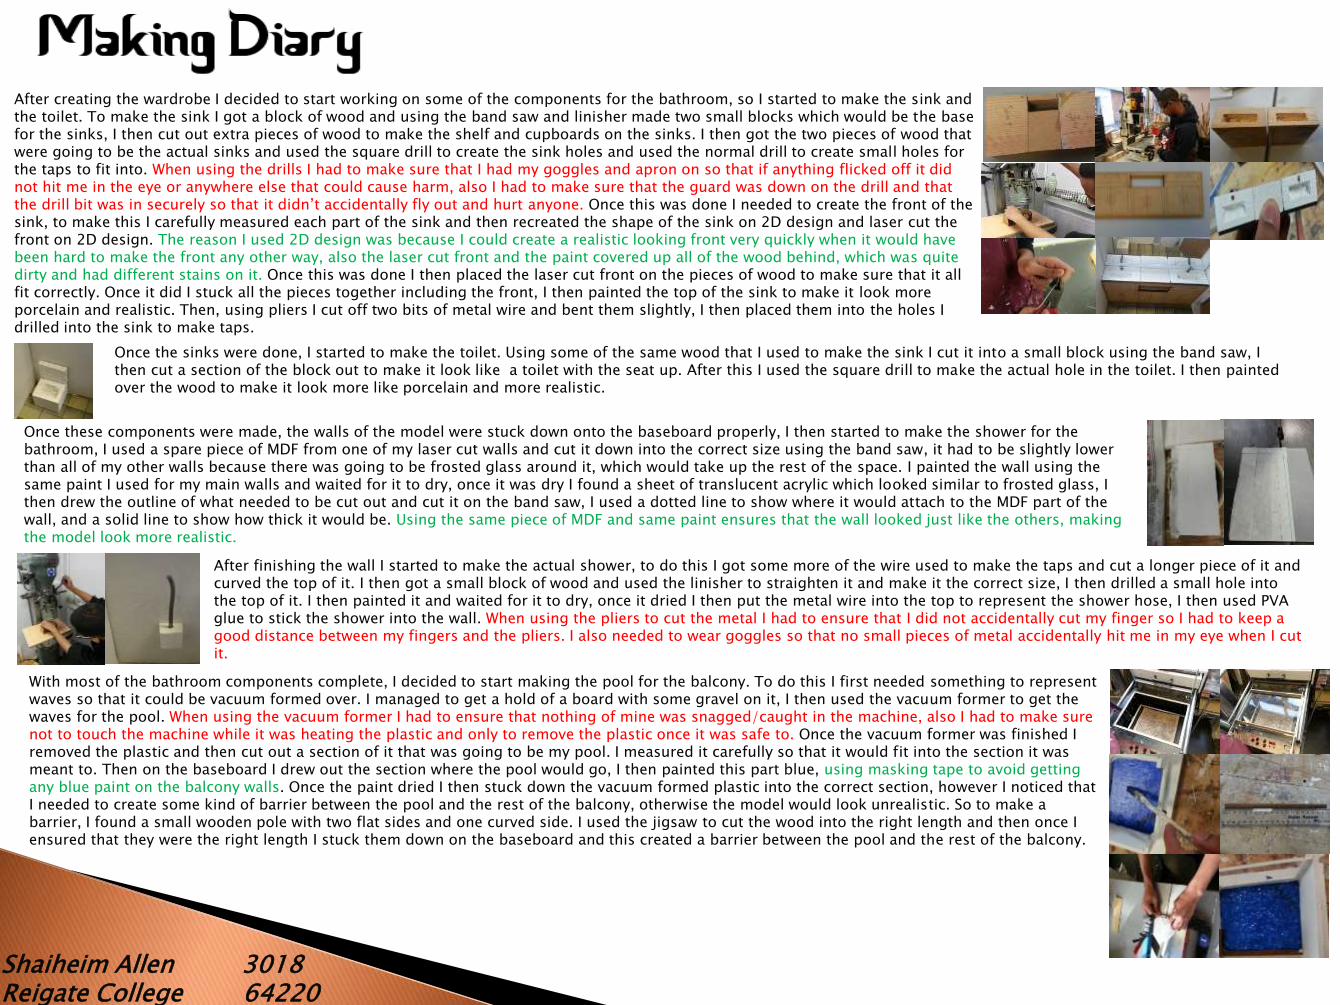
Shaiheim Allen 3018Reigate College 64220
Once the sinks were done, I started to make the toilet. Using some of the same wood that I used to make the sink I cut it into a small block using the band saw, I then cut a section of the block out to make it look like a toilet with the seat up. After this I used the square drill to make the actual hole in the toilet. I then painted over the wood to make it look more like porcelain and more realistic.
Once these components were made, the walls of the model were stuck down onto the baseboard properly, I then started to make the shower for the bathroom, I used a spare piece of MDF from one of my laser cut walls and cut it down into the correct size using the band saw, it had to be slightly lower than all of my other walls because there was going to be frosted glass around it, which would take up the rest of the space. I painted the wall using the same paint I used for my main walls and waited for it to dry, once it was dry I found a sheet of translucent acrylic which looked similar to frosted glass, I then drew the outline of what needed to be cut out and cut it on the band saw, I used a dotted line to show where it would attach to the MDF part of the wall, and a solid line to show how thick it would be. Using the same piece of MDF and same paint ensures that the wall looked just like the others, making the model look more realistic.
After finishing the wall I started to make the actual shower, to do this I got some more of the wire used to make the taps and cut a longer piece of it and curved the top of it. I then got a small block of wood and used the linisher to straighten it and make it the correct size, I then drilled a small hole into the top of it. I then painted it and waited for it to dry, once it dried I then put the metal wire into the top to represent the shower hose, I then used PVA glue to stick the shower into the wall. When using the pliers to cut the metal I had to ensure that I did not accidentally cut my finger so I had to keep a good distance between my fingers and the pliers. I also needed to wear goggles so that no small pieces of metal accidentally hit me in my eye when I cut it.
After creating the wardrobe I decided to start working on some of the components for the bathroom, so I started to make the sink and the toilet. To make the sink I got a block of wood and using the band saw and linisher made two small blocks which would be the base for the sinks, I then cut out extra pieces of wood to make the shelf and cupboards on the sinks. I then got the two pieces of wood that were going to be the actual sinks and used the square drill to create the sink holes and used the normal drill to create small holes for the taps to fit into. When using the drills I had to make sure that I had my goggles and apron on so that if anything flicked off it did not hit me in the eye or anywhere else that could cause harm, also I had to make sure that the guard was down on the drill and that the drill bit was in securely so that it didn’t accidentally fly out and hurt anyone. Once this was done I needed to create the front of the sink, to make this I carefully measured each part of the sink and then recreated the shape of the sink on 2D design and laser cut the front on 2D design. The reason I used 2D design was because I could create a realistic looking front very quickly when it would have been hard to make the front any other way, also the laser cut front and the paint covered up all of the wood behind, which was quite dirty and had different stains on it. Once this was done I then placed the laser cut front on the pieces of wood to make sure that it all fit correctly. Once it did I stuck all the pieces together including the front, I then painted the top of the sink to make it look more porcelain and realistic. Then, using pliers I cut off two bits of metal wire and bent them slightly, I then placed them into the holes I drilled into the sink to make taps.
With most of the bathroom components complete, I decided to start making the pool for the balcony. To do this I first needed something to represent waves so that it could be vacuum formed over. I managed to get a hold of a board with some gravel on it, I then used the vacuum former to get the waves for the pool. When using the vacuum former I had to ensure that nothing of mine was snagged/caught in the machine, also I had to make sure not to touch the machine while it was heating the plastic and only to remove the plastic once it was safe to. Once the vacuum former was finished I removed the plastic and then cut out a section of it that was going to be my pool. I measured it carefully so that it would fit into the section it was meant to. Then on the baseboard I drew out the section where the pool would go, I then painted this part blue, using masking tape to avoid getting any blue paint on the balcony walls. Once the paint dried I then stuck down the vacuum formed plastic into the correct section, however I noticed that I needed to create some kind of barrier between the pool and the rest of the balcony, otherwise the model would look unrealistic. So to make a barrier, I found a small wooden pole with two flat sides and one curved side. I used the jigsaw to cut the wood into the right length and then once I ensured that they were the right length I stuck them down on the baseboard and this created a barrier between the pool and the rest of the balcony.

Shaiheim Allen 3018Reigate College 64220
After I made the pool, I started to create the flooring for my model, the three images to the left show the different flooring I had (balcony, bathroom & main room and entryway). I did the balcony and the bathroom first, this is because they were tiled and I printed off the flooring on paper and then cut it into the correct size using scissors and a guillotine. The reason I used a guillotine was because it would provide me with a perfectly straight cut which would be harder for me to do using scissors, and because the flooring was printed out the exact same size as the floor it was being stuck on I had to ensure that the cut was correct. I then used PVA glue to stick the paper down. The reason I chose to use paper is because it has the same texture as real tiles and also the pattern cannot be replicated as good through any other method. Once the flooring in the bathroom was dry, I then stuck down the sink, toilet and shower wall. To make the entryway and main room flooring, I found a white cotton fabric and cut it into the correct shapes and used PVA glue to stick it down onto the floor, once this was dry I then stuck down my wardrobe, dressing table and sofa to the floor.
When I printed off the flooring for my model, I also printed off a small picture of a lion. The reason for this is because I needed to create a TV for the main room, and the Barbary lion is the national animal of Morocco, so I wanted to represent this somewhere so I place an image of a lion on the TV. To make the actual TV I got a piece of black acrylic and using the band saw I cut it into the correct shape, I also used the linisher to ensure that the edges were smooth. Once I had made the TV I started to work on the mirrors afterwards.
To create the mirrors the first thing I needed was something to represent the mirrors. I managed to find a sheet of mirror, I used the band saw to cut it into the correct shape and sizes for my bathroom and my main room. Once this was done I used double sided tape to temporarily place them on the wall to see if they fit correctly and they were the right size. Once I made sure that they were correct I was going to use contact adhesive to stick them on the wall, however I noticed that the double sided tape was doing a good job at holding the components on the wall, so I decided to stay with using double sided tape. Once this was done I used the double sided tape again to stick the TV onto the wall.
Once those components were done, I decided to finish the components in the entryway. I needed to make a shelf for luggage and suitcases next to the wardrobe so I got a block of wood, and cut out a small section of it on the band saw. Once I had the right size piece of wood, I then used the linisher to smooth the edges to make it safe for the users, as in real life a shelf with a sharp edge could be hazardous, so by smoothing it I made it more suitable for the users, as high quality products would not be as dangerous. I then stuck it to the wardrobe and wall using PVA glue on the sides of it, because it was the correct size foe the gap, it stayed in place while the glue dried.
After finishing the shelf, I decided to make the bedside table next. To do this I got a small block of wood, and using the band saw, cut it into three different sections; top, middle and bottom. I used the linisher to make the middle section smaller than the others, the reason I did this is because while doing my primary research, I saw a pillar with a similar styled pattern on it and I thought that the design was unique and I wanted to incorporate it into my design somewhere. Once this was done I then painted the three sections brown and then once that dried I used PVA glue to stick them together. Once it was dry I then used a standing knife to etch a drawer onto the top section to make it look more realistic.
So that my users could actually use the dressing table, I had to create a stool for them to sit on. To do this I got a small piece of wood, I cut the wood into a small square using the band saw and then cut two holes into it using the jigsaw to make the stool legs. When using the jigsaw I had to ensure that I had goggles and an apron on to prevent anything from accidently hitting me, I also had to make sure to keep my hands a safe distance away from the blade when the machine is on. I also had to make sure that nothing was hanging off of me or my clothing such as headphones or hoodie strings which could accidentally get caught in the machine, when I was done with the machine I had to ensure that it was off so that it did not cause harm to someone else. Once this was done I used the linisher to smooth out the stool and I used the wood dyes to make it darker to match the colour of the dressing table.

Shaiheim Allen 3018Reigate College 64220
After the stool, I decided to create the chairs and table for the balcony, I got some wood and similarly to how I made the toilet, I cut it into a rectangle and cut a section of it out so that it resembled a chair using the band saw, I did this four times and then used the wood dye to make it slightly darker. To make the table, I used the same piece of wood as the chairs, and then cut it into two sections for the table; the table top and the base. The base was a rectangular block and the table top was a thin piece of wood which was slightly bigger than the base. I then used the linisher to curve the edges of the table to make it safer for the users. I then used the same wooden dye that I used on the chairs and then waited for that to dry, once it was dry I then used PVA glue to stick the table top and the base together and then I used the PVA to stick all of the components to the balcony.
One of the last things I did in the main room was add the blanket and pillows to the beds, to make the pillows I used four thin strips of foam and then folded them until they were a suitable size compared to my beds to be pillows, I then got white tissue and cut a small section of it out and wrapped it around the foam. I used sellotape to hold it all together, I then repeated this three more times to create all of the pillows for my room. Once this was done I then started to work on the blankets, to do this I got more tissue and folded it in half to make it thicker and used small amounts of PVA to hold it. I then put PVA on the sides of the bed and put the tissue over it to make it look like a blanker. I then did this for the other bed and then once both beds were done I stuck the beds on the floor in the main room.
During my research I noticed that all of the hotel rooms had wall lights above the beds so I decided to include them in my model. My users also wanted lights above the beds but they wanted to make them look modern/contemporary, I had a look at my features research and decided to use the style of wall lights that I put on there. To do this I used some white acrylic and then using the band saw cut out four square pieces, I used the linisher to ensure that they were straight and that they were all as close to the same size as possible. I then used Uhu glue to stick them to the wall above the bed.
The final component I made in my model was the shower curtain. To make this I had to use a wooden dowel and a white fabric that was similar to a real shower curtain in terms of texture and style. The first thing I did was get the dowel and cut it into the correct length for the gap between the wall and the shower wall, I used the jigsaw to do this and then once it was the right size I used the linisher to make the ends slightly thinner so that it was easier to get the fabric on it. I then cut the fabric making sure that it was slightly bigger than the gap between the walls so that it would be able to fold. I then pierced the top of the fabric using scissors so that there was room for the dowel to fit through, I then put the dowel through the top and then using PVA glue I attached the component to the walls, making the shower curtain and completing the all of the components in my model.
Once all of the components were completed I had to make the model look more presentable, by doing thing such as cleaning the baseboard and painting over any parts of the model that weren’t done properly. Because I used slits to place the inner walls with the main ones, there was a large gap in the wall. To fix this, I got a strip of masking tape, and made it thin enough to cover the gap, without leaving too much extra on the other sides. I then painted it using the same paint I used on the walls and this covered it up making it barely noticeable, I then did this to the outside of the model as well, however the white paint I used for most of the model had un out at this point so the tape was more noticeable on the outside. As well as the slits, I also covered up the corners with masking tape to make them look better as well, because the joining did not work properly the first time around. Other parts of the model that I repainted include the top of it, as you can see from the images below, this made the whole model look a lot more clean and realistic. The reason I did this was to make the model look higher quality, as it is meant to be representing a 4.5* hotel room and I wanted this quality to be reflected in my model so I tried to clean it up and make it as neat and clean as possible to reflect this.
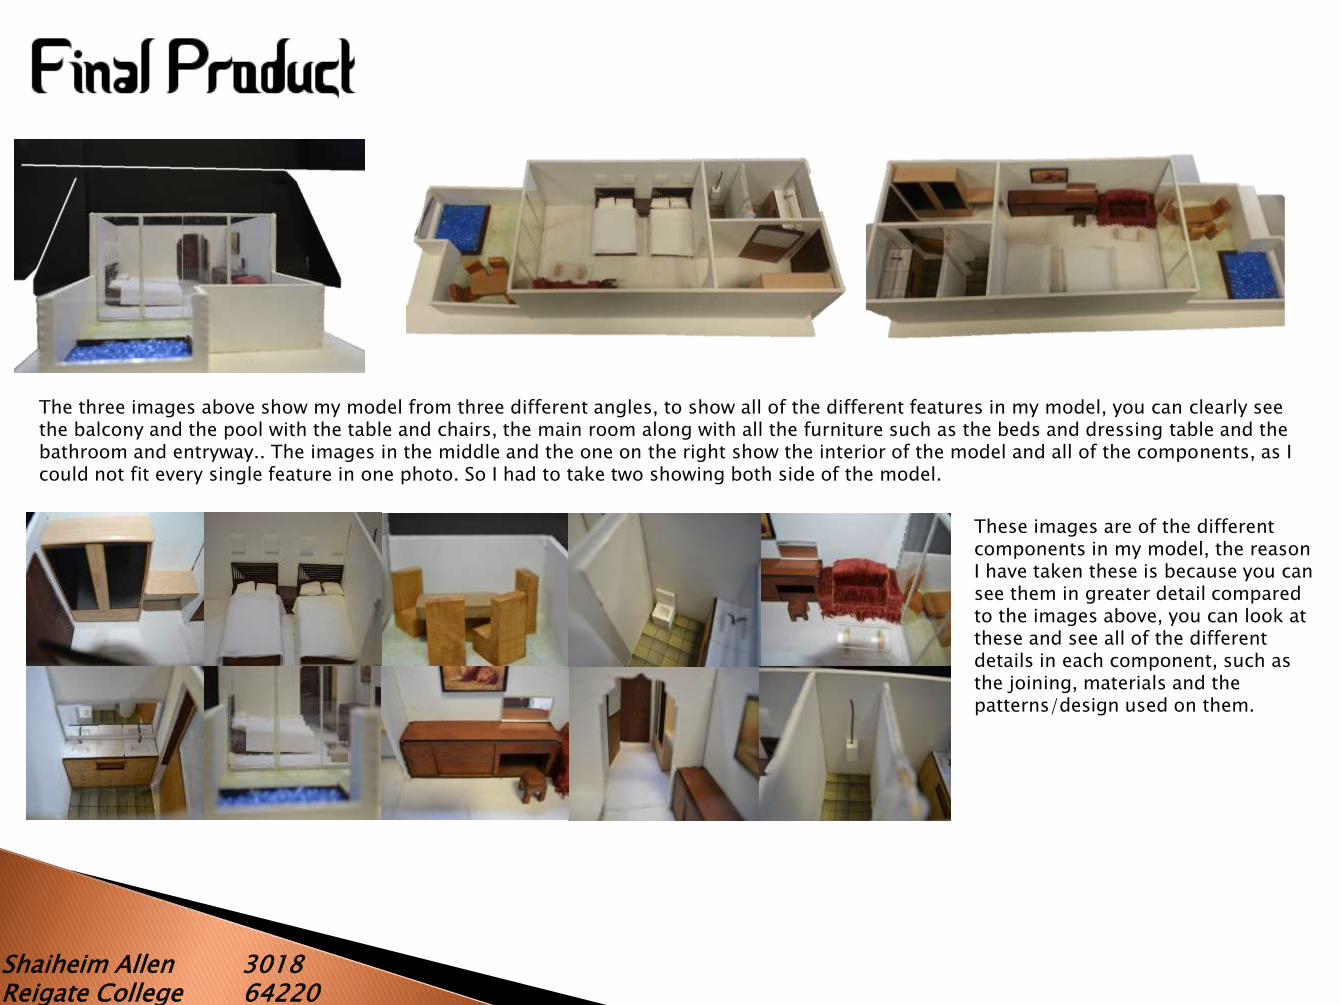
Shaiheim Allen 3018Reigate College 64220
The three images above show my model from three different angles, to show all of the different features in my model, you can clearly see the balcony and the pool with the table and chairs, the main room along with all the furniture such as the beds and dressing table and the bathroom and entryway.. The images in the middle and the one on the right show the interior of the model and all of the components, as I could not fit every single feature in one photo. So I had to take two showing both side of the model.
These images are of the different components in my model, the reason I have taken these is because you can see them in greater detail compared to the images above, you can look at these and see all of the different details in each component, such as the joining, materials and the patterns/design used on them.
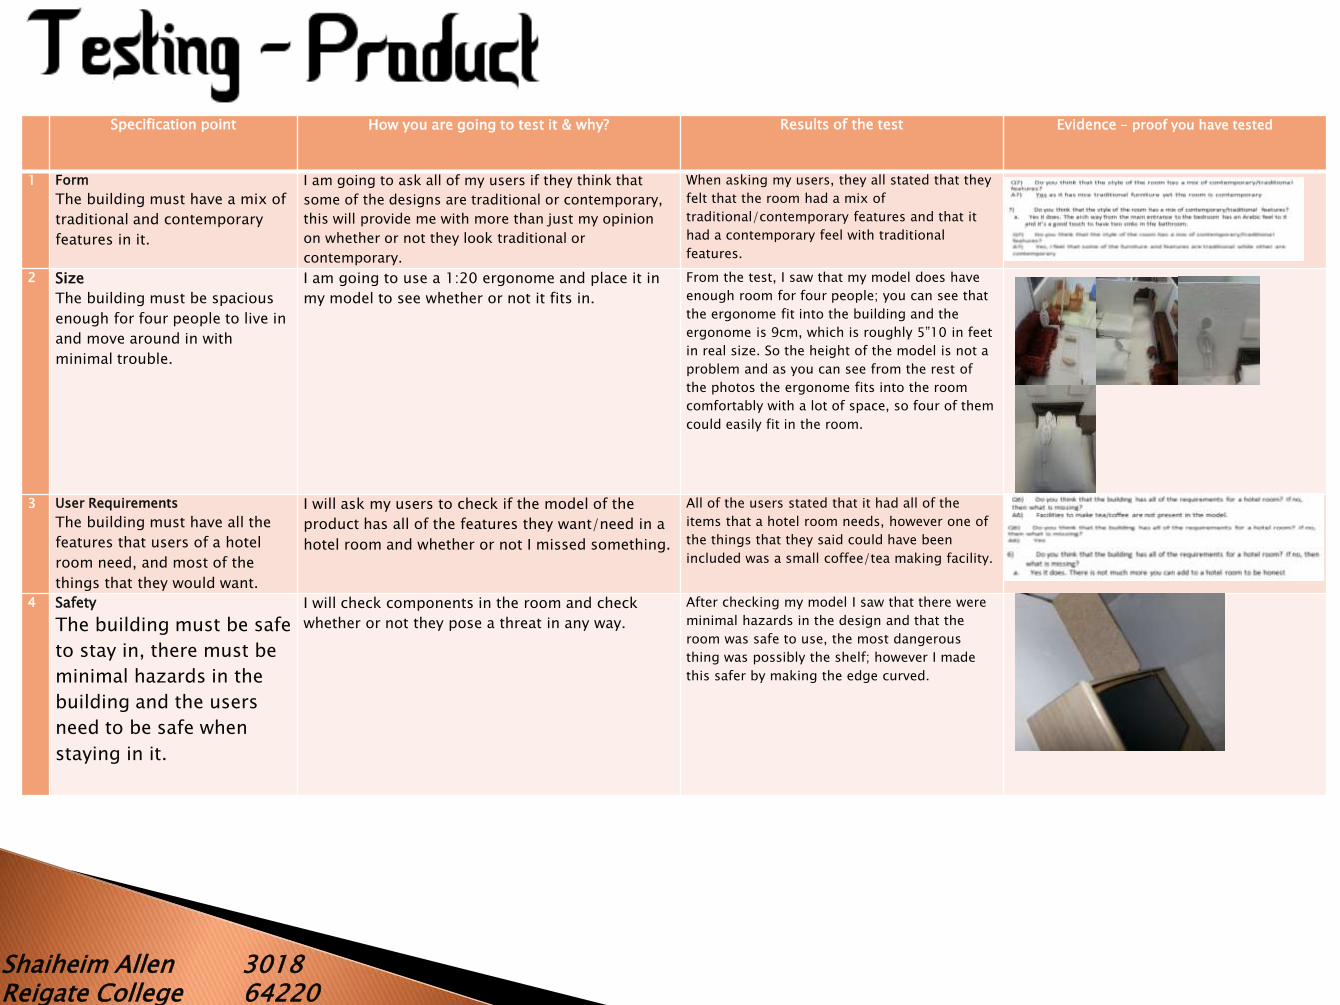
Shaiheim Allen 3018Reigate College 64220
Specification point How you are going to test it & why? Results of the test Evidence - proof you have tested
1 Form
The building must have a mix of
traditional and contemporary
features in it.
I am going to ask all of my users if they think that
some of the designs are traditional or contemporary,
this will provide me with more than just my opinion
on whether or not they look traditional or
contemporary.
When asking my users, they all stated that they
felt that the room had a mix of
traditional/contemporary features and that it
had a contemporary feel with traditional
features.
2 Size
The building must be spacious
enough for four people to live in
and move around in with
minimal trouble.
I am going to use a 1:20 ergonome and place it in
my model to see whether or not it fits in.
From the test, I saw that my model does have
enough room for four people; you can see that
the ergonome fit into the building and the
ergonome is 9cm, which is roughly 5”10 in feet
in real size. So the height of the model is not a
problem and as you can see from the rest of
the photos the ergonome fits into the room
comfortably with a lot of space, so four of them
could easily fit in the room.
3 User Requirements
The building must have all the
features that users of a hotel
room need, and most of the
things that they would want.
I will ask my users to check if the model of the
product has all of the features they want/need in a
hotel room and whether or not I missed something.
All of the users stated that it had all of the
items that a hotel room needs, however one of
the things that they said could have been
included was a small coffee/tea making facility.
4 Safety
The building must be safe
to stay in, there must be
minimal hazards in the
building and the users
need to be safe when
staying in it.
I will check components in the room and check
whether or not they pose a threat in any way.
After checking my model I saw that there were
minimal hazards in the design and that the
room was safe to use, the most dangerous
thing was possibly the shelf; however I made
this safer by making the edge curved.

Shaiheim Allen 3018Reigate College 64220
Specification point How you are going to test it & why? Results of the test Evidence - proof you have tested
1 Purpose
The model must be an accurate
representation of the real product
I will ask my users to evaluate the model and see if they
think it looks like a real hotel room, this is because I
have used them throughout my whole project and they
have already been in a hotel room in Morocco, so they
have previous experience of being in one.
My users stated that they felt that the model
was an accurate representation of a real
hotel room, and that they thought that the
design of it was good.
2 Quality
The features in the model must
resemble what they would look
like in real life including the
materials
I will look at the components in my model and test
the materials I used to make them with the materials
that the real product would use.
Looking at most of the components, they use
similar materials that look/feel like they would
in the real product, such as the beds. The
beds use foam and tissue to make the
mattress, which makes it soft like a real
mattress and the white cover makes it look
more realistic, also using tissue for the sheets
was suitable because they are soft and look
like sheets. The frame for the bed was made
using laser cut MDF that was dyed, it looked
and felt like it was a wooden bed.
3 Size
Because the model is a scale
model, the product must be to a
1:20 scale.
I will get a scale ruler and measure the size of the
model, the real product would have been 11.5m x
4m x 2.3m, and because the model is a 1:20 scale
model, it will need to be 575mm x 200mm x
115mm.
The model was the same size as it should be,
because the model was so long, I needed two
rulers to measure it and I saw that it was
575mm, the width of the model was a bit
thicker than intended, but only by a millimetre
or two because of the thickness of the walls
and the height was measured at 115mm.
4 User requirements
The model must appeal to the
users, and fit in with what they
want in a hotel room.
I will ask my users to evaluate the model and see
what they like / dislike about it, as the product is for
them, the user requirements are very important and
if they are not fulfilled then they are less likely to use
my product.
The users said that the features they do like is
the attention put to detail and design of the
room. However they stated that if they could
change things it would be to make the
bathroom a bit bigger because it seems too
cramped, and also the cover on the sofa.
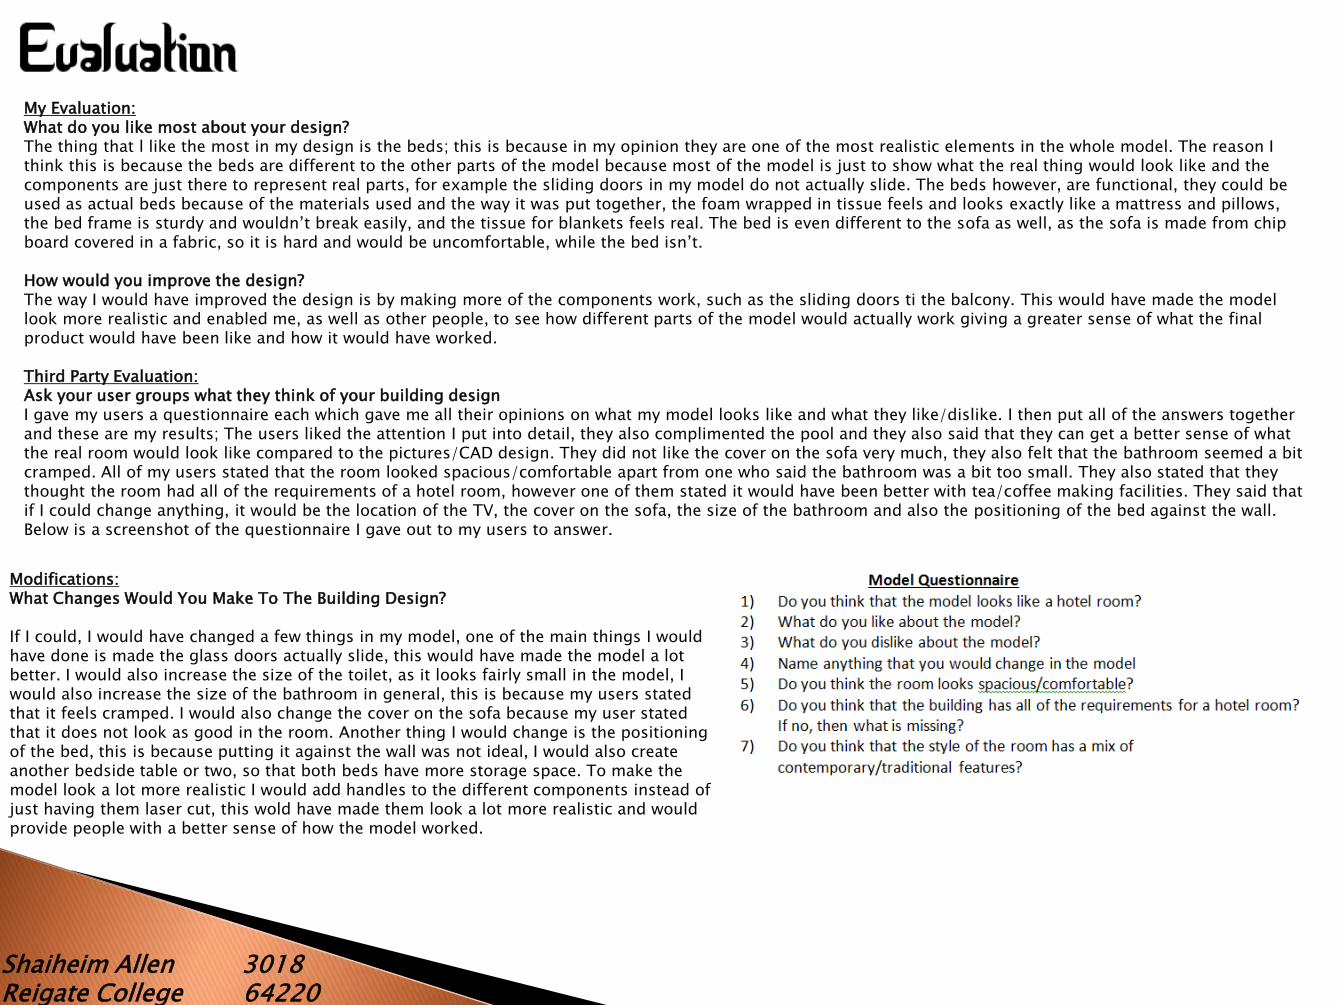
Shaiheim Allen 3018Reigate College 64220
My Evaluation:What do you like most about your design?The thing that l like the most in my design is the beds; this is because in my opinion they are one of the most realistic elements in the whole model. The reason I think this is because the beds are different to the other parts of the model because most of the model is just to show what the real thing would look like and the components are just there to represent real parts, for example the sliding doors in my model do not actually slide. The beds however, are functional, they could be used as actual beds because of the materials used and the way it was put together, the foam wrapped in tissue feels and looks exactly like a mattress and pillows, the bed frame is sturdy and wouldn’t break easily, and the tissue for blankets feels real. The bed is even different to the sofa as well, as the sofa is made from chip board covered in a fabric, so it is hard and would be uncomfortable, while the bed isn’t.
How would you improve the design?The way I would have improved the design is by making more of the components work, such as the sliding doors ti the balcony. This would have made the model look more realistic and enabled me, as well as other people, to see how different parts of the model would actually work giving a greater sense of what the final product would have been like and how it would have worked.
Third Party Evaluation:Ask your user groups what they think of your building design I gave my users a questionnaire each which gave me all their opinions on what my model looks like and what they like/dislike. I then put all of the answers together and these are my results; The users liked the attention I put into detail, they also complimented the pool and they also said that they can get a better sense of what the real room would look like compared to the pictures/CAD design. They did not like the cover on the sofa very much, they also felt that the bathroom seemed a bit cramped. All of my users stated that the room looked spacious/comfortable apart from one who said the bathroom was a bit too small. They also stated that they thought the room had all of the requirements of a hotel room, however one of them stated it would have been better with tea/coffee making facilities. They said that if I could change anything, it would be the location of the TV, the cover on the sofa, the size of the bathroom and also the positioning of the bed against the wall. Below is a screenshot of the questionnaire I gave out to my users to answer.
Modifications:What Changes Would You Make To The Building Design?
If I could, I would have changed a few things in my model, one of the main things I would have done is made the glass doors actually slide, this would have made the model a lot better. I would also increase the size of the toilet, as it looks fairly small in the model, I would also increase the size of the bathroom in general, this is because my users stated that it feels cramped. I would also change the cover on the sofa because my user stated that it does not look as good in the room. Another thing I would change is the positioning of the bed, this is because putting it against the wall was not ideal, I would also create another bedside table or two, so that both beds have more storage space. To make the model look a lot more realistic I would add handles to the different components instead of just having them laser cut, this wold have made them look a lot more realistic and would provide people with a better sense of how the model worked.
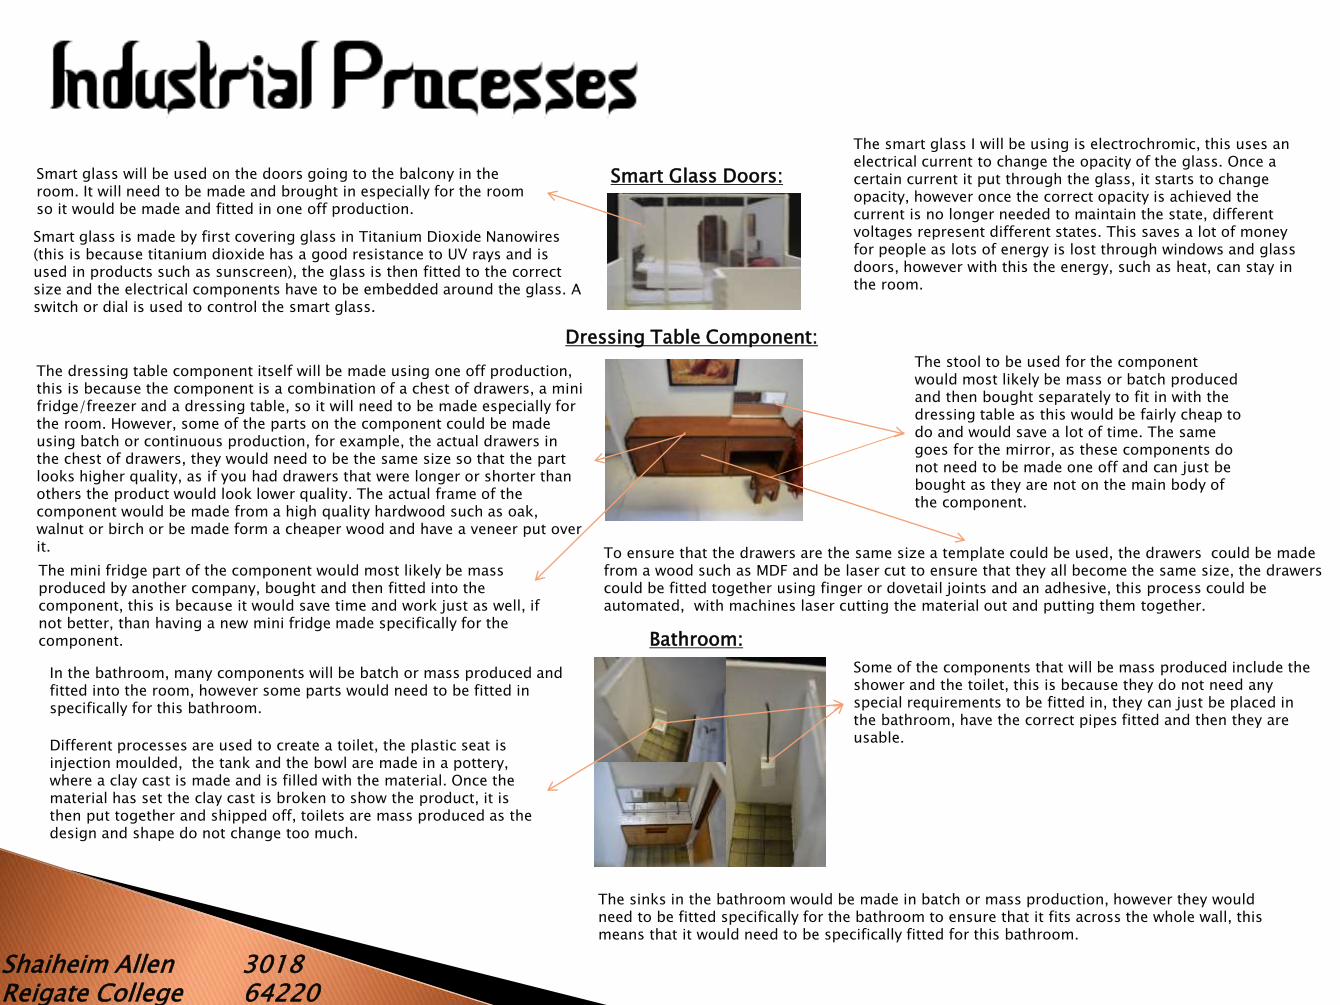
Shaiheim Allen 3018Reigate College 64220
The smart glass I will be using is electrochromic, this uses an electrical current to change the opacity of the glass. Once a certain current it put through the glass, it starts to change opacity, however once the correct opacity is achieved the current is no longer needed to maintain the state, different voltages represent different states. This saves a lot of money for people as lots of energy is lost through windows and glass doors, however with this the energy, such as heat, can stay in the room.
The mini fridge part of the component would most likely be mass produced by another company, bought and then fitted into the component, this is because it would save time and work just as well, if not better, than having a new mini fridge made specifically for the component.
Smart Glass Doors:Smart glass will be used on the doors going to the balcony in the room. It will need to be made and brought in especially for the room so it would be made and fitted in one off production.
Smart glass is made by first covering glass in Titanium Dioxide Nanowires (this is because titanium dioxide has a good resistance to UV rays and is used in products such as sunscreen), the glass is then fitted to the correct size and the electrical components have to be embedded around the glass. A switch or dial is used to control the smart glass.
Dressing Table Component:
The dressing table component itself will be made using one off production, this is because the component is a combination of a chest of drawers, a mini fridge/freezer and a dressing table, so it will need to be made especially for the room. However, some of the parts on the component could be made using batch or continuous production, for example, the actual drawers in the chest of drawers, they would need to be the same size so that the part looks higher quality, as if you had drawers that were longer or shorter than others the product would look lower quality. The actual frame of the component would be made from a high quality hardwood such as oak, walnut or birch or be made form a cheaper wood and have a veneer put over it. To ensure that the drawers are the same size a template could be used, the drawers could be made
from a wood such as MDF and be laser cut to ensure that they all become the same size, the drawers could be fitted together using finger or dovetail joints and an adhesive, this process could be automated, with machines laser cutting the material out and putting them together.
The stool to be used for the component would most likely be mass or batch produced and then bought separately to fit in with the dressing table as this would be fairly cheap to do and would save a lot of time. The same goes for the mirror, as these components do not need to be made one off and can just be bought as they are not on the main body of the component.
Bathroom:
In the bathroom, many components will be batch or mass produced and fitted into the room, however some parts would need to be fitted in specifically for this bathroom.
Some of the components that will be mass produced include the shower and the toilet, this is because they do not need any special requirements to be fitted in, they can just be placed in the bathroom, have the correct pipes fitted and then they are usable.
The sinks in the bathroom would be made in batch or mass production, however they would need to be fitted specifically for the bathroom to ensure that it fits across the whole wall, this means that it would need to be specifically fitted for this bathroom.
Different processes are used to create a toilet, the plastic seat is injection moulded, the tank and the bowl are made in a pottery, where a clay cast is made and is filled with the material. Once the material has set the clay cast is broken to show the product, it is then put together and shipped off, toilets are mass produced as the design and shape do not change too much.
Shaiheim Allen 3018Reigate College 64220
Secondary Research:
Riad - http://www.tripadvisor.co.uk/LocationPhotoDirectLink-g293734-d1926207-i48558729-Riad_Laksiba-Marrakech_Marrakech_Tensift_El_Haouz_Region.html
Arch 1 - http://wallpaperzone.biz/beautiful-moorish-architecture-hd-wallpapers/
Mezquita exterior - http://thebuilderblog.wordpress.com/2008/01/31/mosque-cathedral-of-cordoba-spain/
Mezquita Interior - http://www.8thingstodo.com/mezquita-de-cordoba-spain
Zellige image - http://www.arganiagalleries.com/Zellige/Eng/Our%20products.htm
Tadelakt wall - http://en.wikipedia.org/wiki/File:Echantillon_Tadelakt-St%C3%A9phane_Baron.jpg
Tadelakt wall with sink - http://www.venetian-decorative-finishes.co.uk/760/moroccan-tadelakt/
Existing Products:
Hotel Room 1 - http://www.lawrenceofmorocco.com/accommodation/villa-des-orangers-0
Hotel Room 2 – http://www.lawrenceofmorocco.com/accommodation/hotel-la-mamounia
Initial Ideas 8:
Wooden sliding doors - http://www.moorparkjoinery.co.uk/images/sliding/img001.jpg
Planning my model:
Smart glass diagram - http://freshome.com/2010/03/15/smart-energy-glass-collect-and-save-power/
Development (Features)
Modern light - http://www.esi.info/detail.cfm/Deltalight/Visa-LED-contemporary-wall-light/_/R-PROFILE-112937_SE10QN
Moorish light - http://4.bp.blogspot.com/_6YevsW1YnZY/SdalP1n8oTI/AAAAAAAAAKs/pNyfI5wfRho/s400/653.jpg
Development (Balcony)
Balcony pool photos - http://www.bitrebels.com/design/inspiring-architecture-hotel-balcony-swimming-pools-12-pics/
Anthropometric research:
Wardrobe - http://www.ikea.com/gb/en/catalog/products/S89002114/
Bed - http://www.ikea.com/gb/en/catalog/products/S59002436/
Coffee Table - http://www.ikea.com/gb/en/catalog/products/20173066/