moreviz hmd guide - more3d.commore3d.com/more3d/files/pdf/more3d_moreviz_hmd_guide.pdf · vr hmd...
TRANSCRIPT

more3D GmbH & Co. KGMainzer Straße 276
53179 BonnGermany
Tel +49 (0) 221 677 87 97 0Fax +49 (0) 221 677 87 97 9
Email [email protected]
Create tangible visions.
Create tangible visions.
moreViz HMD Guide
moreViz Guide table of content
moreViz Software
Mainzer Straße 27653179 Bonn, Germany
Fon +49(0)221 677 8797-0Fax +49(0)221 677 8797-9
more3D GmbH & Co.KG
Create tangible visions.
Table of content / Preface 2
VR HMD Comparison 3
VR System Requirements 4
NVidia Quadro Configuration 5
moreViz Server Control Configuration 6
Client: Vive / VivePro Configuration 7
Client: Oculus Rift Configuration 9
App Configuration: NX 10
App Configuration: Plant Simulation 11
App Configuration: Process Simlulate 12
App Configuration: JT2Go 13
App Configuration: Teamcenter Visualization 14
App Configuration: SAP Visual Enterprise 15
App Configuration: Catia / Delmia 16
App Configuration: Catia Composer (Player) 17
App Configuration: Creo View Express 18
App Configuration: SimPack (Viewer) 19
App Configuration: Sketchup 20
Guide: Daily Use / FAQ 21
Thank you very much for using moreViz - the universal VR Software bridge for CAD
moreViz bridges your app directly 1:1 into your existing VR environment. This guide aims at HMD (Head Mounted Display) users. For VR Powerwall and CAVE please refer to the matching guide, provided by your more3D representative or alternatively to be found in the installation directory of the moreViz software.
moreViz basically consists of two components for HMD:
1. The moreViz ClientThe moreViz Client receives the graphics data stream from the CAD application and renders it in VR. It needs to be launched before you start your CAD app.
2. The moreViz Server ControlThe moreViz Server control is used for configuring the connection type between your app and the VR Client. The moreViz Server control also features the moreViz Application enabler which lists and enables your apps for VR Bridging. The server control should be automatically run on system startup, it uses only very little system resources and does not establish any network connections to the internet.
VR HMD Comparison
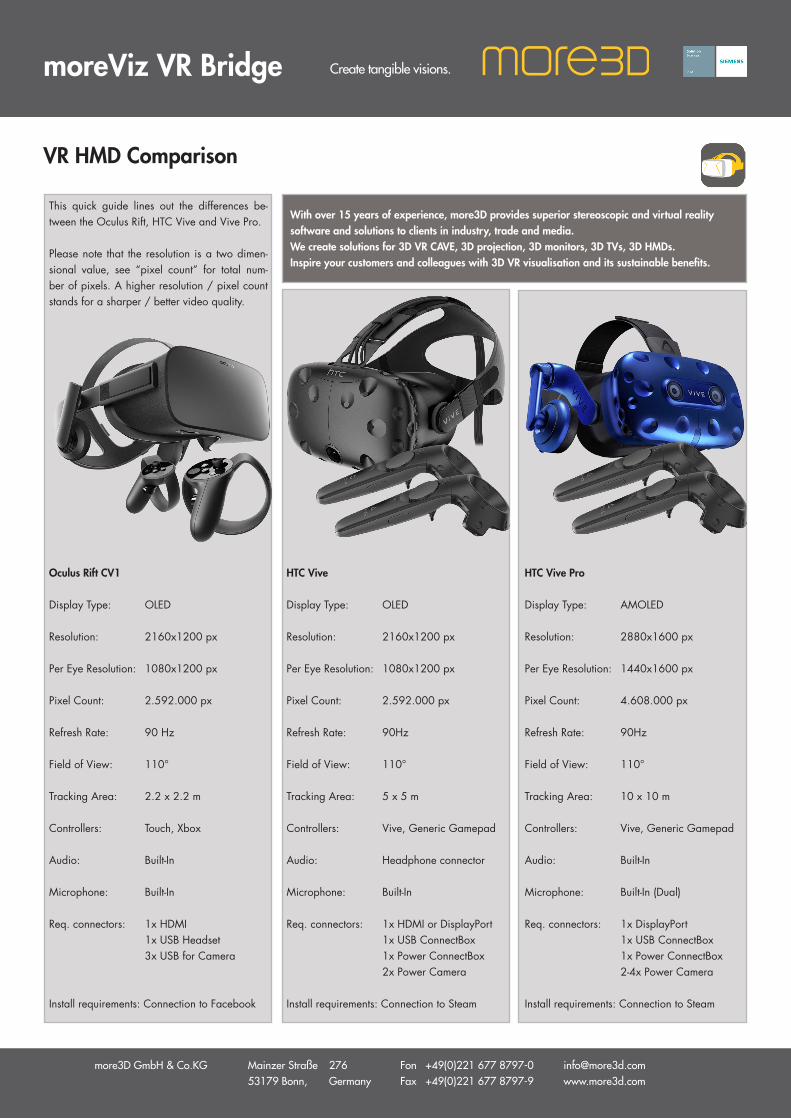
This quick guide lines out the differences be-tween the Oculus Rift, HTC Vive and Vive Pro.
Please note that the resolution is a two dimen-sional value, see “pixel count” for total num-ber of pixels. A higher resolution / pixel count stands for a sharper / better video quality.
Oculus Rift CV1
Display Type: OLED
Resolution: 2160x1200 px
Per Eye Resolution: 1080x1200 px
Pixel Count: 2.592.000 px
Refresh Rate: 90 Hz
Field of View: 110°
Tracking Area: 2.2 x 2.2 m
Controllers: Touch, Xbox
Audio: Built-In
Microphone: Built-In
Req. connectors: 1x HDMI 1x USB Headset 3x USB for Camera
Install requirements: Connection to Facebook
Create tangible visions.moreViz VR Bridge
Mainzer Straße 27653179 Bonn, Germany
Fon +49(0)221 677 8797-0Fax +49(0)221 677 8797-9
more3D GmbH & Co.KG
With over 15 years of experience, more3D provides superior stereoscopic and virtual reality software and solutions to clients in industry, trade and media.We create solutions for 3D VR CAVE, 3D projection, 3D monitors, 3D TVs, 3D HMDs.Inspire your customers and colleagues with 3D VR visualisation and its sustainable benefi ts.
HTC Vive
Display Type: OLED
Resolution: 2160x1200 px
Per Eye Resolution: 1080x1200 px
Pixel Count: 2.592.000 px
Refresh Rate: 90Hz
Field of View: 110°
Tracking Area: 5 x 5 m
Controllers: Vive, Generic Gamepad
Audio: Headphone connector
Microphone: Built-In
Req. connectors: 1x HDMI or DisplayPort 1x USB ConnectBox 1x Power ConnectBox 2x Power Camera
Install requirements: Connection to Steam
HTC Vive Pro
Display Type: AMOLED
Resolution: 2880x1600 px
Per Eye Resolution: 1440x1600 px
Pixel Count: 4.608.000 px
Refresh Rate: 90Hz
Field of View: 110°
Tracking Area: 10 x 10 m
Controllers: Vive, Generic Gamepad
Audio: Built-In
Microphone: Built-In (Dual)
Req. connectors: 1x DisplayPort 1x USB ConnectBox 1x Power ConnectBox 2-4x Power Camera
Install requirements: Connection to Steam
VR System Requirements
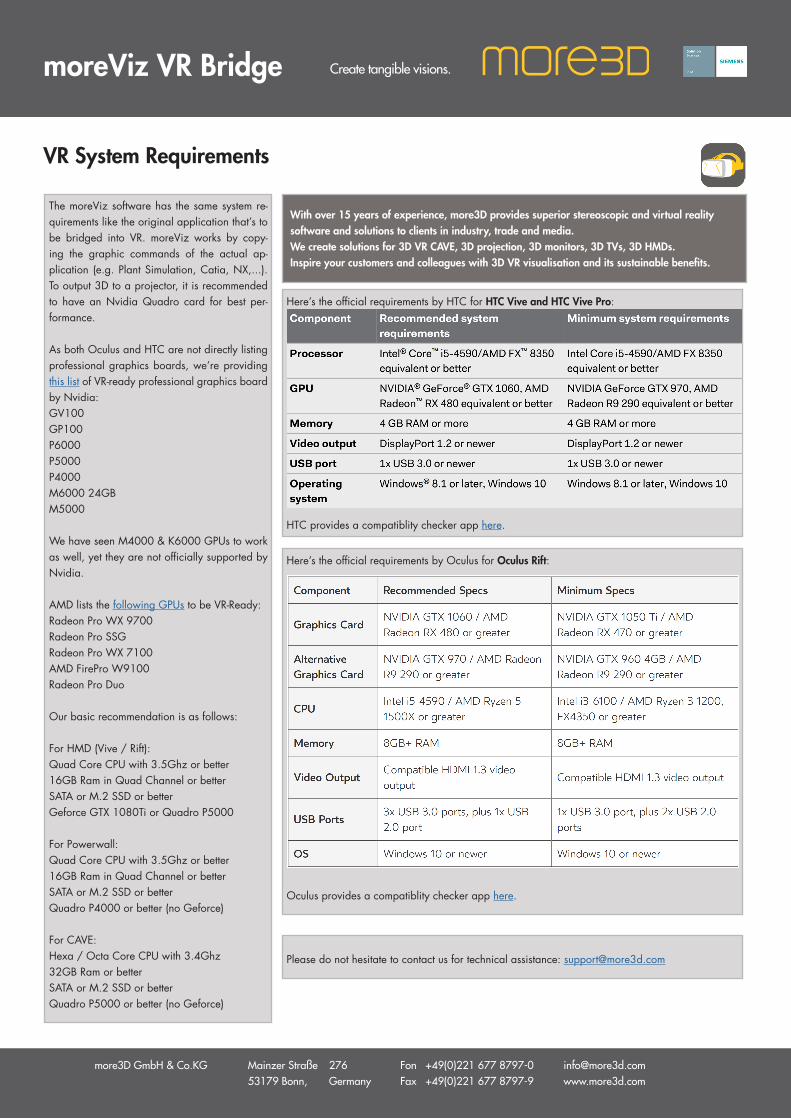
The moreViz software has the same system re-quirements like the original application that’s to be bridged into VR. moreViz works by copy-ing the graphic commands of the actual ap-plication (e.g. Plant Simulation, Catia, NX,...). To output 3D to a projector, it is recommended to have an Nvidia Quadro card for best per-formance.
As both Oculus and HTC are not directly listing professional graphics boards, we’re providing this list of VR-ready professional graphics board by Nvidia:GV100GP100P6000P5000P4000M6000 24GBM5000
We have seen M4000 & K6000 GPUs to work as well, yet they are not officially supported by Nvidia.
AMD lists the following GPUs to be VR-Ready:Radeon Pro WX 9700Radeon Pro SSGRadeon Pro WX 7100AMD FirePro W9100Radeon Pro Duo
Our basic recommendation is as follows:
For HMD (Vive / Rift):Quad Core CPU with 3.5Ghz or better16GB Ram in Quad Channel or betterSATA or M.2 SSD or betterGeforce GTX 1080Ti or Quadro P5000
For Powerwall:Quad Core CPU with 3.5Ghz or better16GB Ram in Quad Channel or betterSATA or M.2 SSD or betterQuadro P4000 or better (no Geforce)
For CAVE:Hexa / Octa Core CPU with 3.4Ghz32GB Ram or betterSATA or M.2 SSD or betterQuadro P5000 or better (no Geforce)
Create tangible visions.moreViz VR Bridge
Mainzer Straße 27653179 Bonn, Germany
Fon +49(0)221 677 8797-0Fax +49(0)221 677 8797-9
more3D GmbH & Co.KG
With over 15 years of experience, more3D provides superior stereoscopic and virtual reality software and solutions to clients in industry, trade and media.We create solutions for 3D VR CAVE, 3D projection, 3D monitors, 3D TVs, 3D HMDs.Inspire your customers and colleagues with 3D VR visualisation and its sustainable benefits.
Here’s the official requirements by HTC for HTC Vive and HTC Vive Pro:
HTC provides a compatiblity checker app here.
Please do not hesitate to contact us for technical assistance: [email protected]
Here’s the official requirements by Oculus for Oculus Rift:
Oculus provides a compatiblity checker app here.
NVidia Quadro Confi guration Guide
To download the latest Version of moreViz, please send us a request to [email protected] will provide the download link within 1 busi-ness day.
Create tangible visions.moreViz VR Bridge
Mainzer Straße 27653179 Bonn, Germany
Fon +49(0)221 677 8797-0Fax +49(0)221 677 8797-9
more3D GmbH & Co.KG
With over 15 years of experience, more3D provides superior stereoscopic and virtual reality software and solutions to clients in industry, trade and media.We create solutions for 3D VR CAVE, 3D projection, 3D monitors, 3D TVs, 3D HMDs.Inspire your customers and colleagues with 3D VR visualisation and its sustainable benefi ts.
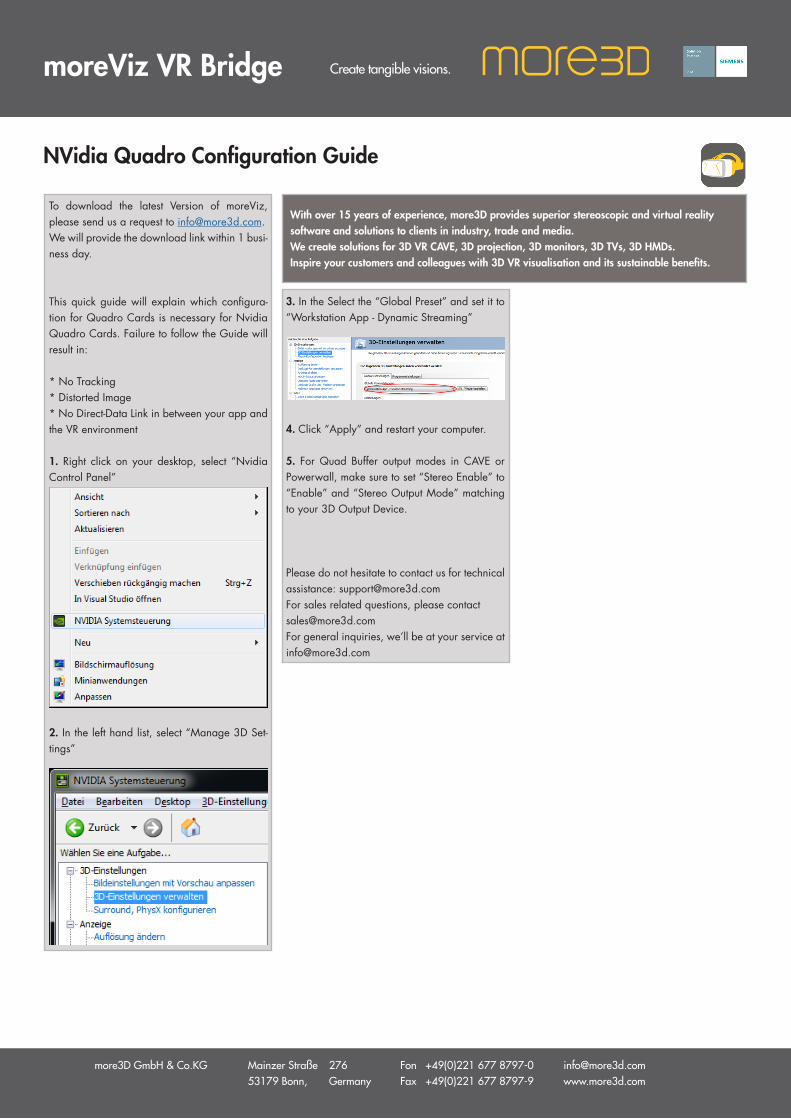
This quick guide will explain which confi gura-tion for Quadro Cards is necessary for Nvidia Quadro Cards. Failure to follow the Guide will result in:
* No Tracking* Distorted Image* No Direct-Data Link in between your app and the VR environment
1. Right click on your desktop, select “Nvidia Control Panel”
2. In the left hand list, select “Manage 3D Set-tings”
3. In the Select the “Global Preset” and set it to “Workstation App - Dynamic Streaming”
4. Click “Apply” and restart your computer.
5. For Quad Buffer output modes in CAVE or Powerwall, make sure to set “Stereo Enable” to “Enable” and “Stereo Output Mode” matching to your 3D Output Device.
Please do not hesitate to contact us for technicalassistance: [email protected] sales related questions, please [email protected] general inquiries, we’ll be at your service [email protected]
moreViz Setup Guide: moreViz Server Control
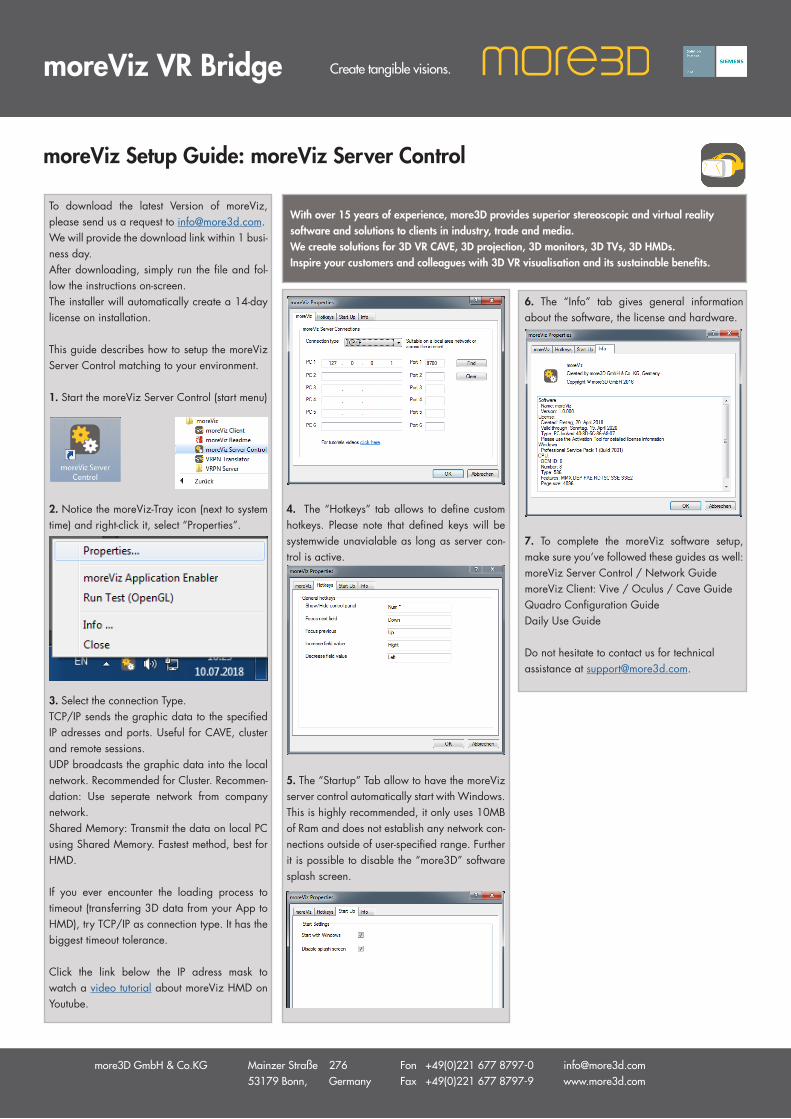
To download the latest Version of moreViz, please send us a request to [email protected] will provide the download link within 1 busi-ness day. After downloading, simply run the fi le and fol-low the instructions on-screen.The installer will automatically create a 14-day license on installation.
This guide describes how to setup the moreViz Server Control matching to your environment.
1. Start the moreViz Server Control (start menu)
2. Notice the moreViz-Tray icon (next to system time) and right-click it, select “Properties”.
3. Select the connection Type.TCP/IP sends the graphic data to the specifi ed IP adresses and ports. Useful for CAVE, cluster and remote sessions.UDP broadcasts the graphic data into the local network. Recommended for Cluster. Recommen-dation: Use seperate network from company network.Shared Memory: Transmit the data on local PC using Shared Memory. Fastest method, best for HMD.
If you ever encounter the loading process to timeout (transferring 3D data from your App to HMD), try TCP/IP as connection type. It has the biggest timeout tolerance.
Click the link below the IP adress mask to watch a video tutorial about moreViz HMD on Youtube.
Create tangible visions.moreViz VR Bridge
Mainzer Straße 27653179 Bonn, Germany
Fon +49(0)221 677 8797-0Fax +49(0)221 677 8797-9
more3D GmbH & Co.KG
With over 15 years of experience, more3D provides superior stereoscopic and virtual reality software and solutions to clients in industry, trade and media.We create solutions for 3D VR CAVE, 3D projection, 3D monitors, 3D TVs, 3D HMDs.Inspire your customers and colleagues with 3D VR visualisation and its sustainable benefi ts.
4. The “Hotkeys” tab allows to defi ne custom hotkeys. Please note that defi ned keys will be systemwide unavialable as long as server con-trol is active.
5. The “Startup” Tab allow to have the moreViz server control automatically start with Windows. This is highly recommended, it only uses 10MB of Ram and does not establish any network con-nections outside of user-specifi ed range. Further it is possible to disable the “more3D” software splash screen.
6. The “Info” tab gives general information about the software, the license and hardware.
7. To complete the moreViz software setup, make sure you’ve followed these guides as well:moreViz Server Control / Network GuidemoreViz Client: Vive / Oculus / Cave GuideQuadro Confi guration GuideDaily Use Guide
Do not hesitate to contact us for technical assistance at [email protected].
moreViz HTC Vive and VivePro Confi guration
To download the latest Version of moreViz, please send us a request to [email protected].
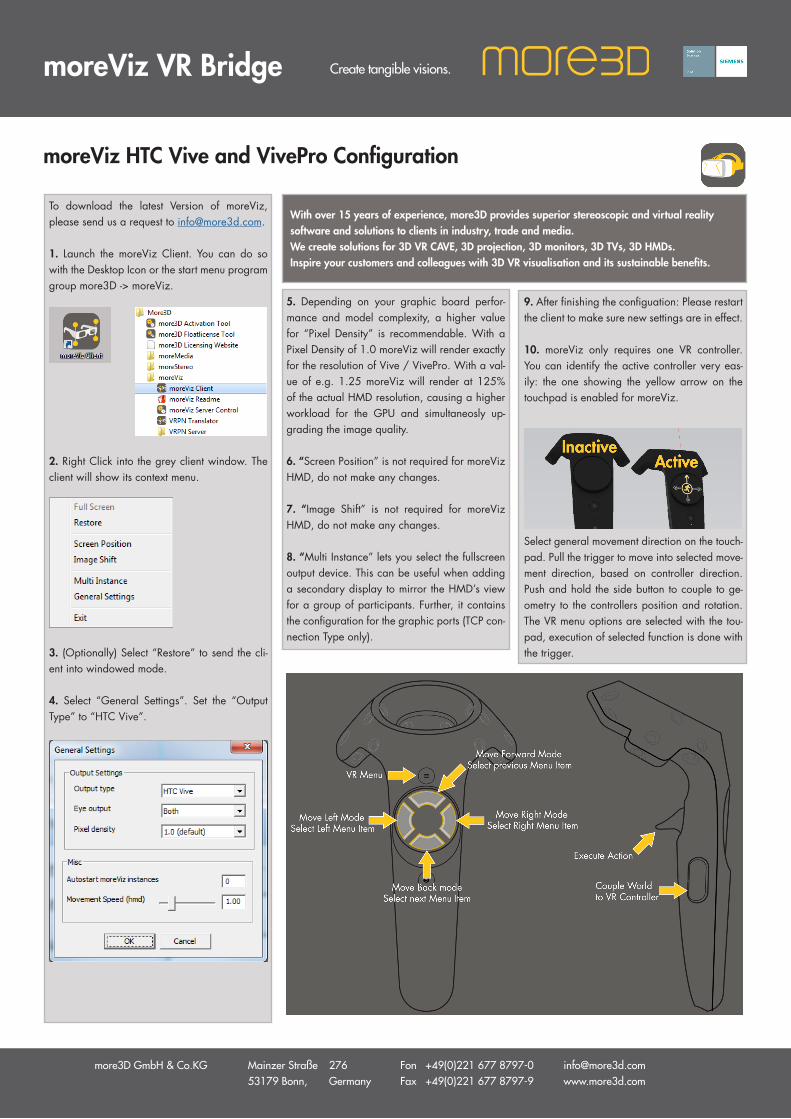
1. Launch the moreViz Client. You can do so with the Desktop Icon or the start menu program group more3D -> moreViz.
2. Right Click into the grey client window. The client will show its context menu.
3. (Optionally) Select “Restore” to send the cli-ent into windowed mode.
4. Select “General Settings”. Set the “Output Type” to “HTC Vive”.
Create tangible visions.moreViz VR Bridge
Mainzer Straße 27653179 Bonn, Germany
Fon +49(0)221 677 8797-0Fax +49(0)221 677 8797-9
more3D GmbH & Co.KG
With over 15 years of experience, more3D provides superior stereoscopic and virtual reality software and solutions to clients in industry, trade and media.We create solutions for 3D VR CAVE, 3D projection, 3D monitors, 3D TVs, 3D HMDs.Inspire your customers and colleagues with 3D VR visualisation and its sustainable benefi ts.
5. Depending on your graphic board perfor-mance and model complexity, a higher value for “Pixel Density” is recommendable. With a Pixel Density of 1.0 moreViz will render exactly for the resolution of Vive / VivePro. With a val-ue of e.g. 1.25 moreViz will render at 125% of the actual HMD resolution, causing a higher workload for the GPU and simultaneosly up-grading the image quality.
6. “Screen Position” is not required for moreViz HMD, do not make any changes.
7. “Image Shift” is not required for moreViz HMD, do not make any changes.
8. “Multi Instance” lets you select the fullscreen output device. This can be useful when adding a secondary display to mirror the HMD’s view for a group of participants. Further, it contains the confi guration for the graphic ports (TCP con-nection Type only).
9. After fi nishing the confi guation: Please restart the client to make sure new settings are in effect.
10. moreViz only requires one VR controller. You can identify the active controller very eas-ily: the one showing the yellow arrow on the touchpad is enabled for moreViz.
Select general movement direction on the touch-pad. Pull the trigger to move into selected move-ment direction, based on controller direction.Push and hold the side button to couple to ge-ometry to the controllers position and rotation. The VR menu options are selected with the tou-pad, execution of selected function is done with the trigger.
moreViz HTC Vive and VivePro Configuration
moreViz Software
Mainzer Straße 27653179 Bonn, Germany
Fon +49(0)221 677 8797-0Fax +49(0)221 677 8797-9
more3D GmbH & Co.KG
Create tangible visions.
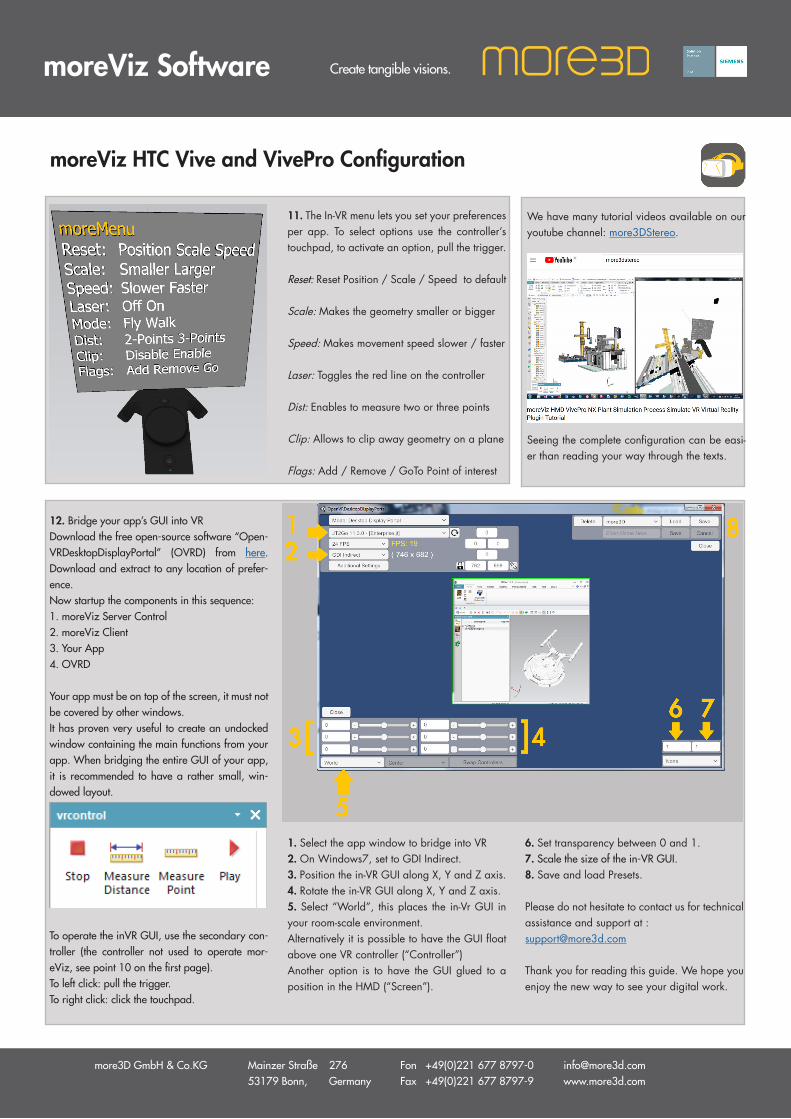
11. The In-VR menu lets you set your preferences per app. To select options use the controller’s touchpad, to activate an option, pull the trigger.
Reset: Reset Position / Scale / Speed to default
Scale: Makes the geometry smaller or bigger
Speed: Makes movement speed slower / faster
Laser: Toggles the red line on the controller
Dist: Enables to measure two or three points
Clip: Allows to clip away geometry on a plane
Flags: Add / Remove / GoTo Point of interest
12. Bridge your app’s GUI into VRDownload the free open-source software “Open-VRDesktopDisplayPortal” (OVRD) from here. Download and extract to any location of prefer-ence. Now startup the components in this sequence: 1. moreViz Server Control2. moreViz Client3. Your App 4. OVRD
Your app must be on top of the screen, it must not be covered by other windows. It has proven very useful to create an undocked window containing the main functions from your app. When bridging the entire GUI of your app, it is recommended to have a rather small, win-dowed layout.
To operate the inVR GUI, use the secondary con-troller (the controller not used to operate mor-eViz, see point 10 on the first page). To left click: pull the trigger. To right click: click the touchpad.
1. Select the app window to bridge into VR2. On Windows7, set to GDI Indirect. 3. Position the in-VR GUI along X, Y and Z axis.4. Rotate the in-VR GUI along X, Y and Z axis.5. Select “World”, this places the in-Vr GUI in your room-scale environment. Alternatively it is possible to have the GUI float above one VR controller (“Controller”)Another option is to have the GUI glued to a position in the HMD (“Screen”).
6. Set transparency between 0 and 1.7. Scale the size of the in-VR GUI.8. Save and load Presets.
Please do not hesitate to contact us for technical assistance and support at :[email protected]
Thank you for reading this guide. We hope you enjoy the new way to see your digital work.
We have many tutorial videos available on our youtube channel: more3DStereo.
Seeing the complete configuration can be easi-er than reading your way through the texts.
We have many tutorial videos available on our youtube channel: more3DStereo.
moreViz Oculus Rift Confi guration
To download the latest Version of moreViz, please send us a request to [email protected].
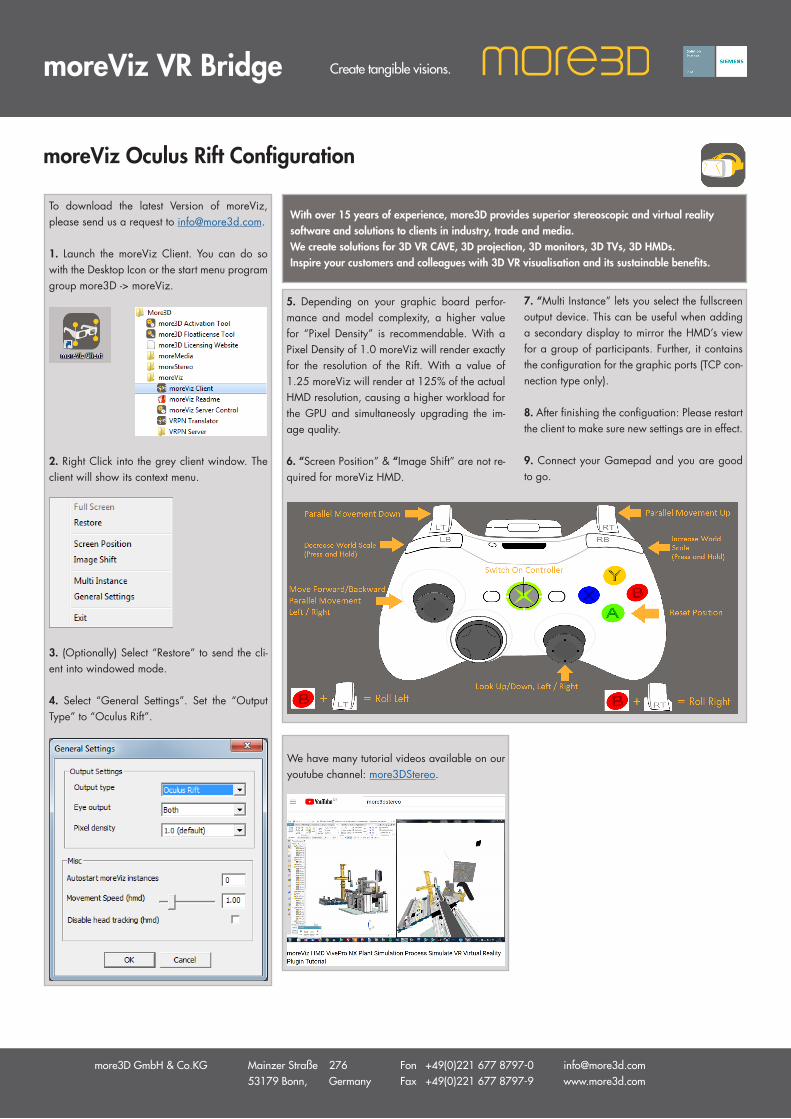
1. Launch the moreViz Client. You can do so with the Desktop Icon or the start menu program group more3D -> moreViz.
2. Right Click into the grey client window. The client will show its context menu.
3. (Optionally) Select “Restore” to send the cli-ent into windowed mode.
4. Select “General Settings”. Set the “Output Type” to “Oculus Rift”.
Create tangible visions.moreViz VR Bridge
Mainzer Straße 27653179 Bonn, Germany
Fon +49(0)221 677 8797-0Fax +49(0)221 677 8797-9
more3D GmbH & Co.KG
With over 15 years of experience, more3D provides superior stereoscopic and virtual reality software and solutions to clients in industry, trade and media.We create solutions for 3D VR CAVE, 3D projection, 3D monitors, 3D TVs, 3D HMDs.Inspire your customers and colleagues with 3D VR visualisation and its sustainable benefi ts.
5. Depending on your graphic board perfor-mance and model complexity, a higher value for “Pixel Density” is recommendable. With a Pixel Density of 1.0 moreViz will render exactly for the resolution of the Rift. With a value of 1.25 moreViz will render at 125% of the actual HMD resolution, causing a higher workload for the GPU and simultaneosly upgrading the im-age quality.
6. “Screen Position” & “Image Shift” are not re-quired for moreViz HMD.
7. “Multi Instance” lets you select the fullscreen output device. This can be useful when adding a secondary display to mirror the HMD’s view for a group of participants. Further, it contains the confi guration for the graphic ports (TCP con-nection type only).
8. After fi nishing the confi guation: Please restart the client to make sure new settings are in effect.
9. Connect your Gamepad and you are good to go.
moreViz Setup Guide: NX
To download the latest Version of moreViz, please send us a request to [email protected] will provide the download link within 1 busi-ness day. After downloading, simply run the fi le and fol-low the instructions on-screen.The installer will automatically create a 14-day license on installation.
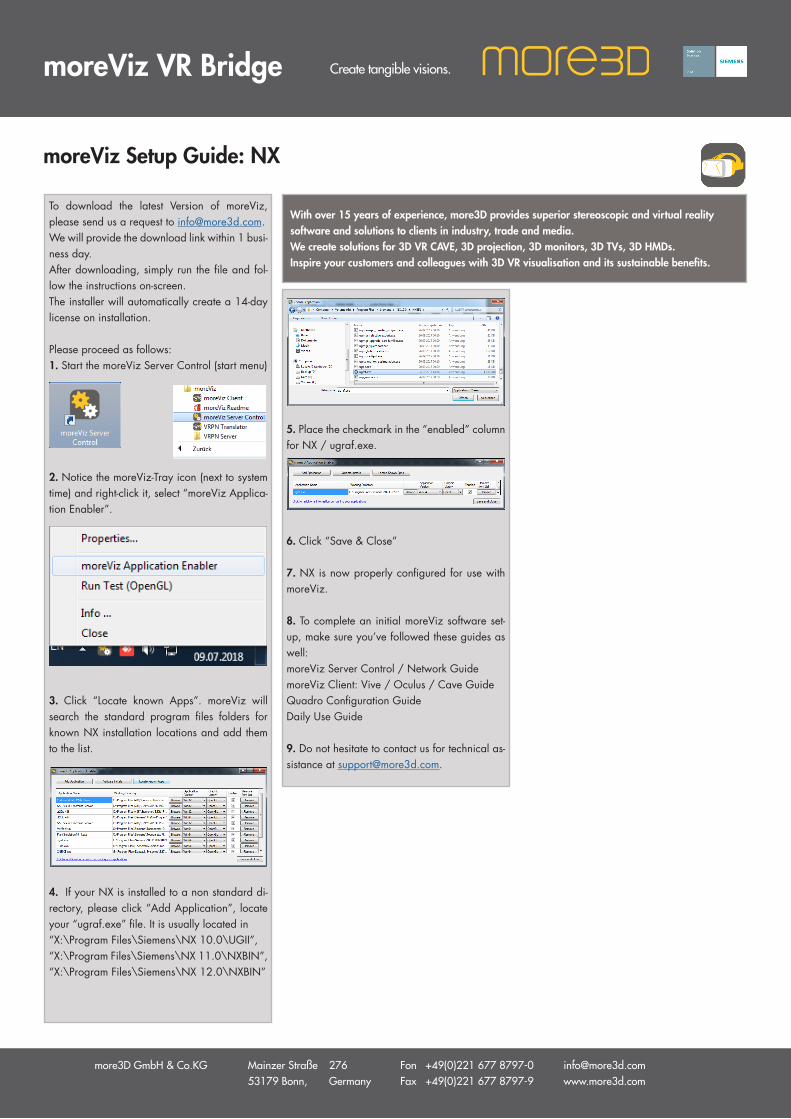
Please proceed as follows:1. Start the moreViz Server Control (start menu)
2. Notice the moreViz-Tray icon (next to system time) and right-click it, select “moreViz Applica-tion Enabler”.
3. Click “Locate known Apps”. moreViz will search the standard program fi les folders for known NX installation locations and add them to the list.
4. If your NX is installed to a non standard di-rectory, please click “Add Application”, locate your “ugraf.exe” fi le. It is usually located in “X:\Program Files\Siemens\NX 10.0\UGII”,“X:\Program Files\Siemens\NX 11.0\NXBIN”,“X:\Program Files\Siemens\NX 12.0\NXBIN”
Create tangible visions.moreViz VR Bridge
Mainzer Straße 27653179 Bonn, Germany
Fon +49(0)221 677 8797-0Fax +49(0)221 677 8797-9
more3D GmbH & Co.KG
With over 15 years of experience, more3D provides superior stereoscopic and virtual reality software and solutions to clients in industry, trade and media.We create solutions for 3D VR CAVE, 3D projection, 3D monitors, 3D TVs, 3D HMDs.Inspire your customers and colleagues with 3D VR visualisation and its sustainable benefi ts.
5. Place the checkmark in the “enabled” column for NX / ugraf.exe.
6. Click “Save & Close”
7. NX is now properly confi gured for use with moreViz.
8. To complete an initial moreViz software set-up, make sure you’ve followed these guides as well:moreViz Server Control / Network GuidemoreViz Client: Vive / Oculus / Cave GuideQuadro Confi guration GuideDaily Use Guide
9. Do not hesitate to contact us for technical as-sistance at [email protected].
moreViz Setup Guide: Plant Simulation
To download the latest Version of moreViz, please send us a request to [email protected] will provide the download link within 1 busi-ness day. After downloading, simply run the fi le and fol-low the instructions on-screen.The installer will automatically create a 14-day license on installation.
Please proceed as follows:
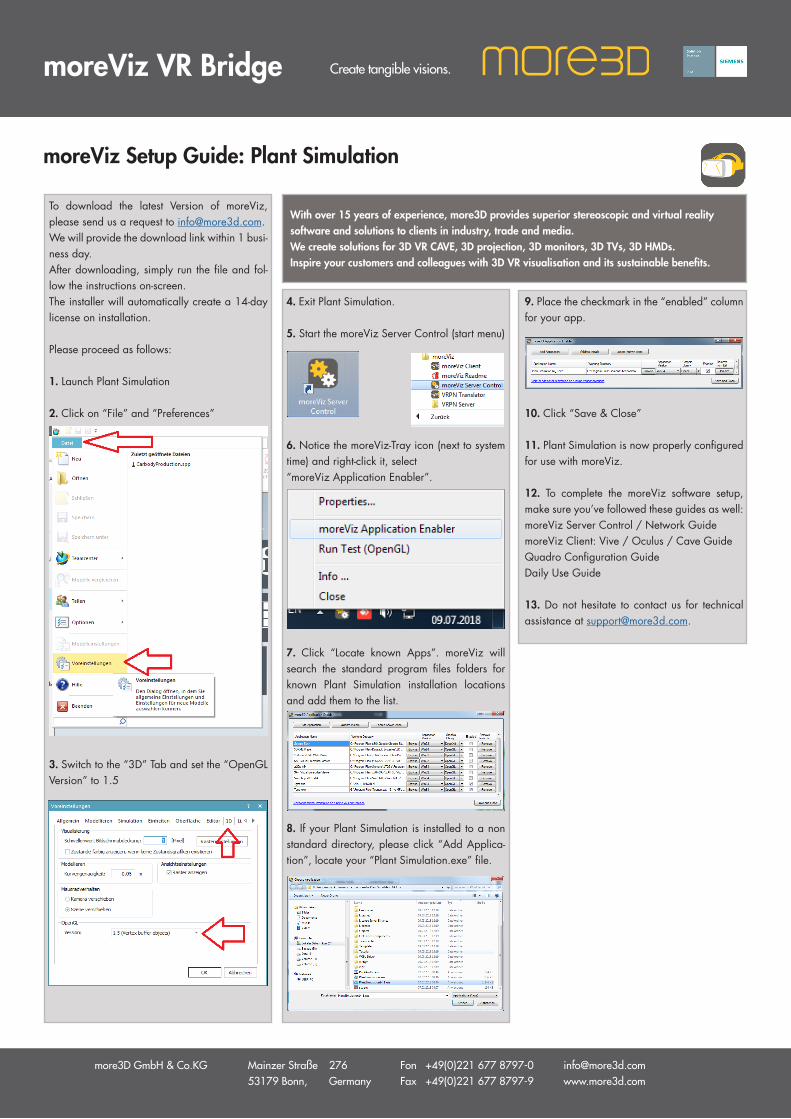
1. Launch Plant Simulation
2. Click on “File” and “Preferences”
3. Switch to the “3D” Tab and set the “OpenGL Version” to 1.5
Create tangible visions.moreViz VR Bridge
Mainzer Straße 27653179 Bonn, Germany
Fon +49(0)221 677 8797-0Fax +49(0)221 677 8797-9
more3D GmbH & Co.KG
With over 15 years of experience, more3D provides superior stereoscopic and virtual reality software and solutions to clients in industry, trade and media.We create solutions for 3D VR CAVE, 3D projection, 3D monitors, 3D TVs, 3D HMDs.Inspire your customers and colleagues with 3D VR visualisation and its sustainable benefi ts.
4. Exit Plant Simulation.
5. Start the moreViz Server Control (start menu)
6. Notice the moreViz-Tray icon (next to system time) and right-click it, select “moreViz Application Enabler”.
7. Click “Locate known Apps”. moreViz will search the standard program fi les folders for known Plant Simulation installation locations and add them to the list.
8. If your Plant Simulation is installed to a non standard directory, please click “Add Applica-tion”, locate your “Plant Simulation.exe” fi le.
9. Place the checkmark in the “enabled” column for your app.
10. Click “Save & Close”
11. Plant Simulation is now properly confi gured for use with moreViz.
12. To complete the moreViz software setup, make sure you’ve followed these guides as well:moreViz Server Control / Network GuidemoreViz Client: Vive / Oculus / Cave GuideQuadro Confi guration GuideDaily Use Guide
13. Do not hesitate to contact us for technical assistance at [email protected].
moreViz Setup Guide: Process Simulate
To download the latest Version of moreViz, please send us a request to [email protected] will provide the download link within 1 busi-ness day. After downloading, simply run the fi le and fol-low the instructions on-screen.The installer will automatically create a 14-day license on installation.
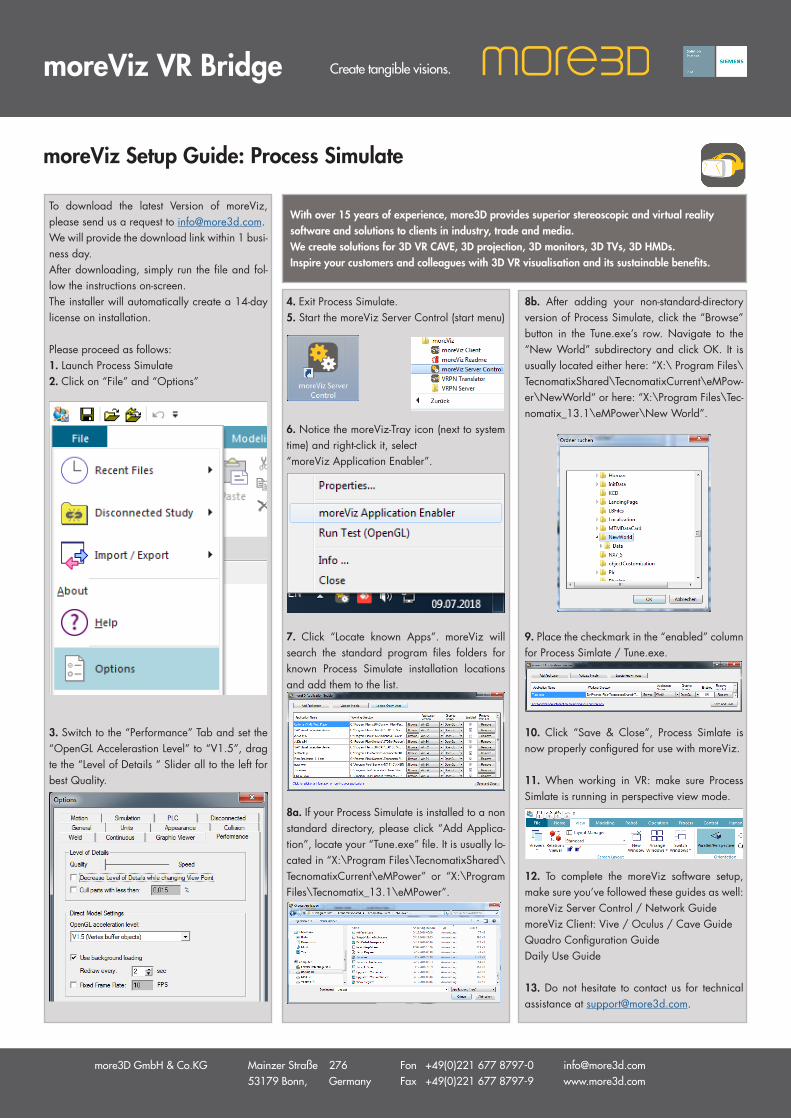
Please proceed as follows:1. Launch Process Simulate 2. Click on “File” and “Options”
3. Switch to the “Performance” Tab and set the “OpenGL Accelerastion Level” to “V1.5”, drag te the “Level of Details “ Slider all to the left for best Quality.
Create tangible visions.moreViz VR Bridge
Mainzer Straße 27653179 Bonn, Germany
Fon +49(0)221 677 8797-0Fax +49(0)221 677 8797-9
more3D GmbH & Co.KG
With over 15 years of experience, more3D provides superior stereoscopic and virtual reality software and solutions to clients in industry, trade and media.We create solutions for 3D VR CAVE, 3D projection, 3D monitors, 3D TVs, 3D HMDs.Inspire your customers and colleagues with 3D VR visualisation and its sustainable benefi ts.
4. Exit Process Simulate.5. Start the moreViz Server Control (start menu)
6. Notice the moreViz-Tray icon (next to system time) and right-click it, select “moreViz Application Enabler”.
7. Click “Locate known Apps”. moreViz will search the standard program fi les folders for known Process Simulate installation locations and add them to the list.
8a. If your Process Simulate is installed to a non standard directory, please click “Add Applica-tion”, locate your “Tune.exe” fi le. It is usually lo-cated in “X:\Program Files\TecnomatixShared\TecnomatixCurrent\eMPower” or “X:\Program Files\Tecnomatix_13.1\eMPower”.
8b. After adding your non-standard-directory version of Process Simulate, click the “Browse” button in the Tune.exe’s row. Navigate to the “New World” subdirectory and click OK. It is usually located either here: “X:\ Program Files\TecnomatixShared\TecnomatixCurrent\eMPow-er\NewWorld“ or here: “X:\Program Files\Tec-nomatix_13.1\eMPower\New World”.
9. Place the checkmark in the “enabled” column for Process Simlate / Tune.exe.
10. Click “Save & Close”, Process Simlate is now properly confi gured for use with moreViz.
11. When working in VR: make sure Process Simlate is running in perspective view mode.
12. To complete the moreViz software setup, make sure you’ve followed these guides as well:moreViz Server Control / Network GuidemoreViz Client: Vive / Oculus / Cave GuideQuadro Confi guration GuideDaily Use Guide
13. Do not hesitate to contact us for technical assistance at [email protected].
moreViz Setup Guide: JT2Go
To download the latest Version of moreViz, please send us a request to [email protected] will provide the download link within 1 busi-ness day. After downloading, simply run the fi le and fol-low the instructions on-screen.The installer will automatically create a 14-day license on installation.
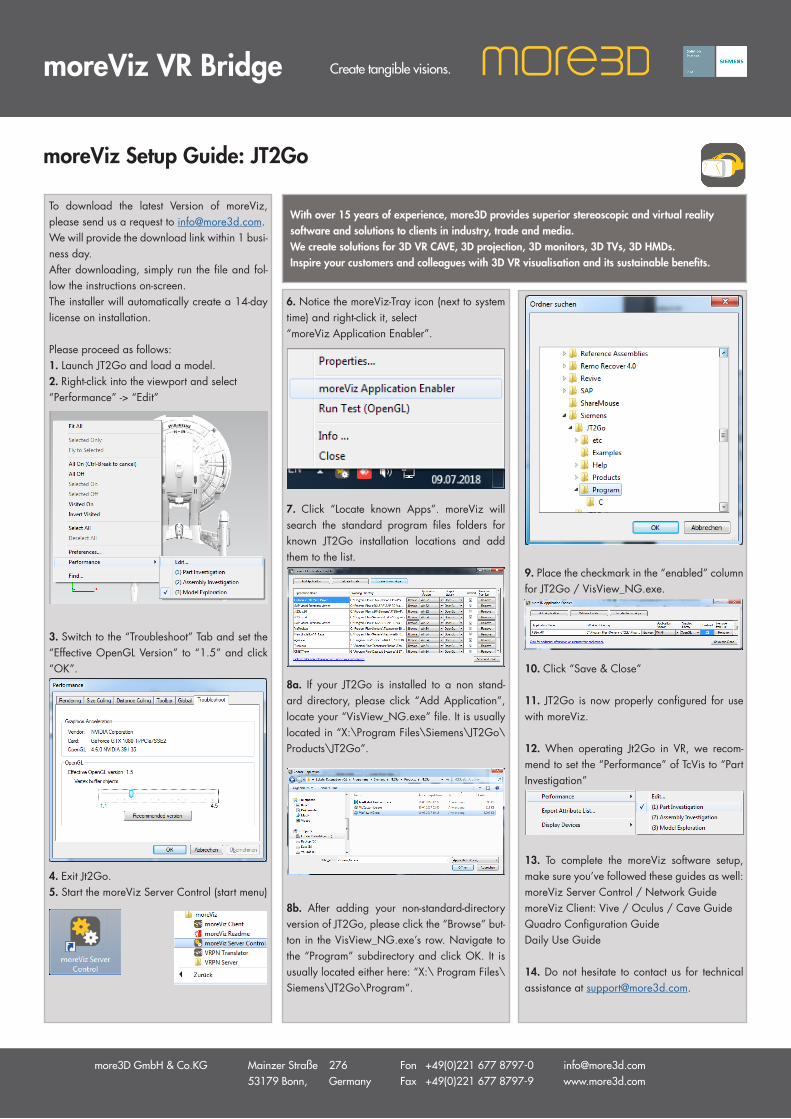
Please proceed as follows:1. Launch JT2Go and load a model. 2. Right-click into the viewport and select “Performance” -> “Edit”
3. Switch to the “Troubleshoot” Tab and set the “Effective OpenGL Version” to “1.5” and click “OK”.
4. Exit Jt2Go.5. Start the moreViz Server Control (start menu)
Create tangible visions.moreViz VR Bridge
Mainzer Straße 27653179 Bonn, Germany
Fon +49(0)221 677 8797-0Fax +49(0)221 677 8797-9
more3D GmbH & Co.KG
With over 15 years of experience, more3D provides superior stereoscopic and virtual reality software and solutions to clients in industry, trade and media.We create solutions for 3D VR CAVE, 3D projection, 3D monitors, 3D TVs, 3D HMDs.Inspire your customers and colleagues with 3D VR visualisation and its sustainable benefi ts.
6. Notice the moreViz-Tray icon (next to system time) and right-click it, select “moreViz Application Enabler”.
7. Click “Locate known Apps”. moreViz will search the standard program fi les folders for known JT2Go installation locations and add them to the list.
8a. If your JT2Go is installed to a non stand-ard directory, please click “Add Application”, locate your “VisView_NG.exe” fi le. It is usually located in “X:\Program Files\Siemens\JT2Go\Products\JT2Go”.
8b. After adding your non-standard-directory version of JT2Go, please click the “Browse” but-ton in the VisView_NG.exe’s row. Navigate to the “Program” subdirectory and click OK. It is usually located either here: “X:\ Program Files\Siemens\JT2Go\Program“.
9. Place the checkmark in the “enabled” column for JT2Go / VisView_NG.exe.
10. Click “Save & Close”
11. JT2Go is now properly confi gured for use with moreViz.
12. When operating Jt2Go in VR, we recom-mend to set the “Performance” of TcVis to “Part Investigation”
13. To complete the moreViz software setup, make sure you’ve followed these guides as well:moreViz Server Control / Network GuidemoreViz Client: Vive / Oculus / Cave GuideQuadro Confi guration GuideDaily Use Guide
14. Do not hesitate to contact us for technical assistance at [email protected].
moreViz Setup Guide: Teamcenter Visualization / TcVis / Connect
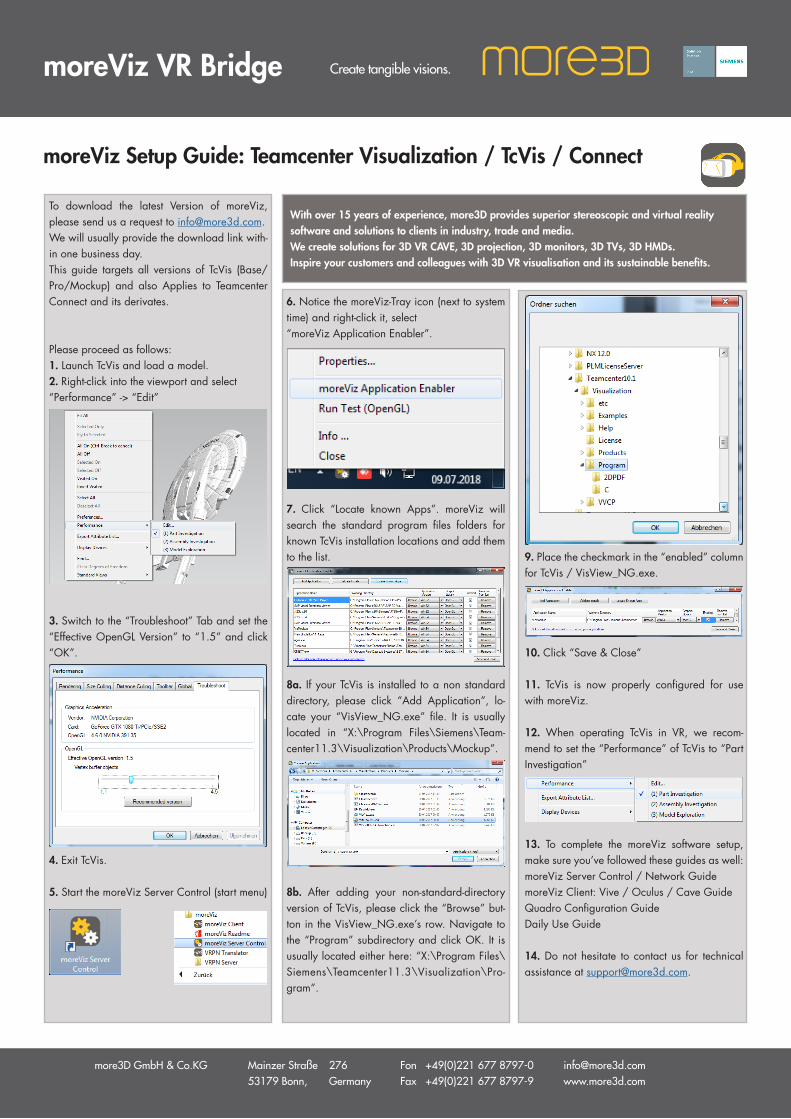
To download the latest Version of moreViz, please send us a request to [email protected] will usually provide the download link with-in one business day. This guide targets all versions of TcVis (Base/Pro/Mockup) and also Applies to Teamcenter Connect and its derivates.
Please proceed as follows:1. Launch TcVis and load a model. 2. Right-click into the viewport and select “Performance” -> “Edit”
3. Switch to the “Troubleshoot” Tab and set the “Effective OpenGL Version” to “1.5” and click “OK”.
4. Exit TcVis.
5. Start the moreViz Server Control (start menu)
Create tangible visions.moreViz VR Bridge
Mainzer Straße 27653179 Bonn, Germany
Fon +49(0)221 677 8797-0Fax +49(0)221 677 8797-9
more3D GmbH & Co.KG
With over 15 years of experience, more3D provides superior stereoscopic and virtual reality software and solutions to clients in industry, trade and media.We create solutions for 3D VR CAVE, 3D projection, 3D monitors, 3D TVs, 3D HMDs.Inspire your customers and colleagues with 3D VR visualisation and its sustainable benefi ts.
6. Notice the moreViz-Tray icon (next to system time) and right-click it, select “moreViz Application Enabler”.
7. Click “Locate known Apps”. moreViz will search the standard program fi les folders for known TcVis installation locations and add them to the list.
8a. If your TcVis is installed to a non standard directory, please click “Add Application”, lo-cate your “VisView_NG.exe” fi le. It is usually located in “X:\Program Files\Siemens\Team-center11.3\Visualization\Products\Mockup”.
8b. After adding your non-standard-directory version of TcVis, please click the “Browse” but-ton in the VisView_NG.exe’s row. Navigate to the “Program” subdirectory and click OK. It is usually located either here: “X:\Program Files\Siemens\Teamcenter11.3\Visualization\Pro-gram“.
9. Place the checkmark in the “enabled” column for TcVis / VisView_NG.exe.
10. Click “Save & Close”
11. TcVis is now properly confi gured for use with moreViz.
12. When operating TcVis in VR, we recom-mend to set the “Performance” of TcVis to “Part Investigation”
13. To complete the moreViz software setup, make sure you’ve followed these guides as well:moreViz Server Control / Network GuidemoreViz Client: Vive / Oculus / Cave GuideQuadro Confi guration GuideDaily Use Guide
14. Do not hesitate to contact us for technical assistance at [email protected].
moreViz Setup Guide: SAP Visual Enterprise Viewer / Author
To download the latest Version of moreViz, please send us a request to [email protected] will provide the download link within 1 busi-ness day. After downloading, simply run the fi le and fol-low the instructions on-screen.The installer will automatically create a 14-day license on installation.
Please proceed as follows:
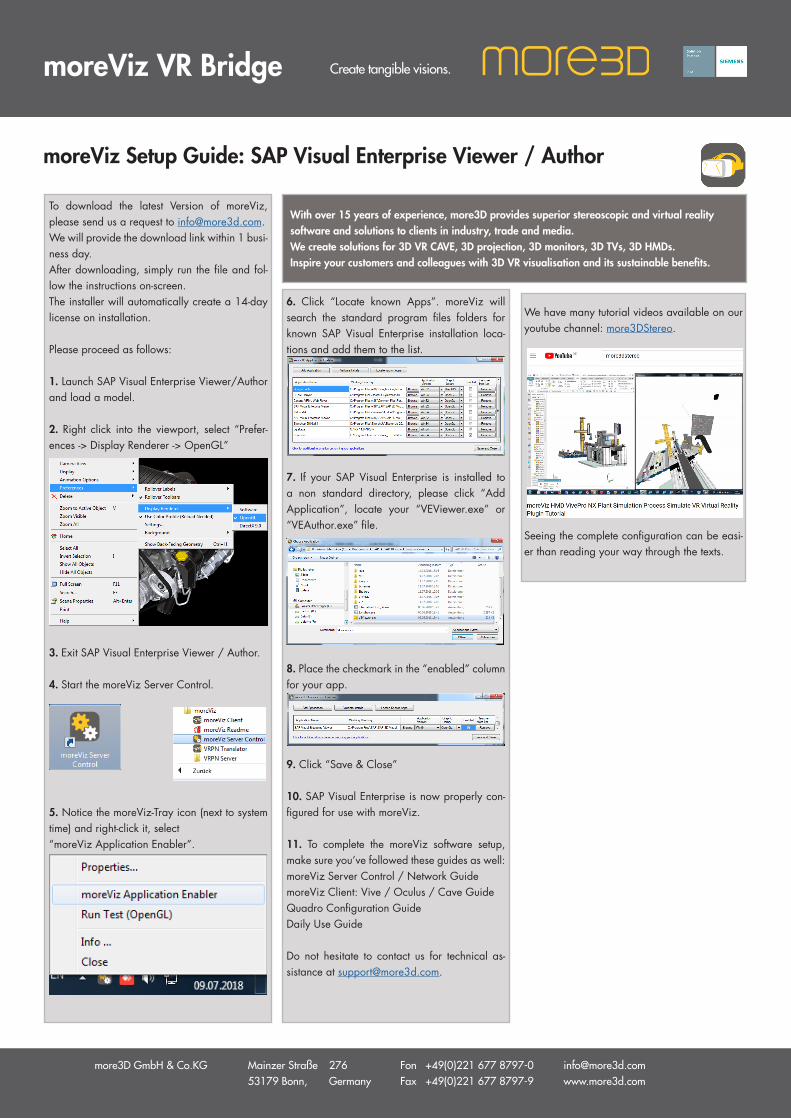
1. Launch SAP Visual Enterprise Viewer/Author and load a model.
2. Right click into the viewport, select “Prefer-ences -> Display Renderer -> OpenGL”
3. Exit SAP Visual Enterprise Viewer / Author.
4. Start the moreViz Server Control.
5. Notice the moreViz-Tray icon (next to system time) and right-click it, select “moreViz Application Enabler”.
Create tangible visions.moreViz VR Bridge
Mainzer Straße 27653179 Bonn, Germany
Fon +49(0)221 677 8797-0Fax +49(0)221 677 8797-9
more3D GmbH & Co.KG
With over 15 years of experience, more3D provides superior stereoscopic and virtual reality software and solutions to clients in industry, trade and media.We create solutions for 3D VR CAVE, 3D projection, 3D monitors, 3D TVs, 3D HMDs.Inspire your customers and colleagues with 3D VR visualisation and its sustainable benefi ts.
6. Click “Locate known Apps”. moreViz will search the standard program fi les folders for known SAP Visual Enterprise installation loca-tions and add them to the list.
7. If your SAP Visual Enterprise is installed to a non standard directory, please click “Add Application”, locate your “VEViewer.exe” or “VEAuthor.exe” fi le.
8. Place the checkmark in the “enabled” column for your app.
9. Click “Save & Close”
10. SAP Visual Enterprise is now properly con-fi gured for use with moreViz.
11. To complete the moreViz software setup, make sure you’ve followed these guides as well:moreViz Server Control / Network GuidemoreViz Client: Vive / Oculus / Cave GuideQuadro Confi guration GuideDaily Use Guide
Do not hesitate to contact us for technical as-sistance at [email protected].
We have many tutorial videos available on our youtube channel: more3DStereo.
Seeing the complete confi guration can be easi-er than reading your way through the texts.
moreViz Setup Guide: Catia / Delmia
To download the latest Version of moreViz, please send us a request to [email protected] will provide the download link within 1 busi-ness day. After downloading, simply run the fi le and fol-low the instructions on-screen.The installer will automatically create a 14-day license on installation.
Please proceed as follows:
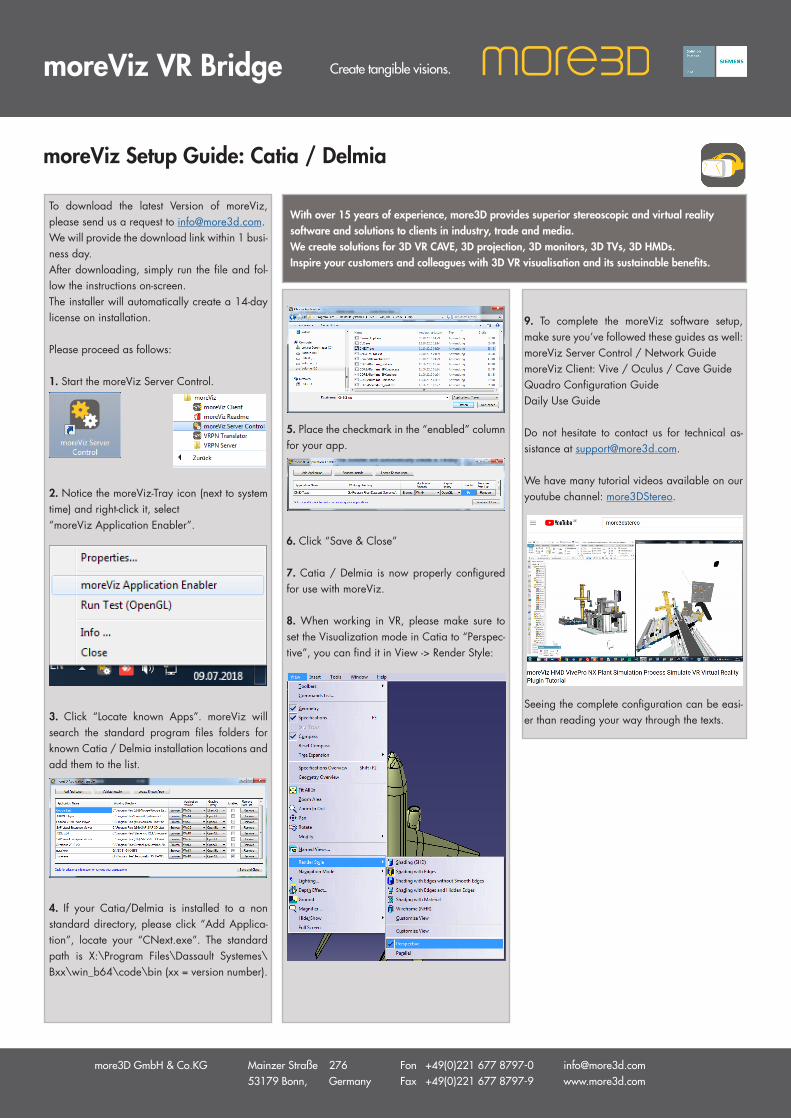
1. Start the moreViz Server Control.
2. Notice the moreViz-Tray icon (next to system time) and right-click it, select “moreViz Application Enabler”.
3. Click “Locate known Apps”. moreViz will search the standard program fi les folders for known Catia / Delmia installation locations and add them to the list.
4. If your Catia/Delmia is installed to a non standard directory, please click “Add Applica-tion”, locate your “CNext.exe”. The standard path is X:\Program Files\Dassault Systemes\Bxx\win_b64\code\bin (xx = version number).
Create tangible visions.moreViz VR Bridge
Mainzer Straße 27653179 Bonn, Germany
Fon +49(0)221 677 8797-0Fax +49(0)221 677 8797-9
more3D GmbH & Co.KG
With over 15 years of experience, more3D provides superior stereoscopic and virtual reality software and solutions to clients in industry, trade and media.We create solutions for 3D VR CAVE, 3D projection, 3D monitors, 3D TVs, 3D HMDs.Inspire your customers and colleagues with 3D VR visualisation and its sustainable benefi ts.
5. Place the checkmark in the “enabled” column for your app.
6. Click “Save & Close”
7. Catia / Delmia is now properly confi gured for use with moreViz.
8. When working in VR, please make sure to set the Visualization mode in Catia to “Perspec-tive”, you can fi nd it in View -> Render Style:
9. To complete the moreViz software setup, make sure you’ve followed these guides as well:moreViz Server Control / Network GuidemoreViz Client: Vive / Oculus / Cave GuideQuadro Confi guration GuideDaily Use Guide
Do not hesitate to contact us for technical as-sistance at [email protected].
We have many tutorial videos available on our youtube channel: more3DStereo.
Seeing the complete confi guration can be easi-er than reading your way through the texts.
moreViz Setup Guide: Catia Composer (Player)
To download the latest Version of moreViz, please send us a request to [email protected] will provide the download link within 1 busi-ness day. After downloading, simply run the fi le and fol-low the instructions on-screen.The installer will automatically create a 14-day license on installation.
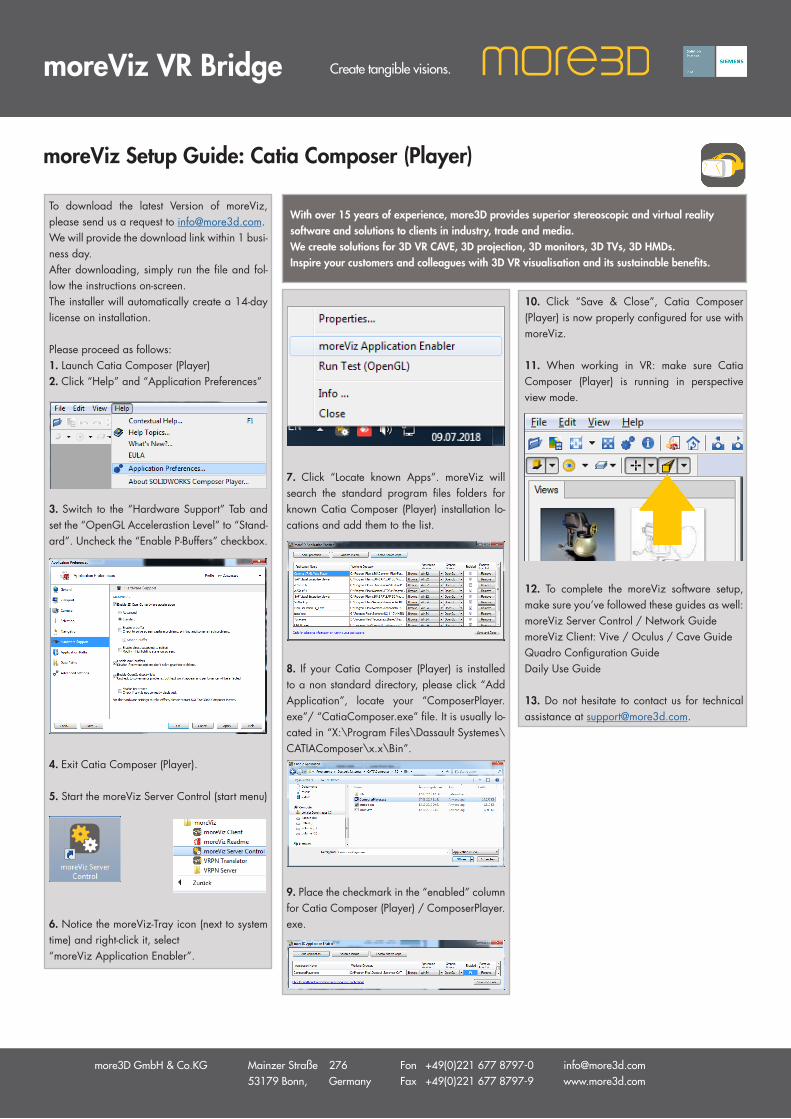
Please proceed as follows:1. Launch Catia Composer (Player) 2. Click “Help” and “Application Preferences”
3. Switch to the “Hardware Support” Tab and set the “OpenGL Accelerastion Level” to “Stand-ard”. Uncheck the “Enable P-Buffers” checkbox.
4. Exit Catia Composer (Player).
5. Start the moreViz Server Control (start menu)
6. Notice the moreViz-Tray icon (next to system time) and right-click it, select “moreViz Application Enabler”.
Create tangible visions.moreViz VR Bridge
Mainzer Straße 27653179 Bonn, Germany
Fon +49(0)221 677 8797-0Fax +49(0)221 677 8797-9
more3D GmbH & Co.KG
With over 15 years of experience, more3D provides superior stereoscopic and virtual reality software and solutions to clients in industry, trade and media.We create solutions for 3D VR CAVE, 3D projection, 3D monitors, 3D TVs, 3D HMDs.Inspire your customers and colleagues with 3D VR visualisation and its sustainable benefi ts.
7. Click “Locate known Apps”. moreViz will search the standard program fi les folders for known Catia Composer (Player) installation lo-cations and add them to the list.
8. If your Catia Composer (Player) is installed to a non standard directory, please click “Add Application”, locate your “ComposerPlayer.exe”/ “CatiaComposer.exe” fi le. It is usually lo-cated in “X:\Program Files\Dassault Systemes\CATIAComposer\x.x\Bin”.
9. Place the checkmark in the “enabled” column for Catia Composer (Player) / ComposerPlayer.exe.
10. Click “Save & Close”, Catia Composer (Player) is now properly confi gured for use with moreViz.
11. When working in VR: make sure Catia Composer (Player) is running in perspective view mode.
12. To complete the moreViz software setup, make sure you’ve followed these guides as well:moreViz Server Control / Network GuidemoreViz Client: Vive / Oculus / Cave GuideQuadro Confi guration GuideDaily Use Guide
13. Do not hesitate to contact us for technical assistance at [email protected].
moreViz Setup Guide: IPS
To download the latest Version of moreViz, please send us a request to [email protected] will provide the download link within 1 busi-ness day. After downloading, simply run the fi le and fol-low the instructions on-screen.The installer will automatically create a 14-day license on installation.
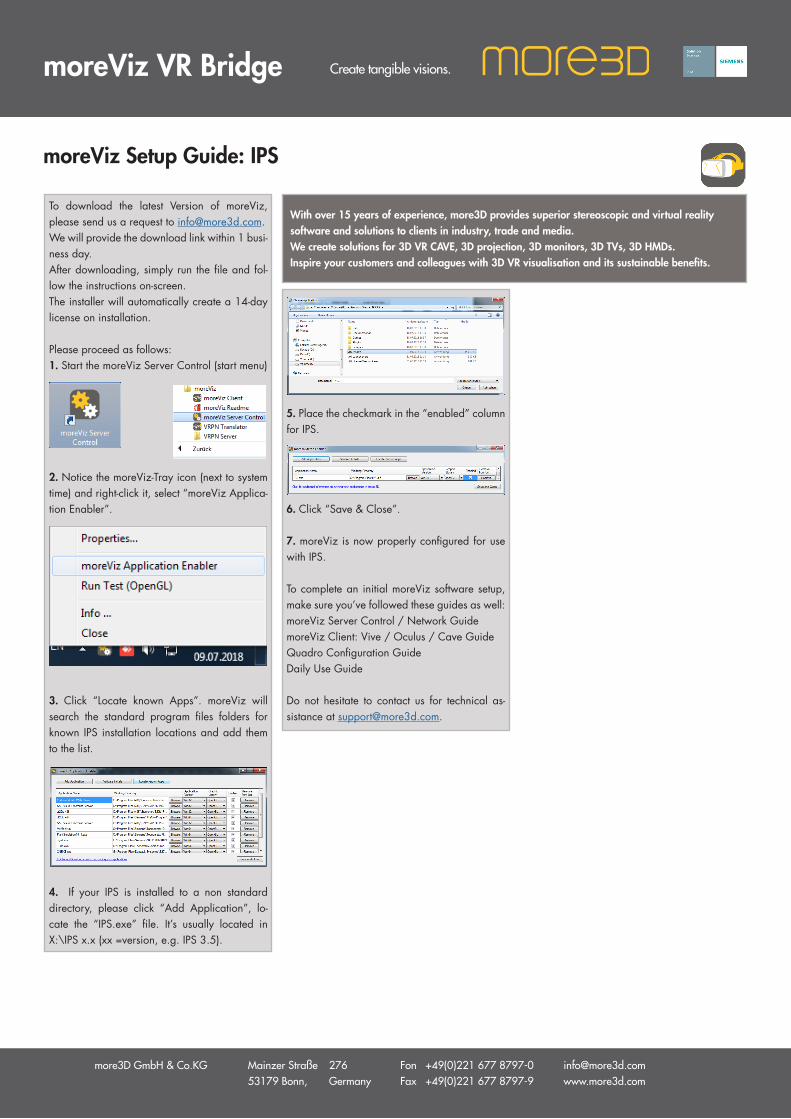
Please proceed as follows:1. Start the moreViz Server Control (start menu)
2. Notice the moreViz-Tray icon (next to system time) and right-click it, select “moreViz Applica-tion Enabler”.
3. Click “Locate known Apps”. moreViz will search the standard program fi les folders for known IPS installation locations and add them to the list.
4. If your IPS is installed to a non standard directory, please click “Add Application”, lo-cate the “IPS.exe” fi le. It’s usually located in X:\IPS x.x (xx =version, e.g. IPS 3.5).
Create tangible visions.moreViz VR Bridge
Mainzer Straße 27653179 Bonn, Germany
Fon +49(0)221 677 8797-0Fax +49(0)221 677 8797-9
more3D GmbH & Co.KG
With over 15 years of experience, more3D provides superior stereoscopic and virtual reality software and solutions to clients in industry, trade and media.We create solutions for 3D VR CAVE, 3D projection, 3D monitors, 3D TVs, 3D HMDs.Inspire your customers and colleagues with 3D VR visualisation and its sustainable benefi ts.
5. Place the checkmark in the “enabled” column for IPS.
6. Click “Save & Close”.
7. moreViz is now properly confi gured for use with IPS.
To complete an initial moreViz software setup, make sure you’ve followed these guides as well:moreViz Server Control / Network GuidemoreViz Client: Vive / Oculus / Cave GuideQuadro Confi guration GuideDaily Use Guide
Do not hesitate to contact us for technical as-sistance at [email protected].
moreViz Setup Guide: Creo View Express
To download the latest Version of moreViz, please send us a request to [email protected] will provide the download link within 1 busi-ness day. After downloading, simply run the fi le and fol-low the instructions on-screen.The installer will automatically create a 14-day license on installation.
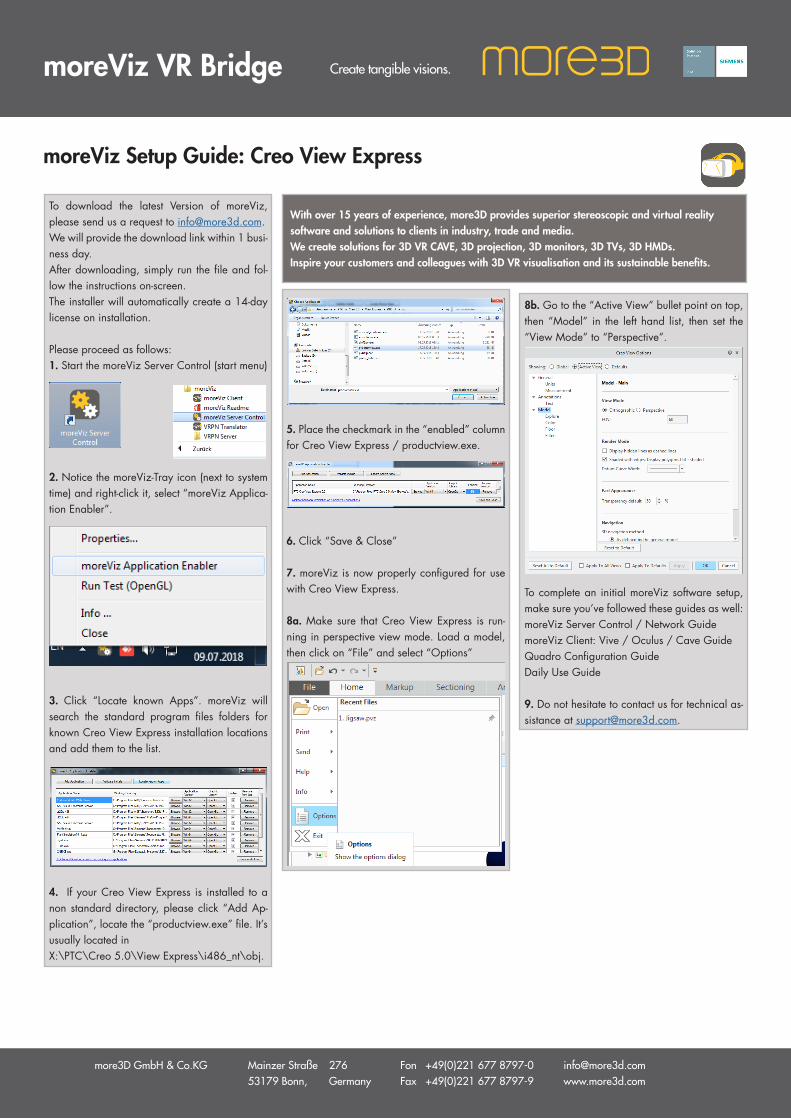
Please proceed as follows:1. Start the moreViz Server Control (start menu)
2. Notice the moreViz-Tray icon (next to system time) and right-click it, select “moreViz Applica-tion Enabler”.
3. Click “Locate known Apps”. moreViz will search the standard program fi les folders for known Creo View Express installation locations and add them to the list.
4. If your Creo View Express is installed to a non standard directory, please click “Add Ap-plication”, locate the “productview.exe” fi le. It’s usually located in X:\PTC\Creo 5.0\View Express\i486_nt\obj.
Create tangible visions.moreViz VR Bridge
Mainzer Straße 27653179 Bonn, Germany
Fon +49(0)221 677 8797-0Fax +49(0)221 677 8797-9
more3D GmbH & Co.KG
With over 15 years of experience, more3D provides superior stereoscopic and virtual reality software and solutions to clients in industry, trade and media.We create solutions for 3D VR CAVE, 3D projection, 3D monitors, 3D TVs, 3D HMDs.Inspire your customers and colleagues with 3D VR visualisation and its sustainable benefi ts.
5. Place the checkmark in the “enabled” column for Creo View Express / productview.exe.
6. Click “Save & Close”
7. moreViz is now properly confi gured for use with Creo View Express.
8a. Make sure that Creo View Express is run-ning in perspective view mode. Load a model, then click on “File” and select “Options”
8b. Go to the “Active View” bullet point on top, then “Model” in the left hand list, then set the “View Mode” to “Perspective”.
To complete an initial moreViz software setup, make sure you’ve followed these guides as well:moreViz Server Control / Network GuidemoreViz Client: Vive / Oculus / Cave GuideQuadro Confi guration GuideDaily Use Guide
9. Do not hesitate to contact us for technical as-sistance at [email protected].
moreViz Setup Guide: SimPack (Viewer)
To download the latest Version of moreViz, please send us a request to [email protected] will provide the download link within 1 busi-ness day. After downloading, simply run the fi le and fol-low the instructions on-screen.The installer will automatically create a 14-day license on installation.
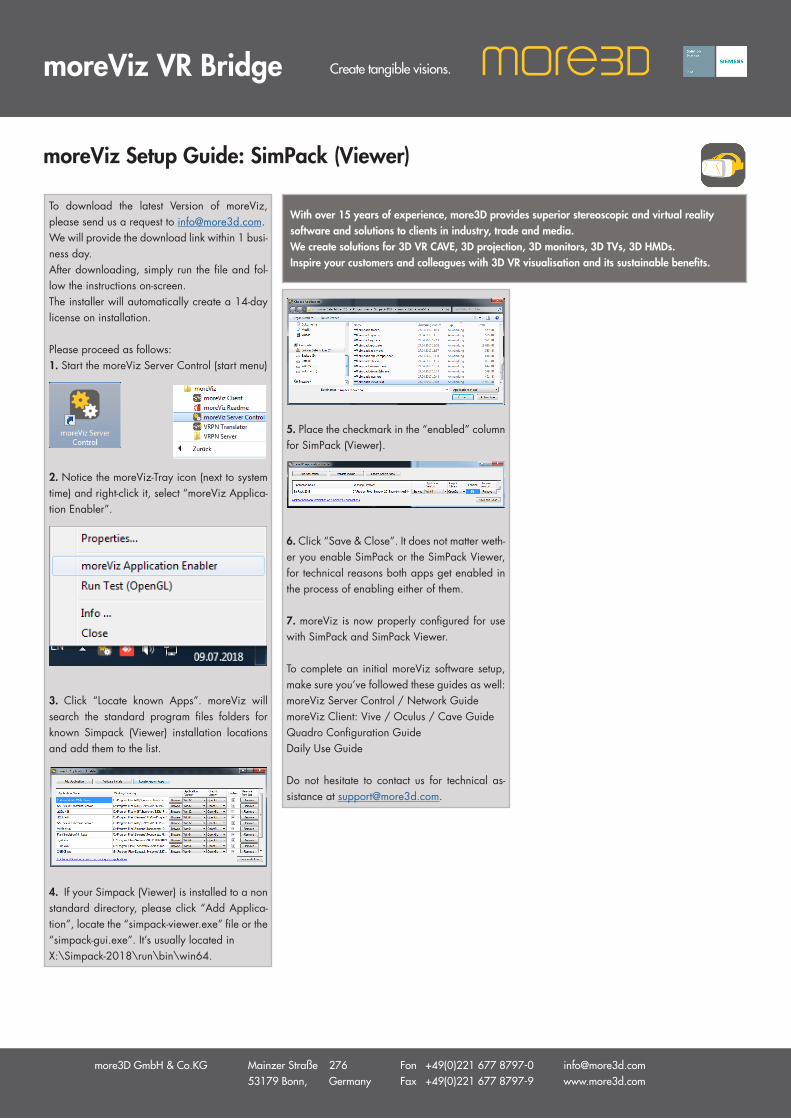
Please proceed as follows:1. Start the moreViz Server Control (start menu)
2. Notice the moreViz-Tray icon (next to system time) and right-click it, select “moreViz Applica-tion Enabler”.
3. Click “Locate known Apps”. moreViz will search the standard program fi les folders for known Simpack (Viewer) installation locations and add them to the list.
4. If your Simpack (Viewer) is installed to a non standard directory, please click “Add Applica-tion”, locate the “simpack-viewer.exe” fi le or the “simpack-gui.exe”. It’s usually located in X:\Simpack-2018\run\bin\win64.
Create tangible visions.moreViz VR Bridge
Mainzer Straße 27653179 Bonn, Germany
Fon +49(0)221 677 8797-0Fax +49(0)221 677 8797-9
more3D GmbH & Co.KG
With over 15 years of experience, more3D provides superior stereoscopic and virtual reality software and solutions to clients in industry, trade and media.We create solutions for 3D VR CAVE, 3D projection, 3D monitors, 3D TVs, 3D HMDs.Inspire your customers and colleagues with 3D VR visualisation and its sustainable benefi ts.
5. Place the checkmark in the “enabled” column for SimPack (Viewer).
6. Click “Save & Close”. It does not matter weth-er you enable SimPack or the SimPack Viewer, for technical reasons both apps get enabled in the process of enabling either of them.
7. moreViz is now properly confi gured for use with SimPack and SimPack Viewer.
To complete an initial moreViz software setup, make sure you’ve followed these guides as well:moreViz Server Control / Network GuidemoreViz Client: Vive / Oculus / Cave GuideQuadro Confi guration GuideDaily Use Guide
Do not hesitate to contact us for technical as-sistance at [email protected].
moreViz Setup Guide: Sketchup
To download the latest Version of moreViz, please send us a request to [email protected] will provide the download link within 1 busi-ness day. After downloading, simply run the fi le and fol-low the instructions on-screen.The installer will automatically create a 14-day license on installation.
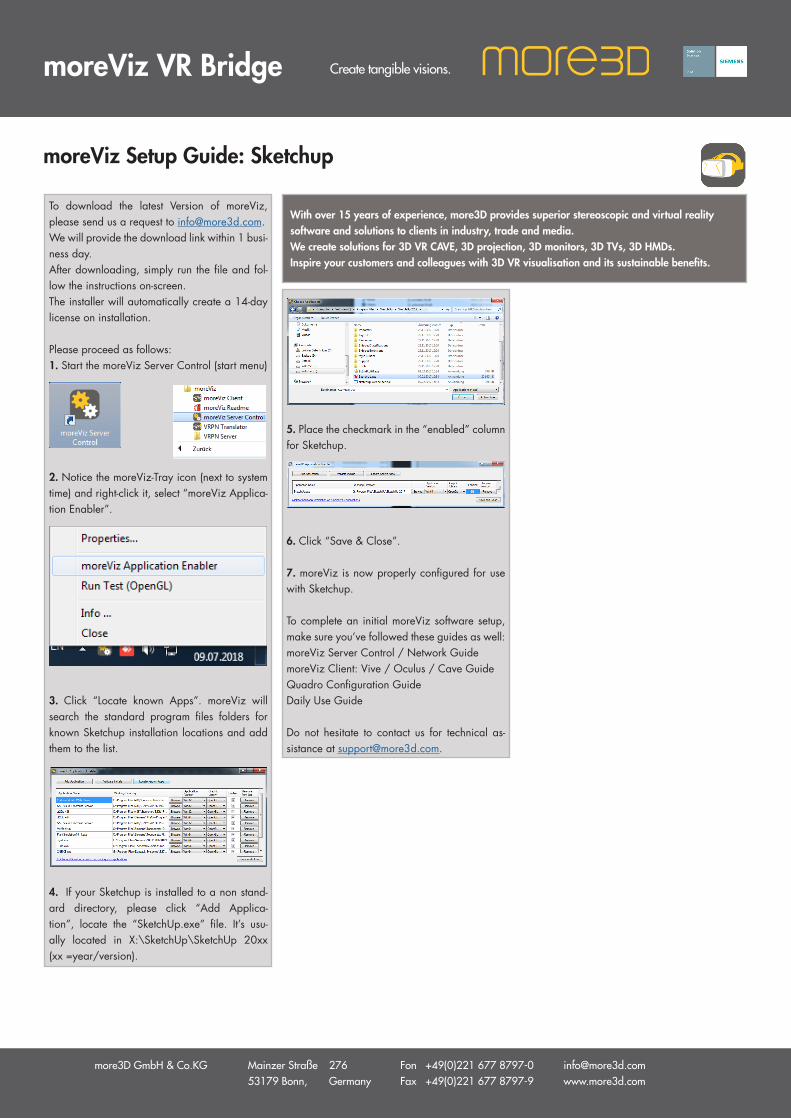
Please proceed as follows:1. Start the moreViz Server Control (start menu)
2. Notice the moreViz-Tray icon (next to system time) and right-click it, select “moreViz Applica-tion Enabler”.
3. Click “Locate known Apps”. moreViz will search the standard program fi les folders for known Sketchup installation locations and add them to the list.
4. If your Sketchup is installed to a non stand-ard directory, please click “Add Applica-tion”, locate the “SketchUp.exe” fi le. It’s usu-ally located in X:\SketchUp\SketchUp 20xx (xx =year/version).
Create tangible visions.moreViz VR Bridge
Mainzer Straße 27653179 Bonn, Germany
Fon +49(0)221 677 8797-0Fax +49(0)221 677 8797-9
more3D GmbH & Co.KG
With over 15 years of experience, more3D provides superior stereoscopic and virtual reality software and solutions to clients in industry, trade and media.We create solutions for 3D VR CAVE, 3D projection, 3D monitors, 3D TVs, 3D HMDs.Inspire your customers and colleagues with 3D VR visualisation and its sustainable benefi ts.
5. Place the checkmark in the “enabled” column for Sketchup.
6. Click “Save & Close”.
7. moreViz is now properly confi gured for use with Sketchup.
To complete an initial moreViz software setup, make sure you’ve followed these guides as well:moreViz Server Control / Network GuidemoreViz Client: Vive / Oculus / Cave GuideQuadro Confi guration GuideDaily Use Guide
Do not hesitate to contact us for technical as-sistance at [email protected].
moreViz HMD daily use guide / FAQ
To download the latest Version of moreViz, please send us a request to [email protected] will provide the download link within 1 busi-ness day. After downloading, simply run the fi le and fol-low the instructions on-screen.The installer will automatically create a 14-day license on installation.
This guide shows how to use moreViz:
1.Make sure the moreViz Server control is active.
Hint: Autostart of the Server Control is available in the moreViz Server Control Properties.
2. When the tray icon of the moreViz Server Control moreViz is available in the tray bar, the software is ready for operation.
3. Launch your moreViz Client.Make sure its confi gured foryour output device.
4. Run your app and load a model. Make sure its set to perspective projection mode. Look up the detail guide for details on your app.
5. Enjoy VR
Create tangible visions.moreViz VR Bridge
Mainzer Straße 27653179 Bonn, Germany
Fon +49(0)221 677 8797-0Fax +49(0)221 677 8797-9
more3D GmbH & Co.KG
With over 15 years of experience, more3D provides superior stereoscopic and virtual reality software and solutions to clients in industry, trade and media.We create solutions for 3D VR CAVE, 3D projection, 3D monitors, 3D TVs, 3D HMDs.Inspire your customers and colleagues with 3D VR visualisation and its sustainable benefi ts.
FAQ1. I’ve launched the app, yet the moreViz client stays grey.* Check if the moreViz Server Control is running* Check if your connection type is correct - try TCP/IP 127.0.0.1:8700* Check if your app is properly enabled* Check if your app is set for OpenGL mode
2. The tracking of my HMD does not work* Check if your app runs in perspective mode* Check if the tracking is disabled (Right click into the client, select “General Settings”)* Verify you followed the Quadro Confi g Guide properly
3. The graphics inside VR look broken* Check if you properly confi gured the OpenGL version for your app.
4. Movement in VR is very slow* Check if the scaling of the app is correct. When the scaling is too big, movement will seem very slow and stereo effect (“3D”) is very little. Try scaling smaller.
5. Graphics inside VR are stretched vertically* Set your app to perspective mode
6. General Performance in VR is low / laggy* VR is expensive on the hardware. Try reduc-ing the amount of data you’re pushing. E.g. remove standard bolts/screws/nuts from your model fi le. Further, try using a simple shaded mode. Disable SteamVR Home Beta (Vive).
To complete the moreViz software setup, make sure you’ve followed these guides as well:moreViz Server Control / Network GuidemoreViz Client: Vive / Oculus / Cave GuideQuadro Confi guration GuideApp Guides
Do not hesitate to contact us for technical as-sistance at [email protected].
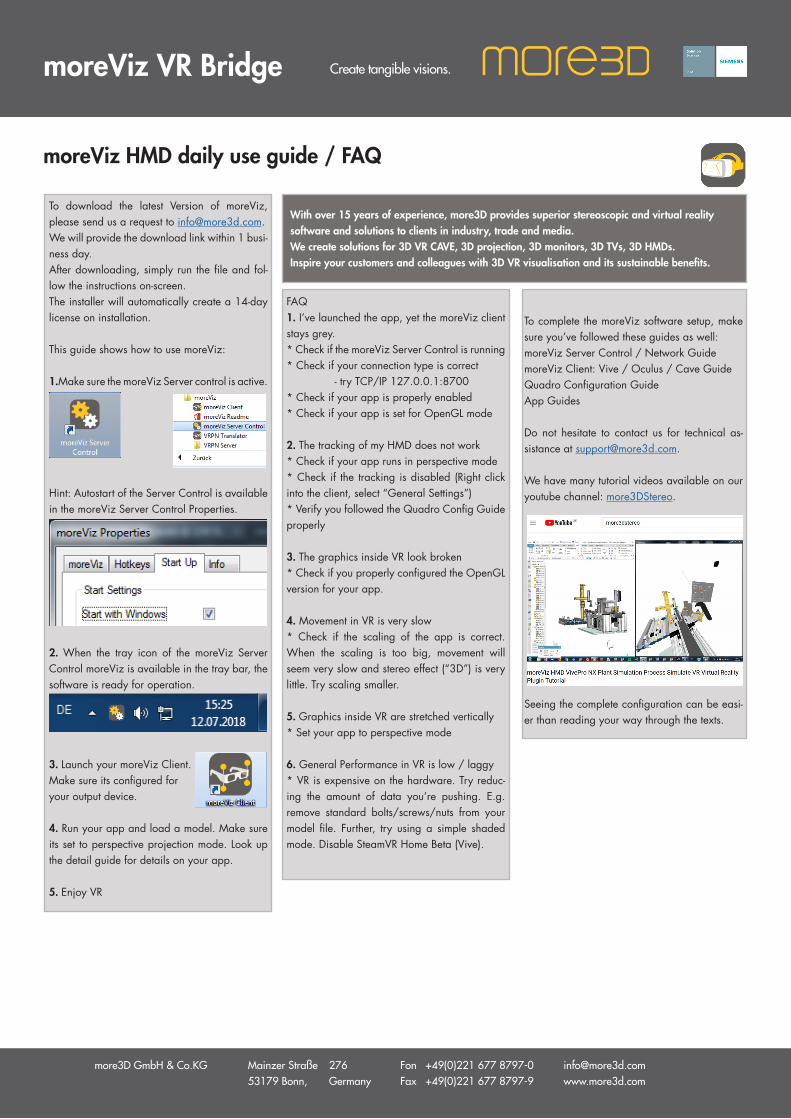
We have many tutorial videos available on our youtube channel: more3DStereo.
Seeing the complete confi guration can be easi-er than reading your way through the texts.