modeling an hourglass
DESCRIPTION
3DS max hourglass tutorialTRANSCRIPT

Tutorial
Creating a Realistic Hourglass
In this tutorial you will learn to model a realistic hourglass using primitive objects and modifiers. You'll use cylinders and hose objects combined with Free-Form Deformation (FFD), Taper, and Slice modifiers. You'll even create the flow of sand using a particle system.
Skill Level: Beginner
Time to Complete: 40 minutes
Features Covered in This Tutorial
l Using Taper, and FFD modifiers to shape the hourglass.
l Using an animated Slice modifier to create the shifting sand level, in the upper globe of the hourglass.
l Using a Particle system to create the falling sand in the lower globe of the hourglass.
l Using an animated hemisphere to create the sand piling up.
Tutorial Files
All the necessary files to do the tutorials can be found on the Tutorial And Sample Files CD, in the \tutorials\hourglass folder. Before doing the tutorials, copy the \tutorials directory from the CD to your \3dsmax6 local installation.
In This Tutorial
Creating a Tapered Cylinder
Adding a Free Form Deformation
Adding the Caps Using Auto Grid
Adding the Posts Using Hose Objects
Adding Materials
Creating Glass and Sand Materials
Animating the Sand Level with Slice Modifiers
Animating the Falling Sand
Creating the Sand Build-Up
Adding a Camera
Page 1 of 45Creating a Realistic Hourglass
30/10/2006file://C:\Documents and Settings\rabed\Local Settings\Temp\~hhB319.htm

Adding Default Lights to the Scene
Rendering Your Work
Comments
Tutorial
Creating a Tapered Cylinder
You'll start by building the chamber that will contain the sand using a cylinder and then add a taper modifier. Using the symmetry and curve parameters, you'll create the approximate shape of an hourglass.
1. Restart 3ds max by choosing File > Reset.
2. Click the Min/Max Toggle button found in the view navigation tools at the lower right corner of the user interface. This switches from a display of four, small viewports to a single, large one. The currently active viewport is the one that is enlarged, in this case the Perspective viewport.
3. On the Create panel click Cylinder.
4. Right-click the Snap Toggle button to open the Grid and Snap Settings dialog and make sure the Grid Points snap setting is active and all other snap settings are turned off. Close the Grid and Snap Settings dialog.
5. Press S on the keyboard to turn on Snaps. As you move your cursor in the viewport you will see the blue snaps icon displayed as you pass over the grid points.
Snap Cursor.
6. When your cursor is snapped to the center of the grid, click the mouse button and drag outward to begin creating a cylinder. Press S again while you are dragging to toggle snap off.
Using Snap in this fashion lets you create the cylinder exactly in the center of the grid, but you can make the radius any amount you want by turning snap off in the middle of the action.
Page 2 of 45Creating a Realistic Hourglass
30/10/2006file://C:\Documents and Settings\rabed\Local Settings\Temp\~hhB319.htm

Drag outward to set the cylinder's radius.
7. Drag out any radius you want, then release the mouse button and drag upward. Now you are setting the height. Click to finish.
Drag upwards to set the cylinder's height
It doesn't matter what radius and height you create now because you will later change them.
Page 3 of 45Creating a Realistic Hourglass
30/10/2006file://C:\Documents and Settings\rabed\Local Settings\Temp\~hhB319.htm

8. Click the Zoom Extents button to center the scene in the viewport.
9. On the Modify panel, in the Parameters rollout, change the Cylinder Radius to 20 and the Height to 60. You can either type the values or use the spinner.
Tip: Use the Tab key to move from field to field as you type the values.
10. Right-click the Perspective viewport label and choose Edged Faces from the menu. You should see the height segments as well as the shaded faces.
Edged Face display
11. Increase the cylinder's Height Segments to 10.
Page 4 of 45Creating a Realistic Hourglass
30/10/2006file://C:\Documents and Settings\rabed\Local Settings\Temp\~hhB319.htm

Additional height segments displayed on the cylinder.
12. From the Modifiers menu, select Parametric Deformers > Taper. The Parameters rollout shows the default Amount setting of 1.
The cylinder tapers in the viewport.
13. In the modifier stack, click the plus button to expand the stack, then click Center.
Page 5 of 45Creating a Realistic Hourglass
30/10/2006file://C:\Documents and Settings\rabed\Local Settings\Temp\~hhB319.htm

The Center tripod is visible in the viewport, as well as the orange taper gizmo.
Taper center
14. On the Parameters rollout, in the Taper Axis group turn on Symmetry, then move the center gizmo upwards in the viewport. Use the transform gizmo to move in the Z direction. Move your cursor over the transform gizmo. When the blue Z axis turns yellow, drag upwards to move the taper center about halfway up the height of the cylinder. Release the mouse button to place the gizmo center.
Page 6 of 45Creating a Realistic Hourglass
30/10/2006file://C:\Documents and Settings\rabed\Local Settings\Temp\~hhB319.htm

Move the Taper center.
15. Type 30 in the Z field of the Coordinate Display at the bottom, just to the left of the Set Keys button. This places the gizmo precisely at the center of the cylinder's height.
16. In the modifier stack, select Cylinder. This lets you make changes to the original cylinder parameters.
On the Parameters rollout of the Modify panel, reduce the radius of the cylinder to 3.
17. Click Taper in the modifier stack, then on the Parameters rollout increase the Taper Amount to 10 and set the Curve amount to 10.
Increased taper and maximum curve amount.
Two more adjustments will make this look more like an hourglass.
Tip: If you don't see the taper when you highlight the Cylinder, turn on the Show End Result on/off toggle button at the bottom of the modifier stack display.
18. Select Cylinder from the modifier stack and increase the Height Segments to 29.
By creating an odd number of height segments, you create a small band around the center of the hourglass.
19. Select Taper from the modifier stack and reduce the amount of Taper to 5.
Page 7 of 45Creating a Realistic Hourglass
30/10/2006file://C:\Documents and Settings\rabed\Local Settings\Temp\~hhB319.htm

The chamber is taking shape.
20. Save your work. Choose File > Save and save your scene as MyHourglass.max.
Although the object is beginning to look more like an hourglass, it still needs some refinement. In the next lesson, you'll add an FFD modifier that will allow you to narrow the passage where the sand will flow from the upper chamber to the lower one.
Next
Adding a Free Form Deformation
Comments
Tutorial
Adding a Free Form Deformation
The Free Form Deformation (FFD) modifier provides a lattice of control points that let you deform geometry.
Continue from the previous lesson or load sands_of_time1.max found in the \tutorials\hourglass directory.
1. On the Modify panel, open the Modifier List and choose Free Form Deformations > FFD(cyl).
Tip: To quickly locate FFD(cyl), type F from the keyboard to cycle through all the modifiers that begin with the letter 'F'.
The FFD gizmo is applied to the tapered cylinder.
Page 8 of 45Creating a Realistic Hourglass
30/10/2006file://C:\Documents and Settings\rabed\Local Settings\Temp\~hhB319.htm

Free Form Deformation Lattice enclosing the cylinder.
2. On the FFD Parameters rollout, in the Dimensions group, click Set Number Of Points. On the Set Dimensions dialog, increase the Height to 15 and click OK.
Now there are many more lattice control points to work with.
3. Click the Min/Max Toggle to reset the display to four viewports. Then right-click the Front view.
Note: Activating a viewport by right-clicking in it will not deselect any selected objects. Left-clicking will activate the desired viewport but deselect any objects.
4. Right-click the Front viewport label and turn on Smooth + Highlights and Edged Faces.
5. From the view navigation tools, click Zoom Extents so that you can zoom in on the FFD Lattice.
Page 9 of 45Creating a Realistic Hourglass
30/10/2006file://C:\Documents and Settings\rabed\Local Settings\Temp\~hhB319.htm

Front view of lattice.
6. On the modifier stack, click the plus button next to FFD(cyl) to expand it. Select Control Points.
Tip: If the modifier stack is blank, click the Select Object button on the toolbar, and select the cylinder.
7. From the view navigation tools, turn on Arc Rotate, then rotate the perspective viewport so you can see the grid behind the hourglass.
Page 10 of 45Creating a Realistic Hourglass
30/10/2006file://C:\Documents and Settings\rabed\Local Settings\Temp\~hhB319.htm

View grid behind the hourglass.
It's important to use a 3/4 view so that you will be able to see the transform corners when they appear.
Now, you'll select the vertices in the Front view, so you're sure to get horizontal rows, then scale the vertices using the transform gizmo in the Perspective view.
8. In the Front viewport, drag a selection rectangle around the middle horizontal row of control points.
The control points become outlined in yellow to show they are selected. You are selecting the points in the Front viewport
Page 11 of 45Creating a Realistic Hourglass
30/10/2006file://C:\Documents and Settings\rabed\Local Settings\Temp\~hhB319.htm

Select the middle row of FFD control points.
9. On the toolbar, turn on Select and Uniform Scale. Right-click in the Perspective viewport to activate it without losing the selection you made in the Front viewport.
10. Press the plus key on the keyboard three times to increase the size of the transform gizmo. Now you can see the three sets of transform corners and plane handles.
Scale the transform gizmo display.
11. To scale the vertices of the lattice in the Perspective viewport, move your mouse over the inner set of triangular plane handles. When the scale cursor appears, click and drag downward. As you move the cursor, watch the coordinate display change. Release the mouse button when the X, Y, Z fields display 30.
Page 12 of 45Creating a Realistic Hourglass
30/10/2006file://C:\Documents and Settings\rabed\Local Settings\Temp\~hhB319.htm

Scale cursor appears over the inner plane handle.
Drag downward to deform the center.
To refine the shape of the hourglass, you'll need to repeat this process on all the horizontal rows of control points, scaling two rows at a time. This is a two-step process:
l Selecting the rows of vertices in the Front viewport.
Page 13 of 45Creating a Realistic Hourglass
30/10/2006file://C:\Documents and Settings\rabed\Local Settings\Temp\~hhB319.htm

l Scaling in the Perspective viewport.
To select the control points, drag a selection rectangle around a row, then press the CTRL key and select the corresponding row in the opposite half of the hourglass.
Here is the shape you are trying to achieve.
FFD lattice scaled from the front.
12. When you are finished, turn off the Control Points level in the modifier stack left-click in the Perspective viewport to deselect the object.
13. Turn on Arc Rotate, click inside the yellow circle, then drag the cursor around to view the object from different angles. It's good to look at objects from all sides while you work.
Page 14 of 45Creating a Realistic Hourglass
30/10/2006file://C:\Documents and Settings\rabed\Local Settings\Temp\~hhB319.htm

Sculpted object.
14. Save your work as MyHourglass1.max.
The next stage in transforming the hourglass involves adding the caps and posts.
Tip: You could more easily create an hourglass by drawing a shape and then using a Lathe modifier to make it 3D. Because the purpose of this tutorial is to learn about modeling with primitive objects and using FFDs, we have taken a different approach.
Next
Adding the Caps Using Auto Grid
Comments
Tutorial
Adding the Caps Using Auto Grid
The Auto Grid tool lets you create an object aligned to the surface of another one. For this part of the exercise, you'll use Auto Grid to create a cap for the top of the hourglass.
1. Turn on Arc Rotate, then drag the cursor around to view the object so that the top part of the hourglass is clearly visible.
2. At the top of Object Type rollout on the Create panel, turn on the Auto Grid Toggle.
3. On the main menu, choose Create > Extended Primitives > Chamfer Cylinder.
4. Move your cursor over the top of the hourglass. A small tripod should appear, which follows your mouse. Press and drag outward to set the radius of the Chamfer Cylinder, then release the mouse button and continue dragging upward to set the height and chamfer.
Page 15 of 45Creating a Realistic Hourglass
30/10/2006file://C:\Documents and Settings\rabed\Local Settings\Temp\~hhB319.htm
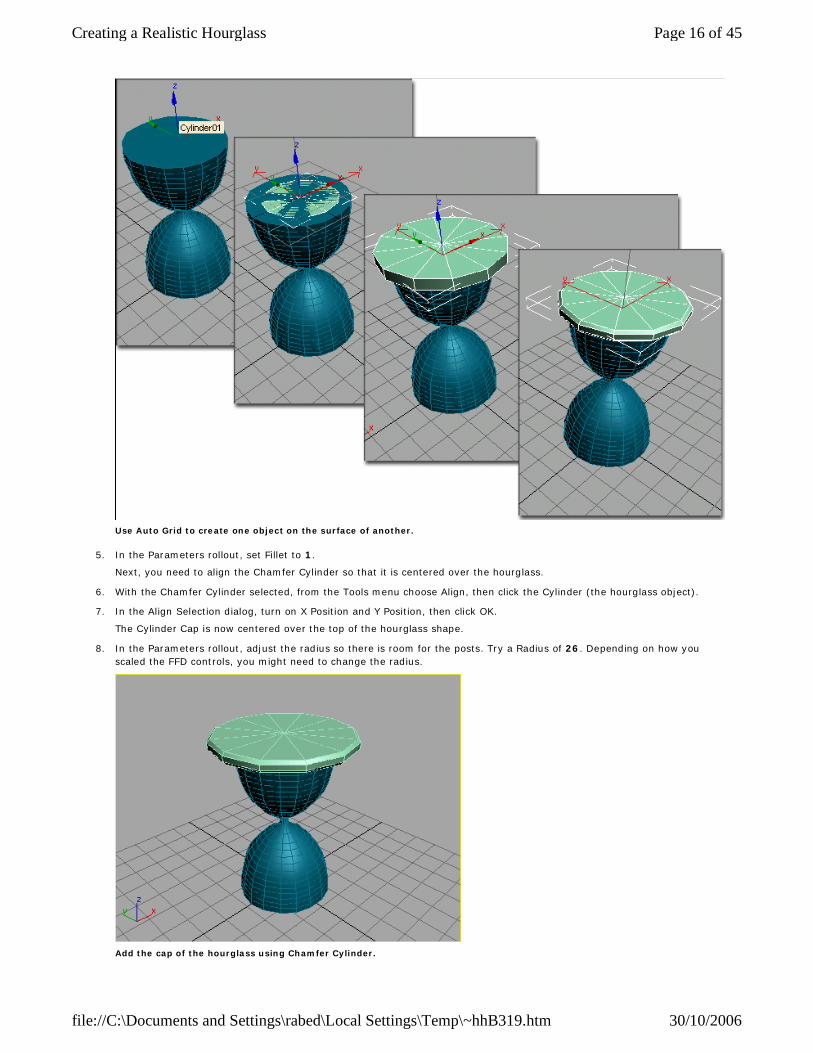
Use Auto Grid to create one object on the surface of another.
5. In the Parameters rollout, set Fillet to 1.
Next, you need to align the Chamfer Cylinder so that it is centered over the hourglass.
6. With the Chamfer Cylinder selected, from the Tools menu choose Align, then click the Cylinder (the hourglass object).
7. In the Align Selection dialog, turn on X Position and Y Position, then click OK.
The Cylinder Cap is now centered over the top of the hourglass shape.
8. In the Parameters rollout, adjust the radius so there is room for the posts. Try a Radius of 26. Depending on how you scaled the FFD controls, you might need to change the radius.
Add the cap of the hourglass using Chamfer Cylinder.
Page 16 of 45Creating a Realistic Hourglass
30/10/2006file://C:\Documents and Settings\rabed\Local Settings\Temp\~hhB319.htm

Although you can repeat the process to create the bottom cap, we'll use a simpler method.
9. Select the Chamfer cylinder, then on the Tools menu, choose Mirror.
10. On the Mirror dialog, in the Clone Selection group, turn on Instance. Set the Mirror Axis to Z, and use the spinner to adjust the Offset to –60. Click OK.
Create a clone by using Mirror with Offset.
11. Choose File > Save As to save your work as MyHourglass2.max.
Next
Adding the Posts Using Hose Objects
Comments
Tutorial
Adding the Posts Using Hose Objects
You can build the posts using an extended primitive called a Hose object. This makes it simple to create nice looking posts.
1. From the Create panel > Object Type rollout, turn on the Auto Grid Toggle, if it's not already on.
2. On the menu bar choose Create > Extended Primitives > Hose.
3. Move your cursor over the bottom chamfer cylinder. The Auto Grid tripod displays. Press and drag to set the radius of the hose.
Page 17 of 45Creating a Realistic Hourglass
30/10/2006file://C:\Documents and Settings\rabed\Local Settings\Temp\~hhB319.htm

4. Release the mouse button and drag upward to set the height of the post.
Now you can adjust the hose parameters to modify its appearance.
5. In the Common Hose Parameters, set the following values:
l Starts: 37
l Ends: 64
l Cycles: 2
l Diameter: –36
6. In the rollout, scroll down to the Hose Shape group. Make sure Round Hose is turned on, and then set the following values:
l Diameter: 3.5
l Sides: 6
Page 18 of 45Creating a Realistic Hourglass
30/10/2006file://C:\Documents and Settings\rabed\Local Settings\Temp\~hhB319.htm

Hose object used to create a post.
With the post created, you can now clone it using one of several ways. Here you will align the hose object's pivot point to match the pivot point of the chamfer cylinder. Then you'll use SHIFT+Rotate to create the other posts.
7. On the Hierarchy panel, in the Adjust Pivot rollout, click to turn on Affect Pivot Only.
8. On the menu bar choose Tools > Align, then click the bottom chamfer cylinder.
9. In the Align Selection dialog, turn on X Position and Y Position in the Align Position group. Click OK. The pivot is now positioned as shown in the illustration.
Align the hose pivot with the chamfer cylinder.
10. In the Adjust Pivot rollout, turn off Affect Pivot Only.
11. On the toolbar, turn on Select and Rotate. Hold down the SHIFT key and move your cursor over the Transform gizmo for the post (displayed where the new pivot is located). When the Z axis ring turns yellow, rotate the post. As you move the mouse, watch the coordinate display until it reads 90 degrees, then release the mouse button.
Page 19 of 45Creating a Realistic Hourglass
30/10/2006file://C:\Documents and Settings\rabed\Local Settings\Temp\~hhB319.htm

Rotate the hose 90 degrees.
Tip: To increase precision, you can turn on the Angle Snap by pressing the A keyboard shortcut.
12. In the Clone Options dialog, make sure Instance is turned on, then set the number of copies to 3. Click OK.
There are now four posts displayed in the viewport.
Clone using SHIFT+Rotate.
13. Save your work. On the menu bar choose File > Save As, and save the model as MyHourglass3.max.
Now that you've built a basic hourglass, you'll add some materials to give it some realism. After making the glass chamber transparent, you'll create the sand contained within the chamber.
Next
Adding Materials
Comments
Page 20 of 45Creating a Realistic Hourglass
30/10/2006file://C:\Documents and Settings\rabed\Local Settings\Temp\~hhB319.htm

Tutorial
Adding Materials
You can create your own materials or open materials that exist in another file. You'll do both in this next section.
Continue from the previous lesson or open sands_of_time2.max from the \tutorials\hourglass folder.
Open existing materials from a library:
1. On the toolbar, click the Material Editor button.
You can also open the Material Editor by typing to keyboard shortcut, M.
2. Click the Get Material button in the Material Editor.
The Material/Map Browser appears.
3. In the Material/Map Browser, in the Browse From group, choose Mtl Library, then click File > Open at the bottom.
4. In the Open Material Library dialog, navigate to the \matlibs folder and choose 3dsmax.mat. Click Open.
The Material/Map Browser fills with materials.
Large icons in the Material/Map Browser.
There are many interesting textured materials in this library. When you have time, look through them so that you can learn about these materials. For this exercise, you'll open two materials that you'll apply to the hourglass.
5. Scroll through the materials until you see Metal_Dark_Gold. Double-click that material so that you can see it in the Material Editor.
Page 21 of 45Creating a Realistic Hourglass
30/10/2006file://C:\Documents and Settings\rabed\Local Settings\Temp\~hhB319.htm

Get Metal_Dark_Gold material from a file.
Next you'll locate a Wood material.
6. In the Material Editor, click the top-middle sample sphere to activate it. Then click Get Material and scroll through the materials until you find Wood_Burloak. Double-click that material to transfer it to the Material Editor.
The Wood_Burloak material is added to the Material Editor.
7. Close the Material/Map Browser.
You'll now find out how easy it is to add these materials to the objects in the scene.
Add the materials:
1. In the viewport, select either the top or bottom cap of the hourglass.
2. In the Material Editor, click the Assign Material To Selection button. The Wood material appears on the cap in the viewport. Repeat the process for the other cap.
You can also drag materials from the Material Editor and drop them onto the objects in the viewport. The objects don't even have to be selected first; just drag right onto them.
3. In the Material Editor, click the sample slot that contains the Metal_Dark_Gold material, and drag the material to all of the posts.
4. Right-click the Perspective viewport label and turn off Edged Faces.
Page 22 of 45Creating a Realistic Hourglass
30/10/2006file://C:\Documents and Settings\rabed\Local Settings\Temp\~hhB319.htm

The Wood_Burloak and Metal_Dark_Gold materials applied to the hourglass.
You've opened some pre-made materials for gold and wood. Now you'll make your own materials for glass and sand.
Next
Creating Glass and Sand Materials
Comments
Tutorial
Creating Glass and Sand Materials
In this lesson, you'll make a transparent material to simulate glass and a new solid material to represent sand. For the glass materials, you'll add transparency falloff and increase the glossiness, then make the material two-sided so you can see through to the inside of the glass.
1. Click the upper-right material sample slot in the Material Editor to activate it.
2. In the Material name field, name the material Glass.
Giving your materials logical names helps you keep track of what you've made. Any materials that you make can be stored in custom material libraries so you can reuse them in the future.
3. Drag the material onto the hourglass in the viewport.
The hourglass should turn gray; the same as the sample sphere.
4. In the Material Editor, click the Background button (right side of sample spheres). A checkered background displays behind the purple sphere. This background is helpful in seeing transparencies in materials.
Page 23 of 45Creating a Realistic Hourglass
30/10/2006file://C:\Documents and Settings\rabed\Local Settings\Temp\~hhB319.htm
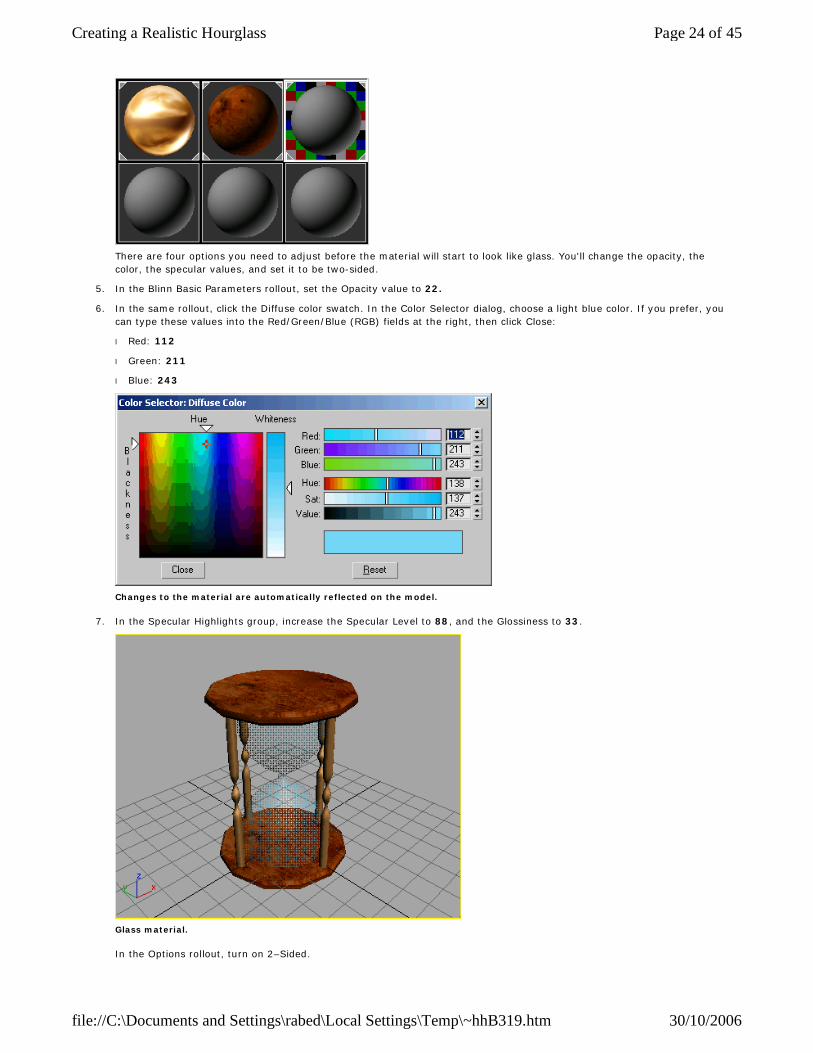
There are four options you need to adjust before the material will start to look like glass. You'll change the opacity, the color, the specular values, and set it to be two-sided.
5. In the Blinn Basic Parameters rollout, set the Opacity value to 22.
6. In the same rollout, click the Diffuse color swatch. In the Color Selector dialog, choose a light blue color. If you prefer, you can type these values into the Red/Green/Blue (RGB) fields at the right, then click Close:
l Red: 112
l Green: 211
l Blue: 243
Changes to the material are automatically reflected on the model.
7. In the Specular Highlights group, increase the Specular Level to 88, and the Glossiness to 33.
Glass material.
In the Options rollout, turn on 2–Sided.
Page 24 of 45Creating a Realistic Hourglass
30/10/2006file://C:\Documents and Settings\rabed\Local Settings\Temp\~hhB319.htm

This option controls the visibility of the inside of the hourglass so that it displays.
Note: There is one additional setting for this glass, but it won't be visible until you render the file to a bitmap image.
8. In the Material Editor, open the Extended Parameters rollout. Set the Falloff value to In, and Amount to 88.
You'll now create the sand material, which is easy to do because it doesn't require as many settings as the glass material.
9. Click the sample slot in the lower-left corner to activate it. In the Material name field, type the name Sand.
10. Click the Diffuse color swatch. In the Color Selector, choose a light brown color or enter these RGB values:
l Red: 216
l Green: 185
l Blue: 137
The Red/Green/Blue settings for sand.
11. Save your scene as MyHourglass4.max.
Now that the Glass and Sand materials are created, you'll create the sand in the hourglass. Once you've created it, you'll apply the sand material.
Next
Animating the Sand Level with Slice Modifiers
Comments
Tutorial
Animating the Sand Level with Slice Modifiers
The Slice modifier is a handy tool for creating the sand in the upper chamber of the hourglass. You'll use two Slice modifiers, and then animate the Slice gizmo to create the effect of the sand level sinking in the glass.
1. Select the tapered cylinder object in the viewport.
2. On the menu bar, choose Edit > Clone.
The Clone Options dialog appears.
3. In the Clone Options dialog, click Copy, and then name the clone Sand in upper globe. Click OK.
4. Right-click the Perspective viewport and choose Hide Unselected. Everything should be hidden in the viewport except for the Sand in upper globe object.
5. In the Material Editor, click the Assign Material To Selection button.
The object in the viewport is assigned the sand material.
Page 25 of 45Creating a Realistic Hourglass
30/10/2006file://C:\Documents and Settings\rabed\Local Settings\Temp\~hhB319.htm

Sand material on object in viewport.
6. Go to the Modify panel. In the modifier stack, click to highlight the FFD(cyl) modifier, then on the menu bar, choose Modifiers > Parametric Deformers > Slice.
The Slice plane is displayed in the viewport.
7. In the stack display, expand the Slice modifier's hierarchy, and highlight Slice Plane.
8. In the Slice Parameters rollout, turn on Remove Bottom.
9. On the toolbar, click to turn on the Select and Move button.
10. In the viewport, select the Z arrow of the Transform gizmo and move the mouse upward so that the Slice plane causes the lower half to disappear entirely from view.
Slice plane with remove bottom turned on.
Tip: If Necessary, watch the other viewports to gauge how much slicing occurs.
11. In the modifier stack, click Slice again to deselect the Slice Plane. Now right-click the stack display, choose Copy, right-click again and choose Paste.
A second Slice modifier appears in the Stack above the original.
12. Expand the new Slice modifier's hierarchy, and highlight Slice Plane.
13. Move the Slice plane two-thirds up the globe, and then in the Slice Parameters rollout change Slice Type to Remove Top.
Page 26 of 45Creating a Realistic Hourglass
30/10/2006file://C:\Documents and Settings\rabed\Local Settings\Temp\~hhB319.htm

Second Slice plane removes top.
14. Select the Slice at the top of the modifier stack, and then on the menu bar, choose Modifiers > Mesh Editing > Cap Holes.
15. In the Parameters rollout, turn on Smooth With Old Faces.
16. Scroll down to the bottom of the modifier stack and select Cylinder, then reduce the Radius to 2.8.
This will make the sand look like as if it's inside the glass.
17. Right-click in the viewport and choose Unhide All.
18. On the toolbar, click Select and Rotate. In the modifier stack, select the uppermost Slice Plane. Rotate the Y axis of the gizmo so that the level of the sand looks a little uneven.
Sand made using Slice Plane and Cap Holes modifier.
19. Click to turn on the Auto Key button.
20. Move the time slider to frame 100. In the modifier stack, highlight the top Slice Plane.
21. On the toolbar, click Select and Move button. Then move the Slice Plane downward along the Z axis of the Transform gizmo in the viewport until the sand completely disappears.
Page 27 of 45Creating a Realistic Hourglass
30/10/2006file://C:\Documents and Settings\rabed\Local Settings\Temp\~hhB319.htm
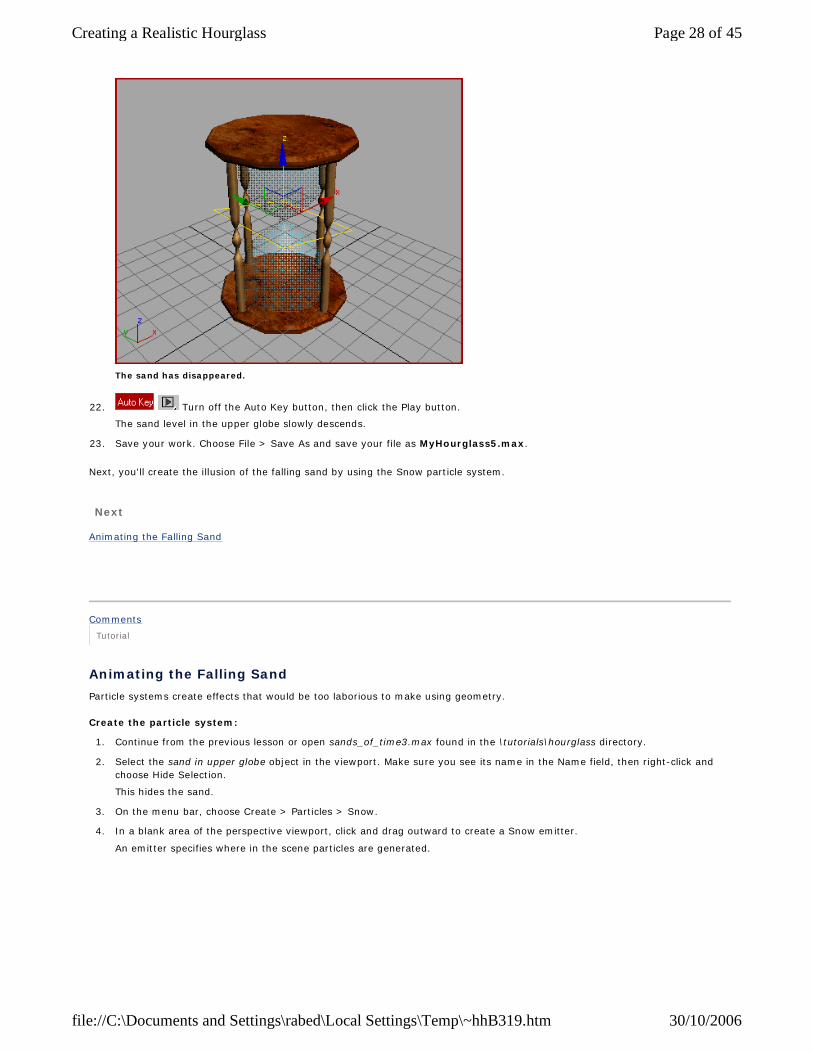
The sand has disappeared.
22. Turn off the Auto Key button, then click the Play button.
The sand level in the upper globe slowly descends.
23. Save your work. Choose File > Save As and save your file as MyHourglass5.max.
Next, you'll create the illusion of the falling sand by using the Snow particle system.
Next
Animating the Falling Sand
Comments
Tutorial
Animating the Falling Sand
Particle systems create effects that would be too laborious to make using geometry.
Create the particle system:
1. Continue from the previous lesson or open sands_of_time3.max found in the \tutorials\hourglass directory.
2. Select the sand in upper globe object in the viewport. Make sure you see its name in the Name field, then right-click and choose Hide Selection.
This hides the sand.
3. On the menu bar, choose Create > Particles > Snow.
4. In a blank area of the perspective viewport, click and drag outward to create a Snow emitter.
An emitter specifies where in the scene particles are generated.
Page 28 of 45Creating a Realistic Hourglass
30/10/2006file://C:\Documents and Settings\rabed\Local Settings\Temp\~hhB319.htm

Snow emitter.
5. Play the animation and watch the snow particles in the viewport.
Play the snow system animation.
6. On the toolbar, click Select and Move button. Then type in the Coordinate Display X: 0, Y: 0 Z: 30.
The snow emitter moves to the correct location at the neck separating the top and bottom chambers of the hourglass.
Tip: To quickly set the X and Y axis coordinates to zero, right-click the spinner arrows. Any current value is set to zero.
7. On the Modify panel, in the Parameters rollout, in the Emitter group, change the width and length of the emitter to 1.5.
Page 29 of 45Creating a Realistic Hourglass
30/10/2006file://C:\Documents and Settings\rabed\Local Settings\Temp\~hhB319.htm
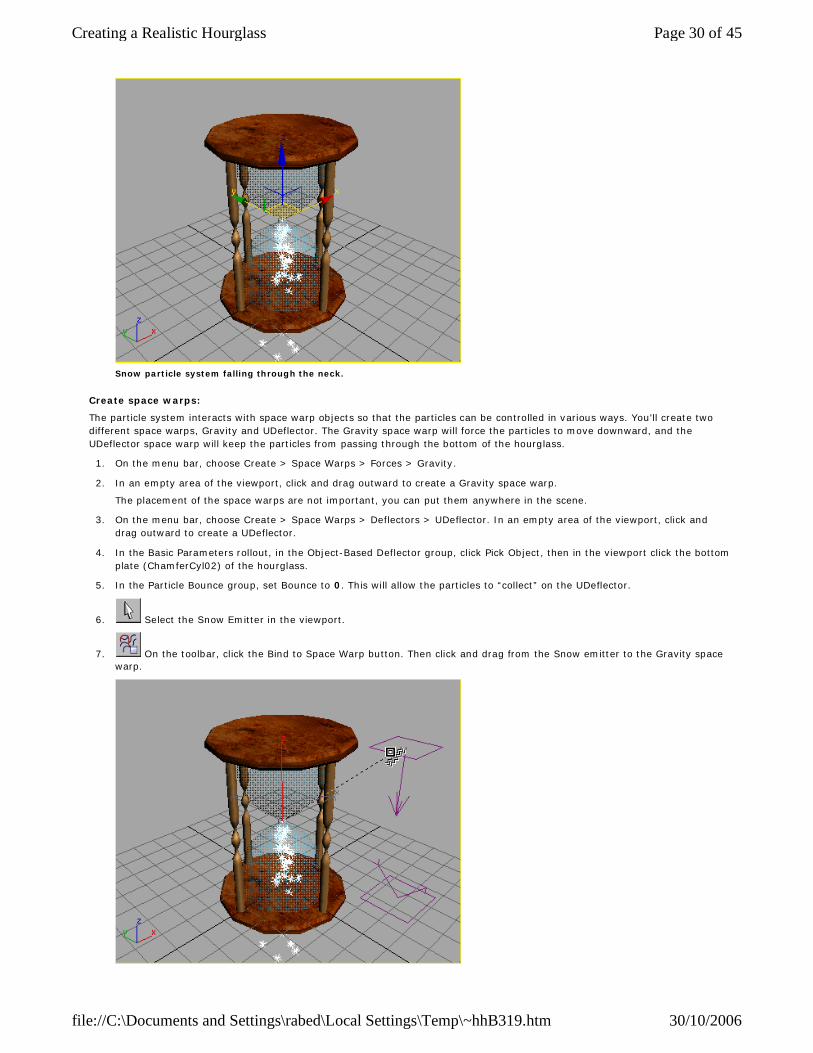
Snow particle system falling through the neck.
Create space warps:
The particle system interacts with space warp objects so that the particles can be controlled in various ways. You'll create two different space warps, Gravity and UDeflector. The Gravity space warp will force the particles to move downward, and the UDeflector space warp will keep the particles from passing through the bottom of the hourglass.
1. On the menu bar, choose Create > Space Warps > Forces > Gravity.
2. In an empty area of the viewport, click and drag outward to create a Gravity space warp.
The placement of the space warps are not important, you can put them anywhere in the scene.
3. On the menu bar, choose Create > Space Warps > Deflectors > UDeflector. In an empty area of the viewport, click and drag outward to create a UDeflector.
4. In the Basic Parameters rollout, in the Object-Based Deflector group, click Pick Object, then in the viewport click the bottom plate (ChamferCyl02) of the hourglass.
5. In the Particle Bounce group, set Bounce to 0. This will allow the particles to “collect” on the UDeflector.
6. Select the Snow Emitter in the viewport.
7. On the toolbar, click the Bind to Space Warp button. Then click and drag from the Snow emitter to the Gravity space warp.
Page 30 of 45Creating a Realistic Hourglass
30/10/2006file://C:\Documents and Settings\rabed\Local Settings\Temp\~hhB319.htm

Binding the Snow emitter to the Gravity Space Warp
8. Repeat the process for the UDeflector, binding the Snow emitter to the UDeflector.
Adjust the appearance:
1. Now click the Play button to play the animation.
You'll change the appearance of the snowflakes so that they look like falling sand.
2. Stop the animation. Select the Snow emitter in the Modify stack, then in the Parameters rollout, enter these settings in the Particles group:
l Viewport Count: 375
l Render Count 888
l Flake Size:0.8
l Speed:0.5
l Variation:0.5
Warning: In general, it is not a good idea to increase the Viewport Count very much. This can seriously slow down 3ds max. If you do increase the Viewport Count, don't use the spinner to do so. If you inadvertently set the spinner to a very high amount, you could incur a long wait. Always enter the values using the keyboard or number keys.
Now you need to make an adjustment in the Timing group.
3. In the Timing group, turn off Constant. Set Life to 60 and Birth Rate to 1.0.
The snow is under control.
Animate the falling sand:
1. With the Snow selected, open the Material Editor (if it isn't already open), and select the Sand material, then click Assign Material To Selection.
2. Right-click the viewport and choose Unhide All and Play the animation.
Page 31 of 45Creating a Realistic Hourglass
30/10/2006file://C:\Documents and Settings\rabed\Local Settings\Temp\~hhB319.htm

Sand made from particles and animated Slice modifier.
To make the effect of the particles disappearing, you'll animate the Birth Rate of the particles.
3. Click the Time Configuration button. In the Time Configuration dialog, in the Animation group, set the Length to 120. Click OK.
4. Click to turn on the Auto Key button, then with the Snow selected, move the time slider to frame 102.
In the Parameters rollout, change the Birth Rate to 0.0. This will stop the particles emitting at frame 102, since the birth will stop.
The particles that were already emitted will continue to fall.
Now move backwards in time to where the sand in the upper chamber is getting smaller and the stream in the lower chamber needs to be stronger.
5. Move the time slider to Frame 86, and set the Birth rate to 6.0.
This will ensure a solid fall of sand at this frame.
6. Move backwards to Frame 78, and set the Birth rate to 5.9.
This keeps the falling sand falling.
7. Move backwards to Frame 15, and set the Birth rate to 6.9
This adds momentum to the falling sand.
8. Move backwards to Frame 0, and set the Birth rate to 5.0.
This keyframe starts the fall of the sand while the sand level drops in the upper chamber.
9. Move the time slider forward in time to frame 106 and set the Birth rate to 1.
This will allow you to set a key at frame 106. Once the key is set you'll change it's values using the time bar right-click menu.
10. On the time bar, select the key at frame 106, right-click and choose Snow01: Birth Rate from the list.
11. In the Snow01 Birth Rate dialog, change the Value to –52 and set the In and Out tangents to Smooth.
This works to end the stream of falling sand.
Page 32 of 45Creating a Realistic Hourglass
30/10/2006file://C:\Documents and Settings\rabed\Local Settings\Temp\~hhB319.htm

12. Turn off the Auto Key button and then play the animation.
The sand descends, the stream falls in concert with the sand in the upper chamber.
Sand falling at frames 15, 86 and 120.
If you had any trouble, you can open sands_of_time4.max to see the file with the correct settings. It's easy to miss a step or make a mistake and not get the correct results.
13. Save your work as MyHourglass6.max.
Next you'll use an animated hemisphere to create the sand building up in the bottom of the lower chamber.
Next
Creating the Sand Build-Up
Comments
Tutorial
Creating the Sand Build-Up
The ability to animate object parameters gives great power and flexibility to 3ds max. In this lesson, you will create a hemisphere with a pivot point at its base, then animate the hemisphere percentage to achieve the illusion that the particles are forming a mound with volume.
Continue from the previous lesson or open sands_of_time4.max from the \tutorials\hourglass directory.
1. Hide the Snow particle system. Select it in the viewport, then right-click and choose Hide Selection from the quad menu. Select the Hourglass object (Cylinder01 unless you've renamed it) and again choose Hide Selection.
2. With the Perspective viewport active, click the Arc Rotate button to display the navigation icon. Rotate the view so that the bottom of the hourglass is clearly visible.
Page 33 of 45Creating a Realistic Hourglass
30/10/2006file://C:\Documents and Settings\rabed\Local Settings\Temp\~hhB319.htm

3. At the top of the Create panel > Object Type rollout, click to turn on the Auto Grid Toggle.
From the main menu, choose Create > Standard Primitives > Sphere.
4. Drag out a Sphere object until the radius is approximately 17. A sphere should be created at the bottom of the hourglass plate.
Tip: Look at the Radius spinner in the Parameters rollout as you drag the sphere.
Right-click and select Unhide By Name and unhide the Hourglass object.
Assign the Sand material to the new sphere. (Open the Material Editor if necessary.)
Sand mound made using a Sphere.
5. On the Parameters rollout, turn on Base To Pivot.
The sphere changes position in the viewport.
The sphere now rests on the bottom plate.
6. Turn on the Auto Key button and then go to frame 0.
7. On the Parameters rollout, change the Hemisphere value using the spinner. Set the Hemisphere setting to .99.
8. Move the time slider to frame 25 and set the Hemisphere to .98. This will keep the hemisphere very small for the first 25 frames.
9. Move to frame 57 and set the Hemisphere to .9.
Page 34 of 45Creating a Realistic Hourglass
30/10/2006file://C:\Documents and Settings\rabed\Local Settings\Temp\~hhB319.htm

10. Move to frame 67 and set the Hemisphere to .8 and Play the animation.
Note: You may first need to change the rotation of the view before playing the animation if you previously rotated the hourglass when creating the sphere object.
The hourglass at frame 57.
11. Move to frame 96 and set the Hemisphere to .6 or so.
The hourglass at frame 96.
12. Turn off Auto Key and play the animation. After stopping the animation, right-click the viewport and choose Unhide All from the quad menu
The sand level goes down in the upper globe as a stream of sand falls and collects into a mound in the bottom globe.
Tip: For a more realistic mound of sand, select the hemisphere and add a Taper Modifier. Set the taper Amount to -.75 and the Curve to -.5, so the hemisphere turns into a rounded cone.
13. From the main menu, choose Tools > Align and pick the bottom plate. In the Align Selection dialog, tun on X Position and Y Position then click OK.
Page 35 of 45Creating a Realistic Hourglass
30/10/2006file://C:\Documents and Settings\rabed\Local Settings\Temp\~hhB319.htm

The finished falling sand effect.
14. Save your work. On the File menu, choose Save As, then name your scene MyHourglass7.max.
If you want, load the file sands_of_time_finished.max to see the finished model.
Next
Adding a Camera
Comments
Tutorial
Adding a Camera
So far you have defined everything in the Perspective viewport without considering lighting or cameras. As you prepare to produce output from your 3D scene, you will want to add cameras and lights to achieve a more realistic effect. Lights can cast shadows or add shiny highlights. Cameras can be animated so that they change your perspective and add emphasis and motion.
1. Continue from the last lesson, or load the sands_of_time_finished.max file from the \tutorials\hourglass directory.
2. Right-click to activate the Top view.
3. On the main menu, click Create > Cameras > Target Camera.
4. In the Top viewport, move your cursor to the lower-right quadrant of the viewport. Click and drag toward the center where the hourglass is situated. Release the mouse button when it is over the hourglass.
Page 36 of 45Creating a Realistic Hourglass
30/10/2006file://C:\Documents and Settings\rabed\Local Settings\Temp\~hhB319.htm

Target camera from Top viewport
5. Press C on the keyboard, to change the viewport to display the view from the Camera.
If necessary, right-click the Camera01 viewport label and turn on Smooth + Highlights.
Target camera is created on the ground plane.
6. From the view navigation tools, use the Truck Camera to move the camera so the hourglass is no longer cut off in the viewport.
Page 37 of 45Creating a Realistic Hourglass
30/10/2006file://C:\Documents and Settings\rabed\Local Settings\Temp\~hhB319.htm

Truck and Dolly the camera to bring the hourglass into view.
7. Turn on Orbit Camerafrom the view navigation tools. Click and drag downward in the viewport to orbit the camera so you have a better view of the top of the sand.
Orbiting the camera.
8. Turn on Dolly Camera. Click and drag in the viewport to zoom back so the hourglass is a bit smaller.
9. Right-click the Camera viewport label and choose Show Safe Frame. You use the Show Safe Frame tool to verify that objects you want to render will not get cut off. Show Safe Frame will display the edges of your output resolution as yellow, cyan, and orange lines in the viewport.
Page 38 of 45Creating a Realistic Hourglass
30/10/2006file://C:\Documents and Settings\rabed\Local Settings\Temp\~hhB319.htm

Show Safe Frame helps you frame your shot.
10. To improve the authenticity of the hourglass, open the Modify panel and select either Chamfer Cylinders that make up the top or bottom caps. Increase the number of Sides to 33.
Because one cap is an instance of the other, changing the number of sides on one cap automatically affects the other.
11. Save your scene as MyHourglass8.max.
Next
Adding Default Lights to the Scene
Comments
Tutorial
Adding Default Lights to the Scene
You can create your own lights, or you can let 3ds max do it for you. In this section you'll add a key light and a fill light using an automatic process.
Continue from the previous lesson.
Add lights to the scene:
1. Right-click the Camera viewport label, and then choose Configure.
2. On the Rendering Method panel, in the Rendering Options group, turn on Default Lighting, and choose 2 Lights. Click OK.
3. On the main menu, choose Views > Add Default Lights To Scene.
4. In the Add Default Lights To Scene dialog, set Distance Scaling to 0.2, then click OK.
This hourglass is relatively small, so you use Distance Scaling to set the lights closer to the object.
View the new lights:
Follow these steps to see the new lights.
1. Press T on the keyboard to change the Camera viewport to a Top view. Also right-click the viewport label and turn off Show Safe Frame.
2. From the view navigation tools, click Zoom Extents.
Page 39 of 45Creating a Realistic Hourglass
30/10/2006file://C:\Documents and Settings\rabed\Local Settings\Temp\~hhB319.htm
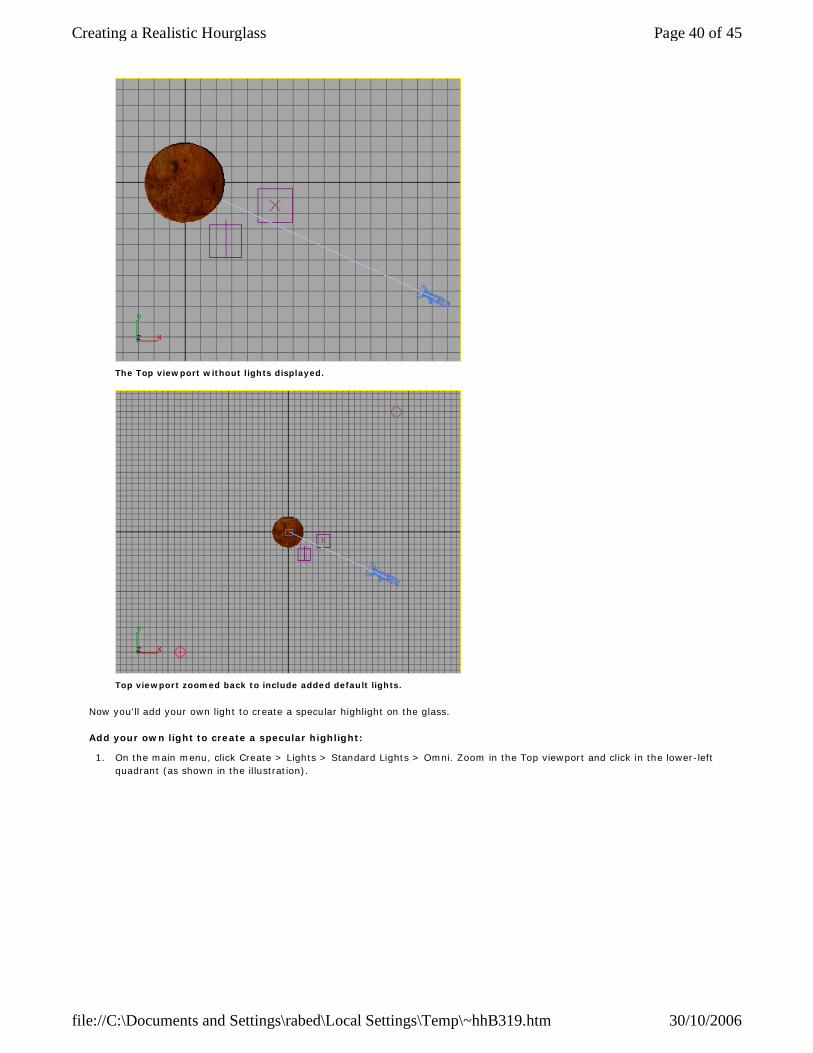
The Top viewport without lights displayed.
Top viewport zoomed back to include added default lights.
Now you'll add your own light to create a specular highlight on the glass.
Add your own light to create a specular highlight:
1. On the main menu, click Create > Lights > Standard Lights > Omni. Zoom in the Top viewport and click in the lower-left quadrant (as shown in the illustration).
Page 40 of 45Creating a Realistic Hourglass
30/10/2006file://C:\Documents and Settings\rabed\Local Settings\Temp\~hhB319.htm

Create an omni light close to the hourglass.
2. Set the Top viewport back to the Camera view by pressing C then move the Omni light up so it is just above the height of the sand level. When you render the image this light will create a specular highlight on the glass.
Move the omni light along the Z axis so it is level with the sand.
3. Open the Modify panel and turn off Cast Shadows, on the General Parameters rollout, for the light you just created.
4. Locate the Multiplier field and change it to 1.33. You can turn up the multiplier to give a larger specular highlight on the glass, or you can move the light closer to the glass.
Page 41 of 45Creating a Realistic Hourglass
30/10/2006file://C:\Documents and Settings\rabed\Local Settings\Temp\~hhB319.htm

Rendered image shows omni-generated highlight.
Save your work:
l Choose File > Save As, and name your file MyHourglass_with_Lights.max.
Next
Rendering Your Work
Comments
Tutorial
Rendering Your Work
So far, everything you've done has been displayed in the viewport only: you haven't actually tried to create any output. You essentially have two output types from which to choose:
l Raster—Raster formats, such as QuickTime MOV and Windows AVI, are flip books of still images, which means they can be rather large in size but very rich visually.
l 3D geometry—3D output, such as VRML, MAX, DWG, 3DS, DXF or AI, allows you to choose your own viewpoint, as well as providing animation and behaviors through proximity triggers.
Since the hourglass has both transparency and particles, you'll choose the only output type which supports both, which is raster. You'll create a QuickTime movie that you can play on a Web site. First you'll render some still frames.
1. Activate the Camera viewport. If you do not have the Camera viewport visible, press C on the keyboard.
2. On the main menu, choose Rendering > Render.
In the Output Size group of the Common parameters rollout, click the 640x480 preset button.
3. Click Render.
Page 42 of 45Creating a Realistic Hourglass
30/10/2006file://C:\Documents and Settings\rabed\Local Settings\Temp\~hhB319.htm

Rendered image shows off the highlights.
4. To change the background, choose Rendering > Environment. In the Background group, click the Background Color swatch. In the Color Selector, type these RGB values:
l Red: 120
l Green: 194
l Blue: 252
This should produce a pale blue.
5. Close the Environment dialog, and press F9 to render again automatically.
Page 43 of 45Creating a Realistic Hourglass
30/10/2006file://C:\Documents and Settings\rabed\Local Settings\Temp\~hhB319.htm

Changing the background color.
Next you'll render to an animation file.
6. In the Render Scene dialog, in the Common Parameters rollout in the Time Output group, change from Single to Active Time Segment. This renders the entire animation.
7. Reduce the size to 320x240. That's a better size animation for Web playback.
8. In the Render Output group, click the Files button and name the file you're about to create myhourglass.avi (for a Video for Windows animation) or myhourglass.mov, (for a QuickTime animation). Make a note of where you are saving this file.
l If you are rendering to AVI, click OK in the Video Compression window, then click Save. To start the rendering, click Render.
l If you are rendering to MOV, make adjustments as you like in the Compression Settings dialog, then click OK. To start the rendering, click Render.
A Rendering dialog appears. As each frame is rendered, a bar shows the progress. You can see all types of information updating in the Rendering Progress group as your rendering advances.
9. When your rendering is finished, close the Rendering dialog. On the File menu, choose View Image File, navigate to where you saved the file, and open it. The appropriate player program will play your animation.
Tip: If you like, you can play sands_of_time.avi or sands_of_time.mov to see a finished rendering of the animation.
Page 44 of 45Creating a Realistic Hourglass
30/10/2006file://C:\Documents and Settings\rabed\Local Settings\Temp\~hhB319.htm

QuickTime MOV output
Summary
From this tutorial, you can see that modeling and animating particle effects doesn't always mean that all particles have to be created with a particle system. In the hourglass animation, you used a particle system only for the falling sand. The effects of sand at the top and bottom of the hourglass were created with various modeling tools.
Comments
Page 45 of 45Creating a Realistic Hourglass
30/10/2006file://C:\Documents and Settings\rabed\Local Settings\Temp\~hhB319.htm