model year owner’s manualmanual · pdf file2002002003 333 model year owner’s ......
TRANSCRIPT
2002002002003333 MODEL YEARMODEL YEARMODEL YEARMODEL YEAR
OWNER’SOWNER’SOWNER’SOWNER’S MANUALMANUALMANUALMANUAL
JULY 03
____________________________________________________________________________________________
__________________________________________________________________________________________ 2
RECORD OF OWNERSHIP
NNNNAMEAMEAMEAME________________________________________________________________________________________________________________________________________________________________________________
AAAADDRESSDDRESSDDRESSDDRESS ____________________________________________________________________________________________________________________________________________________________________
CCCCITYITYITYITY ____________________________________________________________________________ SSSSTATETATETATETATE ________________ ZZZZIPIPIPIP ____________________________________
DDDDATE ATE ATE ATE PPPPURCHASEDURCHASEDURCHASEDURCHASED ____________________________________________________________________________________________________________________________________
MMMMODELODELODELODEL ____________________________________________________________________ SSSSERIAL ERIAL ERIAL ERIAL #### ________________________________________________________________
DDDDEALER EALER EALER EALER NNNNAMEAMEAMEAME ________________________________________________________________________________________________________________________________________________
PPPPHONE HONE HONE HONE #### ____________________________________________________________________________________________________________________________________________________________________
SSSSERVICE ERVICE ERVICE ERVICE TTTTECH ECH ECH ECH RRRREPEPEPEP ____________________________________________________________________________________________________________________________________
NNNNOTESOTESOTESOTES:::: ____________________________________________________________________________________________________________________________________________________________________________
____________________________________________________________________________________________________________________________________________________________________________________________________
____________________________________________________________________________________________________________________________________________________________________________________________________
____________________________________________________________________________________________________________________________________________________________________________________________________
Manufactured by:Manufactured by:Manufactured by:Manufactured by:
6927 Lincoln Parkway6927 Lincoln Parkway6927 Lincoln Parkway6927 Lincoln Parkway Fort Wayne, IN 46804Fort Wayne, IN 46804Fort Wayne, IN 46804Fort Wayne, IN 46804
(260) 436(260) 436(260) 436(260) 436----9100910091009100
____________________________________________________________________________________________
__________________________________________________________________________________________ 3
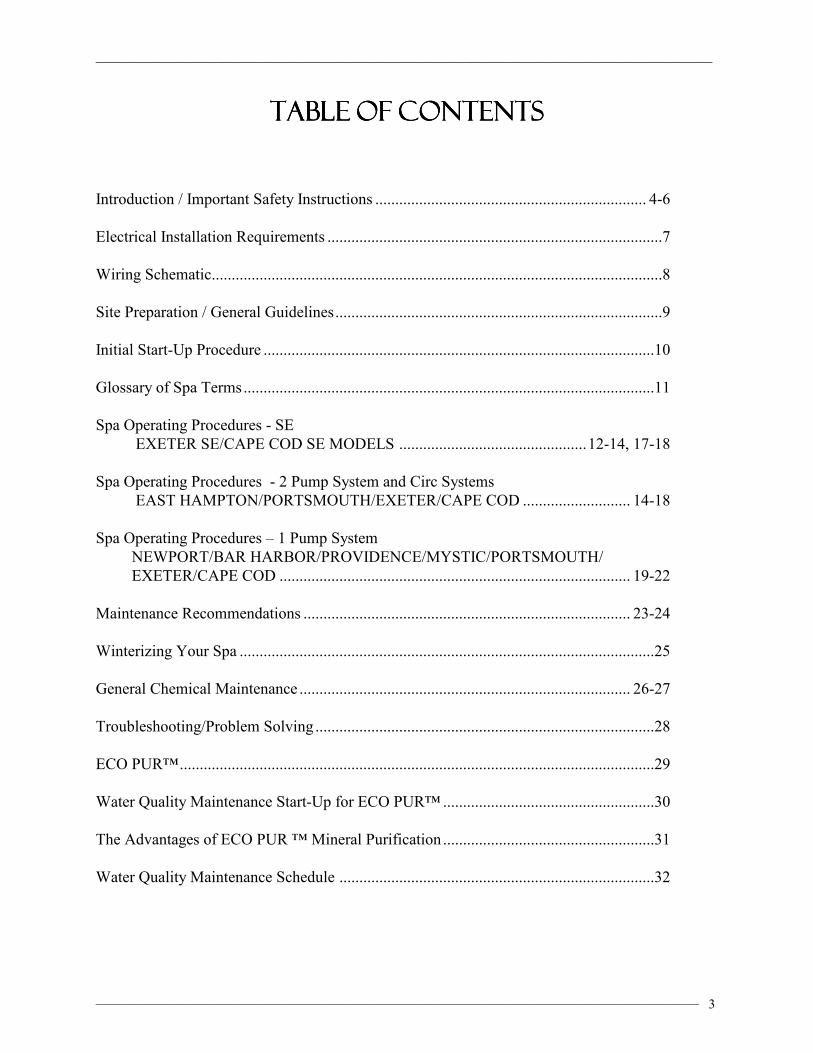
TABLETABLETABLETABLE OFOFOFOF CONTENTSCONTENTSCONTENTSCONTENTS
Introduction / Important Safety Instructions .................................................................... 4-6
Electrical Installation Requirements ....................................................................................7
Wiring Schematic.................................................................................................................8
Site Preparation / General Guidelines..................................................................................9
Initial Start-Up Procedure ..................................................................................................10
Glossary of Spa Terms.......................................................................................................11
Spa Operating Procedures - SE
EXETER SE/CAPE COD SE MODELS ...............................................12-14, 17-18
Spa Operating Procedures - 2 Pump System and Circ Systems
EAST HAMPTON/PORTSMOUTH/EXETER/CAPE COD ........................... 14-18
Spa Operating Procedures – 1 Pump System
NEWPORT/BAR HARBOR/PROVIDENCE/MYSTIC/PORTSMOUTH/
EXETER/CAPE COD ........................................................................................ 19-22
Maintenance Recommendations .................................................................................. 23-24
Winterizing Your Spa ........................................................................................................25
General Chemical Maintenance ................................................................................... 26-27
Troubleshooting/Problem Solving .....................................................................................28
ECO PUR™.......................................................................................................................29
Water Quality Maintenance Start-Up for ECO PUR™ .....................................................30
The Advantages of ECO PUR ™ Mineral Purification .....................................................31
Water Quality Maintenance Schedule ...............................................................................32
____________________________________________________________________________________________
__________________________________________________________________________________________ 4
INTRODUCTIONINTRODUCTIONINTRODUCTIONINTRODUCTION
It’s time to relax! You now have your very own portable spa by Master Spas, Inc. By
fully understanding the operation of each of the features of your new Down East Spa you
will be assured of many years of hassle-free, hot water therapy and fun.
Your safety is of paramount importance to the Master Spa family. We urge you to read
and become thoroughly familiar with all safety aspects addressed in this manual.
Through reading and totally understanding the important information in your owner’s
manual you will realize that you now own A SPA FOR ALL SEASONS!
IMPORTANTIMPORTANTIMPORTANTIMPORTANT SAFETYSAFETYSAFETYSAFETY INSTRUCTIONINSTRUCTIONINSTRUCTIONINSTRUCTIONSSSS
When installing and using this electrical equipment, basic safety precautions should be
followed including:
READ AND FOLLOW ALL INSTRUCTIONSREAD AND FOLLOW ALL INSTRUCTIONSREAD AND FOLLOW ALL INSTRUCTIONSREAD AND FOLLOW ALL INSTRUCTIONS
1. WARNING. To reduce the risk of injury, do not permit children to use this product unless
they are closely supervised at all times.
2. DANGER – RISK OF CHILD DROWNING. Extreme caution must be exercised to
prevent unauthorized access by children. To avoid accidents, insure that children cannot use
a spa or hot tub unless they are closely supervised at all times.
3. A pressure wire connector is provided on the surface of the control box inside the spa to
permit connection of a minimum No. 8 AWG solid copper bonding wire between this point
and any metal equipment, metal enclosures of electrical equipment, metal water pipe or
conduit within 5 feet (1.5M) of the unit.
4. DANGER – RISK OF ELECTRIC SHOCK. Install spa at least five (5) feet (1.5M) from
all metal surfaces. A spa may be installed within five (5) feet (1.5M) of metal surfaces if, in
accordance with the National Electrical Code, each metal surface is permanently connected
by a No. 6 AWG (8.4mm) solid copper conductor attached to the wire connector on the
terminal box. A grounding plug is provided for this purpose.
5. DANGER – RISK OF INJURY. The suction fittings in this spa are sized to match the
specific water flow created by the pump(s). Should the need arise to replace the suction
fitting or the pump(s) be sure that the flow rates are compatible.
* Never operate the spa if the suction fittings are broken or missing. Never replace a
suction fitting with one rated less than the flow rate marked on the original suction fitting.
6. DANGER – To reduce the risk of injury to persons, do not remove suction grate. Suction
through drains and skimmers are powerful when the jets in the spa are in use. Damaged
covers can be hazardous to small children and adults with long hair. Should any part of the
____________________________________________________________________________________________
__________________________________________________________________________________________ 5
body be drawn into these fittings, turn off the spa immediately. As a precaution, long hair
should not be allowed to float in the spa.
7. Install spa so that water can be easily drained out of compartment containing electrical
components so as not to damage equipment. Also, when installing spa, allow enough room
to access for servicing. If adequate room is not provided for access and servicing, additional
cost
may be incurred by the spa owner.
8. WARNING – TO REDUCE THE RISK OF INJURY:
a. Always enter and exit a spa slowly.
b. Do not use the spa alone.
c. Before entering the spa, always measure the water temperature with an accurate
thermometer. Tolerance of water temperature regulating devices can vary as much as
plus/minus 5° F (3° C).
d. Persons suffering from obesity or with a medical history of heart disease, diabetes,
high or low blood pressure or circulatory system problems should consult with their
physician before using the spa.
e. Since excessive water temperature has a high potential for causing fetal damage
during early months of pregnancy, pregnant or possible pregnant women should limit
spa water temperatures to 100° F (38° C).
f. Excessive water temperature can be dangerous. The water in the spa should never
exceed 104° F (40° C). Water temperatures between 100° and 104° F are considered
safe for a healthy adult. Lower water temperatures are recommended for extended
use (exceeding 10 minutes) and for young children. Long exposures at higher
temperatures can result in hyperthermia.
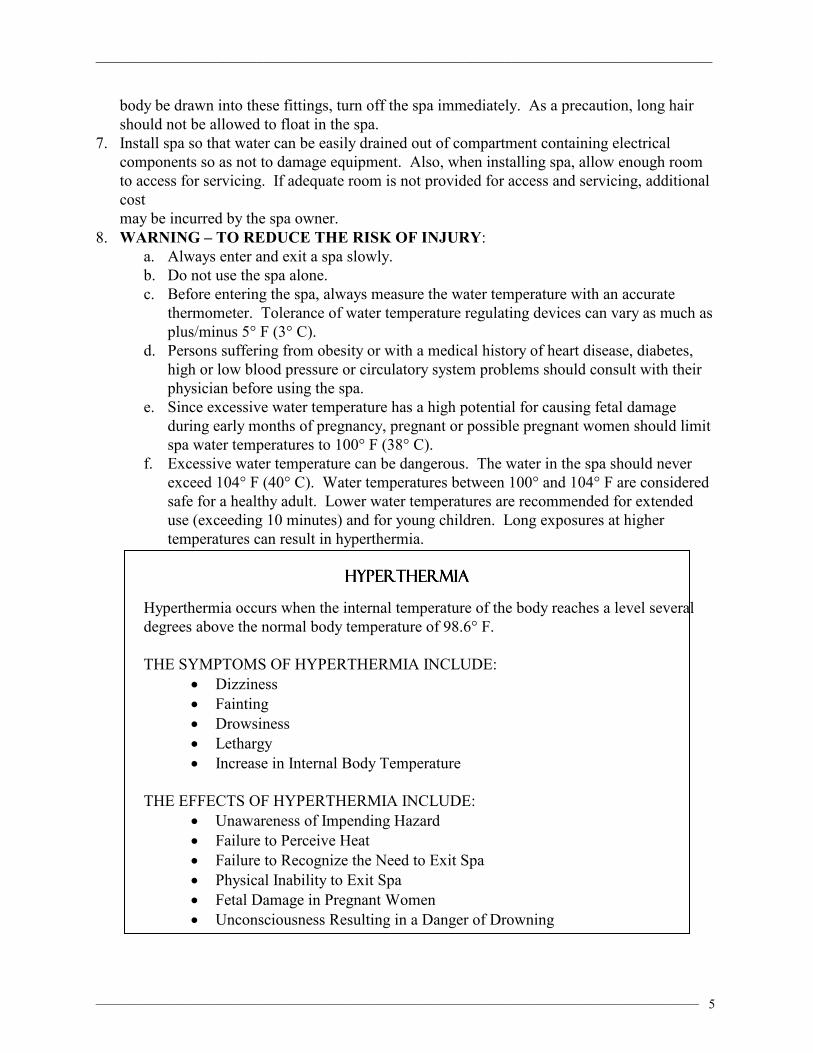
HYPERTHERMIAHYPERTHERMIAHYPERTHERMIAHYPERTHERMIA
Hyperthermia occurs when the internal temperature of the body reaches a level several
degrees above the normal body temperature of 98.6° F.
THE SYMPTOMS OF HYPERTHERMIA INCLUDE:
• Dizziness
• Fainting
• Drowsiness
• Lethargy
• Increase in Internal Body Temperature
THE EFFECTS OF HYPERTHERMIA INCLUDE:
• Unawareness of Impending Hazard
• Failure to Perceive Heat
• Failure to Recognize the Need to Exit Spa
• Physical Inability to Exit Spa
• Fetal Damage in Pregnant Women
• Unconsciousness Resulting in a Danger of Drowning
____________________________________________________________________________________________
__________________________________________________________________________________________ 6
g. Children’s body temperature can increase more rapidly than adults in the same water
with elevated temperatures (above 99° F). Children should spend less time in water
above body temperature than adults.
h. The use of a spa while under the influence of alcohol, drugs and/or medication may
lead to unconsciousness with the possibility of drowning.
* Persons on medication should consult with their physician before entering the
spa since some medication may induce drowsiness while other medication may
affect heart rate, blood pressure and circulation.
10. People with infections, sores or the like should not use the spa. Warm and hot water
temperatures may allow the growth of infectious bacteria if not properly disinfected.
11. DANGER – RISK OF ELECTRIC SHOCK. Do not permit any electric appliance, such as
a light, telephone, radio or television, within five (5) feet of the spa. Never operate any
electrical appliances from inside the spa or while wet.
12. WARNING – RISK OF SUFFOCATION. If this spa is equipped with a gas heater, it is
intended for outdoor use only, unless proper ventilation can be provided for an indoor
installation.
SAVE THESE INSTRUCTIONSSAVE THESE INSTRUCTIONSSAVE THESE INSTRUCTIONSSAVE THESE INSTRUCTIONS
SAFETY SIGNSAFETY SIGNSAFETY SIGNSAFETY SIGN
Included with your new spa is a safety sign. The sign is for you and your guest’s
protection and is suitable for outdoor use in wet locations. The sign should be
placed in a location visible to all users of the spa.
Please take time to point out the physical location of the safety sign and the
importance of the safety precautions displayed on the safety sign to all of your
guests. Remember, your safety and the safety of anyone who enjoys the use of
your spa is our utmost concern.
The sign should be mounted with screws or another type of permanent fastener.
Additional or replacement signs can be obtained from your dealer or direct from
the factory.

____________________________________________________________________________________________
__________________________________________________________________________________________ 7
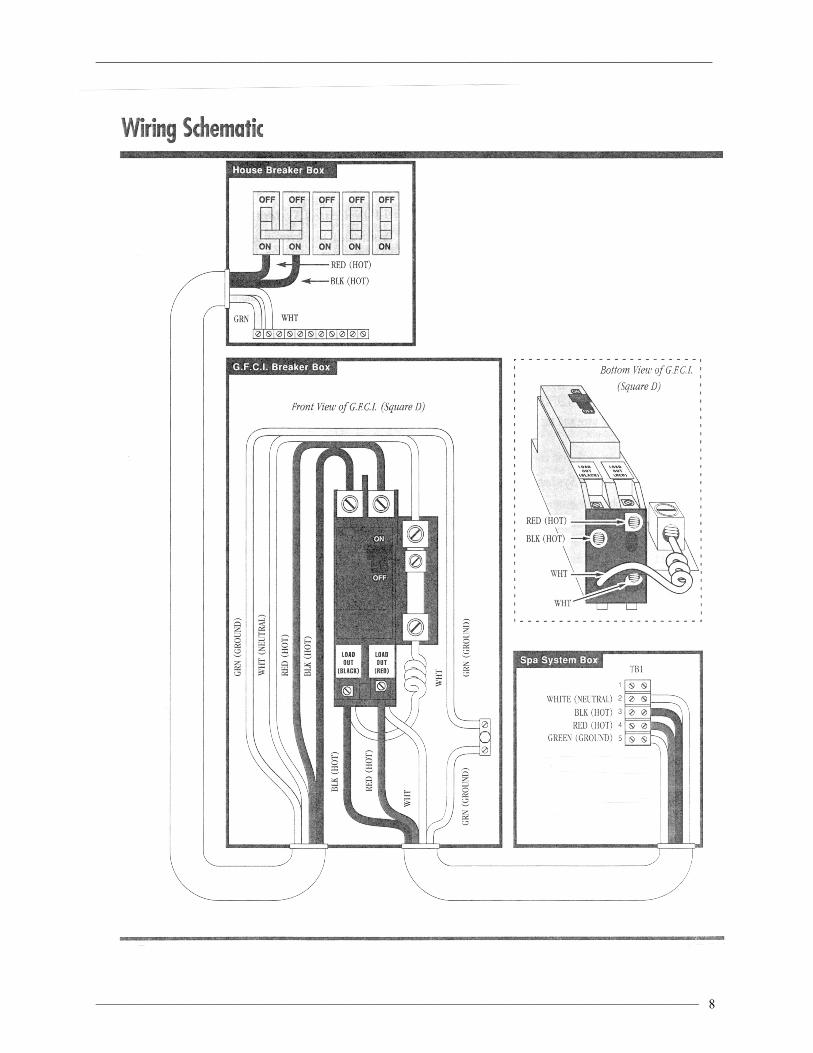
ELECTRICALELECTRICALELECTRICALELECTRICAL INSTALLATIONINSTALLATIONINSTALLATIONINSTALLATION REQUIREQUIREQUIREQUIREMENTSREMENTSREMENTSREMENTS
HAVE YOUR ELECTRICIAN READ THE FOLLOWINGHAVE YOUR ELECTRICIAN READ THE FOLLOWINGHAVE YOUR ELECTRICIAN READ THE FOLLOWINGHAVE YOUR ELECTRICIAN READ THE FOLLOWING INFORMATION BEFORE INSTALLATION BEGINSINFORMATION BEFORE INSTALLATION BEGINSINFORMATION BEFORE INSTALLATION BEGINSINFORMATION BEFORE INSTALLATION BEGINS
Electrical connections made improperly, or the use of wire gauge sizes for
incurring power which are too small, may continually blow fuses in the electrical
equipment box, may damage the internal electrical controls and components, may
be unsafe and in any case will void your warranty.
It is the responsibility of the spa owner to ensure that electrical connections are
made by a qualified electrician in accordance to the National Electric Code and
any local and state electrical codes in force at the time of installation. These
connections must be made in accordance with the wiring diagrams found inside
the control box. This equipment has been designed to operate on 60 HZ
alternating current only, 240 volts as required. Make sure that power is not
applied while performing any electrical installation. A copper bonding lug has
been provided on the electrical equipment pack to allow connection to local
ground points. The ground wire must be at least 6 AWG copper wire and must be
connected securely to a grounded metal structure such as a cold water pipe.
All Down East Spa equipment packs are wired for 240 VAC only.
The only electrical supply for your spa must include a 50 AMP switch or circuit
breaker to open all non-grounded supply conductors to comply with section 422-
20 of the National Electrical Code. The disconnect must be readily accessible to
the spa occupants, but installed at least five feet from the spa.
A Ground-Fault Circuit Interrupter (GFCI) must be used to comply with section
680-42 if the National Electrical Code. A ground fault is a current leak from any
one of the supply conductors to ground. A GFCI is designed to automatically shut
off power to a piece of equipment when a fault current is detected.
Power hook-up to the spa must be 240 volt stranded copper #6 AWG-3. Route
the cable into the equipment for final hook-up to terminals inside the control
panel.
Master Spas, or its authorized service centers will not be held responsible for any
damage to the spa caused by improperly wired spas. Replacement costs shall be
the responsibility of the customer.
____________________________________________________________________________________________
__________________________________________________________________________________________ 8
____________________________________________________________________________________________
__________________________________________________________________________________________ 9
SITESITESITESITE PREPARATION/GENERALPREPARATION/GENERALPREPARATION/GENERALPREPARATION/GENERAL GUIDELINESGUIDELINESGUIDELINESGUIDELINES
Portable spa installation is simple when properly planned. To that end it is important that
you read the following information carefully and consult with your Down East Spa
dealer.
1) Access - The actual dimensions of your new spa will determine the amount of space
that is needed in moving the spa from curbside to its final installation area. Be sure to
measure side yard dimensions, gates or doors and vertical obstructions such as roof
overhangs and overhead cables. Any other space limiting obstacles such as trees or
shrubs must be evaluated.
If the spa is being installed indoors, dimension limitations such as stairs, ceilings and
walls must be taken into consideration. Please have your Down East Spa dealer or
delivery service review site or installation plans prior to delivery.
2) Surface/Pad Requirements - When your new spa is filled with water and bathers, it
may weigh as much as several tons. It is imperative that the base beneath the spa can
support the actual weight. The spa must be on a uniformly firm and continuous
surface. The recommended foundation is a concrete pad with a minimum thickness of
four (4) inches with steel reinforcement bars crossed throughout the pad.
IMPORTANTIMPORTANTIMPORTANTIMPORTANT
When installing your spa indoors or on a wood deck or balcony, the same load
requirements must be met. Total load may be as much as 75 pounds per square foot.
Your Down East Spa dealer should be consulted or you should speak with a qualified
contractor or your local building department. Be sure to locate your spa so that
equipment remains above grade and not subject to flooding.
The equipment side of the spa must be accessible in the event that future service is
needed. Periodical maintenance checks require entry into the equipment bay. When
possible, it is wise planning for the future to leave access to all sides of the spa in the
event your spas plumbing requires maintenance. Your spa warranty does not cover the
cost of providing access for service.
GENERAL CONSIDERATIONS FOR OUTDOOR INSTALLATIONGENERAL CONSIDERATIONS FOR OUTDOOR INSTALLATIONGENERAL CONSIDERATIONS FOR OUTDOOR INSTALLATIONGENERAL CONSIDERATIONS FOR OUTDOOR INSTALLATION
Again, proper planning will increase your total enjoyment factor with your new spa.
Listed below are some additional items to consider when planning your installation.
• How spa will complement landscaping and vice versa
• View from inside spa and view of spa from inside of home
• Exposure to sunlight and shading from trees
• Privacy
• Getting to spa from house and return
____________________________________________________________________________________________
__________________________________________________________________________________________ 10
• Proximity to dressing rooms and bathrooms
• Storage for spa chemicals
• Local building codes ( if applicable)
• Power cable (see electrical requirements)
GENERAL CONSIDERATIONS FOR INDOOR INSTALLATIONGENERAL CONSIDERATIONS FOR INDOOR INSTALLATIONGENERAL CONSIDERATIONS FOR INDOOR INSTALLATIONGENERAL CONSIDERATIONS FOR INDOOR INSTALLATION
Installing your spa indoors creates an entirely different set of considerations. Here again,
with proper planning, no matter what room you spa goes in, it will be your favorite room.
• Work with your Down East Spa dealer and contractor to insure
all local building, electrical and plumbing codes are met
• Plan for a floor drain to drain off excess water or for draining
and cleaning your spa
• A ventilation fan may be necessary due to high humidity
created by your spa
• Finished material in your spa room should also be capable of
withstanding increased humidity
INITIALINITIALINITIALINITIAL STARTSTARTSTARTSTART----UPUPUPUP PROCEDUREPROCEDUREPROCEDUREPROCEDURE
Now that all electrical connections to your new Down East Spa are complete, start-up
procedures may begin. This is the fun part!
CAUTION CAUTION CAUTION CAUTION ---- DO NOT APPLY POWER DO NOT APPLY POWER DO NOT APPLY POWER DO NOT APPLY POWER TO OR OPERATE THE SPTO OR OPERATE THE SPTO OR OPERATE THE SPTO OR OPERATE THE SPA WHEN THE A WHEN THE A WHEN THE A WHEN THE SPASPASPASPA IS PARTIALLY FILLED IS PARTIALLY FILLED IS PARTIALLY FILLED IS PARTIALLY FILLED OR THERE IS NO WATE OR THERE IS NO WATE OR THERE IS NO WATE OR THERE IS NO WATER IN THE SPA!R IN THE SPA!R IN THE SPA!R IN THE SPA!
1) Be sure that the circuit breaker in your breaker panel is off.
2) Be sure all jets in the spa are fully open by turning the jet face clockwise.
3) LOCATE AND OPEN ALL VALVES. NOTE: There are two valves per pump.
Pump locations vary depending on model of spa.
4) Be sure drain fitting is fully closed.
5) Fill your new Down East Spa with water. We recommend using the ECO PUR
Charcoal Pre-Filter which gives you much cleaner water to start your spa. Fill to
waterline, which is approximately three inches above bottom of filter/skimmer
opening.
6) Bleed air from system by briefly opening the external drain fitting then close.
Turn breaker switches on. You may then press any of the spa function
switches. After power has been applied your spa will automatically
move into its pre-set filter cycle. (See operation section for further
information.)
____________________________________________________________________________________________
__________________________________________________________________________________________ 11
GLOSSARYGLOSSARYGLOSSARYGLOSSARY OFOFOFOF SPASPASPASPA TERMSTERMSTERMSTERMS
CIRCULATION PUMP (CIRC PUMP) – This produces water flow through the heater in the spa
and provides the water flow necessary to activate the ozone generator. This fractional HP pump
runs silently for 24 hours of efficient filtration and heating. This is an optional feature on East
Hampton, Portsmouth, Exeter, and Cape Cod models.
PUMP - The water pump(s) in your system produce flow through your hydro-therapy jets, heater
and filtration system. In most systems pumps will consist of two speeds - high or low.
Generally, low speed is used for maintaining a constant temperature or for filtering the water,
while high speed operates your hydro-therapy jet functions.
HEATER – Down East Spas are equipped with a 5.5 KW 220 volt electric heater,
thermostatically controlled and equipped with a high limit temperature safety shut-off switch.
Should your spa water temperature exceed 112° F, the high limit switch will trip and will need to
be re-set. Should your high limit switch repeatedly trip, please contact your authorized service
center.
CONTROL PANEL/REMOTE - Your new Down East Spa is equipped with a solid-state spa-
side control system. You control all functions from safely inside the spa. The digital display will
give you a constant temperature read-out and will notify you in case of certain malfunctions.
Several user programmable functions are also available.
JETS - Your new Down East Spa features a variety of jet styles. All jets, regardless of style,
return the water to the spa. Air is mixed with the water creating a gentle to vigorous massage,
adjusted by simply turning the outer face of the jet. Your Down East Spa will have a
combination of rotating and directionally adjustable jets.
AIR CONTROL DIALS - You can decrease or increase the velocity of your jets by opening or
closing the air control valves. Typically, one dial controls the air to water ratio and mix to a
group of jets. When not in use the air controls should be kept in the closed position, as air
bubbles tend to cool the water.
FILTRATION - Your cartridge filter elements are located under the floating weir and are
designed to remove any debris and oils from your spa water.
SPA LIGHT - Your spa light is designed for safety and is located in the footwell of your spa.
The on/off switch is located on the topside of the control panel.
EQUIPMENT COMPARTMENT - Located behind the door below the spa-side control panel.
This area houses the major components responsible for spa operation. Those components
include the pumps, heater, control panel box and ozonator (if applicable). Before operating spa,
all valves should be fully open and hose bib should be closed.
____________________________________________________________________________________________
__________________________________________________________________________________________ 12
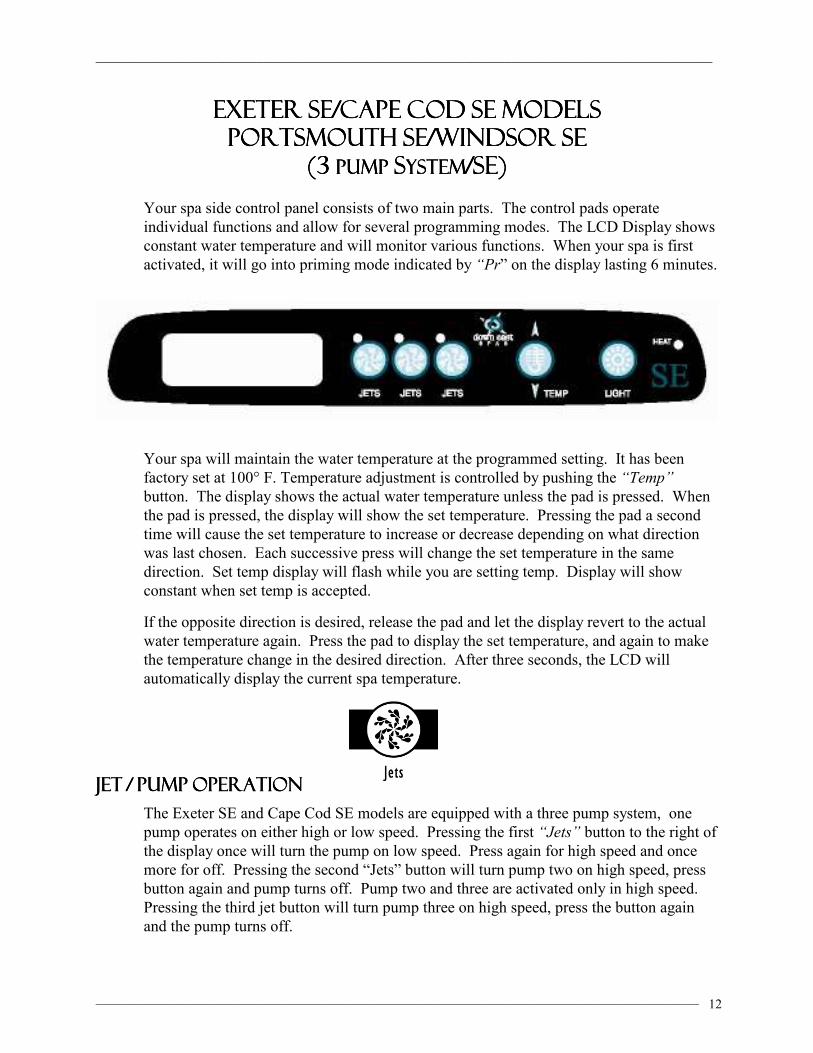
EXETEREXETEREXETEREXETER SESESESE/CAPE/CAPE/CAPE/CAPE CODCODCODCOD SESESESE MODELSMODELSMODELSMODELS PORTSMOUTHPORTSMOUTHPORTSMOUTHPORTSMOUTH SE/WINDSORSE/WINDSORSE/WINDSORSE/WINDSOR SESESESE
(3(3(3(3 PUMP PUMP PUMP PUMP SSSSYSTEMYSTEMYSTEMYSTEM/SE/SE/SE/SE))))
Your spa side control panel consists of two main parts. The control pads operate
individual functions and allow for several programming modes. The LCD Display shows
constant water temperature and will monitor various functions. When your spa is first
activated, it will go into priming mode indicated by “Pr” on the display lasting 6 minutes.
Your spa will maintain the water temperature at the programmed setting. It has been
factory set at 100° F. Temperature adjustment is controlled by pushing the “Temp”
button. The display shows the actual water temperature unless the pad is pressed. When
the pad is pressed, the display will show the set temperature. Pressing the pad a second
time will cause the set temperature to increase or decrease depending on what direction
was last chosen. Each successive press will change the set temperature in the same
direction. Set temp display will flash while you are setting temp. Display will show
constant when set temp is accepted.
If the opposite direction is desired, release the pad and let the display revert to the actual
water temperature again. Press the pad to display the set temperature, and again to make
the temperature change in the desired direction. After three seconds, the LCD will
automatically display the current spa temperature.
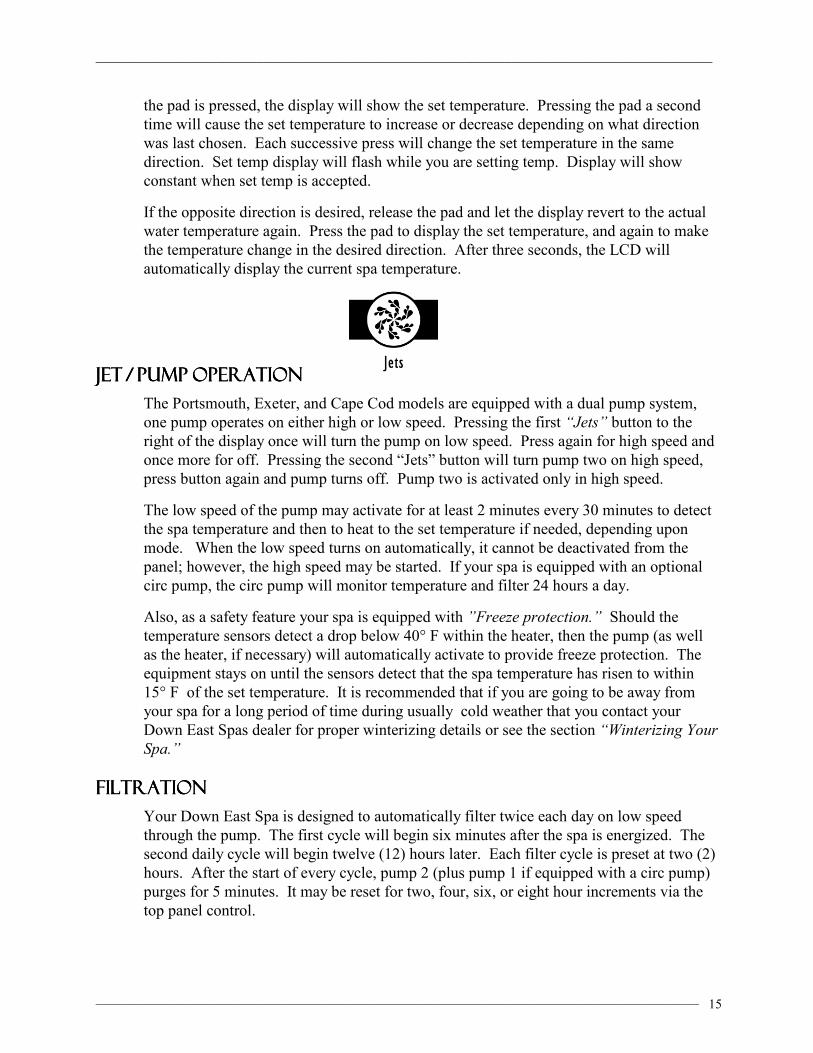
JETJETJETJET //// PUMPPUMPPUMPPUMP OPERATIONOPERATIONOPERATIONOPERATION
The Exeter SE and Cape Cod SE models are equipped with a three pump system, one
pump operates on either high or low speed. Pressing the first “Jets” button to the right of
the display once will turn the pump on low speed. Press again for high speed and once
more for off. Pressing the second “Jets” button will turn pump two on high speed, press
button again and pump turns off. Pump two and three are activated only in high speed.
Pressing the third jet button will turn pump three on high speed, press the button again
and the pump turns off.

____________________________________________________________________________________________
__________________________________________________________________________________________ 13
The low speed of the pump may activate for at least 2 minutes every 30 minutes to detect
the spa temperature and then to heat to the set temperature if needed, depending upon
mode. When the low speed turns on automatically, it cannot be deactivated from the
panel; however, the high speed may be started. Also, as a safety feature your spa is equipped with ”Freeze protection.” Should the
temperature sensors detect a drop below 40° F within the heater, then the pump (as well
as the heater, if necessary) will automatically activate to provide freeze protection. The
equipment stays on until the sensors detect that the spa temperature has risen to within
15° F of the set temperature. It is recommended that if you are going to be away from
your spa for a long period of time during usually cold weather that you contact your
Down East Spas dealer for proper winterizing details or see the section “Winterizing Your
Spa.”
FILTRATIONFILTRATIONFILTRATIONFILTRATION
Your Down East Spa is designed to automatically filter twice each day on low speed
through the pump. The first cycle will begin six minutes after the spa is energized. The
second daily cycle will begin twelve (12) hours later. Each filter cycle is preset at two (2)
hours. After the start of every cycle, pump 2 purges for 5 minutes. It may be reset for
two, four, six, or eight hour increments via the top panel control.
TO PROGRAM FILTER CYCLE:
• Press “Temp”
• Then press the first “Jets” button to the right of display
• Press “Temp” to adjust hours
• Then press the first “Jets” button to the right of the display to exit
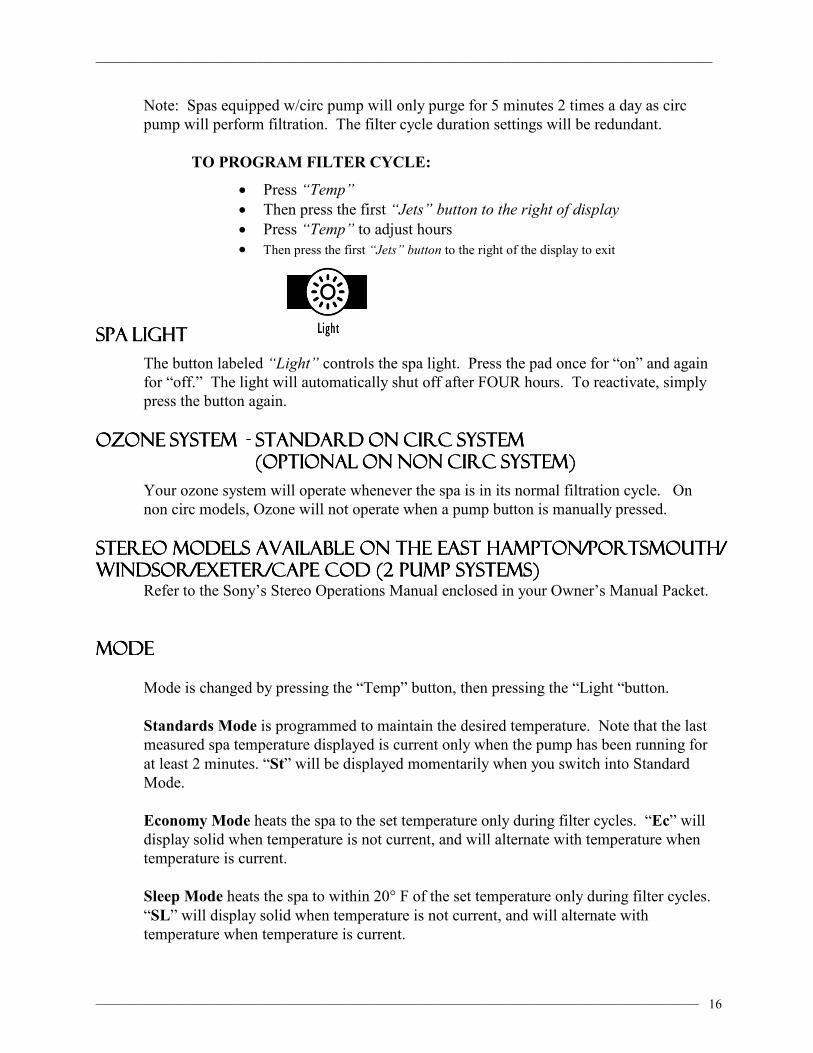
SPASPASPASPA LIGHTLIGHTLIGHTLIGHT
The button labeled “Light” controls the spa light. Press the pad once for “on” and again
for “off.” The light will automatically shut off after FOUR hours. To reactivate, simply
press the button again.
OZONEOZONEOZONEOZONE SYSYSYSYSTEMSTEMSTEMSTEM ---- OPTIONALOPTIONALOPTIONALOPTIONAL
Your ozone system will operate whenever the spa is in its normal filtration cycle.
Ozone will not operate when a pump button is manually pressed.
____________________________________________________________________________________________
__________________________________________________________________________________________ 14
STEREO MODELS AVAILABLE ON THE STEREO MODELS AVAILABLE ON THE STEREO MODELS AVAILABLE ON THE STEREO MODELS AVAILABLE ON THE EAST HAMPTONEAST HAMPTONEAST HAMPTONEAST HAMPTON ////PPPPORORORORTSMOUTH/WINDSORTSMOUTH/WINDSORTSMOUTH/WINDSORTSMOUTH/WINDSOR/E/E/E/EXETER/CAPE CODXETER/CAPE CODXETER/CAPE CODXETER/CAPE COD(2 pump Systems) (2 pump Systems) (2 pump Systems) (2 pump Systems) and and and and SE MODELSSE MODELSSE MODELSSE MODELS
Refer to the Sony’s Stereo Operations Manual enclosed in your Owner’s Manual Packet.
MODEMODEMODEMODE
Mode is changed by pressing the “Temp” button, then pressing the “Light “button.
Standards Mode is programmed to maintain the desired temperature. Note that the last
measured spa temperature displayed is current only when the pump has been running for
at least 2 minutes. “St” will be displayed momentarily when you switch into Standard
Mode.
Economy Mode heats the spa to the set temperature only during filter cycles. “Ec” will
display solid when temperature is not current, and will alternate with temperature when
temperature is current.
Sleep Mode heats the spa to within 20° F of the set temperature only during filter cycles.
“SL” will display solid when temperature is not current, and will alternate with
temperature when temperature is current.
EASTEASTEASTEAST HAMPTON/HAMPTON/HAMPTON/HAMPTON/PORTSMOUTHPORTSMOUTHPORTSMOUTHPORTSMOUTH/WINDSOR/WINDSOR/WINDSOR/WINDSOR//// EXETER/CAPEEXETER/CAPEEXETER/CAPEEXETER/CAPE COCOCOCODDDD (2(2(2(2 PUMP PUMP PUMP PUMP SSSSYSTEMSYSTEMSYSTEMSYSTEMS))))
Your spa side control panel consists of two main parts. The control pads operate
individual functions and allow for several programming modes. The LCD Display shows
constant water temperature and will monitor various functions. When your spa is first
activated, it will go into priming mode indicated by “Pr” on the display lasting 6 minutes.
Your spa will maintain the water temperature at the programmed setting. It has been
factory set at 100° F. Temperature adjustment is controlled by pushing the “Temp”
button. The display shows the actual water temperature unless the pad is pressed. When
____________________________________________________________________________________________
__________________________________________________________________________________________ 15
the pad is pressed, the display will show the set temperature. Pressing the pad a second
time will cause the set temperature to increase or decrease depending on what direction
was last chosen. Each successive press will change the set temperature in the same
direction. Set temp display will flash while you are setting temp. Display will show
constant when set temp is accepted.
If the opposite direction is desired, release the pad and let the display revert to the actual
water temperature again. Press the pad to display the set temperature, and again to make
the temperature change in the desired direction. After three seconds, the LCD will
automatically display the current spa temperature.
JETJETJETJET //// PUMPPUMPPUMPPUMP OPERATIONOPERATIONOPERATIONOPERATION
The Portsmouth, Exeter, and Cape Cod models are equipped with a dual pump system,
one pump operates on either high or low speed. Pressing the first “Jets” button to the
right of the display once will turn the pump on low speed. Press again for high speed and
once more for off. Pressing the second “Jets” button will turn pump two on high speed,
press button again and pump turns off. Pump two is activated only in high speed.
The low speed of the pump may activate for at least 2 minutes every 30 minutes to detect
the spa temperature and then to heat to the set temperature if needed, depending upon
mode. When the low speed turns on automatically, it cannot be deactivated from the
panel; however, the high speed may be started. If your spa is equipped with an optional
circ pump, the circ pump will monitor temperature and filter 24 hours a day. Also, as a safety feature your spa is equipped with ”Freeze protection.” Should the
temperature sensors detect a drop below 40° F within the heater, then the pump (as well
as the heater, if necessary) will automatically activate to provide freeze protection. The
equipment stays on until the sensors detect that the spa temperature has risen to within
15° F of the set temperature. It is recommended that if you are going to be away from
your spa for a long period of time during usually cold weather that you contact your
Down East Spas dealer for proper winterizing details or see the section “Winterizing Your
Spa.”
FILTRATIONFILTRATIONFILTRATIONFILTRATION
Your Down East Spa is designed to automatically filter twice each day on low speed
through the pump. The first cycle will begin six minutes after the spa is energized. The
second daily cycle will begin twelve (12) hours later. Each filter cycle is preset at two (2)
hours. After the start of every cycle, pump 2 (plus pump 1 if equipped with a circ pump)
purges for 5 minutes. It may be reset for two, four, six, or eight hour increments via the
top panel control.
____________________________________________________________________________________________
__________________________________________________________________________________________ 16
Note: Spas equipped w/circ pump will only purge for 5 minutes 2 times a day as circ
pump will perform filtration. The filter cycle duration settings will be redundant.
TO PROGRAM FILTER CYCLE:
• Press “Temp”
• Then press the first “Jets” button to the right of display
• Press “Temp” to adjust hours
• Then press the first “Jets” button to the right of the display to exit
SPASPASPASPA LIGHTLIGHTLIGHTLIGHT
The button labeled “Light” controls the spa light. Press the pad once for “on” and again
for “off.” The light will automatically shut off after FOUR hours. To reactivate, simply
press the button again.
OZONEOZONEOZONEOZONE SYSTEMSYSTEMSYSTEMSYSTEM ---- STANDARDSTANDARDSTANDARDSTANDARD ONONONON CIRCCIRCCIRCCIRC SYSTEMSYSTEMSYSTEMSYSTEM (OPTIONAL(OPTIONAL(OPTIONAL(OPTIONAL ONONONON NONNONNONNON CIRCCIRCCIRCCIRC SYSTEM)SYSTEM)SYSTEM)SYSTEM)
Your ozone system will operate whenever the spa is in its normal filtration cycle. On
non circ models, Ozone will not operate when a pump button is manually pressed.
STEREO MODELS AVAILABLE ON THE STEREO MODELS AVAILABLE ON THE STEREO MODELS AVAILABLE ON THE STEREO MODELS AVAILABLE ON THE EAST HAMPTON/PORTSMOUTH/EAST HAMPTON/PORTSMOUTH/EAST HAMPTON/PORTSMOUTH/EAST HAMPTON/PORTSMOUTH/ WINDSORWINDSORWINDSORWINDSOR/E/E/E/EXETERXETERXETERXETER////CAPE CODCAPE CODCAPE CODCAPE COD (2 pump Systems) (2 pump Systems) (2 pump Systems) (2 pump Systems)
Refer to the Sony’s Stereo Operations Manual enclosed in your Owner’s Manual Packet.
MODEMODEMODEMODE
Mode is changed by pressing the “Temp” button, then pressing the “Light “button.
Standards Mode is programmed to maintain the desired temperature. Note that the last
measured spa temperature displayed is current only when the pump has been running for
at least 2 minutes. “St” will be displayed momentarily when you switch into Standard
Mode.
Economy Mode heats the spa to the set temperature only during filter cycles. “Ec” will
display solid when temperature is not current, and will alternate with temperature when
temperature is current.
Sleep Mode heats the spa to within 20° F of the set temperature only during filter cycles.
“SL” will display solid when temperature is not current, and will alternate with
temperature when temperature is current.
____________________________________________________________________________________________
__________________________________________________________________________________________ 17
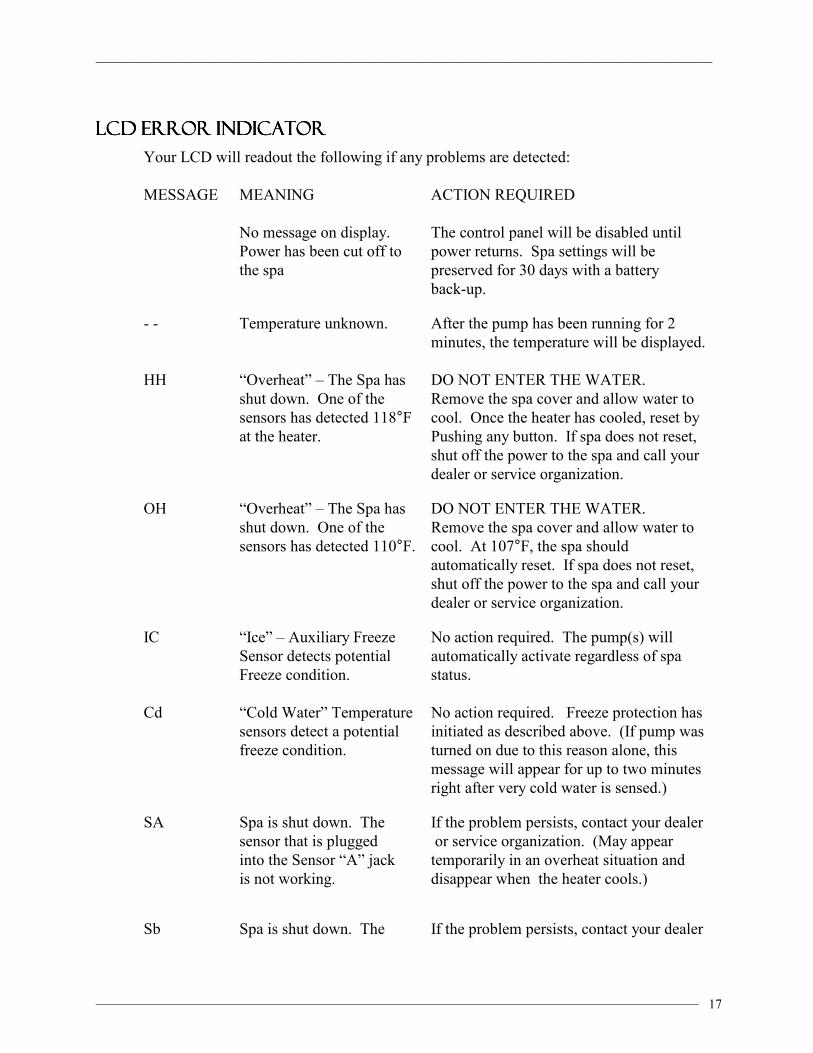
LCDLCDLCDLCD ERRORERRORERRORERROR INDICATORINDICATORINDICATORINDICATOR
Your LCD will readout the following if any problems are detected:
MESSAGE MEANING ACTION REQUIRED
No message on display. The control panel will be disabled until
Power has been cut off to power returns. Spa settings will be
the spa preserved for 30 days with a battery
back-up.
- - Temperature unknown. After the pump has been running for 2
minutes, the temperature will be displayed.
HH “Overheat” – The Spa has DO NOT ENTER THE WATER.
shut down. One of the Remove the spa cover and allow water to
sensors has detected 118°F cool. Once the heater has cooled, reset by
at the heater. Pushing any button. If spa does not reset,
shut off the power to the spa and call your
dealer or service organization.
OH “Overheat” – The Spa has DO NOT ENTER THE WATER.
shut down. One of the Remove the spa cover and allow water to
sensors has detected 110°F. cool. At 107°F, the spa should
automatically reset. If spa does not reset,
shut off the power to the spa and call your
dealer or service organization.
IC “Ice” – Auxiliary Freeze No action required. The pump(s) will
Sensor detects potential automatically activate regardless of spa
Freeze condition. status.
Cd “Cold Water” Temperature No action required. Freeze protection has
sensors detect a potential initiated as described above. (If pump was
freeze condition. turned on due to this reason alone, this
message will appear for up to two minutes
right after very cold water is sensed.)
SA Spa is shut down. The If the problem persists, contact your dealer
sensor that is plugged or service organization. (May appear
into the Sensor “A” jack temporarily in an overheat situation and
is not working. disappear when the heater cools.)
Sb Spa is shut down. The If the problem persists, contact your dealer
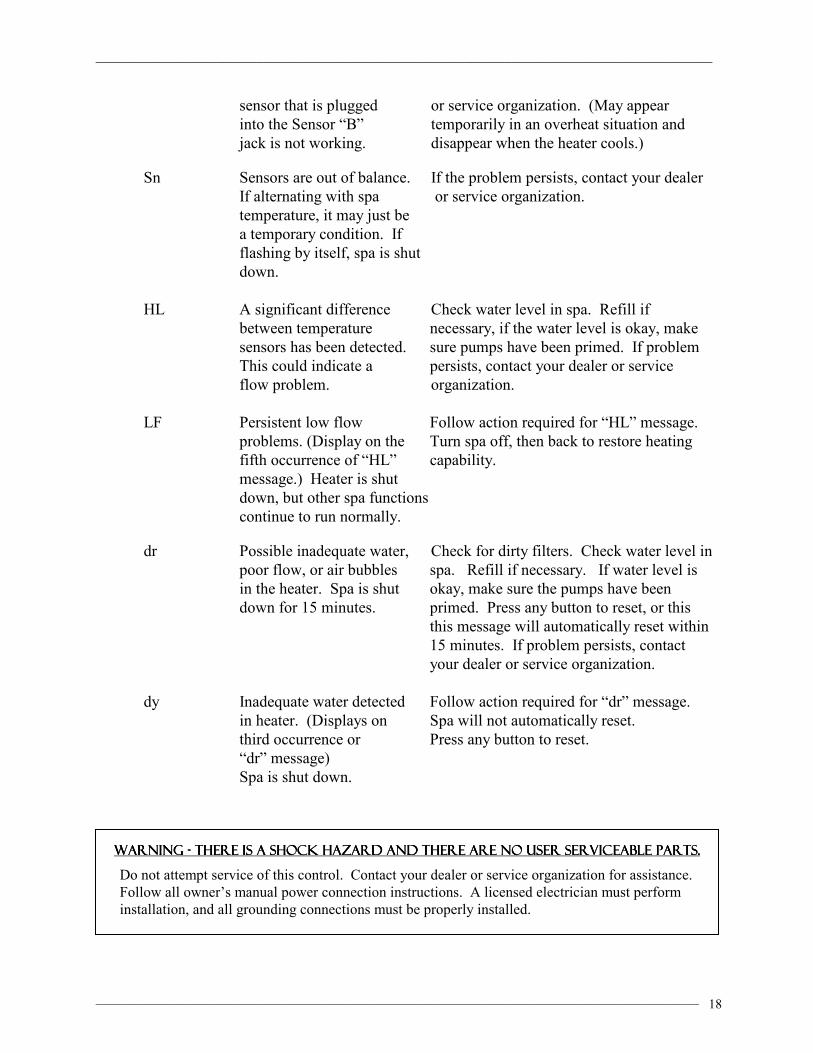
____________________________________________________________________________________________
__________________________________________________________________________________________ 18
sensor that is plugged or service organization. (May appear
into the Sensor “B” temporarily in an overheat situation and
jack is not working. disappear when the heater cools.)
Sn Sensors are out of balance. If the problem persists, contact your dealer
If alternating with spa or service organization.
temperature, it may just be
a temporary condition. If
flashing by itself, spa is shut
down.
HL A significant difference Check water level in spa. Refill if
between temperature necessary, if the water level is okay, make
sensors has been detected. sure pumps have been primed. If problem
This could indicate a persists, contact your dealer or service
flow problem. organization.
LF Persistent low flow Follow action required for “HL” message.
problems. (Display on the Turn spa off, then back to restore heating
fifth occurrence of “HL” capability.
message.) Heater is shut
down, but other spa functions
continue to run normally.
dr Possible inadequate water, Check for dirty filters. Check water level in
poor flow, or air bubbles spa. Refill if necessary. If water level is
in the heater. Spa is shut okay, make sure the pumps have been
down for 15 minutes. primed. Press any button to reset, or this
this message will automatically reset within
15 minutes. If problem persists, contact
your dealer or service organization.
dy Inadequate water detected Follow action required for “dr” message.
in heater. (Displays on Spa will not automatically reset.
third occurrence or Press any button to reset.
“dr” message)
Spa is shut down.
WARNING WARNING WARNING WARNING ---- THERE IS A SHOCK HAZARD AND THERE ARE NO USER SERVICEABLE PARTS. THERE IS A SHOCK HAZARD AND THERE ARE NO USER SERVICEABLE PARTS. THERE IS A SHOCK HAZARD AND THERE ARE NO USER SERVICEABLE PARTS. THERE IS A SHOCK HAZARD AND THERE ARE NO USER SERVICEABLE PARTS.
Do not attempt service of this control. Contact your dealer or service organization for assistance.
Follow all owner’s manual power connection instructions. A licensed electrician must perform
installation, and all grounding connections must be properly installed.

____________________________________________________________________________________________
__________________________________________________________________________________________ 19
____________________________________________________________________________________________
__________________________________________________________________________________________ 20
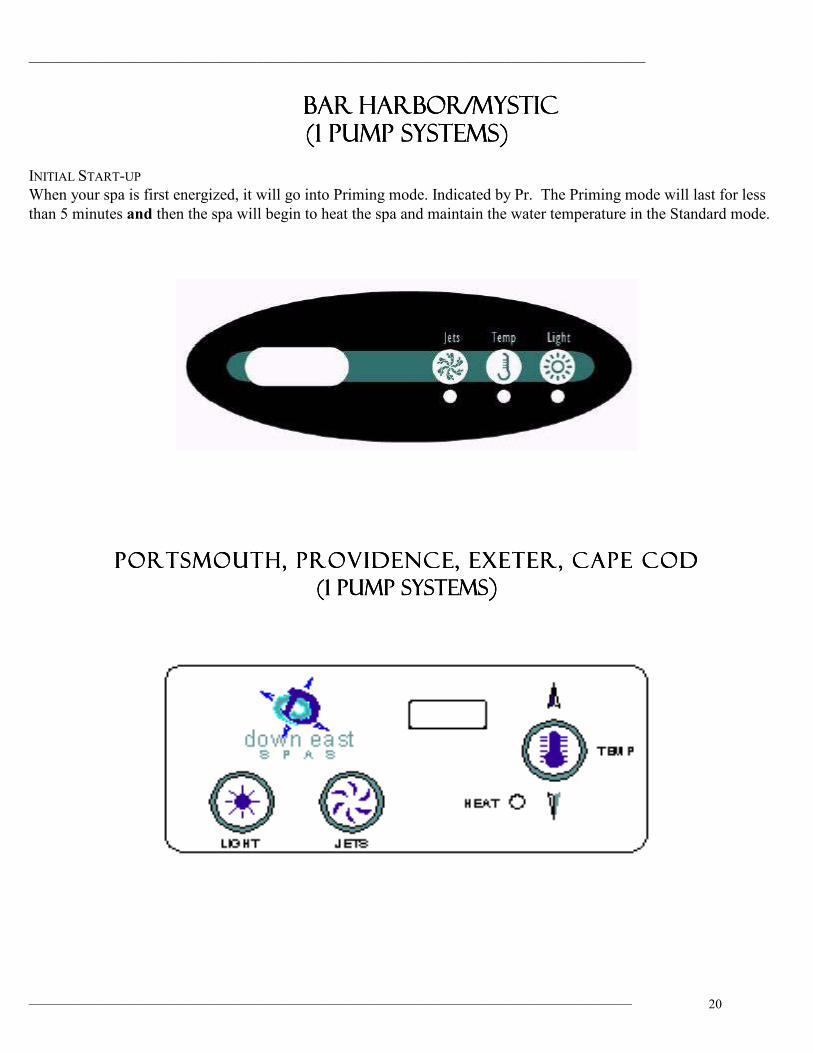
BARBARBARBAR HARBOR/MYSTICHARBOR/MYSTICHARBOR/MYSTICHARBOR/MYSTIC (1 pump Systems)(1 pump Systems)(1 pump Systems)(1 pump Systems)
INITIAL START-UP
When your spa is first energized, it will go into Priming mode. Indicated by Pr. The Priming mode will last for less
than 5 minutes and then the spa will begin to heat the spa and maintain the water temperature in the Standard mode.
PORTSMOUTH, PROVIDENPORTSMOUTH, PROVIDENPORTSMOUTH, PROVIDENPORTSMOUTH, PROVIDENCE, EXETER, CAPE CODCE, EXETER, CAPE CODCE, EXETER, CAPE CODCE, EXETER, CAPE COD
(1 pump Systems(1 pump Systems(1 pump Systems(1 pump Systems))))
____________________________________________________________________________________________
__________________________________________________________________________________________ 21
Temp Set (80°F - 104°F / 26°C - 40°C) The start-up temperature is set at 100°F/37.5°C. The
last measured temperature is constantly displayed on
the LCD.
Note that the last measured spa temperature
displayed
is current only when the pump has been running
for at least 2 minutes.
Press the “Temp” button to display the temperature
previously set. This set temperature is flashed on the
display. Pressing the “Temp” button a second time,
while it is still flashing, will cause the set temperature
to increase or decrease depending on which direction
was last chosen. Each press to follow will change the
set temperature in the same direction. If the opposite
direction is desired, release the pad and let the display
revert to the actual water temperature. Press the button
to display the set temperature and again to make the
temperature change in the desired direction.
Jets Touch the “Jets” button once to activate the low speed
of the pump and again for the high speed. Press the
“Jets” button again to turn off the pump. If left
running, the pump’s low speed will automatically turn
off after 4 hours, and the pump’s high speed will
automatically turn off after 15 minutes. The low speed
pump may also activate for at least 2 minutes every 30
minutes to detect the spa temperature and then to heat,
to the set temperature if needed, depending upon mode.
When the low speed turns on automatically, it cannot
be deactivated from the panel; however the high speed
may be started.
Light Press the “Light” button to turn the light on and off. If
left on, the light automatically turns off after 4 hours.
Mode
Mode is changed by pressing the “Temp” button, then
pressing the “Light“ button.
Standard Mode is programmed to maintain the
desired
temperature. Note that the last measured spa
temperature displayed is current only when the pump
has been running for at least 2 minutes. “St” will be
display momentarily when you switch into Standard
Mode.
Economy Mode heats the spa to set temperature only
during filter cycles. “Ec” will display solid when
temperature is not current, and will alternate with
temperature when temperature is current.
Sleep Mode heats the spa to within 20°F of the set
temperature only during filter cycles. The “SL” will
display solid when temperature is not current and will
alternate with temperature when temperature is current.
Preset Filter Cycles The first filter cycle begins 6 minutes after the spa is
energized. The second filter cycle begins 12 hours
later.
Filter duration is programmable at the Master Control
Pad for 2, 4, 6, 8 hours or for continuous filtration.
(Indicated by “FC”). The default filter time is 2 hours.
To program, press “Temp”, then “Jets”. Press “Temp”
to adjust. Press “Jets” to exit programming.
The low speed of the pump runs during filtration and
the ozone generator (if installed) will be enabled.
Freeze Protection If the temperature sensors detect a drop below 40° F
within the heater, then the pump (as well as the heater,
if necessary) will automatically activate to provide
freeze protection. The equipment stays on until the
sensors detect that the spa temperature has risen to
within 15° F of the set temperature.
____________________________________________________________________________________________
__________________________________________________________________________________________ 22
LCDLCDLCDLCD ERRORERRORERRORERROR INDICATORINDICATORINDICATORINDICATOR
Your LCD will readout the following if any problems are detected:
MESSAGE MEANING ACTION REQUIRED
No message on display. The control panel will be disabled until
Power has been cut off to power returns. Spa settings will be
the spa preserved until next power up.
- - Temperature unknown. After the pump has been running for 2
minutes, the temperature will be displayed.
HH “Overheat” – The Spa has DO NOT ENTER THE WATER.
shut down. One of the Remove the spa cover and allow water to
sensors has detected 118°F cool. Once the heater has cooled, reset by
at the heater. Pushing any button. If spa does not reset,
shut off the power to the spa and call your
dealer or service organization.
OH “Overheat” – The Spa has DO NOT ENTER THE WATER.
shut down. One of the Remove the spa cover and allow water to
sensors has detected 110°F. cool. At 107°F, the spa should
automatically reset. If spa does not reset,
shut off the power to the spa and call your
dealer or service organization.
IC “Ice” – Auxiliary Freeze No action required. The pump will
Potential freeze condition automatically activate regardless of spa
detected. status.
SA Spa is shut down. The If the problem persists, contact your dealer
sensor that is plugged or service organization. (May appear
into the Sensor “A” jack temporarily in an overheat situation and
is not working. disappear when the heater cools.)
Sb Spa is shut down. The If the problem persists, contact your dealer
sensor that is plugged or service organization. (May appear
into the Sensor “B” jack temporarily in an overheat situation and
is not working. disappear when the heater cools.)
Sn Sensors are out of balance. If the problem persists, contact your dealer
If alternating with spa or service organization.
temperature, it may just be
a temporary condition. If
flashing by itself, spa is shut
down.
____________________________________________________________________________________________
__________________________________________________________________________________________ 23
HL A significant difference Check water level in spa. Refill if
temperature sensors necessary. If the water level is okay, make
has been detected. sure the pumps have been primed. If
this could indicate a problem persists, contact your dealer or
flow problem. service organization.
LF Persistent low flow Follow action required for “HL” message.
problems. (Display on the Turn spa off, then back to restore heating
fifth occurrence of “HL” capability.
message.) Heater is shut
down, but other spa functions
continue to run normally.
dr Possible inadequate water, Check for dirty filers. Check water level in
poor flow, or air bubbles spa. Refill if necessary. If water level is
in the heater. Spa is shut okay, make sure the pumps have been
down for 15 minutes. primed. Press any button to reset, or this
message will automatically reset within 15
minutes.
If problem persists, contact your
dealer or service organization.
dy Inadequate water detected Follow action required for “dr” message.
in heater. (Displays on Spa will not automatically reset.
third occurrence or Press any button to reset.
“dr” message)
Spa is shut down.
____________________________________________________________________________________________
__________________________________________________________________________________________ 24
MAINTENANCEMAINTENANCEMAINTENANCEMAINTENANCE RECOMMENDATIONSRECOMMENDATIONSRECOMMENDATIONSRECOMMENDATIONS
Your spa requires periodic draining and cleaning to ensure a safe, healthy environment. It
is recommended that you clean your spa every 60-90 days. Heavy bather load will require
cleaning it more often.
TOTOTOTO DRAINDRAINDRAINDRAIN YOURYOURYOURYOUR SPASPASPASPA
• Turn off power at breaker box.
• Pull out the drain valve located on the exterior wall of the cabinet.
• Turn the black knob counter-clockwise.
• Attach a garden hose and turn the valve counter-clockwise to open and
drain.
TOTOTOTO CLEANCLEANCLEANCLEAN YOURYOURYOURYOUR SPASPASPASPA SURFACESURFACESURFACESURFACE
• With a soft cloth, wipe down the spa surface with a non-abrasive cleaner such
as “409,” “Fantastik” or equivalent. Do not use paper towels.
• If your spa has developed an oily or chalky residue at the waterline it may
require special treatment. Consult your dealer.
TOTOTOTO REFILLREFILLREFILLREFILL YOURYOURYOURYOUR SPASPASPASPA
• Be sure to close the drain valve located on the exterior cabinet wall.
• Be sure all valves are fully opened located next to the pump(s).
• Fill the spa with water. Be sure water level is above skimmer opening.
• Refer to “Initial Start-Up Procedure” section with any questions.
TOTOTOTO CLEANCLEANCLEANCLEAN YOURYOURYOURYOUR FILTERFILTERFILTERFILTER ELEMENTSELEMENTSELEMENTSELEMENTS
The filter in your spa is one of the most important components of your spa. It not only is
essential for clean water, but also for extending the life of the spa equipment. Your filter
elements must be cleaned regularly (twice a month on average) with normal spa use.
With heavy use, they will need to be cleaned more often.
• Turn spa off.
• Remove filter element(s).
• With a garden hose, spray each element under pressure. Periodically, the elements
need to be soaked in a filter cleaner compound. Check with your Down East Spa
dealer for details on cleaning and/or filter replacement recommendations on the
Portsmouth, Exeter, Cape Cod, and Providence models; the filtration consists of a
dual element the interior mineral element should never be cleaned in a filter
cleaner, but only rinsed periodically using water and replaced every 180 days.
____________________________________________________________________________________________
__________________________________________________________________________________________ 25
• Be sure to remove any debris from between filter pleats.
• Replace filter elements.
• Be sure water level is adequate.
• Turn spa on and refer to “Initial Start-Up Procedure” with any questions.
LIGHTLIGHTLIGHTLIGHT BULBBULBBULBBULB REPLACEMENTREPLACEMENTREPLACEMENTREPLACEMENT
Replacing a light bulb in your spa is not difficult. Access to the light fixture is through
your equipment door and behind the electrical panel box. Simply twist (turn counter
clockwise) the holding fixture and remove. The bulb will then pull loose. Replace with
new 12 volt bulb (available through your dealer). Reverse process for fixture
replacement.
CARECARECARECARE OFOFOFOF YOURYOURYOURYOUR SPASPASPASPA PILLOWSPILLOWSPILLOWSPILLOWS
• Your spa pillows need to be rinsed periodically to remove any chemical residue. This
should help to eliminate pillows becoming stiff and discolored.
• If spa is not to be used for a period of time pillows should be removed. Pillow life
will be extended.
CARECARECARECARE OFOFOFOF YOURYOURYOURYOUR SPASPASPASPA COVERCOVERCOVERCOVER
Always cover your spa when not in use. This will greatly reduce energy consumption and
will cause spa water to heat more rapidly. Reduction of water loss and chemical usage
will also be accomplished.
• Do not allow spa to sit uncovered in direct sunlight. This may cause damage to
exposed surfaces of spa. Exposure may void your warranty.
• Periodically hose off both sides of spa cover for maximum life of cover.
NOTE: IF YOUR SPA IS GOING TO BE LEFT EMPTY FOR PROLONGED
PERIODS, DO NOT PLACE COVER DIRECTLY ON SURFACE OF SPA.
PLACE 2”-3” BLOCKS BETWEEN COVER AND SPA. THIS ALLOWS FOR
ADEQUATE VENTILATION OF COVER AND SPA.
CARECARECARECARE OFOFOFOF YOURYOURYOURYOUR SPASPASPASPA CABINETCABINETCABINETCABINET (W(W(W(WOOD ONLYOOD ONLYOOD ONLYOOD ONLY))))
Your quality spa cabinet is produced from hand-crafted cedar. It has been factory treated
with a stain/sealer to maintain its appearance and to preserve its life. Several times a year
(especially if located outdoors) it is recommended that your cabinet be re-treated. Your
local dealer or service center can recommend the appropriate product based on your
cabinet finish. Periodically, remove dust, dirt and grime with clean water.
On spas with polymer cabinets, spray down with a garden hose or use a wet rag to clean.
____________________________________________________________________________________________
__________________________________________________________________________________________ 26
WINTERIZING YOUR SPAWINTERIZING YOUR SPAWINTERIZING YOUR SPAWINTERIZING YOUR SPA
Many people find they enjoy using their spa more in the winter than any other time. Your
spa is designed to be used year round in any type of climate.
However, if you decide you don’t want to use your spa in the winter, you must drain it
and follow the winterizing steps listed below:
NOTE: FAILURE TO WINTERIZE YOUR SPA COULD CAUSE NOTE: FAILURE TO WINTERIZE YOUR SPA COULD CAUSE NOTE: FAILURE TO WINTERIZE YOUR SPA COULD CAUSE NOTE: FAILURE TO WINTERIZE YOUR SPA COULD CAUSE FREEZE DAMAGE TO YOUR PLUMBING WHICH WILL VOID FREEZE DAMAGE TO YOUR PLUMBING WHICH WILL VOID FREEZE DAMAGE TO YOUR PLUMBING WHICH WILL VOID FREEZE DAMAGE TO YOUR PLUMBING WHICH WILL VOID YOUR WARRANTY. FOLLOW THESE STEPS CAREFULLY.YOUR WARRANTY. FOLLOW THESE STEPS CAREFULLY.YOUR WARRANTY. FOLLOW THESE STEPS CAREFULLY.YOUR WARRANTY. FOLLOW THESE STEPS CAREFULLY.
1) Drain your spa completely using the drain valve (see “To Drain
Your Spa”) or use an inexpensive submersible pump that you can
buy from your dealer or your local hardware store.
2) Use a shop vac to get all standing water out of your unit.
3) Remove access panels from equipment area.
4) Loosen all pump unions
5) Remove square winterizing plug from the face of the pump.
6) Using your shop vac in a blowing mode, insert the hose into the
nozzle of each jet and blow the trapped water from the lines into
the interior of the spa.
7) After this is completed, use the shop vac to remove any standing
water in the spa and in the equipment area.
8) Clean the spa with a soft cloth and a non-abrasive cleaner (409,
Fantastik, Glass Plus, etc.).
9) Replace access panels.
10) Cover spa to prevent water from entering the spa.
____________________________________________________________________________________________
__________________________________________________________________________________________ 27
GENERALGENERALGENERALGENERAL CHEMICALCHEMICALCHEMICALCHEMICAL MAMAMAMAINTENANCEINTENANCEINTENANCEINTENANCE
GUIDELINESGUIDELINESGUIDELINESGUIDELINES
There are certain variables to proper chemical application in spas. This information, as it
states, is to be used as a general guideline. Your spa dealer or service center will assist
you with properly detailed recommendations and instructions.
NOTE: IT IS IMPERATIVE THAT pH, TOTAL ALKALINITY AND CALCIUM
HARDNESS LEVELS BE PROPERLY MAINTAINED. FAILURE TO
MAINTAIN PROPER LEVELS WILL DAMAGE YOUR SPAS EQUIPMENT
AND MAY VOID YOUR WARRANTY.
SAFETYSAFETYSAFETYSAFETY CONSIDERATIONSCONSIDERATIONSCONSIDERATIONSCONSIDERATIONS
� Always follow the manufacturer’s instructions with any chemical application.
� If you are to dilute a chemical, always add the chemical to the water, never the water
to the chemical.
� DO NOT EVER MIX TWO CHEMICALS TOGETHER.
� Avoid contact with skin.
� Always add chemicals with pump in operation. Leave pump running for 30 minutes.
NOTE: USING A GOOD CHEMICAL TEST KIT RECOMMENDED BY YOUR
DEALER IS ESSENTIAL FOR PROPER WATER CARE. ALSO, CHANGING
YOUR WATER ON A REGULAR BASIS IS A VERY INEXPENSIVE
CHEMICAL TREATMENT.
ADDITIONALADDITIONALADDITIONALADDITIONAL INFINFINFINFORMATIONORMATIONORMATIONORMATION //// RECOMMENDATIONSRECOMMENDATIONSRECOMMENDATIONSRECOMMENDATIONS
CHEMICAL ADDITIVE BENCHMARKS
� Sanitizer 2.0 - 3.0 PPM free available Chlorine
or 4.0 - 6.0 PPM Bromine
� pH 7.4 - 7.6
���� Shock Treatment Weekly/consult your dealer
� Total Alkalinity 120 - 150 PPM
� Calcium Hardness 180 - 250 PPM
SANITATION
Sanitation is the process of killing bacteria, algae and other organisms that will multiply
in water. Several methods of sanitation are available - Organic Bromine or Chlorine.
Consult your dealer. Always be sure to read and understand chemical instructions.
pH CONTROL

____________________________________________________________________________________________
__________________________________________________________________________________________ 28
� pH is the measure of the relative acid/base content of the water.
� If the pH indicator is below 7.4, your water is too acidic and may
corrode your spa equipment and/or cause irritation to bathers.
� If the pH indicator is above 7.6, the water is too basic and may result in
cloudiness and a scale formation in the spa. High pH also reduces the
effectiveness of chlorine as a sanitizer.
� Proper pH control is essential.
SHOCK TREATMENT
Consult your dealer.
TOTAL ALKALINITY
“TA” is the amount of carbonate, bicarbonate and hydroxyl ions in the water.
Increasing TA increases water pH and acts as a buffer against pH changes. High
TA promotes high pH and makes the water resistant to adjustment. Low TA
makes the pH unstable and difficult to keep in ideal range.
Consult your dealer for methods to measure and control TA.
CALCIUM HARDNESS, STAIN AND SCALE
Calcium hardness can be very important. Water that is too hard (dissolved calcium
over 250 PPM) can promote scale formation, making deposits in the spa and
reducing your heaters efficiency. Water that is too low in calcium hardness may
also be harmful. Soft water (under 180 PPM) will more rapidly dissolve metals,
shortening the life of your spas heater or other metal components.
Staining and scaling are common problems. Hot water causes calcium to deposit
more rapidly. Some local water conditions may require the use of a stain and scale
remover. Please consult your dealer.
NOTE: IF YOU HAVE READ THROUGH YOUR SPA CARE MAINTENANCE
SECTION TO THIS POINT, “GO TO THE HEAD OF THE CLASS!” YOU ARE
GOING TO ENJOY MANY HAPPY, PROBLEM-FREE YEARS OF ENJOYMENT IN
YOUR DOWN EAST SPA.
____________________________________________________________________________________________
__________________________________________________________________________________________ 29
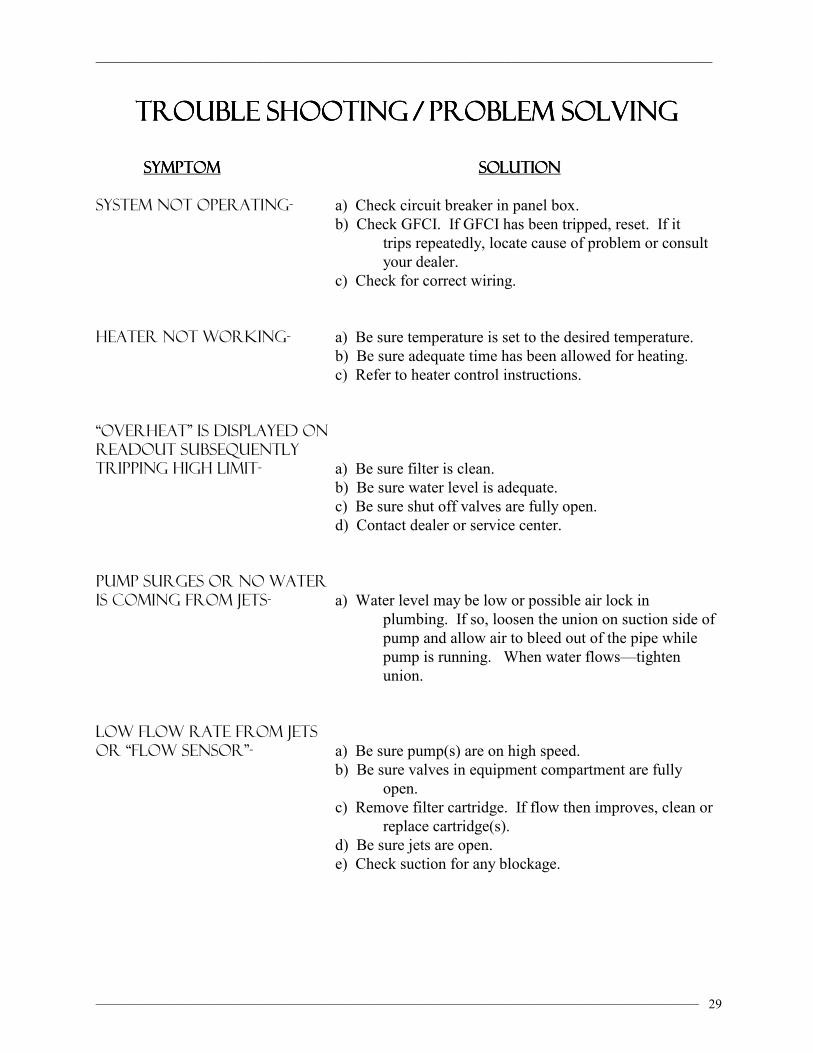
TROUBLETROUBLETROUBLETROUBLE SHOOTINGSHOOTINGSHOOTINGSHOOTING //// PROBLEMPROBLEMPROBLEMPROBLEM SOLVINGSOLVINGSOLVINGSOLVING
SymptomSymptomSymptomSymptom SolutionSolutionSolutionSolution
System not operating- a) Check circuit breaker in panel box.
b) Check GFCI. If GFCI has been tripped, reset. If it
trips repeatedly, locate cause of problem or consult
your dealer.
c) Check for correct wiring.
Heater not working- a) Be sure temperature is set to the desired temperature.
b) Be sure adequate time has been allowed for heating.
c) Refer to heater control instructions.
“Overheat” is displayed on readout subsequently tripping high limit- a) Be sure filter is clean.
b) Be sure water level is adequate.
c) Be sure shut off valves are fully open.
d) Contact dealer or service center.
Pump surges or no water is coming from jets- a) Water level may be low or possible air lock in
plumbing. If so, loosen the union on suction side of
pump and allow air to bleed out of the pipe while
pump is running. When water flows—tighten
union.
Low flow rate from jets Or “Flow Sensor”- a) Be sure pump(s) are on high speed.
b) Be sure valves in equipment compartment are fully
open.
c) Remove filter cartridge. If flow then improves, clean or
replace cartridge(s).
d) Be sure jets are open.
e) Check suction for any blockage.

____________________________________________________________________________________________
__________________________________________________________________________________________ 30
™™™™
SPECIALSPECIALSPECIALSPECIAL NOTENOTENOTENOTE
ECO PUR™ water purification system is designed
to reduce the use of conventional sanitizers. You
may still be required, periodically, based on usage
to add a small amount of chlorine to oxidize
organic compounds. ECO PUR ™will not eliminate
the need to maintain proper water chemistry but
can make the maintenance a more natural experience.
Master Spa Products are not designed to be used with Biquanides. These chemicals are found in SoftSwim® and
Baqua Spa. Due to adverse effects from these types of products, the warranty of the spa may be void.
____________________________________________________________________________________________
__________________________________________________________________________________________ 31
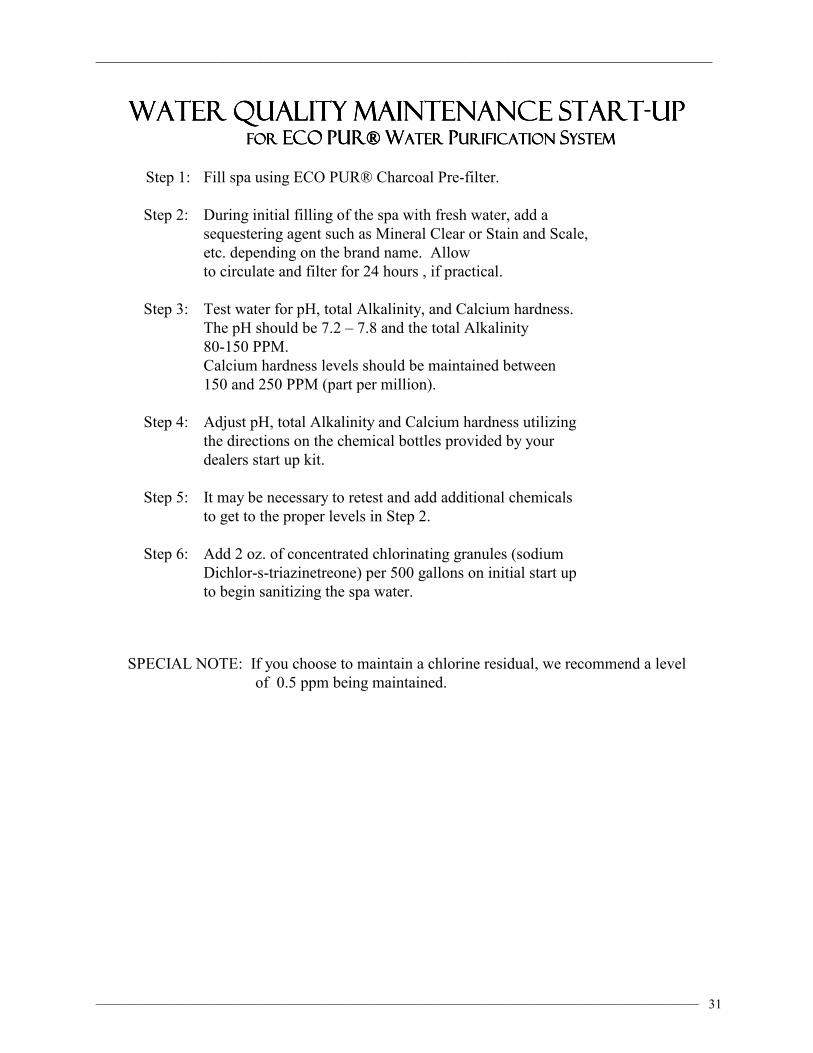
WATERWATERWATERWATER QUALITYQUALITYQUALITYQUALITY MAINTENANCEMAINTENANCEMAINTENANCEMAINTENANCE STARTSTARTSTARTSTART----UPUPUPUP FOR FOR FOR FOR ECOECOECOECO PUR®PUR®PUR®PUR® WWWWATER ATER ATER ATER PPPPURIFICATION URIFICATION URIFICATION URIFICATION SSSSYSTEM YSTEM YSTEM YSTEM
Step 1: Fill spa using ECO PUR® Charcoal Pre-filter.
Step 2: During initial filling of the spa with fresh water, add a
sequestering agent such as Mineral Clear or Stain and Scale,
etc. depending on the brand name. Allow
to circulate and filter for 24 hours , if practical.
Step 3: Test water for pH, total Alkalinity, and Calcium hardness.
The pH should be 7.2 – 7.8 and the total Alkalinity
80-150 PPM.
Calcium hardness levels should be maintained between
150 and 250 PPM (part per million).
Step 4: Adjust pH, total Alkalinity and Calcium hardness utilizing
the directions on the chemical bottles provided by your
dealers start up kit.
Step 5: It may be necessary to retest and add additional chemicals
to get to the proper levels in Step 2.
Step 6: Add 2 oz. of concentrated chlorinating granules (sodium
Dichlor-s-triazinetreone) per 500 gallons on initial start up
to begin sanitizing the spa water.
SPECIAL NOTE: If you choose to maintain a chlorine residual, we recommend a level
of 0.5 ppm being maintained.

____________________________________________________________________________________________
__________________________________________________________________________________________ 32
THETHETHETHE ADVANTAGESADVANTAGESADVANTAGESADVANTAGES OFOFOFOF ECOECOECOECO PPPPUR®UR®UR®UR® MINERALMINERALMINERALMINERAL PURIFICATIONPURIFICATIONPURIFICATIONPURIFICATION
• Completely destroys most bacteria, pathogens, algae, and fungi, protecting you from disease.
• Removes heavy metals like lead and mercury from water to reduce the risk of skin absorption.
• Removes calcium carbonate and hydrogen sulphide from spa water to protect heaters and
equipment from precipitation.
• Leaves residual mineral sanitation in the spa to protect pipe systems and equipment from
bacterial growth.
• Helps stabilizes the pH and alkalinity of the spa water.
• Reduces 95% of chemical usage and still provides safe odor-free water.
• Depletes excess chorine after chemical shock to prevent damage to skin, hair, and swimwear.
• All-natural, environmentally safe sanitizing system that does not require chemical registration
with the EPA.
• Produces ultra-pure water.
• Requires maintenance only after usage.
SPECIAL NOTES
The ECO PUR ® water purification system contain specific minerals found in nature that when
combined create an effective bactercide and algae that will protect your spa water. Mineral purification
will not oxidize organic compounds and will require periodic doses of chlorine to assist in sanitization
and oxidation processes required to maintain clear spa water:
� ECO PUR® water purification will not alter the pH of spa water.
The mineral combination will actually aid in stabilizing the pH.
ECO PUR® does not alter the (TDS) total dissolved solids as it
performs sanitization in the filter and does not add anything to
the water. The use of sequestrants and stain and scale inhibitors
is not required for regular maintenance and should only be used
in the start up procedures.
� The main function of the ECO PUR® water purification system
is to provide clean and clear spa water. The ECO PUR® system
is effective at destroying almost all bacteria and algae that will be
found in the spa water, but proper chemical balance and filtration
are also key components in maintaining healthy spa water. Always
ensure that the pH and TA of the spa water is checked and balanced
at all time. To ensure proper filtration, clean the outer filter cartridge
with a “filter cleaner” every 30 days and rinse the ECO PUR® cartridge
with a hose to remove buildup of containments. (Do not soak
ECO PUR® mineral cartridge in filter cleaner.) If water appears
to be visually cloudy or dull or has an odor, shock water with 2 oz of
chlorine to remove excessive containments and allow the ECO PUR®
to concentrate on removing bacteria.
____________________________________________________________________________________________
__________________________________________________________________________________________ 33
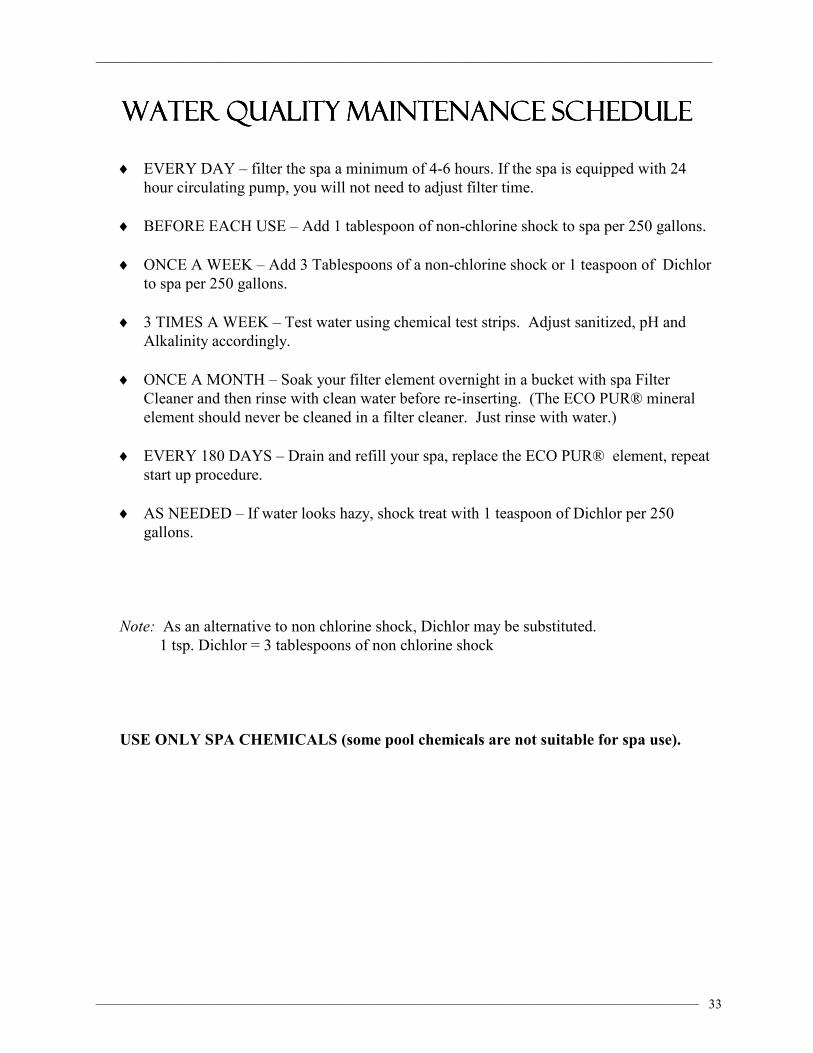
WATERWATERWATERWATER QUALITYQUALITYQUALITYQUALITY MAINTENANCEMAINTENANCEMAINTENANCEMAINTENANCE SCHEDULESCHEDULESCHEDULESCHEDULE
♦ EVERY DAY – filter the spa a minimum of 4-6 hours. If the spa is equipped with 24
hour circulating pump, you will not need to adjust filter time.
♦ BEFORE EACH USE – Add 1 tablespoon of non-chlorine shock to spa per 250 gallons.
♦ ONCE A WEEK – Add 3 Tablespoons of a non-chlorine shock or 1 teaspoon of Dichlor
to spa per 250 gallons.
♦ 3 TIMES A WEEK – Test water using chemical test strips. Adjust sanitized, pH and
Alkalinity accordingly.
♦ ONCE A MONTH – Soak your filter element overnight in a bucket with spa Filter
Cleaner and then rinse with clean water before re-inserting. (The ECO PUR® mineral
element should never be cleaned in a filter cleaner. Just rinse with water.)
♦ EVERY 180 DAYS – Drain and refill your spa, replace the ECO PUR® element, repeat
start up procedure.
♦ AS NEEDED – If water looks hazy, shock treat with 1 teaspoon of Dichlor per 250
gallons.
Note: As an alternative to non chlorine shock, Dichlor may be substituted.
1 tsp. Dichlor = 3 tablespoons of non chlorine shock
USE ONLY SPA CHEMICALS (some pool chemicals are not suitable for spa use).