model 74252 laser sight owner’s manual - crosman · model 74252 laser sight owner’s manual ......
TRANSCRIPT
Model 74252Laser sight
Owner’s ManualRead all instructions and Warnings in this manual before using the laser sight.
Centerpoint Precision Optics 7629 Rt 5 & 20Bloomfield, NY 14469United States of America1-866-726-1122 74252-515
LASER RADIATION—AVOID DIRECT EYE EXPOSURELaser DiodeWavelength: 630-640 nmMax Output: < 5 mW
Class IIIaLaser Product
CAUTION: AVOID DIRECT EYE EXPOSURE. Laser emitted from the aperture.CAUTION: A laser sight is not a toy. It must be used under the supervision of an adult. Improper use or careless use may cause serious injury, especially to the eyes. Avoid direct eye exposure to the laser beam.
Always follow the safety instructions found in the owner’s manual and keep these instructions in safe place for future use.
BUYER AND USER HAVE THE DUTY TO OBEY ALL LAWS ABOUT THE USE AND OWNERSHIP OF THIS LASER SIGHT
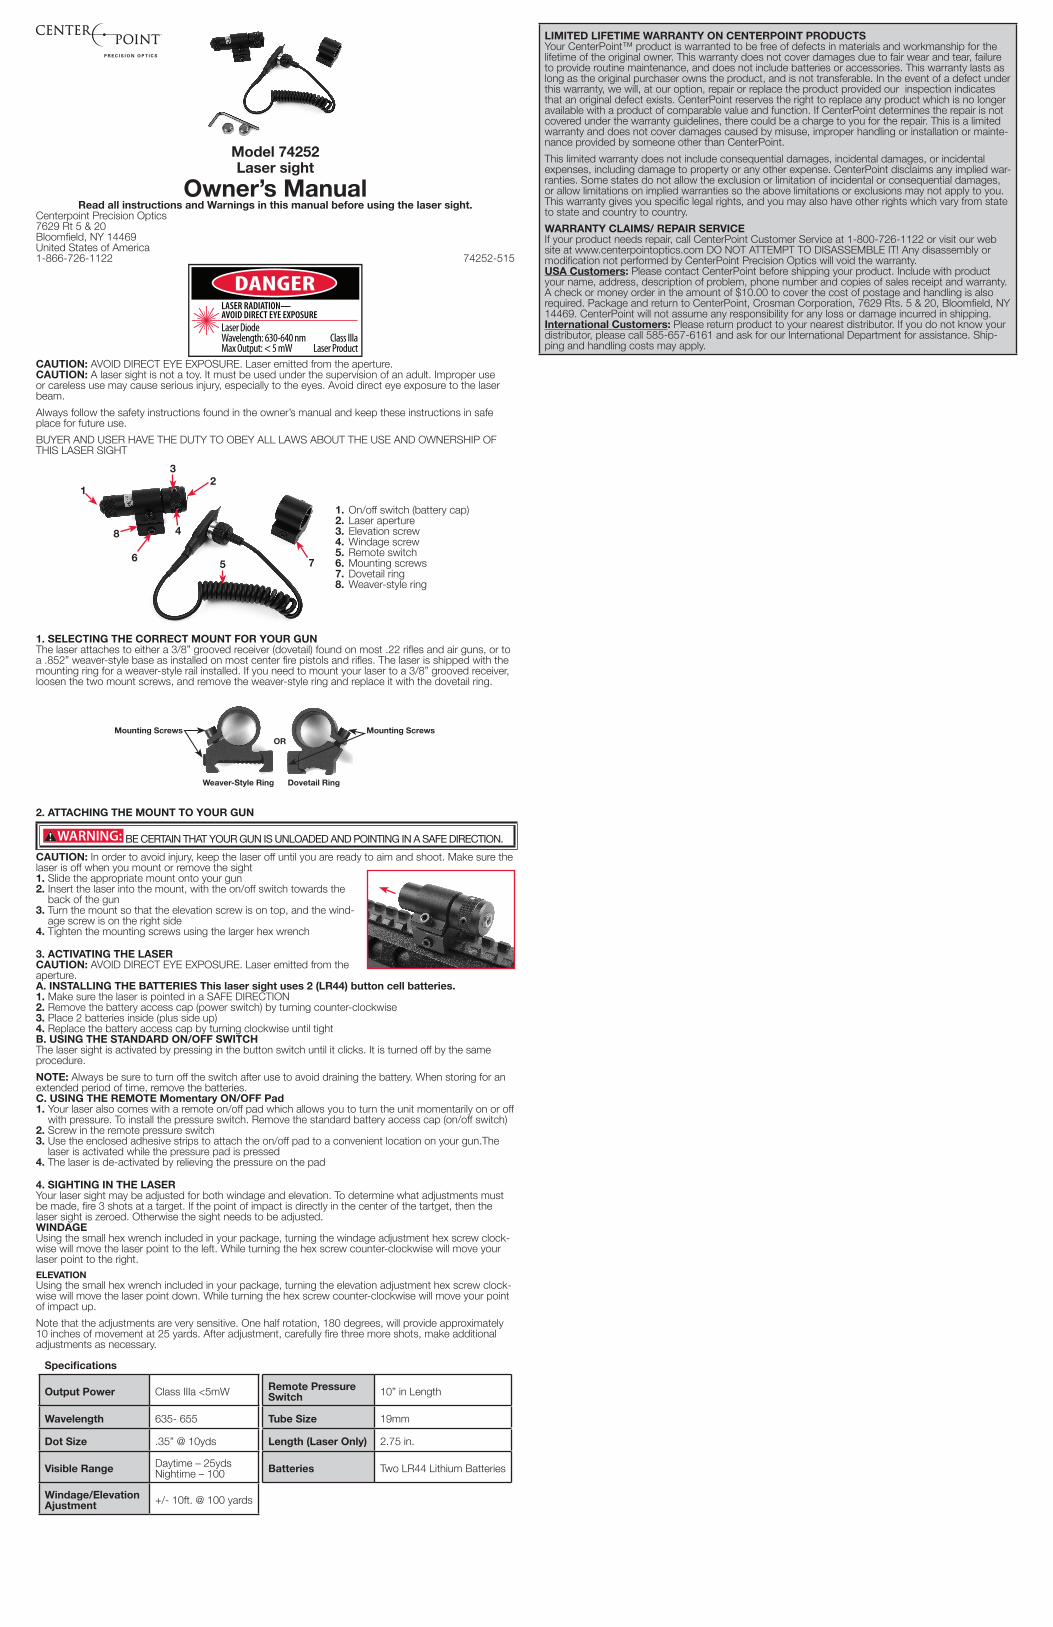
1. On/off switch (battery cap)2. Laser aperture3. Elevation screw4. Windage screw5. Remote switch6. Mounting screws7. Dovetail ring8. Weaver-style ring
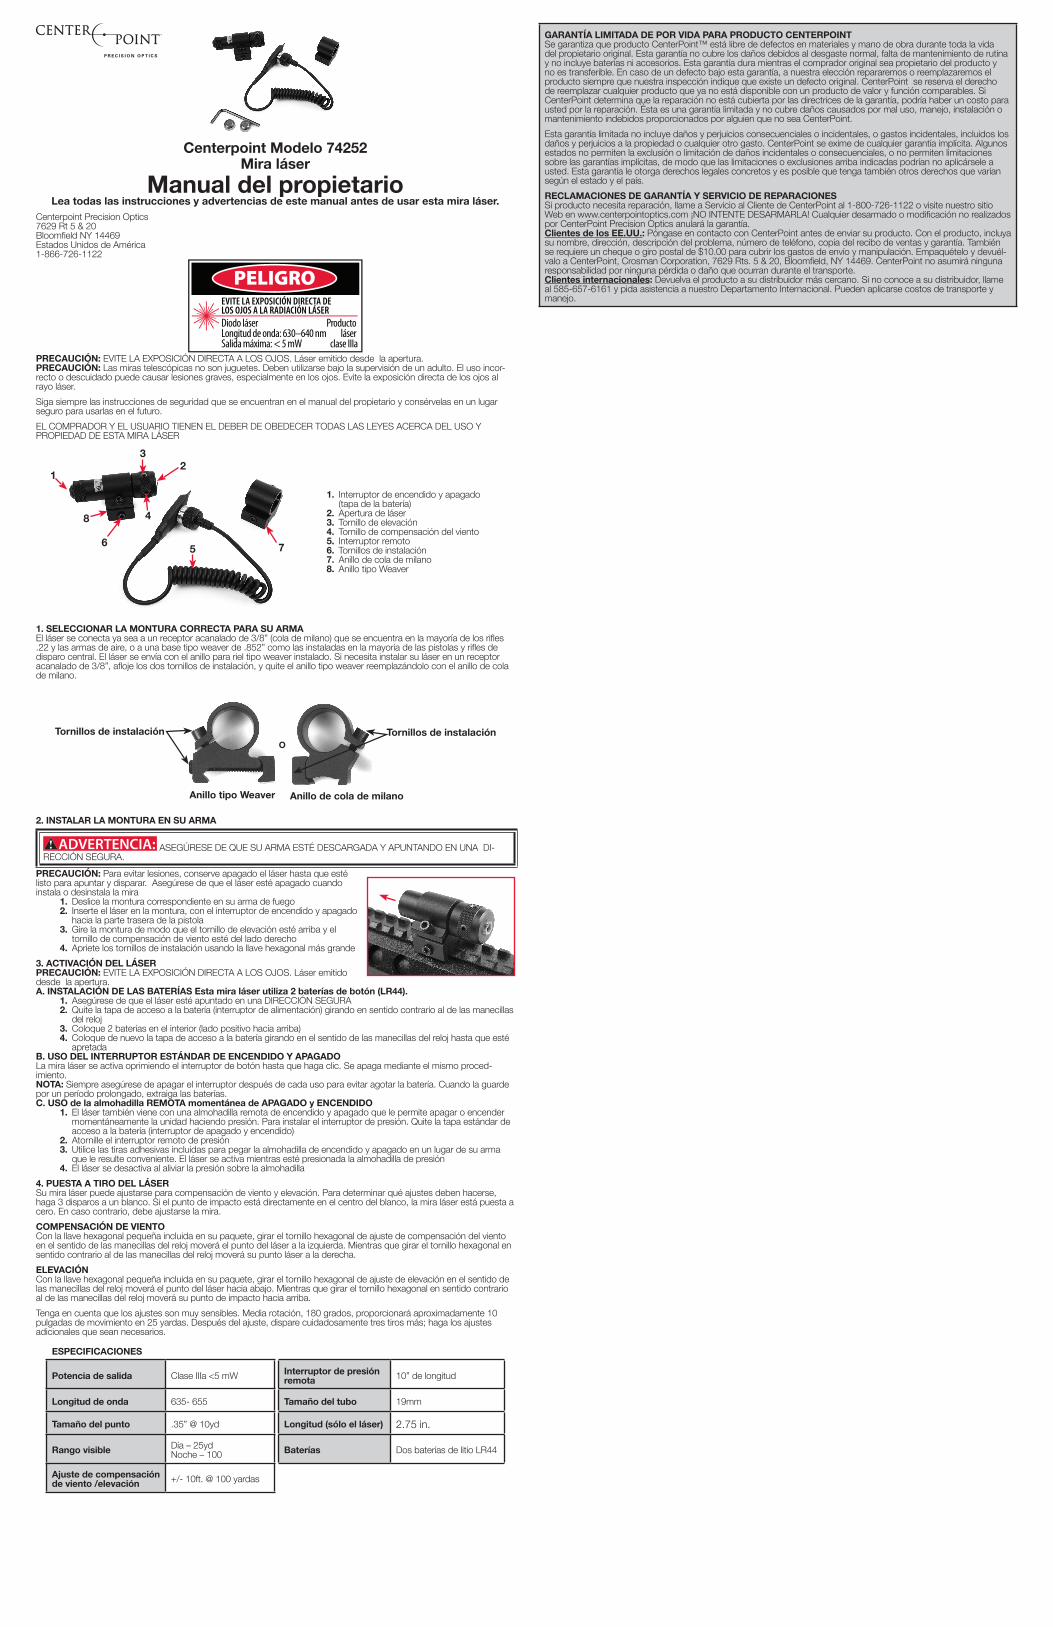
1. SELECTING THE CORRECT MOUNT FOR YOUR GUNThe laser attaches to either a 3/8” grooved receiver (dovetail) found on most .22 rifles and air guns, or to a .852” weaver-style base as installed on most center fire pistols and rifles. The laser is shipped with the mounting ring for a weaver-style rail installed. If you need to mount your laser to a 3/8” grooved receiver, loosen the two mount screws, and remove the weaver-style ring and replace it with the dovetail ring.
Dovetail RingWeaver-Style Ring
Mounting Screws Mounting ScrewsOR
2. ATTACHING THE MOUNT TO YOUR GUN
BE CERTAIN THAT YOUR GUN IS UNLOADED AND POINTING IN A SAFE DIRECTION.
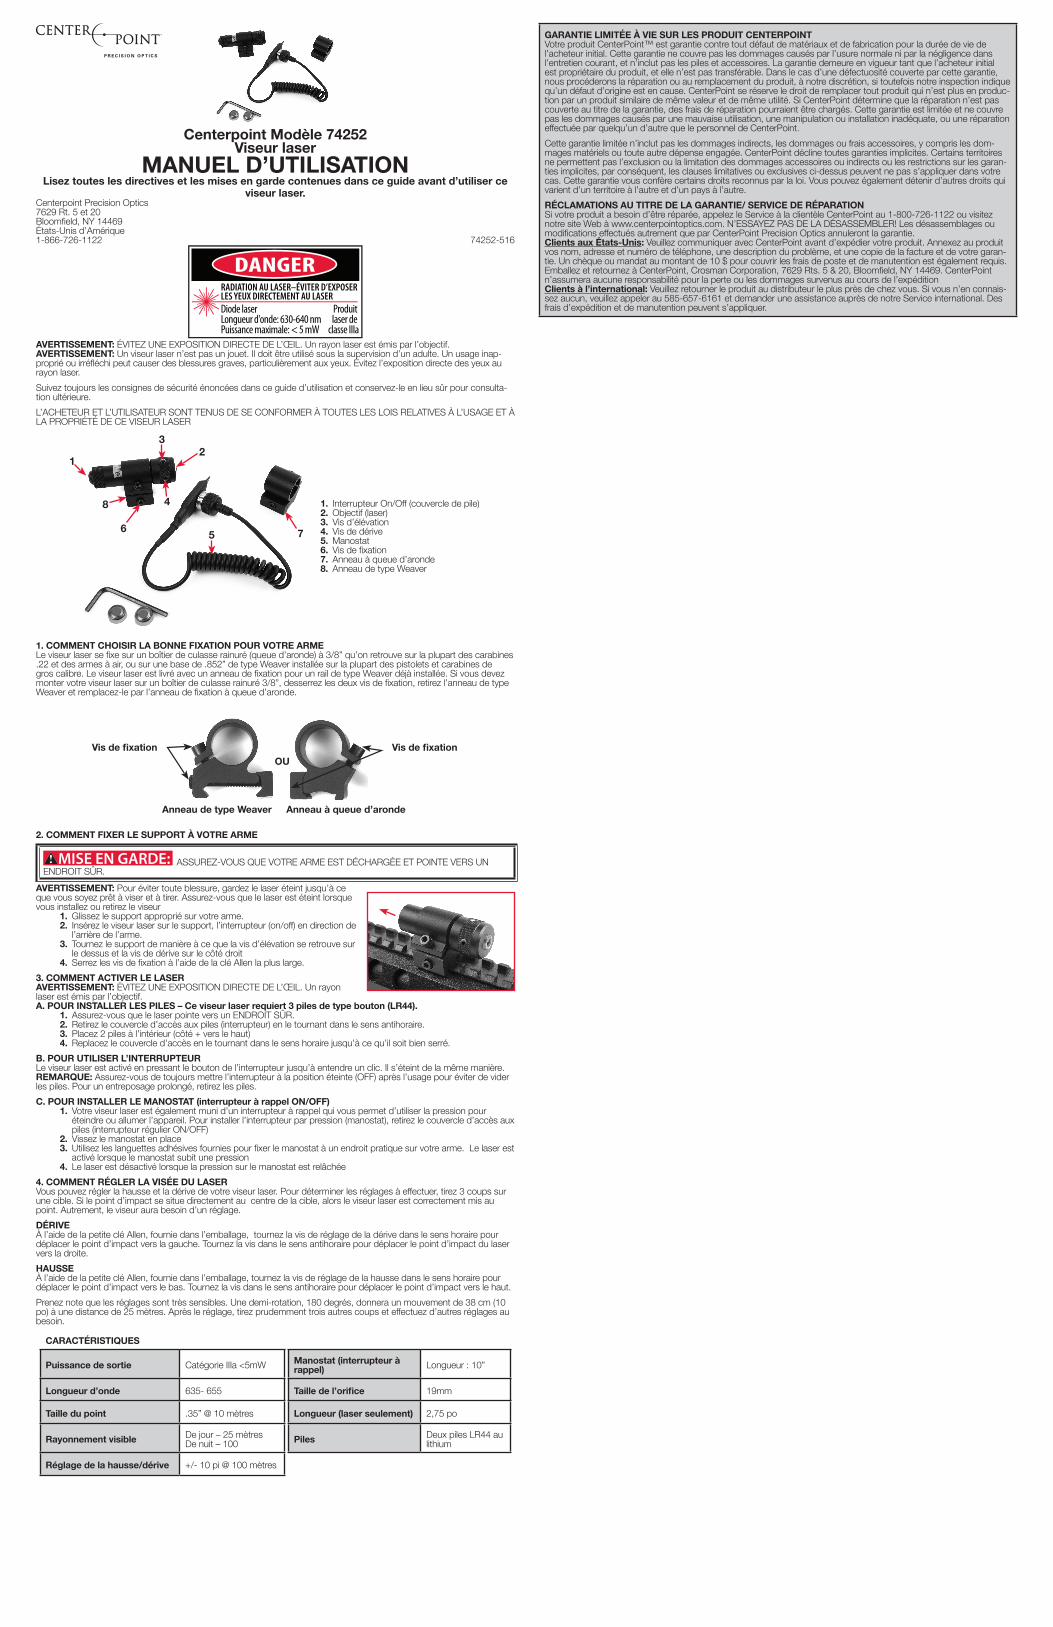
CAUTION: In order to avoid injury, keep the laser off until you are ready to aim and shoot. Make sure the laser is off when you mount or remove the sight1. Slide the appropriate mount onto your gun2. Insert the laser into the mount, with the on/off switch towards the
back of the gun3. Turn the mount so that the elevation screw is on top, and the wind-
age screw is on the right side4. Tighten the mounting screws using the larger hex wrench
3. ACTIVATING THE LASERCAUTION: AVOID DIRECT EYE EXPOSURE. Laser emitted from the aperture.A. INSTALLING THE BATTERIES This laser sight uses 2 (LR44) button cell batteries.1. Make sure the laser is pointed in a SAFE DIRECTION2. Remove the battery access cap (power switch) by turning counter-clockwise3. Place 2 batteries inside (plus side up)4. Replace the battery access cap by turning clockwise until tightB. USING THE STANDARD ON/OFF SWITCHThe laser sight is activated by pressing in the button switch until it clicks. It is turned off by the same procedure.
NOTE: Always be sure to turn off the switch after use to avoid draining the battery. When storing for an extended period of time, remove the batteries.C. USING THE REMOTE Momentary ON/OFF Pad 1. Your laser also comes with a remote on/off pad which allows you to turn the unit momentarily on or off
with pressure. To install the pressure switch. Remove the standard battery access cap (on/off switch)2. Screw in the remote pressure switch3. Use the enclosed adhesive strips to attach the on/off pad to a convenient location on your gun.The
laser is activated while the pressure pad is pressed4. The laser is de-activated by relieving the pressure on the pad
4. SIGHTING IN THE LASERYour laser sight may be adjusted for both windage and elevation. To determine what adjustments must be made, fire 3 shots at a target. If the point of impact is directly in the center of the tartget, then the laser sight is zeroed. Otherwise the sight needs to be adjusted.WINDAGEUsing the small hex wrench included in your package, turning the windage adjustment hex screw clock-wise will move the laser point to the left. While turning the hex screw counter-clockwise will move your laser point to the right.ELEVATIONUsing the small hex wrench included in your package, turning the elevation adjustment hex screw clock-wise will move the laser point down. While turning the hex screw counter-clockwise will move your point of impact up.
Note that the adjustments are very sensitive. One half rotation, 180 degrees, will provide approximately 10 inches of movement at 25 yards. After adjustment, carefully fire three more shots, make additional adjustments as necessary.
Specifications
Output Power Class IIIa <5mW Remote Pressure Switch 10” in Length
Wavelength 635- 655 Tube Size 19mm
Dot Size .35” @ 10yds Length (Laser Only) 2.75 in.
Visible Range Daytime – 25ydsNightime – 100 Batteries Two LR44 Lithium Batteries
Windage/Elevation Ajustment +/- 10ft. @ 100 yards
LIMITED LIFETIME WARRANTY ON CENTERPOINT PRODUCTSYour CenterPoint™ product is warranted to be free of defects in materials and workmanship for the lifetime of the original owner. This warranty does not cover damages due to fair wear and tear, failure to provide routine maintenance, and does not include batteries or accessories. This warranty lasts as long as the original purchaser owns the product, and is not transferable. In the event of a defect under this warranty, we will, at our option, repair or replace the product provided our inspection indicates that an original defect exists. CenterPoint reserves the right to replace any product which is no longer available with a product of comparable value and function. If CenterPoint determines the repair is not covered under the warranty guidelines, there could be a charge to you for the repair. This is a limited warranty and does not cover damages caused by misuse, improper handling or installation or mainte-nance provided by someone other than CenterPoint.
This limited warranty does not include consequential damages, incidental damages, or incidental expenses, including damage to property or any other expense. CenterPoint disclaims any implied war-ranties. Some states do not allow the exclusion or limitation of incidental or consequential damages, or allow limitations on implied warranties so the above limitations or exclusions may not apply to you. This warranty gives you specific legal rights, and you may also have other rights which vary from state to state and country to country.
WARRANTY CLAIMS/ REPAIR SERVICEIf your product needs repair, call CenterPoint Customer Service at 1-800-726-1122 or visit our web site at www.centerpointoptics.com DO NOT ATTEMPT TO DISASSEMBLE IT! Any disassembly or modification not performed by CenterPoint Precision Optics will void the warranty.USA Customers: Please contact CenterPoint before shipping your product. Include with product your name, address, description of problem, phone number and copies of sales receipt and warranty. A check or money order in the amount of $10.00 to cover the cost of postage and handling is also required. Package and return to CenterPoint, Crosman Corporation, 7629 Rts. 5 & 20, Bloomfield, NY 14469. CenterPoint will not assume any responsibility for any loss or damage incurred in shipping.International Customers: Please return product to your nearest distributor. If you do not know your distributor, please call 585-657-6161 and ask for our International Department for assistance. Ship-ping and handling costs may apply.
Centerpoint Modelo 74252Mira láser
Manual del propietarioLea todas las instrucciones y advertencias de este manual antes de usar esta mira láser.
Centerpoint Precision Optics 7629 Rt 5 & 20Bloomfield NY 14469Estados Unidos de América1-866-726-1122
EVITE LA EXPOSICIÓN DIRECTA DE LOS OJOS A LA RADIACIÓN LÁSERDiodo láserLongitud de onda: 630–640 nmSalida máxima: < 5 mW
Producto láser
clase IIIa
PELIGRO
PRECAUCIÓN: EVITE LA EXPOSICIÓN DIRECTA A LOS OJOS. Láser emitido desde la apertura.PRECAUCIÓN: Las miras telescópicas no son juguetes. Deben utilizarse bajo la supervisión de un adulto. El uso incor-recto o descuidado puede causar lesiones graves, especialmente en los ojos. Evite la exposición directa de los ojos al rayo láser.
Siga siempre las instrucciones de seguridad que se encuentran en el manual del propietario y consérvelas en un lugar seguro para usarlas en el futuro.
EL COMPRADOR Y EL USUARIO TIENEN EL DEBER DE OBEDECER TODAS LAS LEYES ACERCA DEL USO Y PROPIEDAD DE ESTA MIRA LÁSER
1. Interruptor de encendido y apagado (tapa de la batería)
2. Apertura de láser3. Tornillo de elevación4. Tornillo de compensación del viento5. Interruptor remoto6. Tornillos de instalación7. Anillo de cola de milano8. Anillo tipo Weaver
1. SELECCIONAR LA MONTURA CORRECTA PARA SU ARMAEl láser se conecta ya sea a un receptor acanalado de 3/8” (cola de milano) que se encuentra en la mayoría de los rifles .22 y las armas de aire, o a una base tipo weaver de .852” como las instaladas en la mayoría de las pistolas y rifles de disparo central. El láser se envía con el anillo para riel tipo weaver instalado. Si necesita instalar su láser en un receptor acanalado de 3/8”, afloje los dos tornillos de instalación, y quite el anillo tipo weaver reemplazándolo con el anillo de cola de milano.
Anillo de cola de milanoAnillo tipo Weaver
Tornillos de instalación Tornillos de instalaciónO
2. INSTALAR LA MONTURA EN SU ARMA
ASEGÚRESE DE QUE SU ARMA ESTÉ DESCARGADA Y APUNTANDO EN UNA DI-RECCIÓN SEGURA.
PRECAUCIÓN: Para evitar lesiones, conserve apagado el láser hasta que esté listo para apuntar y disparar. Asegúrese de que el láser esté apagado cuando instala o desinstala la mira
1. Deslice la montura correspondiente en su arma de fuego2. Inserte el láser en la montura, con el interruptor de encendido y apagado
hacia la parte trasera de la pistola3. Gire la montura de modo que el tornillo de elevación esté arriba y el
tornillo de compensación de viento esté del lado derecho4. Apriete los tornillos de instalación usando la llave hexagonal más grande
3. ACTIVACIÓN DEL LÁSERPRECAUCIÓN: EVITE LA EXPOSICIÓN DIRECTA A LOS OJOS. Láser emitido desde la apertura.A. INSTALACIÓN DE LAS BATERÍAS Esta mira láser utiliza 2 baterías de botón (LR44).
1. Asegúrese de que el láser esté apuntado en una DIRECCIÓN SEGURA2. Quite la tapa de acceso a la batería (interruptor de alimentación) girando en sentido contrario al de las manecillas
del reloj3. Coloque 2 baterías en el interior (lado positivo hacia arriba)4. Coloque de nuevo la tapa de acceso a la batería girando en el sentido de las manecillas del reloj hasta que esté
apretadaB. USO DEL INTERRUPTOR ESTÁNDAR DE ENCENDIDO Y APAGADOLa mira láser se activa oprimiendo el interruptor de botón hasta que haga clic. Se apaga mediante el mismo proced-imiento.NOTA: Siempre asegúrese de apagar el interruptor después de cada uso para evitar agotar la batería. Cuando la guarde por un período prolongado, extraiga las baterías.C. USO de la almohadilla REMOTA momentánea de APAGADO y ENCENDIDO
1. El láser también viene con una almohadilla remota de encendido y apagado que le permite apagar o encender momentáneamente la unidad haciendo presión. Para instalar el interruptor de presión. Quite la tapa estándar de acceso a la batería (interruptor de apagado y encendido)
2. Atornille el interruptor remoto de presión3. Utilice las tiras adhesivas incluidas para pegar la almohadilla de encendido y apagado en un lugar de su arma
que le resulte conveniente. El láser se activa mientras esté presionada la almohadilla de presión4. El láser se desactiva al aliviar la presión sobre la almohadilla
4. PUESTA A TIRO DEL LÁSERSu mira láser puede ajustarse para compensación de viento y elevación. Para determinar qué ajustes deben hacerse, haga 3 disparos a un blanco. Si el punto de impacto está directamente en el centro del blanco, la mira láser está puesta a cero. En caso contrario, debe ajustarse la mira.
COMPENSACIÓN DE VIENTOCon la llave hexagonal pequeña incluida en su paquete, girar el tornillo hexagonal de ajuste de compensación del viento en el sentido de las manecillas del reloj moverá el punto del láser a la izquierda. Mientras que girar el tornillo hexagonal en sentido contrario al de las manecillas del reloj moverá su punto láser a la derecha.
ELEVACIÓN Con la llave hexagonal pequeña incluida en su paquete, girar el tornillo hexagonal de ajuste de elevación en el sentido de las manecillas del reloj moverá el punto del láser hacia abajo. Mientras que girar el tornillo hexagonal en sentido contrario al de las manecillas del reloj moverá su punto de impacto hacia arriba.
Tenga en cuenta que los ajustes son muy sensibles. Media rotación, 180 grados, proporcionará aproximadamente 10 pulgadas de movimiento en 25 yardas. Después del ajuste, dispare cuidadosamente tres tiros más; haga los ajustes adicionales que sean necesarios.
ESPECIFICACIONES
Potencia de salida Clase IIIa <5 mW Interruptor de presión remota 10” de longitud
Longitud de onda 635- 655 Tamaño del tubo 19mm
Tamaño del punto .35” @ 10yd Longitud (sólo el láser) 2.75 in.
Rango visible Día – 25ydNoche – 100 Baterías Dos baterías de litio LR44
Ajuste de compensación de viento /elevación +/- 10ft. @ 100 yardas
GARANTÍA LIMITADA DE POR VIDA PARA PRODUCTO CENTERPOINTSe garantiza que producto CenterPoint™ está libre de defectos en materiales y mano de obra durante toda la vida del propietario original. Esta garantía no cubre los daños debidos al desgaste normal, falta de mantenimiento de rutina y no incluye baterías ni accesorios. Esta garantía dura mientras el comprador original sea propietario del producto y no es transferible. En caso de un defecto bajo esta garantía, a nuestra elección repararemos o reemplazaremos el producto siempre que nuestra inspección indique que existe un defecto original. CenterPoint se reserva el derecho de reemplazar cualquier producto que ya no está disponible con un producto de valor y función comparables. Si CenterPoint determina que la reparación no está cubierta por las directrices de la garantía, podría haber un costo para usted por la reparación. Ésta es una garantía limitada y no cubre daños causados por mal uso, manejo, instalación o mantenimiento indebidos proporcionados por alguien que no sea CenterPoint.
Esta garantía limitada no incluye daños y perjuicios consecuenciales o incidentales, o gastos incidentales, incluidos los daños y perjuicios a la propiedad o cualquier otro gasto. CenterPoint se exime de cualquier garantía implícita. Algunos estados no permiten la exclusión o limitación de daños incidentales o consecuenciales, o no permiten limitaciones sobre las garantías implícitas, de modo que las limitaciones o exclusiones arriba indicadas podrían no aplicársele a usted. Esta garantía le otorga derechos legales concretos y es posible que tenga también otros derechos que varían según el estado y el país.
RECLAMACIONES DE GARANTÍA Y SERVICIO DE REPARACIONESSi producto necesita reparación, llame a Servicio al Cliente de CenterPoint al 1-800-726-1122 o visite nuestro sitio Web en www.centerpointoptics.com ¡NO INTENTE DESARMARLA! Cualquier desarmado o modificación no realizados por CenterPoint Precision Optics anulará la garantía.Clientes de los EE.UU.: Póngase en contacto con CenterPoint antes de enviar su producto. Con el producto, incluya su nombre, dirección, descripción del problema, número de teléfono, copia del recibo de ventas y garantía. También se requiere un cheque o giro postal de $10.00 para cubrir los gastos de envío y manipulación. Empaquételo y devuél-valo a CenterPoint, Crosman Corporation, 7629 Rts. 5 & 20, Bloomfield, NY 14469. CenterPoint no asumirá ninguna responsabilidad por ninguna pérdida o daño que ocurran durante el transporte.Clientes internacionales: Devuelva el producto a su distribuidor más cercano. Si no conoce a su distribuidor, llame al 585-657-6161 y pida asistencia a nuestro Departamento Internacional. Pueden aplicarse costos de transporte y manejo.
Centerpoint Modèle 74252Viseur laser
MANUEL D’UTILISATIONLisez toutes les directives et les mises en garde contenues dans ce guide avant d’utiliser ce
viseur laser.Centerpoint Precision Optics 7629 Rt. 5 et 20Bloomfield, NY 14469États-Unis d’Amérique1-866-726-1122 74252-516
RADIATION AU LASER–ÉVITER D’EXPOSER LES YEUX DIRECTEMENT AU LASERDiode laserLongueur d'onde: 630-640 nmPuissance maximale: < 5 mW
Produit laser de
classe IIIaAVERTISSEMENT: ÉVITEZ UNE EXPOSITION DIRECTE DE L’ŒIL. Un rayon laser est émis par l’objectif.AVERTISSEMENT: Un viseur laser n’est pas un jouet. Il doit être utilisé sous la supervision d’un adulte. Un usage inap-proprié ou irréfléchi peut causer des blessures graves, particulièrement aux yeux. Évitez l’exposition directe des yeux au rayon laser.
Suivez toujours les consignes de sécurité énoncées dans ce guide d’utilisation et conservez-le en lieu sûr pour consulta-tion ultérieure.
L’ACHETEUR ET L’UTILISATEUR SONT TENUS DE SE CONFORMER À TOUTES LES LOIS RELATIVES À L’USAGE ET À LA PROPRIÉTÉ DE CE VISEUR LASER
1. Interrupteur On/Off (couvercle de pile)2. Objectif (laser)3. Vis d’élévation4. Vis de dérive5. Manostat6. Vis de fixation7. Anneau à queue d’aronde8. Anneau de type Weaver
1. COMMENT CHOISIR LA BONNE FIXATION POUR VOTRE ARMELe viseur laser se fixe sur un boîtier de culasse rainuré (queue d’aronde) à 3/8” qu’on retrouve sur la plupart des carabines .22 et des armes à air, ou sur une base de .852” de type Weaver installée sur la plupart des pistolets et carabines de gros calibre. Le viseur laser est livré avec un anneau de fixation pour un rail de type Weaver déjà installée. Si vous devez monter votre viseur laser sur un boîtier de culasse rainuré 3/8”, desserrez les deux vis de fixation, retirez l’anneau de type Weaver et remplacez-le par l’anneau de fixation à queue d’aronde.
Anneau à queue d’arondeAnneau de type Weaver
Vis de fixation Vis de fixationOU
2. COMMENT FIXER LE SUPPORT À VOTRE ARME
ASSUREZ-VOUS QUE VOTRE ARME EST DÉCHARGÉE ET POINTE VERS UN ENDROIT SÛR.
AVERTISSEMENT: Pour éviter toute blessure, gardez le laser éteint jusqu’à ce que vous soyez prêt à viser et à tirer. Assurez-vous que le laser est éteint lorsque vous installez ou retirez le viseur
1. Glissez le support approprié sur votre arme.2. Insérez le viseur laser sur le support, l’interrupteur (on/off) en direction de
l’arrière de l’arme.3. Tournez le support de manière à ce que la vis d’élévation se retrouve sur
le dessus et la vis de dérive sur le côté droit4. Serrez les vis de fixation à l’aide de la clé Allen la plus large.
3. COMMENT ACTIVER LE LASERAVERTISSEMENT: ÉVITEZ UNE EXPOSITION DIRECTE DE L’ŒIL. Un rayon laser est émis par l’objectif.A. POUR INSTALLER LES PILES – Ce viseur laser requiert 3 piles de type bouton (LR44).
1. Assurez-vous que le laser pointe vers un ENDROIT SÛR.2. Retirez le couvercle d’accès aux piles (interrupteur) en le tournant dans le sens antihoraire.3. Placez 2 piles à l’intérieur (côté + vers le haut)4. Replacez le couvercle d’accès en le tournant dans le sens horaire jusqu’à ce qu’il soit bien serré.
B. POUR UTILISER L’INTERRUPTEURLe viseur laser est activé en pressant le bouton de l’interrupteur jusqu’à entendre un clic. Il s’éteint de la même manière. REMARQUE: Assurez-vous de toujours mettre l’interrupteur à la position éteinte (OFF) après l’usage pour éviter de vider les piles. Pour un entreposage prolongé, retirez les piles.
C. POUR INSTALLER LE MANOSTAT (interrupteur à rappel ON/OFF) 1. Votre viseur laser est également muni d’un interrupteur à rappel qui vous permet d’utiliser la pression pour
éteindre ou allumer l’appareil. Pour installer l’interrupteur par pression (manostat), retirez le couvercle d’accès aux piles (interrupteur régulier ON/OFF)
2. Vissez le manostat en place3. Utilisez les languettes adhésives fournies pour fixer le manostat à un endroit pratique sur votre arme. Le laser est
activé lorsque le manostat subit une pression4. Le laser est désactivé lorsque la pression sur le manostat est relâchée
4. COMMENT RÉGLER LA VISÉE DU LASERVous pouvez régler la hausse et la dérive de votre viseur laser. Pour déterminer les réglages à effectuer, tirez 3 coups sur une cible. Si le point d’impact se situe directement au centre de la cible, alors le viseur laser est correctement mis au point. Autrement, le viseur aura besoin d’un réglage.
DÉRIVEÀ l’aide de la petite clé Allen, fournie dans l’emballage, tournez la vis de réglage de la dérive dans le sens horaire pour déplacer le point d’impact vers la gauche. Tournez la vis dans le sens antihoraire pour déplacer le point d’impact du laser vers la droite.
HAUSSEÀ l’aide de la petite clé Allen, fournie dans l’emballage, tournez la vis de réglage de la hausse dans le sens horaire pour déplacer le point d’impact vers le bas. Tournez la vis dans le sens antihoraire pour déplacer le point d’impact vers le haut.
Prenez note que les réglages sont très sensibles. Une demi-rotation, 180 degrés, donnera un mouvement de 38 cm (10 po) à une distance de 25 mètres. Après le réglage, tirez prudemment trois autres coups et effectuez d’autres réglages au besoin.
CARACTÉRISTIQUES
Puissance de sortie Catégorie IIIa <5mW Manostat (interrupteur à rappel) Longueur : 10”
Longueur d’onde 635- 655 Taille de l’orifice 19mm
Taille du point .35” @ 10 mètres Longueur (laser seulement) 2,75 po
Rayonnement visible De jour – 25 mètres De nuit – 100 Piles Deux piles LR44 au
lithium
Réglage de la hausse/dérive +/- 10 pi @ 100 mètres
GARANTIE LIMITÉE À VIE SUR LES PRODUIT CENTERPOINTVotre produit CenterPoint™ est garantie contre tout défaut de matériaux et de fabrication pour la durée de vie de l’acheteur initial. Cette garantie ne couvre pas les dommages causés par l’usure normale ni par la négligence dans l’entretien courant, et n’inclut pas les piles et accessoires. La garantie demeure en vigueur tant que l’acheteur initial est propriétaire du produit, et elle n’est pas transférable. Dans le cas d’une défectuosité couverte par cette garantie, nous procéderons la réparation ou au remplacement du produit, à notre discrétion, si toutefois notre inspection indique qu’un défaut d’origine est en cause. CenterPoint se réserve le droit de remplacer tout produit qui n’est plus en produc-tion par un produit similaire de même valeur et de même utilité. Si CenterPoint détermine que la réparation n’est pas couverte au titre de la garantie, des frais de réparation pourraient être chargés. Cette garantie est limitée et ne couvre pas les dommages causés par une mauvaise utilisation, une manipulation ou installation inadéquate, ou une réparation effectuée par quelqu’un d’autre que le personnel de CenterPoint.
Cette garantie limitée n’inclut pas les dommages indirects, les dommages ou frais accessoires, y compris les dom-mages matériels ou toute autre dépense engagée. CenterPoint décline toutes garanties implicites. Certains territoires ne permettent pas l’exclusion ou la limitation des dommages accessoires ou indirects ou les restrictions sur les garan-ties implicites, par conséquent, les clauses limitatives ou exclusives ci-dessus peuvent ne pas s’appliquer dans votre cas. Cette garantie vous confère certains droits reconnus par la loi. Vous pouvez également détenir d’autres droits qui varient d’un territoire à l’autre et d’un pays à l’autre.
RÉCLAMATIONS AU TITRE DE LA GARANTIE/ SERVICE DE RÉPARATIONSi votre produit a besoin d’être réparée, appelez le Service à la clientèle CenterPoint au 1-800-726-1122 ou visitez notre site Web à www.centerpointoptics.com. N’ESSAYEZ PAS DE LA DÉSASSEMBLER! Les désassemblages ou modifications effectués autrement que par CenterPoint Precision Optics annuleront la garantie.Clients aux États-Unis: Veuillez communiquer avec CenterPoint avant d’expédier votre produit. Annexez au produit vos nom, adresse et numéro de téléphone, une description du problème, et une copie de la facture et de votre garan-tie. Un chèque ou mandat au montant de 10 $ pour couvrir les frais de poste et de manutention est également requis. Emballez et retournez à CenterPoint, Crosman Corporation, 7629 Rts. 5 & 20, Bloomfield, NY 14469. CenterPoint n’assumera aucune responsabilité pour la perte ou les dommages survenus au cours de l’expéditionClients à l’international: Veuillez retourner le produit au distributeur le plus près de chez vous. Si vous n’en connais-sez aucun, veuillez appeler au 585-657-6161 et demander une assistance auprès de notre Service international. Des frais d’expédition et de manutention peuvent s’appliquer.