migrate-small-business 2003 sbs 2011 - guichou.frguichou.fr/contenu/procedures/windows server -...
TRANSCRIPT

Home•About•Hire Me!•
Demazter's Blogif it fit's it's in!Stay updated via RSS
Donate•
Due to numerous requests for the ability to send donations I have included a PayPal donation button.
This is by no means expected but if any of my guides saved you time and/or money and you feel the need you now can. Please click the link below.
SSL Certificates•
Need a commercial SSL certificate for your Exchange or Small Business Server. Buy an SSL Certificate from here: http://www.exchangecertificates.com and remove certificate popups and warning messages.
Recent Posts•
Windows SBS Company Web Connector error when preparing for SBS 2011 Migration◦
Installing SBS Certificate Package Remotely◦
Super Service – UK iPod Repairs◦
Migration Tip #5 – The Aftermath ( SBS 2011 migration )◦
Migration Tip #4 – The Migration ( SBS 2011 migration )◦
Categories•
Backup (2) ◦
Exchange Server (42) ◦
ISA (2) ◦
Migration Guides (9) ◦
Small Business Server 2008 (14) ◦
Small Business Server 2011 (2) ◦
Uncategorized (2) ◦
VMWare (1) ◦
Windows 2000 (6) ◦
Windows 2003 (6) ◦
Blogroll•
Alan Hardisty's Blog◦
Chris Dent◦
Matthew Huxtable (tigermatt)◦
Mike Kline – MVP◦
MS Exchange Team Blog◦
Nitin Gupta – MVP◦ Follow
lundi 13 février 2012
Blog Stats•
210,347 hits◦
Email Subscription•
Enter your email address to subscribe to this blog and receive notifications of new posts by email.
Join 63 other followers
Sign me up!
Migrate Small Business Server 2003 to Small Business Server 2011 ( SBS 2011 migration guide )
Posted: February 24, 2011 in Migration Guides, Small Business Server 2008 Tags: migrate sbs 2011, sbs 2003 to sbs 2011 migration, sbs 2011 migration, Sbs 2011 migration guide, sbs migration, small business server 2011 migration 24
This guide is intended to provide step by step inbeen written using the preview version of SBS2011 therefore some structions on how to migrate from Small Business Server 2003 to Small Business Server 2011.
NOTE: This guide has of the screens may look slightly different on the final release.
For this migration to work you will need the following software:•Windows Small Business Server 2003 (SBS 2003)•Windows Small Business Server 2011•Microsoft Baseline Configuration Analyzer which can be downloaded from: http://www.microsoft.com/downloads/en/details.aspx?familyid=1B6E9026-F505-403E-84C3-A5DEA704EC67&displaylang=en
•
Steps required:
Health Checks on Small Business Server 20031.Configure SBS2003 for single NIC2.Run Migration Preparation tool on SBS2003 & Create Answerfile3.Administrative User Creation4.Setting data locations5.Configure the Network6.Configure the Internet Address7.Migrate Exchange Mailboxes and Settings8.Remove Legacy Group Policies and Logon Settings9.Migrate users’ Shared Data10.Migrate Fax Data11.Migrate Users and Groups12.Uninstall Exchange 2003 from Small Business Server 200313.Check Transfer of the 5 FSMO roles to SBS201114.DCPROMO SBS 2003 server so it is no longer a domain controller and remove from network15.
Step 1. Health Checks on Small Business Server 2003
The absolute first thing you need to do is take a SYSTEM STATE backup of your Small Business Server as well as a full system backup. There is little chance of the data getting lost but the SYSTEM STATE backup backs up Active Directory so that if it all goes wrong we can recover it if needed.
Follow
lundi 13 février 2012
To do this from using your preferred backup product ensure that System Stare is selected from the selection list then run a backup.
What you then need to do on the SBS 2003 server is to make sure you have all the latest available updates. This means you should at a minimum have:
Windows 2003 Service Pack 2 – verify this by right clicking on My Computer and select properties. It should tell you here the Windows Service Pack
•
Windows Small Business Server Service Pack 1 – verify this by checking the registry key HKEY_LOCAL_MACHINE\Software\Microsoft\SmallBusinessServer\ServicePackNumber you are looking for a value of 1 in the bracket.
•
Microsoft Exchange 2003 Service Pack 2 – verify this using the Exchange System Manager. Navigate to first administrative > Servers. With the Servers folder highlighted on the right hand side you will see the SBS2003 servername with the service pack version listed.
•
Once you have installed all of the above, run Windows Update and make sure you select the option in the blue banner bar across the top for Microsoft Update. Microsoft Update will then allow you to update all Microsoft products installed on the server providing a more comprehensive update solution. Keep running the check and installing all updates until there are no more available. Further details on this process can be found in my article here: http://demazter.wordpress.com/2010/06/21/get-more-from-windows-updates/
Check the health of your Active Directory by running DCDIAG, if there is anything reported as an error fix it before moving on.
A common problem that can cause this migration to fail is that the SBS 2003 server does not have its own IP address listed for DNS in the network properties under TCP/IP. If this is the case, update it so that it does (do not use the loopback 127.0.0.1 address).
Step 2 – Configure SBS2003 for single NIC
Before you can migrate from SBS2003 it needs to be configured in a single NIC configuration and ISA server (if in use) needs to be removed.
To do this uninstall the ISA components from Add/Remove programmes.
You may also need an additional internet router appropriate for the type of connection you use. This should support NAT and needs to be configured with an IP address to match the internal NIC on your server.
Once you have done this, disable the second NIC and then run the Connect to the Internet Wizard to ensure SBS2003 is configured correctly.
I would then suggest a reboot to ensure that all these changes are taken in to effect.
Step 3. Run Migration Preparation tool on SBS2003 & Create Answerfile
As part of the Migration Preparation tool it will run the best practice analyzer to identify any issues with the current setup. Before you run the tool you will need to download and install from Microsoft Baseline Configuration Analyzer which can be downloaded from: http://www.microsoft.com/downloads/en/details.aspx?familyid=1B6E9026-F505-403E-84C3-A5DEA704EC67&displaylang=en
We can then run the wizard by inserting the SBS2011 DVD in to the SBS2003 server drive. Allow it to autoplay and you should see the following screen. If you don’t have a DVD drive in the SBS2003 server then there are a few options. Either use a USB DVD Drive, share the drive out from another workstation that does have a DVD drive, or copy the contents of the SBS2011 DVD to the SBS2003 server hard drive. The folders you require specifically are TOOLS and SOURCES. If you copy these 2 folders then instead of seeing the link below you will need to run the SourceTool installer from the TOOLS folder.
Follow
lundi 13 février 2012

From here we need to select the option for Install the Migration Preparation Tool . The first screen we will see asks about getting and installing installation updates. My recommendation here would be to not install updates unless you are encountering an issue that has been identified by the SBS team and you are following specific advice regarding this. (screen below)
Once you have made your choice, the following screen will ask you to confirm that you have an adequate backup of the SBS system. Obviously the data needs to be backed up. But the important thing that needs to be backed up that is often missed is the System State Backup. This includes Active Directory and will be needed to recover with should the migration fail. (screen below)
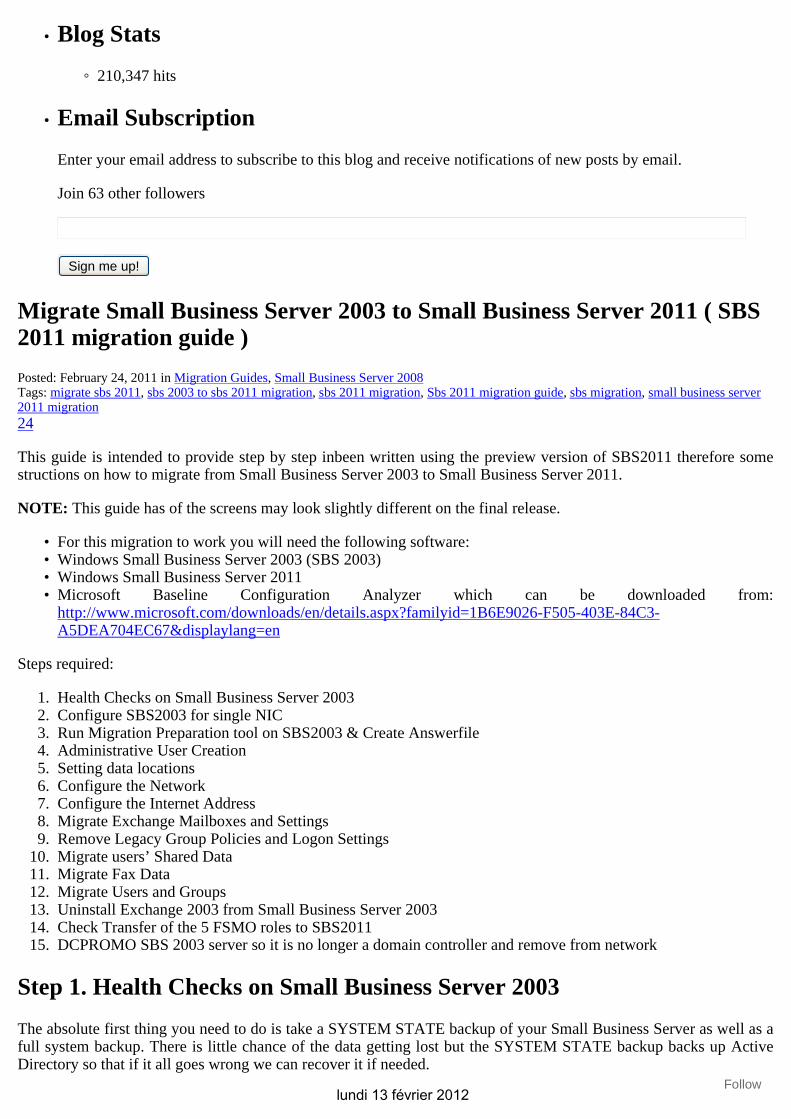
Once you check the box to say you have a backup and click next you will see the screen below. This is preparing Exchange and Active Directory for the introduction of your new SBS2011 server. We are looking for 4 green ticks here.
Follow
lundi 13 février 2012
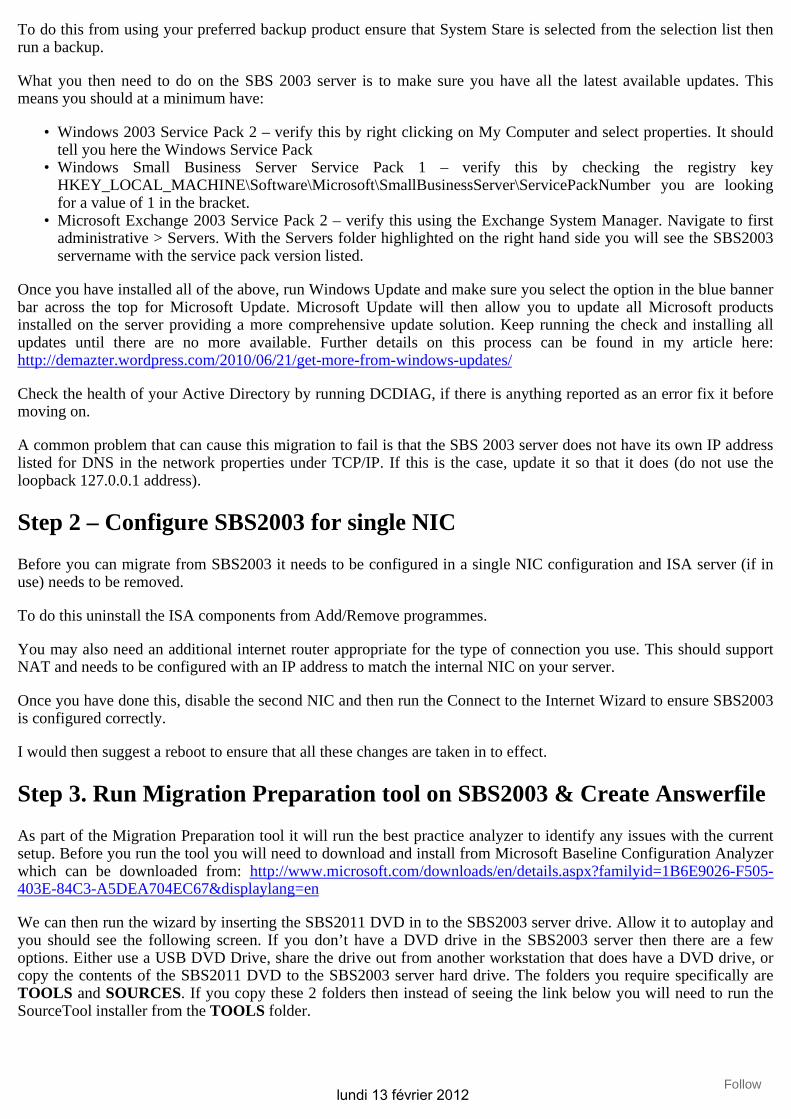
Once this has completed click next. The next stage is the Migration Wizard will use the baseline analyzer tools you installed earlier to check the organisation for any misconfigurations that should cause the migration to fail (screen below)
This could take a few minutes but what we are hoping to see is the screen below that says we have no errors. This means we are ready to proceed with the introduction of the new server.
Clicking Next to move on will tell us the source server has been successfully (image below) prepared and give us the option to view the migration guide. At time of writing this article there was no migration content on the link provided.
Follow
lundi 13 février 2012

The second option is to create an answer file. This is essential for the successful migration to SBS2011 so click this option and complete with the detail as illustrated below. The reason I select these options is that it then asks you to confirm some information at the installation stage. Almost like a second check before proceeding. One of the key options is not to perform any updates. This can be done after the migration, and with my experience from SBS2008 migrations these updates have been known to make changes which cause the migration to fail.
Now we need to save the answer file using the save option. Once done, copy it to a USB drive and place this in your new server along with the SBS2011 DVD and post up.
The first screen we see is the language and keyboard selection screen (image below)
Make the appropriate selections and click next.
We then see the screen below. Click Install Now
Follow
lundi 13 février 2012

We are then presented with the usual License Agreement screen (below). Put a check in the check box and click Next. Obviously only if you agree to the licensing terms as set out by Microsoft.
The following screen (below) provides any storage that has already been configured on your new hardware. If you don’t see anything here you will need to load 3rd party drivers from your vendor using the Load Driver option. If you still don’t see anything listed then you may need to configure your RAID Controller so that there is a volume, most will do this by default on first boot if you don’t select to configure yourself, but some might not.
Once you have made the appropriate selections click next and we will see the usual Windows 2008 R2 component configuration and file copy screen as below.
Follow
lundi 13 février 2012

Once this has finished the server will reboot and display the screen below. As this is a migration we will be selecting Server Migration and then click next.
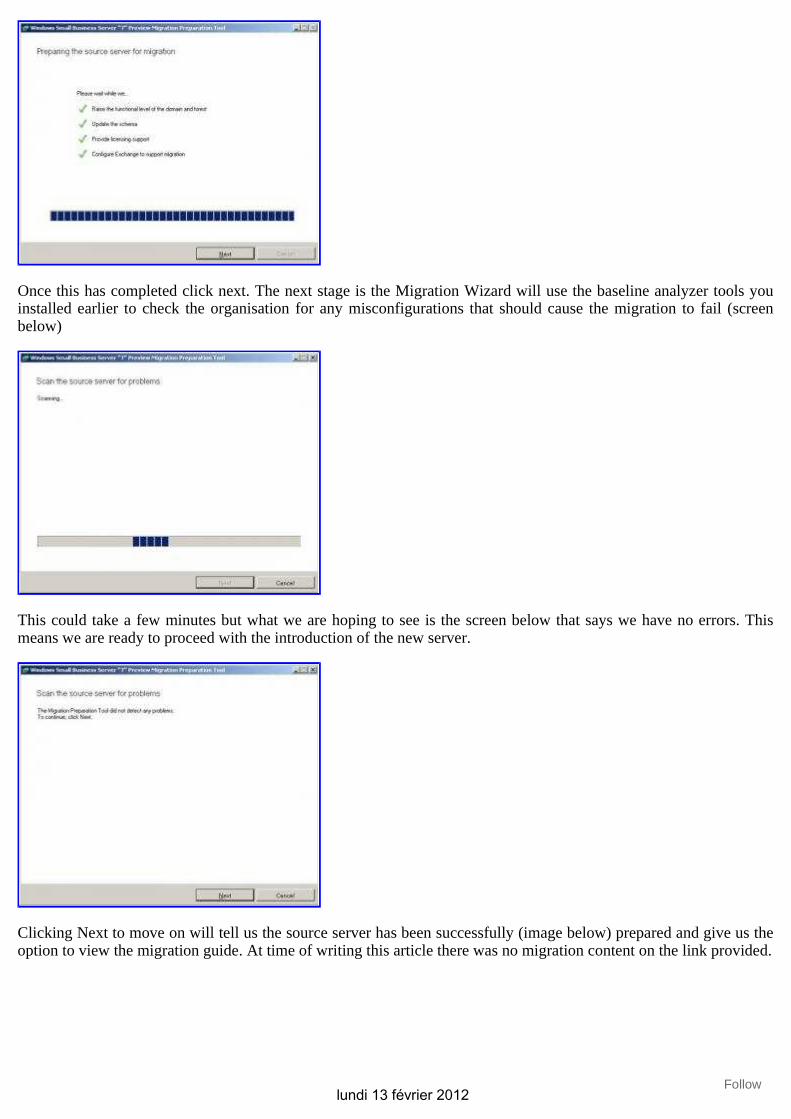
The screen below is the time zone and date/time selection screen. It is absolutely essential that this matches the source server otherwise connection to the domain and promotion to a domain controller will fail.
Verify the time zone and date/time then click Next.
The screen below asks you to verify the source server IP address, the IP address you wish to assign the new server and the gateway address. Confirm the details and then click next.
Follow
lundi 13 février 2012
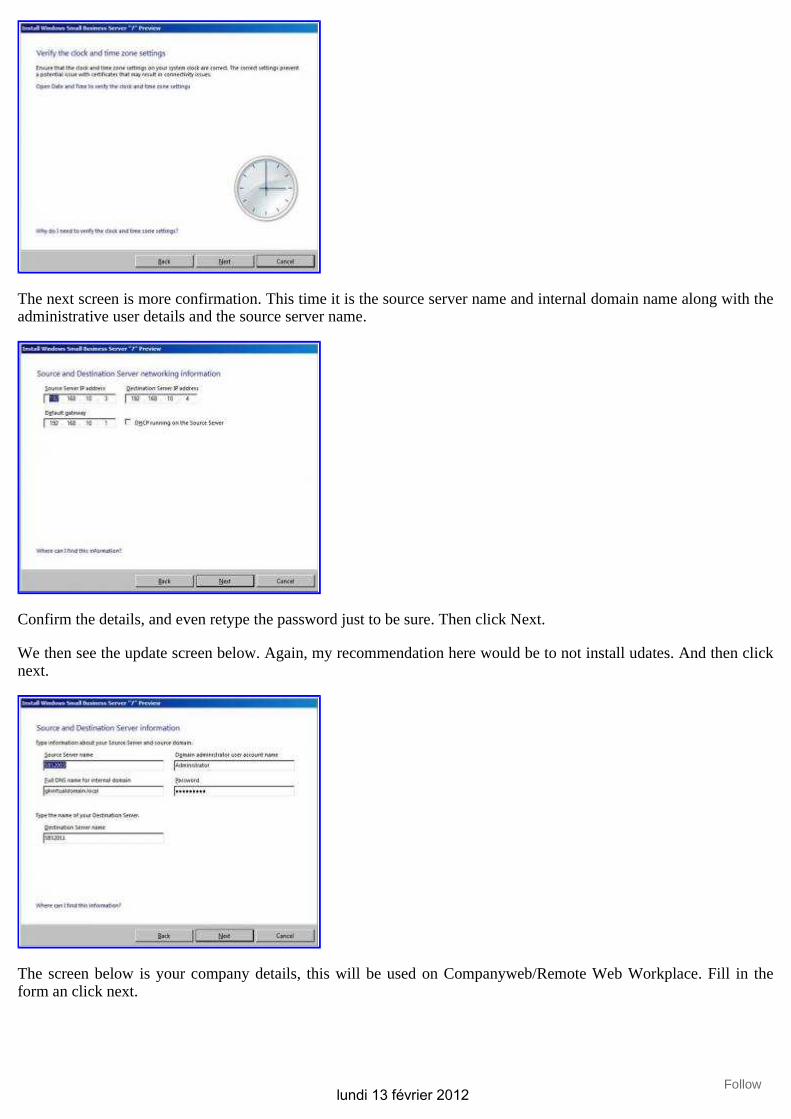
The next screen is more confirmation. This time it is the source server name and internal domain name along with the administrative user details and the source server name.
Confirm the details, and even retype the password just to be sure. Then click Next.
We then see the update screen below. Again, my recommendation here would be to not install udates. And then click next.
The screen below is your company details, this will be used on Companyweb/Remote Web Workplace. Fill in the form an click next.
Follow
lundi 13 février 2012

We then see the screen below which is the start of the SBS2011 component installation, this could take around 30-45 minutes and you can expect the server to reboot at least once during this phase.
Once this has finished you should be presented with the SBS2011 desktop and the screen below. This means that the installation phase of the migration has been completed.
If there were any problems with the migration you would see a troubleshooting assistant informing you of what has failed and how to correct it.
Step 4. Administrative User Creation
Now that SBS2011 has been successfully installed and you have logged in for the first time we will see SBS console. Those of you familiar with SBS2008 will notice that not much has changed.
Follow
lundi 13 février 2012

As with SBS2008 most of the tasks we need to complete need to be performed with an Administrative user other than the built in Administrator account. This was not the case with SBS2003 and you probably do not have another Administrative user. If this is not completed we will receive the error below when trying to launch the Migration Wizard .
So the first step is to create this user.
Using the SBS Console select the Users and Groups option across the top of the console. You will then see the screen as illustrated below.
There will be no users listed here, don’t panic, this is perfectly normal. You will not see the existing users in the SBS Console until the migration is complete.
Click on the Add a new user account on the right hand side. This will launch the new user wizard.
Follow
lundi 13 février 2012
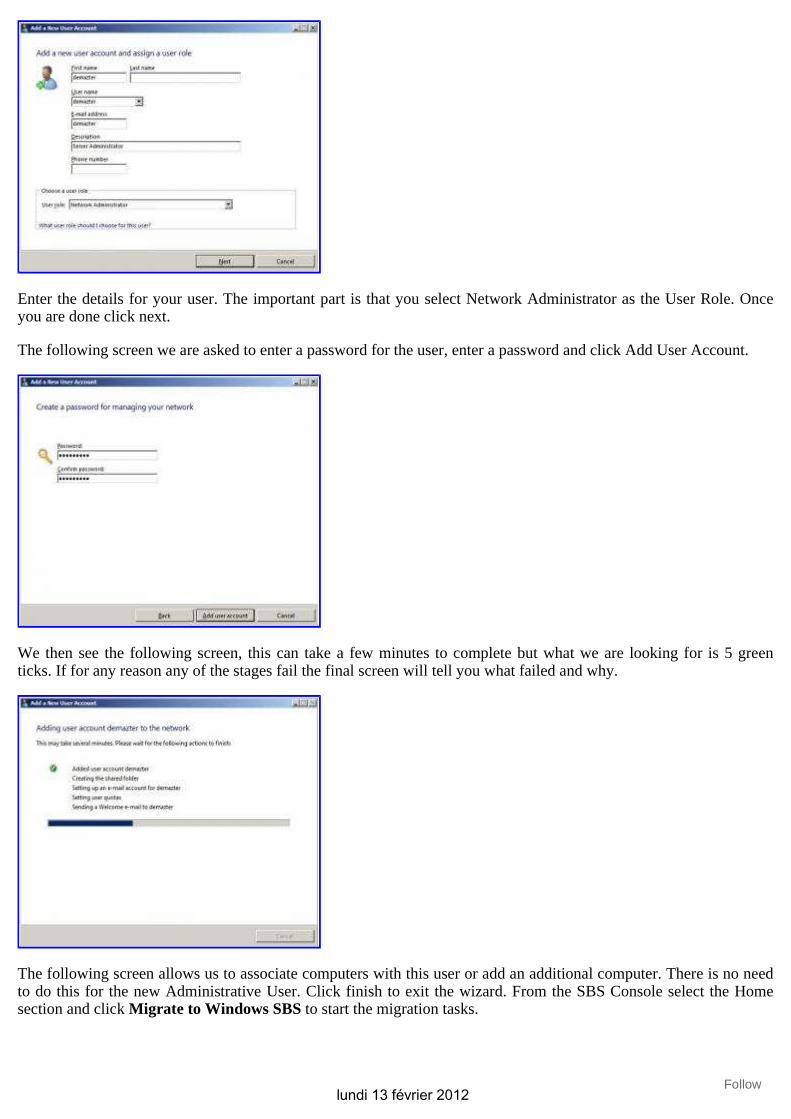
Enter the details for your user. The important part is that you select Network Administrator as the User Role. Once you are done click next.
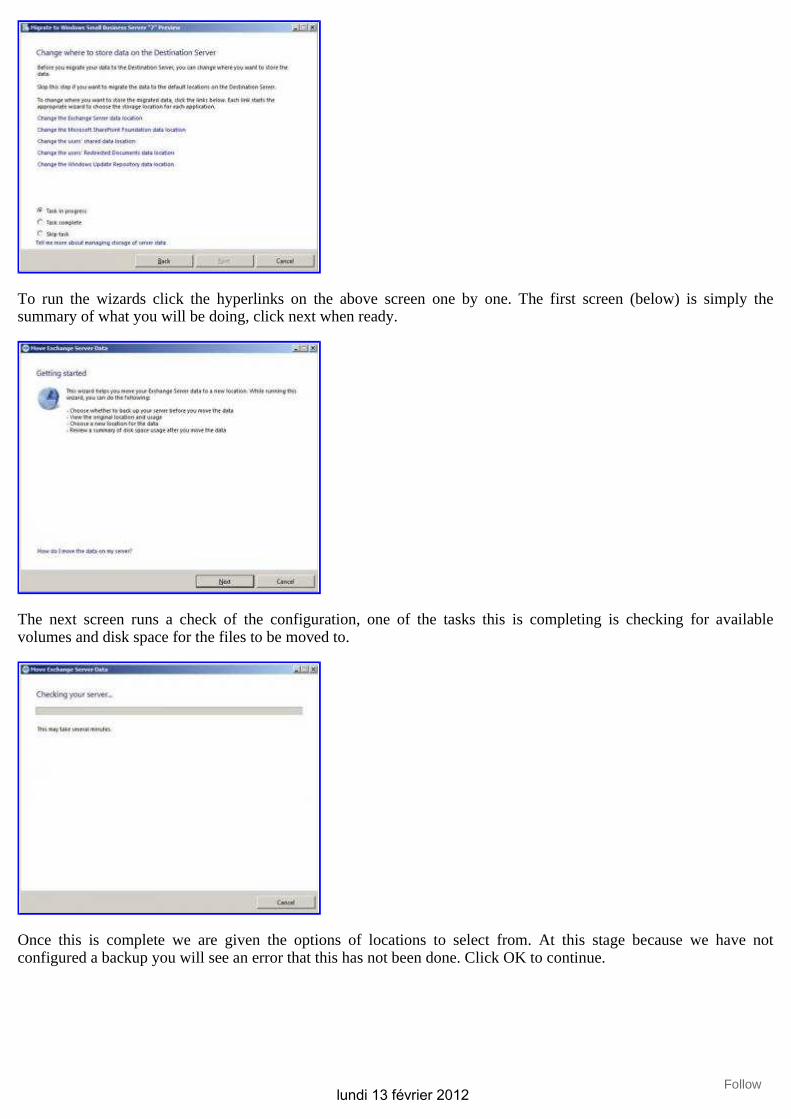
The following screen we are asked to enter a password for the user, enter a password and click Add User Account.
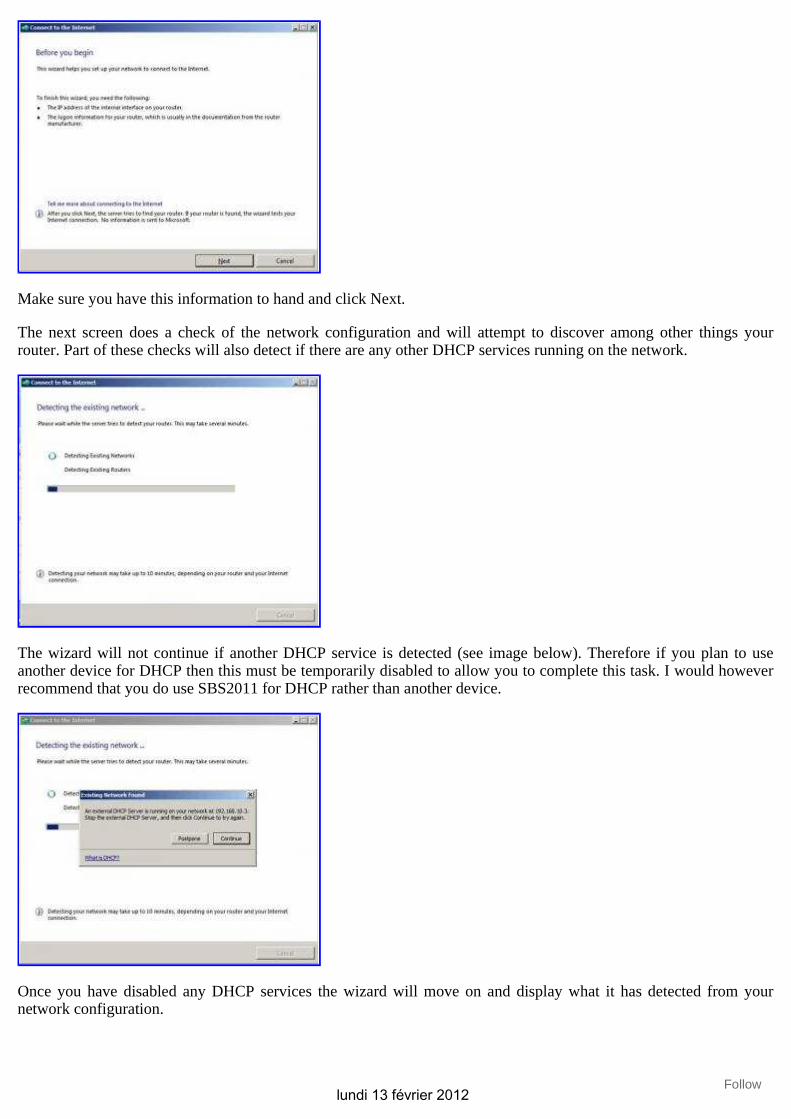
We then see the following screen, this can take a few minutes to complete but what we are looking for is 5 green ticks. If for any reason any of the stages fail the final screen will tell you what failed and why.
The following screen allows us to associate computers with this user or add an additional computer. There is no need to do this for the new Administrative User. Click finish to exit the wizard. From the SBS Console select the Home section and click Migrate to Windows SBS to start the migration tasks.
Follow
lundi 13 février 2012

Step 5. Setting data locations
When launching the migration wizard there is a list of tasks to complete. These should be done in the order they are presented. As illustrated below.
The first task is to set the data locations for Exchange, Sharepoint, Shared Folders, Redirected My Documents and Windows Software Update Services. The wizards are the same for each so this guide will only run through one of them.
NOTE: If you don’t have a second volume configured there is no need to run this part. If you try to you will receive the following error.
If you do not have a second volume and don’t intend to have one, then on the first screen of the wizard put a check in the Task Complete radio and click next. Follow
lundi 13 février 2012
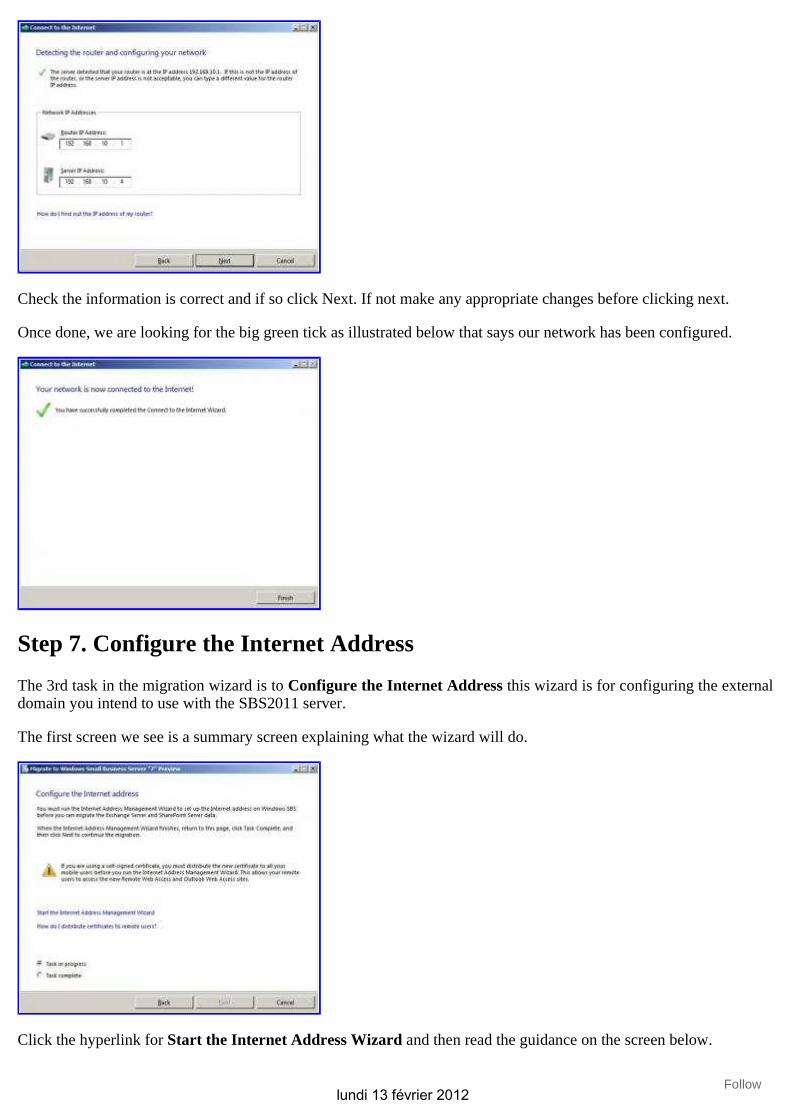
To run the wizards click the hyperlinks on the above screen one by one. The first screen (below) is simply the summary of what you will be doing, click next when ready.
The next screen runs a check of the configuration, one of the tasks this is completing is checking for available volumes and disk space for the files to be moved to.
Once this is complete we are given the options of locations to select from. At this stage because we have not configured a backup you will see an error that this has not been done. Click OK to continue.
Follow
lundi 13 février 2012

Make the drive selection and then click Move. What we want to see is the screen below indicating that the move has been successful. Click finish and then move on to the next hyperlink to continue setting the data locations.
Step 6. Configure the Network
The next task the wizards want us to complete is the Configure the Network wizard. This is the Connect to the Internet Wizard .
When launched, the first screen we see is the one below. From here we need to select the Start the Connect to the Internet Wizard hyper link.
The following screen will give you a summary of some information that will be required to allow the wizard to be completed.
Follow
lundi 13 février 2012
Make sure you have this information to hand and click Next.
The next screen does a check of the network configuration and will attempt to discover among other things your router. Part of these checks will also detect if there are any other DHCP services running on the network.
The wizard will not continue if another DHCP service is detected (see image below). Therefore if you plan to use another device for DHCP then this must be temporarily disabled to allow you to complete this task. I would however recommend that you do use SBS2011 for DHCP rather than another device.
Once you have disabled any DHCP services the wizard will move on and display what it has detected from your network configuration.
Follow
lundi 13 février 2012
Check the information is correct and if so click Next. If not make any appropriate changes before clicking next.
Once done, we are looking for the big green tick as illustrated below that says our network has been configured.
Step 7. Configure the Internet Address
The 3rd task in the migration wizard is to Configure the Internet Address this wizard is for configuring the external domain you intend to use with the SBS2011 server.
The first screen we see is a summary screen explaining what the wizard will do.
Click the hyperlink for Start the Internet Address Wizard and then read the guidance on the screen below.
Follow
lundi 13 février 2012
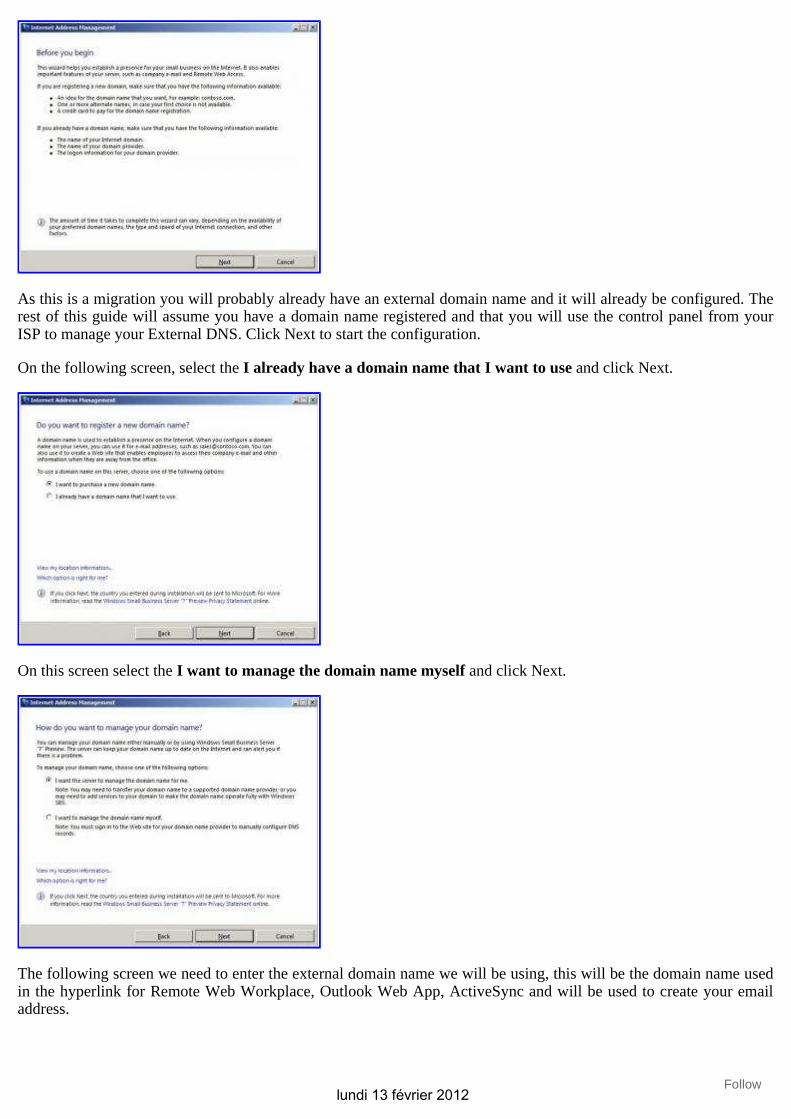
As this is a migration you will probably already have an external domain name and it will already be configured. The rest of this guide will assume you have a domain name registered and that you will use the control panel from your ISP to manage your External DNS. Click Next to start the configuration.
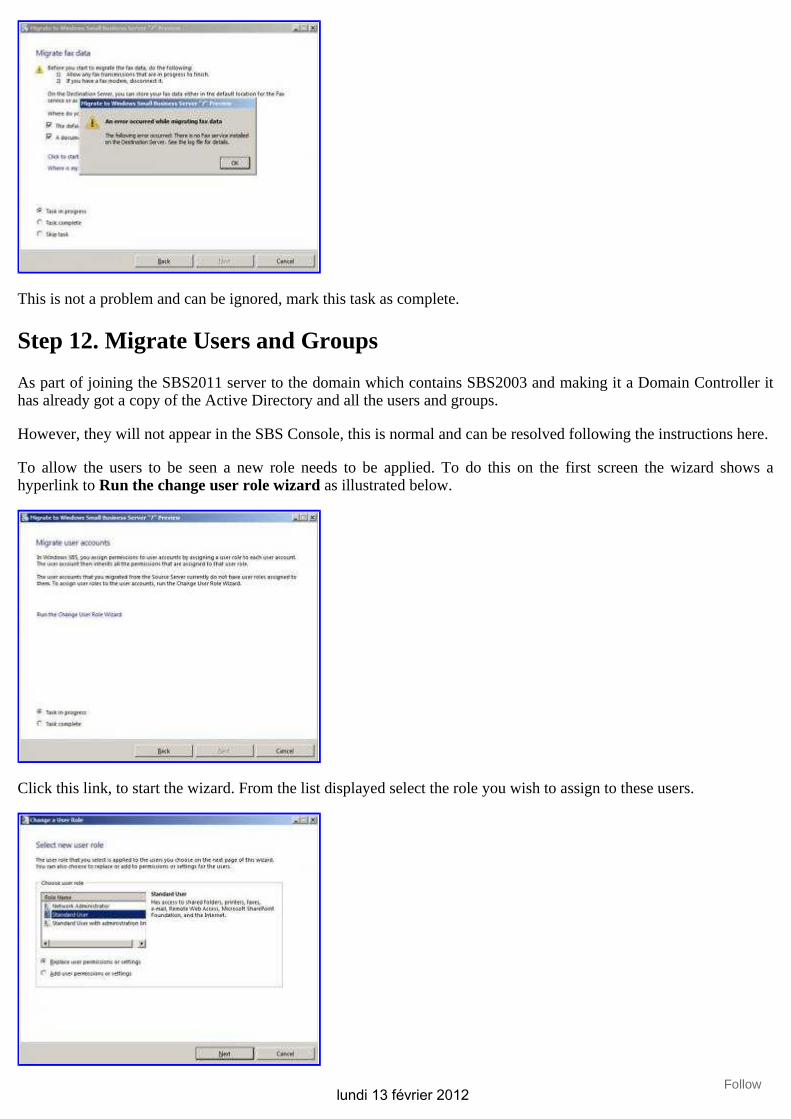
On the following screen, select the I already have a domain name that I want to use and click Next.
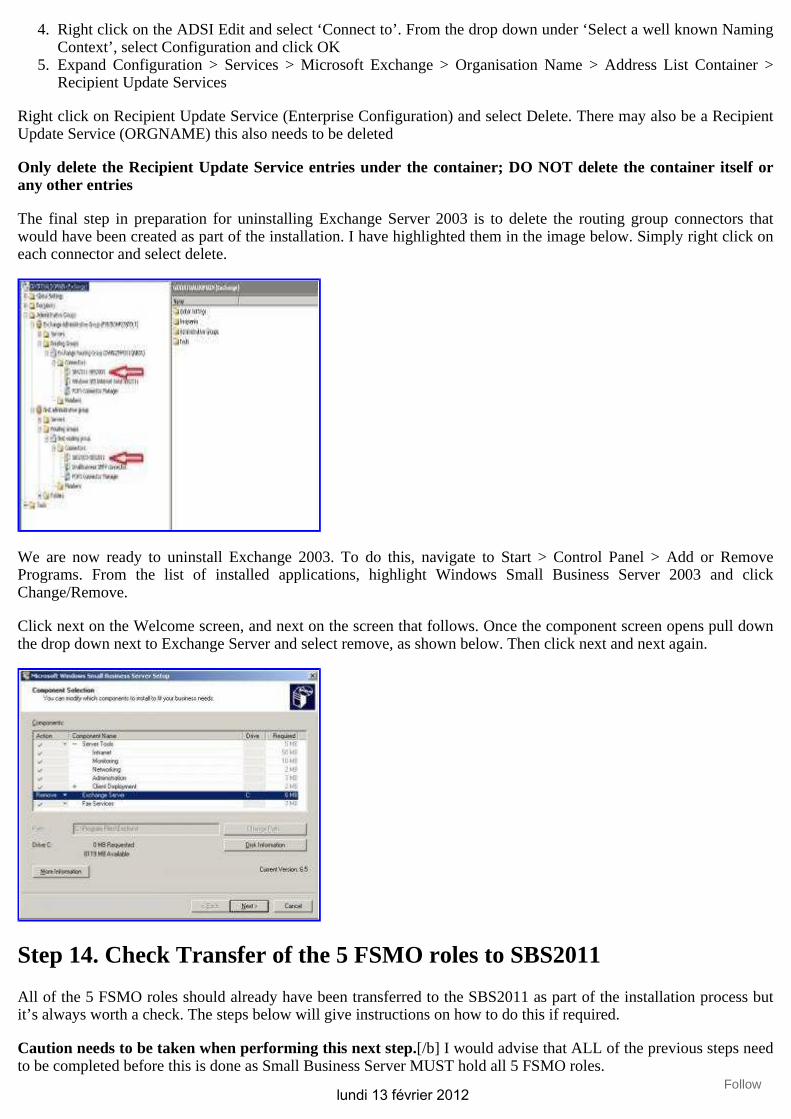
On this screen select the I want to manage the domain name myself and click Next.
The following screen we need to enter the external domain name we will be using, this will be the domain name used in the hyperlink for Remote Web Workplace, Outlook Web App, ActiveSync and will be used to create your email address.
Follow
lundi 13 février 2012

Clicking the Advanced Settings link will allow us to reconfigure the name that appears in the self-signed SSL certificate from remote.domainname.com to something else. If you have mail.domainname.com or owa.domainname.com setup currently then this is where you would enter this information.
Once done click the configure button and the wizard will make the necessary changes. Once completed we want to see the summary screen as below. We are looking for 3 green ticks to say it has been successful.
Step 8. Migrate Exchange Mailboxes and Settings
The next step of the Migration process is to migrate the Exchange Mailboxes and Public Folders. When we launch the wizard for this task we see the following screen.
Follow
lundi 13 février 2012

Clicking the hyperlink (at time of writing) takes you to the technet article for Migrating Mailboxes. To do this, we need to delve in to the Exchange Management Console. Click Start > All Programs > Microsoft Exchange Server 2010 and select Exchange Management Console.
Once the console has launched, navigate to Recipient Configuration > Mailbox. Here we should see all our mailboxes listed. All the mailboxes that appear as Legacy Mailbox are currently located on the SBS2003 servers mailstore.
You can either batch select the mailboxes using SHIFT or CTRL or do each mailbox one by one. Once you have selected the mailboxes to move, from the Action Pane on the right hand side select New Local Move Request. This will start the move mailbox wizard.
From the first screen click the browse button to select the Mailbox Store on the new SBS2011 Server. Once you have done this click Next.
Follow
lundi 13 février 2012

For this screen, leave it at defaults for the first run. If you find that mailboxes fail to move due to corrupt items you may have to increase the value here to allow those corrupt items to be skipped and for the mailbox to move successfully.
The screen above is simply a summary of what task you will be performing, clicking the New button will start the mailbox moves.
Once complete, we are looking for the following screen, all green ticks.
If you are moving the mailboxes in batches then repeat this task until all mailboxes have been moved to the SBS2011 server.
The next stage is to migrate the Public Folders. To do this, complete the following steps on the SBS 2003 Server:
Click Start > All Programs > Microsoft Exchange Server > System Manager1.Navigate to Administrative Groups > First Administrative Group > Servers > Servername > First Storage Group
2.
Right click on the Public Folder Store and select Move All Replicas. The only option that should appear in the list is your Exchange 2010 server. Click OK.
3.
Now that we have moved the data to the SBS2011 server it’s best to leave the Exchange Settings as is for a day or so to a) make sure all the data is moved before we perform any other Exchange related tasks. b) Allow all the outlook clients to update automatically with the new server settings. We can now continue with the rest of the migration.
Step 9. Remove Legacy Group Policies and Logon Settings
The next step is to remove any Legacy Group Policies and Logon Configurations that are incompatible with SBS2011. The recommendation here is that any logon scripts in use should be migrated to Group Policies and/or Group Policy preferences. However in my experience it doesn’t cause any problems if this is not done.
Follow
lundi 13 février 2012

Further information on these processes can be found here:
Remove old logon scripts for Windows SBS migration: http://technet.microsoft.com/en-us/library/cc527605(WS.10).aspx
Remove old Active Directory Group Policy objects for Windows SBS 2008 migration: http://technet.microsoft.com/en-us/library/cc527585(WS.10).aspx
Step 10. Migrate users’ Shared Data
This is another task where you need to perform the configuration manually. The steps required can be found here: http://technet.microsoft.com/en-us/library/cc527517(WS.10).aspx
Once you have the shares configured a simple backup of the SBS2003 server and restore to the 2011 server will restore all data with associated permissions.
Alternatively you could use robocopy which is part of the Windows 2003 Resource Kit which can be downloaded from: http://www.microsoft.com/downloads/en/details.aspx?familyid=9d467a69-57ff-4ae7-96ee-b18c4790cffd&displaylang=en
There is also command line reference for robocopy here: http://technet.microsoft.com/en-us/library/cc733145(WS.10).aspx
Step 11. Migrate Fax Data
There is no fax function in SBS2011 (this may change in the final release) but if you already have Fax data stored on the SBS2003 server you will need to migrate this data.
Launching the wizard will display the following screen.
Clicking the hyperlink Click to start Migrating your fax data this will move the data to the new server. At this stage if there is no fax services installed/configured on the SBS2003 server you will receive the error displayed below.
Follow
lundi 13 février 2012
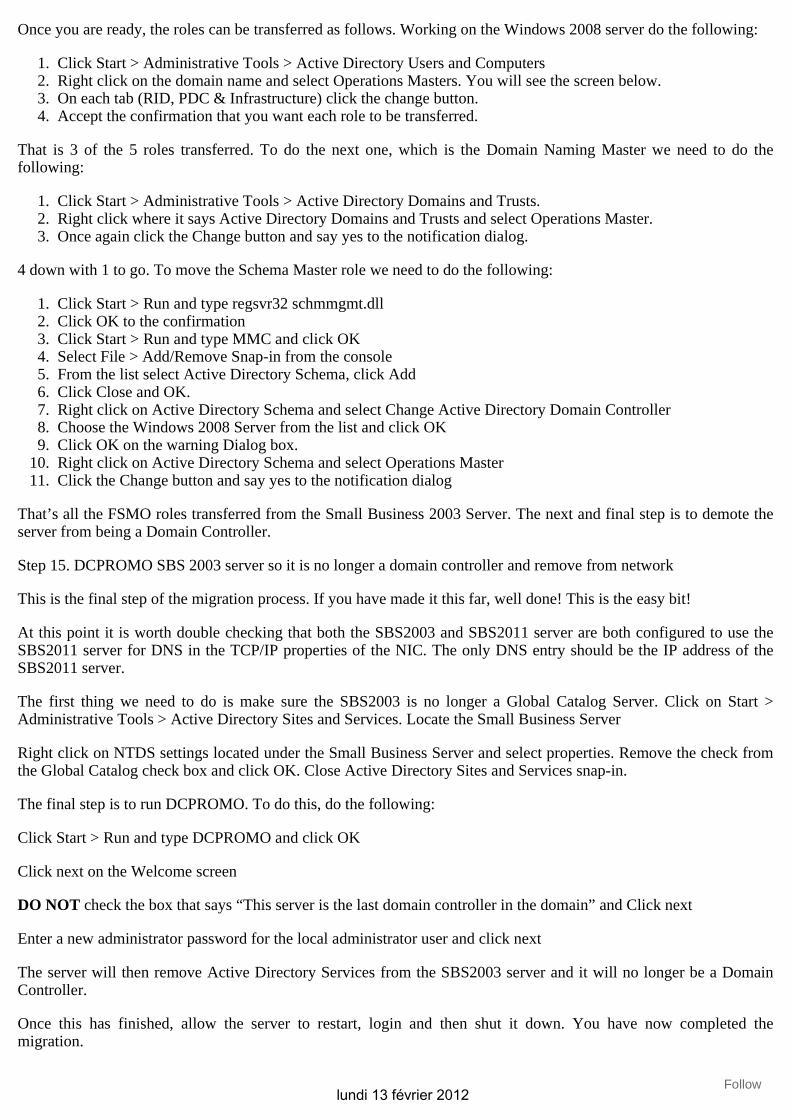
This is not a problem and can be ignored, mark this task as complete.
Step 12. Migrate Users and Groups
As part of joining the SBS2011 server to the domain which contains SBS2003 and making it a Domain Controller it has already got a copy of the Active Directory and all the users and groups.
However, they will not appear in the SBS Console, this is normal and can be resolved following the instructions here.
To allow the users to be seen a new role needs to be applied. To do this on the first screen the wizard shows a hyperlink to Run the change user role wizard as illustrated below.
Click this link, to start the wizard. From the list displayed select the role you wish to assign to these users.
Follow
lundi 13 février 2012

On the following screen put a check in the box for Display all user accounts in the Active Directory as illustrated below. This will display all of the users. Highlight your existing user then click the Add button to move them to the right hand side.
Click the change user role button. We are looking for a screen similar to the one below with lots of green ticks to confirm the roles have changed.
Step 13 – Uninstall Exchange 2003 from Small Business Server 2003
Hopefully you are arriving at this step a day or two after you have migrated all the mailboxes, if not then I would recommend you leave it for a day or two just to allow all client computers to automatically update the Exchange server setting in outlook. If you uninstall Exchange 2003 from the Small Business Server and this hasn’t happened then the clients will have to be changed manually.
To perform this task we will need Small Business Server 2003 CD 2, which will be asked for during the uninstallation. Before we can do this though, there are a few steps we need to perform otherwise we will not be able to uninstall it.
If you use Recipient Policies that are Manage Mailbox policies, then these will need to be removed. Likewise, if you have Recipient Policies that are used for both e-mail address definition and mailbox management, the settings defined under Mailbox Manager Settings will need to be removed. You DO NOT need to remove your e-mail address policies.
The Recipient Update Service is not used in Exchange 2010 and is therefore not required, so it can be removed. To do this you will need to use ADSI Edit. This can be done by using the following procedure:
Click Start > Run > MMC > Click OK1.Select File then Add/Remove Snap-in2.Click Add and select ADSI Edit and click Add, then close and OK3.
Follow
lundi 13 février 2012
Right click on the ADSI Edit and select ‘Connect to’. From the drop down under ‘Select a well known Naming Context’, select Configuration and click OK
4.
Expand Configuration > Services > Microsoft Exchange > Organisation Name > Address List Container > Recipient Update Services
5.
Right click on Recipient Update Service (Enterprise Configuration) and select Delete. There may also be a Recipient Update Service (ORGNAME) this also needs to be deleted
Only delete the Recipient Update Service entries under the container; DO NOT delete the container itself or any other entries
The final step in preparation for uninstalling Exchange Server 2003 is to delete the routing group connectors that would have been created as part of the installation. I have highlighted them in the image below. Simply right click on each connector and select delete.
We are now ready to uninstall Exchange 2003. To do this, navigate to Start > Control Panel > Add or Remove Programs. From the list of installed applications, highlight Windows Small Business Server 2003 and click Change/Remove.
Click next on the Welcome screen, and next on the screen that follows. Once the component screen opens pull down the drop down next to Exchange Server and select remove, as shown below. Then click next and next again.
Step 14. Check Transfer of the 5 FSMO roles to SBS2011
All of the 5 FSMO roles should already have been transferred to the SBS2011 as part of the installation process but it’s always worth a check. The steps below will give instructions on how to do this if required.
Caution needs to be taken when performing this next step.[/b] I would advise that ALL of the previous steps need to be completed before this is done as Small Business Server MUST hold all 5 FSMO roles.
Follow
lundi 13 février 2012
Once you are ready, the roles can be transferred as follows. Working on the Windows 2008 server do the following:
Click Start > Administrative Tools > Active Directory Users and Computers1.Right click on the domain name and select Operations Masters. You will see the screen below.2.On each tab (RID, PDC & Infrastructure) click the change button.3.Accept the confirmation that you want each role to be transferred.4.
That is 3 of the 5 roles transferred. To do the next one, which is the Domain Naming Master we need to do the following:
Click Start > Administrative Tools > Active Directory Domains and Trusts.1.Right click where it says Active Directory Domains and Trusts and select Operations Master.2.Once again click the Change button and say yes to the notification dialog.3.
4 down with 1 to go. To move the Schema Master role we need to do the following:
Click Start > Run and type regsvr32 schmmgmt.dll1.Click OK to the confirmation2.Click Start > Run and type MMC and click OK3.Select File > Add/Remove Snap-in from the console4.From the list select Active Directory Schema, click Add5.Click Close and OK.6.Right click on Active Directory Schema and select Change Active Directory Domain Controller7.Choose the Windows 2008 Server from the list and click OK8.Click OK on the warning Dialog box.9.Right click on Active Directory Schema and select Operations Master10.Click the Change button and say yes to the notification dialog11.
That’s all the FSMO roles transferred from the Small Business 2003 Server. The next and final step is to demote the server from being a Domain Controller.
Step 15. DCPROMO SBS 2003 server so it is no longer a domain controller and remove from network
This is the final step of the migration process. If you have made it this far, well done! This is the easy bit!
At this point it is worth double checking that both the SBS2003 and SBS2011 server are both configured to use the SBS2011 server for DNS in the TCP/IP properties of the NIC. The only DNS entry should be the IP address of the SBS2011 server.
The first thing we need to do is make sure the SBS2003 is no longer a Global Catalog Server. Click on Start > Administrative Tools > Active Directory Sites and Services. Locate the Small Business Server
Right click on NTDS settings located under the Small Business Server and select properties. Remove the check from the Global Catalog check box and click OK. Close Active Directory Sites and Services snap-in.
The final step is to run DCPROMO. To do this, do the following:
Click Start > Run and type DCPROMO and click OK
Click next on the Welcome screen
DO NOT check the box that says “This server is the last domain controller in the domain” and Click next
Enter a new administrator password for the local administrator user and click next
The server will then remove Active Directory Services from the SBS2003 server and it will no longer be a Domain Controller.
Once this has finished, allow the server to restart, login and then shut it down. You have now completed the migration.
Follow
lundi 13 février 2012
Rate this: 6 Votes
Share this: Facebook 2 Email Twitter 2 Reddit LinkedIn Digg
Like this: Like One blogger likes this post.
If you are still with me, well done! There are a few sections of additional reading below if you would like to know some more detail about some of the processes we have just completed. There is an excellent article from EE Expert tigermatt around the purpose of the FSMO roles which you will find under the further reading section.
Further Reading
You will also need a trusted SSL Certificate which can be purchased from http://www.exchangecertificates.com
Move/Migrate Sharepoint Services: http://technet.microsoft.com/en-us/library/cc288664.aspx
Move last legacy Exchange Server: http://technet.microsoft.com/en-us/library/bb288905(EXCHG.80).aspx
Demystifying the Active Directory FSMO Roles by tigermatt: http://www.experts-exchange.com/articles/Software/Server_Software/File_Servers/Active_Directory/Demystifying-the-Active-Directory-FSMO-Roles.html
Comments
Dale says: March 24, 2011 at 22:08
Just what I was looking for, I’ll let you know if I run into any problems.
Reply
1.
SBS 2003 to SBS 2011 Migration #3 Under Way and Going Well « Sirecomtech's Blog says: August 15, 2011 at 15:04
[...] If you are planning your own SBS 2003 to SBS 2011 migration, then Demazter’s guide comes tried and tested by me and I would highly recommend it. http://demazter.wordpress.com/2011/02/24/migrate-small-business-server-2003-to-small-business-server… [...]
Reply
2.
Installing SBS 2011 on an HP Proliant ML110 G6 Server Woes Resolved « Alan Hardisty's Blog – All Things IT Related says: November 8, 2011 at 10:45
[...] http://demazter.wordpress.com/2011/02/24/migrate-small-business-server-2003-to-small-business-server... [...]
Reply
3.
BAsim Bazyar says: December 13, 2011 at 22:30
Hi James
4.
Follow
lundi 13 février 2012
Just wanted to thank you, your instruction was very helpful, I actually paid for a swing kit which end up not using as it was too confusing, Our First Migration went perfectly fine, I would like to donate some money towards your site but can’t find any link on this page… God bless you
Baz
PCEZ Computers
Reply
demazter says: December 15, 2011 at 18:31
Hi Baz,
I am so glad the instructions helped you. I have never used a swing kit so can’t comment on it but I do know many have and have had success with it. I however, don’t see the need.
You are not the first to ask for a donation button, so I have added a widget to the side bar of my blog for this purpose.
Kind Regards Glen
Reply
◦
BAsim Bazyar says: December 15, 2011 at 22:10
Hi Glen
Sorry mate i didn’t even get your name right, Thanx again Glen, ye look the swing kit would be ok if you are planning to migrate a large organisation with plenty of time and preparation to read 400 Pages, but if you are given a job and you have only 2 Days to migrate then your instructions would be the best and I must admit your instructions are very clear, writing good instructions is a skill it self…Any way I found the donation hope it can get you a small x-mass present.
Cheers
Reply
5.
okwei says: December 21, 2011 at 03:22
I am so confused by step 13–Uninstall Exchange 2003 from Small Business Server 2003. Why not just power off the old machine? Does that mean the migation target is still the old server?
Reply
6.
demazter says: December 21, 2011 at 18:36
You need to gracefully remove Exchange from the old server and then demote it as a domain controller.
If you don’t you will have to manually perform these steps which isn’t a step you take lightly if there is a way to do it gracefully.
Reply
◦
Ben says: ■ Follow
lundi 13 février 2012

January 14, 2012 at 16:54
A quick Q on this post:
What if you plan for a clean 2003 install on the old server? Does it still need to be decommissioned? such as the graceful remove etc.
If you don’t “need” to decommission, what step can the tutorial end at?
Kurt Fainman says: December 28, 2011 at 16:57
drat, I just posted to another blog entry before seeing this…if I am doing the above but moving hardware how does the migration change? Thanks
Reply
7.
demazter says: December 28, 2011 at 17:45
You can only do this procedure to new physical or virtual hardware.
There is no in-place upgrade available for SBS2003 to SBS2011.
Reply
◦
Ben says: January 14, 2012 at 16:41
Hi, thank you for an excellent tutorial, however, due to a mess up on my side, the new server only has 2 gig of ram and therefore I cannot continue past the initial SBS 2011 setup stage at present.
My question is can my client continue to use the SBS 2003 for a week even though I have completed the steps which raises elevation etc??
A new backup will not be an issue as I can clone the drive again before starting the migration with extra memory installed on the new server.
Thanks in advance.
Reply
8.
demazter says: January 14, 2012 at 16:46
Yes, you are ok until you join the new server to the domain.
And even then you have 21 days to complete the work.
Reply
◦
Ben says: January 14, 2012 at 16:51
Thanks for the super fast reply, I can sleep tonight now. Yes I saw the 21 day notice when I closed the new server down.
Thanks again.
■
Follow
lundi 13 février 2012

Adam says: January 17, 2012 at 17:13
Great guide. Quick question. How much of the migration can I do “live” without affecting current users? Does any part of it have to be performed after hours? Thanks!
Reply
9.
demazter says: January 17, 2012 at 17:26
It can all be performed in ours. Mailboxes that are being moved will be in available whilst they are being moved but functional before and after that happens.
Other than that the whole process can be completed without downtime.
Reply
◦
Kevin Petre says: January 18, 2012 at 20:16
I ran into an issue where the 2k3 server had an expired self cert and I was unable to ‘Move all replicas’ to the target SBS system. I was getting
The SSL certificate server name is incorrect.
ID no:c103b404 Exchange system manager
I found all sorts of good ways to disable through IIS and this and that but nothing worked for me. I finally combed through Exchange Docs and found this handy command that, if the Servers are properly communicating, can pull the replicas from the new SBS
\Program Files\Microsoft\Exchange Server\V14\Scripts>.\MoveAllReplicas.ps1 -Server “Exchange2003″ -NewServer “Exchange2010″
Pulled them right over, no hassles. I figured I would share this to maybe improve sucess rate. I am eagerly waiting to finish this article as I just passed this road bumb.
Thanks a lot for the great article and the work you put in!!
Kevin
Reply
10.
MK says: January 23, 2012 at 19:17
Demazter, thanks for the great guide. One stupid question which I have to ask. The source server is still functional (AD, Exchange, ect) throughout the whole process, correct? So anytime through out if the destination server fails or crashes the source server is still fully operational. Thanks!
Reply
11.
demazter says: January 23, 2012 at 19:24
Absolutely correct.
◦
Follow
lundi 13 février 2012

The source server only stops functioning when you take it offline.
Reply
MK says: January 23, 2012 at 19:27
Thanks!
■
MK says: January 23, 2012 at 20:50
One more question. If our 2003 sbs has data spread over 4 drives will that cause any issues? Our shares are on different drive than system. Will the migration account for that? Again I’m sure this is an dumb question but just want to be sure. Thanks!
Reply
12.
Ben says: January 24, 2012 at 09:24
Morning demazter, I have hit a prorblem
“The next stage is to migrate the Public Folders”….. The only option that should appear in the list is your Exchange 2010 server”
When I click Move All Replicas (on the sbs2003), the only Public Folder Database I see does not appear to be the same database number which is on the 2011 SBS (the one which is shown when I click browse to move the legacy mail boxes)
Any ideas or advice please?
Thanks
Reply
13.
Ben says: January 24, 2012 at 09:46
Ignore my last post please. I found that what was listed in 2003 was indeed the correct database for public folders.
Reply
◦
MK says: January 24, 2012 at 20:49
What is the impact on file shares during the migration?
Reply
14.
Leave a Reply
Follow
lundi 13 février 2012

Fill in your details below or click an icon to log in:
Notify me of follow-up comments via email. Post Comment
Choosing the correct domain nameMigration Tip #1 – Source Server Health ( SBS 2011 migration )
Creative Commons•
This work by Glen Knight (demazter) is licensed under a Creative Commons Attribution-NonCommercial-NoDerivs 3.0 Unported License. Based on a work at demazter.wordpress.com.
Blog at WordPress.com. | Theme: Greyzed by The Forge Web Creations.
Enter your comment here...
Email (required) (Not published)
Name (required)
Website
Follow
lundi 13 février 2012