microsoft outlook 2007 module 1 - hillsborough...
TRANSCRIPT

http://citt.hccfl.edu
Microsoft Outlook 2007Module 1

©2007 Hillsborough Community College - CITT Faculty Professional Development
Microsoft Outlook 2007:Module 1
August, 2007
The material contained in this training material is copyrighted ©2007 Hillsborough Community College CITT Faculty Professional Development and may not be repro-duced without expressed, written permission. Other trademarks, trade names, logos, designs, brand names, and product services mentioned in this publication may be trademarks or registered trademarks of third parties.
Hillsborough Community College - CITT Faculty Professional Development
Table of Contents
i
Microsoft Outlook 2007 - Module 1
Objectives . . . . . . . . . . . . . . . . . . . . . . . . . . . . . . . . . . . . . .1
Microsoft Office Outlook 2007 . . . . . . . . . . . . . . . . . . . . . . . .3
The New Outlook Environment . . . . . . . . . . . . . . . . . . . . . . . .4
The Office Outlook Window . . . . . . . . . . . . . . . . . . . . . . . . . .5
Navigation Pane . . . . . . . . . . . . . . . . . . . . . . . . . . . . . . . . . .6
To-Do Bar . . . . . . . . . . . . . . . . . . . . . . . . . . . . . . . . . . . . . .7
Activity 1 . . . . . . . . . . . . . . . . . . . . . . . . . . . . . . . . . . .7
Ribbon . . . . . . . . . . . . . . . . . . . . . . . . . . . . . . . . . . . . . . . .8
Contextual Tools . . . . . . . . . . . . . . . . . . . . . . . . . . . . . . . . . .9
Dialogue Box Launcher . . . . . . . . . . . . . . . . . . . . . . . . . . . . .9
Microsoft Office Button . . . . . . . . . . . . . . . . . . . . . . . . . . . .10
Quick Access Toolbar (QAT) . . . . . . . . . . . . . . . . . . . . . . . . . 11
Open/Read E-Mail Message . . . . . . . . . . . . . . . . . . . . . . . . .12
Create/Send New Message . . . . . . . . . . . . . . . . . . . . . . . . . 13
Activity 2 . . . . . . . . . . . . . . . . . . . . . . . . . . . . . . . . . . 13
Insert Tab . . . . . . . . . . . . . . . . . . . . . . . . . . . . . . . . . . . . . 14
View/Send Attachments . . . . . . . . . . . . . . . . . . . . . . . . . . . 15
Create E-Mail Signature . . . . . . . . . . . . . . . . . . . . . . . . . . . 16
Activity 3 . . . . . . . . . . . . . . . . . . . . . . . . . . . . . . . . . . 16
New Contact . . . . . . . . . . . . . . . . . . . . . . . . . . . . . . . . . . .17
Distribution Lists . . . . . . . . . . . . . . . . . . . . . . . . . . . . . . . . 18
Basic Keyboard Shortcuts in Outlook 2007 . . . . . . . . . . . . . . 19
Final Activity . . . . . . . . . . . . . . . . . . . . . . . . . . . . . . . .20


1
Microsoft Outlook 2007 - Module 1
Objectives
Upon completion of this module, participants will be able to:
1. Start and Quit Microsoft Office Outlook 2007;
2. Describe the new Outlook 2007 Environment;
3. Identify and use all elements of the Main screen;
4. Use and modify the Navigation Pane;
5. Use and modify the To-Do Bar;
6. Locate and use Tabs, Groups and Commands in Outlook 2007 ;
7. Use Contextual Tools;
8. Locate and use the Dialogue Box Launcher;
9. Locate and use the Microsoft Office Button;
10. Locate and Customize the Quick Access Toolbar (QAT);
11. Open/Read e-mail Message;
12. Preview Attachments to a message received
13. Describe differences between Reply and Reply All;
14. Create/Send New Message;
15. Attach a file to an e-mail message;
16. Spell check an e-mail message;
17. Apply special options to an e-mail message;
18. Locate and use the Insert Tab;
19. Create a personal Signature;
20. Locate and use the Format Tab;
21. Create a new Contact in the Contact List;
22. Create a Distribution List;
23. Identify Basic Keyboard Shortcuts for Outlook 2007.

Hillsborough Community College - CITT Faculty Professional Development
2
�
Microsoft Outlook 2007 - Module 1
Microsoft Outlook 2007
Outlook 2007 is a communications and scheduling program that helps you correspond with others, keep track of your contacts, and organize your calendar. All personal information is managed in one place, making it quick and easy to access. This new version uses the Microsoft Office Fluent user interface and has many new features to increase your productivity.
Opening Outlook
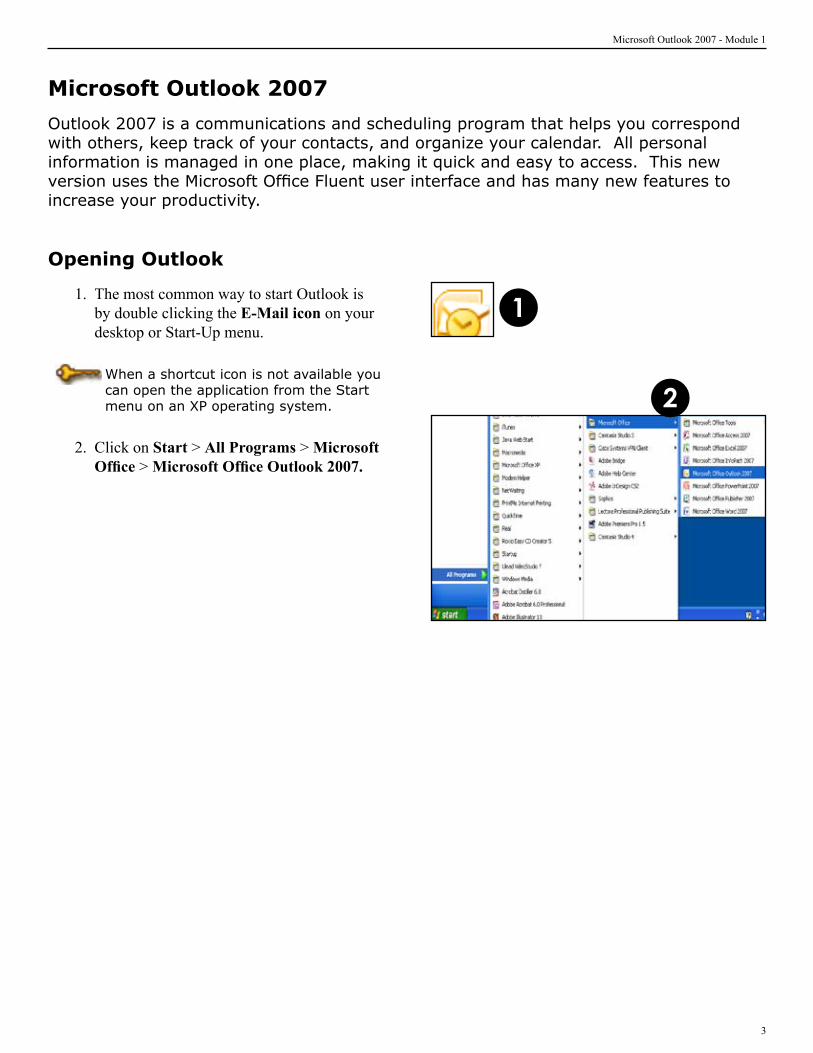
1. The most common way to start Outlook is by double clicking the E-Mail icon on your desktop or Start-Up menu.
When a shortcut icon is not available you can open the application from the Start menu on an XP operating system.
2. Click on Start > All Programs > Microsoft Office > Microsoft Office Outlook 2007.
1
2
Hillsborough Community College - CITT Faculty Professional Development
�
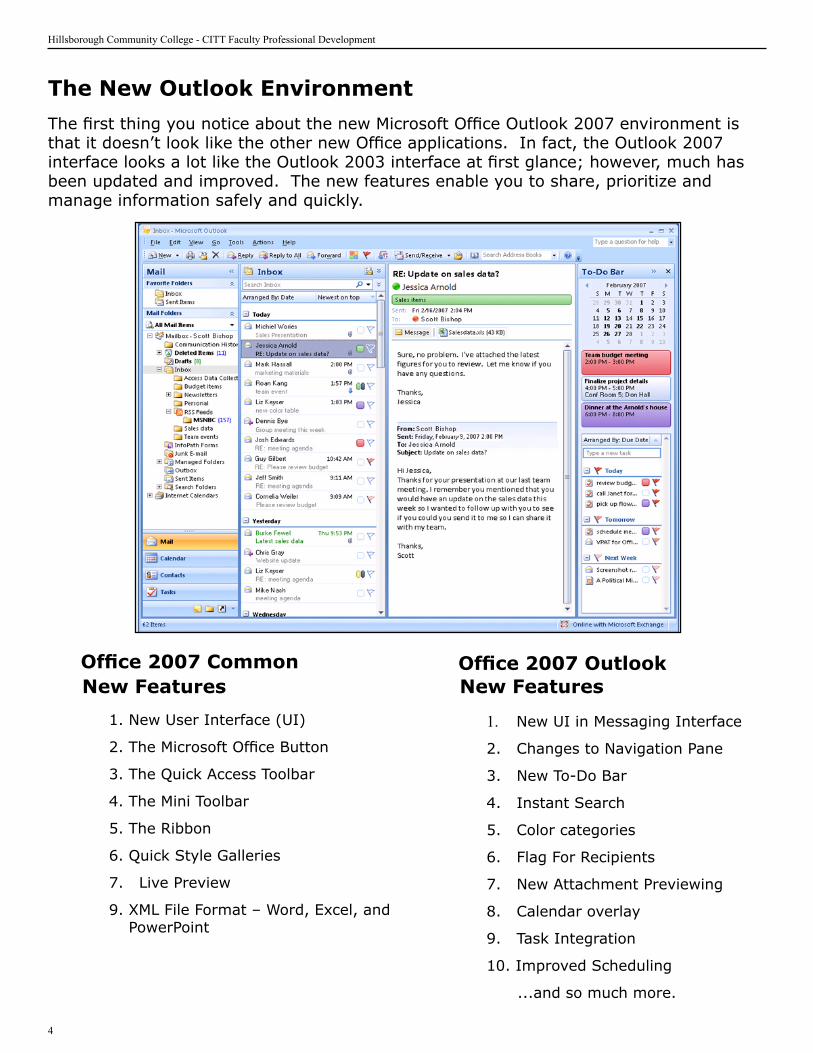
The New Outlook Environment
The first thing you notice about the new Microsoft Office Outlook 2007 environment is that it doesn’t look like the other new Office applications. In fact, the Outlook 2007 interface looks a lot like the Outlook 2003 interface at first glance; however, much has been updated and improved. The new features enable you to share, prioritize and manage information safely and quickly.
New Features
1. New UI in Messaging Interface
2. Changes to Navigation Pane
3 . New To-Do Bar
4 . Instant Search
5 . Color categories
6 . Flag For Recipients
7. New Attachment Previewing
8. Calendar overlay
9. Task Integration
10. Improved Scheduling
...and so much more.
New Features
1. New User Interface (UI)
2. The Microsoft Office Button
3. The Quick Access Toolbar
4 . The Mini Toolbar
5 . The Ribbon
6. Quick Style Galleries
7. Live Preview
9. XML File Format – Word, Excel, and PowerPoint
Office 2007 Common Office 2007 Outlook
�
Microsoft Outlook 2007 - Module 1
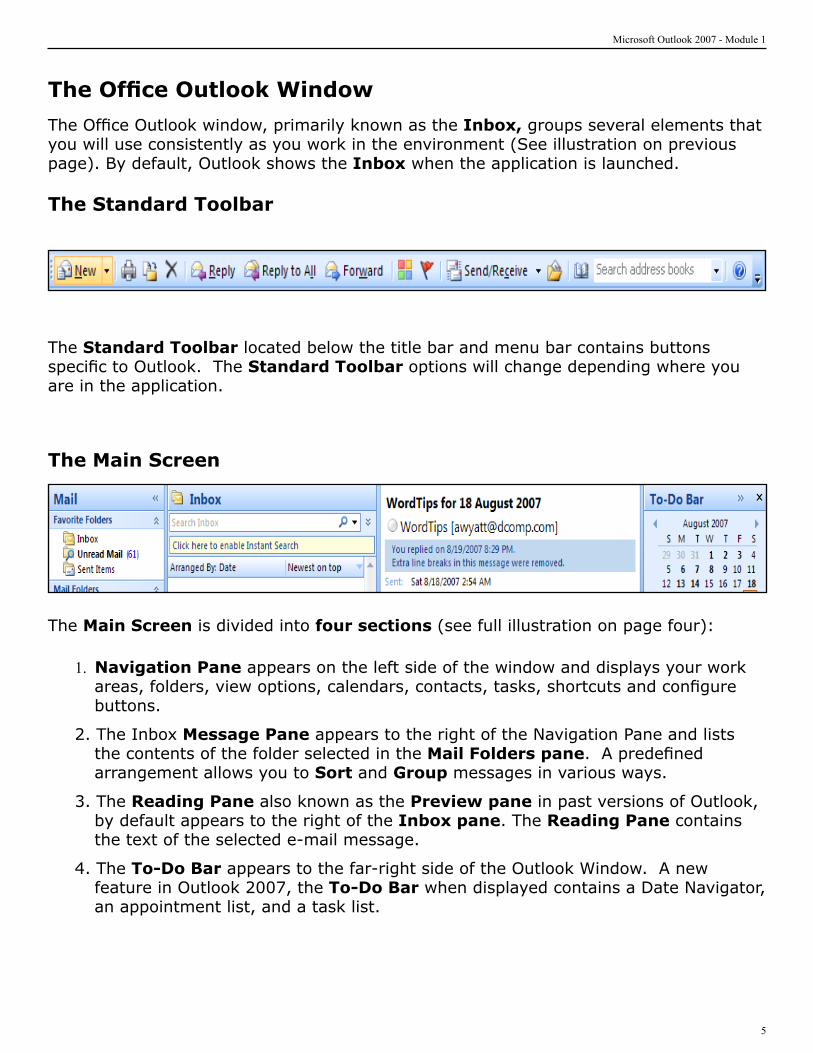
The Office Outlook Window
The Office Outlook window, primarily known as the Inbox, groups several elements that you will use consistently as you work in the environment (See illustration on previous page). By default, Outlook shows the Inbox when the application is launched.
The Standard Toolbar
The Standard Toolbar located below the title bar and menu bar contains buttons specific to Outlook. The Standard Toolbar options will change depending where you are in the application .
The Main Screen
The Main Screen is divided into four sections (see full illustration on page four):
1. Navigation Pane appears on the left side of the window and displays your work areas, folders, view options, calendars, contacts, tasks, shortcuts and configure buttons.
2. The Inbox Message Pane appears to the right of the Navigation Pane and lists the contents of the folder selected in the Mail Folders pane. A predefined arrangement allows you to Sort and Group messages in various ways.
3 . The Reading Pane also known as the Preview pane in past versions of Outlook, by default appears to the right of the Inbox pane . The Reading Pane contains the text of the selected e-mail message.
4 . The To-Do Bar appears to the far-right side of the Outlook Window. A new feature in Outlook 2007, the To-Do Bar when displayed contains a Date Navigator, an appointment list, and a task list.
Hillsborough Community College - CITT Faculty Professional Development
�
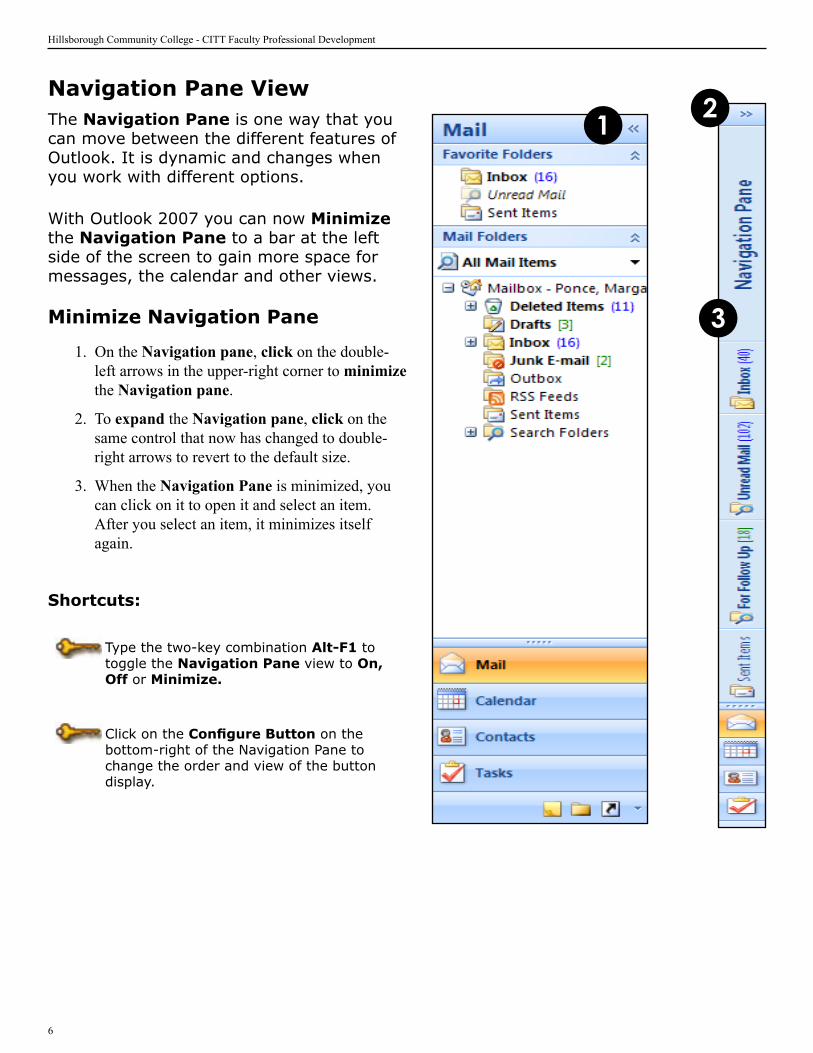
Navigation Pane ViewThe Navigation Pane is one way that you can move between the different features of Outlook. It is dynamic and changes when you work with different options.
With Outlook 2007 you can now Minimize the Navigation Pane to a bar at the left side of the screen to gain more space for messages, the calendar and other views.
Minimize Navigation Pane
1. On the Navigation pane, click on the double-left arrows in the upper-right corner to minimize the Navigation pane.
2. To expand the Navigation pane, click on the same control that now has changed to double-right arrows to revert to the default size.
�. When the Navigation Pane is minimized, you can click on it to open it and select an item. After you select an item, it minimizes itself again.
Shortcuts:
Type the two-key combination Alt-F1 to toggle the Navigation Pane view to On, Off or Minimize.
Click on the Configure Button on the bottom-right of the Navigation Pane to change the order and view of the button display.
1
3
2
7
Microsoft Outlook 2007 - Module 1
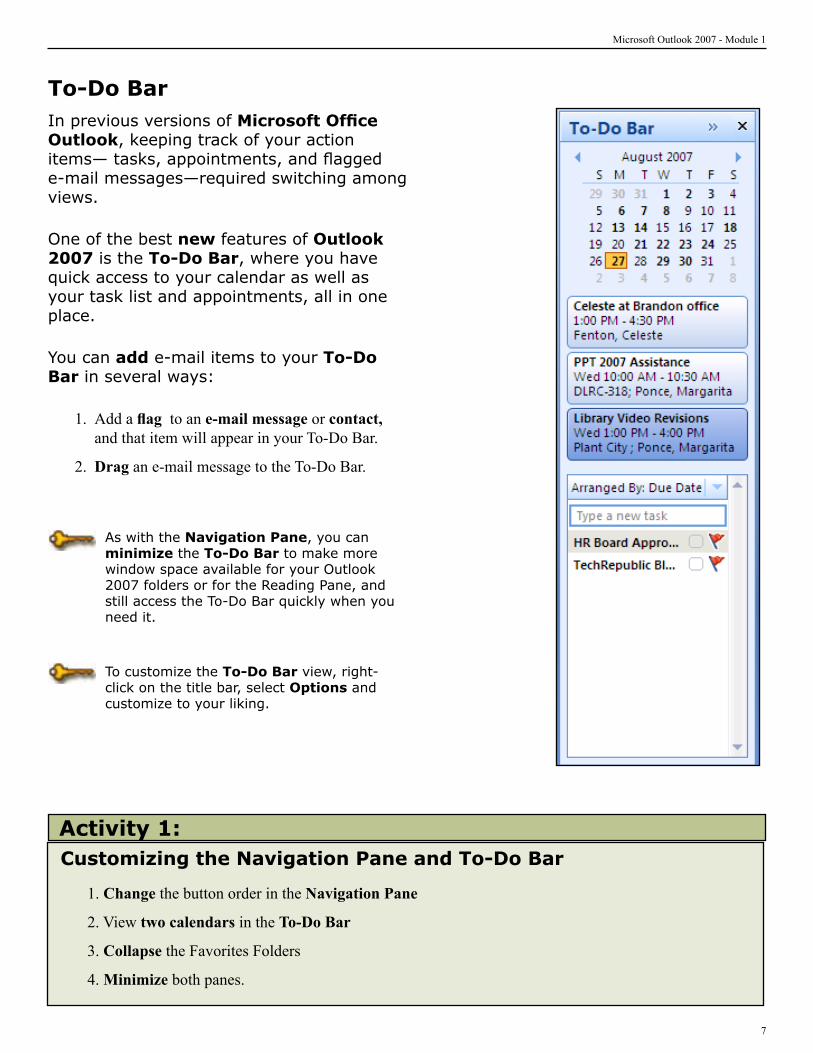
To-Do BarIn previous versions of Microsoft Office Outlook, keeping track of your action items— tasks, appointments, and flagged e-mail messages—required switching among views .
One of the best new features of Outlook 2007 is the To-Do Bar, where you have quick access to your calendar as well as your task list and appointments, all in one place .
You can add e-mail items to your To-Do Bar in several ways:
1. Add a flag to an e-mail message or contact, and that item will appear in your To-Do Bar.
2. Drag an e-mail message to the To-Do Bar.
As with the Navigation Pane, you can minimize the To-Do Bar to make more window space available for your Outlook 2007 folders or for the Reading Pane, and still access the To-Do Bar quickly when you need it.
To customize the To-Do Bar view, right-click on the title bar, select Options and customize to your liking.
Customizing the Navigation Pane and To-Do Bar
1. Change the button order in the Navigation Pane
2. View two calendars in the To-Do Bar
�. Collapse the Favorites Folders
�. Minimize both panes.
Activity 1:
Hillsborough Community College - CITT Faculty Professional Development
�
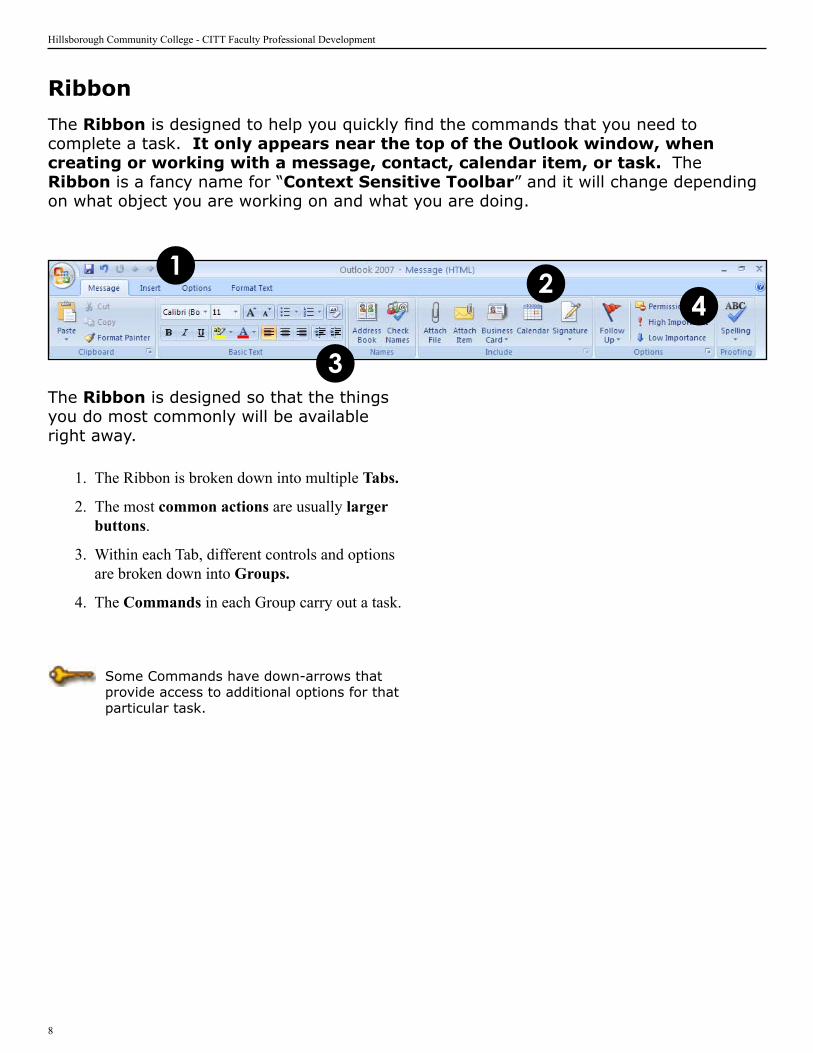
The Ribbon is designed to help you quickly find the commands that you need to complete a task. It only appears near the top of the Outlook window, when creating or working with a message, contact, calendar item, or task. The Ribbon is a fancy name for “Context Sensitive Toolbar” and it will change depending on what object you are working on and what you are doing.
Ribbon
The Ribbon is designed so that the things you do most commonly will be available right away .
1. The Ribbon is broken down into multiple Tabs.
2. The most common actions are usually larger buttons.
�. Within each Tab, different controls and options are broken down into Groups.
�. The Commands in each Group carry out a task.
Some Commands have down-arrows that provide access to additional options for that particular task.
21
3
4
�
Microsoft Outlook 2007 - Module 1
Dialog Box Launcher
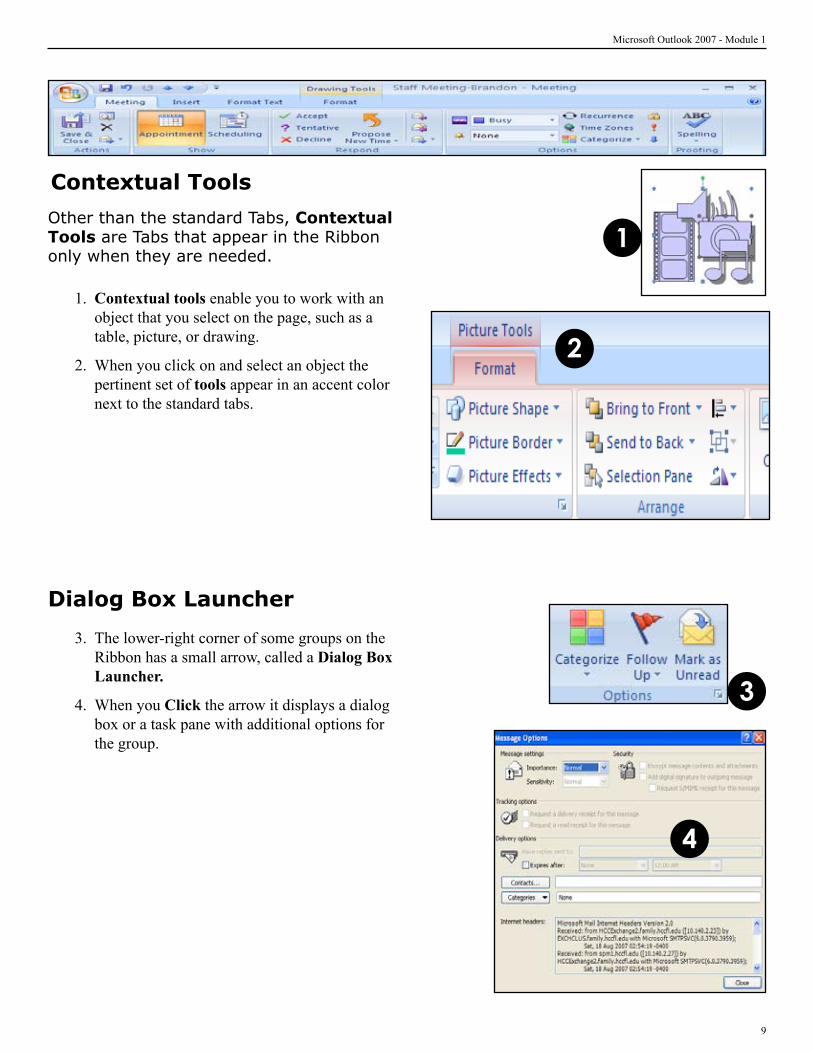
�. The lower-right corner of some groups on the Ribbon has a small arrow, called a Dialog Box Launcher.
�. When you Click the arrow it displays a dialog box or a task pane with additional options for the group.
3
4
Contextual Tools
Other than the standard Tabs, Contextual Tools are Tabs that appear in the Ribbon only when they are needed.
1. Contextual tools enable you to work with an object that you select on the page, such as a table, picture, or drawing.
2. When you click on and select an object the pertinent set of tools appear in an accent color next to the standard tabs.
2
1

Hillsborough Community College - CITT Faculty Professional Development
10
The Office Button, part of the new User Interface is a central location for managing Outlook items. When you click the Office Button, located in the upper-left corner of the window, Outlook displays the Office Button menu . This menu provides you with access to a list of common commands.
Office Button Menu
1. On the left of the menu there are commands for tasks associated with your messages, contacts and scheduling items.
2. When a command is selected, a sub-menu with related options will become available.
�. At the bottom of the menu you have a button that allows you to edit the Quick Access Toolbar and minimize the Ribbon in Outlook.
Microsoft Office Button
12
3

11
Microsoft Outlook 2007 - Module 1
Quick Access ToolbarThe Quick Access Toolbar (QAT), part of the new U.I. is located to the right of the Microsoft Office Button, can be customized to include buttons representing common commands, frequently used. By default, the QAT displays the Save, Undo, Redo, Previous Item, and Next Item commands in Microsoft Outlook 2007.
1. Click the Customize Quick Access Toolbar button to customize the QAT.
2. Select or de-select the command of your choice to include or remove.
Customizing the QAT 1
2
Hillsborough Community College - CITT Faculty Professional Development
12
Open/Read E-Mail Message
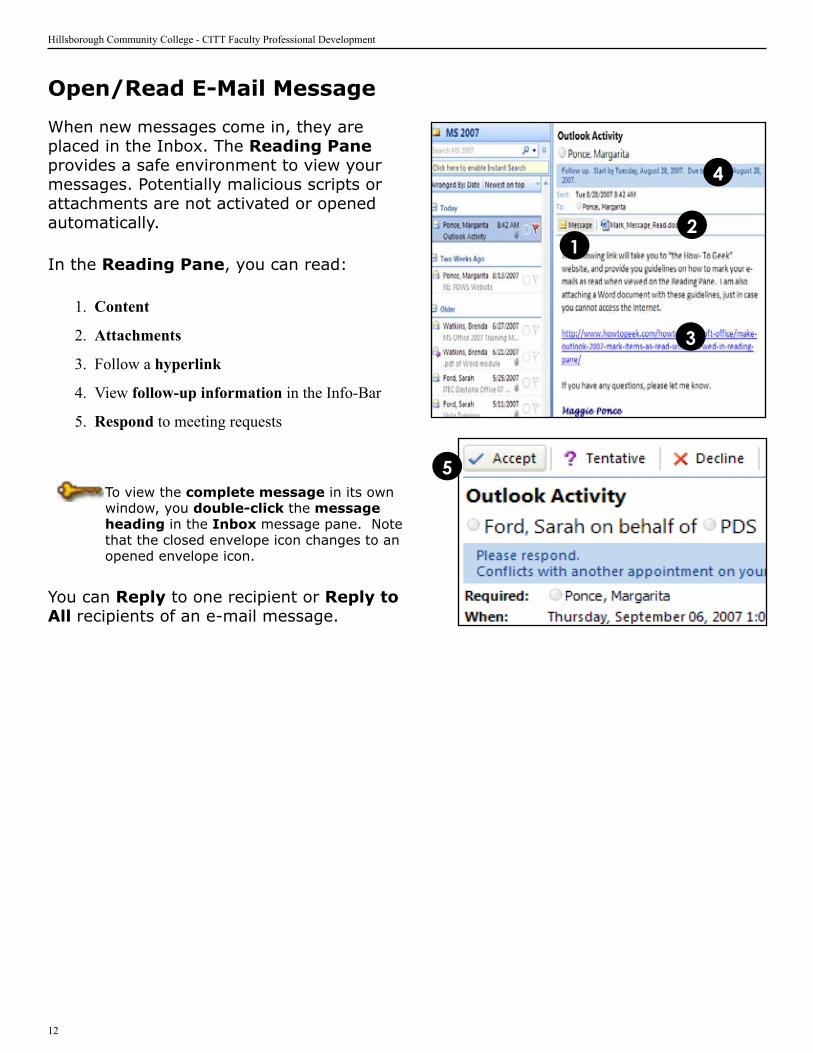
When new messages come in, they are placed in the Inbox. The Reading Pane provides a safe environment to view your messages. Potentially malicious scripts or attachments are not activated or opened automatically.
In the Reading Pane, you can read:
1. Content
2. Attachments
�. Follow a hyperlink
�. View follow-up information in the Info-Bar
�. Respond to meeting requests
To view the complete message in its own window, you double-click the message heading in the Inbox message pane. Note that the closed envelope icon changes to an opened envelope icon.
You can Reply to one recipient or Reply to All recipients of an e-mail message.
21
3
4
5

1�
Microsoft Outlook 2007 - Module 1
Create/Send New MessageTo create an e-mail message, follow these steps:
1. Click on the New button at the top left-hand corner in the Standard Toolbar.
2. A new Message window will open.
�. Fill in the message fields with the recipient’s e-mail address, subject, etc.
�. Format your message, using the Format Tab, Basic Text Group.
�. When your message is ready, click the Send button.
Your message will be placed in the Outbox and be sent when Outlook performs it’s next scheduled Send/Receive function.
You can force the message to be sent immediately by clicking on the Send/Receive button.
1
35
4
2
Compose and Send an E-Mail Message
1. Compose an e-mail message to your instructor with the following information: your full name, title, the department you work in, a brief description of your job responsibilities and a Subject name: “Outlook I Workshop Participant.”
2. Customize the QAT to include “Print Preview”
�. Proof and Preview your message.
�. Send message marked high priority to your instructor.
Activity 2
Hillsborough Community College - CITT Faculty Professional Development
1�
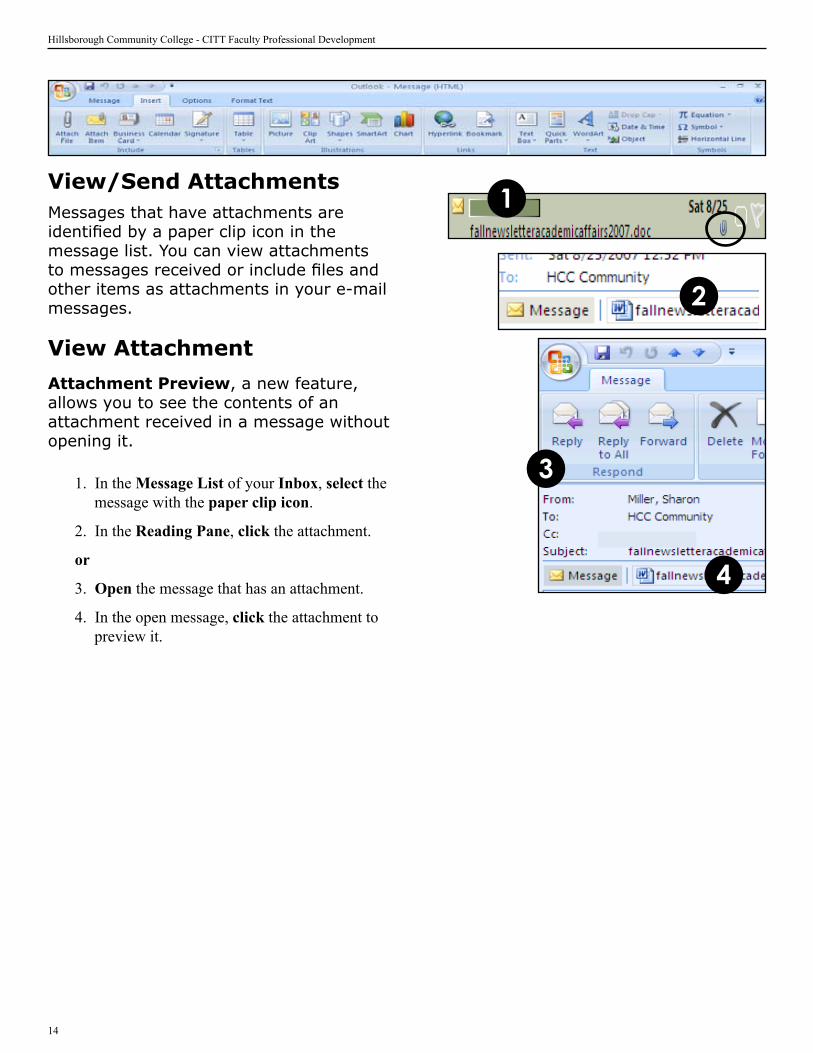
View/Send AttachmentsMessages that have attachments are identified by a paper clip icon in the message list. You can view attachments to messages received or include files and other items as attachments in your e-mail messages.
View Attachment
Attachment Preview, a new feature, allows you to see the contents of an attachment received in a message without opening it .
1. In the Message List of your Inbox, select the message with the paper clip icon.
2. In the Reading Pane, click the attachment.
or
�. Open the message that has an attachment.
�. In the open message, click the attachment to preview it.
1
2
4
3
1�
Microsoft Outlook 2007 - Module 1
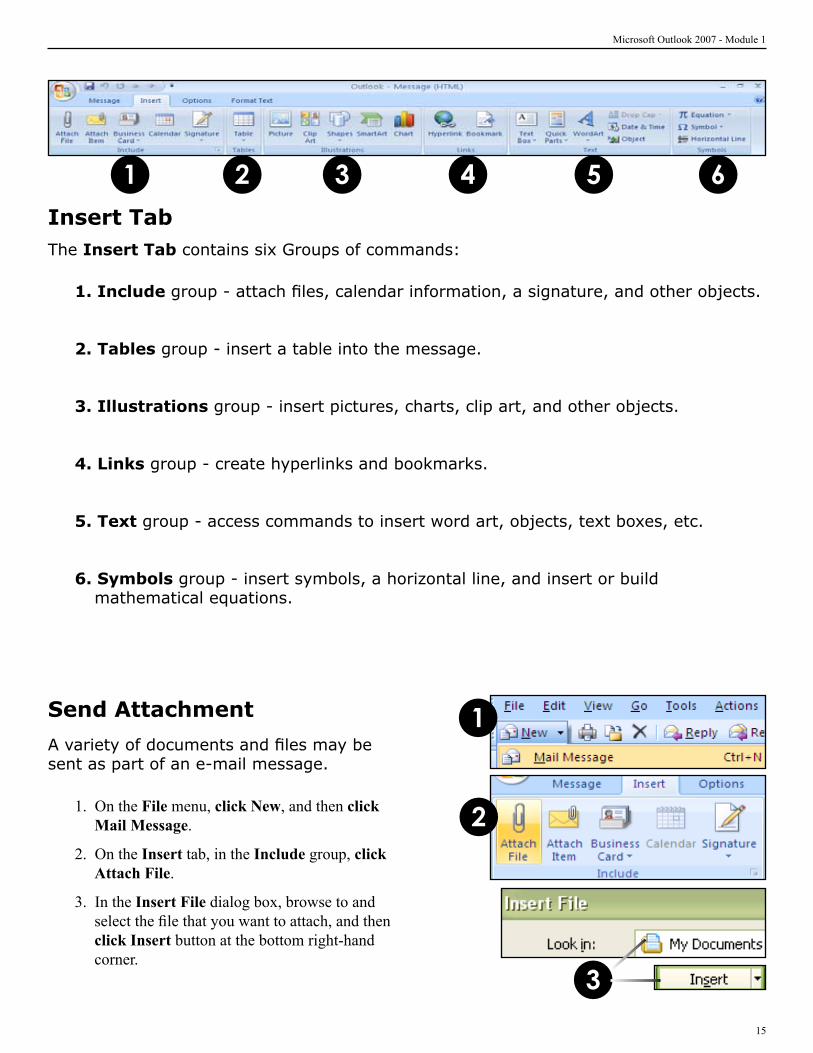
Insert TabThe Insert Tab contains six Groups of commands:
1. Include group - attach files, calendar information, a signature, and other objects.
2. Tables group - insert a table into the message.
3. Illustrations group - insert pictures, charts, clip art, and other objects.
4. Links group - create hyperlinks and bookmarks.
5. Text group - access commands to insert word art, objects, text boxes, etc.
6. Symbols group - insert symbols, a horizontal line, and insert or build mathematical equations.
1 2 3 4 5 6
Send Attachment
A variety of documents and files may be sent as part of an e-mail message.
1. On the File menu, click New, and then click Mail Message.
2. On the Insert tab, in the Include group, click Attach File.
�. In the Insert File dialog box, browse to and select the file that you want to attach, and then click Insert button at the bottom right-hand corner.
3
2
1
Hillsborough Community College - CITT Faculty Professional Development
1�
E-Mail Signature
Open, Read and Send Reply to an E-Mail Message with Signature
1. Open the e-mail sent to you with the Subject line: “The New MS Office Environment”
2. Reply to all workshop participants with your opinion of the New Microsoft Office Outlook Environment. You may include your likes and dislikes.
�. Create and Insert an E-Mail Signature, with your name, title and phone number.
�. Proof and Send your message.
Activity 3
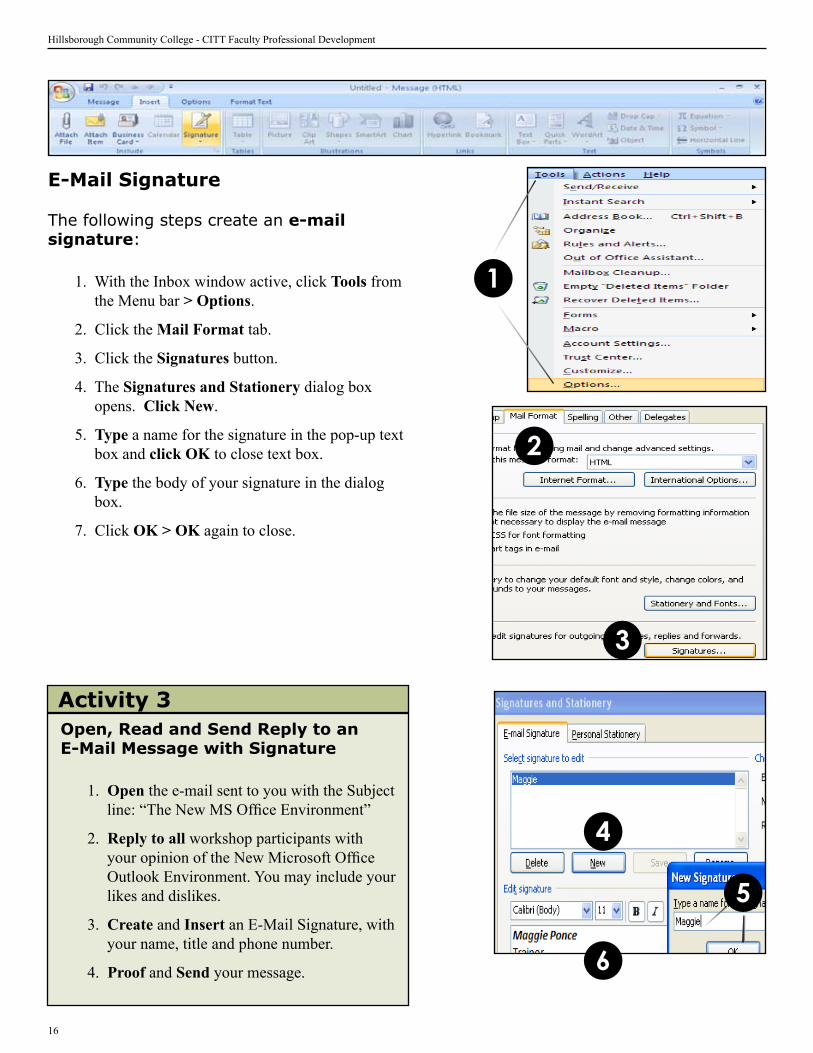
The following steps create an e-mail signature:
1. With the Inbox window active, click Tools from the Menu bar > Options.
2. Click the Mail Format tab.
�. Click the Signatures button.
�. The Signatures and Stationery dialog box opens. Click New.
�. Type a name for the signature in the pop-up text box and click OK to close text box.
�. Type the body of your signature in the dialog box.
7. Click OK > OK again to close.
1
5
4
6
2
3
17
Microsoft Outlook 2007 - Module 1
Contacts
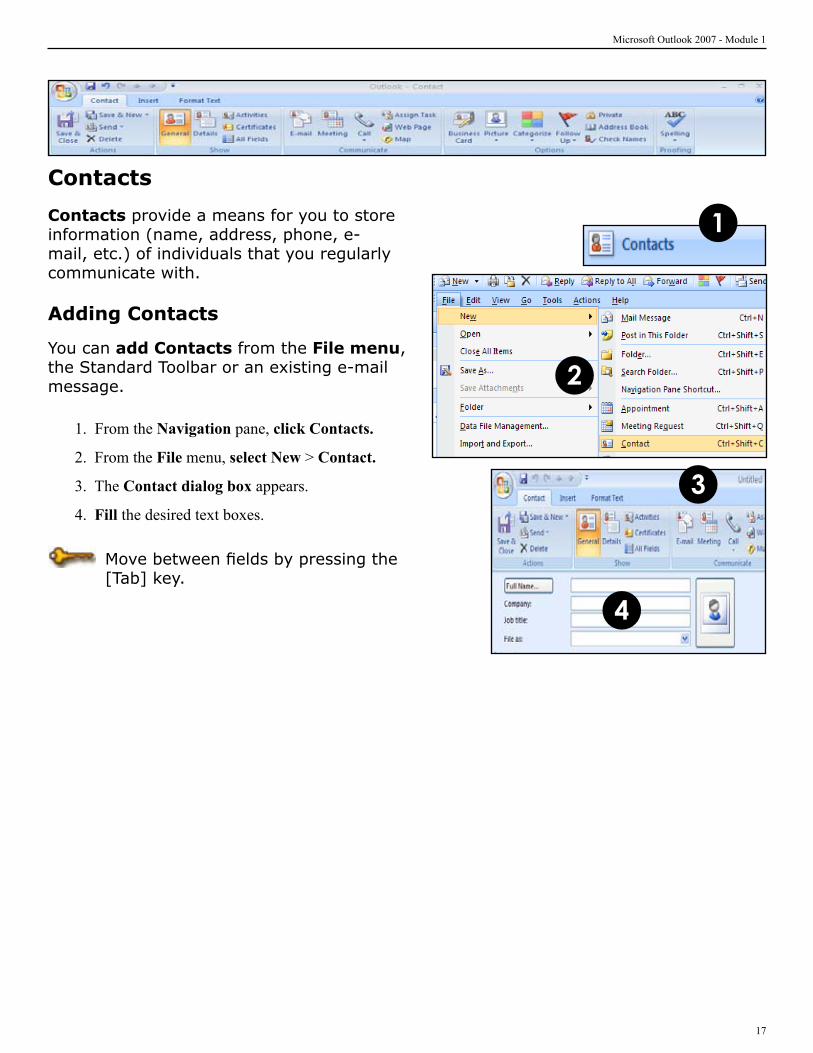
Contacts provide a means for you to store information (name, address, phone, e-mail, etc.) of individuals that you regularly communicate with.
Adding Contacts
You can add Contacts from the File menu, the Standard Toolbar or an existing e-mail message.
1. From the Navigation pane, click Contacts.
2. From the File menu, select New > Contact.
�. The Contact dialog box appears.
�. Fill the desired text boxes.
Move between fields by pressing the [Tab] key.
4
3
1
2
Hillsborough Community College - CITT Faculty Professional Development
1�
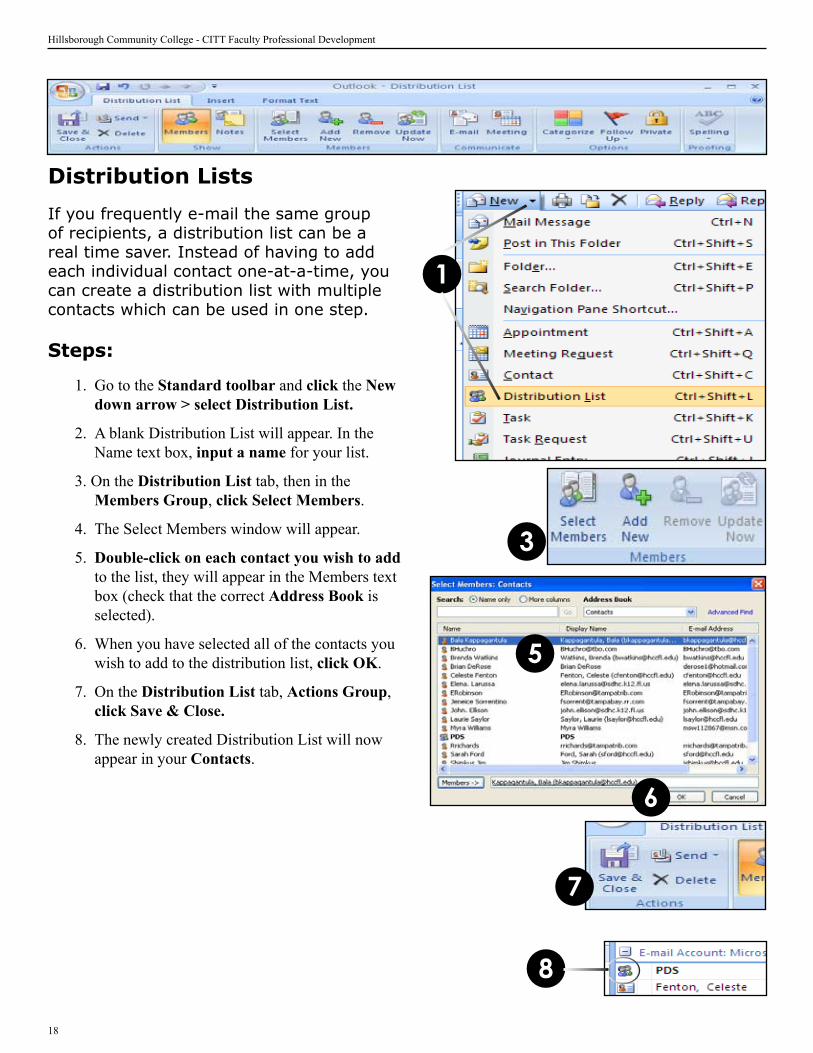
If you frequently e-mail the same group of recipients, a distribution list can be a real time saver. Instead of having to add each individual contact one-at-a-time, you can create a distribution list with multiple contacts which can be used in one step.
Steps:
1. Go to the Standard toolbar and click the New down arrow > select Distribution List.
2. A blank Distribution List will appear. In the Name text box, input a name for your list.
�. On the Distribution List tab, then in the Members Group, click Select Members.
�. The Select Members window will appear.
�. Double-click on each contact you wish to add to the list, they will appear in the Members text box (check that the correct Address Book is selected).
�. When you have selected all of the contacts you wish to add to the distribution list, click OK.
7. On the Distribution List tab, Actions Group, click Save & Close.
�. The newly created Distribution List will now appear in your Contacts.
Distribution Lists
1
3
5
6
7
8
1�
Microsoft Outlook 2007 - Module 1
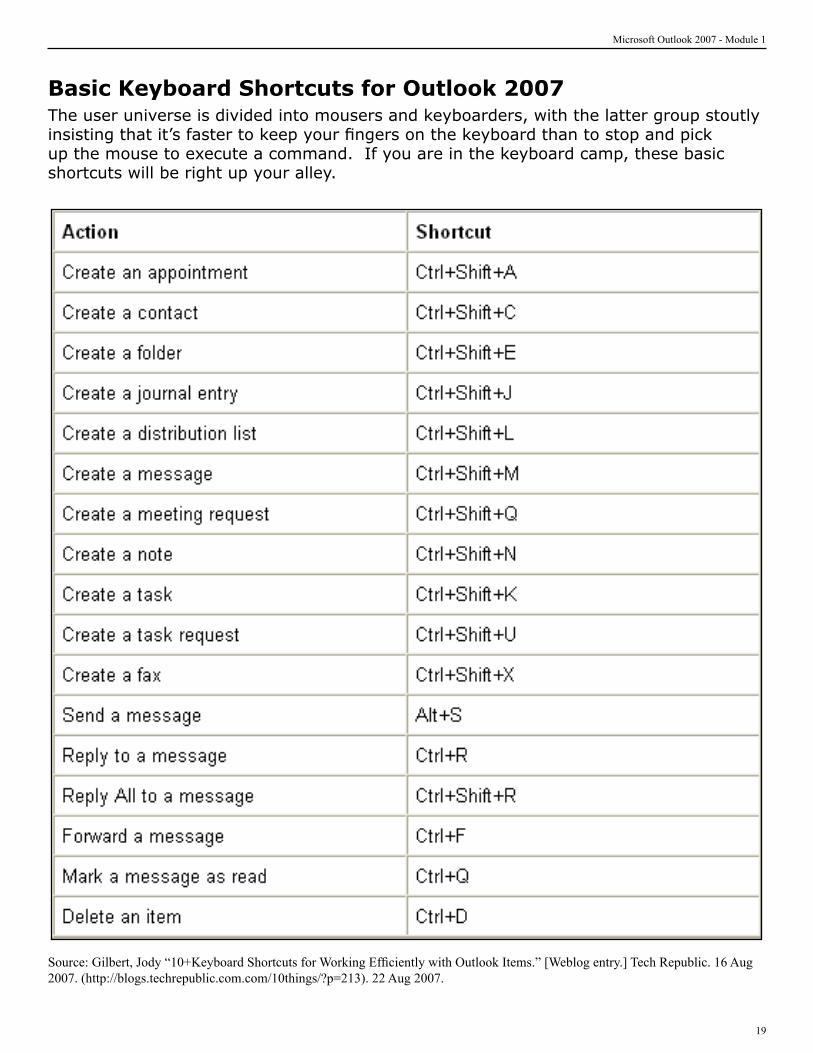
Basic Keyboard Shortcuts for Outlook 2007The user universe is divided into mousers and keyboarders, with the latter group stoutly insisting that it’s faster to keep your fingers on the keyboard than to stop and pick up the mouse to execute a command. If you are in the keyboard camp, these basic shortcuts will be right up your alley.
Source: Gilbert, Jody “10+Keyboard Shortcuts for Working Efficiently with Outlook Items.” [Weblog entry.] Tech Republic. 16 Aug 2007. (http://blogs.techrepublic.com.com/10things/?p=21�). 22 Aug 2007.
Hillsborough Community College - CITT Faculty Professional Development
20
Create a Contact Distribution List and New E-mail message using the guidelines, concepts, and skills presented in this module. This will be a skill building assignment, increasing in difficulty, to be completed in the Advanced Outlook 2007 workshop.
Guidelines:
You will create a Distribution List that includes all participants of this workshop, including your instructor. You will compose a New E-mail and send to the members of your Distribution list using the content provided by your instructor, as described below:
E-mail Text:
“You can’t completely escape the burden of writing tasks: e-mails, status reports, performance evaluations, syllabi, and lesson plans to name a few. If your writing experience has been limited, you could probably stand to brush up on those skills, especially if you are a teacher, manager or aspiring to be one.”
Use these guidelines and the concepts presented in this module to complete the tasks listed below:
Perform the following tasks:
1. Create a Distribution List that includes all participants of this Outlook workshop. Name the Distribution List: Outlook Participants and Save.
2. Create a personal signature, with your Title and Phone Number, using Georgia, 12 pt Font; attach to your message.
�. Create a New E-mail message addressed to the Outlook Participants distribution list.
�. The Subject of the e-mail should read: “Writing Tips”.
�. Copy/Paste the quoted text in the Guidelines e-mail your instructor sent you. Change the font of the paragraph to Arial, 12 pt.
�. Attach the Word document, in the file named “Writing Tips” (Note: The document is located on the desktop in the PDWS/Outlook folder).
7. Type and Bold the text “See attached presentation” in the body of the email.
�. Spell Check your message.
�. Close Outlook 2007.
Final Activity: Module 1