micr repair v8 - imagescan repair 1 micr repair overview magnetic ink character read (micr) repair...
TRANSCRIPT
MICR Repair 1
Overview .......................................... ....................................... 1
Accessing the Item Processing Modules Window ...... ........ 1
Understanding the Item Processing Modules Window .. ............. 2
Refreshing the Item Processing Modules Window ..... ................. 2
Starting MICR Repair .............................. ............................... 3
Understanding the Item Processing - MICR Repair Win dow ...... 4
Image Viewer ............................................................................................... 5
MICR Fields ................................................................................................. 5
Foreign Item Flags ....................................................................................... 8
RT Failure Reasons ..................................................................................... 8
Command Buttons ....................................................................................... 8
Performing MICR Repair ............................ .......................... 10
Keystrokes Used During MICR Repair ................ ....................... 11
Performing Character Repair ....................... ............................... 13
Performing Field Repair ........................... ................................... 14
Aux and Tran Code Fields .......................... ................................. 15
Rejecting an Item ................................. ........................................ 16
Changing the Item Type ............................ .................................. 16
Displaying a Prior Image .......................... ................................... 19
Resizing Images ................................... ........................................ 20
Viewing the Rear Image of an Item ................. ............................ 21
Flipping an Image ................................. ....................................... 22
Rotating an Image ................................. ....................................... 23
Inverting the Image Colors ........................ .................................. 24

MICR Repair 1
MICR Repair
Overview
Magnetic Ink Character Read (MICR) Repair is a process that allows the operator to correct can’t read characters on the MICR line of a payment item. During the capture pass, the transport reads the MICR line on each payment item that gets processed. If the transport cannot read characters on the MICR line, or if the item does not pass RT check digit validation, the item is scheduled for MICR Repair.
NOTE: In order for items to be scheduled for MICR Repair, the lockbox must be set up for MICR Repair and at least one field marked for repair.
The time at which a batch is scheduled for MICR Repair (before or after encode) is defined in Lockbox Setup. However, if data entry is required before encode and the data entry job requires MICR Repair, MICR Repair is scheduled to take place before encode, regardless of the lockbox setup.
Accessing the Item Processing Modules Window
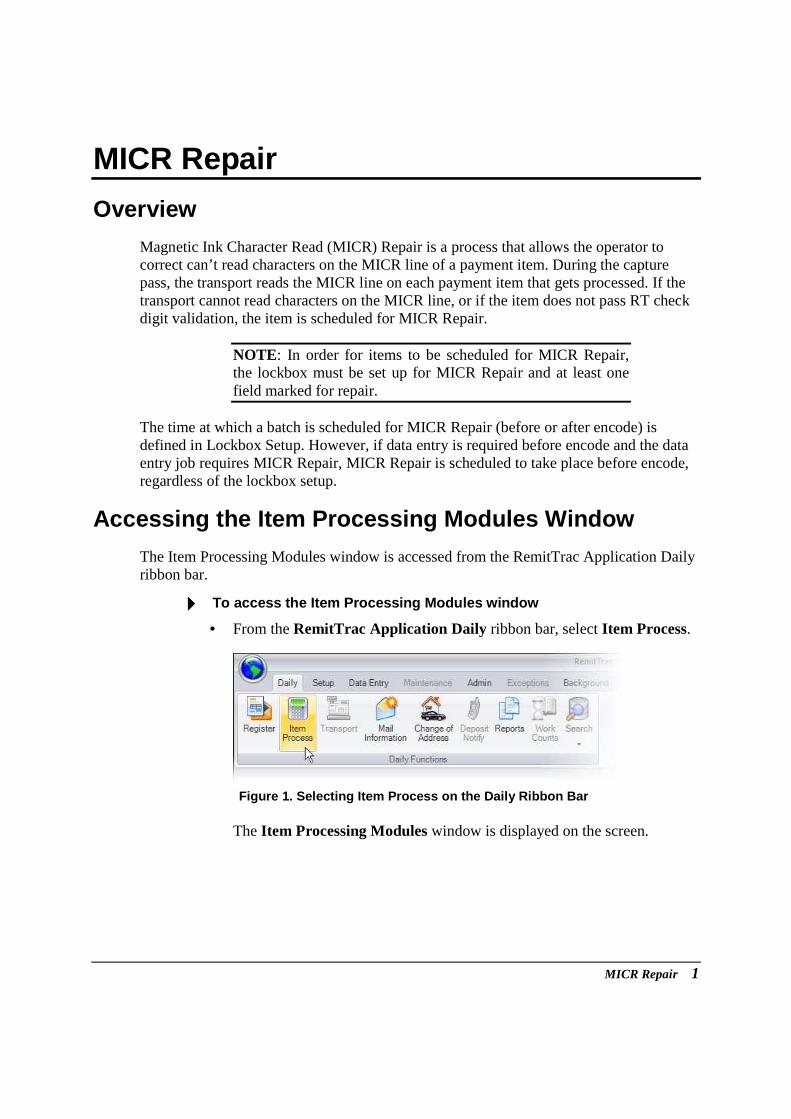
The Item Processing Modules window is accessed from the RemitTrac Application Daily ribbon bar.
���� To access the Item Processing Modules window
• From the RemitTrac Application Daily ribbon bar, select Item Process.
Figure 1. Selecting Item Process on the Daily Ribbo n Bar
The Item Processing Modules window is displayed on the screen.
2 RemitTrac Workflow Manual
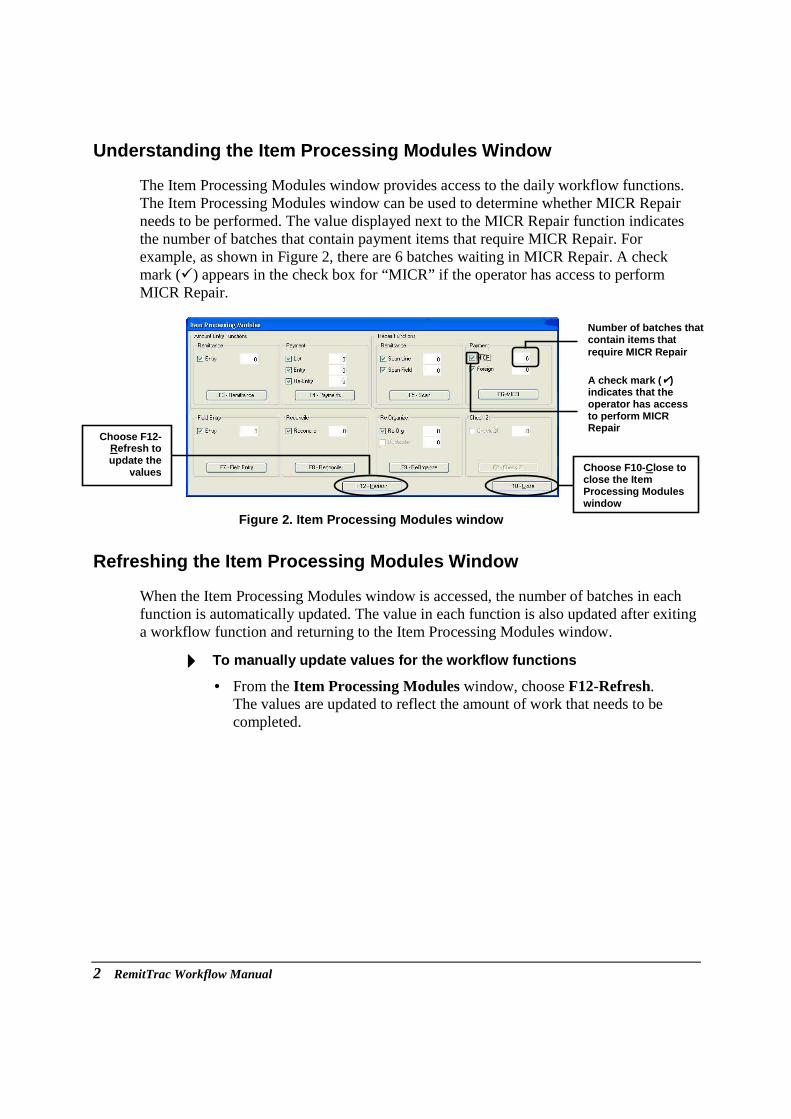
Understanding the Item Processing Modules Window
The Item Processing Modules window provides access to the daily workflow functions. The Item Processing Modules window can be used to determine whether MICR Repair needs to be performed. The value displayed next to the MICR Repair function indicates the number of batches that contain payment items that require MICR Repair. For example, as shown in Figure 2, there are 6 batches waiting in MICR Repair. A check mark (�) appears in the check box for “MICR” if the operator has access to perform MICR Repair.
Figure 2. Item Processing Modules window
Refreshing the Item Processing Modules Window
When the Item Processing Modules window is accessed, the number of batches in each function is automatically updated. The value in each function is also updated after exiting a workflow function and returning to the Item Processing Modules window.
���� To manually update values for the workflow function s
• From the Item Processing Modules window, choose F12-Refresh. The values are updated to reflect the amount of work that needs to be completed.
Number of ba tches that contain items that require MICR Repair
A check mark (����) indicates that the operator has access to perform MICR Repair
Choose F10 -Close to close the Item Processing Modules window
Choose F12-Refresh to update the
values
MICR Repair 3
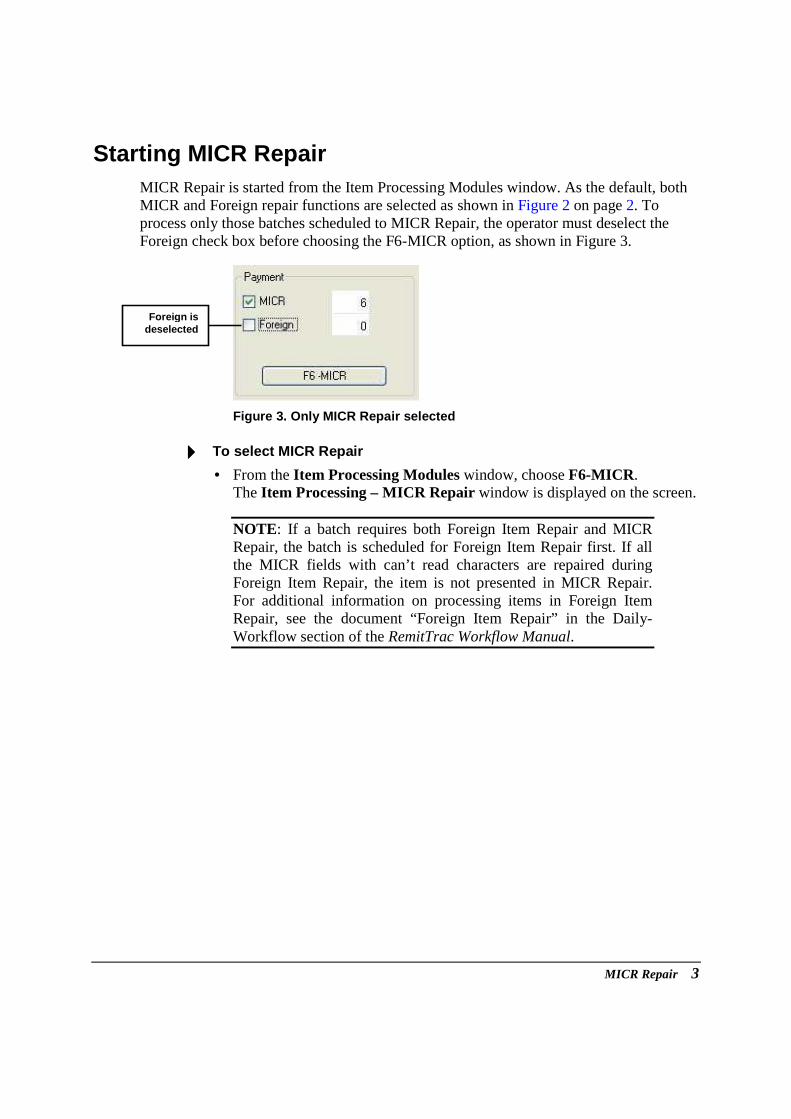
Starting MICR Repair MICR Repair is started from the Item Processing Modules window. As the default, both MICR and Foreign repair functions are selected as shown in Figure 2 on page 2. To process only those batches scheduled to MICR Repair, the operator must deselect the Foreign check box before choosing the F6-MICR option, as shown in Figure 3.
Figure 3. Only MICR Repair selected
���� To select MICR Repair
• From the Item Processing Modules window, choose F6-MICR . The Item Processing – MICR Repair window is displayed on the screen.
NOTE: If a batch requires both Foreign Item Repair and MICR Repair, the batch is scheduled for Foreign Item Repair first. If all the MICR fields with can’t read characters are repaired during Foreign Item Repair, the item is not presented in MICR Repair. For additional information on processing items in Foreign Item Repair, see the document “Foreign Item Repair” in the Daily-Workflow section of the RemitTrac Workflow Manual.
Foreign is deselected
4 RemitTrac Workflow Manual
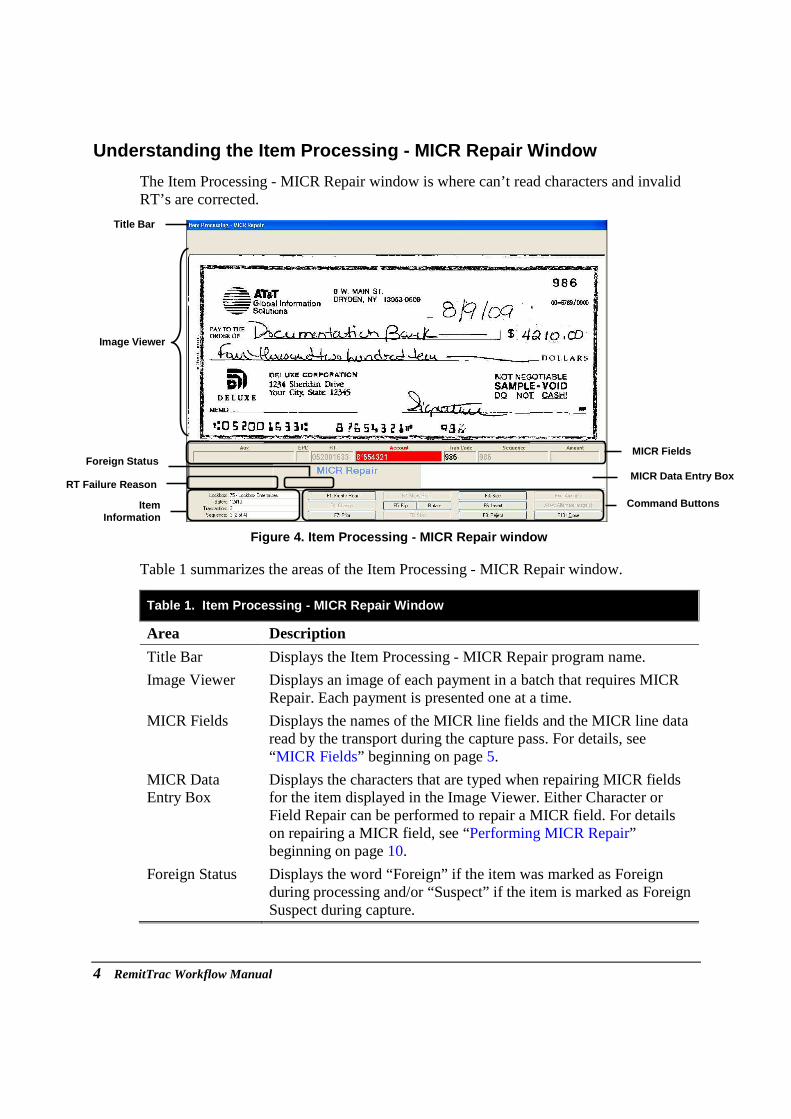
Understanding the Item Processing - MICR Repair Win dow
The Item Processing - MICR Repair window is where can’t read characters and invalid RT’s are corrected.
Figure 4. Item Processing - MICR Repair window
Table 1 summarizes the areas of the Item Processing - MICR Repair window.
Table 1. Item Processing - MICR Repair Window
Area Description
Title Bar Displays the Item Processing - MICR Repair program name.
Image Viewer Displays an image of each payment in a batch that requires MICR Repair. Each payment is presented one at a time.
MICR Fields Displays the names of the MICR line fields and the MICR line data read by the transport during the capture pass. For details, see “MICR Fields” beginning on page 5.
MICR Data Entry Box
Displays the characters that are typed when repairing MICR fields for the item displayed in the Image Viewer. Either Character or Field Repair can be performed to repair a MICR field. For details on repairing a MICR field, see “Performing MICR Repair” beginning on page 10.
Foreign Status Displays the word “Foreign” if the item was marked as Foreign during processing and/or “Suspect” if the item is marked as Foreign Suspect during capture.
Item Information
Title Bar
MICR Data Entry Box
Command Buttons
MICR Fields
Image Viewer
Foreign Status
RT Failure Reason

MICR Repair 5
Table 1. MICR Repair Window (continued)
Area Description
RT Failure Reason Displays the words “Check Digit Failure” if the Routing and Transit Number failed check digit or the words “Mask Failure” if the Routing and Transit number does not match one of the standard RT formats.
Item Information Displays the lockbox number, batch number, transaction number and sequence number of the item within the batch for the item pictured in the Image Viewer.
Command Buttons Command buttons that are used when performing MICR Repair.
Image Viewer
Reading from left to right, the MICR line of a check can contain the following fields: Auxiliary (Aux) Number, External Processing Code (EPC), Routing and Transit (RT) Number, Account Number and Bank Transaction Code (Tran Code).
Figure 5: Business Check showing all fields
MICR Fields
During MICR Repair, the MICR data for the item pictured in the Image Viewer is displayed in the fields. The active field to be repaired is displayed in the color red and any can’t read characters are displayed as an asterisk (*).
Routing and Transit (RT)
Number
Aux
Account Number
Aux value is placed in Sequence field
Tran Code
EPC

6 RemitTrac Workflow Manual
Table 2 defines the fields on a MICR line that may require repair.
Table 2. MICR Fields
Field Contents
Auxiliary (Aux) Bank defined field to the left of the RT. Generally contains the check number on a business check.
EPC The External Processing Code (EPC) that appears on the check. A government specified field used for special processing. Valid characters are a space or a numeric value between 0 and 9.
RT The routing and transit number that appears on the check; either eight or nine characters. Each Bank has a distinct RT.
Account The account number that appears on the check; up to nineteen digits. Format is defined by the issuing bank.
Tran Code Bank defined Transaction Code. Generally contains the check number on a personal check.
Amount The pre-encoded dollar amount of a check. Generally blank for lockbox items.
Selected delimiters present in the MICR line are translated to MICR symbols during processing. Table 3 lists the delimiters that get translated to symbols during processing. These symbols are displayed in the MICR Fields for an item during repair, as shown in Figure 6 on page 7.
Table 3. Translation of Delimiter to MICR Symbol
Delimiter Symbol MICR Field
/ (forward slash) Account
- (dash) Dash (optional separator for values in the Account and RT fields)

MICR Repair 7
Figure 6 illustrates how a check is displayed in MICR Repair when the alternate check number placement processing is utilized. With alternate check number placement processing, the check number is displayed and stored in the Account and Sequence fields.
NOTE: The check number value is to the left of the Account Number and forward slash delimiter , dash or space.
In Figure 6, there is no Aux or Tran Code value; therefore, the Account Number field is evaluated for any special characters denoting the presence of a check number. Since the check number value is found in the Account Number field, the item can be accepted without entering an Aux or Tran Code value.
NOTE: If an Aux field is read, it will default to being used as the check number. If there is not Aux field, the Tran Code will be used as the check number. The Account Number field will only be analyzed for alternate check number placement processing if there is no value in either the Aux or Tran Code field.
Figure 6. Delimiter displayed as symbol during M ICR Repair
Delimiter in Account Number field is displayed as a symbol in Account field during repair
Check Number value is stored in both Account and Sequence fields
8 RemitTrac Workflow Manual
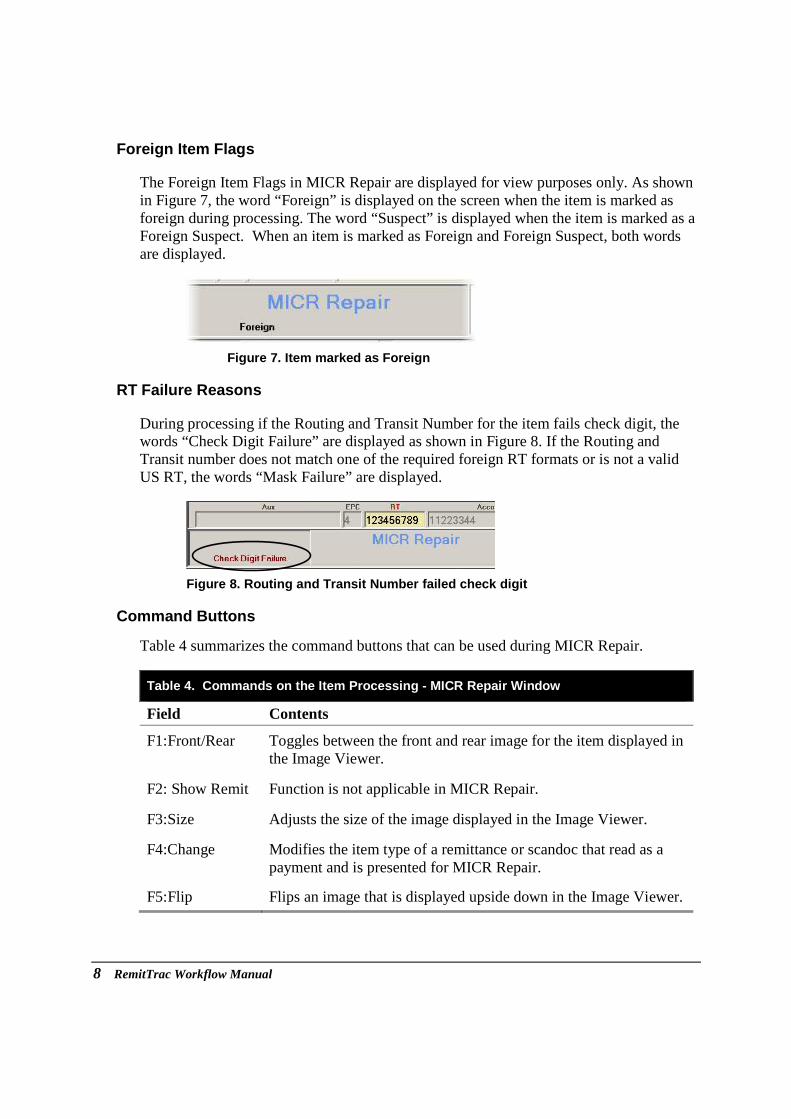
Foreign Item Flags
The Foreign Item Flags in MICR Repair are displayed for view purposes only. As shown in Figure 7, the word “Foreign” is displayed on the screen when the item is marked as foreign during processing. The word “Suspect” is displayed when the item is marked as a Foreign Suspect. When an item is marked as Foreign and Foreign Suspect, both words are displayed.
Figure 7. Item marked as Foreign
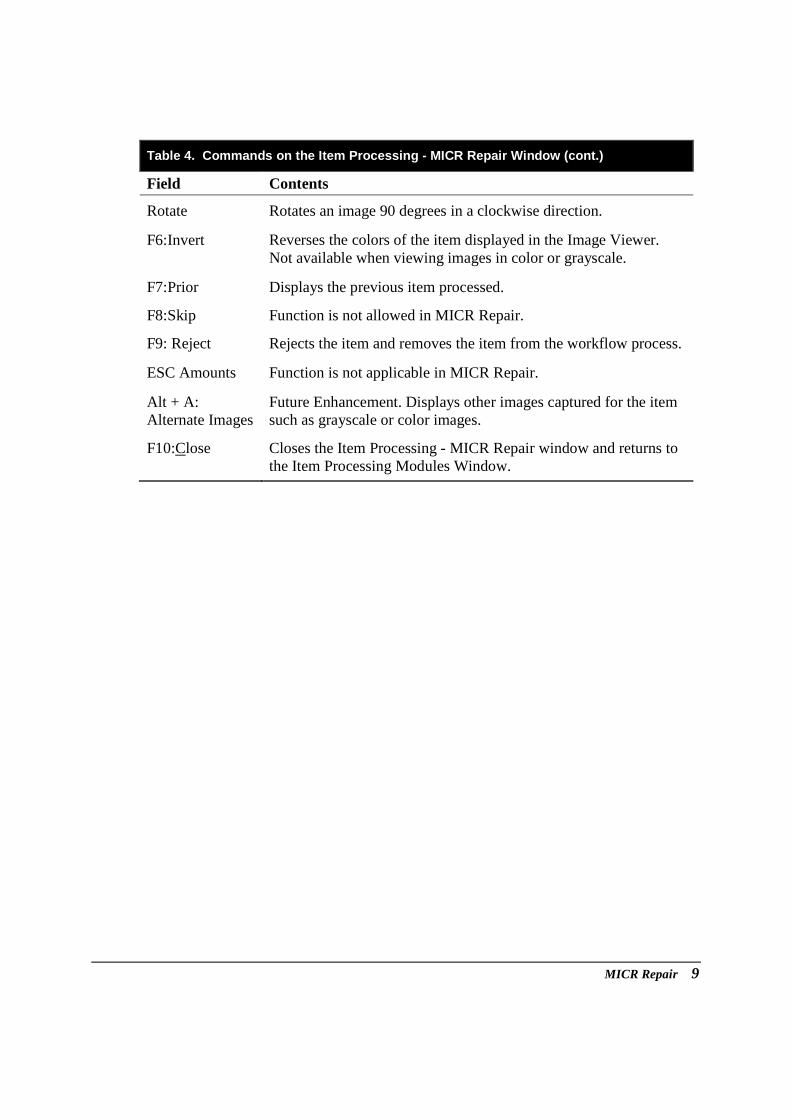
RT Failure Reasons
During processing if the Routing and Transit Number for the item fails check digit, the words “Check Digit Failure” are displayed as shown in Figure 8. If the Routing and Transit number does not match one of the required foreign RT formats or is not a valid US RT, the words “Mask Failure” are displayed.
Figure 8. Routing and Transit Number failed check d igit
Command Buttons
Table 4 summarizes the command buttons that can be used during MICR Repair.
Table 4. Commands on the Item Processing - MICR Re pair Window
Field Contents
F1:Front/Rear Toggles between the front and rear image for the item displayed in the Image Viewer.
F2: Show Remit Function is not applicable in MICR Repair.
F3:Size Adjusts the size of the image displayed in the Image Viewer.
F4:Change Modifies the item type of a remittance or scandoc that read as a payment and is presented for MICR Repair.
F5:Flip Flips an image that is displayed upside down in the Image Viewer.
MICR Repair 9
Table 4. Commands on the Item Processing - MICR Re pair Window (cont.)
Field Contents
Rotate Rotates an image 90 degrees in a clockwise direction.
F6:Invert Reverses the colors of the item displayed in the Image Viewer. Not available when viewing images in color or grayscale.
F7:Prior Displays the previous item processed.
F8:Skip Function is not allowed in MICR Repair.
F9: Reject Rejects the item and removes the item from the workflow process.
ESC Amounts Function is not applicable in MICR Repair.
Alt + A: Alternate Images
Future Enhancement. Displays other images captured for the item such as grayscale or color images.
F10:Close Closes the Item Processing - MICR Repair window and returns to the Item Processing Modules Window.

10 RemitTrac Workflow Manual
Performing MICR Repair During the MICR Repair process, each item that requires repair is displayed one at a time in the Image Viewer. The captured data for each MICR field is displayed in the MICR Fields on the window. When viewing the data, the operator will need to determine whether to use Character Repair or Field Repair to repair the MICR field for the item.
NOTE: If Foreign Processing is enabled and the operator changes the RT to a non-native fund during MICR Repair, the US Fund confirmation box is displayed on the screen.
Figure 9. US Fund confirmation box
• If the item is not a US fund, choose Process as Foreign. –or– If the item is a US fund,choose Repair RT . –or– To reject the item,choose Reject.
If the operator chose Process as Foreign or Repair RT, the Routing and Transit (RT) field becomes the active field and is displayed in the color red.
To process the item, the operator must do one of the following:
• Correct the Routing and Transit (RT) number, if necessary
• Accept the item as is by pressing the ENTER key (if the RT is valid)
• Reject the item
MICR Repair 11
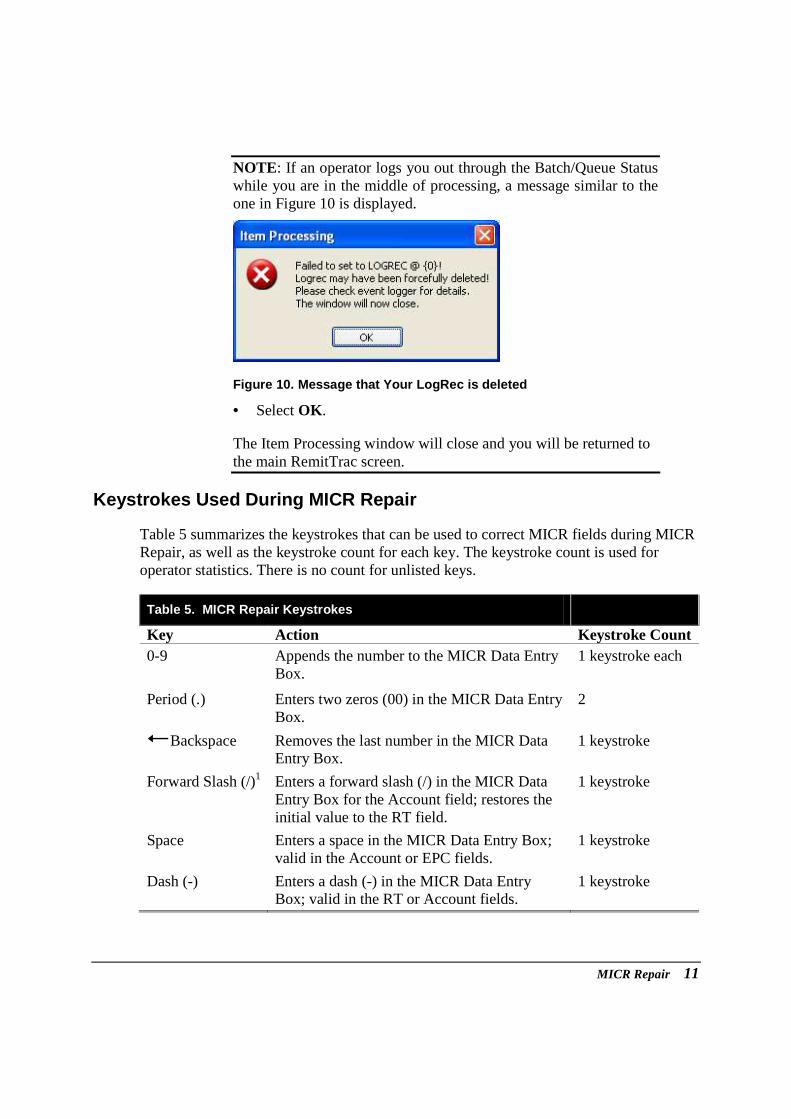
NOTE: If an operator logs you out through the Batch/Queue Status while you are in the middle of processing, a message similar to the one in Figure 10 is displayed.
Figure 10. Message that Your LogRec is deleted
• Select OK .
The Item Processing window will close and you will be returned to the main RemitTrac screen.
Keystrokes Used During MICR Repair
Table 5 summarizes the keystrokes that can be used to correct MICR fields during MICR Repair, as well as the keystroke count for each key. The keystroke count is used for operator statistics. There is no count for unlisted keys.
Table 5. MICR Repair Keystrokes
Key Action Keystroke Count 0-9 Appends the number to the MICR Data Entry
Box. 1 keystroke each
Period (.) Enters two zeros (00) in the MICR Data Entry Box.
2
Backspace Removes the last number in the MICR Data Entry Box.
1 keystroke
Forward Slash (/)1 Enters a forward slash (/) in the MICR Data Entry Box for the Account field; restores the initial value to the RT field.
1 keystroke
Space Enters a space in the MICR Data Entry Box; valid in the Account or EPC fields.
1 keystroke
Dash (-) Enters a dash (-) in the MICR Data Entry Box; valid in the RT or Account fields.
1 keystroke

12 RemitTrac Workflow Manual
Table 5. MICR Repair Keystrokes (continued)
Key Action Keystroke Count Asterisk (* )
Clears the MICR Data Entry Box and the captured data displayed in the MICR field.
NOTE: The clearing asterisk must be typed using * key on the Number Keypad.
1 keystroke
Cntl+Tab Moves to the next MICR field and enables the field for repair.
N/A
Cntl+Shift+ Tab Moves to the previous MICR field and enables the field for repair.
N/A
Tab Moves to the next MICR field that is enabled. N/A
Shift+Tab Moves to the previous MICR field that is enabled.
N/A
Plus Sign (+) Applies the numbers in the MICR Data Entry Box to the can’t read characters of the active field during Character Repair.
1 keystroke
↵ Enter Applies the numbers in the MICR Data Entry Box to the active field.
1 keystroke
1With using alternate check number placement processing, up to four digits can be placed to the left of the “/” in the Account field. If alternate check number placement processing is defined for the lockbox, the check number is stored as the Sequence Number field in the database.
MICR Repair 13
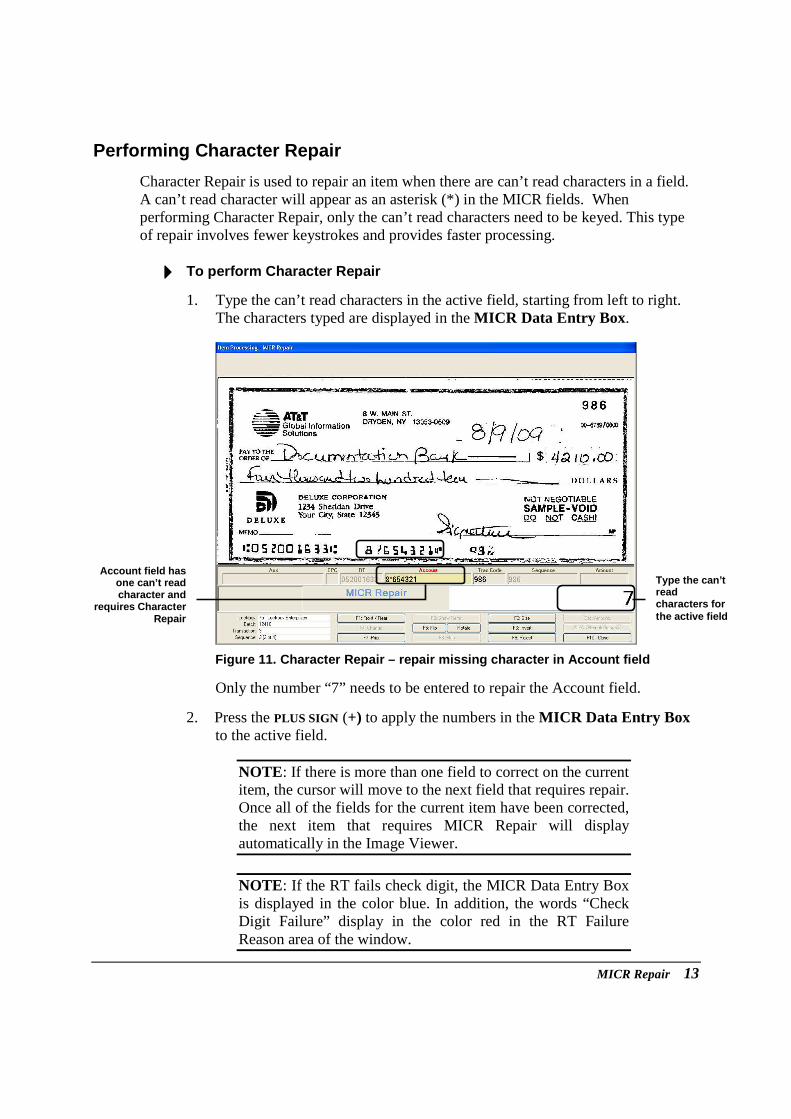
Performing Character Repair
Character Repair is used to repair an item when there are can’t read characters in a field. A can’t read character will appear as an asterisk (*) in the MICR fields. When performing Character Repair, only the can’t read characters need to be keyed. This type of repair involves fewer keystrokes and provides faster processing.
���� To perform Character Repair
1. Type the can’t read characters in the active field, starting from left to right. The characters typed are displayed in the MICR Data Entry Box .
Figure 11. Character Repair – repair missing charac ter in Account field
Only the number “7” needs to be entered to repair the Account field.
2. Press the PLUS SIGN (+) to apply the numbers in the MICR Data Entry Box to the active field.
NOTE: If there is more than one field to correct on the current item, the cursor will move to the next field that requires repair. Once all of the fields for the current item have been corrected, the next item that requires MICR Repair will display automatically in the Image Viewer.
NOTE: If the RT fails check digit, the MICR Data Entry Box is displayed in the color blue. In addition, the words “Check Digit Failure” display in the color red in the RT Failure Reason area of the window.
Type the can’t read characters for the active field
Account field has one can’t read character and
requires Character Repair

14 RemitTrac Workflow Manual
Performing Field Repair
Field Repair allows the operator to repair fields with can’t read characters, an incorrect value or an empty field. The field name displayed in the color red is the current field to be repaired. When performing Field Repair, the entire value of the field must be keyed.
���� To perform Field Repair
1. Type the correct characters for the active field, starting from left to right. The characters typed are displayed in the MICR Data Entry Box .
Figure 12. Field Repair – Tran Code field - typing all the characters in field
The numbers “984” must be entered to repair the Tran Code field.
2. Press ENTER to apply the numbers in the MICR Data Entry Box to the active field.
NOTE: If there is more than one field to correct for the current item, the cursor will move to the next field that requires repair. Once all the fields have been repaired on the current item, the next item that requires MICR Repair will display automatically in the Image Viewer.
NOTE: If the RT fails check digit, the MICR Data Entry Box is displayed in the color blue. In addition, the words “Check Digit Failure” display in the color red in the RT Failure Reason area of the window.
Key all of the characters for the active field
Tran Code field requires Field repair
MICR Repair 15
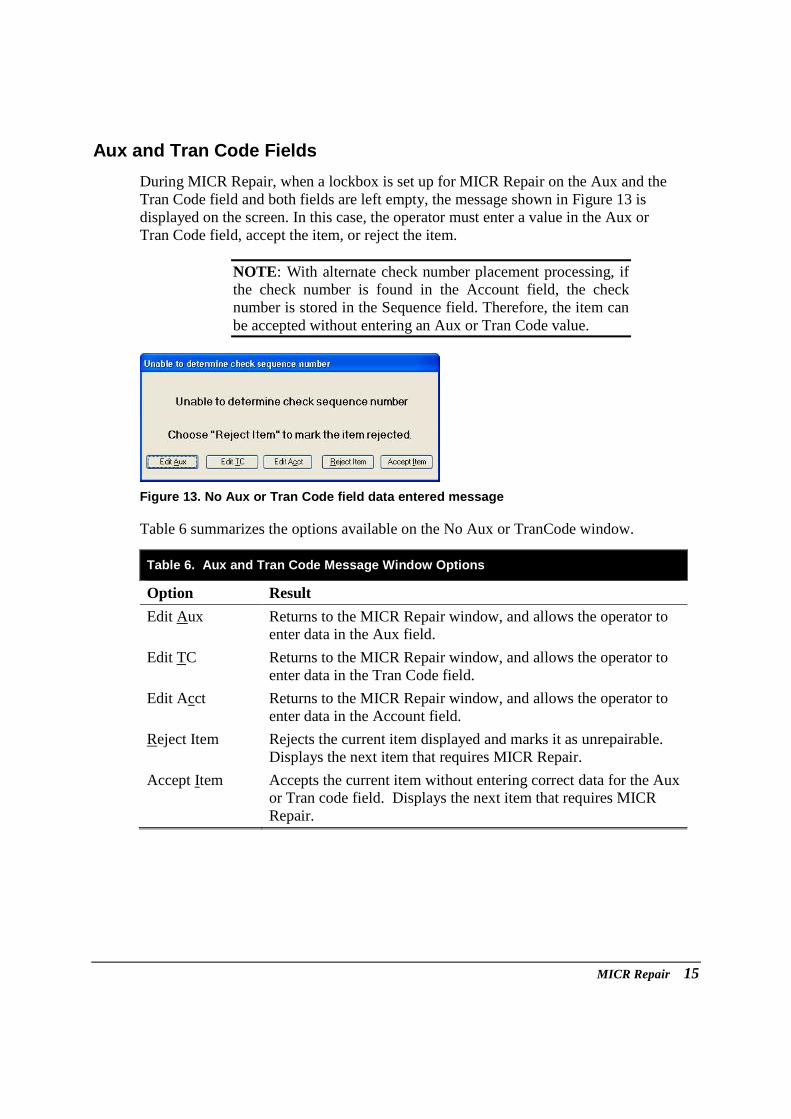
Aux and Tran Code Fields
During MICR Repair, when a lockbox is set up for MICR Repair on the Aux and the Tran Code field and both fields are left empty, the message shown in Figure 13 is displayed on the screen. In this case, the operator must enter a value in the Aux or Tran Code field, accept the item, or reject the item.
NOTE: With alternate check number placement processing, if the check number is found in the Account field, the check number is stored in the Sequence field. Therefore, the item can be accepted without entering an Aux or Tran Code value.
Figure 13. No Aux or Tran Code field data entered m essage
Table 6 summarizes the options available on the No Aux or TranCode window.
Table 6. Aux and Tran Code Message Window Options
Option Result
Edit Aux Returns to the MICR Repair window, and allows the operator to enter data in the Aux field.
Edit TC Returns to the MICR Repair window, and allows the operator to enter data in the Tran Code field.
Edit Acct Returns to the MICR Repair window, and allows the operator to enter data in the Account field.
Reject Item Rejects the current item displayed and marks it as unrepairable. Displays the next item that requires MICR Repair.
Accept Item Accepts the current item without entering correct data for the Aux or Tran code field. Displays the next item that requires MICR Repair.

16 RemitTrac Workflow Manual
Rejecting an Item
An item can be rejected during MICR Repair. If the batch is scheduled for Reconcile, the item tagged as rejected will display in Reconcile as an operator rejected item.
CAUTION: An item should only be rejected if it is unprocessable. A rejected item cannot be edited in Reconcile; however, the item can be unrejected.
���� To reject the item displayed in the image viewer
1. Choose F9: Reject. The MICR Repair - Reject confirmation message is displayed on the screen.
Figure 14. MICR Repair Reject confirmation message
2. Choose OK to reject the item and display the next item that requires MICR Repair.
The item is tagged as a rejected. –or–
Choose Cancel to edit the information for the item.
Changing the Item Type
If a remittance or scandoc that read as a payment is presented in MICR Repair, the operator can change the item type using the F4:Change command.
NOTE: The item type of an item processed in an encoded batch where MICR Repair is scheduled after Encode cannot be changed.
In Wholesale processing, once a type change is completed on an item, the operator will be required to confirm whether or not to schedule the batch for the Re-Organize process. The Re-Organize process provides a means of realigning or reordering the items in the batch to create proper transaction boundaries for data entry processing. For procedures on realigning transactions in a batch, see the “Re-Organize” document in the RemitTrac Workflow Manual.

MICR Repair 17
NOTE: If an operator performs a type change and attempts to exit the batch before all items have been processed, the message “You type-changed an item in this batch. You must complete the batch before exiting” is displayed on the screen.
���� To change the item type of an item
1. From the Item Processing – MICR Repair window, when a remittance or scandoc is presented as a payment item, choose F4:Change.
Figure 15. Changing the item type of an item
The Select New Type message shown in Figure 16 is displayed on the screen.
Figure 16. Select document type message
NOTE: In Retail processing, the Select New Type message includes Remittance and Cancel options. For Retail, the Scandoc option is only presented if the lockbox allows scandocs.
Scandoc displayed in
the Image Viewer during
MICR Repair
Choose F4:Change

18 RemitTrac Workflow Manual
2. Choose Scandoc to change the item to a scandoc. The Change Type confirmation shown in Figure 17 is displayed on the screen.
–or– Choose Cancel to return to the Item Processing - MICR Repair window.
Figure 17. Change Type confirmation message
2. Choose Yes to switch the item to a scandoc. –or– Choose No to return to the Select New Type window.
In Wholesale processing, when MICR Repair is completed for the batch, the Batch Contains Type Changes confirmation message is displayed on the screen. This confirmation determines whether or not to send the batch to the Re-Organize process.
Figure 18. Schedule batch to Re-Organize confirmati on
3. Choose Yes to schedule the batch to the Re-Organize process.
In this case, the item is marked as a scandoc in the system and the batch is scheduled for the Re-Organize process.
NOTE: If a batch is scheduled for both Reconcile and Re-Organize, the batch will not be presented in both processes at one time.
–or– Choose No if the batch does not require the Re-Organize process.
In this case, the item would be marked as a scandoc in the system and would no longer be presented during item processing.
MICR Repair 19
NOTE: If No is selected, the batch can be scheduled manually to the Re-Organize function at a later time. A batch can be scheduled for Re-Organize using the Research tool or from within the Re-Organize function. For instructions on scheduling a batch for Re-Organize see the “Research” or “Re-Organize” document in the RemitTrac Workflow Manual.
Displaying a Prior Image
During MICR Repair, an operator may need to re-display the prior image to correct a keying mistake. The F7:Prior command can be used to cycle back through multiple items within the current batch. The command does not allow the operator to cycle back through items in previous batches.
NOTE: The Research tool can be used to correct the MICR field of a prior payment item that was modified incorrectly during MICR Repair. See the “Research” document in the RemitTrac Workflow Manual for instructions on correcting MICR line data.
���� To display a prior image
1. Choose F7: Prior until the item that needs to be re-keyed is displayed in the Image Viewer.
The MICR Fields are updated with the data for the prior image.
2. View the data and make any necessary edits to the fields, and then press ENTER. –or– Press ENTER to advance to the next image without making any changes.
3. Repeat Step 2 for each item that was “backed over.”
20 RemitTrac Workflow Manual
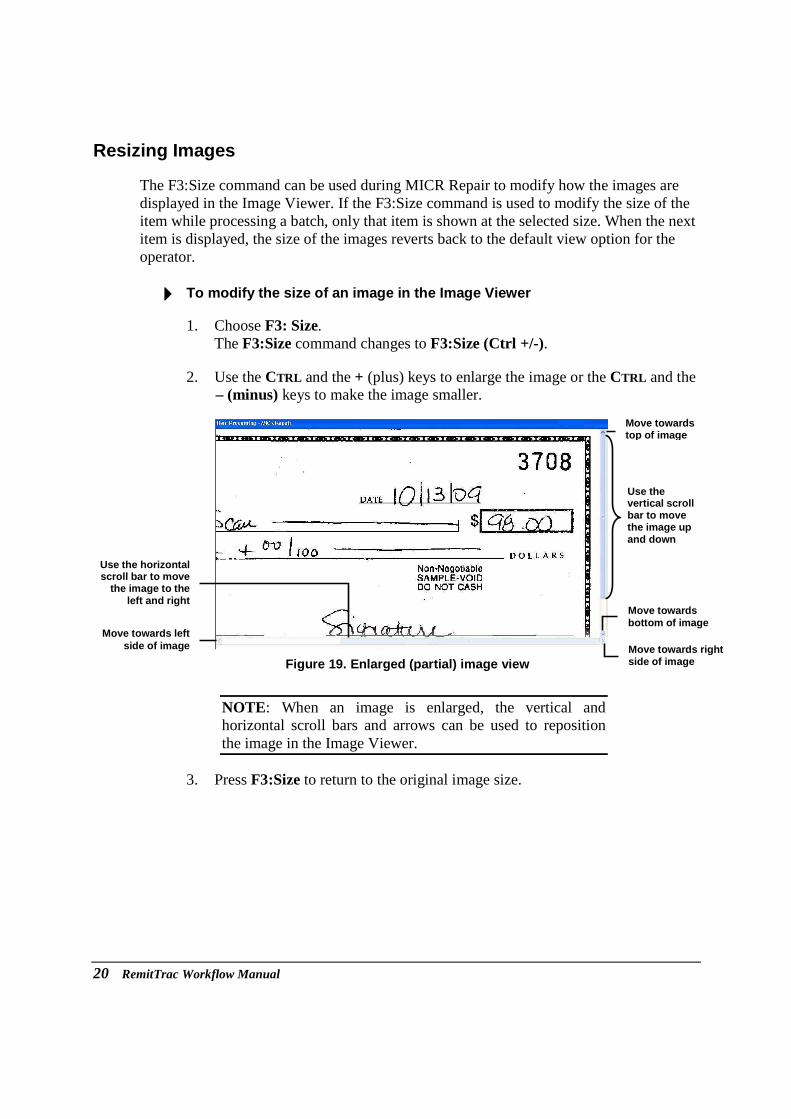
Resizing Images
The F3:Size command can be used during MICR Repair to modify how the images are displayed in the Image Viewer. If the F3:Size command is used to modify the size of the item while processing a batch, only that item is shown at the selected size. When the next item is displayed, the size of the images reverts back to the default view option for the operator.
���� To modify the size of an image in the Image Viewer
1. Choose F3: Size. The F3:Size command changes to F3:Size (Ctrl +/-).
2. Use the CTRL and the + (plus) keys to enlarge the image or the CTRL and the – (minus) keys to make the image smaller.
Figure 19. Enlarged (partial) image view
NOTE: When an image is enlarged, the vertical and horizontal scroll bars and arrows can be used to reposition the image in the Image Viewer.
3. Press F3:Size to return to the original image size.
Use the horizontal scroll bar to move
the image to the left and right
Move towards left side of image
Move towards bottom of image
Move towards right side of image
Use the vertical scroll bar to move the image up and down
Move towards top of image

MICR Repair 21
Viewing the Rear Image of an Item
As a default, during MICR Repair, the front image of each payment item is displayed in the Image Viewer.
NOTE: The rear image of a payment item is only available if the transport option to capture the rear image of payment items is defined for the lockbox and the transport has a rear camera.
���� To view the rear image of an item
• Choose F1: Front/Rear. The rear image of the item is displayed in the Image Viewer.
Figure 20. Rear image of an item
• When the rear image is displayed, choose F1: Front/Rear to view the front image of the item again.
NOTE: If the item is accepted while viewing the rear image, the rear image of the item will be presented in subsequent payment entry passes, workflow functions and when viewing the item in tools such as Research. In addition, the rear image of the item will be printed on image copies.

22 RemitTrac Workflow Manual
Flipping an Image
If an item was upside-down during the capture pass on the transport, it can be “flipped” during MICR Repair.
Figure 21. Flipped image
���� To flip an image
• Choose F5:Flip . The image is rotated 180 degrees in the Image Viewer.
Figure 22. Image right-side up in Image Viewer afte r flipping
NOTE: After an item has been “flipped,” it will be presented right-side up in subsequent payment entry passes, workflow functions and when viewing the item in tools such as Research. The item will also be printed right-side up on image copies.
MICR Repair 23
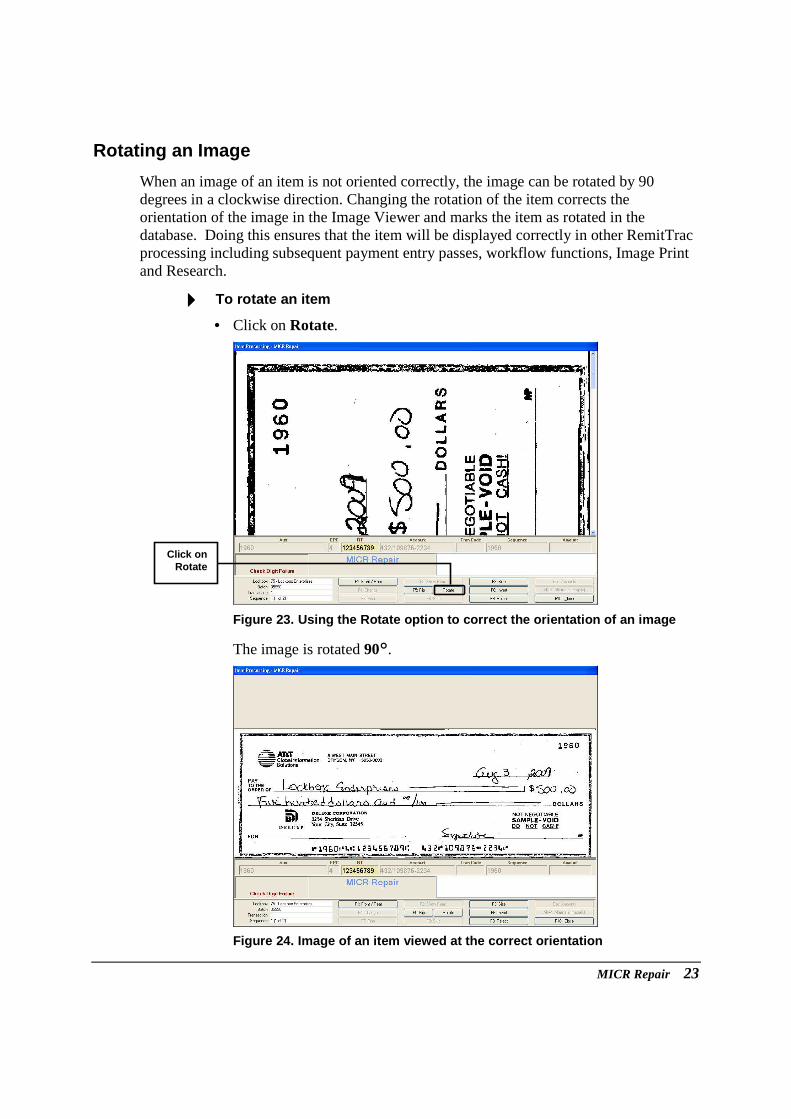
Rotating an Image
When an image of an item is not oriented correctly, the image can be rotated by 90 degrees in a clockwise direction. Changing the rotation of the item corrects the orientation of the image in the Image Viewer and marks the item as rotated in the database. Doing this ensures that the item will be displayed correctly in other RemitTrac processing including subsequent payment entry passes, workflow functions, Image Print and Research.
���� To rotate an item
• Click on Rotate.
Figure 23. Using the Rotate option to correct the o rientation of an image
The image is rotated 90°.
Figure 24. Image of an item viewed at the correct o rientation
Click on Rotate

24 RemitTrac Workflow Manual
Inverting the Image Colors The colors of the “bitonal” item displayed in the Image Viewer can be inverted or reversed. On some images, it is easier to view the image when the colors are reversed. When the colors are inverted, the portions of the image that were originally displayed in white are displayed in black, and the portions that displayed in black are displayed in white, as shown in Figure 25.
NOTE: The Invert option is not available when viewing images in color or grayscale.
���� To invert the colors of an image
• Choose F6: Invert . The colors of the image are inverted.
Figure 25. Inverted Image
NOTE: Inverting the image colors does not affect subsequent processing. Choose F6: Invert to redisplay the image in its original colors.