method statement / application instruction mariseal · pdf filemethod statement / application...
TRANSCRIPT
Method Statement / Application Instruction MARISEAL® SYSTEM
Roof / Terrace Waterproofing
Scope:
Method statement for the application of the MARISEAL® SYSTEM, the liquid-applied polyurethane waterproofing system, for use on roofs and terraces, exposed to UV and domestic pedestrian traffic.
Page of 1 16
QBM, Unit 5C, Grange Avenue,Baldoyle Ind. Est., Baldoyle, Dublin 13.T: +353 1 839 1170 | E: [email protected]: www.qbm.ie
TABLE OF CONTENTS GENERAL INFORMATION! 3!
1.1 SAFETY FIRST! 3!
2. MATERIAL STORAGE! 3!
3. JOB CONDITIONS! 4!
4. APPLICATION SUPERVISOR! 4!
5. GETTING STARTED! 5!
5.1 TOOLS & EQUIPMENT NEEDED! 5!
5.2 ENVIRONMENTAL REQUIREMENTS! 5!
5.3 GENERAL PREPARATION! 6!
5.3.1 Existing Roof! 6!
5.3.2 Building Protection! 6!
5.3.3 Odor Control! 6!
6. SYSTEM APPLICATION! 7!
7. SUBSTRATE PREPARATION! 8!
7.1 Concrete! 8!
7.2 Steel/Metal! 8!
7.3 Wood/Plywood! 8!
7.4 Existing Asphaltic Bituminous Waterproofing! 8!
7.5 Existing Polymeric Single Ply Waterproofing! 9!
7.6 Other Substrate Surfaces! 9!
8. Substrate Leveling, Patching, and Repairing! 9!
9. Preparation of Joints and Cracks! 10!
10. Final Substrate Inspection! 10!
11. Selection of Primer! 11!
12. Products and Description! 12!
12.1 Primers! 12!
12.2 Liquid Waterproofing Membrane! 12!
12.3 Reinforcement Geotextile! 12!
12.4 Top-Coat! 12!
12.5 Joint Sealant! 12!
13. Mixing of Primer! 13!
14. Primer Application! 13!
15. Waterproofing of Details (Flashing)! 14!
16. Application of MARISEAL® 250 Liquid Waterproofing Membrane! 14!
17. Application of MARISEAL® 250 Liquid Waterproofing Membrane reinforced with the MARISEAL® FABRIC! 14!
18. Application of Top Coat! 14!
19. Tool Care and general information ! 15!
20. Drains and Scuppers! 15!
21. Hot Stacks! 15!
22. Protection! 15!
23. Clean-up and disposal! 15!
24. Maintenance! 15!
25. Additional Recommendation! 16!
26. Maris Polymers Warranty Programm Disclaimer ! 16!
Page � of �2 16
GENERAL INFORMATION!!1.1 SAFETY FIRST!!Ensure sufficient ventilation during application. Wear Protective Clothing, Gloves and Chemical Splash Goggles. Also wear Safety Shoes, Overalls, Hardhats and safety Harnesses. Coordinate protective measures with the Owner or his designated Representative. !Remember, these are products are to be handled, used and applied only by professionals. !NOTE: Copies of all current MSDS for all components must be kept on site. Provide all crew members with appropriate safety data information and training as is related to the specific chemical compound he or she may be expected to deal with. Each crew member shall be fully aware of first-aid measures to be undertaken in case of accidents. !Always make sure any ladders being used are securely tied off and take the time to be aware of the surrounding area when on a roof or high rise surface. When required, provide barricades, retaining ropes, safety elements (active/passive) and any appropriate signage required by OSHA, NIOSH, and NSC and/or the Owner or his designated Representative. When near the edge of a roof/deck/surface, always work facing the edge, not with your back to it. Make sure airless sprayer hoses or cables or cords are positioned in such way to minimize the chance of tripping over them. Never point a power washer or airless sprayer gun in the direction of a person. High pressure nozzles can cause injection wounds if held close to the skin. !Do not use open flames to accelerate the drying/curing of any products described herein. These products must air dry on their own. Never work alone. !Maris Polymers recommends that applicators wear UV-rated darkened safety goggles when applying the finish coating in bright sunshine. !As with all chemicals, use caution and good industrial hygiene when handling and disposing of empty containers. Never leave empty or half full containers on site as these can be dangerous and a accidents might happen. Never discharge rest materials directly into any open body of water. If in doubt, always contact the local authorities prior to discharging to the soil surface. Refer to the Product Data Sheets (TDS) and the Material Safety Data Sheets (MSDS) for additional information or contact Maris Polymers Technical Department at [email protected]. !Comply with requirements of OSHA, NIOSH or governing local authority for work place safety. It is the responsibility of the applicator to comply with all local, state, federal, state building codes / regulations and OSHA, NIOSH safety regulations. !CAUTION! : Coated areas become extremely slippery when wet. !!2. MATERIAL STORAGE!!All Maris Polymers components will be delivered to the site in original sealed containers/packaging. Define a storage area for all components that is cool, dry, out of direct sunlight, and in accordance with recommendations of Maris Polymers and relevant regulatory agencies. Also the defined storage area should be secured, to prevent theft, damage or vandalism. Roll goods must be stored horizontally on platforms sufficiently elevated to prevent contact with water and other contaminants. Do not use rolls with damaged ends. Store solvent-bearing solutions, primers, resins, dilutors and sealants in accordance with the MSDS and/or local fire and regulatory authorities. Materials should not be stored in quantities that will exceed design loads, damage sub- strate materials, hinder installation or drainage. !
Page � of �3 16
Optimum storage of materials is between 5°C and 30 °C, in a controlled environment to facilitate application. DO NOT store materials outside in cold weather, as the cooled materials will be difficult to mix and apply due to their thick consistency. DO NOT store materials outside in hot weather, as the heated materials will react too quickly and reduce working times significantly. Application of Maris Polymers products in temperatures between 2 and 5°C is possible but not recommended due to extended curing times. Storage of materials in a warm location until application will help accelerate cure, as will the use of cold weather additives. Application of Maris Polymers products in temperatures above 35°C is possible but not recommended due to the potential for blistering from substrate vapor drive and reduced working times. Storage of materials in a cool location until application will retard cure, and application of materials in the late afternoon can alleviate the potential for blistering related to vapor drive.
Keep Maris Polymers Products away from all ignition sources (i.e., fire, sparks, and flames). Do not smoke.
Follow manufacturer’s directions for proper protection of materials prior to and during installation. Any containers missing proper manufacturer’s identification are not acceptable. All materials at job site must have proper(latest) MSDS Sheets available at the site. Read all container labels for additional information. Keep all containers tightly closed when not in use.
Dispose of materials and their containers in accordance with local, state and/or federal government regulations.
3. JOB CONDITIONSA. Install coating materials under conditions where all of the following conditions are met:
I. Concrete has not been treated with any substance which will adversely affect adhesion or performance.
II. Rain, snow or frost is not anticipated within 18 hours of application, III. Substrate surface temperatures are above 5°C and lower than 35°C, and 3°C higher than
dew point. Consult with Maris Polymers outside of this temperature range. IV. Positive ventilation for interior applications can be continuously supplied throughout the
application period and minimum 8 hours after. V. Open fires and spark producing equipment are not, and will not be, in proximity to the
application area until vapors have dissipated.
B. Post ‘No Smoking’ signs in the surrounding area during and for at least 8 hours following the application period.
C. Strictly adhere to special requirements of Manufacturer as modified by applicable rules and regulations of local, state and federal authorities having jurisdiction.
4. APPLICATION SUPERVISORThe Maris Polymers products/systems Applicator or Applicator Supervisor must be licensed or trained by MARIS POLYMERS SA, and must have a minimum of 2 years experience in application of liquid-applied waterproofing membranes/coatings.
Page of 4 16
5. GETTING STARTED
5.1 TOOLS & EQUIPMENT NEEDEDFollowing is a list of power and/or hand tools and equipment that are typically needed to apply Maris Polymers SA Coatings.
• Protective clothing, gloves, chemical splash goggles, safety shoes and hardhats. • Ladders and safety equipment (safety harnesses, warning flags/lines, tie-offs, etc.) • Stiff bristle broom and scrub brush (eg wire brush). • Solvent Stable Rollers mohair rollers with short / medium hair • Solvent Stable brushes with short / medium hair • Jiffy mixer or heavy duty drill and paddle to mix coatings prior to application. • Masking tapes of 3cm width minimum. • A pair of scissors to cut the Mariseal Fabric into the adequate pieces • Application gun for the application of the Polyurethane joint/crack sealing mastic. • Clean rags and suitable solvent to clean tools. • Electrical extension cords • Garbage bags • Wet Mil Gauge • Generator (optional)
In case of Airless application, use a Airless Sprayer of a translation ratio of 1:70 minimum, coupled with an external compressor of 4 bar. 250 bar minimum at spray tip, 8 liters per minute minimum material output recommended. If hoses exceed 30meters in length or ambient temperature is below 10oC use hose heating at 60oC. We recommend a wide spray fan during application.
5.2 ENVIRONMENTAL REQUIREMENTSTemperature during application should be between 5°C and 35°C, providing the surface is a minimum 3°C above the dew point. Consult with Maris Polymers outside of this temperature range. Application of Maris Polymers products in temperatures between 1°C and 5°C is possible but not recommended due to extended curing times. Storage of materials in a warm location until application will help accelerate cure, as will the use of cold weather additives. Application of Maris Polymers products in temperatures above 35°C is possible but not recommended due to the potential for blistering from substrate vapor drive and reduced working times. Storage of materials in a cool location until application will retard cure, and application of materials in the late afternoon can alleviate the potential for blistering related to vapor drive. High humidity may affect the final finish.
Page of 5 16
5.3 GENERAL PREPARATIONMake sure all steps are followed for each product as published in this Method Statement / Application Instruction:
5.3.1 Existing RoofEvaluate site and building conditions. Maris Polymers SA recommends adhesion tests prior to bidding the project to ensure adhesion and compatibility between the coating and the substrate. Maris Polymers SA is not responsible for any defects in the existing roofing system. Maris Polymers SA requires proper surface preparation of the existing roofing system. Inspecting the existing roof is critical to ensure watertight integrity after application of the coating system. During the inspection, look for deficiencies and damage that need to be repaired or replaced before installing Maris Polymers coatings / products. Maris Polymers recommends repairs be made to correct any defects found in the existing roof system. Do not proceed with the coating job unless the substrate if correctly repaired. Ensure that the air space below the roofing system is properly ventilated. Poorly ventilated air spaces greatly increase the probability of condensation on the bottom of a roof panel or roof deck. Be careful when repairing and/or replacing fasteners on roofs or decks. Make sure there are no wires, conduit, or piping that may be penetrated when working with fasteners.
5.3.2 Building ProtectionProtect building adequately (with tarp or other suitable material) from soil, stains, or spills at all hoisting points and areas of application. Provide protection for Contractor personnel and occupants of the structure and surrounding buildings as required complying with requirements of OSHA, NIOSH and/or governing local authority. Masking or covering to prevent over-spray or accidental coating is required to provide protection of skylights, railings, pipes, HVAC units etc., and other areas not scheduled for coating. The applicator is responsible for any product spills, spray drift, or over spray. Consider rolling or brushing a 5 meter perimeter and then spray applying the remainder to reduce the chance of overspray or spillage on adjacent surfaces. If a roof has skylights or transits, use reduced pressure and a wide fan spray when cleaning with a power washer as most fiberglass panels and other non-load bearing roof components do not have the strength to withstand high pressure cleaning.
5.3.3 Odor ControlOdor control and elimination measures are not typically necessary, but if required by the Owner or his designated Representative, implement odor control and elimination measures before and during the application of the roofing/waterproofing materials. Control/elimination measures must be field tested at off-hours and typically consists of one (1) or multiple of the following measures: 1. Sealing of air intakes with activated carbon filters, and at joints against building exterior walls to prevent leakage of unfiltered air into occupied spaces. 2. Sealing of doorways, windows, and skylights with duct tape and polyethylene sheeting to prevent leakage of air into the building. 3. Erection and use of moveable enclosure(s) sized to accommodate work area(s) and stationary enclosure for resin mixing station equipped with mechanical air intake/exhaust openings, odor control air cleaners, and activated carbon filter at exhaust openings as required to clean enclosed air volume and to prevent odor migration outside the enclosure. Placement of odor elimination stations inside and outside of the enclosure(s) as required.
Page of 6 16
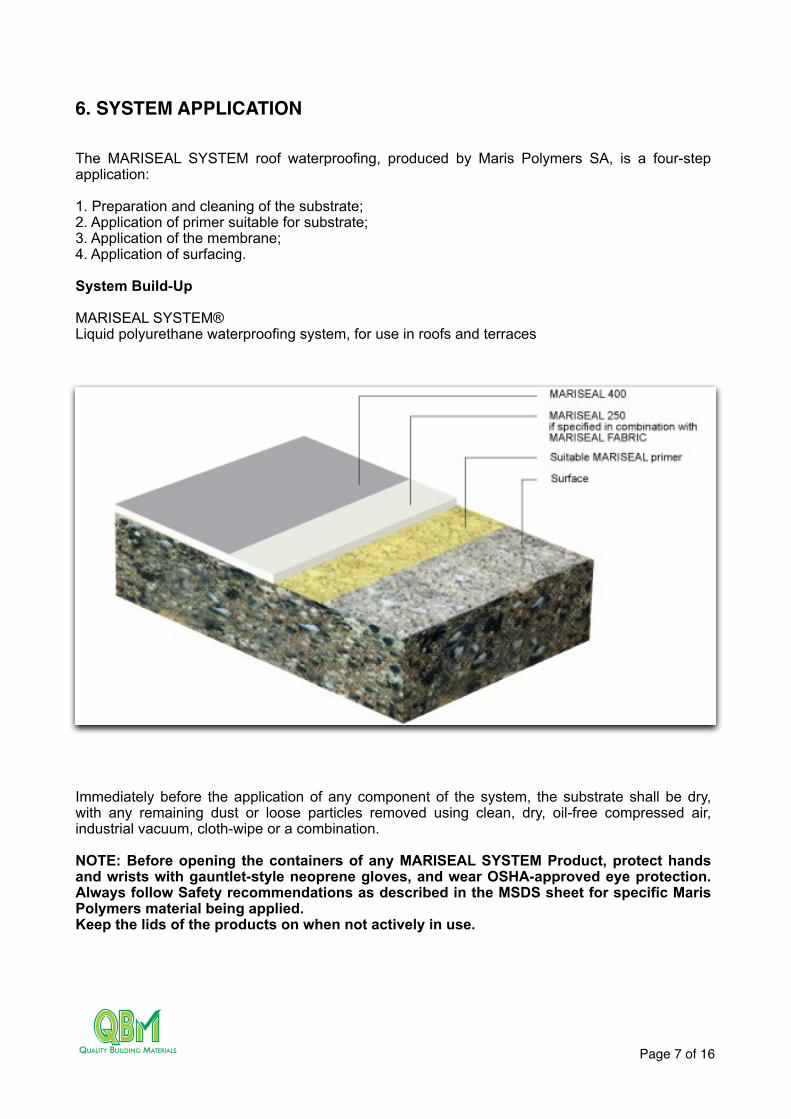
6. SYSTEM APPLICATION
The MARISEAL SYSTEM roof waterproofing, produced by Maris Polymers SA, is a four-step application:
1. Preparation and cleaning of the substrate; 2. Application of primer suitable for substrate; 3. Application of the membrane; 4. Application of surfacing.
System Build-Up
MARISEAL SYSTEM® Liquid polyurethane waterproofing system, for use in roofs and terraces
Immediately before the application of any component of the system, the substrate shall be dry, with any remaining dust or loose particles removed using clean, dry, oil-free compressed air, industrial vacuum, cloth-wipe or a combination.
NOTE: Before opening the containers of any MARISEAL SYSTEM Product, protect hands and wrists with gauntlet-style neoprene gloves, and wear OSHA-approved eye protection. Always follow Safety recommendations as described in the MSDS sheet for specific Maris Polymers material being applied. Keep the lids of the products on when not actively in use.
Page of 7 16
!!7. SUBSTRATE PREPARATION!!7.1 Concrete!!New concrete shall have cured a minimum of 28 days, or as approved by the Maris Polymers SA Technical Department. New or existing concrete shall be free of oil, grease, curing compounds, loose particles, moss, algae growth, laitance, friable matter, dirt, bituminous products and previous waterproofing materials. New or existing concrete shall be dry with a maximum moisture content of (5%) five percent. Coating over wet components will adversely affect the adhesion of the Maris Polymers SA coatings. Where required, concrete shall be abrasively cleaned in accordance with ASTM D4259 to provide a sound substrate free from laitance. Achieve an open concrete surface. Use mechanical methods to remove existing waterproofing products or surface deterioration. Possible surface irregularities need to be smoothened. The substrate shall be sound and all spalls, voids and blow holes on vertical or horizontal surfaces must be repaired prior to placement of the primer coat. Areas of minor surface deterioration of 4 mm or greater in depth shall be repaired to prevent possible ponding of the system, leading to excessive usage of primer and resin. For concrete materials with a compressive strength less than 25MPa and cohesive bond strength less than 1.5MPa contact the Maris Polymers Technical Department for substrate preparation requirements. Hollow-core panels, T-panels, and Twin-T panels shall have grouted joints between panels and shall be provided with mechanical securement from panel to panel. There must be no rising moisture according to ASTM D 4263 (Polyethylene sheet test) !7.2 Steel/Metal!!Clean and prepare metal surfaces to near white metal (power tool clean) or as required by membrane manufacturer. Extend preparation a minimum of 10 cm beyond the termination of the membrane flashing materials. Notch steel surfaces to provide a rust-stop. In addition to cleaning, all metal surfaces shall be abraded to provide a rough open surface. A WIRE BRUSH FINISH IS NOT ACCEPTABLE. Wipe prepared metal surface with MEK or other acceptable solvent cleaner prior to application of primer. !7.3 Wood/Plywood!New or existing wood / plywood shall be dry with a maximum moisture content of (5%) five percent. Coating over wet components will adversely affect the adhesion of the Maris Polymers SA coatings. Plywood shall be identified with Plywood grade trademarks and shall meet the requirements of product standard PS1. Strip plywood joints with 20cm wide strip of MARISEAL membrane fully reinforced with the MARISEAL FABRIC. Cover knot holes or cracks with strips of MARISEAL membrane fully reinforced with the MARISEAL FABRIC. There must be no rising moisture according to ASTM D 4263 (Polyethylene sheet test) !!7.4 Existing Asphaltic Bituminous Waterproofing!!Existing flashings shall be removed down to the structural substrate/penetration at all flashing areas. Damaged/ saturated areas of existing roofing membrane and underlying assembly shall be removed and replaced, or repaired in kind. Smooth-surfaced membrane with applied coating shall have all loose coating removed. Then liquify surface with fire torch and immediately saturate surface with enough dry silica sand (0.4 - 1,2mm). Perform adhesion test to confirm acceptable adhesion. Granule-surfaced membrane shall have all loose granules removed from the surface by vacuuming and power brooming. Gravel-surfaced membrane shall have all loose gravel removed and the roof surface thoroughly cleaned with all ridges and high points removed. Maris Polymers SA recommends adhesion tests prior to bidding the project to ensure adhesion and compatibility between the coating and the substrate. Do not apply Maris Polymers SA coatings over mastic-asphalt or coal-tar-pitch roofs.
Page � of �8 16
Do not apply Maris Polymers SA coatings over asphalt or asphalt products that have not aged for a minimum of 180 days. Coating over uncured (not aged) asphalt products will cause staining and/or blistering of the Maris Polymers coatings. There must be no rising moisture according to ASTM D 4263 (Polyethylene sheet test) !7.5 Existing Polymeric Single Ply Waterproofing!Existing flashings shall be removed down to the structural substrate/penetration at all flashing areas. Damaged/saturated areas of existing roofing membrane and underlying assembly shall be removed and replaced, or repaired in kind. Maris Polymers SA recommends adhesion tests prior to bidding the project to ensure adhesion and compatibility between the coating and the substrate. Wipe prepared Single Ply surface with MEK or other acceptable solvent cleaner prior to application of primer. !7.6 Other Substrate Surfaces!Contact the Maris Polymers Technical Department for acceptance and preparation of other substrate surfaces. !!8. Substrate Leveling, Patching, and Repairing!!MARISEAL primer/sand mix are the preferred materials for all substrate leveling, crack and wall/deck repair and patching. MARISEAL primer/sand mix is not intended to be used as a structural repair material. Commercially-available cementitious repair mortars can also be used to make surface repairs to concrete, masonry, stone, and terra cotta substrate surfaces. MARIFLEX PU 30 polyurethane sealant can be used to fill and seal defects in wood and metal substrate surfaces. Gaps between materials are typically filled by the use of compressible backer rod, followed by application of MARIFLEX PU 30 polyurethane sealant. A sound and even substrate surface shall be provided for all Maris Polymers material applications. Maris Polymers, MARISEAL SYSTEM materials are not intended to span unsupported gaps and voids. !Primer/Sand Options MARISEAL 750 primer/sand patching mix allows patching to be conducted as part of the priming operation. MARISEAL membrane may be applied following an 8-12 hour curing period, provided that primer is fully cured and tack free. MARISEAL 750 primer is recommended for repairs to concrete and masonry surfaces. In addition, recommended for creating slope to drain to address localized drainage deficiencies. !Sand Aggregate Specification and Size All sand must be washed; kiln-dried and dust-free suitable for troweling, broadcast or pourable self-leveling, round grain or angular sized as follows: For voids less than 25mm in depth: silica sand, of cornsize 0.1 – 0.3 mm. For voids between 25mm and 50mm in depth: silica sand, of cornsize 0.4 – 1.2 mm. Silica sand must be kept absolutely dry during storage and handling. Substrate Leveling, Sloping and Patching !Substrate conditions are to be evaluated by the Contractor, the Owner, or his designated Representative, and Maris Polymers. NOTE: Any surface to be leveled or patched with primer/sand must first be primed with an appropriate MARISEAL primer. !The ratio of primer to sand can be varied to create a mixture that provides the proper consistency for the intended application. The leveling mixture typically consists of a slurry of primer and approved kiln-dried silica sand in a 1:2 MARIPOX 750 primer to sand ratio by volume. Spread and plane this compound with a squeegee and trowel to achieve a flat surface. The patching mixture typically consists of a mortar of primer and approved kiln-dried sand in a 1:4 MARIPOX 750 primer to sand ratio by volume. Fill cavities with this compound with a trowel to achieve a flat surface.
Page � of �9 16
The sloping mixture typically consists of a mortar of primer and approved kiln-dried sand in a 1:4 MARIPOX 750 to sand ratio by volume. Create required slope (maximum 50mm thickness in maximum 25mm lifts with a trowel to achieve an even surface. !!9. Preparation of Joints and Cracks!!Joints, cracks, and fractures in the structural deck shall be prepared as defined below before installation of waterproofing membrane. NOTE: Joints, cracks, and fractures may telegraph through the waterproofing membrane. !Non-Moving Cracks Determine that crack is non-moving. Clean out crack by brushing and oil-free compressed air of dust, residue or other contamination. Prime locally with the MARISEAL 710 Primer and allow 2-3 hours to dry. Fill all prepared cracks with MARIFLEX PU 30 sealant. Then apply a layer of MARISEAL 250 membrane, 200mm wide centered over all cracks and while wet, cover with a correct cut stripe of the MARISEAL FABRIC. Press it to soak. Then saturate the MARISEAL FABRIC with enough MARISEAL® 270, until it is fully covered. Allow minimum 12 hours to cure. Work in strict accordance with Maris Polymers written instructions. !Moving Cracks / Joints Determine that crack / joint is moving. Clean concrete expansion joints and control joints of dust, residue or other contamination by brushing and oil-free compressed air. Widen and deepen cracks / joints (cut open) if necessary. The prepared movement joint should have a depth of 10-15 mm. The width:depth ratio of the movement joint should be at a rate of approx. 2:1. Apply some MARIFLEX® PU 30 Joint-Sealant on the bottom of the joint only. Then with a brush, apply a stripe layer of MARISEAL 250 membrane, 200mm wide centered over and inside the joint. Place the MARISEAL FABRIC over the wet coating and with a suitable tool, press it deep inside the joint, until it is soaked and the joint is fully covered from the inside. Then fully saturate the MARISEAL FABRIC with enough MARISEAL 250. Then place a polyethylene cord of the correct dimensions inside the joint and press it deep inside onto the saturated fabric. Fill the remaining free space of the joint with MARIFLEX® PU 30 sealant. Do not cover. Allow minimum 12 hours to cure. Work in strict accordance with Maris Polymers written instructions. !10. Final Substrate Inspection!!All surfaces must be free from gross irregularities, loose, unsound or foreign material such as dirt, ice, snow, water, grease, oil, release agents, curing agents, lacquers, or any other condition that would be detrimental to adhesion of the primer and substrate. This requires careful preparation of existing horizontal and vertical substrates; cracks are filled, expansion joints are prepared, flashings are removed or modified, and termination points are determined. Substrates and penetrations are prepared to rigorous industry standards, and may require scarifying, sandblasting or grinding in some cases to achieve a suitable substrate. The Contractor should perform random tests to determine tensile bond strength of membrane to substrate at the job site using an Elcometer Adhesion Tester Model 106 or similar device, or by the performance of a manual pull test. Contractor shall perform tests on completely cured membrane at the beginning of the Work, and at intervals as required assuring specified adhesion with a minimum of three (3) tests per 500 m2. Maris Polymers requires a tested tensile bond strength of membrane to substrate greater than or equal to 1.0 N/mm2. Alternatively, a manual 135° peel bond strength of membrane to substrate must confirm that cohesive failure of substrate or membrane occurs before adhesive failure of primer/substrate interface. This can be achieved through correct and proper surface preparation. Before priming of the surfaces, inspect and check the prepared substrate. In the event the bond strengths are lower than the minimum specified and cohesive failure of the substrate is not the mode of failure, additional substrate preparation is required. Repeat testing to verify suitability of substrate preparation. Contractor shall immediately notify the Maris Polymers in the event tensile bond test results are below specified values. !
Page � of �10 16

11. Selection of PrimerRefer to the Primer Selection Table below, to select the appropriate primer for the intended substrate.
Substrates MARISEAL 710 MARISEAL AquaPrimer
MARISEAL 750 No Primer required
Concrete ++ ++ ++
Mortar ++ ++ +
Cement Screed ++ ++ +
Plaster ++ ++ +
Bricks ++ ++ +
Stone + ++ ++
Wood ++ ++ ++
Polymeric Bitumenfelt(APP/SBS)
+ ++ +
EDPM Membrane - - - Solvent wiping prior to application
PVC Membrane - - - Solvent wiping prior to application
Steel - ++ ++
Aluminum - ++ ++
Copper - ++ ++
Zink - ++ ++
Polyester - - - Solvent wiping prior to application
Polyacrylate Glass - - - Solvent wiping prior to application
Glass - + ++
Page of 11 16
12. Products and DescriptionThis is the description of the products that are needed for this application job.
12.1 PrimersMARISEAL 710: MARISEAL® 710 is a transparent, rigid, deep penetrating, one component, quick drying polyurethane primer. Solvent-based.
MARISEAL AQUA PRIMER: MARISEAL® AQUA PRIMER is a transparent, rigid, two component epoxy primer. Water-based.
MARISEAL 750: MARISEAL® 750 is a transparent, rigid, two component epoxy primer. Solvent free.
12.2 Liquid Waterproofing MembraneMARISEAL 250: MARISEAL® 250 is a premium, liquid-applied, highly permanent elastic, cold applied and cold curing, one component polyurethane membrane used for long-lasting waterproofing.
12.3 Reinforcement GeotextileMARISEAL FABRIC: MARISEAL® FABRIC is a needle punched, non woven geotextile used for reinforcement of the MARISEAL 250 liquid-applied, polyurethane waterproofing membrane.
12.4 Top-CoatMARISEAL 400: MARISEAL® 400 is a premium, UV stable, aliphatic polyurethane top-coat, used a protection layer over the MARISEAL 250.
12.5 Joint SealantMARIFLEX PU 30: MARIFLEX® PU 30 is a premium, low modulus polyurethane joint sealant, used to prepare and seal cracks and joints before the application of the MARISEAL SYSTEM.
Page of 12 16
13. Mixing of Primer!!Mixing of MARISEAL Aqua Primer !Step 1: Premix MARISEAL AquaPrimer Component A thoroughly with a spiral agitator or stir stick. Step 2: Pour MARISEAL AquaPrimer Component B into Component A and mix the components for approximately 2 minutes with a clean spiral agitator on slow speed without creating any bubbles or streaks. DO NOT AERATE. The Resin solution should be a uniform color, with no light or dark streaks present. Allow the mixture to rest for 3-5 minutes, and then dilute with 20-25% clean water to regulate viscosity. Mix for another 2 minutes with a clean spiral agitator on slow speed without creating any bubbles. !ATTENTION: The mixing of the components in two component products has to be effected very thoroughly, especially on the walls and bottom of the pail until the mixture becomes fully homogeneous. NOTE: DO NOT break down workpacks into smaller quantities – mix the entire workpack. !Mixing of MARISEAL 750 !Step 1: Premix MARISEAL 750 Component A thoroughly with a spiral agitator or stir stick. Step 2: Pour MARISEAL 750 Component B into Component A and mix the components for approximately 2 minutes with a clean spiral agitator on slow speed without creating any bubbles or streaks. DO NOT AERATE. DO NOT DILUTE RESIN. The Resin solution should be a uniform color, with no light or dark streaks present. Leave mixed product for another 5 minutes to rest before application. !ATTENTION: The mixing of the components in two component products has to be effected very thoroughly, especially on the walls and bottom of the pail until the mixture becomes fully homogeneous. NOTE: DO NOT break down workpacks into smaller quantities – mix the entire workpack. !!!14. Primer Application!!Determine required primer coverage for each substrate material/condition and apply in strict accordance with written instructions of Maris Polymers. After the Primer resin is prepared, apply approximately 0.2 - 0.3 kg/m2. The higher application rate is primarily for MARISEAL 710 and MARISEAL 750 primers applied to concrete and masonry substrates that require additional primer to achieve pore saturation. The primer should be rolled evenly onto the surface to fully saturate the substrate in one application. !For MARISEAL 750 Primer applications only, broadcast kiln-dried sand at the rate of 2.5kg/m2 into the wet primer to enhance membrane/primer bond. Remove excess sand after primer has fully cured prior to membrane application. !Curing time is approximately 8-12 hours for MARISEAL AquaPrimer and MARISEAL 750 primers and approximately 2-3 hours for the quick-dry MARISEAL 710 primer. MARISEAL 250 membrane may be applied when the primer is completely dry. Do not apply MARISEAL 250 membrane to wet primer. !NOTE: Exposure of primer in excess of eight (8) days or premature exposure to moisture may require removal and application of new primer. Primer application past the MARISEAL membrane terminations requires surfacing with an approved material. !!
Page � of �13 16
!!15. Waterproofing of Details (Flashing)!!At flashing areas, difficult details and problem areas, like wall-floor connections, wall-wall connections, 90o angles, pipes penetrations, faucets, waterspouts (siphon), etc reinforce the MARISEAL® 250 always with the MARISEAL® FABRIC. In order to do that, apply on the still wet MARISEAL® 250 a correct cut piece of MARISEAL® FABRIC, press it to soak, and saturate again with enough MARISEAL® 250. For detailed application instructions with the MARISEAL® Fabric, contact our R+D department. !16. Application of MARISEAL® 250 Liquid Waterproofing Membrane!!Stir the MARISEAL® 250 well before application. Poor the MARISEAL® 250 onto the prepared / primed surface and lay it out by roller or brush, at a consumption of 0,6 - 0,7 kg/m2. After 12-18 hours (not later than 48 hours) apply a second layer of the MARISEAL® 250, by roller or brush, at a consumption of 0,6 - 0,7 kg/m2. Allow 8-12 hours to cure, before the application of the MARISEAL® 400 topcoat. !17. Application of MARISEAL® 250 Liquid Waterproofing Membrane reinforced with the MARISEAL® FABRIC!!Depending on the existing surface condition, based on the contractors judgement, the MARISEAL 250 can be applied fully reinforced with the MARISEAL FABRIC. When the MARISEAL® 250 is applied fully reinforced, add the MARISEAL® KATALYSATOR to it prior to application. In order to do that, mix the MARISEAL 250 with a spiral agitator until the liquid is a uniform color. to this add the correct amount (3% by weight) of the MARISEAL KATALYSATOR, and mix with the spiral agitator for 3 minutes or until both liquids are thoroughly blended. !Step 1: Poor the MARISEAL® 250 + MARISEAL® KATALYSATOR mixture onto the prepared / primed surface and lay it out by roller or brush, at a consumption of 1.5 kg/m2 .The MARISEAL® 250 + MARISEAL® KATALYSATOR mixture should be rolled or brushed evenly onto the surface. Apply liberally to the prepared surface with a roller or brush using a broad, even stroke. Cover one working area at a time, between 1.5-2 m2. Step 2: Then roll the MARISEAL FABRIC geotextile directly into the coating, making sure the SMOOTH SIDE IS FACING UP(natural unrolling procedure), avoiding any folds and wrinkles. Use a medium nap roller or brush to work the resin into the geotextile, saturating from the bottom up. The appearance of the fleece should be saturated with no unsaturated spots. It is important to correct any faults before the resin cures. For detailed application instructions with the MARISEAL® Fabric, contact our R+D department. Step 3: Apply approximately 0.5-1.5 kg/m2 additional liquid MARISEAL® 250 + MARISEAL® KATALYSATOR mixture on top of the geotextile until fully saturated. Roll this final coating into the fleece, which will result in a glossy appearance. The geotextile can only hold so much coating and all excess should be rolled forward to the unsaturated geotextile. Any excess resin left on the top of the fleece will weather and peel off. The correct amount of coating will completely saturate the geotextile and no white color will be visible. At all MARISEAL FABRIC seams, allow a 5 cm overlap for all side joints and a 10 cm overlap for all end joints. Allow 8-12 hours to cure, before the application of the MARISEAL® 400 topcoat. !18. Application of Top Coat!!Stir the MARISEAL® 400 well before application. Apply the MARISEAL® 400 onto the cured MARISEAL® 250 surface by roller, at a consumption of 0,15 - 0,2 kg/m2. If desired or judged necessary by the contractor, apply another layer of MARISEAL® 400, within 3-4 hours.
Page � of �14 16
!!!!19. Tool Care and general information !Brushes and rollers will remain supple and usable if they are kept moving in liquid resin. If allowed to sit, they will harden quickly as resin begins to cure. Rollers must be discarded once they stiffen. Brushes may be discarded or cleaned with MEK or acetone-based solvent. Roller handles can also be cleaned with MEK or acetone based solvent. If solvent is used, the tool must air dry for twenty-four (24) hours before being reused for mixing and/or application. To minimize cleaning, wipe handle with clean, dry cloth every fifteen (15) to twenty (20) minutes and schedule work to avoid stopping. Do not dilute any of the coatings, before or during application. Keep the lids of the products on when not actively in use. Make sure all materials, debris, used rollers and brushes, containers, etc. are removed from work area and properly disposed. !!20. Drains and Scuppers!Acceptable drain and scupper materials are cast iron, cast aluminum, and copper. Connect new drains and scuppers to existing storm sewer system. Alternatively, replace all broken or damaged parts of existing drains and scuppers. Flashing material shall extend 10cm minimum onto drain or scupper flange and into drain/scupper body. Install clamping ring if provided as part of the drain or scupper design. Install a strainer basket to prevent debris from clogging the drainage line. !21. Hot Stacks!Protect the membrane components from direct contact with steam or heat sources when the in-service temperature exceeds 75oC. In all such cases flash to an intermediate “cool” sleeve. Fabricate “cool” sleeve in the form of a flanged metal cone using galvanized metal, mechanically attached to the structure or wood nailers. !22. Protection!Protect finished application from all other contractors and activities during and after completion. Any damage to the system must be repaired as recommended by Maris Polymers SA. Do not work off installed membrane during application of remaining work before forty-eight (48) hours of curing. Movement of materials and equipment across installed membrane is not acceptable. If movement is necessary, provide complete protection of affected areas. Protect finished membrane from damage by other trades by the use of a cushioning layer such as 3cm thick expanded polystyrene insulation and an impact layer such as 1cm thick exterior-grade plywood. !23. Clean-up and disposal!Remove all masking, protection, equipment, materials, and debris from the work and storage areas and leave those areas in an undamaged and acceptable condition. Cured Mariseal coatings may be disposed of in standard landfills. NOTE: Uncured Mariseal coatings are considered hazardous materials and must be handled as such, in accordance with local, state and federal regulations. Make sure all materials, debris, used rollers and brushes, containers, etc. are removed from work area and properly disposed. !!24. Maintenance!To ensure that your MARISEAL SYSTEM waterproofing/roofing system stays in the best of shape and gives you years of satisfaction the correct cleaning and maintenance schedule should be used. When first installed and fully cured your roof deck should be cleaned with an appropriate cleaner using the most suitable equipment for the area concerned.
Page � of �15 16
If the correct cleaning and maintenance schedule is used the appearance of your deck can be easily maintained.The deck will require regular cleaning (monthly) with either a neutral or mildly alkaline floor cleaner depending upon the type and level of soiling encountered. Organic matter (algae, fungi, etc) need to be removed from the surface. Spillages: Spillages of any liquid should be wiped up or absorbed and removed as soon as possible. Not only is this a responsible action as far as Health and Safety is concerned, it will also help you to keep your deck in good condition. Once the spillage is removed the area should be cleaned as usual with your standard floor cleaner.
25. Additional RecommendationRead the Products Technical Data Sheets(TDS) carefully.
26. Maris Polymers Warranty Programm DisclaimerMaris Polymers SA warrants that its products are of professional grade and free of any and all manufacturing defects. Maris Polymers does not warrant the existing roof system or structural deck or other components not produced by Maris Polymers. Any damages to the coatings system caused by the existing roofing system, including but not limited to delamination, cracking, blistering, bleed-thru, deck deterioration or related failures are outside the scope of the Maris Polymers Warranty. Contact Maris Polymers Technical Department for additional information.
The statements provided concerning the materials shown above are intended as a guide for material usage and were believed to be true and accurate at the time of printing. No statement made by anyone may supersede this information, except when done in writing by Maris Polymers SA in form of a contract. Since the manner of use is beyond our control, Maris Polymers does not make nor authorize anyone to make any warranty of merchantability or fitness for any purpose or any warranty, guarantee or representation, expressed or implied, concerning this materials except that it conforms to Maris Polymers specification properties. Buyer and user accept the product under these conditions and assume the risk of any failure, any injury of person or property (including that of the user), loss or liability resulting from the handling, storage or use of the product whether or not it is handled, stored or used in accordance with the directions or specifications. Maris Polymers must be notified in writing of any claims and be given the opportunity to inspect the complaint or failure before repairs are made.
DISCLAIMER: NO WARRANTY, EXPRESS OR IMPLIED, IS MADE IN THIS DOCUMENT. THE PRODUCT IS NOT CLAIMED TO BE MERCHANTABLE OR FIT FOR ANY PARTICULAR PURPOSE. User and certified Maris Polymers SA applicators determine suitability only. See individual Maris Polymers SA product data sheets, MSDS sheets, guide specifications and details for complete information regarding the suitability, application and handling of Maris Polymers SA products.
Page of 16 16
QBM, Unit 5C, Grange Avenue,Baldoyle Ind. Est., Baldoyle, Dublin 13.
T: +353 1 839 1170 | E: [email protected]: www.qbm.ie