mercedes-benz service package pricing system (spps) · 2020-02-08 · mercedes-benz service package...
TRANSCRIPT
Mercedes-Benz
Service Package Pricing System (SPPS)
Manual for workers of the Market Performance Centre (MPC)
Daimler AG, Stuttgart

SPPS Version 5.5 Page 2
Publisher The team responsible for design, content, updating and duplication is: Daimler AG GSP/ORM HPC: 2401 70546 Stuttgart
SPPS Version 5.5 Page 3
Contents
1 Introduction ................................................................................................................................... 5 1.1 Service Package Pricing System (SPPS) ................................................................................... 5 1.2 The Usage of SPPS ................................................................................................................... 5 1.3 Target Group ............................................................................................................................. 5
2 The Program - SPPS ........................................................................................................................ 6 2.1 Starting and Exiting SPPS ......................................................................................................... 6
3 Mask Design in SPPS .................................................................................................................... 11 4 Workplace ...................................................................................................................................... 12
4.1 MPC Options ........................................................................................................................... 12 4.1.1 General Settings ............................................................................................................... 13 4.1.2 Workplace Settings ........................................................................................................... 14 4.1.3 Settings for job processing ................................................................................................ 14 4.1.4 Change the views / Sorting the columns ........................................................................... 16
4.2 Package management ............................................................................................................. 17 4.2.1 Export package(s) ............................................................................................................. 17 4.2.2 Package Import................................................................................................................. 24 4.2.3 Package Description (Package texts) ............................................................................... 27
4.3 Parts management .................................................................................................................. 30 4.3.1 Undefined parts ................................................................................................................ 30 4.3.2 Merchandise ..................................................................................................................... 31 4.3.3 Original parts .................................................................................................................... 33 4.3.4 Part mapping .................................................................................................................... 35 4.3.5 Import parts ...................................................................................................................... 38 4.3.6 Discount Groups ............................................................................................................... 40
4.4 Labour rates ............................................................................................................................ 41 4.5 Dealer ...................................................................................................................................... 47
5 Package Management ................................................................................................................... 50 5.1 Accepting Packages ................................................................................................................ 51 5.2 Accept adapted packages ........................................................................................................ 55 5.3 Accept or reject a group ........................................................................................................... 56 5.4 Editing Packages ..................................................................................................................... 57
5.4.1 Expansion and reduction of packages .............................................................................. 60 5.4.2 Creating Packages ........................................................................................................... 63 5.4.3 Adding Content ................................................................................................................. 75 5.4.4 Removing Content ............................................................................................................ 76 5.4.5 Copy package ................................................................................................................... 77 5.4.6 Filter view ......................................................................................................................... 77 5.4.7 Calculation packages ........................................................................................................ 79 5.4.8 Target Price Calculation .................................................................................................... 80 5.4.9 Discount Calculation ......................................................................................................... 85 5.4.10 Parts discount in % ........................................................................................................... 86 5.4.11 Discount on wages in % .................................................................................................... 87 5.4.12 Discount on package in % ................................................................................................ 88 5.4.13 Markup calculation ............................................................................................................ 89 5.4.14 Markup in Euro ................................................................................................................. 90 5.4.15 Markup on package in % .................................................................................................. 91 5.4.16 Markup on parts in % ........................................................................................................ 92 5.4.17 Markup on wages in % ...................................................................................................... 94 5.4.18 Mixed calculation .............................................................................................................. 96 5.4.19 Signal price ..................................................................................................................... 107
5.4 Calculating changed packages .............................................................................................. 113
SPPS Version 5.5 Page 4
5.5 Publishing packages .............................................................................................................. 116 5.6 Withdrawing packages ........................................................................................................... 118 5.7 Reject package ...................................................................................................................... 120 5.8 Deleting packages ................................................................................................................. 121 5.9 Rejected packages ................................................................................................................ 122 5.10 Information ............................................................................................................................. 123 5.11 Edit Groups ............................................................................................................................ 126
6 Administration .............................................................................................................................. 135 7 Reports ........................................................................................................................................ 138 8 Notice ........................................................................................................................................... 138 9 Help ............................................................................................................................................. 141 10 Icon Descriptions .......................................................................................................................... 142
10.1 Menu icons ............................................................................................................................ 142 10.2 Package icons ....................................................................................................................... 143 10.3 Additional icons ...................................................................................................................... 144 10.4 Examples ............................................................................................................................... 144
SPPS Version 5.5 Page 5
1 Introduction
1.1 Service Package Pricing System (SPPS)
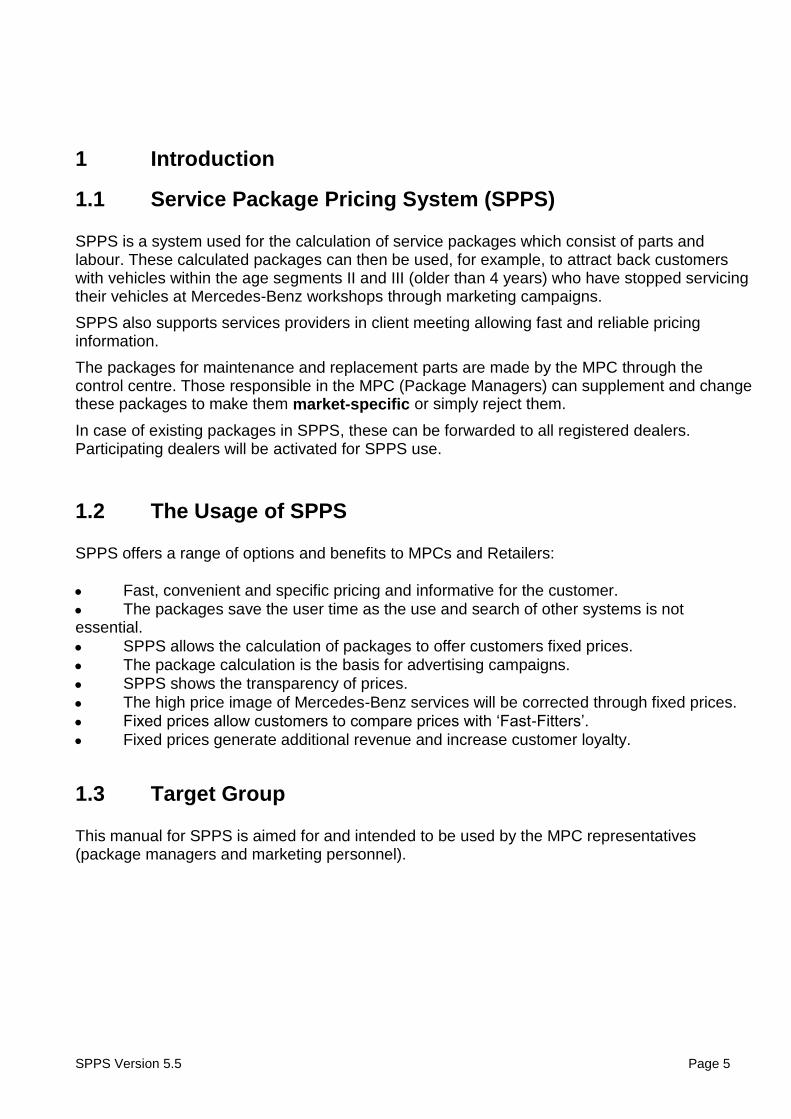
SPPS is a system used for the calculation of service packages which consist of parts and labour. These calculated packages can then be used, for example, to attract back customers with vehicles within the age segments II and III (older than 4 years) who have stopped servicing their vehicles at Mercedes-Benz workshops through marketing campaigns.
SPPS also supports services providers in client meeting allowing fast and reliable pricing information.
The packages for maintenance and replacement parts are made by the MPC through the control centre. Those responsible in the MPC (Package Managers) can supplement and change these packages to make them market-specific or simply reject them.
In case of existing packages in SPPS, these can be forwarded to all registered dealers. Participating dealers will be activated for SPPS use.
1.2 The Usage of SPPS
SPPS offers a range of options and benefits to MPCs and Retailers:
Fast, convenient and specific pricing and informative for the customer.
The packages save the user time as the use and search of other systems is not essential.
SPPS allows the calculation of packages to offer customers fixed prices.
The package calculation is the basis for advertising campaigns.
SPPS shows the transparency of prices.
The high price image of Mercedes-Benz services will be corrected through fixed prices.
Fixed prices allow customers to compare prices with ‘Fast-Fitters’.
Fixed prices generate additional revenue and increase customer loyalty.
1.3 Target Group
This manual for SPPS is aimed for and intended to be used by the MPC representatives (package managers and marketing personnel).
SPPS Version 5.5 Page 6
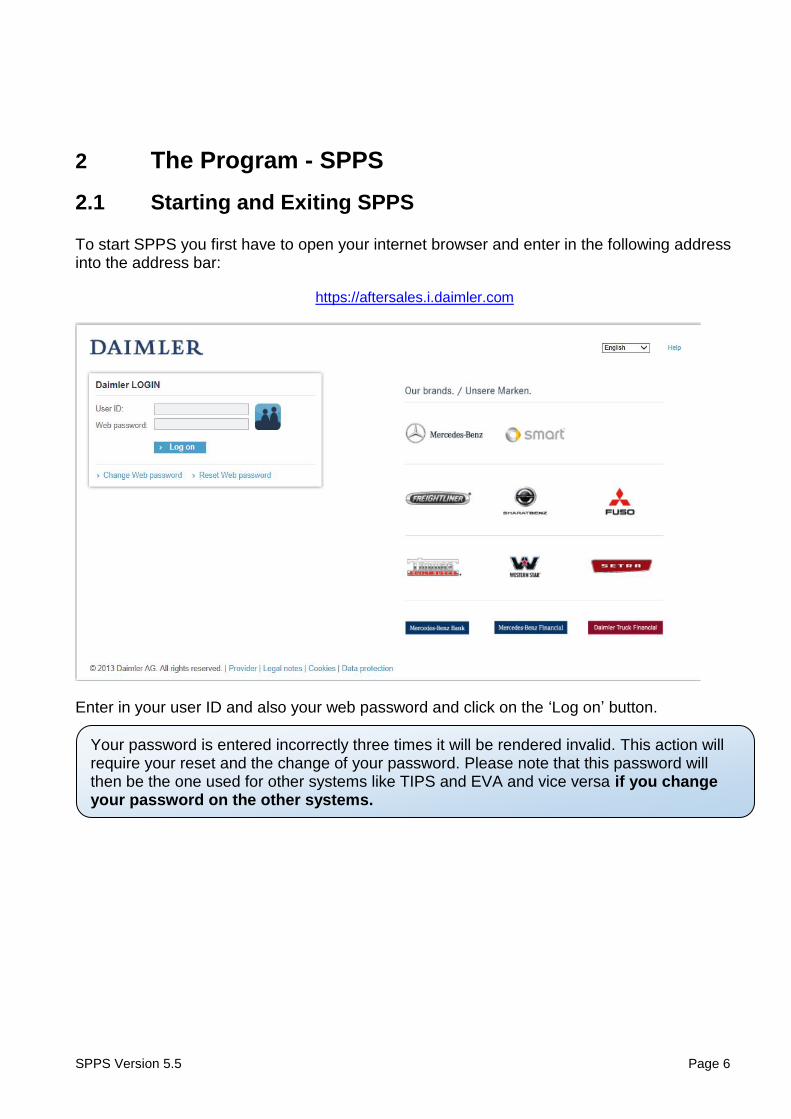
Your password is entered incorrectly three times it will be rendered invalid. This action will require your reset and the change of your password. Please note that this password will then be the one used for other systems like TIPS and EVA and vice versa if you change your password on the other systems.
2 The Program - SPPS
2.1 Starting and Exiting SPPS
To start SPPS you first have to open your internet browser and enter in the following address into the address bar:
https://aftersales.i.daimler.com
Enter in your user ID and also your web password and click on the ‘Log on’ button.
SPPS Version 5.5 Page 7
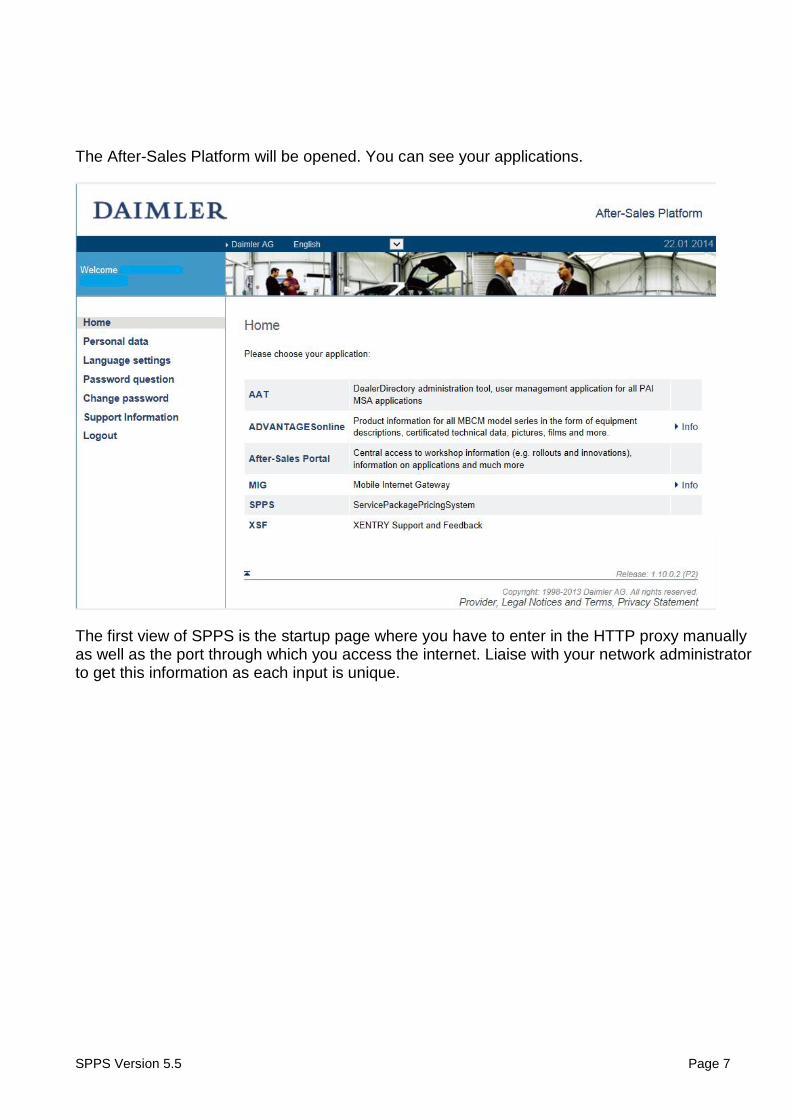
The After-Sales Platform will be opened. You can see your applications.
The first view of SPPS is the startup page where you have to enter in the HTTP proxy manually as well as the port through which you access the internet. Liaise with your network administrator to get this information as each input is unique.
SPPS Version 5.5 Page 8
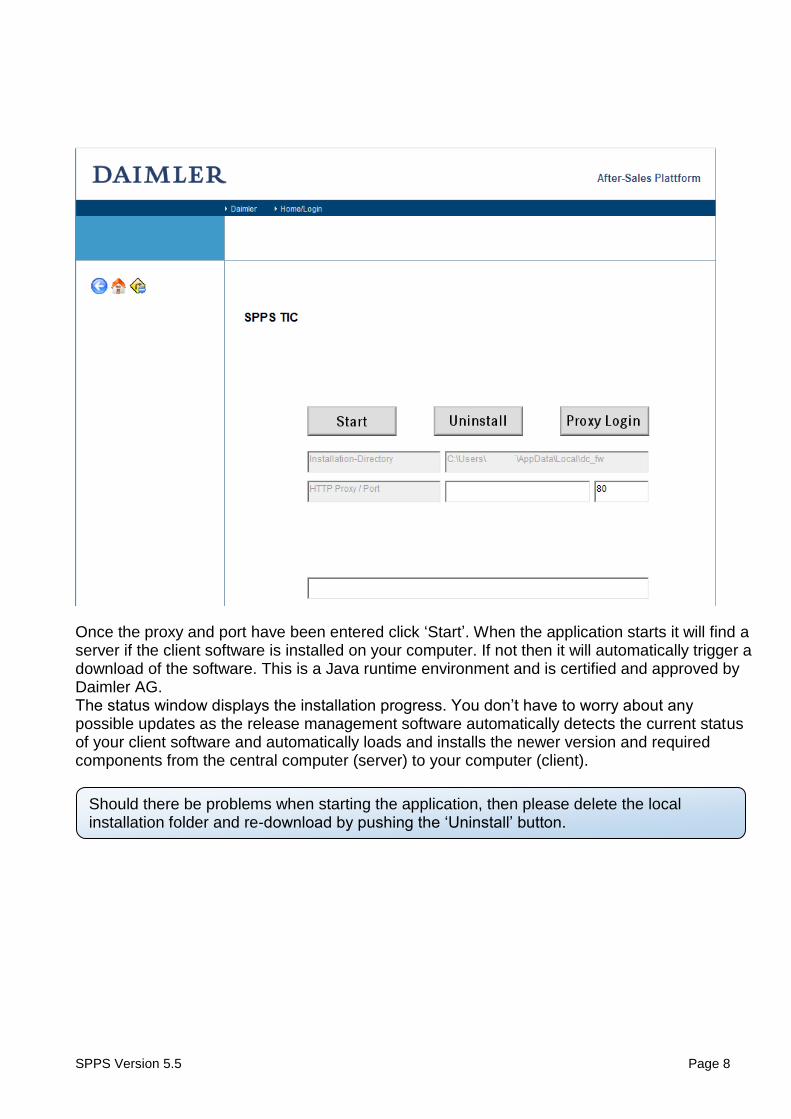
Should there be problems when starting the application, then please delete the local installation folder and re-download by pushing the ‘Uninstall’ button.
Once the proxy and port have been entered click ‘Start’. When the application starts it will find a server if the client software is installed on your computer. If not then it will automatically trigger a download of the software. This is a Java runtime environment and is certified and approved by Daimler AG. The status window displays the installation progress. You don’t have to worry about any possible updates as the release management software automatically detects the current status of your client software and automatically loads and installs the newer version and required components from the central computer (server) to your computer (client).
SPPS Version 5.5 Page 9
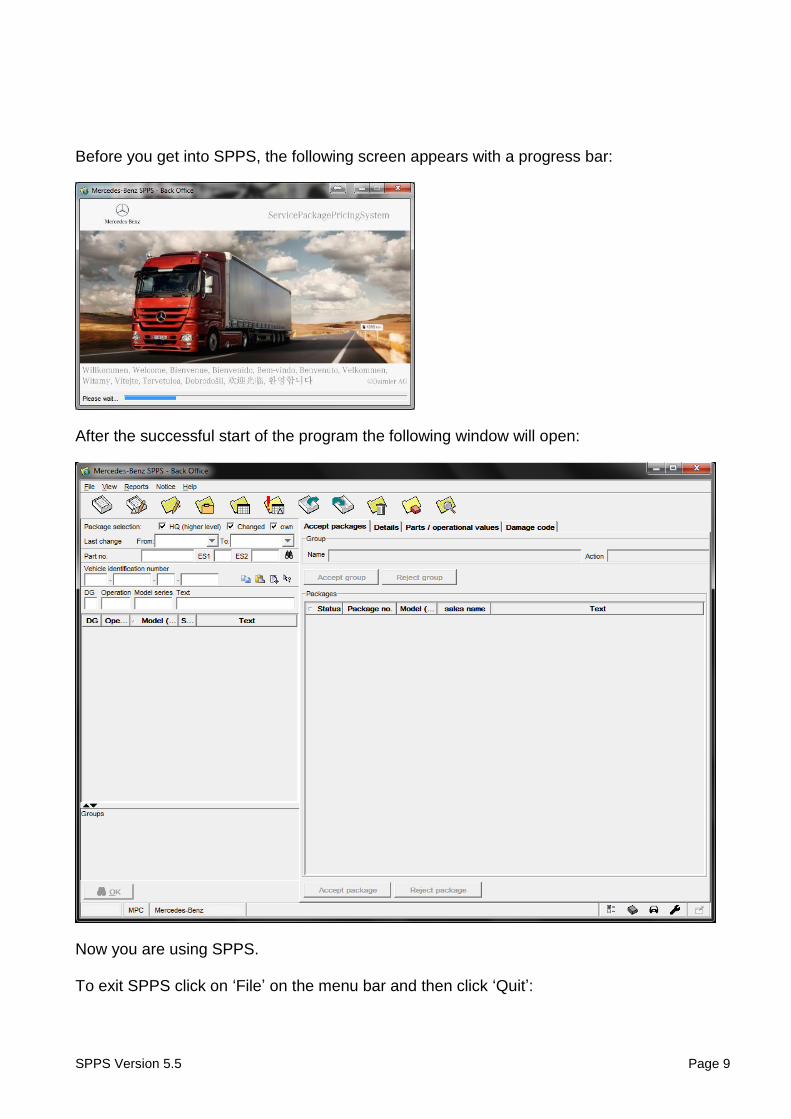
Before you get into SPPS, the following screen appears with a progress bar:
After the successful start of the program the following window will open:
Now you are using SPPS. To exit SPPS click on ‘File’ on the menu bar and then click ‘Quit’:
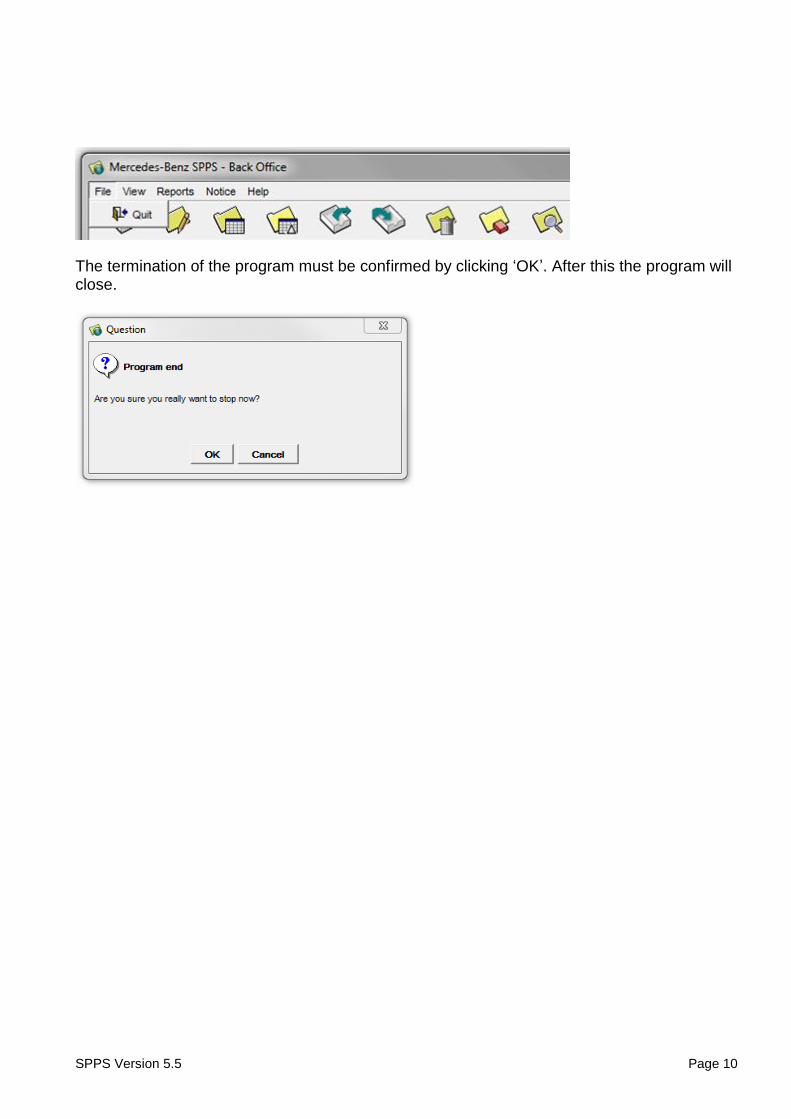
SPPS Version 5.5 Page 10
The termination of the program must be confirmed by clicking ‘OK’. After this the program will close.
SPPS Version 5.5 Page 11
3 Mask Design in SPPS
In SPPS the following work areas are categorized for MPC:
Workplace
Package management
Service management
Administration The individual screens are described in detail in the next chapters. Via the menu item ‘View’ you can switch between the areas.

SPPS Version 5.5 Page 12
4 Workplace
In the Workplace you control and maintain the MPC options and also the discount groups, part management, affiliated retailers management and package descriptions. More information over package exports and imports can be read later on in this manual. Via the menu item ‘View’ you go to the ‘Workplace’.
4.1 MPC Options
In the ‚MPC options‘ you can store the basic values, which are described on the following pages.

SPPS Version 5.5 Page 13
All data entered or changed, you can use the ‘OK’ button to save. By clicking on ‘Cancel’ the data is discarded and not stored.
4.1.1 General Settings
The corresponding market works with labour rates or hourly basis. The applicable VAT rate is to be deposited.
Basic data VAT Rate (%) Enter the relevant rate here. Price base (H/A) The current price calculation basis (work value/hour) is stored and cannot be changed. Language (data) Here your national language is the default language. With the Drop-Down button you can select a different language. Change part mapping Here the hook is set, which allows dealers to change the parts replacements independently. Please do not change. Calculation details The specific details of a calculation are shown in the reports. Please do not change. Steering system Here you are able to select if you want to be able to view packages for left-hand drive vehicles (LHD), right-hand-drive vehicles (RHD) or both.

SPPS Version 5.5 Page 14
4.1.2 Workplace Settings
In the tab ‘Workplace settings’ different paths for the Acrobat Reader and the fonts can be stored.
Settings for Acrobat Reader A setting is not necessary.
4.1.3 Settings for job processing
The E-Mail fields have to be filled and used for better control of the scheduled jobs or tasks in the background.
E-Mail settings by job processing In their respective fields, you can store more E-Mail addresses to receive the acknowledgment by the job processing. Parts price comparison After a parts file is imported, an Email will be sent to this Email address. Approving packages After the package approval is worn through, an Email will be sent to this Email address. Creating new dealer packages After the dealer packages are worn through, an Email will be sent to this Email address.

SPPS Version 5.5 Page 15
Settings for user support Enter the email address which will receive the new request.
SPPS Version 5.5 Page 16
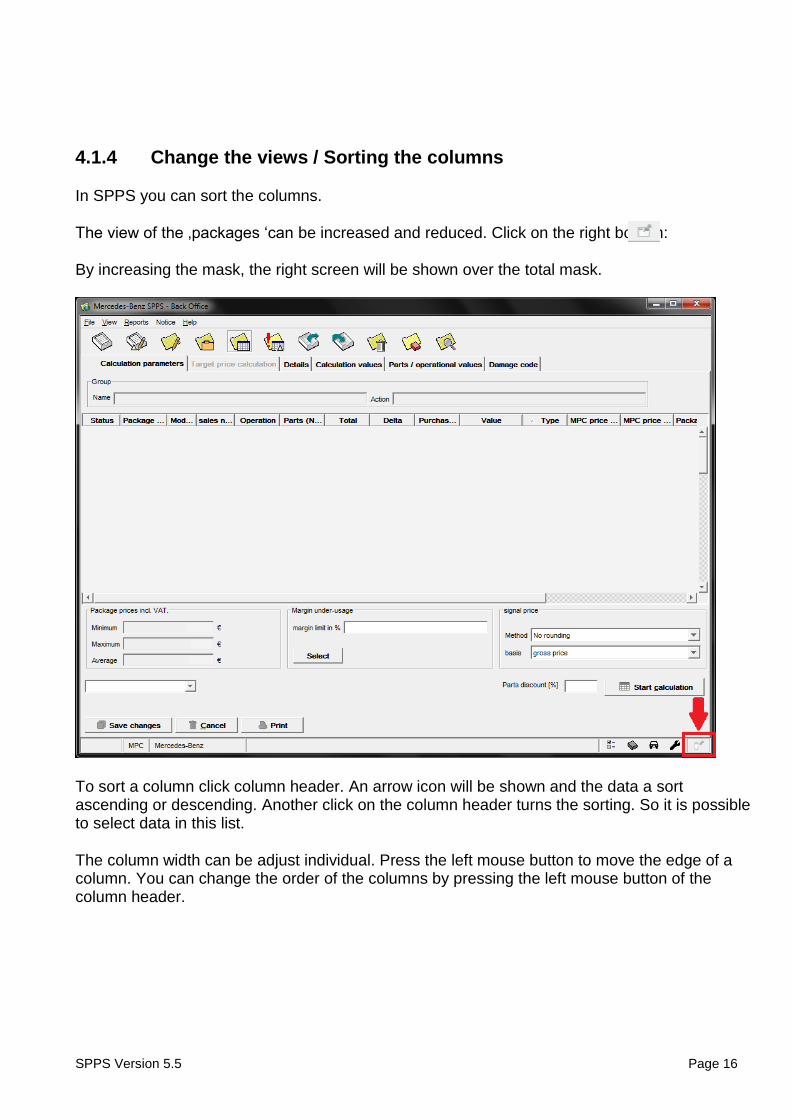
4.1.4 Change the views / Sorting the columns
In SPPS you can sort the columns.
The view of the ‚packages ‘can be increased and reduced. Click on the right bottom:
By increasing the mask, the right screen will be shown over the total mask.
To sort a column click column header. An arrow icon will be shown and the data a sort ascending or descending. Another click on the column header turns the sorting. So it is possible to select data in this list.
The column width can be adjust individual. Press the left mouse button to move the edge of a column. You can change the order of the columns by pressing the left mouse button of the column header.
SPPS Version 5.5 Page 17
4.2 Package management
4.2.1 Export package(s)
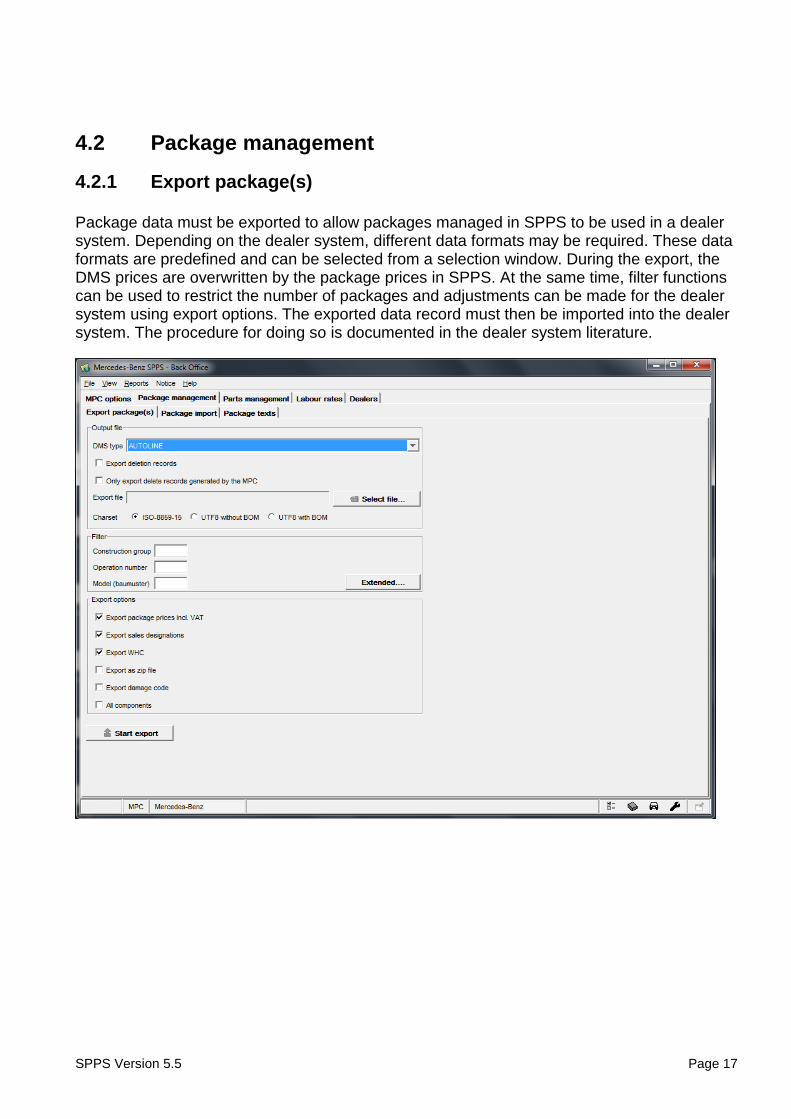
Package data must be exported to allow packages managed in SPPS to be used in a dealer system. Depending on the dealer system, different data formats may be required. These data formats are predefined and can be selected from a selection window. During the export, the DMS prices are overwritten by the package prices in SPPS. At the same time, filter functions can be used to restrict the number of packages and adjustments can be made for the dealer system using export options. The exported data record must then be imported into the dealer system. The procedure for doing so is documented in the dealer system literature.

SPPS Version 5.5 Page 18
Output file DMS type Menu for selecting the dealer system-specific export file format to be used, for example AUTOLINE. List of export formats for the various types of strain RETAS / EXPRESSTOOL: AMS AUTOLINE:
AUTOLINE DAVIS IDIS SERVICE SETTLEMENT Export for SPPS: SPPS SPPS (XML) Export deletion records This can be used only to generate deletion records from packages selected for export. Depending on the dealer system, it may be possible to delete the packages in question.
Only export delete records generated by the MPC This generates deletion records for all packages deleted by MPC.
Export file ‘Select file’ can be used to determine an individual file name and storage location of the export file. Charset Determination of character set for export format. ISO-8859-15
Valid for most Western European languages (standard setting) UTF-8 without BOM Valid for Autoline and special character sets (e.g. Polish, Chinese) UTF8 with BOM Valid for special character sets necessary.
SPPS Version 5.5 Page 19
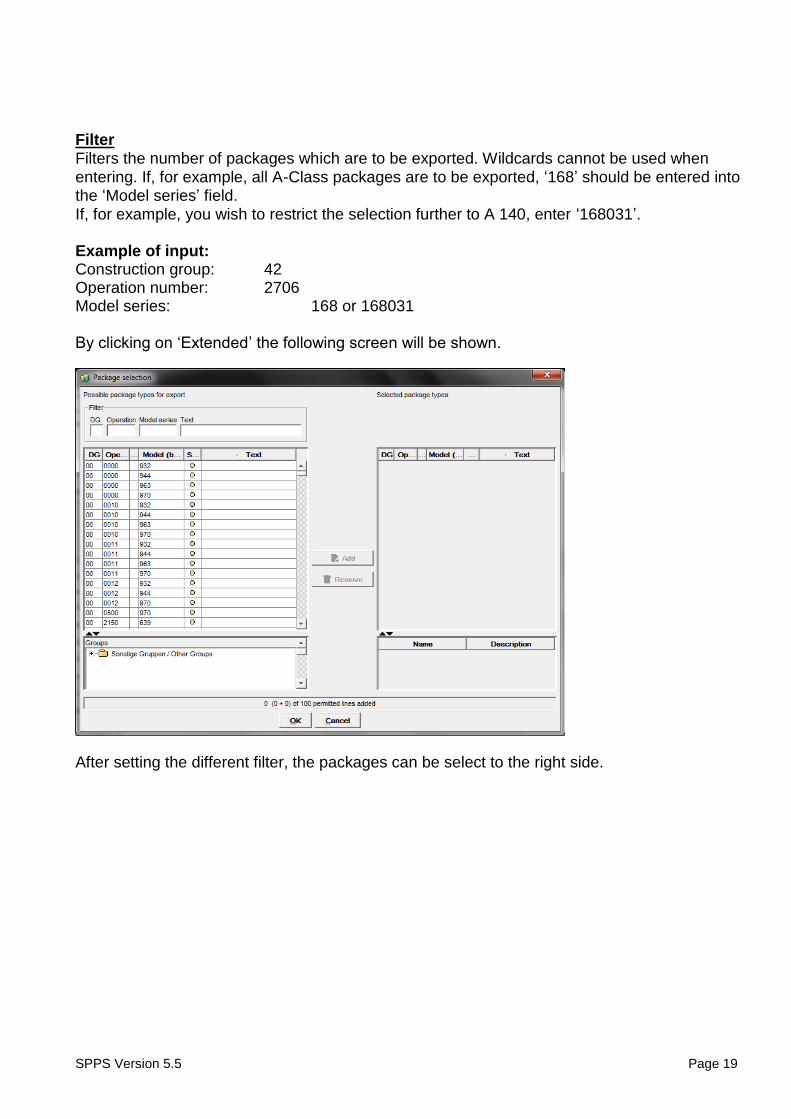
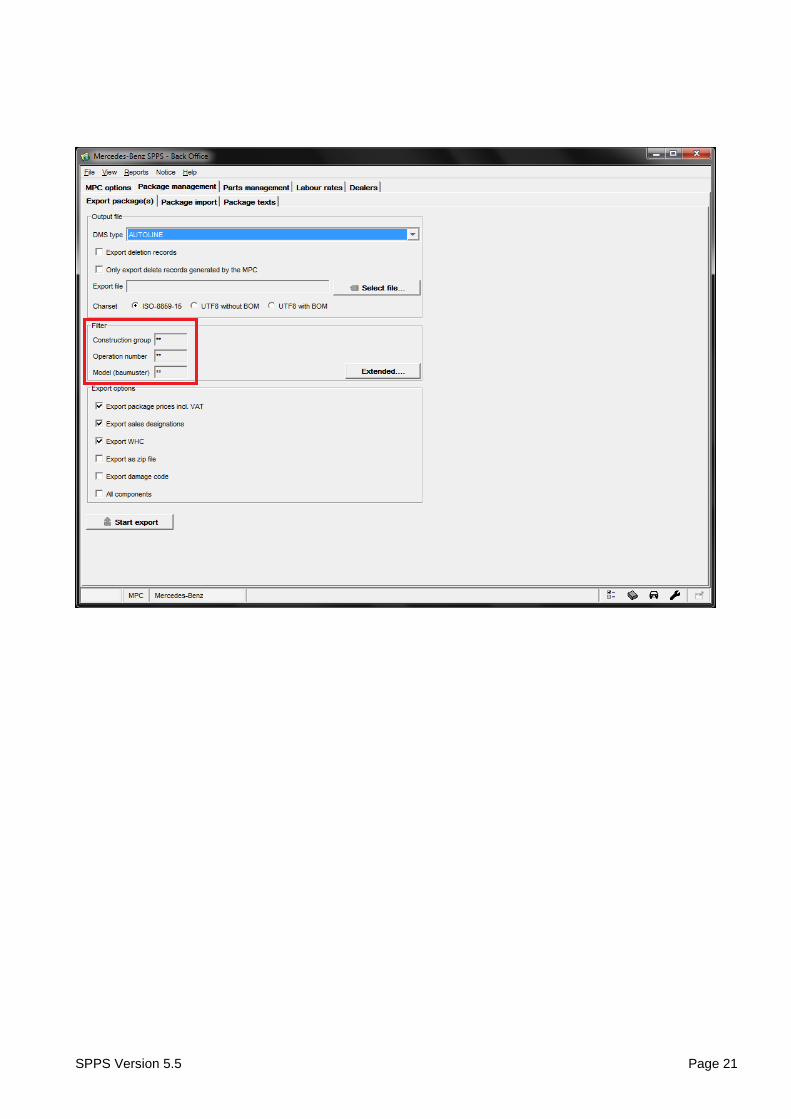
Filter Filters the number of packages which are to be exported. Wildcards cannot be used when entering. If, for example, all A-Class packages are to be exported, ‘168’ should be entered into the ‘Model series’ field. If, for example, you wish to restrict the selection further to A 140, enter ‘168031’. Example of input: Construction group: 42 Operation number: 2706 Model series: 168 or 168031 By clicking on ‘Extended’ the following screen will be shown.
After setting the different filter, the packages can be select to the right side.
SPPS Version 5.5 Page 20
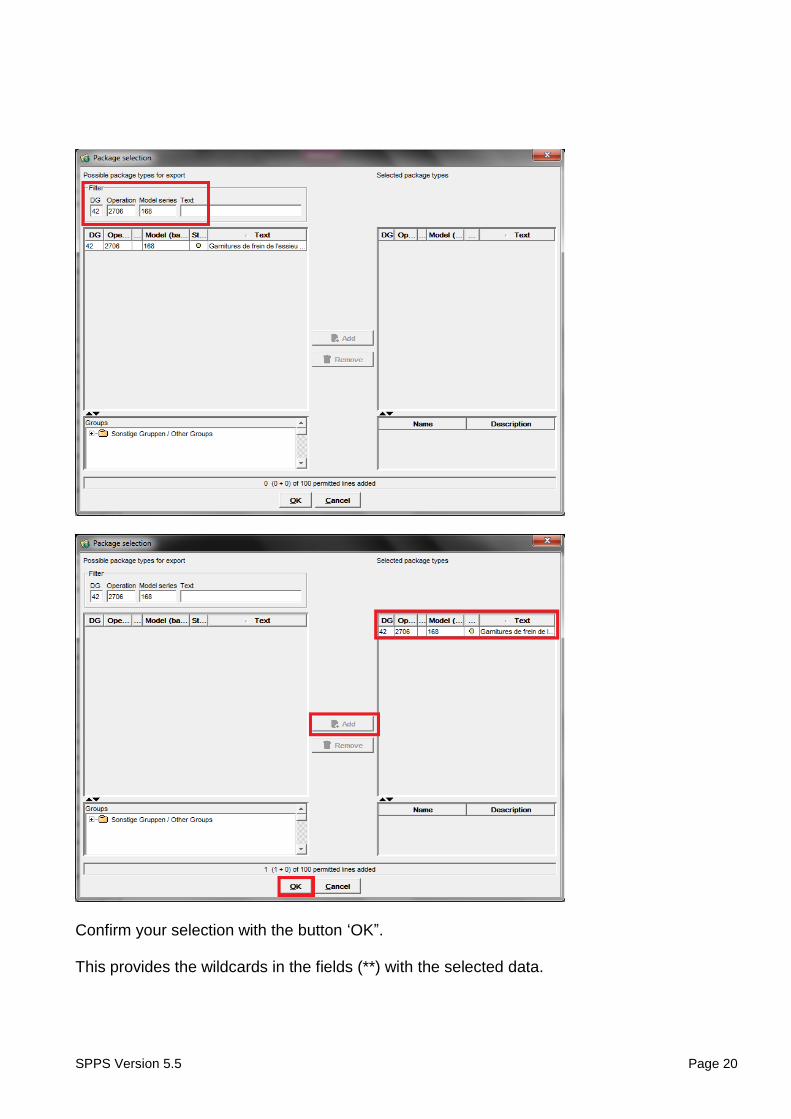
Confirm your selection with the button ‘OK”. This provides the wildcards in the fields (**) with the selected data.
SPPS Version 5.5 Page 21
SPPS Version 5.5 Page 22
Export options Export package prices incl. VAT By setting the hook, you can export the packages including the VAT. This handled differently by DMS, because some DMS automatically calculate the VAT. Export sales designations This setting allows to export the trade description which can be suppressed in the package description. Export WHC The package exports can be used to determine whether the WHC is to be exported. If not, then export the file smaller, since no packages are written multiple times. Export as zip file To keep the file small, the file can be compressed with this setting. Export damage codes Export damage code will be necessary for future Autoline Versiona
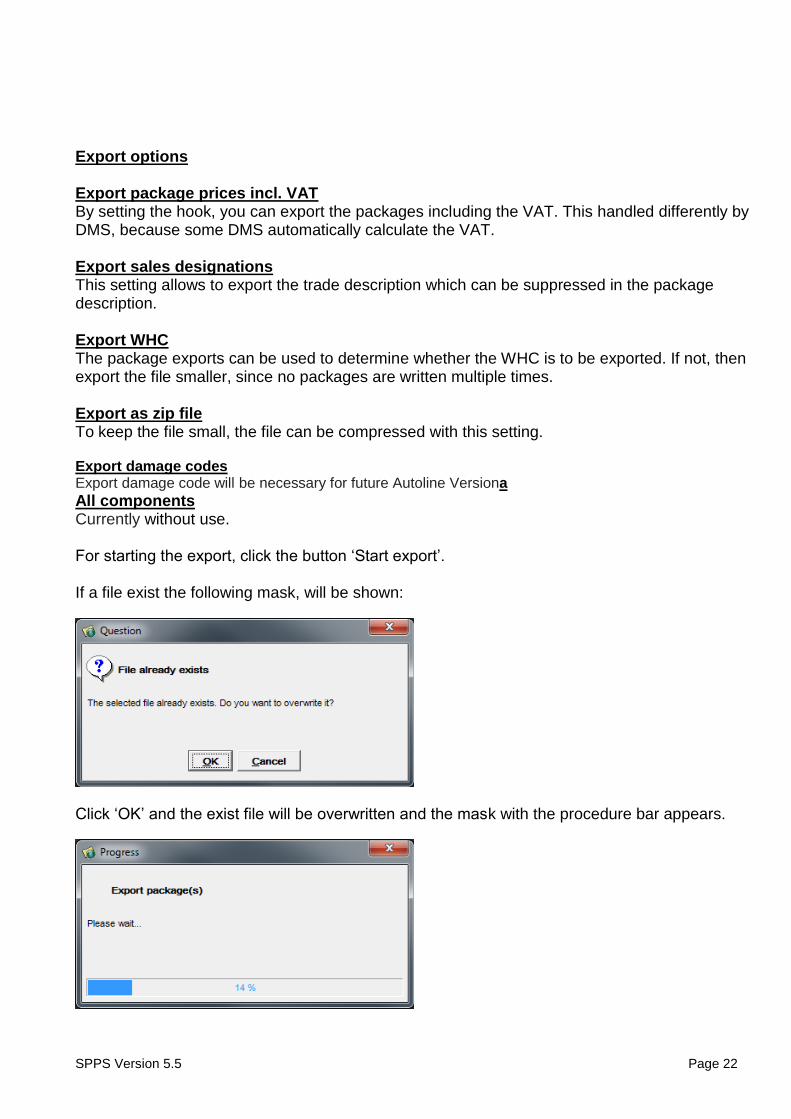
All components Currently without use. For starting the export, click the button ‘Start export’. If a file exist the following mask, will be shown:
Click ‘OK’ and the exist file will be overwritten and the mask with the procedure bar appears.
SPPS Version 5.5 Page 23
You will not receive a confirmation message.
Die Standardverrechnungssätze können nicht gelöscht werden.
After the export is completed (100%), the mask will close automatically.
SPPS Version 5.5 Page 24
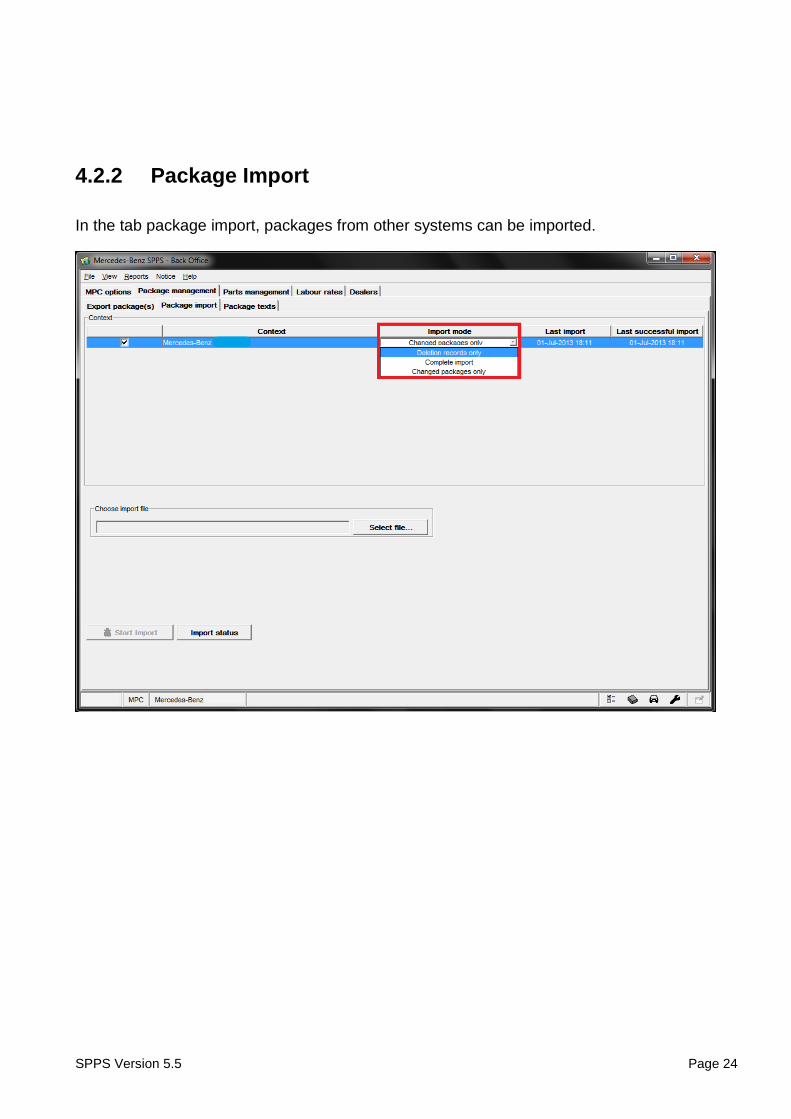
4.2.2 Package Import
In the tab package import, packages from other systems can be imported.
SPPS Version 5.5 Page 25
Context
Selection of the MPC for which packages are to be supplied. Import mode Changed packages only Deletion records only Complete import Generally a complete import will be execute. Last import Data of the last import. Last successful import Data of the last successful import.
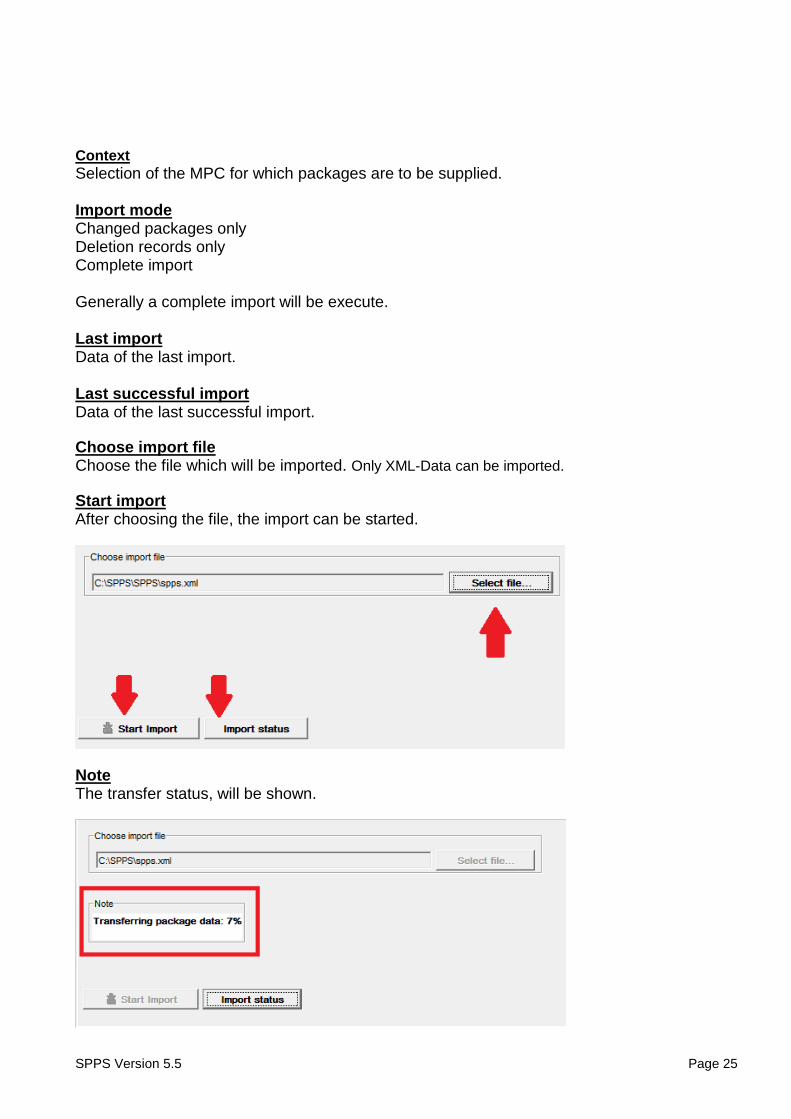
Choose import file Choose the file which will be imported. Only XML-Data can be imported.
Start import After choosing the file, the import can be started.
Note The transfer status, will be shown.
SPPS Version 5.5 Page 26
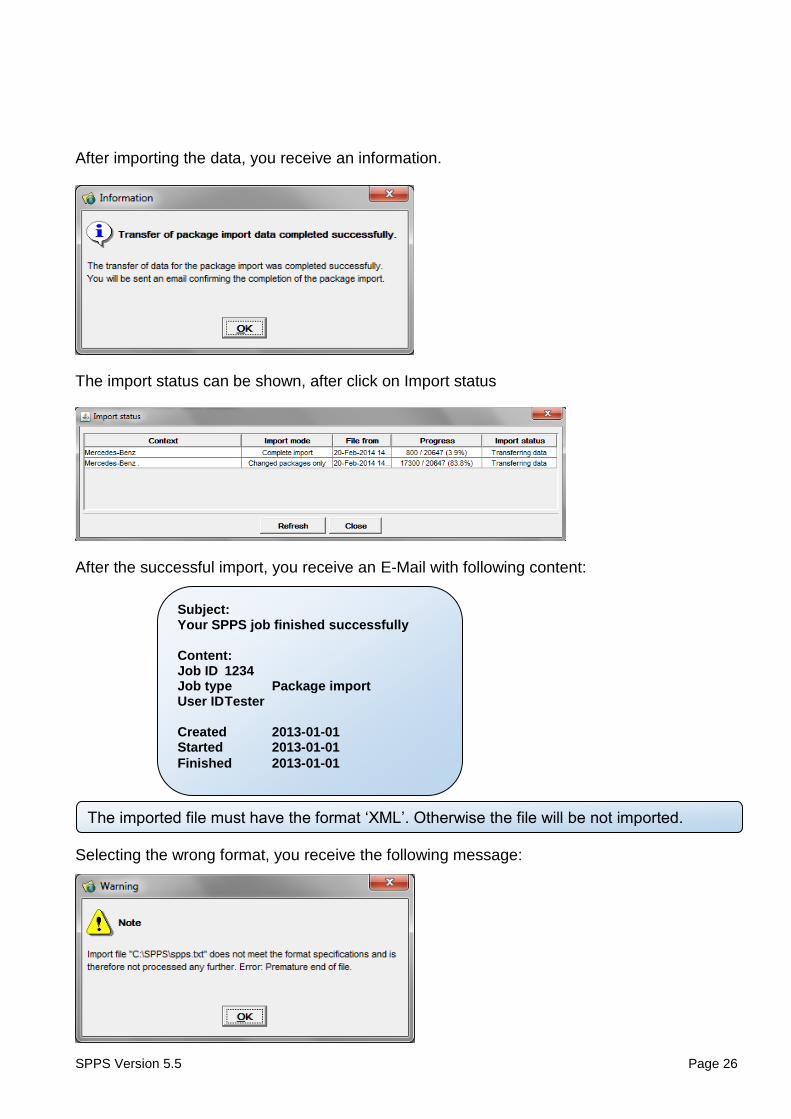
Subject: Your SPPS job finished successfully Content: Job ID 1234 Job type Package import User ID Tester Created 2013-01-01 Started 2013-01-01
Finished 2013-01-01
The imported file must have the format ‘XML’. Otherwise the file will be not imported.
After importing the data, you receive an information.
The import status can be shown, after click on Import status
After the successful import, you receive an E-Mail with following content:
Selecting the wrong format, you receive the following message:
SPPS Version 5.5 Page 27
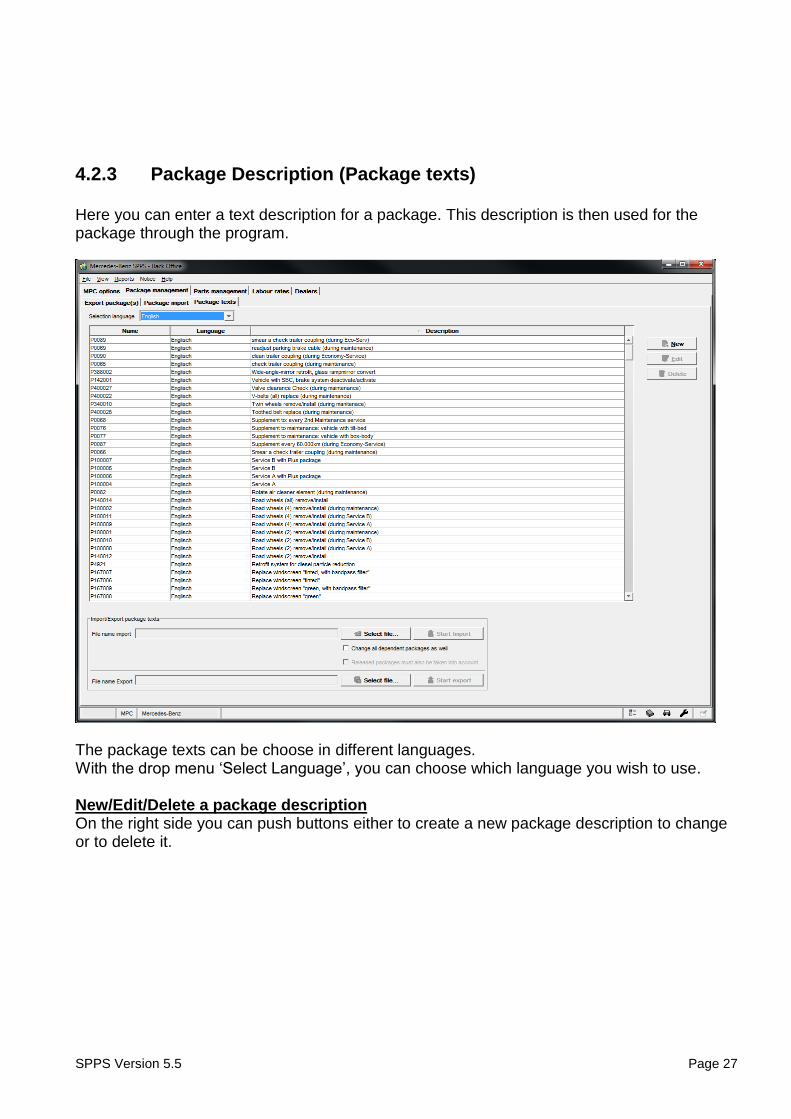
4.2.3 Package Description (Package texts)
Here you can enter a text description for a package. This description is then used for the package through the program.
The package texts can be choose in different languages. With the drop menu ‘Select Language’, you can choose which language you wish to use. New/Edit/Delete a package description On the right side you can push buttons either to create a new package description to change or to delete it.
SPPS Version 5.5 Page 28
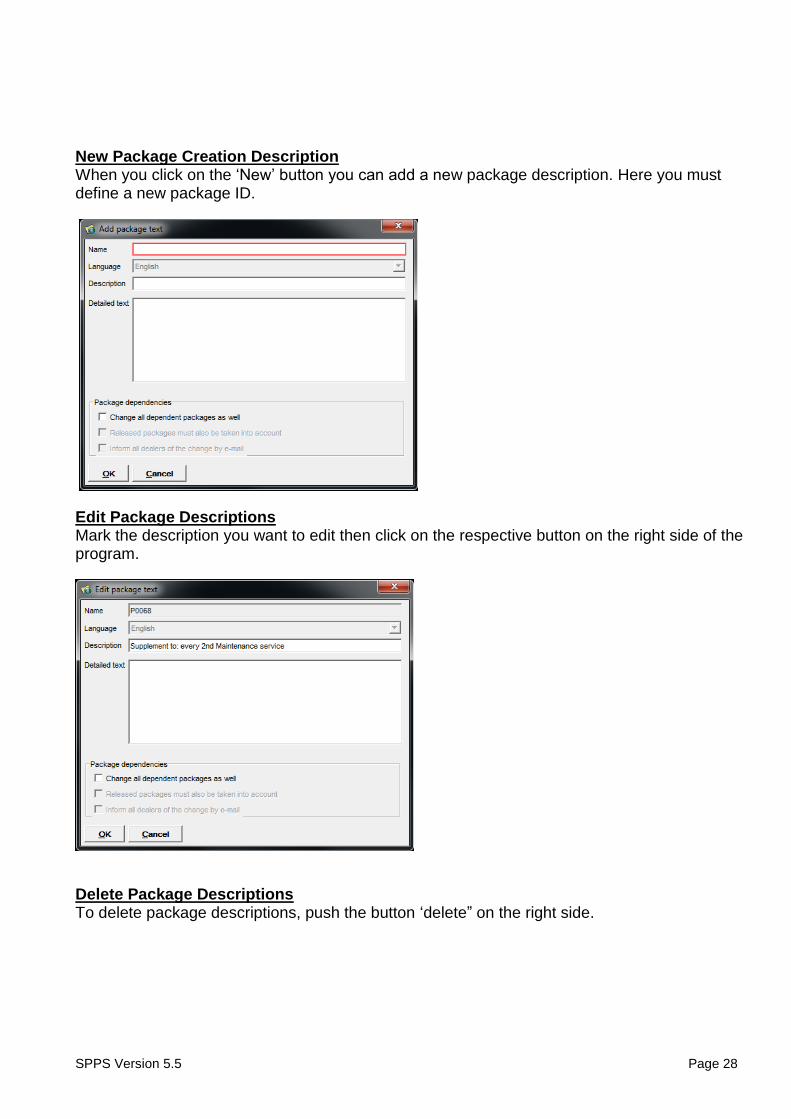
New Package Creation Description When you click on the ‘New’ button you can add a new package description. Here you must define a new package ID.
Edit Package Descriptions Mark the description you want to edit then click on the respective button on the right side of the program.
Delete Package Descriptions To delete package descriptions, push the button ‘delete” on the right side.
SPPS Version 5.5 Page 29
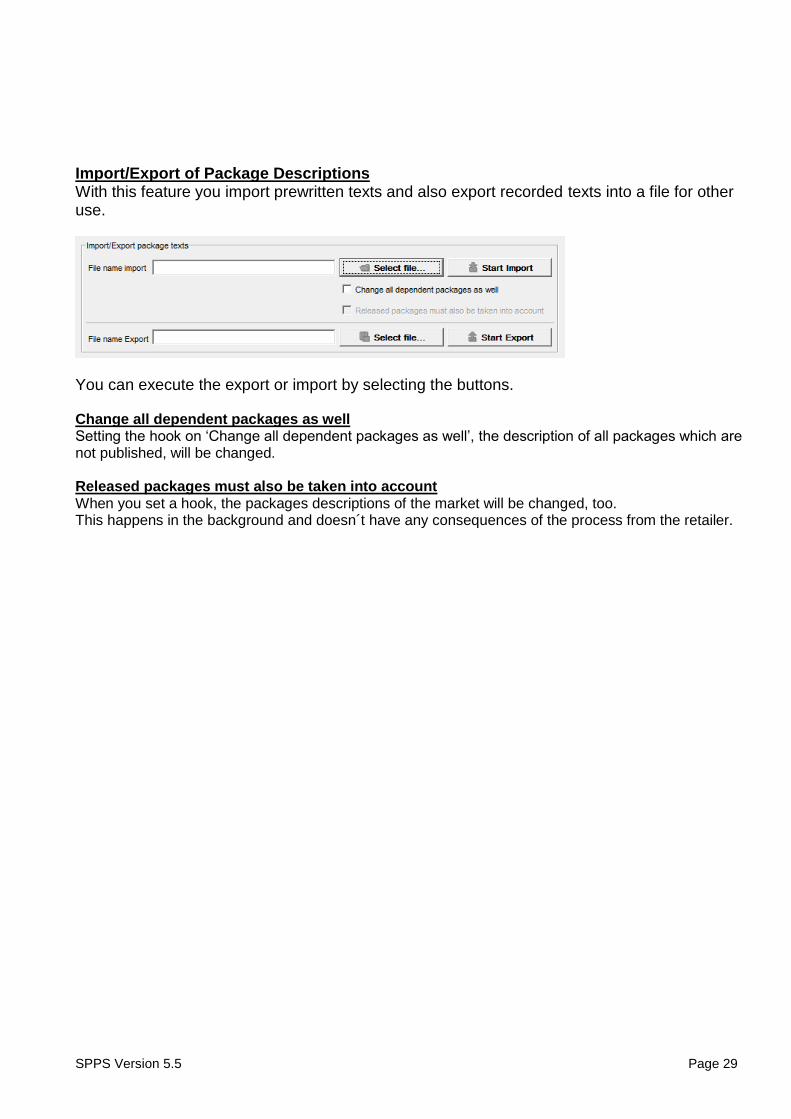
Import/Export of Package Descriptions With this feature you import prewritten texts and also export recorded texts into a file for other use.
You can execute the export or import by selecting the buttons. Change all dependent packages as well Setting the hook on ‘Change all dependent packages as well’, the description of all packages which are not published, will be changed. Released packages must also be taken into account When you set a hook, the packages descriptions of the market will be changed, too. This happens in the background and doesn´t have any consequences of the process from the retailer.
SPPS Version 5.5 Page 30
All packages, which contain undefined parts, cannot be transferred to the own package existence. They are marked in the entrance basket with a white point.
4.3 Parts management
The range partial management contains all kinds of parts. The range is divided into different tabs.
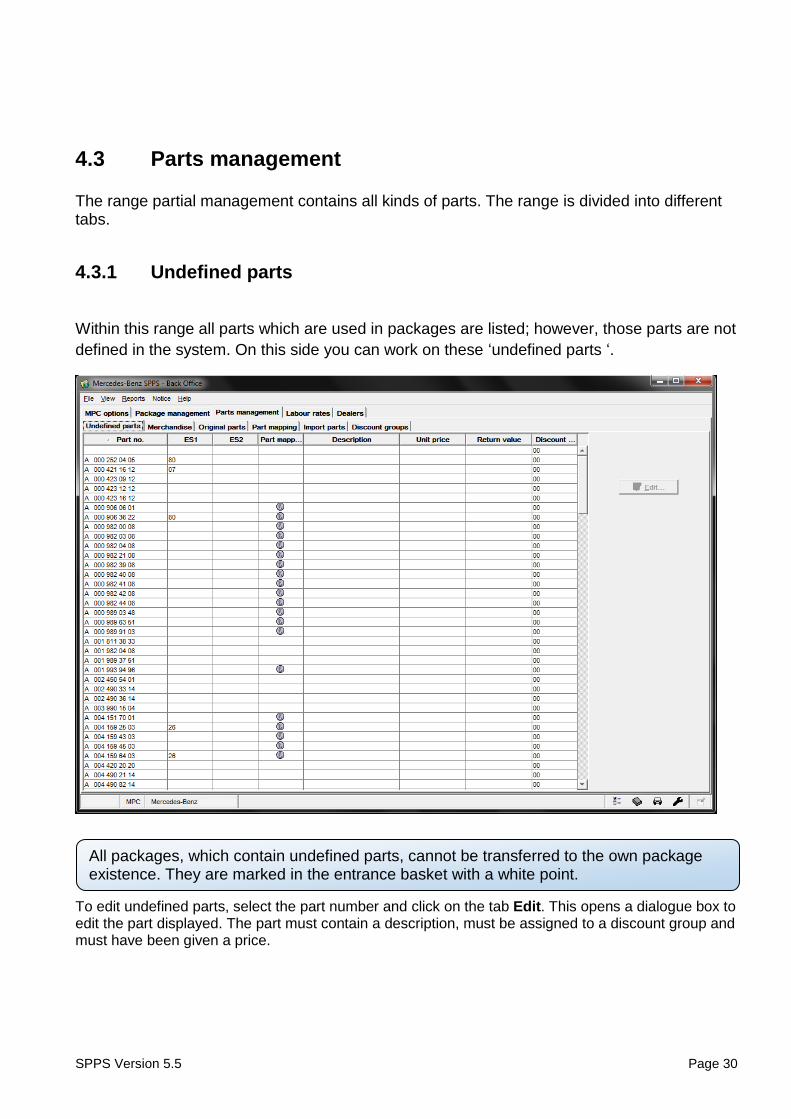
4.3.1 Undefined parts
Within this range all parts which are used in packages are listed; however, those parts are not
defined in the system. On this side you can work on these ‘undefined parts ‘.
To edit undefined parts, select the part number and click on the tab Edit. This opens a dialogue box to edit the part displayed. The part must contain a description, must be assigned to a discount group and must have been given a price.
SPPS Version 5.5 Page 31
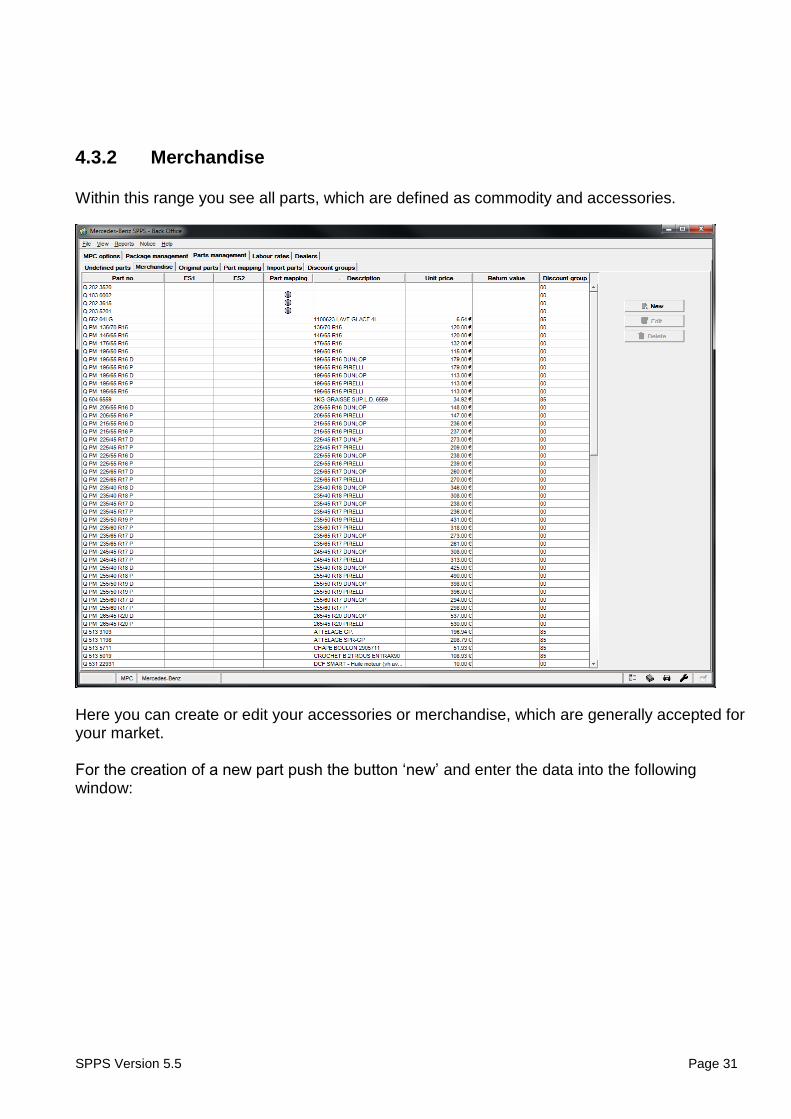
4.3.2 Merchandise
Within this range you see all parts, which are defined as commodity and accessories.
Here you can create or edit your accessories or merchandise, which are generally accepted for your market. For the creation of a new part push the button ‘new’ and enter the data into the following window:
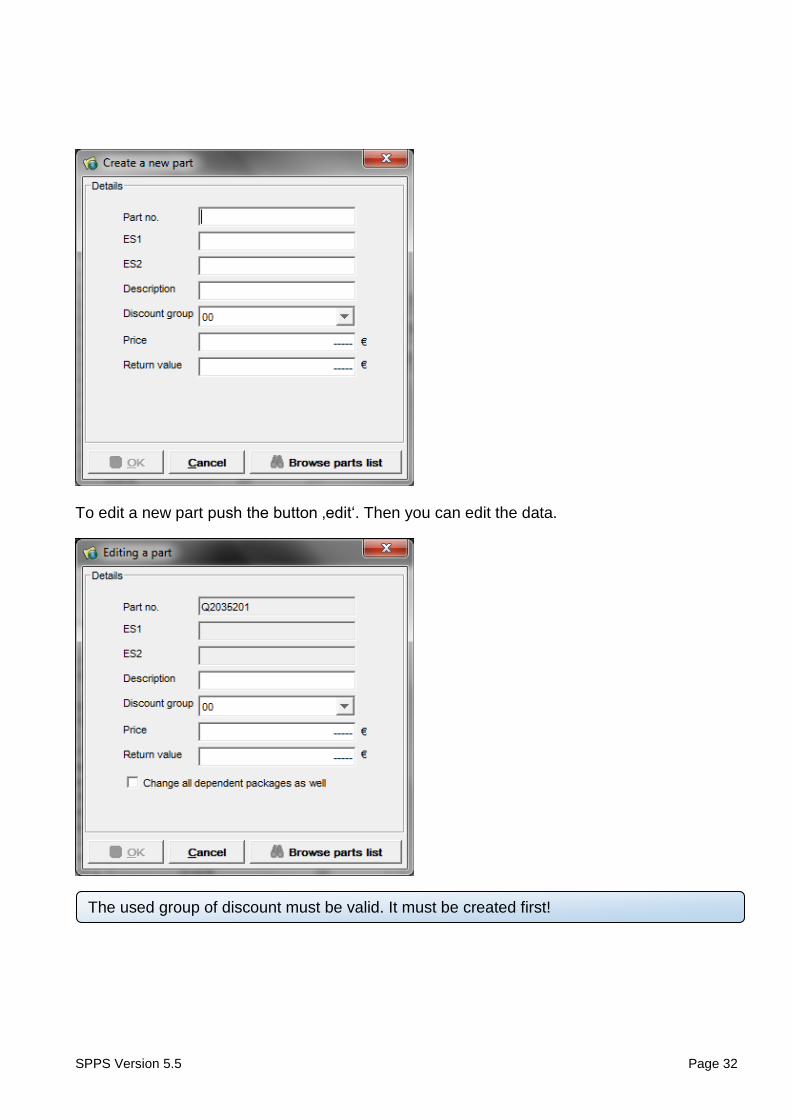
SPPS Version 5.5 Page 32
The used group of discount must be valid. It must be created first!
To edit a new part push the button ‚edit‘. Then you can edit the data.
SPPS Version 5.5 Page 33
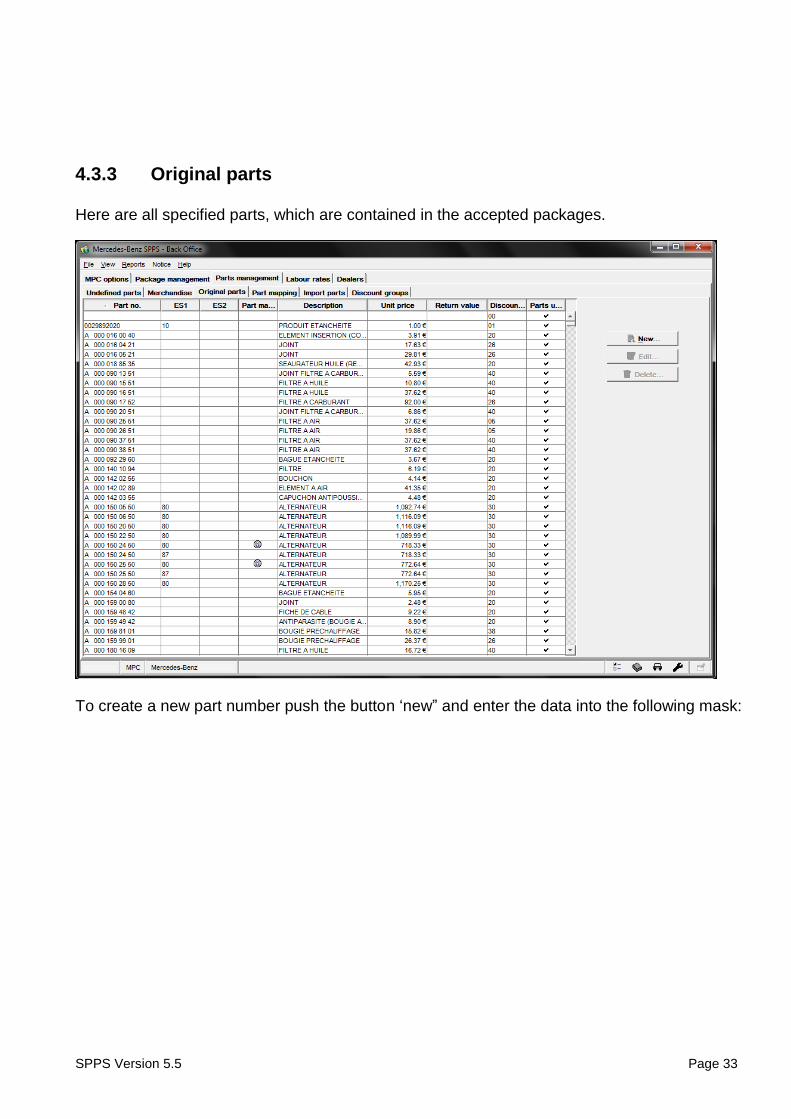
4.3.3 Original parts
Here are all specified parts, which are contained in the accepted packages.
To create a new part number push the button ‘new” and enter the data into the following mask:
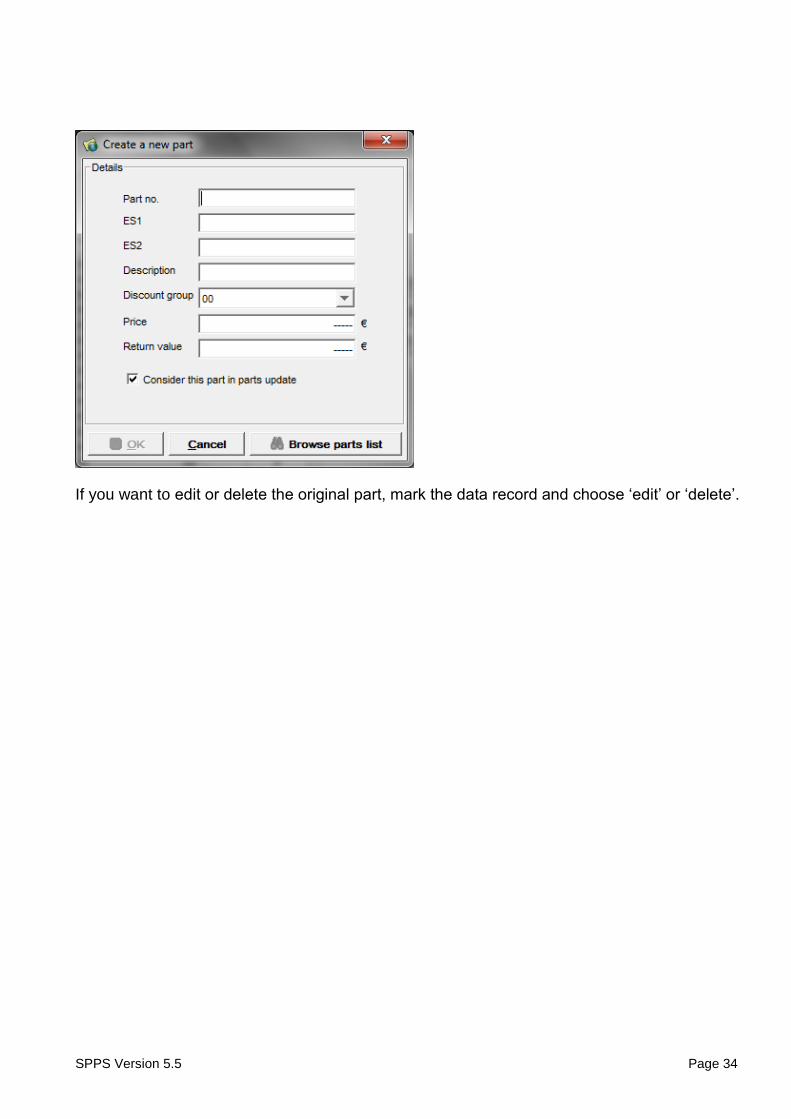
SPPS Version 5.5 Page 34
If you want to edit or delete the original part, mark the data record and choose ‘edit’ or ‘delete’.
SPPS Version 5.5 Page 35
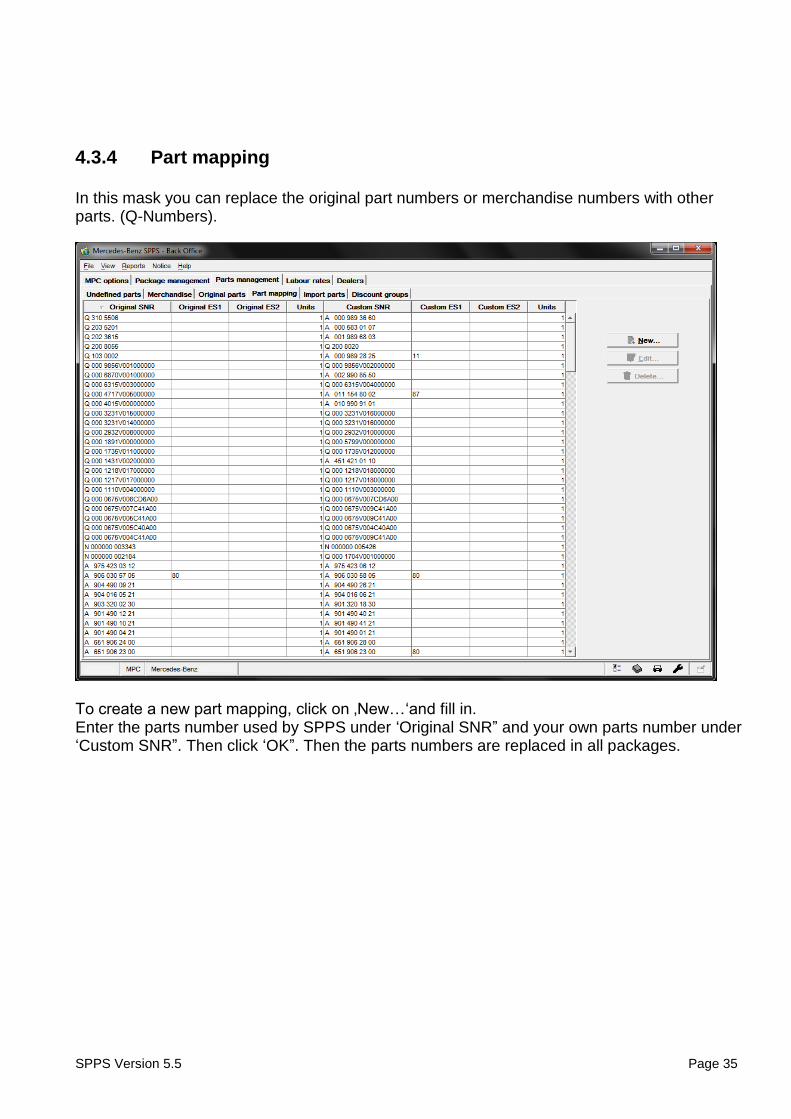
4.3.4 Part mapping
In this mask you can replace the original part numbers or merchandise numbers with other parts. (Q-Numbers).
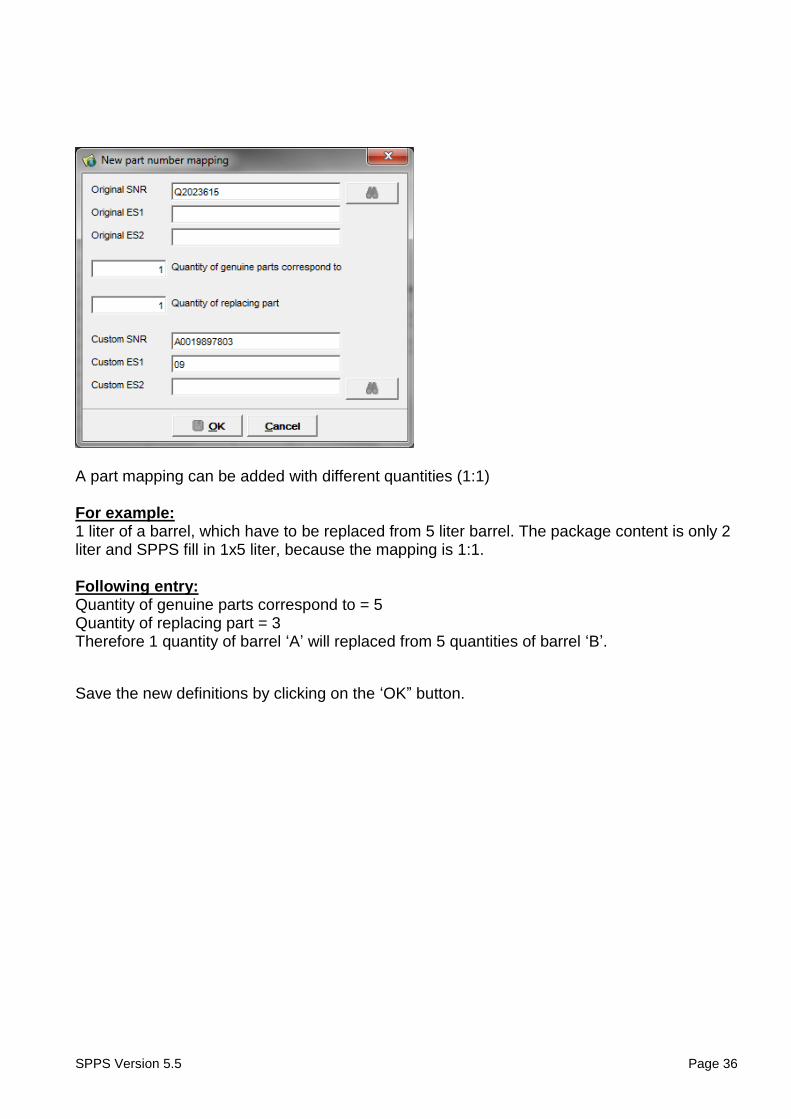
To create a new part mapping, click on ‚New…‘and fill in. Enter the parts number used by SPPS under ‘Original SNR” and your own parts number under ‘Custom SNR”. Then click ‘OK”. Then the parts numbers are replaced in all packages.
SPPS Version 5.5 Page 36
A part mapping can be added with different quantities (1:1) For example: 1 liter of a barrel, which have to be replaced from 5 liter barrel. The package content is only 2 liter and SPPS fill in 1x5 liter, because the mapping is 1:1. Following entry: Quantity of genuine parts correspond to = 5 Quantity of replacing part = 3 Therefore 1 quantity of barrel ‘A’ will replaced from 5 quantities of barrel ‘B’.
Save the new definitions by clicking on the ‘OK” button.
SPPS Version 5.5 Page 37
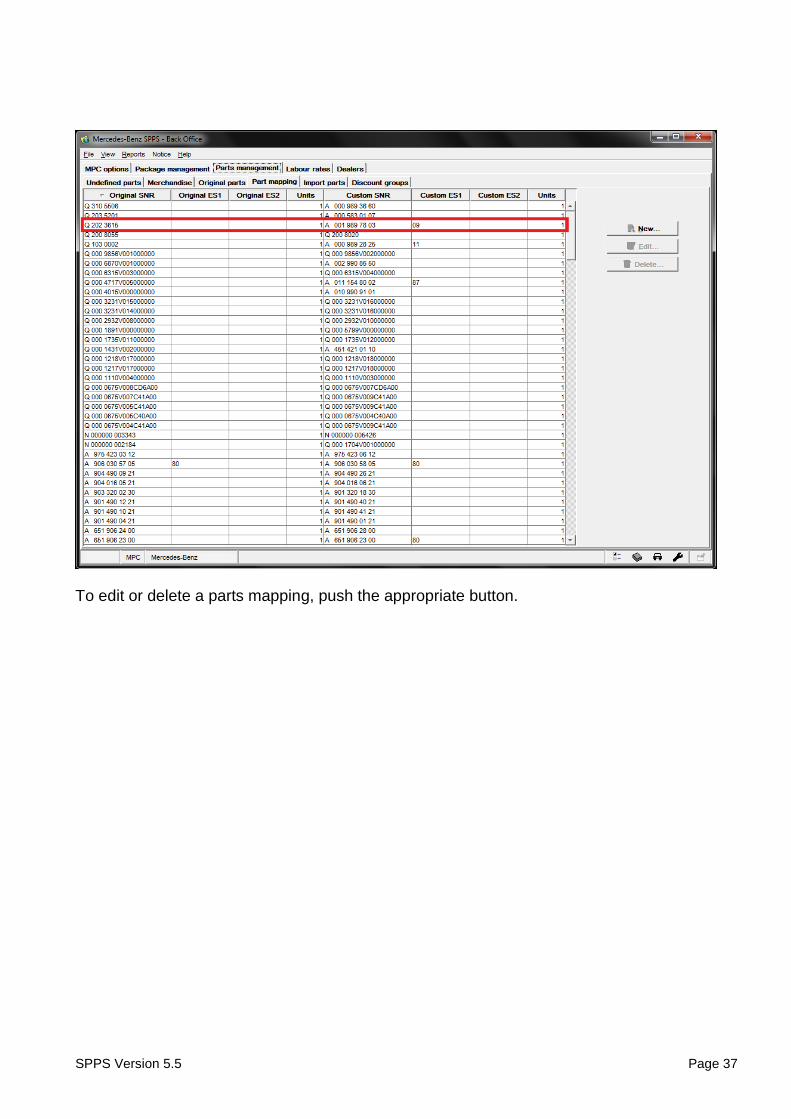
To edit or delete a parts mapping, push the appropriate button.
SPPS Version 5.5 Page 38
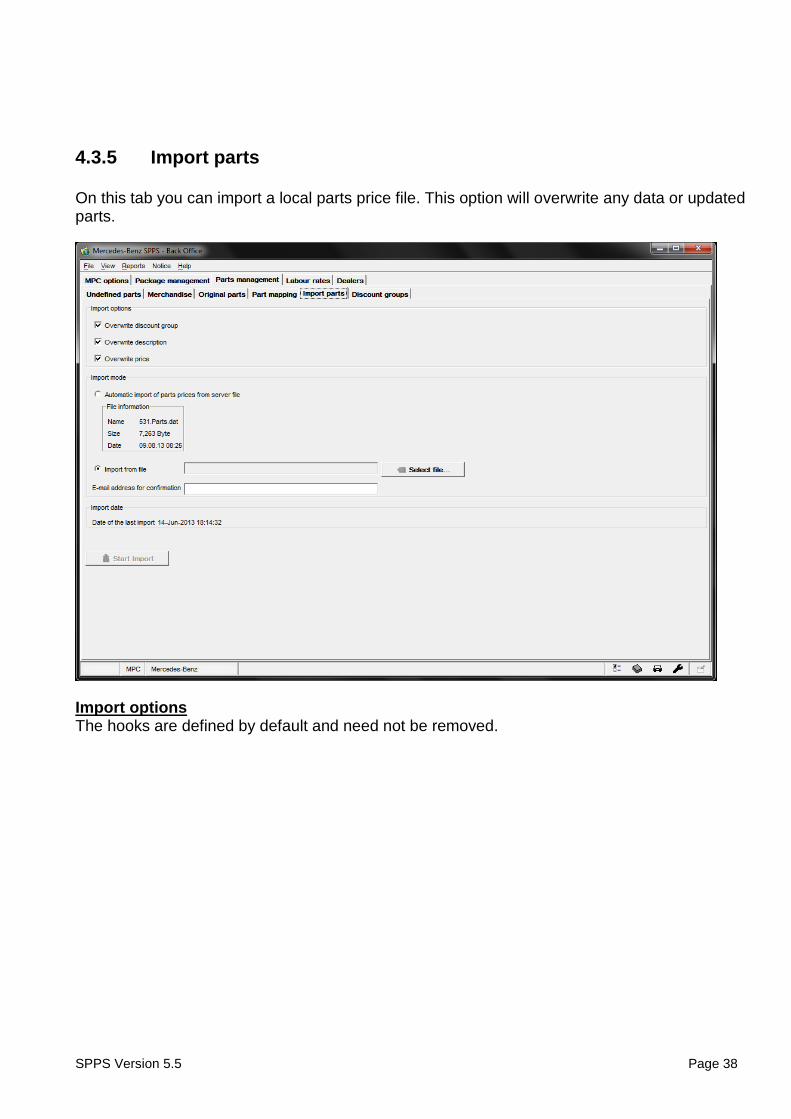
4.3.5 Import parts
On this tab you can import a local parts price file. This option will overwrite any data or updated parts.
Import options The hooks are defined by default and need not be removed.
SPPS Version 5.5 Page 39
Import Mode For update the parts prices, you have two options, the automatic and the manual mode: Automatic import of parts prices from server file In some markets a price file is available, which can be upload. Import from file Usually you will load the file manually. Fill in an E-Mail address, that inform you, when the import finished. Import data The data from the last import will be shown. Start import After choosing an import modus and uploading the file, start the import.
SPPS Version 5.5 Page 40
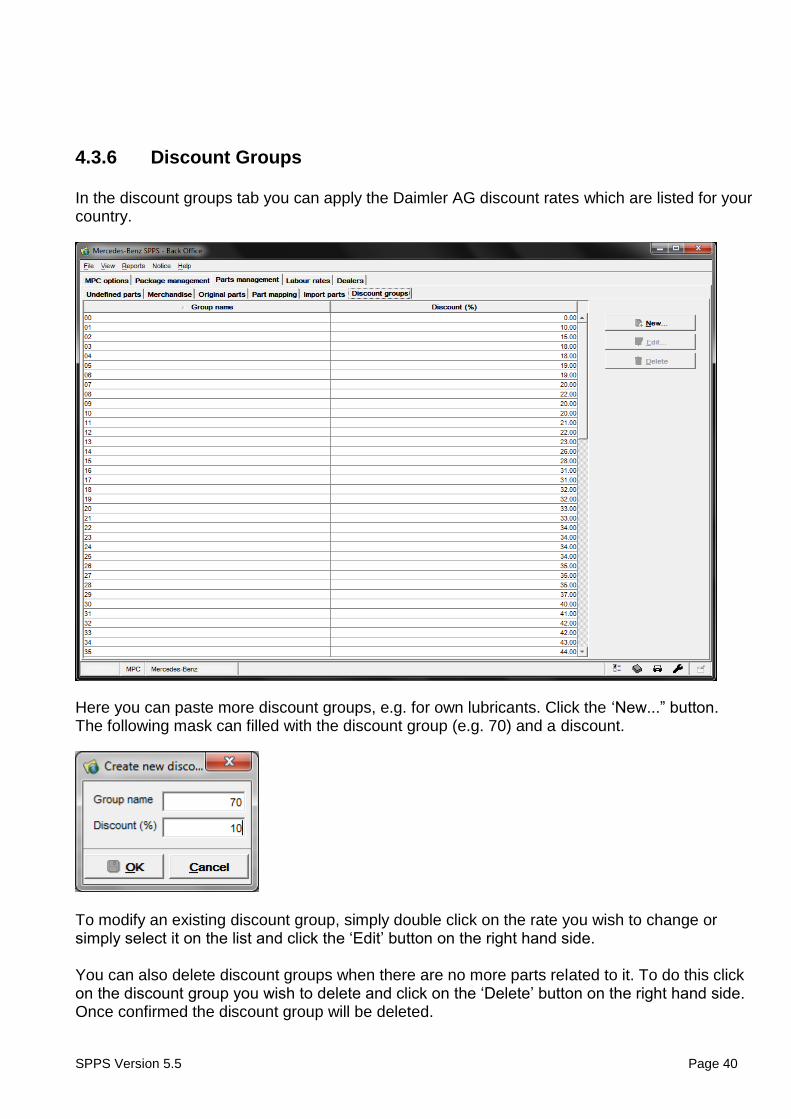
4.3.6 Discount Groups
In the discount groups tab you can apply the Daimler AG discount rates which are listed for your country.
Here you can paste more discount groups, e.g. for own lubricants. Click the ‘New...” button. The following mask can filled with the discount group (e.g. 70) and a discount.
To modify an existing discount group, simply double click on the rate you wish to change or simply select it on the list and click the ‘Edit’ button on the right hand side. You can also delete discount groups when there are no more parts related to it. To do this click on the discount group you wish to delete and click on the ‘Delete’ button on the right hand side. Once confirmed the discount group will be deleted.
SPPS Version 5.5 Page 41
4.4 Labour rates
The ‘Labor rates’ tab allows you to maintain standard labor rates as well as create new price groups and assign these to certain construction groups/jobs and model (baumuster). Furthermore, you can assign a price group to an entire construction group by entering '****' in the ‘Work number’ field. This allows you to assign specific jobs within a construction group to a certain price group, even where they have already been assigned en masse to a different price group (using '****').
During price calculation, it is thus first determined whether a price group assignment exists for exactly this combination of construction group, job and model (baumuster).
If this is not the case, it is determined whether a global price group assignment has been carried out for the associated construction group. If this is not the case either, the standard sales price is applied to the job.
In future, the assigned labor price groups will be calculated taking the set markups or discounts into account. During the calculation, the labor rates are also applied when determining the margin pro package.
Changing a standard labor rate or a price group assignment makes it necessary to recalculate the package. Furthermore, it is possible to specifically define cost rates for a series / model. This package prices are modified not only by the design groups (brakes, electrical, etc.), but also for vehicles or classes of vehicles.
The prices for the associated vehicle-specific billing rates are then used in the calculation of future packages.
SPPS Version 5.5 Page 42
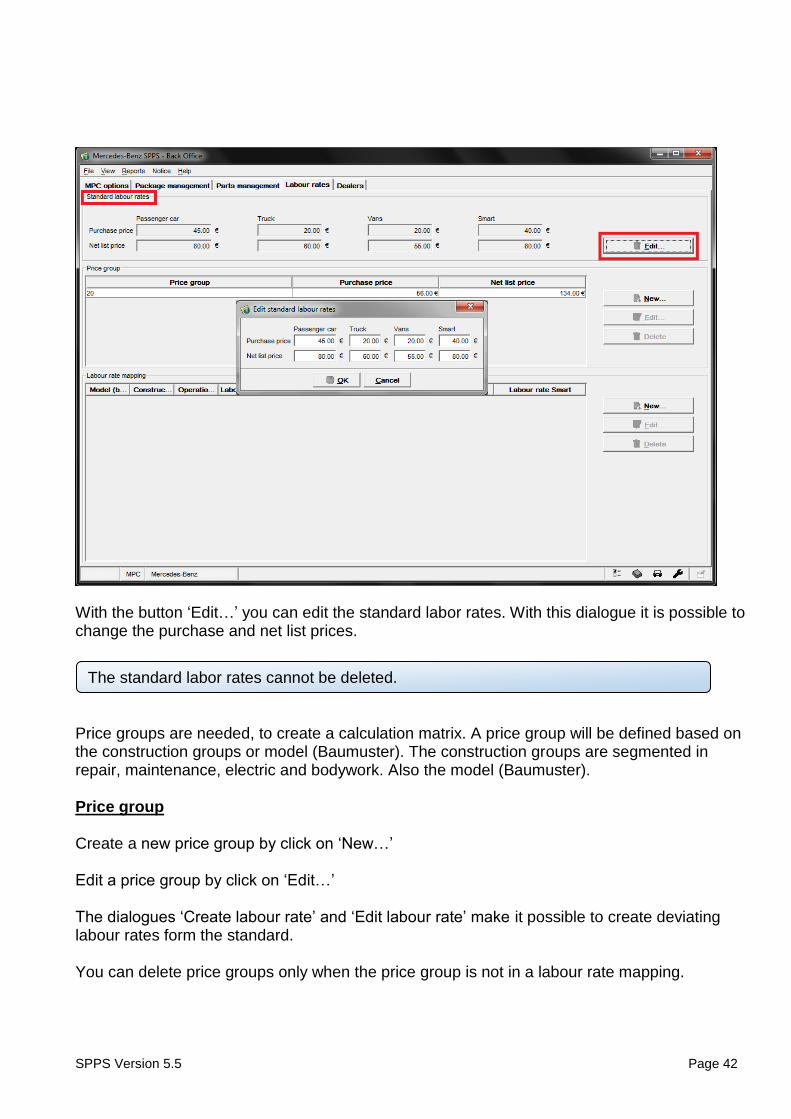
The standard labor rates cannot be deleted.
With the button ‘Edit…’ you can edit the standard labor rates. With this dialogue it is possible to change the purchase and net list prices.
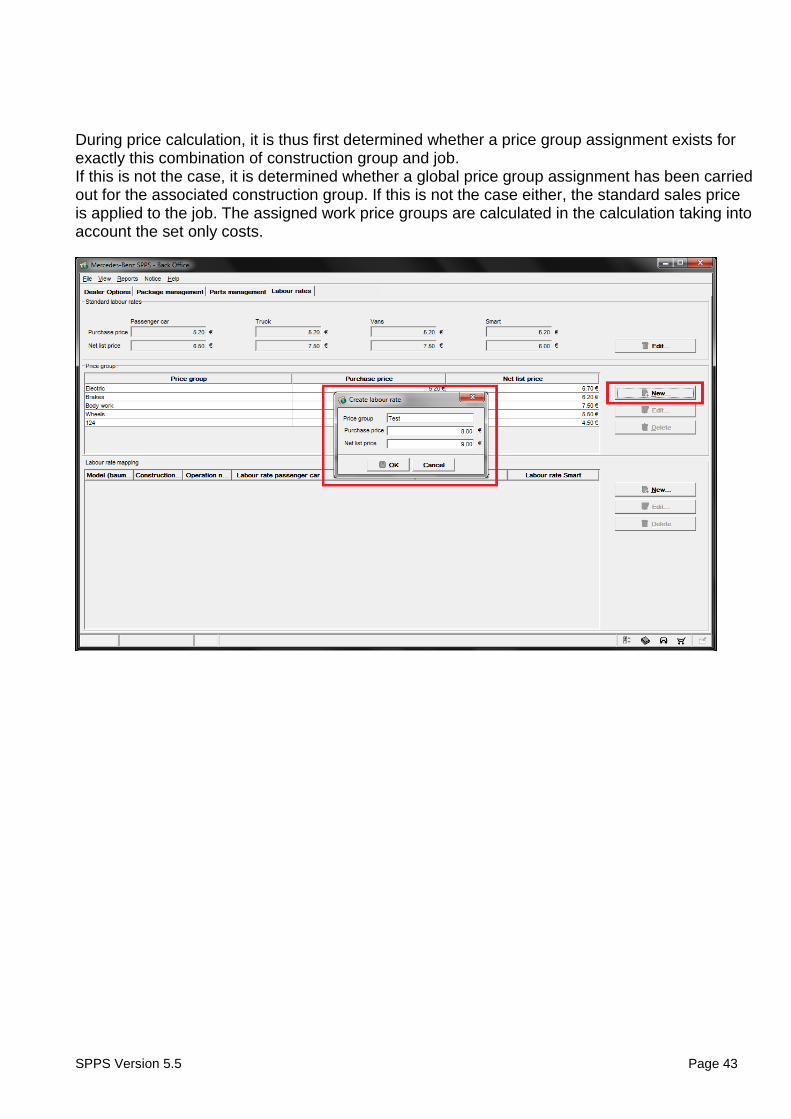
Price groups are needed, to create a calculation matrix. A price group will be defined based on the construction groups or model (Baumuster). The construction groups are segmented in repair, maintenance, electric and bodywork. Also the model (Baumuster). Price group Create a new price group by click on ‘New…’ Edit a price group by click on ‘Edit…’ The dialogues ‘Create labour rate’ and ‘Edit labour rate’ make it possible to create deviating labour rates form the standard. You can delete price groups only when the price group is not in a labour rate mapping.
SPPS Version 5.5 Page 43
During price calculation, it is thus first determined whether a price group assignment exists for exactly this combination of construction group and job. If this is not the case, it is determined whether a global price group assignment has been carried out for the associated construction group. If this is not the case either, the standard sales price is applied to the job. The assigned work price groups are calculated in the calculation taking into account the set only costs.
SPPS Version 5.5 Page 44
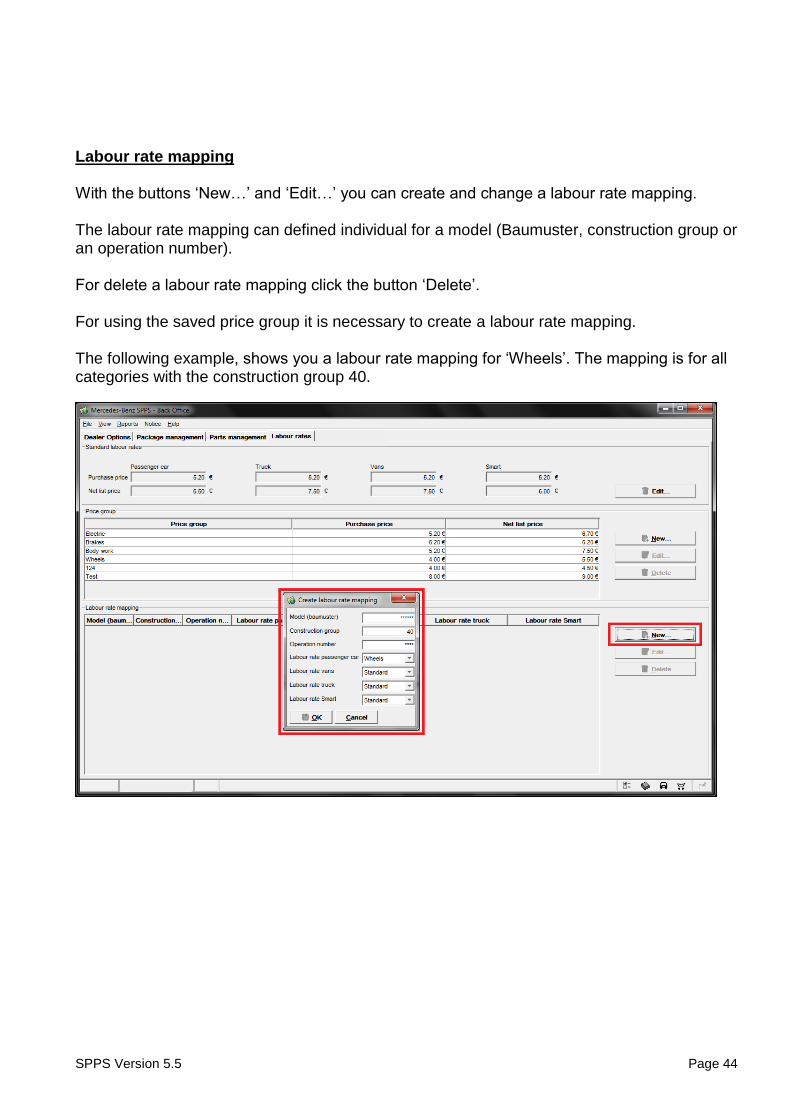
Labour rate mapping With the buttons ‘New…’ and ‘Edit…’ you can create and change a labour rate mapping. The labour rate mapping can defined individual for a model (Baumuster, construction group or an operation number). For delete a labour rate mapping click the button ‘Delete’. For using the saved price group it is necessary to create a labour rate mapping. The following example, shows you a labour rate mapping for ‘Wheels’. The mapping is for all categories with the construction group 40.
SPPS Version 5.5 Page 45
Chart labour rate mapping Model (Baumuster) The column shows the model which are available for the labour rate mapping. You can define which model are specified for a price group. If the price group is not a specified model, insert ‘******’ for place marker. Construction group This column shows the construction group which is available for the labour rate mapping. Operation number This column shows the operation number which is available for the labour rate mapping. Labour rate passenger cars The allocate price group for the category passenger cars. If the selected price group is Standard, the column remains empty. Labour rate vans The allocate price group for the category vans. If the selected price group is Standard, the column remains empty. Labour rate truck The allocate price group for the category truck. If the selected price group is Standard, the column remains empty. Labour rate smart The allocate price group for the category smart. If the selected price group is Standard, the column remains empty.
SPPS Version 5.5 Page 46
In a specified labour rate mapping for model (Baumuster) the hierarchy is the following: The entries can create with following validation:
Available for all model (Baumuster), for example Model (Baumuster) - ******
Available for one amount of model (Baumuster), for example model (Baumuster) = 204***
Available for one model (Baumuster), for example model (Baumuster) = 204000 That means, when the entries are for less baumuster, the assignment is more specific. For example:
a. ****** b. 20**** c. 204*** d. 204000
In summary:
for all model (Baumuster) excluded b, c and d when it is defined (for example 176000)
for all model (Baumuster) which begins with ‘20’, but no c or d (e. g. 203006)
for all model (Baumuster) ‘204’, but not which are defined from d (e. g. 204200)
SPPS Version 5.5 Page 47
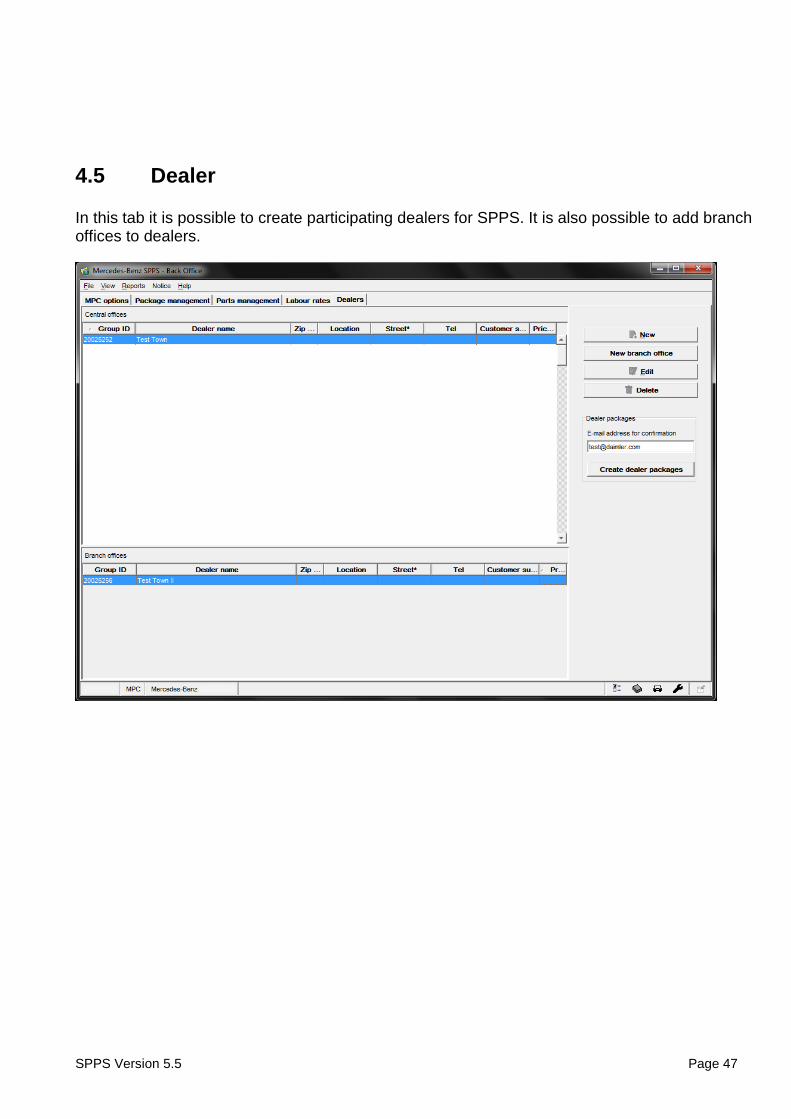
4.5 Dealer
In this tab it is possible to create participating dealers for SPPS. It is also possible to add branch offices to dealers.
SPPS Version 5.5 Page 48
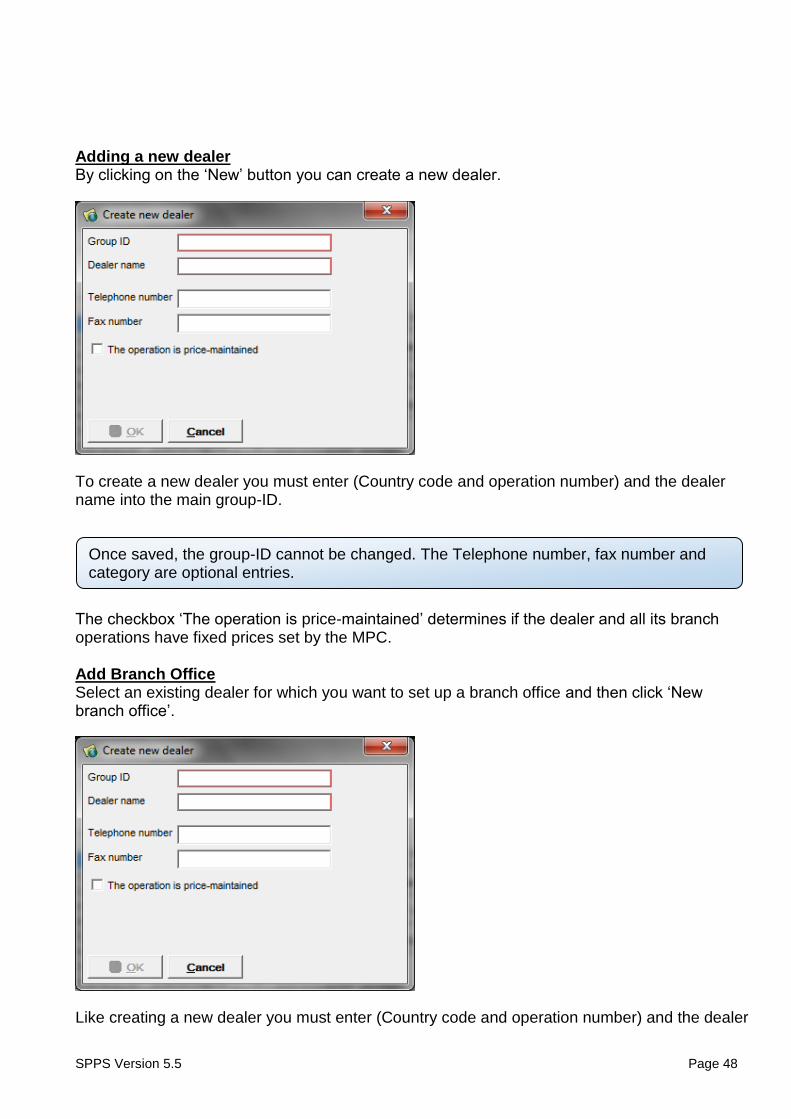
Once saved, the group-ID cannot be changed. The Telephone number, fax number and category are optional entries.
Adding a new dealer By clicking on the ‘New’ button you can create a new dealer.
To create a new dealer you must enter (Country code and operation number) and the dealer name into the main group-ID.
The checkbox ‘The operation is price-maintained’ determines if the dealer and all its branch operations have fixed prices set by the MPC. Add Branch Office Select an existing dealer for which you want to set up a branch office and then click ‘New branch office’.
Like creating a new dealer you must enter (Country code and operation number) and the dealer
SPPS Version 5.5 Page 49
By pressing the button ‘Create new packages, all newly created package dealer receive the shared packages from MPC. At the same time all existing dealer will be checked whether they have received all shared packages that are available and up to date. If an email address is entered, the MPC manager will be informed of a successful package release.
name into the main group-ID which you cannot change once it has been saved. The new branch office will then be added to the dealer it was created through. If you wish to edit or delete a dealer or branch, select it from the list and click on the respective button on the right side of the application.
SPPS Version 5.5 Page 50
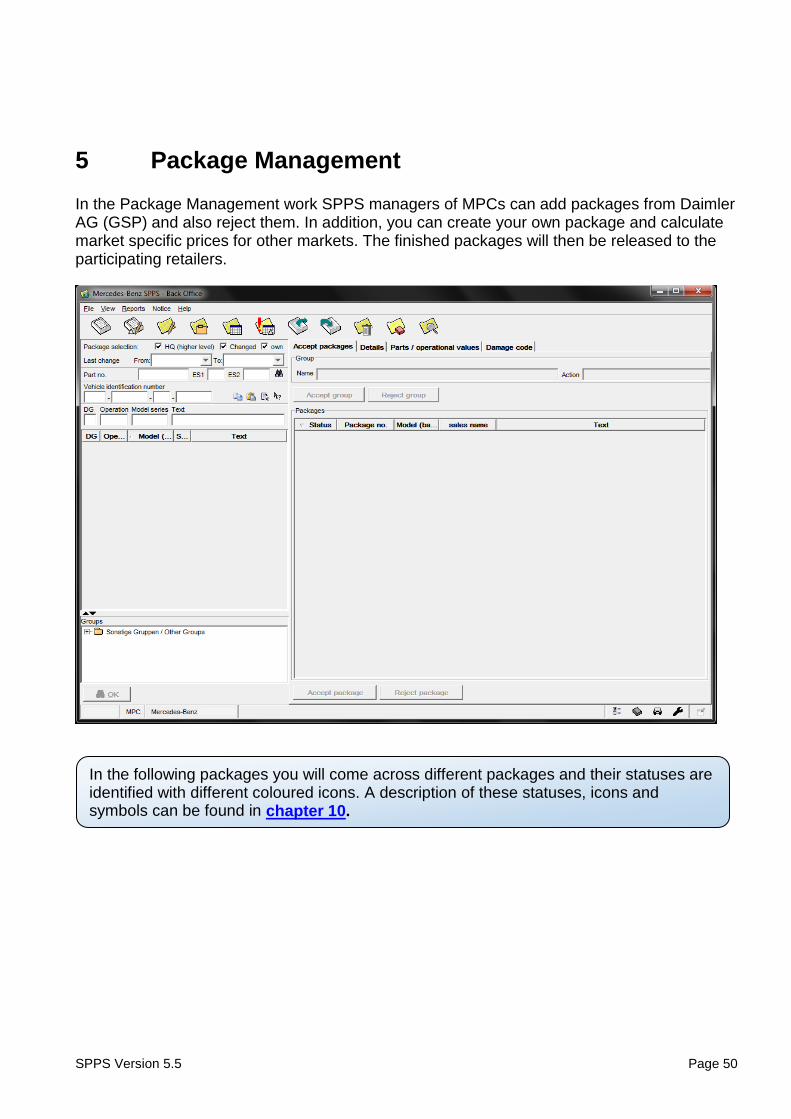
In the following packages you will come across different packages and their statuses are identified with different coloured icons. A description of these statuses, icons and symbols can be found in chapter 10.
5 Package Management
In the Package Management work SPPS managers of MPCs can add packages from Daimler AG (GSP) and also reject them. In addition, you can create your own package and calculate market specific prices for other markets. The finished packages will then be released to the participating retailers.
SPPS Version 5.5 Page 51
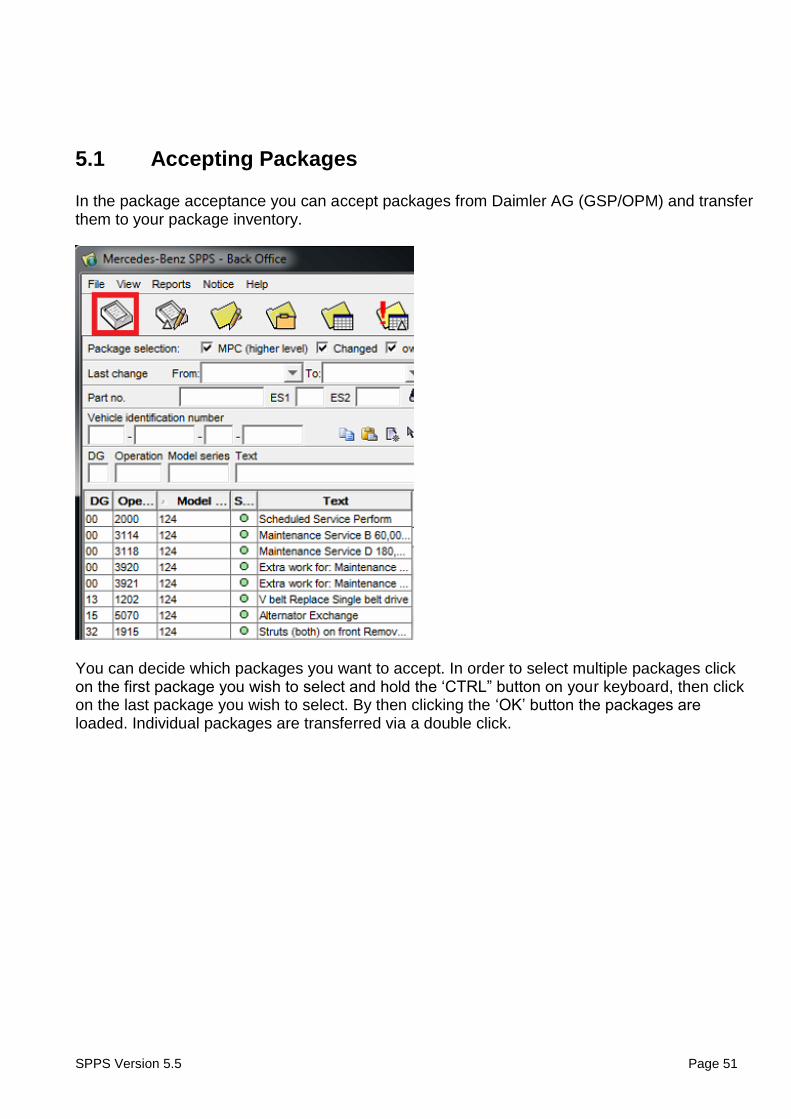
5.1 Accepting Packages
In the package acceptance you can accept packages from Daimler AG (GSP/OPM) and transfer them to your package inventory.
You can decide which packages you want to accept. In order to select multiple packages click on the first package you wish to select and hold the ‘CTRL” button on your keyboard, then click on the last package you wish to select. By then clicking the ‘OK’ button the packages are loaded. Individual packages are transferred via a double click.

SPPS Version 5.5 Page 52
Once you have entered the search criteria, the data filtered will display packages only from the selected model series, operation number or design group.
SPPS Version 5.5 Page 53
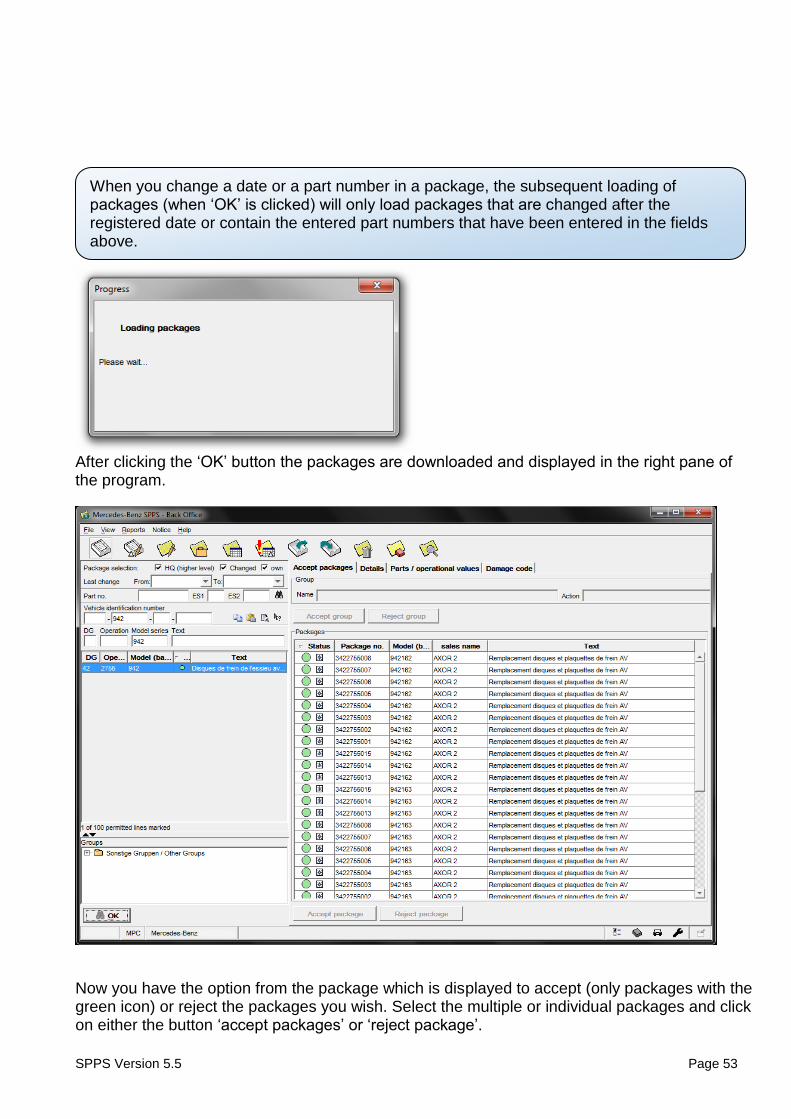
When you change a date or a part number in a package, the subsequent loading of packages (when ‘OK’ is clicked) will only load packages that are changed after the registered date or contain the entered part numbers that have been entered in the fields above.
After clicking the ‘OK’ button the packages are downloaded and displayed in the right pane of the program.
Now you have the option from the package which is displayed to accept (only packages with the green icon) or reject the packages you wish. Select the multiple or individual packages and click on either the button ‘accept packages’ or ‘reject package’.
SPPS Version 5.5 Page 54
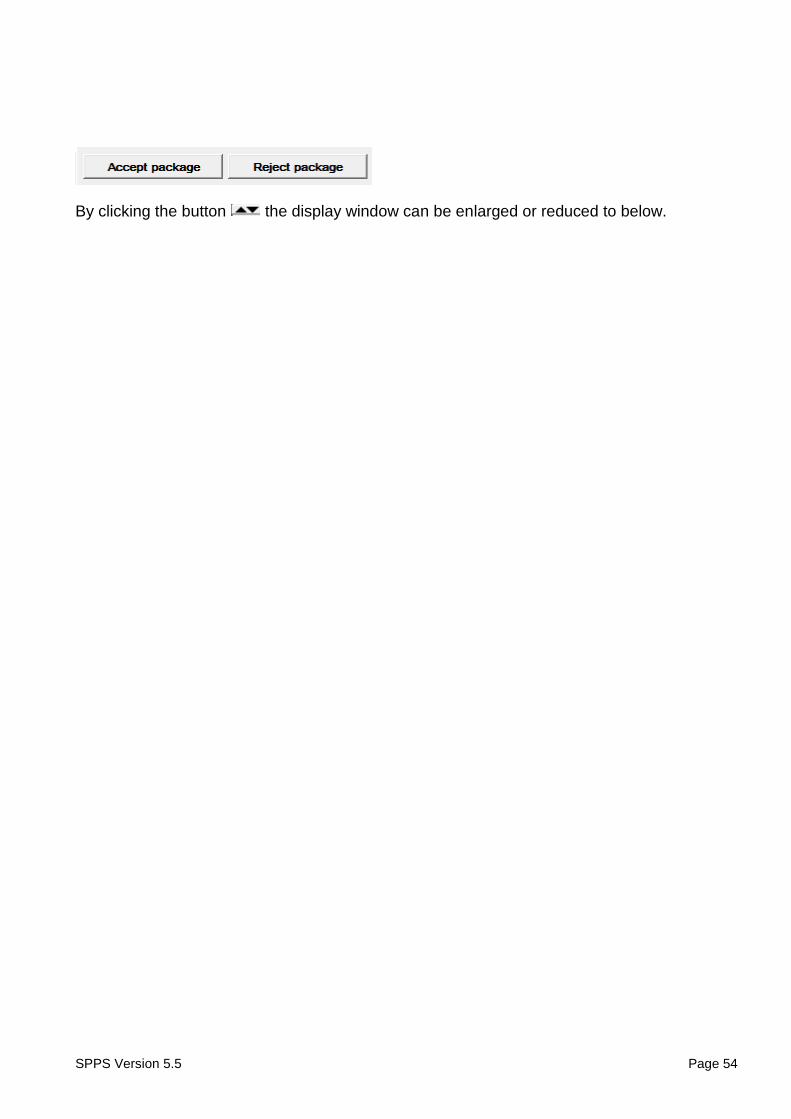
By clicking the button the display window can be enlarged or reduced to below.
SPPS Version 5.5 Page 55
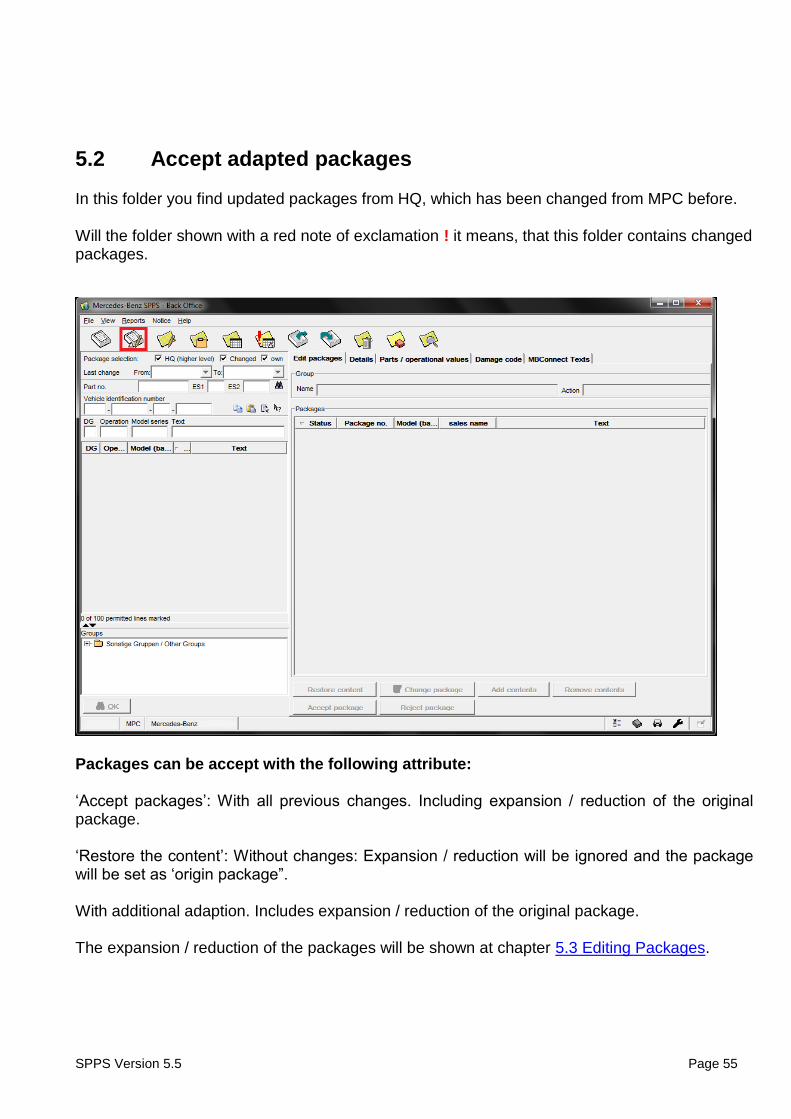
5.2 Accept adapted packages
In this folder you find updated packages from HQ, which has been changed from MPC before.
Will the folder shown with a red note of exclamation ! it means, that this folder contains changed packages.
Packages can be accept with the following attribute:
‘Accept packages’: With all previous changes. Including expansion / reduction of the original package. ‘Restore the content’: Without changes: Expansion / reduction will be ignored and the package will be set as ‘origin package”. With additional adaption. Includes expansion / reduction of the original package. The expansion / reduction of the packages will be shown at chapter 5.3 Editing Packages.
SPPS Version 5.5 Page 56
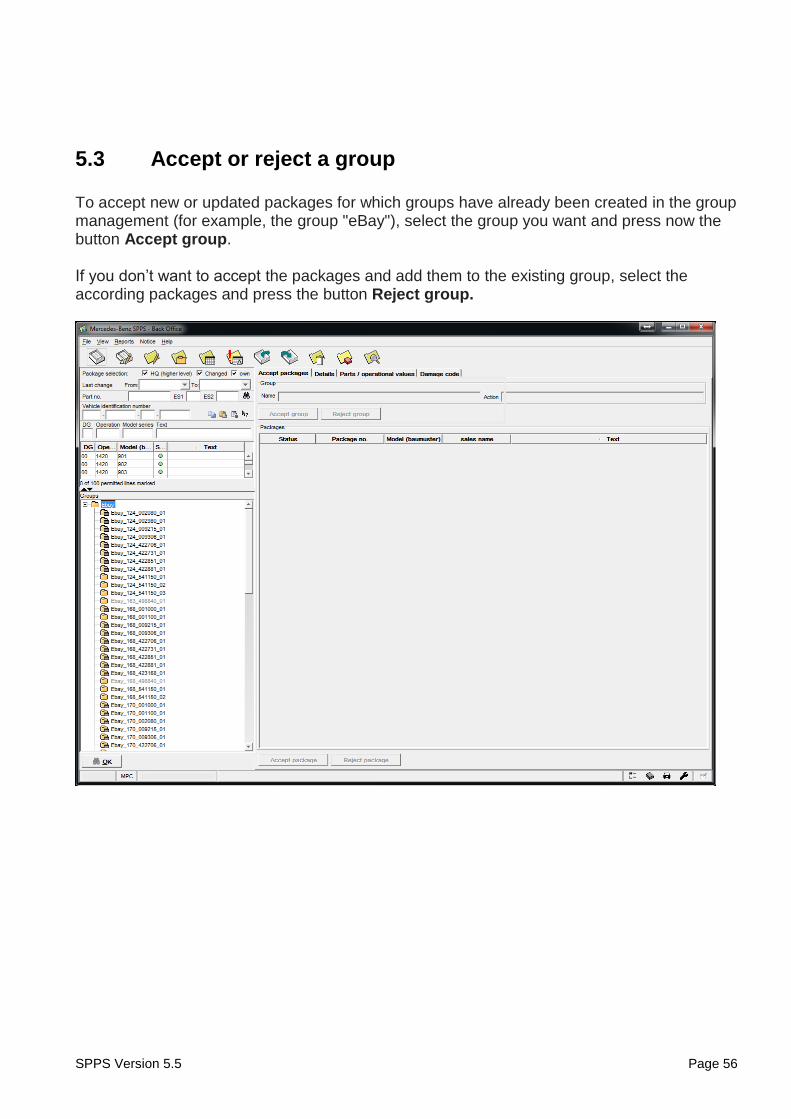
5.3 Accept or reject a group
To accept new or updated packages for which groups have already been created in the group management (for example, the group "eBay"), select the group you want and press now the button Accept group. If you don’t want to accept the packages and add them to the existing group, select the according packages and press the button Reject group.
SPPS Version 5.5 Page 57
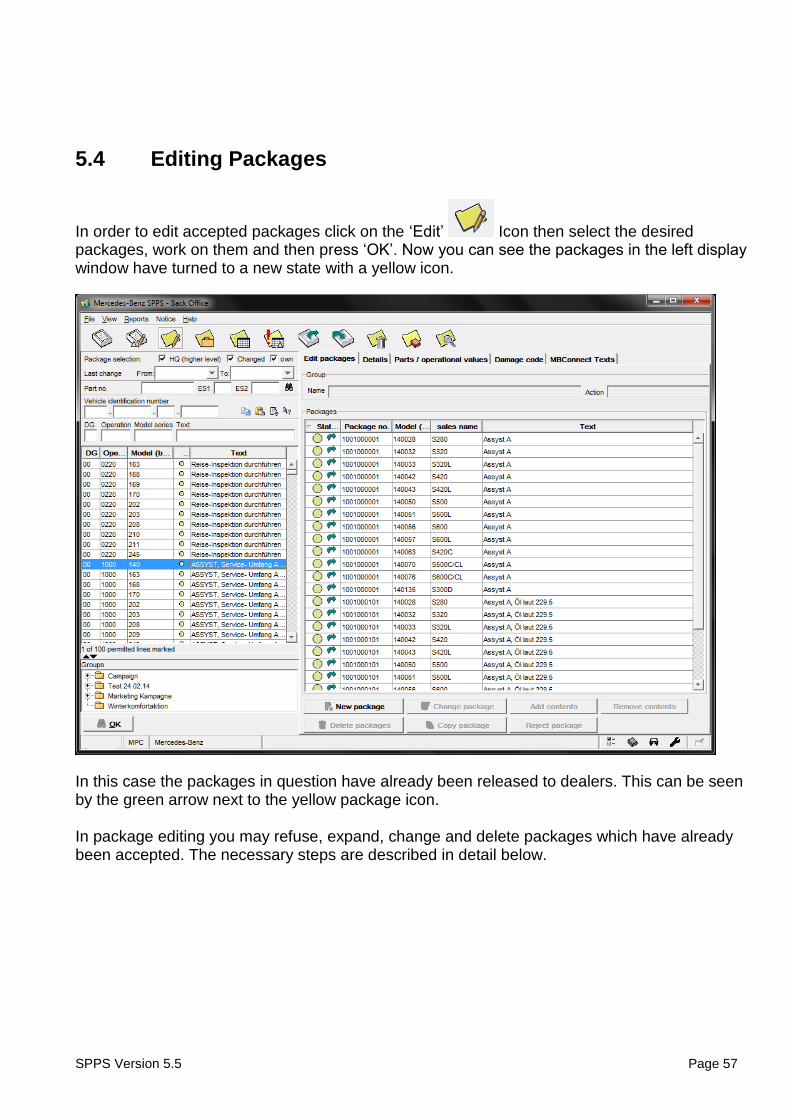
5.4 Editing Packages
In order to edit accepted packages click on the ‘Edit’ Icon then select the desired packages, work on them and then press ‘OK’. Now you can see the packages in the left display window have turned to a new state with a yellow icon.
In this case the packages in question have already been released to dealers. This can be seen by the green arrow next to the yellow package icon. In package editing you may refuse, expand, change and delete packages which have already been accepted. The necessary steps are described in detail below.
SPPS Version 5.5 Page 58
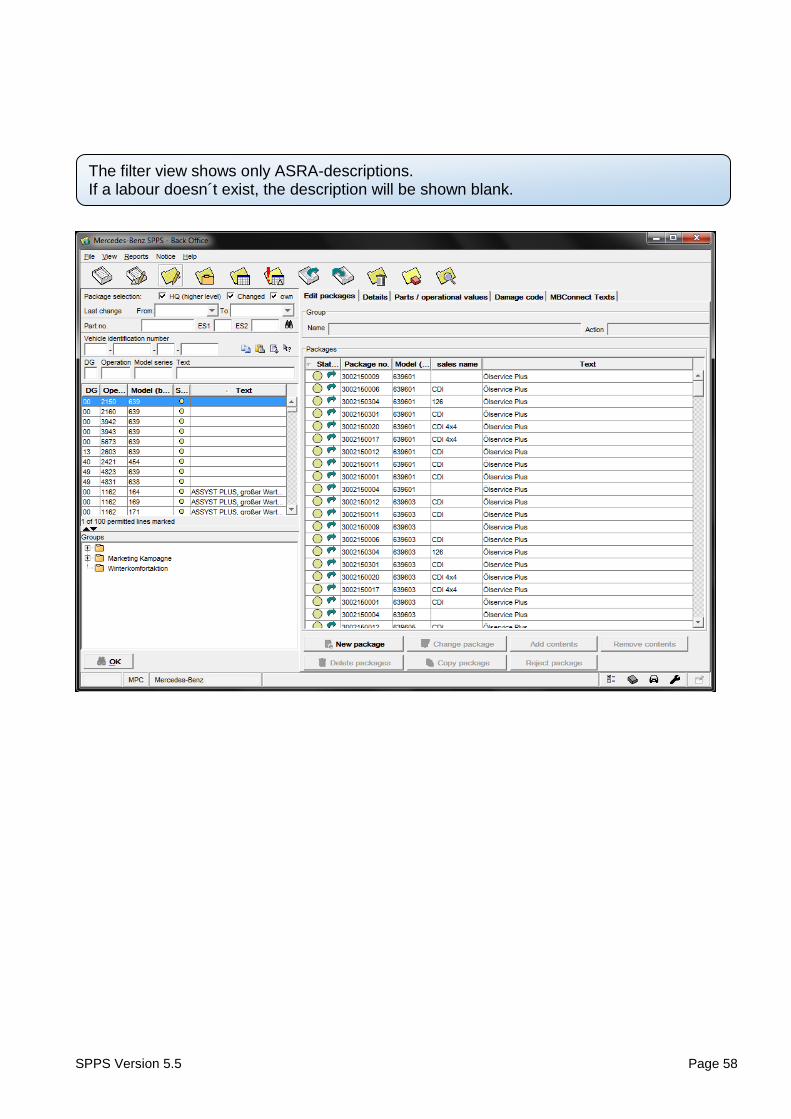
The filter view shows only ASRA-descriptions. If a labour doesn´t exist, the description will be shown blank.
SPPS Version 5.5 Page 59
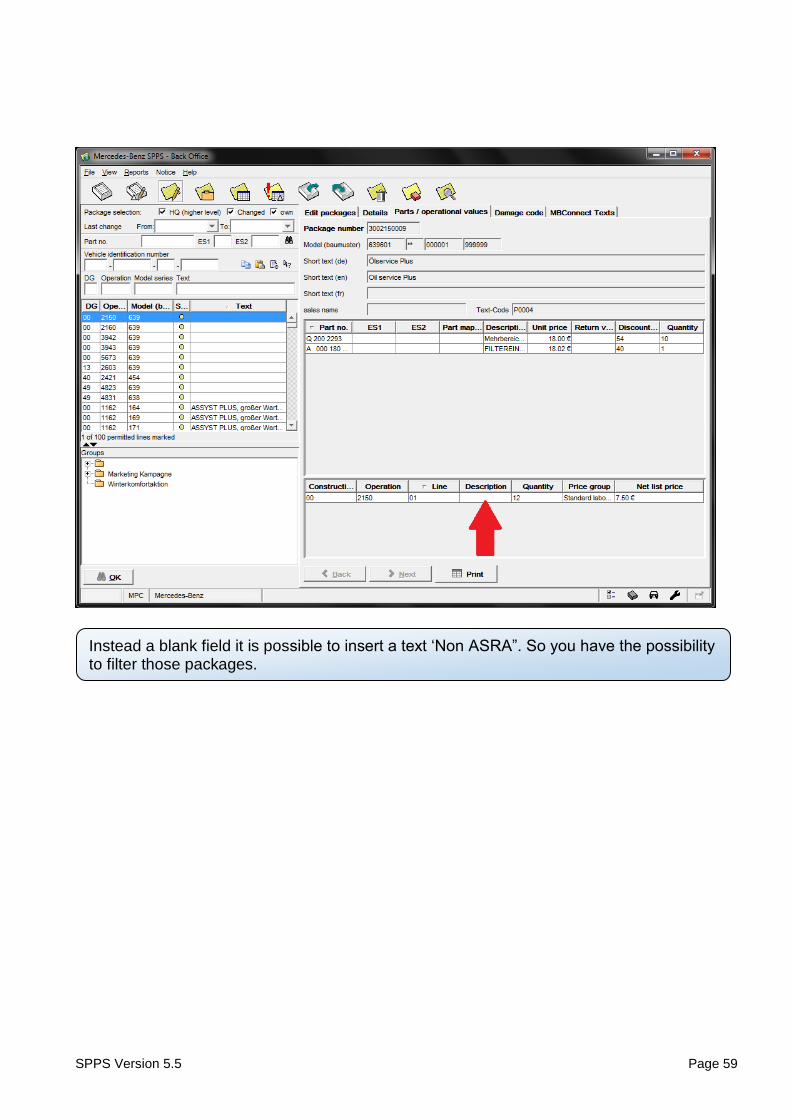
Instead a blank field it is possible to insert a text ‘Non ASRA”. So you have the possibility to filter those packages.
SPPS Version 5.5 Page 60
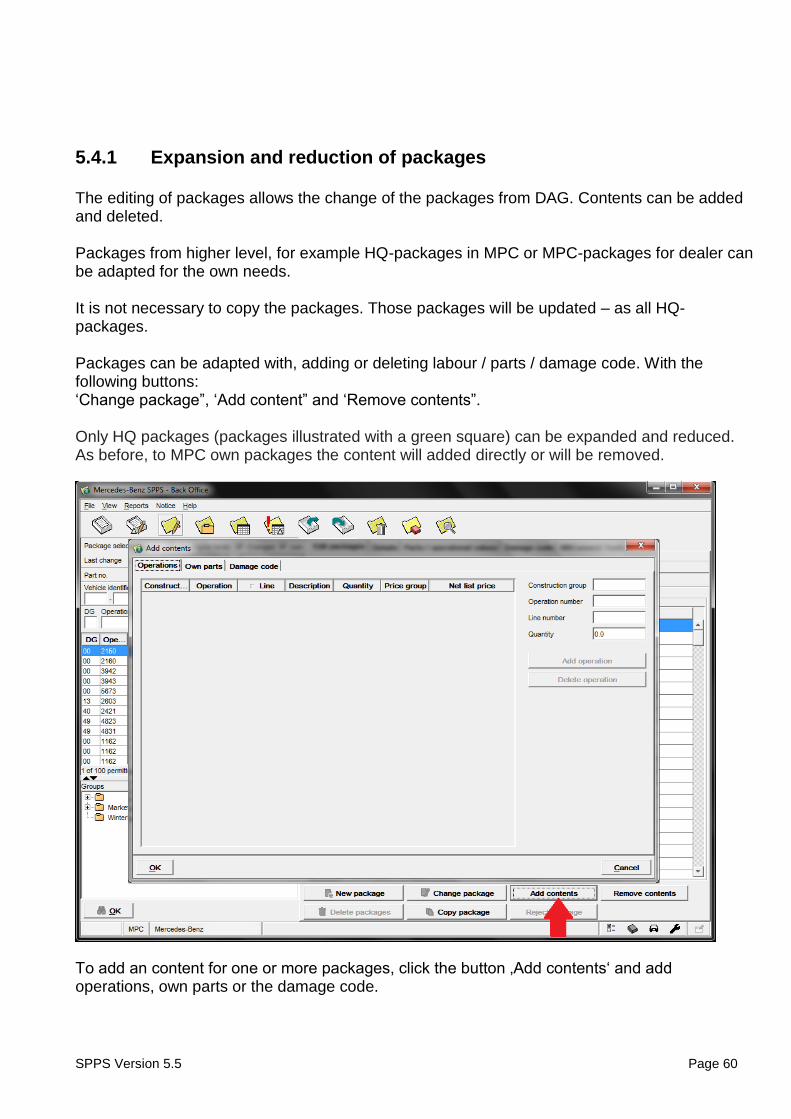
5.4.1 Expansion and reduction of packages
The editing of packages allows the change of the packages from DAG. Contents can be added and deleted. Packages from higher level, for example HQ-packages in MPC or MPC-packages for dealer can be adapted for the own needs. It is not necessary to copy the packages. Those packages will be updated – as all HQ-packages. Packages can be adapted with, adding or deleting labour / parts / damage code. With the following buttons: ‘Change package”, ‘Add content” and ‘Remove contents”. Only HQ packages (packages illustrated with a green square) can be expanded and reduced. As before, to MPC own packages the content will added directly or will be removed.
To add an content for one or more packages, click the button ‚Add contents‘ and add operations, own parts or the damage code.
SPPS Version 5.5 Page 61
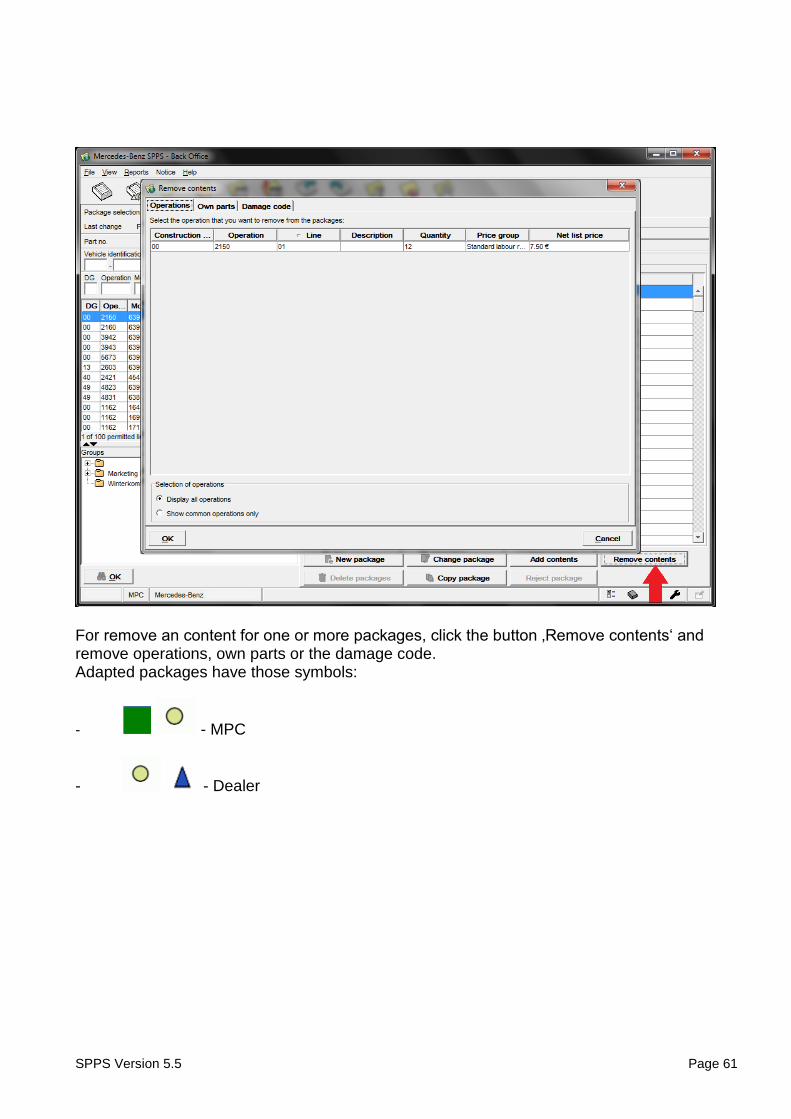
For remove an content for one or more packages, click the button ‚Remove contents‘ and remove operations, own parts or the damage code. Adapted packages have those symbols:
- - MPC
- - Dealer
SPPS Version 5.5 Page 62
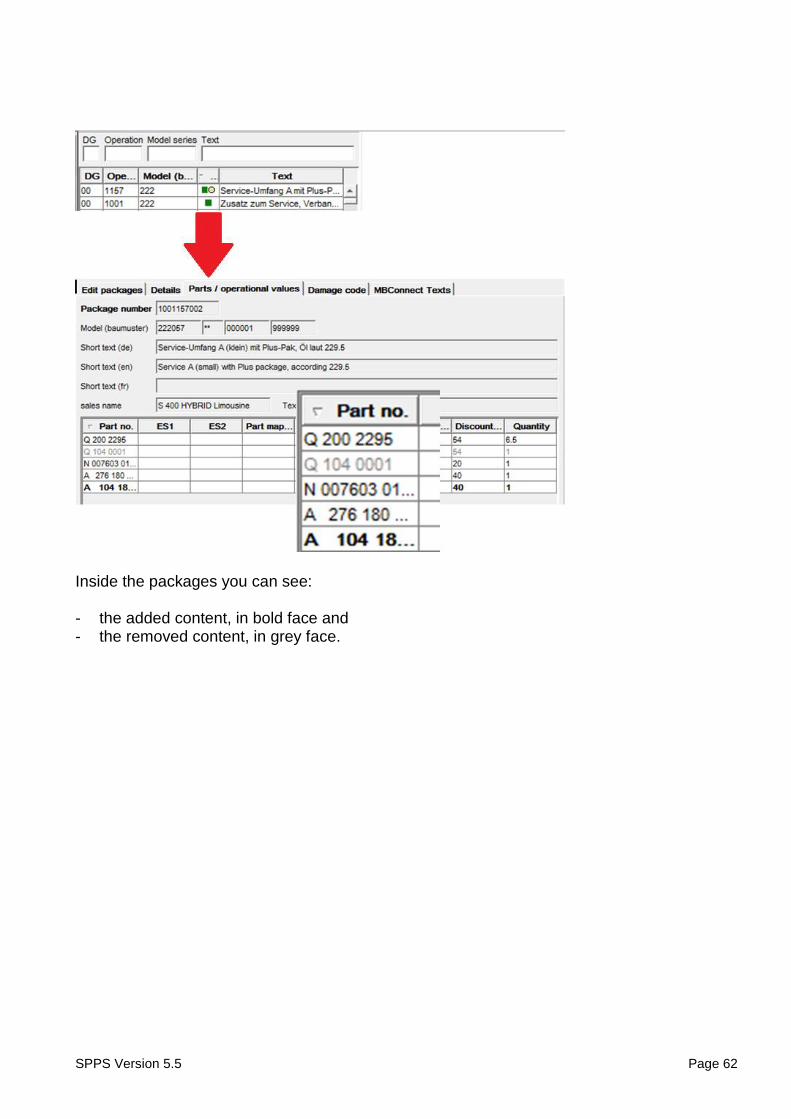
Inside the packages you can see: - the added content, in bold face and - the removed content, in grey face.

SPPS Version 5.5 Page 63
Own packages are not subjects to the update process and will not updated automatically. Own packages will not displays on the service management.
5.4.2 Creating Packages
In this menu you can create packages. Even though this is rather rare as MPC this option is available. For example, in case you want to create market specify packages. Click on ‘New Package’ to open the following dialogue.
SPPS Version 5.5 Page 64
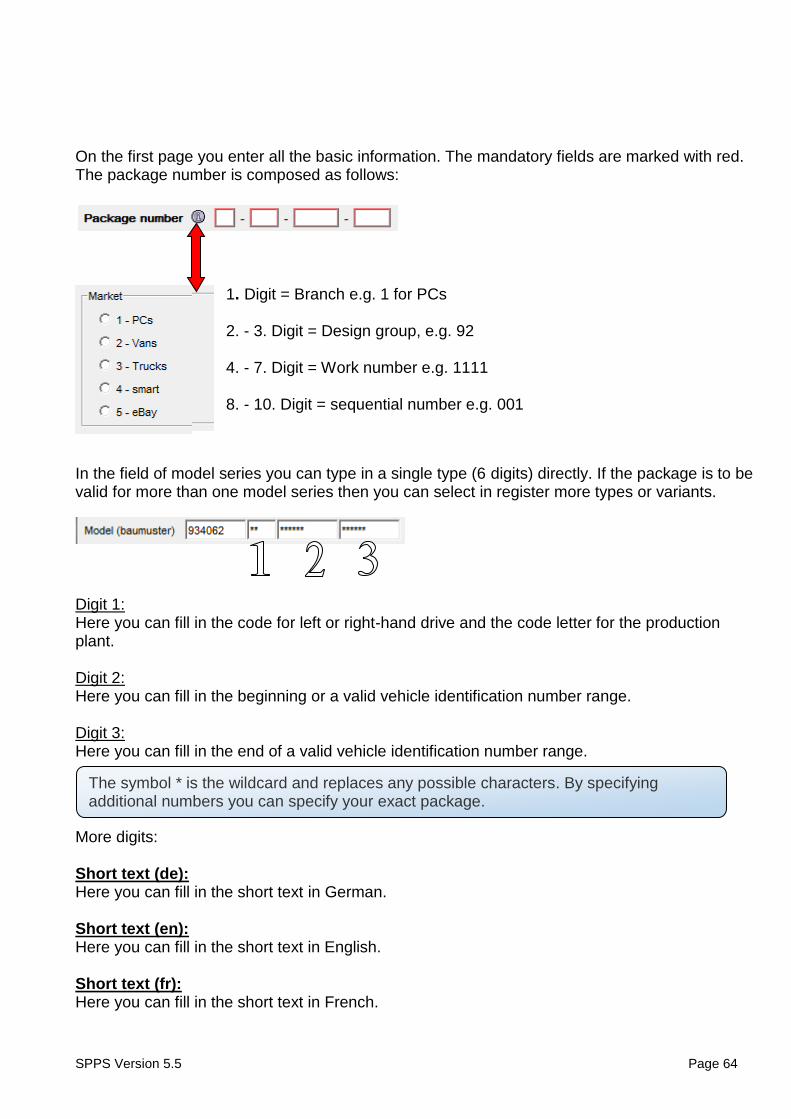
The symbol * is the wildcard and replaces any possible characters. By specifying additional numbers you can specify your exact package.
On the first page you enter all the basic information. The mandatory fields are marked with red. The package number is composed as follows:
1. Digit = Branch e.g. 1 for PCs 2. - 3. Digit = Design group, e.g. 92 4. - 7. Digit = Work number e.g. 1111 8. - 10. Digit = sequential number e.g. 001
In the field of model series you can type in a single type (6 digits) directly. If the package is to be valid for more than one model series then you can select in register more types or variants.
Digit 1: Here you can fill in the code for left or right-hand drive and the code letter for the production plant. Digit 2: Here you can fill in the beginning or a valid vehicle identification number range. Digit 3: Here you can fill in the end of a valid vehicle identification number range.
More digits: Short text (de): Here you can fill in the short text in German. Short text (en): Here you can fill in the short text in English. Short text (fr): Here you can fill in the short text in French.
SPPS Version 5.5 Page 65
Sales name: The sales name is automatically generated when the model class is entered.
SPPS Version 5.5 Page 66
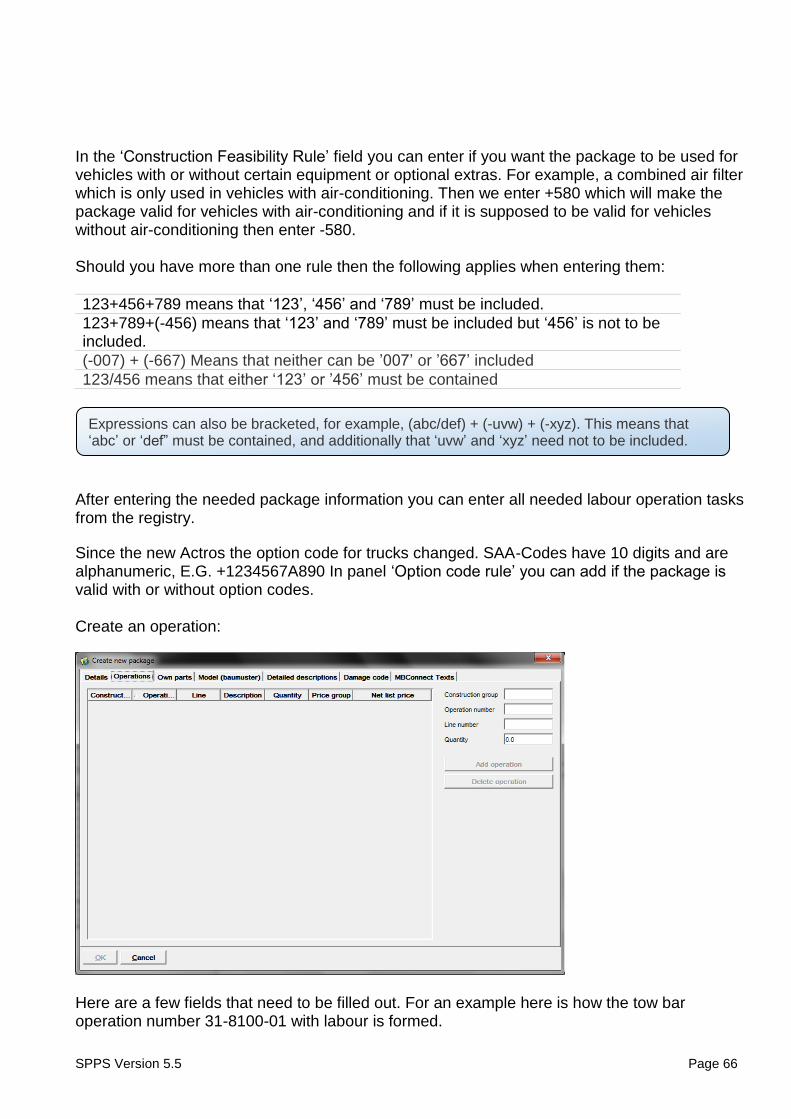
Expressions can also be bracketed, for example, (abc/def) + (-uvw) + (-xyz). This means that ‘abc’ or ‘def” must be contained, and additionally that ‘uvw’ and ‘xyz’ need not to be included.
In the ‘Construction Feasibility Rule’ field you can enter if you want the package to be used for vehicles with or without certain equipment or optional extras. For example, a combined air filter which is only used in vehicles with air-conditioning. Then we enter +580 which will make the package valid for vehicles with air-conditioning and if it is supposed to be valid for vehicles without air-conditioning then enter -580. Should you have more than one rule then the following applies when entering them:
123+456+789 means that ‘123’, ‘456’ and ‘789’ must be included.
123+789+(-456) means that ‘123’ and ‘789’ must be included but ‘456’ is not to be included.
(-007) + (-667) Means that neither can be ’007’ or ’667’ included
123/456 means that either ‘123’ or ’456’ must be contained
After entering the needed package information you can enter all needed labour operation tasks from the registry.
Since the new Actros the option code for trucks changed. SAA-Codes have 10 digits and are alphanumeric, E.G. +1234567A890 In panel ‘Option code rule’ you can add if the package is valid with or without option codes. Create an operation:
Here are a few fields that need to be filled out. For an example here is how the tow bar operation number 31-8100-01 with labour is formed.
SPPS Version 5.5 Page 67
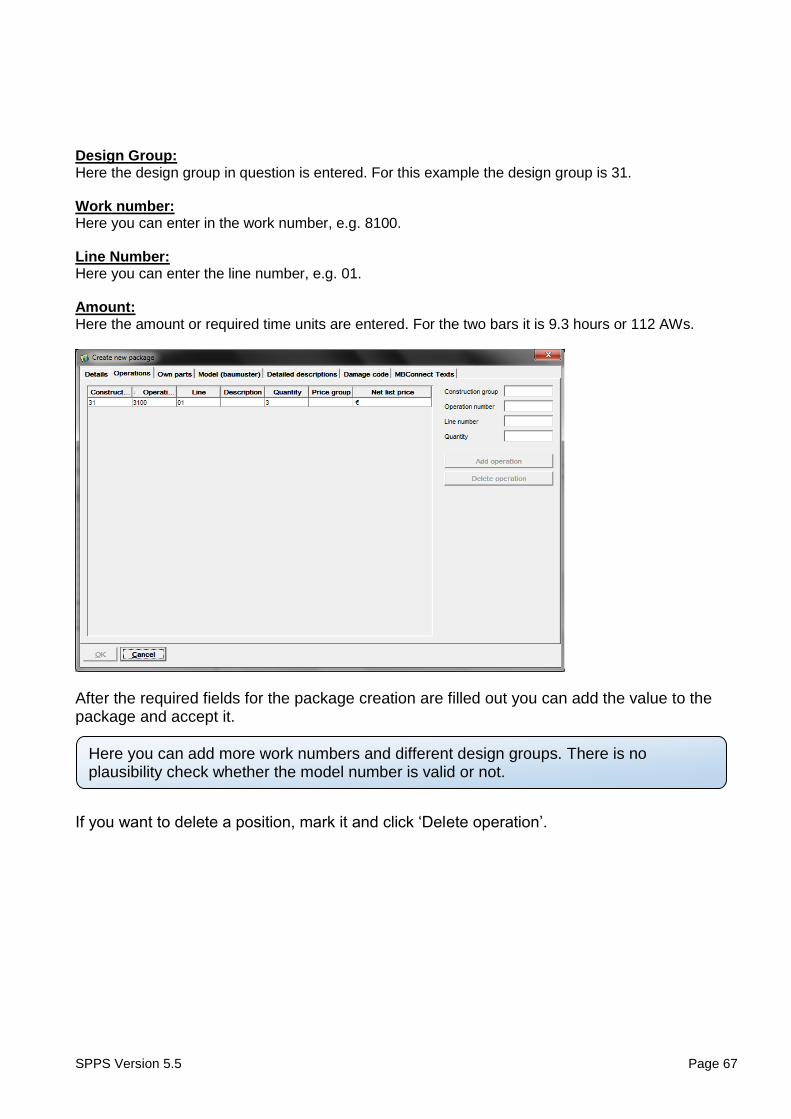
Here you can add more work numbers and different design groups. There is no plausibility check whether the model number is valid or not.
Design Group: Here the design group in question is entered. For this example the design group is 31. Work number: Here you can enter in the work number, e.g. 8100. Line Number: Here you can enter the line number, e.g. 01. Amount: Here the amount or required time units are entered. For the two bars it is 9.3 hours or 112 AWs.
After the required fields for the package creation are filled out you can add the value to the package and accept it.
If you want to delete a position, mark it and click ‘Delete operation’.
SPPS Version 5.5 Page 68
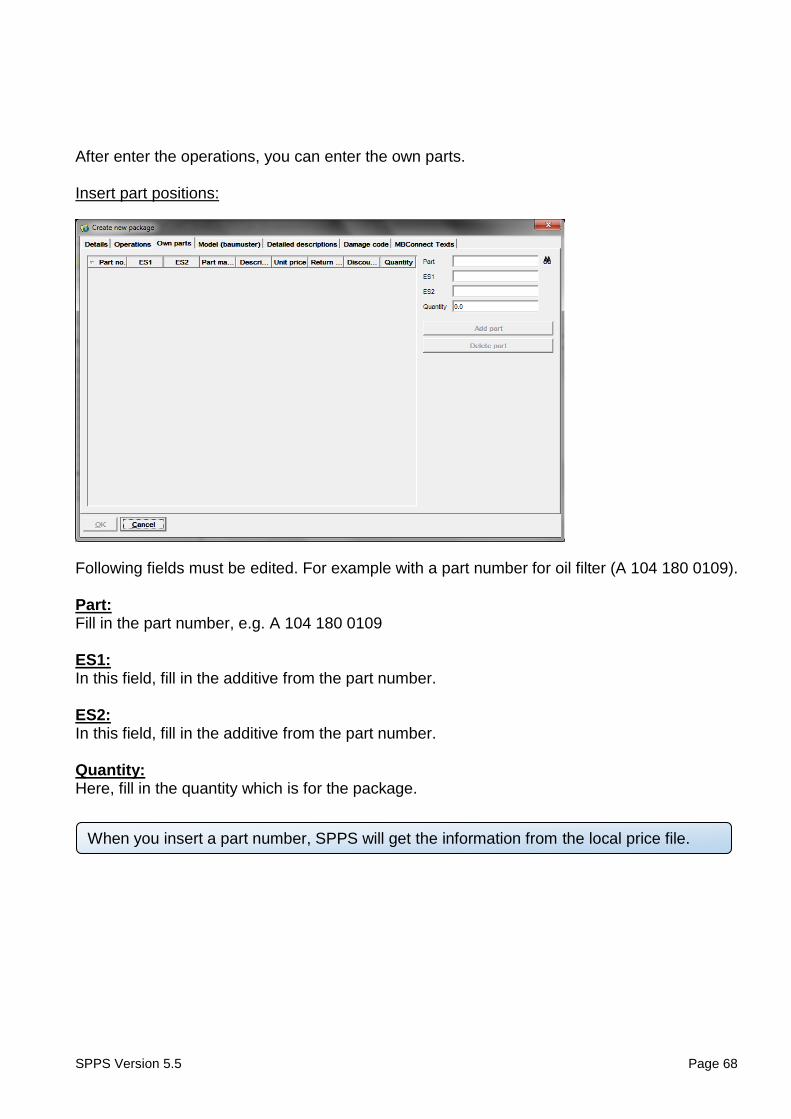
When you insert a part number, SPPS will get the information from the local price file.
After enter the operations, you can enter the own parts. Insert part positions:
Following fields must be edited. For example with a part number for oil filter (A 104 180 0109). Part: Fill in the part number, e.g. A 104 180 0109 ES1: In this field, fill in the additive from the part number. ES2: In this field, fill in the additive from the part number. Quantity: Here, fill in the quantity which is for the package.

SPPS Version 5.5 Page 69
For delete the position, mark it and click on ‘Delete part”.
SPPS Version 5.5 Page 70
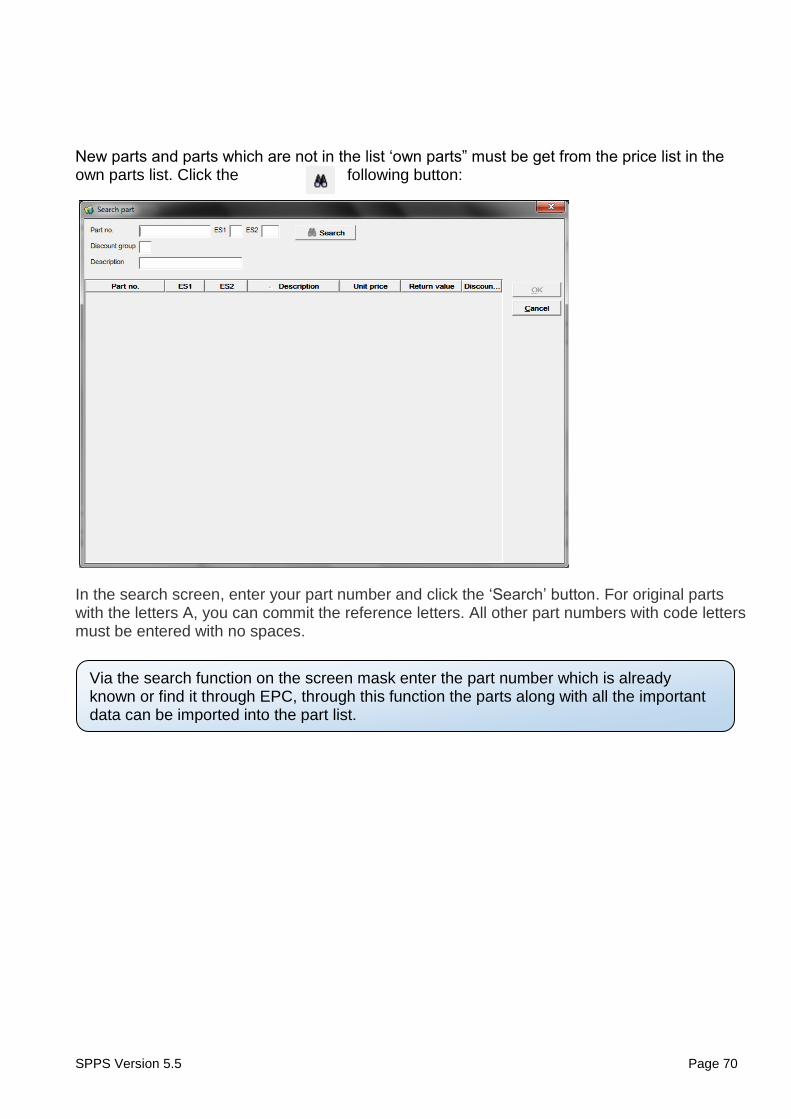
Via the search function on the screen mask enter the part number which is already known or find it through EPC, through this function the parts along with all the important data can be imported into the part list.
New parts and parts which are not in the list ‘own parts” must be get from the price list in the own parts list. Click the following button:
In the search screen, enter your part number and click the ‘Search’ button. For original parts with the letters A, you can commit the reference letters. All other part numbers with code letters must be entered with no spaces.
SPPS Version 5.5 Page 71
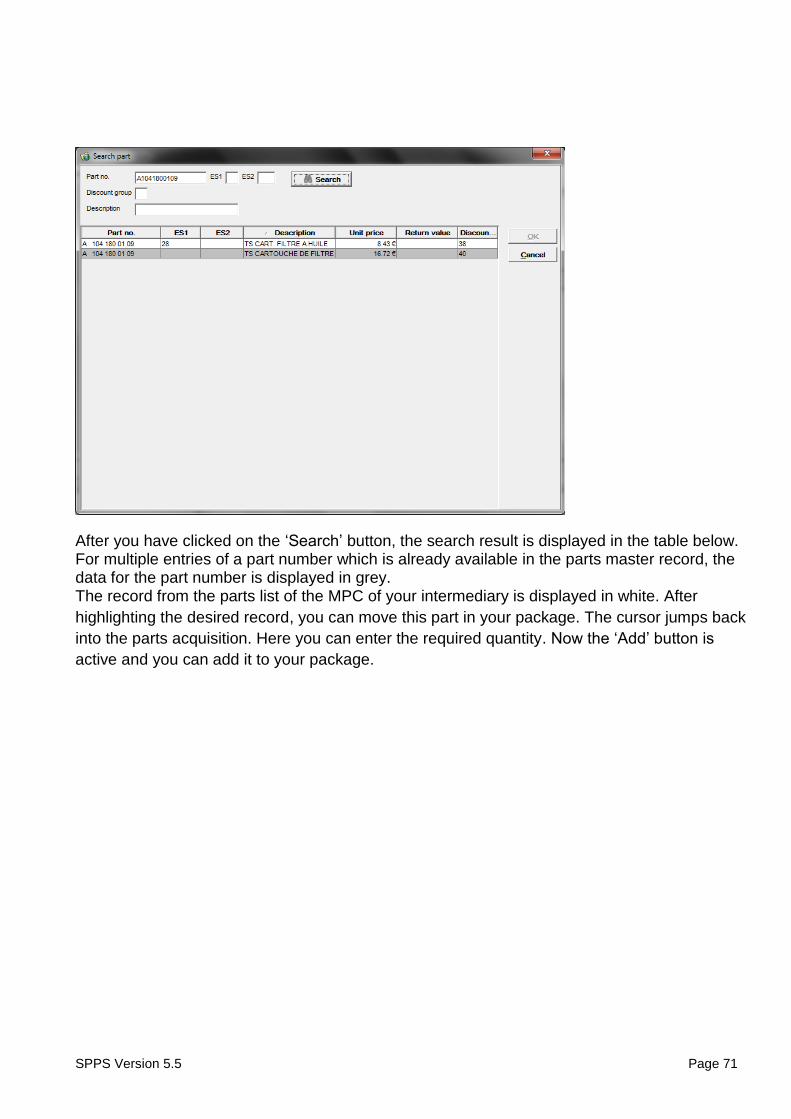
After you have clicked on the ‘Search’ button, the search result is displayed in the table below. For multiple entries of a part number which is already available in the parts master record, the data for the part number is displayed in grey. The record from the parts list of the MPC of your intermediary is displayed in white. After
highlighting the desired record, you can move this part in your package. The cursor jumps back
into the parts acquisition. Here you can enter the required quantity. Now the ‘Add’ button is
active and you can add it to your package.
SPPS Version 5.5 Page 72
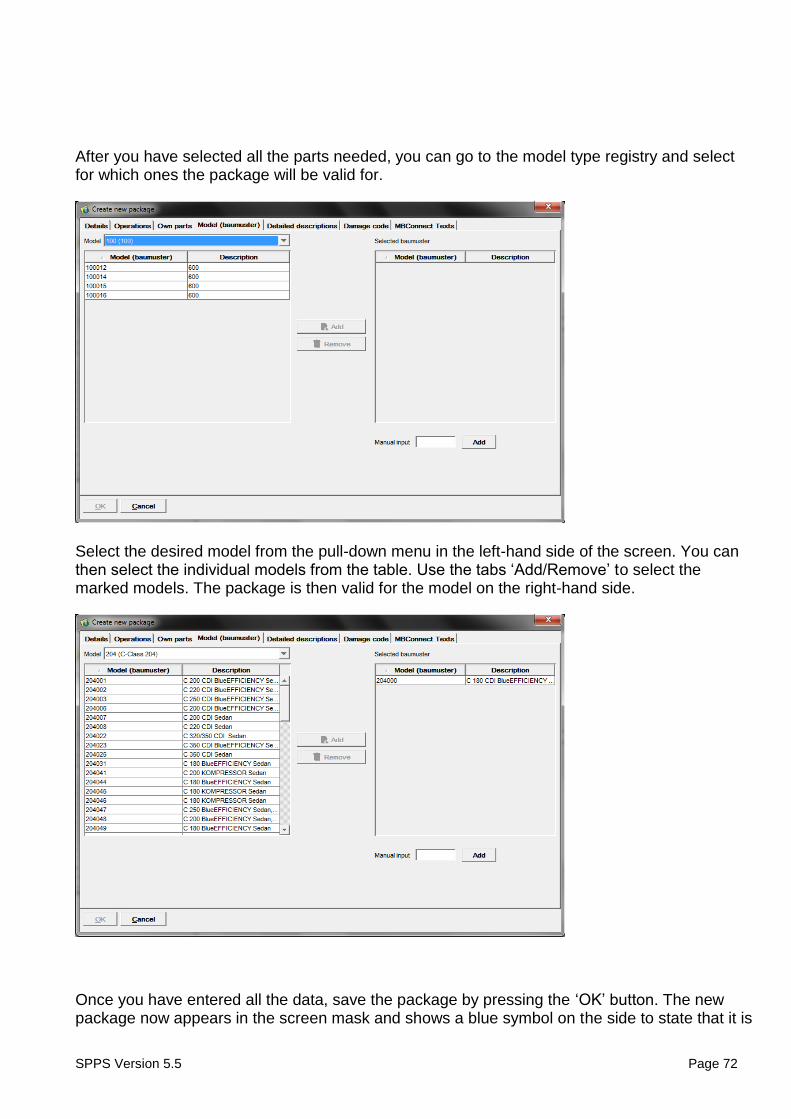
After you have selected all the parts needed, you can go to the model type registry and select for which ones the package will be valid for.
Select the desired model from the pull-down menu in the left-hand side of the screen. You can then select the individual models from the table. Use the tabs ‘Add/Remove’ to select the marked models. The package is then valid for the model on the right-hand side.
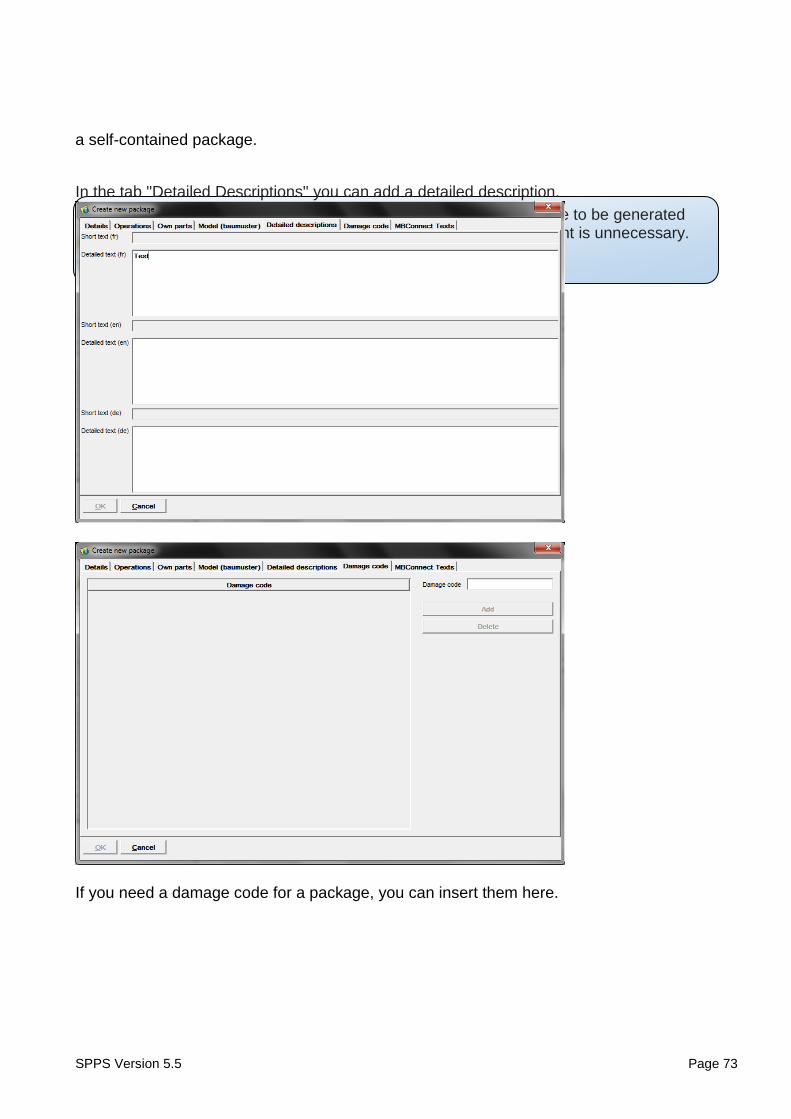
Once you have entered all the data, save the package by pressing the ‘OK’ button. The new package now appears in the screen mask and shows a blue symbol on the side to state that it is
SPPS Version 5.5 Page 73
Note: You only need to add a baumuster/model, when packages are to be generated for multiple models. In one package for only one type the assignment is unnecessary.
a self-contained package.
In the tab "Detailed Descriptions" you can add a detailed description.
If you need a damage code for a package, you can insert them here.
SPPS Version 5.5 Page 74
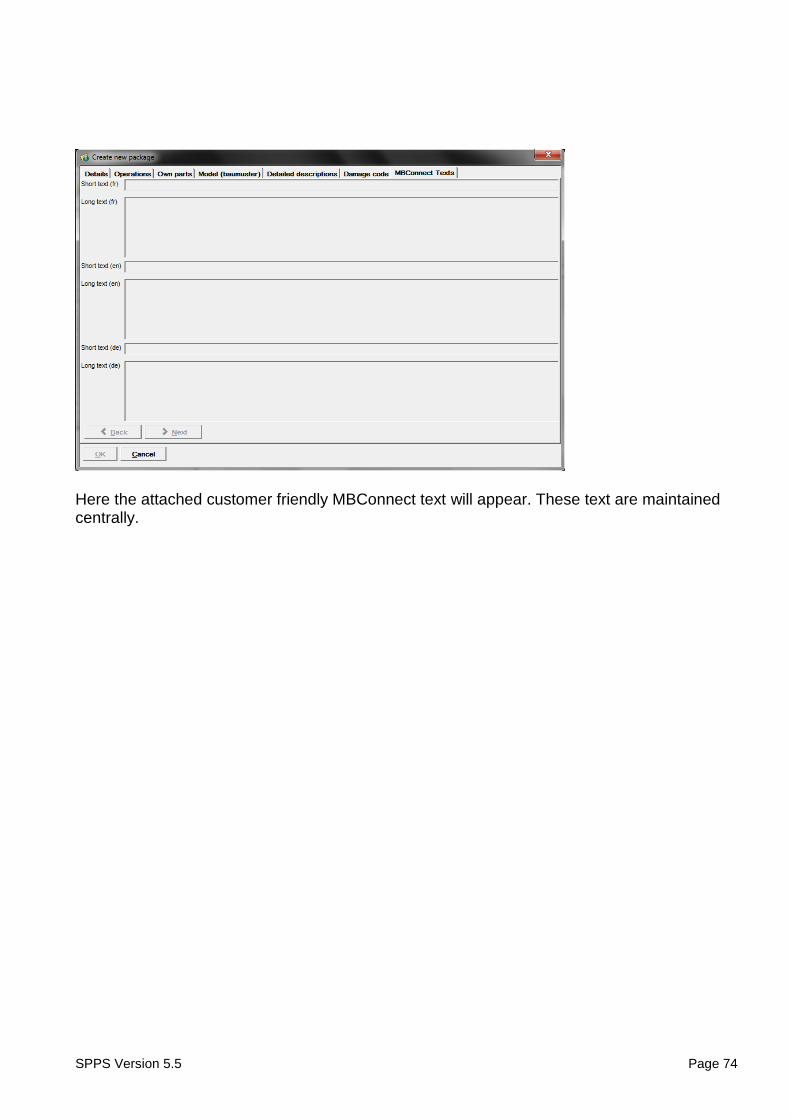
Here the attached customer friendly MBConnect text will appear. These text are maintained centrally.
SPPS Version 5.5 Page 75
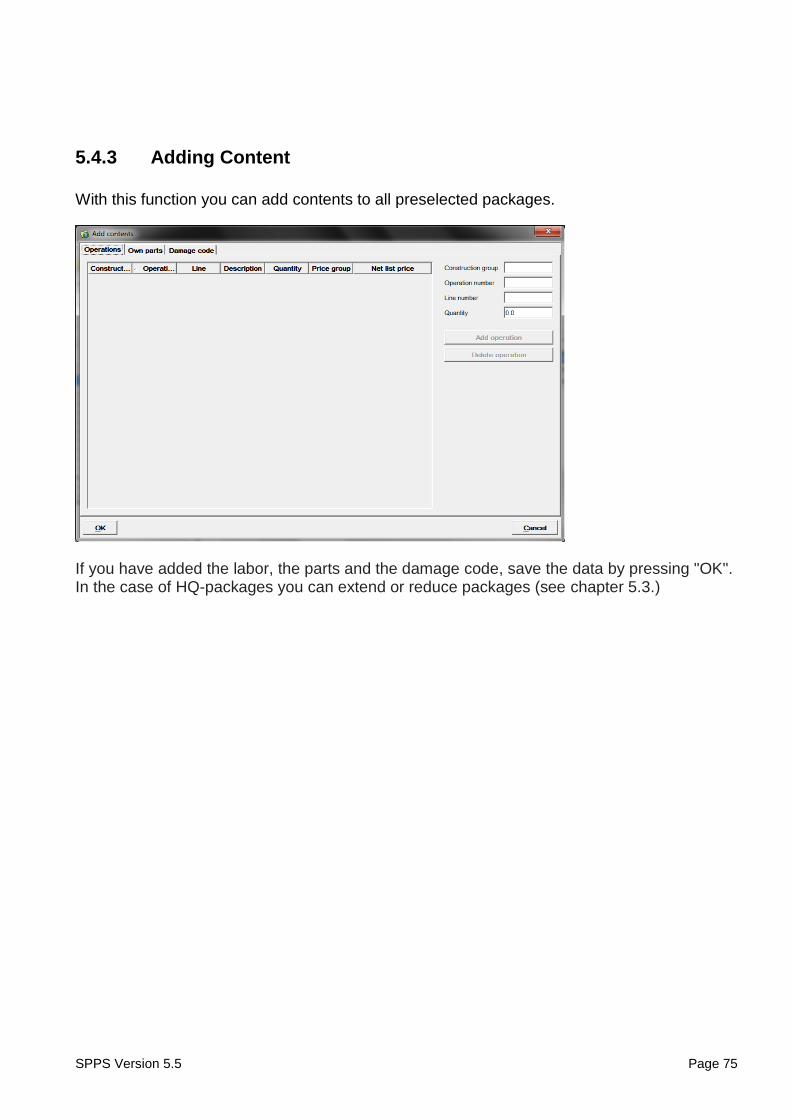
5.4.3 Adding Content
With this function you can add contents to all preselected packages.
If you have added the labor, the parts and the damage code, save the data by pressing "OK". In the case of HQ-packages you can extend or reduce packages (see chapter 5.3.)
SPPS Version 5.5 Page 76
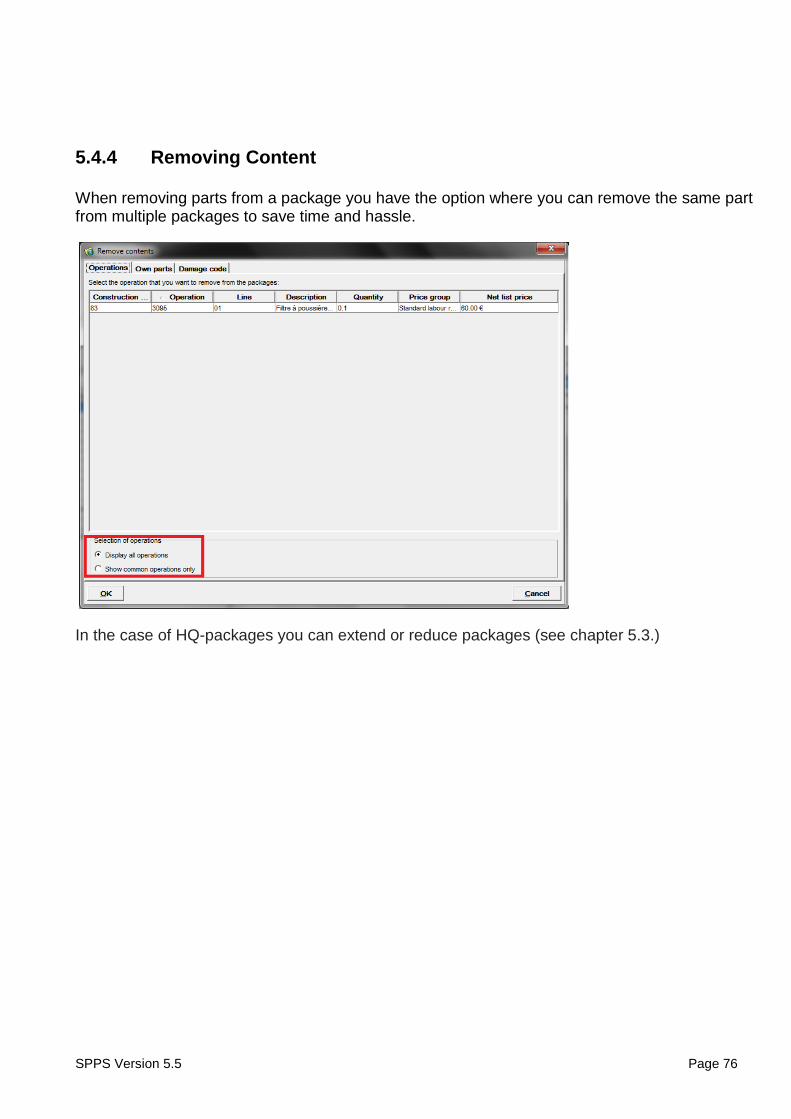
5.4.4 Removing Content
When removing parts from a package you have the option where you can remove the same part from multiple packages to save time and hassle.
In the case of HQ-packages you can extend or reduce packages (see chapter 5.3.)
SPPS Version 5.5 Page 77
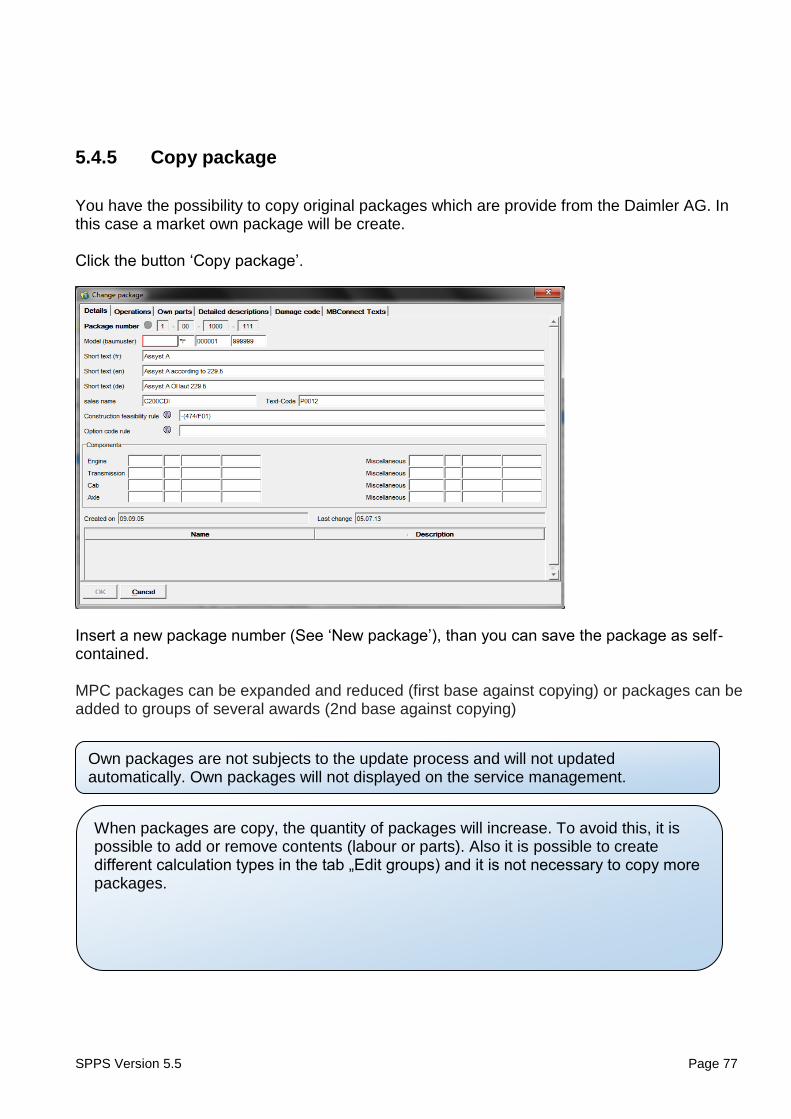
Own packages are not subjects to the update process and will not updated automatically. Own packages will not displayed on the service management.
When packages are copy, the quantity of packages will increase. To avoid this, it is possible to add or remove contents (labour or parts). Also it is possible to create different calculation types in the tab „Edit groups) and it is not necessary to copy more packages.
5.4.5 Copy package
You have the possibility to copy original packages which are provide from the Daimler AG. In this case a market own package will be create. Click the button ‘Copy package’.
Insert a new package number (See ‘New package’), than you can save the package as self-contained. MPC packages can be expanded and reduced (first base against copying) or packages can be added to groups of several awards (2nd base against copying)
SPPS Version 5.5 Page 78
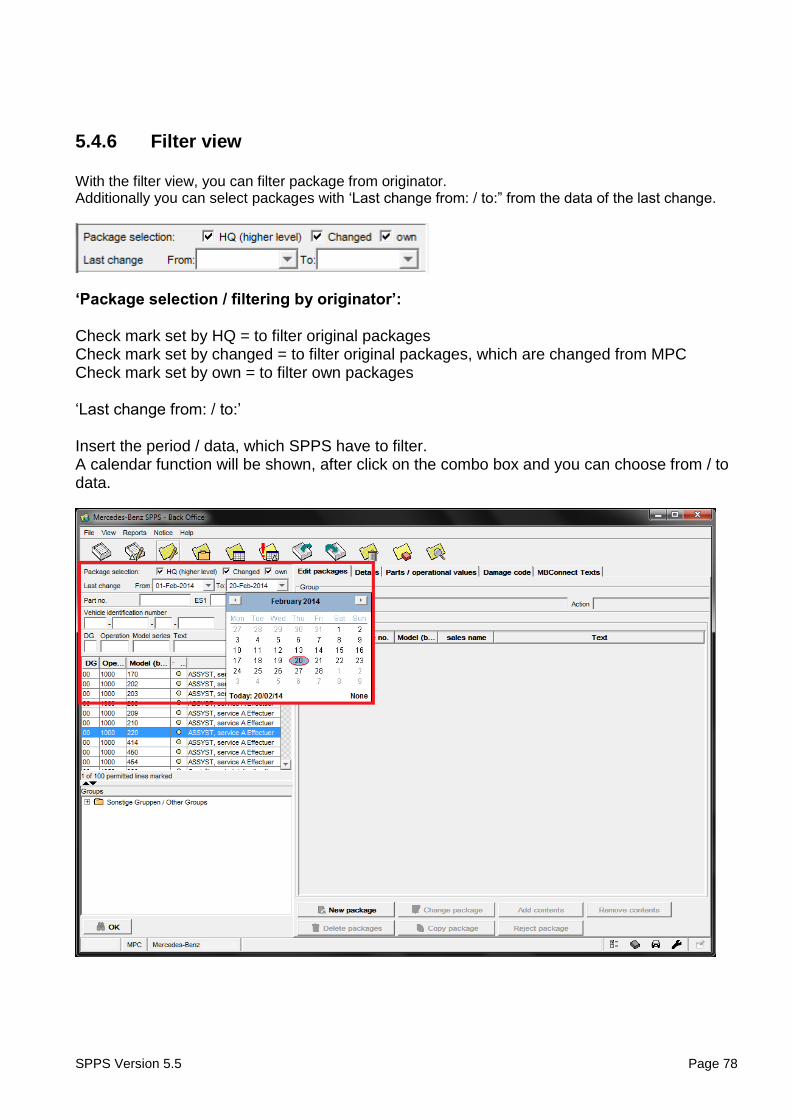
5.4.6 Filter view With the filter view, you can filter package from originator. Additionally you can select packages with ‘Last change from: / to:” from the data of the last change.
‘Package selection / filtering by originator’: Check mark set by HQ = to filter original packages Check mark set by changed = to filter original packages, which are changed from MPC Check mark set by own = to filter own packages ‘Last change from: / to:’ Insert the period / data, which SPPS have to filter. A calendar function will be shown, after click on the combo box and you can choose from / to data.
SPPS Version 5.5 Page 79
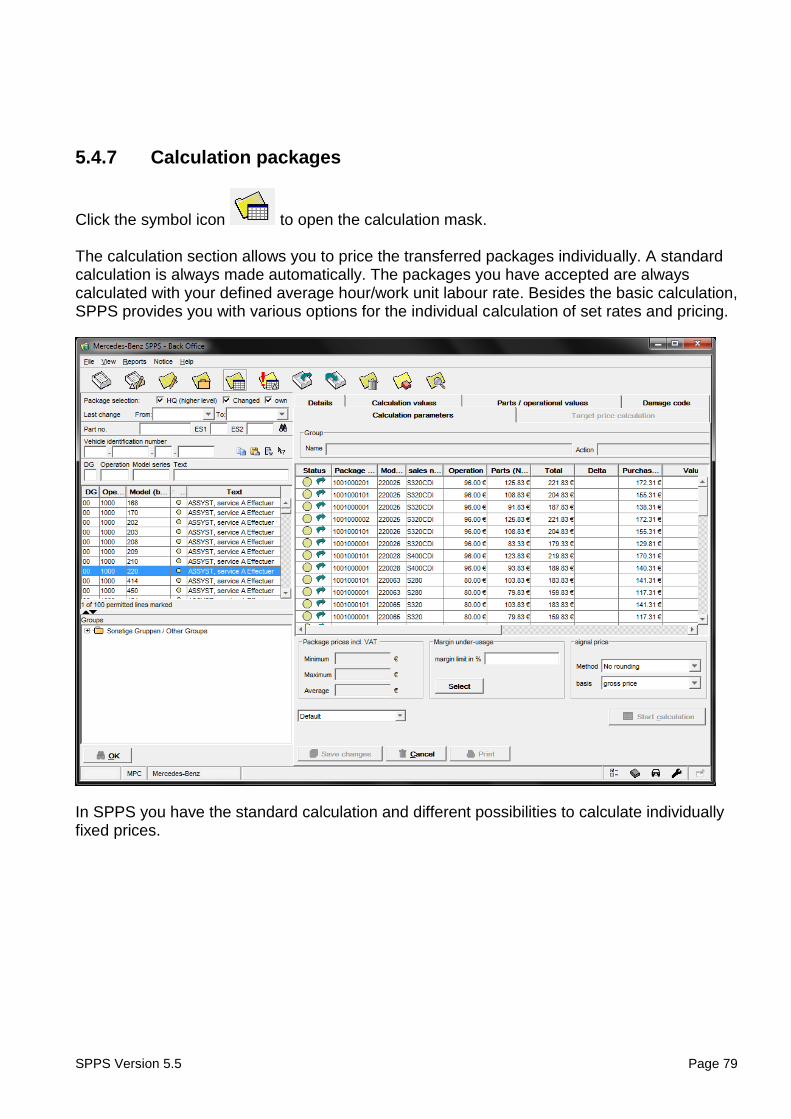
5.4.7 Calculation packages
Click the symbol icon to open the calculation mask. The calculation section allows you to price the transferred packages individually. A standard calculation is always made automatically. The packages you have accepted are always calculated with your defined average hour/work unit labour rate. Besides the basic calculation, SPPS provides you with various options for the individual calculation of set rates and pricing.
In SPPS you have the standard calculation and different possibilities to calculate individually fixed prices.

SPPS Version 5.5 Page 80
5.4.8 Target Price Calculation
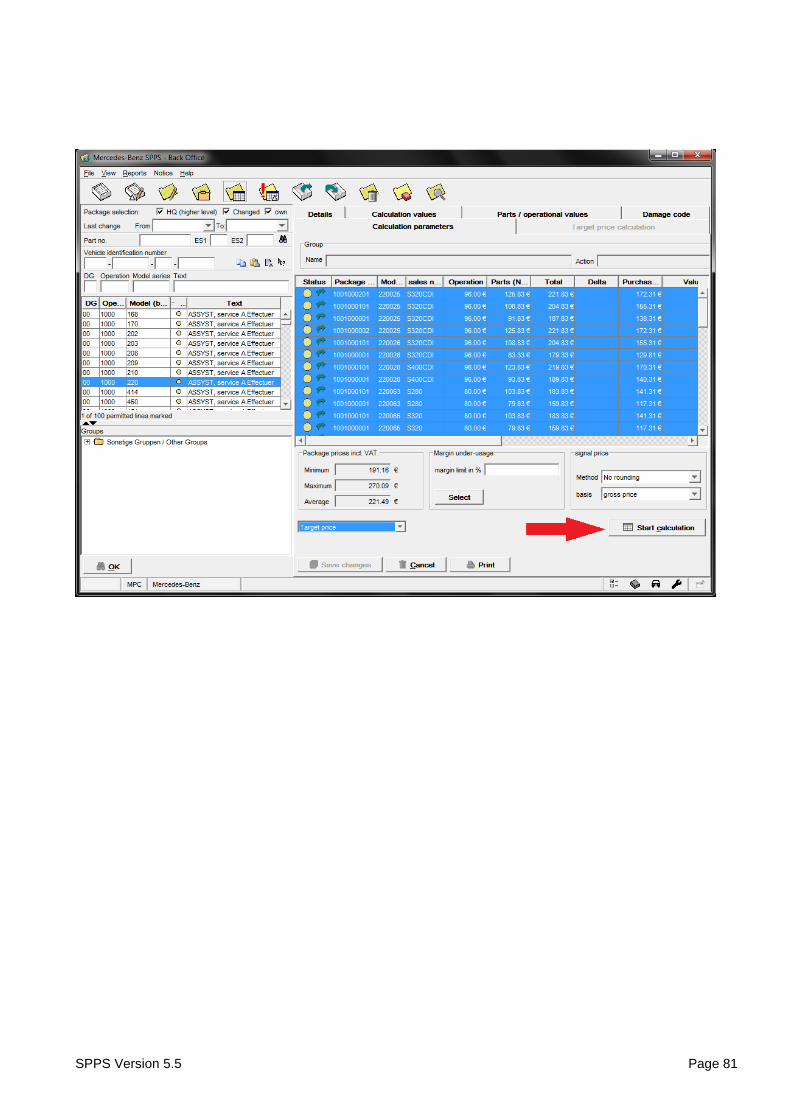
The aim of the target price calculation is to allow you to calculate multiple packages with a target price which you define in a quick and uncomplicated manner. To carry out this kind of calculation, click first on the menu icon ‘Calculation” and then select the desired packages. Then click on the ‘OK” button. The basic package calculations now appear on the right half of the screen. At this point, you are able to select either individual packages by clicking on the respective lines or all packages by using the right-hand mouse button's context menu.
SPPS Version 5.5 Page 81
SPPS Version 5.5 Page 82
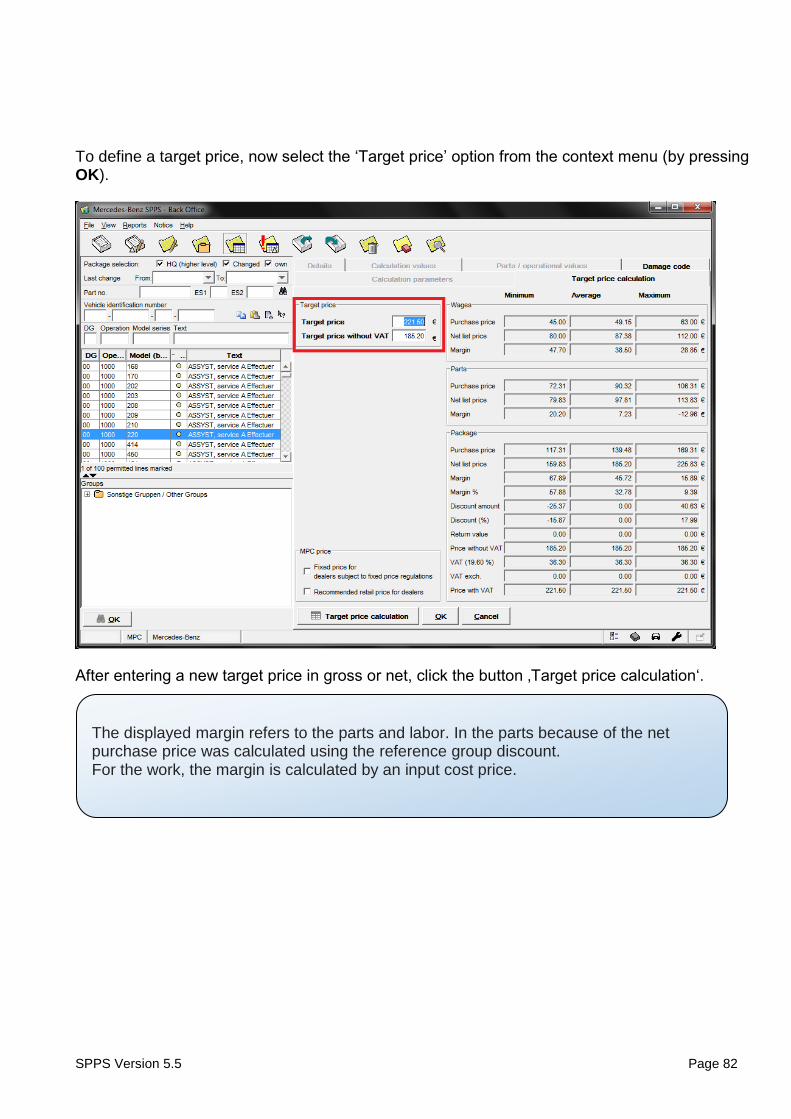
The displayed margin refers to the parts and labor. In the parts because of the net purchase price was calculated using the reference group discount. For the work, the margin is calculated by an input cost price.
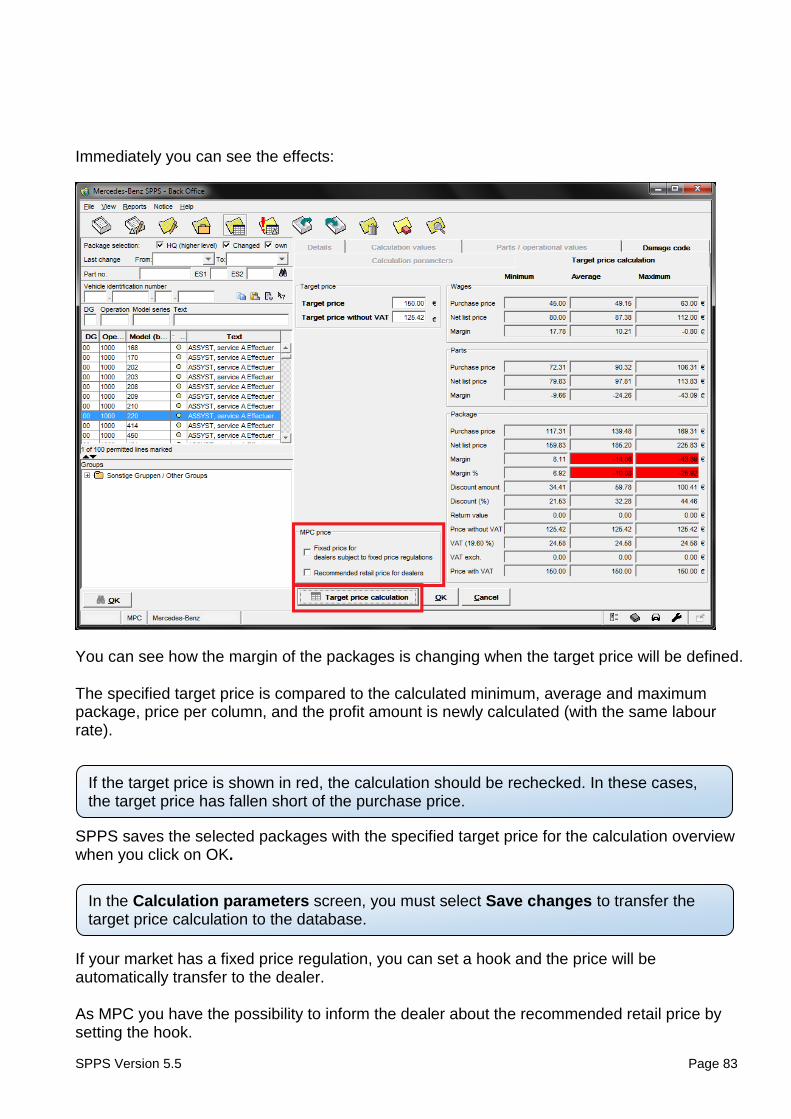
To define a target price, now select the ‘Target price’ option from the context menu (by pressing OK).
After entering a new target price in gross or net, click the button ‚Target price calculation‘.
SPPS Version 5.5 Page 83
If the target price is shown in red, the calculation should be rechecked. In these cases, the target price has fallen short of the purchase price.
In the Calculation parameters screen, you must select Save changes to transfer the target price calculation to the database.
Immediately you can see the effects:
You can see how the margin of the packages is changing when the target price will be defined.
The specified target price is compared to the calculated minimum, average and maximum package, price per column, and the profit amount is newly calculated (with the same labour rate).
SPPS saves the selected packages with the specified target price for the calculation overview when you click on OK.
If your market has a fixed price regulation, you can set a hook and the price will be automatically transfer to the dealer. As MPC you have the possibility to inform the dealer about the recommended retail price by setting the hook.
SPPS Version 5.5 Page 84
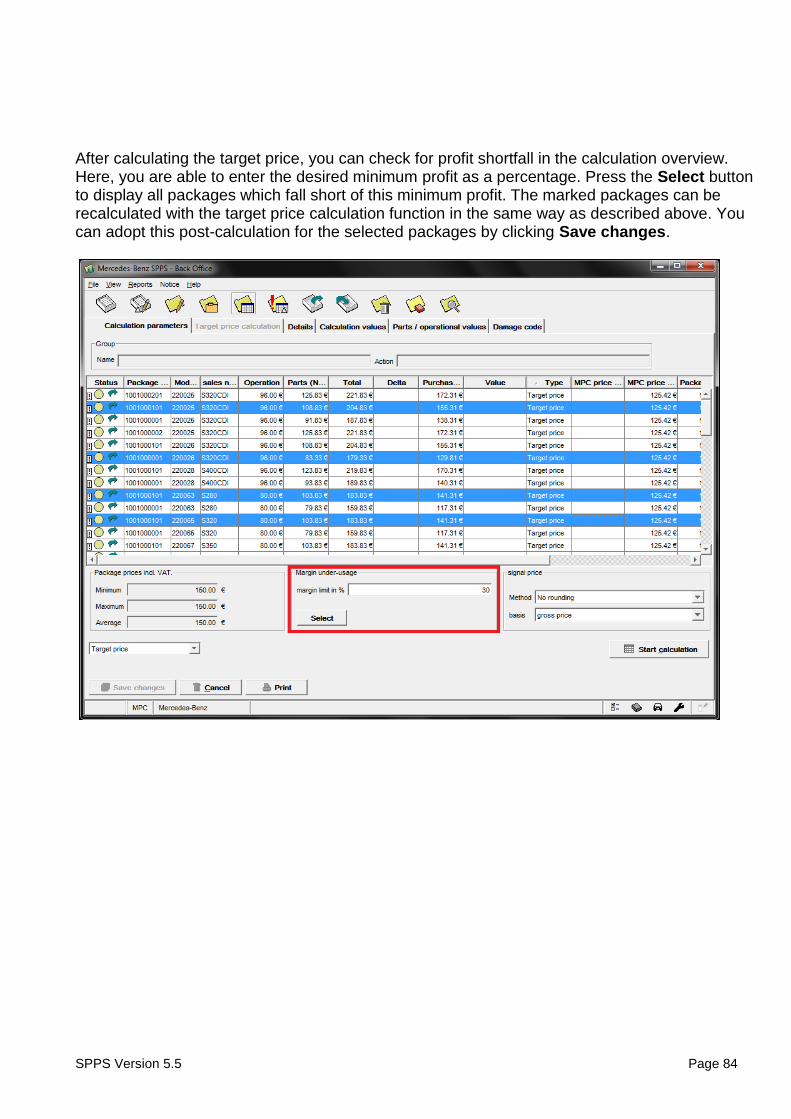
After calculating the target price, you can check for profit shortfall in the calculation overview. Here, you are able to enter the desired minimum profit as a percentage. Press the Select button to display all packages which fall short of this minimum profit. The marked packages can be recalculated with the target price calculation function in the same way as described above. You can adopt this post-calculation for the selected packages by clicking Save changes.

SPPS Version 5.5 Page 85
5.4.9 Discount Calculation
If you would like to calculate packages with a fixed (absolute) discount amount, mark the desired packages and then select ‘Discount’ from the context menu.
Now a previously hidden window opens and you can enter the discount amount.
Press the Start calculation button to recalculate the packages. You will see the new prices in the package window.
You can see the discount amount in the Value column and the selected calculation type in the Type column.
SPPS Version 5.5 Page 86
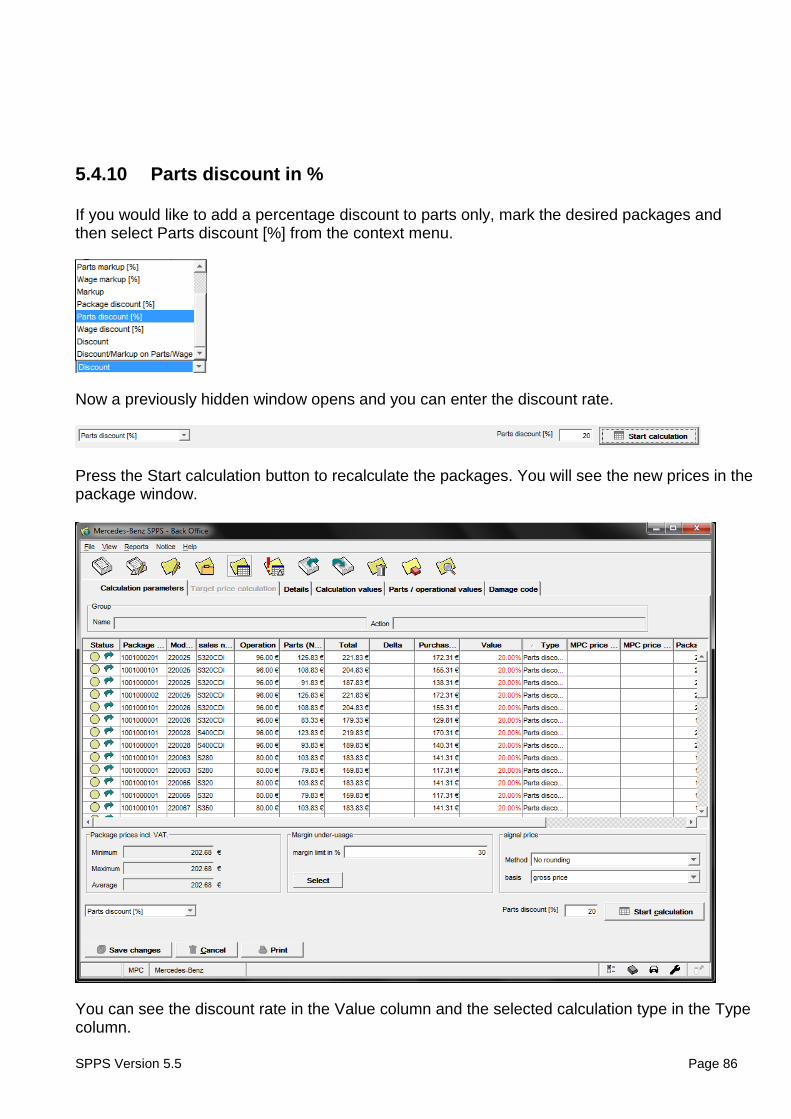
5.4.10 Parts discount in %
If you would like to add a percentage discount to parts only, mark the desired packages and then select Parts discount [%] from the context menu.
Now a previously hidden window opens and you can enter the discount rate.
Press the Start calculation button to recalculate the packages. You will see the new prices in the package window.
You can see the discount rate in the Value column and the selected calculation type in the Type column.
SPPS Version 5.5 Page 87
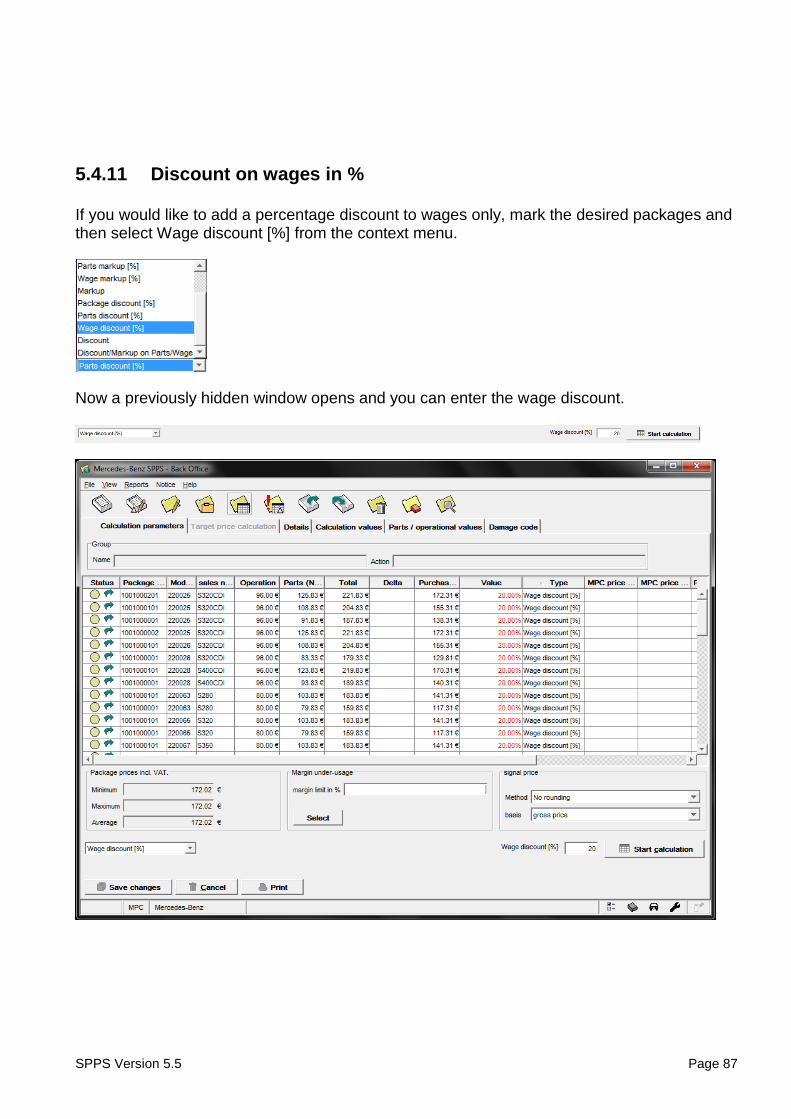
5.4.11 Discount on wages in %
If you would like to add a percentage discount to wages only, mark the desired packages and then select Wage discount [%] from the context menu.
Now a previously hidden window opens and you can enter the wage discount.
SPPS Version 5.5 Page 88
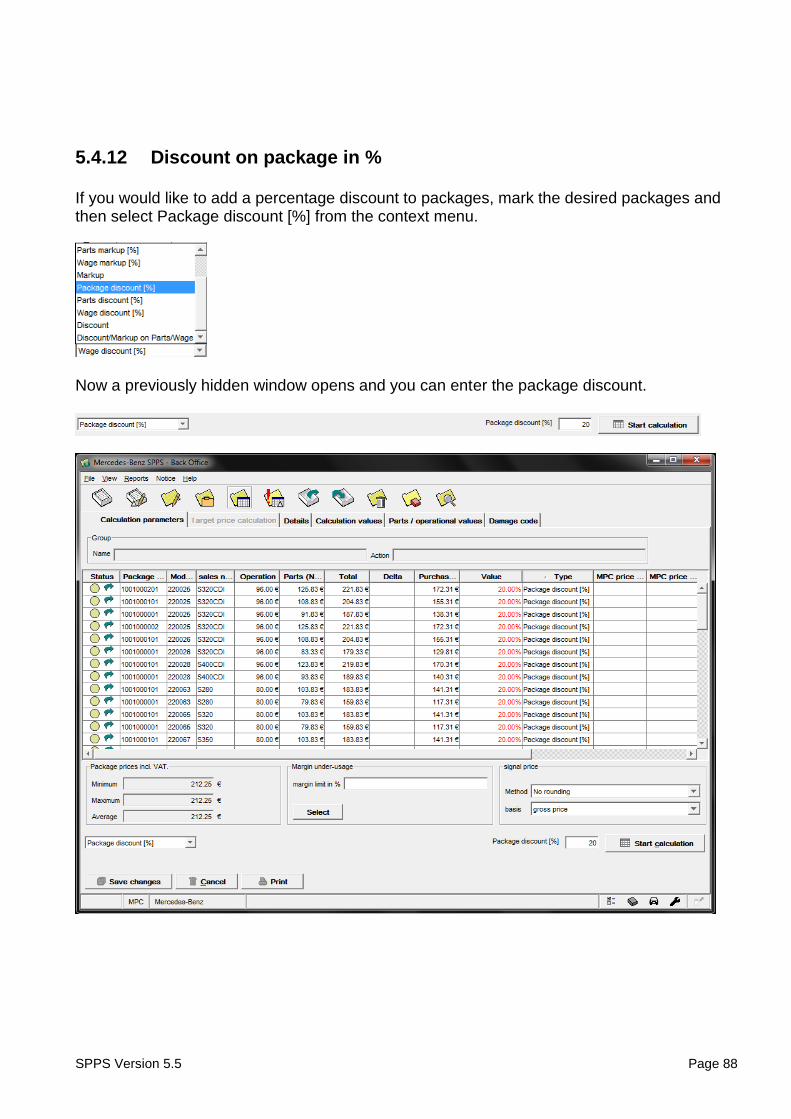
5.4.12 Discount on package in %
If you would like to add a percentage discount to packages, mark the desired packages and then select Package discount [%] from the context menu.
Now a previously hidden window opens and you can enter the package discount.
SPPS Version 5.5 Page 89
The margin is calculated from the reference discounts stored for the respective parts, this is why the value of the margin deviates from that of the markup.
5.4.13 Markup calculation
Here is an example of a surcharge calculation:
Surcharge calculation
Wages + parts (GLP)
= subtotal (net) - Discount according to DC reference discount groups
= Purchase price + Markup desired
= Total price (net)
When calculating a markup, the markup is only applied to the sum total of labour cost plus the net purchase price for the parts. This markup must not be confused with the margin. It is used to define the margin which is to be achieved. Example for markup / margin: Markup 10 % = Margin 9.09 % Markup 20 % = Margin 16.67 % Markup 30 % = Margin 23.08 %
SPPS Version 5.5 Page 90
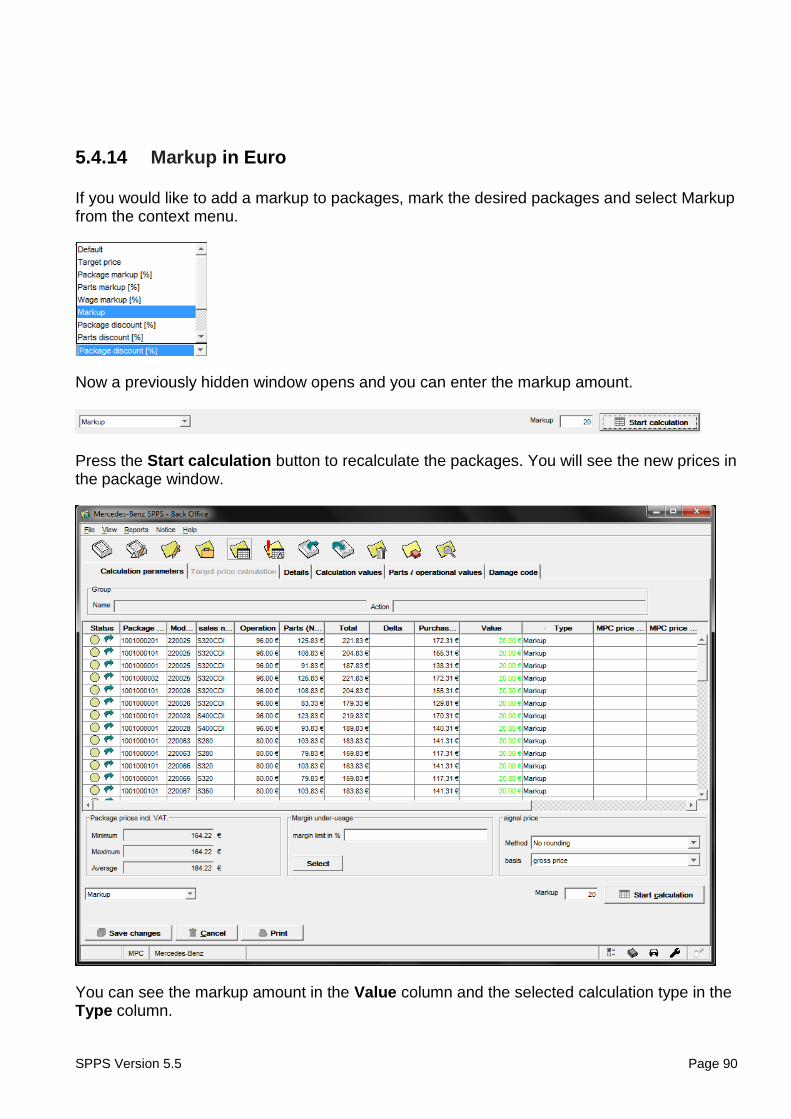
5.4.14 Markup in Euro
If you would like to add a markup to packages, mark the desired packages and select Markup from the context menu.
Now a previously hidden window opens and you can enter the markup amount.
Press the Start calculation button to recalculate the packages. You will see the new prices in the package window.
You can see the markup amount in the Value column and the selected calculation type in the Type column.
SPPS Version 5.5 Page 91
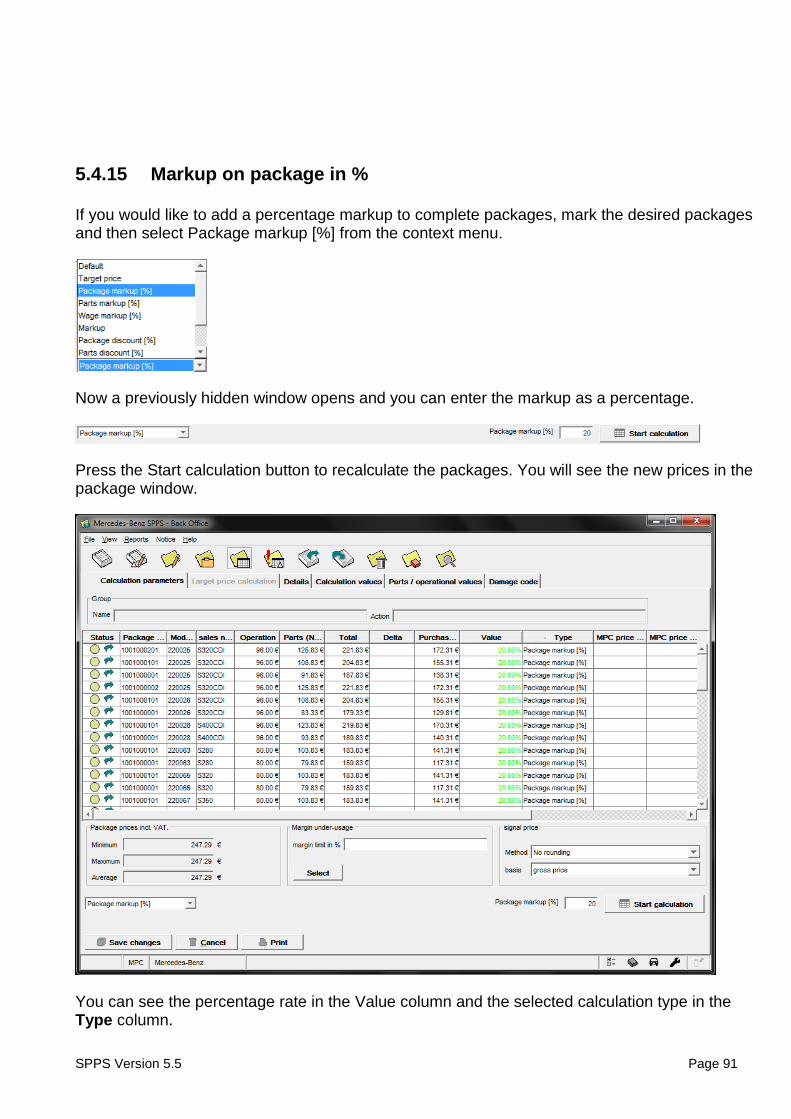
5.4.15 Markup on package in %
If you would like to add a percentage markup to complete packages, mark the desired packages and then select Package markup [%] from the context menu.
Now a previously hidden window opens and you can enter the markup as a percentage.
Press the Start calculation button to recalculate the packages. You will see the new prices in the
package window.
You can see the percentage rate in the Value column and the selected calculation type in the Type column.

SPPS Version 5.5 Page 92
5.4.16 Markup on parts in %
If you would like to add a percentage markup to parts only, mark the desired packages and then select Parts markup [%] from the context menu.
Now a previously hidden window opens and you can enter the markup as a percentage.
Press the Start calculation button to recalculate the packages. You will see the new prices in the
package window.
You can see the percentage rate in the Value column and the selected calculation type in the Type column.
SPPS Version 5.5 Page 93
Calculation: Package net list price, new = parts purchase price + ((X% * parts purchase price)) + net list price wages.
SPPS Version 5.5 Page 94
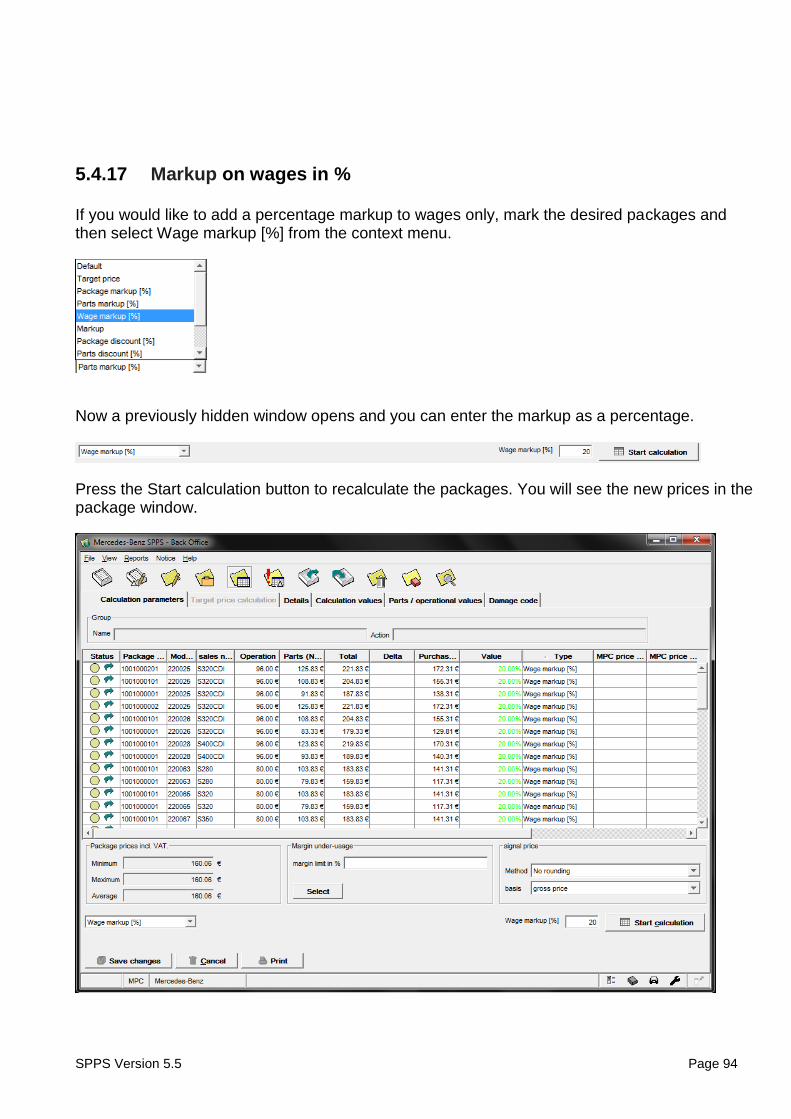
5.4.17 Markup on wages in %
If you would like to add a percentage markup to wages only, mark the desired packages and then select Wage markup [%] from the context menu.
Now a previously hidden window opens and you can enter the markup as a percentage.
Press the Start calculation button to recalculate the packages. You will see the new prices in the package window.
SPPS Version 5.5 Page 95
You can see the percentage rate in the Value column and the selected calculation type in the Type column.
Calculation: Package net list price new = Parts Net list price + (Purchase price wages + (X% * purchase price wages)).
SPPS Version 5.5 Page 96
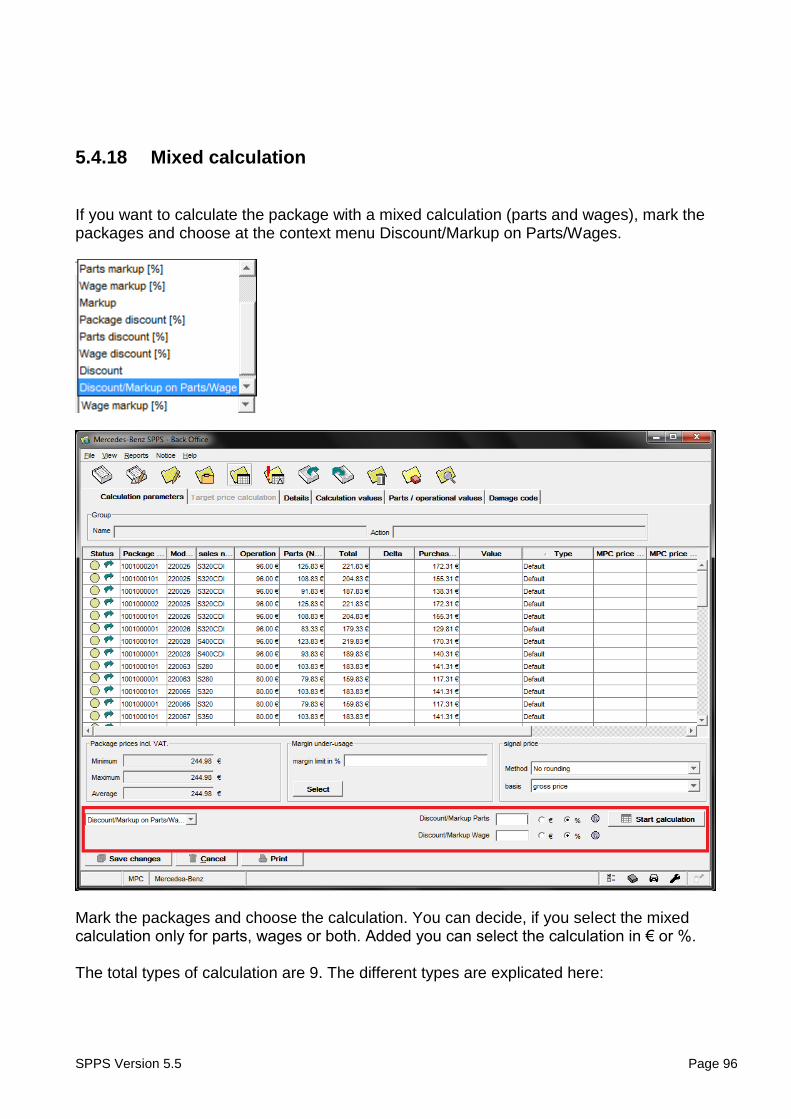
5.4.18 Mixed calculation
If you want to calculate the package with a mixed calculation (parts and wages), mark the packages and choose at the context menu Discount/Markup on Parts/Wages.
Mark the packages and choose the calculation. You can decide, if you select the mixed calculation only for parts, wages or both. Added you can select the calculation in € or %. The total types of calculation are 9. The different types are explicated here:
SPPS Version 5.5 Page 97
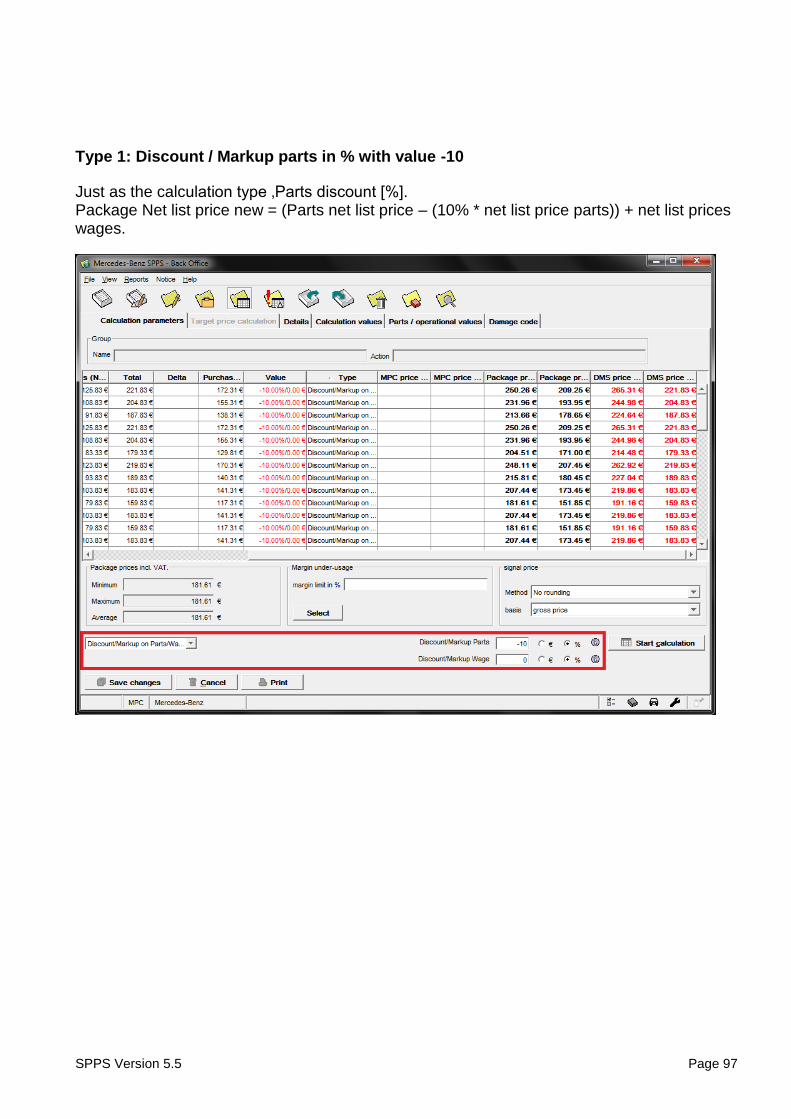
Type 1: Discount / Markup parts in % with value -10
Just as the calculation type ‚Parts discount [%]. Package Net list price new = (Parts net list price – (10% * net list price parts)) + net list prices wages.
SPPS Version 5.5 Page 98
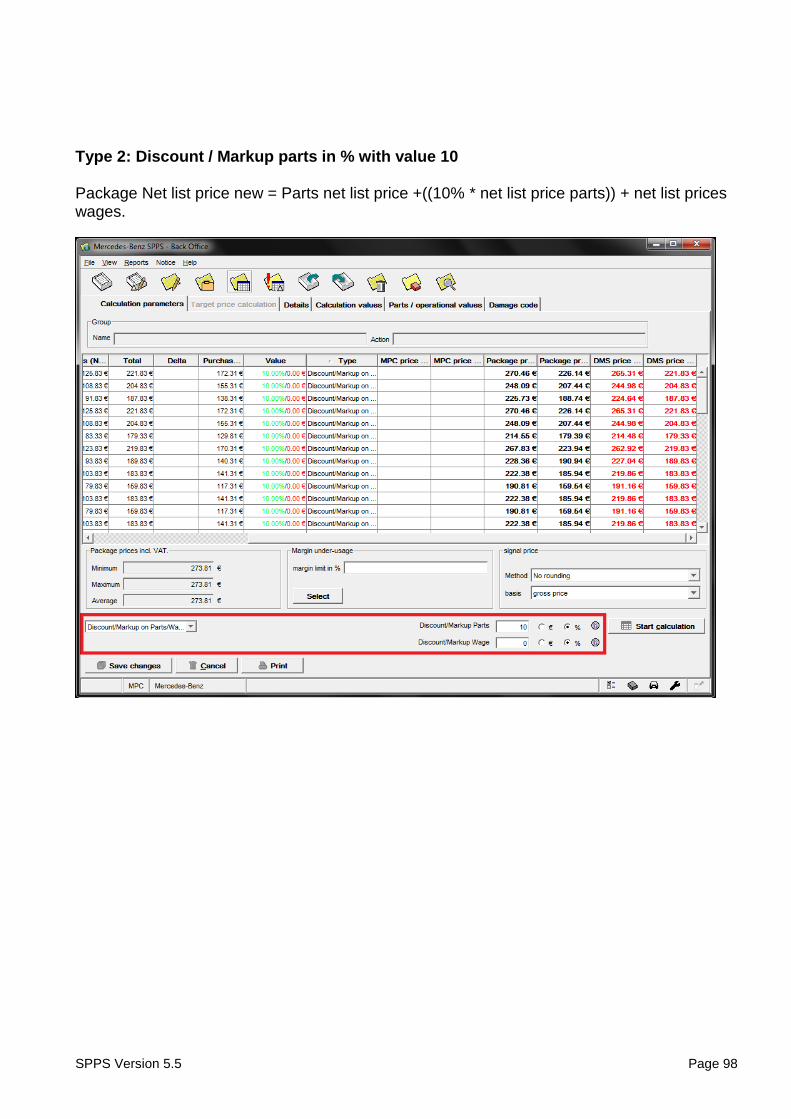
Type 2: Discount / Markup parts in % with value 10 Package Net list price new = Parts net list price +((10% * net list price parts)) + net list prices wages.
SPPS Version 5.5 Page 99
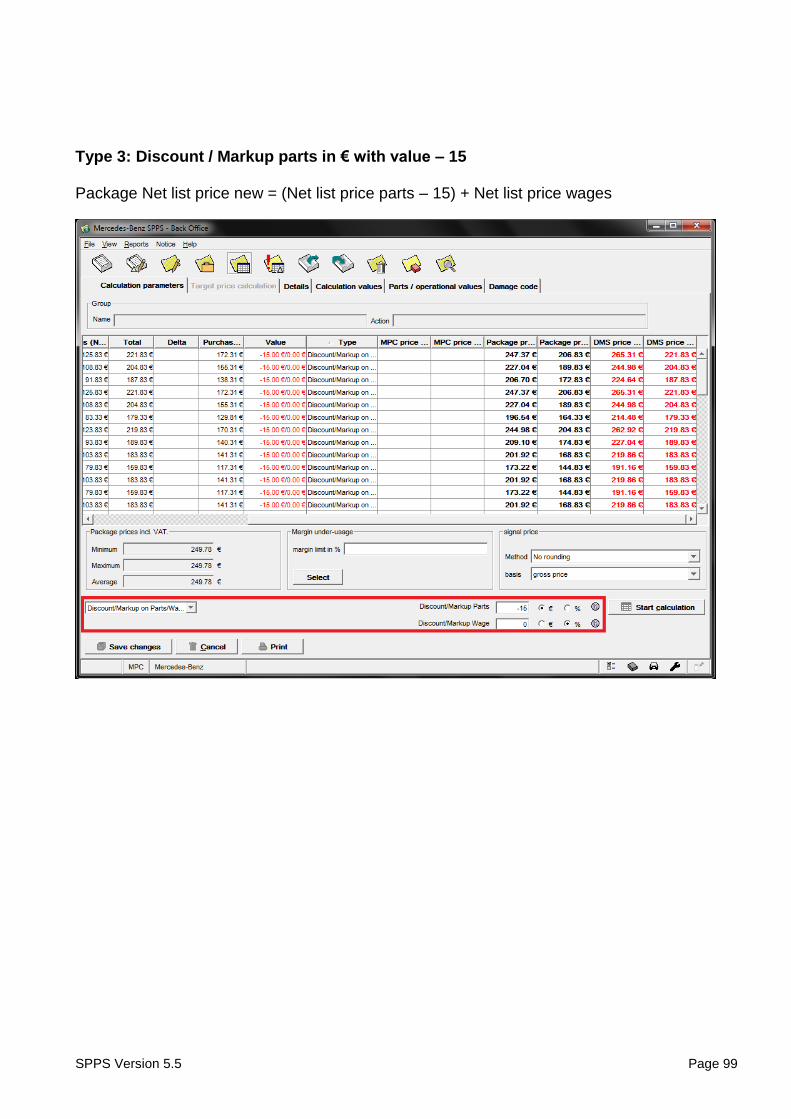
Type 3: Discount / Markup parts in € with value – 15 Package Net list price new = (Net list price parts – 15) + Net list price wages
SPPS Version 5.5 Page 100
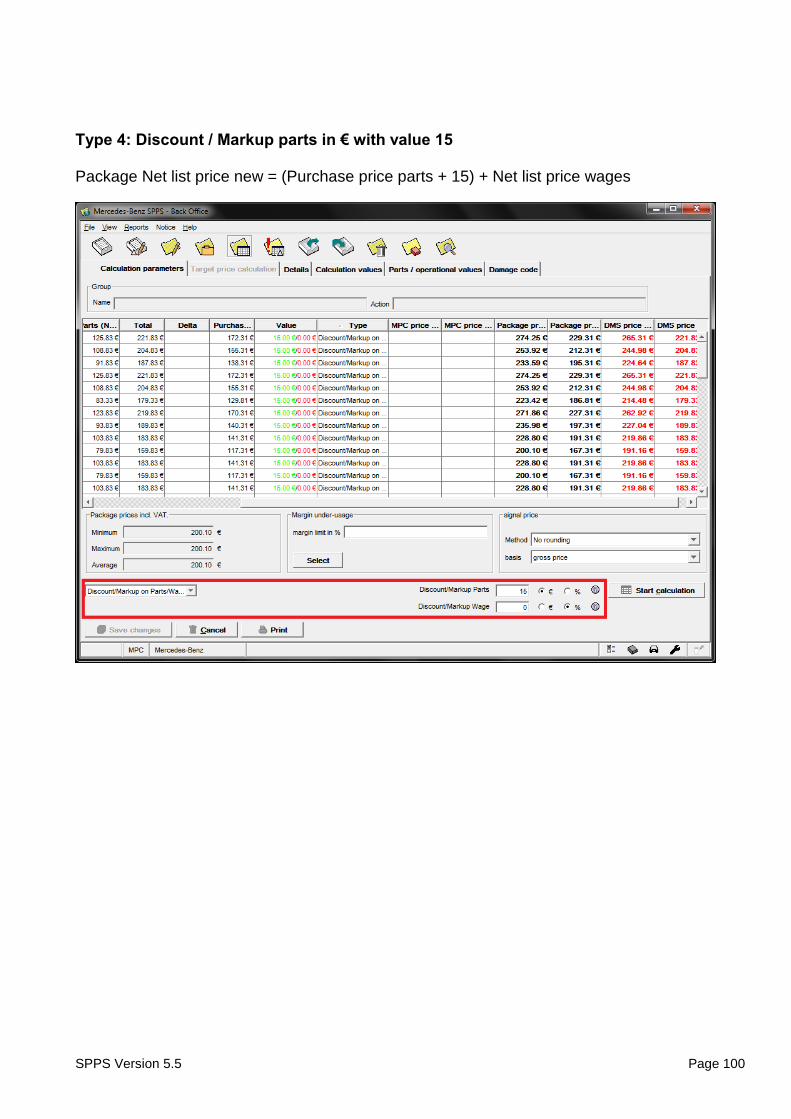
Type 4: Discount / Markup parts in € with value 15 Package Net list price new = (Purchase price parts + 15) + Net list price wages
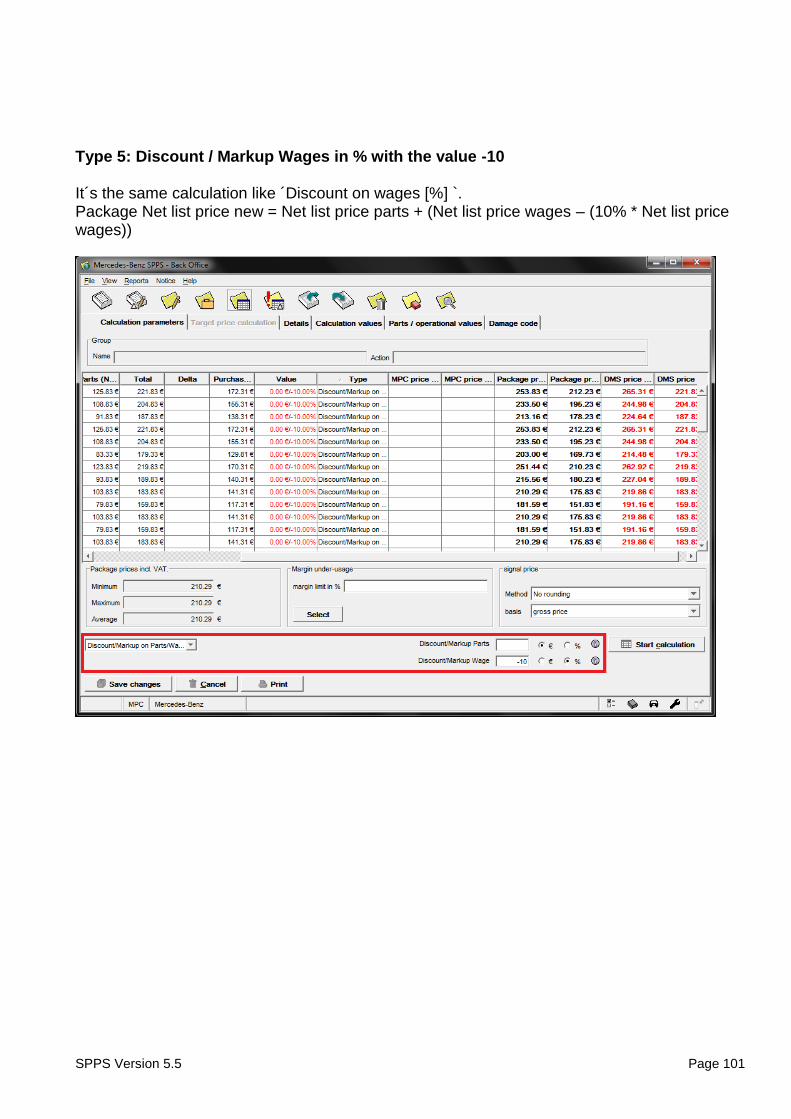
SPPS Version 5.5 Page 101
Type 5: Discount / Markup Wages in % with the value -10 It´s the same calculation like ´Discount on wages [%] `. Package Net list price new = Net list price parts + (Net list price wages – (10% * Net list price wages))
SPPS Version 5.5 Page 102
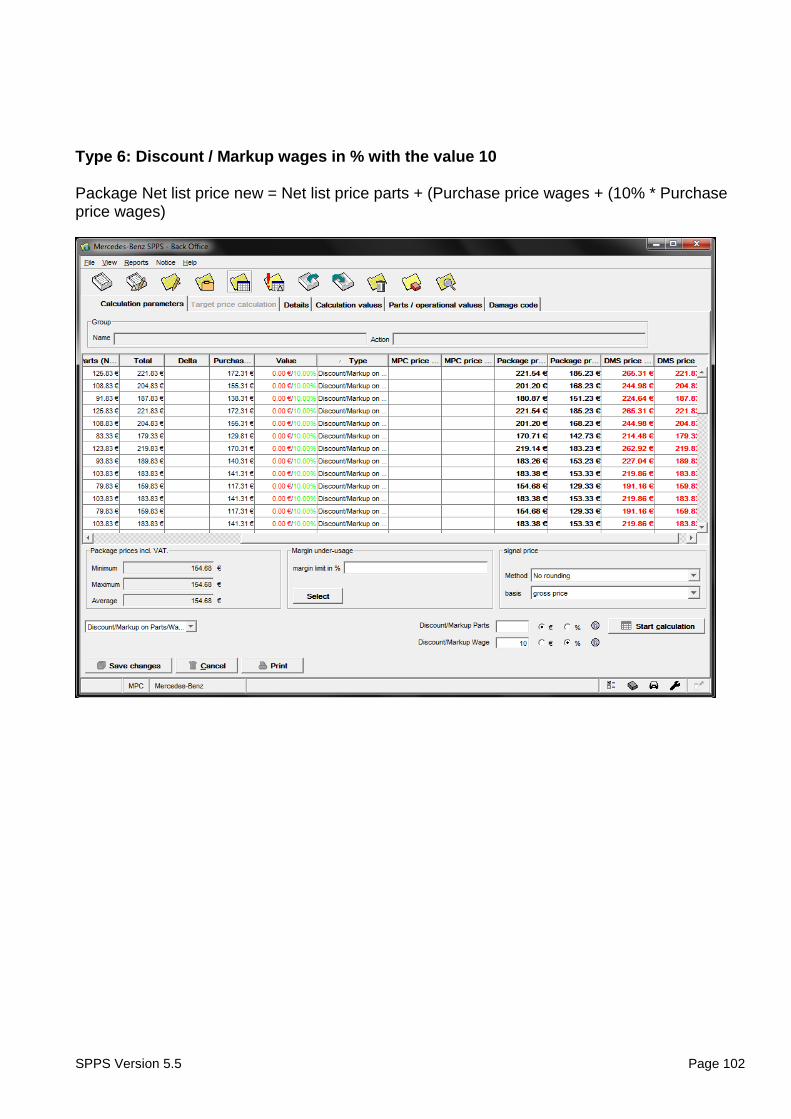
Type 6: Discount / Markup wages in % with the value 10 Package Net list price new = Net list price parts + (Purchase price wages + (10% * Purchase price wages)
SPPS Version 5.5 Page 103
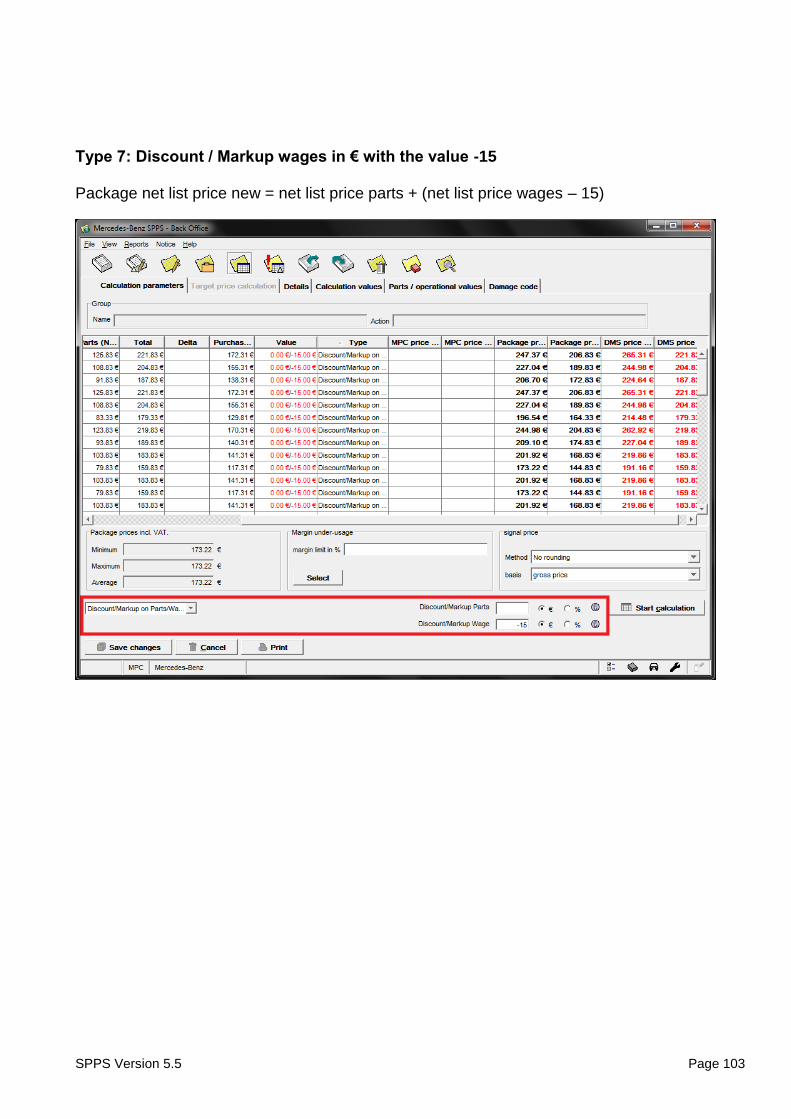
Type 7: Discount / Markup wages in € with the value -15 Package net list price new = net list price parts + (net list price wages – 15)
SPPS Version 5.5 Page 104
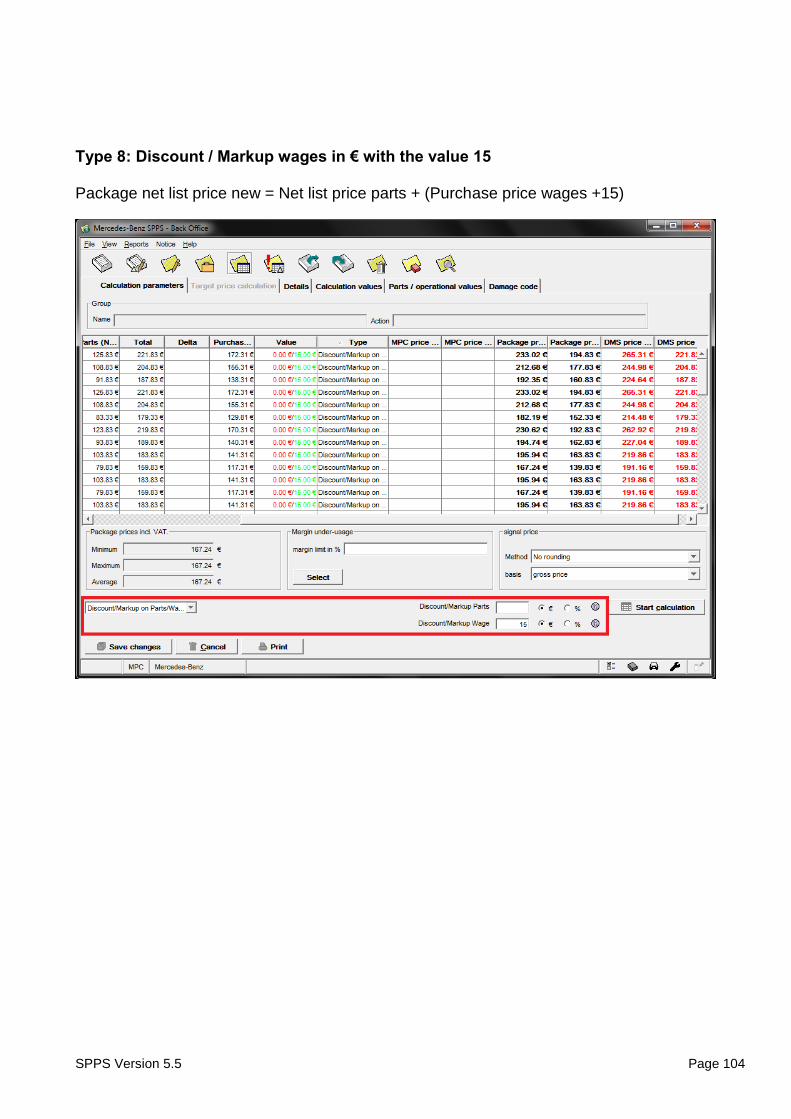
Type 8: Discount / Markup wages in € with the value 15 Package net list price new = Net list price parts + (Purchase price wages +15)
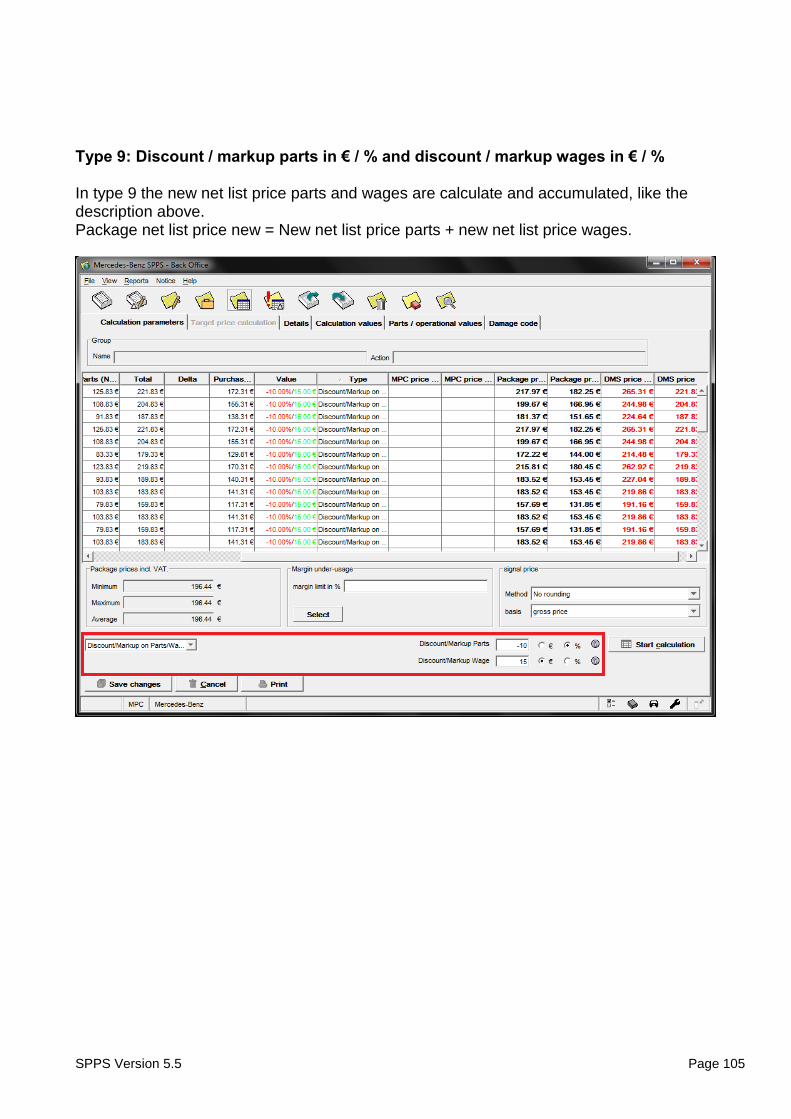
SPPS Version 5.5 Page 105
Type 9: Discount / markup parts in € / % and discount / markup wages in € / % In type 9 the new net list price parts and wages are calculate and accumulated, like the description above. Package net list price new = New net list price parts + new net list price wages.
SPPS Version 5.5 Page 106
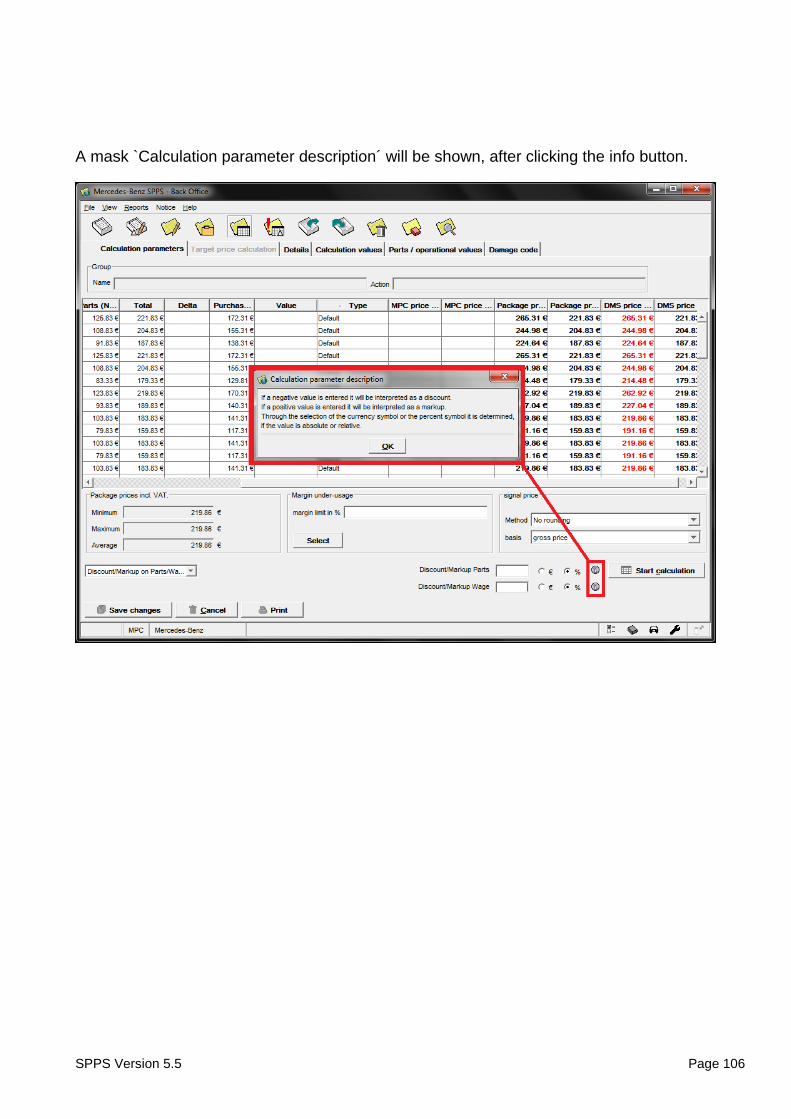
A mask `Calculation parameter description´ will be shown, after clicking the info button.
SPPS Version 5.5 Page 107
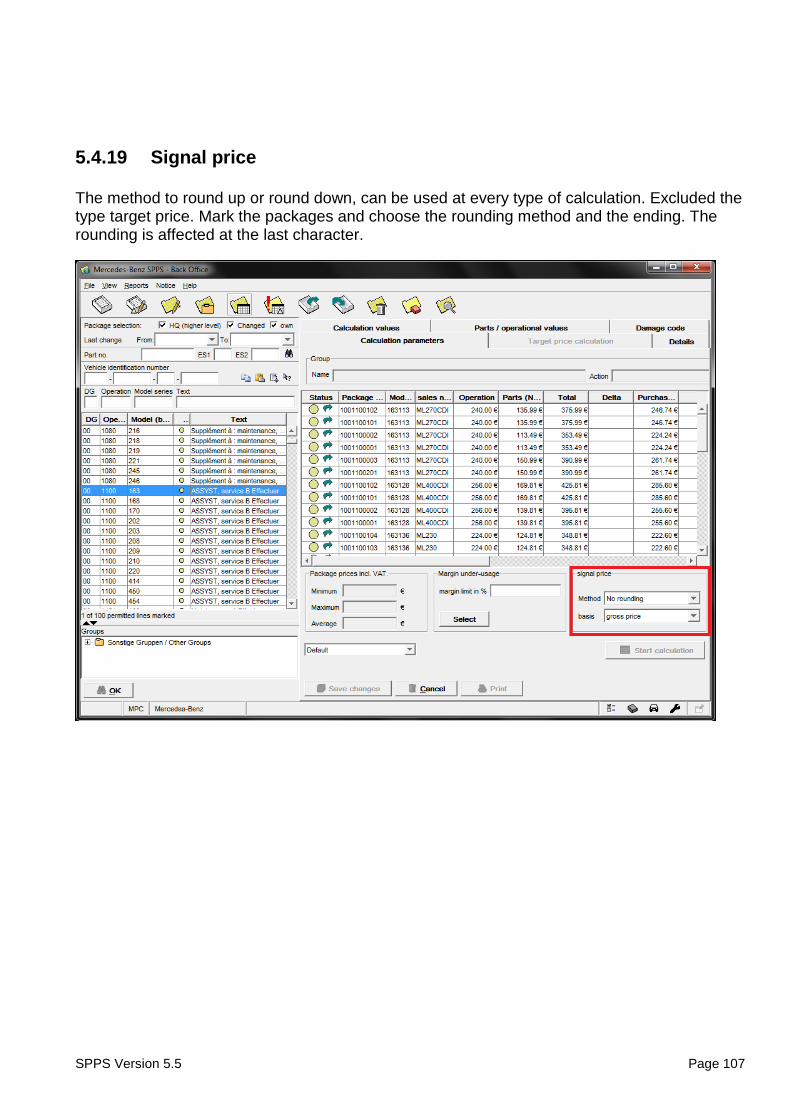
5.4.19 Signal price
The method to round up or round down, can be used at every type of calculation. Excluded the type target price. Mark the packages and choose the rounding method and the ending. The rounding is affected at the last character.
SPPS Version 5.5 Page 108
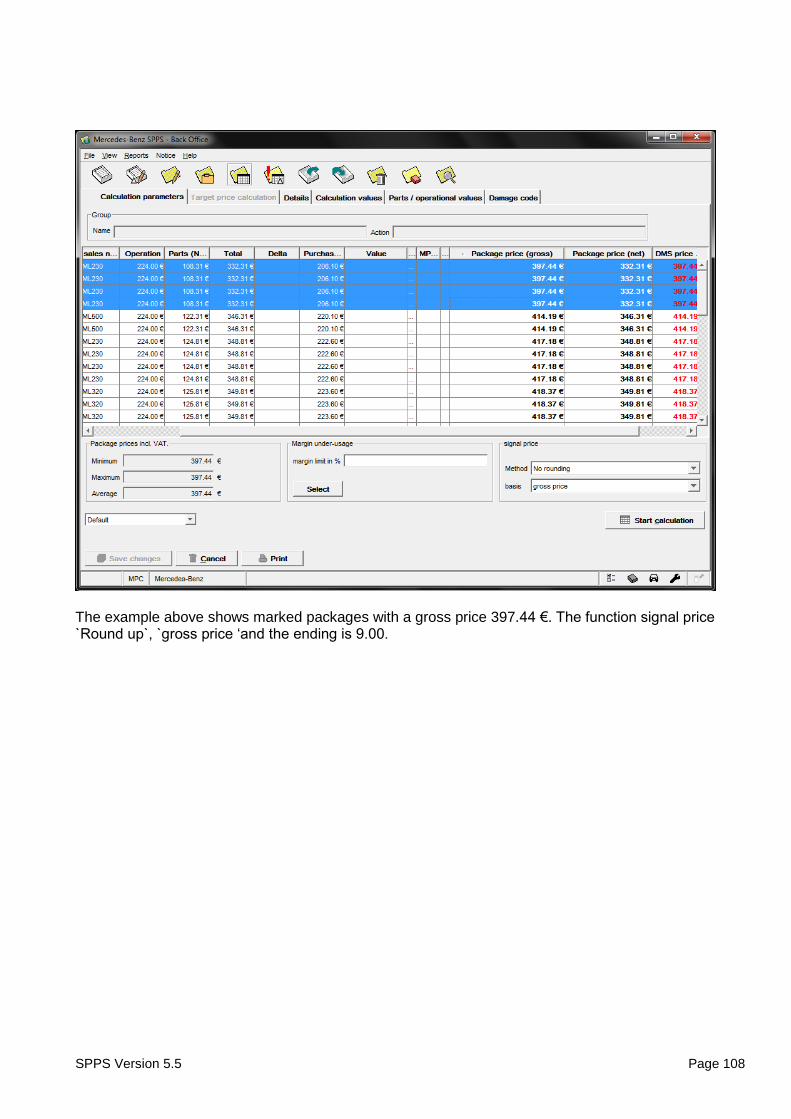
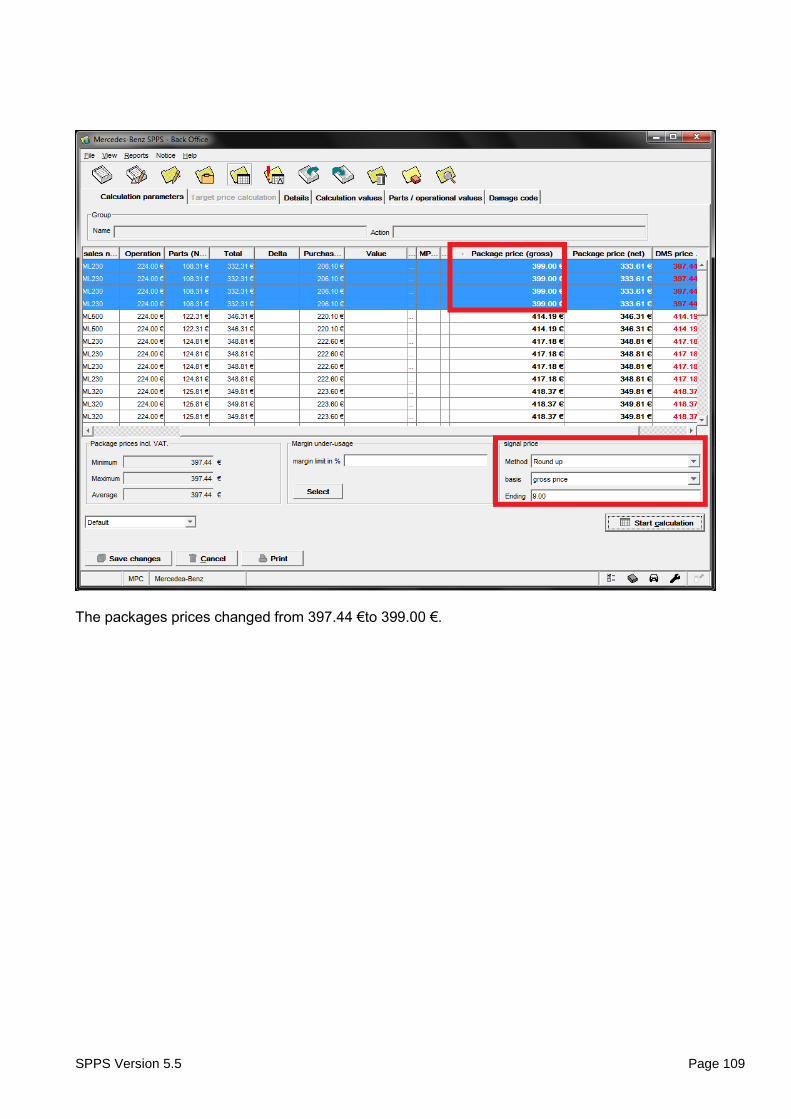
The example above shows marked packages with a gross price 397.44 €. The function signal price `Round up`, `gross price ‘and the ending is 9.00.
SPPS Version 5.5 Page 109
The packages prices changed from 397.44 €to 399.00 €.
SPPS Version 5.5 Page 110
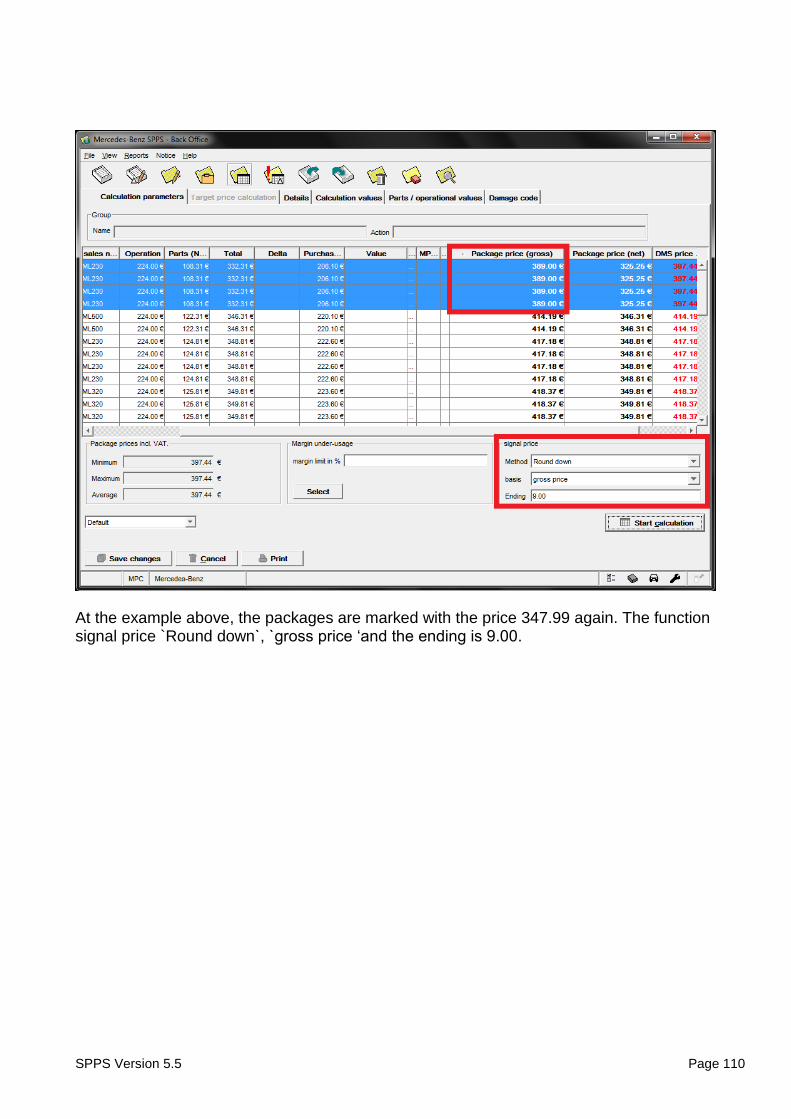
At the example above, the packages are marked with the price 347.99 again. The function signal price `Round down`, `gross price ‘and the ending is 9.00.
SPPS Version 5.5 Page 111
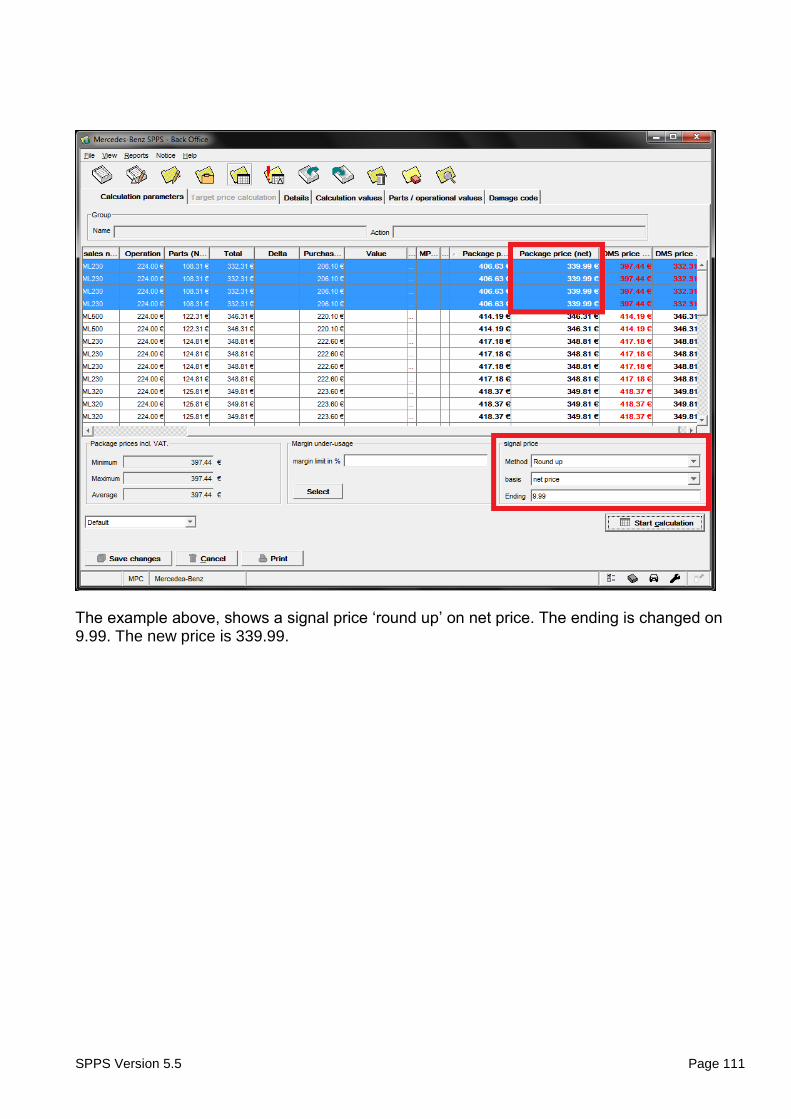
The example above, shows a signal price ‘round up’ on net price. The ending is changed on 9.99. The new price is 339.99.

SPPS Version 5.5 Page 112
The example above, shows a signal price ‘round down’ on net price. The ending is changed on 9.99. The new price is 329.99.
SPPS Version 5.5 Page 113
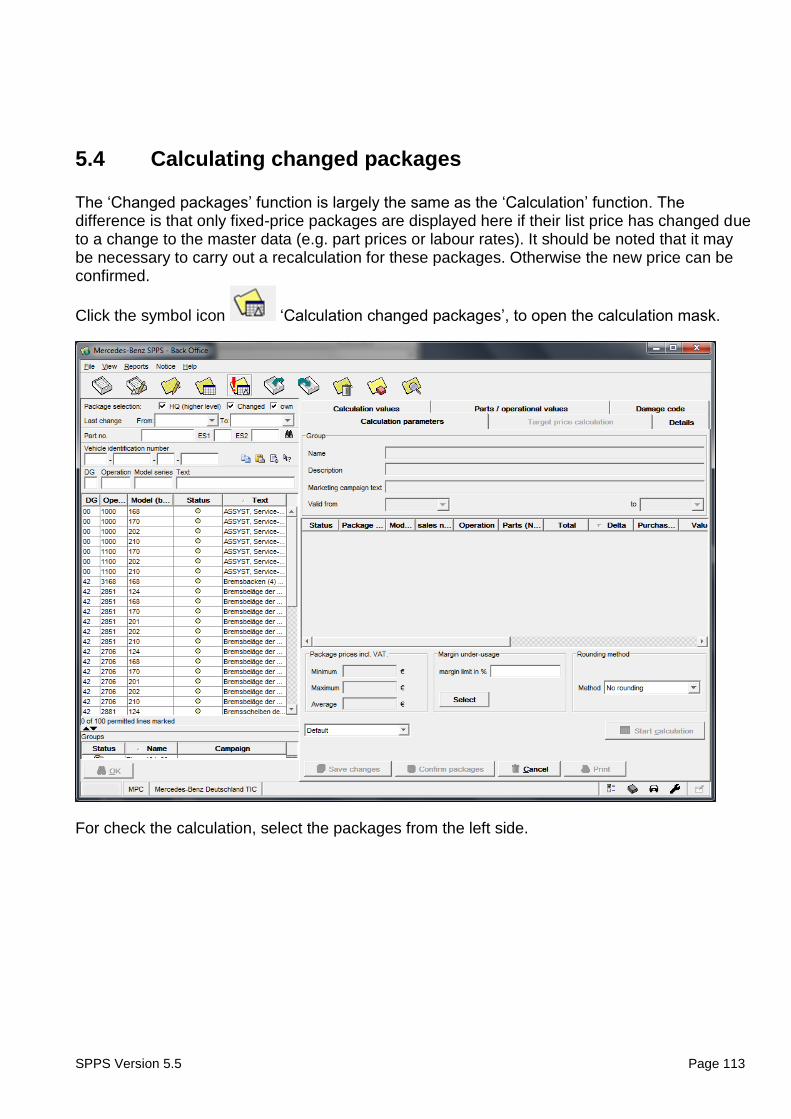
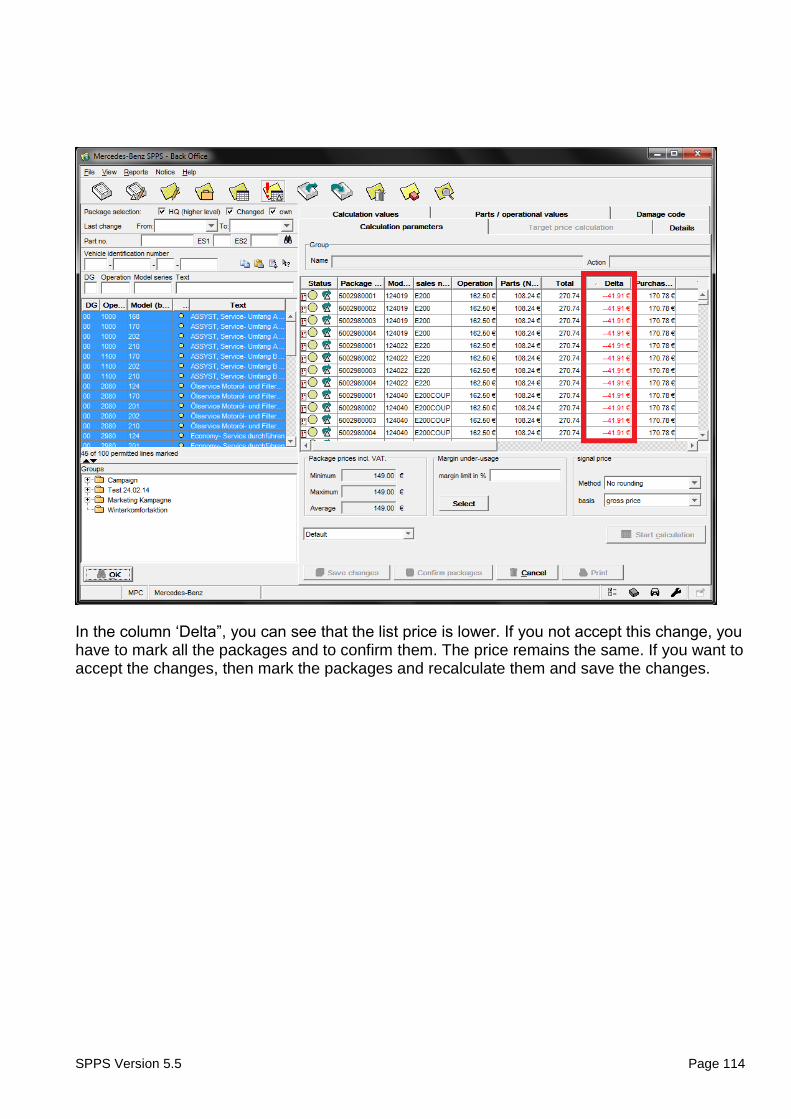
5.4 Calculating changed packages The ‘Changed packages’ function is largely the same as the ‘Calculation’ function. The difference is that only fixed-price packages are displayed here if their list price has changed due to a change to the master data (e.g. part prices or labour rates). It should be noted that it may be necessary to carry out a recalculation for these packages. Otherwise the new price can be confirmed.
Click the symbol icon ‘Calculation changed packages’, to open the calculation mask.
For check the calculation, select the packages from the left side.
SPPS Version 5.5 Page 114
In the column ‘Delta”, you can see that the list price is lower. If you not accept this change, you have to mark all the packages and to confirm them. The price remains the same. If you want to accept the changes, then mark the packages and recalculate them and save the changes.
SPPS Version 5.5 Page 115
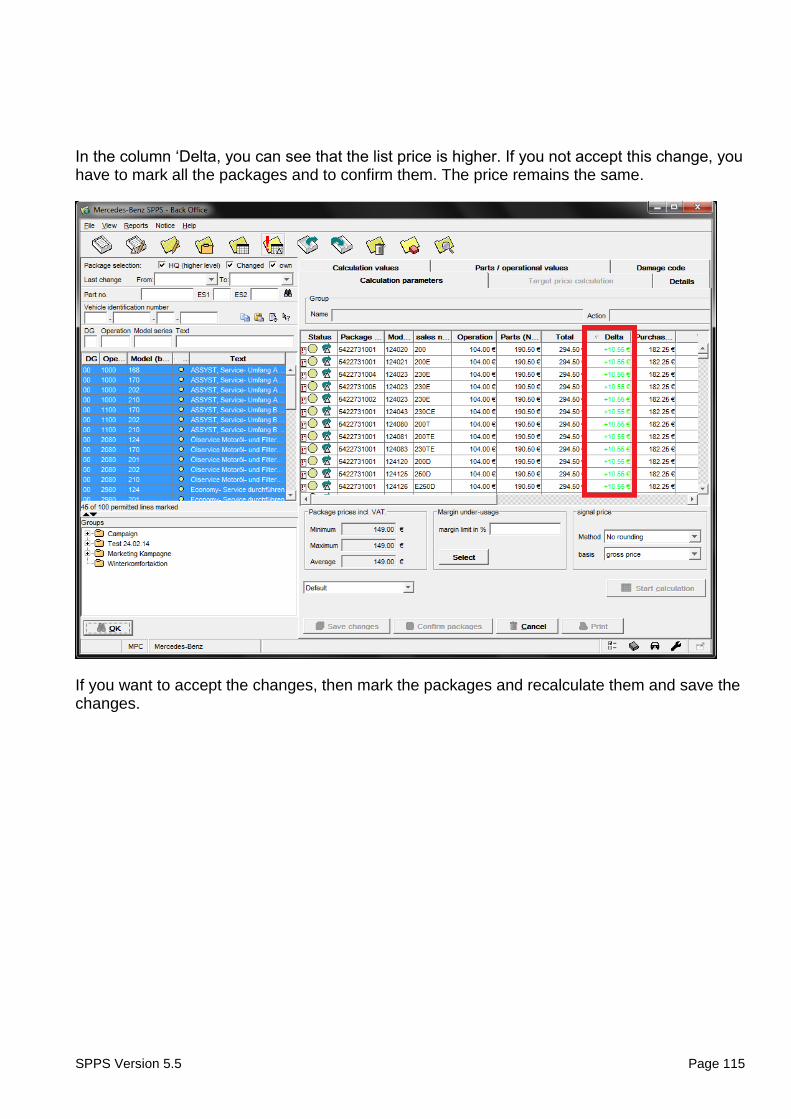
In the column ‘Delta, you can see that the list price is higher. If you not accept this change, you have to mark all the packages and to confirm them. The price remains the same.
If you want to accept the changes, then mark the packages and recalculate them and save the changes.
SPPS Version 5.5 Page 116
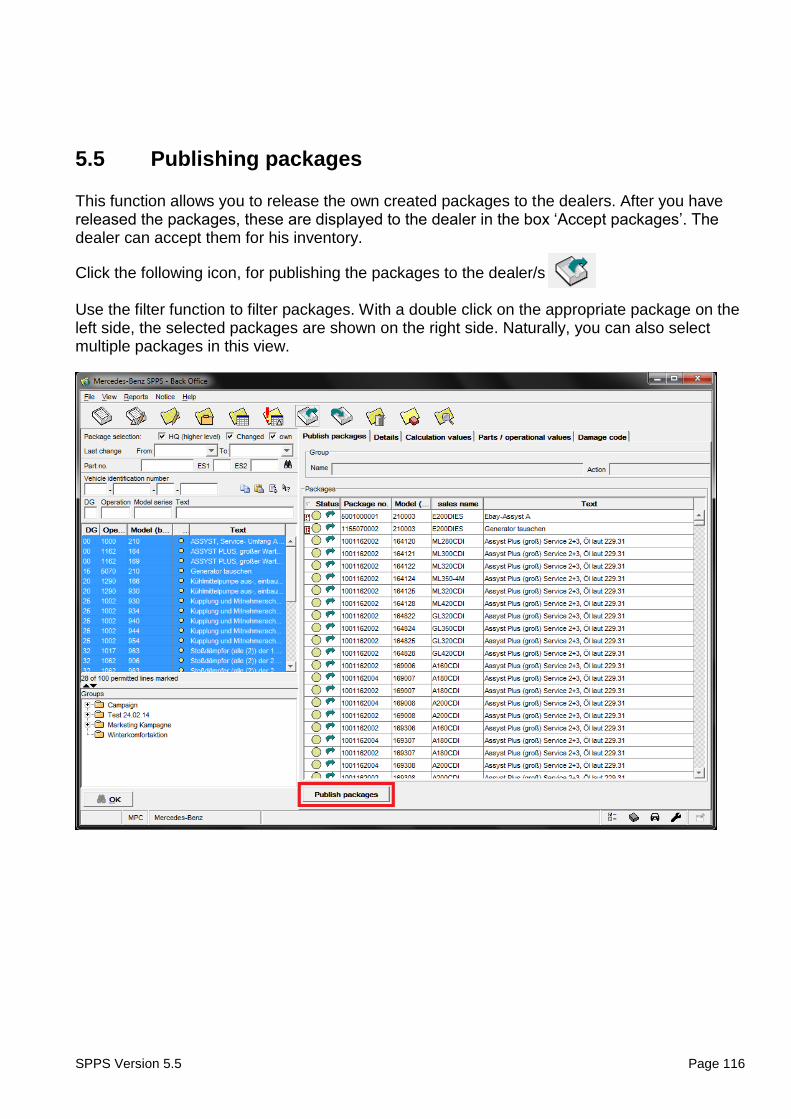
5.5 Publishing packages
This function allows you to release the own created packages to the dealers. After you have released the packages, these are displayed to the dealer in the box ‘Accept packages’. The dealer can accept them for his inventory.
Click the following icon, for publishing the packages to the dealer/s Use the filter function to filter packages. With a double click on the appropriate package on the left side, the selected packages are shown on the right side. Naturally, you can also select multiple packages in this view.
SPPS Version 5.5 Page 117
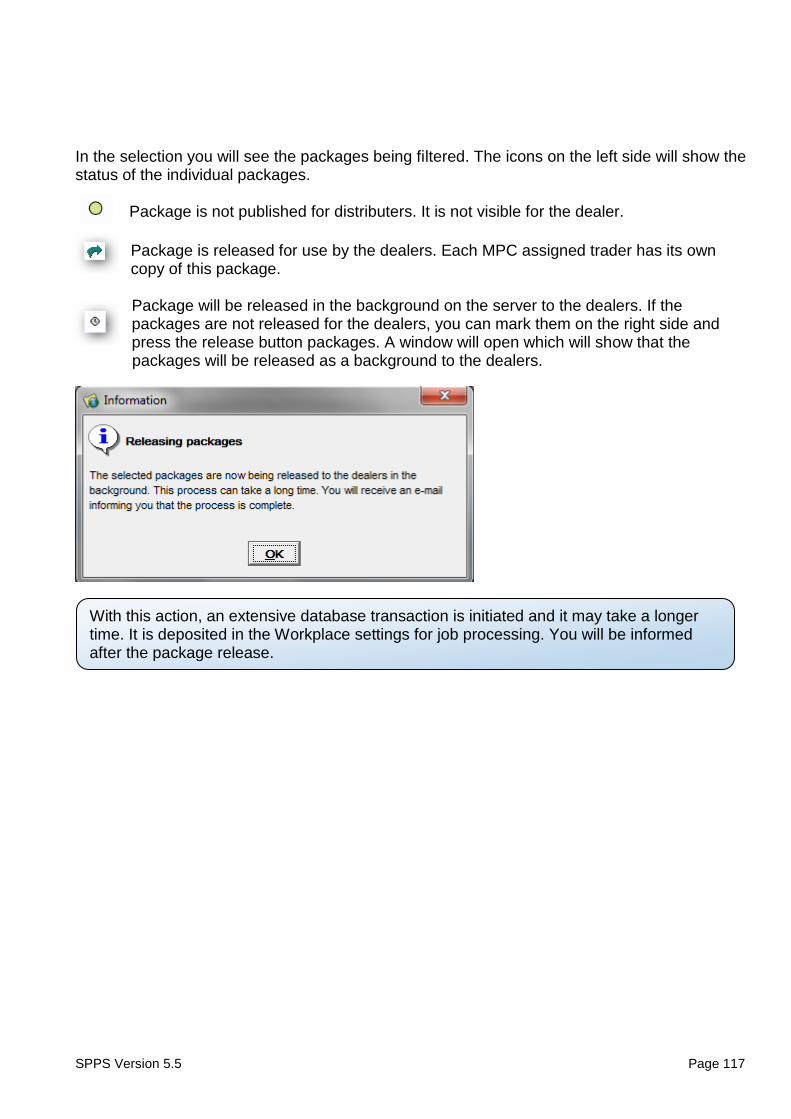
With this action, an extensive database transaction is initiated and it may take a longer time. It is deposited in the Workplace settings for job processing. You will be informed after the package release.
In the selection you will see the packages being filtered. The icons on the left side will show the status of the individual packages.
Package is not published for distributers. It is not visible for the dealer.
Package is released for use by the dealers. Each MPC assigned trader has its own copy of this package.
Package will be released in the background on the server to the dealers. If the packages are not released for the dealers, you can mark them on the right side and press the release button packages. A window will open which will show that the packages will be released as a background to the dealers.
SPPS Version 5.5 Page 118
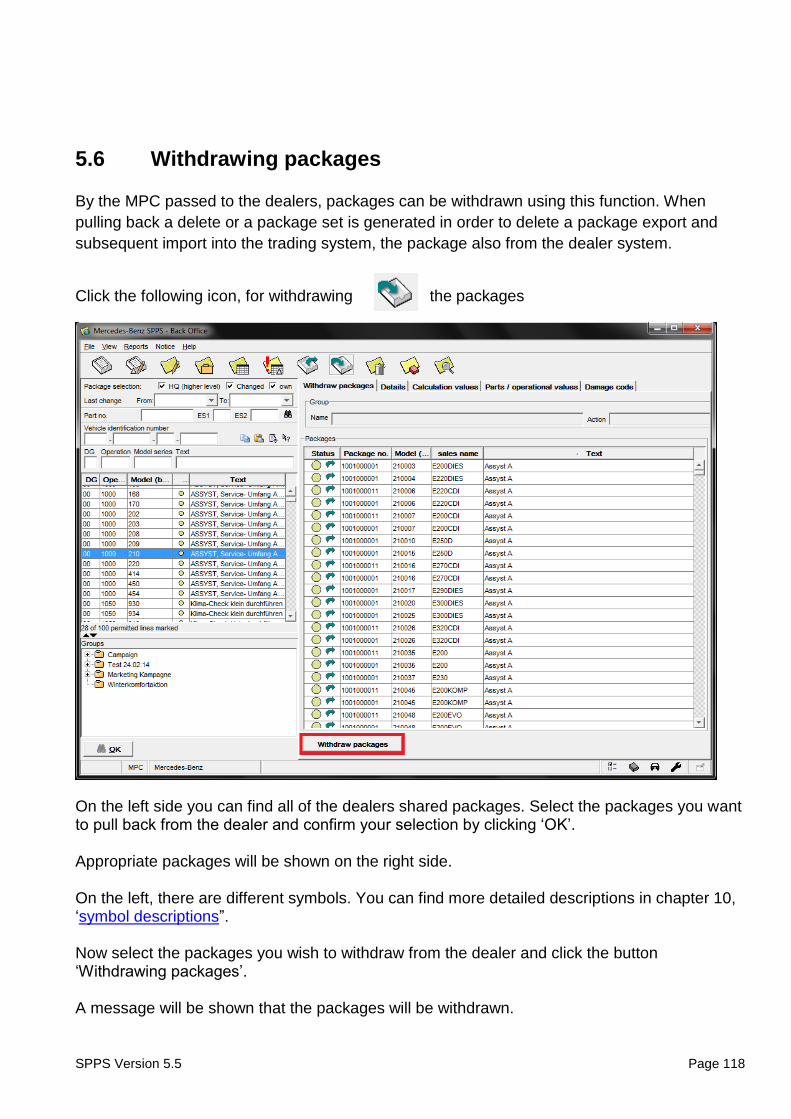
5.6 Withdrawing packages
By the MPC passed to the dealers, packages can be withdrawn using this function. When
pulling back a delete or a package set is generated in order to delete a package export and
subsequent import into the trading system, the package also from the dealer system.
Click the following icon, for withdrawing the packages
On the left side you can find all of the dealers shared packages. Select the packages you want to pull back from the dealer and confirm your selection by clicking ‘OK’. Appropriate packages will be shown on the right side. On the left, there are different symbols. You can find more detailed descriptions in chapter 10, ‘symbol descriptions”. Now select the packages you wish to withdraw from the dealer and click the button ‘Withdrawing packages’. A message will be shown that the packages will be withdrawn.

SPPS Version 5.5 Page 119
The packages are now being withdrawn in the background of the dealer/s.
SPPS Version 5.5 Page 120
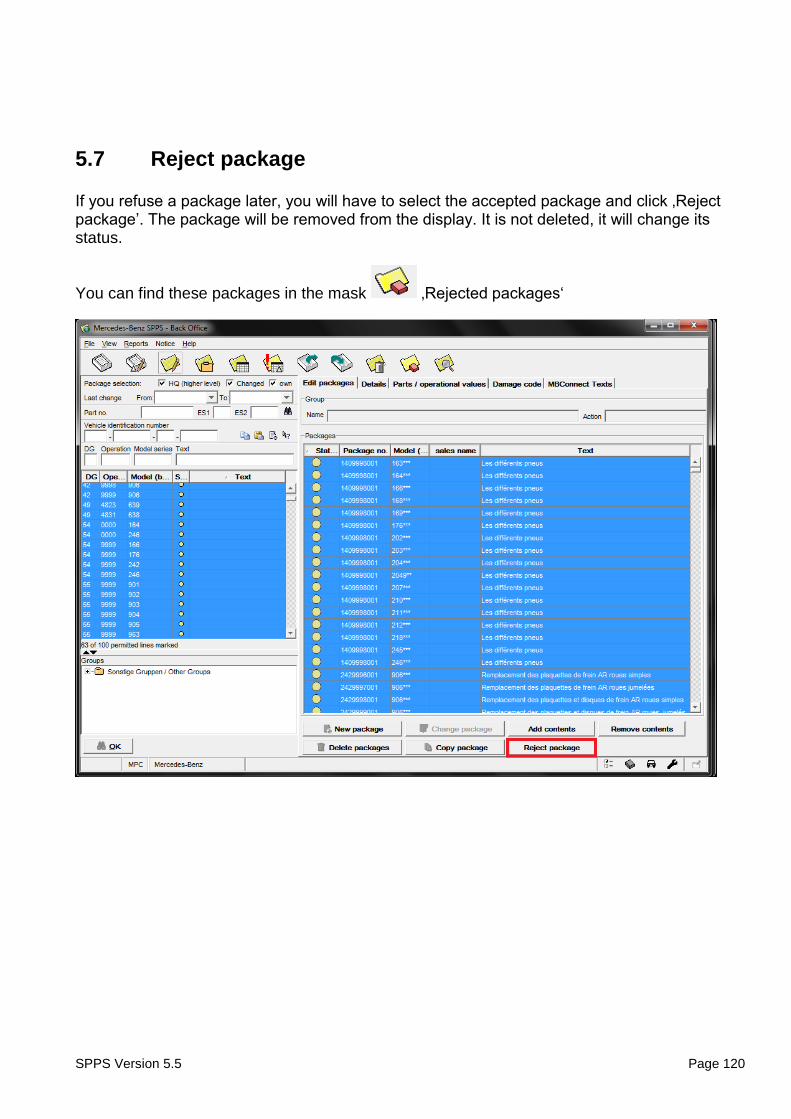
5.7 Reject package
If you refuse a package later, you will have to select the accepted package and click ‚Reject package’. The package will be removed from the display. It is not deleted, it will change its status.
You can find these packages in the mask ‚Rejected packages‘
SPPS Version 5.5 Page 121
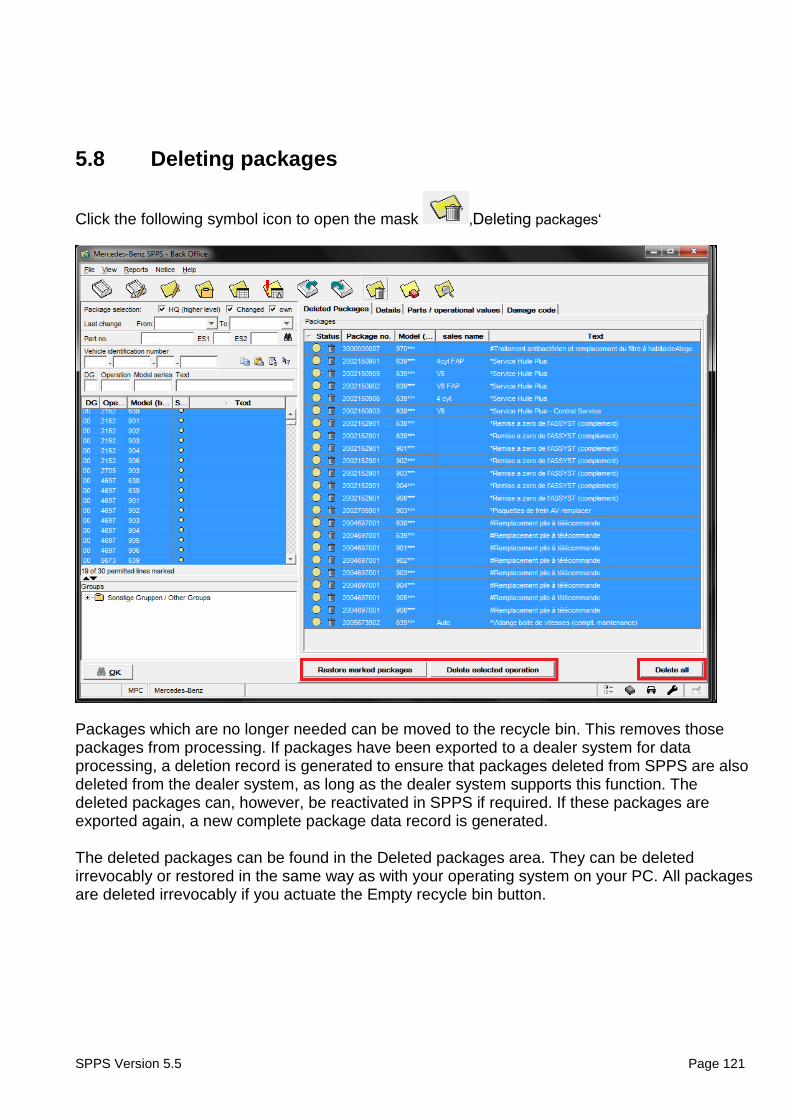
5.8 Deleting packages
Click the following symbol icon to open the mask ‚Deleting packages‘
Packages which are no longer needed can be moved to the recycle bin. This removes those packages from processing. If packages have been exported to a dealer system for data processing, a deletion record is generated to ensure that packages deleted from SPPS are also deleted from the dealer system, as long as the dealer system supports this function. The deleted packages can, however, be reactivated in SPPS if required. If these packages are exported again, a new complete package data record is generated. The deleted packages can be found in the Deleted packages area. They can be deleted irrevocably or restored in the same way as with your operating system on your PC. All packages are deleted irrevocably if you actuate the Empty recycle bin button.
SPPS Version 5.5 Page 122
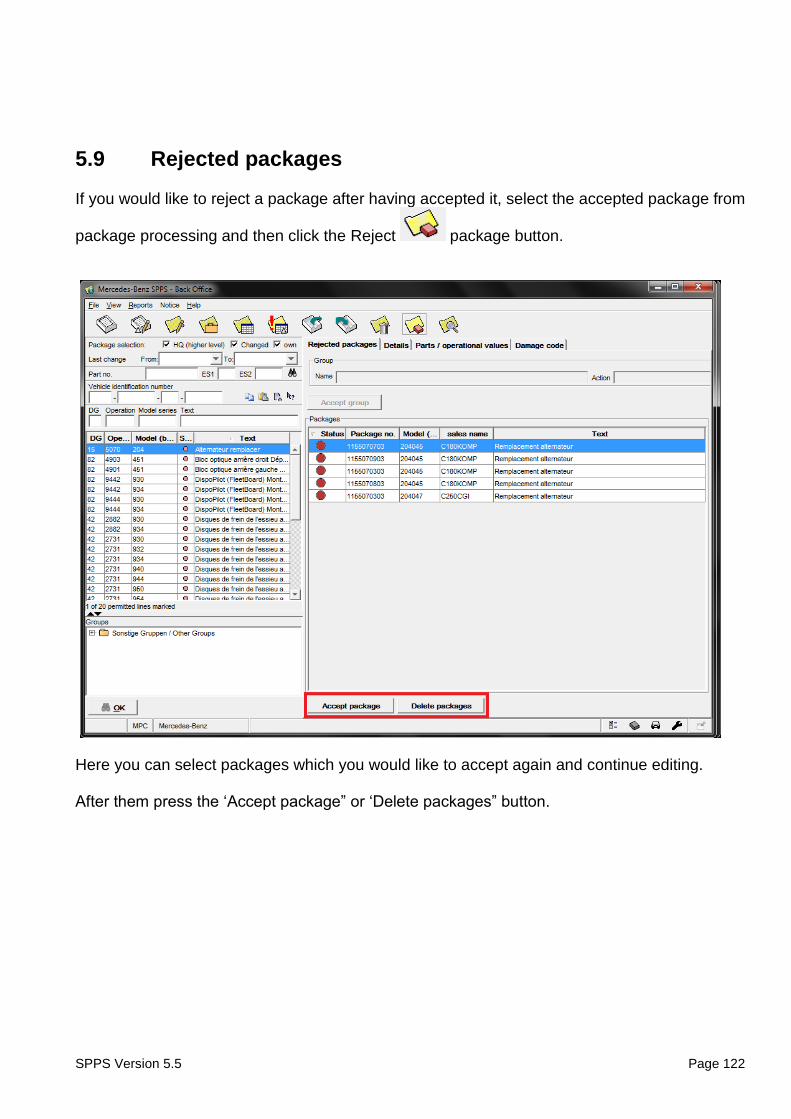
5.9 Rejected packages
If you would like to reject a package after having accepted it, select the accepted package from
package processing and then click the Reject package button.
Here you can select packages which you would like to accept again and continue editing. After them press the ‘Accept package” or ‘Delete packages” button.
SPPS Version 5.5 Page 123
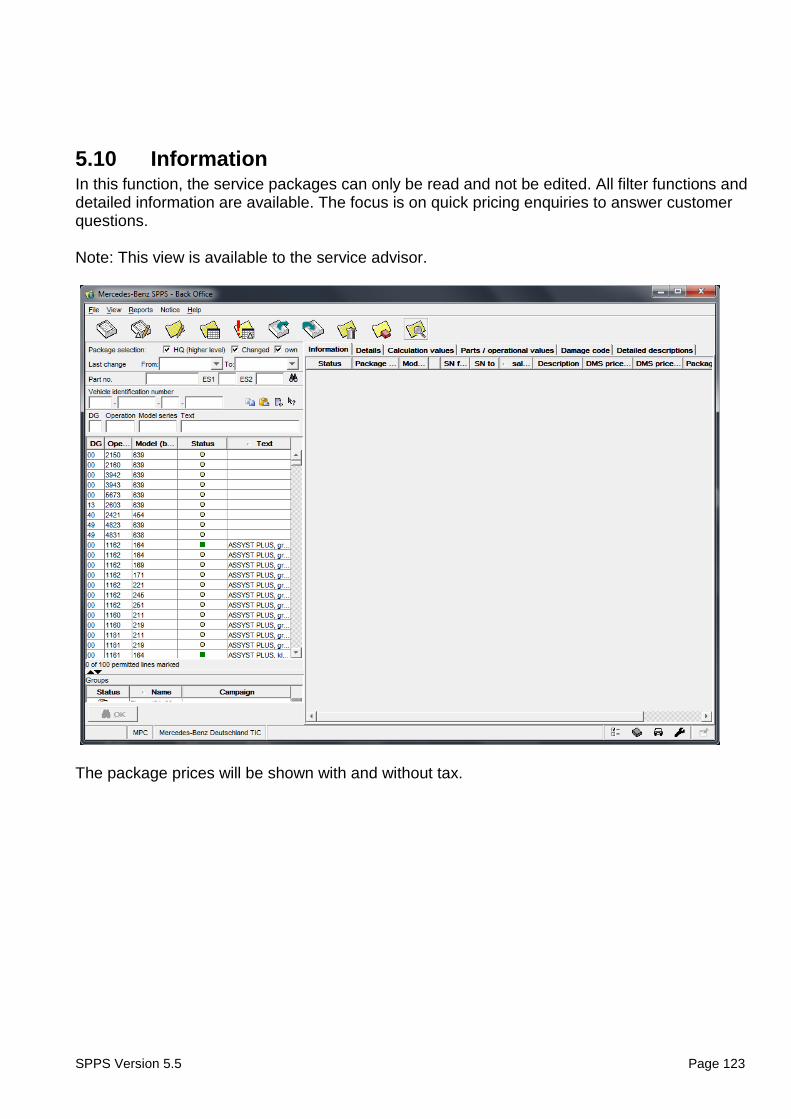
5.10 Information In this function, the service packages can only be read and not be edited. All filter functions and detailed information are available. The focus is on quick pricing enquiries to answer customer questions. Note: This view is available to the service advisor.
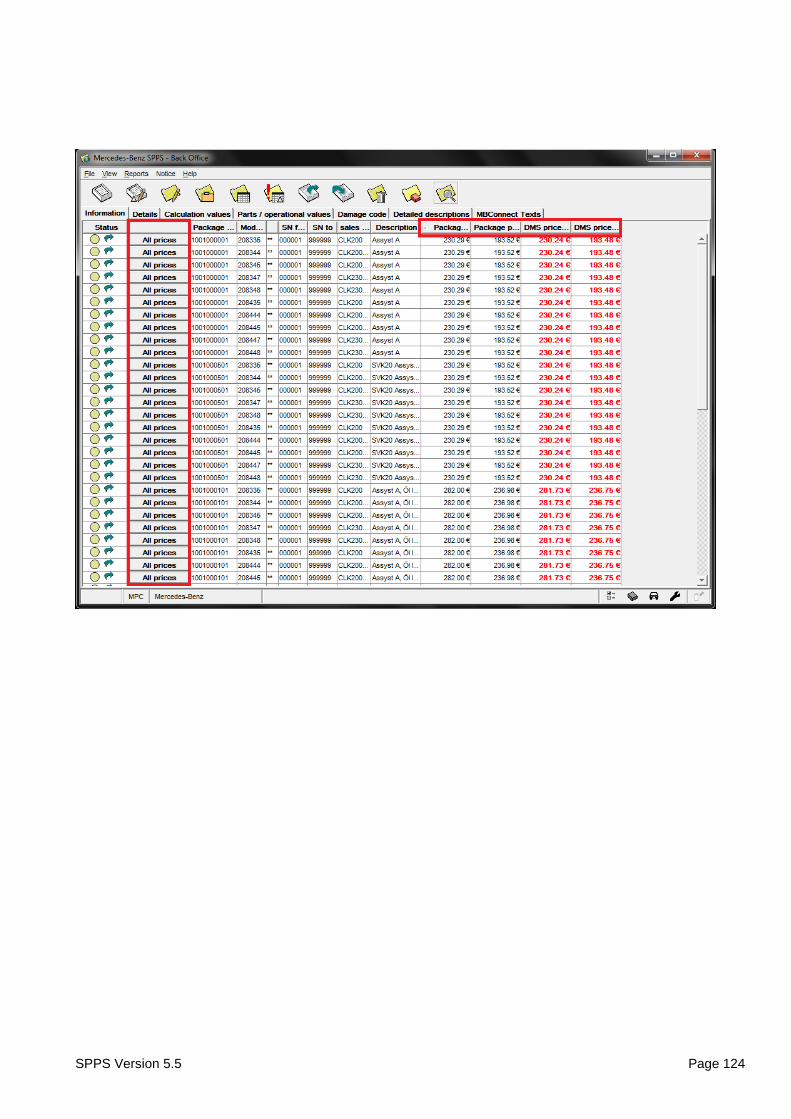
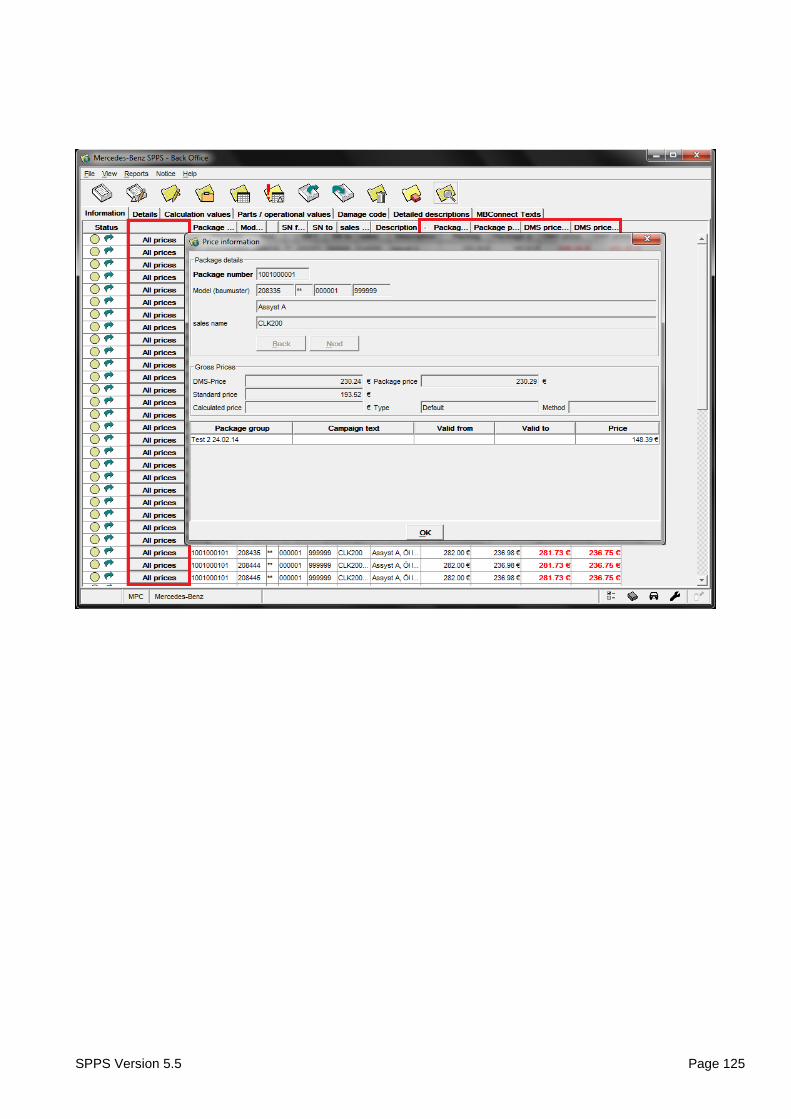
The package prices will be shown with and without tax.
SPPS Version 5.5 Page 124
SPPS Version 5.5 Page 125
SPPS Version 5.5 Page 126
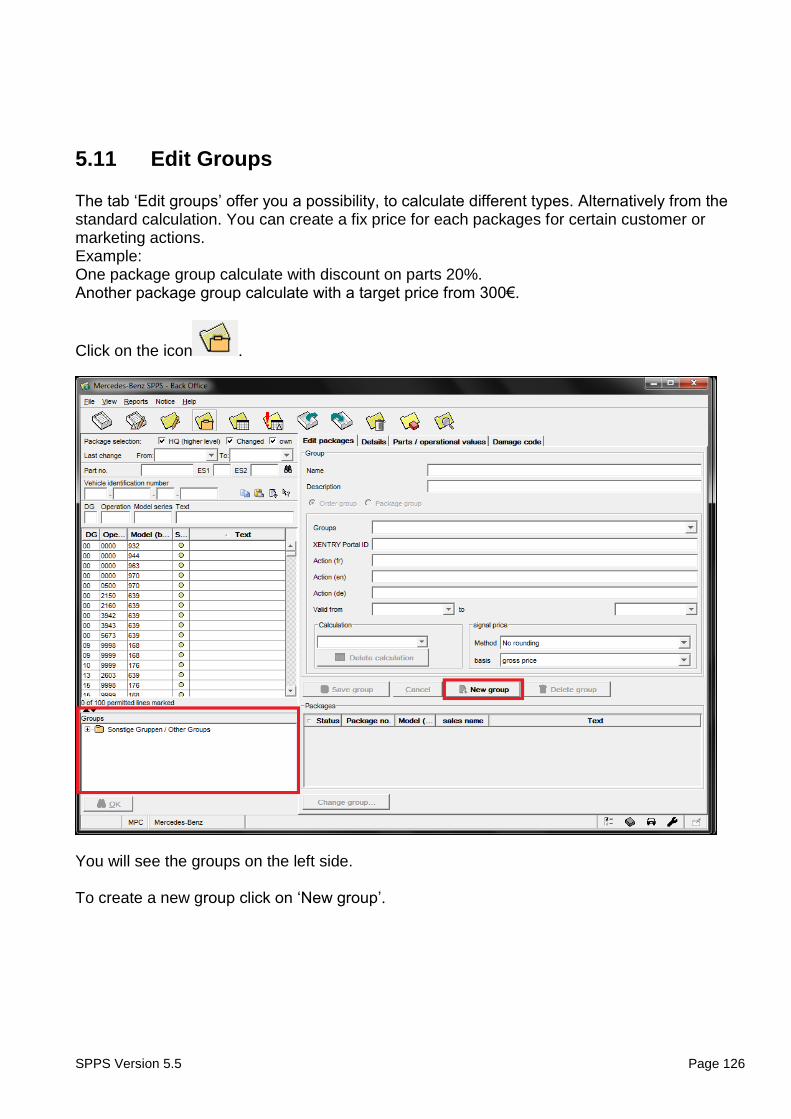
5.11 Edit Groups
The tab ‘Edit groups’ offer you a possibility, to calculate different types. Alternatively from the standard calculation. You can create a fix price for each packages for certain customer or marketing actions. Example: One package group calculate with discount on parts 20%. Another package group calculate with a target price from 300€.
Click on the icon .
You will see the groups on the left side. To create a new group click on ‘New group’.
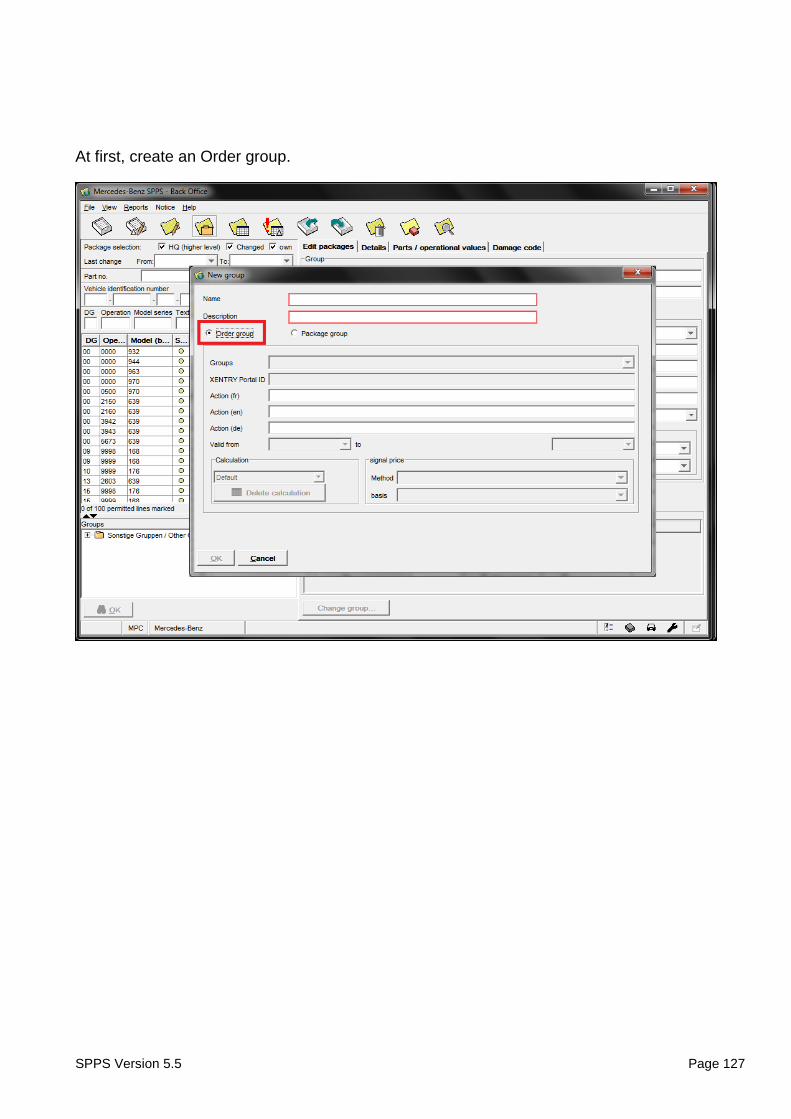
SPPS Version 5.5 Page 127
At first, create an Order group.
SPPS Version 5.5 Page 128
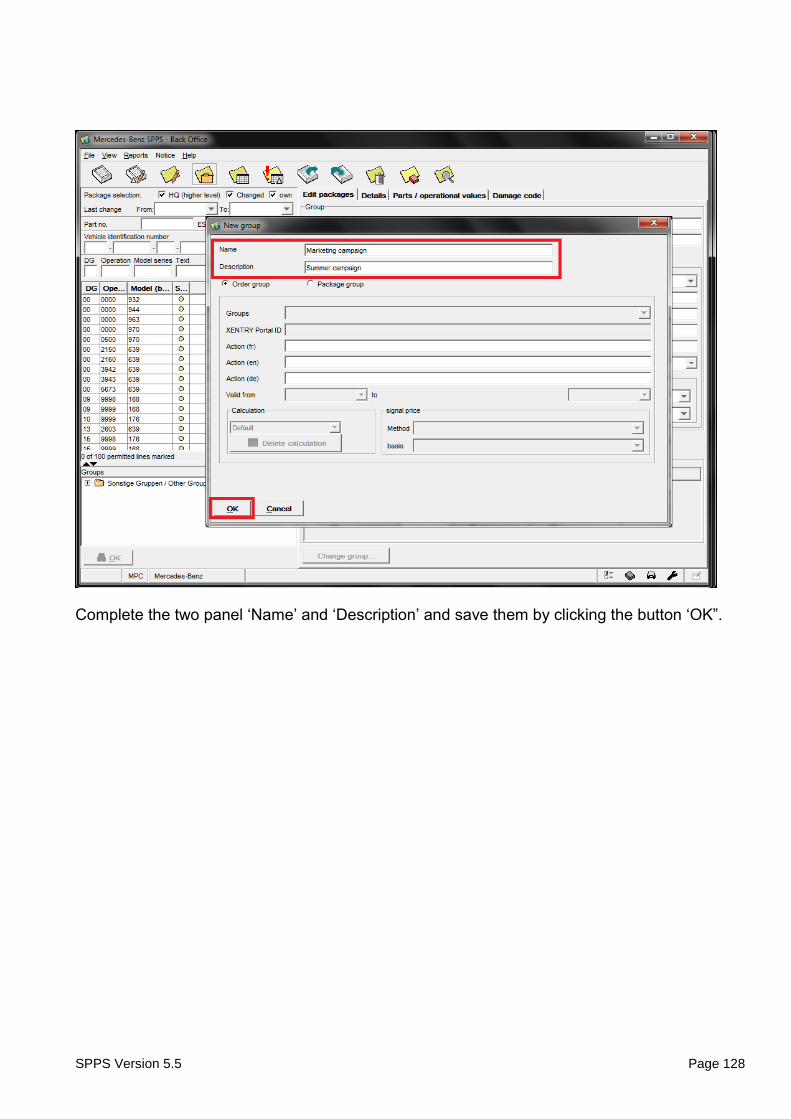
Complete the two panel ‘Name’ and ‘Description’ and save them by clicking the button ‘OK”.
SPPS Version 5.5 Page 129
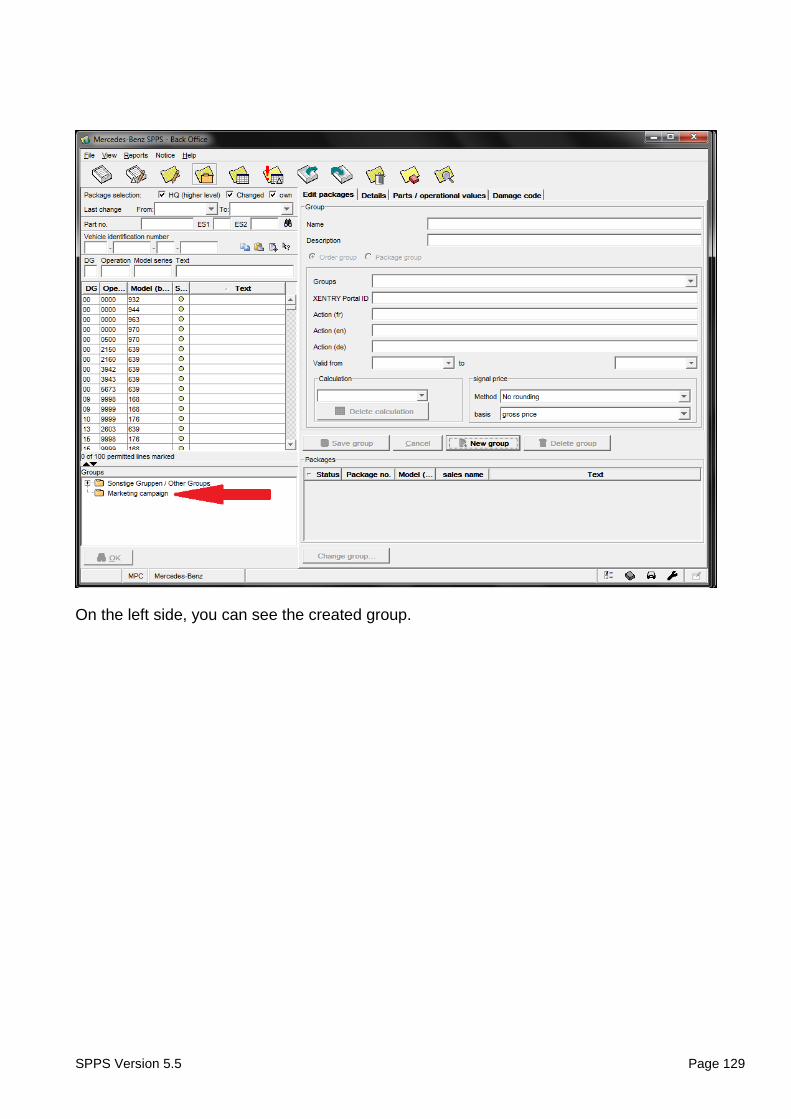
On the left side, you can see the created group.
SPPS Version 5.5 Page 130
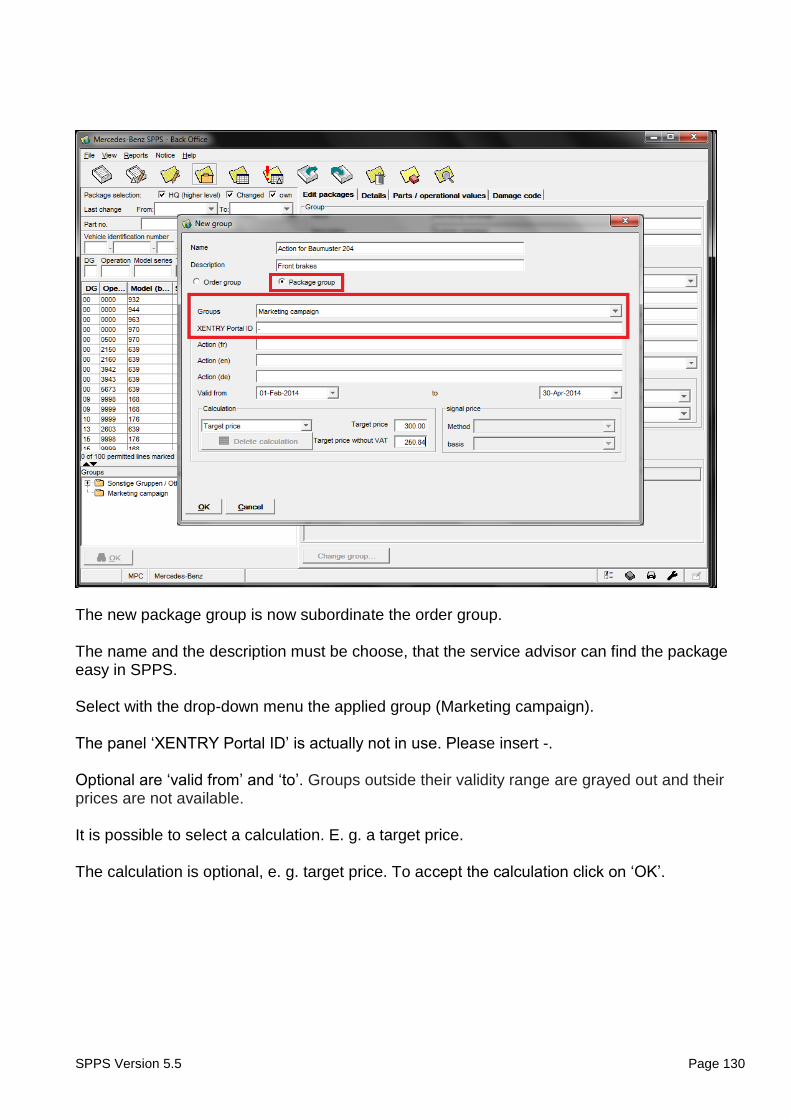
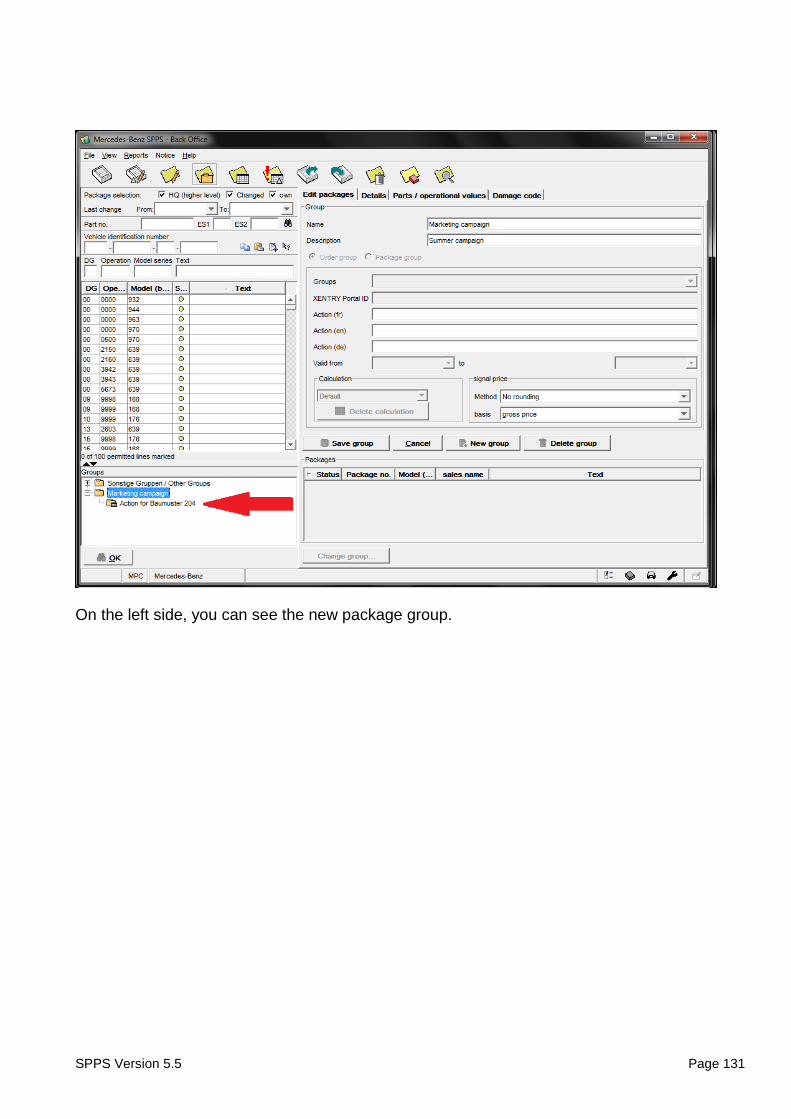
The new package group is now subordinate the order group. The name and the description must be choose, that the service advisor can find the package easy in SPPS. Select with the drop-down menu the applied group (Marketing campaign). The panel ‘XENTRY Portal ID’ is actually not in use. Please insert -. Optional are ‘valid from’ and ‘to’. Groups outside their validity range are grayed out and their prices are not available. It is possible to select a calculation. E. g. a target price.
The calculation is optional, e. g. target price. To accept the calculation click on ‘OK’.
SPPS Version 5.5 Page 131
On the left side, you can see the new package group.

SPPS Version 5.5 Page 132
Select the packages and add them, to the new group.
SPPS Version 5.5 Page 133
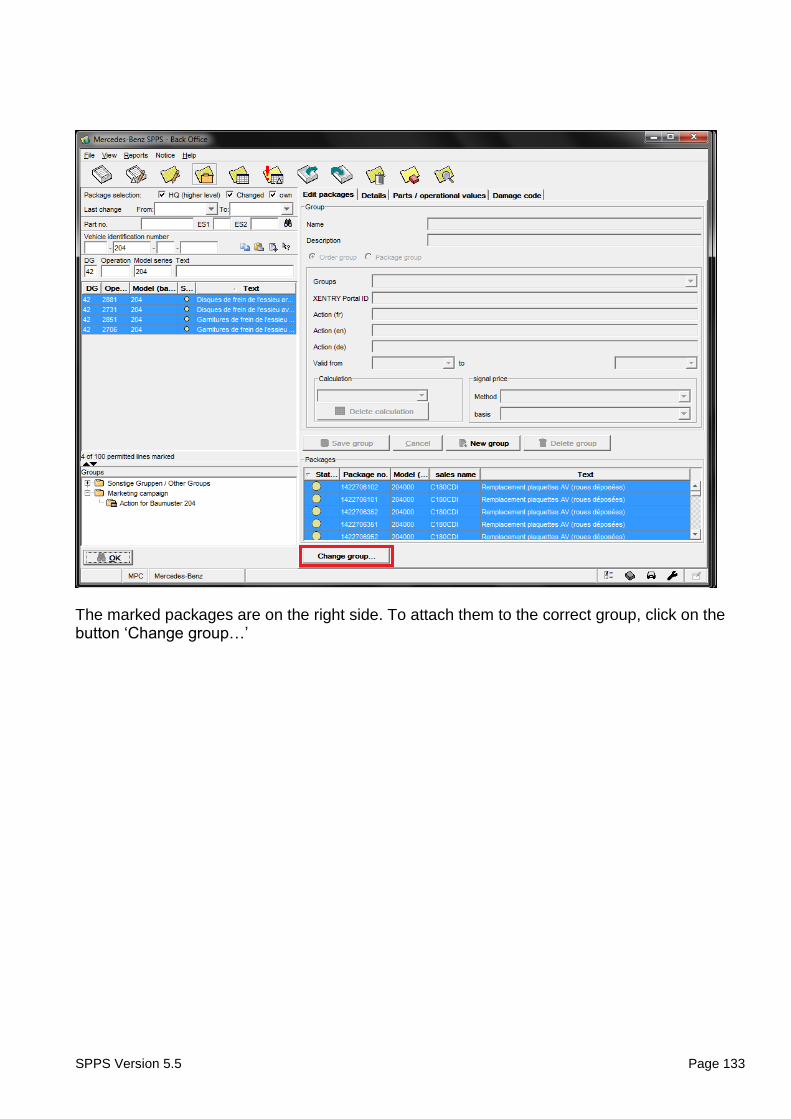
The marked packages are on the right side. To attach them to the correct group, click on the button ‘Change group…’
SPPS Version 5.5 Page 134
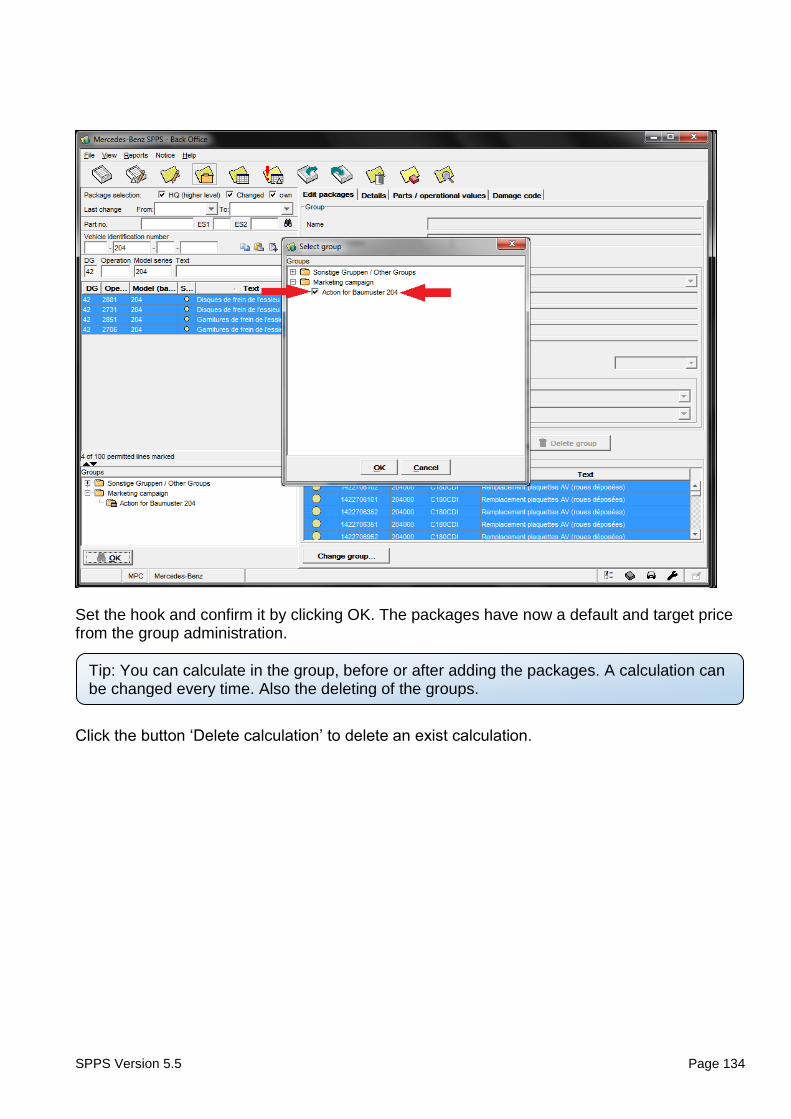
Tip: You can calculate in the group, before or after adding the packages. A calculation can be changed every time. Also the deleting of the groups.
Set the hook and confirm it by clicking OK. The packages have now a default and target price from the group administration.
Click the button ‘Delete calculation’ to delete an exist calculation.
SPPS Version 5.5 Page 135
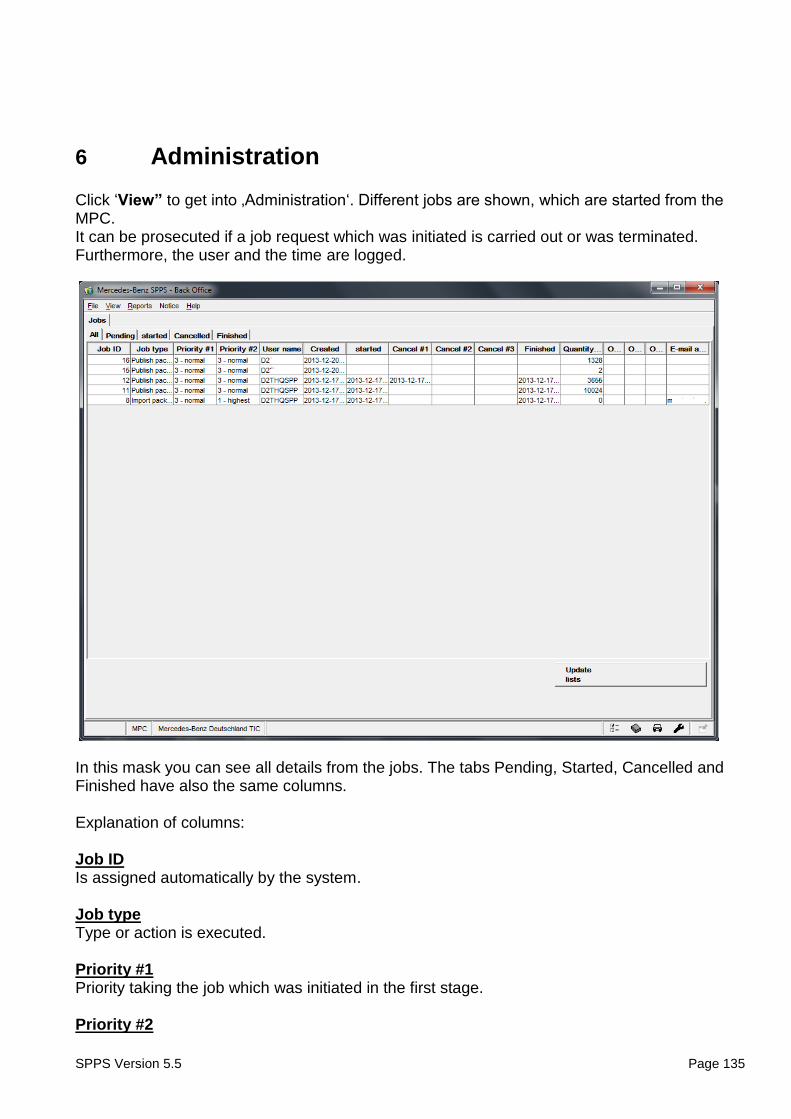
6 Administration
Click ‘View” to get into ‚Administration‘. Different jobs are shown, which are started from the MPC. It can be prosecuted if a job request which was initiated is carried out or was terminated. Furthermore, the user and the time are logged.
In this mask you can see all details from the jobs. The tabs Pending, Started, Cancelled and Finished have also the same columns. Explanation of columns: Job ID Is assigned automatically by the system. Job type Type or action is executed. Priority #1 Priority taking the job which was initiated in the first stage. Priority #2

SPPS Version 5.5 Page 136
Priority taking the job which was initiated in the first stage.
SPPS Version 5.5 Page 137
User name User ID which has initiated the job. Created Date and time of job starting. Started Date and time when the job is executed through the system. Cancel #1, #2, #3 In these three columns cracks are logged which could not be carried out successively. Finished Date and time of print job completion. Quantity of packages Number of packages which have been released or withdrawn. Overwrite discount group Where X is marked, whether discount groups have been overwritten. Overwrite description Where X is marked, whether descriptions have been overwritten. Overwrite price Where X is marked, whether prices have been overwritten. E-Mail address for confirmation Once the job has been running, receives the confirmation of the displayed email address. With the button ‚Update lists‘, you can refresh the screen view to display the job status.
SPPS Version 5.5 Page 138
7 Reports
As MPC you can view the following reports: - Undefined parts - Discount groups - Parts list - Merchandise - Parameter list - Fleets/vehicles Once you click on each report, it opens a PDF document in which the information is listed.
8 Notice
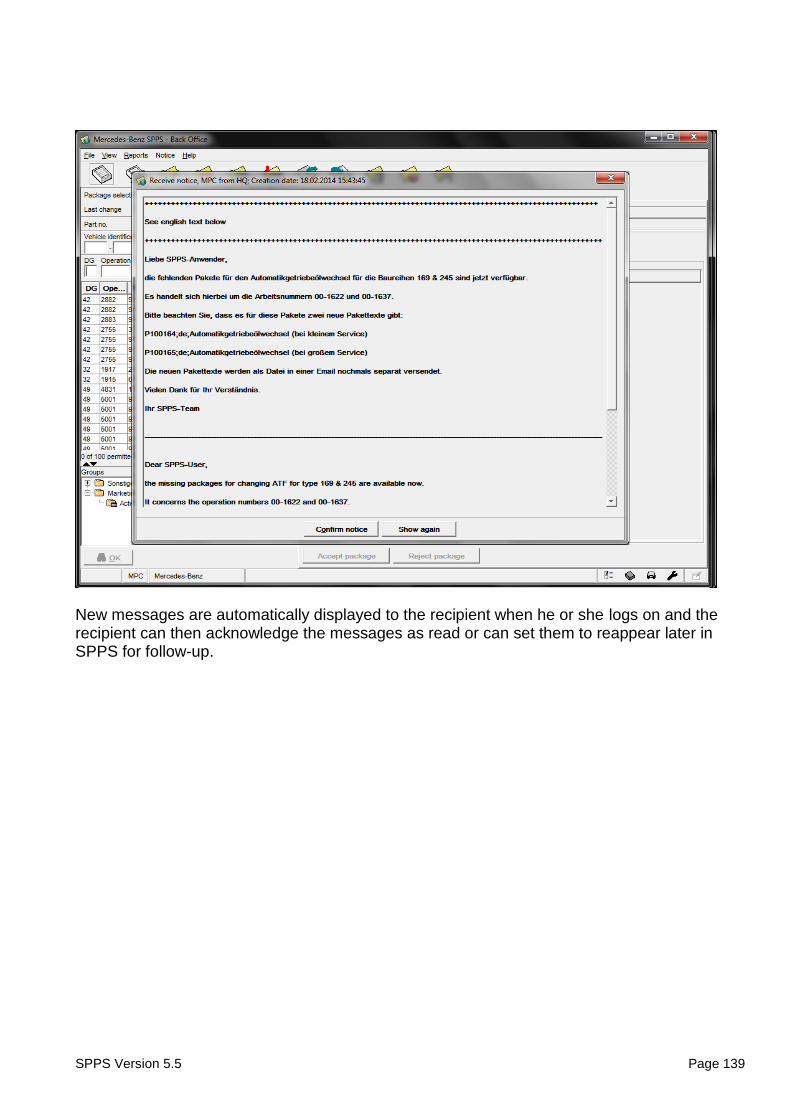
There is a simple method of sending short messages within the SPPS hierarchy, i.e. - from HQ to MPC - from MPC to DPM To compose a message, there is a dialogue box with an entry field and a ‘Send’ button which you can access via a menu.
SPPS Version 5.5 Page 139
New messages are automatically displayed to the recipient when he or she logs on and the recipient can then acknowledge the messages as read or can set them to reappear later in SPPS for follow-up.
SPPS Version 5.5 Page 140
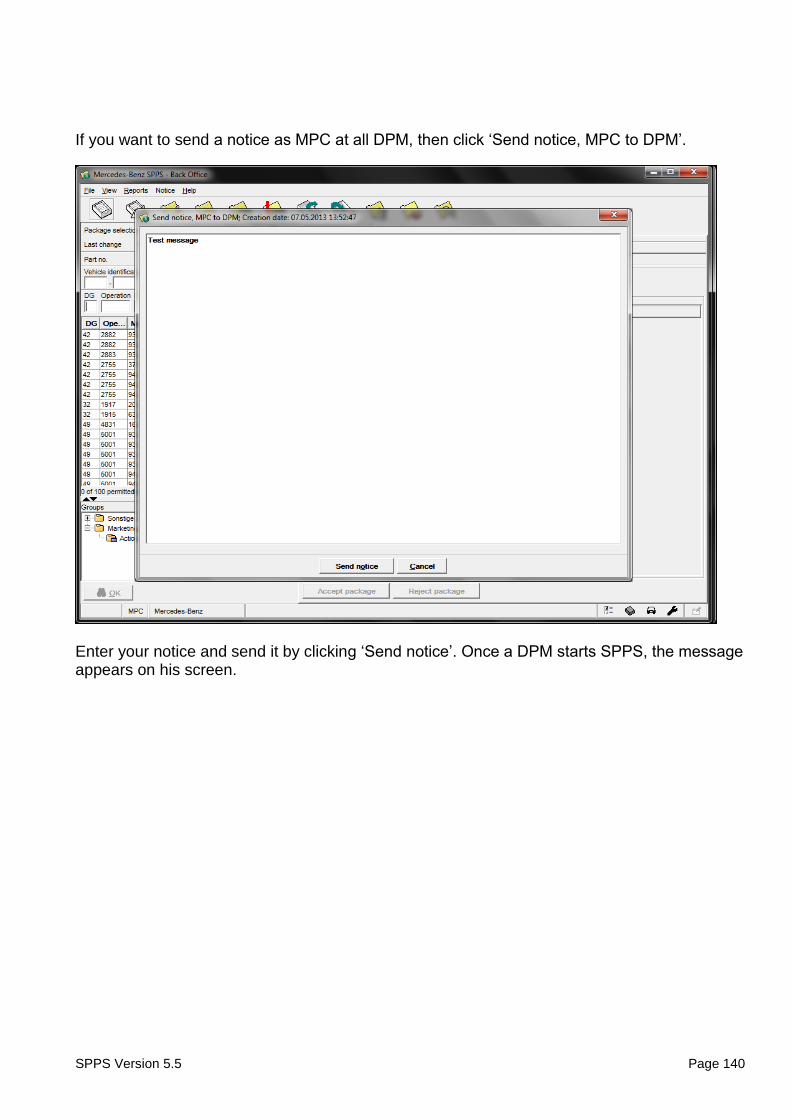
If you want to send a notice as MPC at all DPM, then click ‘Send notice, MPC to DPM’.
Enter your notice and send it by clicking ‘Send notice’. Once a DPM starts SPPS, the message appears on his screen.
SPPS Version 5.5 Page 141
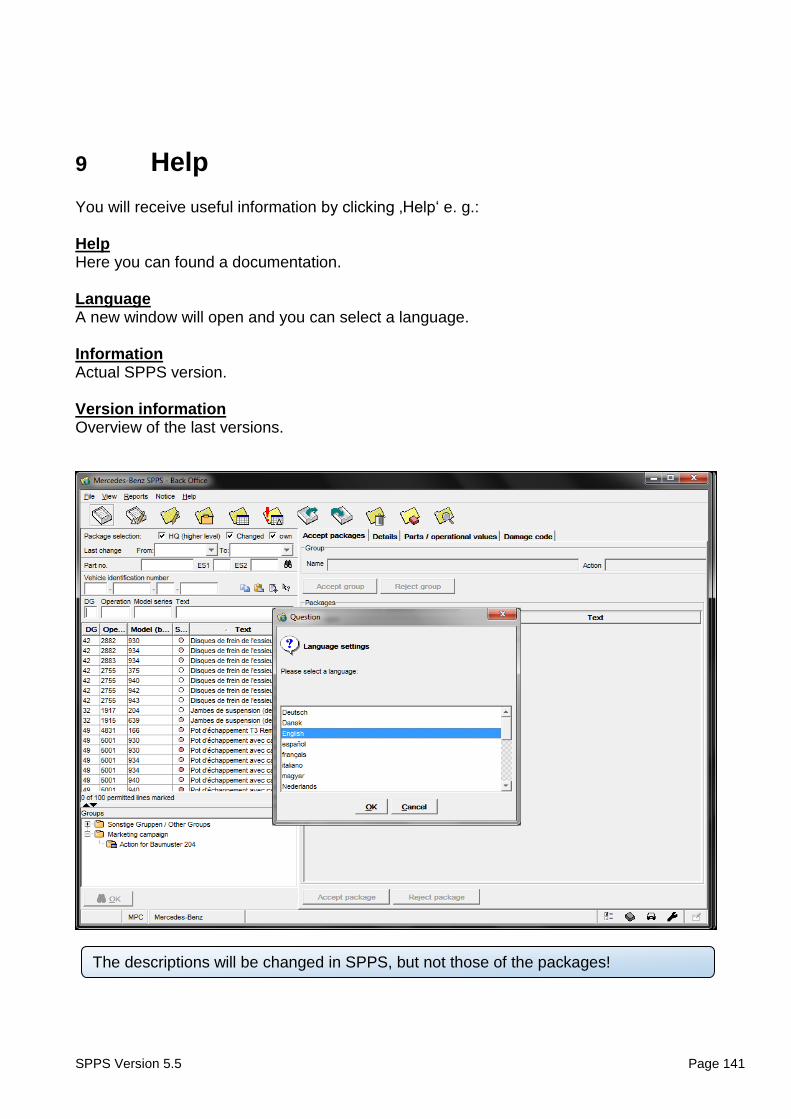
The descriptions will be changed in SPPS, but not those of the packages!
9 Help
You will receive useful information by clicking ‚Help‘ e. g.: Help Here you can found a documentation. Language A new window will open and you can select a language. Information Actual SPPS version. Version information Overview of the last versions.
SPPS Version 5.5 Page 142
10 Icon Descriptions
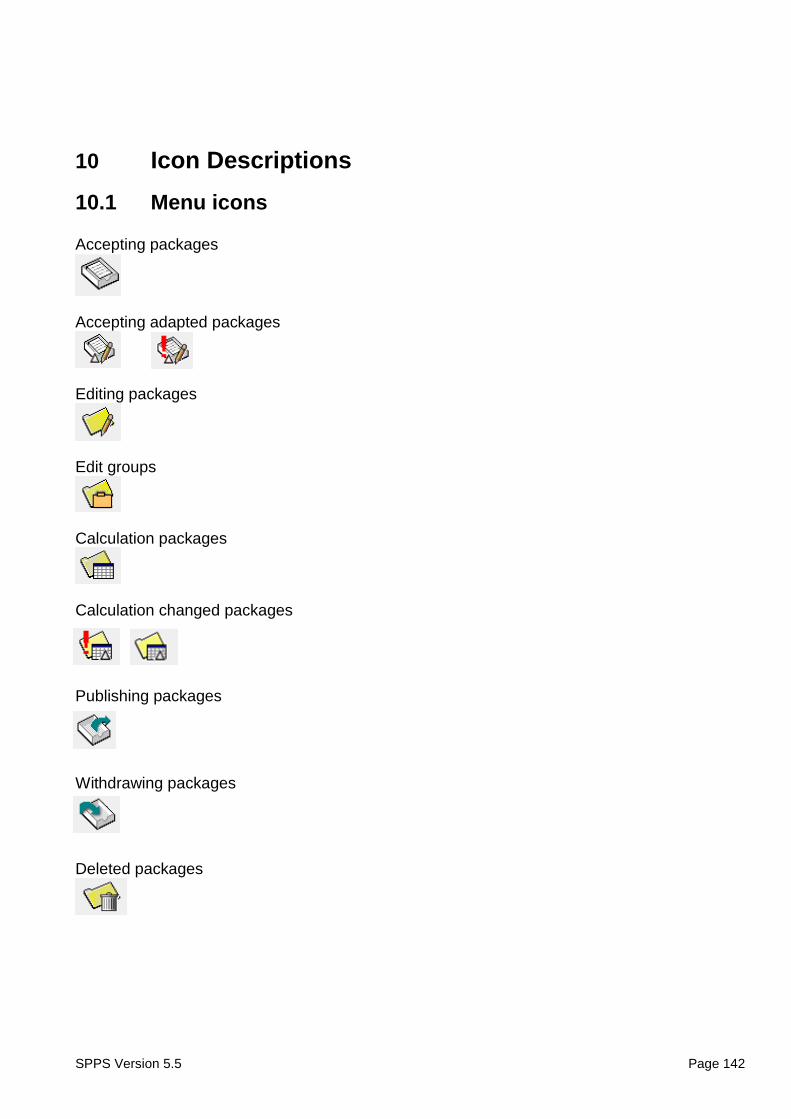
10.1 Menu icons
Accepting packages
Accepting adapted packages
Editing packages
Edit groups
Calculation packages
Calculation changed packages
Publishing packages
Withdrawing packages
Deleted packages
SPPS Version 5.5 Page 143
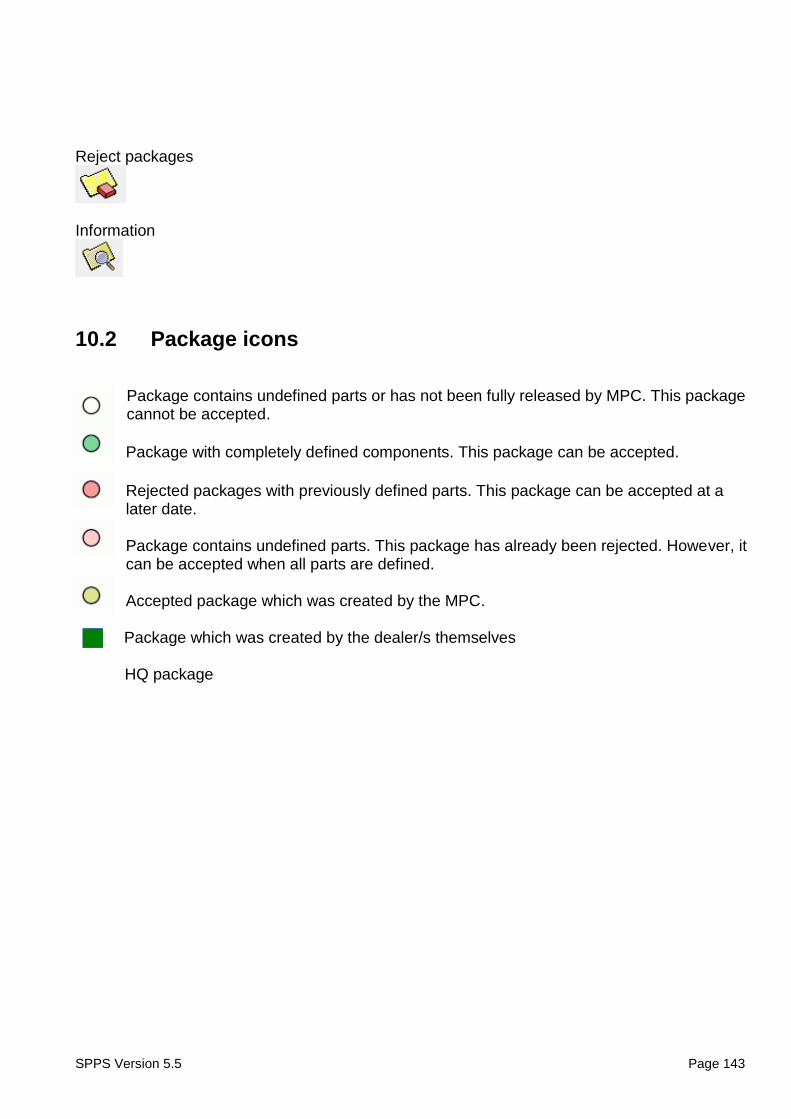
Reject packages
Information
10.2 Package icons
Package contains undefined parts or has not been fully released by MPC. This package cannot be accepted.
Package with completely defined components. This package can be accepted.
Rejected packages with previously defined parts. This package can be accepted at a later date. Package contains undefined parts. This package has already been rejected. However, it can be accepted when all parts are defined. Accepted package which was created by the MPC.
Package which was created by the dealer/s themselves HQ package

SPPS Version 5.5 Page 144
An icon in conjunction with the % symbol indicates an amended purchase price.
10.3 Additional icons
Package has been changed
The cost price of the package has changed
Package has just appeared for the first time as an accepted package
Package will be released to dealers shortly
Package was released to the dealers
Package is offered on internet and can be booked.
Package was rejected at an earlier time
Package was deleted (trash)
Package is in the shopping cart
Package is calculated with a fixed price
10.4 Examples
This package is being offered for the first time by the MPC but cannot be accepted due to
undefined parts.
This package is being offered for the first time by the MPC and is ready to be accepted.
Fixed price package.