membership response overwhelming “we believe in … · membership response overwhelming “we...
TRANSCRIPT
APR MAY JUNE 2009 ISSUE #27
MEMBERSHIP RESPONSE OVERWHELMING “WE BELIEVE IN CARM’S FUTURE” 98.6%
In This Issue 3 Observation Platform 4 Chapter News 10 Maple Leaf Railway 13 Part 9: Crossen Ore Cars on the Cobourg & Peterbor ough. 17 Finale: Transport and Dis play of the Cobourg & Pe terborough. 19 Government of Canada Cylindrical Hopper 19 Under Table Switch Motor Conversion 23 Copetown Pics Cover Photo: Top Left
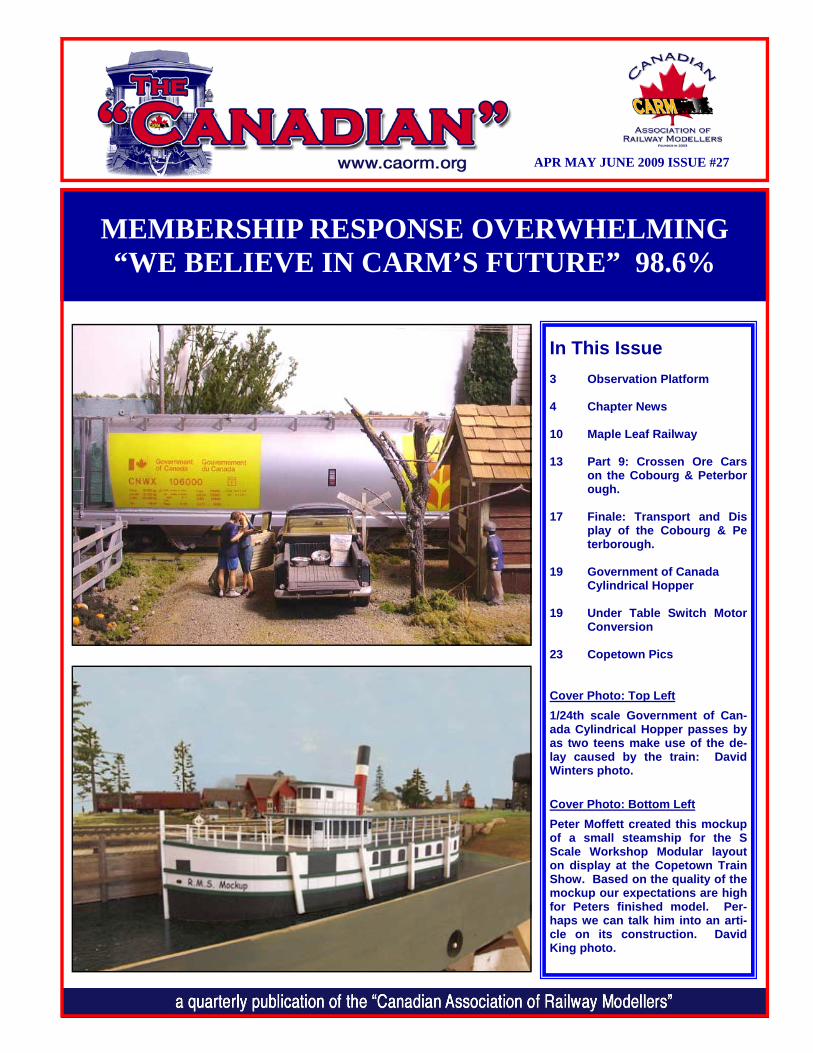
1/24th scale Government of Can-ada Cylindrical Hopper passes by as two teens make use of the de-lay caused by the train: David Winters photo.
Cover Photo: Bottom Left
Peter Moffett created this mockup of a small steamship for the S Scale Workshop Modular layout on display at the Copetown Train Show. Based on the quality of the mockup our expectations are high for Peters finished model. Per-haps we can talk him into an arti-cle on its construction. David King photo.
THE CANADIAN Issue #27 Pg 2
C.A.R.M. VOLUNTEERS
CARM ON THE WORLDWIDE WEB
CHAIR/EDITOR John Johnston 41 Glenview Place, Hamilton, ON, L9C 6H9 [email protected] SECRETARY/TREASURER Peter Moffett CRC MMR 7 Jolie Court, St. Catharines, ON, L2M 6V5 [email protected] MEMBERSHIP DIRECTOR David King 31-120 Quigley Rd, Hamilton, ON, L8K 6L4 [email protected] CRC MANAGER David Burroughs [email protected] WEBMASTER [email protected] CREDIT VALLEY CHAPTER: Chair: vacant Treasurer: vacant ESSEX KENT CHAPTER: Chair: Keith Snider [email protected] Treasurer: Bob Sanford [email protected] Director: Bill Knox [email protected]
MEMBERS AREA PASSWORD
USERNAME: brake PASSWORD: valve
GOLDEN HORSESHOE CHAPTER: Chair: vacant Treasurer: vacant LONDON AND AREA CHAPTER: Chair: Don Wesley [email protected] Treasurer: Eric Blunt [email protected] NATIONAL CAPITAL CHAPTER: Chair: Gary Baillargeon petworth.ems@cyberus,ca Secretary: Robert S. Elliott [email protected] Treasurer: Mike Hind [email protected] ONTARIO CENTRAL CHAPTER: Chair: Bill Osborne Treasurer: Robert Hollywood ONTARIO MIDWESTERN CHAPTER: Chair: Steve Hoshel Treasurer: Randy Schnarr [email protected] TORONTO CHAPTER: Chair: Ian McIntosh [email protected] Treasurer: Cloy Hinbest [email protected] VANCOUVER ISLAND CHAPTER: Chair: Denis McWilliams Treasurer: Sterling Stump [email protected]
THE CANADIAN Issue #27 Pg 3
It has been a very busy winter. Peter’s accident meant that I along with my buddies from the Bayview Junction Modular Group took over the manage-ment of the Copetown Train Show. Everything appeared to go well and most of the response and feedback has been positive. We made some money for CARM and also for the continuing construction of our modular layout. Our goal is to have it ready for display at Copetown next year. The Allegheny Division continues to progress and I will report more on some changes I have made next month. My good buddy Justin has decided that his excellent large N scale layout needed some change and after much discussion that change turned into a full scale makeover. The layout is going from 2 levels to 4 levels and will have over a 400 foot mainline run in N scale when it is done. I have been helping him out as much as possible. The wife and I also made our annual winter trek to Myrtle for a little golf and sunshine. It was interesting to wake up one morning to see Winter Storm Warn-ings flashing across the bottom of the TV screen. They received some flurries, not enough to even stick on the ground, but it was the big news of the day. By noon it was 60 degrees, so it was a bit of a tempest in a teapot.
observation platformobservation platform john johnston: editorjohn johnston: editor
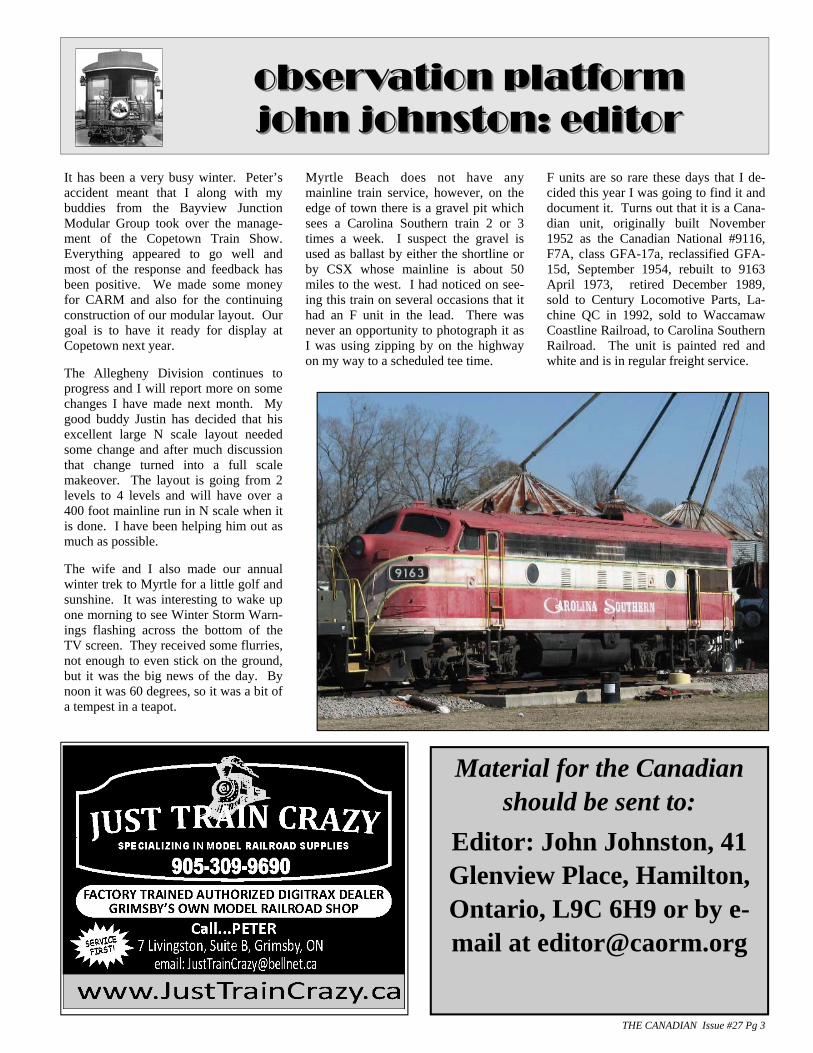
Myrtle Beach does not have any mainline train service, however, on the edge of town there is a gravel pit which sees a Carolina Southern train 2 or 3 times a week. I suspect the gravel is used as ballast by either the shortline or by CSX whose mainline is about 50 miles to the west. I had noticed on see-ing this train on several occasions that it had an F unit in the lead. There was never an opportunity to photograph it as I was using zipping by on the highway on my way to a scheduled tee time.
F units are so rare these days that I de-cided this year I was going to find it and document it. Turns out that it is a Cana-dian unit, originally built November 1952 as the Canadian National #9116, F7A, class GFA-17a, reclassified GFA-15d, September 1954, rebuilt to 9163 April 1973, retired December 1989, sold to Century Locomotive Parts, La-chine QC in 1992, sold to Waccamaw Coastline Railroad, to Carolina Southern Railroad. The unit is painted red and white and is in regular freight service.
Material for the Canadian should be sent to:
Editor: John Johnston, 41 Glenview Place, Hamilton, Ontario, L9C 6H9 or by e-mail at [email protected]

THE CANADIAN Issue #27 Pg 4
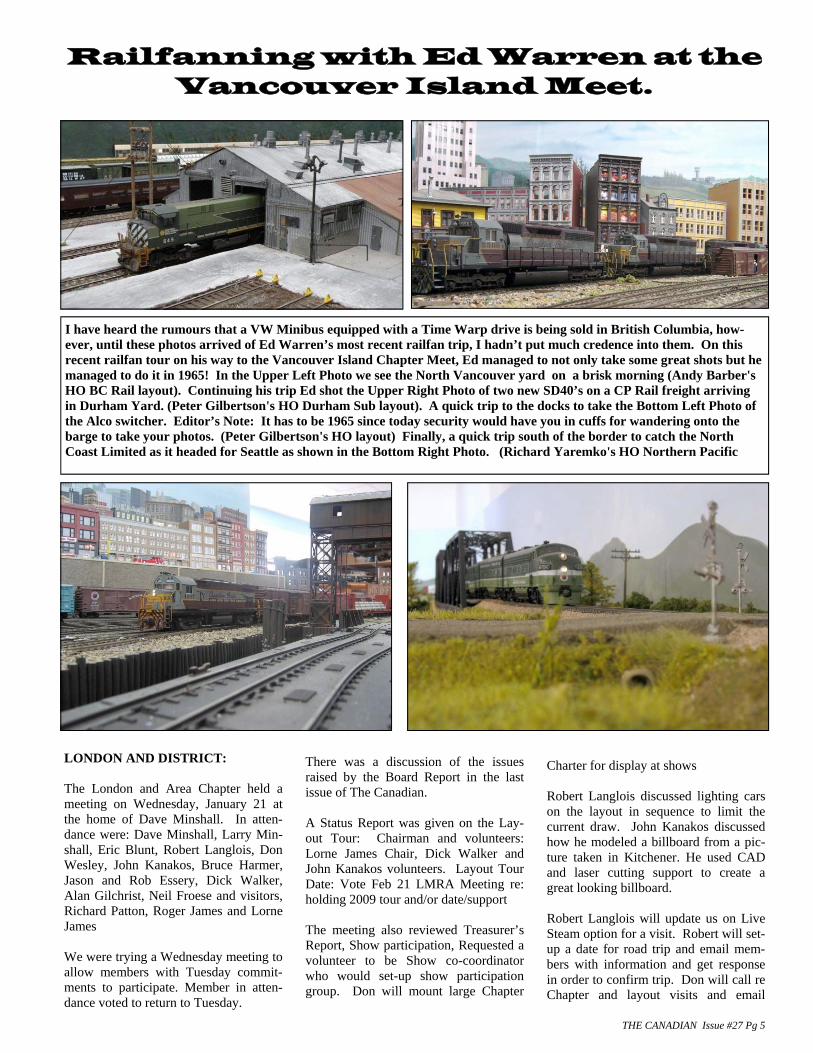
VANCOUVER ISLAND CHAPTER: The Vancouver Island Chapter met on Saturday, January 31, 2009 in the Community Centre in Arbutus Ridge. There were 19 members and 4 guests present. There was a short business meeting with a year end financial report and election of 2009 executive. Denis McWilliams was elected as President, Sterling Stump declared that he was willing to remain as Secretary Treasurer. There was a tremendously informative clinic program arranged by Andy Barber in the morning, a catered lunch, show and tell, and layout tours in the afternoon. Andy gave a clinic on PGE inspection cars and Richard Yaremko gave a clinic on how the Northern Pacific dealt with truck competition in the 1950’s. The layout visits were to Andy Barber’s HO BC Rail layout, Richard Yaremko’s HO NP Montana layout and Peter Gilbertson’s HO CPR Durham Sub layout. The next meet will be at the end of April with possible venues in Nanaimo, Qualicum Beach, or Saanich. Travel distances remain a problem for some members, although car pooling helps. Kudos to Brian Milroy for braving 60 km. of icy roads in coming all the way from Campbell River.
CHAPTER NEWS PAGE
Above Right: Andy Barber gives a clinic on BC Rail track inspection cars at the Vancouver Island Chapter meet, January 31, 2009
Above Left: Tom Byers brought this freelance HO self propelled crew car to the Show and Tell at the VI Chapter meet. The drive is from a Bachman Galloping Goose. There were a lot of entries generating lots of discussion on building techniques.
Centre Left: Bob Thompson brought a kit bashed PGE double door box car to the meet. It was a good example of building up a car to match dry transfers that were on hand.
Bottom Left: Denis McWilliams and Dave Tomljenovich enjoy the outstanding scenery and rolling stock on Richard Yaremko's NP lay-out. Photos by Ed Warren
THE CANADIAN Issue #27 Pg 5
There was a discussion of the issues raised by the Board Report in the last issue of The Canadian. A Status Report was given on the Lay-out Tour: Chairman and volunteers: Lorne James Chair, Dick Walker and John Kanakos volunteers. Layout Tour Date: Vote Feb 21 LMRA Meeting re: holding 2009 tour and/or date/support The meeting also reviewed Treasurer’s Report, Show participation, Requested a volunteer to be Show co-coordinator who would set-up show participation group. Don will mount large Chapter
Charter for display at shows Robert Langlois discussed lighting cars on the layout in sequence to limit the current draw. John Kanakos discussed how he modeled a billboard from a pic-ture taken in Kitchener. He used CAD and laser cutting support to create a great looking billboard. Robert Langlois will update us on Live Steam option for a visit. Robert will set-up a date for road trip and email mem-bers with information and get response in order to confirm trip. Don will call re Chapter and layout visits and email
Railfanning with Ed Warren at the Vancouver Island Meet.
I have heard the rumours that a VW Minibus equipped with a Time Warp drive is being sold in British Columbia, how-ever, until these photos arrived of Ed Warren’s most recent railfan trip, I hadn’t put much credence into them. On this recent railfan tour on his way to the Vancouver Island Chapter Meet, Ed managed to not only take some great shots but he managed to do it in 1965! In the Upper Left Photo we see the North Vancouver yard on a brisk morning (Andy Barber's HO BC Rail layout). Continuing his trip Ed shot the Upper Right Photo of two new SD40’s on a CP Rail freight arriving in Durham Yard. (Peter Gilbertson's HO Durham Sub layout). A quick trip to the docks to take the Bottom Left Photo of the Alco switcher. Editor’s Note: It has to be 1965 since today security would have you in cuffs for wandering onto the barge to take your photos. (Peter Gilbertson's HO layout) Finally, a quick trip south of the border to catch the North Coast Limited as it headed for Seattle as shown in the Bottom Right Photo. (Richard Yaremko's HO Northern Pacific
LONDON AND DISTRICT: The London and Area Chapter held a meeting on Wednesday, January 21 at the home of Dave Minshall. In atten-dance were: Dave Minshall, Larry Min-shall, Eric Blunt, Robert Langlois, Don Wesley, John Kanakos, Bruce Harmer, Jason and Rob Essery, Dick Walker, Alan Gilchrist, Neil Froese and visitors, Richard Patton, Roger James and Lorne James We were trying a Wednesday meeting to allow members with Tuesday commit-ments to participate. Member in atten-dance voted to return to Tuesday.
THE CANADIAN Issue #27 Pg 6
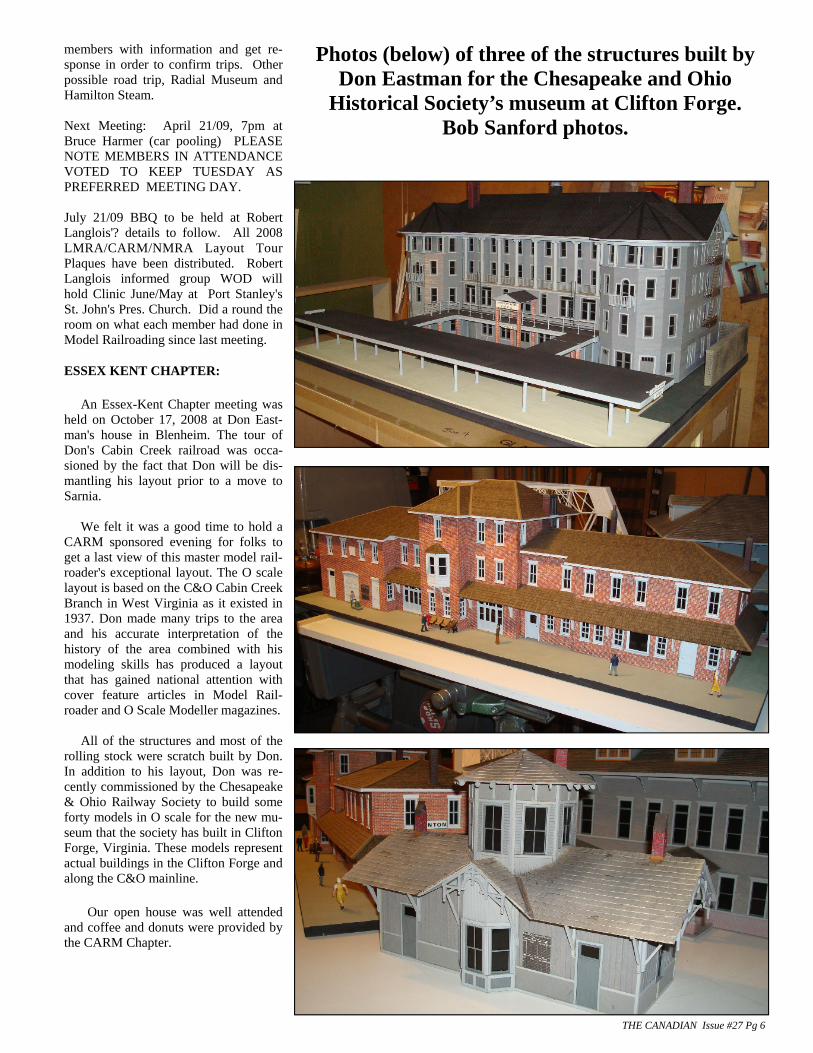
Photos (below) of three of the structures built by Don Eastman for the Chesapeake and Ohio
Historical Society’s museum at Clifton Forge. Bob Sanford photos.
members with information and get re-sponse in order to confirm trips. Other possible road trip, Radial Museum and Hamilton Steam. Next Meeting: April 21/09, 7pm at Bruce Harmer (car pooling) PLEASE NOTE MEMBERS IN ATTENDANCE VOTED TO KEEP TUESDAY AS PREFERRED MEETING DAY. July 21/09 BBQ to be held at Robert Langlois'? details to follow. All 2008 LMRA/CARM/NMRA Layout Tour Plaques have been distributed. Robert Langlois informed group WOD will hold Clinic June/May at Port Stanley's St. John's Pres. Church. Did a round the room on what each member had done in Model Railroading since last meeting. ESSEX KENT CHAPTER:
An Essex-Kent Chapter meeting was held on October 17, 2008 at Don East-man's house in Blenheim. The tour of Don's Cabin Creek railroad was occa-sioned by the fact that Don will be dis-mantling his layout prior to a move to Sarnia. We felt it was a good time to hold a CARM sponsored evening for folks to get a last view of this master model rail-roader's exceptional layout. The O scale layout is based on the C&O Cabin Creek Branch in West Virginia as it existed in 1937. Don made many trips to the area and his accurate interpretation of the history of the area combined with his modeling skills has produced a layout that has gained national attention with cover feature articles in Model Rail-roader and O Scale Modeller magazines. All of the structures and most of the rolling stock were scratch built by Don. In addition to his layout, Don was re-cently commissioned by the Chesapeake & Ohio Railway Society to build some forty models in O scale for the new mu-seum that the society has built in Clifton Forge, Virginia. These models represent actual buildings in the Clifton Forge and along the C&O mainline. Our open house was well attended and coffee and donuts were provided by the CARM Chapter.
THE CANADIAN Issue #27 Pg 7
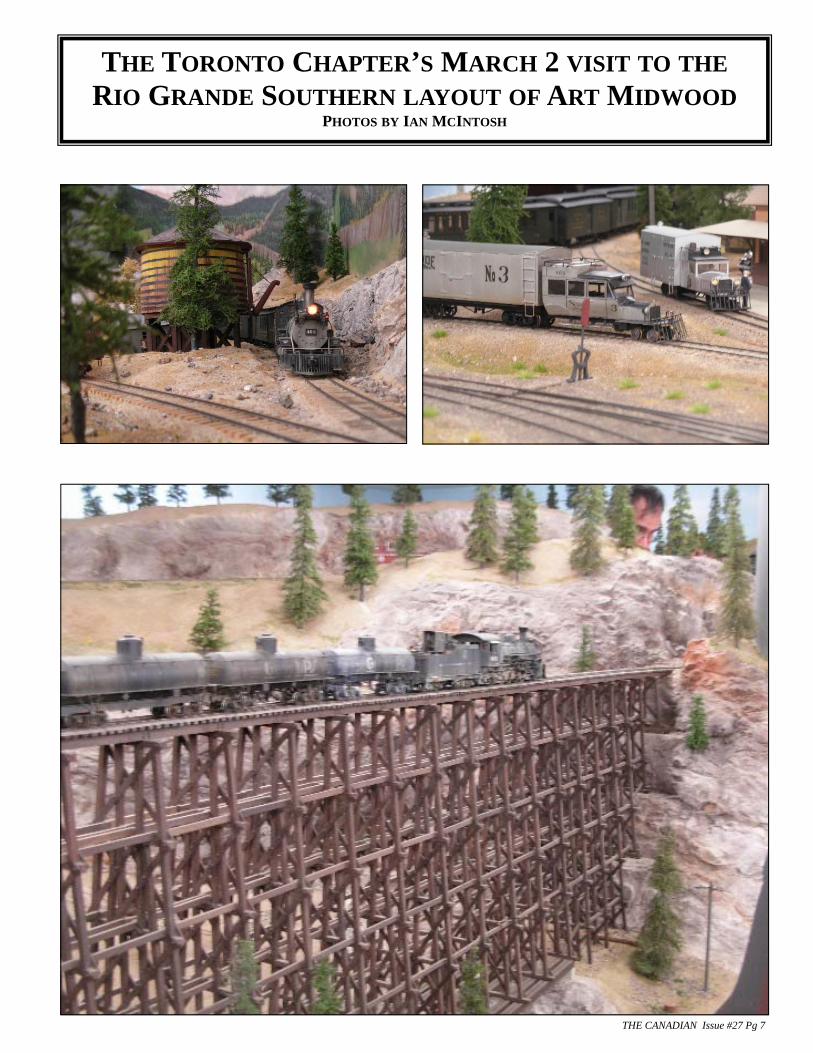
THE TORONTO CHAPTER’S MARCH 2 VISIT TO THE RIO GRANDE SOUTHERN LAYOUT OF ART MIDWOOD
PHOTOS BY IAN MCINTOSH
THE CANADIAN Issue #27 Pg 8
SUPPORT
CARM SPONSORS

THE CANADIAN Issue #27 Pg 9
SUPPORT CARM SPONSORS

THE CANADIAN Issue #27 Pg 10
Maple Leaf Railway Maple Leaf Railway Maple Leaf Railway
Above: A local B&B is a popular destination. The turret creates an interesting architectural feature of the structure and no doubt sports a fancy cost for renting that room. Judging by the shiny and expensive cars in the parking lot, this is not an inexpensive establishment
Above Right: A Maple Leaf Rail Road passenger train on the main line loop slowly approaches the Kings Hill Sta-tion. The station is scratch built using a variety of tech-niques and materials. The same is true of the details that adorn the station platform . Bottom Right: Fed by cool mountain run-off, Bear Creek cascades through the route of the MLRR causing the rail-way to erect several expensive bridges, one of which can be seen to the rear in the centre of this image. Bear Creek also provides an opportunity for fishermen and natural-ists who frequent the Boat House and fishing raft.
Above: A separate trolley line operates between the termi-nal towns of Nook and Cranny. The single truck, 4 wheel, double ended trolley passes Central Auto Works Texaco gas station replete with glass gas fill pumps. The single shingle roof was originally attached to a roof elsewhere!
Below: Warren T. Voyd Harley Davidson shop must be an active retailer judging by the stock of motor cycles on the property. That’s Warren in the white t-shirt taking a new model out for a trial run.

THE CANADIAN Issue #27 Pg 11
My neighbour here in Ontario has re-cently purchased a wintertime property in Zephyrhills, Florida. I had the oppor-tunity to visit him and he and I went for a casual walk. I was surprised to see one of his neighbours had a marvelous G Scale model railway in his front yard. The neighbour, Brad, approached while we taking in the view.
Brad was introduced to model railroad-ing as a youngster by his father who, while convalescing in hospital, con-structed an HO caboose. This led to a basement layout. As an adult Brad served in the RCAF, a career choice that was not compatible with model railroad-ing. Posted to Panama City, Florida, late in his career, he was introduced to G Scale railroading. He had visited the now defunct G railway at Cullen Gar-dens in Whitby but it was a visit to the German Pavilion at EPCOT, which in-spired his entry to G Scale model rail-roading. He exhibits the railroad on a daily open house basis and not just for special occasions. The hazards of branches and leaves falling from three large oak trees, squirrels, armadillos digging holes, and frequent Florida tor-rential rains are all part of the hobby. He operates it on the "retirement sched-ule" which is whenever he wants to.
The Maple Leaf Railroad began as a Florida retirement project, more or less on a capricious note, a small Christmas display that got out of hand. Thereafter Brad followed the time honoured DAYGO principle of model construc-tion: Design As You GO. As such the MLRR is a fictional railway based on prototype appearances of the 1950s and 1960s that combines realistic modeling and landscaping with a touch of whimsy. The scale is G but there is a mixture of LGB (1:22.5), Aristocraft (1:29) and scratch built structures (1:24). The farm scene is modeled in 1:32 scale due to the availability of farm equipment in that scale. There are three separate operating lines.
The Maple Leaf Railroad runs from Kingshill station through farmland to the town of Cranny and continues beyond Necklace Lake and over Bear Creek. The lake received its name because after
installing the pond, the surrounding rocks resembled Wilma Flintstone's necklace. A separate trolley line shuttles passengers from Nook to Cranny. A subsidiary of the MLRR, the Seven Dwarf's Mining Company operates a short line railway. In total there is ap-proximately 300 feet of track covering 1200 square feet of space.
The track is primarily Aristocraft with rail joiners screwed to each segment of track with jumper wires attached to the bottom of the track to provide additional continuity. This method has provided problem free operation since 2001. The track is sitting on loose ballast (block screening) from the local quarry. MRC provides motive power while Aristocraft throttles provide control. Most of the rolling stock is stock, with the exception of a few scratch built specialty cars. One car is a MOW leaf blower, which is a modified "Dust buster".
Brad enjoys the modeling part of the hobby more than the actual operation. Scratch built structures display both Brad's imagination and modeling skills. The structures, figures and vehicles are exposed to the elements on a 24/7 basis, so he has chosen materials and adhe-sives carefully. A master at out-of-the-box thinking, Brad employs a vast array of unusual resources in creating items for his railway. Plywood, Styrofoam, foam insulation and concrete provide building base materials. Pop cans ex-truded through a paper roller provide corrugated roofing material. An old Bar-B-Que grill allied with discarded curtain track transform into a bridge. Roads originally built with gravel col-lected too many leaves so the roads have been paved with roofing shingles. A farm fence was constructed from the plastic holders found in boxes of Christ-mas tree lights. Need a water spout for the water tower? Try using a Bic shaver handle. How about a roof for a barn silo? Try using a toilet tank float. Empty toothpaste tube tops become lampshades. His parts box is bottom-less, but his garage is cleaner. His rail-roading is on a retirement budget, and as such is a challenge to his imagination.
Insightful landscaping provides the
viewer more than 25 separate scenes, each vignette providing subtle detail to encourage repeat visits. Amongst these are a dinosaur dig, a tree house, a shoe-house and several Disney characters. Visitors are encouraged to find Waldo and Mickey Mouse. An Inukshuk stands vigilant over the railway.
Brad uses a variety of local vegetation including dwarf holly, boxwood, mosses, sedums and annuals to provide 'tree' texture to the scene and chives, thyme, parsley and rosemary are grown on the farm scene to provide 'ground foam' for the railroad and variety for his wife's culinary prowess. Bonsai tech-niques have been used to keep the plants in scale. When Brad returns to spend the summers in Kingston, he packs away the details of the village, but leaves the track in place. The Florida summers are subject to hurricanes and heavy rains, providing an ideal environment for weed growth. Upon his return he is greeted by shoulder high non-prototypical vege-tation. After a few hours work, with Susan's help, his railway is back in op-eration.
Equally important to the MLRR land-scaping is its rockwork. Florida is known for sand, not rocks; therefore to build Necklace Lake, the rocks had to be non-native. Brad has collected stones during various trips and visitors have donated some. Stones from Alaska to Key West, from the top of Pike's Peak to the bottom of the Great Salt Lake, from NORAD's underground complex in North Bay to the beaches at Dieppe, from all across Canada, Europe and the Caribbean are part of the layout scenery. Stones from the beach at Dieppe France create a memorial panorama honouring the Canadians who landed on that beach in 1942. The rocks for the Inukshuk are from Greenland. My visit was all too short, but perhaps Brad will share some of his modeling techniques with readers in a future article for The Canadian. Brad also has a N scale layout in King-ston, Ontario. This was also built on a budget. And a future issue will showcase that layout.
in Florida:in Florida:in Florida: Article & Photos by Ted RafuseArticle & Photos by Ted RafuseArticle & Photos by Ted Rafuse
THE CANADIAN Issue #27 Pg 12
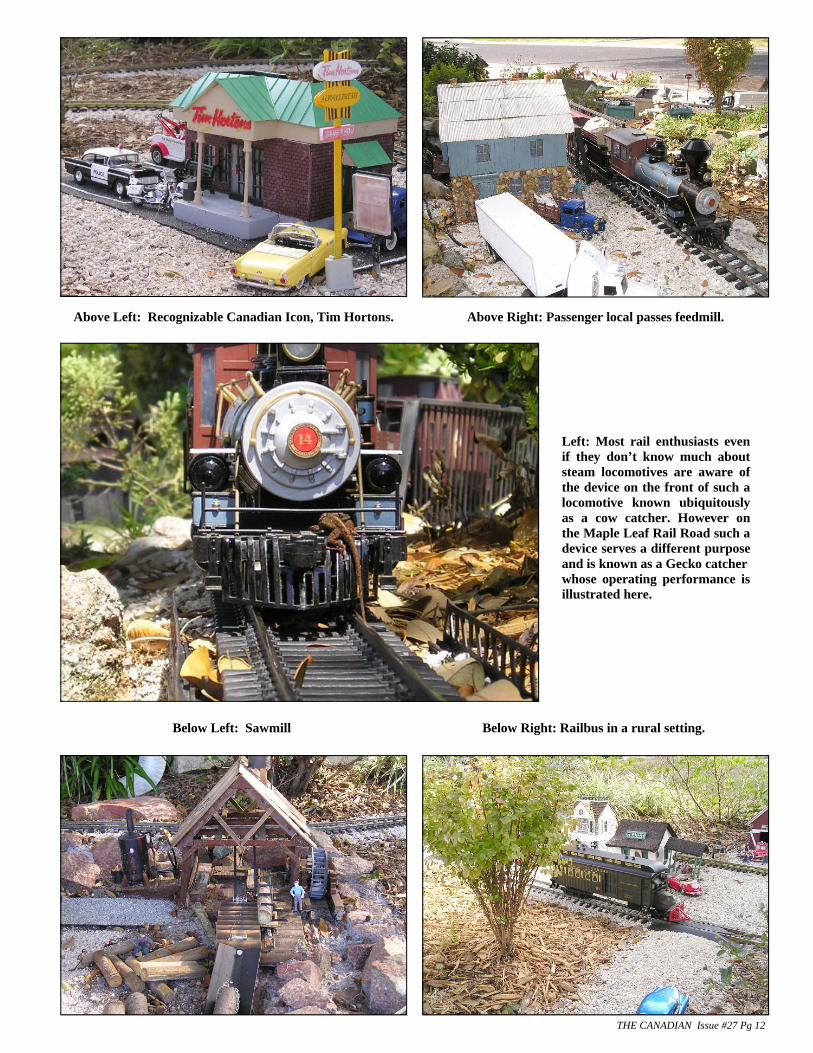
Left: Most rail enthusiasts even if they don’t know much about steam locomotives are aware of the device on the front of such a locomotive known ubiquitously as a cow catcher. However on the Maple Leaf Rail Road such a device serves a different purpose and is known as a Gecko catcher whose operating performance is illustrated here.
Below Left: Sawmill Below Right: Railbus in a rural setting.
Above Left: Recognizable Canadian Icon, Tim Hortons. Above Right: Passenger local passes feedmill.
THE CANADIAN Issue #27 Pg 13
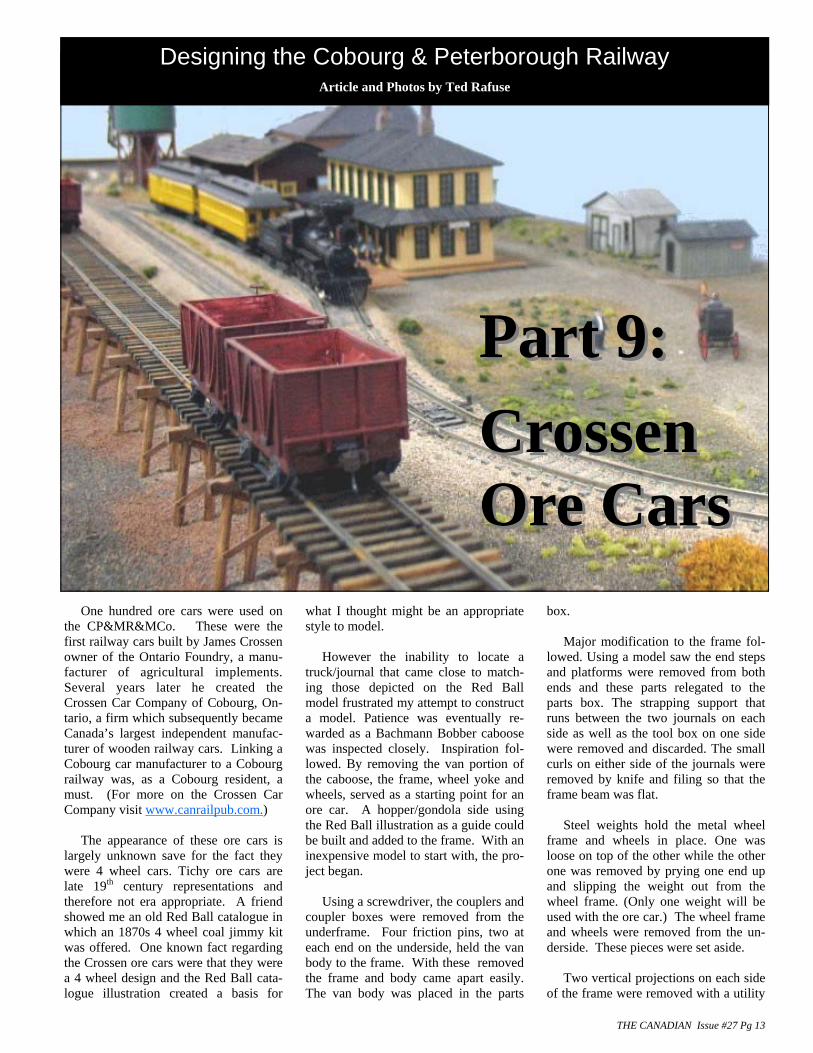
One hundred ore cars were used on the CP&MR&MCo. These were the first railway cars built by James Crossen owner of the Ontario Foundry, a manu-facturer of agricultural implements. Several years later he created the Crossen Car Company of Cobourg, On-tario, a firm which subsequently became Canada’s largest independent manufac-turer of wooden railway cars. Linking a Cobourg car manufacturer to a Cobourg railway was, as a Cobourg resident, a must. (For more on the Crossen Car Company visit www.canrailpub.com.) The appearance of these ore cars is largely unknown save for the fact they were 4 wheel cars. Tichy ore cars are late 19th century representations and therefore not era appropriate. A friend showed me an old Red Ball catalogue in which an 1870s 4 wheel coal jimmy kit was offered. One known fact regarding the Crossen ore cars were that they were a 4 wheel design and the Red Ball cata-logue illustration created a basis for
Part 9:Part 9:
CrossenCrossen Ore CarsOre Cars
Designing the Cobourg & Peterborough Railway
Article and Photos by Ted Rafuse
what I thought might be an appropriate style to model. However the inability to locate a truck/journal that came close to match-ing those depicted on the Red Ball model frustrated my attempt to construct a model. Patience was eventually re-warded as a Bachmann Bobber caboose was inspected closely. Inspiration fol-lowed. By removing the van portion of the caboose, the frame, wheel yoke and wheels, served as a starting point for an ore car. A hopper/gondola side using the Red Ball illustration as a guide could be built and added to the frame. With an inexpensive model to start with, the pro-ject began. Using a screwdriver, the couplers and coupler boxes were removed from the underframe. Four friction pins, two at each end on the underside, held the van body to the frame. With these removed the frame and body came apart easily. The van body was placed in the parts
box. Major modification to the frame fol-lowed. Using a model saw the end steps and platforms were removed from both ends and these parts relegated to the parts box. The strapping support that runs between the two journals on each side as well as the tool box on one side were removed and discarded. The small curls on either side of the journals were removed by knife and filing so that the frame beam was flat. Steel weights hold the metal wheel frame and wheels in place. One was loose on top of the other while the other one was removed by prying one end up and slipping the weight out from the wheel frame. (Only one weight will be used with the ore car.) The wheel frame and wheels were removed from the un-derside. These pieces were set aside. Two vertical projections on each side of the frame were removed with a utility

THE CANADIAN Issue #27 Pg 14
projecting nubs above the weight were filed even with the top of the weight and will provide the supports for the floor. Having shortened the car to provide an appropriate length between the jour-nals, a drop door for the floor was con-structed. The cross wise door was made from ESM #2037 Car Siding. It is a scale 4' wide by 6' long with the boards running from side to side. Each side support for the door was made of .020 sheet styrene in a triangular shape with the base 4/ long rising to a height of 1½
knife even with the outside of the frame. Small square ‘posts’ at either end of the sides at the top of the frame were similarly re-moved. The remainder of these projections were filed smooth with the side. Four scale feet from the frame centred between the two wheels was removed. There is a dimple on the inside top of the frame and this dimple was cut out of the frame. This cut removed most of the cast on brake cylinder as well. The coupler support on the bot-tom of the floor was filed flat even with the cross piece. Using liquid cement the two halves were glued together un-derneath with a piece of .040 sheet styrene cut a scale 7' across by 5' wide. Be sure that this place does not enclose the openings for the metal wheel support. The car will be an approximate scale 12½ feet long. Along the length of the side frame is a designed channel. This channel was filled in using scale 2" by 8" Evergreen Scale Models (ESM) #8208 strip sty-rene. No attempt to fill in the resulting longitudinal lines was made as this would simply represent built up framing members in the finished car. While this assembly was drying 4 scale feet was cut from one end of the weight. The weight was test fit into its position tabs. The
feet. Three strips of ESM #8103 1x3" styrene represent the iron strap hinges of the door: one in the middle and one towards each end were added to the doors in a longi-tudinal plane. These supports ex-tended the full length of each door. When the glue on this sub assem-bly was dry it was glued to the base of the car centred between the axles and the sides of the car. Un-fortunately no description of how this might have operated is known to me so no additional hardware on the car was modelled. The ends were worked on next and the first step was a non-prototypical installation. When constructed by Crossen this car would have had link and pin cou-plers fixtures. Not wanting to use this system on the modular layout I opted for a ‘newer’ system. A KD
coupler box with the mounting ears re-moved, with McHenry couplers inserted, was glued in place on the under side of the floor centred on each end. Slight shimming between the top of coupler box and the cross piece may be neces-sary to raise the coupler to its proper height. Check this with an appropriate gauge. Be aware that once the coupler box is glued in place the wheel holder cannot be removed without removing the coupler pocket. The end frame, with the coupler box
Above: In 1980 an original 1867 CP&MR&MCo Crossen built ore car was extracted from the Trent River. This is the only image of a Crossen car known to the author and this reveals little of its construc-tion beyond the fact that it had four wheels. Parks Canada somewhere in one of its warehouses has stored this car since its elevation to dry land.
Below Left: When first contemplating the construction of a mid 19th century ore car, this Red Ball Models catalogue ad was the only reference available. It became my guide for constructing a Crossen car. Below Right: The friend who showed me the Red Ball ad acquired a model of the coal jimmy. This provided me with addi-tional inspiration to attempt construction of a representative Crossen ore car for the modules. What most appealed in the model were the unusual journals and these caused me to search long for an appropriate model with this feature.

THE CANADIAN Issue #27 Pg 15
installed, was completed to represent a continuation of the sides. These ‘wooden’ frame ends were fashioned from ESM #147 .040x.156 strip styrene which was scribed in the centre, a scale 7¼’ length was cut, filed and test fitted. An opening was cut in this piece and filed in the centre to fit around the coupler box. The depth of the opening is deter-mined such that the frame mates with the bottom member of the floor and clears the coupler pocket. When finished this strip should be even with the bottom of the side frame. When all fit properly, the new end frame was glued in place. Journal straps were installed on both sides of the car using scale 1x6 inch strip styrene (ESM#B106) cut 16 feet long. This was centred on the underside of the two side journal boxes and glued in place and allowed to dry. When firmly set, the ends of the straps were bent upward to the end of the side frame and glued in place with about a scale 9" extending up on the end frame. Excess styrene was cut/filed when the glue was dry. With the end completed the frame assembly was set aside. The ‘ore box’ was constructed using ESM #2050 V-grooved siding styrene. The long walls are 12½ feet meas-ured to the length of the side frame. The ends are 8½ feet wide less two widths of the siding material. The height of the box walls is 5 feet. Before cutting the sides the grooved styrene was turned over and using a dental pick and a ruler lines were scribed to suggest the inside board by board con-struction. The four pieces were then cut and glued together, with liquid plastic cement, to create a rectangular box. A sheet of scribed styrene was cut for the floor with the scribe running the width of the car. The floor was glued to the plas-tic nubs filed earlier on the top of the frame assembly. This allows the floor to rest on top of the wheel/weight assembly. At each inside corner a 4x4" styrene post (ESM#B404) was glued above the floor to the top of the car. External braces provide a unique appearance to the car. Five 4x4 inch styrene posts 5½" long were glued to the out-side of each side at each end, one in the middle, and one each equidistant between each of the panels formed by the first three posts. These posts extend below the car side to the top of the second longitudinal framing member, the one filled in earlier. From the bottom of each post above the middle of each panel a 4x4 inch post was angled to the end of the side and to the middle post of the side. Rectangular gusset plates of scale 1x6 inch styrene strip (ESM#B106) were cut 1¼ scale feet long to fit over the joint near the wheels and at the end middle top joint as well. Two gussets each a scale ¾ feet long were added to each end at the top joint. A 1x6" cap board was attached to the top of the sides to cover the sides and posts. At the brake end, a scale 2x8" styrene walkway was glued to the car above the coupler pocket. Four 4"x4" styrene sup-ports, each ¾ foot long were placed on the 4 end braces as a support for the walkway. The bottom of the support posts and the bottom of the walkway supports are even. A brake wheel platform of 2x8" strip styrene was glued between the two left most posts was similarly attached one foot below the top side and braced similarly to the bottom walkway.
Above: The starting point for this project was a Bachmann bobber caboose. The intact model, painted silver by a previ-ous owner, is in the upper left of the photo. The ladders were removed, the cabin lifted, the weights removed, and the cou-plers disassembled prior to beginning the major alterations.
Above: The step and platforms have been removed from each end of the frame, the frame has been shortened in the centre by 4 scale feet and the two resulting halves of the frame have been glued back together. The gray area in the bottom of the frame is a joint of .040 styrene and the white along the frame is a channel filler strip of scale 2x8" styrene strip.
Above: With the basic box of the ore car completed, scale 4" square styrene strips were added to simulate wood bracing. All braces extend below the bottom of the box and will rest on the top beam of the frame. Three of the five gussets made from scale 1x6" styrene strip are shown.

THE CANADIAN Issue #27 Pg 16
When all was dry #76 hole for the brake staff was drilled. The staff was made from brass wire in my parts box. Attached to the top of the shaft is a brake wheel(Tichy) also from my parts box. Any old style brake wheel will provide the illusion. On the opposite end a similar walkway was installed minus the brake staff and wheel.
Due to my lack of knowledge several features on the model car have are not modelled. Reference was made to the few Civil War era images available to me for guid-ance, but these few images lacked car detail. Although a brake wheel is represented on the model, no representation of the brake system is made. I suspect that some type of beam brake system was used but what its appearance was is un-known to me.
No grab irons or stirrups are applied to the model as again in the Civil War images available to me these features were indistinct or non-existent. On one flat car that gave detail it was obvious that no grab irons or stirrups were attached to the car. If any reader can confirm the appearance of safety appli-ances on mid 1860s freight cars, perhaps they could share that information with all of us in a letter to the editor.
All sides of the ore car were brush painted Floquil Polly S mineral red. The gussets, frame and underbody were painted
Polly S weathered black. When dry the journals were weath-ered with a rust mixture. The box was set on the frame and a successful test run followed. I chose not to glue the floor to the frame but should you wish to do so the four lugs project-ing up from the floor will allow a liquid cement bond to be made.
On the layout, the unusual Crossen inspired ore cars fre-quently initiate a conversation with observers interested in their local railway heritage. Finished cars operating on the layout can be seen in the photo on Page 12.
Above: To the left the brake end of the car has its bracing, wooden walkway, brake staff platform, brake staff and brake wheel in place. To the right the fabricated drop doors on the bottom of the car floor are illustrated. The couplers and end framing have yet to be added.
Above: All side bracing, gusset places and added frame beams are in place on the finished but unpainted side. Left: All end braces, the walkway, the brake staff and wheel and brake staff platform support are in place. Couplers and the end of the car frame have yet to be added.. These additions are de-scribed in the text. Below: The car underframe.

THE CANADIAN Issue #27 Pg 17
Facets of the module still require attention. On the Cobourg module the curved end of a roundhouse needs to be constructed and placed to the west end and projecting from the divider. The freight shed depicted in the images at Cobourg harbour is borrowed from my home layout; a permanent structure for the layout needs to be built and will be placed immediately to the west of the station. (The original was opposite the station and slightly west, but this ar-rangement is not possible on the mod-ule.) Lastly, additional small wooden structures behind the station will be built to complete the scene. More people and horse drawn vehicles will enhance the ‘activity’ on this module. Several months after the station at Harwood was completed, a hitherto un-known photograph of the station on site in 1896 surfaced. This photo verifies the shingle roof, the board and batten siding, the placement of some windows and the location on the west side of the track near the shore line. However the build-ing appears never to have had paint ap-plied, it does not sit on a stone founda-tion, there are three ‘people’ sized doors along the east facade, and a balcony projects from the second storey on the north side. For those who think the re-search is done at a given point, a rude awakening will often occur. To be accu-
The modules are removed from the frame where all has been stored in my basement. With the modules and scenic divider removed, the frame is placed into the back of my rather elderly SUV with the rear seats folded down. Next the modules and scenic divider are in-serted into the frame. Boxes containing the power pack, rolling stock, buildings and repair/tool kit are placed alongside the module frame. Once at the display site the entrance to be used is determined. Before unload-ing a check is also made to ensure that sufficient tables are set aside for my purpose and that an electrical hookup is available. With help from members of the Cobourg Model Railroaders, set-up takes but 15-20 minutes to accomplish. A test run of the locomotives is made to ensure that all is in working order. The operator of the display Cobourg & Peterborough Railway is my seven-year old (at the time of writing) grand-son. He arrives half an hour before the doors are opened to the public and test runs the trains again. Once the show starts he is in charge of operation (barring any problems) while I am avail-able to the public to answer any ques-tions relating to the modules or the rail-way history they portray.
Preparation for the display at the Co-bourg Model Train Show (or for any other display) commences several days in advance. Several hundred information sheets pertaining to the history and fea-tures of Cobourg’s Railways are printed and ready for the show. These pam-phlets, researched, written and printed by myself, are distributed to those view-ers with a more involved interest in Co-bourg’s railway history. My telephone number and e-mail address are printed on these flyers to encourage people to contact me with any information or pho-tographs they may have of local rail-ways in particular or of railways in gen-eral. The week or so prior to the Cobourg Model Train Show the local press are encouraged to take photographs of the layout and conduct an interview to ac-company a pre-show article. If this is done, the modules are set up in my din-ing room. Often the local radio station conducts an in studio interview to publi-cize the Cobourg Model Train Show in conjunction with a draw for a free train set. This provides me with an opportu-nity to mention the layout. The day before the modules are set up they and the carrier are loaded into my vehicle. Often one of my rail bud-dies assists to make the effort easier.
Designing the Cobourg & Peterborough Railway
Article and Photos by Ted Rafuse
series finale:series finale: transport & displaytransport & display
The author’s two grandsons, Ul-tan and Shay, check the opera-tion of the modules prior to the doors opening to the public at the 2007 Cobourg Model Train Show. Shay, the eldest at 7, op-erates the layout while the show is underway and the author of the series talks to the general public. To the dismay of the three year-old Ultan, his mom, after viewing the rest of the show, takes him home!

THE CANADIAN Issue #27 Pg 18
rate, a second Harwood station will have to be built. The Harwood station removed about 1910 to Roseneath has recently been torn down but the lumber saved and stored for future erection at Harwood. The Harwood Restoration Society re-ceived the old structure as a donation so long as it could be removed from the site. The material is currently stored and the Society is currently working towards erecting a ‘new’ station using the origi-nal 1850s internal lumber. Additional ore cars need to be con-structed to sit on the Cobourg harbour trestle and to be part of the freight train. Several on hand Juneco Scale kits will be modified to construct 28' boxcars and 30' flat (platform) cars. These lengths are more in keeping with the historical era depicted. Fearing a mechanical breakdown of a locomotive while the modules are on display, a back-up Mantua or Rivarossi 4-4-0 will be purchased at a future flea market or train show. New on board sound systems are becoming prevalent and this feature would be an interesting feature by which to regale the general public. Additional venues to display the module are numerous. The layout to date has appeared at the Port Hope History Fair and at Northumberland Mall’s heri-tage days exposition. Several local ser-vice organizations have expressed inter-est in the modules as a topic (speaker) for their meetings. Local elementary schools which have a transportation component as part of their curriculum may present another opportunity for display. All of these situations are an opportu-nity to extend the knowledge of railways and model railroading to the general public. Perhaps this article can inspire someone to create another example of a module that reflects a facet of their local railway history. If so, take photographs and record your efforts and keep in con-tact with the editor of The Canadian. Thank you for your patience with A Portable Layout Planned for Train Show Display.
Photo Above: The carrier, the modules and the backdrop/divider loaded in the back of my vehicle and ready to be transported. Although not shown in this illus-tration, there is ample room for the few boxes of rolling stock, structures, trans-former and other necessities to accompany the layout. The window will shut with room to spare. Before the next showing I will build a 6" extension to the legs which will allow the transporter to be raised above the wheel well projection which will allow use of the right rear passenger seat to be used.. Photo Below: During the course of the day many people focus their attention on the operation of the modules or on reading the information text or viewing the images on both sides of the divider. Witnessing the interest of the public with the display is the reward for the author in creating A Portable Layout Planned for Train Show Display.

THE CANADIAN Issue #27 Pg 19
History:
In the early 70’s the Bonnyville Sub-division was still quite active. Freight and passenger service served the region with everything from 36 foot outside braced grain boxcars to newer 50-foot boxcars and tank cars going to Canadian Forces Base Cold Lake, to RSD3’s headed into Grande Center. At that time I hadn’t even seen a modern cylin-drical hopper but I was intrigued by both the new design and colour. My beat up old Pontiac and I chased trains into St. Paul, Vegreville and Lloydminster just to get the first photos of these shinny new cars. M y o w n new railway got under way about that time and for over 30 years it has followed those same rules. A small piece of prairie railroading frozen in time. Government of Canada ‘Trudeau hoppers’ gradu-ally phasing out heavy old wood and steel boxes.
What’s out there:
In the early years I modeled in N scale and there was nothing available ‘off the shelf’. Model-
lers would bash together cars of the ap-propriate shape and size with little or no regard to counting rivets. Hey, we were just happy to run the first long, colour-ful, modern grain trains. As time went by of course wonderful highly detailed models came on the mar-ket. First in HO of course and then fi-nally in N scale and O scale. I was buy-ing my second dozen or so grain hoppers in early 2001 when I was struck by model trains that had gravity. It felt as though I was back in 1972, bashing just about everything I needed. Back to ac-
tually having fun again.
The car:
The cylindrical hopper is an icon of the Canadian West. It has become as prevalent in calendar photos as the Ca-nadian Northern 3rd Class station. In a little over 20 years there were over 30,000 of these cars plying the western grain roads but there were none on the Winter Valley. American and European model makers opted for the typical ACF design. LGB and USA Trains put out cars in various Wheat Board, Govern-
ment of Canada, Saskatchewan and Alberta paint schemes and while I’m no perfectionist, I just couldn’t bring myself to buy and run what was just too obviously wrong.
The construction:
My son got me started on this kitbash. He bought me an LGB ACF type three bay hopper and because the top and sides were separate parts, he quite easily con-verted it into a pretty darn good cylindrical type. He gave me my
Government of Canada Cylindrical HopperGovernment of Canada Cylindrical HopperGovernment of Canada Cylindrical Hopper Article and photos by David WintersArticle and photos by David WintersArticle and photos by David Winters
A 1/29th scale beautyA 1/29th scale beautyA 1/29th scale beauty
My N Scale Hopper Fleet

THE CANADIAN Issue #27 Pg 20
ability pulling 60 to 80 pounds of train by only sacrificing a fraction to scale. Also, the 930 type is a nice red/brown colour. 1/8th inch thick styrene shims were installed below the frame. This lowered the coupler center to properly mate with my home made Kadee height gauge.
The body:
A completely new body had to be applied to the old frame. My plans were taken from a February 1994 Model Rail-roader magazine. They had been printed in S scale (1/64th scale) so that needed to be addressed. A local print and copy shop used them to produce full 1/29th scale drawings at very little cost. This would also come in handy at decal time. The construction material would be white .030 styrene sheet or heavier. Four foot by eight-foot sheets are avail-able at most sign shops for next to noth-ing. Interior Paint and Plastics supplied mine for $16.00 CDN. I had to roll it
into a tight package just to get it home in the car. The cor-rectly shaped ends were lami-nated for strength and detailed with common Evergreen stock from the hobby shop. A solid support structure would be required on the inside of the ‘tank’ to define the proper shape and give strength to the body. I wouldn’t be picking the car up by the body like I did in smaller scales but still…. These were made from ¼ inch plywood and glued and siliconed onto the frame between each hopper.
I found the best way to ‘lock’ the shell over the frame was to Dremel out a groove along the inside between the frame and the hoppers. After much cutting and trimming I had a single sheet of styrene that would set down into the groove on one side, wrap tightly over the wooden supports and snuggle down into the groove on the other side. It would also fit tightly over the ends with little or no gaps. Once I was satisfied with the fit I applied sty-rene cement along the edges and ends and silicone over the wood before roll-ing it into place for the last time. It worked!!
A little trick I was told about on line. If you want to simulate a weld line (and there were obvious weld lines on the prototype) you just have to cover the surface with masking tape leaving a very narrow space between the strips. About .5mm works for me. I applied a running bob of airplane glue to the small gap, let it just dry, and peal off the tape leaving a perfectly straight ‘weld’ on the
Saskatchewan Roughrider car for my birthday and the real fun began. (see photo next page)
The frame:
The frame on the USA Trains car is far more diffi-cult to deal with but I chose this model for the ‘bash’ because (a) it had four beautifully detailed and working hoppers and (b) it was, unlike the LGB model, the correct length. Give or take a couple of inches. Close enough for me any-way. I removed the end frames and all of the brake gear and put them aside. Both would have to be sig-nificantly modified. More on that later. The problems developed when I began carefully cutting the ACF container off the frame because the USAT hoppers are correctly molded above the frame on the underside of the car. That meant I had to do some cutting on the inside. The easiest way to accomplish this was to cut off the sides about an inch above the frame and therefore above the tops of the hoppers. Then I used a Dremel tool to cut around the hoppers as well as remove the ACF style ends.
The couplers:
The USA Trains truck mounted cou-plers are wonderful, well designed and they will last forever. But I had long ago decided to use body mounted Kadee couplers on all my engines and rolling stock. Two sizes are available in my chosen scale and I use the larger of the two feeling I can get a little more reli-
Prototype of the LGB Roughrider car that my son bought for
Frame of USA Trains car and drawings. Frame with woods supports and ends in place.

THE CANADIAN Issue #27 Pg 21
surface. The car I was building had eight welds on each side. Paint was not going to cover them completely and that was good. The brakes: Photos of the prototype B end, and the examination of an HO model I purchased for this job, show the ACF car is significantly different from the cars built in Canada no matter who did the build-ing. The tank and lines had to be reworked and new tank added to the mix. The always turquoise air brake valve had to be moved to the side. The angle iron structure on the USA Trains model was ‘cut off’ at the top corners as in the ACF prototype. Probably for clearance reasons not encountered on the open prairie. That had to be rebuilt into the familiar square shape using Evergreen material. I did not move the inside support for the brake wheel assembly over to the centerline of the car. This extra work would add nothing to the finished car. In fact, as I wasn’t working with steel or brass, it would have just been a weak spot I didn’t need. The roof walks: The roof walk on the ACF model was beautifully done and so I just couldn’t replace it with something else even if something else were available. The walkway shape was wrong at the ends due to that original notched corner issue but I used the ‘over the coupler step plate’ that came with the model (same material) to fashion the correction at each ladder and then used only similar material to replace the step. The hatch covers were completely wrong on the ACF model so I had to scratch build new ones. These were often interchanged in prototype service so colour and style became a de-lightful mix. I built both Landreth and Apex types for my hopper. Two silver and one salmon coloured. The paint and decals: As I hinted at earlier, the decals were going to be a problem. Depending on what 1/29th scale decals were still available I could be finishing with a standard, salmon coloured Government of Can-ada hopper (fist issue) or the aluminum and yellow light weight branch line model. Although I had built the thee-hatch aluminum variety. All gone. No supplies left. The best I could do was a set of S scale dry transfer CDS products. Good for me because I’d used this product in the past and still used it on all my rolling stock but how to ‘scale up’ a dry transfer? The best I could do was apply the dry transfer to white paper and have it blown up to 1/29th scale by the same people who did my drawings. Easy. Then I transferred this new larger pattern onto clear decal paper using my own copier resulting in an accurate G scale water slide decal. Two thin coats of Microscale liquid decal film and I was ready to apply them to my yellow panels. Operation: Now the first of the new hoppers have arrived on the Winter Valley and they draw quite a bit of attention. Some mechanical and some political. But they’re going to be a real blessing around here come harvest and we no longer have to shuffle around half full boxcars with square wheels and bad brakes. And that big pile of grain doors can be sent of to the town dump. (Photos of finished car can be seen at beginning of article and on front cover.
Above and below: Prototype car end details.
Above: Model car end details.
Below: Decals
THE CANADIAN Issue #27 Pg 22
of Aberfoyle. 10 am to 4:30 pm Full direc-tions and information on website at www.aberfoylejunction.com Ontario, Stayner, May 2: 15th Annual Nottawasaga Model Railway Club Auction. St. Anthony’s Parish Hall, Cedar St. and William St. 11:00 a.m. to 4:00 p.m. Open for consignments 8:30—10 a.m. Admission $4. For information call Bill Payne CARM #347 (705) 429-2762 Dolf Roelofsen NMRA #111211, CARM #251 (705) 445-7317 Ontario, Stratford, June 6: Stratford Rail-way Heritage Show, Stratford Rotary Com-plex, McCarthy Road. 10 am to 4 pm. Ad-mission $2, children under 12 free. Contact William Bickley 519-271-4088 or [email protected] British Columbia, Port Alberni, June 13: First Annual Logging Modellers Meet. McLean Mill National Historic Site, Pt. Al-berni, BC. Contact Ken Rutherford (250) 724-4698 or [email protected] Ontario, Ancaster, November 15: TH&B Flea Market, Marritt Hall, Ancaster Fair-grounds, 630 Trinity Road, Ancaster. 10 am to 3:30 pm. Admission $5 children under 12 free. Contact John Henwood 905-335-9112
British Columbia, Nanaimo, April 5: Nanaimo Train Show, Bevan Park Recrea-tion Centre, 2300 Bowan Rd, Nanaimo. 10 a.m. to 4 p.m. Contact Rick Lord, [email protected] or Ken Rutherford (250) 724-4698 [email protected] Ontario, Schomberg, April 18: The Nar-row Gauge Madness Gang presents the Fourth Annual Ontario Narrow Gauge Show, Saturday April 18th, 2009, 10 a.m. 'til 4 p.m. at the Schomberg Community Hall, 325 Main Street, Schomberg, Ontario, Can-ada. Half hour north of Toronto off Hwy 400. $10 advance/$15 at the door. Narrow gauge layouts, clinics, contests, model dis-plays and vendors. Canada's only exclusively narrow gauge show. For more information call Chris 905-939-0694, e-mail: [email protected] or visit the show website at : www.narrowgaugemadness.com Ontario, Whitby, April 18: Pine Ridge Railroaders Annual Open House. St. An-drews Presbyterian Church, 209 Cochrane St, Whitby. 12 pm to 5 pm. N scale layout, HO scale layout and modular Durham Belt Line. Family $5, Adults $3, 12 and under $1, under 5 free. Contact Stephen Pees 905-728-3218 Ontario, Aberfoyle, April 25, 26, May 2, 3, May 9, 10: Aberfoyle Junction O Scale Model Railway Show. Brock Road, Village
COMING EVENTSCOMING EVENTS UPCOMING CARM EVENTS
April 26: Ontario Mid West Chapter: Meeting at the home of Paul Korho-nen, 305 Lakeshore Road N., in Mea-ford, Ontario. April: Vancouver Island Chapter, date and location to be announced. April 21: London and District Chap-ter Meeting at the home of Bruce Harmer. July 21: London and District Chapter barbecue at the home of Robert Lan-glois. Ontario, Lindsay, April 4 & 5: 35th An-nual Lindsay Model Railway Show. Victoria Park Armoury, 210 Kent St. W. Sat. 10 am—5 pm, Sun 10 am—4 pm. Rail and Marine Models, railway modeling clinics for begin-ners. Adults $5, Seniors and Students with ID $4, Children 6 to 12 $2, Children under 6 Free. For information, Wayne Lamb (705) 324-5316 or [email protected]
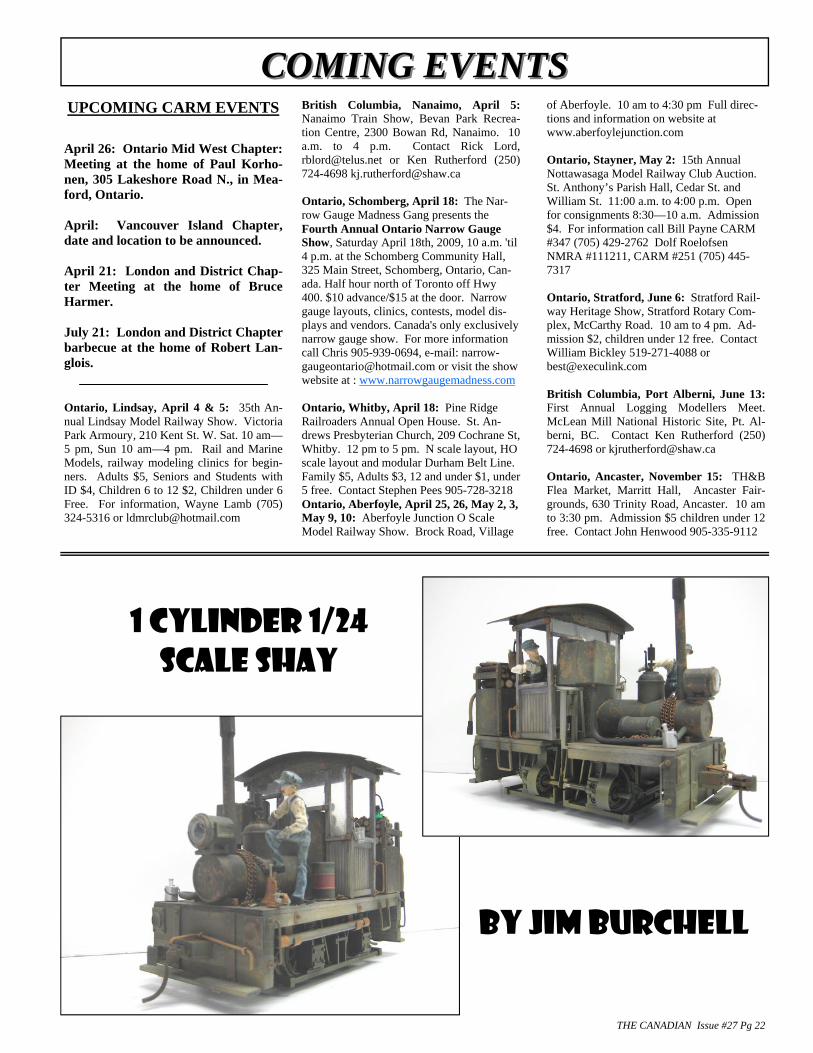
1 cylinder 1/24 scale shay
By Jim Burchell

THE CANADIAN Issue #27 Pg 23
Images of the CARM Copetown Train Show Photos by Steve Hoshel—Photo Bottom Right by David King
David King and Richard Dilley discuss photography. Laser cut structures showcased by Imagine That.
Jason Shron of Rapido Trains Rapido’s Turbo Train runs on the Dundas Modular Club’s layout.
The modular layout of the S Scale Workshop. J.R. Seidel Welding on S Scale layout.

A final tour of Don Eastman’s C&O Cabin Creek BranchA final tour of Don Eastman’s C&O Cabin Creek Branch Photos by Bob SanfordPhotos by Bob Sanford
Group photo of the CARM Chapter on the final visit to Don’s layout prior to it being dismantled as he is moving to Sarnia. Don is the handsome one in the CARM shirt in the back row. Gary Shurgold photo.