mazda north american operations to: mazda dealership ... update sirius... · mazda north american...
TRANSCRIPT
Mazda North American Operations
TO: Mazda Dealership General Managers, Service Managers, and Parts Managers DATE: December 2008 SUBJECT: 2009 RX-8, 2009 CX-7, 2009 CX-9, 2008-2009 Mazda3 with SANYO Audio and
SIRIUS Satellite Receiver Owner Notification Program (ONP) 03 – Audio Preset Reset Method Dear Mazda Dealer: Mazda Motor Corporation has decided to conduct an Owner Notification Program (ONP) on certain 2009 RX-8, 2009 CX-7, 2009 CX-9 and 2008-2009 Mazda3, equipped with both SANYO Audio and SIRIUS Satellite Receiver, and have been subscribed to SIRIUS regular service or 6 months free service. The purpose of this ONP is to prevent the customer’s inconvenience as much as possible when they encounter the audio preset issue. In mid-January 2009, SIRIUS Satellite will perform an Over-The-Air firmware upgrade. It is possible that the satellite preset memories may be erased after the update is complete. Mazda will notify owners of subject vehicles and will send instructions for resetting the preset memories on their own. Owners will also be given the option to bring their vehicles into the dealers for assistance, please take care of them according to the attached instructions. Owners of subject vehicles will be notified by first class mail beginning January 2, 2009. This package contains important information about ONP03: Attachment I Dealer Information Attachment II Reset Instructions Attachment III Owner Notification Letter Please make certain that the appropriate personnel in your dealership are familiar with the details of this program to respond to customer inquiries. We regret any inconvenience this program may cause you and your personnel. Your understanding and support in carrying out this program is greatly appreciated. Sincerely, Susumu Niinai Director, Technical Services Mazda North American Operations
7755 Irvine Center Drive Irvine, CA 92618-2922 PO Box 19734 Irvine, CA 92623-9734 Internet http://www.MazdaUSA.com

ATTACHMENT I – DEALER INFORMATION CONDITION OF CONCERN In mid-January 2009, SIRIUS Satellite will perform an Over-The-Air firmware upgrade. It is possible that the satellite preset memories may be erased after the update is complete. SUBJECT VEHICLES Model VIN Range Production Date
Range Applicable Vehicles
2009 RX-8 JM1FE17** 90 400031 – 402865 March 11, 2008 – November 6, 2008
2009 CX-7 JM3ER29** 90 215756 – 232700 May 6, 2008 – November 5, 2008
2009 CX-9 JM3TB**** 90 164232 – 170110 July 1, 2008 – November 5, 2008
2008-2009 Mazda3 JM1BK**** ** 100006 – 252568 January 7, 2008 –
November 6, 2008
Equipped with SANYO Audio and SIRIUS Satellite Receiver, and subscribed to SIRIUS regular service or 6 months free service. Units with Navigation system are excluded.
The asterisk symbol “*” can be any letter or number. OWNER NOTIFICATION Mazda will notify U.S. owners by first class mail beginning January2, 2009. WARRANTY CLAIM PROCESSING INFORMATION Operation of ROOM Fuse Process Number A0842B Symptom Code 99 Damage Code 99 Part Number Main Cause 7777-SP-D0S Quantity 0 Labor Operation Code XXD53XGX Labor Hours 0.2 hrs.
RESET INSTRUCTIONS Please refer to Attachment II.
Page 1 of 1
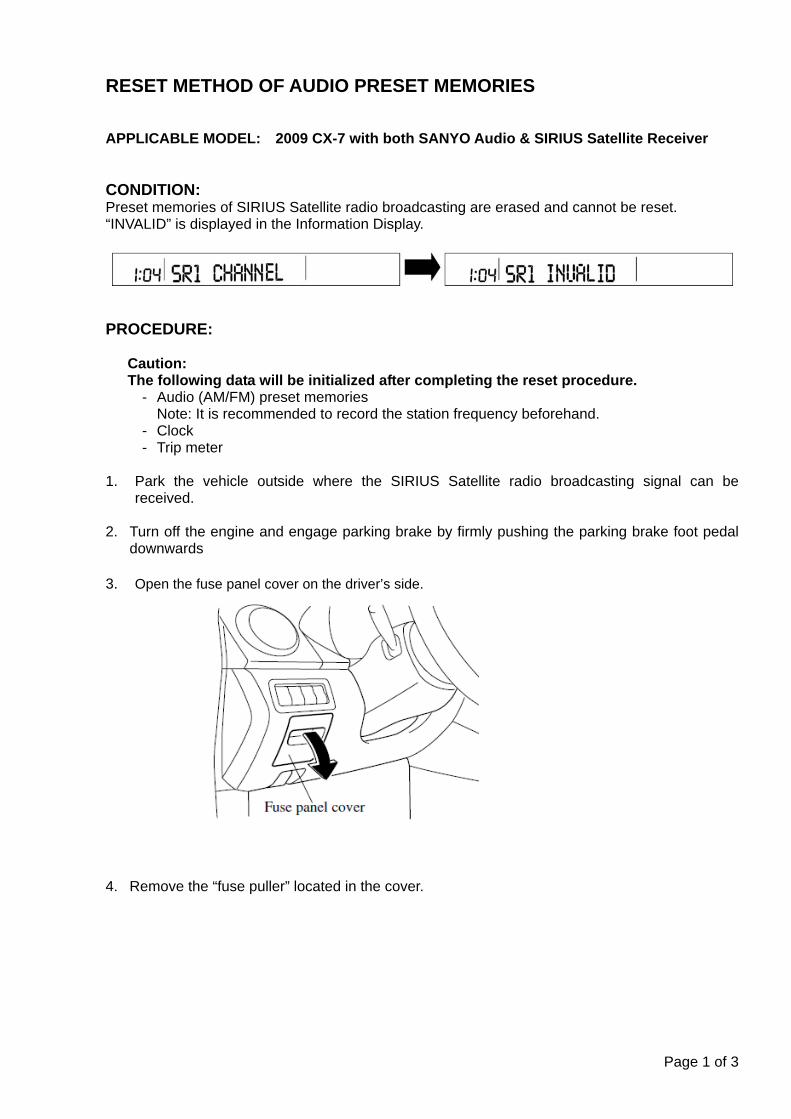
RESET METHOD OF AUDIO PRESET MEMORIES APPLICABLE MODEL: 2009 CX-7 with both SANYO Audio & SIRIUS Satellite Receiver CONDITION: Preset memories of SIRIUS Satellite radio broadcasting are erased and cannot be reset. “INVALID” is displayed in the Information Display.
PROCEDURE:
Caution: The following data will be initialized after completing the reset procedure.
- Audio (AM/FM) preset memories Note: It is recommended to record the station frequency beforehand.
- Clock - Trip meter
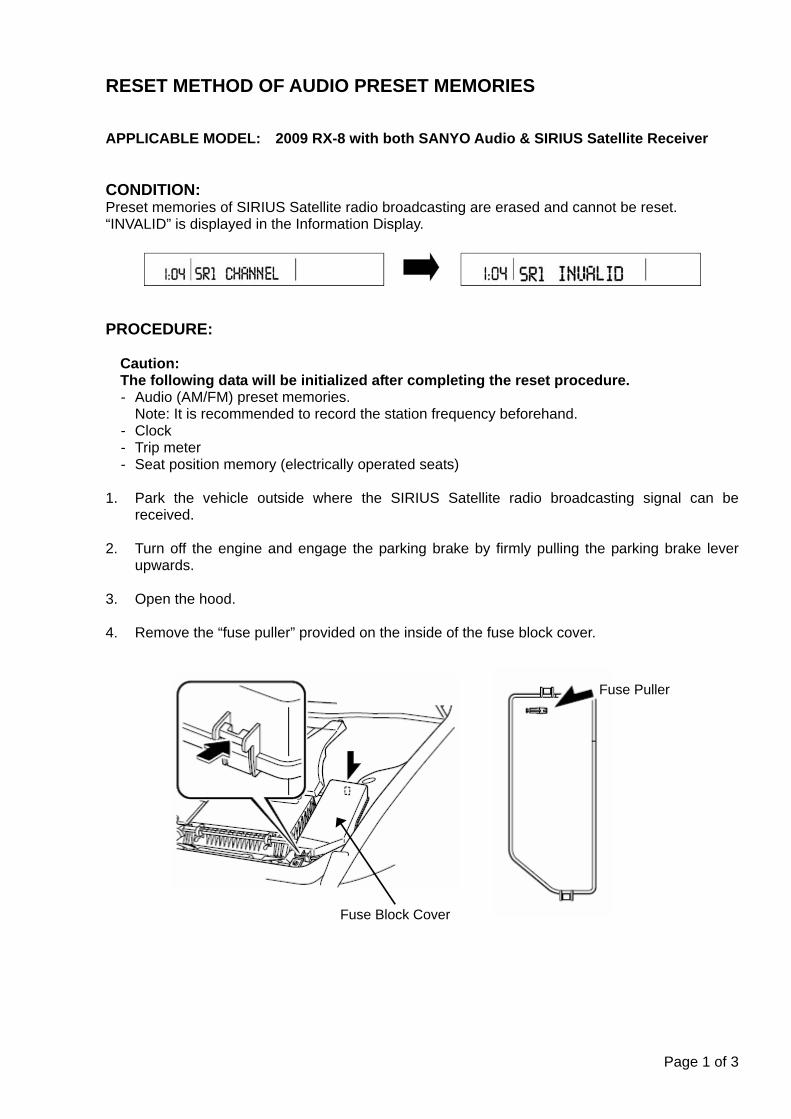
1. Park the vehicle outside where the SIRIUS Satellite radio broadcasting signal can be
received. 2. Turn off the engine and engage parking brake by firmly pushing the parking brake foot pedal
downwards 3. Open the fuse panel cover on the driver’s side. 4. Remove the “fuse puller” located in the cover.
Page 1 of 3
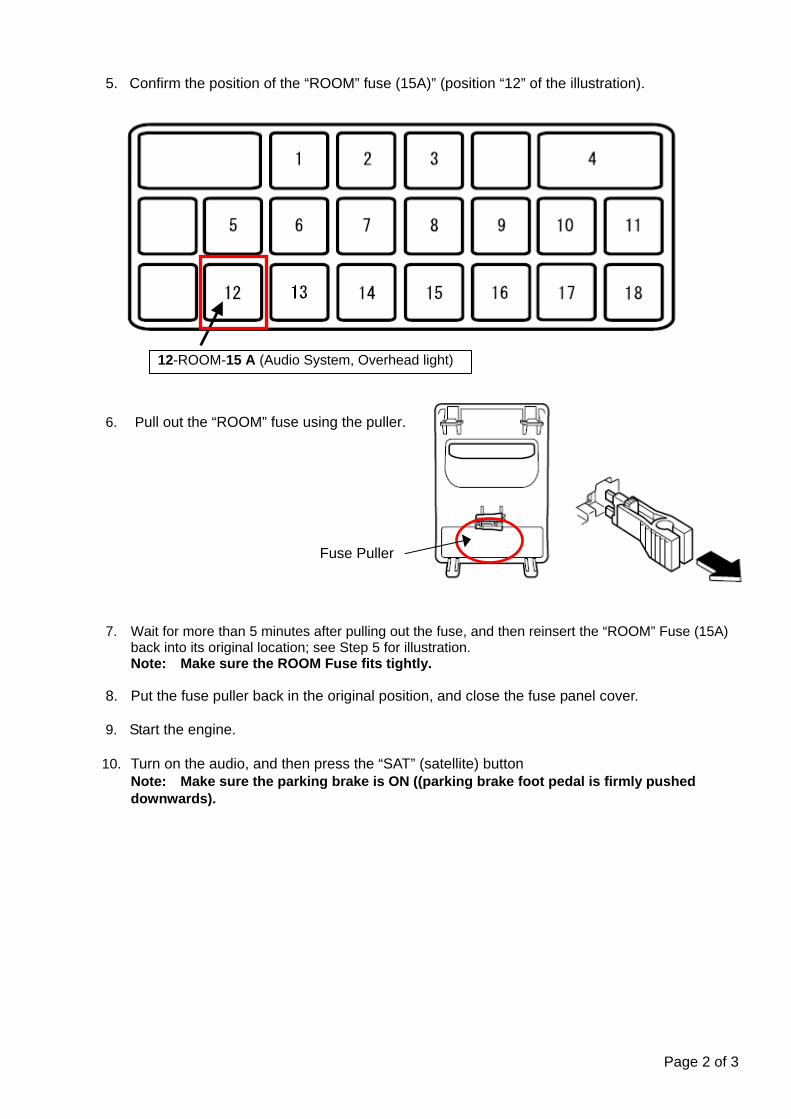
5. Confirm the position of the “ROOM” fuse (15A)” (position “12” of the illustration).
12-ROOM-15 A (Audio System, Overhead light)
Page 2 of 3
6. Pull out the “ROOM” fuse using the puller.
Fuse Puller
7. Wait for more than 5 minutes after pulling out the fuse, and then reinsert the “ROOM” Fuse (15A)
back into its original location; see Step 5 for illustration. Note: Make sure the ROOM Fuse fits tightly.
8. Put the fuse puller back in the original position, and close the fuse panel cover. 9. Start the engine. 10. Turn on the audio, and then press the “SAT” (satellite) button
Note: Make sure the parking brake is ON ((parking brake foot pedal is firmly pushed downwards).
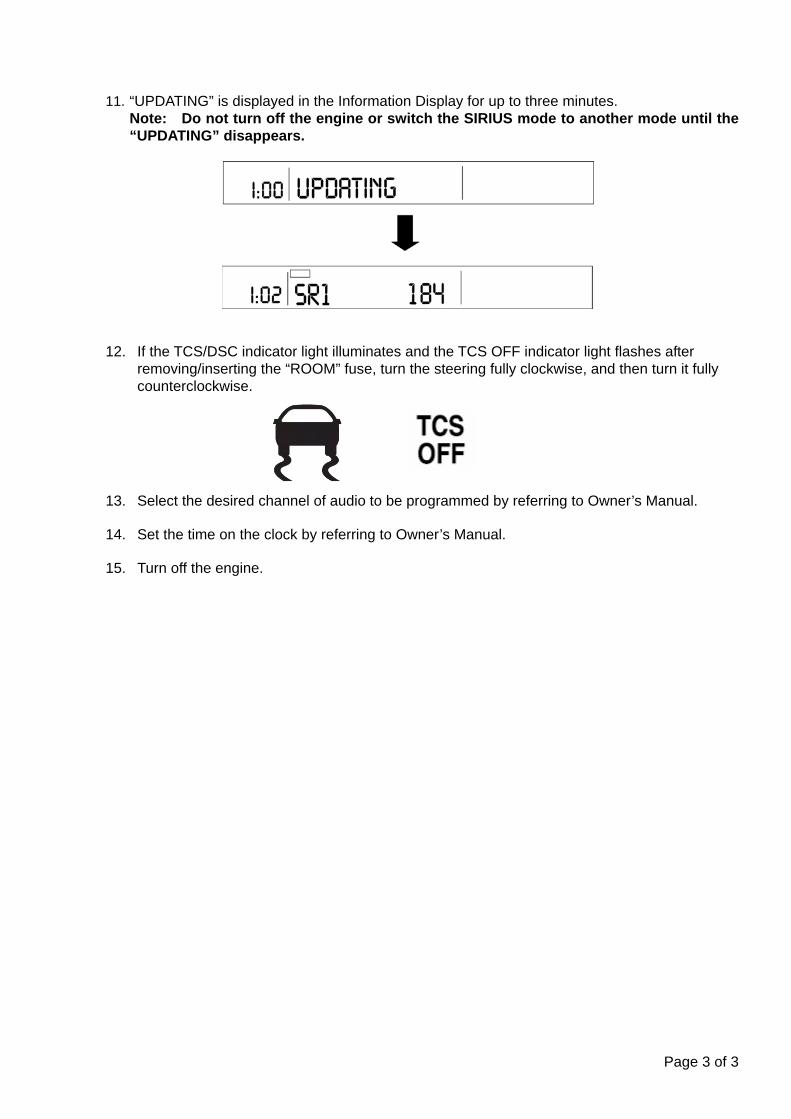
11. “UPDATING” is displayed in the Information Display for up to three minutes.
Note: Do not turn off the engine or switch the SIRIUS mode to another mode until the “UPDATING” disappears.
12. If the TCS/DSC indicator light illuminates and the TCS OFF indicator light flashes after removing/inserting the “ROOM” fuse, turn the steering fully clockwise, and then turn it fully counterclockwise.
13. Select the desired channel of audio to be programmed by referring to Owner’s Manual. 14. Set the time on the clock by referring to Owner’s Manual. 15. Turn off the engine.
Page 3 of 3
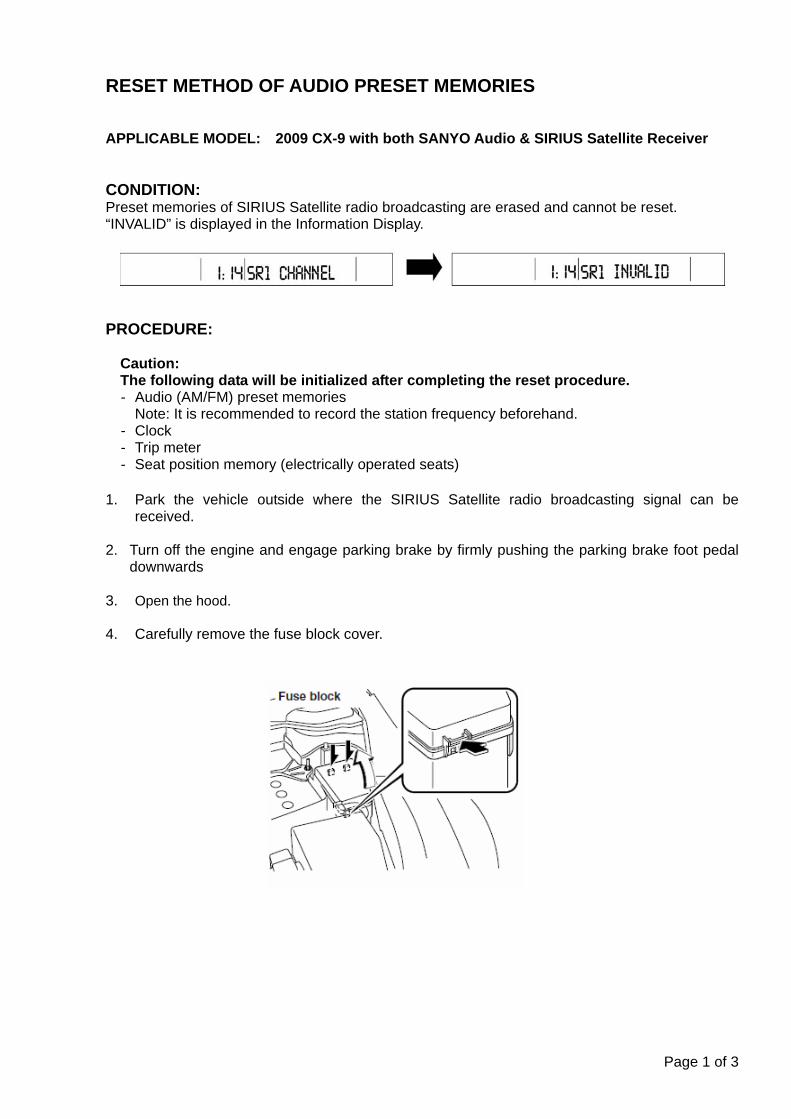
RESET METHOD OF AUDIO PRESET MEMORIES APPLICABLE MODEL: 2009 CX-9 with both SANYO Audio & SIRIUS Satellite Receiver CONDITION: Preset memories of SIRIUS Satellite radio broadcasting are erased and cannot be reset. “INVALID” is displayed in the Information Display.
PROCEDURE:
Caution: The following data will be initialized after completing the reset procedure. - Audio (AM/FM) preset memories
Note: It is recommended to record the station frequency beforehand. - Clock - Trip meter - Seat position memory (electrically operated seats)
1. Park the vehicle outside where the SIRIUS Satellite radio broadcasting signal can be
received. 2. Turn off the engine and engage parking brake by firmly pushing the parking brake foot pedal
downwards 3. Open the hood. 4. Carefully remove the fuse block cover.
Page 1 of 3
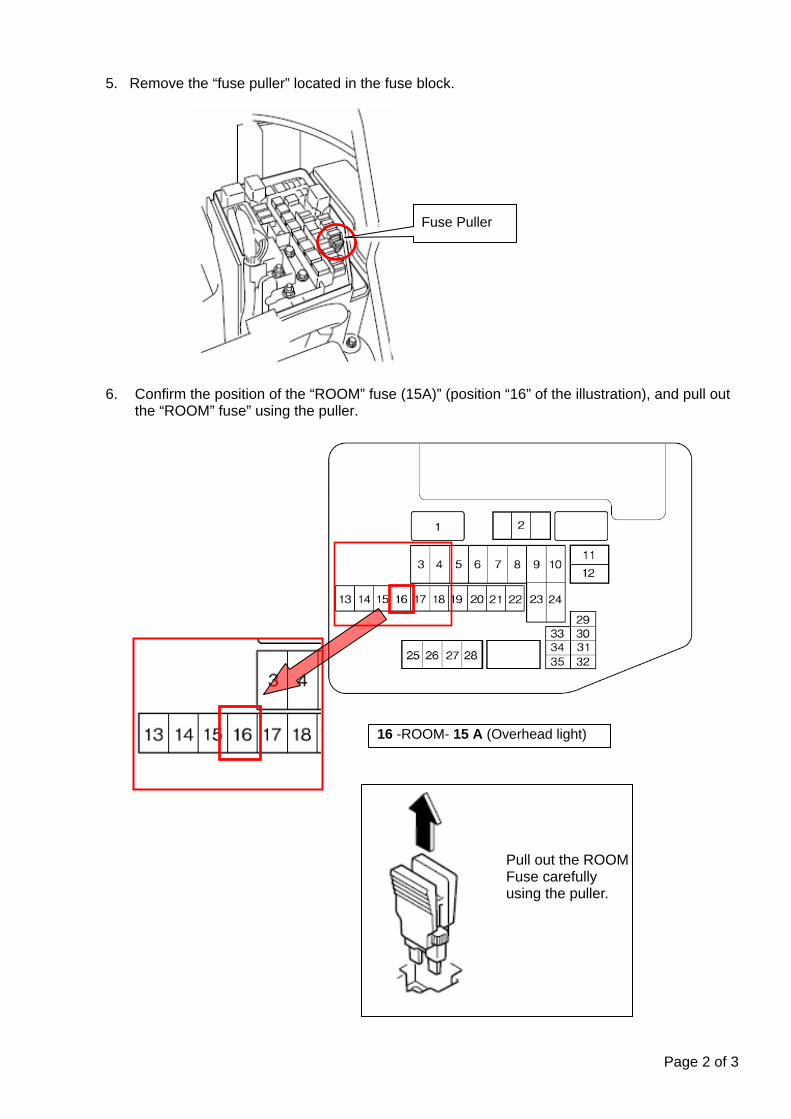
5. Remove the “fuse puller” located in the fuse block.
Fuse Puller
6. Confirm the position of the “ROOM” fuse (15A)” (position “16” of the illustration), and pull out
the “ROOM” fuse” using the puller.
Pull out the ROOM Fuse carefully using the puller.
16 -ROOM- 15 A (Overhead light)
Page 2 of 3
7. Wait for more than 5 minutes after pulling out the fuse, and then reinsert the “ROOM” fuse (15A)
back into its original location; see Step 6 for illustration. Note: Make sure the ROOM Fuse fits tightly.
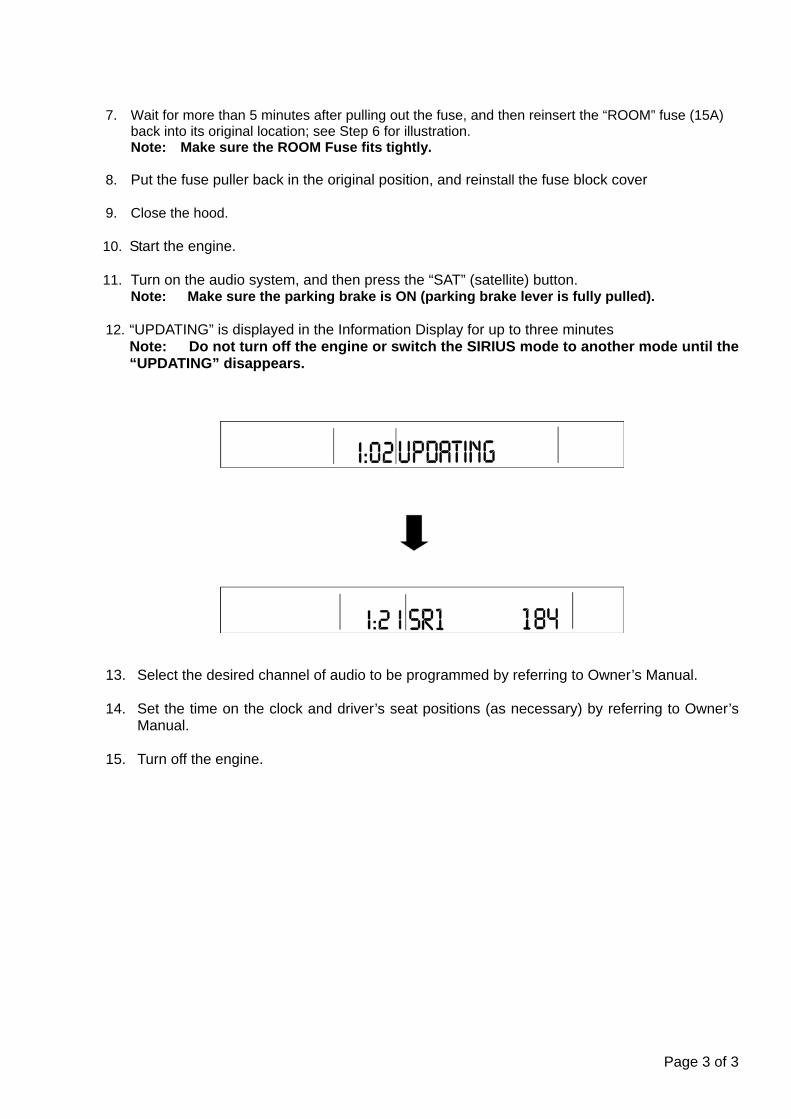
8. Put the fuse puller back in the original position, and reinstall the fuse block cover 9. Close the hood. 10. Start the engine. 11. Turn on the audio system, and then press the “SAT” (satellite) button.
Note: Make sure the parking brake is ON (parking brake lever is fully pulled). 12. “UPDATING” is displayed in the Information Display for up to three minutes
Note: Do not turn off the engine or switch the SIRIUS mode to another mode until the “UPDATING” disappears.
13. Select the desired channel of audio to be programmed by referring to Owner’s Manual. 14. Set the time on the clock and driver’s seat positions (as necessary) by referring to Owner’s
Manual. 15. Turn off the engine.
Page 3 of 3
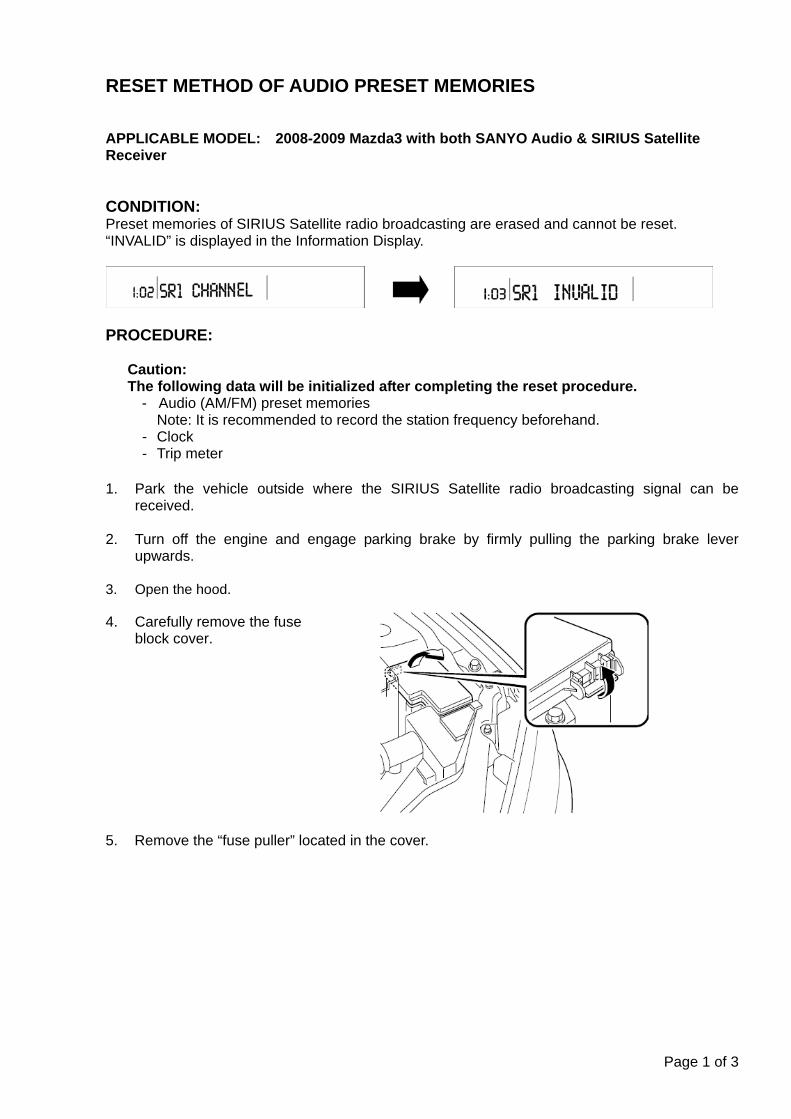
RESET METHOD OF AUDIO PRESET MEMORIES APPLICABLE MODEL: 2008-2009 Mazda3 with both SANYO Audio & SIRIUS Satellite Receiver CONDITION: Preset memories of SIRIUS Satellite radio broadcasting are erased and cannot be reset. “INVALID” is displayed in the Information Display.
PROCEDURE:
Caution: The following data will be initialized after completing the reset procedure.
- Audio (AM/FM) preset memories Note: It is recommended to record the station frequency beforehand.
- Clock - Trip meter
1. Park the vehicle outside where the SIRIUS Satellite radio broadcasting signal can be
received. 2. Turn off the engine and engage parking brake by firmly pulling the parking brake lever
upwards. 3. Open the hood. 4. Carefully remove the fuse
block cover. 5. Remove the “fuse puller” located in the cover.
Page 1 of 3
6. Confirm the position of the “ROOM” fuse (15A) (position “31” of the illustration), and pull out
the “ROOM” fuse using the puller. 31-ROOM-15 A (Interior lights)
Page 2 of 3
Pull out the ROOM
Fuse carefully using the puller.
Fuse
Puller 7. Wait for more than 5 minutes after pulling out the fuse, and then reinsert the “ROOM” fuse (15A)
back into its original location; see Step 6 for illustration. Note: Make sure the ROOM Fuse fits tightly.
8. Put the fuse puller back in the original position, and reinstall the fuse block cover. 9. Close the hood. 10. Start the engine. 11. Turn on the audio system, and then press the “SAT” (satellite) button.
Note: Make sure the parking brake is ON (parking brake lever is fully pulled).

12. “UPDATING” is displayed in the Information Display for up to three minutes
Note: Do not turn off the engine or switch the SIRIUS mode to another mode until the “UPDATING” disappears.
13. Select the desired channel of audio to be programmed by referring to Owner’s Manual. 14. Set the time on the clock by referring to Owner’s Manual. 15. Turn off the engine.
Page 3 of 3
RESET METHOD OF AUDIO PRESET MEMORIES APPLICABLE MODEL: 2009 RX-8 with both SANYO Audio & SIRIUS Satellite Receiver CONDITION: Preset memories of SIRIUS Satellite radio broadcasting are erased and cannot be reset. “INVALID” is displayed in the Information Display.
PROCEDURE:
Caution: The following data will be initialized after completing the reset procedure. - Audio (AM/FM) preset memories.
Note: It is recommended to record the station frequency beforehand. - Clock - Trip meter - Seat position memory (electrically operated seats)
1. Park the vehicle outside where the SIRIUS Satellite radio broadcasting signal can be
received. 2. Turn off the engine and engage the parking brake by firmly pulling the parking brake lever
upwards. 3. Open the hood. 4. Remove the “fuse puller” provided on the inside of the fuse block cover.
Fuse Puller
Fuse Block Cover
Page 1 of 3
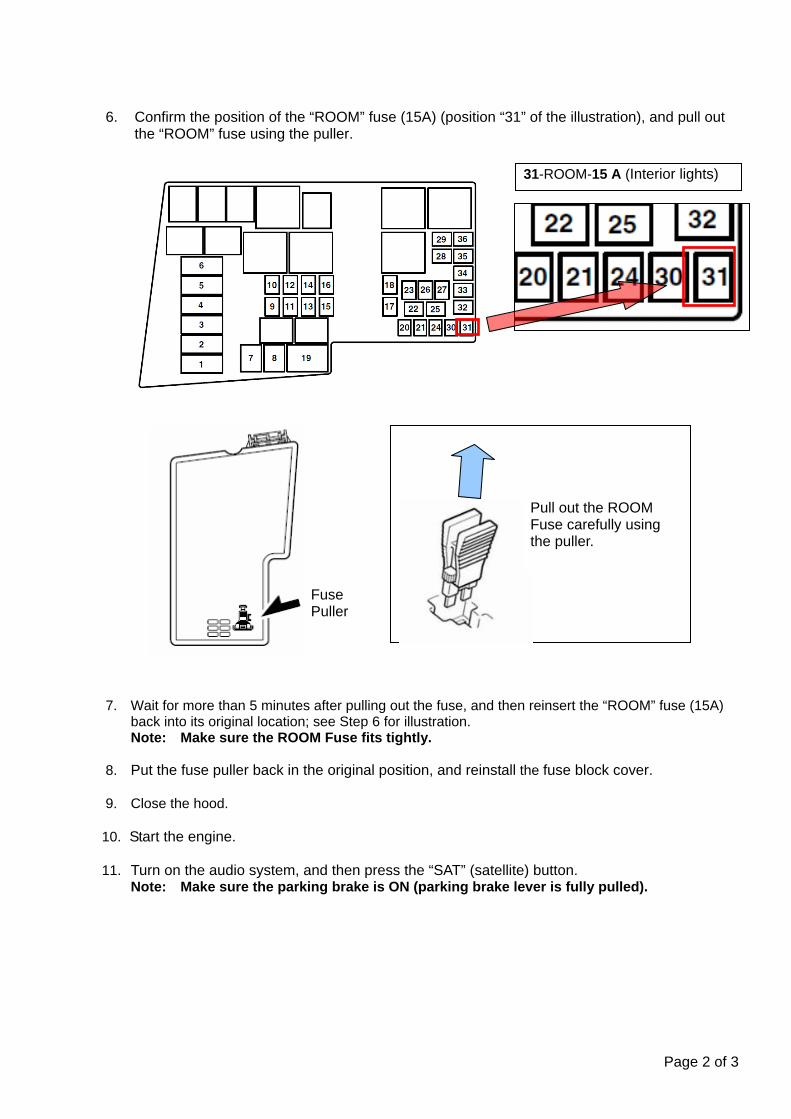
5. Open the fuse panel cover on the driver’s side. 6. Confirm the position of the “ROOM” fuse (15A) (position “14” of the illustration).
Page 2 of 3
1.
14 ROOM 15 A Interior lights
7. Pull out the “ROOM” fuse using the puller.
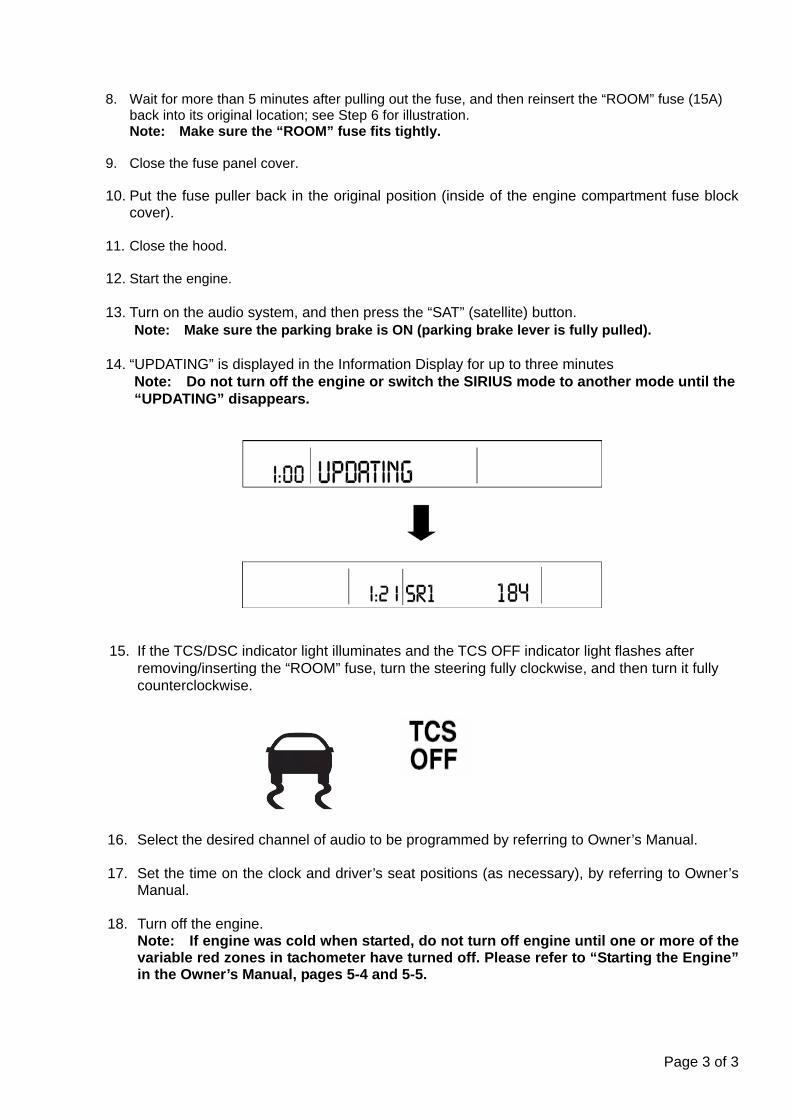
8. Wait for more than 5 minutes after pulling out the fuse, and then reinsert the “ROOM” fuse (15A)
back into its original location; see Step 6 for illustration. Note: Make sure the “ROOM” fuse fits tightly.
9. Close the fuse panel cover. 10. Put the fuse puller back in the original position (inside of the engine compartment fuse block
cover). 11. Close the hood. 12. Start the engine. 13. Turn on the audio system, and then press the “SAT” (satellite) button.
Note: Make sure the parking brake is ON (parking brake lever is fully pulled). 14. “UPDATING” is displayed in the Information Display for up to three minutes
Note: Do not turn off the engine or switch the SIRIUS mode to another mode until the “UPDATING” disappears.
15. If the TCS/DSC indicator light illuminates and the TCS OFF indicator light flashes after
removing/inserting the “ROOM” fuse, turn the steering fully clockwise, and then turn it fully counterclockwise.
16. Select the desired channel of audio to be programmed by referring to Owner’s Manual. 17. Set the time on the clock and driver’s seat positions (as necessary), by referring to Owner’s
Manual. 18. Turn off the engine.
Note: If engine was cold when started, do not turn off engine until one or more of the variable red zones in tachometer have turned off. Please refer to “Starting the Engine” in the Owner’s Manual, pages 5-4 and 5-5.
Page 3 of 3