master posing guide - nuts73.free.frnuts73.free.fr/vava/phillips n. master posing guide for...
TRANSCRIPT
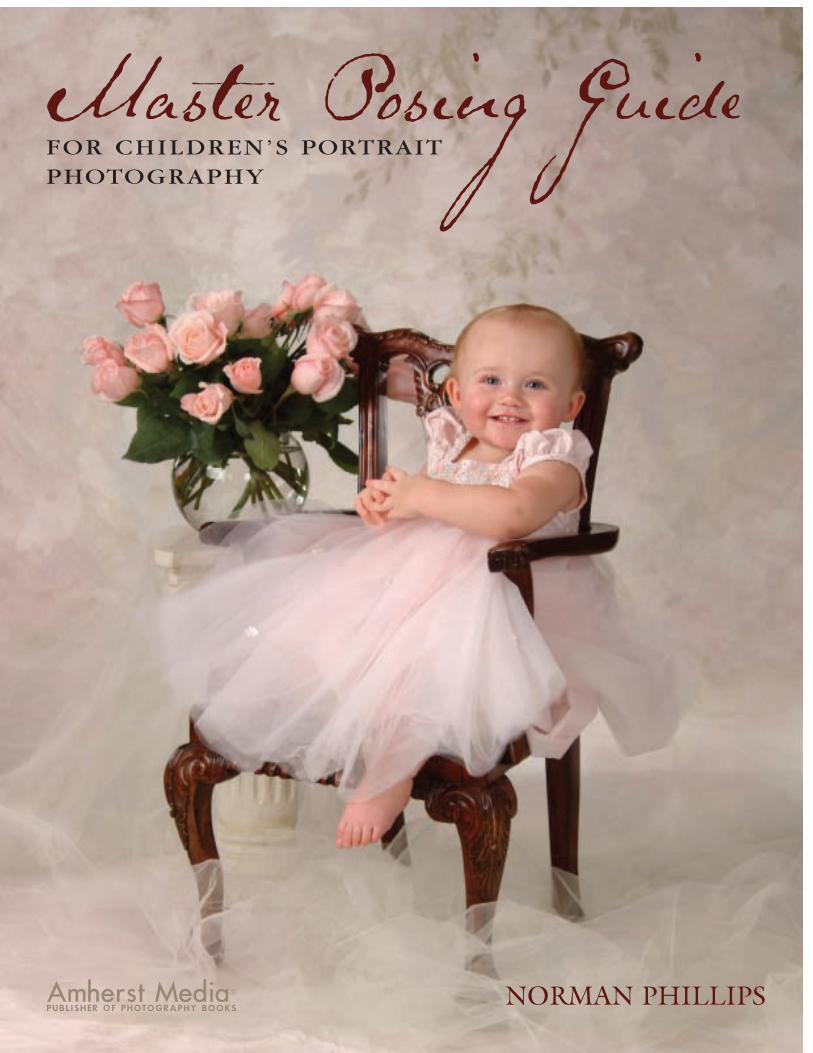
Master Posing Guide
Amherst Media®
PUBLISHER OF PHOTOGRAPHY BOOKSNORMAN PHILLIPS
FOR CHILDREN’S PORTRAITPHOTOGRAPHY

About the AuthorNorman Phillips was born in London, England and became a U.S. resident in 1980. He is married, has three sons,and lives in Highland Park, Illinois. The Norman Phillips of London Photography studio, located in HighlandPark, Illinois, was established in 1983.
Throughout his career, Norman has been a judge at local, regional, and international print competitions andhas presented almost 200 seminars and workshops. He is a frequent contributor to several magazines and newslet-ters, including Rangefinder, Professional Image Maker, Master Photographer, and WPPI Monthly. He has createdeight instructional and educational video titles, instructional manuals, and is the author of Lighting Techniques forHigh Key Portrait Photography, Lighting Techniques for Low Key Portrait Photography, Wedding and PortraitPhotographers’ Legal Handbook, Professional Posing Techniques for Wedding and Portrait Photographers, andAdvanced Studio Lighting Techniques for Digital Portrait Photographers, all from Amherst Media. Norman has cre-ated more than 240 images that have earned a score of 80 or better, ten Best of Show ribbons, and many FirstPlace Awards in various competitions.
Norman is also the recipient of a wide range of honors for his photographic achievements.For more information, see www.NormanPhillipsofLondon.com.
Copyright © 2007 by Norman Phillips.Front cover photograph © Karen Rodgers.Back cover photograph © Norman Phillips.
All rights reserved.
Published by:
Amherst Media®
P.O. Box 586
Buffalo, N.Y. 14226
Fax: 716-874-4508
www.AmherstMedia.com
Publisher: Craig Alesse
Senior Editor/Production Manager: Michelle Perkins
Assistant Editor: Barbara A. Lynch-Johnt
ISBN-13: 978-1-58428-191-7
Library of Congress Control Number: 2006925659
Printed in Korea.
10 9 8 7 6 5 4 3 2 1
No part of this publication may be reproduced, stored, or transmitted in any form or by any means, electronic, mechan-
ical, photocopied, recorded or otherwise, without prior written consent from the publisher.
Notice of Disclaimer: The information contained in this book is based on the author’s experience and opinions. The
author and publisher will not be held liable for the use or misuse of the information in this book.

Introduction . . . . . . . . . . . . . . . . . . . . . . . . . . . . . . . . . . . . . . . . . . . .4About this Book . . . . . . . . . . . . . . . . . . . . . . . . . . . . . . . . . . . . . . . . .4Contributing Photographers . . . . . . . . . . . . . . . . . . . . . . . . . . . . . . . .4
1. Babies and Toddlers . . . . . . . . . . . . . . . . . . . . . . . . . . . . . . . . . . .6Birth to Five Months . . . . . . . . . . . . . . . . . . . . . . . . . . . . . . . . . . . . . .6Six Months to One Year . . . . . . . . . . . . . . . . . . . . . . . . . . . . . . . . . . .16One to Two Years . . . . . . . . . . . . . . . . . . . . . . . . . . . . . . . . . . . . . . .26Two to Four Years . . . . . . . . . . . . . . . . . . . . . . . . . . . . . . . . . . . . . . .35
2. Children . . . . . . . . . . . . . . . . . . . . . . . . . . . . . . . . . . . . . . . . . . . .52Girls versus Boys: Some Observations . . . . . . . . . . . . . . . . . . . . . . . .52Boys and Girls Four to Five Years . . . . . . . . . . . . . . . . . . . . . . . . . . . .53Girls Six to Eight Years . . . . . . . . . . . . . . . . . . . . . . . . . . . . . . . . . . .62Boys Four to Six Years . . . . . . . . . . . . . . . . . . . . . . . . . . . . . . . . . . . .73A Final Note . . . . . . . . . . . . . . . . . . . . . . . . . . . . . . . . . . . . . . . . . . .82
3. Preteens and Teens . . . . . . . . . . . . . . . . . . . . . . . . . . . . . . . . . . .83Girls Nine to Ten Years . . . . . . . . . . . . . . . . . . . . . . . . . . . . . . . . . . .83Girls Eleven to Fourteen Years . . . . . . . . . . . . . . . . . . . . . . . . . . . . . .86Boys Seven to Thirteen Years . . . . . . . . . . . . . . . . . . . . . . . . . . . . . . .91
4. Groups . . . . . . . . . . . . . . . . . . . . . . . . . . . . . . . . . . . . . . . . . . . . .95Small Children and Babies . . . . . . . . . . . . . . . . . . . . . . . . . . . . . . . . .95Groups of Girls . . . . . . . . . . . . . . . . . . . . . . . . . . . . . . . . . . . . . . . .102Groups of Boys . . . . . . . . . . . . . . . . . . . . . . . . . . . . . . . . . . . . . . . .107Boys and Girls in Pairs . . . . . . . . . . . . . . . . . . . . . . . . . . . . . . . . . . .112Mixed Groups . . . . . . . . . . . . . . . . . . . . . . . . . . . . . . . . . . . . . . . . .117
Conclusion . . . . . . . . . . . . . . . . . . . . . . . . . . . . . . . . . . . . . . . . . . .125Index . . . . . . . . . . . . . . . . . . . . . . . . . . . . . . . . . . . . . . . . . . . . . . .126
CONTENTS 3
Contents
Introduction
There are numerous books on the market thatare devoted to posing for portrait and weddingphotography, but this may be the first that
deals with the more challenging task of posing children.When I suggest that posing children can be challeng-ing, I think that many of you understand exactly whatI mean. Oftentimes, the notion of posing children is amisnomer, especially when we are working with littlepeople yet to reach their third birthday.
Working with older subjects who are able to under-stand some direction is generally much easier. But thosetiny subjects have little or no concept of what we areaiming to achieve, no matter how much we apply ourexperience and manipulative skills. Another reason forsome of our difficulties is that the youngest of our sub-jects have limbs that appear not to be connected totheir owner’s brain and gesticulate and make signs thatare entertaining and often hysterically funny, even ifthat’s not what we want.
As we work our way through the various age cate-gories, we will demonstrate ways to overcome most, ifnot all, the challenges by providing practical methodsthat at least give a place from which to begin.
Though the chapters are organized into discrete agecategories, we must remember that there are oftennoticeable differences in each subject’s physical andmental abilities. As such, we need to assess each subjectand not assume that because they are a specific age theywill be like any other subject of that age.
About this BookIn my previous book, Professional Posing Techniques forWedding and Portrait Photographers, I included a brief
reference to posing children—and as you work throughthis book, you will see that this is because posing youngsubjects is simply not the same as working with adults.In sporting vernacular, it’s a different ball game.
At print exhibitions and in books dedicated to chil-dren’s portraits, we see some beautiful images. Yet mostof these do not show us how to pose little people in apractical manner that also evokes our emotions andmakes moms, dads, and grandparents ooh and ahh.
In this book we will review many options and ideasfor effectively posing children—from babies throughearly teens—and will consider the philosophy behindposing young subjects. While many of my own imagesappear in the book, many of the portraits herein werecreated by other highly competent and successful pho-tographers and, as such, you will see a wide array ofposing ideas that are reliable and very workable.
As you peruse the images, you will see that a varietyof props and backgrounds have been employed.Remember to make your images with props and back-grounds that appeal to you and your market so thatwhat you produce is representative of your photogra-phy and not simply a carbon copy of others’ images.
If you are like me, you undoubtedly take great pleas-ure in working with children and babies. With the helpof this book, I think you will find that photographingyoung subjects will become increasingly enjoyable andexciting, and your portraits more successful.
Contributing PhotographersWithout these talented contributors’ images, this bookwould not have been possible. Their images will helpyou to recognize the level of expertise and creativity
4 MASTER POSING GUIDE FOR CHILDREN’S PORTRAIT PHOTOGRAPHY

that photographers are now bringing to children’sportraiture.
Joanne Alice. Joanne Alice has four Best of ShowAwards from Chicagoland Professional Photographer’sAssociation (CPPA) and has won the association’s cov-eted Print of the Year Award four times. She has alsoreceived the People’s Choice Award at the association’sannual convention. Joanne is the four-time winner ofthe CPPA Hoyt Portrait Award and is a CPPA CertifiedProfessional Photographer.
Kerry Firstenberger. Kerry Firstenberger hastrained with and worked alongside Norman Phillips fornine years. She has hung prints at WPPI print competi-tions and has won First Place Awards from CPPA.
Sam Lanza. Although Sam Lanza has not receivedhis PPA Masters degree at the time of this writing, hiswork is of an exceptionally high standard.
Karen Rodgers. Karen Rodgers is a PPA MasterPhotographer with numerous awards including Pho-tographer of the Year, Associated Professional Photog-raphers of Illinois Top Ten, and PPANI Best of Showribbons.
Cindy Romano. Cindy Romano has a PPA Mastersdegree. She is also a PPA Certified Professional Pho-tographer and a PPA Affiliate Judge. In 2005, she wasone the Top Ten photographers in Illinois. Cindy hashung portraits at Epcot Center and has had prints sel-ected four times for the PPA Loan Collection.
Julia Stotlar. Julia is the daughter of master photog-rapher Karen Rodgers. She has clearly inherited hermother’s ability to create outstanding portraits.
Wendy Veugeler. Wendy Veugeler holds a PPAMasters degree and is a PPA Certified ProfessionalPhotographer and has a Fellowship with PPANI. HerAwards include the Kodak Gallery Award, Fuji Master-piece Award, PPA Loan Prints, and PPA Photographerof the Year Award/Silver.
INTRODUCTION 5

In this chapter, we deal with babies and toddlers. We will turn ourattention first to babies too young to sit or stand. While most infantscan partially support themselves at about
four-and-a-half months, many are a little slowergetting to that point in their development. Theselittle people are likely to be laying down on theirback or stomach, possibly resting on their elbows.At this age some are also able to crawl.
Babies who are able to sit but not stand, even with something to holdon to, are covered next.
Moving along, we turn our attention to working with tots from abouttwelve months to twenty-four months. At this age, children are able tostand without something to hold on to and are walking for the first time—and that is about all they want to do!
Small children in the toddler age range, about twenty-four months toage four, are covered next. If you have heard the expression “terribletwos,” then you know what to expect. Individuals in this age group seemto be the most willful of all the categories and are the most difficult to“trap”—photographically speaking—in just the place we need them to be.
Birth to Five MonthsWhen posing babies from birth through five months, we must meet aunique set of challenges. Because these tiny subjects cannot take instruc-tion and often wriggle out of any position we place them in, our mainobjective is to create the best-possible view. This is typically done using avariety of props that present the baby at a desirable angle to the camera,though once a baby can push up on their hands or elbows, floor poses canbe effective too.
Photographing babies in a basket is fairly common, but doing so withstyle will help create an image that is both creative and beautiful. In plate 1,we have a standout portrait by Cindy Romano. Note that the tiny subjectis presented in a perfectly normal position, and that a blanket was used asa cushion to ensure the baby’s comfort. An uncomfortable baby will not be
6 MASTER POSING GUIDE FOR CHILDREN’S PORTRAIT PHOTOGRAPHY
1. Babies and Toddlers
WHEN POSING BABIES FROM BIRTH THROUGH FIVE
MONTHS, WE MUST MEET A UNIQUE SET OF
CHALLENGES.

happy, and the results will be less thanpleasing. Cindy enhanced the set by usingstuffed animals and foliage.
In plate 2, Wendy Veugeler reversed thestyle that Cindy Romano used in plate 1.Here, the subject was positioned on itstummy on a cushioned seat that sweepsupward at each end and caused the baby tocurl up in a snuggle position.
In plate 3, we have a pose that requiredus to position the camera almost directlyabove the baby to prevent a distorted per-spective. In this image, the baby was sim-ply laying on a comfortable quilt and was
BABIES AND TODDLERS 7
Above—Plate 1. Photo by Cindy Romano. Left—
Plate 2. Photo by Wendy Veugeler.
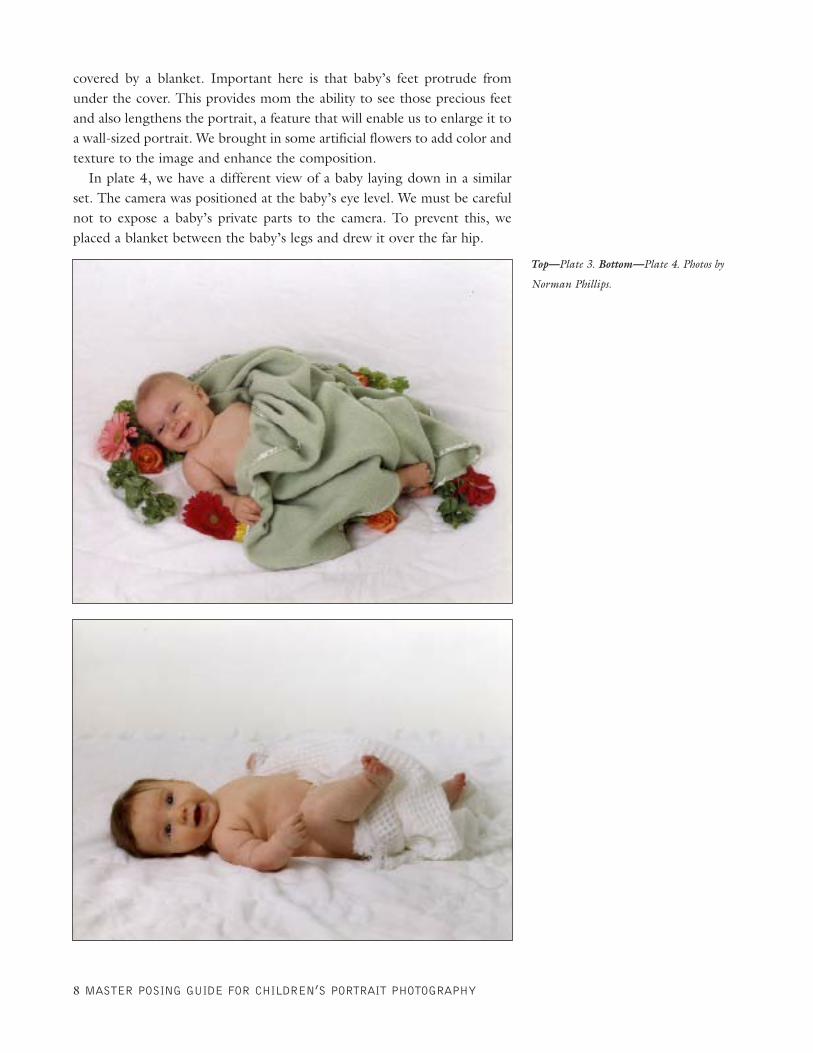
covered by a blanket. Important here is that baby’s feet protrude fromunder the cover. This provides mom the ability to see those precious feetand also lengthens the portrait, a feature that will enable us to enlarge it toa wall-sized portrait. We brought in some artificial flowers to add color andtexture to the image and enhance the composition.
In plate 4, we have a different view of a baby laying down in a similarset. The camera was positioned at the baby’s eye level. We must be carefulnot to expose a baby’s private parts to the camera. To prevent this, weplaced a blanket between the baby’s legs and drew it over the far hip.
8 MASTER POSING GUIDE FOR CHILDREN’S PORTRAIT PHOTOGRAPHY
Top—Plate 3. Bottom—Plate 4. Photos by
Norman Phillips.

In plate 5, we have a portrait of a naked baby about four months old.The angle of view we used in this case prevented us from exposing to thecamera parts of the body that we should not show.
Plate 6 shows a portrait of a baby positioned in a bassinet, a supportiveprop that works a little better than a basket when the baby is alert andactive. The bassinet was covered with soft quilts to maximize the baby’scomfort. This arrangement allowed for a nice presentation.
Plate 7, a portrait by Sam Lanza, shows how the bowl shape of a scalecan be used to hold the baby. Sam placed a blanket and a pretty pillowunder the baby to ensure the little subject’s comfort. While white acces-sories were employed in this case, you can certainly tailor your choice offabric and colors to suit the baby’s gender or the parents’ decor.
BABIES AND TODDLERS 9
Above left—Plate 5. Above right—Plate 6.
Photos by Norman Phillips. Right—Plate 7.
Photo by Sam Lanza.

To create the image shown in plate 8, Joanne Alice placed a pillow ontop of a baby mattress and added an elegant, textural pillow to uplift thebaby’s head and shoulders. In this image, the baby’s shoulders were posi-tioned at the base of the pillow. If the pillow is particularly soft, the baby’sshoulders can be positioned a little higher. This will allow a gentle slope inthe baby’s position and prevent him or her from having too sharp a bendat the neck or waist. If a pillow is too firm and the baby does not have itshead and shoulders on the pillow, the chin will be forced down onto thechest, and the baby will be most uncomfortable—and unhappy.
Note that Joanne concealed the subject’s pelvic area with a blanket.Employing this strategy will allow you to create a modest image if the babyis nude, or to cover up a diaper for a more stylized look.
Plates 9 through 11 show images Joanne Alice created of a five-month-old boy. In plate 9, he is seen nestled in luxurious white bedding. This pres-entation allowed him to stretch his arms out. Note the curved shape of theplatform. If the curve were too deep, the baby would not be able tostretch, as his arms would be locked in.
For plate 10, Joanne placed the baby on his tummy, and he pushed upand raised his head (most babies can do this at about five months of age).When creating an image like this, remember that the set should be firm; ifit is too soft, the baby’s arms and shoulders may be obscured by the fabric.
10 MASTER POSING GUIDE FOR CHILDREN’S PORTRAIT PHOTOGRAPHY
Plate 8. Photo by Joanne Alice.
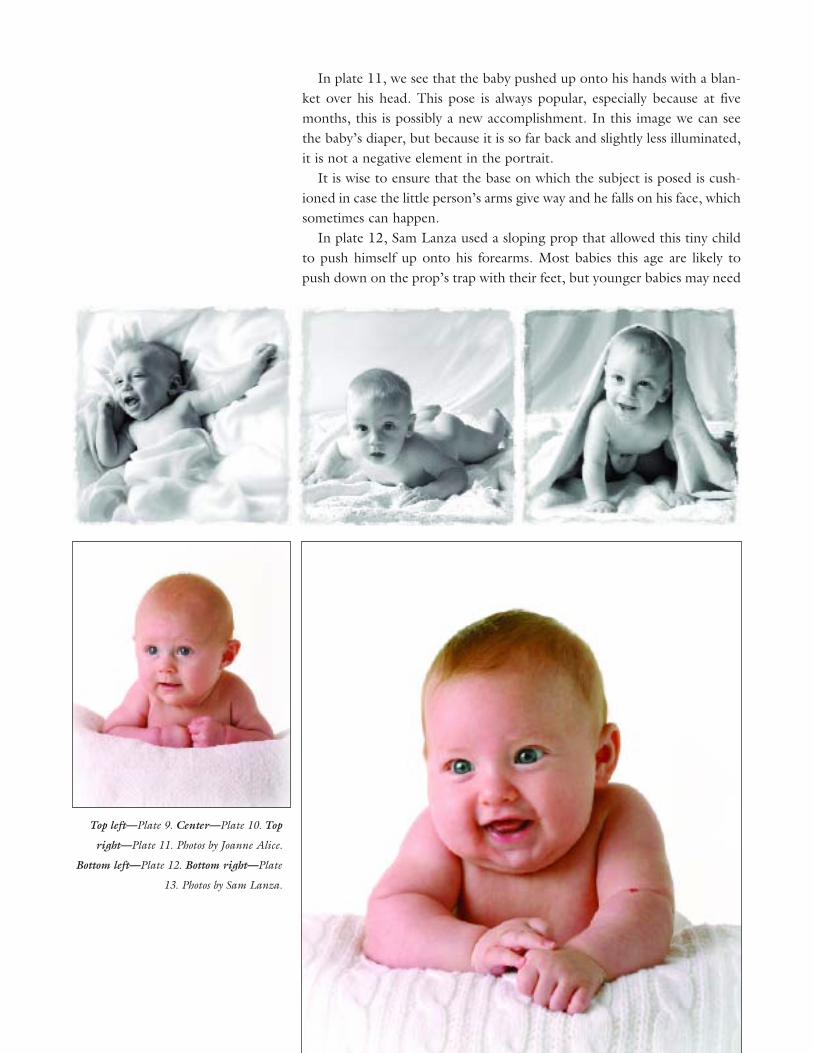
In plate 11, we see that the baby pushed up onto his hands with a blan-ket over his head. This pose is always popular, especially because at fivemonths, this is possibly a new accomplishment. In this image we can seethe baby’s diaper, but because it is so far back and slightly less illuminated,it is not a negative element in the portrait.
It is wise to ensure that the base on which the subject is posed is cush-ioned in case the little person’s arms give way and he falls on his face, whichsometimes can happen.
In plate 12, Sam Lanza used a sloping prop that allowed this tiny childto push himself up onto his forearms. Most babies this age are likely topush down on the prop’s trap with their feet, but younger babies may need
Top left—Plate 9. Center—Plate 10. Top
right—Plate 11. Photos by Joanne Alice.
Bottom left—Plate 12. Bottom right—Plate
13. Photos by Sam Lanza.

to be repositioned when they slide. There are several prop companies thatsell this style of prop, including Wicker by Design, Pro Studio Supplies, andFar West, to name a few.
The sloped prop Sam used in plate 13 is less steep and allowed baby torest on his elbows and hands with a lower risk of sliding down. Because theslope is less pronounced, baby may also be more comfortable with this typeof prop. When choosing between the available sloping props, consider thestage of development of your subject. Always remember that babies matureat different rates.
To create the image shown in plate 14, Sam used yet another variationof the sloping prop. The one shown here is much closer to a floor position;it is ideal for a baby less than four months but will easily accommodateinfants up to five-months-old. Remember, though, the older the baby, theless likely he or she will remain in the desired position.
Plate 15 shows a portrait of a three-month-old positioned on a propsimilar to that shown in plate 12. The pose was originally designed so thatboth arms would appear in the position of the left arm, but the subjectunexpectedly moved his arms, and as a result, the right arm was posed far-ther back.
In plate 16, the subject is shown on a prop with a slope of 45 degrees.A 45-degree slope is advantageous: When the slope is too pronounced,baby will slide down and we will have to continually reset the pose. Whenthe slope is too shallow, the angle of view will be boring and create a slimcomposition that will produce a lot of empty space within the frame.
Plate 17 shows a baby between four and five months of age in a simplefloor pose. Baby is capable of pushing up and showing his strength andalertness. Some babies at this age can roll over onto their side or back andpresent you with the opportunity to get a variety of images that documentthis stage of their development.
12 MASTER POSING GUIDE FOR CHILDREN’S PORTRAIT PHOTOGRAPHY
Left—Plate 14. Photo by Sam Lanza.
Right—Plate 15. Photo by Norman Phillips.
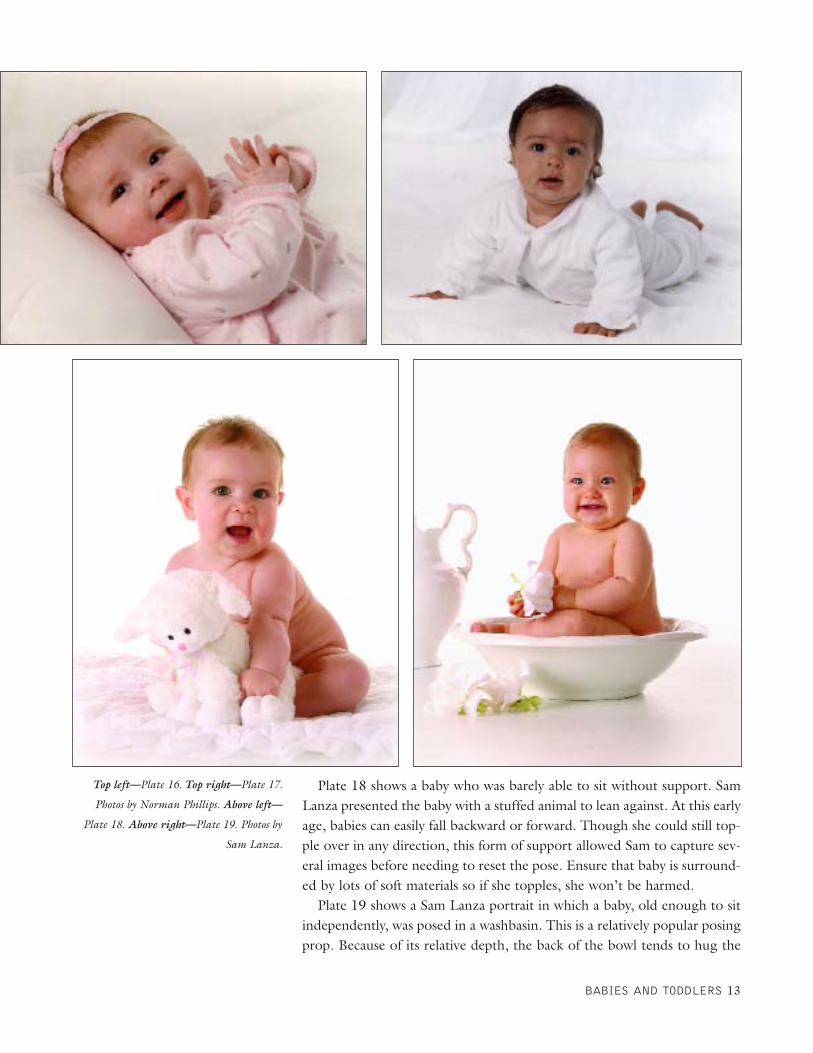
Plate 18 shows a baby who was barely able to sit without support. SamLanza presented the baby with a stuffed animal to lean against. At this earlyage, babies can easily fall backward or forward. Though she could still top-ple over in any direction, this form of support allowed Sam to capture sev-eral images before needing to reset the pose. Ensure that baby is surround-ed by lots of soft materials so if she topples, she won’t be harmed.
Plate 19 shows a Sam Lanza portrait in which a baby, old enough to sitindependently, was posed in a washbasin. This is a relatively popular posingprop. Because of its relative depth, the back of the bowl tends to hug the
BABIES AND TODDLERS 13
Top left—Plate 16. Top right—Plate 17.
Photos by Norman Phillips. Above left—
Plate 18. Above right—Plate 19. Photos by
Sam Lanza.

baby’s hips, increasing stability andallowing the baby to sit independ-ently for at least a short time.
While we won’t focus on mother-and-baby or father-and-baby por-traiture in this book, sometimes get-ting portraits of a baby is not feasibleunless we enlist the help of mom or dad. Sometimes we include a parent inan image to support the baby; other times, we call on a parent to spark thebaby’s attention when he or she is not responsive to our coaching.
In this portrait style it is important to get your camera perspective rightor you will be unable to clearly see baby and mother. The ideal angle forthe subject is approximately 45 degrees to the plane of the camera. Thecamera should be focused on baby, but we also want a flattering view of theparent. In plate 20, Joanne Alice got the shot dead right. Note how themother was turned toward the baby so that we see her nicely presented andshe is not simply a prop but an integral part of the portrait. Mothers some-times want to be a prop—and not to appear in the image—but this fre-quently results in images that are not presentable.
14 MASTER POSING GUIDE FOR CHILDREN’S PORTRAIT PHOTOGRAPHY
Top left—Plate 20. Above—Plate 21.
Bottom left—Plate 22. Photos by Joanne
Alice.

In plate 21, all focus is on the subject of the portrait, as only the parent’shands appear in the image. Joanne Alice’s image was made in an unusualstyle that is highly effective as it has the baby in a wide-eyed pose. In thisstyle of portrait it is important not to show the person holding the baby, sothe perspective of the camera is critical. One way to achieve this is to havethe parent lay or sit down and hold the baby up. A second and perhapsmore common way to achieve this result is to have the parent positionedslightly to one side of the baby with his or her arms outstretched. This maymean having one of his or her arms bent to ensure they are not visible inthe image. The tight crop Joanne used makes this image very effective.
Joanne also created the image shown in plate 22. Note how the man hasbaby seated in the palm of his hand and is supporting the infant’s back withhis other hand and arm. Joanne ensured that the viewer’s eye is first drawnto the baby by presenting the adult in a lower key.
Young babies spend most of their time sleeping, so we inevitably facephotographing sleeping babies on occasion. When this is the case, the pos-
BABIES AND TODDLERS 15
Plate 23. Photo by Cindy Romano.

ing concept used by Cindy Romanoin plate 23 is most appropriate.Cindy had both mother and infantlaying down and very close. Babywas very comfortable and secure inthis position and, while asleep, pre-sented a delightful portrait. (Addi-tionally, some wakeful babies aremuch calmer when close to mother.)While mother is visible in the por-trait, baby is more prominent in theframe.
Plate 24 shows a baby dressed inher christening gown. Her motherwanted to show her in a seated posebut also wanted to show the fulllength of the gown. This presenteda challenge, because photographingthe baby laying down would createa perspective problem unless wephotographed her from high above.So we came up with the idea of seat-ing baby on a high stool, with thesupport of a person positionedbehind the drapes who held tightlyonto the gown and provided theneeded support. We also had thebaby hold onto the drape, whichadded to the composition and hersafety.
Six Months to One YearWith babies six months and over we have many more options in creatingdelightful portraits. Once a baby is able to sit without support and alsostand with or without support our creativity is virtually unlimited. We showsome of the most basic poses in this section.
In plate 25, we have an image by Cindy Romano, who photographed aninfant who was able to sit without support. The baby was positioned infront of a mirror and was quite excited to see her reflection; this allowedher to produce a real parent-pleasing image. At this age, we should seek tohave baby actively involved in the photographic process. We want our lit-tle subjects to show their newest skills and interests, and anything we cando to get them to react will improve the portrait.
Above—Plate 24. Photo by Norman Phillips. Facing page—Plate 25. Photo by Cindy
Romano.
16 MASTER POSING GUIDE FOR CHILDREN’S PORTRAIT PHOTOGRAPHY

Plate 26, a portrait by Julia Stotlar, shows a confident baby of abouteight months of age seated on the floor. Providing an object that holdsbaby’s attention, like the teething ring shown in this image, will help toensure he is in a stable pose. When baby’s interest in the object wanes (andthis may take just a couple of minutes), it’s time to introduce anotherobject of interest.
Because Julia positioned the baby at a 35-degree angle to the camera, wecan see both legs. If he were placed in full profile, he would create anL-shaped image, which would be much less interesting.
In plate 27 we have a portrait by Kerry Firstenberger. Once the baby wasseated, he immediately put his thumb in his mouth and reached for histoes, so there was no need to introduce an object to grab his attention.
Plate 28 shows a girl about seven- to eight-months-old occupied with abasket of flowers. Kerry Firstenberger had this little girl attend to the flow-
18 MASTER POSING GUIDE FOR CHILDREN’S PORTRAIT PHOTOGRAPHY
Left—Plate 26. Photo by Julia Stotlar.
Above—Plate 27. Photo by Kerry
Firstenberger.

ers to produce an image of a dainty little lady ina pretty dress and a bow in her hair—and notrolling around and crawling on all fours. This isanother example of using objects to keep theattention of babies who would otherwise notstay in one place.
Kerry used a different technique to engagethe child in order to create the portrait shown inplate 29. Placing a hat on a child’s head willalmost always result in the child trying to re-move it. As those events unfolded here, Kerryzoomed in for this close-up portrait. We can
have a lot of fun with this strategy, capturing images of great humor as thebaby seeks to remove the hat or tries to discover what is on his or her head.
A string of pearls and a baby girl are compatible image elements, asWendy Veugeler shows us in plate 30. In this image, the pearls captured the
BABIES AND TODDLERS 19
Top left—Plate 28. Top right—Plate 29. Photos by Kerry
Firstenberger. Left—Plate 30. Photo by Wendy Veugeler.

baby’s interest, resulting in a very pleasant portrait. Often, though, whenthe baby’s attention is fixed on such a prop it is difficult to get them toanswer our calls for their attention.
Sam Lanza created the image shown in plate 31. He placed a stuffed ani-mal between the baby’s legs, which helped to make him comfortable andprovided something he could relate to if he lost interest in what was hap-pening behind the camera. Ideally the toy should be one that the babyis familiar with, so parents should be advised to bring such items to thesession.
Baby was placed in profile to the camera, and when his attention wascalled he delightfully expressed his interest. While the stuffed animal shownhere piqued this baby’s interest, keep in mind that blankets, toys, and col-orful objects can work equally well. We need to remember that what mightbe unexciting to us is new and interesting to the baby who is still explor-ing the world.
In plate 32, Sam Lanza cleverly changed the pose of the baby shown inplate 31. Babies are inherently curious, and by turning this little fellowaway from the camera he naturally turned his head to see what was goingon near the camera. This resulted in a delightful expression as he recog-nized someone near the camera.
Plate 33 achieves the same result. In this portrait, baby was turned evenfarther away from the camera than in the previous image. In this instance,
20 MASTER POSING GUIDE FOR CHILDREN’S PORTRAIT PHOTOGRAPHY
Top left—Plate 31. Top right—Plate 32.
Photos by Sam Lanza. Above—Plate 33.
Photo by Norman Phillips.

a blanket was placed around the lit-tle boy, and when his name wascalled he made a very strong turntoward us. Plates 32 and 33 demon-strate how we can take advantage ofa baby’s curiosity and desire to knowwhat’s going on.
Plate 34 shows the result of pho-tographing a baby in a position sim-ilar to the one used to create theportrait shown in plate 33.
Plate 35 is a straightforward andsimple example of a six- to eight-month-old seated with a blanket inhis lap. Keep in mind that a blanket can be used to ensure that we do notsee a diaper or, if the baby is naked, his or her private parts. When we setthis portrait up we were not sure if he would be able to stay seated, and the
BABIES AND TODDLERS 21
Above—Plate 34. Right—Plate 35. Photos
by Norman Phillips.
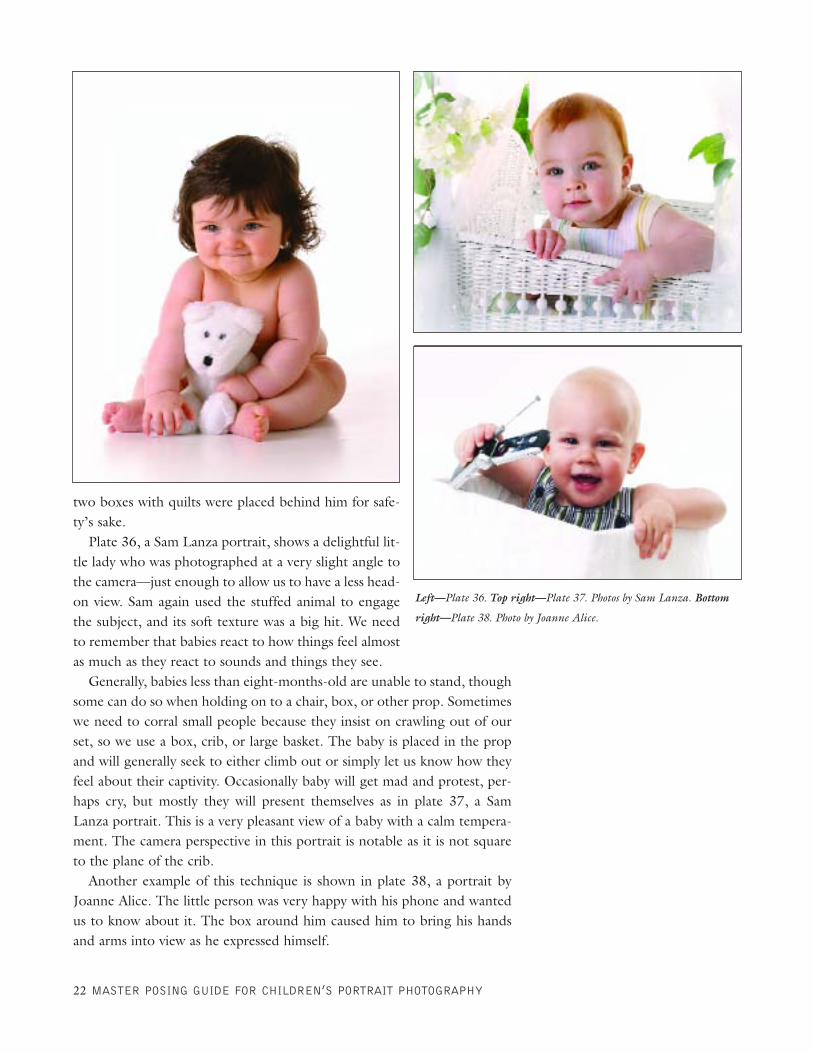
two boxes with quilts were placed behind him for safe-ty’s sake.
Plate 36, a Sam Lanza portrait, shows a delightful lit-tle lady who was photographed at a very slight angle tothe camera—just enough to allow us to have a less head-on view. Sam again used the stuffed animal to engagethe subject, and its soft texture was a big hit. We needto remember that babies react to how things feel almostas much as they react to sounds and things they see.
Generally, babies less than eight-months-old are unable to stand, thoughsome can do so when holding on to a chair, box, or other prop. Sometimeswe need to corral small people because they insist on crawling out of ourset, so we use a box, crib, or large basket. The baby is placed in the propand will generally seek to either climb out or simply let us know how theyfeel about their captivity. Occasionally baby will get mad and protest, per-haps cry, but mostly they will present themselves as in plate 37, a SamLanza portrait. This is a very pleasant view of a baby with a calm tempera-ment. The camera perspective in this portrait is notable as it is not squareto the plane of the crib.
Another example of this technique is shown in plate 38, a portrait byJoanne Alice. The little person was very happy with his phone and wantedus to know about it. The box around him caused him to bring his handsand arms into view as he expressed himself.
22 MASTER POSING GUIDE FOR CHILDREN’S PORTRAIT PHOTOGRAPHY
Left—Plate 36. Top right—Plate 37. Photos by Sam Lanza. Bottom
right—Plate 38. Photo by Joanne Alice.
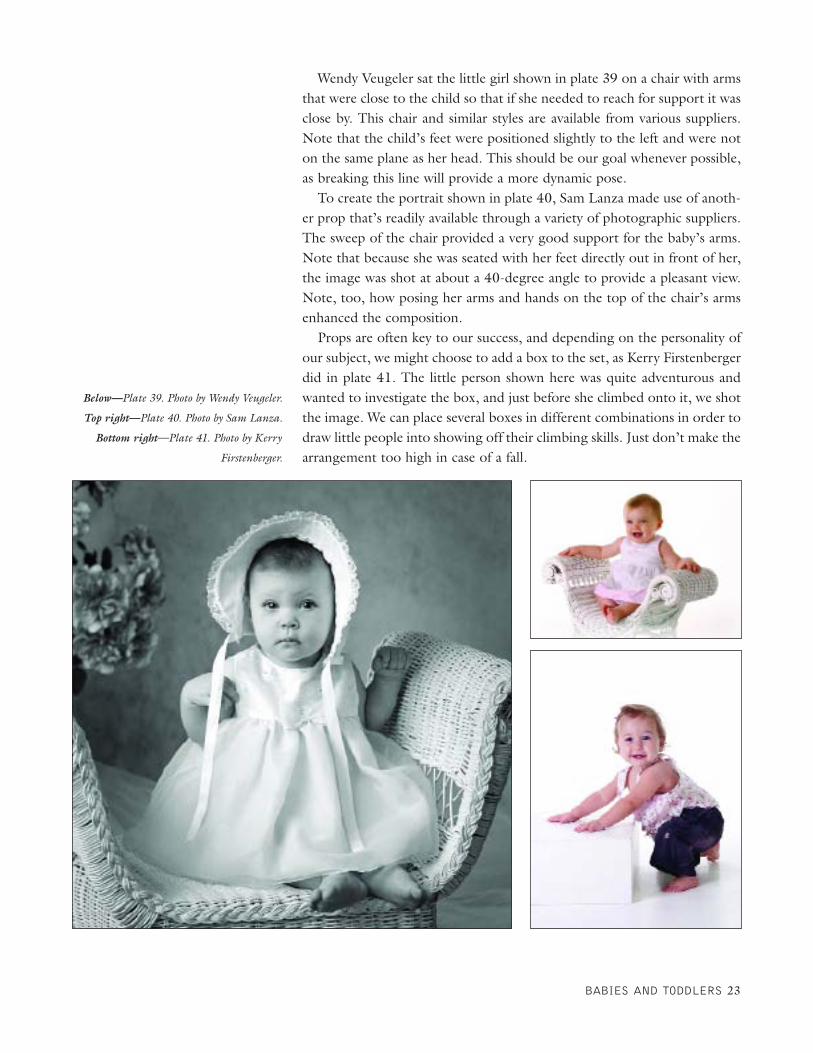
Wendy Veugeler sat the little girl shown in plate 39 on a chair with armsthat were close to the child so that if she needed to reach for support it wasclose by. This chair and similar styles are available from various suppliers.Note that the child’s feet were positioned slightly to the left and were noton the same plane as her head. This should be our goal whenever possible,as breaking this line will provide a more dynamic pose.
To create the portrait shown in plate 40, Sam Lanza made use of anoth-er prop that’s readily available through a variety of photographic suppliers.The sweep of the chair provided a very good support for the baby’s arms.Note that because she was seated with her feet directly out in front of her,the image was shot at about a 40-degree angle to provide a pleasant view.Note, too, how posing her arms and hands on the top of the chair’s armsenhanced the composition.
Props are often key to our success, and depending on the personality ofour subject, we might choose to add a box to the set, as Kerry Firstenbergerdid in plate 41. The little person shown here was quite adventurous andwanted to investigate the box, and just before she climbed onto it, we shotthe image. We can place several boxes in different combinations in order todraw little people into showing off their climbing skills. Just don’t make thearrangement too high in case of a fall.
BABIES AND TODDLERS 23
Below—Plate 39. Photo by Wendy Veugeler.
Top right—Plate 40. Photo by Sam Lanza.
Bottom right—Plate 41. Photo by Kerry
Firstenberger.
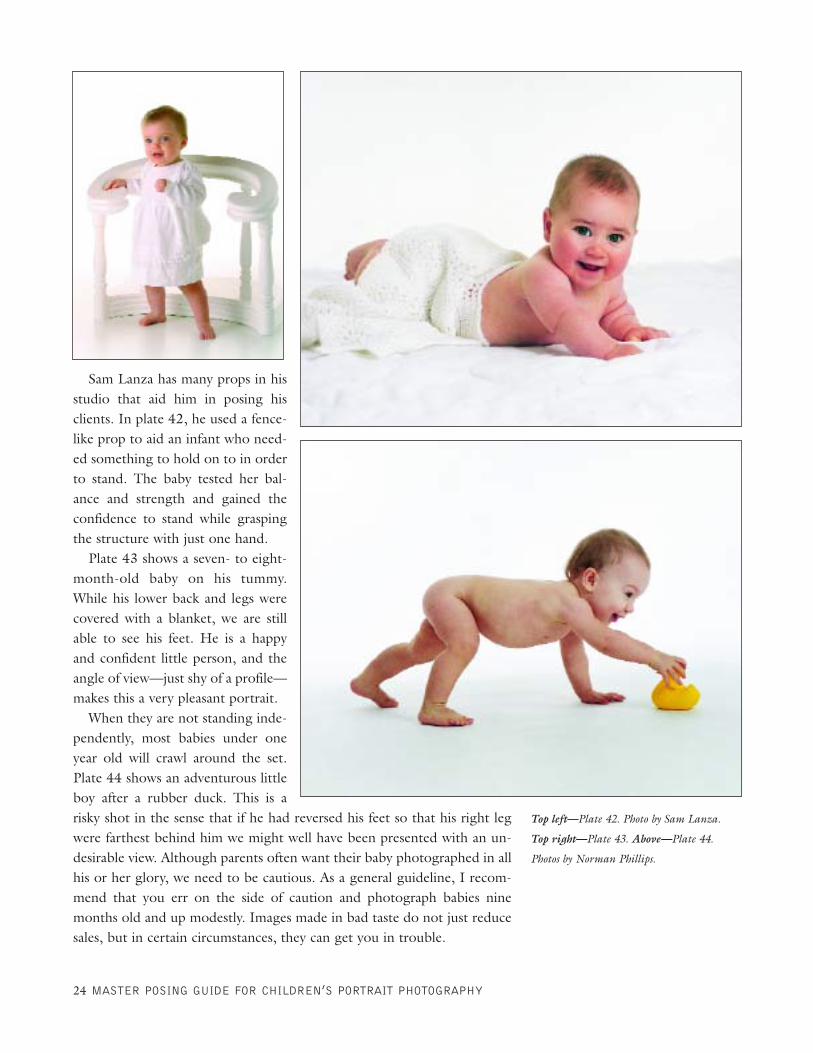
Sam Lanza has many props in hisstudio that aid him in posing hisclients. In plate 42, he used a fence-like prop to aid an infant who need-ed something to hold on to in orderto stand. The baby tested her bal-ance and strength and gained theconfidence to stand while graspingthe structure with just one hand.
Plate 43 shows a seven- to eight-month-old baby on his tummy.While his lower back and legs werecovered with a blanket, we are stillable to see his feet. He is a happyand confident little person, and theangle of view—just shy of a profile—makes this a very pleasant portrait.
When they are not standing inde-pendently, most babies under oneyear old will crawl around the set.Plate 44 shows an adventurous littleboy after a rubber duck. This is arisky shot in the sense that if he had reversed his feet so that his right legwere farthest behind him we might well have been presented with an un-desirable view. Although parents often want their baby photographed in allhis or her glory, we need to be cautious. As a general guideline, I recom-mend that you err on the side of caution and photograph babies ninemonths old and up modestly. Images made in bad taste do not just reducesales, but in certain circumstances, they can get you in trouble.
24 MASTER POSING GUIDE FOR CHILDREN’S PORTRAIT PHOTOGRAPHY
Top left—Plate 42. Photo by Sam Lanza.
Top right—Plate 43. Above—Plate 44.
Photos by Norman Phillips.
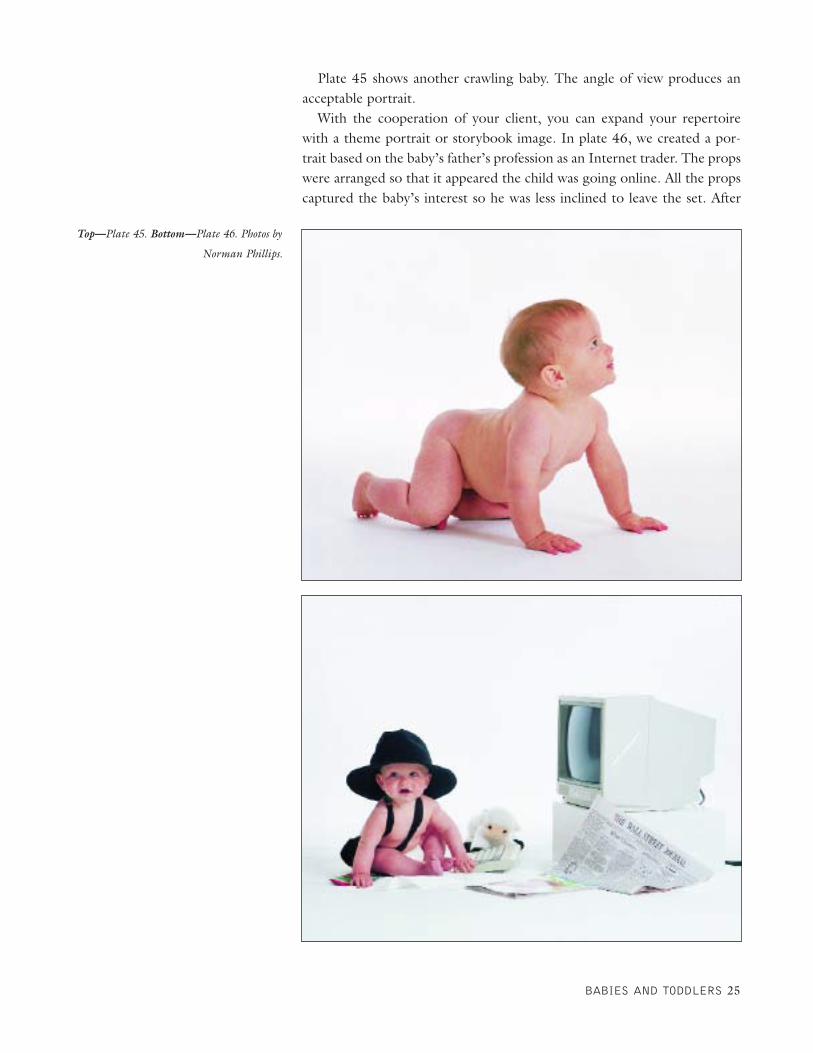
Plate 45 shows another crawling baby. The angle of view produces anacceptable portrait.
With the cooperation of your client, you can expand your repertoirewith a theme portrait or storybook image. In plate 46, we created a por-trait based on the baby’s father’s profession as an Internet trader. The propswere arranged so that it appeared the child was going online. All the propscaptured the baby’s interest so he was less inclined to leave the set. After
BABIES AND TODDLERS 25
Top—Plate 45. Bottom—Plate 46. Photos by
Norman Phillips.
placing him in the set all we had to do was let him get on with it, and theresults just flowed.
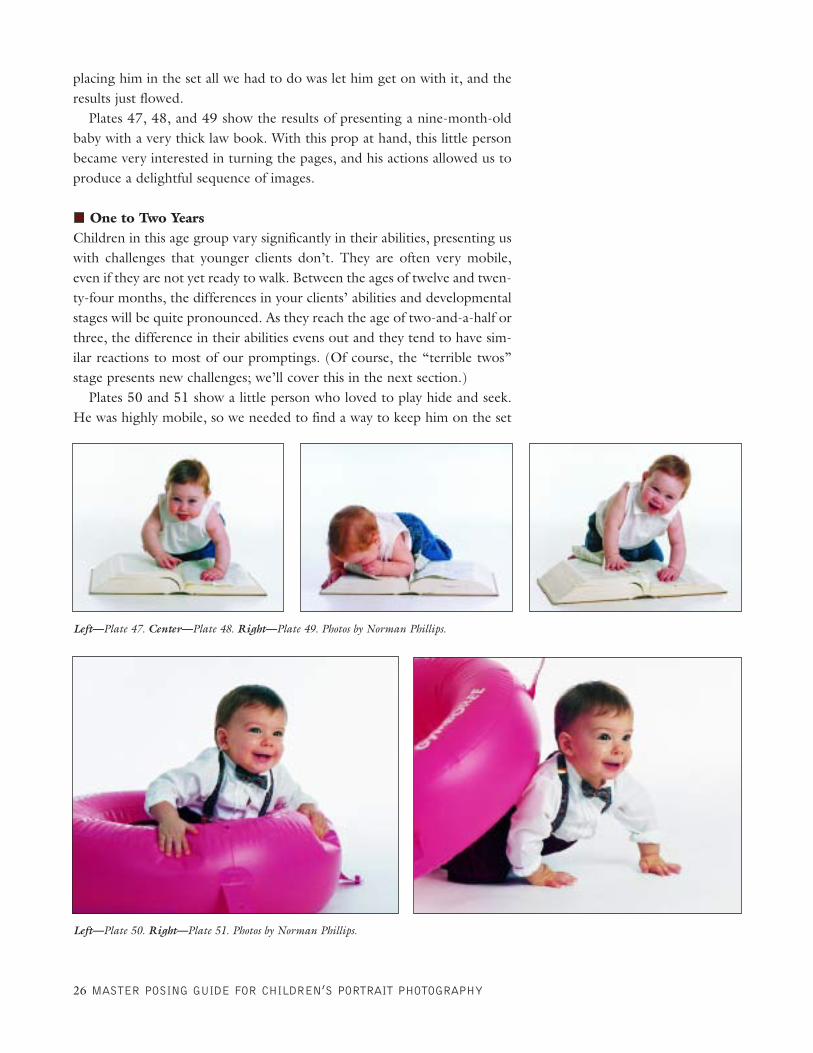
Plates 47, 48, and 49 show the results of presenting a nine-month-oldbaby with a very thick law book. With this prop at hand, this little personbecame very interested in turning the pages, and his actions allowed us toproduce a delightful sequence of images.
One to Two YearsChildren in this age group vary significantly in their abilities, presenting uswith challenges that younger clients don’t. They are often very mobile,even if they are not yet ready to walk. Between the ages of twelve and twen-ty-four months, the differences in your clients’ abilities and developmentalstages will be quite pronounced. As they reach the age of two-and-a-half orthree, the difference in their abilities evens out and they tend to have sim-ilar reactions to most of our promptings. (Of course, the “terrible twos”stage presents new challenges; we’ll cover this in the next section.)
Plates 50 and 51 show a little person who loved to play hide and seek.He was highly mobile, so we needed to find a way to keep him on the set
26 MASTER POSING GUIDE FOR CHILDREN’S PORTRAIT PHOTOGRAPHY
Left—Plate 47. Center—Plate 48. Right—Plate 49. Photos by Norman Phillips.
Left—Plate 50. Right—Plate 51. Photos by Norman Phillips.

for as long as possible. We presented him with a toy tire and positioned himinside it, then invited him to have fun with his mother. This resulted in asequence of images that represented his personality. Two of the resultingimages are shown here.
The client shown in plates 52–54 has been photographed at our studiosince she was a few months old. She has shown us on numerous occasionshow advanced she is, and this sequence of images shows that when we pres-ent a small child with a book he or she will likely stay put long enough toget the desired images. Equipped with a child-size chair and a storybookcollection, you have the basis for creating an image your client will enjoy.
In this session, we sat the client on a child’s chair and gave her a suitablestorybook. Because the child is very bright, she immediately began to actout a fantasy, providing us with the opportunity to create this great trio ofimages. When trying to re-create this look, choosing an appropriate-sizebook and chair are important. These chairs are available in sets of two fromseveral suppliers and will prove to be priceless.
We have also found small ladders to be useful in posing very young chil-dren. They are available through studio prop suppliers in a wood stain orwhite finish. You can also buy unfinished ladders in home improvementstores and finish them any way you wish.
To produce the image shown in plate 55, we used a small white ladderto keep this little person busy on the set. Once young clients are introducedto these ladders, they tend to focus their attention on them when theyarrive for subsequent portrait sessions—even if it’s not an element we planto use in the session! They will not just climb the ladder, they will performdaring feats just to show how clever they are. The pride this little guy hadin his accomplishment shows in the way he took the first step, turned, andsmiled at us.
These ladders are also used for posing older children and groups of two,as shown in later chapters.
BABIES AND TODDLERS 27
Top left—Plate 52. Center—Plate 53.
Right—Plate 54. Above—Plate 55. Photos
by Norman Phillips.
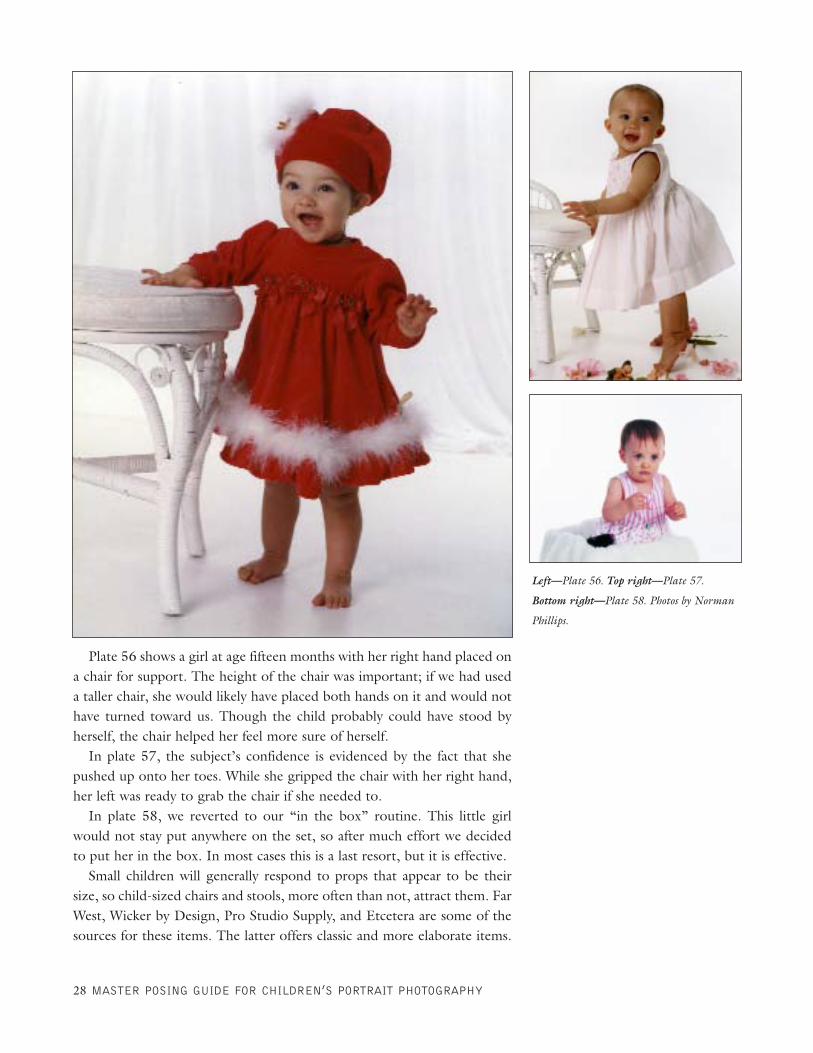
Plate 56 shows a girl at age fifteen months with her right hand placed ona chair for support. The height of the chair was important; if we had useda taller chair, she would likely have placed both hands on it and would nothave turned toward us. Though the child probably could have stood byherself, the chair helped her feel more sure of herself.
In plate 57, the subject’s confidence is evidenced by the fact that shepushed up onto her toes. While she gripped the chair with her right hand,her left was ready to grab the chair if she needed to.
In plate 58, we reverted to our “in the box” routine. This little girlwould not stay put anywhere on the set, so after much effort we decidedto put her in the box. In most cases this is a last resort, but it is effective.
Small children will generally respond to props that appear to be theirsize, so child-sized chairs and stools, more often than not, attract them. FarWest, Wicker by Design, Pro Studio Supply, and Etcetera are some of thesources for these items. The latter offers classic and more elaborate items.
28 MASTER POSING GUIDE FOR CHILDREN’S PORTRAIT PHOTOGRAPHY
Left—Plate 56. Top right—Plate 57.
Bottom right—Plate 58. Photos by Norman
Phillips.

The seat shown in plate 59 is from Wicker by Design. It is ideal for littlegirls—the arms are just right for their little hands, and it allows us to posethem showing their pretty dresses.
The shown bench in plate 60 is probably the most popular prop in ourstudio. We observe the various approaches the children take to positionthemselves on the seat, and this results in a varied selection of poses—fromback views, to side views, to poses like the one shown here—that just hap-pen without our intervention. The same bench is used in the portraitshown in plate 61, and you can see that this child took a different approachto it.
BABIES AND TODDLERS 29
Top left—Plate 59. Right—Plate 60.
Bottom left—Plate 61. Photos by Norman
Phillips.
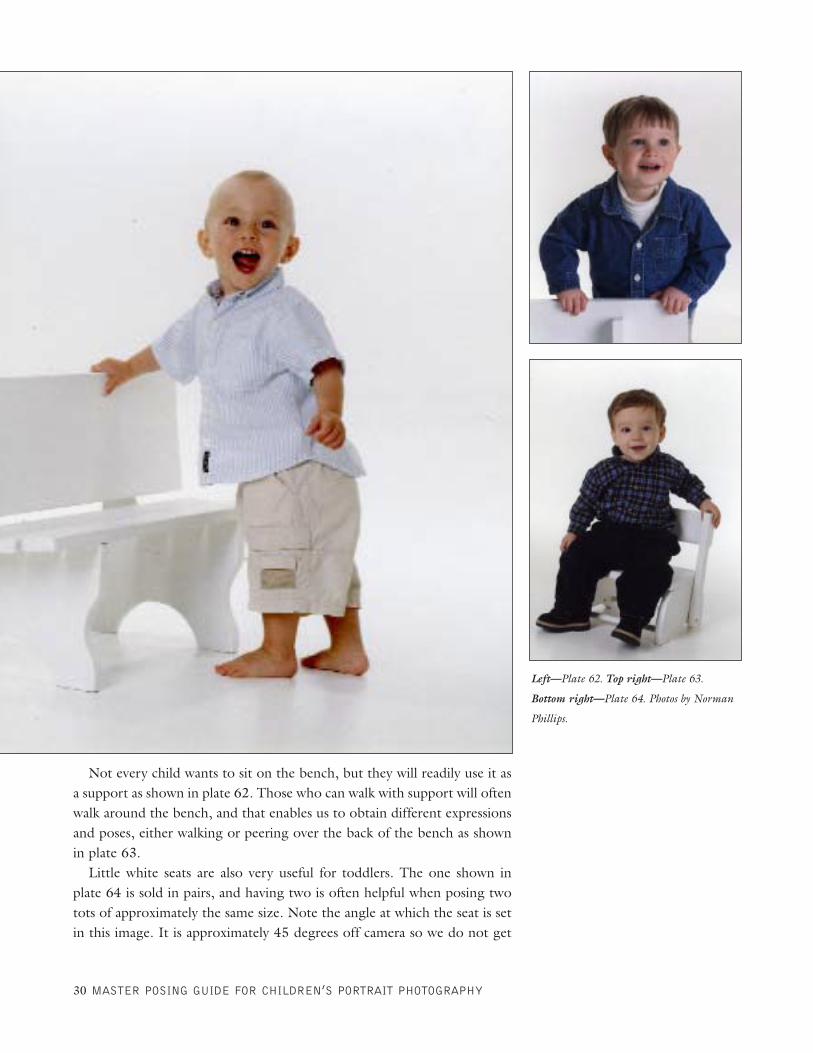
Not every child wants to sit on the bench, but they will readily use it asa support as shown in plate 62. Those who can walk with support will oftenwalk around the bench, and that enables us to obtain different expressionsand poses, either walking or peering over the back of the bench as shownin plate 63.
Little white seats are also very useful for toddlers. The one shown inplate 64 is sold in pairs, and having two is often helpful when posing twotots of approximately the same size. Note the angle at which the seat is setin this image. It is approximately 45 degrees off camera so we do not get
30 MASTER POSING GUIDE FOR CHILDREN’S PORTRAIT PHOTOGRAPHY
Left—Plate 62. Top right—Plate 63.
Bottom right—Plate 64. Photos by Norman
Phillips.

too much of a frontal view of the child. When the child is placedsquare to the plane of the camera we will get a relatively boring view.The three-quarter pose is much more pleasing.
In plate 65, we have the girl positioned by a chair that’s just theright height for this little person. She was placed this way so that shehad to turn in order to see us, which allowed us to create a differentstyle of pose.
Between the ages of twelve and fifteen months, many subjects—especially boys—are drawn to climb, be it on a ladder, an arrange-ment of boxes, or a posing bench, as shown in plate 66. The look ofdelight at his achievement in climbing on this bench is written allover this little guy’s face. Any time we can get a child at such a youngage to perform without us having to Velcro them down is a bonus.
This particular prop can be used in three different positions—on itsend, in reverse, and as is shown here. There are number of these onthe market. This particular one was purchased from the HarringtonProp Company.
To produce the image shown in plate 67, we placed an object thechild was interested in on top of a box and had him go for it. Thistechnique works nine times out of ten when we would otherwisehave difficulty in keeping the child in place. The process results insome very nice portraits.
BABIES AND TODDLERS 31
Plate 66. Photo by Norman Phillips.
Plate 65. Photo by Norman Phillips.
Plate 67. Photo by Norman Phillips.
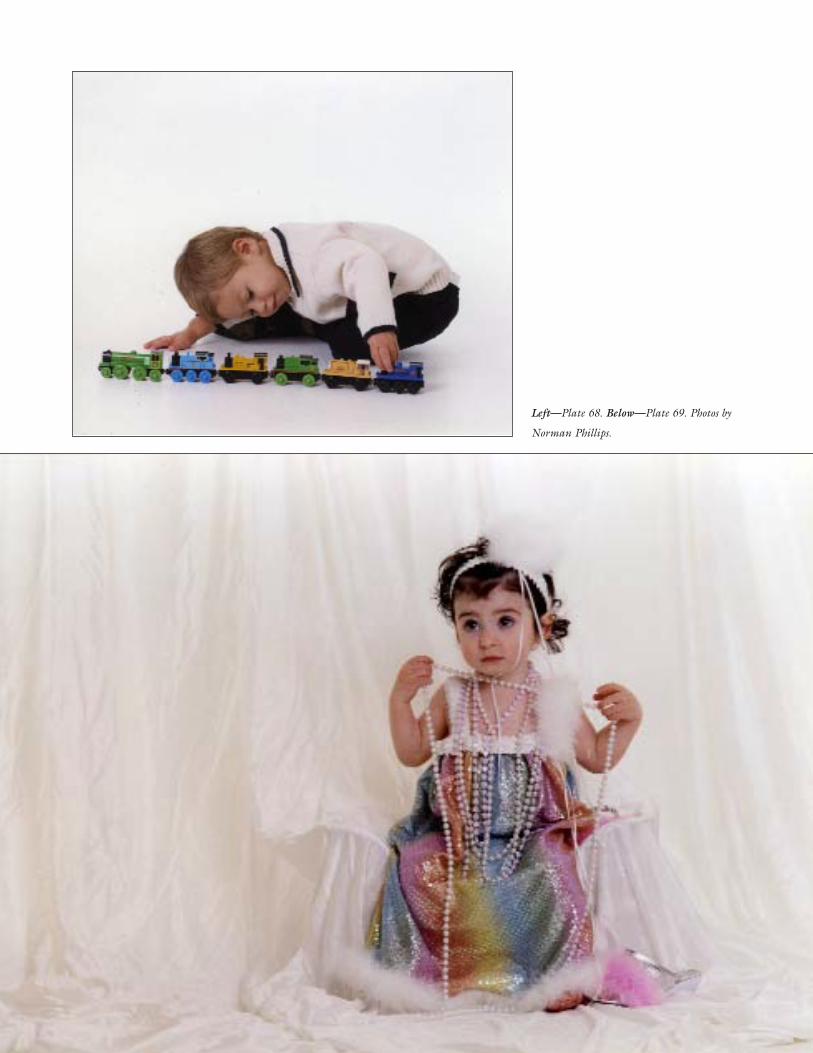
Left—Plate 68. Below—Plate 69. Photos by
Norman Phillips.

BABIES AND TODDLERS 33
To occupy the subject shown in plate 68, we once again provided anobject of special interest to the child. In this case, his mother brought inhis favorite train set. We obtained numerous images of the child, who wastotally captivated by the train. It is usually best to have a parent bring oneof their child’s special playthings to the session. When we provide theprops, the children often think we have presented them with a gift. Thatcan result in some very disappointed toddlers, and they will let us knowhow they feel in no uncertain terms.
In plate 69, we again used the pretty wicker seat shown in plate 66. Thistime, however, we draped a satin fabric behind the girl and brought it overthe seat to create a softer, more delicate look. Boas were used to add to theeffect of the feminine pearls, which she held in her hands. This time,because we had her mother positioned to the left of the camera to attracther attention, positioning the girl square to the camera worked quite well.
In plate 70, we positioned the toddler close to the wicker seat so shecould lean against it. In this portrait she experimented with her ability to
Plate 70. Photo by Norman Phillips.
stand without help by raising her arms,though we cheated a little by placing herupper arm on the arm of the seat.
When outdoors, communicating withlittle people is more difficult because ourvoices do not carry so well as when we areindoors. Additionally, when outdoors,children are drawn into their surround-ings, so getting them to stay in one placeis more difficult than in the camera room.
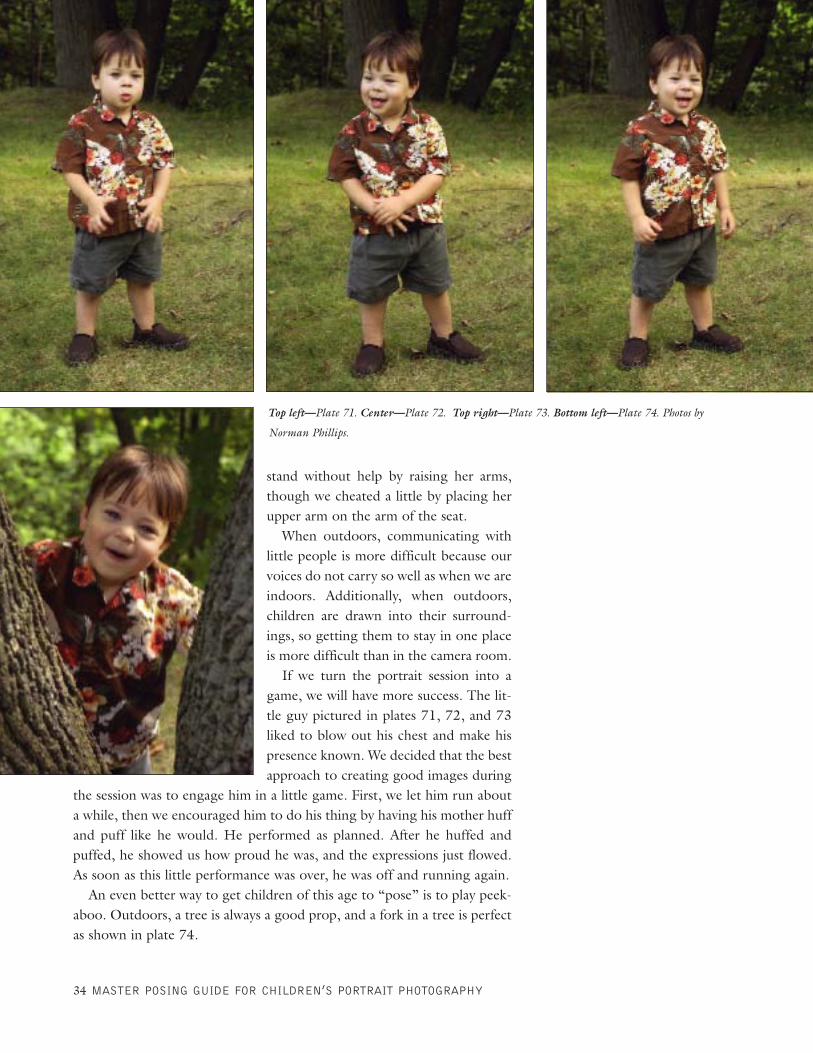
If we turn the portrait session into agame, we will have more success. The lit-tle guy pictured in plates 71, 72, and 73liked to blow out his chest and make hispresence known. We decided that the bestapproach to creating good images during
the session was to engage him in a little game. First, we let him run abouta while, then we encouraged him to do his thing by having his mother huffand puff like he would. He performed as planned. After he huffed andpuffed, he showed us how proud he was, and the expressions just flowed.As soon as this little performance was over, he was off and running again.
An even better way to get children of this age to “pose” is to play peek-aboo. Outdoors, a tree is always a good prop, and a fork in a tree is perfectas shown in plate 74.
34 MASTER POSING GUIDE FOR CHILDREN’S PORTRAIT PHOTOGRAPHY
Top left—Plate 71. Center—Plate 72. Top right—Plate 73. Bottom left—Plate 74. Photos by
Norman Phillips.

Two to Four YearsNow we are truly into the realm of the dreaded “terrible twos.” Whileyounger subjects can be difficult and willful, during this age we get to seethe ability of some toddlers to vex parents and drive photographers aroundthe bend. We are always required to have patience when working with chil-dren, but now our nerves and our tolerance for the tantrum will be tested.
Despite the potential for the camera room to become a psychologicaltesting laboratory, this is the age when we may have a lot more fun and cre-ative satisfaction. Often we will discover that these little people are muchbrighter and more understanding than we anticipated, and we should neverprejudge what a child is capable of.
Once our clients reach two years of age, many have the ability to remem-ber words and repeat them, and we can capitalize on this ability. Ad-ditionally, if we are skilled at communicating with these kids in an age-appropriate manner, we have the chance to create some delightful images.
When we want a child at this age to stand in place we need to use someform of persuasion or demonstration. Karen Rodgers places a penny on thespot she wants the child to stand and invites the child to stand on it. Thisis what she did to obtain the image shown in plate 75.
Placing my index finger on the floor where I want the child to standworks very well. That is what I did to get my subject to stand where he ispictured in plate 76. When working with the younger subjects in this agegroup, I often ask them to pretend their feet are stuck and they cannotmove; this also works well.
BABIES AND TODDLERS 35
Left—Plate 75. Photo by Karen Rodgers.
Right—Plate 76. Photo by Norman Phillips.
Another technique is to give them something to hold on to that occu-pies their hands and arms so they do not let their feet take over their motor.The more we work with these young children, the better we can encour-age them to do what we need them to do.
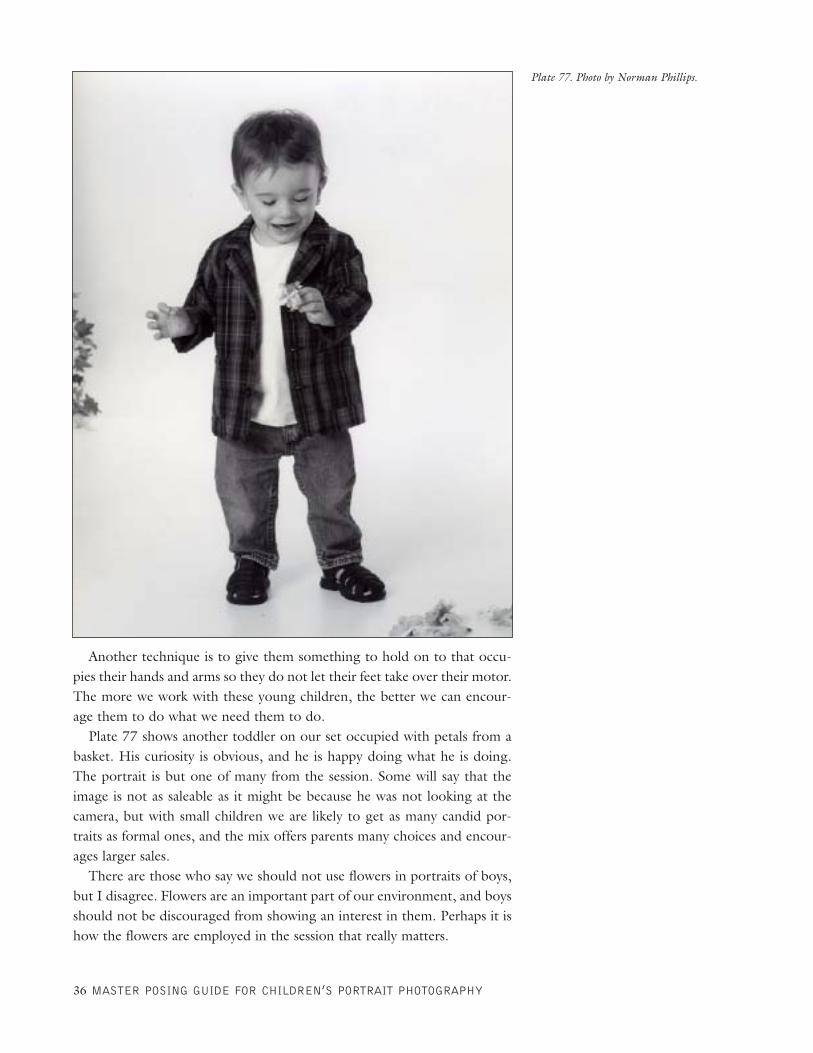
Plate 77 shows another toddler on our set occupied with petals from abasket. His curiosity is obvious, and he is happy doing what he is doing.The portrait is but one of many from the session. Some will say that theimage is not as saleable as it might be because he was not looking at thecamera, but with small children we are likely to get as many candid por-traits as formal ones, and the mix offers parents many choices and encour-ages larger sales.
There are those who say we should not use flowers in portraits of boys,but I disagree. Flowers are an important part of our environment, and boysshould not be discouraged from showing an interest in them. Perhaps it ishow the flowers are employed in the session that really matters.
36 MASTER POSING GUIDE FOR CHILDREN’S PORTRAIT PHOTOGRAPHY
Plate 77. Photo by Norman Phillips.

Plates 78 and 79 show a girl having fun with a basket of flower petals.We usually tip the petals out of the basket and encourage the child to putthem back in. Often they become so involved with the process we have towork hard to get them out of it. During the session we obtain a series ofdifferent views and delightful expressions.
Flower petals played their part in plates 80 and 81, but the scenario inthis sequence was a little different. Though the girl in the portrait had verybusy feet, the basket and petals kept her close to where we wanted her.
BABIES AND TODDLERS 37
Top left—Plate 78. Top right—Plate 79.
Bottom left—Plate 80. Bottom right—Plate
81. Photos by Norman Phillips.
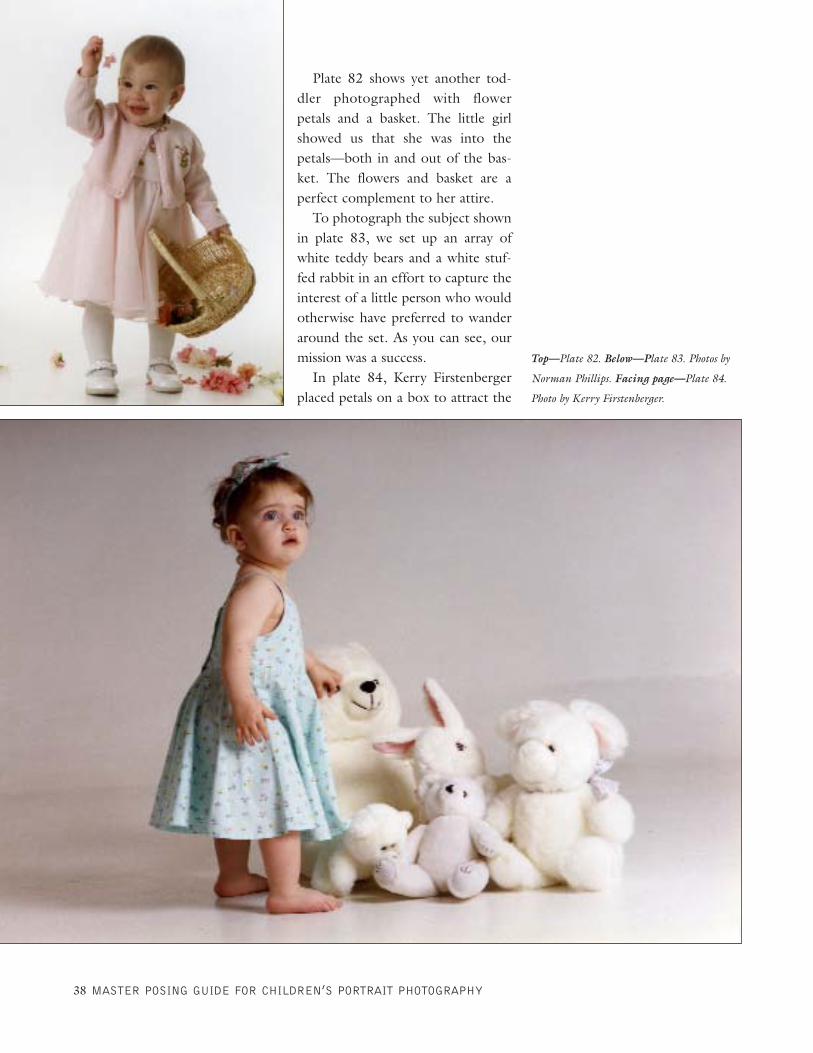
Plate 82 shows yet another tod-dler photographed with flowerpetals and a basket. The little girlshowed us that she was into thepetals—both in and out of the bas-ket. The flowers and basket are aperfect complement to her attire.
To photograph the subject shownin plate 83, we set up an array ofwhite teddy bears and a white stuf-fed rabbit in an effort to capture theinterest of a little person who wouldotherwise have preferred to wanderaround the set. As you can see, ourmission was a success.
In plate 84, Kerry Firstenbergerplaced petals on a box to attract the
38 MASTER POSING GUIDE FOR CHILDREN’S PORTRAIT PHOTOGRAPHY
Top—Plate 82. Below—Plate 83. Photos by
Norman Phillips. Facing page—Plate 84.
Photo by Kerry Firstenberger.


40 MASTER POSING GUIDE FOR CHILDREN’S PORTRAIT PHOTOGRAPHY
Left—Plate 85. Bottom
left—Plate 86. Bottom
right—Plate 87. Photos by
Karen Rodgers.

child. Note how the little subject communicated her interest. The angle ofthe box ensured that when she turned toward the camera, our view of herwould be pleasant.
Placing a child in a full profile pose can produce attractive images asshown in plate 85, a portrait by Karen Rodgers. Karen employed a smallpillar as a prop, and the child was placed so she could rest her hands on itto help her hold her position. The pillars are available from various suppliers.
Plate 86 shows another portrait made by Karen Rodgers. Karen em-ployed a padded stool as a prop and had the child rest her arm on the softfabric; she actually leaned on it, which helped to personalize the pose.
In plate 87, Karen used the same prop, turned in a different direction,and had the child stand with just her hand resting on the stool.
In plate 88, Karen’s subject was positioned with her body in profile tothe camera but with her head turned back toward the camera. We cannotsee the prop the child rested her right hand upon as it is nicely shielded bythe toddler’s body. This is a nice innovation.
BABIES AND TODDLERS 41
Plate 88. Photo by Karen Rodgers.

Using a parent’s legs as a prop canbe very effective, especially when achild is a little reluctant to let go ofthe parent. Kerry Firstenberger pho-tographed a child holding on tomother’s leg, producing the imageshown in plate 89. Using this tech-nique can result in all sorts of attrac-tive portraits. Sometimes we will getimages with the child hugging a par-ent’s leg, and sometimes even bothlegs. Occasionally a child will hidebetween the legs and pop out as in agame of peekaboo.
42 MASTER POSING GUIDE FOR CHILDREN’S PORTRAIT PHOTOGRAPHY
Top—Plate 89. Photo by Kerry Firstenberger.
Bottom—Plate 90. Photo by Wendy Veugeler.

Plate 90, a portrait by Wendy Veugeler, uses a tricycle as a prop. Whileshe managed to capture the image with the child standing in front of it, itis likely that at some point during the session, the child had some contactwith the prop.
In the portraits shown in plates 91 and 92, Julia Stotlar used a couch asa base and prop. In plate 91, she had the little person seated in profile tothe camera. A couch is a safe place for a child as it is something he or she
BABIES AND TODDLERS 43
Top—Plate 91. Bottom—Plate 92.
Photos by Julia Stotlar.
will be familiar with. If you have one in your camera room, it will provevery useful. At this point of the session, the child was more interested in hisfeet than in what was going on at the camera position. In plate 92, Juliasimply placed the child on the couch and let the pose unfold.
Generally, it is not recommended that a subject’s feet be aimed at thecamera as this normally causes them to appear larger than they are.However, by being selective with our exposures we can capture portraitsthat genuinely represent the subject as Julia Stotlar did in this example. Itis the child’s body language that makes this portrait work.
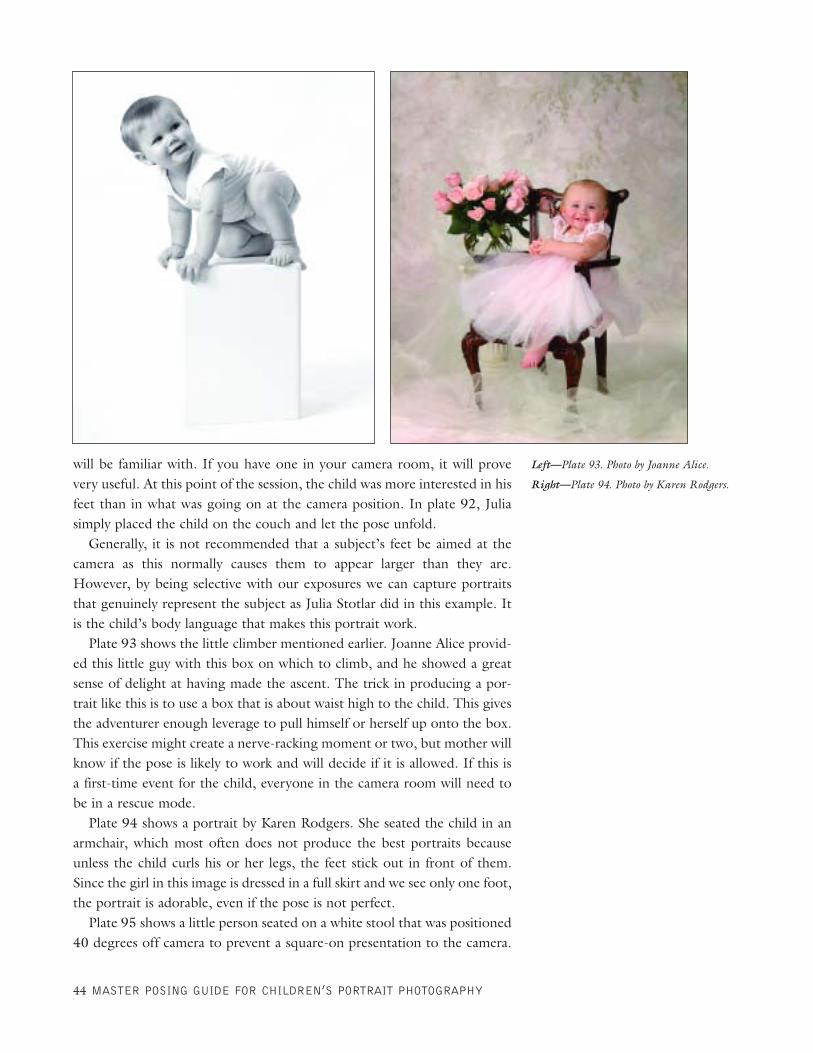
Plate 93 shows the little climber mentioned earlier. Joanne Alice provid-ed this little guy with this box on which to climb, and he showed a greatsense of delight at having made the ascent. The trick in producing a por-trait like this is to use a box that is about waist high to the child. This givesthe adventurer enough leverage to pull himself or herself up onto the box.This exercise might create a nerve-racking moment or two, but mother willknow if the pose is likely to work and will decide if it is allowed. If this isa first-time event for the child, everyone in the camera room will need tobe in a rescue mode.
Plate 94 shows a portrait by Karen Rodgers. She seated the child in anarmchair, which most often does not produce the best portraits becauseunless the child curls his or her legs, the feet stick out in front of them.Since the girl in this image is dressed in a full skirt and we see only one foot,the portrait is adorable, even if the pose is not perfect.
Plate 95 shows a little person seated on a white stool that was positioned40 degrees off camera to prevent a square-on presentation to the camera.
44 MASTER POSING GUIDE FOR CHILDREN’S PORTRAIT PHOTOGRAPHY
Left—Plate 93. Photo by Joanne Alice.
Right—Plate 94. Photo by Karen Rodgers.

Note the angle of his feet as they relate to us. The result is much betterthan it would have been if we had him facing us with both feet in a straightline across the camera plane.
We are sometimes privileged to photograph the most charming of chil-dren, and plate 96 shows one of these delightful little people. In this por-trait we once again employed the little wicker seat. The little girl was anideal candidate for this prop. She was calm and charming and had a lovelysmile. Her full-length dress added to the mood of this delightful image.
The point here is that we should base our prop selections on the matu-rity and personality of our subjects. We need to avoid the temptation toencourage a child to do something he or she is not yet ready to do.Nevertheless, there are times when we are in a position to capture a childdoing something for the first time, which is memorable for the parent.
Karen Rodgers exercised this kind of good judgment when she createdthe portrait shown in plate 97. Placing a child on a chair in this manner atthe age of eighteen months should be done only with the consent of theparent. As adventurous as little people of this age may be, there is alwaysthe risk of a fall because children are impulsive and not aware of the dan-gers of their actions. But in this portrait, the child appears to be comfort-able, though of course we do not know how long he stayed in this pose.
Note the angle of the chair and the child. The boy is posed in three-quarter presentation that allows us to see all of his pleasing characteristics.
BABIES AND TODDLERS 45
Top left—Plate 95. Bottom left—Plate 96.
Photos by Norman Phillips. Bottom right—
Plate 97. Photo by Karen Rodgers.
In this pose the child could easilylook in any direction Karen wishedso she could obtain images that fea-tured a variety of expressions andhead angles.
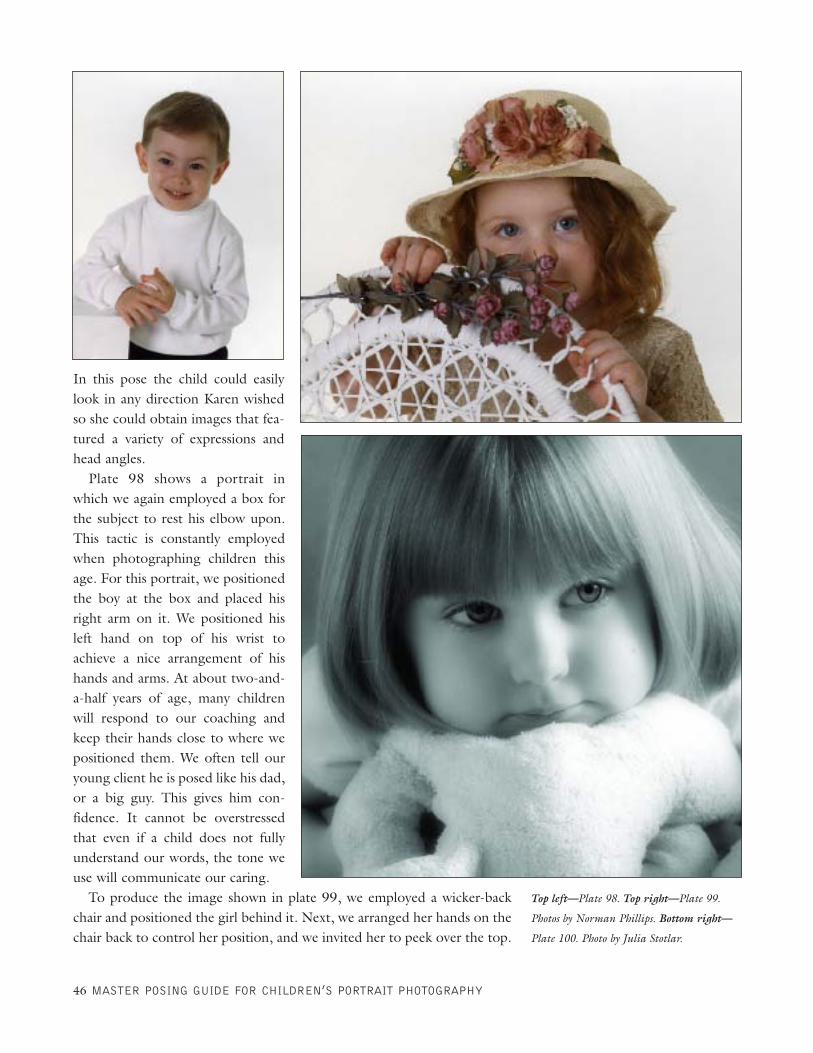
Plate 98 shows a portrait inwhich we again employed a box forthe subject to rest his elbow upon.This tactic is constantly employedwhen photographing children thisage. For this portrait, we positionedthe boy at the box and placed hisright arm on it. We positioned hisleft hand on top of his wrist toachieve a nice arrangement of hishands and arms. At about two-and-a-half years of age, many childrenwill respond to our coaching andkeep their hands close to where wepositioned them. We often tell ouryoung client he is posed like his dad,or a big guy. This gives him con-fidence. It cannot be overstressedthat even if a child does not fullyunderstand our words, the tone weuse will communicate our caring.
To produce the image shown in plate 99, we employed a wicker-backchair and positioned the girl behind it. Next, we arranged her hands on thechair back to control her position, and we invited her to peek over the top.
46 MASTER POSING GUIDE FOR CHILDREN’S PORTRAIT PHOTOGRAPHY
Top left—Plate 98. Top right—Plate 99.
Photos by Norman Phillips. Bottom right—
Plate 100. Photo by Julia Stotlar.

Having her hold a sprig of flowers and wear a hat helped us to produce aportrait that is a little different from the norm.
The chair, though child sized, was just a little high for the client.Though we originally had her posed a little toward our right so that wewould see her more clearly, she moved a little to our left.
In plate 100, Julia Stotlar used a very simple but effective technique toobtain a beautiful portrait. The simplicity is something that is too oftenpassed over as photographers attempt to get different, more creative poses.Julia simply sat the child down and gave her what was probably her favoritestuffed toy, the kind that some little people take everywhere they go. Thegirl did what she usually did: she tucked it under her chin and presented uswith the opportunity to capture this lovely image.
While we are brainstorming on how to pose children, we may well failto recognize the natural tendency of our young subjects to present us withposes of their own creation. Unless we are in the fast-moving studio busi-ness where time is of the essence, we should allow time for children to dotheir own thing. Often all we need to do is set the stage, and the poses willpresent themselves.
The next several examples focus on location portraits, both indoors andoutdoors. In the black & white portrait shown in plate 101, the boy kneltin a reverse position on a chair so he could rest his hands on the back ofthe chair and engage us with a very sweet expression.
BABIES AND TODDLERS 47
Plate 101. Photo by Norman Phillips.

Little people are often very com-fortable on their knees. If you ob-serve small children on a daily basis,you will see them kneeling whilethey play. Therefore, a kneeling poseis a natural choice for posing chil-dren. In some cases we may wish tomove a hand or arm, but the basicpose will be good for several expo-sures. This position can also be usedas the basis for a profiled body poseby turning the chair sideways to thecamera and having the subject turnhis head toward the camera.
When creating images in a privateresidence, we will generally workwith props available in the client’shome. In plate 102, I had the littlegirl seated at the right end of thecouch so she could place her arm onthe armrest. I then brought her left hand to rest on her right forearm. Thepose is delightfully childlike because her resting arm is slightly raised, whichcaused her to tilt slightly to our right. We then simply engaged her in anappropriate dialogue and captured the image.
The girl in plate 103 was photographed in the midst of a garden. For achild of this age a locale like this can be almost overwhelming—but excit-ing. Once she was positioned where we wanted her in the scene, she exam-ined the flowers and expressed her fascination, and we simply changed ourangle to create different expressions and compositions. In this portrait, shesank down and demonstrated pleasure with her surroundings. Capturing apose like this is one of our objectives in such a session.
48 MASTER POSING GUIDE FOR CHILDREN’S PORTRAIT PHOTOGRAPHY
Top left—Plate 102. Top right—Plate 103.
Bottom left—Plate 104. Bottom right—
Plate 105. Photos by Norman Phillips.

To create the image shown in plate 104, we took advantage of the stepsin a garden. The child was seated on the bottom step with her right hand,placed slightly forward of her torso to draw her slightly toward the camera,taking some of her weight. The flower in her hand helped add to the moodand style of the portrait and, as a final touch, we had her cross her ankles.This produced the desired tapered line from her knees to her feet.
When photographing kids about two-and-a-half years old and up, wecan begin the process of separating the boys from the girls. In plate 105,we had the boy bring his left foot to the level of his seated position; this ismore of a boy’s pose than a girl’s. His hands were then brought over to hisraised leg. The pose has style and motion and creates a three-quarter view.This pose is perfectly suited to this person’s personality.
In plates 106, 107, and 108, we see a sequence of images of a little girlseated on—and standing near—the bottom stair in the entrance to herhome. Note how the angle of view allowed us to get attractive poses as shewrestled with the hat we placed on her head. Using a hat tends to lock thechild in roughly the location where we place them since, as in thissequence, they are often just engaged in having fun with it.
In plate 109, we photographed the same child on the next step up, butthis time we had her interact with the family dog. We arranged to have thedog on the same step and the child plucking petals from a rose and offer-ing one to the dog. In addition to adding interest to the image, this kindof interaction can help to keep the child in one place. In this case, position-ing the subjects on a single step ensured that they would stay the same dis-tance from the camera for each of the exposures.
BABIES AND TODDLERS 49
Top left—Plate 106. Center—Plate 107.
Above—Plate 108. Right—Plate 109.
Photos by Norman Phillips.
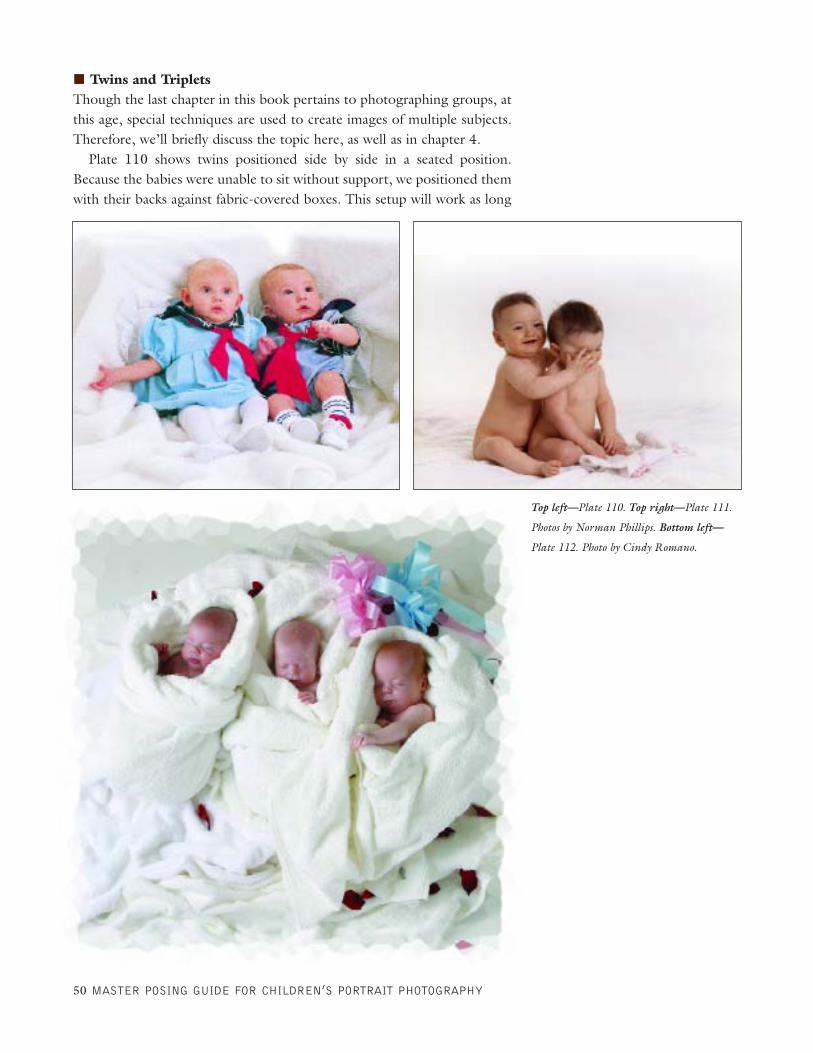
Twins and TripletsThough the last chapter in this book pertains to photographing groups, atthis age, special techniques are used to create images of multiple subjects.Therefore, we’ll briefly discuss the topic here, as well as in chapter 4.
Plate 110 shows twins positioned side by side in a seated position.Because the babies were unable to sit without support, we positioned themwith their backs against fabric-covered boxes. This setup will work as long
50 MASTER POSING GUIDE FOR CHILDREN’S PORTRAIT PHOTOGRAPHY
Top left—Plate 110. Top right—Plate 111.
Photos by Norman Phillips. Bottom left—
Plate 112. Photo by Cindy Romano.
as the babies are reasonably strongand not likely to topple (still, it is agood idea to use fabrics to build asofter, more comfortable set). Theselittle subjects may slide down andbecome little heaps of delight, so wemay have to reset them several timesbefore the session is over.
Plate 111 shows babies aged sixto seven months seated on the floor,one behind the other and profile tothe camera. This pose is sometimesreferred to as the “train.” We cancreate this pose with any number ofbabies if they are able to sit withoutsupport. If they cannot, we may
have to endure a bit of chaos, with infants falling in different directions.Needless to say, this would likely result in some unhappy little people. Keepin mind that often, when a baby falls backward and bumps his head, therewill be a lot of tears—not necessarily because they are hurt, but becausethey have been shocked into a tearful reaction.
Fortunately, in this situation, the babies were able to maintain their poseand, once positioned, immediately became quite animated, creating someinteresting image options.
In plate 112, Cindy Romano swathed a grouping of triplets in soft,white towels. Note that the babies are not positioned too close together; itis important to allow some room for each baby to move around, as some-times they will, even at this early stage of their development. This posingconcept works with individual babies or twins and can be used for up to sixbabies, so if you get the opportunity to photograph sextuplets, you willknow where to begin. Your creativity will then take over.
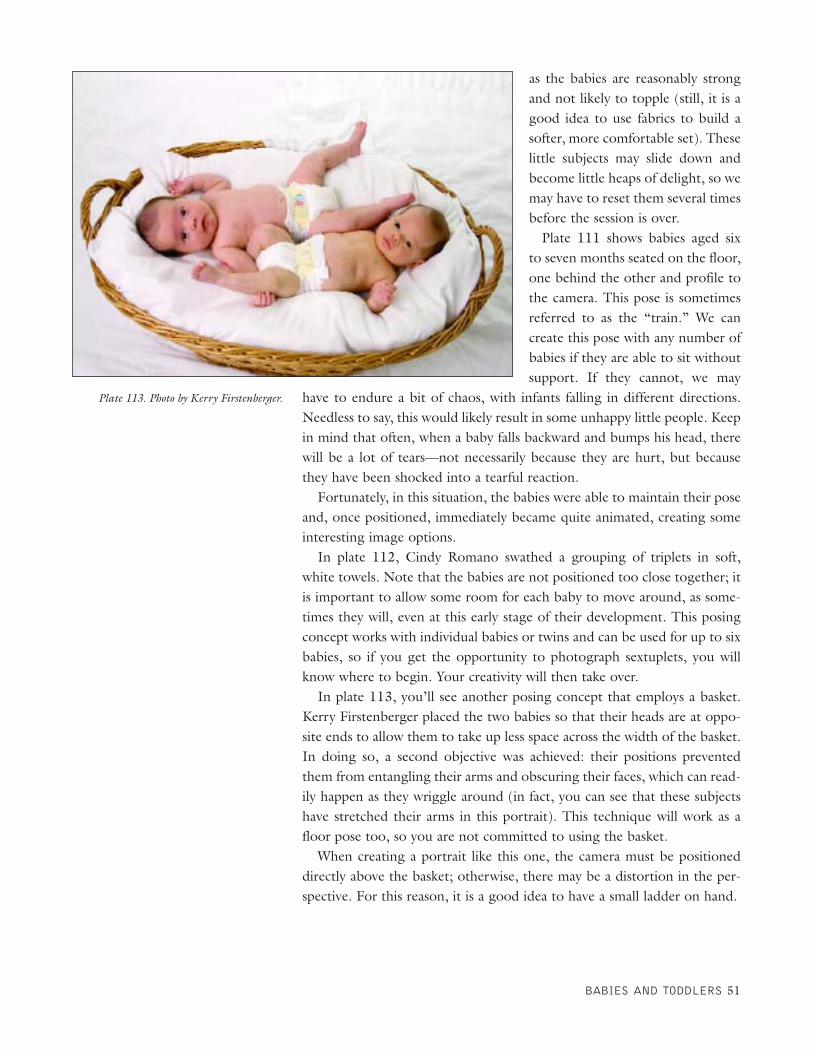
In plate 113, you’ll see another posing concept that employs a basket.Kerry Firstenberger placed the two babies so that their heads are at oppo-site ends to allow them to take up less space across the width of the basket.In doing so, a second objective was achieved: their positions preventedthem from entangling their arms and obscuring their faces, which can read-ily happen as they wriggle around (in fact, you can see that these subjectshave stretched their arms in this portrait). This technique will work as afloor pose too, so you are not committed to using the basket.
When creating a portrait like this one, the camera must be positioneddirectly above the basket; otherwise, there may be a distortion in the per-spective. For this reason, it is a good idea to have a small ladder on hand.
BABIES AND TODDLERS 51
Plate 113. Photo by Kerry Firstenberger.

As children grow into their fourth and fifth year they become moreaware of their limbs and what they do. They are also better able torespond to direction and, as a result, we can create images that are
better composed. When working with the younger children in this agegroup, however, we may find that our subjects’ attention spans are relative-ly short. In order to maintain the composition and the pose we desire, wemay need to reposition our clients and check the composition with eachexposure.
Girls versus Boys: Some ObservationsAt about the age of four, many boys and girls begin to identify stronglywith others of their gender (though for some this takes a little longer). Forinstance, some boys will respond negatively to flowers, and some girls will
steer clear of playing with trucks.While some kids this age couldn’tcare less about the issue, we need tobe sensitive to the parent’s attitudewhen selecting “gender specific”props. Often, the parent will reactnegatively if we seek to pose thechild with a prop or on a set thatthey do not deem gender appropri-ate. Of course, we can also choosefrom an array of props that workequally well with boys and girls.
In the next section, we will lookat individual portraits, and when dis-cussing a pose used for a boy, I willexplain (where applicable) how thepose can be adapted to work with afemale, and vice versa. Later, we willlook at poses that are more explicit-ly feminine or masculine.
52 MASTER POSING GUIDE FOR CHILDREN’S PORTRAIT PHOTOGRAPHY
2. Children
Plate 114. Photo by Norman Phillips.
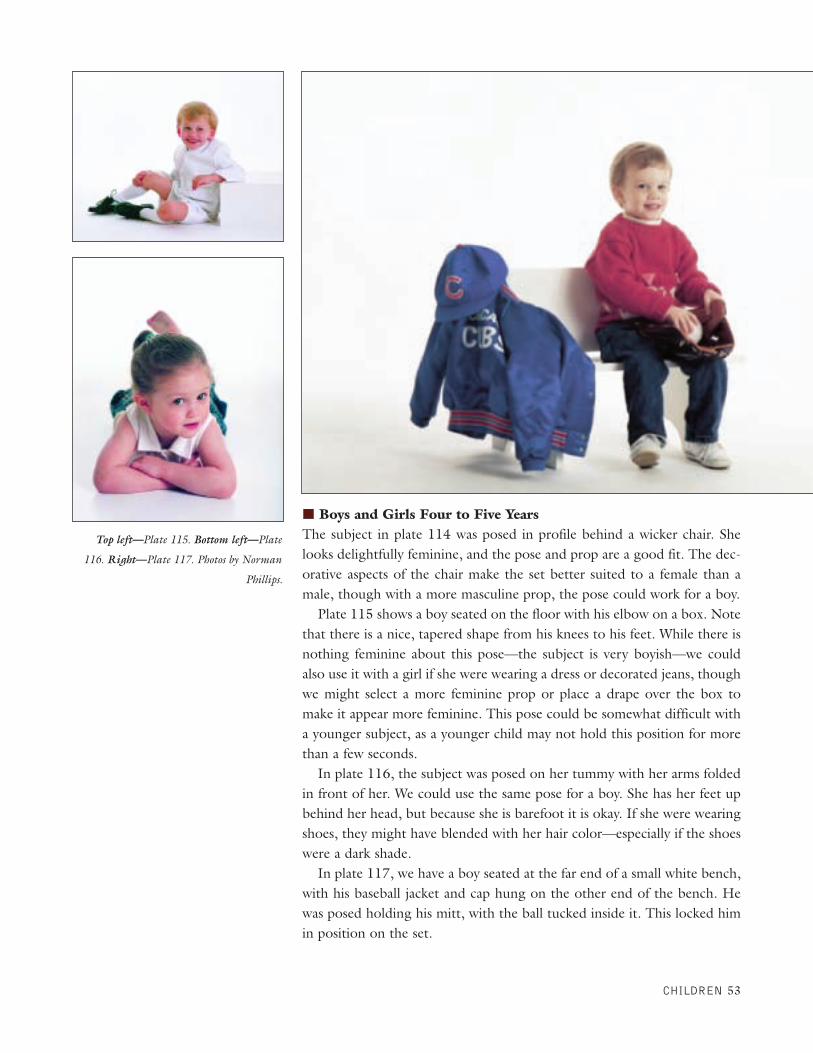
Boys and Girls Four to Five YearsThe subject in plate 114 was posed in profile behind a wicker chair. Shelooks delightfully feminine, and the pose and prop are a good fit. The dec-orative aspects of the chair make the set better suited to a female than amale, though with a more masculine prop, the pose could work for a boy.
Plate 115 shows a boy seated on the floor with his elbow on a box. Notethat there is a nice, tapered shape from his knees to his feet. While there isnothing feminine about this pose—the subject is very boyish—we couldalso use it with a girl if she were wearing a dress or decorated jeans, thoughwe might select a more feminine prop or place a drape over the box tomake it appear more feminine. This pose could be somewhat difficult witha younger subject, as a younger child may not hold this position for morethan a few seconds.
In plate 116, the subject was posed on her tummy with her arms foldedin front of her. We could use the same pose for a boy. She has her feet upbehind her head, but because she is barefoot it is okay. If she were wearingshoes, they might have blended with her hair color—especially if the shoeswere a dark shade.
In plate 117, we have a boy seated at the far end of a small white bench,with his baseball jacket and cap hung on the other end of the bench. Hewas posed holding his mitt, with the ball tucked inside it. This locked himin position on the set.
CHILDREN 53
Top left—Plate 115. Bottom left—Plate
116. Right—Plate 117. Photos by Norman
Phillips.

The same bench was employed in plate 118. To create a storytelling por-trait, we involved the child, who was placed at one end of the bench, inplaying with her doll, which was placed at the other end. The child’s focuson the doll kept her on the bench for a period of time, which enabled usto capture numerous images.
To create the portrait shown in plate 119, we seated the little girl in pro-file to the camera on a stool that allowed her feet to comfortably touch thefloor. We drew her attention to our right to produce this lovely profileimage.
We amused the child with some off-camera humor to elicit the reactionshown in plate 120. The height of the stool allowed the child to tip herupper legs slightly downward and to place her feet on the floor. (To re-create this with your own client, make sure that the seat is about two inch-es higher than the length of her lower leg.) Note that the girl in this imageis holding an object in both hands. The use of an object for a child to hold,and working with a seat that is well suited to the size of the child, helps tocurb the movements of both hands and feet that are quite natural at thisage.
Rocking chairs are always attractive to small children, and we used onein plate 121. The girl was comfortable and confident in this seat, and theposition of her hands on the arms makes the portrait pleasant, but if herankles were crossed, left foot over right, the portrait would be improved.
Plate 122 shows the same girl engrossed with a balloon we had givenher. Placing a second balloon on the seat of the chair kept the girl in the
54 MASTER POSING GUIDE FOR CHILDREN’S PORTRAIT PHOTOGRAPHY
Left—Plate 118. Top right—Plate 119.
Above—Plate 120. Photos by Norman
Phillips.

desired area. In such a case, moving the balloons can present us with dif-ferent views as long as we maintain communication with the subject.
In plate 123, we employed a book as the key prop. We had the child siton the floor with her bottom positioned just beyond the far side of thebook and asked her to extend her legs to our right. In order to turn thepages, she had to rest on her right hand and turn the pages with her lefthand (at a young age, most children are fairly ambidextrous). By taking thepicture with the camera a little to the left of the center of the compositionwe were able to present a nicely composed portrait.
CHILDREN 55
Top left—Plate 121. Top right—Plate 122.
Bottom—Plate 123. Photos by Norman
Phillips.

Small children enjoy interacting with their parents and with us in thecamera room. To create the portrait in plate 124, we had the child stand inthe desired position in the set and asked him, “How tall is the ceiling?” We
56 MASTER POSING GUIDE FOR CHILDREN’S PORTRAIT PHOTOGRAPHY
Top left—Plate 124 Top right—Plate 125.
Bottom—Plate 126. Photos by Norman
Phillips.
might also have asked him to show us how tall he is, and thrown our ownarms upward for him to copy.
In plate 125, the boy was posed in a seated position at a slight angle tothe camera. Note that we have, once again, brought our subject’s handstogether to hold on to an object we provided. We then engaged him inconversation, and he turned toward us with the expression shown here.
In plate 126, we broke one of our own rules by posing the child squareto the camera. Movement of the hands or feet can easily affect the overallpose. Therefore, though only the head and shoulders show in this image,we used a small toy to occupy the client’s hands and chose a seat with aheight that allowed the girl to place her feet firmly on the floor. By tellingsilly stories and making strange sounds, we were able to elicit the desiredexpression.
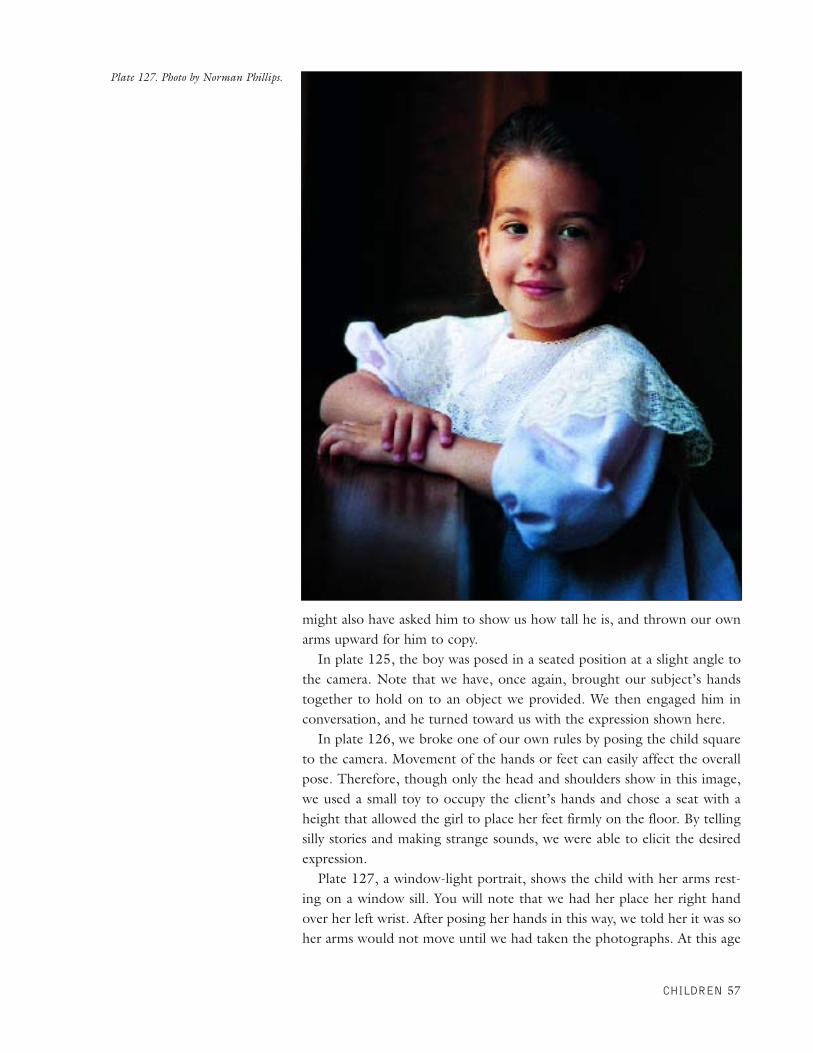
Plate 127, a window-light portrait, shows the child with her arms rest-ing on a window sill. You will note that we had her place her right handover her left wrist. After posing her hands in this way, we told her it was soher arms would not move until we had taken the photographs. At this age
CHILDREN 57
Plate 127. Photo by Norman Phillips.


and older, this little piece of information works really well, and the subjectwill not move her hands until you are ready to re-pose her.
While feminine poses aren’t considered appropriate for boys, there aremasculine poses that work well for females. This point is beautifully illus-trated in plate 128, which shows one of my favorite portraits created byKerry Firstenberger. The girl has style and lots of attitude, and the poseshows it to the fullest. Dressed in a cowboy hat and a matching suit, she isposed perfectly for who she is. By posing her with her head turned to ourright, Kerry heightened the attitude that was largely created by having thesubject rest her left arm nonchalantly on the chair back. While we mayoften rely on poses that are routine and generally acceptable, we may some-times wish to create a portrait with a pose that is distinctly personal.
Plate 129 is another portrait of the same child, and again the girl’s per-sonality exudes from the image. In this portrait, Kerry used the back of thesame chair as the prop and had the girl rest her arms on the top of the chair.The hat, suit, and the back of the chair are harmonious and add to thestrength of the image.
CHILDREN 59
Facing page—Plate 128. Above—Plate 129.
Photos by Kerry Firstenberger.

Plate 130 shows a child posed in a similar style. Kerry had the girl placeher right arm on the top of the chair. She then placed her left hand on topof the other with the fingers of the left hand spread to provide a nice viewof the fingers. If the fingers were closed, we would be presented with toosolid a view of the arm and hand. The height of the chair’s back was wellsuited to the child; she was able to easily rest her chin on her top arm.
This pose would likely be more difficult for a younger child to holdbecause the width of the top of the chair does not offer much of a base onwhich to rest. The prop worked well for this child, however; she is obvi-ously mature for her age. Though Kerry used this particular chair to goodeffect, there are numerous other props that could be used with this type ofpose. Tabletops, posing benches, boxes, and other objects of suitableheight and surface can be just as effective.
Plate 131 shows another portrait of the child pictured in plate 130.While the same prop was used, the mood in the image is different. Notethat Kerry had the girl seated near the edge of the chair so her posture isupright and she appears quite alert. We need to avoid having our little sub-jects seated all the way back in the chair where they are likely to relax andsettle into a loose pose. When seated closer to the front edge of the chair,the child’s feet will rest comfortably on the floor, and he or she will bemore likely to sit up straight and tall.
Plate 132 shows the ideal place for the little person to be seated. Notethat in this position in the chair, she was able to place her feet on the floorand sit upright. Her left foot was crossed over her right, and this caused aforeshortened view of the near leg. It is better to have the right foot acrossthe left in this pose because it makes the leg look longer and sleeker.
Note that the subjects in plates 131 and 132 are each holding a rose.This allowed Kerry to keep their hands where she needed them. For thebest results with this technique, show the child how to hold the stem of the
60 MASTER POSING GUIDE FOR CHILDREN’S PORTRAIT PHOTOGRAPHY
Top left—Plate 130. Top right—Plate 131.
Above—Plate 132. Photos by Kerry
Firstenberger.
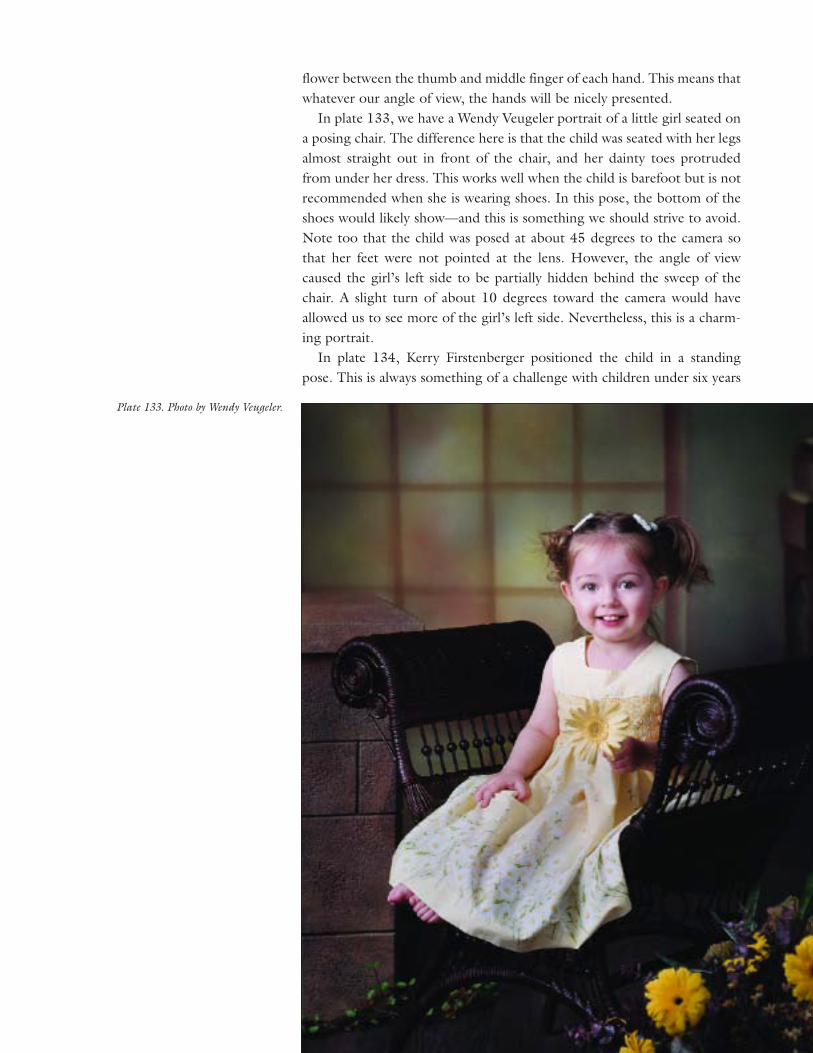
flower between the thumb and middle finger of each hand. This means thatwhatever our angle of view, the hands will be nicely presented.
In plate 133, we have a Wendy Veugeler portrait of a little girl seated ona posing chair. The difference here is that the child was seated with her legsalmost straight out in front of the chair, and her dainty toes protrudedfrom under her dress. This works well when the child is barefoot but is notrecommended when she is wearing shoes. In this pose, the bottom of theshoes would likely show—and this is something we should strive to avoid.Note too that the child was posed at about 45 degrees to the camera sothat her feet were not pointed at the lens. However, the angle of viewcaused the girl’s left side to be partially hidden behind the sweep of thechair. A slight turn of about 10 degrees toward the camera would haveallowed us to see more of the girl’s left side. Nevertheless, this is a charm-ing portrait.
In plate 134, Kerry Firstenberger positioned the child in a standingpose. This is always something of a challenge with children under six years
Plate 133. Photo by Wendy Veugeler.
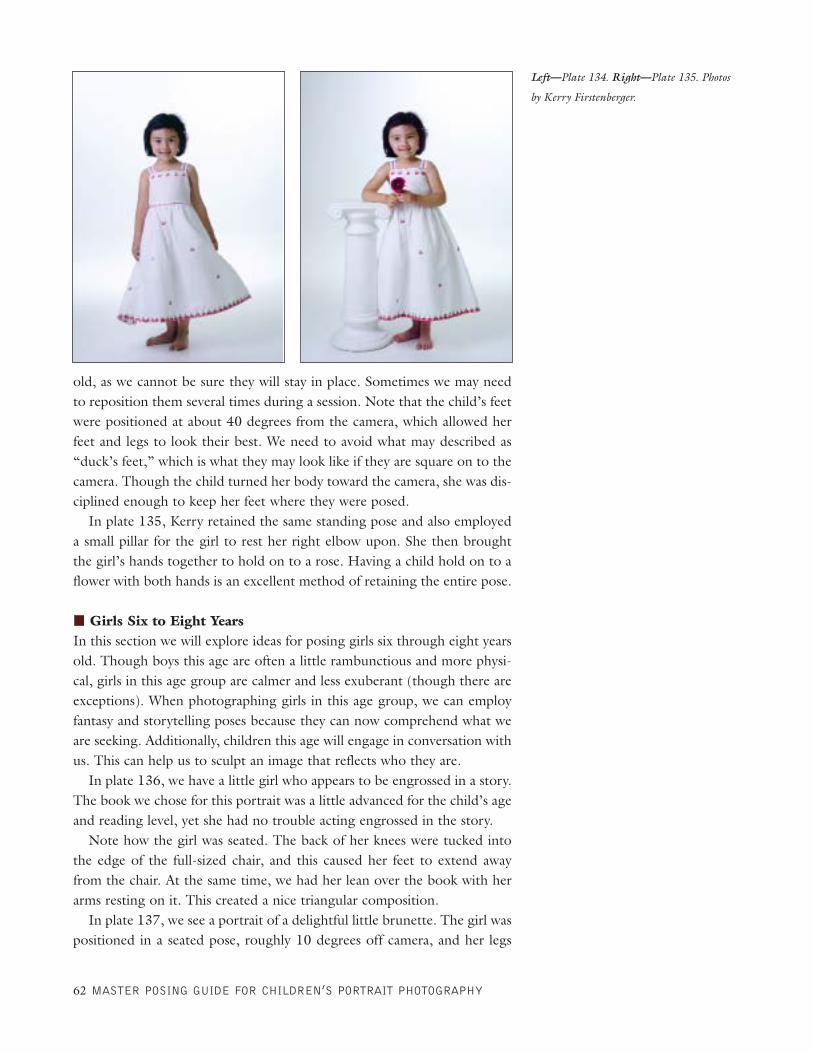
old, as we cannot be sure they will stay in place. Sometimes we may needto reposition them several times during a session. Note that the child’s feetwere positioned at about 40 degrees from the camera, which allowed herfeet and legs to look their best. We need to avoid what may described as“duck’s feet,” which is what they may look like if they are square on to thecamera. Though the child turned her body toward the camera, she was dis-ciplined enough to keep her feet where they were posed.
In plate 135, Kerry retained the same standing pose and also employeda small pillar for the girl to rest her right elbow upon. She then broughtthe girl’s hands together to hold on to a rose. Having a child hold on to aflower with both hands is an excellent method of retaining the entire pose.
Girls Six to Eight YearsIn this section we will explore ideas for posing girls six through eight yearsold. Though boys this age are often a little rambunctious and more physi-cal, girls in this age group are calmer and less exuberant (though there areexceptions). When photographing girls in this age group, we can employfantasy and storytelling poses because they can now comprehend what weare seeking. Additionally, children this age will engage in conversation withus. This can help us to sculpt an image that reflects who they are.
In plate 136, we have a little girl who appears to be engrossed in a story.The book we chose for this portrait was a little advanced for the child’s ageand reading level, yet she had no trouble acting engrossed in the story.
Note how the girl was seated. The back of her knees were tucked intothe edge of the full-sized chair, and this caused her feet to extend awayfrom the chair. At the same time, we had her lean over the book with herarms resting on it. This created a nice triangular composition.
In plate 137, we see a portrait of a delightful little brunette. The girl waspositioned in a seated pose, roughly 10 degrees off camera, and her legs
62 MASTER POSING GUIDE FOR CHILDREN’S PORTRAIT PHOTOGRAPHY
Left—Plate 134. Right—Plate 135. Photos
by Kerry Firstenberger.

were perfectly positioned to create a tapered composi-tion. Her hands were brought together in her lap, justas we would have them if she were an adult. The resultis an elegant pose—one that a younger child might notpresent to us. Her interaction with us shows in herexpression.
Plate 138 illustrates how much easier it is to workwith an older child. The main prop, the white benchshown in some of the images presented earlier, was usedin a different way than we have used it with youngerchildren. In this instance, we had the girl seated withboth legs on the bench and styled as if she were posedon the floor. The difference is that her left leg extendedbeyond the end of the bench and dropped slightly tocreate a nice curved composition. Note the way she
rested her right hand on the bench and placed her left hand on her lower-right leg.
CHILDREN 63
Top left—Plate 136. Top right—Plate 137. Left—Plate 138. Photos
by Norman Phillips.
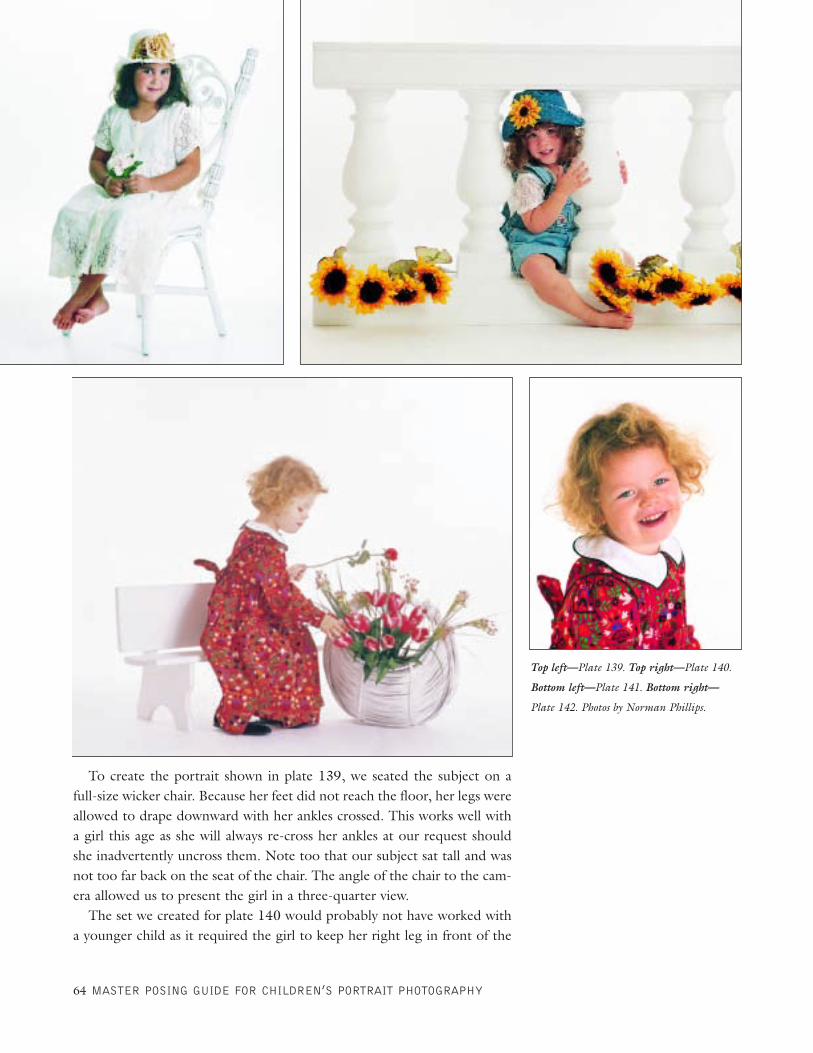
To create the portrait shown in plate 139, we seated the subject on afull-size wicker chair. Because her feet did not reach the floor, her legs wereallowed to drape downward with her ankles crossed. This works well witha girl this age as she will always re-cross her ankles at our request shouldshe inadvertently uncross them. Note too that our subject sat tall and wasnot too far back on the seat of the chair. The angle of the chair to the cam-era allowed us to present the girl in a three-quarter view.
The set we created for plate 140 would probably not have worked witha younger child as it required the girl to keep her right leg in front of the
64 MASTER POSING GUIDE FOR CHILDREN’S PORTRAIT PHOTOGRAPHY
Top left—Plate 139. Top right—Plate 140.
Bottom left—Plate 141. Bottom right—
Plate 142. Photos by Norman Phillips.

prop and to hold on to the pillar—while having fun and looking happy.With younger children, orchestrating such a pose can be challenging and issometimes simply unworkable, but using this prop and pose can producesome delightful images with the right subject.
In the portrait shown in plate 141, we used two props: our little whitebench and a basket of flowers. Because of the child’s age, we had no diffi-culty in getting her to arrange the flowers, and she was completely into theconcept. Note how the bench was turned slightly away from the cameraand the basket was almost square to the lens; this allowed us to achieve aprofile portrait. You can see that this particular subject was a little tallerthan some of the other kids shown seated on this bench by how she placedher feet firmly on the floor.
The portrait in plate 142 is a spin-off from the pose in plate 141. Wesimply zoomed in for a close-up and had the girl turn toward us withoutchanging her position on the bench. This demonstrates that when we havea sound basis for a portrait, simple adjustments allow us to expand our pos-ing options.
Girls love to dress up and act like their mothers, and the portrait in plate143 shows a little girl doing just that. We suggested that she is just like hermother and stood her at the head of a small couch dressed in a hat and coatwith an appropriate black purse. Her right arm rested on the top of thebench arm, and her right foot was crossed over her left leg. All this was cre-ated with our direction, and she beamed with delight as she was truly intothe fantasy we created. Note the angle of the couch, which enabled us tocreate this portrait and several others, including close-ups.
Plate 144 shows a portrait in which we employed a fantasy concept. Awindow set was used as the main prop, and the girl held on to it with herright hand and presented a very feminine pose as she focused on the flowershe held. Because of her age, we were able to have her position her feet as
CHILDREN 65
Left—Plate 143. Right—Plate 144. Photos
by Norman Phillips.

we would like them, with the left foot nearer to the camera than her left.This is a pose that works well for girls this age.
The pose shown in plate 145 is one of the easiest to obtain. We simplyhad the girl lay on her tummy, resting on her arms in profile to the cam-era. We then had her kick up her feet to create some feeling of motion. Theflower arrangement was added to “pretty up” the image. It was very easyto have her turn her head toward the camera for this portrait.
The girl in plate 146 was seated on the floor, profile to the camera, andposed much as we might present an older female. She rested on her righthand, which was turned so that the side of it showed to the camera. Herright leg was extended, and she was encouraged to stretch her toes to avoidpointing them skyward. We then had her draw her left foot toward her to
66 MASTER POSING GUIDE FOR CHILDREN’S PORTRAIT PHOTOGRAPHY
Top left—Plate 145. Top right—Plate 146.
Bottom left—Plate 147. Photos by Norman
Phillips.

create a nice break at the knee. Her left hand was placed on her knee. Theresult is a very simple but effective pose.
We have a variation of the same pose in the image shown in plate 151.We began with the position used in plate 147 but had the girl roll onto herright hip and slightly bend her right knee. Her right hand was moved far-ther to our left to create separation. Finally, her left leg was drawn slightlymore upward than in the previous image so she could comfortably rest herleft elbow on her knee. This created a very nice tapered view of her legs andfeet and produced a comfortable position from which she could presentherself to the camera.
In plate 148, we have another floor pose. To produce this portrait, weonce again used the ideal leg pose in which the near leg is extended withthe toe pointing forward and the far leg is slightly bent so that it showsabove the near leg, creating a nice, tapered appearance. The pink parasolwas held in her left hand, and its stem was brought across the near leg. Herright hand supported her seated pose. Girls enjoy using a parasol as a prop,so having one in the camera room is advisable.
In plate 149, we have a different and more active floor pose. The girl’sarms were stretched out behind her, and both hands served as supports.The child’s feet were pulled together and brought closer to her body thanin the pose shown in plate 148; this caused her shoulders to hunch a little,producing a nice pose that is quite feminine, despite the fact that she wasdressed in jeans. This is a fun pose that allowed us to produce a delightfulportrait of an energetic young girl.
Previous portrait examples showed subjects posed facing the camerawith their elbows resting on various props. In plate 150, the girl is shownin profile to the camera. This is a comfortable pose for most children thisage, but we need to be careful not to show only the upper arm nearest the
CHILDREN 67
Left—Plate 148. Right—Plate 149. Photos
by Norman Phillips.
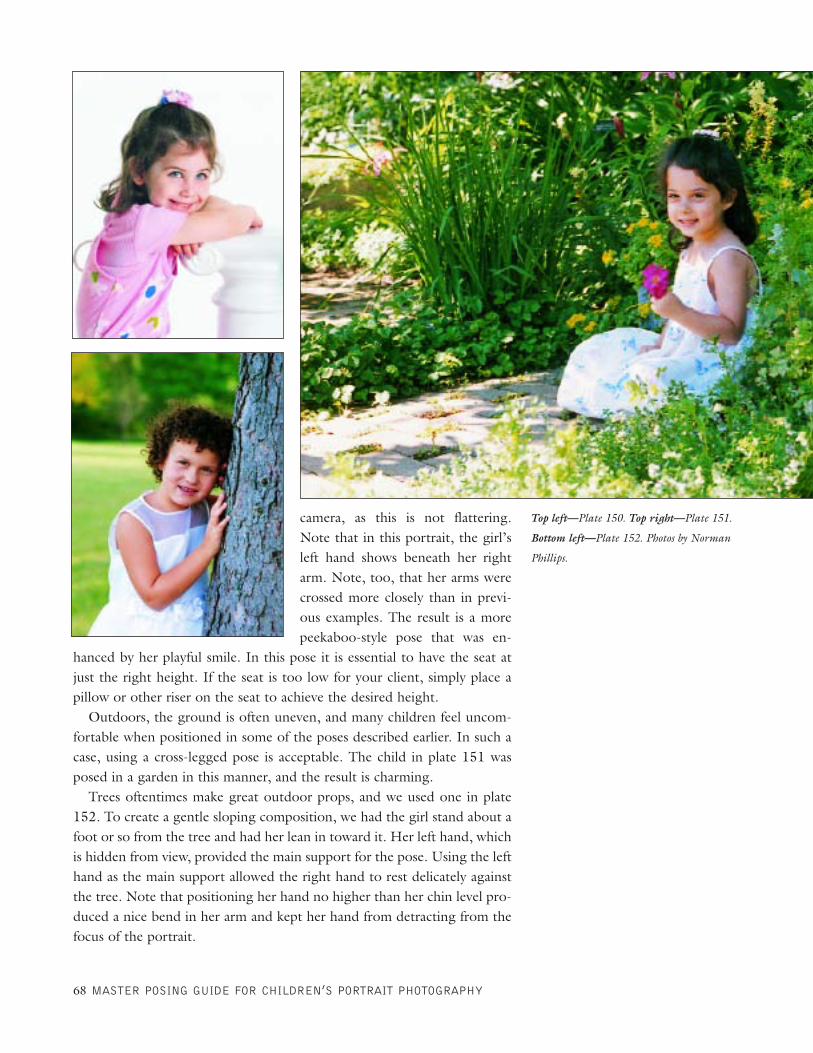
camera, as this is not flattering.Note that in this portrait, the girl’sleft hand shows beneath her rightarm. Note, too, that her arms werecrossed more closely than in previ-ous examples. The result is a morepeekaboo-style pose that was en-
hanced by her playful smile. In this pose it is essential to have the seat atjust the right height. If the seat is too low for your client, simply place apillow or other riser on the seat to achieve the desired height.
Outdoors, the ground is often uneven, and many children feel uncom-fortable when positioned in some of the poses described earlier. In such acase, using a cross-legged pose is acceptable. The child in plate 151 wasposed in a garden in this manner, and the result is charming.
Trees oftentimes make great outdoor props, and we used one in plate152. To create a gentle sloping composition, we had the girl stand about afoot or so from the tree and had her lean in toward it. Her left hand, whichis hidden from view, provided the main support for the pose. Using the lefthand as the main support allowed the right hand to rest delicately againstthe tree. Note that positioning her hand no higher than her chin level pro-duced a nice bend in her arm and kept her hand from detracting from thefocus of the portrait.
68 MASTER POSING GUIDE FOR CHILDREN’S PORTRAIT PHOTOGRAPHY
Top left—Plate 150. Top right—Plate 151.
Bottom left—Plate 152. Photos by Norman
Phillips.

In plate 153, we again used a tree as a prop. This young lady advised usthat she was going to be an actress when she grew up, and she definitelydemonstrated her talent on the set.
We had the subject put her weight on her back foot with her toes point-ed toward the camera, then bring her other leg across it. She rested herright hand on the tree and leaned slightly toward it. By having her placeher left hand on her hip, we were able to create an exaggerated pose that’sfull of drama. It’s the kind of pose that girls around this age can step intowith a little direction as they have the discipline to hold the pose.
We once again used a tree as the prop in plate 154. Our young subjectwas seated on the sloping ground in front of the tree with her right legbent at the knee so that it was positioned horizontally to the camera. Herleft leg extended slightly diagonally to our right to create a nice leg pose.We requested that she place her hands on her knees, which she did—andalthough they are not perfectly posed, the fact that she is young allowed usto get away with a less-than-ideal pose of the hands. We would not allowthis hand pose if the subject were an adult.
CHILDREN 69
Left—Plate 153. Right—Plate 154. Photos
by Norman Phillips.

We once again moved into the camera room to produce the imageshown in plate 155. The little lady was posed with her left forearm restingon the white bench. She placed her weight on her left hip, and her kneeswere slightly bent so that her legs stretched out toward the left of theframe. Her upper leg was positioned slightly in front of her bottom leg,with her lower legs in the recommended tapered position. We used a floweras a prop to bring her hands together. Because of the height of the bench,and her distance from it, we produced a nice sloping line from her head toher toes as well as from her hands to her toes. If she were too close to thebench, her upper body would have been in a vertical position and the slop-ing lines would not be present.
Many young girls study ballet, so in the next two images we show aseven-year-old in two ballet poses. In plate 156, we simply had the childhold a pose as if she were at ballet class. It is the simplest of poses and onethat is very popular. In plate 157, we had her hold on to a chair so shecould get up onto her tiptoes. Because most children at this age are unableto stand for more than a second or two on their ballet toes, using the chairin the image helped to ensure success.
Confirmation portraits are fairly common, and these are created whenthe child is eight years old. On the following two pages, we showa varietyof posing styles. In plate 158, we posed the girl in a three-quarter view tothe camera so that we are able to see her dress. Her hands were broughttogether to hold a flower at about waist level, though having the child hold
70 MASTER POSING GUIDE FOR CHILDREN’S PORTRAIT PHOTOGRAPHY
Above—Plate 155. Top right—Plate 156. Bottom right—Plate 157. Photos by
Norman Phillips.
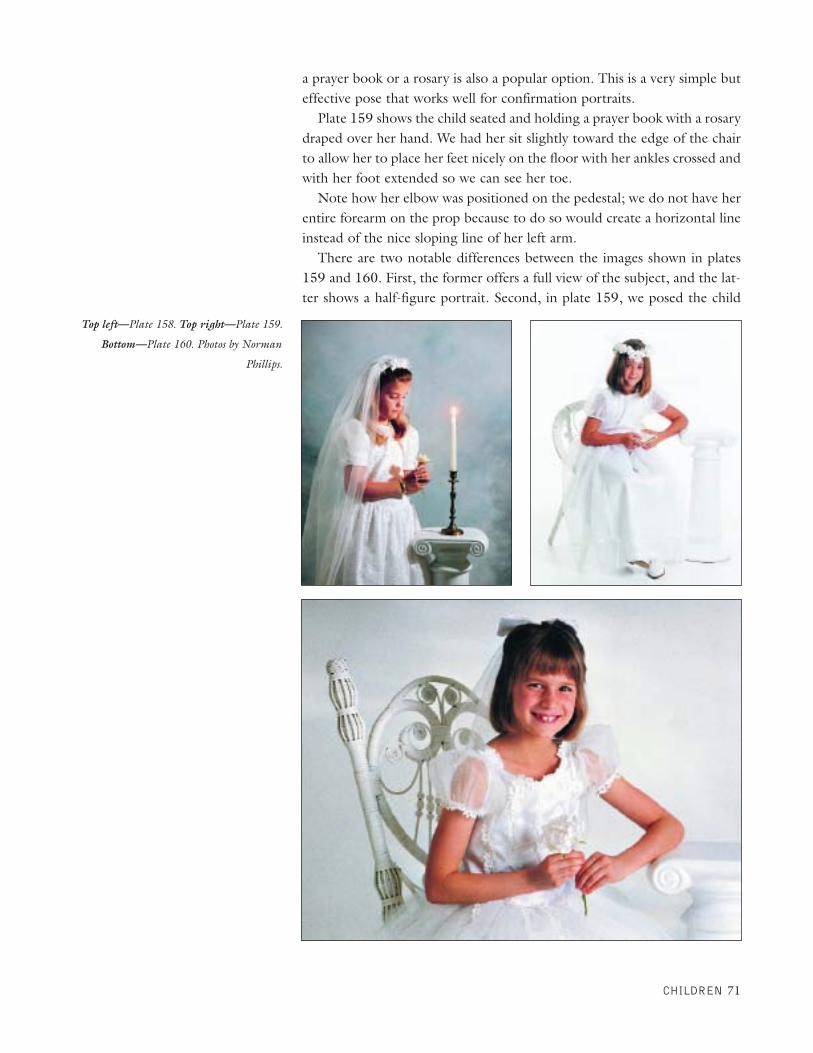
a prayer book or a rosary is also a popular option. This is a very simple buteffective pose that works well for confirmation portraits.
Plate 159 shows the child seated and holding a prayer book with a rosarydraped over her hand. We had her sit slightly toward the edge of the chairto allow her to place her feet nicely on the floor with her ankles crossed andwith her foot extended so we can see her toe.
Note how her elbow was positioned on the pedestal; we do not have herentire forearm on the prop because to do so would create a horizontal lineinstead of the nice sloping line of her left arm.
There are two notable differences between the images shown in plates159 and 160. First, the former offers a full view of the subject, and the lat-ter shows a half-figure portrait. Second, in plate 159, we posed the child
CHILDREN 71
Top left—Plate 158. Top right—Plate 159.
Bottom—Plate 160. Photos by Norman
Phillips.

holding on to her prayer book; in plate 160, we were able to show how del-icately she held on to the flower, gently grasping the stem with her fingers.Such a feminine, graceful approach is desirable; we need to avoid havingour subjects grasp accessories in a way that presents an unflattering view ofthe hands.
In plate 161, we took a slightly different approach to a confirmationpose. Though the girl’s pose resembles that used in the previous portrait,she is in a more relaxed style with the fingertips of her right hand restingon the prop and the fingers of her left hand slightly curled and resting highon the side of her face. The position of her arms and hands creates a circu-lar design that leads to her expression. Note that the prayer book androsary are fully visible and are important elements in the portrait.
Plate 162 is a profile portrait in which we used a chair and a sprig offlowers as a prop and accessory. The child was positioned at approximately45 degrees to the camera to provide a wider base for the profile head posi-
72 MASTER POSING GUIDE FOR CHILDREN’S PORTRAIT PHOTOGRAPHY
Top left—Plate 161. Bottom left—Plate 162.
Above—Plate 163. Photos by Norman
Phillips.

tion. Her hands were placed on top of the back of the chair with the sprigof flowers held between her fingertips. Having her rest her hands on thechair back, rather than grip it, allowed us to create a relaxed look.
Plate 163 shows a simple and elegant seated pose. The subject’s glovedhands rested nicely in her lap without any over posing. Her feet were cor-rectly posed to achieve the desired tapered look. By having her turn herhead about 45 degrees away from the camera and tip it slightly toward hernear shoulder, we produced a traditional (“submissive”) feminine headpose that flattered the subject.
Boys Four to Six YearsLittle boys in this age category vary enormously in their behavior. They canbe shy, passive, boisterous, and even wild, and many will separate them-selves from some of the things that they previously had in common withtheir same-age sisters. When these children arrive for their sessions, weshould be ready for anything to happen.
One of our ploys in the camera room is to ask each of these subjects, doyou have a girlfriend? Their responses vary from a sneer, to horror, toembarrassment—and are at the very least entertaining.
In plate 164, we had several stools available, and this subject chose thesmallest of the set and immediately straddled it as if he were on horseback.This in effect is a self-created pose and is representative of the kind ofresponse we may get from a boy on the set. Clearly, the stool was too smallfor this fellow, but he was having fun, and as that is what we wanted fromthe session, the portrait is successful.
The formally attired subject in plate 165 is a character of a different ilk—calmer, assured, and very happy in this pose. We built two blocks into aprop and posed him in a style that is not fundamentally different from whatwe might use for an adult. His left arm rested on the top of the prop while
CHILDREN 73
Left—Plate 164. Right—Plate 165. Photos
by Norman Phillips.
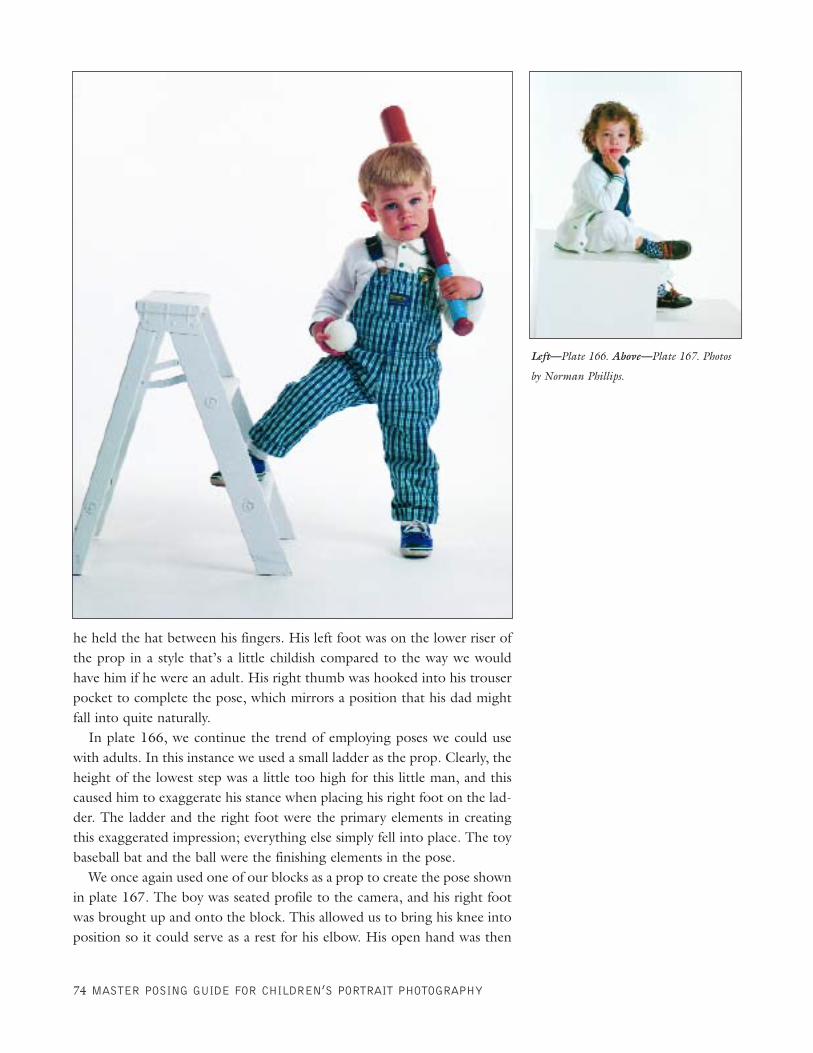
he held the hat between his fingers. His left foot was on the lower riser ofthe prop in a style that’s a little childish compared to the way we wouldhave him if he were an adult. His right thumb was hooked into his trouserpocket to complete the pose, which mirrors a position that his dad mightfall into quite naturally.
In plate 166, we continue the trend of employing poses we could usewith adults. In this instance we used a small ladder as the prop. Clearly, theheight of the lowest step was a little too high for this little man, and thiscaused him to exaggerate his stance when placing his right foot on the lad-der. The ladder and the right foot were the primary elements in creatingthis exaggerated impression; everything else simply fell into place. The toybaseball bat and the ball were the finishing elements in the pose.
We once again used one of our blocks as a prop to create the pose shownin plate 167. The boy was seated profile to the camera, and his right footwas brought up and onto the block. This allowed us to bring his knee intoposition so it could serve as a rest for his elbow. His open hand was then
74 MASTER POSING GUIDE FOR CHILDREN’S PORTRAIT PHOTOGRAPHY
Left—Plate 166. Above—Plate 167. Photos
by Norman Phillips.

used to prop his head up in a very sophisticated manner. This arrangementbrought the boy into a very effective presentation to the camera. The resultis a very traditional presentation of a young boy in a relatively modern con-text. The personality of the subject made this pose possible. Because hecould communicate with us and was happy to work with us, this image is asuccess.
In the portrait shown in plate 168, we managed to present the boy in anadultlike pose without losing the innocence of the child. We used a smallpedestal as our prop and had him lean his left elbow upon it to create thekind of stance that an adult may well take up. We often tell young boys theyare posing just like their dad. The idea is very appealing to a majority ofboys this age. The subject’s left foot was kicked over his right so that histoe rested on top of his right foot. This is the child’s edition of this pose;an adult would have his toe on the floor. To create the finishing touch, wehad the little guy hook the thumb of his right hand into the belt loop ofhis trousers.
In plate 169, we used a posing concept similar to that shown in plate167. In this portrait, the boy was seated on the lower of the two blocks sohe could rest his right arm on the top block and place both feet on thefloor. Note that his feet were separated so they did not merge into a solidmass of black. His left foot was drawn all the way back to the box, and hisright was slightly extended to provide a longer line. His left hand was
CHILDREN 75
Above—Plate 168. Left—Plate 169. Photos
by Norman Phillips.

placed on his right leg to bring him around to face the camera and com-plete this very pleasant composition.
In plate 170, we modified the previous pose to create a close-up portrait.We simply brought the boy’s hand across the plane of the camera andzoomed in. This demonstrates that when we have a sound basis for por-trait, simple adjustments allow us to expand our posing options.
Plate 171 is a variation of similar poses previously discussed. The boy wasseated with this right arm resting on our prop. His right arm was posi-tioned across his body, and his right hand gripped his left. While the backof the hand shows, this is suitable for a male subject. When photographinggirls, it is generally desirable to produce a more delicate hand pose.
The little character shown in plate 172 was positioned in a spot of ourchoosing, then we had him hook his thumbs behind his belt. The childlikefingers help to put an endearing spin on a pose that a grown man mightfall into quite naturally. The fact that his clothes do not quite fit makes thisa delightful portrait for his parents.
76 MASTER POSING GUIDE FOR CHILDREN’S PORTRAIT PHOTOGRAPHY
Top left—Plate 170. Bottom left—Plate 171.
Above—Plate 172. Photos by Norman
Phillips.
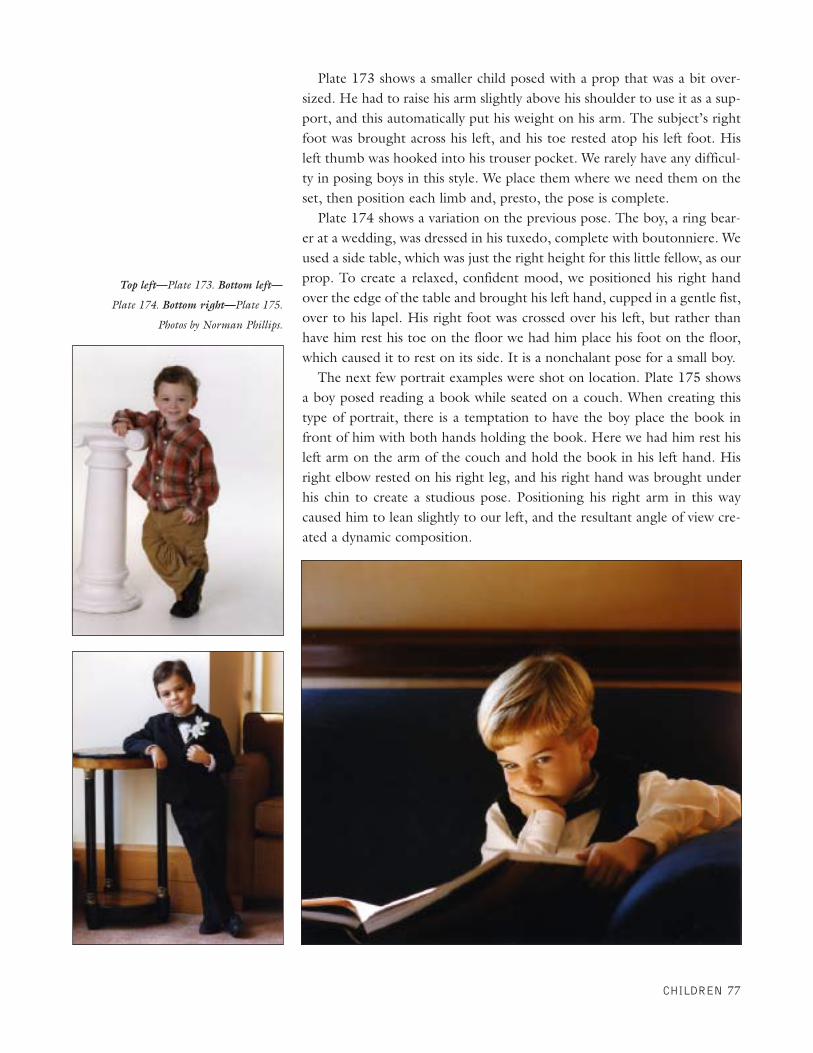
Plate 173 shows a smaller child posed with a prop that was a bit over-sized. He had to raise his arm slightly above his shoulder to use it as a sup-port, and this automatically put his weight on his arm. The subject’s rightfoot was brought across his left, and his toe rested atop his left foot. Hisleft thumb was hooked into his trouser pocket. We rarely have any difficul-ty in posing boys in this style. We place them where we need them on theset, then position each limb and, presto, the pose is complete.
Plate 174 shows a variation on the previous pose. The boy, a ring bear-er at a wedding, was dressed in his tuxedo, complete with boutonniere. Weused a side table, which was just the right height for this little fellow, as ourprop. To create a relaxed, confident mood, we positioned his right handover the edge of the table and brought his left hand, cupped in a gentle fist,over to his lapel. His right foot was crossed over his left, but rather thanhave him rest his toe on the floor we had him place his foot on the floor,which caused it to rest on its side. It is a nonchalant pose for a small boy.
The next few portrait examples were shot on location. Plate 175 showsa boy posed reading a book while seated on a couch. When creating thistype of portrait, there is a temptation to have the boy place the book infront of him with both hands holding the book. Here we had him rest hisleft arm on the arm of the couch and hold the book in his left hand. Hisright elbow rested on his right leg, and his right hand was brought underhis chin to create a studious pose. Positioning his right arm in this waycaused him to lean slightly to our left, and the resultant angle of view cre-ated a dynamic composition.
CHILDREN 77
Top left—Plate 173. Bottom left—
Plate 174. Bottom right—Plate 175.
Photos by Norman Phillips.

As noted previously, trees make good props, and we used one in plate176. We had the boy stand with his back against the tree. Though we can-not see his feet, he was positioned with one foot crossed over the other. Ina previous example, we had a boy with one thumb hooked through a beltloop, and this little guy was posed with both thumbs hooked onto his beltloops. This is an easy pose to create.
A tree was again used as a prop in plate 177. This time the boy was seat-ed on the ground and leaned against the trunk. His right foot was posi-tioned at the knee of the left leg. His right hand was placed on his rightknee, and his left hand was placed beside him, with his elbow slightly bentto avoid forming a straight line from his hand to his shoulder. This is a sim-ple pose for a child.
78 MASTER POSING GUIDE FOR CHILDREN’S PORTRAIT PHOTOGRAPHY
Left—Plate 176. Right—Plate 177. Photos
by Norman Phillips.

Plate 178 shows the result of our patience in attempting to freeze a veryactive, energetic, and expressive child in his own home. We managed toplace him between two pieces of furniture (which seemed a sort of trap)with his right hand on a chair and his left elbow positioned on the table-top. At the sixth or seventh attempt, we froze this pose, which truly por-trays the child’s personality. The two props were ideally placed to keep bothhands in a stable pose.
The set for the portrait shown in plate 179 was three walls. The boy wasplaced at the most dynamic point in the set and leaned against the wall ina profile pose. We once again used the crossover foot position to create thebase for the pose and had him place his hands in his pockets. There is adiagonal line that runs from the portraits on the wall to our left through tothe subject’s feet that aids in the strength of the composition.
CHILDREN 79
Above—Plate 178. Right—Plate 179.
Photos by Norman Phillips.

We return to the pedestal as a prop in plate 180, aKerry Firstenberger portrait. The pose is a variation ofprevious poses made in a similar style. The boy wasplaced close to the pedestal and turned slightly towardthe prop so that he could comfortably rest his right armon its top. His left hand was brought over his right. Thekey difference in this variation is that the subject wasnot turned directly toward the camera as in previousexamples. Note that Kerry used the same foot pose seenin previous portraits, but because the boy’s angle to thecamera was different, the resulting portrait has a dis-tinctly different perspective.
Another portrait by Kerry Firstenberger is shown inplate 181. To create this image, Kerry had her subjectrest his elbows on top of a pedestal. His right hand wasplaced flat on the prop, and his left hand was posed overhis right wrist with his head dipped just behind hishands. Young subjects can easily retain this pose for a series of images, andto produce the pose shown in plate 182, Kerry simply had the boy bringone hand to his face to change the style without having him do anythingradically different.
In plate 183, Kerry Firstenberger employed a small ladder as a prop andsat the boy on the top with both feet on the same level at about 45 degrees
80 MASTER POSING GUIDE FOR CHILDREN’S PORTRAIT PHOTOGRAPHY
Top left—Plate 180. Top right—Plate 181. Bottom right—Plate 182.
Photos by Kerry Firstenberger.

to the camera. This allowed her to place his left arm across both knees. Tofinish the pose, she had him rest his right elbow on his right knee.
The next three portraits are also by Kerry Firstenberger. In the first two,the back of the chair was used as a resting place for the boy’s arms. In plate184, his right arm was positioned over the back of the chair, and his lefthand rested on top of the other. To take up this position, the boy was seat-ed sideways on the chair. Note that both arms were presented in the samelinear position, though on different sides of the chair back. The pose is verymasculine, and because it is very easy to take up this position, it is frequent-ly used when posing males.
Plate 185 shows the boy on the same chair, again seated sideways. Thedifference is that, for this portrait, Kerry had him positioned in a three-quarter view to the camera with his right arm resting on the chair back andhis hand tucked over its edge.
In the floor pose shown in plate 186, Kerry’s subject assumed a cross-legged position facing the camera, then placed his elbows on his knees and
CHILDREN 81
Top left—Plate 183. Center—Plate 184.
Bottom left—Plate 185. Bottom right—
Plate 186. Photos by Karen Firstenberger.

rested his chin on his hands. The pose is the epitome of simplicity. Thoughit is a little symmetrical, it is nonetheless very pleasing.
To create the portrait shown in plate 187, Wendy Veugeler posed hersubject on a window sill with his hands open and cradling his face to cre-ate a frame for his expression. When posing a child in this manner, the cor-rect placement of the elbows is critical to the success of the image. In thisinstance, the boy’s elbows are positioned on the sill, slightly in front of hisface; if they were too far in front or too close to his body, the subject wouldnot appear as relaxed, and the portrait would not be as appealing. Likewise,choosing a seat that is well suited to the size of the subject will ensure thathe looks comfortable in the pose.
A Final NoteThough you might expect to find a section on boys at the upper end of thisage group here, the truth is, boys this age are seldom photographed. Forsimplicity’s sake, a discussion of posing boys aged seven to thirteen is pre-sented in the next chapter.
82 MASTER POSING GUIDE FOR CHILDREN’S PORTRAIT PHOTOGRAPHY
Plate 186. Photo by Wendy Veugeler.

Presented in this chapter are poses that work for preteens and earlyteens. I have found that many children aged nine and up are, froma posing aspect, almost as mature as their teenage siblings. Though
older children often physically appear like adults, because they are still men-tally and emotionally immature, we must employ an appropriate posingpsychology if we are to obtain the best results.
Girls Nine to Ten YearsBecause females in this age range develop faster than they did in earliertimes, they tend to be more sophisticated and take on the attitudes andmannerisms of their elders. Consequently, some of the poses we use withtheir older relatives can be good posing options for this group. (For tips oneffectively posing adult females, see Professional Posing Techniques forWedding and Portrait Photographers [Amherst Media, 2006].) We mustmake judgments about how we pose them based on psychological assess-ments or a consultation with their parents. Though they may seem relative-ly mature, we must also beware the temptation to pose them in a provoca-tive manner.
Plate 188 shows a little lady in asophisticated pose leaning against adraped wall. She held a rose in herleft hand and extended it away fromher. In her right hand she held a hat(we would not have allowed her armto be so vertical if she were notholding the hat). Her feet wereposed to complement her profilepresentation to the camera. Thepose is elegant and one that mostgirls age nine and older are able topresent when directed. You can seehow relaxed and comfortable thesubject appears in this pose.
PRETEENS AND TEENS 83
3. Preteens and Teens
Plate 188. Photo by Norman Phillips.
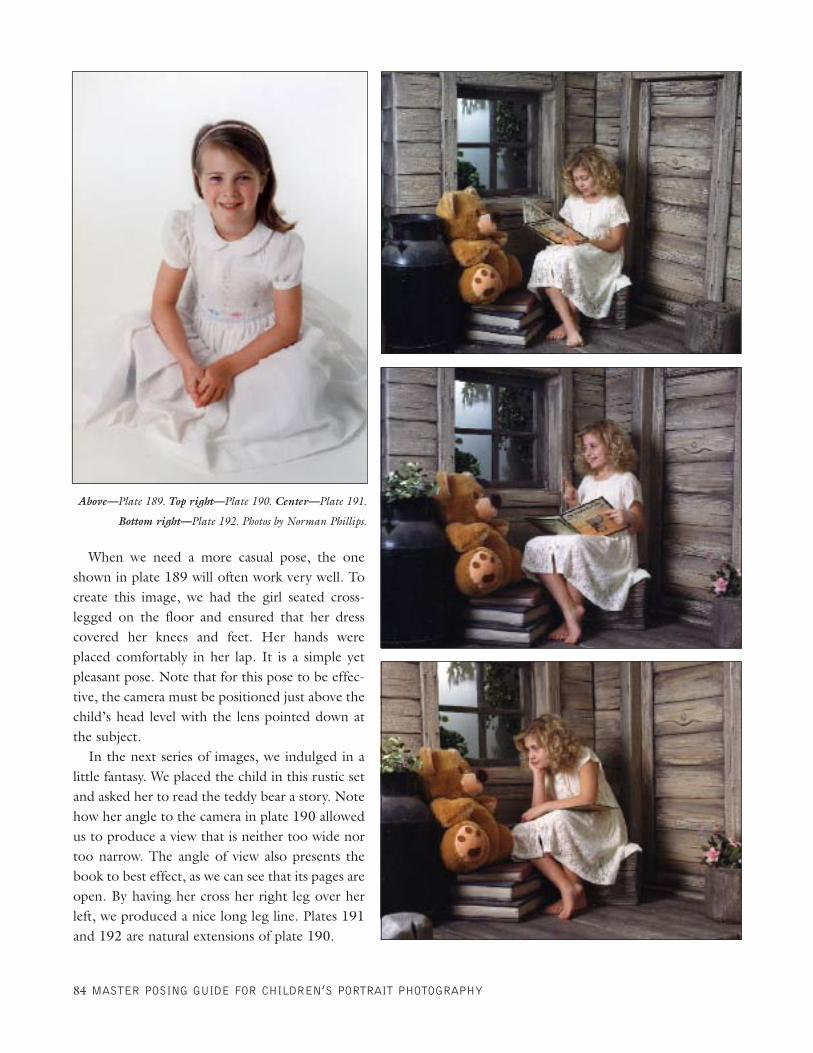
When we need a more casual pose, the oneshown in plate 189 will often work very well. Tocreate this image, we had the girl seated cross-legged on the floor and ensured that her dresscovered her knees and feet. Her hands wereplaced comfortably in her lap. It is a simple yetpleasant pose. Note that for this pose to be effec-tive, the camera must be positioned just above thechild’s head level with the lens pointed down atthe subject.
In the next series of images, we indulged in alittle fantasy. We placed the child in this rustic setand asked her to read the teddy bear a story. Notehow her angle to the camera in plate 190 allowedus to produce a view that is neither too wide nortoo narrow. The angle of view also presents thebook to best effect, as we can see that its pages areopen. By having her cross her right leg over herleft, we produced a nice long leg line. Plates 191and 192 are natural extensions of plate 190.
84 MASTER POSING GUIDE FOR CHILDREN’S PORTRAIT PHOTOGRAPHY
Above—Plate 189. Top right—Plate 190. Center—Plate 191.
Bottom right—Plate 192. Photos by Norman Phillips.

Plate 193 shows the subject in a more casual floor pose. To create theimage, we had the girl sit on the floor, facing the camera, and rested on herright hand, which was slightly extended away from her to our left. Her legswere slightly tucked toward her, which allowed us to have her bring her leftleg over her right and taper them to our right. There is a line that runsfrom her left shoulder sweeping down toward her toes, while her head isslightly tilted to our right to create a nice curve.
In plate 194, we have the same subject with both arms resting on theseat of a chair. They were brought together so that we could position herhands one over the other. In this position we would not have the righthand over the left as it would show only the back of the right hand, andnot the fingers—and this is undesirable.
Plate 195 is a conventional bust portrait. We have not included hands orarms or shown any kind of prop. It is a portrait that we might well see fair-ly regularly on mantels or atop pianos in most homes. We seated our sub-ject on a bench that was angled approximately 20 degrees off camera, and
it was easy for her to address the camera from this posi-tion. We did not use the traditional female head pose;instead, we had her tip her head slightly toward the farshoulder. Personally, I prefer this position, as I believe itbrings most of my subjects to life. It causes the subjectto change from a quiet, almost dreamy presentation toone of interest.
PRETEENS AND TEENS 85
Top left—Plate 193. Bottom left—Plate
194. Bottom right—Plate 195. Photos by
Norman Phillips.
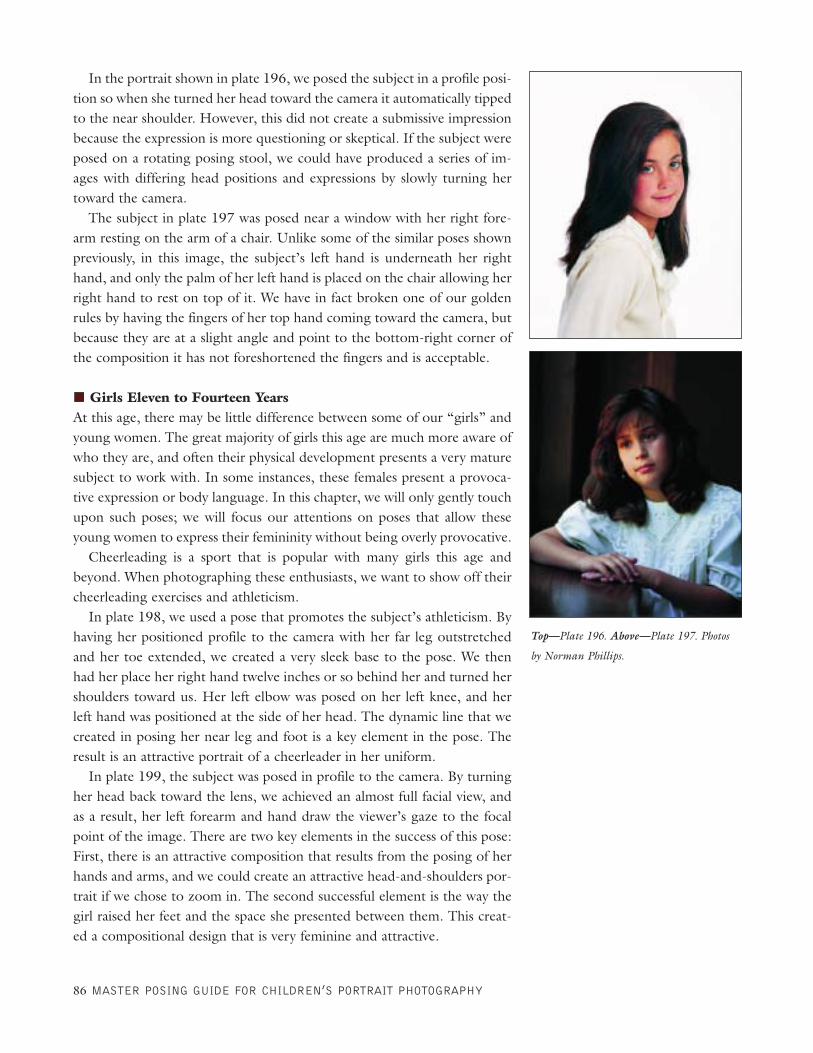
In the portrait shown in plate 196, we posed the subject in a profile posi-tion so when she turned her head toward the camera it automatically tippedto the near shoulder. However, this did not create a submissive impressionbecause the expression is more questioning or skeptical. If the subject wereposed on a rotating posing stool, we could have produced a series of im-ages with differing head positions and expressions by slowly turning hertoward the camera.
The subject in plate 197 was posed near a window with her right fore-arm resting on the arm of a chair. Unlike some of the similar poses shownpreviously, in this image, the subject’s left hand is underneath her righthand, and only the palm of her left hand is placed on the chair allowing herright hand to rest on top of it. We have in fact broken one of our goldenrules by having the fingers of her top hand coming toward the camera, butbecause they are at a slight angle and point to the bottom-right corner ofthe composition it has not foreshortened the fingers and is acceptable.
Girls Eleven to Fourteen YearsAt this age, there may be little difference between some of our “girls” andyoung women. The great majority of girls this age are much more aware ofwho they are, and often their physical development presents a very maturesubject to work with. In some instances, these females present a provoca-tive expression or body language. In this chapter, we will only gently touchupon such poses; we will focus our attentions on poses that allow theseyoung women to express their femininity without being overly provocative.
Cheerleading is a sport that is popular with many girls this age andbeyond. When photographing these enthusiasts, we want to show off theircheerleading exercises and athleticism.
In plate 198, we used a pose that promotes the subject’s athleticism. Byhaving her positioned profile to the camera with her far leg outstretchedand her toe extended, we created a very sleek base to the pose. We thenhad her place her right hand twelve inches or so behind her and turned hershoulders toward us. Her left elbow was posed on her left knee, and herleft hand was positioned at the side of her head. The dynamic line that wecreated in posing her near leg and foot is a key element in the pose. Theresult is an attractive portrait of a cheerleader in her uniform.
In plate 199, the subject was posed in profile to the camera. By turningher head back toward the lens, we achieved an almost full facial view, andas a result, her left forearm and hand draw the viewer’s gaze to the focalpoint of the image. There are two key elements in the success of this pose:First, there is an attractive composition that results from the posing of herhands and arms, and we could create an attractive head-and-shoulders por-trait if we chose to zoom in. The second successful element is the way thegirl raised her feet and the space she presented between them. This creat-ed a compositional design that is very feminine and attractive.
86 MASTER POSING GUIDE FOR CHILDREN’S PORTRAIT PHOTOGRAPHY
Top—Plate 196. Above—Plate 197. Photos
by Norman Phillips.

In plate 200, we show one of the many poses that can be used to showthe interests and physique of a girl interested in gymnastics. The subjectwas presented in a preparatory position on all fours. The positioning of thegirl’s hands allowed us to show her in a three-quarter presentation. Notetoo that her hands and arms are on the same plane as her legs. The pose
PRETEENS AND TEENS 87
Top—Plate 198. Bottom left—Plate 199.
Bottom right—Plate 200. Photos by Norman
Phillips.

allows us to see her pretty shoulders and arms and her lovely smile, but italso allows us to focus on her athleticism.
To create the image shown in plate 201, we employed a window set asa prop. (If you do not have access to such a prop, you can use a pedestal,railing, or fire escape for similar results.) Here, the subject was posedsquare to the camera. While this is generally not advisable, using the sub-ject’s arms and hands as key elements in the composition made her posi-tion acceptable.
The young lady held on to one of the vertical supports with her lefthand, showing her fingers rather than the back of her hand, for the best-possible view. Note that the height at which her hand was positionedallowed us to produce a gentle sloping line in her forearm that leads theviewer’s gaze to her face. She tipped her head toward her left hand, andthis allowed us to show her beautiful hair to best effect. To complete thepose, we had her place her right hand on her hip; this is a position thatfemales may fall into in everyday situations.
88 MASTER POSING GUIDE FOR CHILDREN’S PORTRAIT PHOTOGRAPHY
Left—Plate 201. Top right—Plate 202.
Bottom right—Plate 203. Photos by Norman
Phillips.
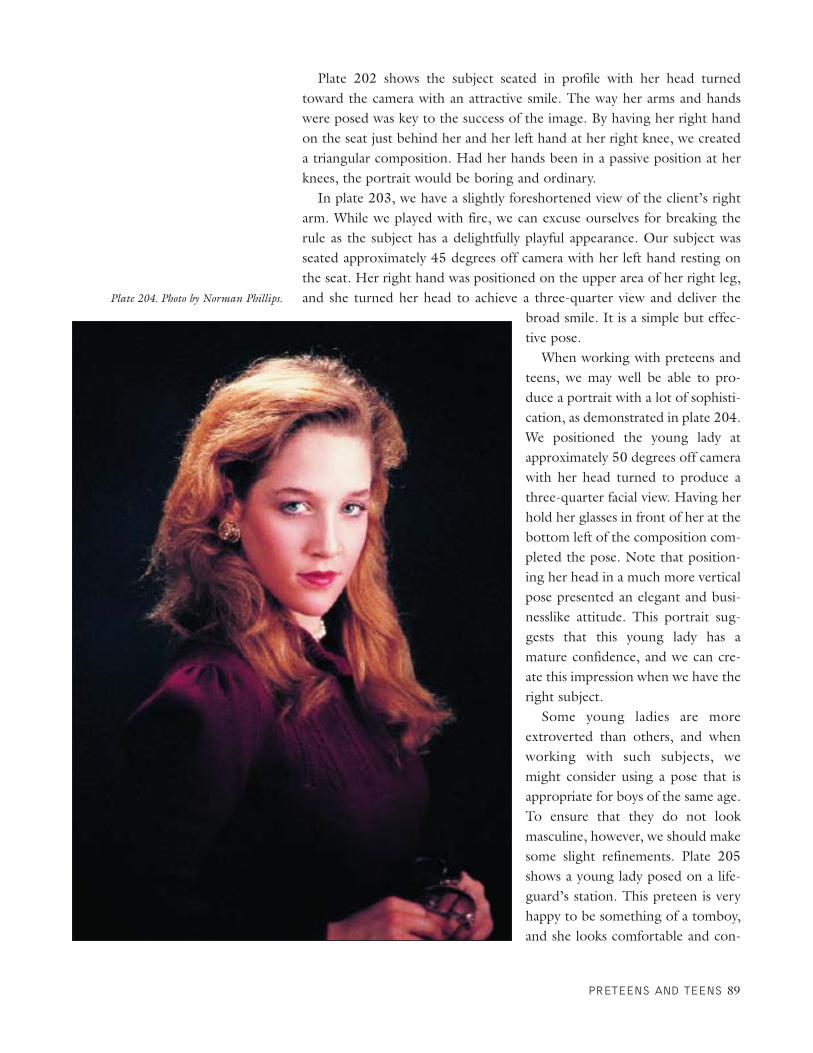
Plate 202 shows the subject seated in profile with her head turnedtoward the camera with an attractive smile. The way her arms and handswere posed was key to the success of the image. By having her right handon the seat just behind her and her left hand at her right knee, we createda triangular composition. Had her hands been in a passive position at herknees, the portrait would be boring and ordinary.
In plate 203, we have a slightly foreshortened view of the client’s rightarm. While we played with fire, we can excuse ourselves for breaking therule as the subject has a delightfully playful appearance. Our subject wasseated approximately 45 degrees off camera with her left hand resting onthe seat. Her right hand was positioned on the upper area of her right leg,and she turned her head to achieve a three-quarter view and deliver the
broad smile. It is a simple but effec-tive pose.
When working with preteens andteens, we may well be able to pro-duce a portrait with a lot of sophisti-cation, as demonstrated in plate 204.We positioned the young lady atapproximately 50 degrees off camerawith her head turned to produce athree-quarter facial view. Having herhold her glasses in front of her at thebottom left of the composition com-pleted the pose. Note that position-ing her head in a much more verticalpose presented an elegant and busi-nesslike attitude. This portrait sug-gests that this young lady has amature confidence, and we can cre-ate this impression when we have theright subject.
Some young ladies are moreextroverted than others, and whenworking with such subjects, wemight consider using a pose that isappropriate for boys of the same age.To ensure that they do not lookmasculine, however, we should makesome slight refinements. Plate 205shows a young lady posed on a life-guard’s station. This preteen is veryhappy to be something of a tomboy,and she looks comfortable and con-
PRETEENS AND TEENS 89
Plate 204. Photo by Norman Phillips.

fident in this pose. Except for the fact that her left leg appears very straightdue to the space between the horizontal bars, the pose is very pleasant. Wecould have created a few more curves by having her tip her head and slight-ly turn her shoulders, but this pose worked with the girl’s personality.
Though females can look very attractive in poses that we use for males,it is not acceptable to pose boys and young men like girls and youngwomen. While males may cry foul, that’s just the way it is.
In plate 206, we brought the subject to the ground. The horizontal barof the chair was used as an armrest, and her arms were nicely placed.Although we do not have a full view of her legs in this image, we can seethat her right leg was positioned as in the previous portrait. This is anoth-er pose that would be appropriate for boys but is equally adaptable for girls.
Plate 207 shows a pose designed for a bust portrait. We employed a propwith an interesting curve that allowed us to pose the subject’s right arm ina sloping line away from her shoulders, then had the subject gently rest herface on her right hand to prevent any distortion of her features. We had herbring her left arm across her body and created a break in the left wrist thatprevented the formation of a rigid line across the image. The diagonalformed by the young woman’s left arm leads to her face. Note that the linesin the portrait lead us to her smile no matter where we start our view. Thisis a relaxed and comfortable pose.
Plate 208 shows a pose that is a little more daring than most, as the sub-ject’s hands and arms served as important elements in the pose. When
90 MASTER POSING GUIDE FOR CHILDREN’S PORTRAIT PHOTOGRAPHY
Left—Plate 205. Right—Plate 206. Photos
by Norman Phillips.

using the subject’s hands in this manner you must be very careful that theydo not look like dangerous weapons, as they are very prominent in thecomposition. Here, we created a break at each wrist to alter the verticallines of her arms. Her hands were slightly fanned out so they did not cre-ate a solid mass beneath her face. At the same time we had her lean towardour left with her arms slightly away from her body to create a sloping lineaway from her shoulder. Note, too, that we had her rest her face gently onher hands so that they did not distort her features.
Plate 209 is an elegant portrait of a young lady in a beautiful dress. Toproperly show the dress in the image, I had the young woman positioned
directly facing the camera. Thoughthis is something I rarely do, becauseof her special persona and presenta-tion, I felt able to do this withoutcompromising my posing standards.Her hands were positioned to thesides of her hips to create a triangu-lar composition from the seat to herhead. Her feet were positioned sothat her left foot was a few inches infront of her right. This positioningpartially hid her back foot and creat-ed a very attractive tapered look. Tofinesse the pose and break the verti-cal line of her torso, I had her moveher left hand a little farther from herbody and lean slightly to her left,then tip her head to her left.
Boys Seven to Thirteen YearsYou might wonder why we coversuch a wide age range in this section.The answer is simple: First, at ageseven or eight, many boys are pho-tographed for their first commun-ion. Bar mitzvah boys are photo-graphed at age twelve to thirteen,and we make portraits of them informal attire. Between the ages ofeight and twelve, boys are seldomphotographed, unless it is with theirsports attire or equipment. Second,after the age of twelve or thirteen,we can use the poses recommended
PRETEENS AND TEENS 91
Top—Plate 207. Bottom left—Plate 208.
Bottom right—Plate 209. Photos by Norman
Phillips.
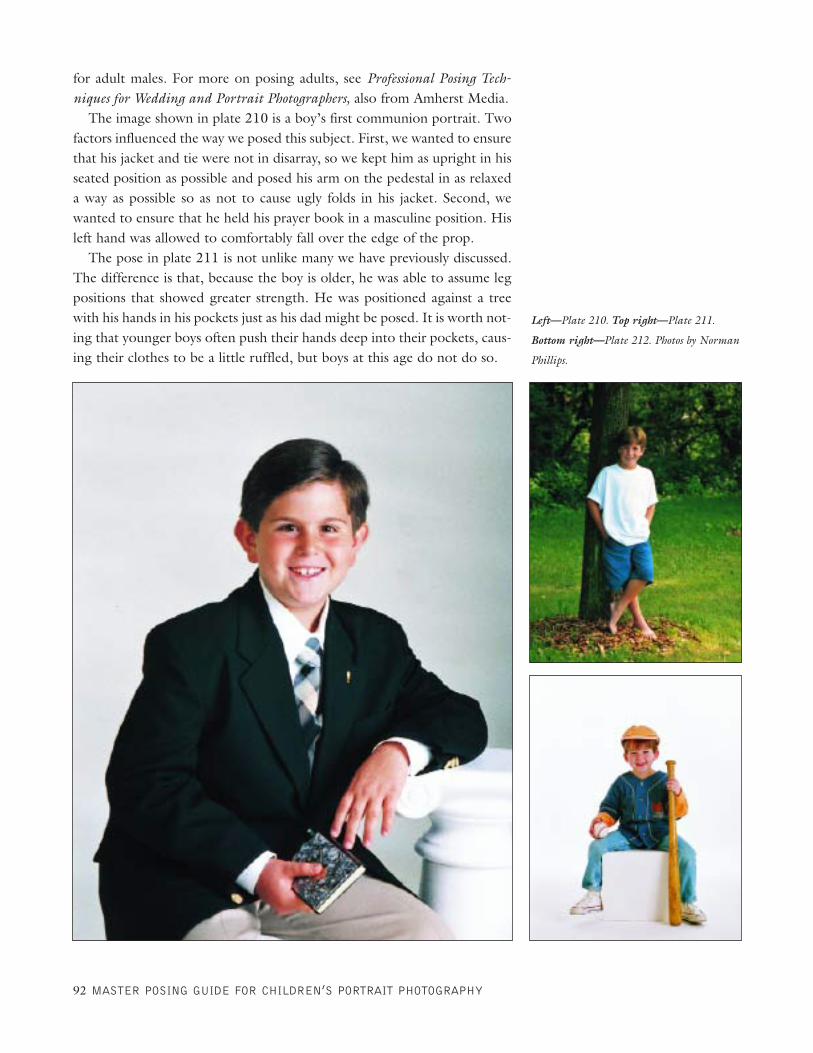
for adult males. For more on posing adults, see Professional Posing Tech-niques for Wedding and Portrait Photographers, also from Amherst Media.
The image shown in plate 210 is a boy’s first communion portrait. Twofactors influenced the way we posed this subject. First, we wanted to ensurethat his jacket and tie were not in disarray, so we kept him as upright in hisseated position as possible and posed his arm on the pedestal in as relaxeda way as possible so as not to cause ugly folds in his jacket. Second, wewanted to ensure that he held his prayer book in a masculine position. Hisleft hand was allowed to comfortably fall over the edge of the prop.
The pose in plate 211 is not unlike many we have previously discussed.The difference is that, because the boy is older, he was able to assume legpositions that showed greater strength. He was positioned against a treewith his hands in his pockets just as his dad might be posed. It is worth not-ing that younger boys often push their hands deep into their pockets, caus-ing their clothes to be a little ruffled, but boys at this age do not do so.
92 MASTER POSING GUIDE FOR CHILDREN’S PORTRAIT PHOTOGRAPHY
Left—Plate 210. Top right—Plate 211.
Bottom right—Plate 212. Photos by Norman
Phillips.

The boy in plate 212 was posed with a baseball batand ball. He sat astride the box with confidence andcomfort. The pose is brazenly male—and happy too. Asyou can see, it was also simple to create.
The pose shown in plate 213 is another first com-munion portrait taken on location at his celebrationparty. Again, we needed to ensure that his jacket and tiewere correctly shown, so he was positioned standing ata window with his left arm on the ledge. Note how weposed his hands with his right gripping his left as it fallsover the ledge. This is a typical male position thatworked well for this portrait.
The portrait shown in plate 214 has the boy seatedon the floor with his left arm resting on an upholsteredstool and his left hand supporting his face. His righthand was placed passively on the stool below his head tocreate a nice line from his hand through his left arm and
to his face. The pose is relaxed and comfortable.The portrait in plate 215 is a simple, straight-on pose, because when a
bar mitzvah boy is wearing his prayer shawl it is important to show bothsides clearly and also ensure it is unruffled. The danger in trying to be toocreative with this particular type of portrait is that the importance of theprayer shawl will be diminished or can look uneven.
PRETEENS AND TEENS 93
Top left—Plate 213. Bottom left—Plate 214. Top right—Plate 215.
Photos by Norman Phillips.

The portrait in plate 216 is a variation of poses previously discussed.Now that we have a boy ten or older we can have a more elegant and mas-culine portrait and at the same time keep his clothes in good order.
His left arm was positioned atop a high stool. The height of the propwas important, as he was able to rest his arm without leaning too far over.Note that this position created a nice line from his head to toe. His lefthand was posed in a gentle fist, placed just over the edge of the stool. Hisright hand was tucked into his pocket, with his jacket thrown behind hispocket to expose his shirt and the front of his dress trousers. The final anddefining element in the portrait was the position of his feet. Instead of hav-ing him kick his left leg over the right and rest the toes on the bottom foot,the left foot was placed on the floor in front of his right foot, which sup-ported his weight. This is almost a fashion-type pose.
When working outdoors, we have the opportunity to create casual posesthat won’t work indoors. To create the final two images in this chapter, weused the same prop and created two different poses with the same subject.In plate 217, the boy leaned against the frame of the prop and rested hisleft foot on one of the horizontal bars while supporting his weight with hisother leg. His thumbs were tucked into his belt loops. Because he is bare-foot and on sand, his baggy clothes and the pose are in tune with eachother.
In plate 218, we changed the boy’s angle to the camera by turning himinto a semi-profile pose with his right foot on the lowest horizontal bar. Heleaned on his right arm, which created a relaxed impression, and the thumbof his left hand was hooked into his pocket. This pose was perfect for thisyoung man, who was a little shy and reserved. He appears relaxed andcomfortable.
94 MASTER POSING GUIDE FOR CHILDREN’S PORTRAIT PHOTOGRAPHY
Plate 217. Photo by Norman Phillips.
Plate 216. Photo by Norman Phillips.
Plate 218. Photo by Norman Phillips.
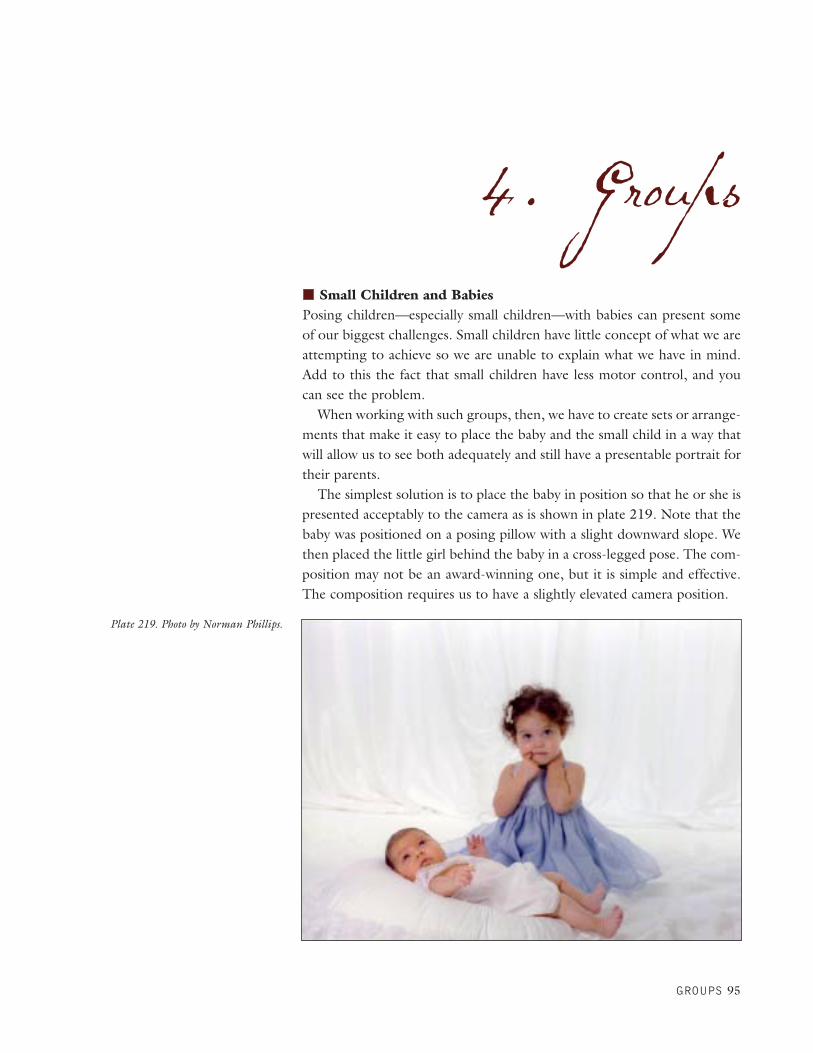
Small Children and BabiesPosing children—especially small children—with babies can present someof our biggest challenges. Small children have little concept of what we areattempting to achieve so we are unable to explain what we have in mind.Add to this the fact that small children have less motor control, and youcan see the problem.
When working with such groups, then, we have to create sets or arrange-ments that make it easy to place the baby and the small child in a way thatwill allow us to see both adequately and still have a presentable portrait fortheir parents.
The simplest solution is to place the baby in position so that he or she ispresented acceptably to the camera as is shown in plate 219. Note that thebaby was positioned on a posing pillow with a slight downward slope. Wethen placed the little girl behind the baby in a cross-legged pose. The com-position may not be an award-winning one, but it is simple and effective.The composition requires us to have a slightly elevated camera position.
GROUPS 95
4. Groups
Plate 219. Photo by Norman Phillips.
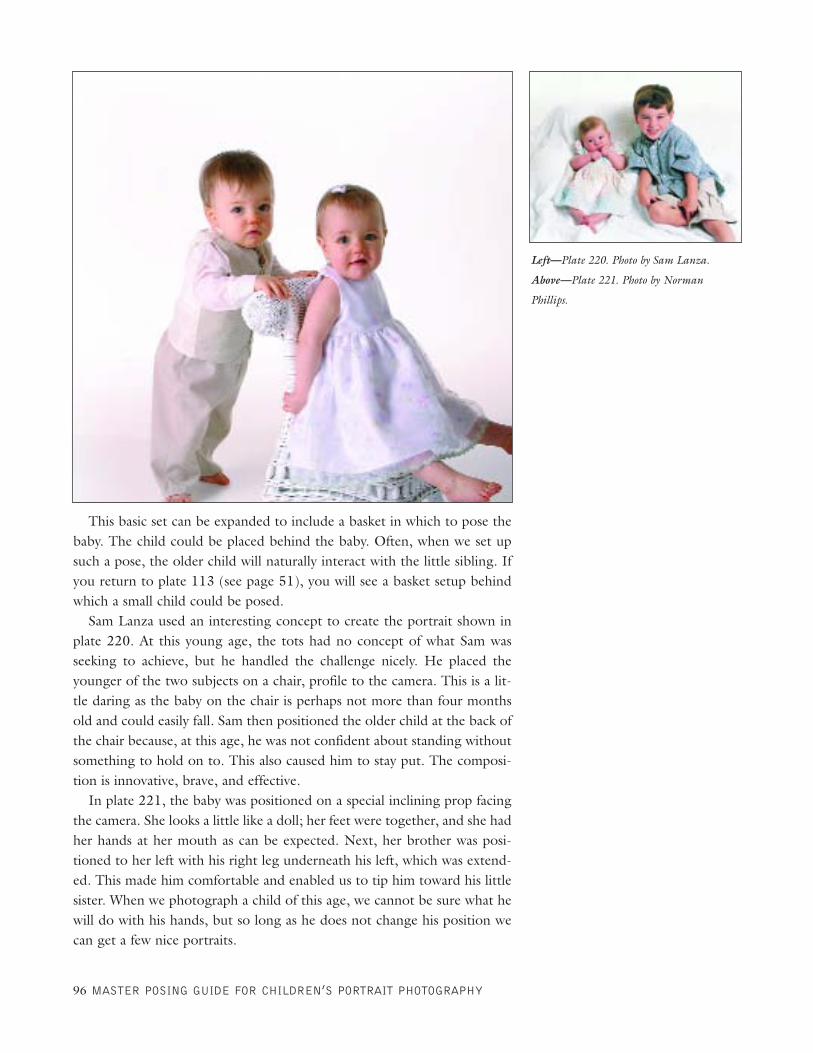
This basic set can be expanded to include a basket in which to pose thebaby. The child could be placed behind the baby. Often, when we set upsuch a pose, the older child will naturally interact with the little sibling. Ifyou return to plate 113 (see page 51), you will see a basket setup behindwhich a small child could be posed.
Sam Lanza used an interesting concept to create the portrait shown inplate 220. At this young age, the tots had no concept of what Sam wasseeking to achieve, but he handled the challenge nicely. He placed theyounger of the two subjects on a chair, profile to the camera. This is a lit-tle daring as the baby on the chair is perhaps not more than four monthsold and could easily fall. Sam then positioned the older child at the back ofthe chair because, at this age, he was not confident about standing withoutsomething to hold on to. This also caused him to stay put. The composi-tion is innovative, brave, and effective.
In plate 221, the baby was positioned on a special inclining prop facingthe camera. She looks a little like a doll; her feet were together, and she hadher hands at her mouth as can be expected. Next, her brother was posi-tioned to her left with his right leg underneath his left, which was extend-ed. This made him comfortable and enabled us to tip him toward his littlesister. When we photograph a child of this age, we cannot be sure what hewill do with his hands, but so long as he does not change his position wecan get a few nice portraits.
96 MASTER POSING GUIDE FOR CHILDREN’S PORTRAIT PHOTOGRAPHY
Left—Plate 220. Photo by Sam Lanza.
Above—Plate 221. Photo by Norman
Phillips.
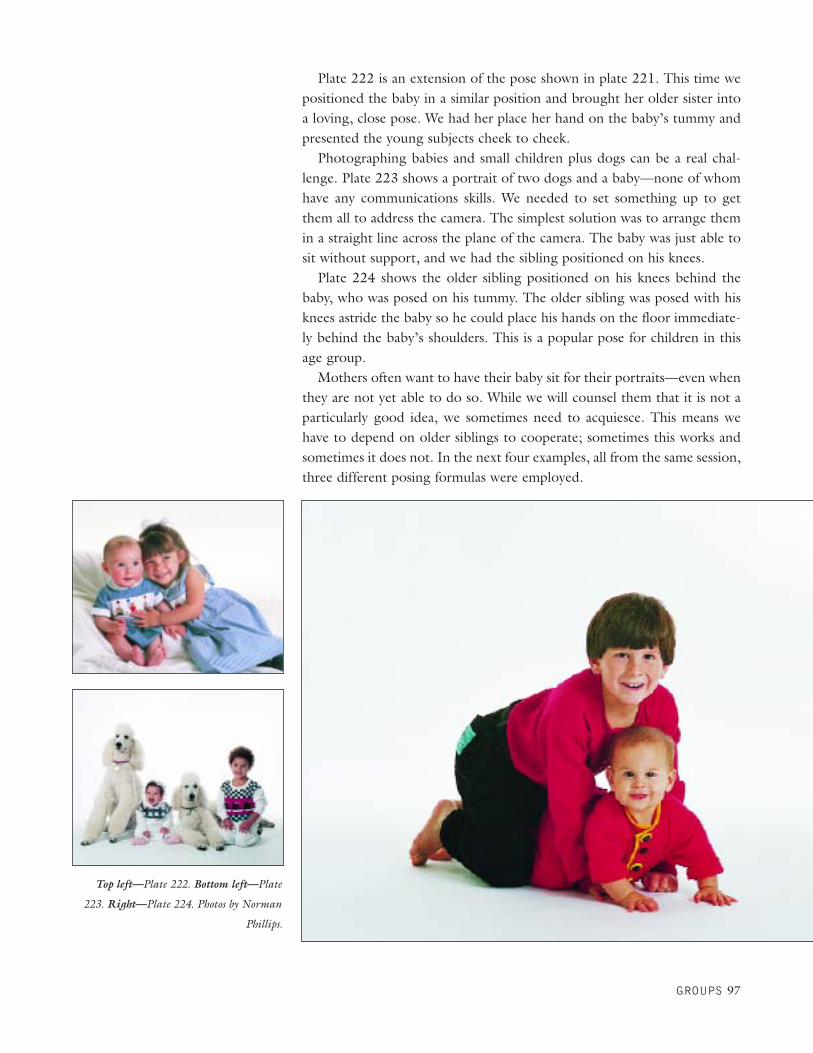
Plate 222 is an extension of the pose shown in plate 221. This time wepositioned the baby in a similar position and brought her older sister intoa loving, close pose. We had her place her hand on the baby’s tummy andpresented the young subjects cheek to cheek.
Photographing babies and small children plus dogs can be a real chal-lenge. Plate 223 shows a portrait of two dogs and a baby—none of whomhave any communications skills. We needed to set something up to getthem all to address the camera. The simplest solution was to arrange themin a straight line across the plane of the camera. The baby was just able tosit without support, and we had the sibling positioned on his knees.
Plate 224 shows the older sibling positioned on his knees behind thebaby, who was posed on his tummy. The older sibling was posed with hisknees astride the baby so he could place his hands on the floor immediate-ly behind the baby’s shoulders. This is a popular pose for children in thisage group.
Mothers often want to have their baby sit for their portraits—even whenthey are not yet able to do so. While we will counsel them that it is not aparticularly good idea, we sometimes need to acquiesce. This means wehave to depend on older siblings to cooperate; sometimes this works andsometimes it does not. In the next four examples, all from the same session,three different posing formulas were employed.
GROUPS 97
Top left—Plate 222. Bottom left—Plate
223. Right—Plate 224. Photos by Norman
Phillips.

In plate 225, we seated the baby on the floor between the two older sib-lings. The boy acted as the support for the baby, who was unable to sit upwithout help. This arrangement worked for a few moments, allowing us tocapture this portrait. When we expanded on the pose to create the kissfrom baby’s brother and sister shown in plate 226, the baby was fallingbackward into the arms of the siblings. This is a loving image, but at thispoint in the session, we were rapidly moving away from the desired format.
In plate 227, we tried a pose that is popular with both parents and sib-lings. Of course, having an older sibling hold a baby is risky. There is achance that baby may be dropped and that the pose will be a ragged mess.In this example, however, the pose worked quite well—except that the sis-ter lost her role in the portrait. We wanted her to place her left hand on herbrother’s shoulder in order to bring the composition together.
In the portrait shown in plate 228, the baby was seated on the boy’sright knee so he could comfortably place his hands in a support mode. Thisallowed us to bring all three heads close together to complete the pose.This works quite well, so long as the child holding the baby is capable andunderstands his or her responsibility.
Plate 229 doubles up on the concept employed in the previous portrait.Here we have twin babies and three older siblings. Both brothers werepositioned with the babies sitting on the knee nearest the center of thegroup. The boys were required to gently but firmly place their handsaround the babies, both of whom were angled toward the center. Note theway the older children held the babies’ tiny hands between their fingers.The babies’ big sister was placed in the center of the composition to pro-duce an undulating line across the group.
98 MASTER POSING GUIDE FOR CHILDREN’S PORTRAIT PHOTOGRAPHY
Top left—Plate 225. Top right—Plate 226.
Bottom left—Plate 227. Bottom right—
Plate 228. Photos by Norman Phillips.
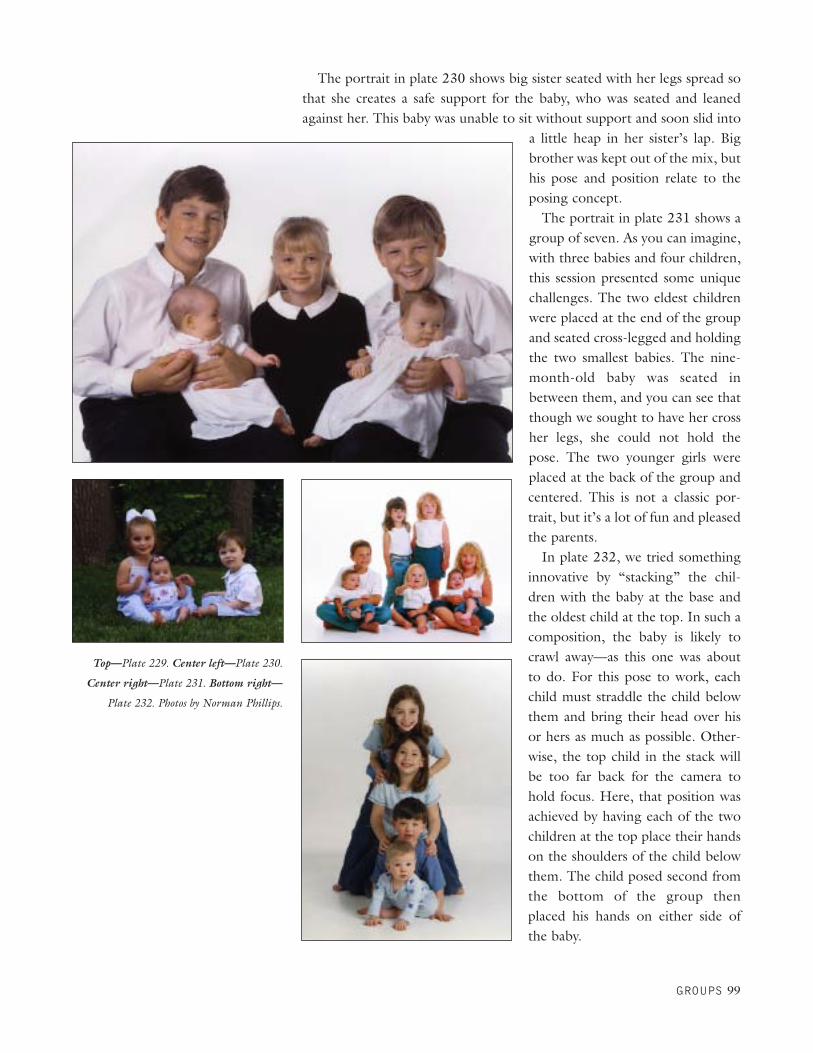
The portrait in plate 230 shows big sister seated with her legs spread sothat she creates a safe support for the baby, who was seated and leanedagainst her. This baby was unable to sit without support and soon slid into
a little heap in her sister’s lap. Bigbrother was kept out of the mix, buthis pose and position relate to theposing concept.
The portrait in plate 231 shows agroup of seven. As you can imagine,with three babies and four children,this session presented some uniquechallenges. The two eldest childrenwere placed at the end of the groupand seated cross-legged and holdingthe two smallest babies. The nine-month-old baby was seated inbetween them, and you can see thatthough we sought to have her crossher legs, she could not hold thepose. The two younger girls wereplaced at the back of the group andcentered. This is not a classic por-trait, but it’s a lot of fun and pleasedthe parents.
In plate 232, we tried somethinginnovative by “stacking” the chil-dren with the baby at the base andthe oldest child at the top. In such acomposition, the baby is likely tocrawl away—as this one was aboutto do. For this pose to work, eachchild must straddle the child belowthem and bring their head over hisor hers as much as possible. Other-wise, the top child in the stack willbe too far back for the camera tohold focus. Here, that position wasachieved by having each of the twochildren at the top place their handson the shoulders of the child belowthem. The child posed second fromthe bottom of the group thenplaced his hands on either side ofthe baby.
GROUPS 99
Top—Plate 229. Center left—Plate 230.
Center right—Plate 231. Bottom right—
Plate 232. Photos by Norman Phillips.

The same group of children is posed in a different style in plate 233. Thistime each child was posed on their tummy and rested on their folded arms.Though baby was capable of crawling away, we sought to have him do thesame as his siblings; he stayed in place, so the resulting portrait works.
The same group is shown in plate 234. For this portrait, we had the twogirls hold baby’s hands and had each sister place their other hand behindbaby so he did not fall. Big brother was posed at the back in the center.
In plate 235, we used a well-received and successful posing concept. Theolder sibling was positioned on the floor in profile to camera, and baby wasplaced on the back of the child. The older child rarely objects to this idea,and baby usually enjoys the pose. However, we may have to repositionbaby a number of times before the session is complete.
100 MASTER POSING GUIDE FOR CHILDREN’S PORTRAIT PHOTOGRAPHY
Top left—Plate 233. Top right—Plate 234.
Left—Plate 235. Photos by Norman Phillips.

The portrait in plate 236 shows another pose that is simple to arrange.Baby appears very confident seated beside her elder sister, who was in across-legged pose. We originally crossed baby’s legs, but they did not stayas arranged, which is quite normal.
When presented with two boys dressed in formal attire and a baby girlwho was able to stand, we opted to arrange our subjects in the formal poseshown in plate 237. We positioned the boy in a seated pose to present himat a head height similar to his brother. We then positioned the youngerbrother and the baby sister at the arms of the seat. The older boy placedhis right hand on the baby’s hand to keep her where she was posed, and hisleft hand was allowed to relax in his lap. The younger boy simply stoodwith his right hand resting on the arm of the seat with his left hand behindhim. The composition is simple but formal and suits their attire.
When we have a little person who will not stay in place we must resortto creative methods. To create the image shown in plate 238, we placed thelittle person in a box lined with a white fluffy blanket so that any potentialsharp edges would not hurt him. He was not necessarily happy, but thearrangement works well in most instances. His sister was seated on a smallseat at an angle immediately behind him so that her left knee was a littleforward of the box. This allowed us to keep her close to the baby.
Engaging a small child in an activity with older siblings will often helpus to produce successful portraits. This is illustrated in plate 239. A simplepuzzle was placed in front of the two older children, and the baby was posi-tioned so she could join the game without wrecking the set. This inter-active concept works well as small children like to be involved with theirolder siblings.
Plate 240 shows an outdoor portrait of three children seated on a stepin order of their age from left to right. By positioning them on the cornerof the step, we were able to bring them closer together.
GROUPS 101
Left—Plate 236. Right—Plate 237. Photos
by Norman Phillips.
Top—Plate 238. Bottom—Plate 239. Photos
by Norman Phillips.
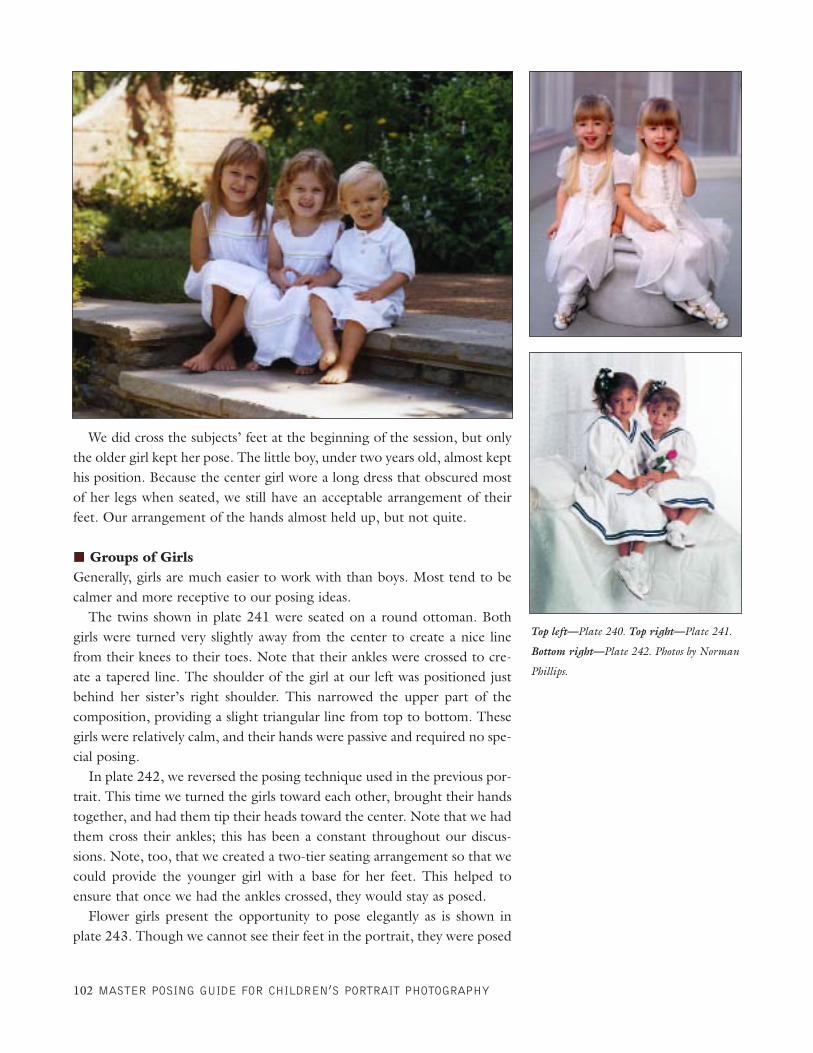
We did cross the subjects’ feet at the beginning of the session, but onlythe older girl kept her pose. The little boy, under two years old, almost kepthis position. Because the center girl wore a long dress that obscured mostof her legs when seated, we still have an acceptable arrangement of theirfeet. Our arrangement of the hands almost held up, but not quite.
Groups of GirlsGenerally, girls are much easier to work with than boys. Most tend to becalmer and more receptive to our posing ideas.
The twins shown in plate 241 were seated on a round ottoman. Bothgirls were turned very slightly away from the center to create a nice linefrom their knees to their toes. Note that their ankles were crossed to cre-ate a tapered line. The shoulder of the girl at our left was positioned justbehind her sister’s right shoulder. This narrowed the upper part of thecomposition, providing a slight triangular line from top to bottom. Thesegirls were relatively calm, and their hands were passive and required no spe-cial posing.
In plate 242, we reversed the posing technique used in the previous por-trait. This time we turned the girls toward each other, brought their handstogether, and had them tip their heads toward the center. Note that we hadthem cross their ankles; this has been a constant throughout our discus-sions. Note, too, that we created a two-tier seating arrangement so that wecould provide the younger girl with a base for her feet. This helped toensure that once we had the ankles crossed, they would stay as posed.
Flower girls present the opportunity to pose elegantly as is shown inplate 243. Though we cannot see their feet in the portrait, they were posed
102 MASTER POSING GUIDE FOR CHILDREN’S PORTRAIT PHOTOGRAPHY
Top left—Plate 240. Top right—Plate 241.
Bottom right—Plate 242. Photos by Norman
Phillips.
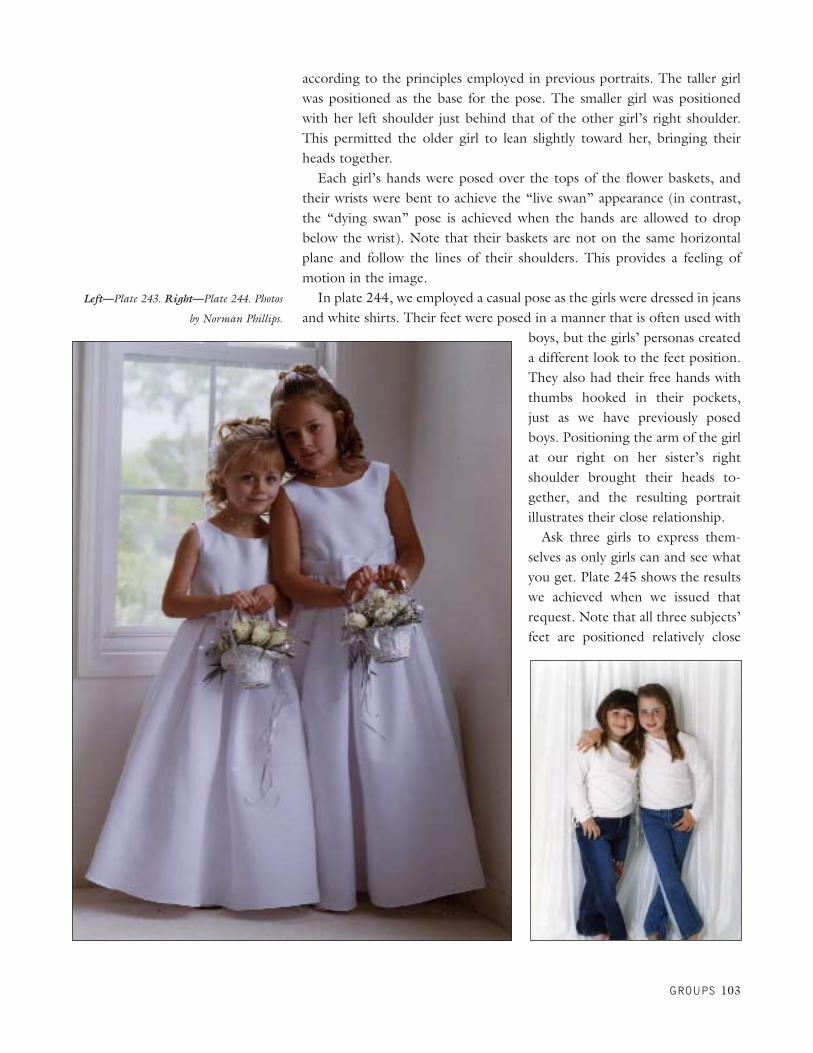
according to the principles employed in previous portraits. The taller girlwas positioned as the base for the pose. The smaller girl was positionedwith her left shoulder just behind that of the other girl’s right shoulder.This permitted the older girl to lean slightly toward her, bringing theirheads together.
Each girl’s hands were posed over the tops of the flower baskets, andtheir wrists were bent to achieve the “live swan” appearance (in contrast,the “dying swan” pose is achieved when the hands are allowed to dropbelow the wrist). Note that their baskets are not on the same horizontalplane and follow the lines of their shoulders. This provides a feeling ofmotion in the image.
In plate 244, we employed a casual pose as the girls were dressed in jeansand white shirts. Their feet were posed in a manner that is often used with
boys, but the girls’ personas createda different look to the feet position.They also had their free hands withthumbs hooked in their pockets,just as we have previously posedboys. Positioning the arm of the girlat our right on her sister’s rightshoulder brought their heads to-gether, and the resulting portraitillustrates their close relationship.
Ask three girls to express them-selves as only girls can and see whatyou get. Plate 245 shows the resultswe achieved when we issued thatrequest. Note that all three subjects’feet are positioned relatively close
GROUPS 103
Left—Plate 243. Right—Plate 244. Photos
by Norman Phillips.

together, with the taller sister at theleft and the shorter at the rightof the portrait. This arrangementhelped to unify the pose. In such asituation, as long as the clients keeptheir foot placements, whateverthey do will generally result in anexpressive portrait.
In plate 246 we used a pose sim-ilar to one we have oftentimes usedwhen photographing boys. The dif-ference is that in this pose, we hadthe girls hold hands, and with boyswe would have them in a bear hug.We simply placed our subjects sideby side and arranged their hands byhaving the older girl present theyounger one with an open palm inwhich to place hers. The pose issimple and charming.
In plate 247, a large book was employed as a prop. Note that the linesof the book link the three subjects, and their mutual focus on the prop addsa storytelling component to the image. Two subjects were presented inprofile, and one was positioned facing the camera. The resulting design hasa very gentle sweep from the head of the subject on our left through thearm of the girl at our right.
A simple standing pose was ideal for the twosome shown in plate 248.The girls were slightly turned toward each other. This allowed us to pres-ent each girl’s outer foot nearer to the camera for a nice presentation of the
104 MASTER POSING GUIDE FOR CHILDREN’S PORTRAIT PHOTOGRAPHY
Top left—Plate 245. Top right—Plate 246.
Below—Plate 247. Photos by Norman
Phillips.

feet. The girls then held hands and gently grasped a flower in the otherhand. The flower was an important accessory as it gave them something todo with the outside hand, and we were able to dictate where the handshould be placed.
For plate 249, we seated three girls on a wicker couch with the youngestof them in the center. The girls at the ends each positioned one arm andshoulder behind the child in the center, and this drew them together. Thechild in the center was posed with her hands in her lap, and each sisterbrought her free hand across her lap. This created a sweeping patternacross the base of the portrait. A last-second instruction to have their headstouch completed the composition.
Plate 250 shows a completely different approach using two boxes as aposing prop. The girl on our left was first seated and then dropped ontoher elbow and forearm and rolled onto her hip. Her right hand was thenplaced on top of her left to complete a circular line around her figure thatleads back to her face. Her left leg was stretched out a little, with a point-ed toe, and slightly rolled onto its side. Her right foot was placed immedi-ately behind the other to create the desired tapered look.
The second girl was seated with her legs on the far side of the prop anddrew her left leg upward. She then rested her left hand on the prop. Thesubjects’ positions allowed them to tip their heads toward each other tocomplete the composition.
Groups of four, whether male or female, always present a design chal-lenge, as we need to avoid having our group appear too symmetrical. Inplate 251, we have a diagonal line of heads running from the top left to thebottom right. The fourth girl, the youngest, was snuggled in at the bottom
GROUPS 105
Top left—Plate 248. Center—Plate 249.
Bottom left—Plate 250. Bottom right—
Plate 251. Photos by Norman Phillips.
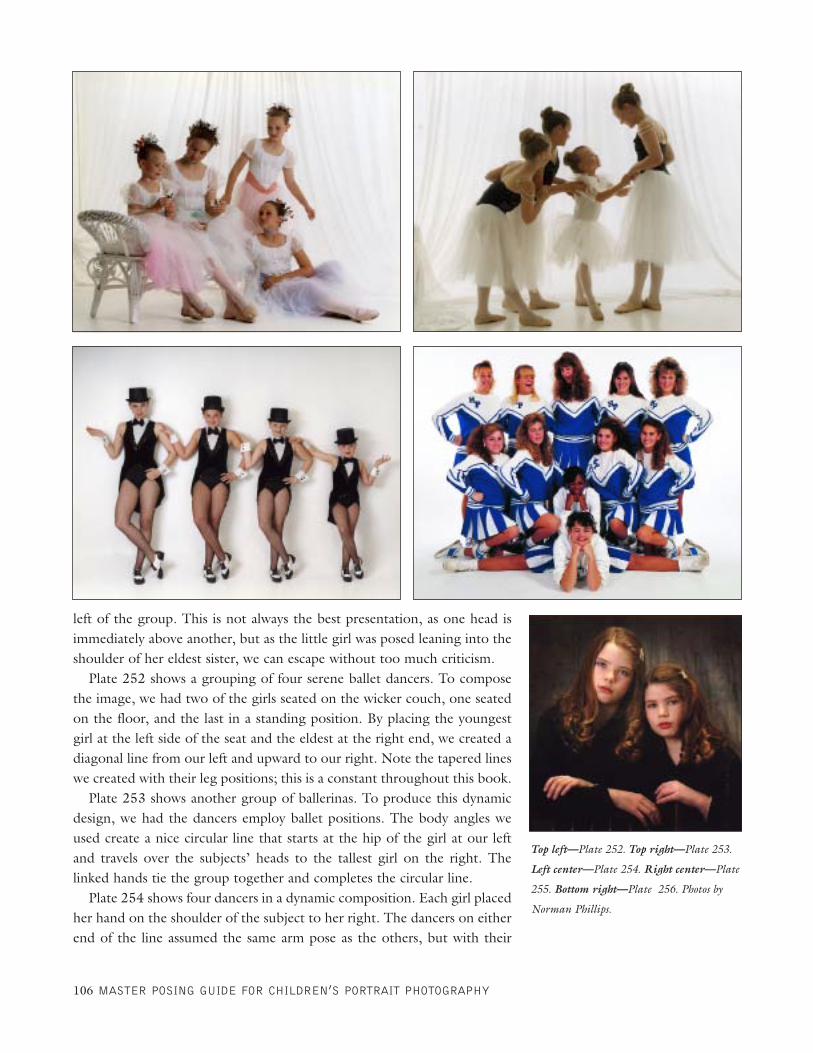
left of the group. This is not always the best presentation, as one head isimmediately above another, but as the little girl was posed leaning into theshoulder of her eldest sister, we can escape without too much criticism.
Plate 252 shows a grouping of four serene ballet dancers. To composethe image, we had two of the girls seated on the wicker couch, one seatedon the floor, and the last in a standing position. By placing the youngestgirl at the left side of the seat and the eldest at the right end, we created adiagonal line from our left and upward to our right. Note the tapered lineswe created with their leg positions; this is a constant throughout this book.
Plate 253 shows another group of ballerinas. To produce this dynamicdesign, we had the dancers employ ballet positions. The body angles weused create a nice circular line that starts at the hip of the girl at our leftand travels over the subjects’ heads to the tallest girl on the right. Thelinked hands tie the group together and completes the circular line.
Plate 254 shows four dancers in a dynamic composition. Each girl placedher hand on the shoulder of the subject to her right. The dancers on eitherend of the line assumed the same arm pose as the others, but with their
106 MASTER POSING GUIDE FOR CHILDREN’S PORTRAIT PHOTOGRAPHY
Top left—Plate 252. Top right—Plate 253.
Left center—Plate 254. Right center—Plate
255. Bottom right—Plate 256. Photos by
Norman Phillips.

palms upturned. All four girls have their right foot kicked over the left, andeach girl’s left hand—with the exception of the girl on her right—is placedat their hip. This is a simple arrangement that has lots of pizzazz.
Cheerleaders in their costumes are always fun to work with, as they arewilling to try anything to create a great portrait. What makes it easy for usis that they are pretty flexible too. Plate 255 shows five of the girls posedin a line at the back. Note that instead of having a curved line across theirheads I created a slightly undulating line.
Four girls were placed in front of the back five; the two to our right knelton their right knee, and the two to our left knelt on their left knee. All fourhave the knee of their other leg bent, and the foot of that leg is placed onthe floor about level with the calf of the kneeling leg. Each of the fourplaced a hand on their hip.
Another girl was placed between the four kneeling girls. The coup degrâce, however, is the girl at the front of the group. She is on her elbowsand in a split-legged position that many girls her age can achieve.
Finally, in plate 256, we have a classic low-key portrait. The girls wereposed behind a chair so they could rest their arms on its back. The girl toour left rested both forearms on the chair and placed her left hand near theelbow, which helped to create a nice presentation of the hand. The youngergirl had her left hand on the knob of the chair back so that it almosttouched the other girl’s hand. This separation between the hands is impor-tant; without it, we would have too great a mass of skin tones.
Groups of BoysPhotographing boys, especially those four to eight years old, can be a lotof fun. We might be in for any number of surprises after we have them onour set. When two twin four-year-old boys arrived at the studio it was obvi-ous that this would not be an ordinary session. So instead of showing aseries of individual images, plate 257 is a collage of one of the sequences.The image speaks for itself. Boys will be boys.
GROUPS 107
Plate 257. Photo by Norman Phillips.
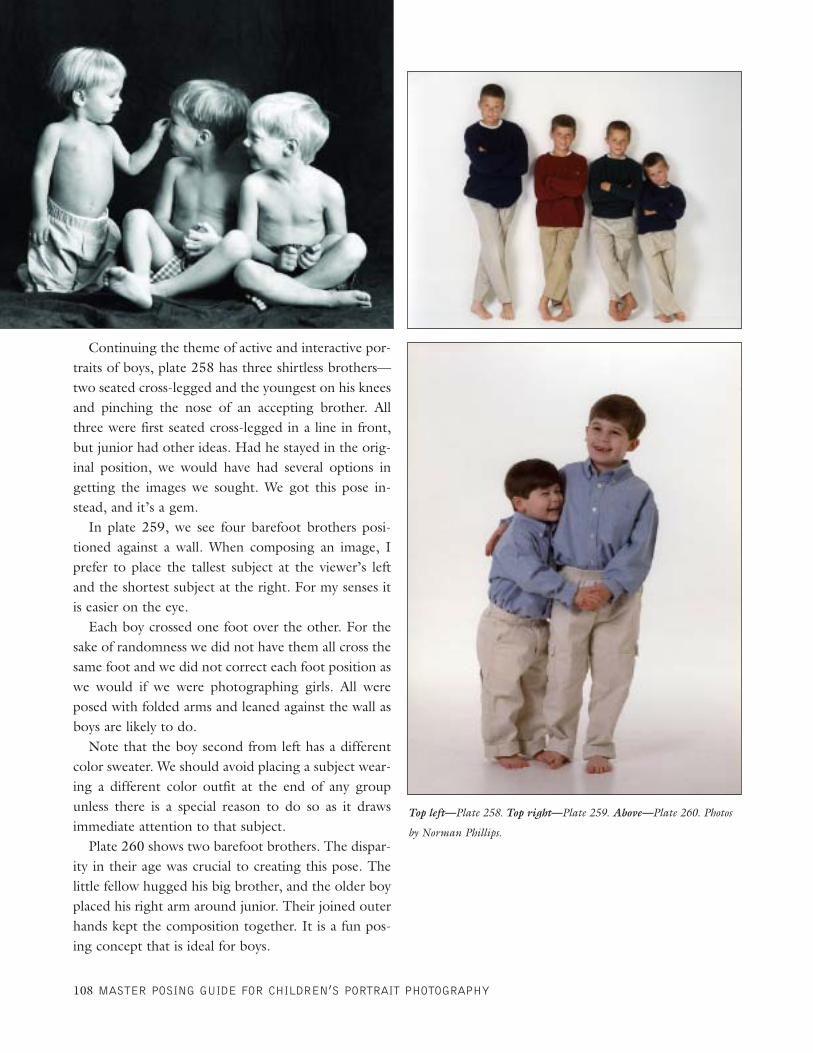
Continuing the theme of active and interactive por-traits of boys, plate 258 has three shirtless brothers—two seated cross-legged and the youngest on his kneesand pinching the nose of an accepting brother. Allthree were first seated cross-legged in a line in front,but junior had other ideas. Had he stayed in the orig-inal position, we would have had several options ingetting the images we sought. We got this pose in-stead, and it’s a gem.
In plate 259, we see four barefoot brothers posi-tioned against a wall. When composing an image, Iprefer to place the tallest subject at the viewer’s leftand the shortest subject at the right. For my senses itis easier on the eye.
Each boy crossed one foot over the other. For thesake of randomness we did not have them all cross thesame foot and we did not correct each foot position aswe would if we were photographing girls. All wereposed with folded arms and leaned against the wall asboys are likely to do.
Note that the boy second from left has a differentcolor sweater. We should avoid placing a subject wear-ing a different color outfit at the end of any groupunless there is a special reason to do so as it drawsimmediate attention to that subject.
Plate 260 shows two barefoot brothers. The dispar-ity in their age was crucial to creating this pose. Thelittle fellow hugged his big brother, and the older boyplaced his right arm around junior. Their joined outerhands kept the composition together. It is a fun pos-ing concept that is ideal for boys.
108 MASTER POSING GUIDE FOR CHILDREN’S PORTRAIT PHOTOGRAPHY
Top left—Plate 258. Top right—Plate 259. Above—Plate 260. Photos
by Norman Phillips.
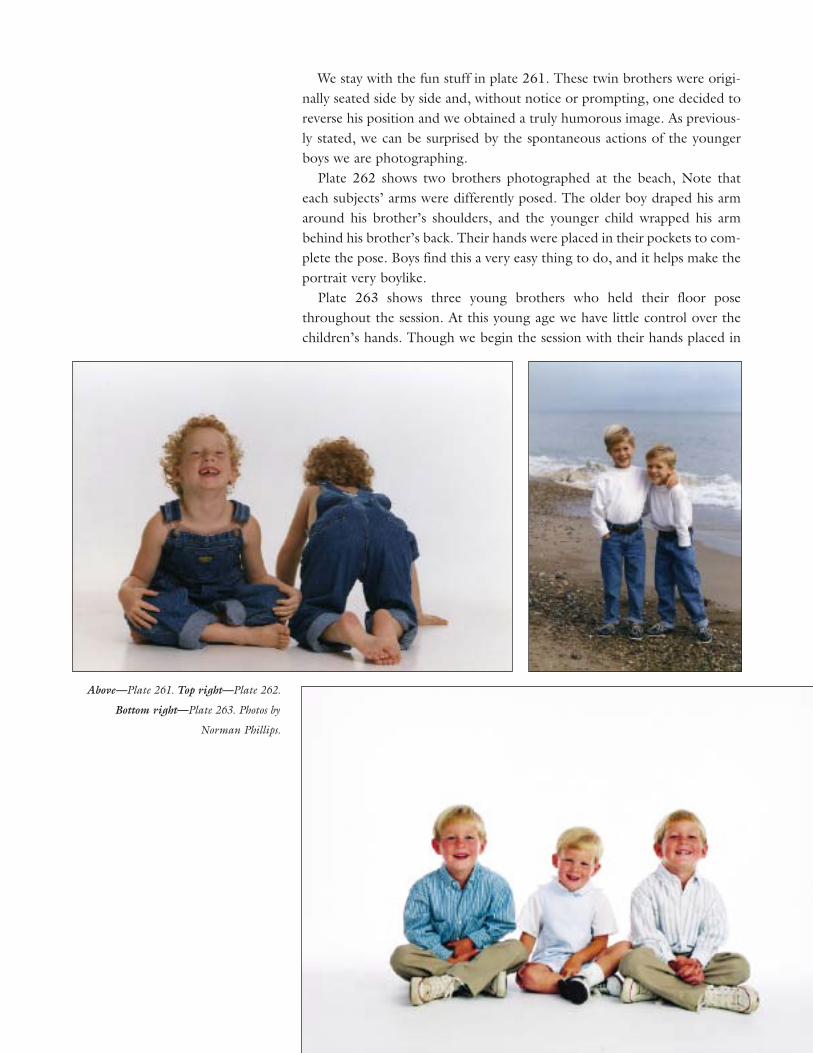
We stay with the fun stuff in plate 261. These twin brothers were origi-nally seated side by side and, without notice or prompting, one decided toreverse his position and we obtained a truly humorous image. As previous-ly stated, we can be surprised by the spontaneous actions of the youngerboys we are photographing.
Plate 262 shows two brothers photographed at the beach, Note thateach subjects’ arms were differently posed. The older boy draped his armaround his brother’s shoulders, and the younger child wrapped his armbehind his brother’s back. Their hands were placed in their pockets to com-plete the pose. Boys find this a very easy thing to do, and it helps make theportrait very boylike.
Plate 263 shows three young brothers who held their floor posethroughout the session. At this young age we have little control over thechildren’s hands. Though we begin the session with their hands placed in
Above—Plate 261. Top right—Plate 262.
Bottom right—Plate 263. Photos by
Norman Phillips.

their laps, what happens to them during the ensuing few minutes oftenhelps make the portrait childlike. With three young people we often use thesee no evil, hear no evil, speak no evil game. Try it; you will be amused atthe results.
Our little white ladder was again used as a prop to produce the imageshown in plate 264. The little boy was seated on the crossbar that bracesthe back of the ladder. The older subject placed one foot on the low stepand leaned his elbows on the top of the ladder. The pose is eminently sim-ple and very effective.
In plate 265, two small, well-dressed boys are simply posed. One wasseated on a bench, and the smallest was seated on the floor. The bench wasangled at about 45 degrees off camera to show some bench instead of hav-ing it in side view, which would not make the composition as interesting.
110 MASTER POSING GUIDE FOR CHILDREN’S PORTRAIT PHOTOGRAPHY
Top left—Plate 264. Top right—Plate 265.
Bottom left—Plate 266. Bottom right—
Plate 267. Photos by Norman Phillips.

We have again employed a book to hold the older child’s interest. The lit-tle boy is posed almost directly at the camera and shows the bottom of hisshoes, something we normally try to avoid. We could have improved theportrait by having him a little more in profile to the camera.
The two little boys in plate 266 would not stay in place so we placedthem in separate baskets. They were perfectly happy in their restrictedspace, and it produced a delightful portrait.
Our little white ladder was again used as the base for the portrait shownin plate 267. This time we had both boys standing on the lower step of theladder. The youngest child will almost always insist on standing just as hisbrother does, and using such a pose keeps them together and in place.
The portrait presented in plate 268 shows another standing pose for twowell-dressed boys. In order to present the clothes in the best-possible view(even though they did not fit in the first place) we had the older boy placehis hand on his companion’s far shoulder. The hands of their right armswere allowed to fall by their sides.
We discussed stacking techniques earlier, and we return to the conceptin plate 269. This time we took a sideways view of the composition sincethe three boys were close in size, and if they were posed facing the camera,we would not see each face. Also, a sideways view is at least as interestingand as much—if not more—fun. Another valuable aspect of such a pose is
GROUPS 111
Above—Plate 268. Right—Plate 269.
Photos by Norman Phillips.

that when it turns into a fun-filled wrestling match we will be presentedwith some additional images that will truly represent the boys’ relationship.
In plates 270 and 271 we captured some wrestling fun had by anotherset of brothers. Little boys can be a lot of fun, and we should never missthe chance to capture the moment.
Boys and Girls in PairsIn this section we explore different options for boy–girl pairs. Many of ourposing decisions depend on the differential in the size of each subject in thegroup and sometimes also by what they are wearing. Casual attire allowsfor a certain freedom, while formal attire may limit our options since wemay need to select poses that show the garments at their best. An addition-al influence is the style of portrait that parents wish to have.
The subjects shown in plate 272 were dressed casually for their session,so we simply posed them with their elbows resting on a tabletop. They cra-dled their faces in the palms of their hands, the boy with his fingers curledand the girl with a more feminine presentation with open hands.
Plate 273 shows the result of photographing a strong-willed girl and aeasygoing younger brother. The elder sibling brought her dolls to the ses-sion, and we were obliged to prominently feature them in the portrait. Allthe dolls were placed immediately in front of her, and she placed her handsaround them. We then simply positioned her brother at her left shoulderwith his left hand on the leg of the doll nearest to him.
Plate 274 shows a close-up presentation of two children in a low keyportrait, per the parent’s request. The two children were seated next toeach other, and we brought their heads close together and had the girlplace her hand on her brother’s shoulder. Note that by allowing the collarof the boy’s shirt to show between her hand and his face, the hand doesnot draw attention away from the focal point of the image.
112 MASTER POSING GUIDE FOR CHILDREN’S PORTRAIT PHOTOGRAPHY
Top—Plate 270. Above—Plate 271. Bottom
left—Plate 272. Bottom right—Plate 273.
Photos by Norman Phillips.

The portrait shown in plate 275uses the elements of style we havepreviously discussed. The girl wasseated at the base of the tree withher legs arranged as we have shownbefore. We then positioned the boyin a standing pose that was demon-strated earlier. Combining these ele-ments made for a charming outdoorcomposition.
In plate 276, we return to a con-cept that was used to successfullypose two earlier groupings—one oftwo boys and another with a boyand a baby. This time we placed thegirl on her tummy in profile and
GROUPS 113
Above—Plate 274. Right—Plate 275.
Photos by Norman Phillips.

brought her younger brother over her so his hands could rest on the flooron the camera side of the composition.
Plates 277 and 278 show variations of the same concept. In plate 277,the girl was positioned over the boy, who was posed on his tummy andpropped up on his left elbow. The girl rested her elbows on the boy withher chin in the palms of her hands. In plate 278, we kept the boy as in theprevious portrait but brought the girl up onto his back so she could snug-gle down.
Plate 279 shows two subjects in a standing pose, with the girl assumingthe role of big sister. The boy’s right hand was placed in his pocket, and hisleft hand was positioned behind his sister. The girl placed her right handon the boy’s shoulder and rested her left hand on her right hand to com-plete the pose. Note the feet positions. The girl assumed a ballet position,
114 MASTER POSING GUIDE FOR CHILDREN’S PORTRAIT PHOTOGRAPHY
Top—Plate 276. Bottom left—Plate 277.
Bottom right—Plate 278. Photos by Norman
Phillips.
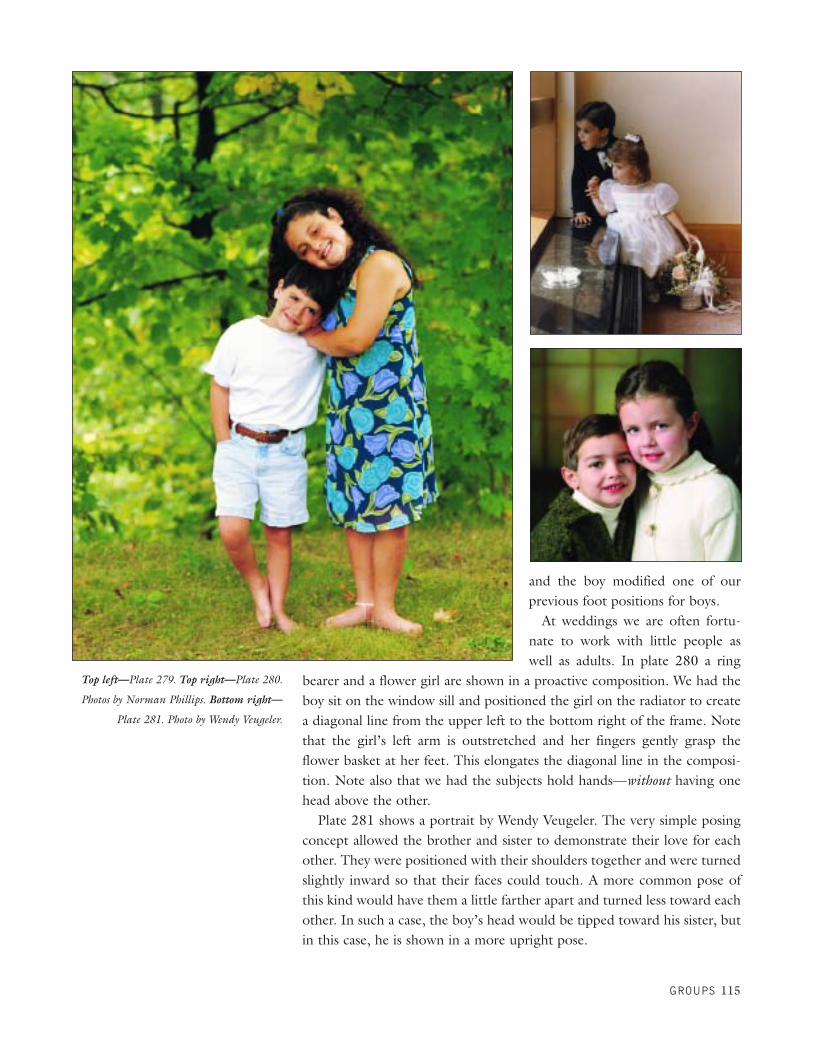
and the boy modified one of ourprevious foot positions for boys.
At weddings we are often fortu-nate to work with little people aswell as adults. In plate 280 a ring
bearer and a flower girl are shown in a proactive composition. We had theboy sit on the window sill and positioned the girl on the radiator to createa diagonal line from the upper left to the bottom right of the frame. Notethat the girl’s left arm is outstretched and her fingers gently grasp theflower basket at her feet. This elongates the diagonal line in the composi-tion. Note also that we had the subjects hold hands—without having onehead above the other.
Plate 281 shows a portrait by Wendy Veugeler. The very simple posingconcept allowed the brother and sister to demonstrate their love for eachother. They were positioned with their shoulders together and were turnedslightly inward so that their faces could touch. A more common pose ofthis kind would have them a little farther apart and turned less toward eachother. In such a case, the boy’s head would be tipped toward his sister, butin this case, he is shown in a more upright pose.
GROUPS 115
Top left—Plate 279. Top right—Plate 280.
Photos by Norman Phillips. Bottom right—
Plate 281. Photo by Wendy Veugeler.

Plate 282 shows another portrait by Wendy Veugeler. This time the boyis depicted in a big-brother role with his little sister leaning against him. Weshould consider the dynamics of our subjects’ relationship before we createthe pose.
In plate 283, the subjects are presented in a different style. Each subjectis turned slightly away from the other in a reversed presentation. We posedthem so that their shoulders touched, and their heads were tipped towardeach other for a delightful portrait. Boys are sometimes reluctant to get tooclose to their sisters. This may have been one of those cases, but because ofthe reversed positions we had no difficulty in getting the boy to cooperate.
The portrait shown in plate 284 departs from convention. These chil-dren are from a musical family and wanted to show off their talents. Wesimply placed them on the set, got the music going, and then recorded aseries of action shots that the children thoroughly enjoyed—and we didtoo. This is another example of an image that uniquely suits the personali-ties of the subjects.
Left—Plate 282. Photo by Wendy Veugeler.
Top right—Plate 283. Bottom right—Plate
284. Photos by Norman Phillips.

Mixed GroupsAs our groups of children grow insize from two to three and then fouror more there may be some chal-lenges in both composition and get-ting the children to hold their posi-tion, especially when there are oneor more very small children in thegroup.
We begin this section with a dis-cussion of plate 285, a truly delight-ful portrait by Cindy Romano. Thebeauty of this portrait is its simplic-ity. The eldest child was seated in the center of the frame with her headtipped slightly downward. The little girl and the boy were then placedbeside her turned slightly inward, and their heads were brought together.It was important to have the two children at the side properly seated sothey could place their inside shoulder slightly behind the shoulder of thecenter subject. The result is an appealing triangular composition.
Plate 286 shows a portrait by Kerry Firstenberger. To create this image,Kerry seated the two eldest children fairly close together and positionedtheir younger sister on a seat immediately in front of them so she obscured
GROUPS 117
Top—Plate 285. Photo by Cindy Romano.
Bottom—Plate 286. Photo by Kerry
Firstenberger.

the view of the inside shoulders of the older children. Next, Kerry broughtthe subjects’ heads together for a result that is simple and yet charming.
Plate 287 shows another option we can use when posing a group ofthree. To compose the image, Kerry Firstenberger had the youngest childseated on a box with the older children on the floor, each with one handon the box behind their sibling. The portrait is almost candid because ofthe leg positions the children assumed after they were originally positioned.
Plate 288 was taken when Kerry witnessed the spontaneous event pic-tured. The image simply documents a special moment that took place dur-ing the session. It is a truly delightful portrait that the subjects’ parents willcherish.
Simplicity is the theme used to create the pose shown in plate 289. Thetwo little rascals shown at either end of the image were shown earlier, andtheir older sister tolerated them to create this portrait. All three subjectswere simply seated side by side, and the sister placed her hands on the backof each boy.
Normally I would not advocate presenting girls on their knees withoutshowing their legs in a tapered pose, but if an idea works well enough, wecan excuse breaking the rules. In plate 290, we sat the boy cross-leggedthen had the girls kneel close on either side and brought the heads closetogether. Though the hands are not ideally placed, we achieved the desiredpattern in their hands and arms.
Plate 291 shows a trio of formally attired children. We wanted to createa relaxed but tidy composition. The boy was posed first. We had him resthis forearm and elbow on the prop and rest his chin on a gentle fist. Next,
118 MASTER POSING GUIDE FOR CHILDREN’S PORTRAIT PHOTOGRAPHY
Left—Plate 287. Top right—Plate 288.
Photos by Kerry Firstenberger. Bottom
right—Plate 289. Photo by Norman Phillips.
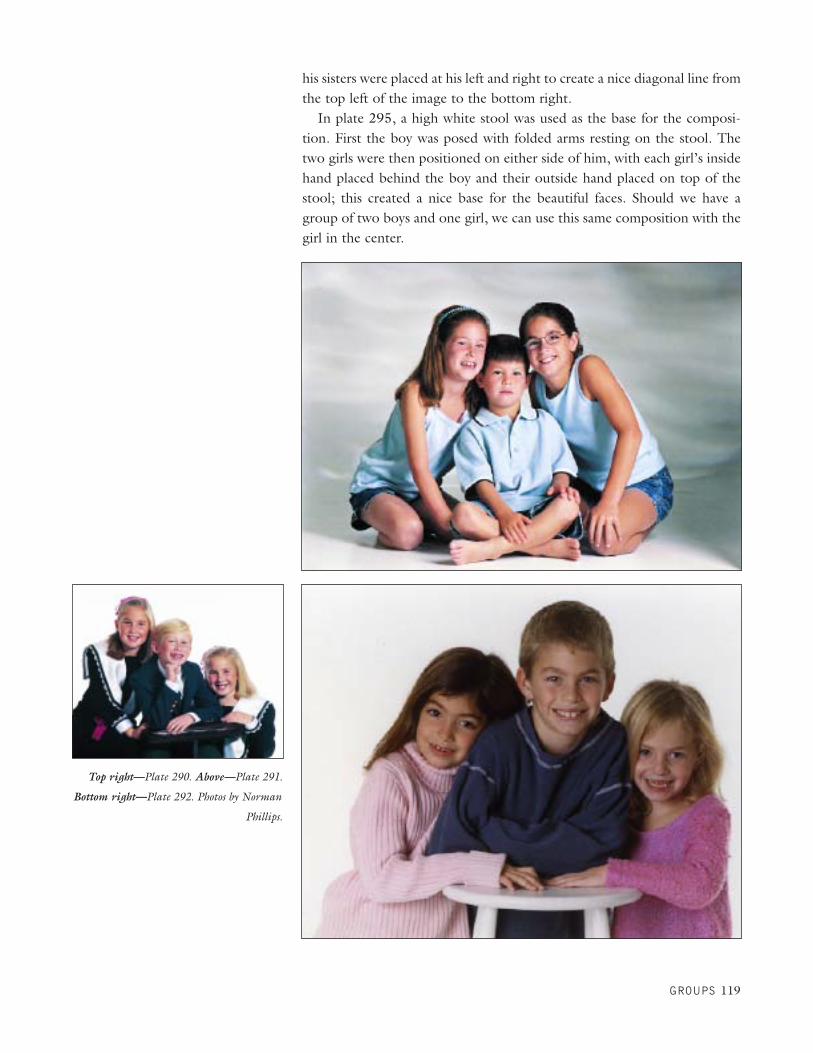
his sisters were placed at his left and right to create a nice diagonal line fromthe top left of the image to the bottom right.
In plate 295, a high white stool was used as the base for the composi-tion. First the boy was posed with folded arms resting on the stool. Thetwo girls were then positioned on either side of him, with each girl’s insidehand placed behind the boy and their outside hand placed on top of thestool; this created a nice base for the beautiful faces. Should we have agroup of two boys and one girl, we can use this same composition with thegirl in the center.
GROUPS 119
Top right—Plate 290. Above—Plate 291.
Bottom right—Plate 292. Photos by Norman
Phillips.

Plate 293 shows three children posedby a forked tree. The boys were posi-tioned on either side of their gigglingsister and rested their inside hands andarms against the tree. The hands of theiroutside arms were tucked into theirpockets. Because the boys were in a verycasual pose, we did not insist on a tradi-tional pose for the feet. The young girlleaned against the fork in the tree andfolded her arms. Her ankles crossed toensure a tapered presentation.
In plate 294, we have three childrenhuddled together on a park bench. Wehad the two boys bring their knees up;the boy on our left hugged his kneesand his brother rested his left hand on the bench. The little girl was thentucked into the space we created for her. Finally, we placed her left hand onthe younger brother’s left shoulder and her right hand on his arm.
Four small children in their pajamas are featured in the portrait shownin plate 295. The key subject in this composition is the older girl, who iscentered and on her left hip with her legs extended to our left. Her left armacted as a support for the smallest child, who was seated at her shoulder.The little girl was then placed beside the little person, and we placed hishand in hers. We then had this little fellow where we wanted him. Lastly,the older boy was placed at the oldest girl’s shoulder with his left hand rest-ing on the floor behind her.
120 MASTER POSING GUIDE FOR CHILDREN’S PORTRAIT PHOTOGRAPHY
Top left—Plate 293. Top right—Plate 294.
Above—Plate 295. Photos by Norman
Phillips.
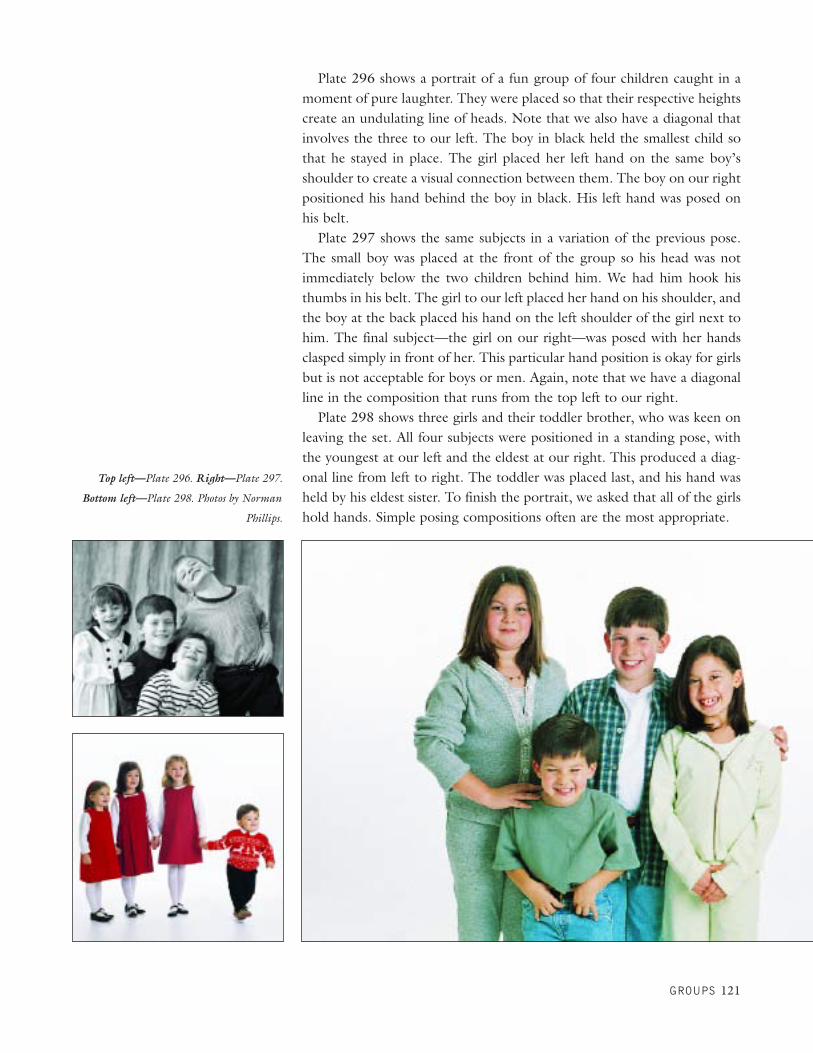
Plate 296 shows a portrait of a fun group of four children caught in amoment of pure laughter. They were placed so that their respective heightscreate an undulating line of heads. Note that we also have a diagonal thatinvolves the three to our left. The boy in black held the smallest child sothat he stayed in place. The girl placed her left hand on the same boy’sshoulder to create a visual connection between them. The boy on our rightpositioned his hand behind the boy in black. His left hand was posed onhis belt.
Plate 297 shows the same subjects in a variation of the previous pose.The small boy was placed at the front of the group so his head was notimmediately below the two children behind him. We had him hook histhumbs in his belt. The girl to our left placed her hand on his shoulder, andthe boy at the back placed his hand on the left shoulder of the girl next tohim. The final subject—the girl on our right—was posed with her handsclasped simply in front of her. This particular hand position is okay for girlsbut is not acceptable for boys or men. Again, note that we have a diagonalline in the composition that runs from the top left to our right.
Plate 298 shows three girls and their toddler brother, who was keen onleaving the set. All four subjects were positioned in a standing pose, withthe youngest at our left and the eldest at our right. This produced a diag-onal line from left to right. The toddler was placed last, and his hand washeld by his eldest sister. To finish the portrait, we asked that all of the girlshold hands. Simple posing compositions often are the most appropriate.
GROUPS 121
Top left—Plate 296. Right—Plate 297.
Bottom left—Plate 298. Photos by Norman
Phillips.

Plate 299 shows a portrait of six children. To create the pose, we firstpositioned the youngest child on a stool and surrounded him with hisbrothers and sister. All the children in the front knelt on one knee; the twoon the left were posed on their left knee and the two on the right on theirright knee. The eldest boy was placed at the back as his height allowed usto see him clearly. His arms were outstretched and his hands were placedon the backs of the two children at the ends. Note that the two wearingwhite were placed between the children in darker attire.
A little chaos is expected when we must photograph a group of six chil-dren—especially when there are three young children involved. Plate 300depicts such a situation.
To compose this image, we tried to position the subjects in a nicearrangement and keep their attention. We arranged a set of risers in such away that the center platform was taller than that used at the back of thecomposition. This enabled us to create an undulating pattern across theheads. The two elder children were seated on the higher block with thesmallest child positioned immediately in front of them. The others werepositioned in the best place for their size, but as you can see, using bubblesto attract their attention toward the camera caused some expected chaos.
To produce the portrait shown in plate 301 we had to get a little cre-ative. We used a curved prop on which to pose the eldest boy with his leftknee pulled toward him and his right leg placed on the floor in front of theprop. His left hand was placed on his high knee and the other on his rightthigh. Next, we placed the girl on the floor in a similar pose. By position-ing her upper leg in front of the lower one, we were able to create thetapered line we desire. The second-eldest boy was positioned in a kneelingpose, with his right knee down so that it is partially hidden. His right arm
122 MASTER POSING GUIDE FOR CHILDREN’S PORTRAIT PHOTOGRAPHY
Left—Plate 299. Top right—Plate 300.
Bottom right—Plate 301. Photos by Norman
Phillips.

rested on the prop. Finally, the youngest child was posed at the high endof the prop and rested his hands on the top of it. The total composition hasa nice undulating line over the heads, and each child is in their own uniquepose.
We return to the stacking posing technique in plate 302. This strategyworks really well when your subjects range widely in age because the dif-ference in their heights makes the pose easy to accomplish. In this image,the subjects ranged in age from eight months through fifteen years. We cansee everyone’s feet except the baby’s, and the oldest child had enoughheight to be able to rest his elbows gently on the sibling in front of him.
Plate 303 shows a portrait of seven children ranging in age from four tofifteen. We had two goals in designing the posing concept: first, we need-ed to accommodate the difference in the color of the subjects’ clothing;second, because the eldest males were very tall, they would have toweredover the rest. To solve these problems, we created a nice even spacingbetween the tones by separating the subjects in darker colors and seated thetwo teen boys to reduce the discrepancy in the subjects’ height. You mightsuggest that we should have had the tall girl at the right in the place of oneof the two boys in the center, but I prefer a girl like this to decorate theend of my composition. Also, placing her at the far right allowed us tobreak what would otherwise have been a simple curved line across thegroup.
GROUPS 123
Above—Plate 302. Right—Plate 303.
Photos by Norman Phillips.
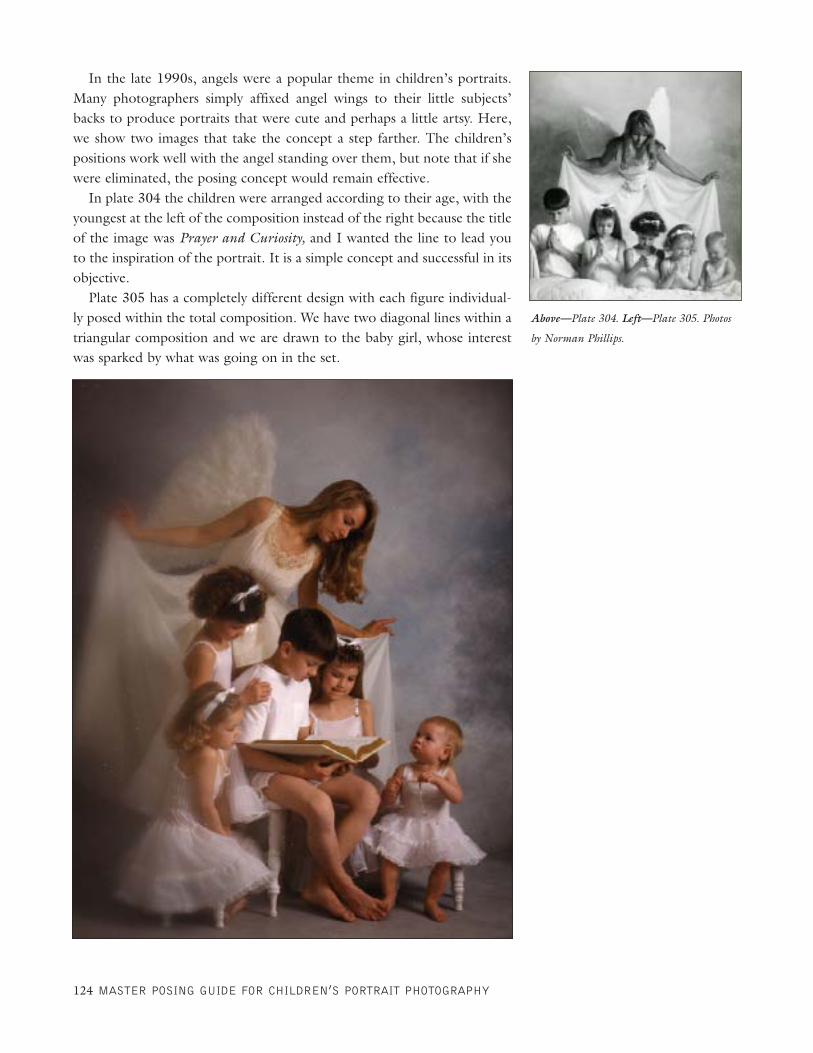
In the late 1990s, angels were a popular theme in children’s portraits.Many photographers simply affixed angel wings to their little subjects’backs to produce portraits that were cute and perhaps a little artsy. Here,we show two images that take the concept a step farther. The children’spositions work well with the angel standing over them, but note that if shewere eliminated, the posing concept would remain effective.
In plate 304 the children were arranged according to their age, with theyoungest at the left of the composition instead of the right because the titleof the image was Prayer and Curiosity, and I wanted the line to lead youto the inspiration of the portrait. It is a simple concept and successful in itsobjective.
Plate 305 has a completely different design with each figure individual-ly posed within the total composition. We have two diagonal lines within atriangular composition and we are drawn to the baby girl, whose interestwas sparked by what was going on in the set.
124 MASTER POSING GUIDE FOR CHILDREN’S PORTRAIT PHOTOGRAPHY
Above—Plate 304. Left—Plate 305. Photos
by Norman Phillips.

This book has over three hundred posing examples, yet it is likelythat there are countless others that we could show if space was notan issue. But what we have shown presents a solid portfolio from
which to expand your posing techniques. We have covered the simplest ofconcepts and the more complex. All of them are usable at some point inour work with children and babies. I am sure that when you have reviewedall that we have discussed, you will be able to expand your range of posingstyles with the hints and suggestions in the preceding chapters.
But I would counsel you to adhere to the principles of good posingwhenever it is feasible. The positioning of feet and hands and the expres-sion of body language is critical to the success of your portraiture. We
should never be lackadaisical when posing ourindividual subjects or when we are creatinggroups portraits. Attention to detail is important,and too often not enough is applied to portraits.When we fail to attend to detail we might assumethat our clients will not know the difference. Ifyou really believe this, I can assure you that you
are wrong. A client may not know why a portrait is not what it should be,but they will know it is not what it should be. By the same token, ourclients know that what we create is good and more than acceptable whenwe discipline ourselves in the art of posing and composition.
While some will advocate that good posing is an art, and to a degree thisis true, good posing comes from recognizing good from not so good—andbad from not so good. Practice and observation are vitally important. Wecan all get better at what we do by not accepting anything we know is notgood enough and being critical of all that we do. If we always examinewhat we do with care and thoughtfulness, we will become our own teach-ers. We can also ask our colleagues to critique our work and offer sugges-tions and advice. We can never stop learning because we can never knowall there is to know, and when it comes to posing and composition ofgroups, there are so many options and ideas from which to work, our cre-ativity can only get better.
CONCLUSION 125
Conclusion
THE POSITIONING OF FEET AND HANDS AND THE
EXPRESSION OF BODY LANGUAGE IS CRITICAL TO
THE SUCCESS OF YOUR PORTRAITURE.

126 MASTER POSING GUIDE FOR CHILDREN’S PORTRAIT PHOTOGRAPHY
AAction shots, 116Angels, 124Angle of view, 7, 8, 9, 14, 15, 16, 22, 24–25, 30,
51–52, 55, 61, 72–73, 76, 80–81, 84, 85, 95Ankles, 49, 54, 64, 71, 102, 120Arms, 10, 12, 36, 59, 65, 67–68, 70, 81, 90, 100,
101, 102Athletes, 86–88, 91, 106–7
BBabies, 6–26, 95–102Bar mitzvahs, 91, 93Bassinets, 9Baskets, 6–7, 39, 51Benches, 29, 30, 31, 33, 53, 54, 60, 63, 70, 85, 110,
120Blankets, 11, 20Books, 26, 27, 55, 62, 84Boys, 49, 52, 62, 73–82, 90, 91–94, 103, 104,
107–124Boxes, 22, 23, 28, 53, 101, 105Bust portraits, 71, 89, 90
CCamera angle, see Angle of viewCasual poses, 84, 94, 103, 112, 118, 120Chairs, 27, 28, 46, 47, 59, 60, 72, 81Children, 52–82, 95–124;See also Preteens and Teens, Babies
Christening gowns, 16Clothing, 76, 92, 94, 111, 123
Composition, 8, 12, 16, 23, 48, 52, 55, 62–63, 68,76, 77, 79, 86, 88, 89, 90, 91, 95, 96, 98,99, 101, 10, 104, 105, 106, 108, 110, 111,113, 115, 117, 118, 119, 120, 122, 123, 124
Confirmation portraits, 70–72Couch, 43–44, 48, 65Crawling, 16, 19, 22, 24, 25, 99, 100
DDepth of field, 99Developmental stages, 12, 16, 26–27, 31Dogs, 49, 97
EElbows, 6, 12, 80, 81, 86, 105, 112
FFeet, 24, 44, 54, 62, 67, 79, 91, 94, 103–4, 105,
114, 120Feminine poses, 53, 59, 65, 67, 72, 73, 85, 86, 112First communion, 91, 92Floor poses, 6–14, 18, 51, 53, 55, 66, 67, 71, 81, 84,
85, 93, 97, 98, 100, 106, 107, 109, 110,114, 118, 120, 122
Flowers, 8, 18–19, 36, 37, 49, 60, 62, 83Formal poses, 101, 112Full-length poses, 71
GGirls, 49, 52, 62–73, 90, 102, 104, 112–24Groups, 95–124
Index
HHands, 15, 28, 36, 47, 57, 60–61, 62, 63, 67, 68,
69, 71–72, 73–75, 79, 84, 85, 86, 90, 91,93, 94, 100, 101, 104, 105, 106, 112, 114
Hats, 19, 49, 83Head-and-shoulders poses, 57, 86Head angle, 46, 73, 85, 86, 91, 103, 105, 116, 117Head height, 101, 105–6, 107, 121, 122
IInteractive sessions, 16, 101
KKnees, 48, 62, 64–65, 67, 69, 70, 74, 78, 81–82, 84,
86, 89, 97, 98, 101, 102, 107, 108, 118,120, 122
Kneeling poses, 48, 97, 107, 122
LLadders, 27, 30, 51, 74, 80, 110, 111Laying poses, 6–14, 53, 100, 113–14Legs, 49, 61, 64, 67, 68, 69, 81, 84, 85, 92, 95, 100,
105, 106, 122Lines, real or imaginary, 49, 53, 70, 85, 86, 88, 90,
94, 103, 105, 106–7, 115, 119, 120, 121,122, 123
Low-key images, 15, 112
MMasculine poses, 53, 59, 81, 89, 92, 93, 94Mirrors, 16Modesty, 8, 10, 21, 24
OObjects of interest, 18, 20, 31, 33Outdoor images, 34, 48, 49, 68, 69, 90, 94, 113,
120
PParents, 14, 16, 42, 97Pearls, 19Perspective, see Angle of viewPillars, 41, 62, 80Pillows, 9, 10
Pockets, 79, 93, 103, 114Preteens, 83–94Profile poses, 24, 41, 48, 53, 54, 65, 72–73, 79, 86,
96Prop selection, 45
SSafety, 11, 44, 45, 51, 98, 99, 100Scale, 9Seated poses, 13–14, 16, 18, 21–22, 23, 43–44, 48,
49, 50, 51, 53, 54, 57, 60, 61, 62–63, 64,65, 66, 67, 69, 71, 73, 74, 75, 76, 77, 78,81, 84, 85, 89, 91, 93, 97, 98, 99, 101, 102,104, 106, 108, 109, 110, 112, 113, 117,118, 122
Self-posing, 47, 73Separation, 107Shoulders, 67, 86, 116Sleeping, 15–16Sloping props, 6, 11, 95Stacking poses, 99, 111, 123Standing poses, 49, 61–62, 93, 96, 104, 106, 111,
113, 114, 121, 124Stool, 16, 41, 54, 93, 94, 119, 122Storybook images, 25, 54, 84, 104Stuffed animals, 13, 20, 47
TTeens, 83–94Terrible twos, 26, 35Texture, 22Three-quarter pose, 31, 45, 64, 70, 81, 87, 89Thumbs, 74, 75, 76, 77, 78, 94, 103, 121Toddlers, 26–51Triplets, 50–51Twins, 50–51
WWashbasins, 13Weddings, 103, 115Window light, 57, 86, 93, 115Window set, 65, 82, 88Wrists, 57, 80, 90, 91, 103
INDEX 127
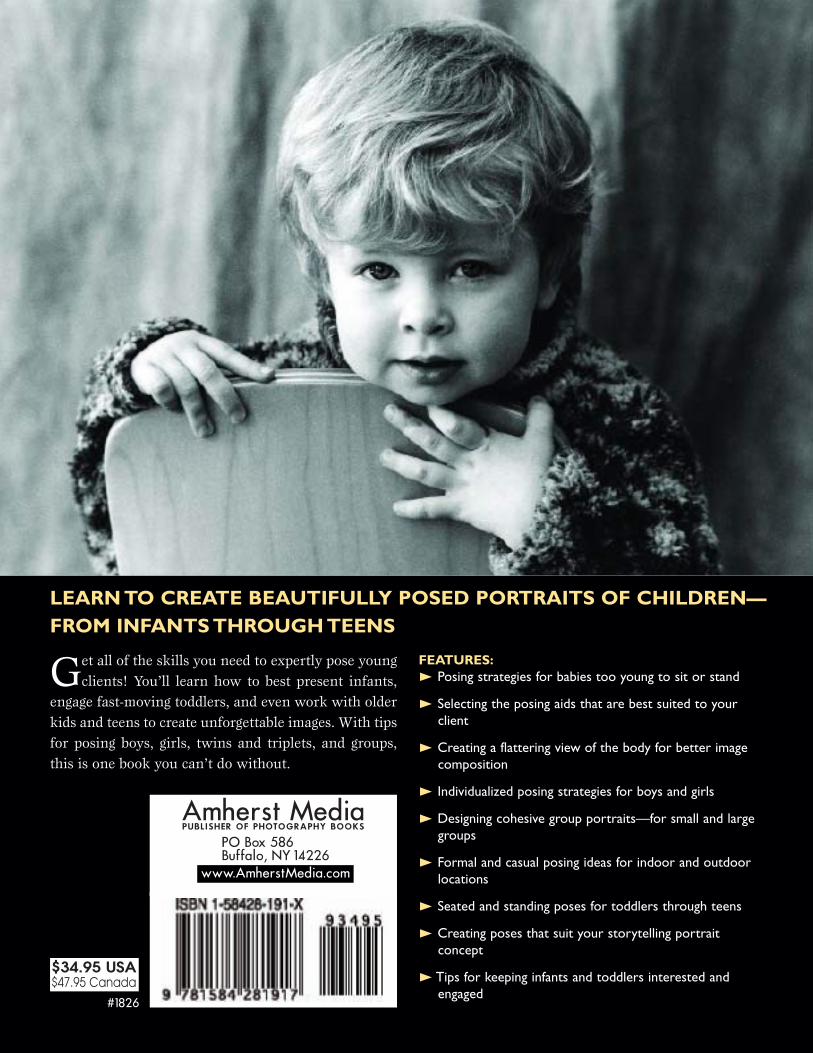
Amherst MediaPUBLISHER OF PHOTOGRAPHY BOOKS
PO Box 586Buffalo, NY 14226
www.AmherstMedia.com
$34.95 USA$47.95 Canada
FEATURES:Posing strategies for babies too young to sit or stand
Selecting the posing aids that are best suited to yourclient
Creating a flattering view of the body for better imagecomposition
Individualized posing strategies for boys and girls
Designing cohesive group portraits—for small and largegroups
Formal and casual posing ideas for indoor and outdoorlocations
Seated and standing poses for toddlers through teens
Creating poses that suit your storytelling portraitconcept
Tips for keeping infants and toddlers interested andengaged
#1826
Get all of the skills you need to expertly pose youngclients! You’ll learn how to best present infants,
engage fast-moving toddlers, and even work with olderkids and teens to create unforgettable images. With tipsfor posing boys, girls, twins and triplets, and groups,this is one book you can’t do without.
LEARN TO CREATE BEAUTIFULLY POSED PORTRAITS OF CHILDREN—FROM INFANTS THROUGH TEENS