manual-r12 assembly prusa i3 step by step
DESCRIPTION
Manual montar a PRUSA i3TRANSCRIPT

Prusa i3 Printer Assembly Guide
Special thanks to Carlos Sanchez and Miguel Sanchez for the graphics.
All graphics captured from their great animation: http://www.carlos-sanchez.com/
Prusa3/
For copyright information, please visit:
http://creativecommons.org/licenses/by-sa/3.0/

Step 1: Identify PartsThe main printed parts (in silver) should include what’s shown below. The following pages will explain what the pieces are.
There are a few pieces not shown here:
- Belt guides (they’re round, and blue, hard to miss
- Endstop brackets (which are detailed in the docs when you get to that point)

Step 2: Identify PartsThese are the X axis parts - from left to right:
X-axis motor-endX-axis carriageExtruder Fan bracketX-axis idler end

Step 3: Identify PartsThese are the Y axis parts.
From top to bottom:
Y-axis motor bracketY-axis belt holderY-axis cornersY-axis idler

Step 4: Identify Parts
These are the Z-axis printed parts.
Above:
Z-axis upper brackets
Left:
Z-axis lower brackets

Step 5: Identify PartsThese are the printed extruder parts.
Top row:
- Extruder Body- Extruder Idler
Bottom row:
- small gear- big gear

Step 6: Identify PartsYou should have 3 bags of nuts and bolts, bearings and springs, etc.
They look like this, only there’s 3 of them.
The ‘big’ bag contains all of your M8 and M10 hardware
The ‘small’ bag contains all of your M3 / M4 / M5 hardware.
The ‘bearings bag’ contents are on the following page.

Step 7: Identify PartsThe ‘bearings / 3’ bag should contain:
2 x 623 bearings
2 x 625 bearings
1 x 608 bearing
1 x drive gear
2 x nylon spacers
2 x extruder springs
Note: We only show 1 of the bearings on here for clarity.

Step 8: Identify PartsEveryone should have a bag marked ‘Belts’ as well.
The bag has 2 belts in it, pre-cut to the right length:
- Y axis: 715mm
- X axis: 900mm

Step 9: Identify PartsPulley Bag!
This has:
- 2 GT2 belt pulleys (Y axis and X axis)
- 2 hose couplers for Z-axis threaded rods
- 1 white bag with set screws and allen wrench for the pulleys. The set screws are TINY, be careful when you open the bag.

Step 10: Identify PartsThis is the heated bed assembly.
The power wires and thermistor wires have been pre-soldered.
There is also a matched piece of borosilicate glass plate. It’ll sit on top of the HBP assembly later on. Keep it safe!

Step 11: Identify PartsThe hot end assembly is as shown.
The thermistor and resistor have been pre-soldered.
The thermistor connection is labeled. The larger wires are for the hot-end power.

Step 12: Identify PartsIn the bags like this are the extruder fans.
The wires on them are long, and will likely need to be trimmed.

Step 13: Identify PartsThe electronics boxes contain your completed electronics.
The guts of this consist of an Arduino Mega 2560 and a ‘RAMPS 1.4’ shield.
The shield is already installed in the Arduino, and the correct configuration for the printers we’re building has been loaded on it.
Also in this box is:
- Ceramic screwdriver for adjusting stepper driver voltages
- SDRamps board, for running your electronics off of a MicroSD card.

Step 14: Identify PartsEach kit has a box with 3 endstop switches in it.

Step 15: Identify PartsThere should be a tied up set of 3 endstop cables in every kit.
They’re marked ‘endstop’ on the end of the cables.

Step 16: Identify Parts
Each kit has a set of 5 stepper motors in it. They’re all wrapped up in bubble wrap or foam like in the photo above. You’ll need 1 for the Y axis, 1 for the X axis, 1 for the extruder, and 2 for the Z-axis.

Step 17: Identify Parts
The rods are as follows:
Top Row: 8mm threaded 205mm, 8mm smooth (short), 5mm threaded rod - 70mm
Middle Row: 8mm smooth (each pair is labeled)
Bottom Row: 10mm threaded rod, Y-axis

Step 18: Identify PartsThe bag marked ‘Tools’ has the following in it:
- M2.5 Allen wrench (for M3 bolts)
- M3 Allen wrench (for M4 bolts)
- Tweezers (for once you’re extruding)
Also in this bag:
- 5mm short threaded shaft for the extruder
- 8mm smooth shaft (tiny) for the extruder idler

Step 19: Let’s go!Locate your:
- M10 threaded rods (2)- 8mm smooth shafts (2)- Pay attention to the lengths!

Step 20: Y-Axis StartLocate your:
- M10 flat washers (4)- M10 fender washers (4)- M10 nuts (8)
Thread the nuts and washers on the M10 rods. The order should be:
Flat washer > Nut > Nut > Fender Washer > Fender Washer > Nut > Nut > Flat washer

Step 21: Y-Axis BearingsLocate your:
- LM8UU Linear Bearings
2 of them go on one of the M8 smooth rods1 goes on the other. They should slide on smoothly. Make sure the rods are clean before you slide them on.

Step 22: Y-Axis CornersLocate your:
- Y-axis corners (4)
These slide onto the end of the M10 rods. Adjust the length so that the smooth rods fit snugly between the Y-corner pieces.
The M8 smooth rods have to snap into place, they can’t sit above the slots.

Step 23: Y-Axis CornersLocate your:
- M10 flat washers (4)- M10 nuts (4)
Each corner gets a washer and a nut. Adjust the inner and outer nuts so that the end of the rod is flush with the outside M10 nut.Do the same on all four corners.

Step 24: Y-Axis Short Rods
Locate your:
- M8 threaded rods (205mm) (4)
Do not slide the rods into the Y corner brackets yet! Just find them.
- STOP! We want the 2 linear bearings on the left-hand side of this photo, not the right.

Step 25: Y-Axis Short Rods
Locate your:
- Y Idler bracket- Y Motor bracket
Slide one onto the one of the M8 rods
Slide the other onto two others. Use the diagram for orientation.

Step 26: Y-Axis Short Rods
Locate your:
- Y Idler bracket- Y Motor bracket
Slide one onto the one of the M8 rods
Slide the other onto two others. Use the diagram for orientation.

Step 27: Y-Axis Short Rods
Locate your:
- M8 flat washers (6)- M8 nuts (6)
Put the idler and motor brackets roughly in the center of their short rods.
On each side of both pieces should be a flat washer and a nut. Do not tighten yet!

Step 28: Y-Axis Short Rods
Locate your:
- M8 flat washers (8)- M8 nuts (8)
Each of the 4 short rods needs a nut and a washer on the end - nut on the inside. Put them approximately 1 inch from the end of the rod.
Use the photo for reference.

Step 29: Y-Axis Short Rods
Locate your:
- M8 flat washers (8)- M8 nuts (8)
Slide the short rod assemblies into the Y corners as shown. Each corner will get 2 washers (one on each rod) and 2 nuts (one on each rod)
Again, adjust the inner and outer nuts for each Y-corner so the rod end is flush with the nuts.DO NOT TIGHTEN YET!
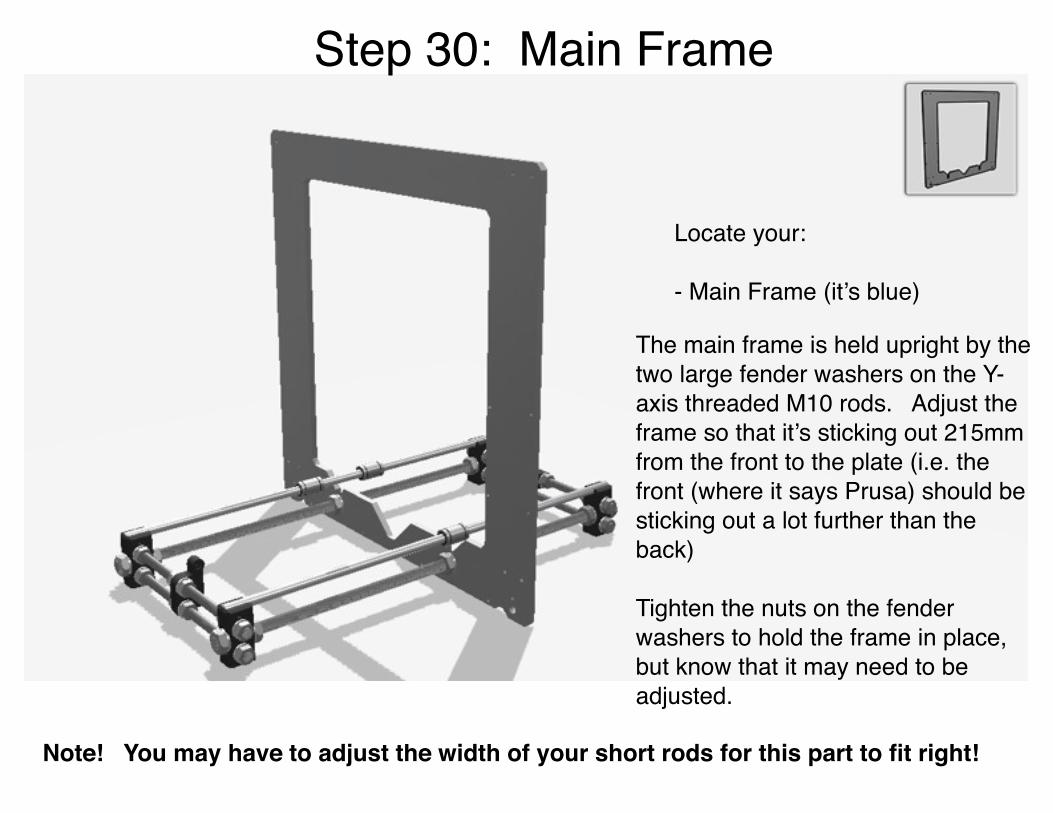
Step 30: Main Frame
Locate your:
- Main Frame (it’s blue)
The main frame is held upright by the two large fender washers on the Y-axis threaded M10 rods. Adjust the frame so that it’s sticking out 215mm from the front to the plate (i.e. the front (where it says Prusa) should be sticking out a lot further than the back)
Tighten the nuts on the fender washers to hold the frame in place, but know that it may need to be adjusted.
Note! You may have to adjust the width of your short rods for this part to fit right!

Step 31: Y-Axis Stepper MotorLocate your:
- Stepper Motor (any is fine, they’reall the same)
Hold it up to make sure that it aligns with the Y-axis motor mount.

Step 32: Y-Axis Stepper MotorLocate your:
- M3 x 10mm bolts (2)- GT2 Belt pulley (1)
The Y-axis motor bolts to the motor mount with two M3 x 10mm bolts. Make sure the wires are facing toward the short M8 bars closest to the motor.
The Pulley mounts to the motor shaft with 2 small set screws. At least one of them should be on the ‘flat’ of the motor shaft. We’ll show it in class.

Step 33: Y-Axis IdlerLocate your:
- Printed belt guides (2)- 623 Bearing (1)
The printed guides slip onto the bearing, with the flanges facing outward.

Step 34: Y-Axis IdlerLocate your:
- M3 x 25mm bolt- M3 nut (nylon)
Put the bolt through the idler, the bearing / belt guides, and the idler again. Secure with an M3 nut. You can tighten this one, but don’t go crazy. Make sure the pulley spins freely.

Step 35: Build PlateLocate your:
- X / Y plate (1)- M3 x 10mm bolts (2)- Y-Axis belt mount
Mount the belt mount to the underside of the X/Y plate using two of the M3 x 10mm bolts. Take note of the orientation of the plate as well as the mount.

Step 36: Build Plate ZIP TIESLocate your:
- 4” zip ties (3)
The build platform frame gets zip-tied to the 3 linear bearings. Each bearing should be centered in the spots cut out for it. The ‘knob’ part of the zip ties must be facing upward!
Note: You may have to loosen / adjust your Y-short rods to get the bearings to line up right with the slots.

Step 37: Build Plate
Locate your:
- GT2 Belt (711mm)
Insert the belt into the belt mount on the underside of the platform, wrap the belt around the stepper motor pulley, under the platform, around the Y-idler, and then back to the belt mount.
We’ll show you how to align it, tension it, and secure it with Zip ties.

Step 38: Heated PlatformLocate your:- Heated Build Platform- M3 x 15mm bolts (4)- M3 locking nuts (4)
Make sure you get the right side up on the HBP, there is a thermistor taped to the bottom!
Put a single locking M3 nut on each M3 bolt - it should be brought up to just barely touch the red board, don’t tighten it down! Keep the board off for now.

Step 39: Heated PlatformLocate your:
- M3 locking nuts (4)
Put another locking nut (keep the orientation right!) on each M3 x 15mm corner bolts. You want to leave about 6mm of the bolt shaft sticking down past the second nut.
There should be 6mm left !

Step 40: Heated Platform
Take the HBP with 4 bolt assemblies and rest it on the X-shaped platform. The bolts should not stick out past the bottom of the frame. NOTE: The wires go out the back (toward the Y-stepper)

Step 41: X-Axis Start
The M5 nuts have been pressed into your X-motor and X-idler ends for you!
Locate your:
- M5 Nuts (2)- X-Axis Motor End- X-Axis Idler End

Step 42: X-Axis Bearings
These bearings have been pressed in for you, as it required special tools.
Locate your:
- LM8UU Linear Bearings- (4 of them)

Step 43: X-Axis Idler
The belt guides press onto the bearing, with the flange sides facing out (like in the image above)
Locate your:
- 623ZZ bearings- Printed belt guides (2)

Step 44: X-Axis Idler
Put the bolt through the idler from front to back, through the assembled bearing with flanges. The nut goes on the back. Make sure the pulley spins freely.
Locate your:
- M3x18mm bolt- M3 locking nut
(Yes, the photo to the right is wrong)

Step 45: X-Axis Rods
Don’t press them into anything yet!
Locate your:
- M8 smooth rods (the long ones in your kit) - 2

Step 46: X-Axis Rods
Slide 2 bearings onto one rod, and one onto the other. Take care putting them on the rods.
Locate your:
- LM8UU linear bearings (3)

Step 47: X-Axis Rods
Slide the X-axis motor-end and the idler-end onto the smooth rods. The rod with 2 bearings has to go on top. This is going to take some force.
Put the X-axis assembly aside for a few minutes.

Step 48: Z-Axis Start
Locate your:
- Z-axis bottom mounts

Step 49: Z-Axis Bottom Mounts
The lower mounts bolt to the blue frame with M3 bolts. The frame is tapped, no nuts are needed.
Locate your:
- M3 x 10mm bolts (6)

Step 50: Z-Axis Bottom Mounts
The Z-axis stepper motors mount to the plastic bottom mounts with M3x10mm bolts. Make sure the wiring for each motor points inward, toward the center of the machine.
Locate your:
- Stepper Motors (2)- M3 x 10mm bolts (6)

Step 51: Z-Axis Bottom Mounts
These tubes slide onto the motor shafts.
Locate your:
- Z-Axis coupler tubes (Clear tubes) - 2

Step 52: Z-Axis Bottom Mounts
The M5 rods get threaded down into the plastic tubes, and the X-axis assembly gets lowered onto the smooth rods and threaded rods. You’ll need to turn the 5mm threaded shafts to lower the assembly a bit. TRY to keep it level.
Locate your:
- M5 threaded rods (2)- M8 smooth rod (2)

Step 53: Z-Axis Bottom Mounts
Locate your:
6” zip ties (2)
These get zipped around the hose coupler, about 1cm apart. Make them tight!

Step 54: Z-Axis Top MountsLocate your:
- Z-axis top mounts

Step 55: Z-Axis Top Mounts
The Z-axis top mounts get bolted to the frame with M3 x 10mm bolts - 2 on each side. You’ll need to slide these mounts over the Z-axis smooth rods.
Locate your:
- M3x10mm bolts (4)

Step 56: X-Axis Start
Mount one of the stepper motors to the X-end-motor piece - it uses three of the M3 x 18mm bolts. The wires on the stepper motor should point downward.
Locate your:
- Stepper Motor (1)- M3 x 18mm bolts (3)

Step 57: X-Axis
Mount the pulley to the stepper motor. Make sure at least one of the set screws is on the flats of the motor shaft. Try to align the geared part of the pulley with the gap in the x-motor-end piece, so we can thread the belt through.
Locate your:
- Metal GT2 pulley

Step 58: X-Axis
The carriage gets mounted to the three LM8UU bearings with zip ties. Make sure that the ‘knob’ part of the zip-ties faces back (i.e. the bearing side, not the flat side).
Locate your:
- X-Axis carriage

Step 59: X-Axis Belt
The belt gets installed in the X-carriage via press fit, and then looped around the motor shaft, under the carriage, around the X-idler bearing assembly, and then back to the X-carriage.
It needs to be tight, you’ll probably need to pull on it with pliers. We can show you how.
Locate your:
- X-Axis GT2 Belt (900mm)
- 4” Zip ties (2)

Step 60: X-Axis Belt
The loose ends of the belt should be zip tied UP to the upper part of the belt.
NOTE: Take note of the white zip tie! The knob has to be facing down like this for clearance later. It’s circled.
Locate your:
- 4” Zip ties (2)

Step 61: Extruder Main Block
Note: Ours looks slightly different from this, don’t panic! Don’t Mount it yet.
Locate your:
- Extruder Main Block

Step 62: Extruder Bearings
These get pressed into the front and back of the Extruder body - they’ll only fit in one place.
Locate your:
- 625ZZ Bearings (2)

Step 63: Extruder Motor
The motor bolts to the piece as shown with the 8mm bolts. Make sure the wires are exiting the top of the motor (see arrow)
Locate your:
- Stepper Motor - M3 x 8mm bolts (4)
Our extruder is slightly different - use 4 of the M3 x 8mm.
Wires should come out this way!

Step 64: Extruder Drive Shaft
NOTE: Before proceeding, read below and look at the next page! It’ll help.
The shaft goes through the first bearing, and then needs to have the filament drive pulley mounted to it. Slide it over loosely, and push the shaft into the rear bearing. Once the shaft is pressed into place, align the valley of the pulley with the filament feed hole directly below it. We need the hole to be directly in the center of the toothed valley in the drive gear. Once it’s centered, tighten (but don’t go crazy) the set screw on the drive pulley.
Locate your:
- M5 shaft (only one left)- Filament Drive Gear (ours looks
slightly different)

Step 65: Extruder Drive Shaft
We want it to be: M5 Nut -> Bearing -> M5 Nut > Drive Gear -> Bearing
The outermost nuts need to be tightened against each other.

Step 66: Extruder Drive Gears
The drive gear we’re using needs to have an M3 nut pushed into the slot, and then the gear is pressed onto the extruder shaft. Our small gear doesn’t look like what’s in the the diagram.
You’ll need an M3 x 8mm bolt to hold the small gear to the shaft. Make sure the bolt lines up with the flat on the shaft.
The large gear gets bolted onto the end of the driveshaft with an M5 nylon nut. !
Locate your:
- Printed extruder gears:- Large (Black)- Small (Light Blue)- M5 Lock Nut

Step 67: Extruder Idler
Got it? Next step!
Locate your:
- Printed extruder idler block

Step 68: Extruder Idler
The smooth rod acts as the axle for the bearing, and should be pressed into the idler block with the bearing on the shaft.
Locate your:
- 608 bearing- 8mm smooth rod (short)

Step 69: Extruder IdlerThe idler block with bearing sits into the extruder body like this. The bearing should have some ‘float’ and be able to slide a little on the axle.
Also - 2 M3 nuts get pressed into the slots at the top.

Step 70: Extruder Idler
The idler block is fastened at the top with two M3 x 40m bolts, 2 springs, and 2 M3 washers.
The bolts should screw into the washers from the previous step.

Step 71: Hotend MountingLocate Your:- Hotend Assembly (1)
- The hot-end assembly is a heater barrel, a heater block, a resistor and a thermistor.
- The soldering has been done ahead of time, there are 2 sets of wires coming from the assembly.

Step 72: Hotend Mounting
- The assembly slides into the track on the bottom of the extruder body. Keep the wires going to your right (away from the stepper motor) - you may have to flex them slightly to clear the extruder chassis. The hotend should slide to the rear position, between the two bolt holes. Secure with two 30mm bolts and nuts.
Locate Your:- M3 x 30mm bolts (2)- M3 nuts (2)

Step 73: HOTEND FAN
The fan bolts to the bracket with an M3 x 18mm bolt. The fan bolts to the long side of the fan bracket.
NOTE: The sticker on the fan should be facing up in this photo. Make sure you get it right!
Locate Your:- M3 x 18mm bolt (1)- M3 x 16mm bolt (1)- M3 locking nut (2)- Fan Mount - Fan
-

Step 74: HOTEND FAN
The fan bracket bolts to the Extruder body using an M3 x 16mm bolt, and a locking nut. See photo for mount details.
-

Step 75: Extruder MountingLocate Your:- M3 x 30mm bolts- M3 nuts
- The completed extruder will now bolt to the X-carriage piece using 2 of the M3 x 30mm bolts, and two of the M3 nuts that press into the X-carriage.
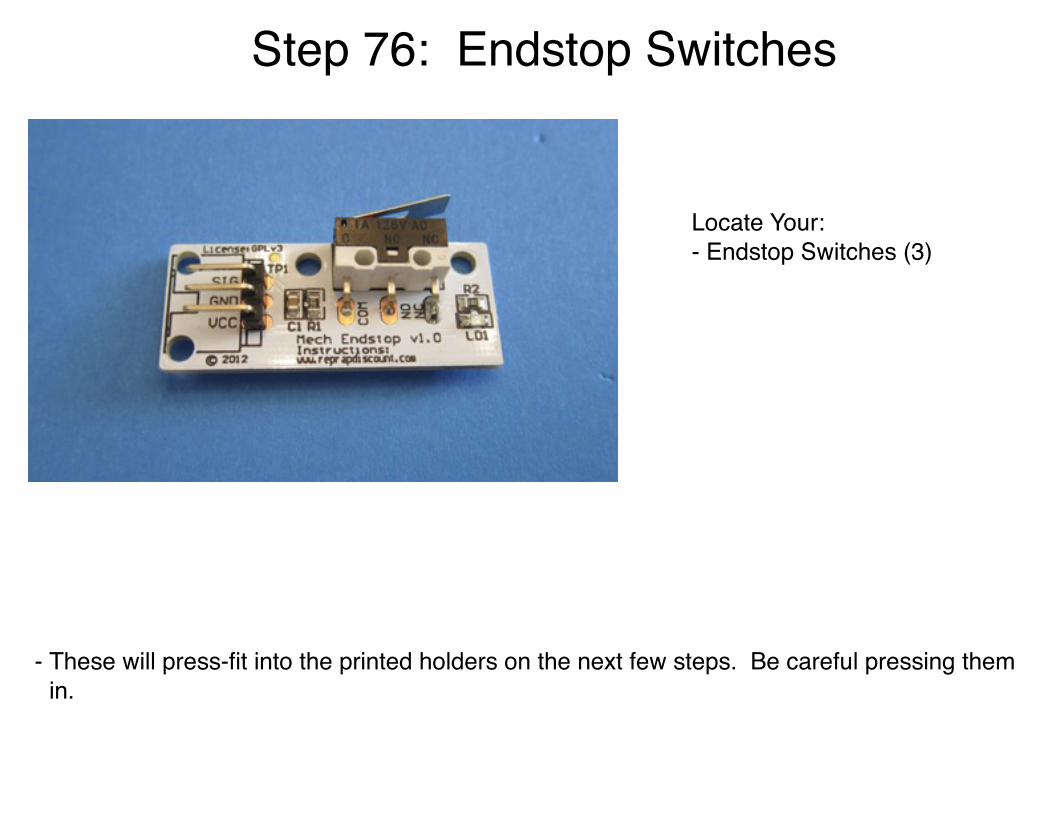
Step 76: Endstop Switches
Locate Your:- Endstop Switches (3)
- These will press-fit into the printed holders on the next few steps. Be careful pressing them in.

Step 77: Z-Endstop
Locate Your:- Z-Endstop Holder (1)- Endstop Switch (1)
- The switch side needs to face toward the circular and square clips.
- The endstop-holder gets snapped onto the blue frame and the Z-axis smooth rod on the left side of the machine.
- You should zip tie a loop in the wires as shown.

Step 78: X-EndstopLocate Your:- X-Endstop Holder- Endstop Switch
- The endstop switch needs to face the round clips on this part.
- The assembled switch and holder clips to the BACK side of the X-axis smooth rods, on the left-hand side. See photo.

Step 79: Y-Endstop
- The endstop switch slides into the holder and faces up in the photo above - the switch gear and electronics should face the small round clip, not the longer one.
- This assembled part clips between the Y-axis smooth and threaded rod in the rear corner. See our demo machine or the photo for details.
Locate Your:- Y-Endstop Holder- Endstop switch
Step 80: Congratulate Yourself- Locate Your:
Recently completed mechanical printer! All of the main build is now done, just time for wiring!

Step 81: Electronics Overview

Step 82: Mount RAMPS to Frame
We mount the RAMPS assembly to the frame with 2 M3x30mm bolts and 2 of the white nylon spacers.
For now just use one bolt in each diagonal corner, as shown. Don’t go crazy on the bolts.
The power terminals and USB port are going to face UP.

Step 83: PSU Wiring
The power supply gets 2 sets of wires - a black and white from the power cord, and a 4 conductor wire (white sheath) that goes to the RAMPS. Wire them in like shown.
(in case this is b&w - the colors are yellow - black - red - blue)

Step 84: PSU Wiring
On the RAMPS board, there are 4 screw terminals on the top edge. Wire them up as shown - and tighten down the terminals. Make sure that no copper from any wires are touching.
The colors (left to right) are: yellow, blue, black, and red)
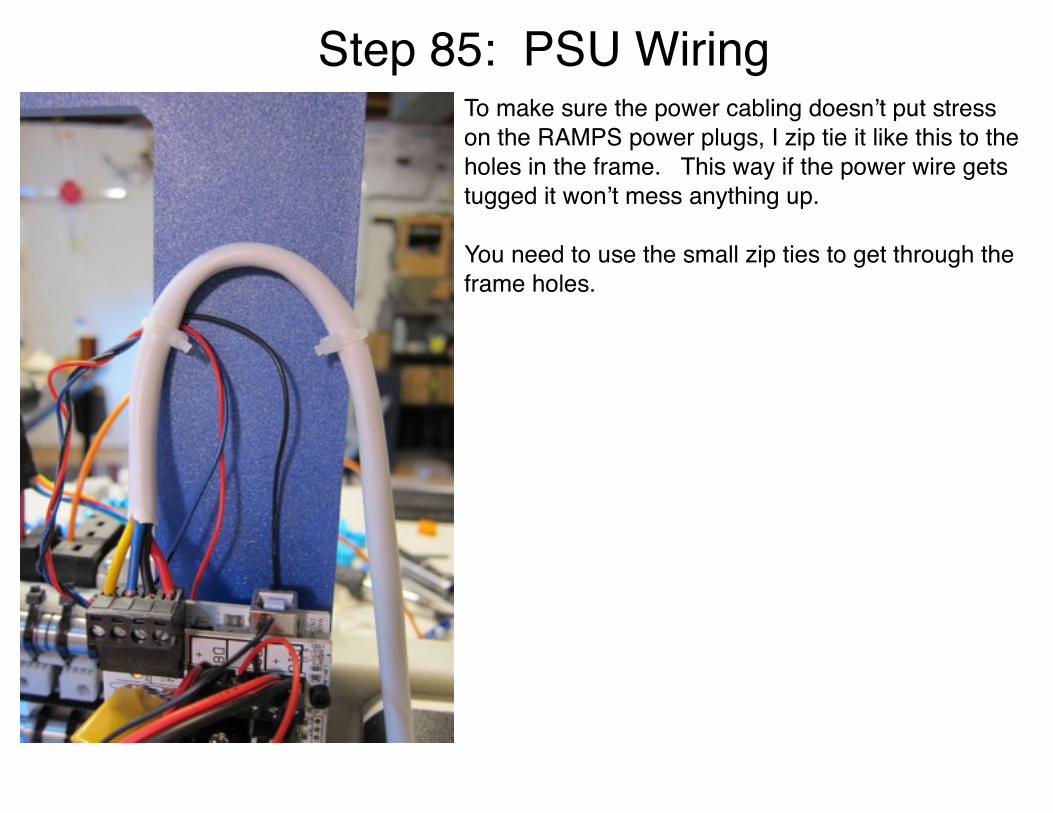
Step 85: PSU WiringTo make sure the power cabling doesn’t put stress on the RAMPS power plugs, I zip tie it like this to the holes in the frame. This way if the power wire gets tugged it won’t mess anything up.
You need to use the small zip ties to get through the frame holes.

Step 86: Endstop Wiring
All three endstops get wired to the RAMPS board similarly.
They go
XYZ
From top to bottom.
Plug in all of the endstop cables on the right hand / lower corner of the board. Red cables go to the left. NOTE: We’re plugging into the 1st, 3rd, and 5th plugs - like the photo.

Step 87: Heated Bed Wiring
The two large wires from the heated bed get plugged into D8 on the Ramps board. Make sure the red goes into the + spot.

Step 88: Heated Bed Wiring
The heated bed thermistor wire goes to T1 - red wire goes up!

Step 89: HotEnd Wiring
- The wiring from the hotend needs to loop up over the top of the frame and then down to the RAMPS board
- The wires labeled ‘Therm’ go to T0 on the RAMPS board. Direction is not important, it’ll work either way.
- The power wires get screwed into the terminals labelled D10. These are not directional, but to be neat it’s good to keep them in the same order as the wires in D8.

Step 90: Extruder Fan Wiring
The extruder fan power wires (small wires) follow the same path as the hot-end wires.
They get plugged into D9 - keep the black and red oriented the same as D8 and D10.

Step 91: Hot End Thermistor Wiring
The hot-end thermistor gets plugged in to T0 on the RAMPS board, red wire up.

Step 92: Extruder Stepper Wiring- Extruder stepper wires go with the loop
up and over the frame (along with hotend power and hotend fan) and plug into E0 on the RAMPS.
The blue wire goes up!
(We need to spin the extruder backwards because of how it’s geared)

Step 93: X Stepper Wiring
- The X-axis stepper motor comes with the correct connector already on the end of the motor cables.
- The X-stepper wire goes to the X spot on the RAMPS board. The RED wire goes toward the main power terminals on the board (i.e. UP!) Look at the diagram !

Step 94: Y Stepper Wiring- The wiring from the Y stepper
motor needs to go to the RAMPS board. It’s probably best to zip tie this to the frame pieces that lead it closer to the RAMPS, or wrap it with cable wrap. Look at the PSU wiring detail photo.
- The Y stepper motor wire goes to the Y spot on the RAMPS board. The red lead goes toward the main power terminals on the board.
The Y stepper plug is directly below the X!

Step 95: Z Stepper Wiring- The Z-axis is different because there are
2 stepper motors, and the wiring for the one needs to come along under the frame to get to the RAMPS board. There are holes in the bottom of the frame to zip-tie it to.
- Each Z-motor plug gets plugged into the Z-motor spots on the RAMPS, with the Red lead pointing toward the main power terminals. - RED wires up.

Step 96: HBP Glass
NOTE: We should test your Z-endstop before you mount the glass. The glass should only go on once you’re getting ready to print.
It gets held on with binder clips.

Step 97: Wiring Cleanup
For the extra length of the stepper wires it’s easiest just to bundle them up and zip tie them out of the way.
For the wires to the hot-end, HBP, and X-stepper, I like to put black spiral wrap around the wires, and zip-tie the ends.
NOTE: For the Hot-end, the HBP, and the Z-axis stepper, make sure that you leave enough wire for the parts to move! We don’t want to move the axes and have it pull wires out.