mainframe installation guide - micro focus · cics server adapter customization 48 ... racf still...
TRANSCRIPT

Mainframe Installation GuideVersion 6.0, November 2003

IONA, IONA Technologies, the IONA logo, Orbix, Orbix/E, Orbacus, Artix, Orchestrator, Mobile Orchestrator, Enterprise Integrator, Adaptive Runtime Technology, Transparent Enterprise Deployment, and Total Business Integration are trademarks or registered trademarks of IONA Technologies PLC and/or its subsidiaries.Java and J2EE are trademarks or registered trademarks of Sun Microsystems, Inc. in the United States and other countries. CORBA is a trademark or registered trademark of the Object Management Group, Inc. in the United States and other countries. All other trademarks that appear herein are the property of their respective owners.While the information in this publication is believed to be accurate, IONA Technologies PLC makes no warranty of any kind to this material including, but not limited to, the implied warranties of merchantability and fitness for a particular purpose. IONA Technologies PLC shall not be liable for errors contained herein, or for incidental or consequential damages in connection with the furnishing, performance or use of this material.
COPYRIGHT NOTICENo part of this publication may be reproduced, stored in a retrieval system or transmitted, in any form or by any means, photocopying, recording or otherwise, without prior written consent of IONA Technologies PLC. No third party intellectual property right liability is assumed with respect to the use of the information contained herein. IONA Technologies PLC assumes no responsibility for errors or omissions contained in this book. This publica-tion and features described herein are subject to change without notice.
Copyright © 1998, 2003 IONA Technologies PLC. All rights reserved.
All products or services mentioned in this manual are covered by the trademarks, service marks, or product names as designated by the companies who market those products.
Updated: 01-Apr-2004
M 3 1 6 2
1 0 0 0 9 6 5 2

Contents
Overview 1Installation Prerequisites 3Installing Orbix Mainframe 10Before You Begin Installing 11Installing on OS/390 12Installing on OS/390 UNIX System Services 22
Customizing Orbix Mainframe 26Standard Customization Tasks 27SSL/TLS Customization 38Naming Service and IFR Customization 45IMS Server Adapter Customization 46CICS Server Adapter Customization 48Client Adapter Customization 53Recap of Configuration Items Set During Customization 57
Verifying the Installation 60Before You Begin Testing 61C++ Installation Tests 62COBOL Installation Tests 64PL/I Installation Tests 72
Uninstalling Orbix Mainframe 79For More Information 80
iii

CONTENTS
iv

Overview
Before you begin This guide describes how to install Orbix Mainframe. Before you begin, visit IONA�s Orbix Mainframe 6.0 documentation web page at http://www.iona.com/support/docs/orbix/mainframe/6.0/index.xml, to read the Mainframe Release Notes and check for updates to this Mainframe Installation Guide.1
Also, before you install, check the prerequisites for your installation (described in �Installation Prerequisites� on page 3) and familiarize yourself with the steps involved in installing the product.
Note for existing customers Version 6.0 of Orbix Mainframe is substantially different from previous versions of IONA�s mainframe product in terms of the DLLs and build procedures it contains. Even though you are upgrading from a previous version, you must perform in full the installation and customization tasks described in this guide, as appropriate for your setup.
Because of these changes to the product, if you have built applications using a previous version, you must recompile the relevant IDL interfaces and rebuild those applications after you have completed the installation and mandatory customization tasks, to take into account the changes inherent in the latest version. See the Mainframe Release Notes for more details of these requirements for existing users.
Product code The product code is s1900. Quote this in any correspondence you might have about this product with IONA support at [email protected].
License code You must have a valid license code from IONA Technologies to install this product. You should have received this in a separate e-mail. If you do not have a license, please contact IONA support at [email protected] or your IONA account representative before proceeding any further.
1. A date beside a document on the IONA documentation web pages indicates that the document was last updated on that date. No date beside a document indicates that it has not been updated since its release on the Documentation CD.
1

Overview
Supported platforms You can install Orbix Mainframe in either of the following ways:
� On OS/390 only.
� On both OS/390 and OS/390 UNIX System Services.
If you choose to install the product on OS/390 UNIX System Services, you must ensure that you have already successfully installed it on OS/390 first. Installing on OS/390 UNIX System Services offers the benefit of a command-line interface to itadmin and the ability to develop CORBA C++ applications that can run on OS/390 UNIX System Services.
The supported platforms are:
� IBM OS/390 V2R10 or OS/390 V2R10 with UNIX System Services.
� IBM z/OS V1R1 or z/OS V1R1 with UNIX System Services.
� IBM z/OS V1R2 or z/OS V1R2 with UNIX System Services.
� IBM z/OS V1R4 or z/OS V1R4 with UNIX System Services.
Supported compilers The supported compilers are:
� IBM z/OS V1.2 ANSI C++ compiler.
� IBM COBOL for OS/390 & VM compiler V2.1.2 or V2.2.1.
� IBM Enterprise COBOL V3.2.0.
� IBM PL/I for MVS & VM compiler V1.1.1.
� IBM Enterprise PL/I for z/OS V3.2.0.
Supported IMS releases The supported IMS release is IMS V7.
Supported CICS releases The supported CICS releases are:
� CICS TS V1.3.
� CICS TS V2.2.
2

Installation Prerequisites
Installation Prerequisites
Overview This section describes the various prerequisites for installing Orbix Mainframe.
OS/390 and z/OS system requirements
The following basic PTFs are required:
Note: Check http://www.iona.com/support/docs/apars/index.xml for details of PTFs and for a more up-to-date list of IBM maintenance requirements for Orbix products.
Operating System Required Patches
OS/390 V2R10 PTFs UQ44334, UQ48506, UQ49095, UQ45856, UQ48561, UQ50238, UQ50443, UQ50508, UQ51126, UQ51324, UQ52971, UQ53132, UQ53820, UQ56638, UQ56832, UQ56833, UQ56834, UQ58575, UQ59195, UQ61158, UQ61159, UQ63206, UQ67046, UW69596, UQ72409, UQ74247, UW74957, UQ79374, UW80957, UW83949
z/OS V1R1 PTFs as V2R10 above
z/OS V1R2 PTFs UQ59196, UQ59561, UQ63520, UQ64119, UQ64147, UQ64151, UQ67047, UQ71066, UQ73052, UQ74977, UQ74978, UQ76932, UQ76933, UQ77455, UQ79384, UQ79385, UQ80958, UQ83949
z/OS V1R4 PTFs UQ70042, UQ71068, UQ73052, UQ74977, UQ74978, UQ76932, UQ76933, UQ77457, UQ79384, UQ79385, UQ79799,
3

Installation Prerequisites
The following PTFs are also required, if you wish to use TLS with Orbix Mainframe:
IMS requirements The following PTFs are required for OTMA, If you wish to use IMS with Orbix Mainframe:
The following PTFs are required for RRS, if you wish to use IMS with Orbix Mainframe:
CICS requirements There are currently no PTF requirements for CICS.
Operating System Required Patches
OS/390 V2R10 PTFs UW75960, UW83574, UW79754, UW70444, UW85214, UW88754
z/OS V1R1 PTFs as V2R10 above
z/OS V1R2 PTFs UW84120, UW84121, UW85215, UW93993
z/OS V1R4 PTFs UA00954, UA01625, UA02136, UA04423
IMS Version Required OTMA Patches
IMS V7 PTFs UQ36236, UQ42739, UQ44378, UQ44386, UQ45778, UQ44377, UQ43992, UQ54431, UQ52484, UQ57697, UQ57016, UQ65071, UQ65871, UQ61666, UQ69350
IMS Version Required RRS Patches
IMS V7 PTFs UQ40581, UQ41543, UQ46116, UQ53832, UQ58254, UQ61331, UQ64692, UQ68927
4

Installation Prerequisites
Disk space requirements The approximate amount of disk space required to install Orbix Mainframe on OS/390 is:
The approximate amount of disk space required to install Orbix Mainframe on OS/390 UNIX System Services is:
Installation requirements The following installation requirements apply:
Files Space
Work space for installation 235 3390-3 cylinders
Product as installed 470 3390-3 cylinders
Files Space
Work space for installation 4 MB
Product as installed 25 MB
Prerequisite Notes
C++ Runtime Libraries The IBM Language Environment (SCEERUN) and C++ runtime libraries (SCLBDLL) must be available when installing your Orbix Mainframe licenses.
UNIX Privileges To install the OS/390 UNIX System Services portion of the product in the default location, you must have root privileges.
To install in a non-default location, you must have permission to create files and directories in that location.
5

Installation Prerequisites
Runtime environment requirements
The following runtime environment requirements apply:
Development environment requirements
The following development environment requirements apply:
Prerequisite Notes
C++ Runtime Libraries The IBM Language Environment (SCEERUN) and C++ runtime libraries (SCLBDLL) must be available when running any Orbix Mainframe program.
Security product To use the optional SAF plugin, the IONA class must be added to the installed security product. Instructions for doing this are provided in HLQ.ORBIX60.DOC(SAF) which is uploaded as part of the installation process.
UNIX Privileges User IDs associated with IONA services, and all client and server user IDs running on OS/390 or OS/390 UNIX System Services, require an OMVS segment. This does not apply to servers running inside IMS or CICS.
Prerequisite Notes
C++ Compiler IBM z/OS V1.2 ANSI C++ compiler.
COBOL Compilers � IBM COBOL for OS/390 & VM compiler V2.1.2 or V2.2.1.
� IBM Enterprise COBOL V3.2.0.
PL/I Compilers � IBM PL/I for MVS & VM compiler V1.1.1.
� IBM Enterprise PL/I for z/OS V3.2.0.
6

Installation Prerequisites
Region size The IBM z/OS ANSI C++ compiler requires a minimum of 48 MB of virtual memory to run. IONA recommends that at least 192 MB is available for compiles. For telnet or rlogin users, this can be done by adjusting the MAXASSIZE parameter in BPXPRMxx. Users of the TSO OMVS shell must also ensure their region size is large enough in their RACF TSO segment.
Prerequisite Notes
7
Installation Prerequisites
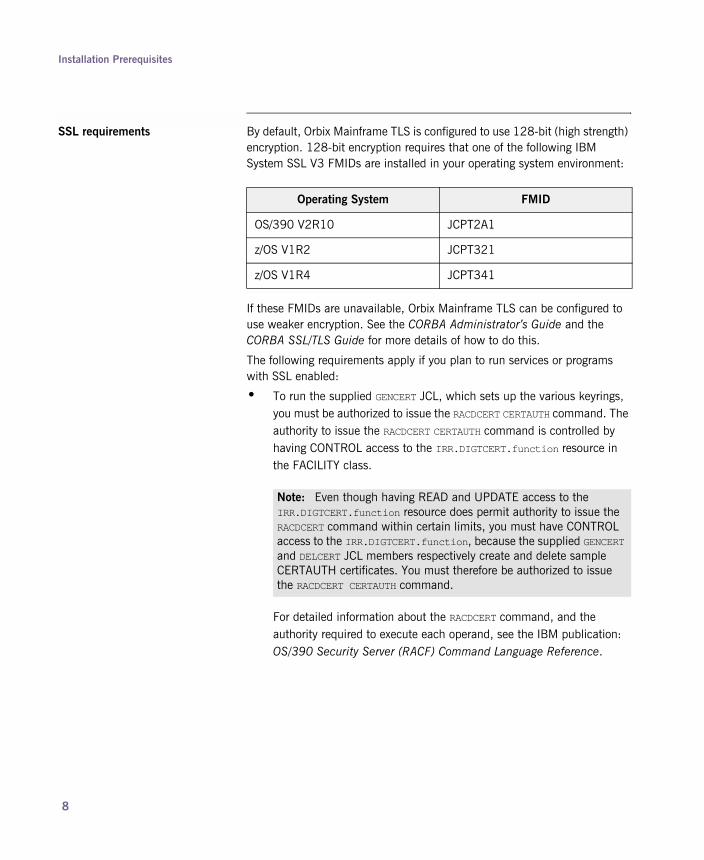
SSL requirements By default, Orbix Mainframe TLS is configured to use 128-bit (high strength) encryption. 128-bit encryption requires that one of the following IBM System SSL V3 FMIDs are installed in your operating system environment:
If these FMIDs are unavailable, Orbix Mainframe TLS can be configured to use weaker encryption. See the CORBA Administrator�s Guide and the CORBA SSL/TLS Guide for more details of how to do this.
The following requirements apply if you plan to run services or programs with SSL enabled:
� To run the supplied GENCERT JCL, which sets up the various keyrings, you must be authorized to issue the RACDCERT CERTAUTH command. The authority to issue the RACDCERT CERTAUTH command is controlled by having CONTROL access to the IRR.DIGTCERT.function resource in the FACILITY class.
For detailed information about the RACDCERT command, and the authority required to execute each operand, see the IBM publication: OS/390 Security Server (RACF) Command Language Reference.
Operating System FMID
OS/390 V2R10 JCPT2A1
z/OS V1R2 JCPT321
z/OS V1R4 JCPT341
Note: Even though having READ and UPDATE access to the IRR.DIGTCERT.function resource does permit authority to issue the RACDCERT command within certain limits, you must have CONTROL access to the IRR.DIGTCERT.function, because the supplied GENCERT and DELCERT JCL members respectively create and delete sample CERTAUTH certificates. You must therefore be authorized to issue the RACDCERT CERTAUTH command.
8

Installation Prerequisites
� Ensure that the RACF DIGTCERT and DIGTRING general resource classes have been activated. If not, ask your RACF administrator to issue the following commands:
� IBM strongly recommends that you issue the RACLIST command on the DIGTCERT class, to improve performance when using digital certificates. If you do not issue the RACLIST command on the DIGTCERT class, digital certificates can still be used, but performance might be affected. For best performance, issue the following command:
� After creating a new digital certificate, you should refresh the DIGTCERT class by issuing the following command:
If you do not refresh the DIGTCERT profiles on which the RACLIST command has been issued, RACF still uses the new digital certificate, but performance might be affected.
For more information about creating keyrings and storing digital certificates in RACF, see the IBM publication: OS/390 Security Server (RACF) Security Administrator's Guide.
SETROPTS CLASSACT(DIGTCERT)SETROPTS CLASSACT(DIGTRING)
SETROPTS RACLIST(DIGTCERT)
SETROPTS RACLIST(DIGTCERT) REFRESH
9

Installing Orbix Mainframe
Installing Orbix Mainframe
Overview This release of Orbix Mainframe is shipped as an IEBCOPY backup file that has been compressed, using the TSO XMIT command. This section explains how to install Orbix Mainframe.
In this section This section discusses the following topics:
Note: You should read each step in full before proceeding with it, because the text might contain important recommendations or requirements that you should be aware of before proceeding.
Before You Begin Installing page 11
Installing on OS/390 page 12
Installing on OS/390 UNIX System Services page 20
10

Installing Orbix Mainframe
Before You Begin Installing
Overview This subsection points out some facts that you should be aware of before you begin installing.
Installation choices You can install Orbix Mainframe in either of the following ways:
� On OS/390 only.
� On both OS/390 and OS/390 UNIX System Services.
If you choose to install Orbix Mainframe on OS/390 UNIX System Services, you must ensure that you have already successfully installed it on OS/390 first.
Customizing the product After you have successfully installed the product on OS/390 (and on OS/390 UNIX System Services if you wish) you must perform some customization tasks before you can actually use it. These customization tasks are described in �Customizing Orbix Mainframe� on page 24.
Sequence of Tasks Do not attempt to perform any installation or customization tasks out of sequence. Installation must be successfully completed before you begin customization. Perform all tasks in the order in which they are described in this guide.
Note for existing customers Version 6.0 of Orbix Mainframe is substantially different from previous versions of IONA�s mainframe product in terms of the DLLs and build procedures it contains. Even though you are upgrading from a previous version, you must perform in full the installation and customization tasks described in this guide, as appropriate for your setup.
11

Installing Orbix Mainframe
Installing on OS/390
Overview This subsection describes how to install Orbix Mainframe on OS/390.
Step 1�Preallocate a data set Preallocate an OS/390 sequential data set with the following information:
Step 2�Copy the ORBIX.SEQ file Copy the ORBIX.SEQ file from your product CD into the OS/390 data set that you preallocated in the preceding step. How you copy the file depends on the type of machine the CD-ROM drive is on. The most convenient way is to use FTP.
The following is an example of the FTP command sequence to transmit the ORBIX.SEQ file into the preallocated data set, where the CD drive letter is d: and XXXX.XXXX represents the name of the data set:
Note: You must complete all the steps in this subsection, in the order in which they are presented.
Space Units Tracks
PRIMARY 3600
SECONDARY 100
RECORD FORMAT FB
RECORD LENGTH 80
BLOCK SIZE 3120
d:ftp os390hostftp> binaryftp> put ORBIX.SEQ 'XXXX.XXXX'
12

Installing Orbix Mainframe
Step 3�Unpack the PDS After the ORBIX.SEQ file has been copied to OS/390, use the TSO RECEIVE command to unpack the PDS (where XXXX.XXXX represents the exact name of the PDS data set that is to be received):
Because the preceding command is a TSO command, you must enter it on an ISPF command screen.
You are prompted with restored parameters similar to the following:
You must choose between one of the following:
� Press Enter, to restore XXXX.XXXX into the default data set, HLQ.ORBIX60.PDS.
� Restore XXXX.XXXX into an alternative data set, by entering the command that appears on your screen, and substituting HLQ.ORBIX60.PDS with the dataset name you want to use.
The sequential data set, XXXX.XXXX, can now be deleted.
Step 4�Expand the PDS The orbixhlq.PDS($FIRST) member contains JCL to expand the other PDS members into the full Orbix Mainframe installation. The default high-level qualifier for installation data sets is HLQ.ORBIX60. If you want to change the default high-level qualifier to your installation standard, you can use a command as follows in ISPF:
In the preceding example, orbixhlq represents your high-level qualifier, which can be up to 19 characters, including one or more periods.
Now submit orbixhlq.PDS($FIRST) to install Orbix Mainframe.
RECEIVE INDSN('XXXX.XXXX')
To receive the Orbix PDS, please specify the following attributesDA('HLQ.ORBIX60.PDS') SPACE(3312,100) RELreplacing the HLQ as appropriate.INMR901I Dataset HLQ.ORBIX60.PDS from JOE on NODENAMEINMR906A Enter restore parameters or 'DELETE' or 'END' +
C 'HLQ.ORBIX60' 'orbixhlq' ALL
Note: This step might take several minutes to complete.
13

Installing Orbix Mainframe
Step 5�Customize your locale (if necessary)
This is only relevant if you want to run Orbix Mainframe in a locale other than the default locale IBM-1047, and your system and compiler are also running in a locale other than IBM-1047.
Orbix Mainframe include files and demonstration sources are coded by default in locale IBM-1047. Follow these steps if you do not want to run Orbix Mainframe in the default IBM-1047 locale, and your system and compiler are also running in a locale other than IBM-1047:
1. In orbixhlq.PDS($SECOND), use the following command in ISPF to change the default high-level qualifier, to make it match your installation value (where orbixhlq represents your high-level qualifier, which can be up to 19 characters, including one or more periods):
2. In orbixhlq.PDS($SECOND), use the following command in ISPF to change the value of the TO variable, to make it match the locale codeset you want to use (where IBM-xxx represents your codeset):
The preceding command lets you simultaneously change all occurences of the default to make it match your codeset.
3. Submit $SECOND to convert the files to match your installation.
Step 6�Check installed data sets Compare your list of installed data sets with the list shown in Table 1:
C 'HLQ.ORBIX60' 'orbixhlq' ALL
C 'IBM-500' 'IBM-xxx' ALL
Table 1: List of Installed Data Sets (Sheet 1 of 6)
Data Set Description
orbixhlq.ADMIN.GRAMMAR Contains itadmin grammar files.
orbixhlq.ADMIN.HELP Contains itadmin help files.
orbixhlq.ADMIN.LOAD Contains Orbix Mainframe administration programs.
orbixhlq.COBOL.LIB Contains programs for Orbix Mainframe COBOL support.
14

Installing Orbix Mainframe
orbixhlq.CONFIG Contains Orbix Mainframe configuration information.
orbixhlq.DEMOS.CICS.COBOL.BLD.JCL Contains jobs to build the CICS COBOL demonstrations.
orbixhlq.DEMOS.CICS.COBOL.COPYLIB Used to store generated files for the CICS COBOL demonstrations.
orbixhlq.DEMOS.CICS.COBOL.LOAD Used to store programs for the CICS COBOL demonstrations.
orbixhlq.DEMOS.CICS.COBOL.README Contains documentation for the CICS COBOL demonstrations.
orbixhlq.DEMOS.CICS.COBOL.SRC Contains program source for the CICS COBOL demonstrations.
orbixhlq.DEMOS.CICS.MFAMAP Used to store CICS server adapter mapping member information for demonstrations.
orbixhlq.DEMOS.CICS.PLI.BLD.JCL Contains jobs to build the CICS PL/I demonstrations.
orbixhlq.DEMOS.CICS.PLI.LOAD Used to store programs for the CICS PL/I demonstrations.
orbixhlq.DEMOS.CICS.PLI.PLINCL Used to store generated files for the CICS PL/I demonstrations.
orbixhlq.DEMOS.CICS.PLI.README Contains documentation for the CICS PL/I demonstrations.
orbixhlq.DEMOS.CICS.PLI.SRC Contains program source for the CICS PL/I demonstrations.
orbixhlq.DEMOS.COBOL.BLD.JCL Contains jobs to build the COBOL demonstrations.
orbixhlq.DEMOS.COBOL.COPYLIB Used to store generated files for the COBOL demonstrations.
Table 1: List of Installed Data Sets (Sheet 2 of 6)
Data Set Description
15

Installing Orbix Mainframe
orbixhlq.DEMOS.COBOL.FNBINIT Used to store initialized records for the FNB demo VSAM files.
orbixhlq.DEMOS.COBOL.LOAD Used to store programs for the COBOL demonstrations.
orbixhlq.DEMOS.COBOL.MAP Used to store name substitution maps for the COBOL demonstrations.
orbixhlq.DEMOS.COBOL.README Contains documentation for the COBOL demonstrations.
orbixhlq.DEMOS.COBOL.RUN.JCL Contains jobs to run the COBOL demonstrations.
orbixhlq.DEMOS.COBOL.SRC Contains program source for the COBOL demonstrations.
orbixhlq.DEMOS.CPP.BLD.JCL Contains jobs to build the C++ demonstrations.
orbixhlq.DEMOS.CPP.GEN Used to store generated code for the C++ demonstrations.
orbixhlq.DEMOS.CPP.H Contains header files for the C++ demonstrations.
orbixhlq.DEMOS.CPP.HH Contains header files for the C++ demonstrations.
orbixhlq.DEMOS.CPP.LOAD Used to store programs for the C++ demonstrations.
orbixhlq.DEMOS.CPP.README Contains documentation for the C++ demonstrations.
orbixhlq.DEMOS.CPP.RUN.JCL Contains jobs to run the C++ demonstrations.
orbixhlq.DEMOS.CPP.SRC Contains program source for the C++ demonstrations.
orbixhlq.DEMOS.IDL Contains IDL for demonstrations.
orbixhlq.DEMOS.IMS.COBOL.BLD.JCL Contains jobs to build the IMS COBOL demonstrations.
Table 1: List of Installed Data Sets (Sheet 3 of 6)
Data Set Description
16

Installing Orbix Mainframe
orbixhlq.DEMOS.IMS.COBOL.COPYLIB Used to store generated files for the IMS COBOL demonstrations.
orbixhlq.DEMOS.IMS.COBOL.LOAD Used to store programs for the IMS COBOL demonstrations.
orbixhlq.DEMOS.IMS.COBOL.README Contains documentation for the IMS COBOL demonstrations.
orbixhlq.DEMOS.IMS.COBOL.SRC Contains program source for the IMS COBOL demonstrations.
orbixhlq.DEMOS.IMS.MFAMAP Used to store IMS server adapter mapping member information for demonstrations.
orbixhlq.DEMOS.IMS.PLI.BLD.JCL Contains jobs to build the IMS PL/I demonstrations.
orbixhlq.DEMOS.IMS.PLI.LOAD Used to store programs for the IMS PL/I demonstrations.
orbixhlq.DEMOS.IMS.PLI.PLINCL Used to store generated files for the IMS PL/I demonstrations.
orbixhlq.DEMOS.IMS.PLI.README Contains documentation for the IMS PL/I demonstrations.
orbixhlq.DEMOS.IMS.PLI.SRC Contains program source for the IMS PL/I demonstrations.
orbixhlq.DEMOS.IORS Used to store IORs for demonstrations.
orbixhlq.DEMOS.PLI.BLD.JCL Contains jobs to build the PL/I demonstrations.
orbixhlq.DEMOS.PLI.LOAD Used to store programs for the PL/I demonstrations.
orbixhlq.DEMOS.PLI.MAP Used to store name substitution maps for the PL/I demonstrations.
orbixhlq.DEMOS.PLI.PLINCL Used to store generated files for the PL/I demonstrations.
Table 1: List of Installed Data Sets (Sheet 4 of 6)
Data Set Description
17

Installing Orbix Mainframe
orbixhlq.DEMOS.PLI.README Contains documentation for the PL/I demonstrations.
orbixhlq.DEMOS.PLI.RUN.JCL Contains jobs to run the PL/I demonstrations.
orbixhlq.DEMOS.PLI.SRC Contains program source for the PL/I demonstrations.
orbixhlq.DEMOS.TYPEINFO Optional type information store.
orbixhlq.DOC Contains miscellaneous documentation.
orbixhlq.DOMAINS Contains Orbix Mainframe configuration information.
orbixhlq.INCLUDE.COPYLIB Contains include file for COBOL programs.
orbixhlq.INCLUDE.H Contains C++ header files.
[email protected] Contains C++ header files.
[email protected] Contains C++ template implementation files.
[email protected] Contains C++ header files.
[email protected] Contains C++ header files.
[email protected] Contains C++ template implementation files.
[email protected] Contains C++ header files.
[email protected] Contains C++ header files.
[email protected] Contains IDL files.
[email protected] Contains C++ header files.
[email protected] Contains C++ header files.
[email protected] Contains C++ header files.
orbixhlq.INCLUDE.OMG.H Contains C++ header files.
orbixhlq.INCLUDE.OMG.HH Contains C++ header files.
Table 1: List of Installed Data Sets (Sheet 5 of 6)
Data Set Description
18

Installing Orbix Mainframe
orbixhlq.INCLUDE.OMG.IDL Contains IDL files.
orbixhlq.INCLUDE.ORBIX.H Contains C++ header files.
orbixhlq.INCLUDE.ORBIX.HH Contains C++ header files.
orbixhlq.INCLUDE.ORBIX.IDL Contains IDL files.
[email protected] Contains C++ header files.
[email protected] Contains C++ header files.
[email protected] Contains IDL files.
[email protected] Contains template implementation files.
[email protected] Contains C++ header files.
[email protected] Contains C++ header files.
[email protected] Contains IDL files.
orbixhlq.INCLUDE.PLINCL Contains include files for PL/I demonstrations.
orbixhlq.JCL Contains jobs to run Orbix Mainframe.
orbixhlq.LKED Contains side-decks for the DLLs.
orbixhlq.LPA Contains LPA eligible programs.
orbixhlq.MFA.LOAD Contains DLLS required for deployment of Orbix programs in IMS.
orbixhlq.PLI.LIB Contains programs for Orbix Mainframe PL/I support.
orbixhlq.PLICICS.LIB Contains programs for CICS PL/I support.
orbixhlq.PROCS Contains JCL procedures.
orbixhlq.RUN Contains binaries & DLLs.
Table 1: List of Installed Data Sets (Sheet 6 of 6)
Data Set Description
19

Installing Orbix Mainframe
Installing on OS/390 UNIX System Services
Overview This subsection describes how to install Orbix Mainframe on OS/390 UNIX System Services. This subsection is only relevant, however, if you plan to develop CORBA C++ applications that will execute under OS/390 UNIX System Services, or if you wish to use the supplied utilities in a command line environment.
Step 1�Create installation directory
From the UNIX System Services shell on your OS/390 system, create a directory for use during the installation. Ensure the file system has the required space for the installation, as specified in �Disk space requirements� on page 5.
Step 2�Transfer tar file to installation directory
Transfer the orbix-6_0.tar file on the product CD into the installation directory that you created in the preceding step. Ensure the file is transferred without undergoing any conversions. Example 1 shows a sample FTP session from OS/390.
Note: If you need to perform the tasks in this subsection, perform them in the order in which they are presented. Before you proceed ensure that the tasks in �Installing on OS/390� on page 12 have already been completed.
Example 1: Sample FTP Session from OS/390 (Sheet 1 of 2)
$ ftp hostname
IBM FTP CS V1R2
Connecting to: hostname ip-address port: 21.220-FTPD1 IBM FTP CS V1R2 at hostname, 06:11:21 on 2001-10-22.220 Connection will close if idle for more than 5 minutes.
NAME (hostname:user):joe
>>>USER joe331 Send password please.PASSWORD:
20

Installing Orbix Mainframe
Step 3�Unpack the tar file The compressed tar file contains a number of other tar files and an installation script. Unpack the tar file as follows:
>>>PASS 230 joe is logged on. Working directory is "JOE.".Command:
cd /home/joe/orbix60>>>CWD /home/joe/orbix60250 HFS directory /home/joe/orbix60 is the current workingdirectoryCommand:
bin
>>>TYPE I 200 Representation type is ImageCommand:
put /<dir>/orbix-6_0.tar /home/joe/orbix60/orbix-6_0.tar
>>>PORT ip-address,port200 Port request OK.>>>STOR /home/joe/orbix60/orbix-6_0.tar125 Storing data set /home/joe/orbix60/orbix-6_0.tar1658880 bytes transferred.250 Transfer completed successfully.1884160 bytes transferred in 12.510 seconds. Transfer rate
150.61 Kbytes/sec.Command:
quit
>>>QUIT221 Quit command received. Goodbye.$
Example 1: Sample FTP Session from OS/390 (Sheet 2 of 2)
$ tar -xvopf orbix-6_0.tar
21

Installing Orbix Mainframe
Step 4�Run the installation script
Run the installation script as follows:
Step 5�Accept license agreement
The license agreement dialog appears. Read the license agreement and, if you agree with the conditions, enter y.
Step 6�Specify high-level qualifier
You are asked to specify the high-level qualifier where you have installed the product data sets on OS/390. This must be the same as the high-level qualifier that you specified in �Step 3�Unpack the PDS� on page 13. If you chose to accept the default high-level qualifier, HLQ.ORBIX60, when you installed on OS/390, press Enter to accept the default now. Otherwise, specify the alternative high-level qualifier that you specified in �Step 3�Unpack the PDS� on page 13.
Step 7�Specify UNIX System Services installation directory
You are next asked to specify a directory where the product is to be installed on OS/390 UNIX System Services. The location you specify is referred to later in this guide as orbix_install_dir. The default is /opt/iona on UNIX. Specify your own directory choice or press Enter to accept the default.
Step 8�Specify codeset You are now asked what codeset the product should use. The default is based on the current LC_ALL setting. Specify the codeset you wish to use or press Enter to accept the default.
At this point, the installation script unpacks the tar files into orbix_install_dir and deletes each tar file.
$ sh install.sh
Note: To use a locale other than IBM-1047, convert the install script before running it, by using the following commands:
$ cp install.sh install.sh.orig
$ iconv -f ibm-1047 -t <codeset> install.sh.orig >install.sh
Note: If you choose a codeset other than IBM-1047, there is a slight delay while the script converts all the relevant files.
22

Installing Orbix Mainframe
Step 9�Delete original tar file When the installation is complete under orbix_install_dir, you can delete the original tar file and the installation script.
Step 10�Connect to configuration domain
Issue the following command to connect to the existing configuration domain:
Step 11�Include SSL load library in STEPLIB (if necessary)
This is only relevant if you want to use TLS from OS/390 UNIX System Services. If so, you must include the IBM System SSL load library in your STEPLIB. Use the following command to do this (where GSK-LOAD-LIBRARY represents the name of your System SSL load library):
. orbix_install_dir/etc/bin/default-domain_env.sh
export STEPLIB=GSK-LOAD-LIBRARY:$STEPLIB
23
Customizing Orbix Mainframe
Customizing Orbix Mainframe
Overview This section describes the customization tasks to be performed after installing Orbix Mainframe before you can use it. First it describes the standard tasks that you must perform. Then it describes additional customization that you might need to perform depending on your setup.
In this section This section discusses the following topics:
Note: You should read each step in full before proceeding with it, because the text might contain important recommendations or requirements that you should be aware of before proceeding.
Standard Customization Tasks page 25
Naming Service and IFR Customization page 44
IMS Server Adapter Customization page 45
CICS Server Adapter Customization page 47
Recap of Configuration Items Set During Customization page 56
24

Customizing Orbix Mainframe
Standard Customization Tasks
Overview This subsection describes standard customization tasks that you must perform before you can use Orbix Mainframe. You must perform these customization tasks in the order in which they are presented.
Step 1�Change dataset name defaults in ORXVARS
Change the default high-level qualifier in orbixhlq.PROCS(ORXVARS), to reflect the proper value for your installation. You can use the following command from ISPF (where orbixhlq represents your high-level qualifier, which can be up to 19 characters, including one or more periods):
Also, verify that the following variables in the ORXVARS member, which represent system dataset high-level qualifiers, match those installed on your OS/390 system:
Note: If you are not using SSL, all the steps in this section are relevant. If you are using SSL, only steps 1�6 in this section are relevant and further customization tasks are described in �SSL/TLS Customization� on page 37.
C 'HLQ.ORBIX60' 'orbixhlq' ALL
TCPIP This is the high-level qualifier for the IBM TCP/IP SEZARNT1 and SEZACMTX libraries. For example:
SET TCPIP=TCPIP
TCPIPCFG This is the TCP/IP configuration file to be used by Orbix programs. It is the file referred to as the TCPIP.DATA file in the IBM TCP/IP publications. For example:
SET TCPIPCFG=SYS1.TCPPARMS(TCPDATA)
CEE This is the high-level qualifier for the IBM Language Environment (L/E) C data sets, such as the SCEELKED library needed to link the sample demonstrations. For example:
SET CEE=CEE
CBC This is the high-level qualifier for the IBM C++ compiler data sets, such as the SCLBDLL library. For example:
SET CBC=CBC
25

Customizing Orbix Mainframe
If the supplied defaults do not match those in use at your site, change them where appropriate.
Step 2�Set ITLOCALE and CPPLCALE (if necessary)
This is only relevant if you want to run Orbix Mainframe in a locale other than IBM-1047, and your system and compiler are running in a locale other than the locale in which you want to run Orbix Mainframe.
If you plan to run Orbix Mainframe in a locale other than IBM-1047, and your system and compiler are running in a locale other than the locale in which you want to run Orbix Mainframe, set the following variables in orbixhlq.PROCS(ORXVARS):
In JCL, the parameter length (that is, the length of the PARM field) can be up to 100 bytes. The RPARM JCL symbolic and PPARM JCL symbolic often comprise the data that is passed in the PARM field. This might pose problems when passing -ORB arguments along with any locale arguments, because the total length of the PARM field might then exceed 100 bytes.
To avoid this potential problem, an optional DD name is supplied in the JCL components in your Orbix Mainframe installation, as follows:
When the preceding DD name is coded in the JCL, arguments of the form -ORBxxx yyy can be specified here rather than in the PARM field. For example:
ITLOCALE This is the locale in which you want to run Orbix Mainframe. For example, to have Orbix Mainframe run in the Swiss German locale, set ITLOCALE as follows:
SET ITLOCALE=',ENVAR(LC_ALL=DE_CH.IBM-500);
As shown in the preceding example, ensure that you include a comma (,) before ENVAR.
CPPLCALE This is the locale in which you want to run the C++ compiler. For example, to have the C++ compiler run in the Swiss German locale, set CPPLCALE as follows:
SET CPPLCALE='LOCALE('DE_CH.IBM-500)'
//ORBARGS DD *
//ORBARGS DD *-ORBname iona_utilities.imsa
26

Customizing Orbix Mainframe
The ORBname is supplied via the ORBARGS DD name rather than on the RPARM symbolic. This yields a saving of 27 bytes of the 100 that are available on the PARM field.
The following rules apply when using the ORBARGS DD name:
� Use it only for arguments of the form -ORBxxx yyy. Do not use it for other arguments.
� Code only one -ORBxxx argument per line.
� Up to a maximum of 16 lines can be coded.
� Each line must be of the form -ORBxxx yyy, where xxx represents the -ORB argument, and yyy represents the value for that argument.
� If multiple lines are coded, an invalidly coded line invalidates all others.
� If the same argument is coded both on the RPARM and in ORBARGS, the RPARM takes precedence.
� ORBARGS can be used with DD * or, alternatively, with DD DSN= pointing to a fixed block data set with a logical record length of 80 bytes.
Step 3�Change dataset name defaults in ORXCPPO
Change the default high-level qualifier in orbixhlq.PROCS(ORXCPPO), to reflect the proper value for your installation. You can use the following command from ISPF (where orbixhlq represents your high-level qualifier, which can be up to 19 characters):
Step 4�Choose a configuration domain name
The orbixhlq.CONFIG(ORBARGS) PDS contains the following setting, which specifies the default configuration domain name:
If you wish, you can specify an alternative configuration domain name other than DEFAULT@. The name can be up to eight characters long.
C 'HLQ.ORBIX60' 'orbixhlq' ALL
-ORBdomain_name DEFAULT@
27

Customizing Orbix Mainframe
When running Orbix Mainframe clients, servers, or services, you can specify the configuration domain name in JCL in either of the following ways:
� Use the ORBARGS DD statement, which allows a -ORBdomain_name to be specified inside the file that is pointed to by the ORBARGS DD statement. For example:
� Use the ITDOMAIN DD statement, which points to orbixhlq.CONFIG(domname), where domname represents the configuration domain name. For example:
If the ITDOMAIN DD statement specifies a PDS with a non-existent member name, a CORBA::INITIALIZE exception with a minor code of ERROR_IN_DOMAIN is thrown.
If you do not take either of the preceding approaches to specify a configuration domain name, the default name of DEFAULT@ is used.
//ORBARGS DD *-ORBdomain_name DEFAULT@/*
//ITDOMAIN DD DSN=orbixhlq.CONFIG(DEFAULT@),DISP-SHR
Note: The ITDOMAIN DD statement cannot be used in JCL that updates settings in the configuration, because it might conflict with a service that is currently running and using this ITDOMAIN DD statement. If you do this, an error occurs on opening the configuration file. In this case, the ORBARGS DD statement should be used instead.
Note: You can also specify the configuration domain name in the PARM field. However, because the PARM field is limited to 100 characters, this can cause JCL errors if other items are also specified. It is therefore recommended that, if you want to specify an alternative configuration domain name, you should use either of the preceding approaches instead of using JCL PARM.
28

Customizing Orbix Mainframe
Step 5�Set up your license file The product license information that you have received by e-mail needs to be transferred to the mainframe and formatted before it can be used by Orbix Mainframe. Follow these steps:
1. Preallocate a small data set on the host with the following information:
2. Use FTP to transfer the license as a text file into the newly created data set. The following is an example of the FTP command sequence, where the drive letter is C: and XXXX.XXXX represents the name of the data set you have just allocated:
3. After the license text file has been copied to OS/390, edit the JCL in orbixhlq.JCL(ORXCOPY), as follows:
♦ Change the default high-level qualifier to reflect the proper value for your installation. You can use the following command in ISPF to do this (where orbixhlq represents your high-level qualifier, which can be up to 19 characters):
C 'HLQ.ORBIX60' 'orbixhlq' ALL
♦ On the IN DD statement, replace where it says your VB dataset here with the name of the data set that contains your license file.
4. Submit ORXCOPY to copy the license file to orbixhlq.CONFIG(LICENSES). The ORXCOPY job copies the license file from a variable-length record file into the fixed-length record license file used by Orbix Mainframe. It splits long lines across records, delimiting them with a backslash in column 72.
Space Units Tracks
PRIMARY 1
SECONDARY 1
RECORD FORMAT VB
RECORD LENGTH 500 (or greater)
BLOCK SIZE 0
C:ftp os390hostftp> ascftp> put license.txt 'XXXX.XXXX'
29

Customizing Orbix Mainframe
Step6�Convert your license file (if necessary)
This is only relevant if you want to run Orbix Mainframe in a locale other than the default locale IBM-1047.
If so, the steps are:
1. In orbixhlq.PDS($THIRD), use the following command in ISPF to change the default high-level qualifier, to make it match your installation value (where orbixhlq represents your high-level qualifier, which can be up to 19 characters, including one or more periods):
C 'HLQ.ORBIX60' 'orbixhlq' ALL
2. In orbixhlq.PDS($THIRD), use the following command in ISPF to change the value of the TO variable, to make it match the locale codeset in which you want to run Orbix Mainframe (where IBM-xxx represents the codeset):
C 'IBM-500' 'IBM-xxx' ALL
The preceding command lets you simultaneously change all occurences of the default to make it match your codeset.
3. Submit orbixhlq.PDS($THIRD) to convert your license file.
4. This is only relevant if your system and compiler are not installed in IBM-1047, and you want to run Orbix Mainframe in a different locale to these.
i. Make a copy of the license file that you converted in point 2, and keep it. This is necessary for running Orbix Mainframe in the locale that you specified in point 2.
ii. In orbixhlq.PDS($THIRD), use the following command in ISPF to change the value of the TO variable, to make it match the locale codeset in which you want to run the Orbix IDL compiler (that is, the locale in which your system and compiler are installed):
C 'IBM-xxx' 'IBM-yyy' ALL
In the preceding example, IBM-xxx represents the locale codeset (that you specified in point 2) in which you want to run Orbix
Note: If your system and compiler are installed in IBM-1047, make a copy of your original license file at this point and keep it. This is necessary for running the Orbix IDL compiler.
30

Customizing Orbix Mainframe
Mainframe, and IBM-yyy represents the locale codeset in which you want to run the Orbix IDL compiler.
iii. In orbixhlq.PDS($THIRD), use the following command in ISPF to change the value of the FROM variable from IBM-1047, to make it match the locale codeset (that you specified in point 2) in which you want to run Orbix Mainframe:
C 'IBM-1047' 'IBM-xxx' ALL
iv. Submit orbixhlq.PDS($THIRD) to convert your license file to match the locale where you want to run the Orbix IDL compiler.
Step 7�Convert configuration file template (if necessary)
This is only relevant if your system and compiler are running in a locale that is different to the locale in which you want to run Orbix Mainframe.
A sample configuration file, orbixhlq.CONFIG(FILETMPL), is provided for an installation not using SSL.
If you want to run Orbix Mainframe in a locale different to the locale in which you are running your system and compiler, edit orbixhlq.PDS($THIRD), by changing the line// EXEC ORXICONV,P=HLQ.ORBIX60.CONFIG,M=LICENSES to the following:
Then run orbixhlq.PDS($THIRD) to convert the configuration file.
Step 8�Create a configuration file
Before you can use any of the supplied Orbix Mainframe services, values must be given to some configuration variables and the services must be run in prepare mode. JCL is provided in orbixhlq.JCL(DEPLOY1) to allow you to do this.
Follow these steps to customize the configuration variables:
1. In the MAKECON step of orbixhlq.JCL(DEPLOY1):
i. In the include "//HLQ.ORBIX60.DOMAINS(FILEDOMA) line, change HLQ to the high-level qualifier for your Orbix Mainframe installation, and change FILEDOMA to the member name of the
// EXEC ORXICONV,P=HLQ.ORBIX60.CONFIG,M=FILETMPL
Note: Before updating the configuration file, you should read at least part 1 of the CORBA Administrator�s Guide (available on the Documentation CD in your product package, or at http://www.iona.com/support/docs).
31

Customizing Orbix Mainframe
domains PDS that holds the configuration settings. FILEDOMA is the default, and can be left unchanged.
ii. Customize each of the following configuration items:
iii. In the //SYSUT2 DD DISP=SHR,DSN=&ORBIX..CONFIG(DEFAULT@) line, ensure that the member name for the //SYSUT2 PDS (DEFAULT@) matches the configuration domain name specified in orbixhlq.CONFIG(ORBARGS) in �Step 4�Choose a configuration domain name� on page 27.
LOCAL_HOSTNAME=""; Specify the fully qualified local hostname.
LOCAL_HFS_ROOT=""; Specify the HFS path of the OS/390 UNIX System Services directory to be used by the IONA services for databases and logs. For example:
"/opt/iona/orbix60";
When you start any of the IONA services, log files and persistent data are stored in the OS/390 UNIX System Services directory that you specify via this setting.
Note: You must have write access to the HFS at this location.
LOCAL_LOCATOR_PORT="5001"; Specify the TCP/IP port to be used by the locator.
LOCAL_NODE_DAEMON_PORT="5002"; Specify the TCP/IP port to be used by the node daemon.
Note: Each port number value must be unique.
32

Customizing Orbix Mainframe
2. In the MAKEDOM step of orbixhlq.JCL(DEPLOY1), change FILEDOMA in the SELECT MEMBER=((FILETMPL,FILEDOMA)) line to the value specified in the include statement of the MAKECON step. (FILEDOMA is the default value. If it was not changed in the MAKECON step, you need not change it here).
If you are deploying to the same domain a second time, and you want to overlay the file domain member, you can modify the SELECT line as follows (with the appropriate changes made to FILEDOMA, if necessary):
After you have set the preceding variables in orbixhlq.JCL(DEPLOY1), change the default high-level qualifier in DEPLOY1, to reflect the proper value for your installation.
Step 9�Update configuration and prepare to run daemons
Now submit orbixhlq.JCL(DEPLOY1). This does all the following:
� It creates a configuration domain in orbixhlq.CONFIG. By default, the configuration domain is created in the DEFAULT@ member.
� It copies the appropriate configuration file template to orbixhlq.DOMAINS(FILEDOMA).
� It runs the locator and node daemon in prepare mode.
� It copies the IORs generated for the locator and node daemon to the LOCAL_LOCATOR_REFERENCE and LOCAL_NODE_DAEMON_REFERENCE configuration variables in orbixhlq.CONFIG(DEFAULT@).
SELECT MEMBER=((FILETMPL,FILEDOMA,R))
Note: The default is FILEDOMA. This might have been customized to an alternative name in �Step 8�Create a configuration file� on page 31. If so, the configuration file template is copied to that member name instead.
Note: The locator and node daemon must be run in prepare mode before you can start Orbix Mainframe. Running the locator and node daemon in prepare mode generates stringified IORs for them.
Note: The orbixhlq.CONFIG(IORLCT) member contains two IORs�IT_Locator and IT_SingleLocator. The IOR for IT_Locator is used.
33

Customizing Orbix Mainframe
The NODEDAEM step produces a message, as shown in the following example. This message can be safely ignored, because there is no native activator supplied in this release of Orbix Mainframe:
When running the prepare jobs, the permissions set for the HFS files and directories that are created are based on a default umask of 022. If you require other permissions (for example, to allow multiple users in the same group to run IONA services (not at the same time)), specify a umask of 002. To do this, add an RPARM to each prepare step. For example, update the locator prepare step in the HLQ.JCL(DEPLOY1) JCL as follows:
If you are not running in the default locale, add the locale to the RPARM, as follows:
You might wish to set a umask for the locator, node daemon, IFR, and Naming Service, in which case you must update the JCL in HLQ.JCL(DEPLOY1) and HLQ.JCL(DEPLOY2).
Mon, 29 Sep 2003 17:25:41.0000000 [host:DEPLOY1,A=0016] (IT_ACTIVATOR:0) W - Activation feature not supported in the batch environment
//*//* Prepare the locator//*//PREPLCT EXEC PROC=ORXG,// PROGRAM=ORXLOCAT,// RPARM='ENVAR(_EDC_UMASK_DFLT=002)',// PPARM='prepare -publish_to_file=DD:ITCONFIG(IORLCT)'//*
//*//* Prepare the locator//*//PREPLCT EXEC PROC=ORXG,// PROGRAM=ORXLOCAT,// RPARM='ENVAR(_EDC_UMASK_DFLT=002,LC_ALL=DE_CH.IBM-500)',// PPARM='prepare -publish_to_file=DD:ITCONFIG(IORLCT)'//*
34

Customizing Orbix Mainframe
Step 10�Run daemons in run mode
You are now ready to start the locator and node daemon. Follow these steps:
1. Edit the JCL in orbixhlq.JCL(LOCATOR) and orbixhlq.JCL(NODEDAEM), to change the default high-level qualifier, so that it reflects the proper value for your installation.
2. Submit the orbixhlq.JCL(LOCATOR) job. After submitting it, wait until you see the following message:
3. Submit the orbixhlq.JCL(NODEDAEM) job. After submitting it, wait until you see the following message:
Step 11�Change demonstration dataset name defaults
Most of the members within the following demonstration libraries contain the default high-level qualifier:
� orbixhlq.DEMOS.CICS.COBOL.BLD.JCL
� orbixhlq.DEMOS.CICS.PLI.BLD.JCL
� orbixhlq.DEMOS.COBOL.BLD.JCL
� orbixhlq.DEMOS.COBOL.RUN.JCL
� orbixhlq.DEMOS.CPP.BLD.JCL
� orbixhlq.DEMOS.CPP.RUN.JCL
� orbixhlq.DEMOS.IMS.COBOL.BLD.JCL
� orbixhlq.DEMOS.IMS.PLI.BLD.JCL
� orbixhlq.DEMOS.PLI.BLD.JCL
� orbixhlq.DEMOS.PLI.RUN.JCL
Before you build and run the supplied demonstrations to test the installation, as described in �Verifying the Installation� on page 59, you must change the preceding libraries to reflect the proper high-level qualifier for your installation.
+ORX2001I ORB iona_services.locator STARTED (hostname:LOCATOR,A=nnnn)
+ORX2001I ORB iona_services.node_daemon STARTED (hostname:NODEDAEM,A=nnnn)
35

Customizing Orbix Mainframe
Step 12�Rebuild existing IDL and applications
If you are an existing user who has built applications using a previous version of the product, you must recompile the relevant IDL interfaces and rebuild those applications, to take into account the changes inherent in the latest version of the product.
36

Customizing Orbix Mainframe
SSL/TLS Customization
Overview This subsection is only relevant if you want to run the services (for example, the locator daemon, node daemon, CICS or IMS adapters) or the supplied demonstrations, with SSL enabled.
Step 1�Create SSL certificates To run the services (for example, the locator daemon, node daemon, CICS or IMS adapters) or the supplied demonstrations, with SSL enabled, you must generate some sample certificates for these services and programs to use. A job is provided in orbixhlq.JCL(GENCERT) to do this.
The GENCERT JCL contains the default high-level qualifier, so first change it to reflect the proper value for your installation. You must also change the user ID to make it match the user ID that the Orbix services use. Then submit orbixhlq.JCL(GENCERT).
Step 2�Add System SSL load library
The services require access to some IBM System SSL modules. You must therefore add the the System SSL load library to the STEPLIB of orbixhlq.PROCS(ORXG), after the existing entries, as follows (where existing entry represents an existing entry, and GSK-LOAD-LIBRARY represents the name of your System SSL load library):
Note: If you need to perform the tasks in this subsection, perform them in the order in which they are presented. Before you proceed ensure that steps 1�6 in �Standard Customization Tasks� on page 25 have already been completed.
//STEPLIB DD existing entry// DD existing entry// DD existing entry// DD existing entry// DD existing entry// DD DISP=SHR,DSN=GSK-LOAD-LIBRARY
37

Customizing Orbix Mainframe
Step 3�Convert configuration file template
This is only relevant if your system and compiler are running in a locale that is different to the locale in which you want to run Orbix Mainframe.
A sample configuration file, orbixhlq.CONFIG(TLSTMPL), is provided for an installation using SSL.
If you want to run Orbix Mainframe in a locale different to the locale in which you are running your system and compiler, edit orbixhlq.PDS($THIRD), by changing the line // EXEC ORXICONV,P=HLQ.ORBIX60.CONFIG,M=LICENSES to the following:
Then run orbixhlq.PDS($THIRD) to convert the configuration file.
Step 4�Create a configuration file
Before you can use any of the supplied Orbix Mainframe services, values must be given to some configuration variables and the services must be run in prepare mode. JCL is provided in orbixhlq.JCL(DEPLOYT) to allow you to do this.
Follow these steps to customize the configuration variables:
1. In the MAKECON step of orbixhlq.JCL(DEPLOYT):
i. In the include "//HLQ.ORBIX60.DOMAINS(FILEDOMA) line, change HLQ to the high-level qualifier for your Orbix Mainframe installation, and change FILEDOMA to the member name of the domains PDS that holds the configuration settings. FILEDOMA is the default, and can be left unchanged.
ii. Customize each of the following configuration items:
// EXEC ORXICONV,P=HLQ.ORBIX60.CONFIG,M=TLSTMPL
Note: Before updating the configuration file, you should read at least part 1 of the CORBA Administrator�s Guide (available on the Documentation CD in your product package, or at http://www.iona.com/support/docs).
LOCAL_HOSTNAME=""; Specify the fully qualified local hostname.
38

Customizing Orbix Mainframe
iii. In the //SYSUT2 DD DISP=SHR,DSN=&ORBIX..CONFIG(DEFAULT@) line, ensure that the member name for the //SYSUT2 PDS (DEFAULT@) matches the configuration domain name specified in orbixhlq.CONFIG(ORBARGS) in �Step 4�Choose a configuration domain name� on page 27.
LOCAL_HFS_ROOT=""; Specify the HFS path of the OS/390 UNIX System Services directory to be used by the IONA services for databases and logs. For example:
"/opt/iona/orbix60";
When you start any of the IONA services, log files and persistent data are stored in the OS/390 UNIX System Services directory that you specify via this setting.
Note: You must have write access to the HFS at this location.
LOCAL_LOCATOR_PORT="5001"; Specify the TCP/IP port to be used by the locator for non-secure conversations.
LOCAL_NODE_DAEMON_PORT="5002"; Specify the TCP/IP port to be used by the node daemon for non-secure conversations.
LOCAL_TLS_LOCATOR_PORT="5101"; Specify the TCP/IP port to be used by the locator for secure conversations.
LOCAL_TLS_NODE_DAEMON_PORT="5102";Specify the TCP/IP port to be used by the node daemon for secure conversations.
Note: Each port number value must be unique.
39

Customizing Orbix Mainframe
2. In the MAKEDOM step of orbixhlq.JCL(DEPLOYT), change FILEDOMA in the SELECT MEMBER=((TLSTMPL,FILEDOMA)) line to the value specified in the include statement of the MAKECON step. (FILEDOMA is the default value. If it was not changed in the MAKECON step, you need not change it here).
If you are deploying to the same domain a second time, and you want to overlay the file domain member, you can modify the SELECT line as follows (with the appropriate changes made to FILEDOMA, if necessary):
After you have set the preceding variables in orbixhlq.JCL(DEPLOYT), change the default high-level qualifier in DEPLOYT, to reflect the proper value for your installation.
Step 5�Update configuration and prepare to run daemons
Now submit orbixhlq.JCL(DEPLOYT). This does all the following:
� It creates a configuration domain in orbixhlq.CONFIG. By default, the configuration domain is created in the DEFAULT@ member.
� It copies the appropriate configuration file template to orbixhlq.DOMAINS(FILEDOMA).
� It runs the locator and node daemon in prepare mode.
� It copies the IORs generated for the locator and node daemon to the LOCAL_LOCATOR_REFERENCE and LOCAL_NODE_DAEMON_REFERENCE configuration variables in orbixhlq.CONFIG(DEFAULT@).
SELECT MEMBER=((TLSTMPL,FILEDOMA,R))
Note: The default is FILEDOMA. This might have been customized to an alternative name in �Step 4�Create a configuration file� on page 38. If so, the configuration file template is copied to that member name instead.
Note: The locator and node daemon must be run in prepare mode before you can start Orbix Mainframe. Running the locator and node daemon in prepare mode generates stringified IORs for them.
Note: The orbixhlq.CONFIG(IORLCT) member contains two IORs�IT_Locator and IT_SingleLocator. The IOR for IT_Locator is used.
40

Customizing Orbix Mainframe
The NODEDAEM step produces a message, as shown in the following example. This message can be safely ignored, because there is no native activator supplied in this release of Orbix Mainframe:.
When running the prepare jobs, the permissions set for the HFS files and directories that are created are based on a default umask of 022. If you require other permissions (for example, to allow multiple users in the same group to run IONA services (not at the same time)), specify a umask of 002. To do this, add an RPARM to each prepare step. For example, update the locator prepare step in the HLQ.JCL(DEPLOYT) JCL as follows:
If you are not running in the default locale, add the locale to the RPARM, as follows:
You might wish to set a umask for the locator, node daemon, IFR, and Naming Service, in which case you must update the JCL in HLQ.JCL(DEPLOYT).
Mon, 29 Sep 2003 17:25:41.0000000 [host:DEPLOYT,A=0016] (IT_ACTIVATOR:0) W - Activation feature not supported in the batch environment
//*//* Prepare the locator//*//PREPLCT EXEC PROC=ORXG,// PROGRAM=ORXLOCAT,// RPARM='ENVAR(_EDC_UMASK_DFLT=002)',// PPARM='prepare -publish_to_file=DD:ITCONFIG(IORLCT)'//*
//*//* Prepare the locator//*//PREPLCT EXEC PROC=ORXG,// PROGRAM=ORXLOCAT,// RPARM='ENVAR(_EDC_UMASK_DFLT=002,LC_ALL=DE_CH.IBM-500)',// PPARM='prepare -publish_to_file=DD:ITCONFIG(IORLCT)'//*
41

Customizing Orbix Mainframe
Step 6�Run daemons in run mode
You are now ready to start the locator and node daemon. Follow these steps:
1. Edit the JCL in orbixhlq.JCL(LOCATOR) and orbixhlq.JCL(NODEDAEM), to change the default high-level qualifier, so that it reflects the proper value for your installation.
2. Submit the orbixhlq.JCL(LOCATOR) job. After submitting it, wait until you see the following message:
3. Submit the orbixhlq.JCL(NODEDAEM) job. After submitting it, wait until you see the following message:
Step 7�Change demonstration dataset name defaults
Most of the members within the following demonstration libraries contain the default high-level qualifier:
� orbixhlq.DEMOS.CICS.COBOL.BLD.JCL
� orbixhlq.DEMOS.CICS.PLI.BLD.JCL
� orbixhlq.DEMOS.COBOL.BLD.JCL
� orbixhlq.DEMOS.COBOL.RUN.JCL
� orbixhlq.DEMOS.CPP.BLD.JCL
� orbixhlq.DEMOS.CPP.RUN.JCL
� orbixhlq.DEMOS.IMS.COBOL.BLD.JCL
� orbixhlq.DEMOS.IMS.PLI.BLD.JCL
� orbixhlq.DEMOS.PLI.BLD.JCL
� orbixhlq.DEMOS.PLI.RUN.JCL
Before you build and run the supplied demonstrations to test the installation, as described in �Verifying the Installation� on page 59, you must change the preceding libraries to reflect the proper high-level qualifier for your installation.
+ORX2001I ORB iona_services.locator STARTED (hostname:LOCATOR,A=nnnn)
+ORX2001I ORB iona_services.node_daemon STARTED (hostname:NODEDAEM,A=nnnn)
42

Customizing Orbix Mainframe
Step 8�Rebuild existing IDL and applications
If you are an existing user who has built applications using a previous version of the product, you must recompile the relevant IDL interfaces and rebuild those applications, to take into account the changes inherent in the latest version of the product.
43

Customizing Orbix Mainframe
Naming Service and IFR Customization
Overview This subsection is only relevant if you want to use the Naming Service or Interface Repository (IFR) components of Orbix Mainframe. It describes the customization tasks to be performed before using them.
Step 1�Prepare to run the naming service and IFR
Before proceeding with this step ensure that the locator and node daemon are running.
If you want to use the Naming Service or Interface Repository (IFR) components of Orbix Mainframe, you must run them first in prepare mode. A job is provided to do this in orbixhlq.JCL(DEPLOY2). This JCL contains the default high-level qualifier, so first change it to reflect the proper value for your installation before you submit it.
Running the Naming Service and Interface Repository in prepare mode generates stringified IORS for them. The DEPLOY2 JCL automatically writes the IORs for the Naming Service and IFR to orbixhlq.CONFIG(IORNAM) and orbixhlq.CONFIG(IORIFR) respectively. It then copies these IORs into the LOCAL_NAMING_REFERENCE and LOCAL_IFR_REFERENCE variables in orbixhlq.CONFIG(DEFAULT@).
Step 2�Run the naming service and IFR in run mode
You are now ready to start the Naming Service and IFR. Edit the JCL in orbixhlq.JCL(NAMING) and orbixhlq.JCL(IFR), to change the default high-level qualifier to reflect the proper value for your installation. Then submit the jobs.
Note: If you need to perform the tasks in this subsection, perform them in the order in which they are presented. Before you proceed ensure that the tasks in �Standard Customization Tasks� on page 25 and �SSL/TLS Customization� on page 37 have already been completed, as appropriate.
Note: The orbixhlq.CONFIG(IORNAM) member contains two IORs�NameService and IT_SingleNameService. The IOR for NameService is used.
44

Customizing Orbix Mainframe
IMS Server Adapter Customization
Overview This subsection is only relevant if you want to use the IMS server adapter component of Orbix Mainframe. It describes the customization tasks to be performed before using the adapter.
Step 1�Avoid known problems IONA recommends that the PTFs listed in �Installation Prerequisites� on page 3 are applied, to avoid known problems.
Step 2�Configure OTMA or APPC for IMS
To use the IMS server adapter, either of the following must be enabled for IMS:
� OTMA and the OTMA Callable Interface.
� APPC.
For details of how to configure OTMA for IMS see the IBM publication: Open Transaction Manager Access Guide and Reference, SC26-8743.
For details of how to configure APPC for IMS see the IBM publication: MVS Planning: APPC/MVS Management, GC28-1807. Additionally, for specific details on the use of APPC by IMS, see the chapter on administration of APPC/IMS and LU 6.2 devices in the IBM publication: IMS/ESA Administration Guide: Transaction Manager, SC26-8104.
Step 3�Verify adapter configuration prerequisites
Verify that the configuration variables in the imsa scope of your configuration file have been changed to match those specified in the IMS control region that you are connecting to. In particular, ensure that you have specified the location of the adapter mapping member that is to be used. For details of how to do this, and the defaults used when the entries are not specified via configuration, see the IMS Adapters Administrator�s Guide (available on the Documentation CD in your product package, or at http://www.iona.com/support/docs).
Note: If you need to perform the tasks in this subsection, perform them in the order in which they are presented. Before you proceed ensure that the tasks in �Naming Service and IFR Customization� on page 44 have already been completed, because you must use the IFR if you want to use the IMS server adapter.
45

Customizing Orbix Mainframe
Step 4�Customize IMS JCL The following libraries should be added to the IMS message region�s STEPLIB concatenation, as follows:
Check if the following entries are already defined in the IMS message region�s JCL. If not, they should be added, to ensure you receive all output from your IMS servers (recycle the message regions to pick up these libraries):
Step 5�Run the IMS server adapter in prepare mode
Before proceeding with this step ensure that the locator daemon, node daemon, and IFR are all running. Also ensure that the relevant IMS region is active.
If you want to use the IMS server adapter, you must run it first in prepare mode. Edit the JCL in orbixhlq.JCL(PREPIMSA), to change the default high-level qualifier, so that it reflects the proper value for your installation. Then submit orbixhlq.JCL(PREPIMSA) to run the IMS server adapter in prepare mode.
Running the IMS server adapter in prepare mode generates a stringified IOR for it and writes this IOR to orbixhlq.CONFIG(IORIMSA). The IT_MFA IOR is automatically added to the configuration file by the prepare step.
Step 6�Run the IMS server adapter in run mode
You are now ready to start the IMS server adapter. Edit the JCL in orbixhlq.JCL(IMSA), to change the default high-level qualifier, so that it reflects the proper value for your installation. Then submit this JCL to run the IMS server adapter.
DD DSN=orbixhlq.MFA.LOAD,DISP=SHRDD DSN=orbixhlq.DEMOS.IMS.COBOL.LOAD,DISP=SHRDD DSN=orbixhlq.DEMOS.IMS.PLI.LOAD,DISP=SHR
SYSPRINT DD SYSOUT=*CEEDUMP DD SYSOUT=*CEEOUT DD SYSOUT=*SYSOUT DD SYSOUT=*
46

Customizing Orbix Mainframe
CICS Server Adapter Customization
Overview This subsection is only relevant if you want to use the CICS server adapter component of Orbix Mainframe. It describes the customization tasks to be performed before using the adapter.
Step 1�Avoid known problems IONA recommends that the PTFs listed in �Installation Prerequisites� on page 3 are applied, to avoid known problems.
Step 2�Configure IRC for CICS To use the CICS server adapter, support for Inter Region Communication (IRC) must be enabled in CICS. In general, IRC can be enabled by specifying the CICS parameter IRC=YES or IRCSTRT=YES (depending on the version), and by using the default CICS definitions in the CSD group DFH$EXCI that are delivered with CICS by default. These definitions are sufficient to get started and they can be used as models for any future requirements you might have. The following message is issued if this support is active and installed correctly within CICS:
If this message is not issued, you cannot use the CICS server adapter to communicate with that CICS region.
Note: If you need to perform the tasks in this subsection, perform them in the order in which they are presented. Before you proceed ensure that the tasks in �Naming Service and IFR Customization� on page 44 have already been completed, because you must use the IFR if you want to use the CICS server adapter.
DFHSI1519I CICS The inter-region communication session was successfully started.
47

Customizing Orbix Mainframe
Step 3�Configure EXCI or APPC for CICS
To use the CICS server adapter, either of the following must be enabled for CICS:
� EXCI
� APPC
For details of how to configure EXCI for CICS see the IBM publication: CICS External Interfaces Guide, SC33-1944.
For details of how to configure APPC for CICS see the IBM publication: MVS Planning: APPC/MVS Management, GC28-1807. Additionally, for specific details on the use of APPC by CICS, see the chapter on defining APPC links in the IBM publication: CICS Intercommunication Guide, SC33-1695.
Step 4�Define required resources to CICS
Before you can run Orbix Mainframe CICS applications in your CICS region, you must perform a number of additional steps to enable CICS to support Orbix Mainframe servers. Depending on your installation, one or all of these tasks might already have been completed (you must verify this with the systems programmer responsible for CICS at your site; see the CICS Adapters Administrator�s Guide for more details of these tasks):
� Check if the latest CICS Language Environment (LE) support is installed in your CICS region. See the IBM publication: Language Environment for OS/390 Customization for details on installing LE support in CICS.
� Check if support for the C++ standard classes is explicitly defined to CICS. See the IBM publication OS/390 C/C++ Programming Guide for details of the steps required to run C++ application programs under CICS.
A sample job is provided in orbixhlq.JCL(ORBIXCSD) to run DFHCSDUP (which is the CICS offline resource definition utility) to define the CICS resources used by the sample jobs and demonstrations. You can run this job, or just use it as a reference when defining the resources online with the CEDA transaction.
When the resources have been defined, use CEDA to install the whole group. If you decide to run the job, first change the JCL to reflect the proper CICS high-level qualifier in use at your site.
48

Customizing Orbix Mainframe
Step 5�Customize CICS JCL Follow these steps to customize the CICS JCL:
� Add the following load libraries to the DFHRPL concatenation in the CICS region, as follows:
� Check if the CEE.SCEERUN and CBC.SCLBDLL libraries are already in the DFHRPL concatenation for the CICS region. If not, add them as follows:
� Check if the CEE.SCEERUN library is already in the STEPLIB concatenation for the CICS region. If not, add it as follows:
� Check if CEEMSG and CEEOUT entries are already defined in the JCL for the CICS region. If not, they should be added as follows, to ensure you receive all output from your CICS servers:
You must recycle CICS to pick up these changes.
Step 6�CICS Security The CICS server adapter uses standard CICS security mechanisms to communicate with the CICS regions. See the CICS Adapters Administrator�s Guide (available on the Documentation CD in your product package, or at http://www.iona.com/support/docs) for a detailed description of security considerations involved in using the adapter, and a review of general Orbix and CICS security implications.
To use the CICS server adapter with a secured CICS region, a number of RACF definitions must be added or changed. The following are some examples of RACF commands that are needed to establish the necessary
DD DSN=orbixhlq.MFA.LOAD,DISP=SHRDD DSN=orbixhlq.DEMOS.CICS.COBOL.LOAD,DISP=SHRDD DSN=orbixhlq.DEMOS.CICS.PLI.LOAD,DISP=SHR
DD DSN=CEE.SCEERUN,DISP=SHRDD DSN=CBC.SCLBDLL,DISP=SHR
DD DSN=CEE.SCEERUN,DISP=SHR
CEEMSG DD SYSOUT=*CEEOUT DD SYSOUT=*
49

Customizing Orbix Mainframe
permissions. Depending on what security options are enabled in your CICS region, or if the region uses SECPRFX=YES, or if you use group instead of member RACF classes, the commands for your region might differ.
The CICS server adapter requires access to the EXCI connection, the CICS region, and the EXCI mirror transaction (the names of which are all specified as arguments to the server adapter when it starts). The following is an example of the commands for the default mode:
With CICS TS, the default setting of the SURROGCHK parameter in the DFHXCOPT options table has changed from NO to YES. To avoid a 423 error from EXCI, set SURROGHCK=NO in the DFHXCOPT options table or give the client user ID�s READ authority to a profile named userid.DFHEXCI in the RACF SURROGAT general resource class. See the chapter on security in the IBM publication: CICS External Interfaces Guide, SC33-1944 for more details of how to do this.
Step 7�Verify adapter configuration prerequisites
Verify that the configuration variables in the cicsa scope of your configuration file have been changed to match those specified in the CICS control region that you are connecting to. In particular, ensure that you have specified the location of the adapter mapping member that is to be used. For details of how to do this, and the defaults used when the entries are not specified via configuration, see the CICS Adapters Administrator�s Guide (available on the Documentation CD in your product package, or at http://www.iona.com/support/docs).
RDEFINE FACILITY (DFHAPPL.ORXPIPE1) UACC(NONE)PERMIT DFHAPPL.ORXPIPE1 CLASS(FACILITY) ID(server)
ACCESS(UPDATE)
RDEFINE FACILITY (DFHAPPL.CICS) UACC(NONE)PERMIT DFHAPPL.CICS CLASS(FACILITY) ID(server) ACCESS(READ)
REDEFINE TCICSTRN ORX1 UACC(NONE)PERMIT ORX1 CLASS(TCICSTRN) ID(server) ACCESS(READ)
50

Customizing Orbix Mainframe
Step 8�Run the CICS server adapter in prepare mode
Before proceeding with this step ensure that the locator daemon, node daemon, and IFR are all running. Also ensure that the relevant CICS region is active.
If you want to use the CICS server adapter, you must run it first in prepare mode. Edit the JCL in orbixhlq.JCL(PREPCICA), to change the default high-level qualifier, so that it reflects the proper value for your installation. Also change cicshlq, to reflect the proper high-level qualifier for CICS at your site. Then submit orbixhlq.JCL(PREPCICA) to run the CICS server adapter in prepare mode.
Running the CICS server adapter in prepare mode generates a stringified IOR for it and writes this IOR to orbixhlq.CONFIG(IORCICSA). The IT_MFA IOR is automatically added to the configuration file by the prepare step.
Step 9�Run the CICS server adapter in run mode
You are now ready to start the CICS server adapter. Edit the JCL in orbixhlq.JCL(CICSA), to change the default high-level qualifier, so that it reflects the proper value for your installation. Also change cicshlq, to reflect the proper high-level qualifier for CICS at your site. Then submit this JCL to run the CICS server adapter.
51
Customizing Orbix Mainframe
Client Adapter Customization
Overview This subsection is only relevant if you want to use the IMS/CICS client adapter component of Orbix Mainframe. It describes the customization tasks to be performed before using the client adapter.
Step 1�Avoid known problems IONA recommends that the PTFs listed in �Installation Prerequisites� on page 3 are applied, to avoid known problems.
Step 2�Configure APPC for IMS To use the client adapter with IMS, APPC communication must be enabled for IMS.
For details of how to configure APPC for IMS see the IBM publication: MVS Planning: APPC/MVS Management, GC28-1807. Additionally, for specific details on the use of APPC by IMS, see the chapter on administration of APPC/IMS and LU 6.2 devices in the IBM publication: IMS/ESA Administration Guide: Transaction Manager, SC26-8104.
Step 3�Configure APPC for CICS To use the client adapter with CICS, APPC communication must be enabled for CICS.
For details of how to configure APPC for CICS see the IBM publication: MVS Planning: APPC/MVS Management, GC28-1807. Additionally, for specific details on the use of APPC by CICS, see the chapter on defining APPC links in the IBM publication: CICS Intercommunication Guide, SC33-1695.
Note: If you need to perform the tasks in this subsection, perform them in the order in which they are presented. Before you proceed ensure that the tasks in �Naming Service and IFR Customization� on page 44 have already been completed, because you must use the IFR if you want to use the IMS/CICS client adapter.
52

Customizing Orbix Mainframe
Step 4�Define client adapter APPC/MVS side information
To use the client adapter, you will need to define a symbolic destination name in the APPC/MVS Side Information data set. Although JCL is not provided to do this in your product installation, the IMS Adapters Administrator�s Guide provides an example of how to do this using a symbolic destination name of ORXCLNT1. The IMS Adapters Administrator�s Guide is available on the Documentation CD in your product package, or at http://www.iona.com/support/docs.
Step 5�Verify client adapter configuration
Follow these steps to verify client adapter configuration:
� Verify that the configuration variables in the mfu scope of your configuration member are valid for your installation. In particular, verify that the following configuration variable matches the client adapter APPC/MVS Side Information DESTNAME you specified in �Step 4�Define client adapter APPC/MVS side information� on page 53. For example:
For details of how to change configuration, and the defaults used when the entries are not specified via configuration, see the IMS Adapters Administrator�s Guide (available on the Documentation CD in your product package, or at http://www.iona.com/support/docs).
� Review the following client configuration parameters shipped in orbixhlq.JCL(MFACLINK) and make any changes that are required:
If you need to change any of the shipped values, you must assemble and relink the new configuration into orbixhlq.MFA.LOAD(ORXMFAC1). Edit the JCL in orbixhlq.JCL(MFACLINK) to change the default high-level qualifier, so that it reflects the proper value for your installation and then submit the JCL.
plugins:amtp_appc:symbolic_destination = "ORXCLNT1";
SYMBDST The value specified must match the value in the client adapter APPC/MVS Side Information DESTNAME you specified in �Step 4�Define client adapter APPC/MVS side information� on page 53.
LOCALLU The value specified must match the client adapter CICS/IMS LU name. This is the LU name used for APPC communications in CICS and IMS.
53

Customizing Orbix Mainframe
Step 6�Customize IMS JCL To use the client adapter with IMS, add the following libraries to the IMS message region�s STEPLIB concatenation, as follows:
Check if the following entries are already defined in the IMS message region�s JCL. If not, they should be added, to ensure that you receive all output from your IMS clients (recycle the message regions to pick up these libraries):
Check if the CEE.SCEERUN library is already in the STEPLIB concatenation for the CICS region. If not, add it as follows:
Step 7�Customize CICS JCL To use the client adapter with CICS, add the following libraries to the CICS region�s DFHRPL concatenation, as follows:
Check if the CEE.SCEERUN and CBC.SCLBDLL libraries are already in the DFHRPL concatenation for the CICS region. If not, add them as follows:
DD DSN=orbixhlq.MFA.LOAD.DISP=SHRDD DSN=orbixhlq.DEMOS.IMS.COBOL.LOAD,DISP=SHRDD DSN=orbixhlq.DEMOS.IMS.PLI.LOAD,DISP=SHR
SYSPRINT DD SYSOUT=*CEEDUMP DD SYSOUT=*CEEOUT DD SYSOUT=*SYSOUT DD SYSOUT=*
DD DSN=CEE.SCEERUN,DISP=SHR
DD DSN=orbixhlq.MFA.LOAD,DISP=SHRDD DSN=orbixhlq.DEMOS.CICS.COBOL.LOAD,DISP=SHRDD DSN=orbixhlq.DEMOS.CICS.PLI.LOAD,DISP=SHR
DD DSN=CEE.SCEERUN,DISP=SHRDD DSN=CBC.SCLBDLL,DISP=SHR
54

Customizing Orbix Mainframe
Step 8�Define required resources to CICS
Before you can run Orbix Mainframe CICS applications in your CICS region, you must perform a number of additional steps to enable CICS to support Orbix Mainframe clients. Depending on your installation, one or all of these tasks might already have been completed. (You must verify with the systems programmer responsible for CICS at your site.) See the CICS Adapters Administrator�s Guide for more details of these tasks:
� Check if the latest CICS Language Environment (LE) support is installed in your CICS region. See the IBM publication: Language Environment for OS/390 Customization for details on installing LE support in CICS.
� Check if support for the C++ standard classes is explicitly defined to CICS. See the IBM publication: OS/390 C/C++ Programming Guide for details of the steps required to run C++ application programs under CICS.
� A sample job is provided in orbixhlq.JCL(ORBIXCSD) to run DFHCSDUP (the CICS offline resource definition utility) to define the CICS resources used by the sample jobs and demonstrations. You can run this job, or just use it as a reference when defining the resources online with the CEDA transaction. When the resources have been defined, use CEDA to install the whole group. If you decide to run the job, first change the JCL to reflect the proper CICS high-level qualifier in use at your site.
Step 9�Start the client adapter You are now ready to start the client adapter. Edit the JCL in orbixhlq.JCL(MFCLA), to change the default high-level qualifier, so that it reflects the proper value for your installation. Then submit this JCL to start the client adapter.
55

Customizing Orbix Mainframe
Recap of Configuration Items Set During Customization
Overview This subsection provides a summary and recap of the configuration items that are set during the customization tasks already described in this subsection.
Items set during standard and SSL/TLS customization
Table 2 summarizes the configuration items that are set during the standard customization tasks. See �Step 8�Create a configuration file� on page 31 and �Step 9�Update configuration and prepare to run daemons� on page 33 for more details of how these are set.
Table 2: Items Set During Standard Customization Tasks
Configuration Item Description
LOCAL_HOSTNAME Fully qualified local hostname.
LOCAL_HFS_ROOT HFS path to be used by IONA services for databases and logs.
LOCAL_NODE_DAEMON_PORT TCP/IP port to be used by the node daemon. (This should be unique.)
LOCAL_TLS_NODE_DAEMON_PORT TCP/IP port to be used by the node daemon for secure conversations. (This should be unique.)
LOCAL_LOCATOR_PORT TCP/IP port to be used by the locator. (This should be unique.)
LOCAL_TLS_LOCATOR_PORT TCP/IP port to be used by the locator for secure conversations. (This should be unique.)
LOCAL_NODE_DAEMON_REFERENCE Stringified IOR for the node daemon.
LOCAL_LOCATOR_REFERENCE Stringified IOR for the locator.
56

Customizing Orbix Mainframe
Items set during naming service and IFR customization
Table 3 summarizes the additional configuration items that are set if you choose to use the Naming Service and IFR. See �Step 1�Prepare to run the naming service and IFR� on page 44 for more details of how these are set.
Items set during IMS or CICS server adapter customization
Table 4 summarizes the additional configuration items that are set if you choose to use the IMS or CICS server adapter. Some configuration items must be manually set.
Table 3: Items Set During Naming Service and IFR Customization
Configuration Item Description
LOCAL_NAMING_REFERENCE Stringified IOR for the Naming Service.
LOCAL_IFR_REFERENCE Stringified IOR for the IFR.
Table 4: Items Set During IMS or CICS Server Adapter Customization
Configuration Item Description
LOCAL_MFA_IMS_REFERENCE Stringified IOR for the IMS server adapter.
LOCAL_MFA_CICS_REFERENCE Stringified IOR for the CICS server adapter.
plugins:imsa:iiop:port TCP/IP port to be used by the IMS server adapter. (This should be unique.) This is only required if running the adapter in direct persistent mode. The default is to run it in indirect persistent mode.
plugins:cicsa:iiop:port TCP/IP port to be used by the CICS server adapter. (This should be unique.) This is only required if running the adapter in direct persistent mode. The default is to run it in indirect persistent mode.
57
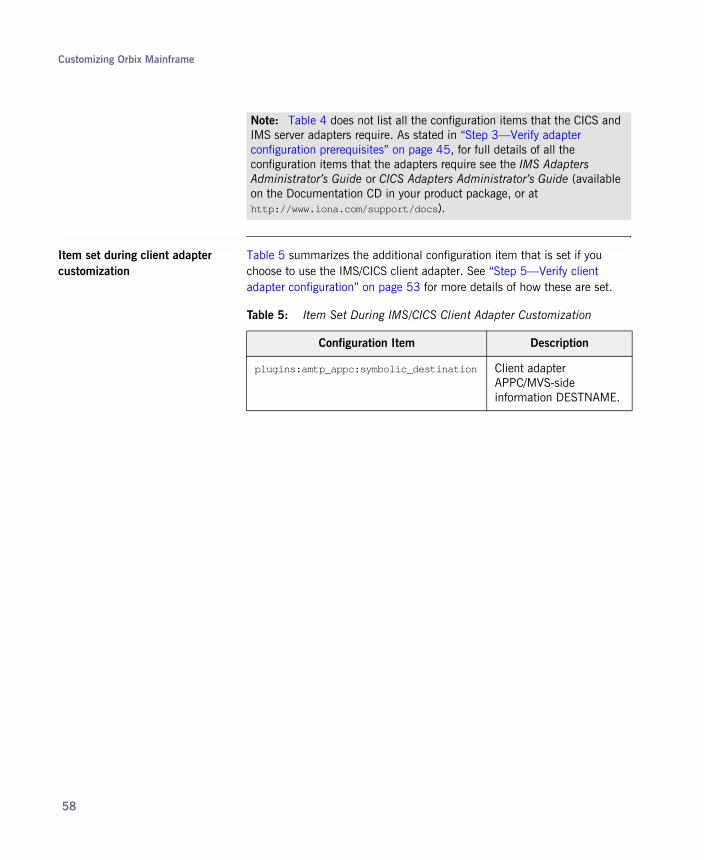
Customizing Orbix Mainframe
Item set during client adapter customization
Table 5 summarizes the additional configuration item that is set if you choose to use the IMS/CICS client adapter. See �Step 5�Verify client adapter configuration� on page 53 for more details of how these are set.
Note: Table 4 does not list all the configuration items that the CICS and IMS server adapters require. As stated in �Step 3�Verify adapter configuration prerequisites� on page 45, for full details of all the configuration items that the adapters require see the IMS Adapters Administrator�s Guide or CICS Adapters Administrator�s Guide (available on the Documentation CD in your product package, or at http://www.iona.com/support/docs).
Table 5: Item Set During IMS/CICS Client Adapter Customization
Configuration Item Description
plugins:amtp_appc:symbolic_destination Client adapter APPC/MVS-side information DESTNAME.
58

Verifying the Installation
Verifying the Installation
Overview Orbix Mainframe is installed with a number of demonstration programs that illustrate some features of the product. This section describes how to run the supplied demonstrations to test your installation.
In this section This section discusses the following topics:
Before You Begin Testing page 60
C++ Installation Tests page 61
COBOL Installation Tests page 63
PL/I Installation Tests page 71
59

Verifying the Installation
Before You Begin Testing
Overview This subsection points out some important information and prerequisites before you begin testing the installation.
Test prerequisites Before you run any demonstration, ensure that:
� The locator and node daemon are running.
� The IFR is also running (if it is a CICS or IMS demonstration).
� The proper high-level qualifier for your installation is reflected in the corresponding demonstration library members, as described in �Step 11�Change demonstration dataset name defaults� on page 35.
OS/390 readme information On OS/390, various README libraries are supplied for the available demonstrations, as follows:
Each README library has a separate member for each demonstration that explains the feature(s) being demonstrated and how to run the programs.
OS/390 UNIX System Services readme information
On OS/390 UNIX System Services, each demonstration directory contains a README.txt file, for C++ developers, that explains what feature of the product is being demonstrated and how to run the programs.
For more information For more details on getting started with the supplied COBOL and PL/I demonstrations see the COBOL Programmer�s Guide and Reference and PL/I Programmer�s Guide and Reference (available on the Documentation CD in your product package, or at http://www.iona.com/support/docs).
orbixhlq.DEMOS.COBOL.README COBOL batch demonstrations.
orbixhlq.DEMOS.CICS.COBOL.README COBOL CICS demonstrations.
orbixhlq.DEMOS.IMS.COBOL.README COBOL IMS demonstration.
orbixhlq.DEMOS.PLI.README PL/I batch demonstrations.
orbixhlq.DEMOS.CICS.PLI.README PL/I CICS demonstrations.
orbixhlq.DEMOS.IMS.PLI.README PL/I IMS demonstrations.
orbixhlq.DEMOS.CPP.README C++ batch demonstrations.
60

Verifying the Installation
C++ Installation Tests
Overview This subsection describes the following:
� �Testing a C++ installation on OS/390� on page 61.
� �Testing a C++ installation on OS/390 UNIX System Services� on page 62.
Testing a C++ installation on OS/390
To ensure that your Orbix Mainframe installation is fully operational, run the simple demonstration, as follows:
Note: The ANSI C++ compiler must be used to compile the C++ demonstrations.
Note: The source code for this C++ demonstration is already supplied in your installation, so you do not need to generate it.
Step Action
1 Build the client executable by submitting orbixhlq.DEMOS.CPP.BLD.JCL(SIMPLECL). This creates the client load module, which is automatically stored in the orbixhlq.DEMOS.CPP.LOAD PDS.
2 Build the server executable by submitting orbixhlq.DEMOS.CPP.BLD.JCL(SIMPLESV). This creates the server load module, which is automatically stored in the orbixhlq.DEMOS.CPP.LOAD PDS.
3 Register the server with the locator daemon, by submitting orbixhlq.DEMOS.CPP.RUN.JCL(SIMPLERG).
4 Run the server by submitting orbixhlq.DEMOS.CPP.RUN.JCL(SIMPLESV).
61

Verifying the Installation
Testing a C++ installation on OS/390 UNIX System Services
To ensure that your Orbix Mainframe installation is fully operational on OS/390 UNIX System Services, run the simple demonstration, as follows:
5 Run the client by submitting orbixhlq.DEMOS.CPP.RUN.JCL(SIMPLECL).
The output should look as follows:
Initializing ORBInvoking methodReading object reference from DD:IORS(SIMPLE)Done
Step Action
Note: The source code for this C++ demonstration is already supplied in your installation, so you do not need to generate it.
Step Action
1 Set the default configuration domain, as follows:
. orbix_install_dir/etc/bin/default-domain_env.sh
2 Change to the simple directory:
cd orbix_install_dir/asp/6.0/demos/corba/orb/simple
3 Build the C++ programs:
make -e
4 Start the server:
cd cxx_server./server
5 Open another command prompt, set the same environment variables as in the other one, and start the client:
cd cxx_client./client
Note: The client should return Done and stop. The server must be manually stopped.
62

Verifying the Installation
COBOL Installation Tests
Overview This subsection describes the following:
� �Verifying setting for CBLOPTS L/E runtime option� on page 63.
� �Testing a COBOL installation on OS/390� on page 64.
� �Testing a COBOL installation with the IMS server adapter� on page 65.
� �Testing a COBOL installation with the client adapter� on page 68.
Verifying setting for CBLOPTS L/E runtime option
When running Orbix Mainframe applications, L/E run-time parameters are required to ensure the successful execution of the program. The specification of these parameters might need to be altered for COBOL applications, depending on how the CBLOPTS L/E runtime option has been set on your operating system.
CBLOPTS specifies the format of the parameter string on application invocation when the main program is written in COBOL (that is, whether runtime options or program arguments appear first in the parameter string). The procedures shipped with Orbix Mainframe expect that the default setting for the CBLOPTS runtime option is in use (that is, CBLOPTS(ON)). If you have changed the default setting to CBLOPTS(OFF), you must change the supplied JCL in HLQ.ORBIX60.DEMOS.COBOL.JCL to execute the ORXG procedure instead of the ORXGCBL procedure. Check with your systems programmer, if you are not certain which value CBLOPTS is set to.
63

Verifying the Installation
Testing a COBOL installation on OS/390
To ensure that your Orbix Mainframe installation is fully operational, run the simple demonstration, as follows:
Note: The source code for the demonstration is already supplied in the orbixhlq.DEMOS.COBOL.SRC PDS, so the options to generate it are disabled in the SIMPLIDL JCL, to avoid overwriting the shipped code.
Step Action
1 Run the Orbix IDL compiler by submitting orbixhlq.DEMOS.COBOL.BLD.JCL(SIMPLIDL). This takes as input the sample IDL in orbixhlq.DEMOS.IDL(SIMPLE), and subsequently generates the relevant COBOL copybooks, which are stored in the orbixhlq.DEMOS.COBOL.COPYLIB PDS.
2 Build the server executable by submitting orbixhlq.DEMOS.COBOL.BLD.JCL(SIMPLESB). This creates the server load module, which is automatically stored in the orbixhlq.DEMOS.COBOL.LOAD PDS.
3 Build the client executable by submitting orbixhlq.DEMOS.COBOL.BLD.JCL(SIMPLECB). This creates the client load module, which is automatically stored in the orbixhlq.DEMOS.COBOL.LOAD PDS.
4 Run the server by submitting orbixhlq.DEMOS.COBOL.RUN.JCL(SIMPLESV). This writes an object reference for the server to orbixhlq.DEMOS.IOR(SIMPLE).
5 Run the client by submitting orbixhlq.DEMOS.COBOL.RUN.JCL(SIMPLECL).
64

Verifying the Installation
Testing a COBOL installation with the IMS server adapter
To ensure that the IMS server adapter component of your Orbix Mainframe installation is fully operational, run the IMS simple server demonstration as follows against the simple batch client:
Note: The IMS server implementation code is already supplied in orbixhlq.DEMOS.IMS.COBOL.SRC(SIMPLES), so the option to generate it is disabled in the SIMPLIDL JCL, to avoid overwriting the shipped code.
Step Action
1 Run the Orbix IDL compiler by submitting orbixhlq.DEMOS.IMS.COBOL.BLD.JCL(SIMPLIDL). This takes as input the sample IDL in orbixhlq.DEMOS.IDL(SIMPLE), and subsequently generates:
� The relevant COBOL copybooks for the IMS server, which are stored in the orbixhlq.DEMOS.IMS.COBOL.COPYLIB PDS.
� The source code for the IMS server mainline program, which is stored in orbixhlq.DEMOS.IMS.COBOL.SRC(SIMPLESV).
� The IMS adapter mapping file, which is stored in the orbixhlq.DEMOS.IMS.MFAMAP PDS.
2 Build the server executable by submitting orbixhlq.DEMOS.IMS.COBOL.BLD.JCL(SIMPLESB). This creates the IMS server load module, which is stored in the orbixhlq.DEMOS.IMS.COBOL.LOAD PDS.
3 Define a transaction definition for the server, to allow it to run in IMS. For example, the following transaction definition is already defined for the supplied demonstration:
APPLCTN GPSB=SIMPLESV, x PGMTYPE=(TP,,2), x SCHDTYP=PARALLELTRANSACT CODE=SIMPLESV, EDIT=(ULC) x
65

Verifying the Installation
4 Provide the server load module to the IMS region that is to run the transaction, by adding orbixhlq.DEMOS.IMS.COBOL.LOAD and orbixhlq.MFA.LOAD to the STEPLIB for that IMS region.
5 Build the client executable by submitting:
� orbixhlq.DEMOS.COBOL.BLD.JCL(SIMPLIDL) to create the copybooks needed by the client program, from the IDL.
� orbixhlq.DEMOS.COBOL.BLD.JCL(SIMPLECB) to create the client load module, which is then stored in the orbixhlq.DEMOS.COBOL.LOAD PDS.
6 Start the IFR (if it is not already running), by submitting orbixhlq.JCL(IFR).
7 Register the IDL in the IFR by submitting orbixhlq.DEMOS.IMS.COBOL.BLD.JCL(SIMPLEREG). The IMS server adapter subsequently uses this registered IDL.
8 Ensure that the full path to the mapping file that contains the relevant mapping entries is specified in the plugins:imsa:mapping_file configuration item. The sample mapping entries are in orbixhlq.DEMOS.IMS.MFAMAP(SIMPLEA).
9 Start the IMS server adapter. See the IMS Adapters Administrator�s Guide (available on the Documentation CD in your product package, or at http://www.iona.com/support/docs) for details of how to do this, or ask your systems administrator to do it for you.
Note: IMS must be running, with the server load module and the server transaction definitions available at this stage.
10 Retrieve the IMS server adapter�s IOR by submitting orbixhlq.DEMOS.IMS.COBOL.BLD.JCL(SIMPLIOR). This retrieves the IOR for the simple interface and places it in orbixhlq.DEMOS.IORS(SIMPLE).
Step Action
66
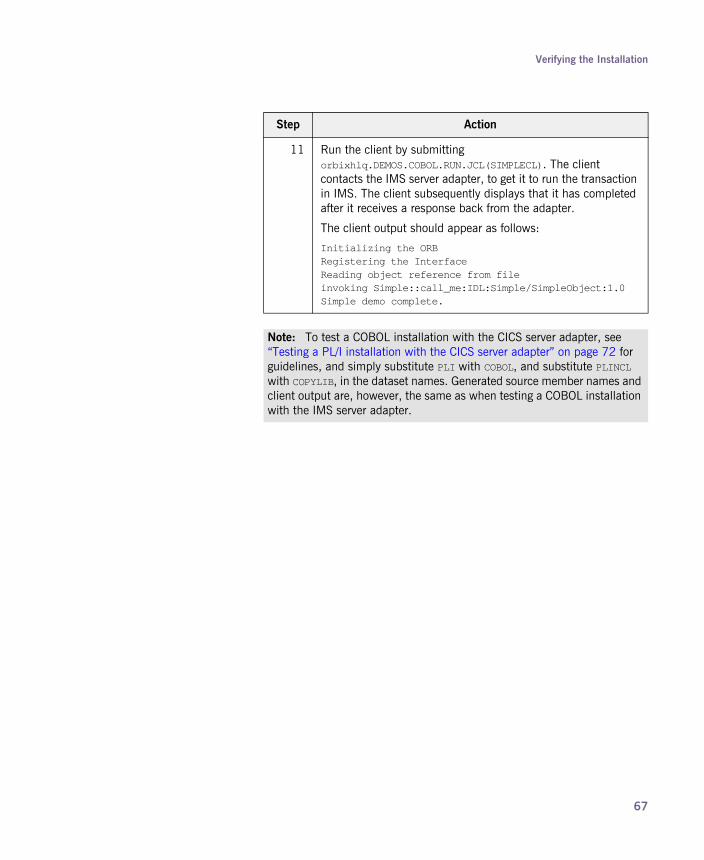
Verifying the Installation
11 Run the client by submitting orbixhlq.DEMOS.COBOL.RUN.JCL(SIMPLECL). The client contacts the IMS server adapter, to get it to run the transaction in IMS. The client subsequently displays that it has completed after it receives a response back from the adapter.
The client output should appear as follows:
Initializing the ORBRegistering the InterfaceReading object reference from fileinvoking Simple::call_me:IDL:Simple/SimpleObject:1.0Simple demo complete.
Note: To test a COBOL installation with the CICS server adapter, see �Testing a PL/I installation with the CICS server adapter� on page 72 for guidelines, and simply substitute PLI with COBOL, and substitute PLINCL with COPYLIB, in the dataset names. Generated source member names and client output are, however, the same as when testing a COBOL installation with the IMS server adapter.
Step Action
67
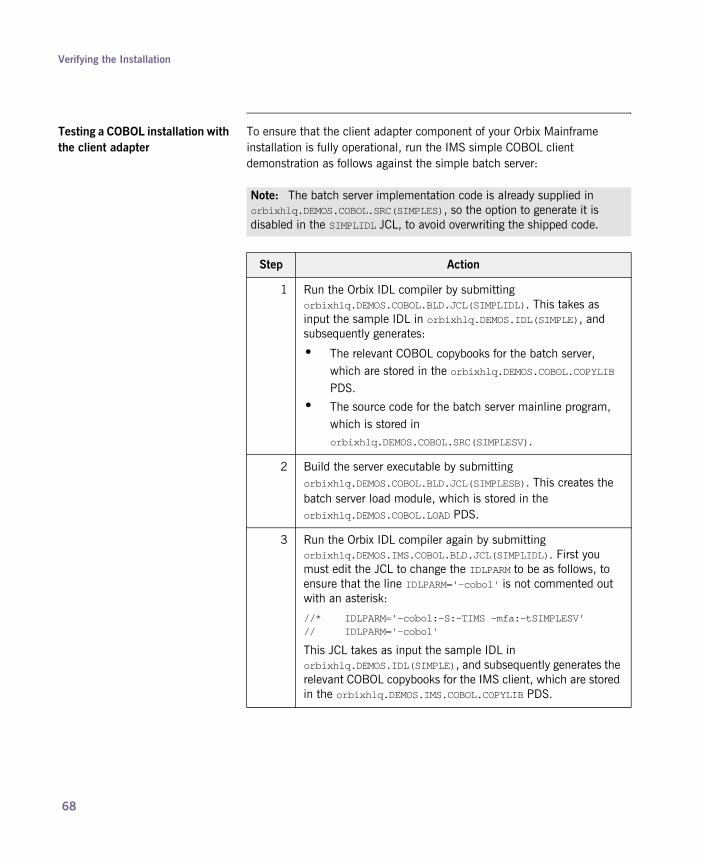
Verifying the Installation
Testing a COBOL installation with the client adapter
To ensure that the client adapter component of your Orbix Mainframe installation is fully operational, run the IMS simple COBOL client demonstration as follows against the simple batch server:
Note: The batch server implementation code is already supplied in orbixhlq.DEMOS.COBOL.SRC(SIMPLES), so the option to generate it is disabled in the SIMPLIDL JCL, to avoid overwriting the shipped code.
Step Action
1 Run the Orbix IDL compiler by submitting orbixhlq.DEMOS.COBOL.BLD.JCL(SIMPLIDL). This takes as input the sample IDL in orbixhlq.DEMOS.IDL(SIMPLE), and subsequently generates:
� The relevant COBOL copybooks for the batch server, which are stored in the orbixhlq.DEMOS.COBOL.COPYLIB PDS.
� The source code for the batch server mainline program, which is stored in orbixhlq.DEMOS.COBOL.SRC(SIMPLESV).
2 Build the server executable by submitting orbixhlq.DEMOS.COBOL.BLD.JCL(SIMPLESB). This creates the batch server load module, which is stored in the orbixhlq.DEMOS.COBOL.LOAD PDS.
3 Run the Orbix IDL compiler again by submitting orbixhlq.DEMOS.IMS.COBOL.BLD.JCL(SIMPLIDL). First you must edit the JCL to change the IDLPARM to be as follows, to ensure that the line IDLPARM='-cobol' is not commented out with an asterisk:
//* IDLPARM='-cobol:-S:-TIMS -mfa:-tSIMPLESV'// IDLPARM='-cobol'
This JCL takes as input the sample IDL in orbixhlq.DEMOS.IDL(SIMPLE), and subsequently generates the relevant COBOL copybooks for the IMS client, which are stored in the orbixhlq.DEMOS.IMS.COBOL.COPYLIB PDS.
68

Verifying the Installation
4 Build the client executable by submitting orbixhlq.DEMOS.IMS.COBOL.BLD.JCL(SIMPLECB). This creates the IMS client load module, which is stored in orbixhlq.DEMOS.IMS.COBOL.LOAD(SIMPLECL).
5 Define a transaction definition for the client, to allow it to run in IMS. For example, the following transaction definition is already defined for the supplied demonstration:
APPLCTN GPSB=SIMPLECL, x PGMTYPE=(TP,,2), x SCHDTYP=PARALLELTRANSACT CODE=SIMPLECL, x EDIT=(ULC)
6 Provide the client load module to the IMS region that is to run the transaction, by adding orbixhlq.DEMOS.IMS.COBOL.LOAD to the STEPLIB for that IMS region.
7 Start the locator, node daemon, and IFR on the batch server host, by submitting orbixhlq.JCL(LOCATOR), orbixhlq.JCL(NODEDAEM), and orbixhlq.JCL(IFR) respectively.
8 Register the IDL in the IFR by submitting orbixhlq.DEMOS.IMS.COBOL.BLD.JCL(SIMPLEREG). The client adapter subsequently uses this registered IDL.
Note: If you have already followed the steps in �Testing a COBOL installation with the IMS server adapter� on page 65 you do not need to do this again.
9 Start the batch server by submitting orbixhlq.DEMOS.COBOL.RUN.JCL(SIMPLESV). This places the IOR for the batch server in orbixhlq.DEMOS.IORS(SIMPLE).
10 Enable the IMS client to obtain the batch server�s IOR by submitting orbixhlq.DEMOS.IMS.COBOL.BLD.JCL(UPDTCONF). This writes a configuration entry to the configuration member to enable the IMS client to contact the batch server.
Step Action
69

Verifying the Installation
11 Configure the client adapter. See the IMS Adapters Administrator�s Guide for more details.
12 Run the client adapter by submitting orbixhlq.JCL(MFCLA).
13 Run the IMS client by entering the transaction name, SIMPLECL, in the relevant IMS region.
Note: To test a CICS COBOL installation with the client adapter, see �Testing a PL/I installation with the client adapter� on page 78 for guidelines, and simply substitute PLI with COBOL, and substitute PLINCL with COPYLIB, in the dataset names. Generated source member names and client output are, however, the same as when testing an IMS COBOL installation with the client adapter.
Step Action
70

Verifying the Installation
PL/I Installation Tests
Overview This subsection describes the following:
� �Testing a PL/I installation on OS/390� on page 71.
� �Testing a PL/I installation with the CICS server adapter� on page 72.
� �Testing a PL/I installation with the client adapter� on page 78.
Testing a PL/I installation on OS/390
To ensure that your Orbix Mainframe installation is fully operational, run the simple demonstration, as follows:
Note: The source code for the demonstration is already supplied in the orbixhlq.DEMOS.PLI.SRC PDS, so the options to generate it are disabled in the SIMPLIDL JCL, to avoid overwriting the shipped code.
Step Action
1 Run the Orbix IDL compiler by submitting orbixhlq.DEMOS.PLI.BLD.JCL(SIMPLIDL). This takes as input the sample IDL in orbixhlq.DEMOS.IDL(SIMPLE), and subsequently generates the relevant PL/I include members, which are stored in the orbixhlq.DEMOS.PLI.PLINCL PDS.
2 Build the client executable by submitting orbixhlq.DEMOS.PLI.BLD.JCL(SIMPLECB). This creates the client load module, which is automatically stored in the orbixhlq.DEMOS.PLI.LOAD PDS.
3 Build the server executable by submitting orbixhlq.DEMOS.PLI.BLD.JCL(SIMPLESB). This creates the server load module, which is automatically stored in the orbixhlq.DEMOS.PLI.LOAD PDS.
4 Run the server by submitting orbixhlq.DEMOS.PLI.RUN.JCL(SIMPLESV). This writes an object reference for the server to orbixhlq.DEMOS.IOR(SIMPLE).
71

Verifying the Installation
Testing a PL/I installation with the CICS server adapter
To ensure that the CICS server adapter component of your Orbix Mainframe installation is fully operational, run the CICS simple demonstration, as follows:
5 Run the client by submitting orbixhlq.DEMOS.PLI.RUN.JCL(SIMPLECL).
Step Action
Note: The server implementation code is already supplied in orbixhlq.DEMOS.CICS.PLI.SRC(SIMPLEI), so the option to generate it is disabled in the SIMPLIDL JCL, to avoid overwriting the shipped code.
Step Action
1 Run the Orbix IDL compiler by submitting orbixhlq.DEMOS.CICS.PLI.BLD.JCL(SIMPLIDL). This takes as input the sample IDL in orbixhlq.DEMOS.IDL(SIMPLE), and subsequently generates:
� The relevant PL/I include files for the CICS server, which are stored in the orbixhlq.DEMOS.CICS.PLI.PLINCL PDS.
� The source code for the CICS server mainline program, which is stored in orbixhlq.DEMOS.CICS.PLI.SRC(SIMPLEV).
� The CICS adapter mapping file, which is stored in the orbixhlq.DEMOS.CICS.MFAMAP PDS.
2 Build the server executable by submitting orbixhlq.DEMOS.CICS.PLI.BLD.JCL(SIMPLESB). This creates the CICS server load module, which is stored in the orbixhlq.DEMOS.CICS.PLI.LOAD PDS.
3 Define a transaction definition for the server, to allow it to run in CICS. See orbixhlq.JCL(ORBIXCSD) for an example of the transaction definition for the supplied demonstration.
4 Provide the server load module to the CICS region that is to run the transaction, by adding orbixhlq.DEMOS.CICS.PLI.LOAD and orbixhlq.MFA.LOAD to the DFHRPL for that CICS region.
72

Verifying the Installation
5 Build the client executable by submitting:
� orbixhlq.DEMOS.PLI.BLD.JCL(SIMPLIDL) to create the include files needed by the client program, from the IDL.
� orbixhlq.DEMOS.PLI.BLD.JCL(SIMPLECB) to create the client load module, which is then stored in the orbixhlq.DEMOS.PLI.LOAD PDS.
6 Start the IFR (if it is not already running), by submitting orbixhlq.JCL(IFR).
7 Register the IDL in the IFR by submitting orbixhlq.DEMOS.CICS.PLI.BLD.JCL(SIMPLREG). The CICS server adapter subsequently uses this registered IDL.
8 Ensure that the full path to the mapping file that contains the relevant mapping entries is specified in the plugins:cicsa:mapping_file configuration item. The sample mapping entries are in orbixhlq.DEMOS.CICS.MFAMAP(SIMPLEA).
9 Start the CICS server adapter. See the CICS Adapters Administrator�s Guide (available on the Documentation CD in your product package, or at http://www.iona.com/support/docs) for details of how to do this, or ask your systems administrator to do it for you.
Note: CICS must be running, with the server load module and the server transaction definitions available at this stage.
10 Retrieve the CICS server adapter�s IOR by submitting orbixhlq.DEMOS.CICS.PLI.BLD.JCL(SIMPLIOR). This retrieves the IOR for the simple interface and places it in orbixhlq.DEMOS.IORS(SIMPLE).
Step Action
73
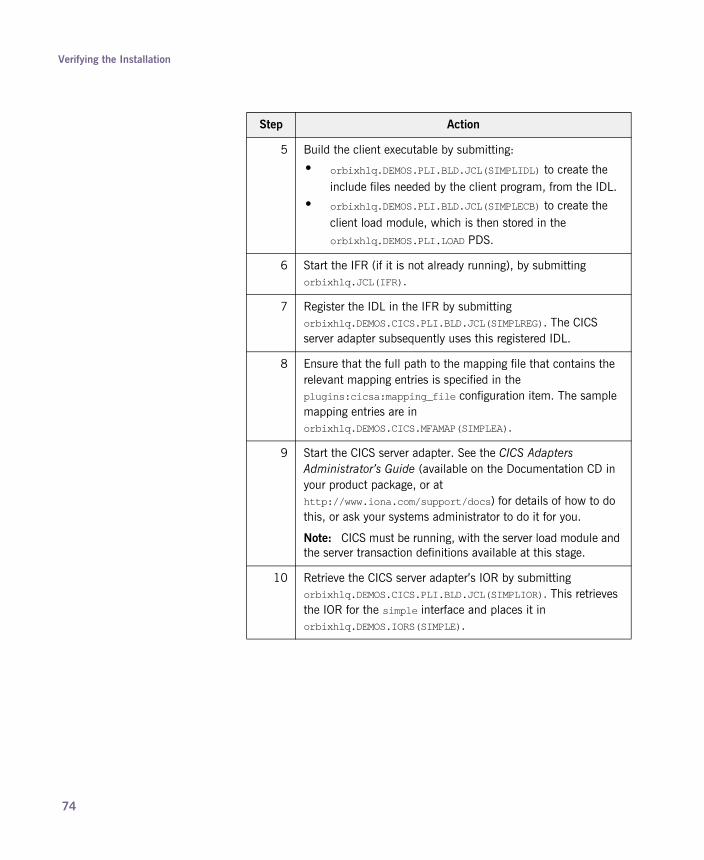
Verifying the Installation
5 Build the client executable by submitting:
� orbixhlq.DEMOS.PLI.BLD.JCL(SIMPLIDL) to create the include files needed by the client program, from the IDL.
� orbixhlq.DEMOS.PLI.BLD.JCL(SIMPLECB) to create the client load module, which is then stored in the orbixhlq.DEMOS.PLI.LOAD PDS.
6 Start the IFR (if it is not already running), by submitting orbixhlq.JCL(IFR).
7 Register the IDL in the IFR by submitting orbixhlq.DEMOS.CICS.PLI.BLD.JCL(SIMPLREG). The CICS server adapter subsequently uses this registered IDL.
8 Ensure that the full path to the mapping file that contains the relevant mapping entries is specified in the plugins:cicsa:mapping_file configuration item. The sample mapping entries are in orbixhlq.DEMOS.CICS.MFAMAP(SIMPLEA).
9 Start the CICS server adapter. See the CICS Adapters Administrator�s Guide (available on the Documentation CD in your product package, or at http://www.iona.com/support/docs) for details of how to do this, or ask your systems administrator to do it for you.
Note: CICS must be running, with the server load module and the server transaction definitions available at this stage.
10 Retrieve the CICS server adapter�s IOR by submitting orbixhlq.DEMOS.CICS.PLI.BLD.JCL(SIMPLIOR). This retrieves the IOR for the simple interface and places it in orbixhlq.DEMOS.IORS(SIMPLE).
Step Action
74

Verifying the Installation
5 Build the client executable by submitting:
� orbixhlq.DEMOS.PLI.BLD.JCL(SIMPLIDL) to create the include files needed by the client program, from the IDL.
� orbixhlq.DEMOS.PLI.BLD.JCL(SIMPLECB) to create the client load module, which is then stored in the orbixhlq.DEMOS.PLI.LOAD PDS.
6 Start the IFR (if it is not already running), by submitting orbixhlq.JCL(IFR).
7 Register the IDL in the IFR by submitting orbixhlq.DEMOS.CICS.PLI.BLD.JCL(SIMPLREG). The CICS server adapter subsequently uses this registered IDL.
8 Ensure that the full path to the mapping file that contains the relevant mapping entries is specified in the plugins:cicsa:mapping_file configuration item. The sample mapping entries are in orbixhlq.DEMOS.CICS.MFAMAP(SIMPLEA).
9 Start the CICS server adapter. See the CICS Adapters Administrator�s Guide (available on the Documentation CD in your product package, or at http://www.iona.com/support/docs) for details of how to do this, or ask your systems administrator to do it for you.
Note: CICS must be running, with the server load module and the server transaction definitions available at this stage.
10 Retrieve the CICS server adapter�s IOR by submitting orbixhlq.DEMOS.CICS.PLI.BLD.JCL(SIMPLIOR). This retrieves the IOR for the simple interface and places it in orbixhlq.DEMOS.IORS(SIMPLE).
Step Action
75

Verifying the Installation
5 Build the client executable by submitting:
� orbixhlq.DEMOS.PLI.BLD.JCL(SIMPLIDL) to create the include files needed by the client program, from the IDL.
� orbixhlq.DEMOS.PLI.BLD.JCL(SIMPLECB) to create the client load module, which is then stored in the orbixhlq.DEMOS.PLI.LOAD PDS.
6 Start the IFR (if it is not already running), by submitting orbixhlq.JCL(IFR).
7 Register the IDL in the IFR by submitting orbixhlq.DEMOS.CICS.PLI.BLD.JCL(SIMPLREG). The CICS server adapter subsequently uses this registered IDL.
8 Ensure that the full path to the mapping file that contains the relevant mapping entries is specified in the plugins:cicsa:mapping_file configuration item. The sample mapping entries are in orbixhlq.DEMOS.CICS.MFAMAP(SIMPLEA).
9 Start the CICS server adapter. See the CICS Adapters Administrator�s Guide (available on the Documentation CD in your product package, or at http://www.iona.com/support/docs) for details of how to do this, or ask your systems administrator to do it for you.
Note: CICS must be running, with the server load module and the server transaction definitions available at this stage.
10 Retrieve the CICS server adapter�s IOR by submitting orbixhlq.DEMOS.CICS.PLI.BLD.JCL(SIMPLIOR). This retrieves the IOR for the simple interface and places it in orbixhlq.DEMOS.IORS(SIMPLE).
Step Action
76

Verifying the Installation
11 Run the client by submitting orbixhlq.DEMOS.PLI.RUN.JCL(SIMPLECL). The client contacts the CICS server adapter, to get it to run the transaction in CICS. The client subsequently displays that it has completed after it receives a response back from the adapter.
The client output should appear as follows:
simple persistent demo======================Calling operation call_me…Operation call_me completed (no results to display)
End of the simple_persistent demo
Note: To test a PL/I installation with the IMS server adapter, see �Testing a COBOL installation with the IMS server adapter� on page 65 for guidelines, and simply substitute COBOL with PLI, and substitute COPYLIB with PLINCL, in the dataset names. Generated source member names and client output are, however, the same as when testing a PL/I installation with the CICS server adapter.
Step Action
77

Verifying the Installation
Testing a PL/I installation with the client adapter
To ensure that the client adapter component of your Orbix Mainframe installation is fully operational, run the CICS simple PL/I client demonstration as follows against the simple batch server:
Note: The batch server implementation code is already supplied in orbixhlq.DEMOS.PLI.SRC(SIMPLEI), so the option to generate it is disabled in the SIMPLIDL JCL, to avoid overwriting the shipped code.
Step Action
1 Run the Orbix IDL compiler by submitting orbixhlq.DEMOS.PLI.BLD.JCL(SIMPLIDL). This takes as input the sample IDL in orbixhlq.DEMOS.IDL(SIMPLE), and subsequently generates:
� The relevant PL/I include members for the batch server, which are stored in the orbixhlq.DEMOS.PLI.PLINCL PDS.
� The source code for the batch server mainline program, which is stored in orbixhlq.DEMOS.PLI.SRC(SIMPLEV).
2 Build the server executable by submitting orbixhlq.DEMOS.PLI.BLD.JCL(SIMPLESB). This creates the batch server load module, which is stored in the orbixhlq.DEMOS.PLI.LOAD PDS.
3 Run the Orbix IDL compiler again by submitting orbixhlq.DEMOS.CICS.PLI.BLD.JCL(SIMPLIDL). First you must edit the JCL to change the IDLPARM to be as follows, to ensure that the line IDLPARM='-pli:-V' is not commented out with an asterisk:
//* IDLPARM='-pli:-TCICS -mfa:-tSIMPLESV'//* IDLPARM='-pli:-TCICS -mfa:-tSMSV'// IDLPARM='-pli:-V'
This JCL takes as input the sample IDL in orbixhlq.DEMOS.IDL(SIMPLE), and subsequently generates the relevant PL/I include members for the CICS client, which are stored in the orbixhlq.DEMOS.CICS.PLI.PLINCL PDS.
78

Verifying the Installation
4 Build the client executable by submitting orbixhlq.DEMOS.CICS.PLI.BLD.JCL(SIMPLECB). This creates the CICS client load module, which is stored in orbixhlq.DEMOS.CICS.PLI.LOAD(SIMPLECL).
5 Define a transaction definition for the client, to allow it to run in CICS. See orbixhlq.JCL(ORBIXCSD) for an example of the transaction definition for the supplied demonstration.
6 Provide the client load module to the CICS region that is to run the transaction, by adding orbixhlq.DEMOS.CICS.PLI.LOAD to the DFHRPL for that CICS region.
7 Start the locator, node daemon, and IFR on the batch server host, by submitting orbixhlq.JCL(LOCATOR), orbixhlq.JCL(NODEDAEM), and orbixhlq.JCL(IFR) respectively.
8 Register the IDL in the IFR by submitting orbixhlq.DEMOS.CICS.PLI.BLD.JCL(SIMPLEREG). The client adapter subsequently uses this registered IDL.
Note: If you have already followed the steps in �Testing a PL/I installation with the CICS server adapter� on page 72 you do not need to do this again.
9 Start the batch server by submitting orbixhlq.DEMOS.PLI.RUN.JCL(SIMPLESV). This places the IOR for the batch server in orbixhlq.DEMOS.IORS(SIMPLE).
10 Enable the CICS client to obtain the batch server�s IOR by submitting orbixhlq.DEMOS.CICS.PLI.BLD.JCL(UPDTCONF). This writes a configuration entry to the configuration member to enable the CICS client to contact the batch server.
11 Configure the client adapter. See the CICS Adapters Administrator�s Guide for more details.
12 Run the client adapter by submitting orbixhlq.JCL(MFCLA).
13 Run the CICS client by entering the transaction name, SMCL, in the relevant CICS region.
Step Action
79

Verifying the Installation
Note: To test an IMS PL/I installation with the client adapter, see �Testing a COBOL installation with the client adapter� on page 68 for guidelines, and simply substitute COBOL with PLI, and substitute COPYLIB with PLINCL, in the dataset names. Generated source member names and client output are, however, the same as when testing a PL/I installation with the CICS server adapter.
80

Uninstalling Orbix Mainframe
Uninstalling Orbix Mainframe
Overview This section describes how to uninstall Orbix Mainframe, both in a native OS/390 and OS/390 UNIX System Services environment.
Native OS/390 environment To uninstall Orbix Mainframe in a native OS/390 environment, stop all Orbix Mainframe services and delete all files under the high-level-qualifier that you used for this installation.
OS/390 UNIX System Services environment
To uninstall Orbix Mainframe in an OS/390 UNIX System Services environment, remove all installed files manually.
Finally, remember to remove any references to the orbixhlq/etc/bin/default-domain_env.sh shell script that you might have in startup scripts, such as /etc/profile, or in individual user profiles. See also the CORBA Administrator's Guide (available on the Documentation CD in your product package, or at http://www.iona.com/support/docs) for a full list of environment variables.
81

For More Information
For More Information
Release notes See the Mainframe Release Notes at:
Knowledge base Review IONA knowledge base articles for Orbix Mainframe at:
Technical support Email technical support with questions and suggestions at:
http://www.iona.com/support/docs/orbix/mainframe/6.0/relnotes/relnotes.pdf
http://www.iona.com/support/knowledge_base/index.xml
82